introductionhardrange.com/downloads/manual/hra-thermsw-install.pdf · installation instructions for...
TRANSCRIPT

Copyright © Hard Range Australia Pty Ltd Page 1 of 6
Installation Instructions for EAS Air Compressor
Thermal Switch
Introduction If you drive a P38 Range Rover you may have been in the situation where the Electronic Air
Suspension (EAS) system becomes slow to raise the vehicle, or in the worse case, stops pumping up
altogether. This is also true for the late Range Rover Classics that were fitted with EAS.
We’re glad you chose this relatively inexpensive kit rather than believing the dealers who say you
need a new (and quite expensive) compressor. When the EAS Air Compressor stops working it is
usually due to the thermal switch failing
What’s in the box/bag? • A replacement thermal switch
• A pop-rivet
• Some screws
Safety Please read & understand these fitting instructions before you commence installation.
Depressurising the system – It is strongly recommended that the EAS is depressurised before any
work is undertaken. It should not be necessary to do this if the valve block is working correctly,
but in the interest of your personal safety we suggest you do this anyway. If diagnostics equipment
(e.g. TestBook, Rovacom/FaultMate, EAS Unlock) is not available to depressurise the system,
ensure the vehicle height is set at the lowest possible height (i.e. Access mode) and take extreme
care when disconnecting air lines from the valve block.
Safety glasses are recommended when disconnecting pressure filled air lines, and whenever
working on the EAS.
If the car is not already sitting on the bump stops, be aware it may drop in height when air
fittings are disconnected.

Copyright © Hard Range Australia Pty Ltd Page 2 of 6
Installation Instructions for EAS Air Compressor
Thermal Switch
Thermal Switch Replacement Procedure Remove the cover from the EAS box in the
engine bay (rear right corner when looking
from the front of the car).
Remove the nuts holding the compressor in
place.
Disconnect the multi-plug (top RH in
picture).
Lift the compressor so you can get to the
brass air line connector.
Use a 12mm spanner to remove the brass air
line connector.
Remove the compressor and put it on the
bench for disassembly.
The Thermal Switch resides in the brush
housing assembly, at the end of the motor.
Remove the mount bracket and the 2 long
bolts. Gently pry up the motor end, pry the
wires out as well.

Copyright © Hard Range Australia Pty Ltd Page 3 of 6
Installation Instructions for EAS Air Compressor
Thermal Switch
Use a 7/64” (2.5-3mm) drill in a drill press
(DO NOT USE A HAND DRILL!!!) to drill out
the rivets, go approx 1/4" (6mm) deep.
This hole will be for the new mounting
screws included in the kit.
Gently pry the brush-plate off with a
screwdriver and clean up the burrs with a
razor knife.
Use a 1/8” (3mm) drill to drill out the
thermal switch rivet.
De-solder the old switch and replace with
the new. It is easier to rivet (also included
with the kit) the new switch in before
soldering.
Discard the plastic ring. Its only purpose is to
create bearing failure. It is loose in 90% of
the compressors we see. If it's still there, pry
it out. Re-assemble the bearing if necessary
and oil with a few drops of light machine oil.

Copyright © Hard Range Australia Pty Ltd Page 4 of 6
Installation Instructions for EAS Air Compressor
Thermal Switch
Press the bearing retainer down with a flat
blade screwdriver and re-crimp with the side
of the blade and a hammer.
Use a solid surface with a hole for the
dimple so the end bell will sit flat. The base
of your drill-press will work very well.
Clean the burrs from the end bell, screw the
socket head screws into the holes drilled
previously, they will cut their own threads.
Start with your electric driver on low torque
and slowly increase until just seated, or run
in by hand.
Ensure the brush assembly is fully seated on
the end-bell, misalignment will cause brush
chatter and vibration.
Copyright © Hard Range Australia Pty Ltd Page 5 of 6
Installation Instructions for EAS Air Compressor
Thermal Switch
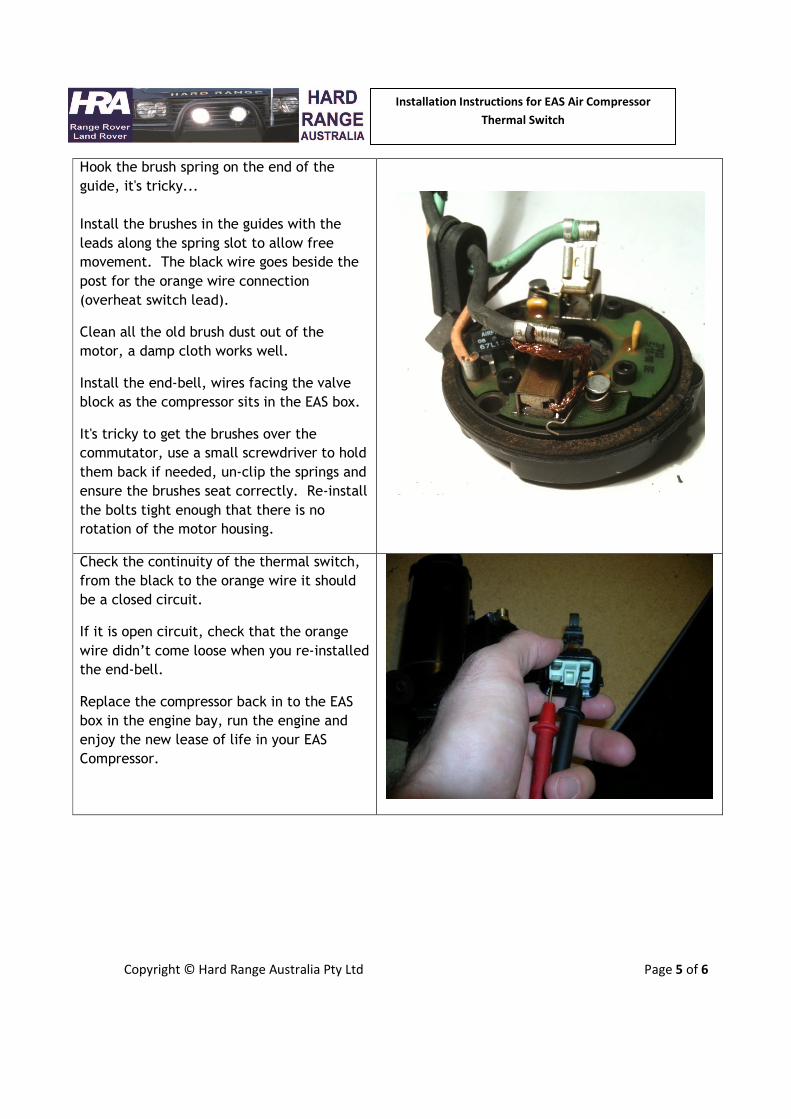
Hook the brush spring on the end of the
guide, it's tricky...
Install the brushes in the guides with the
leads along the spring slot to allow free
movement. The black wire goes beside the
post for the orange wire connection
(overheat switch lead).
Clean all the old brush dust out of the
motor, a damp cloth works well.
Install the end-bell, wires facing the valve
block as the compressor sits in the EAS box.
It's tricky to get the brushes over the
commutator, use a small screwdriver to hold
them back if needed, un-clip the springs and
ensure the brushes seat correctly. Re-install
the bolts tight enough that there is no
rotation of the motor housing.
Check the continuity of the thermal switch,
from the black to the orange wire it should
be a closed circuit.
If it is open circuit, check that the orange
wire didn’t come loose when you re-installed
the end-bell.
Replace the compressor back in to the EAS
box in the engine bay, run the engine and
enjoy the new lease of life in your EAS
Compressor.

Copyright © Hard Range Australia Pty Ltd Page 6 of 6
Installation Instructions for EAS Air Compressor
Thermal Switch
Questions and Suggestions
If you are in or close to Australia, contact Paul or Andy at Hard Range Australia
http://hardrange.com
E-mail: [email protected]
If you are in or close to the USA, contact Scott at So Cal Used Rover Parts
http://www.socalusedroverparts.com
E-mail: [email protected]