citrix provisioning server 5.0 installation and configuration...
TRANSCRIPT
Citrix Provisioning Server 5.0 Installation and Configuration Guide
Citrix® Provisioning Server ™ 5.0 (SP1, SP1a, SP2)June 2009
Revision 14

Copyright and Trademark Notice
Information in this document is subject to change without notice. Companies, names, and data used in examples herein are fictitious unless otherwise noted. Other than printing one copy for personal use, no part of this document may be reproduced or transmitted in any form or by any means, electronic or mechanical, for any purpose, without the express written permission of Citrix Systems, Inc.
Copyright 2001—2009 Citrix Systems, Inc. All rights reserved.
Citrix, ICA (Independent Computing Architecture), NetScaler, and Program Neighborhood are registered trademarks; Citrix XenServer, Citrix Access Essentials, Citrix Access Gateway, Citrix Password Manager, Citrix Application Firewall, Citrix Application Gateway, Citrix Provisioning Server, Citrix Streaming Profiler, Citrix Streaming Client, Citrix Stream Service, Citrix EdgeSight, Citrix WANScaler, Citrix SmoothRoaming, Citrix Authorized Learning Center, Citrix Subscription Advantage, Citrix Technical Support, and Speed Screen are trademarks of Citrix Systems, Inc. in the United States and other countries.
FLEXnet Operations and FLEXnet Publisher are trademarks and/or registered trademarks of Acresso Software Inc. and/or InstallShield Co. Inc.
Copyright RSA Encryption 1996—1998 RSA Security Inc. All rights reserved.
3
Contents
Chapter 1 IntroductionWhat’s New in This Release. . . . . . . . . . . . . . . . . . . . . . . . . . . . . . . . . . . . . . . . . . . .7
Administration and Manageability . . . . . . . . . . . . . . . . . . . . . . . . . . . . . . . . . . . .7Microsoft Management Console (MMC) . . . . . . . . . . . . . . . . . . . . . . . . . . . .8Console Authentication . . . . . . . . . . . . . . . . . . . . . . . . . . . . . . . . . . . . . . . . . .8Provisioning Server Farm Components. . . . . . . . . . . . . . . . . . . . . . . . . . . . . .8Administrative Roles . . . . . . . . . . . . . . . . . . . . . . . . . . . . . . . . . . . . . . . . . . .11Views . . . . . . . . . . . . . . . . . . . . . . . . . . . . . . . . . . . . . . . . . . . . . . . . . . . . . . .11Remote Console . . . . . . . . . . . . . . . . . . . . . . . . . . . . . . . . . . . . . . . . . . . . . . .11
Featured Enhancements. . . . . . . . . . . . . . . . . . . . . . . . . . . . . . . . . . . . . . . . . . . .12Provisioning Server Database . . . . . . . . . . . . . . . . . . . . . . . . . . . . . . . . . . . .12Provisioning Server Console . . . . . . . . . . . . . . . . . . . . . . . . . . . . . . . . . . . . .12vDisk Format . . . . . . . . . . . . . . . . . . . . . . . . . . . . . . . . . . . . . . . . . . . . . . . . .12Boot Device Manager . . . . . . . . . . . . . . . . . . . . . . . . . . . . . . . . . . . . . . . . . .13Support for x64 as a Provisioning Server . . . . . . . . . . . . . . . . . . . . . . . . . . .13Import Device Wizard . . . . . . . . . . . . . . . . . . . . . . . . . . . . . . . . . . . . . . . . . .13Upgrade Methods. . . . . . . . . . . . . . . . . . . . . . . . . . . . . . . . . . . . . . . . . . . . . .13
Provisioning Server Services and Resources . . . . . . . . . . . . . . . . . . . . . . . . . . . . . .14Provisioning Server Documentation . . . . . . . . . . . . . . . . . . . . . . . . . . . . . . . . . .14
Citrix Product Licensing Documentation . . . . . . . . . . . . . . . . . . . . . . . . . . .14Release Notes . . . . . . . . . . . . . . . . . . . . . . . . . . . . . . . . . . . . . . . . . . . . . . . . .14Administrator’s Guide . . . . . . . . . . . . . . . . . . . . . . . . . . . . . . . . . . . . . . . . . .15Programmer’s Guides . . . . . . . . . . . . . . . . . . . . . . . . . . . . . . . . . . . . . . . . . .15Virtual Disk Status Tray Help . . . . . . . . . . . . . . . . . . . . . . . . . . . . . . . . . . . .15Finding Additional Documentation. . . . . . . . . . . . . . . . . . . . . . . . . . . . . . . .15
Getting Service and Support . . . . . . . . . . . . . . . . . . . . . . . . . . . . . . . . . . . . . . . .16Getting the Subscription Advantage . . . . . . . . . . . . . . . . . . . . . . . . . . . . . . . . . .16Locating the Citrix Developer Network . . . . . . . . . . . . . . . . . . . . . . . . . . . . . . .17Participating in Citrix Education and Training. . . . . . . . . . . . . . . . . . . . . . . . . .17
Getting Started . . . . . . . . . . . . . . . . . . . . . . . . . . . . . . . . . . . . . . . . . . . . . . . . . . . . .17
4 Citrix Provisioning Server 5.0 Installation and Configuration Guide
Chapter 2 Installing and Configuring a Provisioning Server ImplementationInstalling and Configuring Provisioning Server. . . . . . . . . . . . . . . . . . . . . . . . . . . .21
Task 1: Planning . . . . . . . . . . . . . . . . . . . . . . . . . . . . . . . . . . . . . . . . . . . . . . . . .21MS SQL Database . . . . . . . . . . . . . . . . . . . . . . . . . . . . . . . . . . . . . . . . . . . . .21Authentication and Configuration . . . . . . . . . . . . . . . . . . . . . . . . . . . . . . . . .22Reviewing System Requirements . . . . . . . . . . . . . . . . . . . . . . . . . . . . . . . . .23Map out Your Farm . . . . . . . . . . . . . . . . . . . . . . . . . . . . . . . . . . . . . . . . . . . .27
Task 2: Getting Product Licensing . . . . . . . . . . . . . . . . . . . . . . . . . . . . . . . . . . .28Task 3: Installing Provisioning Server Software . . . . . . . . . . . . . . . . . . . . . . . .28Task 4: Configuring the Farm. . . . . . . . . . . . . . . . . . . . . . . . . . . . . . . . . . . . . . .30
Configuration Wizard Settings . . . . . . . . . . . . . . . . . . . . . . . . . . . . . . . . . . .31Task 5: Adding Additional Provisioning Servers. . . . . . . . . . . . . . . . . . . . . . . .39
Connecting to the Farm . . . . . . . . . . . . . . . . . . . . . . . . . . . . . . . . . . . . . . . . .39Task 6: Assigning Administrator Roles . . . . . . . . . . . . . . . . . . . . . . . . . . . . . . .39Task 7: Creating a Store . . . . . . . . . . . . . . . . . . . . . . . . . . . . . . . . . . . . . . . . . . .40Task 8: Creating the vDisk File. . . . . . . . . . . . . . . . . . . . . . . . . . . . . . . . . . . . . .40
Creating the vDisk File in the Console . . . . . . . . . . . . . . . . . . . . . . . . . . . . .41Formatting a vDisk. . . . . . . . . . . . . . . . . . . . . . . . . . . . . . . . . . . . . . . . . . . . .41Unmounting a vDisk . . . . . . . . . . . . . . . . . . . . . . . . . . . . . . . . . . . . . . . . . . .43
Task 9: Create and Assign the First Target Device in a Collection . . . . . . . . . .43Task 10: Preparing a Master Target Device for Imaging . . . . . . . . . . . . . . . . . .44
Preparing the Master Target Device’s Hard Disk . . . . . . . . . . . . . . . . . . . . .44Configuring a Master Target Device’s BIOS . . . . . . . . . . . . . . . . . . . . . . . .45Installing Master Target Device Software. . . . . . . . . . . . . . . . . . . . . . . . . . .47Installing Software on a Windows Master Target Device . . . . . . . . . . . . . .48Installing Software on a Linux Master Target Device . . . . . . . . . . . . . . . . .49
Task 11: Building the vDisk Image . . . . . . . . . . . . . . . . . . . . . . . . . . . . . . . . . .50Imaging Linux Target Devices. . . . . . . . . . . . . . . . . . . . . . . . . . . . . . . . . . . .52
Chapter 3 Upgrading from Previous ReleasesChoosing the Upgrade Method. . . . . . . . . . . . . . . . . . . . . . . . . . . . . . . . . . . . . . . . .53Upgrade Utilities and Features . . . . . . . . . . . . . . . . . . . . . . . . . . . . . . . . . . . . . . . . .55Upgrading From 4.x . . . . . . . . . . . . . . . . . . . . . . . . . . . . . . . . . . . . . . . . . . . . . . . . .55
Upgrading Provisioning Servers . . . . . . . . . . . . . . . . . . . . . . . . . . . . . . . . . . . . .56Server Upgrade Prerequisites. . . . . . . . . . . . . . . . . . . . . . . . . . . . . . . . . . . . .57Installing or Upgrading Product Software. . . . . . . . . . . . . . . . . . . . . . . . . . .58
Migrating the Database . . . . . . . . . . . . . . . . . . . . . . . . . . . . . . . . . . . . . . . . . . . .59Converting vDisks to VHD Format . . . . . . . . . . . . . . . . . . . . . . . . . . . . . . . . . .59Upgrading the vDisk . . . . . . . . . . . . . . . . . . . . . . . . . . . . . . . . . . . . . . . . . . . . . .60
5 Citrix Provisioning Server 5.0 Installation and Configuration Guide
Upgrading From 5.0 . . . . . . . . . . . . . . . . . . . . . . . . . . . . . . . . . . . . . . . . . . . . . . . . .62Backing up Data . . . . . . . . . . . . . . . . . . . . . . . . . . . . . . . . . . . . . . . . . . . . . . . . .62Upgrading Provisioning Servers . . . . . . . . . . . . . . . . . . . . . . . . . . . . . . . . . . . . .62Upgrading the vDisk . . . . . . . . . . . . . . . . . . . . . . . . . . . . . . . . . . . . . . . . . . . . . .63
Chapter 4 Uninstalling Product SoftwareUn-installing the Provisioning Server . . . . . . . . . . . . . . . . . . . . . . . . . . . . . . . . . . .65Un-installing Windows Target Device Software . . . . . . . . . . . . . . . . . . . . . . . . . . .65Uninstall Linux Target Device Software . . . . . . . . . . . . . . . . . . . . . . . . . . . . . . . . .65
Chapter 5 Managing Multiple Network Interface CardsRequirements and Considerations for Manufacturer’s NIC Teaming. . . . . . . . . . .67Requirements and Considerations for Provisioning Server NIC Failover . . . . . . .68
Chapter 6 Managing Bootstrap Files and Boot DevicesConfiguring the Bootstrap File From the Console. . . . . . . . . . . . . . . . . . . . . . . . . .71
General Tab: Configure Bootstrap . . . . . . . . . . . . . . . . . . . . . . . . . . . . . . . . . . .71Options Tab: Configure Bootstrap . . . . . . . . . . . . . . . . . . . . . . . . . . . . . . . . . . .72
Using the Manage Boot Devices Utility. . . . . . . . . . . . . . . . . . . . . . . . . . . . . . . . . .76Supported Boot Devices.. . . . . . . . . . . . . . . . . . . . . . . . . . . . . . . . . . . . . . . . . . .76
Configuring the BIOS Embedded Bootstrap . . . . . . . . . . . . . . . . . . . . . . . . . . . . . .79Configuring the BIOS-Embedded Bootstrap Settings . . . . . . . . . . . . . . . . . . . .80
General Tab . . . . . . . . . . . . . . . . . . . . . . . . . . . . . . . . . . . . . . . . . . . . . . . . . .80Target Device IP . . . . . . . . . . . . . . . . . . . . . . . . . . . . . . . . . . . . . . . . . . . . . .80Server Lookup Tab. . . . . . . . . . . . . . . . . . . . . . . . . . . . . . . . . . . . . . . . . . . . .80Options Tab . . . . . . . . . . . . . . . . . . . . . . . . . . . . . . . . . . . . . . . . . . . . . . . . . .81
Chapter 7 Upgrading vDisks Manually
Chapter 8 Glossary

6 Citrix Provisioning Server 5.0 Installation and Configuration Guide

CHAPTER 1
Introduction
The information included in this product introduction includes:
• “What’s New in This Release”
• “Provisioning Server Services and Resources”
• “Getting Started”
What’s New in This ReleaseThis section identifies and defines new features and enhancements that are associated with this release. These new features and enhancements are organized under the following categories:
• “Administration and Manageability”
• “Featured Enhancements”
Administration and ManageabilityThe following new features provide a more user-friendly interface that makes managing and performing role-based administrative tasks easier within your Provisioning Server implementation.
• “Microsoft Management Console (MMC)”
• “Console Authentication”
• “Provisioning Server Farm Components”
• “Administrative Roles”
• “Views”
• “Remote Console”
8 Citrix Provisioning Server 5.0 Installation and Configuration Guide
Microsoft Management Console (MMC)The Provisioning Server Console is now a Microsoft Management Console (MMC) snap-in, which is more commonly supported and familiar to administrators.
Console AuthenticationIntegration improvements have between Provisioning Server and Microsoft Active Directory (AD) have been implemented, in additional to local users and groups including:
• Remote Console Authentication
Console users are authenticated using MMC credentials.
• Interoperability
Active Directory operations, such as adding machine accounts, are performed using the privileges of the user logged in to the Console.
• Authorization
New Provisioning-Server administrative roles tie into AD groups or built-in groups, which determines the tasks each group can perform within the farm.
Provisioning Server Farm ComponentsTo improve the user experience and to introduce role-based administration, a new Provisioning Server Farm hierarchy has been created. The basic hierarchy consists of the following components:
• “Farms”
• “Sites”
• “Device Collections”
• “Stores”
• “vDisk Pools”
For each component level, “Administrative Roles” exist. The combination of role-based administration and the new farm hierarchy simplifies management and improves scalability in a Provisioning Server implementations.
Chapter 1 Introduction 9
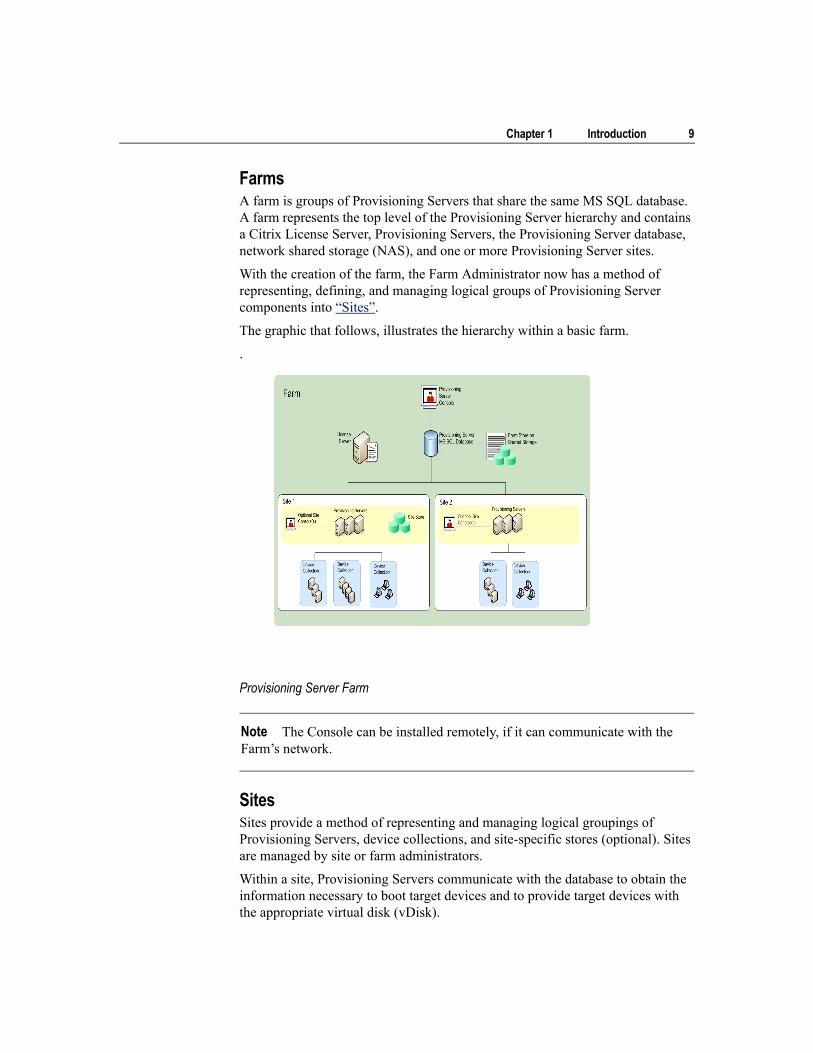
FarmsA farm is groups of Provisioning Servers that share the same MS SQL database. A farm represents the top level of the Provisioning Server hierarchy and contains a Citrix License Server, Provisioning Servers, the Provisioning Server database, network shared storage (NAS), and one or more Provisioning Server sites.
With the creation of the farm, the Farm Administrator now has a method of representing, defining, and managing logical groups of Provisioning Server components into “Sites”.
The graphic that follows, illustrates the hierarchy within a basic farm.
.
Provisioning Server Farm
SitesSites provide a method of representing and managing logical groupings of Provisioning Servers, device collections, and site-specific stores (optional). Sites are managed by site or farm administrators.
Within a site, Provisioning Servers communicate with the database to obtain the information necessary to boot target devices and to provide target devices with the appropriate virtual disk (vDisk).
Note The Console can be installed remotely, if it can communicate with the Farm’s network.
10 Citrix Provisioning Server 5.0 Installation and Configuration Guide
Device CollectionsThe introduction of device collections provides the ability to create and manage logical groups of target devices, which are generally created and managed by device administrators using the Console.
A device collection could represent a physical location, a subnet range, or a logical grouping of target devices. Creating device collections simplifies device management by performing actions at the collection level rather than at the target device level.
StoresA store is a logical name for the physical location of the vDisk folder that can exist within a site or on network shared storage. Provisioning Servers are given permission to access stores, in order to serve its vDisks to target devices.
A store can be visible to different sites and Provisioning Servers depending upon how it is configured.
Server Based Stores
• Private Store: Store resides and is visible locally, on a single Provisioning Server.
• Distributed Store: Same store resides and is visible on more than one Provisioning Server, using a local file path. The server store overrides the global store.
Centralized Stores
• Farm Store: Store is visible using a UNC path to specify the store location.
• Site Store: Store is visible using a UNC path to specify the store location and restricting access to certain sites only.
• Distributed Store: Same store resides and is visible on more than one Provisioning Server, using a local file path. The server store overrides the global store.
vDisk PoolsThe vDisk pool identifies all vDisks available to a site. There is only one vDisk pool per site.
Note A target device can only be a member of one device collection.
Chapter 1 Introduction 11
Administrative RolesIn this release, new administrative roles exist within the new Provisioning Server hierarchy. The ability to view and manage objects within a Provisioning Server implementation now depends on the administrative role assigned to a group of users. Provisioning Server makes use of groups that already exist within the network (Windows or Active Directory groups).
All members within an existing group will share the same administrative privileges within a Provisioning Server Farm. An administrator may also have multiple roles if they belong to more than one group.
The following administrative roles exist:
• Farm Administrator
• Site Administrator
• Device Administrator
• Device Operator
ViewsThe Views feature allows you to create, display, and perform tasks on logical groups of target devices within “Farms” or “Sites”. Target devices that are included in a view can represent devices that are spread across multiple sites and “Device Collections”.
Remote ConsoleGiven the appropriate authorization (administrative role), an administrator can now log in from a remote Console to perform role-based tasks, if that Console has network access to the farm.
Note The Groups feature is no longer available. Views replaces the Groups feature that was available in Provisioning Server 4.5.
12 Citrix Provisioning Server 5.0 Installation and Configuration Guide
Featured EnhancementsThe following new enhancements and features improve performance and scalability within your Provisioning Server implementation:
• “Provisioning Server Database”
• “Provisioning Server Console”
• “vDisk Format”
• “Support for x64 as a Provisioning Server”
• “Import Device Wizard”
• “Upgrade Methods”
Provisioning Server DatabaseTo provide a more viable solution for large enterprise implementations, Provisioning Server Database now supports the following MS SQL 2005 Server editions:
• SQL Server Express Edition
• SQL Server Workgroup Edition
• SQL Server Standard Edition
• SQL Server Enterprise Edition
Provisioning Server ConsoleThe console has been redesigned to include new functionality and to improve the user experience.
vDisk FormatProvisioning Server vDisks now use Microsoft’s published Virtual Hard Disk format (VHD). As a industry standard, other vendors will be developing value added tools based on the VHD format. By adopting this format, Citrix is able to leverage and better integrate with these tools.
Note This change requires that vDisks created prior to this release be upgraded to VHD format. The vDisk’s associated properties are now in a side-car file (.pvp)
Chapter 1 Introduction 13
Boot Device ManagerIn this release, the Boot Device Manager (BDM) utility supports the following devices:
• USB
• CD-ROM (ISO file)
Support for x64 as a Provisioning ServerThe Provisioning Server installation options now include a 64 bit server installer: PVSSRV_Server_x64.exe.
Import Device WizardThe Import Devices Wizard provides a secure way to import target devices into a different collection or site, from the contents of the comma or tab delimited file. Each record needs to have the target device name, MAC address, Site name, Collection name, and optional description.
Upgrade MethodsTo meet a variety of network implementation upgrade requirements, the following upgrade methods are available:
• Rolling Upgrade
• In-Place Upgrade
Note Dell target devices that are shipped with the embedded BIOS bootstrap enabled, can be set to be updated automatically using the Console’s Configure BIOS Bootstrap feature.
14 Citrix Provisioning Server 5.0 Installation and Configuration Guide
Provisioning Server Services and ResourcesThe following services and resources are available to support Provisioning Server.
• “Provisioning Server Documentation”
• “Getting Service and Support”
• “Getting the Subscription Advantage”
• “Locating the Citrix Developer Network”
• “Participating in Citrix Education and Training”
Provisioning Server DocumentationThe following identifies the documentation that is available to support Provisioning Server implementations. All supporting documentation assumes that Provisioning Server administrators are knowledgeable about networking components and administration, and that device operators are familiar with networking concepts.
The majority of product documentation is provided as Adobe Portable Document Format (PDF) files. To view, search, and print PDF documentation, you need to have Adobe Reader 5.0.5 with Search, or a more recent version. You can download these products for free from Adobe System’s Web site at:
http://www.adobe.com/
Most PDF product documentation, including knowledge-based topics and white papers, are accessible from the Citrix Knowledge Center:
http://support.citrix.com/
Citrix Product Licensing DocumentationFor Citrix product licensing documentation, open the Citrix Knowledge Center, then select Licensing under the Knowledge Resources section:
http://support.citrix.com/pages/licensing
Release NotesThis document contains important product information and is intended to be read first. Contents include information on new product features, enhancements, and known product issues as well as late additions that were not included in the other product documentation.
The release notes are accessible from:
• Citrix Knowledge Center:
Chapter 1 Introduction 15
http://support.citrix.com/
• Product installation CD-ROM, when the installation executable is run.
• Programs directory, after completing the product installation:
Start>All Programs>Citrix Provisioning Server>Provisioning Server Release Notes>
Administrator’s GuideUse this guide to manage the Provisioning Server farm. The Console’s context-sensitive help system is based on the Administrator’s Guide and is accessible from the Console’s Help drop-down menu. This guide is available as a PDF and can be accessed from the Citrix Knowledge Center:
http://support.citrix.com/
Programmer’s GuidesAdministrator’s with the appropriate privileges can use any of the following guides to manage your implementation from command lines.
• MCLI Programmer’s Guide
• SOAP Server Programmer’s Guide
• PowerShell Programmer’s Guide
These guides are available as a PDF and can be accessed from the Citrix Knowledge Center:
http://support.citrix.com/
Virtual Disk Status Tray HelpThe Virtual Disk (vDisk) Status Tray help is available to aid in the management and troubleshooting of vDisks on target devices.
This help system is assessable from the Help menu on the Virtual Disk Status Tray.
Finding Additional DocumentationFrom the Help menu or product installation directory, the following additional documentation is available for optional Provisioning Server utilities:
• Boot Device Manager (BDM.hlp)
• BOOTPTab Editor (BPEDIT.hlp)
• BOOTP (BNBOOTP.hlp)
16 Citrix Provisioning Server 5.0 Installation and Configuration Guide
Getting Service and SupportCitrix provides technical support primarily through the Citrix Solutions Advisors Program. Contact your supplier for the first-line support or check for your nearest Solutions Advisor. In addition to the Citrix Solutions Advisors Program, Citrix offers a variety of self-service, Web-based technical support tools from its Knowledge Center at:
http://support.citrix.com/
The Knowledge Center feature includes:
• A knowledge base containing thousands of technical solutions to support your Citrix environment.
• An online product documentation library.
• Interactive support forums for every Citrix product.
• Blogs and communities.
• Access to the latest hotfixes and service packs.
• Security bulletins.
• Additional resources are available to customers with valid support contracts, including online problem reporting and tracking.
• Citrix Live Remote Assistance. Using Citrix’s remote assistance product, GoToAssist, a member of our support team can view your desktop and share control of your mouse and keyboard to get you on your way to a solution.
Another source of support, Citrix Preferred Support Services, provides a range of options that allows you to customize the level and type of support for your organization’s Citrix products.
Getting the Subscription AdvantageSubscription Advantage gives you an easy way to stay current with the latest server-based software functionality and information. Not only do you get automatic delivery of feature releases, software upgrades, enhancements, and maintenance releases that become available during the term of your subscription, you also get priority access to important Citrix technology information.
You can find more information on the Citrix Web site (http://www.citrix.com/) by selecting Subscription Advantage from the Support menu.
You can also contact your Citrix sales representative or a member of the Citrix Solutions Advisors Program for more information.
Chapter 1 Introduction 17
Locating the Citrix Developer NetworkThe Citrix Developer Network (CDN) is at:
http://www.citrix.com/cdn/
This enrollment membership program provides access to developer toolkits, technical information, and test programs for software and hardware vendors, system integrators, and corporate IT developers who incorporate Citrix computing solutions into their products.
Participating in Citrix Education and TrainingCitrix offers a variety of instructor-led training and Web-based training solutions. Instructor-led courses are offered through Citrix Authorized Learning Centers (CALCs). CALCs provide high-quality classroom learning using professional courseware developed by Citrix. Many of these courses lead to certification.
Web-based training courses are available through CALCs, resellers, and from the Citrix Web site.
Information about programs and courseware for Citrix training and certification is is available from:
http://www.citrix.com/edu/
Getting StartedTo get started, ensure that you understand the product technology used to successfully install and configure your first Provisioning Server implementation. This information is available in the Product and Technology Overview chapter in the Administrator’s Guide.
Note There is no cost associated with enrolling with the Citrix Developer Network.

18 Citrix Provisioning Server 5.0 Installation and Configuration Guide
CHAPTER 2
Installing and Configuring a Provisioning Server Implementation
To create a new Provisioning Server implementation, product software and components are installed from the product CD-ROM or as a product download. Both the product CD-ROM and download contain the following installation wizards and product utilities:
• “Citrix Licensing”
• “Provisioning Server Installation Wizard”
• “Provisioning Server Console Wizard”
• “Master Target Device Installation Wizard”
Citrix LicensingCTX_Licensing.msi installs the Citrix licensing software on a server that can communicate with Provisioning Servers within your implementation.
Provisioning Server Installation Wizard Run PVSSRV_Server.exe or PVSSRV_Server_x64.exe
20 Citrix Provisioning Server 5.0 Installation and Configuration Guide
to install the following Provisioning Server components within a farm:
• Provisioning Server Stream Service
• Network Boot Services (optional)
• Configuration Wizard (runs after the installation wizard to configure installed components and creates the Provisioning Server database)
• Management Interfaces
• Provisioning Server Console (also available as a separate, standalone installer)
• Boot Device Manager (BDM)
Provisioning Server Console WizardRun PVSSRV_Console_x64.exe or PVSSRV_Console.exe
to install the Console, which also includes the Boot Device Mangement utility, on machines that do not have the Provisioning Server software installed (Provisioning Server software includes the Console installation). The Console can be installed on any machine that can communicate with the Provisioning Server database.
Master Target Device Installation WizardFor Windows:
PVSSRV_Device.exe
or
PVSSRV_Device_x64.exe
Linux Target Device Software:
PVSSRV_LinuxDevice.run
or
PVSSRV_LinuxDevice_x64.run
Installs the target device software on a Master Target Device. The Master Target Device is used to create the ‘golden image,’ which is then saved to a vDisk file using the Image Builder utility. The Image Builder and Virtual Disk Status Tray utilities install with the target device software.
Note Installing from a UNC path is not supported.
Chapter 2 Installing and Configuring a Provisioning Server Implementation 21
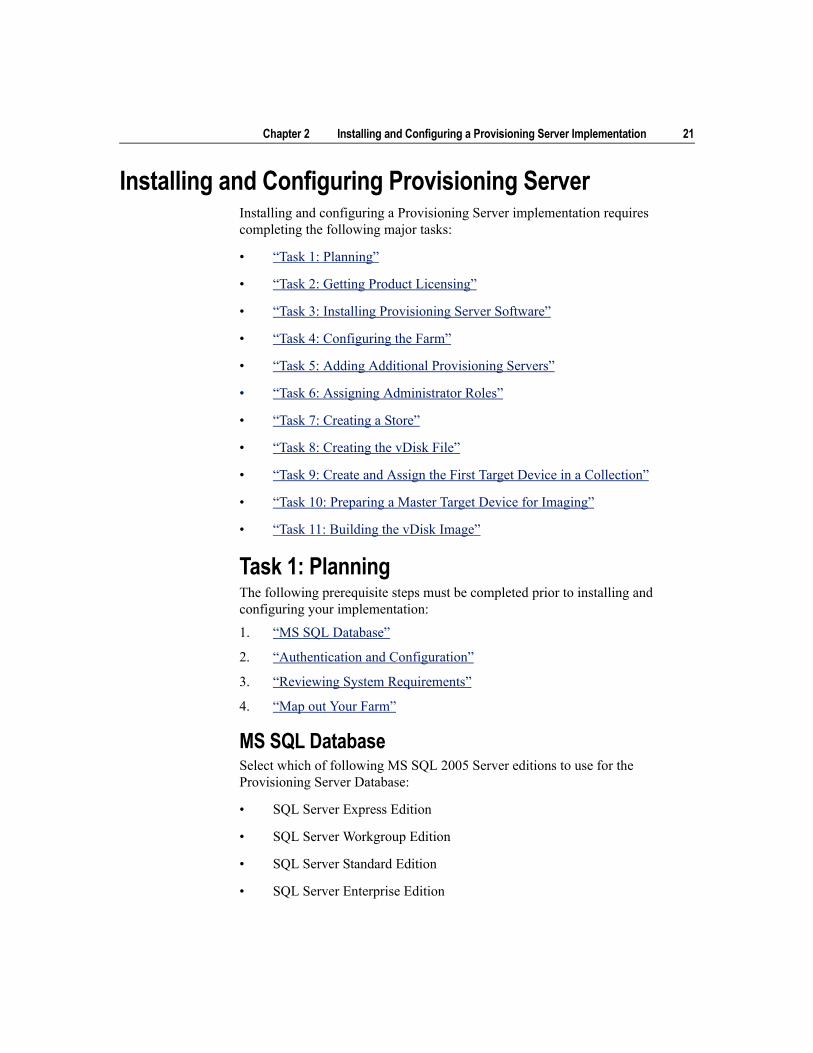
Installing and Configuring Provisioning ServerInstalling and configuring a Provisioning Server implementation requires completing the following major tasks:
• “Task 1: Planning”
• “Task 2: Getting Product Licensing”
• “Task 3: Installing Provisioning Server Software”
• “Task 4: Configuring the Farm”
• “Task 5: Adding Additional Provisioning Servers”
• “Task 6: Assigning Administrator Roles”
• “Task 7: Creating a Store”
• “Task 8: Creating the vDisk File”
• “Task 9: Create and Assign the First Target Device in a Collection”
• “Task 10: Preparing a Master Target Device for Imaging”
• “Task 11: Building the vDisk Image”
Task 1: Planning The following prerequisite steps must be completed prior to installing and configuring your implementation:
1. “MS SQL Database”
2. “Authentication and Configuration”
3. “Reviewing System Requirements”
4. “Map out Your Farm”
MS SQL Database Select which of following MS SQL 2005 Server editions to use for the Provisioning Server Database:
• SQL Server Express Edition
• SQL Server Workgroup Edition
• SQL Server Standard Edition
• SQL Server Enterprise Edition
22 Citrix Provisioning Server 5.0 Installation and Configuration Guide
Authentication and ConfigurationProvisioning Server uses integrated authentication. All Provisioning Server components, including services, that access the database, must run in the context of a user.
User tools, such as the Configuration Wizard, run in the context of the logged-in user. Services, such as the Stream Process and SOAP Server, need to have the user specifically configured with minimal privileges.
The user must have at least the following system privileges:
• Run as service
• Registry read access
• Read/write access to Program Files\Citrix\Provisioning Server
• Read/write access to any vDisk location
Determine which of the following supported user accounts the Stream and Soap services will run under:
• Network service account
• Specified user account (required when using a Windows Share)
Requires user name, domain, and password information.
• Local system account (for use with SAN)
Because authentication is not common in workgroup environments, minimal privilege user accounts must be created on each server, and each instance must have identical credentials (i.e. password).
Caution Installing the SQL database and Provisioning Server Services on the same server can cause poor distribution during load balancing. It is highly recommended that they do not co-exist on the same server.
Chapter 2 Installing and Configuring a Provisioning Server Implementation 23
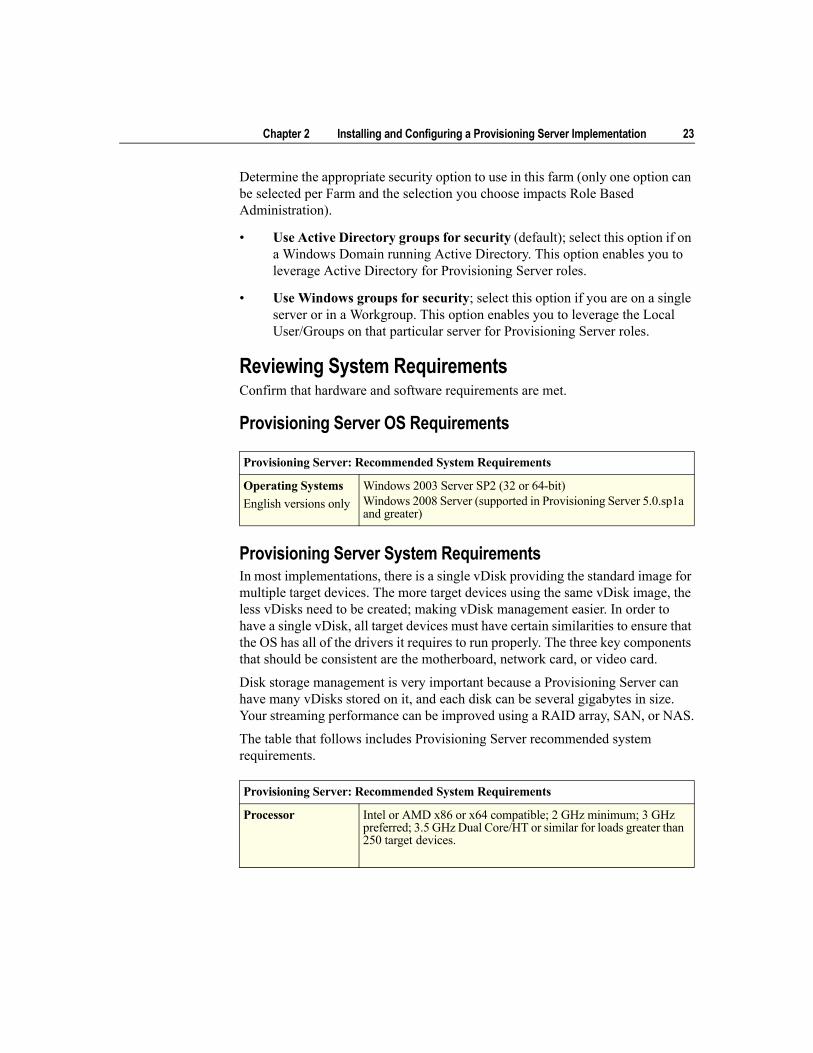
Determine the appropriate security option to use in this farm (only one option can be selected per Farm and the selection you choose impacts Role Based Administration).
• Use Active Directory groups for security (default); select this option if on a Windows Domain running Active Directory. This option enables you to leverage Active Directory for Provisioning Server roles.
• Use Windows groups for security; select this option if you are on a single server or in a Workgroup. This option enables you to leverage the Local User/Groups on that particular server for Provisioning Server roles.
Reviewing System RequirementsConfirm that hardware and software requirements are met.
Provisioning Server OS Requirements
Provisioning Server System RequirementsIn most implementations, there is a single vDisk providing the standard image for multiple target devices. The more target devices using the same vDisk image, the less vDisks need to be created; making vDisk management easier. In order to have a single vDisk, all target devices must have certain similarities to ensure that the OS has all of the drivers it requires to run properly. The three key components that should be consistent are the motherboard, network card, or video card.
Disk storage management is very important because a Provisioning Server can have many vDisks stored on it, and each disk can be several gigabytes in size. Your streaming performance can be improved using a RAID array, SAN, or NAS.
The table that follows includes Provisioning Server recommended system requirements.
Provisioning Server: Recommended System Requirements
Operating SystemsEnglish versions only
Windows 2003 Server SP2 (32 or 64-bit)Windows 2008 Server (supported in Provisioning Server 5.0.sp1a and greater)
Provisioning Server: Recommended System Requirements
Processor Intel or AMD x86 or x64 compatible; 2 GHz minimum; 3 GHz preferred; 3.5 GHz Dual Core/HT or similar for loads greater than 250 target devices.
24 Citrix Provisioning Server 5.0 Installation and Configuration Guide
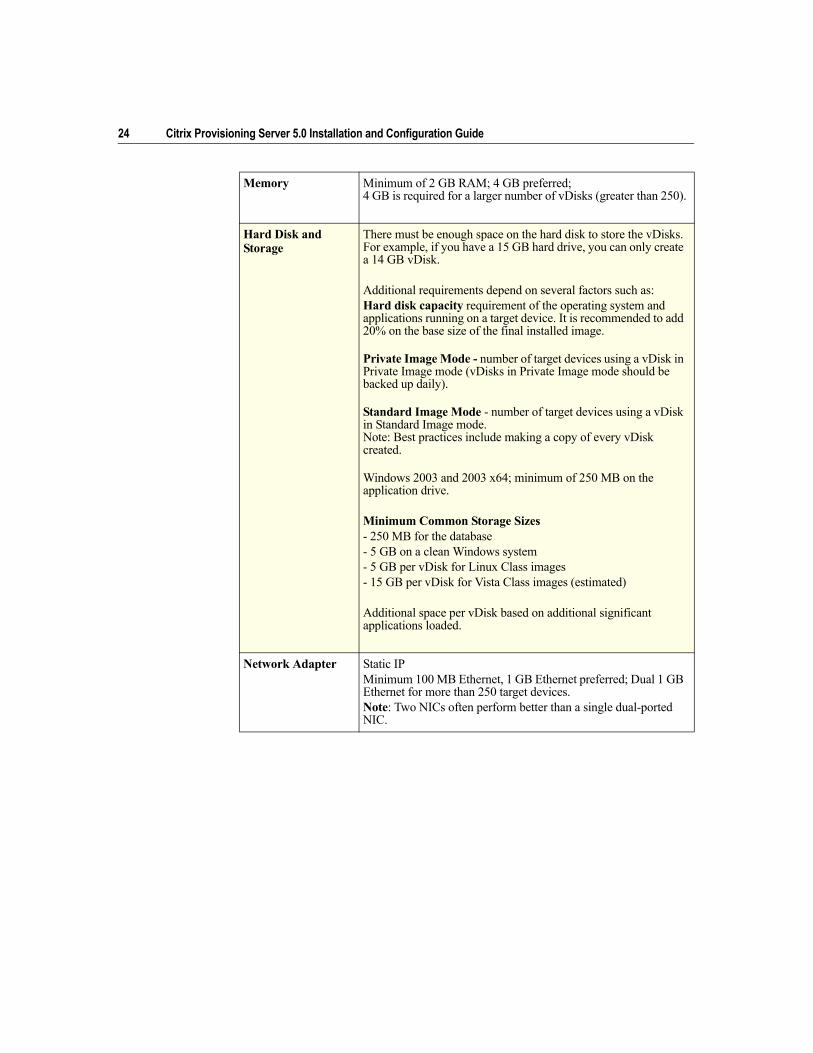
Memory Minimum of 2 GB RAM; 4 GB preferred; 4 GB is required for a larger number of vDisks (greater than 250).
Hard Disk and Storage
There must be enough space on the hard disk to store the vDisks. For example, if you have a 15 GB hard drive, you can only create a 14 GB vDisk.
Additional requirements depend on several factors such as: Hard disk capacity requirement of the operating system and applications running on a target device. It is recommended to add 20% on the base size of the final installed image.
Private Image Mode - number of target devices using a vDisk in Private Image mode (vDisks in Private Image mode should be backed up daily).
Standard Image Mode - number of target devices using a vDisk in Standard Image mode.Note: Best practices include making a copy of every vDisk created.
Windows 2003 and 2003 x64; minimum of 250 MB on the application drive.
Minimum Common Storage Sizes- 250 MB for the database- 5 GB on a clean Windows system- 5 GB per vDisk for Linux Class images- 15 GB per vDisk for Vista Class images (estimated)
Additional space per vDisk based on additional significant applications loaded.
Network Adapter Static IPMinimum 100 MB Ethernet, 1 GB Ethernet preferred; Dual 1 GB Ethernet for more than 250 target devices. Note: Two NICs often perform better than a single dual-ported NIC.
Chapter 2 Installing and Configuring a Provisioning Server Implementation 25
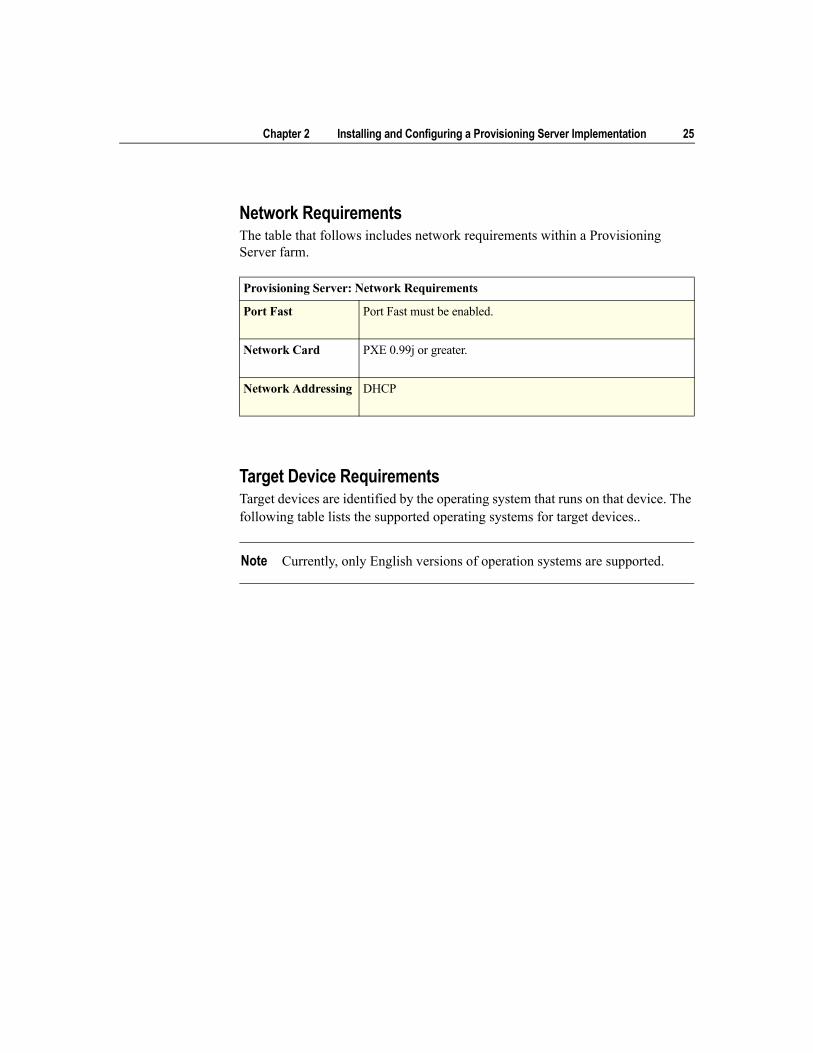
Network RequirementsThe table that follows includes network requirements within a Provisioning Server farm.
Target Device RequirementsTarget devices are identified by the operating system that runs on that device. The following table lists the supported operating systems for target devices..
Provisioning Server: Network Requirements
Port Fast Port Fast must be enabled.
Network Card PXE 0.99j or greater.
Network Addressing DHCP
Note Currently, only English versions of operation systems are supported.
26 Citrix Provisioning Server 5.0 Installation and Configuration Guide
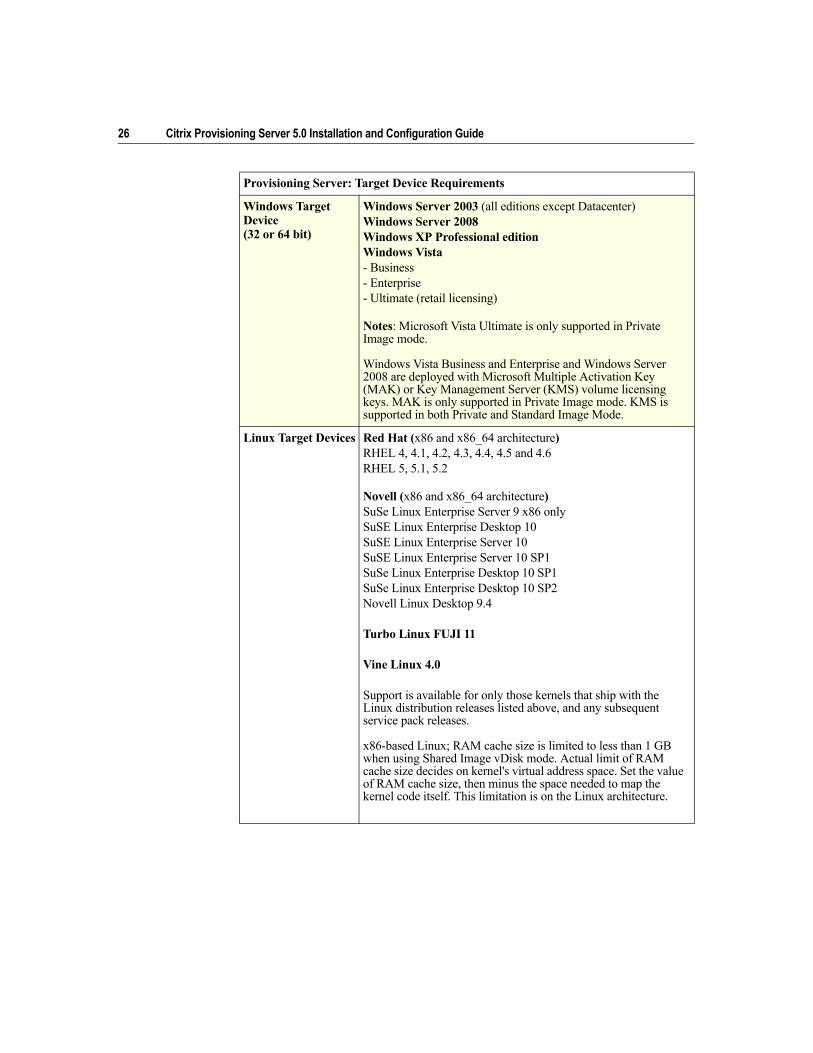
Provisioning Server: Target Device Requirements
Windows Target Device (32 or 64 bit)
Windows Server 2003 (all editions except Datacenter)Windows Server 2008 Windows XP Professional editionWindows Vista- Business- Enterprise- Ultimate (retail licensing)
Notes: Microsoft Vista Ultimate is only supported in Private Image mode.
Windows Vista Business and Enterprise and Windows Server 2008 are deployed with Microsoft Multiple Activation Key (MAK) or Key Management Server (KMS) volume licensing keys. MAK is only supported in Private Image mode. KMS is supported in both Private and Standard Image Mode.
Linux Target Devices Red Hat (x86 and x86_64 architecture)RHEL 4, 4.1, 4.2, 4.3, 4.4, 4.5 and 4.6RHEL 5, 5.1, 5.2
Novell (x86 and x86_64 architecture)SuSe Linux Enterprise Server 9 x86 onlySuSE Linux Enterprise Desktop 10 SuSE Linux Enterprise Server 10 SuSE Linux Enterprise Server 10 SP1 SuSe Linux Enterprise Desktop 10 SP1 SuSe Linux Enterprise Desktop 10 SP2Novell Linux Desktop 9.4
Turbo Linux FUJI 11
Vine Linux 4.0
Support is available for only those kernels that ship with the Linux distribution releases listed above, and any subsequent service pack releases.
x86-based Linux; RAM cache size is limited to less than 1 GB when using Shared Image vDisk mode. Actual limit of RAM cache size decides on kernel's virtual address space. Set the value of RAM cache size, then minus the space needed to map the kernel code itself. This limitation is on the Linux architecture.

Chapter 2 Installing and Configuring a Provisioning Server Implementation 27
Provisioning Server Console RequirementsThe table that follows lists Console requirements.
Map out Your FarmBefore attempting to install and configure Provisioning Server, it is important to first map out your farm and note the information that will be requested during the installation and configuration process.
Complete the sections that follow to create a map of your farm.
Provisioning Server DatabaseOnly one Provisioning Server database is associated with a farm. You can choose to install the Provisioning Server database software on:
• An existing SQL database machine; if that machine can communicate with all Provisioning Servers within the farm.
• A new SQL Express database machine, created using the SQL Express software, which is free from Microsoft.
Database server
Host Name:
__________________________________________________________
Note Currently, only English versions of operation systems are supported.
Provisioning Server Console Requirements
Processor Minimum 1 GHz, 2 GHz preferred
Memory Minimum 1 GB, 2 GB preferred
Hard Disk Minimum 500 MB
Operating System Windows XP Professional SP2 (32 and 64-bit)Windows Vista (32 and 64-bit)Windows Server 2003 SP1 (32 and 64-bit)
Other Required:MMC 3.0
Optional: Adobe Acrobat Reader highly recommended.
28 Citrix Provisioning Server 5.0 Installation and Configuration Guide
Instance Name:
__________________________________________________________
License server
Host Name:
__________________________________________________________
Vendor Daemon / license server port:
__________________________________________________________
Task 2: Getting Product LicensingThe Citrix License Server must be installed on a server within the farm that is able to communicate with all Provisioning Servers within the farm.
Consider the following options when deciding which server to use as the license server:
• Single System: Same system as Provisioning Server; for evaluations, test labs, or implementations with one Citrix product.
• Stand-alone: Separate system that has an existing license server installed; for larger implementations or implementations using multiple Citrix products.
• Point to an existing license server.
To install the license server
Download or run CTX_Licensing.msi from the Product Installation CD-ROM.
For Citrix product licensing documentation, open the Citrix Knowledge Center, then select Licensing under the Knowledge Resources section:
http://support.citrix.com/pages/licensing/
Refer to the Getting Started with Citrix Licensing Guide.
Task 3: Installing Provisioning Server SoftwareInstall any Windows service packs, drivers, and updates before installing the Provisioning-Server software.
Note This installation task is for new Provisioning Server implementations. For upgrade tasks, refer to the “Upgrading from Previous Releases”.
Chapter 2 Installing and Configuring a Provisioning Server Implementation 29
Complete the steps that follow to install the services and applications required to create a Provisioning Server.
1. Click on the appropriate platform-specific install option. The Provisioning Server Welcome window appears.
2. Click Next. The Product License Agreement appears.
3. Scroll to the end to accept the terms in the license agreement, then click Next to continue. The Customer Information dialog appears.
4. Type or select your user name and organization name in the appropriate text boxes, then click Next. The Destination Folder dialog appears.
5. Click Change..., then enter the folder name or navigate to the appropriate folder where the software should be installed, or click Next to install the Provisioning Server to the default folder. The Setup Type dialog appears.
6. Select the radio button that best describes the installation to perform:
Complete - Installs all components and options on this computer (default).
Custom - Choose which components to install and where to install those components.
Click Next.
7. If you select Complete, the ‘Ready to Install the Program’ dialog appears.
Or
If you selected Custom, the ‘Custom Setup’ dialog appears. This dialog provides a ‘Feature Description’ text box that provides a description for the selected component as well as the space required to install that component.
• Expand each component icon and select how that component is to be installed.
• After making component selections, click Next. The ‘Ready to Install the Program’ dialog appears. Or, click Cancel to close the wizard without making system modifications.
8. On the ‘Ready to Install the Program’ dialog, click Install to continue with the installation process (the installation may take several minutes).
Note Installing the Network Boot Services does not activate them. If uncertain about the need for any of these services, choose the Complete installation option.
30 Citrix Provisioning Server 5.0 Installation and Configuration Guide
9. The ‘Installation Wizard Completed’ message displays in the dialog when the components and options are successfully installed.
10. Click Finish to exit the Installation Wizard. The Provisioning Server Configuration Wizard automatically opens.
Task 4: Configuring the Farm Run the Configuration Wizard on a Provisioning Server when creating a new Farm, adding new Provisioning Servers to an existing farm, or reconfiguring an existing Provisioning Server.
When configuring a Provisioning Server, consider the following:
• All Provisioning Servers within a farm must share the same database to locate vDisks for target devices on shared storage devices within the farm. If that shared storage device is a Windows network share, refer to configuration information described in the Administrator’s Guide Managing Network Components section. If that shared storage device is a SAN, no additional configuration is necessary.
• To properly configure the network services, be sure that you understand network service options and settings.
Note The Installation Wizard can be re-run to install additional components at a later time, or re-run on a different computer to install select components on a separate computer.
Note Although Provisioning Server does not require that you restart the server after installing the product software, in some instances, a Microsoft message may appear requesting a restart. If this message appears, complete Task 4: Configuring the Farm using the Configuration Wizard, before restarting the server. If this message appears and the server is not restarted, the removeable drive may not appear.
Chapter 2 Installing and Configuring a Provisioning Server Implementation 31
Configuration Wizard SettingsBefore running the Configuration Wizard, be prepared to make the following selections:
• “Network Topology”
• “Identify the Farm”
• “Identify the Database”
• “Identify the Site”
• “License Server Settings”
• “Network Adapter Settings”
• “Bootstrap Server Settings”.
Starting the Configuration WizardThe Configuration Wizard starts automatically after the Provisioning Server is installed. The wizard can also be started by selecting:
Start>All Programs>Citrix>Provisioning Server>Provisioning Server Configuration Wizard
Configuration Wizard TasksAfter starting the Configuration Wizard, click Next to begin the configuration tasks that follow.
Network TopologyComplete the network configuration steps that follow.
Note If errors occur during processing, the log is written to a ConfigWizard.log file, which is located at C:\Documents and Settings\All Users\Application Data\ Citrix\Provisioning Server.
Note When running the Configuration Wizard, the tasks that appear depend on the network service options that are selected and the purpose for running the wizard.
32 Citrix Provisioning Server 5.0 Installation and Configuration Guide
Selecting the network service to provide IP addresses
To provide IP addresses to target devices, select from the following network service options:
• If the DHCP service is on this server, select the radio button next to one of the following network services to use, then click Next:
• Microsoft DHCP
• Provisioning Server BOOTP service
• Other BOOTP or DHCP service
• If the DHCP service is not on this server, select the radio button next to The service is running on another computer, then click Next.
Selecting the network service to provide PXE boot information
Each target device needs to download a boot file from a TFTP server.
Select the network service to provide target devices with PXE boot information:
• If you choose to use this Provisioning Server to deliver PXE boot information, select The service is running on this computer, then select from either of the following options, then click Next:
• Microsoft DHCP (options 66 and 67)
• Provisioning Server PXE Service
• If this Provisioning Server will not deliver PXE boot information, select The information is provided by a service on another device option, then click Next.
Identify the FarmThe following farm options appear:
• “Farm is already configured”
• “Create a new farm”
• “Join an existing farm”
Note Use existing network services if possible. If for any reason existing network services can not be used, choose to install the network services that are made available during the installation process.
Chapter 2 Installing and Configuring a Provisioning Server Implementation 33
Farm is already configured
Select this option to reconfigure an existing farm, then continue on to the “Configure user account settings” procedure.
Create a new farm
1. On the Farm Configuration dialog, select the Create Farm radio button to create a new farm, then click Next.
2. Use the Browse button to browse for existing SQL databases and instances in the network, or type the database server name and instance.
3. Click Next to continue on to the “Selecting the database location” procedure.
Join an existing farm
1. On the Farm Configuration dialog, select the Join Existing Farm radio button to add this Provisioning Server to an existing farm, then click Next.
2. Use the Browse button to browse for the appropriate SQL database and instance within the network.
3. Select the farm name that displays by default, or scroll to select the farm to join, then click Next. The Site dialog appears.
4. Select from the following site options, then click Next:
• Existing Site
Select the site from the drop-down menu to join an existing site.
• New Site
Create a site by typing the name of the new site and a collection.
Continue on to “Configure user account settings” procedure.
Identify the DatabaseOnly one database exists within a farm. To identify the database, complete the steps that follow.
Note More than one farm can exist on a single server. This configuration is common in test implementations.
34 Citrix Provisioning Server 5.0 Installation and Configuration Guide
Selecting the database location
If the database server location and instance have not yet been selected, complete the following procedure.
1. On the Database Server dialog, click Browse to open the SQL Servers dialog.
2. From the list of SQL Servers, select the name of the server where this database exists and the the instance to use. In a test environment, this may be a staged database.
3. Click Next. If this is a new farm, continue on to the “Defining a Farm”procedure.
Defining a Farm
1. Type in the following information in the appropriate text boxes, then click Next.
A. The name of the database that this farm will use.
B. The name to assign to this farm.
C. The name of the first site to create within this farm.
D. The name of the first target device collection to create in this site.
Continue on to the “Selecting the license server” procedure.
Identify the SiteWhen joining an existing farm, identify the site where this Provisioning Server is to be a member, by either creating a new site or selecting an existing site within the farm. When a site is created, a default target device collection is automatically created for that site.
Create a new site
1. On the Site dialog, enable the New Site radio button.
2. In the Site Name text box, type the new site name where this Provisioning Server is to be a member.
Note When re-running the Configuration Wizard to add additional Provisioning Servers database entries, the Server Name and Instance Name text boxes are already populated. By default, SQL Server Express installs as an instance named ‘SQLEXPRESS’.
Chapter 2 Installing and Configuring a Provisioning Server Implementation 35
3. In the Collection Name, accept the default collection, Collection, or create a new default collection name to associate with this Provisioning Server, then click Next.
Select an existing site
1. On the Site dialog, enable the Existing Site radio button. (The default site name is Site.)
2. Select the appropriate site from the drop-down list, then click Next.
License Server SettingsTo identify the license server, complete the steps that follow.
Selecting the license server
1. Enter the name (or IP address) and port number of the license server (default is 27000). The Provisioning Server must be able to communicate with the license server to get the appropriate product licenses.
2. Optionally, select the checkbox Use Datacenter licenses for desktops if no Desktop licenses are available to enable the license tradeup option.
3. Click Next to continue on to the “Configure user account settings” procedure.
User Account SettingsThe Stream and Soap services run under a user account.
Configure user account settings
1. On the User Account dialog, select the user account that the Stream and Soap services will run under:
• Network service account (default)
• Specified user account (required when using a Windows Share)
Type the user name, domain, and password information in the appropriate text boxes.
• Local system account (for use with SAN)
Note When selecting the license server, ensure that all Provisioning Server’s in the farm are able to communicate with that server in order to get the appropriate product licenses.
36 Citrix Provisioning Server 5.0 Installation and Configuration Guide
2. Select the checkbox next to the Configure the database for the account option, if you selected:
• Network service account, which adds the appropriate database roles (Datareader and Datawriter) for this machine.
• Specified user account, which adds the appropriate database roles (Datareader and Datawriter) for this user.
3. Click Next, the continue on to the “Selecting network cards for the Stream Service” procedure.
Network Adapter Settings
Selecting network cards for the Stream Service
1. Select the checkbox next to each of the network cards that the Stream Service can use.
2. Select the default, or enter the first and last ports to use for Provisioning Server network services communications in the appropriate text box.
3. Select the Soap Server port (default is 8000) to use for Console access, then click Next.
Continue on to the “Selecting the bootstrap server” procedure.
Bootstrap Server SettingsComplete the steps that follow to identify the bootstrap server and configure the bootstrap file location.
Note If multiple network adapters are selected, they must be configured with the same IP subnet address. For example: IP subnet: 100.100.10.x; IP subnet mask 255.255.255.0
Note A minimum of five ports are necessary in the range. For larger implementations, consider allocating additional ports.
Note Bootstrap configurations can be reconfigured by selecting the Configure Bootstrap option from the Provisioning Server Action menu in the Console.
Chapter 2 Installing and Configuring a Provisioning Server Implementation 37
Selecting the bootstrap server
To use the TFTP service on this Provisioning Server:
1. Select the Use the TFTP Service option, then enter or browse for the boot file. The default location is:C:\Documents and Settings\All Users\ProgramData\Citrix\Provisioning Server\Tftpboot
2. Click Next.
Selecting Provisioning Servers to use for the boot process
1. Use the Add button to add additional Provisioning Servers to the list, the Edit button to edit existing information, or Remove to remove the Provisioning Server from the list. Use the Move up or Move down buttons to change the Provisioning Server boot preference order.
In an HA implementation, at least two Provisioning Server must be selected as boot servers.
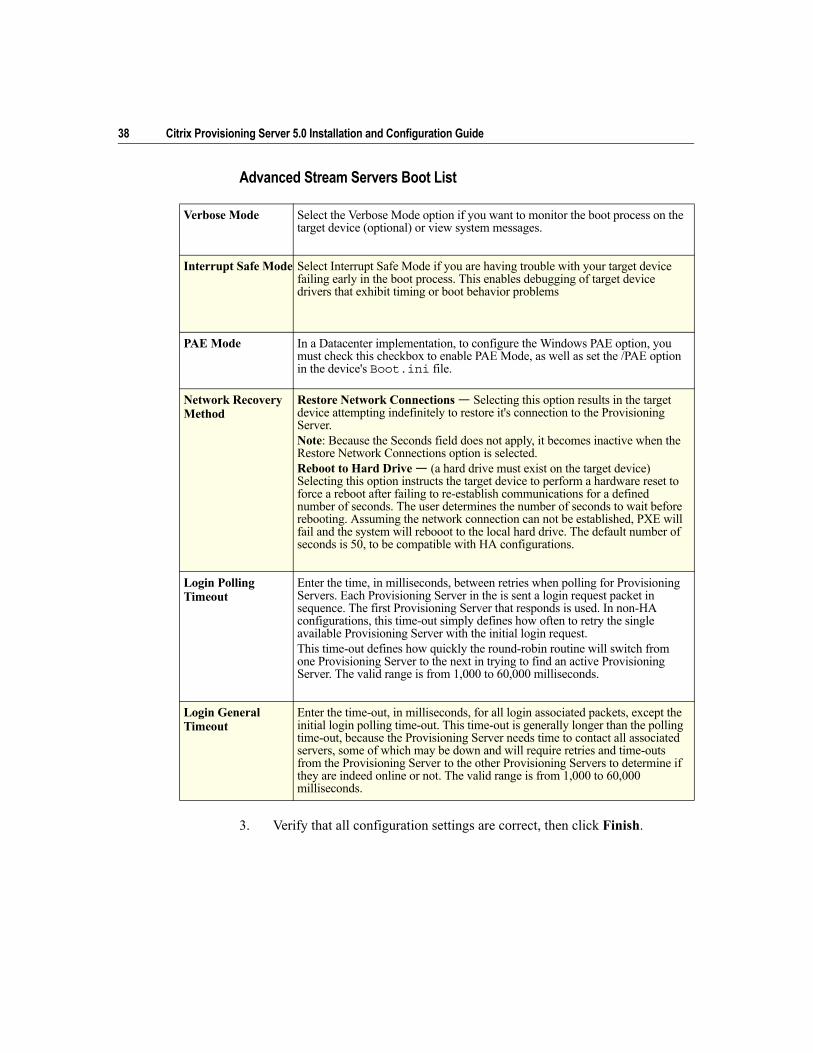
2. Optionally, highlight the IP address of the Provisioning Server that target devices will boot from, then click Advanced. The Advanced Stream Servers Boot List appears.
The following table describes advanced settings that you can choose from. After making your selections, click OK to exit the dialog, then click Next to continue.
Note If a previous version of Provisioning Server was installed on this server, and the default location is:C:\Program Files\Citrix\Provisioning Server\TftpBoot
You must run the Configuration Wizard to change the default location to: C:\Documents and Settings\All Users\ProgramData or ApplicationData\Citrix\Provisioning Server\Tftpboot
If the default is not changed, the bootstrap file can not be configured from the Console and target devices will fail to boot; receiving a ‘Missing TFTP’ error message.
38 Citrix Provisioning Server 5.0 Installation and Configuration Guide
Advanced Stream Servers Boot List
3. Verify that all configuration settings are correct, then click Finish.
Verbose Mode Select the Verbose Mode option if you want to monitor the boot process on the target device (optional) or view system messages.
Interrupt Safe Mode Select Interrupt Safe Mode if you are having trouble with your target device failing early in the boot process. This enables debugging of target device drivers that exhibit timing or boot behavior problems
PAE Mode In a Datacenter implementation, to configure the Windows PAE option, you must check this checkbox to enable PAE Mode, as well as set the /PAE option in the device's Boot.ini file.
Network Recovery Method
Restore Network Connections — Selecting this option results in the target device attempting indefinitely to restore it's connection to the Provisioning Server. Note: Because the Seconds field does not apply, it becomes inactive when the Restore Network Connections option is selected.Reboot to Hard Drive — (a hard drive must exist on the target device) Selecting this option instructs the target device to perform a hardware reset to force a reboot after failing to re-establish communications for a defined number of seconds. The user determines the number of seconds to wait before rebooting. Assuming the network connection can not be established, PXE will fail and the system will rebooot to the local hard drive. The default number of seconds is 50, to be compatible with HA configurations.
Login Polling Timeout
Enter the time, in milliseconds, between retries when polling for Provisioning Servers. Each Provisioning Server in the is sent a login request packet in sequence. The first Provisioning Server that responds is used. In non-HA configurations, this time-out simply defines how often to retry the single available Provisioning Server with the initial login request.This time-out defines how quickly the round-robin routine will switch from one Provisioning Server to the next in trying to find an active Provisioning Server. The valid range is from 1,000 to 60,000 milliseconds.
Login General Timeout
Enter the time-out, in milliseconds, for all login associated packets, except the initial login polling time-out. This time-out is generally longer than the polling time-out, because the Provisioning Server needs time to contact all associated servers, some of which may be down and will require retries and time-outs from the Provisioning Server to the other Provisioning Servers to determine if they are indeed online or not. The valid range is from 1,000 to 60,000 milliseconds.

Chapter 2 Installing and Configuring a Provisioning Server Implementation 39
Task 5: Adding Additional Provisioning ServersTo add additional Provisioning Servers, install the Provisioning Server software on each server that is to a member of the farm. Run the Provisioning Server Installation Wizard, then the Configuration Wizard on each server. When the Configuration Wizard prompts for the site to add the server to, choose an existing site or create a new site.
Connecting to the FarmAfter adding Provisioning Servers to the site, start the Provisioning Server Console and connect to the farm. Verify that all sites and servers display appropriately in the Console window.
To connect to a farm
1. Open the Console by selecting the Start>All Programs>Citrix>Provisioning Server>Provisioning Server Console.
1. Right-click on Provisioning Server Console in the Console tree, then select Connect to farm...
2. Under ‘Server Information’, type the name or IP address of a Streaming Server on the farm and the port configured for server access (default is 8000).
3. Select to log in using one of the following methods:
• Use the Windows credentials that you are currently logged in with, then optionally enable the Auto-login on application start or reconnect feature.
• Use different Windows credentials by entering the username, password, and domain associated with those credentials then optionally, enable the Save Password and Auto-login on application start or reconnect feature.
4. Click Connect. The Farm icon appears in the Console tree.
Task 6: Assigning Administrator RolesUsing the Console’s Farm, Site, and Device property dialogs, assign the appropriate administrator group roles. The role determines what objects appear in the Console and the tasks that a user can perform within this farm.
Note For details, refer to Managing Administrator Roles in the Administrator’s Guide.
40 Citrix Provisioning Server 5.0 Installation and Configuration Guide
Task 7: Creating a StoreTo create a new store
1. In the Console tree, right-click on Stores, then select the Create store menu option. The Store Properties dialog appears.
2. On the General tab, type the store name (logical name for this storage location) and a description of this store.
3. To provide a site administrator with permission to manage this store, under Security, select the site within this farm that will act as the store owner. Otherwise, leave this blank so that only farm administrators can manage this store.
4. On the Paths dialog, type in the default path for this store (physical location of the vDisk folder). If the user is a site administrator, only those sites that they administer will be available in the list. By default, the write cache folder will be created in the physical location of the store.
5. Optionally, click Add to add additional write-cache paths to use for this store. Entering more than one write cache paths allows for vDisk load to be distributed to physically different drives. When a target device first connects, the Stream Service picks from the list. If using HA, the order of the write-cache paths for any override paths in store properties for that server, must match the order of the write-cache paths specified here.
6. Click the Servers tab. Select a site from the list. All Provisioning Servers in that site appear. Check the box next to each Provisioning Server that will access this store. Repeat this step for each site if necessary. (If this procedure is performed by a site administrator, only those sites that they administer appear.)
7. Click OK to save Property settings.
Task 8: Creating the vDisk FileThe following lists the major steps involved in creating and configuring the vDisk file:
• “Creating the vDisk File in the Console”
• “Formatting a vDisk”
• “Unmounting a vDisk”
Chapter 2 Installing and Configuring a Provisioning Server Implementation 41
Creating the vDisk File in the ConsoleTo create a new vDisk file in the Console
1. In the Console tree, right-click on the vDisk Pool in the site where you want to add those vDisks, then select the Create vDisk menu option. The Create vDisk dialog appears.
2. If you accessed this dialog from the site’s vDisk pool, in the drop-down menu, select the store where this vDisk should reside. If you accessed this dialog from the store, from the drop-down menu, select the site where this vDisk will be added.
3. In the Server used to create the vDisk drop-down menu, select the Provisioning Server that will create the vDisk.
4. Type a filename for the vDisk. Optionally, type a description for this new vDisk in the description textbox.
5. In the Size text box, scroll to select the appropriate size to allocate for this vDisk file. If the disk storing the vDisk images is formatted with NTFS, the limit is approximately 2 terabytes. On FAT file systems, the limit is 4096 MB.
6. In the VHD Format text box, select the format as either Fixed or Dynamic (2040 GB for VHD emulating SCSI; 127 GB for VHD emulating IDE).
7. Click Create vDisk, a progress dialog opens. Depending on the disk size and other factors, it may take several minutes or more to create the vDisk. After the vDisk is successfully created, it displays in the Console’s details pane and is ready to be formatted.
8. Right-click on the vDisk in the Console, then select Mount vDisk. The vDisk icon displays with an orange arrow if mounted properly.
Formatting a vDiskIn order for a target device to access the new vDisk, after you have created and allocated space for the vDisk file on the Provisioning Server, you must format the vDisk.
Note vDisks for use by Linux target devices are formatted automatically using the Linux Image Builder.
42 Citrix Provisioning Server 5.0 Installation and Configuration Guide
Select from one of the following vDisk formatting methods:
• From the Console
• From the target device
To format a mounted vDisk from the ConsoleIn the Console, the vDisk should appear as a removable disk to the operating system.
1. Open a Windows Explorer window (click My Computer on the Desktop or on the Start Menu).
2. Right-click on the vDisk, then select Format.
3. Create a descriptive name for the volume label for the vDisk.
4. Click Start, then click OK on the warning message that appears.
5. After formatting, close Windows Explorer.
Continue on to “Unmounting a vDisk”.
To format a mounted vDisk from the target device
1. Ensure that the target device software is installed on the target device.
2. In the Console, create a new vDisk on the Provisioning Server. Assign this vDisk to the Master Target Device.
3. From the Console, configure the target device to boot from its local hard disk, NOT to the assigned vDisk.
4. PXE-Boot the target device. Once started, confirm connectivity from the target device to the Provisioning Server. When the connection is inactive
Note The removable disk used as the vDisk mounting point is always visible to the operating system, even when a vDisk has not been mounted. When Provisioning Server software is installed on the server, this drive is created. The drive letter will be the next available drive letter on your system. (For example, if your Provisioning Server has an A: drive, C: drive and D:.
Caution Formatting erases all data stored on the vDisk. You should only format new vDisks that have not yet been imaged from the target device hard disk.
Chapter 2 Installing and Configuring a Provisioning Server Implementation 43
the Target-Device status icon in the system tray has a red X on it—if there is no red X, then the connection is good.
5. Access the Disk Management utility in Windows by right-clicking My Computer on the desktop and selecting Manage. The Computer Management window should appear.
6. Select Disk Management from the left window pane. The right window pane will display all of the storage devices connected to the target device.
7. Identify the vDisk as the next available storage device after the boot disk (C:) and any additional physical drives connected to the computer. For example, if the target device has two physical drives, a primary boot disk labeled C:, and an additional storage device labeled D:, then the vDisk will be labeled E:.
8. Right-click the vDisk in the right window pane and select Format.
9. Type a Volume Label if desired, such as vDisk1.
10. Select the desired file system, such as NTFS. Leave the Allocation unit size to the default setting.
11. Select Perform a quick format. Leave the box labeled Enable file and folder compression unchecked, then click OK.
12. Once the format is complete the disk should have a status of Healthy on the right window pane. The disk is now formatted and ready to be imaged from the Master Target Device.
Unmounting a vDiskMounted vDisks cannot be used by target devices.
To unmount a vDisk
To unmount a vDisk and make it available to target devices, in the Console, right-click on the vDisk, then select the Unmount vDisk <vDisk name> option.
Task 9: Create and Assign the First Target Device in a CollectionTo create a target device entry in the database
1. Right-click on the collection where this target device will reside.
2. Select Create Device. The Create Device dialog box will appear.
3. Type the name and MAC address of the device, and optionally a description for that device, then click OK.
44 Citrix Provisioning Server 5.0 Installation and Configuration Guide
To assign a vDisk to a target device
1. In the Console tree, expand the Device Collections folder, then click on the collection folder where this target device is a member. The target-device displays in the details pane.
2. Right-click on the desired target device, then select Properties. The Target Device Properties dialog appears.
3. On the General tab, select Hard Disk from the Boot from option.
4. Click on the vDisks tab, then select the Add button within the vDisk for this Device section. The Assign vDisks dialog appears.
5. To locate vDisks to assign to this target device, select a specific Store or Server under the Filter options, or accept the default settings, which includes All Stores and All Servers.
6. In the Select the desired vDisks list, highlight the vDisks to assign, then click OK, then OK again to close the Target Device Properties dialog.
Task 10: Preparing a Master Target Device for ImagingA Master Target Device refers to a target device from which a hard disk image is built and stored on a vDisk. Provisioning Server then streams the contents of the vDisk created from the Master Target Device to other target devices.
1. “Preparing the Master Target Device’s Hard Disk”
2. “Configuring a Master Target Device’s BIOS”
3. “Configuring Network Adapter BIOS”
4. “Installing Master Target Device Software”
Preparing the Master Target Device’s Hard DiskThe Master Target Device is typically different from subsequent target devices because it initially contains a hard disk. This is the hard disk that will be imaged to the vDisk. If necessary, after imaging, the hard disk can be removed from the Master Target Device.
Note In the Console window, use the drag-and-drop feature to quickly assign a vDisk to all target devices in a collection.
Chapter 2 Installing and Configuring a Provisioning Server Implementation 45
In order to support a single vDisk, that is shared by multiple target devices, those devices must have certain similarities to ensure that the operating system has all required drivers. The three key components that must be consistent include the:
• Motherboard
• Network card, which must support PXE
• Video card
However, the Provisioning Server Common Image Utility allows a single vDisk to simultaneously support different motherboards, network cards, video cards, and other hardware devices.
If target devices will be sharing a vDisk, the Master Target Device serves as a ‘template’ for all subsequent diskless target devices as they are added to the network. It is crucial that the hard disk of Master Target Device be prepared properly and all software is installed on it in the proper order:
Software must be installed on the Master Target Device in the order that follows:
1. Operating System (Windows or Linux)
2. Device Drivers
3. Service Packs Updates
4. Target Device Software
Applications can be installed before or after the target device software is installed. If target devices will be members of a domain, and will share a vDisk, additional configuration steps must be completed (refer to Managing Domain Accounts in the Administrator’s Guide, before proceeding with the installation).
Configuring a Master Target Device’s BIOS The following steps describe how to configure the target devices system’s BIOS and the BIOS extension provided by the network adapter, to boot from the network. Different systems have different BIOS setup interfaces – if necessary, consult the documentation that came with your system for further information on configuring these options.
1. If the target device BIOS has not yet been configured, re-boot the target device and enter the system’s BIOS setup. (To get to BIOS setup, press the F1, F2, F10 or Delete key during the boot process. The key varies by manufacturer).
Note Follow the instructions below after installing and configuring the Provisioning Server and creating target devices.
46 Citrix Provisioning Server 5.0 Installation and Configuration Guide
2. Set the network adapter to On with PXE.
3. Configure the target device to boot from LAN or Network first. Optionally, select the Universal Network Driver Interface; UNDI first, if using a NIC with Managed Boot Agent (MBA) support.
4. Save changes, then exit the BIOS setup program.
5. Boot the target device from it’s hard drive over the network to attach the vDisk to the target device.
Configuring Network Adapter BIOSThis procedure is only necessary for older systems.
1. Re-boot the Master Target Device.
2. Configure the network adapter’s BIOS extension through setup.
During the system boot, the network adapter’s BIOS extension will present an initialization message similar to the following:
Initializing Intel ® Boot Agent Version 3.0.03 PXE 2.0 Build 078 (WfM 2.0) RPL v2.43
Enter the network adapter’s BIOS extension. (Consult the network adapter’s documentation.) The key combination for entering the network adapter’s BIOS extension varies by manufacturer. For example, to enter the Intel Boot Agent setup screen, type Ctrl+S.
Note Depending on the system vendor, this setting may appear differently.
Note On some older systems, if the BIOS setup program included an option that permitted you to enable or disable disk-boot sector write protection, ensure that the option is disabled before continuing.
Chapter 2 Installing and Configuring a Provisioning Server Implementation 47
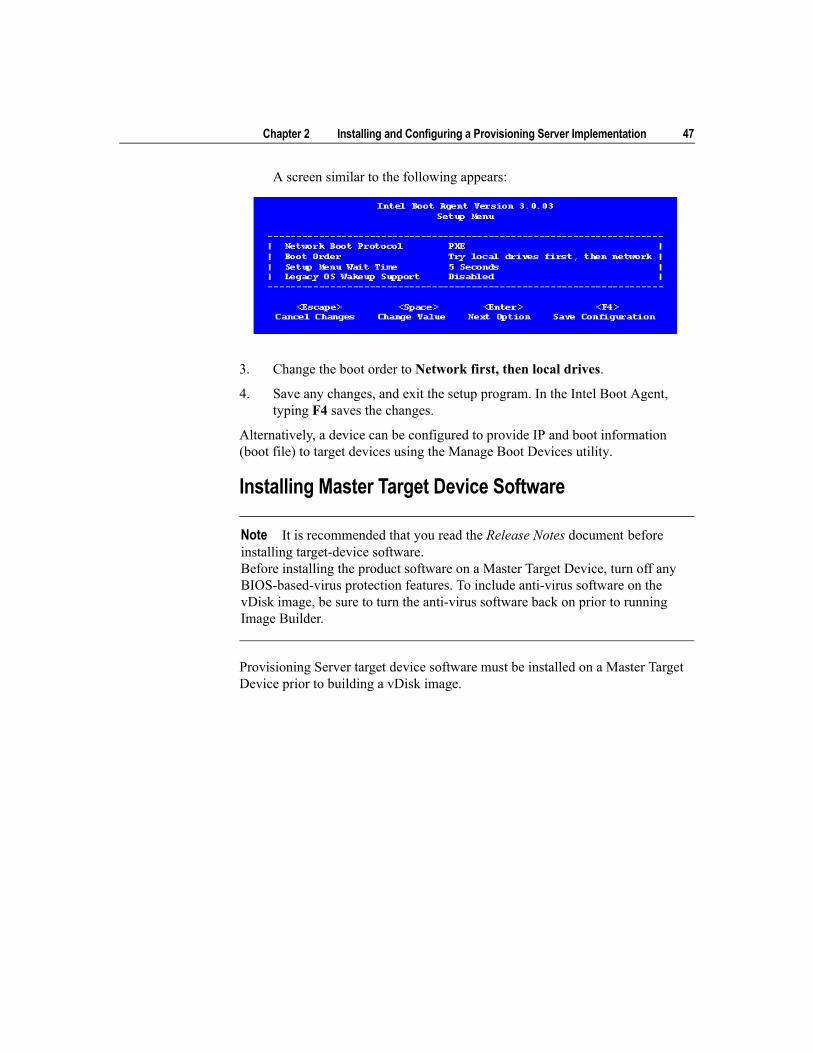
A screen similar to the following appears:
3. Change the boot order to Network first, then local drives.
4. Save any changes, and exit the setup program. In the Intel Boot Agent, typing F4 saves the changes.
Alternatively, a device can be configured to provide IP and boot information (boot file) to target devices using the Manage Boot Devices utility.
Installing Master Target Device Software
Provisioning Server target device software must be installed on a Master Target Device prior to building a vDisk image.
Note It is recommended that you read the Release Notes document before installing target-device software.Before installing the product software on a Master Target Device, turn off any BIOS-based-virus protection features. To include anti-virus software on the vDisk image, be sure to turn the anti-virus software back on prior to running Image Builder.
48 Citrix Provisioning Server 5.0 Installation and Configuration Guide
The Provisioning Server target device software components include:
• Provisioning Server Virtual Disk, which is the virtual media used to store the disk components of the operating system and applications.
• Provisioning Server Network Stack, which is a proprietary filter driver that is loaded over the NIC driver, allowing communications between the target devices and the Provisioning Server.
• Provisioning Server SCSI Miniport Virtual Adapter, which is the driver that allows the vDisk to be mounted to the operating system on the target device.
• Virtual Disk Status Tray Utility, to provide general vDisk status and statistical information. This utility includes a help system.
• Target Device Optimizer Utility, used to change target device setting to improve performance.
Provisioning Server target device software is available for 32-bit and 64-bit Windows and Linux operating systems.
Installing Software on a Windows Master Target DeviceTo install Provisioning Server target device software on a Windows device
1. Boot the Master Target Device from the local hard disk.
2. Verify that all applications on the device are closed.
3. Double-click on the appropriate installer. The product installation window appears.
4. Click the Install Target Device option. On the Welcome dialog that displays, click Next, scroll down to the end, then accept the terms of the license agreement.
5. Click Next to continue, the Customer Information dialog appears.
6. Type your user name and organization name in the appropriate text boxes.
7. Select the appropriate install user option. The option you select depends on if this application will be shared by users on this computer, or if only the user associated with this computer should have access to it.
8. Click Next, the Destination Folder dialog appears.
9. Click Next to install the target device to the default folder (C:\Program Files\Citrix\Provisioning Server). Optionally, click Change..., then either enter the folder name or navigate to the appropriate
Chapter 2 Installing and Configuring a Provisioning Server Implementation 49
folder, and then click Next, then click Install. The installation status information displays in the dialog.
10. The Installation Wizard Completed message displays in the dialog when the components and options have successfully been installed. Close the wizard window.
11. To complete the installation of the target device software, reboot the device when prompted.
12. Install applications on the Master Target Device.
Installing Software on a Linux Master Target DeviceTo install Provisioning Server target device software on a Linux device
1. Log on to the Linux system as root.
2. Insert the product CD-ROM into your Linux target device’s CD-ROM drive. Your Linux target device should auto-mount the CD-ROM and a message should display on your target device. If your Linux target device doesn’t auto-mount the CD-ROM, consult your Linux system documentation on how to mount CD-ROMs or DVDs.
3. Copy the PVSSRV_LinuxDevice.run or PVSSRV_LinuxDevice_x64.run file from the CD-ROM into your /tmp directory.
4. Open a terminal shell/command shell and execute the appropriate Linux target device software.
32-Bit:
# cd /tmp
# sh PVSSRV_LinuxDevice.run
64-Bit:
# cd /tmp
Note The installation process may take several minutes. While the installation process is running, you can click Cancel to cancel the installation and roll-back any system modifications. Close any Windows Logo messages that appear.
Note The Linux target device requires root privileges and visual desktop, such as gnome or KDE to install and execute properly.
50 Citrix Provisioning Server 5.0 Installation and Configuration Guide
# sh PVSSRV_LinuxDevice_x64.run
The Terms and Conditions associated with this product license agreement appears.
Accept the license agreement, and then the installer prompts for a directory location to install the product software. The /root/citrix directory is recommended.
5. After the Linux utilities are installed to the hard disk, the installer prompts you to reboot your system. You can not begin the imaging phase until the target device has been rebooted.
The installer adds an entry into the GRUB boot loader. If GRUB is not used, you must add the Provisioning Server kernel and initrd into your boot loader:
Kernel: vmlinuz-ardence (This is a symbolic link which points to your distribution’s kernel)
Initrd: initrd-ardence
The boot loader prompts you with the Image target device option. Select this option when you are ready to image a target device after booting.
Task 11: Building the vDisk ImageImaging Windows Target Devices.
Before building the image
The target device vDisk status icon should display in the target device tray. Double click on the icon to display the vDisk status. The status should be Active.
OR
Note If the vDisk image is going to be used by multiple target devices, in Standard Image mode, before creating a vDisk image, run the Device Optimizer utility on the target device (Start>All Programs>Citrix>Provisioning Server>Provisioning Server Device Optimizer).
Device Optimizer does not need to be run on Private Image vDisks.
Chapter 2 Installing and Configuring a Provisioning Server Implementation 51
Verify vDisk file availability to the target device by opening an Explorer window on the target device system (select My Computer from the desktop or Start menu). The vDisk will use the next available drive letter. For example, if your target device has an A: drive, C: drive and D: drive, the vDisk drive will be assigned to E: at installation time. The size of this disk will match the size of your vDisk.
To image the Master Target Device’s hard drive to the vDisk, complete the procedure that follows.
Running Image Builder
1. After verifying that the target device has access to the vDisk file on the Provisioning Server, from the target device, select Start>All Programs>Citrix>Provisioning Server>Provisioning Server Image Builder.
2. If the destination drive is not already set, set Destination Drive to the location of the vDisk drive on your system. This varies from system to system depending upon the disks already on the system at the time that the target device software was installed.
3. Be sure that the Delete all files and folders in destination path before building image checkbox is selected.
4. Click Build to begin the image building process, then Yes to confirm the build. This will take several minutes to complete. When the imaging process is complete, the following message appears:
The target device image build is complete.
5. Click OK, and then click Close.
6. Shut-down the target device.
The target device can now be set to boot from the vDisk. Use the General tab on the Console’s Target Device Properties dialog to set the target device to boot from the vDisk. Optionally, disconnect the hard disk on the target device.
Caution Verify that the drive entered is the correct virtual drive. The contents of this drive will be erased by this process!
52 Citrix Provisioning Server 5.0 Installation and Configuration Guide
Imaging Linux Target Devices.
1. On the Target Device Properties tab, configure the target device to boot from the hard drive and assign a vDisk to it.
2. Boot the Master Target Device and login as root.
3. Verify that the Master Target Device is connected to the Provisioning Server. This can be done by looking for a padlock next to the name of the Master Target Device in the list of target devices in the Provisioning Server Console.
4. To image the Master Target Device's hard drive to the vDisk, open a terminal and enter the directory into which Provisioning Services target device software was installed. By default, this is /root/citrix.
5. At the Console prompt, issue the following command:#sh image.sh
6. After the Linux Imager application starts, click Image.
7. Click Begin to begin the imaging process. Allow the imaging process to complete.
8. Click Done to close the Linux Imager application.
9. Shut down the target device. The target device can now be set to boot from the vDisk. Use the General tab on the Console’s Target Device Properties dialog to set the target device to boot from the vDisk. Optionally, disconnect the hard disk on the target device.
Note For Linux, during the imaging process, the /etc/{fstab, hosts, resolv.conf} files are modified by Provisioning Services so that the machine boots off as a diskless device. The system is then expected to be customized by the user in Private Image mode, preserving the Provisioning Services changes to these files. If the system is customized prior to building vDisk, then the /etc files could potentially get clobbered.
CHAPTER 3
Upgrading from Previous Releases
This chapter describes how to upgrade Provisioning Server to the most current version.
Choosing the Upgrade MethodThe following table lists the Provisioning Server components to upgrade based on the version you are upgrading from:
Note Upgrading from Ardence 3.x and 4.0 is not supported.
Caution Be sure to backup vDisks and the database prior to upgrading.
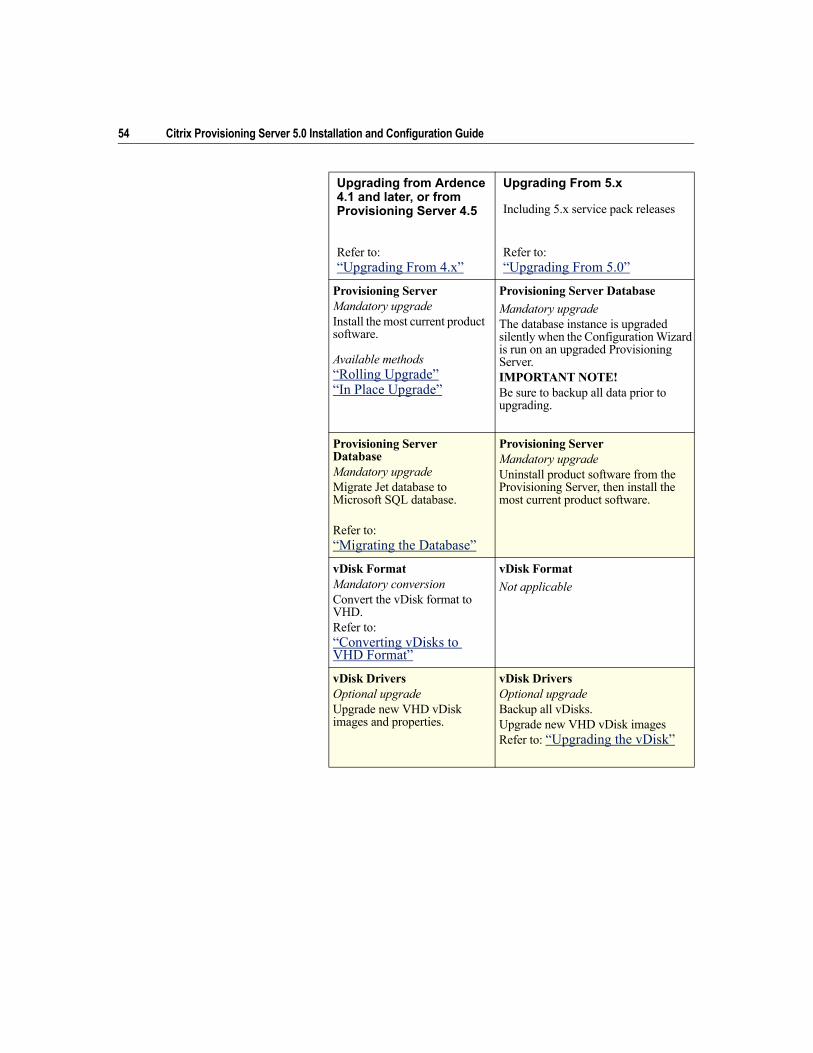
54 Citrix Provisioning Server 5.0 Installation and Configuration Guide
Upgrading from Ardence 4.1 and later, or from Provisioning Server 4.5
Refer to:“Upgrading From 4.x”
Upgrading From 5.x
Including 5.x service pack releases
Refer to:“Upgrading From 5.0”
Provisioning ServerMandatory upgradeInstall the most current product software.
Available methods“Rolling Upgrade”“In Place Upgrade”
Provisioning Server DatabaseMandatory upgradeThe database instance is upgraded silently when the Configuration Wizard is run on an upgraded Provisioning Server.IMPORTANT NOTE!Be sure to backup all data prior to upgrading.
Provisioning Server DatabaseMandatory upgradeMigrate Jet database to Microsoft SQL database.
Refer to:“Migrating the Database”
Provisioning ServerMandatory upgradeUninstall product software from the Provisioning Server, then install the most current product software.
vDisk FormatMandatory conversionConvert the vDisk format to VHD. Refer to:“Converting vDisks to VHD Format”
vDisk FormatNot applicable
vDisk DriversOptional upgradeUpgrade new VHD vDisk images and properties.
vDisk DriversOptional upgradeBackup all vDisks.Upgrade new VHD vDisk images Refer to: “Upgrading the vDisk”
Chapter 3 Upgrading from Previous Releases 55
Upgrade Utilities and FeaturesIn this release, the following set of upgrade utilities and features are included to streamline and automate 4.x and 5.x upgrade tasks:
• The Upgrade Wizard facilitates the automation of the upgrade process, and includes the following utilities:
• The UpgradeAgent.exe runs on the target device to upgrade previously installed product software.
• The UpgradeManager.exe runs on the Provisioning Server to control the upgrade process on the target device.
• The VHD Converter tool (vhdConverter.exe) is used to convert any existing 4.x vDisks to VHD format.
• The MCLI Importdatabase command migrates the target device information from the Microsoft Jet database, used prior to 5.x, to the Microsoft SQL database server.
The upgrade method differs based on the version that is being upgrading (refer to “Choosing the Upgrade Method”).
Upgrading From 4.xComplete the following steps to upgrade your Provisioning Server implementation:
1. “Installing or Upgrading Product Software”
2. “Migrating the Database”
3. “Converting vDisks to VHD Format”
4. “Upgrading the vDisk”
56 Citrix Provisioning Server 5.0 Installation and Configuration Guide
Upgrading Provisioning ServersThe server upgrade process allows you to choose to upgrade in either a single or multi-server Provisioning Server implementation. The major difference between the two upgrade processes is that in a same-server implementation (referred to as an In Place upgrade), you need to uninstall then reinstall the Provisioning Server software. In a multi-server implementation, the software can be installed on a new server (referred to as a Rolling upgrade).
Consider the following before selecting the upgrade method that works best for you.
Rolling Upgrade• Previous Provisioning Server implementation remains operational while
having the ability to stage the new implementation.
• The vDisk conversion supports the previous drivers inside a 5.0 VHD file. However, you cannot boot a previous version of a target device on a 5.0 Provisioning Server.
• The upgrade can be staged:
• In a network that is isolated from your current network.
Note It is highly recommended that vDisks are backed up prior to upgrading Provisioning Server.
Do not back up a vDisk while it is in use or while it is locked. It is recommended to integrate the backing up of vDisks into your normal Provisioning Server backup routine.
If using the Difference Disk mode, updating a vDisk invalidates all associated Difference Disk files, causing the write cache on that file to be deleted automatically. Be sure to create backup copies of all Difference Disks before updating the vDisk.
Note If transferring upgraded servers back to production, it may be necessary to rerun the Configuration Wizard to reconfigure IP address and TFTP information.
Chapter 3 Upgrading from Previous Releases 57
• If both the previous and new versions of the servers are on the same network subnet, there should be only one PXE/TFTP service on the network.
In Place Upgrade• Only requires your existing Provisioning Server infrastructure.
• Works when restricted by minimal hardware availability.
• vDisk storage requirements are greater with the new VHD format (need to have enough storage to backup existing vDisks and newly created VHD vDisks)..
Server Upgrade PrerequisitesThe upgrade prerequisites are listed below.
General• Provisioning Server has not yet been upgraded.
• The vDisk is from a version that has not yet been upgraded.
• The vDisk can boot from the previous version of Provisioning Server.
• All incremental or automated vDisk updates have been applied.
Specific to Rolling Upgrade• Must have both the previous and the new Provisioning Server as dedicated
machines.
• If both the previous and new versions of the servers are on the same network subnet, there should be only one PXE/TFTP service on the network.
Note vDisks may not appear available to add if current permissions do not match the appropriate Provisioning Server permissions when these vDisks are created. For example, if the Provisioning Server services are run under the Network Service account, all vDisks must have their permissions properly set so that Provisioning Server can access them. For details, refer to “Installing and Configuring Provisioning Server”.
58 Citrix Provisioning Server 5.0 Installation and Configuration Guide
Installing or Upgrading Product SoftwareDepending on the upgrade method you select, you will need to either:
• Install product software on a clean machine (Rolling upgrade)
• Upgrade the software on an existing machine (In Place upgrade).
Rolling Upgrade: Install Server SoftwareIf you are installing Provisioning Server product software on a new server complete the “Installing and Configuring a Provisioning Server Implementation” procedure described in the previous chapter, except do not enable network services at this time.
In Place Upgrade: Upgrade Server SoftwareThe default location for configuration, log, bootstrap, and BOOTPtab files are as follows.
For Windows 2003C:\Documents and Settings\All Users\Application Data\Citrix\Provisioning Server
For Windows 2008C:\ProgramData\Citrix\Provisioning Server
To install new product software
1. Uninstall previous product software, then reboot the server.
2. Run the new version of the Provisioning Server installer to install the Provisioning Server software and accept default settings.
3. If upgrading from 4.1.x, it may be necessary to prepare the Citrix Licensing server by adding the new product license file to it, and then verifying the license status from the Citrix Licensing Console.
Note Only one Provisioning Server is required in order to complete the vDisk conversion process.
Note The license server is not required if all Dell target devices feature EasyConnect.
Chapter 3 Upgrading from Previous Releases 59
4. Run the Configuration Wizard to select the Microsoft SQL database and to start services (for details, refer to “Configuration Wizard Tasks”).
Migrating the DatabaseThe Microsoft JET database has been replaced by the Microsoft SQL database. If you have not yet migrated to the Microsoft SQL database, complete this step.
To migrate the database
1. Navigate to the product installation directory.
2. Run the following MCLI command:
mcli run importDatabase /p filename=database.mdb collectionname=collection sitename=site
Where database.mdb is the fully qualified name of the database, filename is the dated sub-directory of the installation directory (the default sub-directory differs depending on the which product version you are upgrading from), collection is the name of the collection where you want the imported target devices to be, and sitename is the site where the collection exists. (For details on using MCLI, refer to the Provisioning Server MCLI Programmer’s Guide).
Converting vDisks to VHD FormatThe vDisk format has been changed to VHD. If Provisioning Server vDisks are not already in VHD format, complete this step.
Note Migrating from the JET database to Provisioning Server 64 bit product software is not supported.
Note If necessary the upgrade process can be stopped after migrating the database. However, until the vDisks are actually upgraded, you can not benefit from the latest vDisk fixes or enhancements.
After successfully converting vDisks to VHD format and migrating the database to Microsoft SQL, you may choose to complete the installation of Provisioning Servers.
60 Citrix Provisioning Server 5.0 Installation and Configuration Guide
The VHD conversion tool converts vDisks to VHD format, while keeping previous drivers intact. This allows the vDisk to boot, however, before upgrading to future product versions, the vDisk upgrade procedure will need to be performed.
To convert vDisks to VHD
1. Locate VHDConvert.exe in the Provisioning Server product installation directory.
2. Use the following syntax to convert vDisks to VHD format:
VHDConvert.exe vDisk VHD [dynamic]
where VHD is the fully qualified name of the new VHD, vDisk is the fully qualified name of the vDisk, and dynamic is an optional tag used to designate that the new VHD will size dynamically.
Upgrading the vDiskComplete the procedures that follow to upgrade VHD formatted vDisks.
Boot VHD formatted vDisks in Private Image mode.
1. Assign the VHD formatted vDisk to the target device that will be used to upgrade. This target device may be placed in a separate Console view to avoid confusing it with another target device.
2. Change the target device vDisk to Private Image mode.
3. PXE boot (or use USB) to boot the target device from the vDisk.
Note Original vDisks can not be in use by a Provisioning Server during the conversion process.
Be sure that all automated and incremental vDisk updates are made prior to upgrading.
Note An administrator may choose to write a script in order to string multiple vDisk conversions together.
Caution Only one vDisk should be assigned to the target device being used for the upgrade.
Chapter 3 Upgrading from Previous Releases 61
To upgrade target device product software on a Master Target Device
1. From the product CD, on the target device, depending on the device platform, run either:
PVSSRV_UpgradeWizard.exe or
PVSSRV_UpgradeWizard_x64.exe
2. Under the target device installation directory, copy the Upgrade Manager executable that is specific to your current Provisioning Server version, to the Provisioning Server installation directory on the Provisioning Server.
3. Run the Upgrade Manager on the Provisioning Server.
4. On the target device, run UpgradeConfig.exe from the shortcut in the Windows Start menu.
5. Specify a local account with Administrator privileges. This local account cannot have an empty password.
6. Specify the destination drive to which the vDisk will be cloned. It is recommended that you use the original machine (master target device) from which the vDisk was created.
Note If upgrading from 4.1.x, expect the following message to appear on the Master Target Device:
No device license is currently available for this computer. A system shutdown will be initiated in 5 minutes. To avoid loss of data, save your work now and close all applications.
Note The target device upgrade should begin within five minutes of starting up of this machine. If steps 1 through 8 are not successfully completed within five minutes, reboot the machine to continue the upgrade at the first incomplete step in this procedure.
Note If the target device hard drive has Vista installed, use disk management to format the OS partition on the hard drive before proceeding.
Note Target devices can not be uninstalled while running from a vDisk.
Note If this is a new hard drive, refer to “Upgrading vDisks Manually” for information on initializing the hard drive.
62 Citrix Provisioning Server 5.0 Installation and Configuration Guide
7. Specify the Provisioning Server IP address and a user account and password to connect to UpgradeManager. This account cannot have an empty password.
8. Click OK and the UpgradeConfig performs a consistency check on various parameters. The machine will reboot several times, and then display a message to indicate that the script has successfully completed.
Upgrading From 5.0
Complete the following steps to upgrade your Provisioning Server implementation:
1. “Backing up Data”
2. “Upgrading Provisioning Servers”
3. “Upgrading the vDisk”
Backing up DataPrior to upgrading, be sure to back up data including:
• vDisks
• database
Upgrading Provisioning ServersComplete the procedure that follows on each server.
1. Uninstall previous version of product software on the server, then reboot the server.
2. Run the new version of the Provisioning Server installer to install the Provisioning Server software.
3. Run the Configuration Wizard. Select Farm already configured. Running the wizard will start the services (for details, refer to “Configuration Wizard Tasks”).
Important When upgrading a 5.0 Provisioning Server farm, all servers in that farm must be upgraded before connecting to the upgraded database. A 5.0 Provisioning Server is not compatable with a 5.0.x database.
Chapter 3 Upgrading from Previous Releases 63
Upgrading the vDiskThe Upgrade Manager automates the steps described in “Upgrading vDisks Manually”.
Complete the procedures that follow to upgrade VHD formatted vDisks.
Boot VHD formatted vDisks in Private Image mode.
1. Assign the VHD formatted vDisk to the target device that will be used to upgrade. This target device may be placed in a separate Console view to avoid confusing it with another target device.
2. Change the target device vDisk to Private Image mode.
3. PXE boot the target device from the vDisk.
Upgrade target device product software on a Master Target Device
1. From the product CD, on the target device, depending on the device platform, run either:
PVSSRV_UpgradeWizard.exe or
PVSSRV_UpgradeWizard_x64.exe
2. Under the target device installation directory, copy the Upgrade Manager executable that is specific to your current Provisioning Server version, to the Provisioning Server installation directory on the Provisioning Server.
3. Run the Upgrade Manager on the Provisioning Server.
4. On the target device, run UpgradeConfig.exe from the shortcut in the Windows Start menu.
5. Specify a local account with Administrator privileges. This local account cannot have an empty password.
Note Only one vDisk should be assigned to the target device being used for the upgrade.
Note If the target device hard drive has Vista installed, use disk management to format the OS partition on the hard drive before proceeding.
Target devices can not be uninstalled while running from a vDisk.
64 Citrix Provisioning Server 5.0 Installation and Configuration Guide
6. Specify the destination drive to which the vDisk will be cloned. It is recommended that you use the original machine (master target device) from which the vDisk was created.
7. Specify the Provisioning Server IP address and a user account and password to connect to UpgradeManager. This account cannot have an empty password.
8. Click OK and the UpgradeConfig preforms a consistency check.
9. The machine will reboot several times, and Upgrade Manager displays a message to indicate that the upgrade process has completed successfully.
Note If this is a new hard drive, use the process described in “Image back using an unformatted, uninitialized hard-disk drive” to initialize the hard drive.
CHAPTER 4
Uninstalling Product Software
Removing the software from your system requires that you uninstall both the Provisioning Server and target device components.
Un-installing the Provisioning Server1. On the Provisioning Server, open the system’s Control Panel. From the
Windows Start menu, select Settings, and then click Control Panel.
2. Double click on the Add/Remove Programs icon.
3. Use Add/Remove Programs from the control panel to uninstall the product software.
Un-installing Windows Target Device Software1. Disconnect the SDOM from the IDE interface on your target device’s
motherboard. Re-connect the original target device hard drive to the IDE interface.
1. Set the system BIOS to boot from the original hard drive.
2. Re-boot the target device directly from the hard drive.
3. On the target device, open the system’s Control Panel.
4. Double-click on the Add>Remove Programs icon.
5. Use Add>Remove Programs from the control panel to uninstall the product software.
Uninstall Linux Target Device Software1. Disconnect the SDOM from the IDE interface on your target device’s
motherboard. Re-connect the original target device hard drive to the IDE interface.

66 Citrix Provisioning Server 5.0 Installation and Configuration Guide
2. Open a terminal shell/command shell window and change directories to where the product software is installed. By default, the software is installed in /root/citrix.
#cd /root/citrix
Execute the uninstall.sh script.#./uninstall.sh
CHAPTER 5
Managing Multiple Network Interface Cards
Provisioning Server provides the ability to run redundant networks between the servers and the target devices. This requires that both the servers and the target devices be equipped with either multi-port NICs or multiple NICs.
Multiple NICs on the target device may be configured into a virtual team by using Manufacturer’s NIC teaming drivers, or into a failover group using the Provisioning Server NIC failover feature.
Requirements and Considerations for Manufacturer’s NIC Teaming
Provisioning Server supports NIC teaming drivers such as provided by Broadcom and Intel. A vDisk that is built after configuring NIC teaming is restricted to run primarily in Private Image Mode only. Manufacturer’s NIC teaming can also be used in Standard Image Mode, but only on the Master Target Device.
• The new virtual team NIC MAC address has to match the physical NIC that performs the PXE boot.
• The new virtual team NIC MAC address has to match to the physical NIC that performs the PXE boot.
• OEM NIC Teaming software should be installed and configured prior to the Target Device software.
• Configure NIC teaming and verify that the selected teaming mode is expected by the application and the network topology. It should expose at least one virtual team NIC to the operating system.
• During the Master Target Device installation process, Provisioning Server target device client drivers need to bind to the new virtual team NIC MAC address. If all physical NICs have been teamed up to a single virtual NIC,
68 Citrix Provisioning Server 5.0 Installation and Configuration Guide
then the Provisioning Server installer will automatically choose the virtual NIC silently, without prompting.
• If changes are required, Provisioning Server Target Device software must be uninstalled before making changes to the teaming configuration, and then reinstalled after those changes are complete.
• Changes to teaming configurations on a Master Target Device that has target device software installed, may result in unpredictable behavior..
Requirements and Considerations for Provisioning Server NIC Failover
A Provisioning Server target device may be configured to support failover between multiple NICs. This feature will work with any brand or a mixture of different brands of NICs and is available in both Standard and Private Image Mode.
• The PXE boot NIC is considered the primary target device MAC address, which is stored in the Provisioning Server Database.
• The failover group of NICs is defined when running the Provisioning Server target device installer on the Master Target Device. If the machine has more than one NIC, the user is prompted to select the NICs that the Provisioning Server drivers bind to. Select all the NICs that participate in NIC failover. Alternatively, in Provisioning Server 5.0 or later, run bindcfg.exe, which is located in the installation directory, to selectively bind NICs post installation.
• A Target Device will only failover to NICs that are in the same subnet as the PXE boot NIC.
• In the event that the physical layer fails, such as when a network cable is disconnected, the Target Device fails over to the next available NIC. The failover timing is essentially instantaneous.
• The NIC failover feature and Provisioning Server HA feature compliment each other, and provide network layer failover support. If the failure occurs
Note Broadcom NIC Teaming Drivers v9.52 and 10.24b are not compatible with Provisioning Server target device drivers.
Chapter 5 Managing Multiple Network Interface Cards 69
in the higher network layer, then the target device fails over to the next Provisioning Server, subject to HA rules.
• If a NIC fails and the target device is rebooted, the next available NIC from the failover group will be used. Therefore, these NICs must be PXE capable and PXE enabled.
• If a virtual NIC (teamed NICs) is inserted into the failover group, the vDisk becomes limited to Private Image Mode. This is a limitation imposed by the NIC teaming drivers.
• Load balancing is not supported in the NIC failover implementation.

70 Citrix Provisioning Server 5.0 Installation and Configuration Guide
CHAPTER 6
Managing Bootstrap Files and Boot Devices
The following information is detailed in this chapter:
• “Configuring the Bootstrap File From the Console”
• “Using the Manage Boot Devices Utility”
• “Configuring the BIOS Embedded Bootstrap”
Configuring the Bootstrap File From the ConsoleFor the Provisioning Server to start a target device, a boot file is downloaded by the Provisioning Server’s MBA or PXE-compliant boot ROM, when the device is turned on. This file must be configured so that it contains the information needed to communicate with the Provisioning Server. The Configure Bootstrap dialog is used to define the IP addresses for up to four Provisioning Servers in the boot file.
The Configure Bootstrap dialog field descriptions are as follows:
General Tab: Configure BootstrapField Description
Bootstrap File The currently selected boot file displays. If you want to select a different boot file to configure, click the Add button or Read DB button.
IP Settings The IP Address, Subnet Mask, Gateway, and Port for up to four Provisioning Servers, which will perform login processing.
72 Citrix Provisioning Server 5.0 Installation and Configuration Guide
Options Tab: Configure Bootstrap
Add button Click the Add button to add a new Provisioning Server to the file. Up to four Provisioning Servers may be specified for Provisioning Servers.
Edit button Highlight an existing Provisioning Server from the list, then click the Edit button to edit this server’s IP settings.
Remove button Select an existing Provisioning Server from the list, then click the remove button to remove this server from the list of available Provisioning Servers.
Move Up and Move Down buttons
Select an existing Provisioning Server, and click to move up or down in the list of Provisioning Servers. The order in which the Provisioning Servers appear in the list determines the order in which the Provisioning Servers are accessed should a server fail.
Read Servers from Database button
To populate the boot file with the Stream Service IP settings already configured in the database, click the Read DB button. This removes any existing settings before populating the list from the database.
Verbose Mode Select the Verbose Mode option if you want to monitor the boot process on the target device (optional) or view system messages.
Interrupt Safe Mode Select Interrupt Safe Mode if you are having trouble with your target device failing early in the boot process.
PAE Mode In a Datacenter implementation, to configure the Windows PAE option, you must check this checkbox to enable PAE Mode, as well as set the /PAE option in the device's Boot.ini file.
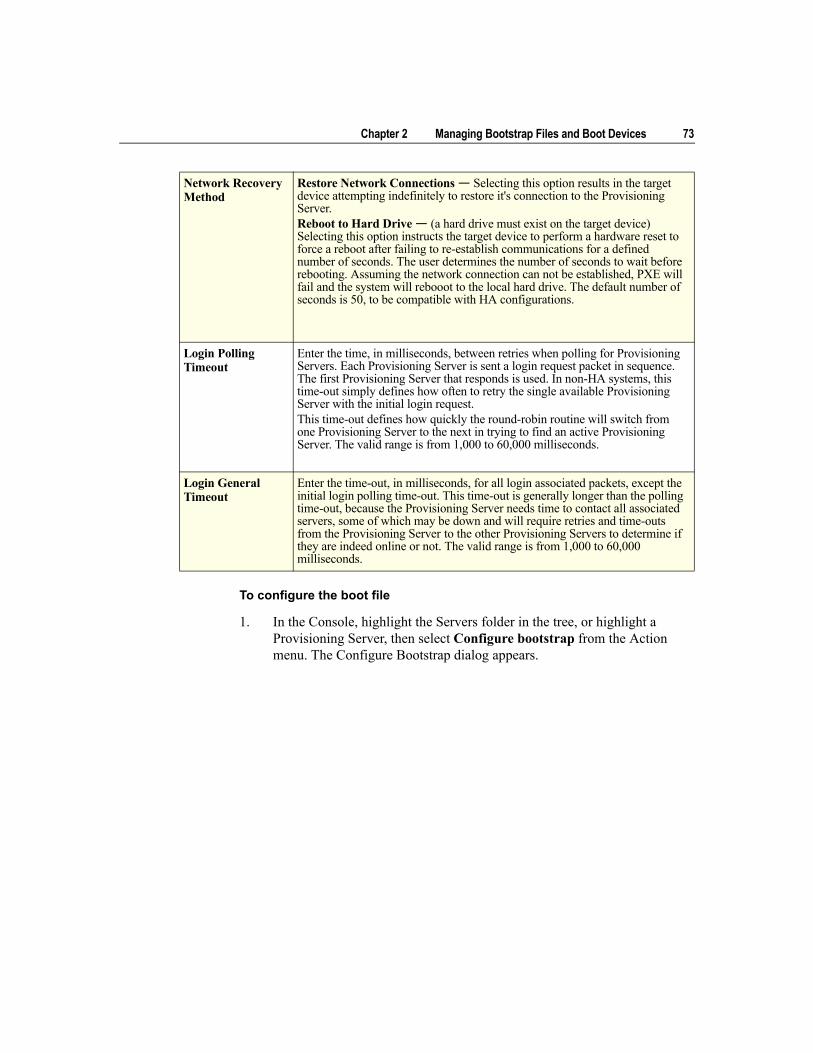
Chapter 2 Managing Bootstrap Files and Boot Devices 73
To configure the boot file
1. In the Console, highlight the Servers folder in the tree, or highlight a Provisioning Server, then select Configure bootstrap from the Action menu. The Configure Bootstrap dialog appears.
Network Recovery Method
Restore Network Connections — Selecting this option results in the target device attempting indefinitely to restore it's connection to the Provisioning Server. Reboot to Hard Drive — (a hard drive must exist on the target device) Selecting this option instructs the target device to perform a hardware reset to force a reboot after failing to re-establish communications for a defined number of seconds. The user determines the number of seconds to wait before rebooting. Assuming the network connection can not be established, PXE will fail and the system will rebooot to the local hard drive. The default number of seconds is 50, to be compatible with HA configurations.
Login Polling Timeout
Enter the time, in milliseconds, between retries when polling for Provisioning Servers. Each Provisioning Server is sent a login request packet in sequence. The first Provisioning Server that responds is used. In non-HA systems, this time-out simply defines how often to retry the single available Provisioning Server with the initial login request.This time-out defines how quickly the round-robin routine will switch from one Provisioning Server to the next in trying to find an active Provisioning Server. The valid range is from 1,000 to 60,000 milliseconds.
Login General Timeout
Enter the time-out, in milliseconds, for all login associated packets, except the initial login polling time-out. This time-out is generally longer than the polling time-out, because the Provisioning Server needs time to contact all associated servers, some of which may be down and will require retries and time-outs from the Provisioning Server to the other Provisioning Servers to determine if they are indeed online or not. The valid range is from 1,000 to 60,000 milliseconds.

74 Citrix Provisioning Server 5.0 Installation and Configuration Guide
Select the boot file that was copied to the directory you selected during the Provisioning Server setup. .
2. Click Read DB. When the Stream Service starts, it creates a record in the database with its own IP address. There is only one Stream Service option record per database. If the service is bound to multiple IP addresses, multiple records appear in the database. The Read DB function chooses only one IP address from each Provisioning Server. This function can also be used to populate the boot file with the Stream Service IP settings already configured in the database.
3. Choose from the following options:
• Select the Verbose Mode option if you want to monitor the boot process on the target device (optional). This enables system messaging on the target device.
• Select Interrupt Safe Mode if the target device hangs early in the boot process.
• Select PAE Mode option when the target device's operating system is enabled with PAE (such as Windows Vista), and the Cache Type in the vDisk properties is set to Cache in device RAM.
4. Select from the following Network Recovery Methods:
Important If a previous version of Provisioning Server was installed on this server, you must change the default location from:
C:\Program Files\<CitrixorOEMname>\Provisioning Server\Tftpboot
to: C:\Documents and Settings\All Users\Application Data\<CitrixorOEMname>\Provisioning Server\Tftpboot
If the default is not changed, the bootstrap file can not be configured from the Console and target devices will fail to boot; receiving a ‘Missing TFTP’ error message.
Note If you installed the Console on a separate machine, select the path of the remote Provisioning Server (which has boot services installed).
Chapter 2 Managing Bootstrap Files and Boot Devices 75
Restore Network Connections - Selecting this option results in the target device attempting indefinitely to restore it's connection to the Provisioning Server.
Reboot to Hard Drive - Selecting this option instructs the target device to perform a hardware reset to force a reboot after failing to re-establish communications for a defined number of seconds. The user determines the number of seconds to wait before rebooting. Assuming the network connection can not be established, PXE will fail and the system will reboot to the local hard drive. The default number of seconds is 50. Click the Browse button to search for and select the folder created in Step 1, or enter a full path or UNC name.
5. Configure the following:
Login Polling Timeout
Enter the time, in milliseconds, between retries when polling for servers. Each server is sent a login request packet in sequence. The first server that responds is used. This time-out simply defines how often to retry the single available server with the initial login request. If you are using the High Availability feature, this time-out defines how quickly the round-robin routine will switch from one server to the next, in trying to find an active server. The valid range is from 1,000 to 60,000 milliseconds.
Login General Timeout
Enter the time-out, in milliseconds, for all login associated packets, except the initial login polling time-out. The valid range is from 1,000 to 60,000 milliseconds.
6. Click OK to save your changes.
Note If the partition containing the vDisks is formatted as a FAT file system, a message displays a warning that this could result in sub-optimal performance. It is recommended that NTFS be used to format the partition containing the vDisks. Do not change the address in the Port field.
Caution All boot services (PXE, TFTP) must be on the same NIC (IP). But the Stream Service can be on a different NIC. The Stream Service allows you to bind to multiple IPs (NICs).
76 Citrix Provisioning Server 5.0 Installation and Configuration Guide
Using the Manage Boot Devices UtilityThe Manage Boot Devices Utility provides an optional method for providing IP and boot information (boot device) to target devices; as an alternative to using the traditional DHCP, PXE, and TFTP methods. Using this method, when the target device starts, it obtains the boot information directly from the boot device. With this information, the target device is able to locate, communicate, and boot from the appropriate Provisioning Server. After the user is authenticated, the Provisioning Server provides the target device with its vDisk image.
Supported Boot Devices.
The following boot devices are supported in this release:
• USB
• CD-ROM (ISO)
• Hard Disk Partition (currently, only physical hard disk partitions are supported)
Boot devices are configured using the Boot Device Management utility. The Manage Boot Devices utility is structured as a wizard-like application, which enables the user to quickly program boot devices.
After installing the boot device, complete the procedures that follow.
Note The Boot Device Management utility is not supported on operating systems older than, and including, Windows 2000. Wireless NICs are not supported.
Caution When an entire hard drive is selected as boot device, all existing disk partitions are erased and re-created with a single active partition. The targeted partition is reserved as a boot device and cannot be used by the operating system or data.
When a hard disk partition is selected as boot device, the selected disk partition data is deleted and set as an active partition. This active partition becomes the boot device.

Chapter 2 Managing Bootstrap Files and Boot Devices 77
Configuring Boot Devices
1. From C:\Program Files\Citrix\Provisioning Server product installation directory, run BDM.exe. The Boot Device Management window opens.
2. Under Server Lookup, select the radio button that describes the method to use to retrieve Provisioning Server boot information:
• Use DNS to find the Provisioning Server from which to boot from. If this option is selected and the Use DHCP to retrieve Device IP option is selected (under Device IP Configuration settings), your DHCP server needs to provide option 6 (DNS Server).
If using HA, specify up to four Provisioning Servers for the same Host name on your DNS server.
• Use the static IP address of the Provisioning Server from which to boot from. If you select this option, click Add to enter the following Provisioning Server information, then click OK to exit the dialog:
• IP Address
• Subnet Mask
• Gateway
• Port (default is 6910)
If using HA, enter up to four Provisioning Servers. If you are not using HA, only enter one. Use the Move Up and Move Down buttons to sort the Provisioning Servers boot order. The first Provisioning Server listed will be the server that the target device attempts to boot from.
3. Click Next. The Set Options dialog appears.
Note The boot device uses Host name plus DHCP option 15 (Domain Name, which is optional) as the fully qualified domain name (FQDN) to contact the DNS server to resolve the IP address.
78 Citrix Provisioning Server 5.0 Installation and Configuration Guide
4. Configure the following local boot options, then click Next:
• Verbose Mode; enable/disables the displaying of extensive boot and diagnostic information that is helpful when debugging issues.
• Interrupt Safe Mode; enable/disable for debugging issues, which is sometimes required for drivers that exhibit timing or boot behavior problems.
• PAE Mode; enables/disables the address extensions, to match your operating system settings. This is only applicable to 32 bit operating systems.
• Network Recovery Method; select to attempt to restore the network connection or to reboot from a hard drive if the target device loses connection to the Provisioning Server, and how long (in seconds) to wait to make this connection.
• Login Polling Timeout; in general, it is recommended that you start values of one second for each of the polling and general timeouts. You should extend these when using 3DES encryption. You should further extend the timers based upon workload. A reasonable setting for 100 target devices running triple DES in the network would be three seconds.
• Login General Timeout; a reasonable setting for 100 target devices running triple DES in the network would be ten Seconds for the General Timeout.
5. On the Burn the Boot Device dialog, configure the target device IP. If the Use DNS to find the Server option is selected and your DHCP service does not provide option 6 (DNS Server), then enter the following required information:
• Primary DNS Server Address
• Secondary DNS Server Address
• Domain Name
6. Configure boot device and media properties, then click Burn. A message appears to acknowledge that the boot device was successfully created.
7. Click Exit to close the utility.
8. If selecting ISO format, use your CD burning software to burn the ISO image.
9. Boot the target device and enter the BIOS Setup. Under the Boot Sequence, move the boot device to the top of the list of bootable devices. Save the change and boot the target device.
Chapter 2 Managing Bootstrap Files and Boot Devices 79
After the boot device is programmed, a target device boot sequence can be configured using the Console’s Target Device Disk Properties dialog. These boot behaviors are used after a target device connects to a Provisioning Server. The Console allows multiple vDisk images to be assigned to a target device. The way in which these vDisks boot depends upon the selected boot behavior.
When configuring the BIOS to work with the boot device (either USB or ISO image), it is imperative that the NIC PXE option is enabled. The PXE boot option is required in order for the NIC Option ROM to stay resident in memory during the pre-boot process. This way, UNDI will be available to the boot device to properly initialize the NIC. Otherwise, the API not found message would be displayed by the boot device.
Configuring the BIOS Embedded BootstrapThis feature is Dell specific and provides end users with systems preconfigured with Provisioning Server, allowing customers to deploy an Provisioning Server-enabled environment with minimal effort. This feature becomes an alternative to the standard PXE boot method.
As part of this solution, the OEM embeds the bootstrap within the target device’s BIOS at the factory. The OEM also pre-configures the device with product license keys.
For the BIOS-Embedded Bootstrap feature to work automatically from the factory, the target network must support the following:
• A DHCP server that is capable of providing the target device’s IP, Subnet & Gateway address. Additionally, the DHCP service must provide the default DNS server for the client to use.
• A DNS server must be active on the network
• A DNS entry must be defined which points the name <IMAGESERVER1> to each Provisioning Server's active IP address. This DNS entry is used by the target device to find an active server.
If the target device boots using the BIOS-Embedded Bootstrap, the configuration settings are obtained from the device’s BIOS. These BIOS settings may indicate using DHCP with DNS to lookup the IP and server information (dynamic), or it may list up to four server IP addresses in the BIOS (static).
Note Provisioning Server 5.0 Dell Edition requires OptiPlex™ target devices run BIOS version A10 or higher.
80 Citrix Provisioning Server 5.0 Installation and Configuration Guide
The first time a target device boots, it reads the product license key and configuration information from the BIOS, locates the Stream Service, and then sends a device registration message to the server. This message contains the information, in addition to the information inherited from the device collection template, necessary to add the device to the Provisioning Server database.
Configuring the BIOS-Embedded Bootstrap SettingsThe OEM configures the BIOS-embedded bootstrap settings so that the bootstrap works ‘out-of-the-box’. If the Provisioning Server administrator needs to change settings, use the Configure BIOS Bootstrap feature in the Console. Configuration changes are updated automatically the next time the target device boots. However, only those BIOS settings that differ from the new settings are updated.
General Tab1. Right-click on a Provisioning Server in the Console window, then select the
Configure BIOS Bootstrap menu option. The Configure BIOS Bootstrap dialog appears.
2. To allow target device BIOS settings to be automatically updated if connected to this server, on the General tab, check the Automatically update the BIOS on the target device with these settings check box. The next time the target device boots, these settings are automatically applied.
Target Device IP1. Select the Target Device IP tab on the Configure BIOS Bootstrap dialog.
2. Select from the following methods to use to retrieve target device IP addresses:
• Use DHCP to retrieve target device IP; default method.
• Use static target device IP; selecting this method requires that a primary and secondary DNS and Domain be identified.
Server Lookup TabOn the Server Lookup tab, select the method that the target device will use to find the Provisioning Server it will boot from:
Note The target device must have enough information stored in the BIOS to make initial contact with the Provisioning Server.
Chapter 2 Managing Bootstrap Files and Boot Devices 81
Use DNS to find server
Select this option to find the server using DNS. The host name displays in the Host name textbox.
Use specific servers
Select this option to manually enter Provisioning Server data. If this information was not previously entered, no data appears. To quickly list all servers in the database, click Read Servers from Database button.
To change or enter new information, click Edit, then manually enter the information in the Server Address dialog.
Options Tab1. On the Options tab, select from the network options that follow:
• Select the Verbose mode option if you want to monitor the boot process on the target device (optional). This enables system messaging on the target device.
• Select Interrupt safe mode if the target device hangs early in the boot process.
• Select PAE Mode option when the target device's operating system is enabled with PAE (such as Windows Vista) and the Cache Type in the vDisk properties is set to Cache in device RAM.
2. Select from the following Network Recovery Methods:
Restore network connections
Selecting this option results in the target device attempting indefinitely to restore it's connection to the Provisioning Server.
Reboot to Hard Drive
Selecting this option instructs the target device to perform a hardware reset to force a reboot after failing to re-establish communications for a defined
Note When using DNS, the DNS server must be able to resolve the name with the IP address of the server.
Note Selecting the Reset to Default button will display a confirmation message to indicating that automatic BIOS updates on the target devices will be disabled and to use DNS to find the server.
82 Citrix Provisioning Server 5.0 Installation and Configuration Guide
number of seconds. The user determines the number of seconds to wait before rebooting. Assuming the network connection can not be established, the target device will fail to contact the server and the system will reboot to the local hard drive. The default number of seconds is 50.
3. Configure the following:
Login Polling Timeout
Enter the time, in milliseconds, between retries when polling for servers. Each server is sent a login request packet in sequence. The first server that responds is used. This time-out simply defines how often to retry the single available server with the initial login request. If you are using the High Availability feature, this time-out defines how quickly the round-robin routine will switch from one server to the next, in trying to find an active server. The valid range is from 1,000 to 60,000 milliseconds.
Login General Timeout
Enter the time-out, in milliseconds, for all login associated packets, except the initial login polling time-out. The valid range is from 1,000 to 60,000 milliseconds.
4. Click OK to save your changes.
Note If the partition containing the vDisks is formatted as a FAT file system, a message displays a warning that this could result in sub-optimal performance. It is recommended that NTFS be used to format the partition containing the vDisks. Do not change the address in the Port field.
Caution All boot services must be on the same NIC (IP). But the Stream Service can be on a different NIC. The Stream Service allows you to bind to multiple IPs (NICs).
CHAPTER 7
Upgrading vDisks Manually
This chapter describes how to upgrade Provisioning Server vDisks manually. This manual method is recommended if vDisks have been upgraded using the Upgrade Wizard prior to version 4.5, to ensure that the previous version has been uninstalled completely.
Use the manual upgrade as a universal approach to upgrading vDisks, or if any of the following are true:
• The vDisk has gone through a number of modifications in Private Image mode
• The original hard drive is no longer available
The tasks performed during a manual upgrade can be performed automatically using the The manual upgrade method includes completing the following tasks:
1. “Image Back to Master Target Devices Hard Drive”
2. “Uninstall Product Software”
3. “Install Master Target Device Software”
4. “Imaging the Hard Drive”
5. “Boot from the vDisk”
Image Back to Master Target Devices Hard DriveThere are two procedures that allow you to image a vDisk back to a hard drive. The procedure you select depends on the state of the disk drive you are imaging to. Select one of the following procedures:
• “Image back to the original hard drive from which the vDisk was created”Use the original hard drive from which the vDisk was created (recommended method).
• “Image back using an unformatted, uninitialized hard-disk drive”Use an unformatted, uninitialized hard-disk drive.
Image back to the original hard drive from which the vDisk was created1. Boot from the vDisk in Private
84 Citrix Provisioning Server 5.0 Installation and Configuration Guide
2. Image Mode.
3. From Windows Administrative Tools, select the Computer Management menu option. The Computer Management window appears.
4. In the tree, under Storage,select Disk Management
5. Note the partition letter of the active partition of the original hard disk.
6. Run the Image Builder utility.
7. Specify the drive letter of the active partition as the ‘Destination Drive’. Image Builder reformats the original hard drive during the imaging process. After completing the imaging process, the vDisk content is cloned back to the hard drive.
8. To connect the vDisk to the Provisioning Server, from the Console, set the target device to boot from the hard drive, the PXE boot the target device. If this step is not completely properly, the Provisioning Server will not be able to connect with the vDisk.
9. “Uninstall Product Software”.
Image back using an unformatted, uninitialized hard-disk drive1. Boot from the vDisk in Private Image Mode.
2. From Windows Administrative Tools, select the Computer Management menu option. The Computer Management window appears.
3. In the tree, under Storage,select Disk Management.
4. Run Initialize and Convert Wizard (which will pop up).
5. Create a new primary partition, as the first partition, assign a drive letter to it, and then format the partition.
6. Right-click on the newly created partition, then choose Mark Partition as Active.
7. Delete the boot.ini.hdisk file from the root of the vDisk.
8. Run the Image Builder utility.
9. Specify the drive letter of the newly created partition as the ‘Destination Drive’. Image Builder will reformat the original hard drive during the reverse image process. After completing the imaging process, the vDisk content is cloned back to the hard drive.
10. To connect the vDisk to the Provisioning Server, from the Console, set the target device to boot from the hard drive, then PXE boot the target device.
Chapter 2 Upgrading vDisks Manually 85
If this step is not completely properly, the Provisioning Server will not be able to connect with the vDisk.
11. “Uninstall Product Software”.
Uninstall Product SoftwareUninstall existing product software from the target device and Provisioning Server.
Install Master Target Device SoftwareComplete the following steps to install the latest product software on the Master Target Device.
1. Run the new Provisioning Server Target Device installer on the target device.
2. PXE boot the target device.
Imaging the Hard DriveComplete the following steps to image the target device’s hard drive on to the vDisk file:
1. Run the Image Builder utility on the Master Target Device.
2. The Destination Drive should point to the vDisk first partition by default. Proceed cloning the hard drive image to the vDisk Destination Drive.
Boot from the vDiskUsing the Console, set the target device on the Provisioning Server to boot from vDisk first, then reboot the target device. The new target device should now be running the new vDisk image.

86 Citrix Provisioning Server 5.0 Installation and Configuration Guide
CHAPTER 8
Glossary
AutoUpdate. A command-line utility that is used to create a delta file when incrementally updating a vDisk.
Boot Device Manager (BDM). A utility used to create boot devices that have the bootstrap and IP information pre-installed; enabling a target device to boot securely over the network without the use of PXE or DHCP.
Boot Services. A set of network boot services that can be used to get the boot information necessary when booting a target device from a vDisk.
BOOTP. An IP/UDP bootstrap protocol (BOOTP), which allows a target device to discover its IP address and other IP configuration parameters.
BOOTPTAB. BOOTP Service and the Provisioning Server’s PXE service management utility.
Common Image Feature. A feature that allows a single vDisk image to work for target devices using network interface cards that vary.
Device Administrator. Device Administrators manage device collections within a site.
Device Collection. A logical grouping of devices. For example, a device collection could represent a physical location, a subnet range and a logical grouping of target devices. A target device can only belong to one device collection.
Device Operator. Device Operators can view the properties of vDisks and target devices, boot or shut down target devices, and send messages to target devices within a device collection.
Disk Store (Store). A logical name given to a physical storage location for vDisks. The store is used by all Provisioning Servers within a farm to refer to a shared storage location.
vDisk Pool. The collection of all vDisks available to a site. There is one vDisk pool per site.
Domain. An Active Directory domain as defined by Microsoft.
Dynamic Host Configuration Protocol (DHCP). A protocol used for assigning IP addresses and other IP parameters to devices on a network.
EULA. End-User License Agreement.
Farm Administrator. A farm administrator can view and manage all objects within a farm. Farm administrators can also create new sites and manage role memberships throughout the entire farm.
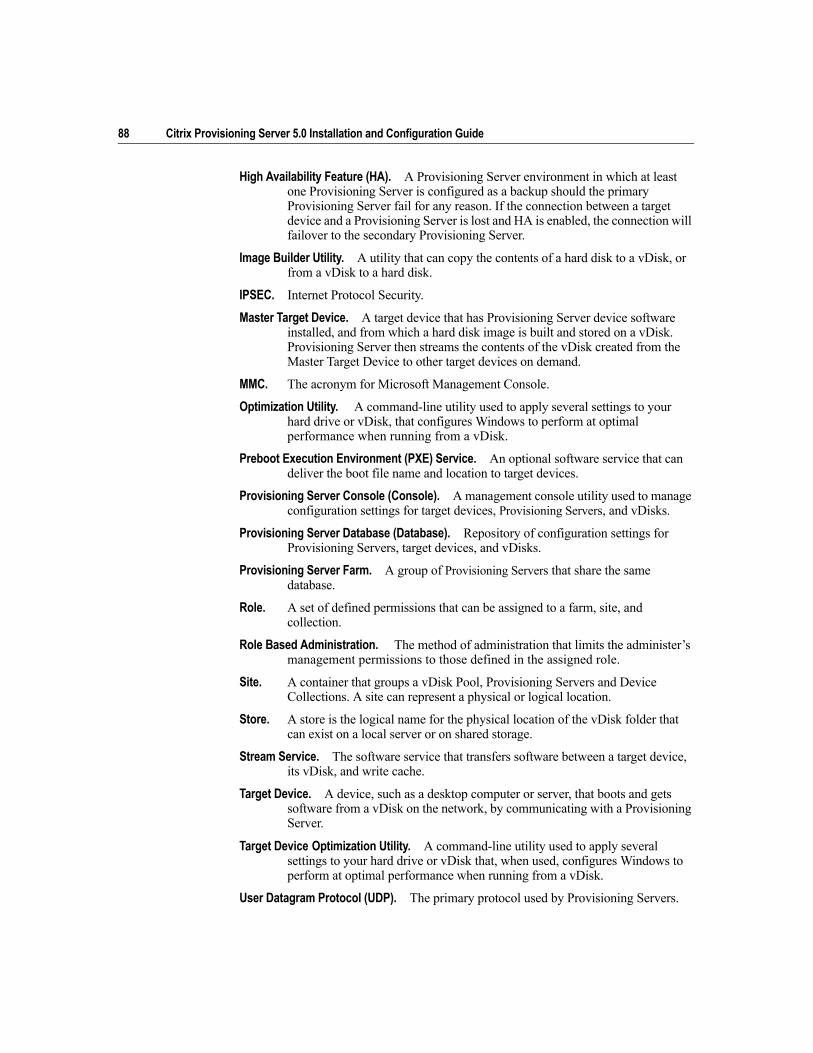
88 Citrix Provisioning Server 5.0 Installation and Configuration Guide
High Availability Feature (HA). A Provisioning Server environment in which at least one Provisioning Server is configured as a backup should the primary Provisioning Server fail for any reason. If the connection between a target device and a Provisioning Server is lost and HA is enabled, the connection will failover to the secondary Provisioning Server.
Image Builder Utility. A utility that can copy the contents of a hard disk to a vDisk, or from a vDisk to a hard disk.
IPSEC. Internet Protocol Security.
Master Target Device. A target device that has Provisioning Server device software installed, and from which a hard disk image is built and stored on a vDisk. Provisioning Server then streams the contents of the vDisk created from the Master Target Device to other target devices on demand.
MMC. The acronym for Microsoft Management Console.
Optimization Utility. A command-line utility used to apply several settings to your hard drive or vDisk, that configures Windows to perform at optimal performance when running from a vDisk.
Preboot Execution Environment (PXE) Service. An optional software service that can deliver the boot file name and location to target devices.
Provisioning Server Console (Console). A management console utility used to manage configuration settings for target devices, Provisioning Servers, and vDisks.
Provisioning Server Database (Database). Repository of configuration settings for Provisioning Servers, target devices, and vDisks.
Provisioning Server Farm. A group of Provisioning Servers that share the same database.
Role. A set of defined permissions that can be assigned to a farm, site, and collection.
Role Based Administration. The method of administration that limits the administer’s management permissions to those defined in the assigned role.
Site. A container that groups a vDisk Pool, Provisioning Servers and Device Collections. A site can represent a physical or logical location.
Store. A store is the logical name for the physical location of the vDisk folder that can exist on a local server or on shared storage.
Stream Service. The software service that transfers software between a target device, its vDisk, and write cache.
Target Device. A device, such as a desktop computer or server, that boots and gets software from a vDisk on the network, by communicating with a Provisioning Server.
Target Device Optimization Utility. A command-line utility used to apply several settings to your hard drive or vDisk that, when used, configures Windows to perform at optimal performance when running from a vDisk.
User Datagram Protocol (UDP). The primary protocol used by Provisioning Servers.

Chapter 2 Glossary 89
View. A logical grouping of target devices within a farm or site, for the purpose of simplify device administration. A view can represent target devices spread across multiple sites and device collections. A target device can belong to any number of views.
Virtual Disk (vDisk). A file that is accessible to a Provisioning Server and is used to emulate a hard drive for a target device.
Write Cache Mode. The cache option selected to store a target device’s disk writes when using a write-protected vDisk. The write cache can reside on the Provisioning Server, on shared storage, in the target device’s RAM, or on the target device’s local hard drive.

90 Citrix Provisioning Server 5.0 Installation and Configuration Guide