hyperpro shock manualhyperpro.com/wp-content/uploads/2016/02/2012-shock-manual-hyperpro... ·...
TRANSCRIPT

2
Hyperpro Shock Manual
HYPERPRO Shock Manual Contents
Safety Remarks Important safety information is highlighted by the following notations: WARNING! Failure to follow warning instructions could result in severe or fatal injury. NOTE! This indicates information that is of importance with regard to procedures. WARNING! Please study this owner’s manual and make certain that you fully understand the mounting instructions. If you have any questions regarding proper installations contact a Hyperpro dealer. WARNING! Installing a shock absorber that is not correct for your bike can affect the stability of your bike. Hyperpro can not be held responsible for any form of damage to the shock, motorcycle, or injury to persons when there is improper installation of the shock absorber and if the instructions for mounting and maintenance are not followed exactly. Similarly, the warranty will become void it the instructions are not followed too. Beware: these pictures in the manual are used as an example for the way of installation. Your situation can be different of the situation on the picture. German customers: Die Documente fur den ABE Zulassung, konnen heruntergeladen werden aus der “Download” Abschnitt von www.so-products.com und / oder www.hyperpro.com
Description Page Shock overview 3
Spring preload adjustment 4
Mounting instructions 5
Shock set-up 10
Trouble shooting 15
Standard shock settings backside

3
Hyperpro Shock Manual
Shock with/without reservoir This is a general description of the Hyperpro 46&36mm shock. The Hyperpro shock absorber might or might not have all options on your shock . In the chapter “Motorcycle set up”, there will be more explanation about the influences of these adjustable features on the handling of your motorcycle. High Speed Compression Adjuster, purple knob, +/-28 clicks. With this you can adjust High Speed Compression speed of the shock absorber. Clockwise is more damping, counter clockwise is less damping. Low Speed Compression Adjuster, gold knob, +/-28 clicks. With this you can adjust Low Speed Compression speed of the shock absorber. Clockwise is more damping, counter clockwise is less damping. Rebound adjuster: Golden ring, +/-48 clicks. Adjuster with screwdriver, +/-28 clicks With this you can adjust Rebound speed of the shock absorber. Clockwise is more damping, counter clockwise is less damping.
Rebound Adjuster
Hydraulic Spring Preload Adjuster Knob
Hydraulic Spring Preload Adjuster
High Speed Compression Adjustment
Low Speed Compression Adjustment
Length Adjuster
4
Hyperpro Shock Manual
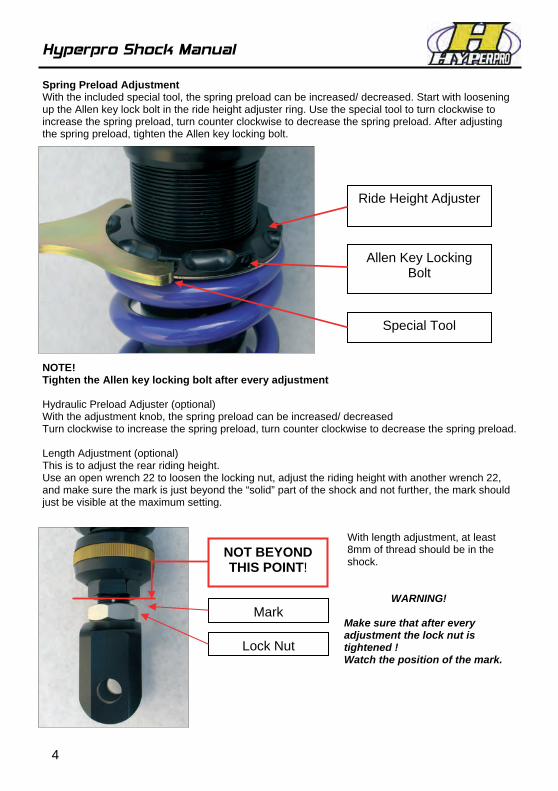
Spring Preload Adjustment With the included special tool, the spring preload can be increased/ decreased. Start with loosening up the Allen key lock bolt in the ride height adjuster ring. Use the special tool to turn clockwise to increase the spring preload, turn counter clockwise to decrease the spring preload. After adjusting the spring preload, tighten the Allen key locking bolt.
Ride Height Adjuster
Allen Key Locking Bolt
Special Tool
NOTE! Tighten the Allen key locking bolt after every adjustment
Hydraulic Preload Adjuster (optional) With the adjustment knob, the spring preload can be increased/ decreased Turn clockwise to increase the spring preload, turn counter clockwise to decrease the spring preload. Length Adjustment (optional) This is to adjust the rear riding height. Use an open wrench 22 to loosen the locking nut, adjust the riding height with another wrench 22, and make sure the mark is just beyond the “solid” part of the shock and not further, the mark should just be visible at the maximum setting.
Mark
NOT BEYOND THIS POINT!
Lock Nut
With length adjustment, at least 8mm of thread should be in the shock.
WARNING!
Make sure that after every adjustment the lock nut is tightened ! Watch the position of the mark.

5
Hyperpro Shock Manual
Mounting instructions Mono shock Place the bike firmly and stable on a smooth surface, with the rear wheel of the ground. Don’t use a stand which supports the swing arm. Remark: this procedure can be used also for motorcycles equipped with “Telelever” front-end. Remove the seat and fairing if necessary. Remove the nuts from the shock absorber retaining bolts (1 & 2). If the shock has a remote reservoir with a hose, the shock has to be removed with the reservoir: it must not be detached from the shock. Remove the bolt(s) or clamps of the remote reservoir, so the reservoir is loose. Shock absorbers with hydraulic preload sometimes have a remote adjustment. Don’t detach it, remove the shock with the adjuster, otherwise there is a chance of leaking. Remove the remote preload adjuster from the bike. Hold the rear wheel in place to take out the shock bolts. Now remove the shock from the bike. Exchange the original shock absorber for the HYPERPRO 3D shock absorber. (read the mounting instruction sheet attached to this manual for motorcycle specific information) Place the shock in the motorcycle; place the top bolt (1). Lift the rear wheel up in order to place the bottom bolt (2) Tighten the nuts. Place (when necessary) the remote reservoir on its place and (when necessary) the hydraulic preload adjuster knob in place.
6
Hyperpro Shock Manual
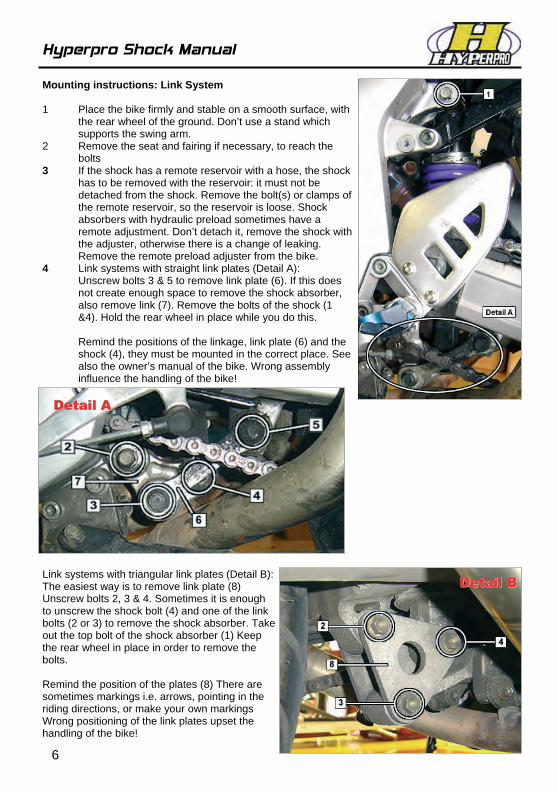
Mounting instructions: Link System 1 Place the bike firmly and stable on a smooth surface, with
the rear wheel of the ground. Don’t use a stand which supports the swing arm.
2 Remove the seat and fairing if necessary, to reach the bolts
3 If the shock has a remote reservoir with a hose, the shock has to be removed with the reservoir: it must not be detached from the shock. Remove the bolt(s) or clamps of the remote reservoir, so the reservoir is loose. Shock absorbers with hydraulic preload sometimes have a remote adjustment. Don’t detach it, remove the shock with the adjuster, otherwise there is a change of leaking. Remove the remote preload adjuster from the bike.
4 Link systems with straight link plates (Detail A): Unscrew bolts 3 & 5 to remove link plate (6). If this does
not create enough space to remove the shock absorber, also remove link (7). Remove the bolts of the shock (1 &4). Hold the rear wheel in place while you do this.
Remind the positions of the linkage, link plate (6) and the
shock (4), they must be mounted in the correct place. See also the owner’s manual of the bike. Wrong assembly influence the handling of the bike!
Link systems with triangular link plates (Detail B): The easiest way is to remove link plate (8) Unscrew bolts 2, 3 & 4. Sometimes it is enough to unscrew the shock bolt (4) and one of the link bolts (2 or 3) to remove the shock absorber. Take out the top bolt of the shock absorber (1) Keep the rear wheel in place in order to remove the bolts. Remind the position of the plates (8) There are sometimes markings i.e. arrows, pointing in the riding directions, or make your own markings Wrong positioning of the link plates upset the handling of the bike!
Detail ADetail ADetail A
Detail BDetail BDetail B

7
Mounting instructions: Twin shock Place the bike firmly and stable on a smooth surface, with the rear wheel of the ground. Don’t use a stand which supports the swing arm. Remove the nuts from the shock absorber retaining bolts (1 & 2). If the shock has a remote reservoir with a hose, the shock has to be removed with the reservoir: it must not be detached from the shock. Remove the bolt(s) or clamps of the remote reservoir, so the reservoir is loose. Shock absorbers with hydraulic preload sometimes have a remote adjustment. Don’t detach it, remove the shock with the adjuster, otherwise there is a change of leaking. Remove the remote preload adjuster from the bike. Hold the rear wheel in place to take out the shock bolts. Now remove the shock from the bike Exchange the original shock absorber for the HYPERPRO 3D shock absorber. (read the mounting instruction sheet attached to this manual for motorcycle specific information) Place the shock in the motorcycle; place the top bolt (1). Lift the rear wheel up in order to place the bottom bolt (2) Tighten the nuts. Place (when necessary) the remote reservoir on its place and (when necessary) the hydraulic preload adjuster knob in place.
Hyperpro Shock Manual
5 Take the shock out of the frame. Depending on the bike this is possible along the upper side of the swing arm or underneath. Sometimes it is necessary to lift the rear wheel to create enough room to take the shock out.
6 Exchange the original shock absorber for the HYPERPRO 3D shock absorber. (Read the mounting instruction sheet attached to this manual for motorcycle specific information)
7 Check the condition of the linkage parts. Regrease the bearing parts if necessary. Check the bearing for damage and excessive play. If necessary replace them.
8 Move the shock into its place and place the upper bolt (1) to secure the shock absorber. 9 Link systems with straight link plates (Detail A): Place the link (7) back in the bike with bolt 2. Move the shock and link so that the lower
shock bolt (4) can be placed in the hole. Bolt the link plates (6) in place with one the bolts (3 or 5) Lift the rear wheel up or down in order to make the link and linkage arm to align. Put the remaining bolt on its place.
Link systems with triangular plates (Detail B): Place the plates (8) back in the bike with two of the three bolts (2, 3 or 4) Lift the rear
wheel up or down to make the link plate align. Place the bolts in the correct place. 10 Tighten all the nuts and bolts to the correct torque setting. (see list in the back of the
manual) Make sure the linkage is assembled properly. Bolt on the remote reservoir and/or the preload adjuster knob. Remount the fairing and seat.

8
Hyperpro Shock Manual
Reservoir mounting instructions If the shock absorber is equipped with a remote reservoir, then the reservoir need to be mounted on the motorcycle. Therefore there are mounting parts included. The mounting can be done with a special clamp, which hold the reservoir and mounts both parts on the motorcycle. When necessary; new bolts are included. The picture on the right shows an example.
Another way to mount the reservoir is with hose clamps and rubber blocks. The reservoir is then attached to one of the frame tubes. The picture on the left shows an example.
NOTE! More specific information is available in the attached mounting instruction sheet.
Hydraulic Pre Load Adjuster mounting instructions If the shock absorber is optionally equipped with a hydraulic preload adjuster, in some cases the preload adjuster knob is mounted on the reservoir. See picture on the right.
If the hydraulic preload adjuster knob is remote with a hose, then the knob has to be mounted on the motorcycle frame. For this there are mounting brackets included. See picture underneath.
NOTE! More specific information is available in the included mounting instruction sheet

9
Hyperpro Shock Manual
Motorcycle Setup: Maintenance, things to check first 1 - Before there are any adjustments made to the suspension settings, be sure everything else is in a good working order using the following steps. Look up the details and settings in your motorcycle manual. Handling problems do not only occur when the suspension is set up wrong. Setting up the suspension is useless when the rest of the bike is not in perfect condition! 2 - Check the tires. Wrong tire pressure can causes various handling problems; it should be checked regularly to insure good handling. The tire manufacturer can provide the correct information for your tires. Check the tires for any unusual wear, damage, leaks and correct thread depth. If the tires are worn out or otherwise in bad condition, replace them. 3 - Check the front suspension. Place the bike stable with the front wheel off the ground. Make sure there is no weight resting on the front suspension. Grab the forks near the front axle. Try to push them front and back, there should be virtually no play between the steering head and the forks. Also notice if there is play in the forks, there should be very little play between the inner and outer tube. If there is play, it is likely the fork bushings are worn out; the fork should be rebuilt. The steering stem can be tightened to set the play. Too tight and the steering becomes heavy. If there is play with a tight steering stem, check the steering head bearings as they’re probably worn out, replace them if necessary. Steer the bike. If the movement is not smooth and/or notches are felt, the steering head bearings should be checked and if worn out they should be replaced. Check the front suspension for leaking seals. 4 - Check the rear suspension. Place the bike stable with the rear wheel off the ground. Don’t use a stand which supports the swing arm. Try to move the swing arm from side to side. There should be little play between the swing arm and the rest of the bike. If there is play the swing arm bearings should be checked and if worn out they should be replaced. Try to move the swing arm up and down. Feel for play between the swing arm, the frame and the shock bearings. If there is play, the bearings of the swing arm and/or the shock are probably worn out. 5 - Check the chain. Make sure the free play is adjusted correctly. Clean and lubricate the chain if necessary. The lubricant penetrates best when the chain is warm, just after riding the bike. Tip: lubricate the chain after driving in the rain as the lubricant can be washed off by the rain. Make sure the wheel and sprockets are aligned properly. There are usually measurement stripes on the swing arm, for the alignment of the rear wheel when the chain free play is adjusted. If any chain links are damaged, worn out, do not move smooth and/or the sprockets are worn out, the chain and sprockets should be replaced. 6 - Check the wheels. Make the wheels spin. If a wheel doesn’t move smooth or has a lot of drag, check if the brake is dragging. If a wheel has play in the mounting (the wheel can move sideways while the axle is tightened) the bearings are probably worn out; replace them if necessary. If there still are a lot of vibrations during driving, check the balancing of the wheels. 7 - Check the wheel alignment; if the wheels are not aligned properly the bike tends to steer to one side. This is also the case when the frame is not straight; if your bike has been in a crash it is possibly bent. 8 - If your bike is not in a technical good working order, visit a qualified dealer for service.

10
Hyperpro Shock Manual
SAG measurements and adjustments 1 - Front Suspension: Right side up front fork: Measure the fork length between the lower fork clamp and the top of the dust seal.
Upside down front fork: Measure the fork length between the top of the axle clamp and the bottom of the dust seal. Measure the following situations: A: Front wheel of the ground, no weight rests on the front suspension. B: The bike stands up on both wheels, on a flat surface without rider. Pull up the front of the bike and let it come down on its own weight slowly, don’t push! C: The bike stands up on both wheels, on a flat surface without rider. Push the front of the bike down and let it come up slowly, slow down the movement a little. Don’t let the bike bounce.
Is the Static Sag. (See STATIC SAG, ON HYPERPRO FRONT FORK KIT, OTHERWISE SEE OWNER’S MANUAL OF THE BIKE)
2 - Rear suspension: Measure the length of the swing arm (L) Use a piece of tape to mark a point at the same distance (L) from the swing arm front bolt to the fairing. Measure the distance from the rear axle to the point when: A: The rear wheel is off the ground, no weight rests on the rear suspension. B: The bike is on both wheels, on a flat surface without rider. Lift the rear end of the bike and let it come down under its own weight slowly, don’t push! C: The bike stands on both wheels, on a flat surface without rider. Push the rear of the bike down let it come up slowly, don’t let it bounce!
Is the STATIC SAG (see box label on the shock absorber box: STATIC SAG) Note: Be sure to use tape that doesn’t damage the fairing. Note: On the box the preload and static SAG are mentioned. The SAG value is the most important. If necessary: adjust the pre-load setting till the SAG value is reached.
⎟⎠⎞
⎜⎝⎛ +
−2
CBA
⎟⎠⎞
⎜⎝⎛ +
−2
CBA

11
Hyperpro Shock Manual
3 - The static sag can be adjusted with the preload adjuster (if available). For less static sag, apply more spring preload. For more static sag apply less spring preload. Adjust the preload if needed to create the STATIC SAG specified on the front page of the Hyperpro front fork spring kit; otherwise: see the owner’s manual of the bike. At the rear suspension special tools are usually needed for adjusting the spring preload. Front: less rings indicates more preload (unless there is a remark on the front page: reversed preload) Rear: view the shock manual for the preload indication. 4 - Under heavy loads (i.e. with a passenger and luggage for a vacation) the sag increases (the bike is pushed to the ground more). Apply more preload to compensate this.
Tuning the suspension 1 - The damping only adjusts the speed of the suspension movement, not the spring force. The suspension will eventually move the same distance when the applied force is the same for long enough, independent of the damping settings. The damping settings only change the time it takes to get there. 2 - The settings of the adjusters recommended by HYPERPRO can be found on the box label of the package (view: REBOUND & COMPRESSION) The HYPERPRO recommended settings are average settings for normal use. It is possible to adjust the suspension to your personal preference and driving style. 3 - To set the suspension up properly, test drive the bike every time something is changed. Test drive the bike according to your normal driving conditions and driving style. Always drive safely and don’t take unnecessary risks! If you change the suspension settings, the bike feels and handles different. Avoid driving in heavy traffic because it can be dangerous when the bike handles different. Make only small changes to one setting at a time. 4 - Check the current setting and write it down. Turn the adjuster to the maximum (clockwise) counting the number of clicks or turns while doing so. Clicks or turns are always counted from the maximum setting (=closed) turn backwards (counter clockwise) and start counting. First check the overall condition of the bike and make sure the static sag is adjusted properly before setting up the damping. Make notes while setting up your suspension. Note the changes and the effect of the changes. Change only one setting at a time as this also gives only one effect at a time. The left & right fork (and left & right twin shocks) should be set the same, else the bike becomes unstable (there are exceptions; check the owners manual to be sure) 5 - A lot of damping makes the bike feel very hard/firm and it feels reasonably controlled on smooth roads, especially with much rebound damping. The bike feels harsh and uncomfortable and it skips or kicks up over bumps in bad roads. Little damping makes the bike feel vague, with little feel of traction and control. The bike is very soft and comfortable over bumps, tough it wallows around and can feel unstable when damping is too little.

12
Hyperpro Shock Manual
Damping settings (rebound & compression) can affect each other slightly in some forks and shocks. I.e. a big increase in fork compression damping can also give an increase in fork rebound damping. NOTE! The difference between High Speed en Low Speed adjusters of the shock must not be more then 10 clicks. 6 - The rebound setting adjusts the speed with which the suspension extends to the normal ride height after going over a bump or when releasing the brake. Turn the screw clockwise for more damping (slower rebound speed) and turn counter clockwise for less damping (faster rebound speed) Rebound damping is also sometimes referred to as tension damping (“ten”) Front: Too much rebound damping can make the fork pack down; the bike does not return fast enough to the standard ride height after being compressed and gets lower and lower over a series of bumps. The front sits low and the bike tends to over steer (drives towards the inside) in long fast corners and it sits up in slow corners. While accelerating, the front can tank slap because the front wheel loses traction. Too much rebound damping makes the front feel locked up and harsh, feel of control is lost Too little rebound makes the fork shoot up when the brake is released. The suspension extends too fast when entering a corner, causing under steer in fast corners and falling down to the inside in slow corners. The front feels vague and gives little feedback.
Rear: Too much rebound damping can make the rear pack down; the bike sits low at the rear and runs wide going out of long corners. The rear feels locked up and harsh. The bike sometimes kicks over bumps. The rear tire has bad traction, because the suspension doesn’t allow the rear wheel to follow the road surface properly.
The rear wheel bounces or hops uncomfortably over the ground during hard braking; it has some road contact and it’s easy to hold a straight line.
Rebound IncreaseRebound IncreaseRebound Increase
Rebound DecreaseRebound DecreaseRebound Decrease
Rebound IncreaseRebound IncreaseRebound Increase
Rebound DecreaseRebound DecreaseRebound Decrease

13
Hyperpro Shock Manual
Too little rebound damping can make the bike wallow in a corner and over bumps. The rear can feel less controlled; it acts like a pogo stick. During hard braking the rear wheel has little traction and feels like it slides over the ground; it feels like the bike wants to pivot around the front. It’s difficult to hold the bike in a straight line during braking.
General rebound setup: With the compression adjuster completely open (counter clockwise, till the minimum is reached) Compress the suspension as much as possible and note how it comes back up. Front: Increase the rebound damping until the suspension comes up with a smooth movement. It shouldn’t move too fast (shoot up) and only bounce once and topping out, move back down to the static SAG height and stop. Rear: Increase the rebound damping until the rear comes up in one smooth movement. It should move as fast upwards as possible, without shooting over the static sag level. Push the rear, the bike comes back up. It should move with your hands, you shouldn’t be able to lift your hands from the bike and the bike shouldn’t be able to push your hands upwards.
7 - The compression setting adjusts the speed with which the suspension is pushed together when hitting a bump or braking hard. Turn the screw clockwise for more damping (slower) and turn counter clockwise for less damping (faster) Compression damping is also sometimes referred to as bump damping. Front: Too much compression damping can make the fork compress too slow, resulting in slow steering into fast corners. Much compression damping can feel good during hard braking although the front feels very harsh over bumps, sometimes even kicking up. The front can shake and most bumps are felt directly through the handlebars. Too little compression damping can make the fork dive much too fast during braking. The bike does not feel controlled when braking hard and over bumps. The bike over steers (steers too fast) into corners. While braking hard the rear wheel can lose traction. Rear: Too much compression damping can make the rear feel very hard. The rear of the bike can kick up over bumps and most bumps are felt directly through the chassis. With too much compression damping the rear wheel can lose traction and slide while accelerating hard; the rear tire will overheat. Too little compression damping can make the rear compress too fast when accelerating. The bike squats, causing under steer, the bike runs wide when accelerating hard out of fast corners. Sometimes the rear compresses so fast it results in tank slapping due to loss of traction at the front tire.
Compression DecreaseCompression DecreaseCompression Decrease
Compression IncreaseCompression IncreaseCompression Increase

14
Hyperpro Shock Manual
General compression setup: Use as little compression damping as possible. The major part of the suspension force should be absorbed by the spring, with the damping as speed restriction. If the suspension compresses too fast increase the compression damping. Reduce the compression damping when the suspension compresses too slow, the bike feels harsh and bumps are directly passed through the frame to the rider. 8 - High speed & low speed Compression: There are high speed and low speed damping adjusters (usually called compression damping) High speed and low speed indicate the speed of suspension movement, not the driving speed of the motorcycle. High speed damping damps out high speed suspension movements; i.e. hitting a big bump in the road. On a bump the suspension has to move very fast to absorb it. Don’t use a lot of damping as this causes harshness, the wheel must be able to follow the road surface in order to maintain traction. Low speed damping damps out low speed suspension movements; i.e. front compression during braking or rear compression during accelerating. Normally there is more low speed damping necessary than high speed damping. Low speed adjustments usually also affect the high speed adjustment; if the low speed damping is increased, the high speed damping is also increased. The shape of the bump and the speed with which the bump is taken are the biggest influence for the speed with which the suspension must compress in order to make the tire follow the road surface. A sharp edged bump creates a higher suspension compressing speed than a rounded bump of the same height. If the bike is harsh over bumps: decrease the high speed compression damping. If the bike dives too fast under braking: increase front low speed compression. If the rear squats too fast under acceleration: increase rear low speed compression. Rebound usually has one adjuster (no high or low speed) because the bike rebounds under the force of the spring; this isn’t dependent on road conditions. 9 - Front and rear balance: There must also be a balance between front and rear. Hold the bike when it is on both wheels. Push in the centre of the bike (seat or tank) and notice how it sags and comes back up. Front and rear should compress and rebound at roughly the same rate. The suspension travel should be about the same distance front and rear. The suspension can move a bit faster at the front, although the difference must not be too great as that would result in wallowing (weave/wobble) and unstable handling behaviour through corners. 10 - Find an optimum setting that suits your driving style. Experiment by increasing or decreasing the damping to give the bike the desired handling behaviour. Use your own notes and experience to get a good feeling for the handling of your bike. Increase or decrease the damping with no more than a few clicks at a time; else there is too much difference in damping. For racing or duo riding there usually is some more damping needed than under normal conditions, in order to absorb the higher forces. Turn the adjustment screws a few clicks clockwise to increase the damping. Duo riding and/or holiday luggage affect the shock more than the fork, as the weight rests more at the rear of the bike, so the damping increase for the shock should usually be larger. Racing affects the front as much as the rear.
PURPLE: High Speed Compression adjuster
GOLD: Low Speed Compression Adjuster

15
►
Susp
ensi
on p
aram
eter►
▼
Han
dlin
g pr
oble
ms▼
Fr
ont P
relo
ad
Fron
t Reb
ound
Fr
ont C
ompr
essi
on
Rea
r Pre
load
R
ear R
ebou
nd
Rea
r Com
pres
sion
R
ide
heig
ht/ G
eom
etry
N
otes
Long
fast
cor
ners
: bik
e ru
ns
wid
e (u
nder
ste
ered
) bik
e si
ts u
p D
ecre
ase
Incr
ease
D
ecre
ase
Incr
ease
D
ecre
ase
Incr
ease
lo
wer
fron
t / ra
ise
rear
fro
nt e
nd ri
des
high
thro
ugh
the
corn
er
Long
fast
cor
ners
: bik
e ru
ns
narr
ow (o
ver s
teer
ed) b
ike
falls
dow
n In
crea
se
Dec
reas
e In
crea
se
Dec
reas
e In
crea
se
Dec
reas
e
front
end
ride
s lo
w th
roug
h th
e co
rner
Shor
t slo
w c
orne
rs: b
ike
falls
dow
n to
the
insi
de
(ove
r ste
ered
) D
ecre
ase
Incr
ease
D
ecre
ase
Incr
ease
D
ecre
ase
Incr
ease
lo
wer
fron
t / ra
ise
rear
fro
nt e
nd ri
des
high
thro
ugh
the
corn
er
Shor
t slo
w c
orne
rs: b
ike
sits
up
whi
le tu
rnin
g (u
nder
st
eere
d)
Incr
ease
D
ecre
ase
Incr
ease
D
ecre
ase
Incr
ease
D
ecre
ase
fro
nt e
nd ri
des
low
thro
ugh
the
corn
er
Fork
div
es to
o fa
st w
hen
brak
ing
hard
, doe
sn't
botto
m o
ut
Incr
ease
bi
ke u
sual
ly a
lso
over
stee
rs in
fa
st c
orne
rs, s
teer
s in
to
corn
ers
too
easi
ly (f
alls
in)
front
sho
ots
up to
o fa
st a
fter
brak
ing,
turn
ing
into
cor
ners
di
fficu
lt
Incr
ease
bike
usu
ally
als
o un
der s
teer
s in
fast
cor
ners
rear
squ
ats
fast
und
er
acce
lera
tion
2
Incr
ease
1
In
crea
se
bi
ke u
sual
ly u
nder
ste
ers
whe
n ac
celle
ratin
g ou
t of l
ong
corn
ers
rear
whe
el lo
oses
road
co
ntac
t (tra
ctio
n) u
nder
har
d br
akin
g
3
In
crea
se
2
Incr
ease
4
D
ecre
ase
1
Incr
ease
it
feel
s lik
e th
e re
ar p
ivot
s ar
ound
the
front
whe
el, a
lso
a lo
t of d
ive
durin
g br
akin
g
tank
sla
ppin
g / f
ront
end
sh
ake
at h
igh
spee
ds &
fast
ac
cele
ratio
n
2
Dec
reas
e
3
Incr
ease
1
Incr
ease
4
lo
wer
fron
t / ra
ise
rear
loss
of f
ront
tyre
trac
tion.
A
stee
ringd
ampe
r can
redu
ce
the
unst
able
feel
ing
wal
low
ing
/ in
mid
cor
ner (
at
long
, fas
t cor
ners
)
2
In
crea
se
4
In
crea
se
1
Incr
ease
3
Incr
ease
A st
eerin
gdam
per c
an re
duce
th
e un
stab
le fe
elin
g
over
a s
erie
s of
bum
ps o
r rip
ples
the
bike
pac
ks d
own,
th
ere
is n
o m
ore
trave
l to
abso
rb b
umps
if
the
front
pak
s do
wn:
de
crea
se
if th
e re
ar p
acks
dow
n:
decr
ease
ther
e is
too
muc
h da
mpi
ng in
th
e su
spen
sion
to re
turn
to th
e no
rmal
ride
hei
ght f
ast
enou
gh. B
ike
feel
s ha
rsh
bike
feel
s to
o ha
rs o
ver
bum
ps, t
he b
umps
are
felt
dire
ctly
thro
ugh
the
fram
e
if
the
front
is h
arsh
: de
crea
se
if th
e re
ar is
har
sh:
decr
ease
hars
hnes
s is
felt
whe
n th
e bi
ke k
icks
up
or s
kips
ove
r bu
mps
. Loc
ked
up a
nd h
arsh
fe
elin
g ca
n al
so b
e ca
used
by
pack
ing
dow
n
The numbers resemble the most likeliness of the solution (1= most likely) Make sure you set the right sag according to chapter s2 in the manual first! Ride height on the rear is adjusted by the length adjuster on the shock, NOT the spring preload

16