huit inc manual v0-6 - harvard web...
TRANSCRIPT

1
Version 0.6 | May 8, 2013 | Draft- Third Sky
Incident Management ITSM ServiceNow User Guide
May 2013
Contact: [email protected]

Document Change Control
VERSION DATE AUTHOR(S) BRIEF DESCRIPTION
0.1 4/3/13 J.Worthington Initial Draft; TOC for review
0.2 4/26/13 J.Worthington/G.Link Second Draft
0.3 4/30/13 G.Link / R.Lo J.Worthington
Final Draft for HUIT review
0.4 5/1/13 J.Worthington Initial HUIT review
05. 5/7/13 J.Worthington Final Draft
0.6 5/8/13 J.Worthington Added ‘Escalation’ as a section; changed ‘Resolution & Recovery’ to ‘Resolve & Close’.

Table of Contents
1 INTRODUCTION ............................................................................................................................................................................ 1
1.1 How this manual is structured .............................................................................................................................. 1
1.2 Who should use this manual ................................................................................................................................. 2
2 NAVIGATING SERVICE-NOW .................................................................................................................................................... 3
2.1 Logging In ............................................................................................................................................................ 3
2.2 The Service-Now User Interface .......................................................................................................................... 3
2.3 Service-Now Icons and Cursor Behavior ............................................................................................................. 5
2.4 General Navigation Tips & Tricks ....................................................................................................................... 5
2.5 Personalization ..................................................................................................................................................... 6
3 IDENTIFYING & LOGGING INCIDENTS AND REQUESTS ................................................................................................... 7
3.1 Creating a New Incident/Request Ticket .............................................................................................................. 7
Entering Data .................................................................................................................................................................. 7
3.2 Working with e-mail ............................................................................................................................................ 9
3.3 Opening tickets on behalf of another user ...........................................................................................................10
4 CATEGORIZING & PRIORITIZING INCIDENTS AND REQUESTS .................................................................................... 11
4.1 Categorizing Incidents and Requests ...................................................................................................................11
4.2 Prioritizing Incidents and Requests .....................................................................................................................12
5 INVESTIGATION & DIAGNOSIS OF INCIDENTS AND REQUESTS .................................................................................. 14
5.1 Working the Incident ...........................................................................................................................................14
5.2 Assigning Incidents .............................................................................................................................................14
5.3 Adding Gauges ....................................................................................................................................................14
6 ESCALATION ............................................................................................................................................................................... 16
6.1 Viewing the on-call list .......................................................................................................................................16
6.2 Relating Incidents ................................................................................................................................................16
7 RESOLVE & CLOSE .................................................................................................................................................................... 18
7.1 Resolving an Incident ..........................................................................................................................................18
7.2 User Satisfaction Surveys ....................................................................................................................................19
7.3 Closure ................................................................................................................................................................20
8 APPENDIX ..................................................................................................................................................................................... 21
8.1 Creating an ad hoc query .....................................................................................................................................21
8.2 Creating a Report ................................................................................................................................................22
8.3 Creating a custom Report ....................................................................................................................................22
8.4 Scheduled Reports ...............................................................................................................................................22

8.5 Exporting Data ....................................................................................................................................................23
8.6 Exporting List data ..............................................................................................................................................23
8.7 Sharing Reports ...................................................................................................................................................23
8.8 Incident & Request Targets .................................................................................................................................23
8.9 Handling inbound e-mail Incidents .....................................................................................................................24
8.10 Creating & Using Templates .............................................................................................................................25
8.11 Security Incidents ..............................................................................................................................................26
8.12 Major Incidents .................................................................................................................................................26
8.13 Updating Group Membership ............................................................................................................................27
8.14 Scheduling Reports ...........................................................................................................................................27
8.15 Related Documentation .....................................................................................................................................28
List of Figures
Figure 1 - Login window .......................................................................................................................... 3
Figure 2 - The Header Area ...................................................................................................................... 3
Figure 3 - The Application Navigator ....................................................................................................... 3
Figure 4 - Main Content Area ................................................................................................................... 4
Figure 5 - Sorting a list ............................................................................................................................. 4
Figure 6 - Using the cursor ....................................................................................................................... 5
Figure 7 - Favorites bar ............................................................................................................................. 6
Figure 8 - New button on Incident list form ............................................................................................. 7
Figure 9 - Incident form ............................................................................................................................ 7
Figure 10 - User List Window .................................................................................................................. 8
Figure 11 - Add User icon ........................................................................................................................ 8
Figure 12 - Add User form ....................................................................................................................... 8
Figure 13 - Email the customer button ..................................................................................................... 9
Figure 14 - Email window ........................................................................................................................ 9
Figure 15 - Customer watch list ................................................................................................................ 9
Figure 16 - Adding yourself to the Customer Watch List ....................................................................... 10
Figure 17 - Classifying Incidents and Requests ...................................................................................... 11
Figure 18 –Services Hierarchy Figure 19 - Categories .................................................................... 11
Figure 20 - Impact, Urgency & Priority .................................................................................................. 12
Figure 21 - Priority Matrix ...................................................................................................................... 12
Figure 22 - The IT Watch List ................................................................................................................ 14
Figure 23 – Adding home page content .................................................................................................. 15

Figure 24 - Escalation & On-Call List .................................................................................................... 16
Figure 25 - Related Incidents tab ............................................................................................................ 16
Figure 26 - Edit Members Form ............................................................................................................. 17
Figure 27 - Incident data in Edit Members window ............................................................................... 17
Figure 28 - Resolving an incident ........................................................................................................... 18
Figure 29 - Mandatory Fields Error Message ......................................................................................... 18
Figure 30 - Resolution Notes .................................................................................................................. 18
Figure 31 - Knowledge sharing opportunity ........................................................................................... 18
Figure 32 - Customer Survey .................................................................................................................. 19
Figure 33 - Resolving Incidents .............................................................................................................. 20
Figure 34 – Filters ................................................................................................................................... 21
Figure 35 - Filters list .............................................................................................................................. 21
Figure 36 - Filter form ............................................................................................................................ 21
Figure 37 - Creating a new filter ............................................................................................................. 21
Figure 38 - View / Run Reports .............................................................................................................. 22
Figure 39 – Report .................................................................................................................................. 22
Figure 40 - Exporting Form data ............................................................................................................ 23
Figure 41 - Exporting List Data .............................................................................................................. 23
Figure 42 - Task SLAs ............................................................................................................................ 24
Figure 43 - Draft Incidents list ................................................................................................................ 24
Figure 44 - Draft incident form ............................................................................................................... 24
Figure 45 – Edit Templates, Create new ................................................................................................. 25
Figure 46 - Template form ...................................................................................................................... 25
Figure 47 - Applying the template .......................................................................................................... 25
Figure 48 - Security Incidents ................................................................................................................. 26
Figure 49 - Major Incident tab ................................................................................................................ 26
Figure 50 - Scheduling reports ................................................................................................................ 28

Harvard University Information Technology User Guide - Incident Versison 0.5 | Draft-Third Sky 1
1 Introduction
This Incident Manual was prepared for the HUIT Incident Management process, version 6.0 dated 02/12/2013, which can be found at http://huitintranet.harvard.edu Manuals for ITSM processes provide users with a guide to the current HUIT process, associated policies and supporting technologies.
Changes to this manual are summarized in the document change control at the front of the document, and will highlight changes to the process and/or tool that may address new capabilities as a result of:
Supporting technology upgrades and revisions Process enhancements and changes Related ITSM process implementation/integration
Questions, concerns and/or feedback about this documentation should be addressed to: [email protected]
1.1 How this manual is structured
This manual follows the HUIT Incident Management process, which is based on the ITIL framework and re-enforces industry best practice, allows for the introduction of related processes and improvements over time, and is consistent with supporting technologies such as ServiceNow.
The table below highlights the purpose of each chapter.
Table 1 - Chapter & purpose
Chapter Purpose
NAVIGATING SERVICENOW Provides IT staff with an overview of the Service‐Now user interface, logging
into Service‐Now and how to personalize the tool to fit your needs.
IDENTIFYING & LOGGING INCIDENTS AND REQUESTS
Describes how to record Incidents and/or Requests.
CATEGORIZING & PRIORITIZING INCIDENTS AND REQUESTS
Provides all staff with information about how tickets are categorized to
enable accurate assignment and reporting. This chapter also covers how
priority is established in alignment to overall University requirements.
INVESTIGATION & DIAGNOSIS OF INCIDENTS AND REQUESTS
This chapter reviews how Incidents are assigned and escalated if needed. It
also discusses the importance of ownership of Incidents, along with how and
when to relate Incidents.
ESCALATION Provides guidance on the escalation of Incidents and Requests.
RESOLVE & CLOSE Provides guidance on the appropriate steps to take when resolving
Incidents, and when Incidents will automatically close based on the current
policy.
INCIDENT TEMPLATES This chapter can help staff create re‐usable templates to make Incident
handling more efficient and effective. It also discusses the Major Incident
and Security Incident handling procedures.
QUERIES & REPORTING This chapter provides more advanced information about how to use the
query and reporting capabilities of ServiceNow.
ADMINISTRATION This chapter is for users with administration privileges and is not relevant for
the ITIL user role.

Harvard University Information Technology User Guide - Incident Versison 0.5 | Draft-Third Sky 2
1.2 Who should use this manual
This manual is not intended for End-Users (i.e., people without direct access to ServiceNow); as the IT Portal is developed there will be documentation made available specifically for end users.
However, as this manual covers the entire Incident Management process, most IT staff should become familiar with its contents. Each chapter covers major activities in the process, and most stakeholders may be involved in these activities at any particular time.
All IT Staff should be familiar with the Incident Management Process Description and its contents, which provides information about roles & responsibilities, policies and other important guidance.
The complete Incident Management Process Description can be found at:
http://huitintranet.harvard.edu

Harvard University Information Technology User Guide - Incident Versison 0.5 | Draft-Third Sky 3
2 Navigating Service-Now
2.1 Logging In
To log onto ServiceNow, go to the following URL:
https://harvard.service-now.com
you will be taken to a Login window as illustrated in Figure 1:
Figure 1 - Login window
Enter your employee ID and password and click enter. If you have difficulty logging into ServiceNow, contact the Service Desk at (617) 495-7777, fax (617) 495-8332 or [email protected]
2.2 The Service-Now User Interface
The ServiceNow page has three primary areas:
1. The header area remains at the top of the screen unless the user selects ‘full screen’ mode (see ServiceNow icons and cursor behavior).
Figure 2 - The Header Area
2. The application navigator will be shown on the left side of the screen, and can also be hidden to increase the screen real estate if desired. The application navigator lists the ServiceNow applications that the user is entitled to use.
Figure 3 - The Application Navigator

Harvard University Information Technology User Guide - Incident Versison 0.5 | Draft-Third Sky 4
3. The content area is the main working section of ServiceNow and could contain forms, lists and/or graphical content based on the work being performed by the user. The content area may be expanded to utilize the entire screen if desired.
Figure 4 - Main Content Area
The list forms in ServiceNow can be sorted by right-clicking on the particular column heading you’d like to sort by; left-clicking a column heading will open a drop down for sorting, exporting data and/or personalizing the list.
Figure 5 - Sorting a list
Another important element when working in lists is to understand that clicking a field will bring you to the form associated with that field. For example, clicking on the ‘Number’ field brings you to the incident form, clicking on an Assignment Group brings you to the Assignment Group form.

Harvard University Information Technology User Guide - Incident Versison 0.5 | Draft-Third Sky 5
add me
2.3 Service-Now Icons and Cursor Behavior
2.3.1 ServiceNow Icons
The ServiceNow Wiki provides a description of the icons used in the interface here:
https://wiki.servicenow.com/index.php?title=Understanding_Icons_in_the_Interface
In some cases you can identify the purpose of an icon using the cursor.
2.3.2 Using the Cursor
The cursor can be used to find out the purpose of a button, icon or field label (i.e., by hovering over the icon as shown in the Figure).
Figure 6 - Using the cursor
when you hover over an icon the cursor looks like this…
and if help is available you will see it here ---------
in other cases hovering the cursor will display a pop-up window, and moving the cursor will remove the
window. An example is hovering over the icon next to the Contact field, which displays a pop-up of the user’s profile for the name shown in the Contact field.
2.4 General Navigation Tips & Tricks
The quickest way to enter data in a field is to begin typing what you are looking for. ServiceNow used type-ahead technology to provide suggestions as you type. Type-ahead suggestions appear under the search box. Suggestions are based on similar searches that begin with the same characters.
Examples include typing a contact’s or an Assignment Group’s name; as you type more letters the drop-down of potential matches gets narrower.
Find information quickly in ServiceNow by using any of the available searches. Searches are not case sensitive. Use advanced options for more specific queries:
Wildcards: use a symbol to represent zero or more characters.
Phrase searches: find a phrase with multiple terms.
Searching lists: control the query for list searches of a specific field.
Boolean operators: refine searches with operators such as AND and OR.
Attachment searches: search in files that are attached to records.
International character sets: perform searches with any Unicode characters.
Punctuation: perform searches that contain punctuation.

Harvard University Information Technology User Guide - Incident Versison 0.5 | Draft-Third Sky 6
2.5 Personalization
Administrators and users with personalization rights may personalize forms and lists; most users can customize their home page, create favorite reports, and create templates.
Every user can create a customized homepage that they see when they log in. This includes:
Setting a refresh time of 5, 15, 30, or 60 minutes, or no refresh. Setting the number of records displayed in your lists Repositioning elements on your homepage Adding items to the homepage
ServiceNow users can also create favorite links with the standard interface. For example, simply by clicking and dragging the ‘Create new’ icon to the favorites bar will create a link for opening a new incident as shown in Figure 9.
The video series may provide users with the best way to learn how to personalize your ServiceNow user interface.
Figure 7 - Favorites bar

Harvard University Information Technology User Guide - Incident Versison 0.5 | Draft-Third Sky 7
3 Identifying & Logging Incidents and Requests
It is important to be as descriptive as possible when logging an incident or request, to minimize the need for the technical resource to ask the user for additional information. Be sure to record any activity performed in the work notes.
3.1 Creating a New Incident/Request Ticket
End-users and customers are likely to use e-mail to create Incidents. The subject of the e-mail will map to the short description in the Incident ticket, and the body of the e-mail will map to the Detailed description field.
Users can send an e-mail message to [email protected] to open an Incident or Request. These will create draft tickets in ServiceNow that will be reviewed and completed by the Service Desk.
IT staff can and should create new Incidents from directly within ServiceNow if possible. Directly creating a new incident can be done in several ways:
Clicking the ‘Create new’ link on the application navigator Clicking the ‘Create new’ icon on your favorites bar Clicking the ‘New’ button from the Incident list form (see Figure 10)
Figure 8 - New button on Incident list form
When you open a new incident, the Incident Form appears (see Figure 11).
Figure 9 - Incident form
Entering Data
The easiest way to enter contact information is to begin typing the contact’s name or employee ID and leverage ServiceNow’s type-ahead capability. You may also choose to leverage the icons next to the contact field. The magnifying glass icon will open a user list window as show below.
ServiceNow shows you which fields are
mandatory by placing a small red bar in the field
label; these fields must have data in order to
save the record.
Yellow bars indicate that ServiceNow has automatically populated these fields Green bars indicate that
you have changed the value of a field.

Harvard University Information Technology User Guide - Incident Versison 0.5 | Draft-Third Sky 8
Figure 10 - User List Window
To choose a user, place your cursor over the Name field and click. You may also use the search capability and search by Name, First name, Last name or Email.
3.1.1 Entering New Users
If you need to enter a new user into ServiceNow, you may use the New icon in the user list window above or the Add User icon next to the Contact field as illustrated below.
Figure 11 - Add User icon
Clicking the Add User icon and/or the New button in the user list window will open the Add User form in a separate window. Complete the mandatory fields and click Save.
Figure 12 - Add User form
Add User

Harvard University Information Technology User Guide - Incident Versison 0.5 | Draft-Third Sky 9
3.2 Working with e-mail
Users can be e-mailed directly from ServiceNow during the handling of an Incident or Request by clicking the ‘Email the customer’ button as illustrated in Figure 15. (This button can be found on the Incident form.)
Figure 13 - Email the customer button
Clicking this button will open a separate window that will allow you to create an Email, add text, attachments, and/or copy additional users/customers as needed. (See Figure 14)
Figure 14 - Email window
ServiceNow also allows you to create ‘Watch Lists’ for cc-ing users/customers as needed. By clicking the lock icon next to the Customer watch list as shown in Figure 15. When you add people to the customer watch list, every time you create an Email from the record, people on the watch list will automatically be entered in the cc field of your Email form.
Figure 15 - Customer watch list

Harvard University Information Technology User Guide - Incident Versison 0.5 | Draft-Third Sky 10
3.3 Opening tickets on behalf of another user
Occasionally someone will be asked to open an incident or request ticket on behalf of another user, such as an assistant opening a request on behalf of an executive. If you are IT staff and have access to ServiceNow, the suggested approach is to put the person who is originating the request in the Contact field and add the person actually filling out the ticket (you) in the Customer Watch List field. The icon shown in Figure 16 will add you to the Customer Watch List by clicking it.
Figure 16 - Adding yourself to the Customer Watch List
If you do not have access to ServiceNow, contact the Service Desk.
Click here to add yourself to the Customer Watch List

Harvard University Information Technology User Guide - Incident Versison 0.5 | Draft-Third Sky 11
4 Categorizing & Prioritizing Incidents and Requests
4.1 Categorizing Incidents and Requests
As the incident ticket is completed, some classification of the ticket is required. Classifying Incidents and Requests involves setting the appropriate priority and categorizing the ticket. HUIT categorizes incidents based on a two-level hierarchy to facilitate reporting and to identify the default assignment group (queue); Services and Categories based on a Symptom (Incidents) or Operation (Requests). If the Incident is wrongly categorized, correct the category.
Figure 17 - Categorizing Incidents and Requests
Each of these fields provides a list of choices as shown below.
Figure 18 –Services Hierarchy Figure 19 - Categories
ServiceNow users should remember to use the type-ahead capability; for example, typing ‘Email’ will bring back any service that has Email in the name. You can then select from a smaller list of choices. In order to drive automatic assignment of the ticket, the second-level category must be selected (i.e., Guest Access). At this point the appropriate symptom/operation drop-down list will be made available, and the relevant category can be selected. (See Figure 19)
Once both service and a category are entered, ServiceNow will automatically populate the default assignment group based on the classification. The Assignment Group may be changed as required.

Harvard University Information Technology User Guide - Incident Versison 0.5 | Draft-Third Sky 12
4.2 Prioritizing Incidents and Requests
Prioritizing incidents and requests in ServiceNow is based on business impact and business urgency as outlined in the process description. The ServiceNow user enters a value for both impact and for urgency that determines the priority; changing either or both impact and urgency is the only way to change the priority.
Figure 20 - Impact, Urgency & Priority
The matrix below and the Incident Management Process Description provide guidance on how to determine business impact and business urgency.
Figure 21 - Priority Matrix

Harvard University Information Technology User Guide - Incident Versison 0.5 | Draft-Third Sky 13
4.2.1 Example Escalations with ServiceNow Priority 4 – Normal Examples
For individual, work is either not affected or is degraded
For single group, work is not affected
A system or component is down or degraded, but client can carry out normal work responsibilities and/or temporary alternative is available
Information request or Consultation
Desktop system performance slow
Minor equipment failure (local printers, speakers, etc.)
“How do I..”
“I need access to..”
User accounts and passwords
Issue with outlook, but able to use Web Access (OWA)
Priority 3 - High Examples
For individual, work is blocked
For single group, work is degraded
A full-time faculty or staff system is down with no workaround available
Urgent incident/Request (as defined by user)
Performance issues with a non-core service. Operationally, customers would have the ability to continue working but may experience impact.
Workaround may be available.
User is unable to print and states it is an urgent issue
File share servers failed their backups
Virus problem on staff PC
VIP mass Mailing
Urgent Employee Termination Requests
User getting a “blue screen”
Priority 2 - Critical Examples
For small group, work is blocked
For Multiple groups or single school, work is degraded
Production system or service is interrupted, affecting multiple locations and/or users
Performance degradation of a critical service or severe degradation of a non-critical service
A workaround may be possible
Emergency Mass Mailing Notification(s)
Production web application unusable
Faculty & staff file shares (i.e. FAS-DEPTS; SOX1) are unavailable
Print server is down
Priority 1 – Major Incident Examples
For Multiple groups or a Single school, work is blocked
For University wide, work is degraded or blocked
Significant impact to a critical service or a substantial percentage of the Harvard population
A production system or service is down, and a critical impact to Harvard operations will occur if service is not restored quickly
No practical workaround is available
Failure of e-mail service
Network down for an entire building, region or campus-wide
Backend Storage systems are down
Enterprise application down
Table 2 - Example Priorities

Harvard University Information Technology User Guide - Incident Versison 0.5 | Draft-Third Sky 14
5 Investigation & Diagnosis of Incidents and Requests
5.1 Working the Incident
If you are assigned an incident, confirm whether the Incident is similar to or a repeat of another active Incident. If two or more tickets are erroneously linked, unlink them. If they are not linked and should be, then link them. Communicate regular updates to the user, if you currently “own” the ticket.
As usual, if you notice that the Incident is wrongly categorized, correct the category and record any activity you perform in the work notes. Communicate regular updates to the user, if you currently “own” the ticket.
5.1.1 Using the IT Watch List
Just as you can add users to customer communications by adding them to the Customer Watch List, you may add IT Staff to an IT Watch List. When you add users to the IT Watch List, all entries in the Work Notes field are sent to the IT Watch List members via e-mail. Customers/users should NOT be added to the IT Watch List.
Figure 22 - The IT Watch List
5.2 Assigning Incidents
If further assignment is necessary, assign to the appropriate support group and provide the reason in the work notes. Before escalating an Incident, search for and apply the relevant Standard Operating Procedures (SOPs) and/or knowledge articles.
Escalations should occur between Assignment Groups. The current Ticket Owner will not escalate a ticket to a specific individual in another group without prior agreement.
The group that a ticket has been functionally escalated to will own the Incident and/or Request. The group owning the ticket is responsible for communicating to the End User(s), tracking, monitoring and invoking hierarchical escalation procedures as necessary.
5.3 Adding Gauges
The Assignment Group/Queue Managers are responsible for managing the queue as outlined in the Incident Management Process Description. You can select a Home Page from the top right drop down on the home screen. Home pages should have a grid showing Incidents Assigned to My Group that shows the active queue. Queue Managers may wish to define reports or gauges to display on their home page such as:
My Groups Work – By Assignee/Oldest 10-20 tickets (i.e, bar chart) Count of open cases by assignee (i.e., gauge)
Adding Existing Gauges to a Homepage
Harvard University Information Technology User Guide - Incident Versison 0.5 | Draft-Third Sky 15
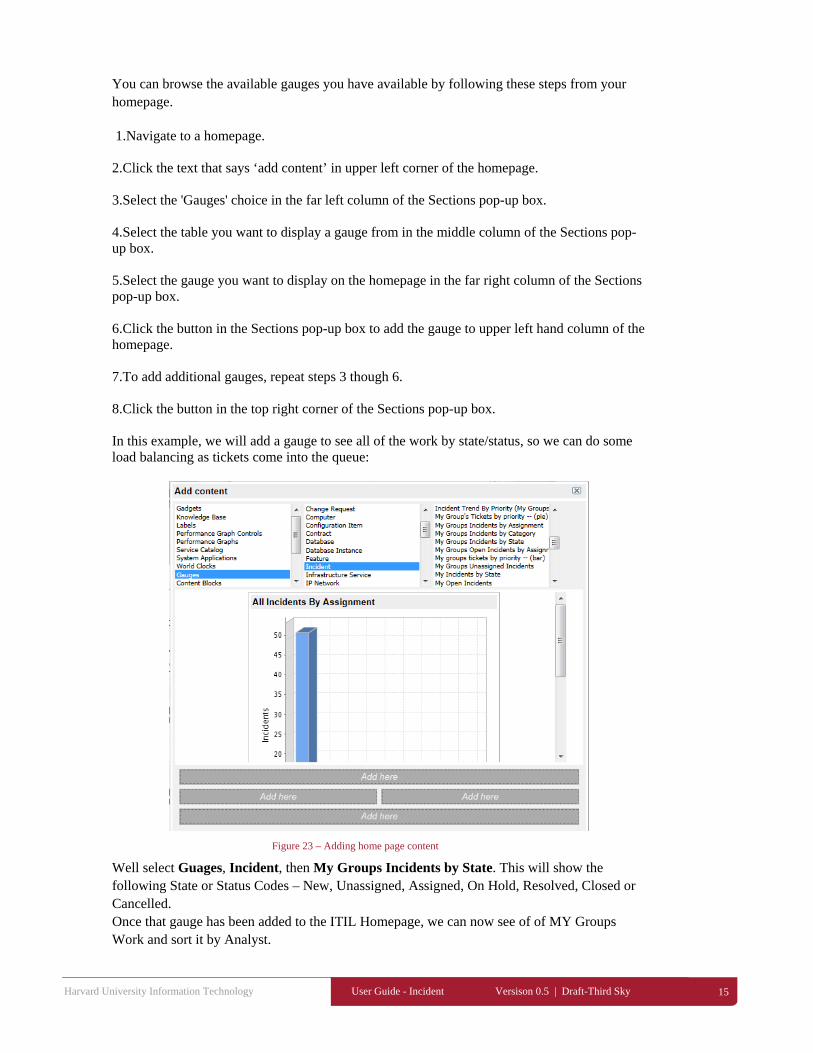
You can browse the available gauges you have available by following these steps from your homepage. 1.Navigate to a homepage. 2.Click the text that says ‘add content’ in upper left corner of the homepage. 3.Select the 'Gauges' choice in the far left column of the Sections pop-up box. 4.Select the table you want to display a gauge from in the middle column of the Sections pop-up box. 5.Select the gauge you want to display on the homepage in the far right column of the Sections pop-up box. 6.Click the button in the Sections pop-up box to add the gauge to upper left hand column of the homepage. 7.To add additional gauges, repeat steps 3 though 6. 8.Click the button in the top right corner of the Sections pop-up box. In this example, we will add a gauge to see all of the work by state/status, so we can do some load balancing as tickets come into the queue:
Figure 23 – Adding home page content
Well select Guages, Incident, then My Groups Incidents by State. This will show the following State or Status Codes – New, Unassigned, Assigned, On Hold, Resolved, Closed or Cancelled. Once that gauge has been added to the ITIL Homepage, we can now see of of MY Groups Work and sort it by Analyst.

Harvard University Information Technology User Guide - Incident Versison 0.5 | Draft-Third Sky 16
6 Escalation
6.1 Viewing the on-call list
To view the on-call list, click on the Escalation and On-Call List icon in the application navigator as shown in Figure 27. A pop-up window appears showing you the current on-call list.
Figure 24 - Escalation & On-Call List
6.2 Relating Incidents
It is important to identify whether an Incident is similar to --- or a repeat of --- another active Incident. If so, relate the tickets in the tool (e.g. create a parent-child relationship).
To relate an Incident, go to the Related Incident tab (or scroll down to the Related Incidents list) and click on ‘Edit’.
Figure 25 - Related Incidents tab
This will open a form called ‘Edit Members’ in a new window (see Figure). You can select the incident you want to include in the related list or use the search function; you may add as many incidents to the related list as needed. Click save when you have added all that you require and they will be added to the Related Incidents list tab.

Harvard University Information Technology User Guide - Incident Versison 0.5 | Draft-Third Sky 17
Figure 26 - Edit Members Form
When looking for incidents to add to the list, you can filter using any of the search criteria we outlined in Section 2, Navigating ServiceNow. If you need to understand basic information about an incident in the list, highlight the incident you need to know about and ServiceNow provides you the information at the bottom of this window as illustrated below.
Figure 27 - Incident data in Edit Members window

Harvard University Information Technology User Guide - Incident Versison 0.5 | Draft-Third Sky 18
7 Resolve & Close
When resolving an Incident, be succinct but descriptive enough to be able to repeat the resolution, i.e. describe what you did as opposed to entering “done” and “fixed”. After an Incident is resolved or a Request is fulfilled the assigned group will attempt to verify with the user that the Incident/Request was resolved to their satisfaction.
7.1 Resolving an Incident
ServiceNow users can resolve incidents by either clicking the Resolve button in the incident form or changing the status field to ‘resolved’ as illustrated below. A new ‘Resolution Information’ tab appears.
Figure 28 - Resolving an incident
If you perform either of these actions without completing mandatory information, ServiceNow provides you with an error message as shown.
Figure 29 - Mandatory Fields Error Message
Enter the Resolution Notes and click Save to update the Incident record’s status to Resolved.
Figure 30 - Resolution Notes
7.1.1 Knowledge Sharing
As the Incident Management process is established within HUIT, greater use of ServiceNow’s knowledge capabilities will be made available. In the meantime, if a ServiceNow user identifies an opportunity to share knowledge that would help others resolve incidents quickly they can click the checkbox labeled ‘Knowledge sharing opportunity’. This will open a text field where you can share how you resolved this incident and how others can leverage your knowledge.
Figure 31 - Knowledge sharing opportunity

Harvard University Information Technology User Guide - Incident Versison 0.5 | Draft-Third Sky 19
7.2 User Satisfaction Surveys
Users will get a link to a survey when incidents are resolved. The survey is illustrated below.
Figure 32 - Customer Survey
The survey results are input to a weekly report produced by the Service Desk.

Harvard University Information Technology User Guide - Incident Versison 0.5 | Draft-Third Sky 20
7.3 Closure
7.3.1 Best Practices
Best practices for incident resolution dictate that rather than closing the incident, the incident should have a state of Resolved. This state gives the service desk a mechanism to verify that caller is satisfied with the resolution, and that the customer agrees with closing the incident.
7.3.2 Auto Closure without customer contact
If the assignee fails to receive verification from the user within 5 business days, the Incident will automatically be Closed. A Closed incident cannot be reopened. A new incident must be reopened.
7.3.3 Normal Resolution
Users with the ITIL role or the ITIL_admin role have the capability to Resolve incidents with no option to close. Users with these roles will see a Resolve Incident button toward the top of the form as well have the option to select Resolved from the Incident State drop down list (see image for ITIL_admin options – See Section 6, Resolution & Recovery):
Figure 33 - Resolving Incidents

Harvard University Information Technology User Guide - Incident Versison 0.5 | Draft-Third Sky 21
8 Appendix
8.1 Creating an ad hoc query
ServiceNow allows you to create and save ad hoc queries. For example, go to the Open Incidents, All Incidents or Closed Incidents list form and create a filter by opening the dropdown list and clicking on the ‘Filters’ option. A list of filters appears, and you can select a filter (such as ‘Closed’ if you had opened the ‘All Incidents’ form).
Figure 34 – Filters
By clicking the link ‘Edit personal filters in the dropdown list, the filters list form is opened.
Figure 35 - Filters list
Click on ‘New’ to open the Filters form and create a new filter.
Figure 36 - Filter form
Name the filter by completing the ‘Title’ field. Select the table you want to get filtering information from (i.e., Incident table).
Figure 37 - Creating a new filter
Choose the filter criteria and save your query/filter criteria. It will now appear in your drop down list.
Harvard University Information Technology User Guide - Incident Versison 0.5 | Draft-Third Sky 22
8.2 Creating a Report
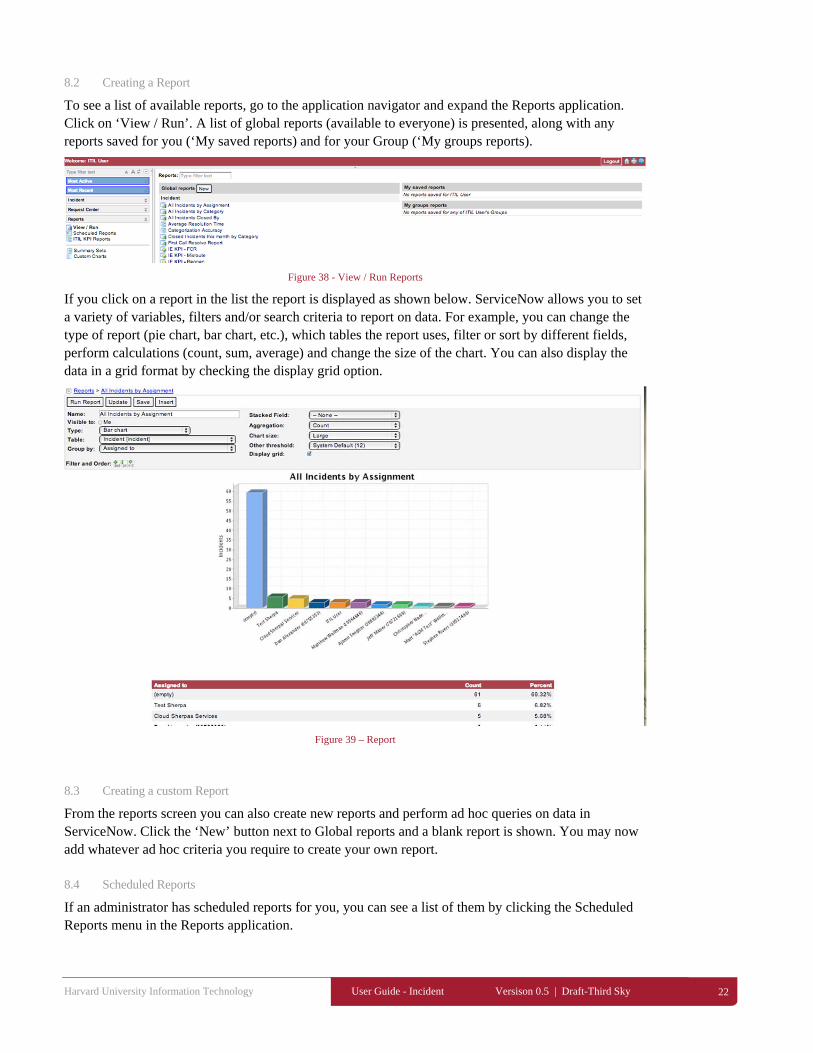
To see a list of available reports, go to the application navigator and expand the Reports application. Click on ‘View / Run’. A list of global reports (available to everyone) is presented, along with any reports saved for you (‘My saved reports) and for your Group (‘My groups reports).
Figure 38 - View / Run Reports
If you click on a report in the list the report is displayed as shown below. ServiceNow allows you to set a variety of variables, filters and/or search criteria to report on data. For example, you can change the type of report (pie chart, bar chart, etc.), which tables the report uses, filter or sort by different fields, perform calculations (count, sum, average) and change the size of the chart. You can also display the data in a grid format by checking the display grid option.
Figure 39 – Report
8.3 Creating a custom Report
From the reports screen you can also create new reports and perform ad hoc queries on data in ServiceNow. Click the ‘New’ button next to Global reports and a blank report is shown. You may now add whatever ad hoc criteria you require to create your own report.
8.4 Scheduled Reports
If an administrator has scheduled reports for you, you can see a list of them by clicking the Scheduled Reports menu in the Reports application.

Harvard University Information Technology User Guide - Incident Versison 0.5 | Draft-Third Sky 23
8.5 Exporting Data
8.5.1 Exporting form data
From the incident form, click the drop down and select ‘Export’ and choose either PDF portrait or landscape.
Figure 40 - Exporting Form data
8.6 Exporting List data
Export a list of records by right-clicking on a list header bar and selecting the export type. Export options include:
Excel CSV XML PDF (Portrait) PDF (Landscape) PDF (Detailed Portrait): Exports the list and the associated form for each record. PDF (Detailed Landscape): Exports the list and the associated form for each record.
Figure 41 - Exporting List Data
8.7 Sharing Reports
If you need to share a report with a user who does not have access to the Reports -> View / Run application, you can give them the direct URL to the report or add the report to a homepage to which the user has access.
8.8 Incident & Request Targets
There are standard targets for handling incidents and requests. The Incident Process Description provides details for generic and desktop targets. To track these go to the Task SLAs list (this can also be a tab if using tabbed preference).

Harvard University Information Technology User Guide - Incident Versison 0.5 | Draft-Third Sky 24
Figure 42 - Task SLAs
8.9 Handling inbound e-mail Incidents
Incidents that are created by e-mail are shown in the draft incidents list illustrated in Figure 18. Emails only appear here if they don’t match a contact in ServiceNow, i.e. if ServiceNow recognizes the email address, it will go directly to creating an Incident.
Figure 43 - Draft Incidents list
The Service Desk can click on the draft incident, review it for completeness and/or mark the incident as spam (see Figure 44).
Figure 44 - Draft incident form

Harvard University Information Technology User Guide - Incident Versison 0.5 | Draft-Third Sky 25
8.10 Creating & Using Templates
ServiceNow users can store populated versions of forms for reuse and reduce the time needed to fill in forms. To create a template, from a new or existing Incident form click to expose the drop down (near the green arrow) and scroll down to ‘templates’. Select ‘Edit Templates’.
A List form appears showing the currently available templates. Click on the ‘New’ button to create a new template.
Figure 45 – Edit Templates, Create new
The Template form appears. Give the template a name (i.e., ‘Remove Software’) and fill in the fields shown. To add a field, click the drop down near ‘choose field’ and a list of fields appears. Add the fields you want/need and pre-fill based on how you will use the template. Save the template.
Figure 46 - Template form
To use your new template, open a new incident record. Go to the drop down and select, ‘Templates’, ‘Apply Template’ and the template you created is shown in the list. Select it and your form will populate based on your requirements.
Figure 47 - Applying the template

Harvard University Information Technology User Guide - Incident Versison 0.5 | Draft-Third Sky 26
8.11 Security Incidents
If a ServiceNow user identifies what they feel is a security incident, they should check the box on the incident form ‘security incident’, and create user and/or group lists as appropriate.
Security operations will flag the incident and apply the appropriate procedures for handling security incidents. These incidents will not appear in searches or reports unless the person making the query or report has the appropriate security clearance.
Figure 48 - Security Incidents
8.12 Major Incidents
There is a specific procedure for handling a Major Incident that can be found at
http://huitintranet.harvard.edu
When a Major Incident is created, a tab is available that allows the Incident Commander to provide additional closure information and notes as shown below.
Figure 49 - Major Incident tab

Harvard University Information Technology User Guide - Incident Versison 0.5 | Draft-Third Sky 27
8.13 Updating Group Membership
When you add users to ServiceNow, make sure that each user is associated with a group. Consider which fields are mandatory. Full, complete user profiles are the most useful. Use a unique user ID when creating new profiles or updating existing profiles. If all logs are updated by the admin user, it becomes difficult to track what was configured and by whom. Consider creating an ITIL-based role for each administrator for these types of tasks. To import large numbers of users at once, consider using import sets.
Creating a User
1. Navigate to User Administration > Users. 2. Click New. 3. Enter the user's information (see table -
https://wiki.servicenow.com/index.php?title=Creating_Users_and_Associating_to_a_Group
4. Click Submit.
The new user record appears at the top of the list.
Associating the User to a Group
1. Navigate to User Administration > Groups. 2. Click the group to which you want to assign the user. 3. In the Group Members related list, click Edit. 4. Select the user in the Collection list, and then click Add. 5. Click Save.
Assigning Roles to the User
A user automatically inherits roles from all groups the user belongs to. These roles cannot be deleted from the user's record, only from the group's record. Roles can also be associated directly with the user.
To add roles to a user's record:
1. Navigate to User Administration > Users. 2. Open a user's record. 3. In the Roles related list, click Edit. 4. Select the desired roles in the Collection list, and then click Add. 5. Click Save.
8.14 Scheduling Reports
To schedule a report you need to access the System Definition > Scheduled Jobs and click ‘New’. A form called Interceptor appears.

Harvard University Information Technology User Guide - Incident Versison 0.5 | Draft-Third Sky 28
Figure 50 - Scheduling reports
On the Scheduled Email of Report form, enter the information as required; see the Wiki for more information here:
http://wiki.servicenow.com/index.php?title=Creating_a_Scheduled_Job
Prepare the email text that the recipients of the report will get, and save the report. It will now appear in the list of Scheduled Reports.
8.15 Related Documentation
Incident Management Process Description