hpe aruba partner workshop aos8 lab guide group x · 2018-10-24 · aos8 - partner workshop 2018...
TRANSCRIPT

Rev 1.0 | © Copyright 2017 Hewlett Packard Enterprise Development LP | Confidential – HPE Aruba Partner Training
HPE Aruba Partner Workshop
AOS8 Lab Guide
Group X Rev. 1.4

AOS8 - Partner Workshop
2018 Rev 1.4 1 HPE Aruba Channel Partner Enablement
AOS8 Partner Workshop HPE Aruba Channel Partner Enablement
Introduction ................................................................................................................................................. 2
Lab 1 - Virtual Mobility Master (VMM) Initial Configuration .................................................................... 3
Lab 2 – 7005 Controller Factory Reset ...................................................................................................... 7
Lab 3 – Adding Controllers to Mobility Master ...................................................................................... 12
Lab 4 – Building a Controller Cluster ...................................................................................................... 20
Lab 5 - AP Discovery ................................................................................................................................ 25
Lab 6 - WLAN Service Creation: PSK ...................................................................................................... 25
Lab 7 - WLAN Service Creation: Guest (Internal Captive Portal) ......................................................... 32
Lab 8 - WLAN Service Creation: Employee Dot1X ................................................................................ 40
Lab 9 - WLAN Service Creation: Employee Dot1x (Server-Derived Role) ........................................... 45
Lab 10 – Cluster Stateful Failover Test ................................................................................................... 54
Appendix A - Convert IAP to CAP ........................................................................................................... 58
Appendix Z – Versions ............................................................................................................................. 60

AOS8 - Partner Workshop
2018 Rev 1.4 2 HPE Aruba Channel Partner Enablement
Introduction
Welcome to the Aruba OS8 Workshop. This workshop is intended to give partners a basic overview the new AOS v8.0 Mobility Solution in a concise lecture/lab format. Beyond this introductory workshop, it is recommended that partner engineers follow-up with formal training to build their presales and delivery skillsets for successful sales and deployments of Aruba Mobility solutions.
Lab exercises during in this workshop provide students a practical hands-on experience in configuration, operation, and maintenance of Aruba’s Controllers and Campus Access Points (APs). They are designed to be executed on an Aruba Mobility Kit which consist of a Campus switch, 7005 Branch Controllers and AP205 APs.
The labs build upon each other adding features and capabilities to build out a flexible and secure Aruba Mobile First environment. Student labs will start from a factory-default configuration and build a 2-node Managed Device Cluster utilizing the new Mobility Master feature to support Employee and Guest wireless services.
Physical Lab Setup
Below is a physical and logical diagram of the workshop environment. There may be slight variations in equipment models however, the functionality will be the same.
Figure 1
AOS8 - Partner Workshop
2018 Rev 1.4 3 HPE Aruba Channel Partner Enablement
Lab 1 - Virtual Mobility Master (VMM) Initial Configuration
Goal:
Verify that your Mobility Master (virtual appliance) has been reset to factory default and existing licenses are intact. To save time, your MM has been pre-installed on your VMware server and licenses have been added.
Task Summary:
Login to your Mobility Master via web GUI .Check to see if there are any left-over configurations
like controller and AP groups, WLAN definitions, etc.
Verify licenses are pre-installed for your lab group.
Workflow:
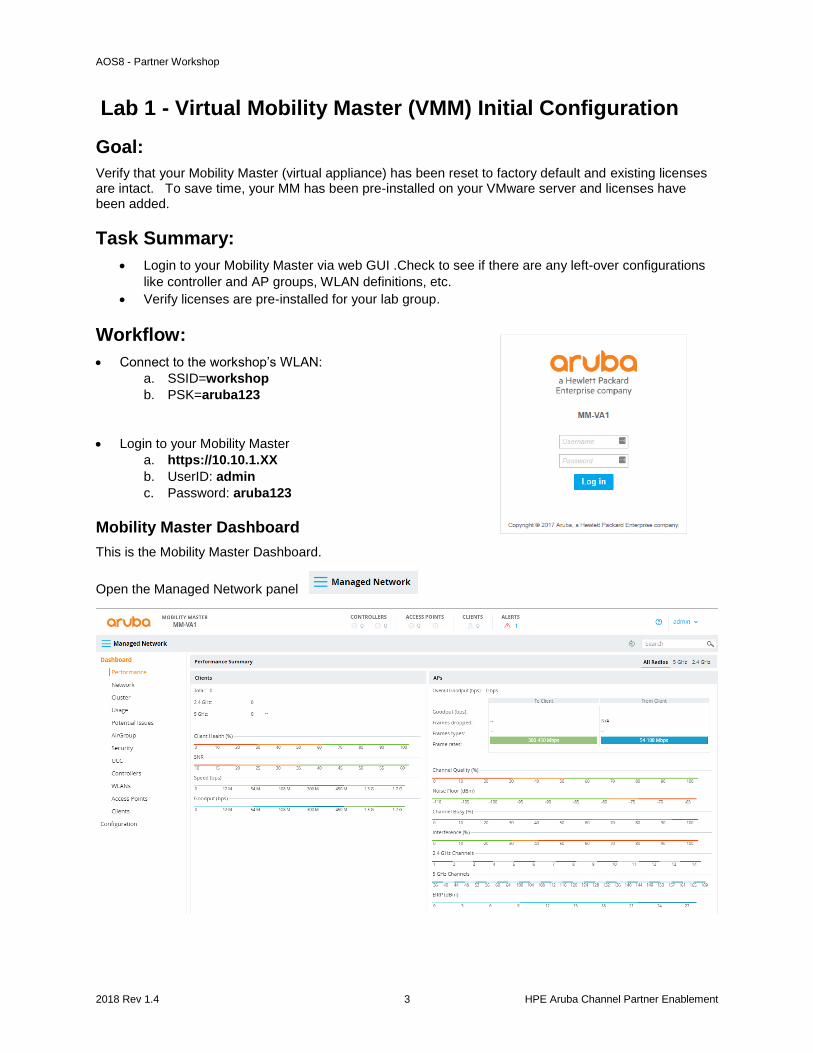
Connect to the workshop’s WLAN:
a. SSID=workshop
b. PSK=aruba123
Login to your Mobility Master
a. https://10.10.1.XX
b. UserID: admin
c. Password: aruba123
Mobility Master Dashboard
This is the Mobility Master Dashboard.
Open the Managed Network panel

AOS8 - Partner Workshop
2018 Rev 1.4 4 HPE Aruba Channel Partner Enablement
Verify that your Mobility Master has no configuration. The Managed Network folder should be empty as shown below. If there is a configuration on your Mobility Master, notify your instructor.
Enable Licenses
The following licenses have been installed on your Mobility Master: MM, AP, PEF, RF Protect & WebCC. You must also “enable” licenses to be consumed from the Global Licensing Pool.
Navigate to: Mobility MasterConfigurationSystemLicensingUsage
Click on Global License Pool
Feature Enabled: AP, PEF RF Protect WebCC

AOS8 - Partner Workshop
2018 Rev 1.4 5 HPE Aruba Channel Partner Enablement
Whenever you make changes to the MM configuration you must Submit the changes, click on Pending Changes & Deploy changes the changes for them to take effect.
Navigate to: UsageGlobal License PoolUsage for Global License Pool.
Observe installed licenses that are enabled (checked)
DNS Configuration
The Workshop ADserver provides DNS services. Configure your Mobility Master to use the workshop’s DNS server.
Navigate to: Mobility MasterConfigurationSystemGeneralDomain Name System
Click +

AOS8 - Partner Workshop
2018 Rev 1.4 6 HPE Aruba Channel Partner Enablement
Add DNS Server: 10.10.1.10
Click Submit
SubmitPending ChangesDeploy changes
System Clock
Next, verify the date, time and time-zone are correctly set on your system clock. Clock settings are
set on each individual MM system. Because we will be using Microsoft NPS for 802.1X
authentications, your MM time must match the time of the workshop’s AD server within 5 minutes.
The Workshop’s AD server is set to Pacific Time Zone.
Navigate to: Mobility MasterMM-VAXSystemGeneralClock
If you make changes to the system time:
SubmitPending ChangesDeploy changes
AOS8 - Partner Workshop
2018 Rev 1.4 7 HPE Aruba Channel Partner Enablement
Lab 2 – 7005 Controller Factory Reset
Goal:
Reset 7005 Controller(s) to factory default settings and provision with IP Address, Interfaces and VLAN settings.
Task Summary:
Connect your assigned controllers to the lab switch.
Connect serial console to your assigned controller.
Use Web GUI or CLI to do a factory reset
Run the setup script (full-setup) to configure your controllers as an MD (managed device)
Workflow:
7005-X Controller Factory Reset
Reset your 1st controller (7005-X) to factory default and run the initial script.
User: admin
Password: aruba123
(7005-X) >enable
Password: enable
(Aruba7005) #write erase
Switch will be factory defaulted. All the configuration and databases will be
deleted.
Press ‘y’ to proceeed: y
Write Erase successful
(Aruba7005) #reload
Do you really want to restart the system(y/n): y
The controller will reboot.

AOS8 - Partner Workshop
2018 Rev 1.4 8 HPE Aruba Channel Partner Enablement
7005-X System Startup Script
Configure your controller via console cable using the “full-setup” configuration script at the end of the
boot sequence.
Auto-provisioning is in progress. It requires DHCP and Activate servers
Choose one of the following options to override or debug auto-provisioning...
'enable-debug' : Enable auto-provisioning debug logs
'disable-debug' : Disable auto-provisioning debug logs
'mini-setup' : Start mini setup dialog. Provides minimal customization and requires DHCP
server
'full-setup' : Start full setup dialog. Provides full customization
Enter Option (partial string is acceptable): full-setup
Are you sure that you want to stop auto-provisioning and start full setup dialog? (yes/no): yes
***************** Welcome to the Aruba7005 setup dialog *****************
This dialog will help you to set the basic configuration for the switch.
These settings, except for the Country Code, can later be changed from the
Command Line Interface or Graphical User Interface.
Commands: <Enter> Submit input or use [default value], <ctrl-I> Help
<ctrl-B> Back, <ctrl-F> Forward, <ctrl-A> Line begin, <ctrl-E> Line end
<ctrl-D> Delete, <BackSpace> Delete back, <ctrl-K> Delete to end of line
<ctrl-P> Previous question <ctrl-X> Restart beginning <ctrl-R> Reload box
Enter System name [Aruba7005]: 7005-X
Enter Switch Role (standalone|md) [md]:
Enter IP type to terminate IPSec tunnel (ipv4|ipvX) [ipv4]:
Enter Master switch IP address or FQDN: 10.10.1.XX
Is this a VPN concentrator for managed device to reach Master switch (yes|no) [no]:
This device connects to Master switch via VPN concentrator (yes|no) [no]:
Is Master switch Virtual Mobility Master? (yes|no) [yes]:
Master switch Authentication method (PSKwithIP|PSKwithMAC) [PSKwithIP]:
Enter IPSec Pre-shared Key: secret
Re-enter IPSec Pre-shared Key: secret
Do you want to enable L3 Redundancy (yes|no) [no]:
Enter Uplink Vlan ID [1]: 1X0
Enter Uplink port [GE 0/0/0]:
Enter Uplink port mode (access|trunk) [access]: trunk
Enter Native VLAN ID [1]: 1X0
Enter Uplink Vlan IP assignment method (dhcp|static) [static]:
Enter Uplink Vlan Static IP address [172.16.0.254]: 10.10.1X0.101
Enter Uplink Vlan Static IP netmask [255.255.255.0]:
Enter IP default gateway [none]: 10.10.1X0.1
Enter DNS IP address [none]: 10.10.1.10
Do you wish to configure IPV6 address on vlan (yes|no) [yes]: no
Do you want to configure dynamic port-channel (yes|no) [no]:
This controller is restricted, please enter country code (US|PR|GU|VI|MP|AS|FM|MH) [US]: US
You have chosen Country code US for United States (yes|no)?: yes
Enter the controller's IANA Time zone [America/Los_Angeles]:
Enter Time in UTC [17:25:37]:
Enter Date (MM/DD/YYYY) [7/12/2017]:
Do you want to create admin account (yes|no) [yes]:
Enter Password for admin login (up to 32 chars): aruba123
Re-type Password for admin login: aruba123
Note: These settings require IP-Based-PSK configuration on Master switch
If you accept the changes the switch will restart!
Type <ctrl-P> to go back and change answer for any question
Do you wish to accept the changes (yes|no)yes
Creating configuration... Done.
System will now restart!
AOS8 - Partner Workshop
2018 Rev 1.4 9 HPE Aruba Channel Partner Enablement
7005-XX Controller Factory Reset
Reset your 2nd controller (7005-XX) to factory default and run the initial script.
User: admin
Password: aruba123
(7005-X) >enable
Password: enable
(Aruba7005) #write erase
Switch will be factory defaulted. All the configuration and databases will be
deleted.
Press ‘y’ to proceeed: y
Write Erase successful
(Aruba7005) #reload
Do you really want to restart the system(y/n): y
The controller will reboot.

AOS8 - Partner Workshop
2018 Rev 1.4 10 HPE Aruba Channel Partner Enablement
7005-XX System Startup Script
Configure your controller via console cable using the “full-setup” configuration script at the end of the boot
sequence.
Auto-provisioning is in progress. It requires DHCP and Activate servers
Choose one of the following options to override or debug auto-provisioning...
'enable-debug' : Enable auto-provisioning debug logs
'disable-debug' : Disable auto-provisioning debug logs
'mini-setup' : Start mini setup dialog. Provides minimal customization and requires DHCP
server
'full-setup' : Start full setup dialog. Provides full customization
Enter Option (partial string is acceptable): full-setup
Are you sure that you want to stop auto-provisioning and start full setup dialog? (yes/no): yes
***************** Welcome to the Aruba7005 setup dialog *****************
This dialog will help you to set the basic configuration for the switch.
These settings, except for the Country Code, can later be changed from the
Command Line Interface or Graphical User Interface.
Commands: <Enter> Submit input or use [default value], <ctrl-I> Help
<ctrl-B> Back, <ctrl-F> Forward, <ctrl-A> Line begin, <ctrl-E> Line end
<ctrl-D> Delete, <BackSpace> Delete back, <ctrl-K> Delete to end of line
<ctrl-P> Previous question <ctrl-X> Restart beginning <ctrl-R> Reload box
Enter System name [Aruba7005]: 7005-XX
Enter Switch Role (standalone|md) [md]:
Enter IP type to terminate IPSec tunnel (ipv4|ipv6) [ipv4]:
Enter Master switch IP address or FQDN: 10.10.1.XX
Is this a VPN concentrator for managed device to reach Master switch (yes|no) [no]:
This device connects to Master switch via VPN concentrator (yes|no) [no]:
Is Master switch Virtual Mobility Master? (yes|no) [yes]:
Master switch Authentication method (PSKwithIP|PSKwithMAC) [PSKwithIP]:
Enter IPSec Pre-shared Key: secret
Re-enter IPSec Pre-shared Key: secret
Do you want to enable L3 Redundancy (yes|no) [no]:
Enter Uplink Vlan ID [1]: 1X0
Enter Uplink port [GE 0/0/0]:
Enter Uplink port mode (access|trunk) [access]: trunk
Enter Native VLAN ID [1]: 1X0
Enter Uplink Vlan IP assignment method (dhcp|static) [static]:
Enter Uplink Vlan Static IP address [172.16.0.254]: 10.10.1X0.102
Enter Uplink Vlan Static IP netmask [255.255.255.0]:
Enter IP default gateway [none]: 10.10.1X0.1
Enter DNS IP address [none]: 10.10.1.10
Do you wish to configure IPV6 address on vlan (yes|no) [yes]: no
Do you want to configure port-channel (yes|no) [no]:
This controller is restricted, please enter country code (US|PR|GU|VI|MP|AS|FM|MH) [US]: US
You have chosen Country code US for United States (yes|no)?: yes
Enter the controller's IANA Time zone [America/Los_Angeles]:
Enter Time in UTC [17:25:37]:
Enter Date (MM/DD/YYYY) [7/12/2017]:
Do you want to create admin account (yes|no) [yes]:
Enter Password for admin login (up to 32 chars): aruba123
Re-type Password for admin login: aruba123
Note: These settings require IP-Based-PSK configuration on Master switch
If you accept the changes the switch will restart!
Type <ctrl-P> to go back and change answer for any question
Do you wish to accept the changes (yes|no)yes
Creating configuration... Done.
System will now restart!full

AOS8 - Partner Workshop
2018 Rev 1.4 11 HPE Aruba Channel Partner Enablement
The 7005 controller takes approximately 10 minutes to reload. After controllers reboot with new settings, verify connectivity via web browser:
7005-1: https://10.10.1X0.101
7005-11: https://10.10.1X0.102 The controller’s MAC address is used if you manually add your controller to your Mobility Master. The controller’s MAC address is the first address allocated in the controller and is shown in the “MAC address start” field. In the next lab, we will leverage the “auto-park” feature to automatically add each controller to your MM group folder.
Navigate to: DashboardController

AOS8 - Partner Workshop
2018 Rev 1.4 12 HPE Aruba Channel Partner Enablement
Lab 3 – Adding Controllers to Mobility Master
Goal:
Configure your Mobility Master (MM) to discover your two controllers configured in the previous lab.
Task Summary:
Login to your Virtual Mobility Master (VMM) via GUI.
Create a controller Group in your Managed Network Folder.
Configure IPsec and Auto-Park to automate Managed Device adoption
Verify controller connectivity.
Workflow:
Managed Network Node
Create Managed Network Node:
Login to your Mobility Master: https://10.10.1.XX
Navigate to: Managed Network
Click +
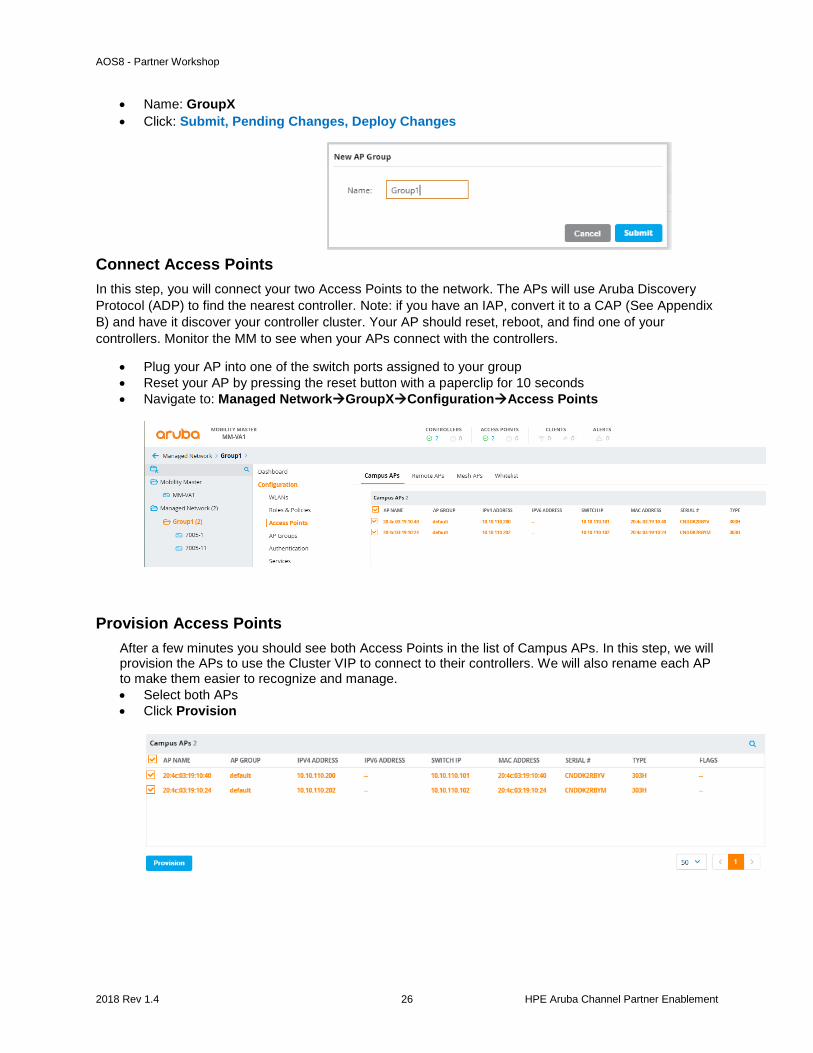
Add: Group
Name: GroupX
Click Submit

AOS8 - Partner Workshop
2018 Rev 1.4 13 HPE Aruba Channel Partner Enablement
Auto-Park
To automate Controller (managed device) adoption and assignment to a group, you need to set up a default entry for IPsec keys (for communication) and enable Auto-Park to automatically place discovered controllers in your MM Group folder. Enable Auto-parking
Navigating to: Mobility Master ConfigurationSystemGeneralAuto-parking
Enable Auto-parking
Folder for auto-parking: Managed Network > GroupX
Click Submit
Configure IPSEC Keys
To establish IPsec communication between your MM and your controllers (managed devices) configure IPSEC keys. Note that this must match the IPSec Pre-shared Key that you specified in the startup script for your 7005 controllers. Navigate to: Mobility MasterConfigurationControllersLocal Controller IPsec Keys

AOS8 - Partner Workshop
2018 Rev 1.4 14 HPE Aruba Channel Partner Enablement
You can specify IP addresses for which controllers can Auto Park. Here we match all controller IP addresses vs specific IP addresses.
Click +
Local Controller IPV4: 0.0.0.0
IPsec Key: secret
Retype IPsec Key: secret
Click Submit, Pending Changes, Deploy Changes
Verify controller discovery/connection to verify the controllers appear in the MM and are auto-parked into your MM group folder. Note: it can take up to 10 minutes to establish communications and auto-park your MD in your Managed Network Group.
Navigate to: Managed NetworkGroupXConfigurationControllers

AOS8 - Partner Workshop
2018 Rev 1.4 15 HPE Aruba Channel Partner Enablement
VLAN Configuration
We will need several VLANs to separate traffic for different services. The table below lists the VLANs that will be required as well as their interface and port settings. We will configure VLANs once at the Group level. Both controllers will inherit the VLAN configuration from the GroupX folder.
Navigate to: Managed NetworksGroupXConfigurationInterfacesVLANS
Click +
Create these VLAN names and ID’s based on this table for your group. Note that VLAN names are case sensitive, so you should enter them in as shown in the table.
Click Submit, Pending Changes, Deploy Changes
When you are finished, the VLAN configuration should be similar to the one shown for GroupX below.
VLAN Assignments
Name ID IP/Mask 802.1q Forwarding Access
management 1X0 10.10.1X0.0/24 Untagged L2 None
guest 1X1 10.10.1X1.0/24 Tagged L2 Open
employee 1X2 10.10.1X2.0/24 Tagged L2 RADIUS
finance 1X3 10.10.1X3.0/24 Tagged L2 RADIUS/RBAC

AOS8 - Partner Workshop
2018 Rev 1.4 16 HPE Aruba Channel Partner Enablement
Guest VLAN Configuration
The guest VLAN (1X1) utilizes a captive portal which requires an IP interface on each controller. Note that
the guest VLAN is inherited from the Group level. IP interfaces must be configured at the Managed
Device level because they are unique to each device. In this case controllers 7005-X and 7005-XX will
have different IP address therefore they must be configured separately.
Navigate to Managed NetworkGroupX7005-XConfigurationInterfacesVLANs
Click guest1X1
A panel which allows you to configure the VLAN interface appears. To configure an IP interface click on
the IPv4 icon.
Click: IPv4
IP assignment: Static
IPv4 address: 10.10.1X1.101
Netmask: 255.255.255.0
IPv4 DHCP settings: none
Click: Submit, Pending Changes, Deploy Changes

AOS8 - Partner Workshop
2018 Rev 1.4 17 HPE Aruba Channel Partner Enablement
Repeat the IP interface configuration for Controller 7005-XX.
Navigate to Managed NetworkGroupX7005-XXConfigurationInterfacesVLANs
Click
guest1X1
A panel which allows you to configure the VLAN interface appears. To configure an IP interface, click on
the IPv4 icon.
Click: IPv4
IP assignment: Static
IPv4 address: 10.10.1X1.102
Netmask: 255.255.255.0
IPv4 DHCP settings: none
Click: Submit, Pending Changes, Deploy Changes

AOS8 - Partner Workshop
2018 Rev 1.4 18 HPE Aruba Channel Partner Enablement
Port Configuration
Configure controller port GE-0/0/0 as a trunk, specifying the native VLAN and the additional VLANS we created in the previous step. Due to potential differences in controller hardware, we will perform this configuration on each individual controller (not at the group level). Configure ports for 7005-X:
Navigate to: Managed NetworksGroupX7005-XConfigurationInterfacesPorts
Click GE-0/0/0
Allowed VLANs: Allow specific VLANS
Click +
Add VLANs 1X1, 1X2, 1X3

AOS8 - Partner Workshop
2018 Rev 1.4 19 HPE Aruba Channel Partner Enablement
When you are returned to the GE-0/0/0 Port panel, review the port settings:
Mode: Trunk
Native VLAN 1X0
Allowed VLANs: Allow specified VLANs o VLANs 1X0 – 1X3 Trusted
Click Submit, Pending Changes, Deploy Changes
Repeat the previous steps for your second controller 7005-XX When you are finished your Port configuration should be the same as your first controller.

AOS8 - Partner Workshop
2018 Rev 1.4 20 HPE Aruba Channel Partner Enablement
Lab 4 – Building a Controller Cluster
Goal:
Build a controller cluster for your two controllers.
Task Summary:
Login to your Virtual Mobility Master (VMM)
Create a Cluster Profile
Assign controllers to your profile
Verify that your cluster has formed a Layer 2 Cluster
Workflow:
Cluster Profile
Create a new cluster profile.
Login into your Mobility Master: https://10.10.1.XX
Navigate to: Managed NetworkGroup XConfigurationServicesClusters
Click +
Give the cluster profile a name and add your 7005 controllers.
Name: ClusterX
In the Controllers section
Click +

AOS8 - Partner Workshop
2018 Rev 1.4 21 HPE Aruba Channel Partner Enablement
Add 7005-X & 7005-XX IP addresses to the list of controllers. This is essentially a whitelist of controllers that will be allowed to be members of this cluster.
Add Controller
IP version: IPv4
Controller IPv4: 10.10.1X0.101
Click OK
Controllers IPv4: Click +
Controller IPv4: 10.10.1X0.102
Click OK
Click: Submit, Pending Changes, Deploy Changes
When you are returned to the Cluster page, verify that both of your controllers are in the list.

AOS8 - Partner Workshop
2018 Rev 1.4 22 HPE Aruba Channel Partner Enablement
Controller Membership
Assign individual controllers to the Cluster profile we built in the previous step. Important Note: To insure
our cluster forms a Layer 2 cluster, we have to exclude any VLANs that are not Layer-2 connected to
other members of the cluster. Each member sends a broadcast probe on each VLAN defined in the
cluster to verify L2 connectivity. This is important to maintain AP and client state synchronization within
your cluster and avoid a client de-authorization should a cluster member fail.
Navigate to: Managed NetworkGroupX7005-XConfigurationServicesClusters
Cluster Profile
Cluster group membership: ClusterX
Exclude VLANs: 1
Click: Submit, Pending Changes, Deploy Changes
Repeat for your second controller:
Navigate to: Managed NetworkGroupX7005-XXConfigurationServicesCluster
Cluster Profile
Cluster group membership: ClusterProfile
Exclude VLANs: 1
Click: Submit, Pending Changes, Deploy Changes

AOS8 - Partner Workshop
2018 Rev 1.4 23 HPE Aruba Channel Partner Enablement
Verify that both controllers have joined the cluster by viewing their status in the Dashboard (give it a few
minutes to push the configuration down and member leader to establish).
Navigate to Managed NetworksDashboardCluster
Verify your controllers have formed a Layer-2 cluster. Verify that the Connection type of each controller is
L2.
Navigate to Managed Networks-->DashboardClusterCluster Members
Click on 10.10.1X0.101
Repeat for Controller 10.10.1X0.102

AOS8 - Partner Workshop
2018 Rev 1.4 24 HPE Aruba Channel Partner Enablement
Cluster VIP
For the final step in building a cluster we will build an AP Master Virtual IP (VIP). In practice, this would
be done in deployments as APs are typically not in the same subnet as the controller cluster. For
discovery methods outside of ADP (L2 broadcast), you would want to provide a virtual IP address that
gets mapped to your controller cluster’s IPs. You will use the AP Master VIP in a later lab as a discovery
option when you provision your AP.
Navigate to: Managed NetworkGroupX7005-X
ConfigurationServicesRedundancyVirtual Router Table
Click +
ID: 1
Description: APMasterVIP
Authentication Password: secret
Retype Authentication Password: secret
IP Address: 10.10.1X0.99
Admin state: up
VLAN: 1X0
Submit, Pending Changes, Deploy Changes
Repeat this for your other controller:
Navigate to: Managed NetworkGroupX7005-XX
ConfigurationServicesRedundancyVirtual Router Table
Click +
ID: 1
Description: APMasterVIP
Authentication Password: secret
Retype Authentication Password: secret
IP Address: 10.10.1X0.99
Admin state: up
VLAN: 1X0
Submit, Pending Changes, Deploy Changes

AOS8 - Partner Workshop
2018 Rev 1.4 25 HPE Aruba Channel Partner Enablement
Lab 5 - AP Discovery
Goal:
In this lab, you will create an AP group that will be used for WLAN service creation in subsequent labs. AP’s will then be reset and discovered by your controller cluster. After discovery, you will approve/provision discovered AP(s) and assign them to your AP group.
Task Summary
Create AP group for service creation
Add AP to your network and verify discovery
Approve/Provision discovered AP into AP group specifying name, address, discovery mode,
deployment model, etc.
Workflow:
Control Plane Security
To simplify AP discovery in this lab, we need to verify that control-plane security (CPsec) is disabled for
your group (System default is Enabled).
Navigate to: Managed NetworkGroupXConfigurationSystemCPSEC
Control Plane Security Enable CPsec: (click off)
Submit, Pending Changes, Deploy Changes
Create an AP group
Navigate to: Managed NetworksGroupXConfigurationAP Groups
Click +
AOS8 - Partner Workshop
2018 Rev 1.4 26 HPE Aruba Channel Partner Enablement
Name: GroupX
Click: Submit, Pending Changes, Deploy Changes
Connect Access Points
In this step, you will connect your two Access Points to the network. The APs will use Aruba Discovery
Protocol (ADP) to find the nearest controller. Note: if you have an IAP, convert it to a CAP (See Appendix
B) and have it discover your controller cluster. Your AP should reset, reboot, and find one of your
controllers. Monitor the MM to see when your APs connect with the controllers.
Plug your AP into one of the switch ports assigned to your group
Reset your AP by pressing the reset button with a paperclip for 10 seconds
Navigate to: Managed NetworkGroupXConfigurationAccess Points
Provision Access Points
After a few minutes you should see both Access Points in the list of Campus APs. In this step, we will provision the APs to use the Cluster VIP to connect to their controllers. We will also rename each AP to make them easier to recognize and manage.
Select both APs
Click Provision

AOS8 - Partner Workshop
2018 Rev 1.4 27 HPE Aruba Channel Partner Enablement
A new window expands where you can assign each AP a unique name, assign them to an AP group and configure the Cluster VIP as the controller’s IP address.
AP Name: Edit
Update AP Names o Name: AP-1 o Name: AP-2
Click OK
AP Group: GroupX
Controller discovery: Static
Controller IP/DNS name: 10.10.1X0.99
Click: Submit, Pending Changes, Deploy Changes
You are warned that your APs will reboot.
Click Continue & Reboot

AOS8 - Partner Workshop
2018 Rev 1.4 28 HPE Aruba Channel Partner Enablement
After a few minutes, check the AP status on the Mobility Master and verify that they are operational (green up status) using the Dashboard. Verify that they reflect their new names and that they are assigned to the GroupX AP Group.
Navigate to: Managed NetworkGroupXDashboardAccess Points

AOS8 - Partner Workshop
2018 Rev 1.4 29 HPE Aruba Channel Partner Enablement
Lab 6 - WLAN Service Creation: PSK
Goal:
In this lab, we will build a pre-shared key WLAN service to test our environment.
Task Summary:
Create PSK WLAN services using the wizard.
Test with your client to verify you underlying configuration is setup properly from previous labs.
Workflow:
Login to your Mobility Master: https://10.10.1.XX
Navigate to: Managed NetworkGroupXConfigurationWLAN
Click +
General
Name (ssid): PSKX
Primary usage: Employee
Select AP Groups GroupX
Forwarding mode: Tunnel
Click next

AOS8 - Partner Workshop
2018 Rev 1.4 30 HPE Aruba Channel Partner Enablement
VLANs
VLAN: management
Click Next
Security
Security: Personal
Key management: WPA-2 Personal
Passphrase: aruba123
Retype: aruba123
Click Next
Access
Default role: Authenticated
Click Finish
Click: Pending Changes, Deploy Changes

AOS8 - Partner Workshop
2018 Rev 1.4 31 HPE Aruba Channel Partner Enablement
Test Service Verification
Verify that your new WLAN has been created and is operational in the Dashboard.
Navigate to: Managed NetworksGroupXDashboardWLAN
Test the WLAN by connecting with your device:
SSID: PSKX
Passphrase: aruba123
Using the dashboard answer the following:
1. What is the IP address of your device?
2. Which AP were you connected to?
3. What role were you assigned?
4. Were you able to browse the Internet?

AOS8 - Partner Workshop
2018 Rev 1.4 32 HPE Aruba Channel Partner Enablement
CLI
In this task we explore new commands that were introduced in AOS8 to navigate and make configuration changes in a Mobility Master managed node hierarchy. We will explore the CLI using the Mobility Master as well as the Managed Device (MD) context. For MDs, we will leverage the new MDC (managed device connect) feature to easily switch between these context.
Connect to your Mobility Master with an SSH client:
ssh 10.10.1.XX
username: admin
password: aruba123
In Mobility Master, configurations are stored in a hierarchy of folders. Look at the node-hierarchy on your MM: (MM-VAX) [/] #show configuration node-hierarchy
Each folder inherits the configuration from its parent folder. To see the configuration for the folder you are in use the “effective” verb. You can also use piping and filtering so find the relevant configuration line. For example, show the ap-group configuration at the root folder level: (MM-VAX) [/] #show configuration effective | include ap-group
Navigation through the node-hierarchy is the same as moving from folder to folder on other platforms. Use the following commands to change to a different folder’s context.
(MM-VAX) [/] #cd /md/groupX
(MM-VAX) [/md/groupX] #pwd
The configuration may be inherited from the parent, or it may be unique at that level. For example repeat the command to show ap-groups and compare the configuration in this folder to the configuration in the root folder above: (MM-VAX) [/md/groupX] #show configuration effective | include ap-group
You can cd directly to your MD. For example: navigate to the 7005-X configuration node context and issue the following commands. Were you able to see any state information on APs or users? (MM-VAX) [/] #cd 7005-X
(MM-VAX) [xx:xx:xx:xx:xx:xx]show ap active
(MM-VAX) [xx:xx:xx:xx:xx:xx]show user
The Mobility Master provides a method to SSH directly into a Managed Device from the MM CLI. A special user named “seamless-logon-w” is created in the MM. This user’s configuration is inherited by each controller. The mdc command starts an SSH session from the MM to the MD using this special
account. Use mdc to access your 7005-XX controller: (MM-VAX) [xx:xx:xx:xx:xx:xx]mdc
In the controller’s context issue the same commands. Are you able to see any state information (APs or users)? Are you able to enter configuration mode and make any changes?
(7005-X) [MDC] *#show ap active
(7005-X) [MDC] *#show user
(7005-X) [MDC] *#configure terminal
(7005-X) [MDC] *#exit

AOS8 - Partner Workshop
2018 Rev 1.4 33 HPE Aruba Channel Partner Enablement
Change your context to 7005-XX. MDC into the controller and repeat the commands. Compare your results to those from 7005-X. Some users and APs may have active sessions on one controller and not the other.
(MM-VAX) [/] #cd 7005-XX
(MM-VAX) [xx:xx:xx:xx:xx:xx]mdc
Are you able to enter configuration mode and make any changes? Which controller is your (wlan) user attached to? Which controller(s) are your APs attached to? (7005-XX) [MDC] *#show ap active
(7005-XX) [MDC] *#show user
(7005-XX) [MDC] *#configure terminal
(7005-XX) [MDC] *#exit
Exercise: The location command annotates the controller with its physical (geo) location. Modify the location using the CLI. At the group level set the location to “California”. Verify that the controllers inherit the “California” location. At the managed device level, make the location unique for each controller. Using MDC, verify the location is unique on each controller. Configure the location for your group (/md/GroupX) = California Configure the location for 7005-X (/md/GroupX/7005-X) = Sunnyvale, CA Configure the location for 7005-XX (/md/GroupX/7005-XX) = Palo Alto, CA Hint: you will need to use the cd, configure terminal, location, write memory & mdc commands. (MM-VAX) [/] #cd 7005-X
(7005-X) [MDC] *#show location

AOS8 - Partner Workshop
2018 Rev 1.4 34 HPE Aruba Channel Partner Enablement
Lab 7 - WLAN Service Creation: Guest (Internal Captive Portal)
Goal:
Build a Guest WLAN service using the controller’s internal captive portal. Examine the default profile created as a result. For Captive Portal service the Guest VLAN must have an IP interface configured on each controller. In Lab 3, we created the Guest VLAN, configured IP interfaces, enabled NAT and configured a DHCP server on each controller.
Task Summary:
Create a Guest (Internal Captive Portal) WLAN services using the wizard
Configure Captive Portal access via Firewall Rule (or Layer 3 IP address)
View default role that was created ( Policies and rules )
Test with your device
Workflow:
Login to your Mobility Master: https://10.10.1.XX
Navigate to: Managed NetworkGroupXConfigurationWLANs
Click +
General
Name (ssid): GuestX
Primary usage: Guest
Select AP Groups GroupX
Forwarding mode: Tunnel
Click Next

AOS8 - Partner Workshop
2018 Rev 1.4 35 HPE Aruba Channel Partner Enablement
VLANs
VLAN: guest
Click Next
Security
Internal captive portal with email registration
Click Next
Access
Note that the wizard creates a default role for guest users named GroupX – Guest-guest
Click Finish
Click: Pending Changes, Deploy Changes

AOS8 - Partner Workshop
2018 Rev 1.4 36 HPE Aruba Channel Partner Enablement
Restricting Guests
Guests are assigned to the guest role. Roles map to security policies which contain firewall rules that restrict access to the network. In this case, we allow guest users to access the Internet. However, they are prevented from accessing the corporate network by this security policy.
Navigate to Managed Network GroupXConfigurationRoles & PoliciesRoles
Click on guest
A lower panel opens that allows you to configure policies in the role.
Click Show Advanced View

AOS8 - Partner Workshop
2018 Rev 1.4 37 HPE Aruba Channel Partner Enablement
The advanced view displays all the policies in this role. Add a new policy to prevent guests from accessing the corporate network.
Click +
Create a new Policy
Policy type: Session
Policy Name: internetonly
Position: 4
Click Submit
Click: Pending Changes, Deploy Changes
You are returned to the Guest Role Policies panel. Create the rules for this policy.
Click internetonly
The internet only policy panel opens. Add a firewall rule to prevent guest traffic from accessing the corporate network.
Click +

AOS8 - Partner Workshop
2018 Rev 1.4 38 HPE Aruba Channel Partner Enablement
Rule type: Access Control
Click OK
guest>internetonly>New forwarding Rule o IP version: IPv4 o Source: User o Destination: Network o IP: 10.10.0.0 o Netmask: 255.255.0.0 o Service/app: Any o Action: Deny o Options: Log
Click: Submit, Pending Changes, Deploy Changes
Re-Order rules
As with any firewall, the order of rules is significant. Insure that the internetonly, dhcp-acl & dns-acl are in positions 4,5 & 6 respectively. If they are not, drag-and-drop the policy to its proper place in the list.
Click: Pending Changes, Deploy Changes
AOS8 - Partner Workshop
2018 Rev 1.4 39 HPE Aruba Channel Partner Enablement
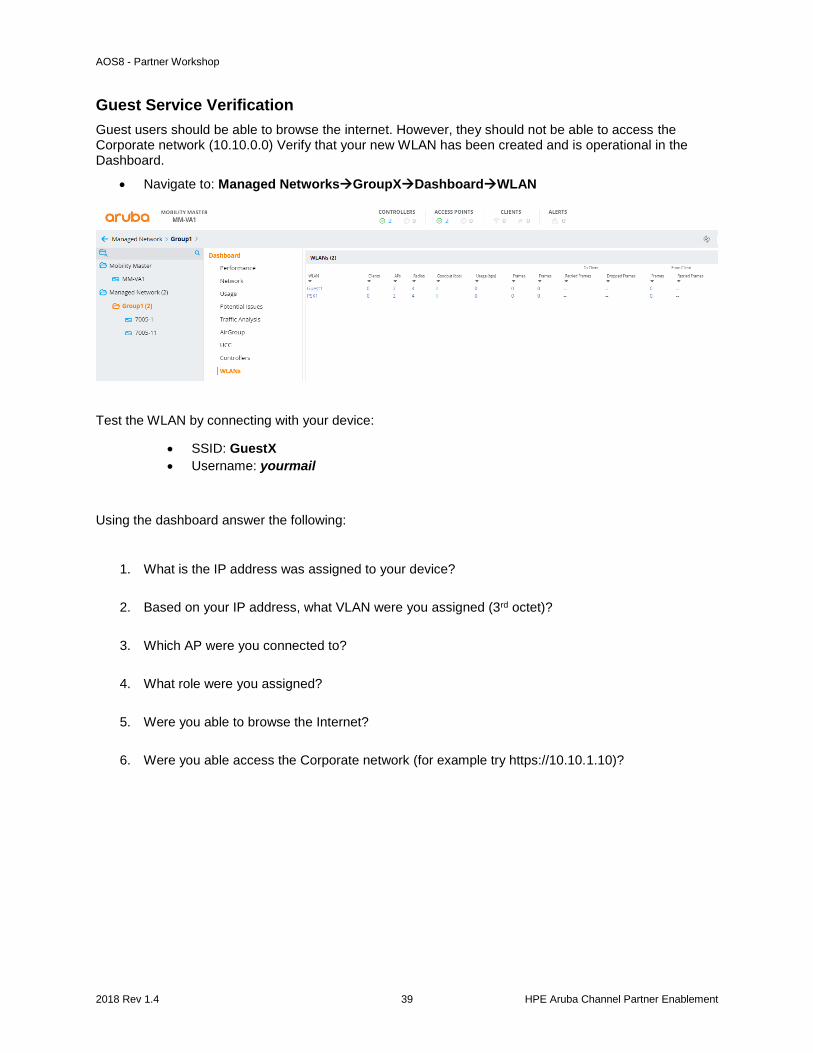
Guest Service Verification
Guest users should be able to browse the internet. However, they should not be able to access the Corporate network (10.10.0.0) Verify that your new WLAN has been created and is operational in the Dashboard.
Navigate to: Managed NetworksGroupXDashboardWLAN
Test the WLAN by connecting with your device:
SSID: GuestX
Username: yourmail
Using the dashboard answer the following:
1. What is the IP address was assigned to your device?
2. Based on your IP address, what VLAN were you assigned (3rd octet)?
3. Which AP were you connected to?
4. What role were you assigned?
5. Were you able to browse the Internet?
6. Were you able access the Corporate network (for example try https://10.10.1.10)?
AOS8 - Partner Workshop
2018 Rev 1.4 40 HPE Aruba Channel Partner Enablement
Lab 8 - WLAN Service Creation: Employee Dot1X
Goal:
The goal of this lab is to build an Employee WLAN service that is authenticated via 802.1x from the workshkop Windows Radius/AD Server. Login will use existing credentials configured on the workshop AD Server.
Task Summary:
Create a RADIUS Server entry for the workshop’s Windows AD Server.
Invoke the WLAN wizard to create a new Employee Service.
Connect and verify you can authenticate and connect to the newly created service
Workflow
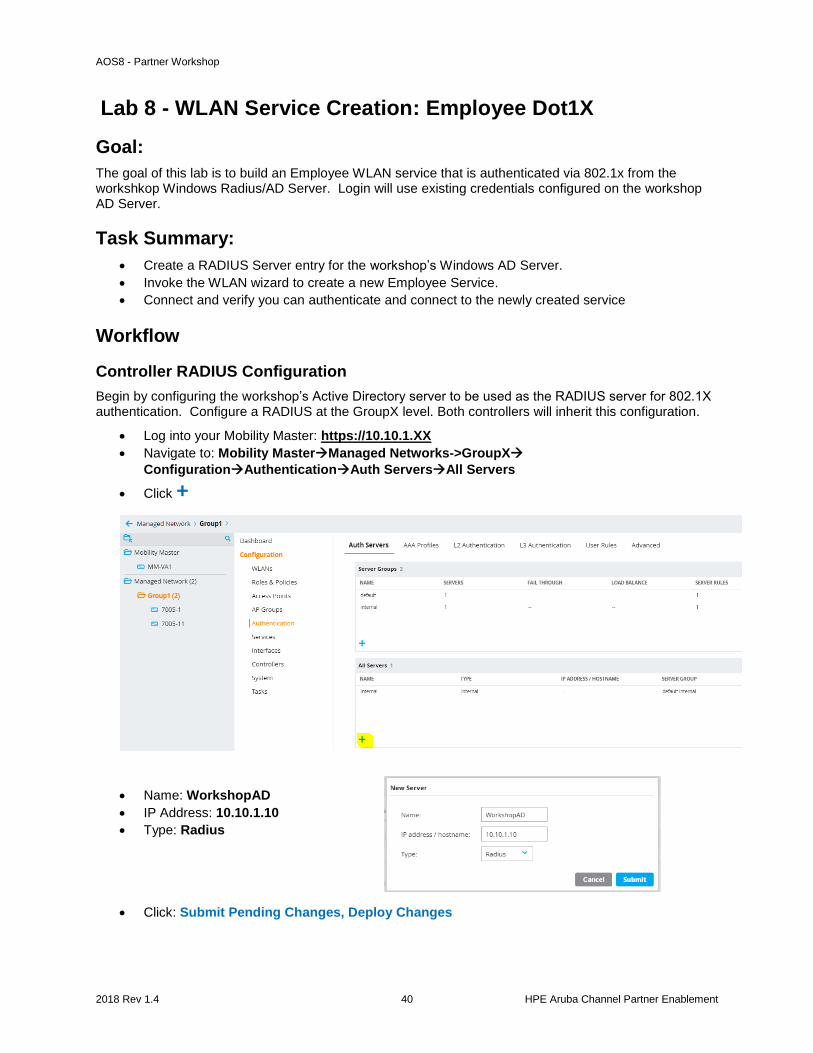
Controller RADIUS Configuration
Begin by configuring the workshop’s Active Directory server to be used as the RADIUS server for 802.1X authentication. Configure a RADIUS at the GroupX level. Both controllers will inherit this configuration.
Log into your Mobility Master: https://10.10.1.XX
Navigate to: Mobility MasterManaged Networks->GroupX
ConfigurationAuthenticationAuth ServersAll Servers
Click +
Name: WorkshopAD
IP Address: 10.10.1.10
Type: Radius
Click: Submit Pending Changes, Deploy Changes

AOS8 - Partner Workshop
2018 Rev 1.4 41 HPE Aruba Channel Partner Enablement
When you are returned to the All Servers panel, note that WorkshopAD is in the list of servers. Configure
the RADIUS shared secret.
Click on WorkshopAD
Server Options o Shared key: secret o Retype key: secret
Click Submit, Pending Changes, Deploy Changes

AOS8 - Partner Workshop
2018 Rev 1.4 42 HPE Aruba Channel Partner Enablement
802.1X Service Creation
Now that we’ve added our RADIUS Server, let’s build our first 802.1x Employee Service.
Navigate to: Managed NetworkGroupXConfigurationWLAN
Click +
General
Name: EmployeeX
Primary Usage: Employee
Select AP Groups: GroupX
Forwarding Mode: Tunnel
Click Next
VLANs
VLAN: employee
Click Next

AOS8 - Partner Workshop
2018 Rev 1.4 43 HPE Aruba Channel Partner Enablement
Security
Security: Enterprise
Key management: WPA-2 Enterprise
Auth servers: +
Add Existing Server: WorkshopAD
Click Submit
Click Next
Access
Default role: authenticated
Click: Finish
Click Pending Changes, Deploy Changes

AOS8 - Partner Workshop
2018 Rev 1.4 44 HPE Aruba Channel Partner Enablement
Employee Service Verification
Users that successfully authenticate with the Workshop’s AD server are assigned to the Employee VLAN (1X2) and should be given full access to the network. Users that fail authentication are prevented from accessing the network. Verify that your new WLAN has been created and is operational in the Dashboard.
Navigate to: Managed NetworksGroupXDashboardWLAN
Test the WLAN by connecting with your device:
SSID: EmployeeX
Username: StudentX
Password: Bill+Dave
Using the dashboard answer the following:
1. What is the IP address was assigned to your device?
2. Based on your IP address, what VLAN were you assigned (3rd octet)?
3. Which AP were you connected to?
4. What role were you assigned?
5. Were you able to browse the Internet?
6. Were you able access the Corporate network (for example try https://10.10.1.10)?
AOS8 - Partner Workshop
2018 Rev 1.4 45 HPE Aruba Channel Partner Enablement
Lab 9 - WLAN Service Creation: Employee Dot1x (Server-Derived Role)
Goal:
The goal of this lab is to expand the Employee service to apply additional restrictions for users in the Finance department. The user’s role is determined at login based on the user’s department which is returned by the AD server. You will create a finance role and a policy that restricts traffic to the internal network. You will also assign finance department users to a special VLAN.
Task Summary:
Create a role called “finance”
Create a policies for the finance role that permits traffic only to 10.10.0.0
Modify the Employee WLAN to use a server-derived role
Test with your client – using login credentials of a user that is in the Finance Department.
Workflow:
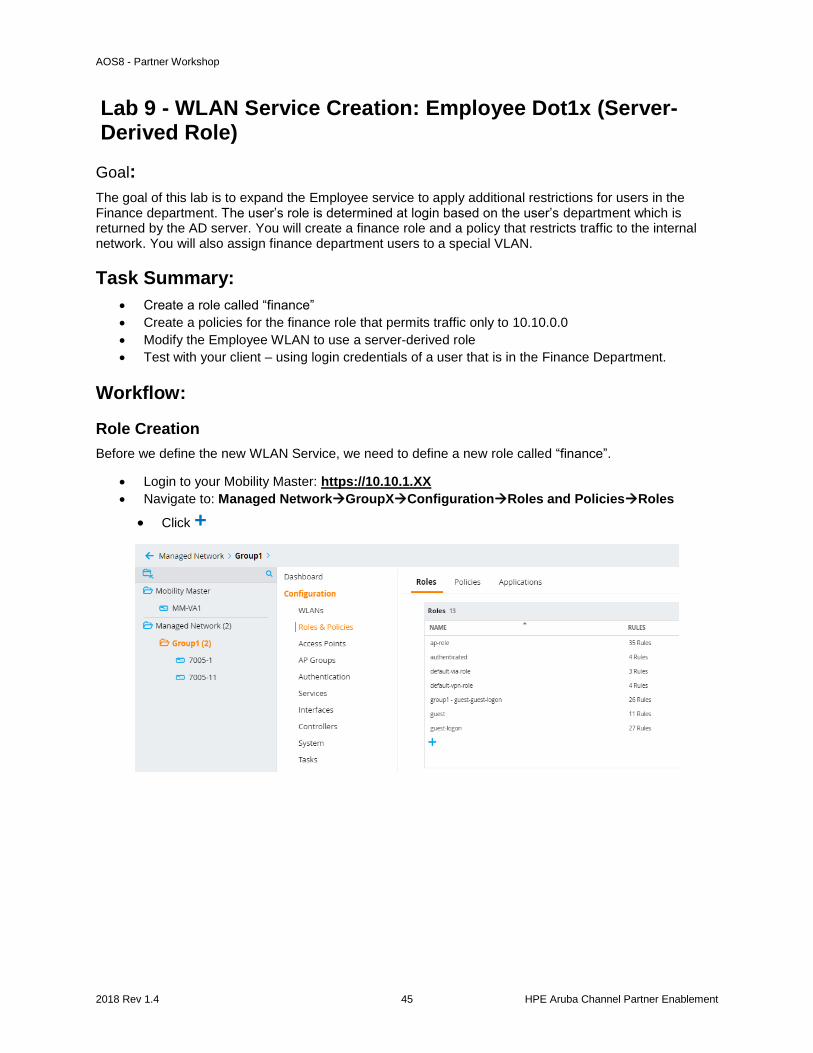
Role Creation
Before we define the new WLAN Service, we need to define a new role called “finance”.
Login to your Mobility Master: https://10.10.1.XX
Navigate to: Managed NetworkGroupXConfigurationRoles and PoliciesRoles
Click +

AOS8 - Partner Workshop
2018 Rev 1.4 46 HPE Aruba Channel Partner Enablement
The role name is case sensitive and must match exactly what is being returned by the RADIUS server.
New Role
Name: finance
Click SubmitPending ChangesDeploy changes
Finance Role VLAN
Modify the finance role to use the finance department’s VLAN (1X3).
Navigate to: Managed NetworkGroupXConfigurationRoles and PoliciesRoles
Click on finance
Click Show Advanced View

AOS8 - Partner Workshop
2018 Rev 1.4 47 HPE Aruba Channel Partner Enablement
A panel opens that allows you to configure the finance role details. Here we will specify that finance users
will be placed in a special finance VLAN (1X3).
Click More
Network
o VLAN: finance
Click SubmitPending ChangesDeploy changes
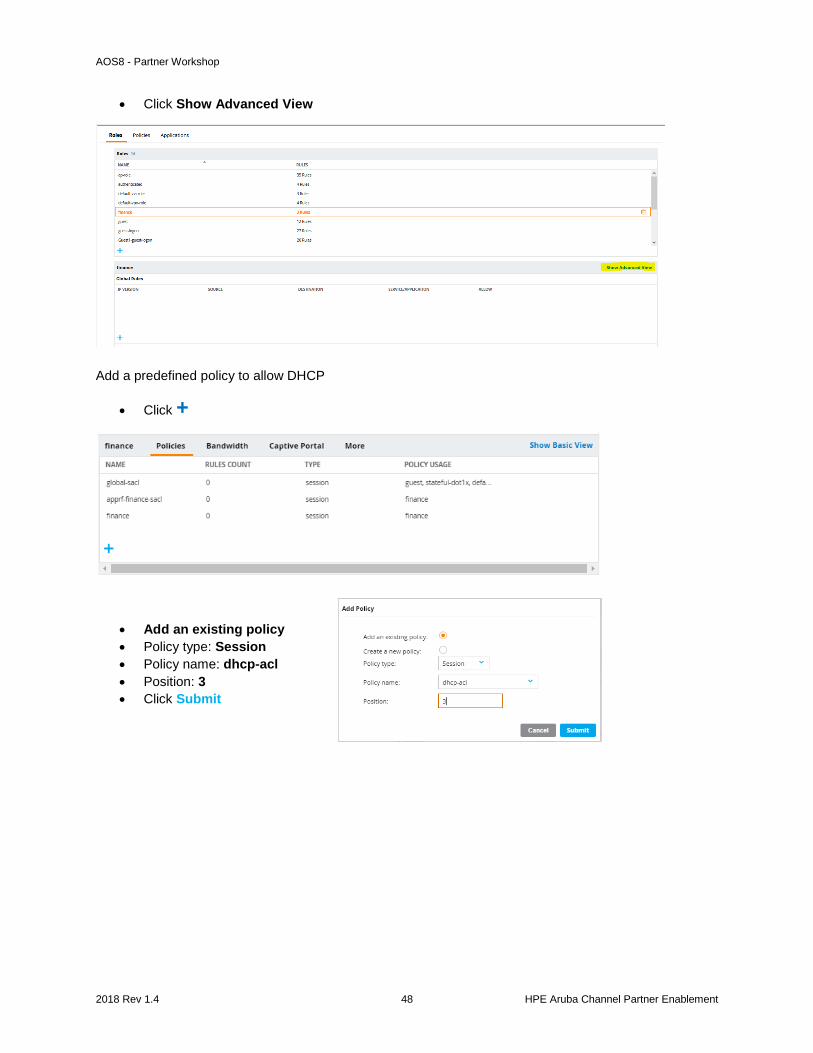
Policy Creation
Add policies to the finance role you just created. Add pre-defined policies to allow DHCP and DNS
services (dhcp-alc, dns-acl). Add a new policy to restrict traffic to the internal 10.10.0.0 network & prevent
access to the internet.
Navigate to: Managed NetworkGroupXConfigurationRoles and PolicesRoles
Click on finance
AOS8 - Partner Workshop
2018 Rev 1.4 48 HPE Aruba Channel Partner Enablement
Click Show Advanced View
Add a predefined policy to allow DHCP
Click +
Add an existing policy
Policy type: Session
Policy name: dhcp-acl
Position: 3
Click Submit

AOS8 - Partner Workshop
2018 Rev 1.4 49 HPE Aruba Channel Partner Enablement
When you are returned to the finance role panel, observe that your dhcp-acl policy has been added in
position 3. Repeat the process and add a predefined rule to allow DNS.
Click +
Add an existing policy
Policy type: Session
Policy name: dns-acl
Position: 4
Click Submit
Policies have an implicit “deny all” rule at the end. Therefore, in order to allow access to the internal
10.10.0.0 network, you must create an allow rule. The finance policy is automatically created when the
role was created. When you select the finance policy, a new window allows you to create rules for the
policy.
Click finance
In the finance>finance window click +

AOS8 - Partner Workshop
2018 Rev 1.4 50 HPE Aruba Channel Partner Enablement
Rule type: Access Control
Click OK
IP version: IPv4
Source: User
Destination: Network
IP: 10.10.0.0
Netmask: 255.255.0.0
Service/app: Any
Action Permit
Click SubmitPending ChangesDeploy changes

AOS8 - Partner Workshop
2018 Rev 1.4 51 HPE Aruba Channel Partner Enablement
Sever Derived Role
In this lab the user’s role is determined by which department they are in. Their role is defined by the “filter-
id” RADIUS attribute returned by the AD server during login. On the AD server, NPS is configured to
return the user’s department (member-of) in the RADIUS filter-id attribute. Modify the EmployeeX service
to use Role Based access.
Navigate to: Managed NetworkGroupXConfigurationWLANs
Click on EmployeeX
Click on Access
Server-derived roles: √
Derivation method: Use rules defined in table below
In the Role Derivation Rules window click +
AOS8 - Partner Workshop
2018 Rev 1.4 52 HPE Aruba Channel Partner Enablement
Add Derived Rule
Attribute: Filter-Id
Condition: value-of
Click SubmitPending ChangesDeploy changes
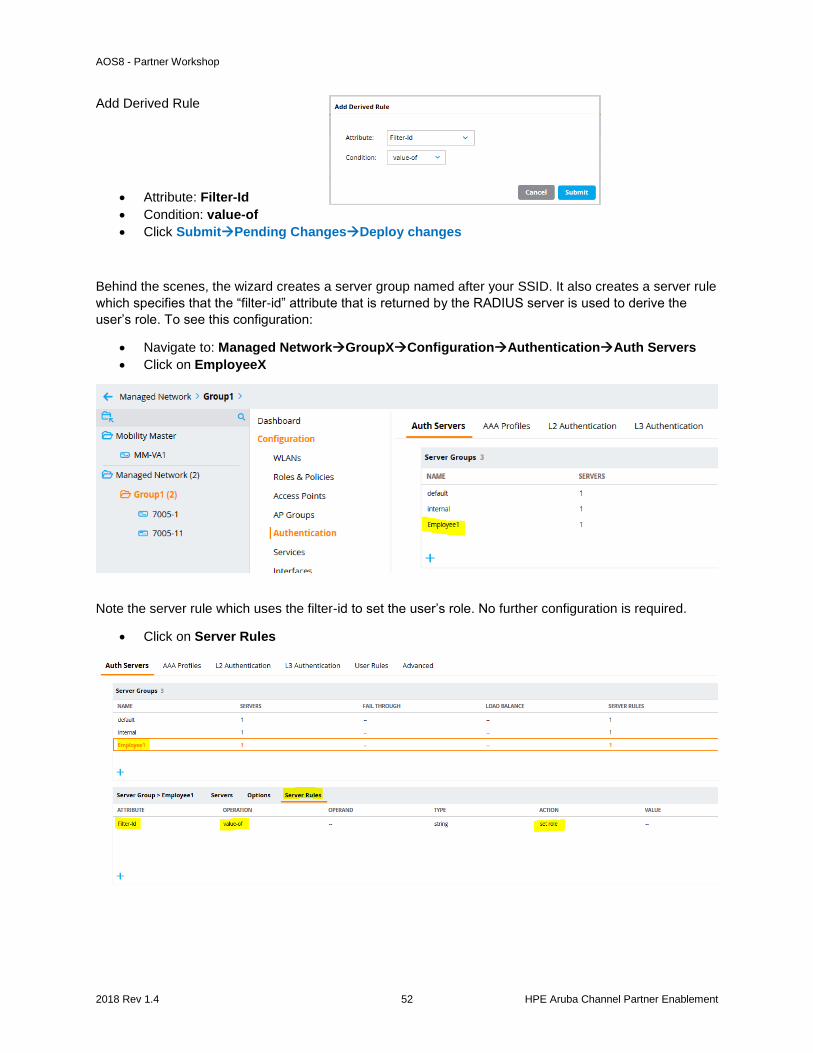
Behind the scenes, the wizard creates a server group named after your SSID. It also creates a server rule
which specifies that the “filter-id” attribute that is returned by the RADIUS server is used to derive the
user’s role. To see this configuration:
Navigate to: Managed NetworkGroupXConfigurationAuthenticationAuth Servers
Click on EmployeeX
Note the server rule which uses the filter-id to set the user’s role. No further configuration is required.
Click on Server Rules

AOS8 - Partner Workshop
2018 Rev 1.4 53 HPE Aruba Channel Partner Enablement
Role Based Access Server Verification
Test the WLAN by connecting with your device using the credentials for a finance user. In this case, the
user John Dough is a member of the finance department. Finance department users will be assigned to
the Finance VLAN (1X3). In addition, Finance users will NOT be allowed to access the Internet. Note that
you may need to “forget” the EmpoyeeX network to authenticate as a different user.
SSID: EmployeeX
Username: JohnDough
Password: Bill+Dave
Attempt to browse to the internet.
Were you able to browse the Internet?
Attempt to browse to an internal server (http://10.10.1.10).
Were you able to browse to the lab network?
Using the dashboard answer the following:
1. What is the IP address of your device?
2. Based on your IP address, what VLAN were you assigned (3rd octet)?
3. Which AP were you connected to?
4. What role were you assigned?
AOS8 - Partner Workshop
2018 Rev 1.4 54 HPE Aruba Channel Partner Enablement
Lab 10 – Cluster Stateful Failover Test
Goal:
In this lab, we will demonstrate the resiliency of controller clustering. This stateful failover tests your controller cluster and its standby anchor connections to the AP and User sessions. You will observe the primary and secondary connect state before, during and after the failure to better understand how service is maintained.
Task Summary:
Establish a wireless session
Observe the current connection state of User and AP anchor and stand-by connection (these are
your primary and standby anchor connections.
Simulate a failure by powering off one of the controllers while streaming a video or audio service.
Verify no interruption in service has occurred and primary anchor connections move to the
remaining controller
Bring back the failed controller online and observe cluster status transition back to a 2-node
cluster and standby anchor connections are established with the second active controller for both
AP and user sessions.
Workflow:
Cluster Status
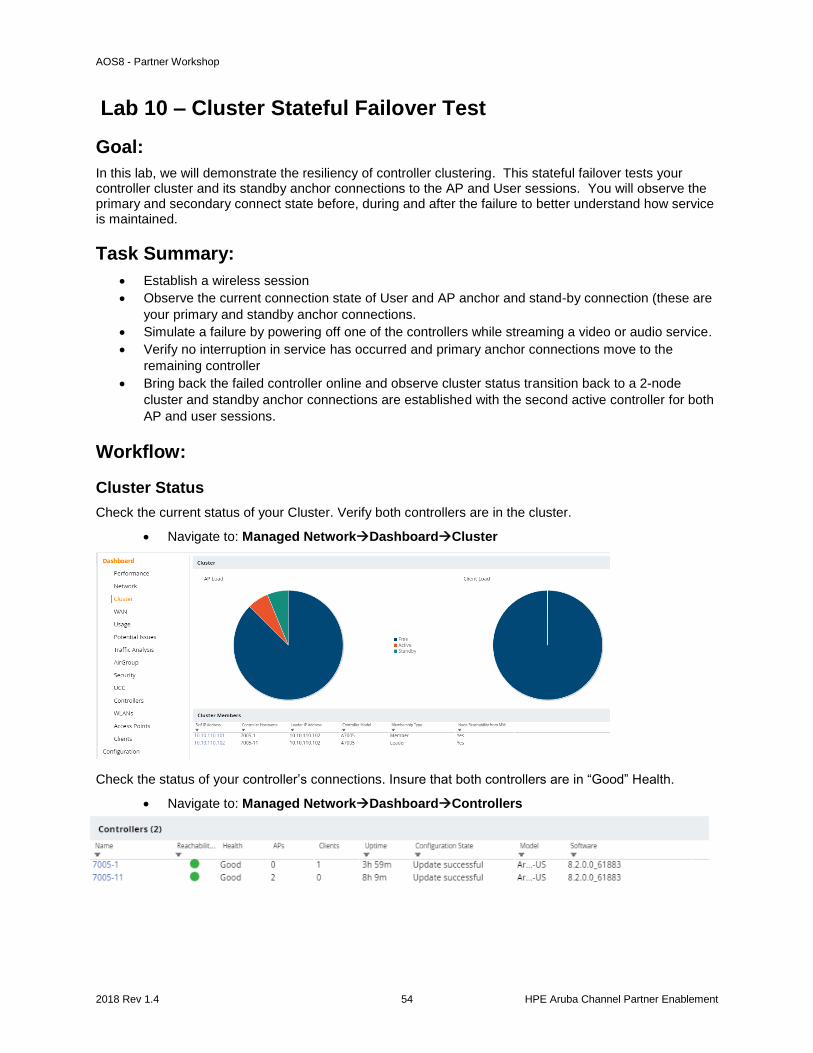
Check the current status of your Cluster. Verify both controllers are in the cluster.
Navigate to: Managed NetworkDashboardCluster
Check the status of your controller’s connections. Insure that both controllers are in “Good” Health.
Navigate to: Managed NetworkDashboardControllers

AOS8 - Partner Workshop
2018 Rev 1.4 55 HPE Aruba Channel Partner Enablement
AP Anchor Controllers
Customize your Dashboard to display the current status of your AP’s Active and Standby Controllers. When complete, your custom view should show the Active and Standby controller for your APs.
Navigate to: Managed NetworkDashboardAccess Points
In the upper right pulldown: Default Columns Custom Columns
In the pull-down menu: Edit Current View
Move Active Controller to the Selected column
Move Standby Controller to the Selected column
Click OK
When you are returned to the AccessP Points panel, you will now see two additional columns that indicate the Active and Standby AP Anchor Controllers (AAC, S-AAC) for your Access Points.

AOS8 - Partner Workshop
2018 Rev 1.4 56 HPE Aruba Channel Partner Enablement
User Anchor Controllers
Customize your Dashboard to display the current status of your Client’s Active and Standby Controllers. When complete, your custom view should show the Active and Standby Anchor controllers for Clients.
Navigate to: Managed NetworkDashboardClients
In the upper right pulldown: Default Columns Custom Columns
In the pull-down menu: Edit Current View
Move Active Controller to the Selected column
Move Standby Controller to the Selected column
Click OK
When you are returned to the Clients panel, you will now see two additional columns that indicate the Active and Standby User Anchor Controllers (UAC, S-UAC) for your Clients.
Make a note of which is your client’s UAC (User Active Controller)

AOS8 - Partner Workshop
2018 Rev 1.4 57 HPE Aruba Channel Partner Enablement
Controller Failover Test
Here, we test a controller failure scenario and verify no service disruption.
Using your client, associate to one of your WLAN services and start a session. Ideally this would be a streaming service like YouTube, etc. If Internet connectivity is not available in your lab, start a continuous ping to the Workshop’s Server 10.10.1.10.
Using the Dashboard, determine which of your 7005’s is the “active” controller for your client session.
Simulate a controller failure by unplugging the Ethernet cable from Port 0 of the UAC (User Anchor Controller) for your client.
How was service disrupted (how many pings did you drop)?
Plug your downed controller back into your POE switch and observe the cluster reform and Active and Standby Controller connections re-establish for your AP and User sessions. Review the Dashboard views earlier in this exercise to verify active and standby anchor points are present after the controllers re-form a cluster.

AOS8 - Partner Workshop
2018 Rev 1.4 58 HPE Aruba Channel Partner Enablement
Appendix A - Convert IAP to CAP
If you have an Aruba Instant AP, use these steps to convert your Instant AP (IAP) to a Campus AP (CAP). Once converted the AP will be configured and maintained from the controller.
AP Reset
Connect a console cable to your AP and open a terminal session.
Using a paper clip, press and hold the reset button on the back of the AP.
Connect your AP to a port for your group on the lab’s core switch as shown in Figure 1.
Wait for 10 full seconds while the AP boots, then release the reset button (paper clip)
Monitor the AP boot process on the console. After about 2 minutes, log into the AP. o User: admin o Password: admin
Determine what the IP Address was issued by the DHCP server: o show ip interfaces
o Verify you can ping the controller from the Instant AP CLI: ping 10.10.1X0.99
o Record the IP address that was assigned to the Instant AP:
_____________________________________
o Record the MAC address of the Instant AP:
______________________________________________________
Off = 10 or 100 MbpsSpeed Mode: Slow Flash = 1 Gbps 2x Flash = 2.5 Gbps 3x Flash = 5 Gbps On = 10 Gbps Fast Flash = 40 Gbps PoE Mode: On= PoE enabledOff= No PoE Flash= Fault/ Over budget A
1 2 3 4 5 6 7 8 9 10 11 12 13 14 15 16 17 18 19 20 21 22 23 24 UID
ConsolePortsLED Mode Spd Reset Clear Status Back Aux PortPoE Usr
10/100/1000 BASE-T PoE+ Ports
Flex Port Blank
3810MJL073A
Port 24
Port 1x
HP Zbook-15-G2 i7-32G
205AP
GE0/1
MSR931-4G
Port 20
GE0/0Internet
7005
Port x
AOS8 - Partner Workshop
2018 Rev 1.4 59 HPE Aruba Channel Partner Enablement
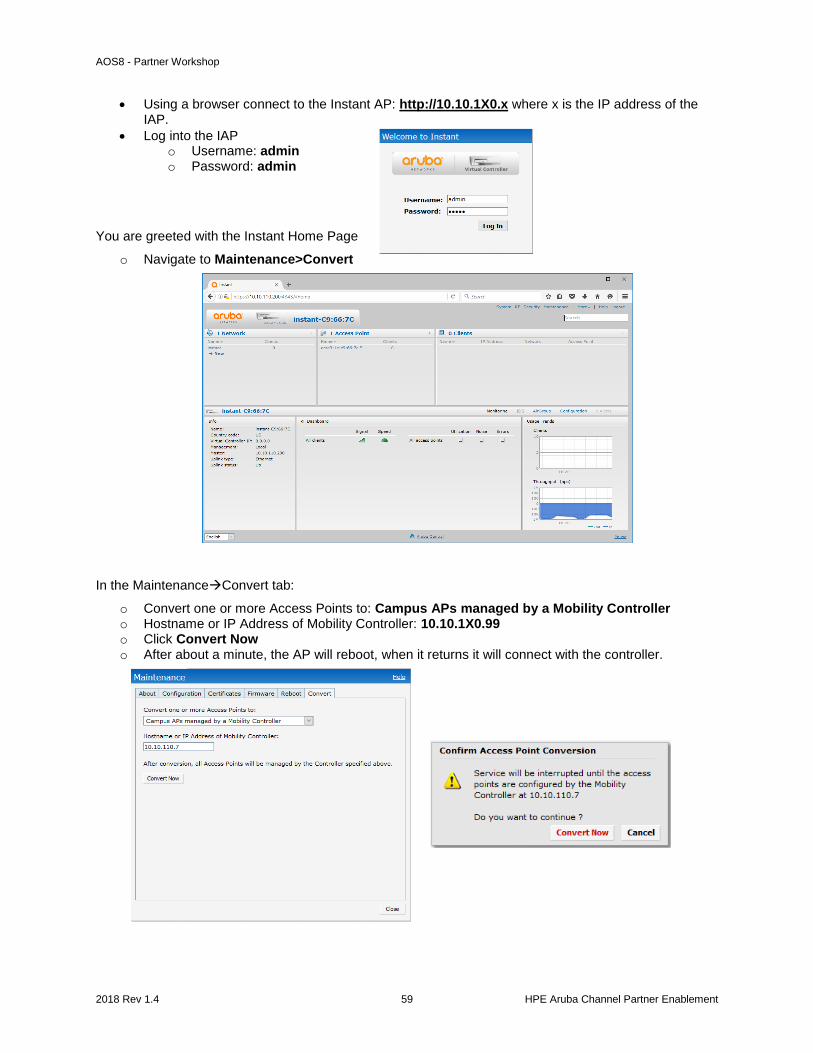
Using a browser connect to the Instant AP: http://10.10.1X0.x where x is the IP address of the IAP.
Log into the IAP o Username: admin o Password: admin
You are greeted with the Instant Home Page
o Navigate to Maintenance>Convert
In the MaintenanceConvert tab:
o Convert one or more Access Points to: Campus APs managed by a Mobility Controller o Hostname or IP Address of Mobility Controller: 10.10.1X0.99 o Click Convert Now o After about a minute, the AP will reboot, when it returns it will connect with the controller.

AOS8 - Partner Workshop
2018 Rev 1.4 60 HPE Aruba Channel Partner Enablement
Appendix Z – Versions
Document version 1.4
Aruba OS 8.3.0.0_64659
Changes:
Shortened SSID names.
Added information about system clock settings.