how to set up the hotspot module with
TRANSCRIPT

Panda GateDefender 5.0
How to set up the HotSpot module with SmartConnect
Panda GateDefender 5.0
2
Content Introduction .................................................................................................................................. 3
Minimum requirements to enable the hotspot module............................................................... 4
Hotspot settings ............................................................................................................................ 6
General settings. ....................................................................................................................... 6
Configuring the HotSpot from the Administration Interface.................................................... 8
Rates (Tickets) settings............................................................................................................ 10
SmartConnect settings. ........................................................................................................... 12
Using the HotSpot ....................................................................................................................... 14
HotSpot protection settings. ................................................................................................... 17
HTTP proxy .............................................................................................................................. 17
POP3 proxy.............................................................................................................................. 18
FTP proxy................................................................................................................................. 18
SMTP proxy ............................................................................................................................. 18
DNS proxy................................................................................................................................ 19
Panda GateDefender 5.0
3
Introduction HotSpot is a GateDefender eSeries module that provides high‐quality, controlled Internet
access to guests and visitors to your business. HotSpot is shipped by default with all
GateDefender eSeries Performa and Integra models at no additional cost.
With the GateDefender eSeries HotSpot module you will be able to easily monitor session
duration and bandwidth usage per user, isolating your company’s local network to prevent
access to your confidential information.
HotSpot is highly flexible and can be implemented in environments where Internet access (free
or paid) becomes a competitive advantage or added value, such as cafes, libraries, train or bus
stations, airports, hospitals, etc.
As an example, in this guide we will configure the GateDefender eSeries HotSpot module to
provide free Internet access limited to 30 minutes for guests or customers, allowing users to
automatically log in to the system via a confirmation email (SmartConnect). This way, your
company will provide Internet access in a controlled way, without intervention from the
network administrator.

Panda GateDefender 5.0
Minimum requirements to enable the hotspot module
For the HotSpot feature to work correctly it is necessary to use GateDefender eSeries in
firewall mode and enable the Blue network zone. The connections from the Blue zone to the
Red zone are governed by the outgoing firewall, so in order to selectively allow Internet
access, appropriate rules must be defined in this area.
For more information about the outgoing firewall, refer to:
http://acs.pandasoftware.com/eSeries/Appliance/5.00/manual/es/firewall.html#outgoing.
For more information about network zones, refer to:
http://acs.pandasoftware.com/eSeries/Appliance/5.00/manual/es/first.html
The above diagram shows the basic network structure needed for the HotSpot to work. As you
can see in the image, there are three network zones that are controlled by the GateDefender
firewall. The HotSpot, which is configured in the Blue zone, is protected by all the
GateDefender protections, and isolated from the Green zone (LAN) by the firewall.
4

Panda GateDefender 5.0
5
Important
To be able to offer the HotSpot service you need to connect an Access Point (AP) to the socket
of the GateDefender eSeries Blue zone.

Panda GateDefender 5.0
Hotspot settings General settings.
To configure the HotSpot module, go to the main menu and select HotSpot.
The HotSpot can be enabled or disabled by clicking the main switch at the top of the page.
Once enabled, one of three roles can be selected:
1. Master/Standalone HotSpot or Standalone HotSpot
When the HotSpot is used as a Master, it stores all configuration data as well as access and
billing information locally. Management tasks are also performed on this HotSpot.
Master HotSpots also show the available VPN accounts that can be assigned to satellite
HotSpots.
HotSpot password
This is the Master HotSpot’s password. Remote satellite systems need to use it to connect to
the Master HotSpot. If this field is left blank, a new random password will be generated.
HotSpot satellites
This is the list of OpenVPN tunnels available for use to connect to a satellite HotSpot. One or
more systems can be selected from this list.
For more information about how to configure VPNs for a HotSpot, refer to:
http://acs.pandasoftware.com/eSeries/Appliance/5.00/manual/es/HotSpot/settings.html
#mastervpn
2. Satellite HotSpot
A Satellite HotSpot does not store any configuration, but relies on the Master HotSpot to verify
user data, ticket availability, and all other settings. When selecting this option, the IP address
and the password of the Master HotSpot must be specified, along with the VPN tunnel name.
In detail, these are the available options:
Master HotSpot IP address
6

Panda GateDefender 5.0
7
Specify in this field the IP address of the Master HotSpot, which is usually the first IP address
available on the OpenVPN subnet defined in the OpenVPN server settings (under Menu bar ‣
VPN ‣ OpenVPN server ‣ Server configuration) of the Master HotSpot.
Master HotSpot password
The Master HotSpot password is typically auto‐generated. Click the Show checkbox to reveal
the password.
HotSpot VPN tunnel
From this drop‐down menu, select the OpenVPN tunnel used to reach the Master HotSpot.
3. External RADIUS server
In this configuration, the HotSpot relies on an external RADIUS server, which stores all the data
about accounting, settings, ticketing and connections. The following information about the
RADIUS server is required for its correct functioning: IP address, password, ports and the IP
address of the fallback server. Additionally, an external portal can be used (see “Use External
Portal”).
RADIUS Server IP address
The IP address of the external RADIUS server.
Fallback RADIUS Server IP address
The IP address of the fallback external RADIUS server.
RADIUS Server password
The password for the RADIUS Server. Click Show to reveal the password.
RADIUS Server AUTH port
The RADIUS server AUTH (Authentication) port number.
RADIUS Server ACCT port
The RADIUS server ACCT (Accounting) port number.
RADIUS Server COA port
The RADIUS server COA port number.
Use External Portal
When this option is selected, an external portal can be configured as the login interface that
the users will see when they want to connect through the HotSpot. The external portal must
be compatible with ChilliSpot. The following options should be configured to activate the
external portal:
For more information about ChilliSpot, refer to:

Panda GateDefender 5.0
http://coova.org/CoovaChilli
External Portal URL
The Web server location on which the portal is located.
NAS ID
The identifier of the RADIUS server that identifies the portal.
UAM Secret
The UAM shared secret of the external RADIUS server. While it is possible to not define a value
for this option, it is recommended to define it, since it improves security.
Allowed Sites /Access
A list of websites accessible even without registering to the HotSpot.
Enable AnyIP
Allows users without an active DHCP client to connect to the HotSpot.
Configuring the HotSpot from the Administration Interface
After enabling the module, go to the HotSpot administration area, and select Settings > Main.
The Portal section allows you to define a series of accessibility settings for the HotSpot login
page. In this area, you can:
Allow access from mobile devices.
Define the home page displayed after login.
Define the websites that can be accessed without being authenticated.
8

Panda GateDefender 5.0
Additionally, in “Global Settings” you can configure the HotSpot name to be displayed to
customers/visitors on logging in, the currency used in tickets, a list of popular countries where
the service will be used, and the default upload and download bandwidth limits for the
Internet connection.
The Accounts and Passwords sections allow you to prevent unauthenticated users from using
the HotSpot feature, as well as configuring password security policies.
9

Panda GateDefender 5.0
Rates (Tickets) settings.
Once you have configured the general settings, you can configure and adapt the HotSpot
feature to the specific needs of the environment where the service is to be offered, configuring
in the first place the service payment tickets. In our example, users will not be charged for
using the service, although the system will monitor session length.
In the Rates section, we will create two new tickets with different specifications.
The first ticket will be automatically assigned to the user after they register for the first
time.
This ticket has the following characteristics:
o It cannot be assigned via SmartConnect.
o It requires prepaid payment.
o The price is 0.
o It is only valid for 1 day after creation.
10

Panda GateDefender 5.0
The second ticket is created to allow users to self‐assign 30 additional minutes of
browsing time to themselves.
This ticket has the following characteristics:
o SmartConnect is enabled.
o It requires prepaid payment.
o As the idea is for the service to be free, the price is 0.
11
Panda GateDefender 5.0
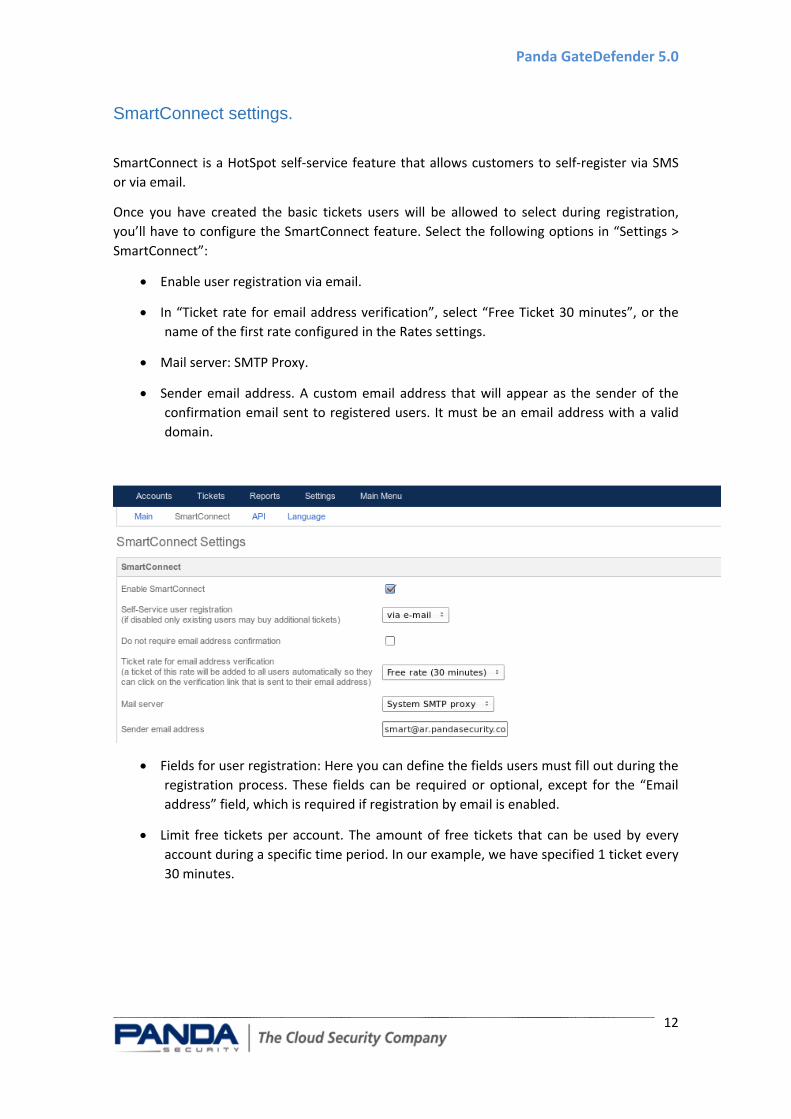
SmartConnect settings.
SmartConnect is a HotSpot self‐service feature that allows customers to self‐register via SMS
or via email.
Once you have created the basic tickets users will be allowed to select during registration,
you’ll have to configure the SmartConnect feature. Select the following options in “Settings >
SmartConnect”:
Enable user registration via email.
In “Ticket rate for email address verification”, select “Free Ticket 30 minutes”, or the
name of the first rate configured in the Rates settings.
Mail server: SMTP Proxy.
Sender email address. A custom email address that will appear as the sender of the
confirmation email sent to registered users. It must be an email address with a valid
domain.
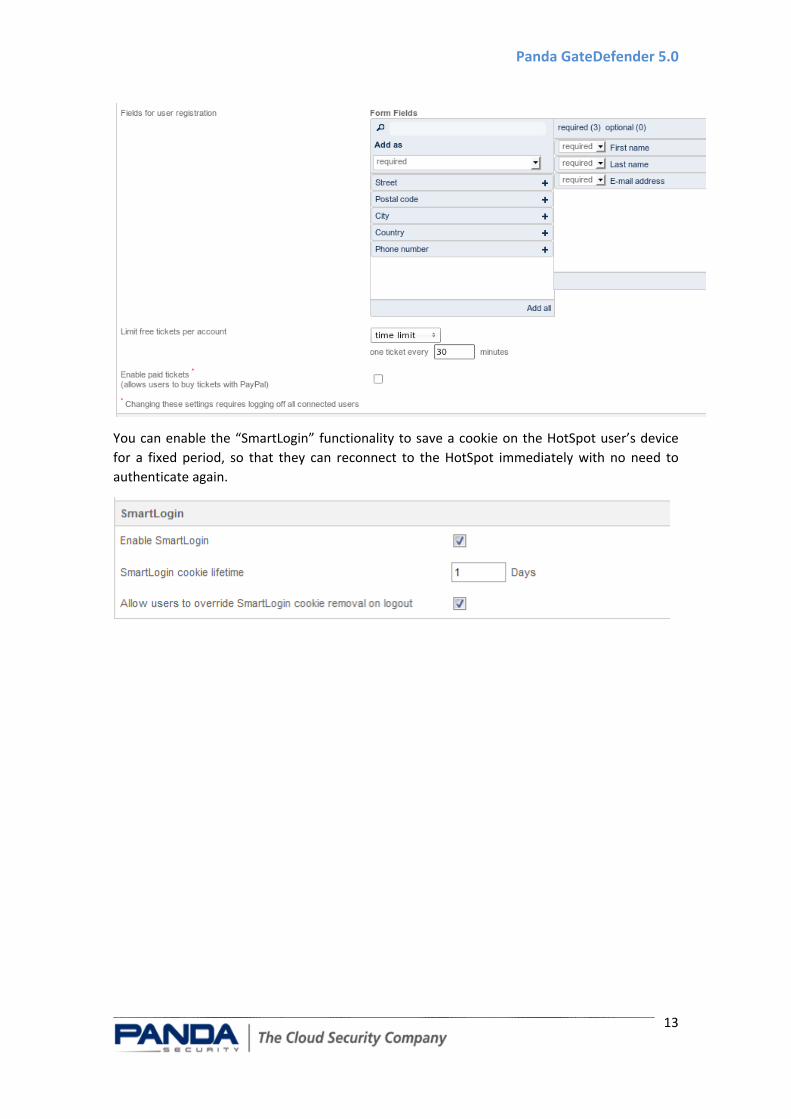
Fields for user registration: Here you can define the fields users must fill out during the
registration process. These fields can be required or optional, except for the “Email
address” field, which is required if registration by email is enabled.
Limit free tickets per account. The amount of free tickets that can be used by every
account during a specific time period. In our example, we have specified 1 ticket every
30 minutes.
12
Panda GateDefender 5.0
You can enable the “SmartLogin” functionality to save a cookie on the HotSpot user’s device
for a fixed period, so that they can reconnect to the HotSpot immediately with no need to
authenticate again.
13

Panda GateDefender 5.0
Using the HotSpot
Once you have completed the previous steps, you will have finished configuring the HotSpot and users will be able to use the service.
When the user runs a browser on their laptop, tablet or smartphone, they will be
automatically redirected to the HotSpot login page:
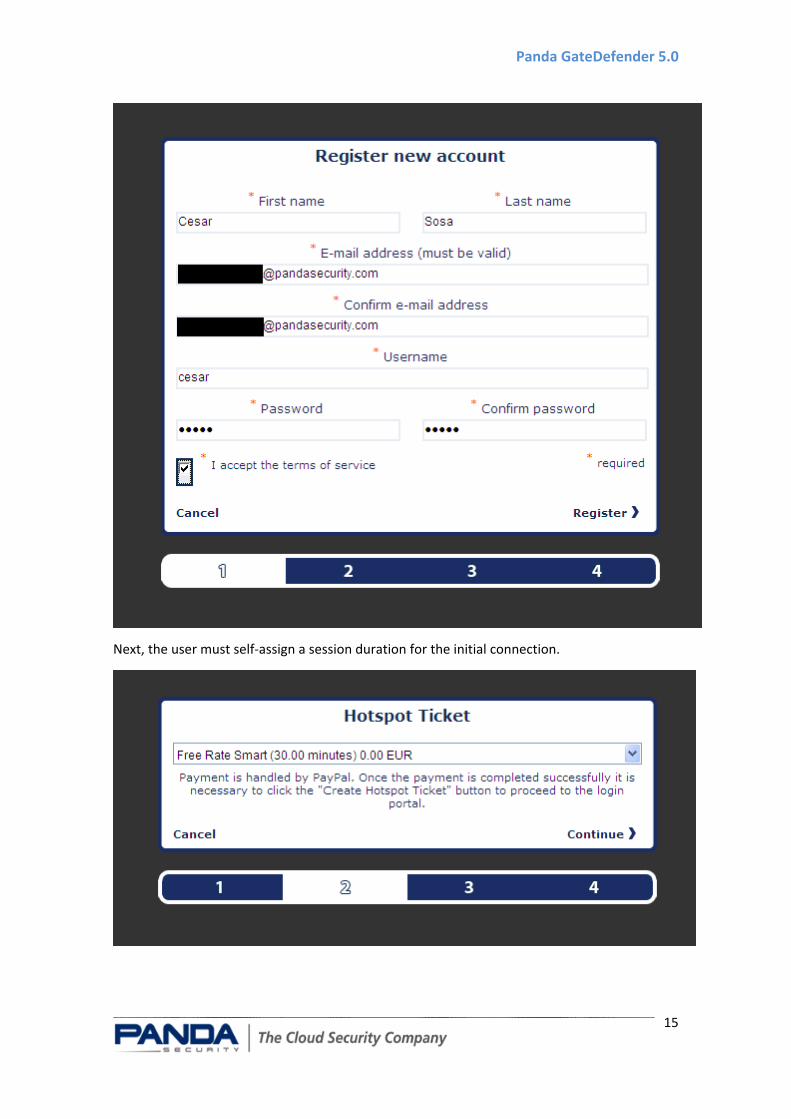
Non‐registered users will have to create a HotSpot account to surf the Internet by clicking the
“Register new account” option. A wizard will then be displayed for the user to enter their data
in the fields previously configured in the “SmartConnect Settings” screen.
14
Panda GateDefender 5.0
Next, the user must self‐assign a session duration for the initial connection.
15

Panda GateDefender 5.0
After the registration process is finished, the user will receive an email message with their user
details and a link to validate their HotSpot account.
Once registered, the user will be able to access the Internet on their device. A tab on the page
will display the session time and the remaining time.
When the session times out, the user will be able to assign a new ticket to themselves for
another 30 minutes by selecting the “Add ticket” option.
16

Panda GateDefender 5.0
Note
You can modify the information shown to the user during the entire process from the HotSpot
administration area, by selecting “Settings” and then “Language”.
HotSpot protection settings.
The HotSpot belongs to a specific zone in GateDefender called the “Blue Zone”. It is possible to
protect the connections established from and to this zone with all the protection modules
available in GateDefender eSeries. To do this, you need to enable the protection for the
relevant protocol in the Blue zone.
Below you can see a number of screenshots illustrating how to enable these protections, as
well as references to more information in the product’s Reference Manual.
HTTP proxy
HTTP proxy configuration:
http://acs.pandasoftware.com/eSeries/Appliance/5.00/manual/es/proxy.html#http
17

Panda GateDefender 5.0
POP3 proxy
POP3 proxy configuration:
http://acs.pandasoftware.com/eSeries/Appliance/5.00/manual/es/proxy.html#pop3
FTP proxy
FTP proxy configuration:
http://acs.pandasoftware.com/eSeries/Appliance/5.00/manual/es/proxy.html#ftp
SMTP proxy
SMTP proxy configuration:
http://acs.pandasoftware.com/eSeries/Appliance/5.00/manual/es/proxy.html#smtp
18

Panda GateDefender 5.0
DNS proxy
DNS proxy configuration:
http://acs.pandasoftware.com/eSeries/Appliance/5.00/manual/es/proxy.html#dns
19