how to participate in ginni ico - · pdf filehow to participate in ginni ico . from desktop...
TRANSCRIPT

HOW TO PARTICIPATE IN GINNI ICO FROM DESKTOP (RECCOMENDED)
CAUTION: If you are not familiar with MyEtherWallet please do not try to use it as you may fall victim to phishing attacks. Whilst MyEtherWallet is a good option for advanced users this is a very dangerous solution for end users who are not familiar with the risks that come with it.
We recommend the software MetaMask from https://metamask.io for end users, the steps on participating in the ICO are written below.
CONDENSED SUMMARY
1. Download MetaMask from www.metamask.io for your Chrome or Firefox browser from the App Store
2. Ensure you have backed up your wallet, set a good security phrase and read the security guide there.
3. DO TRY to restore the wallet on another browser or PC to check if the recovery phrase is correct. (There have been unconfirmed reports of a bug in the recovery phrase, so please do this check.)
4. Add the contract address written in the welcome area after KYC is completed, the Token Symbol and Decimals will populate itself with GNI and 2 automatically.
5. Click Add button after the fields are filled. 6. You can now receive ETH on this wallet and send it out to our smart contract. To get the smart
contract address, please complete the KYC procedure. 7. Once you have the smart contract address please click on the metamask icon and click send 8. Enter the contract address, amount of ether and in the method id enter this without any spaces:
0xa6f2ae3a 9. If you see a message saying WARNING TRANSACTION WILL FAIL, do not continue, read the
instructions above and try again as a step has been missed, most likely step 8. 10. If you do not see that message please click send. 11. Within seconds after the ethereum is confirmed you should see GINNI Tokens in your token tab.

FOR FIREFOX
1. Go to https://addons.mozilla.org/en-GB/firefox/addon/ether-metamask/
2. Click Add to Firefox
3. Click on Add
4. Click on the Metamask icon which appears near the top right corner

5. Click Accept, read and scroll down all to the bottom of Privacy Notice and click Accept
6. Create a new account by keying in a password or import existing den if you have

7. Write down the 12 words on a paper and keep it safe. Do not save it online. Click “I’ve copied it somewhere safe”
8. Now you will see the wallet

9. Make sure it is in the “Main Ethereum Network”, never select other network.
10. If you need to send Ethereum to this wallet. Click … to expand the menu, after that click “Show QR Code”

11. You will see your receiving address, click on the copy icon to copy and paste the address. (Send ether from your wallet / purchasing site to this wallet address)
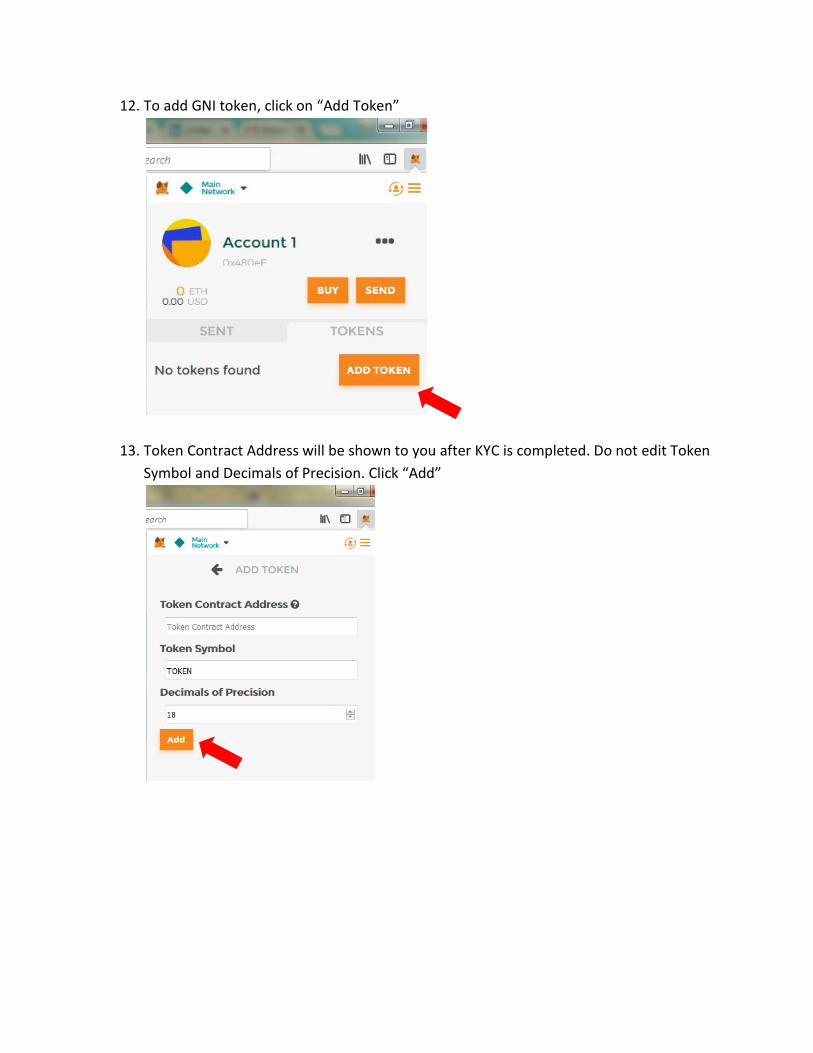
12. To add GNI token, click on “Add Token”
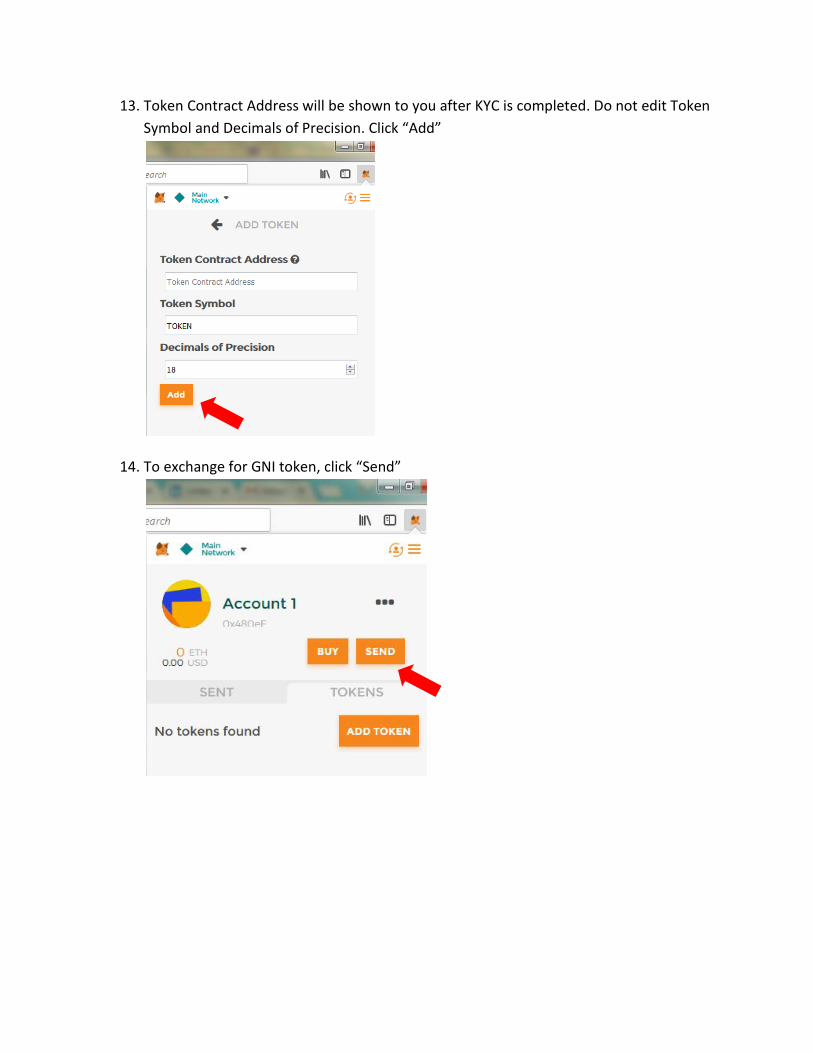
13. Token Contract Address will be shown to you after KYC is completed. Do not edit Token Symbol and Decimals of Precision. Click “Add”
14. To exchange for GNI token, click “Send”

12. Recipient address will be shown to you after KYC is completed. Enter the amount of ether and in the transaction data enter this without any spaces: 0xa6f2ae3a After that click Next to complete the process.

13. You will see a confirm transactions message, if you see the text: GAS LIMIT TOO HIGH THIS TRANSACTION MAY FAIL, please stop. If you do not see this message please proceed to press submit:
14. Here is an example of a transaction which will fail which you should NOT press send, notice the message indicating possible failure and the very high gas limit:

FOR CHROME
1. Go to https://chrome.google.com/webstore/detail/metamask/nkbihfbeogaeaoehlefnkodbefgpgknn
2. Click Add to Chrome
3. Click Add extension

4. Click on the MetaMask icon which appears near the top right corner
5. Click Accept, read and scroll down all to the bottom of Privacy Notice and click Accept again

6. Create a new account by keying in a password or import existing den if you have
7. Write down the 12 words on a paper and keep it safe. Do not save it online. Click “I’ve copied it somewhere safe”

8. Now you will see the wallet
9. Make sure it is in the “Main Ethereum Network”, never select other network.

10. If you need to send Ethereum to this wallet. Click … to expand the menu, after that click “Show QR Code”
11. You will see your receiving address, click on the copy icon to copy and paste the address to the sender.
12. To add GNI token, click on “Add Token”
13. Token Contract Address will be shown to you after KYC is completed. Do not edit Token Symbol and Decimals of Precision. Click “Add”

14. To exchange for GNI token, click “Send”
15. Recipient address will be shown to you after KYC is completed. Enter the amount of ether and in the transaction data enter this without any spaces: 0xa6f2ae3a After that click Next to complete the process.

15. You will see a confirm transactions message, if you see the text: GAS LIMIT TOO HIGH THIS TRANSACTION MAY FAIL, please stop. If you do not see this message please proceed to press submit:
16. Here is an example of a transaction which will fail which you should NOT press send, notice the message indicating possible failure and the very high gas limit: