how to install the ultra air barrier wall system using
TRANSCRIPT

How to Install the Ultra Air Barrier Wall System Using STYROFOAM™ Brand CAVITYMATE™ Ultra Insulation
Dow Building Solutions
I N S T A L L A T I O N I N S T R U C T I O N S | United States | C O M M E R C I A L

2
Ultra Air Barrier Wall System
System OverviewSTYROFOAM™ Brand CAVITYMATE™ Ultra Insulation provides an excellent option for meeting today’s energy code requirements for brick and block wall construction. GREAT STUFF PRO™ Gaps & Cracks Insulating Foam Sealant is a single-component polyurethane foam sealant for general purpose building envelope air/vapor sealing. Together, these two products form the basis of the Ultra Air Barrier Wall System, offering the best of both worlds: a high R-value wall (R-5.6 per inch) with exceptional air/vapor and water barrier capabilities. With fewer steps than conventional masonry wall insulation systems, the Ultra Air Barrier Wall System can save contractors time and money.
Once the veneer ties used to anchor the final building exterior are in place, it’s easy to install by following the steps presented here.
TABLE 1: Suggested Conditions for Installing the Ultra Air Barrier Wall System
Ambient Temperature 32°F or higher recommended.
Substrate Temperature 32°F or higher for recommended.
Moisture % of WallDo not install while raining. Some wall surface moisture is acceptable and will help cure GREAT STUFF PRO™ Gaps & Cracks. However, test for proper adhesion if the wall appears excessively wet.
Can Temperature for GREAT STUFF PRO™ Gaps & Cracks Insulating Foam Sealant
For best results, use between 60-90°F. Protect cans from extreme cold or heat.
Materials ChecklistTo install the Ultra Air Barrier Wall System on a masonry wall, you will need:• STYROFOAM™ Brand CAVITYMATE™
Ultra Insulation• GREAT STUFF PRO™ Gaps & Cracks
Insulating Foam Sealant• PRO Series Foam Dispensing Gun• GREAT STUFF PRO™ Gun Cleaner• Spray adhesive, such as 3M High
Strength 90• Safety gloves• Safety glasses
Wall PreparationMaking sure the wall surface is properly prepared is a key step to a successful installation of the Ultra Air Barrier Wall System. To allow the system to function at maximum effectiveness, first make sure that:• The wall surface is clean and free of
any dirt or debris• Wall ties are properly installed and
spaced• The temperature and moisture levels
fall within acceptable parameters; refer to Table 1 for recommended conditions
• STYROFOAM™ Brand CAVITYMATE™ Ultra Insulation boards are clean and dry

3
Ultra Air Barrier Wall System
How to InstallGeneral Recommendations1. All boards are installed horizontally (15-3/4" x 96" orientation).1. Begin at the bottom of the wall. This is known as course 1.2. At a corner, leave an overhang equal to the board thickness
to allow for staggering on each successive course. (Photo 1)
Installation Overview1. Ensure all skin is covered and safety glasses or goggles are
worn when spraying GREAT STUFF PRO™
2. The first course of insulation requires additional extra adhesion support to the wall. Apply a 1" bead of GREAT STUFF PRO™ Gaps & Cracks Insulating Foam Sealant on the wall above the flashing and just below the first row of wall ties. (If a termination bar is not used, apply the sealant just above the flashing to create the air seal.) (Photo 2)
3. With the printed side facing the exterior, angle the bottom of the STYROFOAM™ Brand CAVITYMATE™ Ultra Insulation board into the corner of the base flashing, then rotate the top onto the wall between the brick ties. (Photo 3)
4. Press the board firmly against the wall to ensure contact with the GREAT STUFF PRO™ Gaps & Cracks Insulating Foam Sealant.*
5. Install adjacent boards across the rest of the bottom course the same way. Place adjacent boards approximately ½" from the edge of the previous board and rotate into position. Tap board into position from the opposite vertical edge, leaving a ¼" gap.
Note: This installation guide illustrates one example of many ways to seal the first course. Another option is to install a waterproofing membrane prior to assembling the Ultra Air Barrier Wall System. In this case, creating a seal at the termination bar and flashing is important as the termination bar will push the rigid insulation away from the wall. For this reason, additional GREAT STUFF PRO™ Gaps & Cracks will be needed in this area.
1
2
3
*Read the label and (Material) Safety Data Sheet carefully before use.

4
Ultra Air Barrier Wall System
Installing Remaining Courses1. Cut the first board to be installed on the second course to 4’
in length to allow for staggering of vertical joints. 2. Apply five balls of GREAT STUFF PRO™ Gaps & Cracks in the
pattern shown in Photo 4. Balls should be about 2” deep by 3” wide.
3. With the printed side out, facing the exterior, angle the STYROFOAM™ Brand CAVITYMATE™ Ultra Insulation board into the top edge of the boards below, then rotate onto the wall.
4. Press the board firmly against the wall to ensure contact with the GREAT STUFF PRO™ Gaps & Cracks Insulating Foam Sealant.
5. After all boards are in position, insert the nozzle of the PRO Series Foam Dispensing Gun in between all vertical and horizontal joints and fills with GREAT STUFF PRO™ Gaps & Cracks Insulating Foam Sealant until bead of foam is visible at the surface edge. (Photo 5)
Installing Around PenetrationsTo install STYROFOAM™ Brand CAVITYMATE™ Ultra Insulation around penetrations such as ducts, electrical boxes and pipes: 1. Cut opening in board approximately ½” to 1” larger than the
measured penetration. 2. Slide board over the penetration. (Photo 6) 3. Fill the gap between the penetration and the board with
GREAT STUFF PRO™ Gaps & Cracks Insulating Foam Sealant. (Photo 7)
4
5
6
7
Note: All penetrations need to be sealed to the base structure to ensure that the air barrier system is maintained.

5
Ultra Air Barrier Wall System
8
9
10
11
Note: Illustrations and details shown are for window applications, but can be utilized for doors or other through-wall openings.
Note: Only GREAT STUFF PRO™ Window and Door should be used for window and door installation.
Installing Around Windows and DoorsWindow Jamb1. Attach wood nailer to block shown in illustration. (Photo 8)2. Apply GREAT STUFF PRO™ Gaps & Cracks Insulating Foam
Sealant to the interface between the wood nailer, bock and STYROFOAM™ Brand CAVITYMATE™ Ultra Insulation board.
3. Install window per window manufacture installation instructions.
4. Seal window as necessary, depending on window design. 5. Flash with LIQUIDARMOR™ Flashing and Sealant as necessary
at terminations. It may be necessary to apply a primer, such as 3M High Strength 90, to the block and/or other substrates to ensure proper adhesion.
Window HeaderNote: Refer to callouts in Photo 91. Install solid fire-rated 2X continuous wood blocking (no
joints) and attach to the steel angle on the front side of the block at the back side. (A)
2. Install window per window manufacturer installation instructions.
3. Install loose-laid structural steel angle. ( C )4. Install pre-formed metal drip edge (E) with required
separation between drip edge and steel angle. 5. Install flashing (D) with termination bar at top. 6. Install cavity drainage net as needed. (B)7. Install weeps as required. 8. Install closure angle (F) to match window material and finish
(e.g., aluminum clad, vinyl clad).
Installing Around Parapet (Roof/Wall)Follow previous instructions for course installation to the top of the wall.
Installing at FoundationFollow previous instructions for first course installation when installing at foundation. (Photo 11)

6
Ultra Air Barrier Wall System
Safety, Product Storage and Use Recommendations
STYROFOAM™ Brand CAVITYMATE™ Brand Insulation• Do not leave STYROFOAM™ Brand CAVITYMATE™ Brand
Insulation exposed to direct sunlight for more than 90 days. Consult a Dow representative is exposure is expected to be longer than 90 days. Prolonged exposure to ultraviolet radiation may cause the surface of STYROFOAM™ Brand CAVITYMATE™ Brand Insulation to become faded and dusty.
• The surface degradation will have no measureable effect on the insulating value of the plastic foam unless the deterioration is allowed to continue until actual foam thickness is lost. Since the dust would impair the performance of the adhesives and finishes, dusty surfaces should be brushed off before these products are applied. A light-colored, opaque protective covering should be used if excessive solar exposure is expected. When stored outdoors, keep insulation boards tarped or covered to protect from weather and weighted down to prevent boards from being blown around by the wind.
• Store above standing water.
GREAT STUFF PRO™ Gaps & Cracks Insulating Foam SealantGREAT STUFF PRO™ Gaps & Cracks Insulating Foam Sealant* is easy to use following the instructions printed on each can, along with a few other guidelines:• Always cover all skin and protect eyes when spraying.• Make sure application surface is free of dust and dirt (a damp
surface will not impair the bond). • Use PRO Series Foam Dispensing Guns to ensure clean and
precise dispensing for professional results. • Read the label and (Material) Safety Data Sheet carefully
before use. • GREAT STUFF PRO™ Gaps & Cracks Insulating Foam Sealant
contains isocyanate and a flammable blowing agent. Vapors may travel to other rooms. Ensure adequate ventilation and shut off all pilot lights and open flames; eliminate all sources of ignition before use. Do not smoke or use lighters or matches while dispensing foam.
• Do not breathe vapors or mists. Use in well-ventilated areas or wear proper respiratory protection. Isocyanate is irritating to the eyes, skin and respiratory system and may cause sensitization by inhalation or skin contact.
• GREAT STUFF PRO™ Gaps & Cracks is very sticky and will adhere to most surfaces and skin. Do not get foam on skin. Wear gloves and goggles or safety glasses. Cured foam must be mechanically removed or allowed to wear off in time.
• The contents are under pressure. The can may burst if left in areas susceptible to high temperatures such as motor vehicles, or near radiators, stoves or other sources of heat. Do not place can in water. Do not puncture incinerate or store can in temperatures above 120ºF.
7
Ultra Air Barrier Wall System
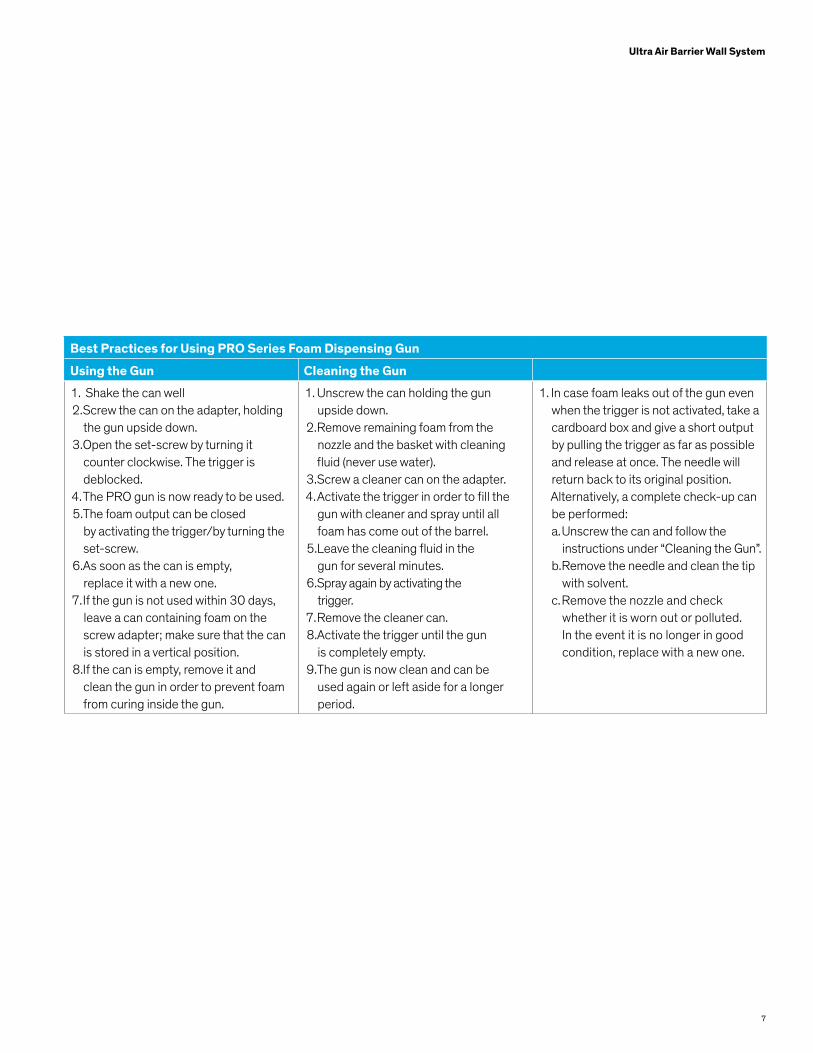
Best Practices for Using PRO Series Foam Dispensing Gun
Using the Gun Cleaning the Gun
1. Shake the can well2. Screw the can on the adapter, holding
the gun upside down. 3. Open the set-screw by turning it
counter clockwise. The trigger is deblocked.
4. The PRO gun is now ready to be used. 5. The foam output can be closed
by activating the trigger/by turning the set-screw.
6. As soon as the can is empty, replace it with a new one.
7. If the gun is not used within 30 days, leave a can containing foam on the screw adapter; make sure that the can is stored in a vertical position.
8. If the can is empty, remove it and clean the gun in order to prevent foam from curing inside the gun.
1. Unscrew the can holding the gun upside down.
2. Remove remaining foam from the nozzle and the basket with cleaning fluid (never use water).
3. Screw a cleaner can on the adapter.4. Activate the trigger in order to fill the
gun with cleaner and spray until all foam has come out of the barrel.
5. Leave the cleaning fluid in the gun for several minutes.
6. Spray again by activating the trigger.
7. Remove the cleaner can. 8. Activate the trigger until the gun
is completely empty. 9. The gun is now clean and can be
used again or left aside for a longer period.
1. In case foam leaks out of the gun even when the trigger is not activated, take a cardboard box and give a short output by pulling the trigger as far as possible and release at once. The needle will return back to its original position. Alternatively, a complete check-up can be performed:a. Unscrew the can and follow the
instructions under “Cleaning the Gun”. b. Remove the needle and clean the tip
with solvent. c. Remove the nozzle and check
whether it is worn out or polluted. In the event it is no longer in good condition, replace with a new one.

8
Ultra Air Barrier Wall System
Ultra Air Barrier Wall System Work RecordInstallers should use this work record to integrate into their product files to demonstrate proper air barrier installation technique for the Ultra Air Barrier Wall System. Use this cover page as a project summary, completed once prior to installation to act as primary record of fundamental project information. The subsequent “Installation Checklist” should be completed daily during installation, compiled with this cover page to be presented for record to the Construction Manager after completion.
PROJECT INFORMATION INSTALLER INFORMATION
Project Name: Company:
Address: Phone Number:
Architect: Address:
CM:
GC (if not CM): Project Mgr:
Start Date: Forman:
Completion Date:
RIGID INSULATION MATERIAL JOINT TREATMENT MATERIAL
Manufacturer: The Dow Chemical Company Manufacturer: The Dow Chemical Company
STYROFOAM™ Brand CAVITYMATE™ Ultra GREAT STUFF PRO™ Gaps & Cracks
STYROFOAM™ Brand Ultra SL LIQUIDARMOR™ - Flashing & Sealant
Product Thickness
WINDOW FLASHING MATERIAL
Manufacturer: The Dow Chemical Company
GREAT STUFF PRO™ Gaps & Cracks
LIQUIDARMOR™ - Flashing & Sealant
This hereby verifies that all parties have reviewed and fully understand the proper installation methods as shown in the official Dow installation instructions for use of this system as an air barrier assembly. With this, it is understood in submitting the following Daily Work Records the contractor recognizes that the level of quality & craftsmanship required is integral to assuring long standing performance.
Contractor Printed Name Signature Date
Project Manager Printed Name Signature Date

9
Ultra Air Barrier Wall System
SUBSTRATE PREPARATION
The wall surface is clean and free of any dirt or debris
Wall ties are properly installed and spaced
Ambient Temperature is above 32F or higher
Substrate Temperature is above 32F or higher
% Moisture of wall
Installation did not occur while raining
Wall did not have visible water droplets on surface
Installation did not occur immediately after raining or wall saturation
GREAT STUFF PRO™ CONDITIONSStorage Temperature (overnight included) above 60F.
Optimal Product Temperature during installation is between 60F-90F.
In below freezing conditions, GREAT STUFF PRO should be stored on site in warmer cooler or trailer.
INSTALLATION PRACTICESAdhered all Insulation boards using GREAT STUFF PRO™ Gaps & Cracks
Applied 1” continuous bead of GREAT STUFF PRO™ Gaps & Cracks above all through – wall flashings
All board joints sealed adequately with GREAT STUFF PRO™ Gaps & Cracks
(Fully filling each joint: from face of CMU to exterior face of rigid insulation)
All adjacent trades penetrating exterior wall have been coordinated with & sealed properly
(Electrical conduit, plumbing, security systems, etc.)
Installed system has not been left exposed for more than 90 days
COMMENTS:
DAILY WORK RECORDFor the CAVITYMATE™ Ultra Wall System

10
Ultra Air Barrier Wall System
WINDOW & DOOR FLASHING INSTALLATION
Flashing Material: LIQUIDARMOR™ Flashing and Sealant
All flashing installation abides by details required by the architect’s drawings & specifications
All flashing material installed from face on insulation into sill, jamb & header
Installed at a recommended 50 ± 5 mils wet thickness
Application Method: Brush Roller Spray Equipment
INSTALLER INFORMATIONName of System Installer(s) on this Date:
Building Façade Installed
North Northeast East Southeast
South Southwest West Northwest
Approximate Area Installed SF Percent Completion %
TRADE COORDINATIONNumber of Windows Flashed___________ Number of Penetrations to Envelope Treated/Sealed___________
Coordination Notes/Comments
Coordination Action Items
DAILY WORK RECORDFor the CAVITYMATE™ Ultra Wall System

11
Ultra Air Barrier Wall System
INSTALLION OVERSEER
Name of Installation Overseer Company
Role on Project: Project Architect Construction Manager Contractor Forman
Validates, to the best of his/her knowledge that the above has been completed honestly and accurately.
Comments
DAILY WORK RECORDFor the CAVITYMATE™ Ultra Wall System

In the U.S. The Dow Chemical Company Dow Building Solutions200 Larkin CenterMidland, MI 48674
NOTICE: No freedom from infringement of any patent owned by Dow or others is to be inferred. Because use conditions and applicable laws may differ from one location to another and may change with time, Customer is responsible for determining whether products and the information in this document are appropriate for Customer’s use and for ensuring that Customer’s workplace and disposal practices are in compliance with applicable laws and other government enactments. The product shown in this literature may not be available for sale and/or available in all geographies where Dow is represented. The claims made may not have been approved for use in all countries. Dow assumes no obligation or liability for the information in this document. References to “Dow” or that “Company” mean the Dow legal entity selling the products to Customer unless otherwise expressly noted. NO WARRANTIES ARE GIVEN; ALL IMPLIED WARRANTIES OF MERCHANTABILITY OR FITNESS FOR A PARTICULAR PURPOSE ARE EXPRESSLY EXCLUDED.
*LIQUIDARMOR™ Read the instructions and (Material) Safety Data Sheets (M)SDS carefully before use. It is recommended that spray applicators and those working in the spray area wear eye protection. Contact with exposed skin may cause skin discoloration and dryness. Gloves are recommended for prolonged exposures. Ensure adequate ventilation during spray applications.
STYROFOAM™ Brand Extruded Polystyrene Foam InsulationCAUTION: This product is combustible and shall only be used as specified by the local building code with respect to flame spread classification and to the use of a suitable thermal barrier. For more information, consult (Material) Safety Data Sheet ((M)SDS), call Dow at 1-866-583-BLUE (2583) or contact your local building inspector. In an emergency, call 1-989-636-4400.
WARNING: Rigid foam insulation does not constitute a working walkable surface or qualify as a fall protection product.
Dow Polyurethane Foam Insulation and SealantsCAUTION: When cured, these products are combustible and will burn if exposed to open flame or sparks from high-energy sources. Do not expose to temperatures above 240ºF. For more information, consult (M)SDS, call Dow at 1-866-583-BLUE (2583) or contact your local building inspector. In an emergency, call 1-989-636-4400.
GREAT STUFF PRO™ sealant and adhesive products contain isocyanate and a flammable blowing agent. Read all instructions and (M)SDS carefully before use. Eliminate all sources of ignition before use. Cover all skin. Wear long sleeves, gloves, and safety glasses or goggles. Provide adequate ventilation or wear proper respiratory protection. Contents under pressure. Not to be used for filling closed cavities or voids such as behind walls and under tub surrounds.CAUTION: When cured, these products are combustible and will burn if exposed to open flame or sparks from high-energy sources. Do not expose to temperatures above 240ºF (116ºC). For more information, consult MSDS, call Dow at 1-866-583-BLUE (2583) or contact your local building inspector. In an emergency, call 1-989-636-4400 in the U.S. or 1-519-339-3711 in Canada.
GREAT STUFF PRO™ Gun Cleaner is flammable and contains acetone and propane. Read all instructions and (M)SDS carefully before use. Eliminate all sources of ignition before use. Cover all skin. Wear gloves, and goggles or safety glasses. Provide adequate ventilation or wear proper respiratory protection. Contents under pressure.
CAUTION: When cured, these products are combustible and will burn if exposed to open flame or sparks from high-energy sources. Do not expose to temperatures above 240ºF (116ºC). For more information, consult MSDS, call Dow at 1-866-583-BLUE (2583) or contact your local building inspector. In an emergency, call 1-989-636-4400 in the U.S. or 1-519-339-3711 in Canada.
Building and/or construction practices unrelated to building materials could greatly affect moisture and the potential for mold formation. No material supplier including Dow can give assurance that mold will not develop in any specific system.
®™ Trademark of The Dow Chemical Company (“Dow”) or an affiliated company of Dow Form Number: 179-04646-0116 CDP
Sales & Technical Information1-866-583-BLUE (2583)
www.dowbuildingsolutions.com