home prefinished solid hardwood flooring …
TRANSCRIPT
PREFINISHED SOLID HARDWOOD FLOORING
NAIL DOWN - NAIL/GLUE ASSIST – GLUE DOWN
Solid Hardwood Flooring
RESIDENTIAL WARRANTY * CARE * COMMERCIAL WARRANTY
HOME
INSTALLATION *
2
LIMITED RESIDENTIAL CONSUMER WARRANTYBellawood Solid Hardwood Flooring
THIS LIMITED WARRANTY GIVES YOU SPECIFIC LEGAL RIGHTS, AND YOU MAY ALSO HAVE OTHER RIGHTS, WHICH VARY FROM STATE TO STATE AND PROVINCE TO PROVINCE.
THIS LIMITED WARRANTY CONTAINS ARBITRATION AND CLASS ACTION WAIVER PROVISIONS (SEE BELOW IN SECTION 9). THIS LIMITED WARRANTY ALSO CON-TAINS LIMITATIONS OF LIABILITY (SEE BELOW IN SECTION 8).
WE LIMIT THE DURATION AND REMEDIES OF ALL IMPLIED WARRANTIES, INCLUD-ING WITHOUT LIMITATION THE WARRANTIES OF MERCHANTABILITY AND FIT-NESS FOR A PARTICULAR PURPOSE TO THE DURATION OF THIS EXPRESS LIMITED WARRANTY (SEE SECTION 2).
SOME STATES AND JURISDICTIONS DO NOT ALLOW LIMITATIONS ON HOW LONG AN IMPLIED WARRANTY LASTS, SO THE ABOVE LIMITATION MAY NOT AP-PLY TO YOU.
OUR RESPONSIBILITY FOR DEFECTIVE GOODS IS LIMITED TO THE STORE CREDIT AS DESCRIBED BELOW IN THIS LIMITED WARRANTY STATEMENT.
[warranty information continues on following page]
© 2020 Lumber Liquidators, 4901 Bakers Mill Lane, Richmond VA 23230-2431 Rev. 04.15.2020 BEWD-SOLD-ND-GD
COMMERCIAL WARRANTY

3
1. WHO MAY USE THIS WARRANTY?
Lumber Liquidators, Inc. (“we,” “us,” and “our”) extends this limited warranty only to the con-sumer who originally purchased the product and, once installed at a property, to each trans-feree of the property where the flooring was initially installed (the relevant owner, “you”), pro-vided the warranty is timely registered as described below and is only for residential use. In a valid and registered transfer, the warranty extends only to the person who owns such property at the time of the warranty claim.
For purposes of this limited warranty, a “residential use” is a product installation at a sin-gle-family home, apartment unit, townhouse, or other place where people live and, notwith-standing the forgoing list, excludes: (a) multi-family housing common areas; (b) any real estate property that is used for business or commercial activities; (c) any location used in whole or in part for business or commercial purposes; and (d) any location where foot traffic exceeds nor-mal, residential foot traffic. We have the sole right to make the determination of whether an application is a residential use or another kind of use. For purposes of such determination, we may need to visit the location that relates to the warranty claim for inspection and use. This limited warranty does not apply to light commercial or heavy commercial use.
This warranty is not transferable unless the original purchaser registers the flooring purchase at www.llflooring.com or via telephone at 1-800-254-0181 within ninety (90) days of your pur-chase. Once registered, we will send the original purchaser a Bellawood Certificate. If you don’t receive your Bellawood Certificate within thirty (30) days of contacting us, please call us at 1-800-254-0181. If you do not call within sixty (60) days of contacting us, we are not obligat-ed to provide or replace any certificates. You should store the original Bellawood Certificate in a safe place and give it to the new owner if you sell or transfer ownership of your property where the product is installed.
To file a claim, any subsequent owner must present the original Bellawood Certificate. No claim by a subsequent owner will be accepted without the timely presentation of the original Bel-lawood Certificate and proof of ownership of the property where the product is installed.
2. WHAT IS THE PERIOD OF COVERAGE?
Subject to the requirements listed in Section 5 below, this limited warranty starts on the date of your purchase and lasts for the time period set forth in the chart below for your specific product (the “Warranty Period”):
Product Identification Warranty Duration
Bellawood 100 Years
Bellawood Artisan 100 Years
If, for any reason, we repair or replace the product, the Warranty Period is not extended. We may change the availability and duration of this limited warranty at our discretion, but any changes will not be retroactive.
3. WHAT DOES THIS WARRANTY COVER?
During the Warranty Period and subject to the complete terms of this limited warranty, this lim-ited warranty covers the following product aspects from defects in materials and workmanship of the purchased product (the “product”):
• Limited Finish Wear Warranty. Finish wear from normal residential use conditions resulting in the exposure of the bare wood, subject to the exclusions provided in Section 4 below.
• Defects Included in Waste Factor. Manufacturing and natural defects in excess of the Waste Factor (defined below). For purposes of this limited warranty, “Waste Factor” shall mean the allowance for manufacturing and natural defects in flooring and is represented by a percentage—namely, that no more than 5% of the total square footage of your purchase
© 2020 Lumber Liquidators, 4901 Bakers Mill Lane, Richmond VA 23230-2431 Rev. 04.15.2020 BEWD-SOLD-ND-GD

4
of a domestic species and 10% for exotic species. For purposes of clarity, the Waste Factor does not relate to product waste caused by your cutting the product for your intended project or use. Rather, the Waste Factor relates to the stated percentage of the product as purchased that a purchaser can expect to have manufacturing or natural defects. Your cutting allowance (that is, the inherent waste created by your cutting the product) is not a defect or deficiency and will depend on your project and your use of the materials.
• Delamination. The product will not delaminate under normal residential use conditions.
4. WHAT DOES THIS WARRANTY NOT COVER?
This limited warranty does not cover any defects or damages due to: (a) failure to strictly follow the Installation and Care Requirements (defined and discussed below) regardless of the installer; (b) transportation; (c) storage; (d) improper use; (e) modifications; (f) unauthorized repair; or (g) ex-ternal causes such as accidents, abuse, or other actions or events beyond our reasonable control. In addition, this limited warranty does not cover any defects or damages due to the following:
• Moisture (or Lack of Moisture). Damages caused by moisture (such as leaking pipes, spills, wet mopping, pets, relative humidity, subfloor moisture etc.) are excluded. Moisture (and dry-ness) can cause issues such as checks, cupping, crowning, warping, buckling, peeling, twisting, seam swelling or gapping. In addition, moisture intrusions from concrete hydrostatic pressure, flooding, or plumbing leaks, along with high levels of alkalinity, can affect flooring and sub-flooring over time and moisture can be trapped below the flooring and/or underlayment and create mildew or mold. Damage from such conditions, including to the floor and subfloor, is not covered under this limited warranty.
• Gloss Reduction. Fading or loss of gloss (or glaze) is not finish wear and not a product defect covered under this limited warranty.
• Within Waste Factor. Defects in flooring that do not exceed the Waste Factor (defined above) are not covered under this limited warranty. Consequently, it is recommended that you add the applicable percentage to your total square footage when ordering your floor.
• Other Finishes. This limited warranty covers the factory-applied finish only. Applying another finish or sanding (such as in preparation for another finish) may damage the factory-applied finish and voids this limited warranty against finish wear.
• Exterior Use. This limited warranty does not cover exterior use of the product.
• Non-Flooring Installations. This limited warranty does not cover use of the products for instal-lations on ceilings or other usages for purposes other than flooring (like furniture or counter-tops).
• Visible Defects. As discussed further below in Section 5.C., products installed with visible de-fects are not covered under this limited warranty. Accordingly, before installation, you and the installer should examine each product to ensure it is satisfactory.
• Natural Characteristics. Wood and bamboo are natural products. They may change as a re-sult of the conditions to which they are exposed including seasonal and environmental factors. Color changes due to aging or exposure to UV/sunlight may also occur. In addition, natural variations from board to board, like differences in grain, color, tone, and knots, may exist.
• Fading from Mats. This limited warranty does not cover fading or discoloration due to use of rubber-backed mats.
• Expansion and Contraction. As a product of nature, wood and bamboo will react to changes in temperature and humidity. Small gaps between planks are a normal occurrence with chang-es in relative humidity. These gaps are seasonal and show up primarily in the winter when cold temperatures lower the relative humidity in the air. Wood and bamboo flooring perform best at relative humidity rates between 30% and 50% and temperatures between 60°F and 80°F (not to exceed a 20% fluctuation in relative humidity), before, during and after the installation and remain at such levels throughout the life of your floor to ensure optimum performance.
© 2020 Lumber Liquidators, 4901 Bakers Mill Lane, Richmond VA 23230-2431 Rev. 04.15.2020 BEWD-SOLD-ND-GD
5
Please note that ideal interior environmental conditions will vary from region to region and jobsite to jobsite, the relative humidity figures on your project maybe higher or lower. You must ensure that the change in relative humidity stays within a 20% range (e.g. 40% - 60%) and does not fluctuate beyond 20% for sustained periods, which may affect the flooring. Home environments where the relative humidity levels are below 30% or above 70% are not recommended or subject to coverage under this limited warranty. Seasonal homes or leaving a building/structure unoccupied without climate control for extended periods of time can lead to damage to the floor from excessive humidity build-up or extremely dry conditions. Both scenarios can damage the floor, cabinets, and furniture.
• Color and Shade Variations. New or replacement flooring may not always match samples, printed color photography (including websites and catalogs), existing flooring or other prod-ucts (such as cabinets, stair railings, trim and moldings) due to, among other things, natural variations that occur in species, age, growing conditions, exposure to UV/sunlight and other factors. These variations should be expected. Inspect product before installation Claims for color and shade variation will not be accepted after the product is installed.
• Odd Lots. An odd lot is flooring that is discounted because it did not pass our rigorous in-spection process and is not covered by this limited warranty.
• Third-Party Purchases. This limited warranty does not cover any purchases other than those made directly from Lumber Liquidators in store, online, or by phone.
• Radiant Heat. This limited warranty does not cover any products installed over radiant heat that are not installed according to the radiant heat manufacturer guidelines or not installed in compliance with the Installation and Care Requirements.
• Outdoor Installation. Outdoor and partial outdoor installations of the product void this limit-ed warranty and are not covered.
• Removal and Replacement. This limited warranty does not cover the cost of the removal or replacement of Countertops, cabinets, built-in appliances or other fixtures, installed on top of your floor.
• Improper Installation and Maintenance. This limited warranty does not cover any dissatis-faction or damage due to improper installation or maintenance. This includes any damages caused by any installation (regardless of the source of the installation advice) that conflicts with the applicable industry installation standards and product installation instructions—for example, damage caused by sub-surface, sub-flooring and jobsite environmental deficiencies, improper transportation, acclimation and storage.
5. HOW DO I MAINTAIN THIS WARRANTY DURING THE WARRANTY PERIOD?
To maintain this limited warranty during the Warranty Period, you are obligated to meet all of the following requirements for your use, installation, and maintenance of the product (the “Installation and Care Requirements”). The Installation and Care Requirements must be strictly followed for the limited warranty to remain valid and not be void.
A. Follow the Pre-Installation Requirements. Prior to installing a single board, tile, or product, you or the installer must determine that the job-site environment and the sub-surfaces (includ-ing subfloor substrates) meet or exceed applicable industry and product standards, including, without limitation, moisture testing and controls. The product installation instructions discuss these standards and are provided in full below. These requirements must be strictly followed.
B. Comply with All Laws. In your installation, maintenance, and use of the product you must comply with all laws and regulations, including, without limitation, all applicable environmental and building codes, regulations and laws.
C. Inspect All Products for Visible Defects. Products installed with visible defects are not cov-ered under this limited warranty. Accordingly, before installation, you and the installer should examine each product to ensure it is satisfactory. If any products are unacceptable for any
© 2020 Lumber Liquidators, 4901 Bakers Mill Lane, Richmond VA 23230-2431 Rev. 04.15.2020 BEWD-SOLD-ND-GD
6
reason, it is up to you to determine to use them, hide them in areas like closets, trim off the imperfection, or not install them at all. You should plan on being present during your installa-tion to ensure that all required procedures are completed and products with visible defects are not installed. It is important to inspect individual boards and tiles and to frequently step back to observe the “whole picture” before installation is completed. If quality issues are suspected before or during installation immediately contact the store where your floor was purchased or call us at 1-800-366-4204.
D. Follow the Installation and Care Instructions. It is your duty to make sure the installation requirements are strictly followed, including, without limitation, as they relate to the use of moisture barriers, installation tools such as nailers and trowels, and the evaluation of job site conditions and moisture testing. The product’s installation and care manual(s) are provided in this document below, and those terms and provisions are part of this limited warranty.
6. WHAT ARE YOUR REMEDIES UNDER THIS WARRANTY?
With respect to any defective product during the Warranty Period, we will provide a Lumber Liqui-dators store credit in the amount of the purchase price paid for the defective portion of the floor-ing (excluding any installation costs and labor) in excess of the applicable Waste Factor (defined above). A store credit is the sole remedy under this warranty and can be used for store product purchases only. Provided, however, we reserve the right, in our sole discretion, to repair or replace such product (or the defective part) free of charge in lieu of a store credit. We will also pay for shipping and handling fees to return the repaired or replacement product to you if we elect to repair or replace the defective product.
There is no guarantee that the same or a similar product to the original flooring will be available at the time a store credit is issued or redeemed.
We reserve the right to investigate, assess, and validate reported claims by, among other things, requesting samples from you for technical analysis and performing an inspection of the flooring and installation location.
7. HOW DO YOU OBTAIN WARRANTY SERVICE?
To file a warranty claim during the Warranty Period, you may:
A. Visit the store where you purchased your floor;
B. Call us at 1-800-366-4204; or
C. Email via the “contact us” link at www.llflooring.com
Claims must be submitted within the Warranty Period and within ninety (90) days of the date that the problem with the floor is first discovered. No warranty claim will be serviced without contact-ing us through one of the methods listed above and providing accurate and complete information in a timely manner.
8. WHAT ARE THE LIMITATIONS OF LIABILITY?
THE REMEDIES DESCRIBED ABOVE IN SECTION 6 ARE YOUR SOLE AND EXCLUSIVE REM-EDIES AND OUR ENTIRE LIABILITY FOR ANY BREACH OF THIS LIMITED WARRANTY. NOT-WITHSTANDING ANY OTHER PROVISION OR TERM, OUR LIABILITY SHALL UNDER NO CIR-CUMSTANCES EXCEED THE ACTUAL AMOUNT PAID BY YOU FOR THE DEFECTIVE PRODUCT OR DEFECTIVE PORTION THEREOF.
UNDER NO CIRCUMSTANCES SHALL WE BE LIABLE FOR ANY CONSEQUENTIAL, INCIDEN-TAL, SPECIAL OR PUNITIVE DAMAGES OR LOSSES, WHETHER DIRECT OR INDIRECT. WITH-OUT LIMITING THE FORGOING SENTENCE, LOSSES, DAMAGES OR EXPENSES RELATING TO ANYTHING OTHER THAN THE FLOOR ITSELF ARE NOT COVERED, INCLUDING, WITHOUT LIMITATION, MISSED TIME FROM WORK, HOTEL STAYS, STORAGE FEES, KENNEL COSTS FOR PETS, REMOVAL OF DEFECTIVE FLOORING, INSTALLATION OF REPLACEMENT FLOOR-
© 2020 Lumber Liquidators, 4901 Bakers Mill Lane, Richmond VA 23230-2431 Rev. 04.15.2020 BEWD-SOLD-ND-GD

7
ING, OR REMOVAL OR REPLACEMENT OF ITEMS BUILT ON TOP OF ANY FLOORING (FOR EXAMPLE, COUNTERTOPS, CABINETS, BUILT-IN APPLIANCES).
SOME STATES AND JURISDICTIONS DO NOT ALLOW THE EXCLUSION OR LIMITATION OF INCIDENTAL OR CONSEQUENTIAL DAMAGES, SO THE ABOVE LIMITATION OR EXCLUSION MAY NOT APPLY TO YOU.
9. TERMS OF DISPUTE RESOLUTION
NO JOINT OR CLASS ACTIONS: Neither you nor Lumber Liquidators shall be entitled to join or consolidate claims in arbitration by or against other customers of Lumber Liquidators with respect to other accounts, bring mass, class action, or consolidated claims in arbitration or a court of com-petent jurisdiction, or arbitrate or litigate any claim as a representative or individual of a class or in a private attorney general capacity. The arbitrator may not consolidate more than one person’s claims and may not otherwise preside over any form of a representative or class proceeding.
ARBITRATION: The following informal dispute resolution procedure is available to you if you believe that we have not performed our obligations under this limited warranty. You must use this informal procedure before pursuing any legal remedy in the courts.
Lumber Liquidators and you agree to attempt to resolve any disputes amicably. If, after thirty (30) days we are unable to do so, then you and Lumber Liquidators each agree that any claim or con-troversy of any sort relating to our agreement, the Products or these limited warranty terms shall be determined by arbitration in the nearest U.S. city to the Lumber Liquidators store where you purchased the products, before one arbitrator. At the option of the first to commence an arbitra-tion, the arbitration shall be administered either by JAMS pursuant to its Streamlined Arbitration Rules and Procedures, or by the American Arbitration Association pursuant to its Commercial Arbitration Rules. The arbitrator shall have no power to add to, delete from or modify these lim-ited warranty terms. Each of us shall have the right to conduct discovery to which we would be entitled had the dispute been resolved in a state court of general jurisdiction in the state of the Lumber Liquidators store where you purchased the products. Judgment on the arbitrator’s award may be entered in any court having jurisdiction. This clause shall not preclude either party from seeking provisional remedies in aid of arbitration from a court of appropriate jurisdiction. The arbitrator may, as part of the award, allocate all or part of the costs of the arbitration, including the fees of the arbitrator and the reasonable attorneys’ fees of the prevailing party. The arbitrator shall only have the authority to resolve individual disputes between you and Lumber Liquidators. Notwithstanding the foregoing, in addition to our rights set forth above, we may initiate proceed-ings directly in the appropriate court located in the U.S. city nearest the Lumber Liquidators store where you purchased the products in connection with any claim to collect amounts due and ow-ing by you.
10. NO OTHER TERMS
SAMPLES, DESCRIPTIONS, AND OTHER INFORMATION CONCERNING THE PRODUCT CON-TAINED IN CATALOGS, ADVERTISEMENTS, OR OTHER PROMOTIONAL MATERIAL OR STATE-MENTS MADE BY SALES REPRESENTATIVES OR DISTRIBUTORS ARE FOR GENERAL INFOR-MATIONAL PURPOSES ONLY AND ARE NOT BINDING UPON LUMBER LIQUIDATORS. NO SALES REPRESENTATIVES, STORE MANAGERS, ACCOUNT REPRESENTATIVES, OR DISTRIBU-TORS SHALL HAVE ANY AUTHORITY WHATSOEVER TO ESTABLISH, EXPAND OR OTHERWISE MODIFY LUMBER LIQUIDATORS’ WARRANTIES. THE TERMS OF THIS LIMITED WARRANTY DOCUMENT MAY NOT BE AMENDED EXCEPT THROUGH A WRITTEN AGREEMENT TITLED “AMENDMENT TO LIMITED WARRANTY” AND SIGNED BY AN AUTHORIZED OFFICER OF LUMBER LIQUIDATORS, PROVIDED, HOWEVER, THAT LUMBER LIQUIDATORS MAY GENER-ALLY MODIFY, CANCEL, UPDATE, OR OTHERWISE CHANGE ITS PROSPECTIVE WARRANTIES FOR FUTURE SALES AT ANY TIME AND FOR ANY REASON.
© 2020 Lumber Liquidators, 4901 Bakers Mill Lane, Richmond VA 23230-2431 Rev. 04.15.2020 BEWD-SOLD-ND-GD
8
11. OTHER PROVISIONS
The section headings provided in this limited warranty are for convenience and informational ref-erence only and shall and shall not affect the interpretation or construction of this limited warranty.
THE PROVISIONS OF THIS LIMITED WARRANTY ARE DEEMED TO BE SEVERABLE AND THE INVALIDITY OR UNENFORCEABILITY OF ONE PROVISION SHALL NOT AFFECT THE VALIDITY OR ENFORCEABILITY OF ANY OTHER PROVISION.
12. ADDRESS FOR LUMBER LIQUIDATORS
Lumber Liquidators, Inc. is located at 4901 Bakers Mill Lane, Richmond, VA 23230.
HOME * INSTALLATION * CARE * COMMERCIAL WARRANTY
© 2020 Lumber Liquidators, 4901 Bakers Mill Lane, Richmond VA 23230-2431 Rev. 04.15.2020 BEWD-SOLD-ND-GD
9
NAIL DOWN - NAIL/GLUE ASSIST GLUE DOWN
INSTALLATION
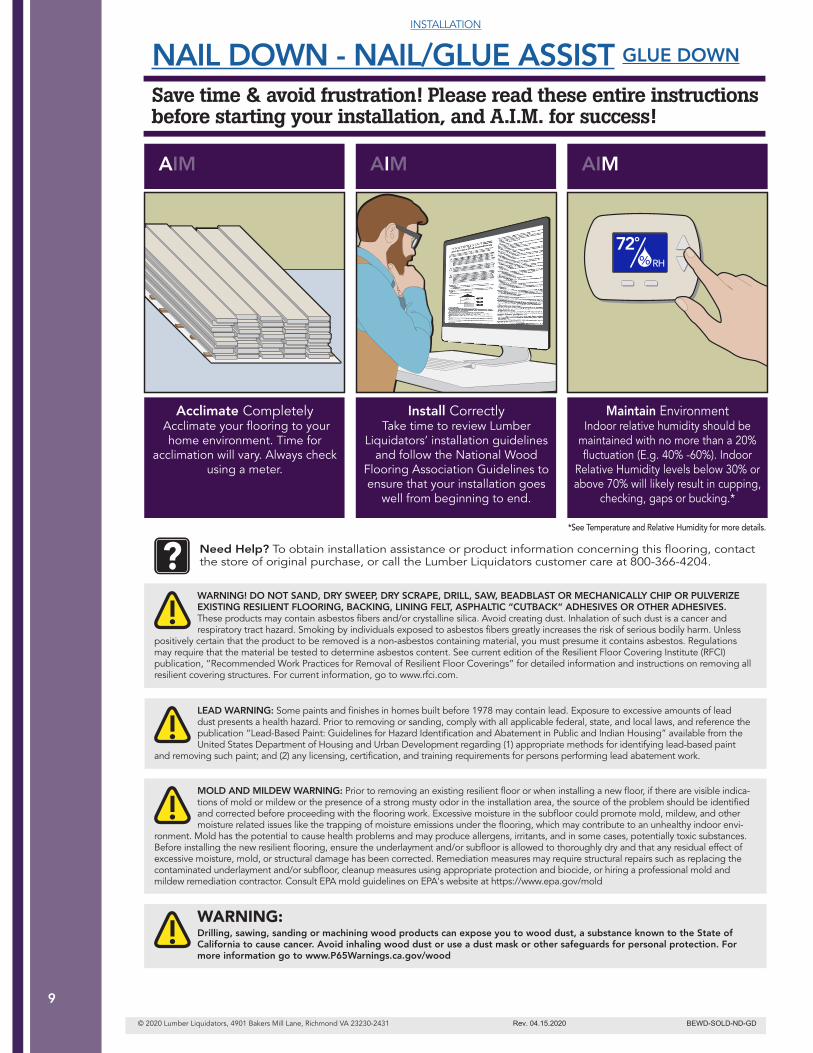
AIM AIM AIM
Acclimate Completely Acclimate your flooring to your
home environment. Time for acclimation will vary. Always check
using a meter.
Install CorrectlyTake time to review Lumber
Liquidators’ installation guidelines and follow the National Wood
Flooring Association Guidelines to ensure that your installation goes
well from beginning to end.
Maintain EnvironmentIndoor relative humidity should be
maintained with no more than a 20% fluctuation (E.g. 40% -60%). Indoor
Relative Humidity levels below 30% or above 70% will likely result in cupping,
checking, gaps or bucking.*
72°RH
Save time & avoid frustration! Please read these entire instructions before starting your installation, and A.I.M. for success!
LEAD WARNING: Some paints and finishes in homes built before 1978 may contain lead. Exposure to excessive amounts of lead dust presents a health hazard. Prior to removing or sanding, comply with all applicable federal, state, and local laws, and reference the publication “Lead-Based Paint: Guidelines for Hazard Identification and Abatement in Public and Indian Housing” available from the United States Department of Housing and Urban Development regarding (1) appropriate methods for identifying lead-based paint
and removing such paint; and (2) any licensing, certification, and training requirements for persons performing lead abatement work.
WARNING! DO NOT SAND, DRY SWEEP, DRY SCRAPE, DRILL, SAW, BEADBLAST OR MECHANICALLY CHIP OR PULVERIZE EXISTING RESILIENT FLOORING, BACKING, LINING FELT, ASPHALTIC “CUTBACK” ADHESIVES OR OTHER ADHESIVES. These products may contain asbestos fibers and/or crystalline silica. Avoid creating dust. Inhalation of such dust is a cancer and respiratory tract hazard. Smoking by individuals exposed to asbestos fibers greatly increases the risk of serious bodily harm. Unless
positively certain that the product to be removed is a non-asbestos containing material, you must presume it contains asbestos. Regulations may require that the material be tested to determine asbestos content. See current edition of the Resilient Floor Covering Institute (RFCI) publication, “Recommended Work Practices for Removal of Resilient Floor Coverings” for detailed information and instructions on removing all resilient covering structures. For current information, go to www.rfci.com.
MOLD AND MILDEW WARNING: Prior to removing an existing resilient floor or when installing a new floor, if there are visible indica-tions of mold or mildew or the presence of a strong musty odor in the installation area, the source of the problem should be identified and corrected before proceeding with the flooring work. Excessive moisture in the subfloor could promote mold, mildew, and other moisture related issues like the trapping of moisture emissions under the flooring, which may contribute to an unhealthy indoor envi-
ronment. Mold has the potential to cause health problems and may produce allergens, irritants, and in some cases, potentially toxic substances. Before installing the new resilient flooring, ensure the underlayment and/or subfloor is allowed to thoroughly dry and that any residual effect of excessive moisture, mold, or structural damage has been corrected. Remediation measures may require structural repairs such as replacing the contaminated underlayment and/or subfloor, cleanup measures using appropriate protection and biocide, or hiring a professional mold and mildew remediation contractor. Consult EPA mold guidelines on EPA's website at https://www.epa.gov/mold
Need Help? To obtain installation assistance or product information concerning this flooring, contact the store of original purchase, or call the Lumber Liquidators customer care at 800-366-4204.?
*See Temperature and Relative Humidity for more details.
Drilling, sawing, sanding or machining wood products can expose you to wood dust, a substance known to the State of California to cause cancer. Avoid inhaling wood dust or use a dust mask or other safeguards for personal protection. For more information go to www.P65Warnings.ca.gov/wood
WARNING:
© 2020 Lumber Liquidators, 4901 Bakers Mill Lane, Richmond VA 23230-2431 Rev. 04.15.2020 BEWD-SOLD-ND-GD
10
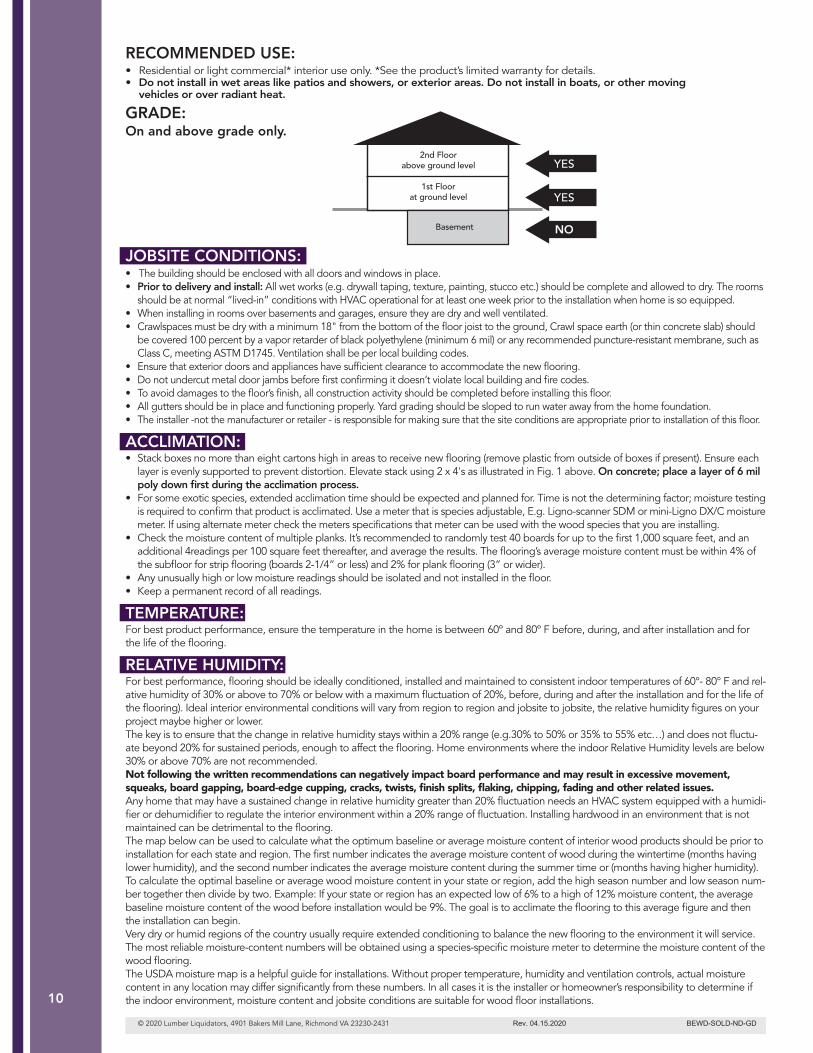
RECOMMENDED USE:• Residential or light commercial* interior use only. *See the product’s limited warranty for details.• Do not install in wet areas like patios and showers, or exterior areas. Do not install in boats, or other moving vehicles or over radiant heat.
GRADE: On and above grade only.
JOBSITE CONDITIONS:• The building should be enclosed with all doors and windows in place.• Prior to delivery and install: All wet works (e.g. drywall taping, texture, painting, stucco etc.) should be complete and allowed to dry. The rooms
should be at normal “lived-in” conditions with HVAC operational for at least one week prior to the installation when home is so equipped.• When installing in rooms over basements and garages, ensure they are dry and well ventilated.• Crawlspaces must be dry with a minimum 18" from the bottom of the floor joist to the ground, Crawl space earth (or thin concrete slab) should
be covered 100 percent by a vapor retarder of black polyethylene (minimum 6 mil) or any recommended puncture-resistant membrane, such as Class C, meeting ASTM D1745. Ventilation shall be per local building codes.
• Ensure that exterior doors and appliances have sufficient clearance to accommodate the new flooring. • Do not undercut metal door jambs before first confirming it doesn’t violate local building and fire codes.• To avoid damages to the floor’s finish, all construction activity should be completed before installing this floor.• All gutters should be in place and functioning properly. Yard grading should be sloped to run water away from the home foundation.• The installer -not the manufacturer or retailer - is responsible for making sure that the site conditions are appropriate prior to installation of this floor.
ACCLIMATION:• Stack boxes no more than eight cartons high in areas to receive new flooring (remove plastic from outside of boxes if present). Ensure each
layer is evenly supported to prevent distortion. Elevate stack using 2 x 4's as illustrated in Fig. 1 above. On concrete; place a layer of 6 mil poly down first during the acclimation process.
• For some exotic species, extended acclimation time should be expected and planned for. Time is not the determining factor; moisture testing is required to confirm that product is acclimated. Use a meter that is species adjustable, E.g. Ligno-scanner SDM or mini-Ligno DX/C moisture meter. If using alternate meter check the meters specifications that meter can be used with the wood species that you are installing.
• Check the moisture content of multiple planks. It’s recommended to randomly test 40 boards for up to the first 1,000 square feet, and an additional 4readings per 100 square feet thereafter, and average the results. The flooring’s average moisture content must be within 4% of the subfloor for strip flooring (boards 2-1/4” or less) and 2% for plank flooring (3” or wider).
• Any unusually high or low moisture readings should be isolated and not installed in the floor. • Keep a permanent record of all readings.
TEMPERATURE:For best product performance, ensure the temperature in the home is between 60º and 80º F before, during, and after installation and for the life of the flooring.
RELATIVE HUMIDITY:For best performance, flooring should be ideally conditioned, installed and maintained to consistent indoor temperatures of 60°- 80° F and rel-ative humidity of 30% or above to 70% or below with a maximum fluctuation of 20%, before, during and after the installation and for the life of the flooring). Ideal interior environmental conditions will vary from region to region and jobsite to jobsite, the relative humidity figures on your project maybe higher or lower. The key is to ensure that the change in relative humidity stays within a 20% range (e.g.30% to 50% or 35% to 55% etc…) and does not fluctu-ate beyond 20% for sustained periods, enough to affect the flooring. Home environments where the indoor Relative Humidity levels are below 30% or above 70% are not recommended. Not following the written recommendations can negatively impact board performance and may result in excessive movement, squeaks, board gapping, board-edge cupping, cracks, twists, finish splits, flaking, chipping, fading and other related issues. Any home that may have a sustained change in relative humidity greater than 20% fluctuation needs an HVAC system equipped with a humidi-fier or dehumidifier to regulate the interior environment within a 20% range of fluctuation. Installing hardwood in an environment that is not maintained can be detrimental to the flooring. The map below can be used to calculate what the optimum baseline or average moisture content of interior wood products should be prior to installation for each state and region. The first number indicates the average moisture content of wood during the wintertime (months having lower humidity), and the second number indicates the average moisture content during the summer time or (months having higher humidity). To calculate the optimal baseline or average wood moisture content in your state or region, add the high season number and low season num-ber together then divide by two. Example: If your state or region has an expected low of 6% to a high of 12% moisture content, the average baseline moisture content of the wood before installation would be 9%. The goal is to acclimate the flooring to this average figure and then the installation can begin. Very dry or humid regions of the country usually require extended conditioning to balance the new flooring to the environment it will service. The most reliable moisture-content numbers will be obtained using a species-specific moisture meter to determine the moisture content of the wood flooring. The USDA moisture map is a helpful guide for installations. Without proper temperature, humidity and ventilation controls, actual moisture content in any location may differ significantly from these numbers. In all cases it is the installer or homeowner’s responsibility to determine if the indoor environment, moisture content and jobsite conditions are suitable for wood floor installations.
2nd Floorabove ground level
1st Floorat ground level
Basement
YES
YES
NO
© 2020 Lumber Liquidators, 4901 Bakers Mill Lane, Richmond VA 23230-2431 Rev. 04.15.2020 BEWD-SOLD-ND-GD

11
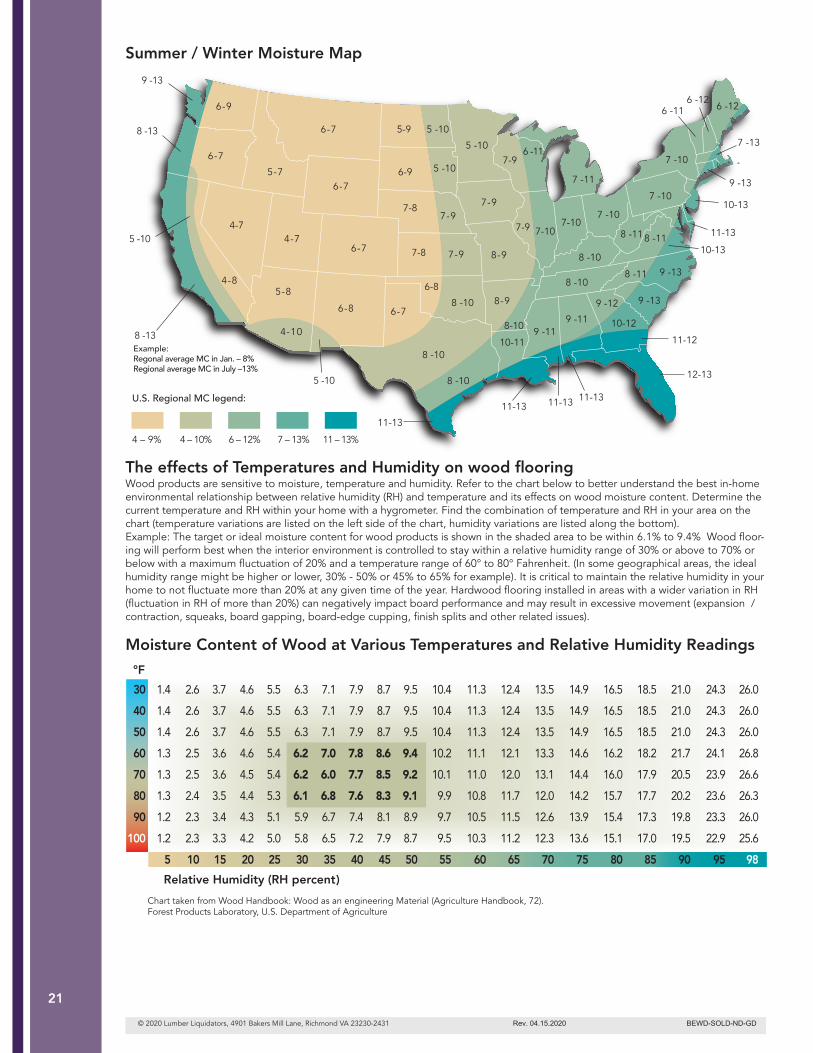
Summer / Winter Moisture Map
The effects of Temperatures and Humidity on wood flooring Wood products are sensitive to moisture, temperature and humidity. Refer to the chart below to better understand the best in-home environmental relationship between relative humidity (RH) and temperature and its effects on wood moisture content. Determine the current temperature and RH within your home with a hygrometer. Find the combination of temperature and RH in your area on the chart (temperature variations are listed on the left side of the chart, humidity variations are listed along the bottom). Example: The target or ideal moisture content for wood products is shown in the shaded area to be within 6.1% to 9.4% Wood flooring will perform best when the interior environment is controlled to stay within a relative humidity range of 30% - 50% or 45% to 65%, for example, and a temperature range of 60° to 80° Fahrenheit. (In some geographical areas, the ideal humidity range might be higher or lower, 30% - 50% or 45% to 65% for example). It is critical to maintain the relative humidity in your home to not fluctuate more than 20% at any given time of the year. Hardwood flooring installed in areas with a wider variation in RH (fluctuation in RH of more than 20%) can negatively impact board performance and may result in excessive movement (expansion / contraction, squeaks, board gapping, board-edge cupping, finish splits and other related issues).
Moisture Content of Wood at Various Temperatures and Relative Humidity Readings
Chart taken from Wood Handbook: Wood as an engineering Material (Agriculture Handbook, 72).Forest Products Laboratory, U.S. Department of Agriculture
30 1.4 2.6 3.7 4.6 5.5 6.3 7.1 7.9 8.7 9.5 10.4 11.3 12.4 13.5 14.9 16.5 18.5 21.0 24.3 26.0 40 1.4 2.6 3.7 4.6 5.5 6.3 7.1 7.9 8.7 9.5 10.4 11.3 12.4 13.5 14.9 16.5 18.5 21.0 24.3 26.0 50 1.4 2.6 3.7 4.6 5.5 6.3 7.1 7.9 8.7 9.5 10.4 11.3 12.4 13.5 14.9 16.5 18.5 21.0 24.3 26.0 60 1.3 2.5 3.6 4.6 5.4 6.2 7.0 7.8 8.6 9.4 10.2 11.1 12.1 13.3 14.6 16.2 18.2 21.7 24.1 26.8 70 1.3 2.5 3.6 4.5 5.4 6.2 6.0 7.7 8.5 9.2 10.1 11.0 12.0 13.1 14.4 16.0 17.9 20.5 23.9 26.6 80 1.3 2.4 3.5 4.4 5.3 6.1 6.8 7.6 8.3 9.1 9.9 10.8 11.7 12.0 14.2 15.7 17.7 20.2 23.6 26.3 90 1.2 2.3 3.4 4.3 5.1 5.9 6.7 7.4 8.1 8.9 9.7 10.5 11.5 12.6 13.9 15.4 17.3 19.8 23.3 26.0 100 1.2 2.3 3.3 4.2 5.0 5.8 6.5 7.2 7.9 8.7 9.5 10.3 11.2 12.3 13.6 15.1 17.0 19.5 22.9 25.6 5 10 15 20 25 30 35 40 45 50 55 60 65 70 75 80 85 90 95 98
Relative Humidity (RH percent)
°F
9 -13
6-9
6-7
6-7
6-7
6-7
6-76-8
6-8
7-8
7-8
6-9
5-9 5 -10
5 -10
5 -10
8 -10
8 -10
8 -10
8-10
7-9
7-9
7-9
7-9
7-9
8-9
8-9
5 -10
7 -11
7-107 -10
7 -10
7 -10
7-10
8 -10
8 -11
8 -11
8 -11
9 -12 9 -13
9 -13
9 -13
7 -13
9 -119 -11
10-11
11-13
11-13
11-13 11-13
10-12
11-12
10-13
10-13
11-13
12-13
8 -10
6 -11
6 -116 -12
6 -12
4-74-7
4-85-8
5-7
4-10
8 -13
5 -10
8 -13Example:Regonal average MC in Jan. – 8%Regional average MC in July –13%
4 – 9% 4 – 10% 6 – 12% 7 – 13% 11 – 13%
U.S. Regional MC legend:
© 2020 Lumber Liquidators, 4901 Bakers Mill Lane, Richmond VA 23230-2431 Rev. 04.15.2020 BEWD-SOLD-ND-GD
12
CUTTING ALLOWANCE and MANUFACTURER TOLERANCE (waste factor):A 10' x 10' room has net 100 square feet (Sq. Ft.) – the actual area that will have flooring – but more product is required to allow for cutting which generates unusable pieces. Carefully measure the net square feet required, adding up multiple areas. The table gives an approximate recommendation for cutting allowance: Quantities are always rounded up to the nearest box. Note: Natural products may have different waste factors depending on grade/type of wood and manufacturer tolerance of 5 – 20% may be allowed. If defects are greater than the waste factor indicated for your flooring, please contact your local store or call Cus-tomer Care at 1-800-366-4204.• In all cases the amount of waste can be reduced by using unsatisfactory planks by: 1) Cutting out affected area to create a satisfactory piece and using as
starter / end pieces for rows 2) Placing in areas that appearance does not matter 3) Using planks in the case of width issues as the last rowTip: If more than half a box is not available for spares we recommend ordering an extra box. Please note: Actual cutting waste may be lower or higher based on room layout. E.g. multiple rooms vs. one large area and ”pattern” being installed. Consider carefully before returning boxes. Keeping extra boxes is a great idea and inexpensive insurance against damage, if a repair if needed the product and batch will be the same, and you have options even if the product has been discontinued. Diagonal installations may require 5% extra material over and above the cutting and manufacturer tolerance allowance.
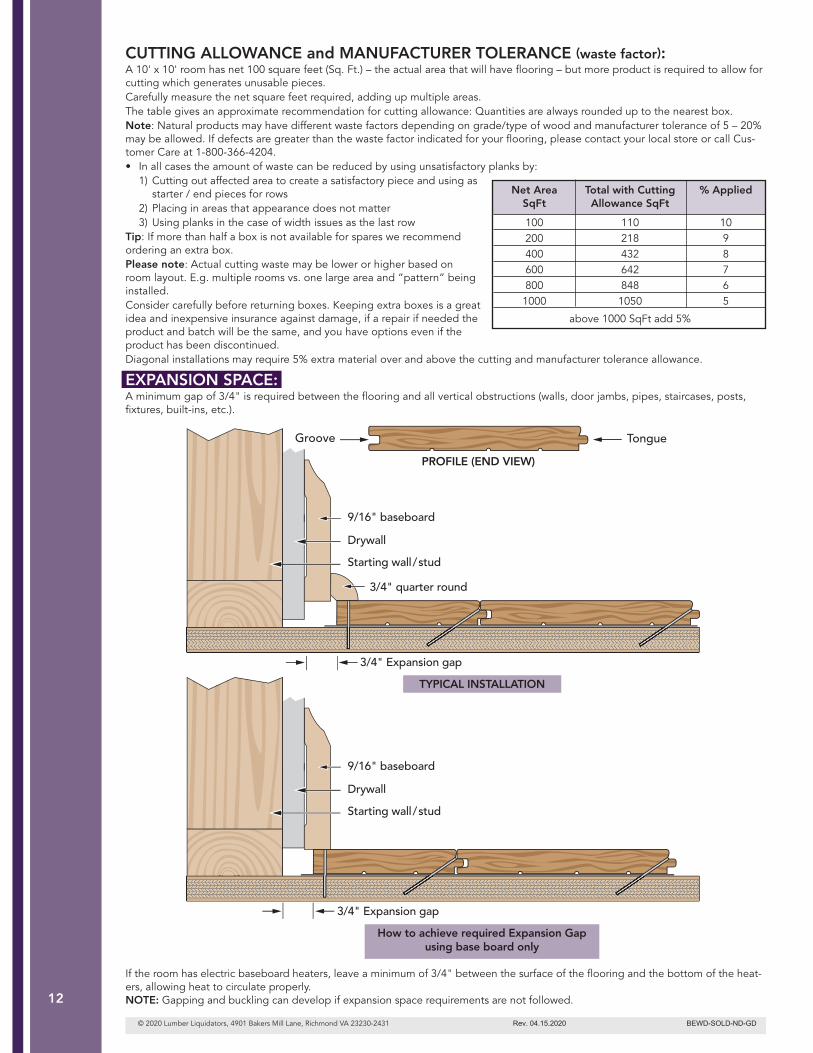
EXPANSION SPACE: A minimum gap of 3/4" is required between the flooring and all vertical obstructions (walls, door jambs, pipes, staircases, posts, fixtures, built-ins, etc.).
If the room has electric baseboard heaters, leave a minimum of 3/4" between the surface of the flooring and the bottom of the heat-ers, allowing heat to circulate properly.NOTE: Gapping and buckling can develop if expansion space requirements are not followed.
Groove Tongue
PROFILE (END VIEW)
9/16" baseboard
9/16" baseboard
Drywall
Drywall
Starting wall/stud
Starting wall/stud
3/4" quarter round
3/4" Expansion gap
3/4" Expansion gap
TYPICAL INSTALLATION
How to achieve required Expansion Gap using base board only
Net Area Total with Cutting % Applied SqFt Allowance SqFt
100 110 10 200 218 9 400 432 8 600 642 7 800 848 6 1000 1050 5
above 1000 SqFt add 5%
© 2020 Lumber Liquidators, 4901 Bakers Mill Lane, Richmond VA 23230-2431 Rev. 04.15.2020 BEWD-SOLD-ND-GD
13
RUN WIDTH AND LENGTH: Nail down: No limit in run length or width.Flooring must have room to expand and contract freely.
CABINETS / FIXED FIXTURES:• Although not recommended, cabinets may be installed on top of this product (See the product’s limited warranty for details).
SUNLIGHT:Depending on the species, your flooring will likely change color “patina” with prolonged exposure to sunlight. Use of window coverings, shades, or tinting your windows is recommended to slow this natural process.
SUBFLOORS NEED TO BE CLEAN – FLAT – DRY:• All substrates must be structurally sound and free from movement or deflection. • For installations using mechanical fasteners of 1-1/2" and longer, the subfloor should be flat to within 1/4" in 10 feet or
3/16" in 6 feet radius. • For installations using mechanical fasteners of less than 1-1/2", the subfloor should be flat to within 3/16" in 10 feet or 1/8"
in 6 feet radius. • Improper substrate or flatness can result in gaps, squeaks, premature wear on surface and poor plank fitting during
assembly.
WOOD SUBFLOOR:• Screw down loose or squeaky sections of plywood and replace areas that are damaged. • To address flatness concerns sand or plane high spots and fill the low spots with a material approved for use under wood
flooring. • 15 - 30 lb. roofing felt, vinyl tile or similar can be used (in layers) to build up low areas on wood subfloors to a max. 3/16"
provided fastener holding strength is not compromised.• Installers are responsible to use materials to ensure product performance. • Substrates that are not level/flat due to structural deficiencies should be repaired by a licensed contractor. • Never apply plastic sheet over wood subfloors.
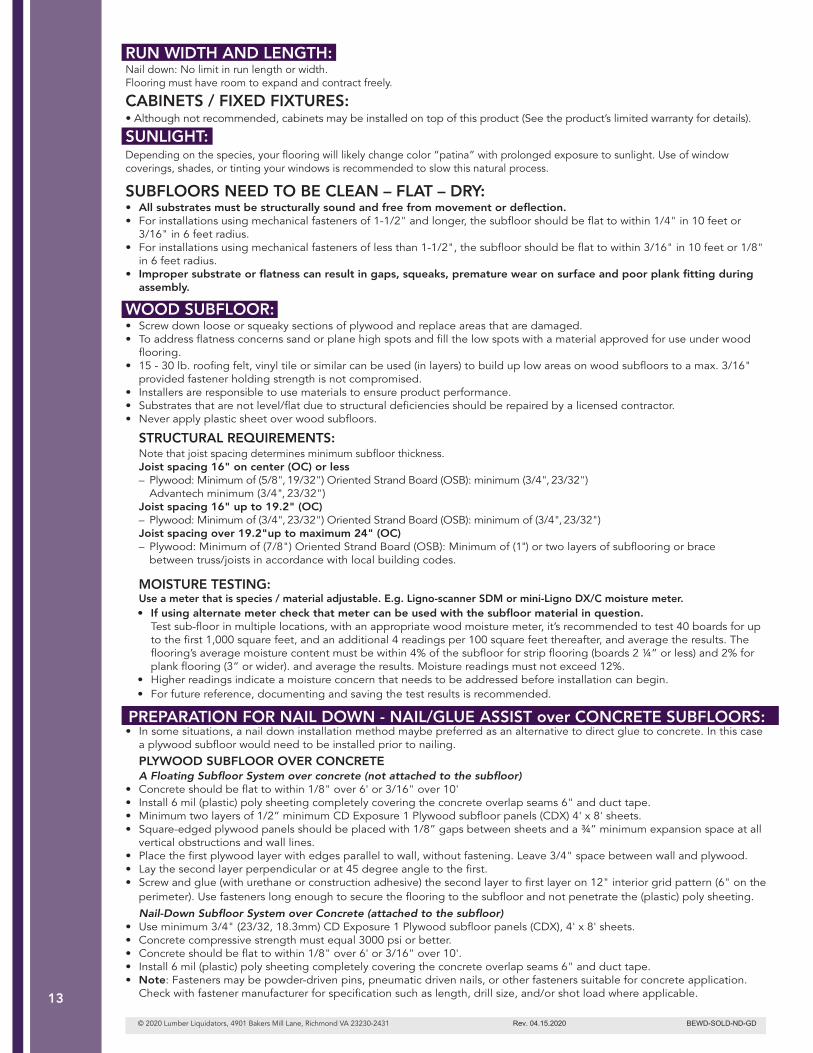
STRUCTURAL REQUIREMENTS:Note that joist spacing determines minimum subfloor thickness.
Joist spacing 16" on center (OC) or less – Plywood: Minimum of (5/8", 19/32") Oriented Strand Board (OSB): minimum (3/4", 23/32")
Advantech minimum (3/4", 23/32") Joist spacing 16" up to 19.2" (OC) – Plywood: Minimum of (3/4", 23/32") Oriented Strand Board (OSB): minimum of (3/4", 23/32") Joist spacing over 19.2"up to maximum 24" (OC) – Plywood: Minimum of (7/8") Oriented Strand Board (OSB): Minimum of (1") or two layers of subflooring or brace
between truss/joists in accordance with local building codes.
MOISTURE TESTING: Use a meter that is species / material adjustable. E.g. Ligno-scanner SDM or mini-Ligno DX/C moisture meter.• If using alternate meter check that meter can be used with the subfloor material in question. Test sub-floor in multiple locations, with an appropriate wood moisture meter, it’s recommended to test 40 boards for up
to the first 1,000 square feet, and an additional 4 readings per 100 square feet thereafter, and average the results. The flooring’s average moisture content must be within 4% of the subfloor for strip flooring (boards 2 ¼” or less) and 2% for plank flooring (3” or wider). and average the results. Moisture readings must not exceed 12%.
• Higher readings indicate a moisture concern that needs to be addressed before installation can begin.• For future reference, documenting and saving the test results is recommended.
• In some situations, a nail down installation method maybe preferred as an alternative to direct glue to concrete. In this case a plywood subfloor would need to be installed prior to nailing.
PLYWOOD SUBFLOOR OVER CONCRETE A Floating Subfloor System over concrete (not attached to the subfloor) • Concrete should be flat to within 1/8" over 6' or 3/16" over 10' • Install 6 mil (plastic) poly sheeting completely covering the concrete overlap seams 6" and duct tape. • Minimum two layers of 1/2” minimum CD Exposure 1 Plywood subfloor panels (CDX) 4' x 8' sheets. • Square-edged plywood panels should be placed with 1/8” gaps between sheets and a ¾” minimum expansion space at all
vertical obstructions and wall lines. • Place the first plywood layer with edges parallel to wall, without fastening. Leave 3/4" space between wall and plywood. • Lay the second layer perpendicular or at 45 degree angle to the first. • Screw and glue (with urethane or construction adhesive) the second layer to first layer on 12" interior grid pattern (6" on the
perimeter). Use fasteners long enough to secure the flooring to the subfloor and not penetrate the (plastic) poly sheeting.
Nail-Down Subfloor System over Concrete (attached to the subfloor) • Use minimum 3/4" (23/32, 18.3mm) CD Exposure 1 Plywood subfloor panels (CDX), 4' x 8' sheets. • Concrete compressive strength must equal 3000 psi or better. • Concrete should be flat to within 1/8" over 6' or 3/16" over 10'. • Install 6 mil (plastic) poly sheeting completely covering the concrete overlap seams 6" and duct tape. • Note: Fasteners may be powder-driven pins, pneumatic driven nails, or other fasteners suitable for concrete application.
Check with fastener manufacturer for specification such as length, drill size, and/or shot load where applicable.
© 2020 Lumber Liquidators, 4901 Bakers Mill Lane, Richmond VA 23230-2431 Rev. 04.15.2020 BEWD-SOLD-ND-GD
PREPARATION FOR NAIL DOWN - NAIL/GLUE ASSIST over CONCRETE SUBFLOORS:
14
• Stagger panel joints allowing approximately 1/8" expansion space around all panels to prevent edge peaking due to compression caused by panel swell.
• Allow 3/4" minimum expansion space at all vertical obstructions. • Panels should be mechanically fastened. For powder load or pneumatic pressure information, contact the manufacture. • Nailing requirements, minimum 32 shots per 4' x 8' panel. • Areas with higher humidity may require additional fasteners. • Use 1-1/2" long fasteners when nailing 3/4" flooring to this subfloor. Glue-Down Subfloor System over Concrete (attached to the subfloor) • Follow the adhesive manufacturers recommendations for type of adhesive, floor prep, moisture barrier and trowel size • Concrete compressive strength must equal 3000 psi or better. • Concrete should be flat to within 1/8" over 6' or 3/16" over 10'. • Use minimum 3/4" (23/32, 18.3mm) CD Exposure 1 Plywood subfloor panels (CDX), 4' x 8' sheets. • Cut 4' x 8' sheets into (4) 12"x 8" planks • Place 12"x 8' planks into wet adhesive, stager joints min 12" allow planks to fully bond/cure before wood installation.
UNDERLAYMENT:• Check Lumber Liquidators product page for cushion recommendations. At a minimum Silicon Vapor Shield® between the
flooring and subfloor to minimize squeaking and when installing over crawl spaces, rooms over basements and garages to provide moisture vapor protection. Install underlayment parallel to the new flooring.
USER / OWNER / INSTALLER RESPONSIBILITIES:Install in good lighting.• Product installation constitutes acceptance. Visually inspect the product and determine acceptability before installation. Claims will
not be accepted regarding visual defects after flooring has been installed. If any planks are unacceptable due to color, finish, milling or any other reason, it is your responsibility to determine to use them, hide them in areas like closets, trim off the imperfection, or not install them at all.
• You should plan on being present during your installation to ensure that all required procedures are completed and boards with vis-ible defects are not installed. It is important to inspect individual boards and to frequently step back to observe the “whole picture” before installation is completed.
• A reasonable amount of installed flooring (up to 25% or 100 sq. ft. whichever is less) is enough to determine acceptance of quality. • Retain a box label and keep on file with your receipt for future reference. • If quality issues are suspected stop the installation and call your local store or CUSTOMER CARE at 800-366-4204.
HELPFUL TOOLS: (as needed) • Tape measure • Pencil • Chalk line • 6' level • Miter saw • Table saw • 60 tooth carbide tip saw blades • Jamb saw
• Eye protection • Ear protection • Niosh dust mask • Knee pads • Gloves • Blue painters tape (2080) • PVA wood glue • Compressor with regulator • Air hose • Floor nailer • Brad / Stapler • Drill • Drill bit set • Hammer • Flat pry bar • Broom • Hygrometer (to monitor in-home humidity) • Species adjustable moisture meter (wood) • Calcium chloride moisture or (RH) Relative Humidity test (concrete) • Approved adhesive remover • Cloth rags • Color putty ) • Stain markers • Speed square
ADDITIONAL NOTES: • When moving furniture and heavy equipment, use luan board, plywood, or other similar covering to protect the floor.
Each project is unique and different. Installation advice or recommendations are given as a courtesy and not intended to take the place of an installer's visual inspection, expertise or informed judgment, which will override any advice or recommendations given in the Installation Guidelines. The end user / contractor on-site is ultimately responsible for ensuring that selected products are appropriate for local conditions and / or the final use of the product.
© 2020 Lumber Liquidators, 4901 Bakers Mill Lane, Richmond VA 23230-2431 Rev. 04.15.2020 BEWD-SOLD-ND-GD

15
PROFILE (End View)
FOR WIDE PLANKS 5" or more “NAIL GLUE-ASSIST” method is recommended(See important details below on page 18)
GETTING STARTED:Remove any existing quarter round, shoe moldings, baseboards and doorway transitions. To achieve the 3/4"expansion you may need to undercut the drywall if is not raised up above the thickness of the flooring. Remove existing floor covering as required, check floor flatness per details on previous page and address any issues. Check that all doors will swing open with adequate clearance over the new flooring prior to starting any work. Important: Any metal doors must be addressed by a specialist to adjust. Do not cut metal door frames!
NAIL DOWN - NAIL/GLUE ASSIST METHOD SOLID HARDWOOD
STEP 1.Undercut all door casings and jambs with a jamb saw to allow the flooring to slide under the doorjamb. If a baseboard is still in place, extend the undercut about 1" beyond the door frame casing. To find the height to cut the jamb, lay a scrap piece of flooring (and underlayment) next to the door frame, and lay the saw blade on top. After cut ensure that the floor plus underlayment does not bind, always leave 1/16" clearance under the doorjamb / casing for the floor to be able to move freely without vertical restriction. Ensure that exterior doors and appliances have suffi-cient clearance to accommodate the new flooring.Do not undercut metal door jambs before first confirming it doesn’t violate local building and fire codesAdjust as required.
STEP 2. LAYOUT: Determine which direction the planks will be installed. Without subfloor modification the flooring must be laid perpendic-
ular to the subfloors joists. If the flooring needs to be installed Parallel to the subfloor joists a second layer comprised of 15/32nd panels should be
fastened to the subfloor using ring or screw shanked nails or proprietary screws long enough to only penetrate the exist-ing subfloor and not penetrating the subfloor joists. Considerations are fireplaces, doors, cabinets, and transitions. For best appearance, full planks are desirable at the focal point and most cases it is the longest unbroken wall in the room.
Installers: It is advisable to determine the installation layout and direction (North/South vs East/West) with the end user. Install recommended underlayment as required, e.g. white Silicon Vapor Shield®.
Preparation of planks for the starting row when needed: To avoid very narrow pieces at finish wall, measure the distance between the starting wall to the finish wall, then divide this number by the width of the flooring planks. The fraction is the width of the last plank.
cutting (Rip) starting row of planks accordingly.
E.g. for an 12' room: Start – Finish = 144" – 1.5" (3/4" expansion x 2) = 142.5"
x plank width 5" x 0.5 = 2.5" If width of last plank is less than 2.5", balance by
© 2020 Lumber Liquidators, 4901 Bakers Mill Lane, Richmond VA 23230-2431 Rev. 04.15.2020 BEWD-SOLD-ND-GD
Width of Plank = 5" 142.5 ÷ 5 =28.5 28 full planks are required and last will be fraction
16
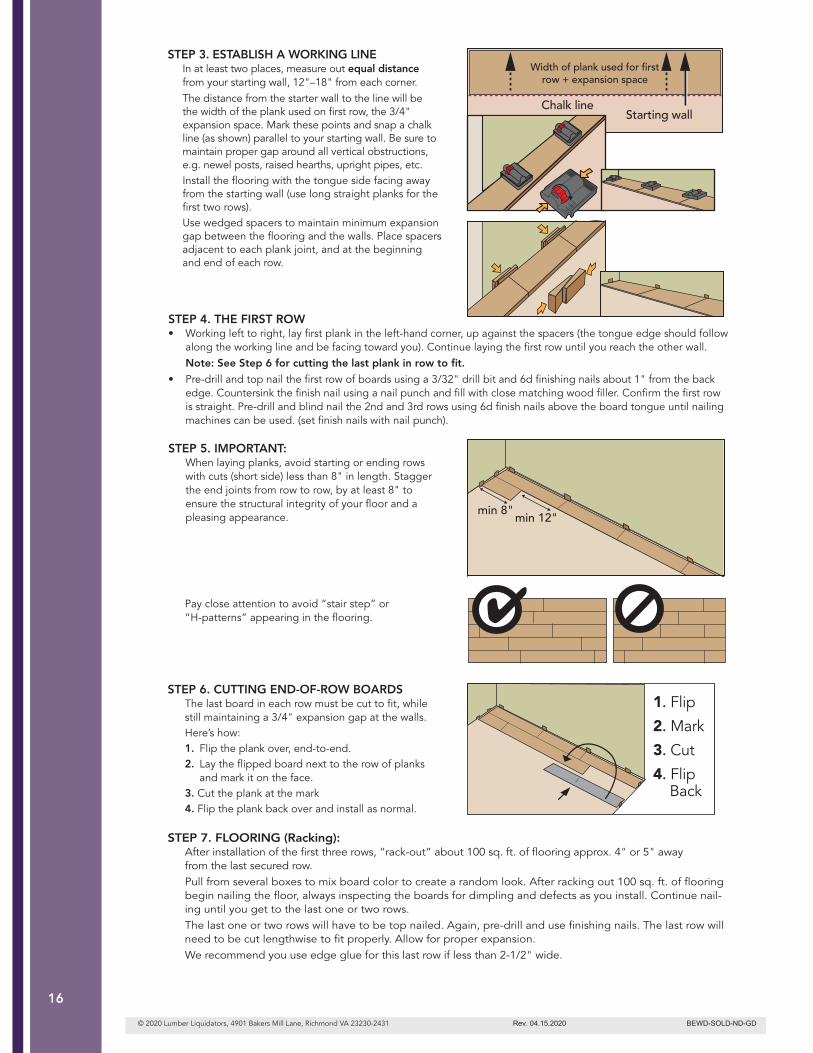
STEP 3. ESTABLISH A WORKING LINE In at least two places, measure out equal distance
from your starting wall, 12"–18" from each corner. The distance from the starter wall to the line will be
the width of the plank used on first row, the 3/4" expansion space. Mark these points and snap a chalk line (as shown) parallel to your starting wall. Be sure to maintain proper gap around all vertical obstructions, e.g. newel posts, raised hearths, upright pipes, etc.Install the flooring with the tongue side facing away from the starting wall (use long straight planks for the first two rows).Use wedged spacers to maintain minimum expansion gap between the flooring and the walls. Place spacers adjacent to each plank joint, and at the beginning and end of each row.
STEP 4. THE FIRST ROW • Working left to right, lay first plank in the left-hand corner, up against the spacers (the tongue edge should follow
along the working line and be facing toward you). Continue laying the first row until you reach the other wall. Note: See Step 6 for cutting the last plank in row to fit.
• Pre-drill and top nail the first row of boards using a 3/32" drill bit and 6d finishing nails about 1" from the back edge. Countersink the finish nail using a nail punch and fill with close matching wood filler. Confirm the first row is straight. Pre-drill and blind nail the 2nd and 3rd rows using 6d finish nails above the board tongue until nailing machines can be used. (set finish nails with nail punch).
STEP 5. IMPORTANT: When laying planks, avoid starting or ending rows
with cuts (short side) less than 8" in length. Stagger the end joints from row to row, by at least 8" to ensure the structural integrity of your floor and a pleasing appearance.
min 8"min 12"
STEP 6. CUTTING END-OF-ROW BOARDS The last board in each row must be cut to fit, while
still maintaining a 3/4" expansion gap at the walls. Here’s how: 1. Flip the plank over, end-to-end. 2. Lay the flipped board next to the row of planks
and mark it on the face. 3. Cut the plank at the mark 4. Flip the plank back over and install as normal.
STEP 7. FLOORING (Racking): After installation of the first three rows, “rack-out” about 100 sq. ft. of flooring approx. 4" or 5" away from the last secured row. Pull from several boxes to mix board color to create a random look. After racking out 100 sq. ft. of flooring
begin nailing the floor, always inspecting the boards for dimpling and defects as you install. Continue nail-ing until you get to the last one or two rows.
The last one or two rows will have to be top nailed. Again, pre-drill and use finishing nails. The last row will need to be cut lengthwise to fit prop erly. Allow for proper expansion.
We recommend you use edge glue for this last row if less than 2-1/2" wide.
1. Flip
2. Mark
3. Cut
4. Flip Back
Pay close attention to avoid “stair step” or “H-patterns” appearing in the flooring.
© 2020 Lumber Liquidators, 4901 Bakers Mill Lane, Richmond VA 23230-2431 Rev. 04.15.2020 BEWD-SOLD-ND-GD
17
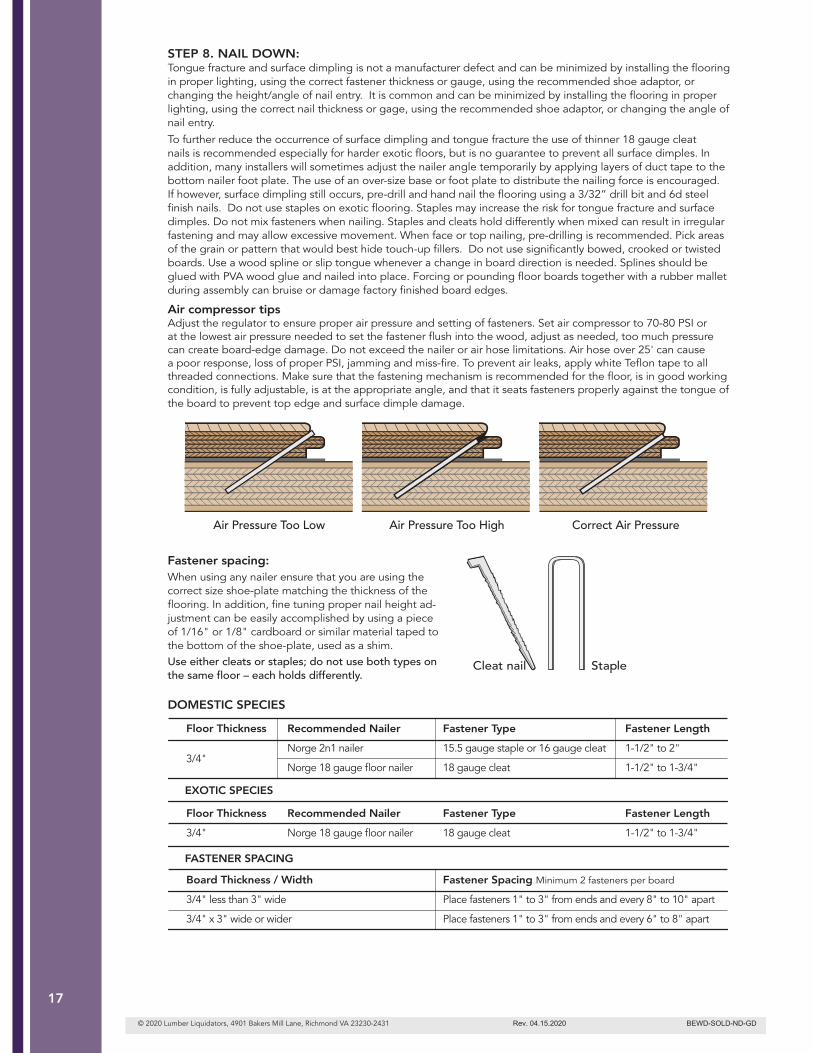
STEP 8. NAIL DOWN:Tongue fracture and surface dimpling is not a manufacturer defect and can be minimized by installing the flooring in proper lighting, using the correct fastener thickness or gauge, using the recommended shoe adaptor, or changing the height/angle of nail entry. It is common and can be minimized by installing the flooring in proper lighting, using the correct nail thickness or gage, using the recommended shoe adaptor, or changing the angle of nail entry.
To further reduce the occurrence of surface dimpling and tongue fracture the use of thinner 18 gauge cleat nails is recommended especially for harder exotic floors, but is no guarantee to prevent all surface dimples. In addition, many installers will sometimes adjust the nailer angle temporarily by applying layers of duct tape to the bottom nailer foot plate. The use of an over-size base or foot plate to distribute the nailing force is encouraged. If however, surface dimpling still occurs, pre-drill and hand nail the flooring using a 3/32” drill bit and 6d steel finish nails. Do not use staples on exotic flooring. Staples may increase the risk for tongue fracture and surface dimples. Do not mix fasteners when nailing. Staples and cleats hold differently when mixed can result in irregular fastening and may allow excessive movement. When face or top nailing, pre-drilling is recommended. Pick areas of the grain or pattern that would best hide touch-up fillers. Do not use significantly bowed, crooked or twisted boards. Use a wood spline or slip tongue whenever a change in board direction is needed. Splines should be glued with PVA wood glue and nailed into place. Forcing or pounding floor boards together with a rubber mallet during assembly can bruise or damage factory finished board edges.
Air compressor tipsAdjust the regulator to ensure proper air pressure and setting of fasteners. Set air compressor to 70-80 PSI or at the lowest air pressure needed to set the fastener flush into the wood, adjust as needed, too much pressure can create board-edge damage. Do not exceed the nailer or air hose limitations. Air hose over 25' can cause a poor response, loss of proper PSI, jamming and miss-fire. To prevent air leaks, apply white Teflon tape to all threaded connections. Make sure that the fastening mechanism is recommended for the floor, is in good working condition, is fully adjustable, is at the appropriate angle, and that it seats fasteners properly against the tongue of the board to prevent top edge and surface dimple damage.
Fastener spacing: When using any nailer ensure that you are using the correct size shoe-plate matching the thickness of the flooring. In addition, fine tuning proper nail height ad-justment can be easily accomplished by using a piece of 1/16" or 1/8" cardboard or similar material taped to the bottom of the shoe-plate, used as a shim.Use either cleats or staples; do not use both types on the same floor – each holds differently.
Cleat nail Staple
DOMESTIC SPECIES
Floor Thickness Recommended Nailer Fastener Type Fastener Length
3/4"
Norge 2n1 nailer 15.5 gauge staple or 16 gauge cleat 1-1/2" to 2"
Norge 18 gauge floor nailer 18 gauge cleat 1-1/2" to 1-3/4"
EXOTIC SPECIES
Floor Thickness Recommended Nailer Fastener Type Fastener Length
3/4" Norge 18 gauge floor nailer 18 gauge cleat 1-1/2" to 1-3/4"
FASTENER SPACING
Board Thickness / Width Fastener Spacing Minimum 2 fasteners per board
3/4" less than 3" wide Place fasteners 1" to 3" from ends and every 8" to 10" apart
3/4" x 3" wide or wider Place fasteners 1" to 3" from ends and every 6" to 8" apart
© 2020 Lumber Liquidators, 4901 Bakers Mill Lane, Richmond VA 23230-2431 Rev. 04.15.2020 BEWD-SOLD-ND-GD
18
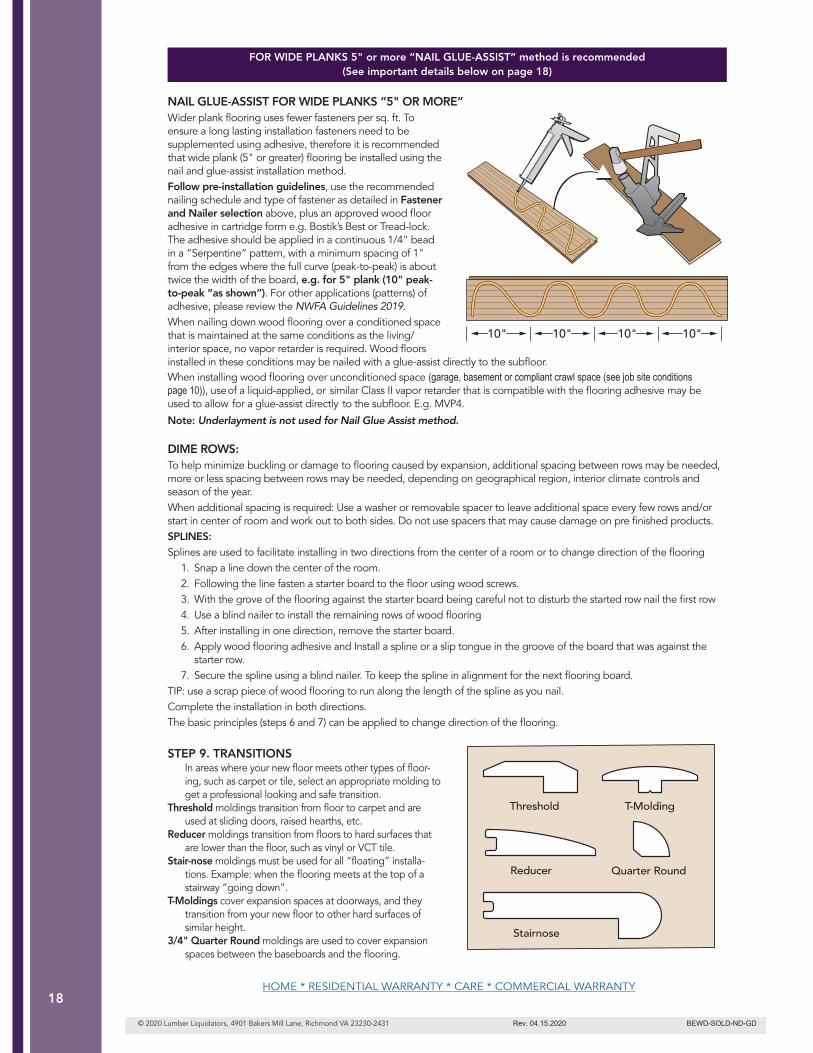
STEP 9. TRANSITIONS In areas where your new floor meets other types of floor-
ing, such as carpet or tile, select an appropriate molding to get a professional looking and safe transition.
Threshold moldings transition from floor to carpet and are used at sliding doors, raised hearths, etc.
Reducer moldings transition from floors to hard surfaces that are lower than the floor, such as vinyl or VCT tile.
Stair-nose moldings must be used for all “floating” installa-tions. Example: when the flooring meets at the top of a stairway “going down”.
T-Moldings cover expansion spaces at doorways, and they transition from your new floor to other hard surfaces of similar height.
3/4" Quarter Round moldings are used to cover expansion spaces between the baseboards and the flooring.
Threshold
Reducer
Stairnose
Quarter Round
T-Molding
HOME * RESIDENTIAL WARRANTY * CARE * COMMERCIAL WARRANTY
DIME ROWS:To help minimize buckling or damage to flooring caused by expansion, additional spacing between rows may be needed, more or less spacing between rows may be needed, depending on geographical region, interior climate controls and season of the year.When additional spacing is required: Use a washer or removable spacer to leave additional space every few rows and/or start in center of room and work out to both sides. Do not use spacers that may cause damage on pre finished products.SPLINES:Splines are used to facilitate installing in two directions from the center of a room or to change direction of the flooring
1. Snap a line down the center of the room.2. Following the line fasten a starter board to the floor using wood screws.3. With the grove of the flooring against the starter board being careful not to disturb the started row nail the first row 4. Use a blind nailer to install the remaining rows of wood flooring5. After installing in one direction, remove the starter board.6. Apply wood flooring adhesive and Install a spline or a slip tongue in the groove of the board that was against the
starter row. 7. Secure the spline using a blind nailer. To keep the spline in alignment for the next flooring board.
TIP: use a scrap piece of wood flooring to run along the length of the spline as you nail.Complete the installation in both directions.The basic principles (steps 6 and 7) can be applied to change direction of the flooring.
NAIL GLUE-ASSIST FOR WIDE PLANKS “5" OR MORE” Wider plank flooring uses fewer fasteners per sq. ft. To ensure a long lasting installation fasteners need to be supplemented using adhesive, therefore it is recom mended that wide plank (5" or greater) flooring be in stalled using the nail and glue-assist installation method. Follow pre-installation guidelines, use the recommend ed nailing schedule and type of fastener as detailed in Fastener and Nailer selection above, plus an approved wood floor adhesive in cartridge form e.g. Bostik’s Best or Tread-lock. The adhesive should be applied in a continuous 1/4" bead in a “Serpentine” pattern, with a minimum spacing of 1" from the edges where the full curve (peak-to-peak) is about twice the width of the board, e.g. for 5" plank (10" peak-to-peak “as shown”). For other applications (patterns) of adhesive, please review the NWFA Guidelines 2019. When nailing down wood flooring over a conditioned space that is maintained at the same conditions as the living/ interior space, no vapor retarder is required. Wood floors installed in these conditions may be nailed with a glue-assist directly to the subfloor.
Note: Underlayment is not used for Nail Glue Assist method.
FOR WIDE PLANKS 5" or more “NAIL GLUE-ASSIST” method is recommended(See important details below on page 18)
© 2020 Lumber Liquidators, 4901 Bakers Mill Lane, Richmond VA 23230-2431 Rev. 04.15.2020 BEWD-SOLD-ND-GD
When installing wood flooring over unconditioned space (garage, basement or compliant crawl space (see job site conditions page 10)), useof a liquid-applied, or similar Class II vapor retarder that is compatible with the flooring adhesive may be used to allow for a glue-assist directly to the subfloor. E.g. MVP4.

19
NAIL DOWN - NAIL/GLUE ASSIST GLUE DOWN
AIM AIM AIM
Acclimate Completely Acclimate your flooring to your
home environment. Time for acclimation will vary. Always check
using a meter.
Install CorrectlyTake time to review Lumber
Liquidators’ installation guidelines and follow the National Wood
Flooring Association Guidelines to ensure that your installation goes
well from beginning to end.
Maintain EnvironmentIndoor relative humidity should be
maintained with no more than a 20% fluctuation (E.g. 40% -60%). Indoor
Relative Humidity levels below 30% or above 70% will likely result in cupping,
checking, gaps or bucking.*
72°RH
Save time & avoid frustration! Please read these entire instructions before starting your installation, and A.I.M. for success!
LEAD WARNING: Some paints and finishes in homes built before 1978 may contain lead. Exposure to excessive amounts of lead dust presents a health hazard. Prior to removing or sanding, comply with all applicable federal, state, and local laws, and reference the publication “Lead-Based Paint: Guidelines for Hazard Identification and Abatement in Public and Indian Housing” available from the United States Department of Housing and Urban Development regarding (1) appropriate methods for identifying lead-based paint
and removing such paint; and (2) any licensing, certification, and training requirements for persons performing lead abatement work.
WARNING! DO NOT SAND, DRY SWEEP, DRY SCRAPE, DRILL, SAW, BEADBLAST OR MECHANICALLY CHIP OR PULVERIZE EXISTING RESILIENT FLOORING, BACKING, LINING FELT, ASPHALTIC “CUTBACK” ADHESIVES OR OTHER ADHESIVES. These products may contain asbestos fibers and/or crystalline silica. Avoid creating dust. Inhalation of such dust is a cancer and respiratory tract hazard. Smoking by individuals exposed to asbestos fibers greatly increases the risk of serious bodily harm. Unless
positively certain that the product to be removed is a non-asbestos containing material, you must presume it contains asbestos. Regulations may require that the material be tested to determine asbestos content. See current edition of the Resilient Floor Covering Institute (RFCI) publication, “Recommended Work Practices for Removal of Resilient Floor Coverings” for detailed information and instructions on removing all resilient covering structures. For current information, go to www.rfci.com.
MOLD AND MILDEW WARNING: Prior to removing an existing resilient floor or when installing a new floor, if there are visible indica-tions of mold or mildew or the presence of a strong musty odor in the installation area, the source of the problem should be identified and corrected before proceeding with the flooring work. Excessive moisture in the subfloor could promote mold, mildew, and other moisture related issues like the trapping of moisture emissions under the flooring, which may contribute to an unhealthy indoor envi-
ronment. Mold has the potential to cause health problems and may produce allergens, irritants, and in some cases, potentially toxic substances. Before installing the new resilient flooring, ensure the underlayment and/or subfloor is allowed to thoroughly dry and that any residual effect of excessive moisture, mold, or structural damage has been corrected. Remediation measures may require structural repairs such as replacing the contaminated underlayment and/or subfloor, cleanup measures using appropriate protection and biocide, or hiring a professional mold and mildew remediation contractor. Consult EPA mold guidelines on EPA's website at https://www.epa.gov/mold
Need Help? To obtain installation assistance or product information concerning this flooring, contact the store of original purchase, or call the Lumber Liquidators customer care at 800-366-4204.?
*See Temperature and Relative Humidity for more details.
Drilling, sawing, sanding or machining wood products can expose you to wood dust, a substance known to the State of California to cause cancer. Avoid inhaling wood dust or use a dust mask or other safeguards for personal protection. For more information go to www.P65Warnings.ca.gov/wood
WARNING:
© 2020 Lumber Liquidators, 4901 Bakers Mill Lane, Richmond VA 23230-2431 Rev. 04.15.2020 BEWD-SOLD-ND-GD

20
RECOMMENDED USE:• Residential or light commercial* interior use only. *See the product’s limited warranty for details.• Do not install in wet areas like patios and showers, or exterior areas. Do not install in boats, or other moving vehicles or over radiant heat.
Grade: On and above grade only.
JOBSITE CONDITIONS:• The building should be enclosed with all doors and windows in place.• Prior to delivery and install: All wet works (e.g. drywall taping, texture, painting, stucco etc.) should be complete and allowed to dry. The rooms
should be at normal “lived-in” conditions with HVAC operational for at least one week prior to the installation when home is so equipped.• When installing in rooms over basements and garages, ensure they are dry and well ventilated.• Crawlspaces must be dry with a minimum 18" from the bottom of the floor joist to the ground, Crawl space earth (or thin concrete slab) should
be covered 100 percent by a vapor retarder of black polyethylene (minimum 6 mil) or any recommended puncture-resistant membrane, such as Class C, meeting ASTM D1745. Ventilation shall be per local building codes.
• Ensure that exterior doors and appliances have sufficient clearance to accommodate the new flooring.• Do not undercut metal door jambs before first confirming it doesn’t violate local building and fire codes. • To avoid damages to the floor’s finish, all construction activity should be completed before installing this floor.• All gutters should be in place and functioning properly. Yard grading should be sloped to run water away from the home foundation.• The installer - not the manufacturer or retailer - is responsible for making sure that the site conditions are appropriate prior to installa-
tion of this floor.
ACCLIMATION:• Stack boxes no more than eight cartons high in areas to receive new flooring (remove plastic from outside of boxes if present). Ensure each
layer is evenly supported to prevent distortion. Elevate stack using 2 x 4's as illustrated in Fig. 1 above. On concrete; place a layer of 6 mil poly down first during the acclimation process.
• For some exotic species, extended acclimation time should be expected and planned for. Time is not the determining factor; moisture testing is required to confirm that product is acclimated. Use a meter that is species adjustable, E.g. Ligno-scanner SDM or mini-Ligno DX/C moisture meter. If using alternate meter check the meters specifications that meter can be used with the wood species that you are installing.
• Check the moisture content of multiple planks. It’s recommended to randomly test 40 boards for up to the first 1,000 square feet, and an additional 4 readings per 100 square feet thereafter, and average the results. The flooring’s average moisture content must be within 4% of the subfloor for strip flooring (boards 2 ¼” or less) and 2% for plank flooring (3” or wider), or if concrete, wood-based products in the home (e.g. Base Board or Door Jambs).
• Any unusually high or low moisture readings should be isolated and not installed in the floor.• Keep a permanent record of all readings.
TEMPERATURE:For best product performance, ensure the temperature in the home is between 60º and 80º F before, during, and after installation and for the life of the flooring.
RELATIVE HUMIDITY:For best performance, flooring should be ideally conditioned, installed and maintained to consistent indoor temperatures of 60°- 80° F and rel-ative humidity of 30% or above to 70% or below with a maximum fluctuation of 20%, before, during and after the installation and for the life of the flooring). Ideal interior environmental conditions will vary from region to region and jobsite to jobsite, the relative humidity figures on your project maybe higher or lower. The key is to ensure that the change in relative humidity stays within a 20% range (e.g.30% to 50% or 35% to 55% etc…) and does not fluctu-ate beyond 20% for sustained periods, enough to affect the flooring. Home environments where the indoor Relative Humidity levels are below 30% or above 70% are not recommended. Not following the written recommendations can negatively impact board performance and may result in excessive movement, squeaks, board gapping, board-edge cupping, cracks, twists, finish splits, flaking, chipping, fading and other related issues. Any home that may have a sustained change in relative humidity greater than 20% fluctuation needs an HVAC system equipped with a humidi-fier or dehumidifier to regulate the interior environment within a 20% range of fluctuation. Installing hardwood in an environment that is not maintained can be detrimental to the flooring. The map below can be used to calculate what the optimum baseline or average moisture content of interior wood products should be prior to installation for each state and region. The first number indicates the average moisture content of wood during the wintertime (months having lower humidity), and the second number indicates the average moisture content during the summer time or (months having higher humidity). To calculate the optimal baseline or average wood moisture content in your state or region, add the high season number and low season num-ber together then divide by two. Example: If your state or region has an expected low of 6% to a high of 12% moisture content, the average baseline moisture content of the wood before installation would be 9%. The goal is to acclimate the flooring to this average figure and then the installation can begin. Very dry or humid regions of the country usually require extended conditioning to balance the new flooring to the environment it will service. The most reliable moisture-content numbers will be obtained using a species-specific moisture meter to determine the moisture content of the wood flooring. The USDA moisture map is a helpful guide for installations. Without proper temperature, humidity and ventilation controls, actual moisture content in any location may differ significantly from these numbers. In all cases it is the installer or homeowner’s responsibility to determine if the indoor environment, moisture content and jobsite conditions are suitable for wood floor installations.
2nd Floorabove ground level
1st Floorat ground level
Basement
YES
YES
NO
© 2020 Lumber Liquidators, 4901 Bakers Mill Lane, Richmond VA 23230-2431 Rev. 04.15.2020 BEWD-SOLD-ND-GD
21
Summer / Winter Moisture Map
The effects of Temperatures and Humidity on wood flooring Wood products are sensitive to moisture, temperature and humidity. Refer to the chart below to better understand the best in-home environmental relationship between relative humidity (RH) and temperature and its effects on wood moisture content. Determine the current temperature and RH within your home with a hygrometer. Find the combination of temperature and RH in your area on the chart (temperature variations are listed on the left side of the chart, humidity variations are listed along the bottom). Example: The target or ideal moisture content for wood products is shown in the shaded area to be within 6.1% to 9.4% Wood floor-ing will perform best when the interior environment is controlled to stay within a relative humidity range of 30% or above to 70% or below with a maximum fluctuation of 20% and a temperature range of 60° to 80° Fahrenheit. (In some geographical areas, the ideal humidity range might be higher or lower, 30% - 50% or 45% to 65% for example). It is critical to maintain the relative humidity in your home to not fluctuate more than 20% at any given time of the year. Hardwood flooring installed in areas with a wider variation in RH (fluctuation in RH of more than 20%) can negatively impact board performance and may result in excessive movement (expansion / contraction, squeaks, board gapping, board-edge cupping, finish splits and other related issues).
Moisture Content of Wood at Various Temperatures and Relative Humidity Readings
Chart taken from Wood Handbook: Wood as an engineering Material (Agriculture Handbook, 72).Forest Products Laboratory, U.S. Department of Agriculture
30 1.4 2.6 3.7 4.6 5.5 6.3 7.1 7.9 8.7 9.5 10.4 11.3 12.4 13.5 14.9 16.5 18.5 21.0 24.3 26.0 40 1.4 2.6 3.7 4.6 5.5 6.3 7.1 7.9 8.7 9.5 10.4 11.3 12.4 13.5 14.9 16.5 18.5 21.0 24.3 26.0 50 1.4 2.6 3.7 4.6 5.5 6.3 7.1 7.9 8.7 9.5 10.4 11.3 12.4 13.5 14.9 16.5 18.5 21.0 24.3 26.0 60 1.3 2.5 3.6 4.6 5.4 6.2 7.0 7.8 8.6 9.4 10.2 11.1 12.1 13.3 14.6 16.2 18.2 21.7 24.1 26.8 70 1.3 2.5 3.6 4.5 5.4 6.2 6.0 7.7 8.5 9.2 10.1 11.0 12.0 13.1 14.4 16.0 17.9 20.5 23.9 26.6 80 1.3 2.4 3.5 4.4 5.3 6.1 6.8 7.6 8.3 9.1 9.9 10.8 11.7 12.0 14.2 15.7 17.7 20.2 23.6 26.3 90 1.2 2.3 3.4 4.3 5.1 5.9 6.7 7.4 8.1 8.9 9.7 10.5 11.5 12.6 13.9 15.4 17.3 19.8 23.3 26.0 100 1.2 2.3 3.3 4.2 5.0 5.8 6.5 7.2 7.9 8.7 9.5 10.3 11.2 12.3 13.6 15.1 17.0 19.5 22.9 25.6 5 10 15 20 25 30 35 40 45 50 55 60 65 70 75 80 85 90 95 98
Relative Humidity (RH percent)
°F
9 -13
6-9
6-7
6-7
6-7
6-7
6-76-8
6-8
7-8
7-8
6-9
5-9 5 -10
5 -10
5 -10
8 -10
8 -10
8 -10
8-10
7-9
7-9
7-9
7-9
7-9
8-9
8-9
5 -10
7 -11
7-107 -10
7 -10
7 -10
7-10
8 -10
8 -11
8 -11
8 -11
9 -12 9 -13
9 -13
9 -13
7 -13
9 -119 -11
10-11
11-13
11-13
11-13 11-13
10-12
11-12
10-13
10-13
11-13
12-13
8 -10
6 -11
6 -116 -12
6 -12
4-74-7
4-85-8
5-7
4-10
8 -13
5 -10
8 -13Example:Regonal average MC in Jan. – 8%Regional average MC in July –13%
4 – 9% 4 – 10% 6 – 12% 7 – 13% 11 – 13%
U.S. Regional MC legend:
© 2020 Lumber Liquidators, 4901 Bakers Mill Lane, Richmond VA 23230-2431 Rev. 04.15.2020 BEWD-SOLD-ND-GD

22
CUTTING ALLOWANCE and MANUFACTURER TOLERANCE (waste factor):A 10' x 10' room has net 100 square feet (Sq. Ft.) – the actual area that will have flooring – but more product is required to allow for cutting which generates unusable pieces. Carefully measure the net square feet required, adding up multiple areas. The table gives an approximate recommendation for cutting allowance: Quantities are always rounded up to the nearest box. Note: Natural products may have different waste factors depending on grade/type of wood and manufacturer tolerance of 5 – 20% may be allowed. If defects are greater than the waste factor indicated for your flooring, please contact your local store or call Cus-tomer Care at 1-800-366-4204.• In all cases the amount of waste can be reduced by using unsatisfactory planks by: 1) Cutting out affected area to create a satisfactory piece and using as
starter / end pieces for rows 2) Placing in areas that appearance does not matter 3) Using planks in the case of width issues as the last rowTip: If more than half a box is not available for spares we recommend ordering an extra box. Please note: Actual cutting waste may be lower or higher based on room layout. E.g. multiple rooms vs. one large area and ”pattern” being installed. Consider carefully before returning boxes. Keeping extra boxes is a great idea and inexpensive insurance against damage, if a repair if needed the product and batch will be the same, and you have options even if the product has been discontinued. Diagonal installations may require 5% extra material over and above the cutting and manufacturer tolerance allowance.
EXPANSION SPACE: A minimum gap of 3/4" is required between the flooring and all vertical obstructions (walls, door jambs, pipes, staircases, posts, fixtures, built-ins, etc.).
If the room has electric baseboard heaters, leave a minimum of 3/4" between the surface of the flooring and the bottom of the heat-ers, allowing heat to circulate properly.NOTE: Gapping and buckling can develop if expansion space requirements are not followed.
GrooveTongue
PROFILE (END VIEW)
9/16" baseboard
9/16" baseboard
Drywall
Drywall
Starting Wall/Stud
Starting Wall/Stud
3/4"quarter round
3/4"quarter round
Glue
Glue
3/4" Expansion gap
3/4" Expansion gap
TYPICAL INSTALLATION
How to achieve required Expansion Gap using base board only
Net Area Total with Cutting % Applied SqFt Allowance SqFt
100 110 10 200 218 9 400 432 8 600 642 7 800 848 6 1000 1050 5
above 1000 SqFt add 5%
© 2020 Lumber Liquidators, 4901 Bakers Mill Lane, Richmond VA 23230-2431 Rev. 04.15.2020 BEWD-SOLD-ND-GD

23
RUN WIDTH AND LENGTH: Glue down: No limit in run length or width.Flooring must have room to expand and contract freely.
CABINETS / FIXED FIXTURES:• Although not recommended, cabinets may be installed on top of this product (See the product’s limited warranty for details).
SUNLIGHT:Depending on the species, your flooring will likely change color “patina” with prolonged exposure to sunlight. Use of window coverings, shades, or tinting your windows is recommended to slow this natural process.
SUBFLOORS NEED TO BE CLEAN – FLAT – DRY:CLEAN Free from contaminants including but not limited to: oil, grease, parting compounds, chemical contaminants, sealing and curing agents, paint, drywall compound, old adhesives such as cutback, solvents, and loose or broken patching agents and other foreign materials that might prevent adhesive bond (refer to the adhesive technical data sheet / install guide). Free from particles including but not limited to: dust, dirt, and grit.
FLAT: Subfloors must be flat within 1/8" over 6', and 3/16" over a 10' span. Improper substrate or flatness can result in gaps, locking mechanism failure and premature wear on surface.
DRY: Follow product use limitations and adhesive manufacturers technical data sheets (TDS) / install guide. Do not install this flooring over plywood underlayment attached to concrete, unless it is known that an appropriate moisture barrier has been installed (all applications). All substrates must be structurally sound and free from movement or deflection
WOOD SUBFLOOR:• Screw down loose or squeaky sections of plywood and replace areas that are damaged. • To address flatness concerns sand or plane high spots and fill the low spots with a material approved for use under wood
flooring. • Glue down applications – low, sagging areas of the subfloor should be cut out and replaced with the same thickness. • Installers are responsible to use materials to ensure product performance. • Substrates that are un-level /flat due to structural deficiencies should be repaired by a licensed contractor. • Never apply plastic sheet over wood subfloors.
STRUCTURAL REQUIREMENTS:Note that joist spacing determines minimum subfloor thickness.
Joist spacing 16" on center (OC) or less – Plywood: Minimum of (5/8", 19/32") Oriented Strand Board (OSB): minimum (3/4", 23/32")
Advantech minimum (3/4", 23/32") Joist spacing 16" up to 19.2" (OC) – Plywood: Minimum of (3/4", 23/32") Oriented Strand Board (OSB): minimum of (3/4", 23/32") Joist spacing over 19.2"up to maximum 24" (OC) – Plywood: Minimum of (7/8") Oriented Strand Board (OSB): Minimum of (1") or two layers of subflooring or brace
between truss/joists in accordance with local building codes.
MOISTURE TESTING: Use a meter that is species / material adjustable. E.g. Ligno-scanner SDM or mini-Ligno DX/C moisture meter.• If using alternate meter check that meter can be used with the subfloor material in question. Test sub-floor in multiple locations, with an appropriate wood moisture meter, it’s recommended to test 20 locations for
up to the first 1,000 square feet, and an additional 4 readings per 100 square feet thereafter, and average the results. Moisture readings must not exceed 12%.
• Higher readings indicate a moisture concern that needs to be addressed before installation can begin. Do not install this flooring over plywood underlayment attached to concrete, unless it is known that an appropriate
mois ture barrier has been installed. • For your protection, documenting and saving the test results is recommended.
CONCRETE SUBFLOORS:To address flatness concerns; Grind down high spots using a Diamond Grinder (Shroud and Vacuum) and fill in low spots with an appropriate Portland cement-based patch or self-leveler. Always check compatibility with the adhesive manufacturer). *CAUTION: Follow OSHA guidelines (29 CFR 1926.1153) regarding silica dust hazards.MOISTURE TESTING (Glue down applications):• The use of adhesives or sealer and adhesive systems with no moisture limits will eliminate the need for testing. E.g. Ultragrip 4 in
1, or MVP4 and approved adhesive. In the event of systems that have a moisture limit. Perform moisture tests regardless of age or grade of the concrete to determine moisture levels. A concrete slab shall be cured a minimum of 60 - 90 days before performing moisture tests. If concrete moisture levels exceed the adhesive manufacturer acceptable limits, do not install the floor.
• Follow the moisture testing instructions, product limitations and procedural guidelines in the adhesive manufacturer's Technical Data Sheets / Manufacturer Guidelines. The test requirements and limits that apply will vary by product specified.
© 2020 Lumber Liquidators, 4901 Bakers Mill Lane, Richmond VA 23230-2431 Rev. 04.15.2020 BEWD-SOLD-ND-GD

24
• There are only two accepted moisture test methods: 1) The Standard Test Method for Determining Relative Humidity in Concrete Floor Slabs Using in situ Probes (ASTM F 2170) 2) The Standard Test Method for Measuring Moisture Vapor Emission Rate of Concrete Subfloor Using Anhydrous Calcium
Chloride (ASTM 1869). • Note: The use of moisture meters, plastic sheet test and/or bond tests are not industry accepted quantitative test methods • For your protection, documenting and saving the test results is recommended. • Slabs must be free of hydrostatic pressure. RECOMMENDED PATCHES/LEVELERS:• Cement Patching- Bostik WebcreteR 95™ • Total Surface Self-Leveling- Bostik SL-175™ (plus Primer Pro) Follow manufacturer’s TDS / installation guide. LIGHTWEIGHT ALTERNATIVE SUBFLOORS (Not approved):Use over gypsum-based/underlayments is limited to dry, "above-grade" installations where the gypsum has dried hard (not dusty / powdery), with a minimum compressive strength > 2,500 psi for solid hardwood installations. Please refer to adhesive / sealer manufacturer recommendations. EXISTING FLOORS:• This flooring can only be glued down to existing flooring that is properly prepped and approved by the adhesive manufacturer. UNDERLAYMENT (Double Stick Applications Only):• Using approved underlayments, your local store can advise on best solution for your situation.
USER / OWNER / INSTALLER RESPONSIBILITIES:Install in good lighting.• Product installation constitutes acceptance. Visually inspect the product and determine acceptability before installation. Claims will
not be accepted regarding visual defects after flooring has been installed. If any planks are unacceptable due to color, finish, mill-ing or any other reason, it is your responsibility to determine to use them, hide them in areas like closets, trim off the imperfection, or not install them at all.
• You should plan on being present during your installation to ensure that all required procedures are completed and boards with visible defects are not installed. It is important to inspect individual boards and to frequently step back to observe the “whole picture” before installation is completed.
• A reasonable amount of installed flooring (up to 25% or 100 sq. ft. whichever is less) is enough to determine acceptance of quality. • Retain a box label and keep on file with your receipt for future reference. • If quality issues are suspected stop the installation and call your local store or CUSTOMER CARE at 800-366-4204.
HELPFUL TOOLS: (as needed) • Tape measure • Pencil • Chalk line • 6' level • Screed • Miter saw • Table saw • 60 tooth carbide tip saw blades
• Jamb saw • Eye protection • Ear protection • Niosh dust mask • Knee pads • Gloves • Blue painters tape (2080) • PVA wood glue • Compressor with regulator • Air hose • Floor nailer • Brad / Stapler • Drill • Drill bit set • Hammer • Flat pry bar • Broom • Hygrometer (to monitor in-home humidity) • Species adjustable moisture meter (wood) • Calcium chloride moisture or (RH) Relative Humidity test (concrete) • Approved adhesive remover • Cloth rags • Color putty • Stain markers • Speed square
ADDITIONAL NOTES: • When moving furniture and heavy equipment, use luan board, plywood, or other similar covering to protect the floor.
Each project is unique and different. Installation advice or recommendations are given as a courtesy and not intended to take the place of an installer's visual inspection, expertise or informed judgment, which will override any advice or recommendations given in the Installation Guidelines. The end user / contractor on-site is ultimately responsible for ensuring that selected products are appropriate for local conditions and / or the final use of the product.
© 2020 Lumber Liquidators, 4901 Bakers Mill Lane, Richmond VA 23230-2431 Rev. 04.15.2020 BEWD-SOLD-ND-GD

25
STEP 1. Undercut all door casings jambs with a jamb saw to
allow the flooring to slide under the doorjamb. If a baseboard is still in place, extend the undercut about 1" beyond the door frame casing. To find the height to cut the jamb, lay a scrap piece of flooring (and underlayment) next to the door frame, and lay the saw blade on top. After cut ensure that the floor plus underlayment does not bind, always leave 1/16" clearance under the doorjamb / casing for the floor to be able to move freely without vertical restriction. Adjust as required.
GLUE DOWN METHOD SOLID HARDWOOD FLOORING
GETTING STARTED.Remove any existing quarter round, shoe moldings, baseboards and doorway transitions. To achieve the 3/4"expansion you may need to undercut the drywall if is not raised up above the thickness of the flooring. Remove existing floor covering as required, check floor flatness per details on previous page and address any issues. Check that all doors will swing open with adequate clearance over the new flooring prior to starting any work. Important: Any metal doors must be addressed by a specialist to adjust. Do not cut metal door frames!
Groove
Glue
Tongue
PROFILE (END VIEW)
STEP 2. LAYOUT: Determine which direction the planks will be installed. Without subfloor modification the flooring must be laid perpen-
dicular to the subfloors joists. If the flooring needs to be installed Parallel to the subfloor joists a second layer comprised of 15/32nd panels should
be fastened to the subfloor using ring or screw shanked nails or proprietary screws long enough to only penetrate the existing subfloor and not penetrating the subfloor joists. Considerations are fireplaces, doors, cabinets, and transitions. For best appearance, full planks are desirable at the focal point and most cases it is the longest unbroken wall in the room.
Installers: It is advisable to determine the installation layout and direction (North/South vs East/West) with the end user. Install recommended underlayment as required, e.g. white Silicon Vapor Shield®.
© 2020 Lumber Liquidators, 4901 Bakers Mill Lane, Richmond VA 23230-2431 Rev. 04.15.2020 BEWD-SOLD-ND-GD
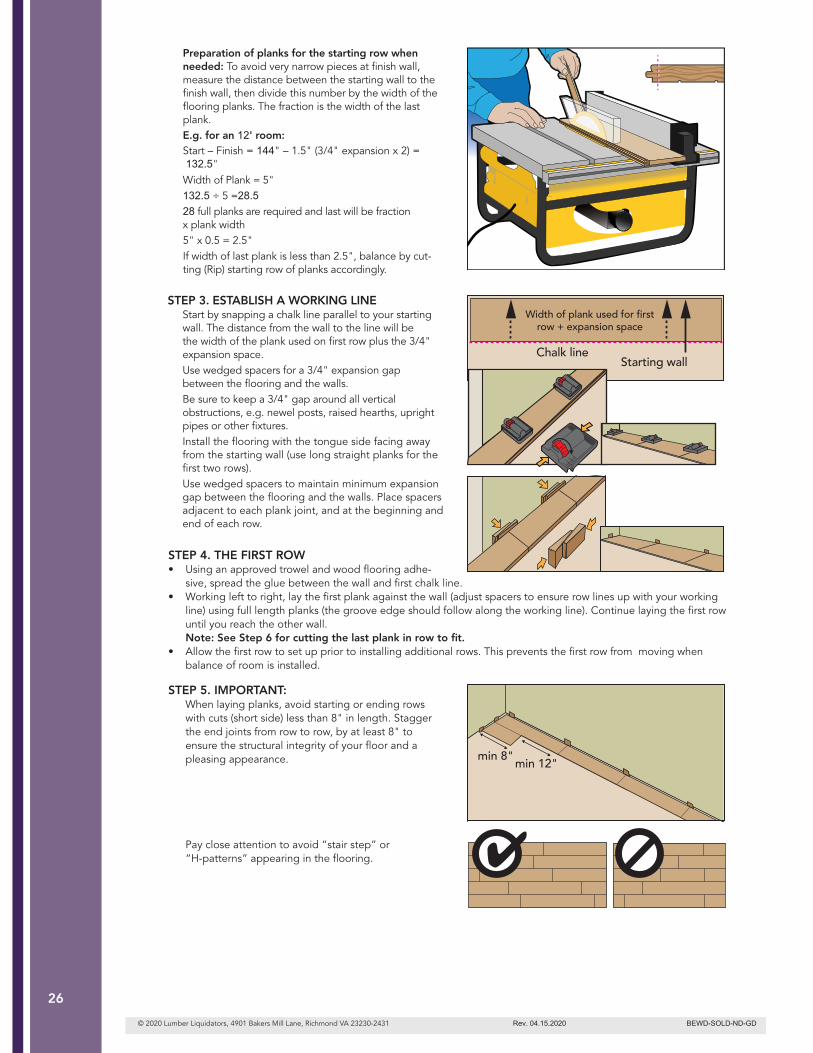
26
STEP 4. THE FIRST ROW • Using an approved trowel and wood flooring adhe-
sive, spread the glue between the wall and first chalk line. • Working left to right, lay the first plank against the wall (adjust spacers to ensure row lines up with your working
line) using full length planks (the groove edge should follow along the working line). Continue laying the first row until you reach the other wall.
Note: See Step 6 for cutting the last plank in row to fit. • Allow the first row to set up prior to installing additional rows. This prevents the first row from moving when
balance of room is installed.
STEP 3. ESTABLISH A WORKING LINE Start by snapping a chalk line parallel to your starting
wall. The distance from the wall to the line will be the width of the plank used on first row plus the 3/4" expansion space.
Use wedged spacers for a 3/4" expansion gap between the flooring and the walls.
Be sure to keep a 3/4" gap around all vertical obstructions, e.g. newel posts, raised hearths, upright pipes or other fixtures.
Install the flooring with the tongue side facing away from the starting wall (use long straight planks for the first two rows).Use wedged spacers to maintain minimum expansion gap between the flooring and the walls. Place spacers adjacent to each plank joint, and at the beginning and end of each row.
STEP 5. IMPORTANT: When laying planks, avoid starting or ending rows
with cuts (short side) less than 8" in length. Stagger the end joints from row to row, by at least 8" to ensure the structural integrity of your floor and a pleasing appearance.
Pay close attention to avoid “stair step” or “H-patterns” appearing in the flooring.
min 8"min 12"
Preparation of planks for the starting row when needed: To avoid very narrow pieces at finish wall, measure the distance between the starting wall to the finish wall, then divide this number by the width of the flooring planks. The fraction is the width of the last plank.
ting (Rip) starting row of planks accordingly.
E.g. for an 12' room: Start – Finish = 144" – 1.5" (3/4" expansion x 2) = 132.5"
x plank width 5" x 0.5 = 2.5" If width of last plank is less than 2.5", balance by cut-
Width of Plank = 5" 132.5 ÷ 5 =28.5 28 full planks are required and last will be fraction
© 2020 Lumber Liquidators, 4901 Bakers Mill Lane, Richmond VA 23230-2431 Rev. 04.15.2020 BEWD-SOLD-ND-GD
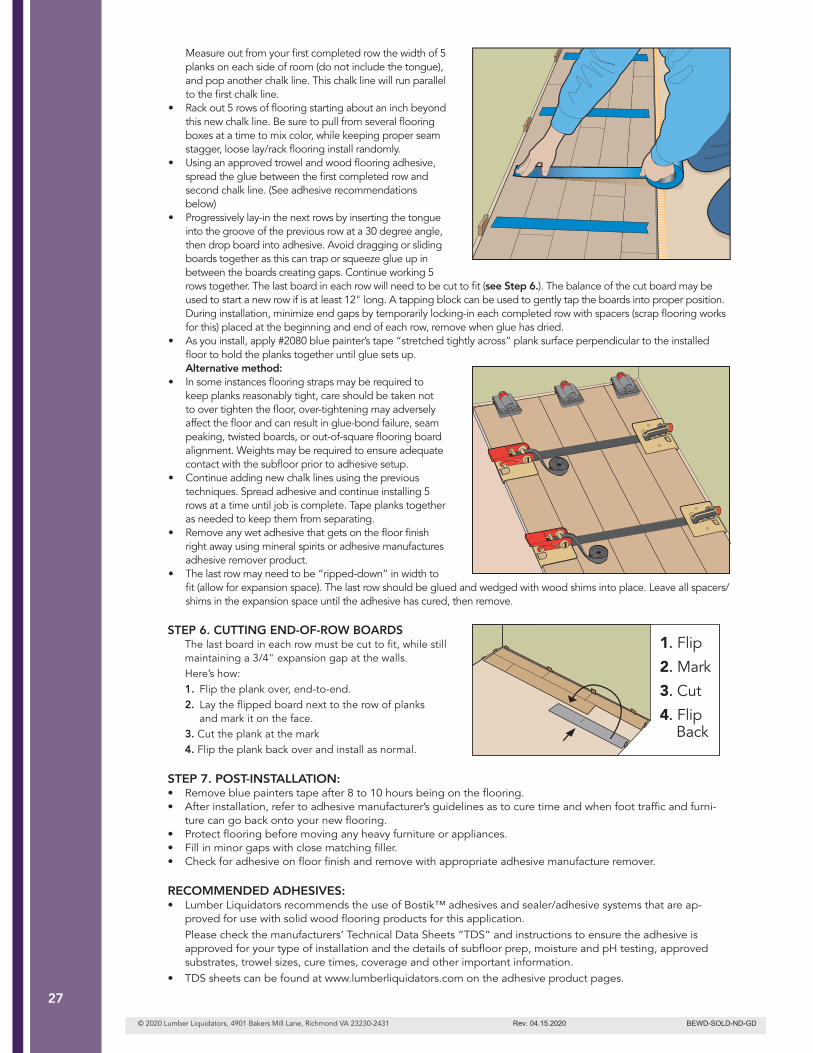
27
STEP 6. CUTTING END-OF-ROW BOARDS The last board in each row must be cut to fit, while still
maintaining a 3/4" expansion gap at the walls. Here’s how: 1. Flip the plank over, end-to-end. 2. Lay the flipped board next to the row of planks
and mark it on the face. 3. Cut the plank at the mark 4. Flip the plank back over and install as normal.
1. Flip
2. Mark
3. Cut
4. Flip Back
STEP 7. POST-INSTALLATION: • Remove blue painters tape after 8 to 10 hours being on the flooring. • After installation, refer to adhesive manufacturer’s guidelines as to cure time and when foot traffic and furni-
ture can go back onto your new flooring.• Protect flooring before moving any heavy furniture or appliances. • Fill in minor gaps with close matching filler. • Check for adhesive on floor finish and remove with appropriate adhesive manufacture remover.
RECOMMENDED ADHESIVES: • Lumber Liquidators recommends the use of Bostik™ adhesives and sealer/adhesive systems that are ap-
proved for use with solid wood flooring products for this application. Please check the manufacturers’ Technical Data Sheets “TDS” and instructions to ensure the adhesive is
approved for your type of installation and the details of subfloor prep, moisture and pH testing, approved substrates, trowel sizes, cure times, coverage and other important information.
• TDS sheets can be found at www.lumberliquidators.com on the adhesive product pages.
Measure out from your first completed row the width of 5 planks on each side of room (do not include the tongue), and pop another chalk line. This chalk line will run parallel to the first chalk line.
• Rack out 5 rows of flooring starting about an inch beyond this new chalk line. Be sure to pull from several flooring boxes at a time to mix color, while keeping proper seam stagger, loose lay/rack flooring install randomly.
• Using an approved trowel and wood flooring adhesive, spread the glue between the first completed row and second chalk line. (See adhesive recommendations below)
• Progressively lay-in the next rows by inserting the tongue into the groove of the previous row at a 30 degree angle, then drop board into adhesive. Avoid dragging or sliding boards together as this can trap or squeeze glue up in between the boards creating gaps. Continue working 5 rows together. The last board in each row will need to be cut to fit (see Step 6.). The balance of the cut board may be used to start a new row if is at least 12" long. A tapping block can be used to gently tap the boards into proper position.
During installation, minimize end gaps by temporarily locking-in each completed row with spacers (scrap flooring works for this) placed at the beginning and end of each row, remove when glue has dried.
• As you install, apply #2080 blue painter’s tape “stretched tightly across” plank surface perpendicular to the installed floor to hold the planks together until glue sets up.
Alternative method: • In some instances flooring straps may be required to
keep planks reasonably tight, care should be taken not to over tighten the floor, over-tightening may adversely affect the floor and can result in glue-bond failure, seam peaking, twisted boards, or out-of-square flooring board alignment. Weights may be required to ensure adequate contact with the subfloor prior to adhesive setup.
• Continue adding new chalk lines using the previous techniques. Spread adhesive and continue installing 5 rows at a time until job is complete. Tape planks together as needed to keep them from separating.
• Remove any wet adhesive that gets on the floor finish right away using mineral spirits or adhesive manufactures adhesive remover product.
• The last row may need to be “ripped-down” in width to fit (allow for expansion space). The last row should be glued and wedged with wood shims into place. Leave all spacers/shims in the expansion space until the adhesive has cured, then remove.
© 2020 Lumber Liquidators, 4901 Bakers Mill Lane, Richmond VA 23230-2431 Rev. 04.15.2020 BEWD-SOLD-ND-GD
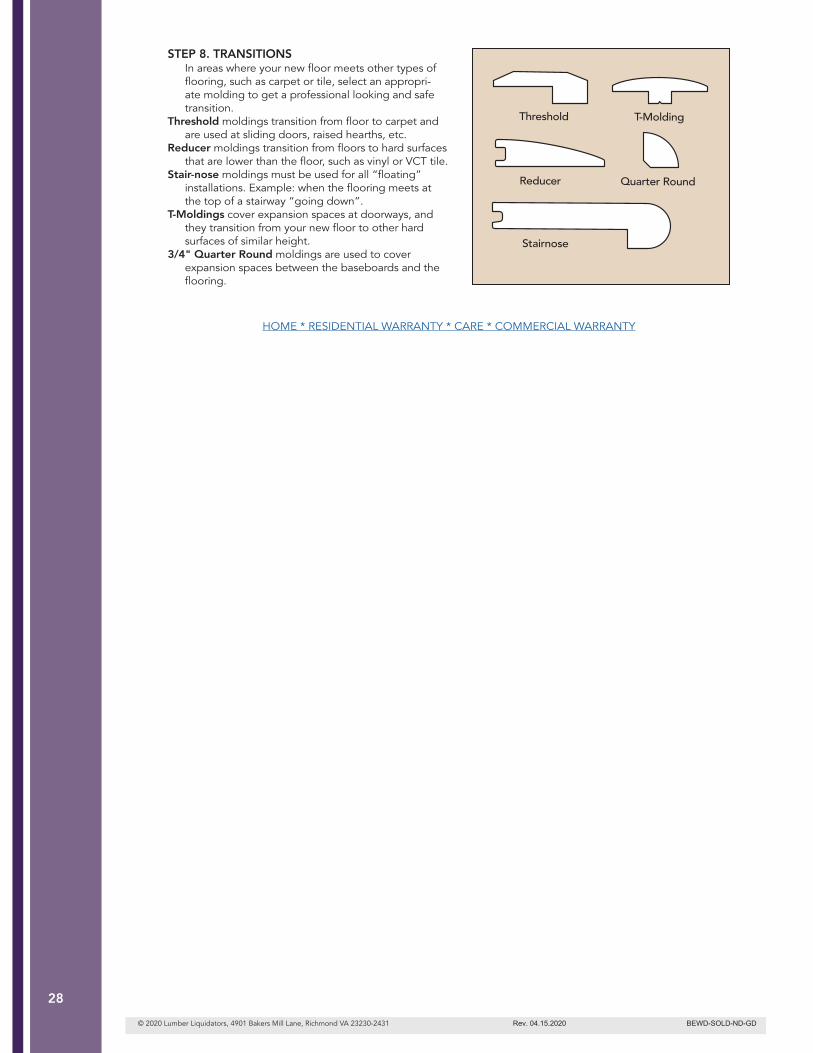
28
STEP 8. TRANSITIONS In areas where your new floor meets other types of
flooring, such as carpet or tile, select an appropri-ate molding to get a professional looking and safe transition.
Threshold moldings transition from floor to carpet and are used at sliding doors, raised hearths, etc.
Reducer moldings transition from floors to hard surfaces that are lower than the floor, such as vinyl or VCT tile.
Stair-nose moldings must be used for all “floating” installations. Example: when the flooring meets at the top of a stairway “going down”.
T-Moldings cover expansion spaces at doorways, and they transition from your new floor to other hard surfaces of similar height.
3/4" Quarter Round moldings are used to cover expansion spaces between the baseboards and the flooring.
HOME * RESIDENTIAL WARRANTY * CARE * COMMERCIAL WARRANTY
Threshold
Reducer
Stairnose
Quarter Round
T-Molding
© 2020 Lumber Liquidators, 4901 Bakers Mill Lane, Richmond VA 23230-2431 Rev. 04.15.2020 BEWD-SOLD-ND-GD

29
CARE AND MAINTENANCE GUIDE Solid Wood Flooring is designed to bring beautiful wood looks to your environment to fit your flooring needs and style, while also providing a solution with easy maintenance.
Created for residential and light commercial applications, this flooring is extremely durable but still re-quires care and attention to keep it looking beautiful for years to come.
For day to day cleaning we recommend the floor to be swept and/or vacuumed. The vacuum head must be a felt brush type. Do not use vacuum with beater bars / very hard bristles. This will eliminate fine parti-cles of dirt and grit that act like sandpaper which will scratch and / or dull the surface of your flooring.
Reduce the visibility of minor scratches using Bellawood Scratch Away.
Minimize abrasive material and dirt by placing mats on both sides of exterior doors and by using area rugs in high-traffic areas.
Use Bellawood Floor Cleaner to deep clean your whole floor and clean spots and soiled areas.
DO NOT use cleaning agents containing wax, oil or polish. Leftover residue will form a dull film.
DO NOT use steel wool or scouring pad, as they will scratch the floor.
DO NOT use steam or wet mops.
This flooring can be dented, gouged and scratched, this can by caused by but is not limited to: dropped objects, damaged shoe heals / soles, abrasive particles, etc. The following steps will help reduce the risk of this kind of damage:
• Floor protectors should always be installed to the bottom of furniture to prevent scratching and marking.
• Minimize abrasive material and dirt by placing mats on both sides of exterior doors and by using area rugs in high-traffic areas.
• We recommend the use of a hard surface (non-studded), non-rubber chair mat to protect your floor from office chairs with casters.
• Light, rolling furniture should be outfitted with broad-surface, non-staining casters that have been en gineered for hard surface floors (casters should be a minimum of 1" wide and at least 2" in diame-ter.
• Never slide or roll heavy furniture or appliances across the floor.
• If flooring will be exposed to rolling traffic or heavy, appliances protect the flooring with plywood or hardboard panels.
• Remove shoes that are damaged exposing sharp metal, have cleats etc. before walking on the floor.
As your floor ages, color change or “patina” can occur.
Whether finished or unfinished, all wood changes color over time due to oxidation and when ex-posed to UV light. Some species darken in color over time, while others tend to lighten. There is no known set value for "color fastness" of a species, so contractors and or customers should be aware of this normal condition. Certain species, including American cherry, Koa, Brazilian cherry, and many imported species, have this tendency to change in color. Some color change is to be expected for all species and a drastic change can be expected for some. This “Patina” process although normal, can be minimized by limiting exposure to direct sunlight or accelerated by exposure. Periodically moving furniture and rugs will help to equalize overall exposure to UV light. If possible avoid com-pletely covering floors with rugs for the first six months.
You should always promptly remove spills using a soft cloth reducing slip hazards.
We love our pets but occasionally accidents happen.
• Cleaning the affected area should begin immediately upon discovery: • Use absorbent paper tissue to collect as much of the deposited material as possible and properly
dispose of it. Remove any existing residue with a suitable disinfecting cleaner. • Repeat until all residue is removed. Buff dry. Clean, using Bellawood Floor Cleaner. • The more time that elapses before removal, the more difficult a stain will be to remove. • Keep pets’ nails trimmed.
We recommend the use of NON-RUBBER backed mats that are labeled “colorfast” by the manufacturer.
Non-staining, vinyl-backed mats or woven rugs should be used at all door entries from outside to avoid discoloration from asphalt driveways, catch dirt, grit, sand, and other debris to help sustain the flooring.
We also recommend using protective mats around sinks and tubs to catch excess water and debris.
HOME * RESIDENTIAL WARRANTY * INSTALLATION * COMMERCIAL WARRANTY
© 2020 Lumber Liquidators, 4901 Bakers Mill Lane, Richmond VA 23230-2431 Rev. 04.15.2020 BEWD-SOLD-ND-GD
30
LIMITED COMMERCIAL WARRANTYBellawood Solid Hardwood Flooring
1. WHO MAY USE THIS WARRANTY?
Lumber Liquidators, Inc. (“we,” “us,” and “our”) extends this limited warranty only to the cus-tomer who originally purchased the product (“you”). It does not extend to any subsequent owner or other transferee of the product. THIS LIMITED WARRANTY IS NOT TRANSFER-ABLE. THE LIMITED WARRANTY EXTENDS ONLY TO THE ORIGINAL PURCHASER.
This warranty is not transferable unless the original purchaser registers the flooring purchase at www.lumberliquidators.com or via telephone at 1-800-254-0181 within ninety (90) days of your purchase. Once registered, we will send the original purchaser a Bellawood Certificate. If you do not receive your Bellawood Certificate within thirty (30) days of contacting us, please call us at 1-800-254-0181. If you do not call within sixty (60) days of contacting us, we are not obligat-ed to provide or replace any certificates. You should store the original Bellawood Certificate in a safe place and give it to the new owner if you sell or transfer ownership of your property where the product is installed.
To file a claim, any subsequent owner must present the original Bellawood Certificate. No claim by a subsequent owner will be accepted without the timely presentation of the original Bel-lawood Certificate and proof of ownership of the property where the product is installed.
2. LIGHT AND HEAVY COMMERCIAL USES AND THE PERIOD OF COVERAGE
• Light Commercial Our products are designed for commercial and business uses. The war-ranty periods for each product are determined by their application and use. Light commer-cial uses are defined as areas where foot traffic is light to moderate, and without the use of heavy chemicals, acids, greases or other such contaminants. Examples of light commercial uses include: professional offices, including lobbies, waiting rooms, hallways; corporate lo-cations such as banks, conference rooms, meeting rooms; small retail stores such as salons, jewelry stores, dressing rooms; applications in apartment lobbies and common areas, and connecting hallways and offices.
• Heavy Commercial Heavy (or Full) Commercial Areas are areas of use with floors subjected to heavy static and dynamic loads, caster use, heavy point loads and moderate to heavy traffic. Portable furnishings with casters, rests and wheels that concentrate the weight of the appliance/equipment are considered heavy use.
• Determination of Application and Use We shall have the sole right to make the deter-mination of whether an application is for light or heavy commercial uses. For purposes of such determination, we may need to visit the location that relates to the warranty claim for inspection and use. These limited warranties do not apply to industrial uses. Industrial uses include but are not limited to use in environments with heavy chemicals, acids, greases (including for food) or other such contaminants, and those use in environments with forklift use, industrial plants, uses where extra heavy static and dynamic loads are applied to flooring, and use of casters bearing extra heavy loads on resilient flooring.
© 2020 Lumber Liquidators, 4901 Bakers Mill Lane, Richmond VA 23230-2431 Rev. 04.15.2020 BEWD-SOLD-ND-GD
RESIDENTIAL WARRANTY
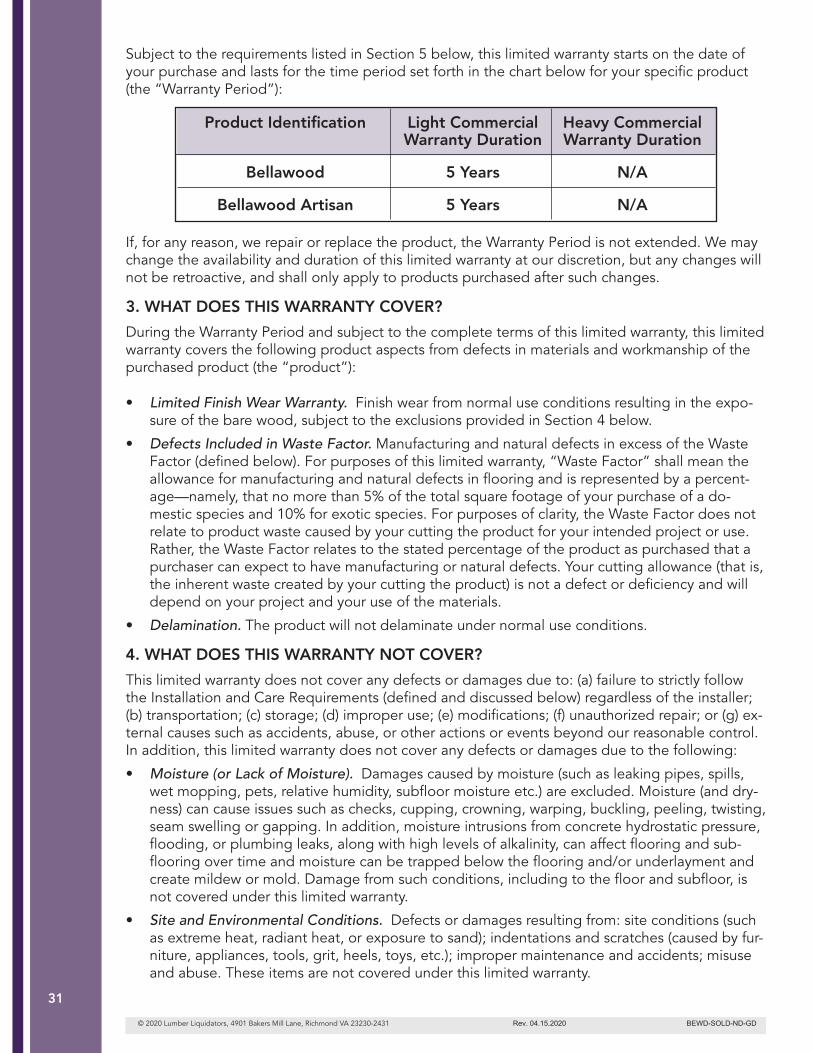
31
Subject to the requirements listed in Section 5 below, this limited warranty starts on the date of your purchase and lasts for the time period set forth in the chart below for your specific product (the “Warranty Period”):
Product Identification Light Commercial Heavy Commercial Warranty Duration Warranty Duration
Bellawood 5 Years N/A
Bellawood Artisan 5 Years N/A
If, for any reason, we repair or replace the product, the Warranty Period is not extended. We may change the availability and duration of this limited warranty at our discretion, but any changes will not be retroactive, and shall only apply to products purchased after such changes.
3. WHAT DOES THIS WARRANTY COVER?
During the Warranty Period and subject to the complete terms of this limited warranty, this limited warranty covers the following product aspects from defects in materials and workmanship of the purchased product (the “product”):
• Limited Finish Wear Warranty. Finish wear from normal use conditions resulting in the expo-sure of the bare wood, subject to the exclusions provided in Section 4 below.
• Defects Included in Waste Factor. Manufacturing and natural defects in excess of the Waste Factor (defined below). For purposes of this limited warranty, “Waste Factor” shall mean the allowance for manufacturing and natural defects in flooring and is represented by a percent-age—namely, that no more than 5% of the total square footage of your purchase of a do-mestic species and 10% for exotic species. For purposes of clarity, the Waste Factor does not relate to product waste caused by your cutting the product for your intended project or use. Rather, the Waste Factor relates to the stated percentage of the product as purchased that a purchaser can expect to have manufacturing or natural defects. Your cutting allowance (that is, the inherent waste created by your cutting the product) is not a defect or deficiency and will depend on your project and your use of the materials.
• Delamination. The product will not delaminate under normal use conditions.
4. WHAT DOES THIS WARRANTY NOT COVER?
This limited warranty does not cover any defects or damages due to: (a) failure to strictly follow the Installation and Care Requirements (defined and discussed below) regardless of the installer; (b) transportation; (c) storage; (d) improper use; (e) modifications; (f) unauthorized repair; or (g) ex-ternal causes such as accidents, abuse, or other actions or events beyond our reasonable control. In addition, this limited warranty does not cover any defects or damages due to the following:
• Moisture (or Lack of Moisture). Damages caused by moisture (such as leaking pipes, spills, wet mopping, pets, relative humidity, subfloor moisture etc.) are excluded. Moisture (and dry-ness) can cause issues such as checks, cupping, crowning, warping, buckling, peeling, twisting, seam swelling or gapping. In addition, moisture intrusions from concrete hydrostatic pressure, flooding, or plumbing leaks, along with high levels of alkalinity, can affect flooring and sub-flooring over time and moisture can be trapped below the flooring and/or underlayment and create mildew or mold. Damage from such conditions, including to the floor and subfloor, is not covered under this limited warranty.
• Site and Environmental Conditions. Defects or damages resulting from: site conditions (such as extreme heat, radiant heat, or exposure to sand); indentations and scratches (caused by fur-niture, appliances, tools, grit, heels, toys, etc.); improper maintenance and accidents; misuse and abuse. These items are not covered under this limited warranty.
© 2020 Lumber Liquidators, 4901 Bakers Mill Lane, Richmond VA 23230-2431 Rev. 04.15.2020 BEWD-SOLD-ND-GD
32
• Gloss Reduction. Fading or loss of gloss (or glaze) is not finish wear and not a product defect covered under this limited warranty.
• Within Waste Factor. Defects in flooring that do not exceed the Waste Factor (defined above) are not covered under this limited warranty. Consequently, it is recommended that you add the applicable percentage to your total square footage when ordering your floor.
• Other Finishes. This limited warranty covers the factory-applied finish only. Applying another finish or sanding (such as in preparation for another finish) may damage the factory-applied finish and voids this limited warranty against finish wear.
• Exterior Use. This limited warranty does not cover exterior use of the product.
• Non-Flooring Installations. This limited warranty does not cover use of the products for instal-lations on ceilings or other usages for purposes other than flooring (like furniture or counter-tops).
• Visible Defects. As discussed further below in Section 5.C., products installed with visible de-fects are not covered under this limited warranty. Accordingly, before installation, you and the installer should examine each product to ensure it is satisfactory.
• Natural Characteristics. Wood and bamboo are natural products. They may change as a re-sult of the conditions to which they are exposed including seasonal and environmental factors. Color changes due to aging or exposure to UV/sunlight may also occur. In addition, natural variations from board to board, like differences in grain, color, tone, and knots, may exist.
• Fading from Mats. This limited warranty does not cover fading or discoloration due to use of rubber-backed mats.
• Expansion and Contraction. As a product of nature, wood and bamboo react to changes in temperature and humidity. Small gaps between planks are a normal occurrence with changes in relative humidity. These gaps are seasonal and show up primarily in the winter when cold temperatures lower the relative humidity in the air. Wood and bamboo flooring perform best at relative humidity rates between 30% and 50% and temperatures between 60°F and 80°F (not to exceed a 20% fluctuation in relative humidity), before, during and after the installation and remain at such levels throughout the life of your floor to ensure optimum performance. Please note that ideal interior environmental conditions will vary from region to region and jobsite to jobsite, the relative humidity figures on your project maybe higher or lower. You must ensure that the change in relative humidity stays within a 20% range (e.g.30% to 50%) and does not fluctuate beyond 20% for sustained periods, which may affect the flooring. En-vironments where the relative humidity drops below 25% are not recommended or subject to coverage under this limited warranty. Leaving a building/structure unoccupied without climate control for extended periods of time can lead to damage to the floor from excessive humid-ity build-up or extremely dry conditions. Both scenarios can damage the floor, cabinets, and furniture.
• Color and Shade Variations. New or replacement flooring may not always match samples, printed color photography (including websites and catalogs), existing flooring or other prod-ucts (such as cabinets, stair railings, trim and moldings) due to, among other things, natural variations that occur in species, age, growing conditions, exposure to UV/sunlight and other factors. These variations should be expected. Inspect product before installation claims for color and shade variation will not be accepted after the product is installed.
• Odd Lots or AS-IS. An odd lot (or flooring sold AS-IS) is flooring that is discounted because it did not pass our rigorous inspection process and is not covered by this limited warranty.
• Third-Party Purchases. Except for an authorized transfer in writing by us, this limited warran-ty does not cover any purchases other than those made directly from Lumber Liquidators in store, online, or by phone.
• Radiant Heat. This limited warranty does not cover any products installed over radiant heat that are not installed according to the radiant heat manufacturer guidelines or not installed in compliance with the Installation and Care Requirements.
© 2020 Lumber Liquidators, 4901 Bakers Mill Lane, Richmond VA 23230-2431 Rev. 04.15.2020 BEWD-SOLD-ND-GD

33
• Outdoor Installation. Outdoor and partial outdoor installations of the product void this limited warranty and are not covered.
• Removal and Replacement. This limited warranty does not cover the cost of the removal or replacement of Countertops, cabinets, built-in appliances or other fixtures, installed on top of your floor.
• Improper Installation and Maintenance. This limited warranty does not cover any dissatisfac-tion or damage due to improper installation or maintenance (but excluding improper installa-tion or maintenance performed by us). This includes any damages caused by any installation (regardless of the source of the installation advice other than directly provided by us) that conflicts with the applicable product installation instructions—for example, damage caused by sub-surface, sub-flooring and jobsite environmental deficiencies, improper transportation, acclimation and storage.
5. HOW DO I MAINTAIN THIS WARRANTY DURING THE WARRANTY PERIOD?
To maintain this limited warranty during the Warranty Period, you are obligated to meet all of the following requirements for your use, installation, and maintenance of the product (the “Installation and Care Requirements”). The Installation and Care Requirements must be strictly followed for the limited warranty to remain valid and not be void.
A. Follow the Pre-Installation Requirements. Prior to installing a single board, tile, or product, you or the installer must determine that the job-site environment and the sub-surfaces (includ-ing subfloor substrates) meet or exceed applicable industry and product standards, including, without limitation, moisture testing and controls. The product installation instructions discuss these standards and are provided in full below. These requirements must be strictly followed.
B. Comply with All Laws. In your installation, maintenance, and use of the product you must comply with all laws and regulations, including, without limitation, all applicable environmental and building codes, regulations and laws.
C. Inspect All Products for Visible Defects. Products installed with visible defects are not cov-ered under this limited warranty. Accordingly, before installation, you and the installer should examine each product to ensure it is satisfactory. If any products are unacceptable for any reason, it is up to you to determine to use them, hide them in areas like closets, trim off the imperfection, or not install them at all. You should plan on being present during your installa-tion to ensure that all required procedures are completed and products with visible defects are not installed. It is important to inspect individual boards and tiles and to frequently step back to observe the “whole picture” before installation is completed. If quality issues are suspected before or during installation immediately contact the store where your floor was purchased or call us at 1-800-366-4204.
D. Follow the Installation and Care Instructions. It is your duty to make sure the installation requirements are strictly followed, including, without limitation, as they relate to the use of moisture barriers, installation tools such as nailers and trowels, and the evaluation of job site conditions and moisture testing. The product’s installation and care manual(s) are provided in this document below, and those terms and provisions are part of this limited warranty.
6. WHAT ARE YOUR REMEDIES UNDER THIS WARRANTY?
With respect to any defective product during the Warranty Period, we will provide a Lumber Liqui-dators’ store credit in the amount of the purchase price paid for the defective portion of the floor-ing (excluding any installation costs and labor) in excess of the applicable Waste Factor (defined above). A store credit is the sole remedy under this warranty and can be used for store product purchases only. Provided, however, we reserve the right, in our sole discretion, to repair or replace such product (or the defective part) free of charge in lieu of a store credit. We will also pay for shipping and handling fees to return the repaired or replacement product to you if we elect to repair or replace the defective product.
© 2020 Lumber Liquidators, 4901 Bakers Mill Lane, Richmond VA 23230-2431 Rev. 04.15.2020 BEWD-SOLD-ND-GD
34
There is no guarantee that the same or a similar product to the original flooring will be available at the time a store credit is issued or redeemed.
We reserve the right to investigate, assess, and validate reported claims by, among other things, requesting samples from you for technical analysis and performing an inspection of the flooring and installation location.
7. HOW DO YOU OBTAIN WARRANTY SERVICE?
To file a warranty claim during the Warranty Period, you may:
A. Visit the store where you purchased your floor;
B. Call us at 1-800-366-4204; or
C. Email via the “contact us” link at www.lumberliquidators.com.
Claims must be submitted within the Warranty Period and within ninety (90) days of the date that the problem with the floor is first discovered. No warranty claim will be serviced without contact-ing us through one of the methods listed above and providing accurate and complete information in a timely manner.
8. WHAT ARE THE LIMITATIONS OF LIABILITY?
THE REMEDIES DESCRIBED ABOVE IN SECTION 6 ARE YOUR SOLE AND EXCLUSIVE REMEDIES AND OUR ENTIRE LIABILITY FOR ANY BREACH OF THIS LIMITED WARRANTY. NOTWITHSTANDING ANY OTHER PROVISION OR TERM, OUR LIABILITY SHALL UNDER NO CIRCUMSTANCES EXCEED THE ACTUAL AMOUNT PAID BY YOU FOR THE DEFECTIVE PRODUCT OR DEFECTIVE PORTION THEREOF.
UNDER NO CIRCUMSTANCES SHALL WE BE LIABLE FOR ANY CONSEQUENTIAL, INCIDEN-TAL, SPECIAL OR PUNITIVE DAMAGES OR LOSSES, WHETHER DIRECT OR INDIRECT. WITH-OUT LIMITING THE FORGOING SENTENCE, LOSSES, DAMAGES OR EXPENSES RELATING TO ANYTHING OTHER THAN THE FLOOR ITSELF ARE NOT COVERED, INCLUDING, WITH-OUT LIMITATION, DAMAGES DUE TO ANY DELAYS, LOST PROFITS, LOSS OF BUSINESS, LOSS OF USE OF PREMISES, MISSED TIME FROM WORK, HOTEL STAYS, STORAGE FEES, KENNEL COSTS FOR PETS, REMOVAL OF DEFECTIVE FLOORING, INSTALLATION OF RE-PLACEMENT FLOORING, OR REMOVAL OR REPLACEMENT OF ITEMS BUILT ON TOP OF ANY FLOORING (FOR EXAMPLE, COUNTERTOPS, CABINETS, BUILT-IN APPLIANCES).
9. TERMS OF DISPUTE RESOLUTION
NO JOINT OR CLASS ACTIONS: Neither you nor Lumber Liquidators shall be entitled to join or consolidate claims in arbitration by or against other customers of Lumber Liquidators with respect to other accounts, bring mass, class action, or consolidated claims in arbitration or a court of com-petent jurisdiction, or arbitrate or litigate any claim as a representative or individual of a class or in a private attorney general capacity. The arbitrator may not consolidate more than one person’s claims and may not otherwise preside over any form of a representative or class proceeding.
ARBITRATION: The following informal dispute resolution procedure is available to you if you believe that we have not performed our obligations under this limited warranty. You must use this informal procedure before pursuing any legal remedy in the courts.
Lumber Liquidators and you agree to attempt to resolve any disputes amicably. If, after thirty (30) days we are unable to do so, then you and Lumber Liquidators each agree that any claim or con-troversy of any sort relating to our agreement, the Products or these limited warranty terms shall be determined by arbitration in the nearest U.S. city to the Lumber Liquidators store where you purchased the products, before one arbitrator. At the option of the first to commence an arbitra-tion, the arbitration shall be administered either by JAMS pursuant to its Streamlined Arbitration Rules and Procedures, or by the American Arbitration Association pursuant to its Commercial Arbitration Rules. The arbitrator shall have no power to add to, delete from or modify these lim-ited warranty terms. Each of us shall have the right to conduct discovery to which we would be
© 2020 Lumber Liquidators, 4901 Bakers Mill Lane, Richmond VA 23230-2431 Rev. 04.15.2020 BEWD-SOLD-ND-GD

35
entitled had the dispute been resolved in a state court of general jurisdiction in the state of the Lumber Liquidators’ store where you purchased the products. Judgment on the arbitrator’s award may be entered in any court having jurisdiction. This clause shall not preclude either party from seeking provisional remedies in aid of arbitration from a court of appropriate jurisdiction. The arbitrator may, as part of the award, allocate all or part of the costs of the arbitration, including the fees of the arbitrator and the reasonable attorneys’ fees of the prevailing party. The arbitrator shall only have the authority to resolve individual disputes between you and Lumber Liquidators. Notwithstanding the foregoing, in addition to our rights set forth above, we may initiate proceed-ings directly in the appropriate court located in the U.S. city nearest the Lumber Liquidators store where you purchased the products in connection with any claim to collect amounts due and ow-ing by you.
10. NO OTHER TERMS
SAMPLES, DESCRIPTIONS, AND OTHER INFORMATION CONCERNING THE PRODUCT CONTAINED IN CATALOGS, ADVERTISEMENTS, OR OTHER PROMOTIONAL MATERIAL OR STATEMENTS MADE BY SALES REPRESENTATIVES OR DISTRIBUTORS ARE FOR GENERAL INFORMATIONAL PURPOSES ONLY AND ARE NOT BINDING UPON LUMBER LIQUIDATORS. NO SALES REPRESENTATIVES, STORE MANAGERS, ACCOUNT REPRESENTATIVES, OR DISTRIBUTORS SHALL HAVE ANY AUTHORITY WHATSOEVER TO ESTABLISH, EXPAND OR OTHERWISE MODIFY LUMBER LIQUIDATORS’ WARRANTIES. THE TERMS OF THIS LIMITED WARRANTY DOCUMENT MAY NOT BE AMENDED EXCEPT THROUGH A WRITTEN AGREE-MENT TITLED “AMENDMENT TO LIMITED WARRANTY” AND SIGNED BY AN AUTHORIZED OFFICER OF LUMBER LIQUIDATORS, PROVIDED, HOWEVER, THAT LUMBER LIQUIDATORS MAY GENERALLY MODIFY, CANCEL, UPDATE, OR OTHERWISE CHANGE ITS PROSPECTIVE WARRANTIES FOR FUTURE SALES AT ANY TIME AND FOR ANY REASON.
11. OTHER PROVISIONS
The section headings provided in this limited warranty are for convenience and informational ref-erence only and shall and shall not affect the interpretation or construction of this limited warranty.
THE PROVISIONS OF THIS LIMITED WARRANTY ARE DEEMED TO BE SEVERABLE AND THE INVALIDITY OR UNENFORCEABILITY OF ONE PROVISION SHALL NOT AFFECT THE VALIDITY OR ENFORCEABILITY OF ANY OTHER PROVISION.
12. ADDRESS FOR LUMBER LIQUIDATORS
Lumber Liquidators, Inc. is located at 4901 Bakers Mill Lane, Richmond, VA 23230.
HOME * RESIDENTIAL WARRANTY * INSTALLATION * CARE
© 2020 Lumber Liquidators, 4901 Bakers Mill Lane, Richmond VA 23230-2431 Rev. 04.15.2020 BEWD-SOLD-ND-GD