home-dzine online · home-dzineonline it’s all about caring for and improving your home and even...
TRANSCRIPT

Home-Dzineonline
It’s all about caring for and improving your home
and even more...denim walls - coastal decor - beachy ideas - decorative planterthe art of space - etching glass - concrete vanity - diy wall unit
September Issue 1
a touch of spring

Home-Dzineonline 2
contentsa touch of spring 3 Nothing quite evokes a sense of calm than a home decorated in the soft shades of sea and sand.
beach theme decor 6here’s how to create your own home accessories.
more ‘beachy’ ideas 7easy ways to display your seaside collectibles.
denim walls 9For the young at heart denim walls add instant fun to a coastal retreat or urban loft. Grab a friend and transform a wall in your home!
turn everyday glassware into art 11There is something magical about etching glass - turns plain glass pieces into decorative objects.
the art of space 12Homeowners are constantly on the lookout for fast, affordable ways to improve their home.
fresh creativity 13What nicer way to welcome spring into our homes than with bright displays of fresh flowers.
cottage kitchen 14Need extra storage for your kitchen? Our project provides extra countertop and storage space.
painted countertops 16With Rust-Oleum Countertop coating you can renew laminate countertops, cabinets and furniture.
decorative vanity 17This cast-in-place vanity features an optional terrazzo finish flecked with bits of white marble.
epoxy floors 19Homeowners worldwide are catching on to the advantages of epoxy floors as an alternative toconcrete and tile.
kiss that leaky roof goodbye 22Fix that leaking roof before the summer storms.
garden beauties - zantedeschia 23With hundreds of new varieties, the range of colours now available is spectacular.
decorative planter 25With a few pieces of scrap timber, wood screws and nails, and Rust-Oleum Rust Kit, making this plant pot is as easy as 1-2-3!
q-zone 26
directory 27
copyright of articles and images, not submitted and licensed by home-dzine or janice anderssen, remain the property of the owner, and home-dzine or janice anderssen claims no intellectual property rights.
Home-Dzine Online is written and compiled by Janice Anderssen. All projects in this issue, or any other issue, remain the property of Home-Dzine and Janice Anderssen, and may not be copied or reproduced in any manner whatsoever without written permission.
It is now officially SPRING! And while the weathertoday may be a bit on the chilly side, I’m looking forward to giving my house a spring clean, especially the curtains, and will be outside in the garden to see how many new buds have appeared!
I am very excited to announce that the Rust-Oleum product range will very shortly be in every self-respecting hardware store. This top quality range of paint products is now being handled by Tile & Floor Care, recognised experts in the field. Be sure to getyour supply of Rust-Oleum products “off the shelf”
A quick note to all those DIY Divas and Dudes that weren’t able to book for some of the DesignTime Furniture classes - don’t despair. We will be running a new series of classes as from 2009, and some of the most popular projects will be featured again.
On the Cape Town front... Still no news on a suitable venue. Our DIY Dude - Rod Baker - is busy looking into all the options and I will be keeping you updated as to developments.
And while it’s not summer yet, this issue we focus on beach living. I felt that in light of the current downslide in the economy, high cost of living, ridiculous petrol price, etc., we all needed a little ‘sun, sea and sand’ in our lives at the moment.
Until next month
Janice
a word or two

a touch of spring...
Incorporating simple style and casual elegance, furniture and colours for decorating tend to be neutral shades with many whites, beiges, tans, light blues, and yellows used as the palette. Carefully selected groupings of colour assist in creating the style of casual coastal elegance. Traditional sand and sea colours are particularly visual when highlighted with shades of white and cream. The personal choice of furnishings and accessories, combined with the perfect colour palette, forms the basis for today’s contemporary coastal retreat.
Nothing quite evokes a sense of calm, relaxation, and peace than a home decorated in the soft shades of sea and sand. And even if your home is far away from the sea you can incorporate elements of beach home decor to the whole house, or a particular room, and experience the tranquility of living by the sea.
imag
es: fr
eedo
m
Take these colours along to your local Prominent Paints Decorating Centre
Home-Dzineonline 3

Home-Dzineonline 4
Coast accessories are essential for your beach home decor. Shapely glass jars filled with seashells ora few bottles put together, maybe with sand or rocks in them, can actually look like art when done correctly.The more modern take on coastal decorating style is far more sophisticated than the kitschy, nautically-themed rooms that defined this style in the past.Today’s coastal decorating is characterised more by a beach-inspired palette than by an over reliance on garish beach-themed knickknacks.
Rattan, cane, bamboo, distressed furniture, raw light or dark hardwoods and upholstered pieces in pale colours and neutrals - it’s more than just the furniture itself; it’s a way of life. It’s about the feeling of the ocean breezes, the open air, and the feeling of calmness.
The feeling of tranquility can become a part of your home by letting the sea and sand be your guiding inspiration.
Visit your local Prominent Paints Decorating Centre and take home some inspiration for your spring decorating scheme.
ABOVE and LEFT: From watery greens, pale blues, lightest yellows and seashell pinks, pastels are easy to mix and match. They mix easily with whites, beiges, and greens, and offer endless colour combinations within a home.

Home-Dzineonline 5
Coastal RetreatNature, the sea and sky serve as inspiration for this trendy look. Choose a palette of blues and greens to brighten up any space. Hang a leaf mural, cover your bed in gorgeous linen, add tropical accents and accessories to your kitchen and voila! Now your home is a perfect island inspired space.
Lampshade 129.95, lamp base 199.95Faux suede fringe scatter cushion 89.95Flower trim scatter cushion 69.95reece embroidered duvet cover set: king 379.95, queen 349.95, double 299.95
Photo frame 19.95, gel
candle 34.95, starfish candle
holder 49.95 Gel candles: small
19.95, tube29.95 Wall
hanging 199.95, chenille throw
119.95, padded scatter cushion
89.95SPECIAL OFFERMid Sept : striped sheets: single @ 49.95. double 59.95 and queen 69.95

Home-Dzineonline 6
Print out and enlarge these designs on a photocopier
create your own beach themed decor!
ABOVE and LEFT: Plain white buttons on cotton or linen cushion covers make a perfect statement in this casual seaside lounge.

Home-Dzineonline 7
Tabletop BeachTo show off a shapely shell, pour sand into a glass cylinder vase. Arrange the conch to call attention to its natural beauty. Stand the vase on its own or rest another shell or two against the base.
more ‘beachy’ ideas
Shells On DisplayLarge shells, individually displayed, are as attractive as fine sculpture. Look for perfectpieces that will sit flat or be propped up on astand or pedestal.
Shelf ShellsThis bookcase is an ode to shell collecting! White shells look stunning set against the grey backdrop while blue hardback books provide a colourful contrast.
sour
ce: m
ered
ith pu
blish
ing

Catch of the DayColours and motifs from the ocean conjure a breezy, mellow mood. Give hardworking wall hooks a soft, decorative makeover with the addition of shells and sea life. Screw the hooks to the wall, then hot-glue shells on top.
Found at SeaA shallow box becomes a pretty display for beach mementos. Paint with acrylic paints in sea hues. Line some compartments with photocopied images and use decoupage medium to adhere the paper. Stand the box upright to show off shells, starfish, and containersof beach glass and sand. If you can’t find a box,make your own with 6mm Supawood.
sour
ce: c
ountr
y hom
e mag
azine
Memory JarsGlass jars in watery hues, right, are natural containers for beach items. If a beach vacation is not in the plans, head to the crafts store for picturesque shells and fine sand. Twist raffiaaround the neck of the jar to attach sea stars and urchins.
Shell KeeperClamshells give a store-bought wreath nautical personality. Wrap a wreath in neutral-hue ribbon. Attach the shells with hot glue, placing some end-to-end as if the clams are open. A knot of gauzy burlap creates a textural hanger.
Home-Dzineonline 8

for a minute or two and then roll it back through the glaze so that it is completely saturated. Apply a thin layer of glaze over the section you will start on. Don’t worry if the glaze is uneven and translucent. Use a trim brush to fill incorners and areas the roller cannot cover.
5. Begin at the top, left-hand corner and drag the weaver brush from left to right in a smooth, firm stroke. The weaver brush should be dryand the bristles should bend when applying. Wipe the brush with a clean cloth to remove excess glaze after every second sweep.
Home-Dzineonline 9
denimwalls
You will need:Prominent Paints Sheen: DK BLUE, LT BLUE - print out these swatches and take them along to your nearest Prominent Paints Decorating Centre.Weaver brushSpirit level, straightedge and chalkMasking tapeTrim paintbrushClean, lint-free cloths
Here’s how:1. Use masking tape around the ceiling and floor
trim. Use a paintbrush to outline ceiling and trim. Roll on DK BLUE in a “W” pattern over the entire wall. Allow to dry before applying a second coat. Leave to dry overnight.
2. Use a spirit level, white chalk and a straightedge to divide the wall into 1 x 1 metre square sections. Section of these areas with masking tape and wipe off the chalk marks.
3. The glaze coat is applied alternately to odd and even sections. It is important to keep the tape outside the section being painted.
4. Combine LT BLUE and scumble glaze in a 1:1 ratio. To begin, soak the roller in the glaze coat sour
ce: r
alph l
aure
nt pa
ints -
not a
vaila
ble in
SA
For the young at heart denim walls add instant fun to a coastal retreat or urban loft. Grab a friend and transform a wall in your home!
For a consistent pattern throughout your room, one partner should be responsible for creating the “weave” while the other helps with the tools.
TIP:Repeat the left-to-right, right-to-left stokes for a total of four strokes over the same horizontal strip. Continue these horizontal strokes down thelength of the wall.

6. Directly on top of this stroke, proceed with a reverse motion from right to left using the opposite side of the bristles. Again, wipe the brush regularly. Start and stop on the tape to keep the glaze from pooling at the tape line. If working in a corner or by trim work, drag the Weaver out of the corner only.
TIP: For the vertical brush strokes, start at the ceiling
and very lightly sweep downward to the floorwith one stroke of the brush. The brush should skim the wall without bending the bristles or erasing the horizontal lines.
7. Pull off the tape along the vertical section seams while glaze is still wet. Leave the tape along the horizontal ceiling and floor trim forthe entire technique process. Remove the tape by gently running a razor knife along the edge where the tape and glaze meet before pulling off the tape.
8. When taping for the remaining wall areas, you can choose between two techniques: abutting-the-seam or overlapping-the-seam. Each gives a slightly different look.
Home-Dzineonline10
ABUTTING-THE-SEAM Place the tape on top of the dried glaze right
along the edge where it meets the adjoining glazed sections.
OVERLAPPING-THE-SEAM Place the tape on top of the dried glaze
approximately 2 to 3mm from the edge. This means that a small area will be painted with a double layer of glaze when the next section is painted.
9. To finish the remaining wall areas, repeat thesteps already mentioned above.

Home-Dzineonline11
Inexpensive glassware is readily available from home stores. Or, chances are, you already have suitable pieces in your own home. Look through your cupboard for old glassware, particularly unusually shaped jars and vases in need of sprucing up.
Here’s how:Note: Always wear rubber gloves and read warning labels carefully when working with etching cream.
1. Using the craft knife, cut a stencil (such as the leaf pattern above) from self-adhesive paper.
2. Stick the stencil on the glass. Rub it on firmly to ensuregood adhesion.
3. Use a brush to apply a generous amount of etching cream into the open part of the stencil. Leave on for fiveminutes.
4. Rinse glass thoroughly with warm water to remove all the cream from the surface. Peel off stencil.
STENCIL TIPSIf you are making a word or phrase stencil, use your computer to print out the word at the exact size you desire. Tape the printout to self-adhesive paper and trace over the letters with a craft knife to create the stencil.
There is something magical about etching glass — the process turns plain glass pieces into decorative objects in minutes. The secret is etching cream. You simply apply it to the glass, and the surface turns into a translucent white. The results are beautiful, subtle, and lasting.
Turn everyday glassware into art
You will need:Craft KnifeSelf-adhesive paperGlassPaintbrushEtching cream (@ Gocco.co.za)
Home-Dzineonline12
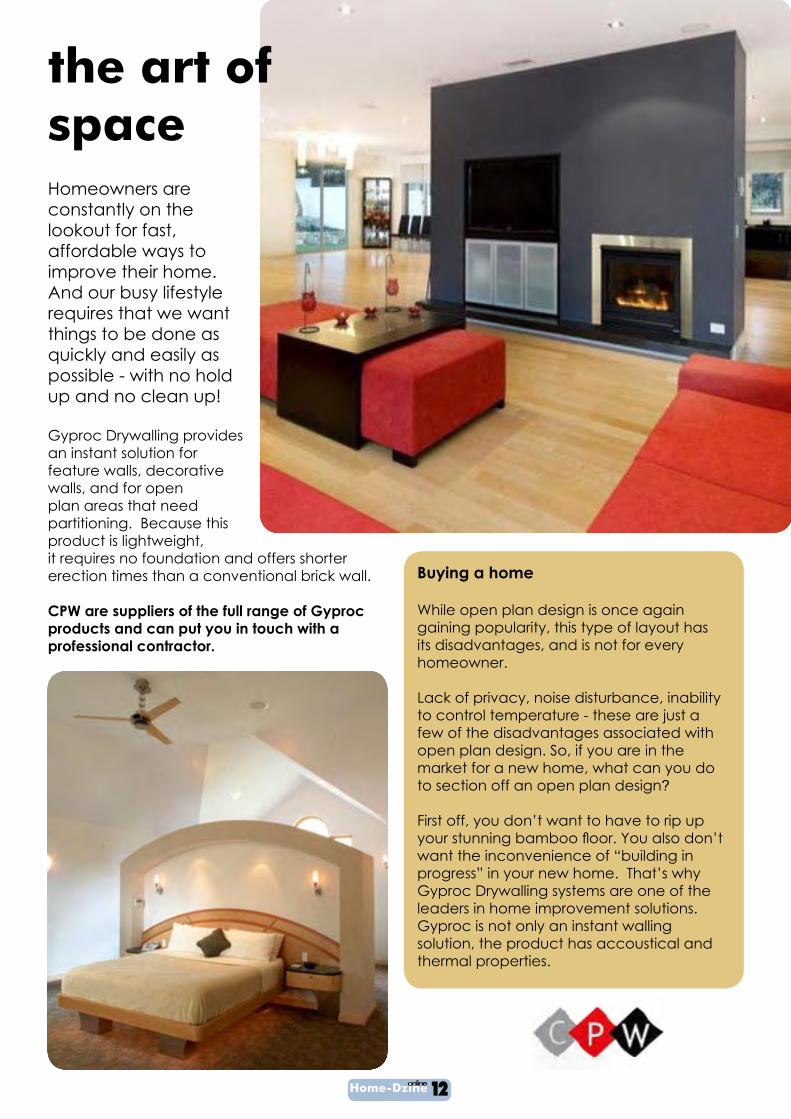
Homeowners are constantly on the lookout for fast, affordable ways to improve their home. And our busy lifestyle requires that we want things to be done as quickly and easily as possible - with no hold up and no clean up!
Gyproc Drywalling provides an instant solution for feature walls, decorative walls, and for open plan areas that need partitioning. Because this product is lightweight, it requires no foundation and offers shorter erection times than a conventional brick wall.
CPW are suppliers of the full range of Gyproc products and can put you in touch with a professional contractor.
the art of space
Buying a home
While open plan design is once again gaining popularity, this type of layout has its disadvantages, and is not for every homeowner.
Lack of privacy, noise disturbance, inability to control temperature - these are just a few of the disadvantages associated with open plan design. So, if you are in the market for a new home, what can you do to section off an open plan design?
First off, you don’t want to have to rip up your stunning bamboo floor. You also don’twant the inconvenience of “building in progress” in your new home. That’s why Gyproc Drywalling systems are one of the leaders in home improvement solutions. Gyproc is not only an instant walling solution, the product has accoustical and thermal properties.

Home-Dzineonline13
fresh creativityWhat nicer way to welcome spring into our homes than with bright displays of fresh flowers.
Forget about going on a course - the new styles for floral arrangements fit in with moderninteriors - and the arrangements are simple and quick to do. They don’t require huge bunches of flowers to achieve - even a couple of flowerstems can transform a room.
With the increasing trend for buying or growing your own flowers more often for ourselves,and for our homes. Many of us are choosing distinctive styles of home decor - and are looking for flowers and plants which fit in withthese styles.
LEFT: A single Gerbera stem in a vase adds an instant ‘pop’ of colour to any room! Sometimes less is better for creating a simple colourful display.
RIGHT: Weave your own magic with this simple arrangement of grasses. Use plain ceramic vases - it’s enough to charm anyone. Got some mismatched glasses lying around? See our article on Etching Glass in this issue.
A simple glass vases and a selection of yellow roses and mums are all that is needed to freshen up a breakfast table or patio. Don’t throw away tin cans, these make perfect vases for your freshly cut garden flowers. Add some decorative trim suchas ribbons, beads, or use one of the many Rust-Oleum products to apply a unique paint finish.
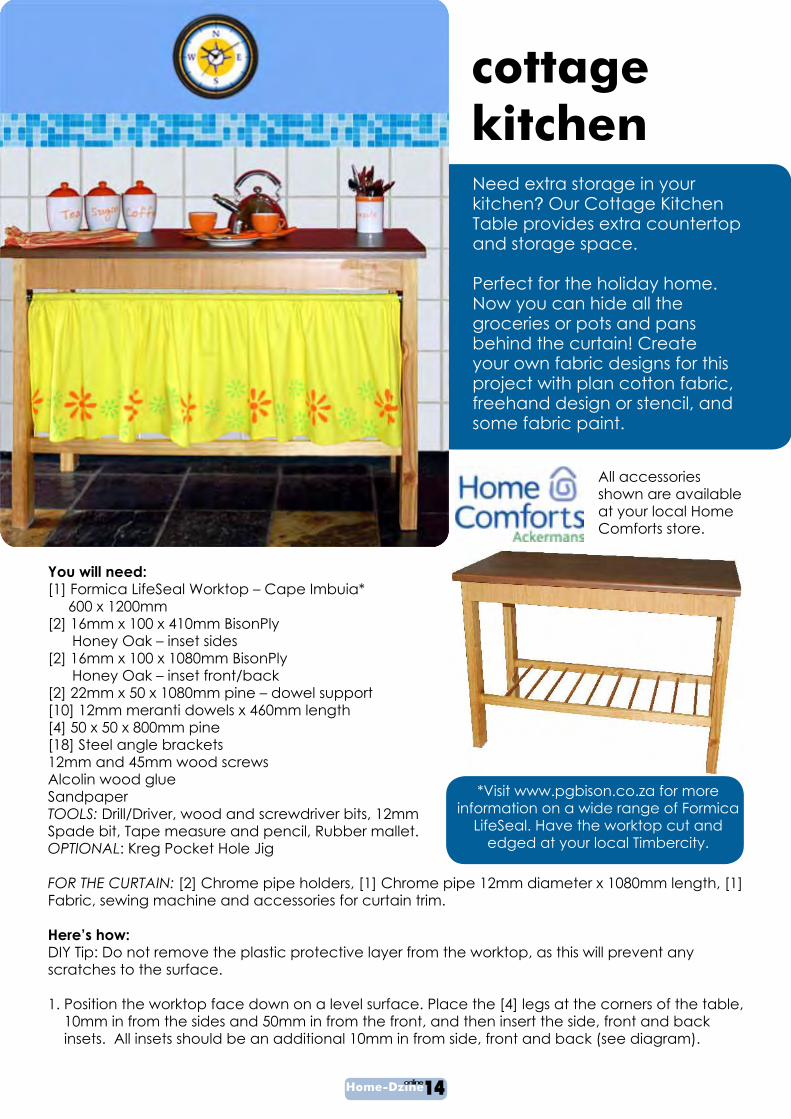
cottage kitchenNeed extra storage in your kitchen? Our Cottage Kitchen Table provides extra countertop and storage space.
Perfect for the holiday home. Now you can hide all the groceries or pots and pans behind the curtain! Create your own fabric designs for this project with plan cotton fabric, freehand design or stencil, and some fabric paint.
You will need:[1] Formica LifeSeal Worktop – Cape Imbuia* 600 x 1200mm[2] 16mm x 100 x 410mm BisonPly Honey Oak – inset sides[2] 16mm x 100 x 1080mm BisonPly Honey Oak – inset front/back[2] 22mm x 50 x 1080mm pine – dowel support[10] 12mm meranti dowels x 460mm length[4] 50 x 50 x 800mm pine[18] Steel angle brackets12mm and 45mm wood screwsAlcolin wood glueSandpaperTOOLS: Drill/Driver, wood and screwdriver bits, 12mm Spade bit, Tape measure and pencil, Rubber mallet. OPTIONAL: Kreg Pocket Hole Jig
FOR THE CURTAIN: [2] Chrome pipe holders, [1] Chrome pipe 12mm diameter x 1080mm length, [1] Fabric, sewing machine and accessories for curtain trim.
Here’s how:DIY Tip: Do not remove the plastic protective layer from the worktop, as this will prevent any scratches to the surface.
1. Position the worktop face down on a level surface. Place the [4] legs at the corners of the table, 10mm in from the sides and 50mm in from the front, and then insert the side, front and back insets. All insets should be an additional 10mm in from side, front and back (see diagram).
Home-Dzineonline14
All accessories shown are available at your local Home Comforts store.
*Visit www.pgbison.co.za for more information on a wide range of Formica
LifeSeal. Have the worktop cut and edged at your local Timbercity.

2. Use [2] angle brackets on each side inset and [3] brackets on each front/back inset, and [2] brackets per leg (see diagram). Use 12mm wood screws to fasten the brackets to the project pieces and the bottom of the worktop.
3. If you have a Pocket Hole Jig, drill pocket holes; use pocket hole screws to attach the legs and inner sides of the insets to the worktop.
4. On dowel supports measure and mark off a centre line and 10 equal marks for the dowels.
5. Use a 12mm spade bit to create a hole to a depth of 5mm in both dowel supports. Use masking tape around the drill bit to ensure that you do not go too deep. Put a small bead of wood glue in each hole.
6. Sand around the edges of the dowels to ensure a tight fit. In oneof the dowel supports insert the dowels into the drilled holes. You may need to lightly tap the dowels with a rubber mallet. Position the other dowel support over the top of the dowels and fit into thedrilled holes. Again, lightly tap the dowel support with a rubber mallet. Allow wood glue to dry completely.
7. On each leg measure and mark 450mm up from bottom and 25mm in from side. Use the 12mm spade bit to create a hole to a 10mm depth. Have someone on hand to help you to hold the dowel shelf into position and screw
8. Finish off by sealing all wood surfaces with Woodoc 10 with Oregon stain concentrate.
Order your Cottage Kitchen Table from Decorating Divas and let us create the
perfect piece for your kitchen. We’ll even print the curtain in your choice of design.
Send us an email at:[email protected] and we’ll
confirm your order.
decorating divas bring you...
Price: R900.00 plain or R1050.00 with curtain (excl. delivery)
Home-Dzineonline15

Home-Dzineonline16
now you can paint your kitchen countertops!
You will need:Rust-Oleum Specialty Countertop Coating Sandpaper or wire brush Paint brush Paint roller
Here’s how:Before starting, set yourself up in a well ventilated area 1. Remove any loose paint with a wire brush
or sandpaper. Lightly sand glossy surfaces. Clean surface with soap and water, rinse and allow to fully dry.
2. If painting on laminate or vinyl surface, no
primer is needed. For bare metal or bare wood surfaces, a Rust-Oleum primer is recommended for superior adhesion.
3. Stir paint thoroughly. Use a high quality brush with flagged (split) ends for smallerareas. For best results, use roller to paint entire surface and use the brush for hard-to-reach or smaller areas.
4. The product dries to the touch in 1-2 hours.
Should the surface need it, you can apply a second coat within 1 hour or after 24 hours. Note: May require more than one coat over contrasting colours. Allow 3 days for surface to dry before use.
DIY Tip:- Clean surface with a damp non-abrasive
cloth, mild detergent or mild household cleaner. Do not scrub with abrasive cleaners, steel wool, sandpaper or scouring pads.
- As with most manufactured laminate surfaces, this paint finish will remain durablewith proper use and care. Use a trivet or other protective material underneath all hot cookware and other heated objects. Use cutting boards or other protective surfaces when preparing food. Heavy pounding, knives or other sharp utensils may scratch the surface.
Tired of looking at that old Countertop? With Rust-Oleum Countertop coating, you can renew laminate countertops, cabinets and furniture. In addition, it contains HomeShield(TM) Antimicrobial Protection which will protect the painted surface by inhibiting the growth of mould and mildew and other odour or stain causing microbes.

Home-Dzineonline17
If you have the luxury of a holiday home, but have to put up with renting it out, you know how finishes become damaged over time. This concrete vanity is the perfect solution; made towithstand everyday knocks, bumps and one hundred percent waterproof!
Here’s how:The countertop rests on a base of 12mm-thick cement board, enabling you to keep the concrete 25mm thick, except at the edges, which are just deep enough to hide the cement board. The result is a normal-height countertop that’s easily supported by standard cabinets. Reinforcingconsists of chicken wire, so you must use aggregate small enough to fit through the openings.
1. Make a template by outlining the shape of your countertop on cardboard. The edges should be flush with the sides of the cabinet. If the counter is bigger than a sheet of cement board,mark joints on the template; they must be placed over cabinet walls. Also mark the sink outline using a template. You can also use the sink template is to create a plug out of foam insulation that’s at least 40mm thick. This will keep the sink free of concrete. Use a jigsaw to cut foam. Sand edges of the foam and wrap them with plastic tape so that they are smooth.
2. Cut the cement board to fit. For straight cuts, score a line with autility knife. Snap the sides into a fold and cut through the interior mesh. Cut a hole for the sink and other curves with a jigsaw fittedwith a wood blade. The blade will wear out fast so have a spare.
3. Drape plastic over the cabinets and against the backsplash. Clamp 50 x 100mm timber planks along the top of the cabinets to support the plastic moulding that will form the outside edge; place wooden moulding of equal height along the backsplash. Then set the cement board in place so that it butts against the backsplash moulding. Secure the foam plug in place with pieces of scrap wood from below. To guard against cracks appearing in the countertop, cover seams in the cement board with the adhesive mesh tape.
4. With tin snips, cut the chicken wire to match the countertop, minus a 25mm gap along all edges, including around the sink. If you need multiple pieces, overlap the mesh by a centimetres. Before you mix the concrete, dampen the cement board with water. If the cement board dries out, repeat this step just before you fill theform, but blot up any puddles.
This cast-in-place vanity features an optional terrazzo finish flecked withbits of white marble, mother-of-pearl, and cobalt-blue glass.
Casting the countertop in place lets you skip the heavy lifting, but trowelling the surface smooth does require some skill. Practice on other projects first.
decorativevanity for a holiday home
sour
ce: s
unse
t pub
lishin
g

Home-Dzineonline18
5. Prepare basic sand mix (1 part cement, 2 parts sand, approximately 1/2 part water) or a bagged sand mix. With a putty knife, take a little of the prepared mix and press it down into seams covered with tape. By hand, pack more of the mixture into the edge form. Work quickly to fill the rest of the form halfway.
6. Place the wire mesh on top of the damp mix. With a float, lightlypress the mesh into the bottom layer of mix, just enough so the wire doesn’t curl. Make sure it isn’t too close to the edges. Then fill theform the rest of the way. With a hammer or stick, tap along the edge band to release air bubbles. Then level the concrete with a straight board as you would for any poured project.
7. Sprinkle glass pieces, mother-of-pearl, or other inlays on the surface. Embed the inlays by trowelling over them. To eliminate gaps around their edges, trowel until they are completely covered with the cream of cement and fine sand that is on the surface. Once you’ve embedded the inlays, cover the countertop with plastic.
For the next 3 days, periodically mist the concrete to keep it damp.
8. Remove the edge form and cut out the sink plug. Then begin polishing with wetdry sandpaper, diamond pads, or solid aluminum-carbide blocks. Start with 100- or 120-grit abrasive and work up to 220 and then 440. If sanding ejects whole pieces of sand or other aggregate, delay this step for another day. Keep handy a pan of water and a sponge so you can keep the surface damp and periodically wipe away the slurry you will create. Stop sanding when you like the effect.
DIY Tip:If you see gaps that you don’t like, fill them with a paste ofcement and water. Allow them to harden for a few days. Polish with wet-dry sandpaper.
Seal and wax the counter before you use it.
products we love We all know how aggravating it can be to fill in cracks only to watch themshrink and crack again as they dry. With Alcolin Litefill you can forget about shrinkage,and you only need one product for both interior and exterior applications! Alcolin Litefill can besuccessfully used to repair and fill cracks, holes andgaps on practically any surface including: walls, plaster, cement, glass, wood and most kinds of other construction materials.
Alcolin Litefill is easy to use:
• Apply to clean surfaces
• Dampen surface and apply litefill with an applicator
• Smooth surface using a slightly wet applicator
• When dry, sand if necessary
• Litefill can be painted 1 hourafter application
• Tools can be cleaned with water

it’s so easy!Be creative and customise your floors with Rust-Oleum’s EpoxyShieldtintable coatings. Available in over 30 custom colours. And while you’re at it, get the garage floor in tip-topcondition too!
EpoxyShield is the latest innovation in hard-wearing, tough, semi-gloss flooring. It’s so easyto apply, before you know it your floors will looklike new!
Give your floors a showroom-quality surface. Thekit includes 2-part water-based epoxy coating, concentrated cleaner, decorative chips, stir stick, and detailed instructions.
Rust-Oleum EPOXYShield Garage Floor Coating creates showroom-quality surfaces. Protects against petrol, antifreeze, motor oil, salt and hot tire pick-up.
Homeowners worldwide are catching on to the advantages of epoxy floors as an alternative toconcrete and tile. With its glossy surface that is easy to clean, durable and slip resistant, it is the ideal flooring choice for high-traffic areas in thehome.
You can use Rust-Oleum EpoxyShield on almost any type of floor - concrete is ideal, butceramic tile is fine. Wood flooring, however,must be removed first since it expands andcontracts, which can crack the epoxy.
Here’s how to create your own stunning floors...First, ensure that the concrete floor is in good condition. Fix up any cracks and attend tomoisture problems as this will be detrimental to the finished coat.
Clean the floor thoroughly with mild detergent and water - Mix parts together for at least 3minutes and let stand for 30 minutes before use - Apply to the floor with a paint roller. Fulldetailed instructions are provided with each kit.
Buy Rust-Oleum EpoxyShield at Mica, Jack’s Paint or Builder’s Warehouse, or contact Tile & Floor Care direct: [email protected]
imag
es: e
asy t
o diy
Home-Dzineonline19

Epoxy Garage Floor KitA waterborne epoxy that can be used indoors (garage) with a semi-gloss finish. It is a onecoat application that eliminates the hot-tire pick up, easy to care for with a low odor and no dangerous etching. Mix the two parts together for 3 minutes (swirl don’t shake) and let the mixed product stand for 30 minutes. It is a single coat application with a nap roller (sheepskin), scatter the chips after each one square metre application to make sure it is evenly spread. It will dry in about 4 – 6 hours, 12 – 16 hours before light traffic and will only beable to deal with vehicles after 7 days. This kit covers 23m². Your clean up is easy with water and soap.
Ideal for garage floors, patios, stairways,walkways, porches and commercial concrete surfaces
Home-Dzineonline20
Epoxy Professional Garage Floor Kit A solvent based epoxy for inside concrete floors(garage) with a semi-gloss finish. Has superioradhesion and durability and can withstand heavy foot and vehicle traffic and is superior inwithstanding chemicals and corrosion.
How to use:Mix the two parts together for 3 minutes (swirl don’t shake) and let the mixed product stand for 30 minutes. It is a single coat application with a nap roller, scatter the chips after each one square metre application to make sure it is evenly spread. It will dry in approx 1-2 hours, 16 hours before light traffic but can only take avehicle 4 days after application. This kit covers a 36m² area. If the surface is rough you might be able to cover about 23m². You need Xylol for the clean up. This product has superior chemical resistance.
Both products are full kits including the 2 tins and chips. The garage floor kit does notinclude the etching.

Home-Dzineonline21
tricks for chicks!Edging and Finishing for Board Products
When you purchase board products from your local Timbercity you have an option to have them edged at the branch. If you prefer to do your own edging, there are three options:
1. Buy iron-on edging strip in the colour and size required. This is then affixed to the surface with a medium-heat iron. Do be careful not to set the iron too hot or you stand the chance of damaging the strip. As added protection place a cotton cloth between the iron and the edging strip.
2. Edging strip can also be affixed with Alcolin Contact Adhesive. Apply adhesive to both surface and leave for the required period of time. Once ready, carefully position one end of the edging strip against the surface and ensure that it lines up one hundred percent.
3. An easy-fix option for edges is to use Alcolin Wood Filler in a matching tint. Smooth the wood filler over the rough edges, leave to dry, and then sand to a smooth finish. Finish off by applying a coat of sealer or varnish.
Supa Finish for Supa Wood!I receive numerous enquiries from readers as to whether or not Supawood can be stained. No! Supawood is not real wood - it is a board product. However, there are tricks that can be used to mimic the look of real wood when using Supawood for projects.
We were recently commissioned to design and manufacture an Fireplace Shelf. Since all the components for this project are made of Supawood, we had to put on our thinking caps as to how we could create the look and feel of real wood.
The first step was to prime the surface with universal undercoat (black), before building of layers of various brown shades. This was the most difficult part as you need to build up layers to create the look of real wood. I also added darkened edges using Guilder’s Paste (black and brown). The shelf was then finished off with Woodoc Antique Wax. Although normally used for wood furniture, this product was excellent to finish the project, and left a glossy shine over the entire surface.
Our Decorating Diva ReproductionFireplace Shelf
Woodoc Antique Wax is formulated in the tradition and high standards of Woodoc wood care products. Blended with the finest waxes on a white wax base, Antique Wax from
Woodoc cleans and refreshes as it polishes, leaving no residual build-up.

kiss that leaky roof goodbye!During a severe storm at the end of summer the IBR roof on a recent addition was damaged by falling branches. The IBR was dented and this caused water to pool and eventually gain access through the sheeting, into the roof, and then through the ceiling.
It was only when I started to request quotations that I realised how terrible customer service has become for South Africans. Of the seven requests for a quotation, only two companies even bothered to respond. Of those two: one quoted in excess of R100,000 to repair the roof, and the other quoted just over R8,000 Talk about a difference in price!
I take my hat off to Frascot Johannesburg, and especially to Kenneth, who went out of his way to solve the problem. He explained the entire process from start to finish andmade sure that arrangements were made for the job to be done as soon as possible. I would have no hesitation in recommending Frascot Johannesburg to anyone who needs to get their roof fixed.
The complete roofing project took half a day, with nodistruption whatsoever, and no mess left behind. The team was extremely efficient and the job was given acomplete final inspection before it was signed off.
For more information contact:
Frascot Johannesburg (Pty) Ltd
Tel: 011 618 1016/7Fax: 011 618 1209Email: [email protected]
with the rainy season just around the corner, isn’t it time you got your roof
fixed
Home-Dzineonline22

I must admit to being a very naughty girl this weekend. I have often seen pictures of the new varieties of Zantedeschia (Arum Lily), but this weekend during a visit to my local nursery I was lucky enough to get my hands on two treasures.
With hundreds of new varieties, the range of colours now available is spectacular. Add to that the fact that these plants are easy to grow and have only a few requirements, you could easily transform your garden into a rainbow of colour. My personal favourite is Black Star (bottom left).
Plant tubers 15 to 20cm apart to a depth of 5cm in well drained soil. Be sure to plant the tuber with the rounded side down. Add 3cm of mulch to the surface to keep the tubers cool during summer. Arums enjoy rich soil, and prefer full sun, but can be grown in partial shade.
After flowering, allowthe foliage to die down naturally and leave the tubers undisturbed in the soil. The tubers will eventually multiply into large clumps.
Zantedeschias do well in pots. Plant the tubers about 5cm apart. Be extra vigilant about watering, especially during hot spells. Once the plants go dormant in late autumn, stop watering the pots. They should be kept dry over the winter months. You can move the pots into a shed or dig them into an
unused corner of the garden, where they can rest until the next spring. im
ages
: had
eco
garden beauties
For a glorious display of colour provide your arums with a sunny spot that receives at least 6 hours of sun each day, copious watering at least twice a week during hot weather, and a fortnightly dose of bulb food.
Home-Dzineonline23

Home-Dzineonline24
Planning your summer flower garden.
The prices of goods are skyrocketing and flowerseedlings are no exception. Planning your summer flower garden before rushing off and buying plants onimpulse will save you lots of time and money.
Try sowing your own seeds this month and grow your own flowers at a fraction of the cost. All ittakes is some of your precious time and can be very rewarding and therapeutic. If you don’t have the time to sow your own seeds it is even more essential that you plan your beds.
Grouping annuals together is much more effective than scattering them all over the place.
Top TipsDecide where the ‘hot spots’ are in your garden and where some colour will be most visible and effective. Groupings of pots can be most effective and a few hanging baskets and window boxes will brighten up any area.
Limit your plantings to those planned areas only and fill any other gaps with perennial plants andgroundcovers. Once these are established you will not need to spend so much money seasonally on annuals.
Take notes on the size of the beds to be planted and whether they receive sun, semi-shade or shade.
Some beds may receive full morning or afternoon sun. Beds that receive only morning sun can be planted with annuals for semi-shade as long as they don’t receive the hot midday sun. Beds that receive full midday and afternoon sun can be planted with annuals for full sun.
Remember that paving and enclosed courtyards will generate a lot of heat and your plants will need to be watered regularly.
Prepare your beds for planting or sowing now. If your soil is rich, soft and friable it is not necessary to dig it over; simply put down a good layer of compost with a dressing of organic 2:3:2 and bonemeal, raking it in and watering well.
If your soil is hard and poorly looking it is essential to dig it over at least 20cm deep, adding lots of compost and a dressing of 2:3:2 and bonemeal.

Home-Dzineonline25
Here’s how:1. Drill 4mm pilot holes for the 20mm wood
screws and countersink all holes.
2. Screw the two 140mm wide pieces to the sides of the 180mm wide pieces (see diagram right).
3. Measure down from the top of both 140mm wide pieces to where you want to position the inner shelf and hammer in nails. The depth of the shelf will be determined by the height of the plant that you want to place in the pot.
4. Fill all the holes with Alcolin Wood Filler and leave to dry. Sand smooth with 120-grit sandpaper.
5. Apply the Rust-Oleum Rust Kit as per the instructions.
6. Slide in the inner shelf.
Note: Not intended for a live plant.
20mm wood screws
20mm wood nails
inner shelf
decorative planter
With a few piecesof scrap timber, wood screws and nails, andRust-Oleum Rust Kit,making this plant pot isas easy as 1-2-3!
You will need:[4] pieces of timber or board
approximately 145 x 180 x 1000mm
[1] piece of timber for the inner shelf
Wood screwsLong nailsDrill/Driver, bits and countersinkRust-Oleum Rust Kit
sour
ce: ja
nice a
nder
ssen
- diy
diva

Home-Dzineonline26
Q zoneSend your Q & A for decor, decorating and DIY dilemmas to [email protected].
Q. Women24.comMy kitchen counter (bar counter) is made of chipboard with a covering (melamine strip?). It’s now looking quite tatty, with the strips on the side peeling off. Is it possible to remove the entire covering and redo it? Many thanks
A. JaniceIt is far easier to replace the whole top - and not as expensive as you may think. The price for a standard top that is 60cm wide by 3.5m long costs about R800.00. Visit the www.pgbison.co.za website and have a look at the range of Formica LifeSeal tops available. If you need help cutting out for the hob, etc, take a look at the recent kitchen makeover that I did all by myself!
Q. DonnaIs it possible to find a wood sealer for oregonand parquet floors that doesn’t darken the floorsafter it’s been sanded? I live in an old house that is quite dark, so I’d prefer it if the floors were toretain its colour when sanded.
A. JaniceEvery sealer will slightly darken sanded wood - no matter what product you use. The lightest solution would be a Woodoc 25 Matt or Satin Floor Sealer.
The only other solution would be to whitewash the floors, which would spoil the wood. Qualitypaint that is applied to a clean floor and thenallowed to cure is virtually impossible to remove once covered with two or three coats of polyurethane.
Q. ShellyWe have a problem with lime in our water and this makes our shower tiles look very grubby - there is no more shine. I have tried everything, rubbing lemons on the tiles, Bang easy off, Handy Andy and pool acid. In your newsletter you mention the floor tile stripping - would therebe something like this to get our tiles looking clean and shiny again. It also is a problem on our imitation rocks around our pool.
A. JaniceI’ve done some research and the best solution would appear to be oven cleaner! But you cannot use this on the aluminium strips or plastic - only on the glass. I have tried the tile stripper on lime stains without much success I’m afraid. For the rocks around your pool I would suggest that you get in touch with John at www.Line-A-Pool.com. Visit their site to download a free instruction booklet.
A. John @ Line-A-Pool.comReducing calcium hardness is very difficult.Either replace some or all of the water in the pool, or add chemicals that will keep the calcium in solution and prevent it from depositing out.
Ozone helps remove metals which can discolor water and stain pool surfaces, prevents calcification, and softens the water. Ozonehas no effect on pH or total alkalinity, so fewer chemicals are needed to adjust pH and water balance. Ozone destroys oils and converts them to carbon dioxide (CO2). The use of enzymes to remove oils is not necessary and bathtub ring formation at the waterline will be reduced.
When properly sized and installed, a corona discharge ozone generation system should result in easier to maintain, less costly, and better smelling, better tasting, and better quality pool water.

Links for this issue
Bosch Power Tools for DIY
CPW
Decorating Centre
Gocco
Garden Shop
Home Comforts
PG Bison
Prominent Paints
Rust-Oleum
Timbercity
Woodoc
Need a back-issue of Home-Dzine Online?CLICK HERE
Want to subscribe?CLICK HERE
Need to send us an email?CLICK HERE
Home-Dzineonline27
directory
SIGN UP FOR YOUR FAVOURITE CLASSES!