home-dzine online · · 2009-11-05home-dzine it’s all about ... newspaper note: protect your...
TRANSCRIPT
Home-DzineIt’s all about caring for and improving your home
November / December 2009
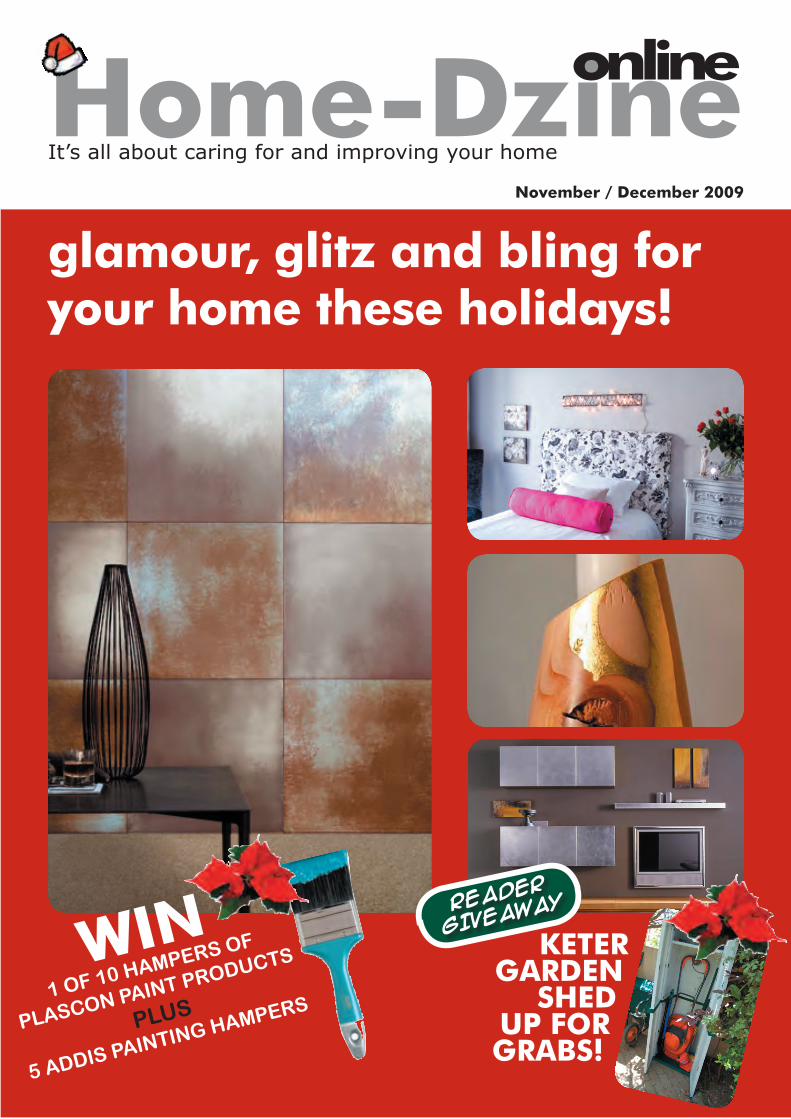
glamour, glitz and bling for your home these holidays!
online
READER
GIVEAWA
Y
KETER GARDEN
SHED UP FOR GRABS!
WIN
1 OF 10 HAMPERS OF
PLASCON PAINT PRODUCTS
PLUS
5 ADDIS PAINTING HAMPERS

7
Home-Dzineonline 2
Home-Dzine Online is written and compiled by Janice Anderssen. All projects in this issue, or any other issue, remain the property of Home-Dzine and Janice Anderssen, or the respective copyright holders, and may not be copied or reproduced in any manner whatsoever without written permission.
Image and content credits:meredith publishing - good homes - chicago home - family handyman - sunset publishing - popular mechanic - house & home - georgia pacific - expert village - channel4 - pottery barn - flikr - nkba - and any others.
Hello all you beautiful Divas and Guys!
This is the last issue for 2009 and I have tried to provide as much information and as many crafts as possible to keep you busy over the coming holidays. You will find some easy decoratingprojects using Plascon’s new Designer Walls range, especially metallic. There are quite a few crafty gift ideas for those who prefer to make unique presents for family and friends. And there are even eco-friendly solutions for celebrating a green Christmas this year.
As we go into 2010 there will plenty of new changes and additions coming to both the website and magazine, and I think that everyone will be delightfully impressed. More competitions and giveaways, and we’ll be getting involved in real life home makeovers - so be ready for the first issue in January.
For this year I would like to wish everyone a safe and blessed holiday.
Janice
a word or two CONTENTSdesigner walls have arrived
easy designer walls
shimmering shelves
win with plascon
gilded boudoir
have a green christmas
affordable holiday decor
edible tree trimmings
a is for art
b is for barbie
c is for candle holder
make a plant holder
boxed blossoms
give the gift of diy
design a garden room
the green light
my grass is still greener
keter shed giveaway
get your tools organised
let me level with you
directory
PAGE
3
4
5
6
7
8
10
11
14
15
16
17
18
19
21
26
27
28
29
30
31

Home-Dzineonline 3
designer walls have arrivedWith the launch of Plascon’s new Designer Walls range of products you can now have suede, pearl, canvas or metallic walls.
With the holiday season almost upon us, I decided to add a touch of bling to a feature wall. The result... see for yourself!
Add a touch of opulence to a neutral bedroom scheme with Plascon Metallic gold from the new Designer Range. This premium waterbased paint shimmers and reflects the light to create a rich lookperfect for the bedroom.
You will need:5l Plascon Metallic - gold5l Plascon Polvin - taupePaint tray and paint rollerClean clothsRubber glovesNewspaper
Note: Protect your floorswith a drop cloth. Use masking tape around trim, light fittings, door and window frames.
Here’s how:1. Apply a base coat of taupe over the entire
wall using the paint roller and leave to dry.
2. Pour metallic gold into a paint tray.
3. Scrunch up a cloth and dip into the paint. Dab onto newspaper to remove any excess. Lightly dab onto the walls in a random effect, but don’t entirely cover the taupe underneath as you want a small amount of this to show through. Continue is this way for the rest of the wall and remember to keep scrunching your cloth for different effects.
DIY Tip: Make sure you apply masking tape to
the edge of any adjacent walls that are not being painted to avoid dabbing paint onto these walls.

Home-Dzine 4
easy designer wallsCreate your own designer walls with Plascon Metallics in gold, silver and copper, and PG Bison Supawood.
You will need:3mm supawood cut to individual squares 600 x 600mm Plascon Designer Range - 1 litre each of gold, silver and copperSea spongePaintbrushClean clothsAlcolin Fix-AllApplication gun3 containersNewspaper
Here’s how:1. There is no need to apply primer
to your supawood squares as you want an uneven finish. Pour a smallquantity of silver, gold and copper paint into individual containers.
2. The supawood squares can be painted in a combination of all three colours or a single colour per square.
3. For this project, paint each square with one coat of silver. The supawood will absorb a fair amount of the paint, but that is fine. Allow this to dry.
4. Dab the sea sponge into the copper paint and then onto the newspaper to remove any excess paint. Now lightly dab onto individual squares randomly. While still wet dab the sponge into the gold and apply to other areas on the squares. You want some of the colours to run together. Any excess can be lightly dabbed off with a cloth.
5. If you want to create a lighter effect, apply more silver with the sea sponge while the paint is still wet.
Plascon Metallic Designer Range comes in Metallic
Silver, Metallic Copper, Metallic Gold and 8
metallic tints: Ashen Silver, Champagne Orchid,
Golden Green, Green Star, Lilac Bar, Shimmering
Sapphire, Topaz Lustre and Amethyst Purple.

Home-Dzineonline 5
shimmering shelvesDress up basic cubes to create unique shelving for a feature wall. Whether you choose to mount a floating shelf or cube shelves, you can easily finish off with silverwaterbased metallic paint.
Here’s how:1. Make up the shelves as shown and cut a
supawood panel to fit over the front. Usewood glue to attach the panel to the front of the cube and clamp in position until set.
2. Apply one coat of Plascon Designer Wall - silver metallic - to the shelves and leave to dry.
3. Apply the next coat with a scrunched up cloth, sea sponge or dry brush, depending upon the effect that you want to achieve. If you’re not sure, practice on a scrap piece of supawood beforehand.
click on image to view project

Home-Dzineonline 6
win with Plascon and turn your ideas into realityPlascon is giving away ten hampers consisting of 5 litres in your choice of either Cashmere or Double Velvet and 5 litres from their Designer Walls range.
Thanks to Plascon, changing your home is both rewarding and fun. Any change, big or small, can lift the tone and mood of a room and alter the way you feel about your environment. Look out for Plascon’s 2010 Colour Forecast at Plascon stockists nationwide, where you’ll find colours inspired by the many faces of the African continent.
Whether you want to add depth and dimensions to your walls or create a rich and exotic look, Plascon’s Designer Walls Range has what you need to transform a wall from drab to fabulous.
Be open to new ideas and inspirations and create a welcoming, happy and inspiring living space. For more information on how easy and valuable it is to make small or big changes, contact the Plascon Advisory Service on 0860 20 40 60 or visit www.plascon.co.za.
To enter send us and email with your name, address and a daytime contact number and tell us what you would do with your Plascon hamper.

Add instant glamour to a bedroom with mirrors and reflective accessories. TOP and LEFT: A 3-panel screen backed with large mirrors provides the perfect finish to a roomdressed with silver, chrome and silky satins.
BELOW: Distressed furniture, a simple headboard wrapped in monochrome fabric, and a decorative wall accessories wrapped with fairy lights create a room that is pretty and glamorous.
LEFT: LED heart lights from Radiant Lighting.
gilded boudoirgilded boudoir
Home-Dzineonline 7

Home-Dzineonline 8
have a greenchristmas
Before you rush out and buy decorations and lights this year, give some thought to more eco-friendly options.
If you’re looking for ways to add a unique touch to your festive decorating, think live plants for instant and affordable decor, and eco-friendly too.
Mini moth orchids create a striking centrepiece for the festive table. Pot up into an elegant container, add a candle or two and a sprig of greens and you a wonderful display that will last for a long time.
Pointsettias are a seasonal favourite and are perfect for adding an accent to your decorating scheme with their dark green leaves and red flowers. As a contrast,Spathiphyllum have glossy green leaves and tall white flowers. Think green this Christmas and decorate your homewith arrangements that add natural beauty and can be added to your garden after the celebrations.
Fake trees are out of season - forever! Now we are all looking for a greener alternative.Visit your local garden centre and select an indigenous tree that can be replanted after the holidays. There are several varieties of Podocarpus that even resemble a real Christmas tree and these can be kept in large pots for several years if correctly cared for.
have a greenchristmas
Home-Dzineonline 9
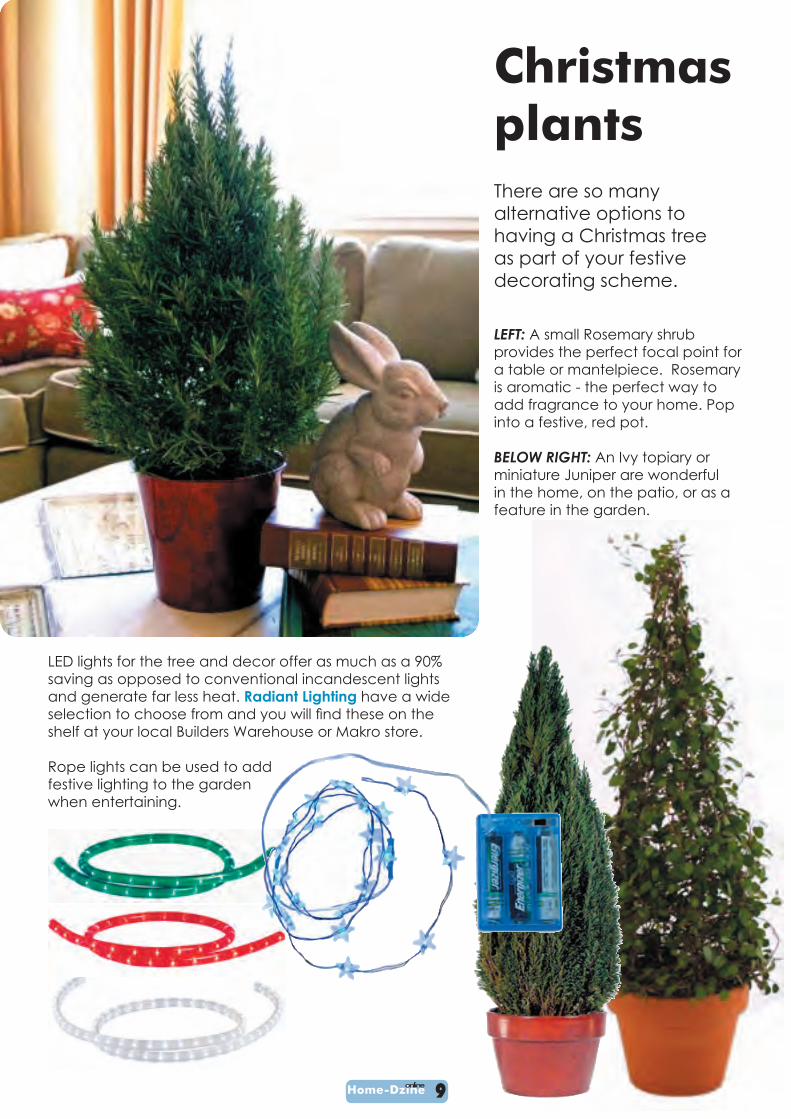
Christmas plantsThere are so many alternative options to having a Christmas tree as part of your festive decorating scheme.
LEFT: A small Rosemary shrub provides the perfect focal point for a table or mantelpiece. Rosemary is aromatic - the perfect way to add fragrance to your home. Pop into a festive, red pot.
BELOW RIGHT: An Ivy topiary or miniature Juniper are wonderful in the home, on the patio, or as a feature in the garden.
LED lights for the tree and decor offer as much as a 90% saving as opposed to conventional incandescent lights and generate far less heat. Radiant Lighting have a wide selection to choose from and you will find these on theshelf at your local Builders Warehouse or Makro store.
Rope lights can be used to add festive lighting to the garden when entertaining.

Home-Dzineonline10
affordable holidaydecorRecycle your old coffee cans and tins into stylish candle holders for the festive season.
Use a tin punch or your drill/driver and a sharp drill bit for metal to create wonderful designs.
DIY Tip:Be sure to clamp the tins firmlybefore drilling or punching. It also helps to full up the tins with sand to prevent the tin or can for a nicer finish.
Use plain, white cotton fabric, ribbons and sprigs of greenery to decorate your christmas table.
LEFT: Make a chair topping to slip over the back of the chair and dress up with lengths of ribbon and garden greenery for a really festive table.
Buy extra fabric to make up matching serviettes for the table and wrap them in the same way as the chairs, with ribbon and greenery.
RIGHT: Use sprigs of greenery to create a wonderful table setting. Insert the sprig into a small offcut of wood and top of with a foil star. Use a toothpick to strengthen your sprig if necessary.

Home-Dzineonline11
edible tree
trimmingsIf you need to replace old or broken ornaments, this year make them yummy!
Gingerbread ornaments are so easy to make. Visit www.hulettssugar.co.za for easy recipes that you can use. You can choose from a basic biscuit recipe, gingerbread, and many others.
Both the kids and Santa will enjoy these tasty treats on Christmas day.
Make popcorn garlands for the Christmas tree
Use cotton and a needle to thread the popcorn for long garlands that can be draped over the tree.
Safety note: Do not use dental floss asrecommended by some Internet sources. This can be dangerous for young children.
If you want to add colour to your popcorn garlands, follow this recipe for a toffee coating that can be coloured. Add flavour withsprinklings of sherbet, vanilla sugar or cocoa powder.

Home-Dzineonline12
DIY Divas and Builders Warehouse offer do-it-yourself workshops for the whole family to show
just how easy it is to Do-It-Yourself
During October, November and December we will be running Pilot Workshops throughout Gauteng. There will be competitions
and giveaways for all those attending!
CLICK HERE FOR DETAILS

Home-Dzineonline13
www.DESIGN-A-BED.co.za

Home-Dzineonline14
A is for ARTUsing Xanita X-Board you can design and create an art easel in an hour. An inexpensive and fun way to keep the kids occupied during the school holidays.
You will need:1 sheet of 16mm Xanita X-board (costs approx R360 for a large board)Sharp craft knife and replacement bladesPencil, steel rule and tape measureRust-Oleum Painters Touch in choice of colours
Here’s how:You can make the board a high as you like - better for taller children. This one measures 1200mm high.
1. Start by drawing and cutting out the A-board. There is a slot in the top section of the board that is 16mm wide and 200mm long. This slot allows fitting of the back support. There are also two slots lower down that allow for fitting of the front tray.
2. The back support is cut to the shape of exactly half the A shape, angled and notched to fit into the slot. The front tray is acurved shape - use a large plate to draw the curves.
3. Slot all the pieces together for instant art and let the kids get crafting. You will probably be able to make 3 to 4 easels out of one board.
Safety First: Always cut the board on a sturdy surface
that can be scratched. Handle sharp craft knives with care and always keep you fingers well out of the way.
Visit www.falconsa.com for X-Board and www.xanita.com for ideas and
inspiration on various projects.

Home-Dzineonline15
b is for barbieDesigned to be the perfect dream home for Barbie and friends, our Barbie paleis is large enough that she can entertain all her friends in style.
This project also uses Xanita X-board, and it is designed to be extremely lightweight for moving around, and easily packed away when not in use.
All you have to do is to furnish the home in style just the way Barbie would want it.
Full instructions on this project can be found in the latest issue of The Home Handyman magazine.
Built to scale for Barbie and friends

Home-Dzineonline16
You will need:Drill* - at least 550W with plenty of torqueJigsawSpade bit - buy candles and measure diameter of the base for the size of spade bitClampsBlock of wood - pine is best120- and 240-grit sandpaperWoodoc 5 sealerAlcolin white wood filler
Here’s how:1. Cut the block of wood to size and clamp firmly to a
sturdy workbench.
2. Insert the spade bit into the end of your drill. Hold the drill perfectly straight and firmly and start slowlyuntil the spurs of the bit start drilling into the wood. Drill to a depth of 30mm.
3. Use the jigsaw to cut out angled sections as show in the image above. Cut in from one side and then the other side to make a ‘V’ shape.
4. Fill the gaps with white Alcolin wood filler and leaveto dry. You may need to apply again if the wood filler cracks or shrinks.
5. Sand the entire block with 120-grit sandpaper and then sand again with 240-grit sandpaper to smooth off.
4. Finish off by sealing with Woodoc 5 sealer. You can add a stain concentrate to the sealer if you want to add a wood tint to the project, or you can use one of Woodoc’s coloured Gel Stains.
RIGHT: Well worth all the hard sanding involved, these candle holders are finished off with gold leaf.
Many of us are going to be looking for alternative gift options this year. I did some looking around to see what unique ideas I could come up with for easy DIY projects that offer wonderful gift options.
Timber offcuts are easily transformed into stylish and unique candle holders.
c is for candle holder
Home-Dzineonline17
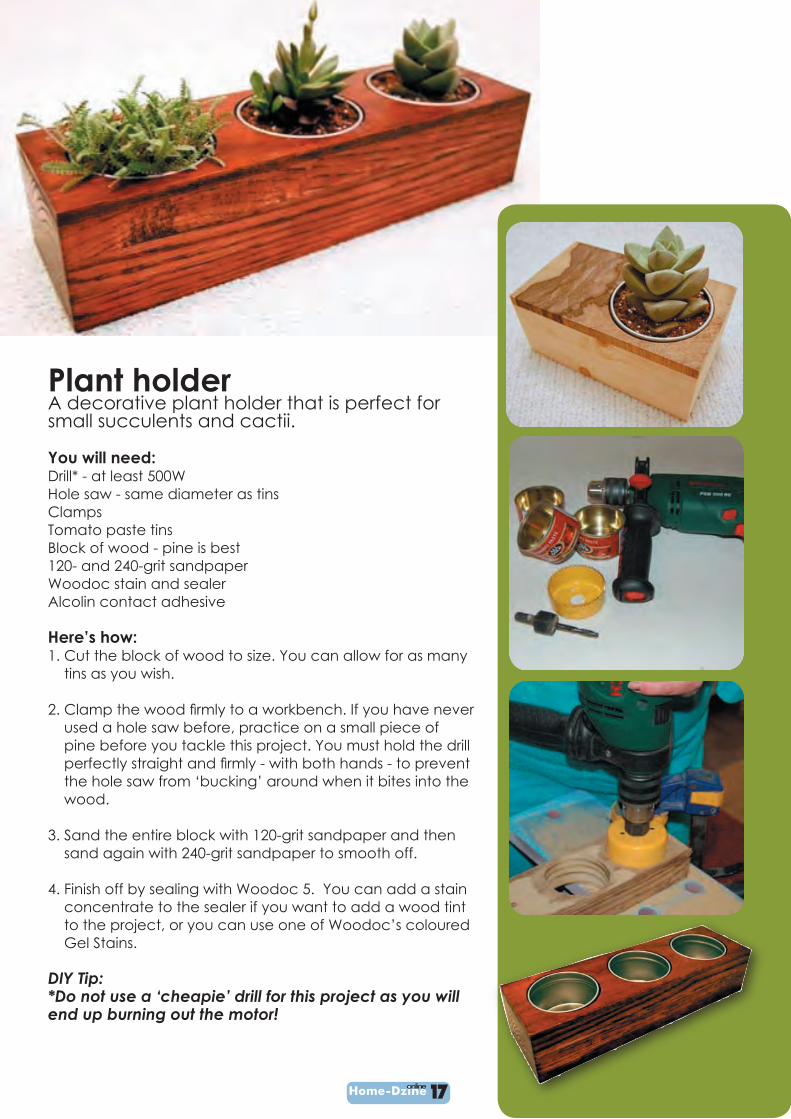
Plant holderA decorative plant holder that is perfect for small succulents and cactii.
You will need:Drill* - at least 500WHole saw - same diameter as tinsClampsTomato paste tinsBlock of wood - pine is best120- and 240-grit sandpaperWoodoc stain and sealerAlcolin contact adhesive
Here’s how:1. Cut the block of wood to size. You can allow for as many
tins as you wish.
2. Clamp the wood firmly to a workbench. If you have neverused a hole saw before, practice on a small piece of pine before you tackle this project. You must hold the drill perfectly straight and firmly - with both hands - to preventthe hole saw from ‘bucking’ around when it bites into the wood.
3. Sand the entire block with 120-grit sandpaper and then sand again with 240-grit sandpaper to smooth off.
4. Finish off by sealing with Woodoc 5. You can add a stain concentrate to the sealer if you want to add a wood tint to the project, or you can use one of Woodoc’s coloured Gel Stains.
DIY Tip:*Do not use a ‘cheapie’ drill for this project as you will end up burning out the motor!

Home-Dzineonline18
boxed blossomsAn easy and decorative way to display single blossoms. This project is very simple yet the result is stunning.
You will need:DrillTest tube - normally available from your local floristSpade bit - same size as diameter of test tubeBlock of wood - pine is bestClampsSmall pieces of veneer for the sidesAlcolin wood glue
Here’s how:1. Clamp the block of wood to a sturdy
workbench and use the spade bit to drill to a depth that is long enough to accept the test tube. Leave approximately 50mm of the test tube showing at the top so that it can be easily removed for cleaning.
2. Sand the entire block with 120-grit sandpaper and then sand again with 240-grit sandpaper to smooth off.
3. Use wood glue to attach the veneered pieces to the sides.
4. Finish off by sealing with Woodoc 5 sealer. You can add a stain concentrate to the sealer if you want to add a wood tint to the project, or you can use one of Woodoc’s coloured Gel Stains.

Home-Dzineonline19
Drills for the DIY ladies! These stylish Drills are lightweight,
ergonomically designed and have a soft grip for comfortable use. Available in pink,
they feature a 10 mm keyless chuck for easier insertion of drill bits and are just the
ticket for a variety of home tasks. The Fragram ‘Can-Do’ Ladies’ 12-volt Cordless Drill retails at approximately
R275 and the 450W Drill at about R310, and are available from leading DIY
retailers.
give the gift of DIYMusic while you work
Tevo has created another great vibe with the launch of shoX airdoc, the premium iPod docking station with two rechargeable wireless speakers. Simply slot in any iPod - or connect to other media players, portable game consoles, computers and PDA’s - and enjoy crystal clear, high quality sound from each of the 6 watt speakers. You can also add as many speakers as you like and enjoy music from the bedroom to the workshop. The shoX airdoc retails at R 1 499.95 and is available from Game, Makro, Musica, Look and Listen and Apple stores or directly from www.tevo.co.za
Quality that lasts
The saying, “You get what you pay for” is so true when buying accessories. Every DIY enthusiasts needs to have a selection of quality accessories for all types of DIY from drilling to sawing. This Christmas invest in quality Bosch accessories - the perfect stocking filler!
Bosch Cordless Drill/Driver PSR 10.8 LILithium-ion technology
Handy and lightweight enough for any DIY Diva, the PSR 10.8LI is perfect for all screwdriving and light drilling around the home.
* No memory effect, no self-discharge: always ready for use thanks to lithium-ion technology
* Click keyless chuck with Bosch Auto-Lock for the fastest and easiest tool changes
* Torque preselection with 10 torque settings plus a drill setting – optimum power for every application

Home-Dzineonline20
affordable quality
Gone are the days when decorating and shopping for the festive season
was a long and tedious process. Bosch has made Christmas easy this
year with its range of products to help you to kick the recession blues
and find an affordable way in whichto celebrate Christmas.
The PSR 12 Cordless Drill-Driver is aimed at making your life easier and the hanging of tinsel and baubles a joyous occasion. The all-purpose power tool is ideal for all drilling and screwdriving applications, from assembling furniture through to fitting wooden floor boardson patios. For the Christmas period, Bosch now offers the PSR 12 with a 2nd Battery + 15 pc screwdriver set – a hot buy for the festive season!
If you want to do it yourself this Christmas then the PSB 600 RE is the tool for you. Drilling through brick walls, tiles, plasterboard, wood, steel or aluminium will prove to be effortless with this two-speed, 600W impact drill. This Christmas do it yourself with not only the PSB 600 RE, you will also receive a 19 piece wrap set and a 600 Watt Impact Drill with the purchase of this power tool
Bosch presents the PSM 160 A multi-sander, which combines the functions of the orbital sander and the delta sander Instead of spending a fortune on presents, why not save money and do something different this year – the PSM 160 is the power tool that will assist you in making memorable Christmas presents that will be treasured forever. To cut back on the credit crunch, with the purchase of the PSM 160 you will also receive a 25-piece sanding paper set.
Thanks to Bosch, Christmas has been made easy. With a range of products that are able to cater for your every need, Bosch has brought back the joys of the festive season. Let the celebrations begin and get down to your nearest retailer to take advantage of these amazing specials.
The Bosch range is available from all Builders Warehouse stores, or visit www.bosch-do-it.co.za

Home-Dzineonline21
design a garden room
Sponsored by Pretoria Treated Timbers and using the Easy-Clip decking system, we recently completed a deck project that anyone can easily and affordably tackle. You will find step-by-step instructions for building your owndeck in the ***** issue of The Gardener magazine, and we will also feature the project in the January issue of Home-Dzine Online.
As part of the deck project we decided that we not only wanted a deck, but an entertainment area. In this article we show you step-by-step how to build your own outdoor leisure seating and make your own accessories from leftovers and a few bought items.
Most of the accessories featured above are made using offcuts and leftovers from the deck project, plus a few items that were lying around and just needed a quick makeover.
Suppliers:
Foam - www.foamfactory.co.zaBlinds - www.decorlattice.co.zaDeck - www.timberstructure.co.zaEasy clip - www.easyclip.co.zaRoofing - www.modek.co.zaPlants & decor - www.gardenshop.co.za
For step-by-step instructions on building the deck and structure, remember to view the January issue of Home-Dzine Online.
See page 25 for instructions on how to transform plain concrete pots using an
antique copper finish.

Home-Dzineonline22
You will need:260 x 45 x 45mm pine - front legs800 x 45 x 45mm pine - back legs565 x 100 x 22mm pine - sides 450 x 100 x 22mm pine - seat slats490 x 45 x 45mm pine - back slats400 x 100 x 22mm pine - front and back20 x 20mm pine - battens/seat supportsAssorted cut screwsBosch multi sander with 120- and 180-grit sanding padsBosch drill/driver plus assorted screw & drill bits and countersinkWoodoc 30 wood sealer and Imbuia stain concentratePaintbrushWoodoc steelwoolCloths6 x 500 x 600 x 250mm high density foam (www.foamfactory.co.za)6 x 50 x 50cm cushion inners3 x 25 x 25cm cushions innersSewing machine and sewing accessoriesWaterproof fabric - we used fabric liningFabric for cushions
Here’s how:
1. Sand all the wood with 180-grit sandpaper before assembly.
2. At the top of each back leg sand off the corners and smooth to a rounded corner - see image left.
3. At the base of all the legs sand at a 45-degree angle and then smooth for a nice finish - seeimage left.
4. Round of all the other square edges on all timber.
DIY Tip:Don’t skimp on the sanding process. The preparation that you put in will provide a smooth finish.
5. Begin assembling the seat frame by joining the sides and legs together using battens - see images right. Drill 3mm pilot holes and countersink for all screws, and when screwing from top and sides, remember to stagger the placement of the screws.
6. The seat support battens are fitted to the seat frame sides at a depth of 22mm from the top so that the seat slats will sit flush and level with the top of the seat frame- see image right.

Home-Dzineonline23
7. The seat slats are screwed to the seat support batten - don’t forget to drill pilot holes and countersink.
8. Attach the back slats to the back legs, again remembering to drill pilot holes and countersink.
Your chairs are now assembled and ready for finishing. For thisproject we used Woodoc 30 Exterior Polywax Sealer and added 2 bottles of Imbuia stain concentrate.
9. Use a paintbrush to apply the sealer liberally over the chairs, adding extra to the ends of the wood and particularly the bottom of the legs. Allow to dry.
10. Use Woodoc steelwool to rub down the chairs and remove any surface residue and apply a second coat. Allow to dry.
11. Wipe down with Woodoc steel wool and apply the final coat.
DIY Tip:It is essential to apply 3 coats of sealer for proper protection. The first coat is absorbed into the wood tonourish, the second coat bonds with the firstcoat and starts to build up a protective layer, and the third and final coat completes the protection.
Making the cushionsJust to let you know that I am awful when it comes to sewing, so I always look for the easiest way to do my sewing projects - if you haven’t already noticed! To cover the foam squares I wrapped the fabric around, cut out the shape, pinned it all together and then sewed it up
- leaving one end open to insert the foam. To give the cover a nice tight fit, I sewed alongall the seams on the outside to create a double seam. The open end was sewn closed by hand sewing.
ABOVE: I used lining fabric for the seat, which only cost R9.00/metre. Very similar
to parachute fabric, it is easy to wipe clean (I have three dogs!), very tough and dries
quickly.

Make your own works of artOffcuts of wood left over from the deck support are transformed into simple yet colourful works of art for the walls.
The thick blocks were cut to size, sanded down and also sealed with Woodoc 30. The designs were printed out on my printer. I applied Alcolin spray contact
adhesive to the wooden block and the back of the design, waited for it to dry and then stuck them together.
Dressing upAn old mirror bought on the cheap and a wall-mounted flower pot frame (www.gardenshop.co.za)are given an Antique Copper look. All you need for this project is a Rust-Oleum Antique Copper Kit. Everything that you need is supplied and there are detailed instructions on what to do - foolproof!
Home-Dzineonline24
Home-Dzineonline25
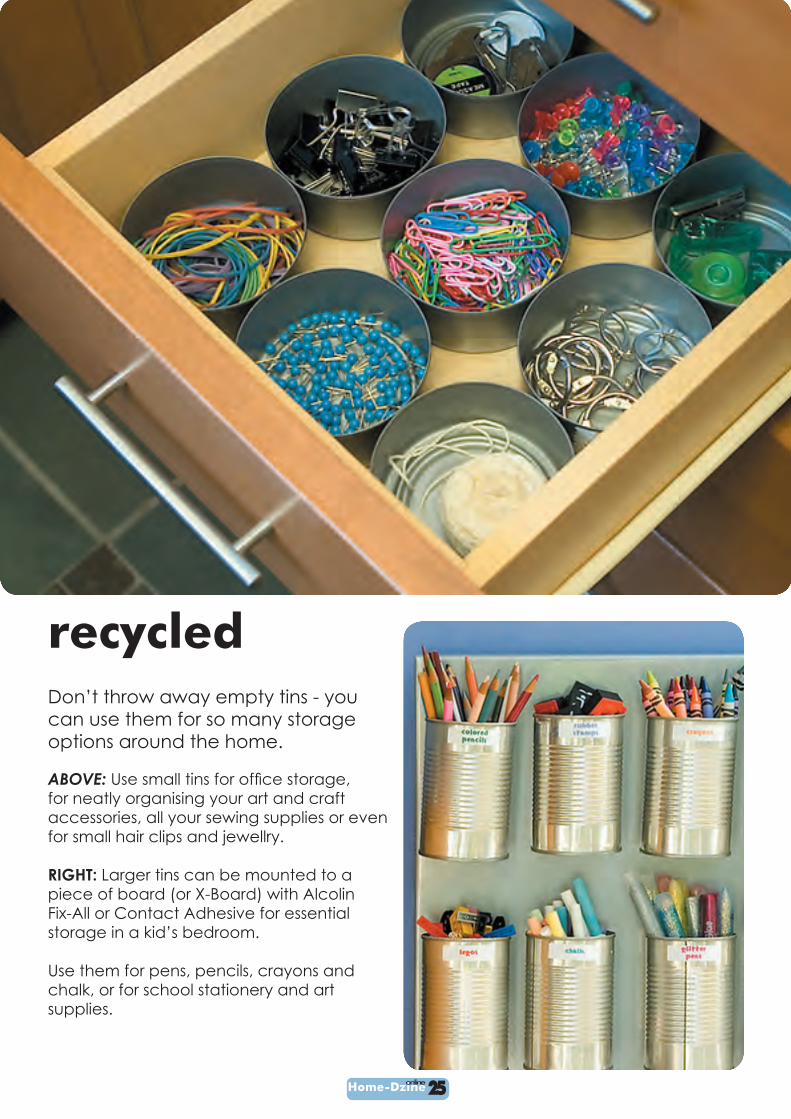
recycledDon’t throw away empty tins - you can use them for so many storage options around the home.
ABOVE: Use small tins for office storage,for neatly organising your art and craft accessories, all your sewing supplies or even for small hair clips and jewellry.
RIGHT: Larger tins can be mounted to a piece of board (or X-Board) with Alcolin Fix-All or Contact Adhesive for essential storage in a kid’s bedroom.
Use them for pens, pencils, crayons and chalk, or for school stationery and art supplies.
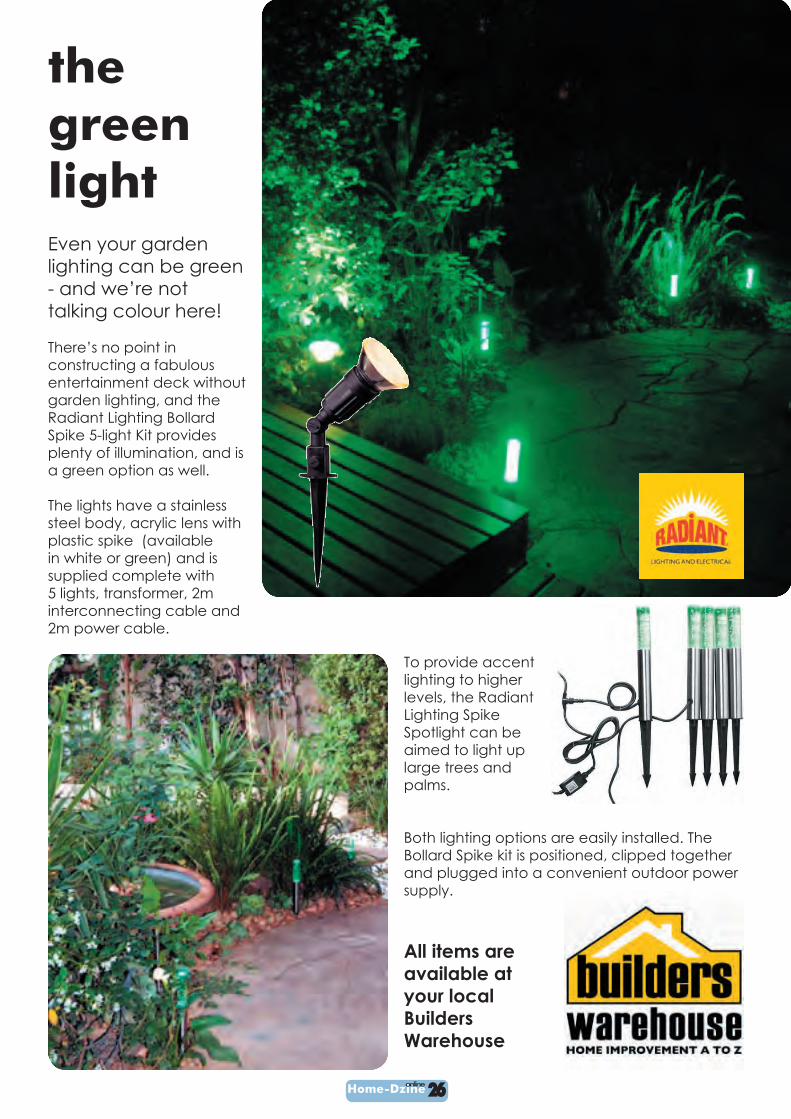
the green lightEven your garden lighting can be green - and we’re not talking colour here!
There’s no point in constructing a fabulous entertainment deck without garden lighting, and the Radiant Lighting Bollard Spike 5-light Kit provides plenty of illumination, and is a green option as well.
The lights have a stainless steel body, acrylic lens with plastic spike (available in white or green) and is supplied complete with 5 lights, transformer, 2m interconnecting cable and 2m power cable.
To provide accent lighting to higher levels, the Radiant Lighting Spike Spotlight can be aimed to light up large trees and palms.
Both lighting options are easily installed. The Bollard Spike kit is positioned, clipped together and plugged into a convenient outdoor power supply.
All items are available at your local Builders Warehouse
Home-Dzineonline26

Home-Dzineonline27
It has been over six months since I installed my duraturf synthetic lawn, and during that time many visitors have seen the garden and commented on the fact that it really does look and feel like real grass.
Over the past six months, the lawn has experienced a cold winter, frequent heavy rains, high temperatures, garden renovations that involved dragging the wheelbarrow back and forth across the lawn, a couple of inpromtu parties, and my three dogs constantly racing their way to the other end of the garden. The result? The grass still looks lush and green and there has been no wear and tear whatsoever.
It is such as joy not to have to worry about daily watering, fertilising and having to squeeze the lawnmower through some pretty tight spaces just to mow a little patch of green. Winter was an absolute pleasure - to walk outside to a still lush garden whilst everyone around us had dry patches of yellow!
my grass is still greener
ABOVE and RIGHT: The before and
after transformation that took place
in May this year. BOTTOM: 6 months on and still looking
good.
Home-Dzineonline27

Home-Dzineonline28
I came across the Keter Midi Compact Shed at my local Builders Warehouse. It’s small enough to fitanywhere in the garden, yet large enough to accommodate the lawnmower, edge trimmer, and all my other tools and equipment.
The Keter midi compact shed is supplied flatpack, but is easy enough to put togetheronce you’ve worked out the instructions. Just in case you struggle we have provided step-by-step images.
If you are getting the garden organised with a new storage shed, take the time to give your tools a good clean, or give them a makeover, before putting them away (see next page).
Get your garden organised
READER
GIVEAW
AY
One lucky reader could have their own Keter Midi Compact Shed.
Simply click here to send us an email and tell us what other products are supplied by Keter
(www.keter.co.za)

Lawnmower and Edge TrimmerYou should clean these after every use, but that isn’t always the case. Remove any build up underneath with warm water and dishwashing detergent and wipe dry. If your lawnmower blades are slightly blunt you can also use the Dremel Multitool and polishing stone head to sharpen them up.
Using a Dremel Multitool to sharpen blades1. Refer to your lawn mower owner’s manual for proper blade
removal instructions.
2. Clean any dirt and debris from the blade. After securing the blade in a vice, sharpen the blade with the lawn mower sharpener attachment (see image right), following the original bevelled edge of the blade. Recommended speed: 25,000 rpm.
Home-Dzineonline29
Garden Shears and CuttersYou can use a Dremel Multitool and a polishing head to quickly and easily sharpen up a pair of garden shears. Have a can of Q20 handy to oil them as well. You can also clean cordless shears with a buffing head to remove any built up residue that blocks themovement. BELOW LEFT: My ISIO garden shears before - BELOW RIGHT: And after.
Get your tools organised
Dremel is available at your local Builders Warehouse
Home-Dzineonline30
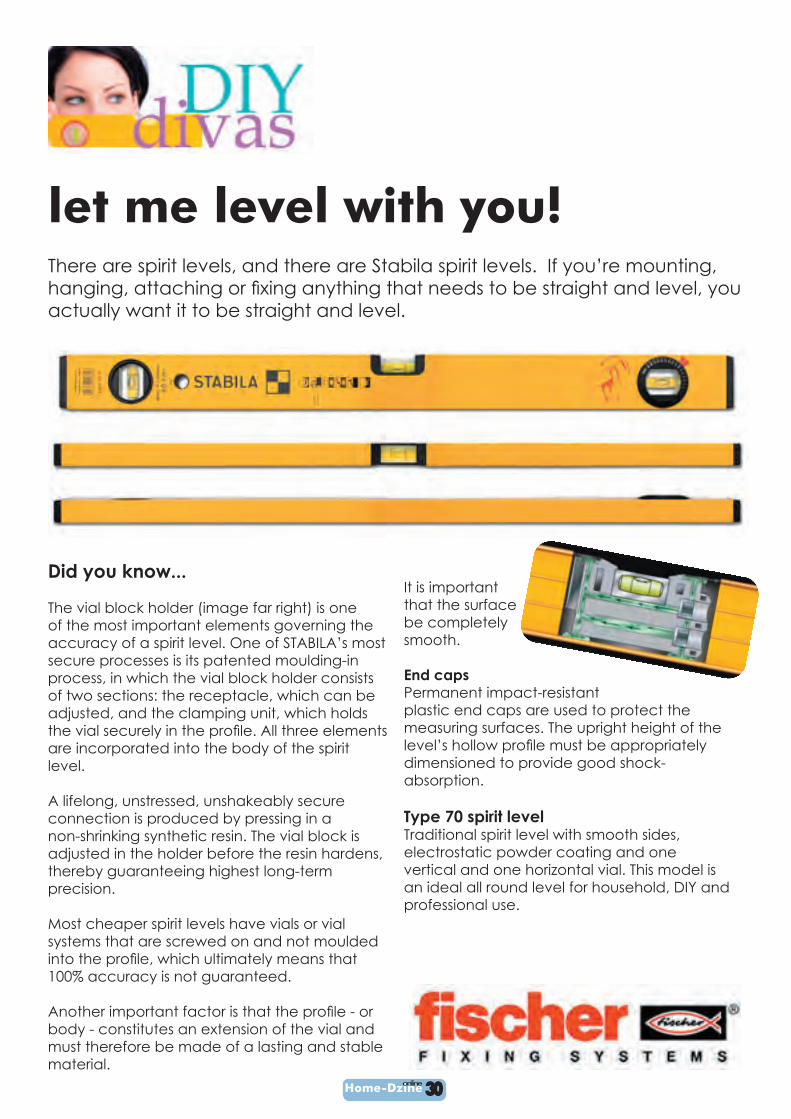
let me level with you!There are spirit levels, and there are Stabila spirit levels. If you’re mounting, hanging, attaching or fixing anything that needs to be straight and level, youactually want it to be straight and level.
Did you know...
The vial block holder (image far right) is one of the most important elements governing the accuracy of a spirit level. One of STABILA’s most secure processes is its patented moulding-in process, in which the vial block holder consists of two sections: the receptacle, which can be adjusted, and the clamping unit, which holds the vial securely in the profile. All three elementsare incorporated into the body of the spirit level.
A lifelong, unstressed, unshakeably secure connection is produced by pressing in a non-shrinking synthetic resin. The vial block is adjusted in the holder before the resin hardens, thereby guaranteeing highest long-term precision.
Most cheaper spirit levels have vials or vial systems that are screwed on and not moulded into the profile, which ultimately means that100% accuracy is not guaranteed.
Another important factor is that the profile - orbody - constitutes an extension of the vial and must therefore be made of a lasting and stable material.
It is importantthat the surface be completelysmooth.
End capsPermanent impact-resistantplastic end caps are used to protect the measuring surfaces. The upright height of thelevel’s hollow profile must be appropriatelydimensioned to provide good shock-absorption.
Type 70 spirit levelTraditional spirit level with smooth sides, electrostatic powder coating and onevertical and one horizontal vial. This model is an ideal all round level for household, DIY and professional use.

directoryLinks for this issue
Alcolin
Belgotex Floorcoverings
Berry Laminate Floors
Bosch Power Tools for DIY
Decor Lattice
Design-A-Bed
DIY-Divas
Dremel MultiTools
DuraTurf
Easy Clip
Easy DIY
fischer Fixings
GardenShop
Home-Dzine
Home Handyman magazine
Homemakers Online
Keter
Modek
PG Bison
Plascon
Pretoria Treated Timbers
Rust-Oleum
The Gardener magazine
Woodoc
Q zoneCLICK HERE TO JOIN OUR BLOG AND ASK YOUR QUESTION OR
SEND US A QUERY!
Home-Dzineonline31
competition winners