history detectives a generic grade five museum school program · detetive kits are availa le to...
TRANSCRIPT

Toolbox for Museum School Programs (2016) 189
The following school program has been designed to be presented at
any Nova Scotia Museum site. The program was developed in
partnership with the Nova Scotia Department of Education and
Early Childhood Development and is approved by the Social Studies
Curriculum Consultant as meeting curriculum outcomes. The
activities are designed to meet the principles of successful museum
school programs as outlined in Module Two of the Museum School
Programs toolbox, with a strong focus on learning with objects.
Sites are encouraged to adapt and personalize this program as
needed to meet their IMP outcomes and logistical realities.
For simplicities sake the program in this appendix is written as it
was presented for the pilot at the Museum of Natural History Sable
Island exhibit. The program has also been piloted at Fisheries
Museum of the Atlantic and in two separate historic houses at the
Highland Village Museum. As the pilots have proved, every activity
can easily adapted to be presented in any location—from an exhibit
based space to a historic room.
Assistance is available to Nova Scotia Museum sites wanting to
personalize “History Detectives” from the IWG Education Sub-
Committee. Assistance can include, but is not limited to:
Training on program development and presentation
Loan of supplies needed to present the program
Assist research and sourcing archival records (documents/
images)
Accessing funding to purchase supplies.
For more information on assistance on personalizing the “History
Detectives” school program for the 2016-17 and 2016-17 school
years contact ICI’s Interpretive Researcher, Maggie MacIntyre.
([email protected] or 902-424-4451).
“History Detectives”
A Generic Grade Five
Museum School
Program
Appendix I Contains:
Instructions for personalizing “History
Detectives” School Program
Information about materials used in
“History Detectives”
Sample “History Detectives” Program
Script and Procedures
Templates for Components of “History
Detectives”
Student Workbook for “History
Detectives”

190 Toolbox for Museum School Programs (2016)
Personalizing “History Detectives” Grade
Five School Program for your Museum
Choosing Activities The program provided comes with four activities. Sites should
choose which three activities best meet their logistical
requirements and the stories they want to tell.
Modern Mysteries: Compares artifacts to modern items
students are familiar with. Can be done with artifacts in situ or
in a prepared space. Best for historic sites. Best done with
working collection that students can touch but can be done
without touching artifacts. Easy to prepare.
Object Investigation: Students each examine a single object.
Can be done with artifacts or specimens. Objects can be in a
prepared space or in situ. Best done with working collection
that students can touch but can also be done without touching.
Easy to prepare.
Clues from the Archives: Students examine archival records in
pairs. Documents can be reproductions. Best done in a clean
area where students can spread out with paper and partner
(tables or clean mats). Requires research to prepare activity.
Curious Construction: Students examine building and
landscape and draw a picture. Activity designed to be done
outside. Requires little preparation and could easily be
facilitated by a volunteer or chaperone.
Alternatively, sites may choose to do only one or two of the
activities and supplement the program with existing or new
activities unique to their site.
Students tested all four activities in multiple pilot programs. Photos
from pilot at Museum of Natural History: Modern Mysteries, Object
Investigation, Clues from the Archives and Curious Construction.

Toolbox for Museum School Programs (2016) 191
Grade: Grade 5 Social Studies
Program Created by:
IWG Education Sub-Committee & MSVU B.Ed. Interns
Date of Creation:
August 2015
Program Updated for Specific Museum by:
Date of Update:
Program Availability:
To be determined by site presenting the program
Add names and dates for your site’s update.
When will you offer it?
Continued...Personalizing “History
Detectives” for your Museum
Personalizing Script and Activities The script provided in this appendix was used for the pilot in the
Museum of Natural History Sable Island Exhibit. Areas that need to
be changed have been highlighted in a light teal colour. A callout
box has been added to explain what needs to be changed.
Example:
Curriculum The program has been designed to address grade five social studies
curriculum outcomes. Sites could easily alter the program to also
include grade four social studies curriculum, comparing history
detectives to history explorers.
The program could also be adapted for other grades however the
activities would need to be changed to reflect the capabilities of
students in younger or older grades. See Appendix D for other
curriculum outcomes this program could be adapted to address.
“The Case”
Early iterations of this program focused on students solving a case.
Through multiple pilots it was proven that solving a specific mystery
did not work in the ninety minutes allotted. Museums personalizing
this program should avoid the template to try to have students
solve a specific mystery.
In the current version of “History Detectives” the case is presented
as a case the students can explore. The activities each give them a
chance to explore different aspects of the case but the focus is on
the skill they are learning rather than the facts. The final goal is to
acquire the skills needed to earn their official history detective
badge rather than find a specific fact or answer.
192 Toolbox for Museum School Programs (2016)
Objects and Materials for “History
Detectives”
Purchasing Objects and Materials This program was designed to be easily implemented at little cost to a
museum. It however still requires some props and materials. Many of
these items are things that a museum might already own (for
example, whiteboard), could make inexpensively (for example,
notebooks), or could purchase at little cost (for example, pencils).
Nova Scotia Museum sites looking to develop this program but who
need help purchasing supplies should apply for a Support 4 Culture
(S4C) interpretive renewal grant. This grant program looks favorably
upon this type of ask. For more information see Module Six.
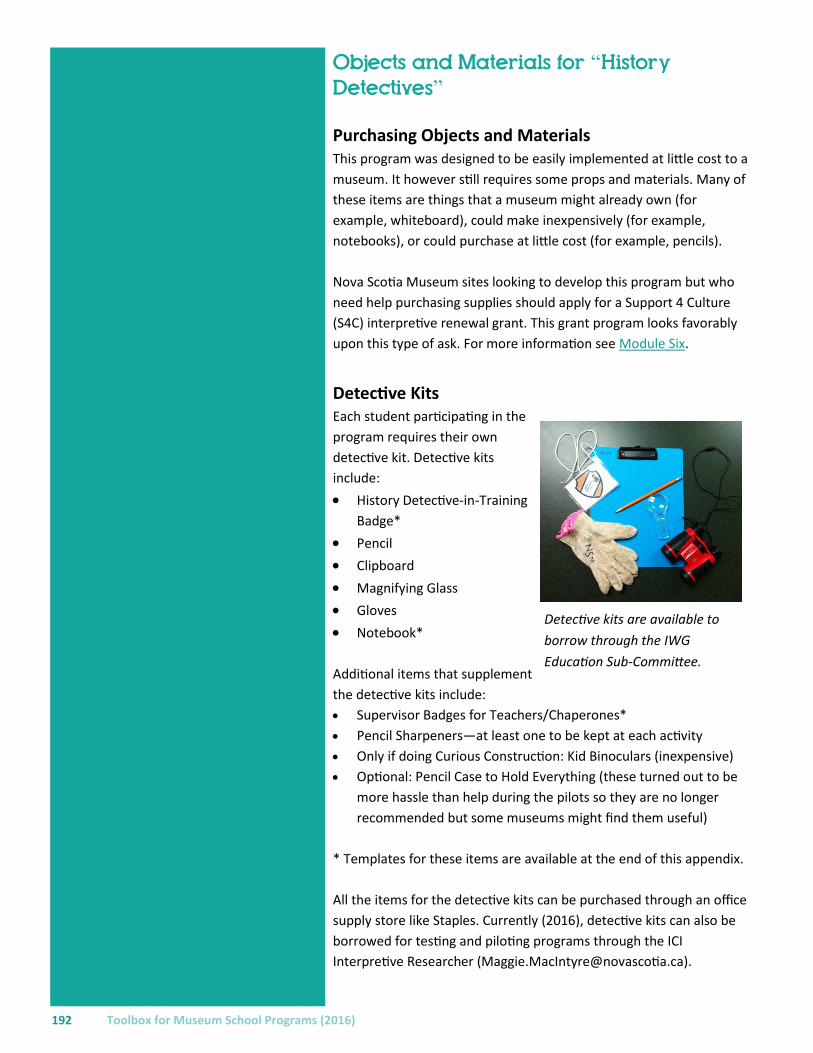
Detective Kits Each student participating in the
program requires their own
detective kit. Detective kits
include:
History Detective-in-Training
Badge*
Pencil
Clipboard
Magnifying Glass
Gloves
Notebook*
Additional items that supplement
the detective kits include:
Supervisor Badges for Teachers/Chaperones*
Pencil Sharpeners—at least one to be kept at each activity
Only if doing Curious Construction: Kid Binoculars (inexpensive)
Optional: Pencil Case to Hold Everything (these turned out to be
more hassle than help during the pilots so they are no longer
recommended but some museums might find them useful)
* Templates for these items are available at the end of this appendix.
All the items for the detective kits can be purchased through an office
supply store like Staples. Currently (2016), detective kits can also be
borrowed for testing and piloting programs through the ICI
Interpretive Researcher ([email protected]).
Detective kits are available to
borrow through the IWG
Education Sub-Committee.

Toolbox for Museum School Programs (2016) 193
Continued...Objects and Materials for
“History Detectives”
Large Props/Infrastructure In addition to a detective kit for each student, the museum should
have the following items to be used in the program:
Whiteboard with markers, eraser and stand
Noise makers, one per group leader
Tables and Chairs (amount depends on activity and set-up)
Mystery Case Files*
Smaller tags, arrows and other paper props—will depend on
activity*
* Templates for these items are available at the end of this appendix.
Museum should also have clean mats specifically for programs for
students if they will be sitting on the floor. This could be large room
rugs that multiple students can sit on or smaller individual mats.
Working Collection, Reproductions and Artifacts
This program relies heavily on students learning from objects.
Although hands-on is always preferred when working with students,
this program was designed to provide an object rich experience
without any risk to museum collection. For this reason, this program
encourages students and staff to wear gloves at all times when
interacting with objects, even if they are working collection, prop or
reproduction. Museums should consider the following ways to ensure
their program is object-rich:
Use working collection pieces. These are pieces that are
officially designated or purchased as working collection or prop.
Use museum collection pieces in situ. Invite students to get
close to museum exhibits or come into historic rooms. Explain
that although they cannot touch they can use their magnifying
glass to see details.
Use reproductions. Artifacts and specimens can be replaced with
reproductions that students can handle. Reproductions are
particularly useful with archival records as high resolution images
can be inexpensively printed.
Provide photographs. If students are unable to pick-up or
manipulate an artifact, provide photographs of the parts of it
they cannot see while it is on display in situ. These photographs
can be printed or provided digitally on appropriate technology.
Get creative and have discussions with collections and
conservation staff. Explain to collections staff the programs and
work with them to find alternative ways for students to interact
with the objects.

194 Toolbox for Museum School Programs (2016)
Program Overview Page
“History Detectives: The Sable Island Case”
Program Highlights (Description for Marketing Purposes):
Can your students solve a history mystery? In this hands-on, minds-on program students become history detectives as they learn about who used to live on Sable Island. Students will rotate through three interactive stations at which they search for clues and develop skills used by historians, researchers and museums to learn about the past. Based on the concept of “learning with objects,” this program will engage students with primary sources, including artifacts and archival records. Students will discover how objects provide evidence of the past and
Overarching Objective: (1 sentence containing 1 idea that describes what the program is about.)
By interacting with real objects at a museum, students will develop skills that relate to how we learn about the past.
Curriculum Outcomes addressed by this program:
Social Studies Grade 5 Curriculum Outcomes Students will develop an understanding of how we learn about the past with a focus on Acadians, African Nova Scotians, Gaels, Mi’kmaq and additional cultures. (Outcome 1) Skills: Citizenship, Communication, Critical Thinking
IMP Content Area: E.4 Cultural Expression E.4.10 Heritage Preservation
Content and Outcomes
Basic Logistics
Grade: Grade 5 Social Studies
Program Created by: IWG Education Sub-Committee & MSVU B.Ed. Interns
Date of Creation: August 2015
Program Updated for Specific Museum by:
IWG Education Sub-Committee (New Curriculum Outcomes)
Date of Update: October 2016
Development Partners: Nova Scotia Museum Pilot Sites: Fisheries Museum of the Atlantic, Highland Village Museum, Museum of Natural History
Nova Scotia Archives Nova Scotia Department of Education and Early Childhood
Development
Program Availability: To be determined by site presenting the program
Program Structure
Program Length: 90 minutes
Maximum Group Size: 30 students – 1 class
Student Groupings: Divide group into 3 smaller groups
Facilitation – # of Staff: 3 staff # of Volunteers: Optional: 3 volunteers
Change to reflect the mystery students will be exploring at your site.
Add names and dates for your site’s update.
Add partners who helped your site.
When will you offer it?
Increase to 60 students? (2 classes)
Use more/less staff or volunteers?
Retitle to reflect case students will be exploring at your site.

Toolbox for Museum School Programs (2016) 195
Program Outline
Activity Location Time Featured Objects
Introduction: “History Detective Training”
Central location that can accommodate the whole group
15 mins. History Detective Kit
Activity 1: “Modern Mysteries”
Location with lots of artifacts, either in situ or on a display table, that students can examine. Can accommodate 1/3 of the group.
20 mins. Artifacts in situ or on display
Photo cards showing modern equivalents of artifacts
Activity 2: “Artifact Investigations”
Location with artifacts where students can spread out to spend time examining a single artifact. Can accommodate 1/3 of the group.
20 mins. Artifacts in situ or on display
Activity 3: “Archival Clues”
Location where students can work independently (if necessary without a staff person) which can accommodate 1/3 of the group. Ideally with tables & chairs, however, sitting on the floor can also work. Can be the same space as introduction.
20 mins. Collection of archival records (reproductions) representing life at the site. Examples include images, documents, audio and visual components.
Conclusion: “Graduation”
Central location that can accommodate the whole group. Possibly same space as introduction.
15 mins. Students’ Observations
Alternative Activity – Can be done in lieu of Activity 1, 2, or 3.
Activity 4: “Curious Construction”
Outside (either the back, front or side yard)
20 minutes
Historical Building (Your Site)
After a full group introduction, the students are divided into three smaller groups, or squads, which will rotate between Activity 1, 2 and 3. They will come back together for a full group conclusion. Museums may wish to substitute Activity 1, 2, or 3 with Activity 4 if it better meets their site’s theme or logistical requirements.
Update locations to reflect where activities will happen at your site
Select which 3 activities will be done. Delete alternative activity.

196 Toolbox for Museum School Programs (2016)
Program Research Page
“History Detectives”
Background Information: Insert site and program specific information here.
For a general understanding about program presentation, it is recommended that sites use the Museums School Program Toolbox as a resource on principals of successful school program (Module Two) and program presentation strategies (Module Five).
Program presenters may also wish to better understand the specific curriculum outcomes and skills addressed by this program. Information on the curriculum outcomes can be found in the “Social Studies Grade 5 Curriculum Guide.”
Sources and References: Insert site and program specific information here.
For general resources on program presentation, Appendix F contains a full list of sources and references that could be consulted to better understand the theory behind this school program. The following sources will be of particular use:
Department of Education, (2012) “Learning with Objects: Artifact Exploration Guide”.
Department of Education, (2011) “Social Studies Grade 5 Curriculum Guide”.
John Hennigar Shuh, (1982), “Teaching Yourself to Teach with Objects”, Journal of Education, 7 (4).
Additionally, be sure to use the Museum School Program Toolbox.
Write 1/2 to 1 pages of background information to help new staff and volunteers know about the case the students will be exploring.
Add 2-5 sources and references where new staff and volunteers can further explore information presented in background information.

Toolbox for Museum School Programs (2016) 197
Activity Description Page “History Detectives: The Sable Island Case”
Introduction: “History Detective Training”
Update program title.
Activity Highlights (Description for Marketing Purposes):
During the program introduction students will participate in History Detective Training and be introduced to the Sable Island history mystery they will need to help solve.
Activity Logistics
Location Time Materials
Central location that can accommodate the whole group
15 minutes Large carpets for students to sit on
White board with dry erase marker
History Detective Kits (one for demonstration plus one
per student). Each kit will contain:
History Detective Badge
Clipboard
Notebook
Pencil
Gloves
Magnifying Glass
Kid Binoculars (to be kept for use at “Curious
Construction” activity)
History Detective Supervisor Badges (one for
demonstration plus one for each teacher/chaperone).
Pencil Sharpeners – to be held by staff, volunteer or
teacher/chaperone
Mystery Envelope – “The Case”
Purpose of Activity: Provide students with an orientation to the site and introduce to them the skills they will be using to do object-based learning.
Curriculum Outcomes addressed by this activity:
Social Studies Grade 5 Curriculum Outcomes Students will develop an understanding of how we learn about the past with a focus on Acadians, African Nova Scotians, Gaels, Mi’kmaq and additional cultures. (Outcome 1) Skills: Citizenship, Communication, Critical Thinking
Set-Up: Set-up an area where students can sign the guest book upon arrival. Prepare a space for students to sit safely as a large group. (See Safety
Considerations.) Consider providing chairs for teachers and chaperons.
Set-up demonstration area with one history detective kit and whiteboard in a location that students can easily see it from where they will be sitting.
Divide the history detective kits and badges into three groups, ready to be handed out at the end of the introduction. Have History Detective Supervisor Badges ready to distribute by the volunteers or museum staff to teachers and chaperones.
Update description to reflect what students will be exploring at your site.
Update using information from Program Outline.
Need help getting materials? Read the information at the start of Appendix I.

198 Toolbox for Museum School Programs (2016)
Procedure
Timing Instruction Possible Script
Minute 1 1. Welcome students to the museum.
Invite them to take a seat on carpets.
Tell them your name and the names
of the other staff/volunteers who will
be presenting the program.
“Welcome to the museum. My name is
Gus. I would also like to introduce you
to Jack and Jill. Today we will be your
museum teachers.”
Minute 2 2. Tell students what will be happening
during their visit. (Set expectations.)
Explain that:
First they will participate in
detective training where they will
learn how to be a detective and
about the case they are going to
explore.
At the end of the introduction they
will be divided into three groups.
Each group will visit three stations.
At each station they do an activity
that will help them explore the
case.
After visiting three stations, they
will return to the large group to
discuss the case and earn their real
history detective badges which they
will get to take back to school.
“We are very happy to you are here
today. Your teacher tells us you would
all make excellent detectives. So today
you are going to learn how to be
history detectives. After this
introduction you will be divided into
three groups. Each group will visit three
stations where you will do three
training activities, each exploring clues
from the museum. Once you are done
we will come back here together and
discuss what you learned. Upon
completion you will earn your history
detective badge which you can take
back to school.
Mins. 3-5 3. History Detective Training – Lesson 1:
The Tools. Show students what will
be in their history detective kits.
Students will be each getting their
own badge, clipboard, notebook,
pencil and gloves. Explain expected
behaviours and reasons for
behaviours in regards to the item.
Clipboard, Notebook and Pencil: For
recording observations and
completing forms. Pencils are used
to avoid making accidental
permanent marks.
“First things first. You are going to need
training to become official history
detectives. The first thing you need to
be a history detective are tools.
The most important items in a
detective kit are clipboard,
notebook and pencil. Notebooks
are useful to record what you see
so that you can refer back to it
when solving the mystery. Some
detective notebooks, like the ones
you will be using today, have forms
to fill out to help remind detectives
where to look for clues.

Toolbox for Museum School Programs (2016) 199
Timing Instruction Possible Script
Continued Gloves: Worn to touch and protect
artifacts. Students must only touch
artifacts when given permission.
Magnifying Glass: Used to look at
details on an object.
Binoculars: Used in the “Curious
Construction” activity to look at
details on a building that might be
difficult to see from a distance.
History Detective in Training Badge:
Used to identify students as part of
the school group.
Next is a pair of gloves. Although
touching in a museum is not
generally allowed, today, as history
detectives, you have special
permission touch certain artifacts.
If you are told it is okay to touch
something, you need to put on your
gloves first. One reason we don’t
touch artifacts is that the dirt and
natural oils on our hands can
damage the artifacts.
Your magnifying glass will help you
look at the small details on objects.
In one activity today it might be
difficult for you get close to the
object you are looking at. In that
activity use your binoculars to see
details from a distance.
The last thing your kit will have is a
special history detective in training
badge. It will show anybody who
sees you today that you are here
doing important work.
Minute 6 4. Explain to Teachers and Chaperones
their role. Hand-out supervisor
badges to the teachers and
chaperones. Ask them to review their
responsibilities listed on the badges
while the students finish training.
“Teachers and Chaperones will also be
given a special history detective
supervisor badge. This badge gives
them some special responsibilities in
order to help the history detectives do
their jobs. These responsibilities are
written on the back of the badges.”
Mins. 7-9 5. History Detective Training – Lesson 2:
The Rules. Have the students come
up with their own rules that they will
follow while in the museum. Use the
white board to write down the agreed
up on rules. Try to keep it to less than
seven rules. Possible rules include:
Stay with your group. No running,
yelling or pushing. Putting your hand
up to talk.
“As History Detectives you will be
exploring many parts of the museum.
We will want to make sure that our
explorations do not put any of the
artifacts at risk and that we are not too
disruptive to the other History
Detectives. What do you think are some
rules we might want to follow today?”

200 Toolbox for Museum School Programs (2016)
Additional Information
Possible Discussion Questions for Extension:
Do not worry if this section ends a little early as it will allow for more time for discussion during the conclusion.
Suggestions for Modifications:
If presenting this to a smaller group of students, use one or two groups instead the three recommended here. Try to keep each group to about 10 students.
Safety Considerations: Ensure the space where students are seated does not block the flow of traffic in the museum more than necessary.
If doing the introduction outside, ensure the area is safe from any hazards such as broken glass, animal feces, poisonous plants, insect homes (for example, bee hives, wasp nests, ant hills). The area should be checked for hazards every time it is used. Be aware of sitting students in the sun without shade, especially if they don’t have sun screen and hats.
Timing Instruction Possible Script
Mins. 10-13 6. History Detective Training – Lesson 3:
Envelopes. Explain how the mystery
envelopes are used at each station.
Open the first mystery envelope and
read the document inside which will
introduce the case which the students
will be exploring.
“Each station you visit today will have
one of these mystery envelopes. The
information inside the mystery
envelope will give you clues. I am now
going to read to you the first mystery
envelope which is going to tell you
about today’s case.”
[Open and read envelope: see text
below.]
Mins. 14-15 7. Divide students into four groups and
start the program. Explain to
students that now that they have
completed their history detective
training they are ready to go look for
clues. Teachers may have already
have divided the students into groups
before arriving but if they haven’t,
work with them to quickly divide the
students into groups. Assign each
group a leader to take them to their
first station where they will receive
their detective kits and badges.
“You now done your history detective
training and are ready to receive your
training badges and tools. With the
help of your teacher, we are now
going to divide you into three
detective squads. Once in your group
you will go to your first station where
you receive your detective kit and
detective badge. Does anybody have
any questions before we start? Have
fun.”
Update to reflect the realities of your site.

Toolbox for Museum School Programs (2016) 201
Mystery Envelope – “The Case”
Sable Island is a small and isolated island that is about 300 km away from Nova Scotia in the
Atlantic Ocean. Today approximately five people live there year-round as scientists and
caretakers. We know a lot about the work that these scientists do because they share their
research with the museum. Much of their research is about the rare plants and animals that call
Sable Island home. This includes the world’s largest breeding colony of grey seals, over three
hundred types of birds, and species of moths and insects found nowhere else on the planet! Most
famously, Sable Island is also home for hundreds of wild horses.
The scientists and caretakers who live on Sable Island today are part of a long history of people
visiting, researching and living on Sable Island. Some of the first people we know who visited
Sable Island over 500 years ago were explorers and fisherman. Over the next three hundred years
several people tried to start a community on the island but the conditions were too harsh. During
this time, the first horses were brought to the island. When the people left, the horses remained
and became wild.
Sable Island is known as the “Graveyard of the Atlantic” because so many shipwrecks happened
on or near the island. The island can be very difficult to see in rough seas, storm and fog. Without
modern navigational tools, fishing and other boats often ran into the island. In 1801, or just over
two hundred years ago, the Nova Scotia government built several life-saving stations and
lighthouses on the island. The people who worked in these life-saving stations and lighthouses
recorded many observations about the plants and animals on the island. This made them some of
the earliest researchers of Sable Island.
In the last fifty years changes in technology made it easier for ships to navigate. Shipwrecks
become less common and it was less necessary to have life-saving stations on the island. The
people who worked on the island left but their recordings, observations, and research continues
today to be very important to researchers today.
At the museum we know a lot about the work done by these unofficial scientists did but we want
to learn more about the people themselves. We need the help of history detectives to discover
clues about the people who lived on Sable Island approximately one hundred years ago. We have
identified areas in the museum we would like you to investigate. Each area you visit will have an
activity where you discover clues. Use these clues to help us better understand life in the past on
Sable Island.
We look forward to finding out what you discover.
Write text to introduce students to your museum’s story and reflect the case they will be exploring. The text should be short and vocabulary age appropriate. Make sure it can be read in less than 4 minutes and should be no longer than 400 words—shorter is better.

202 Toolbox for Museum School Programs (2016)
Activity Description Page “History Detectives: The Sable Island Case”
Activity 1: “Modern Mysteries”
Update program title.
Activity Highlights (Description for Marketing Purposes):
How much has life really changed in the last 100 years? Students will
participate in an investigation in which they will be asked to match items
used today by researchers living on Sable Island to the equivalent item
used by researchers about 100 years ago. Once students have completed
their investigation they will examine how the items have changed over
history and what these changes tell us about the people who used the
Update description to reflect what students will be exploring at your site.
Activity Logistics
Location Time Materials
Location with lots of artifacts, either in situ or on a display table, that students can examine. Can accommodate 1/3 of the group.
20 minutes Working Collection Artifacts (To Be Listed)
Artifact Number Tags
Noisemaker to get students’ attention
Mystery Envelope “Modern Mysteries”
The students will use the following items from their
detective kit:
Clipboard
Notebook
Pencil
Gloves
Purpose of Activity: Students will look at the similarities and differences between artifacts
from the past and their modern equivalent. Using this information they
understand that past society was both similar and different from today’
society.
Curriculum Outcomes addressed by this activity:
Social Studies Grade 5 Curriculum Outcomes Students will develop an understanding of how we learn about the past with a focus on Acadians, African Nova Scotians, Gaels, Mi’kmaq and additional cultures. (Outcome 1) Skills: Citizenship, Communication, Critical Thinking
Set-Up: Set-up tables and place artifacts on the tables, each artifact with a
number tag clearly relating to a specific artifact.
Clear area for students to sit in the room.
Update location using information from Program Outline.
List what working collection artifacts activity will use as well as any special handling instructions. Templates for artifact number tags is available at the end of this appendix.

Toolbox for Museum School Programs (2016) 203
Procedure
Timing Instruction Possible Script
Mins. 1-2 1. Welcome students to the activity and
space. Invite them to take a seat in a
prepared area. Read the first section
of the mystery file to explain that they
will be comparing modern items to
the old items they see in this room.
This is one method used by
researchers to learn about the past.
“Please come and sit over here for a few
minutes. You will be doing an
investigation of the artifacts on the
table but first I am going to give you
some read the mystery file and give
some instructions.”
(Text for mystery file at end of activity
procedure.)
Mins. 3-4 2. Show and explain to students what
they will be doing during this activity.
(Set expectations.)
Students may work individually or
in groups of up to 3. Each student
is expect to complete their own
form, even if working in a team.
They will be completing the
training exercise called “Modern
Mysteries.” Show students which
training exercise this is.
Use a copy of the training exercise
to demonstrate how to complete
the form. First they will put the
number beside the name of the
modern item. Then they will write
one what the old item is different
from the modern item.
Tell students to only complete the
training exercise up to the
“Detective image.” They will need
extra info to answer the last
question.
“For this investigation you may work
alone or with a partner.
Please turn your detective notebook to
the page called “Modern Mysteries.” It
is the page with a magnifying glass in
the top corner. Fill out your own
training exercise even if you are
working with a partner.
Let’s use the first line as an example.
In the first column you will see the
name and picture of an object you
might find in a modern location.
Look at the artifacts. You will notice
numbers attached each one. Try to find
the object that matches the one in your
training exercise and write down the
number.
Next observe the artifact and write
down one way the modern and old
objects are different.
You are going to try to do the same
thing for the remaining items on your
form. Stop when you get to the
detective symbol on the training
exercise as after everyone is done I am
going to read you information from the
mystery envelope that will help you
answer that last question.

204 Toolbox for Museum School Programs (2016)
Timing Instruction Possible Script
Continued Remind students about specific
behaviour expectations for this
room, including how they can
touch the artifacts while wearing
gloves.
Students will have 10 minutes to
complete the activity.
When they hear the noisemaker, it
is time to return to where they are
sitting.
Ask if anybody has any questions
before starting.
While you are doing your investigation
you need to wear your gloves. As long
as you are wearing your gloves you will
be allowed to touch the artifacts.
You are going to have ten minutes to try
to find all your answers. When you hear
me use the noisemaker you know the
time is up and you will need to quickly
come back here and sit down.
Does anybody have any questions
before we start?”
Mins. 5-14 3. Students work independently or in
small groups to complete the form.
Allow students to work as
independently as possible. Answer
questions as needed and supervise
they aren’t accidentally putting the
artifacts at risk. Encourage teachers
and chaperones to aid you with this
as well as assist students who are
struggling. Once time is up, or most
everyone is done, use the noisemaker
to gather the group together.
None.
Mins. 15-17 4. Review answers. Ask the students
what artifact number they choose for
each of the modern items. If possible
allow for discussion amongst the
students if some of them choose
different numbers for the same item.
Ask them to explain to explain their
answer. In many cases there may be
more than one right answer.
“What artifact number did you choose
as the old version of the first item on
your form? Did anybody get something
different? Could you explain why you
think that artifact is the equivalent to
the modern item?”
(Continue discussion until all items on
the training exercise have been
identified. Remain aware of time.)
Mins. 18-20 5. Read mystery envelope to provide
final clue. Ask students to complete
the last question on their training
exercise (the one after the detective
image). Once students are done,
prepare them to move to their next
activity.
“For the final question on your training
exercise I have some additional
information in this mystery envelope.
Let me read to you the clue. [Read
envelope.]
Think about what you just heard and
answer the question after the detective
on your training exercise.”

Toolbox for Museum School Programs (2016) 205
Mystery Envelope – “Modern Mysteries”
At start of activity:
One way researchers learn about the past is by comparing modern objects that they understand
to the historical objects they want to learn about. Historical objects in museums are called
artifacts. As you can see, we have displayed some artifacts from the museum’s collection that we
normally don’t show the public. You will be observing and comparing the modern items on your
sheet to the artifacts. You will be asked to infer how objects have changed over time and what
this means about life in the past.
At end of activity:
Let’s use the skills you just developed to infer about life on Sable Island in the past. Sable Island is
very difficult to get to, especially in bad weather. Today, when people on Sable Island need
something they have to wait for an airplane to come to the island. In the past, before airplanes
existed, the people had to wait for boats to bring their supplies. People on Sable Island can never
be sure when the next boat or airplane with supplies is coming so they need to keep a lot of
different things with them. The artifacts you just studied are examples of all the different things
people needed to keep with them on Sable Island, both for their work and personal needs.
What does this information tell us about life on Sable Island in the past? How was it similar and
how was it different from today?
Write text to provide students with some information about your site and to help them understand the artifacts they are exploring. The text should be short and vocabulary age appropriate. Each section of text should take less than 1 minute to read aloud and be no more than 150 words—less is better.
Additional Information
Possible Discussion Questions for Extension:
If time allows, considering extending the discussion in step 4. Some
additional questions to those included in the above suggested script
could include:
Where do you think these items were purchased? How is this
similar or different than today?
What are these items made from? How is this similar or
different than today?
Today, if something in our home breaks what do we do? What
do you think they do on Sable Island? How would this have
been different in the past?
Suggestions for Modifications:
none
Safety Considerations: Some of the artifacts are fragile and might have sharp edges.
Wearing gloves should help protect the students. Make sure
students are careful and keep the artifacts over the table when
handling them.
Update to reflect the realities of your site.
Write questions specific to your site.

206 Toolbox for Museum School Programs (2016)
Activity Description Page “History Detectives: The Sable Island Case”
Activity 2: “Object Investigations”
Update program title.
Activity Highlights (Description for Marketing Purposes):
Researchers collect objects to learn about a place like Sable Island. We can
use the same objects to discover what they were learning. In this activity
students will do an in-depth investigation of an object of their choosing,
examining it for clues about why people in the past thought it was
important to study Sable Island and how their research can still be used
today.
Update description to reflect what students will be exploring at your site.
Activity Logistics
Location Time Materials
Location with lots of artifacts, either in situ or on a display table, that students can examine. Can accommodate 1/3 of the group.
20 minutes Working Collection or Accessioned Artifacts In Situ
“Look Here” Arrows
Noisemaker to get students’ attention
Mystery Envelope “Object Investigations”
The students will use the following items from their
detective kit:
Clipboard
Notebook
Pencil
Gloves (if they can touch artifacts)
Magnifying Glass
Purpose of Activity: Students will spend time look at a single artifact in depth in order to
develop the skill of learning from objects.
Curriculum Outcomes addressed by this activity:
Social Studies Grade 5 Curriculum Outcomes Students will develop an understanding of how we learn about the past with a focus on Acadians, African Nova Scotians, Gaels, Mi’kmaq and additional cultures. (Outcome 1) Skills: Citizenship, Communication, Critical Thinking
Set-Up: Set-up chairs or stools so that students can sit while they are looking
at their chosen natural history specimen in situ.
Place the “Look Here” arrows around the room to point out artifacts
that might be of interest.
Update location using information from Program Outline.
List what working collection artifacts activity will use as well as any special handling instructions. Templates for artifact number tags is available at the end of this appendix.

Toolbox for Museum School Programs (2016) 207
Procedure
Timing Instruction Possible Script
Mins. 1-2 1. Welcome students to the activity and
space. Invite them to take a seat in a
prepared area. Read the first section
of the mystery file to explain that they
will each be looking at an object in
detail. Doing investigations of a single
object is one method used by
researchers to learn about the past.
“Please come and sit over here for a few
minutes. You each become an expert on
an artifact of your choice in this but first
I am going to give you some read the
mystery file and give some
instructions.”
(Text for mystery file at end of activity
procedure.)
Mins. 3-4 2. Show and explain to students what
they will be doing during this activity.
(Set expectations.)
Give step-by-step instructions for
the object investigation:
Students will be completing
the training exercise called
“Object Investigation.” Show
students which training
exercise this is.
Students will be working
individually however they can
do the same object as one
other person and they can talk
to each other about their
object.
Explain to students how they
will go about choosing their
object.
Use an example of the “Object
Investigation” training exercise
and an easy specimen to
demonstrate to students how
to do an object investigation.
Explain that you will do it
quickly but they will have more
time in order to go into greater
detail.
“Please turn your detective notebook to
the page called “Object Investigation.”
It is the page with a finger print in the
top corner.
You can choose or object from any of
the artifacts you see in this room. The
arrows point out some interesting ones.
You may choose look at the same object
as one other person, and you may talk
to each other about the object, however
you each need to fill out your own form.
Once you have chosen your object, take
a minute to look at it carefully. Look at
it from different angles. Use your
magnifying glass to see the details.
Once you are done looking at the
object, look at your form.
The training exercise asks you to list or
draw at least ten things all the things
you notice about your object. You don’t
have to write full sentences or make
fancy drawings. For example with my
shoe I notice that it is black and that it
looks like it was used a lot. I can quickly
draw the design on the button and label
the drawing “button”. What else do you
notice about the shoe (allow class to
provide answers).

208 Toolbox for Museum School Programs (2016)
Timing Instruction Possible Script
Continued Remind students to only complete
the training exercise up to the
“Detective image.”
Remind students about specific
behaviour expectations for this
room, including how they can
touch the artifacts while wearing
gloves.
Students will have 10 minutes to
complete the activity.
When they hear the noisemaker, it
is time to return to where they are
sitting.
Ask if anybody has any questions
before starting.
Stop when you get to the “Detective
symbol” on the training exercise as after
everyone is done I am going to read
more information from the mystery file
that will help you answer that last
question.
While you are doing your investigation
you need to wear your gloves. As long
as you are wearing your gloves you will
be allowed to touch the artifacts.
You are going to have ten minutes to try
to find all your answers. When you hear
me use the noisemaker you know the
time is up and you will need to quickly
come back here and sit down.
Does anybody have any questions
before we start?”
Mins. 5-14 3. Students work independently or in
small groups to complete the form.
Allow students to work as
independently as possible. Answer
questions as needed and supervise
they aren’t accidentally putting the
artifacts at risk. Encourage teachers
and chaperones to aid you with this
as well as assist students who are
struggling. Once time is up, or most
everyone is done, use the noisemaker
to gather the group together.
None.
Mins. 15-17 4. Review what the students
discovered. Invite the students to
share with the group which object
they chose to investigate. If time
allows ask students to add what they
found the interesting about their
object or why they chose their object.
“Who would like to tell us what object
they investigated? Can you tell us one
thing about your object?”
(Continue discussions until all students
who want to share have been given an
opportunity or you are out of time.)

Toolbox for Museum School Programs (2016) 209
Mystery Envelope – “Object Investigating”
At start of activity:
One way researchers learn about the past is by become experts on specific objects. They become
experts by looking at the object in detail, recording their observations, and inferring what these
observations might tell them. In this activity you will be looking at natural history objects from the
museum’s exhibits. Natural history objects in museums are called specimens. The exhibits around
us right now feature specimens found on Sable Island. You will notice the specimens in this tube
shape case, the horse skeleton spinning in the window and some hidden inside these cases. By
looking closely at the specimens in this exhibit we can learn what life is like on Sable Island and
what types of plants and animals live on the island.
At end of activity:
All of the specimens, or natural history objects, you have been investigating have been collected
by researchers who visited Sable Island. The people who lived on Sable Island a hundred years
ago weren’t official researchers so they didn’t collect specimens to send to the museum. Instead
they spent time exploring the island and making observations. They would record their
observations in letters, diaries, notebooks and drawings, just like the ones you made today. These
observations are still used by researchers as proof of what has changed and what has not
changed on Sable Island over the years.
What can you infer about life in Sable Island by the observations you made about your chosen
object?
Write text to provide students with some information about your site and to help them understand the artifacts they are exploring. The text should be short and vocabulary age appropriate. Each section of text should take less than 1 minute to read aloud and be no more than 150 words—less is better.
Timing Instruction Possible Script
Mins. 18-20 5. Read mystery envelope to provide
final clue. Ask students to complete
the last question on their training
exercise (the one after the detective
image). Once students are done,
prepare them to move to their next
activity.
“For the final question on your
training exercise I have some
additional information in this mystery
envelope. Let me read to you the clue.
[Read envelope.]
Think about what you just heard and
answer the question after the
detective image on your training
exercise.”

210 Toolbox for Museum School Programs (2016)
Additional Information
Possible Discussion Questions for Extension:
If time allows, considering extending the discussion in step 4. Some
additional questions to those included in the above suggested script
could include:
Where else might you find objects like these?
Which of these objects do you think would be common for
researchers to find on Sable Island? Which objects would be
uncommon?
What objects might be missing from this exhibit?
Why would somebody have saved these objects for over a
hundred years?
Suggestions for Modifications:
Use this activity to incorporate technology. If students have
their own tablet or handheld computer, allow them to “collect”
the artifact (or past) version of the artifact by taking a picture of
it with their device.
Safety Considerations: The more students can immerse themselves into a space the
better experience they will have with this activity. Although it
might not always be possible to “go behind the rope” consider
using additional supervision, either a volunteer or parent
chaperones, to assist keeping both students and artifacts safe.
If using the technology modification remember that one of the
dangers to artifacts when being photographed is the people
who are not paying attention to their location while they take a
picture. People taking pictures often take a step back in order
to get a better picture, forgetting that there are objects around
them. This can cause people to bump into objects. Provide
students with a quick training about this behaviour before
letting them take pictures.
Update to reflect the realities of your site.
Write questions specific to your site.

Toolbox for Museum School Programs (2016) 211
Activity Description Page “History Detectives: The Sable Island Case”
Activity 3: “Clues from the Archives”
Update program title.
Activity Highlights (Description for Marketing Purposes):
Not all history is recorded in history books. In this activity students will
look closely at archival records to unlock clues about the people whose
lives are captured in these documents.
Activity Logistics
Location Time Materials
Location where students can work independently (if necessary without a staff person) which can accommodate 1/3 of the group. Ideally with tables & chairs, however, sitting on the floor can also work. Can be the same space as introduction.
20 minutes Archival Records (Reproductions)
The students will use the following items
from their detective kit:
Clipboard
Notebook
Pencil
Gloves (if they can touch artifacts)
Magnifying Glass
Purpose of Activity: Students will investigate archival records, learning how to use primary source materials for research.
Curriculum Outcomes addressed by this activity:
Social Studies Grade 5 Curriculum Outcomes Students will develop an understanding of how we learn about the past with a focus on Acadians, African Nova Scotians, Gaels, Mi’kmaq and additional cultures. (Outcome 1) Skills: Citizenship, Communication, Critical Thinking
Set-Up: Clear area for students to sit and work with archival records in
partners. Students will require space to spread out. Consider
providing tables and chairs if possible for all the students. If not
possible, a clean area on the floor, maybe with a clean mat (for
example, yoga mats) on which they could sit with their archival
records and partner.
Set up one table on which to display all the archival records.
Update description to reflect what students will be exploring at your site.
Update using information from Program Outline.
Need help getting archival records to reproduce? Read the information at the start of Appendix I.

212 Toolbox for Museum School Programs (2016)
Procedure
Timing Instruction Possible Script
Mins. 1-2 1. Welcome students to the activity and
space. Invite them to take a seat in a
prepared area. Read the first section
of the mystery file to explain that they
will each be looking at documents
from the archives with a partner.
Explain what an archives is and what
an archival record is. Explain that
doing research with documents from
the archives is called using primary
sources.
“Please come and sit over here for a few
minutes. You will be working with a
partner to examine a document from
the archives but first I am going to give
you some read the mystery file and give
some instructions.”
(Text for mystery file at end of activity
procedure.)
Mins. 3-4 2. Show and explain to students what
they will be doing during this activity.
(Set expectations.)
Give step-by-step instructions for
the activity:
Students work in pairs. Each
student will be completing the
training exercise called “Clues
from the Archives.” Show
students which training
exercise this is.
Explain to students how they
will go about choosing their
document. These instructions
will be specific to your site and
its set-up.
“Please turn your detective notebook to
the page called “Clues from the
Archives.” It is the page with a white
glove in the top corner.
In pairs you are each going pick and
examine an archival record from those
on the table here. Even if you are
working with a partner, you both need
to do your own training exercise.
The first thing you will need to do is
choose which document you want to
investigate. The documents on the
tables are ones that you can handle
carefully if you are wearing your gloves.
As an example I am going to look at this
photograph.
Once you have chosen your document,
take a minute to look at it carefully. Use
your magnifying glass to see all the
details. Once you are done looking at
the document, look at your form.
In the middle is a cloud where you can
write what you think is the most
important clue in your document.
For example with this photograph. I
notice it is black and white.

Toolbox for Museum School Programs (2016) 213
Timing Instruction Possible Script
Continued Use an example of the “Clues
from the Archives” training
exercise and an easy archival
record to do a brain storm
based on the information they
discover in their document.
Remind students to only
complete the training exercise
up to the “detective image.”
Remind students about specific
behaviour expectations for this
room, including how they can
touch the artifacts while wearing
gloves.
Students will have 10 minutes to
complete the activity.
When they hear the noisemaker, it
is time to turn their attention to
the group.
Ask if anybody has any questions
before starting.
From there start brainstorming with
your partner about all the other
things you notice and give them each
a cloud attached to your main cloud.
For example with this photograph I’m
going to give clouds to each of the
other things I notice: old, people,
house, tree. What else to you see?
(allow class to provide answers)
For each cloud, write all the things
you notice about it. So for people I
might write how many, what ages,
what they are wearing, what they are
doing, and so on. Try to gather as
many facts as possible from your
document.
Stop when you get to the detective
symbol on the form. After everyone is
done I am going to read you another
clue from the mystery file that will
help you answer that last question.
You are going to have ten minutes for
your investigation.
Now before you stand up to pick out
your document and get started I just
want to remind that when you hear
me use the noisemaker you know the
time is up and stop your investigation
and turn your attention to the group.
Does anybody have any questions
before we start?”

214 Toolbox for Museum School Programs (2016)
Timing Instruction Possible Script
Mins. 5-14 3. Students work independently or in
small groups to complete the form.
Allow students to work as
independently as possible. Answer
questions as needed and supervise
they aren’t accidentally putting the
artifacts at risk. Encourage teachers
and chaperones to aid you with this
as well as assist students who are
struggling. Once time is up, or most
everyone is done, use the noisemaker
to gather the group together.
None.
Mins. 15-17 4. Review what the students
discovered. Invite the students to
share with the group which archival
record they chose to investigate. If
time allows ask students to add what
they found the most interesting
about their document or why they
““Who would like to tell us what
archival record they investigated? Can
you tell us one thing about your
document?”
(Continue discussion until all students
who want to share have been given
an opportunity or you are out of
Mins. 18-20 5. Read mystery envelope to provide
final clue. Ask students to complete
the last question on their training
exercise (the one after the detective
image). Once students are done,
prepare them to move to their next
activity.
“For the final question on your
training exercise I have some
additional information in this mystery
envelope. Let me read to you the clue.
[Read envelope.]
Think about what you just heard and
answer the question after the
detective image on your training
exercise.”
Additional Information Possible Discussion Questions for Extension:
If time allows, considering extending the discussion in step 4. Some
additional questions to those included in the above suggested script
could include:
What does that tell us about the document?
Does this document remind you of anything from your own
life today?
Does anything in this document remind you of something
Write questions specific to your site.

Toolbox for Museum School Programs (2016) 215
Mystery Envelope – “Clues from the Archives”
At start of activity:
One way researchers learn about the past is by looking at documents created in the past.
Documents from the past can be called archival records because they are kept in an archives. An
archives is like a museum but instead of objects it houses documents, like a library. Some of the
documents are very important like birth, marriage and death certificates. Other documents might
seem less important but are filled with important information. These could include letters, diaries
and even things that could have been considered garbage like receipts and empty packages. We
have selected a few documents from the archives that we think will help you learn more about
life on Sable Island.
At end of activity:
The documents you have been looking at relate to the research stations on Sable Island. As you
have seen they include government documents, newspaper clippings, personal letters,
photographs and art from a magazine. Each document only has a small amount of information
but also leaves us with lots of questions. This often leads to looking at other archival records.
After making observations on your archival record, what is one new questions you have about life
on Sable Island?
Write text to provide students with some information about your site and to help them understand the artifacts they are exploring. The text should be short and vocabulary age appropriate. Each section of text should take less than 1 minute to read aloud and be no more than 150 words—less is better.
Suggestions for Modifications:
Use this activity to incorporate technology. If students have
their own tablet or handheld computer, allow them to look at
virtual archival records on a trusted webpage like Nova Scotia
Archives.
This activity has been designed to be chaperone led. When
possible, have a staff or volunteer person at this station lead
instead of the chaperone.
If chaperone numbers allow, consider asking one chaperone to
spend the whole time at this station rather than rotating with
the groups. Have a staff person give this chaperone a quick bit
of training while the other staff leads the introduction.
If activity will regularly be chaperone led, and if technology
allows, consider making a movie to play of a staff person
explaining the instructions. The movie could have an on-screen
timer to help the chaperone stay on time.
Safety Considerations: As there may not be a staff or volunteer person at this activity,
ensure that it is held in a location of the museum that does not
require supervision.
Update to reflect the realities of your site.

216 Toolbox for Museum School Programs (2016)
Activity Description Page “History Detectives: The Sable Island Case”
Activity 4: “Curious Construction”
Update program title.
Activity Highlights (Description for Marketing Purposes):
Students will examine specific architecture and landscape features of the
Sable Island research station and create an art project to represent their
chosen feature. Students will then share their art project and hypothesis
what they can learn from that specific architectural feature.
Update description to reflect what students will be exploring at your site.
Activity Logistics
Location Time Materials
Location with lots of artifacts, either in situ or on a display table, that students can examine. Can accommodate 1/3 of the group.
20 minutes 1 large archival photograph of building and landscape
being examined
The students will use the following items from their
detective kit:
Clipboard
Notebook
Pencil
Binoculars (to be kept at the station)
Purpose of Activity: Students will observe the house and landscape as a historical object and
use art to communicate their observations.
Curriculum Outcomes addressed by this activity:
Social Studies Grade 5 Curriculum Outcomes Students will develop an understanding of how we learn about the past with a focus on Acadians, African Nova Scotians, Gaels, Mi’kmaq and additional cultures. (Outcome 1) Skills: Citizenship, Communication, Critical Thinking
Set-Up: Prepare a space outside for students to sit safely as a large group.
(See Safety Considerations.)
Have large image available but hidden from students to be revealed
when final clue is read from the mystery file.
Update location using information from Program Outline.

Toolbox for Museum School Programs (2016) 217
Procedure
Timing Instruction Possible Script
Mins. 1-2 1. Welcome students to the activity and
space. Invite them to take a seat in a
prepared area. Read the first section
of the mystery file to explain that they
will each be looking at the building
and landscape as it stands today.
Drawing and using historic buildings
that still exist is one method used by
“Please come and sit over here for a few
minutes. You will be using these
binoculars to examine and draw a
feature of the building and landscape
this but first I am going to give you
some read the mystery file and give
some instructions.”
(Text for mystery file at end of activity
procedure.)
Mins. 3-4 2. Show and explain to students what
they will be doing during this activity.
(Set expectations.)
Give step-by-step instructions for
the activity:
Students will be completing
the training exercise called
“Curious Construction.” Show
students which training
exercise this is.
Students will be working
individually however they will
have a chance to share their
results with the rest of the
group.
Use an example of the
“Curious Construction”
training exercise and an easy
architectural feature to
demonstrate to students how
to complete the form. Explain
that you will do it quickly but
they will have more time in
order to go into greater
detail.
Remind students to only
complete the training exercise
up to the “Detective image.”
Students will have 10 minutes to
complete the activity.
Please turn their detective notebook to
the page called “Curious Construction.”
It is on the page with the notepad and
pencil in the top corner.
First you are going to look at the
building and landscape. Silently, in your
head, pick one thing that you think is
really interesting about the building or
landscape. You can use the binoculars
to look at your chosen feature more
closely.
Once you have chosen your item you
are going to draw it on your
investigation form. Try to draw it with
as much detail as possible. Don’t worry
about being a good artist. Focus on
trying to capture lots of details.
You are going to have ten minutes to
complete your drawing. Work on your
drawing independently and can sit in
anywhere on the front lawn.
Don’t worry about the last question on
your training exercise after the
“Detective symbol.” Once we are back
together I am going to read you
another clue that will help you answer
that last question.

218 Toolbox for Museum School Programs (2016)
Timing Instruction Possible Script
Continued When they hear the noisemaker, it
is time to return to where they are
sitting.
Ask if anybody has any questions
before starting.
When I use the noisemaker you will
know time is up and you will need to
quickly come back here and sit down.
Once we are all together we are going
to look at and discuss each other’s
drawings.
Does anybody have any questions
before we start?”
Mins. 5-14 3. Students work independently or in
small groups to complete the
training exercise. Allow students to
work as independently as possible.
Answer questions as needed.
Supervise that they are staying safely
with the group and not doing
anything that might but the building,
grounds, themselves or other
students at risk. Encourage teachers
and chaperones to aid you with this
as well as assist students who are
struggling. Once time is up, or most
everyone is done, use the noisemaker
to gather the group together.
None.
Mins. 15-17 4. Invite students to share their
drawings with the group. Do not
force students who do not want to
speak publically to talk more than
they are comfortable. If time allows
ask students to add why they chose
that feature to draw and what they
found interesting about it.
“Let’s go around the group and each
share what we draw. If you want you
can tell the group why you chose to
draw what you did or what interests
you about that feature.”
(Continue discussion until all students
who want to share have been given an
opportunity or you are out of time.)
Mins. 18-20 5. Reveal the archival image in and
read mystery envelope to provide
final clue. Ask students to complete
the last question on their training
exercise (the one after the detective
image). Once students are done,
prepare them to move to their next
activity.
“For the final question on your training
exercise I have some additional
information in this mystery envelope.
Let me read to you the clue. [Read
envelope.]
Think about what you just heard and
answer the question after the detective
on your training exercise.”

Toolbox for Museum School Programs (2016) 219
Mystery Envelope – “Curious Construction”
At start of activity:
One way researchers learn about the past is by looking at buildings and landscapes created in the
past. Buildings and landscapes are wonderful clues about the past because they sometimes look
the same as they did when they were first built. This lets them act like a window to the past. We
can also observe what has changed. Changes can show us new technologies, how lifestyle has
changed and how communities have changed. The research station we are looking at right now is
very similar to a research station on Sable Island.
At end of activity:
Look at this picture from the archives of what a building on Sable Island looked like about a
hundred years ago. As you can see today it looks very similar to this picture. Even without this
picture, just by looking at the building today we can imagine what this place looked like a hundred
years ago. Look for the feature you drew in this picture. Can you find it?
What is similar or different about the research station today compared to the building from a
hundred years ago? Considering these similarities or differences, what does looking at the
research station from today tell us about life on Sable Island a hundred years ago?
Write text to provide students with some information about your site and to help them understand the artifacts they are exploring. The text should be short and vocabulary age appropriate. Each section of text should take less than 1 minute to read aloud and be no more than 150 words—less is better.
Additional Information
Possible Discussion
Questions for Extension:
If time allows, considering extending the discussion in step 4. Some
additional questions to those included in the above suggested script
could include:
How does this building and yard compare to your home and
yard?
How does this building compare with other buildings in the
community?
What would have made this location a good location to
build this building?
How many people do you think work/lived here? Why do
you think that?
Where do you think the builders got the materials to build
on Sable Island? How might this have influenced the
construction?
Write questions specific to your site.

220 Toolbox for Museum School Programs (2016)
Suggestions for
Modifications:
This activity has been designed to be chaperone led. When
possible, have a staff or volunteer person at this station to lead
instead of the chaperone.
If chaperone numbers allow, consider asking one chaperone to
spend the whole time at this station rather than rotating with
the groups. Have a staff person give this chaperone a quick bit
of training while the other staff leads the introduction.
If activity will regularly be chaperone led, and if technology
allows, consider making a movie to play of a staff person
explaining the instructions. The movie could have an on-screen
Safety Considerations: As there may not be a staff or volunteer person at this activity,
ensure that it is held in a location of the museum that does not
require supervision.
As this activity is outside, ensure the area is safe from any
hazards such as broken glass, animal feces, poisonous plants,
insect homes (for example, bee hives, wasp nests, ant hills).
Also check any infrastructure the students may take use to
make sure they are in good repair, such as picnic tables, tents
or outdoor seating. This area should be check for these hazards
every time it is used. Also be aware of the sitting students
directly in the sun without shade, especially if they are not
prepared with sun screen and hats.
When students are outside make sure the area they will be
using is safely away from traffic and the parking lot.
Update to reflect the realities of your site.

Toolbox for Museum School Programs (2016) 221
Activity Description Page “History Detectives: The Sable Island Case”
Conclusion: “History Detective Graduation”
Update program title.
Activity Highlights (Description for Marketing Purposes):
The students will re-assemble as a large group and communicate what
they have discovered during their investigations.
Activity Logistics
Location Time Materials
Central location that can accommodate the whole group. Possibly same space as introduction.
15 minutes Whiteboard with Marker
Official History Detective Badges
Copy of History Detective Pledge
Top Secret File: For Eyes of Official History
Detectives Only (Official Pledge)
The students will use the following items
from their detective kit:
Completed Notebook
Purpose of Activity: Students will share the observations they made during the program
resulting in a deeper understanding not only about the site, but also how
museums and archives can be used to learn about the past.
Curriculum Outcomes addressed by this activity:
Social Studies Grade 5 Curriculum Outcomes Students will develop an understanding of how we learn about the past with a focus on Acadians, African Nova Scotians, Gaels, Mi’kmaq and additional cultures. (Outcome 1) Skills: Citizenship, Communication, Critical Thinking
Set-Up: Re-Prepare a space for students to sit safely as a large group. (See
Safety Considerations.) Consider providing chairs for teachers or
chaperons to sit. If the area was used for the Clues from the Archives
activity put away as much of this material as possible.
Clean whiteboard which was used to write the rules during the
introduction. Set-up whiteboard so students can easily see it from
where they will be sitting.
Be prepared to collect the detective kits from the students and the
history detective supervisor badges from the teachers and
Update using information from Program Outline.
Template for Official History Detective Badges is available at the end of this appendix.

222 Toolbox for Museum School Programs (2016)
Procedure
Timing Instruction Possible Script
Mins. 1-3 1. Welcome students back from their
investigations. As students return
collect all the detective kits and
badges. Don’t forget to also collect
the badges from the teachers and
chaperones. Students should keep
their completed notebook as they will
need it for the discussion during the
conclusion.
“Welcome back history detectives. I
hope you’ve had a good time and been
able to find lots of clues. As you can see
we’ve now exposed the inside of our
research station. Take a look inside it as
we collect everyone’s detective kit,
clipboards and training badge.”
Mins. 4-8 2. Invite students to share what they
learned during their investigations.
For each fact a student provides,
follow up with questions for the group
get evidence for the fact presented.
Continue this discussion with the
group until time is out. If students are
not offering facts, try asking probing
questions based on the activities they
completed at each station. Try to
ensure at least one fact/example is
given from each station. For each
“confirmed” fact, write them on the
white board.
“You have all been wonderful history
detectives. We are looking forward to
hearing what you might have
discovered about the people who used
to live on Sable Island. Use your
notebook to remember some of your
discoveries. Who would like to share
one fact that they discovered during
their investigation today? How did you
discover this fact? What evidence did
you find? Did anybody else find
something similar?”
Mins. 8-11 3. Have a final discussion on how we
learn about the past, and how what
they did today could be useful skills
in other projects they might need to
do for school or personal interest.
Explain that there are many different
jobs that could be considered history
detectives – historians, museum staff,
archives staff, archeologists,
researchers, etc. Have a 1-2 minute
discussion about the ways these
people learn about the past, this
discussion should reflect that the
activities done by the students during
the program are very similar to what
these professionals do.
“Now that we’ve been able to solve our
mystery based on the evidence you
found during your time here, how do
you think real history detectives find out
about the past? What kind of jobs do
you think history detectives have? How
is what they do similar to what you did
here today? How could you use a
museums and archives in other projects
you are working on?”

Toolbox for Museum School Programs (2016) 223
Timing Instruction Possible Script
Mins. 12-13 4. Congratulate students on their hard
work completing their training
exercises and explain they are now
ready to become official history
detectives. Have students repeat the
history detective promise aloud which
is kept in the top secret mystery file:
for history detectives only.
“Great job. You have all proven that
you learned the skills you need to be a
history detective. We have badges for
all of you that we are going to send
back to school for you with your
teacher. But first, to make it official,
you will need to say the history
detective promise. Repeat after me:
I am a History Detective.
I pledge to look at things
carefully, ask questions,
and try to make sense
of the information I study.
I will research in person or online,
at museums, archives, libraries
and historic places
when I want to learn about the
past.”
Minute 14 5. Thank students for coming and
welcome them to come back another
time. Consider telling them about
something exciting and relevant to
them that they could experience at
the museum if they return.
“We really enjoyed having you come
visit us today and we hope you will
come back. We would love to help
you with school projects you may be
working on or to have you come and
show your family everything you
discovered during your visit today.
Today you only got to see a small
section of the museum but we hope
you come back to visit us with your
family.”
Minute 15 6. End program, turning “control” back
over to the teacher. Be sure the
teacher and chaperones understand
the rules for your site re: lunch, post-
visit exploration and visiting the gift
shop. Provide the teacher with any
evaluation forms you are asking them
and/or the students to do. If possible
have them completed the evaluation
before leaving the museum.
“I’m now going to ask your teacher to
tell you what you will be doing now
that the program is finished.”

224 Toolbox for Museum School Programs (2016)
Suggestions for
Modifications:
Provide teachers with a copy of the evaluation training
exercise at the start of the conclusion so that they can
complete it as students participate in the conclusion.
Safety Considerations: See Introduction
Additional Information

I am a History Detective.
I pledge to look at things carefully,
ask questions,
and try to make sense
of the information I study.
I will research in person or online,
at museums, archives, libraries and
historic places
when I want to learn about the past.
“History Detective Pledge”

226 Toolbox for Museum School Programs (2016)
Museum Staff and Volunteer Badges Designed to be printed on Avery Name Badge 78617

Student Badges Designed to be printed on Avery Name Badge 78617

228 Toolbox for Museum School Programs (2016)
Front of Teacher/Chaperone Badges Designed to be printed on Avery Name Badge 78617

Back of Teacher/Chaperone Badges Designed to be printed on Avery Name Badge 78617

For
His
tory
Det
ecti
ves-
in-T
rain
ing
“Th
e C
ase
”
For
His
tory
Det
ecti
ves-
in-T
rain
ing
“Mo
de
rn M
yste
rie
s”

For
His
tory
Det
ecti
ves-
in-T
rain
ing
“Ob
ject
Inve
stiga
tio
n”
For
His
tory
Det
ecti
ves-
in-T
rain
ing
“Clu
es
fro
m t
he
Arc
hiv
es”

For
His
tory
Det
ecti
ves-
in-T
rain
ing
“Cu
rio
us
Co
nst
ructi
on
”
On
ly f
or
the
Eye
s o
f
Offi
cial
His
tory
Det
ecti
ves

Print on acid-free cardstock and cut out. Attach with artifact safe (acid-free) string.

Look Here
Look Here
Print on cardstock and cut out.

Print on cardstock and cut out.

236 Toolbox for Museum School Programs (2016)


