hirden ac servo drive for industrial control application · hirden ac servo drive for industrial...
TRANSCRIPT

Hirden AC Servo Drive
I
Hirden AC Servo Drive for Industrial Control Application H3L10-N Series User Manual (First Version)
Ningbo Hirden Industrial Contro System Co.,Ltd

Hirden AC Servo Drive
II
Thank you very much for purchasing Hirden’s AC servo products.
This manual will be helpful in the installation,wiring,inspection and operation of Hirden AC servo drive.Before using the product,please read this user manual to ensure correct use.
Contents of this manual
This manual is a user guide that provides the information on how to operate and maintain H series AC servo drives.The contents of this manual are including the following topics:
Installation of AC servo drives Configuration and wiring Parameter settings Control functions and adjusting methods of AC servo drives Trial run steps Troubleshooting
Who should use this manual This user manual is intended for the following users: Those who are responsible for installling or wiring. Those who are responsible for operating or programming. Those who are responsible for troubleshooting.
Important precautions
Before using the porduct,please read this user manual thoroughly to ensure correct use and store this manual in a safe and handy place for quick reference whenever to be necessary.Besides,please observe the following precautiongs:
Do not use the product in a potentially explosive environment. Install the porduct in a clean and dry location free from corrosive and inflammable gases or liquids Ensure that the drive is correctly connected to a ground. The grounding metho must comply with the electrical standard of the country. Do not connect a commercial power supply to the U,V,W terminals of drives,otherwise the drive will be damaged. Do not attach,modify and remove wiring when power is applied to the AC servo drive. Do not disconnect the drive and motor when the power is ON. Do not touch the heat sink of the drive duiring operation.
If you do not understand, please contact your local Hirden sales representative. Please place this user manual in a safe location for future reference.

Hirden AC Servo Drive
III
Safety Caution
Installation
◆The applications should be kept away from the water vapor,corrosive
gases,flammable gases and so on.Otherwise it may result in electric
shock,fire or personal injury.
◆The application environment should be without direct sunlight,dust,salt
and metal powder,and so on.
◆The applications should be kept away from the place which the oil and
pharmaceutical will attach or be dipped.
Wiring
◆Connect the ground terminals to a class-3 ground (Ground resistance
should not exceed 100 Ω)
◆The H series AC servo drive is suitable for AC 220V single-phase or
three-phase power.Please do not connect to the power AC 380V.Failure to
observe this precaution may damage the drive.
◆Do not connect any power supplies to the U,V,W terminals.Failure to
observe this caution may result in injury,damage to the drive or fire.
◆Ensure that all screws,wire terminations and connectors are secure on
the power supply,servo drive and motor.Failure to observe this precaution
may result in damage,fire or personal injury.
◆In order to prevent fire hazard and accidents,please form the wiring by
the cable specifications outlined in this manual.

Hirden AC Servo Drive
IV
Operation
◆Before starting the operation with a mechanical system connected,
change the drive parameters to match the user-defined parameters of the
mechanical system.Starting the operation without matching the correct
parameters may result in servo drive or motor damage,or damage to the
mechanical system.
◆Do not touch or approach any rotating parts (e.g. heatsink) while the
servo is running.Failure to observe this caution may cause serious
personal injury.
◆Do not remove the operation panel while the drive is connected to an
electrical power source otherwise electrical shock may result.
◆Do not disassemble the servo drive as electrical shock may result.
◆Do not connect or disconnect wires or connectors while power is applied
to the drive.
◆Wait at least 10 minutes after power has been removed before touching
any drive or motor teminals or performing any wiring or inspection as an
electrical charge may still remain in the servo drive.

Hirden AC Servo Drive
V
1.Code list of the H series AC Servo for adaptive motor
Code Motor Model Power (Kw)
Torque (N.m)
Rated speed (rpm)
Rated current (A)
22 60ST-M00630 0.2 0.64 3000 1.2 23 60ST-M01330 0.4 1.27 3000 2.8 24 60ST-M01930 0.6 1.91 3000 3.7 25 80ST-M01330 0.4 1.3 3000 2.6 26 80ST-M02430 0.75 2.4 3000 4.2 27 80ST-M03330 1 3.3 3000 4.2 30 MG80ST-M04025 1 4 2500 4.4 31 MG90ST-M02430 0.75 2.4 3000 3 32 MG90ST-M03520 0.75 3.5 2000 3 33 MG90ST-M04025 1 4 2500 4 34 110ST-M02030 0.6 2 3000 4 35 110ST-M04030 1.2 4 3000 5 36 110ST-M05030 1.5 5 3000 6 37 110ST-M06020 1.2 6 2000 6 38 110ST-M06030 1.8 6 3000 8 44 130ST-M04025 1.0 4 2500 4 45 130ST-M05025 1.3 5 2500 5 46 130ST-M06025 1.5 6 2500 6 47 130ST-M07720 1.6 7.7 2000 6 48 130ST-M07730 2.4 7.7 3000 9 49 130ST-M10015 1.5 10 1500 6 50 130ST-M10025 2.6 10 2500 10 51 130ST-M15015 2.3 15 1500 9.5 52 130ST-M12020 2.4 12 2000 10
Others 110ST-M04030 1.2 4 3000 5
NOTE:
1. The parameter for moter code is PA1.The default motor code is set for 110ST-M04030 by 35. If you need
to change the motor code PA1,you should set PA0 to 302 firstly.Secondly set PA1 to the code for the
motor which you use according to the list. At last you need to save the parameters that you change.(You
can read the chapter 4 to know how to save the parameters).The parameter PA1 will take effect by restart.
2. Code 22, 23 and 24 are applied to Hirden 60ST series motor only. If your motor is not produced by
Hirden,please refer to chapter 3.
3. There are two types of the rotate direction for the encoder of the servo motor.The default type of Hirden
servo drive and motor is same as the Delta’s.Please makesure the type of the rotate direction for your
motor, or contact your local Hirden sales representative.

Hirden AC Servo Drive
VI
2.Parameters List
No. Function Description Applicable Mode Range Default Unit
PA-0 Password ALL 0-1000 315* PA-1 Motor Code ALL 0~100 35 PA-2 Version ALL 0~999 * PA-3 Monitor Status ALL 0~19 0 PA-4 Control Mode ALL 0~5 0 PA-5 Proportional Speed Loop Gain P,S 5~2000 165* Hz PA-6 Speed Integral Time P,S 1~1000 30* ms PA-7 Low-pass Filter for Torque ALL 1~1000 10 0.1ms PA-8 Speed Detection Filter ALL 1~1000 10 0.1ms PA-9 Proportional Position Loop Gain P 1~1000 50 Hz
PA-10 Position Feed Forward Gain P 0~100 0 % PA-11 Smooth Constant of PA10 P 1~1000 0 ms
PA-12 Electronic Gear Ratio (Numerator) N1 P 1~32767 1
PA-13 Electronic Gear Ratio (Denominator) M1 P 1~32767 1
PA-14 External Pulse Input Type P 0~2 1 PA-15 Direction of External Pulse P 0~1 0 PA-16 Positioning Completed Width P 0~30000 20 Pluse PA-17 Excessive Position Error Range P 0~30000 400 ×100 Pluse
PA-18 Excessive Position Error Function Selection P 0~1 0
PA-19 Smooth Constant of Position Command P 0~30000 0 0.1mS
PA-20 Inhibit Drive Function Selection ALL 0~1 1 PA-21 JOG Operation Speed S -3000~3000 120 r/min PA-22 Speed Command selection S 0~1 1 PA-23 Alarm Enabled Statu Setting ALL 0~1000 200 PA-24 1st Speed Command S -3000~3000 0 r/min PA-25 2nd Speed Command S -3000~3000 100 r/min PA-26 3rd Speed Command S -3000~3000 300 r/min PA-27 4th Speed Command S -3000~3000 -100 r/min PA-28 Target Motor Speed S 0~3000 500 r/min PA-29 Analog Torque Command Gain T 10~100 50 0.1V/100% PA-30 Reserved 167 PA-31 Pulse Logic Function Selection P 1~5000 167 PA-32 Reserved 167 PA-33 Direction of Torque Command T 0~1 0
PA-34 Internal CCW Torque Command Limit ALL 0~200 200* %
PA-35 Internal CW Torque Command Limit ALL -200~0 -200* %
PA-36 External CCW Torque Command Limit ALL 0~200 100 %
PA-37 External CW Torque Command Limit S -200~0 -100
%

Hirden AC Servo Drive
VII
PA-38 Torque Command Limit for JOG and Trial Run JOG, Sr 0~300 100 %
PA-39 Zero-offset Compensation for Torque Command S -2000~2000 0
PA-40 Acceleration Time S 1~10000 0 mS PA-41 Deceleration Time S 1~10000 0 mS PA-42 Accel/Decel S-curve S 1~1000 0 mS PA-43 Analog Speed Command Gain S 10~3000 300 (r/min)/V PA-44 Direction of Speed Command S 0~1 0
PA-45 Zero-offset Compensation for Analog Speed Command S -5000~5000 0
PA-46 Low-pass Fliter for Speed Command S 0~1000 3 mS
PA-47 On Delay Time of Electromagnetic Brake when motor is stopped
ALL 0~200 0 ×10mS
PA-48 Off Delay Time of Electromagnetic Brake when motor is running
ALL 0~200 50 ×10mS
PA-49 Target Speed for Opening Electromagnetic Brake ALL 0~3000 100 r/min
PA-50 Sampling Gain for Bus Voltage ALL 0~1000 506
PA-51 Dynamic Electrionic Gear Function Selection P 0~1 0
PA-52 Electronic Gear Ratio (Numerator) N2 P 1~32767 1
PA-53 Digital Input Terminals Function Selection / Enabled Word 1 ALL 0000~1111 0
PA-54 Digital Input Terminals Function Selection / Enabled Word 2 ALL 0000~1111 0
PA-55 Curret Sampling Gain ALL 0~1000 312 PA-56 Reserved ALL 0 PA-57 Reserved ALL 0~255 0 PA-58 Input Terminal Delay Time ALL 1~1000 2 mS
3. Fault Messages Table
Display Fault Name Fault Decription Err - - Normal
Err 1 Overspeed Motor’s control speed exceeds the limit of normal speed.
Err 2 Overvoltage Max circuit voltage exceeds its maximum allowable value.
Err 3 Undervoltgae Max circuit voltage is below its minimun specified value.
Err 4 Excessive position deviation Position control deviation value exceeds the limit of its allowable setting value.

Hirden AC Servo Drive
VIII
Err 6 Speed loop amplifier saturation
The amplifier of the speed control loop is saturated for a long time, which has exceeded the specified value.
Err 7 Limit switch error Forward or Reverse limit switch is activated Err 8 Position counter overflow Position counter overflow occurs. Err 9 Encoder error Pulse signal is in error. Err 10 Power voltage is overhigh Excessive voltage is applied to the input
Err 11 Current response fault Current error has exceeded the specified value for a long time.
Err 12 Short circuit Main circuit current is higher than 1.5 multiple of drive’s instantaneous maximum current value.
Err 13 Drive temperature error The temperature of drive is over high. Err 14 Regeneration error Regeneration control operation is in error.
Err 16 Instantaneous overload The instantaneous current of the drive is overhigh.
Err 17 Speed response fault Speed error has exceeded the specified value for a long time.
Err 19 Warm reset Software warm global reset
Err 20 EE-PROM error An error accurs when writing the curret settings into EE-PROM.
Err 23 Current sensor adjustment error
Adjusted value of the current sensor exceeds the limit of its allowable setting value when perform electrical adjustment.
Err 29 Overload for motor Servo motor is overload. Err 30 Pulse Z error The pulse Z of the encoder is lost.
Err 32 U,V,W error The wiring connections of U,V,W (for encoder interface) are in error
Err 34 OT The ambient temperature is over high. Err 35 UT The ambient temperature is ultralow.
Err 36 Over curret The main circuit current of the drive is higher than 2 multiple of the rated current.
Err 37 Instantaneous overload for motor
The instantaneous load of the motor is heavier than 1.5 multiple of motor’s maximum load value..
Err 38 Motor temperature error The motor is overload for a long time. Err 5,15,21,22,25,26,27,28,31,33 Reserved
Note:When the fault accurs, please refer to chapter 7.2 or contact your local Hirden sales representative.

Hirden AC Servo Drive
IX
Contents
CHAPTER 1 MODEL EXPLANATION ................................................................................ 1
1.1 NAMEPLAT INFORMATION............................................................................................... 1 1.2 SERIAL NUMBER EXPLANATION ..................................................................................... 1 1.3 MODEL NAME EXPLANATION ......................................................................................... 2 1.4 PRODUCT PART NAMES.................................................................................................... 2 1.5 SERVO DRIVE SPECIFICATION ....................................................................................... 3
CHAPTER 2 INSTALLATION AND STORAGE............................................................... 5
2.1 UNPACKING CHECK........................................................................................................ 5 2.2 MACHINE DIMENSION..................................................................................................... 6 2.3 INSTALLATION ENVIRONMENT ........................................................................................ 6 2.4 INSTALLATION PROCEDURE AND MINIMUM CLEARANCES............................................. 7 2.5 STORAGE CONDITIONS .................................................................................................. 8
CHPATER 3 WIRING.......................................................................................................... 9
3.1 CONNECTORS AND TERMINALS ..................................................................................... 9 3.2 ENCODER CONNECTOR CN1 .......................................................................................11
3.2.1 The Layout and View of CN1.............................................................................11 3.2.2 Signal Identification for CN1 ............................................................................. 12
3.3 I/O INTERFACE CONNECTOR CN2 .............................................................................. 12 3.3.1 The Layout and View of CN2............................................................................ 12 3.3.2 Signals Explanation of Connector CN2........................................................... 13
3.4 I/O INTERFACE TYPE.................................................................................................... 16 3.4.1 Digital signal input interface .............................................................................. 16 3.4.2 Digital signal output interface ........................................................................... 16 3.4.3 Position pulse input interface ........................................................................... 17 3.4.4 Analog signal input interface............................................................................. 18 3.4.5 Encoder signal output interface........................................................................ 19 3.4.6 Encoder Open-collector Z-pulse output interface .......................................... 19 3.4.7 Encoder feedback signal input interface ......................................................... 20
3.5 STANDARD CONNECTION EXAMPLE ............................................................................ 21 3.5.1 Position control mode ........................................................................................ 21 3.5.2 Speed control mode ........................................................................................... 22 3.5.3 Torque control mode .......................................................................................... 23
CHAPTER 4 DISPLAY AND OPERATION .................................................................... 24
4.1 DESCRIPTION OF THE DIGITAL KEYPAD ........................................................................ 24 4.2 MAIN MENU................................................................................................................... 25 4.3 MONITOR DISPLAY(DP--) ....................................................................................... 25

Hirden AC Servo Drive
X
4.4 PARAMETER SETTING(PA--) ................................................................................... 26 4.5 PARAMETER MANAGEMENT(EE--) ......................................................................... 27 4.6 SPEED TRIAL RUN WITHOUT LOAD(SR--)................................................................ 28 4.7 JOG TRIAL RUN WITHOUT LOAD(JR--).................................................................... 28 4.8 ZERO-OFFSET ADJUSTMENT ........................................................................................ 28
CHAPTER 5 TRIAL RUN AND TUNING PROCEDURE ............................................. 30
5.1 INSPECTION WITHOUT LOAD ........................................................................................ 30 5.1.1 Appling power to the drive................................................................................. 31 5.1.2 JOG trial run without load ................................................................................. 31 5.1.3 Speed trial run without load .............................................................................. 32
5.2 POSITION CONTROL MODE ........................................................................................... 33 5.2.1 Simple position control system......................................................................... 33 5.2.2 Parameters for the position control.................................................................. 35 5.2.3 Electronic gear ratio ........................................................................................... 36 5.2.4 Position proportional gain ................................................................................. 38
5.5 GAIN ADJUSTMENT ...................................................................................................... 39 5.5.1 Steps for gain adjustment ................................................................................. 40 5.5.2 Adjustment for speed control loop ................................................................... 40 5.5.3 Adjustment for position control loop ................................................................ 40
5.6 ELECTROMAGNETIC BRAKE ...................................................................................... 41 5.6.1 Parameters about electromagnetic brake....................................................... 41 5.6.2 Matters for electromagnetic brake ................................................................... 42
5.7 TIMING .......................................................................................................................... 43 5.7.1 Timing for power on ........................................................................................... 43 5.7.2 Timing for enable operation .............................................................................. 43 5.7.3 Timing for alarm.................................................................................................. 45
5.8 START-STOP CHARACTERISTICS .................................................................................. 45 5.8.1 On-off frequency and load inertia..................................................................... 45 5.8.2 Adjustment........................................................................................................... 45
CHAPTER 6 PARAMETERS ........................................................................................... 47
6.1 PARAMETER SUMMARY ................................................................................................ 47 6.2 DETAILED PARAMETER SETTING .................................................................................. 49
CHAPTER 7 TROUBLESHOOTING .............................................................................. 56
7.1 FAULT MESSAGES TABLE .............................................................................................. 56 7.2 POTENTIAL CAUSE AND CORRECTIVE ACTIONS.......................................................... 58
CHAPTER 8 SYSTEM CONNECTION.......................................................................... 61

Hirden AC Servo Drive
1
Chapter 1 Model Explanation
1.1 Nameplat Information
AC SERVO DRIVER
MODEL:ACSD-H3L10-NINPUT:AC 200V-230V 3PH 50/60Hz 6.4A AC 200V-220V 1PH 50/60Hz 8.2AOUTPUT:110V 0-200Hz 13.2A/Max
Read manual carefully and follow thedirections.
Disconnect all power and wait 10 min.before servicing. May cause electricshock.
Ningbo Hirden Industrial Control System Co.,Ltd
ACSD-H3L10-N-11-10-A
Hirden
1
2
Mode Name
Power Supply
Rated Current Output
Barcode
AttentionsUse proper grouding techniques.
1.2 Serial Number Explanation
ACSD-H3L10-N-11-10-A
A Version
Month of production
Year of production 12:Year 2012
Encoder resolution :2500ppr (Normal)
Mode Name
Product Type : AC Servo Drives

Hirden AC Servo Drive
2
1.3 Model Name Explanation
ACSD-H3L10 Series AC Servo Drive
ACSD-H3L10-N
Rated Output Power01:100W 02:200W04: 400W 07:750W10:1000W 15:1.5kWInput VoltageL:220V H:380V
Input Phase3:three phase AC power source1:single phase AC power source
H series production
Encoder resolution :2500ppr (Normal)
Product Name: AC Servo Drives
1.4 Product Part Names
ACSD-H Series Front View
Figure 1.1 Components of H series AC servo drive
Hirden AC Servo Drive
3
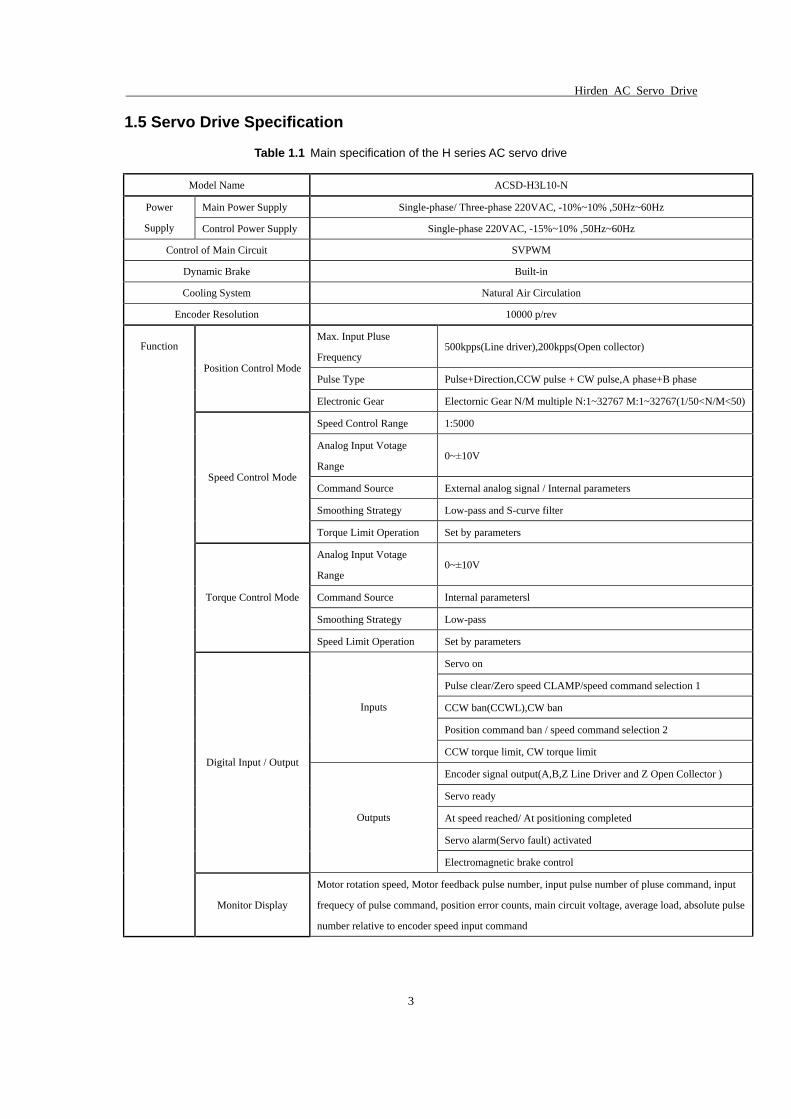
1.5 Servo Drive Specification
Table 1.1 Main specification of the H series AC servo drive
Model Name ACSD-H3L10-N
Main Power Supply Single-phase/ Three-phase 220VAC, -10%~10% ,50Hz~60Hz Power
Supply Control Power Supply Single-phase 220VAC, -15%~10% ,50Hz~60Hz
Control of Main Circuit SVPWM
Dynamic Brake Built-in
Cooling System Natural Air Circulation
Encoder Resolution 10000 p/rev
Max. Input Pluse
Frequency 500kpps(Line driver),200kpps(Open collector)
Pulse Type Pulse+Direction,CCW pulse + CW pulse,A phase+B phase Position Control Mode
Electronic Gear Electornic Gear N/M multiple N:1~32767 M:1~32767(1/50<N/M<50)
Speed Control Range 1:5000
Analog Input Votage
Range 0~±10V
Command Source External analog signal / Internal parameters
Smoothing Strategy Low-pass and S-curve filter
Speed Control Mode
Torque Limit Operation Set by parameters
Analog Input Votage
Range 0~±10V
Command Source Internal parametersl
Smoothing Strategy Low-pass
Torque Control Mode
Speed Limit Operation Set by parameters
Servo on
Pulse clear/Zero speed CLAMP/speed command selection 1
CCW ban(CCWL),CW ban
Position command ban / speed command selection 2
Inputs
CCW torque limit, CW torque limit
Encoder signal output(A,B,Z Line Driver and Z Open Collector )
Servo ready
At speed reached/ At positioning completed
Servo alarm(Servo fault) activated
Digital Input / Output
Outputs
Electromagnetic brake control
Function
Monitor Display
Motor rotation speed, Motor feedback pulse number, input pulse number of pluse command, input
frequecy of pulse command, position error counts, main circuit voltage, average load, absolute pulse
number relative to encoder speed input command

Hirden AC Servo Drive
4
Pretective Functions Overcurrent,Overvoltage, Undervoltage,Moter overheated,Regeneration error, Overload,
Overspeed, Encoder error, Position excessive deviation,
Installation Site Ndoor location( free from direct sunlight),no corrosive liquid and gas
Altitude Altitude 1000M or lower above sea level
Atmospheric Pressure 86kPa~106kPa
Operating temperature 0~45°C(if operation temperature is above 45°C,forced cooling will be required)
Storage temperature -20~65°C
Humidity 0~80%RH(non-condensing)
Environment
Vibration 0.5G

Hirden AC Servo Drive
5
Chapter 2 Installation And Storage
The contents of this chapter is about strorage and installation environment, as well as the installation considerations for the H series AC Servo Drive.
Since the storage and installation environment have an important impact on the service life and the daily performance, please refer to the following announcements about the storage and installation.
2.1 Unpacking Check
After receiving the AC servo drive, please check for the following: Ensure that the product is what you have ordered. Verify the part number indicated on the nameplate corresponds with the part number of your order (Please refer to Section 1.1 and 1.3 for details about the model explanation). Check for damage. Please inspect the unit to insure that it was not damaged duiring shipment. Ensure that the servo motor shaft freely. Rotate the motor shaft by hand, a smooth rotation will indicate a good motor.However, a servo motor with an electromagnetic brake can not be rotated manually. Check for loose screws. Ensure that all necessary screws are tight and secure. If any items are damaged or incorret, please inform the distributor whom you purchased the product from or your local Hirden sales representative.

Hirden AC Servo Drive
6
2.2 Machine Dimension
Figure 2.1 The machine dimension of the H series servo drive
2.3 Installation Environment
The operating temperature for the H series servo drive is from 0℃(32°F) to 55℃(131°F). If the ambient temperature of servo drive is higher than 45℃, please install the drive in a well-ventilated location and do not obstruct the airflow for the cooling fan. The ambient temperature of servo drive for long-term reliability should be under 45℃(113°F). If the servo drive and motor are installed in a control panel, please ensure sufficient space around the units for heat dissipation. Pay particular attention to vibration of the units and check if the vibration has impacted the electric devices in the control panel. Please observe the following cautions when selecting a mounting location. 1. The ambient humidity should be less than 80%, without condensing. 2. Please keep the servo drive or motor away from the heat-radiating elements or in direct sunlight. 3. Please do not mount the drive or motor in a location subjected to corrosive gases, liquids or airborne dust or metallic particles. 4. Please do not mount the servo drive or motor in a location where it will be subjected to high levels of electromagnetic radiation. 5. Please do not mount the servo drive or motor in a location where temperatures and humidity will exceed specification. 6. Please do not mount the servo drive or motor in a location where vibration and shock will exceed specification.

Hirden AC Servo Drive
7
2.4 Installation Procedure and Minimum Clearances
Incorret installation may result in a drive malfunction or premature failure of the drive.Please follow the guidelines in this manual when installing the servo drive. 1. The servo drive should not be tilted or upside down.Please mount the drive perpendicular to the wall or malfunction and damage will occur. 2. The servo drive should be mounted in the control panel with a cooling fan, to enhance air circulation and cooling. 3. In order to ensure the drive is well ventilated, ensure that the all ventilation holes are not obstructed and sufficient free space is given to the servo drive.To define the free space, please refer to the section “Minimum Clearances”. 4. Please mount the servo drive in a location where the foreign matter could be prevented to be inside the drive when the drive is operating. 5. Make sure to tighten the screws for securing drive or motor. Failure to observe this precaution may result in damage. 6. As the drive conducts heat away via the mounting, the mounting plane or surface should not conduct heat into the drive from external sources.
Correct Incorrect
Figure 2.2 The correct direction for installation
Minimum Clearances To increase ventilation to avoid ambient temperatures that exceed the specification, please install a fan. A minimum spacing of two inches must be maintained above and below the drive for ventilation and heat dissipation. Additional space may be necessary for wiring and cable connections.When installing two or more drives adjacent to each other, please follow the clearances as shown in the following diagram 2.3.

Hirden AC Servo Drive
8
Figure 2.3 Clearances for one or two more drives.
2.5 Storage Conditions
The product should be kept in the shipping carton before installation. When it is not to be used for an extended period of time, the drive should be stored properly. Some storage suggestions are mentioned in the following: 1. Correctly packaged and placed on a solid suiface. 2. Store in a clean and dry location free from direct sunlight. 3. The ambient temperature of the storage should be from -20℃(-4°F) to 65℃(149°F)。 4. Store within a relative humidity range of 0% to 90% and non-condensing. 5. Do not store in a location subjected to corrosive gases and liquids.

Hirden AC Servo Drive
9
Chpater 3 Wiring
This chapter provides information about wiring H series drives and motors, the description of I/O signals and gives typical examples of wiring diagrams.
3.1 Connectors and Terminals
Table 3.1 Appellation and intention for the connectors and terminals
Terminal Indentification
Terminal Description
Notes
R、S、T Main circuit
terminal
Used to connect three-phase AC main circuit power depending on connecting servo drive model.
r、t Control circuit
terminal
Used to connect single-phase AC control circuit power depending on connecting servo drive model
U、V、W、PE Servo motor
output
Used to connect servo motor Terminal symbol
Wire color
U Brown V Black W Gray PE Yellow and green
PE Ground terminal
Used to connect grounding wire of power supply or servo motor.
CN1 Encoder
connector Used to connect encoder of servo motor. Please refer to section 3.2 for details.
CN2 I/O connector Used to connect external controllers.Please referto section 3.3 for details.
CN3 Communication
connector (Option)
Used for RS-232 communication connection.

Hirden AC Servo Drive
10
Table 3.2 Cable specifications for servo drive
Terminal Indentification
Terminal Description
Power Cable – Wire gauge
R、S、T Main circuit
terminal 1.5~2.5mm2
r、t Control circuit
terminal 0.75~1 mm2
U、V、W Servo motor
output 1.5~2.5 mm2
PE Ground terminal 1.5~2.5 mm2
CN1 Encoder
connector ≥0.14 mm2, 7 pair shielded twisted-pair cable
CN2 I/O connector ≥0.14 mm2, shielded twisted-pair cable
Wiring Notes:
Please obseve the following wiring notes while performing wiring and touching any electrical connections on the servo drive or servo motor.
1. Ensure to check if the power supply and wiring of the “power” terminals (R, S, T, r, t) is correct. 2. Please use shielded twisted-pair cables for wiring to pervent voltage coupling and eliminate electrical noise and interference. 3. Ensure to check if the U, V, W terminal is correct, or the motor maybe not turn or cause galloping. 4. The ground terminal of the servo drive and motor should be connect to the terminal which is well grounded into a single-point ground, and the ground wire should be rough. 5. As a residual hazardous voltage may remain inside the drive, please do not immediately touch any of the “power” terminals (R, S, T, r, t, U, V &W) or the cables connected to them after the power has been turned off and the charge LED is lit. 6. Please usd a twisted-shield signal wire with grounding conductor for the encoder calbe (CN1) and the position feedback signal connector (CN2). The wire length should be 20m or less. If the length is greater than 20m, the wire gauge should be doubled in order to lessen any signal attenuation. 7. The shield of shielded twisted-pair cables should be connected to the SHIELD end ( ground terminal) of the servo drive. 8. The cable connected to R, S, T and U, V, W terminals should be placed in separate conduits from the encorder or other signal cables. Separate them by at least 30cm. 9. Ensure to check if the direction of the diode for the relay is correct,or damage will occur as a result. 10. Please install a NFB to prevent excessive current which may arise due to short-circuit or flow when power on an power off, so as to avoid the damage on the servo drive.

Hirden AC Servo Drive
11
11. Please turn off the power supply, if the drive will not be used for a long time. 12. The direction definition of rotation: facing the motor shaft, the counter-clockwise direction is defined as the CCW. And the clockwise direction of rotation is defined as the CW. The CCW is the positive direction, and CW as negative direction.
Figure 3.1 The definition of the direction for the rotation
3.2 Encoder Connector CN1
H series servo drive is applicable for incremental encoder which contains A, B, Z, U, V, W signals and the resolution is 2500ppr. The 2500ppr encoder is automatically multipilied to 10000 pulses each circle for increasing control accuracy.
3.2.1 The Layout and View of CN1
The CN1 encoder signal interface terminal is called SCSI 26 produced by 3M,the view and the layout of the CN1 is shown as the following:
Figure 3.2 The view and layout of the CN1 encoder signal interface terminal

Hirden AC Servo Drive
12
3.2.2 Signal Identification for CN1
Table 3.3 Terminal signal identification for CN1
Motor connector PIN No.
Terminal Identification
Quick connector
I/O type
Description
1 A+ 4 Connected to A+ signal 2 A- 7
Type7 Connected to A- signal
3 B+ 5 Connected to B+ signal 4 B- 8
Type7 Connected to B+ signal
5 Z+ 6 Connected to Z+ signal 6 Z- 9
Type7 Connected to Z+ signal
7 U+ 10 Connected to U+ signal 8 U- 13
Type7 Connected to U- signal
9 V+ 11 Connected to V+ signal 10 V- 14
Type7 Connected to V- signal
11 W+ 12 Connected to W+ signal 12 W- 15
Type7 Connected to W- signal
14、15、16、17
Power supply 5V 2 --
18、19、20、21、22、23
GND 3 --
+5V power source is supplied for the servo motor encoder. When the length of the cable is greater, please take several core wires in
parallel to reduce line drop. 26、27、
28 Shielding 1 -- Shielding (PE)
3.3 I/O Interface Connector CN2
The CN2 interface conncetor provides access to three signal groups: 1. General interface for the analog speed and torque control, pulse / direction inputs, and reference voltages. 2. 8 programmable Digital Inputs ( DI ) 3. 4 programmable Digital Outputs ( DO ) A detailed explanation of each group is available in section 3.3.2
3.3.1 The Layout and View of CN2
The CN2 I/O interface terminal is called SCSI 36 produced by 3M,the view and the layout of the CN2 is shown as the following:

Hirden AC Servo Drive
13
Figure 3.3 The view and layout of the CN2 I/O interface terminal
3.3.2 Signals Explanation of Connector CN2
Table 3.4 CN2 Terminal Signal Identification
Terminal Pin No.
Signal name Identification
I/O type
Description
1 OA+ 5 2
Encoder Signal A OA- 5
3 OB+ 5 4
Encoder Signal B OB- 5
5 OZ+ 5 6
Encoder Signal Z OZ- 5
Encoder signal output A, B, Z ( Line-driver output ). The motor encoder signals are available through these terminals.
7 Encoder
Signal CZ
OCZ 6 Encoder signal Z open-collector output.
8 9
Common Ground
GND 5 Reference ground for encoder signal.
10 Servo Enable SON 1
Servo enable signal input terminal. SON ON: enable the drive. SON OFF:drive off and the motor is in a free
state. Note 1:The motor must be before enable the drive.
Note 2:Any other command should be inputted after the
son on signal at least 50ms.
11 Alarm Clear ALRS 1
Clear alarm signal input termina。 ALRS ON:reset the alarm of the servo system ALRS OFF:no action Note 1:This function does not work on the UV and OC
error, which needed to restart the drive.

Hirden AC Servo Drive
14
12 Forward Software
Limit FSTP 1
CCW(counter-clockwise direction) software limit input interminal. FSTP ON: the motor can be drived in the counter-clockwise direction. FSTP OFF: the motor can’t be drive in CCW. Note 1: To disable this function, you could set the
PA20=1, which enables CCW or CW drive allows without
the DI.
13 Reverse Software
Limit RSTP 1
CW(the clockwise direction)software limit input interminal.。 PSTP ON: the motor can be drived in the clockwise direction. PSTP OFF: the motor can’t be drive in CW. Note 1: To disable this function, you could set the
PA20=1, which enables CCW or CW drive allows without
the DI.
Speed Command Selection 1
SC1
The input interminal is defined as the speed conmand selection in the speed control model (PA4=1) when the parameter PA22=0 which determinds the internal or external command as the speed command source. Used to select the different internal speed through the combination of SC1 and SC2. SC1 OFF, SC2 OFF: internal speed 1. SC1 ON, SC2 OFF: internal speed 2. SC1 OFF, SC2 ON: internal speed 3. SC1 ON, SC2 ON: internal speed 4. Note: the value of the internal speed command could be
modified by corretation parameter.
Deviation Counter Reset
CLE
When PA4=0 the terminal is defined as deviation counter reset function: CLE OFF: remain deviation counter. CLE ON: reset deviation counter。
14
Zero Speed Clamping
ZERO
1
In the speed control model when PA22=1 the input interminal is defined as the zero speed clamping function. ZERO OFF: analog input intruction is selected. ZERO ON: speed command is set to 0.

Hirden AC Servo Drive
15
Speed Command Selection 2
SC2
The input interminal is defined as the speed conmand selection in the speed control model when PA4=1 and PA22=0. Used to select the different internal speed through the combination of SC1 and SC2. SC1 OFF, SC2 OFF: internal speed 1. SC1 ON , SC2 OFF: internal speed 2. SC1 OFF, SC2 ON : internal speed 3. SC1 ON , SC2 ON : internal speed 4.
15
Input Pulse Prohibition
INH
1
When PA4=0, the terminal is defined as input pulse prohibition. INH OFF: disable the funcion. INH ON: enable the function.
16 Forward
Torque Limit FIL 1
CCW torque limit input interminal. FIL ON: the torque is limited in the PA36 range. FIL OFF: the torque is not limited. Note:in any case, the torque is limited in the PA34 range
17 Reverse
Torque Limit RIL 1
CW torque limit input interminal. RIL ON: the torque is limited in the PA37range. RIL OFF: the torque is not limited. Note:in any case, the torque is limited in the PA35 range
18 Power Supply Input Terminal
COM+ 1 COM+ is the common voltage rail of the DI and DO signals. The range is DC12~24V and the available current should be greater than 100mA
19 AS+
20
Analog Speed
Command AS- 4
Motor speed command: -10V~+10V, corresponds to -3000~+3000 r/min command and the input impedance is 10kΩ
21 AT+
22
Torque Command AT-
4 Motor torque command: -10V~+10V, corresponds to -100%~+100% rated command and the input impedance is 10kΩ
23 Analog Ground
AGND 4 The reference ground for DI signals.
24 SRDY+
25
Servo Ready Output
SRDY-
2
Servo ready signal output terminal. SRDY is activated when the servo drive is ready to run. All fault and alarm conditions, if present, have been cleared.
26 ALM+
27
Servo Alarm Output
ALM- 2
Servo ready signal output terminal. ALM is activated when the drive has detected a fault condition.

Hirden AC Servo Drive
16
28 COIN+
29
Reaching Target
Speed or Completing Positioning COIN-
2
In the position control mode (PA4=0), COIN is activated when the position error is equel and below the setting value of PA16. 。 In the speed control mode (PA=1), COIN will be activated when the drive has detected the motor has reached the Targe Rotation Speed setting as defined in parameter PA28.
30 BRK+
31
Brake Release Signal BRK -
2 BRK is activated actuation of motor brake.
32 PULS+ 33
Position Pulse Input PULS -
3
34 SIGN+
35
Position Sign Input SIGN -
3
The drive can accept two different types of pulse inputs: Line-drive input (max. input frequency is 500Kpps) and Open-collector input (max.input frequency is 200Kpps). Three different pulse commands can be selected by PA-4.
36 37 38
Shield PE Shielding
3.4 I/O Interface Type
3.4.1 Digital signal input interface
Digital signal input interface circuit is generally composed by optocouplers, switches, relays open-collector transistors or other components as shown in the following figures.
Figure 3.4 Digital signal input interface circuit type 1
1. The voltage of the external power is DC12~24V and available current should be 100mA at least. 2. Ensure that the polarity of the power is correct, otherwise it will damage the drive.
3.4.2 Digital signal output interface
The digital signal output interface circuit composed by optocouplers should be connected to the optocoupler or relay to achieve transferring the isolated digital signal.

Hirden AC Servo Drive
17
Figure 3.5 Digital signal output interface circuit type 2
1. The voltage of the external power is DC5~24V.
2. The output form of optocoupler is open-collector, the max. current is 50ma and the external max. DC
voltage is 25V.
3. When the load is relays or other inductive load, freewheeling diode is needed to parallel at the both ends of
the iinductive components. Ensure the polarity of the diode, otherwise damage maybe occur.
3.4.3 Position pulse input interface
The drive can accept two different types of pulse inputs: Line-drive input and Open-collector input. The max. input frequency of line-drive input with strong anti-jamming capability is 500Kpps has and the one of the Open-collector input is 200Kpps. For reliable pulse signal, the Line-drive input circuit is recommended. 1. Diagram for Line-drive input circuit In the Line-dirve mode, AM26LS31,MC3487 or RS422 is used in the Line-drive output circuit of the host controller.
Figure 3.6 Pulse input interface circuit type 3(Line-drive input circuit)
2. Diagram for Open-collector input circuit The source of pulse input is from the open collector NPN equipment and use the external power supply. This input mode will reduce the operating frequency. The driving current of the circuit is 10~15mA, please determine the desired resistance of the resistor R by the DC power supply voltage.

Hirden AC Servo Drive
18
Figure 3.7 Pulse input interface circuit type 3(Open-collector input circuit)
3.4.4 Analog signal input interface
There are two different input circuit types of analog signal: differential input mode and single-ended input mode. The differential input circuit can inhibit the common-mode interference, so the differential input mode is recommended. Either analog speed command or torque command is needed for “H” series servo drive.The voltage range for the analog command is DC-10V~+10V, and the input impedance is 10kΩ.The zero drift of the analog signal could be compensated by adjusting the parameters.
Figure 3.8 Analog signal input interface circuit type 4 ( differential input mode )
Figure 3.9 Analog signal input interface circuit type 4 ( single-ended input mode )
1. Three connecting wires are needed in differential input mode, but only two connecting wires in single-ended input mode.. 2. The voltage of the signal should not be beyond the specified range (-10V~+10V ) or may damage the drive. 3. This interface is a non-isolated input interface, so the shielded cable is recommended to reduce the noise.

Hirden AC Servo Drive
19
3.4.5 Encoder signal output interface
The drive output the motor encoder feedback position signals by Line-drive transmitter chip AM26LS31. The user could receive the encoder A phase, B phase and Z phases signals by two types: Line-drive receiver chip and the high-speed optocoupler. The host controller receive the encoder signals by Line-drive receiver chip. The circuit connected to the drive is shown as the following.
Figure 3.10 Encoder positon signals output interface circuit type 5(Line-drive)
The value of the resistance is 220Ω~470Ω, and the commond ground (GND) of the encoder should connect with the signal ground of the host controller. For the interface is a non-isolated input interface, when the host controller receives the position signals by high-speed optocoupler, the current-limiting resistance whose value is 220Ω should be in series to the receiving circuit. And the interface circuit is shown as the following.
Figure 3.11 Encoder positon signals output interface circuit type 5(optocoupler)
3.4.6 Encoder Open-collector Z-pulse output interface
The width of the zero position pulse is narrow, therefore the high-speed optocoupler is recommended as the receiver. This interface is a non-isolated input interface, the max.

Hirden AC Servo Drive
20
current is 50mA and the max. voltage is 30V. The specific interface circuit is shown as the following.
Figure 3.12 Encoder Open-collector Z-pulse output interface circuit type 6
3.4.7 Encoder feedback signal input interface
The servo drive receive the encoder feedback signal by the Line-drive receiver IC such as AM26LS32, and the circuit is shown as the following.
Figure 3.13 Encoder feedback signal input interface circuit type 7
Hirden AC Servo Drive
21
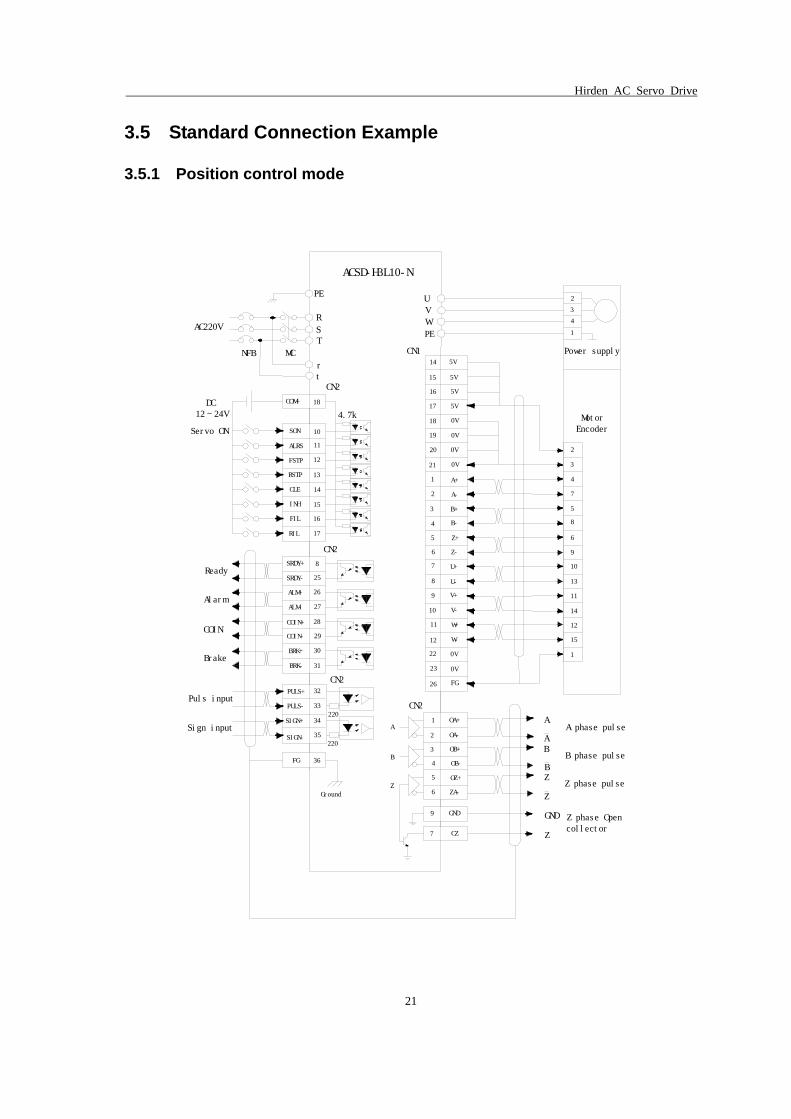
3.5 Standard Connection Example
3.5.1 Position control mode
ACSD-H3L10-N
AC220V
PE
R
ST
UV
W
PE
NFB MC
rt
CN2
CN1
CN2
CN2
CN2
Ground
Power supply
4.7k
A
B
Z
A
AB
BZ
Z
GND
Z
DC12~24V
Servo ON
Ready
Alarm
COIN
Brake
Puls input
Sign input
1
4
3
2
2
3
4
7
5
8
6
9
10
13
11
14
12
15
1
MotorEncoder
14
15
16
17
18
19
1
2
3
4
5
6
7
8
9
10
11
12
22
23
26
20
21
5V
5V
5V
5V
0V
0V
0V
0V
A+
A-
B+
B-
Z+
Z-
U+
U-
V+
V-
W+
W-
0V
0V
FG
COM+
SON
ALRS
FSTP
RSTP
CLE
INH
FIL
RIL
SRDY+
SRDY-
ALM+
ALM-
COIN+
COIN-
BRK+
BRK-
PULS+
PULS-
SIGN+
SIGN-
FG
18
10
11
12
13
14
15
16
17
8
25
26
27
28
29
30
31
32
33
34
35
36
220
2201
2
3
4
5
6
9
7
OA+
OA-
OB+
OB-
OZ+
ZA-
GND
CZ
A phase pulse
B phase pulse
Z phase pulse
Z phase Opencollector

Hirden AC Servo Drive
22
3.5.2 Speed control mode
ACSD-H3L10-N
PE
R
ST
U
V
W
PE
NFB MC
rt
CN2
CN1
CN2
CN2
CN2
Ground
Power supply
4.7k
A
B
Z
A
A
B
B
Z
Z
GND
Z
1
4
3
2
2
3
4
7
5
8
6
9
10
13
11
14
12
15
1
MotorEncoder
14
15
16
17
18
19
1
2
3
4
5
6
7
8
9
10
11
12
22
23
26
20
21
5V
5V
5V
5V
0V
0V
0V
0V
A+
A-
B+
B-
Z+
Z-
U+
U-
V+
V-
W+
W-
0V
0V
FG
COM+
SON
ALRS
FSTP
RSTP
SC1
SC2
FIL
RIL
SRDY+
SRDY-
ALM+
ALM-
COIN+
COIN-
BRK+
BRK-
AS+
AS-
AGND
FG
18
10
11
12
13
14
15
16
17
8
25
26
27
28
29
30
31
19
20
23
36
1
2
3
4
5
6
9
7
OA+
OA-
OB+
OB-
OZ+
ZA-
GND
CZ
10k
DC 12~24V
Servo On
Ready
Alarm
Reached
Brake
Analog command
(-10V~+10V)
A phase pulse
B phase pulse
Z phase pulse
Z phase Opencollector
AC 220V
SC1/ZEROSPD
SC2

Hirden AC Servo Drive
23
3.5.3 Torque control mode
ACSD-H3L10-N
AC220V
PE
R
ST
U
V
W
PE
NFB MC
rt
CN2
CN1
CN2
CN2
CN2
Ground
4.7k
A
B
Z
A
A
B
B
Z
Z
GND
Z
1
4
3
2
2
3
4
7
5
8
6
9
10
13
11
14
12
15
1
14
15
16
17
18
19
1
2
3
4
5
6
7
8
9
10
11
12
22
23
26
20
21
5V
5V
5V
5V
0V
0V
0V
0V
A+
A-
B+
B-
Z+
Z-
U+
U-
V+
V-
W+
W-
0V
0V
FG
COM+
SON
ALRS
FSTP
RSTP
SC1
SC2
FIL
RIL
SRDY+
SRDY-
ALM+
ALM-
COIN+
COIN-
BRK+
BRK-
AS+
AS-
AGND
FG
18
10
11
12
13
14
15
16
17
8
25
26
27
28
29
30
31
21
22
24
36
1
2
3
4
5
6
9
7
OA+
OA-
OB+
OB-
OZ+
ZA-
GND
CZ
10k
A phase pulse
B phase pulse
Z phase pulse
Z phase Opencollector
Power supply
MotorEncoder
DC 12~24V
Servo On
Ready
Alarm
Reached
Brake
Torque command
(-10V~+10V)

Hirden AC Servo Drive
24
Chapter 4 Display and Operation
This chapter describes the basic operation of the digital keypad and the features it offers.
4.1 Description of the digital keypad
The digital keypad includes 4 function keys and the display panel which is composed of 6 LED. The Figure 4.1 shows all of the features of the digital keypad and an overview of their functions.
Figure 4.1 Overview about the keypad
Hirden AC Servo Drive
25
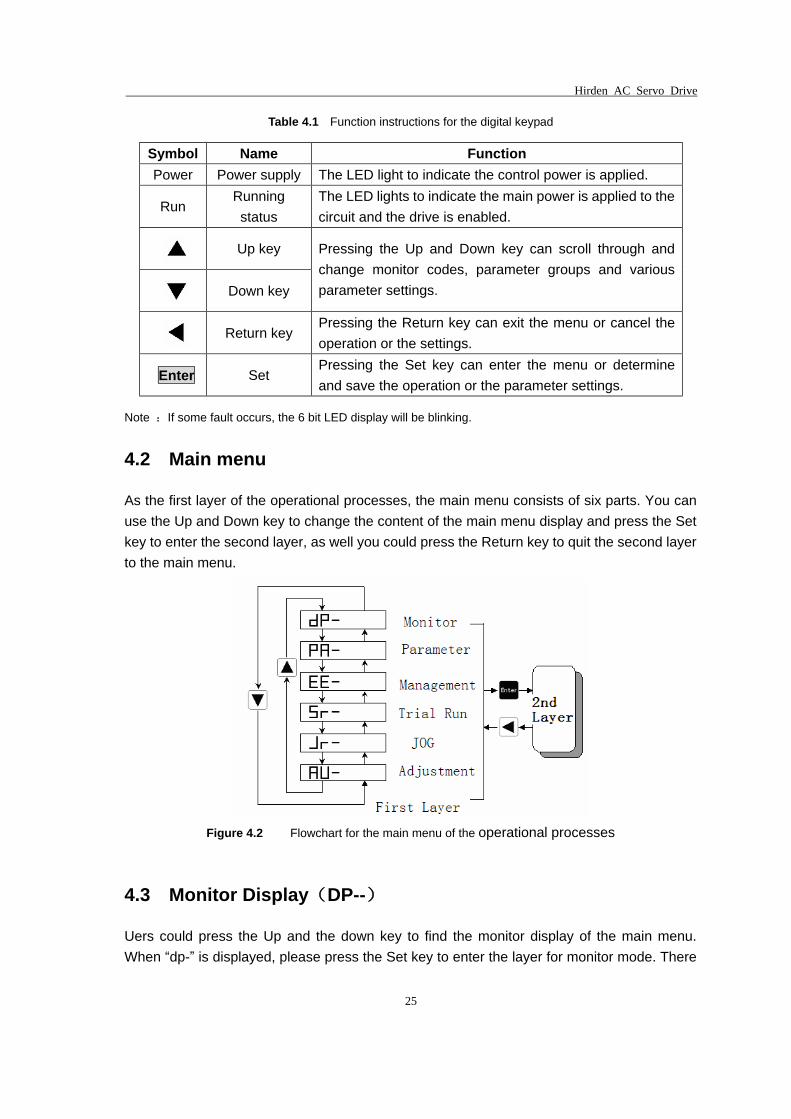
Table 4.1 Function instructions for the digital keypad
Symbol Name Function Power Power supply The LED light to indicate the control power is applied.
Run Running status
The LED lights to indicate the main power is applied to the circuit and the drive is enabled.
Up key
Down key
Pressing the Up and Down key can scroll through and change monitor codes, parameter groups and various parameter settings.
Return key Pressing the Return key can exit the menu or cancel the operation or the settings.
Enter Set Pressing the Set key can enter the menu or determine and save the operation or the parameter settings.
Note :If some fault occurs, the 6 bit LED display will be blinking.
4.2 Main menu
As the first layer of the operational processes, the main menu consists of six parts. You can use the Up and Down key to change the content of the main menu display and press the Set key to enter the second layer, as well you could press the Return key to quit the second layer to the main menu.
Figure 4.2 Flowchart for the main menu of the operational processes
4.3 Monitor Display(DP--)
Uers could press the Up and the down key to find the monitor display of the main menu. When “dp-” is displayed, please press the Set key to enter the layer for monitor mode. There

Hirden AC Servo Drive
26
are 19 kinds status for the monitor display shown as the following. You could select the display you need using the Up and Down key and then press the Set key to enter the specific monitor and display interface.
Feedback Speed(r/min)
Feedback Position(Low)
Feedback Position(X100000)
Position Command(Low)
Position Command(X100000)
Position Error(Low)
Position Error(X100000)
Feedback Torque(%)
Feedback Current(A)
Reserved
Present Control Mode
Pulse frequency(kHz)
Speed Command(r/min)
Torque Command(%)
Motor Current Position
Reserved
Reserved
Voltage of DC Bus
Drive status
Error code
Reserved
Motor speed1000r/min
Position 1245806 Pulse
Command 1245810 Pulse
Position Error 4 Pulse
70% Rated Torque
Motor current 2.3A
Reserved
Control mode 0
Pulse frequency 12.6kHz
Speed command -35r/min
Torque Command -20%
Present Position 3265
Reserved
Reserved
DC Bus Votage is 310V
Status:Servo On
Error 9 occurs
Enter
Figure 4.3 Diagram for the operational processes of the monitor display
4.4 Parameter setting(PA--)
You could find the “PA-” on the main menu by using the Up and Down key, and then enter the parameter selection interface by pressing the Set key. By using the Up and Down key you could select the parameter which you want to change, and then press the Set key to enter the parameter modification interface. You could use the Up and Down key to change parameter to the value you required. When the parameters is modified, the point of the last LED digital tube will be light, that means the parameter is changed but not ye be effective. You could press the Set key to make it, then the point will go out. You could use the Return key to quit.

Hirden AC Servo Drive
27
Figure 4.4 Diagram for the operational processes of parameter setting
4.5 Parameter Management(EE--)
You could find the “EE-” on the main menu by using the Up and Down key, and then enter the parameter management interface by pressing the Set key. The representative meaning of each symbol is shown in the figure 4.5. By using the Up and Down key you could select the operation which you need. And then press and hold the Set key for 3 seconds, when “FINISH” is displayed on the LED means the operation is completed. But if “Error” is displayed, the operation fails, and then please press the Return key to quit.
Parameter Write
Parameter Backup
Press for3 seconds
Success
FailEnter
Parameter Read
Restore Backups
Restore Defaults
Figure 4.5 Diagram for the operational processes of parameter management
• EE-set Write operation: the parameters will be writen in the parameters district of the EEPROM. Even if the power is down the parameter will not be lost.
• EE-rd Read operation: read the data from the parameter district of the EEPROM to the parameter list of the software. If the parameter are modified to result in an error by improper operation, you could use this feature to restore the parameters.
• EE-rs Restore the parameter: read the data svaed in the backup area of the EEPROM into the parameter list of the software. If you want the backup parameter be long-term effective, you need to perform a write operation.
Hirden AC Servo Drive
28
• EE-def Restore the default parameters: read all of the defaults into the parameter list, and then write the parameters into the EEPROM. Even if the drive is restart, the defaults is still effective. After this operation, you should ensure that the motor code (PA1) is adapted for the using motor.
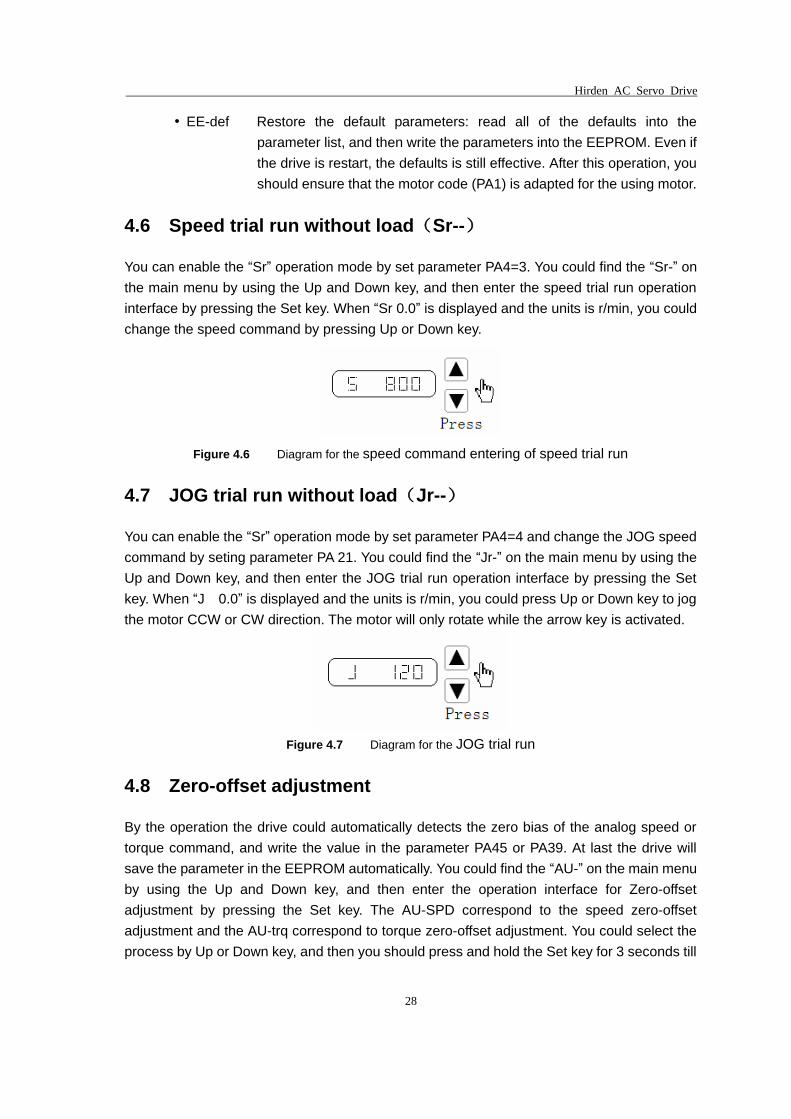
4.6 Speed trial run without load(Sr--)
You can enable the “Sr” operation mode by set parameter PA4=3. You could find the “Sr-” on the main menu by using the Up and Down key, and then enter the speed trial run operation interface by pressing the Set key. When “Sr 0.0” is displayed and the units is r/min, you could change the speed command by pressing Up or Down key.
Figure 4.6 Diagram for the speed command entering of speed trial run
4.7 JOG trial run without load(Jr--)
You can enable the “Sr” operation mode by set parameter PA4=4 and change the JOG speed command by seting parameter PA 21. You could find the “Jr-” on the main menu by using the Up and Down key, and then enter the JOG trial run operation interface by pressing the Set key. When “J 0.0” is displayed and the units is r/min, you could press Up or Down key to jog the motor CCW or CW direction. The motor will only rotate while the arrow key is activated.
Figure 4.7 Diagram for the JOG trial run
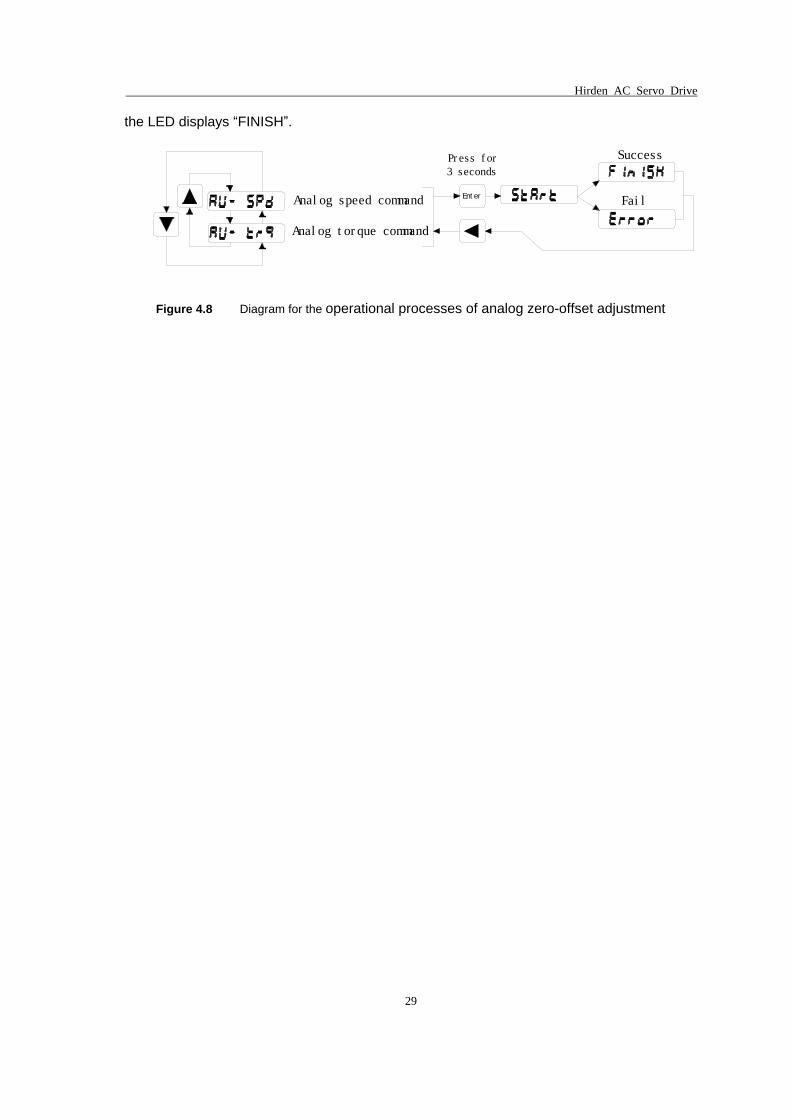
4.8 Zero-offset adjustment
By the operation the drive could automatically detects the zero bias of the analog speed or torque command, and write the value in the parameter PA45 or PA39. At last the drive will save the parameter in the EEPROM automatically. You could find the “AU-” on the main menu by using the Up and Down key, and then enter the operation interface for Zero-offset adjustment by pressing the Set key. The AU-SPD correspond to the speed zero-offset adjustment and the AU-trq correspond to torque zero-offset adjustment. You could select the process by Up or Down key, and then you should press and hold the Set key for 3 seconds till
Hirden AC Servo Drive
29
the LED displays “FINISH”.
EnterAnalog speed command
Analog torque command
Press for3 seconds
Success
Fail
Figure 4.8 Diagram for the operational processes of analog zero-offset adjustment

Hirden AC Servo Drive
30
Chapter 5 Trial Run and Tuning Procedure
This chapter describes trial run for servo drive and motor, including the trial run without load and introductions about the operation mode of the drive. Ensure to complete the trial run without load first before performing the trial run with load.
5.1 Inspection without load
In order to prevent accidents and avoid damaging the servo drive and mechanical system, the trial run should be performed without load. Please disconnect all couplings and belts and do not run servo motor while it is connected to load or mechanical system, for the unassembled parts on motor shaft may easily disassemble during running and it may damage mechanical sysytem or even result in personnel injury. Please perform trial run without load first and then perform trial run with load connected. Before the servo is powered, please observe the following cautions: 1. Ensure whether there is obvious damage on the appearance of the drive and motor. 2. Check whether all of the wiring is correct or not, especially for the R, S, T, U, V, W and PE terminal. The terminals should be connected to the specified calbe and terminal. 3. Ensure that there is no foreign matter inside the drive, such as conductive objects and flammable objects. 4. Confirm that the electromagnetic brake could work normally, if the brake is being used. 5. Ensure that the specification for the power is applicalbe. 6. Make sure that the cable and the mechanical parts are not intertwined, to avoid wear or pulling phenomenon at the run time. 7. Verify that the servo drive and motor are connected to the ground reliably. 8. Make sure control switch is OFF. After the control power is applied, please observe the following cautions: 1. Ensure that the power indicator and LED display is normal. If there is any abnormal condition of the power indicator and LED display, please contact your distributor for assistance or contact with Hirden. 2. Check that all user-defined parameters are set correctly. For the characteristics of different machinery equipment are not the same, in order to avoid accident or cause damage, do not adjust the parameter abnormally and ensure the parameter setting is not an excessive value. 3. Make sure that the servo drive is off when you reset some parameters. 4. Check for abnormal vibrations and sounds during operation. If the servo motor is vibrating or there are unusual nosies while the motor is running, please contact the dealer or manufacturer for assistance. 5. If there is no contact sound or there be any unusual noises when the relay inside the servo drive is operating, please contact your distributor for assistance or contact with Hirden.

Hirden AC Servo Drive
31
5.1.1 Appling power to the drive
Please check the wiring first. If there is no abnormal condition, you could turn on the control power supply ( the main power should be OFF ). If any error except error 3 is displayed on the LED, please check the wiring and the parameter, or you could refer to the chapter 7. Secondly please turen on the main power supply, and the running indicator will be lit. If the indicator has not been lighted or any other error occurs, please check the main power supply and the parameter PA53. And at last you could refer to chapter 7.
5.1.2 JOG trial run without load
It is very convenient to use JOG trial run without load to test the servo drive and motor as it can save the wiring.For safety, it is recommended to set JOG speed at low speed such as 100r/min. The JOG speed could be set in the parameter PA21.
1. Parameters Table 5.1 Parameters about the JOG trial run
Parameter NO.
Name Default Setting Description
PA04 Control Mode 0 4 Select the operation mode as JOG trial running mode.
PA20 Inhibit Drive Function 1 1 Ignore the drive prohibition PA21 JOG speed 120 100 Speed command for JOG
PA40 Acceleration Time 0 Opportune Reduce the acceleration shocks.
PA41 Deceleration Time 0 Opportune Reduce the deceleration shocks.
PA53 Enabled Word 1 0000 0001 Enable the drive without the external signal
2. Operation
Step 1: Enable the drive and the running indicator will be lit by setting the parameter PA53=0001. And then the servo drive and motor is at zero speed running state. Step 2: Set parameter PA21 as JOG speed. After the desired JOG speed is set, and then press the Set key, the speed will be write into the control software. Step 3: Enter the JOG operation interface by using the digital keypad, and the digital LED display should be displayed as the following: J 0.0 (r/min) Step 4: Pressing the Up key and the servo motor will run in CCW direction. After releasing Up key, the motor will stop running. Step 5: Pressing Down key and the servo motor will run in CCW direction. After releasing Down key, the motor will stop running. Step 6: When preesing Return key, the drive could exit JOG operation mode.

Hirden AC Servo Drive
32
CCW and CW definition. CCW( counterclockwis): when facing the servo motor shaft, CCW is running in the counterclockwise direction. CW(clockwis): when facing the servo motor shaft, CW is running in clockwise direction.
Display:
Press
-100
0
100
t
Sr
Operation: Lossen LossenPress
Figure 5.1 Diagram for the JOG trial run without load
5.1.3 Speed trial run without load
Before speed trial run, fix and secure the motor as possible to avoid the danger from the reacting force when motor speed changes.
1. Parameters
Table 5.2 Parameters about the speed trial run
Parameter NO.
Name Default Setting Description
PA04 Control mode 0 3 Select the operation mode as speed trial running control mode.
PA20 Inhibit Drive Function 1 1 Ignore the drive prohibition
PA53 Control word 1 0000 0001 Enable the drive without the external signal
2. Operation
Step 1: Enable the drive and the running indicator will be lit by setting the parameter PA53=0001. And then the servo drive and motor is at zero speed running state. Step 2: Set parameter PA04 =3, choosing the speed trial running mode as the current mode. Step 3: The speed command of the speed trial running is input by pressing Up and Down keys and the minimum given value is 0.1r/min. Use the Up or Down key to select the “Sr” mode on the main menu, and the press the Set key to enter the operation interface for the speed trial running. And the LED display should be shown as the following: S 0.0 (r/min) Positive instruction means that the servo motor runs in the CCW direction, and the negative instruction means that the motor runs in the CW direction.

Hirden AC Servo Drive
33
-100
0
100
t
Sr
Press Press PressLossenLossen
Display:
Operation:
Increase Decrease Increase
Figure 5.2 Diagram for speed trial run
5.2 Position control mode
The position control mode is usually used for the applications requiring precision positioning, such as industry positioning machine, indexing talbe etc. Before position trial run, please observe the following cautions: 1. Ensure that all wiring is correct and wiring terminals of the servo drive and motor are correctly insulated, or damage and malfunction may result. 2. Check whether the motor and the drive is fixed and secure, or the motor or drive may be damaged by the reacting force when motor speed changes.
5.2.1 Simple position control system
A simple position control sysytem only needs two sets of position pulse command signals, drive enable sigal, prohibited drive signal, servo ready and servo alarm output signals. The wiring diagram of the simple system is shown as below.

Hirden AC Servo Drive
34
ACSD-H3L10-N
AC220V
PE
R
ST
U
V
W
PE
NFB MC
rtCN2
CN1
Ground
Power supply
4.7k
DC12~24V
Servo ON
Ready
Alarm
Puls input
Sign input
1
4
3
2
2
3
4
7
5
8
6
9
10
13
11
14
12
15
1
MotorEncoder
14
15
16
17
18
19
1
2
3
4
5
6
7
8
9
10
11
12
22
23
26
20
21
5V
5V
5V
5V
0V
0V
0V
0V
A+
A-
B+
B-
Z+
Z-
U+
U-
V+
V-
W+
W-
0V
0V
FG
COM+
SON
SRDY+
SRDY-
ALM+
ALM-
PULS+
PULS-
SIGN+
SIGN-
FG
18
10
8
25
26
27
32
33
34
35
36220
220
Figure 5.3 wiring diagram for the simple position control system
Note: Refer to the section 3.6.1, you could find the detailed wiring diagram for the position control system.

Hirden AC Servo Drive
35
5.2.2 Parameters for the position control
Table 5.3 Parameters about the position control mode
Parameter NO.
Name Value range default units
PA04 Control mode 0 0 PA09 Proportional Position Loop Gain 0~1000 50 Hz PA10 Position Feed Forward Gain 0~100 0 % PA11 Smooth Constant of PA10 1~1000 0 ms
PA12 Electronic Gear Ratio (Numerator) N1 1~32767 1
PA13 Electronic Gear Ratio (Denominator) M1 1~32767 1
PA14 External Pulse Input Type 0~2 0 PA15 Direction of External Pulse 0~1 0 PA16 Positioning Completed Width 0~30000 20
PA17 Excessive Position Error Range 0~30000 400 100
pulse
PA18 Excessive Position Error Function Selection 0~1 0
PA19 Smooth Constant of Position Command 0~30000 0 0.1mS
PA20 Inhibit Drive Function Selection 0~1 0
PA51 Dynamic Electrionic Gear Function Selection 0~1 0
PA52 Electronic Gear Ratio (Numerator) N2 1~32767 1
PA53 Digital Input Terminals Function Selection / Enabled Word 1 0000~1111 0000
1. External pulse input type
Table 5.4 Type and waveform of the external input pulse
PULS
SIGN
PULS
SIGN
PULS
SIGN
Forward ReversePulse Type PA14
Pulse+
Direction
CCW+CW
ABPhasePulse
0
1
2

Hirden AC Servo Drive
36
Host controller could drive the servo drive and motor running and positioning by external pulse. Referring to parameter PA14, you could see there are three types of the pulse. In the table 5.5 the types of the pulse are diagramed and the pulse edge indicated by arrows could be counted by drive in each pulse type. You could change the direction of the pulse count by setting parameter PA15. The pins 32 ( PULSE+ ), 33 ( PULSE- ), 34( SIGN+ ), 35 ( SIGN- ) of the terminal interface CN2 are set for external pulses input. For the details of the interface CN2, please refer to the section 3.43.
2. Filter for positon control
The filter is for the position smoothing of motion command. Using filter not only can improvethe performance when servo motor accelerate or decelerate but also can make motor to operate more smoothly. When the load is change, the motor usually run not smoothly when starts to run and stop due to the friction and inertia change. At this moment, users can increase the value of the PA19 to improve the performance. But if the vaule is too large, the command delay phenomenon would be more obvious. When the parameter PA19=0, the filter is disable. The value of the PA19 is the time that the frequency of the position command increasee from 0% to 63%of the external pulse frequency. Diagram of the filter is shown as below.( The non-filtering and the filtering waveform are contrasted. )
Figure 5.4 Diagram for comparison between the filtering and non-filtering waveform
5.2.3 Electronic gear ratio
Mechanical transmission ratio and the pulses per circle of the servo motor encoder couldn’t be identified by the host controller. But the unit pulse generated by host controller could be corresponded to the actual moving distance by setting the electronic gear ratio. Electronic gear ratio of the servo system could be calculated as the following.
N1: Numerator of the electronic gear ratio ( PA12 ) M1: Denominator of the electronic gear ratio ( PA13 ) P1: Number of pulses corresponding to 1mm in the host controller F2: Number of encoder pulses per circle S1: Screw pitch of the mechanical transmission (mm) F1: Number of pulses required by actual moving distance 1mm.

Hirden AC Servo Drive
37
F1=N1*P1/M1 ( pulses / mm ) F1=F2/S1 ( pulses / mm ) for actual moving distance without gearbox
Therefore the electronic gear ratio N1/M1 is equal to F2/(S1*P1). For example, if P1 of the host is 1000 pulses/mm, F2 of the H series servo drive is 10000, S1 of the screw is 6mm, the electronic gear ratio N1/M1=10000/(1000*6)=5/3. So you could set the parameter PA12 ( N1 )=5 and the PA13 ( M1 )=3. If there is a gearbox between screw and motor, the ratio of the gearbox is N2/M2;
N2: rotation number of the motor M2: rotation number of the screw F1=N1*P1/M1 ( pulses / mm ) for host controller F1=F2*N2/(S1*M2) ( pulses / mm ) for actual moving distance with gearbox
Therefore the electronic gear ratio N1/M1 is equal to F2*N2/(S1*P1*M2). For the above-mentioned example, if the ratio of the gearbox is N2/M2=5/3. According to the formula, the electronic gear ratio N1/M1=10000*5/(1000*6*3)=25/9. So you should set the parameter PA12 ( N1 )=5 and the PA13 ( M1 )=3 for the mechanical transmission system with a gearbox.
t1 t2
OFF ON OFF
1st ratio 2nd ratio 1st ratioPA12
PA13PA52
PA13PA12
PA13
t1,t2,t3,t4>10mS
INH signal
Pulse command input
Electronic gear ratio
t3 t4
Figure 5.5 Diagram for dynamic electronic gear ratio
Note:H series servo drive provides two sets of dynamic electronic gear ratio, which could be swithced online.
The second numerator of the electronic gear ratio is set in the parameter PA 52, and denominator is the
same as the one of the first one. When the PA51 is equal to 1, the function of the dynamic electronic gear is
enabled and signal connected to pin-15 of the I/O interface CN2 could control the switching of the electronic
gear. When the level of the signal is low, the servo drive would choose the second electronic gear ratio
PA52/PA13.

Hirden AC Servo Drive
38
5.2.4 Position proportional gain
The positional control loop includes the speed control loop, therefore you should complete the speed control setting first by using manual mode before performing position control (setting position control block diagram). Then adjust the proportional position loop gain PA09 and position feed forward gain PA10.
Table 5.5 The parameters about the position proportional gain
Parameter NO.
Name Description Value range
Defaults
PA-09 Position loop proportional gain Increasing the value can improve the response frequency of the position
0~1000 50
PA-10 Position feed forward gain Increasing the value can reduce the position track error
0~100 0
PA-11 Smooth constant of PA10 Be smoother to decrease the position overshoot
0~1000 0
For the positional control loop includes the speed control loop, the position loop bandwidth would be restricted by the one of the speed loop. It is reconmmended that the speed loop responsiveness should be at least four times faster than the position loop responsiveness. This means that the setting value of the proportional speed loop gain PA05 should be at least four times faster than proportional position loop gain PA09. The equation is shown as following:
fp≤fv/4, fv: speed loop responsiveness (Hz) , fp: position loop responsiveness (Hz)
PA09=2*π*fp
For example, the desired position loop responsiveness is equal to 40 Hz.
Then PA09=2*π*40=251 rad/s
+-
++
Position feedforward gain PA-10
Smooth ConstantPA-11
Position loopproportional gain PA09
SpeedCommand
EncoderPositionCounter
Figure 5.6 Flowchart of the position control loop

Hirden AC Servo Drive
39
Increasing the position proportional gain can improve the stiffness of the system, expedite position loop response and reduce position error. However, if the setting value is over high, it may generate vibration or noise. When the value of proportional position loop gain is too great, the position loop responsiveness will be increased and it will result in small phase margin. If this happens, the rotor of motor will oscillate. At this time, you have to decrease the value of the PA09 until the rotor stop oscillating. When there is an external torque command interrupted, over low PA09 value will let the motor cannot overcome the external strength and fail to meet the requirement of reasonable position track error demand. Adjust feed forward gain PA10 to efficiently reduce the dynamic position track error.
5.5 Gain Adjustment
The position and speed frequency response selection is depending on and determined by the control stiffness of machinery and conditions of applications. Generally, high reponsiveness is essential for the high frequency positioning control of mechanical facilities and the applications of high precision process sysytem. However, the higher frequency response may easily result in the resonance of machinery system. Therefore, for the applications of high freqency response, the machinery system with control stiffness is needed to void the resonance. Especially when adjusting the frequency response of unfamiliar machinery system, you could gradually increase the gain setting value to improve frequency response untill the resonance occurs, and then decrease the gain setting value. There are three control loop in the servo drive system, including the outermost position control loop, the intermediate speed control loop and the innermost current control loop. The flowchart for the servo system is shown as below.
Position Control Loop
PositionControlBlock
Speed Detection
Speed Control Loop
SpeedControlBlock
Filter
Current Control Loop
CurrentControlBlock
PowerConversion
Block
+
-
+
-
+
-Motor
Encoder
Position Detection
PositionCommand
Figure 5.7 Diagram for the servo closed-loop control sysytem
The responsiveness of the inner control loop should be greater than the outer control loop, otherwise the control system will be unstable, generating vibration or noise.

Hirden AC Servo Drive
40
Therfoer the value of the gain for the three control loop should be set correctly.Generally, the value of the current control loop gain should be the maximun and the one of the position control loop is the minimum. The responsiveness of the current control loop which couldn’t be change by the customers is set automatically within the system. And then the users should set the values of the speed and position control loop gain properly, avoiding that the inside and outside responsiveness are not matched.
5.5.1 Steps for gain adjustment
In order to obtain a stable system, please do not make major alteration at only one parameter related to the control loop.when one parameter is modified, some other relevant parameters should also be adjusted further to achieve the best results. Therefore to modify the parameters related to the congtrol loop, we follow the following steps.
Table 5.6 The basic rule for modifing the closed-loop parameters
Reduce vibration or overshoot Increase responsiveness
Step 1 Decrease the proportional position control loop gain PA09
Increase the proportional speed control loop gain PA09
Step 2 Increase the integral time of the speed control loop PA06
Decrease the integral time of the speed control loop PA06
Step 3 Decrease the proportional speed control loop gain PA05
Increase the proportional position control loop gain PA09
5.5.2 Adjustment for speed control loop
If the inertia of the machinery and conditions of applications is larger, you could adjust the relative parameters as the following step. Step 1: Increase the integral time of the speed control loop PA06 Step 2: Gradually increase the value of the proportional speed control loop gain PA05 setting untill the resonance occurs, and then decrease the gain setting value. Step 3:Gradually decrease the integral time of the speed control loop PA06 untill the resonance occurs, and then increase the setting value. Step 4: If the resonance occurs, as a result the ideal responsiveness of the system could not be achieved. For this case, you could adjust the value of the low-pass filter for torque PA07 to suppression the resonance. And then you could repeat the above steps, in order to achieve a better responsiveness for the position and speed control loop.
5.5.3 Adjustment for position control loop
If the inertia of the machinery and conditions of applications is larger or the resonance occurs,

Hirden AC Servo Drive
41
you could adjust the relative parameters as the following step. Step 1: Increase the integral time of the speed control loop PA06 Step 2: Gradually increase the value of the proportional speed control loop gain PA05 setting untill the resonance occurs, and then decrease the gain setting value. Step 3:Gradually decrease the integral time of the speed control loop PA06 untill the resonance occurs, and then increase the setting value. Step 4: Gradually increase the value of the proportional position control loop gain PA09 setting untill the resonance occurs, and then decrease the gain setting value. Step 5. For achiving better track error of the position control loop, users could adjust position feed forward gain PA10 and PA11 (the smooth constant of feed forward gain) appropriately. Step 6: If the resonance occurs, as a result the ideal responsiveness of the system could not be achieved. For this case, you could adjust the value of the low-pass filter for torque PA07 to suppression the resonance. And then you could repeat the above steps, in order to achieve a better responsiveness for the position and speed control loop.
5.6 Electromagnetic Brake
When the servo drive is operating, if the digital output BRK is set to off, it indicates that the electromagnetic brake is disabled and motor is stop running and locked. If the digital output BRK is set to ON, it indicates electromagnetic brake is enabled and motor can run freely. The electromagnetic brake is usually used in perpendicular axis ( Z-axis ) direction to reduce the large energy generated from servo motor. Using electromagnetic brake can avoid the load may slip since there is no motor holding torque when power is off. Without using electromagnetic brake may reduce the life of servo motor. To avoid malfunction, the electromagnetic brake should be activated after servo system is off.
5.6.1 Parameters about electromagnetic brake
The on delay time of the electromagnetic brake is set within the servo drive, except this there are three parameters about the off delay time (speed) of the electromagnetic brake. The users can use these three parameters to set the off delay time of electromagnetic brake.
Table 5.7 Parameters about the electromagnetic brake
Parameter NO.
Name Value range
Defaults Units
PA47 On delay time of electromagnetic brake when motor is still
0~200 0 10ms
PA48 Off delay time of electromagnetic brake when motor is running
0~200 50 10ms
PA49 Off speed of the motor for electromagnetic brake when the motor is running.
0~3000 100 r/min

Hirden AC Servo Drive
42
5.6.2 Matters for electromagnetic brake
Wiring of the electromagnetic brake is shown as below:
BRK+
BRK-
Ensure the polarity ofDiode is correct or itmay damage the drive
Relay VDDDC24V
For brakeDC24V
Do not connectVDD and COM+
When emergency stop signalis activated,this circuitbreaker will be enabled.
Motor
Brake
Encoder
Servo drive
Figure 5.8 Diagram for electromagnetic brake
The BRK signal is used to control the brake operation. The VDD DC24V power supply supplied externally should be used to power the relay coil. When BRK is on, the motor brake will be activated. The coil of the brake has no polarity. But the diode has polarit, please ensure the polarity of the diode is corret or it may damage the drive. At last the power supply for brake is DC24V. Never use it for VDD, the +24V source voltage. Timing chart for using servo motor with electromagnetic brake:
T1 T2(PA-49)
OFF
ON
ONOFF
OFF
OFF
PA-48
SON Signal
(CN2-24 input)
BRK Signal
(CN2-30 input)
Motor Speed
Figure 5.9 Timing chart for electromagnetic brake
BRK output timing explanation: 1. when servo off ( when DI SON is not activated), the BRK output goes off (electromagnetic brake is locked ) after the delay time set by PA48 is reached and the motor speed is still higher than the setting value of PA49. 2. when servo off ( when DI SON is not activated), the BRK output goes off (electromagnetic brake is locked ) if the delay time set by PA48 is not reached but the motor speed is still lower than the setting value of PA49.

Hirden AC Servo Drive
43
5.7 Timing
5.7.1 Timing for power on
Step 1. Control power supply should be turned on earlier than the main power, or turned on simultaneously. Step 2. Delay 1.2s after the main power turn on, the servo ready (SRDY) will be ON. And then the servo drive could receive the enable signal (SON) from the host controller. When the servo drive is enabled, the main circuit will work and the motor will run. If the drvie couldn’t receive the SON siganl or detect some error, the main circuit will be disabled and the motor will be at zero-speed status. Step 3. As the cautions, please do not restart frequently.
Control powerr,t
Control power(+5V)
Main Power SupplyL1、L2、L3
Servo Ready Output(DO:RDY)
Servo Enable Signal(DI:SON)
Servo Output PowerU,V,W terminal
BRK signal
( DO )
OFF POWER ON
OFFON
OFF Power ON
OFF
OFF
OFF
OFF
ON
ON
ON
ON
< 0.5ms
< 1.2ms
> 5ms
< 5ms
Figure 5.10 Timing flowchart about drive power on
Note:Even if the host controller output the SON signal before the SRDY signal of the drive, the servo drive
couldn’t receive the SON untill the SRDY signal is ON for 5 msec.
5.7.2 Timing for enable operation
1. Enable operation timing for still motor When the motor is still, if the SON is OFF, the mian circuit will work and the work will not be powered off for some time to hold the position until the electromagnetci brake is disabled for some time set by PA47.

Hirden AC Servo Drive
44
Servo Enable
Signal(SON)
BRK Signal
Motor Current Signal
OFF OFF
OFF
Servo ON
ON (motor free) OFF
ON (motor drived)OFF OFF
<10ms
Set ByPA47
Figure 5.11 Enable operation timing flowchart when motor is still
2. Enable operation timing when the motor is running When the motor is running, if the SON turn off, the main circuit of the drive will be disabled and the motor will be powered off. The electromagnetic brake will still be ON for some delay time set by PA48 or PA49, while the motor could be slow down, avoiding to damage the brake at the high speed. The delay time would be selected the one which is samer between the time set by PA48 and the time motor slow down to the target speed.
Motor speed
(r/min)
PA49
OFFON
ON
( motor drived )
OFF
Power OFF
0r/min
PA48
Servo Enable
Signal(SON)
Motor Current Signal
BRK Signal ON (motor free)
Figure 5.12 Disable operation timing flowchart when motor is running

Hirden AC Servo Drive
45
5.7.3 Timing for alarm
Alarm Signal
(DO:ALM)
Ready Signal
(DO:SRDY)
Motor CurrentSignal
No Alarm Alarm (Error occurs)
OFF (Not Ready)ON
ONMotor Drived
Power OFF
ON OFF
Motor speed
(r/min)
PA49
OFF
0r/min
PA48
BRK Signal ON (motor free)
Servo Enable
Signal(SON)
Figure 5.13 Alarm timing flowchart when motor is running or still
5.8 Start-stop characteristics
The start-stop characteristics of the servo system is determined by many aspects, such as the load inertia, the characteristics of the drive and motor, and the on-off frequency.
5.8.1 On-off frequency and load inertia
When the servo drive and motor is used in the applications which needs high on-off frequency, please confirm whether the frequency is in the permissible range of “H” series servo drive in advance. The frequency range is determined by the motor, the load inertia and the speed of the motor. To determine the frequecy range, you could refer to the following table:
Table 5.8 On-off frequency VS Load inertia
Inertia multiples On-off frequency and ACC/DEC time J≤3Jmotor f>100 /min; less than 70mS J≤5Jmotor 60<f≤100 /min; less than 130mS J>5Jmotor f≤60 /min; greater than 150mS
Note: The above table only gives the on-off frequency in the general case, the specific circumstances will vary with the motor type and the load condition.
5.8.2 Adjustment
When the load inertia is at least five times greater than the motor inertia, some error will occur, such as position overshoot, excessive position deviation and speed response fault etc.

Hirden AC Servo Drive
46
If the above situation occurs, you could adjust the relative parameters as the following. Step 1: Increase the value of PA05 and PA06 Step 2: Decrease the value of PA09.
Stpe 3: Increase the value of the parameter PA40, PA41 and PA42. (ACC/DEC time contant ) Step 4. Increase the ACC/DEC time contant of the host controller. On the other hand, you could select a motor which has larger inertia instead of the using motor.

Hirden AC Servo Drive
47
Chapter 6 Parameters
6.1 Parameter summary
The defaults of the following talbe is shown as an example of the “H” series drive, the value of the parameters marked “*” may be different from other types. In the table, applicable mode means that the parameter can play a role in a certain control mode: P refers to position control mode, S refers to speed control mode, T refers to torque control mode and ALL refers to all of the control mode.
Table 6.1 Parameter List
No. Function Description Applicable Mode Range Default Unit
PA-0 Password ALL 0-1000 315* PA-1 Motor Code ALL 0~100 35 PA-2 Version ALL 0~999 * PA-3 Monitor Status ALL 0~19 0 PA-4 Control Mode ALL 0~5 0 PA-5 Proportional Speed Loop Gain P,S 5~2000 165* Hz PA-6 Speed Integral Time P,S 1~1000 30* ms PA-7 Low-pass Filter for Torque ALL 1~1000 10 0.1ms PA-8 Speed Detection Filter ALL 1~1000 10 0.1ms PA-9 Proportional Position Loop Gain P 1~1000 50 Hz
PA-10 Position Feed Forward Gain P 0~100 0 % PA-11 Smooth Constant of PA10 P 1~1000 0 ms
PA-12 Electronic Gear Ratio (Numerator) N1 P 1~32767 1
PA-13 Electronic Gear Ratio (Denominator) M1 P 1~32767 1
PA-14 External Pulse Input Type P 0~2 1 PA-15 Direction of External Pulse P 0~1 0 PA-16 Positioning Completed Width P 0~30000 20 pluse PA-17 Excessive Position Error Range P 0~30000 400 ×100 pluse
PA-18 Excessive Position Error Function Selection P 0~1 0
PA-19 Smooth Constant of Position Command P 0~30000 0 0.1mS
PA-20 Inhibit Drive Function Selection ALL 0~1 1 PA-21 JOG Operation Speed S -3000~3000 120 r/min PA-22 Speed Command selection S 0~1 1 PA-23 Alarm Enabled Statu Setting ALL 0~1000 200 PA-24 1st Speed Command S -3000~3000 0 r/min PA-25 2nd Speed Command S -3000~3000 100 r/min PA-26 3rd Speed Command S -3000~3000 300 r/min PA-27 4th Speed Command S -3000~3000 -100 r/min PA-28 Target Motor Speed S 0~3000 500 r/min PA-29 Analog Torque Command Gain T 10~100 50 0.1V/100%

Hirden AC Servo Drive
48
PA-30 Reserved ALL 167 PA-31 Pulse Logic Function Selection P 1~5000 167 PA-32 Reserved 167 PA-33 Direction of Torque Command T 0~1 0
PA-34 Internal CCW Torque Command Limit ALL 0~200 200* %
PA-35 Internal CW Torque Command Limit ALL -200~0 -200* %
PA-36 External CCW Torque Command Limit ALL 0~200 100 %
PA-37 External CW Torque Command Limit S -200~0 -100 %
PA-38 Torque Command Limit for JOG and Trial Run JOG, Sr 0~300 100 %
PA-39 Zero-offset Compensation for Torque Command S -2000~2000 0
PA-40 Acceleration Time S 1~10000 0 mS PA-41 Deceleration Time S 1~10000 0 mS PA-42 Accel/Decel S-curve S 1~1000 0 mS PA-43 Analog Speed Command Gain S 10~3000 300 (r/min)/V PA-44 Direction of Speed Command S 0~1 0
PA-45 Zero-offset Compensation for Analog Speed Command S -5000~5000 0
PA-46 Low-pass Fliter for Speed Command S 0~1000 3 mS
PA-47 On Delay Time of Electromagnetic Brake when motor is stopped
ALL 0~200 0 ×10mS
PA-48 Off Delay Time of Electromagnetic Brake when motor is running
ALL 0~200 50 ×10mS
PA-49 Target Speed for Opening Electromagnetic Brake ALL 0~3000 100 r/min
PA-50 Sampling Gain for Bus Voltage ALL 0~1000 506
PA-51 Dynamic Electrionic Gear Function Selection P 0~1 0
PA-52 Electronic Gear Ratio (Numerator) N2 P 1~32767 1
PA-53 Digital Input Terminals Function Selection / Enabled Word 1 ALL 0000~1111 0
PA-54 Digital Input Terminals Function Selection / Enabled Word 2 ALL 0000~1111 0
PA-55 Curret Sampling Gain ALL 0~1000 312 PA-56 Reserved ALL 0 PA-57 Reserved ALL 0~255 0 PA-58 Input Terminal Delay Time ALL 1~1000 2 mS

Hirden AC Servo Drive
49
6.2 Detailed parameter setting
Table 6.2 Detailed settings for the parameter
NO. Name Function description Value range
0 Password
①Generally prevent some parameters modified falsely. If you need to modify the parameters, you need to modify this parameter to the password first. ②Password for general parameters is 315 ③Password for PA1 is 302
0~1000
1 Motor Code The value should be adapted for the motor you used Refer to section 6.3 for specific value and pasword is 302 0~1000
2 Version View the software version which couldn’t be modified 0~999
3 Initial Monitor
Monitoring variables for the initial display when the drive powered on. 0:Feedback speed; 1:Low data of the feedback positon 2:High data of the feedback positon 3:Low data of the position command 4:High data of the position command 5:Low data of the position error 6:High data of the position error 7:Feedback torque 8:Feedback current; 9:Reserved 10:Present control mode; 11:Input frequency of pulse command 12:Speed command (Integrated) 13:Torque command (Integrated) 14:Motro feedback-current position. 15:Reserved 16:Reserved 17:Voltage of the DC bus 18:Drive status; 19:Error code;
0~19
4 Control Mode
Variables for the control mode 0: Position control mode 1: Speed control mode. 2: Torque control mode 3: Speed trial run control mode 4: JOG control mode 5: Control mode for adjusting the zero of the encoder
0~5
5 Proportional Speed Loop Gain
The stiffness and responsiveness of the speed control loop is determined by the proportional speed gain and integral time.The default value is 170. Gernerally if the load inertia is greater, the value should be modified larger. You could increase the value untill the resonance or noise occurs and then decrease the value.
5~2000 Hz

Hirden AC Servo Drive
50
6 Integral Time of Speed Control Loop
The value of the integral time has an effect on the stiffness and responsiveness of the speed control loop. If the value is too samll, overshoot would occur. While the value is too large, the response would be slow. Gernerally, the value should be modified according to the load inertia. Larger inertia needs larger integral time.
1~1000 mS
7 Low-pass Filter for Torque
Time contant for torque low-pass filter has an effect on the responsiveness of the torque control. The function of this parameter is to restrain resonance. Increasing the value will decrease the cutoff frequency resulted in the smaller noise and vibration but lower response. If the interia of the load is large, you could increase the value to restrain the resonance.
1~1000 ×0.1mS
8 Speed Detection Filter
Time contant of the speed detection filter has an effect on the stiffness and responsiveness of the speed control loop. Increasing the value will decrease the cutoff frequency resulted in the smaller noise. If the value is too large, the response will be slow and the vibration or resonance will occur. Gernerally, the value should be modified according to the load inertia.
1~1000 ×0.1mS
9 Proportional Position Loop Gain
Proportional gain of the position control loop has an effect on the stiffness and responsiveness of the control loop. Increasing the value can improve the response frequency of the position Increasing the value will increase the stiffness and decrease the position offset when the position frequency is the same. If the value is too large, the vibration or resonance will occur.
1~1000/S
10 Position Feed Forward Gain
Increasing the value can reduce the position track error 100% means that the track error may be zero at any position frequency. If the value is too large, the vibration or resonance will occur. Gernerally the value is 0, excepting high responsive required by the application condition
0~100%
11 Smooth Constant for PA10
The value is the time contant of the low-pass filter for position feed forward gain. Be smoother to decrease the position overshoot.
1~1000ms
12
Electronic Gear Ratio (Numerator) N1
Electronic gear ratio of the servo system could match the position command of the host controller and the actual distance motor running. The electronic gear ratio can be calculated as the following :N1/M1 =F2/(S1*P1) P1:Number of pulses corresponding to 1mm in the host controller F2:Number of encoder pulses per circle (Default is 10000) S1:Screw pitch of the mechanical transmission (mm) The ideal range of the gear ratio is from 1/50 to 50.
1~32767
13 Electronic Refer to parameter PA12 1~32767

Hirden AC Servo Drive
51
Gear Ratio (Denominator) M1
14 External Pulse Input Type
There are three inputting type kinds for external pulse: 0:pulse + direction. 1:CCW pulse + CW pulse. 2:AB phase pulse.
0~2
15 External Pulse Direction
0:Normal direction 1:Negative direction 0~1
16 Positioning Completed Width
The value is the position error range to judge whether the positioning is completed or not. In the position control mode, the COIN signal will be on when the value of the position error is less then the value of the PA16. In other control mode, the COIN signal will be ON when the speed reachs the target speed command.
0~30000pluse
17 Excessive Position Error Range
The value is the detection range for error 4. In the position control mode, if the position error is larger than the value of PA17, the servo drive will be disabled and the error code would be displayed.
0~30000 ×100 pluse
18
Excessive Position Error Function Selection
0:Enable detection function for excesive position error. 1:Disable the function for detecting the position error. 0~1
19
Smooth Constant of Position Command
Smooth the position command by exponential deceleration, the value of PA19 is the time contant for the exponential deceleration. The pulse would not be lost but the position command may be delay. You could use the function at the following conditon. • The host controller does not have a deceleration / acceleration function. • The electronic gear ratio is larger than 10. • The position frequency is low. ; • Stepping jump and vibration occurs when the motor is running. The function will be disabled when the value is 0.
0~30000 ×0.1mS
20 Inhibition Function Selection
0:Enable the inhibition function, and the FSTP signal is effective. If the CCW FSTP signal is ON, the drive could be drived in CCW direction. If the signal is OFF, the drive could not be drive in the CCW direction. It’s the same to CW FSTP signal. When both of the FSTP signals are OFF, the drive will be disabled. 1:Disable the inhibition function. The motor could run free without FSTP signals.
0~1
21 JOG Operation Command Set the operation speed command for JOG control mode.
-3000~3000
r/min
22 Speed Command selection
0: choose the internal value of the speed as the command. You could choose different inside value as the command by setting SC1 and SC2.
SC1 OFF,SC2 OFF:Internal speed command 1
0~1

Hirden AC Servo Drive
52
SC1 ON, SC2 OFF:Internal speed command 2 SC1 OFF,SC2 ON: Internal speed command 3 SC1 ON, SC2 ON: Internal speed command 4
1: choose the analog signal as the source of the speed command.
23 Alarm level selection
If PA23=200, the Alarm signal will be ON when error occurs. If PA23≠200, the signal will be OFF when error occurs.
0~3000
24 1st Speed Command
When PA4=1 and PA22=0, the value of the parameter PA24 is the source of the speed command if SC1 and SC2 are OFF.
-3000~3000r/min
25 2nd Speed Command
When PA4=1 and PA22=0, the value of the parameter PA24 is the source of the speed command if SC1 is ON and SC2 is OFF.
-3000~3000r/min
26 3rd Speed Command
When PA4=1 and PA22=0, the value of the parameter PA24 is the source of the speed command if SC1 is OFF and SC2 is ON.
-3000~3000r/min
27 4th Speed Command
When PA4=1 and PA22=0, the value of the parameter PA24 is the source of the speed command if SC1 and SC2 are ON.
-3000~3000r/min
28 Target Motor Speed
Set the speed-reached value. In all control mode excepting position control mode, if the motor feedback speed is larger than the value of the parameter, the SCMP signal would be ON, otherwise SCMP would be OFF.
0~3000 r/min
29 Analog Torque Command Gain
Set the proportional relationship between analog input voltage and the value of torque command. Only in the torque control mode, the function is effective. The unit is 0.1V/100%. The default is 30, which means that the value of the torque command would be set to 100% rate torque when the value of the voltage is 3V.
10~100 (0.1V/100
%)
30 Reserved
31 Pulse Logic Function Selection
When the value of the parameter is 167, the input circuit logic is positive logic. Otherwise if PA31=179, the logic would be negative.
32 Reserved
33 Direction of Torque Command
0:The direction of the torque is CCW when analog voltage is bigger than 0. 1:The direction of the torque is CW when analog voltage is bigger than 0.
0~1
34
Internal CCW Torque Command Limit
The value of the parameter set in the drive is the maximum torque provided by the motor in CCW direction. It’s effective in all control mode, and the defaults is 200%.
0~300%
35
Internal CW Torque Command Limit
The value of the parameter set in the drive is the maximum torque provided by the motor in CW direction. It’s effective in all control mode, and the defaults is 200%.
-300~0%
36
External CCW Torque Command Limit
The value is the maximum torque provided by the motor in CCW direction.The function could be enabled by pin-16 (FIL) of terminal CN2. When FIL is on, the function of PA36 is effective. Otherwise the torque of the motor could not be limited in CCW direction by PA36.
0~300%

Hirden AC Servo Drive
53
37
External CW Torque Command Limit
The value is the maximum torque provided by the motor in CW direction.The function could be enabled by pin-17 (RIL) of terminal CN2. When FIL is on, the function of PA36 is effective. Otherwise the torque of the motor could not be limited in CCW direction by PA37.
-300~0%
38
Torque Command Limit for JOG and Trial Run
The value is the maximum torque provided by the motor when the operation mode is JOG. The function of internal or external torque limit is effective at the same time.
0~300%
39
Zero-offset Compensation for Torque Command
The value is the bias compensation for the analog signal of torque command.
-2000~ 2000
40 Acceleration Time
The value is the acceleration time for motor from 0 to 1000r/min and the process is linear. The function is effective only in speed control mode.
1~10000mS
41 Deceleration Time
The value is the deceleration time for motor from 0 to -1000r/min and the process is linear. The function is effective only in speed control mode.
1~10000mS
42 Accel/Decel S-curve
S-curve filter is for the speed smoothing of motion command. The value is the acceleration or deceleration time for the S-curve.
1~10000mS
43 Analog Speed Command Gain
Set the proportional relationship between analog input voltage and the speed command. Only when PA4=1 and PA22=1, the function is effective. The unit is r/(min*V). The default is 300, which means that the value of the speed command would be set to 3000r/min when the value of the voltage is 10V.
10~3000 r/min/V
44 Direction of Speed Command
Select the direction for the external speed command. 0: When the voltage of the external speed command is positive, the speed direction is CCW. 1: When the voltage of the external speed command is positive, the speed direction is CW.
0~1
45
Zero-offset Compensation for Analog Speed Command
The value is the bias compensation for the analog signal of speed command.
-2000~2000
46 Low-pass Fliter for Speed Command
The value is the time contant of the low-pass filter for the analog speed command. The value is larger, the responsiveness is slower and thenosie is smaller. And then if the value is smaller, the responsiveness would be faster and the nosie may be larger. The function is effective only in the following conditions. 1. PA4=4 and PA22=1. 2. PA4=2.
0~1000ms
47
On Delay Time of Electromagneti-c Brake
The value is the delay time for the electromagnetic brake turning on.
0~200 ×10mS
48 Off Delay Time of
The value is the delay time for the electromagnetic brake turning off.
0~200 ×10mS

Hirden AC Servo Drive
54
Electromagnetic Brake
49
Target Speed for Turning off Electromagneti-c Brake
When the motor is running, if the servo on signal turn off or error occurs, the BRK siganl will turn off when the feedback speed is slower than the value of the parameter. The actual delay time is chosed between PA48 and the operation time of PA49.
0~3000 r/min
50 Sampling Gain for Bus Voltage
The value is the linear gain for DC Bus voltage sampling signal.The value is prohibited to be modified.
51
Dynamic Electronic Gear Function Selection
0: the function is disabled. 1: the function is effective. And the servo will chose PA12/PA13 as the electronic gear ratio when INH is Off, but when INH is on, PA52/PA13 would be chosed.
0~1
52
Electronic Gear Ratio (Numerator) N2
The value is the numerator of the 2nd electronic gear ratio. And the denominator of the both electronic gear ratios is the same.
1~32767
53
Digital Input Terminals Function Selection / Enabled Word 1
Enable the function of the external signal. The value 1 means the function is effective such as the function signal is ON. And the value 0 means the function is noneffective such as the signal is off. If the function is enbaled by bit of PA53, the status of the signal would be noneffective. The PA53 is represented by a 4-digit binary number as the following.
Bit 3 Bit 2 Bit 1 Bit 0 RSTP PSTP ALRS SON
Bit 0 SON: Servo enable. (Pin-10 of CN2) Bit 1 ALRS:Alarm clear. (Pin-11 of CN2) Bit 2 FSTP:Forward software limit. (Pin-12 of CN2) Bit 3 RSTP:reverse software limit. (Pin-13 of CN2)
54
Digital Input Terminals Function Selection or Enabled Word 2
It’s the same as the PA53. If the function is enbaled by bit of PA53, the status of the signal would be noneffective. The PA53 is represented by a 4-digit binary number as the following. Bit 3 Bit 2 Bit 1 Bit 0 RIL FIL 1NH/SC2 CLE/SC1/ZEROSPD
Bit 0 CLE/SC1/ZEROSPD: Pin-14 of CN2 Bit 1 INH/SC2: Pin-15 of CN2 Bit 2 FIL: Pin-16 of CN2 Bit 3 RIL: Pin-17 of CN2
0000~111
55 Curret Sampling Gain
The value is the linear gain for output current sampling signal.The value is prohibited to be modified. 0~1000
56 Reserved 57 Reserved
58 Input Terminal Delay Time
The time contant for anti-shaking function of the input terminal. 1~1000ms

Hirden AC Servo Drive
55
1.Code list of the AC Servo for adaptive motor
Code Motor Model Power (Kw)
Torque (N.m)
Rated speed (rpm)
Rated current (A)
22 60ST-M00630 0.2 0.64 3000 1.2 23 60ST-M01330 0.4 1.27 3000 2.8 24 60ST-M01930 0.6 1.91 3000 3.7 25 80ST-M01330 0.4 1.3 3000 2.6 26 80ST-M02430 0.75 2.4 3000 4.2 27 80ST-M03330 1 3.3 3000 4.2 30 MG80ST-M04025 1 4 2500 4.4 31 MG90ST-M02430 0.75 2.4 3000 3 32 MG90ST-M03520 0.75 3.5 2000 3 33 MG90ST-M04025 1 4 2500 4 34 110ST-M02030 0.6 2 3000 4 35 110ST-M04030 1.2 4 3000 5 36 110ST-M05030 1.5 5 3000 6 37 110ST-M06020 1.2 6 2000 6 38 110ST-M06030 1.8 6 3000 8 44 130ST-M04025 1.0 4 2500 4 45 130ST-M05025 1.3 5 2500 5 46 130ST-M06025 1.5 6 2500 6 47 130ST-M07720 1.6 7.7 2000 6 48 130ST-M07730 2.4 7.7 3000 9 49 130ST-M10015 1.5 10 1500 6 50 130ST-M10025 2.6 10 2500 10 51 130ST-M15015 2.3 15 1500 9.5 52 130ST-M12020 2.4 12 2000 10
Others 110ST-M04030 1.2 4 3000 5
NOTE:
1. The parameter for moter code is PA1.The default motor code is set for 110ST-M04030 by 35. If you need to change
the motor code PA1,you should set PA0 to 302 firstly.Secondly set PA1 to the code for the motor which you use
according to the list. At last you need to save the parameters that you change.(You can read the chapter 4 to know how
to save the parameters).The parameter PA1 will take effect by restart.
2. Code 22, 23 and 24 are applied to Hirden 60ST series motor only. If your motor is not produced by Hirden,please
refer to chapter 3.
3. There are two types of the rotate direction for the encoder of the servo motor.The default type of Hirden servo drive
and motor is same as the Delta’s.Please makesure the type of the rotate direction for your motor, or contact your local
Hirden sales representative.
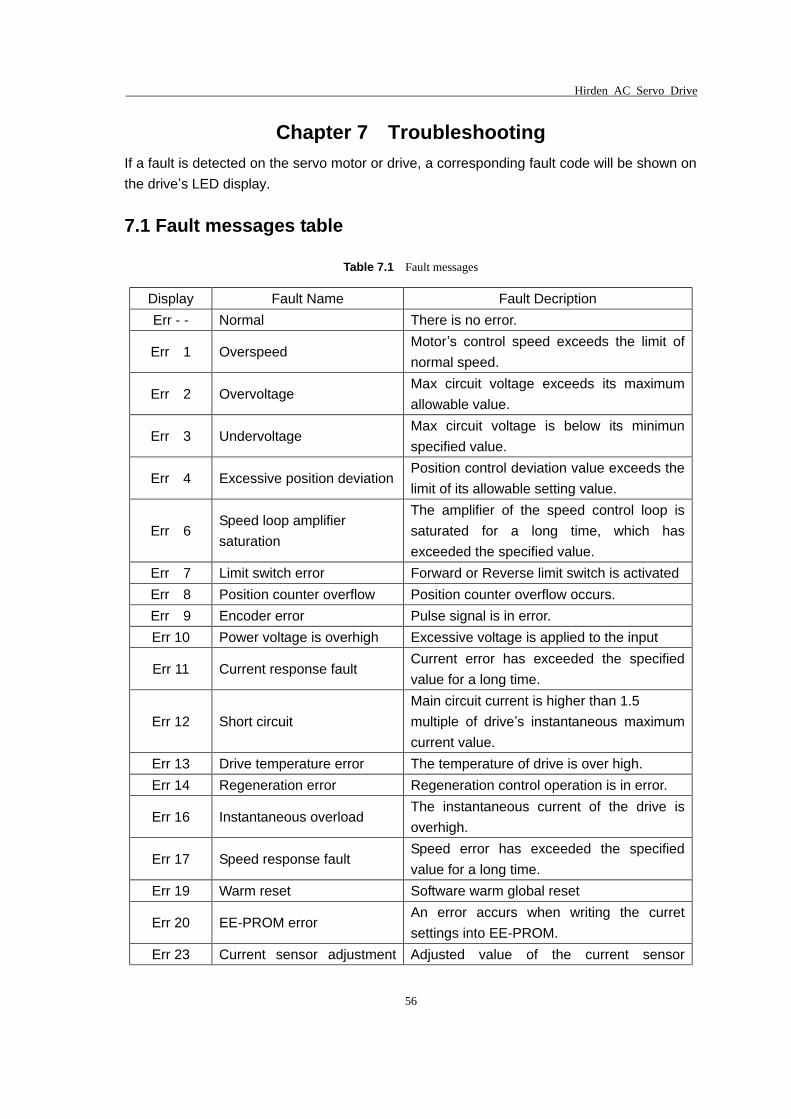
Hirden AC Servo Drive
56
Chapter 7 Troubleshooting If a fault is detected on the servo motor or drive, a corresponding fault code will be shown on the drive’s LED display.
7.1 Fault messages table
Table 7.1 Fault messages
Display Fault Name Fault Decription Err - - Normal There is no error.
Err 1 Overspeed Motor’s control speed exceeds the limit of normal speed.
Err 2 Overvoltage Max circuit voltage exceeds its maximum allowable value.
Err 3 Undervoltage Max circuit voltage is below its minimun specified value.
Err 4 Excessive position deviation Position control deviation value exceeds the limit of its allowable setting value.
Err 6 Speed loop amplifier saturation
The amplifier of the speed control loop is saturated for a long time, which has exceeded the specified value.
Err 7 Limit switch error Forward or Reverse limit switch is activated Err 8 Position counter overflow Position counter overflow occurs. Err 9 Encoder error Pulse signal is in error. Err 10 Power voltage is overhigh Excessive voltage is applied to the input
Err 11 Current response fault Current error has exceeded the specified value for a long time.
Err 12 Short circuit Main circuit current is higher than 1.5 multiple of drive’s instantaneous maximum current value.
Err 13 Drive temperature error The temperature of drive is over high. Err 14 Regeneration error Regeneration control operation is in error.
Err 16 Instantaneous overload The instantaneous current of the drive is overhigh.
Err 17 Speed response fault Speed error has exceeded the specified value for a long time.
Err 19 Warm reset Software warm global reset
Err 20 EE-PROM error An error accurs when writing the curret settings into EE-PROM.
Err 23 Current sensor adjustment Adjusted value of the current sensor

Hirden AC Servo Drive
57
error exceeds the limit of its allowable setting value when perform electrical adjustment.
Err 29 Overload for motor Servo motor is overload. Err 30 Pulse Z error The pulse Z of the encoder is lost.
Err 32 U,V,W error The wiring connections of U,V,W (for encoder interface) are in error
Err 34 OT The ambient temperature is over high. Err 35 UT The ambient temperature is ultralow.
Err 36 Over curret The main circuit current of the drive is higher than 2 multiple of the rated current.
Err 37 Instantaneous overload for motor
The instantaneous load of the motor is heavier than 1.5 multiple of motor’s maximum load value..
Err 38 Motor temperature error The motor is overload for a long time. Err 5,15,21,22,25,26,27,28,31,33 Reserved

Hirden AC Servo Drive
58
7.2 Potential Cause and Corrective Actions
“Err xx” would be shown on the display, when some error occurs (xx is the alarm code ). Some errors are common, such as Err 3, Err 6, Err 9, Err 11, Err 13, Err 17 and Err 38, which may be caused by wiring or opration error. Gernerally, you could restart the servo to clear the alarm and then the servo may work normally. But if after re-powering the error still exists or the alarm occurs frequently, you could refer to the following actions and if necessary you could contact your local Hirden sales representativ.
Table 7.2 Corrective actions for trouble shooting
Code Fault Name Cause Corrective Actions
Improper input instrucion pulse
Check the pulse frequency and the electronic gear ratio
Decrease the load inertia The load inertia is too large.
Increase the Accel/Decel time
Encoder fault Replace the motor
Encoder cable fault Replace the cable
Err01 Overspeed
The max. speed setting error Modify or recover the parameter
Servo drive default Replace the drive
The power voltage is too high Err02 Overvoltage The power waveform is abnormal
Check the power supply.
Servo drive default Replace the drive
The power voltage is too low. Check the power supply.
Transformer capacity is not enough.
Replace the transformer by a larger one
Err03 Undervoltage
The cable is loose Check and fix the cable
Encoder fault Replace the motor The rigidity is not enough Increase the PA5 and PA9
Check the funciton for torque limit Decrease the load
The output torque of motor is not enough.
Replace the motor and drive. Err04
Excessive position deviation
The pulse frequency is inapplicable
Decrease the frequency.

Hirden AC Servo Drive
59
Decrease the load The load is too large.
Replace the motor and servo
The motor is stuck Check the mechanical structure Err06
Speed loop Amplifier saturation
Motor fault Replace the motor
FSTP or RSTP is OFF Check the digital input signal Err07 Limit switch error
Inhibition function is enabled Disable the function
The motor is stuck Check the mechanical structure Err08
Position counter overflow Pulse signal is abnormal Check the pulse signal
Encoder fault Replace the motor
Encoder cable fault Replace the cable Err09 Encoder error
The encoder cable is too long Please shorten the cable or bold the core
Err10 Power voltage is overhigh
The voltage of the power supply is too high
Check the power source and ensure the voltage is normal.
Servo drive fault Replace the servo drive
Short-circuit between U, V and W
Check the wiring
Poorly grounded Confirm to be grounded normally Err11
Current response fault
Winding insulation of the motor is damaged
Replace the motor
Short-circuit between U, V and W
Check the wiring
The load is too heavy Replace the drive by a larger one
Servo motor fault Replace the motor Err12 Short circuit
Servo drive fault Replace the drive
Err13 Drive temperature error
Run for a long time with overload
Decrease the load or choose a larger drive.
Brake circuit fault Replace the drive
Increase the deceleration time Err14 Regeneration error The capacity of regeneration system is not enough Decrease the system inertia
Err16 Instantaneous overload
The load is too heavy Decrease the load or choose a larger drive.

Hirden AC Servo Drive
60
Output is short-circuited Check the motor and wiring
Parameter is set incorrectly Modify or recover the parameters
Interval time between start and stop is too short.
Set the Accel and Decel time correctly
Err17 Speed response fault
Wiring fault for U, V, W Confirm the wiring
Err19 Warm reset The power supply is instability Check wiring or replace the drive
Err20 EEPROM error Servo drive fault Replace the servo drive
Err23 Current sensor adjustment fault
Servo drive fault Replace the servo drive
The load is too heavy Decrease the load or choose a larger drive and motor.
Motor code is inapplicability choose a larger drive and motor. Err29 Overload for motor torque
Parameter is set incorrectly Modify or recover the parameters about motor code and torque.
Encoder fault Replace the servo motor
Encoder cable fault Replace the encoder cable Err30 Pulse Z error
Shielding ground fault Confirm interface and I/O circuit
Encoder fault Replace the servo motor
Cable or shielding fault Replace the cable Err32 U,V,W signal error for encoder
Encoder signal circuit fault Replace the drive
Err34 OT for IC The ambient temperature is too high
Decrease the ambient temperature
Err35 UT for IC The ambient temperature is too low
Increase the ambient temperature
Err36 Over curret The torque of load is too high Decrease the load or choose a larger servo drive and motor
The load is too high for motor Decrease the load or choose a larger motor
The motor is short-circuited Confirm the wiring and terminals Err37 Instantaneous overload for motor
The motor code is incorrectly Confirm the code parameter
The load torque is too high for motor
Decrease the load or choose a larger motor
Err38 Motor temperature error The motor code is set
incorrectly Confirm and modify the parameter

Hirden AC Servo Drive
61
Chapter 8 System connection
1. Diagram for “H” series servo drive connecting with KND host controller such as K100
NAME
DB15M:XS52,XS50,XS53,XS51
PIN
XCP+
XCP-
XDIR+
XDIR-
XPC+
XPC-
0V
0V
XMRDY2
XMRDY1
ALM
VP=+24V
FG
1
9
2
10
3
11
14
15
8
7
5
13
Shell
NAME
CN2 X/Y/Z/4:SCSI-36
PIN
32
33
34
35
5
6
25
27
10
26
18
36
PULS+
PULS-
SIGN+
SIGN-
OZ+
OZ-
SRDY-
ALM-
SON
ALM+
COM+
FG
0.2mm2 (shielded twisted pair cable)
VP=+24V 12 24 SRDY+
2. Diagram for “H” series servo drive connecting with KND host controller such as K10M
NAME
DB15M:XS52,XS50,XS53,XS51
PIN
XCP+
XCP-
XDIR+
XDIR-
XPC+
0V
ALM
XMRDY1
XMRDY2
0V
VP=24V
FG
1
9
2
10
3
15
5
7
8
14
13
NAME
CN2 X/Y/Z/4:SCSI-36
PIN
32
33
34
35
5
8
26
10
18
36
PULS+
PULS-
SIGN+
SIGN-
OZ+
ALM-
ALM+
SON
COM+
FG
27
GND
0.2mm2 (shielded twisted pair cable)
Shell

Hirden AC Servo Drive
62
3、Diagram for “H” series servo drive connecting with KND host controller such as K1
NAME
DB15M:XS52,XS50,XS53,XS51
PIN
XCP+
XCP-
XDIR+
XDIR-
XPC+
XPC-
0V
ALM
XMRDY1
XMRDY2
0V
VP=+24V
FG
1
9
2
10
3
11
14
5
7
8
15
13
Shell
NAME
CN2 X/Y/Z/4:SCSI-36
PIN
32
33
34
35
5
6
27
26
10
18
36
PULS+
PULS-
SIGN+
SIGN-
OZ+
OZ-
ALM-
ALM+
SON
COM+
FG
0.2mm2 (shielded twisted pair cable)
Host Controller Servo Drive
4、Connecting diagram for encoder cable between Hirden drive and motor
1
2
3
4
5
6
7
8
9
10
11
12
15
20
26 FG
0V
+5V
W-
W+
V-
V+
U-
U+
Z-
Z+
B-
B+
A-
A+ 4
7
5
8
6
9
10
13
11
14
12
15
2
3
1
PIN Name
FG
0V
+5V
W-
W+
V-
V+
U-
U+
Z-
Z+
B-
B+
A-
A+
CN1 of Servo Drive Motor Terminal
PIN Name
Hirden AC Servo Drive
63
Version history
Version Published time 1.0 2011.10 2.0 2012.11
Ningbo Hirden Industrial Control System Co,.Ltd Zhouhan village Jiangshan Town, Yinzhou District Ningbo, Zhejiang 315040, China Tel: 0574-88073813 / 83013289 Fex: (86) 0574-88099288-3813
2012.11

Hirden AC Servo Drive
64
Pirated reserved This page intentionally left blank.