high wind echnical uar - home - ibhsdisastersafety.org/.../10/fortified-home-high-wind... ·...
TRANSCRIPT

TECHNICAL SUMMARY
TM
HIGH WIND
2015
EXISTING HOMES

Page 1 of 8
FORTIFIED HOME™ Technical Requirements
Existing Home
INTRODUCTION This FORTIFIED Home™ standard addresses high winds (defined as locations where the design wind speed is equal to or less than 90 mph as determined in ASCE7-05, or 115 mph as determined in ASCE7-10) common in inland communities. The primary goal is to strengthen homes to reduce roof and other forms of property damage, disruption and loss of use caused by severe thunderstorms, straight-line wind events, and high winds at the edges of tornadoes.
For more detailed information about how to make your home stronger, safer and more resistant to high winds, please visit DisasterSafety.org/FORTIFIED. You can also follow us on Twitter at @DisasterSafety and on Facebook at www.facebook.com/buildfortified.
FORTIFIED Home™ Eligible Dwellings To be eligible for a FORTIFIED Home™–High Wind Designation, a home must be a single-family detached home installed on a permanent foundation. New and existing homes may qualify.
The following is a list of property types that are eligible for a FORTIFIED Home™–High Wind Designation:
1. Single-family site-built homes 2. HUD Zone 2 & Zone 3 single-family manufactured homes installed on
qualified permanent foundations 3. Factory-built modular homes installed on qualified permanent foundations
Available Designations FORTIFIED Home™–High Wind Bronze – New Roof FORTIFIED Home™–High Wind Bronze – Existing Roof FORTIFIED Home™–High Wind Silver – New Roof FORTIFIED Home™–High Wind Silver – Existing Roof FORTIFIED Home™–High Wind Gold – New Roof FORTIFIED Home™–High Wind Gold – Existing Roof
Designation Term Limit The FORTIFIED Home™–High Wind Bronze, Silver and Gold Designations are valid for 5 years. Designations expire on March 31 following the fifth anniversary of the awarding of the designation. Homes may be redesignated for an additional 5-year term by having a redesignation inspection. The

Page 2 of 8
FORTIFIED HOME™ Technical Requirements
Existing Home
redesignation inspection focuses on the roof covering and any substantive changes to systems covered under the FORTIFIED Home™ program. Homeowners will receive a notice when a redesignation is required.

Page 3 of 8
FORTIFIED HOME™ Technical Requirements
Existing Home
Hazard: High Wind (HW) Applicable where the design wind speed is equal to or less than 90 mph as determined in ASCE7-05, or 115 mph as determined in ASCE7-10.
Construction Type: Existing residential, single-family detached
Note: Some details have been left out to simplify the summarized descriptions below. Full descriptions of material and installation requirements can be found in the FORTIFIED Home™–High Wind Standards 2015 edition or in related Technical Bulletins that can be found online at DisasterSafety.org/FORTIFIED.
FORTIFIED Home™–HW Bronze Requirements:
• Roof deck must be a minimum of 3/8-in. OSB or plywood for Bronze or Silver designation. For Gold designation, roof deck must be 7/16-in. OSB or plywood.
• Roof deck must be attached properly:
o Minimum 8d smooth shank nails, spaced nominally at 6 in. o.c. along the edges and in the field for Bronze and Silver, or 4 in. o.c. for Gold.
OR
o 8d ring shank nails at 6 in. o.c. along panel edges and 12 in. o.c. in the field for Bronze and Silver, or 6 in. o.c. along all framing members for Gold.
Existing Roof
The FORTIFIED Home™–High Wind & Hail Bronze – Existing Roof provides prescriptive methods to create a qualified roof without requiring roof covering replacement on an existing home. This approach may be used when the following conditions are met: • The existing roof cover is high-wind rated. Documentation is
required and must include: o Name of the installer o Year of installation

Page 4 of 8
FORTIFIED HOME™ Technical Requirements
Existing Home
o Roof covering manufacturer o Product or model number o Wind or wind pressure rating
• The existing roof cover does not show visible signs of damage or deterioration.
• Only one layer of roof covering is present.
• The existing roof cover has at least five years of useful life remaining.
• There is adequate access to the attic to allow application of closed-cell spray urethane-based foam adhesives along joints between roof sheathing and roof framing members, as well as along all seams between roof sheathing elements.
If roof deck attachment does not meet roof deck attachment requirements listed above and/or the roof deck is not sealed with a qualified method, the application of a closed-cell foam adhesive from inside the attic will be required. See detailed requirements below: • To provide enhanced roof sheathing attachment and to seal the
roof deck, apply a 1.5- to 3-in. fillet of 2-part spray-applied polyurethane foam adhesive to:
o All joints between sheathing o All intersections between roof sheathing and roof framing
members o All valleys
Use the minimum density and installation requirements prescribed by the manufacturer to meet a minimum Design Uplift Pressure of 80 psf on the sheathing.
If the Existing Roof conditions listed above are not met, the roof cover must be replaced. When the existing cover is removed, the roof deck must be sealed with a qualified system.
New Roof (sealed roof deck methods)
o Method 1—Tape roof seams between roof sheathing. There are two material options for taping the seams on the roof deck.
Option 1: Apply an ASTM 1970 compliant self-adhering polymer-modified bitumen flashing tape, at least 4 in. wide, directly to the roof deck to seal the horizontal and vertical joints in the roof deck.
Page 5 of 8
FORTIFIED HOME™ Technical Requirements
Existing Home
Option 2: Apply an AAMA 711-13, Level 3 (for exposure up to 80°C/176°F) compliant self-adhering flexible flashing tape, at least 3¾ in. wide, directly to the roof deck to seal the horizontal and vertical joints in the roof deck.
All flashing tape used to achieve a sealed roof deck must be fully adhered without voids (e.g., wrinkles) in order to be accepted. Do not nail or staple the tape to the roof sheathing. Refer to the manufacturer’s requirements for installation as some tapes may require installation over primer. Next, apply a code-compliant #30 ASTM D226 Type II underlayment over the self-adhering tape. This underlayment must be attached using annular ring or deformed shank roofing fasteners with minimum 1-in-diameter caps (button cap nails) at 6 in. o.c. spacing along all laps and at 12 in. o.c. in the field or a more stringent fastener schedule if required by the manufacturer for high-wind installations. Horizontal laps must be a minimum of 2 in. and end laps must be a minimum of 6 in.
o Method 2—Cover the entire roof deck with a full layer of self-adhering polymer-modified bitumen membrane meeting ASTM D1970 requirements. Cover the membrane with a layer of #15 ASTM D226 Type I underlayment over the fully adhered membrane as a bond break when the roof cover is asphalt shingles.
o Method 3—Apply a reinforced synthetic roof underlayment which has an ICC approval as an alternate to ASTM D226 Type II felt paper. The synthetic underlayment must have minimum tear strength of 20 lb per ASTM D1970 or ASTM D4533. This underlayment must be attached using annular ring or deformed shank roofing fasteners with minimum 1-in-diameter caps (button cap nails) at 6 in. o.c. spacing along all laps and at 12 in. o.c. in the field or a more stringent fastener schedule if required by the manufacturer for high-wind installations and prolonged exposure. Horizontal laps must be a minimum of 2 in. and end laps shall be 6 in. and all laps must be sealed with a compatible tape or mastic unless the horizontal laps are increased to 19 in.
o Method 4—Install two (2) layers of ASTM D 226 Type II (#30) or ASTM D 4869 Type IV (#30) underlayment in a shingle-fashion, lapped 19 in. on horizontal seams (36-in. roll), and 6 in. on vertical seams. Fasten underlayment at approximately 6 in. o.c. along the laps and at approximately 12 in. o.c. in the field of the

Page 6 of 8
FORTIFIED HOME™ Technical Requirements
Existing Home
sheet between the side laps. Secure underlayment using annular ring or deformed shank nails with 1-in-diameter caps (button cap nails).
• A drip edge must be installed with 3-in. laps and fastened at 12 in. o.c. spacing.
• Shingle roof coverings must be high-wind rated, ASTM D3161 (Class F) or ASTM D7158 Class G or H. (For details on other roof covering types, refer to FORTIFIED Home™–High Wind 2015 Edition.)
• All other roof materials must be rated for minimum design wind speeds and exposure classification (ASCE 7-05 design wind speed V = 110 mph and Exposure B; ASCE 7-10 design wind speed Vult = 140 mph and Exposure B).
FORTIFIED Home™–HW Silver Requirements:
• All Bronze requirements must be satisfied.
• Gable walls must have minimum of 3/8-in. sheathing.
• Gable overhangs must not be vented.
• Gable end walls must be braced.
• Porches and carports must have adequate connections from the roof framing to the beam/wall, from beam to column and column to structure below.
• Chimneys must be adequately connected to the roof structure.
FORTIFIED Home™–HW Gold Requirements:
• All Bronze and Silver requirements must be satisfied.
• Garage doors meet design pressures associated with 110 mph ASCE 7-05 (140 mph ASCE 7-10) design wind speeds.
• Continuous Load Path (CLP) engineering-based design based on the following minimum design wind speeds and exposure classification (ASCE 7-05 design wind speed V = 110 mph and Exposure B; ASCE 7-10 design wind speed Vult = 140 mph and Exposure B).
In an existing home, it can be very difficult to determine if a home has a continuous load path, and if it does, that the load path meets FORTIFIED

Page 7 of 8
FORTIFIED HOME™ Technical Requirements
Existing Home
Home™ requirements. This is due in large part to the fact that many of the connections required to develop a continuous load path are concealed by finished materials (including but not limited to drywall, trim boards, or exterior cladding like siding, stucco or brick). Additionally, it is extremely rare for homes to be designed by an engineer except in high seismic areas or in certain areas subject to hurricane winds because this type of design is not required in order to obtain a building permit. Therefore, for an existing home, it is necessary to have an analysis performed by a licensed structural engineer, who can then provide a professional opinion about whether an adequate continuous load path exists. This continuous load path analysis must be based on providing connections to resist pressures using 110 mph 3-second gust (ASD) design wind loads for terrain exposure B.
If the engineer determines retrofitting is required to meet FORTIFIED Home™ standards, the engineer will need to provide a retrofit design providing connections to resist wind pressures and resulting loads using 110 mph 3-second gust (ASD) design wind loads for terrain exposure B.
The engineer’s opinion and/or design must provide construction documents prepared by the professional engineer and indicate:
Design wind speed, exposure category, mean roof height
Verification of roof, ceiling and floor framing
Number of stories
Design of load path from roof to wall and/or specific details indicating method of connection
Design of load path from upper floors to lower floors and/or specific details indicating method of anchorage of wall above to wall below
Design of load path from lowest wall to foundation and/ or specific details indicating method of connection
Foundation design that is adequate for wind uplift and lateral loads
The design specifics will be recorded on the Continuous Load Path Compliance Form – Engineering (CLP 1). In addition, the contractor installing the connections specified by the engineer of record will need to complete the Continuous Load Path Compliance Form – Installation (CLP 2). Blank copies of compliance forms can be obtained from IBHS or a Certified FORTIFIED Home™ Evaluator.
Page 8 of 8
FORTIFIED HOME™ Technical Requirements
Existing Home
NOTICE: ALL OF THE ABOVE MUST BE DOCUMENTED PRIOR TO BEING CONCEALED BY FINISHED MATERIALS. TAKE PHOTOGRAPHS OF THE IMPROVEMENTS WHILE THE HOME IS BEING UPGRADED. A COMPLETE PHOTO FILE SHOULD BE PRESENTED TO THE FORTIFIED EVALUATOR WORKING ON THE PROJECT.
Compliance forms from a structural engineer will be required to satisfy the documentation requirements for outlooker framing, gable framing and bracing, porch/carport connections, chimney connections and load path design, if prescriptive designs provided in the FORTIFIED Home–High Wind Standards are not used. When prescriptive designs are used, compliance forms from the installing contractor(s) and photographs are required. Blank copies of these forms can be obtained from IBHS or your FORTIFIED Evaluator.
FORTIFIED ENGINEERING STANDARDS TB 2015-01 1 of 2
Sealed Roof Deck
Bulletin No. 2015-01
First Release: March 19, 2015
Prepared by: Fred Malik, Vice President, FORTIFIED Programs
Applicable Standards: FORTIFIED Home™–Hurricane FORTIFIED Home™–High Wind FORTIFIED Home™–High Wind & Hail FORTIFIED for Safer Living™
Applicable Designation Level:
Revised 1/20/2017
Installation of 2 Layers of #30 Felt as a Qualified Sealed Roof Deck System for Asphalt Shingle or Metal Roofing Abstract The installation of 2 layers of #30 roofing felt has been tested, evaluated and approved by IBHS as a qualified sealed roof deck system for asphalt shingle or metal roofing.
Requirements • Two (2) layers of ASTM D226 Type II (#30) or ASTM D4869
Type III or Type IV (#30) underlayment shall be installed in a shingle fashion, lapped 19 in. on horizontal seams (36-in. roll), and 6 in. on vertical seams. o NOTE: Be sure to check product labeling carefully.
Not all products labeled ASTM D4869 are Type III or Type IV. Look for ASTM D4869 felt that is labeled Type III or Type IV. ASTM D4869 Type I or Type II will NOT be accepted.
• Installation of first course of felt to be installed as described below and shown in Figure 1. o Cut 17 in. off one side of the roll and install the
remaining 19-in.-wide strip of underlayment* along the eave. Safely tack in place. Carefully install a 36-in.-wide roll of underlayment* over the 19-in.-wide course of underlayment along the eave. Follow the same procedure for each, overlapping the sheets 19 in. (leaving a 17-in. exposure). Fasten with one row in the field of the sheet at 12 in. o.c. and one row at the overlaps fastened 6 in. o.c.
• Fasten underlayment at approximately 6 in. o.c. along the laps and at approximately 12 in. o.c. in the field of the sheet between the side laps. o For design wind speeds less than 140 mph (ASCE 7-
05): secure underlayment using annular ring or deformed shank nails with 1-in.-diameter caps (button cap nails).
*Must use ASTM D226 Type II (#30) or ASTM D4869 Type III or Type IV (#30) underlayment.

FORTIFIED ENGINEERING STANDARDS TB 2015-01 2 of 2
Sealed Roof Deck
Bulletin No. 2015-01
First Release: March 19, 2015
Prepared by: Fred Malik, Vice President, FORTIFIED Programs
Applicable Standards: FORTIFIED Home™–Hurricane FORTIFIED Home™–High Wind FORTIFIED Home™–High Wind & Hail FORTIFIED for Safer Living™
Applicable Designation Level:
Revised 1/20/2017
o For design wind speeds 140 mph or greater (ASCE 7-05): secure underlayment using annular ring or deformed shank nails with thin metal disks (“tincaps”).
Compliance Verification Requirements This method of sealing the roof deck is to be documented and verified by a certified FORTIFIED evaluator. Acceptable documentation includes but is not limited to: pictures of laps and fasteners at 4 different locations of the roof; a completed Roof Compliance Form (RCF-1); certification by the installer; bills of lading; invoices; and product packaging.
Completing Evaluation Form (For FORTIFIED Evaluators Only) On the evaluation form, in the “Sealed Roof Deck” section, for question SRD System Type, select “Other” (see Figure 2 below). It will be necessary to provide documentation as described above.
Figure 2. Evaluation Form; Section—Sealed Roof Deck; Question—SRD System Type?

FORTIFIED ENGINEERING STANDARDS TB 2015-02 1 of 4
Sealed Roof Deck
Bulletin No. 2015-02
First Release: July 31, 2015
Prepared by: Fred Malik, Vice President, FORTIFIED Programs
Applicable Standards: FORTIFIED Home™–Hurricane FORTIFIED Home™–High Wind FORTIFIED Home™–High Wind & Hail FORTIFIED for Safer Living™
Applicable Designation Level:
Revised 8/24/2016
Material Options for Taping Roof Deck Seams Abstract The material options for taping the seams of the roof deck have been expanded to include AAMA 711-13, Level 3 (for exposure up to 80°C/176°F).
Requirements There are two material options for taping the seams on the roof deck.
Option 1 ___ Apply an ASTM 1970 compliant self-adhering polymer-modified bitumen flashing tape, at least 4-in. wide, directly to the roof deck to seal the horizontal and vertical joints in the roof deck.
Option 2 ___
Apply an AAMA 711-13, Level 3 (for exposure up to 80°C/176°F) compliant self-adhering flexible flashing tape, at least 3¾-in. wide, directly to the roof deck to seal the horizontal and vertical joints in the roof deck. Any flashing tape used to achieve a sealed roof deck must be fully adhered without voids (e.g., wrinkles) in order to be accepted. In some instances, the ability of self-adhered flashing tapes to adhere to Oriented Strand Board (OSB) sheathing may be compromised by the level of surface texture or the wax used to improve the water resistance of the OSB panel. In applications where flashing tape adhesion to OSB is marginal, apply a manufacturer-specified compatible primer to the OSB panels where the tape will be applied to ensure the proper attachment of the self-adhering tape to the sheathing. Do not nail or staple the tape to the roof sheathing. Refer to the manufacturer’s recommendations for installation and primer requirements (if applicable). Next, apply a code-compliant #30 ASTM D226 Type II or ASTM D4869 Type IV underlayment over the self-adhering tape. This underlayment must be attached using annular ring or

FORTIFIED ENGINEERING STANDARDS TB 2015-02 2 of 4
Sealed Roof Deck
Bulletin No. 2015-02
First Release: July 31, 2015
Prepared by: Fred Malik, Vice President, FORTIFIED Programs
Applicable Standards: FORTIFIED Home™–Hurricane FORTIFIED Home™–High Wind FORTIFIED Home™–High Wind & Hail FORTIFIED for Safer Living™
Applicable Designation Level:
Revised 8/24/2016
deformed shank roofing fasteners with minimum 1-in.-diameter caps (button cap nails) at 6 in. o.c. spacing along all laps and at 12 in. o.c. in the field or a more stringent fastener schedule if required by the manufacturer for high-wind and prolonged exposure installations. Horizontal laps must be a minimum of 2 in. and end laps must be a minimum of 6 in.
Figure 0-1. Minimum photograph requirement and locations (Front, Rear, Left and Right).
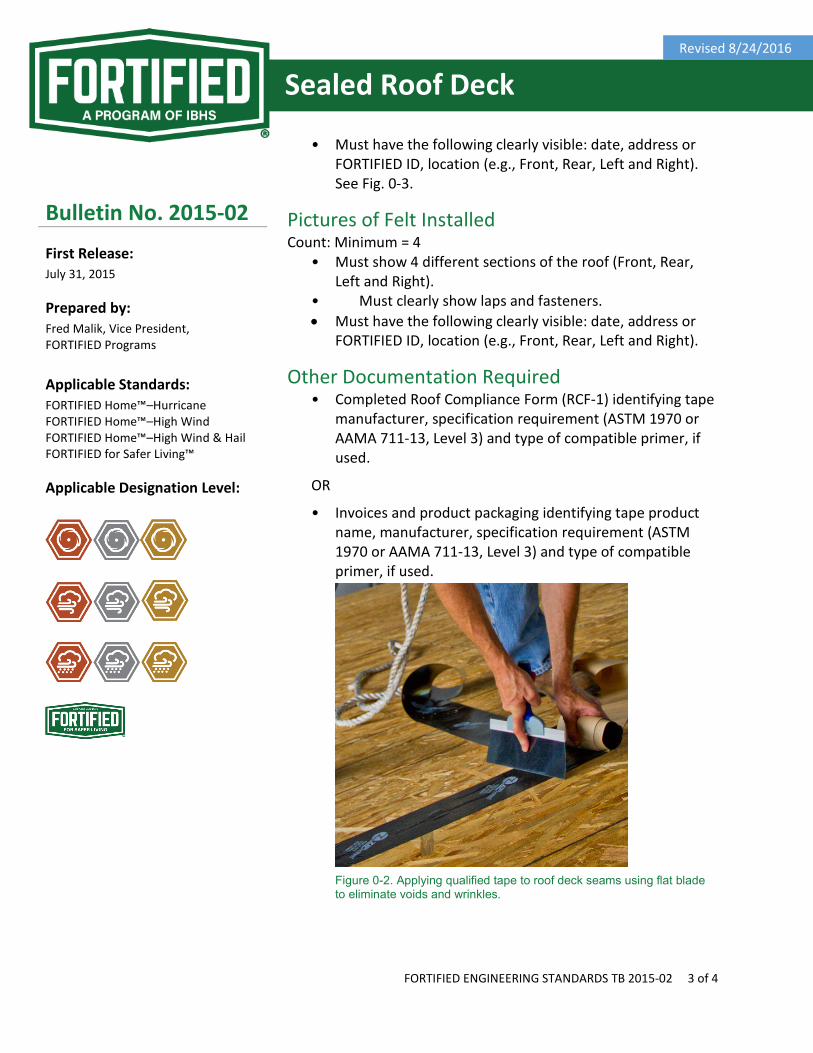
Compliance Verification Requirements This method of sealing the roof deck is to be documented and verified by a certified FORTIFIED Evaluator. Acceptable documentation includes, but is not necessarily limited to:
Pictures of Tape Installed Count: Minimum = 4
• Must show 4 different sections of the roof (Front, Rear, Left and Right). See Fig. 0-1.
• Must clearly show tape fully adhered to the deck without wrinkles or voids. See Fig. 0-2.
• Must show at least one full sheet of roof decking (with all 4 seams taped) per photo.
• Must be in focus.
Note: Although 4 photographs is the minimum number of pictures required, the goal is to achieve a
360° view of the house and FORTIFIED upgrades. Most
photographs will be taken from the ground and site conditions may
dictate that more than the minimum be provided.
FORTIFIED ENGINEERING STANDARDS TB 2015-02 3 of 4
Sealed Roof Deck
Bulletin No. 2015-02
First Release: July 31, 2015
Prepared by: Fred Malik, Vice President, FORTIFIED Programs
Applicable Standards: FORTIFIED Home™–Hurricane FORTIFIED Home™–High Wind FORTIFIED Home™–High Wind & Hail FORTIFIED for Safer Living™
Applicable Designation Level:
Revised 8/24/2016
• Must have the following clearly visible: date, address or
FORTIFIED ID, location (e.g., Front, Rear, Left and Right). See Fig. 0-3.
Pictures of Felt Installed Count: Minimum = 4
• Must show 4 different sections of the roof (Front, Rear, Left and Right).
• Must clearly show laps and fasteners. • Must have the following clearly visible: date, address or
FORTIFIED ID, location (e.g., Front, Rear, Left and Right).
Other Documentation Required • Completed Roof Compliance Form (RCF-1) identifying tape
manufacturer, specification requirement (ASTM 1970 or AAMA 711-13, Level 3) and type of compatible primer, if used.
OR
• Invoices and product packaging identifying tape product name, manufacturer, specification requirement (ASTM 1970 or AAMA 711-13, Level 3) and type of compatible primer, if used.
Figure 0-2. Applying qualified tape to roof deck seams using flat blade to eliminate voids and wrinkles.

FORTIFIED ENGINEERING STANDARDS TB 2015-02 4 of 4
Sealed Roof Deck
Bulletin No. 2015-02
First Release: July 31, 2015
Prepared by: Fred Malik, Vice President, FORTIFIED Programs
Applicable Standards: FORTIFIED Home™–Hurricane FORTIFIED Home™–High Wind FORTIFIED Home™–High Wind & Hail FORTIFIED for Safer Living™
Applicable Designation Level:
Revised 8/24/2016
Figure 0-3. Labeling of roof deck to identify project and photo location.
Completing Evaluation Form When completing the Sealed Roof Deck section of a FORTIFIED Home Evaluation form, select SRD System Type as shown in Fig. 0-4. Add photos and other documentation by clicking on the camera icon. Figure 0-4. Selection for SRD system type.
SRD System Type? 4” wide roof flashing tape over all horiz and vert roof deck joints covered by 30# or synthetic underlayment over the entire roof deck

FORTIFIED ENGINEERING STANDARDS TB 2015-03 1 of 5
Garage Doors
Bulletin No. 2015-03
First Release: September 25, 2015
Prepared by: Fred Malik, Vice President, FORTIFIED Programs
Applicable Standards: FORTIFIED Home™–High Wind FORTIFIED Home™–High Wind & Hail
FORTIFIED for Safer Living™
Applicable Designation Level:
Garage Door Pressure Rating Requirements in High Wind–Prone Areas
Abstract Garage doors cover the largest openings in the building envelope. It is important to ensure each garage door has an adequate design pressure rating for the site conditions. This bulletin provides information on how to specify and verify the design pressure ratings for garage doors installed on homes located in areas that use the FORTIFIED Home™–High Wind and FORTIFIED Home™–High Wind & Hail standards.
Requirements Garage doors must be tested and approved in accordance with, at a minimum, International Residential Code (IRC) accepted design pressure test standards for a Vasd = 110 mph 3-second gust (Vult = 140 mph) design wind speed (or with locally adopted standards if they are more restrictive). Acceptable IRC design pressure test standards include ANSI/DASMA 108 or ASTM E330 (products must be tested to 1.5 times design pressure). The Florida Building Code Testing Application Standard, TAS 202, is also acceptable for the FORTIFIED Home™ program. Design pressure values for garage doors vary depending on the size of the doors, exposure category and mean roof height of the building. The required design pressures can be found in the tables below. Exposure B is for homes located in neighborhoods surrounded by other buildings and/or trees. Exposure C is for homes located in more exposed settings with few buildings and/or there are large open areas (including but not limited to fields, lakes, rivers, and golf courses) adjacent to the home site.
FORTIFIED ENGINEERING STANDARDS TB 2015-03 2 of 5
Bulletin No. 2015-03
First Release: September 25, 2015
Prepared by: Fred Malik, Vice President, FORTIFIED Programs
Applicable Standards: FORTIFIED Home™–High Wind FORTIFIED Home™–High Wind & Hail
FORTIFIED for Safer Living™
Applicable Designation Level:
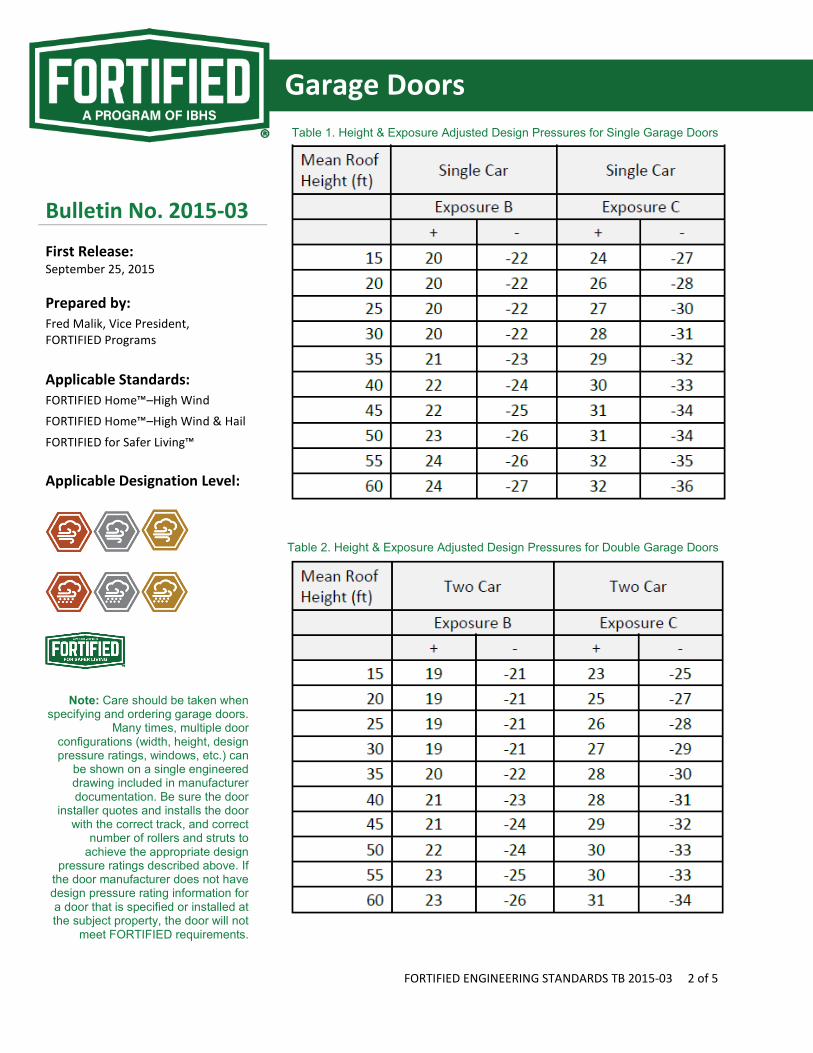
Garage Doors Table 1. Height & Exposure Adjusted Design Pressures for Single Garage Doors
Table 2. Height & Exposure Adjusted Design Pressures for Double Garage Doors
Note: Care should be taken when specifying and ordering garage doors.
Many times, multiple door configurations (width, height, design pressure ratings, windows, etc.) can
be shown on a single engineered drawing included in manufacturer documentation. Be sure the door
installer quotes and installs the door with the correct track, and correct
number of rollers and struts to achieve the appropriate design
pressure ratings described above. If the door manufacturer does not have design pressure rating information for a door that is specified or installed at the subject property, the door will not
meet FORTIFIED requirements.

FORTIFIED ENGINEERING STANDARDS TB 2015-03 3 of 5
Bulletin No. 2015-03
First Release: September 25, 2015
Prepared by: Fred Malik, Vice President, FORTIFIED Programs
Applicable Standards: FORTIFIED Home™–High Wind FORTIFIED Home™–High Wind & Hail
FORTIFIED for Safer Living™
Applicable Designation Level:
Garage Doors All installations must be in accordance with the manufacturer’s instructions.
Compliance Verification Requirements It is not possible to determine the design pressure ratings of a garage door simply by looking at the door or the track. If the door has a design pressure label, which is not common, (see Fig. 0-1 and Fig. 0-2 below) and the design pressures listed meet the criteria above, the door should meet FORTIFIED Home™ requirements.
Figure 0-1
Figure 0-2

FORTIFIED ENGINEERING STANDARDS TB 2015-03 4 of 5
Bulletin No. 2015-03
First Release: September 25, 2015
Prepared by: Fred Malik, Vice President, FORTIFIED Programs
Applicable Standards: FORTIFIED Home™–High Wind FORTIFIED Home™–High Wind & Hail
FORTIFIED for Safer Living™
Applicable Designation Level:
Garage Doors Any door that is not labeled or does not have paperwork that indicates its design pressure ratings meet those outlined above will be deemed not to meet FORTIFIED Home™ requirements. Any door that is labeled, or has documentation but does not meet the design pressure criteria provided above, will need to be retrofitted to meet these pressure requirements or replaced. If the door is retrofitted, documentation will be required certifying the retrofitted door, hardware, tracks and anchorage match those for a new door from the manufacturer that meets the pressure requirements given above. Acceptable documentation includes, but is not necessarily limited to:
Pictures of all Garage Doors Installed Minimum = 3: 1 of track on each side, 1 of entire door, plus 1 close up of any label that identifies door manufacturer, model and/or design pressure rating, if applicable.
Figure 0-3. Minimum photograph requirement and locations. Labeling of garage door to identify project and photo location.
Note: Although 3 is the minimum number of photographs required, the goal is to achieve a complete
view of each garage door. Photographs must be taken from
inside the garage with the garage door closed. Site conditions may
dictate that more than the minimum be provided.

FORTIFIED ENGINEERING STANDARDS TB 2015-03 5 of 5
Bulletin No. 2015-03
First Release: September 25, 2015
Prepared by: Fred Malik, Vice President, FORTIFIED Programs
Applicable Standards: FORTIFIED Home™–High Wind FORTIFIED Home™–High Wind & Hail
FORTIFIED for Safer Living™
Applicable Designation Level:
Garage Doors
• Pictures should be taken of each door while closed and
from inside the garage. • Pictures must be in focus. • Pictures must have the following clearly visible: Date,
Address or FORTIFIED ID, Door ID (e.g., Garage Door 1, Garage Door 2, etc.). See Figure 0-3.
Other Required Documentation • Invoices and/or product packaging identifying garage door
product name, manufacturer, and design pressure rating • Documentation from Miami-Dade, FBC, TDI product
approvals or ICC Evaluation Reports, if applicable
Completing Evaluation Form (For FORTIFIED Evaluator) When completing a FORTIFIED Home™ evaluation form, under Section: Garage Doors, enter:
• Garage door size • Positive design pressure • Negative design pressure

FORTIFIED ENGINEERING STANDARDS TB 2015-04 1 of 4
Sealed Roof Deck Supplemental Deck Attachment
Bulletin No. 2015-04
First Release: October 13, 2015
Prepared by: Fred Malik, Vice President, FORTIFIED Programs
Applicable Standards: FORTIFIED Home™–Hurricane FORTIFIED Home™–High Wind FORTIFIED Home™–High Wind & Hail FORTIFIED for Safer Living®
Applicable Designation Level:
Revised 8/18/2016
Using 2-Part Closed-Cell Foam Adhesive Abstract Strengthening the attachment of roof sheathing and installation of a sealed roof deck system can be achieved simultaneously by applying an ASTM or TAS tested two-part, spray polyurethane foam adhesive to the underside of the roof deck as shown in Figure 1. This system can satisfy two FORTIFIED Home™–Bronze requirements:
1. Sealing the roof deck. 2. Supplemental deck attachment, when the roof deck is
fastened with staples, 6d common nails or 8d common nails at 12 in. on center in the field.
Figure 1. Closed-cell polyurethane foam adhesive applied to the underside of the roof sheathing at the joints between the sheathing panels and along all intersections between roof sheathing and all roof framing members.
FORTIFIED ENGINEERING STANDARDS TB 2015-04 2 of 4
Sealed Roof Deck Supplemental Deck Attachment
Bulletin No. 2015-04
First Release: October 13, 2015
Prepared by: Fred Malik, Vice President, FORTIFIED Programs
Applicable Standards: FORTIFIED Home™–Hurricane FORTIFIED Home™–High Wind FORTIFIED Home™–High Wind & Hail FORTIFIED for Safer Living®
Applicable Designation Level:
Revised 8/18/2016
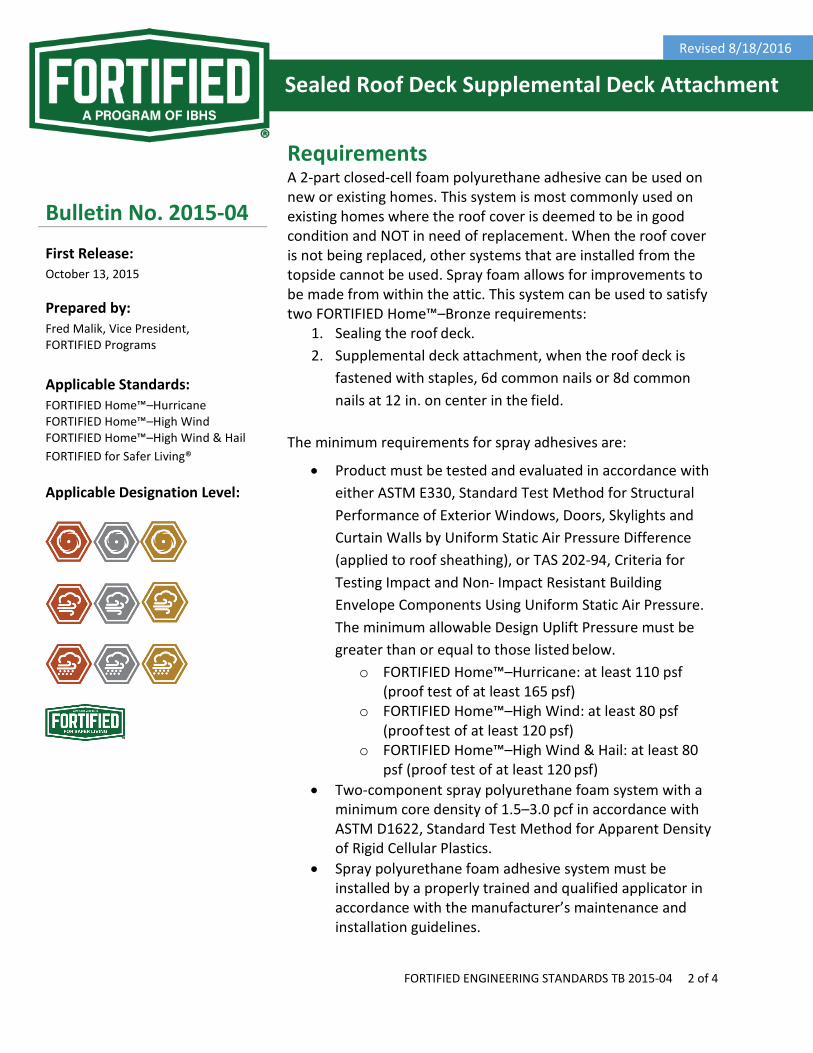
Requirements A 2-part closed-cell foam polyurethane adhesive can be used on new or existing homes. This system is most commonly used on existing homes where the roof cover is deemed to be in good condition and NOT in need of replacement. When the roof cover is not being replaced, other systems that are installed from the topside cannot be used. Spray foam allows for improvements to be made from within the attic. This system can be used to satisfy two FORTIFIED Home™–Bronze requirements:
1. Sealing the roof deck. 2. Supplemental deck attachment, when the roof deck is
fastened with staples, 6d common nails or 8d common nails at 12 in. on center in the field.
The minimum requirements for spray adhesives are:
• Product must be tested and evaluated in accordance with either ASTM E330, Standard Test Method for Structural Performance of Exterior Windows, Doors, Skylights and Curtain Walls by Uniform Static Air Pressure Difference (applied to roof sheathing), or TAS 202-94, Criteria for Testing Impact and Non- Impact Resistant Building Envelope Components Using Uniform Static Air Pressure. The minimum allowable Design Uplift Pressure must be greater than or equal to those listed below.
o FORTIFIED Home™–Hurricane: at least 110 psf (proof test of at least 165 psf)
o FORTIFIED Home™–High Wind: at least 80 psf (proof test of at least 120 psf)
o FORTIFIED Home™–High Wind & Hail: at least 80 psf (proof test of at least 120 psf)
• Two-component spray polyurethane foam system with a minimum core density of 1.5–3.0 pcf in accordance with ASTM D1622, Standard Test Method for Apparent Density of Rigid Cellular Plastics.
• Spray polyurethane foam adhesive system must be installed by a properly trained and qualified applicator in accordance with the manufacturer’s maintenance and installation guidelines.

FORTIFIED ENGINEERING STANDARDS TB 2015-04 3 of 4
Sealed Roof Deck Supplemental Deck Attachment
Bulletin No. 2015-04
First Release: October 13, 2015
Prepared by: Fred Malik, Vice President, FORTIFIED Programs
Applicable Standards: FORTIFIED Home™–Hurricane FORTIFIED Home™–High Wind FORTIFIED Home™–High Wind & Hail FORTIFIED for Safer Living®
Applicable Designation Level:
Revised 8/18/2016
To provide enhanced roof sheathing attachment and to seal the roof deck, apply a 1.5- to 3-in. fillet of 2-part spray-applied polyurethane foam adhesive to:
• All joints between sheathing • All intersections between roof sheathing and roof framing
members • All valleys
Use the minimum density and installation requirements prescribed by the manufacturer to meet a minimum Design Uplift Pressure on the sheathing of 80 psf or 110 psf; as appropriate to the applicable standard. All installations must be in accordance with the manufacturer’s instructions.
Compliance Verification Requirements It is not possible to determine the chemistry of a spray foam product by visual inspection. Therefore, it is necessary to collect documentation from the installing contractor identifying the manufacturer and product used for the improved roof sheathing attachment/sealed roof deck. Documentation must be provided to the Certified FORTIFIED Home™ Evaluator and be included with the FORTIFIED Home evaluation checklist. Documentation must state the installation meets the manufacturer’s requirements for an allowable Design Uplift Pressures detailed below.
• FORTIFIED Home™–Hurricane: at least 110 psf (proof test of at least 165 psf)
• FORTIFIED Home™–High Wind: at least 80 psf (proof test of at least 120 psf)
• FORTIFIED Home™–High Wind & Hail: at least 80 psf (proof test of at least 120 psf)
Note: In order for this method to be accepted for sealing the roof deck and for adding supplemental roof
deck attachment, access to the entire underside of the roof deck within the attic must be available. If the slope of
the roof is low, such that eaves are inaccessible, or any portion of the
underside of the deck is obstructed by equipment or ductwork, or is otherwise inaccessible, it will be necessary to use an alternative
qualified method to seal the portion of the deck that is unreachable by the
spray foam installer.

FORTIFIED ENGINEERING STANDARDS TB 2015-04 4 of 4
Sealed Roof Deck Supplemental Deck Attachment
Bulletin No. 2015-04
First Release: October 13, 2015
Prepared by: Fred Malik, Vice President, FORTIFIED Programs
Applicable Standards: FORTIFIED Home™–Hurricane FORTIFIED Home™–High Wind FORTIFIED Home™–High Wind & Hail FORTIFIED for Safer Living®
Applicable Designation Level:
Revised 8/18/2016
Note: Although 4 photographs is the minimum number of pictures required, the goal is to achieve a complete view of the underside
of the roof deck. Photographs must be taken from inside the
attic and show product installed in accordance with the
requirements listed above. Site conditions may dictate that
more than the minimum be provided.
Minimum Documentation Required
• Letter from installing contractor, on company letterhead, that the material was applied by a trained installer and the installation meets the manufacturer’s requirements for an allowable Design Uplift Pressure specified for the appropriate standard.
• Documentation from Miami-Dade, FBC, TDI product approvals or ICC Evaluation Reports, if applicable (invoices and/or product labels identifying product name and manufacturer may be substituted in the absence of product test documents).
• A minimum of 4 photos of the material applied to the entire underside of the roof deck. Pictures must be taken at 4 different locations of the attic to show complete coverage.
Completing Evaluation Form (For FORTIFIED Evaluator)
Entering Supplemental Deck Attachment Section: Roof Deck First, identify type of attic accessibility.
Next, indicate qualified supplemental documentation is installed. Select closed-cell foam adhesive and upload documentation.
Entering the SRD System Type Section: Sealed Roof Deck Select a closed-cell foam applied along all roof framing members and over all horizontal roof deck seams. Upload documentation.
FORTIFIED ENGINEERING STANDARDS TB 2016-01 1 of 4
Eligible Dwellings
Bulletin No. 2016-01
First Release: March 4, 2016
Prepared by: Remington Brown, Senior Engineering Director
Applicable Standards: FORTIFIED Home™–Hurricane FORTIFIED Home™–High Wind FORTIFIED Home™–High Wind & Hail FORTIFIED for Safer Living®
Applicable Designation Level:
Revised 8/24/2016
FORTIFIED Home™ Dwelling Type Eligibility Requirements Abstract The purpose of this document is to provide specific information about the type of residential building that is eligible for designation consideration in the FORTIFIED Home™ program.
Introduction The goal of IBHS FORTIFIED Home™ program is to strengthen homes against specific natural hazards using system-based resilience upgrades and a comprehensive verification process. “Home” or “dwelling” encompasses a broad category of residential buildings. This technical bulletin defines the specific types of residential buildings that are eligible for consideration in the FORTIFIED Home™ program.
Eligibility
Qualifying Homes—Dwelling Type 1. Single-family detached homes 2. Two-family dwelling units (duplex) 3. (HUD) manufactured homes 4. Townhouses
Definitions and Conditions 1. Single-family detached home—a freestanding residential
building occupied by one family. Limited to three stories above grade. This also includes detached single-family factory-built modular homes that are designed, built and sited to meet all local building codes.
2. Two-family dwelling units (duplex)—a freestanding residential building occupied by two families. Limited to three stories above grade. Note: The entire two-family building, which includes both dwelling units under consideration, must be evaluated under the appropriate FORTIFIED Home™ requirements. Individually evaluated

FORTIFIED ENGINEERING STANDARDS TB 2016-01 2 of 4
Eligible Dwellings
Bulletin No. 2016-01
First Release: March 4, 2016
Prepared by: Remington Brown, Senior Engineering Director
Applicable Standards: FORTIFIED Home™–Hurricane FORTIFIED Home™–High Wind FORTIFIED Home™–High Wind & Hail FORTIFIED for Safer Living®
Applicable Designation Level:
Revised 8/24/2016
units are NOT eligible for designation outside of the entire building being designated.
3. (HUD) manufactured homes—a single-family residential home manufactured to HUD’s Manufactured Home Construction and Safety Standards. Must be sited on a permanent foundation. HUD manufactured homes built before July 1994 are NOT eligible.
4. Townhouse—a single-family dwelling unit constructed in a group of three or more attached units in which each unit extends from foundation to roof and has a yard or public way on not less than two sides. Limited to three stories above grade. Mixed use (commercial and residential) buildings are NOT eligible. Note: The entire townhouse building, which includes all townhouse units under consideration, must be evaluated under the appropriate FORTIFIED Home™ requirements. Individually evaluated townhouse units are NOT eligible for designation outside of the entire building being designated. Example: A four-unit, two-story townhouse with all units attached is eligible for FORTIFIED only if the entire building, including each and every townhouse unit, is evaluated.
Completing Evaluation Forms (For the FORTIFIED Evaluator)
Address Entry in Evaluation Application When completing the FORTIFIED Home Evaluation Application for two-family dwelling units (duplex) or townhouses, list all dwelling unit addresses for the entire building under consideration on the Property Address lines. The example below lists four address numbers for a four-unit townhouse.

FORTIFIED ENGINEERING STANDARDS TB 2016-01 3 of 4
Eligible Dwellings
Bulletin No. 2016-01
First Release: March 4, 2016
Prepared by: Remington Brown, Senior Engineering Director
Applicable Standards: FORTIFIED Home™–Hurricane FORTIFIED Home™–High Wind FORTIFIED Home™–High Wind & Hail FORTIFIED for Safer Living®
Applicable Designation Level:
Revised 8/24/2016
Figure 1. Application indicating four addresses for a four-unit townhouse.
Dwelling Type Entry in Evaluator Checklist Figure 2 shows dwelling type options available on the Evaluator Checklist. This drop-down menu can be found in the General/Site Information section.
Figure 2. FORTIFIED Home Evaluator Checklist indicating dwelling type options.

FORTIFIED ENGINEERING STANDARDS TB 2016-01 4 of 4
Eligible Dwellings
Bulletin No. 2016-01
First Release: March 4, 2016
Prepared by: Remington Brown, Senior Engineering Director
Applicable Standards: FORTIFIED Home™–Hurricane FORTIFIED Home™–High Wind FORTIFIED Home™–High Wind & Hail FORTIFIED for Safer Living®
Applicable Designation Level:
Revised 8/24/2016
Designation Certificates Designation certificates will be issued based on verification of the appropriate FORTIFIED requirements and will list a single address for single-family detached homes. Two-family homes (duplex) and townhouse designation certificates will be issued with all addresses for the building listed on the certificate. Figure 3 is an example of a designation certificate for a four-unit townhouse.
Figure 3. Example certificate for a qualified, four-unit townhouse.

FORTIFIED ENGINEERING STANDARDS TB 2016-04 1 of 3
Roof Deck
Bulletin No. 2016-04
First Release: November 2, 2016
Prepared by: Laurie Jaworski, FORTIFIED QA Manager
Mark Zehnal, Senior Roofing Specialist, FORTIFIED Program Manager – Great Plains
Applicable Standards: FORTIFIED Home™–High Wind FORTIFIED Home™–High Wind & Hail FORTIFIED for Safer Living®
Applicable Designation Level:
Fastening Roof Sheathing Over Existing 1x Roof Deck Boards Abstract FORTIFIED standards, asphalt shingle manufacturers and many municipalities require that shingles be installed over a solidly sheathed roof deck. Often, when re-roofing an existing home, a roof deck constructed with excessive spacing (more than ⅛ in.) between boards is encountered. This bulletin provides information on how/when to install solid sheathing over spaced deck boards on homes located in areas that use the FORTIFIED Home™–High Wind and FORTIFIED Home™–High Wind & Hail standards.
Requirements Maximum spacing of framing members (rafters or trusses) is 24 in. When unacceptably spaced boards exist where solid sheathing is required, there are three allowable options to achieve the FORTIFIED attachment of the new solid sheathing to the existing substrate.
Option 1 Remove existing boards and install sheathing (7⁄16 in. preferred) directly to the rafters/trusses per FORTIFIED requirements: 8d ring shank nails at 6 in. o.c. on all framing members.
Option 2 If the existing boards are in good condition, without cupping or rot present, install sheathing (7⁄16 in. preferred) over the existing boards by attaching the sheathing to the rafters/trusses below using minimum #8 deck screws, which must be long enough to penetrate into the wood framing members a minimum of 1⅝ in.
Option 3 If the existing boards are in good condition, without cupping or rot present, install sheathing (7⁄16 in. preferred) over the existing boards by attaching the sheathing to the rafters/trusses below using minimum 0.120-in.-diameter ring-shank nails, which must

FORTIFIED ENGINEERING STANDARDS TB 2016-04 2 of 3
Roof Deck
Bulletin No. 2016-04
First Release: November 2, 2016
Prepared by: Laurie Jaworski, FORTIFIED QA Manager
Mark Zehnal, Senior Roofing Specialist, FORTIFIED Program Manager – Great Plains
Applicable Standards: FORTIFIED Home™–High Wind FORTIFIED Home™–High Wind & Hail FORTIFIED for Safer Living®
Applicable Designation Level:
be long enough to penetrate into the wood framing members a minimum of 1⅝ in.
Minimum Fastener Lengths for Option 2 and Option 3 Sheathing Thickness
Nominal Board Thickness
Minimum Fastener Length (rounded up to nearest ⅛ in.)
7⁄16 in. ¾ in. 2⅞ in. 7⁄16 in. 1 in. 3⅛ in. 7⁄16 in. 1¼ in. 3⅜ in. 7⁄16 in. 1½ in. 3⅝ in.
Exception In municipalities where the local code requirements exceed the FORTIFIED attachments, local code requirements shall have precedence. Always confirm that the roof deck construction meets the Building Department requirements.
FORTIFIED ENGINEERING STANDARDS TB 2016-04 3 of 3
Roof Deck
Bulletin No. 2016-04
First Release: November 2, 2016
Prepared by: Laurie Jaworski, FORTIFIED QA Manager
Mark Zehnal, Senior Roofing Specialist, FORTIFIED Program Manager – Great Plains
Applicable Standards: FORTIFIED Home™–High Wind FORTIFIED Home™–High Wind & Hail FORTIFIED for Safer Living®
Applicable Designation Level:
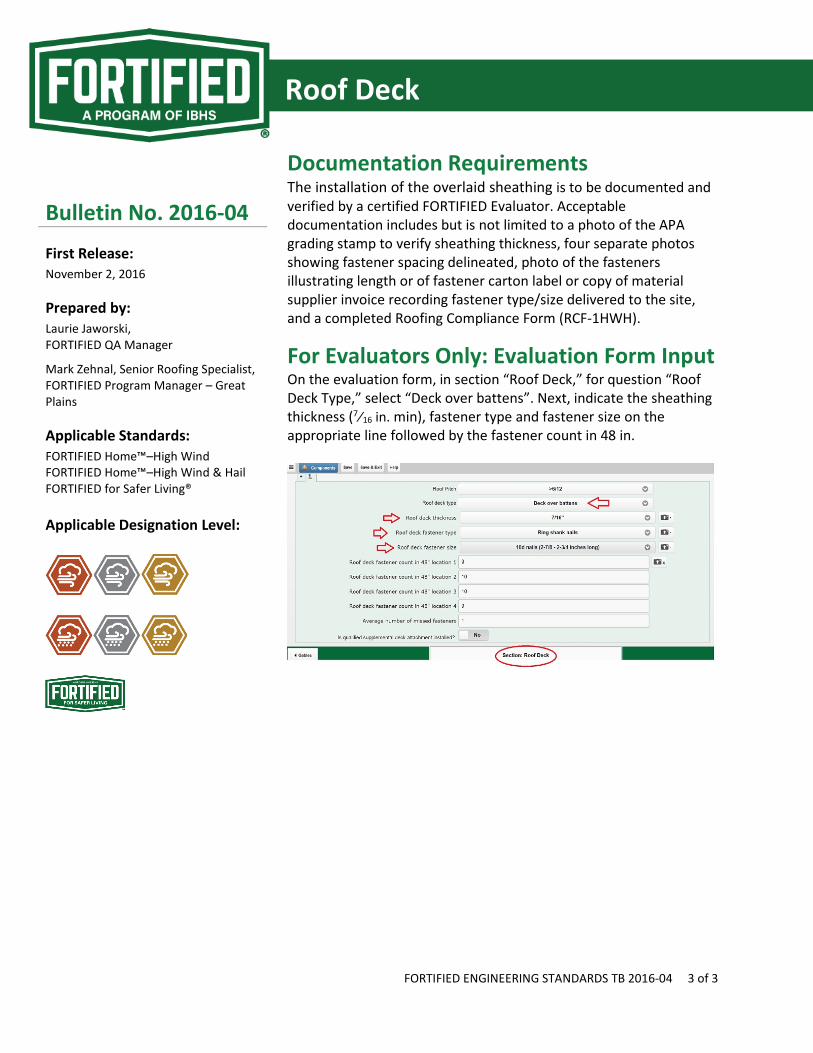
Documentation Requirements The installation of the overlaid sheathing is to be documented and verified by a certified FORTIFIED Evaluator. Acceptable documentation includes but is not limited to a photo of the APA grading stamp to verify sheathing thickness, four separate photos showing fastener spacing delineated, photo of the fasteners illustrating length or of fastener carton label or copy of material supplier invoice recording fastener type/size delivered to the site, and a completed Roofing Compliance Form (RCF-1HWH).
For Evaluators Only: Evaluation Form Input On the evaluation form, in section “Roof Deck,” for question “Roof Deck Type,” select “Deck over battens”. Next, indicate the sheathing thickness (7⁄16 in. min), fastener type and fastener size on the appropriate line followed by the fastener count in 48 in.
FORTIFIED ENGINEERING STANDARDS TB 2016-05 1 of 5
Bulletin No. 2016-05
First Release: November 3, 2016
Prepared by: Fred Malik, Vice President, FORTIFIED Programs Mark Zehnal, Senior Roofing Specialist, FORTIFIED Program Manager – Great Plains
Applicable Standards: FORTIFIED Home™–High Wind
FORTIFIED Home™–High Wind & Hail FORTIFIED Home™–Hurricane
Applicable Designation Level:
Revised 12/4/2017
Shingle Installation at Roof Edge Asphalt Shingle Installation at Roof Edges, Intersections and Valleys Abstract This updated document is intended to provide additional guidance and options for asphalt shingle installations at roof edges, intersections and valleys. The verification and documentation requirement referenced in the original technical bulletin (Technical Bulletin 2016-05, released November 3, 2016) was effective December 5, 2016.
Introduction Research conducted at the IBHS Research Center on a number of three-year-old roofs with various edge attachment details clearly demonstrated the need to ensure that shingles are properly installed and well adhered along the perimeter of a roof. While this directive has been included in standards and guidance since the beginning of the program, and also addressed in manufacturers’ high-wind guidance for asphalt shingle installation, it has not been specifically spotlighted in compliance forms or in evaluator training. As a result, IBHS is issuing this updated technical bulletin to provide additional guidance with options that describe alternate methods to help ensure that asphalt shingles are well sealed and connected at roof edges, intersections and valleys. Please make sure you become familiar with the installation requirements outlined below and work with roofers to ensure proper installation instructions are followed. Additionally, appropriate documentation described at the end of this bulletin continues to be required for all asphalt shingle roof installations.
FORTIFIED ENGINEERING STANDARDS TB 2016-05 2 of 5
Bulletin No. 2016-05
First Release: November 3, 2016
Prepared by: Fred Malik, Vice President, FORTIFIED Programs Mark Zehnal, Senior Roofing Specialist, FORTIFIED Program Manager – Great Plains
Applicable Standards: FORTIFIED Home™–High Wind
FORTIFIED Home™–High Wind & Hail FORTIFIED Home™–Hurricane
Applicable Designation Level:
Revised 12/4/2017
Shingle Installation at Roof Edge Sealed Roof Deck Installation Options
Taped Sheathing Seams
Tape Installation Tape must be rolled to help ensure it is installed flat and adheres to the deck. If the tape doesn’t stick well, the seams must be primed or a different product that does stick well must be used. Recent IBHS experience suggests that there may be fewer adhesion problems for installations on OSB decks with the high temperature–rated acrylic tape allowed by the program.
Underlayment Installation Apply a code-compliant ASTM D226, Type II underlayment over the self-adhering tape (felt or synthetic is allowed). This underlayment shall be attached using annular ring or deformed shank roofing fasteners with minimum 1-in.-diameter caps at 6 in. o.c. spacing along all laps and two rows 12 in. o.c. in the field or a more stringent fastener schedule if required by the manufacturer for high-wind installations. Horizontal laps shall be a minimum of 2 in. and end laps shall be a minimum of 6 in. Nails with plastic or metal caps are allowed in areas where the design wind speed is less than 140 mph. Metal caps are required for areas where the design wind speed is greater than or equal to 140 mph.
ASTM D1970 Self-Adhered Membranes
ASTM D1970 Membrane Installation Cover the entire roof with a full layer of self-adhering polymer-modified bitumen membrane meeting ASTM D1970 requirements.
Recommended Bond Break Installation It is recommended that #15 felt be installed over the membrane to provide a bond break between the self-adhering membrane and the shingles in order to prevent the shingles from fusing with the self-adhering membrane. The bond break shall be held back 8 in. from the eave and rake edges to allow application of flashing cement along the edges to ensure proper sealing of shingles along the roof edges.

FORTIFIED ENGINEERING STANDARDS TB 2016-05 3 of 5
Bulletin No. 2016-05
First Release: November 3, 2016
Prepared by: Fred Malik, Vice President, FORTIFIED Programs Mark Zehnal, Senior Roofing Specialist, FORTIFIED Program Manager – Great Plains
Applicable Standards: FORTIFIED Home™–High Wind
FORTIFIED Home™–High Wind & Hail FORTIFIED Home™–Hurricane
Applicable Designation Level:
Revised 12/4/2017
Shingle Installation at Roof Edge Roof Edges, Intersections and Valleys
Drip Edge Installation Requirements 1. Provide code-compliant, minimum gauge metal drip edge
at eaves and gables. 2. Overlap to be a minimum of 3 in. at joints. 3. Eave drip edges shall extend ½ in. below sheathing and
extend back on the roof a minimum of 2 in. 4. The drip edge shall be mechanically fastened to the roof
deck. Fasteners shall be fabricated from similar or compatible material. For FORTIFIED–Hurricane compliance, spacing shall be a maximum of 4 in. o.c. For FORTIFIED–High Wind and FORTIFIED–High Wind & Hail compliance, spacing shall be a maximum of 12 in. o.c. Mechanical fasteners shall be applied in an alternating (staggered) pattern along the length of the drip edge with adjacent fasteners placed near opposite edges of the leg/flange of drip edge on the roof.
5. Drip edge at eaves shall be installed over the underlayment (this is compatible with high-wind installations where flashing cement is used to seal the edges).
Installation of Starter Strips at Eaves (Drip Edge Installed Over Underlayment) Manufacturer-approved starter strips at eaves shall be set in a minimum 8-in.-wide strip of compatible flashing cement. Maximum thickness of flashing cement shall be ⅛ in. Fasten starter strips parallel to the eaves along a line above the eave line according to the manufacturer’s specifications. Position fasteners to ensure they will not be exposed under the cutouts in the first course. Starter strips and shingles must not extend more than ¼ in. beyond the drip edge.
Approved Option Shingle manufacturer–approved ASTM D1970 fully adhered (peel-and-stick) starter strip with asphaltic adhesive strip at eave—installed so that starter strip adheres to and covers the drip edge top surface.

FORTIFIED ENGINEERING STANDARDS TB 2016-05 4 of 5
Bulletin No. 2016-05
First Release: November 3, 2016
Prepared by: Fred Malik, Vice President, FORTIFIED Programs Mark Zehnal, Senior Roofing Specialist, FORTIFIED Program Manager – Great Plains
Applicable Standards: FORTIFIED Home™–High Wind
FORTIFIED Home™–High Wind & Hail FORTIFIED Home™–Hurricane
Applicable Designation Level:
Revised 12/4/2017
Shingle Installation at Roof Edge
Installation of Shingles at Rakes (Drip Edge Installed Over Underlayment) Install shingles at rakes set in a minimum 8-in.-wide strip of compatible flashing cement. Maximum thickness of flashing cement shall be ⅛ in. Fasten shingles at the rakes according to the manufacturer’s specifications.
Optional Installation of Starter Strips at Rakes (Drip Edge Installed Over Underlayment) Manufacturer-approved starter strips at rakes shall be set in a minimum 8-in.-wide strip of compatible flashing cement. Maximum thickness of flashing cement shall be ⅛ in. Fasten starter strips parallel to the rakes according to the manufacturer’s specifications. Position fasteners to ensure they will not be exposed. Starter strips and shingles must not extend more than ¼ in. beyond the drip edge.
Approved Option Shingle manufacturer–approved ASTM D1970 fully adhered (peel-and-stick) starter strip with asphaltic adhesive strip at rake—installed so that starter strip adheres to and covers the drip edge top surface.
Attachment of Shingles at Intersections and Valley Shingles installed at all intersections and both sides of open valleys shall be set in a minimum 8-in.-wide strip of flashing cement. Maximum thickness of flashing cement shall be ⅛ in. Cut side of closed valleys shall be set in a minimum 2-in.-wide, ⅛-in.-thick strip of flashing cement. Woven valleys to be according to the manufacturer’s specifications.

FORTIFIED ENGINEERING STANDARDS TB 2016-05 5 of 5
Bulletin No. 2016-05
First Release: November 3, 2016
Prepared by: Fred Malik, Vice President, FORTIFIED Programs Mark Zehnal, Senior Roofing Specialist, FORTIFIED Program Manager – Great Plains
Applicable Standards: FORTIFIED Home™–High Wind
FORTIFIED Home™–High Wind & Hail FORTIFIED Home™–Hurricane
Applicable Designation Level:
Revised 12/4/2017
Shingle Installation at Roof Edge Verification and Documentation The contractor shall complete the revised compliance form and provide in-progress photos with identifiable traits or landmarks of the property showing the following:
1. Installation of tape or self-adhered membrane. 2. Fastening of underlayment. 3. Fastening of drip edge metal over underlayment. 4. Application of flashing cement or approved alternate
means of attachment along roof edges, intersections and valleys.
5. Installation of approved starter strips at eaves.
The Evaluator shall verify that shingles along the edges of the roof do not overhang more than ¼ in. beyond the drip edge metal.

FORTIFIED ENGINEERING STANDARDS TB 2017-01 1 of 1
Roof Flashing
Bulletin No. 2017-01
First Release: January 6, 2017
Prepared by: Remington Brown, Senior Engineering Director
Applicable Standards: FORTIFIED Home™–Hurricane FORTIFIED Home™–High Wind FORTIFIED Home™–High Wind & Hail FORTIFIED for Safer Living®
Applicable Designation Level:
Revised 11/15/2017
Abstract Roof flashing is an integral component of the roof system. It is used to seal roof systems where the system is interrupted or terminated and is always required when installing a new roof or re-roofing an existing home. Examples of roof flashing include: drip edge at the eave and rake, valley flashing, wall and chimney flashing, flashing at roof pitch changes, and flashing at all roof penetrations. This bulletin instructs installers that all flashing installed on a FORTIFIED roof must be in new condition and points to roof covering manufacturers for flashing installation instructions.
Requirements When re-roofing an existing home or installing a roof on a new home, all installed flashing shall be new material. When re-roofing, all existing flashing material shall be removed and discarded. New flashing shall be properly installed in accordance with the roof manufacturer’s installation instructions and in compliance with all applicable building codes. FORTIFIED has specific requirements for asphalt shingle drip edge flashing installation and attachment that may go beyond roof manufacturers’ flashing installation instruction and/or typical building code requirements. New drip edge metal must be installed at the eaves and the gable rakes.
Documentation Requirements The installation of new roof flashing is to be verified by a certified FORTIFIED Evaluator through observation and photographs.

FORTIFIED ENGINEERING STANDARDS TB 2017-04 1 of 3
Eligibility Requirements—Foundations
Bulletin No. 2017-04
First Release: December 12, 2017
Prepared by: Fred Malik, Vice President, FORTIFIED Programs
Applicable Standards: FORTIFIED Home™–Hurricane FORTIFIED Home™–High Wind FORTIFIED Home™–High Wind & Hail FORTIFIED for Safer Living™
Applicable Designation Level:
Eligibility Requirements and Retrofit Requirements for Elevated-Floor (Not Slab-on-Grade) Houses Applicable Conditions
1. Dry stack foundations: all house types 2. All elevated-floor home-to-foundation connections
Abstract This technical bulletin is intended to clarify FORTIFIED Home™ requirements that relate to a home’s foundation and the need for the home to have a positive connection to the foundation in order to be eligible for a FORTIFIED Home designation. The criteria included are requirements for any and all FORTIFIED Home designations and are not limited to FORTIFIED Home Gold designations which address the continuous load path.
Requirements
Dry Stack Foundations A dry stack foundation is defined as a foundation constructed of unrestrained stacked masonry or stone. Eligibility: Homes that are supported by a dry stack foundation are ineligible for any level of FORTIFIED Home designation unless the home is retrofitted so that it is supported by and attached to a permanent foundation capable of resisting the design level wind uplift and lateral forces on the building.
All Foundations To be eligible for designation or re-designation under the FORTIFIED Home program, homes with elevated floors (not slab-on-grade construction) must have adequate positive connections from the floor or wall structure to the supporting foundation, e.g. homes on piers or pilings must have a connection from the

FORTIFIED ENGINEERING STANDARDS TB 2017-04 2 of 3
Eligibility Requirements—Foundations
Bulletin No. 2017-04
First Release: December 12, 2017
Prepared by: Fred Malik, Vice President, FORTIFIED Programs
Applicable Standards: FORTIFIED Home™–Hurricane FORTIFIED Home™–High Wind FORTIFIED Home™–High Wind & Hail FORTIFIED for Safer Living™
Applicable Designation Level:
piers/pilings to the perimeter beams of the house. All connectors must be free from damage, corrosion-resistant (if applicable) in accordance with Appendix D of the FORTIFIED Home–Hurricane standards, and installed per the connector manufacturer’s installation instructions.
HUD-Code Manufactured Home Foundations Foundation must meet the design wind load requirements with no more than ¼-in. lateral deflection. Requirements specified in the U.S. Department of Housing and Urban Development (HUD) Permanent Foundation Guide for Manufactured Housing (HUD-4930.3G) dated September 1996 or later provide useful assistance in identifying suitable foundation options. Based on results of past inspections of home installations that were reported as permanent, the following requirements of the HUD Guide and FORTIFIED Home requirements are emphasized and are part of the Field Evaluation inspection.
1. Screw-in soil anchors are not considered a permanent anchorage and cannot be used as any part of the required permanent foundation unless their heads are restrained from lateral movement by embedment in a reinforced concrete footing or concrete slab.
2. All concrete masonry unit (CMU) bearing walls, piers and columns, as well as any units used as part of systems to resist uplift, overturning and lateral loads must be composed of reinforced concrete masonry with mortared bed and head joints. Cells with reinforcing must be fully grouted. Dry-stacking of CMU is not allowed.
3. All bearing walls, piers and columns must be installed on and connected to acceptable footings or a concrete slab. Footings and slabs must be protected from the effects of frost heave by extending below the frost line or by using a frost protected shallow foundation design.
4. Walls and piers used as part of the uplift, overturning or lateral load–resisting system must include adequately sized connections and elements capable of resisting tension or compression loads as appropriate. Straps or cables are acceptable, provided they are connected to the home or its chassis and transfer the design loads to the slab or footings supporting the walls, piers or columns. Use

FORTIFIED ENGINEERING STANDARDS TB 2017-04 3 of 3
Eligibility Requirements—Foundations
Bulletin No. 2017-04
First Release: December 12, 2017
Prepared by: Fred Malik, Vice President, FORTIFIED Programs
Applicable Standards: FORTIFIED Home™–Hurricane FORTIFIED Home™–High Wind FORTIFIED Home™–High Wind & Hail FORTIFIED for Safer Living™
Applicable Designation Level:
of frictional resistance between the home or its chassis and the tops of the walls, piers or columns or between the bottom of the walls, piers or columns and the footings to resist lateral loads is not allowed.
Eligibility: Manufactured homes must be installed on a foundation designed and installed in accordance with the criteria outlined above. A certification attesting to compliance with the design requirements of the HUD Permanent Foundations Guide for Manufactured Housing (HUD-4930.3G) dated September 1996 or later, and the requirements outlined above must be provided by a licensed professional engineer or registered architect. A copy of the certification and foundation design must be provided before or during the Field Evaluation at the time of the house setting for reference by the inspector and submission to IBHS.
Documentation Requirements A minimum of four (4) photographs of a home’s foundation is required. The photographs must be taken from four different locations around the perimeter of the home. Photographs of connectors are required. If any damaged or corroded connectors are present, photographs of the damaged connector(s) need to be provided in the “General/Site Information” section of the evaluation form regardless of designation level being sought. Photographs can be added to the Finished Elevation Photos portion of the form.
For Evaluators Only: Evaluation Form Input Photographs of the foundation and connectors from perimeter beam to foundation need to be uploaded in the “General/Site Information” section of the evaluation form regardless of designation level being sought. Photographs can be added to the Finished Elevation Photos portion of the form.