gv-live streaming mobile app · gv-live streaming 2 date: 6/10/2020 gv-live streaming gv-live...
TRANSCRIPT
GV-Live Streaming 1 Date: 8/10/2020
GV-Live Streaming Mobile App
1. Specifications .......................................................................................................................... 2
2. GV-Software Supported .......................................................................................................... 2
3. Getting Started ......................................................................................................................... 3
3.1 Setting up and Connecting GV-Live Streaming to GV-Software ..................................... 4
3.1.1 Creating GV-Relay Account .................................................................................... 4
3.1.2 Connecting to GV-Software .................................................................................... 5
3.2 Main Page ....................................................................................................................... 7
3.2.1 Adjusting Live View................................................................................................. 8
3.3 Purchasing License & Unlocking Trial ............................................................................. 8
4. System Settings..................................................................................................................... 10
5. Managing GV-Relay Account.................................................................................................11
5.1 Viewing and Purchasing Relay Data ............................................................................. 12
5.2 Sharing Relay Data ....................................................................................................... 12

GV-Live Streaming 2 Date: 8/10/2020
GV-Live Streaming
GV-Live Streaming is a paid mobile app that allows the camera of your Android / iOS mobile
device to connect and stream live video to GeoVision video management systems via
GV-Relay.
Note: Before purchasing, users may try out the full functions of GV-Live Streaming with a
watermark imprinted throughout.
1. Specifications
Supported OS iOS 11; Android 8.0 or later
Default Port 10000
2. GV-Software Supported
GV-Live Streaming is compatible with the following versions of GV-Software
GV-VMS V17.4 / V18.1 or later
Note: GV-Live Streaming can only be connected to one GV-VMS at a time.
GV-Live Streaming 3 Date: 8/10/2020
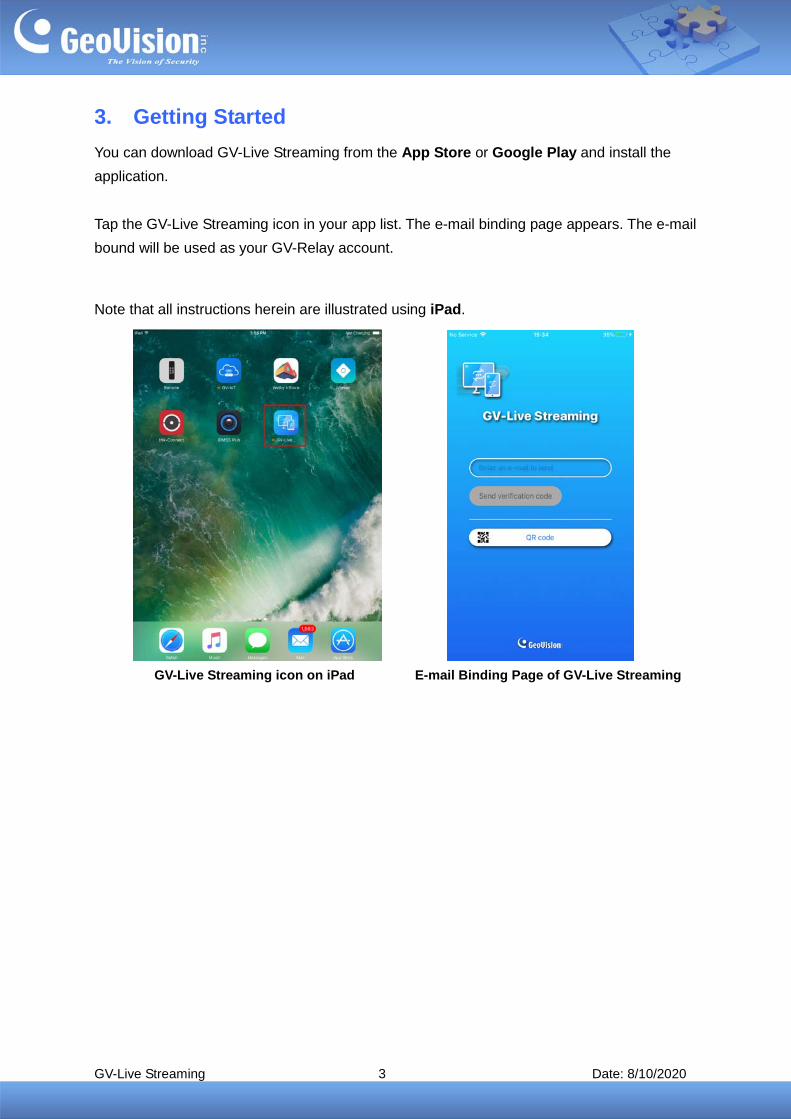
3. Getting Started
You can download GV-Live Streaming from the App Store or Google Play and install the
application.
Tap the GV-Live Streaming icon in your app list. The e-mail binding page appears. The e-mail
bound will be used as your GV-Relay account.
Note that all instructions herein are illustrated using iPad.
GV-Live Streaming icon on iPad E-mail Binding Page of GV-Live Streaming
GV-Live Streaming 4 Date: 8/10/2020
3.1 Setting up and Connecting GV-Live Streaming to GV-Software
This section will guide users through all the necessary settings for connecting and streaming
the live view from the camera of your mobile device to GV-Software.
3.1.1 Creating GV-Relay Account
Prior to using GV-Live Streaming, you must first enter an e-mail to be used as your GV-Relay
account for connecting to GV-Software, and managing the required relay data quota.
There are two types of e-mail accounts that can be bound: Personal e-mail or Google
account, as explained below.
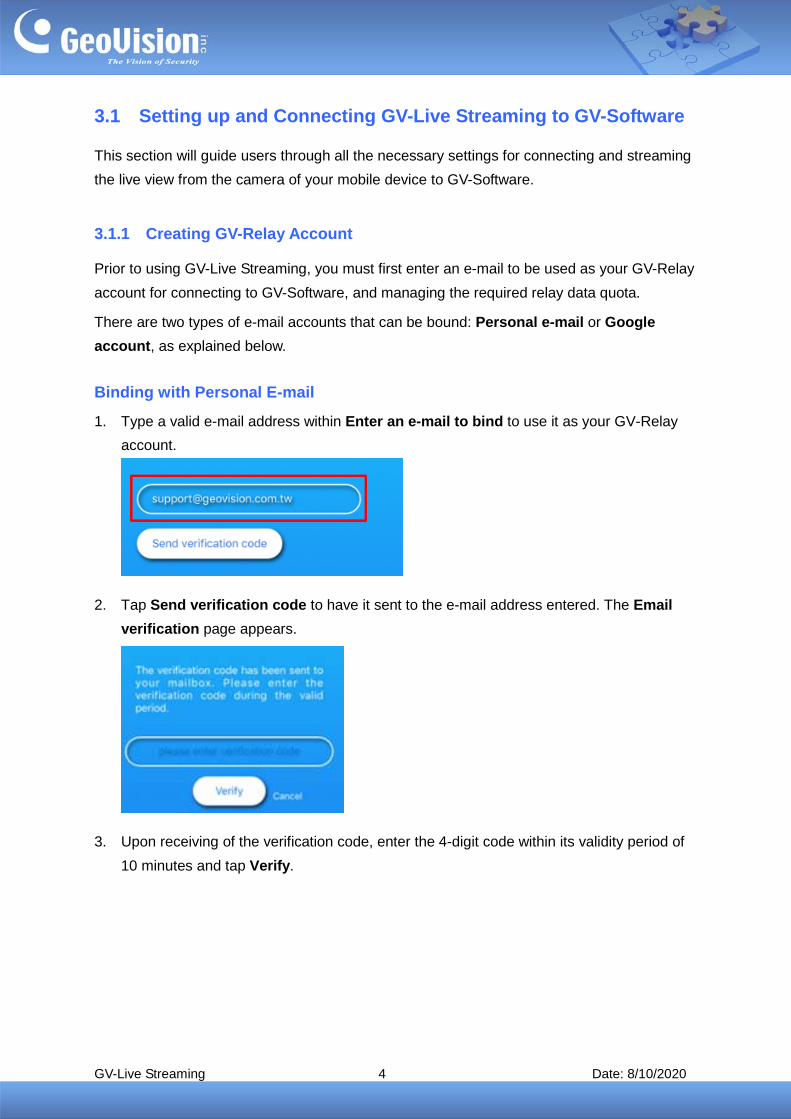
Binding with Personal E-mail
1. Type a valid e-mail address within Enter an e-mail to bind to use it as your GV-Relay
account.
2. Tap Send verification code to have it sent to the e-mail address entered. The Email
verification page appears.
3. Upon receiving of the verification code, enter the 4-digit code within its validity period of
10 minutes and tap Verify.

GV-Live Streaming 5 Date: 8/10/2020
Binding with Google
Note: The binding with Google function is only available on Android devices.
1. To bind a Google account to GV-Live Streaming and use it as your GV-Relay account, tap
Google on the e-mail binding page of GV-Live Streaming.
2. Follow the onscreen instructions to choose a desired Google account and log in.
Once successfully bound, the personal e-mail or Google account is used as your GV-Relay
account and tracks the amount of data available, for viewing images through GV-Relay.
Note: For the QR code function and managing your GV-Relay account, see 5.2 Sharing
Relay Data and 5. Managing GV-Relay Account, respectively.
3.1.2 Connecting to GV-Software
Note: Make sure both the GV-Live Streaming and GV-Software are connected to the Internet.
1. To connect GV-Live Streaming to GV-Software, tap the Settings button on the Main Page
of GV-Live Streaming (No. 4, 3.2 Main Page), as illustrated below.

GV-Live Streaming 6 Date: 8/10/2020
2. Tap Account and tap Binding Code.
3. On the Binding Code page, take note of the Binding Code to be used for connecting to
GV-Software, within its validity period.
For GV-VMS
4. On GV-VMS, click Home > Toolbar > Configure , select Camera Install
and click Add Camera.
5. Click the Mobile icon next to Server IP. This dialog box appears.
6. Type the e-mail account bound to GV-Live Streaming as the ID and the Binding Code
from Step 3, and click Apply.
7. Select the GV-Live Streaming device from the dropdown list to add it to GV-VMS.
8. Once connected, users can start streaming live video from the device’s camera to
GV-VMS by tapping LIVE on the Main Page of GV-Live Streaming (No. 5, 3.2 Main Page).
GV-Live Streaming 7 Date: 8/10/2020
Note: For details on how to adjust the image of the camera streamed to GV-Software and
removing the watermark of Trial Version, see 3.2.1 Adjusting Live View and 3.3 Purchasing
License & Unlocking Trial, respectively.
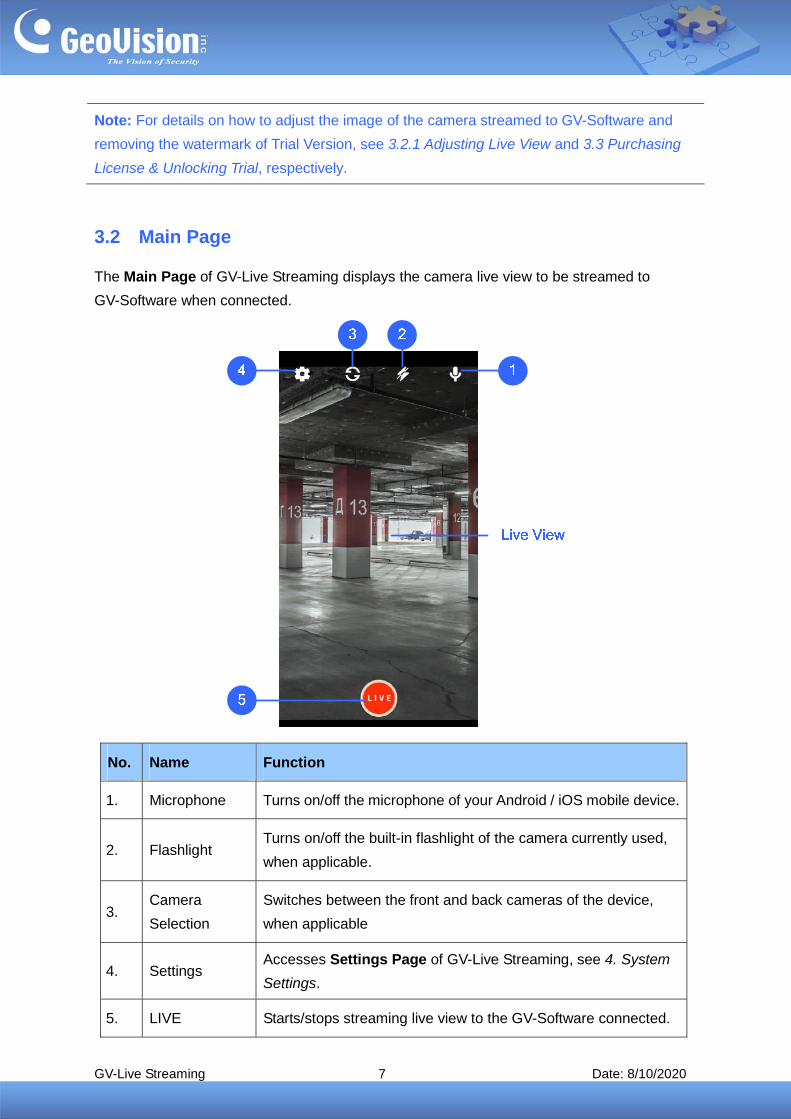
3.2 Main Page
The Main Page of GV-Live Streaming displays the camera live view to be streamed to
GV-Software when connected.
No. Name Function
1. Microphone Turns on/off the microphone of your Android / iOS mobile device.
2. Flashlight Turns on/off the built-in flashlight of the camera currently used,
when applicable.
3. Camera
Selection
Switches between the front and back cameras of the device,
when applicable
4. Settings Accesses Settings Page of GV-Live Streaming, see 4. System
Settings.
5. LIVE Starts/stops streaming live view to the GV-Software connected.
GV-Live Streaming 8 Date: 8/10/2020
Note: The LIVE function can only be used when GV-Live Streaming is connected to a
GV-Software.
3.2.1 Adjusting Live View
Users can adjust the live view image to be streamed to GV-Software through the following
options:
Switching Front/Back Camera: To alternate between the front and back cameras of the
mobile device, tap Camera Selection on the Main Page (No. 3, 3.2 Main Page).
Microphone: To turn on/off the microphone of the mobile device for streaming audio to
the GV-Software connected, tap Microphone on the Main Page (No. 1, 3.2 Main Page).
Flashlight: To turn on/off the flashlight of the mobile device for improved lighting, tap
Flashlight on the Main Page (No. 2, 3.2 Main Page).
Video Resolution: To adjust the video resolution, tap Settings (No. 4, 3.2 Main Page) on
the Main Page, tap Video Resolution and select from High, Medium and Low.
Unlock Trial Version: To remove the watermark of Trial Version, see 3.3 Purchasing
License & Unlocking Trial.
3.3 Purchasing License & Unlocking Trial
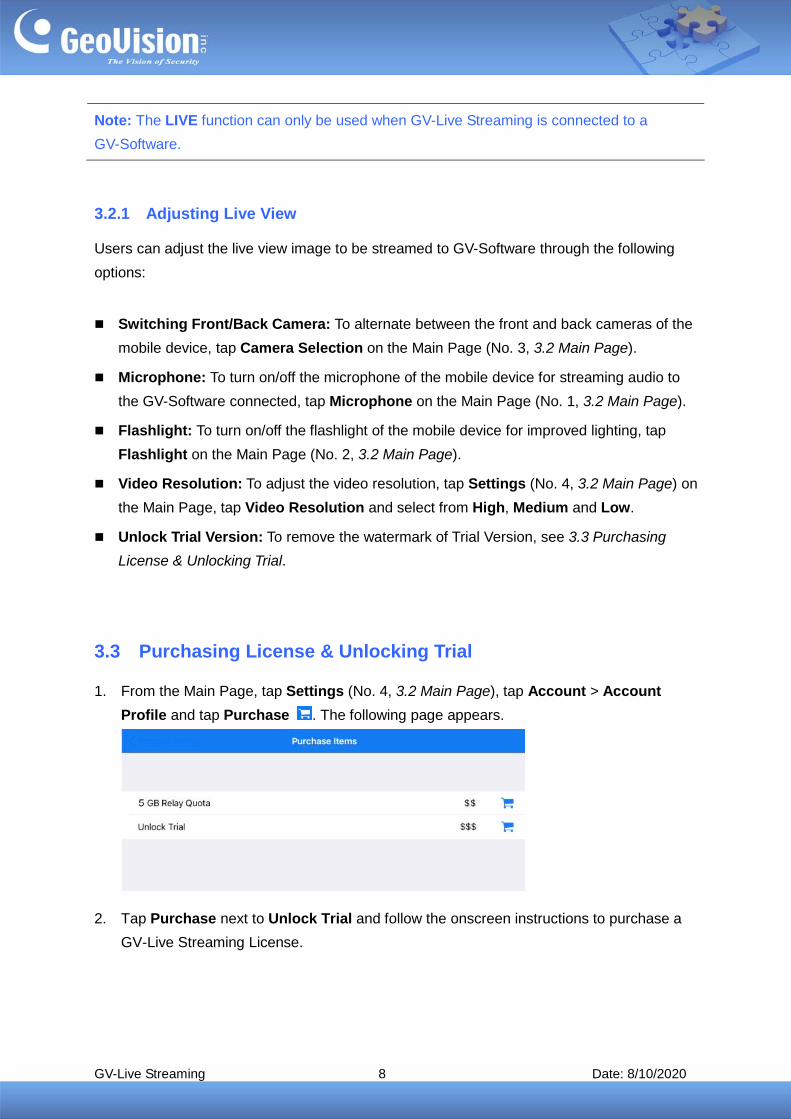
1. From the Main Page, tap Settings (No. 4, 3.2 Main Page), tap Account > Account
Profile and tap Purchase . The following page appears.
2. Tap Purchase next to Unlock Trial and follow the onscreen instructions to purchase a
GV-Live Streaming License.
GV-Live Streaming 9 Date: 8/10/2020
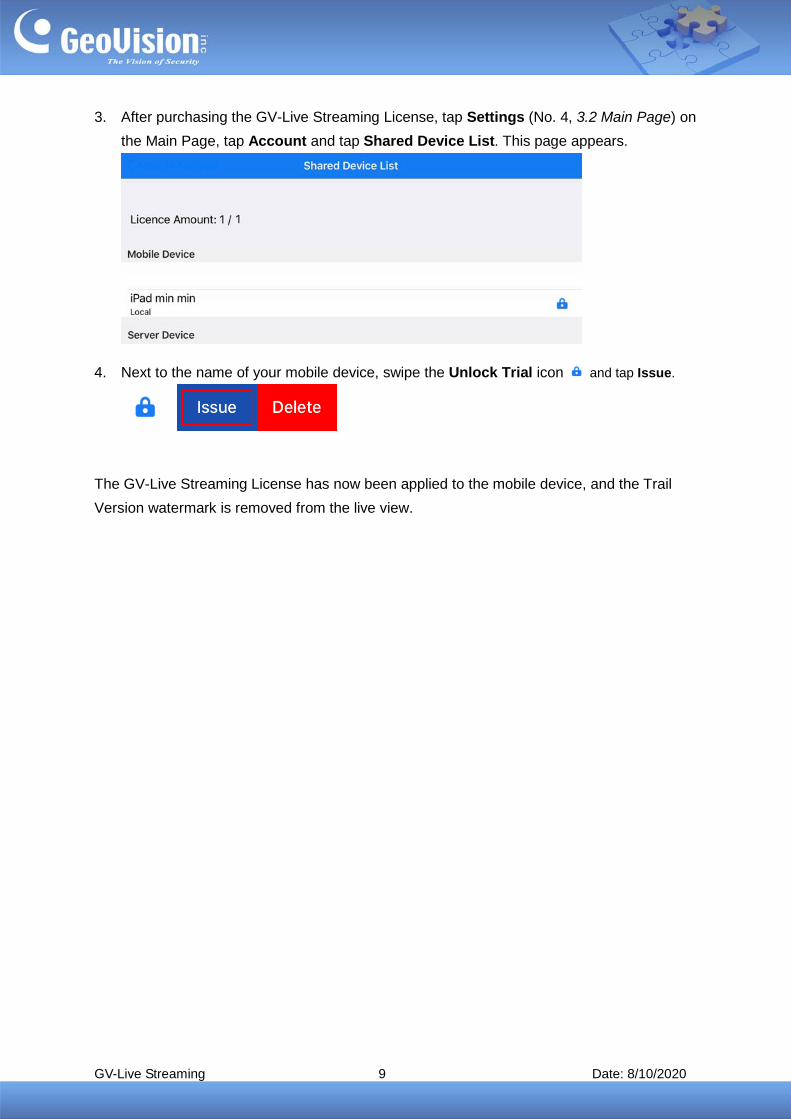
3. After purchasing the GV-Live Streaming License, tap Settings (No. 4, 3.2 Main Page) on
the Main Page, tap Account and tap Shared Device List. This page appears.
4. Next to the name of your mobile device, swipe the Unlock Trial icon and tap Issue.
The GV-Live Streaming License has now been applied to the mobile device, and the Trail
Version watermark is removed from the live view.

GV-Live Streaming 10 Date: 8/10/2020
4. System Settings
Tap Settings (No. 4, 3.1 Main Page) to access the Settings Page, which allows users to
configure and change settings including Device Information, Camera Settings, Connection
Setting, and Account Management.
[DEVICE INFORMATION]
Display Name: Type a desired name for the device.
[CAMERA SETTINGS]
Video Resolution: Select the desired video resolution to be streamed to the GV-Software
connected, from High, Medium or Low.
[ACCOUNT MANAGEMENT]
Account: Displays the GV-Relay account currently logged in. To manage the GV-Relay
account, see 5. Managing GV-Relay Account.
[VERSION]
GV-Live Streaming: Displays the version of GV-Live Streaming currently used.
GV-Live Streaming 11 Date: 8/10/2020
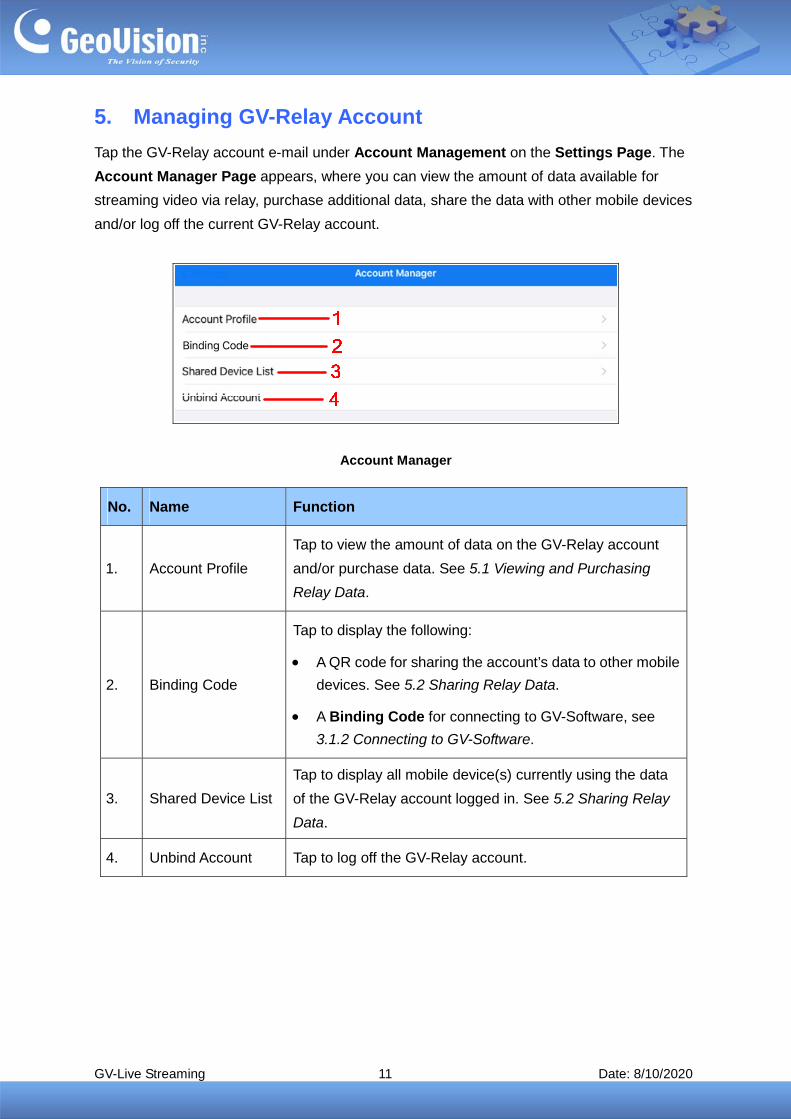
5. Managing GV-Relay Account
Tap the GV-Relay account e-mail under Account Management on the Settings Page. The
Account Manager Page appears, where you can view the amount of data available for
streaming video via relay, purchase additional data, share the data with other mobile devices
and/or log off the current GV-Relay account.
Account Manager
No. Name Function
1. Account Profile
Tap to view the amount of data on the GV-Relay account
and/or purchase data. See 5.1 Viewing and Purchasing
Relay Data.
2. Binding Code
Tap to display the following:
A QR code for sharing the account’s data to other mobile
devices. See 5.2 Sharing Relay Data.
A Binding Code for connecting to GV-Software, see
3.1.2 Connecting to GV-Software.
3. Shared Device List
Tap to display all mobile device(s) currently using the data
of the GV-Relay account logged in. See 5.2 Sharing Relay
Data.
4. Unbind Account Tap to log off the GV-Relay account.

GV-Live Streaming 12 Date: 8/10/2020
5.1 Viewing and Purchasing Relay Data
All GV-Relay accounts are given 5.00 GB of free data every month while additional data can
be purchased as needed. To view the data quota available or purchase data, tap Account
Profile (No. 1, 5. Managing Relay Account). The following page appears.
To purchase additional data, tap Purchase and select the amount of data you wish to
purchase.
5.2 Sharing Relay Data
The data of a GV-Relay account can be shared to other mobile devices for GV-Relay
streaming on those devices. To share the data from device A to device B, follow the steps
below:
1. On device A, tap Binding Code (No. 2, 5 Managing GV-Relay Account) The Share
account QR code, with its validity period, appears.
2. On device B, tap QR code on the E-mail binding page and scan the QR code from Step
1. Once successfully scanned, the data from device A is shared to device B.
All images streamed on both devices A and B will consume the data from the same GV-Relay
account.

GV-Live Streaming 13 Date: 8/10/2020
Removing Device(s)
To remove a shared device or a GV-Software connected, tap Shared Device List (No. 3, 5
Managing GV-Relay Account) and select the account you want to remove.