gv-eye mobile app. - static.geovision.shop.hu
TRANSCRIPT

GeoVision Inc. 1 Revision Date: 10/21/2016
GV-Eye Mobile App.
Contents
1.1 Specifications ........................................................................................................................ 2 1.2 Supported GV-IP Devices and Software.............................................................................. 3 1.2.1 Supported Products ............................................................................................................. 3 1.2.2 Supported Products for Monitoring Activation ..................................................................... 4 1.2.3 Supported Products for Assigning NAS Storage Path ......................................................... 4 1.3 Installing GV-Eye ................................................................................................................... 5 1.4 Main Page ............................................................................................................................... 6 1.5 Connecting to GV-IP Devices and Software........................................................................ 8 1.5.1 Automatic Connection ......................................................................................................... 8 1.5.2 Manual Connection ............................................................................................................ 12 1.5.3 Group Management ........................................................................................................... 15 1.5.4 Adding IP Devices from GV-SNVR through QR Code....................................................... 17 1.6 Live View .............................................................................................................................. 19 1.7 Playing Back Recordings ................................................................................................. 23 1.7.1 Accessing the Recorded Files ........................................................................................... 23 1.7.2 Playback Display................................................................................................................ 24 1.8 Edge Settings....................................................................................................................... 26 1.8.1 Changing IP Address ......................................................................................................... 28 1.8.2 Changing Device Name..................................................................................................... 29 1.8.3 Assigning Storage Path ..................................................................................................... 30 1.8.4 Monitoring HDD Storage.................................................................................................... 32 1.9 System Settings................................................................................................................... 33 1.10 Fisheye Dewarping ............................................................................................................ 35

GeoVision Inc. 2 Revision Date: 10/21/2016
GV-Eye Use GV-Eye to monitor remote sites from your iOS or Android devices. With GV-Eye, you can watch multiple live views, play back recordings, trigger a remote output and take snapshots from your mobile device.
1.1 Specifications Supported OS iOS 8 ~ 9.3.2 ; Android 4.1.2 ~ 6.0.1
Supported Version GV-Eye V2.3 for iOS GV-Eye V2.3 for Android
Default Port Settings • GV-IP devices (VSS Port): 10000 (connection); 5552 (Playback) • GV-Recording Server/Video Gateway Server: 11000 (connection);
5552 (playback) • GV-Mobile Server: 55000 (connection) • GV-VMS: 56000 (connection); 5552 (playback) • GV-DVR/NVR: 56000 (connection); 5552 (playback) • GV-SNVR: 10000 (connection); 80 (playback)
Codec MPEG4, MJPEG, H.264 and H.265
Resolutions Up to 12 MP (4000 x 3000)
Functions Live View, PIP (Picture-in-picture), Fisheye Dewarping (optional), PTZ Control & Preset, Remote Playback, I/O Output trigger, Snapshot, 2-Way Audio, Stream Switching, Device Search, Hardware Decoding
Note:
1. Hardware decoding is only supported by devices using Android 4.1 or later and that contain a GPU (graphic processing unit).
2. Access is only allowed for Admin users.
3. By default, GV-Eye connects to stream 2 of any GV-IP device, which is in H.264 codec and CIF resolution.
4. Fisheye Dewarping is an optional and a paid service. For details, see 1.10 Fisheye Dewarping.
5. The GV-Eye is only compatible with GV-DVR/NVR of version 8.6 or later.

GeoVision Inc. 3 Revision Date: 10/21/2016
1.2 Supported GV-IP Devices and Software
GV-Eye is compatible with the following GV-IP devices and video management software.
Note: To upgrade your GV-IP devices to the latest firmware, please visit http://www.geovision.com.tw/english/5_3.asp.
1.2.1 Supported Products GV-IP Camera • GV-BL110D, GV-BX110D, GV-MFD110, GV-FE110/111 and GV-PT110D (firmware V1.01
or later) • GV-PTZ010D (firmware V1.09 or later) • GV-SD220/220S and GV-SD010/010S (firmware V1.02 or later) • GV-Target IP Cameras (firmware V1.01 or later) • Other GV-IP Cameras (firmware V2.11 or later)
Note: GV-SD200 and GV-SD200S are not supported.
GV-Compact DVR • GV-Compact DVR V2 (firmware V1.10 or later) • GV-LX4C3 Series 4-Ch Compact DVR V3 (firmware V1.04 or later) • GV-LX8C Series 8-Ch Compact DVR V3 (firmware V1.02 or later) GV-Video Server • GV-VS04A (firmware V1.06 or later) • GV-VS11 (firmware V1.03 or later) • GV-VS12 (firmware V1.07 or later) • GV-VS14 (firmware V1.01 or later) Surveillance System • GV-SNVR0400F (firmware V1.00 or later) • GV-SNVR0411 (firmware V2.00 or later) • GV-SNVR1600 (firmware V1.00 or later)
Note: For GV-SNVR0400F, the playback is not supported using GV-Eye. For GV-SNVR1600, the playback is only supported by firmware V1.2 or later.

GeoVision Inc. 4 Revision Date: 10/21/2016
Video Management Software • GV-Mobile Server (V1.3 or later) • GV-Recording Server (V1.22 or later) • GV-Video Gateway (V1.22 or later) • GV-VMS (V14.10 or later) • GV-DVR/NVR (V8.6 or later)
1.2.2 Supported Products for Monitoring Activation GV-IP Camera • GV-BL110D, GV-BX110D, GV-MFD110, GV-FE110/111 and GV-PT110D (firmware V1.01
or later) • GV-PTZ010D (firmware V1.09 or later) • GV-SD220/220S and GV-SD010/010S (firmware V1.02 or later) • GV-Target IP Cameras (firmware V1.01 or later) • Other GV-IP Cameras (firmware V2.11 or later)
Note: GV-SD200 and GV-SD200S are not supported.
GV-Video Server • GV-VS11 (firmware V1.03 or later) • GV-VS12 (firmware V1.07 or later) • GV-VS14 (firmware V1.01 or later) Video Management Software • GV-VMS (V15.10 or later) 1.2.3 Supported Products for Assigning NAS Storage Path GV-IP Camera • GV-Target IP Cameras (firmware V1.02 or later) • Other GV-IP Cameras (firmware V3.0 or later)

GeoVision Inc. 5 Revision Date: 10/21/2016
1.3 Installing GV-Eye You can download GV-Eye from the App Store or Android Market and install the application. The GV-Eye icon appears on the desktop of your mobile device. Tap to open the app. Upon the first launch, you will be directed to a dialogue box to enable or disable Demo Mode (see 1.9 System Settings). Select Yes to enable Demo Mode for trial experience of GV-Eye features. Select No to disable Demo Mode and connect your GV-IP devices and software with the app.
GV-Eye icon on iPad Dialogue Box of Demo Mode on iPad

GeoVision Inc. 6 Revision Date: 10/21/2016
1.4 Main Page
Tap the GV-Eye icon on the desktop of your device. The GV-Eye main page appears. iPad screenshot is used as an example.
1 4
6
7
3 5
2
No. Name Function
1. Group List Manages groups for GV-IP devices. For details, see Group Management in this installation guide.
2. Camera List Adds and removes connections to GV-IP devices and software. For details on adding a camera, see Connecting to GV-IP Devices and Software in this installation guide.
3. Full Screen iPads and Android Tablets: Opens and closes the Camera List.
iPhones, iPod Touch and Android Phones: Opens the Camera List.

GeoVision Inc. 7 Revision Date: 10/21/2016
4. Device Name Shows the device name. The icon shows red when the recording is enabled.
5. Edge Setting Configures IP address and recording storage path of the device.
6. Settings Tap this button to access the GV-Eye settings. For details, see the Settings section later in this installation guide.
7. Device Time Shows the device time.

GeoVision Inc. 8 Revision Date: 10/21/2016
1.5 Connecting to GV-IP Devices and Software Follow the steps below to connect your mobile device to GV-IP devices and software. iPad screenshots are mainly used as examples.
1.5.1 Automatic Connection
1. Click the GV-Eye icon on the desktop of your mobile device. This page appears.
2. Tap the Add button . This page appears.

GeoVision Inc. 9 Revision Date: 10/21/2016
3. Enable WiFi Search to detect any GeoVision IP devices and software under the same LAN.
4. Select desired devices and software and tap Save.

GeoVision Inc. 10 Revision Date: 10/21/2016
5. To display a camera live view, follow the steps below.
• On iPads and Android tablets, tap and drag the camera from the Camera List to the live view grid you want.
• On iPhones and Android phones, tap the + sign on the live view grid you want and select a camera from the popped-up Camera List.

GeoVision Inc. 11 Revision Date: 10/21/2016
6. To disconnect a live view, tap and hold the live view and drag the live view into the trash can icon.
7. To remove an entry from the Camera List, glide the entry to the left and tap Delete.
Tip: To remove all the entries on the Camera List, tap Delete All Entries on Camera List from the Settings page. For details, see 1.9 System Settings.
8. To change the device information, tap the entry from the Camera List to modify. The modified camera will be reconnected after you save the settings.
Note: You can assign up to 96 channels on the live-view pages, but access only 16 channels of live views on a single page at the same time.
GeoVision Inc. 12 Revision Date: 10/21/2016
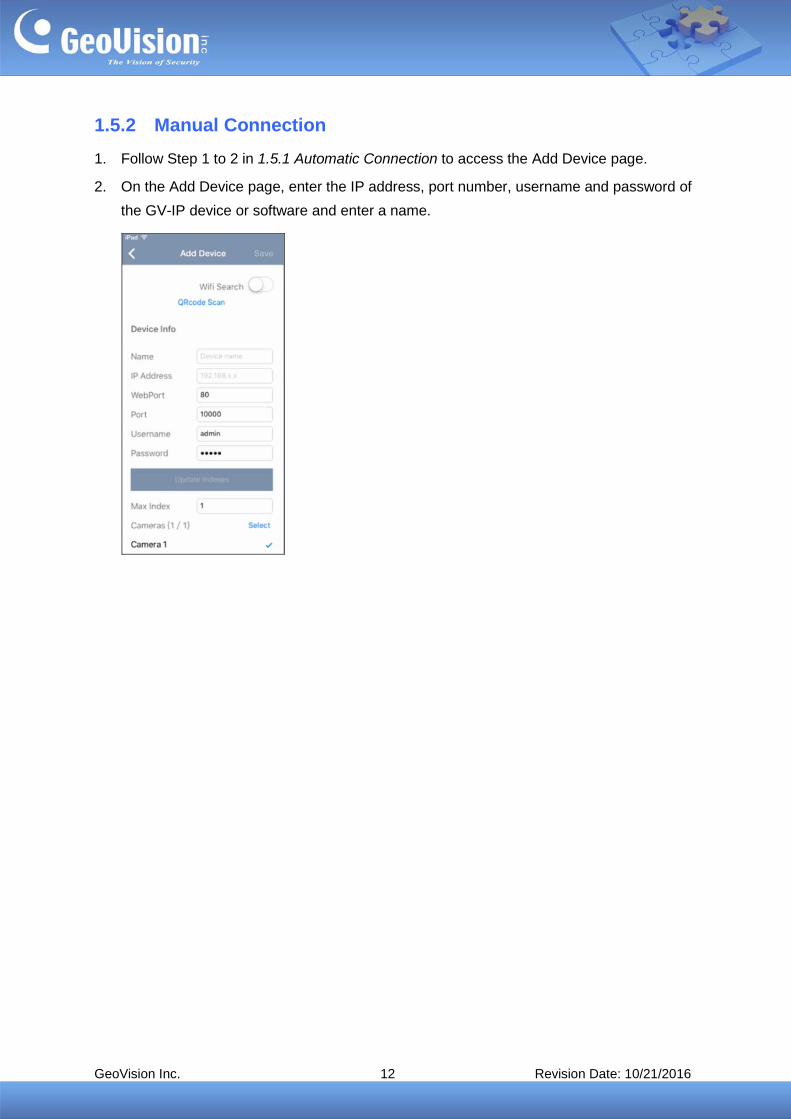
1.5.2 Manual Connection 1. Follow Step 1 to 2 in 1.5.1 Automatic Connection to access the Add Device page.
2. On the Add Device page, enter the IP address, port number, username and password of the GV-IP device or software and enter a name.

GeoVision Inc. 13 Revision Date: 10/21/2016
Note:
1. For different GV-IP devices and software, you need to modify the Port Number when setting up the above connection. For example, to connect GV-DVR/NVR/VMS, type port 56000. For a list of default port numbers for GV-IP devices and software, see System Requirements earlier in this Installation Guide.
If a router or firewall is installed with these remote servers and IP devices, ensure the corresponding port is open too. Refer to http://portforward.com/english/routers/port_forwarding/
2. To allow mobile access to GV-DVR/NVR/VMS, enable the ViewLog and mobile function in advance. From the main screen on GV-VMS, select Toolbar , select Network
and then select WebCam Server. From the main screen on GV-DVR/NVR, select Network and then select WebCam Server.

GeoVision Inc. 14 Revision Date: 10/21/2016
3. Click Update Indexes. The total number of cameras and each installed GV-IP Cameras are displayed.
4. By default, all the installed cameras are selected. To change this setting, deselect the cameras by tapping the check marks next to the cameras, or tap Select to set the range of cameras to add.
5. Tap Save on the top-right corner. The selected cameras are added to Camera List.
6. To display, disconnect live view and remove a camera from the list, refer to Step 5 to 8 in 1.5.1 Automatic Connection.

GeoVision Inc. 15 Revision Date: 10/21/2016
1.5.3 Group Management Follow the steps below to create different groups for your GV-IP devices. You can create up to 8 groups.
1. In the Settings page (No. 6, 1.4 Main Page), click Group Management.
2. On the Group Management page, name the group, for example, Group 1, Group 2, and etc.
3. To edit the name of a group or to delete a group, click Edit.

GeoVision Inc. 16 Revision Date: 10/21/2016
4. To choose layouts for each group, click the > sign. There are 6 pages in total with each displaying up to 16 channels of live view.
5. Return to the main page and select a desired group for adding IP devices.
Click to display the drop-down list of the group menu

GeoVision Inc. 17 Revision Date: 10/21/2016
1.5.4 Adding IP Devices from GV-SNVR through QR Code You can add the IP devices from GV-SNVR using the QR Code scan. Follow the steps below to scan the QR Code.
Note: 1. Currently GV-SNVR1600 (firmware V1.20 or later) and GV-SNVR0411 (firmware V2.00
or later) are supported for this function. 2. To use this function, the computer installed with GV-SNVR must be connected to the
Internet.
1. Follow Step 1 to 2 in 1.5.1 Automatic Connection to access the Add Device page.
2. Click QRcode Scan to enable the QR Code scan. The QR Code reader appears.
GeoVision Inc. 18 Revision Date: 10/21/2016
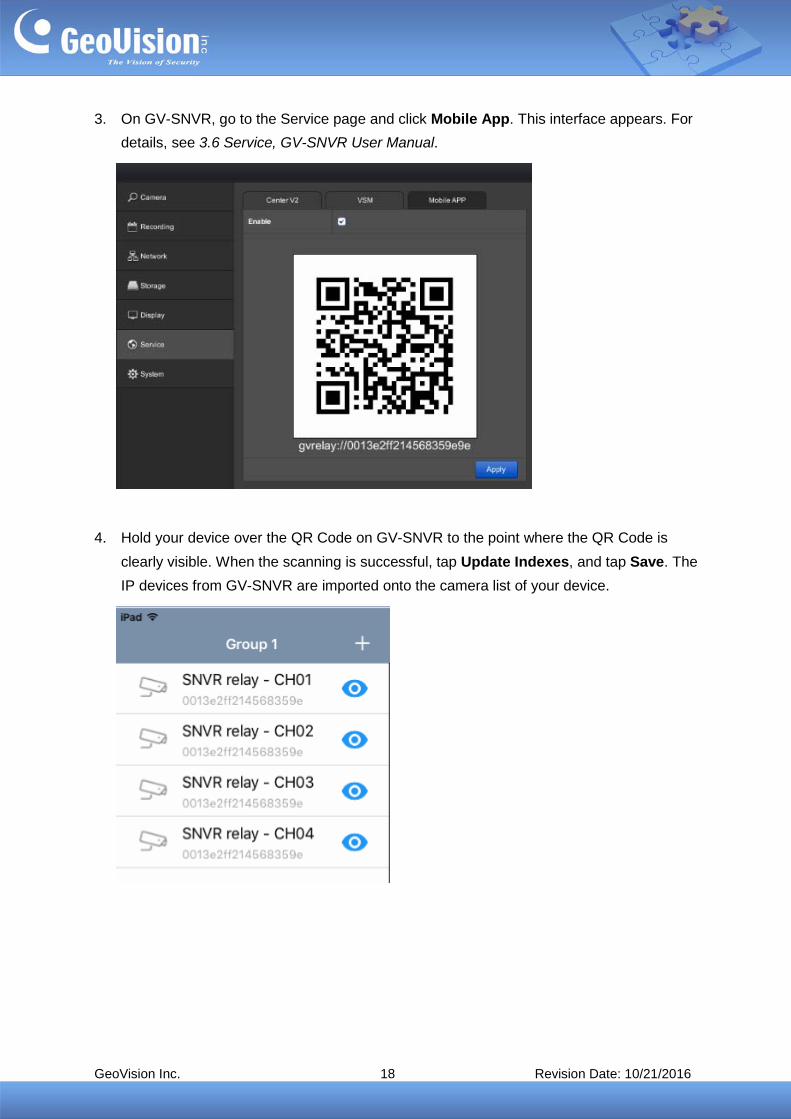
3. On GV-SNVR, go to the Service page and click Mobile App. This interface appears. For details, see 3.6 Service, GV-SNVR User Manual.
4. Hold your device over the QR Code on GV-SNVR to the point where the QR Code is clearly visible. When the scanning is successful, tap Update Indexes, and tap Save. The IP devices from GV-SNVR are imported onto the camera list of your device.

GeoVision Inc. 19 Revision Date: 10/21/2016
1.6 Live View
Tap the live view for a full-screen display as below.
You can access the following functions by tapping the corresponding icon. With the functions enabled, the record icon glows red while the others glow blue.
Icon Name Function
Snapshot Snapshots the current live view and saves it to the photos or
gallery folder of your mobile device.
Record Starts the recording. A colored camera name at the upper-left
corner of the live view indicates the status of the camera.
• Yellow: successful connection between GV-IP devices and software
• Green: starts monitoring • Red: starts recording
Only for connecting GV-Eye with GV-VMS, the camera name shows red when monitoring or recording is enabled.
The recording function is disabled by default. Tap the button again to disable the recording.

GeoVision Inc. 20 Revision Date: 10/21/2016
Icon Name Function
Speaker Broadcasts sounds from the surveillance site. This function is
enabled by default.
Microphone Speaks to the surveillance site. This function is enabled by
default.
Stream Switch Switches the connected stream. By default, stream 2 (with lower
resolution) is connected.
PIP Displays a picture-in-picture view which is a close-up view with
its original view displayed in an inserted window. This function is enabled by default. On your mobile device, pitch to zoom the part of the live view you wish to examine. You can then glide on the screen to see the different parts of the close-up view.
PTZ Panel Enables the PTZ control panel. You can control the camera view
using the following:
• : tap the arrow and drag toward the direction you wish to
move the camera view
• : zooms in and out
• : focuses in and out
• : Moves the camera view to the home position
• : Moves the camera view to a predefined position by selecting a preset number
Auto Focus Automatically focus the live view. This function is only accessible
when the PTZ panel is enabled.
I/O Trigger Manually trigger the output and edit the output naming displayed
on your mobile device.
Fisheye Dewarp Dewarps the fisheye live view and allows users to align the live view, select display mode and define the installation type. For details, see Image Alignment, Display Mode and Installation Type in this table.
Note: This is a paid service. When the option is selected, you will be directed to App Store or Android Market to download the tool. This is free for trial when the Demo Mode is enabled in the Settings page (see 1.9 System Settings).

GeoVision Inc. 21 Revision Date: 10/21/2016
Icon Name Function
Image Alignment Defines the size and center of the Fisheye view. Tap to enable
this function and then enlarge, minimize and move the red circle. Tap this icon again to apply the setting.
Display Mode Defines the display mode of a GV-Fisheye Camera. • Quad View: shows the live view in 4 PTZ views • 360-Degree View: shows 2 PTZ views and a 360° view • Single 180° view: shows one 180° view • Single View: shows one PTZ view
Installation Type Defines the installation type of a GV-Fisheye Camera. Tap the
icon and select among:
• ceiling mount
• wall mount
• ground mount
Alarm
Notification
Enable the alarm notification to GV-Center V2 when events occur. This function is disabled by default. Enable it in the Settings page (see 1.9 System Settings), and the icon will be added on the live view.
Note: The notification settings should be configured in advance on GV-IP Cameras.
Email Notification
Enable the function of receiving alert notification through e-mails when events occur. This function is disabled by default. Enable it in the Settings page (see 1.9 System Settings), and the icon will be added on live view.
Note: The notification settings should be configured in advance on GV-IP Cameras.
Playback Plays back recordings. For details, see Playing Back Recordings later in this installation guide.
Motion Detection Indicates detected motions. The icon becomes red when a
motion is detected.
Hardware Decode
Enables GPU decoding which lowers the CPU loading and increases the smoothness of live view. Note this function is only supported by Android mobile devices.
FPS Indicates the number of frames per second, ranging from 0 to 30.
The more frames per second, the smoother the motion appears.

GeoVision Inc. 22 Revision Date: 10/21/2016
Note:
3. The control of enabling or disabling recording is only available for supported GV-IP Cameras and GV-VS11 / 12 / 14. For details, see 1.2 Supported GV-IP Devices and Software.
4. PTZ Panel functions are fully or partially supported by the following GV-IP device:
• GV-IP Speed Dome and GV-PTZ Camera: all functions supported
• GV-PT Camera: all functions supported except zoom in/out
• GV-IP Cameras that support remote focus/zoom adjustment: only support auto focus, focus in/out and zoom in/out.
5. Fisheye Dewarping is available at the App Store or Android Market and is only applicable to GV-Fisheye Cameras. Alternatively, tap Upgrade from the Settings page to purchase this tool. For details, see 1.10 Fisheye Dewarping.
6. The microphone function is only supported by GV-IP Cameras and GV-Recording Server V1.3 or later.
GeoVision Inc. 23 Revision Date: 10/21/2016
1.7 Playing Back Recordings
1.7.1 Accessing the Recorded Files
Make sure the following functions are enabled ahead to allow remote access from the GV-Eye:
• GV-DVR / NVR / GV-VMS: enable Remote ViewLog Service
• GV-IP Camera / GV-Video Server / GV-Compact DVR: enable ViewLog Server
Note:
1. If a router or firewall is installed with the remote servers and IP devices, ensure the corresponding playback port is open. For example, to play back the files from GV-DVR/NVR/VMS, open port 5552 on the router. For a list of default port numbers for GV-IP devices and software, see System Requirements earlier in this Installation Guide. For how to open an port on the router, refer to http://portforward.com/english/routers/port_forwarding/
2. Audio function is not supported for video playback.
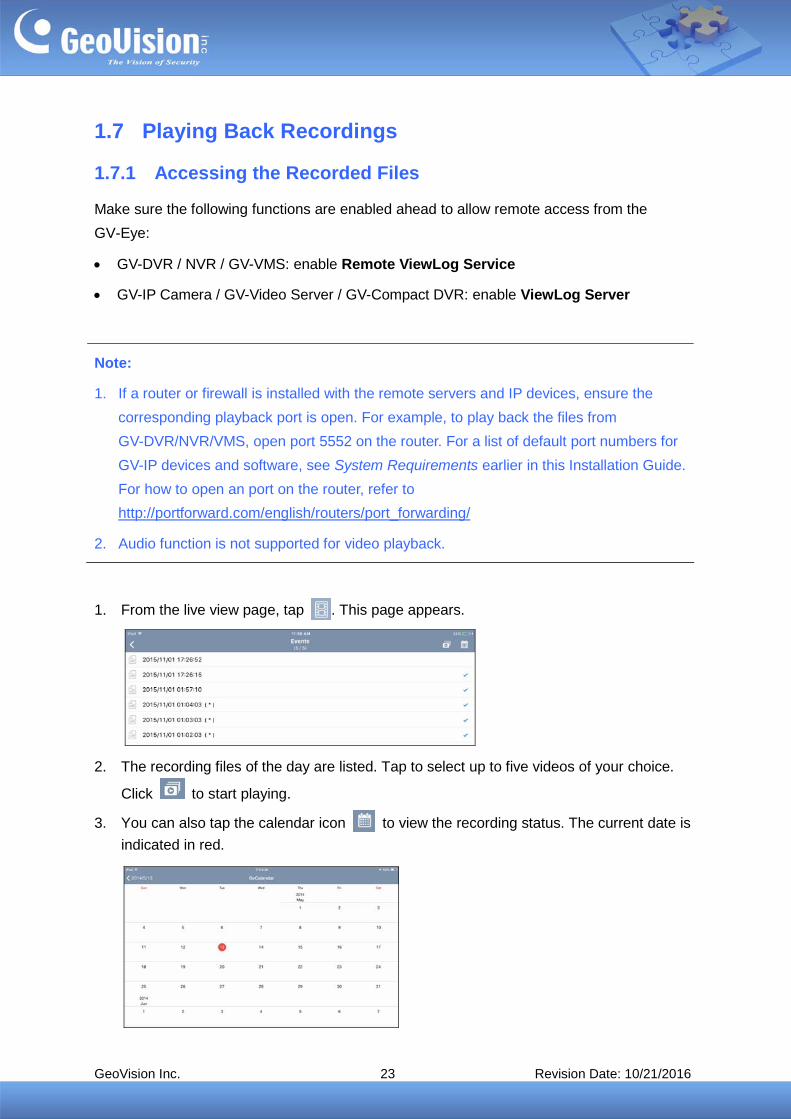
1. From the live view page, tap . This page appears.
2. The recording files of the day are listed. Tap to select up to five videos of your choice.
Click to start playing.
3. You can also tap the calendar icon to view the recording status. The current date is indicated in red.

GeoVision Inc. 24 Revision Date: 10/21/2016
1.7.2 Playback Display The full-screen display is as below.
You can access the following functions by tapping the corresponding icon. With the functions enabled, the icons glow blue.
Icon Name Function
Snapshot Snapshots the current playback and saves it to the photos or
gallery folder of your mobile device.
PIP Displays a picture-in-picture view which is a close-up view with
its original view displayed in an inserted window. This function is enabled by default. On your mobile device, pitch to zoom the part of the playback you wish to examine. You can then glide on the screen to see the different parts of the close-up view.

GeoVision Inc. 25 Revision Date: 10/21/2016
Hide Control Bar Hides the control bar on the playback window so that the users
can get a full view of the playback display.
Rotate Rotates the playback display by 90° for each tap.
Fisheye Dewarp Dewarps the fisheye live view and allows users to align the
playback scenes, select display mode and define the installation type. For details, see Image Alignment, Display Mode and Installation Type in this table.
Note: This is a paid service. When the option is selected, you will be directed to App Store or Android Market to download the tool.
Image Alignment Defines the size and center of the Fisheye view. Tap to enable
this function and then enlarge, minimize and move the red circle. Tap this icon again to apply the setting.
Display Mode Defines the display mode of a GV-Fisheye Camera.
• Quad View: shows the live view in 4 PTZ views • 360-Degree View: shows 2 PTZ views and a 360° view • Single 180° view: shows one 180° view
Single View: shows one PTZ view
Installation Type Defines the installation type of a GV-Fisheye Camera. Tap the
icon and select among:
• ceiling mount
• wall mount
• ground mount

GeoVision Inc. 26 Revision Date: 10/21/2016
1.8 Edge Settings The Edge settings section allows you to configure the IP address, device name and storage path for GV-IP devices. To access the settings, enable Edge Tool in the Settings page (see 1.9 System Settings), and the Edge settings button will be added on the main page. Tap and the Edge settings page appears.
Main Page Edge Settings Page

GeoVision Inc. 27 Revision Date: 10/21/2016
Note: For Android devices, click on the main page and tap Edge Tool to access the Edge settings.

GeoVision Inc. 28 Revision Date: 10/21/2016
1.8.1 Changing IP Address To change the IP address of a GV-IP Device, follow the steps below.
Note: The function of changing IP address is only supported by compatible GV-IP Camera, GV-Video Server and GV-Compact DVR.
1. On the IP settings page, select the desired GV-IP Device. A green tick appears under camera name.
2. Tap Next at the upper-right corner. This page appears.
3. Type a new IP address and optionally tap the Advanced button to configure the Mask, Gateway and DNS settings.
4. Tap Save to enable the settings.

GeoVision Inc. 29 Revision Date: 10/21/2016
1.8.2 Changing Device Name To change the device name of a GV-IP Device, follow the steps below.
Note: The function of changing device name is only supported by compatible GV-IP Camera, GV-Video Server and GV-Compact DVR.
1. On the Edge settings page, tap the Name button . The Name settings page appears.
2. Select the desired GV-IP Device and tap Next. This page appears.
3. Type a new name for the device and tap Save.
4. On the Name settings page, pull to refresh. The device name is updated.

GeoVision Inc. 30 Revision Date: 10/21/2016
1.8.3 Assigning Storage Path To assign the recording storage path on GV-NAS System for a GV-IP Camera, follow the steps below.
Note:
1. Make sure the camera stops recording before assigning storage path.
2. This function is only supported by GV-IP Camera firmware V3.0 or later and GV-Target IP Camera firmware V1.02 or later.
3. The Edge recording is only supported by GV-NAS Systems.
1. On the Edge settings page, tap the HDD button . The HDD settings page appears.
2. Select the desired camera and tap Next. This page appears.
3. Tap the Edit button and select Yes in the pop-up dialog box to add a valid path.

GeoVision Inc. 31 Revision Date: 10/21/2016
4. In the pop-up Host List, select the desired host, type the username and password of the host and tap Login.
5. In the pop-up Storage Path List, select the desired storage path, type a name and tap Save.
6. To view the added storage path, on the Edge settings page, tap the Storage button . The added path is displayed.

GeoVision Inc. 32 Revision Date: 10/21/2016
1.8.4 Monitoring HDD Storage
To view the HDD storage status, tap the Info button on the HDD settings page. The HDD Info page appears and displays the capacity.
Note:
1. This function is only supported by GV-IP Camera firmware V3.0 or later and GV-Target IP Camera firmware V1.02 or later.
2. For the camera with its storage path being assigned on the GV-NAS System, the HDD Info page displays the NAS storage capacity; for the camera without storage path assigned, the HDD Info page displays the SD card storage capacity.

GeoVision Inc. 33 Revision Date: 10/21/2016
1.9 System Settings To access GV-Eye settings, click on the main page. The settings page appears.
Main Page Settings Page
[DEMO]
Demo Mode: Displays 3 channels of live view for you to experience the features of GV-Eye.
Note: If you enable Demo Mode, your current connection of IP-devices and layout settings of live view will be temporarily closed. Instead, 3 demo channels and default layout will be displayed. To resume your previous settings, disable Demo Mode.
[APP STARTUP]
Auto Add to Live View: Automatically displays the added IP devices to live view. This function is disabled by default.
[SYSTEM SETTING]
Disable Screen Off: Turns off sleep mode of the mobile device when the GV-Eye is running. This function is disabled by default.

GeoVision Inc. 34 Revision Date: 10/21/2016
[LIVE VIEW]
Show Device Name: Displays device name on live view.
Show Device Time: Displays device time on live view.
Keep Image Ratio: Displays the live view in proportion to the device’s resolution.
Multi View Buffering: Enhances the smoothness of live view with multiple divisions. This function is for Android devices only.
ARM & EMAIL: Displays the alarm invocation and e-mail notification icons on live view.
Edge Tool: Displays the edge settings icon on live view.
PTZ Speed: Changes the PTZ speed. Speed 1 is the slowest and speed 5 the fastest.
Icon Size: Only for iOS devices, changes the size of the icon.
Group Management: Creates groups and arranges live view layouts. GV-Eye can receive up to 96 channels of live view from various GV-IP devices. Users can create up to 8 groups, and each group has 6 pages in total with each displaying up to 16 channels of live view. See 1.5.3 Group Management for details.
[ADD DEVICE]
Default Username: Sets the default username when adding a new IP device to the Camera List. The default is admin.
Default Password: Sets the default password when adding a new IP device to the Camera List. The default is admin.
Delete All Entries on Camera List: Click to delete all the entries from the Camera List of all groups.
Upgrade: Click to purchase the tool for fisheye dewarping and see 1.10 Fisheye Dewarping.

GeoVision Inc. 35 Revision Date: 10/21/2016
1.10 Fisheye Dewarping
To purchase the Fisheye Dewarping functions, click on the main page and tap Upgrade (see figure on page 15).
Note:
1. Fisheye Dewarping is not applicable for GV-Mobile Server hosts.
2. Once you have purchased the function, you can also use it on another device set with the same Google account.
For iOS Devices
Tap Purchase to buy the function for the first time. Tap Restore when you’ve already purchased the function and would like install it on another device.

GeoVision Inc. 36 Revision Date: 10/21/2016
For Android Devices
Tap the cost button to purchase the function.