guide to my netteller. my netteller provides a dashboard style view of netteller options. an...
TRANSCRIPT
Guide to My NetTeller
My NetTeller
• Provides a dashboard style view of NetTeller Options.
• An alternative, customizable landing page for the end-user.
• Does not replace any existing page within NetTeller – it is an addition to existing pages.
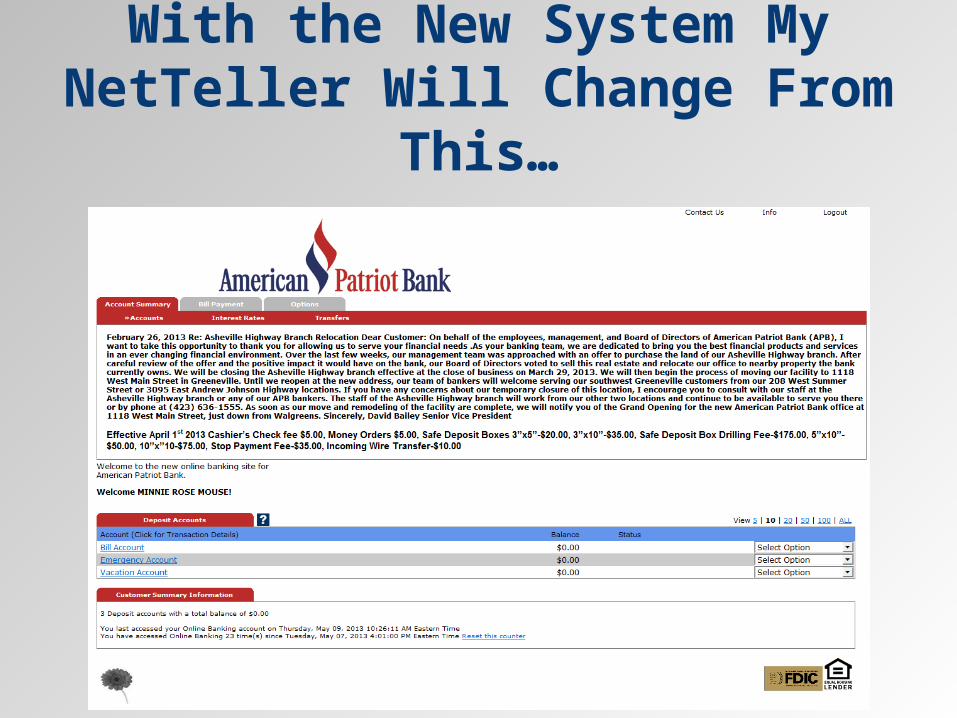
With the New System MyNetTeller Will Change From This…
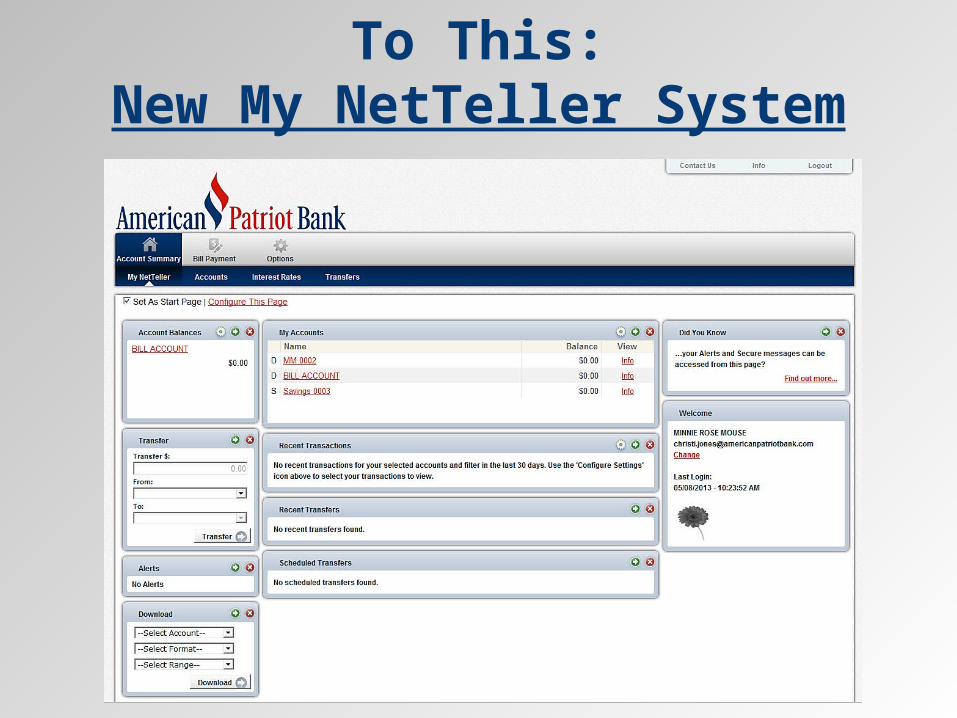
To This:New My NetTeller System
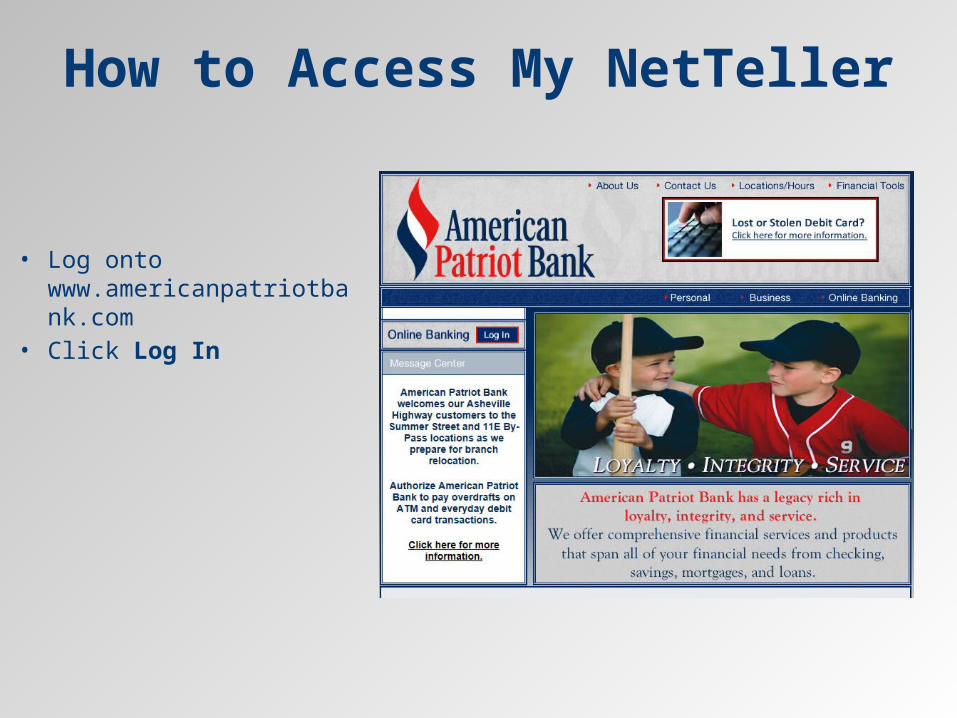
How to Access My NetTeller
• Log onto www.americanpatriotbank.com
• Click Log In

How to Access My NetTellerCont.
• Enter your Online Banking ID• Click Submit

How to Access My NetTellerCont.
• Enter password• Click Submit
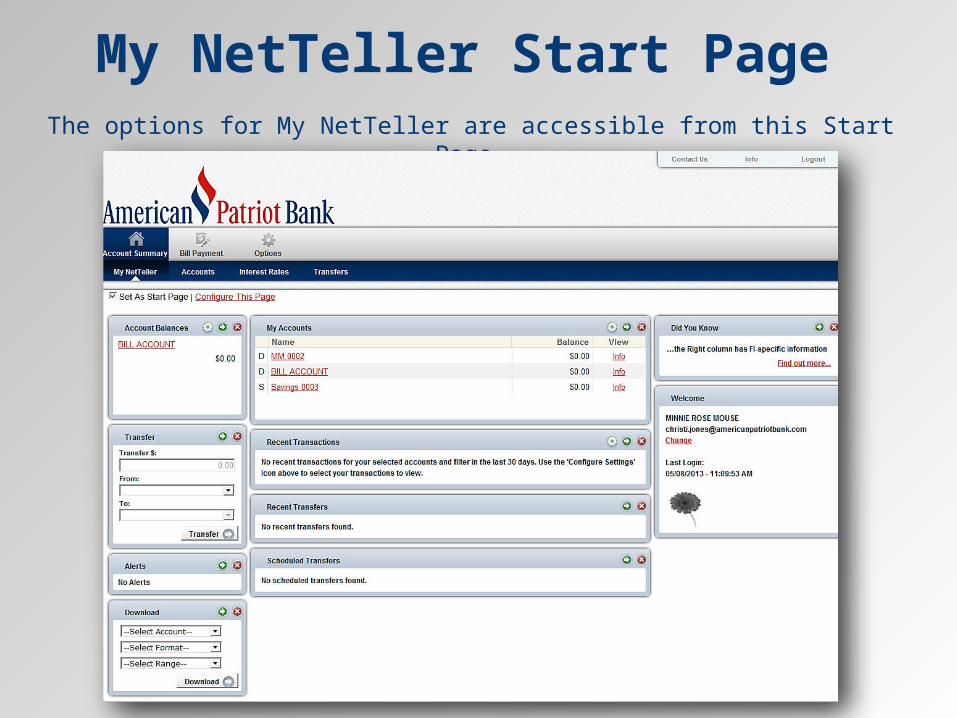
My NetTeller Start PageThe options for My NetTeller are accessible from this Start Page.
• To make the NetTeller Start Page visible upon login, select Set As Start Page to save this page setup for each log in.
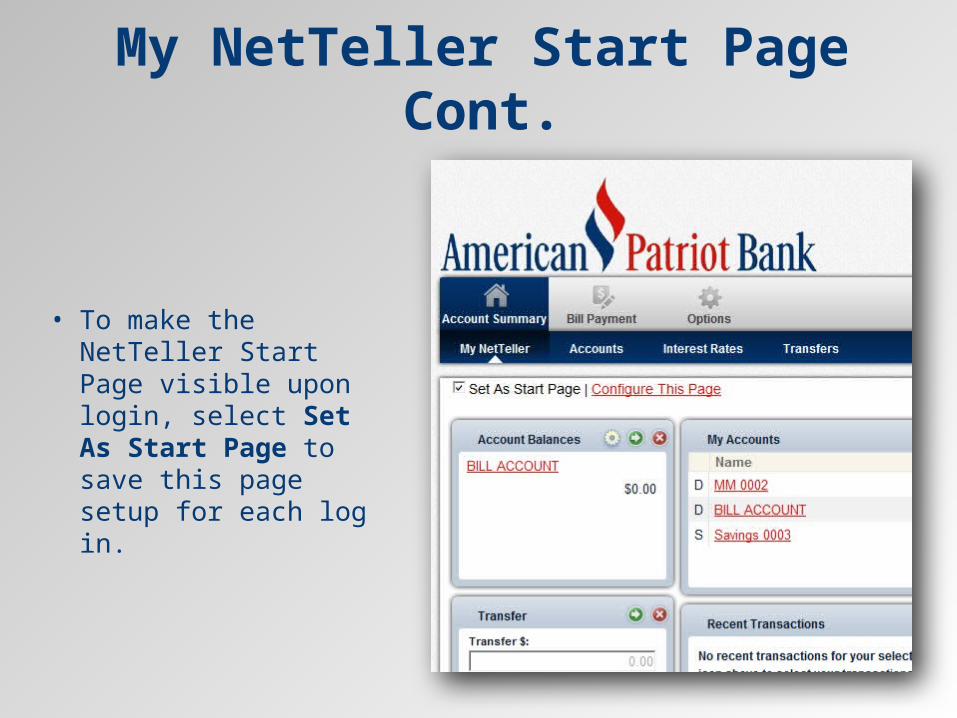
My NetTeller Start PageCont.
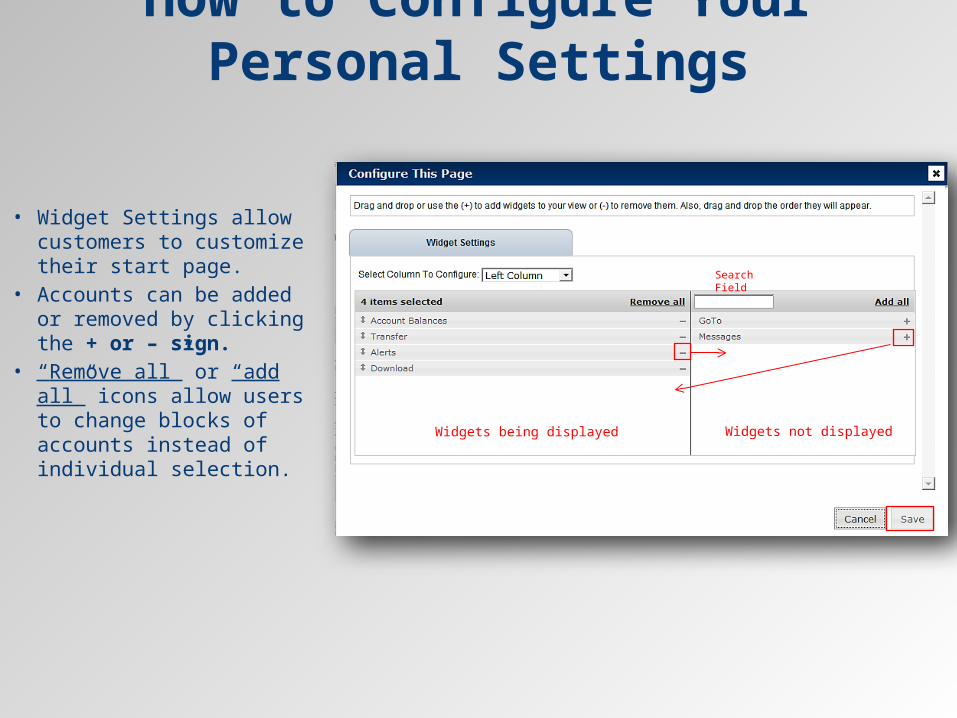
How to Configure Your Personal Settings
• Widget Settings allow customers to customize their start page.
• Accounts can be added or removed by clicking the + or – sign.
• “Remove all” or “add all” icons allow users to change blocks of accounts instead of individual selection.
Widgets being displayed Widgets not displayed
Search Field
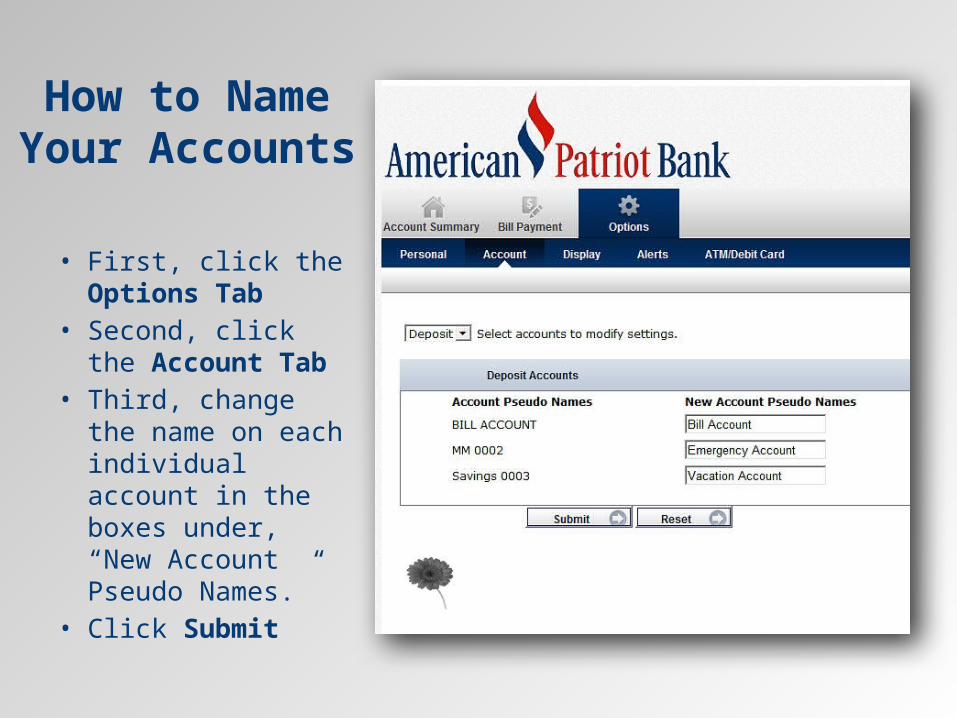
How to Name Your Accounts
• First, click the Options Tab
• Second, click the Account Tab
• Third, change the name on each individual account in the boxes under, “New Account Pseudo Names.”
• Click Submit
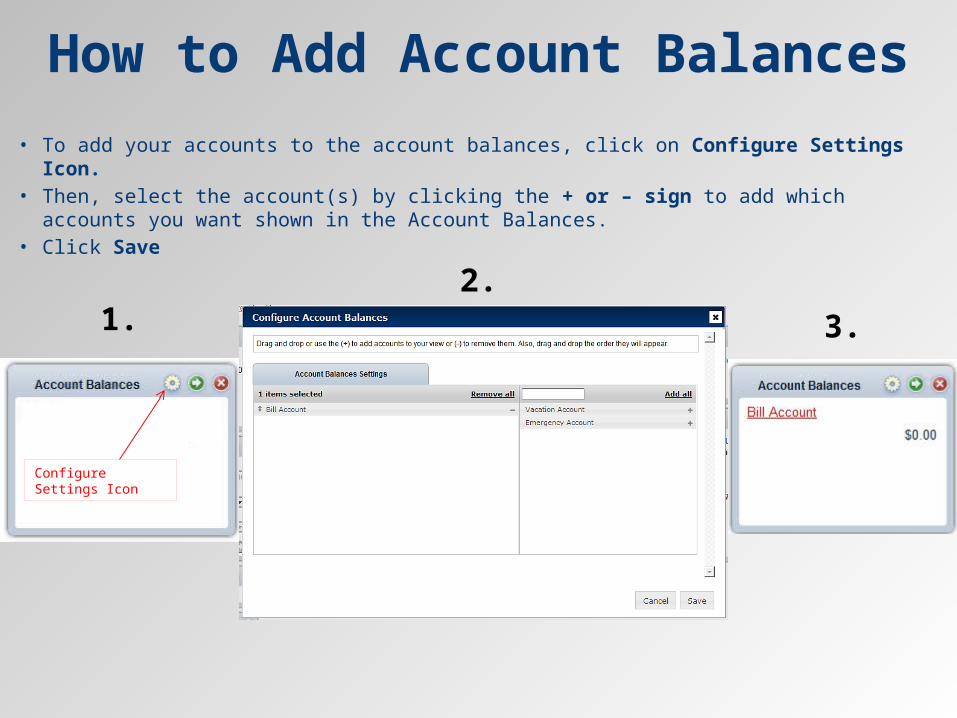
How to Add Account Balances
• To add your accounts to the account balances, click on Configure Settings Icon.• Then, select the account(s) by clicking the + or – sign to add which accounts you want
shown in the Account Balances.• Click Save
Configure Settings Icon
1.2.
3.

Account Listing
• Here is where you will find information on all of your accounts such as DDA and Loans.
• The drop-down boxes next to each account list the activities available for that account such as Transactions, Download, Transfers, Account Information, and Stop Payments.
• Customer Summary Information is listed below to show the total balances among deposit accounts.
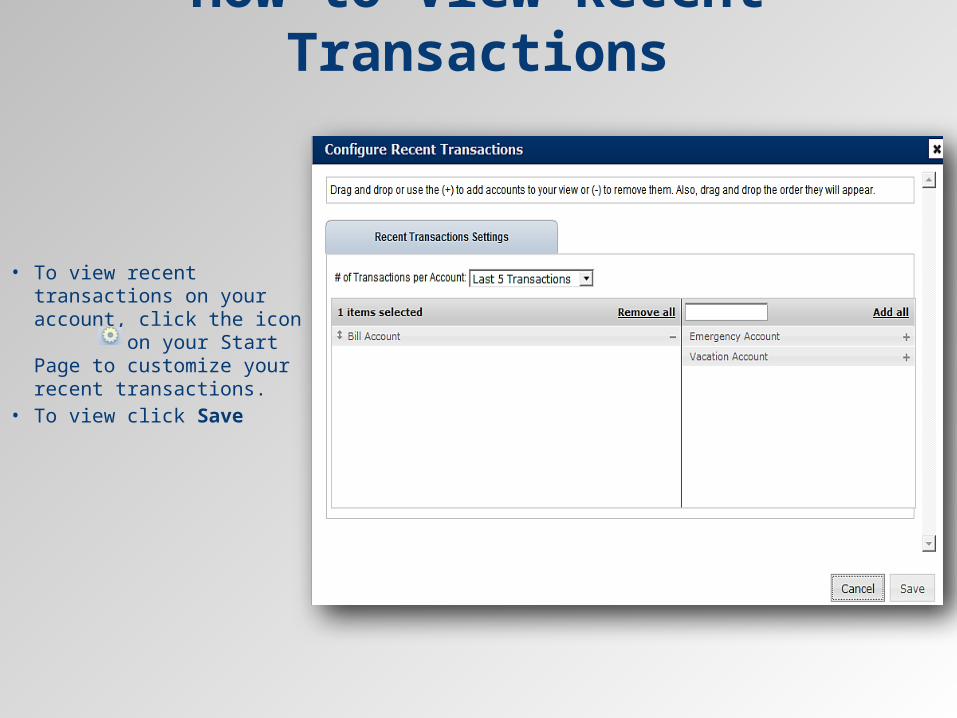
How to View Recent Transactions
• To view recent transactions on your account, click the icon on your Start Page to customize your recent transactions.
• To view click Save

How to View Recent TransactionsCont.
• You can also view Recent Transactions of your account through the Account Screen.• Transactions can be viewed since your last statement, for the past 7, 15, or 30 days, or you
may select a range of transactions.• You may view up to 3 months of history on your accounts.
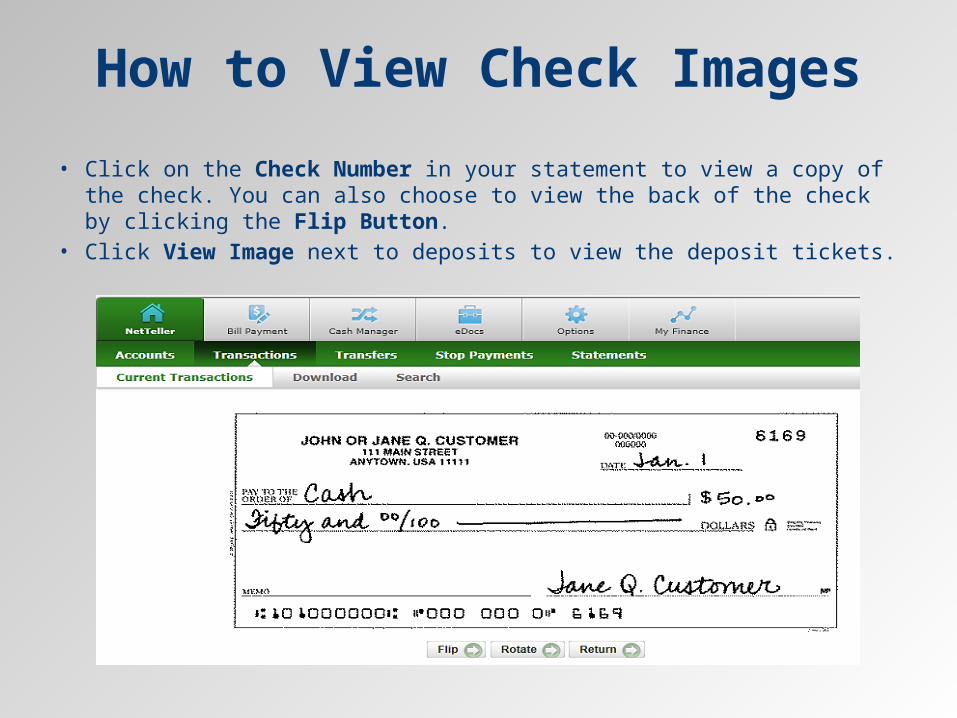
How to View Check Images
• Click on the Check Number in your statement to view a copy of the check. You can also choose to view the back of the check by clicking the Flip Button.
• Click View Image next to deposits to view the deposit tickets.
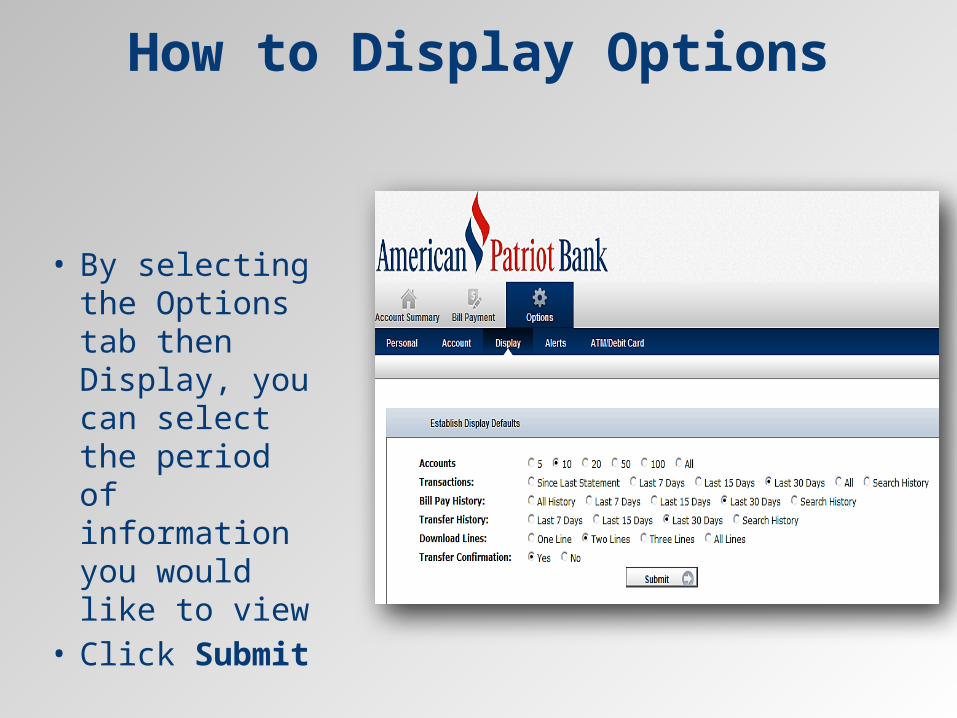
How to Display Options
• By selecting the Options tab then Display, you can select the period of information you would like to view
• Click Submit
How to Make Transfers
• You can make transfers from one account to another
• Make loan payments

How to Make TransfersCont.
• Transfers can be completed in 2 different steps.• The first step to make your transfer is on your
customized start page.• Type in amount to transfer• From: Bill Account• To: Vacation Account• Click Transfer
• The second way to complete a transfers is by clicking the icon on your customized start page.
• Can be accessed on the Account Screen.
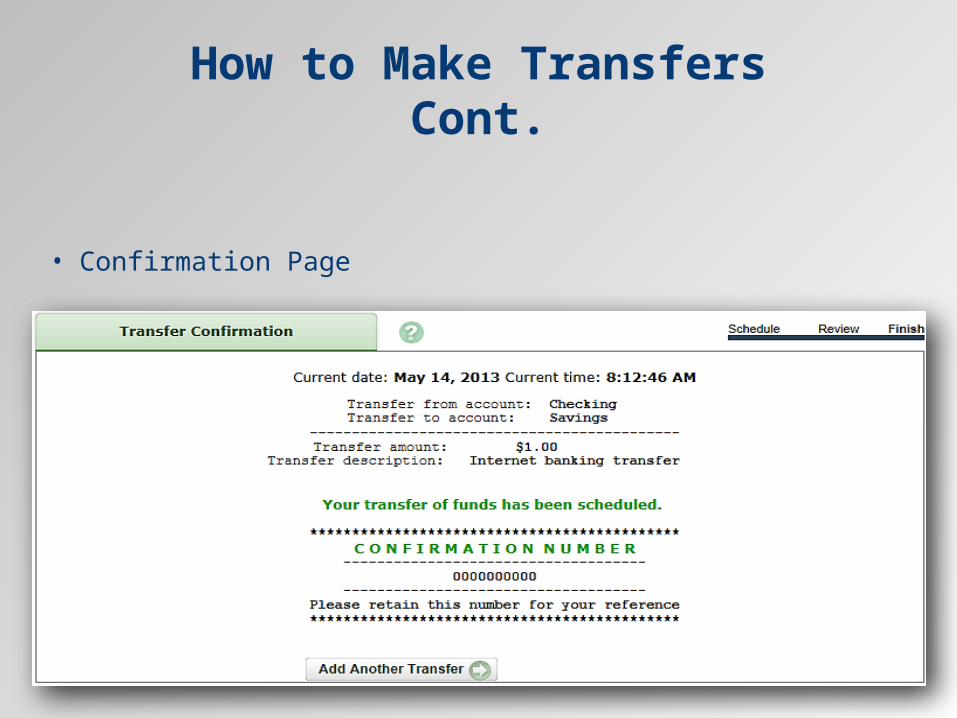
How to Make TransfersCont.
• Confirmation Page
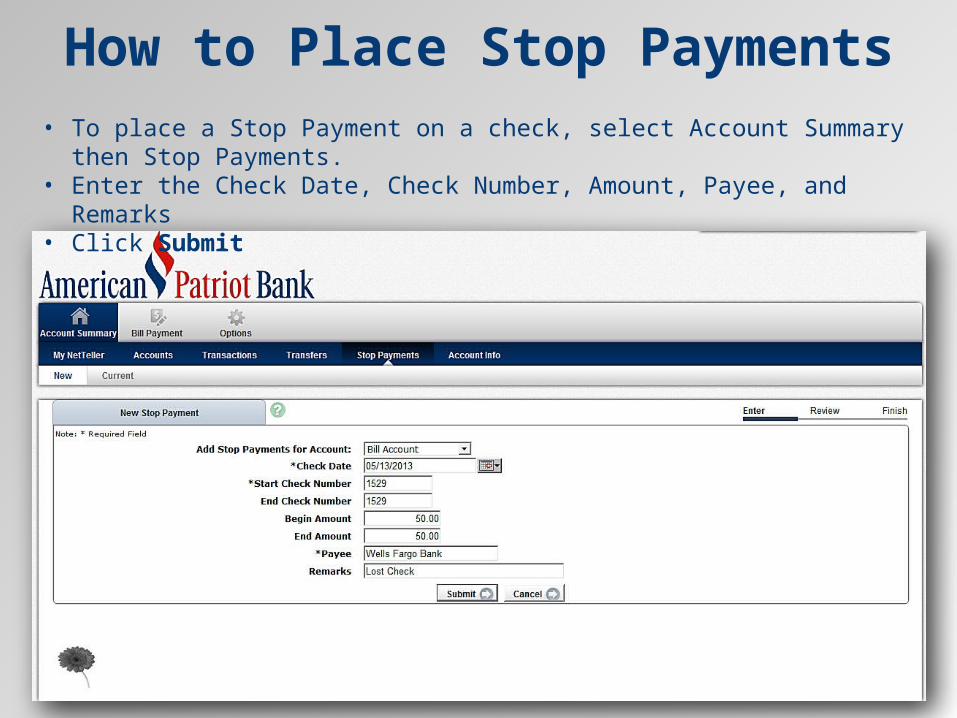
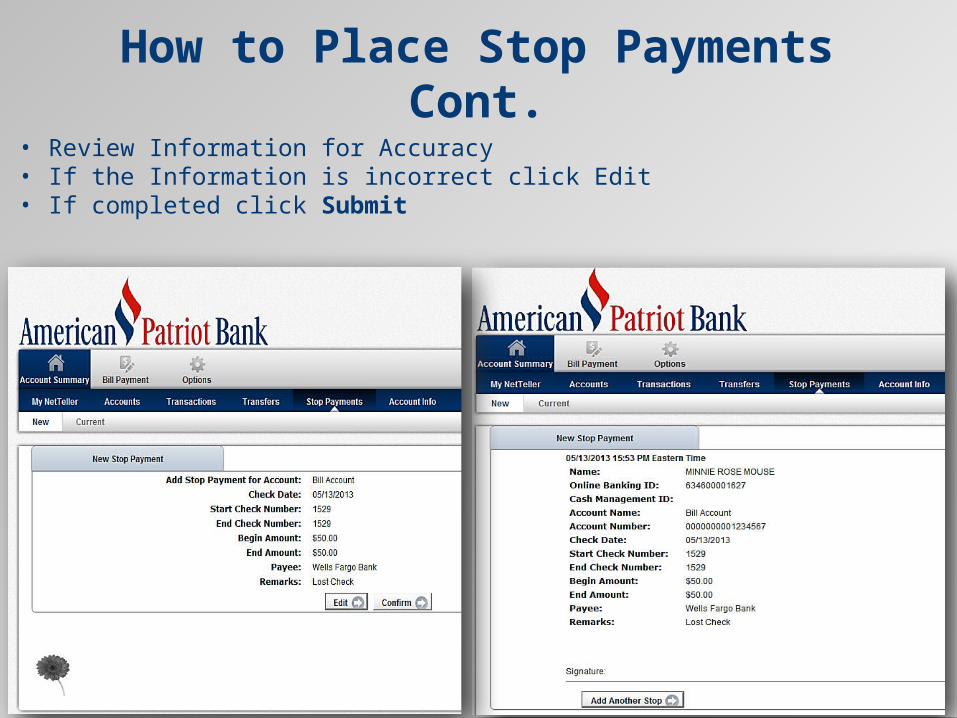
How to Place Stop Payments• To place a Stop Payment on a check, select Account Summary then Stop Payments.• Enter the Check Date, Check Number, Amount, Payee, and Remarks• Click Submit
How to Place Stop PaymentsCont.
• Review Information for Accuracy • If the Information is incorrect click Edit• If completed click Submit
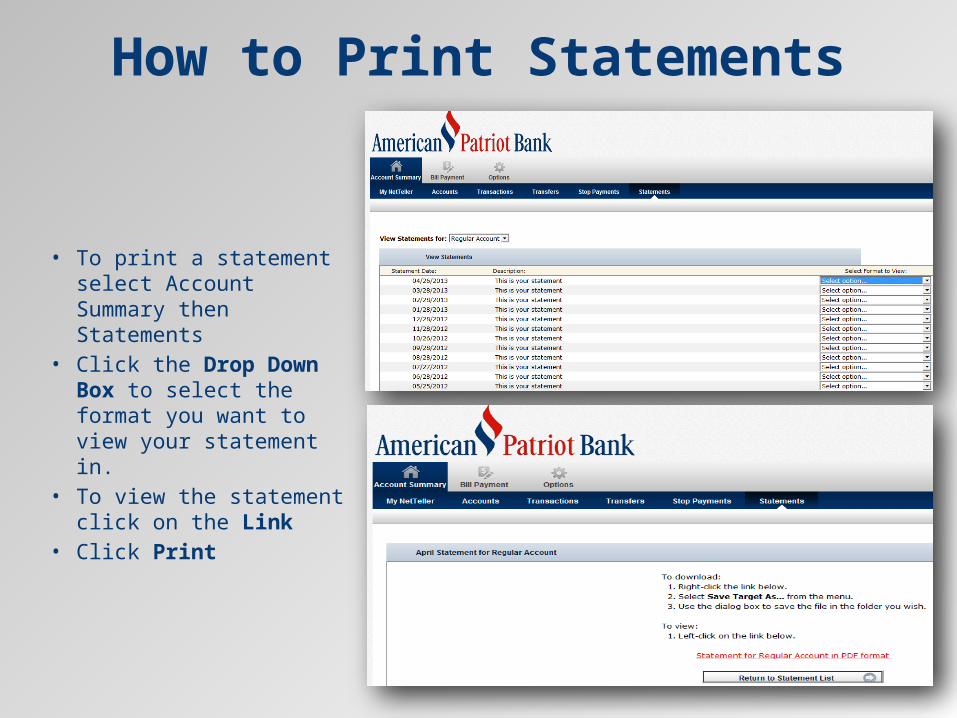
How to Print Statements
• To print a statement select Account Summary then Statements
• Click the Drop Down Box to select the format you want to view your statement in.
• To view the statement click on the Link
• Click Print

How to Add Alerts • To add alerts on your account, click icon on your start page or select options then alert tab.• There are several different alerts that allow you to add on your account.
• Edit Event Alerts• Balance Alerts• Item Alert• Personal Alert
Click
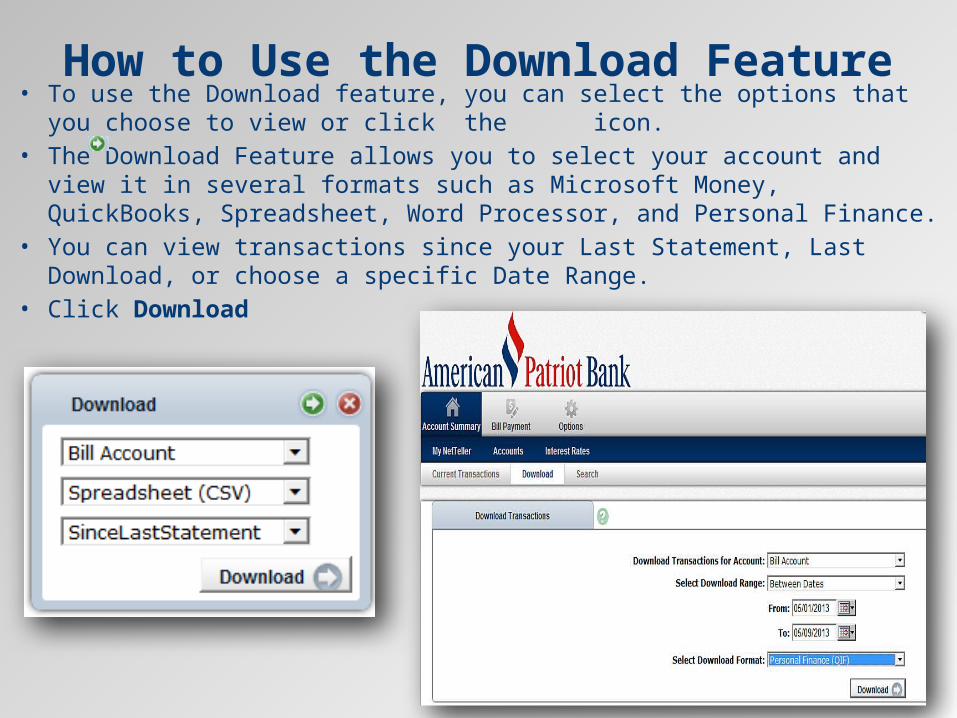
How to Use the Download Feature• To use the Download feature, you can select the options that you choose to view or click
the icon.• The Download Feature allows you to select your account and view it in several formats such
as Microsoft Money, QuickBooks, Spreadsheet, Word Processor, and Personal Finance.• You can view transactions since your Last Statement, Last Download, or choose a specific
Date Range.• Click Download
How to Report Lost/Stolen Debit Card
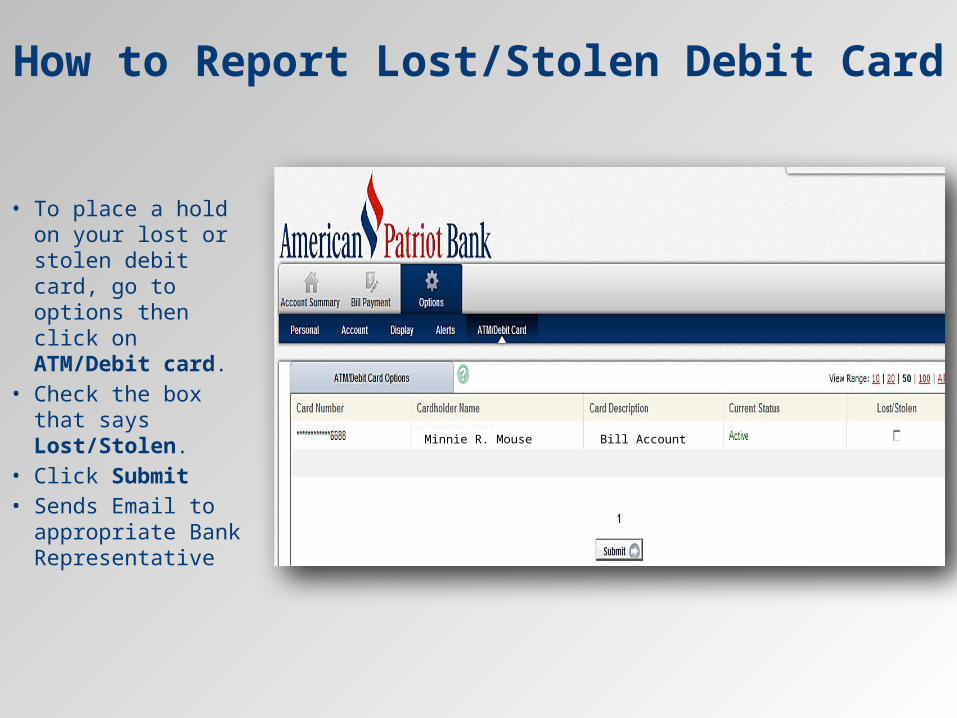
• To place a hold on your lost or stolen debit card, go to options then click on ATM/Debit card.
• Check the box that says Lost/Stolen.
• Click Submit• Sends Email to
appropriate Bank Representative
Minnie R. Mouse Bill Account
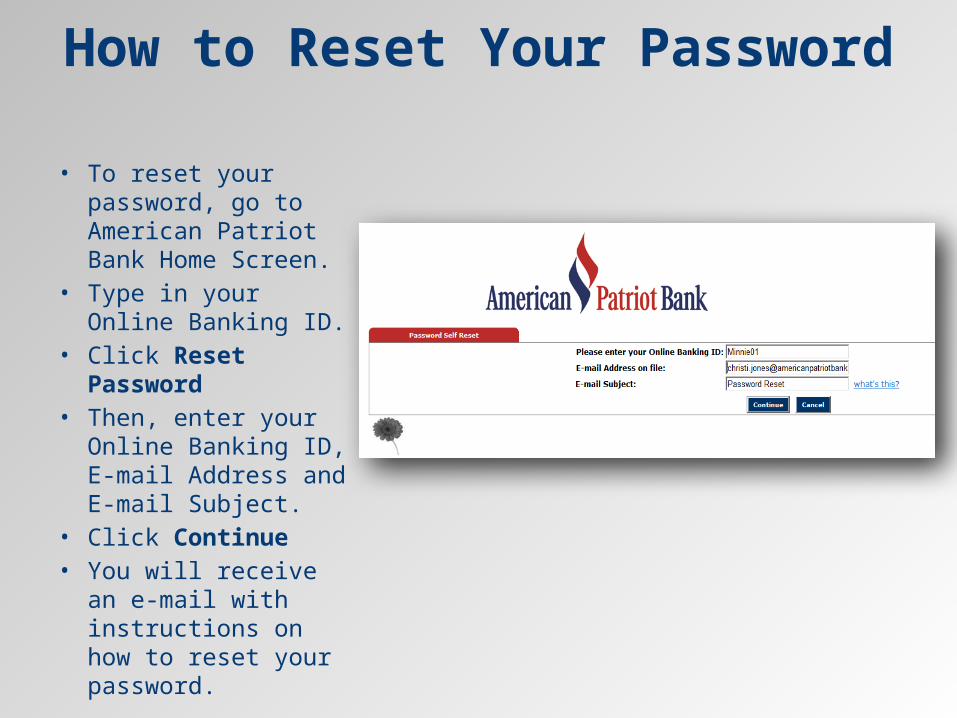
How to Reset Your Password
• To reset your password, go to American Patriot Bank Home Screen.
• Type in your Online Banking ID.
• Click Reset Password• Then, enter your Online
Banking ID, E-mail Address and E-mail Subject.
• Click Continue• You will receive an e-mail
with instructions on how to reset your password.
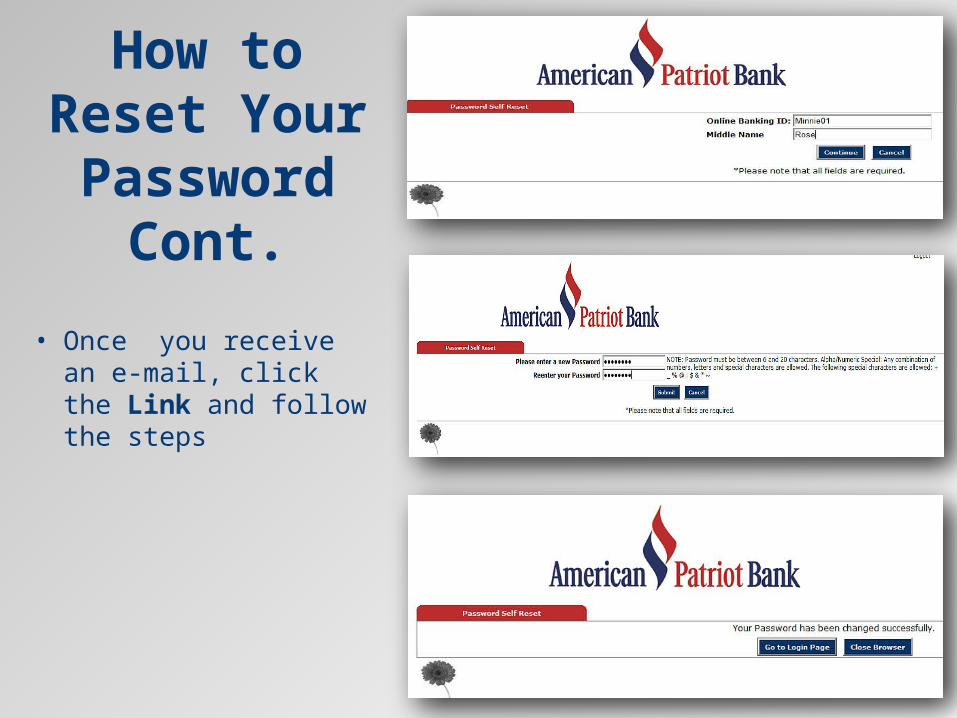
How to Reset Your Password
Cont.
• Once you receive an e-mail, click the Link and follow the steps

How to Setup Bill Payment• Bill Payment is an automatic feature that allows you to setup payments that will allow funds
to be automatically withdrawn from your account.• To setup automatic payments click on the Bill Payment tab then Payment Center.• Select account for Bill Pay.• Click Submit

• Enter the Payee’s Information, this allows you to save the payee’s information for future payments.
• Click Submit
• This shows the information of the payee.
• If you click on Select Option it allows you to edit the payee’s information or delete the payment.
How to Setup Bill Payment Cont.
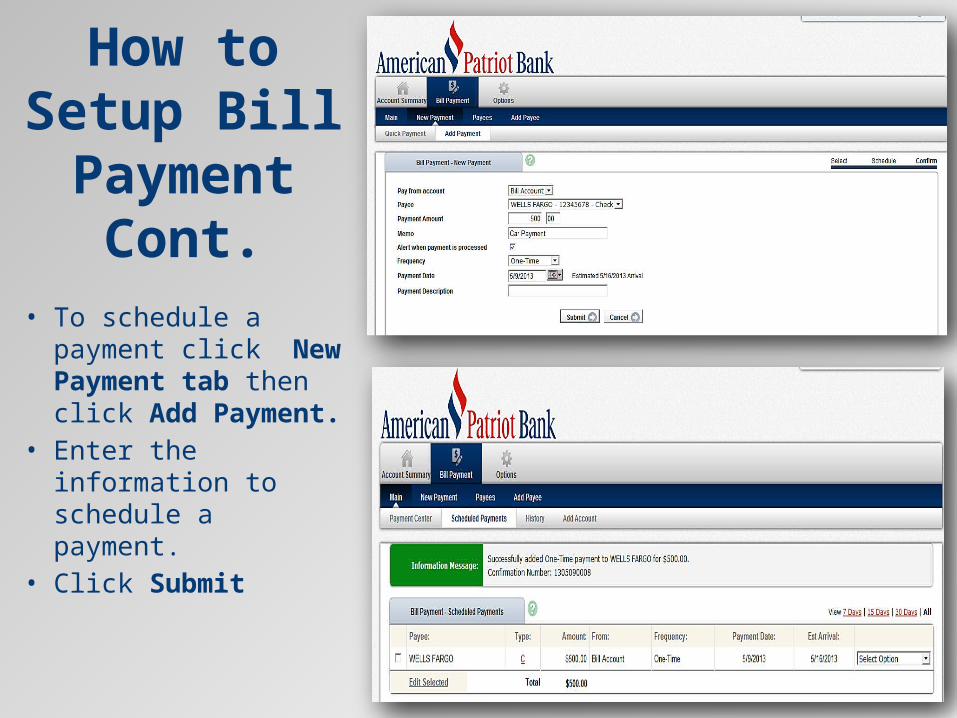
• To schedule a payment click New Payment tab then click Add Payment.
• Enter the information to schedule a payment.
• Click Submit
How to Setup Bill Payment
Cont.
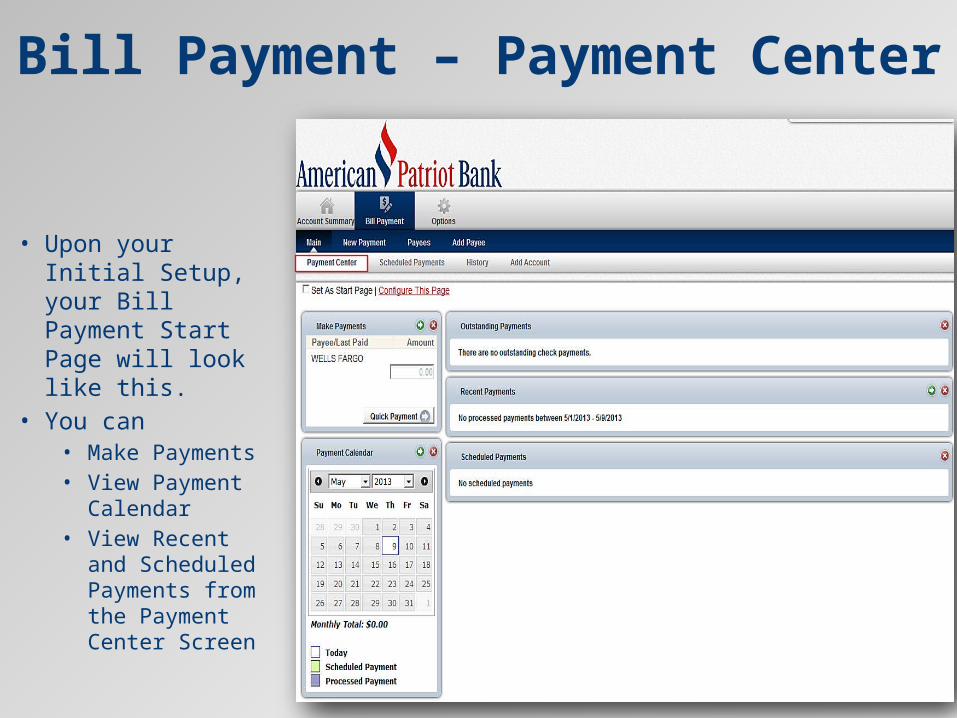
Bill Payment – Payment Center
• Upon your Initial Setup, your Bill Payment Start Page will look like this.
• You can• Make Payments• View Payment
Calendar• View Recent and
Scheduled Payments from the Payment Center Screen