- nec hong kong limitedhk.nec.com/.../en/pdf/jobcenter_web_function_r14.1_nec_en.pdf · sap erp,...
TRANSCRIPT

R14.1<Guide for using the Web function>

ii
■Windows, Windows Vista and Windows Server are trademarks or registered trademarksof Microsoft Corporation in the United States and other countries.
■UNIX is exclusively licensed by The Open Group which is a registered trademark in theUnited States and other countries.
■Solaris is a trademark of Sun Microsystems.
■HP-UX is a trademark of Hewlett-Packard.
■AIX is a trademark of IBM Corporation.
■Linux is a registered trademark of Linus Torvalds in the United States and other countries.
■Oracle Linux, Oracle Clusterware and Java are registered trademarks of Oracle and/orits affiliates.
■Red Hat is a registered trademark of Red Hat, Inc.
■SUSE is a registered trademark of Novell, Inc.
■NQS is a Network Queuing System that was developed by Sterling Software for NASAAmes Research Center.
■Microsoft Excel and Internet Explorer are trademarks or registered trademarks ofMicrosoft Corporation in the United States and other countries.
■SAP ERP, SAP NetWeaver BW and ABAP are trademarks or registered trademarks of SAPAG.
■All other software and hardware products mentioned herein are trademarks or registeredtrademarks of their respective owners.
The symbols (R), TM, and (c) are omitted in this document.
Precautions on exporting
This product (software) falls under a category of technology whereestablishment specified in the foreign exchange currency law is regulated.
Please file necessary applications, such as permission for trade, withthe Japanese government prior to exporting this product. Contact thedealer where you purchased the product or our nearest sales officefor information on documents necessary for filing such applications.

iii
IntroductionThis manual describes the basic functions and operating methods of JobCenter. Much ofits content is devoted to presenting operating procedures that use the GUI displays thatJobCenter offers to the user. Note that the sample screens shown herein may differ fromthe actual screens.
Note that this document is subject to change without prior notice.

Introduction
iv
1. LegendThe legend used in this manual is explained below.
Information that you should pay attention to.
Supplementary information about a description in the text.
Note Explanation of a note that appears in the text.__ The underlined parts in the descriptions for the installation window for
UNIX mean inputs from a keyboard.

Introduction
v
2. Related manualsThe following are manuals related to JobCenter. They are contained in JobCenter Media.
For information on the latest manuals, refer to the download page of the JobCenter productsite.
http://www.nec.co.jp/middle/WebSAM/products/JobCenter/download.html (Japanese only)
Document title OverviewJobCenter Installation Guide Describes how to newly install JobCenter or
upgrade it.JobCenter Quick Start Guide (Japanese only) Describes the basic functions of JobCenter,
as well as a complete set of operations, forfirst-time users of JobCenter.
JobCenter Basic Guide Describes the basic functions of JobCenter,as well as how to operate it.
JobCenter Environment Guide Describes various setting methods onthe construction of environments requiredfor using JobCenter, transferring ofenvironment, linkage with other products,etc.
JobCenter Guide for using NQS function(Japanese only)
Describes methods of using NQS functions,the basis of JobCenter, from JobCenter.
JobCenter Guide for using operation logs andexecution logs
Describes the functions for acquiringoperation logs and job network executionlogs from JobCenter CL/Win, as well as howto set the functions.
JobCenter Command Reference (Japaneseonly)
Describes JobCenter commands forperforming job network entry and executionstate referencing, etc. from the commandline like a GUI.
JobCenter Guide for using Cluster function Describes linkage methods for operatingJobCenter in the cluster system.
JobCenter Guide for using Helper function(Japanese only)
Describes the following three functionsthat enable efficient operation ofJobCenter using Excel: JobCenter DefinitionHelper (definition information maintenance),JobCenter Report Helper (business reportcreation), and JobCenter Analysis Helper(performance analysis).
JobCenter Guide for using SAP function(Japanese only)
Describes how to link JobCenter and SAP.
JobCenter Guide for using WebOTX BatchServer linkage function (Japanese only)
Describes how to link JobCenter and WebOTXBatch Server.
JobCenter Guide for Using the Web Function Describes JobCenter CL/Web that is afunction to monitor jobs by using a webbrowser.
JobCenter Guide for using the textdefinition function (Japanese only)
Describes how to define a job network,schedule, calendar, custom job template byusing a text file.

Introduction
vi
JobCenter Guide for upgrading the versionand applying the patches in a clusterenvironment (Japanese only)
Describes how to upgrade the version ofJobCenter and apply the patches in a clusterenvironment.
JobCenter R14.1 Release Notes Provides the information specific toJobCenter R14.1.

Introduction
vii
3. Revision historyEdition Date of revision Item Format Contents of revision
1 August 24, 2015 New - First Edition

viii
Table of ContentsIntroduction ...................................................................................................................... iii
1. Legend .................................................................................................................. iv2. Related manuals .................................................................................................... v3. Revision history .................................................................................................. vii
1. Overview ....................................................................................................................... 11.1. Function Overview ............................................................................................. 21.2. Introduction Effects ......................................................................................... 41.3. About the License ............................................................................................. 61.4. Operating Environment ...................................................................................... 71.5. Glossary ............................................................................................................. 81.6. Flow of the Steps for Using JobCenter CL/Web .............................................. 9
2. Installing and Uninstalling the CL/Web Server .......................................................... 102.1. Installation ...................................................................................................... 11
2.1.1. Before Installation ............................................................................... 112.1.2. Installing LicenseManager ..................................................................... 112.1.3. Installing the CL/Web Server ............................................................... 11
2.2. Uninstallation .................................................................................................. 152.2.1. Uninstalling LicenseManager ................................................................. 152.2.2. Uninstalling the CL/Web Server ........................................................... 15
2.3. Upgrade ............................................................................................................ 162.3.1. Upgrading CL/Web Server for UNIX ..................................................... 162.3.2. Upgrading CL/Web Server for Windows ............................................... 16
2.4. Case When Re-installing is Needed ................................................................. 182.4.1. Re-installing the CL/Web Server for UNIX ........................................... 182.4.2. Re-installing the CL/Web Server for Windows ..................................... 18
2.5. Checking the Version ....................................................................................... 203. Environment Setup ..................................................................................................... 21
3.1. CL/Web Server ................................................................................................. 223.1.1. CL/Web Configuration File (clweb.conf) ............................................... 223.1.2. Setting the Port to Use ....................................................................... 223.1.3. Setting SSL Signature Certificate ........................................................ 243.1.4. Setting Subdirectory of URL ................................................................ 24
3.2. Web Browser .................................................................................................... 253.2.1. Setting Active Scripting ....................................................................... 253.2.2. Setting Font Download ......................................................................... 253.2.3. Setting TLS (SSL) ................................................................................. 263.2.4. Enabling Cookies ................................................................................... 273.2.5. Case When Safari Running on iOS Is Used ............................................ 27
4. Starting and Stopping the CL/Web Server ................................................................ 284.1. Starting the CL/Web Server ........................................................................... 29
4.1.1. Starting the CL/Web Server for UNIX ................................................. 294.1.2. Starting the CL/Web Server for Windows ........................................... 29
4.2. Stopping the CL/Web Server ........................................................................... 314.2.1. Stopping the CL/Web Server for UNIX ................................................. 314.2.2. Stopping the CL/Web Server for Windows ........................................... 31
5. Basic Operations ......................................................................................................... 335.1. Basic CL/Web Operations ................................................................................ 34
5.1.1. Name and Outline of Each Part of the CL/Web Window ...................... 345.1.2. Search Function .................................................................................... 355.1.3. Sort Function ........................................................................................ 385.1.4. Display Table Column Display Function ................................................ 395.1.5. Setting the Tab Display Order in the Navigation Bar .......................... 415.1.6. My Page Function ................................................................................. 42
5.2. Accessing the CL/Web Server Using a Browser ............................................... 435.3. Logging In or Out ........................................................................................... 44

<Guide for using the Web function>
ix
5.3.1. Logging In ............................................................................................. 445.3.2. Logging Out .......................................................................................... 45
5.4. Job Network-related Operations ..................................................................... 475.4.1. Viewing a Group ................................................................................... 475.4.2. Viewing a Job Network ........................................................................ 485.4.3. Submitting a Job Network Immediately ............................................... 48
5.5. Tracker-related Operations ............................................................................. 535.5.1. Viewing Trackers .................................................................................. 535.5.2. Operating Trackers ............................................................................... 605.5.3. Reloading the Tracker Window Automatically ...................................... 685.5.4. Displaying Trackers in a Gantt Chart .................................................. 69
5.6. Schedule-related Operations ........................................................................... 745.6.1. Viewing a List of Schedules ................................................................. 745.6.2. Viewing the Schedule Definition .......................................................... 755.6.3. Viewing the Linking JNW ..................................................................... 765.6.4. Enabling or Disabling the Schedule ...................................................... 77
5.7. Machine-related Operations ............................................................................ 815.7.1. Viewing a List of Machines .................................................................. 815.7.2. Viewing a List of Queues ..................................................................... 815.7.3. Operating a Queue ............................................................................... 835.7.4. Viewing a List of Users ....................................................................... 85
5.8. Calendar-related Operations ........................................................................... 875.8.1. Viewing a List of Calendars ................................................................. 875.8.2. Viewing the Calendar Definition .......................................................... 87
5.9. My Page Function ............................................................................................ 905.9.1. Function Overview ................................................................................ 905.9.2. Using My Page ...................................................................................... 915.9.3. Common Panel Operations .................................................................... 935.9.4. Details of Panels ................................................................................ 1005.9.5. Setting My Page (JobCenter Administrator) ...................................... 118
6. Details of Other Functions ...................................................................................... 1226.1. Details of the Mail Transmission Function ................................................... 123
6.1.1. Configuring the SMTP Server ............................................................. 1236.1.2. Setting Character Code for Email ...................................................... 1246.1.3. Mail Transmission Function ................................................................ 1246.1.4. Setting Email Template ...................................................................... 127
6.2. Macro Functions ............................................................................................ 1306.2.1. Macro Functions (MG/SV) ................................................................... 1306.2.2. Event Linkage ..................................................................................... 132
6.3. Other User Monitoring Function ................................................................... 1346.3.1. Function Overview .............................................................................. 1346.3.2. Procedure for Switching to Other Users ........................................... 134
6.4. WebAPI Function ............................................................................................ 1366.4.1. Function Overview .............................................................................. 1366.4.2. Overview of WebAPI Introduction ...................................................... 1376.4.3. Flow of WebAPI Utilization ................................................................ 1386.4.4. WebAPI Function Details .................................................................... 142
7. Information Collection at Failure Occurrence .......................................................... 1758. Notes and Restrictions ............................................................................................ 176
8.1. Notes ............................................................................................................. 1778.2. Restrictions ................................................................................................... 178
9. Error Message List ................................................................................................... 1799.1. CL/Web Server Error Messages ..................................................................... 1809.2. Web Browser Error Messages ........................................................................ 181

x
List of Figures1.1. Image of the JobCenter CL/Web window .................................................................. 11.2. Introduction effect 1 ................................................................................................ 41.3. Introduction effect 2 ................................................................................................ 51.4. Introduction effect 3 (an example of the HPOM product) ....................................... 51.5. Flow of the steps for using JobCenter CL/Web ....................................................... 93.1. Active scripting setting window ............................................................................. 253.2. Font download setting window ............................................................................... 263.3. TLS (SSL) setting window ....................................................................................... 274.1. [Run] dialog box ..................................................................................................... 294.2. Service start window .............................................................................................. 304.3. Window where the service is started ..................................................................... 304.4. Service stop window ............................................................................................... 314.5. Window where the service is stopped .................................................................... 325.1. CL/Web window ....................................................................................................... 345.2. Search bar window .................................................................................................. 365.3. Search result window .............................................................................................. 365.4. Status bar screenshot ............................................................................................. 375.5. Window before sorting ............................................................................................ 385.6. Window after sorting .............................................................................................. 395.7. Window where the [Hide/Show Columns] button is selected ................................. 405.8. Display column list screenshot ............................................................................... 405.9. Display column list result screenshot ..................................................................... 415.10. Example of order change in the CL/Web screen navigation bar ........................... 425.11. Error screen for the certificate ........................................................................... 435.12. Image of the CL/Web login window ...................................................................... 445.13. Window after logging in to CL/Web ..................................................................... 455.14. Image of the JobCenter CL/Web logout window .................................................. 465.15. Image of the window where a group is selected .................................................. 475.16. Job network display .............................................................................................. 485.17. Window where [Submit] is selected in the job network display table .................. 495.18. [Submit JNW] dialog box ...................................................................................... 505.19. Success of job network submission ...................................................................... 505.20. Window where [Submit] is selected in the job network display window .............. 515.21. Tracker display in the tracker display table ........................................................ 535.22. Settings ................................................................................................................. 555.23. [Set] dialog box .................................................................................................... 565.24. [Detail] button ...................................................................................................... 575.25. [Editing a Filter] dialog box ................................................................................ 585.26. Job flow display window ...................................................................................... 585.27. Detailed information window of a part ................................................................ 595.28. Part list window ................................................................................................... 595.29. Window where a group name is selected .............................................................. 615.30. Shortcut menu screenshot .................................................................................... 615.31. Window where the submission time is changed .................................................... 625.32. Detailed information window of a unit job tracker part ..................................... 635.33. Detailed information window of a sub job tracker part ...................................... 645.34. Detailed information window of a dialog tracker part ........................................ 655.35. Detailed information window of a job waiting part ............................................. 665.36. Change to automatic reload ON state .................................................................. 685.37. [Auto Reload Setting] dialog box ......................................................................... 695.38. [Set] button .......................................................................................................... 705.39. Switch to [Gantt chart] in the [Set] dialog box ................................................. 715.40. Displaying a Gantt chart of trackers ................................................................... 725.41. Image of the window where a group is selected .................................................. 745.42. Schedule definition display window ...................................................................... 75

<Guide for using the Web function>
xi
5.43. Clicking the [Linking JNW] Tab ............................................................................ 765.44. Linking JNW window ............................................................................................. 765.45. Shortcut menu screenshot .................................................................................... 775.46. [Schedule Operation] dialog box ........................................................................... 785.47. Success of operating schedule .............................................................................. 785.48. Shortcut menu screenshot .................................................................................... 795.49. [Group Operation] dialog box ............................................................................... 795.50. Success of enabling schedules under the group .................................................... 805.51. Machine list display window ................................................................................. 815.52. Window where a machine is selected .................................................................... 825.53. Queue list display window .................................................................................... 825.54. Window where a queue is selected ....................................................................... 845.55. [Queue Control] start dialog box ......................................................................... 845.56. [Queue Control] end dialog box ............................................................................ 845.57. Window where the [User] tab is selected ............................................................ 855.58. Window where the [User] tab is selected ............................................................ 865.59. Calendar list display window ................................................................................ 875.60. Calendar list display window ................................................................................ 885.61. Calendar definition display window ...................................................................... 885.62. Example of [My Page] window ............................................................................. 905.63. Referencing the job networks of multiple users simultaneously .......................... 915.64. [My Page] window (when there is no panel added) .............................................. 925.65. [Add Panel] button ............................................................................................... 925.66. [Add Panel] dialog box ......................................................................................... 935.67. [Panel Setting] dialog box .................................................................................... 935.68. Panel window ......................................................................................................... 945.69. [Add Panel] button ............................................................................................... 955.70. [Add Panel] dialog box ......................................................................................... 965.71. [Panel Setting] dialog box .................................................................................... 975.72. [Panel Setting] dialog box (moving a panel or changing a panel size) .................. 975.73. Example of the panel layout ................................................................................. 985.74. [Panel Setting] dialog box (changing a panel name) ............................................. 995.75. [Panel Setting] dialog box (deleting a panel) ....................................................... 995.76. Confirmation dialog box for deleting a panel ....................................................... 995.77. Side menu window ............................................................................................... 1005.78. JNW My List ........................................................................................................ 1015.79. [JNW My List Setting] dialog box (JNW My List Setting) ................................. 1025.80. [JNW My List Setting] dialog box (Display Column) ........................................... 1035.81. Tracker My List (displayed in full size) ............................................................. 1045.82. [Tracker My List Setting] dialog box (selecting job networks) ......................... 1055.83. [Tracker My List Setting] dialog box (with tracker status details displayed) ... 1065.84. [Tracker My List Setting] dialog box (selecting the columns to be displayed) ... 1085.85. Side menu of the Tracker My List ..................................................................... 1095.86. Tracker Summary ................................................................................................. 1105.87. [Tracker Summary Setting] dialog box ............................................................... 1115.88. Side menu of the Tracker Summary .................................................................... 1135.89. Tracker Report .................................................................................................... 1135.90. Tracker Report (hiding a chart) ......................................................................... 1145.91. [Tracker Report setting] dialog box .................................................................. 1155.92. Changing the reference date in the Tracker Report temporarily (before thechange) .......................................................................................................................... 1165.93. Changing the reference date in the Tracker Report temporarily (after thechange) .......................................................................................................................... 1165.94. Side menu of the Tracker Report ....................................................................... 1175.95. Setting button (displayed only for the JobCenter administrator) ..................... 1185.96. Specifying a limited user .................................................................................... 1195.97. When a limited user logs in (only My Page is displayed) .................................... 119

<Guide for using the Web function>
xii
5.98. Switching users in the [My Page] window (from the JobCenter administratorto the limited user) ...................................................................................................... 1205.99. [My Page] window (when the JobCenter administrator displays and edits the[My Page] window of the limited user) ....................................................................... 1216.1. Window where the [Mail] button is displayed ..................................................... 1256.2. [Send Mail] dialog box .......................................................................................... 1266.3. Mail transmission confirmation dialog box ........................................................... 1276.4. Case study 1 ......................................................................................................... 1306.5. Mail setting window example for CL/Win ............................................................. 1316.6. Case study 2 ......................................................................................................... 1336.7. Clicking user name ................................................................................................ 1346.8. Select user name ................................................................................................... 1356.9. After switching to another user .......................................................................... 1356.10. Effects of WebAPI introduction ......................................................................... 1376.11. Click the user name ............................................................................................ 1386.12. Clicking the [KEY] button .................................................................................. 1396.13. API Access Key Information window ................................................................... 1406.14. HTTP authentication screen ................................................................................ 1416.15. GET method setting items .................................................................................. 1426.16. Example of job network list display ................................................................... 1436.17. Example of immediate job network submission .................................................. 1476.18. Example of tracker list display .......................................................................... 1506.19. Example of tracker details display ..................................................................... 1566.20. Example of tracker details display ..................................................................... 1606.21. Example of tracker details display ..................................................................... 1636.22. Example of tracker part control instruction ...................................................... 1666.23. Example of tracker stop instruction screen ....................................................... 172
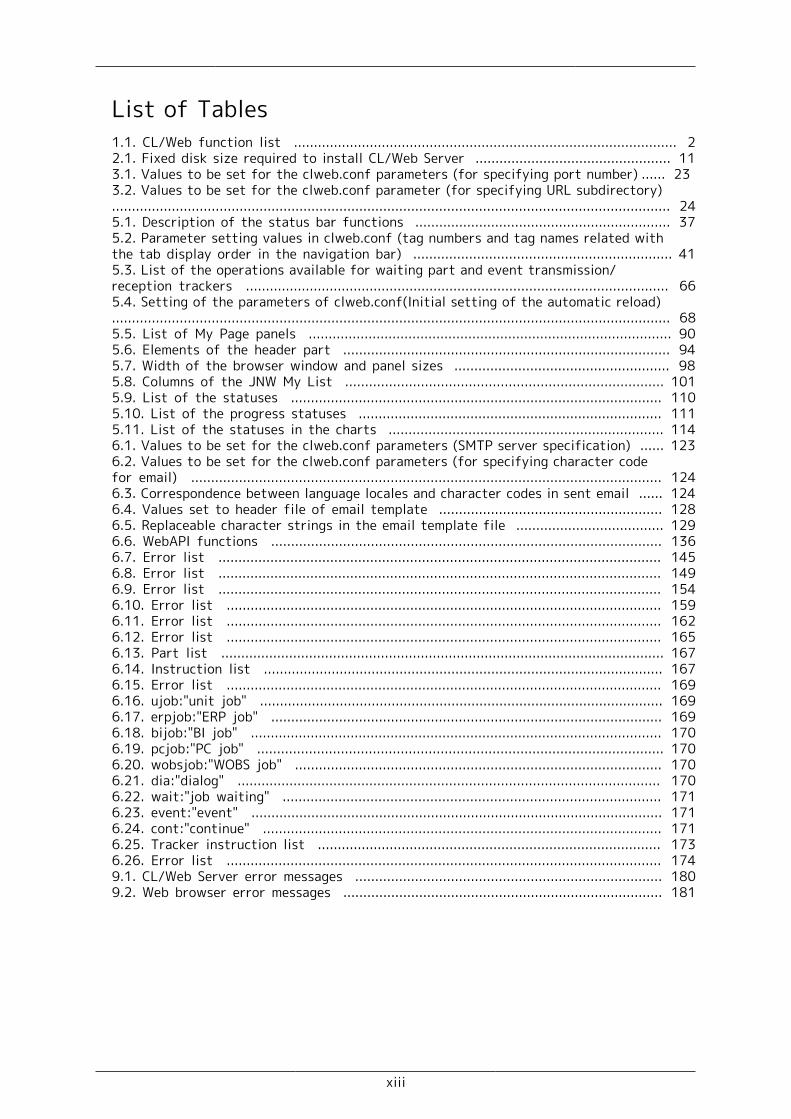
xiii
List of Tables1.1. CL/Web function list ................................................................................................ 22.1. Fixed disk size required to install CL/Web Server ................................................. 113.1. Values to be set for the clweb.conf parameters (for specifying port number) ...... 233.2. Values to be set for the clweb.conf parameter (for specifying URL subdirectory)............................................................................................................................................ 245.1. Description of the status bar functions ................................................................ 375.2. Parameter setting values in clweb.conf (tag numbers and tag names related withthe tab display order in the navigation bar) ................................................................. 415.3. List of the operations available for waiting part and event transmission/reception trackers .......................................................................................................... 665.4. Setting of the parameters of clweb.conf(Initial setting of the automatic reload)............................................................................................................................................ 685.5. List of My Page panels ........................................................................................... 905.6. Elements of the header part .................................................................................. 945.7. Width of the browser window and panel sizes ...................................................... 985.8. Columns of the JNW My List ................................................................................ 1015.9. List of the statuses ............................................................................................. 1105.10. List of the progress statuses ............................................................................ 1115.11. List of the statuses in the charts ..................................................................... 1146.1. Values to be set for the clweb.conf parameters (SMTP server specification) ...... 1236.2. Values to be set for the clweb.conf parameters (for specifying character codefor email) ...................................................................................................................... 1246.3. Correspondence between language locales and character codes in sent email ...... 1246.4. Values set to header file of email template ........................................................ 1286.5. Replaceable character strings in the email template file ..................................... 1296.6. WebAPI functions .................................................................................................. 1366.7. Error list ............................................................................................................... 1456.8. Error list ............................................................................................................... 1496.9. Error list ............................................................................................................... 1546.10. Error list ............................................................................................................. 1596.11. Error list ............................................................................................................. 1626.12. Error list ............................................................................................................. 1656.13. Part list ............................................................................................................... 1676.14. Instruction list .................................................................................................... 1676.15. Error list ............................................................................................................. 1696.16. ujob:"unit job" ..................................................................................................... 1696.17. erpjob:"ERP job" .................................................................................................. 1696.18. bijob:"BI job" ....................................................................................................... 1706.19. pcjob:"PC job" ...................................................................................................... 1706.20. wobsjob:"WOBS job" ............................................................................................ 1706.21. dia:"dialog" .......................................................................................................... 1706.22. wait:"job waiting" ............................................................................................... 1716.23. event:"event" ....................................................................................................... 1716.24. cont:"continue" .................................................................................................... 1716.25. Tracker instruction list ...................................................................................... 1736.26. Error list ............................................................................................................. 1749.1. CL/Web Server error messages ............................................................................. 1809.2. Web browser error messages ................................................................................ 181

1
Chapter 1. OverviewThis chapter provides an overview of JobCenter CL/Web.
JobCenter CL/Web enables execution state monitoring, immediate job network submission,and parameter checking by using a web browser.
Figure 1.1. Image of the JobCenter CL/Web window
■Conventions for abbreviations
JobCenter CL/Web is referred to as "CL/Web."
The JobCenter CL/Web Server is referred to as the "CL/Web Server."

Overview
2
1.1. Function OverviewThe CL/Web functions are outlined below.
Table 1.1. CL/Web function list
Category Function ReferenceLists job networks. Section 5.4.1, “Viewing a Group”Submits a job networkimmediately.
Section 5.4.3, “Submitting a JobNetwork Immediately”
Lets you browsejob network definitioninformation.
Section 5.4.2, “Viewing a JobNetwork”
Job Network
Searches the job networklist.
Section 5.1.2, “Search Function”
Lists trackers. Section 5.5.1.1, “Listing Trackers”Lets you operate trackersand tracker parts.
Section 5.5.2.1, “Operating a JobNetwork Tracker”
Searches the tracker list. Section 5.1.2, “Search Function”Lets you set a monitoringfilter.
Section 5.5.1.2, “Displaying theTracker List with a PeriodSpecified”
Tracker
Sends the URL shown in thetracker window via mail.
Section 6.1.3, “Mail TransmissionFunction”
Lists schedules. Section 5.6.1, “Viewing a List ofSchedules”
Lets you browse scheduledefinition information.
Section 5.6.2, “Viewing theSchedule Definition”
Schedule
Enables/Disables schedules Section 5.6.4, “Enabling orDisabling the Schedule”
Lists machines. Section 5.7.1, “Viewing a List ofMachines”
Lists queues. Section 5.7.2, “Viewing a List ofQueues”
Lets you operate a queue. Section 5.7.3, “Operating a Queue”Lists users. Section 5.7.4, “Viewing a List of
Users”
Machine
Searches a list window. Section 5.1.2, “Search Function”Lists calendars. Section 5.8.1, “Viewing a List of
Calendars”Calendar
Lets you browse calendardefinition information.
Section 5.8.2, “Viewing theCalendar Definition”
Displays the My Pagewindow.
Section 5.9.2.1, “Displaying MyPage”
Lets you add a panel to theMy Page window.
Section 5.9.2.2, “Adding a Panel”
My Page
Lets you change panelsettings.
Section 5.9.3, “Common PanelOperations”

Overview
3
Lets you limit the use of MyPage.
Section 5.9.5.1, “Limit Mode”

Overview
4
1.2. Introduction EffectsCL/Web enables job operation and monitoring using an install-less client, including errorjob discovery and immediate job network submission.
■Introduction effect 1
Previously, it was necessary to install a dedicated client (JobCenter CL/Win) for eachmonitoring terminal. Introducing CL/Web makes it possible to perform monitoring via aweb browser without installing a dedicated client.
Figure 1.2. Introduction effect 1
■Introduction effect 2
Previously, when an error occurred, the relevant tracker name was sent via mail. With themail transmission function of MG, the URL information of the tracker window presentwhen the error occurred can be sent to a specified mail address. For details, refer toSection 6.1, “Details of the Mail Transmission Function”.
Overview
5
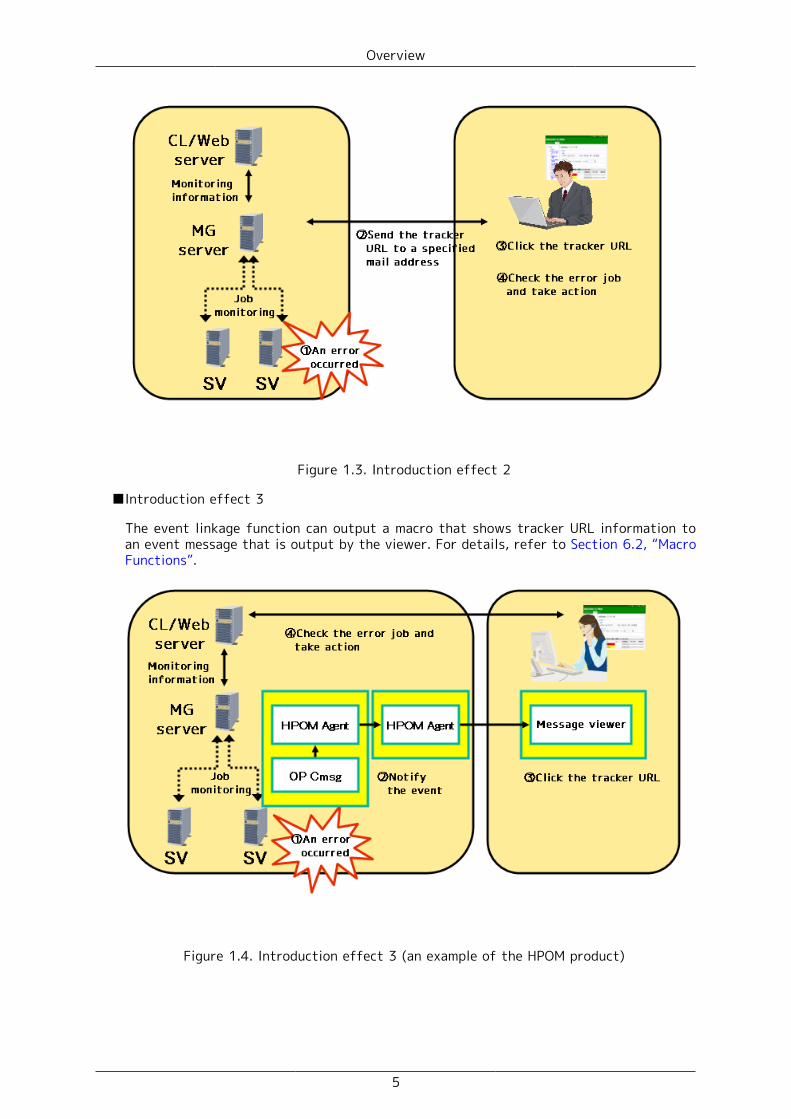
Figure 1.3. Introduction effect 2
■Introduction effect 3
The event linkage function can output a macro that shows tracker URL information toan event message that is output by the viewer. For details, refer to Section 6.2, “MacroFunctions”.
Figure 1.4. Introduction effect 3 (an example of the HPOM product)

Overview
6
1.3. About the LicenseCL/Web is offered as a chargeable option of JobCenter.
To use this function, you need to purchase the license of JobCenter CL/Web.

Overview
7
1.4. Operating EnvironmentFor information about the operating environment of CL/Web, refer to Section 3.1.5, “Detailsof the OSs supported by JobCenter CL/Web, required software, and browsers” in <ReleaseNotes>.

Overview
8
1.5. GlossaryThe terms commonly used in relation to the Web functions are listed below.
Term DescriptionJobCenter CL/Web Name of this product. JobCenter CL/Web enables execution
state monitoring, immediate job network submission, andparameter checking by using a web browser.
JobCenter CL/Web Server Provides HTML contents and objects to be displayed in aweb browser.
Overview
9
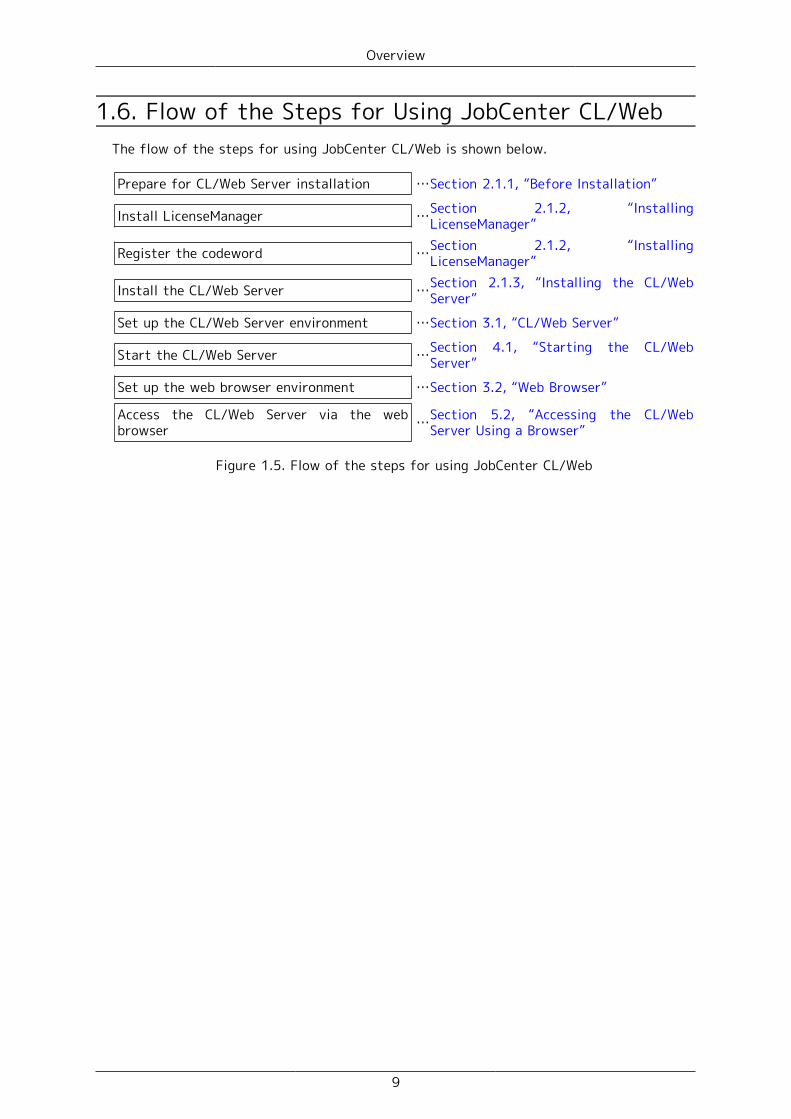
1.6. Flow of the Steps for Using JobCenter CL/WebThe flow of the steps for using JobCenter CL/Web is shown below.
Prepare for CL/Web Server installation …Section 2.1.1, “Before Installation”
Install LicenseManager …Section 2.1.2, “InstallingLicenseManager”
Register the codeword …Section 2.1.2, “InstallingLicenseManager”
Install the CL/Web Server …Section 2.1.3, “Installing the CL/WebServer”
Set up the CL/Web Server environment …Section 3.1, “CL/Web Server”
Start the CL/Web Server …Section 4.1, “Starting the CL/WebServer”
Set up the web browser environment …Section 3.2, “Web Browser”
Access the CL/Web Server via the webbrowser …Section 5.2, “Accessing the CL/Web
Server Using a Browser”
Figure 1.5. Flow of the steps for using JobCenter CL/Web

10
Chapter 2. Installing and Uninstalling the CL/Web Server
This chapter describes how to install and uninstall the CL/Web Server.

Installing and Uninstalling the CL/Web Server
11
2.1. InstallationThis section describes the procedures for installing LicenseManager and CL/Web Server.
2.1.1. Before Installation
This section describes the tasks you need to perform before installation and the pointsto note.
■Installing the JRE
CL/Web is set up using Java in the installer. Therefore, before installing CL/Web Server,you need to install Java SE JRE7 or later supplied from Oracle.
Download the latest version from Oracle's website.
When installing CL/Web Server to Red Hat Linux 5, you need to install JavaSE JRE7 or later supplied from Oracle, because the version of the defaultJRE is old.
■Stopping and uninstalling CL/Web Server (common to UNIX and Windows)
If CL/Web Server is already installed, you need to stop and uninstall it.
For information about how to stop and uninstall CL/Web Server, refer to Section 2.2,“Uninstallation”.
2.1.2. Installing LicenseManager
This section describes how to install LicenseManager.
LicenseManager is a product for license management.
You need to install LicenseManager because the product is required to run CL/Web Server.For information about how to install LicenseManager, refer to Section 2.2, “InstallingLicenseManager” in <Installation Guide>.
For information about codeword registration, refer to Section 2.3, “Codeword Registration”in <Installation Guide>.
2.1.3. Installing the CL/Web Server
This section describes how to install the CL/Web Server.
The following table shows the fixed disk size required to install CL/Web Server.
Table 2.1. Fixed disk size required to install CL/Web Server
Fixed disk capacity 100 MB
2.1.3.1. Installing CL/Web Server for UNIX
This section describes the procedure for installing CL/Web Server for UNIX.
1. Log in as the root user.

Installing and Uninstalling the CL/Web Server
12
2. Insert and mount the JobCenter media (DVD-ROM). For details about how to mount theDVD-ROM, refer to the product manual of the target OS and other relevant documents.
3. Expand the CL/Web package in the media to an appropriate directory.
root> cd <directory-to-which-to-expand-the-package> root> unzip <CLWEB_PRODUCT_PATH>
<CLWEB_PRODUCT_PATH> represents the path to thepackage file (<directory-to-which-to-mount-the-media>/PACKAGE/JB/OTHER/CLWEB/NECJCpkg-clweb.zip).
The path to the directory to which to expand the package must not containany multibyte character. If any multibyte character is used, the execution ofthe install script described below will fail.
4. Execute the following script.
root> <directory-to-which-the-package-has-been-expanded>/clweb_install.sh
When asked about the installation path, select y if you will use the default path. Tochange the installation path, select n.
Do you use default installation path('/usr/local/jcclweb')? (y/n)
If you select n, the following message appears and you need to specify the installationpath.
Please input installation path. /var/jcclweb
Here, an example of changing the installation path to [/var/jcclweb] isdescribed.
■The installation path must not contain any space or multibyte character.
■If CL/Web Server is already installed, a warning is output and theinstallation is interrupted.
■If the specified folder already exists, a message (Already exists and is notan empty directory.) is output and the installation is interrupted. If thedirectory is empty, the installation continues.
If you select y or specify the installation path when asked about the default path, theinstallation starts.
If the message "Cannot find Java 1.5 or higher." is output and CL/WebServer cannot be installed even when the JRE is installed, set the JREinstallation path in the environment variable JAVA_HOME before executing[clweb_install.sh] (the following is a setting example in which /bin/sh isused).

Installing and Uninstalling the CL/Web Server
13
JAVA_HOME=<JRE-install-path> export JAVA_HOME
5. If there is no error after command execution, the following message appears. Theinstallation has been finished successfully.
Install finished successfully.
6. If the installation has been finished successfully, proceed to Chapter 3, "EnvironmentSetup" .
2.1.3.2. Installing CL/Web Server for Windows
This section describes the procedure for installing CL/Web Server for Windows.
In the following description, Q: is assumed to be the CD/DVD-ROM drive. Ifthe CD/DVD-ROM drive is assigned to a different drive, read the descriptionaccordingly.
1. Log in as the local administrator.
2. Set the JobCenter media (DVD-ROM) and copy the CL/Web package in the media (Q:\PACKAGE\JB\OTHER\CLWEB\NECJCpkg-clweb.zip) to a desired location on the localdisk.
3. Expand "NECJCpkg-clweb.zip" to an appropriate directory using the expansion functionof the OS or a decompression tool.
The path to the directory to which the package is to be expanded must notinclude multibyte characters. If multibyte characters are used, the executionof the install script described below will fail.
4. Open the command prompt. You can open the command prompt by selecting [Start], [AllPrograms], and then [Accessories].
5. At the command prompt, execute [clweb_install.bat].
<directory-to-which-the-package-has-been-expanded>\clweb_install.bat
When asked about the installation path, select y if you will use the default path. Tochange the installation path, select n.
Do you use default installation path('C:\jcclweb')? (y/n)
If you select n, the following message appears and you need to specify the installationpath.
Please input installation path. D:\jcclweb
Here, an example of changing the installation path to [D:\jcclweb] isdescribed.

Installing and Uninstalling the CL/Web Server
14
■The installation path must not include multibyte characters.
■If CL/Web Server is already installed, a warning is output and theinstallation is interrupted.
■If the specified folder already exists, a message (Already exists and is notan empty directory.) is output and the installation is interrupted. If thefolder is empty, the installation continues.
If you select y or specify the installation path when asked about the default path, theinstallation starts.
If the message "Cannot find Java 1.5 or higher." is output and CL/WebServer cannot be installed even when the JRE is installed, set the JREinstallation path in the environment variable JAVA_HOME before executing[clweb_install.bat].
set JAVA_HOME=<JRE-install-path>
6. If there is no error after command execution, the following message appears. Theinstallation has been finished successfully.
Start CL/Web service regist Finish CL/Web service regist Install finished successfully.Finish. Please Push a Key...
After the above is displayed, press any key to return to the prompt.
7. If the installation has been finished successfully, proceed to Chapter 3, "EnvironmentSetup" .

Installing and Uninstalling the CL/Web Server
15
2.2. UninstallationThis section describes how to uninstall LicenseManager and CL/Web Server.
2.2.1. Uninstalling LicenseManagerFor information about how to uninstall LicenseManager, refer to Section 4.1, “UninstallingLicenseManager” in <Installation Guide>.
2.2.2. Uninstalling the CL/Web Server
2.2.2.1. Uninstalling the CL/Web Server for UNIX
This section describes the procedure for uninstalling CL/Web Server for UNIX.
1. Stop the CL/Web Server services. For information about how to stop the services, referto Section 4.2.1, “Stopping the CL/Web Server for UNIX”.
2. Execute the following command to uninstall CL/Web Server for UNIX.
%InstallDirectory%/run/clweb_ctrl.sh uninstall
3. Delete %InstallDirectory%.
2.2.2.2. Uninstalling the CL/Web Server for Windows
This section describes the procedure for uninstalling CL/Web Server for Windows.
1. Stop the CL/Web Server service. For information about how to stop the service, referto Section 4.2.2, “Stopping the CL/Web Server for Windows”.
2. Execute the following command to uninstall CL/Web Server for Windows.
%InstallDirectory%\run\clweb_service.bat uninstall
3. Delete %InstallDirectory%.

Installing and Uninstalling the CL/Web Server
16
2.3. UpgradeThis section describes the CL/Web Server upgrade procedure.
2.3.1. Upgrading CL/Web Server for UNIX
This section describes how to upgrade CL/Web Server for UNIX.
1. Stop the CL/Web Server services. For information about how to stop the services, referto Section 4.2.1, “Stopping the CL/Web Server for UNIX”.
2. Back up the CL/Web Server configuration file. Copy the following file to a directoryunrelated with the CL/Web Server.
%InstallDirectory%/config/clweb.conf
Back up the CL/Web Server mail template file in the same way. Copy the followingdirectory to a directory unrelated with the CL/Web Server.
%InstallDirectory%/config/mail
Back up the CL/Web Server My Page configuration file in the same way. Copy the followingdirectory to a directory unrelated with the CL/Web Server.
%InstallDirectory%/config/mypage
Back up the CL/Web Server execution log file in the same way. Copy the followingdirectory to a directory unrelated with the CL/Web Server.
%InstallDirectory%/log
3. Uninstall the CL/Web Server. For information about how to unistall the server, refer toSection 2.2.2.1, “Uninstalling the CL/Web Server for UNIX”.
4. Install the new version of the CL/Web Server.
5. Restore the backed-up CL/Web Server configuration file.
2.3.2. Upgrading CL/Web Server for Windows
This section describes how to upgrade CL/Web Server for Windows.
1. Stop the CL/Web Server services. For information about how to stop the services, referto Section 4.2.2, “Stopping the CL/Web Server for Windows”.
2. Back up the CL/Web Server configuration file. Copy the following file to a folderunrelated with the CL/Web Server.
%InstallDirectory%\config\clweb.conf
Back up the CL/Web Server mail template file in the same way. Copy the following folderto a folder unrelated with the CL/Web Server.
%InstallDirectory%\config\mail
Back up the CL/Web Server mypage configuration file in the same way. Copy the followingfolder to a folder unrelated with the CL/Web Server.

Installing and Uninstalling the CL/Web Server
17
%InstallDirectory%\config\mypage
Back up the CL/Web Server execution log file in the same way. Copy the following folderto a folder unrelated with the CL/Web Server.
%InstallDirectory%\log
3. Uninstall the CL/Web Server. For information about how to unistall the server, refer toSection 2.2.2.2, “Uninstalling the CL/Web Server for Windows”.
4. Install the new version of the CL/Web Server.
5. Restore the backed-up CL/Web Server configuration file.

Installing and Uninstalling the CL/Web Server
18
2.4. Case When Re-installing is NeededThe CL/Web Server needs to be re-installed in the following cases.
■The JRE installation path is changed due to a reason such as JRE upgrade.
■The LicenseManager installation path is changed due to a reason such as re-installationof LicenseManager.
■You want to change the CL/Web Server installation path.
2.4.1. Re-installing the CL/Web Server for UNIXThis section describes how to re-install the CL/Web Server for UNIX.
1. Stop the CL/Web Server services. For information about how to stop the services, referto Section 4.2.1, “Stopping the CL/Web Server for UNIX”.
2. Back up the CL/Web Server configuration file. Copy the following file to a directoryunrelated with the CL/Web Server.
%InstallDirectory%/config/clweb.conf
Back up the CL/Web Server execution log file in the same way. Copy the followingdirectory to a directory unrelated with the CL/Web Server.
%InstallDirectory%/log
3. Uninstall the CL/Web Server. For information about how to unistall the server, refer toSection 2.2.2.1, “Uninstalling the CL/Web Server for UNIX”
4. Upgrade JRE and re-install LicenseManager.
5. Re-install the CL/Web Server.
6. Restore the backed-up CL/Web Server configuration file.
2.4.2. Re-installing the CL/Web Server for WindowsThis section describes how to re-install the CL/Web Server for Windows.
1. Stop the CL/Web Server services. For information about how to stop the services, referto Section 4.2.2, “Stopping the CL/Web Server for Windows”.
2. Back up the CL/Web Server configuration file. Copy the following file to a folderunrelated with the CL/Web Server.
%InstallDirectory%\config\clweb.conf
Back up the CL/Web Server execution log file in the same way. Copy the following folderto a folder unrelated with the CL/Web Server.
%InstallDirectory%\log
3. Uninstall the CL/Web Server. For information about how to unistall the server, refer toSection 2.2.2.2, “Uninstalling the CL/Web Server for Windows”.
4. Upgrade JRE and re-install LicenseManager.

Installing and Uninstalling the CL/Web Server
19
5. Re-install the CL/Web Server.
6. Restore the backed-up CL/Web Server configuration file.

Installing and Uninstalling the CL/Web Server
20
2.5. Checking the VersionThis section describes how to check the version of CL/Web.
■When you can connect to CL/Web via a browser
Connect to CL/Web via a browser, and check "JobCenter CL/Web R XX.YY" at the bottomof the login window.
■When you cannot connect to CL/Web via a browser or CL/Web is stopped
Check '$clweb_version = "XX.YY"' in %InstallDirectory%/config/version.rb.
XX.YY indicates the version number.

21
Chapter 3. Environment SetupThis chapter describes the environment setup for CL/Web.

Environment Setup
22
3.1. CL/Web Server
3.1.1. CL/Web Configuration File (clweb.conf)
Specify various CL/Web Server settings by editing the CL/Web configuration file(clweb.conf).
clweb.conf is stored in the following location:
%InstallDirectory%\config\clweb.conf
The default format of clweb.conf is as follows:
# $port = 443# $bind = "0.0.0.0"# $ssl_disable = false# $tracker_auto_refresh = false# $jccombase = 611# $allow_ssl = false# $mail_server = "smtpserver"# $mail_port = 25# $mail_domain = ""# $mail_authentication = "plain"# $mail_username = "username"# $mail_password = "password"# $mail_from = ""# $mail_charset_utf8 = true# $relative_url_root = "/clweb"# main menu tab order# jnws: 1, trackers: 2, schedules: 3, machines: 4, calendars: 5, mypage: 6# $tab_order = "6 1 2 3 4 5"
You need to restart CL/Web to put the settings of the CL/Web configurationfile (clweb.conf) into effect.
3.1.2. Setting the Port to Use
The default communication protocol used by the CL/Web Server is TLS (SSL). Communicationis enabled by setting the port number to be used in the CL/Web configuration fileclweb.conf.
Set the port number in the clweb.conf file as follows:
1. Delete the # sign that is written at the beginning of the line containing the port variable$port.
Text following the # sign is assumed to be commented out. The setting is disabled if theline has the # sign at the beginning. To enable the setting, the # sign needs to be deleted.
■Setting example
Before the default port number is set
# $port=443

Environment Setup
23
After the default port number is set
$port=443
2. The default port number is 443. If you do not use the default port number, change itto a desired number.
For the port used by the CL/Web Server, refer to Section 2.1.6, “https” in<Environment Guide>.
3. Save the clweb.conf file.
The format of the clweb.conf file and the items to be set are as shown below.
Table 3.1. Values to be set for the clweb.conf parameters (for specifying port number)
Setting Description Type Default settingvalue
$port Specify an TLS (SSL) port numberrequired for communication between theCL/Web Server and web browsers. (If TLS(SSL) is disabled, specify an HTTP portnumber.)
Numericalvalue
443
$bindNote 1 If the server has more than one IPaddress, you need to specify an IPaddress.
Characterstring
0.0.0.0
$ssl_disable Specify true or false to determinewhether to disable TLS (SSL) forcommunication between the CL/WebServer and web browsers.
true: Disable TLS (SSL). HTTP is usedfor communication between the CL/WebServer and web browsers.
false: Enable TLS (SSL).
True/falsevalue
false
$jccombase Specify the port (JCCOMBASE) to be usedfor the CL/Web Server to communicatewith MG/SV.
If the port to be used is not changed onthe MG/SV side, this parameter does notneed to be set.
Numericalvalue
611
$allow_ssl Specify true or false to determinewhether to use only TLS forcommunication between the CL/WebServer and web browsers without usingSSLv3.
true: Enable SSLv3. A connection can alsobe set up using SSLv3. (Be careful aboutvulnerabilities.)
false: Disable SSLv3. Communication canbe performed only using TLS.
True/falsevalue
false

Environment Setup
24
■Note 1: Optional parameter. Do not change this parameter if it does notneed to be set.
■When a character string is specified, it needs to be enclosed within doublequotation marks.
■If a firewall exists in the machine where CL/Web Server is installed, youneed to open a hole for the network port to be used by CL/Web.
3.1.3. Setting SSL Signature CertificateIf the CL/Web Server performs TLS (SSL) communication, self-signed certificates are usedby default. By storing a certificate file and a secret key file in the CL/Web environment,you can use your own SSL signature certificate.
The CL/Web configuration file is stored in the following location:
%InstallDirectory%\config
The certificate file and the secret key file are the following files:
Certificate file name ssl_certSecret key file name ssl_keyFile format The files are issued from the certificate authority and the
format is the one used by OpenSSL.
■If either the ssl_cert file or the ssl_key file does not exist, CL/Web outputsan error message and CL/Web Server abnormally stops.
■If neither of the two files exists, a default self-signed certificate is used.
3.1.4. Setting Subdirectory of URLThe CL/Web Server access URL is https://<CL/Web Server host name or IP address>/ bydefault.
By setting the subdirectory, the access URL can be changed to https://<CL/Web Server hostname or IP address>/<subdirectory>/.
Using this setting and the reverse proxy function provided by Apache, etc., the CL/WebServer and other servers can be in the same URL space.
Specify the URL subdirectory in the CL/Web configuration file clweb.conf.
The format and items included in clweb.conf related to URL subdirectory are as follows:
Table 3.2. Values to be set for the clweb.confparameter (for specifying URL subdirectory)
Parameter Description Type Setting value$relative_url_root Specifies the
subdirectory path.Character string Subdirectory path

Environment Setup
25
3.2. Web BrowserThis section describes the settings needed to start the web browser.
3.2.1. Setting Active Scripting
To use Internet Explorer, you need to have [Active scripting] enabled.
1. Start Internet Explorer, and click [Tools] - [Internet Options].
2. Select the [Security] tab, and click [Customize level] in [Internet Zone].
3. In the [Security Settings] dialog box, check that the option button for [Enable] isselected under [Active scripting]. If the option button for [Enable] is not selected,select it.
Figure 3.1. Active scripting setting window
3.2.2. Setting Font Download
To use Internet Explorer, you need to have Font download enabled.
1. Start Internet Explorer, and click [Tools] - [Internet Options].
2. Select the [Security] tab, and click [Custom Level] in [Internet Zone].
3. In the [Security Settings] dialog box, check that the option button for [Enable] isselected under [Font download]. If the option button for [Enable] is not selected, selectit.

Environment Setup
26
Figure 3.2. Font download setting window
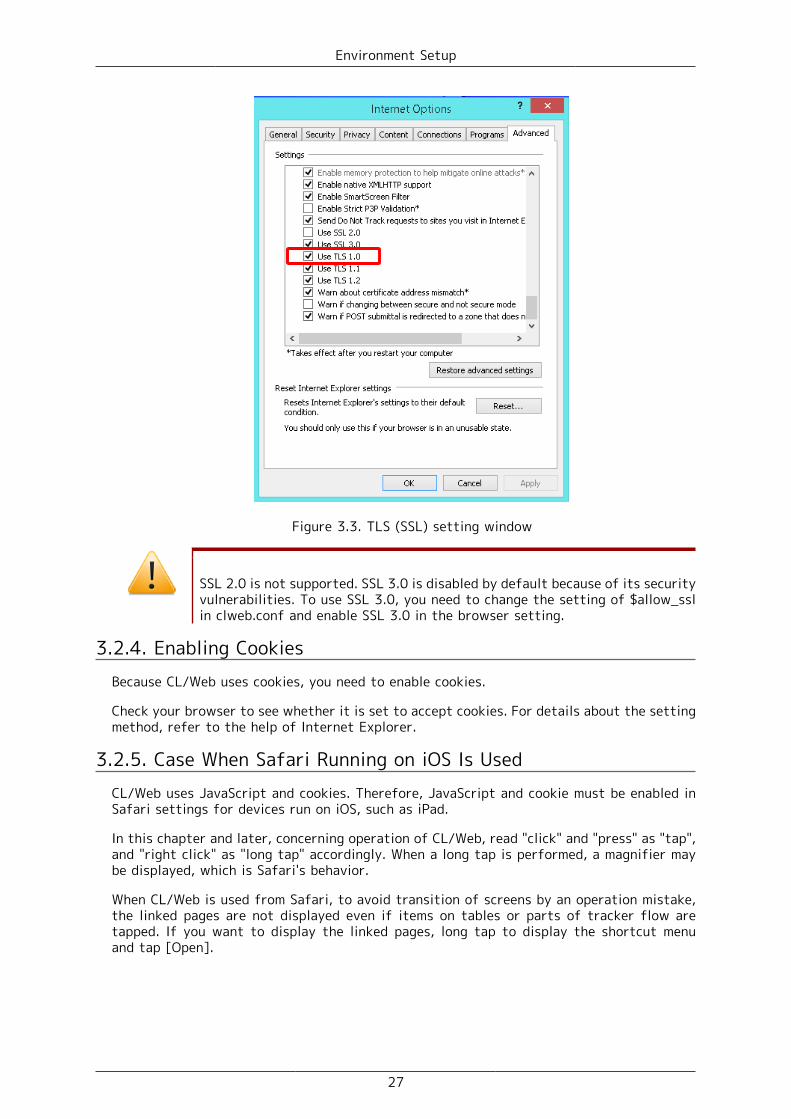
3.2.3. Setting TLS (SSL)
When you use TLS (SSL) for communication between the CL/Web Server and web browser(Internet Explorer), you need to have the browser set to use TLS (SSL).
1. Start Internet Explorer, and click [Tools] - [Internet Options].
2. Select the [Advanced] tab, and check that one of the following option buttons is selectedin the [Security] section under [Settings]:
■[Use TLS 1.0]
■[Use TLS 1.1]
■[Use TLS 1.2]
3. If neither option button is selected, select one of them.
Environment Setup
27
Figure 3.3. TLS (SSL) setting window
SSL 2.0 is not supported. SSL 3.0 is disabled by default because of its securityvulnerabilities. To use SSL 3.0, you need to change the setting of $allow_sslin clweb.conf and enable SSL 3.0 in the browser setting.
3.2.4. Enabling CookiesBecause CL/Web uses cookies, you need to enable cookies.
Check your browser to see whether it is set to accept cookies. For details about the settingmethod, refer to the help of Internet Explorer.
3.2.5. Case When Safari Running on iOS Is UsedCL/Web uses JavaScript and cookies. Therefore, JavaScript and cookie must be enabled inSafari settings for devices run on iOS, such as iPad.
In this chapter and later, concerning operation of CL/Web, read "click" and "press" as "tap",and "right click" as "long tap" accordingly. When a long tap is performed, a magnifier maybe displayed, which is Safari's behavior.
When CL/Web is used from Safari, to avoid transition of screens by an operation mistake,the linked pages are not displayed even if items on tables or parts of tracker flow aretapped. If you want to display the linked pages, long tap to display the shortcut menuand tap [Open].

28
Chapter 4. Starting and Stopping the CL/WebServer
This chapter describes how to start and stop the CL/Web Server.
Starting and Stopping the CL/Web Server
29
4.1. Starting the CL/Web Server
4.1.1. Starting the CL/Web Server for UNIX
In the case of the CL/Web Server for UNIX, start the service by executing a script.
1. Execute the following script.
/etc/init.d/jcclweb start
4.1.2. Starting the CL/Web Server for Windows
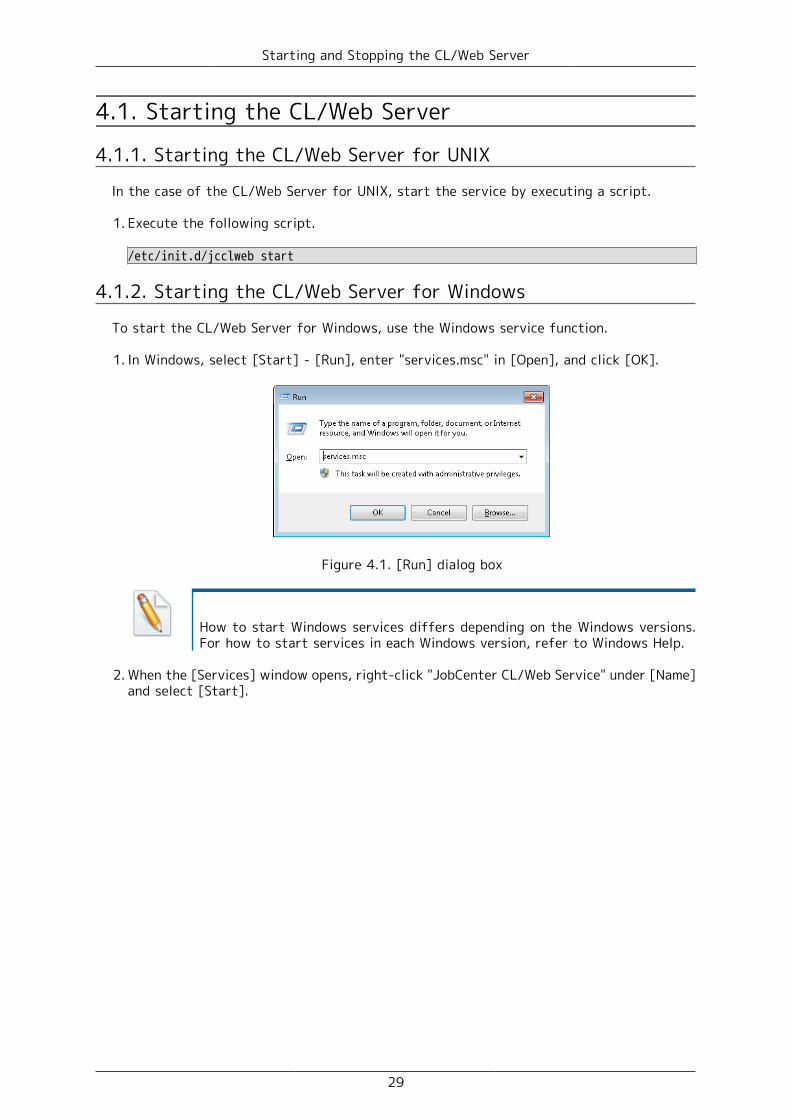
To start the CL/Web Server for Windows, use the Windows service function.
1. In Windows, select [Start] - [Run], enter "services.msc" in [Open], and click [OK].
Figure 4.1. [Run] dialog box
How to start Windows services differs depending on the Windows versions.For how to start services in each Windows version, refer to Windows Help.
2. When the [Services] window opens, right-click "JobCenter CL/Web Service" under [Name]and select [Start].

Starting and Stopping the CL/Web Server
30
Figure 4.2. Service start window
3. When the status of "JobCenter CL/Web Service" is [Started], the procedure for startingCL/Web Server is complete.
Figure 4.3. Window where the service is started
After CL/Web Server is installed, the service is stopped. You need to startit manually.

Starting and Stopping the CL/Web Server
31
4.2. Stopping the CL/Web Server
4.2.1. Stopping the CL/Web Server for UNIX
In the case of the CL/Web Server for UNIX, stop the service by executing a script.
1. Execute the following script.
/etc/init.d/jcclweb stop
4.2.2. Stopping the CL/Web Server for Windows
To stop the CL/Web Server for Windows, use the Windows service function.
1. Start the Windows service. For details, refer to Section 4.1.2, “Starting the CL/WebServer for Windows”.
2. When the [Services] window opens, right-click "JobCenter CL/Web Service" under [Name]and select [Stop].
Figure 4.4. Service stop window
3. When the status of "JobCenter CL/Web Service" is blank as shown in the followingscreenshot, the procedure for stopping CL/Web Server is complete.

Starting and Stopping the CL/Web Server
32
Figure 4.5. Window where the service is stopped

33
Chapter 5. Basic OperationsThis chapter describes how to operate the basic functions of CL/Web.
The descriptions in this chapter assume that TLS (SSL) is enabled. If TLS (SSL)is disabled, "https" in the URL of the CL/Web Server shown in the descriptionsshould be replaced with "http."

Basic Operations
34
5.1. Basic CL/Web OperationsThe following sections describe how to perform the basic operations mentioned in thisdocument by using examples.
5.1.1. Name and Outline of Each Part of the CL/Web Window
(7)
(1)
(2)
(3)
(4)
(5)(6)
Figure 5.1. CL/Web window
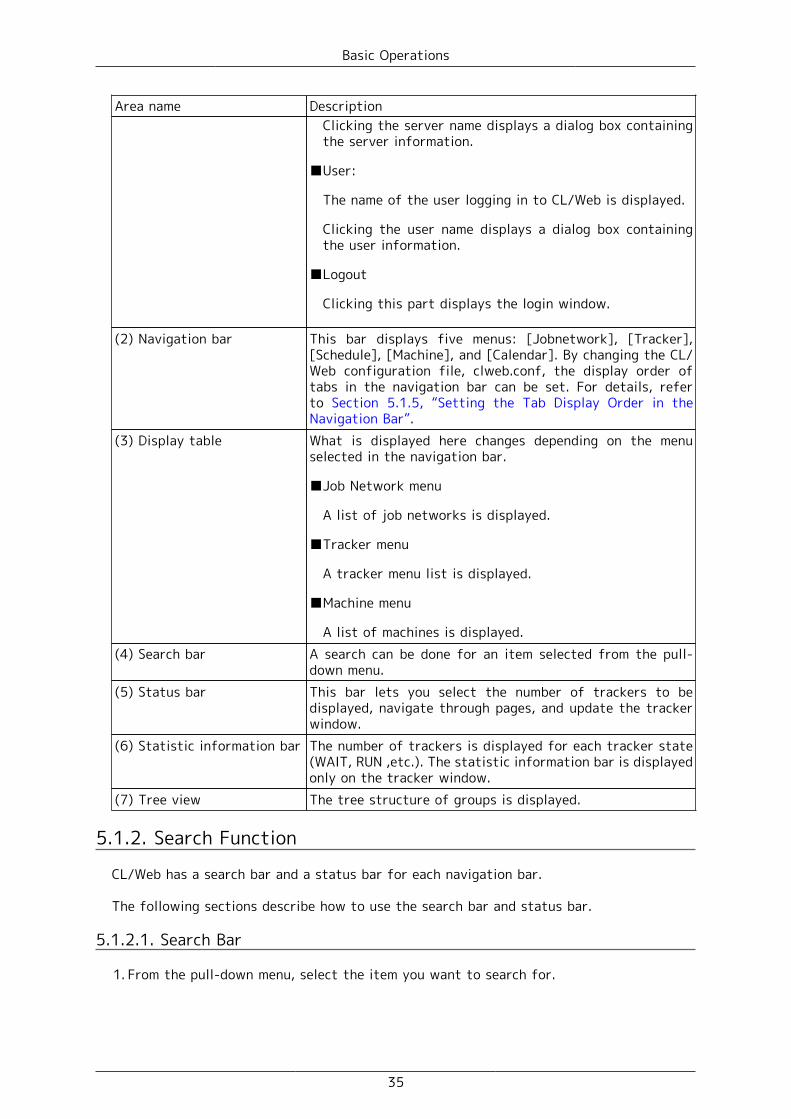
The name and outline of each part of the CL/Web window are given below.
Area name Description(1) Title bar This is the header representing a JobCenter product.
■Product name
JobCenter CL/Web is displayed.
■User mode
Either UMS or EUI is displayed depending on the user whologs in.
Also, the mode selected at the time of login is displayed.
For information about the login user-specific GUI screenmode and the registration mode selected at the time ofserver connection, refer to Section 2.3.3, “GUI DisplayMode per Login User, Login Mode when Connecting Server”in <Basic Guide>.
■Server:
The server name is displayed.
Basic Operations
35
Area name DescriptionClicking the server name displays a dialog box containingthe server information.
■User:
The name of the user logging in to CL/Web is displayed.
Clicking the user name displays a dialog box containingthe user information.
■Logout
Clicking this part displays the login window.
(2) Navigation bar This bar displays five menus: [Jobnetwork], [Tracker],[Schedule], [Machine], and [Calendar]. By changing the CL/Web configuration file, clweb.conf, the display order oftabs in the navigation bar can be set. For details, referto Section 5.1.5, “Setting the Tab Display Order in theNavigation Bar”.
(3) Display table What is displayed here changes depending on the menuselected in the navigation bar.
■Job Network menu
A list of job networks is displayed.
■Tracker menu
A tracker menu list is displayed.
■Machine menu
A list of machines is displayed.(4) Search bar A search can be done for an item selected from the pull-
down menu.(5) Status bar This bar lets you select the number of trackers to be
displayed, navigate through pages, and update the trackerwindow.
(6) Statistic information bar The number of trackers is displayed for each tracker state(WAIT, RUN ,etc.). The statistic information bar is displayedonly on the tracker window.
(7) Tree view The tree structure of groups is displayed.
5.1.2. Search Function
CL/Web has a search bar and a status bar for each navigation bar.
The following sections describe how to use the search bar and status bar.
5.1.2.1. Search Bar
1. From the pull-down menu, select the item you want to search for.

Basic Operations
36
Figure 5.2. Search bar window
2. Enter a search name in the Search text box, and press "Enter" on the keyboard.
3. The search result is displayed according to the items set on the search bar.
Figure 5.3. Search result window
The items to be set on the search bar are as follows.

Basic Operations
37
■Search
Enter the string to search for.
■Ignore case
If you select this check box, you can make the search case insensitive.
■Search using a regular expression
If you select this check box, you can use a Perl-compatible regular expression.
If you do not select the [Search using a regular expression] check box, an exactmatch search is done.
5.1.2.2. Status Bar
The status bar lets you set the number of lines to be displayed, navigate through pages,update the display table, etc.
(1) (2) (3) (4) (5) (6) (7) (8) (9)
(10)
Figure 5.4. Status bar screenshot
The following table describes the functions of the status bar, each of which is given anumber in the above screenshot.
Table 5.1. Description of the status bar functions
No. Description(1) Clicking this icon hides the status bar. To put the status bar back on, click the icon
again.(2) From the pull-down menu, you can specify the number of lines to be displayed in the
display table. The specifiable values are 10, 15, 20, 30, 50, 100, and 200.(3) Clicking this icon displays the top page.(4) Clicking this icon displays the previous page.(5) The current page number is displayed. If you enter a page number and press "Enter"
on the keyboard, the specified page is displayed.(6) Clicking this icon displays the next page.(7) Clicking this icon displays the last page.(8) Clicking this icon updates the display table to its latest state.(9) The number of displayed matches is displayed. The display range changes depending
on the value specified in (2).(10) You can move the search bar and status bar up and down. If you click the bottom
part of the status bar and move the cursor up or down while holding down the mousekey, the search bar and status bar moves up or down.
You cannot update the tree view by using the function of (8). To update thetree view, use the F5 key or the refresh function of the web browser.

Basic Operations
38
5.1.3. Sort Function
You can sort a specific column in the display table in dictionary order.
The sorting method is described below.
1. Place the cursor on the desired column name tab, and click it.
Figure 5.5. Window before sorting
2. The column is sorted in dictionary order. To restore its previous state, place the cursoron the column name tab and click it again.

Basic Operations
39
Figure 5.6. Window after sorting
The sort function can be used for all the columns.
5.1.4. Display Table Column Display Function
You can display columns other than the default values in the display table. You can alsohide a specific column.
The display table column display function is described below.
1. If you place the cursor on a column name tab, the [Hide/Show Columns] button is displayedon the right. Click the [Hide/Show Columns] button.

Basic Operations
40
Figure 5.7. Window where the [Hide/Show Columns] button is selected
Regardless of which column name tab is selected, what is displayed is thesame, as long as you are working on a column in the display table.
2. When the list of available columns is displayed, select the check box for each column youwant to have displayed other than the default values. In this case, choose [Navigationbar], [Tracker], and then [Job network name] and select [Status Class].
Figure 5.8. Display column list screenshot

Basic Operations
41
A column is not displayed when the corresponding check box is not selected.
3. The column tab of a column whose check box is selected is displayed.
Figure 5.9. Display column list result screenshot
The available column tab types differ for each display table.
5.1.5. Setting the Tab Display Order in the Navigation BarThe files used for setting the tab display order in the navigation bar is the CL/Webconfiguration file, clweb.conf, which is the same as setting of the used port. For details,refer to Section 3.1.1, “CL/Web Configuration File (clweb.conf)”.
The format and setting items in clweb.conf related with the tab display order in thenavigation bar are as follows:
# main menu tab order# jnws: 1, trackers: 2, schedules: 3, machines: 4, calendars: 5, mypage: 6# $tab_order = "6 1 2 3 4 5"
The correspondence between tab names and tab numbers is fixed. The display order of tabnames in the navigation bar is the order of tab numbers written in $tab_order. The defaultorder from first to last is [Jobnetwork], [Tracker], [Schedule], [Machine], and [Calendar].The screen displayed first after login is the name of the first tab number set in $tab_order.
Table 5.2. Parameter setting values in clweb.conf (tag numbers andtag names related with the tab display order in the navigation bar)
Tab number Tab name

Basic Operations
42
1 Jobnetwork2 Tracker3 Schedule4 Machine5 Calendar6 My Page
Example: If the order of tab numbers set in $tab_order of the CL/Web configuration file,clweb.conf, is as below, the display of the tab names in the navigation bar is as shown inthe figure below. The screen displayed first after login is [Tracker].
# main menu tab order# jnws: 1, trackers: 2, schedules: 3, machines: 4, calendars: 5, mypage: 6$tab_order = "2 1 3 5 4"
Figure 5.10. Example of order change in the CL/Web screen navigation bar
5.1.6. My Page FunctionThe My Page function displays a customized window that contains information that is ofinterest to the user.
For details of the My Page function, refer to Section 5.9, “ My Page Function”.

Basic Operations
43
5.2. Accessing the CL/Web Server Using a BrowserThis section describes how to access CL/Web Server using a web browser.
1. From [Programs] in the [Start] menu, start Internet Explorer.
2. If you enter the following URL in the address bar of Internet Explorer, the CL/Web loginwindow is displayed.
https://<CL/Web Server host name or IP address>/
If the TLS (SSL) port number is set to any value other than the default valueof 443 (or, when TLS (SSL) is disabled, if the port number is set to otherthan 80), specify the set port number after the CL/Web Server host name orIP address followed with a colon (:).
Because CL/Web uses a self-signed certificate by default, an error screen for the certificatemay be displayed when you access the above URL. In this case, if you continue browsing thewebsite in the error screen, the CL/Web login screen is displayed.
Figure 5.11. Error screen for the certificate
As for the way to use a prepared certificate, refer to Section 3.1.3, “Setting SSL SignatureCertificate”.

Basic Operations
44
5.3. Logging In or OutConnect to the server by using the OS account.
■Before connecting to the server, you need to start JobCenter MG/SV.
5.3.1. Logging In
1. If you enter the URL (https://<CL/Web Server host name or IP address>/) in the addressbar of the web browser, the [Login] window of CL/Web is displayed.
■The CL/Web display language depends on the language setting of the webbrowser. The supported languages are Japanese (starting with "ja"), English(starting with "en"), and simplified Chinese (starting with "zh"). If you wantto change the display language, change the language setting of the webbrowser to a language supported by CL/Web.
■If the OS does not have a Chinese font, characters are garbled. Install anappropriate font.
■If you want to change the display language temporarily, you can do itby clicking a language name in the upper right-hand part of the loginscreen However, if the change is done temporarily and the web browser isonce exited, the display language returns to the language set for the webbrowser.
Note that the version of JobCenter MG/SV needs to match that of CL/WebServer.
For example, you cannot log in to JobCenter MG/SV of the R13.2 versionfrom the CL/Web Server of the R14.1 version.
Figure 5.12. Image of the CL/Web login window

Basic Operations
45
2. Enter [Server], [User], and [Password], and select [Mode].
■In [Server], enter the name of the machine on which JobCenter MG/SV is installed.When a domain is used, enter the machine name including the domain.
■In [User], enter the name of the user logging in to JobCenter MG/SV.
■In [Password], enter the password of the above-mentioned user account.
■In [Mode], select either [Edit Mode], [View Mode], or [Ref Mode].
If you are to enable/disable schedules, log in to JobCenter MG/SV by selecting [EditMode].
3. After entering and selecting all the items, click the [Login] button.
4. If the login succeeds, the job network list window is displayed.
Figure 5.13. Window after logging in to CL/Web
5.3.2. Logging Out
1. Click [Logout] on the title bar.

Basic Operations
46
Figure 5.14. Image of the JobCenter CL/Web logout window
2. When the [Login] window of CL/Web is displayed, the logout process is complete.
3. To exit the [Login] window of CL/Web, close the web browser.
You can also log out by entering the URL of the [Login] window directly in theaddress bar of the web browser and displaying the [Login] window while youare logged in.

Basic Operations
47
5.4. Job Network-related Operations
5.4.1. Viewing a Group
1. Expand the tree in the tree view, place the cursor on the desired group name, and click it.
2. If there is any job network, shortcut, or group under the target group, the object isdisplayed in the display table.
Figure 5.15. Image of the window where a group is selected
■Display table list columns
Column name Description RemarkName Displays the name of the object.Type Displays the type of the object (job network,
group, or shortcut).Non-default itemNote1
Parent Group Displays the name of the group to which theobject belongs.
Comment Displays the comment for the object.
Note 1: Non-default items can be added by using the [Hide/Show Columns]button. For details, refer to Section 5.1.4, “Display Table ColumnDisplay Function”.
If you click a group name and then click another group name before the readingof the display table for the first clicked group is complete, the display tablemay show the information of the first clicked group, instead of that of thesecond clicked group. Before clicking a group name in the tree view, make surethat the reading of the display table is complete.

Basic Operations
48
5.4.2. Viewing a Job Network
1. Place the cursor on the desired job network name in the display table, and click it orselect [Open] in the shortcut menu that appears when you right-click it.
2. The page of the selected job network is displayed.
Figure 5.16. Job network display
5.4.3. Submitting a Job Network Immediately
There are two methods to submit a job network immediately: by submitting it from thedisplay table and by submitting it from the job network flow window.
The following sections describe these two immediate submission methods.
You cannot submit a job network immediately if [Ref Mode] is selected as thelogin mode or you do not have the permission to execute a job network for CL/Win.
5.4.3.1. Submitting a Job Network Immediately from the Display Table
Submit a job network and execute it, regardless of the schedule.
1. In the display table, place the cursor on the name of the job network you want to executeand then right-click the mouse.
2. Select [Submit] from the shortcut menu that appears when you right-click.

Basic Operations
49
Figure 5.17. Window where [Submit] is selected in the job network display table
3. The [Submit JNW] dialog box opens.
4. Click the [OK] button.
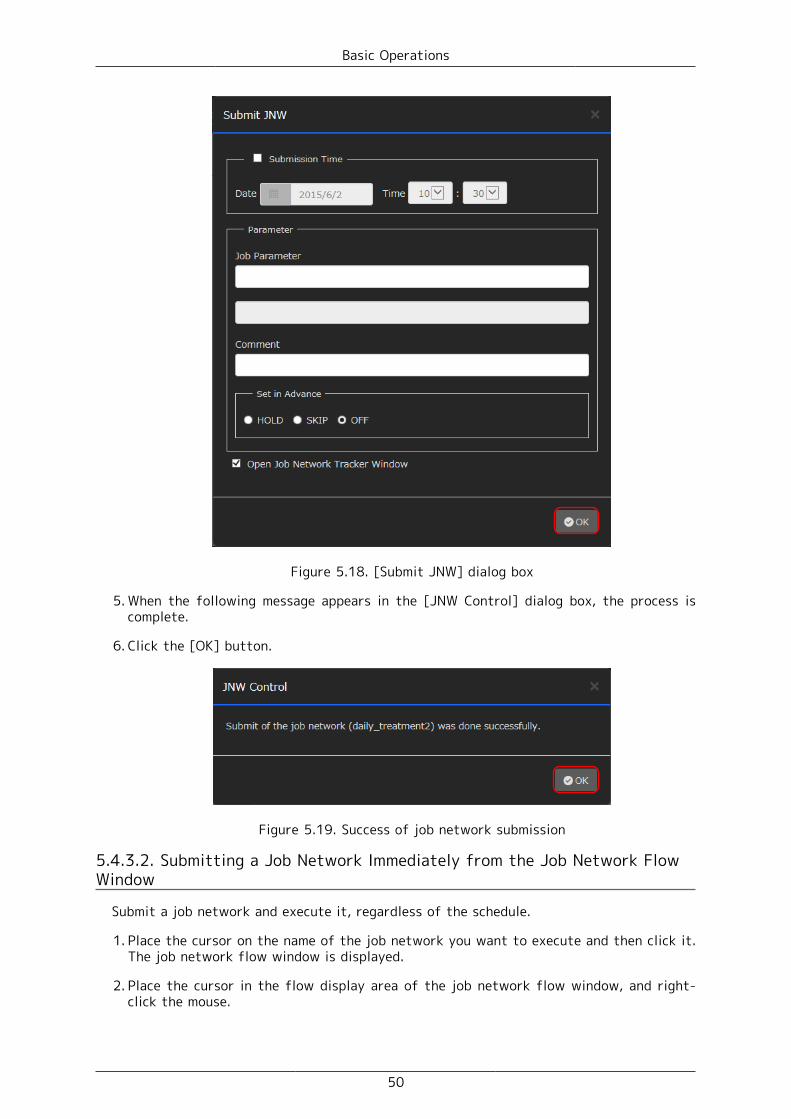
Basic Operations
50
Figure 5.18. [Submit JNW] dialog box
5. When the following message appears in the [JNW Control] dialog box, the process iscomplete.
6. Click the [OK] button.
Figure 5.19. Success of job network submission
5.4.3.2. Submitting a Job Network Immediately from the Job Network FlowWindow
Submit a job network and execute it, regardless of the schedule.
1. Place the cursor on the name of the job network you want to execute and then click it.The job network flow window is displayed.
2. Place the cursor in the flow display area of the job network flow window, and right-click the mouse.

Basic Operations
51
3. Select [Submit] from the shortcut menu that appears when you right-click.
Figure 5.20. Window where [Submit] is selected in the job network display window
The rest of the procedure is the same as step 4 and subsequent steps described inSection 5.4.3.1, “Submitting a Job Network Immediately from the Display Table”.
5.4.3.3. Setting Immediate Submission
The immediate submission settings to be specified in the [Submit JNW] dialog box are asfollows:
■Submission Time
Set the submission time of the job network. If you do not select this check box, the jobnetwork is submitted and executed immediately.
If you select the check box, you can have the job network executed at a specified time.
■Job Parameter
Set the parameter to be passed to the script of each unit job of the job network.The character string specified here is set in each unit job's environment variable"NSJNW_PARAM" and passed to the script of each unit job.
If the default value and description of [Job Parameter] are already set in the job networkparameter, the value and description are displayed as initial values. If the job networkis submitted with the initial values cleared, the default value of [Job Parameter] alsotakes effect.
In the text input area, up to 128 characters can be entered.
For details about the job parameter for immediate submission, refer to "Jobparameter" Section 3.2.1, “To Submit a Job Network Immediately” in <BasicGuide>.

Basic Operations
52
■Comment
A comment on immediate submission can be specified. If a comment is already set, thecomment is changed only when a tracker is submitted immediately.
In the text input area, up to 128 Japanese, alphanumeric, and Kana (double-byte andsingle-byte) characters can be entered (different types of characters may be mixed).
■Set in Advance
You can set the job network status to HOLD or SKIP in advance.
HOLD The status of the job network is set to HOLD when it is submitted.SKIP The status of the job network is set to SKIP when it is submitted.OFF The status of the job network is not set to HOLD or SKIP when it
is submitted.
■Open Job Network Tracker Window
If you select this check box, the job network tracker window is set to open afterimmediate submission.
Note on immediate submission
▪ If the destination queue is not specified in the job network parameter orunit job parameter, the queue set in [Default Submission Queue name] byselecting [User Config] - [Base Config] - [Default Job Network parameter]of JobCenter CL/Win is automatically used. If the default queue is set, notethat the default value is set to 1 as the number of job requests that can beexecuted concurrently in the guibs_1 batch queue where job requests areactually executed.

Basic Operations
53
5.5. Tracker-related OperationsAfter a job network is submitted or automatic execution is registered, the execution stateof that job network can be changed or monitored and the result can be referenced usinga list or window called a tracker.
A tracker displays the processes of the executed job network and their results.
The job statuses are distinguished by colors and labels, enabling errors to be recognizedreadily. The job status colors are common to the Job Network Tracker icons as well as tothe Tracker List text mode and graphic mode. This makes the job statuses easy to identify.
The colors used to represent the job statuses are those that are saved as thedefaults in [Color Config] of [System Config] of CL/Win. For details about howto set colors, refer to Section 6.6, “Changing Color Settings” in <EnvironmentGuide>.
5.5.1. Viewing TrackersPerform operations such as listing trackers and setting the display period.
5.5.1.1. Listing Trackers
1. Select [Tracker] on the navigation bar.
2. Expand the tree view, and click the name of the group you want to view.
If you select a group name, trackers are displayed in the display table.
Figure 5.21. Tracker display in the tracker display table
■Tracker list columns
Column name Description RemarkName Displays the job network name.

Basic Operations
54
Column name Description RemarkGroup Displays the name of the group to which the
tracker belongs.Status Displays the execution status of the job
network.Status Class Displays the status in English. Non-default column
Note 1
Tracker ID Displays the tracker ID. Non-default columnNote 1
Comment Displays the comment specified for the jobnetwork.
Expected Start Time Displays the expected start time registeredin the schedule.
Expected End Time Displays the expected end time calculatedfrom the settings in the parameter windowsof the job network and unit job.
Start Time Displays the time when the job networkactually started.
End Time Displays the time when the job networkactually ended.
User Displays the user who executed the jobnetwork.
Machine Displays the name of the machine on whichthe job network was executed.
If you click a group name and then click another group name before the readingof the display table for the first clicked group is complete, the display tablemay show the information of the first clicked group, instead of that of thesecond clicked group. Before clicking a group name in the tree view, make surethat the reading of the display table is complete.
5.5.1.2. Displaying the Tracker List with a Period Specified
1. Click [Set] at the upper right of the display table, with trackers displayed.

Basic Operations
55
Figure 5.22. Settings
2. The [Set] dialog box opens.
3. Set [Period] and [Display Options].
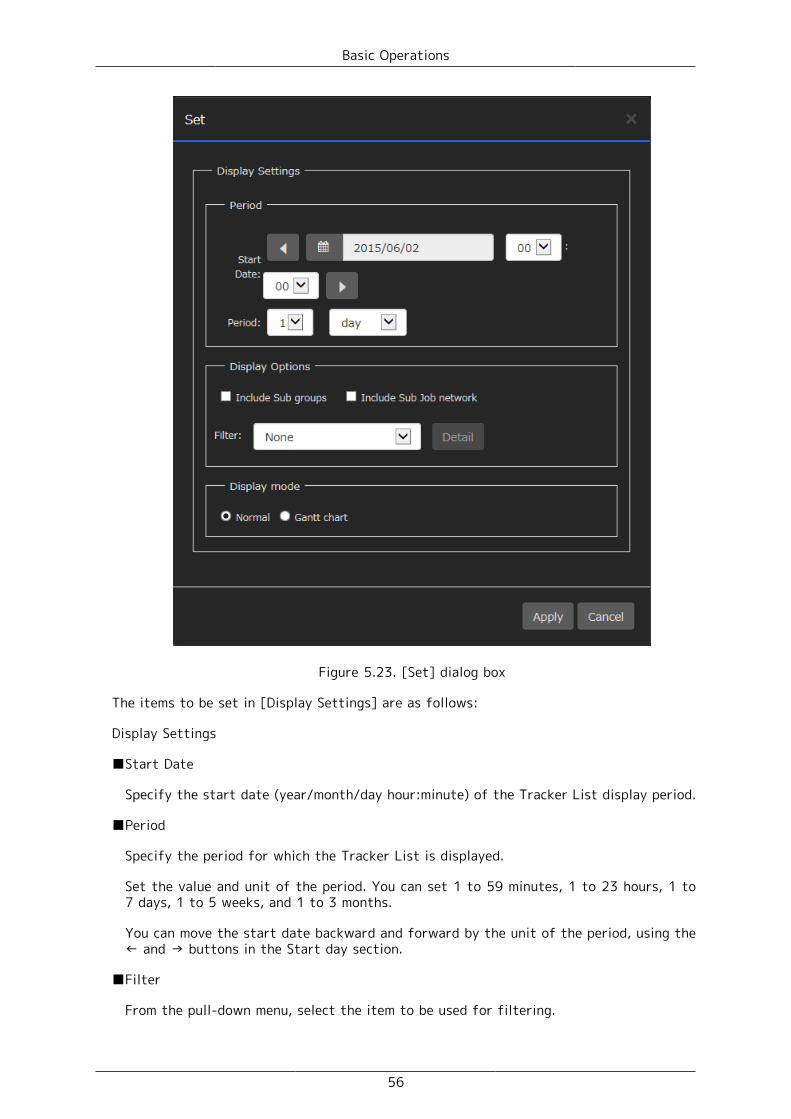
Basic Operations
56
Figure 5.23. [Set] dialog box
The items to be set in [Display Settings] are as follows:
Display Settings
■Start Date
Specify the start date (year/month/day hour:minute) of the Tracker List display period.
■Period
Specify the period for which the Tracker List is displayed.
Set the value and unit of the period. You can set 1 to 59 minutes, 1 to 23 hours, 1 to7 days, 1 to 5 weeks, and 1 to 3 months.
You can move the start date backward and forward by the unit of the period, using the← and → buttons in the Start day section.
■Filter
From the pull-down menu, select the item to be used for filtering.

Basic Operations
57
The available filtering items are as follows: None, WARNING/ERROR, STOP(ERROR),RUNNING, HOLD, SCHEDULED, and User Defined Filter 1 to 3.
■Display mode
Set the display mode of trackers.
Select [Normal] or [Gantt chart].
For the Gantt chart display of trackers, refer to Section 5.5.4, “Displaying Trackers ina Gantt Chart”.
■Setting a user-defined filter
For the filtering, set the trackers to be displayed and the display conditions such asSCHEDULED, RUNNING, and STOP.
1. Selecting "User Defined Filter" from the pull-down menu list activates the [Detail] buttonto the right of the list. Click the [Detail] button.
Figure 5.24. [Detail] button
2. The [Editing a Filter] dialog box opens.

Basic Operations
58
Figure 5.25. [Editing a Filter] dialog box
3. Set the display target and conditions.
4. When done with the settings, click the [OK] button.
5. Click [Apply] in the [Set] dialog box.
6. The settings are applied to the tracker display table.
The settings of a user-defined filter are saved as a cookie in the web browser.
5.5.1.3. Displaying a Part
1. If you click a job network name in the display table, the job network flow of the trackeris displayed.
By default, the [Flow] tab is selected.
Figure 5.26. Job flow display window

Basic Operations
59
If you place the cursor on the [Start] or [End] icon, the tracker ID and stateare displayed as shown in Figure 5.26, “Job flow display window”. If you placethe cursor on a part icon, the part name and state are displayed.
2. If you click a part in the flow, the detailed information about that part is displayed.
Figure 5.27. Detailed information window of a part
When the part is a unit job or custom job, the [Stdout], [Stderr], and [Script]tabs can be selected in addition to the [Detailed Information] tab. As for ERP,BI, PC, and WOBS jobs, the tabs that respectively display unique informationcan be selected.
3. If you select the [List of Parts] tab, the part list is displayed.
Figure 5.28. Part list window
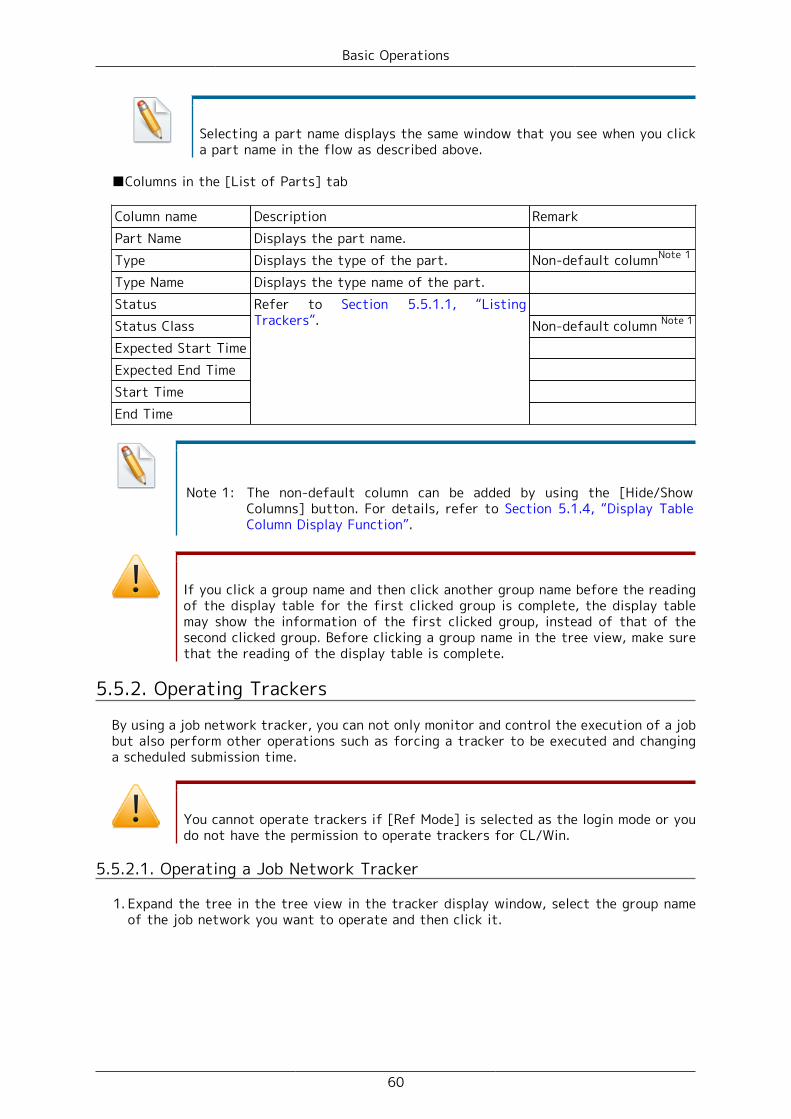
Basic Operations
60
Selecting a part name displays the same window that you see when you clicka part name in the flow as described above.
■Columns in the [List of Parts] tab
Column name Description RemarkPart Name Displays the part name.Type Displays the type of the part. Non-default columnNote 1
Type Name Displays the type name of the part.StatusStatus Class Non-default column Note 1
Expected Start TimeExpected End TimeStart TimeEnd Time
Refer to Section 5.5.1.1, “ListingTrackers”.
Note 1: The non-default column can be added by using the [Hide/ShowColumns] button. For details, refer to Section 5.1.4, “Display TableColumn Display Function”.
If you click a group name and then click another group name before the readingof the display table for the first clicked group is complete, the display tablemay show the information of the first clicked group, instead of that of thesecond clicked group. Before clicking a group name in the tree view, make surethat the reading of the display table is complete.
5.5.2. Operating Trackers
By using a job network tracker, you can not only monitor and control the execution of a jobbut also perform other operations such as forcing a tracker to be executed and changinga scheduled submission time.
You cannot operate trackers if [Ref Mode] is selected as the login mode or youdo not have the permission to operate trackers for CL/Win.
5.5.2.1. Operating a Job Network Tracker
1. Expand the tree in the tree view in the tracker display window, select the group nameof the job network you want to operate and then click it.

Basic Operations
61
Figure 5.29. Window where a group name is selected
2. Select the name of the job network tracker you want to operate, and right-click it.
3. The shortcut menu lists the available operations.
Figure 5.30. Shortcut menu screenshot
Operations on the shortcut menu which appears by right-clicking are as follows:
■Open
Browses the job network tracker.
■Skip
Skips the job network tracker.
■Release skip

Basic Operations
62
Cancels the scheduled skipping that is set with the "Skip" menu item.
■Hold
Holds the job network tracker.
■Release hold
Cancels the scheduled hold that is set with the [Hold] menu.
■Forced Stop
Stops the execution of a running job network. The job request process in the job networkis stopped forcibly.
■Forced Start
Starts the execution of a waiting job network forcibly.
■Rerun
Executes a job network tracker immediately whose status is other than WAIT andPREPARE.
■Rerun from Error Point
Reruns a job network whose status is STOP(ERROR) from the error location.
■Rerun from the Next (Skip Error)
Skips the error location for a job network whose status is STOP(ERROR).
■Delete
Deletes the job network tracker.
■Archive
Archives the job network tracker. Once the job network tracker is archived, only [Open]and [Delete] can be performed. For information about archiving, refer to Section 7.15.12,“Manually Archiving the Tracker” in <Basic Guide>.
■Change Submission Time
The expected execution time of a job network tracker whose status is WAIT or PREPAREcan be changed.
Figure 5.31. Window where the submission time is changed
In the [Change Submission Time] dialog box, set the following:

Basic Operations
63
Day If you click the field where the date is displayed, a calendar appears.By selecting < and >, a calendar for the past one year and next oneyear can be displayed.
Time Select the time from the pull-down menu. The available range is from00:00 to 23:59.
■Prepare
The WAIT state of a job network tracker can be changed to PREPARE.
The grayed-out items in the shortcut menu are operations that are not available.
5.5.2.2. Operating a Unit Job Tracker Icon
1. Select [Tracker] on the navigation bar, and click a job network name.
2. Place the cursor on the unit job icon you want to operate and then right-click it.
3. The shortcut menu lists the available operations.
Figure 5.32. Detailed information window of a unit job tracker part
Operations on the shortcut menu which appears by right-clicking are as follows. For details,refer to Section 7.16.1, “Operating a Unit Job Tracker Icon” in <Basic Guide>.
■Open
■Status
■Skip
■Release skip
■Hold
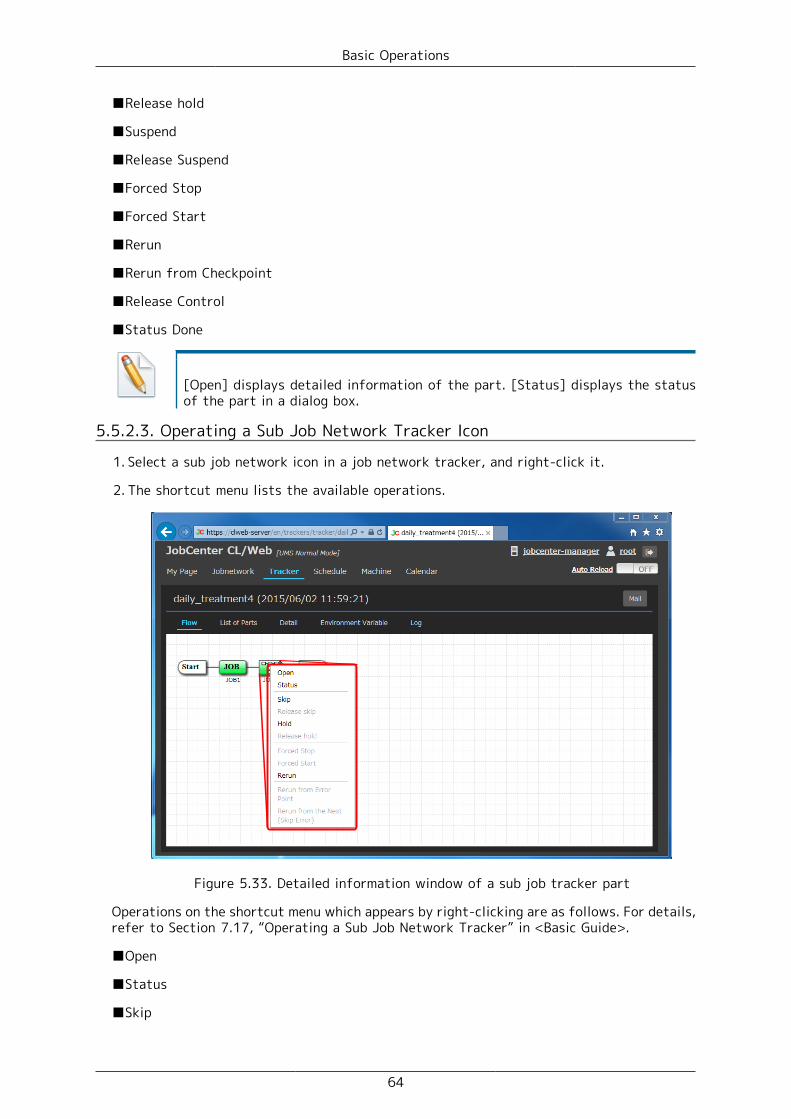
Basic Operations
64
■Release hold
■Suspend
■Release Suspend
■Forced Stop
■Forced Start
■Rerun
■Rerun from Checkpoint
■Release Control
■Status Done
[Open] displays detailed information of the part. [Status] displays the statusof the part in a dialog box.
5.5.2.3. Operating a Sub Job Network Tracker Icon
1. Select a sub job network icon in a job network tracker, and right-click it.
2. The shortcut menu lists the available operations.
Figure 5.33. Detailed information window of a sub job tracker part
Operations on the shortcut menu which appears by right-clicking are as follows. For details,refer to Section 7.17, “Operating a Sub Job Network Tracker” in <Basic Guide>.
■Open
■Status
■Skip
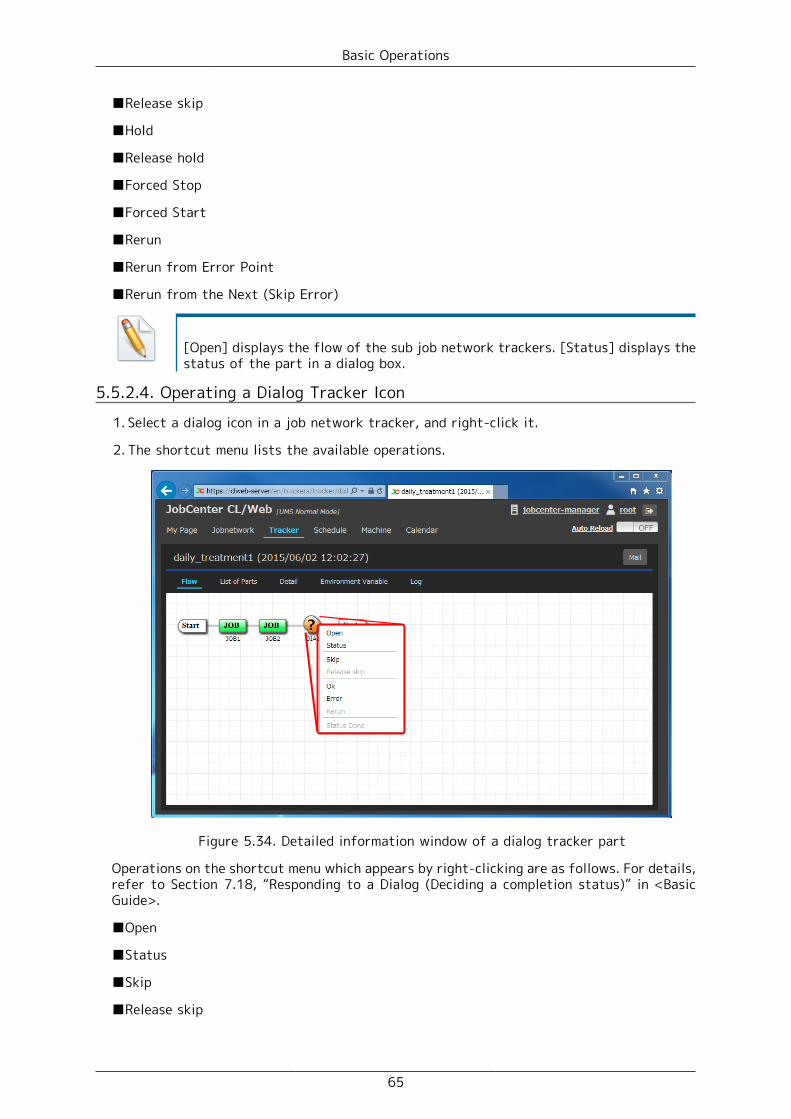
Basic Operations
65
■Release skip
■Hold
■Release hold
■Forced Stop
■Forced Start
■Rerun
■Rerun from Error Point
■Rerun from the Next (Skip Error)
[Open] displays the flow of the sub job network trackers. [Status] displays thestatus of the part in a dialog box.
5.5.2.4. Operating a Dialog Tracker Icon
1. Select a dialog icon in a job network tracker, and right-click it.
2. The shortcut menu lists the available operations.
Figure 5.34. Detailed information window of a dialog tracker part
Operations on the shortcut menu which appears by right-clicking are as follows. For details,refer to Section 7.18, “Responding to a Dialog (Deciding a completion status)” in <BasicGuide>.
■Open
■Status
■Skip
■Release skip

Basic Operations
66
■Ok
■Error
■Rerun
■Status Done
[Open] displays detailed information of the part. [Status] displays the statusof the part in a dialog box.
5.5.2.5. Operating a Waiting Part or Event Transmission/Reception Icon
1. Select a job waiting part icon, and right-click it.
2. The shortcut menu lists the available operations.
Figure 5.35. Detailed information window of a job waiting part
Operations on the shortcut menu which appears by right-clicking are as follows. For details,refer to Section 7.19, “Skipping Waiting Part and Event Transmission/Reception Jobs” in<Basic Guide>.
Table 5.3. List of the operations available for waitingpart and event transmission/reception trackers
Waiting part tracker and event reception/transmission tracker
Operation available from the shortcut menu
Job Waiting ■Open
■Status
■Skip
■Release skip
■Rerun

Basic Operations
67
■Status DoneJNW Waiting ■Open
■Status
■Skip
■Release skip
■Rerun
■Status DoneTimer Waiting ■Open
■Status
■Skip
■Release skip
■Rerun
■Status DoneFile Waiting ■Open
■Status
■Skip
■Release skip
■Rerun
■Status DoneEvent Transmission ■Open
■Status
■Skip
■Release skip
■Hold
■Release hold
■Forced Stop
■Forced Start
■Rerun
■Status DoneEvent Reception ■Open
■Status
■Skip
■Release skip

Basic Operations
68
■Hold
■Release hold
■Forced Stop
■Forced Start
■Rerun
■Status Done
[Open] displays detailed information of the part. [Status] displays the statusof the part in a dialog box.
5.5.3. Reloading the Tracker Window AutomaticallyThe content displayed in the tracker window is reloaded periodically. Automatic reloadingis enabled in the tracker list window (including the case when a specific JNW is specified)and the tracker information window (flow, details, environment variable, log).
5.5.3.1. Enabling Automatic Reloading
In order to reload the contents automatically, change automatic reload slide bar from OFFto ON. (If you slide the bar to the right while clicking the mouse, it switches to ON.)
Figure 5.36. Change to automatic reload ON state
If the auto-reload slide bar is turned ON, the automatic reload is done.
5.5.3.2. Initial setting of the automatic reload
You can set the initial value of the automatic reload in the configuration file(clweb.conf)for a CL / Web server. The initial value of the automatic reload you have set, are commonto all users.
The format and item of the clweb.conf file that are related to the initial setting of theautomatic reload are as follows.
Table 5.4. Setting of the parameters ofclweb.conf(Initial setting of the automatic reload)
Parameter Description Type Value$tracker_auto_refreshSet the initial state
of the automaticreload slide bar.
True/false value false (default value)
The status of the automatic reload slide bar is determined by the initial value set in theclweb.conf file when access is made for the first time.
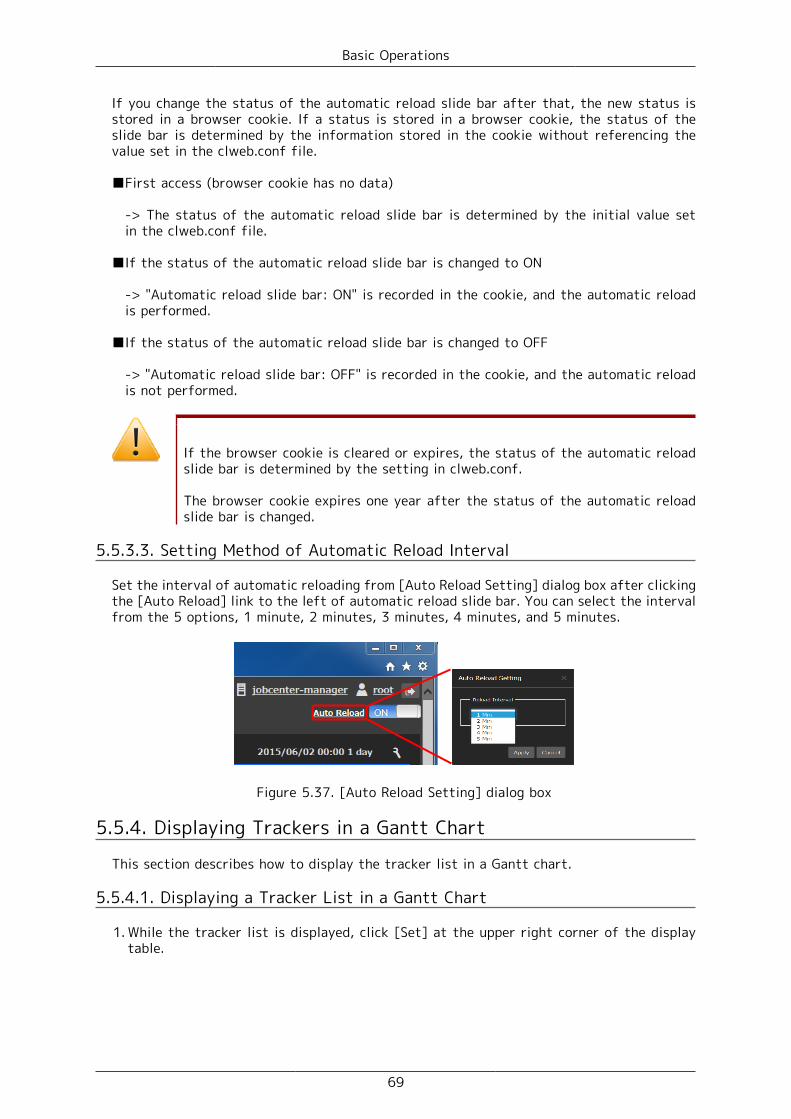
Basic Operations
69
If you change the status of the automatic reload slide bar after that, the new status isstored in a browser cookie. If a status is stored in a browser cookie, the status of theslide bar is determined by the information stored in the cookie without referencing thevalue set in the clweb.conf file.
■First access (browser cookie has no data)
-> The status of the automatic reload slide bar is determined by the initial value setin the clweb.conf file.
■If the status of the automatic reload slide bar is changed to ON
-> "Automatic reload slide bar: ON" is recorded in the cookie, and the automatic reloadis performed.
■If the status of the automatic reload slide bar is changed to OFF
-> "Automatic reload slide bar: OFF" is recorded in the cookie, and the automatic reloadis not performed.
If the browser cookie is cleared or expires, the status of the automatic reloadslide bar is determined by the setting in clweb.conf.
The browser cookie expires one year after the status of the automatic reloadslide bar is changed.
5.5.3.3. Setting Method of Automatic Reload Interval
Set the interval of automatic reloading from [Auto Reload Setting] dialog box after clickingthe [Auto Reload] link to the left of automatic reload slide bar. You can select the intervalfrom the 5 options, 1 minute, 2 minutes, 3 minutes, 4 minutes, and 5 minutes.
Figure 5.37. [Auto Reload Setting] dialog box
5.5.4. Displaying Trackers in a Gantt Chart
This section describes how to display the tracker list in a Gantt chart.
5.5.4.1. Displaying a Tracker List in a Gantt Chart
1. While the tracker list is displayed, click [Set] at the upper right corner of the displaytable.

Basic Operations
70
Figure 5.38. [Set] button
2. The [Set] dialog box opens.
3. Select [Gantt chart] as the display mode and click [Apply].

Basic Operations
71
Figure 5.39. Switch to [Gantt chart] in the [Set] dialog box
4. The Gantt chart of the tracker list is displayed.

Basic Operations
72
Figure 5.40. Displaying a Gantt chart of trackers
In a Gantt chart, the horizontal axis shows time and the vertical axis shows the trackername, and the start time and the end time of each tracker are shown as a horizontal bar.
■Gantt chart columns
Column name Description Remark(1) Tracker name Displays the tracker names.
Clicking a tracker name displays its trackerflow screen.
Right-clicking a tracker name displays theshortcut menu for operating the tracker.
(2) Display table Displays the start time and the end time ofeach tracker as a horizontal bar.
Narrow horizontal bars show planned start/end time. Wide horizontal bars show actualstart/end time.
The color of wide horizontal bar correspondsto the tracker's status.
(3) Page switchingbutton
Switches the pages when all the trackerscannot be contained in one screen.
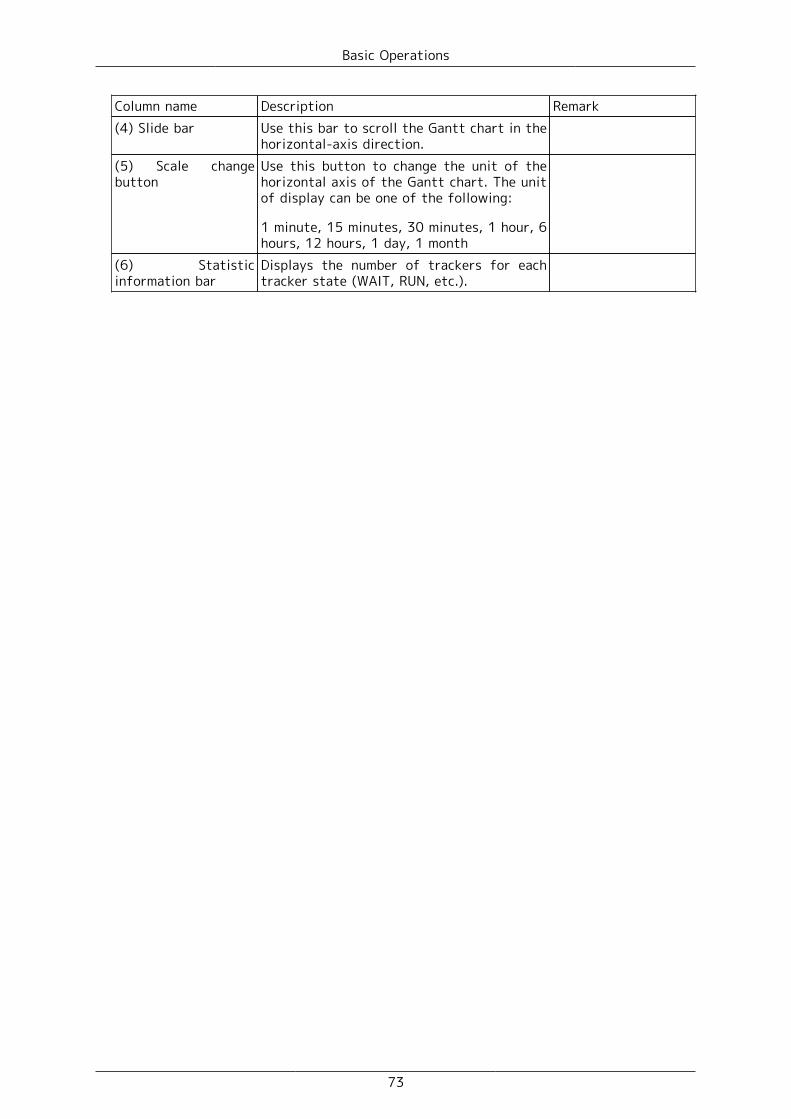
Basic Operations
73
Column name Description Remark(4) Slide bar Use this bar to scroll the Gantt chart in the
horizontal-axis direction.(5) Scale changebutton
Use this button to change the unit of thehorizontal axis of the Gantt chart. The unitof display can be one of the following:
1 minute, 15 minutes, 30 minutes, 1 hour, 6hours, 12 hours, 1 day, 1 month
(6) Statisticinformation bar
Displays the number of trackers for eachtracker state (WAIT, RUN, etc.).

Basic Operations
74
5.6. Schedule-related OperationsYou can view lists or definitions of schedules. In addition, you can perform operation ofenabling and disabling schedules.
5.6.1. Viewing a List of Schedules
1. Select [Schedule] on the navigation bar.
2. Expand the tree in the tree view, place the cursor on the desired group name, and click it.
3. If there is any schedule or group under the target group, the object is displayed in thedisplay table.
Figure 5.41. Image of the window where a group is selected
■Display table list columns
Column name Description RemarkName Displays the name of the object.Type Displays the type of the object (schedule or
group).Enable/Disable Displays whether the schedule is enabled or
disabled.Comment Displays the comment specified for the
object.Parent Group Displays the name of the group to which the
object belongs.

Basic Operations
75
5.6.2. Viewing the Schedule Definition
1. In the schedule list display window, place the cursor on the name of the schedule whosedefinition you want to view, and then click it.
2. The definition of the selected schedule is displayed.
Figure 5.42. Schedule definition display window
■Schedule definition columns
Column name Description Remark(1) Schedule name Displays the name of the viewed schedule
definition.(2) Monthly operatingday schedule
Displays the schedule execution datesfor each month. The dates with greenbackground are execution dates.
(3) Execution starttime
By clicking a schedule execution date, thelist of schedule execution start time on thatdate is displayed.
(4) Calendar name Displays the name of the calendar that isapplied to the schedule.
(5) Time zone Displays the specified time zone.(6) Daylight savingstime offset
Displays whether the daylight savings time(summer time) is set.
(7) Rule Displays the rule of schedule definition.The displayed items are [+/-] (registration/exclusion), [Type], [Break shift], [Relative],[Time], and [Term].

Basic Operations
76
5.6.3. Viewing the Linking JNW
1. The linking JNW set in the schedule definition is displayed. Click the [Linking JNW] tabin the schedule definition information screen.
Figure 5.43. Clicking the [Linking JNW] Tab
2. The list of the JNWs linked with the schedule is displayed.
Figure 5.44. Linking JNW window

Basic Operations
77
5.6.4. Enabling or Disabling the Schedule
This section describes how to enable or disable schedules.
Schedule enabling and disabling can be done either for each schedule or for each schedulegroup.
You need to select [Edit Mode] as the login mode.
If you do not have the permission to edit the user's own job network for CL/Win, you cannot enable or disable schedules.
5.6.4.1. Enabling/Disabling Schedules
This section describes how to enable or disable each schedule individually.
1. In the display table, place the cursor on the name of the schedule you want to enable(or disable) and right-click it.
2. Select [Enable] (or [Disable]) in the shortcut menu.
Figure 5.45. Shortcut menu screenshot
3. The [Schedule Operation] dialog box opens.
4. Click the [OK] button.

Basic Operations
78
Figure 5.46. [Schedule Operation] dialog box
5. If the following message is output in the [Schedule Operation] dialog box, the operationis completed.
6. Click the [OK] button.
Figure 5.47. Success of operating schedule
5.6.4.2. Enabling/Disabling Schedule Groups
This section describes how to enable or disable all the schedules under the group.
1. In the display table, place the cursor on the name of the schedule group you want toenable (or disable) and right-click it.
2. Select [Enable] (or [Disable]) in the shortcut menu.

Basic Operations
79
Figure 5.48. Shortcut menu screenshot
3. The [Group Operation] dialog box opens.
4. Click the [OK] button.
Figure 5.49. [Group Operation] dialog box
5. If the following message is output in the [Group Operation] dialog box, the operationis completed.
6. Click the [OK] button.

Basic Operations
80
Figure 5.50. Success of enabling schedules under the group

Basic Operations
81
5.7. Machine-related OperationsYou can view a list of machines recognized by JobCenter MG/SV, a list of queues, and a listof users. You can also perform operations such as starting and stopping a queue.
5.7.1. Viewing a List of Machines
1. Select [Machine] on the navigation bar.
2. A list of machines recognized by JobCenter MG/SV is displayed.
Figure 5.51. Machine list display window
■Machine list columns
Column name Description RemarkMachine Machine name recognized by JobCenter MG/
SVPrincipal Name Displays the formal name of the machine.Machine ID Displays the machine ID.Machine Type Displays the machine type (nec or necnt).
5.7.2. Viewing a List of Queues
1. In the machine list display window, place the cursor on the name of the machine whosequeue list you want to view and then click it.

Basic Operations
82
Figure 5.52. Window where a machine is selected
2. The queue list of the selected machine is displayed.
Figure 5.53. Queue list display window
3. The Queue Flag column can be added by using the [Hide/Show Columns] button. Forinformation about the [Hide/Show Columns] button, refer to Section 5.1.4, “Display TableColumn Display Function”.
■Queue list columns

Basic Operations
83
Column name Description RemarkNameType
Refer to Section 10.1.2, “Displaying a QueueList in the NQS Frame Window” in <BasicGuide>
Queue Flag Displays one of the following wordsrepresenting the queue type: NORMAL,LOADBALANCE, and TRANSPARENT.
■NORMAL
This indicates a normal pipe queue or batchqueue.
■LOADBALANCE
This indicates a demand delivery loadbalancing queue.
■TRANSPARENT
This indicates a transparent pipe queue.
The Queue Flagcolumn can beadded by using the[Hide/Show Columns]button.
SubmissionExecutionRun LimitTotalQueuedRunningWaitingHolding
Refer to Section 10.1.2, “Displaying a QueueList in the NQS Frame Window” in <BasicGuide>.
5.7.3. Operating a Queue
1. In the queue list window, place the cursor on the name of the queue you want to operateand then right-click it.

Basic Operations
84
Figure 5.54. Window where a queue is selected
CL/Web queues cannot be operated by anyone other than the JobCenteradministrator.
If you are not the administrator, the columns are grayed out.
Even if you are the administrator, you cannot operate queues when you arelogged in Ref mode.
2. Place the cursor on the queue you want to operate, and click it.
3. When the [Queue Control] dialog box opens, click [OK].
Figure 5.55. [Queue Control] start dialog box
4. When the queue operation is complete, a result message is displayed. Click [OK].
Figure 5.56. [Queue Control] end dialog box

Basic Operations
85
■Queue operations (shortcut menu)
Operation name DescriptionStart/Stop Sets the queue status to start or stop.Enable/Disable Enables or disables the queue status.
5.7.4. Viewing a List of Users
1. Select the [User] tab in the queue list display window.
Figure 5.57. Window where the [User] tab is selected
2. A list of users recognized by JobCenter MG/SV is displayed.
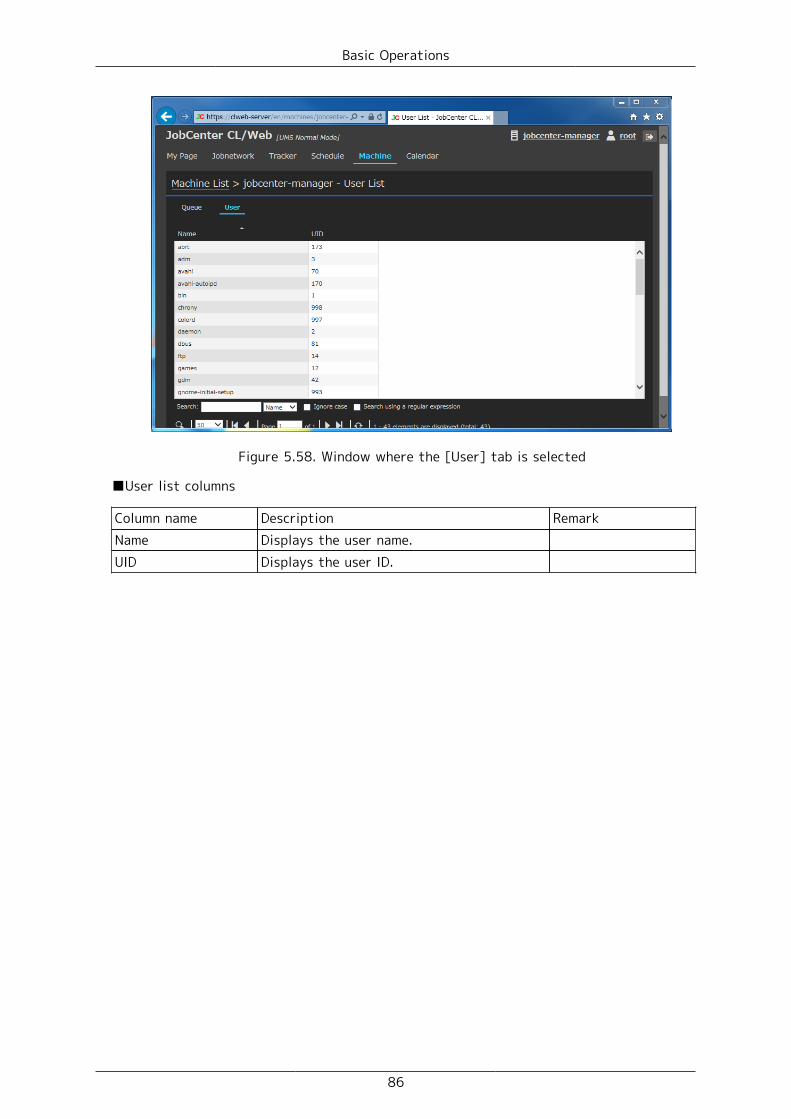
Basic Operations
86
Figure 5.58. Window where the [User] tab is selected
■User list columns
Column name Description RemarkName Displays the user name.UID Displays the user ID.

Basic Operations
87
5.8. Calendar-related OperationsYou can view a list of calendars, rules set for calendars, etc.
5.8.1. Viewing a List of Calendars
1. Select [Calendar] on the navigation bar.
2. A list of calendars is displayed.
Figure 5.59. Calendar list display window
■Calendar list column
Column name Description RemarkName Displays the calendar name.
5.8.2. Viewing the Calendar Definition
1. In the calendar list display window, place the cursor on the name of the calendar whosedefinition you want to view, and then click it.

Basic Operations
88
Figure 5.60. Calendar list display window
2. The definition of the selected calendar is displayed.
Figure 5.61. Calendar definition display window
■Calendar definition columns

Basic Operations
89
Column name Description Remark(1) Calendardefinition name
Displays the name of the viewed calendardefinition.
(2) Monthly operatingday calendar
Displays the operating-day dates for eachmonth. The characters in black are theregistered dates.
(3) Time zone Displays the specified time zone.(4) Daylight savingstime offset
Displays whether the daylight savings time(summer time) is set.
(5) Rule Displays the rule of calendar definition.The displayed items are [+/-] (registration/exclusion), [Type], [Break shift], [Relative],and [Term].

Basic Operations
90
5.9. My Page Function
5.9.1. Function Overview
The My Page function allows the user to customize the information to be displayed. "Panels"having different functions can be placed on the [My Page] window. One type of paneldisplays only the information about the job networks that the user wants to monitor.There is also another type of panel that displays the transition in the number of JobCentertrackers.
Figure 5.62. Example of [My Page] window
The following table lists the panels available with the My Page function.
Table 5.5. List of My Page panels
Category Panel name Function DescriptionJNW My List Lets you create a list
of job networks that youwant to monitor.
For details, refer toSection 5.9.4.1.1, “JNWMy List”.
My List
Tracker My List Lets you create a listof only the trackers ofthose job networks thatyou want to monitor.
For details, referto Section 5.9.4.1.2,“Tracker My List”.
Tracker Summary Lets you view thejob network executionsummary by status orprogress in the form of apie chart.
For details, referto Section 5.9.4.2.1,“Tracker Summary”.
Report
Tracker Report(Can be addedonly by theJobCenteradministrator.)
Lets you view the numberof trackers used in theentire JobCenter or thenumber of trackers usedby those users who are
For details, referto Section 5.9.4.2.2,“Tracker Report”.

Basic Operations
91
using most trackers, inthe form of a graph.
The My Page function allows you to use job network information in various ways. Forexample, you can place multiple [JNW My List] panels in a single window, as shown below,and reference the job networks of different users simultaneously.
Figure 5.63. Referencing the job networks of multiple users simultaneously
The My Page limit mode function is also available that provides users with only the functionsthey need. Once the limit mode is set for users, only the [My Page] window is displayedafter they log in, which makes operations simple and prevents operation errors. For detailsof the limit mode, refer to Section 5.9.5, “Setting My Page (JobCenter Administrator)”.
5.9.2. Using My Page
5.9.2.1. Displaying My Page
When you log in to JobCenter CL/Web, the [My Page] window appears. When you have nopanel added, the window looks as shown below.

Basic Operations
92
Figure 5.64. [My Page] window (when there is no panel added)
5.9.2.2. Adding a Panel
You can add panels to the [My Page] window. Once you add panels, the window is restoredto the state it is in when you add them, the next time you log in.
To add a panel to the [My Page] window, first click the [Add Panel] button in the upperright of the window.
Figure 5.65. [Add Panel] button
If you click the [Add Panel] button, the [Add Panel] dialog box appears as shown below. Toadd a panel, select the one you want to add. For details of the settings of the [Add Panel]dialog box, refer to Section 5.9.3.2, “Adding a Panel”.

Basic Operations
93
Figure 5.66. [Add Panel] dialog box
5.9.2.3. Setting a Panel
Each type of panel has its own set of items to be set. The [Panel Setting] dialog boxlets you change the settings so that the panel displays the content you want to view.For information about the [Panel Setting] dialog box, refer to Section 5.9.3.3, “SettingDialog Box”.
Figure 5.67. [Panel Setting] dialog box
5.9.3. Common Panel OperationsThere are operations that are common to the panels that you can place in the [My Page]window, such as addition, deletion, and reload. These common operations are describedbelow.

Basic Operations
94
5.9.3.1. Panel Window
A panel window consists of three parts: header, body, and footer.
Footer part
Body part
Header part
Figure 5.68. Panel window
1. Header part
The header part displays the panel name and buttons. The elements of the header partare as follows.
Table 5.6. Elements of the header part
No. Element name Description(1) Panel icon An icon representing the
type of panel is displayed.For information about thepanel icons, refer tothe sections pertaining tothe individual panels inSection 5.9.4, “Details ofPanels”.
(2) Panel name The panel name that you setwhen you added the panelis displayed. This panel namemay be up to 30 characterslong and contain Japanesecharacters and symbols aswell. You can set a namethat is identical to that ofanother panel. However, itis recommended to specifya different name so as todistinguish the panel fromother panels.
(3) [Reload] button If you click this button,the information displayed inthe body part is reloaded.

Basic Operations
95
The reload operation isperformed based on theinformation of the settingdialog box. Any setting youchange using the side menuwill be restored to the statethat is set in the settingdialog box.
(4) [Panel Setting] button The setting dialog box isdisplayed. The setting dialogbox allows you to set thepanel. For details, referto Section 5.9.3.3, “SettingDialog Box”.
(5) [Side menu] button The side menu slides fromthe right side of thebody part. When you clicksomewhere outside the sidemenu, it slides out ofview. For details, refer toSection 5.9.3.7, “Side Menu”.
2. Body part
The body part can display information that is unique to the panel. The informationdisplayed in this area is updated through an appropriate operation such as clicking the[Reload] button in the header part. The following operations update the information inthe body part.
■Displaying the initial [My Page] window
■Clicking the [Reload] button
■Saving the [Panel Setting] dialog box
■Changing a setting by using the side panel
3. Footer part
The footer part displays a summary of the information currently displayed in the bodypart and warning information (JobCenter MG/SV communication error).
5.9.3.2. Adding a Panel
If you click the [Add Panel] button at the upper right of the [My Page] window, the [AddPanel] dialog box appears.
Figure 5.69. [Add Panel] button

Basic Operations
96
On the left side of the [Add Panel] dialog box, select the type of panel that you want toadd. Enter a panel name and other items to be set, and then click the [Save] button. If allnecessary items have been set, the panel is added to the [My Page] window.
Figure 5.70. [Add Panel] dialog box
To quit adding the panel, click the [x] button at the upper right corner of the dialog box(or click somewhere outside the dialog box area). The addition of the panel is canceled, andthe [Add Panel] dialog box is closed.
You can change the panel name, panel size, and panel order in the [Add Panel] dialog boxafter adding the panel, by using the setting dialog box.
No more than six panels can be added per user.
5.9.3.3. Setting Dialog Box
If you click the [Panel Setting] button, the setting dialog box appears as shown below.This setting dialog box lets you set not only the items unique to a specific panel but alsothe items common to all panels. When you select an item on the left side, the items youcan set are displayed on the right side. Change the settings as necessary, and click the[Save] button to save the changes. The items that are saved using the setting dialog boxwill remain in effect the next time the same user logs in.
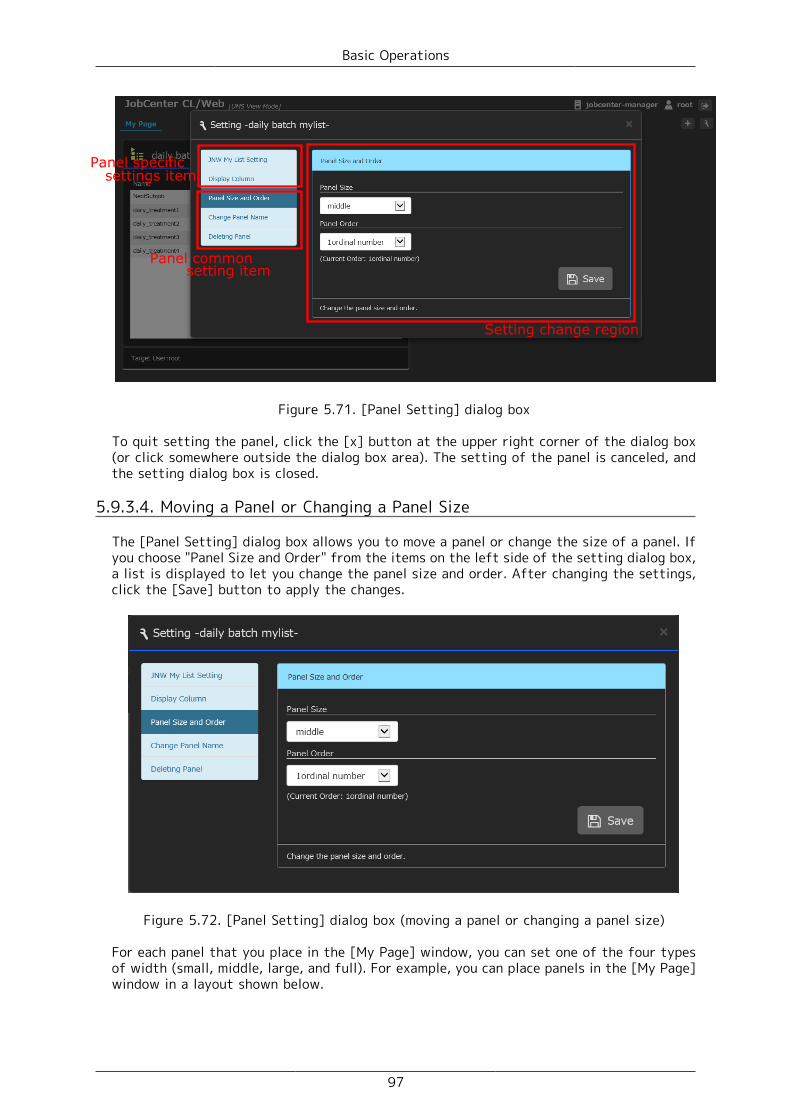
Basic Operations
97
Figure 5.71. [Panel Setting] dialog box
To quit setting the panel, click the [x] button at the upper right corner of the dialog box(or click somewhere outside the dialog box area). The setting of the panel is canceled, andthe setting dialog box is closed.
5.9.3.4. Moving a Panel or Changing a Panel Size
The [Panel Setting] dialog box allows you to move a panel or change the size of a panel. Ifyou choose "Panel Size and Order" from the items on the left side of the setting dialog box,a list is displayed to let you change the panel size and order. After changing the settings,click the [Save] button to apply the changes.
Figure 5.72. [Panel Setting] dialog box (moving a panel or changing a panel size)
For each panel that you place in the [My Page] window, you can set one of the four typesof width (small, middle, large, and full). For example, you can place panels in the [My Page]window in a layout shown below.

Basic Operations
98
Middle
12
Figure 5.73. Example of the panel layout
If the width of a panel extends off the window frame, the panel is displayed on the nextrow. As shown in the example above, if a panel of the middle size (1/2) and a panel of thelarge size (2/3) are placed side by side, the panel of the large size cannot be drawn onthe same row and is therefore displayed on the next row. The following table shows thewidth necessary for each panel size. These width values change according to the width ofthe browser window (pixels).
Table 5.7. Width of the browser window and panel sizes
Panel sizeBrowser width (pixels) small middle large full981 pixels or more 1/3 of the
width1/2 of thewidth
2/3 of thewidth
Entire width
768 to 980 pixels 1/2 of thewidth
1/2 of thewidth
Entire width Entire width
767 pixels or less Entire width Entire width Entire width Entire width
If you change the browser window size on a PC, or if the browser window widthchanges as you change the orientation of the iPad from vertical to horizontal,the panel sizes (widths) dynamically change.
5.9.3.5. Changing a Panel Name
The [Panel Setting] dialog box allows you to change the name of a panel. Choose "ChangePanel Name" from the items on the left side of the setting dialog box, and then enter a newpanel name. After entering the panel name, click the [Save] button to apply the change.

Basic Operations
99
Figure 5.74. [Panel Setting] dialog box (changing a panel name)
5.9.3.6. Deleting a Panel
You can delete an unnecessary panel from the [Panel Setting] dialog box. If you choose"Delete Panel" from the items on the left side of the setting dialog box, the [Delete] buttonappears. If you click the [Delete] button, a confirmation dialog box appears. Before deletingthe panel, confirm whether you want to delete it.
Figure 5.75. [Panel Setting] dialog box (deleting a panel)
Figure 5.76. Confirmation dialog box for deleting a panel
5.9.3.7. Side Menu
If you click the [Side Menu] button, the side menu window slides from the right side ofthe body part. The side menu window lets you set and change the display conditions andcontents. The items that you change in this window will be changed back to the settings

Basic Operations
100
made in the setting dialog box when you log out, reload the information, or perform someother operations.
Figure 5.77. Side menu window
If you click somewhere outside the side menu window that has slid into view, the windowis closed.
5.9.4. Details of Panels
There are two groups of panels: [My List] panels and [Report] panels. This section describes[My List] panels and [Report] panels in detail.
5.9.4.1. [My List] Panels
A [My List] panel displays a collection of job network definitions and tracker informationthat the user wants to reference in a single window so that the user can check them ata glance.
5.9.4.1.1. JNW My List
The [JNW My List] panel displays specified job networks. This panel allows you to displayand submit only those job networks that you frequently use, as well as to reference theirlatest trackers in the same window.

Basic Operations
101
Figure 5.78. JNW My List
No item is displayed in the [JNW My List] panel when it is added. To display job networks,select target users and job networks from "JNW My List Setting" of the setting dialog box.
5.9.4.1.1.1. What the JNW My List Displays
After job networks are set, the JNW My List displays a list of registered job networks.The following table shows the columns of the JNW My List.
Table 5.8. Columns of the JNW My List
Column name Description RemarkName The job network name is
displayed. If you click thisitem, a job network windowopens in a new tab.
Default item
Type The type of object isdisplayed. In the JNW MyList, the type is fixed to jobnetwork.
Status The execution status of thejob network is displayed. Ifyou click this item, a trackerwindow opens in a new tab.
Default item
Status class The status is displayed.Tracker ID The tracker ID is displayed.Group The name of the group to
which the tracker belongs isdisplayed.
Comment The comment set for the jobnetwork is displayed.
Action The button for submittingthe job network is displayed.If you click this button,the [Submit JNW] dialog boxappears.
Default item

Basic Operations
102
The [Submit JNW] dialog box of the [JNW My List] panel has unique settings, andthe "Open Job Network Tracker Window" check box is not selected by default. Ifyou select the check box, the tracker window opens in a new tab and the [JNWMy List] panel is reloaded.
For the other settings of the [Submit JNW] dialog box, refer to Section 5.4.3.3,“Setting Immediate Submission”.
The latest execution status of a job network and its tracker ID are displayedas the summary information (Status, Status class, and Tracker ID). If the jobnetwork has not been executed, "-" is displayed.
The right-click operation (context menu) is not available in the [JNW My List]panel.
5.9.4.1.1.2. Setting the JNW My List
The [JNW My List Setting] dialog box allows you to change the target user, the job networksof that user, and what to display in the columns.
Figure 5.79. [JNW My List Setting] dialog box (JNW My List Setting)

Basic Operations
103
Figure 5.80. [JNW My List Setting] dialog box (Display Column)
■Target User
Select the target user of the JNW My List.
▪ Default value
Login user. Note that, when you are referencing another user by using theuser switch function, the target user is the user to whom you have switched.
▪ Restrictions
A user with no reference permission cannot be selected.
▪ Remark
For details of the permissions related to the JNW My List, refer toSection 5.9.4.3, “Permissions to Display Panels and Change Settings”.
■Job Network List
A list of the job networks of the selected target user is displayed. Select the job networkyou want to register. The selected job network is displayed in the "Selected List".
▪ Default value
None
▪ Restrictions
At least one job network must be registered.
Up to 20 job networks can be registered.
■Display Column
Set the default items for the columns of the JNW My List. For details of the items ofthe columns, refer to Table 5.8, “Columns of the JNW My List”.

Basic Operations
104
■Default value
Name
Status
Action
■Restrictions
Select one or more job networks.
■Remark
None
5.9.4.1.1.3. Side menu of the JNW My List
There is no side menu for the JNW My List.
5.9.4.1.2. Tracker My List
The [Tracker My List] panel displays a list of trackers of the job networks registered in theMy List. This panel allows you to display the execution results of only those job networksthat you want to monitor. Also, as with the Tracker List, you can jump to the detail pageof the target tracker from the link.
Figure 5.81. Tracker My List (displayed in full size)
5.9.4.1.2.1. What the Tracker My List Displays
The Tracker My List displays a list of trackers of registered job networks (the sameinformation as the Tracker List window). The content that this list displays is the sameas that of the Tracker List window. For details, refer to Section 5.5, “Tracker-relatedOperations”.
Clicking a displayed tracker name opens the tracker details window (track flow).Unlike the Tracker List window, a new tab opens.

Basic Operations
105
By using the search window at the bottom of the body part, you can do a search in the sameway as described in Section 5.1.2, “Search Function”, and change the number of trackersto be displayed.
5.9.4.1.2.2. Setting the Tracker My List
You can register job networks using "Tracker My List Setting" in the setting dialog box. Inthe job network tree, select the check boxes of the job networks that you want to register.The trackers of the selected job networks are displayed in the list of the body part. Notethat, if you do not have permission to reference trackers, you cannot reference trackers.
If you are authorized to reference trackers of another user, you can specify that userin "User Name" and select job networks. Change the user name in the setting dialog box,and specify the job networks that you want to register. Note that you can specify onlyone user per Tracker My List. If you want to monitor more than one user, create as manyTracker My Lists.
Figure 5.82. [Tracker My List Setting] dialog box (selecting job networks)
If you click the word "Show" next to "Tracker Status Detail", the items to be set in trackerstatus details are displayed.

Basic Operations
106
Figure 5.83. [Tracker My List Setting] dialog box (with tracker status details displayed)
■Target User
Select the target user of the Tracker My List.
▪ Default value
Login user. Note that, when you are referencing another user by using theuser switch function, the target user is the user to whom you have switched.
▪ Restrictions
A user with no reference permission cannot be selected.
▪ Remark
For details of the permissions related to the Tracker My List, refer toSection 5.9.4.3, “Permissions to Display Panels and Change Settings”.
■Job Network List
A list of the job networks of the selected target user is displayed. Select the job networkyou want to register. The selected job network is displayed in the "Selected List".
▪ Default value
None
▪ Restrictions
At least one job network must be registered.
Up to 20 job networks can be registered.
■Tracker Status Detail
Select the status, archive status, and other items that you want to output to the TrackerMy List. For details of the individual items, refer to Section 5.5.1, “Viewing Trackers”.

Basic Operations
107
▪ Default value
Archived tracker
Unarchived tracker
Scheduled
Running
Complete
▪ Restrictions
Select one or more job networks.
■Display period
Specify the period during which trackers are to be displayed. The available options are "1day", "2 days", "3 days", "1 week", "2 weeks", and "4 weeks". For example, if you specify"1 week", the trackers during the past 1-week period including the present day can bedisplayed.
▪ Default value
1 day
▪ Restrictions
None
▪ Remark
If you specify a long period and the number of trackers to be displayed islarge, it takes time before tracker status details are displayed.
You can change items of the columns to be displayed in the Tracker My List, by using"Display Column" in the setting dialog box.
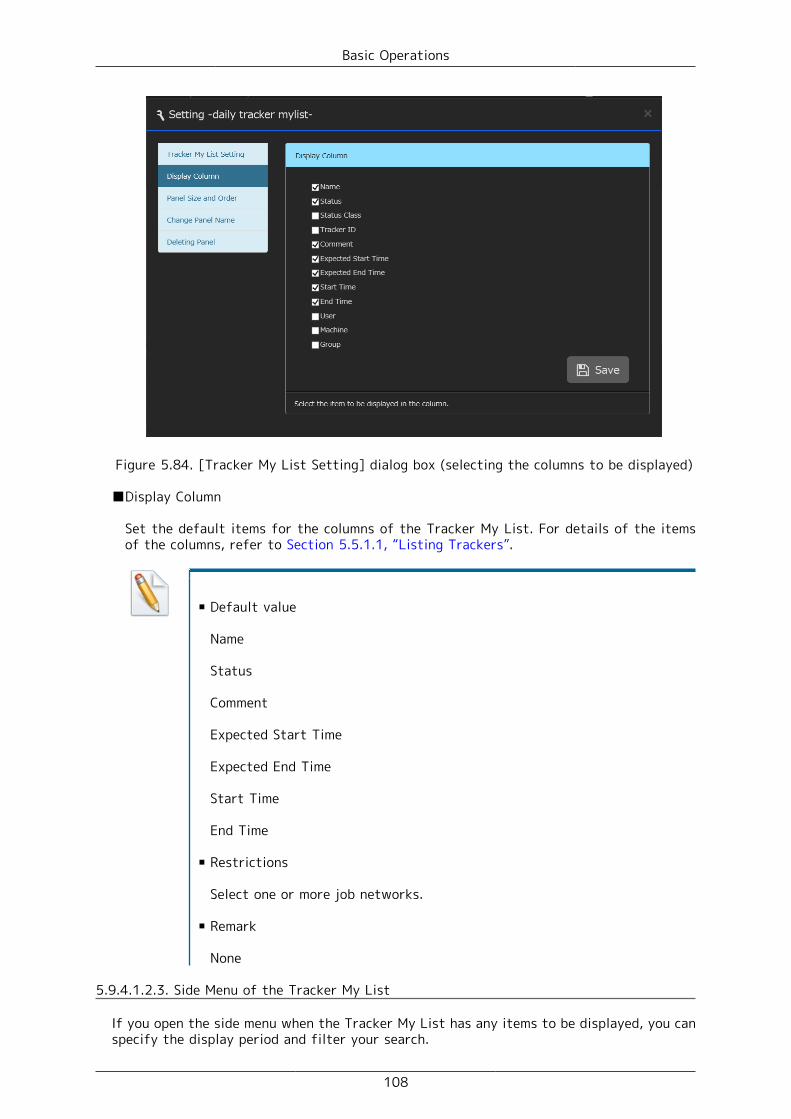
Basic Operations
108
Figure 5.84. [Tracker My List Setting] dialog box (selecting the columns to be displayed)
■Display Column
Set the default items for the columns of the Tracker My List. For details of the itemsof the columns, refer to Section 5.5.1.1, “Listing Trackers”.
▪ Default value
Name
Status
Comment
Expected Start Time
Expected End Time
Start Time
End Time
▪ Restrictions
Select one or more job networks.
▪ Remark
None
5.9.4.1.2.3. Side Menu of the Tracker My List
If you open the side menu when the Tracker My List has any items to be displayed, you canspecify the display period and filter your search.

Basic Operations
109
Figure 5.85. Side menu of the Tracker My List
■Display period
The available options are "1 day", "2 days", "3 days", "1 week", "2 weeks", and "4 weeks".
▪ Default value
1 day
▪ Restrictions
None
▪ Remark
After you make a change, the list is reloaded immediately, displaying thelatest information.
When the list is reloaded, the display period is reset to the value you set.
■Search
You can filter the items to be displayed in the list. This search is done in the same way asdescribed in Section 5.1.2.1, “Search Bar”. Specify a character string, and press the Enterkey. The Tracker My List information is collected again, and the new list is displayed.
▪ Default value
None
▪ Restrictions
None
▪ Remark
After you press the Enter key, the list is reloaded immediately, displayingthe latest information.

Basic Operations
110
When the list is reloaded, the filter is canceled.
5.9.4.2. Report Panels
Report panels let you view the operation status and statistical information of JobCenter.
5.9.4.2.1. Tracker Summary
The [Tracker Summary] panel obtains and displays the current summary information oftrackers (transition in the number of trackers by status). This panel allows you to checkhow many trackers have caused an error so far and how many trackers are scheduled tobe submitted from now on.
Figure 5.86. Tracker Summary
The [Tracker Summary] panel displays the tracker status when the panel is added. A tableshowing the number of tracks is displayed on the left side of the [Tracker Summary] panel,and a donut chart is on the right side. To change the display, make necessary changesusing the setting dialog box. To change the display temporarily, use the side menu to makenecessary changes.
When you use Internet Explorer or the FireFox browser, placing the mouse cursoron the donut chart displays a popup window showing the tracker items and theirratios.
5.9.4.2.1.1. What the Tracker Summary Displays
The Tracker Summary displays two types of information: "Status" and "Progress".
In addition to "SUCCESS", the status list displays "FAILURE", "HOLD", and other statusesthat require user action. The following table shows the statuses that may be displayedin the list.
Table 5.9. List of the statuses
Status DescriptionSUCCESS Execution ended normally.WARNING Warning occurred.

Basic Operations
111
Status DescriptionHOLD Execution is stopped to wait for a response
from a dialog box.FAILURE Execution is stopped due to an error or ended
abnormally.INCOMPLETE The tracker is scheduled or currently
running, and not in the WARNING, HOLD, orERROR status.
The "Progress" list displays the progress statuses. The following table shows the progressstatuses that may be displayed in the list.
Table 5.10. List of the progress statuses
Progress DescriptionDONE Completed trackerRUN Currently running trackerPREPARE Scheduled tracker
5.9.4.2.1.2. Setting the Tracker Summary
In the [Tracker Summary] panel, you can change three items: target user, display type,and display period.
Figure 5.87. [Tracker Summary Setting] dialog box
■Target User
Select the target user of the Tracker Summary. Besides an individual user, the JobCenteradministrator can select all users.
▪ Default value
Login user. Note that, when you are referencing another user by using theuser switch function, the target user is the user to whom you have switched.

Basic Operations
112
▪ Restrictions
A user with no reference permission cannot be selected.
▪ Remark
For details of the permissions related to the Tracker My List, refer toSection 5.9.4.3, “Permissions to Display Panels and Change Settings”.
■Display Type
You can choose the display type between "Status" and "Progress".
▪ Default value
Status
▪ Restrictions
None
▪ Remark
None
■Display period
The available options are "1 day", "2 days", and "3 days" including the reference date.
▪ Default value
1 day
▪ Restrictions
None
▪ Remark
The reference date refers to the day on which the [My Page] window isdrawn for the first time or reloaded.
5.9.4.2.1.3. Side Menu of the Tracker Summary
The side menu of the Tracker Summary allows you to change the display type and displayperiod.
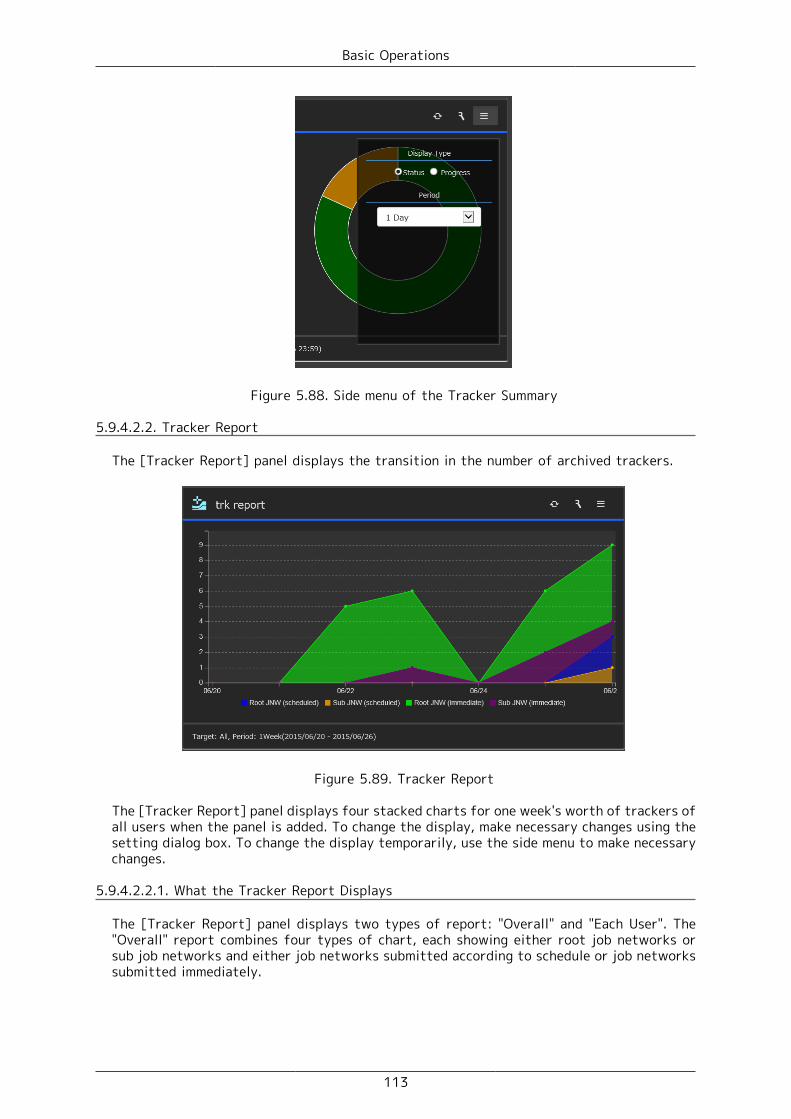
Basic Operations
113
Figure 5.88. Side menu of the Tracker Summary
5.9.4.2.2. Tracker Report
The [Tracker Report] panel displays the transition in the number of archived trackers.
Figure 5.89. Tracker Report
The [Tracker Report] panel displays four stacked charts for one week's worth of trackers ofall users when the panel is added. To change the display, make necessary changes using thesetting dialog box. To change the display temporarily, use the side menu to make necessarychanges.
5.9.4.2.2.1. What the Tracker Report Displays
The [Tracker Report] panel displays two types of report: "Overall" and "Each User". The"Overall" report combines four types of chart, each showing either root job networks orsub job networks and either job networks submitted according to schedule or job networkssubmitted immediately.

Basic Operations
114
Table 5.11. List of the statuses in the charts
Item DescriptionRoot JNW (scheduled) Number of job networks submitted according
to scheduleSub JNW (scheduled) Number of sub job networks submitted
according to scheduleRoot JNW (immediate) Number of job networks submitted
immediatelySub JNW (immediate) Number of sub job networks submitted
immediately
The "Each User" report displays charts for several users who submitted the most archivedtrackers during the display period. You can set and change the number of users to bedisplayed in this report.
There is another display function, which allows you to toggle between displaying and hidinga chart in the [Tracker Report] panel by clicking that chart.
Figure 5.90. Tracker Report (hiding a chart)
5.9.4.2.2.2. Setting the Tracker Report
In the [Tracker Report] panel, you can change three items: chart type, display period, andreport type.
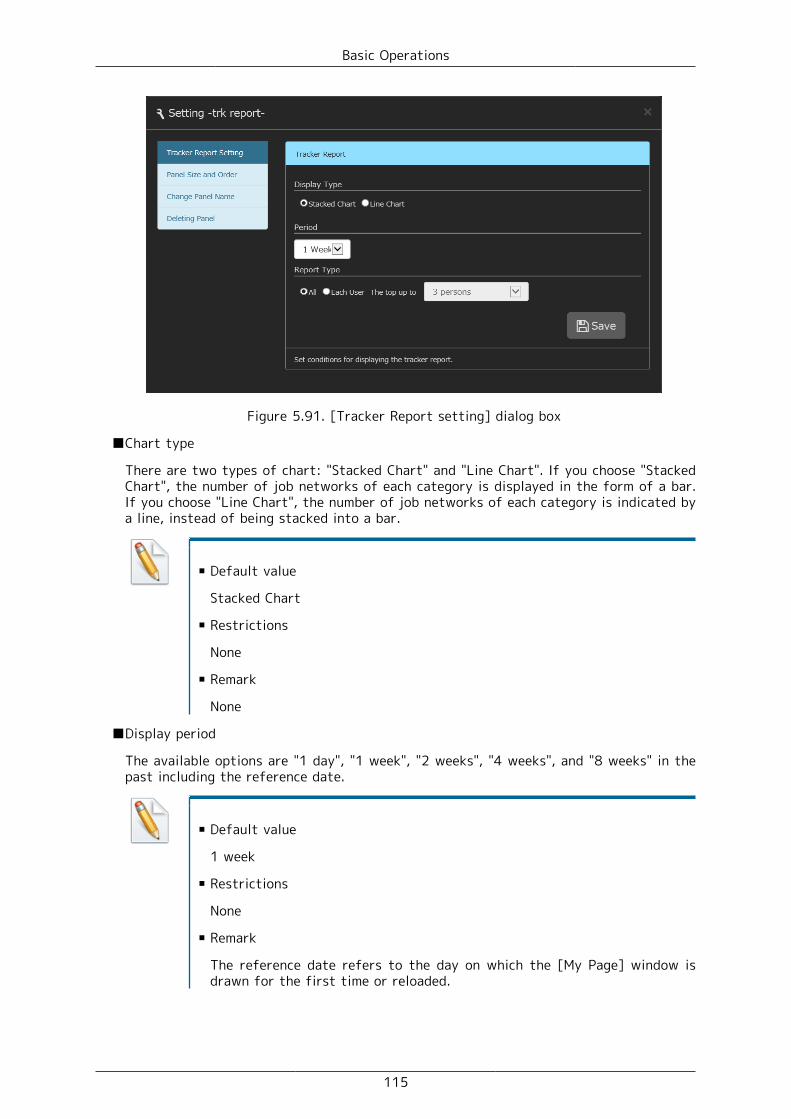
Basic Operations
115
Figure 5.91. [Tracker Report setting] dialog box
■Chart type
There are two types of chart: "Stacked Chart" and "Line Chart". If you choose "StackedChart", the number of job networks of each category is displayed in the form of a bar.If you choose "Line Chart", the number of job networks of each category is indicated bya line, instead of being stacked into a bar.
▪ Default value
Stacked Chart
▪ Restrictions
None
▪ Remark
None
■Display period
The available options are "1 day", "1 week", "2 weeks", "4 weeks", and "8 weeks" in thepast including the reference date.
▪ Default value
1 week
▪ Restrictions
None
▪ Remark
The reference date refers to the day on which the [My Page] window isdrawn for the first time or reloaded.

Basic Operations
116
If you click somewhere on a chart when the display period is other than 1day, the day corresponding to the position where you clicked is selected.If you change the display period in this condition using the side menu, theselected day becomes the reference date. Note that this change is temporaryand becomes ineffective when the information is reloaded.
Figure 5.92. Changing the reference date in theTracker Report temporarily (before the change)
Figure 5.93. Changing the reference date in theTracker Report temporarily (after the change)
■Report type
You can choose between "Overall" and "Each User". If you choose "Each User", select howmany users who submitted the most trackers during the display period are to be displayed,from "3 users", "5 users", and "10 users".
▪ Default value

Basic Operations
117
Overall
▪ Restrictions
None
▪ Remark
Users are ranked according to the total number of archived trackers thatare submitted during the display period.
5.9.4.2.2.3. Side Menu of the Tracker Report
The side menu of the Tracker Report allows you to change the display type, display period,and report type.
Figure 5.94. Side menu of the Tracker Report
5.9.4.3. Permissions to Display Panels and Change Settings
You need the JobCenter permissions to display panels and change settings.
The "JobCenter administrator" has all permissions and can display all the panels and changeall the settings.
A "general user" needs the permissions shown in the table below to display individualpanels and change settings. For details of the JobCenter permissions, refer to Chapter 13,"Authority Setting of General User (Permission)" in <Basic Guide>.
Panel name Required permissions RemarkJNW My List JNW reference permission,
JNW execution permission,tracker reference permission,tracker operation permission
If you do not have anyof the indicated permissionsor if access to the targetuser is limited, you cannotdisplay the panel and changesettings.
Tracker My List Tracker reference permission If you do not have anyof the indicated permissions

Basic Operations
118
Panel name Required permissions Remarkor if access to the targetuser is limited, you cannotdisplay the panel and changesettings.
Tracker Summary Tracker reference permission If you do not have anyof the indicated permissionsor if access to the targetuser is limited, you cannotdisplay the panel and changesettings.
Tracker Report A general user is notauthorized to place the[Tracker Report] panel.
Only the JobCenteradministrator can display thepanel and change settings.
5.9.5. Setting My Page (JobCenter Administrator)
Only when you log in as the JobCenter administrator, the [My Page Setting] button isdisplayed in the upper right of the [My Page] window. If you click this button, the [MyPage Setting] dialog box appears.
Figure 5.95. Setting button (displayed only for the JobCenter administrator)
The [My Page Setting] dialog box lets you set the "limit mode".
The [My Page Setting] button is displayed only when the JobCenteradministrator is referencing his or her own [My Page] window. If the JobCenteradministrator is referencing another user by using the user switch function, the[My Page Setting] button is not displayed.
5.9.5.1. Limit Mode
The limit mode function allows a specified user to access only the [My Page] window. Thisfunction prevents operation errors and makes operations easy to perform. For example,suppose that only the [Tracker My List] panel is placed in the [My Page] window and thatthe My Page is intended only to reference the job networks registered in the My List.This way, the only operation that the user has to perform is to reference the trackers inthe My List, which helps prevent the user from performing erroneous operations such assubmitting the wrong job network.
5.9.5.1.1. Setting the Limit Mode
In the setting dialog box, specify the user for whom you want to set the limit mode. Inthe example shown below, the limit mode is set for "user1". After selecting a user, clickthe [Save] button to save the setting.

Basic Operations
119
Figure 5.96. Specifying a limited user
It is also possible for the JobCenter administrator to make himself or herselfa limited user. In that case, after the setting is saved, the information isautomatically reloaded and the limited mode window is displayed.
When "user1" logs in after the setting is saved, only My Page is displayed. The limit modetakes effect when the target user logs in or when all pages are reloaded.
Figure 5.97. When a limited user logs in (only My Page is displayed)
5.9.5.1.2. User Operations in the Limit Mode
In the limit mode, the user can operate only those panels that are placed in the [My Page]window. For example, when the [JNW My List] panel is placed, the user can reference the

Basic Operations
120
job network flows of the job networks registered in the JNW My List and submit thosejob networks.
Note that the user cannot add panels to the [My Page] window or change the JNW My Listby using the [Panel Setting] dialog box. The JNW My List of the user in the limited modeis set by the JobCenter administrator.
5.9.5.1.3. Setting a Panel for the User in the Limit Mode
The JobCenter administrator needs to set in advance the panel to be placed in the [My Page]window of the target user, by using the user switch function. The JobCenter administratorcan display the [My Page] window of the target user, by switching the user name in theupper right of his or her [My Page] window.
Only the JobCenter administrator can reference the [My Page] window of thetarget user by using the user switch function. A general user can reference onlyhis or her own [My Page] window.
Figure 5.98. Switching users in the [My Page] window(from the JobCenter administrator to the limited user)
The following figure shows the window that is displayed when the JobCenter administrator"nsumsmgr" switches to the [My Page] window of the limited user "user1". The window hasthe user name "nsumsmgr(user1)" displayed on it and shows the content of the [My Page]window of "user1". If a panel is added or a setting is changed on this window, the change isalso applied to the content displayed on the [My Page] window of the limited user "user1".

Basic Operations
121
Figure 5.99. [My Page] window (when the JobCenter administratordisplays and edits the [My Page] window of the limited user)
In the limit mode, the display result changes as shown below, depending on whether thelogin user is a limited user and whether the user is switched.
Login user Whether the useris switched
Tabs displayed atthe top
[Add Panel]button andsetting button ofeach panel
[My PageSetting] button
Not switched All tabs Displayed DisplayedJobCenteradministrator(not limited user)
Switched All tabs Displayed Not displayed
Not switched Only My Page Not displayed DisplayedJobCenteradministrator(limited user)
Switched Only My Page Not displayed Not displayed
Not switched All tabs Displayed Not displayedGeneral user (notlimited user) Switched All tabs Not displayed
(The [My Page]window itselfcannot bereferenced.)
Not displayed(The [My Pagewindow itselfcannot bereferenced.)
Not switched Only My Page Not displayed Not displayedGeneral user(limited user) Switched Only My Page Not displayed
(The [My Page]window itselfcannot bereferenced.)
Not displayed(The [My Page]window itselfcannot bereferenced.)

122
Chapter 6. Details of Other FunctionsThis chapter describes the other functions of CL/Web in detail.
The descriptions in this chapter assume that TLS (SSL) is enabled. If TLS (SSL)is disabled, "https" in the URL of the CL/Web Server shown in the descriptionsshould be replaced with "http."

Details of Other Functions
123
6.1. Details of the Mail Transmission FunctionThe mail transmission function allows the URL shown in the tracker status window to besent to a specified mail address.
6.1.1. Configuring the SMTP ServerThe file to be used to configure the SMTP server is the same as the CL/Web configurationfile, clweb.conf, that is used when configuring the port to be used. For details, refer toSection 3.1.1, “CL/Web Configuration File (clweb.conf)”.
The items to be set differ depending on the settings of the SMTP server to communicatewith. Check the settings of the SMTP server in use before configuring it.
The format of the clweb.conf file and the items to be set in relation to the SMTP serverare as follows.
Table 6.1. Values to be set for the clweb.conf parameters (SMTP server specification)
Parameter Description Type Value$mail_server Specify the name of
the SMTP server.Character string SMTP server name
$mail_port Specify the number ofthe port to be usedfor mail transmission.
Numerical value 25 (Note 1)
$mail_domain Specify the domainname of the SMTPserver. The domainname is used in theHELO command.
Character string SMTP server domainname
$mail_authentication Specifyauthentication fortransmission. Ifauthentication isnot required, specify"none".
Character string One of the "login" or"plain" or "cram_md5"or "none".
$mail_username Specify the loginuser name only whenlogin is specified in$mail_authentication.
Character string Login user name
$mail_password Specify the loginpassword only whenlogin is specified in$mail_authentication.
Character string Login password
$mail_from Specify the mailaddress of thesender.
Character string Mail address of thesender
■Note 1: Default value
■When a character string is specified, it needs to be enclosed within doublequotation marks.
■If a firewall exists in the machine where CL/Web Server is installed, you needto open a hole for the network port to be used by CL/Web Server.

Details of Other Functions
124
The following is an example of configuration.
$mail_server = "mail.something.com"$mail_port = 25$mail_domain = "something.com"$mail_authentication = "plain"$mail_username = "[email protected]"$mail_password = "clwebpass"$mail_from = "[email protected]"
6.1.2. Setting Character Code for Email
Although the default character code for sending email is UTF-8, it can be changed usingthe CL/Web configuration file, clweb.conf.
The format and setting items included in clweb.conf related to this setting are as follows:
Table 6.2. Values to be set for the clweb.confparameters (for specifying character code for email)
Parameter Description Type Setting value$mail_charset_utf8 This specifies
whether thecharacter code ofemail you send is thedefault UTF-8.
True/false True (Default)
If $mail_cahrset_utf8 is set to false, the following character code corresponding to eachlanguage locale is set.
Table 6.3. Correspondence between language locales and character codes in sent email
Language locale Character code of sent emailja ISO-2022-JPen US-ASCIIzh GB18030
6.1.3. Mail Transmission Function
This section describes the mail transmission procedure.
1. Open the tracker window from which you want to send mail, and click the [Mail] buttonat the upper right of the display table.

Details of Other Functions
125
Figure 6.1. Window where the [Mail] button is displayed
2. When the [Send Mail] dialog box opens, choose a mail template, enter the destinationaddress, title, and body text as necessary, and then click [OK].

Details of Other Functions
126
Figure 6.2. [Send Mail] dialog box
The items to be set in the [Send Mail] dialog box are as follows:
■Template
A list of defined email templates is displayed. If the tracker status or the trackerpart status is STOP(ERROR), DONE(ERRO), or KILLED, an email template in which$mail_template_status in the header file indicates NG or a null character is displayed. Ifthe tracker status or the tracker part status is other than STOP(ERROR), DONE(ERRO),or KILLED, an email template in which $mail_template_status in the header fileindicates OK or a null character is displayed.
■To
Specify the address to which you sent the email. If an email template is selected, theaddress of the selected email template is displayed. If an email template is undefined,for the second or later transmissions, the address to which you sent mail last isdisplayed.
Multiple addresses can be specified by delimiting each of them by a comma (,).
If an email template is undefined, the address to which you sent mail lastis saved as a cookie in the browser.
■Subject

Details of Other Functions
127
Enter the title of the mail to be sent. If an email template is selected, the subject ofthe selected email template is displayed.
■Text body
Enter the text body of the mail to be sent. If an email template is selected, the contentof the body file of the selected email template is displayed.
If an email template is undefined, by default, the message containing theURL information of the tracker is entered.
3. When the mail transmission confirmation dialog box opens, click [OK].
Figure 6.3. Mail transmission confirmation dialog box
4. When mail transmission succeeds, the mail transmission result dialog box opens.
6.1.4. Setting Email TemplateCreate and edit an email template by creating or editing an email template file.
Email template files are stored in the following location:
%InstallDirectory%\config\mail
Edit email template files in the following way:
1. Define the name of the email template file.
■When the language locale is Japanese:
Header files
template01_ja_head.def to template99_ja_head.def
Body files
template01_ja_body.def to template99_ja_body.def
■When the language locale is English:
Header files
template01_en_head.def to template99_en_head.def
Body files
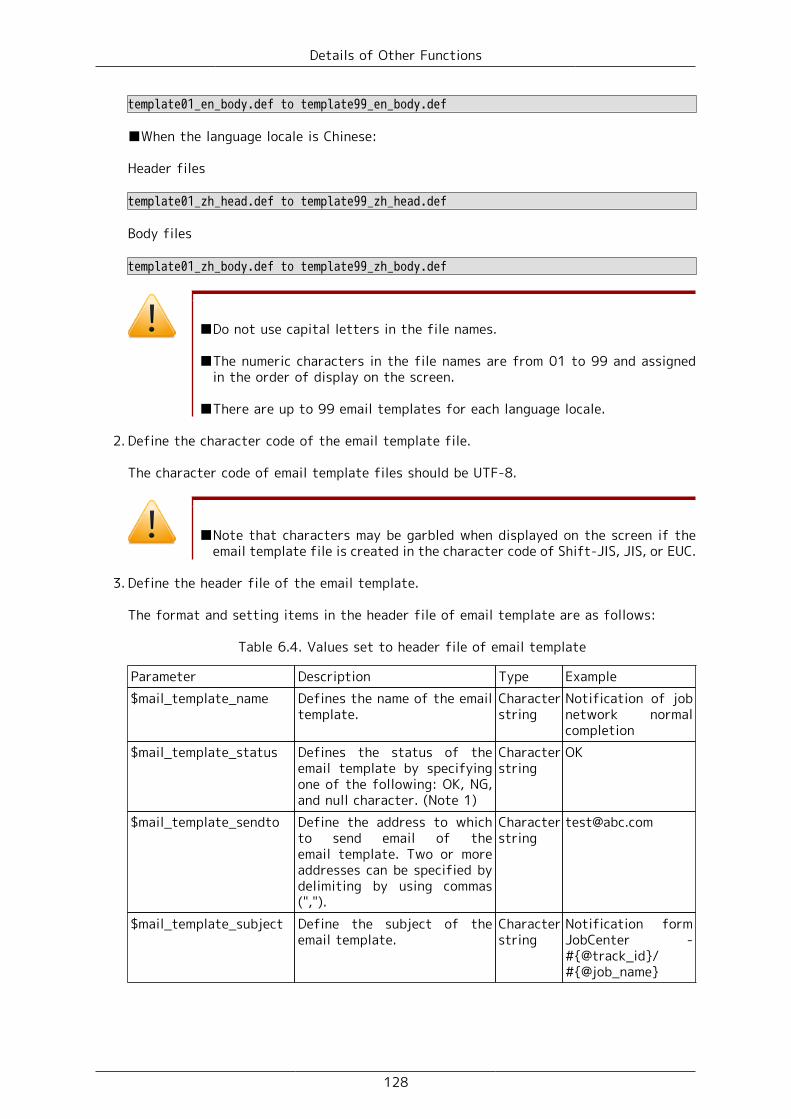
Details of Other Functions
128
template01_en_body.def to template99_en_body.def
■When the language locale is Chinese:
Header files
template01_zh_head.def to template99_zh_head.def
Body files
template01_zh_body.def to template99_zh_body.def
■Do not use capital letters in the file names.
■The numeric characters in the file names are from 01 to 99 and assignedin the order of display on the screen.
■There are up to 99 email templates for each language locale.
2. Define the character code of the email template file.
The character code of email template files should be UTF-8.
■Note that characters may be garbled when displayed on the screen if theemail template file is created in the character code of Shift-JIS, JIS, or EUC.
3. Define the header file of the email template.
The format and setting items in the header file of email template are as follows:
Table 6.4. Values set to header file of email template
Parameter Description Type Example$mail_template_name Defines the name of the email
template.Characterstring
Notification of jobnetwork normalcompletion
$mail_template_status Defines the status of theemail template by specifyingone of the following: OK, NG,and null character. (Note 1)
Characterstring
OK
$mail_template_sendto Define the address to whichto send email of theemail template. Two or moreaddresses can be specified bydelimiting by using commas(",").
Characterstring
$mail_template_subject Define the subject of theemail template.
Characterstring
Notification formJobCenter -#{@track_id}/#{@job_name}

Details of Other Functions
129
■Note 1: If you want to display the email template when the tracker statusor the tracker part status is STOP(ERROR), DONE(ERRO), or KILLED, set thestatus of the email template to NG.
If you want to display the email template when the tracker status or thetracker part status is other than STOP(ERROR), DONE(ERRO), or KILLED,set the status of the email template to OK.
If you want to display the email template unconditionally, set the statusof the email template to null character.
The following is an example of the header file of an email template:
$mail_template_name = "Notification of job network normal completion"$mail_template_status = "OK"$mail_template_sendto = "[email protected]"$mail_template_subject = "Notification form JobCenter - #{@track_id}/#{@job_name}"
4. Define the body file of the email template.
There is no predefined format for the body file of the email template. The followingis an example:
From: JobCenter CL/Web (Notice of normal end)
Status: #{@job_status}Access the following URL to check the tracker.
#{@url}
5. Define the replaceable character strings in the email template file.
Replaceable character strings in the header files and the body files are as follows:
Table 6.5. Replaceable character strings in the email template file
Setting Description Type Example replacement#{@url} The URL of reference
screen is output.Character string https://clwebhost/en/
trackers/parts/UJOB/Jnw.20130829055101/JOB1?s=machine&u=user
#{@track_id} The tracker ID is output. Character string Jnw.20130829055101#{@job_name} The job network name or
the part name is output.Character string JOB1
#{@job_status} The tracker status nameor the part status name isoutput.
Character string DONE [ARCHIVED]

Details of Other Functions
130
6.2. Macro FunctionsThis section describes the CL/Web macros that can be used with the MG/SV mailtransmission function.
6.2.1. Macro Functions (MG/SV)
By using the %trkpath% and %partspath% macros that can be used in the title and textbody of the mail transmission function of JobCenter MG, the URL for referencing a trackerfrom the CL/Web Server can be included in the text body of the mail.
■Setting the macro
When using a macro, you need to specify "https://<address or URL>/en".
Specify the macro as follows:
https://<CL/Web Server host name or IP address>/en%trkpath%
For details about the macros, refer to Section 14.5, “List of Macros That CanBe Used in Subjects and Messages” in <Basic Guide>.
■Case study
To send the URL of the tracker window where an error occurred to the person in charge
Figure 6.4. Case study 1
▪ Case study 1 is described below.
1. A job error occurs in JobCenter SV.
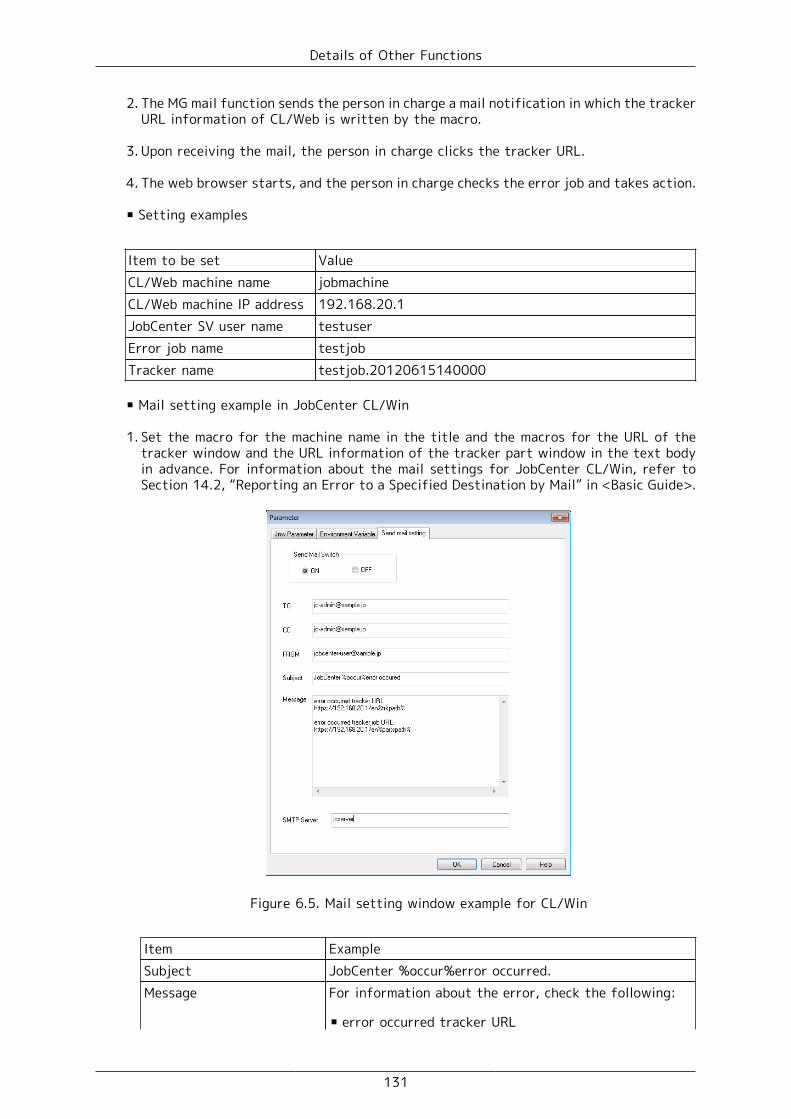
Details of Other Functions
131
2. The MG mail function sends the person in charge a mail notification in which the trackerURL information of CL/Web is written by the macro.
3. Upon receiving the mail, the person in charge clicks the tracker URL.
4. The web browser starts, and the person in charge checks the error job and takes action.
▪ Setting examples
Item to be set ValueCL/Web machine name jobmachineCL/Web machine IP address 192.168.20.1JobCenter SV user name testuserError job name testjobTracker name testjob.20120615140000
▪ Mail setting example in JobCenter CL/Win
1. Set the macro for the machine name in the title and the macros for the URL of thetracker window and the URL information of the tracker part window in the text bodyin advance. For information about the mail settings for JobCenter CL/Win, refer toSection 14.2, “Reporting an Error to a Specified Destination by Mail” in <Basic Guide>.
Figure 6.5. Mail setting window example for CL/Win
Item ExampleSubject JobCenter %occur%error occurred.Message For information about the error, check the following:
▪ error occurred tracker URL

Details of Other Functions
132
Item Examplehttps://192.168.20.1/en%trkpath%
▪ error occurred tracker job URL
https://192.168.20.1/en%partspath%
2. If an error occurs, the function of MG sends mail to the address set in step 1.
▪ (Example) Received mail
Title: An error occurred in JobCenter jobmachine.
Text body: For information about the error, check the following:
- Error tracker URL https://192.168.20.1/en/trackers/tracker/testjob.20120615140000?s=jobmachine&u=testuser - Error tracker part URL https://192.168.20.1/en/trackers/parts/UJOB/testjob.20120615140000/JOB1?s=jobmachine&u=testuser
3. Upon receiving the mail, the person in charge clicks the URL. When the CL/Web loginwindow opens, the person in charge logs in by entering the password for the displayedserver name.
By default, the window has the server name and user name already entered.
6.2.2. Event Linkage
By using the %trkpath% and %partspath% macros that can be used for event linkage, theURL for referencing a tracker from the CL/Web Server can be output to an event message.
For information about event linkage settings, refer to Chapter 11, "Event Linkage" in<Environment Guide>.
In the following case study, an example of linkage with the HPOM product is described.
■Case study
To view error information on the web browser window in the case of an event

Details of Other Functions
133
Figure 6.6. Case study 2
▪ Case study 2 is described below.
1. A job error occurs in JobCenter SV.
2. The HPOM product notifies the event.
3. The tracker URL information of CL/Web is displayed in the message of the messageviewer.
4. The person in charge clicks the URL or copies and pastes the URL to the address barof the web browser to check the error and take action.
▪ Setting examples
Item to be set ValueCL/Web machine name jobmachineCL/Web machine IP address 192.168.20.1JobCenter SV user name testuserError job name testjobTracker name testjob.20120615140000
1. In the event definition file, specify the format of the event to be output to the eventtransmission destination.
When a unit job ends with an error
EVENT jnwsv.uj.err 0x2003 JNW_UNITJOB_ERROR "https://192.168.20.1/en%trkpath%"
2. If an event occurs, the URL of the tracker window is displayed on the integratedmonitoring terminal. The person in charge clicks the URL or copies and pastes the URLto the address bar of the web browser to execute the browsing.
3. When the CL/Web login window opens, the person in charge logs in by entering thepassword for the displayed server name.

Details of Other Functions
134
6.3. Other User Monitoring FunctionThis section describes other user monitoring function.
6.3.1. Function Overview
Other user monitoring function enables referencing and operating the definitioninformation of other users if permitted by the permission.
6.3.2. Procedure for Switching to Other Users
Switch to other users as follows:
1. After logging in to the CL/Web Server, click the user name at the upper right corner onthe screen to display the user information screen.
Figure 6.7. Clicking user name
2. In the [User Information] dialog box, select the user name to which you want to switchfrom the pull-down menu of [Select User], and then click [OK].

Details of Other Functions
135
Figure 6.8. Select user name
3. You can refer to the definition and other information of the user you have switched to.
Figure 6.9. After switching to another user

Details of Other Functions
136
6.4. WebAPI FunctionThis section describes the Web-based API function that uses the HTTP/HTTPS protocol.
6.4.1. Function OverviewThe main WebAPI functions are shown below:
Table 6.6. WebAPI functions
Category Function DescriptionJob network reference Obtains job network list. For details, refer to
Section 6.4.4.1, “Obtaining JobNetwork List”.
Job network operation Submits a job networkimmediately.
For details, refer toSection 6.4.4.2, “Immediate JobNetwork Submission”.
Obtains a tracker list. For details, refer toSection 6.4.4.3, “ObtainingTracker List”.
Obtains a tracker part list. For details, refer toSection 6.4.4.4, “ObtainingTracker Part List”.
Obtains a tracker status. For details, refer toSection 6.4.4.5, “ObtainingTracker Status”.
Tracker reference
Draws tracker flows. For details, refer toSection 6.4.4.6, “ObtainingTracker Flow”.
Operates tracker parts. For details, refer toSection 6.4.4.7, “Executionof Tracker Part ControlInstruction”.
Tracker operation
Operates trackers. For details, refer toSection 6.4.4.8, “Execution ofTracker Control Instruction”.

Details of Other Functions
137
6.4.2. Overview of WebAPI IntroductionBy introducing WebAPI, you can construct job network reference and immediate submission,tracker status reference, and other functions with your own screens.
You can construct your own screens using application servers with CGI and provide themto your clients.
The API functions can be used only while the CL/Web Server and JobCenter are running.If there is any inconsistency in the operation of API functions, check the startup statusof the CL/Web Server, MG/SV, etc.
■Effects of WebAPI introduction
Previously, it was necessary to log in to the CL/Web and perform operation based on itsscreen specifications. If you introduce WebAPI, you can provide your own screens to yourclients. This will enable the clients to display screens specialized for specific trackersand perform various necessary operations together.
Before im port
After im port
Client
CL/Web Server MG/SV Server
CL/Web Server MG/SV ServerAP Server
Client
CL/Web Server can only use the created im ages.
With WebAPI, it is possible to provide own im ages for the client .
WebAPI
Figure 6.10. Effects of WebAPI introduction
General users access AP servers from clients, and developers create screens that handlethose accesses. In the development of those screens, JobCenter information can be includedvia the CL/Web Server by using WebAPI, if necessary.

Details of Other Functions
138
6.4.3. Flow of WebAPI UtilizationThe CL/Web Server provides Web API functions that use HTTP.
If you send HTTP requests to the CL/Web Server in a specific format, you can obtain andcontrol the information described in Section 6.4.1, “Function Overview”.
This WebAPI supports two types of authentication methods: API access key authenticationand HTTP authentication.
6.4.3.1. API Access Key Authentication
For authentication of MG/SV users who use WebAPI, an API access key is set to the relevantHTTP request parameter. The API access key is created at the first login to the CL/WebServer and is retained in the CL/Web Server.
The API access key consists of 40-byte character string. When requested by the user, it isinitialized and a new 40-byte character string is created.
The API access key is not a key created by encoding user information, password information,etc. Therefore, the password and user name cannot be restored even if the API access keyis divulged.
If the user password is changed in MG/SV, log in to CL/Web as the user whosepassword is changed. After the login, the API key and the new password areassociated and enabled. If you use the API key before logging in to CL/Web, theHTTP request causes an error.
6.4.3.2. Referencing the API Access Key
Reference an access key as follows:
1. After logging in to the CL/Web Server, click the user name at the upper right corner onthe screen to display the User Information dialog box.
Figure 6.11. Click the user name

Details of Other Functions
139
2. Click the [KEY] button on the user information screen to display the access keyinformation screen.
Figure 6.12. Clicking the [KEY] button
3. The access key is the character string of 40 characters displayed to the right of APIaccess key on the API Access Key Information window.
If you want to initialize the key, click the [Reset] button. A new key is created and theold key is no longer available. (After clicking the [Reset] button, check the API accesskey again.)

Details of Other Functions
140
Figure 6.13. API Access Key Information window

Details of Other Functions
141
6.4.3.3. HTTP Authentication (Basic Authentication)
For authentication of MG/SV users who use WebAPI, you can use HTTP authentication whereauthentication is done based on the MG/SV user name and the password after the HTTPrequest.
If an access is done with the target MG/SV host name being specified in the HTTP request,the status code 401 is returned in the response header and, if it is received by the browser,a screen for inputting the user name and password is displayed. If the user name and thepassword are authenticated correctly, the specified API function is performed.
Figure 6.14. HTTP authentication screen
Access can be done with the user name and the password specified in the request header.In this case, the requested response can be obtained without the status code 401 beingreturned.
Because Basic authentication is used, specify the Base64-encoded information(Authorization: Basic xxxxxxxxxxxx) in the request header. For Ruby, the following codecan specify it:
response = Net::HTTP.start($hostname, $port) {|http| req = Net::HTTP::Get.new(URI.escape(uri_str)) req.basic_auth username, password if username && password http.request(req)}
For authentication, specify one of "API access key" or "MG/SV host name".
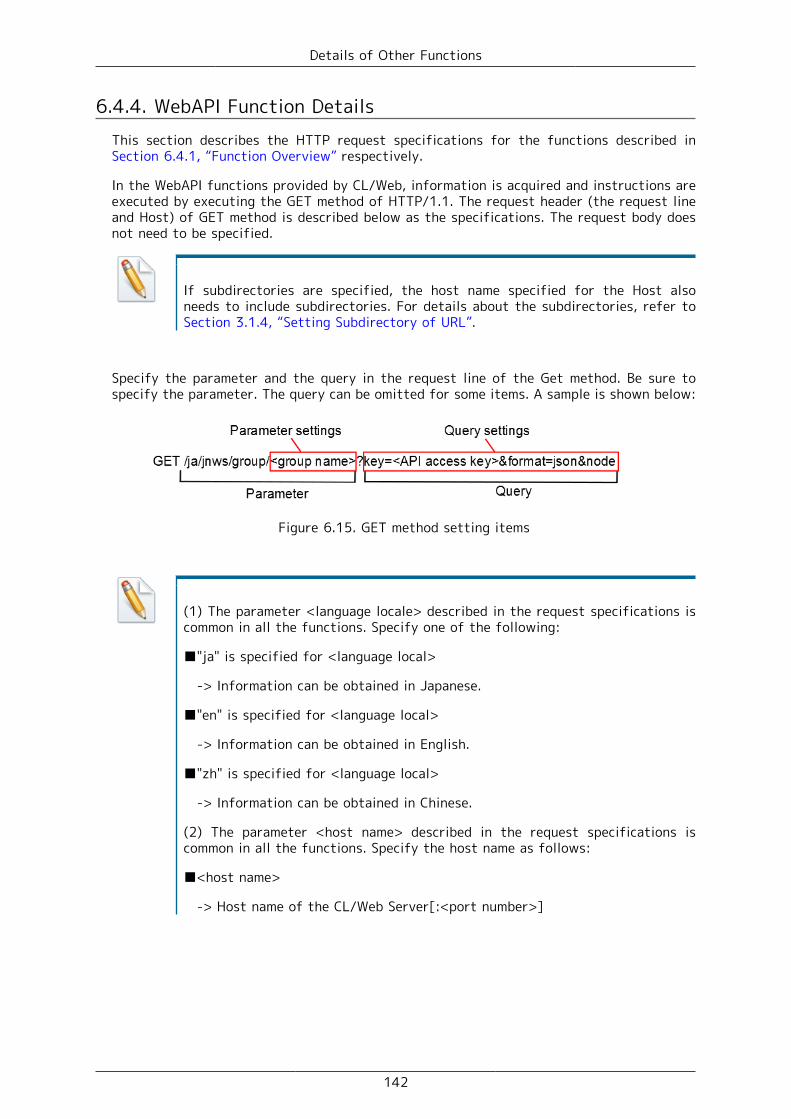
Details of Other Functions
142
6.4.4. WebAPI Function DetailsThis section describes the HTTP request specifications for the functions described inSection 6.4.1, “Function Overview” respectively.
In the WebAPI functions provided by CL/Web, information is acquired and instructions areexecuted by executing the GET method of HTTP/1.1. The request header (the request lineand Host) of GET method is described below as the specifications. The request body doesnot need to be specified.
If subdirectories are specified, the host name specified for the Host alsoneeds to include subdirectories. For details about the subdirectories, refer toSection 3.1.4, “Setting Subdirectory of URL”.
Specify the parameter and the query in the request line of the Get method. Be sure tospecify the parameter. The query can be omitted for some items. A sample is shown below:
Figure 6.15. GET method setting items
(1) The parameter <language locale> described in the request specifications iscommon in all the functions. Specify one of the following:
■"ja" is specified for <language local>
-> Information can be obtained in Japanese.
■"en" is specified for <language local>
-> Information can be obtained in English.
■"zh" is specified for <language local>
-> Information can be obtained in Chinese.
(2) The parameter <host name> described in the request specifications iscommon in all the functions. Specify the host name as follows:
■<host name>
-> Host name of the CL/Web Server[:<port number>]

Details of Other Functions
143
6.4.4.1. Obtaining Job Network List
■Function description
This is the API that enables to obtain a job network list. Data can be obtained in thejson format.
For example, the following screen can be created.
Figure 6.16. Example of job network list display
■HTTP request specifications
▪ For API access key authentication
GET /<language locale>/jnws/group/<group name>?key=<API access key>&format=json&page=<page number>&rp=<number of elements per page>&node=all HTTP/1.1Host: <host name>
URL sample
https://hostname.com/en/jnws/group/Root/Newgroup1?key=dsfvoeishfhseiofhoseihfiosheiofhsioehfi&format=json&page=3&rp=50&node=all
▪ For HTTP authentication
GET /<language locale>/jnws/group/<group name>?mghost=<MGSV server address>&format=json&page=<page number>&rp=<number of elements per page>&node=all HTTP/1.1Host: <host name>Authorization: Basic xxxxxxxxxxxx
URL sample

Details of Other Functions
144
https://hostname.com/en/jnws/group/Root/Newgroup1?mghost=mghostname.com&format=json&page=3&rp=50&node=all
■Parameter
Parameter details to be set are described below.
▪ <group name>
Specify the group name to be obtained, from the root.
Example: /Root/Newgroup1 (Display the list of job networks under Newgroup1, whichis associated with Root)
■Query
Query details to be set are described below.
▪ key query
Specify the API access key when authentication by API access key is performed.
▪ mghost query
Specify the host name (IP address) of the MGSV server when HTTP authentication isperformed.
▪ format query
Specify "json".
▪ page query
Specify the page number as an integer number that is one or more.
If the specified page does not exist, no element is displayed.
▪ rp query
Specify the number of elements displayed per page as an integer number that is oneor more.
▪ node=all query (can be omitted)
If you want to obtain job networks that are associated with groups still more underthe specified group, specify the query "node=all". If this query is not specified, onlyinformation immediately under the group name can be obtained.
■HTTP response specifications
▪ Normal end
• Header part
Status code: 200
• Body section
When the process ends normally, the json data as shown below is returned to thebody section.
→"page": Page number

Details of Other Functions
145
→"total": Number of obtained data items
→"rows": Obtained data row. Data is stored in the form of "rows":[{"cell":[…]},{"cell":[…]},......].
→"cell": One data item of the job network list. Data is stored in the form of "cell":["name","type","associated group","comment"].
An example of data returned to the body section is shown below.
{ "page": 1, "total": 13, "rows": [ { "cell": [ "group 1", "group", "/", "comment 1" ] }, { "cell": [ "NewJnw10", "job network", "/group 1", "comment 2" ] },
...
{ "cell": [ "network 3", "job network", "/group 1", "comment 2" ] } ]}
▪ Abnormal end
When the process ends abnormally, the following response is returned.
Table 6.7. Error list
Status code Error message Error cause400 {"msg":"Failed in obtaining data: ... } The specified group does
not exist.401 HTTP Basic: Access denied. HTTP authentication
failed.

Details of Other Functions
146
403 {"msg":"Not authorized to reference the jobnetwork."}
The user is notauthorized to referencethe JNW.
403 {"msg":"API access key is wrong."} The access key is notvalid.
403 {"msg":"Communication with server failed.Confirm that JobCenter MG/SV is running."}
MG/SV has not beenstarted.
403 {"msg":"The user name or the password iswrong."}
The user name or thepassword input for APIauthentication or HTTPauthentication is wrong.
■Notes
The obtained json data contains not only job networks but also groups and shortcuts.
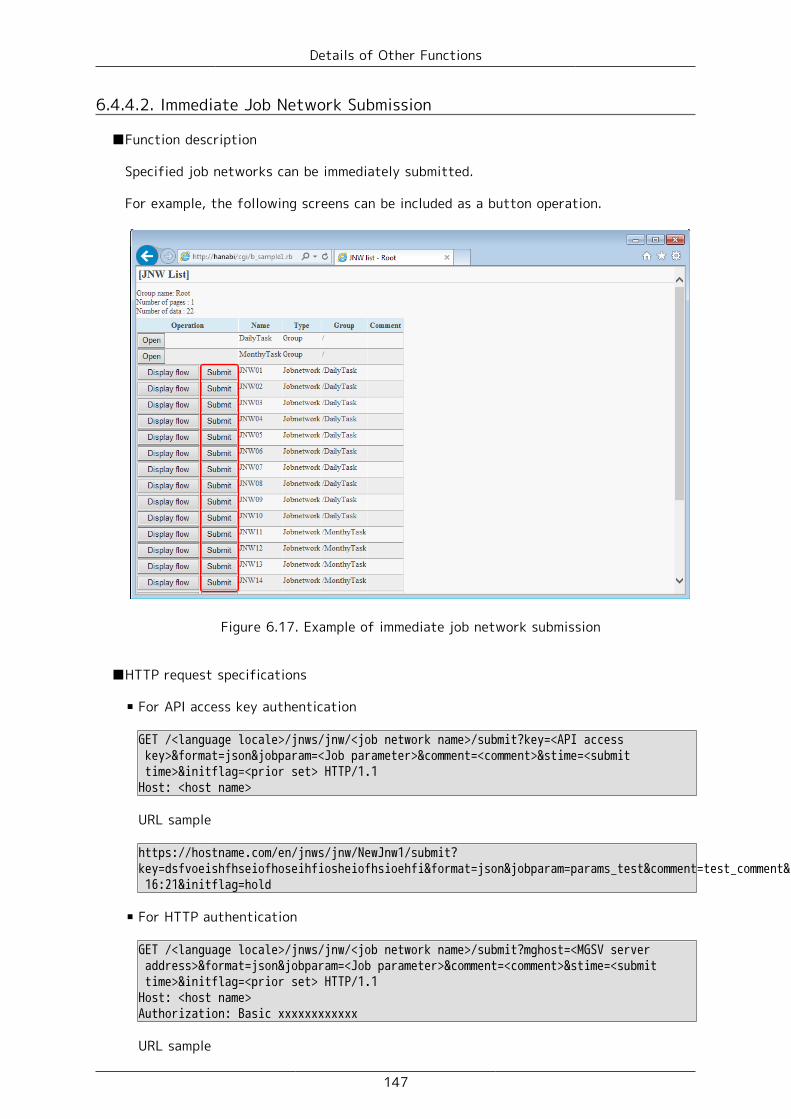
Details of Other Functions
147
6.4.4.2. Immediate Job Network Submission
■Function description
Specified job networks can be immediately submitted.
For example, the following screens can be included as a button operation.
Figure 6.17. Example of immediate job network submission
■HTTP request specifications
▪ For API access key authentication
GET /<language locale>/jnws/jnw/<job network name>/submit?key=<API access key>&format=json&jobparam=<Job parameter>&comment=<comment>&stime=<submit time>&initflag=<prior set> HTTP/1.1Host: <host name>
URL sample
https://hostname.com/en/jnws/jnw/NewJnw1/submit?key=dsfvoeishfhseiofhoseihfiosheiofhsioehfi&format=json&jobparam=params_test&comment=test_comment&stime=2013/06/26 16:21&initflag=hold
▪ For HTTP authentication
GET /<language locale>/jnws/jnw/<job network name>/submit?mghost=<MGSV server address>&format=json&jobparam=<Job parameter>&comment=<comment>&stime=<submit time>&initflag=<prior set> HTTP/1.1Host: <host name>Authorization: Basic xxxxxxxxxxxx
URL sample

Details of Other Functions
148
https://hostname.com/en/jnws/jnw/NewJnw1/submit?mghost=mghostname.com&format=json&jobparam=params_test&comment=test_comment&stime=2013/06/26 16:21&initflag=hold
■Parameter
Parameter details to be set are described below.
▪ <job network name>
Specify the name of the job network to be submitted immediately.
■Query
Query details to be set are described below.
▪ key query
Specify the API access key when authentication by API access key is performed.
▪ mghost query
Specify the host name (IP address) of the MGSV server when HTTP authentication isperformed.
▪ format query
Specify "json".
▪ jobparam query (can be omitted)
Specify the value to be set to the job parameter.
▪ comment query (can be omitted)
Specify comments.
▪ stime query (can be omitted)
Specify the job network submission time. The format is "YYYY/MM/DD hh:mm".
YYYY: Calendar year (four-digit number)
MM: month (two-digit number)
DD: day (two-digit number)
hh: hour (two-digit number)
mm: minute (two-digit number)
* For consistency of the number of digits, specify "02", not "2".
This query can be omitted. If this is not set, the job network is submitted immediately.
▪ initflag query (can be omitted)
Specify the initial job status. You can specify "hold", "skip", or "off". This parametercan be omitted.
"hold": The job starts in the hold state.
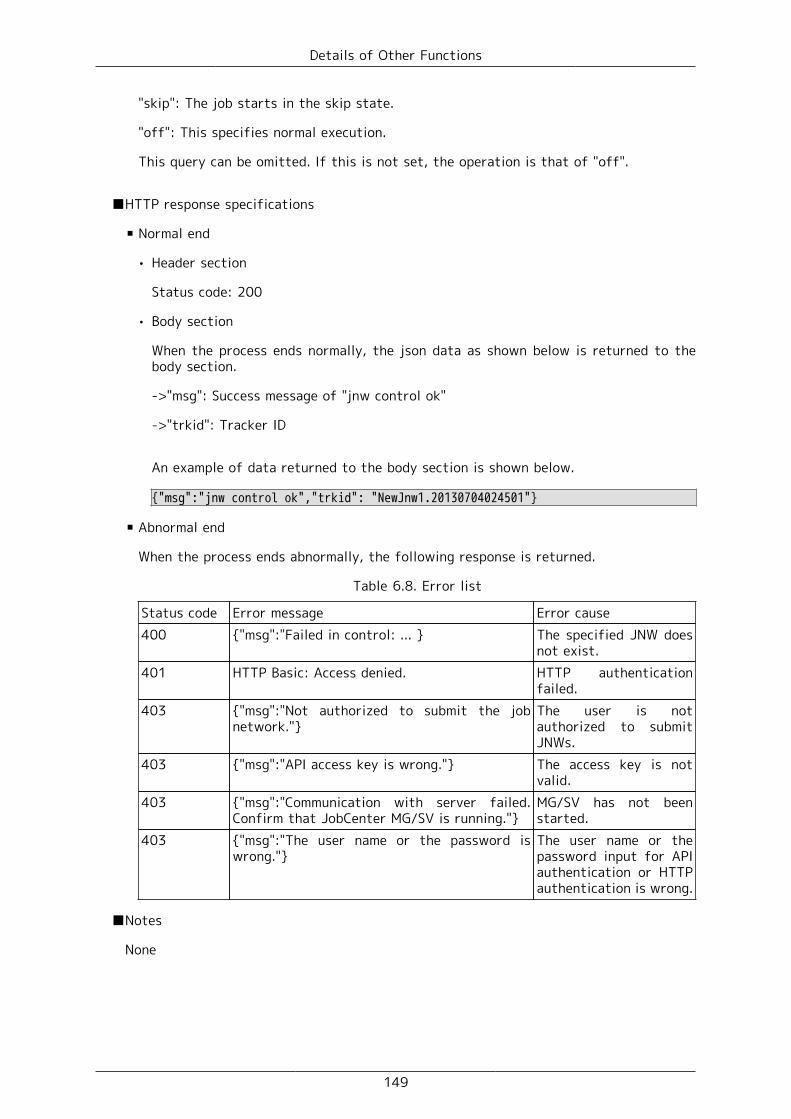
Details of Other Functions
149
"skip": The job starts in the skip state.
"off": This specifies normal execution.
This query can be omitted. If this is not set, the operation is that of "off".
■HTTP response specifications
▪ Normal end
• Header section
Status code: 200
• Body section
When the process ends normally, the json data as shown below is returned to thebody section.
->"msg": Success message of "jnw control ok"
->"trkid": Tracker ID
An example of data returned to the body section is shown below.
{"msg":"jnw control ok","trkid": "NewJnw1.20130704024501"}
▪ Abnormal end
When the process ends abnormally, the following response is returned.
Table 6.8. Error list
Status code Error message Error cause400 {"msg":"Failed in control: ... } The specified JNW does
not exist.401 HTTP Basic: Access denied. HTTP authentication
failed.403 {"msg":"Not authorized to submit the job
network."}The user is notauthorized to submitJNWs.
403 {"msg":"API access key is wrong."} The access key is notvalid.
403 {"msg":"Communication with server failed.Confirm that JobCenter MG/SV is running."}
MG/SV has not beenstarted.
403 {"msg":"The user name or the password iswrong."}
The user name or thepassword input for APIauthentication or HTTPauthentication is wrong.
■Notes
None

Details of Other Functions
150
6.4.4.3. Obtaining Tracker List
■Function description
A list of specified trackers can be obtained.
For example, the following screen can be created.
Figure 6.18. Example of tracker list display
■HTTP request specifications
▪ For API access key authentication
GET /<language locale>/trackers/group/<group path>?key=<API access key>&format=json&page=<page number>&rp=<number of elements per page>&node=all&subjnw=1&start_date=<display start date>&start_time=<display start time>&period_unit=<display start format>&period_num=<numerical specification> HTTP/1.1Host: <host name>
URL sample
https://hostname.com/en/trackers/group/Root/NewGroup1?key=dsfvoeishfhseiofhoseihfiosheiofhsioehfi&format=json&page=3&rp=50&node=all&subjnw=1&start_date=2013/07/13&start_time=11:45&period_unit=day&period_num=10
▪ For HTTP authentication
GET /<language locale>/trackers/group/<group path>?mghost=<MGSV server address>&format=json&page=<page number>&rp=<number of elements per page>&node=all&subjnw=1&start_date=<display start date>&start_time=<display start time>&period_unit=<display start format>&period=<numerical specification> HTTP/1.1Host: <host name>Authorization: Basic xxxxxxxxxxxx

Details of Other Functions
151
URL sample
https://hostname.com/en/trackers/group/Root/NewGroup1?mghost=mghostname.com&format=json&page=3&rp=50&node=all&subjnw=1&start_date=2013/07/13&start_time=11:45&period_unit=day&period_num=10
■Parameter
Parameter details to be set are described below.
▪ <group path>
Specify the path for the group to which the referenced tracker belongs.
■Query
Query details to be set are described below.
▪ key query
Specify the API access key when authentication by API access key is performed.
▪ mghost query
Specify the host name (IP address) of the MGSV server when HTTP authentication isperformed.
▪ format query
Set "json".
▪ page query
Specify the page number as an integer number that is one or more.
If the specified page does not exist, no element is displayed.
▪ rp query
Specify the number of elements displayed per page as an integer number that is oneor more.
▪ node=all query (can be omitted)
If you want to obtain all the tracker information under the specified tracker, specifynode=all.
▪ subjnw=1 query (can be omitted)
Specify subjnw=1 if you want to obtain sub job network.
▪ start_date query
Specify the tracker display start date. The format is "YYYY/MM/DD". (Be sure to includeslashes ("/").)
Example: If trackers on July 13th in 2013 and later are referenced, input "2013/07/13"to this query.
▪ start_time query (can be omitted)

Details of Other Functions
152
Specify the tracker display start time. The format is "hh:mm". (Be sure to include acolon (":").)
Example: If trackers from 9:45 are referenced, input "09:45" to this query.
This query can be omitted. If omitted, information is referenced by the default value"00:00".
▪ period_num query
Specify a numerical value in the unit specified in the unit query.
Example: If "month" is specified in the period_unit query and "2" is specified in theperiod_num query, trackers during two months from the date specified in the datequery are displayed.
▪ period_unit query
Specify the format for the period from the start date. You can select from 5 formats,"month", "week", "day", "hour", and "min".
month: Trackers during the "period_num" months from the start date and time aredisplayed. Specify a number between 1 and 3.
week: Trackers during the "period_num" weeks from the start date and time aredisplayed. Specify a number between 1 and 5.
day: Trackers during the "period_num" days from the start date and time are displayed.Specify a number between 1 and 7.
hour: Trackers during the "period_num" hours from the start date and time aredisplayed. Specify a number between 1 and 23.
min: Trackers during the "period_num" minutes from the start date and time aredisplayed. Specify a number between 1 and 59.
■HTTP response specifications
▪ Normal end
• Header section
Status code: 200
• Body section
When the process ends normally, the json data as shown below is returned to thebody section.
->"page": Page number
->"total": Number of obtained data items
->"summary": The summary of trackers is stored here, and "planned number ofexecutions", "number of processes in execution", "number of executions normallyended", and "number of executions abnormally ended" are stored in the [] in this order.
->"rows": Data row of the obtained tracker list. The data is stored in the form of"rows":[{"status":…,"id":xx,"cell":[…]}, {"status":…,"id":xx,"cell":[…]}, ......].

Details of Other Functions
153
->"status": Status of tracker
->"id": Number in tracker list (in the rows)
->"cell": Detailed tracker information. The data is stored in the form of "cell":["job network name","execution status","status","tracker ID","comment","plannedstart time","planned end time","actual start time","actual end time","executinguser","executing server name","associated group"].
An example of data returned to the body section is shown below.
{ "page": 1, "total": 49, "summary": [ 1, 1, 42, 3, 2 ], "rows": [ { "status": "run,D", "id": 0, "cell": [ "jc-11623_jnw_waitexfile", "dialog", "status-dia", "jc-11623_jnw_waitexfile.20130611052202", "", "2013/06/11 14:22:02", "2013/06/11 14:22:02", "2013/06/11 14:22:03", "", "username", "hostname.com", "/jc-11623_grp" ] }, { "status": "run,fr", "id": 1, "cell": [ "jc-11655_jnw", "STOP(ERROR)", "status-stop", "jc-11655_jnw.20130411064108", "", "2013/04/11 15:41:08", "2013/04/11 15:41:08", "2013/04/11 15:41:08", "", "username", "hostname.com", "/jc-11655_grp" ]

Details of Other Functions
154
},
...
{ "status": "done,ad", "id": 48, "cell": [ "jc-11651_jnw", "DONE [ARCHIVED]", "status-done", "jc-11651_jnw.20130409023122", "", "2013/04/09 11:31:22", "2013/04/09 11:31:22", "2013/04/09 11:31:23", "2013/04/09 11:31:29", "username", "hostname.com", "/jc-11651_grp" ] } ]}
▪ Abnormal end
When the process ends abnormally, the following response is returned.
Table 6.9. Error list
Status code Error message Error cause400 {"msg":"Failed in obtaining data: ...} The specified group does
not exist.401 HTTP Basic: Access denied. HTTP authentication
failed.403 {"msg":"Not authorized to reference the
tracker."}The user is notauthorized to referencethe tracker.
403 {"msg":"API access key is wrong."} The access key is notvalid.
403 {"msg":"Communication with server failed.Confirm that JobCenter MG/SV is running."}
MG/SV has not beenstarted.
403 {"msg":"The user name or the password iswrong."}
The user name or thepassword input for APIauthentication or HTTPauthentication is wrong.
403 {"msg":"Failed in setting the period."} The specified date andtime are wrong.
403 {"msg":"Set period_num to an integer 1 ormore."}
A non-integer is set toperiod_num.
403 {"msg":"Set period_num to a period from xxxto zzz."}
A numerical valueoutside the specifiedrange is input toperiod_num.

Details of Other Functions
155
403 {"msg":"Set period_unit to month, week, day,hour, or min."}
The unit specified forperiod_unit is wrong.
■Notes
Trackers before the start date and time are not displayed. If trackers you want to displayare not displayed, check the start date and time.
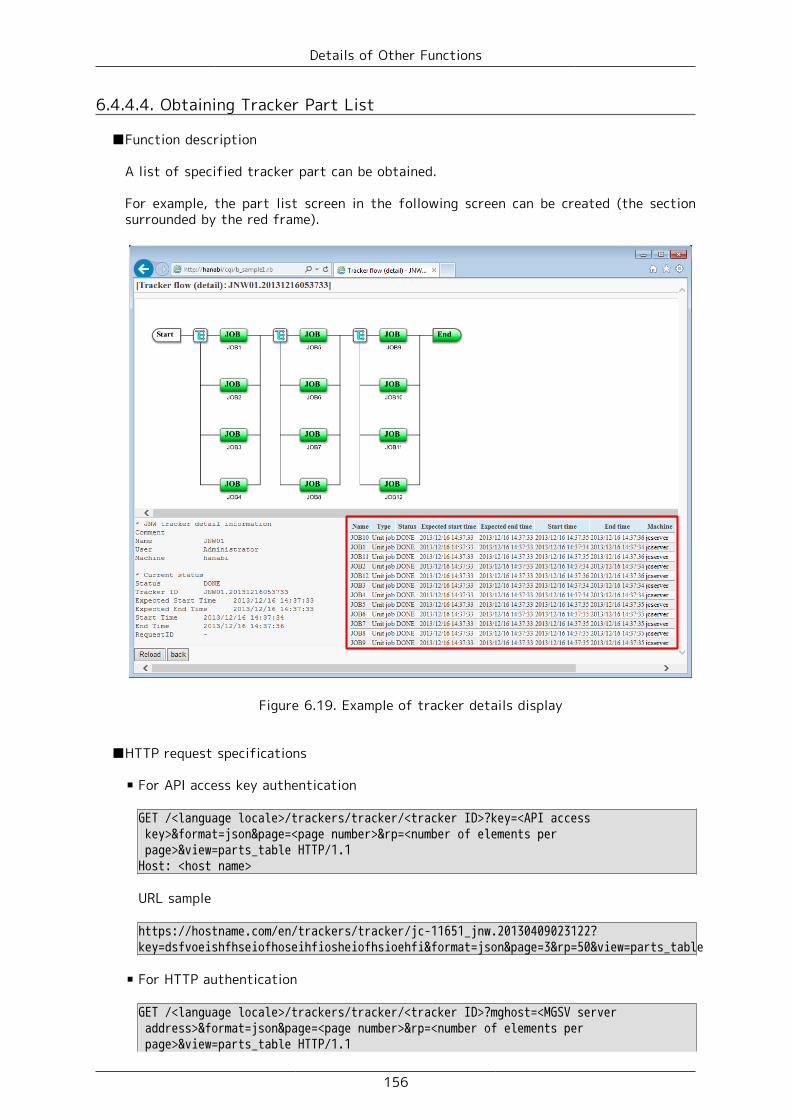
Details of Other Functions
156
6.4.4.4. Obtaining Tracker Part List
■Function description
A list of specified tracker part can be obtained.
For example, the part list screen in the following screen can be created (the sectionsurrounded by the red frame).
Figure 6.19. Example of tracker details display
■HTTP request specifications
▪ For API access key authentication
GET /<language locale>/trackers/tracker/<tracker ID>?key=<API access key>&format=json&page=<page number>&rp=<number of elements per page>&view=parts_table HTTP/1.1Host: <host name>
URL sample
https://hostname.com/en/trackers/tracker/jc-11651_jnw.20130409023122?key=dsfvoeishfhseiofhoseihfiosheiofhsioehfi&format=json&page=3&rp=50&view=parts_table
▪ For HTTP authentication
GET /<language locale>/trackers/tracker/<tracker ID>?mghost=<MGSV server address>&format=json&page=<page number>&rp=<number of elements per page>&view=parts_table HTTP/1.1

Details of Other Functions
157
Host: <host name>Authorization: Basic xxxxxxxxxxxx
URL sample
https://hostname.com/en/trackers/tracker/jc-11651_jnw.20130409023122?mghost=mghostname.com&format=json&page=3&rp=50&view=parts_table
■Parameter
Parameter details to be set are described below.
▪ <Tracker ID>
Specify the tracker ID.
■Query
Query details to be set are described below.
▪ key query
Specify the API access key when authentication by API access key is performed.
▪ mghost query
Specify the host name (IP address) of the MGSV server when HTTP authentication isperformed.
▪ format query
Specify json.
▪ page query
Specify the page number as an integer number that is one or more.
If the specified page does not exist, no element is displayed.
▪ rp query
Specify the number of elements displayed per page as an integer number that is oneor more.
▪ view query
Specify parts_table.
■HTTP response specifications
▪ Normal end
• Header section
Status code: 200
• Body section
When the process ends normally, the json data as shown below is returned to thebody section.
->"page": Page number

Details of Other Functions
158
->"total": Number of obtained data
->"jnwstatus": The status of job networks is stored here. The data is stored in theform of "jnwstatus": {"status":status,"extstat":execution status}.
->"rows": Data row of the obtained tracker part list. The data is store in the formof "rows":[{"status":…,"id":xx,"cell": […]},{"status":…,"id":xx,"cell":[…]}, ...... ].
->"status": Status of part
->"id": Number in part list (in the rows)
->"cell": Detailed tracker part information. The data is stored in the formof "cell":["part name","English type","Japanese type","Japanese status","Englishstatus","planned start time","planned end time","actual start time","actual endtime","executing server name"].
An example of data returned to the body section is shown below.
{ "page": 1 "total": 100, "jnwstatus": { "status": "done", "extstat": "ad" }, "rows": [ { "status": "done,-", "id": 0, "cell": [ "JOB98", "UJOB", "unit job", "DONE", "status-done", "2013/04/11 15:52:18", "2013/04/11 15:52:18", "2013/04/11 16:40:22", "2013/04/11 16:40:34", "hostname.com" ] }, { "status": "done,-", "id": 1, "cell": [ "JOB99", "UJOB", "unit job", "DONE", "status-done", "2013/04/11 15:52:18", "2013/04/11 15:52:18", "2013/04/11 16:40:34", "2013/04/11 16:40:46", "hostname.com"

Details of Other Functions
159
] },
...
{ "status": "done,-", "id": 99, "cell": [ "JOB97", "UJOB", "unit job", "DONE", "status-done", "2013/04/11 15:52:18", "2013/04/11 15:52:18", "2013/04/11 16:40:09", "2013/04/11 16:40:21", "hostname.com" ] } ],}
▪ Abnormal end
When the process ends abnormally, the following response is returned.
Table 6.10. Error list
Status code Error message Error cause400 {"msg":"The specified tracker does not exist."} The specified group does
not exist.401 HTTP Basic: Access denied. HTTP authentication
failed.403 {"msg":"Not authorized to reference the
tracker."}The user is notauthorized to referencethe tracker.
403 {"msg":"API access key is wrong."} The access key is notvalid.
403 {"msg":"Communication with server failed.Confirm that JobCenter MG/SV is running."}
MG/SV has not beenstarted.
403 {"msg":"The user name or the password iswrong."}
The user name or thepassword input for APIauthentication or HTTPauthentication is wrong.
■Notes
None

Details of Other Functions
160
6.4.4.5. Obtaining Tracker Status
■Function description
The status (detailed parameters) of the specified tracker can be obtained.
For example, the status display section in the following screen can be created. (Thesection surrounded by the red frame)
Figure 6.20. Example of tracker details display
■HTTP request specifications
▪ For API access key authentication
GET /<language locale>/trackers/tracker/<tracker ID>?key=<API access key>&format=json&view=detail HTTP/1.1Host: <host name>
URL sample
https://hostname.com/en/trackers/tracker/jc-11651_jnw.20130409023122?key=dsfvoeishfhseiofhoseihfiosheiofhsioehfi&format=json&view=detail
▪ For HTTP authentication
GET /<language locale>/trackers/tracker/<tracker ID>?mghost=<MGSV server address>&format=json&view=detail HTTP/1.1Host: <host name>Authorization: Basic xxxxxxxxxxxx

Details of Other Functions
161
URL sample
https://hostname.com/en/trackers/tracker/jc-11651_jnw.20130409023122?mghost=mghostname.com&format=json&view=detail
■Parameter
Parameter details to be set are described below.
▪ <Tracker ID>
Specify the tracker ID.
■Query
Query details to be set are described below.
▪ key query
Specify the API access key when authentication by API access key is performed.
▪ mghost query
Specify the host name (IP address) of the MGSV server when HTTP authentication isperformed.
▪ format query
Specify json.
▪ view query
Specify detail.
■HTTP response specifications
▪ Normal end
• Header section
Status code: 200
• Body section
When the process ends normally, the json data as shown below is returned to thebody part.
->"detail": Tracker information is stored here.
An example of data returned to the body section is shown below.
{ "detail": "*JNW tracker detailed informationcomment Name jc-11661_archive_jnwUser username1Machine hostname.com
* Current statusStatus DONE [ARCHIVED]

Details of Other Functions
162
Tracker ID jc-11661_archive_jnw.20130411065218planned start time 2013/04/11 15:52:18planned end time 2013/04/11 15:52:18actual start time 2013/04/11 15:52:20actual end time 2013/04/11 16:40:59request ID -"}
▪ Abnormal end
When the process ends abnormally, the following response is returned.
Table 6.11. Error list
Status code Error message Error cause400 {"msg":"The specified tracker does not exist."} The specified group does
not exist.401 HTTP Basic: Access denied. HTTP authentication
failed.403 {"msg":"Not authorized to reference the
tracker."}The user is notauthorized to referencethe tracker.
403 {"msg":"API access key is wrong."} The access key is notvalid.
403 {"msg":"Communication with server failed.Confirm that JobCenter MG/SV is running."}
MG/SV has not beenstarted.
403 {"msg":"The user name or the password iswrong."}
The user name or thepassword input for APIauthentication or HTTPauthentication is wrong.
■Notes
None

Details of Other Functions
163
6.4.4.6. Obtaining Tracker Flow
■Function description
This can obtain a script that draws the flow of the specified tracker.
For example, the flow in the following screen can be displayed. (The section surroundedby the red frame)
Figure 6.21. Example of tracker details display
■HTTP request specifications
▪ For API access key authentication
GET /<language locale>/trackers/flow/<tracker ID>?key=<API access key>&format=html HTTP/1.1Host: <host name>
URL sample
https://hostname.com/en/trackers/flow/jc-11651_jnw.20130409023122?key=dsfvoeishfhseiofhoseihfiosheiofhsioehfi&format=html
▪ For HTTP authentication
GET /<language locale>/trackers/flow/<tracker ID>?mghost=<MGSV server address>&format=html HTTP/1.1Host: <host name>Authorization: Basic xxxxxxxxxxxx

Details of Other Functions
164
URL sample
https://hostname.com/en/trackers/flow/jc-11651_jnw.20130409023122?mghost=mghostname.com&format=html
■Parameter
Parameter details to be set are described below.
▪ <tracker ID>
Specify the tracker ID.
■Query
Query details to be set are described below.
▪ key query
Specify the API access key when authentication by API access key is performed.
▪ mghost query
Specify the host name (IP address) of the MGSV server when HTTP authentication isperformed.
▪ format query
Specify "html".
■HTTP response specifications
▪ Normal end
• Header section
Status code: 200
• Body section
When the process ends normally, the html data as shown below is returned to thebody section.
<script src="https://192.168.34.32/assets/application-29dae6e564c77ae1fc999e3a09d1f3c0.js" type="text/javascript"></script>
For example, HTML files can be created on the CGI side and the screens are passedto the clients as the HTML below.
Include the script returned to the head section dynamically and embed div tags atthe point you want drawing.
<!DOCTYPE html><html><head><meta http-equiv="Content-Type" content="text/html; charset=utf-8"><title>JNW flow drawing - jc-11623_jnw_waitjnw</title><!--From here, include returned HTML dynamically--> <script src="https://192.168.34.32/assets/application-29dae6e564c77ae1fc999e3a09d1f3c0.js" type="text/javascript"></script>

Details of Other Functions
165
<!--To here--> </head><body><h3>[JNW flow drawing: jc-11623_jnw_waitjnw]</h3><!--From here, div tag embedded for drawing. id must be jc_area.--> <div id="jc_area" style="height: 600px; width: 98%;"> <div id="msg" class="flash error"></div> <div id="jnw-canvas"></div></div><!--To here--> </body></html>
As for the setting values of style in the div tag such as height and width,adjust them in each Web application.
▪ Abnormal end
When the process ends abnormally, the following response is returned.
Table 6.12. Error list
Status code Error message Error cause400 {"msg":"The specified tracker does not exist."} The specified group does
not exist.401 HTTP Basic: Access denied. For HTTP authentication
failed.403 {"msg":"Not authorized to reference the
tracker."}The user is notauthorized to referencethe tracker.
403 {"msg":"API access key is wrong."} The access key is notvalid.
403 {"msg":"Communication with server failed.Confirm that JobCenter MG/SV is running."}
MG/SV has not beenstarted.
403 {"msg":"The user name or the password iswrong."}
The user name or thepassword input for APIauthentication or HTTPauthentication is wrong.
■Notes
Set the height and the width of div tag according to the environment. If not set, theflow drawing might be corrupted.
The div tag can be made common in all tracker flows (section that can be staticallyimplemented).

Details of Other Functions
166
6.4.4.7. Execution of Tracker Part Control Instruction
■Function description
By specifying a tracker ID, this can make parts of the tracker execute a controlinstruction.
For example, the following screens can be included as a button operation.
Figure 6.22. Example of tracker part control instruction
■HTTP request specifications
▪ For API access key authentication
GET /<language locale>/trackers/parts/<part type>/<tracker ID>/<part name>/<instruction content>?key=<API access key>&format=json HTTP/1.1Host: <host name>
URL sample
https://hostname.com/en/trackers/parts/ujob/jc-11651_jnw.20130409023122/job1/skip?key=dsfvoeishfhseiofhoseihfiosheiofhsioehfi&format=json
▪ For HTTP authentication
GET /<language locale>/trackers/parts/<part type>/<tracker ID>/<part name>/<instruction content>?mghost=<MGSV server address>&format=json HTTP/1.1Host: <host name>Authorization: Basic xxxxxxxxxxxx

Details of Other Functions
167
URL sample
https://hostname.com/en/trackers/parts/ujob/jc-11651_jnw.20130409023122/job1/skip?mghost=mghostname.com&format=json
■Parameter
Parameter details to be set are described below.
▪ <part type>
Specify a part type for which an instruction is executed from the following:
Table 6.13. Part list
Part name Part contentujob "unit job"bijob "BI job"erpjob "ERP job"wobsjob "WOBS job"pcjob "PC job"customjob "custom job"dia "dialog"cont "continue"sjnw "sub job network"wjob "job waiting"wtime "time waiting"wsjnw "job network waiting"wfile "file waiting"evtsnd "event transmission"evtrcv "event reception"
▪ <tracker ID>
Specify the target tracker ID.
▪ <part name>
Specify the name of the part for which the instruction is executed.
Data obtained by the part list obtaining function may be in the form of "xxx(part name)". In this case, specify the part name in "()".
▪ <instruction content>
Specify an instruction content from the following. Executable instructions are limiteddepending on parts.
Table 6.14. Instruction list
instruction name instruction contentskip "skip"

Details of Other Functions
168
noskip "release skip"hold "hold"release "release hold"estop "forced stop"forcestart "forced start"rerun "rerun"suspend "suspend"resume "release suspend"start_immediat "run (immediately)"start_asap "run (ASAP)"ok "OK"error "ERROR"restart "restart"freecontrol "release control"statusdone "change to be considered as normal"
■Query
Query details to be set are described below.
▪ key query
Specify the API access key when authentication by API access key is performed.
▪ mghost query
Specify the host name (IP address) of the MGSV server when HTTP authentication isperformed.
▪ format query
Specify "json".
■HTTP response specifications
▪ Normal end
• Header section
Status code: 200
• Body section
When the process ends normally, the json data as shown below is returned to thebody section.
->"msg": Tracker part control result is stored here.
{"msg":"tracker parts control ok"}
▪ Abnormal end
When the process ends abnormally, the following response is returned.

Details of Other Functions
169
Table 6.15. Error list
Status code Error message Error cause400 {"msg":"Failed in controlling parts: invalid
args ... "}The specified trackercontrol command doesnot exist.
400 {"msg":"Failed in controlling parts: ... "} The specified trackerdoes not exist or controlof tracker failed.
401 HTTP Basic: Access denied. HTTP authenticationfailed.
403 {"msg":"Not authorized to reference thetracker."}
The user is notauthorized to referencethe tracker.
403 {"msg":"API access key is wrong."} The access key is notvalid.
403 {"msg":"Communication with server failed.Confirm that JobCenter MG/SV is running."}
MG/SV has not beenstarted.
403 {"msg":"The user name or the password iswrong."}
The user name or thepassword input for APIauthentication or HTTPauthentication is wrong.
■Notes
The combination of parts and executable instructions is as follows:
▪ Table 6.16. ujob:"unit job"
Instruction name Processing contentskip "skip"noskip "release skip"hold "hold"release "release hold"suspend "suspend"resume "release suspend"estop "forced stop"forcestart "forced start"rerun "rerun"restart "restart"freecontrol "release control"statusdone "change to be considered as normal"
▪ Table 6.17. erpjob:"ERP job"
Instruction name Processing contentskip "skip"noskip "release skip"hold "hold"

Details of Other Functions
170
release "release hold"cancel "cancel"forcestart "forced start"start_immediat "run (immediately)"start_asap "run (ASAP)"rerun "rerun"statusdone "change to be considered as normal"
▪ Table 6.18. bijob:"BI job"
Instruction name Processing contentskip "skip"noskip "release skip"hold "hold"release "release hold"forcestart "forced start"rerun "rerun"statusdone "change to be considered as normal"
▪ Table 6.19. pcjob:"PC job"
Instruction name Processing contentskip "skip"noskip "release skip"hold "hold"release "release hold"forcestart "forced start"rerun "rerun"statusdone "change to be considered as normal"
▪ Table 6.20. wobsjob:"WOBS job"
Instruction name Processing contentskip "skip"noskip "release skip"hold "hold"release "release hold"estop "forced stop"forcestart "forced start"rerun "rerun"freecontrol "release control"statusdone "change to be considered as normal"
▪ Table 6.21. dia:"dialog"
Instruction name Processing contentskip "skip"

Details of Other Functions
171
noskip "release skip"ok "Ok"error "Error"rerun "rerun"statusdone "change to be considered as normal"
▪ Table 6.22. wait:"job waiting"
Instruction name Processing contentskip "skip"noskip "release skip"rerun "rerun"statusdone "change to be considered as normal"
▪ Table 6.23. event:"event"
Instruction name Processing contentskip "skip"noskip "release skip"hold "hold"release "release hold"estop "forced stop"forcestart "forced start"rerun "rerun"statusdone "change to be considered as normal"
▪ Table 6.24. cont:"continue"
Instruction name Processing contenthold "hold"release "release hold"statusdone "change to be considered as normal"

Details of Other Functions
172
6.4.4.8. Execution of Tracker Control Instruction
■Function description
This executes an instruction to the specified tracker.
For example, the following screens can be included as a button operation.
Figure 6.23. Example of tracker stop instruction screen
■HTTP request specifications
▪ For API access key authentication
GET /<language locale>/trackers/tracker/<tracker ID>/<instruction content>?key=<API access key>&format=json HTTP/1.1Host: <host name>
URL sample
https://hostname.com/en/trackers/tracker/jc-11651_jnw.20130409023122/estop?key=dsfvoeishfhseiofhoseihfiosheiofhsioehfi&format=json
▪ For HTTP authentication
GET /<language locale>/trackers/tracker/<tracker ID>/<instruction content>?mghost=<MGSV server address>&format=json HTTP/1.1Host: <host name>Authorization: Basic xxxxxxxxxxxx
URL sample
https://hostname.com/en/trackers/tracker/jc-11651_jnw.20130409023122/estop?mghost=mghostname.com&format=json
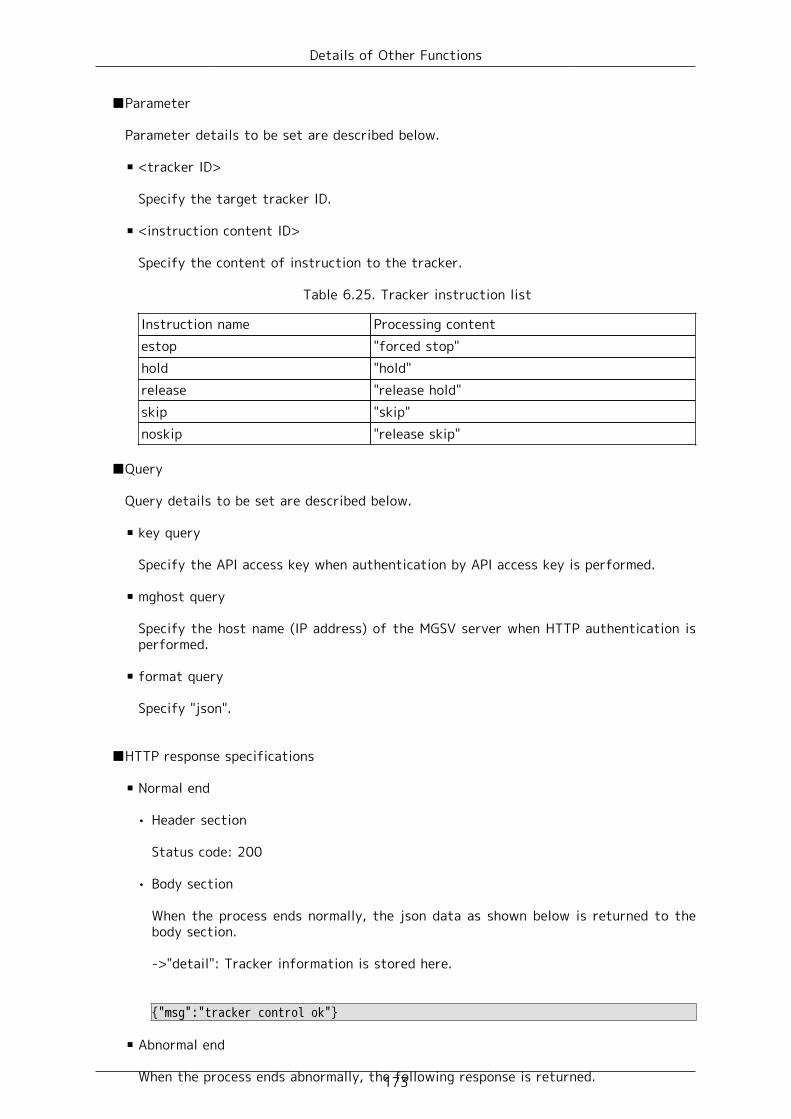
Details of Other Functions
173
■Parameter
Parameter details to be set are described below.
▪ <tracker ID>
Specify the target tracker ID.
▪ <instruction content ID>
Specify the content of instruction to the tracker.
Table 6.25. Tracker instruction list
Instruction name Processing contentestop "forced stop"hold "hold"release "release hold"skip "skip"noskip "release skip"
■Query
Query details to be set are described below.
▪ key query
Specify the API access key when authentication by API access key is performed.
▪ mghost query
Specify the host name (IP address) of the MGSV server when HTTP authentication isperformed.
▪ format query
Specify "json".
■HTTP response specifications
▪ Normal end
• Header section
Status code: 200
• Body section
When the process ends normally, the json data as shown below is returned to thebody section.
->"detail": Tracker information is stored here.
{"msg":"tracker control ok"}
▪ Abnormal end
When the process ends abnormally, the following response is returned.

Details of Other Functions
174
Table 6.26. Error list
Status code Error message Error cause400 {"msg":"Failed in controlling trackers: ... "} The specified tracker
does not exist or controlof tracker failed.
401 HTTP Basic: Access denied. HTTP authenticationfailed.
403 {"msg":"Not authorized to reference thetracker."}
The user is notauthorized to referencethe tracker.
403 {"msg":"API access key is wrong."} The access key is notvalid.
403 {"msg":"Communication with server failed.Confirm that JobCenter MG/SV is running."}
MG/SV has not beenstarted.
403 {"msg":"The user name or the password iswrong."}
The user name or thepassword input for APIauthentication or HTTPauthentication is wrong.
■Notes
Do not perform the stop instruction continually.

175
Chapter 7. Information Collection at FailureOccurrence
When a failure occurs in the CL/Web Server, use the command "clweb_getinfo" to completelycollect primary information necessary for cause investigation.
For details about the clweb_getinfo command, refer to "7.2 clweb_getinfo - Collecting allnecessary information for investigation when the CL/Web Server failed" in the <CommandReference> (Japanese only).

176
Chapter 8. Notes and RestrictionsThis chapter describes the notes and restrictions concerning CL/Web.
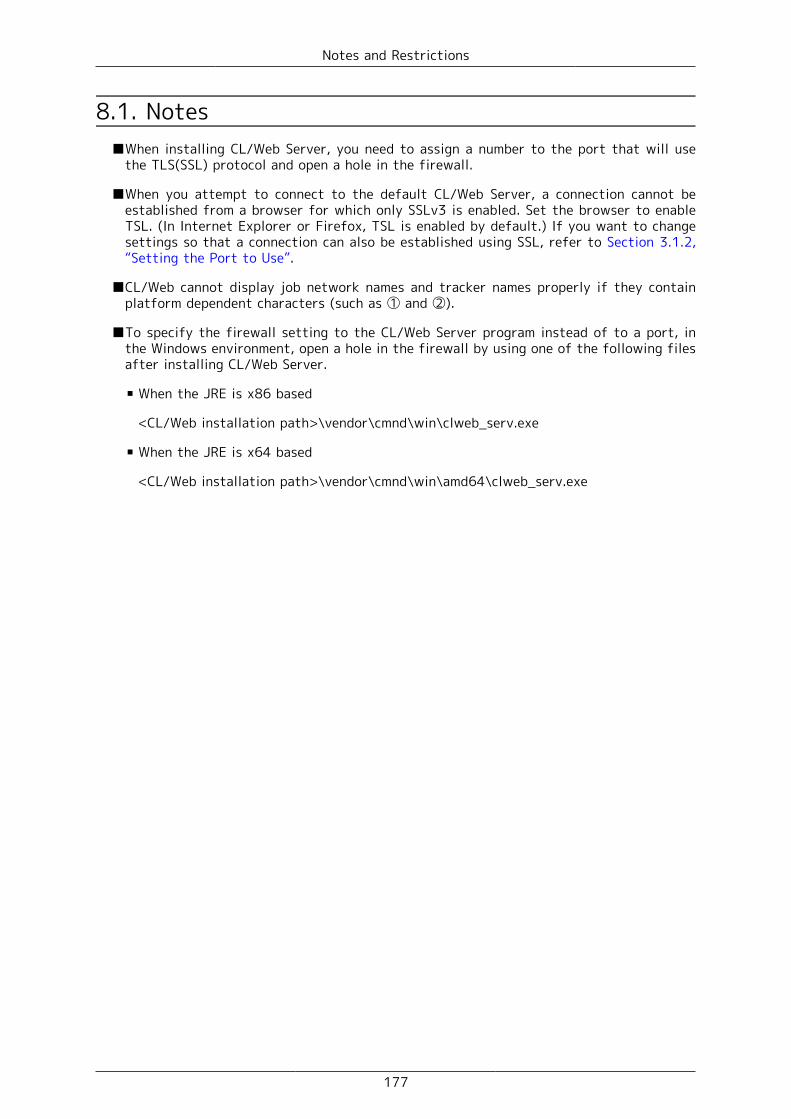
Notes and Restrictions
177
8.1. Notes■When installing CL/Web Server, you need to assign a number to the port that will use
the TLS(SSL) protocol and open a hole in the firewall.
■When you attempt to connect to the default CL/Web Server, a connection cannot beestablished from a browser for which only SSLv3 is enabled. Set the browser to enableTSL. (In Internet Explorer or Firefox, TSL is enabled by default.) If you want to changesettings so that a connection can also be established using SSL, refer to Section 3.1.2,“Setting the Port to Use”.
■CL/Web cannot display job network names and tracker names properly if they containplatform dependent characters (such as ① and ②).
■To specify the firewall setting to the CL/Web Server program instead of to a port, inthe Windows environment, open a hole in the firewall by using one of the following filesafter installing CL/Web Server.
▪ When the JRE is x86 based
<CL/Web installation path>\vendor\cmnd\win\clweb_serv.exe
▪ When the JRE is x64 based
<CL/Web installation path>\vendor\cmnd\win\amd64\clweb_serv.exe

Notes and Restrictions
178
8.2. Restrictions■The path used to start the CL/Web installer and the installation path specified when
installing CL/Web must not include any multibyte character. If CL/Web is installed inan UNIX environment, the installation path must not include space characters as well asmultibyte characters.

179
Chapter 9. Error Message ListThis chapter describes the error messages that may be displayed in a dialog box or otherwindow when you are operating CL/Web.
There are a large number of error messages. Described below are the selected errormessages, possible causes, and actions.
Note that the error messages shown herein may be slightly different from the actualmessages.

Error Message List
180
9.1. CL/Web Server Error MessagesThis section describes the error messages that may be displayed for the CL/Web Server.
Table 9.1. CL/Web Server error messages
Error message Possible error cause and action Relatedoperation
Cannot find Java 1.5 or higher. The Java JRE is not found.
If the JRE is not installed, install it.
If this message is displayed evenwhen the JRE is installed, setthe JRE installation path in theenvironment variable JAVA_HOMEbefore installing CL/Web Server.
Installation
Cannot locate Java installation,specified by JAVA_HOME
The specification of theenvironment variable JAVA_HOMEis invalid.
Check that the JRE installationpath is correctly set in theenvironment variable JAVA_HOME.
Installation
LicenseManager is not found. Pleaseinstall LicenseManager.
LicenseManager is not installed.
Install LicenseManager beforeinstalling CL/Web Server.
Installation
no such a directory(<directorypath>)
The parent directory of thespecified installation directorydoes not exist.
Create the directory beforeinstalling CL/Web Server.
Installation
"<directory path>" already existsand is not an empty directory.
The specified installation directoryis not empty.
Change the installation directory,or make the directory empty.
Installation
Permission denied - <directorypath>
Data cannot be written to thespecified installation directory.
Check the access permission for theinstallation directory.
Installation
Only Administrator can execute thiscommand.
An installation attempt was madeby a user other than the localadministrator.
To install CL/Web, log in as thelocal administrator.
Installation

Error Message List
181
9.2. Web Browser Error MessagesThis section describes the error messages that may be displayed for the web browser.
Table 9.2. Web browser error messages
Web browser error message Possible error cause and actionThe server name is empty. The server name is not entered.
Enter the correct server name.An odd number of double slashes (\\) cannotbe entered at the end of a password. Anopening curly brace ({) cannot be enteredwhen there is no closing curly brace (}) afterthat.
You cannot enter an odd number of doubleslashes (\\) at the end of a password. Youcannot enter an opening curly brace ({)without entering any closing curly brace (})after that.
Change the password so that it does not endwith an odd number of double slashes (\\)or contain an opening curly brace ({) whenthere is no closing curly brace (}) after that.
The user name is empty. The user name is not entered.
Enter the correct user name.The password is empty. The password name is not entered.
Enter the correct password name.Communication with the server failed. Checkthe server name.
The specified server name is invalid.
Enter the correct server name.The user name or password is invalid. The specified user name or password is
invalid.
Enter the correct user name and password.Failed to send the mail. The SMTP server settings may be invalid.
Correct the SMTP server settings.Communication with the server failed. Checkwhether JobCenter MG/SV is active.
JobCenter MG/SV is inactive.
Start JobCenter MG/SV.The specified page is not found. The specified page does not exist.
If the URL is directly entered, check theentered URL.
Job network reference permission wasdenied.
There is no job network referencepermission.
Check your CL/Win permission settings tosee whether you have permissions to list andview job networks.
Tracker reference permission was denied. There is no tracker reference permission.
Check your CL/Win permission settings tosee whether you have permissions to list andview trackers.

Error Message List
182
Failed to get information. The processing for collecting the informationto be displayed in the My Page panel failed.
Check whether the JobCenter MG/SV hasstarted normally.
One or more items need to be selected inTracker Status Detail.
An attempt was made to save the content ofthe [Tracker My List Setting] dialog box forthe My Page without selecting any item in"Tracker Status Detail".
Select one or more items in "Tracker StatusDetail".
The job network reference permissionand execution permission, as well as thetracker reference permission and operationpermission, are necessary.
An attempt was made to add JNW My Listwhen the job network reference permissionand execution permission, as well as thetracker reference permission and operationpermission, were unavailable.
Check the CL/Win permission settings tomake sure that the user is authorized to listand reference job networks and trackers.
Internet Explorer cannot display thewebpage.
There is a problem with the communicationwith the CL/Web Server.
Check the connected destination, whetherthe CL/Web Server service is active, and theweb browser settings. For details about theweb browser settings, refer to Section 3.2,“Web Browser”.

Date of Issue August 2015NEC Corporation 2015