gomo learning - onpoint digital content using gomo learning ... images, audio and video resources...
TRANSCRIPT
GOMO LEARNING Content Planning Guide
Summer 2014
© OnPoint Digital, Inc. 2014 All Rights Reserved.
1
Table of Contents
Creating Content using GoMo Learning ....................................................................................................... 2
What are the Advantages and Disadvantages of GoMo? ............................................................................. 2
Getting Started .............................................................................................................................................. 4
What is responsive content? ......................................................................................................................... 4
Working from a Template .............................................................................................................................. 4
Content and GoMo Elements ........................................................................................................................ 5
Authoring Interface ....................................................................................................................................... 6
Converting from Existing Content Documents .............................................................................................. 7
New Content.......................................................................................................................................... 7
Whitespace ............................................................................................................................................ 8
Links ...................................................................................................................................................... 9
Images ................................................................................................................................................... 9
Audio ..................................................................................................................................................... 9
Video ..................................................................................................................................................... 9
Publish ......................................................................................................................................................... 10
Import into OPLS/Cellcast ........................................................................................................................... 11
Advanced Optional Features............................................................................................................... 16
Assigning Users and Groups ...................................................................................................................... 18
Assigning Users .................................................................................................................................. 18
Assigning Groups ................................................................................................................................ 20
Workflow...................................................................................................................................................... 22
Additional Resources .................................................................................................................................. 22
Questions .................................................................................................................................................... 22

© OnPoint Digital, Inc. 2014 All Rights Reserved.
2
Using GoMo on Your OnPoint Learning Platform
This job aid provides instructions for using GoMo version 2.x from GoMo Learning, a subsidiary of a
London-based Learning Technologies Group (LTG plc) ,to create content for online and mobile delivery to
OnPoint Digital’s OPLS and CellCast Solution platforms. GoMo is a cloud based authoring tool to design
adaptive, responsive content that can be exported and deployed into OnPoint’s OPLS and CellCast
Solution platforms quickly and easily.
What are the Advantages and Disadvantages of GoMo?
GoMo’s greatest attribute is creating content that can adapt and respond to all the various screens in a
multi-delivery scenario spanning online, tablets and handsets. OnPoint Digital believes responsive tools
are the best approach to building content in a modern learning world. Because you can drag and drop
your content, it is easy to learn and anyone can do it. GoMo is limited in that only up to 4 columns can be
added in a section, so when you are adding smaller sections of content you are using a lot of real estate
for the desktop access. Additionally, the customization through the interface is limited to branding. You
can adjust the CSS in the exported file, however, and this will give you unlimited customization depending
your skill level of working with HTML and CSS files.
Use Cases for GoMo – Where does it fit?
GoMo is a sophisticated and diverse authoring package and offers an array of features that Instructional
Designers can leverage to create digital courseware, performance support tools and interactive marketing
materials for their online and mobile audiences. The following table summarizes the common use cases,
supported communications methods and target devices OnPoint believes are best suited for GoMo-
created materials.

© OnPoint Digital, Inc. 2014 All Rights Reserved.
3
Where Does GoMo Fit/Work?
Supports
Common Use Cases
Learning Features
Interaction and
Engagement
Gaming Elements
Reference
Materials/EPSS
Social Features
Communication Methods With LMS/TM Platforms
Non-SCORM
SCORM v1.2
SCORM v2004
Tin Can/Experience API
Supported Devices
Desktop Mac/Windows/Linux: Microsoft Internet Explorer, Google Chrome, Mozilla Firefox,
Apple Safari
Apple iPad Tablets iOS5
iOS6
iOS7
Apple iPhones & iPod
touch
iOS5
iOS6
iOS7
Android Tablets V3.x - v4.x
Android Handsets v2.3.7- v4.x

© OnPoint Digital, Inc. 2014 All Rights Reserved.
4
Getting Started
To get started, you should have either purchased or signed up for a free 21-day trial account for the
GoMo learning authoring platform. All content is stored in “the cloud” and managed using the (SAAS)
software as a service. If you need to sign up for a new account, visit:
https://accounts.gomolearning.com/signup
We also recommend that you download and review GoMo’s own guide (link below) before beginning your
project.
Getting Started User Guide
So, What is Responsive Content?
Responsive content enables you to design, build and publish content once then publish it for delivery to
desktop, tablets and smartphones. Responsive content automatically repositions itself based on the
screen’s space available and adapts to show using available screen size. Screens are optimized for the
size of the screen, with the most appropriate alternative being selected to ensure content remains user-
friendly and high quality. As you develop your content, think about how the content responds across the
multiple delivery methods common among your target audience.
Working from a Template
You can create a working template to duplicate projects from to ensure cohesion among projects and
increase production efficiencies. This would include your company brand theme settings. It is important to
only use the global theme settings so that any change would distribute to all projects. You will see the
global theme options when you login by clicking Themes Tab.

© OnPoint Digital, Inc. 2014 All Rights Reserved.
5
In addition to theme settings, to improve production efficiency your
template should include placeholders for:
1. Formatting of text assets (H1, H2, etc.)
2. Headline naming of text assets
3. Layout column counts on individual pages
4. Image assets that repeat
5. Menus
6. Back and next link configuration
Once you have finalized your template, you begin each project by
duplicating a copy from it and renaming your project name.
Content and GoMo Elements
Images, audio and video resources can be uploaded to your GoMo
portal and shared across projects and team members using the shared
content feature. You can organize your resources so that you can have
a folder that is solely used for a particular project or others that contain
useful resources such as organizational logos and stock imagery that
can be used by your team across projects.
It will streamline your workflow to upload all of your assets at once in
the beginning of each project. Otherwise, you will have to exit your
project each time you need to add media.

© OnPoint Digital, Inc. 2014 All Rights Reserved.
6
Authoring Interface
GoMo’s content editor is an easy to use drag-and-drop interface for creating content that appears on
screen. The left and right panels of the content editor can expand and collapse, allowing you to maximize
your working area.
The content editor is built around the following five key elements:
1. Header area
2. Navigator panel (screens)
3. Content assets panel
4. Content area
5. Properties panel

© OnPoint Digital, Inc. 2014 All Rights Reserved.
7
Converting from Existing Content Documents
If you are taking content from a Microsoft document, the easiest way to “grab” all the images is to export it
into a HTML document and Microsoft will automatically create an images folder. You can easily upload
the entire batch in one upload this way. Once you have uploaded, as you are cutting text and pasting it
from the original document into GoMo you select each image from your assets panel.
Note: When you cut and paste your text into a text box from your document, your formatting will
not carry over with the paste. You will have to go back and rebold, etc. any text that had
formatting.
New Content
GoMo does not have any spell check features. It may be useful to create content in a solution that
provides spell check and has a review workflow for your team to collaborate and refine content before
dropping into GoMo.
To avoid extra spacing, do not create a content block for each text asset type. In the
example below, 3 text assets within a single content block make up the overview, second
heading, and second text.
To optimize the reading experience for your users, take advantage of GoMo’s fluid grid
layout options. In desktop view, your user can struggle with long running sentences in wide
formats. The same way magazines take advantage of multi-column widths to create a better
reading experience, you can take advantage of fluid grids so that your content adapts from
desktop to phone while creating an optimized experience regardless of device. For optimal

© OnPoint Digital, Inc. 2014 All Rights Reserved.
8
reading, organize your content using columns. In smaller device screens, they will
automatically stack and be scrollable for faster consumption.
Whitespace
Whitespace is important as you consider content. By letting content breathe, it is easier and faster to
consume by the end user. Because desktop screens are so large in comparison to pads and phones, you
can create an empty text box column to layout your page as the same approach in print design practices.
In desktop mode, the empty text box forces the content to the other columns. However because on
mobile devices screen real estate is so valuable, it adapts and will only stack the visible content. No
space is wasted.
Additionally, in some case you may have to create an empty content block on the top of the page with an
empty text block to force the content below the page titles being displayed. This will ensure the second or
third column not being higher than first column.

© OnPoint Digital, Inc. 2014 All Rights Reserved.
9
Links
GoMo does not currently have a good solution for dealing with external links. As a work around, you can
use the menu button, but be mindful of these things:
1. Menu titles must be short or they will be cropped off on phone devices
2. The user will be taken away from your content to review the external content
3. Links are not integrated into the body text and affect content flow.
Images
Make sure that images do not have any extra white space around them because GoMo provides padding
between images. The padding will be more than necessary if your images are not cropped.
Saving photos at the smallest size possible while still maintaining visual quality, is the best way to ensure
that images are responsive. Web images are saved as 72 DPI. Images should be in PNG format.
Audio
Any Audio should be in MP3 format and compressed for fast load times.
Video
Videos are most successful when they are 1-3 minutes in length. If your topic is longer, break into bite-
size subtopic videos. This will allow smaller files sizes and ensure efficient load times for downloading the
video. In addition to keeping videos short, ensure to compress the video to the smallest size while still
maintaining quality to ensure proper load times.
As a recommendation, the video should be sized at 480x320 as it still looks good when scaled up, but
keeps the file size down. Video and animations must be MP4 files encoded using an H264 codec for
widest device support.
When uploading a video, an image thumbnail should be uploaded to go with it. This will be displayed at
100% and when clicked it will launch the video full screen.

© OnPoint Digital, Inc. 2014 All Rights Reserved.
10
Publish
Publishing is easy in GoMo because it provides HTML5 responsive, adaptable content. As a result, there
are no setting options. All you have to do is publish project and download it.
Open the project you want to publish, click on the Actions dropdown at the top right of the Project
structure view and select Publish project:
GoMo will now take the content of your project, apply the theme you've selected for it and create a multi-
device HTML 5 package with all the wrapper code needed to communicate with the SCORM 1.2
compliant LMS platform from OnPoint Digital.
When it's completed it will be ready for downloading on the main project’s page.
Click the Download button and a zip file will be transferred from the GoMo servers to the Downloads
folder of the browser on your computer. GoMo will download with the file name based on the project
number and date, if you want to rename, make sure to use underscores in place of spaces and keep as
zip file so that your file will upload into the OnPoint LMS properly.

© OnPoint Digital, Inc. 2014 All Rights Reserved.
11
Import into OPLS/CellCast
From Content Tab, click Wizards.
The Wizards options screen will appear. Select Content Wizard.
© OnPoint Digital, Inc. 2014 All Rights Reserved.
12
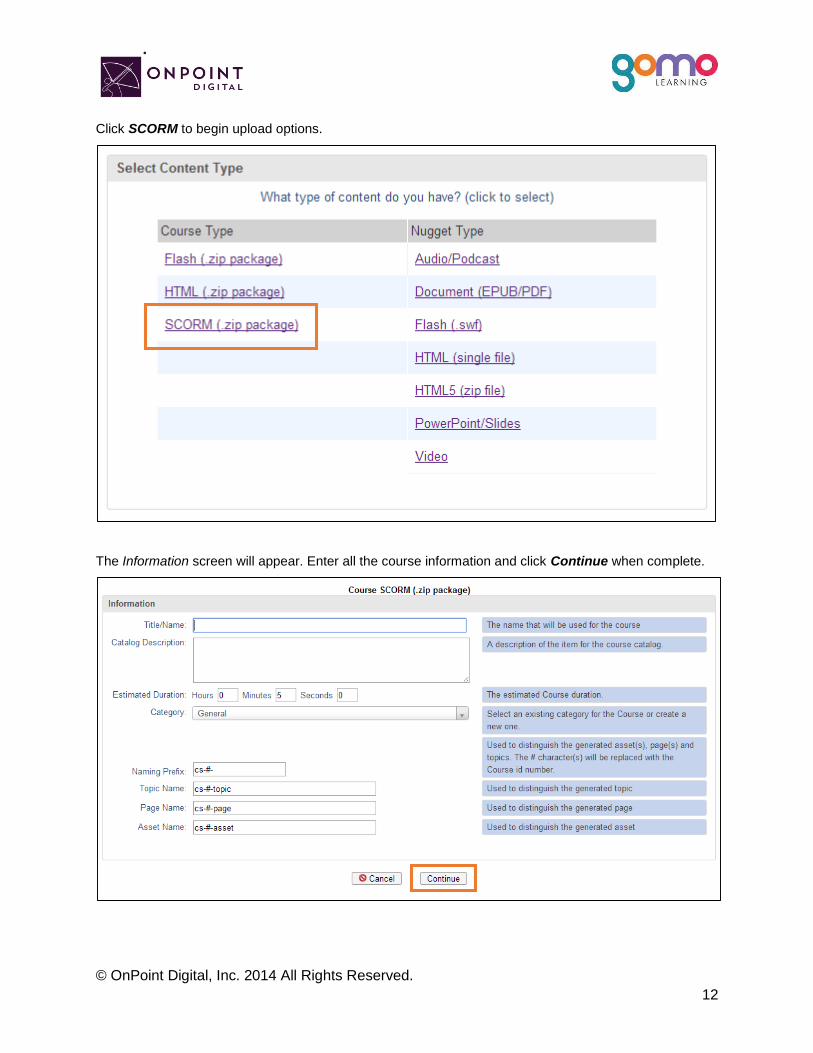
Click SCORM to begin upload options.
The Information screen will appear. Enter all the course information and click Continue when complete.

© OnPoint Digital, Inc. 2014 All Rights Reserved.
13
Browse for your ZIP package to upload course and click Continue.
Browse for and upload your course thumbnail image and click continue, or click Proceed… and use
default thumbnail.
1
2
1
2

© OnPoint Digital, Inc. 2014 All Rights Reserved.
14
Review course information and click Generate Course.
3

© OnPoint Digital, Inc. 2014 All Rights Reserved.
15
Because your Welcome Message was created in the GoMo package, Hide the Welcome message so the
user goes straight to your content. Additionally, if you do not want your content to be eligible for self-
service enroll you must disable the OnPoint Content Viewer (“OPCV”) Catalog option by selecting No.
If your course
is for mobile
delivery,
always keep
hidden.

© OnPoint Digital, Inc. 2014 All Rights Reserved.
16
Select your publish options for browser and mobile and click Publish.
Your course is now published, click Continue.
Advanced Optional Features
There are advanced options to choose from to improve the user experience. One thing to think about is
screen real estate. To maximize your content’s real estate, you can choose settings in the Advanced Tab.
A: Select for
Online Portal
Delivery
B: Select to
Deliver for
CellCast App
C: Select to
Deliver for
Mobile Web
A
B
C
© OnPoint Digital, Inc. 2014 All Rights Reserved.
17
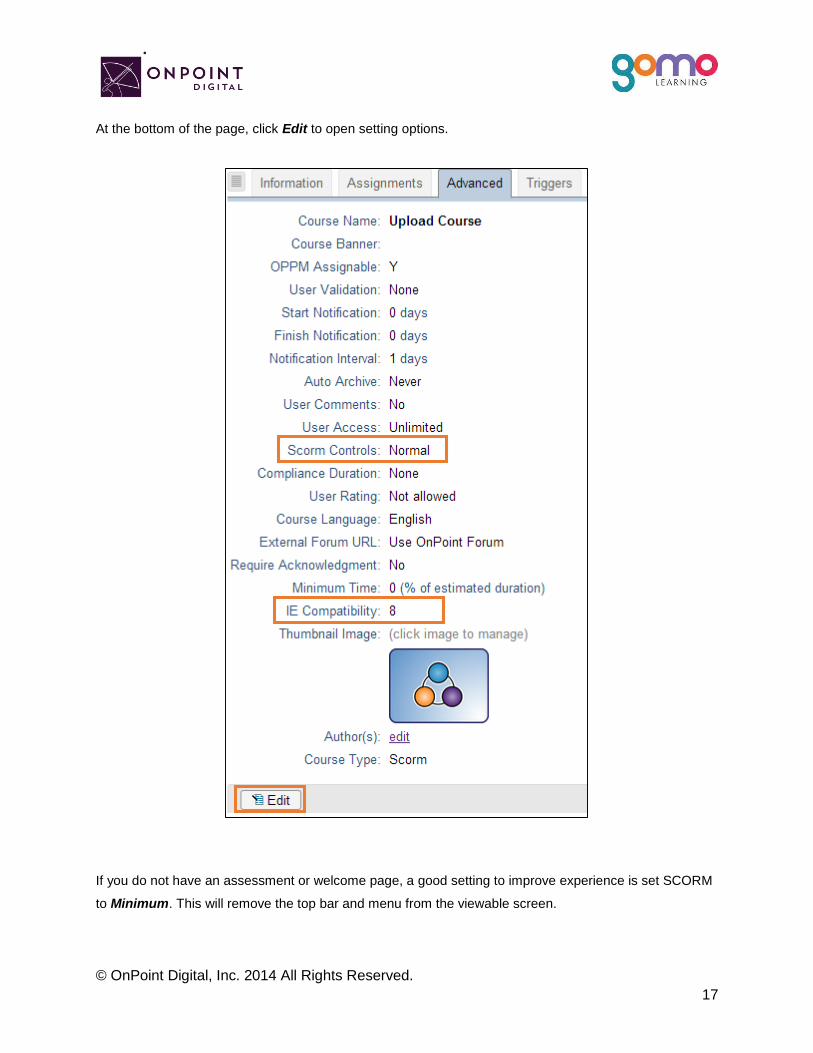
At the bottom of the page, click Edit to open setting options.
If you do not have an assessment or welcome page, a good setting to improve experience is set SCORM
to Minimum. This will remove the top bar and menu from the viewable screen.

© OnPoint Digital, Inc. 2014 All Rights Reserved.
18
When using GoMo the most important setting to ensure is IE8 compatibility is disabled. This is set to true
by default and must be unchecked.
Assigning Users and Groups
Once you have published your course, you can assign users or groups to be assigned to the course.
Assigning Users
From the Content Tab, select Courses.
A list of all courses will show. Select your Course Name from list.
From Assignments Tab, click Assign in the Assigned Users section.

© OnPoint Digital, Inc. 2014 All Rights Reserved.
19
Select desired User from Available Users and click Assign.
You will now see the user in the Assigned Users section. Click Finish.
© OnPoint Digital, Inc. 2014 All Rights Reserved.
20
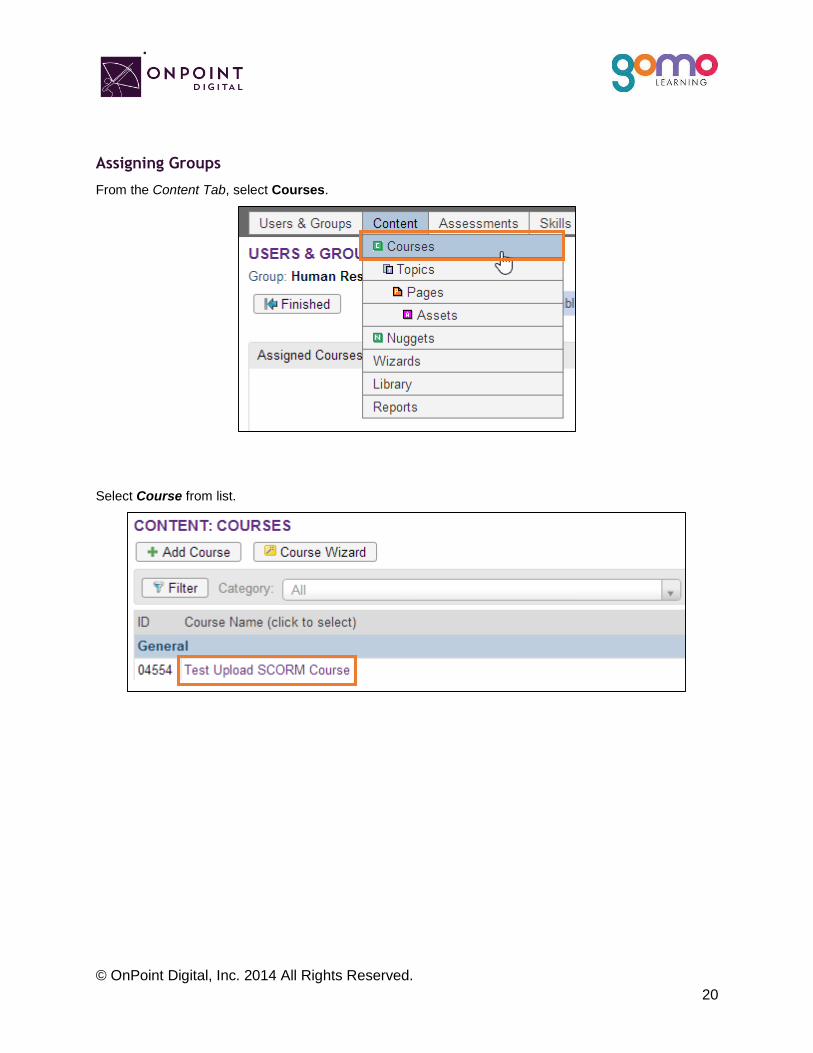
Assigning Groups
From the Content Tab, select Courses.
Select Course from list.

© OnPoint Digital, Inc. 2014 All Rights Reserved.
21
From Assignments Tab, click Assign in the Assigned Users section.
Click Groups to view the list of groups to choose from.

© OnPoint Digital, Inc. 2014 All Rights Reserved.
22
From the list of available groups, select your Group.
You will now click Assigned and Finish, as you did before to assign a user.
Workflow Considerations
Because GoMo does not have folder creation functionality, the projects cannot be organized. After some
time, it may become harder to keep up with multiple projects. As a workaround, the admin can un-assign
a team member’s access to past projects and create a “clean” workspace for your new projects.
Additional Resources
For additional resources, visit GoMo’s Web site http://www.gomolearning.com/support/.
To view a Getting Started Video, visit http://www.gomolearning.com/support/knowledge-base/getting-
started/welcome-to-gomo.
Questions
If you have a question about this guide or would like OnPoint Digital’s support team contact us at 912-
898-9202 or email [email protected].