getting your students to publish
TRANSCRIPT

©2002 by John G. Hendron. Last updated on: 12/13/05
Getting Your Students to Publish a Technology Integration Course by John G. Hendron Allowing students to create: original works, musical compositions, new recipes, games to play, designs for cars, airplanes, or homes; these are all admirable duties each teacher should accommodate in each student’s education. What kinds of “works” your students create should be straightforward—it will depend upon what kind of class you teach. This course focuses upon the publication of student projects using the following types of media:
• hypertext • printed materials • computer-driven multimedia • digital e-books
The final medium is not important. The spirit promoted here focuses on the benefits of allowing students to showcase their work through publication. By “publication,” I mean:
a work specially formatted using a digital tool (such as a computer with appropriate software) that requires the student to format the work in addition to creating it—suitable for an audience to read, reflect, or experience the work.
The “art” of publication spans hundreds of years, from illuminated manuscripts to the modern printing press. Examples of such “publications” for student projects include:
• a formatted book (with or without illustrations or pictures) • a multimedia presentation (with sound) • an Acrobat “document” with navigation (e-book) • a printed brochure or pamphlet • a web page • a diagram with hyperlinks
Software used to publish and format documents created by students might include:
• Microsoft Office (Excel, Word, PowerPoint) • Adobe Acrobat • Inspiration, Kidspiration • Appleworks • Simple Text • Netscape Communicator
The process of writing and creating needs to end with a review of the work. “Published” works should be read or examined by others, including peers, teachers, and parents. In other words, distribution of the project is part of the process of publication. Fortunately, many software tools today make it easy to publish using the Internet. Comments from readers may be routed to the instructor. Designing a project is comprised of four steps: Planning, Content Generation, Formatting, and Publication.

©2002 by John G. Hendron. Last updated on: 12/13/05
Project Planning To get an idea of the types of projects that might be possible using this model, let’s start by visiting several web sites that offer ideas, models, and sample projects by students. Bookmark (Command-D, Add to Favorites) any web page that you think would be useful in your own teaching. Many of the sites listed below link to yet other useful sites.
• Publishing of Student Writing [http://www.lclark.edu/~krauss/tesol98/publishing.html] • Empowering Student Learning with Web Publishing [http://www.siec.k12.in.us/~west/article/publish.htm] • Review of the Literature [http://www.publishingstudents.com/researchbenefits.html] • New Media Publishing - What is New Media Publishing? [http://www.rit.edu/~nmpub/whatis.html] • Publishing Student Stories/Projects [http://www.lacnyc.org/resources/conference/powerpt2/sld027.htm] • Electronic Publishing for the WWW [http://www.ccc.commnet.edu/DL/~moriber/syllabi/cis150.htm] • Education World® : Collaborative Projects [http://www.ccc.commnet.edu/DL/~moriber/syllabi/cis150.htm]
Based upon some the ideas gleaned from the sites (or others) above, complete the following chart with three ideas you have for a project involving students in your class: Type of Product Subject Area or SOL Correlation Software Required
Content Generation Next, consider what the student has to produce—this may be something students already are doing in your class. Examples of different kind of content are stories, city plans, a piece of artwork, an interview, informative literature, or a family tree and history. This phase of the project should focus upon the writing and not formatting. Any simple text editor or word processor may be used for text. A digital camera works well for drawings and artwork. One example might be a series of drawings that will later get put into a “book” using Power Point to tell a story. How will you grade the content? The content grade should be a separate component from the formatting and/or publishing grade. You may wish to consider the rubric (and change it for your needs) presented at the end of this course.
Formatting The next two steps, Formatting and Publication, are what make this type of project unique. Any (or more) of the software applications listed above may be used. Thi s po rt i on of the cou rs e , ho weve r , c over s Mi cr os of t Of f i ce ap pl i c at ion s Po we r P oin t and Wo r d e xc lu sive ly . Before we dive-in, I’d like to make one note about Adobe Acrobat. One option that is available through the high school is use of the A do be Ac ro b at application, which is installed only in the Technology Center (room C143). Interactive documents may be created through Acrobat and we are exploring this technology through one of our courses this year: Graphical Communications Systems 3. Word documents that use special fonts or many pictures are sometimes better distributed in the form of an Acrobat (PDF) file. Using the Acrobat software, it’s very easy to transform a Word document into an eBook for distribution on the web. Contact John Hendron if you’re interested in this option.
©2002 by John G. Hendron. Last updated on: 12/13/05
Microsoft Word Free video-tutorials on Word are available through Atomic Learning at: http://www.atomiclearning.com/word2001.shtml?122;1037978004 I am going to assume you have some basic knowledge about the application. We will cover:
• Tables • Columns • Templates (Project Gallery)
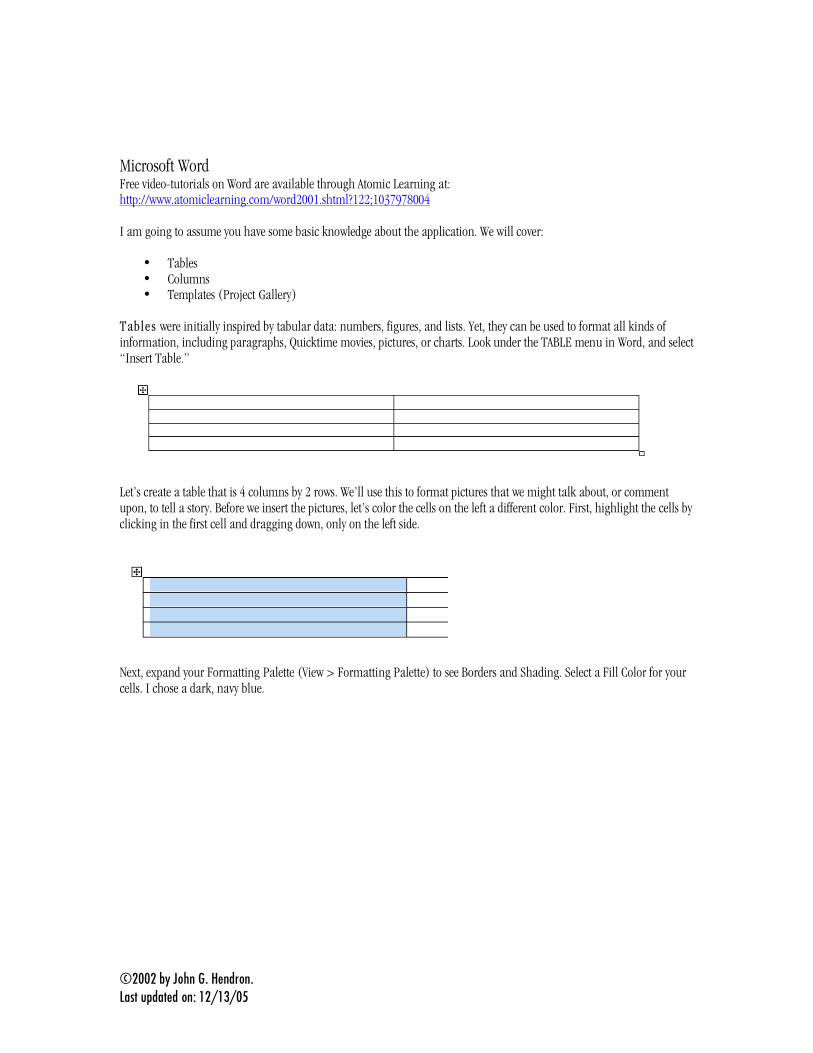
Table s were initially inspired by tabular data: numbers, figures, and lists. Yet, they can be used to format all kinds of information, including paragraphs, Quicktime movies, pictures, or charts. Look under the TABLE menu in Word, and select “Insert Table.”
Let’s create a table that is 4 columns by 2 rows. We’ll use this to format pictures that we might talk about, or comment upon, to tell a story. Before we insert the pictures, let’s color the cells on the left a different color. First, highlight the cells by clicking in the first cell and dragging down, only on the left side.
Next, expand your Formatting Palette (View > Formatting Palette) to see Borders and Shading. Select a Fill Color for your cells. I chose a dark, navy blue.

©2002 by John G. Hendron. Last updated on: 12/13/05
Now that your cells are filled-in with color, it’s time to insert the pictures we’d like to use. For this example, you can use the MS Clip art, or pictures on your hard drive. Don’t have pictures? Try downloading some from http://pics4learning.com/ To download a picture from a web site (and only free, or public domain pictures please), press and hold the mouse button down over a picture. A pop-up menu will appear with the option to “Download image to disk…” or similar wording. Save all your pictures in the same place, such as your desktop. Next, click in the first cell of your table and go to Insert > Picture > From File… and navigate to your picture.
Your picture may be too large for your table. No problem! Use Word to “shrink” down your photograph by dragging diagonally after clicking on one of the handles on the four corners of your photograph. If you don’t see the handles, first click on the photograph.

©2002 by John G. Hendron. Last updated on: 12/13/05
The handles appear blue in the illustration below. Only resize photos using the handles on the corners of pictures.
Complete the insertion process for the remaining three blue cells. Next, we’ll select the entire column so we can align the pictures in the middle of each cell. Place the cursor over the column and watch it change to a “down arrow.” Click and highlight the column.
While the cells are highlighted, go to Table > Table Properties > Cells. Vertically align the cells to be centered.

©2002 by John G. Hendron. Last updated on: 12/13/05
Next, click on the “Row” tab (pictured above), and set the desired height of the rows to be something larger than the pictures you’ve inserted. Click on OK, and then align the cells horizontally (to center) using the Formatting Palette.
And then—voila!
The last step would be to click in the white cells and type out your narrative. We’ll skip this step for now, but this is an excellent start to a student project. Creat in g a we b pa ge is also easy from this point! I highly recommend using tables when you wish to create a web site with pictures, using Microsoft Word. To convert this into a web page:
• Select a Background Color (Format > Background) • Add a title and Spell Check • Use the Save As… Web Page feature in FILE

©2002 by John G. Hendron. Last updated on: 12/13/05
Make sure to save your web page from Word in a new folder. It will save HTML documents as well as pictures. To view these in Internet Explorer, open your webpage (pictures.html is what I am calling mine) by going to File > Open… in Internet Explorer. Here are some guidelines for saving your web documents:
• Always create a new folder for each page you save • Use only lower-case letters for your filename • Include NO spaces or special characters (%,*,/,#, etc.) in your filename • Include the filename extension .html or .htm for your web pages.
To get your web page on the Internet, you will need to send the folder you created to your library media specialist to be uploaded to your class web site on Goochland’s web server (this is free). Column s in Word are easy to use, too. To ensure it will be an easy process, follow these steps (in this order):
• Type out all of your text first • Add an extra return between titles that you wish to go across the entire page • Use justified alignment for your article • Highlight the text to go into columns… • and then (at last) create your columns • then… add pictures if you like.
Start with a new word processing document with some text. To try this, insert some “dummy” text and copy-paste it into paragraphs, or copy some text off a web site into your document. For my example, I borrowed an article from CNN. After following the steps above, I go to the column option in the Formatting toolbar for columns to create my columns. I chose three:

©2002 by John G. Hendron. Last updated on: 12/13/05
And then, I was about ready to insert a picture:
It’s best to insert the picture at the top of your document. Click before your title, and then Insert > Picture > from Clip Art. Anything will do, for now. Once the clip art is inserted into your document, double-click it to change the formatting for the image.
Choosing “Tight” or “Square” under “Layout” will enable text-wrap. This is a cool feature. Text will automatically wrap around your image, and the image can be dragged around anywhere on your document. Mine ended up looking like this:

©2002 by John G. Hendron. Last updated on: 12/13/05
Columns and embedded pictures (as seen above) do not translate well into web documents. Another option when publishing with Word are the pre -m ad e t e mp late s that make up the Project Gallery. An example of the Project Gallery is seen here:
You may choose any template (on the left) that you like; I am going to choose “Newsletter.” Once you choose a template, you will probably have the option of using a Wizard to help format your document with information:

©2002 by John G. Hendron. Last updated on: 12/13/05
Once you exit “Save and Exit” the Wizard, you can manipulate the objects in your template and replace the text and pictures to your own choosing. Simply click on (or within) an object (such as a text box), and replace with your own content. Remember to save your work often. As a testament of what Word can do—just consider a moment this course tutorial. It was created using Microsoft Word! Microsoft PowerPoint If the type of project you wish to do focuses more upon pictures or multimedia (movies, interaction), PowerPoint is probably the tool you’ll want to use. PowerPoint files (PPT) can be viewed on screen as a show (PPS), printed out as slides or notes, and projected using an LCD projector. Consider using the PPT as an “interactive kiosk” where students could sit for a limited period of time and learn about a new subject. For this tutorial, I’ll cover:
• Adding Narration to Power Point • Adding Interactivity through Buttons • Exporting to HTML or Movie (Quicktime)
Na rr at i on adds a benefit to a presentation: forcing the viewer to listen paces the presentation and can add detail to images present on slides. Narration isn’t always appropriate, but is great for some projects. All iMacs, iBooks, and PowerBooks have built-in microphones. Make sure the microphone is “on.” Go to the Sound Control Panel under the Apple Menu and check the input section. “Built-in Mic” should be selected. Note: Adding narration is the last part of a presentation. Only record your narration once the entire presentation is otherwise complete. Go to Slide Show > Record Narration. The box that appears may differ in appearance from the one below, but must be used to set where your narration (sound files) will be stored. I’d save them in the same folder where you’ve saved your presentation.

©2002 by John G. Hendron. Last updated on: 12/13/05
Once you click on “Record,” you will view the presentation much in the same way you do to “Rehearse Timings.” Once the countdown begins, begin your narration. Press the space bar to move to the next slide. Recording ends when you’ve reached the end of your presentation. View the Slide Show (Slide Show > View Show) to hear your narrated presentation. Because sound files are so large, narrated-presentations are not good for the web or online delivery. They may, however, be saved to ZIP disc or CD-ROM. They can also of course be viewed on the computer it was created. You can also record just one sound for one slide. Look under Insert > Movies & Sound.
Power Point is enhanced through In te rac t i ve but to ns. These can direct you to other files on the computer, to hyperlinks on the web, or to other slides—creating a non-linear progression of slides. This functionality can be used to create games and “Choose Your Own Adventure” type stories!

©2002 by John G. Hendron. Last updated on: 12/13/05
The easiest way to add this functionality to PowerPoint is through the Action Buttons. From the drawing toolbar in Power Point, navigate to the action buttons and draw the button (by dragging on your slide).
For each button you create, you can set two states: mouseOver, and mouseClick. Obviously, clicking the mouse is the default event you’d be anticipating. By setting “Hyperlink to…” and choose a particular slide, you build the interactive power of Microsoft Power Point to your presentation or kiosk. Notice in the dialog box below, you can also add sounds to your mouse clicks!
©2002 by John G. Hendron. Last updated on: 12/13/05
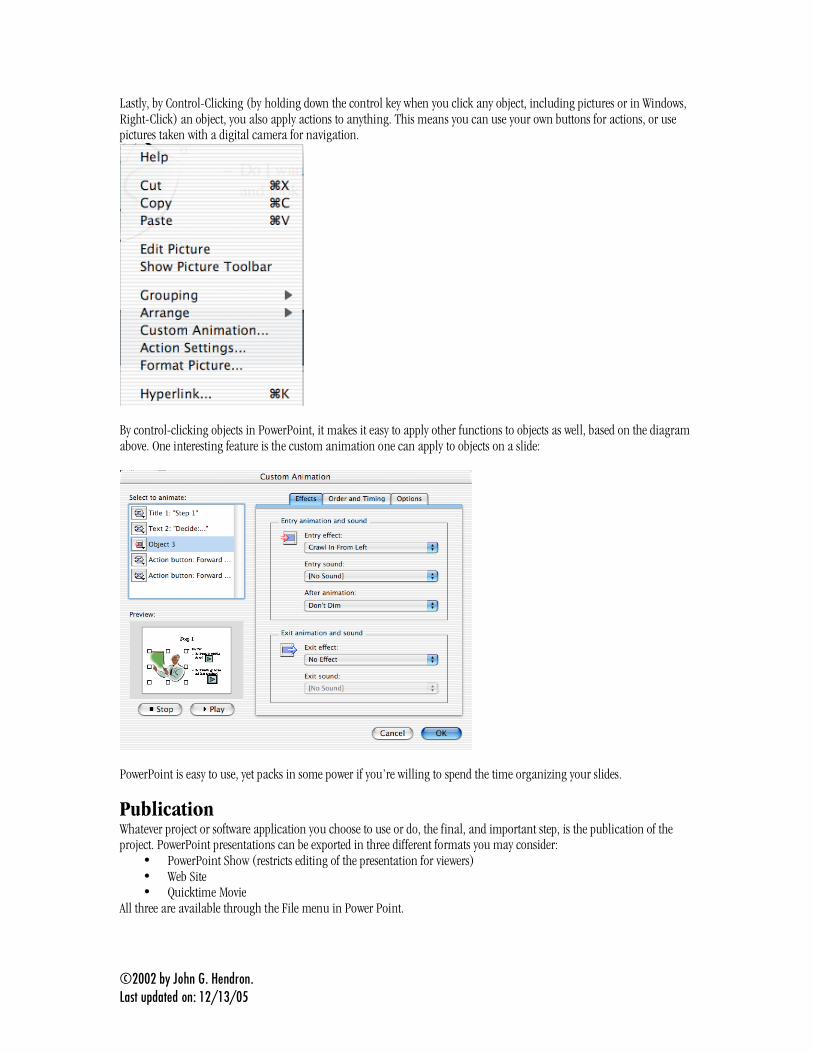
Lastly, by Control-Clicking (by holding down the control key when you click any object, including pictures or in Windows, Right-Click) an object, you also apply actions to anything. This means you can use your own buttons for actions, or use pictures taken with a digital camera for navigation.
By control-clicking objects in PowerPoint, it makes it easy to apply other functions to objects as well, based on the diagram above. One interesting feature is the custom animation one can apply to objects on a slide:
PowerPoint is easy to use, yet packs in some power if you’re willing to spend the time organizing your slides.
Publication Whatever project or software application you choose to use or do, the final, and important step, is the publication of the project. PowerPoint presentations can be exported in three different formats you may consider:
• PowerPoint Show (restricts editing of the presentation for viewers) • Web Site • Quicktime Movie
All three are available through the File menu in Power Point.

©2002 by John G. Hendron. Last updated on: 12/13/05
Publication is an important part of the project—for one very important reason—many students feel higher stakes and higher expectations are involved when others will be viewing, or reviewing their work. Where and when you can make this possible is a rewarding experience for those students.
Class/Course Assignment To receive 5 points recertification for this class, you will need to complete the assignment below and submit the assignment through the Blackboard Drop Box. Upon receipt and review, you will be issued a certificate for your participation in this course. Choose one of the two options below: Opt i on 1 Using Microsoft Word, create a 2-page family newsletter on your own, not using the MS Templates. The newsletter must have a masthead (a title at 40-70 point font) and 2 or 3 columns. The topic is up to you, and may be class based. If you cannot think of anything, make the newsletter topic be about your family. Included in the newsletter must be at least 2 pictures (any source—Internet, digital pictures, clip art). Insert a Text Box (Insert > Text Box) to add a caption below each picture. Opt i on 2 Using Microsoft Power Point, create a 16 or longer slide “Choose Your Own Adventure” style story. How? What does this mean?
• Start a short story for the grade level you teach, and include the reader as a character in the story. • Include about a paragraph per slide. • At the end of 3 different slides, offer choices (2 or 3) for the reader to take… • Use navigation buttons on each slide. For the three slides where choices are available, have the user skip slides to
follow that “storyline.” • At least two slides should include an animation • At least one slide should include a recorded sound from your laptop • The story does not need to end… you can leave us hanging at the last slide…
Depending upon your project, name the file:
• publish.doc (MS Word) OR • publish.ppt (MS PowerPoint)
Finally, print out this document for your own needs and documentation. Created and Designed by John G. Hen dr on ([email protected])