general ledger help reference - city university of new york
TRANSCRIPT

PUBLIC SECTORGENERAL LEDGER HELP REFERENCE
GL HELP 2
SUNGARD PUBLIC SECTOR LLC MAKES NO REPRESENTATIONS OR WARRANTIES, ORAL OR WRITTEN, EXPRESS OR IMPLIED, WITH RESPECT TO THE SYSTEM, SERVICES, SOFTWARE, DOCUMENTATION, OPERATING ENVIRONMENT, ANY OTHER SOFTWARE OR SERVICES PROVIDED HEREUNDER OR ANY OTHER MATTER ADDRESSED HEREUNDER, AND SUNGARD PUBLIC SECTOR LLC EXPLICITLY DISCLAIMS ALL OTHER WARRANTIES, EXPRESS OR IMPLIED, INCLUDING THE IMPLIED WARRANTIES OF TITLE, MERCHANTABILITY AND FITNESS FOR A SPECIFIC PURPOSE. SunGard Public Sector LLC shall not be liable for errors contained herein or for incidental or consequential damages in connection with the furnishing, performance or use of this material. This documentation is proprietary and confidential information of SunGard Public Sector LLC. Copying, reproduction or distribution is strictly prohibited. All rights reserved.
Copyright © 2008 by
SunGard Public Sector LLC
890 Fortress Street
Chico, CA 95973
Should you wish to make a comment, or if you find an error in the text, please contact us via email:

GL HELP 3
Document Change Log
Version Date Change Description
7.9.1 October 2008 7.9.1 Version

GL HELP 4
Contents
1 General Ledger Help.......................................................................................................... 7
1.1 Budget Adjustments Screen (GLBUBAAJ) .............................................................................. 7 1.1.1 Set Tab..................................................................................................................................................9 1.1.2 Screen Footer......................................................................................................................................10 1.1.3 Budget Adjustment Tab .......................................................................................................................10
1.2 Annual Budgets Screen (GLBUBAAN) .................................................................................. 14 1.2.1 Screen Footer......................................................................................................................................15 1.2.2 Enable Budget Offset ..........................................................................................................................15 1.2.3 Automatic Update Logging ..................................................................................................................15 1.2.4 Automatic Budget Offset......................................................................................................................16 1.2.5 View Distributed Budget Transactions.................................................................................................16 1.2.6 Set Tab................................................................................................................................................16 1.2.7 Budget Adjustment Tab .......................................................................................................................17
1.3 General Ledger Budget Transfers Screen (GLBUBATR)....................................................... 21 1.3.1 The Set Tab.........................................................................................................................................22 1.3.2 Screen Footer......................................................................................................................................23 1.3.3 Budget Transfer Tab............................................................................................................................23 1.3.4 Text Tab ..............................................................................................................................................26 1.3.5 Posting Debits and Credits ..................................................................................................................26 1.3.6 The GLBU TROBJxxx Common Code ................................................................................................27
1.4 Budget Adjustment/Transfer Screen (GLBUBAUB) ............................................................... 28 1.4.1 Set Tab................................................................................................................................................29 1.4.2 Budget Adjustment Tab .......................................................................................................................31
1.5 Average Salary (GLBUFTAS) ................................................................................................ 34 1.5.1 Single Record View .............................................................................................................................35
1.6 Fringe Benefit Rate (GLBUFTFR).......................................................................................... 37 1.6.1 Single Record View .............................................................................................................................38 1.6.2 GLFG FRINGE – Common Code ........................................................................................................39
1.7 Budget Update FTE Screen (GLBUFTUB) ............................................................................ 40
GL HELP 5
1.7.1 Change Logging Tab ...........................................................................................................................44 1.8 Budget Templates (GLBUTM)................................................................................................ 48
1.8.1 The Budget Template screen ..............................................................................................................48 1.8.2 Selecting a Template in the Budget Entry screen................................................................................50 1.8.3 Example of a Budget Template, and how it manifests in the Budget Entry Screen .............................52
1.9 Budget Update Annual Screen (GLBUUP) ............................................................................ 53 1.9.1 Change Logging Tab ...........................................................................................................................57 1.9.2 Using GLBUUP: Totaling Options........................................................................................................58
1.10 GL Journal Entry (GLJEUB)................................................................................................... 64 1.10.1 Set Tab................................................................................................................................................67 1.10.2 Transactions Tab.................................................................................................................................69 1.10.3 Copy Set Tool for GLJEUB..................................................................................................................75
1.11 Default Account Mapping: GLUPDF ...................................................................................... 76 1.12 GL Update General Information (GLUPGN) .......................................................................... 79
1.12.1 Screen Header ....................................................................................................................................80 1.12.2 Organization Key Tab..........................................................................................................................82 1.12.3 Primary Key Parts................................................................................................................................84 1.12.4 Secondary Key Parts...........................................................................................................................86 1.12.5 Select Code Titles ...............................................................................................................................88 1.12.6 Org Key Options ..................................................................................................................................89 1.12.7 Object Code Tab .................................................................................................................................91 1.12.8 Primary Object Groups ........................................................................................................................93 1.12.9 Secondary Object Groups ...................................................................................................................96
1.13 Org. Key Part Definition Screen (GLUPKP) ......................................................................... 108 1.14 Budget Level and Accumulator Definition (GLUPLV)........................................................... 110
1.14.1 Where the Accumulators are Stored..................................................................................................111 1.15 Object Code Definition (GLUPOB)....................................................................................... 112
1.15.1 Primary Object Groups ......................................................................................................................115 1.15.2 Secondary Object Groups .................................................................................................................116
1.16 Object Group Definition Screen (GLUPOG)......................................................................... 117 1.17 GLUPQU: GL Quick Account Numbers (GLUPQU) ............................................................. 118 1.18 GL Rule Definition Screen (GLUPRU) ................................................................................. 121 1.19 General Ledger Start/End Dates by Subsystem (GLUPSE) ................................................ 124 1.20 General Ledger Direct Transaction Update (GLUPTR)........................................................ 127
GL HELP 6
1.21 General Ledger Browse Actual Amounts (GLUTAC) ........................................................... 130 1.22 Budget Copy Utility (GLUTDICB) ......................................................................................... 131 1.23 Import Budget Utility (GLUTDIIB)......................................................................................... 140 1.24 Sync Budget Transactions Utility (GLUTDISBCT) ............................................................... 146 1.25 Update Budget Amount Utility (GLUTDISBUB).................................................................... 151 1.26 Utility for File Upload (GLUTRI) ........................................................................................... 157 1.27 GL JE Import Data and Templates (GLUTRIJT) .................................................................. 160 1.28 Browse Summary Accumulators (GLUTSM)........................................................................ 161
1.28.1 Where the Accumulators are Stored..................................................................................................163 1.28.2 Running the Recalculate Tool............................................................................................................163
1.29 General Ledger Posting Preferences (GLUTSPPP) ............................................................ 166
GL HELP 7
1 General Ledger Help
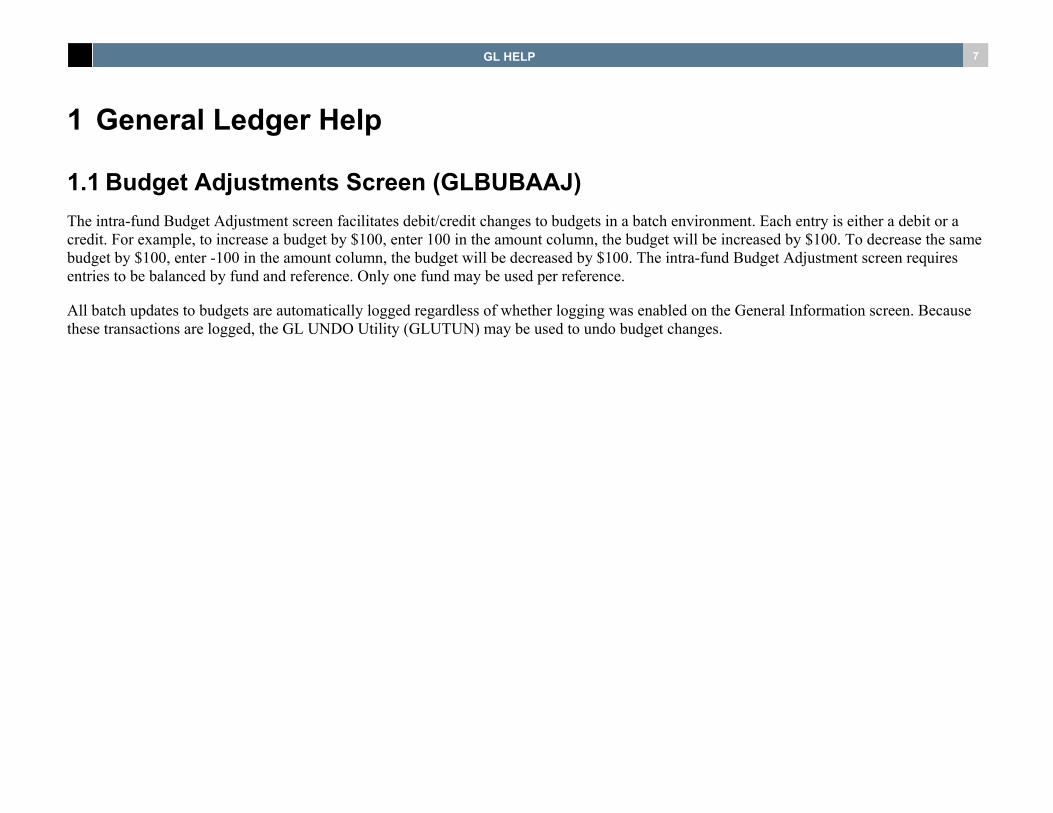
1.1 Budget Adjustments Screen (GLBUBAAJ) The intra-fund Budget Adjustment screen facilitates debit/credit changes to budgets in a batch environment. Each entry is either a debit or a credit. For example, to increase a budget by $100, enter 100 in the amount column, the budget will be increased by $100. To decrease the same budget by $100, enter -100 in the amount column, the budget will be decreased by $100. The intra-fund Budget Adjustment screen requires entries to be balanced by fund and reference. Only one fund may be used per reference.
All batch updates to budgets are automatically logged regardless of whether logging was enabled on the General Information screen. Because these transactions are logged, the GL UNDO Utility (GLUTUN) may be used to undo budget changes.

GL HELP 8
GLBUBAAJ differs from GLBUBAUB in that it prevents inter-fund adjustments, unbalanced budget entries, and restricts allocations to certain object codes and types, and balance increases/decreases. Set up common codes GLBU/GL372C and GLBU/AJOBJxxx and GLBU/BALTYPE for controls. For more information about common codes, refer to the Common Guide.

GL HELP 9
1.1.1 Set Tab The Set Tab is used to set up general batch information.
Ledger Side: Select a 2-character code to identify the GL or JL ledger.
Create Date: Display-only field showing the date of creation. This is useful in determining current from non-current sets, and may be a flag to the user that the system has an unposted set.
Create User: The system displays the user ID of the user currently logged into the system when creating a set.
Update Date: A display-only field showing the date of the batch update.
Update User: The system displays the user ID of the user currently logged into the system when updating the set.
Ref. Count: The number of references in the batch.

GL HELP 10
Record Count: The number of records in the batch.
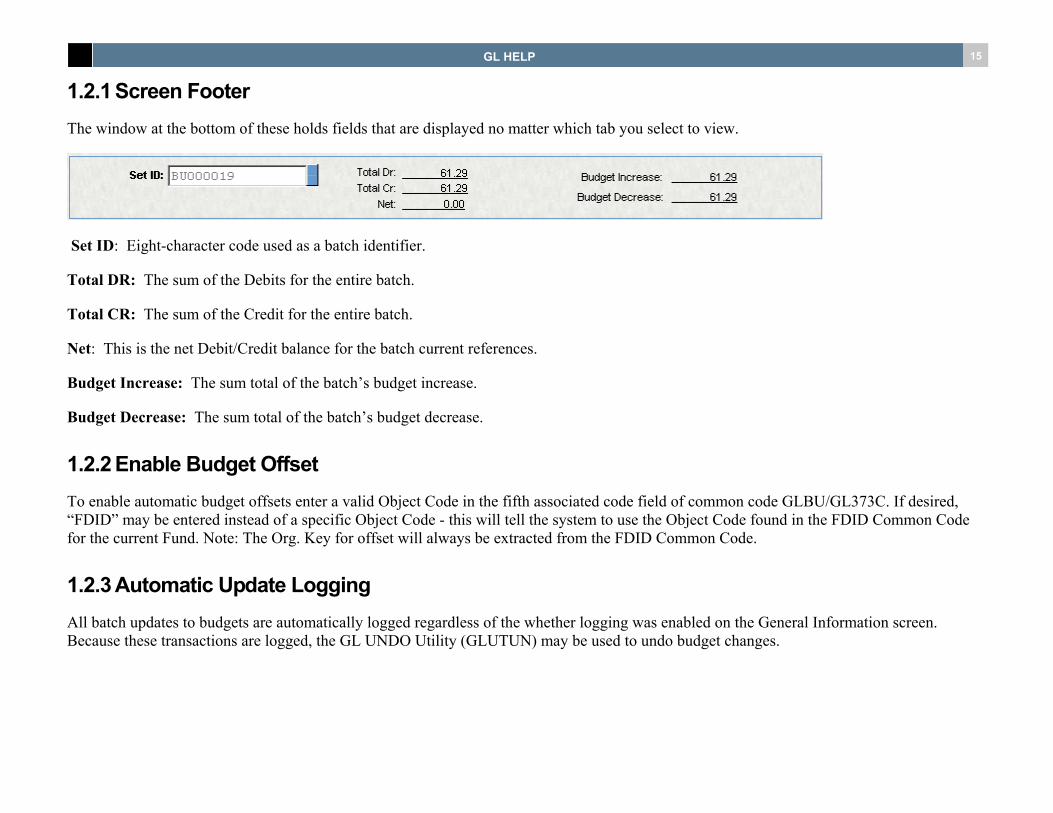
1.1.2 Screen Footer The window at the bottom of these holds fields that are displayed no matter which tab you select to view.
Set ID: Eight-character code used as a batch identifier.
Total DR: The sum of the Debits for the entire batch.
Total CR: The sum of the Credit for the entire batch.
Net: This is the net Debit/Credit balance for the batch current references.
Budget Increase: The sum total of the batch’s budget increase.
Budget Decrease: The sum total of the batch’s budget decrease.
1.1.3 Budget Adjustment Tab The Budget Adjustments tabbed page is used to input increases and decreases to accounts. The bottom of the screen duplicates information regarding the input on the batch as a whole.

GL HELP 11
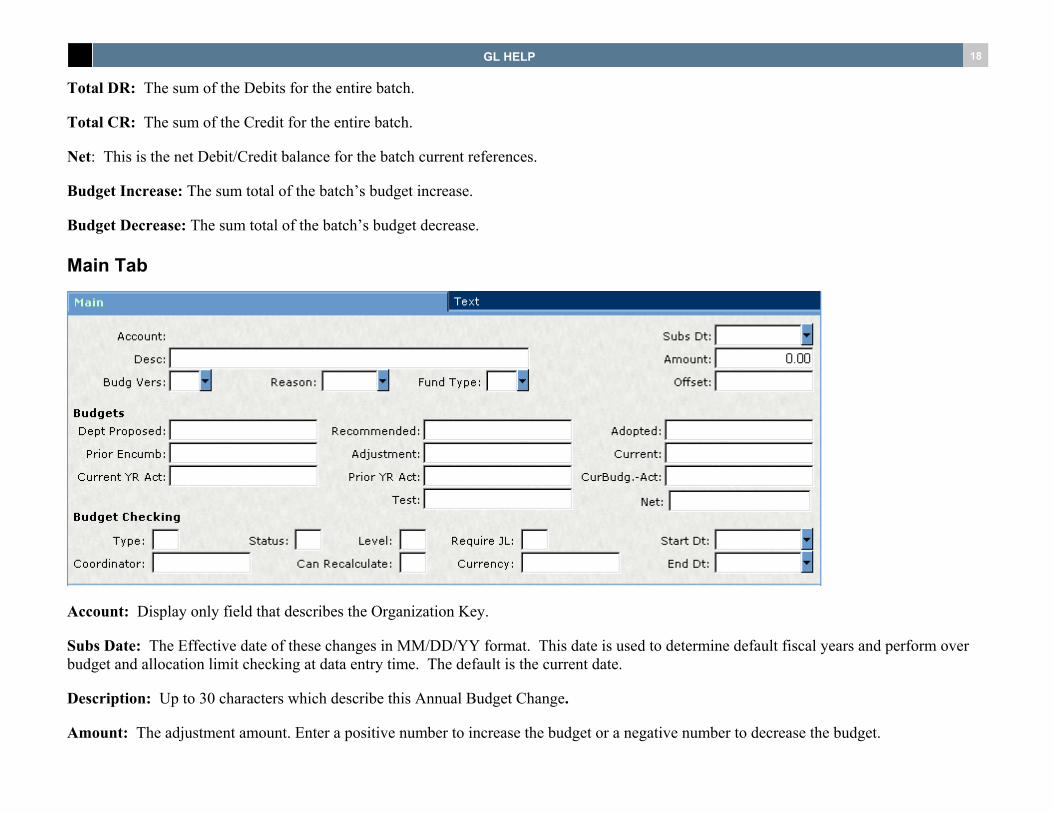
Main Tab
Description: Up to 30 characters which describe this budget adjustment.
Date: The effective date of these changes in MM/DD/CCYY format.
Ledger: A two-character code which identifies the ledger code.
Account: Up to 40 characters which describe the account to be affected. Individual object codes and/or ranges may be excluded from use by setting up common code(s) GLBU-AJOBJxxx. See the Common Code Reference Manual for more information on this common code. The title of this column may be changed by placing the new title in the long description of the common code GLBU-GL372C. The allowable object types may be limited by placing the allowed types in the medium description of common code GLBU-GL372C.

GL HELP 12
To look up a ledger code or account part (key, object, etc.), place the cursor in the field and press CTRL+L or press the “…” button and select Lookup xx where xx is the field where the cursor is placed.
When pressing the , a drop-down box, displayed above, appears. You can alter the structure of the Account # field by selecting the following options:
GL Org Key-Object: Select this option or press CTRL+K to find an account using the ledger organization and object code. Account numbers may be entered as fully qualified, organization key and object code.
GL Quick: This option allows you to find an account using a quick key that you may have set up in the Quick Account Numbers (GLUPQU) screen.
Show Ledger: Selecting this option allows you to identify a specific general ledger.
Debit/ Credit/Net: The adjustment amount. Enter a positive number to increase the budget or a negative number to decrease the budget. This value is the net change only, it is NOT the new amount of the budget. The title of this column may be changed by placing the new title in the fourth associated code field on common code GLBU-GL372C.
Increase-Decrease: This field denotes whether the entry is an increase or decrease to the budget.
Object Type: The object type of the object code that is associated with this entry (e.g., XP = Expenses).
Reason Code: A four-character code which provides a reason for these adjustments. Values placed into this field must have been previously defined using the common code BURS/CHECK. The first associated code field on common code GLBU-GL372C can be used to set a default for this field.See the Common Code Reference Manual for more details.
Fund Type: A two-character code which describes the Fund Type of the transaction. Values placed into this field must have been previously defined on the COMMON CODES MASTER screen (NUUPCD). Only people with appropriate capabilities may define Common Codes. When the COMMON CODE MASTER screen appears, enter “BUFT” in the Code Category field. Enter up to two characters for the Fund Type in the Code value field. Be sure to enter a description of the Fund Type in the Medium Description field. If a Common Code of “BUFT” and Code Value of “CHECK” exists, validation always occurs, even if the field is blank.
Level: A two-character code which specifies the level at which these budgets are defined. Valid codes are “OB”, and “G1” ... “G8”. The third associated code field on common code GLBU-GL372C can be used to set a default for this field.
GL HELP 13
Budget Version: A two-character identifier which denotes the budget version to be adjusted. The second associated code field on common code GLBU-GL372C can be used to set a default for this field. Nucleus budget version security applies.
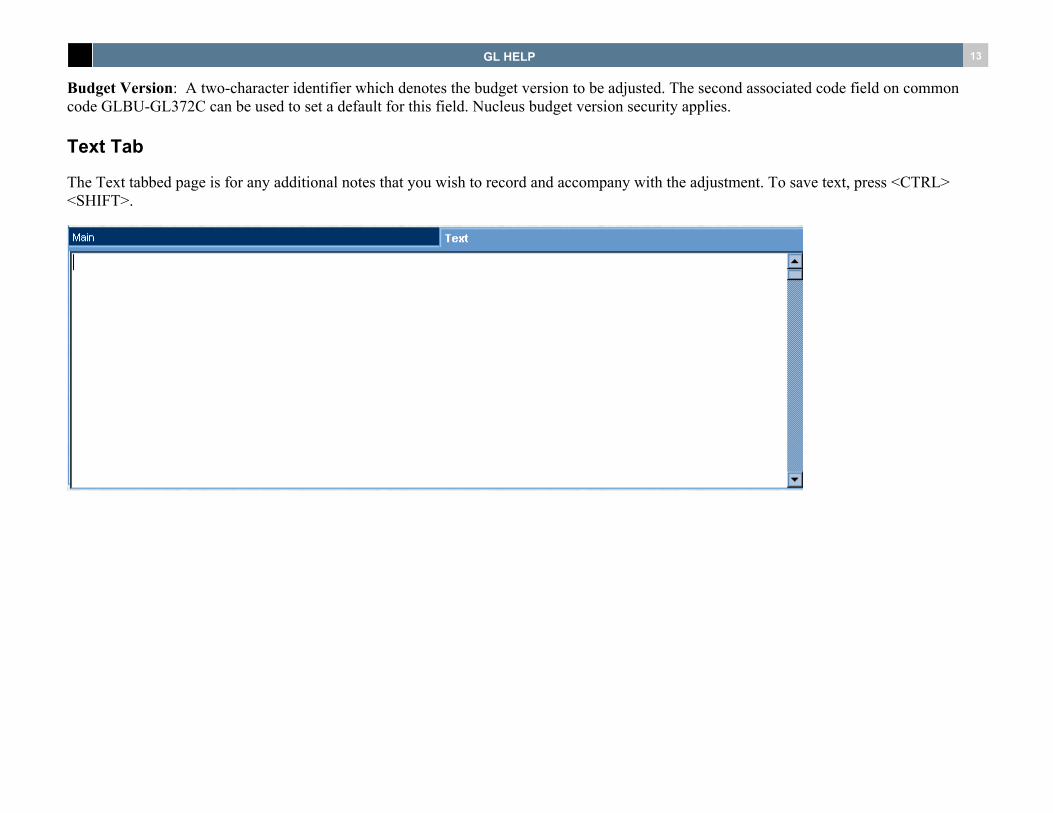
Text Tab
The Text tabbed page is for any additional notes that you wish to record and accompany with the adjustment. To save text, press <CTRL> <SHIFT>.

GL HELP 14
1.2 Annual Budgets Screen (GLBUBAAN) The intra-fund Annual Budget Changes screen facilitates debit/credit changes to budgets in a batch environment. To increase a budget by $100, enter 100 in the amount column. To decrease the same budget by $100, enter -100 in the amount column.
GL HELP 15
1.2.1 Screen Footer The window at the bottom of these holds fields that are displayed no matter which tab you select to view.
Set ID: Eight-character code used as a batch identifier.
Total DR: The sum of the Debits for the entire batch.
Total CR: The sum of the Credit for the entire batch.
Net: This is the net Debit/Credit balance for the batch current references.
Budget Increase: The sum total of the batch’s budget increase.
Budget Decrease: The sum total of the batch’s budget decrease.
1.2.2 Enable Budget Offset To enable automatic budget offsets enter a valid Object Code in the fifth associated code field of common code GLBU/GL373C. If desired, “FDID” may be entered instead of a specific Object Code - this will tell the system to use the Object Code found in the FDID Common Code for the current Fund. Note: The Org. Key for offset will always be extracted from the FDID Common Code.
1.2.3 Automatic Update Logging All batch updates to budgets are automatically logged regardless of the whether logging was enabled on the General Information screen. Because these transactions are logged, the GL UNDO Utility (GLUTUN) may be used to undo budget changes.

GL HELP 16
1.2.4 Automatic Budget Offset Use automatic budget offsets to avoid performing balance checking. The Object Code, to which Budget offsets will be made, can be found in the Offset field. If this field contains a valid Object Code, the Annual Budget Changes batch will not be required to be in balance. Budget offsets will be created as required to balance each Fund at distribution time.
1.2.5 View Distributed Budget Transactions To view budget transactions already distributed, use the GL File Listing of Budget Changes (GLREFLCB).
1.2.6 Set Tab The Set Tab is used to set up general batch information.
Ledger Side: Select a 2-character code to identify the GL or JL ledger.
GL HELP 17
Create Dt: Display-only field showing the date of creation. This is useful in determining current from non-current sets, and may be a flag to the user that the system has an unposted set.
Create User: The system displays the User ID of the user currently logged into the system when creating a set.
Update Dt: A display-only field showing the date of the batch update.
Update User: The system displays the user ID of the user currently logged into the system when updating the set.
Ref. Count: The number of reference in the batch.
Record Count: The number of records in the batch.
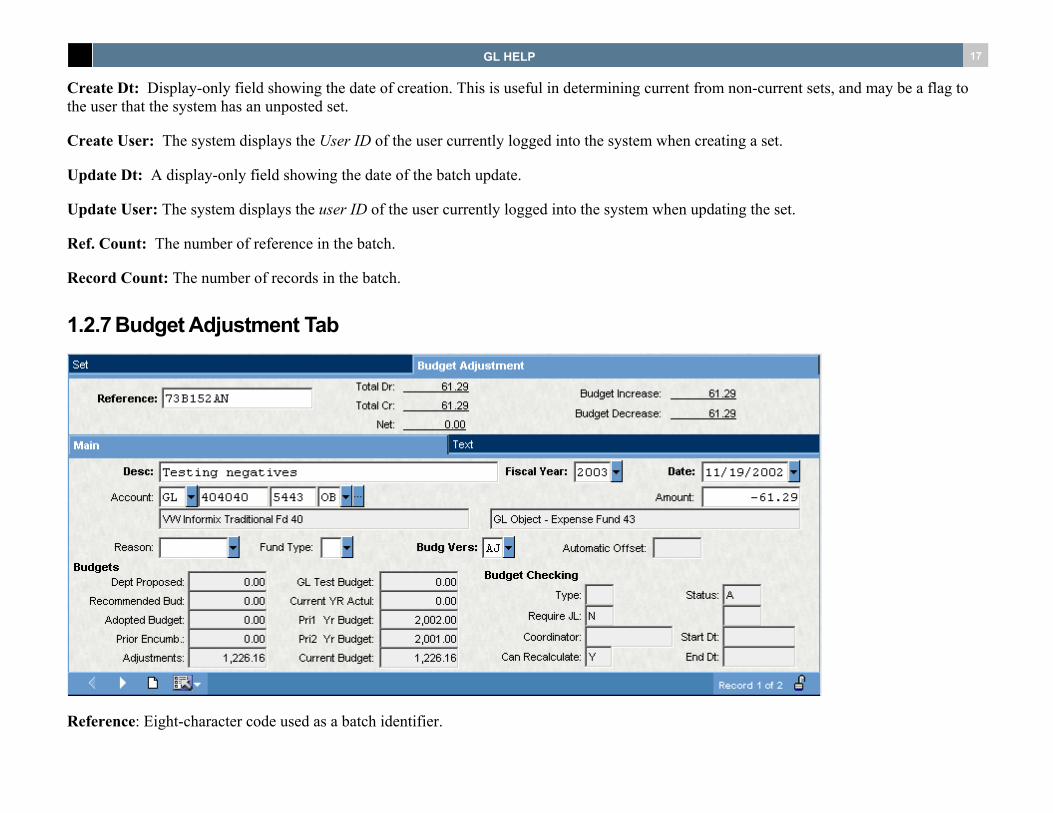
1.2.7 Budget Adjustment Tab
Reference: Eight-character code used as a batch identifier.
GL HELP 18
Total DR: The sum of the Debits for the entire batch.
Total CR: The sum of the Credit for the entire batch.
Net: This is the net Debit/Credit balance for the batch current references.
Budget Increase: The sum total of the batch’s budget increase.
Budget Decrease: The sum total of the batch’s budget decrease.
Main Tab
Account: Display only field that describes the Organization Key.
Subs Date: The Effective date of these changes in MM/DD/YY format. This date is used to determine default fiscal years and perform over budget and allocation limit checking at data entry time. The default is the current date.
Description: Up to 30 characters which describe this Annual Budget Change.
Amount: The adjustment amount. Enter a positive number to increase the budget or a negative number to decrease the budget.

GL HELP 19
Budget Vers: Up to 16 characters which provide a reference for these changes. Use of this field is typically analogous to the use of JE-IDs. It groups together a set of transactions that form one logical accounting transaction in budgeting which should not be split apart. Note: If the previous screen has the “Last?” flag set to “Y”, then the reference will be blank in the next collect mode screen to allow the user to enter a new reference.
Reason: A four-character code which provides a reason for these adjustments. Values placed into this field must have been previously defined on the Common Codes Master screen (NUUPCD). Only people with appropriate capabilities may define Common Codes. When the Common Code Master screen appears, enter “BURS” in the Code Category field. Enter up to four characters for the Reason code in the Code value field. Be sure to enter a description of the reason in the Medium Description field. If a Common Code of “BURS” and Code Value of “CHECK” exists, validation always occurs, even if the field is blank. The first associated code field on common code GLBU-GL373C can be used to set a default for this field.
Fund Type: A two-character code which describes the Fund Type of the transaction. Values placed into this field must have been previously defined on the COMMON CODES MASTER screen (NUUPCD). Only people with appropriate capabilities may define Common Codes. When the COMMON CODE MASTER screen appears, enter “BUFT” in the Code Category field. Enter up to two characters for the Fund Type in the Code value field. Be sure to enter a description of the Fund Type in the Medium Description field. If a Common Code of “BUFT” and Code Value of “CHECK” exists, validation always occurs, even if the field is blank.
Offset: The Object Code to which Budget offsets will be made. If this field contains a valid Object Code, the Annual Budget Changes batch will not be required to be in balance. Budget off-sets will be created as required to balance each Fund at distribution time. To enable automatic budget offsets enter a valid Object Code in the fifth associated code field of Common Code GLBU-GL373C. If desired “FDID” may be entered instead of a specific Object Code. This will tell the system to use the Object Code found in the FDID Common Code for the current Fund. Note: The Org. Key for offset will always be extracted from the FDID Common Code.
Budgets Fields
Budget versions defined on the GLUPGN screen will appear as fields in the center of this screen. Enter the new annual budget amount in these fields.

GL HELP 20
Budget Checking
Type: If budget checking is to be performed at data entry, the two-character code, which indicates the type and level of checking desired, will be displayed here.
Status: “A” - Active, “I” - Inactive.
Level: A two-character code which specifies the level at which these budgets are defined. Valid codes are “OB”, and “G1” ... “G8”. The third associated code field on common code GLBU-GL373C can be used to set a default for this field.
Require JL: Indicate whether this Account (Org. Key and Object) will also require a JL Side account upon data entry.
Start Dt: The starting date for the budget, if not on a fiscal year basis.
Coordinator: The person's name who is identified as the director of the Budget or Organization Key.
Can Recalculate: “Y” will allow any derived budget values to be recalculated when the GL Utility, Recalculate Balances is executed. This may not be desired when an OBJECT GROUP level budget has been manually entered and is not derived from Object Code level budgets.
Currency: The type of currency used for this budget.
End Dt: The ending date for the budget, if not on a fiscal year basis.

GL HELP 21
Text Tab
To save text, press <CTRL> <ENTER>.
1.3 General Ledger Budget Transfers Screen (GLBUBATR) GLBUBATR is an intrafund budgeting screen. It facilitates debit/credit changes to budgets using sets. Its purpose is to allow end users to distribute budgets, from a fund holding account, to the "lower level" accounts they are responsible for. When using these screens to create sets, the entries must balance by fund and reference. Only one fund may be used per reference.
If the client wishes to use this screen to do interfund budgeting, a holding account for each fund should be created. Money can then be transferred from each fund holding account into their corresponding "lower level" accounts. If this is not feasible, then GLBUBAUB should be used to create budget sets.
The amount posted from this set is a change to the budget, not the new amount of the budget.
GL HELP 22
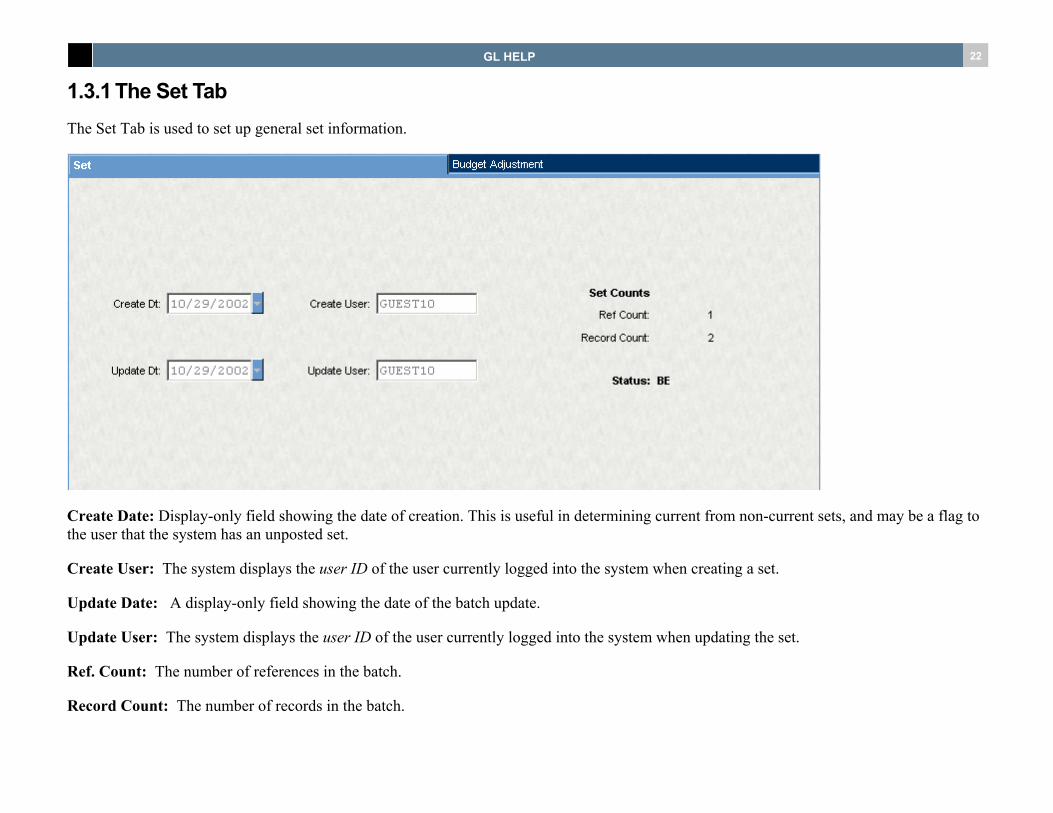
1.3.1 The Set Tab The Set Tab is used to set up general set information.
Create Date: Display-only field showing the date of creation. This is useful in determining current from non-current sets, and may be a flag to the user that the system has an unposted set.
Create User: The system displays the user ID of the user currently logged into the system when creating a set.
Update Date: A display-only field showing the date of the batch update.
Update User: The system displays the user ID of the user currently logged into the system when updating the set.
Ref. Count: The number of references in the batch.
Record Count: The number of records in the batch.

GL HELP 23
Status: A one-character status code which indicates if the Organization Key is 'A' (Active), 'C' (Closed) or 'I' (Inactive). An Organization key can have new transactions posted against it only if the Status is 'A' (Active). Closed and Inactive Organization Keys will continue to show up on standard reports for fiscal years where there has been activity posted against that Key.
1.3.2 Screen Footer The window at the bottom of these holds fields that are displayed no matter which tab you select to view.
Set ID: Eight-character code used as a batch identifier.
Total DR: The sum of the Debits for the entire batch.
Total CR: The sum of the Credit for the entire batch.
Net: This is the net Debit/Credit balance for the batch current references. Each reference must have a zero Net for the batch to be accepted.
Budget Increase: The sum total of the batch’s budget increase.
Budget Decrease: The sum total of the batch’s budget decrease.
1.3.3 Budget Transfer Tab The Budget Transfer tab is used to input increases and decreases to accounts. The bottom of the screen duplicates information regarding the input on the batch as a whole. This page includes two sub-tabs: Main and Text. Each tab is described below.

GL HELP 24
Reference: Eight-character code used as a batch identifier.
Total DR: The sum of the Debits for the entire batch.
Total CR: The sum of the Credit for the entire batch.
Budget Increase: The sum total of the batch’s budget increase.
Budget Decrease: The sum total of the batch’s budget decrease.
Net: This is the net Debit/Credit balance for the batch current references. Each reference must have a zero Net for the batch to be accepted.
Main Tab
Description: Up to 30 characters which describe this Budget Transfer.
Fiscal Year: Four-digit identifier which denotes the fiscal year budget to be adjusted.
Date: The Date field holds the effective date of the changes. The FY field is derived from the Date field.

GL HELP 25
GL Account: Up to 40 characters which describe the account to be affected. Individual Object Codes and/or ranges may be excluded from use by setting up Common Code(s) GLBU-TROBJxxx. See the GL User Guide for more information on this Common Code. The title of this column may be changed by placing the new title in the long description of the Common Code GLBU-GL371C. The allowable Object Types may be limited by placing the allowed types in the medium description of Common Code GLBU-GL371C.ther a set of transactions that form one logical accounting transaction in budgeting which should not be split apart.
Balance Type: The side that the entry will be made on; e.g. if an account has a balance type of Debit and a positive number (increase) is entered in the amount column, then the budget will be increased. If a negative amount is entered, 'Credit' will appear in this field, and the budget will be decreased. Budgeting normal balances default to the opposite of their Object Code's Balance type. Individual Object Codes and/or ranges may be setup to force to a specific Budgeting Normal Balance type through use of Common Code GLBU-AJOBJxxx. See the GL User Guide for more information on this Common Code.
Object Type: The Object Type of the Object Code that is associated with this entry (e.g., XP = Expenses).
Adjustment:
Increase-Decrease: This field denotes whether the entry is an increase or decrease to the budget.
Debit: The sum of the Debits.
Credit: The sum of the Credits.
Amount: This is the net Debit/Credit balance for the current reference.
Reason: A four-character code which provides a reason for these adjustments. Values placed into this field must have been previously defined on the COMMON CODES MASTER screen (NUUPCD). Only people with appropriate capabilities may define Common Codes. When the COMMON CODE MASTER screen appears, enter 'BURS' in the Code Category field; enter up to four characters for the Reason code in the Code value field; be sure to enter a description of the Reason in the Medium Description field. If a Common Code of 'BURS' and Code Value of 'CHECK' exists, validation will always occurs, even if the field is blank. The first associated code field on common code GLBU-GL373C can be used to set a default for this field.
Fund Type: A two-character code which describes the Fund Type of the transaction. Values placed into this field must have been previously defined on the COMMON CODES MASTER screen (NUUPCD). Only people with appropriate capabilities may define Common Codes. When the COMMON CODE MASTER screen appears, enter 'BUFT' in the Code Category field; enter up to two characters for the Fund Type in the Code value field; be sure to enter a description of the Fund Type in the Medium Description field. If a Common Code of 'BUFT' and Code Value of 'CHECK' exists, validation will always occurs, even if the field is blank.

GL HELP 26
Budget Version: A two-character identifier which denotes the budget version to be changed. The second associated code field on Common Code GLBU-GL373C can be used to set a default for this field. Nucleus budget version security applies.
1.3.4 Text Tab The Text tabbed page is for any additional notes that you wish to record and accompany with the adjustment. To save text, press <CTRL> <SHIFT>.
1.3.5 Posting Debits and Credits Each transaction is either a debit or a credit. Currently, the following is used to determine whether a debit or credit will increase or decrease the budget:
Trns Type Object Type Result
DR DR Decreases budget
CR DR Increases budget
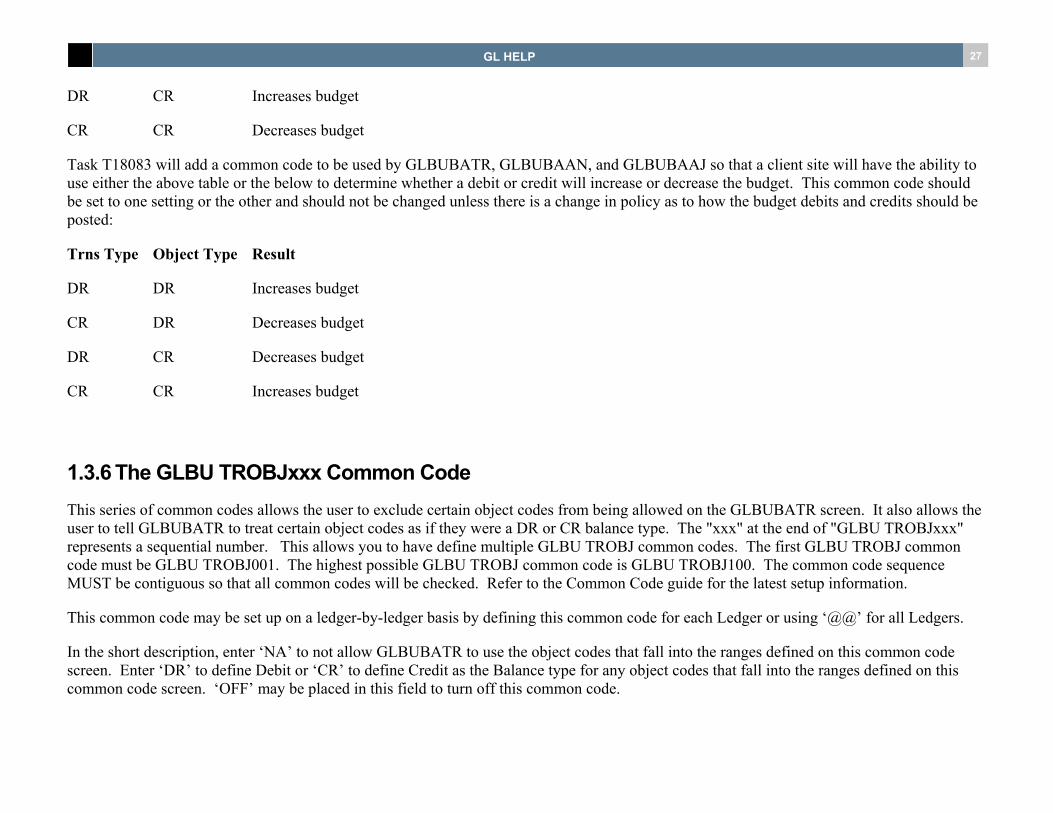
GL HELP 27
DR CR Increases budget
CR CR Decreases budget
Task T18083 will add a common code to be used by GLBUBATR, GLBUBAAN, and GLBUBAAJ so that a client site will have the ability to use either the above table or the below to determine whether a debit or credit will increase or decrease the budget. This common code should be set to one setting or the other and should not be changed unless there is a change in policy as to how the budget debits and credits should be posted:
Trns Type Object Type Result
DR DR Increases budget
CR DR Decreases budget
DR CR Decreases budget
CR CR Increases budget
1.3.6 The GLBU TROBJxxx Common Code This series of common codes allows the user to exclude certain object codes from being allowed on the GLBUBATR screen. It also allows the user to tell GLBUBATR to treat certain object codes as if they were a DR or CR balance type. The "xxx" at the end of "GLBU TROBJxxx" represents a sequential number. This allows you to have define multiple GLBU TROBJ common codes. The first GLBU TROBJ common code must be GLBU TROBJ001. The highest possible GLBU TROBJ common code is GLBU TROBJ100. The common code sequence MUST be contiguous so that all common codes will be checked. Refer to the Common Code guide for the latest setup information.
This common code may be set up on a ledger-by-ledger basis by defining this common code for each Ledger or using ‘@@’ for all Ledgers.
In the short description, enter ‘NA’ to not allow GLBUBATR to use the object codes that fall into the ranges defined on this common code screen. Enter ‘DR’ to define Debit or ‘CR’ to define Credit as the Balance type for any object codes that fall into the ranges defined on this common code screen. ‘OFF’ may be placed in this field to turn off this common code.

GL HELP 28
Up to five object ranges may be defined on each common code screen. The first object in the range is placed in an associated code, and the last object code in the range is placed in the corresponding associated description. For example, to use the range 0000-1000, put 0000 in the first associated code, and put 1000 in the last associated code.
You can fill in all 5 of the associated codes and description, starting with the first code and description, and go on from there to list up to 5 ranges. Don't skip any rows.
The GLBU GL371C Common Code
This Common Code allows the user to define allowable Object Types and some field defaults for GLBUBATR. Field defaults may be set up for Reason Code, Budget Version, and Budget Level. You can also change the titles for the Debit and Credit columns for GLBUBATR. This Common Code may be set up on a ledger-by-ledger basis by defining this Common Code for each Ledger or using ‘@@’ for all Ledgers. Refer to the Common Code guide for the latest setup information.
The short description should be blank unless you want to turn off this common code. To turn off this common code, place ‘OFF’ or ‘N/A’ in the short description.
You can leave the medium description blank to accept all Object Types, or you can a comma-delimited list of Object Types to be allowed, for example, RV,XP,TI,TO.
You can leave the long description blank, or you can enter up to 40 characters (left justified) to use as alternative field title for the ‘ACCOUNT’ field on the Transfers Set Screen. Backslash codes will be translated, for example if ‘\GT’ is used, the account description on GLUPGN screen 4 will be used.
The first associated code holds the default reason code. The second associated code holds the default budget version. The third associated code holds the default budget level.
If the fourth associated code is not blank, its contents will be used as the title for the Debit column. Backslash codes will be translated. If the fifth associated code is not blank, its contents will be used as the title for the Credit column. Backslash codes will be translated.
1.4 Budget Adjustment/Transfer Screen (GLBUBAUB) The Budget Adjustment/Transfer screen facilitates net changes to budgets in a batch environment. Each transaction is simply the net change (i.e., a $100 transaction will increase the budget by 100 dollars when the batch is distributed). If no budget exists, it will be created. To transfer budgetary amounts from one account or fiscal year to another, simply specify the appropriate account or fiscal year on the 'FROM' portion of the transaction. Use negative amounts to reduce the budget (e.g., -500 will reduce the budget by 500 dollars).

GL HELP 29
All batch updates to budgets are automatically logged regardless of the whether logging was enabled on the General Information screen. Because these transactions are logged, the GL UNDO Utility (GLUTSUUN) may be used to undo budget changes.
To view budget transactions already distributed, use the GL File Listing of Budget Changes: GLREFLCB.
There are two tabbed pages: the Set tab and the Budget Adjustment tab. The tabbed pages are described below.
1.4.1 Set Tab
Create Date: Display-only field showing the date of creation. This is useful in determining current from non-current sets, and may be a flag to the user that the system has an unposted set.

GL HELP 30
Create User: The system displays the User ID of the current user logged into the system to create a set.
Update Date: Display-only field showing the date of the batch update.
Update User: The system displays the User ID of the current user logged into the system to update the set.
Ref. Count: The number of references in a set.
Record Count: The number of record in a set.
Status: System derived status of the set.
Set ID: Enter an 8-character code to identify a set (batch).
Total DR: The sum of the debits for an entire set (batch).
Total CR: The sum of the credits entire set (batch).
Net: This is the net Debit/Credit balance for the set of current reference.
Budget Increase: The sum total of set budget increases for each reference.
Budget Decrease: The sum total of set budget decreases for each reference.

GL HELP 31
1.4.2 Budget Adjustment Tab
The Budget Adjustment tab is used to input increases and decreases to accounts.
Main Tab
Reference: Up to 16 characters which provide a reference for these changes.
Set ID: Enter an 8-character code to identify a set (batch).
Total DR: The sum of the debits for an entire set (batch).
Budget Increase: The sum total of set budget increases for each reference.

GL HELP 32
Total CR: The sum of the credits entire set (batch).
Budget Decrease: The sum total of set budget decreases for each reference
Net: This is the net Debit/Credit balance for the set of current reference.
Fiscal Year: Enter the fiscal year this change relates to.
Description: Up to 30 characters which describe this Budget Adjustment.
Date: The Effective date of these changes in MM/DD/YY format. This date is used to determine default fiscal years and perform over budget and allocation limit checking at data entry time. The default is the current date.
Amount: The Transaction Amount. Use positive values to increase the budget, negative values to decrease the budget. For 'A' type budget adjustments or type 'T' or 'X' budget transfers, this is the NET CHANGE only; an absolute amount to which the budget is to be set. For type 'N' new budgets, this is the absolute amount to which the budget is to be set.
(Optional) From: This field must be left blank except when doing 'T' or 'X' type budget transfers. In this case, enter the 'FROM' budget account in this field. Placing a value in this field automatically sets the transaction type to 'T' (Transfer) or 'X' (when running from GLBUBAUX). If running from GLBUBAUX, this field is required.
Balance Type: The normal balance type for the object code (“DR” for debit and “CR” for credit).
Object: The Object Type of the Object Code that is associated with this entry (e.g., XP = Expenses).
Adjustment: The side that the entry will be made on ( e.g., if an account has a balance type of Debit and a positive number is entered in the amount column, then the budget will be increased). If a negative amount is entered, 'Credit' will appear in this field, and the budget will be decreased. Budgeting normal balances default to the opposite of their Object Code's Balance type. Individual Object Codes and/or ranges may be setup to force to a specific Budgeting Normal Balance type through use of Common Code GLBU-AJOBJxxx. See the Common Code guide for more information on this Common Code.
To: Up to 40 characters which describe the account to be affected. This is a standard account number field accepting input in the normal format configured on GLUPGN screen 4 (KO, K-O, OK, various FAQs, etc.) For 'T' or 'X' type transfers, this is the 'TO' account.
Reason: A user-definable four-character code providing the reason for these budget changes. This allows categorize budget changes in meaningful ways. Values placed into this field must have been previously defined in Common Codes (NUUPCD). Only people with sufficient access capabilities may define Common Codes. These Common Codes have a Category of 'BURS' and a set of Codes equaling the set of

GL HELP 33
reasons chosen. When a question mark ('?') is placed in this field, a pick-list will appear facilitating choice of a code and displaying the description from the medium description on the corresponding Common Code. If a Common Code exists with a Category of 'BURS' and a Code of 'CHECK', validation will always occur, making this a required field. Also, the first associated code field on Common Code GLBU-GL370C can be used to set a default for this field.
Fund Type: This two-character code contains a user-definable code describing the transaction type. This code will be validated against Common Codes having a Category of 'BUFT' and a Code equaling the type entered. Further, if a Common Code with a Category of 'BUFT' a Code of 'CHECK' exists, validation will always occur, making this a required field.
Budget Version: This two-character field identifies the budget version to be changed. The second associated code field on Common Code GLBU-GL370C can be used to set a default for this field. Nucleus budget version security applies.
Set ID: Enter an 8-character code to identify a set (batch).
Total DR: The sum of the debits for an entire set (batch). The total debits must equal the total credits for each reference.
Budget Increase: The sum total of set budget increases for each reference.
Total CR: The sum of the credits entire set (batch). The total credits must equal the total debits for each reference.
Budget Decrease: The sum total of set budget decreases for each reference
Net: This is the net Debit/Credit balance for the set of current reference. Each reference must have a zero Net for the batch to be accepted.

GL HELP 34
Text Tab
To save text, press <CTRL> < ENTER>.
1.5 Average Salary (GLBUFTAS) The Average Salary screen is used to define average salaries for use in the calculations on the GLBUFTUB (FTE budgeting) screen.
The parts displayed on this screen are defined in common code: GLFG AVGSAL. (See the last section of this document for an example, but refer to the Common Code guide for specific setup information.) Up to five GL parts/groups can be used on this screen. The part01, part02, etc. are replaced by the entries defined in the common code. In the example, we are using Job Class (Object Group) and Project (Key Part). Blank values may be entered for a Part that would be treated as a wild card. You may create an entry for just Job Class by leaving the Project blank. If there are conflicting entries, then the closest match accessing the parts from top to bottom is used. For example, if there is a separate entry for Job Class: 2100 with no Project & an entry for Project: 611 with no Job Class & no entry for both, then the entry for Project: 611 will be used when there is a budget entry for an account in Project: 611 and Job Class: 2100.
Note: Because of the configurable nature of this screen, no data lookup or validation will be made for the part values entered here. The user must know what Project and/or Job Class (and/or any other parts you choose to configure in the five boxes) that they choose to enter. If no Project 611 exists, then it will be accepted here. It will have no impact on the budget screen until a project 611 is created.

GL HELP 35
1.5.1 Single Record View
Fields
Part01-05: Key, Key Part, Object, or Object Group as defined in GLFG AVGSAL common code. The tags for these items will be changes to the values in the associated descriptions of the common code. Given our example, instead of seeing part01 through part05 you should see “Project” then “Job Class” with the other three unused parts being blank.
Average Salary: The average salary for someone being paid out the key/group account combination defined by the values entered in the parts above. Consider, for example, using “Project” as part one and “Job Class” as part two. If the overage salary for someone who works for Project 1000 and has a Job Class of 8000 is 80,000.00, the user enters 1000 in part 01 and 8000 in part02 and 80,000.00 in the average salary.
Ledger: The ledger code associated with the parts/groups entered above. GLFG AVGSAL – Common Code

GL HELP 36
NOTE: Refer to the Common Code guide for specific setup of this common code.
This is where you define what Parts/Groups are used for the Average Salary definition screen.

GL HELP 37
Associated Codes: Enter the four character Key, Key Part, Object, Object Group from GLUPGN or use “#M1” through “#M8” for Key Misc Codes (one through eight) or use “#S1” through “#S8” for Key Select Codes (one through eight).
Associated Descriptions: Enter the “Tag” description to appear next to this code on the Average Salary screen.
1.6 Fringe Benefit Rate (GLBUFTFR) The Fringe Benefit Rate screen is used to define the fringe benefit rate for calculation on the GLBUFTUB (FTE budgeting) screen. Additionally, it defines what account the fringe benefits is budgeted against.
The parts displayed on this screen are defined in common code: GLFG FRINGE. (See the last section of this document for an example, but refer to the Common Code guide for specific setup information.) The same logic is used as the Average Salary table. Blank values entered for a Part are treated as a wild card. You may create a entry for just Job Class by leaving the Object blank. If there are conflicting entries, then the closest match accessing the parts from top to bottom are used. For example, if there is a separate entry for Job Class: 2100 with no Object & an entry for Object: 210 with no Job Class & no entry for both, then the entry for Object 210 will be used when there is a budget entry for an account in Object 210 and Job Class: 2100.
In other words, if Object is blank then all entries in the given Job Class will use the entered Fringe Rate. If Job Class is blank then all entries in the specified Object will use the given Fringe Rate. If there is a conflict, then the Part defined first on the screen (defined by the client via common code GLFG FRINGE) takes precedence.
Note: Because of the configurable nature of this screen, no data lookup or validation will be made for the part values entered here. The user must know what Object and/or Job Class (and/or any other parts you choose to configure in the five boxes) that they choose to enter. If no Object 210 exists, then it will be accepted here. It will have no impact on the budget screen until an Object 210 is created.

GL HELP 38
1.6.1 Single Record View
Fields
Part01-05: Key, Key Part, Object, or Object Group as defined in GLFG FRINGE common code. The tags for these items are changes to the values in the associated descriptions of the common code. Given our example, instead of seeing part01 through part05, you would see “Project” then “Job Class” with the other three unused parts being blank.
Fringe Rate: The fringe rate for someone being paid out of the key/group account combination defined by the values entered in the parts above. Consider, for example, using “MPS Object” as part one. If the fringe for someone who works an account who’s MPS object is 3456 is 24.5%, the user would enter 3456 in part 01 and 24.50000 in the Fringe Rate.
Fringe Org Key: The Org. key the fringe posts to. If “SAME” is entered, then the fringe will post to the same org. key as the emplyee’s wages.

GL HELP 39
Fringe Object: Object code the fringe is posted to.
Ledger: The ledger code associated with the parts/groups entered above.
1.6.2 GLFG FRINGE – Common Code NOTE: Refer to the Common Code guide for specific setup of this common code.
GL HELP 40
This is where you define what Parts/Groups are used for the Fringe Rate definition screen.
Associated Codes: Enter the four character Key, Key Part, Object, Object Group from GLUPGN or use “#M1” through “#M8” for Key Misc Codes (one through eight) or use “#S1” through “#S8” for Key Select Codes (one through eight).
Associated Descriptions: Enter the “Tag” description to appear next to this code on the Fringe Rate screen.
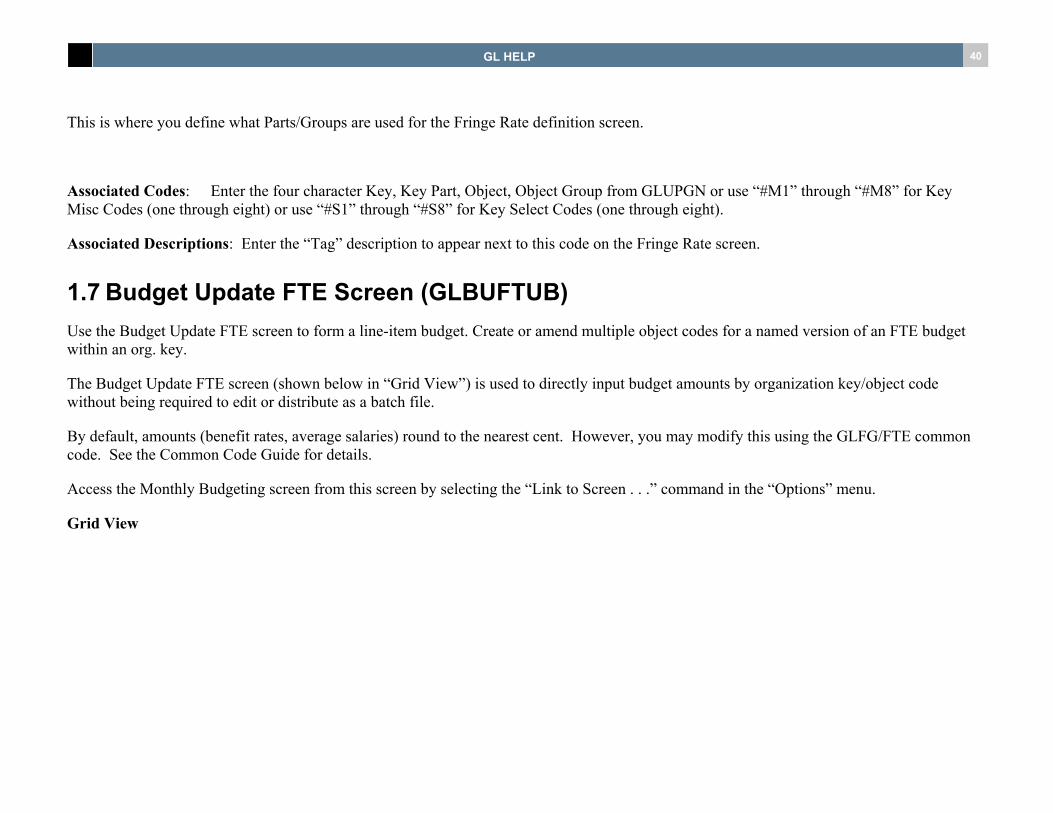
1.7 Budget Update FTE Screen (GLBUFTUB) Use the Budget Update FTE screen to form a line-item budget. Create or amend multiple object codes for a named version of an FTE budget within an org. key.
The Budget Update FTE screen (shown below in “Grid View”) is used to directly input budget amounts by organization key/object code without being required to edit or distribute as a batch file.
By default, amounts (benefit rates, average salaries) round to the nearest cent. However, you may modify this using the GLFG/FTE common code. See the Common Code Guide for details.
Access the Monthly Budgeting screen from this screen by selecting the “Link to Screen . . .” command in the “Options” menu.
Grid View
GL HELP 41
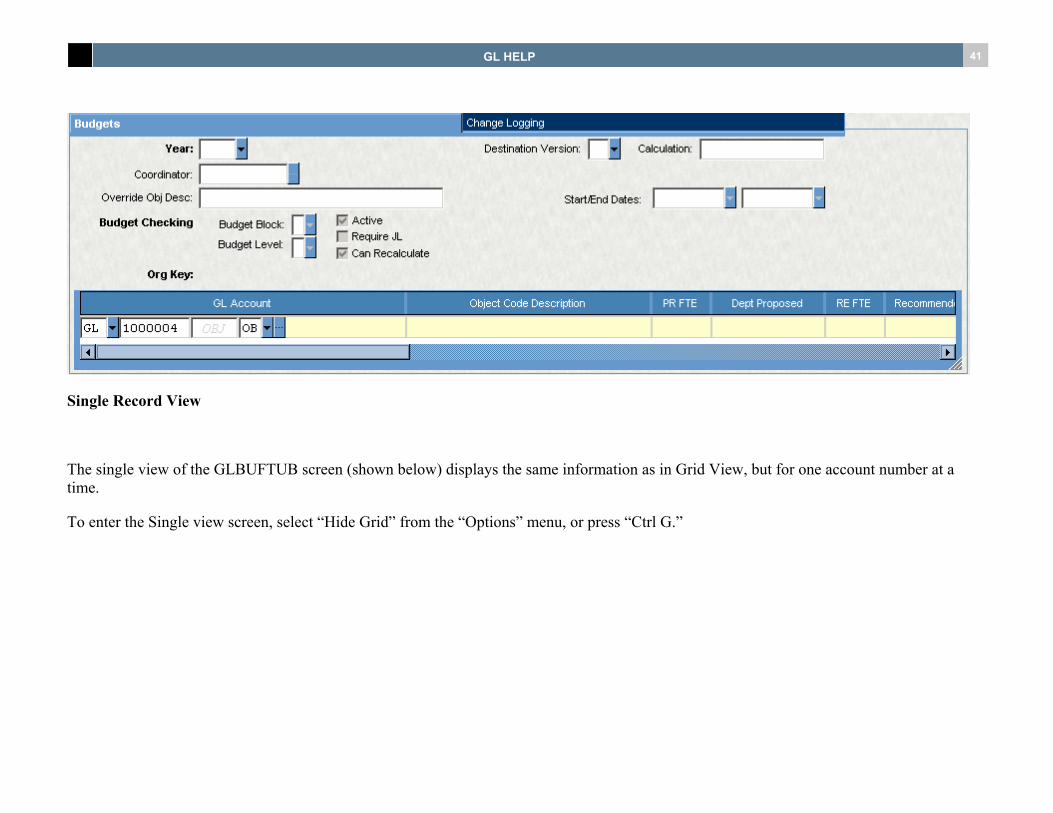
Single Record View
The single view of the GLBUFTUB screen (shown below) displays the same information as in Grid View, but for one account number at a time.
To enter the Single view screen, select “Hide Grid” from the “Options” menu, or press “Ctrl G.”

GL HELP 42
Fields:
Year: The four-digit fiscal year number for the budget.
Destination Version (Calculation): The two character budget version that will be updated if you enter an amount in the box immediately following the base version. For example, if the proposed budget (PB) is placed in the base version, the adopted budget (AB) is placed in the destination version, and you place +100 in the next box, the new adopted budget will be the proposed budget plus one-hundred dollars. This is easier to use in single record mode because the changes are easier to see. If used in grid mode, the changes are applied to the line that is active.

GL HELP 43
Coordinator: Enter a previously defined PE ID to indicate the person within the organization coordinating the budget for this account. PE IDs are entered through the Person/Entity database. Please consult the Person/Entity User Guide for help in defining PE IDs.
Override Obj Desc: The next column is used to override the object code description, if desired.
Start/End Dates: The starting date and ending date for the budgets being prepared, if not on a fiscal year basis. Format is MM/DD/YYYY.
Note: Using a date range is most useful in budgeting grants, construction projects, and other multi-year activities. These are informational only to be used for reporting purposes.
Budget Checking: Budget checking is defined by selecting the following options under the type and level fields:
Budget Block: Blank = None; A = Authorize; B = Block; W = Warn
Budget Level: Select the object group level for which budgets are being defined. “G1, G2, G3, . . . G8” correspond to previously defined object groups. Other options include “Blank” (meaning none) and “O” (meaning object code).
Active: Select the active flag to indicate the budget is active. Deselect for inactive.
Require JL: Select to require, for this account (Org. Key and Object), a JL side account at data entry.
Can Recalculate: Select this field to recalculate any derived budget values when the GL Utility, Recalculate Balances, executes. Do not select the field to avoid recalculating budgets based on lower level budget entries.
GL Org Key-Object: Select this option or press CTRL+K to find an account using the ledger organization and object code. Account numbers may be entered as fully qualified, organization key and object code.
Account: Up to 36 characters which uniquely identify the General Ledger Account and, optionally, the Job Ledger Account. For ease of use, this field supports a variety of methods of data entry including the Quick and Fully Qualified Account methods to specify both the GL Account and/or the JL Account. General Ledger (GL) account must be keyed into this field. If the Job Ledger (JL) module is used and this transaction relates to an account in the JL, enter a JL account number.

GL HELP 44
To look up a ledger code or account part (key, object, etc.), place the cursor in the field and press CTRL+L or press the '…' button and select “Lookup xx”, where xx is the field in which the cursor s placed.
When pressing the , a drop-down box (displayed above) appears. You can alter the structure of the Account # field by selecting the following options:
GL Quick
This option allows you to find an account using a quick key that you may have set up in the Quick Account Numbers (GLUPQU) screen.
Show Ledger Selecting this option allows you to identify a specific general ledger.
Show Work Order Enter a Work Order prefix with a pound (#) sign. The work order number must have been set up in the Work Order module.
Column Fields: Budget versions defined on the GLUPGN screen will appear as fields in the right column of this screen. Enter the new annual budget amount in these fields.
While the screen is in grid view, you can input changes/additions directly into the grid cells in the row for the appropriate org. key/object code (account number), and under the column for the intended budget version.
Currency Code: If you have defined currency codes in the foreign currency module, you can enter a currency code on the screen to determine how and in what form of currency the amounts are stored. If this field is left blank , the default is United States currency.
1.7.1 Change Logging Tab

GL HELP 45
The Change Logging tab is used to add information to the log record associated with any budget changes. If entered, these values will be placed on any glc_budg_dtl change log records that are generated if budget logging is enabled in the GLUPGN screen.
Using GLBUFTUB
When user enters a budget dollar amount the following will occur:
1. Lookup average salary in GLA-AVG-SAL-MSTR based on the configured background parts. If it exists then give an error that the user cannot enter a dollar figure but must enter an FTE then stop. Allow an option, by user, to override this error. (Suggest using DB security: GLDB “BU AMT OVERRIDE” similar to “JE BU OVERRIDE” for the JE screen.)
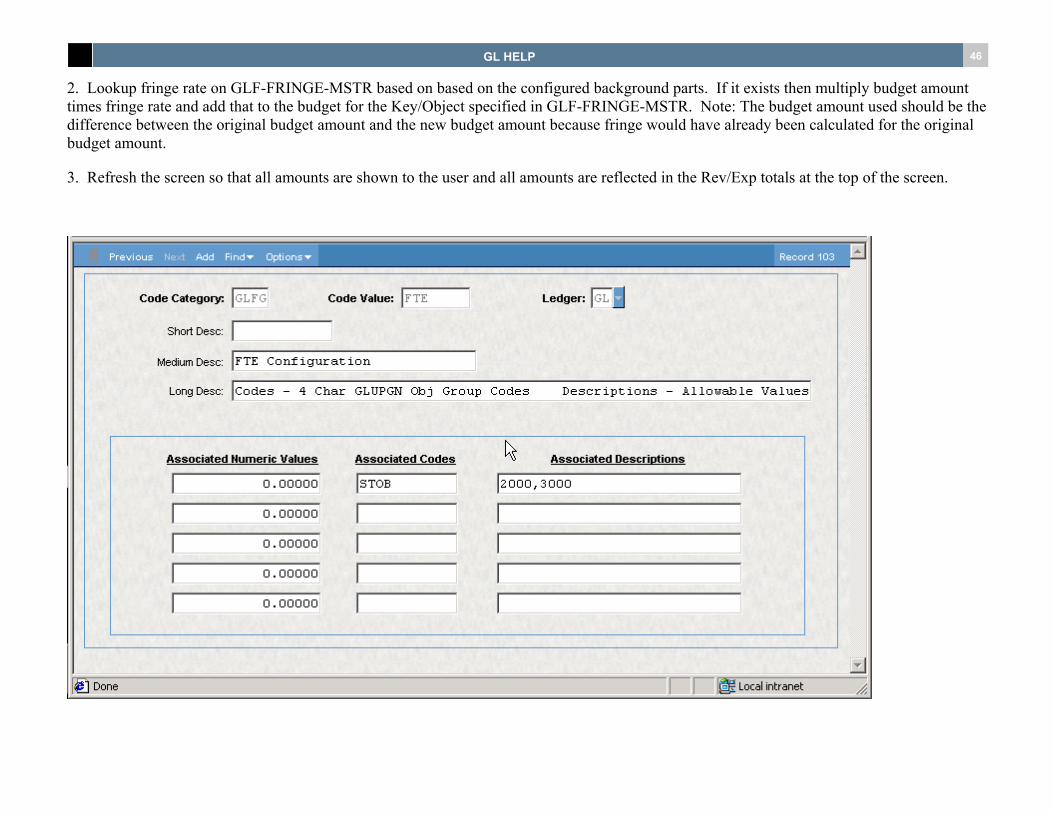
GL HELP 46
2. Lookup fringe rate on GLF-FRINGE-MSTR based on based on the configured background parts. If it exists then multiply budget amount times fringe rate and add that to the budget for the Key/Object specified in GLF-FRINGE-MSTR. Note: The budget amount used should be the difference between the original budget amount and the new budget amount because fringe would have already been calculated for the original budget amount.
3. Refresh the screen so that all amounts are shown to the user and all amounts are reflected in the Rev/Exp totals at the top of the screen.

GL HELP 47
GLFG FTE Common Code - Allowable Entries for FTE
First Associated Code: Four character Object Code/Group from GLUPGN. This tells the system which Obj/Obj group to use.
Associated Descriptions: One or more code values, separated by commas, allowing FTE's to be entered.
In our example above an error will be generated if a user tries to enter an FTE number for any budget record where the State Object code is not 2000 and is not 3000. (See step 1. under 'When user enters an FTE number' above.)
Add FTE to Budget Copy Utilities:
When copying from one year/version to another year/version always include the FTE. Ask a new question 'Is FTE to be multiplied by the change percentage? (Y/N):' If the answer is Yes then multiply from FTE by change percentage. IF No then copy FTE as-is even though dollars may change.
When copying from a flat file add the following underlined options to question GL3F:
Upload Which Type of Budgets? (RETURN=AN):
AN Annual Budgets MO Fiscal Period Budgets
QT Quarterly Budgets FT FTE Budgets Only
FA FTE & Annual Budgets

GL HELP 48
1.8 Budget Templates (GLBUTM) Budget Templates allow you to define up to 20 columns to be shown on the main Budget Entry screen (GLBUBE). The columns defined can be calculated, or from different fiscal years than the current working fiscal year. The following 3 sections describe the Budget Template screen, how to select a template from the Budget Entry screen, and finally, how the template chosen affects the Budget Entry screen.
1.8.1 The Budget Template screen
Each row in the Budget Template screen defines a column that will appear on the Budget Entry screen. Up to 4 values from the Budget/Actual table can be added or subtracted to produce the column. As you select values for a column, a Column Header is generated for you, and displayed in the right-most column of the screen. This will become the Column header in the Budget Entry screen. You may use this Header, or overwrite it with your own.
GL HELP 49
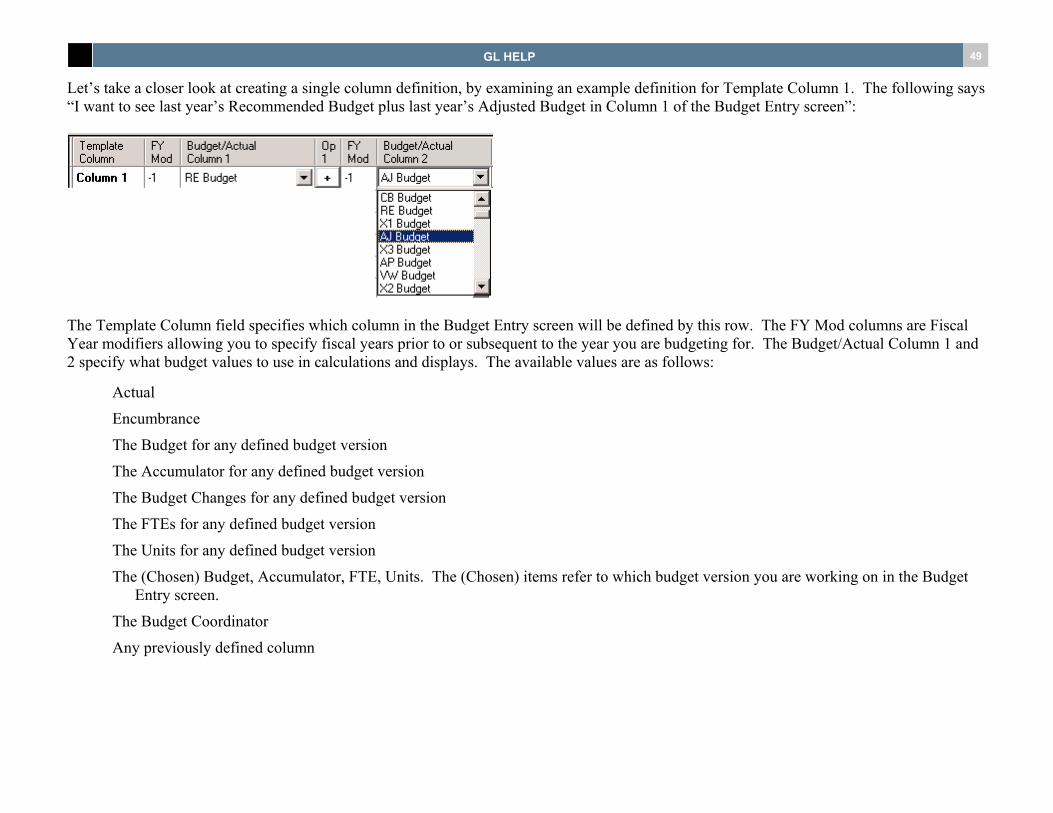
Let’s take a closer look at creating a single column definition, by examining an example definition for Template Column 1. The following says “I want to see last year’s Recommended Budget plus last year’s Adjusted Budget in Column 1 of the Budget Entry screen”:
The Template Column field specifies which column in the Budget Entry screen will be defined by this row. The FY Mod columns are Fiscal Year modifiers allowing you to specify fiscal years prior to or subsequent to the year you are budgeting for. The Budget/Actual Column 1 and 2 specify what budget values to use in calculations and displays. The available values are as follows:
Actual
Encumbrance
The Budget for any defined budget version
The Accumulator for any defined budget version
The Budget Changes for any defined budget version
The FTEs for any defined budget version
The Units for any defined budget version
The (Chosen) Budget, Accumulator, FTE, Units. The (Chosen) items refer to which budget version you are working on in the Budget Entry screen.
The Budget Coordinator
Any previously defined column
GL HELP 50
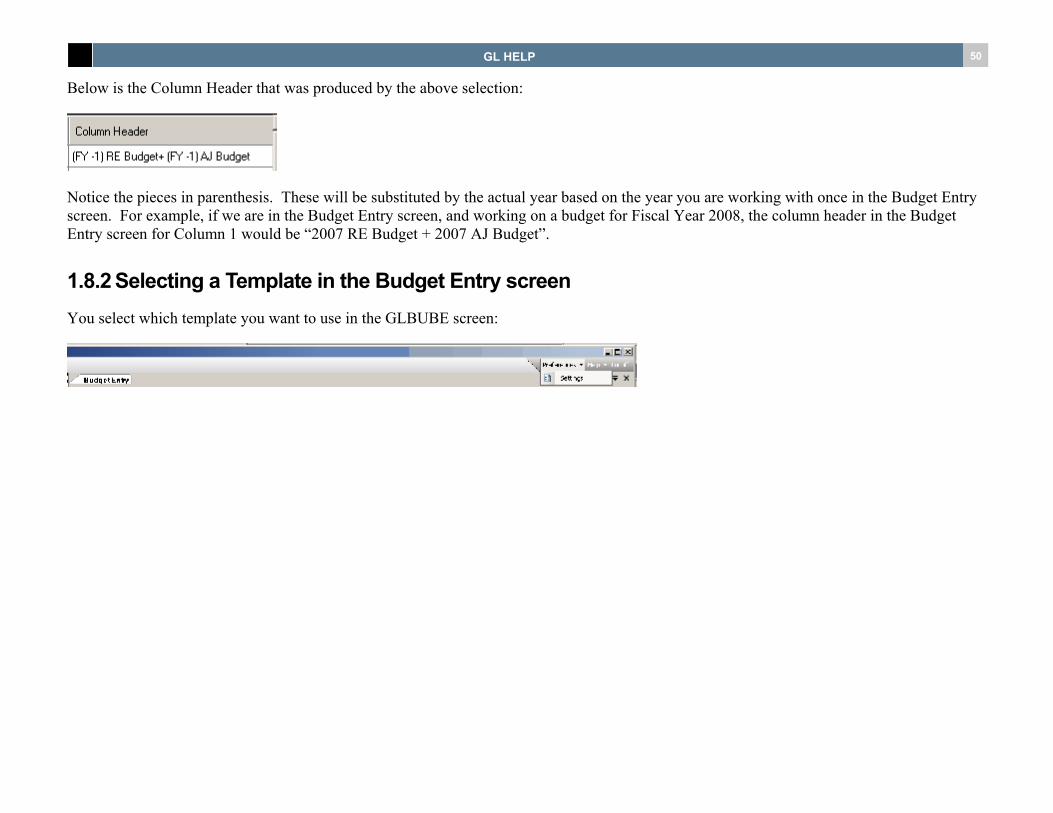
Below is the Column Header that was produced by the above selection:
Notice the pieces in parenthesis. These will be substituted by the actual year based on the year you are working with once in the Budget Entry screen. For example, if we are in the Budget Entry screen, and working on a budget for Fiscal Year 2008, the column header in the Budget Entry screen for Column 1 would be “2007 RE Budget + 2007 AJ Budget”.
1.8.2 Selecting a Template in the Budget Entry screen You select which template you want to use in the GLBUBE screen:

GL HELP 51
Selecting Settings from the Preferences menu in the Budget Entry screen brings up this dialog box, where you select the template to use:
The Template Name Combo Box allows you to select any of the defined templates, and will be saved for your user the next time you launch the Budget Entry screen.

GL HELP 52
1.8.3 Example of a Budget Template, and how it manifests in the Budget Entry Screen Let’s take the example Template from the beginning of this section:
In this example, 10 of the possible 20 columns are defined. They are defined as follows:
Column 1 is the accumulator for whichever budget version is being worked on.
Column 2 is the Actual.
Column 3 is the Encumbrance.
Column 4 is the Proposed plus Adjusted Budgets.
Column 5 is last years Working Budget.
Column 6 is the changes for the current Working Budget.
Column 7 is last years PR Budget plus last years AD Budget plus last years PR Changes.
Column 8 is the Adjusted Budget.
Column 9 is Column 7 minus column 4
Column 10 is the Budget Coordinator.

GL HELP 53
In the Budget Entry Screen, for our example, the selected version to work on is the Proposed Budget for Fiscal Year 2001:
Based on the selected Budget Version/Fiscal Year, below shows how this Template controls what is shown in the Budget Entry screen when this template is chosen:
1.9 Budget Update Annual Screen (GLBUUP) Use the Budget Update Annual screen to form a line-item budget. Create or amend multiple object codes for a named version of an annual budget within an org. key.
The Budget Update Annual screen (shown below in “Grid View”) is used to directly input budget amounts by organization key/object code without being required to edit or distribute as a batch file.
Access the Monthly Budgeting screen from this screen by selecting the “Link to Screen . . .” command in the “Options” menu.
GL HELP 54
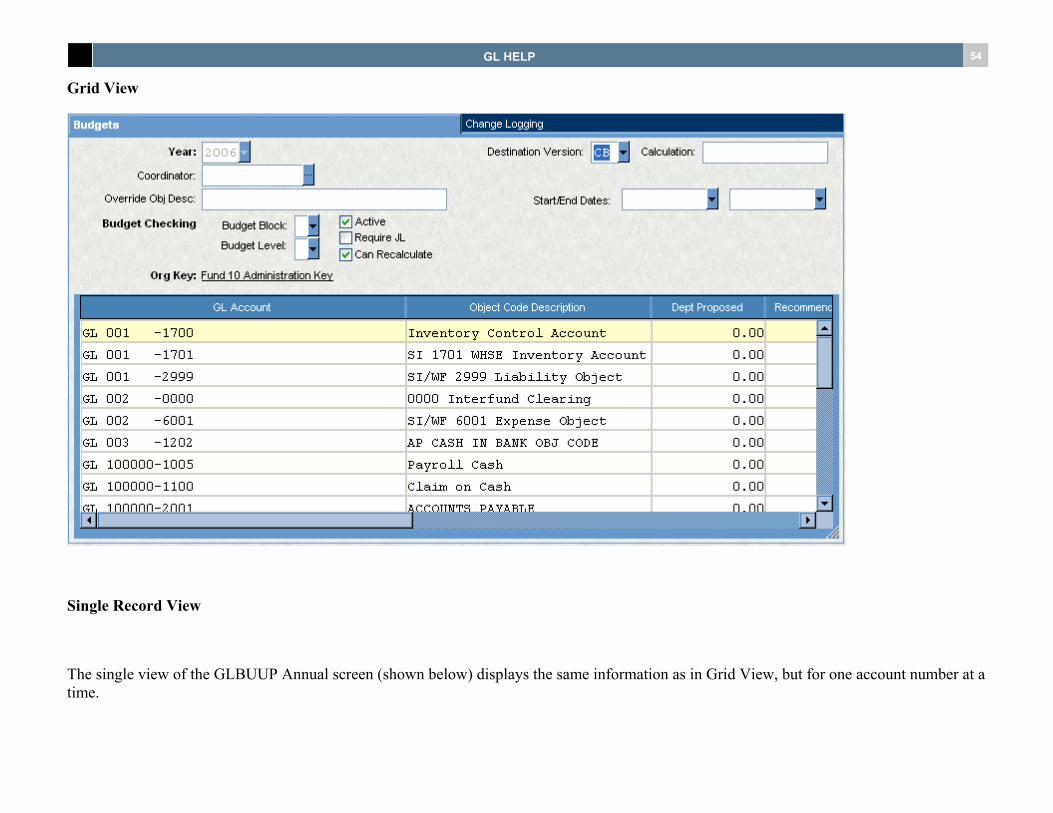
Grid View
Single Record View
The single view of the GLBUUP Annual screen (shown below) displays the same information as in Grid View, but for one account number at a time.

GL HELP 55
To enter the Single view screen, select “Hide Grid” from the “Options” menu, or press “Ctrl G.”
Year: The four-digit fiscal year number for the budget.
Destination Version (Calculation): Enter the destination version, put the base version in as part of the calculation. For example, put AB in the Destination version window, then, in the calculation window, put PB+100. This is easier to use in single record mode because the changes are easier to see. If used in grid mode, the changes are applied to the line that is active.
Coordinator: Enter a previously defined PE ID to indicate the person within the organization coordinating the budget for this account. PE IDs are entered through the Person/Entity database. Please consult the Person/Entity User Guide for help in defining PE IDs.
Override Obj Desc: The next column is used to override the object code description, if desired.

GL HELP 56
Start/End Dates: The starting date and ending date for the budgets being prepared, if not on a fiscal year basis. Format is MM/DD/YYYY.
Note: Using a date range is most useful in budgeting grants, construction projects, and other multi-year activities. These are informational only to be used for reporting purposes.
Budget Checking: Budget checking is defined by selecting the following options under the type and level fields:
Budget Block: Blank = None; A = Workflow Authorize (Over Budget conditions must be approved via Workflow before posting is allowed); B = Block; W = Warn
Budget Level: Select the object group level for which budgets are being defined. “G1, G2, G3, . . . G8” correspond to previously defined object groups. Other options include “Blank” (meaning none) and “O” (meaning object code).
Active: Select the active flag to indicate the budget is active. Deselect for inactive.
Require JL: Select to require, for this account (Org. Key and Object), a JL side account at data entry.
Can Recalculate: Select this field to recalculate any derived budget values when the GL Utility, Recalculate Balances, executes. Do not select the field to avoid recalculating budgets based on lower level budget entries.
GL Org Key-Object: Select this option or press CTRL+K to find an account using the ledger organization and object code. Account numbers may be entered as fully qualified, organization key and object code.
Account: Up to 36 characters which uniquely identify the General Ledger Account and, optionally, the Job Ledger Account. For ease of use, this field supports a variety of methods of data entry including the Quick and Fully Qualified Account methods to specify both the GL Account and/or the JL Account. General Ledger (GL) account must be keyed into this field. If the Job Ledger (JL) module is used and this transaction relates to an account in the JL, enter a JL account number.
To look up a ledger code or account part (key, object, etc.), place the cursor in the field and press CTRL+L or press the ‘…’ button and select “Lookup xx”, where xx is the field in which the cursor s placed.

GL HELP 57
When pressing the , a drop-down box (displayed above) appears. You can alter the structure of the Account # field by selecting the following options:
GL Quick
This option allows you to find an account using a quick key that you may have set up in the Quick Account Numbers (GLUPQU) screen.
Show Ledger
Selecting this option allows you to identify a specific general ledger.
Show Work Order
Enter a Work Order prefix with a pound (#) sign. The work order number must have been set up in the Work Order module.
Column Fields: Budget versions defined on the GLUPGN screen will appear as fields in the right column of this screen. Enter the new annual budget amount in these fields.
While the screen is in grid view, you can input changes/additions directly into the grid cells in the row for the appropriate org. key/object code (account number), and under the column for the intended budget version.
Currency Code: If you have defined currency codes in the foreign currency module, you can enter a currency code on the screen to determine how and in what form of currency the amounts are stored. If this field is left blank , the default is United States currency.
1.9.1 Change Logging Tab The Change Logging tab is used to add information to the log record associated with any budget changes. If entered, these values will be placed on any glc_budg_dtl change log records that are generated if budget logging is enabled in the GLUPGN screen.

GL HELP 58
1.9.2 Using GLBUUP: Totaling Options On the find menu, there are 3 totaling options. “Show Totals” which, when checked, displays the totals box (until unchecked). “Apply Find to Totals” which, when checked, locks in a query to use for totaling (until it is unchecked). “Refresh Totals” may be selected at any time (while totals are shown) to update the totals. This is useful if multiple users are making changes to the same data simultaneously.

GL HELP 59
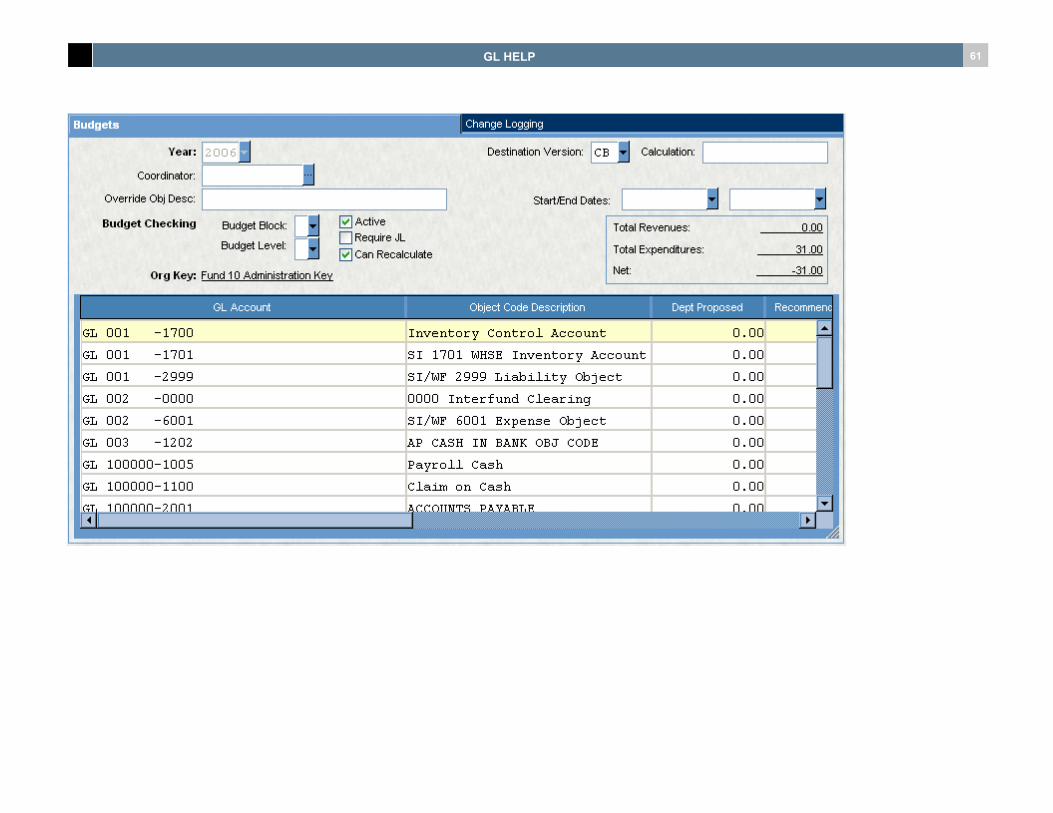
How to Display Revenue and Expense Totals:
If the “Show Totals” option is selected, a totals box will appear on the top right section of the screen.

GL HELP 60
The totals are calculated from the budget amount for the selected “Destination Version”. “Total Revenues” reflect the sum of all records selected by the current find that have object types of “RV” or “TI”. “Total Expenditures” reflect the sum of all records selected by the current find that have object types of “XP” or “TO”. “Net” is “Total Revenues” minus “Total Expenditures”. These totals will be updates whenever a new find is done, the “Destination Version” is changed, a record is added/updated/deleted, or “Refresh Totals” is selected.
GL HELP 61

GL HELP 62
How to “Lock In” Selection Criteria for Totals:
The “Apply to Totals” option may be selected whenever totals are shown and the screen is in “Find Mode”. Once new find criteria is entered, “Apply to Totals” is selected from the find menu. This will update the totals immediately with the current find criteria. The totals selection criteria is now bound to the current find criteria and will not change until the “Apply to Totals” option is unchecked.

GL HELP 63
In this case we want lock in the totals for Org Key 200000 only. From now on, until “Apply Find to Totals” is unchecked, we will only see totals for Org Key 200000 – no matter what our current find returns.
GL HELP 64
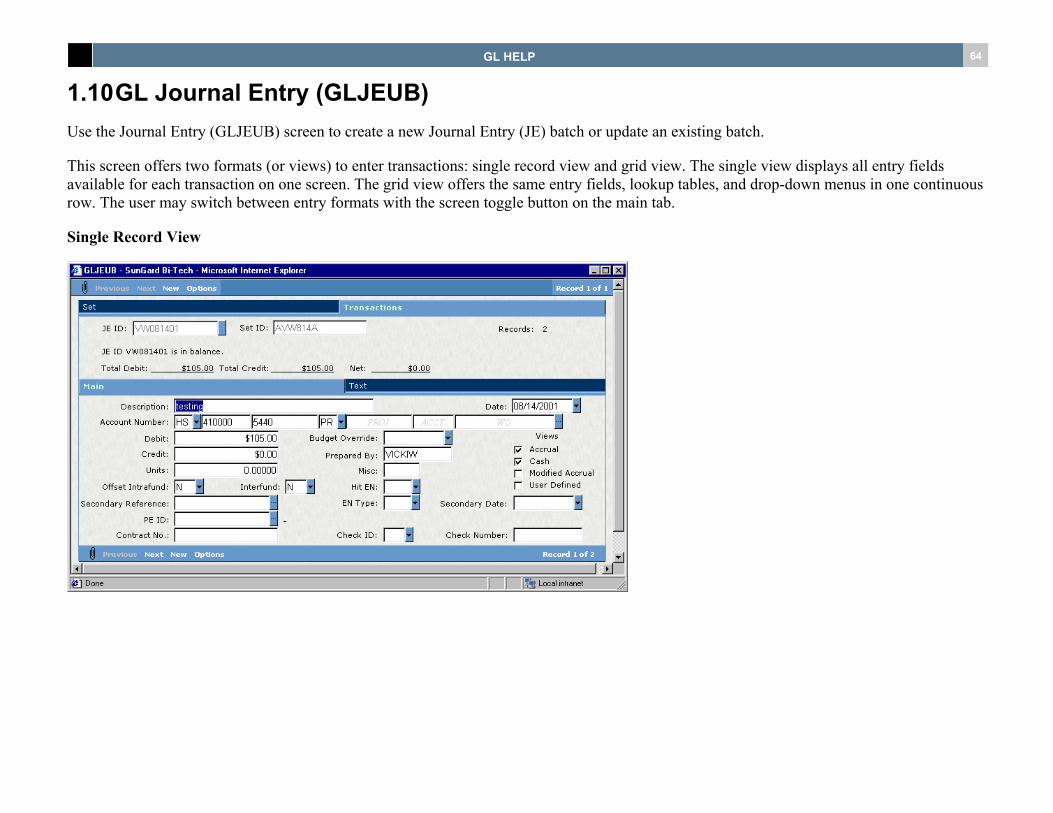
1.10 GL Journal Entry (GLJEUB) Use the Journal Entry (GLJEUB) screen to create a new Journal Entry (JE) batch or update an existing batch.
This screen offers two formats (or views) to enter transactions: single record view and grid view. The single view displays all entry fields available for each transaction on one screen. The grid view offers the same entry fields, lookup tables, and drop-down menus in one continuous row. The user may switch between entry formats with the screen toggle button on the main tab.
Single Record View

GL HELP 65
Grid View
When entry of the pertinent data into the record is completed and verified, press the Accept button to store the record. Continue by entering the balancing transaction. The debit, credit, and net balance of the transaction associated with this JEID is displayed under the JEID on both the Transactions (above) and Set (below) tabs.
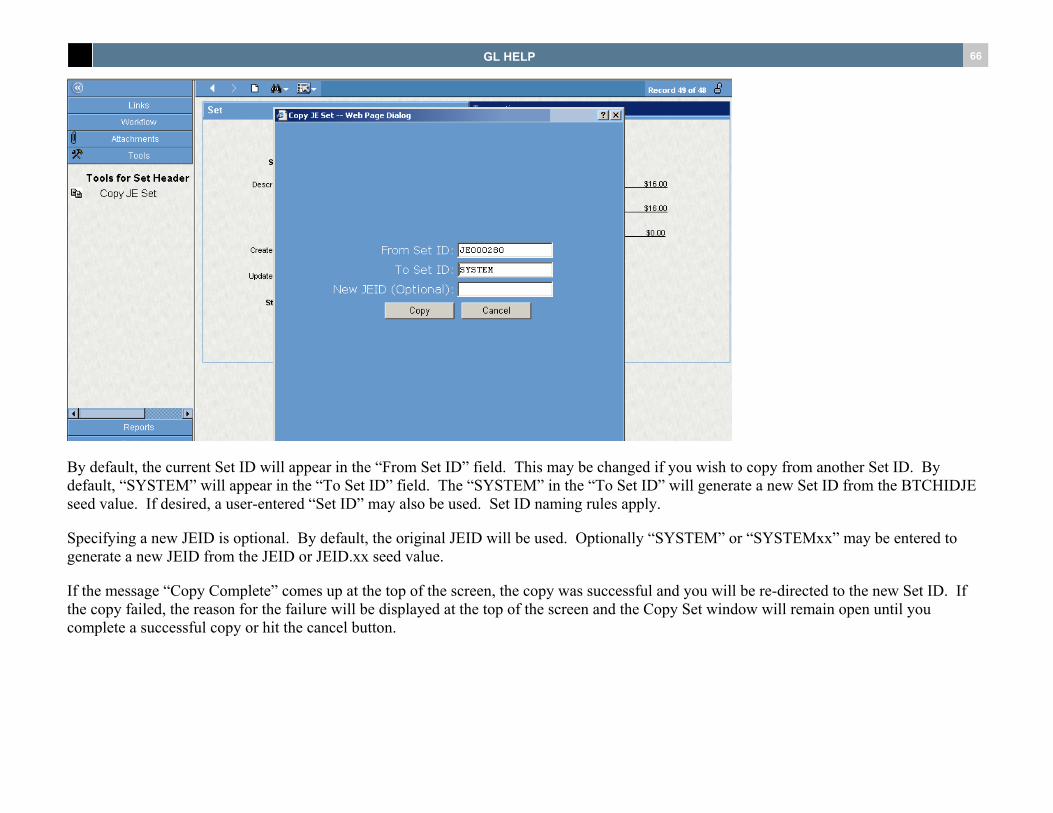
Copy Set Tool for GLJEUB
A Copy JE Set Tool is available under the Tools section of the Options Bar. The user must have access to the “COPY” command in NUUPUS use this tool. The Copy JE Set tool allows you to copy an existing JE set (and corresponding detail records) from one Set ID to another. The Set copied from will remain unchanged.
GL HELP 66
By default, the current Set ID will appear in the “From Set ID” field. This may be changed if you wish to copy from another Set ID. By default, “SYSTEM” will appear in the “To Set ID” field. The “SYSTEM” in the “To Set ID” will generate a new Set ID from the BTCHIDJE seed value. If desired, a user-entered “Set ID” may also be used. Set ID naming rules apply.
Specifying a new JEID is optional. By default, the original JEID will be used. Optionally “SYSTEM” or “SYSTEMxx” may be entered to generate a new JEID from the JEID or JEID.xx seed value.
If the message “Copy Complete” comes up at the top of the screen, the copy was successful and you will be re-directed to the new Set ID. If the copy failed, the reason for the failure will be displayed at the top of the screen and the Copy Set window will remain open until you complete a successful copy or hit the cancel button.

GL HELP 67
1.10.1 Set Tab The Set form displays the Set ID batch name, Create Date, Create User, Update fields, Status, and the System Totals box that displays transaction information pertaining to the Set ID.
Set ID: Each JE batch file must be given a unique name or set ID. The file name may be a maximum of eight (16) characters and must start with an alphabetic letter. For instance, the following two examples would be an appropriate set ID for a naming a set file:
JEHB0125 “JE” = Journal Entries, “HB” = person’s initials, and “0125” = 125th batch since the beginning of the fiscal year.
OR
JELH81626 Initials = LH; Month = 8; Day = 16 Batch # = 26
A set file may contain several batches of entries in the same file by changing the code in the JE ID field. Each JE ID identifies separate batches of entries within the set file. It is important to establish a naming convention that will be consistently used by everyone involved in creating set (batch) files within your organization.

GL HELP 68
Description: Describe the purpose of the Set entry in this field.
Create Date: Once the set is created this becomes a display-only field showing the date of creation. This is useful in determining current from non-current sets, and may be a flag to the user that the system has an unposted set.
Create User: This field will display the name of the person creating the set file. The name used to log in will be the default name.
Update Date: Once the set is created this becomes a display-only field showing the date of creation. This is useful in determining current from non-current sets, and may be a flag to the user that the system has an unposted set.
Update User: This field will display the name of the person updating the set file. The name used to log in will be the default name.
Status: The system automatically populates this field indicating whether or not the journal entry set has been distributed. You enter a code in this field when searching for records in Find mode. The status codes and their meanings are listed below:
DS The entry set has been distributed.
BE The entry set has not been distributed.
Total Debit: Display-only fields showing the accumulated amounts associated with set ID.
Total Credit: Display-only fields showing the accumulated amounts associated with set ID.
Net: Display-only fields showing the accumulated amounts associated with set ID.
JE Count: Display-only field showing the number of JEIDs associated with set ID.
Records: Display-only field showing the number of records associated with set ID. The user may want to clean up unwanted files that have a record size of zero.

GL HELP 69
1.10.2 Transactions Tab
General Information Window
The window prompts for and displays the JE ID for the set record. The display-only fields provide summary information pertaining to the transactions associated with JE ID.
JE ID: Up to 16 characters that uniquely identify a balanced set of account entries for the Journal Entry. This becomes the Primary Reference of the resulting transaction that is posted to GL.
Set ID: This field displays a unique name or ID for the set.

GL HELP 70
Records: Display-only field showing the number of records associated with transaction.
Total Debit: Display-only fields showing the accumulated amounts associated with the transaction.
Total Credit: Display-only fields showing the accumulated amounts associated with the transaction.
Net: A display-only field showing the net amount associated the the transaction.
Main Tab
Select the Main tab for transaction entry.
Fields
Description: Up to 30 characters describing the Journal Entry.
Date: Enter or select the journal entry date, in MM/DD/YY or MM/DD/YYYY form. This date is replaced by the posting date (question GL29 when running GLJEDS) when the batch is distributed. If the batch is distributed as a multiple posting date batch (using GLJEDM) then this date will become the Primary Date of the resulting transaction that is posted to GL. REQ
Account Number: Up to 36 characters which uniquely identify the General Ledger Account and, optionally, the Job Ledger Account. For ease of use, this field supports a variety of methods of data entry including the Quick and Fully Qualified Account methods of specifying both the GL Account and/or the JL Account.
General Ledger (GL) account must be keyed into this field. If the Job Ledger (JL) module is used and this transaction relates to an account in the JL, enter a JL account number.

GL HELP 71
To look up a ledger code or account part (key, object, etc.), place the cursor in the field and press CTRL+L or press the ‘…’ button and select Lookup xx where xx is the field where the cursor s placed.
When pressing the , a drop-down box, displayed above, appears. You can alter the structure of the Account # field by selecting the following options:
GL Org Key-Object
Select this option or press CTRL+K to find an account using the ledger organization and object code. Account numbers may be entered as fully qualified, organization key and object code.
GL Quick
This option allows you to find an account using a quick key that you may have set up in the Quick Account Numbers (GLUPQU) screen.
Show Ledger
Selecting this option allows you to identify a specific general ledger.
Show Work Order
Enter a Work Order prefix with a pound (#) sign. The work order number must have been set up in the Work Order module.
Debit / Credit: Enter the debit or credit amount to be distributed to the given GL and/or JL account reference. While the normal processing of journal entries will be for dollar amounts, the system will also accept transactions based on units. Units might be helpful in tracking the number of labor hours expended, addition of units to endowment principal, or kilowatts charged for electricity usage. Any value entered in the Debit or Credit field preceded by a “U” will be distributed into the General Ledger as units. All units may be entered with accuracy up to five (5) places to the right of the decimal point. Units may be associated on the same transaction with dollar amounts or separately without dollar amounts. If units are entered on the credit side, they will be posted to the account as a negative value with a minus sign.

GL HELP 72
Units: All units may be entered with accuracy up to five (5) places to the right of the decimal point. Units may be associated on the same transaction with dollar amounts or separately without dollar amounts. If units are entered on the credit side, they will be posted to the account as a negative value with a minus sign.
Intrafund Offset: When a batch is created using the Intra-Fund Journal Entry Batch Editor, all funds within the batch must be balanced and the Offset code must always be 'NN'. No manual inter-fund offsetting or automatic offsetting of any kind will be allowed.
Interfund Offset: When a batch is created using the Inter-Fund Journal Entry Batch Editor all funds within the batch must be balanced and the Offset code must always be 'NY'. No manual inter-fund offsetting or automatic intra-fund offsetting will be allowed.
Secondary Reference: An optional second Reference Code of up to 16 characters; the first Reference Code is of course the Journal Entry ID. The Sec Ref becomes the Secondary Reference (Subsystem Reference) of the resulting transaction that is posted to the GL.
PE ID: Up to 12 characters that uniquely identify the Person Entity to be associated with this transaction. OPT
Contract No: Up to 16 characters that identify the primary contract reference that is associated with this JE. The contract number can be entered to track activity against a contract. The contract number may be used to correct Accounts Payable entries in the General Ledger only. If the 'Hit?' field is set to 'B', then this field must contain the Budget Fiscal Year (positions 1-4), Version (positions 5-6), Level (positions 7-8), Reason Code (positions 9-12), and Fund Type (positions 13-14).
Budget Override: If users creating batches have the required Budget Override security defined in Nucleus Database Security, a "Y" can be placed in this field to override budget blocks at data entry time allowing exit from and thus creation of an over-budget JE batch. NOTE: This flag only allows creation of the batch. Correction of the over-budget condition is still required before the batch will post.
Prepared By: An 8-character code that is used to identify the individual preparing the Journal Entry.
Misc: Up to four characters may be associated with each distribution line which represent a miscellaneous code that is stored with the resulting transaction posted to the GL.
Hit EN: If this field is set to ‘GL’ then the transaction will be posted to both the GLDB & ENDB or, if set to 'EN' posting will be exclusive to ENDB, no GL. The transactions will be posted to EN with the given type in the EN Type (Transaction Type) field.
EN Type: If the Hit EN option is selected enter or select type from the drop down menu. The options include DE, EN, FP and PP.
Check ID: Two-character check ID code previously defined. Valid options are displayed in drop down menu.

GL HELP 73
Views: Four check boxes to select the accounting views to which these transactions will relate. Click on the box to check the views you would like. Accumulation of totals for the various options is determined by the selection made in GLUPGN on the Misc. tab.
Accrual: (checked by default)
Cash: (checked by default)
Modified Accrual: (blank by default)
User Defined (blank by default)
Secondary Date: An optional second date that is to be associated with the Journal Entry. This date should be entered in MM/DD/YY form. This becomes the Secondary Date (Subsystem Date) of the resulting transaction that is posted to the GL.
Check Number: An eight-digit check number to be referenced with this JE.

GL HELP 74
Transactions Text Tab
Use the Transactions Text tabbed page to record in free text any notes referring to the transaction. To save text, press <SHIFT> <ENTER>.

GL HELP 75
1.10.3 Copy Set Tool for GLJEUB A Copy JE Set Tool is available under the Tools section of the Options Bar. The user must have access to the “COPY” command in NUUPUS use this tool. The Copy JE Set tool allows you to copy an existing JE set (and corresponding detail records) from one Set ID to another. The Set copied from will remain unchanged.
By default, the current Set ID will appear in the “From Set ID” field. This may be changed if you wish to copy from another Set ID. By default, “SYSTEM” will appear in the “To Set ID” field. The “SYSTEM” in the “To Set ID” will generate a new Set ID from the BTCHIDJE seed value. If desired, a user-entered “Set ID” may also be used. Set ID naming rules apply.
New Primary and Secondary JE Dates may optionally be provided otherwise the dates on each detail record will be copied over as is.
Specifying a new JEID is recommended. By default, the original JEID will be used. Optionally “SYSTEM” or “SYSTEMxx” may be entered to generate a new JEID from the JEID or JEID.xx seed value.

GL HELP 76
If the message “Copy Complete” comes up at the top of the screen, the copy was successful and you will be redirected to the new Set ID. If the copy failed, the reason for the failure will be displayed at the top of the screen and the Copy Set window will remain open until you complete a successful copy or hit the cancel button.
1.11 Default Account Mapping: GLUPDF The Default Account Mapping screen is used to establish a link between GL keys/objects and JL keys/objects.
You must check the option Enable Default Account Mapping on the Presentation tabbed page of the GLUPGN screen for the default account mapping to go into effect.
Optionally, the GLDF-OBJTYPE common code may be used to allow default mapping to be limited by the object type of the GL object code to be mapped. If the object type does not exist in the concatenated list of object types stored on the common code, the entire account GL/JL will not be mapped. For more information, see the description of this common code in the common codes section of the General Ledger User Guide.

GL HELP 77
Grid View
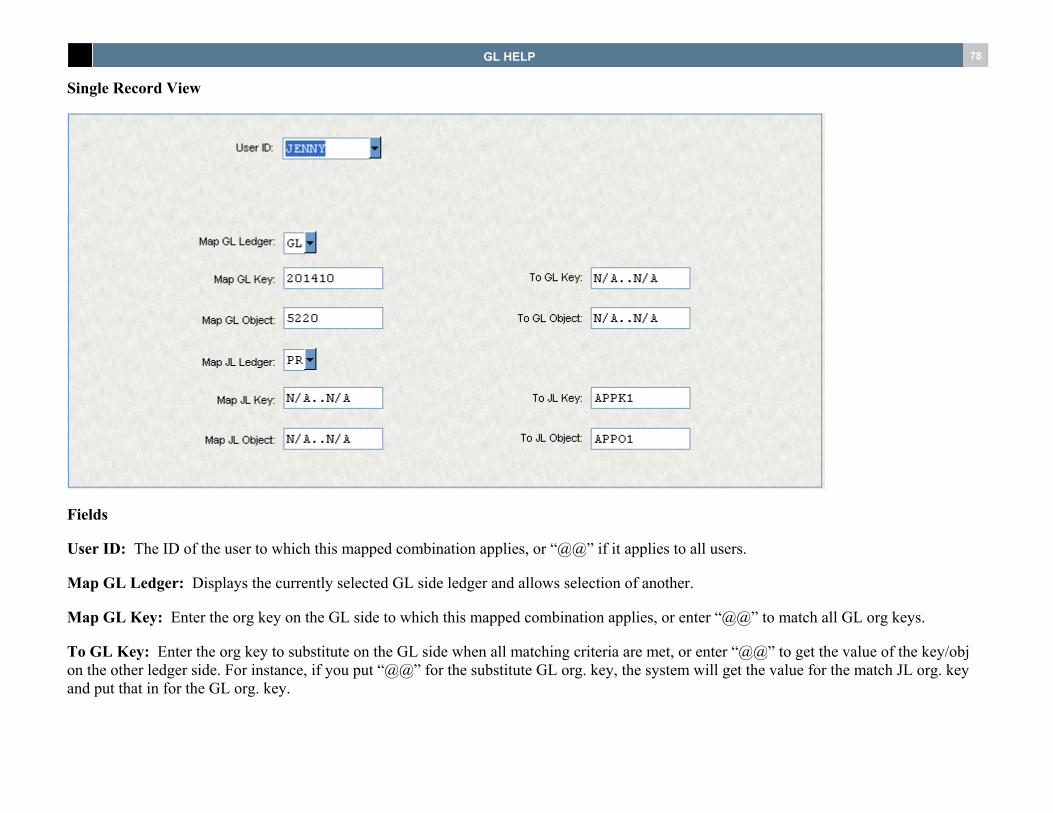
GL HELP 78
Single Record View
Fields
User ID: The ID of the user to which this mapped combination applies, or “@@” if it applies to all users.
Map GL Ledger: Displays the currently selected GL side ledger and allows selection of another.
Map GL Key: Enter the org key on the GL side to which this mapped combination applies, or enter “@@” to match all GL org keys.
To GL Key: Enter the org key to substitute on the GL side when all matching criteria are met, or enter “@@” to get the value of the key/obj on the other ledger side. For instance, if you put “@@” for the substitute GL org. key, the system will get the value for the match JL org. key and put that in for the GL org. key.
GL HELP 79
Map GL Object: Enter the Object Code on the GL side to which this mapped combination applies, or enter “@@” to match all GL Object Codes.
To GL Object: Enter the Object Code to substitute on the GL side when the matching criteria are met, or enter “@@” to get the value of the key/obj on the other ledger side.
Map JL Ledger: Displays the currently selected JL side ledger and allows selection of another.
Map JL Key: Enter the org key on the JL side to which this mapped combination applies, or enter “@@” to match all JL org keys.
To JL Key: Enter the org key to substitute on the JL side when all matching criteria are met, or enter “@@” to get the value of the key/obj on the other ledger side.
Map JL Object: Enter the object code on the JL side to which this mapped combination applies, or enter “@@” to match all JL object codes.
To JL Object: Enter the object code to substitute on the JL side when the matching criteria are met, or enter “@@” to get the value of the key/obj on the other ledger side.
1.12 GL Update General Information (GLUPGN) Use the General Information (GLUPGN) screen to create or update system parameters, which are control fields that tell the system how it is to work with the General Ledger. Examples of the parameters to define are listed below:
The amount of periods in a fiscal year. The first month of the fiscal year. The names of various versions of budgets which may be prepared. The names of various organizational parts, such as Fund, Function, Division, Budget Officer, and Cost Center. The names of object groups, such as Budget Category, Income Statement Groups, and Balance Sheet Groups. The format of the period calendar.
Each ledger will be on the General Ledger side (GL) or the Job Ledger side (JL). Each GL side ledger may have zero or more JL side ledgers associated with it, but no other GL side ledgers. Each JL side ledger must be associated with a GL side ledger.

GL HELP 80
Defining GL and JL side associations in this way prevents erroneous posting of transactions to ledgers which are unrelated, and guarantees postings to the job ledgers will always hit the appropriate GL ledgers for accounting.
1.12.1 Screen Header

GL HELP 81
Ledger Code: The General Ledger may be defined with different ledger structures within each side. For instance, General Ledger operational accounts may be identified by the code “GL”, while Agency Fund accounts “AG” and Job Ledger projects identified as “JL”. Each is able to define its own unique, separate structure, yet be maintained in the same general ledger database (GLDB). All account related information is qualified by this Ledger code.
Description: A 30-character description for the defined ledger code.
Side: The two GLDB sides are “GL” for General Ledger and “JL” for Job Ledger. Typically, “GL” identifies traditional Fund Accounting operating account structures. On the other hand, “JL” identifies Job Cost or Project accounting.
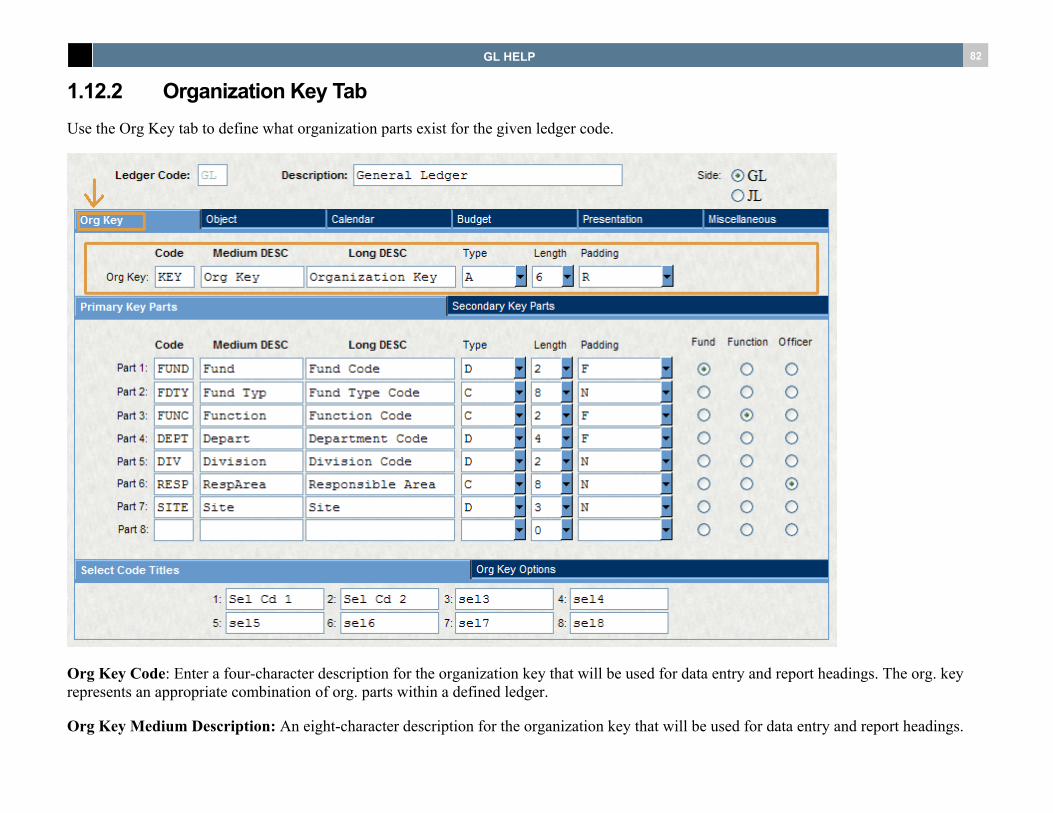
GL HELP 82
1.12.2 Organization Key Tab Use the Org Key tab to define what organization parts exist for the given ledger code.
Org Key Code: Enter a four-character description for the organization key that will be used for data entry and report headings. The org. key represents an appropriate combination of org. parts within a defined ledger.
Org Key Medium Description: An eight-character description for the organization key that will be used for data entry and report headings.

GL HELP 83
Org Key Long Description: A sixteen-character description for the organization key that will be used for report headings.
Type: The type of the organizational key; “D” for digit or “C” for character. “A” indicates that the org. key is generated automatically by the system at data entry time.
Length: The length, from one to ten, for the organization key.
Padding: The term “padding” refers to the ability to enter individual values or codes with a shorter length than expected by the software. For instance, an org. key is defined as having a length of four digits. However, when creating a key with only two digits (“21”), the system will automatically fill in or “pad” the last two zeros to the right to make it a four-character code (“2100”). Padding may be to the left (L), right (R), none (N) or fixed (F). In the case of “none”, each defined code may have a different length.
Consider using the padding feature consistently for all org. keys, regardless of the ledger within which they are defined. For instance, perform all padding to the right of the entered key to accelerate the data entry process and increase recognition of key stroke requirements.

GL HELP 84
1.12.3 Primary Key Parts These key parts will be used as the main org. parts for data entry and report headings.
Part Code: Enter a four-character description for organization part that will be used for data entry and report headings. The org. part represents a logical “part” of your company. Examples are Fund, Function, Division, Budget Officer, and Cost Center.
Part Medium Description: An eight-character description for the organization part that will be used for data entry and report headings.

GL HELP 85
Org Key Long Description: A sixteen-character description for the organization part that will be used for report headings.
Type: The type of the organizational part; “D” for digit or “C” for character. “A” indicates that the org. part is generated automatically by the system at data entry time.
Length: The length, from one to ten, for the organization part.
Padding: The term “padding” refers to the ability, to enter individual values or codes with a shorter length than expected by the software. For instance, an org. part is defined as having a length of four digits. However, when creating a part with only two digits (“21”), the system will automatically fill in or “pad” the last two zeros to the right to make it a four-character code (“2100”). Padding may be to the left (L), right (R), none (N) or fixed (F). In the case of “none”, each defined code may have a different length.
Consider using the padding feature consistently for all org. parts, regardless of the ledger within which they are defined. For instance, perform all padding to the right of the entered part to accelerate the data entry process and increase recognition of key stroke requirements.
Fund, Function, and Officer: For each org. part, select the appropriate grouping to automatically generate various standard reports which summarize data based on the accounting groups.

GL HELP 86
1.12.4 Secondary Key Parts These key parts will be used as the secondary org. parts for data entry and report headings. These are merely an extension of the primary key parts and allow more levels of granularity to be defined for an org. key.
Part: This is a non-editable field used to label the secondary part. Note that only 25 secondary parts can be defined for an org key.
Code: Enter a four-character description for organization part that will be used for data entry and report headings. The org. part represents a logical “part” of your company. Examples are Fund, Function, Division, Budget Officer, and Cost Center.

GL HELP 87
Medium DESC: An eight-character description for the organization part that will be used for data entry and report headings.
Long DESC: A sixteen-character description for the organization part that will be used for report headings.
Type: The type of the organizational part; “D” for digit or “C” for character. “A” indicates that the org. part is generated automatically by the system at data entry time.
Length: The length, from one to ten, for the organization part.
Padding: The term “padding” refers to the ability, to enter individual values or codes with a shorter length than expected by the software. For instance, an org. part is defined as having a length of four digits. However, when creating a part with only two digits (“21”), the system will automatically fill in or “pad” the last two zeros to the right to make it a four-character code (“2100”). Padding may be to the left (L), right (R), none (N) or fixed (F). In the case of “none”, each defined code may have a different length.
Consider using the padding feature consistently for all org. parts, regardless of the ledger within which they are defined. For instance, perform all padding to the right of the entered part to accelerate the data entry process and increase recognition of key stroke requirements.
Required: This checkbox will require that an org part code is entered on the GLUPKY screen for the corresponding org part. For example, if org part 1 has a code of “TMA” and a medium description of “Team Alpha”, then GLUPKY’s org part 1 labeled “Team Alpha” will require an org part code to be entered.
Validate: This checkbox will require that an org part code is valid on the GLUPKY screen for the corresponding org part. For example, if org part 1 has a code of “TMA” and a medium description of “Team Alpha”, then GLUPKY’s org part 1 labeled “Team Alpha” will require that a valid org part of code “TMA” exist on the GLUPKY02 screen (this is where org part codes are defined for org parts).

GL HELP 88
1.12.5 Select Code Titles The "Select Code Titles" tab simply gives names or titles to the corresponding select codes that show up on the GLUPKY screen. If you want the Grant number in select code three, place "Grant" in the third select code title in GLUPGN and the third select code will be labeled as such in GLUPKY.
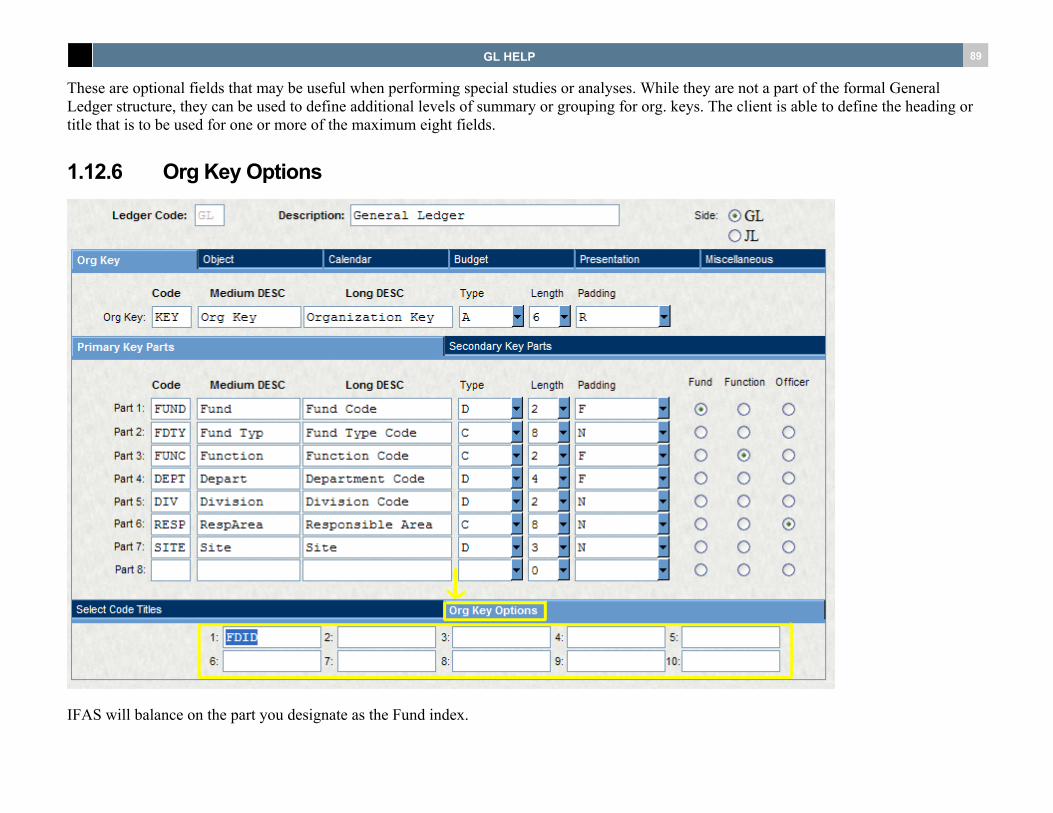
GL HELP 89
These are optional fields that may be useful when performing special studies or analyses. While they are not a part of the formal General Ledger structure, they can be used to define additional levels of summary or grouping for org. keys. The client is able to define the heading or title that is to be used for one or more of the maximum eight fields.
1.12.6 Org Key Options
IFAS will balance on the part you designate as the Fund index.

GL HELP 90
Optionally, IFAS can balance by two Organization Parts. To enable this feature, enter menu mask GLUPGN and go to the Org Key tab. Set first option field to ‘FDID’ and 2nd option field in two four char (Desc) Organization Parts associated with Organization Key. First four character for the first Organization Part description and the last 4 character for the 2nd Organization Part description. The first part named should always correspond to the part indicated by the Fund index. To set the combined fund to Fund plus the Function you would put “FUNDFUNC” in option field 2. Common codes for category FDID will contain the two Org Key Part values, no spaces, and will be limited to 8 total characters.

GL HELP 91
1.12.7 Object Code Tab Use this page to associate combined object groups to an object code and to define the length, type, and description of the object code. The maximum length is eight characters or digits for the object code and eight characters or digits for each of the object groups. For the object code and each associated object group, provide a short, medium, and long description to automatically tailor all screens, error messages, prompts, dialogue, and reports to a user’s terminology and structure. To define object groups such that budgets are created and budget checking occurs at any level, the object groups MUST be defined in a strict hierarchical form for budget entry, checking, and subsequent reporting. For example, we might define three different object groups for budgeting (Budget Category, Budget Area, and Budget Group). They are defined in a hierarchy such that Budget Category is subordinate to Budget Area subordinate to Budget Group. Each object code will be associated with these three levels. Object codes defined within a Budget Category cannot be independently defined to separate Budget Areas and Budget Groups.
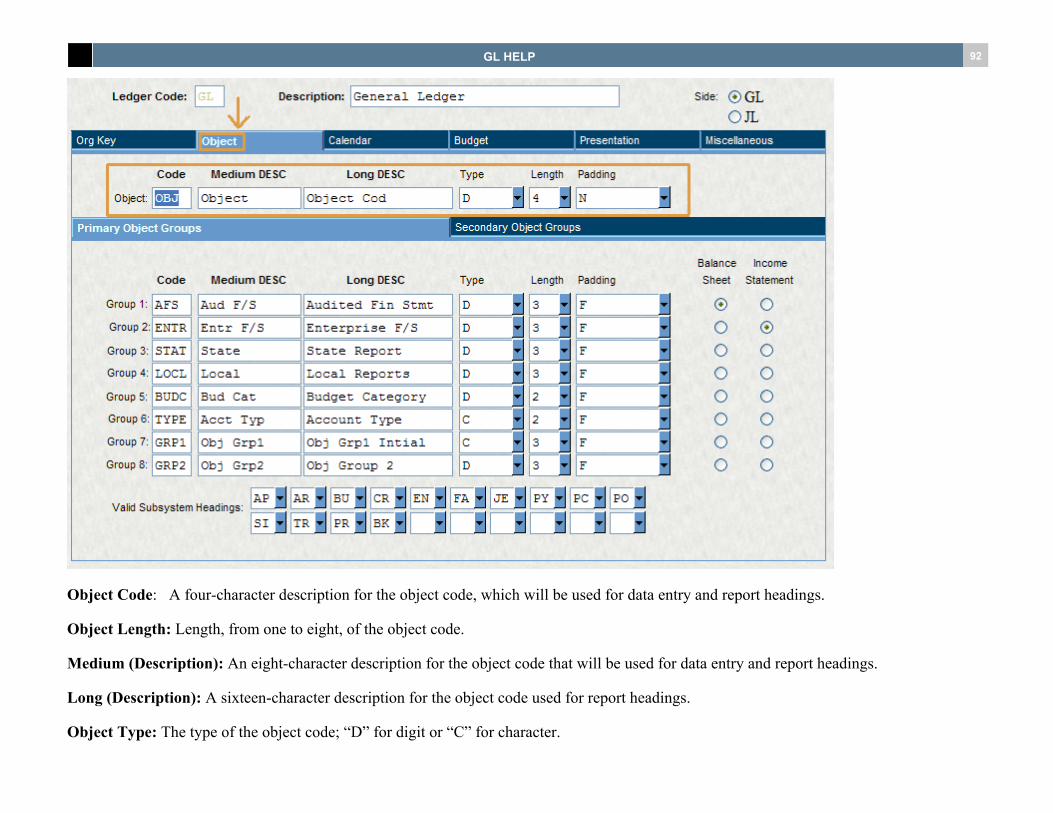
GL HELP 92
Object Code: A four-character description for the object code, which will be used for data entry and report headings.
Object Length: Length, from one to eight, of the object code.
Medium (Description): An eight-character description for the object code that will be used for data entry and report headings.
Long (Description): A sixteen-character description for the object code used for report headings.
Object Type: The type of the object code; “D” for digit or “C” for character.

GL HELP 93
Object Length: The length, from 0-8, of an object code.
Object Padding: The term “padding” refers to the ability to enter individual values or codes with a shorter length than expected by the software. For instance, an object code is defined as having a length of four digits. However, when creating a key with only two digits (“21”), the system will automatically fill in or “pad” the last two zeros to the right to make it a four-character code (“2100”). Padding may be to the left (L), right (R), none (N) or fixed (F). In the case of “none”, each defined code may have a different length.
Consider using the padding feature consistently for all object codes, regardless of the Ledger within which they are defined. For instance, perform all padding to the right of the entered code to accelerate the data entry process and increase recognition of key stroke requirements.
1.12.8 Primary Object Groups These object group parts will be used as the main object groups for data entry and report headings.

GL HELP 94
Code: A four-character description of the object group part associated with an object code.
Medium Desc.: An eight-character description of the object group part associated with an object code.
Long Description: A 16-character description of the object group part associated with an object code.
Type: A code that indicates the type of part which is associated with an object code: “D” for digit or “C” for character.
Length: The length, from 0-8, of an object group part associated with the object code.

GL HELP 95
Padding: A code indicating the method of zero padding to be used when specifying and Object Code Part. Valid Codes are “L”, “R”, “N” or “F” as described for the “Org. Key Pad” field.
Balance Sheet and Income Statement: For each org. part, select the appropriate grouping to automatically generate various standard reports which summarize data based on the accounting groups. Balance Sheet and Income Statement indicate the Obj.Group Part (1-8) which should be used in summarizing data for the Balance Sheet and Income Statement, respectively.
Valid Subsystem Headings: Enter or select the names of subsystems from which an object code may receive postings. (AP, AR, CR, PY, FA, JE, EN, PO, BU, TR, SI, and PC are standard, with eight remaining for future use.) The chosen subsystems will appear as flags on the Object Code Definition (GLUPOB) screen.

GL HELP 96
1.12.9 Secondary Object Groups These object group parts will be used as the secondary obj. group parts for data entry and report headings. These are merely an extension of the primary object group parts and allow more levels of granularity to be defined for an object group.
Code: A four-character description of the object group part associated with an object code.
Medium Desc.: An eight-character description of the object group part associated with an object code.

GL HELP 97
Long Description: A 16-character description of the object group part associated with an object code.
Type: A code that indicates the type of part which is associated with an object code: “D” for digit or “C” for character.
Length: The length, from 0-8, of an object group part associated with the object code.
Padding: A code indicating the method of zero padding to be used when specifying and Object Code Part. Valid Codes are “L”, “R”, “N” or “F” as described for the “Org. Key Pad” field.
Required: This checkbox will require that an object group id is entered on the GLUPOB screen for the corresponding object group part. For example, if object group part 1 has a code of “TMA” and a medium description of “Team Alpha”, then GLUPOB’s object group part 1 labeled “Team Alpha” will require an org part code to be entered.
Validate: This checkbox will require that an object group id is valid on the GLUPOB screen for the corresponding org part. For example, if object group part 1 has a code of “TMA” and a medium description of “Team Alpha”, then GLUPOB’s object group part 1 labeled “Team Alpha” will require that a valid object group part of code “TMA” exist on the GLUPOB02 screen (this is where object group ids are defined for object group parts).
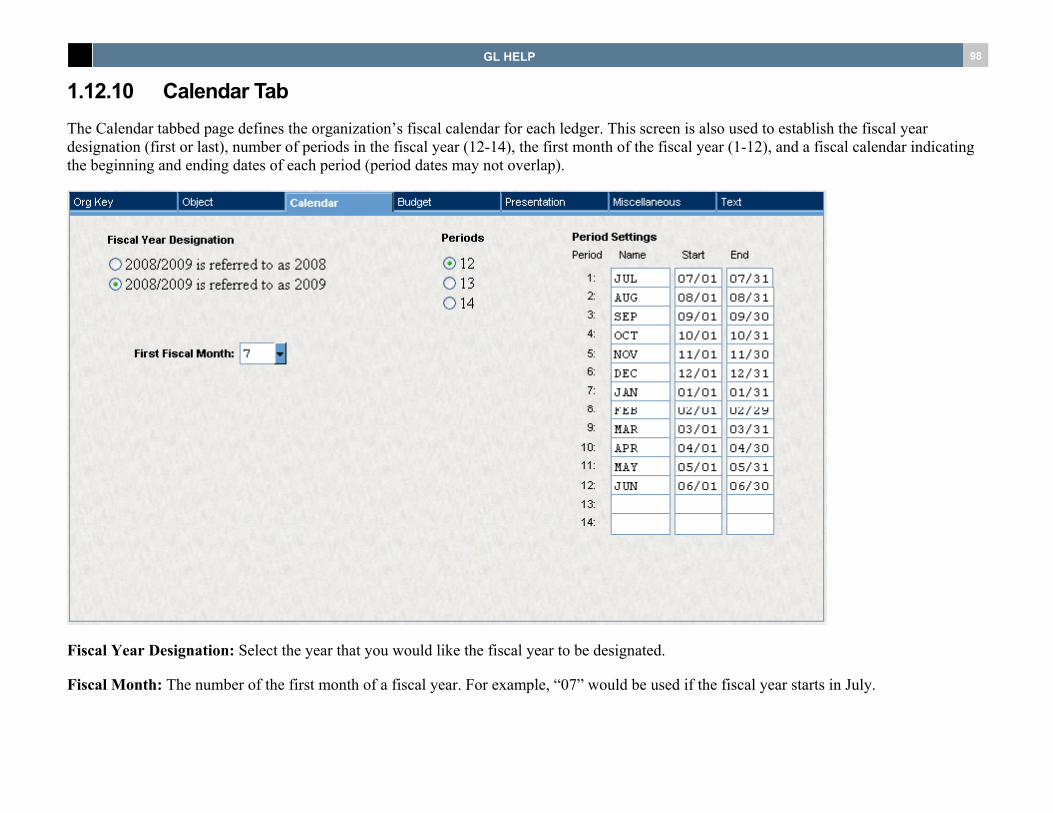
GL HELP 98
1.12.10 Calendar Tab The Calendar tabbed page defines the organization’s fiscal calendar for each ledger. This screen is also used to establish the fiscal year designation (first or last), number of periods in the fiscal year (12-14), the first month of the fiscal year (1-12), and a fiscal calendar indicating the beginning and ending dates of each period (period dates may not overlap).
Fiscal Year Designation: Select the year that you would like the fiscal year to be designated.
Fiscal Month: The number of the first month of a fiscal year. For example, “07” would be used if the fiscal year starts in July.

GL HELP 99
Period Code: Select “12” for standard 12 month periods, with closing entries in the twelfth month. Select “13” for four week periods, with closing entries in the thirteenth period. Select “14” for four week periods, with closing entries in the fourteenth period. This automatically provides for the accumulation of period balances. Closing entries cannot be placed in a separate period from regular entries.
Period Name: The names of the 14 periods. This will typically contain the names of the 12 months of the year (JAN, FEB, etc.) plus “CLOS” if defining a specific closing period.
Period Start: Enter the beginning date for each period in MM/DD format.
Period End: Enter the ending date for each period in MM/DD format.

GL HELP 100
1.12.11 Budget Tab The Budget tabbed page (shown below) defines up to twenty-five budget versions for each ledger. Fields designate the version number, short, medium, and long descriptions of each budget version. Other options may be selected and budget checked object types may be designated by checking appropriate boxes.
Version: A numeric representation of the budget version (1-25). This number is automatically generated by the system.
Code: A two-character code which will be used to specify the various named versions of budgets (e.g., “PR” for Proposed, “RE” for Recommended, “AP” for Approved).
Medium Desc.: A maximum of eight characters which describe the budget name.

GL HELP 101
Long Description: A maximum of 16 characters that describe the budget name.
Date: For a named version of the budget, enter a symbolic representation of the date after which the budget cannot be amended. Appropriate formats are listed below:
MM/FY - Specific Month, Current Fiscal Year
MM/FY-1 - Specific Month, Last Fiscal Year
MM/FY+1 - Specific Month, Next Fiscal Year
There is also a reserved date code “AC” that is used to signify that the corresponding budget version is to contain actual information from the current fiscal year. If multiple budget versions containing actuals (AC in the date code field) are used, the versions cannot have a budget name of “AC.” The date code can be used to indicate that a specific named budget is the sum of other named budgets.
Calc: Indicates that a specific named budget is the arithmetic calculation of up to four other named budgets. For example, we may set up two budgets, “EN” (prior year encumbrance budget rollover) and “FB” (fiscal budget). We would like to define “WB” (working budget) as being the sum of “EN + FB”. Each time a report is requested for budget version “WB”, the system will automatically add budget values for the two versions together and report them as if they were one budget. It is possible for a specific named budget to reference four other budgets in the date code, and one or more of these budgets may reference four other budgets. The format for referencing four budgets is “EN+FB+WBRB”. There is a limit to the number of budgets that can be referenced in this way, however. A budget which is the sum of other budgets (also referred to as a calculated budget, a derived budget, and a summed budget), may have no more than 10 total references to non-summed budgets and no more than 10 total references to summed budgets. The date code may also reference prior or future year budgets. If the date code contains -####BV or +####BV, then a prior year or future year budget will be used. For example, to have a new budget version that contains the prior year WB version budget, enter “-0001WB” in the date code field of this new budget version.
To see prior year actuals in a budget version , enter “-0001AC” in the date code field. Calculated budgets and prior year/future year budgets features may not be used within the same date code.
Note that either the Date OR the Calc field can be used but NOT both.
Default Version: Select the version of the budget that is to be the default for all budget checking and reporting.
Log: Select this field to indicate that changes made to any budgets for this version will be logged.
Enable Logging : Select this field to enable budget logging for this ledger. When checked, budget logging is possible for this ledger, but is enabled or disabled on a version-by-version basis on the screen next to each budget version.

GL HELP 102
Use Percentages for Derived Monthly Figures: Select this flag to cause the system to automatically calculate percentage monthly budget spreads if none already exist. This is especially useful for summed budget versions, which are budget versions defined to be the sum of other budget versions. For summed versions, the monthly budget spread is not stored, but rather derived from the added versions, which must be converted to the same type (percentages, dollars, non-existent linear) and weighted together. The result can be reported and shows what the budget spread would have to be to be equivalent. Not selecting this flag disables automatic generation of monthly budget spreads.
Use ‘Negative Budget’ Rules: If you select this flag, budget checking for accounts with negative budgets will be reversed such that budget-actual > 0 mean over budget. In other words, when negative-going accounts attempt to exceed their negative budget in the negative direction, blocking or warning can occur. Budget checking on accounts with positive budgets does not change. Not selecting this flag disables the reversal of budget checking with negative budgets.
Check Secondary Transactions at Data Entry Time: If you select this flag, when transactions are checked for validity, the automatic RJE will be activated to create temporary secondary transactions which will also be checked against the budget. Leaving this field blank (the default) disables synthesis/checking of secondary transactions at data entry time.
Use ‘Copy Key’ for Associations: Select this field to cause the system to use the org key - object code associations of a different key when checking for required associations. An “N” or blank requires each key to have its own associations. When a particular key and object have been used together or are budgeted to be used together they are considered associated. When setting up a new key which has never been used and has not yet been budgeted, it has no associations and cannot be used if associations are required. This option is often useful in that the new key’s associations can be defined to be the same as another similar key’s by entering the similar key in the Copy Key field of the new key (GLUPKY).
Expenses (XP,TO): This field controls which object types will be checked against budgets. Select to check Expenses (XP) and Transfers Out (TO).
Revenues ( RV,TI): This field controls which object types will be checked against budgets. Select to check Revenues (RV) and Transfers-In (TI).
Assets/Liabilities (AS,LI,FB): This field controls which object types will be checked against budgets. Select to check Assets (AS), Liabilities (LI) and Fund Balance (FB).

GL HELP 103
1.12.12 Presentation Tab The Presentation tabbed page (shown below) allows the user to name the account number, define input and output formats, specify JL & WO delimiters, and enables zero fill and default account mapping features.
Account Heading: The 30-character description that should appear above the output account format when displayed or printed on screens and reports.
Input Formats: Describes the user-defined format used at data entry. The following conventions are used: K = Org. Key, O = Object Code, each is followed by the number of digits in the Key or Object (e.g. K, O). P1, P2 . . . P8 = Org. Parts and G1, G2 . . . G8 = Obj. Groups. To define the input format, indicate the order in which the structural parts should appear and the types of characters which should separate them

GL HELP 104
(e.g. ’-’, ’ ’, ’+’, etc.). For example, data entry could be just the org. key and object code separated with a hyphen: K-O. Another valid input would be org. part 1, org. key, and object code each separated by spaces. This would be defined as P1KO. By running them in a string together, the data entry person does not need to enter the spaces and the system will automatically separate them.
Output Formats: Describes the user-defined format used for reporting. The following conventions are used: K = Org. Key, O = Object Code, each is followed by the number of digits in the key or object (e.g. K, O). P1, P2 . . . P8 = Org. Parts and G1, G2 .... G8 = Obj. Groups. To define the output format, indicate the order in which the structural parts should appear and the types of characters which should separate them (e.g. ’-’, ’ ’, ’+’, etc.). For example, reporting could be just the org. key and object code separated with a hyphen: K-O. Another valid output would be Org. Part 1, Org. Key, Obj. Group 1 and Object Code each separated by spaces. This would be defined as P1 K G1 O.
JL Delimiter: Valid only on GL Ledgers. Defines the character delimiter between the GL and JL portions of the account field. All documentation will present this field with a backslash ( / ). (Note: Using a hyphen (-) in the JL Delimiter or in the WO Delimiter field will cause the Account Number verification to fail.)
WO Delimiter: Valid only on GL Ledgers. Defines the character delimiter between the GL (or JL) portion of the account number field and the work order number. All documentation will present this field with a pound sign( # ).
Zero-fill Account Numbers: Select this flag to cause the system to zero-fill account numbers at data entry time. Not selecting this field (the default) disables the zero-fill padding. This is useful on longer account numbers to reduce data entry keystrokes.
Enable Default Account Mapping: Select this flag to enable the GL/JL default Account Number Mapping feature. Not selecting the flag (the default) disables re-mapping. If Account Number Mapping is enabled, GLUPDF must be used to configure the mapping details. Account Number Mapping is often useful in reducing data entry keystrokes while assuring entries on the other ledger side are correct. It can also be useful for re-mapping a memorized account number to a new preferred replacement.
(Validate Work Order: Validate Work Order check box is selected, work orders will be validated for the given ledger.)

GL HELP 105
1.12.13 Miscellaneous Tab The Miscellaneous tab (shown below) allows the user to enable or disable numerous system option flags relating to various functionality, association, and security issues.
Key-level Budget Totals: Do not select this flag to suppress updating of key level budget totals for each org key. These totals are displayed at the bottom of each column on the GLBUUP screen. Selecting the flag enables the software to automatically accumulate these totals and is the default. If this field is changed, one GL recompute of budgets (GLUTDICP) is required to adjust these totals.

GL HELP 106
Unit Balances: Select this flag to have the system automatically accumulate a separate set of UNITS transaction balances in addition to the normal ACCRUAL and/or CASH balance accumulators. Not selecting the flag disables UNITS accumulators. This allows summary level reporting of units for accounts where units have been posted.
Prior Year Encumbrances: Select this flag to cause the system to create and maintain a set of special accumulators to track current year activity against encumbrance references originating in prior fiscal years. Both actual and encumbrance activity are accumulated. Options then become available on many reports to include, exclude, or show by itself this current year activity against references originating in prior years. Not selecting the flag (the default) disables the “Prior EN” accumulators. This option is useful if reports must be run excluding prior year activity. If this field is changed, one recompute of actuals and encumbrances (GLUTDICP, AE) is required to adjust these accumulators.
Enable MISC Flag for Prior Year: Select this flag to allow users to mark GL actual transactions as being from a prior year by placing “PY” in first 2 characters of the MISC field , even if the GL transactions are not from a prior year. Not selecting this flag disables this feature.
This feature is useful when dealing with prior year encumbrances and hence is typically used in conjunction with the ProrEN flag on GLUPGN screen 1. In certain cases, there may be no PO reference in the EN database, but actual transactions need to be posted which deal with things originating in a prior fiscal year. One such case is where PO numbers change at the fiscal year boundary, but actually constitute continuation of a PO from the prior year. Note that "PY" marking of the MISC field is applicable to both GL and EN transactions, and that it only matters that the first two characters are "PY". When using this feature, make sure no other transactions have been marked with "PY@@", for some other purpose (such as payroll). Any batch that posts to GL in detail (such as AP) will include a MISC code on the GL transaction. Recompute after changing.
Pre-Encumbered Purchase Requisitions: Select this flag to cause the system to generate encumbrances for purchase requests, which will later be transferred to corresponding POs. If you do not select the flag(the default), PRs are not encumbered and encumbrances are generated at PO time. This option is useful when PR approval cycles are long, causing PRs to accumulate, possibly resulting in over-budget conditions which pre-encumbering will catch. It also creates a special set of accumulators for reporting purposes. If this field is changed, one GL recompute of actuals and encumbrances (GLUTDICP, AE) is required to adjust these accumulators.
Those defined in “GLFG LEVELS” code: Selecting this flag causes the system to use the common code GLFG-LEVELS (if it exists) to specify at which object and object group levels to maintain accumulators, and at which of these to block or warn. Not selecting the flag (the default) causes the system to ignore the GLFG-LEVELS common code.
NOTE: If this lag is changed, one GL recompute of budgets, actuals and encumbrances (GLUTDICP, All) is required to adjust these accumulators.
Expenses (XP, TO) Always allowed: This flag determines which object code types to check for JL account numbers (JL association requirements). Whether or not a JL account number is required is defined on Keys (GLUPKY), Objects (GLUPOB) and budgets (GLBUUP), but this field selects certain object types for the checking of these requirements. Select for Expenses (XP) and Transfers Out (TO).

GL HELP 107
Allow Revenues ( RV,TI): ): This flag determines which object code types to check for JL account numbers (JL association requirements). Whether or not a JL account number is required is defined on Keys (GLUPKY), Objects (GLUPOB) and budgets (GLBUUP), but this field selects certain object types for the checking of these requirements. Select for Revenues (RV) and Transfers In (TI).
Allow Assets/Liabilities (AS,LI,FB): This flag determines which object code types to check for JL account numbers (JL association requirements). Whether or not a JL account number is required is defined on Keys (GLUPKY), Objects (GLUPOB) and budgets (GLBUUP), but this field selects certain object types for the checking of these requirements. Select for Assets (AS), Liabilities (LI) and Fund Balance (FB).
Intra Fund Object Code: The Object Code used for automatic balancing entries which indicate the relationship between Fund level administrative accounts and Org. Key level accounts. This is an optional feature.
Inter Fund Object Code: The Object Code used for Interfund account entries. These automatic entries are generated to show the relationship between Fund level administrative accounts and the Entity level accounts such as those which hold bank accounts. Also known as Claim on Cash or Due To/From Other Funds. This is an optional feature.
Enforce Key/Obj Security at Data Entry Time: Select this flag to perform security checking on GL and JL account Keys and Objects at data entry time (default). Not selecting this flag blank disables security checking. This applies across subsystems.
Implement GL Security with ‘OR’ operator: Select this flag to cause account security to “OR” together nucleus data-base constraints for GL and JL Org Keys and object codes. This applies across subsystems. Do not select this flag to “AND” together nucleus database security classes. For example, assume two constraints are entered in nucleus database security: Fund 10 and Function 327. The normal “AND” function would grant access only if the account fell into both Fund 10 AND Function 327. If the “OR” function is enabled, access would be granted if the account fell into either Fund 10 OR Function 327.
FQA Format: This option controls the Fully Qualified Account uniqueness criteria when both the org key and parts are specified in the input format on GLUPGN screen. This occurs when both Ks and Ps are placed anywhere in the input format string. Options are:
Unique Parts Mode - If a blank (default) or a “U” is placed in this field, then the combination of the Parts specified in the Input Format must have a unique one-to-one relationship to the Keys they represent.
Key-Unique Mode - If a “K” is placed in this field, then the combination of the Key and Parts specified in the Input Format must be unique. This option allows multiple Keys to be created with the same specified Part values without violating uniqueness checks.
Cash and Accrual Method: Select one of the options in the drop down menu to identify which types of accumulators to keep in the GLDB. The default value for this option is “ “, which denotes “Accrual Only” (same as B). These flags are useful for locations requiring simultaneous types of reporting. Special accrual/reversal postings are required along with special Subsystem Interface configurations (GLUTSPSI). If this option field is changed, a GL recompute of actuals, encumbrances, and budgets (GLUTDICP, All) is required to adjust these accumulators.
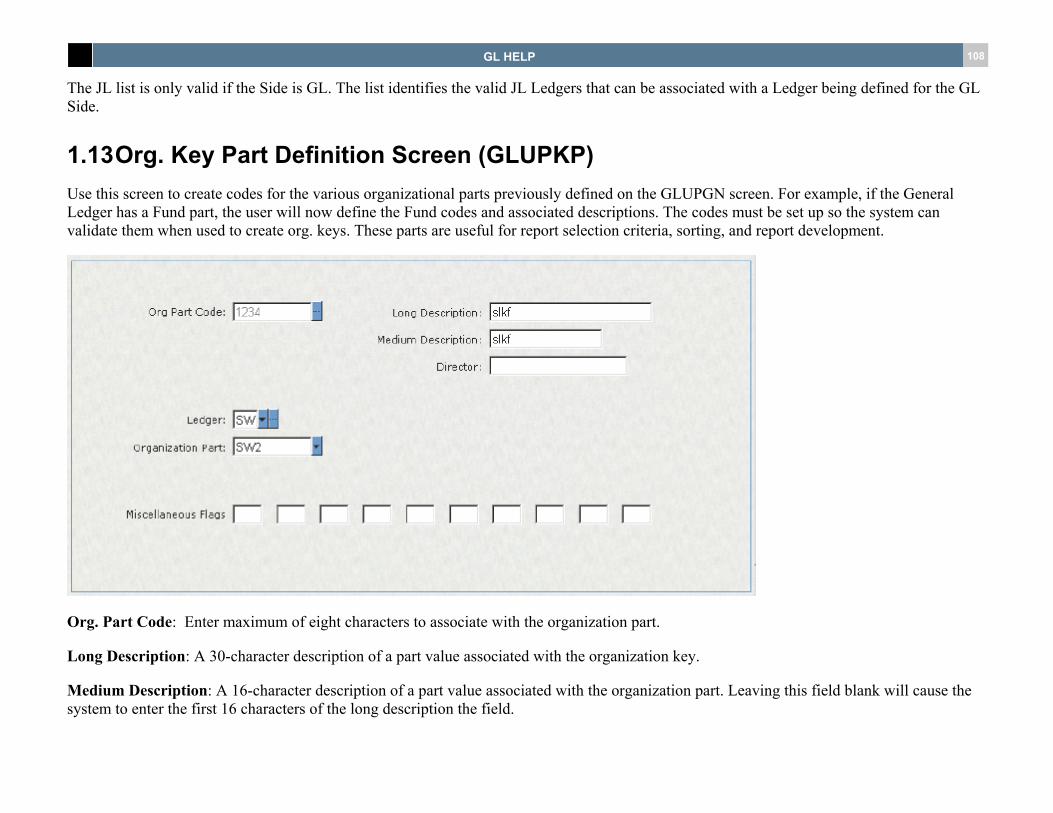
GL HELP 108
The JL list is only valid if the Side is GL. The list identifies the valid JL Ledgers that can be associated with a Ledger being defined for the GL Side.
1.13 Org. Key Part Definition Screen (GLUPKP) Use this screen to create codes for the various organizational parts previously defined on the GLUPGN screen. For example, if the General Ledger has a Fund part, the user will now define the Fund codes and associated descriptions. The codes must be set up so the system can validate them when used to create org. keys. These parts are useful for report selection criteria, sorting, and report development.
Org. Part Code: Enter maximum of eight characters to associate with the organization part.
Long Description: A 30-character description of a part value associated with the organization key.
Medium Description: A 16-character description of a part value associated with the organization part. Leaving this field blank will cause the system to enter the first 16 characters of the long description the field.
GL HELP 109
Director: The name of the person identified as the director of organization part.
Ledger: The two-character code that indicates a defined Ledger on the General Information (GLUPGN) screen (e.g., “L”,”AG”, or “JL”). A Ledger code must be indicated because the system will automatically check to see that the Organization Part has been defined.
Organization Part: The short description of the org. part as defined on the General Information (GLUPGN) screen.
Misc. Flags: Up to ten, two-character flags which may be associated with a part value associated with the Organization Key.

GL HELP 110
1.14 Budget Level and Accumulator Definition (GLUPLV) The Budget Level and Accumulator Definition screen is used to define custom budget levels and accumulators for budget checking and for reporting. This screen enables users to define the types of budget levels and accumulators to be maintained by the system. Budgets can be entered against these levels using the Budget Entry screen. Actual and Encumbrance accumulators are updated automatically whenever a GL transaction is added, updated, or deleted. When a new budget level/accumulator is added or selection items are changed on an existing record, the recalculate tool should be run to bring the accumulator up to date.
Fields

GL HELP 111
Ledger: The GL or JL Ledger code to which this accumulator applies.
Level: Up to 8 alpha-numeric characters that give a name to this budget level/accumulator
Parent: When defining a budget hierarchy you designate the parent Level in the hierarchy here. This must be a previously defined Level for the same Ledger(s) as the Level being defined.
JL Ledger (Optional): If the Ledger indicate above is a GL side ledger then you can optionally define a Job Ledger code to which this budget level/accumulator applies. If there is no JL ledger associated with this level, then select “—“. If the Ledger code entered above is a JL side ledger this code will automatically be filled in with the same JL ledger code.
Selection Items: The Org Key, Part, Object, Group, Select Code, or Misc Code for which this level code will accumulate. (e.g., KEY: An accumulated total will be kept for each unique Org Key).
Active?: Check this box if the budget level is to be actively used. If the box is unchecked this budget level will be ignored.
Used for Budget Checking?: Check this box if the budget level is to be used for budget checking purposes. If the box is unchecked this budget level will be ignored when checking for over budget conditions.
Default Budget Block/Warn: This set the default for budget checking. Valid options are B (Block), W (Warn), or A (Authorize.) This can be overridden for an Org. Key or on the Budget line item.
Default Allocation Block/Warn: This set the default for budget allocation checking. Valid options are B (Block), W (Warn), or A (Authorize.) This also can be overridden for an Org. Key or on the Budget line item.
1.14.1 Where the Accumulators are Stored Totals are stored in the glba_budact_mstr table. Budgets are stored by version. Actuals are stored by period in the gla_actual01-14 columns. Encumbrances are stored as balances by period in the gla_en01-14 columns. Items in this table may be viewed on the Browse Summary Level Accumulators screen (GLUTSM).

GL HELP 112
1.15 Object Code Definition (GLUPOB) Define each object code to be associated with the various object group codes. Define an object code for all types of transaction and budget activity, including assets, liabilities, and fund balances. Define object codes to form a complete account. A complete account consists of an org. key and an object code (i.e., an organizational area and a transaction classification).
Access the Object Part Definition screen from this screen by selecting the Link to Screen . . . command on the Options menu.
Ledger: Enter the two-character Ledger code for the object code to be found, if it is different than the current record.

GL HELP 113
Object: Enter a code, from one to eight characters, that defines a specific type of financial activity (e.g., accounts receivable, office supplies, etc.). Many times this is called a sub-object and typically represents the lowest level at which transactions and budgets are recorded for the organization. All classes of object activity are included: assets, liabilities, fund balance (equity), revenue, and expenditures.
Short Description: A 16-character description of the object code (e.g., “Cash in Bank”).
Long Description: A 30-character description of the object code (e.g., “Cash in Bank”).
Debit or Credit:Individual object codes must have a balance type: “DR” Debit or “CR” Credit. When defining contra objects, maintain the same balance type as the objects to which they are contra. For example, a contra revenue account should have a balance type of “CR.” This allows the actual balances in contra accounts to be reported with a minus ( - ) sign, making them recognizable.
Status: “A” - Active, “I” - Inactive, “C” - Closed.
Type: Enter a two-character code indicating the classification of the object code. Use the types for report extractions, transaction entry control, and the fiscal year-end process. Valid codes are listed below:
“AS” assets
“LI” liabilities
“FB” fund balance
“RV” revenue
“XP” expenses
“TI” transfers in
“TO” transfers out
“NA” not applicable
Start/End Date: Enter the date range (using MM/DD/YY format) for which the object code is valid. If the object code appears on transactions after the ending date, the transaction will be flagged as an error. To indicate that the object code is always valid, leave the fields blank.
While most object codes will not have a start/end date, this is helpful when the user is changing accounting practices and does not wish transactions to be keyed against an unused or invalid object code value. An optional date range can be specified indicating when each object code is valid. Attempts to post to an object code outside its date range can be set to either warn the user or to block posting. The mask NUUPER can be used to access error messages GL479, GL473, GL480, GL497, GL481, GL482, GL483, and GL484 to control the severity of
GL HELP 114
warnings/errors as well as grace periods. Common code GLEN-GL820 can be set to begin automatically generating warnings when Object Codes are used within a specified number of days prior to the end date.
Director: The name of the person who is identified as the director of the object code. When an individual is assigned responsibility for one or more object codes (such as an accountant who prepares inventory or investment schedules), they may be assigned as the director and easily extract information for analysis purposes.
Old No: When converting from an old system or when an object code is changed, this field contains the old value of the Object Code.
Currency Code: Enter a code to indicate the foreign currency in which this object will be held.
Recalculate Currency?: Select this flag if the foreign currency value is to be recalculated.
Require Association?: Select this flag to associate the object code with an org. key prior to accepting data entry.
Require JL?: Select this flag to require JL account when the object code is entered at data entry time.

GL HELP 115
1.15.1 Primary Object Groups This tab is where the primary object group codes are entered in order to associate object codes with their respective background parts.
Object Group Codes: Up to eight object group values which define the object code. These groups and group codes were previously defined on the object group definition form (GLUPOB-screen2).
Allow Subsystem Flags (AP, AR, etc.): The object code subsystem field titles were defined on the GLUPGN screen. They now appear as flags on the GLUPOB screen. Select the flags to indicate from which subsystems this object code will receive transactions and/or budget.

GL HELP 116
1.15.2 Secondary Object Groups This tab is where the secondary object group codes are entered in order to associate object codes with their respective background parts. These secondary objects are intended to be used for reporting purposes only, and will not be associated with a Fully Qualified Account the way that primary groups are.
Object Group Codes: Up to thirty-two object group values which define the object code. These groups and group codes were previously defined on the object group definition form.

GL HELP 117
1.16 Object Group Definition Screen (GLUPOG) Use this screen to define codes for each of the object groups for a given ledger. Define all object group codes before defining object codes. Each value entered has a long and medium description and is associated with object group previously defined on the GLUPGN screen.
Group Code: Enter maximum eight-character code to be associated with an object group. The code typically represents summary levels for financial reports, levels at which budgets are to be entered and/or checked, or special internal reporting.
Long Description: A 30 character description of the object group to be associated with the object group code (e.g., “Current Assets”).
Medium Description: A 16-character description of the object group to be associated with an object group code (e.g., “Current Assets”).
Director: The name of the person who is the director of the object group.
Ledger: The two-character code that indicates a defined ledger on the General Information (GLUPGN) screen (e.g., “GL”,”AG”, or “JL”). A Ledger Code must be entered because the system will automatically check to see that the object group has been defined.

GL HELP 118
Object Group:The short description of the group as defined on the General Information screen (GLUPGN).
Misc Flags: Up to ten, two-character flags which may be associated with a objecct group associated with the object group code.
1.17 GLUPQU: GL Quick Account Numbers (GLUPQU) Use this screen to define a quick account number for those instances when it is necessary to enter a single number for an account rather than requiring entry of the org. key/object code or the fully qualified account. For example, a department which has very few accounts may prefer to enter only a three or four-digit number.
Single Record View
Quick account numbers do not change the standard input format but provide an optional override method for account entry. Optionally, the account key or object code may be defined separately in the quick key account number fields and then combined. For example, if you define a

GL HELP 119
quick key as “GENERAL” (which maps to the org. key “101200”) and a quick key as “TRAVEL” (which maps to the object code “5001”), “GENERAL-TRAVEL” will translate to “101200-5001”when entered in an account number field on a data entry screen.
Fields
Quick Number: Enter a single, unique number from one to ten digits or characters in length which will represent a single org. key, a single object code, or an org. key-object code combination.
Ledger/ Fully Qualified Account Number: Up to 36 characters which uniquely identify the General Ledger Account and, optionally, the Job Ledger Account. For ease of use, this field supports a variety of methods of data entry including the Quick and Fully Qualified Account methods of specifying both the GL Account and/or the JL Account. General Ledger (GL) account must be keyed into this field. If the Job Ledger (JL) module is used and this transaction relates to an account in the JL, enter a JL account number.
To look up a ledger code or account part (key, object, etc.), place the cursor in the field and press CTRL+L or press the ‘…’ button and select Lookup xx where xx is the field where the cursor s placed.
When pressing the , a drop-down box, displayed above, appears. You can alter the structure of the Account # field by selecting the following options:
GL Org Key-Object Select this option or press CTRL+K to find an account using the ledger organization and object code. Account numbers may be entered
as fully qualified, organization key and object code.
GL Quick This option allows you to find an account using a quick key that you may have set up in the Quick Account Numbers (GLUPQU)
screen.
Show Ledger

GL HELP 120
Selecting this option allows you to identify a specific general ledger.
Show Work Order Enter a Work Order prefix with a pound (#) sign. The work order number must have been set up in the Work Order module.
Org. Key: The account key assigned to the fully qualified account number will be displayed in this field.
Object: The object code assigned to the fully qualified account number will be displayed in this field.
Grid View
You have the option of adding a quick key using the screen’s grid view by entering the same information for fields defined above. In addition, previously defined quick keys are displayed in grid mode.

GL HELP 121
To define a quick account number, from the GLUPQU grid mode the following form will be displayed.
1.18 GL Rule Definition Screen (GLUPRU) Many times it is important to establish rules within the software that insure the correct codes are used when creating/using Org. Keys, Object Codes, Accounts, or GL/JL combinations. For example, whenever an Org. Key is created within the “ADMN” Function it must be associated with the FUND “10”or “30,” and OFCR “VPFA.” By defining these types of rules or logic, IFAS will require that the correct combination of values are entered. This increases the level of internal documentation for the creation of account information and helps to insure the validity of the account reporting structure.
To define the rule logic from the main menu key GLUPRU, the following form will be displayed:

GL HELP 122
In creating rules related to a specific item, the user should think of the following syntax:
For the given Ledger, Org. Key, Org. Part, Object Code, Object Group, Org. Key Select Code, Org. Key Misc Code, or Object Type, the following Code(s) may be associated together and will be reviewed in the order of priority defined.
Fields
Rule Ledger: A two-character ledger code within which the organization part code has been defined.
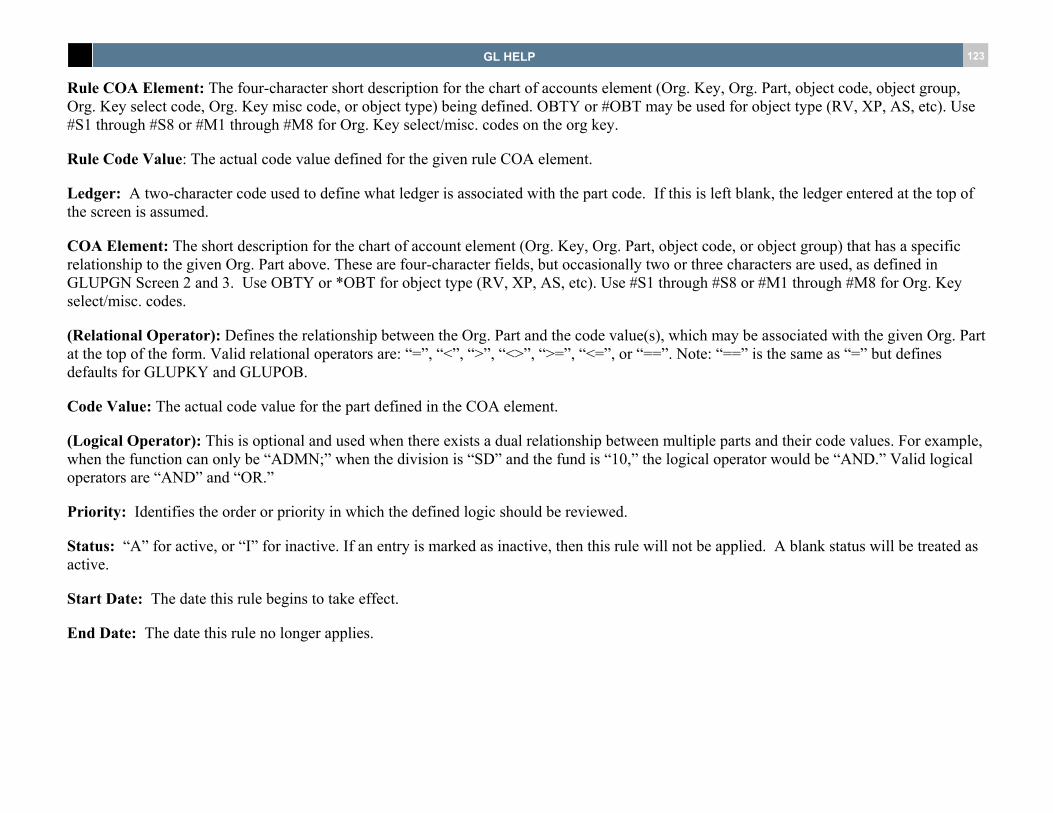
GL HELP 123
Rule COA Element: The four-character short description for the chart of accounts element (Org. Key, Org. Part, object code, object group, Org. Key select code, Org. Key misc code, or object type) being defined. OBTY or #OBT may be used for object type (RV, XP, AS, etc). Use #S1 through #S8 or #M1 through #M8 for Org. Key select/misc. codes on the org key.
Rule Code Value: The actual code value defined for the given rule COA element.
Ledger: A two-character code used to define what ledger is associated with the part code. If this is left blank, the ledger entered at the top of the screen is assumed.
COA Element: The short description for the chart of account element (Org. Key, Org. Part, object code, or object group) that has a specific relationship to the given Org. Part above. These are four-character fields, but occasionally two or three characters are used, as defined in GLUPGN Screen 2 and 3. Use OBTY or *OBT for object type (RV, XP, AS, etc). Use #S1 through #S8 or #M1 through #M8 for Org. Key select/misc. codes.
(Relational Operator): Defines the relationship between the Org. Part and the code value(s), which may be associated with the given Org. Part at the top of the form. Valid relational operators are: “=”, “<”, “>”, “<>”, “>=”, “<=”, or “==”. Note: “==” is the same as “=” but defines defaults for GLUPKY and GLUPOB.
Code Value: The actual code value for the part defined in the COA element.
(Logical Operator): This is optional and used when there exists a dual relationship between multiple parts and their code values. For example, when the function can only be “ADMN;” when the division is “SD” and the fund is “10,” the logical operator would be “AND.” Valid logical operators are “AND” and “OR.”
Priority: Identifies the order or priority in which the defined logic should be reviewed.
Status: “A” for active, or “I” for inactive. If an entry is marked as inactive, then this rule will not be applied. A blank status will be treated as active.
Start Date: The date this rule begins to take effect.
End Date: The date this rule no longer applies.

GL HELP 124
The start and end dates allow a rule to be applied for a specific period of time. Usually, these dates correspond to the beginning or end of a fiscal year. This allows different sets of rules to be maintained for different fiscal years or any time period. For example, if state laws no longer allow certain combinations to be used after a given date, then an end date can be applied to the rule.
1.19 General Ledger Start/End Dates by Subsystem (GLUPSE) Start and End dates (cutoff dates) may be defined by subsystem at the Org. Key, Key Background Part, Key Select Code, and/or Key Miscellaneous Code Level. These work in conjunction with the existing Start/End dates on the Org. Key.
The following subsystems are supported:
AP – Accounts Payable AR – Accounts Receivable CR – Cash Receipts JE – Journal Entries PY – Payroll FA – Fixed Assets PR – Purchase Requests PO – Purchase Orders BU – Budgeting EN – Encumbrances TR – Typed/Reversed AP Checks SI – Stores Inventory PC – Position Control @@ - All subsystems (This is redundant if this is setup at the Org. Key level but may be useful for other levels.)
Note: These are IFAS subsystems. Payroll transactions or any other types of transactions coming in from an outside source are treated as a Journal Entry.

GL HELP 125
You may also enter the number of days prior to the end date to issue a warning that the users are nearing the end date. Each entry may be set to Block/Warn/Authorize if a transaction falls in the defined date range.
If two or more Start/End dates are active for a given transaction, then the most restrictive dates are used. For example, if an Org. key has global Start/End dates of 7/1/2002-6/30/2003 and also has an AP Start/End date of 1/1/2002-12/31/2002 then AP transactions will only be allowed for that Org. Key between 7/1/2002-12/31/2002.
Fields

GL HELP 126
Org. Key/Key Part: The four-character description for the Org. Key, Org. Key Part. #S1 through #S8 may be used for Org. Key Select Codes. #M1 through #M8 may be used for Org. Key Misc Codes. Required.
Code Value: The actual code defined for the given Org. Key, Org. Key Part, Select, or Misc Code. Required.
Subsystem: The Subsystem ID for which this start/end date definition is to be effective. @@ may be entered to denote all subsystems. Required.
Object Code/Object Group: The four-character description for the Object Code or Object Group.
Code Value: The actual code defined for the given Object Code or Object Group.
Priority: If this flag is set, then this will be the only rule checked (if it matches the account selection criteria).
Start Date: The first date on which transactions may be entered for the selected subsystem. Before which a block or warn will be given.
Symbolic Start Date: A symbolic start date may be used instead of the an actual date. Entering a symbolic date will clear any entered start date on the record. This field consists of three parts; the date code, adjustment, and adjustment type. Valid date codes are RDT (Current Date), MOB (Month Begin Date), MOE (Month End Date), PRE (Period Begin Date), PRE (Period End Date), QTB (Quarter Begin Date), QTE (Quarter End Date), FYB (Fiscal Year Begin Date), FYE (Fiscal Year End Date), KYB (Key Start Date), and KYE (Key End Date). Optional adjustments to this date may be in the form of + or – and number. Optional adjustment types are D (Days), M (Months), P (Periods), Q (Quarters), and Y (Years). For example, KYB+6D.
End Date: The last date on which transactions may be entered for the selected subsystem. After which, a block or warn is issued.
Symbolic End Date: A symbolic end date may be used instead of the an actual date. Entering a symbolic date will clear any entered end date on the record. This field consists of three parts; the date code, adjustment, and adjustment type. Valid date codes are RDT (Current Date), MOB (Month Begin Date), MOE (Month End Date), PRE (Period Begin Date), PRE (Period End Date), QTB (Quarter Begin Date), QTE (Quarter End Date), FYB (Fiscal Year Begin Date), FYE (Fiscal Year End Date), KYB (Key Start Date), and KYE (Key End Date). Optional adjustments to this date may be in the form of + or – and number. Optional adjustment types are D (Days), M (Months), P (Periods), Q (Quarters), and Y (Years). For example, KYE+6D.
Warn Days: The number of days after the warn date which a block will be treated as a warn. This provides an optional grace period.
Block/Warn: The type of error to be produces: B (Block), W (Warning), or A (Authorize).
Ledger: The GL or JL ledger code for which this definition is active. Required.

GL HELP 127
1.20 General Ledger Direct Transaction Update (GLUPTR) The Direct Transaction Update screen allows for the entry of transactions into the General Ledger without benefit of any batch processing, budget, or balance checking. It is generally only used to enter initial balances during the implementation process. This update capability should be limited to very specific individuals through NUCLEUS Security, such that unauthorized access will not occur.
Fields
JE ID: System derived.
Set ID: A maximum of eight characters must be entered to indicate a control code or number for this set of transactions. This may be used for data extraction on reconciliation reports or special analysis.

GL HELP 128
Year: This display-only field indicates the Fiscal year into which the transaction will be posted. It is derived from the Primary Date.
Period: This display-only field indicates the Accounting Period into which this transaction will be posted. It is derived from the Primary Date.
Description: A maximum of 30 characters may be entered which describe the purpose or action causing the need for this transaction.
Date: Enter the date of the transaction, in MM/DD/YY format, which indicates the date it is entered and held as part of the actual account balance.
GL Account: A General Ledger (GL) account must be keyed into this field. If the Job Ledger (JL) module is used and this transaction relates to an account in the JL, follow the GL account with a slash (/) and then enter the JL account. Following the GL, and optionally the JL account, a Work Order number prefixed with a pound (#) sign, may also be entered. Thus, this field may contain up to three values: A required GL account; an optional JL account; and, an optional Work Order number. This may be quite a long number. As an example, if a transaction is to be coded to GL account "12006000", to JL account "10400", and to Work Order "5544", the following would be entered into this field: 12006000/10400 #5544. Account Numbers may be entered as Fully Qualified, Org. Key and Object Code, and/or Quick Keys.
Debit: If the entry is to be a debit to the account, enter the amount in this field.
Credit: If the entry is to be a credit to the account, enter the amount in this field.
Currency Code: Not currently available. For use with Foreign Currency Installations - A four-character code which indicates the country's currency definition in the Foreign Currency Module.
FC Debit: Not currently available. For use with Foreign Currency Installations - The amount of the transaction on the debit side of the entry expressed in the original foreign currency valuation.
FC Credit: Not currently available. For use with Foreign Currency Installations - The amount of the transaction on the credit side of the entry expressed in the original foreign currency valuation.
Currency Rate: Not currently available. For use with Foreign Currency Installations - A four-character code used to identify the Foreign Currency Valuation version.
Units: If any amount of unit usage is associated with this transaction, enter the amount in this field. A maximum of five places to the right of the decimal may be used.
Prepared By: The ID of the user who performed the update.

GL HELP 129
Secondary Reference: Up to 16 characters may be used as the secondary reference for this transaction or series of transactions. For instance, it may be a code to indicate audit adjustments, Board decisions, or any other secondary source document identification. This is not a required field.
Misc: A maximum of four characters to indicate a miscellaneous code associated with this transaction. This may be used for any type of historical analysis, data extraction, or reporting which may be desired.
Views: Accrual, Cash, Modified Accrual, and User Defined views may be selected.
PEID: Up to 12 characters for the Person/Entity ID of the individual to whom this transaction relates. For transactions from the Accounts Payable system this would be the Vendor or Payee ID. The PE ID must have been previously entered into the Person/Entity system. The person's name will be echoed in the following field. This is not a required field.
Contact No: The primary contract number reference associated with this transaction.
Check ID: Enter the two-digit Check Stock ID code if this transaction relates to information held in the Check Management system.
Check Number: The check number within the Check Management system to which this transaction relates. Maximum of six characters.
Sequence Number: A sequential number assigned by the system.
Secondary Date: An optional secondary accounting period into which this transaction should be placed. Currently, this option is not active.
Type: A two-character code may be used to indicate a specific type of transaction. (i.e. "ST" Standard Transaction, "CL" Year end Closing Transaction, "AJ" Audit Adjustment Entries, "AC" Accrual Entry, etc
Job Number: Enter the IFAS Job Number which should be assigned to this transaction. Under normal batch processing, this is automatically entered by IFAS when the transaction is posted to the General Ledger.
Entry Time: System derived.
User Number: System derived.
Subsystem: A two-character subsystem identification code to which this transaction or series of transactions relate. Valid codes are: "JE" Journal Entry, "OH" A/P Open Hold, "IP" A/P Immediate Pay, "TR" A/P Void, Typed, Reversed, "AR" Accounts Receivable, "CR" Cash Receipts, "CK" Check Management, "FA" Fixed Assets, and "PY" Payroll.

GL HELP 130
Original FY: This display-only field indicates the Fiscal year into which the transaction was originally posted. It is derived from the Primary Date.
1.21 General Ledger Browse Actual Amounts (GLUTAC) This utility is used to interactively display the actual amounts in GL accounts. Balances are displayed for a specific account number within the reference for the appropriate Ledger Code and Fiscal Year in total by individual month format.

GL HELP 131
1.22 Budget Copy Utility (GLUTDICB) The budget copy utility is used in order to copy existing budgets between fiscal years and versions. In order to use the budget copy utility navigate to GLUTDICB from the main IFAS7 screen. Once the utility loads, you will see prompts as shown in Figure 1 below.
Figure 1 – The Budget Copy Utility
Ledger: This is the two character code corresponding to all ledgers defined on the GLUPGN screen.

GL HELP 132
From Version: This is the budget’s version to copy from. These are the two character version codes defined in GLUPGN’s budget tab. These values are dynamic and will change if the ledger value is changed.
To Version: This is the budget’s version to copy to. These are the two character version codes defined in GLUPGN’s budget tab. These values are dynamic and will change if the ledger value is changed.
Level: These are the levels defined for the current ledger selected in GLUPLV. These values are dynamic and will change if the ledger value is changed.
Level Selection Criteria: Depending on the level selected, the part codes that make up a level will appear allowing subsets of levels within budgets to be copied (see Figure 2 below).
Figure 2 – Using selection criteria within levels

GL HELP 133
If copying all budgets for the FDDEPT level were desired, placing values in the FUND and DEPT level selection criteria text boxes could narrow which budgets will actually be copied by the utility. As shown above, the selection criteria means to copy only categories 100 through 500 of departments A.
Include All Transaction Detail: This is the option that will copy over existing budget transactions along with the actual budget definition.
New Transaction Approved Date: This will be used as the approved date for all the transactions copied.
Document Delta Transaction: The delta transaction is the budget transaction created to offset the budget amount copied between fiscal years and versions. Checking this box will document the delta transaction with the information below (if specified):
Reference Number: An alphanumeric code up to sixteen characters long that can be used to reference the delta transaction.
Package/Request ID: An alphanumeric code up to sixteen characters long that can be used to reference a group of transactions.
Reason: An alphanumeric code up to 4 characters long used to designate a reason for the transaction.
Description: A 100 character field used to store a description of the transaction
From Fiscal Year: The year to copy budgets from.
To Fiscal Year: The year to copy budgets to.
Change Percentage: Used to change the from fiscal year / version budget amount by a percent. Blank/100 designate that no change should occur during the copy. Values less than 100 will decrease the amount copied and values greater than 100 will increase it. Ex: If 110 is specified as the change percentage, the following will be the new budget amount:
1.10 x “From” Budget Amount = “To” Budget Amount
Replace Existing Budgets: This option is used in order to replace the “to” budget if it already exists. If this option is checked, all old budget transactions will NOT be deleted but will be offset by a delta transaction equivalent to the sum of the old budget transactions. If this option is not checked, the budget amount that already exists for the “to” budget will be summed with the “from” budget. This new value will replace the previous “to” budget’s amount.
Report Only: This option will not make any database changes and will only produce a report of what changes would have been made.
Exceptions Only: This option will make all the necessary changes to the database, but only show errors on the report.

GL HELP 134
Do you want to copy only those entries with an active status? This option will only copy budgets marked as active. Budgets marked as inactive will be ignored.
New Budget Status:
00 Same as old budget: The “to” budget’s status will be the same as the “old” budget’s status
01 Force new budgets active: The “to” budget’s status will be forced to active and the “old” budget’s status isn’t observed
02 Force new budgets inactive:
The “to” budget’s status will be forced to inactive and the “new” budget’s status isn’t observed
New Block/Warn/Authorize:
A The “to” budget’s block level will be set to authorize
B The “to” budget’s block level will be set to block
W The “to” budget’s block level will be set to warn
N The “to” budget’s block level will be set to none

GL HELP 135
C The “to” budget’s block level will be set to the “from” budget’s block level
Enter New Transaction Approved Date: this is the approved and request date that will be used when creating a delta transaction to offset the new budget amount that was copied.
To view the results of the GLUTDICB utility, go to the 7i dashboard and click the Jobs Tool Strip Item as shown in Figure 1. After clicking the Jobs Tool Strip Item, the screen in Figure 2 should appear.
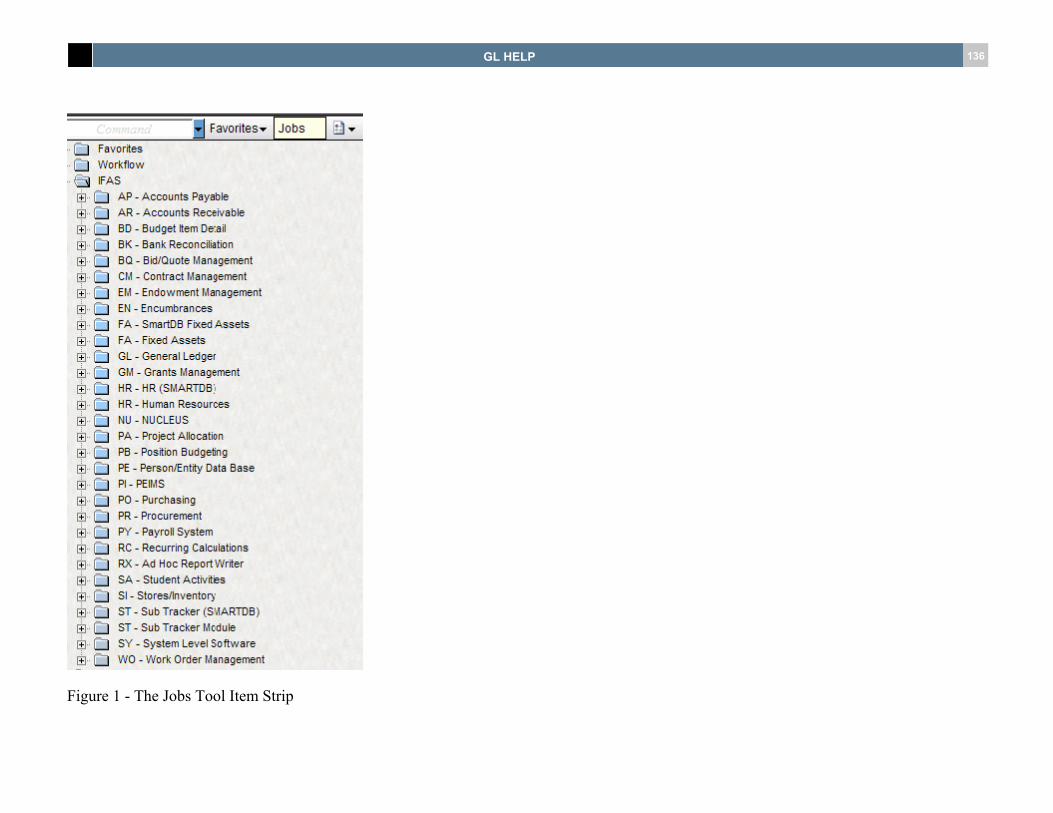
GL HELP 136
Figure 1 - The Jobs Tool Item Strip

GL HELP 137
Figure 2 - The IFAS Jobs UI
The IFAS Jobs UI can be used in order to view specific details about jobs that are currently running and jobs that are finished. Each entry in the list contains:

GL HELP 138
IFAS Job Number This number is unique to each job that is run on the system. The job number should have been shown on the “tailsheet” of the mask when the job was submitted
Mask This represents the mask that was used to submit an IFAS job
Job Type this described what type of job was run by the mask (usually Utility Job)
Status The status of a job that reflects if the job is still running, completed, or encountered a fatal error during execution
Start/End When the job started/finished
User The user who submitted the IFAS job
There are controls on the IFAS Jobs UI that can be used to filter what types of IFAS Jobs are displayed. By default, only jobs that are running for the current user are displayed in the list of IFAS Jobs. Checking the Show Completed checkbox will add the completed jobs to the list of the jobs currently running. Checking the Show All Users checkbox will add jobs submitted by other users to the jobs submitted by the user currently logged on to IFAS.

GL HELP 139
Each IFAS Job number contains a link to the detailed output that an IFAS job will produce. When clicking on this link, the page in figure 3 appears. This detailed output is helpful to see the details of exactly what a job did during execution. It could also help troubleshoot any problems that might occur during execution of a job.
Figure 3 - Detailed IFAS Job Output

GL HELP 140
1.23 Import Budget Utility (GLUTDIIB) The budget import utility is used in order to import budgets from a file. In order to use the budget copy utility navigate to GLUTDIIB from the main IFAS7 screen. Once the utility loads, you will see prompts as shown in Figure 1 below.
Figure 1 – The Budget Copy Utility
Ledger: This is the two character code corresponding to all ledgers defined on the GLUPGN screen
To Version: This is the budget’s version to copy to. These are the two character version codes defined in GLUPGN’s budget tab. These values are dynamic and will change if the ledger value is changed.

GL HELP 141
Level: These are the levels defined for the current ledger selected in GLUPLV. These values are dynamic and will change if the ledger value is changed.
Figure 2 – To Version and Level are Ledger specific
If importing budgets from a file into the JT ledger, the To Version and Level selections will only include what has been defined for the JT ledger. In Figure 2 above, the JL budget version was previously defined using GLUPGN. The FD level was previously defined using GLUPLV. If a version or level is not defined for a ledger, it will not appear as a selection.
To Fiscal Year: The year to import budgets into.
Replace Existing Budgets: This option is used in order to replace the “to” budget if it already exists. If this option is checked, all old budget transactions will NOT be deleted but will be offset by a delta transaction equivalent to the sum of the old budget transactions. If this option is not checked, the budget amount that already exists for the “to” budget will be summed with the “from” budget. This new value will replace the previous “to” budget’s amount.
New Budget Status:
01 Force new budgets active:
The “to” budget’s status will be forced to active and the “old” budget’s status isn’t observed
02 Force new budgets inactive:
The “to” budget’s status will be forced to inactive and the “new” budget’s status isn’t observed
New Block/Warn/Authorize:

GL HELP 142
A the “to” budget’s block level will be set to authorize
B The “to” budget’s block level will be set to block
W The “to” budget’s block level will be set to warn
N The “to” budget’s block level will be set to none
Exceptions Only: This option will make all the necessary changes to the database, but only show errors on the report.
Do you want to copy only those entries with an active status? This option will only copy budgets marked as active. Budgets marked as inactive will be ignored.
Input File: The file containing delimited data that is used to import budgeting data into the system. The file must be either comma or tab delimited. Note that if the file is comma delimited, commas MUST NOT be used when representing amounts.

GL HELP 143
To view the results of the GLUTDIIB utility, go to the 7i dashboard and click the Jobs Tool Strip Item as shown in Figure 1. After clicking the Jobs Tool Strip Item, the screen in Figure 2 should appear.
Figure 1 - The Jobs Tool Item Strip

GL HELP 144
Figure 2 - The IFAS Jobs UI
The IFAS Jobs UI can be used in order to view specific details about jobs that are currently running and jobs that are finished. Each entry in the list contains:
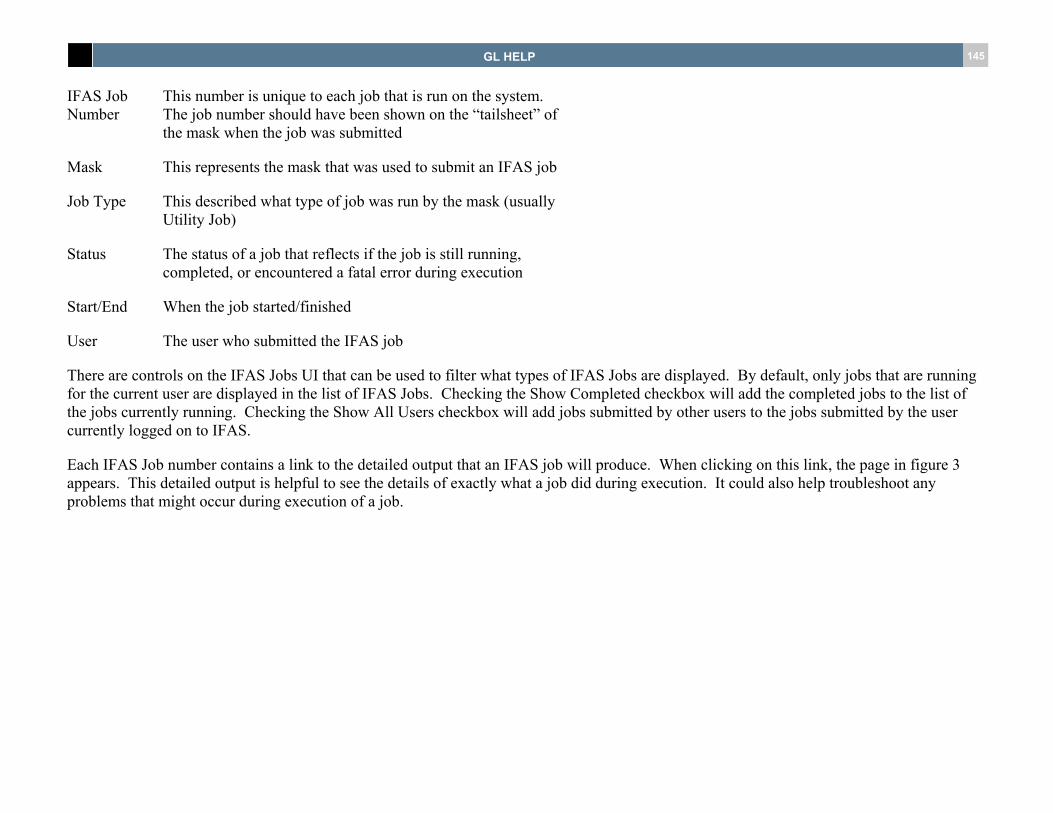
GL HELP 145
IFAS Job Number
This number is unique to each job that is run on the system. The job number should have been shown on the “tailsheet” of the mask when the job was submitted
Mask This represents the mask that was used to submit an IFAS job
Job Type This described what type of job was run by the mask (usually Utility Job)
Status The status of a job that reflects if the job is still running, completed, or encountered a fatal error during execution
Start/End When the job started/finished
User The user who submitted the IFAS job
There are controls on the IFAS Jobs UI that can be used to filter what types of IFAS Jobs are displayed. By default, only jobs that are running for the current user are displayed in the list of IFAS Jobs. Checking the Show Completed checkbox will add the completed jobs to the list of the jobs currently running. Checking the Show All Users checkbox will add jobs submitted by other users to the jobs submitted by the user currently logged on to IFAS.
Each IFAS Job number contains a link to the detailed output that an IFAS job will produce. When clicking on this link, the page in figure 3 appears. This detailed output is helpful to see the details of exactly what a job did during execution. It could also help troubleshoot any problems that might occur during execution of a job.
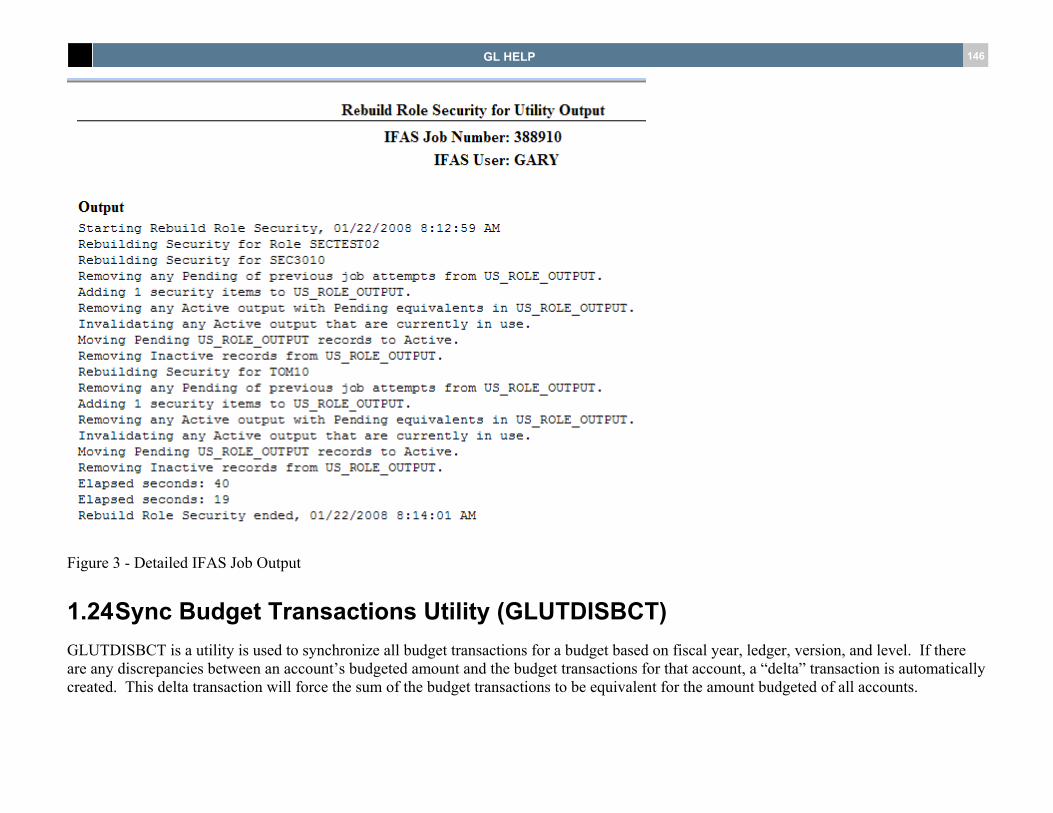
GL HELP 146
Figure 3 - Detailed IFAS Job Output
1.24 Sync Budget Transactions Utility (GLUTDISBCT) GLUTDISBCT is a utility is used to synchronize all budget transactions for a budget based on fiscal year, ledger, version, and level. If there are any discrepancies between an account’s budgeted amount and the budget transactions for that account, a “delta” transaction is automatically created. This delta transaction will force the sum of the budget transactions to be equivalent for the amount budgeted of all accounts.

GL HELP 147
After navigating to this screen, enter the fiscal year, ledger, version, and the decision to delete orphaned records. Orphaned records are budget transactions that do not correspond to a budget version and/or budgeting account. The percent wildcard (%) can be used to specify all records. For example, to sync all transactions for the all fiscal years, all ledgers, and all versions put a ‘%’ in the box corresponding to fiscal year, ledger, and version.

GL HELP 148
After entering fiscal year, ledger, version, and delete orphans, click the Submit button in order to sync all budget transactions matching the selection criteria entered. A message will appear at the top of the screen once the job has been submitted.
To view the results of the GLUTDISBCT utility, go to the 7i dashboard and click the Jobs Tool Strip Item as shown in Figure 1. After clicking the Jobs Tool Strip Item, the screen in Figure 2 should appear.

GL HELP 149
Figure 1 - The Jobs Tool Item Strip
Figure 2 - The IFAS Jobs UI
The IFAS Jobs UI can be used in order to view specific details about jobs that are currently running and jobs that are finished. Each entry in the list contains:

GL HELP 150
IFAS Job Number
This number is unique to each job that is run on the system. The job number should have been shown on the “tailsheet” of the mask when the job was submitted
Mask This represents the mask that was used to submit an IFAS job
Job Type This described what type of job was run by the mask (usually Utility Job)
Status The status of a job that reflects if the job is still running, completed, or encountered a fatal error during execution
Start/End When the job started/finished
User The user who submitted the IFAS job
There are controls on the IFAS Jobs UI that can be used to filter what types of IFAS Jobs are displayed. By default, only jobs that are running for the current user are displayed in the list of IFAS Jobs. Checking the Show Completed checkbox will add the completed jobs to the list of the jobs currently running. Checking the Show All Users checkbox will add jobs submitted by other users to the jobs submitted by the user currently logged on to IFAS.

GL HELP 151
Each IFAS Job number contains a link to the detailed output that an IFAS job will produce. When clicking on this link, the page in figure 3 appears. This detailed output is helpful to see the details of exactly what a job did during execution. It could also help troubleshoot any problems that might occur during execution of a job.
Figure 3 - Detailed IFAS Job Output
1.25 Update Budget Amount Utility (GLUTDISBUB) GLUTDISBUB is a utility is used to synchronize all budget transactions for a budget based on fiscal year, ledger, version, and level. If there are any discrepancies between an account’s budgeted amount and the budget transactions for that account, the budgeted amount will be
GL HELP 152
adjusted to match the budget transaction amount. This will force the sum of the budget transactions to be equivalent for the amount budgeted of all accounts.
GL HELP 153
After navigating to this screen, enter the fiscal year, ledger, version, and the decision to delete orphaned records. Orphaned records are budget transactions that do not correspond to a budget version and/or budgeting account. The percent wildcard (%) can be used to specify all records. For example, to sync all transactions for the all fiscal years, all ledgers, and all versions put a ‘%’ in the box corresponding to fiscal year, ledger, and version.
After entering fiscal year, ledger, version, and delete orphans, click the Submit button in order to sync all budget transactions matching the selection criteria entered. A message will appear at the top of the screen once the job has been submitted.

GL HELP 154
To view the results of the GLUTDISBUB utility, go to the 7i dashboard and click the Jobs Tool Strip Item as shown in Figure 1. After clicking the Jobs Tool Strip Item, the screen in Figure 2 should appear.
Figure 1 - The Jobs Tool Item Strip

GL HELP 155
Figure 2 - The IFAS Jobs UI
The IFAS Jobs UI can be used in order to view specific details about jobs that are currently running and jobs that are finished. Each entry in the list contains:

GL HELP 156
IFAS Job Number
This number is unique to each job that is run on the system. The job number should have been shown on the “tailsheet” of the mask when the job was submitted
Mask This represents the mask that was used to submit an IFAS job
Job Type This described what type of job was run by the mask (usually Utility Job)
Status The status of a job that reflects if the job is still running, completed, or encountered a fatal error during execution
Start/End When the job started/finished
User The user who submitted the IFAS job
There are controls on the IFAS Jobs UI that can be used to filter what types of IFAS Jobs are displayed. By default, only jobs that are running for the current user are displayed in the list of IFAS Jobs. Checking the Show Completed checkbox will add the completed jobs to the list of the jobs currently running. Checking the Show All Users checkbox will add jobs submitted by other users to the jobs submitted by the user currently logged on to IFAS.

GL HELP 157
Each IFAS Job number contains a link to the detailed output that an IFAS job will produce. When clicking on this link, the page in figure 3 appears. This detailed output is helpful to see the details of exactly what a job did during execution. It could also help troubleshoot any problems that might occur during execution of a job.
Figure 3 - Detailed IFAS Job Output
1.26 Utility for File Upload (GLUTRI) The purpose of this test case is to validate the process and functionality of the 7i upload utility for files residing on local machine connected to 7i server.
GL HELP 158
To enable file upload capability in 7i, question GLI1 must be activated in NUUPJB for the desired menu mask.

GL HELP 159
The menu mask used in this test case is GLUTRIIJ.
Upload file must be created in comma delimited format specifically defined for batch type being uploaded.

GL HELP 160
1.27 GL JE Import Data and Templates (GLUTRIJT) This screen is used to setup templates and defaults for the GLUTRIJI utility. When the utility is run, it looks for a template that was created and uses any values supplied as defaults for those items that are not supplied by the interfaced information. This can also be used to look at the raw data created for that interface. This data is stored in the ifgl_je_imp table in IFAS.
Tran ID: For an interface this ID is generally system generated. Within a given Set ID, it is used to relate balanced debits and credits together to form one “transaction”. When creating a template, this item needs to begin with “TEMPLATE” followed by a space and then the template ID. For example if you are creating a template called “ADP” you would enter “TEMPLATE ADP” in this field.
Tran Dt: This is the date the transaction or template was created.
GL HELP 161
Tran Op: Transaction Operator. This is effectively the status of the transaction. The interface may use any number of values for specific purposes. For templates it can remain blank.
All other fields: All the other fields are the same as those on the standard IFAS Journal Entry screen - GLJEUB. See that screen for details on each field. It is assumed that if you are entering data here that you are already familiar with these fields. No items on this screen are required. This allows you to be able to only fill in the defaults needed for a particular interface template.
1.28 Browse Summary Accumulators (GLUTSM) The Browse Summary Accumulators screen is used to view the totals maintained by the system for custom accumulators. This screen is read-only.

GL HELP 162
Fields
FY: The fiscal year for which this accumulator is kept.
GL Ledger: The General Ledger code for which this accumulator is kept.
JL Ledger: The Job Ledger code for which this accumulator is kept.
Summary Code: The name of the accumulator.

GL HELP 163
Selection Values: The Org Key, Part, Object, Group, Select Code, or Misc Code values for which this accumulator is kept.
Actuals: The net Debit and Credit totals by fiscal period for the selected accumulator.
Encumbrances: The Encumbrance totals by fiscal period for the selected accumulator.
1.28.1 Where the Accumulators are Stored Totals are stored in the gls_budact_summ table. Actuals are stored by period in the gla_actual01-14 columns. Encumbrances are stored by period in the gla_en01-14 columns.
1.28.2 Running the Recalculate Tool A Recalculate Tool is available under the Tools section of the Options Bar. The Recalculate tool will delete all the existing accumulated totals for the selected accumulator and then re-add them by reading the transaction detail records.

GL HELP 164
By default, the current Summary Code, GL Ledger, JL Ledger, and Fiscal Year will be automatically entered when the tool screen comes up. These items may be changed. Hit the “Recalculate” button to launch the recalculation process. Whether “Recalculate” or “Cancel” is selected,

GL HELP 165
the window will close. If “Recalculate” is selected, the accumulators will be recalculated in the background and you may continue your work. The recalculated accumulators will not be available until the process completes.

GL HELP 166
1.29 General Ledger Posting Preferences (GLUTSPPP) All posting codes are set up through the Posting Preferences. This screen is used in conjunction with GLUTSPSI. Posting Preferences eliminate the need to enter the Posting Code during data entry time by automatically determining the appropriate code for each transaction based on the data entered on the Default Posting Codes Screen. The order in which the posting codes are entered on the Posting Preferences Screen determines the order the system will search to find the applicable posting code for a given transaction. Therefore, it is important to enter data on the Screen in a hierarchy from specific to general.
Ledger: Two character ledger code.
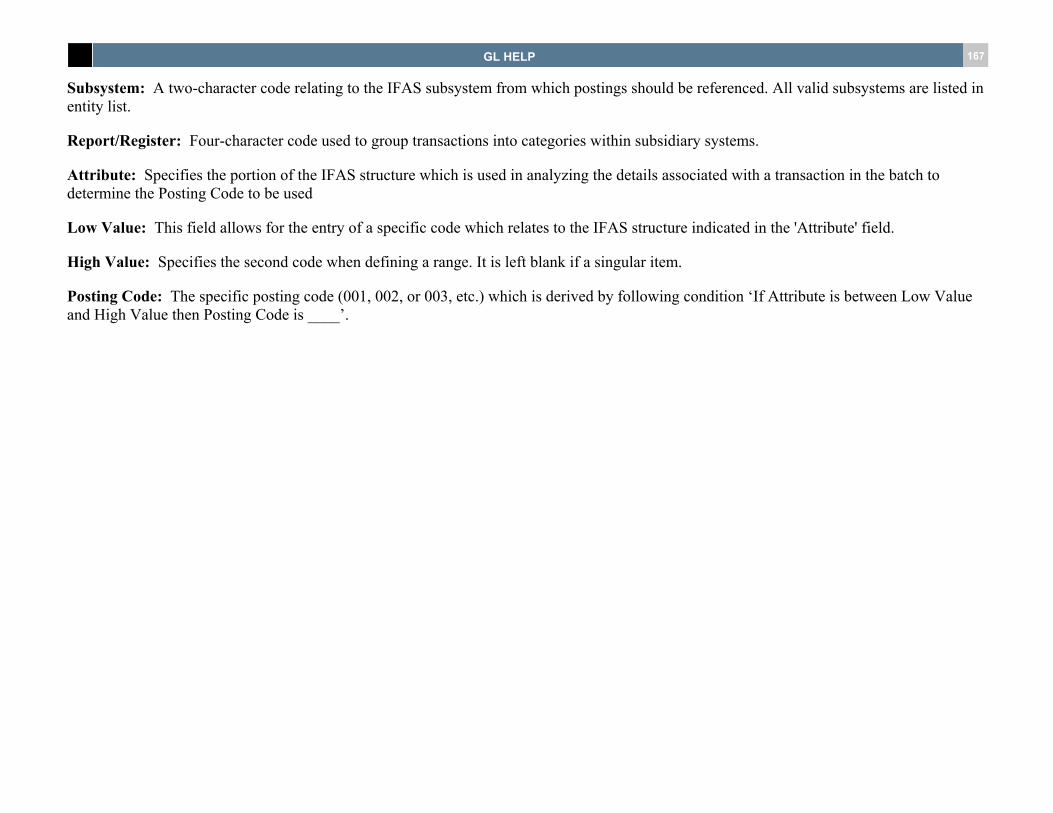
GL HELP 167
Subsystem: A two-character code relating to the IFAS subsystem from which postings should be referenced. All valid subsystems are listed in entity list.
Report/Register: Four-character code used to group transactions into categories within subsidiary systems.
Attribute: Specifies the portion of the IFAS structure which is used in analyzing the details associated with a transaction in the batch to determine the Posting Code to be used
Low Value: This field allows for the entry of a specific code which relates to the IFAS structure indicated in the 'Attribute' field.
High Value: Specifies the second code when defining a range. It is left blank if a singular item.
Posting Code: The specific posting code (001, 002, or 003, etc.) which is derived by following condition ‘If Attribute is between Low Value and High Value then Posting Code is ____’.