ge oil & gas 77000 series · ge oil & gas 77000 series ... pre-weld preparation ... the...
TRANSCRIPT

GE Oil & Gas
77000 SeriesMasoneilan* Axial Flow, Labyrinth Trim Control ValvesInstruction Manual
GE Data Classification : Public

b | GE Oil & Gas © 2015 General Electric Company. All rights reserved.
THESE INSTRUCTIONS PROVIDE THE CUSTOMER/OPERATOR WITH IMPORTANT PROJECT-SPECIFIC REFERENCE INFORMATION IN ADDITION TO THE CUSTOMER/OPERATOR’S NORMAL OPERATION AND MAINTENANCE PROCEDURES. SINCE OPERATION AND MAINTENANCE PHILOSOPHIES VARY, GE (GENERAL ELECTRIC COMPANY AND ITS SUBSIDIARIES AND AFFILIATES) DOES NOT ATTEMPT TO DICTATE SPECIFIC PROCEDURES, BUT TO PROVIDE BASIC LIMITATIONS AND REQUIREMENTS CREATED BY THE TYPE OF EQUIPMENT PROVIDED.
THESE INSTRUCTIONS ASSUME THAT OPERATORS ALREADY HAVE A GENERAL UNDERSTANDING OF THE REQUIREMENTS FOR SAFE OPERATION OF MECHANICAL AND ELECTRICAL EQUIPMENT IN POTENTIALLY HAZARDOUS ENVIRONMENTS. THEREFORE, THESE INSTRUCTIONS SHOULD BE INTERPRETED AND APPLIED IN CONJUNCTION WITH THE SAFETY RULES AND REGULATIONS APPLICABLE AT THE SITE AND THE PARTICULAR REQUIREMENTS FOR OPERATION OF OTHER EQUIPMENT AT THE SITE.
THESE INSTRUCTIONS DO NOT PURPORT TO COVER ALL DETAILS OR VARIATIONS IN EQUIPMENT NOR TO PROVIDE FOR EVERY POSSIBLE CONTINGENCY TO BE MET IN CONNECTION WITH INSTALLATION, OPERATION OR MAINTENANCE. SHOULD FURTHER INFORMATION BE DESIRED OR SHOULD PARTICULAR PROBLEMS ARISE WHICH ARE NOT COVERED SUFFICIENTLY FOR THE CUSTOMER/OPERATOR'S PURPOSES THE MATTER SHOULD BE REFERRED TO GE.
THE RIGHTS, OBLIGATIONS AND LIABILITIES OF GE AND THE CUSTOMER/OPERATOR ARE STRICTLY LIMITED TO THOSE EXPRESSLY PROVIDED IN THE CONTRACT RELATING TO THE SUPPLY OF THE EQUIPMENT. NO ADDITIONAL REPRESENTATIONS OR WARRANTIES BY GE REGARDING THE EQUIPMENT OR ITS USE ARE GIVEN OR IMPLIED BY THE ISSUE OF THESE INSTRUCTIONS.
THESE INSTRUCTIONS ARE FURNISHED TO THE CUSTOMER/OPERATOR SOLELY TO ASSIST IN THE INSTALLATION, TESTING, OPERATION, AND/OR MAINTENANCE OF THE EQUIPMENT DESCRIBED. THIS DOCUMENT SHALL NOT BE REPRODUCED IN WHOLE OR IN PART TO ANY THIRD PARTY WITHOUT THE WRITTEN APPROVAL OF GE.

Masoneilan 77000 Series Control Valve Instruction Manual | 1© 2015 General Electric Company. All rights reserved.
ContentsSafety Information. . . . . . . . . . . . . . . . . . . . . . . . . . . . . . . . . . . . . . . . . . . . . . . . . . . . . . . . . . . . . . . . . . . . . . . . . . . . . . . . . . . . 2
Important - Please Read Before Installation . . . . . . . . . . . . . . . . . . . . . . . . . . . . . . . . . . . . . . . . . . . . . . . . . . . . . . . . . . . . . . . . 2About this Manual . . . . . . . . . . . . . . . . . . . . . . . . . . . . . . . . . . . . . . . . . . . . . . . . . . . . . . . . . . . . . . . . . . . . . . . . . . . . . . . . . . . . . . . . . 2Warranty . . . . . . . . . . . . . . . . . . . . . . . . . . . . . . . . . . . . . . . . . . . . . . . . . . . . . . . . . . . . . . . . . . . . . . . . . . . . . . . . . . . . . . . . . . . . . . . . . 2
Introduction . . . . . . . . . . . . . . . . . . . . . . . . . . . . . . . . . . . . . . . . . . . . . . . . . . . . . . . . . . . . . . . . . . . . . . . . . . . . . . . . . . . . . . . . . 3Scope . . . . . . . . . . . . . . . . . . . . . . . . . . . . . . . . . . . . . . . . . . . . . . . . . . . . . . . . . . . . . . . . . . . . . . . . . . . . . . . . . . . . . . . . . . . . . . . . . . . . . 3Serial Plate . . . . . . . . . . . . . . . . . . . . . . . . . . . . . . . . . . . . . . . . . . . . . . . . . . . . . . . . . . . . . . . . . . . . . . . . . . . . . . . . . . . . . . . . . . . . . . . . 3After Sales Service . . . . . . . . . . . . . . . . . . . . . . . . . . . . . . . . . . . . . . . . . . . . . . . . . . . . . . . . . . . . . . . . . . . . . . . . . . . . . . . . . . . . . . . . 3Spare Parts . . . . . . . . . . . . . . . . . . . . . . . . . . . . . . . . . . . . . . . . . . . . . . . . . . . . . . . . . . . . . . . . . . . . . . . . . . . . . . . . . . . . . . . . . . . . . . . 3Actuator and Accessories . . . . . . . . . . . . . . . . . . . . . . . . . . . . . . . . . . . . . . . . . . . . . . . . . . . . . . . . . . . . . . . . . . . . . . . . . . . . . . . . . . 3
Numbering System . . . . . . . . . . . . . . . . . . . . . . . . . . . . . . . . . . . . . . . . . . . . . . . . . . . . . . . . . . . . . . . . . . . . . . . . . . . . . . . . . . . 3Unpacking . . . . . . . . . . . . . . . . . . . . . . . . . . . . . . . . . . . . . . . . . . . . . . . . . . . . . . . . . . . . . . . . . . . . . . . . . . . . . . . . . . . . . . . . . . . 4Installation . . . . . . . . . . . . . . . . . . . . . . . . . . . . . . . . . . . . . . . . . . . . . . . . . . . . . . . . . . . . . . . . . . . . . . . . . . . . . . . . . . . . . . . . . . 4
Recommended Installation . . . . . . . . . . . . . . . . . . . . . . . . . . . . . . . . . . . . . . . . . . . . . . . . . . . . . . . . . . . . . . . . . . . . . . . . . . . . . . . . 4Handling . . . . . . . . . . . . . . . . . . . . . . . . . . . . . . . . . . . . . . . . . . . . . . . . . . . . . . . . . . . . . . . . . . . . . . . . . . . . . . . . . . . . . . . . . . . . . . . . . . 4Piping Cleanliness . . . . . . . . . . . . . . . . . . . . . . . . . . . . . . . . . . . . . . . . . . . . . . . . . . . . . . . . . . . . . . . . . . . . . . . . . . . . . . . . . . . . . . . . . 4Isolation Bypass Valve . . . . . . . . . . . . . . . . . . . . . . . . . . . . . . . . . . . . . . . . . . . . . . . . . . . . . . . . . . . . . . . . . . . . . . . . . . . . . . . . . . . . . 4Heat Insulation . . . . . . . . . . . . . . . . . . . . . . . . . . . . . . . . . . . . . . . . . . . . . . . . . . . . . . . . . . . . . . . . . . . . . . . . . . . . . . . . . . . . . . . . . . . . 4Hydrostatic Testing and Line Cleaning . . . . . . . . . . . . . . . . . . . . . . . . . . . . . . . . . . . . . . . . . . . . . . . . . . . . . . . . . . . . . . . . . . . . . . 4Flow Direction . . . . . . . . . . . . . . . . . . . . . . . . . . . . . . . . . . . . . . . . . . . . . . . . . . . . . . . . . . . . . . . . . . . . . . . . . . . . . . . . . . . . . . . . . . . . . 4Welded Connections . . . . . . . . . . . . . . . . . . . . . . . . . . . . . . . . . . . . . . . . . . . . . . . . . . . . . . . . . . . . . . . . . . . . . . . . . . . . . . . . . . . . . . 4
Pre-Weld Preparation . . . . . . . . . . . . . . . . . . . . . . . . . . . . . . . . . . . . . . . . . . . . . . . . . . . . . . . . . . . . . . . . . . . . . . . . . . . . . . . . 4Welding Process . . . . . . . . . . . . . . . . . . . . . . . . . . . . . . . . . . . . . . . . . . . . . . . . . . . . . . . . . . . . . . . . . . . . . . . . . . . . . . . . . . . . . 5Post Weld Cleaning & Assembly . . . . . . . . . . . . . . . . . . . . . . . . . . . . . . . . . . . . . . . . . . . . . . . . . . . . . . . . . . . . . . . . . . . . . . 5
Actuator Assembly . . . . . . . . . . . . . . . . . . . . . . . . . . . . . . . . . . . . . . . . . . . . . . . . . . . . . . . . . . . . . . . . . . . . . . . . . . . . . . . . . . . . . . . . 5Disassembly . . . . . . . . . . . . . . . . . . . . . . . . . . . . . . . . . . . . . . . . . . . . . . . . . . . . . . . . . . . . . . . . . . . . . . . . . . . . . . . . . . . . . . . . . 5
Valve Actuation . . . . . . . . . . . . . . . . . . . . . . . . . . . . . . . . . . . . . . . . . . . . . . . . . . . . . . . . . . . . . . . . . . . . . . . . . . . . . . . . . . . . . . . . . . . 5Disconnect Instrumentation . . . . . . . . . . . . . . . . . . . . . . . . . . . . . . . . . . . . . . . . . . . . . . . . . . . . . . . . . . . . . . . . . . . . . . . . . . . . . . . 5Air-to-Extend (Open) Actuators . . . . . . . . . . . . . . . . . . . . . . . . . . . . . . . . . . . . . . . . . . . . . . . . . . . . . . . . . . . . . . . . . . . . . . . . . . . . . 5
Lever and Linkage Removal . . . . . . . . . . . . . . . . . . . . . . . . . . . . . . . . . . . . . . . . . . . . . . . . . . . . . . . . . . . . . . . . . . . . . . . . . . 5Actuator Removal . . . . . . . . . . . . . . . . . . . . . . . . . . . . . . . . . . . . . . . . . . . . . . . . . . . . . . . . . . . . . . . . . . . . . . . . . . . . . . . . . . . 5
Valve Disassembly . . . . . . . . . . . . . . . . . . . . . . . . . . . . . . . . . . . . . . . . . . . . . . . . . . . . . . . . . . . . . . . . . . . . . . . . . . . . . . . . . . . . . . . . 5Maintenance & Repair. . . . . . . . . . . . . . . . . . . . . . . . . . . . . . . . . . . . . . . . . . . . . . . . . . . . . . . . . . . . . . . . . . . . . . . . . . . . . . . . . 6
Packing Box . . . . . . . . . . . . . . . . . . . . . . . . . . . . . . . . . . . . . . . . . . . . . . . . . . . . . . . . . . . . . . . . . . . . . . . . . . . . . . . . . . . . . . . . . . . . . . . 6Packing Replacement . . . . . . . . . . . . . . . . . . . . . . . . . . . . . . . . . . . . . . . . . . . . . . . . . . . . . . . . . . . . . . . . . . . . . . . . . . . . . . . . . . . . . 7Parts Repair . . . . . . . . . . . . . . . . . . . . . . . . . . . . . . . . . . . . . . . . . . . . . . . . . . . . . . . . . . . . . . . . . . . . . . . . . . . . . . . . . . . . . . . . . . . . . . . 7
Guiding Surfaces . . . . . . . . . . . . . . . . . . . . . . . . . . . . . . . . . . . . . . . . . . . . . . . . . . . . . . . . . . . . . . . . . . . . . . . . . . . . . . . . . . . . 7Seating Surfaces . . . . . . . . . . . . . . . . . . . . . . . . . . . . . . . . . . . . . . . . . . . . . . . . . . . . . . . . . . . . . . . . . . . . . . . . . . . . . . . . . . . . 7Seat Lapping . . . . . . . . . . . . . . . . . . . . . . . . . . . . . . . . . . . . . . . . . . . . . . . . . . . . . . . . . . . . . . . . . . . . . . . . . . . . . . . . . . . . . . . . 7Gaskets . . . . . . . . . . . . . . . . . . . . . . . . . . . . . . . . . . . . . . . . . . . . . . . . . . . . . . . . . . . . . . . . . . . . . . . . . . . . . . . . . . . . . . . . . . . . . 8
Valve Reassembly . . . . . . . . . . . . . . . . . . . . . . . . . . . . . . . . . . . . . . . . . . . . . . . . . . . . . . . . . . . . . . . . . . . . . . . . . . . . . . . . . . . . 8Body Bolting . . . . . . . . . . . . . . . . . . . . . . . . . . . . . . . . . . . . . . . . . . . . . . . . . . . . . . . . . . . . . . . . . . . . . . . . . . . . . . . . . . . . . . . . . . . . . . 9Low Emissions LE* Packing (Optional) . . . . . . . . . . . . . . . . . . . . . . . . . . . . . . . . . . . . . . . . . . . . . . . . . . . . . . . . . . . . . . . . . . . . . 10
Preparation . . . . . . . . . . . . . . . . . . . . . . . . . . . . . . . . . . . . . . . . . . . . . . . . . . . . . . . . . . . . . . . . . . . . . . . . . . . . . . . . . . . . . . . . . 11Stem . . . . . . . . . . . . . . . . . . . . . . . . . . . . . . . . . . . . . . . . . . . . . . . . . . . . . . . . . . . . . . . . . . . . . . . . . . . . . . . . . . . . . . . . . . . . . . . . . . . . 11Packing Box . . . . . . . . . . . . . . . . . . . . . . . . . . . . . . . . . . . . . . . . . . . . . . . . . . . . . . . . . . . . . . . . . . . . . . . . . . . . . . . . . . . . . . . . . . . . . . 11Packing . . . . . . . . . . . . . . . . . . . . . . . . . . . . . . . . . . . . . . . . . . . . . . . . . . . . . . . . . . . . . . . . . . . . . . . . . . . . . . . . . . . . . . . . . . . . . . . . . . 11Spring Loaded Follower . . . . . . . . . . . . . . . . . . . . . . . . . . . . . . . . . . . . . . . . . . . . . . . . . . . . . . . . . . . . . . . . . . . . . . . . . . . . . . . . . . . 11Packing Installation . . . . . . . . . . . . . . . . . . . . . . . . . . . . . . . . . . . . . . . . . . . . . . . . . . . . . . . . . . . . . . . . . . . . . . . . . . . . . . . . . . . . . . 11
Valve Travel Requirements . . . . . . . . . . . . . . . . . . . . . . . . . . . . . . . . . . . . . . . . . . . . . . . . . . . . . . . . . . . . . . . . . . . . . . . . . . . 12Parts Reference Table. . . . . . . . . . . . . . . . . . . . . . . . . . . . . . . . . . . . . . . . . . . . . . . . . . . . . . . . . . . . . . . . . . . . . . . . . . . . . . . . 13Actuation . . . . . . . . . . . . . . . . . . . . . . . . . . . . . . . . . . . . . . . . . . . . . . . . . . . . . . . . . . . . . . . . . . . . . . . . . . . . . . . . . . . . . . . . . . . 15
Type 87/88 Multi-Spring Diaphragm Actuators . . . . . . . . . . . . . . . . . . . . . . . . . . . . . . . . . . . . . . . . . . . . . . . . . . . . . . . . . . . . . 16Type 51/52/53 Cylinder Actuators . . . . . . . . . . . . . . . . . . . . . . . . . . . . . . . . . . . . . . . . . . . . . . . . . . . . . . . . . . . . . . . . . . . . . . . . . 18
Parts Reference Table 51/52/53 Actuators . . . . . . . . . . . . . . . . . . . . . . . . . . . . . . . . . . . . . . . . . . . . . . . . . . . . . . . . . . . . . 24

2 | GE Oil & Gas © 2015 General Electric Company. All rights reserved.
Safety InformationImportant - Please Read Before InstallationMasoneilan 77000 Series instructions contain DANGER, WARNING, and CAUTION labels, where necessary, to alert you to safety related or other important information . Read the instructions carefully before installing and maintaining your control valve . DANGER and WARNING hazards are related to personal injury . CAUTION hazards involve equipment or property damage . Operation of damaged equipment can, under certain operational conditions, result in degraded process system performance that can lead to injury or death . Total compliance with all DANGER, WARNING, and CAUTION notices is required for safe operation .
This is the safety alert symbol . It alerts you to potential personal injury hazards . Obey all safety messages that follow this symbol to avoid possible injury or death .
Indicates a potentially hazardous situation which, if not avoided, could result in death or serious injury .
Indicates a potentially hazardous situation which, if not avoided, could result in serious injury .
Indicates a potentially hazardous situation which, if not avoided, could result in minor or moderate injury .
When used without the safety alert symbol indicates a potentially hazardous situation which, if not avoided, could result in property damage .
Note: Indicates important facts and conditions.
About this Manual• The information in this manual is subject to change
without prior notice .
• The information contained in this manual, in whole or part, shall not be transcribed or copied without GE's written permission .
• Please report any errors or questions about the information in this manual to your local supplier .
• These instructions are written specifically for the 77000 Series Axial Flow, Labyrinth Trim Control Valves, and do not apply for other valves outside of this product line .
Life PeriodThe current estimated useful life period for the Masoneilan 77000 Series control valve is 25+ years . To maximize the useful life of the product it is essential to conduct annual inspections, routine maintenance and ensure proper installation to avoid any unintended stresses on the product . The specific operating conditions will also impact the useful life of the product . Consult the factory for guidance on specific applications if required prior to installation .
WarrantyItems sold by General Electric are warranted to be free from defects in materials and workmanship for a period of one year from the date of shipment provided said items are used according to GE recommended usages . GE reserves the right to discontinue manufacture of any product or change product materials, design or specifications without notice .
This instruction manual applies to the Masoneilan 77000 Series .
Note:
• The valve must be installed, put into service and maintained by qualified and competent professionals who have undergone suitable training .
• All surrounding pipe lines must be thoroughly flushed to ensure all entrained debris has been removed from the system .
• Under certain operating conditions, the use of damaged equipment could cause a degradation of the performance of the system which may lead to personal injury or death .
• Changes to specifications, structure, and components used may not lead to the revision of this manual unless such changes affect the function and performance of the product .

Masoneilan 77000 Series Control Valve Instruction Manual | 3© 2015 General Electric Company. All rights reserved.
IntroductionScopeThe following instructions are designed to guide the user through the installation and maintenance of the Masoneilan 77000 Series control valves .
The Masoneilan 77000 Series is part of GE’s severe service portfolio, and may be custom designed to fit our customer’s most difficult applications . This document provides detailed installation and maintenance instructions for all sizes, ratings and trim types used in the 77000 Series product line .
Serial PlateThe serial plate is usually fixed to the side of the actuator yoke . It indicates information about the valve including size and type, pressure class rating, body/bonnet material, and serial number .
After Sales ServiceGE offers After Sales Service comprised of highly qualified technicians to support the installation
operation, maintenance and repair of its equipment . For support contact the local GE representative or Masoneilan factory located closest to you .
Spare PartsOnly Masoneilan replacement parts should be used when carrying out maintenance operations . Obtain replacement parts through local GE representatives or Masoneilan Parts Department .
When ordering spare parts, the model and serial numbers indicated on the manufacturer’s serial plate must be given . The serial plate is on the side of the actuator yoke .
Actuator and AccessoriesActuators and other valve accessories have their own instruction manuals, that provide information and details on the assembly and installation . Refer to the appropriate instruction manual for each unique accessory .
Numbering System
2nd7
5th4th3rd2nd1st 1st7
6th
0 Undefined
1 Linear
Trim TypeBody Series
77 Multi-stage, axial flow labyrinth trim control valve
Options
F Forged Body
0 Undefined
1 Bottom Entry; Outlet Spool Design
2 Top Entry; Bolted Bonnet Design
Design
0 Undefined
1 Trim A Unbalanced
2 Trim B Unbalanced
3 Trim C Unbalanced
TrimCharacteristic
Actuator Type
Spring Diaphragm37 Spring-Diaphragm Direct,
air to open (fail close action)
38 Spring-Diaphragm Reverse, air to close (fail open action)
87 Spring-Diaphragm Direct, air to open (fail close action)
88 Spring-Diaphragm Reverse, air to close (fail open action)
Piston Cylinder51 Cylinder : double acting
without spring, air to open and air to close action
52 Cylinder : Spring return, air to open, single acting, air failure to close
53 Cylinder : spring return, air to close, single acting, air failure to open

4 | GE Oil & Gas © 2015 General Electric Company. All rights reserved.
UnpackingCare must be exercised when unpacking the valve to prevent damage to the accessories and component parts . Contact the local GE Sales Office or Service Center with any issues or problems . Be sure to note the valve model number and serial number in all correspondence .
Installation
The 77000 Series valve must always be installed with the flow tending to open the valve plug. For applications where insulation of the valve body is required, do not insulate the valve bonnet when possible.
Recommended InstallationIt is recommended to install the 77000 Series valves in the vertical position with the actuator extended up whenever possible . This orientation eliminates the need for additional pipe support, reduces the side load friction on the actuator, and provides ease of removal of the trim during maintenance for weld-end construction designs .
For best acoustical performance provide a minimum of 10 pipe diameters of straight pipe length at the exit of the valve before installation of any pipe bends or additional equipment .
For applications involving flashing or erosive service it is highly recommended to include a minimum of 20 pipe diameters for best system performance .
HandlingWhen lifting the valve for installation it is important to never lift the valve by the actuator, lever or other assembled components .
It is recommended to use lifting straps around the body or flange connection whenever picking the valve for installation or removal from the piping system .
Piping CleanlinessBefore installing the valve in the line, clean piping and valve of all foreign material such as welding chips, scale, oil, grease or dirt .
Gasket mating surfaces must be thoroughly cleaned to ensure leak-free joints. Sacrificial start-up fixtures can be purchased from GE to protect the operational trim during the installation and line flushing phases.
If major system or piping modifications (or repairs) are performed, thorough flushing and blowdown of the system will be required prior to reinstalling the 77000 Series trim . Sacrificial flushing trim should be installed in this valve to protect the integrity of the flow passages . Failure to follow this warning will violate the valve warranty agreement and could result in control instability, excessive noise levels, and valve leakage .
Isolation Bypass ValveTo allow for in-line inspection, maintenance and removal of the valve without service interruption, provide a manually operated shutoff valve on each side of the control valve and a manually operated throttling valve in the bypass line .
Heat InsulationIn case of a heat-insulated installation, do not insulate the valve bonnet and take protective measures relative to personal safety .
Hydrostatic Testing and Line CleaningDuring this operation, the control valve must not be used as an isolating valve . This means that the valve must always be opened before carrying out pressure tests in the process line, cleaning of pipes, etc . Otherwise equipment damage or failure of the seal rings could result . Flushing and hydrostatic test equipment can be purchased from the Masoneilan factory .
Flow DirectionThe valve must be installed so that the process fluid will flow through the valve in the direction indicated by the flow arrow located on the body .
Welded Connections
Carefully review the information in this section prior to welding any valves inline. Refer any additional questions to the local GE Sales Office or Service Center.

Masoneilan 77000 Series Control Valve Instruction Manual | 5© 2015 General Electric Company. All rights reserved.
Pre-Weld PreparationCarefully follow the installation steps defined in the sections noted above prior to performing weld procedures .
Welding ProcessPerform welding process in accordance with the standard requirements for the materials and weld construction of the specific valve . Apply post weld heat treatment if required .
Internal valve components should be removed prior to performing any post weld heat treatment in order to prevent damaging any soft goods. If unable to remove the elastomeric components, then other methods must be employed to prevent the local temperature around the seals from exceeding the maximum material limits.
Post Weld Cleaning & AssemblyInspect the body, bonnet, and trim components for cleanliness and surface condition . Remove any foreign materials, such as weld chips, slag or scale . Make sure there are no nicks, scratches, burrs or sharp corners on sealing and sliding surfaces . Clean all gasket interface surfaces and reassemble using new gaskets to ensure sealing integrity .
Actuator AssemblyAssemble the actuator onto the control valve using the appropriate instructions for the specific actuator model and type . Connect air pressure lines to the actuator ports to meet intended operating mode (i .e ., air-to-extend, air-to-retract, or double-acting) .
Disassembly
Prior to performing any maintenance on the valve, isolate the valve and vent the process pressure.
Valve ActuationAccess to the internal components of the valve should be accomplished with the actuator removed . Follow the detailed instructions below and refer to the appropriate actuator instruction manuals .
Actuator may be pre-loaded with tension from air pressure or springs. Prior to disconnecting instrumentation read all instructions for the specific actuator.
Disconnect InstrumentationDisconnect all mechanical connections between the positioner and the other instruments . Disassemble the valve stem, actuator stem, and lever connectors as described in the following sections .
Note: The 77000 Series is an up-seating control valve design, which is the opposite action of most reciprocating control valves . For this design air-to-extend actuators will use the plant supply air to open the valve and air-to-retract actuators will use the plant supply air to close the valve .
Air-to-Extend (Open) ActuatorsLever and Linkage RemovalApply sufficient air pressure to the actuator to extend the stem completely and take the plug off of the seat . Remove the Body Clevis Retaining Rings (22) and Actuator Link Retaining Rings (29); along with the respective link pins (21) and (28) . Unscrew the actuator connector link (27) from the actuator stem connection . Disengage and remove the lever (23), Body Clevis (20), and for sizes 1” to 3” remove the Actuator Link Clevis (37) from the valve assembly .
Actuator RemovalDisconnect all electrical and air connection to and from the actuator .
Disassemble drive nut (32) and attachment screws, and lift actuator off of the valve being careful not to damage the drive nut threads .
Valve DisassemblyThe valve must always be reassembled with new packing set and gaskets. Before disassembly, make sure the recommended spare parts are available for reassembly .
1 . Disconnect the piping to the leak detector or lubrication connection on the body/bonnet (if applicable) .

6 | GE Oil & Gas © 2015 General Electric Company. All rights reserved.
2 . Unlock the lock nut (26) and remove the anti-rotation screw (25) then unscrew the stem pivot adapter (24) from the plug stem (5) . Loosen the packing box nuts (16) to reduce the friction of the packing on the plug stem .
For Bottom Entry Designs follow disassembly instructions 3-8:
3 . Remove the spool nuts (10) from the bottom entry spool (2) section on the valve . Remove the spool (2) from the body (1), along with the lower spider gasket (7) . Remove the spider (4) from inside the valve body . If the spider is difficult to remove you may nudge it out by applying downward force on the plug stem (5) . Remove the upper spider gasket (8) .
Note: Some designs may be equipped with an integral spider as part of the bottom entry spool . For these designs remove the spool and associated gaskets and proceed to step 4 .
4 . Remove the plug stem (5) along with the seat ring (3) .
Be careful not to damage the plug stem (5) or the seat ring (3) while removing these parts from the body. Scratches or damage to these parts can result in leakage and premature wear.
5 . Remove the packing flange nuts (16), packing flange (14), and packing follower (13) .
6 . Remove the old packing set (11) and lantern ring (12) .
Note: Lantern ring is applicable only for units with the optional leak detector option .
7 . Remove the upper stem guide bushing (6) .
8 . Inspect the body (1), spool (2), seat ring (3), spider (4), and plug stem (5) for any visual defects or damage . Carefully inspect the dynamic sliding surfaces and seal interface areas .
Ensure all parts are clean, particularly the seating surfaces prior to reassembly .
For Top Entry Designs follow disassembly instructions 9-15:
9 . Remove the packing flange nuts (16), packing flange (14), and packing follower (13) .
10 . Remove the bonnet nuts (10) and pressing down
on the stem remove the top entry bonnet (2) from the valve body (1) . While removing the bonnet the old packing set (11) and lantern ring (12) may also pull away from the stem . These parts should be removed at this time .
Note: Lantern ring is applicable only for units with the optional leak detector option .
11 . Remove the bonnet gasket (34) and upper stem guide bushing (6) from the valve body .
12 . Using the threaded lifting holes and eye bolts remove the seat ring retainer (33) from the valve body .
13 . Using the threaded lifting holes and eye bolts carefully lift the seat ring (3) from the valve body while paying close attention to not damage the plug stem (5) or seat ring (3) parts . Next remove the plug stem (5) .
Be careful not to damage the plug stem (5) or the seat ring (3) while removing these parts from the body. Scratches or damage to these parts can result in leakage and premature wear.
14 . Remove the lower guide bushing (35), spider (4), upper spider gasket (8), and lower spider gasket (7) from the valve body .
15 . Inspect the body (1), bonnet (2), seat ring (3), spider (4), and plug stem (5) for any visual defects or damage . Carefully inspect the dynamic sliding surfaces and seal interface areas .
Ensure all parts are clean, particularly the seating surfaces prior to reassembly .
Maintenance & RepairThe purpose of this section is to provide recommended maintenance and repair procedures . These procedures assume the availability of standard shop tools and equipment .
Packing BoxPacking box maintenance is one of the principal tasks during routine service . Tightness of the packing set (11) is maintained by proper compression . Compression is achieved by evenly tightening the packing flange nuts (16) against the packing flange (14) . Periodic re-tightening of the packing flange nuts may be required to maintain proper sealing,
Masoneilan 77000 Series Control Valve Instruction Manual | 7© 2015 General Electric Company. All rights reserved.
Always clean trim parts before reinstalling in the valve .
Guiding SurfacesGuiding Surfaces including the upper stem guide bushing (6), plug stem (5), and lower guide bushing (35) available on the top entry design or spider guide (4) as shown on the bottom entry design must be checked . If there is only slight wear indications, then use a light abrasive to smooth out the specific guiding surface areas . Parts with greater damage or wear on the guide surfaces must be replaced .
Guiding surfaces are hard-coated and excessive removal of surface material can expose base material.
Seating SurfacesThe seat ring (3) and plug stem (5) seating surfaces shown in Figure 1 must be completely free of dents, scratches, wear, or other visual damage . If the valve demonstrates excessive leakage or shows signs of deterioration on the seating surfaces the parts may be refurbished in accordance with the following guidelines .
Seat LappingSeating surfaces may need to be lapped in order to restore the necessary surface integrity to meet valve leakage requirements . Prior to lapping ensure the plug and seat ring seating surfaces are free from large scratches or dents . Remachining of these surfaces may be necessary . If so a maximum of .015” (0 .4mm) metal removal from both the plug and seat seating surfaces is allowable for any valve size . Seating Surfaces Make sure the seating angles on the reworked parts are within the specified tolerances as shown in Figure 2 below . Parts requiring more metal removal to restore should be discarded and replaced .
Care must be taken to not over tighten, as this could create unnecessary friction preventing smooth valve operation. If packing leakage persists after applying maximum compression, then the packing needs to be replaced.
The valve must be isolated and the process pressure vented prior to performing any packing box maintenance.
Packing ReplacementFor top entry designs, disassembly of the valve bonnet from the body is recommended before replacing the standard Teflon V-Ring packing .
Other packing types can be replaced without removal of the bonnet .
Use the following procedures to replace existing packing:
1 . Loosen and remove the packing flange nuts (16) .
2 . Remove the packing flange (14) and packing follower (13) .
3 . Remove the old packing set (11) and lantern ring (12) .
Note: Lantern ring is applicable only for units with the optional leak detector option .
4 . Replace packing (11) and lantern ring (12) if applicable, referring to Figures 4 through 9 for correct number of packing rings .
Note: For Teflon packing, assemble new packing with the cuts in the rings 120° apart from the adjacent ring . Press rings into the packing box one at a time .
5 . Reassemble the packing follower (13) and the packing flange (14) .
6 . Tighten the packing flange nuts (16) without over compressing the packing rings .
7 . For graphite packing, open and close the valve several times then retighten the packing as required .
8 . Place the valve back into service and check for leakage . Tighten packing flange nuts (16) as required .
Parts RepairCarefully examine parts for any scratches, unusual wear, or other visual damage prior to reassembly .

8 | GE Oil & Gas © 2015 General Electric Company. All rights reserved.
Figure 1: Plug and Seat Surfaces
Figure 2: Plug and Seat Ring
1 . Clean body gasket surface areas .
2 . If lapping is to be done outside of the body ensure the seat ring (3) is set on a flat and stable surface and proceed to step 5 .
3 . For lapping done with the trim installed inside the body, install new gaskets into the valve to ensure the ideal geometric characteristics in order to have the correct position of the seat ring during lapping .
Note: The gaskets used during lapping must not be reused for the body reassembly .
4 . Loosen the packing flange nuts (16) to remove friction and allow the plug (5) to rest against the seat ring (3) by its own weight .
5 . Spread a fine layer of high quality lapping compound (600 grit) on the seating surface of the seat ring . If lapping with the trim installed inside the valve, insert the seat ring (3) into the valve body (1) .
Do not allow the lapping compound to get onto plug or nonseating stages of the seat ring.
6 . Insert the plug (5) carefully into the seat ring (3) until it is seated .
Note: It is highly recommended to assemble the valve completely including using new gaskets before lapping the valve . Assembly with the top
5
3
Ra 0.4
32° 0'31° 0'
.03[.001] A
Ra 0.4
31° 0'30° 0'
.03[.001] A
entry bonnet or bottom spool aligns the trim parts and improves the integrity of the surface geometric characteristics .
7 . Place an appropriate tool on the valve stem (5) threaded to allow for manual rotation . Options for creating a manual resurfacing tool include using a T-handle secured with a locknut, or using a flat piece of steel with a drilled hole and two locknuts to fasten to the valve stem (5) .
8 . Lapping of the seat ring (3) is accomplished by rotating the plug (5) in short oscillating strokes . After 8 to 10 strokes, lift the plug (5) and repeat the operation three or more times in increments of 90°, 180°, and 270°, from the original position .
Note: Performing the operation at various increments is critical in maintaining concentricity between the parts during lapping .
9 . Lapping can be repeated, but should be limited as much as possible so that the seat remains sufficiently narrow to guarantee tightness .
10 . After lapping, disassemble the parts to clean them and then reassemble, making sure the seating angles are within tolerance as shown in Figure 2 .
GasketsGasket seating surfaces must be free of dents, scratches, corrosion, or other types of damage . Clean mating surfaces as required and replace any non-conforming parts . Spiral wound gaskets (items 7, 8 and 34 for top entry designs) must always be replaced after disassembly .
Valve ReassemblyAfter completing the recommended maintenance and repair actions noted above, reassemble the valve using the following procedure .
Make sure the valve body and all gasket surfaces are clean and free of any damage
Make sure any recommended lubricants or sealing compounds are compatible with the process fluid . Use acceptable substitutes as required .
For Bottom Entry Designs follow disassembly instructions 1-4:
1 . Install the upper stem guide bushing (6) into the top end of the body (1) .
2 . Install the seat ring (3) into the body and carefully

Masoneilan 77000 Series Control Valve Instruction Manual | 9© 2015 General Electric Company. All rights reserved.
lower the plug stem (5) into the seat ring using caution to not damage any surfaces .
Be careful not to damage the plug stem (5) or the seat ring (3) while removing these parts from the body. Scratches or damage to these parts can result in leakage and premature wear.
3 . Coat the upper spider gasket (8) lightly with gasket compound and secure on top of spider (4) . Insert spider into the valve body over the plug (5) until it makes contact with the seat ring (3) . Install the lower spider gasket (7) over the spider .
Note: Some designs may be equipped with an integral spider as part of the bottom entry spool . For these designs there will not be a lower spider gasket as it is a one piece construction .
4 . Align the bottom entry spool (2) section bolt holes with the body studs (9) . Proceed to the bolting instructions .
For Top Entry Designs follow disassembly instructions 5-11:
5 . Assemble the lower spider gasket (7) into the valve body .
6 . Assemble the lower guide bushing (35) onto the spider (4) pressing down until contact is made .
7 . Assemble the upper spider gasket (8) onto the spider (4) and install into the body (1) making sure that it aligns correctly on top of the lower spider gasket (7) located in the body .
8 . Assemble the plug stem (5) into the seat ring (3) . Using the plug stem carefully lower the parts together into the valve body until they rest on the spider (4) . The seat ring should mechanically fit on to the liner with a stepped connection .
Be careful not to damage the plug stem (5) or the seat ring (3) while removing these parts from the body. Scratches or damage to these parts can result in leakage and premature wear.
9 . Lower the seat ring retainer (33) over the plug stem (5) onto the seat ring (3) .
10 . Install the bonnet gasket (34) onto the body (1) .
11 . Press the upper stem guide bushing into the bonnet (2) and align the bonnet (2) bolt holes with the body studs (9) .Proceed to the bolting instructions .
Body Bolting1 . Grease the threads of the valve body studs (9)
and the bearing surfaces of the bonnet or spool nuts (10) .
2 . Assemble the bonnet or spool nuts (10) onto the body studs (9) manually, and hand tighten evenly so that the internal parts are held in place . The face of the bonnet or spool should be parallel to surface of the valve body (1) .
3 . Tighten the bonnet or spool nuts (10) evenly by applying torque in the increments and the sequences as defined in Table 1 and Figure 3 .
Note: To ensure tightness of the gasket joints torque the bonnet or spool down until metal to metal contact exists between the body and mating part .
4 . Check the plug stem (5) in between various tightening steps to make sure it is not binding due to misalignment of the trim . If there is binding, disassemble the bonnet or spool and reassemble the trim taking care to ensure proper alignment .
Note: Tighten the bonnet or spool nuts (10) in the following increments (units of ft-lbs [daNm]): 10 [1 .3], 20 [2 .6], 40 [5], 75 [10], 140 [19], 225 [30], 400 [54], 650 [88], plus increments of 250 [34] until the required torque is reached . Between each pass check to make sure the plug stem (5) strokes freely to ensure proper alignment .
5 . Visually inspect the assembly for proper stud and nut installation by checking the number of exposed threads . If less than 1 stud thread or more that 2-1/2 stud threads are extended above the nut after final tightening, then double check the assembly for proper installation and alignment .

10 | GE Oil & Gas © 2015 General Electric Company. All rights reserved.
Valve SizeBolting
Size
Torque Requirements ft-lbs [daNm]
Inches DNA193 Gr.
B7M A453 Gr.
660 A193 Gr. B7/B16
1 25 .750-10UNC 60 [8] 65 [9] 75 [10]
1 .000-8UNC 140 [19] 150 [20] 170 [23]
2 501 .250-7UNC 290 [39] 310 [42] 360 [49]
1 .500-8UN 540 [73] 575 [78] 680 [92]
3 80 1 .500-8UN 540 [73] 575 [78] 680 [92]
4 1001 .750-8UN 1100 [149] 985 [134] 1100 [149]
2 .000-8UN 1300 [176] 1385 [188] 1700 [230]
6 150
1 .875-8UN 1100 [149] 985 [134] 1100 [149]
2 .000-8UN 1300 [176] 1385 [188] 1700 [230]
2 .500-8UN 2680 [363] 2855 [387] 3350 [454]
8 2002 .000-8UN 1300 [176] 1385 [188] 1700 [230]
2 .250-8UN 1925 [261] 2050 [278] 2405 [326]
Table 1: Body Bolting Torque Requirements
Figure 3: Bolt Torque Sequence
Packing Box AssemblyVisually inspect the stem & packing box for cleanliness and proper surface finish . Lubricate the I .D . of the packing box with Never- Seez or equivalent . Assemble the packing box components per the maintenance instructions on page 5 .
Figure 4: Standard Packing
Figure 5: 285C or Latty 326.1M Packing
Figure 6: Graphite Packing
Low Emissions LE* Packing (Optional)The Masoneilan LE (Low Emissions) Packing is a high performance packing system capable of containing fugitive emissions well below the specifications of the most severe recommendations . It is also available in a firesafe configuration .
1 V-Ring Packing Adapter 7 Pieces: V-Ring Packing
6 Pieces: 285C 6 Pieces: Latty 326.1

Masoneilan 77000 Series Control Valve Instruction Manual | 11© 2015 General Electric Company. All rights reserved.
Packing Set Follower Assembly
Part Qty Part Qty
VESPEL Female Adapter 1 Upper Follower 1
KALREZ V-Ring 2 Disc Spring 8
VESPEL V-Ring 1 Lower Follower 1
VESPEL Male Adapter 1
Figure 7: LE Packing Configuration (Shown in Loaded Position)
The packing is provided as a set of five pieces . It consists of two adapter rings and three V-rings . An alternating pattern of Perfluoroelastomer (PFE) and long carbon fiber filled Teflon (PTFE) V-rings are used .
Applied properly, this packing exhibits very little cold flow (or creep) . Consequently, it can effectively prevent fugitive emissions leaks from a control valve . The LE Packing system can directly replace conventional packing, requiring no modification to the control valve or actuator .
A spring loaded, two-piece follower assembly is used to maintain a constant load on the packing, and is necessary for thermal cycling applications . As the definition of thermal cycling can vary, and processes are potentially subject to unpredicted thermal gradients, LE Packing is only available with the spring loaded follower .
Installation should be performed as detailed in the following paragraphs .
PreparationStem Inspect stem for any nicks or scratches on the surface finish . Reject the stem for any of these reasons as they may damage packing .
Note: A properly etched part number on the stem in the packing area will have no adverse effect on the performance of the packing .
Stem finish should be 3-7 AARH (Ra 0,1/0,2) .
Packing BoxNote: Bonnets that have a lube hole require installation of a lantern ring within the packing arrangement shown in Figure 8 .
Packing box should be clean and free of burrs, rust, and any foreign matter. Parts can be cleaned with denatured alcohol.
Note: Packing box finish should be 125 AARH (Ra 0 .8) or better .
The packing box may be bored or honed oversize by up to 0 .015” (0 .38 mm) above the nominal diameter to improve the finish . For instance, a nominal 0 .875” (22 .22 mm) packing box may be bored or honed up to 0 .890” (22 .60 mm) and the LE Packing will still seal properly .
Packing box must be finished to the bottom of the bore .
Figure 8
PackingInspect packing rings . DO NOT use packing if any nicks or scratches on packing are observed . Check packing and ensure that it is in the proper arrangement (see Figure 9) . PFE material can be identified by the gloss black molded finish . PTFE material has a dull black machined finish .
Figure 9
Spring Loaded FollowerThe spring loaded follower (available for applications rated ANSI 300 and below) consists of an upper and
View shown with graphite packing optionand lantern ring with lube hole
22
16
17
h ith hit ki
22
16
17
PFE - V-Ring
PFE - V-Ring
PTFE - V-Ring
PTFE - male adapter
PTFE - female adapter

12 | GE Oil & Gas © 2015 General Electric Company. All rights reserved.
lower follower and eight (8) disc springs (see Figure 10) . The springs are installed inside the lower follower and positioned alternately . The assembly is held together by tape, which must be removed before installation .
Figure 10
Packing Installation1 . The packing must be lubricated with Krytox®
fluorinated grease prior to installation (Krytox GPL206 or equivalent) .
2 . Packing should be lubricated as a set (not individually) to minimize getting lubricant between the rings .
3 . Packing should be lubricated with a generous application to the O .D . and I .D . of the packing set .
Note: All exposed surfaces of the packing set must be covered with the lubricant .
4 . PFE/PTFE is to be installed as a set . Carefully slide the packing set down the stem . Do not cock or force the packing on the threads .
If the packing set separates while on the stem, do not remove . Continue installing the remaining pieces to put the set back together .
5 . Gently press the packing into the packing box . Do not tap the packing down into the box .
Scribe Mark
Upper Follower
LowerFollower
Disc Springs
6 . The spring loaded follower is installed on top of the packing . This follower is installed as an assembly held together by tape . This tape should be removed after assembly . Proper assembly of the packing box will leave the top of the Lower Follower 0 .25 - 0 .50 inches (6 to 13 mm) above the bonnet .
A groove is scribed into the O .D . of the upper follower . The packing flange is tightened evenly until the top of the Lower Follower aligns with the scribe mark (groove) in the Upper Follower .
Note: This is the optimum loading for this packing . Further tightening will shorten life of the packing . Thread locking compound can be used on packing nuts .
7 . The packing should be checked for leakage .
8 . Packing load should be checked after the valve has cycled approximately 500 times . Adjust if necessary . No further adjustment should be required for the life of the packing .
Valve Travel RequirementsSee table below for rated travel by specific valve size .
Valve Size Travel
inches DN inches mm
1 25 0 .25 6
2 50 0 .25 6
3 80 0 .38 10
4 100 0 .50 13
6 150 0 .50 13
8 200 1 .00 25
Table 2: Valve Travel
Note: Actuator over travel of 0 .12” (3 mm) past the rated travel noted above is necessary to achieve required seat loading .

Masoneilan 77000 Series Control Valve Instruction Manual | 13© 2015 General Electric Company. All rights reserved.
Parts Reference TableItem No. Description
1 Body
2 Bonnet (Top Entry) or Spool (Bottom Entry)
3 Seat Ring
4 Spider
5 Plug Stem
6 Stem Guide Bushing
7 Lower Spider Gasket
8 Upper Spider Gasket
9 Body Stud
10 Bonnet/Spool Nut
11 Packing Set
12 Lantern Ring
13 Packing Follower
14 Packing Flange
15 Packing Flange Stud
16 Packing Flange Nut
17 Actuator Toggle Bracket
18 Bracket Stud
19 Bracket Nut
20 Body Clevis
21 Body Clevis Pin
22 Body Clevis Retaining Ring
23 Lever
24 Stem Pivot Adapter
25 Anti-rotation Screw
26 Locknut
27 Actuator Link Connector
28 Actuator Link Pin
29 Actuator Link Retaining Ring
30 Travel Stop Stud
31 Travel Stop Nut
32 Drive Nut
33 Seat Ring Retainer (Top Entry Design Only)
34 Bonnet Gasket (Top Entry Design Only)
35 Lower Guide Bushing (Top Entry Design Only)
36 Spud Adapter (Bottom Entry Design Only)
37 Actuator Link Clevis (Sizes 1” - 3”)
38 Conical Spring (Top Entry Design Only)
•Recommended spare parts for each maintenance interval

14 | GE Oil & Gas © 2015 General Electric Company. All rights reserved.
Detail AScale 1 : 2
Detail BScale 1 : 2

Masoneilan 77000 Series Control Valve Instruction Manual | 15© 2015 General Electric Company. All rights reserved.
Detail AScale 2 : 5 Detail C
Scale 2 : 5Top Entry
Detail BScale 2 : 5

16 | GE Oil & Gas © 2015 General Electric Company. All rights reserved.
ActuationType 87/88 Multi-Spring Diaphragm ActuatorsConnecting Type 87 (Air to Extend) No. 6 Actuator (Figure 10)1 . Tightly assemble the hex nuts (1) onto the plug stem .
2 . Push down the actuator, and screw on the yoke nut (33) at the same time . Then assemble the bottom stem connector (2) . As soon as it becomes possible, insert the valve stem into the actuator stem (10) . The stem must be inserted far enough so that when there is no air in the actuator, the valve plug does not touch the seat .
3 . Tighten the yoke nut (33) .
4 . Supply air to the actuator at the final pressure .
5 . Use the pointer (7) to set the travel scale (9) to the valve open position .
6 . Supply the actuator with air at a sufficiently high pressure to obtain a travel equal to the nominal travel of the valve .
7 . Unscrew the plug stem until the valve plug is in contact with the seat . Do not turn the valve plug on the seat as this could damage the sealing surfaces .
8 . Screw the hex nuts (1) as far as they will go and check that operation is correct .
Connecting Type 88 (Air to Retract) No. 6 Actuator (Figure 10)1 . Tightly assemble the hex nuts (1) onto the plug stem .
2 . Push down the actuator, and screw on the yoke nut (33) at the same time . Then assemble the bottom stem connector (2) . As soon as it becomes possible, insert the valve stem into the actuator stem (10) . The stem must be inserted far enough so that when there is no air in the actuator, the valve plug does not touch the seat .
3 . Tighten the yoke nut (33) .
4 . Unscrew the valve plug stem until the valve plug comes into contact with the seat . Do not turn the valve plug on the seat as this could damage the sealing surfaces .
5 . Supply air to the actuator until the stem has travelled at least .40 inches (10 mm) .
6 . Unscrew the plug stem by the number of turns N1 specified in Table 3 .
7 . Screw the hex nuts (1) as far as they will go and check that operation is correct .
8 . Use the pointer (7) to set the travel scale (9) to the valve closed position .
Connecting Type 87 (Air to Extend) No. 10, 16 and 23 Actuators (Figure 10)1 . Tightly assemble hex nut (1) onto the plug stem .
2 . Screw the top stem connector (4) assembly tightly onto the actuator stem (10) .
3 . Push down the actuator, and screw on the yoke nut (33) at the same time . Then assemble the bottom stem connector (2) assembly by screwing until it comes into contact with the hex nut (1) .
4 . Push down the actuator and tighten the yoke nut (33) .
5 . Supply the actuator with air at the initial pressure indicated on the spring scale .
6 . Position the stem connector assembly at distance “X” indicated in Table 4 .
7 . Use the pointer (7) to set the travel scale (9) to the valve open position .
8 . Supply the actuator with air at a high enough pressure to obtain a travel equal to the nominal travel of the valve .
9 . With the plug correctly positioned on the seat, unscrew the bottom stem connector (2) assembly until it comes into contact with the top stem connector (4) . Tighten the socket head cap screws (5), hex nut (1) and lock nut (32) and check that the operation is correct .
Connecting Type 88 (Air to Retract) No. 10, 16 and 23 Actuator (Figure 10)1 . Supply the actuator with air to retract stem .
2 . Unscrew the top stem connector (4) in accordance with dimension “X” in Table 4 .
3 . Tightly assemble hex nut (1) onto the plug stem .
4 . Tightly screw the top stem connector (4) assembly onto the actuator stem (10) .
5 . Push down the actuator, and screw on the yoke nut (33) at the same time . Then assemble the bottom stem connector (2) assembly by screwing until it comes into contact with the hex nut (1) .
6 . Push down the actuator and tighten the yoke nut (33) .
7 . With the plug correctly positioned on the seat, unscrew the bottom stem connector (2) assembly to bring it into contact with the top stem connector (4) .
8 . Supply air to the actuator until the stem has travelled at least 0 .40 inches (10 mm) .
9 . Unscrew the top stem connector (4) by the number of turns N1 specified in Table 3 then lock manually with hex nut (1) .
10 . Release the pressure in the actuator . Use pointer (7) to set the travel scale (9) to the actuator supply

Masoneilan 77000 Series Control Valve Instruction Manual | 17© 2015 General Electric Company. All rights reserved.
pressure so that the two stem connectors come into contact . Then tighten the socket head cap screws (5), hex nut (1), and lock nut (32) .
11 . Shut off the closed valve pressure and check that operation is correct .
Actuator Size
Travel “X”Actuator 87 “X”Actuator 88
in mm in mm in mm
10 0 .8 20 5 .12 130 .04 .62 117 .3
10 1 .5 38 5 .44 138 .2
16 0 .8 20 8 .00 203 .2
7 .02 178 .3
16 1 .5 38 8 .50 228 .6
16 2 .0 51 9 .28 235 .7
16 2 .5 63 .5 9 .50 241 .3
23 0 .8 20 8 .25 209 .5
23 1 .5 38 8 .62 218 .9
23 2 .0 51 9 .12 231 .6
23 2 .5 63 .5 9 .59 243 .6
Table 4: Position of Top Stem Connector
Figure 10
Type 87 Air to CloseNo. 6
Type 87 Air to CloseNo. 10-16-23
Model 87 ActuatorAir to Extend (Close)
Type 88 Air to OpenNo. 6
Type 88 Air to CloseNo. 10-16-23
Model 88 ActuatorAir to Retract (Open)
Parts Reference For Spring Diaphragm Actuators - Type 87/88 Multispring
Item No. Description
1 Hex Nut
2 Stem Connector, Bottom
3 Cap Screw, Hex Head
4 Stem Connector, Top
5 Cap Screw, Socket Head
6 Connector Insert
7 Pointer
8 Screw, Pan Head
9 Scale, Travel
10 Actuator Stem
31 Yoke, Machining
32 Lock Nut
33 Yoke Nut
• Not provided for Size 6 Actuator
18 | GE Oil & Gas © 2015 General Electric Company. All rights reserved.
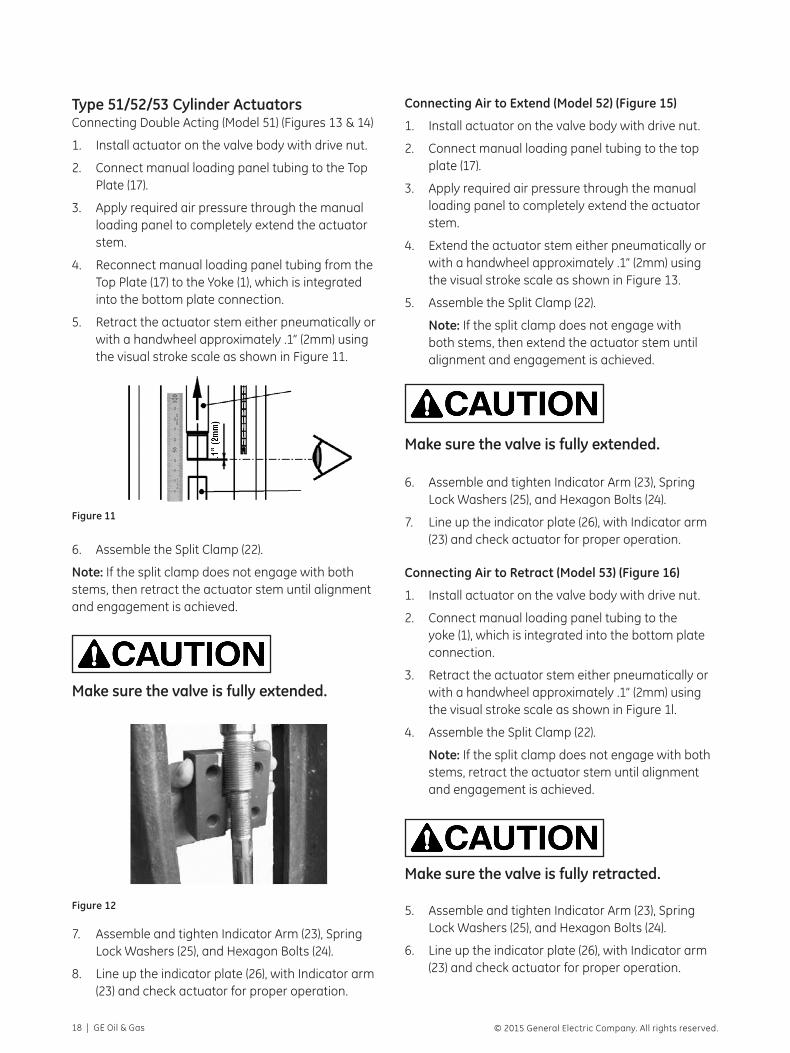
Type 51/52/53 Cylinder ActuatorsConnecting Double Acting (Model 51) (Figures 13 & 14)
1 . Install actuator on the valve body with drive nut .
2 . Connect manual loading panel tubing to the Top Plate (17) .
3 . Apply required air pressure through the manual loading panel to completely extend the actuator stem .
4 . Reconnect manual loading panel tubing from the Top Plate (17) to the Yoke (1), which is integrated into the bottom plate connection .
5 . Retract the actuator stem either pneumatically or with a handwheel approximately .1” (2mm) using the visual stroke scale as shown in Figure 11 .
Figure 11
6 . Assemble the Split Clamp (22) .
Note: If the split clamp does not engage with both stems, then retract the actuator stem until alignment and engagement is achieved .
Make sure the valve is fully extended.
Figure 12
7 . Assemble and tighten Indicator Arm (23), Spring Lock Washers (25), and Hexagon Bolts (24) .
8 . Line up the indicator plate (26), with Indicator arm (23) and check actuator for proper operation .
Connecting Air to Extend (Model 52) (Figure 15)
1 . Install actuator on the valve body with drive nut .
2 . Connect manual loading panel tubing to the top plate (17) .
3 . Apply required air pressure through the manual loading panel to completely extend the actuator stem .
4 . Extend the actuator stem either pneumatically or with a handwheel approximately .1” (2mm) using the visual stroke scale as shown in Figure 13 .
5 . Assemble the Split Clamp (22) .
Note: If the split clamp does not engage with both stems, then extend the actuator stem until alignment and engagement is achieved .
Make sure the valve is fully extended.
6 . Assemble and tighten Indicator Arm (23), Spring Lock Washers (25), and Hexagon Bolts (24) .
7 . Line up the indicator plate (26), with Indicator arm (23) and check actuator for proper operation .
Connecting Air to Retract (Model 53) (Figure 16)
1 . Install actuator on the valve body with drive nut .
2 . Connect manual loading panel tubing to the yoke (1), which is integrated into the bottom plate connection .
3 . Retract the actuator stem either pneumatically or with a handwheel approximately .1” (2mm) using the visual stroke scale as shown in Figure 1l .
4 . Assemble the Split Clamp (22) .
Note: If the split clamp does not engage with both stems, retract the actuator stem until alignment and engagement is achieved .
Make sure the valve is fully retracted.
5 . Assemble and tighten Indicator Arm (23), Spring Lock Washers (25), and Hexagon Bolts (24) .
6 . Line up the indicator plate (26), with Indicator arm (23) and check actuator for proper operation .

Masoneilan 77000 Series Control Valve Instruction Manual | 19© 2015 General Electric Company. All rights reserved.
Figure 13
Model 51 Double ActingWith handwheel without volume chamber
Model 51 Double ActingWith handwheel with volume chamber

20 | GE Oil & Gas © 2015 General Electric Company. All rights reserved.
Figure 14
Model 51 Double ActingWithout handwheel without volume chamber
Model 51 Double ActingWithout handwheel with volume chamber

Masoneilan 77000 Series Control Valve Instruction Manual | 21© 2015 General Electric Company. All rights reserved.
Model 52Air to extend with handwheel
Model 52Air to retract without handwheel
FIgure 15

22 | GE Oil & Gas © 2015 General Electric Company. All rights reserved.
Model 53Air to extend with handwheel
Model 53Air to retract without handwheel
Figure 16

Masoneilan 77000 Series Control Valve Instruction Manual | 23© 2015 General Electric Company. All rights reserved.
CM, DM handwheelTypical for Models 51/52/53
SCTN B-B SCTN C-C
SCTN A-A
A
FIgure 17.

24 | GE Oil & Gas © 2015 General Electric Company. All rights reserved.
Parts Reference Table 51/52/53 ActuatorsRef No. Description Ref No. Description Ref No. Description
1 Yoke 24 Hexagon bolt 47 Locking pin case
2 Piston rod S/A 25 Spring lock washer 48 Pin
3 Lower spring button 26 Indicator plate 49 Spring
4 Spring 27 Cross recessed head screw 50 Hexagon socket set screw
5 Hexagon socket head cap screw
28 Exhaust pipe 51 Guide key
6 Spring lock washer 29 Spring lock washer 52 Worm gear
7 Spring tube 30 Plug 53 Spacer tube
• 8 Guide bushing 3 1 Piston S/A 54 Adapter
9 Compression bolt • 32 Guide bushing 55 Set screw
10 Upper spring button • 33 O ring (Piston rod) 56 Worm
11 Thrust bearing • 34 Rod scraper • 57 Bearing
12 Compression nut 35 Hexagon bolt 58 Retaining ring
13 Separator plate Model 52/53 36 Spring lock washer 59 Hand wheel shaft
14 Cylinder tube 37 Gear box 60 Key (Worm)
15 Cylinder tube 38 Gear box cover S/A 61 Key (Handwheel)
• 16 Guide ring • 39 O ring 62 Retaining ring
17 Top plate • 40 Thrust bearing 63 Handwheel
18 Set screw 41 Adjustment screw 64 Grip
19 Center bolt 42 Locking nut 65 Directional plate
20 Hexagon nut 43 Adjustment nut 66 Self locking nut
• 21 O ring (Piston, Top plate) 44 Piston rod engagement 67 Operating information plate
22 Split clamp • 45 Bearing 68 Drive screw
23 Indicator arm 46 Retaining pin 69 Separator plate (Model 51)
70 Volume chamber tube
• Recommended Spare Parts

Masoneilan 77000 Series Control Valve Instruction Manual | 25© 2015 General Electric Company. All rights reserved.
NOTES

GEA30544B 05/2015
* Denotes a trademark of the General Electric Company .
Other company names and product names used in this document are the registered trademarks or trademarks of their respective owners .
© 2015 General Electric Company . All rights reserved .
AUSTRALIABrisbane:Phone: +61-7-3001-4319Fax: +61-7-3001-4399
Perth:Phone: +61-8-6595-7018Fax: +61 8 6595-7299
Melbourne:Phone: +61-3-8807-6002Fax : +61-3-8807-6577
BELGIUMPhone: +32-2-344-0970Fax: +32-2-344-1123
BRAZILPhone: +55-11-2146-3600Fax: +55-11-2146-3610
CHINAPhone: +86-10-5689-3600Fax: +86-10-5689-3800
FRANCECourbevoiePhone: +33-1-4904-9000Fax: +33-1-4904-9010
GERMANYRatingenPhone: +49-2102-108-0Fax: +49-2102-108-111
INDIAMumbaiPhone: +91-22-8354790Fax: +91-22-8354791
New DelhiPhone: +91-11-2-6164175Fax: +91-11-5-1659635
ITALYPhone: +39-081-7892-111Fax: +39-081-7892-208
JAPANChiba Phone: +81-43-297-9222Fax: +81-43-299-1115
KOREAPhone: +82-2-2274-0748Fax: +82-2-2274-0794
MALAYSIAPhone: +60-3-2161-0322Fax: +60-3-2163-6312
MEXICOPhone: +52-55-3640-5060
THE NETHERLANDSPhone: +31-15-3808666Fax: +31-18-1641438
RUSSIAVeliky NovgorodPhone: +7-8162-55-7898Fax: +7-8162-55-7921
MoscowPhone: +7 495-585-1276Fax: +7 495-585-1279
SAUDI ARABIAPhone: +966-3-341-0278Fax: +966-3-341-7624
SINGAPOREPhone: +65-6861-6100Fax: +65-6861-7172
SOUTH AFRICAPhone: +27-11-452-1550Fax: +27-11-452-6542
SOUTH & CENTRAL AMERICA AND THE CARIBBEANPhone: +55-12-2134-1201Fax: +55-12-2134-1238
SPAINPhone: +34-93-652-6430Fax: +34-93-652-6444
UNITED ARAB EMIRATESPhone: +971-4-8991-777Fax: +971-4-8991-778
UNITED KINGDOMBracknellPhone: +44-1344-460-500Fax: +44-1344-460-537
SkelmersdalePhone: +44-1695-526-00Fax: +44-1695-526-01
UNITED STATESMassachusettsPhone: +1-508-586-4600Fax: +1-508-427-8971
Corpus Christi, Texas Phone: +1-361-881-8182Fax: +1-361-881-8246
Deer Park, TexasPhone: +1-281-884-1000Fax: +1-281-884-1010
Houston, TexasPhone: +1-281-671-1640Fax: +1-281-671-1735
DIRECT SALES OFFICE LOCATIONS