fundamentals and drills for youth baseball · fundamentals and drills for youth baseball. royce...
TRANSCRIPT

Promoting baseball through the education of recreational coaches to better serve the baseball youth in Omaha and surrounding areas.
fundamentals and drills for youth baseball

Royce Maynard
Mike Hinrichs
Jeff Arney
Tim Kerrigan
Chris Hinrichs
Burke Harr
Pat Lawlor
Larry Gardner
Board Members: The Baseball Hilltoppers Board would like to thank the following underwriters for their contributions. Without the shared vision of the board members, coaching staff, and underwriters, the Baseball Hilltoppers program would not be possible. It is only through this joint effort that we can fulfill our mission of offering complimentary youth clinics and educational materials to the youth players and coaches in the Omaha area.
baseball hilltoppers underwriters
Godfather’s PizzaDon Bellino
Continuum WorldwideGeorge Venteicher
Ellis FamilyBob Hogan
Larry GardnerDenny Mailliard
Mike FinleyPete Leddy
Bimbo Pietro, DDSLeo Lapito
Gabe LapitoMike HinrichsTim Kerrigan
Revised 1/31/2013

MissionThe purpose of the Baseball Hilltoppers is to promote baseball through the education of recreational coaches to better serve the baseball youth in Omaha and surrounding areas. This organization stresses baseball fundamentals, respect for the game, and high character for coaches and players alike. The Baseball Hilltoppers foundation will fulfill its mission through complimentary clinics and educational material.
baseball hilltoppersThe Baseball Hilltoppers are proud to team with Creighton Head Baseball Coach Ed Servais and his staff. Ed’s teams have led the nation in fielding percentage the past eight years. This has been achieved through strong fundamentals, respect for the game, and high expectations of his players. Ed and his staff exemplifty all of the core values the Baseball Hilltoppers stand for. The goal of the organization is that by partnering with Ed and his staff, we can teach these fundamentals to metro area coaches who can then teach them to their players.
Purpose of the manualThis manual was designed to help educate the coaches of youth baseball in Omaha and the surrounding areas. By compiling knowledge from Creighton Head Coach Ed Servais and his staff, this manual provides instruction on the basic fundamentals of the game. Many of the drills and examples in this manual are used by the Creighton staff with their college players everyday, but are also great tools for teaching youth players. By stressing the fundamentals and building blocks that are provided in this manual, coaches can teach their players to play baseball the correct way from a young age.

• Creighton is coming off back-to-back NCAA Tournament appearances(2011&2012)forthefirsttimesince1999&2000.
• In December, Creighton’s head baseball coach Ed Servais was tabbed as one of three assistants for USA Baseball’s 2013 Collegiate NationalTeam.ServaiswillcoachteamdefenseandserveasthefirstbasecoachfortheUSANationalTeam.
• Withacareerrecordof327-195,ServaisledtheJaystotheNCAATournament in three of the past six seasons (2007, 2011 & 2012) andwasnamedtheMissouriValleyConferenceCoachoftheYearfourtimesinhistenureatCreighton(2004,2005,2007&2011).
• Servais’teamshavefinishedamongthenation’sbestinfieldingpercentageandsacrificebuntseveryseason,including2012,whentheBluejaysfinishedeighthinfieldingpercentage(.978).
Creighton Baseball Highlights

TABLE OF CONTENTS
CHARACTER & RESPECT.. . . . . . . . . . . . . . . . . . . . . . . . . . . . . . . . . . . . . . . . . . . . . .1
FUNDAMENTALS. . . . . . . . . . . . . . . . . . . . . . . . . . . . . . . . . . . . . . . . . . . . . . . . . . . . . . . . . 4
H I T T I NG . . . . . . . . . . . . . . . . . . . . . . . . . . . . . . . . . . . . . . . . . . . . . . . . . . . . . . . . . . 6
PITCHING.. . . . . . . . . . . . . . . . . . . . . . . . . . . . . . . . . . . . . . . . . . . . . . . . . . . . . . . . . . . . . . . . . . . . .12
PRACTICEORGANIZATION.. . . . . . . . . . . . . . . . . . . . . . . . . . . . . . . . . . . . . . . . .17
OUTFIELD... . . . . . . . . . . . . . . . . . . . . . . . . . . . . . . . . . . . . . . . . . . . . . . . . . . . . . . . . . . . . . . . . . . . . . .21
INFIELD. . . . . . . . . . . . . . . . . . . . . . . . . . . . . . . . . . . . . . . . . . . . . . . . . . . . . . . . . . . . . . . . . . 2 5
CATCHING... . . . . . . . . . . . . . . . . . . . . . . . . . . . . . . . . . . . . . . . . . . . . . . . . . . . . . . . . . . . . . . . . . . . . .29
BASE RUNNING.. . . . . . . . . . . . . . . . . . . . . . . . . . . . . . . . . . . . . . . . . . . . . . . . . . . . . . . . . . . .32

CHARACTER AND RESPECT

One of the many benefits of coaching and working with our youth is that we have the opportunity to reach out and not only teach the skills of the game, but to also teach the young players about character and respect. At Creighton University, we believe very strongly in teaching the fundamentals of the great game of baseball. We believe you will see that as you go through this booklet that we have put together. We also believe very strongly in developing character in our players and having them learn to respect the game and all that goes along with that.
Character How do we as youth coaches help develop character in our young players? One of the best things coaches can do is to role model proper behavior. Make sure to role model all the characteristics that you feel are important. Here is a list of mine: • Being on time for practices and games • Being prepared for practices and games • Being a hard worker • Doing what is right • Using proper language • Teaching your players how to deal with adversity
Teaching young people the traits that are listed above will go a long way in helping them develop the life skills necessary to lead a productive and successful adult life. There is a quote that I like and think about often that sums up this topic on character. The quote is from Thomas McCauley. “The measure of a man’s real character is what he would do if he knew he would never be found out.”
2
CHARACTER AND RESPECT

3
CHARACTER AND RESPECT
RespectCoaches have a great opportunity to teach respect to their players through sport. Here is a list of areas in which you can work with your players in helping teach respect through the game of baseball.
Respectyourteammates – Players need to show their teammates that they care and that they are all in this together. No one is better than anyone else.
Respectyourcoaches – Make your players look at you and listen when you are instructing them.
Respect parents and grandparents - Make sure your players show their parents/ grandparents that they appreciate all that they do for them.
Respect umpires – Questioning a call by an umpire is not an option. Talk to your players about the treatment of umpires. Make sure that you are role modeling proper behavior with the umpires.
Respect the rules of the game – Teach your players the rules of the game. Make sure that you do not allow them to make excuses for failures and that you do not allow throwing of bats or helmets in frustration.
Respectyourself – The players will have a difficult time respecting themselves if you do not respect them. This might be the most import one of them all.

FUNDAMENTALS

5
FUNDAMENTALS
Fundamentals
Coaches, as you prepare for your practices and your games, remember that the young players that you work with are not always going to appreciate the fact that you are stressing the fun-damentals of the game. The skills of throwing, catching, hitting, and base running should be incorporated into each practice.
Sometimes you may think, “Can I make the teaching of these fundamentals interesting and fun?” Yes, if you are creative and organized for practice. In order for young players to really enjoy the game of baseball, they will need to have a solid foundation of baseball skills. They will enjoy the game more if they can find success. Success can be traced back to thier funda-mentals. Most youngsters want to learn and it is our hope that the information in this booklet will help that process.

Hitting

7
HITTING
Five Step Process for Teaching Youth Hitting When teaching hitting to young players, coaches need to understand the challenges that young players have in learning how to hit. Hitting a baseball squarely is very difficult, so as you work with youngsters on hitting, make sure to simplify the process. When teaching hitting, break it down into these five components:1. Stance2. Load3. Stride4. Pivot5. Swing-to-Contact / Follow Through
1. Stance What stance should a young hitter use (open / close / square)? I would suggest to try and make the hitting process as simple as possible. The simplest way is to use a square stance. In the proper stance, feet should be the length of the bat apart. The hitter’s knees should be slightly bent and in an athletic position. The toes on both feet should be pointed straight ahead toward home plate. The feet are the foundation from which your hitters will work.Hands The grip is another very important part to hit-ting a baseball. You do not want your hitter to grip the bat too hard. Tension will not allow the hitter to swing the bat freely. Hitters should grip the bat with their fingers and not in the palm of their hand. The middle knuckles from the top hand should line up with the middle knuckles of the bottom hand. Have your players hold their hands where they are comfortable. A good starting point would be slightly below shoulder height. Hold the bat at a 45 degree angle over the back shoulder. Elbows should be relaxed and tension free. Avoid a bat wrap, where the bat gets behind the hitter’s head. A good stance is the foundation to the swingHead The hitter’s head should be level and the eyes should be level as well. Many hitters have their heads tilted, thus making it very difficult to see the ball. Make sure to turn the head fully towards the pitcher to see the ball with both eyes.
7
HITTING

8
HITTING
2. Load Before the pitch is delivered, the batter must take his hands back in order to hit.The load is comprised of a front-to-back movement. The hitter should take his hands back with some rhythm; this should not be a jerky movement. The hitter must make sure to take both hands back – they work together as one unit in the swing. Be sure the hitter does not take the bat back too far in order avoid an arm bar. An arm bar happens when the lead arm gets straightened and prevents a good swing path. The hitter must make sure not to wrap the bat around the head during the load (bat wrap). In a proper load, the bat goes back, slightly up, and stays inside or close to the body.
3. Stride The stride is the step the hitter should take before the ball is delivered. The stride is nothing more than a timing device, it doesn’t give the hitter power, the hips do. A problem with many young hitters is striding too late. Many hitters step late and the timing of the swing is destroyed. The stride does not take the hitter to the ball, a good stride is completed before the ball is released by the pitcher. A hitter’s stride should be controlled. The stride takes the hitter toward the pitcher and not toward the plate or 3rd baseman. A good stride goes out and comes down with the inner portion of the front foot. The front foot should be closed after the stride. If the stride foot is open, the hips will open early and cause the hitter to spin off the ball. The stride should not transfer the weight of the hitter from the backside to the frontside. After a stride, the hitter should still be well balanced. One of the bigger mistakes a young hitter can make is to over stride. A good stride should be controlled. This means the stride should be short and soft. In over striding, the eyes and head tend to move too far forward, which gives the illusion of a faster pitch. Over striding will also cause a loss of power.
After a controlled stride, the batter has his timing and is
still well-balanced

9
HITTING
4. Pivot Pivoting on the back foot will allow the
weight transfer from the back side to the front side. The pivot will start the swing and the hands to the ball. The legs are what start the swing. The pivot will also get the hips into your swing, which is where the hitter’s power comes from.
A good hitter does not want to hit the ball with hands and arms only. The hips are what start and drive the swing. Not pivoting on the back foot will cause a loss of balance and a loss of power.The pivot starts the swing and the hands towards the ball. The bottom hand is leading the bat to the ball.
5. Swing-to-contact/follow throughSwing Once the pivot has been started, the swing will begin and the hands will go towards the ball. During the swing, the hitter’s hands need to be above the plane of the ball. The bottom hand will lead the bat to the ball during a good swing. The swing path should be directly to the baseball, not below or around the ball. At the contact point between the bat and the ball, the bottom hand should be “palm down” and top hand should be “palm up.” As the bat enters the hitting zone, the hitter pushes his weight forward into a stiff front leg. At contact the lower and upper body should be facing the pitcher. The hitter’s arms should not be extended at the point of contact. A good phrase to remember – short to the ball and long after the ball.
The picture on the left shows a good example of palm up/palm down. The picture on the right shows a player with his hands above the ball, a stiff front leg, and upper and lower body facing the pitcher at contact.

10
HITTING
Follow Through After contact has been made, the swing is continued until both arms are extended. It is very important for the bat to accelerate through the ball at contact. After contact has been made and the arms are extended, the arms and hands will naturally roll over. If the hitter does not follow through, the swing will have slowed the bat down at the point of contact – exactly what the hitter does not want to do.
The picture on the left shows a player fully extended after contact. The picture on the right shows the hands naturally rolling over as the swing is finished.
hitting drillsTee Work1. Regular – set ball on the tee with two seams facing hitter. Have the hitter concentrate on hitting the inside seam.2. High Tee – put tee on a small bucket to raise the tee. Have hitters focus on hitting the inside seam and driving the ball into the net. Will help in developing a short swing path.3. Shuffle and Hit – Hitter stands behind the tee and shuffle his feet and strikes the ball off the tee. Good drill to teach to hit through the baseball.4. Outside Pitch – Line baseball off the inside part of back leg. Work on hitting the ball the other way.
Soft Toss1. Soft Toss Regular – tosser is at a 45 degree angle. The coach will toss the ball somewhere between his knee and waist and the toss will be made underhand. Hitter will swing and drive the ball into the net.

11
HITTING
HITTING DRILLS
Things to Remember• Keep your swings to five and rotate• Two sets of five at each station (10 swings total) before you rotate• Try to organize your hitting into stations• Partner your players up – two per station• Have a coach or parent at each station• Coach or parent should do the tossing or pitching• Keep the players moving – spend 20-25 minutes on hitting each practice
2. Soft Toss Look Back - same as regular soft toss with one difference. Put a baseball on the ground in front of the plate a few inches. After the batter hits the ball, his eyes look down at the ball that is on the ground. Forces hitter to keep his head (eyes) behind the ball.3. Soft Toss Command – same as regular soft toss with this difference. The tosser will tell the hitter, “Back, Step” and than toss the ball. The tosser will give the commands to the hitter.4. Soft Toss, No Stride – same as regular soft toss except the hitter does not take a stride. Try-ing to get the hitter to go back before he goes forward.5. Soft Toss, Step Back – same as regular soft toss except the hitter takes a small step backwards with his back foot. This will help the hitter get back before he goes forward.
Front Side Toss1. Regular – tosser stands behind screen and tosses the ball to the hitter from the front side. Need a screen (L-screen or Base screen) for this drill.2. Outside / Inside Pitches – tosser will alternate throwing pitches to the inside part of the plate and than to the outside part of the plate.3. Soft Toss / Hard Toss – alternate your tosses from soft to hard. Forces the hitter to see and react to the ball and not just swing at the action of the person tossing the ball.4. Command Drill – same as command drill from soft toss position. Person tossing the ball will command the hitter to go back and than step before he tosses the ball to the hitter.
Short Batting Practice* I strongly suggest throwing batting practice from a short distance. The distance could be 25-35 ft. This will help with accuracy and your hitters will get that much more work in.
1. Regular Short Batting Practice – limit your hitters to five swings and rotate.2. Batting Practice with Cones – set small cones out in the outfield (left center and right center) and give points for balls that are hit between the cones.

pitching
13
PITCHING
Five Step Process for Teaching Youth Pitching Mechanics
Pitching mechanics for young pitchers can be a very tough thing to teach as many of them do not have the motor skills yet to fully grasp the difficulties of pitching a baseball properly. Due to a lack of strength, many of them fight momentum and struggle to maintain balance and direction as energy is added to their motion. I am a firm believer that the pitching motion should not have any stops or pauses in it, but when breaking it down to help teach young pitchers, I feel you have to allow them to learn it in steps. For this reason, I have developed a five step process that keeps mechanics simple, and in segments for them to learn and understand. You can get more detailed with each step as you feel the pitcher is advancing and grasping what you are trying to teach. I have presented the five steps, and touched briefly on some of the issues that come with each phase of the delivery. As you teach it, I feel it’s important to make the pitcher master the early steps as they are simple and should not present too much trouble. The final two phases will be the most challenging and will require the most work. Here are the five steps in this mechanical system for teaching youth pitchers.
Step One – Starting PositionStep Two – Rocker StepStep Three – Pivot and LiftStep Four – Stride and BreakStep Five – Throw and Finish
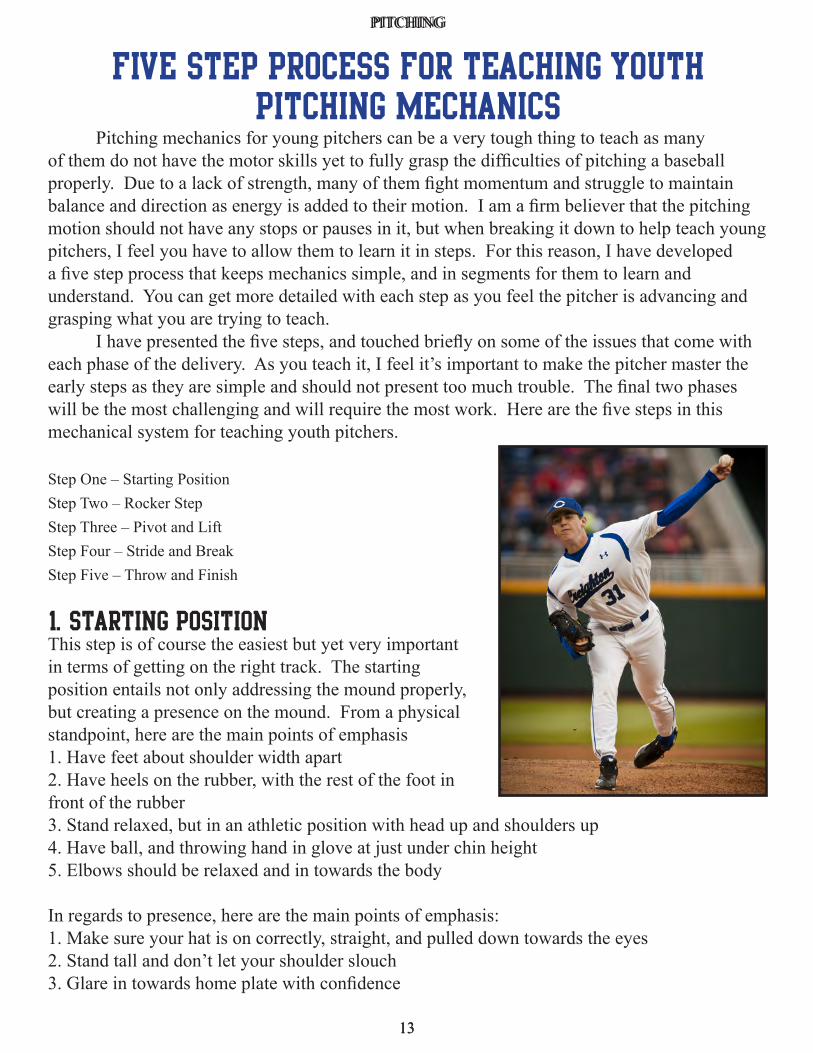
1. Starting positionThis step is of course the easiest but yet very important in terms of getting on the right track. The starting position entails not only addressing the mound properly, but creating a presence on the mound. From a physical standpoint, here are the main points of emphasis1. Have feet about shoulder width apart2. Have heels on the rubber, with the rest of the foot in front of the rubber3. Stand relaxed, but in an athletic position with head up and shoulders up4. Have ball, and throwing hand in glove at just under chin height5. Elbows should be relaxed and in towards the body
In regards to presence, here are the main points of emphasis:1. Make sure your hat is on correctly, straight, and pulled down towards the eyes2. Stand tall and don’t let your shoulder slouch3. Glare in towards home plate with confidence
13
PITCHING
14
PITCHING
2. Rocker step The rocker step is the first movement with in the delivery. It most cases, it will actually do more to hurt the delivery than help it. The rocker step should be very simple in nature and consist of only a very small movement backwards. The step should be about four to six inches in length and the head should not move. The pitcher should work to keep his head over his feet during the rocker step.
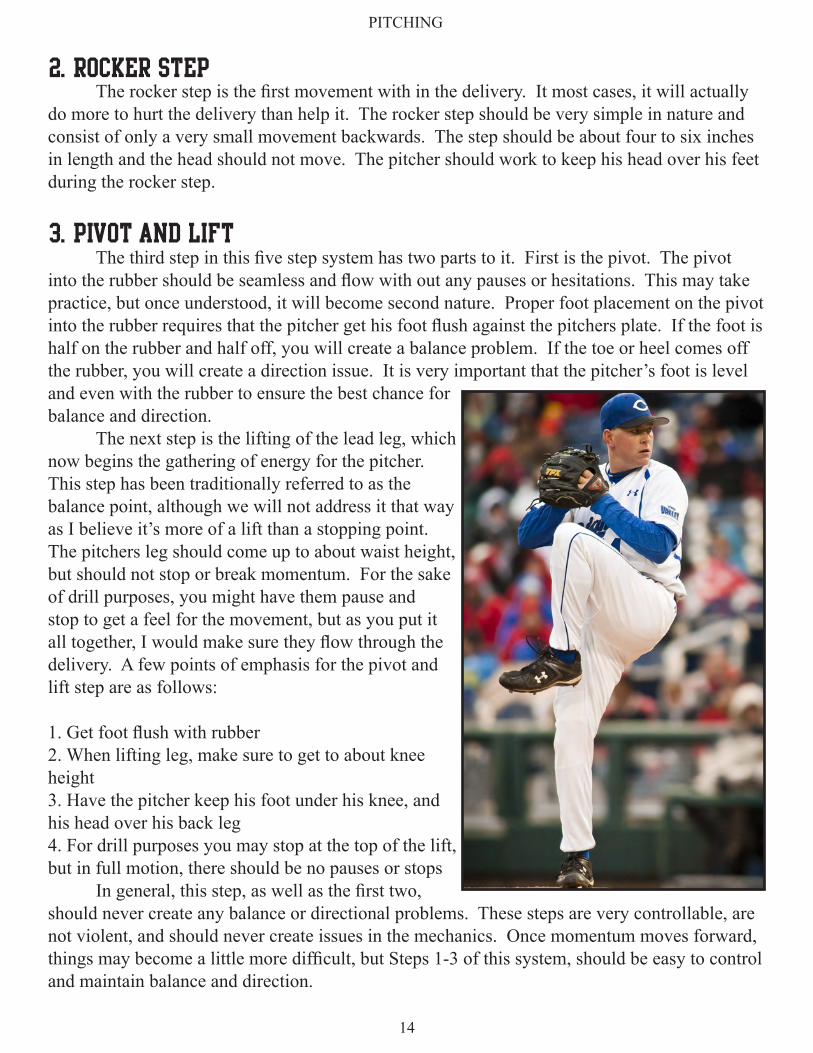
3. Pivot and lift The third step in this five step system has two parts to it. First is the pivot. The pivot into the rubber should be seamless and flow with out any pauses or hesitations. This may take practice, but once understood, it will become second nature. Proper foot placement on the pivot into the rubber requires that the pitcher get his foot flush against the pitchers plate. If the foot is half on the rubber and half off, you will create a balance problem. If the toe or heel comes off the rubber, you will create a direction issue. It is very important that the pitcher’s foot is level and even with the rubber to ensure the best chance for balance and direction. The next step is the lifting of the lead leg, which now begins the gathering of energy for the pitcher. This step has been traditionally referred to as the balance point, although we will not address it that way as I believe it’s more of a lift than a stopping point. The pitchers leg should come up to about waist height, but should not stop or break momentum. For the sake of drill purposes, you might have them pause and stop to get a feel for the movement, but as you put it all together, I would make sure they flow through the delivery. A few points of emphasis for the pivot and lift step are as follows:
1. Get foot flush with rubber2. When lifting leg, make sure to get to about knee height3. Have the pitcher keep his foot under his knee, and his head over his back leg4. For drill purposes you may stop at the top of the lift, but in full motion, there should be no pauses or stops In general, this step, as well as the first two, should never create any balance or directional problems. These steps are very controllable, are not violent, and should never create issues in the mechanics. Once momentum moves forward, things may become a little more difficult, but Steps 1-3 of this system, should be easy to control and maintain balance and direction.

15
PITCHING
4. Stride and break This phase of the delivery plays a big part in the directional aspects of the pitcher’s delivery. The best way to help the young pitcher understand how the stride and break work together is to have them take their glove arm forward with their lead leg. As the lead leg moves towards home plate, the lead arm goes along with it. In addition to that, the pitcher now must understand that the throwing arm moves opposite of the front arm. In other words, when one arm goes forward, one arm goes back. This will create balance and symmetry in the pitcher’s mechanics. Once the front foot has landed, the pitcher should be in what is traditionally called the “power position”. Here are some basic points in regards to this phase of the delivery.
1. The lead arm and lead leg move together2. As one arm moves forward, the other goes back3. Once landed, the pitcher should be in the “power position” with a firm base, and both arms still in balance with each other
5. throw and finish This step usually is the most difficult, and it creates most of the problems young
pitchers have. After arriving to foot strike and finding what is traditionally called the “power position”, the young pitcher must now allow his momentum to continue forward while maintaining direction and balance. This process can be difficult as the momentum and weight transfer will cause many young pitchers to pull off or tilt their heads into release. As they move into this final step there are a few things that I feel are good lessons. First, you will need to address the throwing arm and glove side. As we talked about one arm moving forward and one arm moving back in Step 4, we do the same in Step 5. As the throwing arm moves forward
towards release, the glove-side arm should move back towards the center of the body. Glove-side action should finish with the palm of the glove facing the pitchers body. Next, focus on

the pitcher’s head in regards to home plate. Ideally, if you can help the young pitcher minimize their head movement into release, it will give them the best chance to throw strikes. Finally, after release occurs, the backside leg should follow the throwing arm forward into the final finishing position.
Here are some points to keep in mind when working with the throw and finish step:1. As the throwing arm moves forward, the glove arm returns to the center of the body2. The palm of the glove should be facing the pitcher’s body3. Minimize head movement into and after release4. Back leg should follow throwing arm during deceleration In conclusion, you will find there are many different points you can address with each step, but that will be determined by the skill and strength level of each pitcher you work with. As with any teaching model, it has to flow and allow the young player to understand how the points all connect. Avoid bouncing around too much as it will create confusion and make it more difficult for them to understand.
16
PITCHING

practice organization
16

18
PRACTICE ORGANIZATION
Practice OrganizaTION I would recommend that the length of practice be one hour to 90 minutes. During this time keep your players moving. Do not stay with the same drill very long. Try to avoid lines during practice. Working in stations as much as possible will help to keep players from standing idle during practice. Partner work is always good for practice as well. When working in partners, make sure to switch the pairings often. This will help the players get to know each other better. If at all possible, have your practice plan written out and try to stay with it.
sTRETCHINGIt is very important to stretch your players out at the beginning of each workout with dynamic stretching activities. Getting the players worked up before you start your baseball activities helps to prevent injuries. Here is an example of a program you can do to get your players ready for practice:
• Set cones about 30 yards apart and have your team partner off• Have the players jog back-and-forth - Repeat the sequence with backpedals, basketball shuffles, and carioca• Perform form running back-and-forth between the cones - High Knees / Kick backs / Striders
Follow this dynamic stretching with some arm exercises and move into base running.
bASE rUNNINGAfter the players have warmed up, move into base running drills. A few important base running skills for young players to work on are listed below.
• Running from Home to 1st Base– make sure runners hit the front part of 1st base (either foot) and break down after touching the bag. The player should then look to the right and the left to find the ball in case of a poor throw.• Running from Home to 2nd Base– discuss the proper turn around 1st • Sliding• Tagging up at bases• Leading off – primary leads vs. secondary leads

19
PRACTICE ORGANIZATION
THROWING PROGRAMMake sure your Throwing Program is supervised by the coaches. Coaches need to make this a priority of every practice. This is not a warm-up exercise, but a time to work on throwing and catching skills.
Example of a throwing program: • Start on two knees around 15 feet apart – 1 min. • One knee throwing from 20 feet – 1min. • Stand Up – Turn and Throw from 25 feet – 1 min. • Turn body sideways – Back and throw from 30 feet – 1 min. • Body sideways – Front – Back and throw from 35 feet – 1 min. • Body sideways – click heels and throw from 45 feet – 1 min. • Body sideways – right – left throw and follow from 55 feet – 1 min. • Continue to stretch arm out to 60 – 90 feet – 2-3 min. • Rapid catch / Rapid fire
Helpful Coaching Hints:
• Makesuretostretchyourteamoutbeforeeveryworkoutorgame• Allowplayerstoexperienceplayingseveralpositions• Allowallplayerstohitineverygame• Switchbattingorderforeachgame• Donotallowplayerstosittwoconsecutiveinnings• Turnyourplayersontobaseballandnotoff• Keeppracticesmoving–trytomakethemcompetitive• Keeppracticesbetween1and1½hours• Makeyourplayershustleonandoffthefield• Makethemstarttobecomeaccountablefortheiractions• Paycloseattentiontopitchcounts• 9-10yearsold(15–20pitchesforagame)• 11-12yearsold(15-30pitches)• 13-14yearsold(15-45pitches)

dEFENSIVE WORKOUTAfter the players have warmed up properly, worked on base running, and done the throwing program, they are now ready to work on some additional defensive skills.
• Infielders - Ground ball work with a lot of throwing and catching • Outfielders - Fly ball work and ground ball work • Catchers - Work on receiving the ball and blocking the baseball
OFFENSIVE WORKOUTLastly, I would discuss and work on hitting. I always hit last during practice because I have found that you do not need to motivate players to hit. Teach one part of hitting and get your players into hitting drills or station work.
Examples of some hitting drills that you could use: • Tee work – do not underestimate the importance of tee work • Soft Toss – regular • Front Side Toss – behind L-screen • Soft Toss – look back (ball on the ground) • Short Batting Practice – live work
**Trytofinishpracticewithacompetitivedrillorgame.Makethegameabaserunningdrillonedayandahittingdrillthenext.Theplayerswillfeelbetterabouttheirpracticeifitendsonapositiveandfunnote.
20
PRACTICE ORGANIZATION

Outfield
PRACTICE ORGANIZATION

22
OUTFIELD
fUNDAMENTALS FOR OUTFIELD PLAY Outfield play is an important part of baseball. While a lot of importance is placed on the pitchers and infielders at a young age, teaching the proper fundamentals to outfielders is impor-tant as well. The three most important parts of outfield play are throwing, fielding, and com-munication. All three are explained below along with a brief outline of some drills for young outfielders.
throwing
fielding
Outfielders want to grip the baseball across the seams with the thumb splitting the index and middle fingers underneath the baseball. When throwing from the outfield, players want to have a longer arm action than infielders to put more on the throw. An easy way to explain this motion is by saying, “You make a big circle with the arm by taking your thumb to your thigh, and then your fingers to the sky.” The fingers need to stay on top of the baseball. This will create more backspin on the baseball and help the ball stay straight and travel further. The baseball is released out in front of the body getting good extension with the arm while also keeping a flexed front knee. The feet and legs will get the outfielder aligned and allow them to give a strong throw. A crow hop will give maximum ef-fort on the throw. Take the inside of the throwing foot towards the target. One big mistake players make is jumping when they use the crow hop. Negative movement is created when doing this. The player wants to gain ground towards the target when using a crow hop.
Pre-Pitch Routine Before the pitch the outfielders want their shoulders and feet square to the batter. They should always be on the balls of their feet, feet shoulder width apart, and knees slightly bent in a good, athletic position. When the pitch is in flight, the outfielders should take a couple creep steps towards the hitter. This should always keep their feet active. The first couple of steps will decide if the play is going to be made. The arms should be relaxed to the side with the glove relaxed.
CatchingtheFlyBall Players should run on the balls of their feet toward the baseball; this will keep their heads from bouncing and control the movement of the ball in the players’ vision. Outfielders want to set up three steps behind the ball and to gain momentum towards the target through the catch. Catch the baseball at eye level, on the throwing side of your body. The ball should be caught with a tall glove inside the pocket, using two hands to secure the ball.

23
OUTFIELD
communication
Fielding a ground ball Outfielders always want to be aggressive to the ball hit on the ground. The main objective is to field the ball cleanly and get it back into the infielder’s hands as quickly as possible. With nobody on base, the ball can be fielded by going down to a knee and keeping the baseball in front of them. The player wants the knee of his glove hand on the ground. Keep the player’s chest tall in case the ball takes a bad hop in order to keep the baseball in front of them. With runners on, the ball has to get back into the infield quickly. There are two ways that this can be done. The first is by squaring the ball up and fielding the baseball like an infielder. The second is to field a do-or-die play. The baseball should be fielded on the outside of the player’s glove foot. If they field the baseball with their glove foot forward, this will allow them to transition to their crow hop quickly. One key to remember—if the head stays down the glove will stay down; if the head comes up, the glove will come up.
Communication is key between all players on defense. The team should have a set “call” that all players will know and use when calling for the baseball. A few examples of this are “Mine Mine Mine,” “I Got It,” or “Ball Ball Ball.” You should also have a “call” for the player backing up the play. Examples for these would be “Take It Take It” or “You, You, You.” “Help” is the universal word when a player loses the ball in the sun or lights. Outfielders always have priority on calling the baseball over the infielders. The centerfielder has priority over the leftfielder and right fielder.
An example of an outfielder going to a knee to field a ground ball
An example of an outfielder executing a do-or-die play on a ground ball.

OUTFIELD Drills These drills should be done in a progression. Do the drill first with no ball, working on footwork only. Next, add the ball in the players glove and have them work through transferring the ball from the glove to the hand. Lastly, throw or “fungo” the ball to go through the entire act of catching and throwing the ball.
Combo8Do each of these eight with a partner. They should be done without the ball before they are done with the ball. 45˚ Drop Step over Left Shoulder, Fly Ball 45˚ Drop Step over Right Shoulder, Fly Ball 180˚ Straight Back Fly Ball Crossover to Left Fly Ball Crossover to Right Fly Ball 45˚ Drop Step over Left Shoulder, Ground Ball 45˚ Drop Step over Right Shoulder, Ground Ball Do-or-Die Ground Ball
Box Drill -Set up a box with cones -Basic 5 (Fundamentals with a Partner)
2 Line Communication DrillDivide the players into two lines. This drill focuses on communication between the outfielders. Throw or “fungo” the ball between the two players. Work on communication in these different scenarios: - Fly balls - Fence - Ground Balls - other outfielder is talking about where the runner is and where to throw the ball
24
OUTFIELD

Infield

26
INFIELD
fUNDAMENTALS FOR infield PLAY
I firmly believe that you can make your young players into good infielders. Good infield play will make the games more enjoyable for both your players and for the people watching the game. Make it a priority for your team to play a high quality form of catch. If your players improves their ability to catch and throw the baseball, then their defense and infield play will improve.
Ready Position Step One in improving your young player’s ability to field the ball correctly is to make sure that they are in a ready position. The ready position means just that. Getting your infielders ready to field the play before the hitter puts the ball in play. Get your infielders into an “athletic posi-tion” with their glove open to the hitter. Your infielder’s should take a step toward the hitter to get their feet started before the ball is put into play. Remember to have your glove open and feet moving before the batter hits the ball.
Approach To The Ball Once the ball has been hit to the infielder, how does he go to the ball? The infielder should take a circle or banana route to the ball. This route will allow the infielder to read the ball better and to get his body going into the direction of his throw. The infielder should ap-proach the ball under control with his glove out in front. As the player gets closer to the ball, he should begin to break down and get his glove below the baseball. The player needs to make sure to field the ball away from the body.
A good ready position

27
INFIELD
Glove Action When the infielder is in position to field the ball, his glove should be below the ball. The proper glove action for an infielder is to take the glove down and up-and-in. Again the glove action is a three step process: down – up – in. Make sure the player keeps his glove away from his body. If the glove is close to the body, the ball will likely hit the glove and bounce out.
Footwork For Throw Once the infielder has secured the ball, he must get his feet moving to help with throwing the baseball. The infielder should shuffle his feet toward his throwing target and deliver the baseball. Make sure that your players never throw the baseball with dead feet. There are many more mistakes made in throwing than there are in fielding the baseball.

infield drillsShort Hops
1. Two knees without glove – Players will partner up and get on both knees. They will short-hop the baseball back-and-forth and work on fielding the ball away from their body.
2. Two knees with glove – Same drill as the previous one except this time the players have their gloves on. Remember to field the ball out in front of their body.
3. Standing Short Hops - Both players are standing with feet shoulder-width apart in a good fielding position. Players will short-hop the ball back-and-forth working their hands out in front of their body.
4. Standing Short Hops – Freeze – Same as last drill, except the player will freeze or hold the ball out in front of their body. Forces player to concentrate on fielding the ball away from the body.
OtherInfieldDrillsThese drills can be done in a progression. The first drill will be the most basic, and each drill will add a new step in the process.
1. Ball in glove on the ground – The infielder will start with his glove on the ground in the fielding position and a baseball in the glove. Fielder will come up out of this position and go right, left, and throw the ball to first. The fielder is working on his footwork and transferring the ball to the throwing hand.
2. Roll ball to infielder – You will roll the ball to the infielder and he will field the ball and go right, left, and throw the ball to first. Again, he is working on footwork, the transfer, and fielding the ball. 3. Short “fungo” to infielder – Fungo the infielder from around 30-40 feet away. The infielder will field the ball and go right, left, and throw the ball to first. Now he is working on his footwork, the transfer, fielding, and reading the ball off the bat.
28
INFIELD

catching
INFIELD

30
CATCHING
fUNDAMENTALS for catchersIn order to be a catcher, a player needs to have the right make up as well as the right physical tools. This section will detail what goes into being a catcher both mentally and physically.
Personality and Make-up A catcher must be tough-minded and have leadership qualities. First, a catcher must be tough and not be afraid of the baseball. Catching comes with its bumps and bruises, and this can not intimidate the player. Also, a player behind the plate needs to be someone who “loves to get dirty.” This means that the player doesn’t mind the sweat and dirt that goes into being a good catcher. A good catcher also needs to be a leader. The catcher is the only player on the field who can see everything that is going on. This means that the catcher needs to direct traffic on the field and be very vocal.
StanceSignal stance There are three different stances that catchers use throughout the game. The first of these three stances is the signal stance. This is the stance where the catcher gives the sign to the pitcher. In the signal stance, the catcher should be sitting comfortably, back on the shin guards. The bare hand should sit just at the top of the player’s protective cup and the hand and fingers should be visible to the pitcher. The catcher needs to sit tall with a big chest with his knees pointed to the middle infielders. The glove should be over the left knee in order to block the 3rd base coach’s view of the signs.Receiving stance The second stance is the receiving stance with no one on base. Flexibility is key in the receiving stance, as the catcher wants to get the body as low to the ground as possible. Being low to the ground ensures a low target for the pitcher and a good view for the umpire. The feet and knees are wider than in the signal stance, and the catcher should be well balanced with his weight on the balls of his feet. The toes and knees should point outward. The catcher’s chest should be down between the knees with the elbows clear of the knees in order to work freely. The throwing hand should be placed behind the back or foot, with the fingers wrapping the thumb for protection. The body should be relaxed and loose in order to sway and catch the ball. The catcher should sit close enough to the hitter that he can almost touch the batter’s hip. The target should be placed at the bottom of the hitter’s knee. Blocking / throwing stance The third and final stance that catchers use is the blocking and throwing stance. This is the most athletic stance. The feet are wider than in the receiving stance with the toes and knees pointed forward. The catcher should be well balanced on the balls of his feet. The backside should be elevated to knee level with the chest over the knees. Keeping the chest down allows

31
CATCHING
the body to stay low. The throwing hand should be placed behind the glove in the throwing or blocking stance. The target should again be set at the bottom of the hitter’s knee.
Receiving Pitches Receiving pitches is one of the most important aspects of catching. It is the catcher’s job to receive the pitch in order to give the umpire a clear view of balls and strikes. In order to do that, the catcher must have soft but firm hands. The catcher should relax the forearm after the pitcher starts his motion. This will allow the catcher to stick pitches that are close to the strike zone. Sticking pitches means to hold the ball for one second. When sticking pitches, it is important to use smooth movements and not jerk the ball or body around. Another important aspect in receiving is swaying. This is where the catcher shifts his weight from side to side in order to catch the ball in front of their nose. This should be done with the hips low and in a smooth motion.
Blocking Having a catcher that is good at blocking can save your team a lot of runs. Passed balls and wild pitches not only allow runners to score from third base, but they also allow runners to advance into scoring position. One of the biggest keys to blocking is anticipation. If the catcher is not ready to block on every pitch, they will be surprised when a pitch is in the dirt. When blocking the ball, the glove hits the ground first followed by the knees. The catcher wants to block with his shoulders tall and rounded forward. This will keep a space between the chest and chest protector in order to cushion the ball. The catcher’s chin should be tucked down and the glove and glove hand should cover the hole between the catcher’s legs. The throwing hand should be completely behind the glove. For balls to the side, the catcher should use his legs to push off in order to get in front of and around the pitch.
Throwing When a catcher is throwing, it is as important for the catcher to be quick as it is to have a good arm. The catcher should always stay low, keeping momentum and drive towards the target. The ball should be caught out front with two hands. The ball and throwing hand then travel straight up to the throwing position. While the catcher is receiving the pitch he should also be gaining ground. A short jab step is taken towards the target with the right foot. The feet should end up in a straight line to the target to prevent throwing across the body. The glove-side elbow needs to be pointed at the target as well. It is important to follow the throw to the glove, making sure all of the catcher’s momentum is behind the throw.

base running

33
BASE RUNNING
Base Running fUNDAMENTALSRunning Technique Not only is it important to know how to run the bases, it is also important to have good running technique. In order to have good technique, the player should run on the balls of their feet and keep his head up in order to see what is going on. The player should also use his arms when running; the hands should go from the hips to the lips, rotating at the shoulders, not the elbows.
Infield hit When the player hits the ball on the ground to an infielder, it is important to get to first base as fast as possible. After taking three steps out of the batter’s box, the runner will look to see where the ball was hit and if it was fielded. When the ball is fielded, he stays in a direct line with first base. The player will run hard all the way through the bag, making sure to hit the front third of the base with either foot. It is important to keep running and to stay in stride all the way through the base, not just to the base. When hitting the base, the player should lean forward like a track runner through the finish line. Within three to four steps after passing first, the player will break down. Breaking down means the player chops his step and drops the backside to slow down quickly, but safely. When the player breaks down, he looks to the right and then to the left for the baseball, in case of an overthrow.
Ground ball through the infield When a ground ball is hit that makes it through the infield, the player again starts out of the box straight towards first base. Three steps in, the runner should look to see where the ball is. When the player recognizes that the ball has made it through the infield, the runner should start an arch to round first base. If drawn, the path would look similar to a fish hook. The player wants to round first base in order to get himself running in a straight line towards second base. When rounding, the runner will hit the inside corner of first base and push off in a direct line for second. During the turn, the player should have a shoulder tilt to redirect his body towards the next base. The best way to teach this turn or round, is to set up cones in the path you want the player to run around the base.
Ball hit in the air to the Outfield When the ball is hit in the air to the outfield, the batter or runner will immediately start his round or arch around first base out of the batters box. Instead of a fish hook, this path will look more like a semi-circle. The purpose of the arch or round is to get the player moving straight towards second after hitting first base. Again, cones can be used to teach this path to the players when practicing base running.
primary Leads When a player takes his primary lead, he should make sure the pitcher is engaged to the rubber. The base runner should always keep his eyes on the baseball. To take his lead from
33
BASE RUNNING

34
BASE RUNNING
first base, the player takes a step with the right foot, a step with the left foot, another step with the right, and then two shuffles. The lead should be even with the bag in the baseline. The player’s knees are slightly bent in an athletic position (similar to a linebacker or playing defense in basketball). The runner’s right foot should be back and turned slightly open in order to give the base runner a quicker jump towards second base. The length of each player’s lead should be about a step and a dive back to first base. When diving back into the bag on a pickoff, the runner wants to dive to the back part of the base, away from the tag. The right hand should be extended and the runner should use his left as a swim fin to help gain momentum back to the bag.
Secondary Leads A secondary lead is important to get a runner’s momentum moving towards the next bag and anticipating either a passed ball or a wild pitch. The secondary lead also gets the runner ready to move if the batter makes contact. After the pitch has been released or crossed the plate, the runner should gain ground towards the next base. This is done with three low shuffles. The player should move directly towards the next base. It is also important for the player not to be hopping up and down, but maintaining an athletic position while shuffling. If the pitch is received cleanly, the player hustles back to the bag.
Sliding It is very important to teach young players how to slide correctly. If taught the correct way to slide at an early age, players can avoid injuries throughout their careers. The safest way to slide is feet first, directly into the base. This is called the figure-four slide. To teach this slide, have the player stand on both his feet, then tuck one foot behind the knee of his other leg and sit down. One leg will be extended. The legs will look like the number four. The player’s hands should go in the air. If the hands go into the ground, hand and wrist injuries are possible. A safe way to teach and practice sliding is to wet an area of grass or a tarp. This creates a safe sliding area. Have the players practice sliding in their socks or barefoot in order to prevent spikes from snagging.
Feet-first is the safest way to slide. It is important to keep the hands up in the air to avoid injuries.
When diving back to the base, the player should reach for the back corner to avoid a tag.