2016 · casting full contour build-up follow-up & ... on the european federation of...
TRANSCRIPT

20167

2 GC get connected
Dear reader,
Welcome to the seventh edition of GC Get Connected! As usual, we invite you to read away through this issue and get the latest on GC.
With the summer and a well-deserved rest behind us, this second half of the year is marked by a multitude of dental congresses, fairs and seminars all over Europe. Of course, GC and its local entities insist on being present on many events all over Europe, so if you have the opportunity to visit us, you’re more than welcome! When talking about events, there’s no denying that the next edition of the IDS is something to look forward to. From March 21st to 25th 2017, GC Europe will showcase all its novelties and innovations at the world’s biggest dental event in Cologne. Look for us at Hall 11.2, stand N010-O019 / N020-O029. Some of these products have already been or will be released in the coming months, so keep your eyes open to see them, on events or in a GC Campus training facility near you!
Among the new stars on the lab side are Gradia Plus, GC’s Modular composite system for indirect restorations, where innovation meets indication; as well as GC Initial CAST, a CoCr-based casting alloy for C&B techniques & metal ceramic veneering. Also featured in this edition of Get Connected is GC’s Repair Kit, the brand new chairside kit for all your intra-oral repairs, and a fresh look at some of our more established products, such as Fuji Plus or the everStick range, both very complete offers which remain an added value to any dental office.
In 2016, GC Europe has been recognised as Prize Winner in the EFQM Excellence Award competition. We received this Prize in the category of Leading with Vision, Inspiration & Integrity. GC Europe was assessed during the last week of April where more than 100 associates from Head office and branches had been interviewed.
In my view, the secret of our success lies in our corporate culture – a culture that links people to the company and allows everyone to grow and prosper together. With the help and passion of each and every one of our Nakama – our associates – around the world we are working on a better future, a new “Century of Health.” Our achievement on the EFQM Excellence Award competition, Europe’s most prestigious award on Business Excellence / Total Quality Management, in the year we are celebrating our 95th anniversary, means a lot to all of us.
Enjoy the read,
Michele Puttini
President, GC Europe
Dear readersWelcome to the 7th edition of GC’s Get Connected newsletter.

GC get connected 3
1. Welcome word M. Puttini 2
2. Clinical evaluations confirm longevity of glass ionomer cements EQUIA by GC excels in long term studies as permanent posterior restorative
By Professor L. Sebnem Turkun, Ege University School of Dentistry, Turkey 5
3. Non-invasive composite reconstructions in cases of worn lower anterior teeth Clinical case report by Maciej Żarow, Kraków 9
4. Changing perspectives on direct CAD/CAM restorations Choosing hybrid ceramics (GC Cerasmart) as an option 15
5. Which kind of luting cements do you have in your drawer?
Clinical case report by Emmanuel d’Incau, Bordeaux 21
6. Chairside tooth replacement using a simplified procedure to create a fibre-reinforced composite bridge
By Dr. Esra Can Say, Turkey 27
7. GRADIA PLUS - A new concept for indirect lab composite techniques Interview with Diederik Hellingh from GC EUROPE and master dental technicians
Mr Simone Maffei and Mr Michael Brusch on a new indirect lab composite 31
Bonding &Conditioning
Contents
Endo Bonding &Conditioning
Restoratives
Impression Taking& Model Creation
Finishing & polishing
Identify
Prevent
ModellationResin / Wax
Pressing
Intra Oral Scanning
Lab Scanning& CAD
Chairside CAM
Staining
Cementation
Casting FullContour
Build-Up
Follow-up &maintenance
CAM Frameworks
Implant &Preparation
Restoratives
Prevent
Cementation
FullContour
Build-Up
Welcome to GC ‘get connected’, GC Europe’s newsletter that showcases our latest
product innovations, techniques and trends in restorative dentistry.

EQUIA Forte from GC
EQUIA Forte takes the proven EQUIA approach to the next level.
No need for conditioning or bonding with its built-in universal adhesive technology and
outstanding wettability. EQUIA Forte is extremely tolerant
and bonds equally well to all surfaces even in the deepest of lesions. With EQUIA Forte Coat acting
like a lustre coating, you save on polishing time and achieve excellent aesthetics in no time.
The glass hybrid revolution
GC EUROPE N.V. Head Office Tel. [email protected]://www.gceurope.com

GC get connected 5
Clinical evaluations confirm longevity of glass ionomer cementsEQUIA by GC excels in long term studies as permanent posterior restorative
By Professor L. Sebnem Turkun, Ege University School of Dentistry, Turkey
L. Sebnem TurkunProfessor Sebnem Turkun graduated from Ege University School of Dentistry in 1991. In 1998 she obtained her PhD degree in Restorative Dentistry, became an Associate Professor in 2004 and a Professor in 2009. She is currently working in Ege University School of Dentistry in the Department of Restorative Dentistry as a full time Professor and head of the Restorative Dentistry Department. Her principal areas of interest are adhesive dentistry, aesthetic restorative materials and their clinical performance, antibacterial restorative materials, glass ionomer restoratives and minimal invasive dentistry. She has published many international and national papers in her fields of interest, participates as keynote speaker in many international and national congresses and presents numerous workshops and hands-on courses. She is a member of the IADR, EDAD, Turkish Restorative Dentistry Association, MI European Board and serves on the European Federation of Conservative Dentistry (EFCD) executive committee. Since 2007, she is the translating editor of the journal Quintessence Turkey and the board member of many international and national dental journals.
For more than three decades, thousands of clinical studies
have been conducted comparing the clinical performance
of aesthetic resin based materials. Thanks to these, we now
know that if done properly, resin composites perform as
well as amalgam restorations in the timeframe of 8 to 10 years.
However, with some high caries risk patients, it is literally a
crime to place posterior resin restorations before stabilizing
the oral environment. What is needed in cases like these is
a high wear resistant, long-lasting and fluoride releasing
dental material for posterior restorations.

6 GC get connected
A few years ago, when GC launched its new reinforced glass ionomer material, EQUIA, we wanted to test its long-term clinical performance in comparison to another reinforced and encapsulated glass ionomer, Riva (SDI, Australia). We believed that comparing two materials in the same group would expedite our ultimate goal of successfully using minimum intervention materials in posterior restorations. So in 2008 we decided to conduct a PhD thesis comparing the clinical performance and some mechanical properties of the two encapsulated and reinforced glass ionomer cements.
Important outcomes
The study revealed that the EQUIA Fil system was more successful than Riva when it came to color-match and retention rate after a 6-year clinical period. Despite minor reparable defects, the overall clinical performance of EQUIA Fil was excellent, even in large posterior two-surfaces restorations after a period of 6 years.
As we know very well, conventional glass ionomer cements have a chalky appearance, wear quickly and are easily fractured from the marginal ridges in multi-surface restorations. With the improvement in glass ionomer technology, reinforced and encapsulated glass ionomers were launched in the market, eliminating the problem of wear.
However, aesthetics and fracture resistance remained a great problem which limited the clinical indications
of the glass ionomer cement restorations. At that time, EQUIA was developed by GC in combination with a light curing resin coating placed over the restoration immediately after setting. This unique coating protects the glass ionomer material from wear until it fully matures and gives it a shiny, aesthetic look. The most important concern then was its clinical longevity, especially in moderate to large two-surface restorations.
So the most important outcome of this long-term clinical study is that we could destroy the myth that glass ionomer cements wear quickly and therefore were only suitable as provisional posterior restorative materials.
The impact on day-to-day dentistry
The long-term clinical findings of our study in combination with many others already published, proved that glass ionomer cements are not provisional restorative materials but a bona fide permanent material of choice even in large proximal restorations. These restorations are placed very quickly in bulk and without the need for adhesive systems. When the patient is at high caries risk or isolation of the cavity poses a problem, now the material of choice is a reliable reinforced glass ionomer with resin coating.
In Turkey, the government covers most of the basic dental treatments in dental hospitals or university clinics for insured employees. We have a large amount of patients attending our clinics every day for
many reasons, but mostly for caries and periodontal problems. For the past two years, national social security has not reimbursed hospitals for glass ionomer restorations because it considers them to be provisional restorations instead of permanent.
However, these patients are in need of a fluoride-releasing restorative material to stabilize their oral environment. For that purpose and for convincing the Ministry of Health that this material is now a proven permanent restorative material, we needed evidence based research and long-term clinical trials. With the published data that are now available in the literature, I think that we will be successful very soon.
1
Clinical evaluations confirm longevity of glass ionomer cements
The overall clinical performance of EQUIA Fil was excellent even in large posterior two-surfaces restorations after a period of 6 years.
6 years

GC get connected 7
The EQUIA Fil system
Nowadays, most of the reinforced and encapsulated glass ionomer materials can be used for a minimum of two years without any problems in posterior teeth with small to moderate cavities.1 However, if color match is a concern for the patient, or if we need a more resistant permanent material for medium to large cavities and if we are looking for a long-term restoration, a more sophisticated brand like EQUIA Fil with a resin coating should be used.2
The EQUIA Fil system is different to other reinforced and encapsulated glass ionomer materials on the market due to its reliable color matching properties and easy handling. The
other materials, including Riva, have a chalky appearance, similar to conventional powder liquid glass ionomer cements after placement. EQUIA Fil matures under the resin coating and develops a very hard and resistant consistency as time passes. This fracture resistance is crucial as the material needs to function in the mouth for a long period of time.
References
1. Clinical Evaluation Of New Encapsulated Glass Ionomers And Surface Coating Combinations For 24-Months. Ozgur KANIK, L. Sebnem TURKUN
2. Clinical Evaluation Of Reinforced Glass Ionomer Systems After 6 Years LS TURKUN1 and O KANIK2, 1Ege University School of Dentistry, Izmir, Turkey; 2 Kocatepe University School of Dentistry, Afyon, Turkey, CED-IADR 2015 Antalya.
3. Gurgan S, Kutuk ZB, Ergin E, Oztas SS, Cakir FY. Four-year randomized clinical trial to evaluate the clinical performance of a glass ionomer restorative system. Oper Dent. 2015 Mar-Apr;40(2):134-43.
2
Clinical evaluations confirm longevity of glass
ionomer cements
3
6 years
4
6 years 6 years
6 years6 years
Even in larger two-sided restorations, its longevity is better than other glass ionomers and similar to resin composites, as proved in a 4-year clinical study published by my colleagues from Hacettepe University/Turkey [include reference]. 3
Further research
A new version of EQUIA Fil has been launched earlier this year, EQUIA Forte, with further improved color matching and resistance. We are excited to be taking part in a multi-center long-term clinical study alongside universities in Croatia, Italy and Bulgaria to test the clinical efficacy of this material.

GC EUROPE N.V. Head Office Tel. [email protected]://www.gceurope.com
Essentia™
from GCOpen the door to
simplification
Follow your intuition
Aesthetics brought
back to the essentials

GC get connected 9
Non-invasive composite reconstructionsin cases of worn lower anterior teethClinical case report by Maciej Żarow, Krakow, Poland
Maciej ŻarowDr Maciej Zarow graduated from Semmelweis University in Budapest in 1995. After a three-year training programme he achieved specialisation in operative dentistry in 1999. From 1998 until 2005 he was teaching at the Jagiellonian University in Krakow. There, in 2002, he defended his PhD and, in 2005, he achieved specialisation in endodontics. He is also the co- author of more than 50 papers published in Polish and international journals. Dr Zarow is the author of a book called Endo-Prosthodontics: Guidelines for Clinical Practice, published by Quintessence Publishing (in Polish, Russian and English ). Since 2012 he has been editor-in-chief of the Polish language dental magazine Medycyna Praktyczna - Stomatologia. Member of the Polish Academy of Aesthetic Dentistry, Dr Zarow has lectured extensively in Poland and other European countries. Visiting Professor of Uniwersity in Chieti (Italy) 2015-2016, lecturing for postgraduate master programs at UIC in Barcelona (2012-2016). He runs a private dental clinic since 1999 and postgraduate course centre, since 2003, in Krakow, Poland.
Figure 1: Photo of the patient’s face and smile at the first appointment.
Figure 2: Panoramic X-ray before the treatment.
Clinical Case Overview
A 56–year-old woman with fair oral hygiene presented at the surgery, seeking functional improvement (Fig 1, Fig 2).
The patient stated that she had difficulties with chewing food, as she lost her posterior teeth in the lower jaw. Her anterior teeth had been worn significantly in recent years, and had become shorter (Fig 3).
Figure 3: View of the lower and upper teeth from the vestibular side
1
3
2

10 GC get connected
Non-invasive composite reconstructions in cases of worn lower anterior teeth
She used a removable denture in the lower jaw in order to replace missing posteriors, but the denture was not acceptable as the acrylic teeth had been worn long before, and did not support the occlusion (Fig 4a & 4 b; Fig 5a & (b).
Her medical history was unremarkable, apart from an allergy to penicillin. In the past she had suffered from blood hypertension, but at the time of her visit, her blood pressure was acceptable. Her dental history, meanwhile, revealed no periodontal problem, but she indicated that her jaws became tired when speaking, and that she avoided
the OVD have shown that it is preferable to plan such cases in a CR position [1,2,3], this being an acceptable and reproducible position.
CR has been well described in the literature and, although easy to understand, it often is elusive in clinical practice. Anyone who has attempted to mount cases in CR knows that some patients can be extremely difficult to manage for accurate bite relationships. The Kois Deprogrammer has been found to be an effective device for achieving these bite registrations.
chewing gum and sticky foods. These complaints all indicated the presence of unacceptable function, with an occlusal dysfunction. As the patient’s main problem was not the need for a new, aesthetic smile, the treatment efforts were focused on improving function.
Treatment Plan
The treatment plan included professional hygiene, restoration of some minor cavities and the exchange of some composite restorations, prosthetic rehabilitation of missing posterior teeth in the mandible and restoration of worn lower anterior teeth. It was also explained to the patient that upper jaw rehabilitation would be possible in the near future, and that this procedure was indicated in order to enhance the final goal of the treatment, which would mean stability in the posterior areas with stable occlusion and efficient anterior guidance. As it was planned to increase the OVD following aesthetic analysis, a Kois deprogrammer (Fig 6) was used for four weeks to deprogram the patient and find the centric relation (CR) position (Fig 7).
Many studies concerning full-mouth rehabilitation associated with increasing
Figure 7: Schematic representation of CR. The expectation is to find and register a starting point to start full oral rehabilitation.
7
Figure 6: The Kois Deprogrammer (KD) is a palatal-coverage maxillary acrylic device with a flat plane lingual to the anterior teeth. It separates the dental arches and provides a single, lower-central incisor contact against the anterior bite plane.
6
Figure 4a & 4b:. Occlusal view of the upper (a) and lower jaw (b).
4a 4b
Figure 5a & 5b: Close up view of the posterior teeth from both sides.
5a
5b

GC get connected 11
Figure 8a, 8b, 8c & 8d: CT evaluation of the area of the missing teeth. (8a- tooth 44; 8b - tooth- 46, 8c & 8d – teeth 34 and 35)
8b8a
8c 8d
Figure 10. The situation before restorations, and before the silicon index was taken from the laboratory wax up.
10
Figure 9: Porcelain fused to metal, implant- supported fixed bridges (34-O-36) and crowns (44, 46), and wax-up of anterior teeth.
9It has several other uses as well, and is an invaluable tool in diagnosing the three most common types of abnormal occlusal attrition: occlusal dysfunctional, parafunction (e.g. bruxism), and a constricted path of closure [4,5].
After four weeks of deprogramming, the CR was recorded and a treatment plan was simulated with the wax up. The patient accepted the mock up made of temporary resin and transferred to the mouth with the silicon indexes.
Surgical Treatment
With the panoramic X-ray (Fig 2 ) and CT evaluation (Fig 8a, 8b, 8c, 8d) the appropriate size of implants was planned, the fixtures were placed in the area of the missing teeth (34, 36,
44 and 46), and the healing screws were obtained. It was explained that tooth 45 was the one at risk, and extraction was considered (as it was situated between the two planned implants), but the patient insisted on keeping it. After three months, an open tray impression with appropriate transfers was made, and the dental technician made the implant-supported fixed partial denture and mandibular anteriors wax up to facilitate the direct restorations (Fig 9).
Restorative Treatment with Composite Resin
The silicon indexes were taken in accordance with the wax up, and cut in such a manner as to facilitate the composite reconstruction (Fig 10).
Non-invasive composite reconstructions in cases of worn lower anterior teeth

12 GC get connected
Non-invasive composite reconstructions in cases of worn lower anterior teeth
Figure 11a, 11b & 11c: The finish of the margin with a chamfer modified with a slight bevel.
11a 11c11b
The teeth were cleaned with pumice and the incisal parts were abraded with 50 microns aluminum oxide particles. On the incisal vestibular edge, a 1mm chamfer was obtained using a diamond ball tip (001-006-2, Olident) [6] and the lower part of the chamfer was delicately elongated using an 80-degree bevel (around 0.5 mm) (Fig 11a, 11b &11c) [7].
The lower anteriors were found to be tight and crowded, and in this particular case the operator found it easier to restore the teeth without rubber dam isolation.
The enamel was etched with 38% phosphoric acid for 20 s, then the G-Bond (GC) adhesive was meticulously placed on the dentin and enamel, dried with air and light-cured for 20s.
Figure 12b: Blue view Varistrip facilitates the restoration of approximal walls, creating proper contact points.
12b
Figure 12a: The composite “frame” created from Essentia Light Enamel resin (LE) in order to outline the final size of the restoration and facilitate the next steps.
12a
The first layer of composite resin (Essentia Light Enamel LE, GC) was placed on the silicon index in order to create the lingual wall of the teeth. Next, the approximal walls were built utilising Blue View Varistrip (Garisson) matrices and, again, enamel composite resin (Essentia LE). In this way a kind a “frame” was created to make the final composite layering much easier (Fig 12a & 12b).
When the “enamel frame” was created, the only remaining difficulty was to achieve the right proportion between the dentin and enamel resin layers.

GC get connected 13
Figure 15: The clinical situation after final polishing of the restorations
15
Figure 16a & 16b: Clinical situation seven days after the restorative treatment of the lower jaw.
16a 16b
The first dentin layer was built using Essentia Dark Dentin (DD) and placed first in irregular masses, creating a kind of mamelons that are often seen in natural teeth (Fig 13a). After light-curing of the first layer of dentin, a second, slightly lighter layer was placed (Essentia Medium Dentin, MD) both on the mamelons and on the top of the incisal edge, in order to emphasize the “Halo” effect (Fig 13b). Before light-curing, the thickness of dentin material was checked using the Misura (Style Italiano, LM Dental, Finland (Fig 13c)) to make sure that there was sufficient space left for the final external enamel layer.
A delicate layer of Opalescent resin(Essentia Opalescent Modifier, OM) was placed of the incisal groove and light-cured (Fig 13d).
A dark enamel composite resin (Essentia Dark Enamel DE) was placed, followed by a final 40s polymerization. In order to achieve appropriate characterization, a pencil and a “correction” diamond drill (Komet Bresseler 831-204-012) were utilised (Fig 14) [8].
The final occlusion was checked after implant restorations were fixed. Then the patient was seated upright at 45 degrees, and she was asked to reproduce normal chewing motions while a piece of 200-μm-thick articulating paper was held in place. Where streaks were noted on the vestibular surfaces of the lower anteriors, the surfaces were modified in order to reduce the friction between the lower and upper anteriors, and to reduce the risk of failure of the composite restorations.
Figure 14: The surface characterization of the teeth was marked by pencil followed by delicate motions with drill 831-2014-12.
14
Non-invasive composite reconstructions in cases of worn lower anterior teeth
Figure 13a to 13d: The layers of Essentia Dark Dentin (DD) and Medium Dentin ( MD) were placed in order to leave an appropriate space of around 0.5 mm for the final enamel (Essentia Light Enamel, LE) layer (13a & 13b). The Misura instrument (13c) can be used to take this measurement. Opalescent resin (Essentia Opalecent Modifier OM) was placed in the incisal part of the tooth (13d).
13a 13b
13c
13d
After the functional occlusal corrections were made, the final polishing was obtained using GC DiaPolisher polishing paste and a goat-hair brush (Fig 15).The check up at the following
appointment - seven days later - showed excellent colour match and the patient was satisfied with the treatment of the lower arch (Fig 16a & 16b).

14 GC get connected
Figure 18: Panoramic X-ray after the restorative treatment of the lower jaw.
18
Conclusions
1. When full mouth rehabilitation is planned, the CR position seems to be crucial as a starting point for new reconstructions.
2. To facilitate finding the CR position and repeating this, a Kois Deprogrammer is a predictable instrument.3. Non-invasive composite reconstructions in cases of worn lower anterior teeth seem to represent a reliable,
repeatable and functional option in contemporary dentistry. 4. Finding the adequate proportions between the inside (dentin) and outside (enamel) layers of the composite resin
are a predictable method of matching the right colour.
Bibliography[1] Ammannato R. Ferraris F. Marchesi G. The “index technique” in worn dentition: a new and condervative approach. The International
Journal Of Esthetic Dentistry; 2014, Vol 9, Number 4; [2] Stuart CE, Golden IB. The History of Gnathology. CE Stuart Gnathological Instruments 1981;13–32,113.[3] Granger ER. Practical procedures in oral rehabilitation. Philadelphia: Lippincott,1962:66–74[4] Jayne D. A Deprogrammer for Occlusal Analysis and Simplified Accurate Case Mounting. The Journal of Cosmetic Dentistry; 2006,
Volume 21, Number 4[5] Kois J. Occlusion: Complex restorative management. Course 8 Manual. Seattle, WA; 2013[6] Donly KJ, Browning R. Class IV preparation design for microfilled and macrofilled composite resin. Pediatr Dent. 1992 Jan-Feb;14(1):34-6.[7] Heintze SD, Rousson V, Hickel R. Clinical effectiveness of direct anterior restorations--a meta-analysis. Dent Mater. 2015 May;31(5):481-95.
doi: 10.1016/j.dental.2015.01.015. Epub 2015 Mar 13. Review.[8] Manauta J, Salat A. Layers, An atlas of composite resin stratification. Quintessence Books, 2012
Non-invasive composite reconstructions in cases of worn lower anterior teeth
Figure 17a-d: Clinical situation six months after the restorative treatment of the lower jaw.
17a 17b
17c 17d
The check up after six months revealed good function of the composite restorations and perfect colour match (Fig 17a to 17d & Fig 18). The patient is expected to continue restorative treatment of the upper jaw.

GC get connected 15
Changing perspectives ondirect CAD/CAMrestorationsChoosing hybrid ceramics (GC Cerasmart) as an optionBy Grzegorz Witkowski, Olsztyn, Poland
“Is there only one material of choice for CAD/Cam restorations?”
When you ask a dentist about their CAD/CAM material of choice, they will probably answer with one of several common options like feldspathic, disilicate or some other kind of ceramic that in their opinion is “the hardest”. But when we think about it, is extreme hardness an overwhelming advantage? And what does it really mean? If we mean inflexible, then generally speaking it’s not really a great advantage. And luckily for patients, dentists change their minds sometimes.
I am a big fan of composites but as we all know, some of the restorations we do these days should be done by the indirect method. Using porcelain in dentistry is very common, but dealing with ceramics needs a lot of skill from the technician.
When we think about indirect there are two main options. One is the dental lab, which of course is a good
solution but it takes valuable time to produce and deliver the restoration. The second solution is a CAD/CAM system like Cerec. With that we can prepare our indirect restorations in the dental office.
With the Cerec solution there are plenty of materials to choose from. We can use feldspathic, leucite, lithium disilicate, glass ceramics or zirconia blocs and hybrid ceramics that have more composite than ceramic in them. When choosing a material for a restoration, one has to consider several aspects, including flexibility, reparability and aesthetics, as well as wear to opposite dentition.
Now we are not limited just to pure ceramics. GC Cerasmart is a hybrid material that can be used with great success for a lot of indications.
“Cerasmart combines the best of two worlds”As an endodontist I do a lot of endo/resto cases and most of them are indirect. Any person who has milled
Dr Grzegorz Witkowski was born in 1979 in Białystok, Poland. He studied at Medical University of Warsaw and graduated in 2003. Member of European Association of Endodontics, Polish Association of Endodontics, Polish Academy of Aesthetic Dentistry and American Dental Association. Dr Witkowski is a recognized international speaker and author of many articles regarding endodontics, CAD/CAM solutions and use of the microscope in everyday practice. Since 2004 Dr Grzegorz works in a private clinic in Olsztyn, Poland, focusing on endodontics, CAD/CAM and aesthetic dentistry. In private life husband, father and amateur triathlete.

Changing perspectiveson direct CAD/CAMrestorations
even a few cases using pure ceramic already knows that when problems arise they are mostly on the margin: if it is too thin it will chip. But that is not going to happen with Cerasmart because it behaves as a composite during the milling process. With this material we can prepare crowns, inlays, onlays, overlays, veneers and even veneering structures for bridges. A big advantage with Cerasmart is that we can also prepare a margin that is much thinner than we can achieve with any pure ceramic block.
Some will ask, why should we even consider Cerasmart as our material of choice? Well, the answer is simple. This material combines all the best
from two worlds. The composite resin part gives us flexibility, and the high-strength ceramic part improves its mechanical properties. The material has other advantages as well. There is no need to use an oven, and the procedure can be very simple. All you need to do after the Cerec machine mills the restoration is to polish with mostly the same instruments you would use with your composites. If you want to add some characterisation, you can do it using GC Optiglaze Color nano-reinforced coloring glaze.
There are lots of cases where you can use a cut-back technique to characterise your final restoration even more. And if the restoration fails
over time, it can easily be repaired. It should also be mentioned that this kind of material does not „wear” the opposite teeth as normal porcelain does with enamel.
The following case illustrates the use of Cerasmart for creating on onlay after endodontic treatment. All steps from the procedure are described, including the final bonding steps which are critical to ensure the intra-oral longevity of the restorations. In case of Cerasmart, a dual-cure bonding cement will be recommended, such as G-CEM LinForce. In case the thickness of the restoration is limited, the onlay can also be luted using a heated composite.
16 GC get connected
Figure 0: Initial situation after endodontic treatment
0
Figure 1 & 2: Preparation after undercuts have been blocked
1 2
Case Report
Initial situation & preparationAfter the endodontic treatment was completed (Figure 0), the decision had to be made on the best type of restoration for the case. Due to the big loss of hard tissue, we chose an
indirect restoration. Cementation of an onlay can be a challenge. In order to do it properly, you should follow the procedure very carefully. When preparing the build-up, remember to block every undercut. You can do it with various composite materials, such as Essentia (figure 1 & 2).

GC get connected 17
Changing perspectiveson direct CAD/CAM
restorations
Figure 3, 4 & 5: Use of try-in pastes to confirm that the selected luting shade is the right one.
3 4 5
Figure 6: Cleaning of the preparation with prohy paste and brush, followed by thorough rinsing.
6
Figure 7 &8: Selective etching of the enamel
7 8
After the preparation was finished, a scan was performed with the Cerec system SW 4.4.2. When scanning with Cerec, you should always bear in mind that your outcome can only be as good as your preparation. After scanning and proper planning using CAD/CAM software and milling, the cementation phase can be started. Of course, you must expect that to have an aesthetically acceptable restoration, some characterisation will be needed. GC Optiglaze Color was used to finalise and fine-tune the onlay. The large colour palette gives the clinician a wide spectrum of possibilities. Optiglaze Color can
be used equally as well superficially and internally, giving beautiful 3D effects. The colours are also very stable and will last for a long time, even if used superficially, and can be added again in the patient’s mouth if the outer layer wears off.
Cementation procedureBefore final cementation, it is advisable to use try-in pastes like the ones in the G-Cem LinkForce cement kit (Figure 3, 4 & 5). The Try-in pastes match the colour of the cement after light-curing. In this way, you can check how the final restoration will look before light-curing the cement.
It is important to clean the surface of your preparation before cementation and to plan enough time to do this properly. You can use your normal prophy brush and prophy paste to do it, but be sure to rinse it thoroughly with water (Figure 6). The next step, sandblasting, is also essential, as it will improve the adhesion.
In case the restoration features a lot of enamel, selective etching is the best technique (Figure 7 & 8). The application time with enamel is very important and should be carefully monitored. It is also important to apply a silane coupling agent (e.g.

18 GC get connected
Changing perspectiveson direct CAD/CAMrestorations
Figure 10 & 11: Application of the bonding agent (G-Premio BOND) on the surface of the preparation, followed by drying & light-curing steps
10 11
G-Multi Primer) on the inner surface of the onlay after the sandblasting and cleaning steps (Figure 9). To enhance silane’s properties, you may heat it for three minutes with hot air (approx. 100C).
The bonding agent is then applied on the surface of the preparation (Figure 10). Each bonding agent is
12
Figure 12: Application of G-CEM LinkForce luting cement on a concave surface (in this case the preparation)
13
Figure 13: Placing the onlay onto position. Excesses are then removed before tack-curing. Final removal of excess can be done with blade No 12.
9
Figure 9: Application of a silane coupling agent (G-Multi Primer) on the inner surface of the onlay
featuring different instructions for use, so remember to carefully check and follow the protocol and timings of your bonding agent in order to optimise the bonding strength.
With GC G-Premio BOND, the procedure is easy: wait for 10 seconds after application before blowing with maximum air for 5 seconds (Figure 11). Make sure that the layer of the bonding agent fully covers all parts of the cavity.
After blowing off any excess bonding agent and light-curing the
tooth, apply the cement of your choice. Two options are possible in this case: G-CEM LinkForce dual-cure resin cement or a heated composite. Remember that when using heated composite, a micro-hybrid would be a better choice and that you would need to apply and light-cure the bonding agent also on the inner part of the onlay. We achieve very good results in my clinic with GC G-CEM LinkForce. Because the product is flowable, it should be applied onto the concave surface (the preparation in the case) to ensure it is located properly (Figure 12).
After applying the correct amount of cement, you can put your onlay in position (Figure 13). The excess cement is removed afterwards with a microbrush. Remember that at this stage your onlay is still not fixed and can move, so do this step very gently. When you are sure that you have removed most of the excess, you can light-cure for approximately five seconds, then and only then can you remove all other excess cement. I suggest to use blade No. 12. Clean everything perfectly and then apply

GC get connected 19
19
a layer of glycerine gel to the margins to ensure a complete curing of the cement and prevent the formation of an oxygen inhibition layer (Figure 14). By placing Teflon tape before cementation, you can isolate interdental areas and make cleaning and removal of excess much easier.
If all phases have gone smoothly, the last step in the cementation process will just be the polishing.
To do it properly, use polishing discs (Figure 15), rubbers (Figure 16), goat hair discs and all the polishing pastes that you would normally use, for example with the polishing procedures of composites (Figure 17 & 18).
Remove the rubber dam, check the occlusion and appreciate the beautiful integration of the onlay (Figure 19). Take an x-ray so that you can check every aspect of your work. It will help you to evaluate the quality of your restoration. If any mistake was made, you will see it on the x-ray.
14
Figure 14: Final light-curing. A glycerine gel was first applied at margins to prevent the formation of an air-inhibition layer.
15 16
Figure 15 & 16: Polishing steps with discs, rubbers, goat hair discs following a classical composite polishing procedure
17 18
Figure 17 & 18: Situation after polishing procedure
Figure 19: Final situation after removal of the rubber dam and control of the occlusion

20 GC get connected
Metal-based indirect restorations
Indirect restorations made of glass-ceramics,
zirconia, alumina or hybrid ceramics
Direct & indirect composite restorations
Ceramic Primer II
G-Premio BOND
GRADIA PLUS Opaque
4-MET
for a reliable adhesion to enamel
& dentin
MDP
for an excellent adhesion to enamel & dentin, zirconia,
alumina and non-precious
metals
MDTP
to bond to precious metals*
Following the zero compromise approach, we suggest the use of a separate silane primer (Ceramic Primer II) together with our adhesive G-Premio BOND, for a durable adhesion to glass ceramics and hybrid ceramics.
A universal bonding which offers optimal adhesion to all substrates
thanks to 3 different monomers.
This light-cured opaquer efficiently masks dark backgrounds, to ensure high aesthetics in case of porcelain
fused to metal restorations.
For the step-by-step, consult also the GC Restorative Dentistry Guides!
Technique card
A technique card with step-by-step of all different clinical situations is added in the box.
Repair Kit from GCThree components…
Advertorial
…to fit all your repairs!
*MDTP: Methacryloyloxydecyldihydrogen thiophosphate to bond to precious metals.

GC get connected 21
Step-By-step
6. Apply GRADIA PLUS Opaque onto the metal surface and light cure each layer for 20 sec.
7. Build-up with composite (e.g. Essentia or G-ænial) and light-cure each layer.
8. Final result.
1. Roughen the bonding surface with a coarse diamond bur. Rinse and dry.
2. Apply Ceramic Primer II only onto the ceramic surface to be repaired. Dry.
3. Apply G-Premio BOND to all bonding surfaces (including tooth structure if any). Wait 10 sec.
5. Light cure following below guidelines.
10sec.
4. Dry with maximum air pressure for 5 sec.
MAX. Air
5sec.
Metal-based indirect restorations (precious & non-precious)
5. Build-up with composite (e.g. Essentia or G-ænial) and light-cure each layer.
6. Final result.
1. Roughen the bonding surface with a coarse diamond bur. Rinse and dry.
2. Apply G-Premio BOND to all bonding surfaces (including tooth structure if any). Wait 10 sec.
3. Dry with maximum air pressure for 5 sec.
4. Light cure following below guidelines.
10sec.
5sec.
Composite restorations
Advertorial
Indirect restorations made of glass-ceramics, zirconia, alumnia & hybrid ceramics (e.g. Cerasmart)
1. Roughen the bonding surface with a coarse diamond bur. Rinse and dry.
2. Apply Ceramic Primer II only onto the restoration surface to be repaired*. Dry.
3. Apply G-Premio BOND to all bonding surfaces (including tooth structure if any).Wait 10 sec.
5. Light cure following below guidelines.
10sec.
4. Dry with maximum air pressure for 5 sec.
MAX. Air
5sec.
6. Build-up with composite (e.g. Essentia or G-ænial) and light-cure each layer.
7. Final result. *In case of monolothic zirconia or alumina, the use of Ceramic Primer II is not needed.
Light curing time of G-Premio BOND
Distance from light guide tip
Light curing unit <10mm >10mm
Halogen / LED (700 mW/cm²)
10 sec. 20 sec.
High power LED(>1200 mW/cm²)
5 sec. 10 sec.

Smart solutionsfrom GC
for all your luting challenges
Let’s Join Forces!
5HIGH
GC LUTINGSOLUTIONS
Zinc oxide cement
Self-adhesive resin cement
Adhesive resin cement
Resin-modified glass ionomer (RMGI) cement
Conventional glass ionomer
(GI) cement
GC EUROPE N.V. Head Office Tel. [email protected]://www.gceurope.com

GC get connected 23
Emmanuel d’Incau obtained his degree of Doctor of Dental Surgery in 1998 in the Faculty of Odontological Sciences at Bordeaux. From 2002 to 2006 he was an assistant professor in the prosthetics department. At the same time he worked in a private practice until 2012, when he obtained his PhD and took up the post of Associate Professor. Emmanuel is currently active on three fronts: he teaches occlusions and fixed prostheses at the Faculty of Odontology at Bordeaux, is also conducting research into dental wear in the PACEA laboratory (UMR 5199 of the CNRS) and works full-time at the university hospital of Bordeaux.
Which kind of
luting cementsdo you have in your drawer?Clinical case report by Emmanuel d’Incau, Bordeaux
No luting material is universal, because the properties required are numerous and sometimes conflicting. They mainly concern adhesion to dental tissue and indirect restorations, aesthetic results, biocompatibility, anti-cariogenic capacity, ease of use, lack of post-operative sensitivity and cost. It is therefore necessary to have different luting materials at hand. I personally have three at all times:• a resin-modified glass ionomer
cement (RMGI). This is the Fuji PLUS marketed by GC, which I use on a routine basis, particularly in cases where the prosthetic limits are subgingival and/or when the preparations have a high intrinsic retention. This is the case for porcelain fused to metal bridges or crowns, ceramic crowns with zirconia infrastructures and some ceramic inlays. Fuji PLUS, which has proven its worth over time, is extremely simple to use,
and it allows an easy removal of excess. It also possesses unique properties such as excellent biocompatibility, intrinsic adhesion to moist dental tissue and an anti-cariogenic action linked to the release of fluoride ions. In short, this is a material that is easy to use, with a simple protocol and comes at a relatively low cost.
• an adhesive resin cement used with an adhesive system. It is aesthetic and adheres well to dental tissue. However, its protocol is long and delicate. In particular, it requires the use of a rubber dam and a curing light. I therefore reserve it for luting partial restorations made of ceramic or composite, such as veneers, onlays or overlays.
• a self-adhesive cement that needs no prior adhesive system. This is the G-CEM LinkAce, which I use when the preparations are slightly retentive and the aesthetic demand is moderate.

24 GC get connected
For which indications and in which clinical situations do you use Fuji PLUS?
Because the protocol for Fuji PLUS is particularly simple and not technique sensitive, I use it whenever the clinical conditions allow. This mainly includes peripheral crowns, bridges and cast core and posts. In this case, and unlike with adhesive resin cement, the level of the cervical limits may be subgingival because the material is hydrophilic. I also use Fuji PLUS for the cementation of long span bridges because the removal of excess is particularly easy and effective, and all at a relatively low cost. The excellent pulp tolerance of this material, combined with its sealing ability, also
means I choose it whenever possible for vital teeth. Finally, I sometimes use it to cement glass-ceramic inlays, as this combination gives excellent long-term results (van Dijken 2003).
Tell us a bit more about your clinical experience with Fuji PLUS. What do you like about Fuji PLUS?
I have cemented many prosthetic elements with this material over the past 15 years and more. Analysis of my clinical activity simply allows me to say that it functions correctly. I therefore have every confidence in it. Handling Fuji PLUS is particularly pleasant and reassuring. It is easy to check the amount of
Case report 1: Cementation of a porcelain fused to metal bridge
Figure 1: Initial state highlighting major occlusal disorders
Figure 5: Insertion of retraction cords
material going into the restoration and the film thickness (10 µm), allowing an easy seating of the restorations. The working and setting times are also compatible with the fitting oflong span bridges and easy removalof excess.
“In which clinical case would you use Fuji PLUS?”
The use of a luting material must answer a reasoned choice. This is dictated by a number of parameters that depend on the initial retention of the preparations, the aesthetics, the substrate used, the situation of the cervical limits, the extent of the restoration, the simplicity of the protocol, the possibility of isolating
The 71-year-old patient requires a comprehensive restoration of the oral cavity. The initial clinical examination (fig. 1) highlights many occlusal disorders related to major wear and probably linked to awake and sleep bruxism (fig. 2).
After mounting and analysis on the articulator (fig. 3), it is decided to proceed with the repair of the maxillary arch using porcelain fused to metal bridges and crowns, for their solidity, while a fully removable prosthesis should allow a functional occlusion to be recreated. After
fitting cast core and posts (fig. 4), this passes through a temporisation period allowing the new maxillomandibular relations to be validated. Once this new occlusion has been validated, impressions of the fixed maxillary restorations are taken. Access to the sulcus is by the double retraction cord technique (fig. 5) then a two-step, two-viscosity impression is taken using polyvinyl siloxane (fig. 6). The working model is then prepared (fig. 7) before being mounted in the articulator after the centric relation has been recorded (fig. 8).
Which kind of luting cements do you have in your drawer?
1
5

GC get connected 25
The choice of RMGI is made according to various parameters specific to the restoration in question and the intra-oral conditions:
• initial high retention of preparations
• impossibility of placing a rubber dam
• presence of gingival fluid
• prosthetic substrate
• risk of caries
Figure 2: Major wear linked to probable bruxism
Figure 3: Mounting in articulator and occlusal analysis
Figure 4: Cementation with Fuji PLUS of cast core and posts
Figure 6: Impression in silicone - two-steps and with two viscosities
Figure 7: Maxillary working model
the gingival fluids during the luting procedure and finally the cost. To illustrate this, we will develop two clinical cases.
What are the advantages of Fuji PLUS for your patients?
Like most RMGIs, Fuji Plus is hydrophilic. It is more resistant to hydrolysis and dehydration than a traditional glass ionomer cement. This gives it an excellent seal and consequently a good clinical behaviour. This is fundamental to the prognosis of restorations and beyond the confidence that patients can expect from it.
References
Van Dijken JW. Resin-modified glass ionomer cement and self-cured resin composite luted ceramic inlays. A 5-year clinical evaluation. Dent Mater 2003; 19(7): 670-4.
No luting material is universal, because the properties required are numerous and sometimes conflicting.
Which kind of luting cements do you have
in your drawer?
2
6
3
8
4
7
Figure 8: Recording of the centric relation

26 GC get connected
Once the crowns and bridges have been produced in the laboratory, the prostheses are tried and adjusted in the clinic (fig. 9). Then comes the fundamental step of luting the restoration. In this case, the patient presents the following characteristics (✔), making Fuji PLUS an appropriate luting material: The Fuji PLUS protocol recommends to clean the preparations beforehand then apply Fuji conditioner for 20 seconds (fig. 10).
Figure 11: Dispensing of Fuji PLUS into the prosthesis
Figure 12: Excess material must be avoided Figure 13: Removal of excess may begin after the gelling phase. It is much easier
Figure 15: X-ray check allowing the possibility to highlight excess of cement
Figure 16: Immediate final result
Figure 9: Trial and adjustment of the occlusion on the prosthesis
Figure 10: Prior application of Fuji conditioner for 20 seconds
The use of the conditioner increases the adhesion to the tooth. The teeth then have to be rinsed and dried. Various capsules previously stored in the refrigerator (to increase the working time) are then successively vibrated for 10 seconds to mix the components. The material is then dispensed into the prosthesis (fig. 11) in a non-excessive way (1 mm of material is sufficient) (fig. 12). The crowns must then be put into position
within 30 seconds. Around one minute after seating, which corresponds to the gelling phase, the excess cement must be removed (fig. 13). Previously fitted dental floss facilitates cleaning around the bridge pontics. The isolation must be maintained until final setting, which takes place in 4 minutes (fig. 14). Finally, any remaining excess cement can be highlighted by means of an X-ray (fig. 15) in order to allow the patient to leave (fig. 16).
Which kind of luting cements do you have in your drawer?
161514
131211
109
Figure 14: Isolation until final setting (4 minutes)
initial high retention of preparations
✔
impossibility of placing a rubber dam
✗
presence of gingival fluid ✗
prosthetic substrate: non-precious metal
✔
risk of caries ✗

GC get connected 27
Case report 2: Cementation of a zirconia bridge
I have cemented many prosthetic elements with Fuji PLUS over the past 15 years and more. I use it on a routine basis, particularly in cases where the prosthetic limits are subgingival and/or when the preparations have a high intrinsic retention. Fuji PLUS is particularly simple and not technique sensitive!
The young woman, aged 22, requires a maxillary anterior restoration following a road accident eight years ago. In the impact, the two central incisors and a significant amount of substance were lost (fig. 18). She underwent two bone grafts aimed at allowing the fitting of implants
Which kind of luting cements do you have
in your drawer?
Figure 22: Matured gingival tissues
22
Figure 21: Temporary bridge allowing the gingival tissues to mature. The support teeth are kept alive
21
Figure 20: Treatment by sub-epithelial connective tissue graft aimed at improving the periodontal conditions (Dr. J.M. Marteau – CHU de Bordeaux)
20
Figure 19: Orthodontic treatment aimed at improving the occlusal conditions (Pr. MJ Boileau – CHU de Bordeaux)
19
Figure 18: Initial state highlighting the absence of 11 and 21 and a major loss of substance
18
Figure 23: Impression of preparations
23
but these were unsuccessful, so now we opt, with her approval, for a dento-supported fixed restoration (zirconia-infrastructure bridge, from 13 to 23). This therapy requires prior orthodontic treatment to reduce the width between 12 and 22 (fig. 19), many connective tissue grafts
(fig. 20) and relining of the temporary bridge (fig. 21) to improve the aesthetic integration and prognosis of the final bridge. Once the gingival tissues have matured (fig. 22), a two-step, two-viscosity impression is taken (fig. 23).
28 GC get connected
Figure 31: New smile for the patient
Which kind of luting cements do you have in your drawer?
31
Figure 30: X-ray check
30
Figure 29: Removal of excess of Fuji PLUS
29
Figure 28: Try-in of the final bridge
28
Figure 27: Final bridge
27
Figure 26: Check of the passivity of the prosthetic work with Fit-Checker Advanced Blue (GC)
26
Figure 25: Check of the cervical adjustment of the prosthetic work
25
Figure 24: Zirconia infrastructure
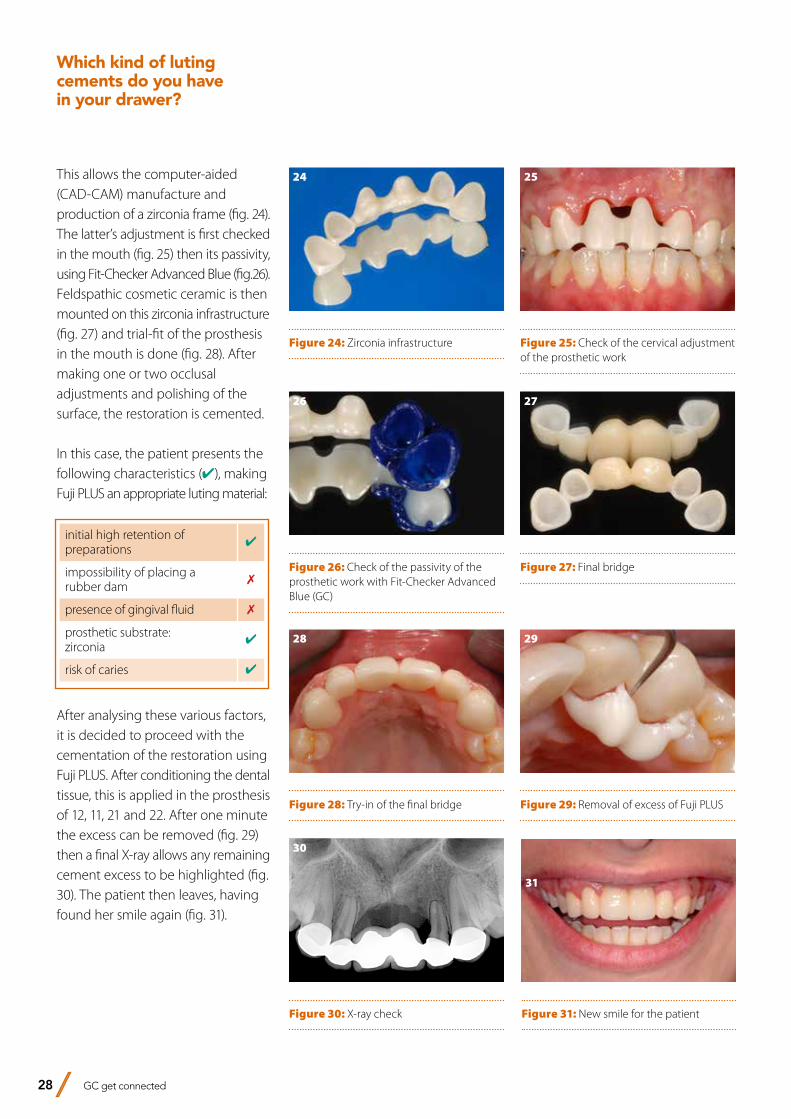
24This allows the computer-aided (CAD-CAM) manufacture and production of a zirconia frame (fig. 24). The latter’s adjustment is first checked in the mouth (fig. 25) then its passivity, using Fit-Checker Advanced Blue (fig.26). Feldspathic cosmetic ceramic is then mounted on this zirconia infrastructure (fig. 27) and trial-fit of the prosthesis in the mouth is done (fig. 28). After making one or two occlusal adjustments and polishing of the surface, the restoration is cemented.
In this case, the patient presents the following characteristics (✔), making Fuji PLUS an appropriate luting material:
initial high retention of preparations
✔
impossibility of placing a rubber dam
✗
presence of gingival fluid ✗
prosthetic substrate: zirconia
✔
risk of caries ✔
After analysing these various factors, it is decided to proceed with the cementation of the restoration using Fuji PLUS. After conditioning the dental tissue, this is applied in the prosthesis of 12, 11, 21 and 22. After one minute the excess can be removed (fig. 29) then a final X-ray allows any remaining cement excess to be highlighted (fig. 30). The patient then leaves, having found her smile again (fig. 31).

GC get connected 29
Chairside tooth replacement using a simplified procedure to create a fibre-reinforced composite bridgeBy Prof. Esra Can Say, Turkey
Prof. Esra Can Say graduated from İstanbul University Faculty of Dentistry in 1994 where she also attended the PhD program of Restorative Dentistry in the academic years of 1995-1999. Then she worked as a research assistant in Yeditepe University Faculty of Dentistry, Department of Restorative Dentistry from 2000 to 2002 and received her associated professorship degree in Restorative Dentistry in 2006 and her professorship degree in 2014. She worked as a visiting research fellow in Tokyo Medical and Dental School and University of Pennsylvania School of Dentistry. As a researcher she is widely published in peer reviewed journals and has presented at several international conferences. She is one of the officers of the Continental European Division of IADR (CED IADR) since 2013 and is the president of CED IADR in 2015-2016. Her research topics are mainly focused on adhesive dentistry, dental materials, bleaching and aesthetic dentistry and she is also giving many lectures and hands-on courses on these topics. She is a member of Turkish Dental Association, Association of Dental Laser Academy, Association of Restorative Dentistry and International Association for Dental Research.
The congenital absence of permanent teeth, also known as partial anodontia, involves both functional and aesthetic considerations. The treatment options to replace one or both missing lateral incisors include cuspid lateralisation, implant-supported or conventional fixed prostheses, Maryland bridges, or fibre-reinforced anterior adhesive bridges created using a direct or indirect technique. While implant-supported or conventional fixed prostheses can be the treatments of choice for adults, minimally invasive and reversible provisional procedures are necessary for adolescents as their vertical facial growth continues and the implantation at a young age could lead to submergence of the implant crown and create aesthetic and periodontal problems. On the other hand, their growth in the horizontal plane is completed sooner than the growth in the vertical plane. Therefore, for adolescents fibre-reinforced adhesive bridges are the optimum solution for the long-term provisional treatment of the congenital absence of permanent teeth. Along with a simple chairside application technique, this treatment plan also offers minimal tooth preparation, cost effectiveness, and time savings. The limitations of this technique are principally related to occlusal factors, such as deep bite or heavy interference, presence of extensively restored abutment teeth or the presence of diastemas which may limit the potential aesthetic gains.

30 GC get connected
Figures 1 & 2: Unaesthetic appareance of the Maryland bridge which was previously placed to replace the congenitally absent maxillary right lateral incisor.
Figures 3, 4 & 5: Following rubber dam placement, retention grooves were prepared on palatal surfaces of the maxillary central incisor and canine. The required length of everStick C&B was determined using dental floss.
Chairside tooth replacement using a simplified procedure to create a fibre-reinforced composite bridge
A 15-year-old female patient was referred to the University Restorative Clinic complaining about the unaesthetic appareance of the Maryland bridge that was placed after the completion of the orthodontic treatment as a long-term provisional restoration for the congenital absence of the maxillary lateral incisor (Figures 1 & 2).
After intraoral and radiographic examinations, it was decided to replace the Maryland bridge with a fibre-reinforced anterior adhesive bridge. Following the placement of a rubber dam (Figure 3), approximately 2mm wide and 2mm deep retention grooves were prepared with a fine diamond bur (Acurata G+K Manhardt Dental 544#018) on the palatal surfaces of the maxillary central incisor and canine. The length of the fibre (everStickC&B; GC) was determined by placing dental floss from the distal wall of the maxillary right central incisor’s retention groove to the distal wall of the maxillary right canine’s retention groove (Figures 4 & 5). Then the fibre was cut to the defined length and protected from the light under a cover. Enamel around the retention grooves was etched with 37% phosphoric acid for 15 seconds, rinsed thoroughly with water and dried with an air syringe (Figures 6 & 7).
G-Premio BOND (GC), a universal adhesive that contains multiple functional monomers (4-MET, MDP and MDTP) and offers an easy procedure with a low technique sensitivity, was used following the selective-etch technique; it was applied for 10 seconds onto the enamel and dentin surfaces, dried thoroughly for 5 seconds with oil-free air under maximum air pressure and light-cured for 10 seconds (Figure 8). A thin layer of flowable composite (G-ænial Universal Flo; GC) was applied to the palatal grooves using a centrix syringe and kept uncured. The fibre reinforcement (everStickC&B) was then pressed into the grooves, on top of the unpolymerised flowable composite using a hand instrument and tucked interproximally. The anatomical enlargement of the fibre framework at the pontic area (height and width) to support the veneering material improves the fracture resistance of fiber-reinforced adhesive bridges. Therefore, the fibre construction was enlarged at the region of the pontic, labially curved and light-cured for 40 seconds (Figures 9 & 10).
1
2
3
4
5

GC get connected 31
The pontic was then built using the simplified composite Essentia (GC), based on a simple duo-layering technique emulating the aging of natural teeth. Essentia is based on different compositions: a microhybrid formulation for dentin shades to offer an optimal light scattering; and an ultra-fine hybrid composition for enamel to ensure excellent polishability and gloss retention in time. Due to the young age of the patient, Medium Dentin & Light Enamel were the most appropriate shades for this two-shade restoration. When using Essentia, the enamel and dentin layers can simply reproduce those found in a natural tooth, making it easier to define the right thicknesses of composite that should be applied. The dentin layer was sculpted approximately 1.5mm away from the incisal edge (Figure 11). The two-shade restoration was completed by
Figures 6, 7 & 8: Selective etching of the enamel surfaces for 15 seconds with 37% phosphoric acid and application of the universal adhesive G-Premio BOND on dentin and enamel surfaces for 10 seconds. The adhesive should be dried thoroughly for 5 seconds with an oil-free air under maximum pressure and light-cured for 10 seconds. Shortened or light air-drying may not be sufficient for adequate solvent evaporation. The residual solvent may compromise the adhesive polymerisation and therefore the resultant bond strength.
Figures 9 & 10: everStickC&B was bonded to enamel and dentin using G-ænial Universal Flo. To support the composite pontic and to improve the fracture resistance of the pontic, the fibre framework was enlarged and labially curved.
Figures 11 & 12: The pontic was built using Essentia composite, based on a simple duo-layering technique emulating natural tooth aging. Considering the young age of the patient, Medium Dentin and Light Enamel shades were selected to achieve a natural result. MD dentin shade which offers an optimal light-scattering effect was covered with LE enamel shade that displays an excellent polishability and translucency.
Chairside tooth replacement using a
simplified procedure to create a fibre-reinforced
composite bridge
applying a Light Enamel (LE) layer buccally and palatinally (Figure 12). The exposed fibres on the palatal surfaces of the abutment teeth were also fully covered with the same enamel shade and light-cured for 40 seconds.
6
7
8
9
10
11
12

32 GC get connected
Finishing and polishing procedures were accomplished using fine burs (Acurata G+K Manhardt Dental 544#018) and Sof-Lex discs (3M ESPE). The final gloss was obtained using a goat hair brush and DiaPolisher (GC) diamond paste. The final chairside fibre-reinforced adhesive bridge after rehydration showed a good aesthetic integration and a high surface polish (Figures 13 & 14).Possible issues with fibre-reinforced bridges can be minor, such as discoloration or small chipping of composite, or they may be major, such as framework fracture or debonding that leads to the replacement of the entire construction. Treatment planning, the specific occlusion of the patient, and material properties all have a significant influence on the success of the restorations. In general, the survival rate for fibre-reinforced composite bridges at 4.5 years was reported as 73.4%.The physical properties of the fibre reinforcements depend on the type of matrix, type of fibre, fibre distribution, fibre/matrix ratio, diameter and length of the fibres. everStickC&B is composed of unidirectional continuous glass fibres impregnated with Bis-GMA and PMMA with a diameter of 1.5mm and containing 4000 individual glass fibers, with an elastic modulus of 27 GPa. These characteristics allow the fibre reinforcement to be easily placed on the tooth surface and shaped without
splaying. The use of a HEMA-free adhesive such as G-Premio BOND can contribute to the preservation of the bonding layer against hydrolysis that leads to discolorations in time. In addition to this, the thin film thickness of this bonding agent can help to improve the adaptation of the fibre to the retention grooves.
The use of fibre reinforcements to create direct or indirect composite bridges has been supported in the literature as increasing the strength and longevity of such bridges. It is also an optimal solution for young patients as it is fully reversible and leaves all the options open until the patient’s growth is completed and a permanent treatment can be considered. Finally, it also offers an aesthetic and very cost-effective alternative for patients of all ages who cannot always afford conventional prosthetic treatments.
ReferencesFreilich MA, Meiers JC, Duncan JP, Goldberg AJ. Fiber reinforced composites in clinical dentistry. Illinois: Quintessence Publishing Co, Inc, 2000: 49-70.Fudalej P, Kokich VG, Leroux B. Determining the cessation of vertical growth of the craniofacial structures to facilitate placement of single-tooth implants. Am J Orthod Dentofacial Orthop 2007; 131:S59-S67.Gibson CJ. A modified technique for minimal-preparation, resin-retained bridges: four case reports. Dent Update. 2001; 9: 442-448.Meiers JC, Freilich MA. Design and use of a prefabricated fiber-reinforced composite substructure for the chairside replacement of missing premolars. Quint Int. 2006; 37(6):449-454.Saikaew P, Chowdhury AF, Fukuyama M, Kakuda S, Carvalho RM, Sano H. The effect of dentine surface preparation and reduced application time of adhesive on bonding strength. J Dent. 2016;47:63-70. van Heumen CCM, Kreulen CM, Creugers NHJ. Clinical studies of fiber-reinforced resin-bonded fixed partial dentures: a systematic review. Eur J Oral Sci 2009; 117: 1–6.Yokoyama D , Shinya A, Lassila LV, Gomi H, Nakasone Y, Vallittu PK, Shinya A. Framework design of an anterior fiber-reinforced hybrid composite fixed partial denture: a 3D finite element study. Int J Prosthodont. 2009;22(4):405-412.Yurdagüven H, Say EC, Güler N. Long-term provisional anterior tooth replacement using fiber-reinforced composite and avulsed tooth crowns as pontics. J Adhes Dent. 2010;12(1):71-75.
Chairside tooth replacement using a simplified procedure to create a fibre-reinforced composite bridge
Figures 13 & 14: The final chairside fibre-reinforced adhesive bridge after rehydration showed a good aesthetic integration and a high surface polish.
13
14

GC get connected 33
GRADIA® PLUS A new concept for indirect lab composite techniquesInterview with Diederik Hellingh from GC EUROPE and master dental technicians Mr Simone Maffei and Mr Michael Brüsch on a new indirect lab composite
GC is proud to introduce its new laboratory composite GRADIA® PLUS, a unique modular system approach for dental lab composite techniques. Developed by GC in close co-operation with a group of top dental technicians, guaranteeing a lifelike appearance that perfectly mimics the natural tooth. We spoke to Diederik Hellingh, Group Product Manager and master dental technician Mr Maffei and Mr Brüsch who explain the innovative concept offering technicians a new standard in layering of composites.

34 GC get connected
GRADIA® PLUS A new concept for indirect lab composite techniques
Why has GC developed GRADIA® PLUS as a modular concept and what does that actually mean?
D. Hellingh: We don’t want to dictate to the technician how he or she should do their job. So GRADIA® PLUS was developed as a modular system with a number of standalone sets. These sets, for example the Layer sets, Paint set, Gum set are all standalone products that give optimum performance. We are not forcing the technician to adopt them all at once, although we want them to be aware that this is an integrated system and we’re confident that used in its entirety it will produce the best outcomes. MDT M.Brüsch: But the lab technician can choose to use whichever modules suit their way of working and the indications of each particular case, and use other modules or extend the system whenever they see fit. To make it even more user friendly, GRADIA® PLUS also has fewer standard colours, which makes it even more compact and cost-effective. GRADIA® PLUS is a unique material and, with this modular concept, offers a unique approach to in-lab composite restorations.
Technologically, what’s especially new about GRADIA® PLUS?
D. Hellingh: Certainly we must talk about the technology behind. In a first - for lab indirect composites - GC has developed a nano-hybrid, light-cured composite that uses the latest nano-filler polymer technology. This uses high-density and homogeneously
dispersed ultra-fine fillers that are blended into the resin matrix. The resulting material has a brightness, translucency and chroma in the mouth that compares favourably with porcelain. GRADIA® PLUS has the highest physical properties, with the same high value for heavy and light body pastes. It has outstanding wear resistance and yet thanks to its mechanical properties is itself gentle on the opposing teeth. This makes it wonderfully versatile – suitable anywhere from anterior right through to high-wear, high-pressure posterior restorations that are at risk of cracking or chipping if made from porcelain. MDT M. Brüsch: The composite is also remarkably easy to polish thanks to its highly compacted surface and inherent self-polishing properties, so a durable, natural and beautiful gloss is routinely achieved.
What is the thinking behind GRADIA® PLUS?
D. Hellingh: Well, as with all GC innovations, foremost in our minds is making technological and systematic improvements that actually relate to the needs and work practices of our customers. So GRADIA® PLUS is a complete lab composite system with a range of improvements relevant to the dental technician, including wider indications, exceptional durability and highly aesthetic replication of natural dentition, with particular emphasis on making it easier to create whatever colour the technician is looking for. We’ve managed to do all of that and at the same time make the system more compact. MDT S. Maffei: There are half as many syringes as before, but the trick is that the technician can use the shades pure or mix them, using a very easy technique, offering a way of working that’s similar to ceramic veneering, with no compromise to strength. It sets a new standard in the mixing and layering of shades for outstanding aesthetic outcomes. MDT M. Brüsch: We are sure technicians will love it, dentists will love it and their patients will love it.

GC get connected 35
GRADIA® PLUS A new concept for indirect lab composite techniques
MODULAR COMPOSITE SYSTEM FOR INDIRECT RESTORATIONS
GRADIA® PLUS – Opaque
OPAQUE0.5 mm
O-BASE OA OB OC OD
GRADIA® PLUS – Paste Heavy Body
DENTIN1.0 mm
HB-DA1 HB-DA2 HB-DA3 HB-DA3.5 HB-DB1 HB-DB3 HB-DC3 HB-DD2 HB-DW
ENAMEL1.0 mm
HB-EL HB-ED HB-PE HB-CLF
OPAQUE DENTIN1.0 mm HB-ODA HB-ODB HB-ODC HB-ODD HB-ODW
GRADIA® PLUS – Paste Light Body
BASE1.0 mm
LB-Base D LB-Base E LB-Base CLF LB-Base OD LB-Base Opal
EFFECT1.0 mm
LB-Orange LB-Red LB-Yellow LB-Blue LB-Grey LB-Milky
INLAY1.0 mm
LB-Inlay E LB-Inlay TD
BLEACH1.0 mm
LB-DW LB-ODW Image by S. Maffei This
cha
rt is
inte
nded
as
a re
fere
nce
guid
e on
ly
MODULAR COMPOSITE SYSTEM FOR INDIRECT RESTORATIONS
GRADIA® PLUS – One Body
DENTIN1.0 mm
LB-A LB-B LB-C LB-D
BLEACH1.0 mm
LB-W
GRADIA® PLUS – Gum
GUM OPAQUE0.5 mm
GO-1 GO-2
GUM LIGHT BODYGUM HEAVY BODY1.0 mm GLB-1
GHB-1 GLB-2GHB-2
GLB-3GHB-3
GLB-CLGHB-CL
http://www.gceurope.comz L CC 8 79 06/16 Image by S. Maffei
GRADIA® PLUS – Lustre Paint
LP-A LP-B LP-C LP-D
LP-Cream LP-Grey LP-Lavender LP-Blue LP-CLF
GLP-Violet GLP-Bright red LP-CL
GLASSCLEAR
GLASSCLEAR
This
cha
rt is
inte
nded
as
a re
fere
nce
guid
e on
ly
You have talked generally about wider indications for use, but where specifically can we use GRADIA® PLUS?
MDT M. Brüsch: GRADIA® PLUS certainly has wide indications, so, for example, the technician can use it with the utmost confidence in metal-backed crown and bridge restorations, metal-free restorations including jacket crowns, inlays, onlays and laminated veneers, as well as implant super structures and the reproduction of gum tissue for crown and bridge work.
You say that GC is always considering the needs of the user, so what is different about GRADIA® PLUS in making the technician’s job easier?
D. Hellingh: We know that technicians get frustrated when they are offered too many choices, so we have halved the number of syringes – with absolutely no compromise to the end result. So now with just eight dentins and five opaques we can offer 16 V-shades. We have Heavy and Light Body pastes
with the ideal consistency for their indications and area of application, including tooth structure and gingival tissue – they’re very technique-tolerant – and you can also mix the pastes to achieve your own desired colour tone, opalescence level and translucent level of every shade when desired. MDT M. Brüsch: GRADIA® PLUS also offers an almost unlimited number of colour and texture combinations despite the smaller number of syringes, to produce highly aesthetic crown and bridge work using the layering technique.
MDT S. Maffei: GRADIA® PLUS screams “ease of use”. Just take the monolithical reproduction of standard Vita shades. With our single One Body pastes you get perfect results quickly and easily. Being a light body type, they are simply injected using a transparent mould and are then light-cured.

36 GC get connected
GRADIA® PLUS A new concept for indirect lab composite techniques
Moreover, with its combination of durability and aesthetics, GRADIA® PLUS is equally at home in posterior and anterior restorations and is up to the most aesthetically demanding case.
Added colour, internally and externally, is crucial to the aesthetics of a restoration. What does GRADIA® PLUS have to offer that improves the options for the technician?
D. Hellingh: We’ve used the “less is more” philosophy with Lustre Paint; our paint-on set that includes a wide range of colours for both internal and external characterisation and adds a key dimension to the GRADIA® PLUS system. MDT M. Brüsch: Lustre Paint has a simple technique for achieving durable colour and superb surface gloss with great wear resistance, and using this
light-cured characterisation on your surfaces reduces the polishing stage, saving valuable time. The results are just beautiful. MDT S. Maffei: Oh, and you can easily mix the colours to produce subtle changes, and alter the consistency if necessary by using the diluting liquid provided.
Tell us more about GRADIA® PLUS’s approach to complex “red” aesthetic cases. What is the GC solution?
MDT M. Brüsch: We know that matching the countless variations in gingival tissue is challenging. But with the GRADIA® PLUS Gum set, which includes a wide variety of red shades, we believe close matches in colour and texture are made much easier, regardless of age or ethnicity. MDT S. Maffei: The gum set is for implant superstructures and other fixed or removable prostheses like crowns, bridges and partial dentures. GRADIA® PLUS gum shades have the same strength, durability and handling properties as GRADIA® PLUS tooth shades.
The GRADIA® PLUS modular concept includes a new light-curing unit. Just what is “new” about it that will appeal to the technician?
D. Hellingh: We call it the LABOLIGHT DUO. It’s an all-in-one device for step-by-step intermediate curing and final curing. Thanks to GC, no more need for two separate devices – imagine that! This dual purpose is achieved with two curing modes – pre-curing, which is the

GC get connected 37
CDT Diederik Hellingh – Leuven Group Product Manager for dental technician products In this position he is responsible for the further development of GC’s laboratory & digital dentistry product lines.
MDT Michael Brüsch – Düsseldorf (Germany)Michael Brüsh trained as a dental technician from 1976-1979, after which he was employed as a dental technician. In 1986 he completed his Master Dental Technician degree in Düsseldorf and then became a laboratory director focusing on all-ceramic restoration work. In 1989 he set up his own, privately based dental laboratory specialising in functional and aesthetic prosthetics with a focus on multichromatic-additive veneering techniques for composite and porcelain.He is considered to be an authority on the subject of all-ceramic and biomaterials and functional restoration work and regularly presents workshops and publishes papers.
MDT Simone Maffei – Modena (Italy)Graduated dental technician in 1996, began working in laboratory of his father William in Modena, since then has attented numerous courses with the most important speakers at the International level, both in dental technology and in the field of dental photography.He has written various articles on national and international journals on applied photography in the dental field and on the aesthetics.He currently teaches courses on Dental Photography, Digital Smile Design, ceramic veneers on refractory and natural layering technique on metal and zirconium.Holder of the Maffei Dental Laboratory in Modena, together with his sister Elisa , they focus on advanced aesthetic solutions using composites and ceramics.
About the interviewees:
GRADIA® PLUS A new concept for indirect lab composite techniques
step mode, and final curing, on full mode. It uses high-output, long-life, double wavelength LED technology and we’re confident technicians will love the LABOLIGHT DUO’s compact and ergonomic design, which has already been recognised with a win at the 2016 IF Design Awards. This
curing light causes no change at all to the colour of GRADIA® PLUS, so technicians can monitor the precise colour of the restoration throughout its fabrication. Not only that, thanks to an automated rotary system and the reflective plate, the LABOLIGHT DUO distributes light with optimum
efficiency, so the restoration receives even light on all sides. It’s worth noting, too, that GRADIA® PLUS can be cured with both the LABOLIGHT LV-III and GC’s STEPLIGHT SL-I.
Thank you very much for this interview.
GC get connected 37

GRADIA PLUS from GC
when innovation meets indication...
GC EUROPE N.V.Head OfficeResearchpark Haasrode-Leuven 1240Interleuvenlaan 33B-3001 LeuvenTel. +32.16.74.10.00Fax. [email protected]://www.gceurope.com


GC EUROPE N.V.East European OfficeSiget 19BHR-10020 ZagrebTel. +385.1.46.78.474Fax. [email protected]://eeo.gceurope.com
GC IBÉRICADental Products, S.L.Edificio Codesa 2Playa de las Americas, 2, 1°, Of. 4ES-28290 Las Rozas, MadridTel. +34.916.364.340Fax. [email protected]://spain.gceurope.com
GC AUSTRIA GmbHSwiss OfficeBergstrasse 31cCH-8890 FlumsTel. +41.81.734.02.70Fax. [email protected]://switzerland.gceurope.com
GC AUSTRIA GmbHTallak 124A-8103 Gratwein-StrassengelTel. +43.3124.54020Fax. [email protected]://austria.gceurope.com
GC NORDIC ABDanish Branch Harbour House Sundkrogsgade 21 DK-2100 København Tel. +45 23 26 03 [email protected] http://denmark.gceurope.com
GC NORDIC ABFinnish BranchVanha Hommaksentie 11BFIN-02430 MasalaTel. & Fax. [email protected]://finland.gceurope.com
GC BENELUX B.V.Edisonbaan 12NL-3439 MN NieuwegeinTel. +31.30.630.85.00Fax. [email protected]://benelux.gceurope.com
GC GERMANY GmbHSeifgrundstraße 2D-61348 Bad HomburgTel. +49.61.72.99.59.60Fax. [email protected]://germany.gceurope.com
GC UNITED KINGDOM Ltd.16-23, Coopers CourtNewport PagnellUK-Bucks. MK16 8JSTel. +44.1908.218.999Fax. [email protected]://uk.gceurope.com
GC FRANCE s.a.s.8, rue Benjamin FranklinF-94370 Sucy en Brie CedexTel. +33.1.49.80.37.91Fax. [email protected]://france.gceurope.com
GC NORDIC ABBox 703 96SE-107 24 StockholmSwedenTel: +46 8 506 361 [email protected]://nordic.gceurope.com
GC ITALIA S.r.l.Via Calabria 1I-20098 San Giuliano MilaneseTel. +39.02.98.28.20.68Fax. [email protected]://italy.gceurope.com
GC EUROPE N.V. • Head Office • Researchpark Haasrode-Leuven 1240 • Interleuvenlaan 33 • B-3001 LeuvenTel. +32.16.74.10.00 • Fax. +32.16.40.48.32 • [email protected] • http://www.gceurope.com