fs duchess manual
TRANSCRIPT

2Duchess
Flying Club: DuchessFor Microsoft Flight Simulator 2004 and Flight Simulator X
Pilot’s Notes
CONTENTS
INTRODUCTION ....................................................................................3
INSTALLATION......................................................................................5
DUCHESS PANEL ..................................................................................7Main Panel (IFR and Takeoff Panel)................................................................................................7
Cockpit Navigator ..........................................................................................................................9
Radios ............................................................................................................................................9
Right Panel ..................................................................................................................................10
Lower Left Panel ..........................................................................................................................10
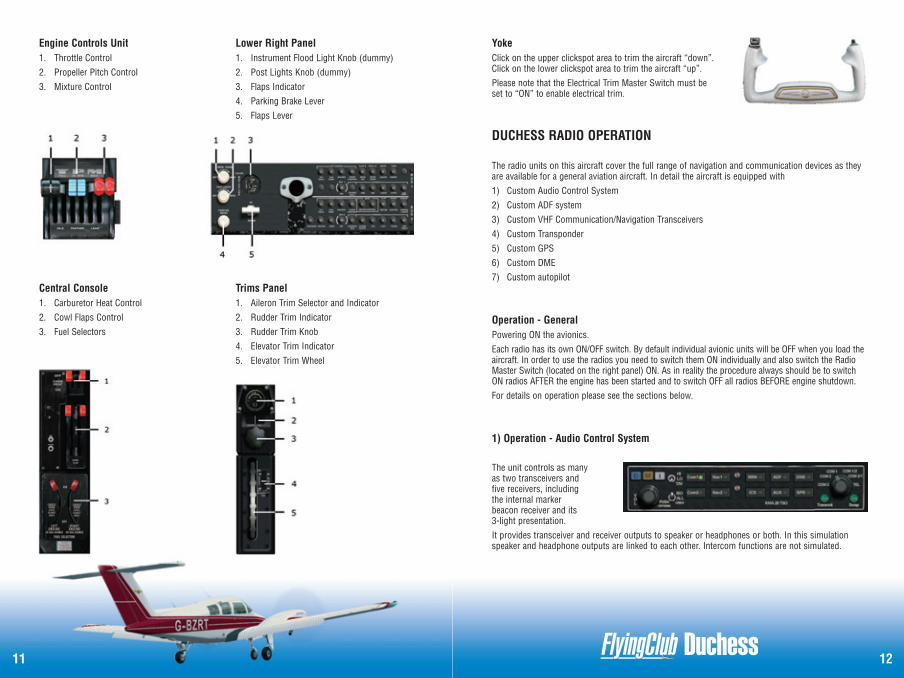
Engine Controls Unit (ECU) ..........................................................................................................11
Lower Right Panel ........................................................................................................................11
Central Console ............................................................................................................................11
Trims Panel ..................................................................................................................................11
Yoke..............................................................................................................................................12
DUCHESS RADIO OPERATION..................................................................12Operation – General ......................................................................................................................12
Operation - Audio Control System................................................................................................12
Operation - ADF ............................................................................................................................13
Operation - COM / NAV units........................................................................................................15
Operation - Transponder ..............................................................................................................17
Operation - DME ..........................................................................................................................18
Operation - Autopilot ....................................................................................................................19
OPERATING THE PARKING ANIMATIONS (FSX ONLY) ......................................20
CREDITS ..........................................................................................21
COPYRIGHT ......................................................................................22
PIRACY ............................................................................................22
4
• Emergency gear extension valve operation under cockpit floor • Operating navigation, flashing strobe and landing lights • Cockpit night lighting • In-sim pop-up checklist and reference list • Simply click on your passengers to show or hide them in the Virtual cockpit • Unique park animations (FSX only) - watch the pilot place the wheel chocks, pitot cover and tie
downs around the aircraft and remove them before take off! • The FSX version uses the new FSX sound system - the sounds change as you move around the
outside of the aircraft• FSX version features: Specular and bump mapping as well as FSX-style gauge night lighting!
Outside you can actually see the individual rivets! The textures are optimised to give an ultra-reallook and feel and reflection maps have been included so that the textures reflect the environment.
• FSX model includes multiple additional views, taking advantage of the new FSX view system • FSX version features the new Virtual Cockpit lighting • FSX version features clickable door handles.
SYSTEM OPERATIONS
• Authentic aircraft systems for even more accurate flying• Electrical system simulation and operation • Engine indications • Fuel system simulation with tank change-over.
A COMPLETE AND ACCURATE CUSTOM SET OF AVIONICS
• Audio Control panel • ADF system, including working Flight Timer and Elapsed Timer • Two different VHF Communication/Navigation Transceivers • Transponder • DME (Distance Measuring Equipment) including groundspeed and time-to-station display • Operating autopilot • Transponder with flashing Identification lamp.
INTRODUCTION
Welcome to the latest instalment in our hugely popular Flying Club series.The Beechcraft Duchess 76 is a twin engine General Aviation training and touring aircraft that ispopular around the world. This model - for FSX and FS2004 - comes with an authentic avionics suiteand a realistic set of liveries.The highly detailed aircraft model is based on careful research on a real example of the aircraft.Unique parking animations in FSX let you watch the pilot place the wheel chocks, pitot cover andtie-downs around the aircraft and remove them before take off!The FSX version uses the new FSX sound system in which the sounds change as you move aroundthe outside of the aircraft. The FSX version also features specular and bump mapping as well asFSX-style gauge night lighting. The textures are optimised to give an ultra-real look and reflectionmaps have been included so that the textures reflect the environment.The FSX model includes multiple additional views, taking full advantage of the new FSX view system,and also features the new Virtual Cockpit lighting.
FEATURES OVERVIEW
• Five aircraft to fly • Five different liveries • Authentic custom sound sets built from the real aircraft sounds inside and out • Animated pilot figure - he moves as the controls move! • Realistic custom flight model • Immersive virtual cockpit with mouse-clickable instruments, levers and knobs and operating
control yokes, throttle, mixture and carb heat controls, with ‘click to remove’ yokes in both theVC and 2D panels to allow for easy viewing of all instruments and controls
• High-visibility lower height 'landing panel' view available by simple mouse click to allow a betteroutside view for landing and take-off - or to just enjoy the view!
• Click on the yokes in the Virtual Cockpit to simply remove them from view! • Full set of authentic custom gauges and annunicator lights • Authentic animations: propeller, rotating wheels, moving flaps, elevators, rudder, ailerons, nose
wheel steering, entry doors, baggage bay door, undercarriage shock absorber movement, controlsurface trim tabs - even the door handles and sun visors work!
• Small but important items are modelled: Pitot head, Comms and Nav radio antennas, sun visors,footsteps, tie-down points, flap hinges, door hinges, temperature gauge probes, fuel tank caps -even the hand grab handles are modelled!
• The direct vision window is operational
3Duchess
6
Please note: You can only unlock a product three times. If you need to exceed this number ofunlocks an administrative fee may be required. In this case please contact our download shopsupport line at [email protected]
Website updatesPlease check our website at http://www.justflight.com for news or updates on this and other products.
Technical Support?To obtain technical support (in English) please visit the support section at http://www.justtrains.net.As a Just Flight Customer you can obtain free technical support for any Just Flight or Just Trainsproduct. If you don’t have Internet access, please write to us at Just Flight Technical Support,2 Stonehill, Stukeley Meadows, Huntingdon, PE29 6ED, UK.
Regular newsTo get the latest news about Just Trains products, sign up for our newsletter here:http://www.justflight.com/subscribe.asp
UNINSTALLING (BOXED OR DOWNLOAD)
To uninstall the product from your system:
Go to the Windows Start menu.Select 'Settings' and then 'Control Panel'. In the Control panel window double-click on 'Add/Remove Programs'. Select and click on the appropriate entry from the list. A dialogue box will appear offering to Modify,Repair or Remove the program. Click on the ‘Remove’ option and then click ‘Next’. A confirmationbox will appear asking if you really wish to remove the product. Clicking 'OK' will remove the productfrom your system.Click 'Finish' to end this operation.
Uninstalling or deleting the product in any other way may cause problems when using this program inthe future or with your Windows set-up.
REALISTIC COCKPIT OPERATIONS
• Unique - the aircraft has altimeters that change from Millibars to Inches indications in thepressure setting window, depending on which international settings you have set in FlightSimulator - to make it easier to read
• Individual Avionics can be turned ON or OFF • Silky smooth gauge operation • Engine ‘Starter motor engaged’ warning light, with 'Press to test' facility • Low-voltage warning light with 'Press to test' facility • Mouse-over tool tip text show instrument name and actual instrument readings • All avionics are available in a large pop-up window • Yokes can be toggled to show/hide in the Virtual cockpit with a mouse click.
INSTALLATION
INSTALLING THE SOFTWARE - DOWNLOAD VERSION
If you’ve purchased the download then you’ve already got this far by following the instructions onour website. However, here are some FAQs that might be helpful.
How do I install and unlock the software once I have paid for it?Full instructions will appear on screen once you have bought a download add-on. These will also besent to you in an email for future reference.
How will I know the product has unlocked correctly?A message will appear on screen telling you that the unlocking process has been completed (andhow to contact us in the unlikely event that you experience any problems). Please read allinstructions and e-mails carefully.
What happens if I change my PC or need to reinstall the software?If you change your computer system or your licence files are ‘broken’ (perhaps due to are-installation of Windows or a hard drive malfunction) you will need to unlock the software again.Once you have unlocked the product you can install it as often as you like on the same computer system.
5Duchess

8
1. ASI (Airspeed Indicator)2. Turn Coordinator3. HSI (Horizontal Situation Indicator)4. Artificial Horizon5. VSI (Vertical Speed indicator)6. Altimeter with altimeter calibration knob. (Hold mouse pointer over knob to see pressure setting)7. Tachometer8. Manifold Pressure9. Clock10. Altimeter with altimeter calibration knob (Hold mouse pointer over knob to see pressure setting)11. Switch icons (Checklists, ATC window, Map)12. EGT (Exhaust Gas Temperature)13. Starter Warning Lights (Press to test)14. HSI Switch Panel (inop)15. ADF Indicator16. VOR 2 Indicator17. NAV/GPS mode switch18. Cockpit Navigator click area – press to show the Cockpit Navigator19. DME (Distance Measuring Equipment)20. Oil Pressure Indicator (Left and Right)21. Oil Temperature Indicator (Left and Right)22. Fuel Quantity Indicator (Left and Right)23. Fuel Pressure Indicator (Left and Right)24. Cylinder Temperature Indicator (Left and Right)25. Alt Load Indicator (Left and Right)26. Alt Load Test button
DUCHESS PANEL
Main Panel - IFR
Main Panel – TakeoffThe Takeoff Panel View is a reduced size panel to allow better outside visibility during approachesand landings.
7Duchess
10
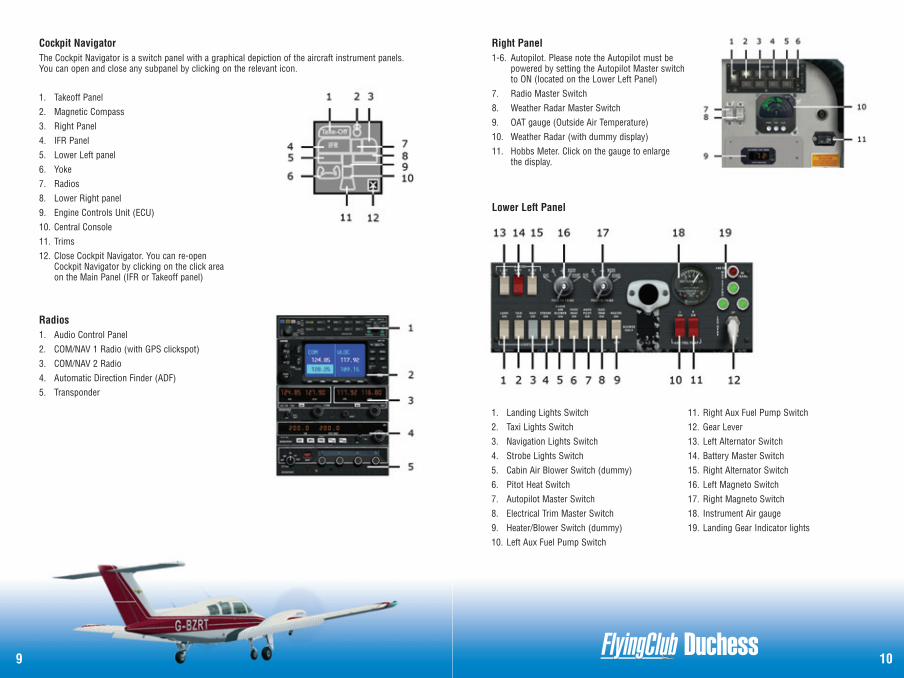
Right Panel1-6. Autopilot. Please note the Autopilot must be
powered by setting the Autopilot Master switchto ON (located on the Lower Left Panel)
7. Radio Master Switch8. Weather Radar Master Switch9. OAT gauge (Outside Air Temperature)10. Weather Radar (with dummy display)11. Hobbs Meter. Click on the gauge to enlarge
the display.
1. Landing Lights Switch2. Taxi Lights Switch3. Navigation Lights Switch4. Strobe Lights Switch5. Cabin Air Blower Switch (dummy)6. Pitot Heat Switch7. Autopilot Master Switch8. Electrical Trim Master Switch9. Heater/Blower Switch (dummy)10. Left Aux Fuel Pump Switch
11. Right Aux Fuel Pump Switch12. Gear Lever13. Left Alternator Switch14. Battery Master Switch15. Right Alternator Switch16. Left Magneto Switch17. Right Magneto Switch18. Instrument Air gauge19. Landing Gear Indicator lights
Cockpit NavigatorThe Cockpit Navigator is a switch panel with a graphical depiction of the aircraft instrument panels.You can open and close any subpanel by clicking on the relevant icon.
1. Takeoff Panel2. Magnetic Compass3. Right Panel4. IFR Panel5. Lower Left panel6. Yoke7. Radios8. Lower Right panel9. Engine Controls Unit (ECU)10. Central Console11. Trims12. Close Cockpit Navigator. You can re-open
Cockpit Navigator by clicking on the click areaon the Main Panel (IFR or Takeoff panel)
Radios1. Audio Control Panel2. COM/NAV 1 Radio (with GPS clickspot)3. COM/NAV 2 Radio4. Automatic Direction Finder (ADF)5. Transponder
9Duchess
Lower Left Panel
12
YokeClick on the upper clickspot area to trim the aircraft “down”.Click on the lower clickspot area to trim the aircraft “up”.Please note that the Electrical Trim Master Switch must beset to “ON” to enable electrical trim.
DUCHESS RADIO OPERATION
The radio units on this aircraft cover the full range of navigation and communication devices as theyare available for a general aviation aircraft. In detail the aircraft is equipped with1) Custom Audio Control System2) Custom ADF system3) Custom VHF Communication/Navigation Transceivers4) Custom Transponder5) Custom GPS6) Custom DME7) Custom autopilot
Operation - GeneralPowering ON the avionics.Each radio has its own ON/OFF switch. By default individual avionic units will be OFF when you load theaircraft. In order to use the radios you need to switch them ON individually and also switch the RadioMaster Switch (located on the right panel) ON. As in reality the procedure always should be to switchON radios AFTER the engine has been started and to switch OFF all radios BEFORE engine shutdown.For details on operation please see the sections below.
1) Operation - Audio Control System
The unit controls as manyas two transceivers andfive receivers, includingthe internal markerbeacon receiver and its3-light presentation.It provides transceiver and receiver outputs to speaker or headphones or both. In this simulationspeaker and headphone outputs are linked to each other. Intercom functions are not simulated.
Engine Controls Unit1. Throttle Control2. Propeller Pitch Control3. Mixture Control
Lower Right Panel1. Instrument Flood Light Knob (dummy)2. Post Lights Knob (dummy)3. Flaps Indicator4. Parking Brake Lever5. Flaps Lever
Central Console1. Carburetor Heat Control2. Cowl Flaps Control3. Fuel Selectors
Trims Panel1. Aileron Trim Selector and Indicator2. Rudder Trim Indicator3. Rudder Trim Knob4. Elevator Trim Indicator5. Elevator Trim Wheel
11Duchess
14
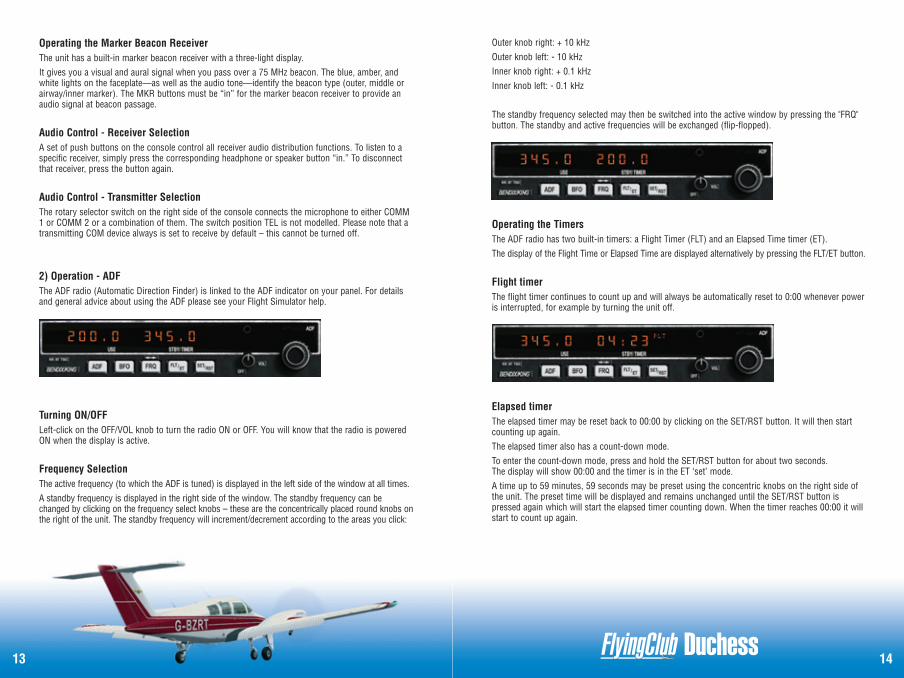
Outer knob right: + 10 kHzOuter knob left: - 10 kHzInner knob right: + 0.1 kHzInner knob left: - 0.1 kHz
The standby frequency selected may then be switched into the active window by pressing the "FRQ"button. The standby and active frequencies will be exchanged (flip-flopped).
Operating the TimersThe ADF radio has two built-in timers: a Flight Timer (FLT) and an Elapsed Time timer (ET).The display of the Flight Time or Elapsed Time are displayed alternatively by pressing the FLT/ET button.
Flight timerThe flight timer continues to count up and will always be automatically reset to 0:00 whenever poweris interrupted, for example by turning the unit off.
Elapsed timerThe elapsed timer may be reset back to 00:00 by clicking on the SET/RST button. It will then startcounting up again.The elapsed timer also has a count-down mode.To enter the count-down mode, press and hold the SET/RST button for about two seconds.The display will show 00:00 and the timer is in the ET ‘set’ mode.A time up to 59 minutes, 59 seconds may be preset using the concentric knobs on the right side ofthe unit. The preset time will be displayed and remains unchanged until the SET/RST button ispressed again which will start the elapsed timer counting down. When the timer reaches 00:00 it willstart to count up again.
Operating the Marker Beacon ReceiverThe unit has a built-in marker beacon receiver with a three-light display.It gives you a visual and aural signal when you pass over a 75 MHz beacon. The blue, amber, andwhite lights on the faceplate—as well as the audio tone—identify the beacon type (outer, middle orairway/inner marker). The MKR buttons must be “in” for the marker beacon receiver to provide anaudio signal at beacon passage.
Audio Control - Receiver SelectionA set of push buttons on the console control all receiver audio distribution functions. To listen to aspecific receiver, simply press the corresponding headphone or speaker button “in.” To disconnectthat receiver, press the button again.
Audio Control - Transmitter SelectionThe rotary selector switch on the right side of the console connects the microphone to either COMM1 or COMM 2 or a combination of them. The switch position TEL is not modelled. Please note that atransmitting COM device always is set to receive by default – this cannot be turned off.
2) Operation - ADFThe ADF radio (Automatic Direction Finder) is linked to the ADF indicator on your panel. For detailsand general advice about using the ADF please see your Flight Simulator help.
Turning ON/OFFLeft-click on the OFF/VOL knob to turn the radio ON or OFF. You will know that the radio is poweredON when the display is active.
Frequency SelectionThe active frequency (to which the ADF is tuned) is displayed in the left side of the window at all times.A standby frequency is displayed in the right side of the window. The standby frequency can bechanged by clicking on the frequency select knobs – these are the concentrically placed round knobs onthe right of the unit. The standby frequency will increment/decrement according to the areas you click:
13Duchess
16
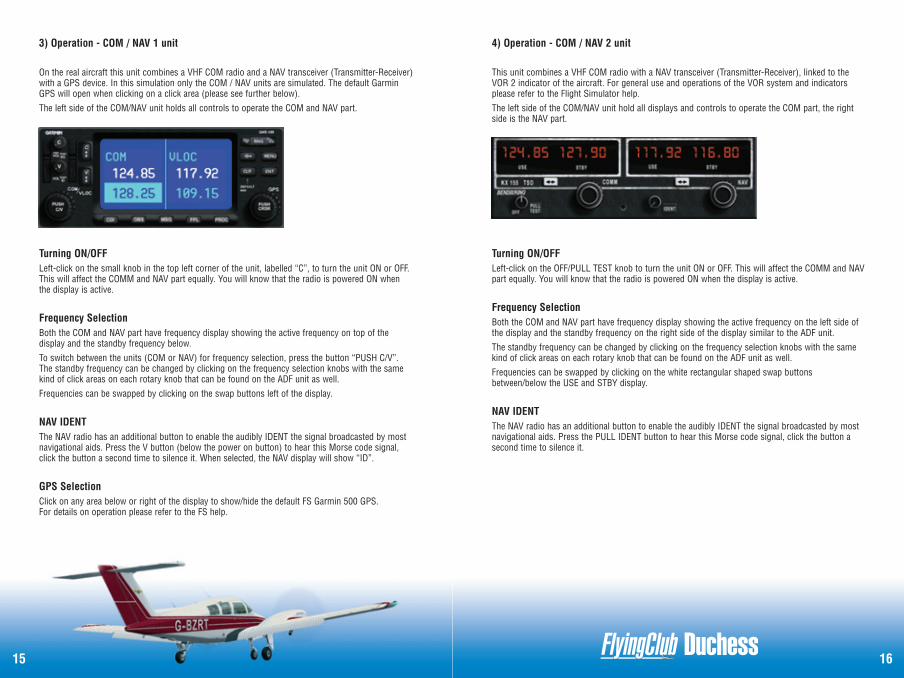
4) Operation - COM / NAV 2 unit
This unit combines a VHF COM radio with a NAV transceiver (Transmitter-Receiver), linked to theVOR 2 indicator of the aircraft. For general use and operations of the VOR system and indicatorsplease refer to the Flight Simulator help.The left side of the COM/NAV unit hold all displays and controls to operate the COM part, the rightside is the NAV part.
Turning ON/OFFLeft-click on the OFF/PULL TEST knob to turn the unit ON or OFF. This will affect the COMM and NAVpart equally. You will know that the radio is powered ON when the display is active.
Frequency SelectionBoth the COM and NAV part have frequency display showing the active frequency on the left side ofthe display and the standby frequency on the right side of the display similar to the ADF unit.The standby frequency can be changed by clicking on the frequency selection knobs with the samekind of click areas on each rotary knob that can be found on the ADF unit as well.Frequencies can be swapped by clicking on the white rectangular shaped swap buttonsbetween/below the USE and STBY display.
NAV IDENTThe NAV radio has an additional button to enable the audibly IDENT the signal broadcasted by mostnavigational aids. Press the PULL IDENT button to hear this Morse code signal, click the button asecond time to silence it.
3) Operation - COM / NAV 1 unit
On the real aircraft this unit combines a VHF COM radio and a NAV transceiver (Transmitter-Receiver)with a GPS device. In this simulation only the COM / NAV units are simulated. The default GarminGPS will open when clicking on a click area (please see further below).The left side of the COM/NAV unit holds all controls to operate the COM and NAV part.
Turning ON/OFFLeft-click on the small knob in the top left corner of the unit, labelled “C”, to turn the unit ON or OFF.This will affect the COMM and NAV part equally. You will know that the radio is powered ON whenthe display is active.
Frequency SelectionBoth the COM and NAV part have frequency display showing the active frequency on top of thedisplay and the standby frequency below.To switch between the units (COM or NAV) for frequency selection, press the button “PUSH C/V”.The standby frequency can be changed by clicking on the frequency selection knobs with the samekind of click areas on each rotary knob that can be found on the ADF unit as well.Frequencies can be swapped by clicking on the swap buttons left of the display.
NAV IDENTThe NAV radio has an additional button to enable the audibly IDENT the signal broadcasted by mostnavigational aids. Press the V button (below the power on button) to hear this Morse code signal,click the button a second time to silence it. When selected, the NAV display will show “ID”.
GPS SelectionClick on any area below or right of the display to show/hide the default FS Garmin 500 GPS.For details on operation please refer to the FS help.
15Duchess
18
Other functions
IDENT modeWhen you are asked to "Ident or Squawk" by ATC, press the small IDENT button.
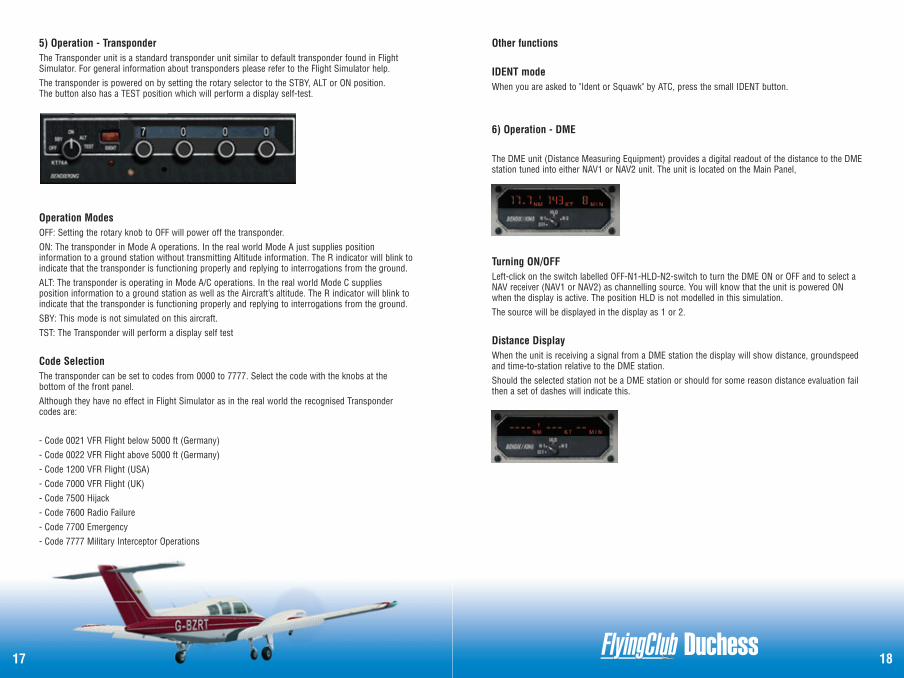
6) Operation - DME
The DME unit (Distance Measuring Equipment) provides a digital readout of the distance to the DMEstation tuned into either NAV1 or NAV2 unit. The unit is located on the Main Panel,
Turning ON/OFFLeft-click on the switch labelled OFF-N1-HLD-N2-switch to turn the DME ON or OFF and to select aNAV receiver (NAV1 or NAV2) as channelling source. You will know that the unit is powered ONwhen the display is active. The position HLD is not modelled in this simulation.The source will be displayed in the display as 1 or 2.
Distance DisplayWhen the unit is receiving a signal from a DME station the display will show distance, groundspeedand time-to-station relative to the DME station.Should the selected station not be a DME station or should for some reason distance evaluation failthen a set of dashes will indicate this.
5) Operation - TransponderThe Transponder unit is a standard transponder unit similar to default transponder found in FlightSimulator. For general information about transponders please refer to the Flight Simulator help.The transponder is powered on by setting the rotary selector to the STBY, ALT or ON position.The button also has a TEST position which will perform a display self-test.
Operation ModesOFF: Setting the rotary knob to OFF will power off the transponder.ON: The transponder in Mode A operations. In the real world Mode A just supplies positioninformation to a ground station without transmitting Altitude information. The R indicator will blink toindicate that the transponder is functioning properly and replying to interrogations from the ground.ALT: The transponder is operating in Mode A/C operations. In the real world Mode C suppliesposition information to a ground station as well as the Aircraft’s altitude. The R indicator will blink toindicate that the transponder is functioning properly and replying to interrogations from the ground.SBY: This mode is not simulated on this aircraft.TST: The Transponder will perform a display self test
Code SelectionThe transponder can be set to codes from 0000 to 7777. Select the code with the knobs at thebottom of the front panel.Although they have no effect in Flight Simulator as in the real world the recognised Transpondercodes are:
- Code 0021 VFR Flight below 5000 ft (Germany)- Code 0022 VFR Flight above 5000 ft (Germany)- Code 1200 VFR Flight (USA)- Code 7000 VFR Flight (UK)- Code 7500 Hijack- Code 7600 Radio Failure- Code 7700 Emergency- Code 7777 Military Interceptor Operations
17Duchess
20
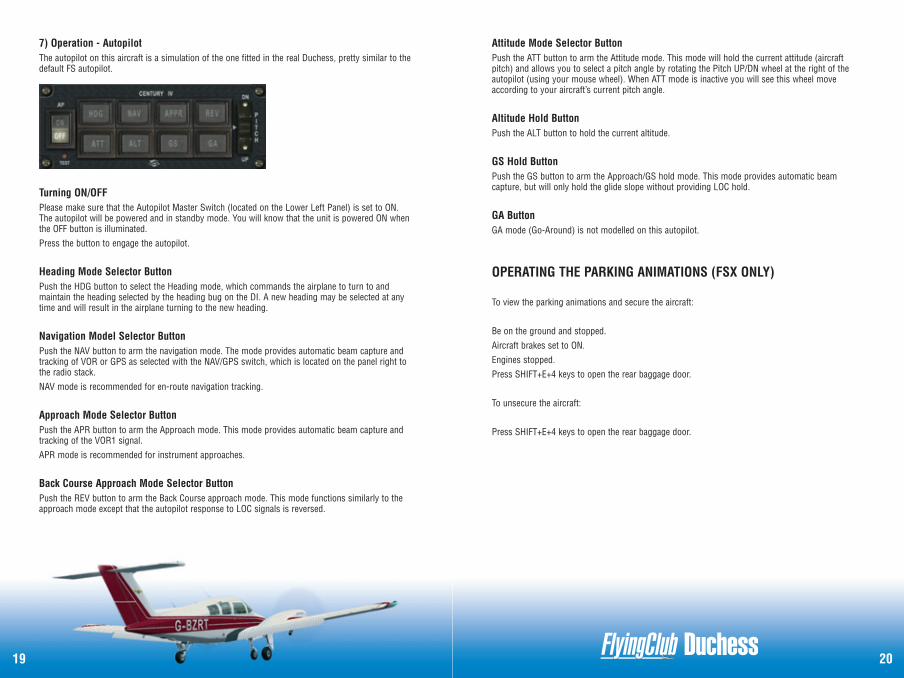
Attitude Mode Selector ButtonPush the ATT button to arm the Attitude mode. This mode will hold the current attitude (aircraftpitch) and allows you to select a pitch angle by rotating the Pitch UP/DN wheel at the right of theautopilot (using your mouse wheel). When ATT mode is inactive you will see this wheel moveaccording to your aircraft’s current pitch angle.
Altitude Hold ButtonPush the ALT button to hold the current altitude.
GS Hold ButtonPush the GS button to arm the Approach/GS hold mode. This mode provides automatic beamcapture, but will only hold the glide slope without providing LOC hold.
GA ButtonGA mode (Go-Around) is not modelled on this autopilot.
OPERATING THE PARKING ANIMATIONS (FSX ONLY)
To view the parking animations and secure the aircraft:
Be on the ground and stopped. Aircraft brakes set to ON.Engines stopped.Press SHIFT+E+4 keys to open the rear baggage door.
To unsecure the aircraft:
Press SHIFT+E+4 keys to open the rear baggage door.
7) Operation - AutopilotThe autopilot on this aircraft is a simulation of the one fitted in the real Duchess, pretty similar to thedefault FS autopilot.
Turning ON/OFFPlease make sure that the Autopilot Master Switch (located on the Lower Left Panel) is set to ON.The autopilot will be powered and in standby mode. You will know that the unit is powered ON whenthe OFF button is illuminated.Press the button to engage the autopilot.
Heading Mode Selector ButtonPush the HDG button to select the Heading mode, which commands the airplane to turn to andmaintain the heading selected by the heading bug on the DI. A new heading may be selected at anytime and will result in the airplane turning to the new heading.
Navigation Model Selector ButtonPush the NAV button to arm the navigation mode. The mode provides automatic beam capture andtracking of VOR or GPS as selected with the NAV/GPS switch, which is located on the panel right tothe radio stack.NAV mode is recommended for en-route navigation tracking.
Approach Mode Selector ButtonPush the APR button to arm the Approach mode. This mode provides automatic beam capture andtracking of the VOR1 signal.APR mode is recommended for instrument approaches.
Back Course Approach Mode Selector ButtonPush the REV button to arm the Back Course approach mode. This mode functions similarly to theapproach mode except that the autopilot response to LOC signals is reversed.
19Duchess
22
COPYRIGHT
©2009 Just Flight. All rights reserved. Just Flight and the Just Flight logo are trademarks ofMastertronic Group Limited, 2 Stonehill, Stukeley Meadows, Huntingdon, PE29 6ED, UK.All trademarks and brand names are trademarks or registered trademarks of the respective ownersand their use herein does not imply any association or endorsement by any third party.
PIRACY
We at Just Flight have invested significant time, effort and money to develop, manufacture andpublish any of our flight simulation products. This includes rewarding the programmers and artistswhose creativity contributes so much to the products we all enjoy.A pirate, otherwise known as a thief, simply pays a few pence for a gold disc, places it into a CD-writer, clicks a record button, and makes over £4.00 profit PER SALE for his troubles. This is actuallymore profit than the publishers and developers make from the sale of an original title. Piracy is notjust the domain of the casual domestic user in his or her back room, but it is also a multi-millionpound business conducted by criminals often with associations with the illegal drugs trade.Buying pirated copies of programs directly support these illegal operations.In addition to this there is the real risk that the pirate product will be of inferior quality and will oftencontain mechanisms that degrade the performance of the game.The people who really suffer from game piracy are the artists, programmers and other committedgame development staff. Piracy & theft directly affects people, and their families. Loss of revenue tothe games industry through piracy means many are losing their jobs due to cut-backs that have tobe made to ensure developers and publishers survive. The logical outcome of this is that eventuallythere would be no more Flight Simulation programs commercially available.Some of the most highly regarded, hard-working and creative people in the UK and around the worldare losing their jobs while the pirates line their own pockets with YOUR money. Where's the justicein that?It's not just copying software that is against the law, owning copied software also constitutes acriminal offence; so anyone buying from these people is also at risk of arrest and prosecution.To find out more about the implications of piracy please press the Piracy button on our website atwww.justflight.com
Duchess
CREDITS
Just Flight
Project Management Alex FordDevelopment Wolfgang Schwarz, Marc SiegelInstaller Richard SlaterManual Editing Wolfgang Schwarz, Dermot StapletonSales James, Andy H, Harley, Mark W, LucaProduction Management Dermot StapletonLeadership Andy PayneArtwork Fink CreativeTechnical Support Richard Slater, Simon Martin, Martyn Northall, Matt West-Robinson
SoundsTurbine Sound Studios
Flight modelsShane Olguin and Wayne Tudor
Special thanks toBill MackayBournemouth Commercial Flight TrainingHoward J CurtisRichard NaishWayne Tudor
21