framing table manual 2010 - southern tool home page all of the framing table components and remove...
TRANSCRIPT
R
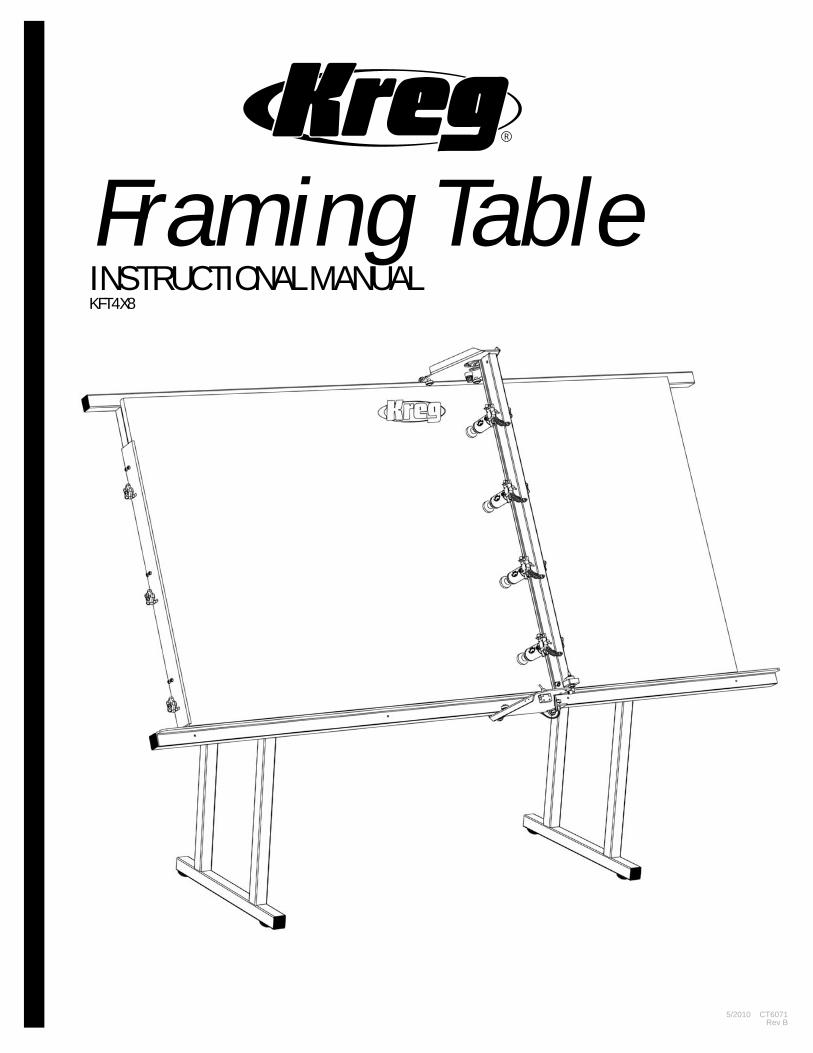
Framing TableINSTRUCTIONAL MANUALKFT4X8
R
5/2010 CT6071Rev B

R
Thank you for your purchase! Kreg Tool Company is proud to manufacture top quality machines that are surpassed only by our commitment to customer service. If after reviewing this manual you still have a question or concern that you would like addressed please visit our website at www.kregtool.com, call 800-447-8638 or email: [email protected].
Table of Contents
TABLE OF CONTENTS 1
SAFETY GUIDELINES 2
PARTS DIAGRAM 3
ASSEMBLY INSTRUCTIONS 4-5
CLAMPING CYLINDERS 6
SQUARING THE FENCE 7
RETRACTING THE FENCE 8
OPTIONAL SCREW GUN & HOSE 9
MAINTENANCE 10
ACCESSORIES AND OTHER PRODUCTS 11
Table of Contents1.

R Safety Guidelines 2.
R
KREG TOOL COMPANY201 Campus DriveHuxley, Iowa 50124
www.kregtool.com 800.447.8638
Safety Guidelines• To avoid injury, never place hand under clamping cylinders while adjusting them.• When drilling, make sure drill comes to a complete stop before removing or securing workpiece.• Don’t use in dangerous environment. Keep work area well lit.• Keep children and visitors away. All children and visitors should be kept a safe distance from work area.• Wear proper apparel. No loose clothing, gloves, neckties, rings, bracelets, or other jewelry to get caught in moving parts. Nonslip foot wear is recommended. Wear protective hair covering or hat to contain long hair.• Maintain tools in top condition. Keep tools sharp and clean for best and safest performance• Disconnect tools from power supply before servicing.• Use recommended accessories. The use of improper accessories may cause hazards.• Never sit or stand on table. Serious injury could occur if the table is tipped or falls over.• Check damaged parts. Before further use of the tool, a guard or other part that is damaged should be carefully checked to ensure that it will operate properly and perform its intended function. Check for alignment of moving parts, binding of moving parts, breakage of moving parts, mounting, and any other conditions that may affect its operation. A guard or other part that is damaged should be properly repaired or replaced.• Drugs, alcohol, medication. Do not operate table while under the infl uence of drugs, alcohol or any medication.
WARNING: This product contains one or more chemicals known to the State of California to cause cancer and birth defects or other reproductive harm. Wash hands after handling.
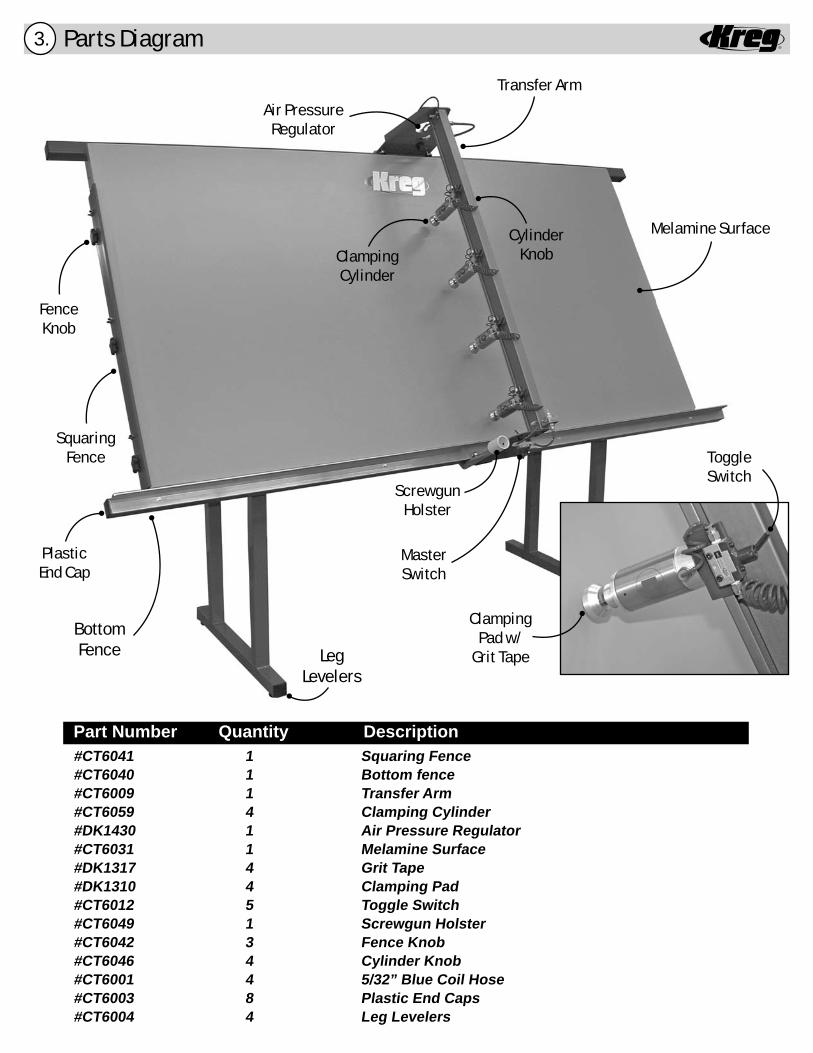
RParts Diagram3.
Squaring Fence
BottomFence
Clamping Cylinder
Transfer Arm
ScrewgunHolster
Air PressureRegulator
Melamine Surface
#CT6041 1 Squaring Fence#CT6040 1 Bottom fence#CT6009 1 Transfer Arm#CT6059 4 Clamping Cylinder#DK1430 1 Air Pressure Regulator#CT6031 1 Melamine Surface#DK1317 4 Grit Tape#DK1310 4 Clamping Pad#CT6012 5 Toggle Switch#CT6049 1 Screwgun Holster#CT6042 3 Fence Knob#CT6046 4 Cylinder Knob#CT6001 4 5/32” Blue Coil Hose#CT6003 8 Plastic End Caps#CT6004 4 Leg Levelers
Part Number Quantity Description
Clamping Pad w/
Grit Tape
ToggleSwitch
Fence Knob
CylinderKnob
Master Switch
PlasticEnd Cap
LegLevelers

R
Step 1Unpack all of the Framing Table components and remove them from the pallet. Carefully lay the components out on the fl oor and make sure you have everything needed to begin the assembly process.
Tools Required for Installation: Flat screwdriver, 1/2” socket and wrench and a 1/4” hex wrench.
Step 5With the help of others, lift the table into an upright position to continue with the assembly process. See fi gure 3 above.
Step 2Lay clamping table face down on a fl at surface. See fi gure 1.
Step 3Remove the four hex bolts from the back of the table frame to prepare it for attaching the legs.
Step 4Place the legs in position so that the adjustable feet are point-ing towards the bottom fence. Place hex bolts through frame legs, tighten securely as shown in fi gure 2.
Follow the steps below for assembling your new Kreg Framing Table. If you have any questions, please give us a call at 1.800.447.8638.
Step 6Remove the black plastic end cap from the bottom frame rail with a fl at screwdriver to reveal the socket head stop bolt & nut. See fi gure 4 below.
Pry off black plastic end cap with a screwdriver.
Lay table surface fl at.
Tighten leg bolts securely.
Assembly Instructions 4.
Figure 1
Figure 2
Figure 3
Figure 4Hex Bolts

RAssembly Instructions5.
Step 7Remove the socket head stop bolt from the table frame. Seefi gures 5 below.
Step 8Slide the clamping arm onto both the top and bottom frames so that it rolls freely. See fi gures 6 below.
Remove socket head bolt.
Step 10Connect to your shop’s air supply at 3/8” fi tting located on top of clamping arm. See fi gure 8 above.
Step 11Air pressure regulator on top of clamping arm controls pres-sure to optional screw gun. See fi gure 9 above.
Step 9Replace stop bolt, tighten and reattach the plastic cap in position.
Replace socket head bolt and end cap.
If you have additional questions on the set-up, operation or maintenance of your clamping table please call 800-447-8638 or email us at [email protected].
R
Figure 5
Figure 8
Figure 7
Figure 6
Figure 9

R
Clamping CylindersEach of the four clamping cylinders included with this framing table throw over 400 lbs. per square inch of pressure on the joint line. Each clamping cylinder can be moved independently of every other cylinder by simply sliding it up and down the transfer arm. A toggle switch is located on the top of each cylinder assembly that controls air fl ow to that particular cylinder. Each cylinder can then be turned on or off independently of the other cylinders. In addition, a master switch is located at the bottom of the transfer arm that has the ability to control all of the cylinders at one time (if they are in the “on” position).
To Clamp and Join a Frame:1) Place workpiece into alignment with squaring fence2) Adjust clamp pad so that it is directly over the joint line3) Throw cylinders independently or all at once with the master switch4) Drive screws and repeat processing
Figure 1
Figure 2
Figure 3
Figure 4
Place workpiece into alignment with squaring fence
Adjust clamp pad so that it is directly over the joint line
Throw cylinders independently or all at once with the master switch
Drive screws and repeat process
Operating Instructions - Clamping Cylinders 6.

ROperating Instructions - Squaring the Fence7.
Squaring the FenceThe squaring fence serves as a general reference to keep your workpieces aligned prior to assembly. It comes calibrated from the factory with a basic carpenters square. It should be noted that the most important aspect of making sure your frames turn out square and fl ush is by assuring that your workpieces are cut square and true prior to assembly. Simply put, if your workpieces are not square prior to assembly, your frame will not be square onceassembled. The squaring fence features set screws that allowit to be easily re-calibrated if knocked out of alignment.
To re-align squaring fence:1) Place carpenter’s square on base of table 2) Loosen locking nuts 3) Adjust allen screw inward or outward to re-square fence 4) Re-tighten locking nut
Figure 2
Figure 3
Figure 4Figure 1
Loosen locking nuts with hex wrench, and adjust the set screws with an allen wrench to square fence.
Re-tighten locking nut once complete.Place carpenter’s square on base of table and check for gap.
Adjusting the set screw.

R
Figure 1
Figure 2
Figure 3
Retracting the Fence In addition, the squaring fence retracts below the table surface for use when joining large frames. This allows the frame to be moved down beyond the left-hand side of the table so that assembly can continue down the right-hand side of the table on extremely large frames.
To retract fence for large frames:1) Loosen locking knobs on side of fence 2) Lift fence up and down to move out of the way3) Slide frame over the edge as needed
Loosen locking knobs on side of fence
Lift fence up and down to move out of the way
Slide large frame over the edge of the table as needed.
Operating Instructions - Retracting the Fence 8.

ROperating Instructions - Optional Screw Gun & Hose9.
Optional Screw GunThis table can accommodate an optional pneumatic screw gun for use in assembling frames (Kreg part number CT6030). An air regulator on the top of the transfer arm regulates the amount of air that is supplied to the screw gun. We recommend that you adjust the pressure to a level that causes the screw gun to stall out when the screw has been seated completely. To adjust, simply turn the regulator and run the gun to reach the desired setting. We fi nd that a set-ting around 60 psi works well for driving screws into oak with the CT6030 screwgun.
Optional Polyurethane Coil HoseThis polyurethane coil hose (Kreg part number CT6023) is a great complement to our Screw Gun. It is 8’ long, plenty of length to reach across the table and has brass 1/4” NPT fi ttings on both ends.
Regulator controls amount of air pressure to the screw gun.
Fitting where screw gun is connected to the table.
Screw GunItem# CT6030
Coil HoseItem# CT6023

ROperating Instructions - Maintenance 10.
MaintenanceTable Surface –
The slick melamine coating of the table surface cleans up wellfrom glue. If you’d like to make the table even more “glue-proof” we recommend coating the surface with Bates Glue Release(1-888-363-2628) or Empire Top Saver (1-866-700-5823). Replacing the table surface can also be completed relatively easily. Just remove 1” wood screws (11 total) from the mounting holes found on the backside of the frame as shown in fi gure 2. We suggest you shim up the bottom of the new table surface slightly before reapplying to allow wood chips to fall out of the way.
Optional Screw Gun –As with any pneumatic tool, you’ll want to add air tool oil to the gun periodically to keep it operating its best.
Figure 1
Figure 2
Holes in the backside of frame allow access to table mounting screws.

RAccessories and other Products11.
R
KREG TOOL COMPANY201 Campus Drive Huxley, Iowa 50124
www.kregtool.com 800.447.8638Visit www.kregtool.com today for additional tools, accessories, plans and instructional videos.
The Foreman - #DB55, DB110If your production needs have outpaced manual jigsbut you’re not ready for a heavy-production machine, the Foreman is just what the contractor ordered. Its one-step operation drills perfect Pocket Holes in seconds withhands-free clamping for added speed and safety. Available in both pneumatic and electric models, each built with the same rugged features.
Be sure to visit www.kregtool.com to get all the detailssurrounding our entire product line.
DK3100 Pro Series - #DK3100The DK3100 Pro Series Pocket Hole Machine is the only machine on the market that has the ability to drill two pocket holes in one machine cycle across rails of varying widths. It has 3/4”, 1” and 1-3/4” on-center spindle spacings, one touch foot pedal operation, dust collections chute and more.
DK1100 Pro Series - #DK1100 TP, DK1100 FP, DK1100 FEThe DK1100 Single-Spindle Pro Series consists of three machines built to fi t the needs of every type of production shop. They feature Hardened steel drill guides, one-touch foot pedal operation, dust collection chute and are available in pneumatic or electric versions.
DK5100 Pro Series - #DK5100The DK5100 Multi-Spindle Pocket Hole Machine drills up to fi ve pocket holes in one machine cycle. The machine contains 5 separate drill motors mounted 6” on-center. This machine features individually actuated motors, entirely pneumatic design, hardened steel drill guides, swing stops, one-touch foot pedal, prefi lter, automatic lubricator and more.
See it in action online.
See it in action online.
See it in action online.
See it in action online.