for support email
TRANSCRIPT

Thank you for purchasing the kit for building the WJ9J DTMF controller. After building, you should read the document on operation (WJ9JDTMFControllerV5.pdf) in order to use. This document only deals with the building of the kit.
This kit is meant for kits builders with intermediate-advanced kit building experience. If you have never built an electronic kit before, you should start with something simpler first. If you don’t have the correct soldering equipment, (like if you only have a 100 wat gun for example) do not attempt. You will also need Kester 44 or some other good solder. I sell lead free solder in 10 foot lengths also on ebay if you need solder.
This document is divided up into steps, please check off as you do each step. Note, some parts in the sample board may vary in value slightly or in color, but the locations circled in yellow are correct.
For support email:
Manual updates can be found by always going to www.qrz.com and looking up WJ9J, and clicking the links from there

While the parts are already inventoried at the factory, please verify the inventory – check as you go:
Check Qty Description
____ 1 Microchip 16F88 18 pin DIP IC Chip (In the tube)
____ 1 8870 DTMF Decoder 18 pin DIP IC Chip (In the tube)
_____ 1 ULN2803 18 pin DIP IC Chip (In the tube)
_____ 3 18 Pin DIP Socket (In the tube)
_____ 1 Blank (unpopulated) PC Board
_____ 1 78L05 3 terminal regulator TO-92 case
_____ 10 LEDs Light Emitting Diodes (Either red green yellow or blue depending on stock available. If you have a preference, please specify when ordering)
_____ 1 3.58 Xtal
_____ 1 1N4148 small signal switching diode
_____ 1 NPN switching transistor (unspecified value and not critical)
_____ 10 3.3K ¼ watt 5% Resistor (Orange-Orange-Red-Gold)
_____ 2 100K ¼ watt 5% Resistors (Brown-Black-Yellow-Gold)
_____ 1 330K ¼ watt 5% Resistor (Orange-Orange-Yellow-Gold)
_____ 1 10K ¼ watt 5% Resistor (Brown-Black-Orange-Gold)
_____ 1 22.1k 1/8 watt 1% Resistor (In marked bag)
_____ 1 68.1K ¼ watt 1% Resistor (In marked bag)
_____ 5 2.2 uf 35V Tantalum Capacitors
_____ 6 .1 uF Capacitors (Could also be substituted .22 uF capacitor)
_____ 1 16 position terminal block
_____ 1 DC Coaxial Power Jack
_____ 1 DC Coaxial Power Plug
_____ 1 Stereo 1/8” Audio Jack
_____ 1 2 position DIP Switch
_____ 1 10K Potentiometer (In marked bag)
_____ 1 2K Potentiometer (In marked bag)

_____ Insert the 10 3.3K ¼ Watt Resistors. These go into R4, R6, R7, R8, R9, R10, R11, R12, R13, & R14. It doesn’t matter which direction you insert them but for cosmetic reasons, you should keep them all the same way. I suggest the gold band to the right or bottom. See picture for placement circled in yellow. Bend the leads back after inserting to keep the parts flush to the board. Solder all 10 resistors and cut the leads flush to the board. These last instructions won’t be repeated, as it is assumed in each step you will know to solder and cut.
_____ Insert the 2 100K ¼ watt resistors, R1 & R2
_____ Insert the 330K ¼ watt resistor R3
_____ Insert the 10K ¼ watt resistor R5
_____ Insert the 22.1k 1/8 watt 1% resistor R15
_____ Insert the 68.1K ¼ watt 1% resistor R16
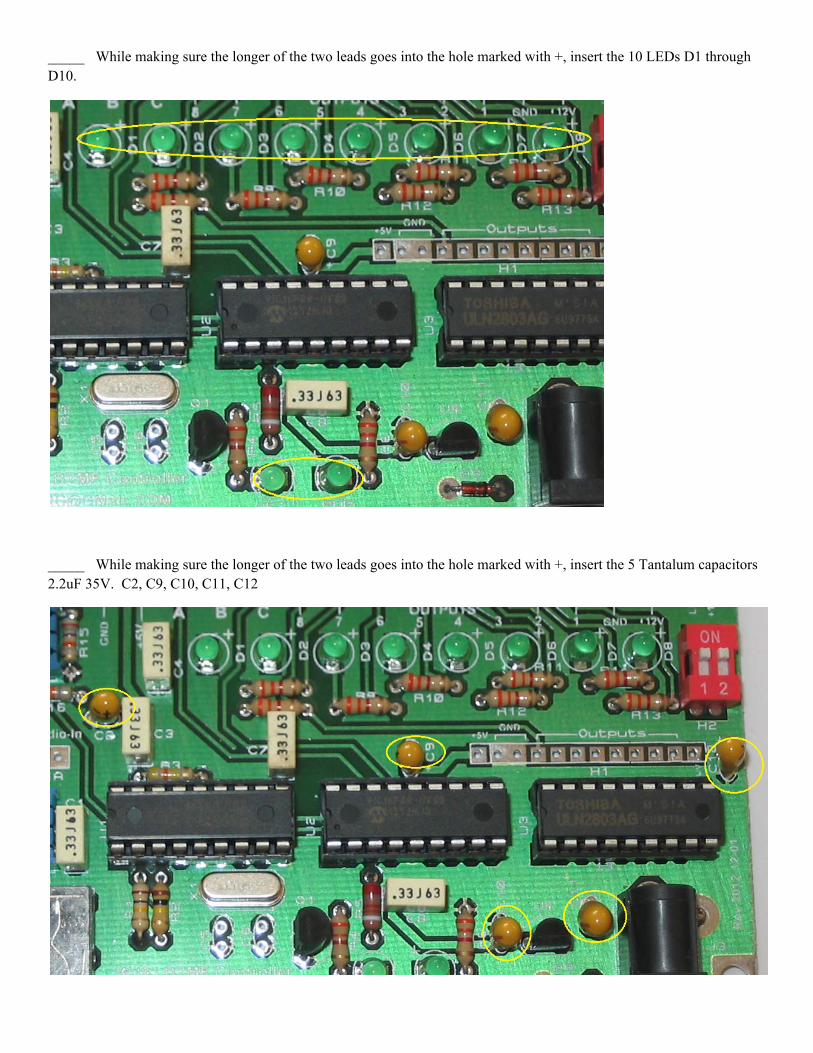
_____ While making sure the longer of the two leads goes into the hole marked with +, insert the 10 LEDs D1 through D10.
_____ While making sure the longer of the two leads goes into the hole marked with +, insert the 5 Tantalum capacitors 2.2uF 35V. C2, C9, C10, C11, C12
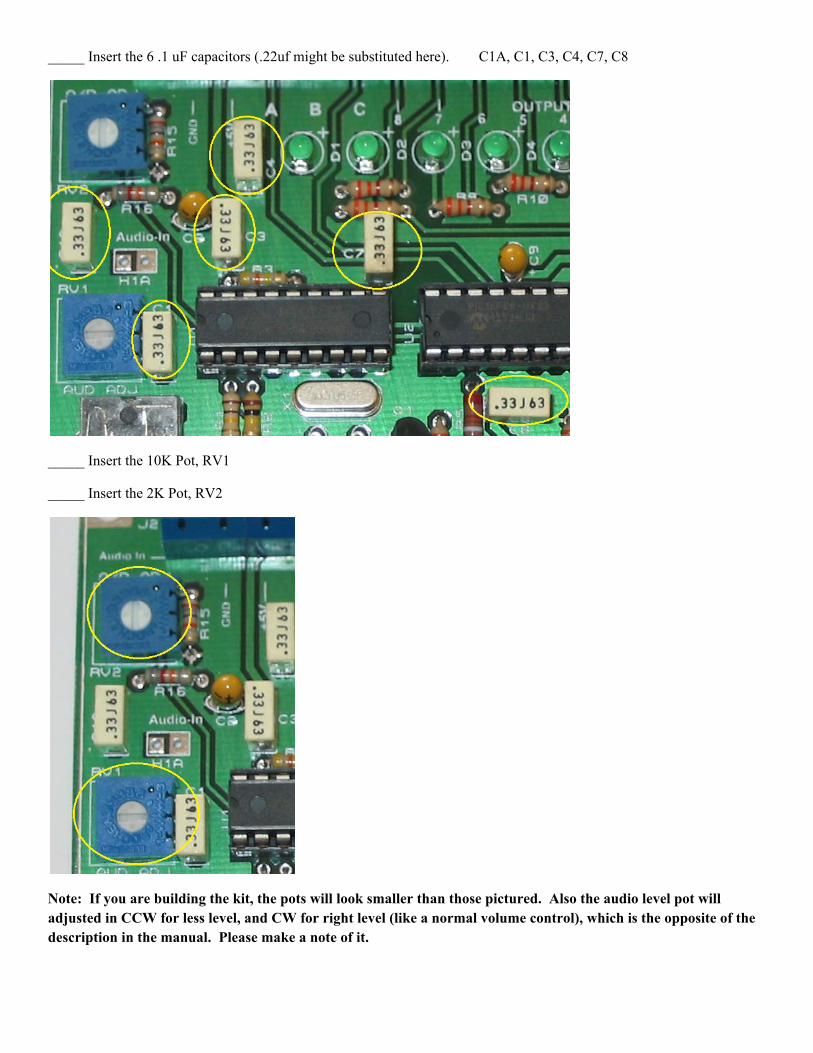
_____ Insert the 6 .1 uF capacitors (.22uf might be substituted here). C1A, C1, C3, C4, C7, C8
_____ Insert the 10K Pot, RV1
_____ Insert the 2K Pot, RV2
Note: If you are building the kit, the pots will look smaller than those pictured. Also the audio level pot will adjusted in CCW for less level, and CW for right level (like a normal volume control), which is the opposite of the description in the manual. Please make a note of it.
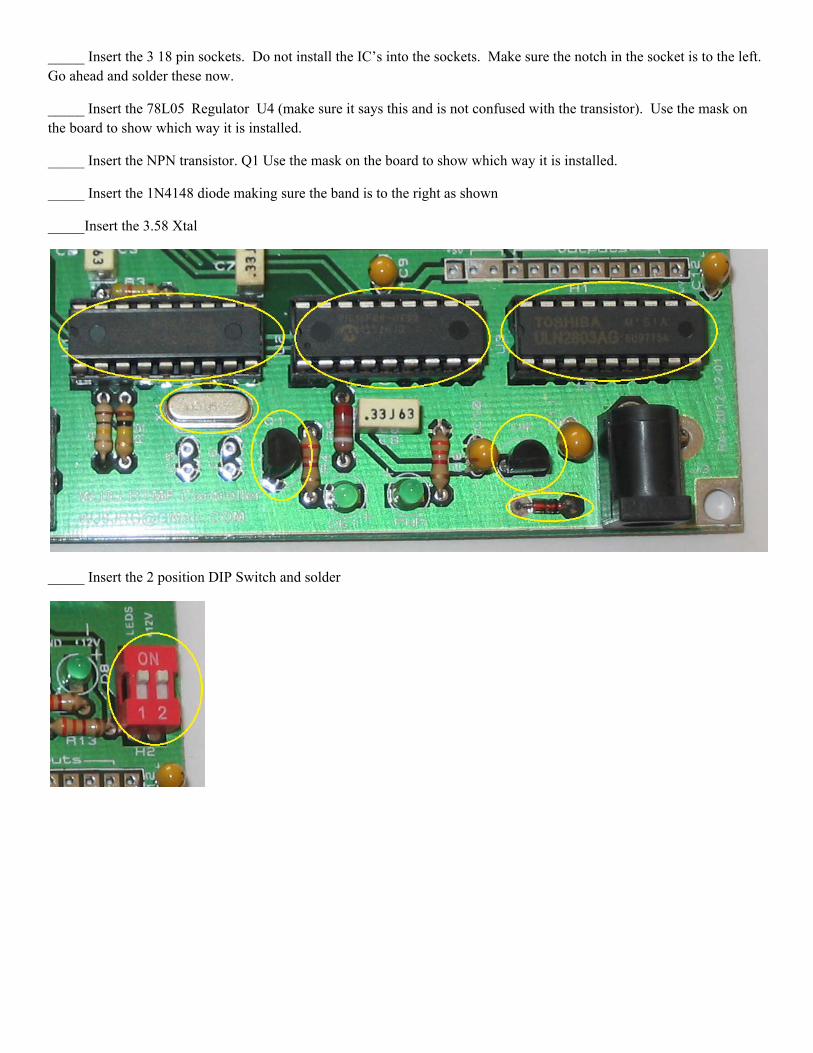
_____ Insert the 3 18 pin sockets. Do not install the IC’s into the sockets. Make sure the notch in the socket is to the left. Go ahead and solder these now.
_____ Insert the 78L05 Regulator U4 (make sure it says this and is not confused with the transistor). Use the mask on the board to show which way it is installed.
_____ Insert the NPN transistor. Q1 Use the mask on the board to show which way it is installed.
_____ Insert the 1N4148 diode making sure the band is to the right as shown
_____Insert the 3.58 Xtal
_____ Insert the 2 position DIP Switch and solder
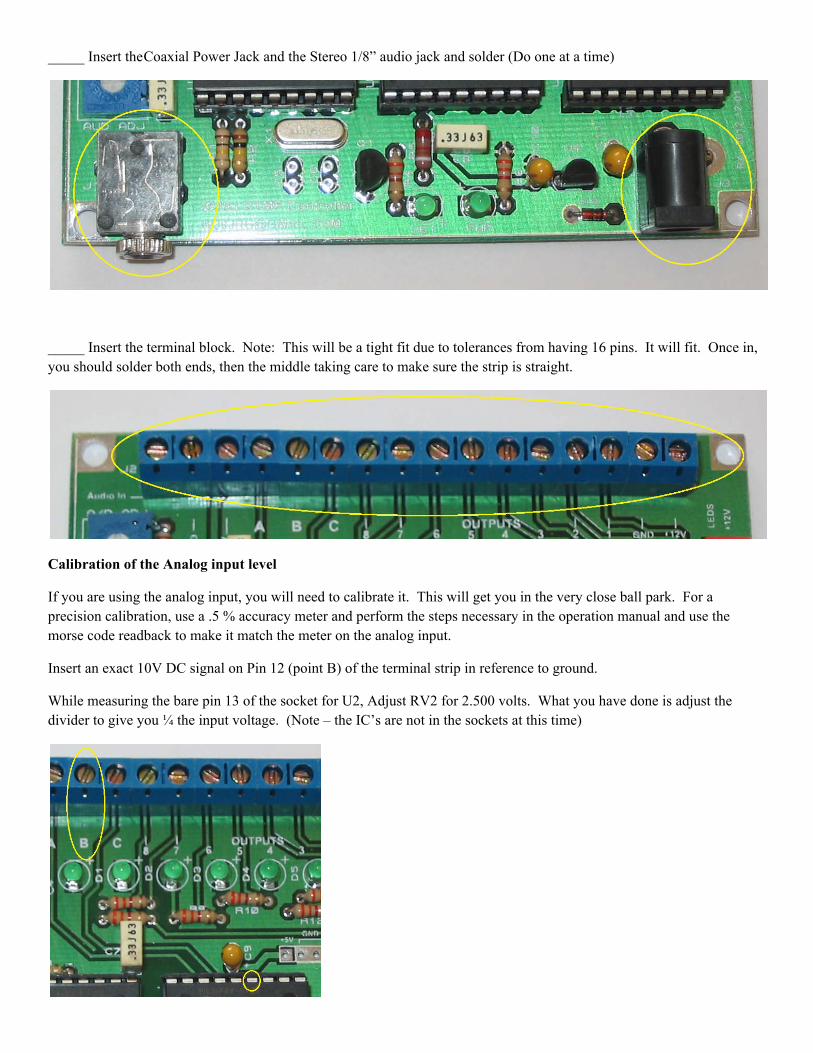
_____ Insert the Coaxial Power Jack and the Stereo 1/8” audio jack and solder (Do one at a time)
_____ Insert the terminal block. Note: This will be a tight fit due to tolerances from having 16 pins. It will fit. Once in, you should solder both ends, then the middle taking care to make sure the strip is straight.
Calibration of the Analog input level
If you are using the analog input, you will need to calibrate it. This will get you in the very close ball park. For a precision calibration, use a .5 % accuracy meter and perform the steps necessary in the operation manual and use the morse code readback to make it match the meter on the analog input.
Insert an exact 10V DC signal on Pin 12 (point B) of the terminal strip in reference to ground.
While measuring the bare pin 13 of the socket for U2, Adjust RV2 for 2.500 volts. What you have done is adjust the divider to give you ¼ the input voltage. (Note – the IC’s are not in the sockets at this time)
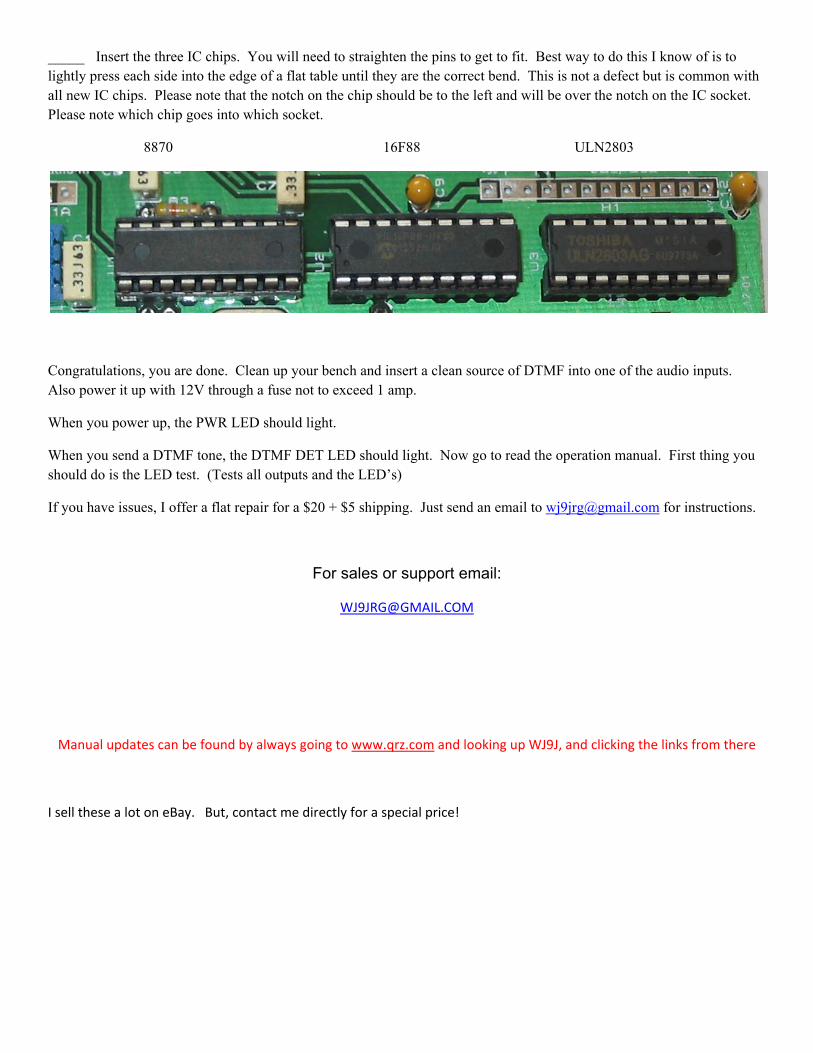
_____ Insert the three IC chips. You will need to straighten the pins to get to fit. Best way to do this I know of is to lightly press each side into the edge of a flat table until they are the correct bend. This is not a defect but is common with all new IC chips. Please note that the notch on the chip should be to the left and will be over the notch on the IC socket. Please note which chip goes into which socket.
8870 16F88 ULN2803
Congratulations, you are done. Clean up your bench and insert a clean source of DTMF into one of the audio inputs. Also power it up with 12V through a fuse not to exceed 1 amp.
When you power up, the PWR LED should light.
When you send a DTMF tone, the DTMF DET LED should light. Now go to read the operation manual. First thing you should do is the LED test. (Tests all outputs and the LED’s)
If you have issues, I offer a flat repair for a $20 + $5 shipping. Just send an email to [email protected] for instructions.
For sales or support email:
Manual updates can be found by always going to www.qrz.com and looking up WJ9J, and clicking the links from there
I sell these a lot on eBay. But, contact me directly for a special price!