for etp-hycon type f and fx this instruction is valid for ... · page 1 e-page 1 etp-hycontm...
TRANSCRIPT

Page 1 Page 1E-
ETP-HYCONTM
Hydro-mechanical coupling for high torque and rigidity
Installation instruction for ETP-HYCON type F and FX
This instruction is valid for:
Coupling:According to drawing:
ETP Transmission ABRoxtorpsgatan 22, Box 1120 SE-581 11 Linköping, SwedenTel +46 (0) 13 24 71 00 • Fax +46 (0) 13 24 71 90Internet: www.etp.se • E-mail: [email protected]

Page 2E- Page 2
CONTENTS
● General information Page 3
● Safety regulations Page 3
● Mounting of ETP-HYCON Page4
● Drive up, single pump arrangement Page 5
● Drive up, double pump arrangement Page 6
● Maintenance Page 7
● Drive down, single pump arrangement Page 8
● Drive down, double pump arrangement Page 9
● Removal Page 10
● Assembly drawing Page 11

Page 2Page 2 Page 3E-
1. General information
ETP-HYCON has a hydraulic torque setting possibility. By adjusting the hydraulic mounting pressure, the torque and axial force can be set to the required level.
Always use Mobil oil SHC624 for lubrication and drive up procedure.
2. Safety regulations
• Protection glasses must be worn at all times when handling ETP-HYCON.
• Do not pressurise ETP-HYCON before installation.
• At drive up and drive down the relieve valve on the pump must be opened beforeremoving the pump.

Page 4E- Page 4
3. Mounting of ETP-HYCON
Note! See assembly drawing for data related to these instructions.
Clean ETP-HYCON with a solvent and check that the visible sealing surfaces and the friction surface are damage free. Apply a thin layer of oil (Mobil SHC 624) on the visible sealing surfaces and the friction surface. Repeat the operation on the shaft (clean and lubricate). Wipe off the excessive oil from the friction surface on ETP-HYCON and the shaft (see figure 3-1).
Push1 ETP-HYCON carefully into position on the shaft according to drawing. Ensure ETP-HYCON doesn´t press onto the shaft, guide it carefully to prevent it from becoming misaligned and damaging the shaft (see figure 3-2).
If a transport-locking device is mounted, untighten the screws to remove the transport-locking device from ETP-HYCON.
1 IMPORTANT: The force to move ETP-HYCON, must always be applied to the innersleeve. The transport-locking device holds the outer sleeve in place.
figure 3-1 Friction surfaces
figure 3-2 Slide carefully onto the shaft
figure 3-3 Final position
Chamfer
Sealingsurfaces

Page 4Page 4 Page 5E-
4. Before drive up
Measure the diameter (Dnoted) at the groove of ETP-HYCON before the drive up proce-dure and make a note for later reference. Fill the pump with oil, use Mobil SHC 624.
5. Drive up, single pump arrangement
Exchange the two plugs to quick connections with seal washer and tighten them firmly. Connect the hydraulic hoses to the quick connections, “TAPER” and “JACK”. Close valve “R” and open valve “A”. Activate the pump. With increasing pressure, the outer sleeve moves up on the inner sleeve (see arrow in figure 5-1). Once the drive up length (see drawing) has been reached, stop the pump, close valve “A”, then open the relieve valve on the pump. Wait for 5 minutes, then open valve “R” and valve “A” to completely depressurize the pump and hoses so the hoses can be removed. Measure the new diameter, Dcurrent, at the groove of the outer sleeve2 (see formula below).
∆Dexpansion = Dcurrent - Dnoted (∆Dexpansion = Exp. see drawing)
Repeat with changed pressure until correct expansion has been reached. Then discon-nect both hydraulic hoses and reassemble the protection plugs. Ensure that the protec-tion plugs are tightened properly.
2 See assembly drawing for correct expansion. If the expansion can´t be reached, contact ETP for further instructions.
figure 5-1 Drive up procedure
Quick connectionsInner sleeve
Outer sleeve
Groove for Ø to check
Dnoted
JACK TAPER

Page 6E- Page 6
6. Before drive up
Measure the diameter (Dnoted) at the groove of ETP-HYCON before the drive up procedure and make a note for later reference. Fill the pump with oil, use Mobil SHC 624.
7. Drive up, double pump arrangement
Exchange the two plugs to quick connections with seal washer and tighten them firmly. Connect two hydraulic hoses from ONE3 pump to the quick connections, “TAPER” and “JACK”. Activate the pump. With increasing pressure, the outer sleeve moves up on the inner sleeve (see arrow in figure 7-1). Once the drive up length (see drawing) has been reached, stop the pump, and slowly open the relieve valve on the pump to completely depressurize the pump and hoses so the hoses can be removed. Wait 5 minutes, then measure the new diameter, Dcurrent, at the groove of the outer sleeve4 (see formula below).
∆Dexpansion = Dcurrent - Dnoted (∆Dexpansion = Exp. see drawing)
Repeat with changed pressure until correct expansion has been reached. Then disconnect both hydraulic hoses and reassemble the protection plugs. Ensure that the protection plugs are tightened properly.
3 The pressure in “JACK” and “TAPER” must always be the same during drive up, therefore only one pump must be used, however for drive down two pumps are used.
4 See assembly drawing for correct expansion. If the expansion can´t bee reached, contact ETP for further instructions.
figure 7-1 Drive up procedure
Quick connectionsInner sleeve
Outer sleeve
Groove for Ø to check
Dnoted
JACK TAPER

Page 6Page 6 Page 7E-
8. Maintenance of ETP-HYCON
ETP-HYCON is practically maintenance free if the sealing surfaces are protected with silicon after drive up, (use for example Bostic Silicon Universal). Replace and/or repair the silicon surface if necessary.
figure 8-1 Maintenance of ETP-HYCON
Sealing surface
Sealing surfaces
Page 8E- Page 8
9. Before drive down
Check so there is free volume in the pump to evacuate some left over oil from ETP-HYCON. Remove the silicon from the the sealing surface (see figure 8-1 Maintenance of ETP-HYCON).
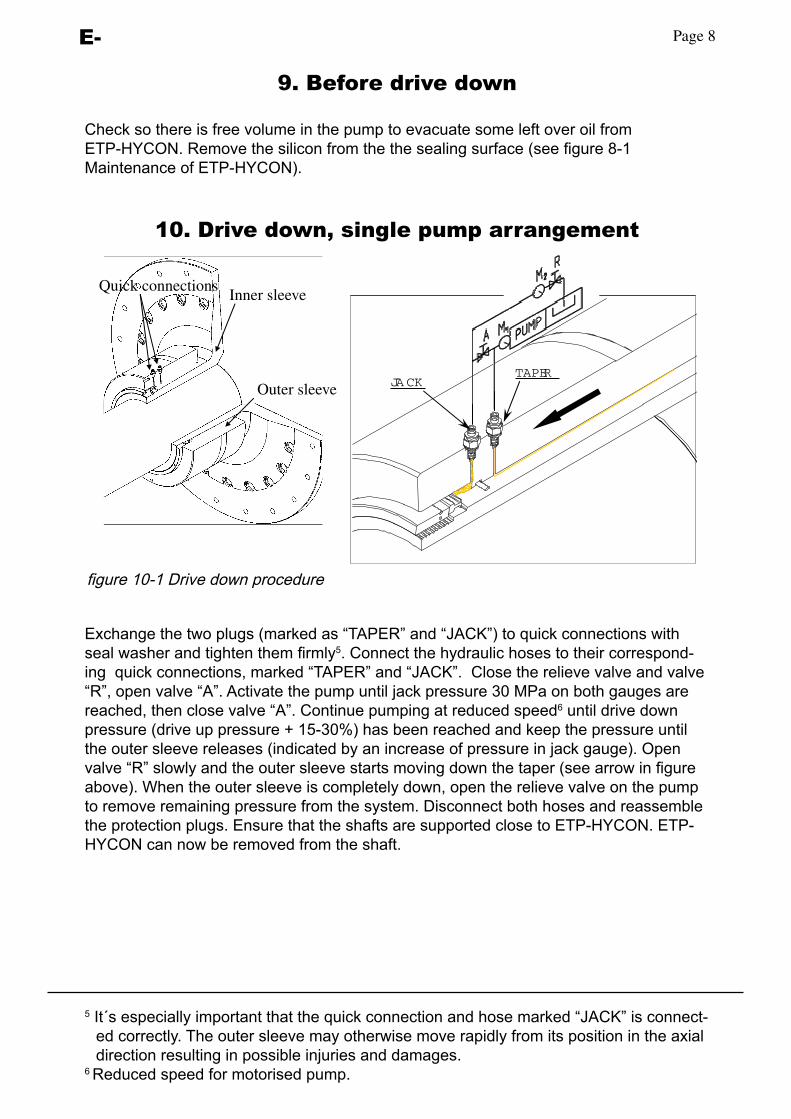
10. Drive down, single pump arrangement
Exchange the two plugs (marked as “TAPER” and “JACK”) to quick connections with seal washer and tighten them firmly5. Connect the hydraulic hoses to their correspond-ing quick connections, marked “TAPER” and “JACK”. Close the relieve valve and valve “R”, open valve “A”. Activate the pump until jack pressure 30 MPa on both gauges are reached, then close valve “A”. Continue pumping at reduced speed6 until drive down pressure (drive up pressure + 15-30%) has been reached and keep the pressure until the outer sleeve releases (indicated by an increase of pressure in jack gauge). Open valve “R” slowly and the outer sleeve starts moving down the taper (see arrow in figure above). When the outer sleeve is completely down, open the relieve valve on the pump to remove remaining pressure from the system. Disconnect both hoses and reassemble the protection plugs. Ensure that the shafts are supported close to ETP-HYCON. ETP-HYCON can now be removed from the shaft.
5 It´s especially important that the quick connection and hose marked “JACK” is connect-ed correctly. The outer sleeve may otherwise move rapidly from its position in the axial direction resulting in possible injuries and damages.
6 Reduced speed for motorised pump.
TAPERJA CK
figure 10-1 Drive down procedure
Quick connectionsInner sleeve
Outer sleeve

Page 8Page 8 Page 9E-
11. Before drive down
To avoid flooding the pumps, don´t fill them with more oil than evacuation of the return-ing oil from ETP-HYCON is possible. Remove the silicon from the the sealing surface (see figure 8-1 Maintenance of ETP-HYCON).
12. Drive down, double pump arrangement
Exchange the two plugs (marked as “TAPER” and “JACK”) to quick connections with seal washer and tighten them firmly7. Connect one pump to “TAPER” and the other to “JACK”. Activate the “JACK”-pump and wait until jack pressure 30 MPa is reached. Then activate the “TAPER”-pump and wait until drive down pressure (drive up pressure + 15-30%) has been reached. Keep that pressure until the outer sleeve releases (indicated by an increase of pressure in jack gauge). Open the relieve valve on the “JACK”-pump slowly and the outer sleeve starts moving down the taper (see arrow in figure above). When the outer sleeve is completely down, open the relieve valve on the “TAPER”-pump to remove remaining pressure from the system. Disconnect both hoses and reassemble the protection plugs. Ensure that the shafts are supported close to ETP-HYCON. ETP-HYCON can now be removed from the shaft.
7 It´s especially important that the quick connection and hose marked “JACK” is connect-ed correctly. The outer sleeve may otherwise move rapidly from its position in the axial direction resulting in possible injuries and damages.
figure 12-1 Drive down procedure
Quick connectionsInner sleeve
Outer sleeveJACK TAPER

Page 10E- Page 10
13. Removal
Note! See assembly drawing for data related to these instructions.
Remove remaining silicon from the sealing surfaces and attach the transport-locking device, if available, to the end of ETP-HYCON. Remove the bolts from the flange and detach ETP-HYCON (see figure 13-1).
Slide ETP-HYCON all the way along the shaft until free (see figure 13-2 ).
figure 13-1 Remove silicon
figure 13-2 Remove from the shaft
Sealing surfaces

Page 10Page 10 Page 11E-
figure 13-1 Remove silicon
figure 13-2 Remove from the shaft
14. Assembly drawing