floriculture production guide - british columbia · routinely during the cropping cycle and, if...
TRANSCRIPT

Floriculture Production Guide Table of Contents ● i
Floriculture Production Guide
Table of Contents Number of
Pages
Chapter 1 Integrated Pest Management 16
Chapter 2 Soil, Water and Nutrient Management 16
Chapter 3 Managing the Plant Environment 17
Chapter 4 Plant Growth Regulators 9
Chapter 5 Diseases 24
Chapter 6 Nematodes 5
Chapter 7 Insects, Mites and Animal Pests 25
Chapter 8 Weed Control 6
Chapter 9 Invasive Alien Species 3
Chapter 10 Pesticide Properties & LD50 Values 13
Chapter 11 Pesticide Regulations and Safety 15
Chapter 12 Pesticide Application Equipment 6
Chapter 13 Pesticide Sprayer Calibration 7
Appendix A Metric Conversion Factors 2
Appendix B Preparing a Complete Fertilizer Solution 3
Appendix C Light Measurement Conversions 2
Appendix D Season Daylight Hours 1
Appendix E Plant Diagnostic Lab Submission Form 2
Appendix F Publications and Industry Contacts 6
Appendix G Grower’s Record 1
Appendix H Calibration Worksheets 7
Appendix I Pesticide Terms 3
Appendix J Ministry of Agriculture Office Locations 1
Index 3
This guide was produced by the B.C. Ministry of Agriculture, PO Box 9120 STN PROV GOVT, Victoria, BC.
The technical portion is copyright © by the British Columbia Ministry of Agriculture.
While every effort has been made to ensure that the information contained in this publication is correct, the
author and the publisher caution against the use of the information contained in this publication in any
particular application and accept no responsibility or liability for errors, omissions, or representations,
expressed or implied, contained herein or in any written or oral communication associated with this
publication. Errors brought to the attention of the publisher will be corrected in periodic updates to this
guide.

Integrated Pest Management 1 (updated January 2009)
An integrated pest management (IPM) program (or total plant management) takes into account all factors which influence plant health and vigour as well as those factors that affect the health and reproductive capacity of various pests. Typically, an IPM program will attempt to optimize growing conditions for the crop while minimizing the conditions for pest development. The keys to planning a strategy for pest management in the greenhouse are:
• sanitation, • control of the greenhouse environment, • monitoring for pests, • understanding the life cycle of pests, and • timely use of biological and chemical pest
control agents.
Sanitation Growers with clean greenhouses have fewer pest problems. Greenhouse sanitation includes the removal or exclusion of factors that allow pests to gain access to the greenhouse, survive from crop to crop, or spread from plant to plant. Good crop hygiene focuses on starting clean and preventing the introduction of pathogens or insects to the crop. If possible, growers should empty the greenhouse entirely between crops and sanitize the facility.
A factsheet titled On-Farm and Greenhouse Sanitation and Disinfection Practices is available on-line from the BC Ministry of Agriculture and Lands.
Start with Clean Plants Ensure that trays and wagons/carts with propagation material are clean before coming into your greenhouse.
If your new plant material originated off site, check for evidence of pests and diseases when plants arrive from the propagator. Inspect plants upon arrival and remove diseased, insect or mite infested product.
Install a foot bath. A container with a foam mat is effective. Use a labelled disinfectant (See the section on Disinfectants and Algicides in Chapter 10). Change solutions every two weeks and ensure the footbath is used. Post strict signage on use. Control visitor access and require them to use disposable coveralls when entering sensitive areas. Insects and disease organisms can be carried on clothing.
Meet with staff to discuss pest management. Discuss the importance of early pest and disease detection. Explain the early symptoms caused by specific pests and diseases.
Install sticky traps to monitor for certain insect pests. See the Crop Monitoring and Scouting section in this chapter.
Keep the growing area for growing. Do your container filling and transplanting in a non-growing area of the greenhouse.
Sanitation During the Crop Sanitize cutting tools between cuttings or when moving to a new stock plant. There are several disinfectants available and different products have different properties and uses. See Table 1.1 for a list of disinfectants and treatment times. For more information on disinfectant products, refer to Chapter 10. Do not dip cuttings in disinfectant. Chlorine bleach is very corrosive and may damage cutting tools over time. Keep ethanol containers away from flames.
Avoid putting “pet” house plants or vegetable plants in the greenhouse. These are often a source of disease and insects.
Floriculture Production Guide Integrated Pest Management • 1
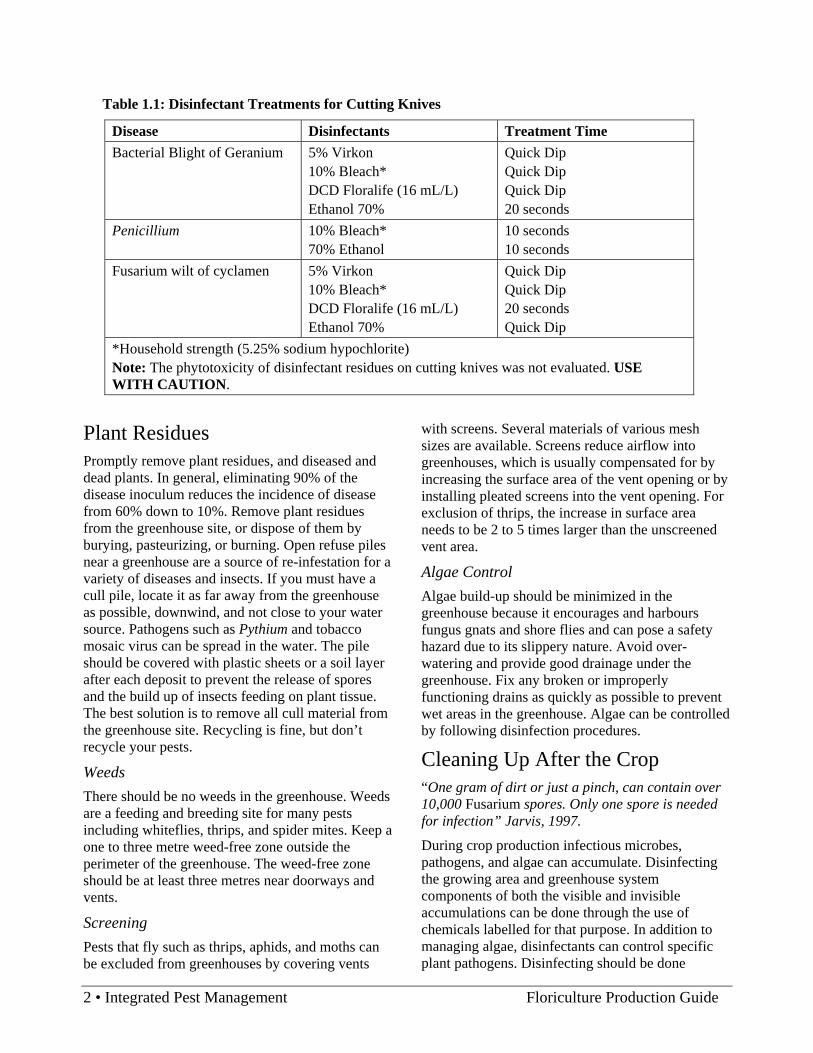
Table 1.1: Disinfectant Treatments for Cutting Knives
Disease Disinfectants Treatment Time Bacterial Blight of Geranium 5% Virkon
10% Bleach* DCD Floralife (16 mL/L) Ethanol 70%
Quick Dip Quick Dip Quick Dip 20 seconds
Penicillium 10% Bleach* 70% Ethanol
10 seconds 10 seconds
Fusarium wilt of cyclamen 5% Virkon 10% Bleach* DCD Floralife (16 mL/L) Ethanol 70%
Quick Dip Quick Dip 20 seconds Quick Dip
*Household strength (5.25% sodium hypochlorite) Note: The phytotoxicity of disinfectant residues on cutting knives was not evaluated. USE WITH CAUTION.
Plant Residues Promptly remove plant residues, and diseased and dead plants. In general, eliminating 90% of the disease inoculum reduces the incidence of disease from 60% down to 10%. Remove plant residues from the greenhouse site, or dispose of them by burying, pasteurizing, or burning. Open refuse piles near a greenhouse are a source of re-infestation for a variety of diseases and insects. If you must have a cull pile, locate it as far away from the greenhouse as possible, downwind, and not close to your water source. Pathogens such as Pythium and tobacco mosaic virus can be spread in the water. The pile should be covered with plastic sheets or a soil layer after each deposit to prevent the release of spores and the build up of insects feeding on plant tissue. The best solution is to remove all cull material from the greenhouse site. Recycling is fine, but don’t recycle your pests.
Weeds There should be no weeds in the greenhouse. Weeds are a feeding and breeding site for many pests including whiteflies, thrips, and spider mites. Keep a one to three metre weed-free zone outside the perimeter of the greenhouse. The weed-free zone should be at least three metres near doorways and vents.
Screening Pests that fly such as thrips, aphids, and moths can be excluded from greenhouses by covering vents
with screens. Several materials of various mesh sizes are available. Screens reduce airflow into greenhouses, which is usually compensated for by increasing the surface area of the vent opening or by installing pleated screens into the vent opening. For exclusion of thrips, the increase in surface area needs to be 2 to 5 times larger than the unscreened vent area.
Algae Control Algae build-up should be minimized in the greenhouse because it encourages and harbours fungus gnats and shore flies and can pose a safety hazard due to its slippery nature. Avoid over-watering and provide good drainage under the greenhouse. Fix any broken or improperly functioning drains as quickly as possible to prevent wet areas in the greenhouse. Algae can be controlled by following disinfection procedures.
Cleaning Up After the Crop “One gram of dirt or just a pinch, can contain over 10,000 Fusarium spores. Only one spore is needed for infection” Jarvis, 1997.
During crop production infectious microbes, pathogens, and algae can accumulate. Disinfecting the growing area and greenhouse system components of both the visible and invisible accumulations can be done through the use of chemicals labelled for that purpose. In addition to managing algae, disinfectants can control specific plant pathogens. Disinfecting should be done
2 • Integrated Pest Management Floriculture Production Guide

routinely during the cropping cycle and, if possible, growers should empty the greenhouse entirely between crops and sanitize the facility.
Between crops and before a crop goes in, disinfect all benches, equipment, flats, and tanks. Pressure wash with a mild soap detergent followed by a disinfectant at label rates. Never mix bleach and ammonia compounds together as hazardous gases may form.
Remove debris on walkways and header-house floors. Wash down with a disinfectant. Note: If high levels of organic debris are present on surfaces being treated with products that work through oxidation such as bleach or hydrogen peroxide, their efficacy is significantly reduced. Mineral deposits can also be safe havens for pathogens. Remove as much debris with detergents and water before applying disinfectants.
Whenever the Greenhouse is Empty Take the opportunity to clean out irrigation lines when the greenhouse is empty. The following steps outline the process:
• Keep lines charged at a low rate prior to cleaning to prevent drying out. Once they dry out, it is difficult to remove dried salts and other debris.
• Remove EC and pH electrodes. • Divert cleaning solutions away from slow sand
filters. Keep the slow sand filter units charged with old solution.
• Pressure-flush the irrigation lines with air or water before acid or bleach treatment.
• Flush lines with nitric or phosphoric acid at a pH of 1.6 to 1.7 for 24 hours if there is scale in the lines. This is prepared by adding 1 part 60 to 70% acid concentrate to 50 parts water. Apply twice if you have older lines or narrow orifice capillary lines. CAUTION, some lines have neoprene diaphragms that can be damaged with exposure to solutions with a pH less than 3.0 or buffered bleach. Consult your supplier for information on compatible disinfectants.
• RINSE WELL. When acid contacts bleach, dangerous chlorine gas may form.
• Flush lines and tanks with a disinfectant. NOTE: disinfectant disposal recommendations have not been developed. Contact the BCMAL office in Abbotsford for further information.
• It is more effective to flush the lines as a ‘pulse charge’ four times with one hour intervals than to flush with one pulse charge and leave the solution in the line for four hours. Do not drop the pH below 5.0 when using buffered bleach. Target your pH for 6.5 to 7 and follow all safety recommendations on the label. Use a non-phytotoxic surfactant such as Super Spreader* at the rate of 1 L/1,000 L of water solution. Used buffered bleach solution must be collected and disposed of in accordance with Ministry of Environment guidelines. It can be used for other disinfection purposes. It can also be dechlorinated.
• Rinse with fresh water. • Disinfect regular sand filters with bleach. Do
not treat slow sand filtration (biological) systems with bleach.
• Power wash the structure and glass with water to remove larger pieces of debris. Then power wash the structure with a cleaner. Use registered products and follow label directions. If you have had a virus problem, use Virkon*. Apply Virkon with LVM or mist after the plastic is down. If using ammonium bifluoride, remove it within 5 minutes or it will damage glass. AVOID MIXING BLEACH AND AMMONIA COMPOUNDS –HAZARDOUS CHLORINE GAS COULD BE PRODUCED.
For more information on greenhouse sanitation and clean-up: a factsheet Greenhouse Vegetable Crop Clean-Up is available from the BC Ministry of Agriculture and Lands.
Environmental Control Light, temperature, water, and air quality are climatic factors that influence plant growth. When any of these factors are more or less than optimum, there are stresses placed on the plants. Actively growing root systems will often ‘out grow’ root rot organisms. Stressed plants tend to grow slower and are more susceptible to pest damage.
Precise climate control is important. Large swings in the greenhouse climate can produce an environment that is ideal for disease development. Remember, strong and healthy plants have the best chance to fight pests and resist infections. For more information, see the Managing the Plant Environment section in Chapter 3.
Floriculture Production Guide Integrated Pest Management • 3
Crop Monitoring and Scouting Monitoring and scouting are essential to insect and disease management. In order for an integrated pest management program to be effective, it is necessary to detect pests early when their population levels are low. A successful program requires commitment and time must be allowed for crop monitoring. Inspect plants regularly for signs of pests. Workers are in close contact with the crop. Inform them about symptoms to look for so they can spot problems early. Examine all new material before it is brought into the greenhouse. It is easier to prevent new insect and pathogen outbreaks than to control established ones.
It is usually best to have one person assigned to maintain a scouting and monitoring program. However, everyone should be trained to be on the
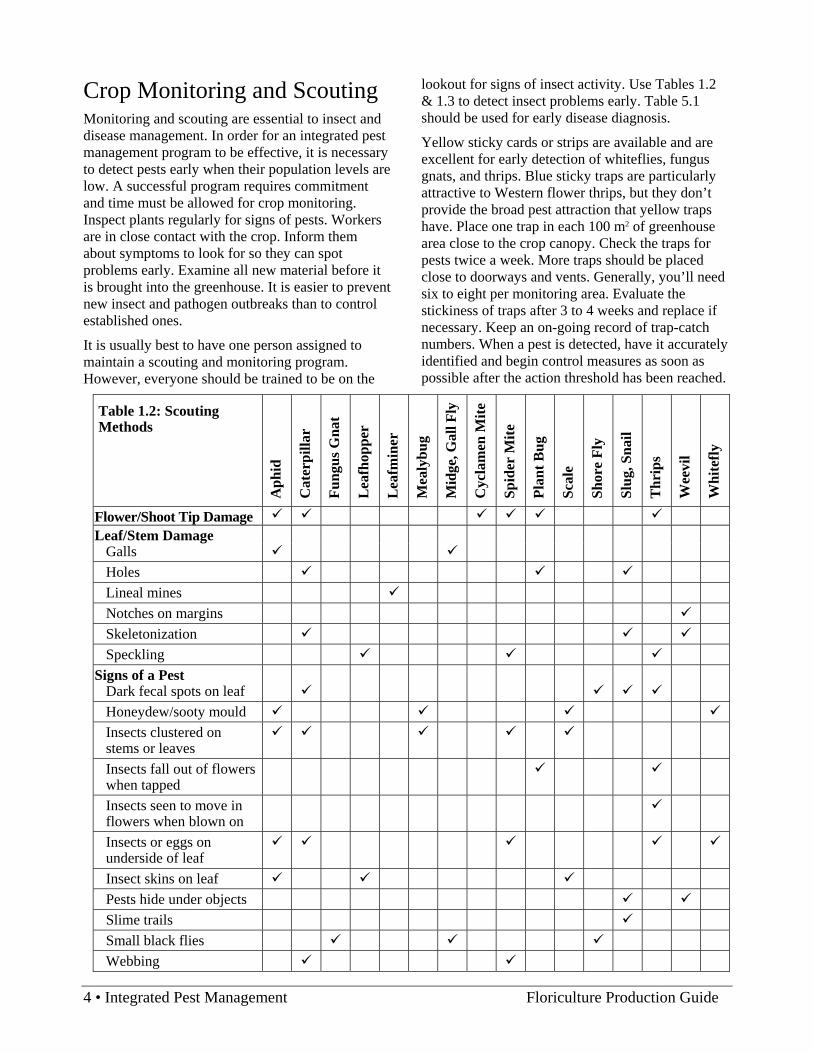
lookout for signs of insect activity. Use Tables 1.2 & 1.3 to detect insect problems early. Table 5.1 should be used for early disease diagnosis.
Yellow sticky cards or strips are available and are excellent for early detection of whiteflies, fungus gnats, and thrips. Blue sticky traps are particularly attractive to Western flower thrips, but they don’t provide the broad pest attraction that yellow traps have. Place one trap in each 100 m2 of greenhouse area close to the crop canopy. Check the traps for pests twice a week. More traps should be placed close to doorways and vents. Generally, you’ll need six to eight per monitoring area. Evaluate the stickiness of traps after 3 to 4 weeks and replace if necessary. Keep an on-going record of trap-catch numbers. When a pest is detected, have it accurately identified and begin control measures as soon as possible after the action threshold has been reached.
Table 1.2: Scouting Methods
Aph
id
Cat
erpi
llar
Fung
us G
nat
Lea
fhop
per
Lea
fmin
er
Mea
lybu
g
Mid
ge, G
all F
ly
Cyc
lam
en M
ite
Spid
er M
ite
Plan
t Bug
Scal
e
Shor
e Fl
y
Slug
, Sna
il
Thr
ips
Wee
vil
Whi
tefly
Flower/Shoot Tip Damage Leaf/Stem Damage
Galls Holes Lineal mines Notches on margins Skeletonization Speckling
Signs of a Pest Dark fecal spots on leaf Honeydew/sooty mould Insects clustered on stems or leaves
Insects fall out of flowers when tapped
Insects seen to move in flowers when blown on
Insects or eggs on underside of leaf
Insect skins on leaf Pests hide under objects Slime trails Small black flies Webbing
4 • Integrated Pest Management Floriculture Production Guide

Table 1.3: Monitoring Methods
Aph
id
Fung
us G
nat
Lea
fhop
per
Lea
fmin
er
Mite
Mot
h
Plan
t Bug
Shor
e Fl
y
Thr
ips
Whi
tefly
Yellow sticky cards at top of plant canopy Blue sticky cards at top of plant canopy Trap crops/catch plants Potato sections on soil surface Light traps Visual Inspection
Understand the Pest It is important to know the life cycle of the pest as some control methods will be specific to certain stages of the insect. Often the egg or pupal stages of insects and the spores of pathogens are resistant to pesticides. Many chemicals used against whiteflies will control the adults but are not effective against the pupal stages. These types of sprays must be timed to coincide with periods of high adult populations. Some insects live part of their lives in the soil (thrips and fungus gnats). At such times pest control applications to the leaf area of the plant will be ineffective, whereas treating the soil will control the pest and avoid possible plant injury from sprays on the foliage.
When pest control is required, time the applications to control the stage of the pest for which the control agent is recommended and monitor its effect afterwards. Knowledge of a pest’s life cycle will help determine the best time for control methods. Keep dated records of pest problems and the stages of crops attacked, and any treatments done and their level of effectiveness (efficacy). Use this information to anticipate and prepare for future pest problems.
For some pests, monitoring techniques using the ratio between a pest and its natural enemies have been developed as a measure of whether more biologicals need to be added or if the system is keeping the pest in check. For example, the ratio of Encarsia-parasitized (black) whitefly scales (larvae) compared to un-parasitized (white) scales.
Biological Control The term “biological control” refers to the use of natural enemies to suppress pests. Biological control tactics include both recognizing and conserving naturally occurring beneficials organisms as well as introducing commercially produced biological control agents in a timely and effective manner.
Many beneficial organisms will occur naturally in field grown flower crops and greenhouses, particularly when the use of insecticides is minimized. It is important to understand and recognize the natural predators and parasites since they can often limit the growth of a pest population or even control a pest outbreak and keep pest numbers below economic thresholds.
The successful use of introduced biological control agents in ornamental crops is dependent on a number of factors. The pest level that can be tolerated in a crop is important because a biological control program seldom eliminates all the pests. The range of insects, mites, and diseases that a crop is susceptible to must be considered as compatible control methods must be available for all potential pest problems. The use of biological control is most suitable to long-term crops because the predators and the parasitoids must go through at least one generation to build-up to effective levels and establish a dynamic equilibrium with the pests.
If chemical controls are required, try to choose a selective pesticide that will have the least impact on beneficial insects. Table 1.5, which is at the end of this chapter, contains information on the toxicity of pesticides and PGRs to biological control agents. Generally, old broad spectrum insecticides (e.g. organophosphates) are not compatible with
Floriculture Production Guide Integrated Pest Management • 5

biocontrol agents, as they kill them outright as well as impede re-establishment for several weeks. Newer insecticides tend to be more compatible with biocontrol agents. “Spot spraying” is a useful approach to limit pest hotspots and allow biocontrol agents to ‘catch up’, however, pesticide toxicity and persistence still needs to be considered or the biological control agents will not establish in the hotspot.
Getting Started With Biologicals The following section, “Getting Started with Biologicals”, is based on a presentation at the CanWest Horticulture Show, September 26, 1996, by James A. Matteoni, British Columbia Horticulture Centre at Kwantlen University College.
Switching to biologicals can’t be implemented over night and should be started on a small scale to minimize potential risks. The transition process is smoother and often more effective if it’s carried out in several phases. The three phases are: monitoring and recording; modifying your pesticide program; and implementing biological control.
Table 1.4: The Three Phases of Getting Started with Biologicals
Phase I – Monitoring and Recording
make a commitment research and choose methods allow time for them to work involve staff in the program keep good records (avoid last
year’s mistakes!)
The crucial step is to make the commitment to the program, and even more important, to make the commitment to the time involved. Monitoring isn’t something that is only done when you have the time and is discontinued during busy periods. It has to be the primary duty of one or more workers that is carried out a specified number of times a week. Involving the rest of the staff is as easy as putting up a “pest alert” board in the lunch or shipping area. Staff can mark on the site or greenhouse plan where and what pests they saw. You don’t have to give awards for “sightings”, but get staff involved.
Phase II – Modifying Your Pesticide Use
continue to monitor determine pest threshold levels eliminate ineffective pesticides time your pesticide sprays (i.e.
when your neighbour cuts his hay) stop unnecessary sprays spray only hot spots
This is the phase where pesticide use is scrutinized. Start evaluating whether the spray is needed or if there are other options. Check your records to see if the pesticide actually was effective or if there was any phytotoxicity. It’s up to you to determine your own threshold levels for your different crops; they’re not conveniently listed in a table
Phase III – Introducing the Biological Control Agents
identify the pest and choose the biocontrol agent(s)
reduce use of toxic pesticides (avoid broad spectrum, long residual, especially pyrethroids)
identify the biocontrol suppliers and their routes
calculate rates and timing (think big!) inspect biologicals upon arrival correct any imbalances adjust your expectations
Phase III involves long-term planning that must start months before the biologicals are released. Many commonly used pesticides must be discontinued one to two months before biologicals are introduced. See Table 1.5. Don’t hesitate to involve experts in pest identification and biocontrol strategies. Often biologicals are pest specific and a wrong identification can mean that the program is doomed from the start.
6 • Integrated Pest Management Floriculture Production Guide

Using the three phases for implementing a biological control program breaks the process into smaller, more easily managed steps. Proceeding one phase at a time allows you and your staff to become familiar with each step before moving onto the next phase. Despite everyone’s good intentions, the program may fail because of some of the following reasons:
• the pest was incorrectly identified, • environmental conditions weren’t suitable for
the biological agent, • host plant interference (the biological didn’t like
the taste of the crop), • pesticide residue (see Table 1.5), • wrong biological agent was used, • too few biologicals and too late, • biologicals were sick or dead upon arrival, • unexpected pests interfered with control, or • your goals and expectations of the program
were not appropriate. Biologicals may not be a “silver bullet” to solve all your pest management problems, so don’t give up on using them. But then, no control tool should be relied on exclusively, including pesticides. Biological control agents might effectively control pests in certain stages or areas of production. Successful biological control means no more problems with pesticide phytotoxicity and resistance, improved worker safety and access (no re-entry intervals), and it can be used as a public relations tool.
Biological Control Agents – Listed by Pest Aphids Aphids have several natural enemies; two of these are commonly used as biological control agents in greenhouse crops. Aphidius colemani, a small wasp that parasitizes aphids, and Aphidoletes aphidimyza, a predatory fly (midge), have been shown to be reliable aphid control agents and are widely available. They are most effective when used together because Aphidoletes provides a rapid reduction of aphid numbers and Aphidius seeks outs and attacks the remaining aphids.
Aphidius and Aphidoletes should be released while aphid populations are low; weekly or bi-weekly checks of new foliage are needed to monitor aphid
population levels. The two are capable of seeking out ‘hot-spots’ to lay their eggs. Heavy aphid infestations should be treated with a pesticide.
Aphidoletes adults are small, about 2 - 3 mm in size, and delicate flyers. It is the larval stage that feeds on aphids. They’re orange and grow to about 3 mm long, and eat over 60 species of aphids. Females are active at night, searching for aphids and laying up to 250 eggs over their 10-day lifespan. Eggs are laid singly or in small groups near aphids, and hatch in 2 to 3 days. Larvae attack nearby aphids and suck them dry. High aphid population levels cause larvae to kill more aphids than they can eat. Depending upon temperature, the larval stage lasts 4 to 7 days. They drop to the ground and burrow 2 to 4 cm into the growing medium to pupate. Adults emerge 2 weeks later. The life cycle takes 3 to 4 weeks.
High relative humidity increases adult longevity. If the greenhouse floor is covered with cement or plastic, population build-up cannot occur because this eliminates pupation sites. Areas of bare soil or sawdust are required to complete the life cycle. As the days shorten in fall, Aphidoletes go into diapause and stop reproducing. This can be prevented by using lights in the greenhouse.
Aphidoletes are purchased as pupae in moist vermiculite. They should be applied in small piles (10 mL minimum) in shaded, humid areas. To control low infestations apply 2 to 3 midges per square metre. Because the predatory larval stage lasts for only 4 to 7 days and the pupal stage lasts for 2 weeks, it is important to do staggered releases. Make 2 to 3 releases at 2-week intervals. Protect cocoons from ants. Aphidoletes will not establish in low aphid populations and is not recommended for preventive use.
Aphidius are tiny, black parasitic wasps that are less than 2 mm long. They lay their eggs inside aphids. As the wasp larva develops, it kills the aphid and then uses the mummified body as its pupal case. The rigid, light brown or bronze aphid mummies show up on leaves 7 to 10 days after the aphids are parasitized and the adults emerge in 5 days by chewing an exit hole in the mummy.
Aphidius is purchased as pupae inside aphid cases. Some adults will be present by the time they are used in the greenhouse. Application rates for low infestations are 2 to 4 per square metre, applied 2 to 3 times a week apart. Naturally occurring Aphidius may also enter greenhouses during the summer provided insecticide usage is minimal.
Floriculture Production Guide Integrated Pest Management • 7
Banker plants are used in the greenhouse as a rearing system for biocontrol agents. When used properly, they keep a high level of parasites present in the greenhouse on an ongoing basis with limited cost and effort. Cereal host plants infested with cereal aphids is a well studied banker plant system for Aphidius colemani. Other types of banker plant systems that have proven useful include the use of pepper plants to support growth of Orius insidiosus, and mullen and eggplants to support Dicyphus hesperus.
During late summer, Aphidius itself often become parasitized (hyper-parasitism) by naturally occurring parasites. In addition, high summer temperatures may reduce its efficacy, so aphid populations should be monitored carefully during hot spells and in late summer.
Aphidius colemani is the most effective parasite for green peach aphids. However other Aphidius species are more effective for other aphids. Suppliers of biological agents can recommend the correct parasite. Other species include Aphidius ervi and Aphelinus abdominalis; both are bigger parasites that will control larger aphid species such as foxglove or potato aphid.
Other beneficial agents that can contribute to aphid control in greenhouses are ladybug beetles and lacewings. However these have not been found to reduce aphid numbers to acceptable levels exclusively; Aphidius and Aphidoletes must be part of the aphid control program.
Note that if your crop is susceptible to aphid transmitted viruses, using biological control agents exclusively may not be advisable because there will likely be a low level of aphids present that are capable of transmitting viruses.
Fungus Gnats (Sciaridae) Biological control for fungus gnats relies primarily on Hypoaspis miles, a predatory mite, Steinernema feltiae, an insect-parasitizing nematode, and Bacillus thuringiensis subspecies israelensis, a bacterial larvacide.
The predatory mite is golden to reddish-brown and about 0.5 mm long. It’s easily seen without magnification. Both immatures and adults feed on small soil dwelling insects, including fungus gnat eggs and young larvae. The mites live and feed on the surface and upper 2 cm of growing media. For successful control, the soil should be moist, but not overly wet, and the soil temperature must be at least
15oC. They should be introduced to the crop as early as possible in production at the preventive rate of 100/m2. When they are applied to potted crops, the rate should be determined on the basis of how much area the pots occupy. Ideally, they should be applied at the plug stage to allow easy dispersal through the media and early establishment. If the greenhouse has exposed soil or other media under the tables, then Hypoaspis should also be applied to these areas. These mites do not diapause so will remain active in the fall and winter as long as the soil temperature is high enough.
Hypoaspis are general feeders; in addition to feeding on fungus gnats, they will also feed on thrips nymphs that drop to the soil to pupate. They must not be used as the sole thrips control measure however; they can be part of an overall thrips control program.
The insect parasitic nematodes (Trade name: Nemasys) are applied to the growing media in water to attack the larval stages of fungus gnats. Mortality usually occurs within 48 hours. These nematodes require adequate soil moisture for survival and mobility, so make sure the soil is quite wet at the time of application. This can be accomplished by applying it as a drench or by pre-wetting the soil/media if the nematodes are to be applied as a spray or through the irrigation system. Soil temperature should be 15 to 28oC. Though there is some reproduction of nematodes within the soil, this should not be relied upon for ongoing fungus gnat control. A second application should be made in 10 to 14 days, and ongoing monitoring should occur over the life of the crop.
VectoBac, a product containing the insect pathogenic bacteria, Bacillus thuringiensis subspecies israelensis, can be applied to the soil to kill fungus gnat larvae. Apply as a drench in adequate water to wet the soil surface. The larvae must ingest the bacteria, and this requires the product be applied over the entire surface and to a depth of 2 cm. VectoBac must not be applied in combination with fertilizer or fungicides containing copper or chloride. For ongoing regular maintenance of low populations, use the low rate: mix 200 - 400 mL of product in 100 L of water and apply as a drench at weekly intervals if monitoring indicates fungus gnats are present. If a high population with all life stages is present, the initial treatment should be with the high rate of 400 – 800 mL, followed by weekly treatments with the lower rate of 200 - 400 mL per 100 L water.
8 • Integrated Pest Management Floriculture Production Guide
Atheta coriaria, a predatory rove beetle, can be used for fungus gnats and shore flies. For more information, see the Shore Flies section in this chapter.
Leafminers (Liriomyza spp.) Parasitic wasps are commercially available as biological control agents for leafminers. Opius pallipes (a braconid wasp, is not as commonly used and may not be locally available), Dacnusa sibirica, and Diglyphus isaea parasitize and kill leafminer larvae. Dacnusa lays eggs within the tunneling leafminer larva. But it does not immediately kill the larva, so it continues to feed and expand mines within the leaf. The larva may drop to the ground and pupate, but an adult Dacnusa will emerge. In contrast, Diglyphus paralyses leafminer larvae, larvae stop feeding, and therefore mines are not expanded. This difference between the two should be kept in mind when evaluating their control efficacy. When using them you must be able to tolerate some leafminer damage (mines) to the crop because they will not eradicate the pest. Therefore, it is not suitable for crops where there is a zero tolerance of mine damage, for example, some export markets.
Parasites should be applied at a rate of at least 2 per m2, three times at 2-week intervals. Initial introductions should be done when the number of mines is low. Dacnusa should be used during the cooler months, and their use should be discontinued once temperatures exceed 25oC. This is a good agent to use early in the season. Diglyphus works well when leafminer populations are moderate to high, during the warmer spring and summer months. The parasites, purchased as adults, should be applied in the morning or evening when the greenhouse is cooler. Biocontrol with parasites cannot be used as the sole control agents once the leafminer population is well established or when there are large numbers of adult leafminers present.
Parasitic nematodes (Nemasys), applied for fungus gnat control, will parasitize leafminer pupae in the soil. Nematodes applied as a foliar spray will enter tunnels and parasitize mining larvae, so can be a useful tool in some crops.
Mealybugs (primarily citrus mealybug, Planococcus citri) The Australian ladybug beetle, Cryptolaemus montrouzieri, is the most successful and commonly used biological control agent for mealybugs. This
predator, called the mealybug destroyer, feeds on all stages of mealybugs. The 4 mm long adult beetle is shaped like a ladybug, while the larvae are “cotton” covered and resemble mealybugs. Adults are most active in sunny conditions and temperatures greater than 20oC.
The parasitic wasp, Leptomastix dactyopii, can be an effective control agent for citrus mealybugs. The adults are good flyers and have excellent searching ability. Because it is effective at low densities, L. dactyopii can be used to supplement C. montrouzieri, which works best at high host densities.
Green lacewings, Chrysopa carnea, also feed on mealybugs, but they do not disperse well in greenhouses.
Mites – Two-Spotted Spider Mites (Tetranychus urticae) The most effective biological control agent for two-spotted mites for most greenhouse crops is the predatory mite Phytoseiulus persimilis. This mite is widely available from producers of biological control agents. Tropical in origin, this predator is well adapted to greenhouse conditions. It is not effective outdoors in BC. Adult P. persimilis are shiny orange, while immature stages are a pale salmon colour. They can be distinguished from the ‘red’ phase of the two-spotted spider mite by the lack of spots, smooth pear shaped body, and their faster movement over leaf surfaces.
To be most effective, P. persimilis should be introduced at the first sign of spider mites or their feeding (stippling on leaves). Predatory mites are most effective at greater than 70% RH and from 20 to 30oC. Very hot, bright conditions favour spider mites and can result in pest outbreaks. Ideally, the plants should be in close contact, allowing the predators to move easily through the crop from one plant to another. Each female lays about 50 eggs. At favourable temperatures the life cycle is about a week, twice as fast as the two-spotted spider mite. Phytoseiulus persimilis consume 5 to 20 eggs or adults a day. They are not affected by day length, do not diapause, and will remain in the crop as long as pest mites are present and temperatures are adequate. The P. persimilis will not survive between crops in an empty greenhouse. They do not eat pollen.
Introduction rates range from 2 to 30 per plant, depending upon infestation levels and the crop
Floriculture Production Guide Integrated Pest Management • 9

involved. Suppliers can usually suggest more precise rates based on your crop and situation. The most effective and economical introduction system is to apply at least two P. persimilis to all infested plants and to every fifth plant in the rest of the crop. Subsequently, treat any “hot-spots” that develop. Be sure to release some P. persimilis into areas outside any outbreaks to encourage the predators to disperse and look for food. At very high spider mite levels it is often advisable to apply insecticidal soap or other non-residual miticides before releasing P. persimilis. Successful spider mite biological control programs are based on releasing predators every two to four weeks, starting early, on the assumption that there will be low levels of mites from the start of the crop.
For outdoor crops, Amblyseius (Neoseiulus) fallacis, a predatory mite of temperate origin, is promising for two-spotted mite control, but it has not been fully evaluated in ornamentals. Use of A. fallacis has been primarily in berry crops. It occurs naturally in areas with habitual two-spotted spider mite populations.
Other biocontrol agents for mites include Feltiella acarisuga, a predatory gall midge, Amblyseius californicus, a predatory mite that eats pollen, other mite species and thrips, and Amblyseius swirskii which feeds secondarily on spider mites. These can be used in conjunction with P. persimilis for season long mite control.
Scales There are several species of scales that can impact floriculture crops. It is important to know the type of scale or species of concern in order to successfully implement a biological control program for scales. Scales are divided into soft and armoured scales, and each requires a different parasite. Armoured scales develop a waxy covering over their bodies, but it is not attached to the insects’ bodies. They do not secrete honeydew. Soft scales also develop a waxy covering, but it is attached to their bodies. Soft scales produce honeydew.
Commercially available parasites are Aphytis melinus for armoured scales and Metaphycus helvolus for soft scales. These require high release rates, and even then control is variable. Some commercially available predators can contribute to scale control. The predatory ladybug beetle, Cryptolaemus montrouzieri, which is primarily used to control mealybugs, will feed on soft scales if food is scarce. Other commercially available ladybug beetles, including Hippodamia convergens, may
provide some control if released in large numbers. The green lacewing, Chrysopa carnea, feeds on immature scales and may contribute to control.
Shore Flies (Scatella spp.) Shore flies do not feed directly on plants. They feed sometimes on rotting plant material, but mostly on bacteria and other small organisms within algal communities that develop on continually wet surfaces. Shore flies deposit black ‘fly specks’ (excrement) on plant leaves. They are generally a nuisance pest and an indicator of wet areas in the greenhouse. They are often found in association with fungus gnats. Atheta coriaria, a predatory rove beetle of soil insects, is available for management of fungus gnats and shore flies. It can be released into any type of growing media, including rockwool, coconut coir, sawdust, and soil. Both adults and larvae are highly voracious and mobile, so will move around the greenhouse in search of prey.
Thrips (most common species is Frankliniella occidentalis, Western Flower Thrips) Several biological control agents are available to manage thrips. Some predatory mites, predatory pirate bugs, Orius spp., and nematodes can be part of an effective thrips biological control program under greenhouse conditions. Biological control agents should not be used exclusively if impatiens necrotic spot virus (INSV) is a concern. Biocontrol agents do not totally eliminate thrips, so the low level of thrips that are not killed by the agents will continue to transmit the virus throughout the crop.
It is most efficient and effective to introduce predatory mites before thrips populations reach damaging levels. They will not control large populations of well established thrips, nor will they control large numbers of adult thrips migrating into greenhouses. Their use requires a thrips monitoring program entailing sticky traps and crop examination. Amblyseius do best at temperatures from 20 to 25oC and relative humidities above 70%. Lower humidities result in high egg mortality and can prevent establishment of Amblyseius. Females lay one to two eggs per day over a 10 to 20 day lifespan. Amblyseius kill only about 6 first instar thrips per day, so large numbers are needed for control. Rates range from 10 to 50 predatory mites per plant per week, plus 25 to 100 predators for every infested plant. Ideally a ratio of one predator per two thrips should be achieved. It will also feed on spider mites, but it cannot be relied to bring about any degree of control.
10 • Integrated Pest Management Floriculture Production Guide

Amblyseius degenerans controls thrips in flowers better than A. cucumeris, is less sensitive to low humidity, has a faster population growth rate, and is more mobile than A. cucumeris. It also feeds on pollen. It is best to introduce A. degenerans early in the season, as with all predatory mites.
Amblyseius swirskii has recently become available. It has similar characteristics to A. cucumeris (feeds on pollen), as well as significant advantages including: A. swirskii is more effective at high temperatures, and also feeds on whitefly eggs and larvae. Secondarily, it will feed on other mite species.
The predatory mite, Hypoaspis miles, will feed on thrips larvae that drop to the soil to pupate. They should not be used as the sole thrips control measure; but are useful in an overall thrips control program.
Orius feeds on all thrips stages and actively searches them out. Orius will also feed on pollen if few prey are available, so Orius numbers will build up and remain high even if thrips numbers are low. Successful use of Orius on ornamental crops largely depends on the presence of pollen in the crop. After hatching, all stages of Orius are predatory. The nymphs are amber coloured, while the adults are black and white and about 3 mm long. The life cycle is about 20 days under greenhouse conditions. Orius reproduction is affected by day length and some species stop laying eggs when days are less than 12 hours long, limiting their use to spring and summer. In addition to thrips, they will also feed on small aphids, caterpillars, and spider mites. They will also prey on beneficial mites such as A. cucumeris, but the rapid movement of these predatory mites makes them more difficult to capture. On cut flowers, the tendency of Orius to frequent flowers may result in a large part of the population being removed with each harvest causing poor establishment. Introduction rates and number of releases vary by crop and pest level. Contact a supplier for recommended release rates. Orius adults will often fly to the greenhouse roof during the heat and brightness of the afternoon, so it is best to apply them in early morning or late afternoon.
The insect parasitic nematode Steinernema feltiae is available in a gel formulation that can be sprayed directly on the plants and flowers, where the nematodes infest and kill thrips. No residue remains from the gel.
A Western flower thrips pheromone is now available. It can be used in conjunction with sticky cards (blue or yellow) to increase trap sensitivity for monitoring purposes, which enables growers to detect thrips earlier than with only the sticky traps. Pheromones plus traps can be used for mass trapping. Some growers have experimented with releasing pheromone into the greenhouse shortly before pesticide sprays which appears to result in better pesticide efficacy. Thrips commonly stay hidden within flowers, so coverage is often an issue with pesticide applications. The pheromone appears to draw the thrips out of their hiding places by agitating and causing them to be more active and exposed.
Weevils (primarily Otiorynchus sulcatus, Black Vine Weevil)
Insect parastitic nematodes such as Steinernema kraussei, Heterorhabditis bacteriophora, and H. megidis are commercially available. Nematodes are added to water and drenched into the soil/media. They kill weevil larvae within a few days, and a new generation of nematodes are released from the host larvae. Still, a second and likely subsequent applications are recommended to keep the pest population under control. Small larvae are more susceptible to nematode attack.
A fungal entomopathogen, Metarhizium anisopliae strain F52, is expected to be registered in Canada soon. This generalist insect-infesting fungus has shown promise particularly in container stock. Metarhizium is applied to the soil as a drench. The fungal spore germinates on the insect surface and enters the soil-inhabiting larvae and grows within it, killing it within several days. There is evidence that Metarhizium remains present and active in soil or media for 1-2 years.
Whiteflies (Trialeurodes vaporarioum, Greenhouse Whitefly and Bemisia spp., Sweet Potato and Silverleaf Whiteflies) Encarsia formosa is a parasitic wasp that is commercially available for biological control of greenhouse whiteflies. The adult wasp is about the size of a spider mite, with a dark head and thorax and yellow abdomen. It makes short hopping flights, attracted by honeydew or a scent given off by the whitefly. Almost the entire population is female. Adult females lay eggs in the third and early fourth larval growth stages of the whitefly. They will also kill the first, second, and late fourth stages by feeding on them. The parasite larvae feed within the scale.
Floriculture Production Guide Integrated Pest Management • 11

The scales turn black within two weeks, which provides a convenient way of assessing the success of the Encarsia introductions. Development time, adult life span, and numbers of eggs laid are dependent upon temperature. The threshold for development is 13oC. Females live 15 to 30 days and can lay up to 400 eggs. The wasp larvae go through three larval and one pupal stage before the adult stage. The emerging wasp adult cuts a small exit hole in the top of the black scale.
At its optimum development temperature of 27oC, the egg laying capacity of Encarsia is twice that of the greenhouse whitefly. However, the wasp is more sensitive to cold than are whiteflies and the whitefly lays ten times as many eggs as Encarsia below 21oC. The critical average temperature for good control is approximately 23oC, however, a minimum night temperature of 15oC is satisfactory as long as the day temperature is sufficient to raise the average daily temperature to 23oC. A daily average temperature of 18oC will hold the status quo. (See Table 3.1, Day and Night Temperatures Needed to Produce Various Average Daily Temperatures.) Encarsia is impeded by hairy-leaved plants and by honeydew. Encarsia has been reported to be fully reproductive at light intensities of only 7300 lux, and intensities below 4200 lux cause high mortality. This, together with the fact that they do not become active until four hours after sunrise, probably explains the poor control sometimes obtained during the dark winter months. Supplementary lighting helps achieve better control.
Trying to control a severe whitefly infestation with Encarsia is unlikely to succeed, and is not cost effective because of the large number of Encarsia required. Chemical insecticides may be necessary to reduce heavy infestations to low levels prior to releasing Encarsia. A chemical with little or no persistence and minimal effect on other biological agents in the crop should be used.
Encarsia should be released preventively, before the first whiteflies are seen, at a rate of 0.5/m2 per week. Use yellow sticky traps to detect the first whiteflies and then increase the release rate to 3/m2 each week. Monitor the lower leaves for the presence of black (parasitized) scales, and when 90% of the scales are black the application rate can be reduced.
Encarsia are purchased as parasitized whitefly scales on thick paper cards which are placed in the crop for adult emergence. The cards should be placed in a shady position on the lower part of the
plant. In potted plants, do not let the card contact the growing medium. Avoid handling the scales. Distribute the cards uniformly throughout the crop.
A few Encarsia adults and other predators and parasites will be trapped on yellow stick traps, but most will remain in the crop searching for whitefly scales.
Eretmocerus eremicus, another small wasp-like whitefly parasite is available for both Trialeurodes spp. and Bemisia spp. It kills whiteflies by parasitizing larvae as well as directly feeding on the whitefly. Eretmocerus is more effective than Encarsia at high temperatures (> 30oC), and is more effective than Encarsia against Bemisia spp., an occasional pest of poinsettias. Eretmocerus mundus is available specifically as a Bemisia spp. parasite. It is effective at both higher and lower temperatures than E. eremicus, so is well-suited to early season releases, warm mid summer temperatures, and cool fall temperatures.
Dicyphus hesperus, a plant bug, and generalist predator, feeds on whitefly nymphs. Because it has a relatively long generation time (5 to 8 weeks), Dicyphus can take at least 10 weeks before significantly affecting whitefly levels. It must be introduced as soon as whiteflies are found to be economical. Release at a rate of 0.25 to 0.5 Dicyphus/m2 and repeat in 2 to 3 weeks. Dicyphus needs high levels of prey to reproduce, however they can survive without food for a long time. It is useful to release Dicyphus in hotspots. This predator is fast moving and highly mobile. It will also feed on thrips and spider mites, but should not be relied on for control. Dicyphus will feed on plants to obtain water, but feeding damage is usually superficial and not noticeable. However caution is advised in ornamentals, for example, Dicyphus should not be used on gerbera due to damage to stems.
Additional Reading on Biological Control Agents Ball Identification Guide to Greenhouse Pests and Beneficials, Stanton Gill and John Sanderson, Ball Publishing, Batavia Illinois, USA, ISBN 1-883052-17-3, 1998.
Ball Pest and Disease Manual, Disease, Insect, and Mite Control on Flower and Foliage Crops, Charles C. Powell and Richard K. Lindquist, Ball Publishing, Batavia Illinois, USA, ISBN 0-9626796-4-X, 1992.
12 • Integrated Pest Management Floriculture Production Guide

Knowing and Recognizing, The Biology of Glasshouse Pests and their Natural Enemies, M. Malais and W. J. Ravensberg, Koppert B.V., Berkel en Rodenrijs, the Netherlands, First Edition, 1992. Translated from Kennen en herkennen, levenswijzen van kasplagen en hun natuurlijke vijanden. (Contact your Koppert representative for a copy.)
Pasteurization and Fumigation of Soil Soil pasteurization or fumigation can be an effective treatment for controlling soil-borne diseases, insects, weeds, and nematodes. Observe the following rules to achieve satisfactory results.
• The soil temperature at 15 cm depth must be 13oC or higher for successful treatment with chemicals.
• The soil must be in a loose condition to allow gas penetration. Sods, lumps, and organic materials must be thoroughly broken up.
• If organic materials (manure, compost, etc.) are to be used, they must be incorporated before treatment in order to prevent recontamination.
• The soil must be moist, but not wet. When soil is pasteurized with steam or fumigated with chemicals, the number of soil micro-organisms is greatly reduced for the first few days, then it rises and eventually exceeds that of untreated soil. Pasteurization or fumigation destroys a large part of the dense population of soil microbes, and the first organisms to return after treatment meet no competition. Thus, if plant pathogens are among the first to recolonize the soil, they may develop rapidly and cause severe disease losses. Therefore, it is important that the grower make every effort to prevent recontamination. Pathogens can gain entrance to the soil by:
• splashing of rain or watering, • contaminated cuttings, • soil in water hoses, • infested containers, • infested tools and equipment, • growers’ hands and footwear, • placing containers on the ground, • unsterilized tarps, and • infected plants or seeds.
Soil Pasteurization Steam is the most common form of heat used for soil pasteurization. For potting mixes it can be injected into the media pile. Old truck boxes are often good containers. Ground beds can be steamed through underground tile drainage pipes or through canvas hoses covered by tarps. In either case, the soil should be heated to 70oC, measured at points farthest from the source of steam and maintained for 30 minutes.
Above 82oC beneficial soil organisms are destroyed and excess manganese may be released. Aerated steam should be used to prevent overheating. This allows the soil to be pasteurized without the problems associated with over-steaming such as excessive ammonia release, manganese toxicity, higher salt levels, and destruction of organic matter and beneficial organisms. Unless there are specific problems, a pasteurization time of 30 minutes at 70oC should eliminate most pathogens and all but the most heat-resistant weed seeds, while leaving some beneficial, heat-tolerant organisms to compete with the re-colonization attempts of disease organisms.
Manganese Toxicity Manganese toxicity may occur on acid mineral soils or on steamed soils with a pH below 6.0. Symptoms of toxicity include: • root browning, • brown spotting of the stem, petioles and veins of
the lower leaves, • yellowing of the leaf starting at the veins, and/or • premature loss of lower leaves. This problem may be avoided by liming the soil, by pasteurizing at a lower temperature, using a steam-air mixture, and by increasing the application of super-phosphate.
Soil Fumigation Some fumigants control fungi, bacteria, nematodes, insects, and weeds, whereas others, that are more specific in their action, control only nematodes or fungi. Soil fumigation is not always an adequate substitute for soil steaming. Fumigants may not destroy all soil-borne pathogens harboured in root debris and other plant parts.
The soil must be prepared properly before treatment. It must be tilled and kept moist for at least two
Floriculture Production Guide Integrated Pest Management • 13
weeks after removing the plants to allow the roots to rot before treatment. Cultivate the area thoroughly, breaking up lumps and loosening the soil deeply and thoroughly. The soil should be moist before treatment; cultivate lightly if the soil has crusted. Seal the soil with a plastic cover after the chemical is injected. An approved respirator must be used during treatment and at any time when fumes remain.
After an area has been fumigated, care must be taken to avoid contaminating it with nematodes, seeds, or soil pathogens. Don’t add any untreated soil, manures, or mulches. Use clean tools and check for soil adhering to workers’ footwear. As much as possible, use certified, disease-free seeds or transplants.
Use one of the following treatments:
Basamid (dazomet) - Apply 3.25 - 5 kg/100 m2
evenly on the soil surface. This may be done by hand when wearing rubber gloves or by means of a fertilizer spreader. Immediately after application, incorporate to a depth of 15 to 23 cm and seal the soil by irrigation, compacting, or covering with plastic sheets. The amount of time for fumigation and aeration depends on soil temperatures. The soil must be aerated before planting. Fumes are harmful to plants; all traces must disappear from the treated soil before planting or sowing is undertaken or extreme plant damage may result. Do not use treated soil until the safety germination test has been carried out and has shown the soil to be safe to use. See the label for complete instructions. Do not use when soil temperatures are below 6oC. Basamid controls nematodes (except encysted phases), soil fungi, soil insects, and germinating weed seeds.
Telone C-17 (1,3-dichloropropene + chloropicrin) - Use as a preplant treatment to control soilborne nematodes and diseases. Apply in the spring when soil moisture is at 50% of field capacity and soil temperature is between 5 to 27oC at a depth of 20 cm. Apply at a rate of 2 L per 100 m2 for greenhouse beds. Seal the soil immediately following application. At the end of the exposure period, allow the soil to aerate completely before planting the crop. Vapam (metam-sodium) - See the label for rate and application methods. Do not apply to the soil surface if air temperatures are above 32oC or when strong winds would cause the loss of Vapam before it can be sealed into the soil. Do not use in
greenhouses where plants are present. Vapam controls germinating weed seeds, nematodes, and soil-borne fungal diseases such as damping-off and root rot. It is toxic to fish.
Weed Control Keep the interior of the greenhouse weed-free. Weeds in the greenhouse and in the area surrounding the greenhouse are a continuous source of mite, aphid, whitefly, and thrips re-infestation. Never use the same sprayer for herbicides and other pesticides. Many growers have suffered economic losses from herbicide damage by using non-registered herbicides or herbicide contaminated sprayers in the greenhouse.
To kill weeds outside, surrounding the greenhouse, use a contact weed killer such as Gramoxone (paraquat) for annual weeds, or Roundup (glyphosate) for perennial weeds. A 1 to 5 metre weed-free zone around the greenhouse is recommended. Do not use hormone-type herbicides such as 2,4-D or MCPA for weed control adjacent to greenhouses. Use low pressure (less than 275 kPa) to avoid misting and drift into the greenhouse.
For more information, see Chapter 8, Weed Control.
14 • Integrated Pest Management Floriculture Production Guide
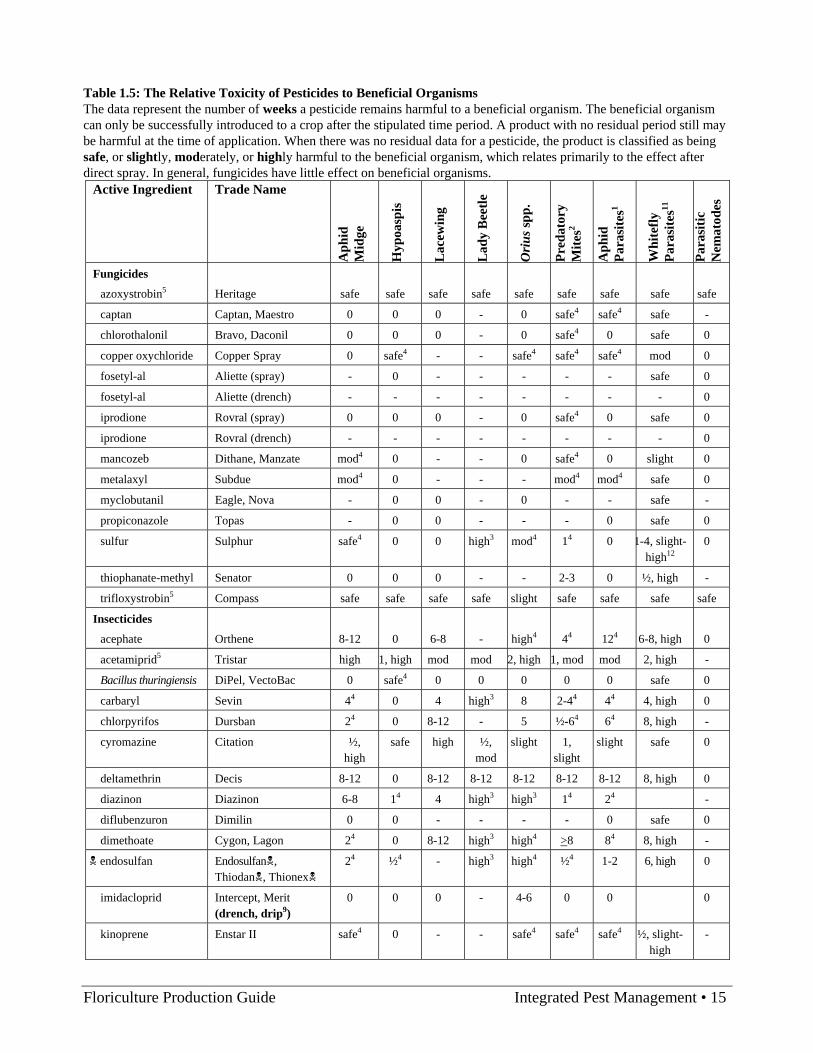
Table 1.5: The Relative Toxicity of Pesticides to Beneficial Organisms The data represent the number of weeks a pesticide remains harmful to a beneficial organism. The beneficial organism can only be successfully introduced to a crop after the stipulated time period. A product with no residual period still may be harmful at the time of application. When there was no residual data for a pesticide, the product is classified as being safe, or slightly, moderately, or highly harmful to the beneficial organism, which relates primarily to the effect after direct spray. In general, fungicides have little effect on beneficial organisms.
Active Ingredient Trade Name
Aph
id
Mid
ge
Hyp
oasp
is
Lac
ewin
g
Lad
y B
eetle
Ori
us sp
p.
Pred
ator
y M
ites2
Aph
id
Para
site
s1
Whi
tefly
Pa
rasi
tes11
Para
sitic
N
emat
odes
Fungicides
azoxystrobin5 Heritage safe safe safe safe safe safe safe safe safe
captan Captan, Maestro 0 0 0 - 0 safe4 safe4 safe -
chlorothalonil Bravo, Daconil 0 0 0 - 0 safe4 0 safe 0
copper oxychloride Copper Spray 0 safe4 - - safe4 safe4 safe4 mod 0
fosetyl-al Aliette (spray) - 0 - - - - - safe 0
fosetyl-al Aliette (drench) - - - - - - - - 0
iprodione Rovral (spray) 0 0 0 - 0 safe4 0 safe 0
iprodione Rovral (drench) - - - - - - - - 0
mancozeb Dithane, Manzate mod4 0 - - 0 safe4 0 slight 0
metalaxyl Subdue mod4 0 - - - mod4 mod4 safe 0
myclobutanil Eagle, Nova - 0 0 - 0 - - safe -
propiconazole Topas - 0 0 - - - 0 safe 0
sulfur Sulphur safe4 0 0 high3 mod4 14 0 1-4, slight-high12
0
thiophanate-methyl Senator 0 0 0 - - 2-3 0 ½, high -
trifloxystrobin5 Compass safe safe safe safe slight safe safe safe safe
Insecticides
acephate Orthene 8-12 0 6-8 - high4 44 124 6-8, high 0
acetamiprid5 Tristar high 1, high mod mod 2, high 1, mod mod 2, high -
Bacillus thuringiensis DiPel, VectoBac 0 safe4 0 0 0 0 0 safe 0
carbaryl Sevin 44 0 4 high3 8 2-44 44 4, high 0
chlorpyrifos Dursban 24 0 8-12 - 5 ½-64 64 8, high -
cyromazine Citation ½, high
safe high ½, mod
slight 1, slight
slight safe 0
deltamethrin Decis 8-12 0 8-12 8-12 8-12 8-12 8-12 8, high 0
diazinon Diazinon 6-8 14 4 high3 high3 14 24 -
diflubenzuron Dimilin 0 0 - - - - 0 safe 0
dimethoate Cygon, Lagon 24 0 8-12 high3 high4 >8 84 8, high -
endosulfan Endosulfan , Thiodan , Thionex
24 ½4 - high3 high4 ½4 1-2 6, high 0
imidacloprid Intercept, Merit (drench, drip9)
0 0 0 - 4-6 0 0 0
kinoprene Enstar II safe4 0 - - safe4 safe4 safe4 ½, slight-high
-
Floriculture Production Guide Integrated Pest Management • 15

Table 1.5: The Relative Toxicity of Pesticides to Beneficial Organisms (continued) Active Ingredient Trade Name
Aph
id
Mid
ge
Hyp
oasp
is
Lac
ewin
g
Lad
y B
eetle
Ori
us sp
p.
Pred
ator
y M
ites2
Aph
id
Para
site
s1
Whi
tefly
Pa
rasi
tes11
Para
sitic
N
emat
ode
Insecticides (cont.)
malathion Malathion 2 0 high3 >2 high4 24 8-12 8, high 0
permethrin Pounce 8-12 0 8-12 high3 8-12 8-12 8-12 8, high -
petroleum oil Dormant Oil safe3 - 0 - safe3 mod3 0 - 0
pyrethrins Pyrethrins - - 0 0 - - ½ 2, high -
pymetrozine5 Endeavor mod slight safe - slight safe-slight safe-slight
safe -
salts of fatty acids Insecticidal Soap 04 04 safe3 - mod4 04 04 - -
spinosad5 Success safe safe safe safe slight-mod
safe mod 1, mod -
tebufenozide Confirm - - 0 - - - - safe -
trichlorfon Dylox - 0 - - - 2 - mod 0
Miticides
abamectin Avid 24 24 - - 3 2 1 1, high 0
acequinocyl5 Shuttle, Kanemite - safe - - - safe-high6 - - -
bifenazate5 Floramite high safe safe safe safe safe-mod8 mod safe -
dicofol Kelthane ½4 0 1 - mod4 2-44 24 1, high 0
fenbutatin-oxide Vendex 0 0 0 - 0 mod4 0 safe -
pyridaben DYNO-Mite 3½4 24 - - safe4 24 >44 2, high -
pyriproxyfen5 Distance safe safe safe mod safe safe-slight safe mod -
spiromesifen5 Forbid high safe - safe safe safe-mod7 safe slight -
Sources: Side Effects Guide, Koppert Biological Systems, unless stated otherwise. The data was collected from greenhouse-grown crops in northwest Europe. Under warmer and brighter conditions, or in the field, a pesticide’s residual effect is often shorter. 1 Data for Aphidius spp. 2 Applies to Amblyseius cucumeris, A. californicus, A. degenerans and Phytoseiulus persimilis
3 From: A Field Guide to Beneficial Insects and Arachnids in British Columbia Seed Orchards, 1996, BC Ministry of Forests
4 From: Floriculture Production Guide, 1999, British Columbia Ministry of Agriculture, Food and Fisheries
5 From: Side Effects Manual, BioBest Biological Systems, www.biobest.ca, based on results obtained under Western European horticultural and climatic conditions.
6 Non-toxic to Amblyseius swirskii nymphs, but highly toxic to Phytoseiulus persimilis nymphs. Unknown on other Amblyseius species.
7 Non-toxic to Amblyseius degenerans and A. swirskii nymphs, slightly toxic to A. cucumeris nymphs, and moderately toxic to A. californicus and Phytoseiulus persimilis nymphs.
8 Non-toxic to Amblyseius cucumeris, A. californicus, and A. degenerans nymphs, moderately toxic to A. swirskii nymphs, and slightly toxic to Phytoseiulus persimilis nymphs.
9 Imidacloprid is toxic to many biocontrol agents if sprayed directly. Drip/drench applications are safer, however persistence can limit re-introduction of biocontrols.
10 Only Amblyseius swirskii was tested. 11 Whitefly parasites are Encarsia formosa and Eretmocerus spp. For many pesticides, both were tested, but for some
only E. formosa was tested. From www.biobest.ca 12 Highly toxic to Encarsia formosa adults; do not reintroduce for 4 weeks after treatment. Slightly toxic to
Eretmocerus spp. adults; can reintroduce after 1 week.
16 • Integrated Pest Management Floriculture Production Guide
Soil, Water, and Nutrient Management 2 (updated September 2008)
This chapter covers the basic principles of soil, water, and nutrient management for field-grown floriculture crops. Information specific to the production of container crops is presented in Chapter 3. Other useful resources on general soil management include two Ministry publications titled Soil Management Handbook for the Lower Fraser Valley and Soil Management Handbook for the Okanagan and Similkameen Valleys that are available from the Abbotsford Soil Conservation Association. Other useful information can be obtained through local BC Ministry of Agriculture and Lands offices.
Recommendations in all manuals, including this production guide, are general guidelines only. Qualified consultants are available on a fee-for-service basis to give recommendations specific to each farm. Growers planning to plant a new parcel of land should consult with a professional for recommendations on soil suitability, and for advice on nutrient management, irrigation and drainage.
Soil Management Good soil management begins before planting. Assess the soil conditions of each field and understand the potential problems as a first step to planting a floriculture crop. Land may be inadequately drained, have shallow topsoil, have impermeable subsoil or be too steeply sloped for successful cropping. Soil management problems are generally related to soil texture, soil structure, drainage, and erosion.
Soil Texture The mineral components of soils are simply small fragments of rock or mineral materials derived from rock that were altered by water and chemical reactions in the soil. Soil particles are grouped into four particle sizes: gravel, sand, silt and clay. In describing soil, “texture” refers to the relative percentages of sand, silt and clay sized particles in the soil. Soil texture is a permanent characteristic. Texture will not change unless a large quantity of soil of another texture is added to it, such as might
occur during land clearing or very deep plowing into subsoil of a different texture.
Problems related to soil texture are common. Stony soils can interfere with tillage and digging operations, and will reduce the overall nutrient and water storage capacity when they cover greater than 50% of the surface area or make up more than 75% of the soil volume. Coarse, sandy soils will require careful nutrient and water management.
Soil Structure In soil, individual sand, silt and clay particles become more closely packed and bonded together to form larger particles called aggregates. “Soil structure” refers to the type and arrangement of aggregates found in soils. Aggregates occur in almost all soils, but their strengths, sizes and shapes vary considerably among soil types. Some of these aggregates are in stable forms that are not easily broken down by water or physical forces. In addition to the soil texture, the organic matter content can play a significant role in the development of good soil structure.
The formation of soil structure results from many different processes, including the growth of plant roots, activities of soil organisms, wetting and drying, freezing and thawing, and tillage. Plant roots excrete sugars and resins that bind aggregates and, upon their death, leave behind pores in the soil. Soil organisms also bind aggregates with “glues” or, as in the case of earthworms, create channels that improve drainage and aeration.
Soil structure also affects the internal drainage of the soil, water holding capacity, temperature and the growth of plant roots. In soils under cultivation, most aggregates at the surface tend to break down under the forces of rainfall, irrigation, tillage and traffic. When soils are left exposed to rainfall or are excessively cultivated under less than ideal moisture conditions, the result is the degradation of soil structure. Structure degradation leads to crusting or puddling of the soil surface, or compaction deeper within or below the root zone. This can lead to poor crop growth, poor drainage and soil erosion.
Floriculture Production Guide Soil, Water, and Nutrient Management • 1

Maintaining Soil Structure Soil structure is the most important soil characteristic to consider when managing soils as it is most affected by farming practices. It also is one of the most important factors in crop growth, along with water and nutrients. The main objective in soil management is to promote and maintain good soil structure that will be favorable to crop growth.
Soil structure degradation can be reversed by carefully using these cultural practices:
• add organic matter from manure or compost, • use appropriate and timely tillage, and • protect the soil surface by using cover crops.
Adding Organic Matter. Managing soil organic matter is integral to sound soil management and is a key to long-term productive field operations, particularly where significant quantities of topsoil are removed over time. Organic matter provides structure to soil, increases water holding capacity and is a major source of phosphorus, sulphur and the primary source of nitrogen. Numerous, readily available soil amendments (e.g. manure and compost) can be applied to the land to improve soil fertility and/or structure. The nutrient content of these amendments must be the first consideration for their use. Nutrients added from the amendment must match the crop’s nutritional requirements.
Animal manures are abundant; however, they can be major sources of ground and surface-water pollution if not properly managed. Rates and times of manure application must be considered, as well as the nutrient requirement of the crop, soil characteristics (e.g. drainage and slope of land) and the presence of surface and ground waters. Manure should, in most cases, not be applied to bare land, due to leaching and/or volatilization potential. Generally, a late summer (July/August) manure application is recommended, followed (after approximately 1 week) by seeding a winter cover crop, which will act to ‘catch’ the nutrients. When manure is used, fertilization rates should be reduced.
Compost application is another option to add humus to the soil. Composts are generally low in available nutrients but should be tested for nutrient content prior to use. Non-composted materials should not be used, as they will cause nutrient tie-ups. As an example, straw and woodwaste can be beneficial to soil, however, when added directly to the soil, nitrogen can be ‘tied-up’. In order to avoid this, urea or an ammonium salt should be added at the same
time at a rate of 20-40 kg/ha. Woodwaste should only be applied in the top 10 cm of the soil.
Growing and tilling-in cover crops can also increase organic matter levels.
Appropriate and Timely Tillage. Tillage is used to prepare a suitable planting bed, to bury or incorporate crop residues, fertilizers, lime, manure or other soil amendments, to kill weeds, and to form raised planting beds. There are two groups of tillage implements. Primary tillage implements, such as plows, discs, subsoilers and rotary spaders, are used to break soil, reverse compaction and incorporate residues. Secondary tillage implements such as cultivators, harrows and rotovators are used to prepare planting beds and incorporate soil amendments. Secondary implements can have a large impact on soil structure by breaking soil aggregates.
Caution is advised when tilling soil because improper tillage can degrade soil structure. Repeated plowing to the same depth may form a compacted layer that can impede water and root penetration. Many growers rely on the conventional rototiller for residue incorporation or for weed control between rows. Too much cultivation with a rototiller or rotovator will pulverize the soil and compact the subsoil over time. Avoid slow tractor speeds that result in excessive pulverizing of the soil. An alternative tillage implement that is not as damaging to soil structure is the spading machine. Medium to fine textured soils are the most susceptible to structural damage. The soil moisture content also does influence the degree of soil degradation that occurs during tillage.
When a tillage operation is carried out, ask the following questions:
• What is the purpose of the tillage operation? • Is the timing of the tillage operation best for the
soil moisture and weather conditions? • Is the tillage implement the best for the intended
purpose?
Using Cover Crops. Cover crops have many benefits in addition to improving soil structure. Refer to the section on cover crops below.
Problem Soils Most floriculture crops require moderately to well-drained soils with at least 0.5 m unrestricted rooting depth in order to obtain top yields. Most lowland soils in the South Coastal area have poor natural
2 • Soil, Water, and Nutrient Management Floriculture Production Guide

drainage with a high water table in the fall, winter and spring. These soils are not well suited to crop production without the use of a tile drainage system to remove excess water from the rooting zone.
Many upland soils in the Coastal region have a hardpan subsoil within 0.5 m of the surface. In most cases, this hardpan will not allow the soils to drain during the fall, winter and spring. Such soils require a tile drainage system to remove excess water from the rooting zone.
In the Coastal region, all soils are susceptible to water erosion when cultivated and left bare over the winter. Many upland soils have slopes from 5-10% or more, and have a serious problem with water erosion. Valuable topsoil is removed from the upper slopes and may be deposited deep enough to bury plants on the lower slopes. Where water erosion occurs, the soils require drainage and other special management practices such as cover cropping.
Erosion Control Where water or wind erosion is a problem, erosion control practices should be used to reduce soil loss. Water erosion damage is most severe on long or steep slopes where the crop rows run up and down the slope, or where cropping practices leave the soil surface exposed to rainfall impact. In South Coastal areas, water erosion will occur on any site where the soil becomes saturated and is left exposed.
Where possible, use the following practices to minimize the loss of soil by water or wind erosion. Although any of the listed practices will help control erosion, the best control is achieved by using as many of the practices together that are appropriate.
Water erosion:
• install a drainage system, • use contour planting (plant across the slope), • maintain a protective layer of crop residues or a
winter cover crop on the soil, and • establish a permanent cover crop on field roads,
field margins and water runs.
Wind erosion (these practices slow the wind speed at the crop or soil surface):
• establish windbreaks (e.g. tree rows, snow fences or hedges), and
• maintain a protective layer of crop residues (the residue should be anchored to the soil) or a winter cover crop on the soil.
Cover Crops As mentioned above, cover crops will protect soils against erosion by wind and water. Cover crops are also used to improve soil structure, trafficability and soil fertility, to suppress some insect pests and weeds, and to promote some beneficial insects. They are not usually grown for harvest or forage. They are planted when portions of the field, or the entire field, is left bare. Cover crops are also called green manure, living or dead mulches, plow down, companion, relay, double or catch crops depending on their specific use.
Before planting a cover crop, it is important to know the soil problem that needs to be addressed. Is the cover crop for erosion-control, organic matter addition and/or trafficability? For example, cover crops will not prevent flooding, but if a field is drained they can help to improve the movement of rainwater into the soil and the drains without staying on the soil surface.
Choosing a Cover Crop Once the purpose is established, planting date and subsequent management are important factors. Spring cereals sown in the fall are usually winter-killed leaving a protective mat on the soil. Winter cereals will usually grow slowly over the winter, producing the majority of their growth in the spring. Winter cereals require a spring management program. Grasses or white clover are recommended for permanent covers. Some varieties of cover crops have been reported to suppress pests or increase the population of beneficial insects. Others may be useful for specialized conditions such as organic production or specific soil management concerns. Table 2.1 lists the best types, seeding rates and planting dates for cover crops.
If a winter-killed cover crop is desired, then a late August or early September seeding date is desirable. Beyond this time, cover crop growth tends to be slower and winter-kill may not occur. If, however, overwintering cover crops are preferable, seeding can be delayed until mid-October, although earlier seeding will ensure maximum ground cover. Winter-hardy cover crops must be controlled either by mechanical or chemical methods in the spring. Permanent cover crops such as perennial ryegrass mixes and turfgrass species (e.g. fescues), are another consideration for long-term floriculture crops and can be planted in late summer, early fall or early spring.
Floriculture Production Guide Soil, Water, and Nutrient Management • 3
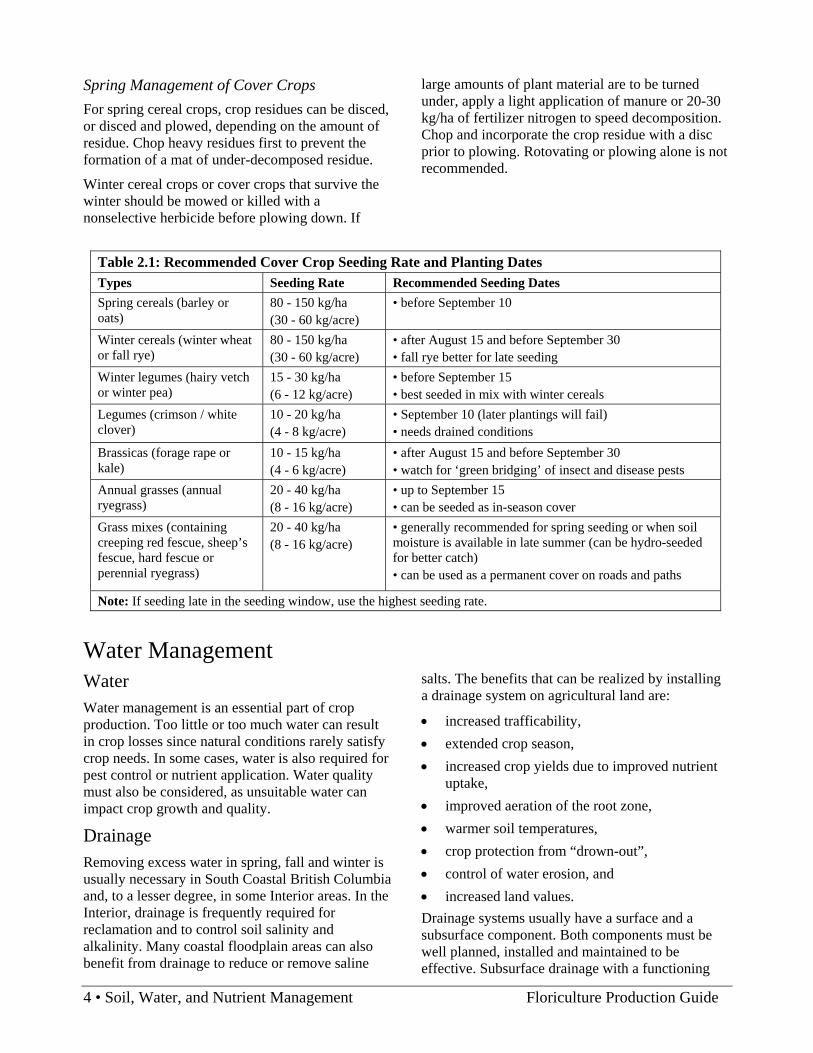
Spring Management of Cover Crops For spring cereal crops, crop residues can be disced, or disced and plowed, depending on the amount of residue. Chop heavy residues first to prevent the formation of a mat of under-decomposed residue.
Winter cereal crops or cover crops that survive the winter should be mowed or killed with a nonselective herbicide before plowing down. If
large amounts of plant material are to be turned under, apply a light application of manure or 20-30 kg/ha of fertilizer nitrogen to speed decomposition. Chop and incorporate the crop residue with a disc prior to plowing. Rotovating or plowing alone is not recommended.
Table 2.1: Recommended Cover Crop Seeding Rate and Planting Dates Types Seeding Rate Recommended Seeding Dates Spring cereals (barley or oats)
80 - 150 kg/ha (30 - 60 kg/acre)
• before September 10
Winter cereals (winter wheat or fall rye)
80 - 150 kg/ha (30 - 60 kg/acre)
• after August 15 and before September 30 • fall rye better for late seeding
Winter legumes (hairy vetch or winter pea)
15 - 30 kg/ha (6 - 12 kg/acre)
• before September 15 • best seeded in mix with winter cereals
Legumes (crimson / white clover)
10 - 20 kg/ha (4 - 8 kg/acre)
• September 10 (later plantings will fail) • needs drained conditions
Brassicas (forage rape or kale)
10 - 15 kg/ha (4 - 6 kg/acre)
• after August 15 and before September 30 • watch for ‘green bridging’ of insect and disease pests
Annual grasses (annual ryegrass)
20 - 40 kg/ha (8 - 16 kg/acre)
• up to September 15 • can be seeded as in-season cover
Grass mixes (containing creeping red fescue, sheep’s fescue, hard fescue or perennial ryegrass)
20 - 40 kg/ha (8 - 16 kg/acre)
• generally recommended for spring seeding or when soil moisture is available in late summer (can be hydro-seeded for better catch) • can be used as a permanent cover on roads and paths
Note: If seeding late in the seeding window, use the highest seeding rate.
Water Management Water Water management is an essential part of crop production. Too little or too much water can result in crop losses since natural conditions rarely satisfy crop needs. In some cases, water is also required for pest control or nutrient application. Water quality must also be considered, as unsuitable water can impact crop growth and quality.
Drainage Removing excess water in spring, fall and winter is usually necessary in South Coastal British Columbia and, to a lesser degree, in some Interior areas. In the Interior, drainage is frequently required for reclamation and to control soil salinity and alkalinity. Many coastal floodplain areas can also benefit from drainage to reduce or remove saline
salts. The benefits that can be realized by installing a drainage system on agricultural land are:
• increased trafficability, • extended crop season, • increased crop yields due to improved nutrient
uptake, • improved aeration of the root zone, • warmer soil temperatures, • crop protection from “drown-out”, • control of water erosion, and • increased land values. Drainage systems usually have a surface and a subsurface component. Both components must be well planned, installed and maintained to be effective. Subsurface drainage with a functioning
4 • Soil, Water, and Nutrient Management Floriculture Production Guide

outlet is the best way to control water on most soils. Lightweight, continuous, flexible, perforated plastic drainpipe is used. On sloping land, porous surface or blind inlets may be needed to lead water to the subsurface drains in order to reduce overland flow and erosion. On sandy soils, geotextile filters are needed around the perforated pipe to prevent sand from clogging the drain tube. Filters should not be used on organic soils.
Drainage contractors using specialized equipment quickly install plastic drainpipe. Installation depth and spacing differs with fields and is mainly based on the climatic conditions and soil type. Pumps are sometimes needed in low-lying areas that lack gravity outlets.
Drainage systems must be maintained. This includes periodic cleaning of drainpipes, outlets and ditches, and careful in-field soil management. Soil conservation and best management practices should be followed to reduce the need for ditch cleaning and avoid damage to soil tilth. Agricultural ditches are often connected to channels and streams that contain fish and provide good fish habitat. When conducting channel maintenance, producers must follow the Drainage Management Guide. The guide also provides information on how to prepare a drainage management plan and on the operation of drainage systems.
Soil loosening may be a consideration where soils are poorly drained as a result of a plow pan or compacted subsoil. Soil loosening, however, may not be economically viable unless problems with compaction have led to obvious yield declines. For more information on tillage refer to either the Soil Management Handbook for the Lower Fraser Valley or the Soil Management Handbook for the Okanagan and Similkameen Valleys.
The British Columbia Agricultural Drainage Manual, and Ministry of Agriculture and Lands factsheets provide more information and details on installing a subsurface drainage system.
Irrigation In almost all parts of the province, natural rainfall is insufficient to replace water lost from the soil due to evaporation or crop usage, for at least part of the growing season. At these times, irrigation can result in higher yields and, in some cases, prevent crop failure. Irrigation is especially necessary for recently transplanted stock, since it will have a small and shallow root system.
Irrigation systems include drainage systems used for subirrigation, trickle and drip systems, and various forms of sprinkler irrigation. Each system has merits. The systems must be properly designed, installed, operated, and maintained to be effective. Efficient delivery and distribution systems conserve water and save on power and fertilizers. Applying too much water or having leaky pipes may lead to soil erosion, reduced production and higher operating costs. Over-application of water will also result in leaching of nutrients such as nitrogen and boron. Check pipes, pumps and sprinklers on a regular basis, and repair or replace them if necessary. The Irrigation Industry Association of BC (IIABC) offers certification courses for designers to become Certified Irrigation Designers (CID). CIDs can provide design plans and products that are cost-effective and efficient based on the standards and guidelines set out by the IIABC. The Association has recently developed courses for installers to become Certified Irrigation Technicians (CIT Level 1 and 2) to ensure proper system installation and to develop irrigation schedules that match up with the systems and field conditions. The Association can be contacted at 604 859-8222 for further information.
A water license is required to use irrigation water from surface water sources under the Water Act. Licenses can be obtained from the BC Ministry of Environment. Groundwater is not licensed at the present time; however, the peak withdrawal rate taken from a well should be similar to what is authorized under a surface water licence. Therefore, should groundwater licensing be implemented in the future, the well, pump size, and irrigation system peak flow rate established will be close to the licensing requirement. For more information on irrigation system design, operation and maintenance, refer to the B.C. Irrigation Management Guide, the BC Trickle Irrigation Manual and the BC Sprinkler Irrigation Manual that are available from the Irrigation Industry Association of BC, or irrigation factsheets available online and from BCMAL offices. Irrigation Scheduling Irrigation scheduling is a systematic method by which a producer can decide when to irrigate, how much water to apply, and how often to irrigate. The goal of an effective scheduling program is to supply the plants with sufficient water while minimizing losses to deep percolation or run-off. Irrigation scheduling depends on soil, crop, climate, irrigation
Floriculture Production Guide Soil, Water, and Nutrient Management • 5
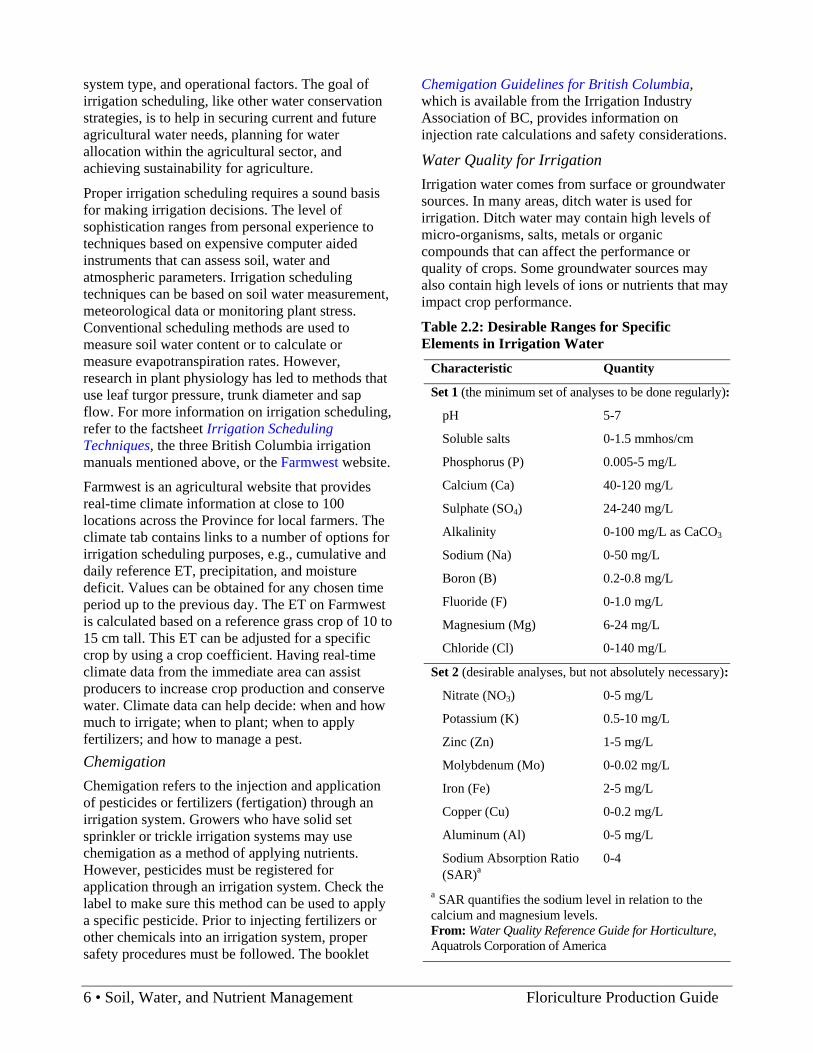
system type, and operational factors. The goal of irrigation scheduling, like other water conservation strategies, is to help in securing current and future agricultural water needs, planning for water allocation within the agricultural sector, and achieving sustainability for agriculture.
Proper irrigation scheduling requires a sound basis for making irrigation decisions. The level of sophistication ranges from personal experience to techniques based on expensive computer aided instruments that can assess soil, water and atmospheric parameters. Irrigation scheduling techniques can be based on soil water measurement, meteorological data or monitoring plant stress. Conventional scheduling methods are used to measure soil water content or to calculate or measure evapotranspiration rates. However, research in plant physiology has led to methods that use leaf turgor pressure, trunk diameter and sap flow. For more information on irrigation scheduling, refer to the factsheet Irrigation Scheduling Techniques, the three British Columbia irrigation manuals mentioned above, or the Farmwest website.
Farmwest is an agricultural website that provides real-time climate information at close to 100 locations across the Province for local farmers. The climate tab contains links to a number of options for irrigation scheduling purposes, e.g., cumulative and daily reference ET, precipitation, and moisture deficit. Values can be obtained for any chosen time period up to the previous day. The ET on Farmwest is calculated based on a reference grass crop of 10 to 15 cm tall. This ET can be adjusted for a specific crop by using a crop coefficient. Having real-time climate data from the immediate area can assist producers to increase crop production and conserve water. Climate data can help decide: when and how much to irrigate; when to plant; when to apply fertilizers; and how to manage a pest. Chemigation Chemigation refers to the injection and application of pesticides or fertilizers (fertigation) through an irrigation system. Growers who have solid set sprinkler or trickle irrigation systems may use chemigation as a method of applying nutrients. However, pesticides must be registered for application through an irrigation system. Check the label to make sure this method can be used to apply a specific pesticide. Prior to injecting fertilizers or other chemicals into an irrigation system, proper safety procedures must be followed. The booklet
Chemigation Guidelines for British Columbia, which is available from the Irrigation Industry Association of BC, provides information on injection rate calculations and safety considerations.
Water Quality for Irrigation Irrigation water comes from surface or groundwater sources. In many areas, ditch water is used for irrigation. Ditch water may contain high levels of micro-organisms, salts, metals or organic compounds that can affect the performance or quality of crops. Some groundwater sources may also contain high levels of ions or nutrients that may impact crop performance.
Table 2.2: Desirable Ranges for Specific Elements in Irrigation Water
Characteristic Quantity
Set 1 (the minimum set of analyses to be done regularly):
pH 5-7
Soluble salts 0-1.5 mmhos/cm
Phosphorus (P) 0.005-5 mg/L
Calcium (Ca) 40-120 mg/L
Sulphate (SO4) 24-240 mg/L
Alkalinity 0-100 mg/L as CaCO3
Sodium (Na) 0-50 mg/L
Boron (B) 0.2-0.8 mg/L
Fluoride (F) 0-1.0 mg/L
Magnesium (Mg) 6-24 mg/L
Chloride (Cl) 0-140 mg/L
Set 2 (desirable analyses, but not absolutely necessary):
Nitrate (NO3) 0-5 mg/L
Potassium (K) 0.5-10 mg/L
Zinc (Zn) 1-5 mg/L
Molybdenum (Mo) 0-0.02 mg/L
Iron (Fe) 2-5 mg/L
Copper (Cu) 0-0.2 mg/L
Aluminum (Al) 0-5 mg/L
Sodium Absorption Ratio (SAR)a
0-4
a SAR quantifies the sodium level in relation to the calcium and magnesium levels. From: Water Quality Reference Guide for Horticulture, Aquatrols Corporation of America
6 • Soil, Water, and Nutrient Management Floriculture Production Guide

Nutrient Management Water quality should be checked at a laboratory before planting a crop. If the crop is established, check the water before using for crop production. Refer to your local Yellow Pages™ under “Laboratories - Analytical”, for a listing of laboratories that conduct water testing. Appendix F also includes a list of laboratories that conduct soil, tissue, and water analysis services. Water tests should assess salt levels (both electrical conductivity and sodium adsorption ratio), pH, metals, nutrients, possible toxic elements and coliforms (see Table 2.2). Also check the levels of bicarbonate (HCO3), calcium, and magnesium. High levels will cause precipitates to form on the crop or possibly plug a drip irrigation system. The British Columbia Sprinkler Irrigation Manual and the British Columbia Trickle Irrigation Manual provide further information on irrigation water quality guidelines. Table 2.2 shows the acceptable levels of some chemical aspects of water.
Soil Testing A soil analysis is the most accurate guide to fertilizer and lime requirements. It is especially important to determine soil fertility and pH levels before planting a crop, so that the necessary lime and fertilizer can be applied to the soil. Soil and tissue testing are useful for determining fertilizer requirements in established crops. Soil and tissue sampling must be done accurately and carefully to be representative of soil and crop conditions. Refer to the Ministry of Agriculture and Lands factsheet Soil Sampling for proper methods of collecting and handling a soil sample. For more information, see the section on tissue analysis in Chapter 3.
Soil and tissue testing are provided by several commercial laboratories in British Columbia (see Appendix F). It is recommended that you use the local laboratories as they have the knowledge and experience of local conditions to conduct the appropriate analyses and give correct recommendations. Once a lab is chosen, it should be used each year in order to obtain consistent interpretations and recommendations.
The presence of plant-available nutrients in the greenhouse water supply does not usually present a problem, unless they exceed the amounts normally fed to plants. However, they must be taken into account when formulating nutrient solutions. Certain fertilizer materials, such as phosphoric acid, will react at high concentrations with dissolved calcium and magnesium to form insoluble precipitates. The precipitates may clog drippers. Water supplies high in calcium and magnesium may not be suitable for use in mist systems due to the accumulation of unsightly mineral residues on plant surfaces.
Fertilizer Application Nitrogen should be surface applied each spring. The quantity applied will depend on the amount available in the soil, the soil environment, the plant type and size, and the objective of the grower. A rate of 150 kg N/ha is suggested but can be modified with experience. Higher rates are used in areas of intensive production. The total amount of nitrogen should be divided into 2-3 applications. Apply the first and largest amount in early spring, either before new growth begins or just after planting. Spread the remaining smaller application(s) over the next 3-4 months. Do not apply nitrogen after August 15 on the Coast and July 15 in the Interior, as the late growth induced may suffer winter injury. Slow release forms of nitrogen fertilizer can be used.
More information on greenhouse water quality is provided in Chapter 3 and in the factsheet Irrigation Water Quality for BC Greenhouses available from the Ministry of Agriculture and Lands.
Protecting Water Quality Waste products generated during the planting, maintenance, and harvesting of floriculture crops may negatively impact water. Growers who operate at the highest environmental standards will be better able to protect themselves from possible challenges to their operations. Proper use and storage of pesticides, fertilizers, manure, and woodwaste will help to protect water quality. Growers are reminded to use best soil management practices.
Application of fertilizer can be broadcast, banded along each side of the row or dropped around each plant by hand. Broadcast application is not recommended for most field stock because of the wasted fertilizer applied between rows. Fertilizer can also lodge in the foliage and cause chemical burn. Banding or hand dropping the fertilizer ensures application to the root zone of the plant. The placement should be 15-30 cm (6-12 in) away from the main stem to prevent chemical burn to the bark.
Floriculture Production Guide Soil, Water, and Nutrient Management • 7
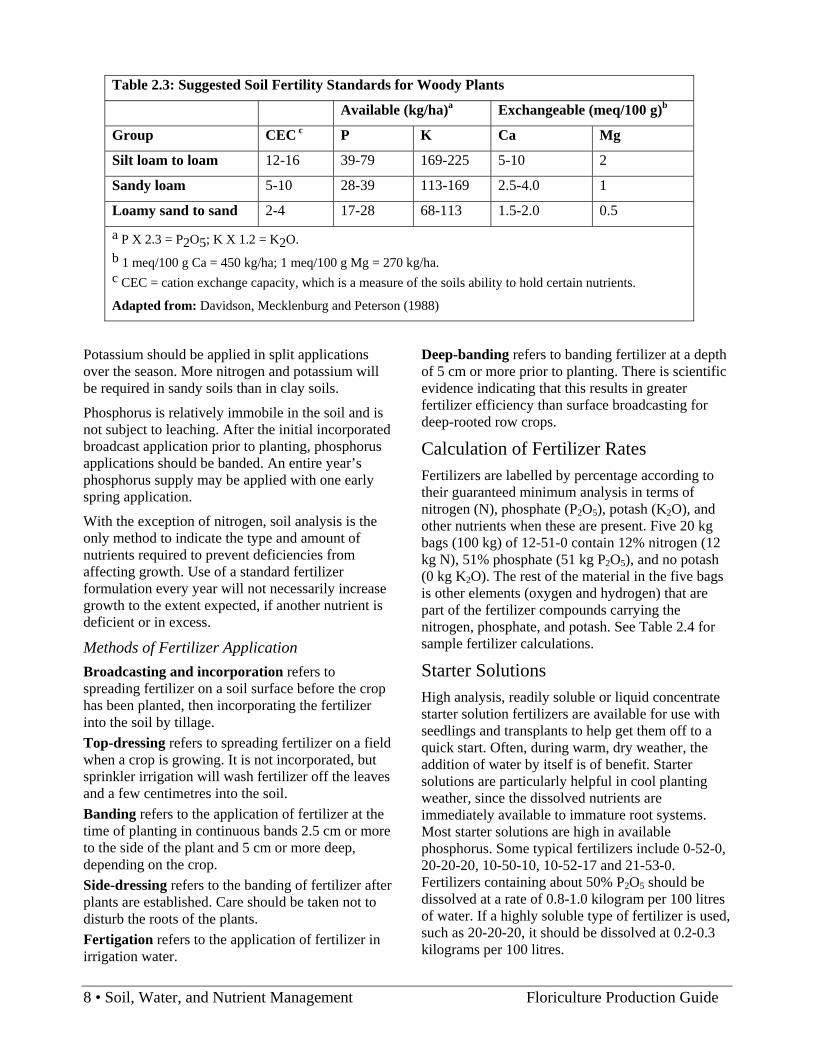
Table 2.3: Suggested Soil Fertility Standards for Woody Plants
Available (kg/ha)a Exchangeable (meq/100 g)b
Group CEC c P K Ca Mg
Silt loam to loam 12-16 39-79 169-225 5-10 2
Sandy loam 5-10 28-39 113-169 2.5-4.0 1
Loamy sand to sand 2-4 17-28 68-113 1.5-2.0 0.5
a P X 2.3 = P2O5; K X 1.2 = K2O. b 1 meq/100 g Ca = 450 kg/ha; 1 meq/100 g Mg = 270 kg/ha. c CEC = cation exchange capacity, which is a measure of the soils ability to hold certain nutrients.
Adapted from: Davidson, Mecklenburg and Peterson (1988)
Potassium should be applied in split applications over the season. More nitrogen and potassium will be required in sandy soils than in clay soils.
Phosphorus is relatively immobile in the soil and is not subject to leaching. After the initial incorporated broadcast application prior to planting, phosphorus applications should be banded. An entire year’s phosphorus supply may be applied with one early spring application.
With the exception of nitrogen, soil analysis is the only method to indicate the type and amount of nutrients required to prevent deficiencies from affecting growth. Use of a standard fertilizer formulation every year will not necessarily increase growth to the extent expected, if another nutrient is deficient or in excess.
Methods of Fertilizer Application Broadcasting and incorporation refers to spreading fertilizer on a soil surface before the crop has been planted, then incorporating the fertilizer into the soil by tillage. Top-dressing refers to spreading fertilizer on a field when a crop is growing. It is not incorporated, but sprinkler irrigation will wash fertilizer off the leaves and a few centimetres into the soil. Banding refers to the application of fertilizer at the time of planting in continuous bands 2.5 cm or more to the side of the plant and 5 cm or more deep, depending on the crop. Side-dressing refers to the banding of fertilizer after plants are established. Care should be taken not to disturb the roots of the plants. Fertigation refers to the application of fertilizer in irrigation water.
Deep-banding refers to banding fertilizer at a depth of 5 cm or more prior to planting. There is scientific evidence indicating that this results in greater fertilizer efficiency than surface broadcasting for deep-rooted row crops.
Calculation of Fertilizer Rates Fertilizers are labelled by percentage according to their guaranteed minimum analysis in terms of nitrogen (N), phosphate (P2O5), potash (K2O), and other nutrients when these are present. Five 20 kg bags (100 kg) of 12-51-0 contain 12% nitrogen (12 kg N), 51% phosphate (51 kg P2O5), and no potash (0 kg K2O). The rest of the material in the five bags is other elements (oxygen and hydrogen) that are part of the fertilizer compounds carrying the nitrogen, phosphate, and potash. See Table 2.4 for sample fertilizer calculations.
Starter Solutions High analysis, readily soluble or liquid concentrate starter solution fertilizers are available for use with seedlings and transplants to help get them off to a quick start. Often, during warm, dry weather, the addition of water by itself is of benefit. Starter solutions are particularly helpful in cool planting weather, since the dissolved nutrients are immediately available to immature root systems. Most starter solutions are high in available phosphorus. Some typical fertilizers include 0-52-0, 20-20-20, 10-50-10, 10-52-17 and 21-53-0. Fertilizers containing about 50% P2O5 should be dissolved at a rate of 0.8-1.0 kilogram per 100 litres of water. If a highly soluble type of fertilizer is used, such as 20-20-20, it should be dissolved at 0.2-0.3 kilograms per 100 litres.
8 • Soil, Water, and Nutrient Management Floriculture Production Guide
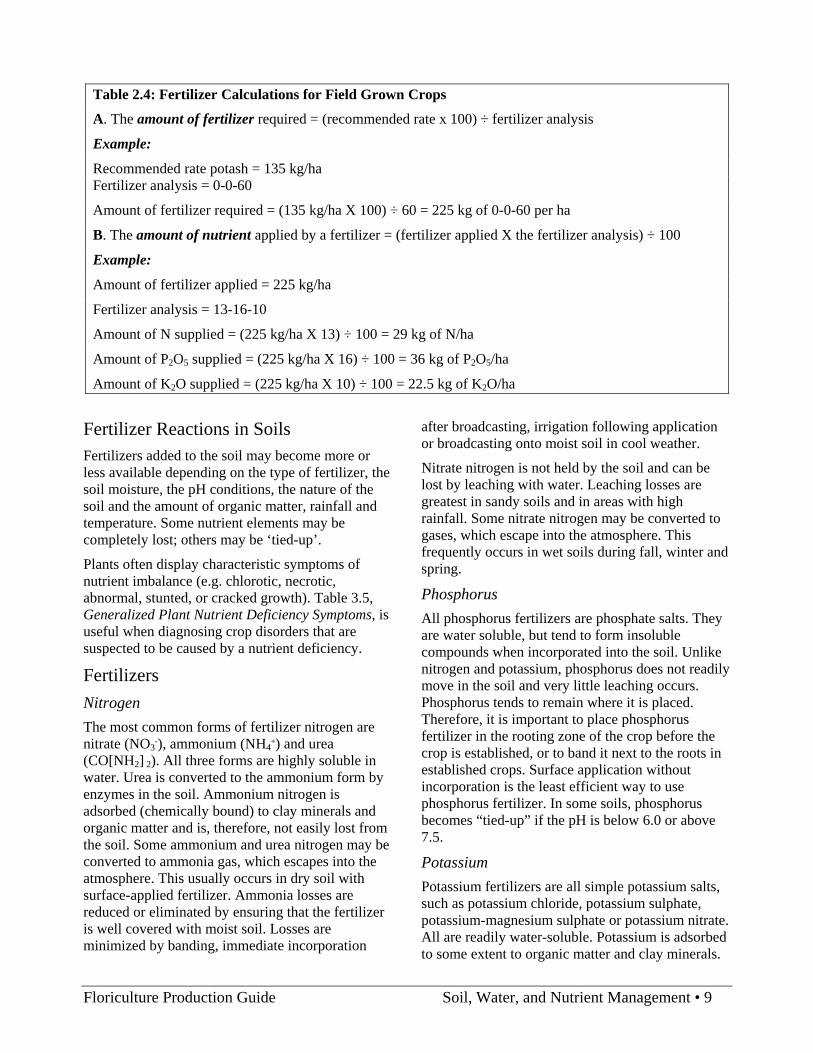
Table 2.4: Fertilizer Calculations for Field Grown Crops
A. The amount of fertilizer required = (recommended rate x 100) ÷ fertilizer analysis
Example:
Recommended rate potash = 135 kg/ha Fertilizer analysis = 0-0-60
Amount of fertilizer required = (135 kg/ha X 100) ÷ 60 = 225 kg of 0-0-60 per ha
B. The amount of nutrient applied by a fertilizer = (fertilizer applied X the fertilizer analysis) ÷ 100
Example:
Amount of fertilizer applied = 225 kg/ha
Fertilizer analysis = 13-16-10
Amount of N supplied = (225 kg/ha X 13) ÷ 100 = 29 kg of N/ha
Amount of P2O5 supplied = (225 kg/ha X 16) ÷ 100 = 36 kg of P2O5/ha
Amount of K2O supplied = (225 kg/ha X 10) ÷ 100 = 22.5 kg of K2O/ha
Fertilizer Reactions in Soils Fertilizers added to the soil may become more or less available depending on the type of fertilizer, the soil moisture, the pH conditions, the nature of the soil and the amount of organic matter, rainfall and temperature. Some nutrient elements may be completely lost; others may be ‘tied-up’.
Plants often display characteristic symptoms of nutrient imbalance (e.g. chlorotic, necrotic, abnormal, stunted, or cracked growth). Table 3.5, Generalized Plant Nutrient Deficiency Symptoms, is useful when diagnosing crop disorders that are suspected to be caused by a nutrient deficiency.
Fertilizers Nitrogen The most common forms of fertilizer nitrogen are nitrate (NO3
-), ammonium (NH4+) and urea
(CO[NH2] 2). All three forms are highly soluble in water. Urea is converted to the ammonium form by enzymes in the soil. Ammonium nitrogen is adsorbed (chemically bound) to clay minerals and organic matter and is, therefore, not easily lost from the soil. Some ammonium and urea nitrogen may be converted to ammonia gas, which escapes into the atmosphere. This usually occurs in dry soil with surface-applied fertilizer. Ammonia losses are reduced or eliminated by ensuring that the fertilizer is well covered with moist soil. Losses are minimized by banding, immediate incorporation
after broadcasting, irrigation following application or broadcasting onto moist soil in cool weather.
Nitrate nitrogen is not held by the soil and can be lost by leaching with water. Leaching losses are greatest in sandy soils and in areas with high rainfall. Some nitrate nitrogen may be converted to gases, which escape into the atmosphere. This frequently occurs in wet soils during fall, winter and spring.
Phosphorus All phosphorus fertilizers are phosphate salts. They are water soluble, but tend to form insoluble compounds when incorporated into the soil. Unlike nitrogen and potassium, phosphorus does not readily move in the soil and very little leaching occurs. Phosphorus tends to remain where it is placed. Therefore, it is important to place phosphorus fertilizer in the rooting zone of the crop before the crop is established, or to band it next to the roots in established crops. Surface application without incorporation is the least efficient way to use phosphorus fertilizer. In some soils, phosphorus becomes “tied-up” if the pH is below 6.0 or above 7.5.
Potassium Potassium fertilizers are all simple potassium salts, such as potassium chloride, potassium sulphate, potassium-magnesium sulphate or potassium nitrate. All are readily water-soluble. Potassium is adsorbed to some extent to organic matter and clay minerals.
Floriculture Production Guide Soil, Water, and Nutrient Management • 9

However, it is subject to leaching, especially in sandy soils.
Secondary Nutrients Magnesium and sulphur levels in the soil may be inadequate for good crop growth. Soil and tissue testing are the only accurate ways to determine if they are lacking. Since calcium is applied as lime it is rarely deficient in soils. Many common fertilizers contain calcium. Sulphur and magnesium fertilizers are also available.
Micronutrients The soil levels of iron (Fe), manganese (Mn), copper (Cu), zinc (Zn) and boron (B) are sometimes inadequate for optimum crop production. Micronutrients are required in very small amounts and it is important to ensure that micronutrient fertilizers are applied at the correct rate. High levels of micronutrients, especially boron and manganese, are toxic to plants. Soil and/or tissue testing are the only accurate ways to determine if these elements are lacking. If they are needed, micronutrients can be added to blended fertilizers and applied along with the routine fertilizer program. If necessary, micronutrients can be applied in irrigation water or with a crop sprayer.
Boron Boron deficiency may cause a wide variety of abnormalities in crops. Fertilizers that include boron can be obtained in most areas. Caution: Do not exceed the recommended amount of boron per hectare as it may cause plant injury. If boron-deficiency symptoms occur during the growing season, boron can be applied as a foliar spray. Apply Borospray, Solubor or Borax at manufacturers’ directions.
In the Interior, boron should be applied in the fall. At the Coast, it should be applied in the spring where a need for it has been shown.
Managing Soil pH pH is a measure of the acidity or alkalinity of the soil. Soil pH is very important because it affects the availability of nutrients to the plant. Most floriculture crops do not respond to fertilization when the pH is very low (extremely acid soils, pH less than 5.0) or very high (extremely alkaline soils, pH above 7.5).
Calcium, phosphorus, magnesium, and molybdenum are the nutrients that are most likely to be deficient
under acid soil conditions. Test the soil to determine pH before planting and every 2-3 years to monitor changes. Soil pH can usually be modified to obtain a suitable pH.
Raising Soil pH Soils in South Coastal British Columbia are typically acidic and, therefore, many acid-loving crops do not require modification of soil pH. Lime application to raise soil pH is usually required for species that are not acid-loving. When the soil pH is not known, a soil test should be performed.
On extremely acidic soils, most crops will not respond to fertilization or other management factors. Agricultural grade limestone (calcium carbonate or CaCO3) is generally recommended to correct soil acidity. For the Fraser Valley, the general application rate is 1-2 tonnes/ha/yr (400-800 kg/acre) for pH sensitive crops. Rates higher than 2-4 tonnes (800-1,600 kg/acre) are not recommended due to soil reactivity and the difficulty of incorporation. Lime should not be applied within 1 week of applying nitrogen fertilizer or manure. The high soil pH that occurs shortly after liming will increase the loss of ammonia.
Lime does not move through the soil, it must be incorporated.
Some soils limed heavily over a period of years may not require further applications. Some light-textured soils that have an adequate pH occasionally test very low in calcium, and therefore require lime. If calcium levels are low, gypsum or fertilizers such as calcium nitrate may also be used to supply calcium, rather than using lime. Gypsum (CaSO4) is not a liming agent. It will not increase soil pH, and under certain conditions it is used to lower soil pH. The use of some dolomitic limestone is recommended since it contains a significant quantity of magnesium, an essential and often deficient plant nutrient.
The positive effects of lime application include:
• reduce soil acidity, • improve the physical condition of the soil, • provide calcium and magnesium (if dolomitic
limestone is used), • favour bacterial action and, thereby, hasten the
decomposition of organic matter and the release of nitrogen,
10 • Soil, Water, and Nutrient Management Floriculture Production Guide

The principal materials used to lower soil pH are elemental sulphur, sulphuric acid, aluminum sulphate and iron sulphate (ferrous sulphate). Ammonium sulphate, ammonium phosphate and other ammonium containing fertilizers are also quite effective when the soil receives sufficient water, though they are primarily sources of plant nutrients.
• improve conditions for availability of other nutrients, notably phosphorus and some minor elements, and
• reduce the toxicity of some elements such as manganese and aluminium.
Growers need to be careful when applying lime. If applied at too high a rate (above 5 tonnes per ha), lime may tie up some micronutrients (e.g. boron) or cause nutrient imbalances. Lime application may aggravate magnesium deficiencies, especially in sandy soil. Where this is a problem, some dolomitic lime should be used. Liming can also increase the rate of organic matter depletion and encourage the germination of some weeds. Lime should always be used in conjunction with a planned soil testing and fertilizer program.
For large areas, elemental sulphur is probably the most economical product to use. The finer ground the sulphur, the more quickly it will react in the soil to lower the pH. Flower sulphur is very fine (powder) and reacts relatively quickly. Solid sulphur prills (granules) are less finely ground and therefore react more slowly and are more convenient to apply. Finely ground sulphur is sometimes available in prills that contain a mixture of flower sulphur and bentonite clay that improves the handling, stability, and safety of the material. Forms of Lime Used
Calcium oxide: quicklime, caustic lime, burnt lime. Not recommended for use on agricultural land.
Soil test laboratories can, by request, determine total soil acidity and calculate the sulphur required to attain a desired pH. As a general recommendation apply the equivalent of 2 tonnes/ha (800 kg/acre) in a band where the planting beds will be formed. For more information refer to the Ministry’s factsheet, Acidifying Soils.
Calcium hydroxide: hydrate or slaked lime. Should only be used as a spring application for rapid results. “Agricultural Lime” refers to this form but the use of this term is not recommended. It is the quicker acting form of agricultural lime. It will correct soil acidity quickly, but is usually two or more times as expensive. Excessive rates above 1,100 kg/ha (450 kg/acre) may be quite caustic and “burn out” organic matter.
Soluble Salts in Soil Elevated salt levels in soil will interfere with water uptake and eventually plant growth. The effects range from delayed or non-germination of seed to death of new transplants and serious reduction in growth of new or established plants (see Table 2.5). Most soils in BC are low in soluble salts. However, there are regions where salts can accumulate, such as lowland areas adjacent to ocean dykes, areas where salt-water intrusion may affect irrigation water, alkali seep areas in the Interior, and areas where road salts or fertilizer salts have accumulated. The problem with soluble salts is most severe when soil moisture is low and salt concentration is high.
Ground limestone: calcium carbonate. The most convenient form to handle. May be applied at any time of the year. It dissolves slowly and lasts longer in the soil. (Usually grey lime material sold in bulk in South Coastal BC.)
Ground dolomite: calcium-magnesium carbonate. May be substituted for ordinary limestone. It contains magnesium in addition to calcium.
Note: Fineness of grind is very important. Fine grinds (100 mesh and above) react in soil much quicker than coarse grinds (10-100 mesh). Very coarse limestone (less than 10 mesh) is not recommended. Some coarse material is desirable to facilitate lime handling. Excessively fine material will not flow readily and is subject to wind drift during spreading.
Lowering Soil pH
Sometimes it is advantageous to lower or acidify the soil pH. In Interior areas, alkaline mineral soils may need to be acidified for crop production.
Floriculture Production Guide Soil, Water, and Nutrient Management • 11

Table 2.5: Soil Conductivity Readings (derived from field soil samples using a 2:1 water and soil paste mixture) Conductivity Reading (milliSiemens/cm)
Rating Plant Response
0-0.25 Low 0.26-0.45 Medium
Suitable for most plants when using recommended amounts of fertilizer.
0.46-0.70 High 0.71-1.00 Excessive
May prevent emergence and cause slight to severe damage to most plants.
1.00 Excessive Expected to severely damage most plants.
Source: OMAFRA Nursery & Landscape Plant Production, Publication 383
Manure and Woodwaste Management Code of Agricultural Practice for Waste Management The use of livestock manure and agricultural vegetation wastes is covered by the Code of Agricultural Practice for Waste Management. This Code is part of the Agriculture Waste Control Regulation under the Environmental Management Act. The Code describes general practices for the use, storage, and management of agricultural waste in an environmentally sound manner. Also refer to the BC Environmental Farm Plan Reference Guide. The guide describes in general terms many of British Columbia's diverse farm practices. It also refers the reader to existing government legislation, industry guidelines, and other sources of information related to farm practices in BC.
Storage The Code requires that agricultural waste, particularly manures, be kept in a storage facility or covered if not used immediately. The storage must prevent escape of manure to the environment that could cause pollution. Manure may be stored uncovered in the field for up to 2 weeks prior to use. Manure may be stored in the field for up to 9 months if it is kept in a temporary storage facility that prevents the escape of nutrients to the environment (e.g. securely covered with a tarp on a dry site). In the Lower Fraser Valley and Vancouver Island regions, stored manure must be covered from October 1 to April 30. The field storage facility must be 30 meters from a watercourse or a water source used for domestic purposes.
Nutrient Value Manures supply plant food over a period of time. Table 2.6 shows the typical amount of nutrients supplied in various types of livestock manure. The moisture and nutrient content varies as a result of storage method, litter content, and manure age.
The nitrogen values given in Table 2.6 are for total nitrogen. For all types of manure, the amount of nitrogen that is available to the crop after it is applied may vary from the value listed in the table. Incorporate all manures (solid or liquid) within 12-24 hours of spreading to reduce ammonia volatilization and to achieve the greatest benefit from the manure nutrients. If the manure is incorporated soon after spreading, 20% of the nitrogen may be lost. However, as much as 50% of the nitrogen can be lost if the manure is left on the soil surface after being spread.
Test the nutrient content of the manure after it is delivered to the farm. The nutrient content will not change significantly if the manure is kept covered. If a manure test is unavailable, the table values can be used but they may require adjustment for the moisture content of the manure. Nutrient applications from all sources, including manure and commercial fertilizer, should be balanced to meet the crop requirements. The release of nutrients from manure is not consistent. Therefore, in any year manure should only be used to supply up to 75% of the crop’s nitrogen requirement. About 50% of the phosphorus in manure is readily available in the year it is applied. Where manure has been used repeatedly, phosphorus is assumed to be 100% available. All potassium from manure is available in the year of application.
12 • Soil, Water, and Nutrient Management Floriculture Production Guide
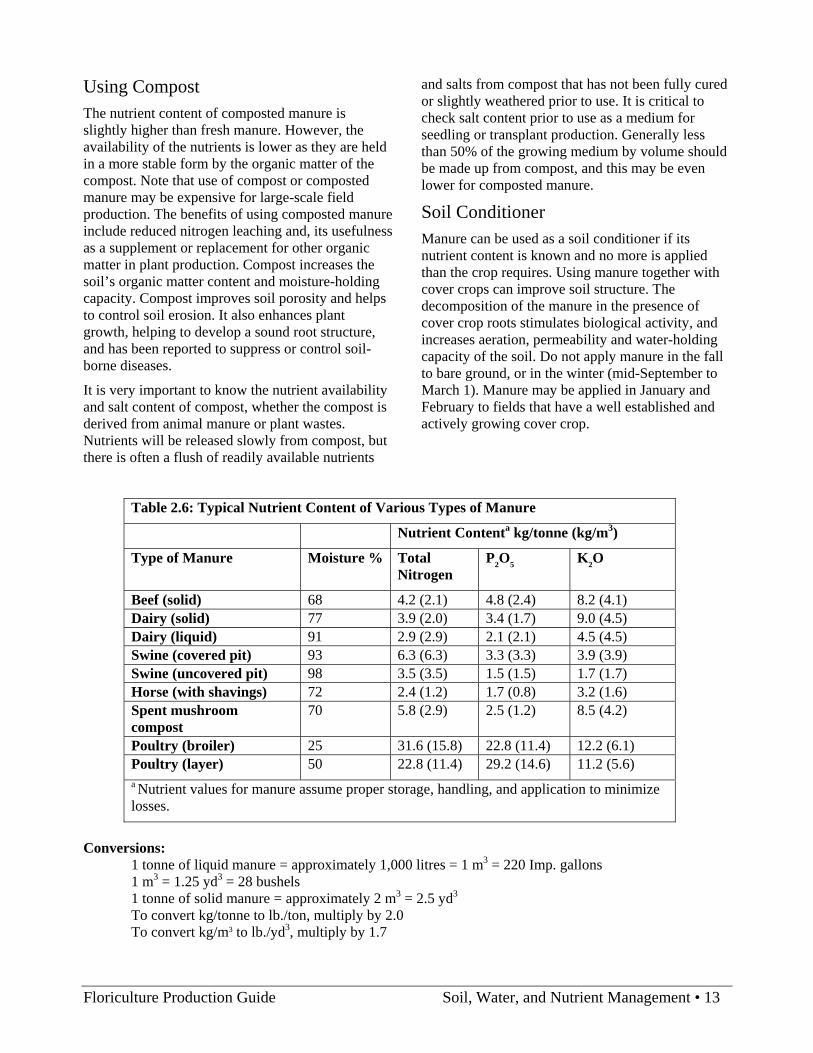
Using Compost The nutrient content of composted manure is slightly higher than fresh manure. However, the availability of the nutrients is lower as they are held in a more stable form by the organic matter of the compost. Note that use of compost or composted manure may be expensive for large-scale field production. The benefits of using composted manure include reduced nitrogen leaching and, its usefulness as a supplement or replacement for other organic matter in plant production. Compost increases the soil’s organic matter content and moisture-holding capacity. Compost improves soil porosity and helps to control soil erosion. It also enhances plant growth, helping to develop a sound root structure, and has been reported to suppress or control soil-borne diseases.
It is very important to know the nutrient availability and salt content of compost, whether the compost is derived from animal manure or plant wastes. Nutrients will be released slowly from compost, but there is often a flush of readily available nutrients
and salts from compost that has not been fully cured or slightly weathered prior to use. It is critical to check salt content prior to use as a medium for seedling or transplant production. Generally less than 50% of the growing medium by volume should be made up from compost, and this may be even lower for composted manure.
Soil Conditioner Manure can be used as a soil conditioner if its nutrient content is known and no more is applied than the crop requires. Using manure together with cover crops can improve soil structure. The decomposition of the manure in the presence of cover crop roots stimulates biological activity, and increases aeration, permeability and water-holding capacity of the soil. Do not apply manure in the fall to bare ground, or in the winter (mid-September to March 1). Manure may be applied in January and February to fields that have a well established and actively growing cover crop.
Table 2.6: Typical Nutrient Content of Various Types of Manure
Nutrient Contenta kg/tonne (kg/m3)
Type of Manure Moisture % Total Nitrogen
P2O5 K2O
Beef (solid) 68 4.2 (2.1) 4.8 (2.4) 8.2 (4.1) Dairy (solid) 77 3.9 (2.0) 3.4 (1.7) 9.0 (4.5) Dairy (liquid) 91 2.9 (2.9) 2.1 (2.1) 4.5 (4.5) Swine (covered pit) 93 6.3 (6.3) 3.3 (3.3) 3.9 (3.9) Swine (uncovered pit) 98 3.5 (3.5) 1.5 (1.5) 1.7 (1.7) Horse (with shavings) 72 2.4 (1.2) 1.7 (0.8) 3.2 (1.6) Spent mushroom compost
70 5.8 (2.9) 2.5 (1.2) 8.5 (4.2)
Poultry (broiler) 25 31.6 (15.8) 22.8 (11.4) 12.2 (6.1) Poultry (layer) 50 22.8 (11.4) 29.2 (14.6) 11.2 (5.6)
a Nutrient values for manure assume proper storage, handling, and application to minimize losses.
Conversions:
1 tonne of liquid manure = approximately 1,000 litres = 1 m3 = 220 Imp. gallons 1 m3 = 1.25 yd3 = 28 bushels 1 tonne of solid manure = approximately 2 m3 = 2.5 yd3
To convert kg/tonne to lb./ton, multiply by 2.0 To convert kg/m3 to lb./yd3, multiply by 1.7
Floriculture Production Guide Soil, Water, and Nutrient Management • 13

Applying Manure Under the Code, manure can only be applied to land as a fertilizer or soil conditioner. In South Coastal British Columbia, apply manure to field crops between mid-March and early July. Be sure that the amount of manure applied is no more than what is needed to fertilize the crop. Manure can be applied to a cover crop or permanent grass crop between July and October if, based on a soil test, the application rate matches the crop’s nutrient requirements. Manure should not be applied to bare land after July. No manure should be applied between October and March. In the Interior of British Columbia, spread manure only when the risk of run-off is near zero. Manure should not be applied to frozen or snow-covered ground. Manure may be applied in the fall if the application rate is equivalent to the crop’s nutrient requirements, and if there is a cover crop in place and no run-off will occur.
Additional Precautions Concerns have been raised recently over the potential contamination of watercourses with constituents of manure. Floriculture growers are encouraged to use best management practices to avoid direct discharge or run-off losses of manure into watercourses. This concern applies not only to the nutrient and solid fractions, but also to the potential pathogens that may exist in animal manure.
Water in ditches is often used for irrigation and crop washing, so its quality is important. Growers are encouraged to avoid direct contact between the harvestable portions of plants and any manure applied to the crop as a fertilizer. Growers may wish to follow the British Columbia Certified Organic Production Operations Policies and Farm Management Standards that state the use of raw manure is allowed only prior to seeding a cover crop or a green manure crop. Crop production standards of organic certification organizations may recommend the use of composted manure or the incorporation of manure prior to planting a cover crop. In either case, it places sufficient time between the application of manure and the growth of the crop to allow the soil to effectively assimilate nutrients and for the pathogen risk to be eliminated.
The levels of pathogenic micro-organisms in manure, such as Salmonella and fecal coliform, are reduced
by 99% in about 18 days when soil temperatures are at 15oC. It may take as long as 45 days to reduce the numbers when the soil is about 5oC.
Non-Agricultural Wastes (Biosolids, Whey, Yard Waste, Pulp Sludge, Fish Waste, Etc.) Caution: Many wastes generated off-farm are being offered, or sold to farmers for use as soil conditioners or fertilizers. The use of all agricultural wastes is covered by the Environmental Management Act in BC. Use of these materials may be allowed under Regulation or an authorization under the Act. Many of these materials can provide benefits to the soil or crop. However, they come with characteristics or contaminants that can be undesirable to growers. Refer to the Ministry’s factsheet, Use Caution When Bringing Non-Agricultural Waste or Products on to Your Farm.
Determining the Amount of Manure to Spread on the Field To spread manure as a fertilizer the following must be known:
• the nitrogen content of the manure, • the amount of nitrogen supplied by the manure
to the crop, • the amount of manure the spreader can hold (its
capacity), • the nitrogen needs of the crop, and • the number of spreader loads of manure per area
in the field.
Table 2.7 outlines the steps to follow to calculate the amount of manure to spread based on crop requirements.
Environmental Considerations • Application of fertilizer around each plant, but not touching the stems or foliage, will ensure efficient application to the root zone. This reduces weed growth between rows and nutrient loss to the environment through leaching or run-off. • Irrigating in the early morning will prevent or reduce the incidence of foliar diseases and reduce the need for fungicides. • Weed control around each plant will improve plant quality, while reducing damage by rodents and insects.
14 • Soil, Water, and Nutrient Management Floriculture Production Guide

Table 2.7: Calculating the Quantity of Manure to Apply
Step 1. Determine the nitrogen content of the manure.
Refer to Table 3.8 for typical total nitrogen contents of various types of livestock manure. Use these values if a laboratory or quick test value is not available. Nitrogen comes in several forms in manure. The amount of nitrogen in manure also varies and is subject to many management and environmental conditions that can result in nitrogen losses.
Step 2. Calculate the approximate amount of nitrogen supplied by the manure (kg N/yd3).
Losses of nitrogen upon application of manure can range from a low of 20% if manure is incorporated within 24 hours, to as much as 50% by volatilization if the manure is left on the soil surface.
N supplied by manure (kg/m3) (see Table 3.8) X initial application loss factor* 1.31 m3/yd3
*Initial application loss factor = 100% - % nitrogen lost
Step 3. Determine the capacity of the manure spreader (yd3).
Box length (ft) X width (ft) X average depth of manure in spreader (ft) 27 ft3/yd3
Step 4. Determine the nitrogen needs of the crop (kg/ha).
Refer to specific crop recommendations in the results of a soil test.
Step 5. Calculate the number of spreader loads of manure per area in the field (loads/ha).
Crop N requirements (kg N/ha) ÷ spreader capacity (yd3/load) N supplied by the manure (kg N/yd3)
Example:
A spreader has a box that is 7.5 feet long and 4 feet wide. It is filled with solid poultry (broiler) manure to an average depth of 2.25 feet. The manure will be spread prior to planting a crop that, based on soil testing, requires about 80 kg/ha (32 kg/acre) of nitrogen. The manure is to be broadcast over the entire area using a conventional spreader. How many loads are needed to supply the crop’s nitrogen requirements?
Step 1. Determine the nitrogen content of manure.
From Table 3.8, poultry manure contains 15.8 kg N/m3
Step 2. Calculate the approximate amount of nitrogen supplied by the manure (kg N/yd3).
= 15.8 kg N/m3 (from Table 3.8) X 0.80 = 9.6 kg N/ yd3
1.31 m3/yd3
Step 3. Determine the capacity of the manure spreader (yd3).
= 7.5 ft long X 4 ft wide X 2.25 ft deep = 2.5 yd3/load 27 ft3/yd3
Step 4. Determine the nitrogen needs of the crop (kg/ha).
80 kg N/ha (32 kg N/ac) (based on soil testing)
Step 5. Calculate the number of spreader loads of manure per area in the field (loads/ha).
= 80 kg N/ha ÷ 2.5 yd3/load = 3.3 loads/ha (÷ 2.47 = 1.3 loads/acre) 9.6 kg N/yd3
Floriculture Production Guide Soil, Water, and Nutrient Management • 15
BC Environmental Farm Plan Program The long-term prosperity of British Columbia’s agricultural sector is linked to its environmental sustainability. With increasing agricultural production intensity and expanding knowledge of our biological and physical environment, the need for improving farm practices has been recognized. The goal of Environmental Farm Planning is to raise awareness amongst producers and enhance environmental farm stewardship. This can be accomplished through the establishment and implementation of Environmental Farm Plans. Environmental Farm Planning (EFP) is normally seen as a voluntary, confidential, producer-driven planning exercise that uses specifically designed resource materials and technical assistance. In British Columbia, both the senior governments and the agriculture industry recognize the value of EFPs, and programming is available in all agricultural regions. Between 2003 and 2008, recognized planning advisors working under the Canada-British Columbia Environmental Farm Planning Program provided Planning Workbook and Reference Guide materials to participating farmers. These materials are used to develop a farm plan that identifies on-farm environmental risks and subsequently establishes a priority sequence of action items for addressing those risks.
The EFP concept has been around for over two decades. The first in North America was the Farm-A-Syst program in Michigan. This was adapted by the Ontario Farm Environment Coalition for use by Ontario farmers. The Ontario program has been in place for well over 10 years. Since 2004, all Canadian provinces have had an EFP program in place. EFPs are voluntary. There are no government laws or regulations that require a farmer or rancher to prepare a plan. However, institutions such as banks, insurance companies, and food processors and buyers are paying increasing attention to the impact of agriculture on the environment and are requesting some form of environmental risk assessment from their customers. Farmers may find their environmental farm plan to be a very useful tool when dealing with these other organizations.
What is an EFP? An EFP is an agriculture-environment risk identification process. It is conducted through a
comprehensive review of activities and facilities that exist on the farm or ranch with respect to their impact on the environment. The review also looks at the impact of the environment on the farm, for example impacts from wildlife or flooding. The review considers current environmental regulation requirements and beneficial management practices that should be in place on farm. It looks at the risk of the operation to the environment as well as the risk of the environment to the farm or ranch operation.
Why Do an EFP? • To determine the standing with respect to
environmental rules and regulations and the environmental risk of management practices.
• To sustain the resources used and affected by farming practices for long-term production.
• To increase public confidence that BC farmers are “doing it right” with respect to the environment.
• To improve farm/ranch profitability. Some potential economic benefits include making fertilizer dollars go further through nutrient management planning, reducing tillage costs by converting to conservation tillage practices, and minimizing cost of pesticides by using integrated pest management techniques.
• To differentiate your product(s) in the market-place and thereby maintain or enhance marketing opportunities.
• To help plan for unforeseen contingencies such as floods, spills or fires.
• To demonstrate due diligence on the part of the producer.
• To reduce potential for new legislation or regulation.
• To improve relationships with regulatory agencies and to reduce the need for further regulation.
More information on the program is available on the Ministry of Agriculture and Lands website. Contact Hedy Dyck at the BC Landscape and Nursery Association (604 574-7772) for information on the status of the program.
16 • Soil, Water, and Nutrient Management Floriculture Production Guide

Managing the Plant Environment 3 (updated October 2008)
There are factors other than pests that affect optimum plant performance, such as:
• light, temperature, water, and air, • nutrient levels and balances, • planting media, • pollution and chemical injury, and • mechanical injury. In many cases, weakening of plants due to problems with these factors can predispose them to disease and insect problems. For this reason, it is important to be aware of the specific needs and sensitivities of each crop.
Principle of Limiting Factors In any crop system, the level of production can be no greater than the genetic potential of the plants. However, the full genetic potential is often not realized due to some other limiting factor. The most limiting factor will determine how much of a plant’s genetic potential can be realized. For instance, if nitrogen is in short supply, it will limit crop growth even though the other inputs (e.g. light and water) are in abundance.
A good cropping strategy should aim to maximize and exploit the full potential of the crop by providing optimum amounts of all of the factors required for growth, and by applying these inputs in a cost effective and environmentally responsible manner.
Temperature Generally, the warmer the air temperature, the faster a plant will grow and develop, assuming all other conditions are optimum. Plant leaf temperatures are related to light levels and air temperature, and are regulated by transpiration. Sudden changes in air temperature will affect humidity and transpiration rates, and can result in plant stress, and unwanted condensation on leaves and greenhouse surfaces.
The difference between day and night temperature is as important as the actual temperature values. The processes that produce food for plants to grow and develop (photosynthesis) stop working at about 35oC and above. The processes that make the plant grow and develop (respiration) continue at night. At a certain low temperature (specific to the crop) these processes will also stop.
Recent research has brought about a re-thinking of greenhouse temperature control. Researchers have found that high night/low day temperatures will reduce or eliminate the need to apply plant growth regulators for certain plant species such as chrysanthemums, lilies, and poinsettias.
The technique of temperature control of plant height is based on the concept of average temperature. Plants grow and develop at a rate dependent on the average temperature they receive over the 24 hour period.
Average Temperature = [(day temp x hrs day) + (night temp x hrs night)] ÷ 24
If plants are behind schedule, the daily average temperature can be raised to speed up development. If plants are ahead of schedule, the daily average temperature can be lowered to slow down development.
Plant height is influenced by the difference (DIF) between day and night temperature. A positive DIF (higher day than night) will produce taller plants. A negative DIF (higher night than day) will produce shorter plants. Plant height can be decreased by lowering the day temperature and also by increasing the night temperature. It can also be decreased by introducing a relatively cooler temperature, or DIP for two hours starting just before sunrise. DIP and DIF affect the length of the stem internodes rather than the number of leaves.
If plants are behind schedule, then raise the daily average temperature to speed up development. If plants are ahead of schedule, then lower the daily average temperature to slow down development.
Floriculture Production Guide Managing the Plant Environment • 1

Table 3.1: Day and Night Temperatures Needed to Produce Various Average Daily Temperatures
Temperature °C Average Daily Temperature °C
Day Night 9 Hr Day 10 Hr Day 11 Hr Day 12 Hr Day 13 Hr Day 14 Hr Day
12 12 12.0 12.0 12.0 12.0 12.0 12.0 14 12 12.8 12.8 12.9 13.0 13.1 13.2 16 12 13.5 13.7 13.8 14.0 14.2 14.3 18 12 14.3 14.5 14.8 15.0 15.3 15.5 20 12 15.0 15.3 15.7 16.0 16.3 16.7 22 12 15.8 16.2 16.6 17.0 17.4 17.8 12 14 13.3 13.2 13.1 13.0 12.9 12.8 14 14 14.0 14.0 14.0 14.0 14.0 14.0 16 14 14.8 14.8 14.9 15.0 15.1 15.2 18 14 15.5 15.7 15.8 16.0 16.2 16.3 20 14 16.3 16.5 16.8 17.0 17.3 17.5 22 14 17.0 17.3 17.7 18.0 18.3 18.7 12 16 14.5 14.3 14.2 14.0 13.8 13.7 14 16 15.3 15.2 15.1 15.0 14.9 14.8 16 16 16.0 16.0 16.0 16.0 16.0 16.0 18 16 16.8 16.8 16.9 17.0 17.1 17.2 20 16 17.5 17.7 17.8 18.0 18.2 18.3 22 16 18.3 18.5 18.8 19.0 19.3 19.5 12 18 15.8 15.5 15.3 15.0 14.8 14.5 14 18 16.5 16.3 16.2 16.0 15.8 15.7 16 18 17.3 17.2 17.1 17.0 16.9 16.8 18 18 18.0 18.0 18.0 18.0 18.0 18.0 20 18 18.8 18.8 18.9 19.0 19.1 19.2 22 18 19.5 19.7 19.8 20.0 20.2 20.3 12 20 17.0 16.7 16.3 16.0 15.7 15.3 14 20 17.8 17.5 17.3 17.0 16.8 16.5 16 20 18.5 18.3 18.2 18.0 17.8 17.7 18 20 19.3 19.2 19.1 19.0 18.9 18.8 20 20 20.0 20.0 20.0 20.0 20.0 20.0 22 20 20.8 20.8 20.9 21.0 21.1 21.2 12 22 18.3 17.8 17.4 17.0 16.6 16.2 14 22 19.0 18.7 18.3 18.0 17.7 17.3 16 22 19.8 19.5 19.3 19.0 18.8 18.5 18 22 20.5 20.3 20.2 20.0 19.8 19.7 20 22 21.3 21.2 21.1 21.0 20.9 20.8 22 22 22.0 22.0 22.0 22.0 22.0 22.0
A table of day/night temperature combinations and their effect on average daily temperature is included for those growers who may wish to experiment with this technique (Table 3.1). Keep in mind that the threshold temperatures necessary for proper growth and flower induction for specific crops still apply.
Accurate temperature control is important for optimum plant performance. High temperature injury results in tissue collapse due to desiccation or overheating of cellular fluids and is more prevalent on young tissues and at leaf margins.
Unless freezing occurs, low temperature problems are more subtle. Slow growth, chlorosis of the leaves, defoliation, and various nutritional and pathogenic diseases often occur after plants are exposed to low temperatures. When propagating plants, the soil temperature must be monitored, since the rooting medium is often cooler than the air temperature due to evaporative cooling. Low temperatures can slow the growth of seedlings, or the rooting of cuttings. A sudden rise in air temperature may result in moisture condensing on leaf surfaces, providing conditions favourable to some plant diseases.
2 • Managing the Plant Environment Floriculture Production Guide
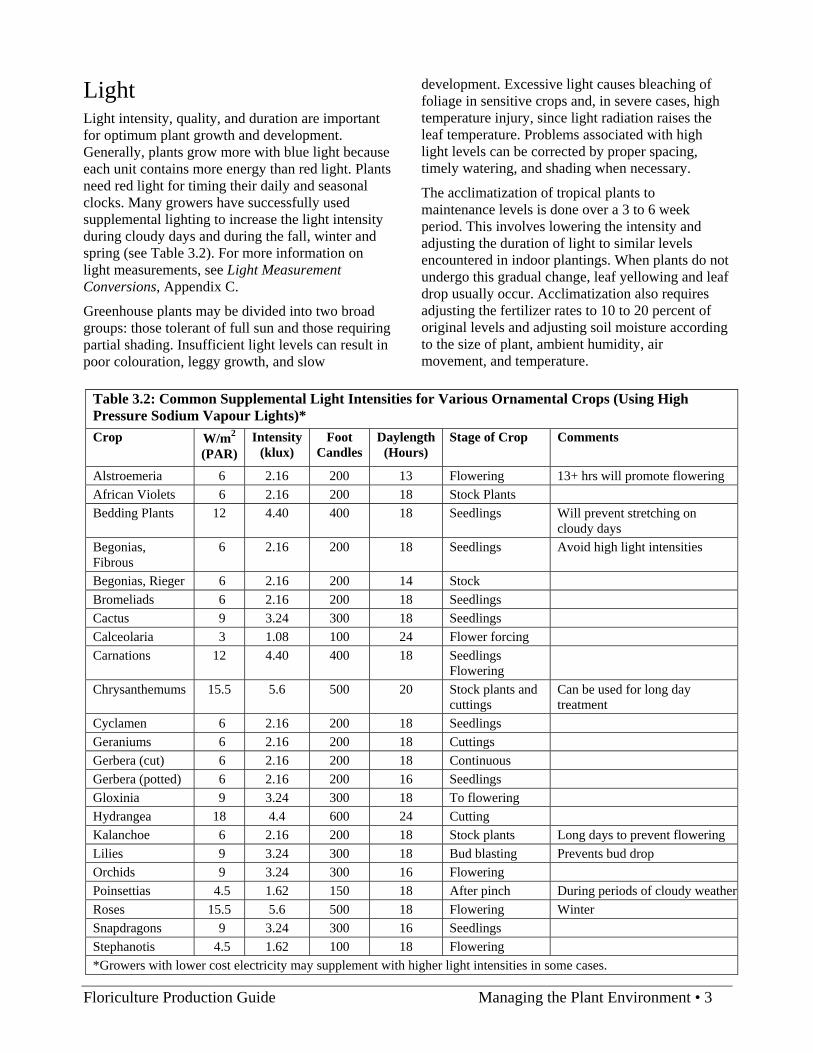
Light Light intensity, quality, and duration are important for optimum plant growth and development. Generally, plants grow more with blue light because each unit contains more energy than red light. Plants need red light for timing their daily and seasonal clocks. Many growers have successfully used supplemental lighting to increase the light intensity during cloudy days and during the fall, winter and spring (see Table 3.2). For more information on light measurements, see Light Measurement Conversions, Appendix C.
Greenhouse plants may be divided into two broad groups: those tolerant of full sun and those requiring partial shading. Insufficient light levels can result in poor colouration, leggy growth, and slow
development. Excessive light causes bleaching of foliage in sensitive crops and, in severe cases, high temperature injury, since light radiation raises the leaf temperature. Problems associated with high light levels can be corrected by proper spacing, timely watering, and shading when necessary.
The acclimatization of tropical plants to maintenance levels is done over a 3 to 6 week period. This involves lowering the intensity and adjusting the duration of light to similar levels encountered in indoor plantings. When plants do not undergo this gradual change, leaf yellowing and leaf drop usually occur. Acclimatization also requires adjusting the fertilizer rates to 10 to 20 percent of original levels and adjusting soil moisture according to the size of plant, ambient humidity, air movement, and temperature.
Table 3.2: Common Supplemental Light Intensities for Various Ornamental Crops (Using High Pressure Sodium Vapour Lights)* Crop W/m2
(PAR) Intensity
(klux) Foot
Candles Daylength
(Hours) Stage of Crop Comments
Alstroemeria 6 2.16 200 13 Flowering 13+ hrs will promote flowering African Violets 6 2.16 200 18 Stock Plants Bedding Plants 12 4.40 400 18 Seedlings Will prevent stretching on
cloudy days Begonias, Fibrous
6 2.16 200 18 Seedlings Avoid high light intensities
Begonias, Rieger 6 2.16 200 14 Stock Bromeliads 6 2.16 200 18 Seedlings Cactus 9 3.24 300 18 Seedlings Calceolaria 3 1.08 100 24 Flower forcing Carnations 12 4.40 400 18 Seedlings
Flowering
Chrysanthemums 15.5 5.6 500 20 Stock plants and cuttings
Can be used for long day treatment
Cyclamen 6 2.16 200 18 Seedlings Geraniums 6 2.16 200 18 Cuttings Gerbera (cut) 6 2.16 200 18 Continuous Gerbera (potted) 6 2.16 200 16 Seedlings Gloxinia 9 3.24 300 18 To flowering Hydrangea 18 4.4 600 24 Cutting Kalanchoe 6 2.16 200 18 Stock plants Long days to prevent flowering Lilies 9 3.24 300 18 Bud blasting Prevents bud drop Orchids 9 3.24 300 16 Flowering Poinsettias 4.5 1.62 150 18 After pinch During periods of cloudy weatherRoses 15.5 5.6 500 18 Flowering Winter Snapdragons 9 3.24 300 16 Seedlings Stephanotis 4.5 1.62 100 18 Flowering *Growers with lower cost electricity may supplement with higher light intensities in some cases.
Floriculture Production Guide Managing the Plant Environment • 3

Water The moisture requirements of plants are closely tied to light and temperature factors. Potting mediums should be well drained. Under-watering encourages salt accumulation and may lead to serious damage when plants wilt during bright, hot weather. Over-watering is a common cause of root disease. Roots are unable to obtain enough oxygen in a constantly saturated media. This leads to tissue death and provides an entry site for plant pathogens.
Watering methods should be used to provide accurate delivery of water and nutrients to the crop with a minimum of waste, leaching, and undesirable wetting of foliage. Many greenhouse potted flower producers have converted to capillary mat, trough, or ebb and flood recirculating systems. These systems offer accurate watering and great flexibility in crop configuring and spacing. They can also reduce or eliminate problems associated with run-off from greenhouses. However, subirrigation systems increase the risk of spreading soil borne diseases between plants within a production unit.
An abundant supply of good irrigation water is the first step to producing high quality greenhouse crops. Small amounts of impurities are found in almost all water sources, and while some of these may be beneficial, others can be harmful to plant growth. It is even possible for irrigation water to be too “pure”, leading to undesirable instabilities in pH. Therefore, every greenhouse fertilizer program should start with a complete irrigation water quality analysis for initial nutrient, salt, pH, and alkalinity levels.
Factors Affecting Water Quality Ionic Content When elemental compounds dissolve in water, they separate, or dissociate into their respective ions. Therefore, sodium bicarbonate is present in its dissolved state as sodium ions (Na+) and bicarbonate ions (HCO3
-). Ions having a positive charge are called cations and those having a negative charge are called anions. In any solution, the total number of anions tends to balance with the total number of cations. The actual balance between anions and cations is not the most important factor in determining the quality of an irrigation source. The relative amounts of ions in the water and which of those ions tend to predominate is more important.
Hard Water and Soft Water Pure distilled water is said to be very soft since it contains no dissolved minerals. Likewise, rainwater and most surface water supplies are soft because they contain relatively few minerals. However, soft water does not always mean the absence of minerals. Highly mineralized water supplies where sodium is the predominant cation are also said to be soft. Soft water will produce a soap lather easily. Hard water contains high amounts of dissolved calcium and/or magnesium and does not produce a soap lather easily. Although not as desirable for washing and cleaning purposes, hard water is usually preferable to high sodium soft water when it comes to greenhouse production. Some types of water softening equipment replace the calcium and magnesium in water with sodium. This makes them unsuitable as water treatment devices for greenhouse production.
Salinity The total amount of dissolved salts in a water supply constitutes its salinity. The cells of plant roots absorb water as a result of the difference in osmotic pressure between the cell contents and the surrounding soil water. Whenever the salinity of the soil solution is near to or greater than that of the cell contents, plants are unable to take up sufficient water for growth, cell pressure maintenance, and transpiration. Some species are more sensitive to high salts than others and mature plants can tolerate higher salts than young seedlings. Since liquid feeding programs add additional fertilizer salts to the irrigation water, it is usually desirable to start with water sources that have as low a salinity level as possible.
Non-fertilizer salts tend to accumulate in soils since they are not removed or used by the crop. Therefore, water sources with a high salinity content of non-fertilizer elements may require heavy leaching to reduce salt build-up in the growing media. This can lead to wasting of fertilizers and unacceptable levels of greenhouse run-off. High salinity water sources are less suited for use in sub-irrigated or recycled systems. When used in misting systems, highly saline water can leave a residue on plants and mineral precipitates may cause clogging of emitters.
Salinity is usually measured as a determination of the electrical conductivity (EC) of a solution. Conductivity increases with salinity. The standard unit for measuring conductivity is the millisiemen
4 • Managing the Plant Environment Floriculture Production Guide

(mS). Another commonly used unit is the millimho (mmho) which is equal to the millisiemen (mS). Sometimes salinity values are reported in microsiemens (µS) or micromhos (µmmho) when the water is very pure. One µS is 1/1000th of a mS. Yet another commonly used unit of measurement for salinity is total dissolved salts (TDS), measured in parts per million (ppm). An EC reading of 1 mS is equal to about 666 ppm TDS.
Common Toxicity Problems sodium: high sodium levels can contribute to
salinity problems, interfere with magnesium and calcium availability, and cause foliar burns associated with poor water uptake and sodium accumulation in the tissues. The sodium absorption ratio (SAR) is an indication of the sodium hazard. Most labs now report SAR adj. (adjusted), which includes a variety of other chemical factors that are taken into account to more accurately assess the sodium hazard.
chloride: often associated with sodium since sodium chloride (table salt) is a common constituent of some water supplies, particularly well water. Levels above 140 ppm are considered toxic to plants. Some fertilizers also contain chlorides, such as potassium chloride.
fluoride: levels above 1 ppm may cause foliar problems on sensitive crops such as lilies and freesias. Flouride can accumulate in greenhouse media, therefore it is best to find water supplies as close to zero as possible. The small amount of fluoride that is applied to drinking water in some cities for dental health purposes does not usually pose a problem for horticulture (see the section on Fluoride Injury at the end of this chapter).
boron: although a necessary plant nutrient, boron may sometimes be present in quantities toxic for plant growth. High boron levels are commonly associated with alkaline soil formations in areas of low rainfall.
pH pH is a measure of the relative acidity (hydrogen ion concentration) in the water supply. It is influenced by alkalinity. The pH of the soil solution affects the relative availability of nutrients. Most greenhouse crops require a pH of about 5.5 to 6.5 in the growing medium. The pH of the irrigation source may influence medium pH depending on the buffering capacity of the medium (its ability to neutralize acids). In general, water with high alkalinity will
tend to raise medium pH. The amount of acid or base needed to change the pH of a water supply is determined by the alkalinity of the water. The purer the water the easier it is to change the pH. Water that is “too pure” may require the addition of a small amount of buffering agent, such as potassium bicarbonate, to stabilize the pH and prevent nutrient precipitation in the feeding solutions.
The pH of the growing media and water is one of the most important factors in production because it directly affects nutrient availability. Figure 3.1 shows that as you move from a pH of 4 to 7 the amount of calcium and magnesium available increases, while the amount of iron available decreases. This is why geraniums suffer from iron toxicity when the pH drops below 5.8.
Measuring pH is a relatively quick test that can prevent many nutritional problems. Tests should be carried out on a regular basis because many factors influence media pH. Some common factors that raise media pH include lime, alkaline water, root activity, and several nutrients (e.g. calcium, potassium and magnesium). Some factors that lower media pH include the decay of organic matter, acid forming fertilizers, and acidic water.
Alkalinity The alkalinity of a water source is more significant than its pH because it takes into account the main constituents that affect its ability to influence media pH. An alkalinity test measures the combined amount of carbonate (CO3
=), bicarbonate (HCO3-),
and hydroxyl (OH-) ions. Alkalinity test values are usually reported in ppm (parts per million) or meq (mille-quivalents per litre) of calcium carbonate (CaCO3). A pH measurement, on the other hand, only indicates the relative concentration of hydrogen ions, and provides essentially no information on how the water will affect medium pH. Alkalinity rises as the amount of dissolved carbonate and bicarbonate rises. Since bicarbonate and carbonates will neutralize acidity, and acids, in turn, will neutralize them, it is possible to correct water and media pH once the alkalinity is known. Highly alkaline water can be adjusted by adding phosphoric, sulfuric, or nitric acids. This will tend to reduce media pH over time. Similarly, overly acidic conditions can be corrected by increasing the alkalinity of the irrigation water.
Floriculture Production Guide Managing the Plant Environment • 5
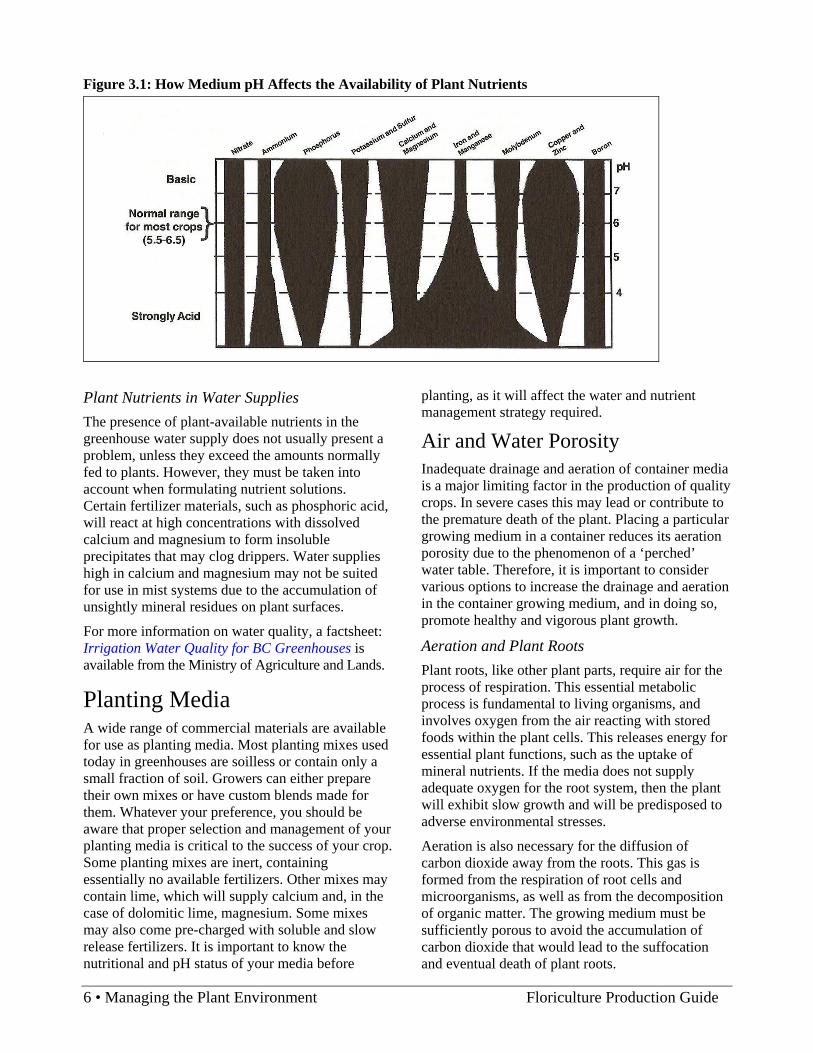
Figure 3.1: How Medium pH Affects the Availability of Plant Nutrients
Plant Nutrients in Water Supplies The presence of plant-available nutrients in the greenhouse water supply does not usually present a problem, unless they exceed the amounts normally fed to plants. However, they must be taken into account when formulating nutrient solutions. Certain fertilizer materials, such as phosphoric acid, will react at high concentrations with dissolved calcium and magnesium to form insoluble precipitates that may clog drippers. Water supplies high in calcium and magnesium may not be suited for use in mist systems due to the accumulation of unsightly mineral residues on plant surfaces.
For more information on water quality, a factsheet: Irrigation Water Quality for BC Greenhouses is available from the Ministry of Agriculture and Lands.
Planting Media A wide range of commercial materials are available for use as planting media. Most planting mixes used today in greenhouses are soilless or contain only a small fraction of soil. Growers can either prepare their own mixes or have custom blends made for them. Whatever your preference, you should be aware that proper selection and management of your planting media is critical to the success of your crop. Some planting mixes are inert, containing essentially no available fertilizers. Other mixes may contain lime, which will supply calcium and, in the case of dolomitic lime, magnesium. Some mixes may also come pre-charged with soluble and slow release fertilizers. It is important to know the nutritional and pH status of your media before
planting, as it will affect the water and nutrient management strategy required.
Air and Water Porosity Inadequate drainage and aeration of container media is a major limiting factor in the production of quality crops. In severe cases this may lead or contribute to the premature death of the plant. Placing a particular growing medium in a container reduces its aeration porosity due to the phenomenon of a ‘perched’ water table. Therefore, it is important to consider various options to increase the drainage and aeration in the container growing medium, and in doing so, promote healthy and vigorous plant growth.
Aeration and Plant Roots Plant roots, like other plant parts, require air for the process of respiration. This essential metabolic process is fundamental to living organisms, and involves oxygen from the air reacting with stored foods within the plant cells. This releases energy for essential plant functions, such as the uptake of mineral nutrients. If the media does not supply adequate oxygen for the root system, then the plant will exhibit slow growth and will be predisposed to adverse environmental stresses.
Aeration is also necessary for the diffusion of carbon dioxide away from the roots. This gas is formed from the respiration of root cells and microorganisms, as well as from the decomposition of organic matter. The growing medium must be sufficiently porous to avoid the accumulation of carbon dioxide that would lead to the suffocation and eventual death of plant roots.
6 • Managing the Plant Environment Floriculture Production Guide

A lack of aeration caused by poor drainage leads to a wet, waterlogged, oxygen starved condition that can result in root death. The presence of dead roots predisposes the plant to attack by soil borne pathogens, such as Phytophthora and Pythium, which are responsible for root rots and damping-off.
Porosity Aeration is a function of soil porosity. Growing media consists of solid particles, such as peat or bark, as well as the pore spaces both between and within these particles. These pore spaces are categorized into either large pores, which are normally filled with air, or smaller pores that can be either air or water filled. Although increasing aeration results in a corresponding decrease in water retention, this is the preferred situation. It is usually better to irrigate more frequently than to not have sufficient aeration. However, planting media that retains very little water will cause problems with post harvest care of potted plants. A good compromise is to use a growing medium that has sufficient large pore spaces to allow for good aeration, while still having high water holding capacity.
The best way to achieve good aeration is to select media ingredients of sufficiently large particle size. In general, there should be a good proportion of coarse textured components in the size range of 1 to 2 mm. For example, a good quality, fibrous sphagnum peat moss should be used rather than a more decomposed, less fibrous type of peat moss, like hypnum. Additional components such as perlite are often added to increase the overall air porosity.
Stability The stability of a planting mix needs to be considered. Although sawdust initially gives a mix a high aeration porosity, its rapid decomposition may reduce the porosity over time, as well as tie up nutrients during decomposition. Peat, composted bark, and coco peat products tend to be quite stable organic amendments. Inorganic components such as perlite and vermiculite have the advantage of not being subject to decomposition, although vermiculite can lose much of its porosity through compaction.
Perched Water Table Placing a growing medium in a container creates the phenomenon of a “perched” water table where all pore spaces at the bottom of the container are filled with water. A perched water table cannot be
corrected by increasing the number of drainage holes in the container. This is usually not a problem in a field situation, since the water table is usually relatively deep, as opposed to being almost at the surface in a shallow plug tray.
The only way to reduce the effects of a perched water table is to increase the depth of the container. For any planting mix, deep containers result in greater overall gravitational drainage and higher media air porosity. The impact of container depth on media properties is demonstrated by the data in Table 3.3. Air porosity is significantly higher in a 6 inch pot (21%) relative to a shallow plug tray (3%).
Table 3.3: The Effect of Container Size on Media Aeration 6"
Pot 4" Pot
BP Cell
Plug Tray
% Air Space 22% 15% 9% 3% % Water Space 49% 56% 62% 68% % Solid Material 29% 29% 29% 29%
Therefore, increasing the depth of the container will increase the drainage and aeration. In many cases economics and aesthetics preclude the use of deeper containers. But where saturated media can be a problem, such as during propagation, deeper containers should be considered. This may make particular sense with difficult to establish species where excess water is not immediately taken up by roots. The increase in aeration and the concurrent reduction in water, particularly at the surface, can also help to reduce the presence of moisture dependent pests like algae, liverworts, moss, and fungus gnats.
Improving Aeration This can be achieved by using sufficiently coarse media components and deeper containers where feasible. In addition, growers should avoid:
• using finer components that may plug up the larger pore spaces,
• overmixing the media, which could reduce the particle size of components,
• irrigation and handling practices that may compact growing media, and
• using media components that may decompose and result in the loss of large pore spaces.
Floriculture Production Guide Managing the Plant Environment • 7

On-site Testing of Planting Media Nutritional problems are a primary cause of economic losses associated with poor crop quality and yield. Two of the most important indicators of nutrient availability and water quality, pH and total soluble salts, are easily monitored under greenhouse conditions. With routine testing of salts and pH, and occasional complete laboratory analyses, it is possible to eliminate almost all nutritional problems associated with the production of potted and cut flowers.
pH The pH of the growing medium and the irrigation source can affect the availability of nutrients in solution, and the health of root systems. Most plants have a relatively narrow range of preferred pH levels. The preferred range for most greenhouse crops grown in organic substrates is a pH of 5.5 to 6.5. Acid tolerant crops, such as azaleas, are usually grown at a pH of 5.0 to 5.5. Some crops are tolerant of a wide range of pH values, while others, such as geraniums require a relatively narrow range (pH 5.8 to 6.2). Although pH can be measured by chemical titration and with the use of color indicating litmus papers, an electronic pH meter provides the most accurate and practical means of on-site testing.
pH Meters Portable pH meters suitable for greenhouse use range in price from about $100 to $1,000. In general, the accuracy and longevity of the meter increases with the amount paid. Most meters use a remote semi-permeable glass electrode filled with a solution of mercury or silver chloride. In some cases the electrodes are refillable, which extends their useful life. Whenever an electrode cannot be accurately calibrated between two standard buffer ranges, there is usually a problem with the electrode, or the batteries are low. These instruments must be handled and stored carefully, and the electrode end must usually be kept immersed in a liquid according to manufacturer’s directions. A new type of pH meter is now available that uses a flat electrode which does not require wet storage. Other features to look for in a pH meter are automatic temperature compensation and calibration. Digital readouts are now standard in most meters. The level of accuracy needed for horticulture is to one decimal point, i.e., pH 6.2.
Electrical Conductivity (EC) Fertilizers and other dissolved salts change the ability of a solution to conduct electricity. Pure water is not a particularly good conductor, but as the salinity level increases, its conductance also increases. Salt meters (conductivity meters) are used to measure the electrical conductivity of solutions. This provides a rough idea of the fertilizer content of the irrigation water and the media solution. One factor that must be kept in mind is that not all salts are fertilizers. Some water sources are high in nonfertilizer minerals that tend to increase the overall conductivity. So while EC measurements are a good indicator of relative fertility levels, particularly if measured regularly and tracked over time, it is important to establish the background mineral content of irrigation sources and to have an occasional complete mineral analysis performed on the media. Another point to remember is that different fertilizers have different salt indexes.
EC Meters Portable EC meters for use in horticulture range in price from about $120 to $1,000. The more expensive meters should last many years, although the electrode sensors may need replacement periodically. There are a variety of inexpensive ‘pen type’ meters that are quite accurate and convenient to use for spot checking irrigation solutions and media salts. Standard solutions are available for calibrating the meters. Some features to look for are auto calibration, auto temperature compensation, easy to read displays, and probe replaceability. EC meters usually provide a readout in millimho’s (mmho) or millisiemens (mS). They are numerically identical units. Some autoranging meters may provide a readout in micromho’s (µmho) or microsiemens (µS). These units are 1/1000th of a millimho or millisiemen respectively.
Testing Methods For irrigation water and fertilizer solutions, testing is a straightforward matter of monitoring the pH or EC directly. Follow the instructions provided with the meter and be careful to rinse the electrode surfaces after use and store the instruments properly. Buffered calibrating solutions are usually supplied with pH meters, and standard salt solutions are available to check and adjust the accuracy of EC meters. These calibrations should be performed often.
8 • Managing the Plant Environment Floriculture Production Guide

Water and Nutrient Solutions Well or tap water should be checked before fertilizers are added to determine any background levels of salinity and the initial pH. It is important to allow tap water to sit for about 60 minutes when measuring pH. This allows any carbon dioxide gas dissolved in the water to come to equilibrium with the air. Dissolved C02 will tend to lower pH readings. If the water shows any substantial salt content (0.5 mS or above), an irrigation water quality analysis should be performed by a testing laboratory to determine the background mineral content. The report should include the elemental content, including the level of bicarbonates. Once a background EC is known, it must then be taken into account when measuring fertilizer content with a salt meter. For instance, if your water has an initial EC of 0.8 mS, then you will need to subtract this amount from your fertilizer solution readings to determine the actual fertilizer content of your nutrient solutions. This is important whenever you are checking the accuracy of injectors. Most commercial soluble fertilizers will indicate the EC values on the bag for various feeding concentrations. In order to check the calibration of your injectors, you must subtract the background EC levels from your measured fertilizer EC values after injection.
Record Keeping Growing media should be tested for salts and pH on a routine basis. Testing should begin before the crop is planted and be performed at least every two weeks. It’s important to keep records so that you can chart pH and EC levels over time. Graphically charting your pH and EC values will show whether the pH and EC are rising, falling, or staying steady. This is at least as important as the actual reading. It will enable you to make informed decisions about fertilizer concentrations, watering frequencies, and leaching rates. Growers who use routine media testing often can produce superior crops with less fertilizer and lower leaching rates, thereby reducing waste and the possibility of environmental contamination.
Collecting a Media Sample There are two strategies available for media sampling. First, you could take several samples and measure them individually. This would provide you with a good indication of the uniformity of your watering and fertilizing program. If the results are dramatically different between pots or locations, it
might provide a clue to uneven growth or other crop problems. However, collecting and measuring 10 or more separate samples and measuring them individually can be very time consuming, and may not provide information that is any more useful than a representative or average sample. In any case, it is not practical to water and fertilize each plant individually therefore, the representative sample method is usually the one to use.
To obtain a representative sample it is necessary to combine several sub-samples to obtain an average value. Depending on the size of the crop, samples from about 10 or more pots or growing bed locations are required. Combined samples should always be from within one distinct growing unit, environment, or irrigation zone. The samples should be obtained from uniform plants that are the same type, age, and in the same size container. Try to collect your samples at the same time between irrigations, i.e., just before the next watering. Avoid sampling the top 2 cm of media since there are usually very few roots in this zone, and the salts tend to be higher due to evaporation of water from the soil surface. Salt accumulation on the surface of the media is most pronounced with subirrigation. Collect samples from the mid-range of the pot, making sure to include more than just the soil at the outside edge of the container. You can usually remove about 10% of the media without harming the plant. Fresh, moistened growing media can be used to replace the soil removed by your sample. Follow the same procedure for growing beds, by avoiding the top 2 cm and making sure that your sample is from the area of most active root growth. It is very important to be consistent in your sampling methods, so that your results will be accurate when tabulated over time. When all the sub-samples have been collected, they are placed in a clean container or bag and mixed thoroughly, taking care not to crush any controlled release fertilizer prills. The sample can then be sent in for professional analysis, or measured on-site.
Extraction Methods Only the media solution can be tested, and there is usually not enough of it to sufficiently immerse the EC or pH probes without adding water. Also, the EC in the growing media changes with moisture content, becoming more saline as the media dries. It is therefore necessary to add enough water to the sample to immerse the electrodes and to have comparable readings from one sampling date to another.
Floriculture Production Guide Managing the Plant Environment • 9

Over the years, several dilution and extraction methods have been devised. All have advantages and disadvantages, and all may provide different instrument readings. This often leads to confusion when trying to discuss or compare values obtained from different extraction methods.
Three methods are described in the factsheet: On-Site Testing of Growing Media and Irrigation Water available from your nearest Ministry of Agriculture and Lands office. The factsheet details the materials, and procedures for the 1:2 extraction, the saturated media extraction (SME), and the pour-through method. Other methods such as the 1:5, and the 1:1.5 dilution methods are described briefly, although they are not as commonly used.
Air Carbon Dioxide CO2 is essential for plant growth. Next to water it is the nutrient used in the greatest quantities by the plant. Plants will stop growing when the CO2 concentration in the air drops below 180 to 200 ppm. CO2 can be supplemented to 1,000 ppm whenever daytime ventilation is reduced. Supplemental CO2 will have a minimal effect on plant growth under very low light conditions.
Supplemental CO2 can be provided from pure liquid sources, or from the clean combustion of natural gas. There may be an economic advantage to supplemental CO2 at 350 to 400 ppm during periods of ventilation since crop canopy levels can drop to 200 to 250 ppm when the greenhouse is fully vented. CO2 burners can be placed overhead but it is often better to inject CO2 at the crop level. CO2 levels should be maintained with an automatic controller. Utilization of a time clock system does not provide precise control for optimum production. Some sensitive species may be damaged by CO2 levels above 2,000 ppm. Humans should not work in levels exceeding 5,000 ppm.
Humidity Control Adequate ventilation and air circulation can reduce the incidence of many foliar diseases. The humidity in the air is crucial to the health of plants. Humidity levels must often be reduced in greenhouses to avoid water condensation on leaves and flowers. High humidity levels can result in guttation and oedema. Guttation occurs in some species as a seepage of cellular fluids from the margins or edges
of leaves. Although guttation may not harm the plant, it can indicate a humidity problem. Oedema is a disorder brought on by wet conditions and high humidities. Cells rupture due to excessive turgor pressure (internal plant water pressure), creating calloused, corky spots on the undersides of leaves and sometimes on the stem. Ivy geraniums are especially sensitive. In addition, certain minerals such as calcium, which move only through the water conducting vessels, may not be translocated efficiently at high levels of humidity.
Humidity can be the most difficult environmental factor to control in greenhouses. Maintaining desired humidity levels can be a challenge for even the most sophisticated monitoring and control equipment. Humidity levels fluctuate with changes in air temperature, and plants are constantly adding water to the air through transpiration. Although automated controls have added a higher level of precision to the art of sensing and correcting humidity levels, it is still important to have a good understanding of the dynamics of atmospheric water vapour. There is a natural tendency with sophisticated equipment to just ‘set it and forget it’. However, lost yields, plant stress, disease outbreaks, and wasted energy are still as possible as ever unless we realize the limitations of our equipment and the implications of environmental control decisions.
A factsheet, Understanding Humidity Control in Greenhouses is available from the Ministry of Agriculture and Lands.
Dehumidification In greenhouses, it is usually desirable to avoid humidity levels near the dewpoint since free water condensing onto plant surfaces can promote the growth of disease organisms. Under saturated humidity conditions, plants cannot evaporate water from their leaves, so the uptake of nutrients such as calcium and boron may be limited. It is important to remember that when the relative humidity reaches 90%, it takes only a slight drop in temperature to reach the dewpoint. The problem is compounded by the fact that not all surfaces in the greenhouse are necessarily at the same temperature as the air. Any surfaces that are cooler than the air at high relative humidities will condense water vapour. This is why dripping can be such a problem with glazing materials during the heating season.
Monitoring and controlling the relative humidity of the greenhouse air is not always a guarantee that the dewpoint will be avoided. Local condensation
10 • Managing the Plant Environment Floriculture Production Guide

problems can still occur due to uneven heat distribution and the thermal mass of plant materials, particularly on plants with fruits and other large water-filled parts. This causes their surface temperatures to lag behind when sudden changes in air temperature occur. It’s the same reason a glass of ice water sweats when the relative humidity of the room air is well below the dewpoint. Cold surfaces within the greenhouse cool the air immediately surrounding them. If the cooling reaches the dewpoint temperature, water condensation occurs.
Excess humidity is usually more problematic in the spring and fall seasons when the weather is cool and moist. High humidities are not as much of a problem during freezing weather, since the relative humidity of the outside air is very low. Humidity levels in the greenhouse can be reduced by venting, which exchanges moist inside air with drier outside air, and by heating. In addition to reducing relative humidity levels, heating raises the temperature of plant surfaces and warms the incoming air. Glass panes and other cold surfaces in the greenhouse serve as natural dehumidifiers when the outside air is colder. However, this may cause problems with dripping, even though the relative air humidity is low.
Preventing Condensation Problems • Make sure your temperature and humidity
sensors are accurate and located in the crop canopy. Test your temperature sensors regularly against an accurate thermometer. Bring various humidity sensors to one spot to see that they are the same. Relative humidity can also be checked with a sling psychrometer.
• Use thermal screens at night to reduce radiative heat loss from plant surfaces.
• Avoid sudden temperature elevations at sunrise by programming a gradual pre-dawn temperature rise and dehumidification period. (Sudden temperature drops can cause condensation problems as well, particularly on cold glazing materials as the capacity of the air to hold water decreases. However, in this case, thermal lag should prevent condensation and disease on plant surfaces, at least temporarily.)
• Place radiant heat sources near the crop to keep plant surfaces as close as possible to or slightly warmer than air temperatures.
• Use horizontal air flow fans or poly tubes to maintain even temperatures throughout the crop.
• Use a combination of venting and heating to reduce excessive humidities.
• Start dehumidifying at about 85% RH. Relative humidities above this level are not easily managed without an increased risk of condensation, disease problems, and nutrient uptake interference due to inactive plants (lack of transpiration).
Raising the Humidity Although dehumidification is sometimes expensive, it is usually easier to reduce humidity levels than to increase them. Raising humidity levels without creating excessive free water requires some sort of evaporative device such as misters, fog units, or roof sprinklers, all of which add water vapour to the air, or screens that help hold in the water that is being evaporated from the plant canopy.
Evaporative devices accomplish three things. First, they cool the air, raising the humidity and relieving stress on the crop. Second, they add water vapour to the air, further increasing the relative humidity. Third, they reduce the vapour pressure deficit which is the force that evaporates water from the leaves. Screens may also reduce leaf temperatures and help to trap the large amount of water that the plants are evaporating. Evaporative cooling and screening are often used together. When humidifying under sunny conditions, some venting is necessary. Without venting the greenhouse would soon become a steam bath. Venting is necessary to introduce fresh, dry air that will evaporate more water and displace hot greenhouse air.
Plants, by themselves, can do an excellent job of cooling and humidifying a greenhouse. Evaporative cooling equipment works with the plants, helping relieve transpirational stress and allowing them to grow at optimum rates. The benefits of maintaining a humidification set-point include better plant quality, faster cropping, and lower disease and insect problems.
Fogs, Mists, Roof Sprinklers, and Pan & Fan Systems Many evaporative cooling and humidifying systems are available. They add water vapour to the air, and may subsequently reduce the amount of water that the plants need to transpire. Systems should be sized to permit a maximum vapour pressure deficit of 7 grams/m3 (11 millibars) when operated in conjunction with a transpiring crop.
Roof sprinklers add water vapour and cool the incoming air. On large ranges, it is possible to decrease the temperature by 3 to 5oC and increase the humidity 5 to 10%. Pad and fan systems consist of porous wet pads at the inlet end of a fan
Floriculture Production Guide Managing the Plant Environment • 11
ventilated greenhouse. As the exhaust fans draw air through the wet pads, water evaporates to cool and humidify the air. Temperatures tend to be coolest nearer the fans and hottest at the exhaust when using these systems. Mist and fog systems produce tiny water droplets that evaporate, thereby cooling and humidifying the greenhouse air.
Points to Remember About Humidification • Plants are the primary humidifiers/coolers of
greenhouse air. Ensure adequate irrigation for evapotranspiration needs on hot days.
• Greenhouses with sealed floors tend to be drier, since evaporation from the soil is prevented.
• Heat and humidity levels are easier to manage in taller greenhouses.
• If wetting of floors or foliage occurs, stop humidifying in the late afternoon or early evening to allow enough time for drying.
• Evaporative cooling depends upon the total amount of water that can be evaporated. Evaporative cooling systems must therefore be engineered with water output needs in mind.
• Evaporative cooling requires good ventilation rates. It is the evaporative process that cools the air. Fresh, dry air must be continually introduced and warm, humid air exhausted.
• To measure leaf vapour pressure deficit, accurate sensors for leaf and air temperature, as well as an accurate relative humidity sensor, are required.
Plant Nutrition and Fertilization A plant’s health and performance is dependent on the availability of the necessary macronutrients (e.g. nitrogen, phosphorus, potassium, calcium, magnesium, and sulphur), and the micronutrients (e.g. iron, boron, manganese, zinc, copper, molybdenum, and chlorine) (Table 3.4). Some crops require more of certain elements than others. For example, poinsettias are known to require molybdenum in higher quantities than most other crops. Micronutrients, especially copper, molybdenum, and boron, can reach toxic levels fairly quickly if too much is applied.
Nutrient deficiencies often result in slow growth and poor leaf shape or colouration. Excess nitrogen produces soft leaf tissues that are more susceptible to foliar diseases such as Botrytis. Chrysanthemum leafminers appear to be attracted to plants grown with high nitrogen levels. Nutritional deficiencies or excesses may be avoided by checking feeding
formulas and verifying that all of the required elements are available in the correct quantities. Ensure that the correct amounts of fertilizers are incorporated into potting mixes. A soil test may be necessary. A simple test of pH and conductivity can help indicate if soil conditions are adequate. Tissue analysis can be used to determine the levels of elements actually present in a plant and to verify fertilizer imbalances.
Table 3.4: Essential Elements for Plant Growth From Air & Water
Macronutrients Micronutrients
Oxygen* Nitrogen Iron Carbon* Phosphorus Manganese Hydrogen* Potassium Boron Calcium Copper Magnesium Zinc Sulphur Molybdenum Chlorine** * Oxygen, carbon, and hydrogen are assimilated from the
air and water and are not normally considered under the heading of plant nutrition. All other nutrients are absorbed primarily through the root system.
**Chlorine is required in minute quantities and is not normally applied intentionally. It is usually available in quantities far in excess of plant needs as chlorides in water supplies and in various fertilizer compounds.
Commercially prepared ‘complete feed’ fertilizers contain macro- and micronutrients. Generally the micronutrients in the mix will be sufficient to produce a good crop. Iron, especially if the media has a pH greater than 6.5, may need to be supplemented. These fertilizers often do not contain calcium, sulphur and magnesium in sufficient levels to satisfy plant needs. Therefore, premixed fertilizers may have to be supplemented with calcium nitrate and Epsom salts or magnesium nitrate unless calcium, magnesium, and sulphur are available from other sources. Dolomitic limestone in the media will also supplement calcium and magnesium levels, and gypsum (calcium sulphate) will supply calcium and sulphur. Complete feed fertilizers have been introduced that contain higher levels of calcium, magnesium, sulphur, and micronutrients, thereby reducing the need for supplements. See Appendix B, for more information on liquid fertilizers.
Tables 3.5 and 3.6 list some of the more common symptoms of plant nutrient deficiencies and toxicities. Table 3.7 shows how the availability of nutrients varies with other nutrients and with changes in pH. Use the three tables together when analyzing potential nutritional problems.
12 • Managing the Plant Environment Floriculture Production Guide

Table 3.5: Generalized Plant Nutrient Deficiency Symptoms Symptoms Deficient Nutrient
Stunting of Shoot Tips Young leaves are thick, leathery and chlorotic; stems are brittle; “Witch’s
broom” appearance; poor flowering Boron ⇒
Young leaves chlorotic or distorted (crinkled, strap-like, downward curling
of leaf tips); roots may become short, stunted and thick; weakened stems ⇒ Calcium
Wilting and dieback of shoot tips; poor pigmentation ⇒ Copper Interveinal Chlorosis
A. Young leaves
Veins usually remain distinctly green; chlorosis progresses to older leaves; leaves may appear white; twig dieback
Iron ⇒
Gradation of colour from yellow to dark green at the midribs, often not a sharp distinction between yellow and green areas; leaves may develop brown or purple spots, and become necrotic
Manganese ⇒
Terminal growth stunted, forming a rosette Zinc ⇒ B. Older leaves
Upward curling along leaf margins; mid-rib areas remain green ⇒ Magnesium Overall Leaf Chlorosis
A. Occurs first on young leaves
Associated with leaf wilting ⇒ Chlorine Stunting and lack of vigour; distorted ‘whiptail’ leaves or leaf scorch ⇒ Molybdenum Slow, spindly growth; leaves may turn beige Sulphur ⇒
B. Occurs first on older leaves Leaves may become necrotic; stunted, slow, spindly growth Nitrogen ⇒ Plants Dark Green with Purple Coloration of Older Leaves
Slow growth; stunted plants; older leaves turn chlorotic, then necrotic Phosphorus ⇒ Necrotic Spots on Margins or Tips of Older Leaves
Weak stems and stalks that fall over easily; slow growth; small flowers ⇒ Potassium
Table 3.6: Generalized Plant Nutrient Toxicity Symptoms Element Toxicity Symptoms Ammonium Nitrogen
• Wilted appearance of older leaves, margins of older leaves curl, may become chlorotic and eventually necrotic, root tips may burn.
• Factors contributing to ammonium toxicity include: using high ammonium based fertilizers when soil temperatures are below 15oC, low light levels, overly saturated media or when soil pH is below 5.5.
Iron • Chlorotic and necrotic speckling - common on geraniums and marigolds. • Factors contributing to iron toxicity include: over feeding of iron nutrients and
low pH. Manganese • Chlorosis and death of the growing terminal.
• Some sawdusts may contain toxic levels of manganese. • Factors contributing to manganese toxicity include: oversteaming and low pH.
Boron • Blackening and death of the growing terminals. • Marginal chlorosis or necrosis of older leaves. • Factors contributing to boron toxicity include: excessive amounts in irrigation
water, soil or fertilizers; low pH.
Floriculture Production Guide Managing the Plant Environment • 13

Table 3.7: Nutrient Interactions with Other Nutrients and pH Availability as pH Element Excessive Amounts Inhibit
Falls Below 5.5 Rises Above 6.5 Nitrogen Potassium Ammonium Calcium, Copper increases Phosphorus Copper, Iron, Zinc, Boron decreases decreases Potassium Nitrogen, Calcium, Magnesium decreases Calcium Magnesium, Boron decreases increases Magnesium Calcium decreases decreases Sulphur decreases Iron Manganese increases decreases Manganese Iron, Molybdenum increases decreases Copper Manganese, Iron, Molybdenum increases decreases Boron increases decreases Zinc Manganese, Iron increases decreases Molybdenum decreases Sodium Calcium, Potassium, Magnesium increases
Plant Nutrients Most plants are capable of converting simple elements into more complex molecules such as sugars, starches, proteins, and lipids. Plants require carbon, hydrogen, oxygen, and several macro- and micronutrients for growth. These nutrients are described in Tables 3.8. Plants can assimilate some from the air, all the rest must be provided by either the media or the fertilizer program. Plants need nutrients in varying amounts.
Nutrient ratios are as important as the actual levels in the media. Some nutrients will interfere or promote the uptake of other nutrients. For example, the calcium:magnesium ratio should be maintained at 1:0.4 for optimum uptake of both nutrients. The ratio of some nutrients will influence the growth of the plant. For example, a nitrogen:potassium ratio of 1:1 will generally produce normal growth and height development, whereas a nitrogen:potassium ratio of 5:8 will often produce darker, shorter plants.
Another principle to consider is that plants which are active in vegetative growth will require more calcium and nitrogen, while plants that are actively flowering with little growth will require more phosphorus and potassium.
Tissue Analysis Tissue analysis is a method to determine nutrient imbalances within a plant. The technique is an excellent diagnostic tool when used to compare
healthy and “poor” growth. Based on the results, corrective actions can be implemented. Foliar feeding can be effective as a short-term solution for micronutrient deficiencies. But it is not effective for macronutrient deficiencies, since the amount of fertilizer required to correct the deficiency is more than can be supplied.
Correct sampling is important. Before collecting a sample, contact the lab for advice on how to collect a good tissue sample. The following is a basic guide to taking plant tissue samples:
• Nutrient levels vary widely with tissue age. The general rule is to sample recently matured leaves.
• Submit a 500-gram sample of leaf tissue. • Sometimes the damaged portion of the leaf is
very small, such as with marginal necrosis. If the entire leaf was analyzed, the nutrient imbalance in the leaf margins could be masked due to nutrient levels in the rest of the leaf. In such cases, it is recommended to only collect tissue from the damaged portions of the leaf.
• Collect as little woody material as possible, since it is relatively low in nutrients and will reduce the nutrient levels detected in the sample.
• Rinse foliage in clean water if it is dirty, otherwise submit as is.
• Samples should be stored and shipped in a paper bag or box.
14 • Managing the Plant Environment Floriculture Production Guide
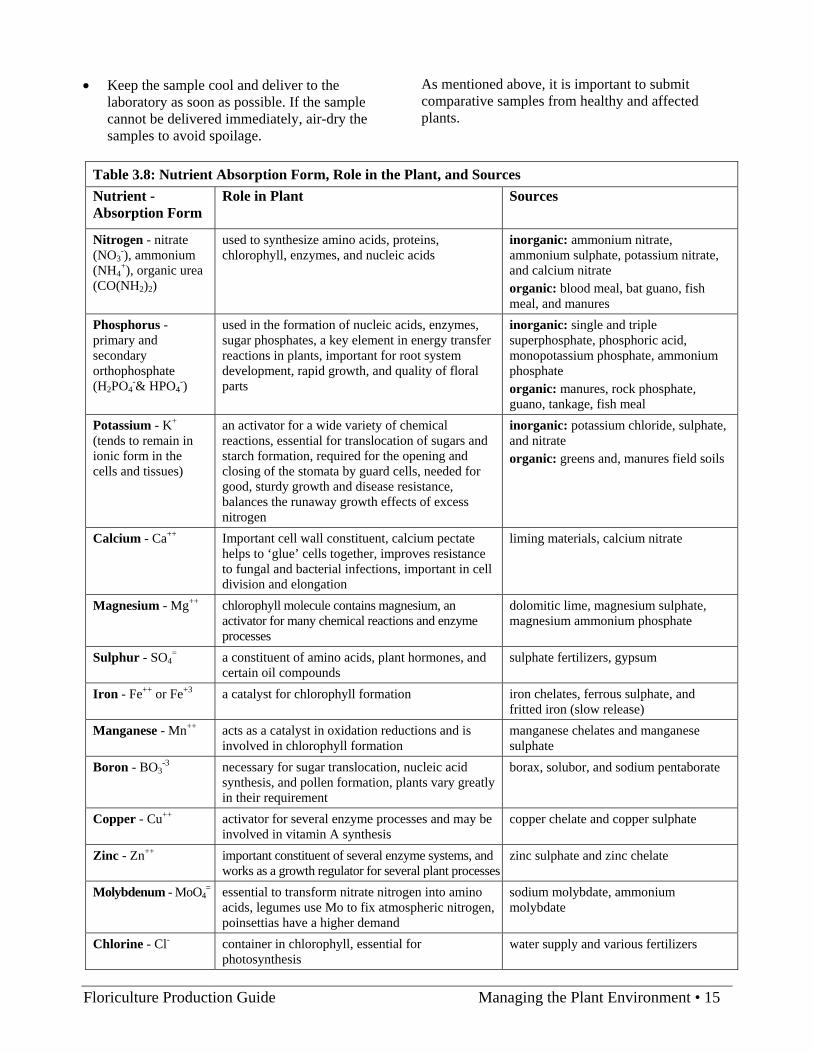
• Keep the sample cool and deliver to the laboratory as soon as possible. If the sample cannot be delivered immediately, air-dry the samples to avoid spoilage.
As mentioned above, it is important to submit comparative samples from healthy and affected plants.
Table 3.8: Nutrient Absorption Form, Role in the Plant, and Sources Nutrient - Absorption Form
Role in Plant Sources
Nitrogen - nitrate (NO3
-), ammonium (NH4
+), organic urea (CO(NH2)2)
used to synthesize amino acids, proteins, chlorophyll, enzymes, and nucleic acids
inorganic: ammonium nitrate, ammonium sulphate, potassium nitrate, and calcium nitrate organic: blood meal, bat guano, fish meal, and manures
Phosphorus - primary and secondary orthophosphate (H2PO4
-& HPO4-)
used in the formation of nucleic acids, enzymes, sugar phosphates, a key element in energy transfer reactions in plants, important for root system development, rapid growth, and quality of floral parts
inorganic: single and triple superphosphate, phosphoric acid, monopotassium phosphate, ammonium phosphate organic: manures, rock phosphate, guano, tankage, fish meal
Potassium - K+ (tends to remain in ionic form in the cells and tissues)
an activator for a wide variety of chemical reactions, essential for translocation of sugars and starch formation, required for the opening and closing of the stomata by guard cells, needed for good, sturdy growth and disease resistance, balances the runaway growth effects of excess nitrogen
inorganic: potassium chloride, sulphate, and nitrate organic: greens and, manures field soils
Calcium - Ca++ Important cell wall constituent, calcium pectate helps to ‘glue’ cells together, improves resistance to fungal and bacterial infections, important in cell division and elongation
liming materials, calcium nitrate
Magnesium - Mg++ chlorophyll molecule contains magnesium, an activator for many chemical reactions and enzyme processes
dolomitic lime, magnesium sulphate, magnesium ammonium phosphate
Sulphur - SO4= a constituent of amino acids, plant hormones, and
certain oil compounds sulphate fertilizers, gypsum
Iron - Fe++ or Fe+3 a catalyst for chlorophyll formation iron chelates, ferrous sulphate, and fritted iron (slow release)
Manganese - Mn++ acts as a catalyst in oxidation reductions and is involved in chlorophyll formation
manganese chelates and manganese sulphate
Boron - BO3-3 necessary for sugar translocation, nucleic acid
synthesis, and pollen formation, plants vary greatly in their requirement
borax, solubor, and sodium pentaborate
Copper - Cu++ activator for several enzyme processes and may be involved in vitamin A synthesis
copper chelate and copper sulphate
Zinc - Zn++ important constituent of several enzyme systems, and works as a growth regulator for several plant processes
zinc sulphate and zinc chelate
Molybdenum - MoO4= essential to transform nitrate nitrogen into amino
acids, legumes use Mo to fix atmospheric nitrogen, poinsettias have a higher demand
sodium molybdate, ammonium molybdate
Chlorine - Cl- container in chlorophyll, essential for photosynthesis
water supply and various fertilizers
Floriculture Production Guide Managing the Plant Environment • 15

Table 3.9: Typical Tissue Analysis Values of Representative Floriculture Crops* Crop Nitrogen Phosphorus Potassium Calcium Magnesium Azalea 1.50 - 2.50 0.20 - 0.50 0.50 - 1.50 0.50 - 1.50 0.25 - 1.00 Chrysanthemum 3.50 - 5.00 0.23 - 0.70 3.50 - 5.00 1.20 - 2.50 0.25 - 1.00 Poinsettia 4.00 - 6.00 0.30 - 0.50 1.50 - 3.50 0.70 - 2.00 0.30 - 1.00 Rose 3.00 - 5.00 0.25 - 0.50 1.50 - 3.00 1.00 - 2.00 0.25 - 0.50 Snapdragon 3.08 - 5.00 0.30 - 0.50 2.00 - 3.00 1.00 - 1.50 *From: Agricultural Schedule of Services, Norwest Labs, March 2003
Pollution and Chemical Injury Pollution of soil, air, or water is an occasional cause of greenhouse and field grown plant disorders. Symptoms can sometimes be confused with those produced by plant pathogens.
Some pollutants that may cause problems are: sulphur dioxide, ozone, PANs (peroxyacetyl nitrates), carbon monoxide, and ethylene. Small amounts of ozone can be produced from metal halide and very high output (VHO) fluorescent lights. This will not be a problem unless the growing structure has a low air exchange rate and lights are placed close to the foliage. Some brown flecking from ozone may appear on tender bedding plant seedlings grown close to VHO fluorescent lights.
Fluoride Injury Some crops, including calathea, cordyline, dracaena, freesias, gerberas, gladioli, lilies, maranta, tulips, and zebrina, are sensitive to fluorides that are sometimes found in water supplies, certain fertilizers (e.g. superphosphate), and soil aggregates (e.g. some perlites). Fluoride toxicity can be reduced if the soil pH is raised above 6.5.
Carbon Monoxide and Ethylene Carbon monoxide (CO) injury can occur when improperly vented or operating oil or gas heaters are used. CO is odourless and is a severe health risk to humans. Ethylene damage can be associated with incomplete combustion of propane or natural gas, or an excess of senescing or ripening vegetation. Operation of gasoline engines, such as those found on some sprayers, can produce injurious levels of both carbon monoxide and ethylene in a greenhouse. Symptoms vary from burning of flowers and foliage to twisted, deformed or ‘blind’ growth. Ethylene damage can also occur in storage and shipping when
sensitive crops are exposed to ethylene sources, such as combustion engines and ripening fruit.
Pesticide Injury to Crops Given the right circumstances, most pesticides can injure a plant. Greenhouse pesticides are formulated to be as safe as possible to target crops, but injury to certain varieties or species may occur.
Wherever pesticide recommendations are given in this publication, some of the more commonly damaged plants have been listed. This information is by no means complete, and growers are strongly advised to use caution when using unfamiliar materials, or familiar ones on new crops.
Spray injury can occur as marginal or complete leaf burning, leaf spots, flower spots, or distorted growth. Damage from drenched materials may also produce root death, resulting in the sudden wilting, and sometimes death of part or all of the plant.
Misuse is a frequent cause of pesticide damage to plants. Some common causes are over-application (too much chemical or too frequent), application to wet foliage (especially with fumigants), improper timing, and application to non-registered crops.
Few herbicides are labelled for flower crops. Misuse, spray drift, and residual damage from previously applied herbicides are a common cause of chemical injury (see Chapter 8).
The following precautions can minimize pesticide injury problems:
1. READ THE LABEL: be sure of the proper use, application rates, and methods of applying the product. Labels often specify varieties and species that may be harmed.
2. CHECK THE FORMULATION: the specific formulation of a pesticide (e.g. dust, wettable
16 • Managing the Plant Environment Floriculture Production Guide

powder, emulsifiable concentrate, etc.) can affect its safety to plants. If you use a new formulation of a familiar product, test it on a small group of plants first and monitor them for several days for signs of phytotoxicity.
3. TIMING: the state of plant growth is an important consideration for a pesticide application. Young seedlings and flower parts are generally more susceptible to injury than are vegetative phases of growth.
4. PLANT ENVIRONMENT: plants may be more susceptible to pesticide injury when under stress. This can occur when plants are under water stress. A good time to spray is often in the early morning or late afternoon. Pesticides should not be applied when temperatures exceed 25 - 30oC. Injury may also occur when pesticides are applied to wet foliage.
5. TESTING: before using a new material or mixture, or whenever a new pesticide is being used on a crop, it is a good idea to test it on a small number of plants. If no symptoms occur within several days, it is likely safe for crop use.
Mechanical Injury Plants can be severely damaged through mishandling. Seedlings are particularly susceptible to injury during transplanting, so care must be taken to avoid stem and root damage.
Improper watering practices such as too much pressure, or volume, and the application of excessively cold water can be very harmful. Fans can cause damage by ‘whipping’ and desiccating foliage.
Plants are usually capable of recovering from some degree of mechanical injury, however, it may serve as a starting point for further problems once infections set in on damaged tissues. By using common sense in avoiding injuries, it is possible to prevent a lot of further problems and expense.
Floriculture Production Guide Managing the Plant Environment • 17

Floriculture Production Guide Plant Growth Regulators • 1
Plant Growth Regulators 4 Plant growth regulators (PGRs) are used to control plant height and enhance flowering. Their main mode of action is to reduce stem growth (i.e. shorten internodes). Generally, they do not interfere with flower development, however late applications or high application rates can delay flowering and affect flower size. Most PGRs inhibit the production of gibberellic acid within plants, which are involved in cellular elongation. Without gibberellins, cell elongation is reduced and plants do not grow as tall. Used properly, plants will be more compact, and will have deeper green foliage and an improved post harvest life. Applying PGRs at the incorrect rate or time can result in stunted plants, delayed flowering,
or market unsuitability. This is especially true for the products that are effective at extremely low concentrations (e.g. Bonzi, Piccolo, and Sumagic).
The effectiveness of PGRs varies from cultivar to cultivar. Environmental and cultural factors will also influence the degree of height control obtained. Care should be taken when using PGRs for the first time or for the first time on a new cultivar. Always double check your calculations. When using a PGR for the first time, leave some untreated plants to evaluate its effectiveness. To improve subsequent years’ height control, keep records of the effects of PGRs on each plant cultivar. Table 4.1 gives an overview of the PGRs labelled for specific crops.
Table 4.1: Plant Growth Regulators Labelled for Specific Crops
Crop A-Rest B-Nine & Dazide
Bonzi & Piccolo
Cycocel Cycocel Extra
Florel Sumagic
Asters Azaleas Begonias Celosia Chrysanthemum Coleus Cosmos Fuchsia Geraniums Hydrangea Impatiens Ipomea Lantana Lilies, Easter Marigolds Pansy Petunia Poinsettias Salvia Snapdragon Vinca Viola Zinnias
2 • Plant Growth Regulators Floriculture Production Guide
For additional information, the North Carolina State University website contains numerous factsheets on how to control plant height with PGRs and by cultural practices.
Be sure to read labels and follow their
recommendations carefully.
Factors that Affect PGR Performance Environmental Conditions Growing conditions directly affect the
effectiveness and the amount of PGR needed. Rates may differ between winter and summer
months for the same crops because of the differences in environmental conditions.
Plants grown under high light conditions will need higher rates than those grown under low light conditions.
Stem elongation increases under high temperature conditions, so plants will need more PGRs than those grown under cool conditions.
Do not apply PGRs when temperatures exceed 22oC.
Production Practices Crops grown with tight spacing, high fertilizer
levels, and optimum irrigation may require higher PGR application rates.
Stressed, dry, or weak plants will be more susceptible to the effects of PGRs and more prone to damage.
A well-watered plant is better able to translocate PGRs.
A pine bark based media will reduce the efficacy of Bonzi, Piccolo, and Sumagic drenches.
Cultivar Differences Optimum rates vary with each plant species and
even by cultivar. Generally, short, slow growing varieties require
a lower rate than fast growing varieties.
Most labels suggest that growers do small-scale tests using low-label rates on each cultivar to gain experience in using the product and to determine the optimum rate under their growing conditions.
Keep records of cultivar response to PGR treatments to improve height control in subsequent years.
Timing Timing is critical; plants must be in the right
stage of growth to achieve the desired effects. Generally, plants must have sufficient foliage to prevent excessive stunting.
Drenches should only be applied to plants with well-developed root systems.
Base the application time on the stage of plant growth, rather than its age. Labels give general timing recommendations, but it is plant size that ultimately determines when to apply a PGR.
Applications late in the production cycle may result in reduced flower size or delayed flowering.
Application Techniques Uniformity and consistency are two key
components of application technique. Use precise spray techniques when doing foliar applications. This is essential for success with products that are active at extremely low concentrations, such as Bonzi, Piccolo, and Sumagic.
Double check application rate calculations. The correct rate is essential for success.
Do not tank-mix PGRs with any fertilizers, insecticides, or fungicides.
Sprayers should have a pressure gauge and pressure regulators for uniform spray distribution. A reliable output is crucial in delivering a uniform rate over the entire crop.
Sprayer nozzle size affects droplet size and spray dispersal. For consistent results, always use the same nozzle size.

Floriculture Production Guide Plant Growth Regulators • 3
A-Rest (ancymidol) (0.0264% a.i. = 0.264 g a.i. per L) Apply as a drench treatment to moist soil to control the height of greenhouse-grown potted chrysanthemums, lilies, and poinsettias. A short delay of two to five days in flower development may occur at the higher recommended treatment levels. Each 15 cm pot should be drenched with either 60 or 120 mL of the final solution. It is very important that the entire medium mass is uniformly
drenched. Table 4.2 outlines application rates and timing. Refer to the label for the amount to drench per container. Rates will vary with plant species, cultivar, timing, type of treatment, and growing conditions. Do not add a wetting agent.
See the label for complete information on using
this product.
Table 4.2: A-Rest Drench Application Rates and Timing
Crop Rate (ppm)* Timing
Chrysanthemums 2 – 8 Treat plants when 5 to 15 cm in height (approximately 2 weeks following pinch).
Lilies 2 – 8 Plants may be treated from emergence to 30 cm in height. For optimum results, treat plants when they are 5 to 15 cm tall.
Poinsettias 2 – 8 Apply at pinch to 4 weeks after pinch, or 8 to 12 weeks before finishing.
*Apply as a drench to moist soil only.
B-Nine & Dazide (daminozide) (85% a.i. = 850 mg a.i. per gram)
Apply as a foliar spray to control the height and enhance flowering of select potted ornamentals grown in a greenhouse or shade house. Daminozide is one of the easiest of the PGRs to use. It is very mobile in the plant, moving readily throughout the plant after application. Therefore, uniformity of spray application is not as critical as it is with some other PGRs. It is rapidly broken down in the media, so it is not effective as a drench. It provides a moderate level of height reduction and is often used in split applications.
See Tables 4.3 and 4.4 for dilutions, application rates, and timing. Do not apply to wilted plants. Plants should be well watered and the foliage should be dry when application is made. Do not use a wetting agent. Apply it when conditions favour slow drying, such as high humidity with little air movement, overcast conditions, or in the early morning or late evening. Once it dries on the leaf, very little additional product gets into the plant. It is readily washed off by overhead irrigation, thus it is recommended to not wet the foliage for 18 to 24 hours following application.
Do not apply with another pesticide or foliar fertilizer. Leaf burn can occur if tank-mixed or applied 7 days before or after the application of a copper-containing product.
See the label for complete information on using
this product.
Table 4.3: B-Nine WSG & Dazide 85 WSG Dilution Rates
Concentration Dilution (g/L)
ppm % Active Ingredient
1,500 0.15 1.8
2,500 0.25 3.0
3,750 0.375 4.5
5,000 0.50 6.0
7,500 0.75 9.0
10,000 1.0 12.0

4 • Plant Growth Regulators Floriculture Production Guide
Table 4.4: B-Nine & Dazide 85 WSG Application Rates and Timing
Crop Purpose Spray Rate (ppm)*
Timing Comments
Azaleas Enhance flower bud development on plants grown for greenhouse forcing
1,500 (apply twice at a 1-week interval) or 2,500 (1 application)
Apply following final shaping when new growth is 2-5 cm long.
May delay flowering of some cultivars.
Bedding Plants (asters, cosmos, marigolds, petunias, salvia, zinnias)
Height control 5,000 Apply when 4-5 cm of new growth has developed after transplanting or pinching (~2–3 weeks), or when plants start to stretch.
Chrysanthemums (potted, branched plants)
Height control 2,500 Two weeks after pinching, spray to run-off. Repeat in 3weeks, if necessary.
Tall varieties in small pots may require more frequent applications at the higher rate.
Chrysanthemums (potted, single stemmed plants)
Height control 5,000 Two weeks after planting, spray to run-off.
Chrysanthemums (cut)
To retard neck stretching
2,500 Two days after disbudding, spray the top 1/3 of the foliage to run-off.
Hydrangeas Height control of spring forcing growth
5,000 Apply when new growth has just started to unfold and 4-5 pairs of leaves are visible. Apply 2–4 weeks after the start of forcing but not later.
Poinsettias (pinched)
Height control 5,000 or 7,500 See the label for complete details.
Apply when new growth is 7–10 cm long and reapply in 2 weeks, if necessary.
Rate and number of applications vary with date of pinching or propagation.
Poinsettias (single stem)
Height control 5,000 or 7,500 See the label for complete details.
Apply 1–2 weeks after rooting. See label for second application date.
* apply just to the point of run-off.
Bonzi & Piccolo (paclobutrazol) (0.4% a.i. = 4 g a.i. per L) Use as a soil drench or foliar spray to control the height of select greenhouse-grown ornamental bedding plants in containers. When applied as a foliar spray, it is essential to achieve thorough and uniform spray coverage of the stems. Uneven coverage will result in uneven height control. Spray volume is important in application effectiveness; sprays should thoroughly wet plant stems. It is generally recommended to use high volume application equipment. A light, misting spray on the leaves will not result in good height control. However, do not spray to the point of excessive run-off because product contacting the soil will be taken
up by the roots, which will result in shorter than expected plants. Use lower rates and spray volumes in the early growth stages when leaves don’t cover the media surface to prevent the drench effect. Plants can be sprayed by area at a rate of 1-2 L/10 m2, depending on the stage of growth, or sprayed by individual plants. Refer to Tables 4.5, 4.6, and 4.7 for information on dilution and application rates. It is not necessary to add wetting agents. Spray drift can be a problem if crops that have significantly different application rates are grown closely together.

Floriculture Production Guide Plant Growth Regulators • 5
Table 4.5: Bonzi and Piccolo Dilution Rates
Concentration (ppm) Dilution (mL/L)
1 0.25
2 0.50
3 0.75
4 1.00
5 1.25
6 1.50
7 1.75
8 2.0
9 2.25
10 2.50
12 3.0
15 3.75
20 5.0
25 6.25
30 7.50
40 10.0
50 12.5
60 15.0
Paclobutrazol is readily absorbed by plant roots. The amount of chemical applied as a drench is more important than the volume of water used. Drenches should be applied to moist media and should deliver
the desired milligrams of growth regulator per pot. Media containing bark will reduce the effectiveness of the product when it is applied as a drench.
Paclobutrazol is extremely active at very low concentrations. Plant response to an application varies widely depending upon growing conditions, cultural practices, and cultivar. Short, slow growing cultivars require a lower rate than fast growing cultivars. Be sure of your calculations, volume measurements, and sprayer calibration. When in doubt, recalculate! Frequent agitation of the spray mixture is essential. It is recommended to conduct a test spray to determine the optimum application rate for a given cultivar and growing conditions. Keep spray records to improve height control in subsequent years. High application rates may delay flowering of impatiens and petunias.
See the label for complete information on using
this product.
Table 4.6: Volume of Drench Solution Applied per Container
Pot Diameter (cm)
Bonzi Drench Volume (mL)
Piccolo Drench Volume (mL)
10 60 - 80 60
12.5 - 90
15 120 - 140 120
20 180 - 200 300
25 - 740
Table 4.7: Suggested Bonzi and Piccolo Application Rates, Methods, and Volumes
Crop Rate (ppm)* Method Application Volume
Begonia (cellpack) 1 - 2 SPRAY 200 mL/m2
Celosia (cellpack) 20 - 40 SPRAY 200 mL/ m2
Coleus (cellpack) 20 - 40 SPRAY 200 mL/ m2
Geranium** (10-cm pot) 5 - 15 SPRAY 200 mL/ m2
Impatiens (plugs) 1 - 6 SPRAY 150 mL/ m2
Impatiens (cellpack) 6 - 12 SPRAY 150 mL/ m2
Petunia (cellpack) 30 - 60 SPRAY 200 mL/ m2
Petunia (10-cm pot) 0.5 - 1.0 DRENCH 60 mL/pot
Salvia (cellpack) 20 - 40 SPRAY 200 mL/ m2
*One application at full label rate or repeated applications at 7-10 day intervals at half label rates. **Geranium species are extremely sensitive to paclobutrazol treatment. Apply with caution.

6 • Plant Growth Regulators Floriculture Production Guide
Cycocel (chlormequat chloride) (11.8 % a.i. = 118 g a.i. per L) Use as a foliar spray or soil drench to control plant height and promote flowering in azaleas, geraniums, and poinsettias. Foliar sprays often result in phytotoxicity in the form of chlorotic spotting on leaves. Apply foliar spray to well watered, vigorously growing plants. Foliage should be dry at the time of application. Apply when conditions favour slow drying, such as high humidity with little air movement, overcast conditions, or in the early morning or late evening. See Tables 4.8, 4.9 and 4.10 for information on dilution, drench volumes, and application rates. Do not use Cycocel in combination with insecticides, acaricides, fungicides or fertilizers.
See the label for complete information on using
this product.
Table 4.8: Cycocel Dilution Rates
Concentration (ppm) Dilution (mL/L)
1,000 8.5
1,500 (1:80) 12.7
2,000 17.0
2,500 21.2
3,000 (1:40) 25.4
Table 4.9: Cycocel Soil Drench Volumes
Pot Diameter (cm) Drench Volume (mL)
6 to 8 * 55
10 85
13 110
15 170
20 220
*Two applications will be necessary to apply the recommended volume in 6 cm pots.
Table 4.10: Cycocel Application Rates and Timing Crop Purpose Rate and
Method Timing Comments
Azaleas Early flower formation and shaping
12 mL/L spray Apply following pinching or shearing when regrowth is 2-2.5 cm long. Repeat 1 week later.
May damage some cultivars (e.g. ‘Dawn’ or other Pericat varieties). Over-treatment may cause temporary leaf yellowing.
Azaleas, nursery stock
Prevent late season growth in nursery stock
19 mL/L spray Apply when plants have reached desired size after final pinch/shear. Repeat 1week later. If foliage becomes wet within 24 hours of treatment, repeat application.
May damage some cultivars. Over-treatment may cause temporary leaf yellowing and flower delay.
Geraniums, grown from seed in a greenhouse (Carefree only)
Height control 1 L/40 L (~3,000 ppm) applied as a soil drench
Apply 3 weeks after transplanting.
May cause chlorosis on leaf margins.
Poinsettias (red, pink, and white varieties)
Height control, stronger stems, and deeper foliage and bract colors
1 L/40 L (~3,000 ppm) applied as a soil drench
Apply when plants a have well established root system and their shoots are 2–4 cm long.
Most effective when applied during periods of active root growth. Do not apply after mid-October.
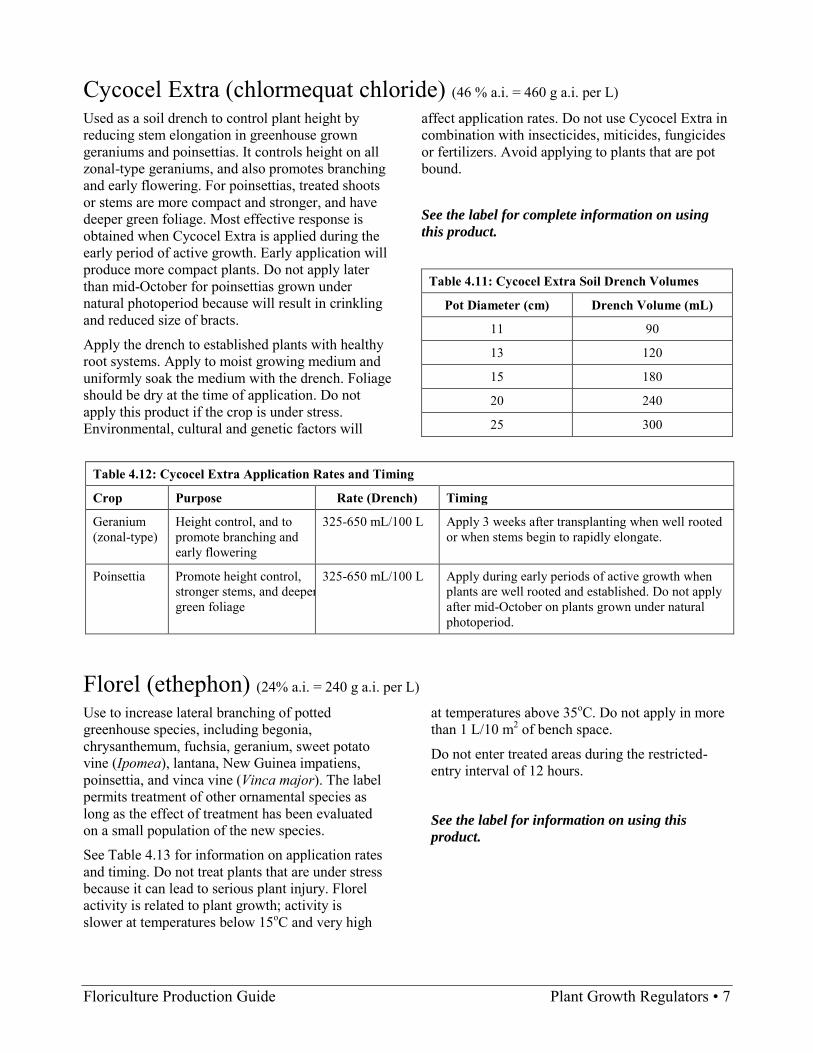
Floriculture Production Guide Plant Growth Regulators • 7
Cycocel Extra (chlormequat chloride) (46 % a.i. = 460 g a.i. per L) Used as a soil drench to control plant height by reducing stem elongation in greenhouse grown geraniums and poinsettias. It controls height on all zonal-type geraniums, and also promotes branching and early flowering. For poinsettias, treated shoots or stems are more compact and stronger, and have deeper green foliage. Most effective response is obtained when Cycocel Extra is applied during the early period of active growth. Early application will produce more compact plants. Do not apply later than mid-October for poinsettias grown under natural photoperiod because will result in crinkling and reduced size of bracts.
Apply the drench to established plants with healthy root systems. Apply to moist growing medium and uniformly soak the medium with the drench. Foliage should be dry at the time of application. Do not apply this product if the crop is under stress. Environmental, cultural and genetic factors will
affect application rates. Do not use Cycocel Extra in combination with insecticides, miticides, fungicides or fertilizers. Avoid applying to plants that are pot bound.
See the label for complete information on using
this product.
Table 4.11: Cycocel Extra Soil Drench Volumes
Pot Diameter (cm) Drench Volume (mL)
11 90
13 120
15 180
20 240
25 300
Table 4.12: Cycocel Extra Application Rates and Timing
Crop Purpose Rate (Drench) Timing
Geranium (zonal-type)
Height control, and to promote branching and early flowering
325-650 mL/100 L Apply 3 weeks after transplanting when well rooted or when stems begin to rapidly elongate.
Poinsettia
Promote height control, stronger stems, and deeper green foliage
325-650 mL/100 L Apply during early periods of active growth when plants are well rooted and established. Do not apply after mid-October on plants grown under natural photoperiod.
Florel (ethephon) (24% a.i. = 240 g a.i. per L) Use to increase lateral branching of potted greenhouse species, including begonia, chrysanthemum, fuchsia, geranium, sweet potato vine (Ipomea), lantana, New Guinea impatiens, poinsettia, and vinca vine (Vinca major). The label permits treatment of other ornamental species as long as the effect of treatment has been evaluated on a small population of the new species.
See Table 4.13 for information on application rates and timing. Do not treat plants that are under stress because it can lead to serious plant injury. Florel activity is related to plant growth; activity is slower at temperatures below 15oC and very high
at temperatures above 35oC. Do not apply in more than 1 L/10 m2 of bench space.
Do not enter treated areas during the restricted-entry interval of 12 hours.
See the label for information on using this
product.

8 • Plant Growth Regulators Floriculture Production Guide
Table 4.13: Florel Foliar Spray Application Rates and Timing
Crop Rate Timing Comments
New Guinea Impatiens 104 mL/100 L of water (250 ppm)
Apply in the evening or early morning. Do not exceed 4 applications. Stock Plants: apply on a 14-day interval. Do not apply for 2 weeks prior to cutting harvest. Finished Plants: apply 14 to 21 days after rooted cuttings are transplanted. Re-apply every 10 to 14 days. Do not apply for 6 to 8 weeks prior to bloom or planned sale.
Ensure a high soil temperature (21-23oC) and a low carrier pH (5.5) is maintained. Apply to thoroughly wet the foliage without run-off.
Begonia, Chrysanthemum, Fuchsia, Geranium, Ipomea, Lantana, Poinsettia, Verbena, and Periwinkle (Vinca minor)
208 mL/100 L of water (500 ppm) Use the 104 mL/100 L rate under low light conditions and on compact varieties as a strong growth regulating effect can occur under these conditions.
Sumagic (uniconazole-P) (0.055% a.i. = 0.5 g a.i. per L) Use as a foliar spray for height control of certain ornamental greenhouse grown plants (e.g. bedding plants, chrysanthemum, Easter lily, geranium, and poinsettia). Thorough and uniform spray coverage is essential. It will not move from one lateral shoot to another, so plants will become uneven if each lateral shoot is not uniformly sprayed. It is most effective when applied to the stems, so foliar sprays should concentrate on uniform stem coverage. Ensure that adequate spray volumes are used and use high volume application equipment. Light, misting sprays over leaf tops will not result in good height control. Do not spray to the point of excessive run-off. Excess product will move into the soil and will be taken up by the roots, resulting in shorter than expected plants. Use lower rates and spray volumes in the early growth stages when leaves don’t cover the media surface. See Tables 4.14 and 4.15 for more information on dilution and application rates. Apply uniformly at a rate of 2 litres of spray solution per 10 m2 of bench area. Use only on well-watered, vigorously growing plants. It is recommended to apply during the morning or late afternoon. Do not tank-mix with pesticides, fertilizers, or adjuvants.
Sumagic is extremely active at very low concentrations. Therefore, extreme caution must be exercised when measuring, diluting, and applying this growth regulator. If in doubt, recalculate! Excessive doses, either too high or too often, will result in severe growth retardation and possible adverse affects on flowering, plant appearance, and marketability. Avoid spray drift onto non-target crops. Do not use in greenhouses with soil floors
consisting of sand or sandy loam. Plant response varies widely depending upon growing conditions, species, and cultivar. It is very important to do small-scale trials on every cultivar using the low rate before any large-scale applications are made.
See the label for information on using this
product.
Table 4.14: Sumagic Dilution Rates
Concentration (ppm) Dilution (mL/L)
1 2
2.5 5
5 10
10 20
12.5 25
15 30
20 40

Floriculture Production Guide Plant Growth Regulators • 9
Table 4.15: Sumagic Foliar Spray Application Rates and Timing
Crop Rate (ppm)* Timing** Comments
Chrysanthemums 5–10 (= 10–20 mL/L)
Apply 7–14 days after pinching when the breaks are 3.8–5.0 cm long. A single repeat application can be made 7–21 days later.
Cultivars vary in their response. Ensure uniform coverage of all lateral shoots. Two applications may have more effect than the same amount of product used in a single treatment.
20 (= 40 mL/L) Do not make a repeat application.
Easter Lilies 3–30 (= 6–60 mL/L)
Apply when shoots are 7.5 cm tall. A second application (3–5 ppm) can be made if the first application was not > 5 ppm.
Avoid late season applications. Treated plants may need less water. Use with caution if you are controlling plant height with DIF.
Poinsettias 2–8 (= 4–16 mL/L)
When breaks are 3.5–5.0 cm in length (e.g. about 10–14 days after pinching). Up to 2 repeat applications can be made at 7 day intervals.
May reduce bract size and delay flowering. DO NOT APPLY AFTER THE INITIATION OF SHORT DAYS. Some cultivars are very sensitive.
Bedding Plants:
Celosia plumosa 2.5–10 5-10 cm height Do not apply more than twice.
Coleus spp. 5–10 2-5 cm height Do not apply more than once.
Impatiens walleriana or I. balsamina
2.5–10 3-10 cm height Do not apply more than 2 applications.
Marigold (Calendula officinalis, Tagetes erectus, T. patula, and T. signata)
5–15 5-10 cm height Do not apply more than twice.
Pansy (Viola wittrockiana)
1–6 3-5 cm height One application if >3 ppm rate; 2 applications if both are 1-3 ppm.
Periwinkle (Vinca minor) 1–3 5-10 cm height Do not apply more than twice.
Petunia hybrida 10–30 2-5 cm height Do not apply more than once.
Salvia splendens, S. horminum, S. farinacea, S. coccinea, and S. sclarea
1–10 3-10 cm height Do not apply more than twice.
Snapdragon (Antirrhinum majus)
10–30 5-10 cm height One application if >15 ppm applied; two applications if both are 10-15 ppm.
Viola tricolor, V. cornuta, and V. williamsii
1–5 2-5 cm height Do not apply more than once.
Ivy and Zonal Geraniums (Pelargonium hortorum, P. peltatum)
Seed-grown: 2–4
Apply when plants are 5-16 cm tall.
Do not apply more than twice.
Vegetative cuttings: 2–8
Apply once rooting is established.
*Apply 2 litres of solution per 10 m2 of bench area. **The second application should not be made earlier than 7 days after the first application.

Floriculture Production Guide Diseases • 1
Diseases 5 (updated June 2012)
Most microorganisms do not cause plant diseases. In fact, many are beneficial to plants because they increase nutrient availability by breaking down dead organic matter, or deploy antagonistic activity against plant pathogens and, thereby, protect plants. A number of microorganisms (e.g. certain fungi, bacteria, protists, viruses, viroids, phytoplasmas, and nematodes), however, do cause plant diseases.
There are three requirements for a plant disease to occur. First, the pathogen must be present. Second, the environmental conditions must be favourable for
disease development. Third, the plant must be susceptible due to age or genetic make-up. If a single requirement is lacking, the disease will not develop. Therefore, an integrated strategy is the most effective approach to manage diseases. This strategy focuses on preventing the introduction of disease causing microorganisms (pathogens), managing the environment to promote healthy plant growth, using resistant cultivars, monitoring for early signs of disease, practicing good sanitation, correctly identifying problems, and efficient use of fungicides.
Table 5.1: A Simplified Disease Diagnostic Key (symptoms and possible causes) PLANT Stem rot Decay of seed/seedlings Botrytis, Sclerotinia
damping-off (pre- and post-emergence) Erwinia chrysanthemi, Erwinia carotovora low temperatures viruses (tomato spotted wilt or impatiens necrotic spot) insect feeding on roots Necrotic stem lesions high salts and/or improper pH tomato spotted wilt virus or impatiens necrotic spot virus poor water management (too much or too little) chlorine damage (poinsettias - bleach) viruses (tomato spotted wilt or impatiens necrotic spot) Girdling of stem at crown
Stunting of plants Fusarium, Rhizoctonia root rot damping-off caused by Pythium or Phytophthora poor water management (too much or too little) LEAVES/FLOWERS viruses/viroids/phytoplasma Chlorosis (yellowing) insects or nematodes feeding on roots poor root growth (check for root rot) low fertility poorly drained medium high salts and/or improper pH low pH; nutrient deficiency
Poor rooting of cuttings Leaf reddening Pythium rot poor root growth (check for root rot) low rooting temperature low nutrition levels desiccation of leaves Raised corky spots
Wilting, dieback oedema caused by a saturated media & high RH Xanthomonas blight Leaf spots root rot caused by Fusarium, Pythium,
Phytophthora, Rhizoctonia or Thielaviopsis Botrytis, Alternaria, Ramularia, Septoria,
Xanthomonas or Pseudomonas Fusarium, Ralstonia, Verticillium tomato spotted wilt virus or impatiens necrotic spot virus poor root growth (check for root rot) miscellaneous fungi and protists viruses (tomato spotted wilt or impatiens necrotic spot) White, powdery growth poor water management powdery mildew (don‟t confuse with spray residue)
STEMS Corky pustules that are not the same colour as the leaf Cankers, branch dieback rust (can be red, brown, yellow, white or black)
Phytophthora ramorum (Sudden Oak Death) Small spots on petals Botrytis, miscellaneous fungal blights

2 • Diseases Floriculture Production Guide
Prevention is the best way to avoid diseases. (Refer to the section on sanitation in Chapter 1.) Use disease-free propagation material where possible, but remember that material advertised as „disease-free‟ is only free of specific pathogens for which it has been tested or indexed. Keep new plant material isolated from established plants until you can examine them for the presence of diseases and insects.
Disease treatment begins with an accurate diagnosis; the disease must be properly identified so that the best control measure can be used (see Table 5.1). If you are unsure of the cause of a plant disorder, you may wish to submit a sample to the Provincial Plant Health Laboratory: 1767 Angus Campbell Road, Abbotsford, BC, V3G 2M3. Appendix E contains details on how to submit a sample and a submission form.
Table 5.2: Fungicide Chemical Families and Resistance Management Groups Fungicide Active Ingredient Chemical Family Resistance
Mgmt Group Acrobat dimethomorph morpholine F-5 Actinovate Streptomyces lydicus biological/microbial Aliette fosetyl aluminum organo-tin F-U Botran dicloran chlorophenyl F-14 Captan captan phthalimide F-M Compass trifloxystrobin strobilurin F-11 Contans WG Coniothyrium minitans biological/microbial Copper Spray 50% copper oxychloride inorganic F-M Daconil chlorothalonil chloronitrile F-M Decree fenhexamid hydroxyanilide F-17 Dithane mancozeb dithiocarbamate F-M Folpan folpet - F-M Maestro captan phthalimide F-M Manzate mancozeb dithiocarbamate F-M Meltatox dodemorph-acetate morpholine F-5 MilStop potassium bicarbonate inorganic F-M MycoStop Streptomyces griseoviridis biological/microbial - No-Damp oxine benzoate organic - Nova myclobutanil triazole F-3 Penncozeb mancozeb dithiocarbamate F-M Phyton 27 copper complex inorganic F-M Prestop Gliocladium catenulatum biological/microbial Previcur propamocarb hydrochloride carbamate F-U Pristine boscalid + pyraclostrobin anilid + strobilurin F-7 + F-11 Quintozene quintozene aromatic hydrocarbon F-14 Rhapsody ASO Bacillus subtilis biological/microbial - RootShield Trichoderma harzianum biological/microbial - Rovral iprodione dicarboximide F-2 Senator thiophanate-methyl benzimidazole F-1 Subdue MAXX metalaxyl-M & S- isomer acylamine F-4 Truban etridiazole aromatic hydrocarbon F-14
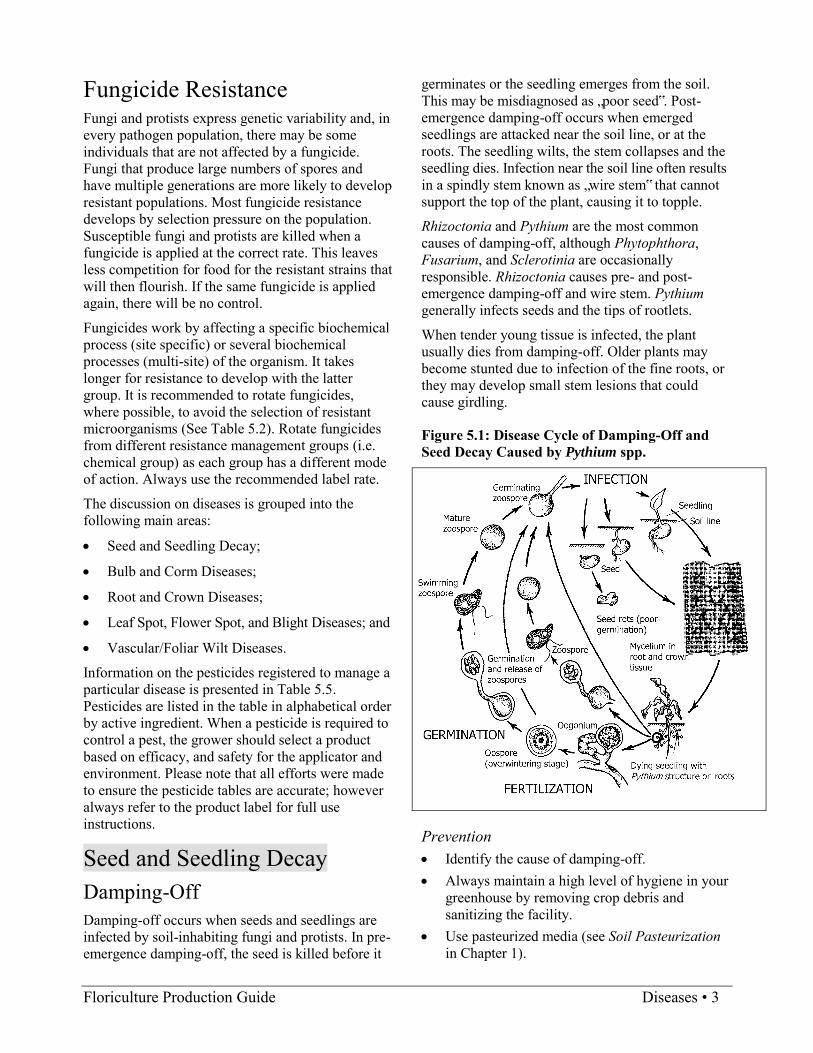
Floriculture Production Guide Diseases • 3
Fungicide Resistance Fungi and protists express genetic variability and, in every pathogen population, there may be some individuals that are not affected by a fungicide. Fungi that produce large numbers of spores and have multiple generations are more likely to develop resistant populations. Most fungicide resistance develops by selection pressure on the population. Susceptible fungi and protists are killed when a fungicide is applied at the correct rate. This leaves less competition for food for the resistant strains that will then flourish. If the same fungicide is applied again, there will be no control.
Fungicides work by affecting a specific biochemical process (site specific) or several biochemical processes (multi-site) of the organism. It takes longer for resistance to develop with the latter group. It is recommended to rotate fungicides, where possible, to avoid the selection of resistant microorganisms (See Table 5.2). Rotate fungicides from different resistance management groups (i.e. chemical group) as each group has a different mode of action. Always use the recommended label rate.
The discussion on diseases is grouped into the following main areas:
Seed and Seedling Decay;
Bulb and Corm Diseases;
Root and Crown Diseases;
Leaf Spot, Flower Spot, and Blight Diseases; and
Vascular/Foliar Wilt Diseases.
Information on the pesticides registered to manage a particular disease is presented in Table 5.5. Pesticides are listed in the table in alphabetical order by active ingredient. When a pesticide is required to control a pest, the grower should select a product based on efficacy, and safety for the applicator and environment. Please note that all efforts were made to ensure the pesticide tables are accurate; however always refer to the product label for full use instructions.
Seed and Seedling Decay Damping-Off Damping-off occurs when seeds and seedlings are infected by soil-inhabiting fungi and protists. In pre-emergence damping-off, the seed is killed before it
germinates or the seedling emerges from the soil. This may be misdiagnosed as „poor seed‟. Post-emergence damping-off occurs when emerged seedlings are attacked near the soil line, or at the roots. The seedling wilts, the stem collapses and the seedling dies. Infection near the soil line often results in a spindly stem known as „wire stem‟ that cannot support the top of the plant, causing it to topple.
Rhizoctonia and Pythium are the most common causes of damping-off, although Phytophthora, Fusarium, and Sclerotinia are occasionally responsible. Rhizoctonia causes pre- and post-emergence damping-off and wire stem. Pythium generally infects seeds and the tips of rootlets.
When tender young tissue is infected, the plant usually dies from damping-off. Older plants may become stunted due to infection of the fine roots, or they may develop small stem lesions that could cause girdling.
Figure 5.1: Disease Cycle of Damping-Off and Seed Decay Caused by Pythium spp.
Prevention Identify the cause of damping-off. Always maintain a high level of hygiene in your
greenhouse by removing crop debris and sanitizing the facility.
Use pasteurized media (see Soil Pasteurization in Chapter 1).

4 • Diseases Floriculture Production Guide
Prevent any contamination of growing media. Use clean tools, equipment, pots and flats. Use a porous, well-drained, seedling mix. Maintain adequate heat for germination. Do not sow seeds too densely or too deeply
(avoid overcrowding). Buy fungicide-treated seeds. Avoid overhead watering if possible. Ensure pH and soluble salt levels are suitable to
promote seedling growth. Manage shore flies and fungus gnats.
Bulb and Corm Diseases Fusarium Diseases
Fusarium diseases affect a wide range of bulb crops. Fusarium spores are spread by water in soil or in storage. Plants infected with Fusarium typically die down prematurely and frequently have a chocolate brown decay on the bulb. Under damp conditions, a covering of white to pink mycelium may be evident.
The most important disease in this group is basal rot of narcissus. Others include sour rot of tulip, gladiolus yellows, and Fusarium rots of lily, iris, and freesia.
Prevention Harvest promptly in dry weather, if possible,
taking care not to damage the bulbs. Protect harvested bulbs from the heat of the sun. Discard infected bulbs but do not leave them on
the field. Provide cool, well-ventilated storage. Follow as long a rotation as is practical for your
operation.
Gladiolus Dry Rot The most serious disease of gladiolus is dry rot, which is caused by the fungus Stromatinia. The fungus enters the leaves near the soil line causing them to turn yellow and then brown. Examination of the leaf and stem bases reveals tiny black sclerotia. This differentiates the disease from Fusarium yellows in which most of the damage is done to the corms and there are no sclerotia on the leaves. The fungus overwinters in the soil and in dark surface lesions on the corms.
Prevention Carefully examine corms for signs of disease
and discard any that are mummified or that have superficial lesions.
Avoid „old‟ gladiolus soil. Rogue out and destroy yellowed or stunted
plants.
Gladiolus Scab This bacterial disease, which is caused by a species of Pseudomonas, is serious only on gladiolus but can also infect crocus and freesia. Slightly infected corms produce normal flowers but exhibit sunken, shiny black lesions that are most numerous on the base of the corm. Severely affected plants develop a neck rot that may cause the top to collapse. Prevention Avoid planting in poorly drained soils. Examine corms carefully prior to planting and
discard any with scab lesions. Follow a three year rotation. Carefully rogue out infected plants as they are
seen.
Hyacinth Yellow Disease Yellow disease is caused by the bacterium, Xanthomonas. It is very destructive to hyacinth bulbs. Symptoms progress rapidly from a few small yellow spots within the bulb to complete decay accompanied by bacterial slime. Spread to other plants is by wind and rain splash. Common bacterial soft rot caused by Erwinia also infects hyacinths but in this case most of the damage is below the neck. Prevention In bulbs containing some yellow disease,
storage at 30-37oC will encourage the breakdown of slightly infected bulbs so that they can be discarded prior to planting. It is important, however, that the storage is well ventilated as warm, moist storage encourages bacterial soft rot.
Avoid overcrowding, overfertilizing, and overwatering to help prevent both bacterial diseases.
At the first sign of disease, carefully remove infected plants and surrounding soil. This
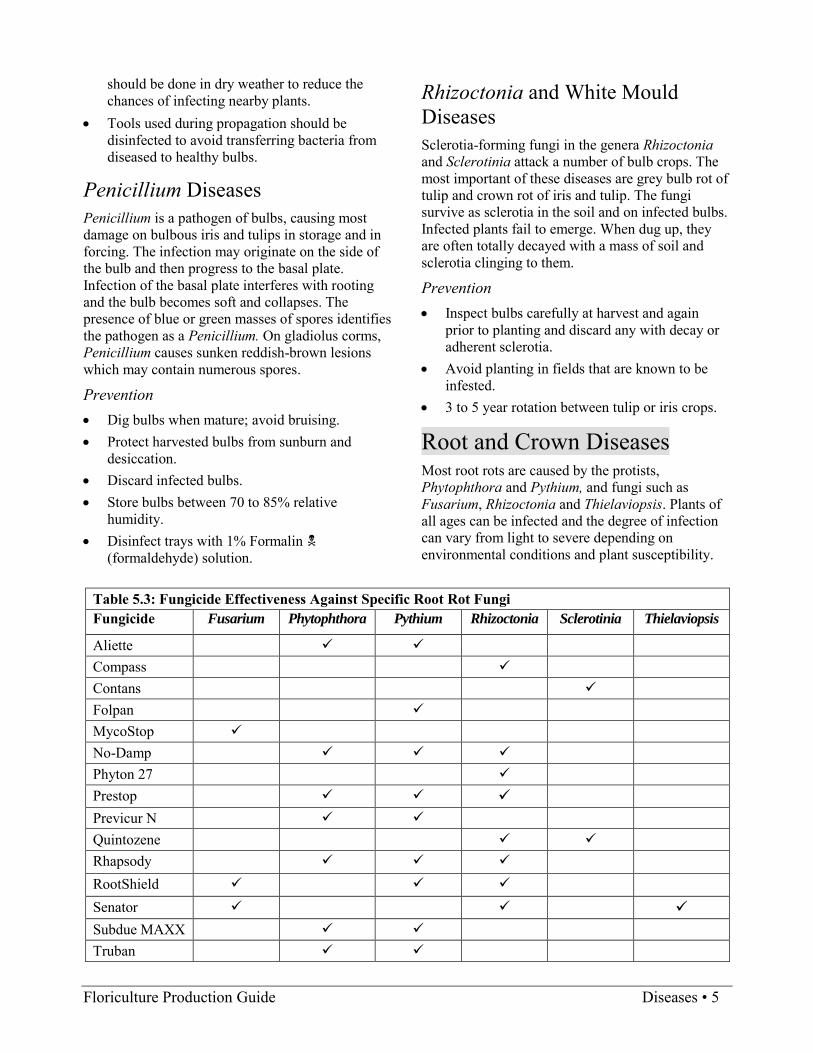
Floriculture Production Guide Diseases • 5
should be done in dry weather to reduce the chances of infecting nearby plants.
Tools used during propagation should be disinfected to avoid transferring bacteria from diseased to healthy bulbs.
Penicillium Diseases Penicillium is a pathogen of bulbs, causing most damage on bulbous iris and tulips in storage and in forcing. The infection may originate on the side of the bulb and then progress to the basal plate. Infection of the basal plate interferes with rooting and the bulb becomes soft and collapses. The presence of blue or green masses of spores identifies the pathogen as a Penicillium. On gladiolus corms, Penicillium causes sunken reddish-brown lesions which may contain numerous spores.
Prevention Dig bulbs when mature; avoid bruising. Protect harvested bulbs from sunburn and
desiccation. Discard infected bulbs. Store bulbs between 70 to 85% relative
humidity. Disinfect trays with 1% Formalin
(formaldehyde) solution.
Rhizoctonia and White Mould Diseases Sclerotia-forming fungi in the genera Rhizoctonia and Sclerotinia attack a number of bulb crops. The most important of these diseases are grey bulb rot of tulip and crown rot of iris and tulip. The fungi survive as sclerotia in the soil and on infected bulbs. Infected plants fail to emerge. When dug up, they are often totally decayed with a mass of soil and sclerotia clinging to them.
Prevention Inspect bulbs carefully at harvest and again
prior to planting and discard any with decay or adherent sclerotia.
Avoid planting in fields that are known to be infested.
3 to 5 year rotation between tulip or iris crops.
Root and Crown Diseases Most root rots are caused by the protists, Phytophthora and Pythium, and fungi such as Fusarium, Rhizoctonia and Thielaviopsis. Plants of all ages can be infected and the degree of infection can vary from light to severe depending on environmental conditions and plant susceptibility.
Table 5.3: Fungicide Effectiveness Against Specific Root Rot Fungi Fungicide Fusarium Phytophthora Pythium Rhizoctonia Sclerotinia Thielaviopsis
Aliette Compass Contans Folpan MycoStop No-Damp Phyton 27 Prestop Previcur N Quintozene Rhapsody RootShield Senator Subdue MAXX Truban

6 • Diseases Floriculture Production Guide
Root and crown organisms are soil-borne. The presence of root exudates stimulates Pythium and Phytophthora spores to move toward and infect the roots. Infected plants have discoloured roots that are reduced in number and lack the healthy rootlets that absorb water and nutrients from the soil.
Environmental conditions play an important role in root diseases. Roots can be injured by factors that stress plants, such as over or under watering, soil pH, temperature extremes, or high salts. Weak pathogens that might not cause disease on their own can invade the injured tissue and cause further damage. Insects, such as fungus gnat larvae, can spread fungi and protists. Their feeding damage can provide an entry site for infection. Maintaining conditions that favour plant growth and promote good overall plant health will reduce disease severity.
Irrigation water from storage ponds collected from run-off water may contain root rot pathogens, whereas water from municipal treatment systems, or deep wells is normally pathogen-free. Most natural soils contain a diverse population of microorganisms, including those that cause root rot and beneficial microbes. The components of artificial growing media (e.g. perlite, vermiculite, and rockwool) start off sterile and slowly build up low populations of microorganisms during the crop cycle. If a pathogenic organism is accidentally introduced into a sterile media, there are few or no antagonistic fungi or bacteria present to suppress it. This gives the pathogen the opportunity to spread. Naturally occurring media components, for example peat moss, may contain pathogenic organisms (e.g. Pythium or Thielaviopsis) and beneficial organisms.
General Root Rot Prevention Use pasteurized media (see Soil Pasteurization
in Chapter 1) and keep it clean. Use porous, well-drained media. Avoid watering with cold water or splashing. Don‟t over-water. Maintain optimum root temperatures. Maintain proper soil pH for the crop. Don‟t propagate from diseased plant material. Handle plants carefully and use good sanitation
during transplanting. Control fungus gnats and shore flies (see
Chapter 7, Insects, Mites, and Animal Pests).
Clean tools, hoses, walkways, benches, and tables between crops (see Sanitation in Chapter 1).
Avoid anything that may stress the crop, such as sudden swings in EC, pH, or temperature.
Crown Gall (Agrobacterium tumefaciens) Crown gall disease is caused by a soil-borne bacterium called Agrobacterium tumefaciens. Over 600 plant species in more than 90 families can be infected. Common hosts include aster, chrysanthemum, Cydonia, daisy, Malus, marigold, Prunus, Pyrus, roses, and willows.
Galls may develop on the crown, roots or, in some cases, on the aerial shoots and branches of infected plants. Galls are usually soft, spongy and white at first, but later turn hard and brown. They range in size from a few millimeters to several centimeters in diameter. Infected plants often first show symptoms of nutrient deficiency, such as yellowing or discolouration of leaves, followed by a general decline and stunting. A large gall at the crown may be more damaging than several smaller galls on roots or stems, since it interferes with the main vascular system of the plant.
Disease Cycle: The bacterium can survive for at least 2 years in soil. It spreads on diseased nursery stock, in irrigation or ground water, and on cultivation and pruning equipment. The bacterium infects roots and crowns, often entering through wounds caused by pruning tools, insects, freezing, or pathogenic nematodes. Rain splash can spread bacteria from soil to stems and leaves.
Bacterial DNA enters the genome of the plant cells and stimulates the cells to divide rapidly, producing a tumour-like mass of tissue in which bacteria multiply. As old galls break down, the bacteria are released into soil and water.
Diagnosing crown gall is difficult because some susceptible plants also produce physiological plant growths that resemble galls. If in doubt as to the cause of galling, it is best to obtain a laboratory analysis to confirm the cause. However, it is often impossible to recover Agrobacterium tumefaciens in laboratory culture from older galls. There are also saprophytic strains of these bacteria in soil that do not cause disease. Thus, even a laboratory diagnosis may be “uncertain”.

Floriculture Production Guide Diseases • 7
If a definite diagnosis is not possible, the grower must decide whether or not to remove the plants, keeping in mind:
the potential market or outcome for the plants, whether there was a previous crown gall
problem in that soil, the fact that large physiological galls can also be
damaging to plants, the risk of disease spread to other nearby
susceptible plants through ground water, soil particles or plant maintenance activities,
as a general rule, galls that appear only on the branches, main trunk, or at the graft union, but not on roots, are likely caused by a physiological factor.
Management and Control Purchase new stock only from a reputable
supplier. Plants grown in soil infested with crown gall may appear clean but can carry latent infections that will produce galls.
Inspect new stock for crown gall before planting and do not plant any with gall symptoms.
Avoid injuring the roots and bark in the crown area when planting or cultivating, as this creates potential entry-sites for bacteria.
If only a few plants are affected, remove and destroy them to prevent spread. Remove all roots and soil from around infected plants and take to a landfill. Do not compost infected plant debris or soil.
If only a few branches are affected, prune off galls. Disinfect pruners between cuts.
Do not take cuttings or propagate from diseased plants.
Do not re-plant susceptible species into previously infected soil for at least 2 years.
Rotate with grasses or small grains. Grasses do not develop crown gall disease, although they may harbour the bacterium.
Soil solarization has been successful in some areas on light, sandy soils, but it is doubtful whether temperatures would reach high enough levels in most BC soils to kill the bacterium.
Pythium and Phytophthora Root Rot Infected roots are often soft, mushy and various shades of brown. The outer covering of roots (the cortex) infected with Pythium or Phytophthora is usually rotted and slides off easily, leaving the string-like vascular bundles behind. Above-ground symptoms include stunting, wilting and yellowing as a result of nutrient and water deficiencies occurring from root loss. Most ornamental crops are susceptible to at least one of these protists. High soil moisture favours Pythium and Phytophthora.
Prevention
See General Root Rot Prevention at the beginning of this section.
Figure 5.2: Pythium and Phytophthora Life Cycle
Rhizoctonia Root Rot Infected roots are often reddish-brown, with a dry rot. Cool, moderately wet conditions encourage Rhizoctonia. This disease can cause infections of the stem as well as the roots. Above ground symptoms include stunting, yellowing and wire stem. Wire stem refers to situations where the stem is severely constricted, to a width of 1 to 3 mm, usually at the crown.
Prevention See General Root Rot Prevention at the beginning of this section.

8 • Diseases Floriculture Production Guide
Figure 5.3: Rhizoctonia Life Cycle
Sclerotinia (White Mould) This fungal disease can attack a wide range of crops. It is soilborne and is more commonly a problem in field grown crops, but can also be found in greenhouses. It causes crown and stem rot. The fungus enters the crown at the soil line or through other plant parts such as leaves touching the soil. Infected plants turn yellow, wilt and fall over. It also causes pre-emergent and post-emergent damping-off. Stem rot occurs when spores land on blossoms or leaf axils and grow into the stem tissues.
Sclerotinia is often characterized by masses of white, cottony mycelial growth arising from infected areas of stems and crowns. Dark, irregular-shaped sclerotia, which are similar in appearance to mouse droppings, form inside plant tissues or in the cottony growths of the fungus. These bodies are able to persist in the soil for many years. The fungus will produce spores when conditions become favourable, usually the following spring in outdoor situations. Look for white, fluffy mycelium and grey or black sclerotia about the size of a fat grain of rice lodged in the rotting tissues or in the surrounding mycelium.
Prevention Rotate crops so susceptible ones are not grown
every year in the same location. Choose your growing site to avoid growing next-door to
fields which had a disease infestation, as the spores are spread by wind.
Don‟t plant in fields following a susceptible vegetable crop such as lettuce, beans, and carrots.
Clear debris out of the field before sclerotia are formed, if possible.
Space crops to allow air movement, avoiding shady or “dead-air” pockets.
Avoid over-head irrigation which provides favourable conditions for infections.
Figure 5.4: Sclerotinia Life Cycle
Thielaviopsis Root Rot Thielaviopsis (also referred to as Chalara) causes black root rot on cyclamen, fuchsias, geraniums, impatiens, kalanchoes, pansies, petunias, poinsettias, primulas, and other crops. Infected roots may have black lesions covering all or part of the root. This can be observed after the growing mix has been washed off. Above ground plant parts are stunted and the leaves are pale or may have symptoms of nutrient deficiency.
Wet soils and neutral to alkaline pH levels favour black root rot. Plant stress arising from high soluble salts or excessive fungicide applications can promote disease development. Prevention is the best method of control.
Prevention Thielaviopsis is suppressed at low pH levels. Adjust the pH of the potting mix to 5.5 or below if the crop
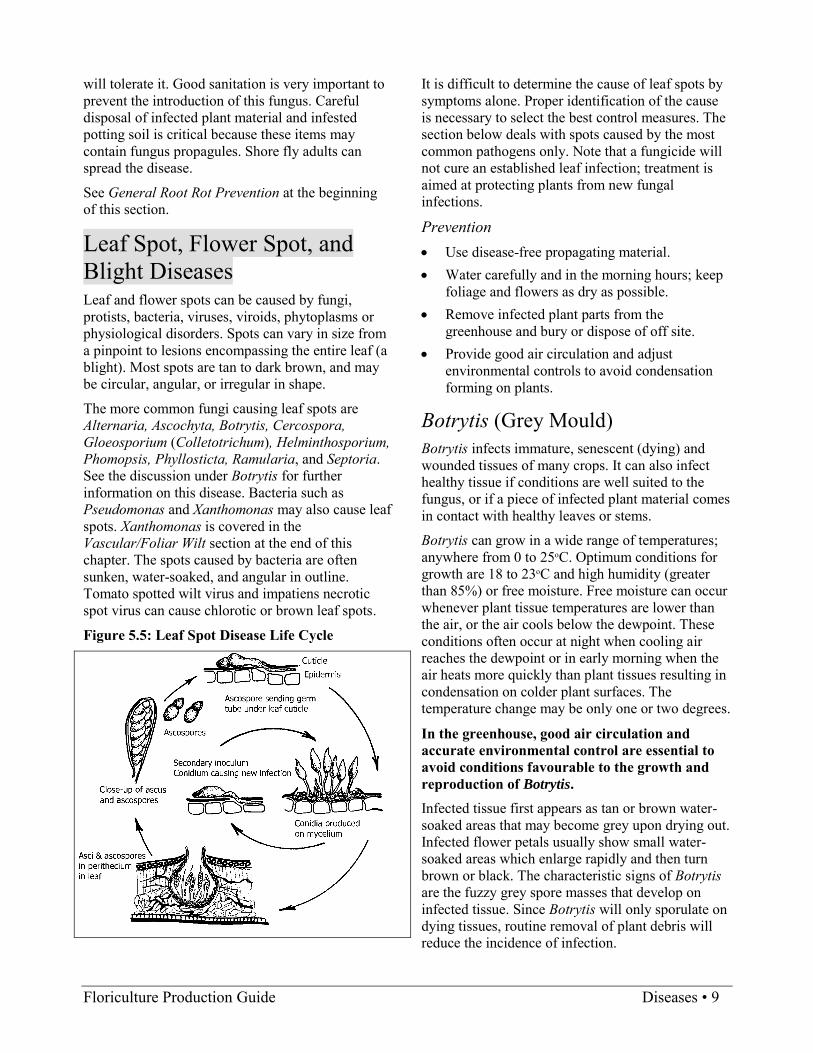
Floriculture Production Guide Diseases • 9
will tolerate it. Good sanitation is very important to prevent the introduction of this fungus. Careful disposal of infected plant material and infested potting soil is critical because these items may contain fungus propagules. Shore fly adults can spread the disease.
See General Root Rot Prevention at the beginning of this section.
Leaf Spot, Flower Spot, and Blight Diseases Leaf and flower spots can be caused by fungi, protists, bacteria, viruses, viroids, phytoplasms or physiological disorders. Spots can vary in size from a pinpoint to lesions encompassing the entire leaf (a blight). Most spots are tan to dark brown, and may be circular, angular, or irregular in shape.
The more common fungi causing leaf spots are Alternaria, Ascochyta, Botrytis, Cercospora, Gloeosporium (Colletotrichum), Helminthosporium, Phomopsis, Phyllosticta, Ramularia, and Septoria. See the discussion under Botrytis for further information on this disease. Bacteria such as Pseudomonas and Xanthomonas may also cause leaf spots. Xanthomonas is covered in the Vascular/Foliar Wilt section at the end of this chapter. The spots caused by bacteria are often sunken, water-soaked, and angular in outline. Tomato spotted wilt virus and impatiens necrotic spot virus can cause chlorotic or brown leaf spots.
Figure 5.5: Leaf Spot Disease Life Cycle
It is difficult to determine the cause of leaf spots by symptoms alone. Proper identification of the cause is necessary to select the best control measures. The section below deals with spots caused by the most common pathogens only. Note that a fungicide will not cure an established leaf infection; treatment is aimed at protecting plants from new fungal infections.
Prevention Use disease-free propagating material. Water carefully and in the morning hours; keep
foliage and flowers as dry as possible. Remove infected plant parts from the
greenhouse and bury or dispose of off site. Provide good air circulation and adjust
environmental controls to avoid condensation forming on plants.
Botrytis (Grey Mould) Botrytis infects immature, senescent (dying) and wounded tissues of many crops. It can also infect healthy tissue if conditions are well suited to the fungus, or if a piece of infected plant material comes in contact with healthy leaves or stems.
Botrytis can grow in a wide range of temperatures; anywhere from 0 to 25oC. Optimum conditions for growth are 18 to 23oC and high humidity (greater than 85%) or free moisture. Free moisture can occur whenever plant tissue temperatures are lower than the air, or the air cools below the dewpoint. These conditions often occur at night when cooling air reaches the dewpoint or in early morning when the air heats more quickly than plant tissues resulting in condensation on colder plant surfaces. The temperature change may be only one or two degrees.
In the greenhouse, good air circulation and accurate environmental control are essential to avoid conditions favourable to the growth and reproduction of Botrytis. Infected tissue first appears as tan or brown water-soaked areas that may become grey upon drying out. Infected flower petals usually show small water-soaked areas which enlarge rapidly and then turn brown or black. The characteristic signs of Botrytis are the fuzzy grey spore masses that develop on infected tissue. Since Botrytis will only sporulate on dying tissues, routine removal of plant debris will reduce the incidence of infection.

10 • Diseases Floriculture Production Guide
Figure 5.6: Botrytis Life Cycle
Botrytis is almost always present in greenhouses. New infections occur when conditions are optimum for spore spread and germination. Spores are spread by air currents and splashing water. Botrytis overwinters in soil and plant debris. Bulb Crops: Most bulb crops are susceptible to one or more species of Botrytis. The most important one is tulip fire. The first indications of this disease are infected shoots that fail to open and become covered with black sclerotia and grey spores. Under wet conditions these „primaries‟ release spores that cause numerous leaf and flower spots on other nearby tulips. Other Botrytis diseases that may be serious from time to time include fire of hyacinth, core rot of gladiolus, fire and smoulder of narcissus, and blight of lily.
Prevention In the greenhouse, keep the relative humidity
below 85% by heating or venting of moist air. Don‟t overcrowd plants. Ensure adequate air
circulation around the plants. Minimize dripping of water onto plants from
roof condensation or overhead sprinklers. Plan your irrigation to minimize the time that
plants are wet. If possible, water in the mornings. Remove dead or diseased plant material. Don‟t leave large stubs (heels) or joints on stock
plants after taking cuttings.
Remove senescent flowers and leaves before they drop onto other plant parts.
Clean and examine bulbs and corms before planting and discard any with lesions or sclerotia.
A plant disease cannot be controlled by chemicals
until environmental and management problems
are corrected.
Bulb Viruses Bulb stocks are vulnerable to a buildup of viruses over the years since they are vegetatively propagated. At least 15 different viruses have been identified in narcissus alone. Some of these viruses are specific for narcissus and others have a wider host range. Most bulb viruses are transmitted by the feeding of aphids or nematodes that had previously acquired the virus from other infected plants. Symptoms of virus infection vary greatly depending on the crop and the number and combination of viruses present. They range from stunting of plants to leaf mosaics and flower distortions. The best known is tulip breaking virus. It causes flower streaking in otherwise solid coloured flowers. Infected bulbs were in demand as novelties in Europe during the 1600s. It wasn‟t until the 1920s that the cause was identified as an aphid transmitted virus. Prevention Plant disease-free bulbs and corms from a
recognized meristem culture program if available.
Grow the virus-free stocks in isolation away from old, infected crops.
Control aphids. Rogue off-types early and often. Avoid fields with known populations of the
main nematode vectors within the genera Longidorus, Trichodorus, and Xiphinema.
Downy Mildew Roses, snapdragons, and violas are commonly infected by downy mildew, while alyssum, salvia, and Lamium (silver nettle) are less common hosts. Infection occurs under conditions that cause leaf wetness. Leaf wetness is more common during periods of cool temperatures and high humidity. Downy mildew spores enter plants through leaves and stem buds, and grow systemically in the stem,

Floriculture Production Guide Diseases • 11
crown and even the roots. It may produce reddish-purple splotches on the upper leaf surface. When humidity levels are high, a mauve-grey, felt-like mat appears, usually on the lower leaf surface. Many spores are present in the mat and can be spread between plants via air movement and water splash. The pathogen carries over to new crops on dead plant material and may also persist in the soil.
Figure 5.7: Downy Mildew Life Cycle
Symptoms on rose: sudden defoliation may be the first symptom that is noticed. Foliar symptoms may resemble pesticide phytotoxicity. Careful examination of leaves should reveal pale, reddish-coloured blotches on the upper surfaces of leaves.
Symptoms on snapdragons: greyish downy growth may be present on lower surfaces of leaves, but the first symptom could be overall stunting due to systemic infection, distortion of new leaves, and downward leaf curling.
Prevention Monitor for infections. Keep relative humidity below 85% and prevent
condensation on the crop and in the greenhouse. Clean up all crop debris at the end of the season
and remove from the greenhouse site. Rotate with less susceptible crops, if possible. Control weeds in and around the greenhouse
because downy mildew may survive on them. Rouge out affected plants; place them in a box
or bag before moving them through the greenhouse.
Space plants to allow for air circulation.
Powdery Mildew Powdery mildew is sometimes confused with spray residues. It causes whitish-grey patches of fungal growth on the upper leaf surface. Lower leaf surfaces, flowers, and stems can also be infected. Many ornamental crops are infected by various powdery mildew fungi. Each of the many species of powdery mildew is specific to one or a limited number of host plants. They cause serious economic losses through loss of plant vigour, a reduction in the number of blooms, and reduced aesthetic appeal.
Powdery mildews can occur either in a warm, dry environment, or in a cool to warm, humid environment. Spores will be released, germinate, and cause infection without a film of water on the plant surface. A fairly high relative humidity, approximately 95% and above, is required for the initial infection. Once the plant is infected, the fungus can continue to grow regardless of the relative humidity. The fungus grows on the leaf surface but obtains nutrients from the plant by penetrating into leaf cells with specialized structures called haustoria. Spores of the powdery mildew fungus are spread by air movement. Powdery mildew fungi overwinter by producing sexual spores (ascospores) in enclosed fruiting bodies.
Figure 5.8: Powdery Mildew Life Cycle
12 • Diseases Floriculture Production Guide
Prevention Choose resistant varieties of plants if these are
available. Eliminate weeds in and around the outside
perimeter of the greenhouse. Some may be sources for powdery mildew.
Carefully monitor humidity levels to avoid high humidities and large swings in humidity.
Maintain optimum plant growing temperatures. Space plants to allow for air circulation.
Rusts Rust diseases appear initially as small, yellow swellings or pustules on lower surfaces of leaves. These become blisters that contain either white, yellow, orange, brown, or black spores. The pustules are often on the underside of the leaves, but may also occur on the top surfaces and stems depending on the rust species and the stage in the life cycle. The leaf surface directly above the pustule is frequently yellow or discoloured. Plants may be infected with rust but not show any symptom
Spores are spread by splashing water or moving air, and require wet conditions for infection. There are several important rust diseases of greenhouse ornamentals, notably on asters, carnations, chrysanthemums, fuchsias, geraniums, and snapdragons.
Geranium rust is no longer regulated and is not considered a quarantinable disease by Canadian Food Inspection Agency. However, growers should inspect all new stock carefully to avoid introducing this disease into their operation.
Prevention Inspect new plant materials carefully before
bringing them into the greenhouse. Avoid wetting foliage and control greenhouse
environment to avoid condensation on plants. Remove and destroy infected plant parts where
possible.
Chrysanthemum white rust, Puccinia horiana, is not established in Canada and is a quarantinable disease that must be reported if detected to the Canadian Food Inspection Agency. In the past few years, a number of isolated outbreaks of white rust were eradicated in home gardens and greenhouses in southern BC. Flower growers are at risk to white
rust which could be introduced into greenhouses on symptomless but systemically infected chrysanthemum cuttings. Growers receiving suspect imported stock should immediately notify the Canadian Food Inspection Agency.
Symptoms of white rust begin as light coloured spots the size of a pin head to 5 mm in diameter on the leaf surface. The spots become sunken and whitish, raised pustules form on the under surface below the leaf spot. Under severe conditions the flowers and stems can also become infected. Plants with white rust become stunted, twisted and defoliated. White rust pustules increase to 2 cm in diameter and become a light brown in colour.
The life cycle of white rust is completed on the single host, chrysanthemum, unlike many other rust fungi which require two host plant species. White rust has two spore forms, the over wintering, resistant teliospores and infective basidiospores. The microscopic, infective spore stage is spread by air currents, splashing water and by workers, on clothing, equipment and greenhouse surfaces.
Prevention Verify that imported chrysanthemum cuttings
originate from P. horiana-free production facilities.
Thoroughly inspect imported cuttings before bringing them into an isolated area of the greenhouse where they can be frequently monitored and handled last.
Do not wet the foliage and control the greenhouse environment so that plant surfaces remain dry.
Plants should be spaced to reduce crowding. Between crops, debris should be cleaned out
from the greenhouse, and the benches, floors and equipment washed down with a bleach solution (10%).
Mother plants for overwintering should be heat treated. This involves placing the crowns (stools) into water heated to between 45 to 51oC for five minutes and then plunging them immediately into a solution of cold water and fungicide. Crowns should be fully dormant before undergoing treatment.

Floriculture Production Guide Diseases • 13
Sudden Oak Death and Ramorum Blight & Dieback Sudden Oak Death is caused by the protist, Phytophthora ramorum. The disease has attracted considerable interest since 2001, when it was determined to be responsible for the death of tens of thousands of native oaks in California. The disease leads to tree death due to the development of bleeding cankers that girdle the trunk of tanoaks and coast live oaks. Girdling cankers occur on a few hosts, including tanoak, European beech, rhododendron, viburnum, horse-chestnut, and on a number of species of oaks. P. ramorum does not cause trunk cankers on the majority of hosts. More commonly, P. ramorum causes non-lethal brown leaf spots and/or branch dieback, and this disease is referred to as Ramorum Blight & Dieback. Therefore, P. ramorum is responsible for two distinctly different diseases of woody plants.
P. ramorum is primarily a pest of nursery plants. Although it affects few floriculture crops, it has disrupted the importation of florist azaleas and Easter lily bulbs (associated with soil) from regulated areas in California and Oregon. The disease primarily infects woody trees and shrubs, such as camellia, kalmia, oak, Pieris, rhododendron, and viburnum.
P. ramorum is a cool-temperate organism with an optimum temperature for growth of around 20°C, although laboratory studies have shown that it will grow at 2 to 30°C. The pathogen is spread locally by the release of spores from leaf and shoot tip lesions by rain splash or wind-driven rain. Spores can also be spread in irrigation or ground water, and in soil.
The Canadian Food Inspection Agency has imposed strict regulatory controls to prevent the entry of this pathogen into Canada. The importation of propagative (seeds) and non-propagative material (e.g. branches, wreaths, greenery, cuttings and prunings) of host plants and soil, which is either alone or in association with a plant, is regulated. Neither Canada nor the US regulates the movement of cut flowers. The current list of Plants Regulated for P. ramorum includes over 130 species of plants
from 80 genera. Host plants and plants associated with soil can only be imported from regulated areas of the Continental US that have been grown in a pest-free place of production. Canada regulates all countries of the European Union, Norway, Switzerland, and 15 counties in California and Curry County in Oregon.
Recommendations Verify that all imported host material originates
from P. ramorum-free sites or is produced under an approved pest-free place of production.
Check Agency bulletins for current disease quarantine regulations.
Tomato Spotted Wilt Virus and Impatiens Necrotic Spot Virus Tomato spotted wilt virus (TSWV) and impatiens necrotic spot virus (INSV) can infect over 1,000 plant species, including many ornamentals. They are spread by thrips and infected propagation material, but are not easily spread by crop handling. They are the two most common viruses found in floriculture crops.
The two strains of tomato spotted wilt virus (impatiens and lettuce) are now recognized as two separate diseases. The impatiens strain has been renamed „impatiens necrotic spot virus‟ (INSV) while the lettuce strain has retained the original name „tomato spotted wilt virus‟ (TSWV). INSV infects floriculture crops more frequently than TSWV. They both belong to the tospovirus group.
Both viruses cause stunting, leaf distortion, mosaic mottling of leaves, leaf vein clearing, necrotic areas on leaves, wavy lines on foliage, concentric rings on foliage or flowers, and stem necrosis. The necrotic leaf lesions can easily be mistaken for pesticide toxicity. The symptoms vary depending on host age, host species, cultivar, the level of nutrition, temperature, and the virus strain. See Table 5.4 for further information on symptom expression on specific crops.

14 • Diseases Floriculture Production Guide
Table 5.4: Tomato Spotted Wilt Virus (TSWV) and Impatiens Necrotic Spot Virus (INSV) Crop Symptoms Calceolaria Symptoms of TSWV and INSV resemble a fungal wilt disease. Central areas or one-
sided wilt patterns develop on leaves with a greasy-grey colour. Plants eventually collapse without recovery.
Chrysanthemum Susceptible cultivars such as „Polaris‟ develop necrotic stem lesions and leaves become necrotic and collapse. Flowering plants have a blighted appearance and appear to be infected with Fusarium wilt.
Cineraria Young plants may develop symptoms similar to those on gloxinia while older plants develop ring spots and line patterns on leaves. Dark purple to brown sunken lesions develop on petioles, frequently at the leaf junction. The petiole may be girdled or the lesions may move into the stem.
Cyclamen Initial symptoms include necrotic leaf spots and vein necrosis. Occasionally, lesions radiate along several veins from the base of the leaf, which produces an oak-leaf pattern. Chlorotic leaf lesions develop into necrotic spots or concentric rings. Leaf collapse can result from petiole necrosis or coalescence of numerous ring spots. Necrosis in the vascular bundles of the corm has been observed in some plants. Symptom development is optimum at 13oC. Infected plants tend to be symptomless at 22oC. Symptoms develop approximately 3 to 4 months after infection when plants are grown at 13oC.
Exacum TSWV and INSV cause straw-coloured necrotic leaf lesions 7 to 14 mm in diameter. Leaves may become completely necrotic and collapse. Stem lesions become slightly sunken and light to dark grey or straw coloured. On larger plants, one branch or the entire plant may collapse and die.
Gloxinia Infected plants that are less than six weeks old develop symptoms resembling Phytophthora root rot. The base and central part of lower leaves darken and plants collapse. Older plants develop spots and line patterns on upper and lower leaf surfaces which begin as chlorotic patterns that become necrotic. Necrotic areas may coalesce and plants develop a ragged appearance. Flowers may become distorted.
Marigold Infected plants exhibit leaf strapping symptoms, particularly on the youngest leaves. Marigolds planted outside the greenhouse should be examined for symptoms.
New Guinea Impatiens
TSWV and INSV cause local leaf lesions that include ring spots and papery necrotic areas. The virus becomes systemic and causes faint purplish ring patterns or a mottle on newer leaves. Growing points may abort. Susceptible cultivars may die, or more often, some branches will die back while others survive. „Mojave‟ produces some leaves with necrotic ring and spotting symptoms, but many leaves will be symptomless while cultivars in the „Sunshine Series‟ are often killed.
Pepper Fruit ripens unevenly if infected after fruit set. If infected before fruit set, fruit develops unevenly and becomes misshapen. Dark brown soft spots may develop on fruit and ring patterns may occur. Look for stem lesions, petiole, and peduncle necrosis, loss of leaders, branch dieback, and tan, dry lesions on leaves.
Tomato The most common symptoms are rapid browning of the young leaves followed by cessation of growth. The leaves later become distorted with necrotic spotting and fruit formed after infection may develop blotches or mottling. None of the cultivars currently being grown exhibit resistance.

Floriculture Production Guide Diseases • 15
Method of Spread Three species of thrips present in Canada can spread TSWV and INSV. They are Frankliniella occidentalis (Western flower thrips), F. fusca and Thrips tabaci. The Western flower thrips is the most dangerous vector due to its ability to develop insecticide resistance faster than other thrips species. See Thrips in Chapter 7.
Thrips must feed on infected tissue while they are larvae to acquire the virus. They introduce the virus when they pierce the plant surface to feed. Once a thrips picks up the virus it remains infected for the rest of its life. During this period many plants can be infected. There is a direct relationship between the number of thrips and incidence of the virus. Thrips must feed on infected plants for at least 15 minutes to acquire the virus. They have a latent period of at least four days after picking up the virus during which they cannot transmit it.
Additional information is available in the Ministry of Agriculture factsheet, Thrips – Biology & Control.
TSWV and INSV are also reportedly transmissible through the seed of cineraria.
Control Strategies for TSWV and INSV An effective insecticide program is an essential component in the control of TSWV and INSV, but sole reliance on insecticides to control Western flower thrips is a short-term solution due to the development of resistance. An integrated approach must be used.
Start with clean stock. Plants infected with TSWV and INSV usually have a latent period during which they show no symptoms. Also, some hosts may be infected but remain symptomless. These are a threat to more susceptible hosts that may be present in the greenhouse. When purchasing cuttings or seedlings ensure there are no thrips on the plants, which may have already infected them or may be a source of infection for other crops already in the greenhouse. Look for signs of thrips feeding or other damage.
Separate plants grown from seed and cuttings. Vegetatively propagated material can be a source, whereas seeds usually are not. Do not hang vegetatively propagated baskets overtop of bedding plant seedlings. Young seedlings are highly susceptible.
Monitor Western flower thrips populations with yellow or blue sticky traps. Place cards at the crop level to monitor any population changes and near doorways and vents to detect movement of thrips into the greenhouse.
Screen vents and cover open doorways with heavy plastic strips to reduce movement into the greenhouse.
Ensure that greenhouses are weed-free and that a weed-free border 3 to 6 metres wide is maintained around the greenhouse. Many weeds are hosts for the Western flower thrips and TSWV/INSV and act as virus reservoirs or banks. The ground next to doors and vents should have a weed-free border at least 6 metres wide. Avoid planting susceptible bedding plants around the greenhouse.
Place potted petunia indicator plants among your crop along with non-sticky blue cards to detect thrips. Small, papery tan leaf spots will appear on petunias within 3 to 5 days after infection. Several petunia cultivars, such as „Red Cloud‟, „Summer Madness‟, and „Super Magic Coral‟, are good indicator plants. Remove any flowers to force the thrips to feed on the leaves.
Destroy all infected plants. If the virus has been confirmed in one or two plants of a certain batch or cultivar you must presume all these plants are potentially infected. Spray all diseased plants with an insecticide to kill thrips on the plants. This prevents virus-carrying thrips from flying to healthy crops when their host is disturbed. Infected plants should be placed in plastic bags at the bench or bed site to prevent thrips from spreading through the greenhouse as they are removed from the area.
Bio-control agents are generally not effective at preventing virus spread because they will not eradicate the population of thrips and, even a low number of virus-carrying thrips can cause economic damage.
Planting beds should be steam-treated or fumigated to kill thrips and larvae. Larvae are found in the top few centimetres of soil, so they may be treated with a soil spray. See Thrips in Chapter 7 for larval control strategies.
If the greenhouse is cleared out before a new crop begins, increasing the temperature to 35oC for 5 days or 40oC for 2 to 3 days will help control thrips pupae. The pupal stage will be
16 • Diseases Floriculture Production Guide
shortened at these temperatures and emerging adults will starve because there is no food source.
Educate your staff so that they can identify the symptoms of TSWV and INSV.
If TSWV and INSV are suspected, submit a sample to a virus testing laboratory (see Appendix F).
Vascular/Foliar Wilt Diseases Wilt occurs when the water flow to affected plant parts is stopped or slowed. Wilt symptoms can develop slowly or suddenly; they may be temporary, as on hot days, or they may be permanent. Wilt can be caused by moisture stress, although this is usually temporary, except where water has been withheld for long periods. Wilt can also be caused by excessively wet soil, which results in an oxygen deficient root zone, followed by natural root decay. Other causes of wilting are high soluble salt levels in the media, root rot organisms, and chewing insects.
There are several species of fungi and bacteria that cause wilt diseases. Plants wilt when infected by a wilt organism because the organism plugs or damages the water conducting vessels. Symptoms include the wilting of a leaf, a number of branches of the plant, or of the whole plant. Affected plants may be yellow and stunted, and may have discoloured vascular tissue. The fungi most often involved in wilt diseases are Fusarium oxysporum, Verticillium dahliae, and Verticillium albo-atrum. Verticillium fungi infect many types of ornamental plants, while special forms of Fusarium oxysporum infect specific host plants. For example, Fusarium oxysporum f.sp. cyclaminis infects only cyclamen, and Fusarium oxysporum f.sp. dianthi infects only members of the carnation family.
One of the most common bacterial wilt pathogens in BC is Xanthomonas campestris. Various forms (pathovars) of Xanthomonas campestris exist which attack specific hosts. For example, Xanthomonas campestris pv. pelargonii causes bacterial blight of Pelargonium species, and Xanthomonas campestris pv. syngonii causes bacterial blight of Syngonium. Wilt diseases may also be caused by three other bacteria, Erwinia carotovora, Erwinia chrysanthemi, and Ralstonia solanacearum. They are usually serious only at temperatures above 27oC.
See the following sections for information on Ralstonia and Xanthomonas diseases of geraniums.
Fungal wilt pathogens enter plants primarily through the roots. They do not require wounds. Bacteria require wounds or natural openings to enter plants. Symptomless cuttings may be infected with wilt diseases if the mother plant was infected. Both can be spread in propagative material, by water movement through soil, by soil movement, by equipment (especially cutting knives), by contaminated flats and by splashing water. Wilt fungi can survive in the soil for several years, whereas bacterial wilt pathogens generally survive for only one to six months in soil. Both fungi and bacteria have good survival rates in infected plant debris.
High temperatures and high relative humidity generally favour the wilt diseases. Conditions that contribute to plant stress will also increase disease severity.
There are no effective fungicides or bactericides
available for the control of wilt diseases. Infected
plants usually must be destroyed.
Prevention Use disease-free propagating material. Use pasteurized growing media (see Soil
Pasteurization in Chapter 1). Where possible, grow varieties that have been
selected for resistance to wilt diseases. Avoid high salts caused by overfeeding and/or
underwatering. Monitor the crop‟s EC levels (see On-site Testing of Planting Media in Chapter 3).
Minimize the risk of contaminating crops with soil pathogens by keeping hose ends and pots off the ground.
Minimize heat stress by shading or ventilating. Scout for symptoms; a simplified disease
diagnostic key is provided in Table 5.1. Avoid water stress events that may damage
roots. If possible, use nitrate nitrogen rather than
ammonium nitrogen.

Floriculture Production Guide Diseases • 17
Ralstonia Bacterial Wilt of Geranium Ralstonia solanacearum race 3 biovar 2 is a quarantine bacterium in Canada and the US that is not known to occur in either country. It causes severe brown rot of potato and a wilt disease in tomato and geranium. Symptoms on geraniums include water-soaked leaf spots, lower leaf yellowing, and wilting. Several isolated outbreaks of geranium wilt were detected in 2003 and 2004 in eastern Canada and the US. These outbreaks were traced to geranium imports from offshore propagators. The detections lead to the suspension of importations of all Pelargonium from the source countries.
The pathogen is transmitted through contaminated media, cuttings, irrigation water, cutting knives, and staff. The pathogen is not believed to spread readily from plant-to-plant in water splash, although it can spread in subirrigation systems.
In 2003, the Canadian Food Inspection Agency implemented regulations for R. solanacearum race 3 biovar 2 (D-03-09). Importations of host plants from regulated countries must be accompanied by a Phytosanitary Certificate that states they were produced in a facility that was sampled, tested and found free of the pathogen in accordance with Canada‟s import requirements. Note: the directive was under review at the time of writing this section.
Recommendations Verify that all geranium imports are free of R.
solanacearum race 3 biovar 2 and have a Phytosanitary Certificate with the correct documentation if they are from a country where Ralstonia exists.
Provide a disinfectant foot bath at each doorway to geranium production compartments.
Do not subirrigate geraniums. Disinfect hand tools and implements during and
after use. Destroy weeds in and around the greenhouse,
since a number of weeds (e.g. lamb‟s-quarters, mustards, nightshade, pigweed, and purslane) are hosts of Ralstonia.
Regularly scout crops for disease symptoms and immediately report Ralstonia-like symptoms to the Canadian Food Inspection Agency or the BC Ministry of Agriculture and Lands.
Xanthomonas Blight of Geraniums Bacterial blight, which is caused by Xanthomonas campestris pv. pelargonii, is the single most important disease of geraniums. This disease becomes systemic in the plant and can quickly kill it. The most common symptom of the disease is wilt, which will occur even though the roots appear healthy. Leaf spot and stem rot may or may not occur. Leaf spots are most likely to be observed on plants in advanced stages of the disease.
Xanthomonas bacterial blight may occur wherever geraniums are grown and is a continual threat to their production. It infects all varieties of zonal (Pelargonium X hortorum), ivy (P. peltatum), Regal/Martha Washington (P. X domesticum), and perennial geraniums. Ivy geraniums are especially susceptible. Martha Washingtons and specialty types (e.g. P. acerfolium, P. ‘Torento’, P. tomentosum, and P. scarboroviae) have some tolerance to the disease but can be symptomless carriers of the bacterium.
Debris from infected plants is a source of seasonal carry-over of Xanthomonas. In addition, it can survive on the leaves or wounded stems of other ornamentals, such as tuberous begonia, chrysanthemum, coleus, fuchsia, impatiens, lantana, verbena, and vinca. The surface of pots, benches, and tools can also be a source of infection. Research has found that the disease may also survive on weeds. It is uncertain how long the bacterium can survive in soil.
Sources of Infection infected cuttings carry-over of stock plants debris from infected plants
Sources of Spread mechanical taking cuttings workers‟ hands and clothing water splashing during irrigation from diseased
tissue or contaminated surfaces recirculating irrigation systems and water films pesticide spraying insects such as whiteflies and fungus gnats
There is no cure for this disease, so the focus must
be on prevention of introduction and spread.

18 • Diseases Floriculture Production Guide
Steps to Early Detection of Bacterial Blight Xanthomonas spreads quickly and easily, so
early detection is of paramount importance. What makes the disease even more devastating is that there can be a considerable time lag between infection and symptom expression. By the time plants begin to show symptoms, thousands of plants may already be infected and have to be destroyed.
Do routine weekly checks of the geranium crop, looking out for any browning or yellowing of leaves, and be cautious of any signs of wilting. Suspect plants should be isolated from the growing area and tested. When moving plants through the greenhouse, make sure they don‟t become a disease vector. Make your staff aware of what symptoms to look for and encourage them to report suspicious plants to you. If a crop is doing poorly even though pH and EC levels are within acceptable parameters, consider sending plants to a lab for testing for Xanthomonas.
Look for dark brown, sunken leaf spots that are 1.5 - 3 mm in diameter. Note: Not all geranium varieties will show leaf spot symptoms.
Look for V-shaped, yellow wedges that form at the leaf margin and taper down to the base of the leaf. The wedge is usually bound by leaf veins on both sides. Botrytis can cause similar symptoms, but the infections usually do not taper down to the leaf base and are not confined by leaf veins.
Cut the base of the leaf petiole and the stem in half to check for a dark discolouration in the vascular tissue.
Wilting caused by Xanthomonas can usually be differentiated from root rot caused by Pythium/Phytophthora by observation of the roots. Xanthomonas affected plants will usually have healthy roots.
Symptoms usually do not develop when the temperature is below 21oC. The optimum temperature for disease development is 27 to 29oC. Symptom development is highly dependent on the geranium species or variety, the growing conditions, and environmental conditions. In the cooler months of winter and early spring, affected plants may not show the “classic” symptoms.
Steps to Minimize the Spread of the Bacterium
Strict sanitation combined with the exclusive use of
culture virus indexed (CVI) stock from reputable
propagators is the only way to minimize losses
from bacterial blight.
Start of Season Purchase CVI disease-free plants each year. Use a sterile, soilless mix, and new or clean pots. Provide a disinfectant foot bath at each
doorway. Clean and recharge it daily. Keep the greenhouse weed-free and maintain a
3 m weed-free zone around each greenhouse.
Production Techniques Break off cuttings from stock plants rather than
using cutting knives. Keep exact records of the plant source of cuttings to enable infections to be traced back to the source stock.
Isolate incoming material and keep shipments in different greenhouse, or at least in different blocks in the greenhouse. It is important to be able to locate specific shipments in case any problems develop at a later date.
Entry into the stock plant growing areas should be tightly restricted and limited. Entry into the growing area should also be tightly controlled. Consider providing visitors with disposable overalls and overboots. This is especially true if they had been in another geranium production greenhouse that day.
Start work from the cleanest production area to the dirtiest, i.e. stock plants → propagation area → production area → end at the cull pile.
Isolate your scented and Regal/Martha Washington geraniums from the zonals. They can be carriers of the disease and not show symptoms.
Separate seed and cutting geraniums. Xanthomonas is not thought to be transmitted by seed, but seedlings can catch the disease from other geraniums.
Management Techniques Adequate spacing will promote air circulation
and minimise water splashing affects. Keep hoses off the ground. Avoid splashing
when watering. Do not have ornamental plantings of geraniums
outside the greenhouse.

Floriculture Production Guide Diseases • 19
Do not hang geraniums, whether they are ivies, zonals, or mixed spring baskets, above other geraniums. Dripping irrigation water will quickly spread any disease.
Avoid plant-to-plant contact, common water films (e.g. capillary mats, ebb and flood benches), and overhead watering, particularly for stock plants.
End of Season Clean-up Discard all geraniums at the end of each season,
including old favourites that may not be commercially available. Do not save outdoor-grown geranium plants for use as stock plants.
Clean up and remove all debris on tables and the floor of the greenhouse. Wash down all bench surfaces with a disinfectant. Do not mix these compounds as hazardous gases can result.
Disinfect watering lines. Discard all returned plants and do not allow
them to be brought into growing areas. Do not reuse pots for a geranium crop.
When Plants Test Positive for the Bacterium Discard all plants found to be infected. They
should be buried or removed off site.
Do not compost them on the greenhouse site or spread them on adjacent fields.
Do not carry infected or suspicious plants through the greenhouse; place them in a plastic bag or box before moving them.
Geraniums immediately next to an infected plant should be discarded, as well as the flats or boxes they might be growing in. Do not reuse pots or trays from infected plants.
Wash down all greenhouse surfaces (benches, walls, drippers, walkways) and disinfect all tools used to handle the plants with a disinfectant.
Disinfect the irrigation system if you have a recirculating system.
Do not grow geraniums of any type in the area for three months.
Table 5.5: Fungicides and Bactericides Registered for Specific Diseases of Floriculture Crops Disease
Pesticide Trade Name RMGb Foliar Rate
(product/1,000 L water) **exceptions noted
Interval (days)
Crops
SEED/SEEDLING DECAY Damping-Off - General Captan 80 WDG F-M Bulb dip: 3.8-9.4 kg Treat bulbous iris, dahlia, gladiolus, narcissus,
tuberous begonia, and tulip before storage Maestro 80DF F-M Bulb dip: 3.75-9.5 kg No-Damp - Drench: 10 mL/L Ornamental seedlings and cuttings Damping-Off – Protists Prestop - Preplant: 12.5-25 L of
0.5% solution/m3 of media - To control Pythium sp. on potted poinsettia and
saintpaulia, and bedding plants (alyssum, geranium, pansy, petunia, salvia, snapdragon, and tagetes) Postplant drench: 2 L of
0.5-1.0% solution/m2 21-42
Subdue MAXX F-4 Soil mix: 5 mL/m³ Container, bench, or bed-grown foliage and bedding plants (see label for crops) in greenhouses or outdoors
Drench: 24 mL/1,000 L, apply 5 L of solution/m² at seeding & transplanting
Container, bench, or bed-grown bedding plants (see label for crops) in greenhouses or outdoors
Drench: 40 mL/1,000 L, apply 5L of solution/m2
For use at transplanting of gloxinia (may cause phytotoxicity)
Truban 25%EC F-14 Drench: 90-115 mL/ 380 L/75 m2
28-42 Use at seeding and transplanting of bedding plants (see label for crops)
Drench: 115-240 mL/ 380 L/40 m2
see label
Foliage, and bed- and container-grown plants (see label for crops)
Truban 30%WP F-14 Drench: 150-225 g/600 L/ 100 m2
28-56 Use at seeding and transplanting of bedding plants (see label for crops)
Drench: 600-900 g/ 1,200 L/100 m2
see label
Bench plantings of foliage plants, and for bed- and container-grown plants (see label for crops)

20 • Diseases Floriculture Production Guide
Table 5.5: Fungicides and Bactericides Registered for Specific Diseases of Floriculture Crops (continued) Disease
Pesticide Trade Name RMGb Foliar Rate
(product/1,000 L water) **exceptions noted
Interval (days)
Crops
Damping-Off – Protists (cont‟d)
Truban 30%WP F-14 Drench: 225-750 g/ 1,200 L/100 m2
28-84 For bed-grown foliage plants (see label for crops)
Dry soil mix: 55-110 g/m3 Bedding and foliage plants (see label for crops), and chrysanthemum, Easter lily, poinsettia, rhododendron
Damping-Off - Rhizoctonia Compass 50WG F-11 Drench: 3.8 g/100 L On greenhouse ornamentals at seeding Prestop - Preplant: 12.5-25 L of
0.5% solution/m3 of media - To control Rhizoctonia solani on potted poinsettia
and saintpaulia, and bedding plants (alyssum, geranium, pansy, petunia, salvia, snapdragon, and tagetes)
Postplant drench: 2 L of 0.5-1.0% solution/m2
21-42
Rovral WDG or WP F-2 Drench: 2 g/5 L/m2 Celosia and salvia; test tolerance of other species before large-scale application
BULB/CORM ROT Phyton 27 F-M 1.25 L To control Erwinia soft rot on cyclamen Quintozene 75WP F-14 Bulb dip (5-minute):
100 g/L Dip for iris, hyacinth, narcissus, and tulip bulbs
ROOT & STEM-END ROT Aliette Ornamental &
WP F-U 2.8 kg/ha 14-30 Greenhouse ornamentals (Aglaonema, azalea,
pothos, shefflera, and spathiphilium) 2.8 kg/ha 14 Bedding plants (begonia, geranium, vinca, celosia,
petunia, salvia, and impatiens) Drench: 360 g/380 L per 36 m2
30
Captan 80 WDG F-M Cutting dip: 5-9.4 g/10 L Dip azalea, carnation, chrysanthemum for 20-30 min. Compass 50WG F-11 Drench: 3.8 g/100 L; wet
top ½ of growing medium 21-28 To control Rhizoctonia at seeding, rooting of
cuttings, and transplanting (see label for crop list) Contans WG 4 kg/ha at or prior to
planting For suppression or control of Sclerotinia in outdoor-
and greenhouse-grown cut flowers Folpan 50 WP F-M 2.0-2.25 kg 10 To control Pythium root rot of greenhouse poinsettias Mycostop - Pot plants: 2-5 mg/plant 21-42 Growing media treatment to suppress Fusarium,
Pythium, and Phytophthora of greenhouse ornamentals
Cut flowers (in beds): 5-10 g/100 m2 Seedling production: 2-10 g/100 m2
Phyton 27 F-M Drench: 1.5-2.5 L 7 Poinsettia Cutting dip: 1.25-2.5 L Quick dip to control Erwinia soft rot of poinsettia 1.25 L 14 To control Erwinia soft rot of cyclamen Prestop - Preplant: 12.5-25 L of
0.5% solution/m3 of media - To control Phytophthora cryptogea on potted
poinsettia, saintpaulia, and bedding plants (alyssum, geranium, pansy, petunia, salvia, snapdragon, and tagetes)
Postplant Drench: 2 L of 0.5-1.0% solution/m2
21-42
Previcur N 28 Drench: 1.5 mL/L; apply 100 mL of solution/10 cm pot
21-40 To control Pythium on greenhouse- and outdoor-grown African violet, azalea, cyclamen, geranium, gerbera. holly, poinsettia, rose, and snapdragon
Drench: 1.5 mL/L; apply 4.9 L of solution/m2 of surface area
21-40 To control Phytophthora on greenhouse- and outdoor-grown African violet, azalea, cyclamen, geranium, gerbera. holly, poinsettia, rose, and snapdragon
Rhapsody ASO - Drench: 10-20 L 21-28 Greenhouse and outdoor ornamentals to control Phytophthora, Pythium, and Rhizoctonia

Floriculture Production Guide Diseases • 21
Table 5.5: Fungicides and Bactericides Registered for Specific Diseases of Floriculture Crops (continued) Disease
Pesticide Trade Name RMGb Foliar Rate
(product/1,000 L water) **exceptions noted
Interval (days)
Crops
ROOT & STEM-END ROT (cont‟d)
RootShield HC - Drench: 55-110 g/m3 potting mix
Greenhouse ornamental crops
Bulb dip: 60g/L Treat ornamental bulb crops prior to planting RootShield G - Mix 600-750 g/m3 of
soil or planting mix Greenhouse and outdoor ornamental crops
Senator 70WP F-1 Drench: 650-850 g 15 To control Fusarium and Rhizoctonia on greenhouse potted ornamentals
Subdue MAXX F-4 Soil mix: 5 mL/m³ To control Pythium and Phytophthora on container, bench, or bed-grown foliage and bedding plants (see label for crops) in greenhouses or outdoors
Drench: 24 mL/1,000 L; apply 5 L of solution/m² at seeding & transplanting
To control Pythium and Phytophthora on container, bench, or bed-grown bedding plants (see label for crops) in greenhouses or outdoors
Drench: 40 mL/1,000 L; apply 5L of solution/m2
For use at transplanting of gloxinia (may cause phytotoxicity)
FOLIAR DISEASES Anthracnose
Daconil 2787 F-M 2.5 La 7-14 Greenhouse and outdoor statice Daconil Ultrex F-M 1.5 kga 7-14 Greenhouse and outdoor statice Rhapsody ASO - 10-20 L 7 Leatherleaf fern (greenhouse and outdoor)
Bacterial Blight Copper Spray 50% F-M Spring: 2 g/L 7-10 Outdoor-grown forsythia, lilac, and rose Fall: 6 kg/1,000 L/ha
Black Spot Captan 80 WDG F-M 1.2-1.4 kg 7-10 Roses Maestro 80DF F-M 1.2-1.5 kg Compass 50WG F-11 150-200 g Greenhouse and outdoor ornamentals (suppression) Cylcone - 1.5%-2.5% dilution;
apply 800 L/ha 5-10 Greenhouse roses
Daconil 2787 F-M 1.8 La 7-14 Greenhouse and outdoor roses Daconil Ultrex F-M 1.1 kga 7-14 Greenhouse and outdoor roses Rhapsody ASO - 10-20 L 7 Greenhouse and outdoor roses Senator 70WP F-1 500-750 g 10-14 Roses
Botrytis (Grey Mold) Botran 75W F-14 1.75 kg Apply prior to lifting rose and hydrangea for
storage or shipping 925 g 7-14 Rose, geranium, and chrysanthemum stock
cuttings or greenhouse plants Captan 80 WDG F-M 1.2-1.4 kg 7-10 Chrysanthemum Maestro 80DF F-M 1.2-1.5 kg Compass 50WG F-11 75-300 g 14 Greenhouse and outdoor ornamental bedding
plants (suppression) Daconil 2787 F-M 2.5 La 7-14 Carnation, chrysanthemum, geranium, gladiolus,
iris, lily, petunia, statice (greenhouse and outdoor) Daconil Ultrex F-M 1.5 kga Daconil 2787 F-M 1.8 La 7-14 Greenhouse- and outdoor-grown roses Daconil Ultrex F-M 1.1 kga

22 • Diseases Floriculture Production Guide
Table 5.5: Fungicides and Bactericides Registered for Specific Diseases of Floriculture Crops (continued)
Disease Pesticide Trade Name
RMGb Foliar Rate (product/1,000 L water) **exceptions noted
Interval (days)
Crops
Botrytis (cont‟d) Decree F-17 1.12 kg/ha 7-14 Greenhouse- and outdoor-grown ornamentals, such as
African violet, geranium, petunia, poinsettia, and rose Phyton 27 F-M 1.25-2.5 L 7 Cyclamen and roses 1.0-1.5 L 7 Fuchsia and primula 2.5 L 7 Geranium 1.0-2.0 L 7 Hibiscus and spathiphyllum 1.25-2.0 L 7 Gerbera and kalanchoe 1.0-1.25 L 7 New Guinea impatiens and orchids 1.5 L 7 Poinsettia Cut flower dip: See label Alstromeria, freesia, rose and sweet pea Prestop - 25 g/5 L 21-28 Poinsettia, saintpaulia, bedding plants (alyssum,
geranium, pansy, petunia, salvia, snapdragon, tagetes) Rhapsody ASO - 10-20 L 7 Greenhouse and outdoor poinsettia, geranium,
white petunia RootShield HC - 7.5 g/L 7-14 Outdoor ornamentals Rovral WDG or WP F-2 1.0 kg 21 See label for crops. May scorch petals of Saintpaulia. Senator 70WP F-1 650-850 g 7 Greenhouse potted ornamentals
Downy Mildew Acrobat 50 WP F-5 48 g/100 L/ha 7-14 Greenhouse (excluding cut flowers) and outdoor-
grown ornamentals Flower Blight
Daconil 2787 F-M 2.5 La 7-14 Mycosphaerella ray blight on chrysanthemum (greenhouse and outdoor) Daconil Ultrex F-M 1.5 kga 7-14
Leaf Spots Captan 80 WDG F-M 1.2-1.4 kg 7-10 Carnation and to control Septoria on chrysanthemum Maestro 80DF F-M 1.2-1.5 kg Daconil 2787 F-M 2.5 La 7-14 Carnation, chrysanthemum, dracaena, gladiolus,
hydrangea, iris, leatherleaf fern, parlor palm, prayer plant, statice, syngonium, philodendron. May discolour blooms of some hydrangea varieties.
Daconil Ultrex F-M 1.5 kga 7-14
Folpan 50 WP F-M 2.0 kg 7-10 Outdoor-grown chrysanthemum, iris Phyton 27 F-M 2.0 L 7 To control Alternaria on dusty miller 1.25-2.75 L 3-5 To control Cylindrocladium on azalea 1.25-2.0 L 7 Heterosporium on dianthus & Cylindrocladium on
spathiphyllum 2.5 L 7 To prevent the spread of Xanthomonas on geraniums 1.25-4.0 L 7 To control Cylindrocladium on miniature roses Rhapsody ASO - 10-20 L 7 To control Xanthomonas on geranium and
Aglaonema 10 L 7 To control Pseudomonas delphinii on delphinium Senator 70WP F-1 650-850 g 7 Greenhouse potted ornamentals
Phytophthora Foliar Blight & Dieback
Aliette Ornamental F-U 5 kg/ha in < 1,000 L of water
14-21 To suppress Phytophthora ramorum on host plants grown in the greenhouse and field
Daconil Ultrex F-M 1.5 kga 7-14 Greenhouse and outdoor azalea, petunia, philodendron; may discolour petunia blooms Daconil 2787a F-M 2.5 La 7-14

Floriculture Production Guide Diseases • 23
Table 5.5: Fungicides and Bactericides Registered for Specific Diseases of Floriculture Crops (continued) Disease
Pesticide Trade Name RMGb Foliar Rate
(product/1,000 L water) **exceptions noted
Interval (days)
Crops
Phytophthora Foliar Blight & Dieback (cont‟d)
Dithane DG Manzate DF Penncozeb 80WP
F-M 1.8-2.5 kg To control twig blight (Phytophthora ilicis) on holly
Subdue MAXX F-4 Drench at seeding: 24 mL/1,000 L; apply 5 L of solution per m2
60-90 To suppress Phytophthora ramorum on indoor and outdoor container-grown ornamental hosts
Drench at transplanting: 40 mL/1,000 L; apply 5 L of solution per m2
60-90
Powdery Mildew Actinovate SP - 500 g/1,100 L water/ha 7 Greenhouse- and outdoor-grown gerbera daisy Compass 50WG F-11 140-210 g 7-14 Begonia, cosmos, geranium, photinia, poinsettia,
rose, salvia, verbena, and snapdragon (suppression) 300 g 14 Greenhouse and outdoor ornamental bedding plants 150-200 g 14 Greenhouse and outdoor ornamentals (suppression) Cylcone - 1.5%-2.5% dilution;
apply 800 L/ha 5-10 Greenhouse roses
Daconil 2787 F-M 2.5 La 7-14 Greenhouse and outdoor zinnia Daconil Ultrex F-M 1.5 kga 7-14 Greenhouse and outdoor zinnia Folpan 50 WP F-M 2.0 kg 7-10 Outdoor-grown asters, chrysanthemum, phlox, and
rose Meltatox F-5 2.5 L 10-14 Greenhouse- and field-grown roses; do not spray
under hot, sunny and low humidity conditions MilStop - 5.6 kg/ha 7-14 Greenhouse-grown poinsettia, hydrangea Nova 40W F-3 280 g 10-14 Poinsettia 340 g 10-14 Cut and potted roses, gerbera, aster, and
chrysanthemums (greenhouse and outdoor) Phyton 27 F-M 1.25-2.5 L 7-10 Begonia, phlox, and roses 1.25-2.0 L 7 Hydrangea (may damage blue flowers) and
monarda 1.0-1.5 L 7 New guinea impatiens 1.25 L 7 Poinsettia 1.75 L 14 Verbena Pristine WG F-7 + 11 0.735-1.2 kg 7-10 Greenhouse-grown bedding plants Regalia Maxx - 1.25-2.5 mL/L 7-10 Greenhouse and outdoor ornamentals, annual and
perennial flowering plants (suppression) Rhapsody ASO - 10-20 L 7 Poinsettia, garden phlox, dwarf bee balm, and
roses (greenhouse and outdoor) Senator 70WP F-1 650-850 g 7 Greenhouse potted ornamentals
Rust Daconil 2787 F-M 2.5 La 7-14 Geranium and hydrangea (greenhouse and
outdoor) Daconil Ultrex F-M 1.5 kga 7-14 Geranium and hydrangea (greenhouse and
outdoor) Nova 40W F-3 340 g 10-14 Cut and potted roses, gerbera, aster, and
chrysanthemums (greenhouse and outdoor) and geraniums

24 • Diseases Floriculture Production Guide
Table 5.5: Fungicides and Bactericides Registered for Specific Diseases of Floriculture Crops (continued) Disease
Pesticide Trade Name RMGb Foliar Rate
(product/1,000 L water) **exceptions noted
Interval (days)
Crops
WILT DISEASES Phyton 27 F-M 2.5 L 7 To prevent the spread of Xanthomonas on geraniums Rhapsody ASO - 10-20 L 7 To control Xanthomonas on geranium and Aglaonema a Do not apply with a mistblower or high pressure spray equipment for greenhouse applications. b Pesticides are categorized into Resistance Management Groups (RMG) based on their target site / mode of action. It is important to rotate pesticides of different RMGs to manage against the development of pest resistance. RMG "M" comprises a collection of various chemicals that have several sites of action, which may differ between group members. c Use 50% of the recommended rate for plants that were treated during the propagation stage. d See Table 5.3 for information on the specific root rot pathogens that are controlled by each fungicide.

Nematodes 6
(updated November 2008)
Nematodes are microscopic worms that inhabit soil and water. Free-living species feed on bacteria, fungi and other nematodes while others parasitize insects, plants and animals. This chapter will focus on nematodes that parasitize plants. Plant parasitic nematodes are a diverse group of organisms with species that can be found in foliage, stems, roots and in the soil with most species feeding on the roots. They range in size from about 0.3-5.0 mm in length. Most feed by inserting a syringe-like mouthpart into plant tissue, which wounds the cells and creates entry sites for other disease causing organisms. Generally, nematodes do not kill the plant but produce vague symptoms such as yellowing, stunting, and general poor growth. They are often part of a complex of problems that result in plant decline. Some nematodes are capable of vectoring viruses. In the field, nematodes can spread through movement of infested soil and symptoms are often exhibited as patchy areas that expand every year. Nematodes that live in the roots and stems can spread by moving infested plants to new areas.
Nematodes commonly found on ornamental crops are meadow or root lesion nematodes (Pratylenchus spp.), root knot nematodes (Meloidogyne spp.), foliar nematodes (Aphelenchoides spp.), and stem and bulb nematodes (Ditylenchus spp.). Root lesion and root knot nematodes are found in the soil and the roots, while foliar and stem and bulb nematodes can be found in the soil, roots, stem and foliage. The populations increase with temperature and low initial populations in spring can reach damaging levels by autumn. Damage level is dependent on factors such as susceptibility of the host, soil type, temperature, type and number of nematodes present, plus stress factors affecting the crop such as drought and low fertility. Generally, damage is more severe in sandy soils. Crops in organic soils can tolerate higher numbers of nematodes. Weeds are an important host that help to maintain populations over the winter. Most damage occurs in the first year of planting. It is important that plants establish a healthy root system, especially perennials, since this enables them to tolerate some nematode feeding. Proper soil pasteurization as well as clean storage of the potting soil is essential to prevent damage caused by nematodes.
Figure 6.1: Microscopic View of a Nematode (lateral section)
Most nematode species have similar life cycles. After mating, the female lays eggs in the same area where she is feeding. The larvae go through four moults, completing their life cycle within 3 to 4 weeks. Some types or species of nematodes may go into a dormant stage if conditions are unfavourable, remaining in the soil or plant debris for many years. Movement is through soil and plant roots, as well as through films of water on leaves.
Root Lesion Nematode Meadow or root lesion nematodes, Pratylenchus spp., can be found in the soil and inside the roots of many ornamental plants including bulbs. High populations in the soil and roots result in poor growth, often causing patches of dying plants in the field.
Root Knot Nematode Root knot nematodes (Meloidogyne spp.) cause stunting, lack of plant vigour, and the leaves may be discoloured. When the roots of infested plants are examined they usually exhibit knots or galls. The
Floriculture Production Guide Nematodes • 1

damaged root systems may cause plants to wilt under the slightest water stress. Damaged host plants are more susceptible to secondary disease pathogens like Pythium, Rhizoctonia, and Phytophthora. They are primarily a problem of long term greenhouse crops such as roses and carnations grown in soil beds. Transmission occurs via soil-contaminated machinery, hands, feet, and irrigation water.
Foliar Nematode Foliar nematodes (Aphelenchoides spp.) can attack a wide range of plants including anemones, begonias, chrysanthemums, crocus, iris, narcissus, strawberry, and tulips. They feed on the outside of young foliage, stems, and buds, causing curling, twisting, and stunting damage to new growth. They can also crawl into the leaf through wounds or via the stomata, resulting in water soaked or yellow areas that eventually turn brown. Affected areas tend to be limited by veins. Leaves later dry up and turn brown. Foliar nematode symptoms may be similar to sunburn, high temperature, or pesticide damage, which makes accurate visual diagnosis difficult. If allowed to build up they can cause serious losses in crops such as Easter lilies and begonias. Infested plants exhibit stunted, blotched, and curled leaves that fade from green to yellow, and finally to brown. If plants are growing close together so that the leaves are touching, the nematodes can move from one leaf to another during wet weather. They survive from year to year in bulbs, leaf tissue, and in the soil.
Stem & Bulb Nematodes The most important nematode pest of bulbs is the narcissus stem and bulb nematode (Ditylenchus dipsaci). As many as 400 different species of plants including all of the bulb crops, strawberries, onions, alfalfa, cereals, perennial flowers including phlox, and numerous weeds may be attacked by one or more races of this nematode. Some populations can attack a wide range of hosts while others are restricted to only a few. A related species, Ditylenchus destructor is a pest of dahlias and potatoes, however this nematode has not been found in BC.
Figure 7.2: Life Cycle of Bulb Nematodes
In the field, infested narcissus plants tend to start growth early but the leaves are shorter and often wider than normal. Some of the leaves are bent or otherwise deformed and exhibit pale areas with elongated swellings known as ‘spikkles’. These swellings contain nematodes that become dormant when the leaves dry up and then fall to the soil where they can be reactivated when conditions are favourable.
Infected bulbs are softer than normal and may exhibit a dark neck rot. When suspect bulbs are cut in cross section, concentric rings of dark infested scales are seen alternating with white uninfested scales.
Management of Nematodes in Soil Nematodes can be introduced to a field in infested soil adhering to farm equipment and in infested planting stock. To reduce the risk of introducing nematodes to a field, test the roots and associated soil of planting stock for nematodes (e.g. root lesion, stem and bulb, and root knot nematodes) prior to planting out and, clean equipment before moving between fields. It is also recommended to periodically sample field and
2 • Nematodes Floriculture Production Guide
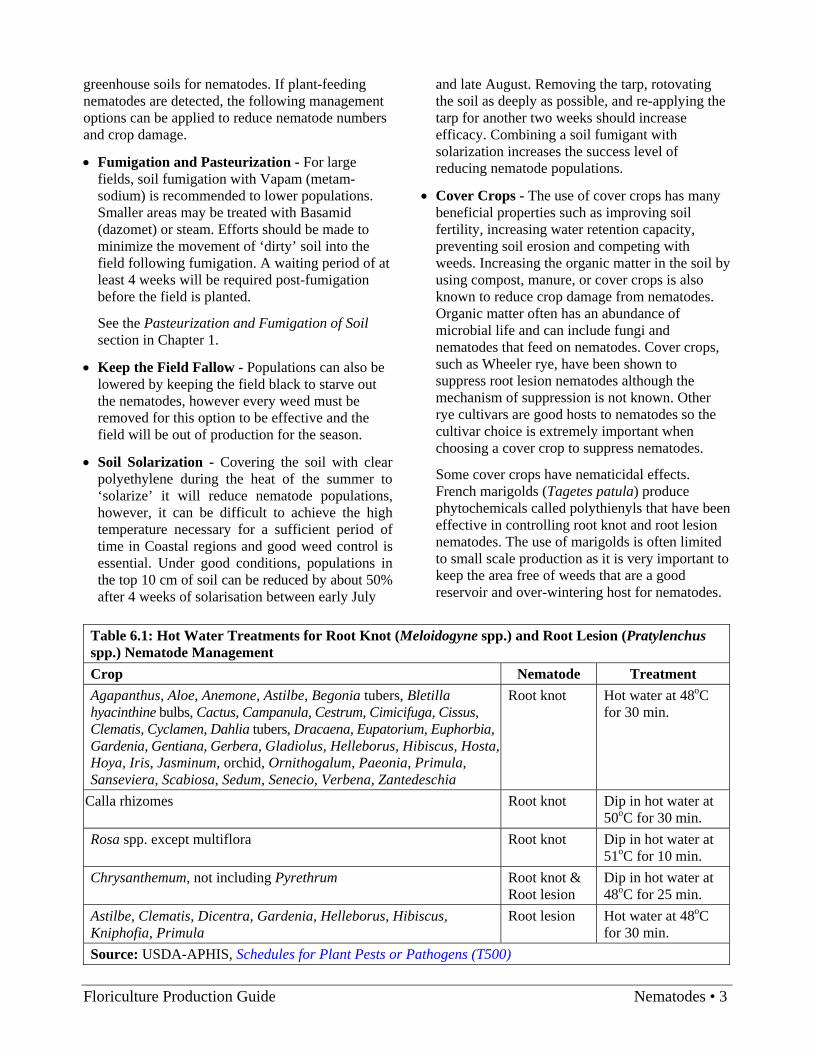
greenhouse soils for nematodes. If plant-feeding nematodes are detected, the following management options can be applied to reduce nematode numbers and crop damage.
• Fumigation and Pasteurization - For large fields, soil fumigation with Vapam (metam-sodium) is recommended to lower populations. Smaller areas may be treated with Basamid (dazomet) or steam. Efforts should be made to minimize the movement of ‘dirty’ soil into the field following fumigation. A waiting period of at least 4 weeks will be required post-fumigation before the field is planted.
See the Pasteurization and Fumigation of Soil section in Chapter 1.
• Keep the Field Fallow - Populations can also be lowered by keeping the field black to starve out the nematodes, however every weed must be removed for this option to be effective and the field will be out of production for the season.
• Soil Solarization - Covering the soil with clear polyethylene during the heat of the summer to ‘solarize’ it will reduce nematode populations, however, it can be difficult to achieve the high temperature necessary for a sufficient period of time in Coastal regions and good weed control is essential. Under good conditions, populations in the top 10 cm of soil can be reduced by about 50% after 4 weeks of solarisation between early July
and late August. Removing the tarp, rotovating the soil as deeply as possible, and re-applying the tarp for another two weeks should increase efficacy. Combining a soil fumigant with solarization increases the success level of reducing nematode populations.
• Cover Crops - The use of cover crops has many beneficial properties such as improving soil fertility, increasing water retention capacity, preventing soil erosion and competing with weeds. Increasing the organic matter in the soil by using compost, manure, or cover crops is also known to reduce crop damage from nematodes. Organic matter often has an abundance of microbial life and can include fungi and nematodes that feed on nematodes. Cover crops, such as Wheeler rye, have been shown to suppress root lesion nematodes although the mechanism of suppression is not known. Other rye cultivars are good hosts to nematodes so the cultivar choice is extremely important when choosing a cover crop to suppress nematodes.
Some cover crops have nematicidal effects. French marigolds (Tagetes patula) produce phytochemicals called polythienyls that have been effective in controlling root knot and root lesion nematodes. The use of marigolds is often limited to small scale production as it is very important to keep the area free of weeds that are a good reservoir and over-wintering host for nematodes.
Table 6.1: Hot Water Treatments for Root Knot (Meloidogyne spp.) and Root Lesion (Pratylenchus spp.) Nematode Management Crop Nematode Treatment Agapanthus, Aloe, Anemone, Astilbe, Begonia tubers, Bletilla hyacinthine bulbs, Cactus, Campanula, Cestrum, Cimicifuga, Cissus, Clematis, Cyclamen, Dahlia tubers, Dracaena, Eupatorium, Euphorbia, Gardenia, Gentiana, Gerbera, Gladiolus, Helleborus, Hibiscus, Hosta, Hoya, Iris, Jasminum, orchid, Ornithogalum, Paeonia, Primula, Sanseviera, Scabiosa, Sedum, Senecio, Verbena, Zantedeschia
Root knot Hot water at 48oC for 30 min.
Calla rhizomes Root knot Dip in hot water at 50oC for 30 min.
Rosa spp. except multiflora Root knot Dip in hot water at 51oC for 10 min.
Chrysanthemum, not including Pyrethrum Root knot & Root lesion
Dip in hot water at 48oC for 25 min.
Astilbe, Clematis, Dicentra, Gardenia, Helleborus, Hibiscus, Kniphofia, Primula
Root lesion Hot water at 48oC for 30 min.
Source: USDA-APHIS, Schedules for Plant Pests or Pathogens (T500)
Floriculture Production Guide Nematodes • 3

There are some brassica cultivars that are also effective. When the plants are incorporated into the soil, they release compounds such as isothiocyanates that are toxic to nematodes. Many other potential cover crops have been tested with promising results for specific situations. It is important to note that there is a lot of variability between cover crops and the type of nematode that they suppress.
• Crop Rotation – Consider rotating with a non-host crop to reduce the population of nematodes in the field.
• Resistant Varieties – If available, grow crop cultivars that are resistant to nematodes.
• Soilless System – For greenhouse crops, use a hydroponic or soilless growing system. Take steps to ensure nematodes cannot move from the soil into the containers of soilless media, i.e. do not place the soilless media in direct contact with infested soil.
Management of Nematodes in Plant Roots Hot water treatments can be used to kill nematodes in roots before planting in clean media or soil. The success of hot water treatments is dependent on accurate time and temperature controls. Various plants have different sensitivities to the treatments. Refer to Table 6.1 for recommended treatments for specific crops. Management of Nematodes in Foliage and Bulbs • Use Nematode-free Stock – Although leaf and
stem cuttings will be free of root feeding nematodes, they will not necessarily be free of foliar nematodes. Test the stock prior to use. Use only clean or hot-water-treated stock for propagation.
• Discard Heavily Infested Bulbs.
• Hot Water Treatment – Refer to Table 6.2 for recommended treatments to manage foliar and stem & bulb nematodes. Cultivars vary in tolerance to hot water treatment. Bulbs of uniform size should be treated in the same batch.
If basal rot is present, hot water treatment with Formalin is recommended as the hot water
treatment alone can spread basal rot from infected to healthy bulbs. Cured hyacinth, iris, and narcissus bulbs should be pre-soaked in water at 24oC for 2 hours to activate the nematodes from the resting state. Treat bulbs for 4 hours in a 44oC Formalin solution (500 mL of Formalin in 100 L of water). Dry and return to cool storage.
Read the label for detailed information.
• Crop Rotation – Follow a 3 to 4 year rotation between crops. During that time, weeds must be controlled and all volunteer bulbs must be removed from the field to manage stem & bulb nematodes. If it is not feasible to follow long rotations between susceptible crops, infested fields may be fumigated to reduce the nematode population.
• Sanitation – Rogue and destroy symptomatic plants and plants adjacent to them. Remove plant debris in greenhouses, propagation, and equipment storage areas because it can harbour these nematodes. Take care in disposing of infested material as foliar and stem & bulb nematodes can survive in plant debris for long periods of time.
Small infestations of foliar nematodes on individual leaves can be removed and destroyed.
Thoroughly wash all tools and equipment that come in contact with infested soil or bulbs with a solution of 1 part Formalin (formaldehyde) and 9 parts water.
• Irrigation – Space plants so that they do not touch one another and avoid overhead watering to prevent splashing of nematodes to new plants. Water carefully.
If you suspect nematode damage to your crop, samples can be submitted to the BC Ministry of Agriculture and Lands Plant Diagnostic Lab for analysis. Dying plants and soil should be included in the sample. Contact the Lab for information on how to take a representative sample. The Lab can be reached at 604-556-3001 or Toll-free at 1-888-221-7141.
To test soil before planting to a crop, contact you agricultural advisor. These samples should be tested in a private lab.
4 • Nematodes Floriculture Production Guide

Table 6.2: Hot Water Treatments for Foliar (Aphelenchoides spp.) and Stem & Bulb (Ditylenchus spp.) Nematode Management Crop Nematode Treatment Allium, Amaryllis, Bulbs (general) Stem & bulb Presoak bulbs in water at 24oC for 2 hours,
then in hot water at 43-44oC for 4 hours. Bletilla hyacinthina Foliar Hot water at 48oC for 30 min. Hyacinthus bulbs, Iris bulbs and rhizomes
Stem & bulb Presoak in water at 21-27oC for 2.5 hours, followed by hot water immersion at 43-44oC.
Narcissus bulbs Stem & bulb Presoak cured bulbs in water at 21-27oC for 2 hours, followed by hot water immersion at 43-44oC until all bulbs reach that temperature and hold for 4 hours.
Begonia Foliar Dip in hot water at 48oC for 5 min. Astilbe, Bletilla hyacinthina, Cimicifuga, Hosta, Paeonia
Foliar Presoak in water at 20oC for 1 hour followed by hot water soak at 43oC for 1 hour. Then dip in cold water and let dry.
Senecio Foliar Treat with hot water at 43oC for 1 hour. Crocus Foliar, Stem &
bulb Hot water at 43oC for 4 hours. Should be done immediately after digging.
Amaryllis, Gladiolus, Scilla Stem & bulb Hot water at 43oC for 4 hours. Should be done immediately after digging.
Muscari, Ornithogalum Stem & bulb Dip in hot water at 45oC for 4 hours. Source: USDA-APHIS, Schedules for Plant Pests or Pathogens (T500)
Floriculture Production Guide Nematodes • 5

Floriculture Production Guide Insects, Mites, and Animal Pests • 1
Insects, Mites, and Animal Pests 7 (updated June 2012)
This chapter contains a description of and management recommendations for common insects, mites, and animal pests that damage floriculture crops. Some information on biological controls is provided; additional information is present in Chapter 1. Information on the pesticides registered to manage a particular pest is presented in Table 7.1. Pesticides are listed in the table in alphabetical order by active ingredient.
When a pesticide is required to control a pest, select a product based on efficacy, and safety for the applicator and environment. The symbol is used to indicate products that are very toxic to mammals.
All efforts were made to ensure the pesticide tables are accurate; however always refer to the product label for full use instructions. Note that not all formulations listed will necessarily be available.
Aphids Aphids are small pear-shaped, soft bodied, winged or wingless insects. There are more than 4,000 species worldwide. Some are restricted to one or a few host plants, while others have large host ranges. Many species infest ornamental crops in both greenhouse and field production. They are often pale green in colour but are sometimes black, orange, pink, yellow, or brown. The adults can be from 2 to 3 mm in length, and nymphs up to 1.8 mm. They are usually found on the tender portions of stems, new shoots, and the underside of leaves.
Aphids extract plant fluids from the phloem tissues by means of specialized piercing-sucking mouth parts. Because many aphids prefer the soft new tissues near the growing points, plant growth is often interfered with and new buds may be malformed. The honeydew that aphids secrete can produce a shiny, sticky film on plant surfaces. Honeydew provides a medium for the growth of a black sooty fungus that gives the plant a dirty appearance and interferes with photosynthesis. Leaves are often littered with white „skins‟ (exoskeletons) that are shed as the young aphids grow and moult. In addition, aphids are vectors of plant viruses.
Some important aphid pests of floriculture crops include: the green peach aphid (Myzus persicae), the cotton or melon aphid (Aphis gossypii), the chrysanthemum aphid (Macrosiphoniella sanborni), the rose aphid (Macrosiphum rosae), the foxglove aphid (Aulacorthum solani), and the potato aphid (Macrosiphum euphorbia). Most aphid pests of floriculture crops are found in the open. However, some ornamental species may be infested by aphids that can live underground on roots for a portion of their life cycle, or within plant galls that form as a result of insect feeding, or under a woolly substance that provides a protective barrier. Aphid species vary considerably in their susceptibility to pesticides and suitability for biological control.
Figure 7.1: Aphid Life Cycle (6 – 14 days)
Life Cycle Under greenhouse conditions, many aphids can remain active year-round. Outdoors, they overwinter as eggs, emerging in spring as wingless females. They give birth to living young that are capable of reproducing within 7 to 10 days. A single aphid can

2 • Insects, Mites, and Animal Pests Floriculture Production Guide
produce 60 to 100 young over a 20 day period. Subsequent generations may develop wings when conditions become crowded. This allows the aphids to fly to other host plants. In fall, males are produced to fertilize females who then lay the overwintering eggs. In milder climates, adult aphids can overwinter in the ground or in plant debris. Upon emerging in the spring, females often produce a winged generation that disperses to host plants.
Prevention Remove weeds from inside greenhouses and
from a three metre wide band around the outside perimeter of greenhouses.
Avoid bringing infested plant materials into the greenhouse.
Screen vents and other openings to prevent entry from the outside.
Monitor winged populations with yellow sticky traps; visual examination of new shoots is necessary for early detection of wingless aphids.
Biological Control Aphidius colemani, a small wasp that parasitizes aphids, and Aphidoletes aphidimyza, a midge that is an aphid predator, can control aphids on greenhouse crops. Apply A. colemani at a rate of 5/10 m2 and A. aphidimyza at the rate of 10/10 m2. The two should be used in combination to achieve the best control; Aphidoletes quickly reduces large populations and Aphidius provides on-going control of low populations.
“Aphid Chaser” is a commercially available alarm pheromone for the control of aphids on roses. It does not kill aphids, but disrupts their feeding and reduces their population growth. This will also increase the effectiveness of natural enemies. Apply early in the season according to package instructions, and replace every 4 weeks or when aphids re-appear.
Tulip Bulb Aphid Tulip bulb aphid (Anuraphis tulipae) adults are wingless and greyish in colour with dark heads. They are found under the dry outer skins of bulbs, where they feed by sucking sap. They infest bulbs in storage. Crocus, gladiolus, freesia, iris, and lily bulbs are also hosts. When infested bulbs are planted, the foliage is stunted, weak, and unhealthy, and the flowers may be also stunted. Tulip bulb aphids are a vector of the lily-symptomless and tulip-break viruses.
Prevention Rogue and destroy plants that appear abnormal.
Bulb Flies Narcissus Bulb Fly The narcissus bulb fly (Merodon equestris) is the most serious insect pest of narcissus. The adult female resembles a small bumble bee. The males are slender and, when they fly, their wings produce a high pitched sound. The adults are about 12 mm long. Adult activity is from mid-May through June in the field. If the bulbs are greenhouse forced for early sales, flies will become active earlier. Damaged bulbs are soft, scarred, and may produce spindly and dwarfed leaves, or they may fail to grow and rot. While narcissus is the main host, it also affects amaryllis, hyacinth, iris, scilla, and tulip bulbs.
Life Cycle The eggs are laid singly in soil cracks around bulbs or in the foliage in the neck of the bulb. The eggs are susceptible to both desiccation and excessive dampness. They hatch within 10 to 15 days to produce whitish or yellowish-white maggots that are from 1 to 2 mm long. They make their way to the bottom of the bulb and bore into it. Usually only one maggot is found per infested bulb and they overwinter inside the bulbs either in storage or in the field. The maggots usually exit from the bulb when they are fully grown (18 mm long). The maggots then bore upward in the soil and pupate just below the soil surface sometime in late April. Adult flies emerge 4 - 6 weeks later. It takes one year for the life cycle.
Lesser Bulb Fly Adult flies (Emmerus tuberculatus and related species) are about 6 mm long, the size of house flies, and are usually associated with damaged, sick, or rotting bulbs. Occasionally they have been found attacking healthy bulbs in storage. They occur from late April and last throughout the year under favourable conditions.
Life Cycle The first generation of adult flies emerges from April to the end of June. The second generation starts to appear in July and lasts until October. The female begins to lay eggs within 5 days. Eggs are laid in groups on or near weak, injured, or decaying

Floriculture Production Guide Insects, Mites, and Animal Pests • 3
bulbs. Depending upon temperature, eggs hatch in 2 - 12 days. The maggots are 8 mm long when fully grown and are found mainly in the neck of the bulb. They pupate after 2 - 4 weeks and the adults emerge 1 - 3 weeks later. The second generation may mature the same year, but most overwinter as maggots in the bulbs, which pupate and emerge the following spring as adult flies.
Prevention Rogue and destroy plants with spindly or
abnormal growth. Destroy rotten bulbs in storage.
Caterpillars, Loopers, Leafrollers, and Cutworms Many species of Lepidoptera will feed on floriculture crops. The adult moths tend to be dull-coloured and about 18 mm long. Many fly at night and may be attracted to greenhouse lights. Caterpillar infestations begin when adult moths or butterflies lay eggs on host plants. The emerging larvae feed on their preferred plant parts. Young looper and armyworm larvae skeletonize leaves, later consuming entire leaves as they grow. Cutworms are usually dull-coloured caterpillars up to 4 cm long that feed at night. Some species cut off plants at the soil surface. Others feed on plant parts above the ground. They usually hide during the day below the soil surface or in plant debris, or sheltered within the plant foliage. Leafrollers fold or roll leaves together with silk and feed on the inside. Leafroller larvae wriggle violently out of these shelters when disturbed and drop on a silk strand.
Some common caterpillar pests of floriculture crops include cabbage loopers (Trichoplusia ni), variegated cutworms (Peridroma saucia), and omnivorous leafrollers (Platynota stultana).
Life Cycle Depending on the species, there may be from one to several generations per year and life cycles are highly variable. Adult moths lay eggs on the leaves or stems of host plants. The newly hatched larvae begin feeding immediately and disperse on the plant as they grow. At maturity they enter a pupal stage, often inside a silken cocoon that may be located on the host plant or in debris on the ground. Leafrollers often pupate inside the rolled leaves. Overwintering may occur as partially grown larvae, eggs, or adults, in foliage, soil, or on structures.
Prevention Examine new shipments carefully for signs of
caterpillar infestation, particularly if received from a new supplier or out-of-country.
Screen vents and other greenhouse openings. Remove weeds from inside greenhouses and
from a three metre wide band around the outside perimeter of greenhouses.
Look for signs of feeding, caterpillars, and dark coloured droppings.
Examine plants frequently and remove caterpillars by hand if numbers are low.
Biological Control Bacillus thuringiensis var. kurstaki (Btk) is registered and available for use on some greenhouse and outdoor ornamentals. This microbial pesticide works best on young caterpillars, as the larvae must eat a lethal amount of Btk. After eating a sufficient dose, larvae stop feeding and die in 2-5 days.
Fungus Gnats and Shore Flies Fungus gnats are small, delicate, dark grey or black flies about 3 mm long. They are often seen running on the soil surface or flying around potted plants, particularly in wet areas. The slender white larvae have shiny black heads, no legs, and live in the potting media or soil. Most species feed on decaying organic matter and algae; they are common in compost. Larvae may damage roots on seedlings, rooted cuttings, and young plants. Root feeding can provide an access point for disease organisms.
Shore flies are similar in appearance to fungus gnats but they do not inflict significant damage. They may, however, contribute to the spread of diseases. Adult shore flies can be distinguished from fungus gnats by their apparent lack of antennae and faint spots or mottling on wings while at rest. They are also stouter and are stronger fliers than fungus gnats (see Figure 8.2). Shore fly larvae develop in standing water and lack the distinctive black head of fungus gnat larvae.
Life Cycle (Fungus Gnats) Females live about seven to ten days, laying a hundred or more eggs. The tiny white eggs are laid singly or in groups on the soil surface near host plants, and hatch in four to six days. Mature larvae are about 5.5 mm long with shiny black head capsules and white translucent bodies. They feed for

4 • Insects, Mites, and Animal Pests Floriculture Production Guide
Figure 7.2: Distinguishing Characteristics of Fungus Gnats and Shore Flies
about two weeks before pupating in the soil. Adults emerge in about one week. Many overlapping generations occur throughout the year. Fungus gnats become more active and reproduce faster as temperature increases.
Figure 7.3: Fungus Gnat Life Cycle (22 – 40 days)
Prevention Avoid over watering. Provide good drainage under the greenhouse. Control algae. (See Algae Control in Chapter 1.) Practice strict sanitation. Remove weeds from inside greenhouses and from
a three meter band around the outside perimeter of greenhouses.
Monitor populations with yellow sticky traps hung above crop canopy and close to the soil surface.
Biological Control Predatory mites, Hypoaspis miles, feed on the eggs and larvae of fungus gnats. They do not feed on plant tissue. They can be purchased in plastic bottles or cardboard tubes containing 10,000 or more mites in vermiculite. They should be applied on a preventive basis at the rate of 100 mites per m2 (2 mites/15 cm pot) or 5 cc vermiculite and mite mixture/pot. A predatory rove beetle, Atheta coriaria, feeds voraciously on eggs, larvae, and pupae of fungus gnats and shore flies, and will feed on thrips or other insects in the media/soil. Bacillus thuringiensis var. israelensis (Bti) is registered and available for use in greenhouse ornamentals. Bti kills larval stages of fungus gnats and shore flies. Apply as a soil/media drench when larvae are present.
Leafhoppers Leafhoppers are small (up to 6 mm) sap sucking insects that feed on foliage and or young shoots. They are usually pale green, white or yellow, and may have patterns on their wings. Leafhoppers are very mobile and will readily walk or fly when disturbed. Leaves that are fed on may appear stippled, scorched, or burned. Leafhoppers that feed on vascular tissues can cause severe deformities in new growth. Aster or six-spotted leafhoppers (Macrosteles quadrilineatus) transmit the aster yellows phytoplasma disease to many susceptible ornamental plants. Rose leafhoppers (Edwardsiana rosae) are also a notable pest in ornamental plantings.

Floriculture Production Guide Insects, Mites, and Animal Pests • 5
Figure 7.4: Adult and Nymph Leafhoppers
Life Cycle Leafhopper eggs hatch in spring. Immature leafhoppers are wingless, and progress through several stages (instars) before becoming winged adults. Depending upon the species and climate, a second generation may be produced in August or September.
Prevention Start inspecting outdoor plantings for signs of
leafhopper presence and damage by mid-May.
Leafminers The chrysanthemum or serpentine leafminer (Liriomyza trifoilii) is a particular problem on chrysanthemum, gerberas, and related species. Damage results from pale yellow tunnels in the leaves. Vigour of the plant may be reduced with high populations. The pea leafminer (Liriomyza huidobrensis) has been collected from ornamental greenhouse crops in the Fraser Valley. This pest has a wide host range and growers noticing leafminer damage to crops should have samples identified. Other leafminers that cause occasional problems on ornamental crops include the boxwood leafminer (Monarthropalpus buxi), the azalea leafminer (Caloptilia azaleella), the holly leafminer (Phytomyza spp.), and the lilac leafminer (Caloptilia syringella). A thorough understanding of the life cycle of the species of concern is important for good control.
Life Cycle (Chrysanthemum or Serpentine Leafminer) Adult flies are about 2.5 mm long with black and yellow markings. Adult activity begins at sunrise, peaking during mid-morning. Mating can occur at anytime. Females feed on leaves by puncturing the surface. These sites are speckled or stippled, usually
near the leaf tip. About 15% of all feeding punctures are used for egg laying. After 2 - 5 days, the eggs hatch and the larvae begin to feed inside the leaves, causing characteristic snake-like tunnels, tracks or „mines‟. In 5 - 7 days, the larvae cut a hole in the leaf, crawl out of the mine, and drop to the ground to pupate. They emerge as adults in 10 - 12 days. The length of the life cycle is directly affected by temperature. There can be several generations per year particularly in the greenhouse.
Prevention Inspect all new plant material coming into the
greenhouse and destroy any affected tissue. Maintain a diligent sanitation program. Plant
debris can harbour leafminers. Remove weeds inside greenhouses and from a
three metre wide band around the outside perimeter of greenhouses. Many weeds are alternate hosts.
Choose leafminer-tolerant varieties when possible. Avoid highly susceptible chrysanthemum varieties.
Monitor continuously using yellow sticky cards or tapes hung just above the crop and dispersed evenly among plants (1 trap/100 m2). Yellow sticky traps may be used to trap very low adult populations. Adults will be caught on them long before they are detected in the crop. Early detection is essential for effective control and prevention of leaf damage.
Timing and coverage are critical for effective chemical control.
Leafminers are prone to development of resistance to pesticides; be sure to rotate pesticides from different groups.

6 • Insects, Mites, and Animal Pests Floriculture Production Guide
Figure 7.5: Leafminer Life Cycle (24 – 30 days)
Biological Control See Chapter 1 for information on biological control of leafminers.
Mealybugs Mealybugs are closely related to scale insects, but have a white waxy covering instead of a hard scale. They are often found under bud scales and in leaf axils. Mealybugs feed on plant sap, which can cause infested plant parts to dry and turn yellow. Affected areas eventually die. Some species called ground mealybugs feed on the roots of the plants. Like most sucking insects, mealybugs excrete large quantities of sticky honeydew which hosts the growth of black sooty mould. Sooty mould gives the plant a dirty appearance and interferes with photosynthesis. Common species of mealybugs attacking floriculture crops include the citrus mealybug (Planococcus citri), long tailed mealybug (Pseudococcus longispinus), and the root mealybug (Rhizoecus spp.).
Life Cycle Mealybug development is favoured by high temperatures and humidities. Females deposit their eggs in a cottony, waxy sac under their bodies. When egg laying is complete, the female dies. The eggs hatch in about 10 days; less if the temperature is higher. The larvae or crawler stage moves about the plant to feed. As their life cycle progresses, they develop the waxy covering and move about less. The adult males are winged and do not feed on the
plant. About 30 days are required for one generation, so several generations can occur per year in greenhouses or interior plantscapes.
Prevention Examine new plants carefully before
introducing into the greenhouse. Isolate and treat infested plants. Avoid keeping
“pet” plants in the greenhouse. The crawler stage is most susceptible to
chemical controls; direct contact and good coverage of infested plant tissue is important when spraying.
Biological Control See Chapter 1 for information on biological control.
Figure 7.6: Mealybug Life Cycle (30 – 60 days)
Mites Mites are arachnids, not insects, and belong to the same class as spiders. Several mite species can cause damage to floriculture crops, most notably spider mites and cyclamen mites. European red mites, McDaniel spider mites, broad mites, bulb mites, bulb scale mites, and clover mites may occasionally become pests of greenhouse or field grown floriculture crops. Blister, gall, and rust mites (family: Eriophyidae) are microscopic and therefore hard to see and identify; but they can cause significant plant damage.

Floriculture Production Guide Insects, Mites, and Animal Pests • 7
Bulb Mite Bulb mite (family: Acaridae) (Rhizoglyphus echinopus) adults are smooth, colourless, shiny, and about 0.5 to 0.7 mm in length. They are plump, oval in shape, and move sluggishly. Bulb mites are considered secondary pests of bulbs, invading them at points of bruising or other mechanical injury. It is a pest of various bulb species during storage. The longer the storage period, the greater the mite build-up and the damage that may occur. Bulbs become soft as a result of mite damage. Infested bulbs, when planted, develop weak or sickly looking foliage, or fail to grow. Once a population is established, the bulbs are quickly reduced to a rotten pulp. During storage the mites can move between bulbs. Mite feeding may provide access for and vector plant diseases, particularly Fusarium species. Bulb mites are found on gladioli, hyacinths, lilies, narcissi, freesias, and tulips.
Prevention and Control Rogue and destroy plants and bulbs that appear
abnormal. Clean and disinfect bins and storage areas before use.
Handle bulbs carefully to avoid bruising. Maintain low humidity in storage. Hot water treatment can be used to destroy mite
infestations on some bulbs. See the section on hot water treatment in Chapter 6.
Steam pasteurization has been found to eliminate bulb mites from the soil.
Biological Control The predatory mite, Hypoaspis aculeifer, will help manage bulb mites, and can be applied as a preventive measure to bulbs in soil, or once the bulb mites are present (curative). Hypoaspis aculeifer will feed on other small soil insect pests and can survive without food for several weeks.
Bulb Scale Mite Bulb scale mites (family: Tarsonemidae) (Steneotarsonemus laticeps) are very tiny, about 0.2 mm in length, and are pale amber-coloured. They will infest healthy bulbs. Infestation occurs in the neck area of the bulbs while in storage. Infested bulbs are abnormally dry, small, and soft, and the outer scales may adhere tightly to the bulb. When infested bulbs are planted, the growing foliage and flower stems will have yellowish brown streaks that are the result of mite feeding on the tissue in the
neck of the bulb. Affected leaves may develop a „saw-tooth‟ disfiguration. Mite populations do not increase rapidly during the cool, early spring period. As temperatures rise, populations explode and mites spread freely over the leaves. Excessive feeding leads to premature wilting, which reduces food reserves within the bulb and results in a smaller bulb. As the foliage dies back, the mites move deep down within the bulb scales to survive the dormant season. When the bulbs are first lifted, the mites are concentrated in the neck region. During storage, as the bulbs dry and shrink, the mites move deeper between the bulb scales.
Prevention and Control Remove and destroy infested bulbs during
sorting, and any abnormal plants. Clean and disinfect bins and storage areas
before use. Hot water treatment can be used to destroy mite
infestations on some bulbs. See the section on hot water treatment in Chapter 6.
Cyclamen Mite Cyclamen mites (family: Tarsonemidae) (Stenotarsonemus pallidus) are very tiny, about 0.2 mm in length, and are pale amber-coloured. Because cyclamen mites avoid light, they congregate within unopened buds and between the halves of folded leaflets, sucking the sap from buds and growing points. They cannot be easily seen with the naked eye, so the first sign of a problem is often plant symptoms. Infested plants have leaves that are curled, twisted, and brittle. Infested buds may fail to open and flowers are blotched and distorted. Cyclamen are usually the most seriously affected crop, but other flowering and tropical plants may also be attacked. Other favoured hosts include African violets, fuchsia, geraniums, ivy, snapdragons, and strawberry.
Life Cycle Females lay eggs around the crown of the plant, and along the midrib of new unfolded leaves. Development is similar to two-spotted spider mites. The life cycle takes around 18 days, varying with temperature. Cyclamen mites thrive in cool temperatures and high relative humidity.

8 • Insects, Mites, and Animal Pests Floriculture Production Guide
Prevention and Control Examine new plants carefully for symptoms
before placing in greenhouse. Remove weeds from inside greenhouses and
from a three metre wide band around the outside perimeter of greenhouses.
Lowering relative humidity will reduce infestation levels. If only a few plants are infested, they should be removed and destroyed.
When spraying, good coverage deep into the growing points is critical; use a high water volume. Two to three applications at 7 day intervals may be necessary.
Lewis Mite Lewis mites (family: Tetranychidae) (Eotetranychus lewisi McGregor) have been found in several locations in BC on greenhouse-grown poinsettias. Lewis mites are similar in appearance to two-spotted spider mites, but they are smaller, greenish or straw coloured, and have several distinctive spots when viewed under a microscope or a powerful hand lens. The mite pierces the epidermis of the plant leaf and removes the cell contents, resulting in a distinctive stippled appearance characteristic of spider mite feeding. Eventually the entire leaf becomes bleached and falls off.
Life Cycle The life cycle from egg to adult is approximately 12 - 14 days. Females will oviposit 2 - 3 eggs per day for approximately 30 days. Lewis mites do not enter diapause (resting stage) in the fall and winter as do two-spotted spider mites.
Prevention and Control See the recommendations for two-spotted spider mites.
Two-Spotted Spider Mite Two-spotted spider mites (family: Tetranychidae) (Tetranychus urticae) may be called „red spiders‟ because of their red colour during diapause (winter resting stage). The mites are yellowish-pale green with two dark spots on the back. They vary in size from near microscopic to visible with the unaided eye depending on the stage and the plant species they have infested (mites are smaller on chrysanthemums). They feed mostly on the underside of leaves, sucking plant juices. Infested foliage develops a yellow mottling on the upper
surface. Leaves become brittle and parchment-like or bronzed as mite feeding progresses. Webs of fine silk strands are formed on upper leaves of highly infested plants. Entire plants may eventually be enveloped in sheets of webbing. Two-spotted spider mites thrive in warm and dry conditions.
Females lay an average of 100 eggs in a lifetime. Eggs are laid on the underside of the foliage. The newly hatched mites go through a larval and two nymphal stages before becoming adults. The life cycle depends upon temperature. During periods of high temperatures, spider mite populations can increase very rapidly, with a life cycle taking only 10 days. More time is required in colder conditions. As temperatures and day length decrease, females enter diapause (winter resting stage) by about mid September. They stop laying eggs, turn orange or red, and crawl down into a crack, crevice, or soil where they remain until spring. This stage is highly resistant to pesticides.
Figure 7.7: Two-Spotted Spider Mite Life Cycle (8 – 40 days)
Prevention and Control Eliminate weeds inside and from a three metre
wide band around the outside perimeter of greenhouses.
Monitor for early signs of presence and damage. Mites will not show up on sticky traps, so it‟s necessary to visually inspect plant leaves.
Discard heavily infested plants. Orient holes in overhead poly tubes so that plants are not under a direct blast of hot dry air. For example, have

Floriculture Production Guide Insects, Mites, and Animal Pests • 9
the holes point up instead of down onto the crop.
Good coverage of the upper and undersides of leaves is required when using sprays.
Biological Control Predatory mites, including Phytoseiulus persimilis are available for biological control. Apply at rates of 2 per m2 as a preventive treatment and 6 - 20 per m2 to control light to heavy infestations. Additional information is provided in Chapter 1.
Plant Bugs Several plant bugs may attack floriculture crops, including lygus or tarnished plant bugs (Lygus lineolaris), four lined plant bugs (Poecilocapsus lineatus), and stink bugs (Acrosternum spp.). The immature stages resemble large aphids, but they are fast moving compared to aphids, and easily disturbed. They can cause considerable damage, such as distortion and stunting of new shoots, terminals, and flower buds. Adults are shield-shaped, flattened, and fly when disturbed. Many species have distinctive dark and light markings and wing patterns.
Prevention and Detection Yellow sticky traps will catch adult lygus bugs,
so can be used to detect insect presence usually before they are seen within the plants. Set traps around the edges of plantings in spring (April, May) to detect the movement of adults into the crop.
From spring onwards, look for adults and nymphs in the crop. Nymphs often hide in the growing points or flower clusters but they can be shaken loose on to a collection pan, a white beating tray, or sheet of paper for identification.
Look for distorted growth and feeding injury on new tissues and flowers.
Rose Midge The rose midge, Dasineura rhodophaga, is an increasing pest of nursery grown roses in the Fraser Valley. The larvae (maggots) feed in developing shoot tips and flower buds, which become black and shrivelled and usually die. Rose midge is primarily a pest of outdoor grown roses, but has been known to invade greenhouses.
Life Cycle The insect spends the winter as pupae in the soil below plants infested the previous season. The tiny flies leave the soil in mid-spring and fly to the tips of nearby roses. Eggs are laid and within two days larvae begin feeding on the new growth. After about a week they move to the soil to pupate and soon new flies emerge. There can be several generations per year.
Prevention Un-infested rose nurseries should be cautious
when importing container stock from other nurseries. The midge will not be present in dormant, bare root stock.
Removal and safe disposal of obviously infested shoots and buds will reduce rose midge numbers.
Rose midge has no known natural enemies in BC.
Pesticides may not be very effective because the larvae are protected from sprays within folded leaves.
Scales Scales are small, wingless insects up to 3 mm in length. Their body shape is usually oval or hemispherical with a waxy or scale-like covering. Scales feed on the sap of their host plants, reducing plant vigour and causing wilting, yellowing, and distortion of leaves. Excess sap is secreted as honeydew, upon which a black sooty mould grows, giving the plant a dirty appearance and interfering with photosynthesis. Many scale species can infest floriculture crops, particularly woody plants including roses (rose, oystershell, lecanium scales), lilacs (oystershell and lecanium scales), and holly (holly scale). The soft brown scale (Coccus hesperidum) can attack a wide range of crops.
Life Cycle Mature females lay large masses of eggs under their bodies. Each egg hatches into a small pale crawler that moves about for a few days to find a suitable feeding site. The crawler will settle down and become stationary on a leaf, branch, or the trunk of the plant and begin to feed. The crawler is the best stage to target for chemical control measures as mature scales are protected by waxy or hard coverings that are difficult to penetrate.

10 • Insects, Mites, and Animal Pests Floriculture Production Guide
Figure 7.8: Soft Scale Life Cycle
Prevention Examine new plant material carefully before
bringing it into the greenhouse. Do not keep “pet” plants in the greenhouse. Read labels carefully for information on proper
timing and application methods for specific crops. The crawler stage is most susceptible to pesticide application. Direct contact is important when using sprays.
Biological Control See Chapter 1 for information on biological control. Use of biocontrol agents cannot be relied upon for complete control of scale; an integrated approach is required.
Sowbugs Sowbugs, also called woodlice or pillbugs, have dark, segmented, flattened, oval-shaped bodies with 7 pairs of legs. These are actually crustaceans (related to lobsters and crabs) that live entirely on land. They feed mostly at night, hiding in dark, damp places during the day. Sowbugs feed mostly on decaying plant material. At high population levels they will occasionally feed on roots and stems or eat holes in leaves. They may cause severe damage to seedlings.
Prevention and Control Soil pasteurization. Habitat management is the most effective way
to decrease populations, which includes:
Removing old boards and other rotted organic materials from the greenhouse, and reducing moisture levels on the greenhouse floor.
Spittlebugs Spittlebugs are a group of sap-sucking insects that cover themselves in a saliva-like froth during their immature stages. Damage results from the general unsightliness of infested plants, and distorted or irregular growth due to feeding injury and/or the transmission of viruses or phytoplasmas. The meadow spittlebug (Philaenus spumarius) has a wide, almost indiscriminate host range and is common on many ornamentals grown in the field.
Prevention and Control Pesticides are registered for use against spittle
bugs; however, spittlebug nymphs are easily dislodged with a stream of water from a hose.
Thrips Thrips are small, slender insects, 0.5 - 1 mm in length. Adults have two pairs of narrow wings fringed with long, fine hairs. Their colour varies from yellow to brown or blackish-brown. Thrips are found on the underside of leaves and within flower buds and new shoots. Adults and larvae feed by removing sap from punctures of the plant tissue made by mouthparts. Damaged leaves have a silver-flecked appearance, flowers are malformed and distorted, and foliage is dwarfed and mottled. In the greenhouse, the two principal species are Western flower thrips (WFT) (Frankliniella occidentalis) and onion thrips (Thrips tabaci). WFT are particularly harmful because they build up pesticide resistance very quickly.
WFTs are vectors of tomato spotted wilt and impatiens necrotic spot viruses. (See Chapter 5.) They must feed on infected tissue while they are in the larval stage to acquire the virus. They introduce the virus into plants when their stylet pierces the leaf tissue. Once a thrips picks up the virus it remains infected for the rest of its life. When viruses are a concern, early detection and control of thrips is essential. Use sticky traps for monitoring.
Two other thrips have been identified on greenhouse floriculture crops in the Fraser Valley; Echinothrips americana and Frankliniella intonsa (European flower thrips). These thrips have a wide host range.

Floriculture Production Guide Insects, Mites, and Animal Pests • 11
A factsheet on the biology and control of thrips is available from the BC Ministry of Agriculture.
Figure 7.9: Thrips Life Cycle (13 – 40 days)
Life Cycle The female lays eggs in a slit cut in the plant tissue by the ovipositor. The eggs hatch in 5 to 7 days and the emerging nymphs feed on leaves and flower petals. They pass through nymph and pupal stages before becoming adults. Many species pupate in the soil. Timing of the complete life cycle is temperature dependent. The adults can live and feed for up to 45 days.
Prevention and Control Remove weeds from inside greenhouses and
from a three metre wide band around the outside perimeter of greenhouses. Weeds are often alternate hosts for thrips.
Screen vents to prevent entry into the greenhouse.
Use yellow or blue sticky traps to monitor populations. WFT are more attracted to blue than yellow.
Be especially vigilant when nearby hay fields are harvested.
Thrips are difficult to control using pesticides because they are often hidden within plant parts. Good coverage is critical for good control.
Thrips are prone to developing resistance to pesticides, so rotation of products and less reliance on pesticides is important.
Biological Control There are several commercially available predatory mites (Amblyseius cucumeris) and insects (Orius spp.) for control of thrips in greenhouses. These are most effective and economical when applied on a preventive basis. Apply A. cucumeris at a rate of 50/m2 every 2 weeks and Orius spp. at 2 introductions (or 1 if the crop has pollen) 2 weeks apart at a rate of 0.5/m2. Amblyseius swirskii will feed on thrips, whitefly, and mites. Amblyseius degenerans controls thrips well in flowers, and feeds on pollen when prey numbers are low. Beneficial nematodes (Steinernema feltiae) sold in a specially formulated product for application to foliage can be used for thrips control on plants and flowers.
Weevils Several species of root weevils are present in British Columbia. Control is often directed at the adult beetles. Adults are dark coloured with long snouts and feed nocturnally, usually hiding in debris on the ground during the day. Look for fresh notches on the outer edges of leaves. The white or cream coloured grubs have dark heads and c-shaped bodies, and they feed on root and crown tissues in the soil. Several root weevils are common to BC including the black vine weevil (Otiorhynchus (syn. Brachyrhinus) sulcatus), the strawberry root weevil (Otiorhynchus ovatus), the clay coloured weevil (Otiorhynchus singularis), the rough strawberry weevil (Otiorhynchus rugosostriatus), and the woods or bush weevil (Nemocestes incomptus).
Life Cycle There is one generation per year. Adult weevils emerge throughout the spring and feed on foliage for about four weeks before mating and laying eggs. Eggs are laid in the soil near target plants where the hatching larvae begin to feed on roots. They overwinter as nearly full grown, non-feeding larvae. The following spring they pupate and emerge as adults. Adult weevils can overwinter in trash and debris in the field and at the margins of cultivated fields. Adult weevils travel by walking and do not fly.
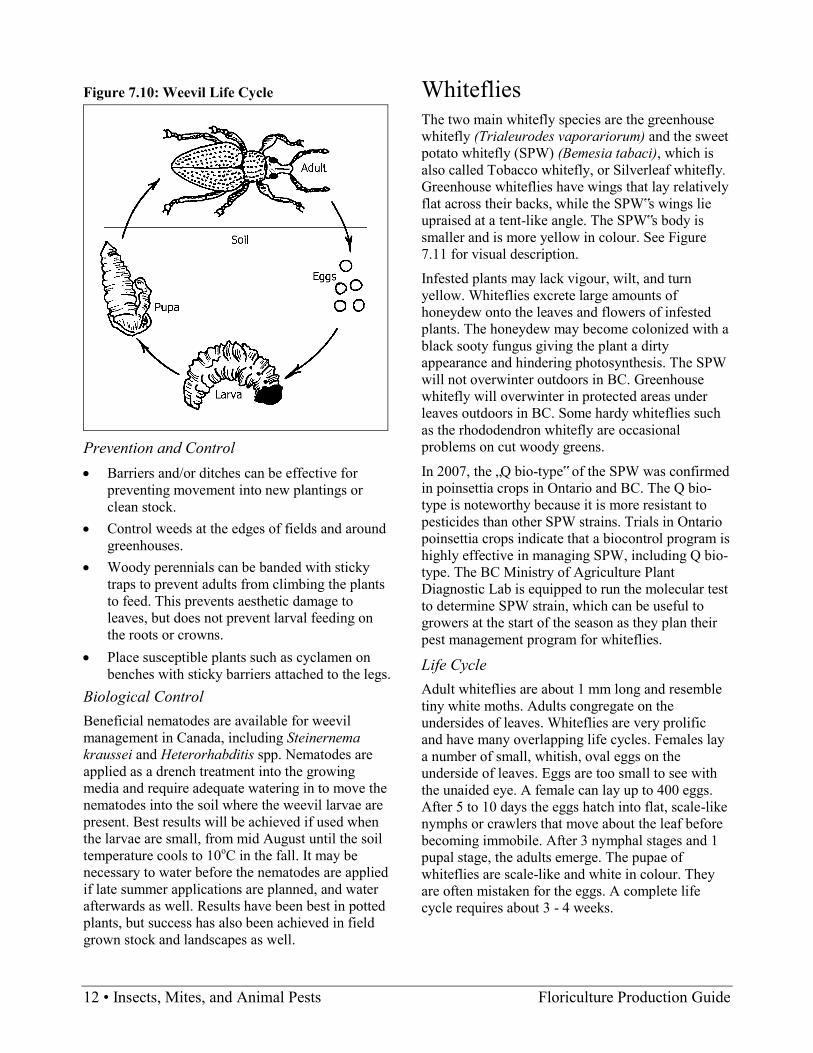
12 • Insects, Mites, and Animal Pests Floriculture Production Guide
Figure 7.10: Weevil Life Cycle
Prevention and Control Barriers and/or ditches can be effective for
preventing movement into new plantings or clean stock.
Control weeds at the edges of fields and around greenhouses.
Woody perennials can be banded with sticky traps to prevent adults from climbing the plants to feed. This prevents aesthetic damage to leaves, but does not prevent larval feeding on the roots or crowns.
Place susceptible plants such as cyclamen on benches with sticky barriers attached to the legs.
Biological Control Beneficial nematodes are available for weevil management in Canada, including Steinernema kraussei and Heterorhabditis spp. Nematodes are applied as a drench treatment into the growing media and require adequate watering in to move the nematodes into the soil where the weevil larvae are present. Best results will be achieved if used when the larvae are small, from mid August until the soil temperature cools to 10oC in the fall. It may be necessary to water before the nematodes are applied if late summer applications are planned, and water afterwards as well. Results have been best in potted plants, but success has also been achieved in field grown stock and landscapes as well.
Whiteflies The two main whitefly species are the greenhouse whitefly (Trialeurodes vaporariorum) and the sweet potato whitefly (SPW) (Bemesia tabaci), which is also called Tobacco whitefly, or Silverleaf whitefly. Greenhouse whiteflies have wings that lay relatively flat across their backs, while the SPW‟s wings lie upraised at a tent-like angle. The SPW‟s body is smaller and is more yellow in colour. See Figure 7.11 for visual description.
Infested plants may lack vigour, wilt, and turn yellow. Whiteflies excrete large amounts of honeydew onto the leaves and flowers of infested plants. The honeydew may become colonized with a black sooty fungus giving the plant a dirty appearance and hindering photosynthesis. The SPW will not overwinter outdoors in BC. Greenhouse whitefly will overwinter in protected areas under leaves outdoors in BC. Some hardy whiteflies such as the rhododendron whitefly are occasional problems on cut woody greens.
In 2007, the „Q bio-type‟ of the SPW was confirmed in poinsettia crops in Ontario and BC. The Q bio-type is noteworthy because it is more resistant to pesticides than other SPW strains. Trials in Ontario poinsettia crops indicate that a biocontrol program is highly effective in managing SPW, including Q bio-type. The BC Ministry of Agriculture Plant Diagnostic Lab is equipped to run the molecular test to determine SPW strain, which can be useful to growers at the start of the season as they plan their pest management program for whiteflies.
Life Cycle Adult whiteflies are about 1 mm long and resemble tiny white moths. Adults congregate on the undersides of leaves. Whiteflies are very prolific and have many overlapping life cycles. Females lay a number of small, whitish, oval eggs on the underside of leaves. Eggs are too small to see with the unaided eye. A female can lay up to 400 eggs. After 5 to 10 days the eggs hatch into flat, scale-like nymphs or crawlers that move about the leaf before becoming immobile. After 3 nymphal stages and 1 pupal stage, the adults emerge. The pupae of whiteflies are scale-like and white in colour. They are often mistaken for the eggs. A complete life cycle requires about 3 - 4 weeks.
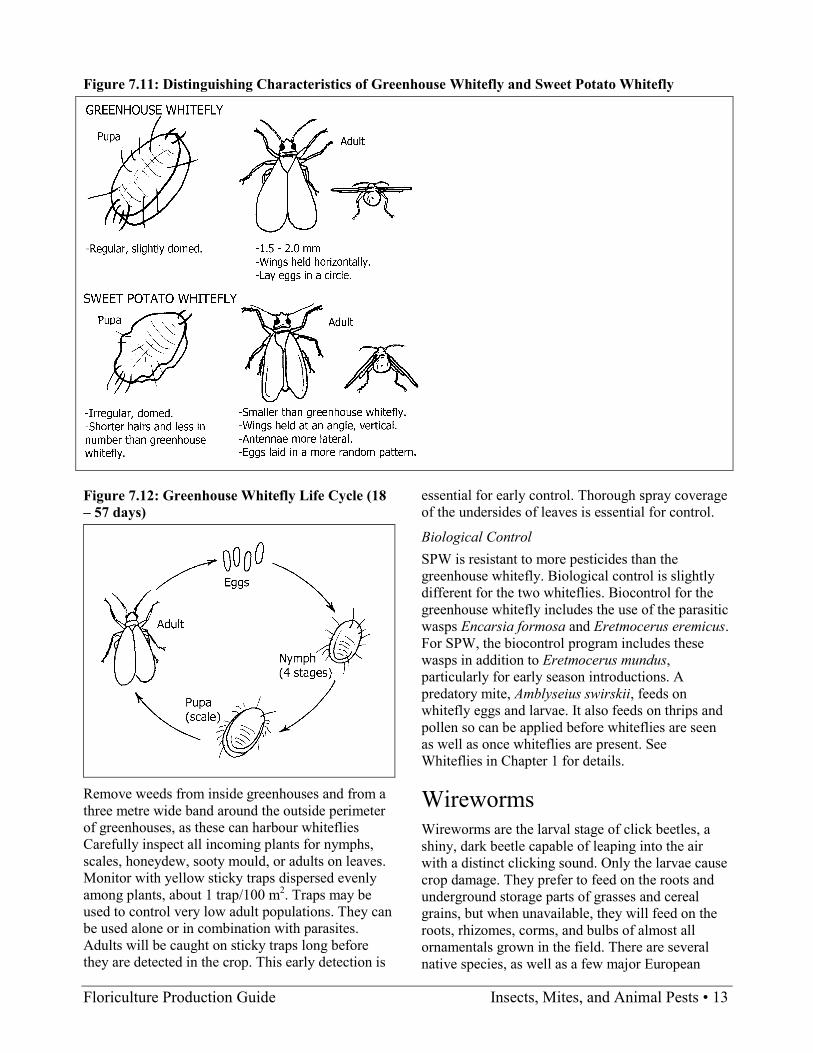
Floriculture Production Guide Insects, Mites, and Animal Pests • 13
Figure 7.11: Distinguishing Characteristics of Greenhouse Whitefly and Sweet Potato Whitefly
Figure 7.12: Greenhouse Whitefly Life Cycle (18 – 57 days)
Remove weeds from inside greenhouses and from a three metre wide band around the outside perimeter of greenhouses, as these can harbour whiteflies Carefully inspect all incoming plants for nymphs, scales, honeydew, sooty mould, or adults on leaves. Monitor with yellow sticky traps dispersed evenly among plants, about 1 trap/100 m2. Traps may be used to control very low adult populations. They can be used alone or in combination with parasites. Adults will be caught on sticky traps long before they are detected in the crop. This early detection is
essential for early control. Thorough spray coverage of the undersides of leaves is essential for control.
Biological Control SPW is resistant to more pesticides than the greenhouse whitefly. Biological control is slightly different for the two whiteflies. Biocontrol for the greenhouse whitefly includes the use of the parasitic wasps Encarsia formosa and Eretmocerus eremicus. For SPW, the biocontrol program includes these wasps in addition to Eretmocerus mundus, particularly for early season introductions. A predatory mite, Amblyseius swirskii, feeds on whitefly eggs and larvae. It also feeds on thrips and pollen so can be applied before whiteflies are seen as well as once whiteflies are present. See Whiteflies in Chapter 1 for details.
Wireworms Wireworms are the larval stage of click beetles, a shiny, dark beetle capable of leaping into the air with a distinct clicking sound. Only the larvae cause crop damage. They prefer to feed on the roots and underground storage parts of grasses and cereal grains, but when unavailable, they will feed on the roots, rhizomes, corms, and bulbs of almost all ornamentals grown in the field. There are several native species, as well as a few major European

14 • Insects, Mites, and Animal Pests Floriculture Production Guide
species (Agriotes spp.) that are increasing in range and causing significant field crop damage in British Columbia and the rest of Canada. The larvae are highly attracted by carbon dioxide given off by germinating seeds and roots. Newly hatched larvae must feed within 1 to 3 weeks or starve, but older larvae are able to survive up to 2 years without feeding. Wireworm populations are usually at their highest and most damaging when crops are planted in newly broken sod. Damage is caused by the small tunnels or bore holes they make in the roots and secondary infections that establish. The damage often results in wilting and death of the seedling.
Life Cycle In spring, batches of 40 - 100 eggs are laid on or near the soil surface. These hatch in 5 - 6 weeks into (3 mm) grubs that are shiny, white, and worm-like at first, with three pairs of thoracic legs. The later stages become longer (3 cm), slim, and orange as they mature, with tough segmented wiry bodies. All larval stages are spent in the soil and, depending upon the climate and the availability of food, may require 3 - 11 years to reach maturity. They then pupate in the soil, emerging as adults. Larvae move up and down in the soil profile dependent on season, temperature, and moisture. Because they can spend a significant time deep in the soil, they can be hard to find and control. Prevention, Detection, and Control In the spring, use baits consisting of 30 g of
whole wheat flour buried at 10 cm to detect the presence of wireworms in newly broken fields. Mark the location of the bait with a stake. Baits should be placed at the rate of 50 per hectare. Dig up the baits after four days. An average of 1 or more wireworms per bait can cause severe damage to susceptible crop.
Avoid planting susceptible crops into infested fields.
Plant non-host crops for a season at least before planting susceptible crops. This has limited impact because it takes a number of years for wireworms to mature.
Before planting, sow a “trap crop” of insecticide-treated wheat. This is ideally done in April or May when the wireworms are near the surface.
The most effective wireworm insecticides have been removed from the Canadian marketplace, causing an apparent resurgence of these insects.
There are no suitable replacement insecticides currently available.
A combination of approaches must be used to manage this pest.
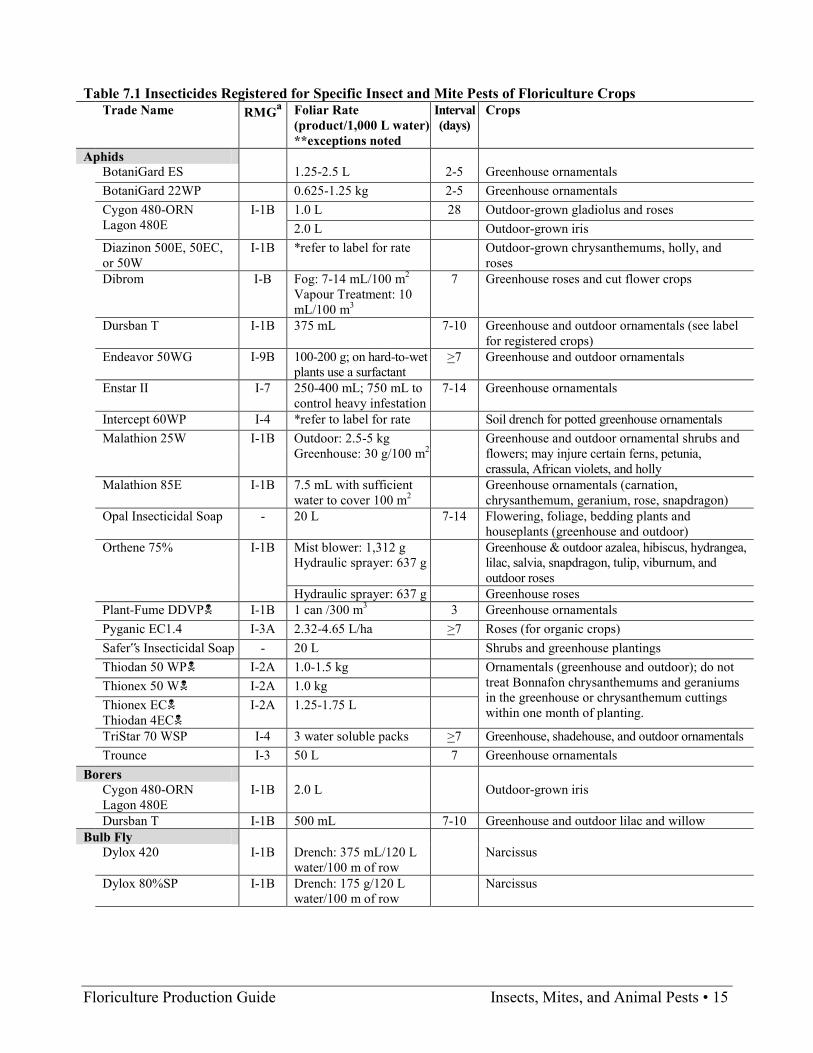
Floriculture Production Guide Insects, Mites, and Animal Pests • 15
Table 7.1 Insecticides Registered for Specific Insect and Mite Pests of Floriculture Crops Trade Name RMGa Foliar Rate
(product/1,000 L water) **exceptions noted
Interval (days)
Crops
Aphids BotaniGard ES 1.25-2.5 L 2-5 Greenhouse ornamentals BotaniGard 22WP 0.625-1.25 kg 2-5 Greenhouse ornamentals Cygon 480-ORN
Lagon 480E I-1B 1.0 L 28 Outdoor-grown gladiolus and roses
2.0 L Outdoor-grown iris Diazinon 500E, 50EC,
or 50W I-1B *refer to label for rate Outdoor-grown chrysanthemums, holly, and
roses Dibrom I-B Fog: 7-14 mL/100 m2
Vapour Treatment: 10 mL/100 m3
7 Greenhouse roses and cut flower crops
Dursban T I-1B 375 mL 7-10 Greenhouse and outdoor ornamentals (see label for registered crops)
Endeavor 50WG I-9B 100-200 g; on hard-to-wet plants use a surfactant
>7 Greenhouse and outdoor ornamentals
Enstar II I-7 250-400 mL; 750 mL to control heavy infestation
7-14 Greenhouse ornamentals
Intercept 60WP I-4 *refer to label for rate Soil drench for potted greenhouse ornamentals Malathion 25W I-1B Outdoor: 2.5-5 kg
Greenhouse: 30 g/100 m2 Greenhouse and outdoor ornamental shrubs and
flowers; may injure certain ferns, petunia, crassula, African violets, and holly
Malathion 85E I-1B 7.5 mL with sufficient water to cover 100 m2
Greenhouse ornamentals (carnation, chrysanthemum, geranium, rose, snapdragon)
Opal Insecticidal Soap - 20 L 7-14 Flowering, foliage, bedding plants and houseplants (greenhouse and outdoor)
Orthene 75% I-1B Mist blower: 1,312 g Hydraulic sprayer: 637 g
Greenhouse & outdoor azalea, hibiscus, hydrangea, lilac, salvia, snapdragon, tulip, viburnum, and outdoor roses
Hydraulic sprayer: 637 g Greenhouse roses Plant-Fume DDVP I-1B 1 can /300 m3 3 Greenhouse ornamentals Pyganic EC1.4 I-3A 2.32-4.65 L/ha >7 Roses (for organic crops) Safer‟s Insecticidal Soap - 20 L Shrubs and greenhouse plantings Thiodan 50 WP I-2A 1.0-1.5 kg Ornamentals (greenhouse and outdoor); do not
treat Bonnafon chrysanthemums and geraniums in the greenhouse or chrysanthemum cuttings within one month of planting.
Thionex 50 W I-2A 1.0 kg Thionex EC
Thiodan 4EC I-2A 1.25-1.75 L
TriStar 70 WSP I-4 3 water soluble packs >7 Greenhouse, shadehouse, and outdoor ornamentals Trounce I-3 50 L 7 Greenhouse ornamentals Borers Cygon 480-ORN
Lagon 480E I-1B 2.0 L Outdoor-grown iris
Dursban T I-1B 500 mL 7-10 Greenhouse and outdoor lilac and willow Bulb Fly Dylox 420 I-1B Drench: 375 mL/120 L
water/100 m of row Narcissus
Dylox 80%SP I-1B Drench: 175 g/120 L water/100 m of row
Narcissus

16 • Insects, Mites, and Animal Pests Floriculture Production Guide
Table 7.1 Insecticides Registered for Specific Insect and Mite Pests of Floriculture Crops (continued) Trade Name RMGa Foliar Rate
(product/1,000 L water) **exceptions noted
Interval (days)
Crops
Caterpillars Confirm 240F I-18 0.5 L/ha 10-14 Control cabbage loopers on greenhouse ornamentals 1.0 L/ha 10-14 Control leafrollers on greenhouse ornamentals Diazinon 500E or 50EC I-1B 1 L Outdoor-grown chrysanthemums Diazinon 50W I-1B 0.5-1 kg Dipel 2X DF I-11 250 g/400 L To control leafroller on greenhouse-grown roses Dipel WP I-11 500 g/400 L Dipel 2X DF I-11 125-250 g/400 L To control cabbage looper on greenhouse-grown
chrysanthemum Dipel WP I-11 250-500 g/400 L Dibrom I-B Fog: 7-14 mL/100 m2
Vapour Treatment: 10 mL/100 m3
7 To control leafrollers on greenhouse roses and cut flower crops
Orthene 75% I-1B Mist blower: 1,312 g 7-10 Leafrollers on holly and outdoor roses, and sunflower moth on marigolds (greenhouse & outdoor) Hydraulic sprayer: 637 g
Hydraulic sprayer: 637 g To control leafrollers on greenhouse roses Sevin T&O I-1A 2.3-3.5 L 7-14 To control leafrollers on outdoor chrysanthemum,
gladiolus, holly, hydrangea, lilac, roses, zinnia; do not use on Boston ivy or Maidenhair fern
Thuricide HPC I-11 5 L To control cabbage loopers on chrysanthemums and leafrollers on roses
Cutworms Confirm 240F I-18 0.5 L/ha 10-14 Greenhouse ornamentals Dylox 420 I-1B 2.75-4 L/ha or 30-40
mL/8 L water/100 m2 Outdoor-grown flowers and shrubs;
phytotoxicity has occurred on varieties of carnation, zinnia, begonia, salvia and cineraria Dylox 80%SP I-1B 1.5-2.25 kg/ha or 15-20
g/8 L water/100 m2
Fungus Gnats Citation 75WP I-17 133 g/ha Greenhouse ornamentals Drench: 133 g; see label
for quantity to apply/pot Greenhouse ornamentals
Dimilin 25% I-15 150 g/1,000 L; apply 5-15 L of solution/10 m2
28-56 Ornamentals in ground beds, plug trays, and flats; do not treat poinsettias, hibiscus, or Reiger begonia
Drench: 18 g; see label for quantity to apply per pot
Potted ornamentals; do not treat poinsettias, hibiscus, or Reiger begonia
Nemasys (nematodes) - *refer to label for rate Ornamentals Vectobac 600L I-11 Soil Drench: 4-8 L Greenhouse ornamentals Leafhoppers Cygon 480-ORN
Lagon 480E I-1B 1.0 L 28 Outdoor-grown roses
Dursban T I-1B 1.0 L 7-10 Greenhouse and outdoor ornamentals; do not treat azaleas, camellias, poinsettias, roses, variegated ivy
Orthene 75% I-1B Mist blower: 1,312 g 7-10 Dahlia (greenhouse and outdoor) Hydraulic sprayer: 637 g
Sevin T&O I-1A 2.3-3.5 L 7-14 Outdoor chrysanthemum, gladiolus, holly, hydrangea, lilac, roses, zinnia; do not use on Boston ivy or Maidenhair fern
TriStar 70 WSP I-4 5 water soluble packs >7 Greenhouse, shadehouse, outdoor ornamentals

Floriculture Production Guide Insects, Mites, and Animal Pests • 17
Table 7.1 Insecticides Registered for Specific Insect and Mite Pests of Floriculture Crops (continued) Trade Name RMGa Foliar Rate
(product/1,000 L water) **exceptions noted
Interval (days)
Crops
Leafminers Ambush 50EC I-3 200 mL 7 Greenhouse-grown chrysanthemum Avid 1.9% EC I-6 600 mL >7 Greenhouse ornamentals; phytotoxicity observed
on some ferns (e.g. Adiantum) and Shasta daisies Citation 75WP I-17 188 g/ha Greenhouse ornamentals Cygon 480-ORN
Lagon 480E I-1B 1.0 L Outdoor-grown holly
1.25 L 42 Outdoor-grown lilac Diazinon 500E or 50EC I-1B 1 L Outdoor-grown chrysanthemums and holly Diazinon 50W I-1B 0.5 kg 7 Outdoor-grown chrysanthemums 1 kg Outdoor-grown holly Dylox 420 I-1B 2.75-4 L/ha; or 30-40
mL/8 L water/100 m2 Outdoor-grown flowers and shrubs;
phytotoxicity has occurred on varieties of carnation, zinnia, begonia, salvia and cineraria Dylox 80%SP I-1B 1.5-2.25 kg/ha; or 15-
20 g/8 L water/100 m2
Orthene 75% I-1B Mist blower: 1,312 g 7-10 Holly, lilac, marigolds, and zinnia (greenhouse and outdoor) Hydraulic sprayer: 637 g
Pounce 384 EC I-3 260 mL 7 Greenhouse ornamentals for chrysanthemum leafminer TriStar 70 WSP I-4 5 water soluble packs >7 To control tentiform leafminers on ornamentals
grown in the greenhouse, shadehouse, or outdoor Mealybugs Dibrom I-B Fog: 7-14 mL/100 m2
Vapour Treatment: 10 mL/100 m3
7 Greenhouse roses and cut flower crops
Dursban T I-1B 200 mL 7-10 Greenhouse and outdoor ornamentals; do not treat azaleas, camellias, poinsettias, roses, variegated ivy
Malathion 25W I-1B Outdoor: 2.5-5 kg Greenhouse and outdoor ornamentals; may injure ferns, petunias, crassula, African violets, and holly Greenhouse: 30 g/100 m2
Malathion 85E I-1B 7.5 mL with sufficient water to cover 100 m2
Greenhouse ornamentals (carnation, chrysanthemum, geranium, rose, snapdragon)
Opal Insecticidal Soap - 20 L 7-14 Flowering, foliage, bedding plants and houseplants (greenhouse and outdoor)
Orthene 75% I-1B Mist blower: 1,312 g 7-10 Azalea (greenhouse and outdoor) Hydraulic sprayer: 637 g
Plant-Fume DDVP I-1B 1 can /300 m3 3 Greenhouse ornamentals Safer‟s Insecticidal Soap - 20 L Shrubs and greenhouse plantings Sevin T&O I-1A 2.3-3.5 L 7-14 Outdoor chrysanthemum, gladiolus, holly,
hydrangea, lilac, roses, zinnia; do not use on Boston ivy, Maidenhair fern
Trounce I-3 50 L 10-14 Greenhouse ornamentals Midge, Rose Orthene 75% I-1B Hydraulic sprayer: 637 g Greenhouse roses Mist blower: 1,312 g 7-10 Field-grown roses
Hydraulic sprayer: 637 g Mites Apollo SC I-10 80 mL/1,000 L/ha Outdoor deciduous stock, including roses,
willow and herbaceous perennials Avid 1.9% EC I-6 300 mL Greenhouse ornamentals; phytotoxicity observed
on some ferns (e.g. Adiantum) and Shasta daisies Cygon 480-ORN
Lagon 480E I-1B 1.0 L 28 Outdoor-grown holly and roses
Diazinon 500E or 50EC I-1B 1 L Outdoor-grown chrysanthemums Diazinon 50W I-1B 0.5-1 kg
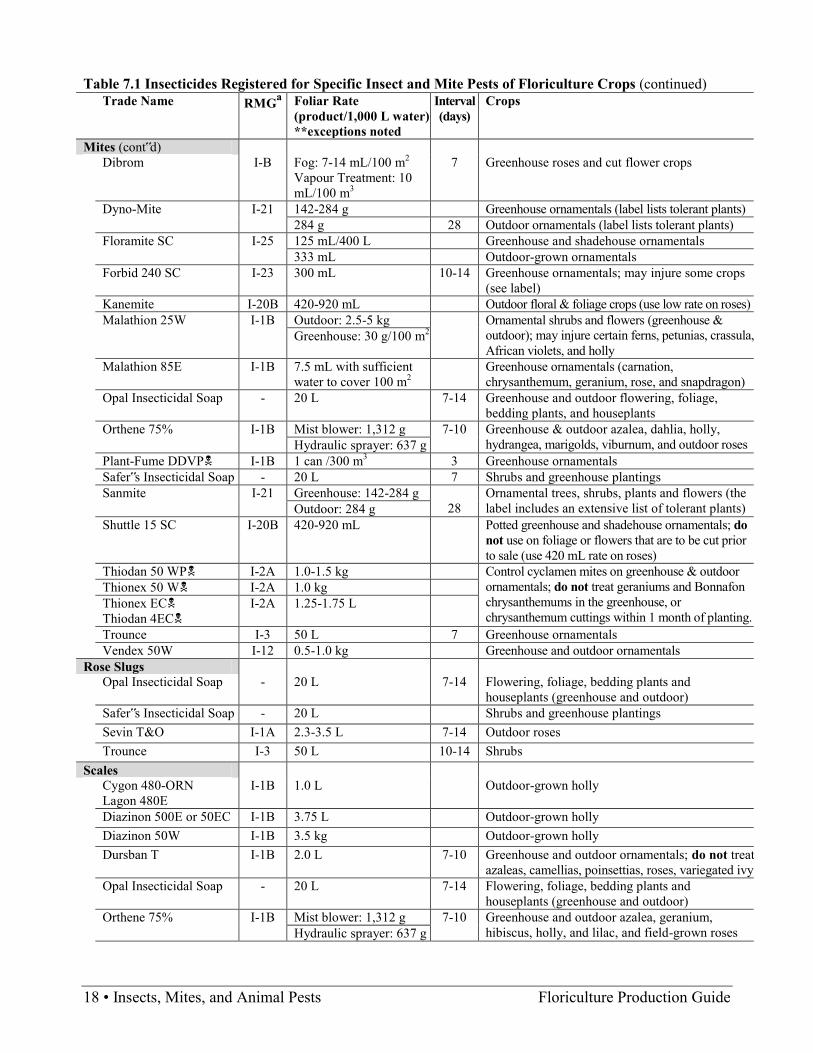
18 • Insects, Mites, and Animal Pests Floriculture Production Guide
Table 7.1 Insecticides Registered for Specific Insect and Mite Pests of Floriculture Crops (continued) Trade Name RMGa Foliar Rate
(product/1,000 L water) **exceptions noted
Interval (days)
Crops
Mites (cont‟d) Dibrom I-B Fog: 7-14 mL/100 m2
Vapour Treatment: 10 mL/100 m3
7 Greenhouse roses and cut flower crops
Dyno-Mite I-21 142-284 g Greenhouse ornamentals (label lists tolerant plants) 284 g 28 Outdoor ornamentals (label lists tolerant plants) Floramite SC I-25 125 mL/400 L Greenhouse and shadehouse ornamentals 333 mL Outdoor-grown ornamentals Forbid 240 SC I-23 300 mL 10-14 Greenhouse ornamentals; may injure some crops
(see label) Kanemite I-20B 420-920 mL Outdoor floral & foliage crops (use low rate on roses) Malathion 25W I-1B Outdoor: 2.5-5 kg Ornamental shrubs and flowers (greenhouse &
outdoor); may injure certain ferns, petunias, crassula, African violets, and holly
Greenhouse: 30 g/100 m2
Malathion 85E I-1B 7.5 mL with sufficient water to cover 100 m2
Greenhouse ornamentals (carnation, chrysanthemum, geranium, rose, and snapdragon)
Opal Insecticidal Soap - 20 L 7-14 Greenhouse and outdoor flowering, foliage, bedding plants, and houseplants
Orthene 75% I-1B Mist blower: 1,312 g 7-10 Greenhouse & outdoor azalea, dahlia, holly, hydrangea, marigolds, viburnum, and outdoor roses Hydraulic sprayer: 637 g
Plant-Fume DDVP I-1B 1 can /300 m3 3 Greenhouse ornamentals Safer‟s Insecticidal Soap - 20 L 7 Shrubs and greenhouse plantings Sanmite I-21 Greenhouse: 142-284 g
28 Ornamental trees, shrubs, plants and flowers (the label includes an extensive list of tolerant plants) Outdoor: 284 g
Shuttle 15 SC I-20B 420-920 mL Potted greenhouse and shadehouse ornamentals; do not use on foliage or flowers that are to be cut prior to sale (use 420 mL rate on roses)
Thiodan 50 WP I-2A 1.0-1.5 kg Control cyclamen mites on greenhouse & outdoor ornamentals; do not treat geraniums and Bonnafon chrysanthemums in the greenhouse, or chrysanthemum cuttings within 1 month of planting.
Thionex 50 W I-2A 1.0 kg Thionex EC
Thiodan 4EC I-2A 1.25-1.75 L
Trounce I-3 50 L 7 Greenhouse ornamentals Vendex 50W I-12 0.5-1.0 kg Greenhouse and outdoor ornamentals Rose Slugs Opal Insecticidal Soap - 20 L 7-14 Flowering, foliage, bedding plants and
houseplants (greenhouse and outdoor) Safer‟s Insecticidal Soap - 20 L Shrubs and greenhouse plantings Sevin T&O I-1A 2.3-3.5 L 7-14 Outdoor roses Trounce I-3 50 L 10-14 Shrubs Scales Cygon 480-ORN
Lagon 480E I-1B 1.0 L Outdoor-grown holly
Diazinon 500E or 50EC I-1B 3.75 L Outdoor-grown holly Diazinon 50W I-1B 3.5 kg Outdoor-grown holly Dursban T I-1B 2.0 L 7-10 Greenhouse and outdoor ornamentals; do not treat
azaleas, camellias, poinsettias, roses, variegated ivy Opal Insecticidal Soap - 20 L 7-14 Flowering, foliage, bedding plants and
houseplants (greenhouse and outdoor) Orthene 75% I-1B Mist blower: 1,312 g 7-10 Greenhouse and outdoor azalea, geranium,
hibiscus, holly, and lilac, and field-grown roses Hydraulic sprayer: 637 g

Floriculture Production Guide Insects, Mites, and Animal Pests • 19
Table 7.1 Insecticides Registered for Specific Insect and Mite Pests of Floriculture Crops (continued) Trade Name RMGa Foliar Rate
(product/1,000 L water) **exceptions noted
Interval (days)
Crops
Scales (cont‟d) Safer‟s Insecticidal Soap - 20 L Shrubs and greenhouse plantings Sevin T&O I-1A 2.3-3.5 L 7-14 Outdoor chrysanthemum, gladiolus, holly,
hydrangea, lilac, roses, zinnia; do not treat Boston ivy or Maidenhair fern
Trounce I-3 50 L 10-14 Control soft scale crawlers on greenhouse ornamentals Shore Flies Citation 75WP I-17 133 g/ha Greenhouse ornamentals Drench: 133 g; see label
for quantity to apply/pot Greenhouse ornamentals
Dimilin 25% I-15 150 g/1,000 L; apply 5-15 L of solution/10 m2
28-56 Ornamentals in ground beds, plug trays, & flats; do not treat poinsettias, hibiscus, or Reiger begonia
Drench: 18 g/1,000 L; see label for quantity / pot
Ornamentals grown in individual containers; do not treat poinsettias, hibiscus, or Reiger begonia
Thrips BotaniGard ES 5 L 2-5 Greenhouse ornamentals BotaniGard 22WP 1.25-2.5 kg 2-5 Greenhouse ornamentals Conserve 480 SC I-5 50 mL 7-14 To control exposed Western flower thrips
(WFT) on outdoor ornamentals Cygon 480-ORN
Lagon 480E I-1B 1.0 L 28 Outdoor-grown gladioli and roses
2.0 L Outdoor-grown iris Decis 5EC I-3 350-500 mL 5-7 Greenhouse ornamentals (chrysanthemum,
cineraria, Easter lilies, and geraniums) Diazinon 500E or 50EC I-1B 1 L Outdoor-grown chrysanthemums Diazinon 50W I-1B 0.5-1 kg Dursban T I-1B 500 mL 7-10 Greenhouse and outdoor ornamentals; do not treat
azaleas, camellias, poinsettias, roses, variegated ivy Entrust 80W I-5 30 g 7-14 Control exposed WFT on outdoor ornamentals Malathion 25W I-1B Outdoor: 2.5-5 kg Ornamental shrubs and flowers (greenhouse &
outdoor); may injure certain ferns, petunias, crassula, African violets, and holly
Greenhouse: 30 g/100 m2
Malathion 85E I-1B 7.5 mL with sufficient water to cover 100 m2
Greenhouse ornamentals (carnation, chrysanthemum, geranium, rose, snapdragon)
Orthene 75% I-1B Mist blower: 1,312 g 7-10 Greenhouse & outdoor gladiolus, marigolds, petunia, salvia, snapdragon, zinnia, and field roses Hydraulic sprayer: 637 g
Hydraulic sprayer: 637 g Greenhouse roses Plant-Fume DDVP I-1B 1 can /300 m3 3 Greenhouse ornamentals Sevin T&O I-1A 2.3-3.5 L 7-14 Outdoor chrysanthemum, gladiolus, holly, hydrangea,
lilac, roses, zinnia; do not treat Boston ivy or Maidenhair fern
Success 480 SC I-5 50 mL/1,000 L/ha 7-10 To control exposed WFT on greenhouse and outdoor ornamentals
Whiteflies Ambush 50EC I-3 200 mL Greenhouse ornamentals (refer to label for list of
registered crops) BotaniGard ES 1.25-2.5 L 2-5 Greenhouse ornamentals BotaniGard 22WP 0.625-1.25 kg 2-5 Greenhouse ornamentals Dibrom I-B Fog: 7-14 mL/100 m2
Vapour Treatment: 10 mL/100 m3
7 Greenhouse roses and cut flower crops
Distance I-7 450 mL 14-28 Greenhouse ornamentals

20 • Insects, Mites, and Animal Pests Floriculture Production Guide
Table 7.1 Insecticides Registered for Specific Insect and Mite Pests of Floriculture Crops (continued) Trade Name RMGa Foliar Rate
(product/1,000 L water) **exceptions noted
Interval (days)
Crops
Whiteflies (cont‟d) Dursban T I-1B 500 mL 7-10 Greenhouse and outdoor ornamentals; do not treat
azaleas, camellias, poinsettias, roses, variegated ivy Dyno-Mite 284-425 g Greenhouse ornamentals (label lists tolerant plants) Endeavor 50WG I-9B 100-200 g; on hard-to-wet
plants use a surfactant >7 Greenhouse ornamentals
Enstar II I-7 250-400 mL; 750 mL to control a heavy infestation
7-14 Greenhouse ornamentals
Forbid 240 SC I-23 300 mL 10-14 Greenhouse ornamentals; risk of injury on some crops (see label)
Intercept 60WP I-4 *refer to label for rate Soil drench for potted greenhouse ornamentals Malathion 25W I-1B Outdoor: 2.5-5 kg Ornamental shrubs and flowers (greenhouse &
outdoor); may injure certain ferns, petunias, crassula, African violets, and holly
Greenhouse: 30 g/100 m2
Malathion 85E I-1B 7.5 mL with sufficient water to cover 100 m2
Greenhouse ornamentals (carnation, chrysanthemum, geranium, rose, snapdragon)
Opal Insecticidal Soap - 20 L 7-14 Flowering, foliage, bedding plants and houseplants (greenhouse and outdoor)
Orthene 75% I-1B Mist blower: 1,312 g 7-10 Azalea, lantana, salvia, viburnum, and zinnia (greenhouse and outdoor) Hydraulic sprayer: 637 g
Hydraulic sprayer: 637 g Greenhouse roses Plant-Fume DDVP I-1B 1 can /300 m3 3 Greenhouse ornamentals Pounce 384 EC I-3 260 mL Greenhouse ornamentals (see label for crops) Safer‟s Insecticidal Soap - 10 L 14 Shrubs and greenhouse plantings Sanmite I-21 284-425 g Greenhouse ornamentals (the label includes an
extensive list of tolerant plants) Thiodan 50 WP I-2A 1.0-1.5 kg Greenhouse & outdoor ornamentals; do not treat
Bonnafon chrysanthemums and geraniums in the greenhouse, or chrysanthemum cuttings within 1 month of planting
Thionex 50 W I-2A 1.0 kg Thionex EC
Thiodan 4EC I-2A 1.25-1.75 L
TriStar 70 WSP I-4 5-10 water soluble packs >7 Greenhouse, shadehouse, outdoor ornamentals Trounce I-3 50 L 14 Greenhouse ornamentals a Pesticides are categorized into Resistance Management Groups (RMG) based on their target site / mode of action. It is important to rotate pesticides of different RMGs to manage against the development of pest resistance.
Floriculture Production Guide Insects, Mites, and Animal Pests • 21
Animal Pests Deer Two species of deer are found in British Columbia: the mule deer (including the black-tailed deer), found throughout most of the province, and the white-tailed deer, which is abundant in the Southern Interior valleys. Both kinds can cause serious damage to a variety of grasses, shrubs and trees (especially fruit trees), although some plant species are preferred over others. In spring and summer, most damage is done to new, leafy growth. In winter, buds and twigs may be eaten and bark stripped off trunks and branches of trees. Antler-rubbing may break branches and remove bark. Damaged plants are set back in growth and may never develop properly.
Management Fencing is the best solution for chronic deer damage. Woven wire fences should be at least 2.4 m high and use a 15-cm wire mesh to keep deer out. The mesh should be secured as close to the ground as possible to prevent deer from crawling underneath. Solid board or panel fences need be only about 1.5 m high, because deer are much less likely to jump over them. Electric fences are also effective and are much less expensive. Electric fences should be 1.5-2.1 m high with 7-9 strands of smooth, high-tensile wire at 20-30 cm spacing. A high-voltage energizer must be used with this type of fence. For more information on electric deer fencing, consult the Electric Fencing Manual, available from District Offices of the Ministry of Agriculture.
Chemical repellents, such as putrescent whole egg solids (Deer-Away), effectively repel deer. Dormant trees and shrubs should be dusted when moist, so that the repellent will adhere to the leaves and twigs. Thiram (Skoot) is a rabbit repellent, but is also effective against deer (see Rabbits below). Repellents may not work if deer are numerous or very hungry.
Field Mice (Voles) Field mice, also called voles (not to be confused with moles), include the Townsend‟s vole on the South Coast and the meadow vole and mountain vole in the Southern Interior. Voles are 13-23 cm
long, including the tail. Compared to house mice, they have shorter ears (barely projecting above the fur) and short, furry tails that are up to ½ the length of the body. House mice have longer, naked tails. Field mice are mainly pests of agricultural crops, but sometimes invade gardens next to farms or uncultivated fields. Their numbers fluctuate widely; in some years they can be abundant. They eat almost any kind of plant matter including grass, root vegetables, plant roots, and in winter, the bark of trees and shrubs. In the winter, they will frequently girdle the roots, crown and stems of field-grown trees, especially if there is grass or snow cover around the base of the plants. They build underground burrows, and the small burrow openings are a sure sign of field mouse activity.
Management The best control, where possible, is frequent mowing or cultivation of vegetation within or next to crop areas. Field mice prefer the cover of tall grasses; they avoid areas that do not provide adequate cover. Trapping is not often practical in commercial crops. Ordinary mousetraps baited with peanut butter, apple slices or other fruit may help to reduce numbers. Cats are also effective at controlling mice.
Poison baits. Several rodent baits (zinc phosphide) are registered for the control of meadow voles in orchards and nurseries. The bait must be placed in a covered bait station to protect it from the weather and to prevent accidental poisoning of other animals. Bait stations can be easily built from metal or plastic pipes, tin cans, and pieces of wood, or may be purchased commercially. They should be placed at 3-4 m intervals in areas where there are signs of mouse activity. The disappearance of the contents will indicate that mice are still present.
Mice, Rats (Coastal Area only), and Wood Rats Two types of rats, the roof (black) rat and the Norway (brown) rat, infest buildings at the Coast. Both are long-tailed rodents about 40 cm long (including the tail). The roof rat is slender; it is usually black rather than brown, and has a tail longer than the body and big ears. The Norway rat has a tail shorter than the body and smaller ears.

22 • Insects, Mites, and Animal Pests Floriculture Production Guide
The native bushy-tailed wood rat (also called pack rat) is found throughout the mainland. It is similar in size and shape to the Norway rat, but has larger eyes and ears, softer fur, and a hairy tail. It normally lives in rockslides and other broken terrain. The bushy-tailed wood rat often will invade cabins, storage sheds and other infrequently used buildings and carry off jewellery, kitchen utensils and other shiny objects, hence the name “pack rat.” They can cause considerable damage by gnawing buildings or by eating stored food products.
The house mouse, which is found throughout almost all of the province, is about half the length of a full-grown rat, and is distinguished from a young rat by its smaller head and feet.
The deer mouse ranges in colour from grey to reddish-brown. It has larger ears than the house mouse, a white belly and white-sided tail. Although more common in woodlands, the deer mouse can also occur in urban areas. The deer mouse can transmit Hantavirus in British Columbia (see below).
Rats and mice are rarely seen unless very numerous, but can be detected by the following signs:
droppings (cylindrical and about 5 to 20 mm long with rounded ends in rats; about 3 mm long with pointed ends in mice),
sounds (gnawing, squeaking, scampering), tracks on dusty surfaces or in snow, evidence of burrows or holes, or runways and greasy rub marks along walls and
pipes. Hantavirus gets into human lungs through exposure to infected feces (droppings), urine and saliva of the deer mouse. The deer mouse is the only known carrier in Canada, although the virus has been found in other rodents in the United States. Hantavirus can lead to severe respiratory infection or death.
Take safety precautions to avoid Hantavirus. When opening and cleaning buildings or storage facilities such as cabins, barns, garages or attics, open windows and let the room air out for a few hours, if possible. If you see any signs of rodent infestation or dead rodents, do not sweep or vacuum, since this will stir up infected dust. Instead, thoroughly wet the area with 10% household bleach (1 part bleach to 9 parts water) or a disinfectant such as Lysol, for at least 10 minutes. Clean up the material with a towel and mop or sponge with disinfectant again.
Wear rubber gloves. Clean the whole floor, not just the spot where you see the droppings.
Dispose of gloves and droppings in double plastic bags and bury. Wash hands thoroughly with soap and water.
Rodent-proofing buildings and eliminating sources of food, water and shelter for rodents are the best means of controlling rats and mice. Trapping and poisoning will provide only temporary relief. Eliminate water sources such as leaky taps or open pools. Get rid of piles of lumber or discarded material and clear vegetation and grass from around foundations so mice will not build nests there. Buildings can be made rodent-proof by installing tight-fitting doors and windows, and wire screen over basement windows and vents. Sheet metal kick-plates on wooden doors will stop rodents from gnawing through.
Management Trapping is useful when only a few rodents are present. Traps should be baited with meat, bacon or fish for rats, and with cheese, cake or peanut butter for mice. Wood rats are considered wildlife under the Wildlife Act but property owners or occupants are allowed to trap and kill them to protect private property. Wood rats are fairly easy to trap. Either a standard rat-trap (snap trap) or a live trap can be effective. Appropriate baits include nut-meats, bacon rind, peanut butter and oatmeal, or dried fruit. There are no poisons registered for wood rat control.
Rodenticides are available for controlling house mice and/or Norway rats. Because of the wide variety of trade names for rodenticides, only the common names are given below.
Use one of the following according to label directions:
Anticoagulant rodenticides (multiple doses): may require several feedings to effect a lethal dose, but eventually cause death from internal or external bleeding. The most potent anticoagulants are brodifacoum, bromadiolone, chlorophacinone and diphacinone; however, less toxic anticoagulants such as warfarin (may also include ergocalciferol or sulfaquinoxaline) may also give adequate control, and are less hazardous to domestic animals. Warning: Diphacinone is highly toxic to dogs.
Acute rodenticides (single dose): are more toxic and can cause death after a single feeding. Covered

Floriculture Production Guide Insects, Mites, and Animal Pests • 23
bait stations, recommended for all rodenticides, are essential with single-dose rodenticides if there is a possibility of other animals being poisoned. Zinc phosphide is an acute rodenticide.
Moles (Coast and Lower Mainland only) In British Columbia, there are two damaging species of moles, the Coast (Scapanus orarius orarius True, approx. 15 cm long) and the Townsend (Scapanus townsendi Bachman, approx. 20 cm long) moles. Both are similar in habits and are confined to the Fraser Valley. They differ from the moles of Eastern Canada and Europe. In Interior British Columbia and the Prairies, they are sometimes confused with pocket gophers, but they are not related. Moles not only have very different habits and food requirements, but are also controlled in different ways from pocket gophers.
Moles produce two types of tunnels, feeder and main tunnels. In the spring and summer, a mole may tunnel 1 km or more making surface, feeder tunnels by throwing up a ridge of excavated soil. Feeder tunnels are often used only once. In fall and winter they make permanent main tunnels in sod land. A network of main tunnels may cover an area of about 50 m2. The tunnels are burrowed from 10 to 100 cm below the surface, but usually are only 15 cm deep. Main tunnels are highways that lead between feeding areas and their nest. One mole may make 100 to 200 hills, averaging a metre apart, during the fall and winter. In agricultural land, 5 to 10 moles per hectare represent an average population. However, in gardens and around homes, the population can be much larger.
Moles live entirely underground, and burrow year round, day and night in search of food. The Townsend mole prefers moister habitats and the Coast mole prefers drier, upland sites. Moles can consume up to 100% of their body weight per day. For both mole species, earthworms represent about 70% of their diet. They also feed on a range of insect larvae and occasionally on plants.
Damage Moles are serious pests and cause extensive damage in the mild and damp Lower Mainland. They injure plants by breaking roots, and their tunnels enable cold air in winter and dry air in summer to freely enter the soil, both of which may cause more root damage. Their earthen mounds can also damage machinery.
In city and suburban gardens, moles make more or less permanent tunnels in the undisturbed soil around established plantings. These tunnels run along hedges, sidewalks and walls, and among tree roots and under foundations. From the main tunnels the moles make feeding tunnels under lawns and in flower beds.
Management Moles are very difficult pests to control. Even if resident moles are controlled, the area may be re-invaded quickly by neighbouring moles due to their wandering habits. An array of “home remedies” have been used with little success to control moles. Coast moles will not eat baits or chewing gum, and cannot be readily poisoned with gases, nor easily eliminated with explosives, nor driven away by killing earthworms. Some patent mole-killers or deterrents that were tested proved useless. The placing of propellers, shafts, or broken bottles in the tunnels, which according to folklore repel moles, are also ineffective. Trapping is the best method of control and should be started as soon as there is evidence of moles.
Trapping: Trapping is more successful in the spring and fall, and following a rain. In the winter and summer, moles generally reside in deeper tunnels and are more difficult to locate. Two other keys to success are locating a frequently used tunnel and correctly setting the trap.
Selecting a good location for the trap is critical to success. The trap must be placed in a frequently used tunnel. There are several methods to locate a suitable tunnel. One method is to look for a new tunnel that either connects two new mounds, runs in a straight line, or that follows the contour of a solid structure. Another option is to uncover a hill with a trowel and follow the passage toward a main tunnel, which will be indicated by an open tunnel going two ways. A third option is to flatten a small section of tunnel and observe whether it is repaired. Moles quickly repair damage to active tunnels, so a tunnel that is persistently reopened is a good place for a trap, especially where the tunnel enters solid ground at the edge of a path or lawn. Do not set a trap in the passage from a hill to a main tunnel, since the mole only uses this passage to get rid of loose soil.
Setting the trap correctly will also influence trapping success. Moles are very aware of changes to their tunnels. If a mole detects a trap, it will tunnel around it or abandon the tunnel. If the trap is not

24 • Insects, Mites, and Animal Pests Floriculture Production Guide
successful in 2 to 3 days, it should be moved to a new location.
There are several different types of mole traps. The main types of traps are the English scissor, choker loop, and harpoon.
The English scissors trap is quite effective and relatively simple to set. Dig a cylindrical cavity above a tunnel and set the trap in the tunnel. The trigger should be 1¼ cm above the bottom of the tunnel. It is important to exclude light and air currents from the tunnel. Plug the opening by covering it with an inverted pail or by burying the trap up to the pivot with loose soil. The trap should be checked every day or two. If the handles are close together leave it alone. If they are sprung apart, a mole is trapped or the trap is sprung – check and reset. Several moles may be caught at the same place, so it is not necessary to move the trap after one mole is trapped.
There are a few modifications that can be made to the scissors trap to make it more reliable:
The trigger is attached with a wire. This wire does not allow for free action of the trigger. REPLACE this wire with a 10 to 12.5 cm piece of 3-mm thick nylon string.
Where the trap handles are riveted into the trap jaws, the long rivet stubs should be filed down some to let the jaws snap shut quickly.
When using the choker loop trap, obstruct the tunnel by loosely filling it with soil. Set the trap in the loose soil so that the loops encircle the tunnel.
The harpoon trap is one of the simplest to set. The first step is to flatten a section of the tunnel and then push the trap into the soil until the trigger pad rests firmly on the depression.
Rabbits (Cottontails) and Hares Two kinds of rabbits, the eastern cottontail and the snowshoe hare, sometimes damage nursery crops. The eastern cottontail is found only on Vancouver Island and in the Lower Fraser Valley. It is about 40-45 cm long and weighs 1-2 kg. It is greyish-brown with a cinnamon patch on the back of the neck, and a white underside of the tail (hence “cottontail”). They eat many kinds of garden vegetables and flowers; few garden plants are immune to rabbit damage. Shrubs and trees may be damaged or even killed by rabbits chewing on bark during the winter. Twigs clipped off neatly indicate
rabbit damage; twigs with a ragged edge are typical of deer damage.
The snowshoe hare, found most commonly east of the Coast Range, is a somewhat larger animal, with longer hind legs, and is usually white in winter. It sometimes damages young conifers in forest nurseries.
Management Fencing or tree guards may be necessary for severe rabbit problems. A fence of 60 cm high chicken wire (2.5 cm mesh or smaller), fastened to the ground or slightly buried, will keep rabbits out. Valuable trees may be protected by cylinders of 6 mm mesh hardware cloth or hard plastic tree-guards, which will also prevent mouse damage.
Repellents that leave an unpleasant taste, such as thiram-based repellents (Skoot), may be painted or sprayed on trunks and twigs of vulnerable plants. Alternatively, ammonia-based products (e.g. Readi-Spray Animal Repellent - DOMESTIC) may be sprayed on trunks and twigs. Do not apply either repellent on edible plant parts within 14 days of harvest.
Trapping is permitted without a license or permit on rural, private land, since neither the eastern cottontail nor the snowshoe hare is protected by law. A permit to kill snowshoe hares is required on Crown Land. In winter, both are fairly easy to catch in live traps. In winter, cobs of corn or dried apples make good bait. Trapped rabbits may either be killed or released in a non-farming area.
Shooting rabbits may be effective if only a few are present. Consult local authorities regarding firearm by-laws and regulations.
Slugs and Snails Slugs and snails are soft-bodied mollusks. They are most prevalent in the spring, but can be active throughout the year if the temperature and humidity are suitable. Most will overwinter in the egg stage, hatch in spring, mature during the summer and lay eggs in the fall. Because they require moisture for survival, slugs and snails are most active at night or during damp weather. Slugs often hide during the day in dark, damp, sheltered places such as under boards, pots, weeds and debris. Snails can remain on plants during the day but will withdraw into their shells on hot, dry days.

Floriculture Production Guide Insects, Mites, and Animal Pests • 25
Slugs and snails damage foliage as well as flowers, roots and tubers. Damage can be most severe in damp greenhouses and coldframes. They have rasping mouthparts that produce irregular holes in leaves. Silvery, slime trails on soil, grass and foliage is evidence of slugs and snails.
Management Slugs prefer damp, shaded areas. Removing vegetative trash and other daytime hiding places helps to control them.
Trapping can provide effective control in small areas. Planks, grapefruit rinds or cabbage leaves can be placed on the ground overnight and the next day slugs sheltering underneath can be destroyed (cut in half). Unlike earthworms, slugs cannot recover from being cut in half. Traps baited with fermented liquids are commercially available or they can be made from beer or fermented yeast.
Zinc or copper strips repel slugs and can be applied as a barrier around raised beds and greenhouses.
Baits can be used where slugs and snails are a serious problem. Baits containing ferric phosphate can be used safely without the risk of poisoning pets and wildlife. Sprinkle the bait on the surface of the soil around plants. This product is as effective as products containing metaldehyde and much safer to use.
Pets are attracted to metaldehyde, therefore it should only be used in a “bait protector”. Bait protectors can be made from a coffee can. Puncture the lower sides of the container with a can opener. Place the bait in the bottom of the can and replace the lid. This method will not protect dogs, since they can knock over the container or remove the cover to get at the bait. If there are dogs in the area and you wish to use metaldehyde, it is safer to use the RTU (ready-to-use) liquid formulation. Metaldehyde is not to be applied to plants after edible portions have formed.

Floriculture Production Guide Weed Control • 1
Weed Control 8 (updated June 2012)
Weeds reduce crop yields because they compete with crops for water, light, and nutrients. Reductions in yields may be small if only a few weeds are present. However, complete crop failure can occur with high weed pressure. In some cases, when perennial weeds get established, the land cannot be used for crop production until the infestation has been controlled. Weed control is critical, especially during the early growth stages of a crop. Weeds may also harbour insects, diseases, and rodents that will increase the need for pest controls.
Integrated Weed Management An integrated approach to weed management is a program that includes prevention as well as physical, cultural and chemical control methods. The following six processes are involved in maintaining a successful integrated weed management program:
manage resources to prevent weeds from invading;
proper identification and knowledge of weed species;
map and monitor weed populations and damage; make control decisions based on knowledge of
potential crop damage and cost; use a combination of control methods to reduce
weed levels to an acceptable level; and evaluate the effectiveness of methods used.
Prevention Prevention is the most important but least used method to manage weeds. Wind, water, wild animals, livestock and man are agents of weed dispersal. When weeds are spread by these or other natural agents, control can be very difficult or impossible. Limiting the introduction of weeds and weed parts, and preventing existing weeds from going to seed are two important means of prevention.
Weeds have evolved very effective survival and dispersal mechanisms. Therefore, it is easier to prevent or exclude weeds than to treat established
populations. Seed production, particularly for annual weeds, is very high and the seeds can remain dormant in the soil for many years. Perennial weeds are equally insidious since a new plant can arise from a root fragment. Weeds or weed parts are often introduced to the greenhouse or field inadvertently on growing media, planting stock, machinery, and contaminated seed or through improperly managed compost and manure.
Careful sanitation practices can go a long way to prevent the introduction and spread of weeds in a greenhouse or the field. Anything that enters the site may carry weeds or weed parts. Machinery should be washed regularly and staff must be aware of the risk of bringing weed parts and seeds in with them on their clothing or other materials. Be sure that all composts and manures are well rotted, and always choose certified weed-free seeds for sowing.
Before purchasing soil and media from a new supplier, investigate the steps they take to keep the product clean. The media can be checked for weed seeds using a germination test. Media and plants brought onto a site should be visually inspected for weeds prior to use. If weeds are present, quarantine (if possible) the plants until the problem is corrected. Where weeds or weed seeds are seen or suspected, follow-up treatments will likely be required to prevent them from spreading at the site.
It is also important to keep media clean once it arrives at the site. The media should be kept dry and clean, and not stored outdoors where it will be exposed to contaminants. If storage outdoors is the only option, then it is recommended to store media on an impermeable pad and to cover it with a tarp. It is important to not allow surface water run-off to contact the pile since it may contain weed seeds and plant pathogens.
Weeds and weed parts can also be avoided by keeping fence lines, irrigation ditches and farm roads weed free. It is recommended to keep a three to five meter strip around the greenhouse free of weeds to decrease the potential of weed parts being carried into the structure. Seeds from nearby weeds can also be carried through greenhouse vents by

2 • Weed Control Floriculture Production Guide
wind. It is important to control weeds on the entire site before they go to seed.
Physical Control Physical methods can effectively reduce weed levels. Physical controls include mechanical removal (e.g. tillage, hand weeding and mowing), cover cropping and mulching.
Mechanical Removal Tillage can be an efficient way to remove weeds, although it is a laborious process and great care must be taken to not injure the lower stems and surface roots of desirable plants. This method involves discing or scuffing between planted rows to disturb weed growth. Tillage should be done in the spring or fall. Only the top 10 cm of soil should be worked. Tillage should be timed to catch the first flush of weeds before sowing the crop. Post seeding tillage, if possible, should be done on a dry and warm day so that disturbed weed seedlings are not able to transplant themselves. Remember that weed seeds can germinate even after many years of burial, so while deep tillage buries weed seeds and temporarily minimizes problems, subsequent tillage can bring these weed seeds to the surface again. Keep in mind that poor cultivation practices can damage soil structure and tilth. Do not cultivate too often or when the soil is too wet or too dry.
When weeds are too large or there are too many to control by hand, some alternative control methods include mowing and mechanical removal. Mechanical removal may simply consist of chopping off the tops with a hoe, or using a line trimmer to cut the weeds as low as possible. Food reserves in the root system are depleted following repeated treatments, or the weed is sufficiently stressed to succumb to a pest or environmental stress. Established perennial weeds will usually require several years of frequent cutting before the food reserves in the roots are exhausted. If only a single mowing is possible, the best time is just prior to blooming to prevent the formation and spread of seeds.
Hand weeding and hoeing are possible control options, but the size of commercial operations often limits the practicality of these methods. Hand pulling, burning and even steaming of emerged weeds can be effective but should be done when weeds are young (prior to flowering and seeding) and the soil is moist. Keep in mind that hand pulling established weeds must be done very carefully as leaving any
seeds and/or weed parts in the soil will permit the weeds to re-establish.
Mulching and Cover Cropping Mulches control weeds by creating a relatively dry surface that is inhospitable for weed seed germination and by smothering small weeds. Mulches can exclude light from the tops of the weeds until the reserve food supply is depleted and the weeds starve. In addition to weed control, they moderate soil temperature and retain soil moisture.
Mulching materials include clean straw, hay or manure, tar paper, sawdust, landscape fabric and black plastic. Organic mulches have the additional benefits of providing nutrients and organic matter to the soil. Always remember that plant roots and the inner bark are living tissues. Anything that restricts gas exchange from these tissues will stress and perhaps kill them.
Mulches can be effective in controlling weed growth in container-grown plants. There are a number of drawbacks that limit the use of mulches in containers. Mulches can be difficult and expensive to apply uniformly and efficiently, they do not all hold up well with heavy irrigation, and their effectiveness is dramatically reduced if the integrity of the layer is disrupted by shrinkage or shifting of the mulch. At times the mulch can be phytotoxic. Toxic levels of boron have been found in some nursery mulches (American Nurseryman, February 15, 2001). The decomposition of woody mulches can reduce nitrogen availability and lead to slower crop growth. To avoid or correct the situation, about 0.5 kg of nitrogen per cubic meter of sawdust must be added to the crop.
The need for weed control can be reduced for winter annual weeds by sowing a fall cover crop between the rows. Cover crops also provide erosion control and increase trafficability. More information on cover crops is provided in Chapter 2.
Cultural Control Modifying habitat is an effective method of weed control that is often overlooked. Creating growing conditions that favour the crop relative to weeds can provide a successful and long-term solution to a weed problem. Weeds have evolved particular adaptations to environmental conditions. Changing soil conditions (e.g. correct drainage, pH or compaction problems) and cultural practices (e.g. fertilization, irrigation and pest control) can provide

Floriculture Production Guide Weed Control • 3
an effective solution to a weed problem, since healthy and vigorous plants are better able to compete against weeds. The advantage of cultural methods, relative to herbicides, is they provide a longer-term solution to weed problems.
Chemical Control – Herbicides
At the time of writing, no herbicides were
registered for use inside greenhouses. This section
applies only to herbicide use on outdoor, field-
grown ornamentals.
If herbicides are used, they must be applied accurately, under the correct climatic conditions, and at the right stage of weed growth for maximum effect. Always read and follow label instructions. Application equipment must be correctly adjusted and used to make accurate and thorough applications. The spray pattern must be even and uniform. Never use the same sprayer for herbicides and other pesticides. Always use clean water in the spray tank because dirty water can reduce herbicide effectiveness. Salty or hard water may result in gumminess or precipitates which cause plugged nozzles and an uneven spray pattern. Table 8.2 categorizes the herbicides that are registered for use on non-crop land and for field-grown ornamentals.
Table 8.1: Herbicide Classes
Preplant Apply before a plant is planted or transplanted into the treated soil.
Postplant Apply after planting or transplanting.
Preemergent to Weeds Herbicides that are applied to weed-free media/soil to destroy weed seedlings as they germinate and emerge. They do not control established weeds.
Postemergent to Weeds Herbicides that are applied to young, actively growing weeds.
Selective Controls specific weeds without injuring the ornamental crop. The tolerance of a plant to a specific herbicide formulation is listed on the label.
Nonselective Kills any green foliage or bark that the spray contacts. Commonly used on non-crop areas, such as roadsides and fence lines. May be registered for use as a directed spray in established crops.
Directed Spray The spray is directed to cover the weeds but not the established crop.
Table 8.2: Classification of Various Herbicides Herbicide Preemergent
to Weeds Postemergent
to Weeds Selective Nonselective
acetic acid x x amitrole x x chlorthal x x dichlobenil x x diquat x x fluazifop-p-butyl x x flumioxazin x x glyphosate x x napropamide x x paraquat x x propyzamide x x simazine x x x s-metolachlor x x x trifluralin x x

4 • Weed Control Floriculture Production Guide
Nonselective, Postemergent The five non-selective herbicides described in this section are registered for use on non-crop land only. Do not apply them to crops or use them in a greenhouse. Application to crop plants may result in serious plant injury.
Amitrol 240 (amitrole) – Registered for spot treatment on non-crop land to control Canada thistle, dandelion, sow thistle, hoary cress, milkweed, poison ivy, and toadflax. See label for rates. It is most effective when sprayed on foliage of actively growing weeds. Good coverage is necessary; thoroughly wet all leaves and stems of the weeds. Spray weeds to point of run-off. Do not disturb or mow treated plants for at least three weeks after treatment. Refer to the label for the appropriate stage of growth for effective control. Repeat applications when new growth appears. Heavy rainfall within 10 to 12 hours of application may reduce effectiveness. Do not apply to crops and do not use in a greenhouse. EcoClear (acetic acid) - To control herbaceous broadleaf and grassy weeds on non-crop land areas of nurseries and around greenhouses. Do not use in a greenhouse. Foliar contact results in rapid burn down of annual weeds and suppression (top growth reduction) of herbaceous perennial weeds. Retreatment is required for complete control of established perennial weeds. To control annual weeds early in the season (3-5 leaf stage), use 1 L of product for every 3 L of water. To control larger annual weeds and to suppress perennial weed growth, use 1 L of product for every 2.25 L of water. Rainfall within 1 hour of application will reduce effectiveness. Avoid contact of desirable plants. Do not apply to reactive metals, such as aluminum, tin or iron because it may stain or mottle the metal surface.
Gramoxone (paraquat) - It is effective for controlling emerged grasses and broadleaf weeds. See label for rates and weeds controlled. Apply as a directed spray, to prevent spray contact of green foliage or bark, between rows of established ornamentals. Do not use in a greenhouse. The number of applications required for control varies with the weed. The foliage must be thoroughly covered to obtain good results because the product is not translocated within the plant. It is best applied on a cloudy day, during dull sunlight or just prior to or during the evening. It does not have to be
incorporated. Do not apply to crops. This herbicide has no known antidote.
Reglone and Reward (diquat) – Registered for weed control in non-crop land areas. Apply at 2.3-4.5 L of product per ha. Use the higher rates and higher volume of water for dense weed growth. Thoroughly wet foliage. Reglone is a nonvolatile, fast acting product. It kills green foliage rapidly after application. Annual weeds are generally killed with one application. Repeat application may be needed to achieve control of perennial weeds. It is inactivated on contact with the soil and therefore has no residual effect. It is most effective when applied in the evening or on a dull day. It does not have to be incorporated. Do not apply to crops and do not use in a greenhouse.
Roundup, Credit 45, Touchdown Total, and Weedmaster (glyphosate) - See label for rates and weeds controlled. Use as a directed spray or in non-crop areas to control emerged annual and perennial weeds. It does not have to be incorporated. Do not apply to crops and do not use in a greenhouse.
Selective Postemergent Kerb 50 WSP (propyzamide) – Use on established ornamentals, including iris and peony, to control quackgrass, certain other perennial grasses, most annual grasses, and chickweed. Apply in the fall at the rate of 30 g per 100 m2 (1 pouch will treat 1,500 m2). Do not use in a greenhouse.
Venture L (fluazifop-p-butyl) - A systemic herbicide that is translocated from the treated foliage to the growing point of shoots and roots. It is registered to control grassy weeds in newly transplanted or established non-grassy species of field ornamentals, such as chrysanthemum, delphinium, dianthus, hydrangea, iris, and lily. Venture does not control broadleaf weeds. Refer to the label for the complete list of registered crops. Do not use in a greenhouse. Use up to 2.0 L per ha. Refer to the label for the recommended application rate for different grassy weeds. Apply to thoroughly cover grass foliage but not to run-off. Best results are achieved when applied at the correct stage of grassy weed development and when the weeds are actively growing. Women in child-bearing age should use this product with extreme caution.
Selective Preemergent Bonanza 480 L and Rival 500EC (trifluralin) - To control certain annual grasses and broadleaf

Floriculture Production Guide Weed Control • 5
weeds in transplanted herbaceous perennial and woody stock. Apply and incorporate prior to transplanting ornamental plants. See the label for information on application rates. Apply from three weeks before planting up to the time of planting. For established woody stock, apply as a directed spray to the soil surface. Incorporation is an essential part of application. Incorporate immediately after application and as closely as possible to the crop without damaging the roots. If the field is too wet, crusty or lumpy to permit proper incorporation, poor control or crop damage could occur. To incorporate, work into the soil in two different directions. The first incorporation should be done within 8 hours of application. Use a tandem disc or field cultivator for the first incorporation, set to work 8 to 10 cm deep. The second incorporation should be done anytime prior to planting in a cross direction at the same depth. Do not apply to wet soils that are subject to excessive flooding. Do not apply to soils that contain less than 1% or greater than 15% organic matter (e.g. peat and muck soils). Do not use in a greenhouse.
Casoron 4G (dichlobenil) - To control annual grasses, broadleaf weeds, and certain perennials in established plantings of woody ornamentals, including forsythia, holly (except Ilex crenata, I. rotunda, and I. vomitoria), lilac, rose, and willow. See label for rates and the complete list of registered crops. Apply to prepared weed-free soil either in early spring or in late fall before annual weed seeds germinate, or after cultivation has removed weeds. Early spring treatment is preferred in coastal areas. Do not apply on sandy soils or soils with less than 2-3% organic matter. Do not apply when temperatures are above 16oC. Do not use in or near greenhouses.
Dacthal W-75 (chlorthal) – Registered for use on ornamental plantings, such as baby’s breath, forsythia, gladiolus, holly, peony, salvia, and willow. Apply at lining out in late fall or early spring at the rate of 17 kg/ha in 340 litres of water (150 grams/100 m2). Apply to soil that has been recently cultivated to a uniform texture. Application can be made immediately following lining out of stock. For established plantings, cultivate to remove existing weeds prior to application. Weed control up to 4 months or more may be expected following proper application. The label recommends to not use Dacthal on certain ornamentals, including celosia, phlox, and snapdragon. Do not use in a greenhouse.
Devrinol 10-G and 50-DF (napropamide) - To control certain annual grasses and broadleaf weeds
in field-grown ornamentals, including aster, dahlia, forsythia, holly, hosta, narcissus, shrub roses, and viburnum. See label for the complete list of registered crops and application rates. Devrinol does not control established weeds. It must be applied to freshly weeded soils before weeds germinate. It needs mechanical incorporation, adequate irrigation or natural moisture (rainfall or snow) for optimum results. The treatment must reach the zone of weed seed germination. If there is inadequate rainfall following application, the product should be incorporated mechanically (to a depth of 2.5 to 5 cm) or by irrigation. Sufficient water should be applied to wet the soil to a depth of 5 to 10 cm. Do not apply to soils high in organic matter. Do not apply more than once per growing season. Do not use in a greenhouse.
Dual II Magnum (s-metolachlor) – Registered to control nightshade, annual grasses, and redroot pigweed (suppression only) in plantings of outdoor ornamentals (woody and herbaceous). Do not use in a greenhouse. Apply prior to weed emergence or when weeds are young (1 to 2 leaf stage). Apply at a rate of 1.25–1.75 L/ha. To avoid plant injury, do not apply to seedbeds, cutting beds, or uprooted cuttings before transplanting. Do not apply until the soil has firmly settled around the roots of the crop. To reduce the risk of plant injury when applied over-the-top, irrigate following application to wash the herbicide off the foliage.
Princep Nine-T and Simazine 480 (simazine) - To control certain annual and perennial broadleaf weeds and grasses in field-grown holly, peony, and rose. Do not use in a greenhouse. Refer to the label for application rates. Apply only to dormant stock that has been established for one year or more. Apply in the fall or in spring prior to weed emergence and bud-break. Irrigation or rainfall is required to move it into the soil. If weeds have emerged, hoe or cultivate before application. Use the low rate for sandy or low organic matter soils. Use the high rate for clay or high organic soils. Control in muck soils may be minimal due to chemical adsorption. Do not use treated areas for seedbeds for at least 12 months after treatment. If application was uneven, or if rates were in excess of those recommended, a longer period should elapse before such use. See label for a complete list of weeds controlled.
SureGuard (flumioxazin) – Use to control broadleaf and grassy weeds in non-crop areas in and around ornamental nurseries. See label for rates and

6 • Weed Control Floriculture Production Guide
weeds controlled. It should be applied to a tilled, weed-free surface. It may be incorporated with 1-2 cm of water following application. Mechanically incorporating SureGuard will disturb soil surfaces, which may reduce herbicidal efficacy. Moisture is necessary to activate SureGuard. Dry weather following application may reduce effectiveness. When adequate moisture is not received after application, weed control may be improved by irrigation with at least ½ cm of water. Do not apply to crops and do not use in a greenhouse.

Invasive Alien Species 9 (updated October 2008)
Invasive alien species (also know as non-native or exotic pests) are organisms that are introduced to a country or region outside their natural habitats. Invasive alien species include invasive bacteria, fungi, insects, mites, molluscs, nematodes, plants, and viruses. Many of these non-native pests fit in with their new environment and do not cause appreciable damage to their hosts. Others can quickly establish themselves and spread if suitable hosts and environmental conditions are present. The lack of natural enemies, which regulate their abundance in their home range, may also aid in their establishment and spread. In time, natural enemies or introduced biocontrol agents may reduce the damage and permit us to live with such pests. Some invasive alien species never come into balance with their new environment and their presence continues to cause trade restrictions.
There are numerous examples of invasive alien species that are brought to BC by human activity, both by legal trade, ignorance and deliberate smuggling. Inspectors with the Canadian Food Inspection Agency (CFIA) attempt to prevent the entry of alien species but they need the help of the horticulture sector in addition to all Canadians. Make yourself aware of what is native or exists on your property and report the presence of a new pest to the CFIA or BC Ministry of Agriculture and Lands (contact information for these organizations is listed in Appendix F, Publications and Industry Contacts). Alien pests cost everyone in lost productivity and dollars. Lets work together to keep them out of BC!
Introduced Pests and their Impacts Countries around the world regulate the movement of goods to prevent the introduction of some alien pests. In Canada, the CFIA has regulations for more than 240 alien pests. The list of pests regulated by Canada is available on the CFIA web site at www.inspection.gc.ca/english/plaveg/protect/listpespare.shtml.
Importing countries use phytosanitary measures to prevent the introduction and/or spread of alien, regulated pests. If a regulated pest is detected in a region, then eradication measures are often implemented. If the detection is at a floriculture operation, the actions could include prohibitions on plant movements and destruction of affected stock at the facility. The discovery can also lead to lost market opportunities for individual operations or an entire region. These actions can cause serious financial hardship to the affected businesses. The threat posed by a regulated pest being found in a greenhouse operation is very real and it has been referred to as the single greatest external threat to industry operators.
Several alien pests have recently been detected in North America and have had a very negative impact on the ornamental industry. Some of the regulated pests that have been detected include Sudden Oak Death (Phytophthora ramorum), Bacterial Wilt of Geranium (Ralstonia solanacearum race 3, biovar 2), and Emerald Ash Borer (Agrilus planipennis). The detection of R. solanacearum race 3, biovar 2 in North America in 2003 had a very negative impact on the floriculture industry. The regulatory actions implemented to eradicate this bacterial wilt disease from the US resulted in more than 800 greenhouses being quarantined and financial losses for the industry estimated at $4 to $5 million. The entire geranium crop was destroyed at some greenhouses with no guarantee of future financial compensation for this loss.
There is a risk of introducing alien pests on imported plants. Therefore, producers need to implement detection procedures. A first step is awareness of the key alien pests that threaten your business. Below is a brief description of several alien pests that pose a threat to floriculture producers in BC. Additional information on invasive alien species is available on the Ministry’s web site at www.agf.gov.bc.ca/cropprot/nonnativepests.htm.
Floriculture Production Guide Invasive Alien Species • 1

Chrysanthemum White Rust (Puccinia horiana) is a fungal disease that has been detected in commercial greenhouses in BC on several occasions. The disease is difficult to detect since it only develops visual symptoms in the fall when chrysanthemum plants are in bloom. The movement of symptomless cuttings from outside of North America brings this alien species to Canada. This disease is regulated in both Canada and the U.S. See the section on Rusts in Chapter 11 for recommended actions to prevent this disease from being introduced into your greenhouse.
Figure 9.1: Yellowish lesions of Chrysanthemum white rust on the upper leaf surface and rust pustules on the under leaf surface (inset).
Golden Nematode (Globodera rostochiensis) is a tiny parasitic worm that was introduced to the Saanich area of Vancouver Island many years ago, most likely on bulbs or plants from Europe. Quarantines established in the 60’s to prevent the spread of the nematode have caused difficulties for Island potato producers as well as producers in the horticulture industry. The quarantine continues today and still impacts the movement of stock from the area to the rest of Canada and the US.
Pink Hibiscus Mealybug (Maconellicoccus hirsutus) attacks more than 360 plants including many greenhouse ornamental and flowering plants such as hibiscus, bougainvillea, chrysanthemum, poinsettia, ficus, begonia, palms, pothos and oleander, to name a few. The mealybug releases a toxic substance while feeding that causes leaf curling and plant death. It has the potential to cause great economic loss and the wide host range makes it easy for the pest to spread and establish rapidly. The pink hibiscus mealybug occurs in many tropical parts of the world, Asia, the Middle East, Africa, Australia, and Hawaii. In the 1990’s it became a
serious problem in the Caribbean and the US Virgin Islands. The pest was detected in Southern California in 1999 and in Florida in 2002. Because the pest attacks many economically important hosts, it is categorized as a quarantine pest in the US. It is not regulated in Canada.
Bacterial Wilt of Geranium (Ralstonia solanacearum race 3, biovar 2) is a pathogen that causes several plant diseases including potato brown rot, bacterial wilt of tomato, and geranium southern bacterial wilt. As well as being fatal to geraniums, it is a major concern to the potato industry because infected tubers are unmarketable. Due to this risk, R. solanacearum race 3, biovar 2 is now considered a quarantine pest in Canada, Europe and the US. It was included in the Select Agents and Toxins list in the USDA’s Agricultural Bioterrorism Act (2002). In 2003, the presence of R. solanacearum race 3, biovar 2 was confirmed in the US from diseased plant material in Guatemala. The Guatemalan greenhouse ceased shipping to the US and, as a precaution, all geraniums received in Canada from the affected US greenhouses were destroyed. On a few occasions in 2003, the pathogen was brought to Canada on infected plant material from Costa Rica, Guatemala, and Kenya. In order to eradicate the infection nearly 2 million geraniums and associated plants were destroyed across North America. Infected plants were exported from Guatemala in 2004 and over 1 million plants and cuttings in the US were destroyed.
Melon Thrips (Thrips palmi) is an insect pest that has a wide host range including chrysanthemum, cyclamen, certain orchids, and many other greenhouse ornamentals and vegetables. T. palmi causes stunting or death of affected plants, and can also be responsible for spreading viral diseases. On top of this, it is resistant to many pesticides, which makes it difficult to control. It is presently known to occur in Asia, Africa, Central and South America, and The Caribbean. The pest has also been present in Hawaii and Florida since the early 1980’s. In Hawaii, T. palmi causes severe damage to ornamental orchids and thus is a pest of quarantine importance to the US. This pest is also quarantined in most of Europe and The Caribbean. While it has yet to be detected in Canada, it would also be economically harmful to our greenhouse crops if it were to spread here. Melon thrips is not regulated in Canada.
2 • Invasive Alien Species Floriculture Production Guide

Invasive Plant Species Plants themselves can also be invasive pests. Introduced plant material can escape from a garden and has the potential to negatively impact natural resources or industries such as agriculture, forestry or tourism. The desirable characteristics for ornamental varieties (hardiness, persistence, self-seeding ability, pest resistance, and vigorous growth and establishment) are some of the same attributes that make a plant species a successful invader. A few ornamentals that have escaped to damage BC’s environment include: purple loosestrife (Lythrum salicaria), Japanese knotweed (Polygonum cuspidatum), giant hogweed (Heracleum mantegazzianum), Russian olive (Elaeagnus angustifolia), baby’s-breath (Gypsophila paniculata), reed canarygrass (Phalaris arundinacea), Scotch broom (Cytisus scoparius), policeman’s helmet (Impatiens glandulifera) and English ivy (Hedera helix).
Legislation, Import and Export Concerns Currently there is only limited invasive plant legislation in Canada that regulates the import of aggressive or potentially noxious plants for landscape and garden use. Weed laws and regulations are normally enacted to limit further spread after a plant has proven itself as an invasive weed. Federally, the Seeds Act regulates the allowable weed seed content of crop seed and the Plant Protection Act regulates the import of a few aquatic and parasitic plants. Provincially, 45 plant species are regulated under the BC Weed Control Act. This Act places a duty on all land occupiers to control listed plants and to prevent their propagation and transport. Weeds currently legislated in BC can be found online at www.agf.gov.bc.ca/cropprot/weedguid/weedguid.htm.
In the US, the Plant Protection Act regulates the movement and importation of over 100 aquatic, terrestrial and parasitic plants. Japanese bloodgrass (Imperata cylindrica), giant hogweed (Heracleum mantegazzianum), 4 Pennisetum spp. and 2 blackberry species (Rubus fruticosus, Rubus moluccanus) are examples of plants not permitted entry into the US. The US National Invasive Species Council has recommended screening all new introductions for “invasiveness” before the plants are allowed entry. In addition, most states have enacted weed legislation aimed at enforced control or
prevention of introduction of nearly 500 invasive species. For additional information about invasive plant species in the US, see the National Plant Board Internet site at //nationalplantboard.org/laws/index.html.
Reducing Invasive Pest Potential Because floriculture trade takes place on a world wide basis, it is especially important to monitor products for plant parts and seeds which may spread invasive species and result in both import and export concerns. When importing plant material from outside of BC, both growers and the public need to be cautious to avoid the introduction of new invasive plants. Once established in an area, invasive plants can be impossible to eradicate or difficult to control due to extensive creeping, rhizomatous roots or because they produce vast amounts of seed.
Take care to monitor seedling establishment and spread of propagated stock to adjacent natural areas and control escapes. Also, discontinue production and sale of any plant species known to be invasive to BC and check all imported stock for new, unfamiliar pests, symptoms, weeds or weed parts. If you find an uncommon, aggressive weed in imported stock, contact your local BC Ministry of Agriculture and Lands office or a Canadian Food Inspection Agency Inspector for assistance.
Floriculture Production Guide Invasive Alien Species • 3

Pesticide Properties & LD50 Values 10 (updated October 2008)
This chapter is intended for reference and background information only; it is by no means intended to replace labels. Always consult the label; it is the primary source for information on safety, rates, and application methods. Material in this chapter was compiled from the following sources: Farm Chemicals Handbook ’99, MeisterPro Reference Guides; pesticide labels; The Pesticide Manual, Eleventh and Twelfth Editions, Editor C. D. S. Tomlin, British Crop Protection Council; The BioPesticide Manual, British Crop Protection Council, 2001; and the Handbook for Pesticide Applicators and Dispensers by BC Ministry of Environment, Lands and Parks.
The relative acute toxicity of a pesticide is expressed by its LD50 value. The LD50 value represents the amount of active ingredient (a.i.) of a chemical in milligrams used per kilogram of test animal weight that kills 50% of the population. It is measured for both oral (e.g. the amount ingested through the mouth or nose) and dermal exposure (e.g. the amount that penetrates through the skin). The higher the LD50 figure, the less toxic the product is to humans. However, the figures do not indicate the long-term or chronic health effects of a pesticide. Always keep pesticide exposure to a minimum by wearing protective clothing, even when working with products that have high LD50 values.
Pesticides can lose their effectiveness due to the development of resistance by pests. When an insect population develops resistance to one pesticide it may also prove to be resistant to compounds in the same chemical class. To prevent the development of pesticide resistance: use a pest control program based on integrated pest management (IPM) practices, monitor treated populations for resistance development, never rely on a single pesticide class, and rotate the use of pesticides based on their resistance groups and chemical family classifications.
The pesticides referenced in this guide are categorized as closely as possible into resistance management groups (RMG) and families of chemical compounds to aid in the planning of rotation schedules for avoiding the development of
resistance. RMG numbers used in this guide are preceded by an I, F or H to separate Insecticide, Fungicide and Herbicide resistance groups. Typically, resistance management groups are stated on the product label or can be determined by the chemical families. The group number given on the product label will not include I, F or H. Some pesticide products have not been assigned to a specific resistance management group due to a lack of understanding of their target site or mode of action, or because there is presently no history of resistance development for the product. Pesticides in group M have multiple modes of action.
Pesticides are covered in the following order: adjuvants, disinfectants and algicides, fumigants, fungicides and bactericides, herbicides, insecticides and miticides, plant growth regulators, and rodenticides and molluscicides.
Adjuvants Adjuvants can be an important part of a pest control program as they help to overcome some of the variables that potentially reduce the effectiveness of a pesticide. Adjuvants are used as spray solution additives to prevent problems associated with spray application such as beading, incomplete coverage, run-off, adverse water quality or removal through rain and wind. Adjuvant products include surfactants, wetting agents, crop oils, thickeners, drift control agents, penetrants, anti-foam agents, stickers and spreaders. When choosing an adjuvant, decide which aspects of the spray application need improvement. The environmental conditions before, during and after the application (e.g. temperature, rain and wind) as well as the characteristics of the plant surface should also be considered.
Surfactants are perhaps the most frequently used class of adjuvant. Surfactants reduce the surface tension of a solution so that it can spread and cover a surface more efficiently. Surfactants are classified as non-ionic (uncharged), cationic (positively charged), and anionic (negatively charged). Spray coverage can also be improved by the type and set-up of the application equipment.
Floriculture Production Guide Pesticide Properties and LD50 Values • 1

Not all pesticides are labelled to be used with adjuvants. Always consult the product labels as some combinations can be hazardous for your health, damaging to crops, or cause the product to be ineffective.
nonylphenoxy polethoxy ethanol (Agral 90) - A non-ionic liquid wetting and spreading agent registered for use with a range of specific crops and controlled products. Controlled products that can be mixed with Agral 90 include Gramoxone and Reglone. This product may cause eye and skin irritation so proper protective wear should be used. Applying more than the recommended rate, or combining this product with pesticides that already contain a wetting agent, can lead to loss of spray due to excess run-off. Specific spray mix and usage instructions vary and are available on the pesticide labels. Refer to the Agral 90 product label for a complete list of compatible products.
octylphenoxypolyethoxy ethanol (Super Spreader, Citowett Plus, Companion) - A non-ionic, water soluble product that forms a continuous, uniform film on the leaf surface to improve foliage wettability. When added, this adjuvant agent improves the adherence of the pesticide to the leaf surface and prevents the product from dripping off, resulting in longer spray activity. Citowett Plus is especially useful for application to plants with hairy, dusty or waxy leaf and bud surfaces. Compatible with a number of chemical products at a range of mix rates. Take precautions when applying this product as contact with eyes can cause severe burning and stinging or lead to loss of vision. Get medical attention immediately if this product gets in eyes. Consult the product labels for a full list of products approved for use with these adjuvants along with their specific use instructions.
ethoxylated alkyl phenols (AquaGro 2000 L) – A non-ionic surfactant for growing media that is designed to ensure easy rewetting and uniform distribution and availability of moisture in the root zone. It lasts 4-6 weeks and is biodegradable and non-toxic to plants. It causes eye irritation and may be fatal if absorbed through the skin. The use of proper protective wear is important.
dimethylpolysiloxane (Fighter-F 10, Halt, Valid) – Use in the spray tank to control foam formation or existing foam. For best results, add it to the spray tank before adding the pesticide. Keep from freezing.
polyacrylamide (On Target) - A drift retarding compound for deposition improvement and drift
retardation during spray operations. On Target is compatible with most water soluble and wettable powder pesticides and desiccants. This product can be irritating to the eyes, skin and respiratory system. Keep from freezing.
Disinfectants and Algicides didecyl dimethyl ammonium chloride (KleenGrow) - A mild quaternary ammonium chloride compound with wide spectrum fungicidal and bactericidal properties. Use to disinfectant greenhouse surfaces. Aids in controlling Fusarium, Botrytis, Penicillium and Didymella. It must contact surfaces for at least 30 seconds to be effective. Corrosive, causes eye damage and skin irritation and is harmful if swallowed. Contains a source of chlorine and can form dangerous gas if mixed with incompatible materials.
Fumigants dazomet (Basamid) - A granular soil fumigant that is applied dry. It controls unencysted nematodes, soil fungi, and most germinating weed seeds commonly found in soil and mixtures of soil and peat used in propagation beds. On contact with moist soil the active ingredient releases toxic gases that spread in the air phase of the soil. Granules are applied to moist, well prepared soil when the soil temperature is above 6oC. Immediately following incorporation to a depth of 20 to 25 cm, the soil surface must be sealed by rolling or packing and possibly light irrigation. After 7 to 10 days the soil is cultivated to allow phytotoxic gases to escape. Depending on soil temperatures, 2 to 6 weeks must pass before any crop can be safely planted. It is toxic to all growing plants. Do not use treated soil until a safety germination test with lettuce or radish seeds has been carried out and has shown the soil to be safe. If very early spring planting is anticipated, it is best applied in September or October of the preceding year when the soil is warm. It has a moderate mammalian acute toxicity (LD50: oral = 519) and may be irritating to skin. It is toxic to fish and nontoxic to bees.
dichloropropene (Telone II, Telone C-17) - It is used for preplant treatments in both field and greenhouse soils. It kills nematodes, controls some fungal diseases, and suppresses germination of some weed seeds. It can be phytotoxic to crops planted too soon after the fumigation. Soils need to be
2 • Pesticide Properties and LD50 Values Floriculture Production Guide

exposed to the fumigant for a minimum of 7 to 14 days; colder soils require a longer treatment period. Once the exposure period is complete, the soil should be cultivated and left to aerate for a minimum of one week. Aerate longer if: a high application rate was used; the soil temperature is below 15.5oC; the soil is very wet; or if an organic soil was treated (muck). If applied in the fall or winter, then the aeration period should extend until spring. Do not plant if you can still smell the fumigant. While it has a moderate mammalian acute toxicity (LD50: oral = 125; dermal = 423), it is hazardous to use because of the toxic gas it produces (LD50: inhalation = 9 mg/L). Telone may be fatal if inhaled. It is irritating to the skin, eyes, and upper respiratory tract. It has a relatively low toxicity to birds but is highly toxic to fish.
metam-sodium (Vapam) - A liquid soil fumigant that may be injected into the soil, applied to the soil surface as a drench, or metered into irrigation systems. Do not use in greenhouses that contain growing plants or where fumes may enter nearby houses that contain growing plants. In the presence of water, it releases the more toxic methyl isothiocyanate which is then lost to the atmosphere by vaporization. It controls germinating weed seeds (it does not control dormant seeds), fungi that cause damping-off and root rot, and nematodes. It has a low mammalian acute toxicity (LD50: oral = 820; dermal = 2,000), but it may be irritating to the eyes, nose, throat, and skin. It is hazardous to use because of the gas it produces. It is toxic to fish, but is nontoxic to bees.
Fungicides and Bactericides Bacillus subtilis (Rhapsody) – A naturally occurring soil bacterium that can colonize plant surfaces and out compete disease-causing organisms. It is a broad spectrum, preventive biofungicide for the control or suppression of many diseases of ornamental plants. Do not tank mix with other pesticides, surfactants or fertilizers. It has a low mammalian acute toxicity (LD50: oral > 5,000; dermal > 5,000). May be irritating to skin and eyes.
captan (Captan, Maestro) – A broad-spectrum, protective and curative dicarboximide that controls a wide range of leaf spots, as well as seed and soil-borne diseases. It is also used as a bulb dust and as a soil drench to control bedding plant damping-off diseases. Do not combine with oil or strongly alkaline materials such as hydrated lime. Do not use
in combination with, immediately before or closely following an oil spray. It has a low mammalian acute toxicity (LD50: oral = 8,400), but it may cause skin and eye irritation. It is toxic to fish.
chlorothalonil (Daconil 2787, Exotherm Termil) - A broad-spectrum, nonsystemic chlorinated hydrocarbon with foliar protectant activity. Daconil is used as a foliar spray for the control of botrytis, leaf spots, and rusts of certain greenhouse and field grown crops. Exotherm Termil is used as a smoke fumigator for the control of Botrytis in greenhouse crops. It has a very low mammalian acute toxicity (LD50: oral > 10,000), but it causes severe eye damage. May cause allergic side effects in some people. Toxic to fish.
copper complex (Phyton 27) - A copper complex with systemic fungicide and bactericide properties, broad spectrum action, and low phytotoxicity. Used as a flower dip to control Botrytis and as a foliar spray or cutting dip to control certain diseases. Rates above 125 mL/100 L may damage tender, open blooms. Use of low volume equipment is effective against botrytis, but is ineffective against established powdery mildew and bacterial infections. It has a low mammalian acute toxicity (LD50: oral = 4,500), but is corrosive to both the eyes and skin. Direct contact causes irreversible eye damage and severe skin burns. Toxic to fish. Do not tank-mix any copper containing compounds with B-Nine and do not apply B-Nine within 7 days, either before or after, a copper application. Burning of the leaves may result. Avoid mixing with other metals, or salts and stickers. Use ionically active stickers only at low rates. Do not mix with Aliette, horticultural oil, or Senator.
copper oxychloride (Copper Spray) - A foliar fungicide and bactericide with protective action. It works as a preventive, so application must be made to the crop before spore germination. It controls leaf spot and downy mildew on ornamental crops. Copper oxychloride is strongly absorbed by soils. It is non-toxic to bees and moderately toxic to fish and it has a low mammalian acute toxicity but may be irritating to skin and eyes (LD50: oral = 700 – 800; dermal > 2,000).
copper sulfate (Copper 53W) - A protective foliar fungicide and bactericide. It is non-toxic to bees and moderately toxic to fish. It has a low mammalian acute toxicity but may be irritating to skin and eyes (LD50: oral = 1,000; dermal > 8,000).
Floriculture Production Guide Pesticide Properties and LD50 Values • 3

dimethomorph (Acrobat) – Is a locally systemic fungicide that has protectant and curative activity. It is very effective against downy mildew, which is caused by Peronospora species. It inhibits the formation of cell walls in susceptible species. Refer to the label for precautions to delay the onset of fungicide resistance. It has a low mammalian acute toxicity (LD50: oral = 2,939; dermal > 2,000), and is not irritating to eyes and skin.
dodemorph-acetate (Meltatox) - An systemic organic compound with foliar protectant and eradicant activity against powdery mildew. It has a low mammalian acute toxicity (LD50: oral = 2,500), but it can cause skin irritation and serious, permanent eye damage. It is toxic to fish and is slightly toxic to bees.
etridiazole (Truban) - A selective thiazole soil fungicide to control damping-off caused by Pythium and Phytophthora in greenhouse and field grown crops. It is a contact fungicide with protective and curative action. It has a low mammalian acute toxicity (LD50: oral = 1,077). It is toxic to fish.
fenhexamid (Decree) - A nonsystemic, protectant hydroxyanilide compound for the control of botrytis in ornamental crops. It acts by preventing the penetration of fungi into the plant by inhibiting germ tub elongation, mycelial growth, and spore germination. It should be applied in advance of infection; the frequency of applications varies with environmental conditions. Thorough coverage is essential. Spray solution should be constantly agitated during application. For resistance management purposes, it should not be applied in successive applications. It has a low mammalian acute toxicity (LD50: oral > 5,000; dermal > 5,000). It is practically nontoxic to birds, slightly toxic to freshwater invertebrates, and moderately toxic to freshwater fish. It is not harmful to honeybees and ladybug beetles.
formaldehyde (Formalin) - Formaldehyde is used as a seed treatment and as hot or cold water treatment for tubers and bulbs against a wide variety of plant diseases. While it has moderate mammalian acute dermal toxicity, its vapours are highly toxic; its inhalation LD50 is very low and severe obstructive tracheobronchitis may result from inhalation. High concentrations may produce pulmonary edema or spasm of the larnyx. Vapors are very irritating to eyes, nose, and upper respiratory tract. A gas mask is required in confined areas. It should be treated and handled as a very toxic product.
fosetyl-aluminum (Aliette) - A systemic fungicide for foliar or drench applications; used to control diseases caused by phytophthora and pythium, also protects against some bacterial plant pathogens. It is most effective when used as a preventive treatment; it inhibits spore germination and blocks pathogen penetration into the plant. In infected plants, Aliette blocks mycelial development and sporulation, and may also reinforce the defensive mechanisms of the plant to seal off the invading organism. It has a low mammalian toxicity (LD50: oral > 2,000; dermal > 2,000) and is irritating to the eyes. It is not toxic to bees or fish.
Gliocladium catenulatum Strain J1446 (Prestop) – Is a biological fungicide that suppresses soil-borne and foliar diseases on greenhouse ornamentals. It contains a naturally occurring soil fungus. By colonizing plant roots in advance of pathogens, Prestop deprives pathogens of living space and nourishment. It also is a hyperparasite of some harmful fungi. It has a low mammalian acute toxicity (LD50: oral > 2,000; dermal > 2,000). It may cause sensitization by skin contact, and can be mildly irritating to eyes.
iprodione (Rovral) - A broad-spectrum, systemic, contact carboximide with protectant and eradicant properties. It’s used to control Botrytis and damping-off caused by Rhizoctonia. It has a low mammalian acute toxicity (LD50: oral > 4,400). It is mildly irritating to the eyes.
mancozeb (Manzate 200, Penncozeb) - A broad-spectrum, protective carbamate used to control leaf spots and blights. It is similar to maneb, but with the addition of zinc. It has a low mammalian acute toxicity (LD50: oral = 7,900), it may irritate eyes, nose, throat, and skin. Toxic to fish and nontoxic to birds.
metalaxyl (Subdue Maxx, Subdue 2G) - An alanine methylester compound with systemic and curative properties used to control damping-off caused by Pythium and Phytophthora. Do not tank-mix with other pesticides or fertilizers. It has a low mammalian acute toxicity (LD50: oral = 670), but it may cause skin irritation. Relatively nontoxic to fish.
myclobutanil (Nova 40W, Eagle) - A sterol-inhibiting product that is locally systemic and has both eradicant and protectant properties. Effective against rusts and powdery mildew of specific crops. It is important not to exceed the maximum of six applications per growing season or to use higher
4 • Pesticide Properties and LD50 Values Floriculture Production Guide
than label rates. Note the phytotoxicity disclaimer on the label. In the United States, myclobutanil labels carry the warning that over-dosage can result in observable foliar greening and shortened internodes. Use extra caution during cool, dark periods when plants are not growing rapidly. It has a low mammalian acute toxicity (LD50: oral = 1,600; dermal > 5,000). It is hazardous to fish.
oxine benzoate (No-Damp) - An organic compound used as a soil drench for the control of damping-off diseases of seedlings and cuttings. It has a low mammalian acute toxicity.
potassium bicarbonate (MilStop) - A contact fungicide that controls/suppresses powdery mildew. The addition of a surfactant or wetting agent is not required. Do not adjust the spray solution pH after mixing; acidification of the solution will cause reduced performance. It has a low mammalian toxicity (LD50: oral = 2,700; dermal > 5,000), but is a skin and eye irritant
propiconazole (Banner) - A broad-spectrum, systemic, sterol inhibitor fungicide with protective and curative action. For best results, use in a preventive disease control program in rotation with other fungicides. Cross-resistance may occur to myclobutanil (Nova). Do not add surfactants or wetting agents as this may result in phytotoxicity. It has a low mammalian acute toxicity (LD50: oral = 1,517; dermal > 4,000), and causes skin and eye irritation. Skin sensitization may occur in some individuals. It is toxic to fish.
quintozene (Quintozene) - A long lasting aromatic hydrocarbon soil fungicide. It is effective against Rhizoctonia and Sclerotinia root and stem rots, and Sclerotinia bulb rots. Repeated use will result in soil build-up. Treated soil must not be used to produce food crops other than when used for club root control in cole crops. It has a low mammalian acute toxicity (LD50: oral = 1,700 - 5,000), but it may cause skin irritation. It is toxic to fish.
Streptomyces griseoviridis (MycoStop) - Bacterium used as a microbial fungicide for control of damping off, root and stem rot, and wilt caused by Fusarium of greenhouse ornamentals. The bacterium out competes fungal pathogens for essential nutrients and secretes various enzymes and metabolites which inhibit pathogen growth. Do not tank mix with chemical pesticides. Not toxic to animals but inhalation should be avoided (LD50: dermal = 5,000). May cause sensitization by inhalation and skin contact. Toxic to fish; do not
apply directly to water or to areas where surface water is present. sulphur (Sulphur 92) - A naturally occurring element used to control certain diseases, especially powdery mildew. It may injure plants during hot, dry weather. Do not tank-mix with an oil pesticide, or apply immediately before or immediately after an oil spray. Do not use when temperatures are above 30oC. Relatively nontoxic to man, but it may be irritating to the eyes and skin. Relatively nontoxic to animals and bees.
thiophanate-methyl (Senator) - A benzimidazole compound similar to benomyl. It is systemic with protectant and eradicant properties and long residual activity. It is effective as a spray against powdery mildew and other diseases, or as a systemic soil treatment against Botrytis, powdery mildew, and other diseases, such as leaf spots on orchids. Do not tank mix with lime or other alkaline material. It has a low mammalian acute toxicity (LD50: oral = 7,500). It is toxic to fish and slightly toxic to birds.
Trichoderma harzianum (RootShield) - A fungus that actively grows onto plant roots as they develop and suppresses root diseases caused by Pythium, Rhizoctonia and Fusarium. It also improves growth of the plant root system and aids in soil nutrient solubility. Not a skin irritant but may cause skin sensitization. Avoid contact with eyes and clothing and avoid inhalation. It has a slight to moderate acute mammalian toxicity (LD50: oral > 500). Not toxic to bees.
trifloxystrobin (Compass) - A broad spectrum fungicide with primarily preventive activity. It is rain-fast and penetrates the plant to control powdery mildew and rhizoctonia root rot on ornamental crops. Applying to poinsettia after bract formation may cause injury to bracts. It may cause injury to petunias, violets, and New Guinea impatiens. It has a low mammalian acute toxicity but is irritating to eyes and may cause skin sensitization (LD50: oral > 5,000). It is toxic to fish and other aquatic organisms and practically non-toxic to bees. Harmful to beneficial predatory or parasitic arthropods.
Herbicides acetic acid (EcoClear) - A foliar active herbicide for non-selective post-emergent control of broadleaf and grass weeds. Contains organic acids that are components of vinegar and lemon juice. Overspray or drift will injure contacted vegetation. This
Floriculture Production Guide Pesticide Properties and LD50 Values • 5

product is non-residual in the soil. Avoid application to reactive metals. Severe eye, skin and respiratory tract irritant. Avoid contact with skin, eyes and clothing. May be toxic to aquatic organisms. Do not use in greenhouses.
amitrole (Amitrol 240) - A nonselective, postemergent triazole compound particularly useful for controlling many perennial weeds such as quackgrass, horsetail, poison-ivy, milk-weed, Canada thistle, and cattails. It is used for spot treatment of weeds on noncropped land. Avoid spray drift onto foliage of any crops or desirable plants. It is a systemic herbicide readily absorbed by roots and foliage and is translocated to growing tips during active growth. It affects plants by upsetting the formation of chlorophyll, causing them to turn yellow or yellow-white within two weeks. Persistence in the soil is usually two to four weeks. It has a low mammalian acute toxicity (LD50: oral = 1,100). Not toxic to fish, bees, and birds. Do not use in greenhouses.
dichlobenil (Casoron) - A selective, preemergent benzontrile granular herbicide used to control grasses and broadleaf weeds in established trees and shrubs. It inhibits germination. It also inhibits actively dividing meristems, acting primarily on growing points and root tips. Apply to prepared weed-free soil only in early spring or late fall. Early spring treatment is preferred in coastal areas. Do not apply on sandy soils, soils with less than 2 to 3% organic matter. Do not apply when temperatures are over 16oC. Do not apply until at least four weeks after transplanting. Do not apply within three months prior to or following grafting or budding of root stocks or planting of new grafts. Do not apply until six months after rooting of cuttings in the field. Do not use on gladiolus, herbaceous perennials, and certain Ilex (I. crenata, I. rotunda, I. vomitoria). It has a low mammalian acute toxicity (LD50: oral = 3,160; dermal = 1,350). Do not use in greenhouses.
diquat (Reglone) - A pyridine compound that interferes with the photosynthetic process. It is a nonselective, postemergent contact herbicide for use on noncropped land. It is absorbed by all leaf and stem tissues but it is not translocated. Avoid spray drift onto foliage of any crops or desirable plants. It is not effective for long-term control of perennial weeds as they grow back after their tops are burned off. It is very rapidly and completely deactivated by soil. It should only be used with clean water since muddy water adsorbs diquat and reduces its effectiveness. It is most effective when it’s applied
during the evening or dull days. While it has a moderate mammalian acute toxicity (LD50: oral = 215; dermal > 3,000), it should be treated and handled as a very toxic product; use protective gear for handling and application. It may be irritating to the skin. Do not use in greenhouses.
fluazifop-p-butyl (Venture L) - A selective, postemergent herbicide for control of a broad range of annual and perennial grasses in many newly transplanted or established non-grassy ornamentals. It will not control broadleaf weeds, fescue, bluegrass species, or sedges. See label for a list of tolerant crop species. It is absorbed by the foliage and moves quickly to the growing points to stop growth of both shoots and roots or rhizomes. It has a low mammalian acute toxicity (LD50: oral = 3,300; dermal > 2,400), but it causes severe skin and eye irritation. Experimental feeding studies in rats have demonstrated that the active ingredient in this product can produce birth defects and other adverse effects in the developing fetus of rats. Women in child bearing years should be particularly careful when handling this product. Do not use in greenhouses.
glyphosate (Roundup) - A broad-spectrum, postemergent phosphono amino acid compound. It is used for control of many annual and deep-rooted perennials weeds in noncropped land. Avoid spray drift onto foliage of any crops or desirable plants as damage will occur. It is useful in preparing soil for planting. It is readily translocated to the roots and growing points. It is quickly deactivated in soil, so no residues remain in the soil to affect subsequent crops. It is not effective against horsetail. It has a low mammalian acute toxicity (LD50: oral = 4,300; dermal > 7,900), but it may cause eye irritation. It has a low toxicity to fish. Do not use in greenhouses.
napropamide (Devrinol) - A selective, preemergent alkanamide herbicide for certain established field stocks. It does not control established weeds. Seed germination is stopped. Growth of grass roots is inhibited. It must be applied to freshly weeded soils before weeds germinate or during fall and winter months. Rainfall or irrigation must carry it to a depth of five to ten cm soon after application. If rainfall or irrigation is not available, mechanical incorporation is required to a depth of 2.5 to 5 cm. Do not apply to soils high in organic matter. Do not apply more than once per growing season. It has an average persistence in the soil of 8 to 12 weeks. It has a low mammalian acute toxicity (LD50: oral = 5,000; dermal > 5,000). Do not use in greenhouses.
6 • Pesticide Properties and LD50 Values Floriculture Production Guide
paraquat (Gramoxone) - This herbicide has no known antidote. A pyridine compound that provides nonselective, postemergent, contact control of herbaceous plants. Use only as a directed spray or on noncropped land. Avoid spray drift onto foliage of any crops or desirable plants. It is water-soluble and results in rapid foliar kill. It translocates slightly in perennial grasses such as quack grass and bluegrasses. It is not effective against clover or prostrate knotweed. It is absorbed and inactivated in the soil. It is slightly more corrosive than diquat, especially at high concentrations. Equipment should be thoroughly cleaned after use. It has a moderate mammalian acute toxicity (LD50: oral = 150; dermal = 80), but it should be treated and handled as a very toxic product because of its lack of antidote. All solutions should be handled with caution. Use protective gear for handling and applying the product. The lung is the primary organ affected. Avoid any intake by mouth or breathing of fine mists of the spray solution. Slightly toxic to fish, moderately toxic to birds. Do not use in greenhouses.
simazine (Simazine, Simadex Simazine, Princep Nine-T) - A triazine compound similar to atrazine but less soluble and therefore more residual. It is applied as a preemergence or postemergence herbicide for select ornamental crops. Treated areas cannot be used for seedbeds for at least 12 months after treatment. It is tightly held by the soil. It will not leach readily and breaks down slowly in soil. If application was uneven, or if rates exceeded label rates, a longer period should elapse before use. Continued use over several years will also produce longer residual affects. It controls several annual broad-leaved and grassy weeds but is not effective against deep-rooted perennials such as dandelion. Some weeds, such as groundsel, pigweed, and lambsquaters have developed resistance to simazine (triazine herbicides). It is absorbed mostly through plant roots with little or no leaf penetration. It does not adhere well and is readily washed-off by rain. After it is absorbed by roots, it moves up the plant to growing tips and leaves. At high rates it is a good soil sterilant. Do not treat coarse, sandy, or gravelly soil. It has a low mammalian acute toxicity (LD50: oral = 5,000; dermal > 20,000). Nontoxic to fish and bees. Do not use in greenhouses.
trifluralin (Bonanza, Treflan) - A dinitroaniline compound used as a selective, preplant incorporated herbicide for control of several annual broad-leaved and grassy weeds. It prevents cell division in root
and shoot tips as they emerge from the seed. Weeds are killed as they germinate. To work effectively, it must be uniformly mixed throughout the soil in the zone of weed seed germination since it acts on the growing points of the root and shoot as they emerge from the seed. It inhibits cell division and the actively growing points in the root and shoot. Do not apply to peat or muck soils. Do not apply to wet soils, soils in poor working condition or soils which contain more than 15% organic matter. It is not effective against nightshade, shepherd’s purse, groundsel, lady’s thumb, cudweed or wild mustard. It has an average half-life of 45 to 120 days. It has a low mammalian acute toxicity (LD50: oral = 3,700; dermal > 2,000). It may cause eye irritation and damage. It is toxic to fish, nontoxic to bees and earthworms. Do not use in greenhouses.
Insecticides and Miticides abamectin (Avid) - A naturally derived miticide/insecticide produced by the soil micro-organism Streptomyces avermitilis. It acts by stimulating the presynaptic release of GABA, an inhibitory neurotransmitter. Pests become immobilized shortly after ingesting or coming in contact with it. It may take three to four days to achieve maximum mortality; pests will continue moving, but will not feed or breed. It has translaminar activity and penetrates the leaf tissue and remains there, so when it’s applied to upper leaf surfaces, it penetrates into tissue and kills pests that inhabit and feed on lower leaf surfaces. Surface residues rapidly dissipate and degrade in sunlight. It is effective against all mite stages except the egg stage; it is effective against leafminer larvae and adults. Do not use on Adiantum spp. ferns, Leucanthemum spp. (Shasta daisy), and conifers. Do not use with a spreader sticker. Do not tank mix with copper or use shortly after the application of a copper spray. It has a moderate mammalian acute toxicity (LD50: oral = 300; dermal > 1,800). It causes substantial, but temporary eye injury. It is toxic to predatory mites, fish, wildlife, and highly toxic to bees. For resistance management purposes, it’s recommended not to use it in successive applications. Rotate sprays with at least one other product before using it again. Do not apply more than twice in sequence or more than six times per year or per crop for perennials.
Floriculture Production Guide Pesticide Properties and LD50 Values • 7

acephate (Orthene T & O) - An organophosphorous compound with contact and systemic activity. It has moderate persistence with residual activity of 6 to 9 days. It has a low mammalian acute toxicity (LD50: oral = 866; dermal = 2,000). It is moderately toxic to birds, slightly toxic to fish, and highly toxic to bees.
acequinocyl (Kanemite, Shuttle) - A contact miticide that provides quick knockdown and long residual control of 2-spotted and spruce spider mites. Thorough coverage of the foliage is required for optimal control. It controls all life stages of susceptible mite species. Do not use in successive applications in order to manage against pest resistance. It has a low mammalian acute toxicity (LD50: oral > 5,000; dermal > 2,000), and causes mild skin irritation.
acetamiprid (Tristar) - A systemic insecticide that is effective through contact and ingestion. It is used as a foliar spray to provide control of aphids, European pine sawfly, leaf miners, leafhoppers and whiteflies on a wide range of crops. It has a low to moderate mammalian acute toxicity and is irritating to skin, eyes, and through inhalation (LD50: oral = 147 - 217; dermal > 2,000). It is practically not toxic to fish. Acetamiprid is toxic to honey bees exposed to direct treatment.
Bacillus thuringiensis (Dipel, Vectobac) - A microbial insecticide based on toxins produced by a bacterium species. There are a number of varieties of this bacterium which are toxic to specific groups of insects. The two main varieties used in commercial products are Bacillus thuringiensis Berliner var. kurstaki, used to kill leaf-eating caterpillars and Bacillus thuringiensis var. israeliensis, used to kill fungus gnat larvae. Products are formulated as a wettable powder, dust, or suspension of spores and crystals produced by the bacteria. They must be eaten by the target insects to cause toxic effects; there is no contact activity. Thorough coverage is essential. The pest stops all further eating and death occurs within one to three days. It has a short residual effect, so applications must be repeated every few days until control is achieved. Products do not control the adult stage life cycle, so applications must be timed for when the target pest is in the correct stage of its life cycle. For example, when fungus gnat larvae are present. Avoid applying in conjunction with fertilizers or fungicides that contain copper or chlorine because they may neutralize the active ingredient. Do not apply to plants under stress or follow application with excessive amounts of water. It has a low
mammalian acute toxicity (LD50: oral = 5,000 - 13,000; dermal = 75,000).
bifenazate (Floramite) - A selective miticide that provides quick knockdown through contact activity and long residual activity (up to 21 days). It is not effective against rust mites, broad mites, and flat mites. Do not apply more than twice per year or in successive applications. It has a low mammalian acute toxicity (LD50: oral > 5,000; dermal > 5,000). It is an eye irritant and is toxic to aquatic organisms. Do not discharge effluent, waste and drainage water containing this product into water bodies.
carbaryl (Sevin) - A broad spectrum carbamate with stomach and contact action and slight systemic properties. Under dry conditions it has long residual action, but its effectiveness decreases markedly following rain or overhead sprinkler irrigation. It is effective against many insects, but it does not control spider mites. To avoid possible injury to tender foliage, do not apply to wet foliage or when rain or high humidity is expected during the next two days. It is unstable under highly alkaline conditions. It has a moderate mammalian acute toxicity (LD50: oral = 400; dermal > 2,000), but it is extremely toxic to honey bees. Foraging bees may be killed up to two weeks after treatment. For maximum honey bee hazard reduction, apply from late evening to early morning or when bees are not foraging.
chlorpyrifos (Dursban) - A nonsystemic organophosphorous compound with contact, stomach, and respiratory action. Spraying open blooms may cause petal drop. Do not use with wetting agents or spreader stickers. It has a moderate mammalian acute toxicity (LD50: oral = 82; dermal = 202), but it causes substantial eye injury. It is toxic to birds and wildlife, and extremely toxic to fish and aquatic organisms. Do not apply directly to water. It is highly toxic to bees, avoid application if bees are actively visiting the treatment area.
clofentezine (Apollo) – An acaricide that has long residual, contact activity. It acts primarily as an ovicide but also has an effect on young motile stages. It does not control adult stages. It has a low mammalian acute toxicity (LD50: oral > 5,200; dermal > 2,100). It is a mild eye and skin irritant.
cyromazine (Citation 75WP) - An insect growth regulator for the control of leafminers, shore flies and fungus gnats. It acts by interfering with molting and pupation, so it affects only immatures and not
8 • Pesticide Properties and LD50 Values Floriculture Production Guide
adults. Affected insects usually die during molting. If they do reach maturity, they are often unable to reproduce. It provides gradual control rather than a quick knock-down of the target pest. It exhibits translaminar effects, so its action is somewhat systemic. While it reaches the mining larvae within leaves, it does not prevent the initial damage caused by the adult stage. It is only effective on leafminer of the Liriomyza genus; this includes all our greenhouse leafminers. Use with caution if you’re using beneficial biologicals as it is slightly harmful to several beneficials including, but not limited to, Encarsia formosa and Hypoaspis. It has a low mammalian acute toxicity (LD50: oral = 3,387; dermal > 3,100).
deltamethrin (Decis) - A fast acting pyrethroid compound that is nonsystemic, controlling insects through contact and/or ingestion. Thorough coverage is essential. Deltamethrin is temperature-sensitive in its effect against insects, being most toxic at cool temperatures and becoming less effective as temperatures rise. A reduction in control occurs at temperatures above 25oC. It has a moderate mammalian acute toxicity (LD50: oral, oily solvent = 128; aqueous suspension > 5,000). It is a severe eye and skin irritant. It is toxic to fish, aquatic organisms, bees, and other beneficial insects.
diazinon (Diazinon) - A broad-spectrum organophosphorous compound that is nonsystemic with contact, stomach, and respiratory action. It has moderate residual activity. Phytotoxic to some plants. Emulsifiable concentrates may cause more plant damage than wettable powders. It has a moderate mammalian acute toxicity (LD50: oral = 300 - 400; dermal = 3,600). It is toxic to fish, bees (highly), birds, and wildlife.
dicofol (Kelthane) - An organochlorine material that controls various mites. It is nonsystemic with high initial kill and high residual activity. Repeat applications will be necessary once eggs hatch. It is a specific miticide with little or no effect on beneficial insect predators. It has a low mammalian acute toxicity (LD50: oral = 575; dermal = 2,000 - 5,000), it is toxic to fish and nontoxic to bees.
diflubenzuron (Dimilin) - A non-systemic insect growth regulator that can be applied as a soil spray or a drench. It is used to control soil dwelling insects such as fungus gnats and shore flies. It acts at the time of insect molting or at egg hatch, interfering with exoskeleton development. Insect mortality
occurs several days after treatment. Emerging adults may lay eggs, but any new larvae should be controlled. Exceeding label rates, volumes or number of applications can cause serious foliar injury to some crops. Care should be exercised when using Dimilin with capillary mat watering systems. Repeat applications could result in build-up and phytotoxicity. It may cause injury to poinsettia, hibiscus, and varieties of begonia. It is not toxic to bees but is highly toxic to fish. It has a low mammalian toxicity (LD50: oral > 4,640; dermal > 2,000).
dimethoate (Cygon, Lagon) - A broad spectrum, systemic organophosphorous compound with stomach and contact action. It is phytotoxic to a large number of plant species, including chrysanthemums. It has a moderate mammalian acute toxicity (LD50: oral = 215; dermal = 400), it is toxic to birds, bees, and other wildlife.
endosulfan (Endosulfan, Thiodan, Thionex) - An organochlorine compound that is nonsystemic with contact and stomach action. It is fairly persistent, undergoes slow hydrolysis, and is stable in sunlight. It has a high mammalian acute toxicity (LD50: oral = 22.7 - 160; dermal = 359). It is very toxic to fish and moderately toxic to bees and birds.
fenbutatin oxide (Vendex) - An organic tin compound that is nonsystemic with contact and stomach action. It controls two-spotted spider mites, but is relatively harmless to predaceous mites. It has good residual control. Damage to tender plants has been observed when used with wetting agents. It has a low mammalian acute toxicity (LD50: oral = 2,630; dermal > 2,000), but it is irritating to the skin and eyes. It is nontoxic to bees but toxic to fish and birds.
Heterorhabditis megidis - An insect pathogenic nematode used to control vine weevil larvae. Nematodes actively seek target pest in the media and they penetrate either via body openings or directly through the cuticle. Upon entry, symbiotic bacteria (Photorhabdus luminescens) are released and infect the host, resulting in rapid death. Nematodes then reproduce in the cadaver. It’s effective up to four weeks. For optimum results, the media temperature must not fall below 12oC. The most important time to apply is when the larvae are present from August to the end of September and April/May. It is considered nontoxic to mammals.
Floriculture Production Guide Pesticide Properties and LD50 Values • 9

imidacloprid (Intercept, Merit) - A cloronicotinyl that combines systemic activity with long residual control of aphids and whiteflies. It has no effects on spider mites. Do not use it as a foliar spray. It should be applied as a soil drench to actively growing plants with a developed root system. It is translocated upwards within the plant. Use drip irrigation, overhead irrigation, or hand-held or motorized calibrated irrigation equipment to apply the soil drench. For best results, do not leach for ten to fourteen days after treatment. It’s affect on biologicals is generally unknown, but it is harmful to Aphidius and Aphidoletes. It has a moderate mammalian acute toxicity (LD50: oral = 450; dermal > 500). It is highly toxic to aquatic invertebrates.
kinoprene (Enstar II) - An insect growth regulator for the control of whiteflies and aphids. It does not produce an immediate insect kill, but results in a gradual reduction of the insect population. At the preventative (low) rate, it shows morphological, ovicidal, and sterilizing effects. At the high rate, it kills adults. To minimize potential phytotoxic effects, it should be used in the prebloom stage. Application to certain varieties of poinsettias and roses has produced damage. It has a low mammalian acute toxicity (LD50: oral = 4,900; dermal = 9,000).
malathion (Malathion) - A nonsystemic organophosphorous with contact, stomach, and respiratory action. It controls a broad spectrum of pests in greenhouse and field grown crops. It is phytotoxic to a number of plants, including ferns, orchids, and petunias. It is nonpersistent and has a low mammalian acute toxicity (LD50: oral = 1,000; dermal = 4,100). It is highly toxic to fish and bees and has a very strong odour. permethrin (Pounce) - A broad spectrum synthetic pyrethroid. It is nonsystemic with fast acting stomach and contact action, but no fumigant effects. Thorough coverage is essential. Do not tank-mix with other pesticides or fertilizers. It has a low mammalian acute toxicity (LD50: oral = 430 - 4,000; dermal > 2,000). May cause skin or eye irritation. It is highly toxic to fish, aquatic organisms, and bees.
pymetrozine (Endeavor) - A foliar spray insecticide that provides control of aphids and reduces whitefly populations by stopping their feeding activity. Insects stop feeding within hours, but remain on the plant for a short time (2-4 days). It should not be applied to poinsettias pre-bract. On hard-to-wet plants, such as chrysanthemum and roses, add a non-ionic or organosilicone-based
surfactant such as Agral 90 at a rate of 250 mL/100L (0.25% v/v) to improve coverage. For ornamentals grown for cut flower production (e.g. rose, chrysanthemums, gerbera) or those requiring significant foliar contact during cultivation (e.g. pinching, pruning, hand harvesting), do not apply more than three applications per greenhouse per year. It is not toxic to fish or bees and has a low mammalian toxicity (LD50: oral = 5,820; dermal > 2,000). It is a potential skin sensitizer.
pyridaben (DYNO-Mite) - A pyridazinone that acts as a mitochondrial electron transport inhibitor; it blocks cell respiration causing the pest to lose motile co-ordination and eventually die. It is nonsystemic with contact action, so thorough spray coverage is essential, especially of the lower leaf surfaces. It has rapid knock-down of the susceptible stages and has long residual activity for white flies. With spider mites, the most susceptible stages are the larval and first two nymph stages (protonymphal and deutonymphal). The egg stage is less susceptible and the adult stage is least susceptible. If adult females represent more than 15% of the population, then a product that provides quick adult knock-down should be used before applying DYNO-Mite. For whiteflies, the most susceptible stages are adults and the first two nymphal stages; the third nymph stage is less susceptible, while the eggs and pupae are least susceptible. The full extent of its efficiency is not seen until 4 to 7 days after application; a point that should be considered when evaluating its efficacy. It has a low mammalian acute toxicity (LD50: oral = 820 - 1350: dermal > 2,000). For resistance management purposes, it’s recommended not to use DYNO-Mite in successive applications. Rotate sprays with at least one other product before using it again.
pyriproxyfen (Distance) – A juvenile hormone mimic that suppresses embryogenesis and adult formation. It is registered to control whiteflies on greenhouse ornamentals. It is not irritating to skin or eyes, and has a low mammalian toxicity (LD50: oral > 5,000; dermal > 2,000). This pesticide is toxic to fish and aquatic invertebrates. Do not apply directly to water, or to areas where surface water is present. It is toxic to certain beneficial insects.
soap (Insecticidal Soap) - An organic substance consisting of the salts of oleic acid - a natural constituent of oils and fats. Thorough coverage of all surfaces of the sprayed plants is essential as it kills only by contact action at the time of application and has no residual effect. It may injure soft plant
10 • Pesticide Properties and LD50 Values Floriculture Production Guide
tissues. Do not use on delicate ferns, nasturtiums, and sweetpeas. While its mammalian toxicity is very low, it may cause minor lung irritation if misting occurs during application. Use an approved respirator. Eye exposure to concentrated soap may cause irritation
spinosad (Success 480) - A compound derived from the fermentation of Saccharpolyspora spinosa. It is active by contact and ingestion and causes insect paralysis. For control of thrips, gypsy moth, leaf beetles and tent caterpillars. Uniform spray coverage is critical for effective insect control. Do not spray if rain is expected within 48 hours of application. Low mammalian acute toxicity but may cause eye and skin irritation (LD50: oral = 3,783 – 5,000; dermal > 2,000). It is toxic to aquatic invertebrates and to bees when sprayed directly, but residuals have little effect when dry.
Steinernema feltiae (Nemasys, Nemasys F, Exhibitline SF) - An entomopathogenic nematode used to control the larval stage of fungus gnats in greenhouse and nursery crops, and Western flower thrips and leafminer larvae in a range of protected crops. The nematodes actively seek target pests and penetrate via body openings. Upon entry, symbiotic bacteria are released and infect the host, resulting in rapid death. Nematodes then reproduce in the cadaver. Apply as a soil drench to control fungus gnats. Expect a population decline 18 to 21 days after the first curative treatment. Water and media temperatures must be between 15 and 30oC. Keep the spray tank constantly agitated to prevent the nematodes from settling to the bottom of the tank. Apply to moist growing media and irrigate within 30 minutes to distribute the nematodes from the surface. Do not irrigate to the point of leaching. Apply as a foliar spray to control Western flower thrips and leafminer larvae. Applications should be made out of direct sunlight and early evening applications are best.
spiromesifen (Forbid) – A contact insecticide and miticide with translaminar movement throughout the leaf surface. However, to assure optimum effectiveness, the product should be applied to wet both the upper and lower surfaces. It is effective against whitefly nymphs and it has an effect on the pupal stage. It will not knock down adult whitefly populations. It is active on all mite developmental stages, although juvenile stages are often more susceptible than adults. An adjuvant may be used to improve coverage on hard to wet foliage. It has a low mammalian acute toxicity (LD50: oral > 2,000;
dermal > 2,000) and is an eye irritant. It is toxic to aquatic organisms and certain beneficial organisms.
Steinernema kraussei (Exhibitline SK, Nemasys L) - A new insect parasitic nematode used to control the black vine weevil (Otiorhynchus sulcatus). The nematode moves through the soil in water films and seeks out black vine weevil larvae. Once the nematode enters a larva, it releases a symbiotic bacterium that kills the pest. S. kraussei is tolerant of low temperatures, and is reported to be effective at temperatures as low as 5oC. Apply when larvae are active in March to May or August to November.
tebufenozide (Confirm 240) - An insecticide that mimics the action of a Lepidopteran molting hormone. Larvae stop feeding within hours after ingesting a toxic dose, although they may continue moving for several days. They begin to undergo an unsuccessful and lethal molt, and die within 3 to 10 days. Use on early larval stages. Good spray coverage is essential for control. It has a low mammalian acute toxicity rate but is irritating to skin and eyes (LD50: oral = 5,000; dermal > 2,000). It is moderately toxic to fish and also highly toxic to certain invertebrates. Not toxic to bees.
trichlorfon (Dylox) - A nonsystemic organophosphorous material with contact and stomach action. It should not significantly affect beneficial insects, especially when applied at minimum label rates. It has a moderate mammalian acute toxicity (LD50: oral = 450; dermal = 2,000). It can cause irreversible eye damage. Keep spray away from streams, lakes, and ponds. Toxic to fish, birds, and other wildlife.
Plant Growth Regulators ancymidol (A-Rest) - A pyrimidinyl carbinol that inhibits gibberellin synthesis. It is absorbed by the leaves and roots and is readily translocated throughout the plant in the phloem tissue. It inhibits internode elongation to produce more compact plants. It is active as a spray or a drench. Foliar application may cause phytotoxicity that appears as necrotic spots on leaves and leaf margins. It is more likely to occur at temperatures above 21oC. It has a low mammalian acute toxicity (LD50: oral = 4,500; dermal > 5,000). It is nontoxic to bees.
chlormequat chloride (Cycocel, Cycocel Extra) - A quaternary ammonium compound that inhibits gibberellin biosynthesis. It inhibits cell elongation, hence shortening and strengthening the stem and
Floriculture Production Guide Pesticide Properties and LD50 Values • 11

producing a sturdier plant. It also influences the developmental cycle, leading to increased flowering and harvest. It may also increase chlorophyll formation and root development. It is effective both as a drench and as a foliar spray. When used as a spray it may cause phytotoxicity that appears as chlorotic spotting. It is most obvious on leaves that were expanding at the time of application. The symptoms appear in 3 to 5 days and are due to damage to the chloroplast. Drenches do not usually cause phytotoxicity, however it has low activity in media. It has a low mammalian acute toxicity (LD50: oral = 883; dermal > 4,000). It is nontoxic to bees.
daminozide (B-Nine, Dazide) - An organic acid that interferes with gibberellic acid biosynthesis. It is absorbed by the leaves and readily translocated throughout the plant. It produces more compact plants by inhibiting internode elongation. It is not active as a drench because it is broken down quickly in media mixes. Under warm temperatures and low humidity, the spray solution may dry too quickly leading to poor plant absorption. The solution must remain wet on the plant to be effective. Do not tank-mix with wetting agents, alkaline materials, oils, and copper-containing compounds (such as Phyton 27). Do not apply to wilted or water-stressed plants. Leaves should be dry when spray is applied. Do not wet foliage within 24 hours of application. It has a low mammalian acute toxicity (LD50: oral = 5,000; dermal > 5,000). It is nontoxic to bees.
paclobutrazol (Bonzi, Piccolo) - An azole compound that inhibits gibberellin and sterol biosynthesis and hence the rate of cell division. It produces more compact plants and enhances flowering. It is taken into the xylem through the leaves, stems, or roots, and is translocated to growing sub-apical meristems. Bonzi residues cannot be removed by washing with soap or by steaming, therefore do not reuse trays or pots from a treated crop. This is especially important for crops that are sensitive to Bonzi (e.g. begonias). It has a low mammalian acute toxicity (LD50: oral = 5,346; dermal > 1,000). See below for more information on using Bonzi.
uniconazole (Sumagic) - An azole compound that inhibits gibberellin biosynthesis that is absorbed by stems and roots with translocation in the xylem to growing points. It has a low mammalian acute toxicity (LD50: oral = 2,020; dermal > 2,000). See below for more information on using Sumagic.
Bonzi and Sumagic - Both products are extremely active at very low concentrations. It’s recommended to do a test spray at the low label rate on each cultivar if you have not used either product before to avoid over-stunting or plant damage. They do not move readily within the plant. Transportation is most effective when they’re applied to the stem or if absorbed through the roots. When applied as a drench and absorbed by the roots, the xylem carries them up through the stem to the growing points. However, they don’t move in the phloem tissue, so material that is sprayed on the leaves will not move out into the stem or roots. When it is applied as a foliar spray, it is the stems that absorb it to move it to the growing points, so it’s important to ensure that the stems as well as the leaves are uniformly covered. Spray application technique is very important with these two products; they both require precise application of a known volume of spray each time. Use your most experienced spray applicator for these two products. Any variation in spray coverage will produce variation in plants. Spray volumes are important and affect efficacy. Caution should be taken during foliar sprays to not spray to the point of excessive run-off. Excess product will run down the plant and into the soil where it acts as a drench and result in plants becoming shorter than expected. Spray drift can be a problem if crops are closely grown together that have significantly different rates.
Rodenticides and Molluscicides bromadiolone (Just One Bite) - Bait rodenticide to control rats and mice including those resistant to warfarin. Mammalian toxicity is very high (LD50: oral = 1.125; dermal = 1.71). Not toxic to bees.
bromethalin (Terminator) - An acute bait rodenticide for control against rats and mice. Effective against rodents resistant to anticoagulant rodenticides. Does not induce bait shyness. It has a high mammalian toxicity (LD50: oral = 2; dermal = 1,000).
brodifacoum (Ratak) - An acute bait rodenticide that controls rodent pests at a lower dose than is necessary with many other anticoagulant rodenticides. It has an extremely high mammalian toxicity (LD50: oral = 0.4). It is also a mild skin and eye irritant and a moderate skin sensitizer and is highly toxic to fish.
12 • Pesticide Properties and LD50 Values Floriculture Production Guide

difethialone (Hombre) – An anticoagulant bait formulation for the control of Norway rats, roof rats and house mice on farms. It has a high mammalian toxicity (LD50: oral = 0.55). May be harmful if swallowed or absorbed through the skin., and may cause mild irritations to eyes. Prolonged or repeated exposures (ingestion and skin absorption) may cause cumulative toxicity.
diphacinone (Ramik Brown) - A water resistant bait rodenticide for nursery and outdoor use. Ramik Brown is an anticoagulant that is lethal to rodents after multiple feedings, it is also lethal to other animals, so it is recommended to recover rodent bodies and unused bait and dispose of them through burial. It has a high mammalian toxicity (LD50: oral = 2.3; dermal > 200) and it is also moderately toxic to fish.
ferric phosphate (Slug and Snail Bait) - Controls species of slugs and snails through ingestion. After ingesting even small amounts of the bait slugs and snails cease feeding. Affected slugs and snails die within 3 to 6 days. Appropriate for use in the field or in the greenhouse. Uneaten bait degrades into the soil where it is harmless to pets and wildlife. The soil should be moist when applied but with little or no standing water. Ferric phosphate has a low mammalian toxicity (LD50: oral > 5,000; dermal > 5,000) and it is practically not toxic to fish.
metaldehyde (various products) - An attractant bait that controls slugs and snails through ingestion and contact. It has a moderate mammalian toxicity (LD50: oral = 283; dermal > 5,000) and it is slightly toxic to fish and not toxic to bees. Dogs are attracted to metaldehyde baits and accidental poisoning may result.
zinc phosphide (Rodent Pellets) – Formulated as pellets to control pocket gophers, meadow voles, mice, and Norway and roof rats. Not recommended for use in areas prone to being wet. It has a high mammalian toxicity (LD50: oral = 40; dermal > 2,000). It is irritating to eyes, skin, and mucus membranes.
Floriculture Production Guide Pesticide Properties and LD50 Values • 13

Pesticide Regulations and Safety 11 (updated October 2008)
The information on safe pesticide use is summarized from the BC Pesticide Applicator Course for Agricultural Producers. Study kits for the course are available from Office Products at 1-800-282-7955.
Legislation Laws protect applicators, bystanders, consumers and the environment. You can be fined for breaking the laws.
Canadian Laws Pest Control Products Act & Regulations Every pesticide used or sold in BC must be registered by Health Canada. Each label must have a PCP Act # on it. Using pesticides without a PCP Act # (from other countries) is against the law unless you have a pesticide Own Use Import Program, which can be obtained through the Pest Management Regulatory Agency. Each label must also list the crops and pests the pesticide can be used on. Using pesticides for uses not on the label is against the law.
Pesticides are labeled as Domestic, Commercial or Restricted. Restricted products are more hazardous and have special restrictions on the label.
Agriculture and Agri-Food Administrative Monetary Penalties Act (AMPs) AMPs provides an enforcement tool which can be imposed when a person has violated the Pest Control Products Act (PCP), rather than pursuing prosecution under the PCP Act itself. It imposes monetary penalties (similar to court imposed fines, such as for speeding) through an administrative process with no criminal record or imprisonment.
The Food and Drugs Act All foods must be free of harmful amounts of substances. Health Canada sets levels of allowable pesticide residues on crops at harvest. These levels are called maximum residue limits or MRLs. The
Canadian Food Inspection Agency takes random samples of crops to test for pesticide residues at the time of sale. If residues are more than the MRL the crop may be seized. If you follow the label recommendations and wait the required days before harvest, residues should not be over the limit.
The Fisheries Act and Migratory Birds Regulations You can be charged if you kill or harm fish or migratory birds with pesticides. This applies to creeks, rivers, and lakes on your own property as well as on public land. It is illegal to introduce pesticides into waters either directly or indirectly through spray drift or run-off.
Transportation of Dangerous Goods Act Certain dangerous goods cannot be transported unless you use shipping documents, special labels, and vehicle signs. Ask your pesticide dealer if the product you have bought needs special transport procedures. Growers are usually exempt from this when they are transporting less than 500 kg of pesticide.
British Columbia Laws Integrated Pest Management Act and Regulations The BC Ministry of Environment also has rules about the sale and use of pesticides in BC. Rules that apply to farmers include:
1. Pesticides labeled Restricted or Commercial must be kept in vented and locked storage that has a warning sign on the door.
2. Anyone buying or using pesticides labeled Restricted must have an applicator certificate. Table 11.2 lists pesticides (referred to in this guide) that can be purchased and used only by certified applicators under the Integrated Pest Management Act.
3. An authorization such as a pesticide use licence, pest management plan or permit is required to apply pesticides to public land. Contact your local Ministry of Environment office for details.
Floriculture Production Guide Pesticide Regulations and Safety • 1

4. Businesses selling pesticides must be licensed and their sales people must be certified.
5. Anyone applying pesticides in exchange for a fee must have an applicator certificate and a Pesticide Use Licence. But, if you spray your neighbour’s crops you do not need a license as long as the work is done as a favor and no money is exchanged.
6. Everyone must dispose of containers and leftover pesticides safely.
WorkSafeBC (formerly the Workers’ Compensation Board) WorkSafeBC Regulations for Occupational Health and Safety apply to farmers who must be registered by WorkSafeBC. If you are unsure whether they apply to you, call WorkSafeBC at 1-888-621-7233. FARSHA (Farm and Ranch Safety and Health Association) at 1-877-533-1789 can also provide information on WorkSafeBC regulations.
The WorkSafeBC regulations cover conditions of workplaces such as general safety procedures, hazardous substances, pesticides, confined spaces such as silos and storage bins, protective clothing and equipment, tools, machinery and equipment, and animal handling.
The regulations on pesticides outline requirements for pesticide applicator certification, emergency medical care, washing facilities, personal protective clothing and equipment, application equipment, pesticide application, posting warning signs, re-entry into treated areas, record keeping, drift prevention, and aerial application. Copies of the regulations are available from any WorkSafeBC office.
Their pesticide regulations state that workers must be over 16 years old and must have a valid pesticide applicator certificate from the Ministry of Environment if they mix, load or apply moderately or very toxic pesticides, or if they clean or maintain application equipment for these pesticides.
Table 11.2 lists which pesticides are moderately or very toxic and, identifies which pesticides can only be used by certified applicators. Anyone under the age of 25 years is considered a young employee and must complete a “new or young employee” orientation. FARSHA (1-877-533-1789) can help develop or present a program for your farm.
The WorkSafeBC re-entry requirements are listed in this chapter in the Re-entry Restrictions section. The record keeping requirements have been incorporated into the grower’s spray record. Refer to the regulations for the rest of WorkSafeBC’s requirements.
Pesticide Toxicity Some pesticides are more poisonous or toxic than others. The categories of pesticide toxicity used in this guide are listed in Table 11.1. The categories indicate short-term toxicity and are based on the LD50 of the active ingredient. The LD50 values are only a guide to the toxicity of a pesticide to humans.
Table 11.1: Oral and Dermal LD50 Values of the Short Term Toxicity Categories Toxicity Oral LD50
(mg/kg) Dermal LD50
(mg/kg) Very Toxic 0 to 50 0 to 200
Moderately Toxic 51 to 500 201 to 1,000
Slightly Toxic over 500 over 1,000
Hazard Shapes and Symbols Shapes and symbols on pesticide labels indicate how harmful a pesticide can be. The shapes indicate how hazardous the product is. The symbols inside the shapes tell you the type of hazard. If symbols are not on labels, the pesticide has very low hazard.
Exposure Pesticides can enter your body through the skin (dermal), the mouth (oral), the lungs (inhalation), or the eyes. The skin is the most common route of poisoning for pesticide applicators. Skin contact may occur from a splash, spill or drift. Your skin is most likely to get contaminated when mixing and loading pesticides.
Hazard The hazard of using a pesticide depends on both its toxicity and the amount of exposure. Reduce hazards by selecting pesticides with low toxicity and by reducing exposure. Wear protective gear and follow safety guidelines.
2 • Pesticide Regulations and Safety Floriculture Production Guide

Figure 11.1: Pesticide Warning Symbols
Poisoning and First Aid Symptoms of Pesticide Poisoning Know the poisoning symptoms of the pesticides you use. Read pesticide labels for symptoms. Effects from pesticide poisoning vary from person to person and are often hard to recognize. Some poisoning symptoms are headache, fatigue, nausea, dizziness, irritation of the skin or nose or throat, blurred vision, tiny pupils, trembling, perspiration, difficulty breathing, vomiting, and unconsciousness.
Call the Poison Control Centre or a doctor immediately if you suspect poisoning, and follow their instructions.
Poison Control Centres are open 24 hours a day. They give first aid information and treatments for
poisoning. The phone number of the Poison Control Centre (1-800-567-8911) can be found in the front of the phone book under Emergency Numbers.
First Aid Make sure you, and other people on the farm, know what to do in case of an emergency. Consider taking a first aid course and CPR course.
If someone has been poisoned:
1. Protect yourself. 2. Move the victim from the area of contamination. 3. Check if the victim is breathing. If breathing has
stopped or is very weak, clear the airway and begin artificial respiration. Continue until the victim is breathing normally or until medical help arrives. When doing mouth-to-mouth
Floriculture Production Guide Pesticide Regulations and Safety • 3

resuscitation, use a plastic mask to protect yourself from poison.
4. Call the Poison Control Centre (1-800-567-8911) or ambulance. Be ready to tell them the pesticide name, active ingredient, and the PCP Act registration number.
5. Unless the Poison Control Centre or doctor tells you otherwise, follow the procedures listed below, then transport the patient to the nearest hospital.
If a pesticide contacts the eyes put on waterproof gloves and hold the eyelids open and rinse with clean water for 15 minutes or more. Do not use an eye cup. Do not use chemicals or drugs in the wash water.
If pesticide contacts the skin, put on waterproof gloves, remove the contaminated clothing, and wash the affected area of the skin with lots of soap and water. Cover burned areas with a loosly applied, clean cloth. Do not apply any drugs or medications to the burned area. Do not use oinments, greases, creams, lotions or other drugs. If the victim is in shock, keep the person lying down and warm until medical help arrives.
If pesticide was breathed in, take the victim to fresh air as quickly as possible, loosen tight clothing and watch for signs of unconsciousness or convulsions. Keep the airway open and begin resuscitation if breathing has stopped or is difficult. Use a plastic facemask to protect yourself. To prevent chilling, wrap the patient in blankets but do not overheat. Keep patient as quite as possible.
If a pesticide is swallowed:
• If a person is conscious and able to swallow, give them ½ to 1 glass of milk or water. Larger quantities may cause vomiting.
• Do not induce vomiting. • Call the Poison Control Centre at 1-800-567-
8911 for further advice. • If the patient is retching or vomiting, place the
patient face down with their head lower than their body in the recovery position. This prevents vomit from entering the lungs and causing more damage. Do not let the patient lay on their back. Clean the vomit from the patient and collect some in case the doctor needs it for chemical tests.
• When medical advice cannot be obtained, check and follow the pesticide label for directions.
• The doctor may recommend to administer activated charcoal to adsorb pesticide still in the stomach. Follow the doctor’s instructions. Activated charcoal should be administered only with the advice of a medical attendant or doctor.
Protective Clothing and Equipment Wear protective clothing and equipment to minimize exposure to pesticides. Remember to wear safety equipment during mixing and loading, application, and clean-up. Always wear coveralls, waterproof boots, waterproof gloves, and a proper hat. You may also need to wear eye or face protection, and a respirator, waterproof apron, waterproof pants and jacket. The equipment you wear depends on the pesticide and type of application. Therefore, follow the safety recommendations on the pesticide label.
Coveralls - Wear long-sleeved coveralls over full-length pants and long-sleeved shirts. Make sure the coveralls are closed at the neckline and wrists. Remove your coveralls as soon as you have finished your pesticide activities. Remove them immediately if they become wet through with pesticide. Wear waterproof clothing if you might get wet during pesticide application.
Some disposable coveralls are suitable for pesticide use. Check with your supplier to see which ones can be used for pesticide application. When removing disposable coveralls, take care not to contaminate the inside if you will wear them again. Between wearing, hang them in a well-ventilated area away from other clothing.
Do not launder disposable coveralls but do wash clothing worn under disposable coveralls as you would other clothing worn during pesticide use. Replace with a new coverall when severe pilling (balls on the surface), rips or holes appear. To discard, place in a plastic garbage bag and take to a landfill site. Do not burn used coveralls.
Gloves - Always wear gloves when handling pesticides. Many glove materials are available. Use unlined waterproof gloves unless the pesticide label recommends a specific material. Do not use gloves made of leather, cloth, or natural rubber, or gloves with cloth linings. Make sure the gloves have no holes or leaks. Keep your coverall sleeves over the gloves and fold down the tops of the gloves to make
4 • Pesticide Regulations and Safety Floriculture Production Guide

cuffs. Wash your gloves before removing them and after each use.
Boots - Wear waterproof, unlined knee-high boots of rubber or neoprene when you load, mix or apply pesticides. Wear your pant legs outside of your boots. Do not wear boots made of leather or fabric. Wash the outside of your boots after each use.
Goggles and Face Shields - Wear goggles if there is a chance of getting pesticide spray or dust in your eyes. Do not use goggles with cloth or foam headbands. Do not wear contact lenses when handling pesticides. Face shields provide extra protection when mixing and loading toxic pesticides. Wash goggles and face shields after use.
Hats - Wear a waterproof hat when pesticides may be splashed or when you could be exposed to drift. Wear a wide brimmed rubber rain hat when you will get wet with spray. Do not wear baseball caps, fabric hats, or hats with leather or cloth inner bands.
Aprons - Wear a waterproof apron when you pour and mix concentrated pesticides.
Respirators - Wear a respirator when the label says to wear one; or when the label says to avoid inhalation of dust, vapour, or spray mist; or if there is a danger poison symbol on the label; or if you are applying pesticides in an enclosed space. Make sure your respirator fits. Men should shave before using a respirator as facial hair prevents a proper fit.
Full-face respirators give more protection and may be more comfortable than a half facemask and goggles.
Do not use dust masks when applying pesticides. They do not protect you from the fumes.
Specially designed, enclosed tractor cabs fitted with air-purifying devices can protect you from pesticide vapours. A regular enclosed cab is not adequate protection if a respirator is required.
Special respirators must be worn when using a highly toxic fumigant such as methyl bromide. Check the label for details.
Respirators must be approved by NIOSH or an agency sanctioned by WorkSafeBC. The cartridges remove toxic fumes from the air. Cartridges labeled for organic vapours or pesticides are needed for most pesticides. Filters remove dust and mist. Both filters and cartridges must be replaced regularly for the respirator to work.
When you use your respirator:
1. Check the intake and exhaust valves.
2. Make sure there are no air leaks around the facemask. Do an inhalation or exhalation test.
3. Change the dust filter after 4 hours of use or more often if breathing becomes difficult.
4. Change the cartridges after 8 hours of use or sooner if you can smell the pesticide. Replace cartridges at least once a year and more often if you use them frequently.
Protective Equipment for Fumigants, Smoke Bombs and Foggers Use a full-face gas mask with correct canister when applying very toxic pesticides indoors. Keep a spare canister on hand as they can lose their effectiveness. A self-contained breathing apparatus that supplies clean air is recommended for indoor work with gases or extremely toxic compounds.
Wear a full-face mask when lighting smoke bombs and when airing the house. Light the bomb farthest from the door and work toward the door. If smoke bombs are placed in more than one path, they should be lit at the same time by a separate person in each path.
When using fogging machines, wear complete protective clothing, including hat, jacket, pants or coveralls, waterproof gloves and full-face mask.
Cleaning Protective Clothing and Equipment After application, wash your gloves, boots, goggles, faceshield and apron. Wash your respirator face piece with soap and warm water. Then rinse it with clean water and dry it with a clean cloth. Keep the cleaned respirator in a plastic bag in a clean, dry place. Store the respirator and protective clothing away from pesticides and spray equipment.
Discard clothing that has been soaked with a pesticide.
Launder all your clothing after each day of applying pesticides. Wash protective clothing separately from the rest of the laundry. Do not touch contaminated clothing with bare hands. Use rubber gloves. Pre-rinse clothing using the presoak cycle. Use a high water level and the hottest water setting on your machine. Use a heavy-duty detergent.
Floriculture Production Guide Pesticide Regulations and Safety • 5

If clothes are heavily contaminated, run through two complete cycles. Hang clothes outside to dry in the sunlight if possible. Clean the washing machine by running it through a full cycle with detergent and no clothes to remove any pesticide residue.
Personal and Environmental Safety Guidelines Buying Pesticides • Make sure the pesticide is registered for your
specific use (crop and pest). • Only buy what you can use up in a year.
Transporting Pesticides • Never transport pesticides with food, feed,
fertilizer, clothing, or household goods. • Lock up the pesticides if you leave your vehicle. • Never transport pesticides in the passenger
section of any vehicle. • Ask the supplier if you need shipping papers
and vehicle warning signs.
Storing Pesticides & Shelf Life Pesticides vary in their stability and response to storage conditions. Try to only purchase quantities of pesticides that can be used up in one growing season. However, under proper storage conditions most pesticides can be used after at least one year of storage.
Follow these guidelines for storage:
• The law says Commercial and Restricted pesticides must be kept in locked and vented storage that has a warning sign on the door.
• Store pesticides in their original container with the original label. If a label is illegible or missing, label it with the trade name, active ingredient, quantity in the container and PCP number. Then obtain a replacement label from your dealer or the PMRA website.
• Never keep pesticides near livestock, food, feed, fertilizer, seed, wells, water supplies, or in your home.
• Pesticide storage should be 30.5 metres from any well.
• Keep herbicides separate from other pesticides.
• Return pesticides to storage when not in use. • Keep a list of the pesticides in storage. • Protect the pesticides from extreme
temperatures. Freezing destroys some liquid pesticides.
• Close containers when not in use. • Dispose of unwanted, unmarked and damaged
containers. • Keep containers above floor level to protect
from dampness and flooding. • Post emergency numbers nearby. • Keep a fire extinguisher, broom and shovel,
absorptive material, and protective clothing near-by in case of emergencies.
Mixing and Loading Pesticides • Wear protective clothing and equipment. • Read and follow label directions. • Choose a mixing and loading site away from
people, livestock, pets, wells, and water bodies. • Measure accurately. • Do not rip open paper pesticide bags. Slit them
open with a sharp knife. • Mix pesticides in still or low wind conditions.
Stand upwind of the pesticide. • Hold the container below eye level when
measuring or adding pesticide into the spray equipment.
• Only use mixing equipment for pesticides and return it to locked storage when not in use.
• Triple rinse pesticide containers as soon as they are empty. Rinse measuring and mixing equipment. Put rinse water into the sprayer.
• Use clean water. The pH of the water should be from 5.0 to 7.0, and the alkalinity should be below 60 to 80 ppm.
• Prevent overflow. Don’t leave the tank unattended. • Prevent contaminating the water supply by leaving
at least a 15 cm air gap between the end of the filler hose and the water in the spray tank. You can also use a backflow preventer valve.
Applying Pesticides • Read and follow label directions. • Use calibrated application equipment. • Use the label or production guide rate.
6 • Pesticide Regulations and Safety Floriculture Production Guide

• Wash before eating, drinking, smoking, or using the toilet.
• Have fresh water and emergency supplies on hand. • Make sure the area to be treated is clear of
people and animals. • Don’t work alone when handling very toxic
pesticides. • Post warning signs if necessary to keep people
out of treated areas. • Use separate equipment for applying herbicides. • Cover or remove animal food and water
containers near the treatment area. • Wear gloves to replace or clean plugged
nozzles. Do not blow out a plugged nozzle or screen with your mouth. Use a soft brush or toothpick.
• Shut off the spray nozzles when you turn and stop the flow of granulars at the end of rows.
• Pesticides must be registered for chemigation before they can be applied through irrigation systems. Therefore, only apply pesticides through the irrigation system when the label has instructions for chemigation. If chemigation is used, follow Chemigation Guidelines for BC. This publication is available from the Irrigation Association of BC.
• Use and maintain the tractor speed chosen during calibration.
• Prevent pesticides from contaminating non-target areas. Leave an untreated area around lakes, streams, ditches, and wells. Spray down wind from sensitive areas.
• Minimize drift by: not spraying in strong winds or dead calm.
There is usually less wind in the early morning and late evening.
not spraying when temperatures are >30°C. using boom sprayers with as low pressure as
possible, the correct nozzles, large volumes of water, and setting the boom as near to the ground as possible to still get uniform coverage.
using a drift control agent. using drift guard or other specialty nozzles
that reduce drift.
After Applying Pesticides • Clean equipment away from water supplies.
• Remove and clean protective clothing and equipment.
• Shower. • Keep records of every application.
Disposal of Unwanted Pesticides • Calculate the amount needed so none is left
over. • Do not re-spray an area to get rid of leftover
spray. • Apply left over material according to label
directions on another site or crop listed on the label. Do not put unwanted pesticides into sewers, down drains, or on the land.
• Contact the regional office of the BC Ministry of Environment or Ministry of Agriculture and Lands for information on the disposal of unwanted pesticides.
Disposal of Containers • Drain the container into the spray tank for at
least 30 seconds or shake out the bag. • Triple or pressure rinse drums, glass bottles,
plastic and metal containers. Single rinse plastic and paper bags.
• Put the rinse water into the spray tank. • Crush, puncture or damage empty containers so
they cannot be re-used. • Return the containers to your pesticide storage
until you can take them to a public dump, back to the supplier, or to a collection site. Containers can be buried on your land 0.5 metres below the surface. The burial site must be flat, not a bog, gravel or sandy soil and at least 200 metres from wells, lakes, rivers, streams or ponds.
• Do not burn pesticide containers.
Re-entry Restrictions Poisoning may occur when people work in treated areas too soon after pesticides have been applied. Such poisoning may be from breathing pesticide fumes or handling treated plants. Warn farm workers of areas recently sprayed. Some pesticide labels state when treated areas can be re-entered. Follow these directions.
Floriculture Production Guide Pesticide Regulations and Safety • 7

When there are no re-entry times on a pesticide label, follow the WorkSafeBC regulations, which state that people may not enter a treated field until they have waited the following re-entry or restricted entry intervals:
Applicators are required to leave a buffer zone when the label says to. A buffer zone only needs to be left between the end of the spray boom and the downwind sensitive area. Labels will tell you what sensitive areas must be protected and the size of the buffer zone. Labels may require protection of water bodies (aquatic) or planted areas (terrestrial). • 24 hours for a slightly toxic pesticides,
• 48 hours for moderately or very toxic pesticides, and Protecting Fish and Other Wildlife
• the total of the re-entry intervals for tank mixes of moderately and very toxic pesticides.
All insecticides, as well as some fungicides and herbicides, are very toxic to fish. Insecticides are toxic to birds and wildlife. Exposure to trace amounts of these pesticides may kill fish or birds. Destroying the vegetation along fish-bearing water harms fish by removing food and shelter.
Table 11.2 indicates whether a pesticide is slightly, moderately, or very toxic. Use the re-entry interval on the label if it is longer than the WorkSafeBC intervals. If a person needs to enter a treated area before the re-entry period is over, wear protective gear. Farmers must post a sign that informs workers when they can enter a field. The sign must state the application date and the re-entry time. Signs can be obtained from FARSHA.
Although mmigratory birds may be pests and damage crops, it is an offence under the Migratory Birds Convention to release any substance that may harm them. Responsible pesticide use helps to protect migratory birds.
Grazing Restrictions Protect fish and wildlife from pesticide poisoning by following label precautions, safety guidelines in the guide, and the guidelines below: If animals are to graze a treated area, check the
pesticide label for grazing restrictions. Wait the required time before grazing. • Use pesticides only when necessary.
• Select the least toxic and least persistent pesticides. Special Environmental Precautions • Follow label directions regarding the size of
buffer zones from downwind bodies of water to keep pesticides out of the water. Buffer Zones
Many pesticide labels now contain buffer zone information. Buffer zones are strips of land next to sensitive areas that cannot be treated with a pesticide (see Figure 11.2). The purpose of the buffer zone is to protect sensitive areas from pesticide drift.
• Do not destroy vegetation along fish bearing waters and do not spray with pesticide.
• Incorporate granular insecticides. • Use precautions to prevent drift, leaching and
run-off to ares outside the treated area. • Store treated seed where it cannot be eaten by
animals. • Place baits in covered bait stations.
Figure 11.2: Schematic of Pesticide Buffer Zones
8 • Pesticide Regulations and Safety Floriculture Production Guide

Protecting Bees and Beneficial Insects Bees and other pollinating insects are essential for the production of many crops. Some other insects control pests. Many pesticides, particularly insecticides, are very toxic to honeybees, wild bees, and beneficial insects. Protect these insects from pesticide poisoning by:
• Telling nearby beekeepers about your spray program.
• Not applying pesticides near hives. • Not applying pesticides toxic to bees when
plants are in bloom. • Selecting formulations least harmful to bees.
Microencapsulated formulations are very hazardous; dusts are more hazardous than sprays; wettable powders are more hazardous than EC and liquid formulations; granulars are least hazardous to bees.
• Reducing drift. • Timing applications carefully. Evening sprays
are less hazardous than morning sprays. Both are safer than midday.
Protecting Groundwater Groundwater is the source of water for wells and springs. It is very difficult to clean contaminated groundwater. The solution to groundwater contamination is prevention.
Groundwater contamination is most likely to occur where soils are gravelly or sandy, the water table is close to the soil surface, there is high rainfall or extensive irrigation, or the pesticide is injected or incorporated into the soil. Pesticides that are persistent in the soil, are weakly absorbed and leach quickly, or are highly soluble may contaminate groundwater.
Remember to avoid spills, drift, and irrigation run off and to properly dispose of unwanted pesticides and empty containers. Never store pesticides near wells or pumphouses and guard against leaking containers.
Well construction, maintenance and location can be factors in contamination. Maintain proper seals between pump and pump base, as well as seals between well casings.
Streamside Protection Protecting stream bank or riparian habit is an important part of envionrmental health, fish protection, and water quality.
There are numerous laws relating to the protection fo fish habitat, wetlands, and streamside areas. A few of the laws that farmers must comply with include the Water Act, the Fisheries Act, and the Integrated Pest Management Act and Regulations. Farmers and producers are expected to exercise due diligence to ensure that they are conforming to regulations. They should also recognize that voluntary actions help to protect the environment.
Growers are encouraged to:
1. identify fish habitat, wetlands, and streamside areas on their farms,
2. assess whether any farming practices could harm these areas, and
3. modify practices to ensure they do not harm fish habitat, wetlands, and streamside areas.
The BC Agriculture Council’s (BCAC ) Envionrmental Farm Plan Program (EFP) will facilitate these activities. Contact your grower association or the BCAC for more information on the program. EFP materials include a reparian management guide that will help to assess streamside areas.
The federal Fisheries Act prohibits the deposit of deleterious substances into streams. This includes farm products such as pesticides, fertilizers or wastes. The Fisheries Act also prohibits harmful alteration, disruptioni or destruction of fish habitat. This includes changes in fish habitat that reduces its capacity to support fish (i.e. removing streamside vegetation).
The provincial Integrated Pest Control Act and Regulations prohibits the use of a pesticide in a way that would cause an unreasonable adverse effect.
Emergency Response • Keep the phone numbers for the Poison Control
Centre, doctor, ambulance, and Provincial Emergency number for dangerous goods spills nearby (1-800-663-3456). The Poison Control Centre phone number is in the front section of the telephone book.
Floriculture Production Guide Pesticide Regulations and Safety • 9

• Have protective gear and equipment easily available.
• Keep absorptive material, a container for contaminated waste, tools to pick up contaminated material, bleach, and hydrated lime available.
Spills • Protect yourself. • Keep bystanders away. • Don’t eat, smoke or drink during clean up. • Work upwind of the spill. • Contain the spill. Surround and cover it with
absorbent material. • Clean up the spill. • Decontaminate the area using bleach or detergent.
Absorb excess liquid with absorbent material. • Put contaminated absorbent material in the
special waste container and seal it. • Remove and wash protective gear. Shower. • If you need help, call the Provincial Emergency
number (1-800-663-3456).
Fires Fires involving pesticides can be very dangerous. Burning pesticides may release toxic fumes that are poisonous to firefighters, bystanders, and animals, or that may contaminate the environment. Pressurized containers can explode. Pesticides can spill out of containers damaged by the fire. Runoff from fighting a fire can contaminate a larger area.
Ahead of time, give your fire department a list of all pesticides in storage (brand names, active ingredient, PCP #’s and quantity remaining). Update the list each year.
In case of a fire, call the fire department and tell them there is a fire involving pesticides. Keep people and animals away from the fire.
For more information on practices to reduce the potential of fires and dealing with fires involving pesticides see the Ministry of Agriculture and Lands Pesticide Wise website.
Tank Mixing Pesticides It is often both economical and convenient to apply a mixture of two or more pesticides when more than one pest is to be controlled. However, if the
pesticides are not compatible, applying the tank mix may result in damage to the application equipment, poor pest control, or plant injury.
Many pesticide labels contain a list of compatible pesticides. Some labels even contain directions for mixing the product with other pesticides. Compatibility charts are also available on the Internet. This information is useful in determining whether two pesticides are compatible, but the pesticide user should still take additional precautions when trying new pesticide mixtures.
The compatibility of the mix should be tested by mixing the pesticides in a small volume of water in the relative proportions the grower plans to use them.
The components should mix well when the mixture is stirred or shaken. The mixture should not separate nor should components settle out rapidly upon standing. New mixtures should also be applied initially on a small scale.
In general, it is riskier to mix two different types of formulations, for example wettable powders with emulsifiable concentrates. When using emulsified concentrates, always read the warnings on the manufacturer’s label. When two or more chemicals are combined in the tank, the solution should be applied promptly to reduce the risk of crop injury or a decrease in effectiveness.
Spray injury can also arise from a variety of other causes. Improper operation of sprayers, excess dosage of chemicals, sudden weather change during or following spraying, sprays applied at low volume, or spraying during extremely hot periods, (32°C or higher) may cause either fruit or foliage injury.
Pesticides Registered for Floriculture Use Pesticide Names, Relative Toxicity and Certification Requirement Most pesticides have three different names, which include the chemical, trade, and common names. The common and trade names are most frequently used when referring to a particular pesticide. The common name is an acceptable abbreviation of the chemical name (= active ingredient). The manufacturer or formulator assigns the pesticide trade name. There can be multiple trade names for one active ingredient. For example, Dithane, Manzate and Penncozeb are all trade names of
10 • Pesticide Regulations and Safety Floriculture Production Guide

insecticides containing the active ingredient mancozeb. The first letter of a trade name is always capitalized (e.g. Dithane), whereas the first letter of the common name is lower case (e.g. mancozeb), with the exception of abbreviated common names (e.g. MCPA).
Products labeled RESTRICTED require pesticide applicator certification under the BC Integrated Pest Management Act (IPMA). All products that are very or moderately toxic, either orally or dermally, require pesticide applicator certification under WorkSafeBC (WSBC) regulations. If either regulation requires certification, the pesticide applicator must have the certificate. The toxicity data are based on tests with rats and
rabbits and are considered relevant to all mammals including humans. To obtain a certificate you must pass the provincial
Pesticide Applicator Exam. Courses are offered at some community colleges and through the United Flower Growers Co-operative Association to prepare applicants for the exam. For more information on how to apply to write the Pesticide Applicators or Dispensers Exam in your area, refer to Appendix F of this guide.
The principal sources of information for the tables are Farm Chemicals Handbook (1999), The Pesticide Manual (12th Edition, 2000) published by the British Crop Protection Council, and product MSDS reports. Table 11.1 lists the toxicity categories used in this guide.
Table 11.2: Acute Toxicity, Chemical Class and Certification Requirements of the Pesticides Registered for use on Floriculture Crops Acute Relative
Toxicity Certification
Required
Trade Name Active Ingredient Group 1 Oral Dermal IPMA 2 WSBC 3
ALGAECIDES & DISINFECTANTS
KleenGrow didecyl dimethyl ammonium chloride
QA M N Y
FUMIGANTS
Basamid dazomet I-16 S S N N
Vapam metam-sodium - S S N N
FUNGICIDES
Acrobat 50 WP dimethomorph F-5 S S N N
Aliette Ornamental & WDG fosetyl-aluminum F-U S S N N
Banner MAXX & 130EC propiconazole F-3 S S N N
Captan 50-WP, 80-WP, 80WDG captan F-M S S N N
Compass 50WG trifloxystrobin F-11 S S N N
Copper Spray 50% copper oxychloride F-M S S N N
Copper 53W tribasic copper sulphate F-M S S N N
Daconil 2787F & Ultrex chlorothalonil F-M S S N N
Decree 50 WDG fenhexamid F-17 S S N N
Dithane DG, M-45, WSP 80WP mancozeb F-M S S N N
Table 11.2: Acute Toxicity, Chemical Class and Certification Requirements of the Pesticides
Floriculture Production Guide Pesticide Regulations and Safety • 11

Registered for use on Floriculture Crops (continued)
Acute Relative Toxicity
Certification Required
Trade Name Active Ingredient Group1 Oral Dermal IPMA 2 WSBC 3
FUNGICIDES cont.
Eagle WSP & T&O myclobutanil F-3 S S N N
Lime Sulphur 22% sulphide sulphur F-M M S N N
Maestro 80DF captan F-M S S N N
Manzate DF & PRO-STICK mancozeb F-M S S N N
Meltatox dodemorph-acetate F-5 S S N N
MilStop potassium bicarbonate - S S N N
Mycostop Streptomyces griseoviridis
- S - N N
No-Damp 3.2% oxine benzoate - S S N N
Nova 40W myclobutanil F-3 S S N N
Penncozeb 80 WP mancozeb F-M S S N N
Phyton 27 copper, as elemental F-M S S N N
Prestop Gliocladium catenulatum - S S N N
Quintozene 75WP quintozene F-14 S S N N
Rhapsody ASO Bacillus subtilis - S S N N
Rootshield G & WP Trichoderma harzianum
- S - N N
Senator 70WP thiophanate-methyl F-1 S S N N
Subdue MAXX metalaxyl-M and S-isomer
F-4 S S N N
Sulphur sulphur F-M S S N N
Truban 25EC & 30WP etridiazole F-14 S S N N
HERBICIDES
Amitrol 240 amitrole H-11 S S N N
Bonanza 400 trifluralin H-3 S S N N
Casoron G-2 & G-4 dichlobenil H-20 S S N N
Dacthal chlorthal H-4 S S N N
Devrinol 2-G, 10-G, 50-DF napropamide H-15 S S N N
Dual II Magnum s-metolachlor H-15 S S N N
12 • Pesticide Regulations and Safety Floriculture Production Guide

Table 11.2: Acute Toxicity, Chemical Class and Certification Requirements of the Pesticides Registered for use on Floriculture Crops (continued) Acute Relative
Toxicity Certification
Required
Trade Name Active Ingredient Group1 Oral Dermal IPMA 2 WSBC 3
HERBICIDES cont.
EcoClear acetic acid - S S N N
Gramoxone paraquat H-22 M M N Y
Kerb 50 WSP propyzamide H-15 S S N N
Princep Nine-T simazine H-5 S S N N
Reglone diquat H-22 M M N Y
Rival EC trifluralin H-3 S S N N
Roundup Ultra2, Transorb HC, Original 360
glyphosate H-9 S S N N
Simadex Simazine F, Simanex, Simazine 480
simazine H-5 S S N N
Treflan EC & G trifluralin H-3 S S N N
Venture L fluazifop-P-butyl H-1 S S N N
INSECTICIDES
Ambush 50EC permethrin I-3 M S N Y
Avid 1.9% EC abamectin I-6 S S N N
Citation 75WP cyromazine I-17 S S N N
Confirm 240F tebufenozide I-18 S S N N
Conserve 480 SC spinosad I-5 S S N N
Cygon 480-ORN dimethoate I-1B M M N Y
Decis 2.5EC & 5EC deltamethrin I-3 M S N Y
Diazinon 50 W, 500 E, 50 EC diazinon I-1B S S N N
Dimethoate 480 EC dimethoate I-1B M M N Y
Dimilin 25% WP diflubenzuron I-15 S S N N
Dipel WP & 2X DF Bacillus thuringiensis I-11 S S N N
Distance pyriproxyfen I-7 S S N N
Dursban T chlorpyrifos I-1B M S N Y
Dylox 420 L & 80% SP trichlorfon I-1B M S N Y
Floriculture Production Guide Pesticide Regulations and Safety • 13

Table 11.2: Acute Toxicity, Chemical Class and Certification Requirements of the Pesticides Registered for use on Floriculture Crops (continued) Acute Relative
Toxicity Certification
Required
Trade Name Active Ingredient Group1 Oral Dermal IPMA 2 WSBC 3
INSECTICIDES cont.
Dyno-Mite pyridaben I-21 S S N N
Endeavor 50WG pymetrozine I-9B S S N N
Endosulfan 400EC endosulfan I-2A V M N Y
Enstar II kinoprene I-7 S S N N
Entrust 80 W spinosad I-5 S S N N
Forbid 240 SC spiromesifen I-23 S S N N
Intercept 60 WP imidacloprid I-4 M S N Y
Insecticidal Soaps – Opal 47%, PRO 25%, Safer’s 50.5%
salts of fatty acids - S S N N
Lagon 480 E dimethoate I-1B M M N Y
Malathion 25W, 85EC, 500 E, 50, Gardex 50%
malathion I-1B S S N N
Merit 60 WP imidacloprid I-4 M S N Y
Nemasys Steinernema feltiae - S S N N
Nemasys H & L Heterorhabditis megidis
- S S N N
Orthene 75% SP acephate I-1B S S N N
Sanmite pyridaben I-21 S S N N
Sevin Liquid, SL, T&O, XLR PLUS, 50W
carbaryl I-1A M S N Y
Success 480 SC spinosad I-5 S S N N
Thiodan 4EC , Thionex EC & 50 W
endosulfan I-2A V M N Y
Trounce salts of fatty acids and pyrethrins
I-3 S S N N
TriStar 70 WSP acetamiprid I-4 S S N N
MITICIDES
Apollo SC clofentezine I-10 S S N N
Avid 1.9% EC abamectin I-6 S S N N
Dyno-Mite pyridaben I-21 S S N N
Floramite SC bifenazate I-25 S S N N
14 • Pesticide Regulations and Safety Floriculture Production Guide

Table 11.2: Acute Toxicity, Chemical Class and Certification Requirements of the Pesticides Registered for use on Floriculture Crops (continued) Acute Relative
Toxicity Certification
Required
Trade Name Active Ingredient Group1 Oral Dermal IPMA 2 WSBC 3
MITICIDES cont.
Forbid 240 SC spiromesifen I-23 S S N N
Kanemite 15 SC acequinocyl I-20B S S N N
Kelthane 50WP dicofol I-3 S S N N
Sanmite pyridaben I-21 S S N N
Shuttle 15 SC acequinocyl I-20B S S N N
Vendex 50W fenbutatin-oxide I-12 S S N N
PLANT GROWTH REGULATORS
A-Rest ancymidol - S S N N
B-Nine WSG daminozide - S S N N
Bonzi paclobutrazol - S S N N
Cycocel chlormequat chloride - S S N N
Dazide 85 WSG daminozide - S S N N
Piccolo paclobutrazol - S S N N
Sumagic uniconazole - S S N N
RODENTICIDES
Hombre difethialone - S S N N
Just One Bite bromadiolone - V S N Y
Ramik Brown diphacinone - V V N Y
Ratak brodifacoum - V V Y Y
Rodent Pellets zinc phosphide - V S N Y
Terminator bromethalin - V M N Y
1 Pesticides are categorized into different Resistance Management Groups based on their target site/mode of action. It is important to rotate pesticides of different groups to manage against the development of pest resistance. 2 Ministry of Environment’s Integrated Pest Management Act 3 WorkSafeBC
Floriculture Production Guide Pesticide Regulations and Safety • 15

Pesticide Application Equipment 12 (updated September 2008)
Sprayer Basics High-Volume Sprayers Conventional pesticide application involves chemicals diluted in large amounts of water. The large amounts of water (high-volume) are used because conventional sprayers produce large spray droplets (100 to 400 microns in diameter) and the spray is applied until the foliage is visibly, thoroughly sprayed to get uniform coverage. High-volume or dilute sprays are well suited to low pressure back-pack sprayers, whereas using low-volume back-pack sprayers it is next to impossible to achieve uniform coverage. Run-off occurs if excessive high-volume spray is used and the active ingredient will not cover the foliage well with the large droplets if too little spray is applied. The large droplets minimize the risk of drift in field conditions. High-volume spraying is sometimes referred to as dilute spraying.
Low-Volume Sprayers Low-volume is a relative term that is used differently by various groups. A low-volume rate for field application is not the same as a low volume rate in greenhouses. Low-volume (LV) pesticide application normally refers to spraying pesticides at the labelled rate (per area) with much less water, resulting in a more concentrated spray mixture. Thus low-volume equipment applies the same quantity of pesticide active ingredient to a given area as high-volume spraying equipment. The term low-volume refers to the small amount of water or diluent used to apply the pesticide. Low-volume spraying is sometimes referred to as concentrate spraying. Conventional field sprayers can be operated as both high and low volume sprayers depending on nozzle selection and travel speeds. Low volume in greenhouses is typically associated more with misters and foggers that are used only in greenhouses. Misters and foggers are ultra-low-volume when compared to most field sprayers.
Droplet Size Spray droplets are categorized based on their size and size can vary greatly depending on the spray equipment. Spray droplet size and typical uses are shown in Table 12.1.
Very small droplets are typically used in greenhouse misting or fogging operations and are generally termed low-volume, or even ultra-low-volume applications. The droplets are tiny enough to remain suspended in the air for long periods.
Spraying with smaller droplets results in less spray used to cover the surface. Because the volume of the droplet is based on the cube of the droplet diameter, one thousand 10-micron diameter droplets have the same volume of water as one 100-micron diameter droplet. Relative to a single large droplet, the 1,000 small droplets will cover the surface area much better, are less prone to run-off, and are more easily carried by the swirling airstream to the undersides of leaves. While the science behind droplet transport and impact on plant surfaces is complicated the results are not; smaller droplets mean more area is covered with less water and less run-off.
The disadvantage of smaller droplets is that they are more prone to drift in field applications due to wind conditions. Smaller droplets are also more vulnerable to dry air conditions which may cause the water carrier to evaporate before the droplet lands on the target. In greenhouses this may restrict mister and fogger use to night-time when workers are not present and when the venting systems can be closed to contain the mist and fog within greenhouses. This would cause overheating during warm, sunny days. The air circulation system of LV sprayers is used to help distribute the pesticide spray throughout the greenhouse, so it is possible to apply pesticides without any workers in the greenhouse. By venting the greenhouses and observing the re-entry times, potential worker exposure to pesticides is reduced.
In field operations, reducing droplet size is limited by the greater risk of smaller droplets drifting away from the application area.
Floriculture Production Guide Pesticide Application Equipment • 1

Table 12.1: Typical Droplet Sizes for Various Types of Pesticide Applications
Type of Spray Average Droplet Size (microns)
Examples of Uses
Fog 0.1 - 5.0 greenhouse foggers
Fine mist 5.0 - 50 greenhouse misters
Coarse mist 50 - 100 air-blast and high pressure boom sprays of insecticides or fungicides
Fine spray 100 - 250 typical insecticide or fungicide sprays
Medium spray 250 - 500 typical flat fan nozzle herbicide sprays
Coarse spray 500 - 700 low pressure flat fan nozzle herbicide sprays
Very coarse spray 700 - 1,000 large droplet flooding fan and raindrop nozzle sprays for soil applied herbicides
Monitoring Spray Coverage Decisions on the type of pesticide application equipment to use and whether to use high or low volume spraying should be based on which provides the best coverage. If purchasing new equipment, arrange a trial where the new technology can be tested for coverage. Obtaining complete coverage is critical to good pest control and good coverage is not as obvious when spraying with lower volumes that do not “wet the crop to the point of run-off”.
Water sensitive paper available from most sprayer supply companies can be attached to tops and bottoms of leaves with paper clips. Spray drops of water will be visible as small coloured dots on the paper. Very fine droplets such as fogs and smaller mist droplets may be too small to register on the water sensitive paper. For these sprays buy a florescent dye to be mixed in the water then view the leaves under a black light to see the coverage of the spray droplets. Contact your local Ministry of Agriculture and Lands office for more information.
High-Volume Spraying Equipment Backpack Sprayer The most common spraying equipment on small operations is the backpack sprayer. It is suitable for high-volume or dilute spraying both in field and greenhouse conditions. Basic, low cost backpack sprayers will generate only low pressures and lack features such as diaphragm pumps, agitators, pressure adjustment controls (regulator), and pressure gauges found on commercial grade units.
Low pressure sprayers that lack pressure regulators and gauges should not be used to apply pesticides that require uniform. This is especially true with some of the plant growth regulars where uniform coverage is a crucial part of their effectiveness. These sprayers with their limited control options are better suited for the home gardener situation.
Diaphragm pumps and agitators will allow sprayers to be used with wettable powder sprays more effectively. Pressures should be above 80 psi to achieve the finer sprays suitable for applying insecticides and fungicides. Pressure gauges and pressure regulators enable the sprayer to operate at higher pressures (80 to 200 psi) and the operator to achieve a more uniform output from the sprayer. Note that a smooth, uniform walking speed and spray wand motion is also required to achieve uniform coverage. Nozzles must be selected for the operating pressure of the sprayer and spraying conditions. Backpack sprayers should have a positive shut-off spray control valve to eliminate pesticide drips from the wand and nozzle. Drip-proof nozzle assemblies are also available as an alternative. Ball check valves in the nozzle body require 5 to 10 psi of liquid pressure to start spraying and close when the pressure drops below this level to prevent drips.
Powered Boom Sprayers Electric or gas engine powered backpack sprayers can be compared to tractor mounted low powered boom sprayers for field use or to cart mounted boom systems for greenhouse use. These sprayers are typically classed by the pressures they attain; low pressure (up to 60 psi) hydraulic sprayers forming
2 • Pesticide Application Equipment Floriculture Production Guide
coarse droplets are suitable for herbicide applications and high pressure systems (80 - 300 psi) forming finer droplets are suitable for insecticide and fungicide applications. The higher pressure causes the spray to travel at higher speeds, creating air currents and penetrating plant canopies more effectively than the low pressure coarse sprays. The downside is that the risk of off-target spray drift is much greater with high pressure, fine droplet sprays than with low pressure, coarse droplets. Tractor operated sprayers have an advantage over hand operated sprayers because they can maintain a steady forward speed. With a properly set-up boom, tractor based sprayers provide a more uniform coverage than hand operated sprayers, especially when smaller droplets and lower spray volumes are used.
Specialized Greenhouse Pesticide Equipment (LVMs) Pesticide application equipment for greenhouses is often differentiated by the kind of particle they produce, namely mists, fogs, or smokes. A more accurate method to group them is by the method used to make the droplets rather than by the particle size. Technically the four pesticide applicators, mist blowers, thermal foggers, high pressure applicators, and compressed air systems, are all low volume mist (LVM) systems. They produce fine droplets, less than 100 microns in size and they use very low water volumes. However, industry terminology generally only refers to the compressed air systems as LVMs. Table 12.2 compares the four specialized greenhouse sprayers.
Mist Blower A small engine and fan creates an air stream with a velocity of 100 to 200 mph. Concentrated spray injected into the air stream by a special nozzle is carried to the target by the air. Application is done by the applicator walking through the greenhouse directing the nozzle into the plant canopy to get good penetration and coverage. Nozzles held too close to the plants may cause blast damage. For good coverage, the nozzle should be moved at a pace that replaces the air within the canopy with air from the mist blower. They are suitable for large and small treatment areas. Greenhouses do not have to be tightly sealed during application; vents may remain open, but fans should be turned off. Rotary misters use a spinning disc to break up the spray into small droplets. The spray stream must be directed at
the crops and moved up and down to take advantage of air turbulence and get good distribution. Some manufacturers also include a fan behind the disc to propel the spray towards the target and create a turbulent air stream. They are also referred to as controlled droplet applicators and rotary atomizers. Trade names include: “Ulvafan”, “Electrafan”, “Motafan”, and “Turbair”.
Thermal Fogging Machines Thermal foggers have been used for many years. They are usually gasoline-powered backpack or cart mounted units that are moved throughout the greenhouse as they operate. The pesticide is sprayed onto a hot element and evaporates. As it condenses it produces a heavy fog that drifts through the greenhouse and penetrates the foliage. It covers both upper and lowers surfaces of the crop. Thermal foggers require specialized carrier solutions to produce a visible fog, eliminate the evaporation of droplets, and to ensure uniform particle sizes. The pesticide usually is sold as a ready to apply mixture with the carrier. Greenhouses must be tightly sealed during application and for several hours afterwards to allow the fine particles to settle out of the air. Trade names include: “Pulsfog”.
High Pressure Pesticide Applicator This specialized greenhouse pesticide applicator uses extremely high pressures (1,000 to 3,000 psi) to create extremely fine sprays. Sprayers working at 3,000 psi can produce spray droplets averaging 30 to 60 microns in diameter that are projected 20 to 25 feet from the spray gun. A small spray tank, motor, pump, long high pressure hose, and hand gun are all mounted on a small wheeled hand cart. Applicators walk slowly through the greenhouse directing the spray ahead and into the crop. They do not require special fogging solutions. It is not necessary to tightly seal the greenhouse during application; vents may remain open, but fans should be turned off. They are also referred to as mechanical foggers. Trade names include: “Coldfogger”.
Compressed Air or Aerosol Generators These devices use compressed air to break the spray liquid into small drops using an air atomizing nozzle. The nozzles are typically placed in front of a fan which disperses the spray into the greenhouse space. These units are often used as stationary sprayers that rely on the greenhouse’s air movement system to circulate the spray throughout the area to be treated and through any dense foliage.
Floriculture Production Guide Pesticide Application Equipment • 3

Table 12.2: Comparison of Specialized Greenhouse Sprayers Sprayer Droplet size
(microns) Tightly sealed
greenhouse Moved by applicator
or stationary Special carrier
solution
Mist blower 60 - 80 no moved by applicator no
Thermal fogger 12 - 25 yes moved by applicator yes
High pressure 30 - 60 no moved by applicator no
Compressed air 5 or less yes stationary no
These sprayers are designed to operate unattended from a single location in the greenhouse. The spray mixture is placed in the tank and a timer set to start the application when staff are not present. Good coverage depends upon proper placement in the greenhouse and good air movement throughout the greenhouse. Special fogging solutions are not required. Greenhouses must remain tightly sealed during application and for several hours afterwards. Trade names include: “Autofog”.
Electrostatic Sprayers These are not a separate class of sprayers, rather it’s a feature that is found on some of the previously mentioned sprayers. Electrostatic sprayers electrically charge droplets as they leave the nozzle. The charged droplets penetrate the foliage and adhere to all plant surfaces, including the underside of leaves.
Smoke Fumigators - Cans A pesticide fog or smoke that comes in ready-to-use cans. When the fumigant is ignited, the smoke carries the pesticide throughout the greenhouse on greenhouse air currents. Each can is sufficient for a certain volume of greenhouse. Greenhouses must be tightly sealed during and after application. They should only be used when there are not any staff present.
Sprayer Components Power Source The power-sprayer is normally driven by the PTO (power take off) of the tractor or by an auxiliary engine. The power rating of these should be double the theoretical power required by the pump.
Pumps A pump creates the pressure required for atomization and penetration of the spray. Choose a pump that
has the specifications required for your job. The capacity of the pump should be determined by the highest rate of application the sprayer is expected to deliver, plus an adequate volume for agitation.
Common pumps include:
• roller pump: excessive wear can occur with wettable powders
• piston pump • diaphragm pump
Tanks The size of the spray tank will depend on the intended rate of application and the mounting space available. For proper mixing, it is important to know the volume capacity of your spray tank. The tank should be equipped with a large screened opening for easy filling and cleaning. Tanks may be constructed of steel, stainless steel, epoxy-coated steel, fibreglass, aluminum or polyethylene. Stainless steel, polyethylene, and fibreglass tanks are preferred because of their rust and corrosion resistance. Neither the herbicide glyphosate (Roundup or Touchdown) nor liquid nitrogen should be put into galvanized steel tanks as hazardous chemical reactions can occur. The rusting of steel tanks can be reduced by proper draining, cleaning, and airing of the tank after use and by the use of rust-proofing compounds. Either hydraulic by-pass or mechanical agitation must be provided. If hydraulic agitation is used in the spray tank, additional pump capacity is required. Mechanical agitation is preferred if wettable powders are to be used.
Nozzles The size of droplet produced by various nozzles depends upon operating pressure and nozzle design. The droplet size decreases with an increase in pressure and with a decrease in nozzle orifice diameter.
4 • Pesticide Application Equipment Floriculture Production Guide

Types The main nozzle types used for chemical application are (see Figure 12.1):
• Tapered flat-fan spray nozzles are used for low volume, low pressure spraying such as the application of herbicides and insecticide drenches. They are also known as fan type or T-jets. They produce a fan type pattern with less material applied along the edges of the spray pattern. By properly over-lapping the spray, a uniform application is produced across the area covered by the spray boom. Nozzle spacing on the boom and height of the boom above the target are critical in obtaining a uniform coverage. Sprayer equipment suppliers can advise growers as to the correct height of the boom at different nozzle spacings.
• Even flat-fan spray nozzles produce an even spray pattern across the entire fan width. These nozzles are used in band spraying of herbicides where there is no overlap from other nozzles.
• Cone nozzles are used for high pressure spraying (mostly fungicides and insecticides). These nozzles produce a swirling mist so the spray material can reach the undersides of leaves. They are available as either hollow cone or solid cone types - both produce the same swirling mist but the solid cone nozzles are used when larger volumes are required. The most commonly used cone nozzles are the two-piece disc-core nozzles. They must be correctly installed with the rear nibs facing the nozzle body. See Figure 12.2.
• The size of droplet produced by various nozzles depends upon operating pressure and nozzle design. The droplet size decreases with an increase in pressure and with a decrease in the orifice and swirl plate openings. Various sizes of swirl plates and orifices can be fitted in the same nozzle body.
Sizes Various sizes of flat and cone nozzles may be used to obtain the volume of water desired. Your sprayer equipment supplier should have information on nozzle flow rates for different nozzle sizes.
Materials Nozzles are made from a variety of materials. Choice of material depends upon the abrasiveness of the spray mixture. Wettable powders are more
abrasive than emulsions. Brass tips are cheap but the metal is softer and the tips wear faster. In sequence of durability the following materials are used: brass, stainless steel, hardened stainless steel, ceramic, and tungsten carbide.
As nozzles wear out, the rate of application increases. Tests have shown that some wettable powders wear nozzles sufficiently to increase the rate as much as 12% after spraying only 20 ha. For this reason, frequent calibration of equipment is necessary. Spray patterns are distorted and uneven applications result from worn nozzles.
Figure 12.1: The Main Nozzle Types Used for Chemical Application
Figure 12.2: Assembly of Disc-core Cone Nozzles
Floriculture Production Guide Pesticide Application Equipment • 5

Screens Screens prevent larger particles from entering the system, clogging nozzles, and wearing out the pump.
There should be screens in the tank opening, between the tank and the pump, and in the nozzle tips. Suction strainers, line strainers and nozzles should all be equipped with 50 mesh screens when wettable powders are to be used. Screens finer than 50 mesh, for example 100 mesh, may prevent the unrestricted flow of some wettable powders. Screens are generally used in fine nozzles, but slotted strainers can be used in those that have a larger opening, and with cone nozzles. Clean screens and strainers are essential to the efficient operation of the spray system. They should be cleaned often and checked for breaks in the mesh.
Mixing Chemicals When mixing the chemical in the sprayer tank, NEVER put the chemical in first and then top up with water. Always fill the tank ⅓ to ½ full with clean water, start the agitator and then add the required quantity of chemical. Continue the agitation while continuing to fill the tank. If two or more chemicals are to be applied together, first check the labels for compatibility and then add the first chemical at the ⅓ to ½ full stage and the second chemical at the ⅔ to ¾ full stage. Mixing by this method will ensure that the chemical is completely mixed in the water. Wettable powders can be premixed before being added to the spray tank. Make a slurry of wettable powder and water and then pour it into the spray tank. Always follow manufacturers’ directions when mixing. Always keep the agitator running once the spray materials have been added to the tank.
Sprayer Cleaning Immediately after use, drain and collect any excess spray mixture. This excess solution can be very difficult to dispose of properly, therefore spray applications should be properly calibrated to avoid any excess. Flush the sprayer with soapy water and then rinse with clean water. Select a cleaning area where water will not contaminate wells, streams, or crops.
Separate equipment is recommended for applying 2,4-D, MCPA or similar hormone-type herbicides. If this is not possible, use separate sprayer hoses when using these chemicals as they cannot be properly washed out of the hose lines. To thoroughly clean equipment after applying 2,4-D, MCPA, etc., follow these steps:
• Drain and collect any excess spray solution from the tank.
• Rinse tank, lines, screens, pumps, and nozzles thoroughly with warm water.
• Remove pressure chamber and line strainer and drain.
• Fill tank with 100 L of warm water and then add one of the following: ▪ 1 litre of household ammonia or Agri-Kleen; or ▪ 500 g washing soda, lye or Nutrasol.
• Spray out small amount of solution and leave remainder in tank overnight.
• Drain and rinse the equipment several times with warm soapy water. Rinse out the soapy water with clean water.
Even stainless steel nozzles will rust if left in the sprayer. Nozzles and nozzle screens should be removed and cleaned each fall and stored in a can of light oil or diesel fuel if the sprayer is not going to be used over the winter. After a spray application the nozzles should be cleaned and coated with a light coat of oil to prevent corrosion. Ceramic nozzles are not subject to corrosion. Before winter storage, remember to drain the pump, boom, and all the lines to prevent frost damage. Add light oil or antifreeze during the last rinsing to leave a protective coating on all parts.
6 • Pesticide Application Equipment Floriculture Production Guide

Pesticide Sprayer Calibration 13 (updated September 2008)
Calibration helps ensure good pest control. It also helps prevent potential crop damage, high pesticide residues, and environmental contamination. All application equipment should be calibrated to ensure that pesticides are applied accurately and uniformly at the recommended rate. Calibration involves preparing the equipment so it is working properly, measuring the delivery rate, adjusting the equipment to change the delivery rate, and calculating how much pesticide to add to the sprayer tank. Calibrate equipment regularly, at least once per year, to make sure the output is not changing. Also calibrate equipment when it is new and when making changes that affect the delivery rate. Proper calibration will minimize, if not eliminate, left-over pesticide solutions in the sprayer tank that can be very difficult to dispose of properly.
There are four basic procedures to be carried out when calibrating almost any sprayer. Details on these procedures are given below. (Also refer to the Pesticide Applicator Course for Agricultural Producers.) Use the Calibration Worksheet in Appendix H to follow these four procedures when applying pesticides to your crop.
1. Set-up 2. Measuring delivery rate 3. Adjusting delivery rate (if different from
recommended rate) 4. Calculating how much pesticide to add to the
spray tank Calibration of backpack sprayers, boom sprayers, and specialized greenhouse sprayers will be discussed. All spraying equipment should be calibrated using the same basic steps; more complex equipment may require more set-up.
Set-Up Set-up is often the most neglected component of calibration and without proper set-up the likelihood of good spray coverage and uniformity is greatly diminished. The reason why set-up is often neglected is that it takes time, lots of time, if the sprayer is not well maintained. During sprayer set-
up, check that the sprayer nozzles, forward speed, and spray pressure suit the pesticide, the weather, and the crop conditions. Check the equipment to ensure all parts are in good condition, clean, and working properly. Refer to the sprayer’s operating manual for specific operational information. The sprayer must emit the pesticide solution uniformly across the width of the boom or spray swath to properly cover the application area. The Calibration Worksheets in Appendix H give a thorough checklist to use for boom sprayer set-up, whether it is a tractor operated system in the field or a stationary or cart based sprayer with a hand boom in greenhouses.
All sprayers should be properly set-up before you move on to the second step in calibration, measuring the delivery rate. The last page of the worksheet gives formulas for checking the speed of your tractor gears. Knowing the speed of each gear will help to make adjustments in the sprayer’s delivery rate. To use the calibration formulas you must also determine your sprayer’s swath width.
Select Spray Volume Most pesticides used for floriculture crops are given as dilution rates where the crop is to be sprayed thoroughly. Spraying a test area of the crop with water will allow the operator to determine the amount of water required to adequately cover an hectare or given area. This technique is useful to determine the amount of pesticide needed per hectare when labels only provide dilution rates. The same technique can be used to identify a spray volume to use when the label rate is expressed as a certain amount of pesticide active ingredient per area. The spray volume (and amount of water) may depend on crop, stage of growth, the pest, the pesticide, weather and soil conditions, and the method of application.
For herbicides, spray volumes range from 50 to 1,000 L/ha. Refer to the product label for specific recommendations. Pesticide application rates and spray volumes for herbicides are normally given as a broadcast treatment as if the entire field is sprayed. However, in some crops, herbicides are often
Floriculture Production Guide Pesticide Sprayer Calibration • 1

applied in bands along the rows spraying only a part of the field. Therefore, to spray only bands and not the entire field, the amount of area actually treated must be calculated to determine how much herbicide to add to the sprayer.
For fungicides and insecticides, volumes of 300 to 1,000 L/ha are typically used. For foliar sprays, just enough water should be used to obtain thorough coverage of the leaves without run-off. Early in the season when growth is light, 300 L/ha of water may be adequate. In situations where foliage is dense and coverage is critical, at least 1,000 L/ha of water should be used. For drenches (high-volume, low-pressure sprays directed to the soil for control of soil-borne pests), usually at least 2,000 L/ha is used.
Use of drop pendants in tall, leafy field crops will permit lower spray volumes and better coverage than a conventional straight boom. To maintain effective coverage of the foliage with lower spray volumes, finer droplets are required to cover the same area. Finer droplets will be more prone to drift in windy conditions. In hot, dry weather, low ambient relative humidity may cause the water in fine droplets to evaporate before the pesticide reaches the target. This is another cause of drift. Sprayer operators should carefully monitor the foliage including the lower stems and undersides of lower leaves to ensure thorough coverage. Water sensitive spray cards are available to assist in carrying out this task. Also monitor spray drift.
Select Nozzle Pressure Herbicides are generally applied at low pressures, 100 to 275 kPa, or 15 to 40 psi, to keep drift to a minimum. Do not use higher pressures unless they are specifically recommended. Some new nozzles are available that work over extended pressure ranges. Insecticides and fungicides are applied at pressures up to 2,000 kPa (300 psi) in conventional spraying equipment depending upon the pest to be controlled, the type of pesticide, and the density of the foliage. For non-systemic pesticides and high, dense plant canopies, high nozzle pressures should be used to penetrate and cover the foliage. Systemic pesticides and plants with open canopies can be sprayed at lower nozzle pressures, generally 550 kPa or 80 psi and higher, to avoid spray drift. Commercial quality backpack sprayers will produce sprays up to 1,000 kPa (150 psi). These units should be equipped with a pressure gauge and pressure regulator just like powered sprayers. Some
manufacturers supply kits to convert backpack sprayers that do not have these components.
Many nozzle manufacturers have chosen to report nozzle outputs with pressures in “bars” not kilopascals (kPa). The bar unit is equal to 100 kPa. Pesticide labels report pressures in kPa. Use a pressure gauge on the sprayer marked in both psi and kPa (or bar) so both units can be read directly from the gauge. The maximum pressure on the pressure gauge for powered sprayers should be twice the maximum spray pressure used to protect the gauge from damage and allow it to be read accurately.
Determine Sprayer Swath Width (Boom Sprayers)
Swath width is the width of treated area over which spray droplets are distributed in one pass of the applicator. See Figures 13.1 to 13.4. In a broadcast spray, it is the nozzle spacing multiplied by the number of nozzles and for band treatments it is the sum of the treated band widths. For row crops it is the row spacing (from center-to-center) multiplied by the number of rows. When crops are grown in beds, usually the plant canopy covers the whole field area. The sprayer swath width is the bed spacing (from center to center of wheel tracks) multiplied by the number of beds.
The swath width is used in sprayer calibration to calculate the sprayer’s delivery rate. As the sprayer swath width is based on the treated area, the delivery rate will also be based on the treated area when band spraying herbicides.
When sprayers are set-up during calibration, check to make sure that the driving pattern used in spraying does not cause skips – areas where portions of the crop are not sprayed between successive passes of the sprayer. The sprayer boom may also overlap the first pass when spraying the next strip or swath. Skips and overlaps can be caused by not matching the nozzles on the boom to the driving pattern of the sprayer. Sometimes different nozzles are needed at the end of the boom when spraying beds or row crops to get a uniform spray coverage of the crop. With skips and overlaps, either pests will go uncontrolled or high spray residues can occur which may be dangerous to humans, plants and the environment. While spraying, the true swath width of the sprayer is determined by the driving pattern of the sprayer through the field.
2 • Pesticide Sprayer Calibration Floriculture Production Guide

Figure 13.1: Broadcast Swath Width
= # of nozzles x spacing = 5 nozzles x 50 cm = 250 cm = 2.5 m
Figure 13.2: Broadcast Swath Width
= # of beds x bed width = 2 * x 180 cm = 360 cm = 3.6 m
*Note that the number of beds = ½ bed + 1 bed + ½ bed = 2 beds
Figure 13.3: Band Swath Width
= # of bands x band width = 3 bands x 30 cm = 90 cm = 0.9 m
Figure 13.4: Row Crop Swath Width
= # of rows x row width = 3 rows x 90 cm = 270 cm = 2.7 m
The swath width is used in sprayer calibration to calculate the sprayer’s delivery rate. As the sprayer swath width is based on the treated area, the delivery rate will also be based on the treated area when band spraying herbicides.
When sprayers are set-up during calibration, check to make sure that the driving pattern used in spraying does not cause skips, i.e. areas where portions of the crop are not sprayed between
successive passes of the sprayer. The sprayer boom may also overlap the first pass when spraying the next strip or swath. Both skips and overlaps can be caused by not matching the nozzles on the boom to the driving pattern of the sprayer. Sometimes different nozzles are needed at the end of the boom when spraying beds or row crops to get a uniform spray coverage of the crop. With skips and overlaps, either pests will go uncontrolled or high spray
Floriculture Production Guide Pesticide Sprayer Calibration • 3

residues can occur that may be dangerous to humans, plants and the environment. While spraying, the true swath width of the sprayer is determined by the driving pattern of the sprayer through the field.
Measure Delivery Rate (Boom Sprayers) There are two basic methods used to measure sprayer delivery rates, the test area method and the timed output method.
1. The test area method uses fewer calculations, however, it can take longer to carry out. If an entire acre or hectare is used as the test area, then the measured discharge of water is the delivery rate per acre or hectare and no further calculations are required. The most common problem with the test area method is measuring the amount of spray water discharged. If too small a test area is used or it is not covered with enough passes, the actual amount of water discharged will be too small to accurately measure in the tank. The tractor and sprayer tank should be parked in the exact same location and the water must settle in the tank after stopping, before measuring the tank level after spraying.
2. The timed output method can avoid these problems, however it will require more calculations. It involves using forward speed and output per minute.
By using both the test area and timed output method, the accuracy of your sprayer calibration can be checked.
Adjust Delivery Rate (All Portable Sprayers) If the measured delivery rate of the sprayer is different than the spray volume listed on the pesticide label or recommended in the production guide, it can be adjusted in three ways:
1. Nozzle size should be changed before making large changes in delivery rate. Check with the nozzle supplier or agricultural advisor. Obtain a catalogue listing nozzles and nozzle outputs in litres per minute (L/min).
2. Forward speed changes will adjust the delivery rate. Slower speeds increase the amount sprayed in a field, and faster speeds reduce the amount.
If the delivery rate is 112 L/ha at 6 kph, then by halving the speed to 3 kph, the delivery rate is doubled to 224 L/ha. Speed changes are usually made by using a different gear in order to keep tractor RPM’s and spray pressure constant and within the range recommended for the sprayer pump.
3. Spray pressure should be set for the correct droplet size. Changing pressure is recommended only for very small changes in delivery rates. Otherwise the droplet size will change and cause drift or run-off problems. Since pressure must be increased four times to double the delivery rate, this is not a good way to adjust delivery rate.
After making the adjustments, measure the delivery rate again!
Calculate How Much Pesticide to Add to the Spray Tank Once the sprayer delivery rate is known, then calculate how many hectares can be sprayed by a full tank and how much pesticide to add to the spray tank. Formulas to use when spraying only a partial tank are given in the Calibration Worksheets in Appendix H. Be very careful to accurately measure the area to be covered by the last tank to minimize left-over spray solution.
Calibrate Hand Operated Sprayers Sprayer Set-up Hand operated sprayers should be checked to make sure that there aren’t any leaks, especially where the hose enters the tank and around the trigger valve. The nozzle should deliver a uniform spray pattern. Many nozzles can be adjusted to produce the desired droplet size. Adjust the nozzle to produce a coarse spray with large droplets for herbicides, and medium to fine spray with small droplets for insecticide and fungicide applications.
For uniform spray application it is important to maintain a constant spray pressure. Some manufacturers offer pressure regulators and pressure gauges as optional accessories that enable the operator to set specific pressures depending on the spraying job. Commercial quality backpack sprayers should have these options as standard equipment. Uniform spray application also requires the operator
4 • Pesticide Sprayer Calibration Floriculture Production Guide

to co-ordinate the walking speed with uniform sweeping movements of the nozzle. The back and forth movements determine the swath width.
Most pesticide labels give instructions as a specific amount of pesticide per unit area (e.g., apply 2.4 L/ha). Some pesticides give directions to dilute an amount of pesticide in water and apply with thorough and complete coverage.
Application Rate Given as a Dilution with Water When the application rate is given as a dilution rate, then the amount of pesticide to mix in a full tank can be calculated directly.
Also estimate how much spray mixture is needed so pesticide solutions are not left over. Do this by applying water to a measured test area to determine the total solution needed. If large areas are being sprayed (more than one backpack tank-full), then a full tank of pesticide can be sprayed and the area measured to determine how many tanks are needed for the whole area. If smaller areas are to be sprayed, then use the same procedures as for pesticide application rates given as an amount of pesticide per unit area to determine how much pesticide to add to the tank.
Example: A label recommends mixing 1 L of pesticide in 100 L of water and applying to foliage with thorough coverage. A 12-litre backpack will be used. How much pesticide will be needed per tank?
Method - The amount of pesticide to add to the tank can be calculated with the following formula: Amount of pesticide = label rate (product amount ÷ water volume) X sprayer volume
Amount of pesticide = 1 L product ÷ 100 L water X 12 L tank = 0.12 L product/tank
If only a partial tank full (e.g. 8 L) of pesticide mix is required, use that figure as the “sprayer volume” in the formula.
Application Rate Given as Amount of Pesticide per Hectare Measuring delivery rate of the hand-operated sprayer follows the same basic steps as with the tractor mounted boom sprayer but on a smaller scale. Remember during set-up of the sprayer that a steady walking speed and swath width must be used.
1. Mark out a measured length of test strip at least 60 feet long. 2. Fill the tank about half full with water and record the volume or level of water. Pump the tank to the
pressure level that will be used. 3. Carefully spray the measured test strip while maintaining a steady forward speed and pumping action.
Repeat enough runs over the test area until at least 10% of a full tank has been sprayed. 4. Measure the volume of water sprayed in the test strip by refilling the tank to the starting level.
Follow these steps to determine the application rate:
1. Calculate the test area: Test area (ft2) = strip length (ft) X swath width (ft) X # runs
1. Calculate the delivery rate: Delivery rate (L/acre) = water sprayed (L) ÷ test area (ft2) X 43,560 ft2/acre Adjust the delivery rate as necessary by changing the walking speed.
2. Calculate the amount of area sprayed by a full tank: Area sprayed (by full tank) = tank volume (L) ÷ delivery rate (L/acre)
3. Calculate how much pesticide to add to the spray tank: Amount of pesticide to add to tank = application rate X area sprayed by one tank
Floriculture Production Guide Pesticide Sprayer Calibration • 5

Example: A grower wants to apply a foliar spray at a rate of 0.5 kg/800 L of water per ha. A test strip of 20 m long and 1 m wide is sprayed with one pass of water to measure delivery rate. To refill the spray tank, 1.7 L of water is required. What is the delivery rate, area sprayed by a full tank, and the amount of pesticide to add to a 12 L tank?
Method
Test area = 20 m X 1 m X 1 run = 20 m2
Delivery Rate = 1.7 L ÷ 20 m2 X 10,000 m2/hectare = 850 L/ha
Area sprayed (by full tank) = 12 L ÷ 850 L/ha = 0.0121 hectare
Amount of pesticide to add to one tank = 0.5 kg/ha X 0.0141 ha = 0.007 kg = 7 mg
Calibrate Granular Applicators Calibration of granular applicators involves the same first three steps as a liquid pesticide sprayer:
1. Set-up 2. Measuring delivery rate 3. Adjusting delivery rate Granular pesticide formulations may be applied by broadcast, band, or in-furrow methods. Granular pesticides used in the floriculture industry are typically broadcast in the field. There are several factors that can cause variation in output including, size of meter openings, roughness and slope of the field, forward speed, and granule flowability.
Set-up Set-up includes inspecting the equipment to make sure it is cleaned, lubricated, and operating properly according to the operator’s manual. Set the equipment to the approximate settings to deliver the recommended application rate. Swath width on tractor mounted spinning disc and oscillating spout spreaders is dependent on the PTO (and engine) RPM. Proper spreading width, overlap of tapered patterns, and swath width will require several test runs to determine settings that will work in your field. Pneumatic spreaders that use air to carry the granules through hoses to individual distributing nozzles will drop the granules directly over the target. On a smaller scale, gravity drop granular pesticide applicators are available with in-furrow applications or with distributing nozzles for broadcast applications.
Measuring Delivery Rate Delivery rate is generally determined by measuring the amount of granules discharged while the
applicator is run over a test area or test length for in-furrow applications. It is usually necessary to capture the output and weigh it.
1. Mark out a measured test strip at least 60 m or 200 ft long.
2. Fill the applicator hopper(s) about half full of granules.
3. Choose a tractor gear and throttle setting. 4. Attach bags or other containers under each
downspout to catch the granules during calibration. For granular equipment that uses air flow for distribution, either use porous mesh bags (e.g. nylons) or shut off the air flow and catch the granules from directly under the metering device.
5. Drive towards the first stake at the correct speed and discharge granules over the test strip only.
6. Repeat until enough granules are discharged to allow for accurate weights to be measured. Record the number of runs.
7. Weigh the granules from each bag or container and record the amounts. Compare the individual weights for uniformity across the swath. If outputs are uniform, then add them together. Otherwise, make adjustments and retest.
Determine the delivery rate (kg/acre) using the following formula:
= amount collected in test (kg) x 43,560 (ft2)test area (ft2)
Adjusting Delivery Rate Increase the meter opening to discharge more granules or decrease the meter opening to discharge less granules and retest.
6 • Pesticide Sprayer Calibration Floriculture Production Guide

Calibration Example – Boom Sprayers Refer to the Calibration Worksheet (Boom Sprayers) in Appendix H when working through the following example.
A grower has set-up a 1,000 L sprayer to spray foliage with a fungicide at the recommended rate of 2.5 kg/ha in 500 L/ha of water. The sprayer boom uses 11 nozzles spaced at 50 cm. After spraying a 100 m test strip with four runs (to discharge enough water from the spray tank to accurately measure it), 105 L of water were required to refill the tank.
What is the sprayer swath width?
From Calibration Worksheet under Set-up - Swath Width
Row crop swath width = 11 nozzles X 50 cm = 550 cm = 5.50 m
What is the delivery rate (litres per hectare) of the sprayer?
Follow Steps 1 - 8, Measuring Delivery Rate – Test Area Method, from the Calibration Worksheet
Test area = 100 m X 5.50 m X 4 runs = 2,200 m2
Follow Step 9, Measuring Delivery Rate - Test Area Method, from the Calibration Worksheet
Delivery rate = 105 L ÷ 2,200 m2 X 10,000 m2/ha = 477 L/ha
The sprayer is operating at a delivery rate of 477 L/ha. The delivery rate is close enough to the desired spray volume of 500 L/ha. Use the delivery rate of 477 L/ha when calculating how much pesticide to add to the tank.
How many hectares will be covered with one full tank of spray?
Follow Calculating How Much Pesticide to Add to the Tank – Full Tank, from the Calibration Worksheet
Area = 1,000 L ÷ 477 L/ha = 2.10 ha
One full tank of spray will cover 2.10 ha.
How much pesticide must be added to a full tank of water?
Follow Calculating How Much Pesticide to Add to the Tank – Full Tank, from the Calibration Worksheet
Pesticide = 2.5 kg/ha X 2.10 ha = 5.25 kg
Add 5.25 kg of pesticide to make one full sprayer tank of spray mixture.
Floriculture Production Guide Pesticide Sprayer Calibration • 7

Appendix A. Metric Conversion Factors (updated October 2008)
Imperial Units Conversion
Factor Metric Units
LENGTH inches 2.5 centimetres (cm) feet 30 centimetres (cm) feet 0.3 metres (m) yards 0.9 metres (m) miles 1.6 kilometres (km)
AREA square inches 6.5 square centimetres
(cm2) square feet 0.09 square metres (m2) acres 0.40 hectares (ha)
VOLUME cubic inches 16 cubic centimetres
(cm3) cubic feet 0.03 cubic metres (m3) cubic yards 0.8 cubic metres (m3) fluid ounces (Imperial)
28 millilitres (mL)
pints 0.57 litres (L) quarts 1.1 litres (L) gallons (Imperial)
4.5 litres (L)
gallons (U.S.) 3.75 litres (L) bushels 0.36 hectolitres (hL)
WEIGHT ounces 28 grams (g) pounds 0.45 kilograms (kg) short tons 0.9 tonnes (t)
TEMPERATURE Fahrenheit (°F - 32)
0.56 Celsius (°C)
POWER horsepower 750 watts (w)
0.75 kilowatts (kw)
Imperial Units
Conversion Factor
Metric Units
oz./acre 70 g/ha
lb./acre 1.12 kg/ha
bu./acre 0.9 hL/ha
tons/acre 2.24 t/ha
fl. oz./acre 70 mL/ha
pt./acre 1.4 L/ha
qt./acre 2.8 L/ha
gal./acre 11.2 L/ha
gal./acre (US) 9.35 L/ha
plants/acre 2.47 plants/ha
oz./gal. 6.2 mL/L
lb./gal. 0.1 kg/L
oz./sq.ft. 305 g/m2
lb./sq.ft 4.9 kg/m2
oz./ft.row 93 g/m row
lb./ft.row 1.5 kg/m row
ft./sec. 0.3 m/s
m.p.h. 1.6 km/h
p.s.i. 6.9 kPa
To convert from imperial to metric, multiply by the conversion factor. For example: 10 inches x 2.5 = 25 centimetres
To convert from metric to imperial, divide by the conversion factor. For example: 25 centimetres ÷ 2.5 = 10 inches
Imperial Conversions:
lb/acre x 0.0033 = oz/yd2
gal/acre x 0.033 = oz/yd2
Floriculture Production Guide Metric Conversion Factors • 1

Useful Measurements 1 Imperial gallon = 4 quarts = 8 pints = 160 fluid ounces = 10 pounds of water = approximately 1.2 U.S. gallons
1 U.S. gallon = 0.8345 or approximately 5/6 Imperial gallon = 8.3 pounds
1 Imperial pint = 20 fluid ounces = 570 mL
1 U.S. pint = 16 fluid ounces = 475 mL
1 pound = 16 ounces
1 tablespoon = 3 teaspoons = 14 mL
2 tablespoons = 1 fluid ounce = 28 mL
1 pound in 100,000 gallons of water = 1 ppm (part per million)
1 mile = 5,280 feet = 1,760 yards
1 yard = 3 feet = 36 inches
1 foot = 12 inches
1 acre = approximately 209 by 209 feet or 43,560 square feet.
1 square yard = 9 square feet
1 square foot = 144 square inches
1 mile per hour = 88 feet per minute
1 cubic yd = 27 cubic feet
1 cubic centimetre = 1 mL = 1 gram (for water)
Parts Per Million 1 per cent = 10,000 parts per million
Imperial: 1 fl. oz./gallon = 6,250 ppm
1 gallon in 1,000,000 gallons of water = 1ppm
1 litre in 1,000,000 litres of water = 1ppm = 1 mL/1,000 L
Metric: 1 mg/litre (water) = 1 ppm
1 g/litre (water) = 1,000 ppm
1 mL/litre = 1,000 ppm
Metric Units for Farm Sprayers Tank Capacities Pressures
Imperial Gallon Litres (L) US Gallon Litres Pounds per Square Inch (PSI)
Kilopascals (kPa)
100 455 100 379 10 70
200 910 200 758 15 100
250 1,138 250 948 20 140
300 1,365 300 1,137 25 175
400 1,820 400 1,516 30 200
500 2,275 500 1,895 35 240
600 2,730 600 2,274 40 275
800 3,640 800 3,032 45 310
1,000 4,550 1,000 3,790 50 345
2 • Metric Conversion Factors Floriculture Production Guide

Appendix B. Preparing a Complete Fertilizer Solution (updated October 2008)
There are many ‘complete’ fertilizer products on the market for use in liquid feeding programs. However, most of the single package dry or liquid concentrate formulations available are unable to supply all the fertilizers required for growth since some of the elements react with one another in concentrated form. Most commonly, calcium will react with the phosphate and sulphate sources to form insoluble precipitates. Magnesium sulphate may also react with other dry fertilizer ingredients. For this reason, calcium and magnesium are often omitted from soluble fertilizer products or they are provided in very small quantities.
For short term potted crops this is seldom a problem. It is not always necessary to feed calcium and magnesium in the fertilizer solution since the dolomitic limestone used to buffer the low pH of most peat based potting soils usually supplies sufficient quantities of calcium and magnesium as the lime slowly dissolves. However, many growers find it useful to supply calcium and magnesium supplements in their feed solutions as well, particularly for hydroponic applications or longer term potted crops. This can be accomplished in several ways:
• If you use a single headed injector system you can occasionally substitute either calcium nitrate or magnesium sulphate (never both together!) for your standard ‘complete’ feed.
• A double or triple headed injector system can be set up to dose calcium and magnesium solutions along with your commercial blend. However, since this will also provide more nitrogen than you may need, you may have to choose a different commercial fertilizer blend to compensate.
• Some companies offer a two or three part fertilizer program that requires separate mixing and concentrate injection to deliver a balanced complete feed that will supply all of the required nutrients when proportioned simultaneously.
• You can make up your own fertilizer solutions from scratch.
There are almost endless variations of liquid fertilizer recipes intended to fit the needs of special
crops, conditions, or crop timing. For certain crop situations, the elemental balance, overall concentration (EC), and the effect on media pH can be adjusted by altering the choice of individual constituents, their overall concentration, and their ratios to one another.
The following is an example of a generic complete feed recipe formulated from base fertilizer compounds that are commonly used in greenhouse liquid feeding programs. If the materials are to be mixed in concentrate form for injection (above 15 x the dilute feeding level), it is necessary to separate the calcium nitrate into one concentrate tank (tank A) and the phosphate and sulphate compounds into another (tank B). A third injection tank (tank C) may be required if you need to administer pH adjusting acids or bases. You may come across other variations of this ABC concentrate tank method, but they will almost always keep the calcium nitrate separate from phosphorus and magnesium sources.
Floriculture Production Guide Preparing a Complete Fertilizer Solution • 1

A Generic Complete Fertilizer Formula Suitable for a Hydroponic or Constant Feeding Program
Recipe for 1000 Litres of Regular Strength (Dilute) Feed Solution**
Ingredients Grams for 1,000 Litres of Feed
Solution
Elements Supplied
Parts Per Million
A Tank: Nitrogen 200
Calcium Nitrate 947 Phosphorus 40
Iron Chelate 15 Potassium 200
Potassium Nitrate (half) 206 Calcium 180
B Tank: Magnesium 35
Magnesium Sulphate 350 Sulphur 46
Monopotassium Phosphate 174 Iron 2
Potassium Nitrate (half) 206 Manganese 0.7
Manganese Chelate 5.8 Boron 0.5
Solubor 2.4 Zinc 0.5
Zinc Chelate 3.5 Copper 0.5
Copper Sulphate 2.0 Molybdenum 0.05
Sodium Molybdate 0.13
**When using an injector system you must divide the final volume desired by the proportioning ratio. For example, using a 100x injection rate, the volume of each fertilizer concentrate tank would be 1,000 litres (final volume) / 100 times dilution. Therefore you would dissolve the fertilizers required for tank A and B into 10 litres of water each.
Rules for Mixing Soluble Fertilizers:
• Buy greenhouse grade fertilizers for maximum solubility and purity.
• Wear a dust mask and gloves to avoid contact with fertilizer concentrates and dusts.
• Dissolve fertilizers individually in hot water before adding to tanks.
• To avoid the formation of insoluble precipitates, do not mix any fertilizers containing calcium (calcium nitrate) with those containing sulphates (magnesium sulphate) or phosphates (monpotassium phosphate) in their concentrated form.
• Partially fill tanks with water and then mix in the dissolved fertilizer concentrates.
• Precipitates do not normally occur when complete solutions are prepared at low concentrations. Therefore, one tank is usually sufficient for mixing all the ingredients if you plan to make up the fertilizer solution at the dilute feeding rate or at a concentration that is below 15 x. Beyond that, injector systems that proportion concentrates at up to 200 x the final dilute feed level will require 2 or 3 tanks (an A and B tank for fertilizers, and a C tank for pH adjustment) to keep reactive fertilizer materials separate and maintain the proper pH balance.
2 • Preparing a Complete Fertilizer Solution Floriculture Production Guide

Liquid Fertilizer Calculations To calculate the amount of fertilizer needed for any given quantity of solution:
• ppm required / elemental content (fraction) x litres required = grams/litres required 1,000
• ppm (parts per million required) - this is the feed concentration (when using blended or ‘complete’ fertilizers, you normally calculate the amount to dissolve based on the ppm nitrogen required).
• elemental content of the fertilizer - the fertilizer label lists the elemental content of each fertilizer constituent as a percentage. For “elemental content” in the calculation, put this percent in the form of a fraction, for example, 20% nitrogen = 20/100 = 0.20. The only exceptions are for P and K. Since they are always expressed as P205 (phosphoric pentoxide) and K20 (potash), they must first be converted to their true elemental content:
P205 divided by 2.291 = P (elemental phosphorus content)
K20 divided by 1.205 = K (elemental potassium content)
• litres required – the amount of finished (dilute) fertilizer solution you plan to make up. If you plan to use a fertilizer concentrate injector you can calculate the injection ratio after you find the dilute rate (this causes the least confusion).
Examples:
• To prepare 500 litres of a 20-20-20 fertilizer at 200 ppm nitrogen concentration:
(200 ppm / 0.20) x 500 = 500 grams per 500 litres 1,000
• To prepare 400 litres (final solution) of calcium nitrate (15.5-0-0-19) at 140 ppm Ca concentration for injection at 200:1:
(140 ppm / 0.19) x 400) = 295 grams per 400 litres (final solution) 1,000
Since you are going to inject this at 200:1, you will dissolve your 295 grams into 2 litres of water (400 litres finished solution / 200):
400 litres / 200 = 2 litres
• You plan to use diammonium phosphate (21-53-0) to supply 30 ppm of phosphorus to a bedding plant feed. Your tank holds 1,000 litres.
First convert P205 to P (53% / 2.291) = 23.1% P
( 30 ppm / 0.231 ) x 1,000 litres = 130 grams per 1,000 litres 1,000
Floriculture Production Guide Preparing a Complete Fertilizer Solution • 3
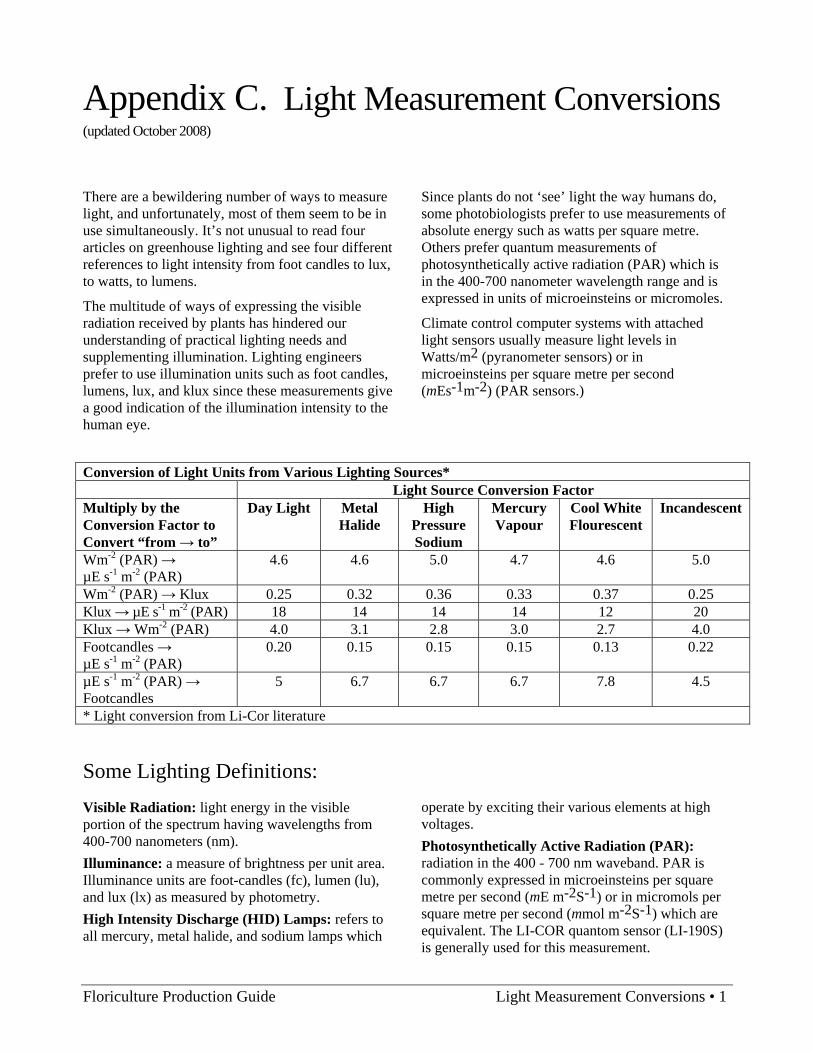
Appendix C. Light Measurement Conversions (updated October 2008)
There are a bewildering number of ways to measure light, and unfortunately, most of them seem to be in use simultaneously. It’s not unusual to read four articles on greenhouse lighting and see four different references to light intensity from foot candles to lux, to watts, to lumens.
The multitude of ways of expressing the visible radiation received by plants has hindered our understanding of practical lighting needs and supplementing illumination. Lighting engineers prefer to use illumination units such as foot candles, lumens, lux, and klux since these measurements give a good indication of the illumination intensity to the human eye.
Since plants do not ‘see’ light the way humans do, some photobiologists prefer to use measurements of absolute energy such as watts per square metre. Others prefer quantum measurements of photosynthetically active radiation (PAR) which is in the 400-700 nanometer wavelength range and is expressed in units of microeinsteins or micromoles.
Climate control computer systems with attached light sensors usually measure light levels in Watts/m2 (pyranometer sensors) or in microeinsteins per square metre per second (mEs-1m-2) (PAR sensors.)
Conversion of Light Units from Various Lighting Sources* Light Source Conversion Factor Multiply by the Conversion Factor to Convert “from → to”
Day Light Metal Halide
High Pressure Sodium
Mercury Vapour
Cool White Flourescent
Incandescent
Wm-2 (PAR) → µE s-1 m-2 (PAR)
4.6 4.6 5.0 4.7 4.6 5.0
Wm-2 (PAR) → Klux 0.25 0.32 0.36 0.33 0.37 0.25 Klux → µE s-1 m-2 (PAR) 18 14 14 14 12 20 Klux → Wm-2 (PAR) 4.0 3.1 2.8 3.0 2.7 4.0 Footcandles → µE s-1 m-2 (PAR)
0.20 0.15 0.15 0.15 0.13 0.22
µE s-1 m-2 (PAR) → Footcandles
5 6.7 6.7 6.7 7.8 4.5
* Light conversion from Li-Cor literature
Some Lighting Definitions: Visible Radiation: light energy in the visible portion of the spectrum having wavelengths from 400-700 nanometers (nm). Illuminance: a measure of brightness per unit area. Illuminance units are foot-candles (fc), lumen (lu), and lux (lx) as measured by photometry. High Intensity Discharge (HID) Lamps: refers to all mercury, metal halide, and sodium lamps which
operate by exciting their various elements at high voltages. Photosynthetically Active Radiation (PAR): radiation in the 400 - 700 nm waveband. PAR is commonly expressed in microeinsteins per square metre per second (mE m-2S-1) or in micromols per square metre per second (mmol m-2S-1) which are equivalent. The LI-COR quantom sensor (LI-190S) is generally used for this measurement.
Floriculture Production Guide Light Measurement Conversions • 1

Other Light Conversions:
Multiply by:
Klux to Lux 0.001
Lux to Klux 1,000
Klux to footcandles 92
Foot candles to Klux 0.011
Lux to lumens m2 1
Lux to lumens ft2 0.0920
2 • Light Measurement Conversions Floriculture Production Guide

Appendix D. Season Daylight Hours (updated October 2008)
Figure D.1 shows the seasonal day length for three locations. It can be used as a reference guide for photoperiod sensitive plants such as poinsetties or pot mums. Daylength can be determined at a glance to determine if extended night or day treatment is necessary.
The figures are derived from the time lapse between sunrise and sunset and assume a flat horizon. For example, nearby mountains will tend to decrease day length. The values are not the exact cut-off between darkness and light since the twilight periods before sunrise and after sunset will tend to increase the effective daylength.
Figure D.1: Seasonal Daylight Hours for Vancouver, Prince George, and Whitehorse
Floriculture Production Guide Seasonal Daylight Hours • 1

PLANT HEALTH LABORATORY SAMPLE SUBMISSION FORM
BC Ministry of Agriculture Date received: Plant Health Laboratory Sent via: Mail □ Courier □ Walk in □ Abbotsford Agriculture Centre
Abbotsford, British Columbia, V3G 2M3 SPECIMEN NO. Telephone: (604) 556-3126, Toll-Free 1-888-221-7141 GROWER NAME PHONE NO. SUBMITTED BY PHONE NO.
FARM NAME FAX NO. COMPANY NAME FAX NO.
ADDRESS ADDRESS
POSTALCODE POSTALCODE
EMAIL EMAIL
SAMPLE COLLECTION SITE Landscape □ Field □ Nursery □ Golf course □ Greenhouse □ Orchard □ Vineyard □ Other □
DIAGNOSTIC REPORT TO BE SENT TO
SAMPLE TYPE Whole Plant □ Branches □ Leaves □ Soil □ Insect ID □ Other □
PLANT VARIETY PLANT AGE COLLECTION DATE DESCRIPTION OF SYMPTOMS (Problem description, possible causes, specific questions etc.).) ATTACH SEPARATE SHEET IF NECESSARY.
HERBICIDES/OTHER CHEMICALS USED IS THE PROBLEM SPREADING?
DISTRIBUTION OF SYMPTOMS
Whole crop □ Random □ Localized □ Edge of field □ Few rows □ High/dry area □ Low/wet area □ Sunny area □ Shady area □ Varietal □ Other □
PRIORITY
□ Urgent □ Routine □ Casual □ Research □ Invasive Alien Species
SEVERITY OF SYMPTOMS □ Slight □ Moderate □ Severe % CROP AFFECTED
WHEN DID SYMPTOMS FIRST APPEAR
DRAINAGE
Good □
Fair □
Poor □
IRRIGATION TYPE
Overhead □
Drip □
Other □
PRODUCTION SYSTEM
CONVENTIONAL □
ORGANIC □
PREVIOUS CROP
OTHER CROP OR WEEDS SHOWING SYMPTOMS
FUTURE CROP
SAMPLE DIAGNOSTIC TURN-AROUND TIME AND FEES
STANDARD DIAGNOSTIC PROCEDURE includes identification of most plant pathogenic fungi, bacteria, insects, nematodes, phytoplasma, viruses, viroids as well as cultural and physiological conditions that are apparent and may be responsible for plant health problems. Cost per submission:*
Urgent – 3 days** = $33.60
Routine – 7 days** = $22.40
Casual – 14 days** = $16.80
Standard Diagnostic Fee includes the HST (12%)
** Diagnostic response time (working days) may vary depending upon the procedures/tests required
for the sample. Suggested time frame is not guaranteed.
*Each plant sample with different symptoms collected from different locations is considered a separate submission. A separate report will be prepared for each submission number. If the problem is widespread (common problem on many hosts or varieties), plants from these groups can be pooled to submit under one submission number. A diagnostic report will be provided on the submission not on individual plants. *Golf course samples from different areas/greens require separate submission numbers. Any questions, call us at the number printed on top of the page.
NOTE: RESULTS ARE VALID ONLY FOR THE SAMPLE SUBMITTED TO THE LAB.
PAYMENT METHOD:
Cash/Cheque/Credit/Debit. Enclose payment with the sample.
Cheques payable to: Minister of Finance and Corporate Relations
Updated May 2, 2012
For out of province
samples, please
contact (604)556-3128
prior to submitting.
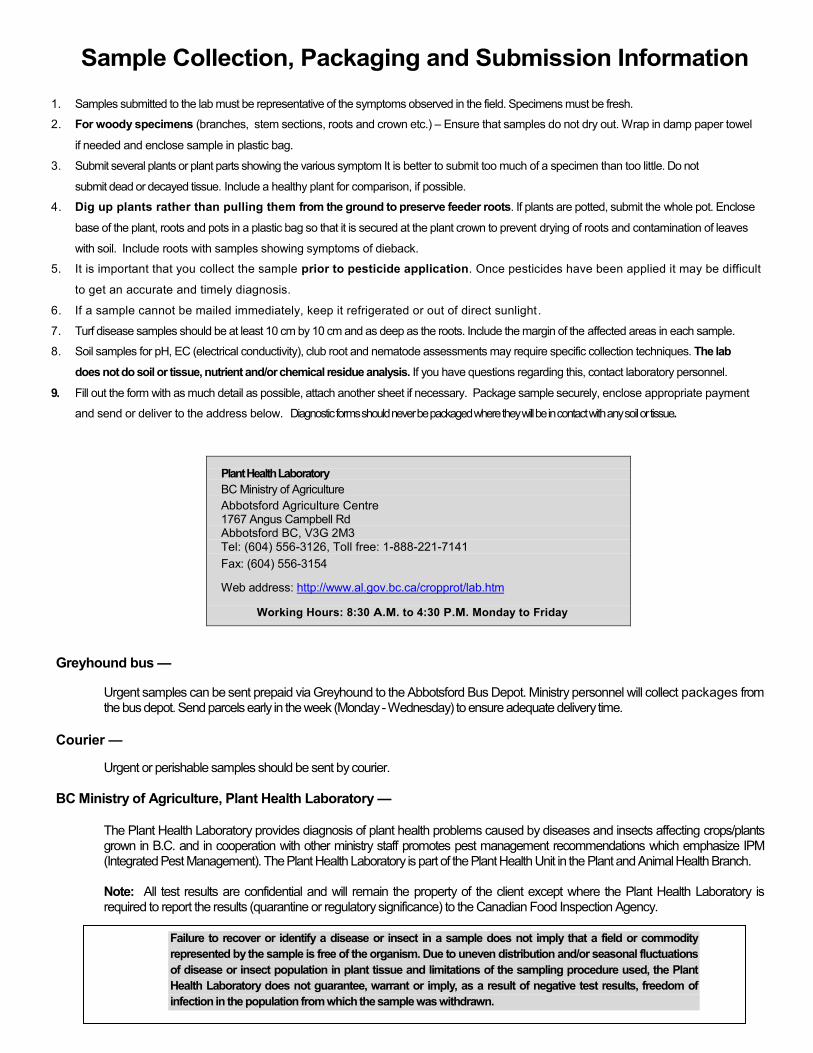
Sample Collection, Packaging and Submission Information
1. Samples submitted to the lab must be representative of the symptoms observed in the field. Specimens must be fresh.
2. For woody specimens (branches, stem sections, roots and crown etc.) – Ensure that samples do not dry out. Wrap in damp paper towel
if needed and enclose sample in plastic bag.
3. Submit several plants or plant parts showing the various symptom It is better to submit too much of a specimen than too little. Do not
submit dead or decayed tissue. Include a healthy plant for comparison, if possible.
4. Dig up plants rather than pulling them from the ground to preserve feeder roots. If plants are potted, submit the whole pot. Enclose
base of the plant, roots and pots in a plastic bag so that it is secured at the plant crown to prevent drying of roots and contamination of leaves
with soil. Include roots with samples showing symptoms of dieback.
5. It is important that you collect the sample prior to pesticide application. Once pesticides have been applied it may be difficult
to get an accurate and timely diagnosis.
6. If a sample cannot be mailed immediately, keep it refrigerated or out of direct sunlight.
7. Turf disease samples should be at least 10 cm by 10 cm and as deep as the roots. Include the margin of the affected areas in each sample.
8. Soil samples for pH, EC (electrical conductivity), club root and nematode assessments may require specific collection techniques. The lab does not do soil or tissue, nutrient and/or chemical residue analysis. If you have questions regarding this, contact laboratory personnel.
9. Fill out the form with as much detail as possible, attach another sheet if necessary. Package sample securely, enclose appropriate payment
and send or deliver to the address below. Diagnostic forms should never be packaged where they will be in contact with any soil or tissue.
Plant Health Laboratory BC Ministry of Agriculture Abbotsford Agriculture Centre 1767 Angus Campbell Rd Abbotsford BC, V3G 2M3 Tel: (604) 556-3126, Toll free: 1-888-221-7141 Fax: (604) 556-3154
Web address: http://www.al.gov.bc.ca/cropprot/lab.htm
Working Hours: 8:30 A.M. to 4:30 P.M. Monday to Friday
Greyhound bus —
Urgent samples can be sent prepaid via Greyhound to the Abbotsford Bus Depot. Ministry personnel will collect packages from the bus depot. Send parcels early in the week (Monday - Wednesday) to ensure adequate delivery time.
Courier —
Urgent or perishable samples should be sent by courier.
BC Ministry of Agriculture, Plant Health Laboratory —
The Plant Health Laboratory provides diagnosis of plant health problems caused by diseases and insects affecting crops/plants grown in B.C. and in cooperation with other ministry staff promotes pest management recommendations which emphasize IPM (Integrated Pest Management). The Plant Health Laboratory is part of the Plant Health Unit in the Plant and Animal Health Branch. Note: All test results are confidential and will remain the property of the client except where the Plant Health Laboratory is required to report the results (quarantine or regulatory significance) to the Canadian Food Inspection Agency. Failure to recover or identify a disease or insect in a sample does not imply that a field or commodity
represented by the sample is free of the organism. Due to uneven distribution and/or seasonal fluctuations of disease or insect population in plant tissue and limitations of the sampling procedure used, the Plant Health Laboratory does not guarantee, warrant or imply, as a result of negative test results, freedom of infection in the population from which the sample was withdrawn.

Appendix F. Publications and Industry Contacts (updated October 2008)
Internet Sites The BC Ministry of Agriculture and Lands launched a new Internet information portal, InfoBasket, in March 2001. InfoBasket was developed to make it easier for clients to access information on the Internet. The site is a one-stop shop for information on production & processing, business management and finance, marketing and trade, regulations and legislation, directories and contacts, and statistics and market data.
The Ministry is acting as an information broker through the site, linking clients to relevant information on Internet sites from government, industry associations, educational/research institutions, and other relevant sites worldwide. All of the material on the site is selected by Ministry staff, which provides an advantage over other public search engines. The new information portal is available at: infobasket.gov.bc.ca/.
There are numerous Internet sites that have catalogues of useful floriculture publications, including:
• Timber Press • University of California, Agriculture and
Natural Resources Catalog • Ball Publishing Bookshelf • Ohio Florists Association (OFA) Bookstore
Factsheets covering a wide range of topics are available online from the Ministry of Agriculture and Lands on the Resource Management Branch and the Investment and Innovation Branch webpages.
Publications Business Management Ball Redbook Vol.1: Greenhouses and Equipment, 2003, Beytes, Ball Publishing, ISBN 1883052343
Ball Redbook Vol. 2: Crop Production, 2003, Hamrick, Ball Publishing, ISBN 1883052351
British Columbia Organic Agricultural Products Certification Regulations, Operation Policies, and Farm Management Standards Manual, 1995, BC Ministry of Agriculture and Food
Direct Marketing, A Handbook for Farm Producers, 1994, BC Ministry of Agriculture and Food and The Canadian Farm Business Management Council
Greenhouse Operation and Management, 6th Edition, 2002, Nelson, Paul V., Prentice Hall, ASIN 0133746879
Floriculture and General Production Ball Perennial Manual, 1996, Nau, Ball Publishing, ISBN 1883052106
BC Agriculture Drainage Manual, 1997, BC Ministry of Agriculture and Food
Breeding Ornamental Plants, 2000, Callaway and Callaway, Timber Press, ISBN 0881924822
CO2 Enrichment in the Greenhouse, 1988, Hicklenton, ISBN 0881921211
Easter Lily and Hybrid Lily Production, 1992, Miller, Timber Press, ISBN 0881922056
EuroAmerican Container Garden Cookbook, 2001, Quellet, Ball Publishing, ISBN 1883052254
Field Grown Cut Flowers, 1997, Stevens, Avator’s World, ISBN 09653065OX
Gerbera Production, 1990, Rogers and Tjia, Timber Press, ISBN 0881921726
Greenhouse Engineering, 1994, Aldrich and Bartok ISBN 0935817573
Floriculture Production Guide Publications and Industry Contacts • 1

Hydrangea Production, 1989, Bailey, Timber Press, ISBN 0881921432
Information on Special Bulbs, International Flower Bulb Centre (IBC), The Netherlands
Pansy Production Handbook, 2000, North Carolina Flower Growers Association
Plant Production in Containers, 1984, Whitcomb, Lacebark Publications, ISBN 096131091X
Plug and Transplant Production, 1997, Styer and Koranski, Ball Publishing, ISBN 1883052149
Postharvest Handling and Storage of Cut Flowers, Florist Greens and Potted Plants, 1990, Nowak and Rudnicki, Timber Press, ISBN 0881921564
Production of Florist Azaleas Vol.6, 1993, Larson, Timber Press, ISBN 0881922307
Production of Potted Roses, 1997, Pemberton, Kelly and Ferare, Timber Press, ISBN 0881922307
Soil Management Handbook for the Okanagan and Similkameen Valleys, 1993, BC Ministry of Agriculture and Food
Soil Management Handbook for the Lower Fraser Valley, 1991, BC Ministry of Agriculture and Food
Specialty Cut Flowers, 2003, Armitage and Laushman, Timber Press, ISBN 1881925799
Tips on Growing Specialty Potted Crops, 1997, Ohio Florists Association
Understanding pH Management for Container Grown Crops, Argo and Fisher, Meister Publications
Wood Preservation on the Farm, 1993, BC Ministry of Agriculture and Food
Irrigation BC Frost Protection Guide, Van der Gulik and Williams, Irrigation Industry Association of BC (IIABC) & BC Ministry of Agriculture, Fisheries & Food (Available from the IIABC).
BC Sprinkler Irrigation Manual, Van der Gulik, Irrigation Industry Association of BC (IIABC) & BC Ministry of Agriculture, Fisheries & Food (Available from the IIABC).
BC Trickle Irrigation Manual, 1999, Van der Gulik, BC Ministry of Agriculture and Food and the Irrigation Industry Association of BC (IIABC) (Available from the IIABC).
Chemigation - Guidelines for British Columbia, 1993, Van der Gulik, BC Ministry of Agriculture, Fisheries & Food and Irrigation Industry Association of BC (IIABC) (Available from the IIABC).
Hydroponics, 1997, Jones, St. Lucie Press, ISBN 1884015328
Water, Media and Nutrition for Greenhouse Crops, 1996, Reed, Ball Publishing, ISBN 1883052122
A wide range of irrigation factsheets are available from the Sustainable Agriculture Management Branch of the BC Ministry of Agriculture and Lands:
Energy Efficient Sprinkler Irrigation System Design
Irrigation Economics, 2000 (580.000-3)
Trickle Irrigation Scheduling Using Evapotranspiration Data, 2001 (577.100-4)
Trickle Irrigation Emitter Selection
Trickle Irrigation Design Information, 1987 (565.230-1)
Efficient Installation of a Centrifugal Pump, 1982 (575.340-1)
Is Your Irrigation Plan Economically Feasible?
Irrigation System Underground Pipe Installation
Irrigation System Maintenance, 1994 (577.200-1)
Irrigation System Cross Connection Control, 1985 (578.130-1)
Irrigation Parameters for Efficient System Operation, 1988 (551.200-2)
Irrigation Flow Measurements, 1976 (501.400-1)
Irrigation Tips to Conserve Water on the Farm, 2001 (500.310-1)
Irrigation Scheduling Techniques, 1997 (577.100-1)
Irrigation Equipment Costs, 1994 (580.200-1)
2 • Publications and Industry Contacts Floriculture Production Guide

Insect and Disease Identification and Management Ball Identification Guide to Greenhouse Pests and Beneficials, 1998, Gill and Sanderson, Ball Publishing, ISBN 1883052173
Ball Pest and Disease Manual, 1997, Powell and Lindequist, Ball Publishing, ISBN 1883052130
Biological Control in Plant Protection, 2003, Heyter, Brown and Cattlin, Timber Press, ISBN 0881925993
Compendium of Chrysanthemum Diseases, 1997, Horst and Nelson, APS Press, ISBN 0890541779
Compendium of Flowering Potted Plant Diseases, 1995, Daughtry, Wick and Peterson, APS Press, ISBN 0890542023
Compendium of Rhododendron and Azalea Diseases, 1986, Coyier and Roane, APS Press, ISBN 0890540756
Compendium of Rose Diseases, 1983, Horst, APS Press, ISBN 0890540527
Diseases of Annuals and Perennials, 1995, Chase, Daughtry, and Simone, Ball Publishing, ISBN 188305208
Diseases of Floral Crops Vol. 1 and Vol. 2, 1985, Strider, Praeger Publishers, Vol. 1: ISBN 0030621941; Vol. 2: ISBN 0030029287
Foliage Plant Diseases, 1997, Chase, APS Press, ISBN 0890541795
Identification of Insects and Related Pests of Horticultural Plants, 1991, Lindquist, Ohio Florists Association (OFA) Bookstore
Knowing and Recognizing: The Biology of Greenhouse Pests and their Natural Enemies, 1992, Malais and Ravensberg, Koppert Biological Systems
Pacific Northwest Plant Disease, Insect and Weed Control Handbooks. Revised annually. Oregon State University Extension Service, Corvallis; Phone: (541) 737-2513, Fax: (541) 737-0817, Email: [email protected], Internet: extension.oregonstate.edu/eesc/
Pests and Diseases of Herbaceous Perennials, 1999, Gill, Clement and Dutky, Ball Publishing, ISBN 1883052203
Phytophthora, Its Biology, Taxonomy, Ecology, and Pathology, 1988, Erwin, Bartnicki-Garcia and Tsao,
American Phytopathological Society, APS Books, ISBN 0890540845
Powdery Mildews (EB 1054), 1991, Maloy, Washington State University Cooperative Extension
Rodent Control on Agricultural Land in British Columbia, 1980, BC Ministry of Agriculture and Food (Available online at: http://www.agf.gov.bc.ca/resmgmt/publist/300series/384200-4.pdf ).
Scale Insects on Ornamentals (EB 1552), 1990, Suomi, Washington State University Cooperative Extension
Standard Practices for Pesticide Applicators – Facility Design for Pesticide Storage, 1990, Workers’ Compensation Board
Integrated Pest Management Integrated Pest Management for Bedding Plants: A Scouting and Pest Management Guide (IPM #407), 2nd Edition, 2000, Casey (editor), Cornell Cooperative Extension, Ithaca, NY
Integrated Pest Management for Floriculture and Nurseries, 2001, Dreistadt, University of California Statewide Integrated Pest Management Project, ISBN 1879906465
Natural Enemies Handbook: The Illustrated Guide to Biological Pest Control (#3386), 1998, University of California Statewide Integrated Pest Management Project, ISBN 1879906414
Weed Management Common and Botanical Names of Weeds in Canada, 1992, Mulligan, Canada Communication Group Publishing, Cat. No. A53-1397/1991
Common Weeds of Canada Field Guide, 1992, Mulligan, NC Press Ltd. (Agriculture Canada), ASIN 0920053599
Field Guide to Noxious and Other Selected Weeds of British Columbia, 2000, Cranston, Ralph and Wikeem, BC Ministry of Agriculture and Food & BC Ministry of Forests
Pacific Northwest Weed Control Handbook, Revised annually. Oregon State University Extension Service, Corvallis
The Grower’s Weed Identification Handbook, 1998, ANR Publications, University of California
Floriculture Production Guide Publications and Industry Contacts • 3

Weeds of the West, 9th Edition, 2000, Whitson, Western Society of Weed Science - University of Wyoming, ISBN 0941570134
Industry Contacts Associations and Societies
Integrated Weed Management – An Introductory Manual, BC Ministry of Agriculture and Lands Association of Specialty Cut Flower Growers
Box 268 Oberlin OH USA Phone: 440 774-2887 Propagation Fax: 440 774-2435
Plant Propagation: Principles and Practices, 6th Edition, 1996, Hartmann (editor), Kester and Davies, Prentice-Hall Canada, Inc., ISBN 0132061031
www.ascfg.orgCanadian Ornamental Plant Foundation 975 McKeown Ave, 5A - # 218 North Bay, Ontario, Canada P1B 9P2 Phone: 1-800-265-1629 Plant Propagation Volumes 1 & 2 (VHS video 20
minutes per volume), 1986, Volume 1: Seed, Specialized Parts, Division, Micropropagation. Volume 2: Cuttings, Layering, Grafting, Budding. American Nurseryman Publishing Co. Suite 2100, 77 W. Washington St. Chicago, IL, 60602-2904
Fax: (705) 495-1449 www.copf.org/indexmain.aspFlowers Canada Growers 7856 Fifth Line South Milton, Ontario L9T 2X8 Phone: 905 875-0707 Plants from Test Tubes: An Introduction to
Micropropagation, 3rd Edition, 1996, Kyte and Kleyn, Timber Press, ISBN 0881923613
Toll-free: 1-800-447-5147 Fax: 905 875-3494 www.flowerscanadagrowers.comInternational Plant Propagator’s Society, Inc. Western Region - http://www.ippswr.org
Irrigation Industry Association of BC (IIABC) 2330 Woodstock Dr., Abbotsford, BC V3G 2E5 Phone: 604 859-8222 www.irrigationbc.comPerennial Plant Association
3383 Schirtzinger Rd. Hilliard, Ohio 43026 Phone: 614-771-8431 www.perennialplant.orgSociety of American Florists
1601 Duke Street Alexandria, VA USA Phone: 703 836-8704 Toll Free 1-800-336-4743 www.safnow.org
United Flower Growers Co-Operative Association 4085 Marine Way Burnaby, BC V5J 5E2 Phone: 604 430-2211 Toll Free: 1-877-430-2211 www.ufgca.com
4 • Publications and Industry Contacts Floriculture Production Guide

BC Ministry of Agriculture and Lands Contacts Contact Ornamental Specialization Location Phone Fax
David Trotter Agroforestry and Christmas Trees Abbotsford1 (604) 556-3148 (604) 556-3099
Siva Sabaratnam Disease Management Abbotsford1 (604) 556-3029 (604) 556-3117
Tracy Hueppelsheuser Insect and Mite Management Abbotsford1 (604) 556-3031 (604) 556-3030
Caroline Bédard Minor Use Pesticide Registration Abbotsford1 (604) 556-3028 (604) 556-3117
Dave Woodske Ornamental Crop Production Abbotsford1 (604) 556-3044 (604) 556-3080
Madeline Waring Pesticides Abbotsford1 (604) 556-3027 (604) 556-3117
Vippen Joshi Plant Diagnostic Laboratory Abbotsford1 (604) 556-3127 (604) 556-3154
Sustainable Agriculture Management Branch Abbotsford1 (604) 556-3100 (604) 556-3099 1Abbotsford Agriculture Centre, 1767 Angus Campbell Rd., Abbotsford, V3G 2M3
Canadian Food Inspection Agency Operations Directorates Burnaby
4321 Still Creek Dr., Suite 400 Burnaby, BC, V5C 6S7 Phone: (604) 666-2891 Fax: (604) 666-8577
Victoria Room 103 – 4475 Viewmont Avenue Victoria, BC V8Z 6L8 Phone: (250) 363-3618 Fax: (250) 363-0144
Kelowna 1905 Kent Road Kelowna, BC V1Y 7S6 Phone: (250) 470-4884 Fax: (250) 470-4899
Western Area Plant Products Program Network Horticulture Specialist Rob Ormrod 1905 Kent Road Kelowna, BC V1Y 7S6 Phone: (250) 470-4884 Fax: (250) 470-4899 Horticulture Specialist Barb Peterson 4321 Still Creek Dr., Suite 400 Burnaby, BC, V5C 6S7 Phone: (604) 666-3826 Fax: (604) 666-6130
Horticulture / Grains & Field Crops Specialist Ken Wong 4321 Still Creek Dr., Suite 400 Burnaby, BC, V5C 6S7 Phone: (604) 666-3826 Fax: (604) 666-6130
Pesticide Applicators & Dispensers Certificates Study kits for certification courses are available online from the Integrated Pest Management Program of the Ministry of Environment.
In Greater Vancouver: Kwantlen Polytechnic University Assessment and Testing Service 12666 - 72nd Ave. Surrey, BC V3W 2M8 Phone: 604 599-3100 Toll Free: 1-877-272-7122 www.kwantlen.ca
Outside Greater Vancouver: Administrator, Pesticide Examinations Government Agent Office 310 Ward Street Nelson, BC V1L 5S4 Phone: 250 354-6585 Toll Free: 1-866-205-2102
University of the Fraser Valley 33844 King Road Abbotsford, BC V2S 7M8 Continuing Studies Program Director Phone: 604 864-4650 www.ucfv.ca
Floriculture Production Guide Publications and Industry Contacts • 5

Soil, Tissue and Water Analysis Services A&L Canada Laboratories 2136 JetStream Rd. London, ON N5V 3P5 Phone: 519 457-2575 Fax: 519 457-2664 Email: [email protected] Website: www.alcanada.comGriffin Laboratories Corp. #2 - 2550 Acland Road Kelowna, BC V1X 7L4 Phone: 250 765-3399 / Toll Free: (800) 661-2339 Fax: 250 765-3556 Grotek Analytical Lab 9850 - 201 Street Langley, BC V1M 4A3 Phone: 604 881-7244 Fax: 604 882-7659 Email: [email protected] Website: www.grotek.net/labBodycote Testing (formerly Norwest Labs) Phone: 1-866-BODYCOT(e) Email: [email protected]: www.bodycotetesting.comPacific Soil Analysis #5 - 11720 Voyageur Way Richmond, BC V6X 3G9 Phone: 604 273-8226 Fax: 604 273-8082 Email:[email protected]
Virus Testing Laboratories Phyto Diagnostics Co. Ltd. 9381 Ardmore Drive North Saanich, BC V8L 5G4 Phone: 250 655-1444 Fax: 250 655-3115 Email: [email protected] Website: www.phytodiagnostics.com/
Plant Diagnostic Laboratory BC Ministry of Agriculture and Lands 1767 Angus Campbell Road Abbotsford, BC V3G 2M3 Phone: 604 556-3126 or 1-800-661-9903 (main office) Fax: 604 556-3154 Website: www.agf.gov.bc.ca/cropprot/lab.htm
6 • Publications and Industry Contacts Floriculture Production Guide

Appendix G. Grower’s Record (updated October 2008)
Obs
erva
tion
Not
es
Re-
Entr
y D
ate/
Tim
e
Rat
e U
sed
Prod
uct
Use
d
Pest
C
ontr
olle
d
Cro
p/G
row
th
Stag
e
Loca
tion
&
Size
App
licat
ion
Dat
e/Ti
me
*photocopy for your record keeping
Floriculture Production Guide Grower’s Record • 1

Appendix H. Calibration Worksheets (updated October 2008)
Floriculture Production Guide Calibration Worksheet for Boom Sprayers • 1

2 • Calibration Worksheet for Boom Sprayers Floriculture Production Guide

Measuring Delivery Rate
Floriculture Production Guide Calibration Worksheet for Boom Sprayers • 3

Adjusting Delivery Rate
4 • Calibration Worksheet for Boom Sprayers Floriculture Production Guide
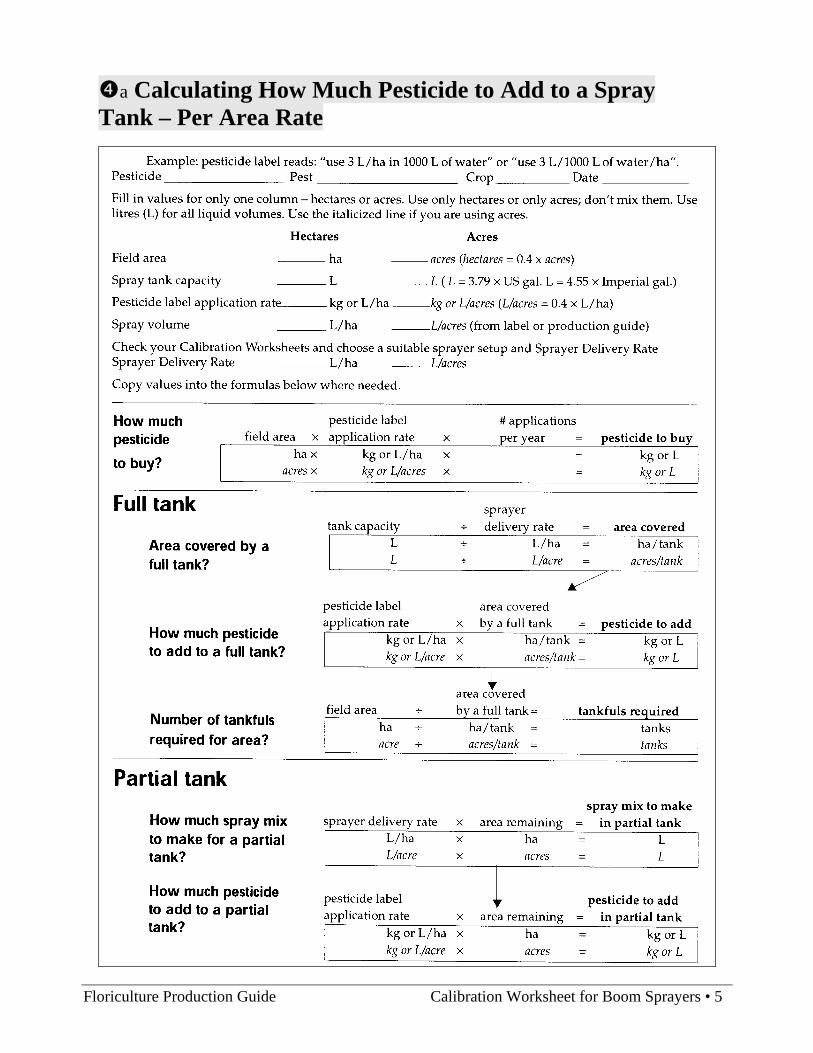
a Calculating How Much Pesticide to Add to a Spray Tank – Per Area Rate
Floriculture Production Guide Calibration Worksheet for Boom Sprayers • 5

b Calculating How Much Pesticide to Add to a Spray Tank – Per Dilution Rate
6 • Calibration Worksheet for Boom Sprayers Floriculture Production Guide

Floriculture Production Guide Calibration Worksheet for Boom Sprayers • 7

Appendix I. Pesticide Terms (updated October 2008) Active ingredient - That portion of a pesticide formulation that is toxic to pests (a.i.).
Acute toxicity - Ability of a substance to cause ill effects that develop soon after exposure; usually used to describe toxicity of a pesticide to humans or animals.
Actual - The active ingredient of a fertilizer; for example 13-16-10 contains 13 kg nitrogen, 16 kg phosphate and 10 kg potash in each 100 kg of fertilizer mix.
Adjuvant - An agent added to a pesticide mixture to help the active ingredient do a better job of wetting, sticking to or penetrating the target pest or weed.
Aeration - The process by which air in soil is replaced by air in the atmosphere; often refers to the time required for a toxic fumigant to leave treated soil before it is safe to seed or transplant.
a.i. - Active ingredient.
Carrier - A material mixed with active ingredients to make a fertilizer or pesticide easier to handle and apply (e.g. finely divided clay or talc; petroleum distillate).
Chelate - When referring to minor element fertilizers, a complex molecule combining a metallic ion (e.g. Fe) with an organic chemical to improve availability and uptake from the soil and to reduce toxicity of foliar application.
Chronic toxicity - Ability of a substance to cause ill effects that don’t appear for some time after exposure; often used to describe long-term health effects on humans or test animals following repeated or prolonged exposure to a pesticide.
Compatibility - Materials are compatible if one does not reduce the effectiveness of the other, if a precipitate does not form, and if crop injury does not result from use of the combination.
Contact pesticide - An insecticide or herbicide that kills the insect or weed by direct contact. A contact insecticide must actually touch the insect or the insect must walk onto a droplet in order to be effective. A contact herbicide must cover as much of the foliage as possible to be effective. To kill deep-
rooted perennial weeds, the herbicide must also be translocated from the leaves into the roots.
Detergent - A cleaning agent. Because of their surface active properties, detergents have a variety of other uses. (See “Surfactant.”)
D - In pesticide terms, a dust formulation.
DF - A dry flowable formulation of a pesticide in which water dispersible granules are used instead of wettable powders which are dusty and more hazardous for the person filling the spray tank; sometimes referred to as WDG.
DG - A dry granular formulation of a pesticide; usually applied in the planting furrow, in the case of insecticides or broadcast on the soil surface, in the case of herbicides.
Drench - A drench is a spray applied in a high volume of water in order to penetrate dense foliage or soak the soil with pesticide in an attempt to control soil-inhabiting insects or pathogens. A drench requires at least 1000 L/ha of water as an overall spray of a seed-bed, for example, or it may be applied as a directed spray at the base of row crops after transplanting.
Dust - A pesticide formulation in which a low concentration of active ingredient is attached to finely ground dry particles which are applied without further dilution.
E - A liquid pesticide formulation in which the active ingredient will form an emulsion when mixed with water; also referred to as EC.
EC – Is an abbreviation commonly used for an emulsifiable concentrate pesticide formulation and the electrical conductivity of a solution.
Electrical conductivity (EC) - The ability of a salt solution to conduct an electrical current. In crop production, provides a quantitative measure of the salt concentration in a solution. It provides only an approximate measure of the total quantity of nutrients in a solution, since not all nutrients are detected (e.g. urea). It is also used to describe the suitability of water for irrigation purposes.
Floriculture Production Guide Pesticide Terms • 1

Emulsifiable concentrate (EC) - A liquid pesticide formulation consisting of active ingredient, solvent and an emulsifier that can mix with water to form an emulsion (e.g. Diazinon 50EC).
F - Abbreviation for a flowable formulation of pesticide.
Flowable - A pesticide formulation in which finely ground particles are suspended in a liquid carrier; developed to replace wettable powders to reduce operator hazard during filling of the sprayer
Formulation - In pesticide terms, the form in which the pesticide is packaged, sold and used. It consists of a mixture of active ingredient, carrier and adjuvants.
Fumigation - The use of pesticides in gaseous form to destroy insects, pathogens, nematodes and weeds.
G - Granular formulation of a pesticide.
Granular pesticide - Relatively coarse particles with a low concentration of active ingredient. They are applied dry with a spreader, seeder or special applicator.
Instar - Used to identify the progressive stages in the life cycle of an insect which moults repeatedly in order to grow.
IPM - Integrated pest management; management of pests using a combination of cultural, biological, and chemical methods with due consideration for the environment.
L or LC - A liquid formulation of a pesticide; similar to E and EC.
LD50 – Is a measurement of the acute toxicity of a pesticide. It is expressed as the milligrams of chemical per kilogram of body weight of the test animals that is required to kill 50% of the test population. The lower the LD50, the more acutely toxic the pesticide. This does not, however, indicate the long term (chronic) health effects of the pesticide.
Nematicide - A pesticide used to control nematodes; may be applied as fumigants, granules, foliar sprays or soil drenches.
Pesticide - Any kind of material that is used to kill, control and manage pests including insecticides, fungicides, herbicides, miticides, nematicides, and rodenticides. Plant growth regulators are also
considered to be pesticides for the purposes of regulation and control.
Pesticide residue - A deposit that remains in, or on, a product following application of a pesticide; usually taken to mean the amount that is still present when the crop is harvested and/or marketed.
pH - A measure of acidity or alkalinity. It measures the activity of H+ ions in solution. (Expressed as a negative logarithmic scale, e.g. pH = 6 has ten times more H+ ions than pH = 7.) Soils in which the soil solution is above pH 7 are said to be alkaline, while those below pH 7 are said to be acidic. Most plants grow best between pH 5.5 and 6.5. The pH of water affects pesticide efficacy.
Phytotoxicity - Damage to a crop plant following the application of pesticides. Chances of phytotoxicity can be reduced by reading the warnings on the label, carefully measuring the correct quantities, and observing weather conditions prior to application.
PPM - A measure of concentration expressed as parts per million; often used to describe the concentration of foliar nutrient sprays, disinfectant solutions, solubility of soil-applied herbicides, and pesticide residues. 1ppm = 1 gram in 1000 kilograms or 1 mL in 1000 litres.
Residue tolerance - The maximum amount of a pesticidal residue that may lawfully be present in, or on, a food product offered for sale. It is expressed in parts per million.
SC - A sprayable concentrate pesticide formulation.
SG - A soluble granule pesticide formulation.
SL - A soluble liquid pesticide formulation.
SP - A soluble powder pesticide formulation.
Spray - A pesticide formulation or nutrient dissolved or suspended in a liquid, usually water, which evaporates after application to leave a uniform deposit of pesticide or nutrients on the plant or soil surface.
Spreader sticker - An adjuvant that assists in the even distribution of the spray solution over the target and also helps it to adhere to the treated surface.
Surfactant - A compound which reduces the surface tension of a liquid (e.g. emulsifiers, soaps, wetting agents, detergents, and spreader stickers)
2 • Pesticide Terms Floriculture Production Guide
allowing close contact with the sprayed surface which might otherwise repel the droplets of liquid.
Systemic pesticide - A pesticide which is absorbed into and flows through the vascular system of a plant or animal. Examples are Cygon insecticide and Roundup herbicide.
Toxicity - The degree to which a substance is harmful or poisonous to a living organism. In terms of pesticides, mammalian toxicity refers to the potential for poisoning of humans and higher animals; phytotoxicity refers to the potential for injury to plants.
W or WP - A wettable powder formulation of a pesticide.
Water-soluble packet - A pesticide formulation in which a premeasured quantity of a wettable powder is sealed in a packet that will dissolve in water. The packets are intended to be added directly to the spray tank, thereby eliminating worker exposure to the concentrated pesticide at mixing. Exposure to moisture or excessive handling can rupture the packets.
Wettable powder - Dry formulation which is normally mixed with water to form a sprayable suspension. Due to the danger of inhalation and spilling the powder while filling the spray tank, most toxic wettable powders are now sold in small soluble bags which can be dropped in the spray tank without being opened.
Wetting agent - An adjuvant that helps solutions or suspensions make better contact with surfaces to be treated; similar to a surfactant.
WSP or WSB - A pesticide that is sealed in a water-soluble packet or bag.
Floriculture Production Guide Pesticide Terms • 3

Floriculture Production Guide Ministry of Agriculture Office Locations • 1
Appendix J. Ministry of Agriculture Office Locations (updated June 2012)
Abbotsford Abbotsford Agriculture Centre 1767 Angus Campbell Road V3G 2M3 Phone: (604) 556-3001, 1-888-221-7141 Fax: (604) 556-3030
Courtenay 2500 Cliffe Avenue V9N 5M6 Phone: (250) 897-7540 Fax: (250) 334-1410
Cranbrook 205 Industrial Road G (MoE Office) V1C 7G5 Phone: (250) 489- 8540, 1-888-332-3352 Fax: (250) 489-8506
Creston 1243 Northwest Boulevard V0B 1G6 Phone: (250) 402-6429 Fax: (250) 402-6497
Dawson Creek 1201 - 103rd Avenue V1G 4J2 Phone: (250) 784-2601, 1-877-772-2200 Fax: (250) 784-2299
Duncan Service BC Building
5785 Duncan Street V9L 5G2 Phone: (250) 746-1210 Fax: (250) 746-1292
Fort St. John 10043 100th St V1J 3Y5
Phone: (250) 787-3240 Fax: (250) 787-3299
Kamloops 441 Columbia Street V2C 2T3 Phone: (250) 828-4510, 1-888-823-3355 Fax: (250) 828-4154 Kelowna Room 200 - 1690 Powick Rd. V1X 7G5 Phone: (250) 861-7211, 1-888-332-3352 Fax: (250) 861-7490 Oliver #201 – 583 Fairview Road V0H 1T0 Phone: (250) 498-5250, 1-888-812-8811 Fax: (250) 498-4952
Prince George 2000 South Ospika Blvd V2N 4W5 Toll Free: 1-800-334-3011 Phone: (250) 614-7400 Fax: (250) 614-7435
Vernon 2501 – 14th Avenue V1T 8Z1 Phone: (250) 260-4610, 1-877-702-5585 Fax: (250) 460-4602
Victoria PO Box 9120 Stn Prov Govt V8W 9B4
Phone: (250) 387-5121 Williams Lake 300 - 640 Borland Street V2G 1R8 Phone: (250) 398-4500, 1-800-474-6133 Fax: (250) 398-4688
ENQUIRY BC - To reach any of the above offices Toll Free, calls may be routed through: Enquiry BC – 1-800-663-7867 Victoria - (250) 387-6121
Agricultural Land Commission - 133 - 4940 Canada Way Phone: (604) 660-7000
Agriculture Risk Management – Production Insurance (formerly Crop Insurance): http://www.agf.gov.bc.ca/production_insurance/
Provincial Emergency Program – To report an emergency, Phone: 1-800-663-3456
Recycling Hot Line – Phone: (604) 732-9253 (within Vancouver) or 1-800-667-4321 (province wide)
Crown Publications – For copies of legislation and other government publications: Phone: (250) 387-6409, 1-800-663-6105
BC Poison Control Centre – 1-800-567-8911

Index (updated January 2009)
Page number format: Chapter or Appendix . page # e.g. 4.3-5 refers to pages 3 to 5 in Chapter 4; B.3 refers to page 3 in Appendix B
A A-Rest 4.3, 10.11 abamectin 10.7 acephate 10.8 acequinocyl 10.8 acetamiprid 10.8 acetic acid 8.4, 10.5 Acrobat 10.4 Active ingredient I.1 Administrative Monetary Penalties
Act (AMPS) 11.1 Adjuvants 10.1-2, I.1 Agrobacterium tumefaciens 5.6 Algae 1.2 Alien species 9.1-3 Aliette 10.4 alkalinity 2.6, 3.5 Amblyseius 1.10-11, 1.15-16, 7.11,
7.13 Amitrol 8.4, 10.6 ancymidol 4.3, 10.11 Aphelenchoides 6.2, 6.5 Aphelinus 1.8 Aphidius colemani 1.7-8, 1.15-16 Aphidoletes aphidimyza 1.7-8, 1.15-16 Aphids 1.7-8, 7.1-2 Aphytis melinus 1.10 Apollo 10.8 Aster yellows 7.4 Atheta 1.9-10, 7.4 Avid 10.7
B B-Nine 4.3, 10.12 Bacillus subtilis 10.3 Bacillus thuringiensis 1.8, 7.3-4, 10.8 Bacterial blight 5.17-19 Banner 10.5 Basamid 1.14, 10.2 BC Environmental Farm Plan
Program 2.10, 2.16 bifenazate 10.8 Biological control agents 1.7-12 Biosolids 2.14 Bonanza 8.4, 10.7 Bonzi 4.4, 10.12 Boron 2.10, 3.5 Botrytis 5.9-10
Bulb mite 7.7 Bulb nematodes 6.2, 6.5 Bulb flies 7.2 Bulb scale mite 7.7 Bulb & corm rot 5.4 Bulb viruses 5.10
C Calcium 2.10 captan 10.3 carbaryl 10.8 Carbon dioxide 3.10 Carbon monoxide 3.16 Casoron 8.5, 10.6 Caterpillar 7.3 Chemigation 2.6 Chloride 3.5 chlormequat chloride 4.5, 10.11 chlorothalonil 10.3 chlorpyrifos 10.8 chlorthal 8.5 Chrysanthemum white rust 5.12,
9.2 Chrysopa carnea 1.9-10, 1.15-16 Citation 10.8 clofentazine 10.8 Code Agricultural Practices for
Waste Management 2.12 Compass 10.5 Compost 2.13 Confirm 10.11 Copper 10.3 Cover crops 2.3, 6.3-4 Crown gall 5.6 Cryptolaemus montrouzieri 1.9 Cutworms 7.3 Cycocel 4.5, 10.11 Cycocel Extra 4.6, 10.11 Cygon 10.9 cyromazine 10.8
D Dacnusa sibirica 1.9 Daconil 2787 10.3 Dacthal 8.5 daminozide 4.3, 10.12 Damping-Off 5.3 Dazide 4.3, 10.12
dazomet 10.2 Decis 10.9 Decree 10.4 Deer 7.20 deltamethrin 10.9 Devrinol 8.5, 10.6 diazinon 10.9 dichlobenil 8.5, 10.6 dichloropropene 10.2 dicofol 10.9 Dicyphus 1.8, 1.12 DIF / DIP 3.1 diflubenzuron 10.9 Diglyphus isaea 1.9, 1.12 dimethoate 10.9 dimethomorph 10.4 Dimilin 10.9 Dipel 10.8 diquat 8.4, 10.6 Disease diagnostic key 5.1 Disinfectants 11.12 Distance 10.10 Ditylenchus 6.2, 6.5 dodemorph-acetate 10.4 Downy mildew 5.10-11 Dual Magnum 8.5 Dursban 10.8 Dylox 10.11 DYNO-Mite 10.10
E Eagle 10.4 EC 3.4, 3.8-10 EcoClear 8.4, 10.5 Electrical conductivity 3.4, 3.8-10 Emmerus tuberculatus 7.2 Encarsia formosa 1.11-12, 1.15-16,
7.13 Endeavor 10.10 endosulfan 10.9 Enstar 10.10 Environmental Farm Plan 2.10, 2.16 Environmental Management Act
2.12, 2.14 Eretmocerus 1.15-16, 7.13 Erwinia 5.16 Ethylene 3.16
Floriculture Production Guide Index • 1

etridiazole 10.4 Exotic pests 9.1-3
F Feltiella 1.10 fenbutatin oxide 10.9 fenhexamid 10.4 Fertigation 2.6 Fertilizers 2.7-11
application 2.7 liquid fertilizer calculations B.1-3
Floramite 10.8 fluazifop-p-butyl 10.6 Fluoride 3.5, 3.16 Forbid 10.11 formaldehyde 10.4 Formalin 10.4 fosetyl-aluminum 10.4 Four lined plant bugs 7.9 Fumigants 10.2, 11.12 Fungicides 11.12-13 Fungus gnats 1.8-9, 7.3-4 Fusarium 5.4
G Geranium bacterial wilt 5.16 Geranium rust 5.12 Gladiolus dry rot 5.4 Gladiolus scab 5.4 Gliocladium catenulatum 10.4 Globodera rostochiensis 9.2 glyphosate 8.4, 10.6 Golden nematode 9.2 Gramoxone 8.4, 10.7 Grey mold 5.9 Guttation 3.10
H Hantavirus 7.21 Height control
DIF / DIP 3.1 PGRs 4.1-8
Herbicides 8.3-5, 11.13 preemergent 8.4-5 postemergent 8.4
Heterorhabditis 1.11, 1.15-16, 7.12, 10.9
Hippodamia 1.10, 1.15-16 Hot-water treatment of bulbs 6.3-5 Humidification 3.11 Humidity 3.10-12 Hyacinth yellow disease 5.4 Hypoaspis 1.8, 1.11, 1.15-16, 7.4, 7.7
I imidacloprid 10.10 Impatiens necrotic spot virus 5.13-16 Insecticidal soap 10.10 Insecticides 7.15-20, 11.14-15 INSV 5.13-16 Integrated Pest Management Act
11.1 Intercept 10.10 Invasive Species 9.1-3 IPM 1.1-16
biological control 1.5-13 monitoring 1.4-5 sanitation 1.1 scouting 1.4 soil pasteurization 1.13
iprodione 10.4 Irrigation 2.5
K Kanemite 10.8 Kelthane 10.9 Kerb 8.4 kinoprene 10.10 KleenGrow 10.2
L Lagon 10.9 LD50 10.1 Leaf spots 5.9-16 Leafhoppers 7.4-5 Leafminers 1.9, 7.5-6 Leafrollers 7.3 Lepidoptera 7.3 Leptomastix dactyopii 1.9 Light 3.3 Light conversions C.1-2 Loopers 7.3 Lygus or tarnished plant bugs 7.9
M Maconellicoccus hirsutus 9.2 Maestro 10.3 Magnesium 2.10 malathion 10.10 mancozeb 10.4 Manure 2.12-15 Manzate 10.4 Mealybugs 1.9, 7.6 Media testing 3.8-10 Meloidogyne 6.1, 6.3 Meltatox 10.4 Merit 10.10 Merodon equestris 7.2 metalaxyl 10.4
metam-sodium 10.3 Metaphycus helvolus 1.10 Metarhizium 1.11 metolachlor 8.5 Mice 7.20-22 Micronutrients 2.10 Migratory Birds Regulations 11.1 MilStop 10.5 Mites 1.9-10, 7.6-9 Miticides 11.15 Moles 7.22-23 Molluscicides 7.24, 10.12-13 myclobutanil 10.4 MycoStop 10.5
N napropamide 8.5, 10.6 Nemasys 1.8-9, 10.11 Nematodes 6.1-5 Neoseiulus fallacis 1.10 Nitrogen 2.7, 2.9 No-Damp 10.5 Nova 40W 10.4 Nutrient deficiency 3.12-14 Nutrient toxicity 3.12-14
O Oedema 3.10 Opius pallipes 1.9 Orius 1.8, 1.10-11, 1.15-16, 7.11 Orthene 10.8 oxine benzoate 10.5
P paclobutrazol 4.4, 10.12 paraquat 8.4, 10.7 Pennicillium 5.5 Penncozeb 10.4 permethrin 10.10 Pest Control Products (PCP) Act 11.1 Pesticides
application 11.7 buffer zones 11.8 cleaning protective clothing 11.5 container disposal 11.7 disposal of unwanted pesticides
11.7 environmental protection 11.8-9 first aid 11.3-4 formulations I.1-3 mixing and loading pesticides
11.6, 11.10 phytotoxicity 3.16 protective clothing & equipment
11.4-5
2 • Index Floriculture Production Guide

Pesticides (cont’d) re-entry intervals 11.8 regulations 11.1-2 resistance management 5.2-3 spills 11.10 sprayers 12.1-6 sprayer calibration 13.1-7, H.1-7 storing pesticides 11.6 transporting pesticides 11.6 toxicity 11.2-3 LD50 11.2, I.2
pH adjusting soil pH 2.10-11, 3.5 alkalinity 3.5 lime 2.11 testing 3.8-10 water 3.5
Phosphorus 2.8-9 Phyton 27 10.3 Phytophthora 5.7, 5.13 Phytoseiulus persimilis 1.9-10,
1.15-16, 7.9 Piccolo 4.4, 10.12 Pink hibiscus mealybug 9.2 Plant bugs 7.9 Plant Diagnostic Lab E.1-2 Plant Protection Act (BC) 9.3 Plant growth regulators 4.1-8,
10.11, 11.15-16 Potassium 2.8-9 Potassium bicarbonate 10.5 Pounce 10.10 Powdery mildew 5.11-12 Pratylenchus 6.1, 6.3 Prestop 10.4 Princep Nine-T 8.5 propiconazole 10.5 Pseudomonas 5.4, 5.9 Puccinia horiana 5.12, 9.2 pymetrozine 10.10 pyridaben 10.10 pyriproxyfen 10.10 Pythium 5.7
Q quaternary ammonium 10.2 quintozene 10.5
R Rabbits 7.23-24 Rats 7.21-22 Ralstonia solanacearum 5.16-17,
9.1-2 Re-entry restrictions 11.7-8 Reglone 8.4, 10.6 Rhapsody 10.3
Rhizoctonia 5.5, 5.7 Rival 8.4 Rodenticides 7.22, 10.12-13, 11.16 Root rot 5.5-8 RootShield 10.5 Round-up 8.4, 10.6 Rovral 10.4 Rusts 5.12
S Salinity 3.4 Sanitation 1.1-3, 6.4 SAR 2.6-7 Scales 1.10, 7.9-10 Sclerotinia 5.5, 5.8 Secondary nutrients 2.10 Senator 10.5 Sevin 10.8 Shore flies 1.10, 7.3-4 Shuttle 10.8 Simadex/Simanex 8.5, 10.7 simazine 8.5, 10.7 Slugs 7.24 Snails 7.24 soap 10.10 Sodium 3.5 Sodium absorption ratio 2.6-7 Soil
drainage 2.4 erosion 2.3 fumigation 1.13-14 management 2.1-4 organic matter 2.2 pasteurization 1.13, 6.3 pH 2.10-11 sampling 2.7 solarization 6.3 testing 2.7 tillage 2.2
Soilless media 3.6-10 Sowbugs 7.10 Spider mites 1.9-10, 7.6-9 Spikkels 6.2 spinosad 10.11 spiromesifen 10.11 Spittlebugs 7.10 Sprayers 12.1-6 Steinernema feltiae 1.8, 1.11, 1.15-
16, 7.11-12, 10.11 Steinernema kraussei 1.11, 1.15-16,
7.11-12, 10.11 Streptomyces griseoviridis 10.5 Subdue 10.4 Success 10.11 Sudden Oak Death 5.13 sulphur 2.10, 10.5 Sumagic 4.7, 10.12
Surfactants 10.1-2
T tebufenozide 10.11 Telone 1.14, 10.2-3 Temperature 3.1-2 The Food and Drugs Act 11.1 Thielaviopsis 5.8 Thiodan 10.9 Thionex 10.9 thiophanate-methyl 10.5 Thrips 1.10-11, 7.10-11 Tissue testing 3.14 Tomato spotted wilt virus (TSWV)
5.13-16 Transportation of Dangerous Goods
Act 11.1 Treflan 10.7 trichlorfon 10.11 Trichoderma harzianum 10.5 trifloxystrobin 10.5 trifluralin 8.4, 10.7 Tristar 10.8 Truban 10.4
U uniconazole 4.7, 10.12
V Vapam 1.14, 10.3 VectoBac 1.8 Vendex 10.9 Venture L 8.4, 10.6 Verticillium 5.16 Virkon 1.2 Voles 7.20-21
W Water quality 2.6, 3.4-6 Water management 2.4-7 Weed control 8.1-5 Weed Control Act (BC) 9.3 Weevils 1.11, 7.11-12 White rot / mould 5.5, 5.8 Whiteflies 1.11-12, 7.12-13 Wilt Diseases 5.16-19 Wireworms 7.13-14 WorkSafeBC 11.2
X Xanthomonas 5.9, 5.17-19 Xanthomonas campestris pv.
pelargonii 5.17-19
Floriculture Production Guide Index • 3