flare getting started guide -...
TRANSCRIPT

USER GUIDE
MADCAP FLARE 2018 r2
Getting Started

Copyright 2018 MadCap Software. All rights reserved.
Information in this document is subject to change without notice. The software described in this document is fur-nished under a license agreement or nondisclosure agreement. The software may be used or copied only in accord-ance with the terms of those agreements. No part of this publication may be reproduced, stored in a retrieval system,or transmitted in any form or any means electronic or mechanical, including photocopying and recording for any pur-pose other than the purchaser's personal use without the written permission of MadCap Software.
MadCap Software7777 Fay AvenueLa Jolla, California 92037858-320-0387www.madcapsoftware.com
THIS PDF WAS CREATED USING MADCAP FLARE.

CONTENTS
CHAPTER 1
Introduction 6Basic Steps 7Getting Started Video and Tutorial 8Planning Your Project 9Key Concepts and Features 10Architecture 12Getting Additional Help 13
CHAPTER 2
Creating a New Project 14
CHAPTER 3
Adding Topics and Elements 16Topics 18Cross-References (and Other Links) 18Equations 18Footnotes 19Glossaries 19Images 19Indexes 19Master Pages 20
CONTENTS iii

Multimedia 20Page Layouts 20QR Codes 21Responsive Content 21Slideshows 21Snippets 22Tables 22Tables of Contents 22Text Boxes 23Variables 23
CHAPTER 4
Making It Look Good 24Styles and Local Formatting 25Common Ways to Make Your Output Look Good 26
CHAPTER 5
Developing Targets 31Targets 32Online Versus Print-based Output 33HTML5—Recommended Online Output Type 34PDF and Word—Recommended Print-based OutputTypes 36Other Output Types 37Legacy Output Options 38Output Type Comparison Tables 38Conditions 39
CHAPTER 6
Building and Publishing Output 41
CONTENTS iv
Ways to Build and Publish Targets 42Interface or Command Line 43Where Output Files are Stored 43Publishing Features 44
APPENDIX
PDFs 47
CONTENTS v
CHAPTER 1
IntroductionWelcome to MadCap Flare—the first native XML content authoring application, which offers single-source authoring in an environment that does not require you to know any coding. From a singleFlare project you can produce output in many different formats, including documentation for theweb, desktop, print, and mobile.
This chapter discusses the following:
Basic Steps 7
Getting Started Video and Tutorial 8
Planning Your Project 9
Key Concepts and Features 10
Architecture 12
Getting Additional Help 13
CHAPTER 1 6

Basic StepsWhen you break down the authoring process in Flare, you will discover that it can be quite simple.Following are the basic steps that you need to follow for creating and developing a project in Flare.
1. Start Projects Create a project from scratch, or start a project by importing existing contentfrom a variety of sources. See "Creating a New Project" on page 14.
2. Add Elements Add content and elements to your project, such as topics, text, a table of con-tents, cross-references, navigation, page layouts, and all of the other things necessary to helpyour end users. See "Adding Topics and Elements" on page 16.
3. Make It Look Good Through the use of elements such as stylesheets, skins, and masterpages, you can develop a look and feel for your output. See "Making It Look Good" on page 24.
4. Develop Targets Decide the type(s) of output formats that you want to generate and designtargets accordingly to meet your needs. See "Developing Targets" on page 31.
5. Build and Distribute Output Generate output from a target, then make the files accessible toyour end users. See "Building and Publishing Output" on page 41.
CHAPTER 1 7

Getting Started Video and TutorialIn addition to this PDF guide, we also recommend the Getting Started Video and Getting StartedTutorial for new Flare users. Although there is certainly common information in all three of theseresources, each one is also unique.
The Getting Started Video provides a visual demonstration of how to create a new project, intro-duces basic information about Flare, and points you to additional videos and resources to furtherdevelop the project.
The Getting Started Tutorial is a PDF file that you can use alongside Flare to create, develop, andgenerate output from an actual project.
You can access the video and tutorial from the Start Page in Flare.
CHAPTER 1 8
Planning Your ProjectBefore you create a project in Flare, you should first take some time to decide exactly what youwant to accomplish with your output. Here are some of the questions you might consider:
n What kinds of output do you want to create?
n Do you need online output, print output, or both?
n Howmany different versions of online and print output do you need?
n Does the output need to be up on a server or placed locally on the end users' computers?
n How will you name your files to keep things consistent and organized?
n What kinds of reusable content will you need?
n How do you want your output to look? Will someone provide you with a design, or will you useone of Flare's project templates, swapping out your company logo and colors?
n Will one author be working on the project or will multiple people be involved?
n Do you need to use a source control system? Which one?
n Do you need to merge multiple project outputs together?
n Would it be useful to keep a few shared files (such as a stylesheet and some images) in a par-ent project and then synchronize them with child projects (Global Project Linking)?
You might not think of all of the questions you need to ask beforehand. There might be some issuesthat come to mind after you're already well into your project. And you certainly won't know how toaccomplish everything you want to right away. As is the case with any powerful and flexible soft-ware application, you will become more familiar and comfortable with it over time and the more youuse it. So don't expect to be an expert immediately. But the more planning and preparation you doahead of time, the smoother your journey in Flare will be.
Also, it's a good idea to create some test projects and play with Flare's different features. Once youfeel more comfortable with the basic steps and features in Flare, as well as the workspace, goahead and get started with your own project.
CHAPTER 1 9
Key Concepts and FeaturesThere are seemingly an endless number of things you can do in Flare. But you don't have to do all ofthem, or even most of them. Instead, you should begin by learning about the most important con-cepts and features. These ideas all tend to revolve around the idea of content reuse (or single-sourcing), which means that you can take the same content, reuse it, and produce multiple outputsfrom it.
Here are some of the most important concepts and features in Flare:
n Building Blocks—Content Reuse In other authoring tools, you’re probably used to everythingbeing a part of a single file—the content, the table of contents, the glossary, the styles, and soon. It’s not like that in Flare. Instead, most of the pieces are separate, sort of like buildingblocks. This is one of the things that helps to make Flare so powerful and give you so muchflexibility in how to create your output.
n Topic-based Authoring Topics are where you type your text and add other content. If youcome from the world of print publishing, you’ll probably be tempted at first to create reallylong topics—such as one topic for each chapter or even one topic for an entire PDF manual.And while Flare lets you create very long topics and there may be cases where you need to dothat, for the most part, you want your topics to be smaller, digestible chunks of content thatyou can reuse for different outputs.
n Conditions A condition is something that you can apply to different areas of your content sothat some sections show up in some of your outputs but not in others. This is where Flare getsreally powerful. For example, maybe you need to produce both online and print-based output.Much of the content you create is going to be the same for both outputs, but some of it isgoing to be written only for online output, and some only for print-based output. So you cancreate condition tags for each and use them to separate the content when you build your out-put.
n Styles You can take advantage of cascading stylesheets (CSS files) and the rules aroundthem to control the look of your output in one place. This helps to keep the content separatefrom its presentation, which is very important when it comes to single-sourcing. CSS isn’t aFlare idea. It’s an international standard for formatting web content, and it was developed bya group called the World Wide Web Consortium (or W3C). You can learn all about the W3C atw3.org.
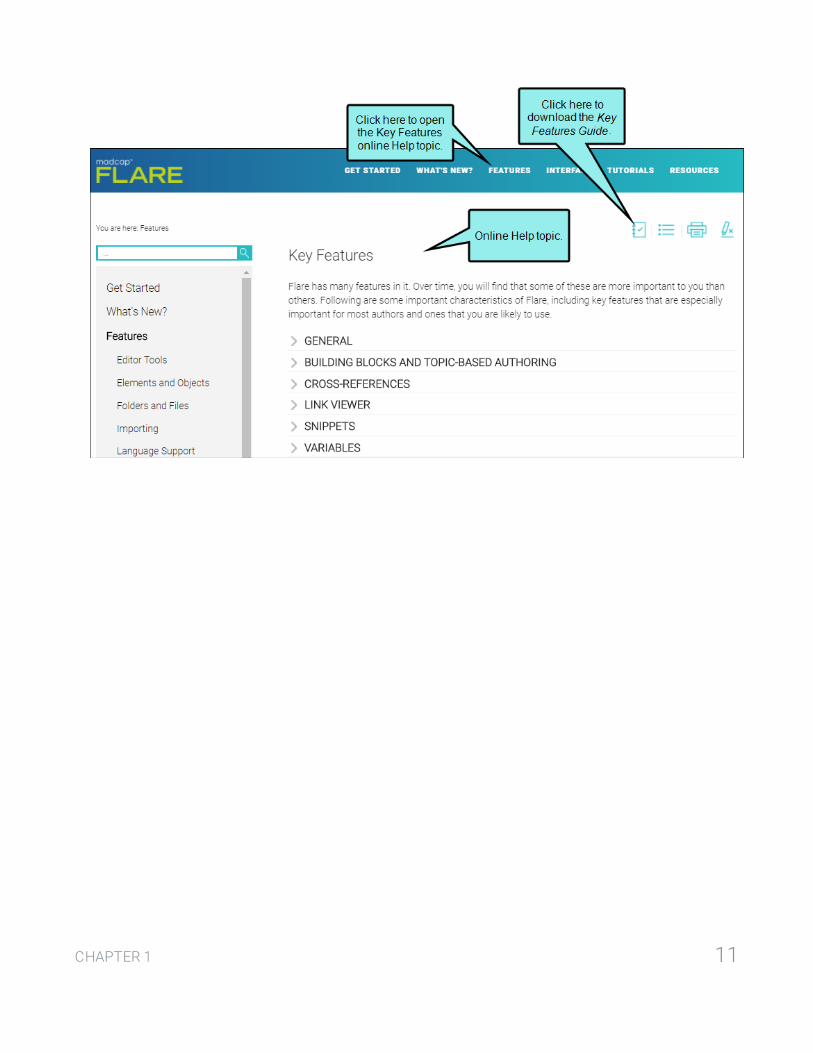
Once again, these are just a few of the more important concepts and features in Flare. For moreinformation about each of these concepts features, as well as others, open the online Help andcheck out the "Key Features" topic. You can also download the Key Features Guide.
CHAPTER 1 10
CHAPTER 1 11

ArchitectureYou should think about what’s important for your goals, consider the features that will best supportyour efforts, and come up with a structural design.
Flare is extremely flexible, which means your project universe (i.e., all of your projects, tools, fea-tures, elements, and content; and how it is all put together) might end up being somewhat unique.Therefore, you will want to take some time to plan your project architecture, both externally andinternally.
For detailed information about project architecture, see the online Help or download the Archi-tecture Guide.
CHAPTER 1 12

Getting Additional HelpYou can use any of the following resources for additional help not provided in this manual.
Knowledge BaseYou can browse the online Knowledge Base for articles covering common support issues.
http://kb.madcapsoftware.com/
Peer-to-Peer Online ForumsYou can visit the online forums to learn from other users or share your own expertise.
http://forums.madcapsoftware.com/
Contact Flare SupportYou can contact the Flare support team and get answers to your specific support issues.
http://madcapsoftware.com/support/
CHAPTER 1 13
CHAPTER 2
Creating a New ProjectThe first step in developing a project after you launch Flare is to start a project. You can start a pro-ject in one of several ways, such as by importing other projects or files. Following are the steps forcreating a new project using the Start New Project Wizard.
For more information, see the Project Creation Guide. For links to this manual and others, see theonline Help.
HOW TO CREATE A NEW PROJECT
1. Do one of the following, depending on the part of the user interface you are using:
n Start Page Select Templates. Then use the slideshow to find a template that you want touse as a starting point for your project. When you find one, click it.
n Ribbon Select File > New Project.
The Start New Project Wizard opens.
2. In the Project name field, type a name for your project.
3. In the Language field select the language that you want to use for the project.
4. (Optional) If you want to integrate the new Flare project with a source control application,select Bind to Source Control.
5. Click Next.
CHAPTER 2 14
6. (Optional) If you have selected the "Bind to Source Control" option, click Bind Project. Then inthe Bind Project dialog, complete the fields, depending on the source control application beingused. When you are finished, click Next.
7. If you used the Start Page to choose a template, it is already selected for you here and youcan continue to the next page of the wizard. If you did not use the Start Page, do the fol-lowing.
In the Source area, select a file as a starting point for the project. When you first get started,you will probably want to select New from template, choose a factory template, click Next,and continue with the rest of the steps below.
However, if you have legacy files (e.g., Word, FrameMaker, DITA HTML Help, RoboHelp) thatyou want to use, you can select New from import, click the file type, and complete the fields inthe new wizard that opens. For more information on each of these import wizards and thesteps to complete them, see the online Help, the Import Guide, or the Project Creation Guide.
8. Click Next.
9. From the Available Targets field, select the primary target for your project.
10. Click Finish.
CHAPTER 2 15
CHAPTER 3
Adding Topics and ElementsAs soon as you start a project, you can do any number of things with it. Technically, you could buildthe final output immediately. However, if it is a new project, building the output right away would notdo your end users much good, since the output does not yet have any real substance. The projectneeds topics, content, cross-references, navigation, and all of the other elements necessary to helpyour end users.
Some of these features can be used in online output as well as print-based output, some are foronline output only, and some are for print output only. Topics are essential for any project, but oth-erwise you can pick and choose which of the following to include and which to leave out. Also, it isnot necessary that you add these items and features in any particular order, although topics usuallyare created first.
For more detailed information about each of these features—including examples—see the onlineHelp or the appropriate PDF guide.
This chapter discusses the following:
Topics 18
Cross-References (and Other Links) 18
Equations 18
Footnotes 19
Glossaries 19
Images 19
Indexes 19
Master Pages 20
Multimedia 20
CHAPTER 3 16

Page Layouts 20
QR Codes 21
Responsive Content 21
Slideshows 21
Snippets 22
Tables 22
Tables of Contents 22
Text Boxes 23
Variables 23
CHAPTER 3 17
TopicsA topic is simply a chunk of information about a particular subject. Topics are the most importantpart of a Flare project. Everything else is contained within topics (e.g., cross-references, text,images) or points toward topics (e.g., tables of contents, indexes, browse sequences). The veryreason end users open a Help system or manual is to find information, a little direction. They findthat help within individual topics.
To create a topic, open the Content Explorer on the left side of Flare. Then click in the local tool-bar. After the topic is created and opened, you can edit it in the XML Editor to the right.
Cross-References (and Other Links)You can create many kinds of links, such as cross-references, text hyperlinks, text popups, topicpopups, image hyperlinks, togglers, and bookmarks. Cross-references are especially useful in Flare.
A cross-reference is a dynamic navigation link that lets you connect one topic to another (or a book-mark within a topic). This is somewhat similar to a text hyperlink. However, cross-references differfrom hyperlinks in a few ways. (1) They are based on format commands that help you keep the lookof links consistent. (2) They are especially useful for print output because they let you automaticallyrefer to specific areas and/or page numbers in the output. (3) Both the source and destination filesmust be part of the same target output within the same project. A cross-reference in a topic will dis-play as a link in online output but point to a specific page in print-based output.
To insert a link into a content file, open the Insert ribbon and use the appropriate button to create alink in the topic, snippet, or master page that is open.
EquationsFlare supports equations written in Mathematical Markup Language (MathML) and LaTeX. Afteryou've created an equation, you can then copy and paste it into Flare's editor. This gives you moreflexibility to use the editor and format you want. Once you add an equation into your project, Flareuses MathJax to render it.
To insert an equation into a content file, open the Insert ribbon and select Equation.
CHAPTER 3 18
FootnotesA footnote is a comment that is used to explain a specific area of the text. It is used primarily forprint-based output. Both the area in the text and the comment contain a number or symbol that tiesthe two together. A footnote comment is typically placed at the end of a page where the cor-responding number or symbol is placed in the text. Otherwise, you can place a comment later in themanual, such as at the end of a document, chapter, section, or book; in this case, the comment isusually referred to as an endnote.
To insert a footnote into a content file, open the Insert ribbon and select Footnote. Then providetext for the footnote at the bottom of the content file.
GlossariesA glossary is a feature that you can add to your output to help users understand the meaning of indi-vidual terms. You can include a glossary in both online and print-based output. To create a gen-erated glossary in print output, you can let Flare auto-generate one for you (faster method), or youcan create a unique topic and insert a Glossary proxy into it (more powerful and flexible method).
To add a glossary file, open the Project Organizer on the left side of Flare. Right-click the Glossariesfolder and select Add Glossary. After the glossary is created and opened, you can edit it in the Gloss-ary Editor to the right.
ImagesYou can insert images into content files (e.g., topics, snippets). Flare supports the following typesof raster and vector image files: BMP, EMF, EPS, EXPS, GIF, HDP, JPG, JPEG, PDF, PNG, PS, SVG,SWF, TIF, TIFF, WDP, WMF, XAML, XPS.
To insert an image into a content file, open the Insert ribbon and select Image.
IndexesYou can include an index in your output through the use of index keywords. An Index proxy is alsonecessary for print-based outputs. Unlike some features in Flare, there is no independent index filein your project that becomes the index in your output. Instead, the index is automatically generatedwhen you build output, based on index keywords that you insert into content files in your project.
CHAPTER 3 19

To insert an index keyword into a content file, open the View ribbon and select Index Window. Thenuse the Index window pane on the right to create index keywords, which will be inserted at yourcursor location in the open content file.
Master PagesA master page is an element that you can create in your project in order to apply certain content tomultiple topics. A master page is primarily used in online outputs, but it can be used in Word andFrameMaker outputs as well. Depending on the output type, you might use a master page in onlineoutput to apply features such as breadcrumbs, menus, toolbars, search bars, mini-TOCs, or footertext to multiple topics, or even all topics in a target. For Word and FrameMaker output, a masterpage allows you to determine page specifications (such as size or orientation) and to apply certaincontent (such as header text or page numbers) to many topics in a manual. For print-based outputsother than Word and FrameMaker, page layouts are used instead of master pages.
To add a master page file, open the Content Explorer on the left side of Flare. Expand the Resourcesfolder. Right-click the MasterPages folder (you can create this subfolder from the local toolbar if itdoesn't already exist) and select New > Master Page. After the master page is created and opened,you can edit it in the XML Editor to the right.
MultimediaFlare allows you to include various kinds of multimedia elements in your output, including video,audio, and 3D models.
To insert multimedia into a content file, open the Insert ribbon and from the Multimedia drop-down,choose the kind of element you'd like to add.
Page LayoutsA page layout is an element that you can create in your project in order to determine page spe-cifications (e.g., size, margins) and to apply certain content (e.g., headers, footers, page numbers)to many (or all) topics in print-based output. It allows for easy configuration through the use of con-tent frames, bleeds, crop marks, registration marks, margins, padding, alignment features, andmore. Page layouts are similar to master pages, but are more flexible and easier to use. The generalrule of thumb is that page layouts are recommended for print-based output (when possible), andmaster pages continue to be the best method for automatically adding headers, footers, and bread-crumbs in multiple topics for online output. Another difference between page layouts and masterpages is that page layouts can be used for any of the print-based outputs (Adobe FrameMaker,
CHAPTER 3 20
Adobe PDF, Microsoft Word, XHTML Book), whereas master pages can be used only for MicrosoftWord and FrameMaker when creating print-based output.
To add a page layout file, open the Content Explorer on the left side of Flare. Expand the Resourcesfolder. Right-click the PageLayouts folder (you can create this subfolder from the local toolbar if itdoesn't already exist) and select New > Page Layout. After the page layout is created and opened,you can edit it in the XML Editor to the right.
QR CodesYou can insert a quick response (QR) code into a content file (e.g., topic, snippet) using the XMLEditor. A QR code is a type of barcode that can be read by devices such as smart phones. The dataencoded in the QR code can be text, a website URL, an email address, contact information, or SMS(Short Message Service, which is used for sending text messages). Basically, QR codes are a way tobridge the gap between a static print document and searchable, more detailed online information atyour fingertips
To insert a QR code into a content file, open the Insert ribbon and select QR Code.
Responsive ContentFor HTML5 output, you can use the Responsive Layout window pane to help you design responsivecontent. This window pane lets you create a one-row grid to hold content. The benefit of puttingyour content into such a grid is that it allows it to shift and be responsive to screens of differentsizes. The Tutorials topic in Flare's Help system is one example where such a responsive layout isused.
To create a responsive layout, open the Home ribbon and select Responsive Layout. Then use theResponsive Layout window pane on the right to create a style, insert a row, and create a responsivelayout in the open content file.
SlideshowsYou can add a slideshow as an alternative way to display content, using navigation controls to movefrom slide to slide to view different content. Most kinds of content can be placed into a slideshow,including snippets, text, tables, and more.
To insert a slideshow into a content file, open the Insert ribbon and select Slideshow.
CHAPTER 3 21

SnippetsA snippet is an important file used for single-sourcing that acts sort of like a miniature topic. In asnippet, you can insert and format text, tables, pictures, and whatever else can be included in a nor-mal topic. We’re not usually talking about single words or phrases; that’s what variables are for. Asnippet can be inserted into one or more topics throughout your project. You can even insert theminto other snippets, creating nested snippets.
To add a snippet file, open the Content Explorer on the left side of Flare. Expand the Resourcesfolder. Right-click the Snippets folder (you can create this subfolder from the local toolbar if itdoesn't already exist) and select New > Snippet. After the snippet is created and opened, you canedit it in the XML Editor to the right.
To insert a snippet into a content file, open the Insert ribbon and select Snippet.
TablesA table in Flare is much like it is in any word processing program, such as Microsoft Word, or in a prin-ted textbook. It is a group of intersecting columns and rows that you can add to a topic for variouspurposes, such as comparing different elements.
To insert a table into a content file, open the Table ribbon and select Insert Table.
Tables of ContentsA table of contents (TOC) in Flare works much like a TOC in a printed book. It provides an outline ofcontents in your Help system so that end users can easily and quickly navigate to the informationthey need. You create a TOC, adding books, topic links, and links to external files in a structure thatyou think would be useful for the user. End users then browse through a TOC to find information. Forprint-based and EPUB output, you need to use the TOC Editor to create a TOC just as you would cre-ate one for online output. However, there is a fundamental difference. Performing this task foronline output creates an actual TOC in the output, which people use to navigate from topic to topic.This is not the case for print-based output. Performing this task for print-based output lets you indic-ate which topics will be included in the output and in what order. In that sense, this TOC functionsmore as an outline for print-based output. Therefore, for print-based output, you can think of it as an"outline TOC." If you want to include a generated TOC in print-based output, you need to use a TOCproxy in a topic instead.
CHAPTER 3 22

To add a TOC file, open the Project Organizer on the left side of Flare. Right-click the TOCs folderand select Add Table of Contents. After the TOC is created and opened, you can edit it in the TOCEditor to the right.
Text BoxesYou can insert a box into a topic and add content to it. The text box is separate from the regular textin the topic and can be positioned in a variety of places on a page (e.g., aligned left on the page, out-side frame, center of column). You might add a text box, for example, to create an example or casestudy that runs alongside the main text in a topic, in order to enhance the reader's understanding ofthe main text.
To insert a text box into a content file, open the Insert ribbon and select Text Box.
VariablesVariables are brief, non-formatted pieces of content (such as the name of your company’s productor phone number) that can be edited in one place but used in many places throughout your project.They're especially good for text that might change frequently, such as version numbers and dates.Variables are stored in variable sets, which can hold multiple variables. Depending on the templateyou select when creating a project, Flare may provide you with an initial variable set, but you canadd asmany additional variable sets and variables as you like. There are different kinds of variables:(1) basic ones that you create, (2) custom date/time variables that you create, (3) system variables(e.g., date and time; titles; page count; Chapter, Section, and Volume numbers), (4) Heading vari-ables, and (5) Running Head variables. Some of these are especially useful for page headers andfooters in print-based output.
To add a variable set file, open the Project Organizer on the left side of Flare. Right-click the Vari-ables folder and select Add Variable Set. After the variable set is created and opened, you can edit itin the Variable Set Editor to the right, adding asmany variables as you need into it.
To insert a variable into a content file, open the Insert ribbon and select Variable.
CHAPTER 3 23
CHAPTER 4
Making It Look GoodThere are numerous features for "dressing up" your output. For more detailed information about thefeatures in this chapter, including examples, see the online Help or the appropriate PDF guide.
This chapter discusses the following:
Styles and Local Formatting 25
Common Ways to Make Your Output Look Good 26
CHAPTER 4 24
Styles and Local FormattingThe two basic methods for accomplishing most formatting tasks are the use of styles and localformatting.
Styles and StylesheetsYou can take advantage of cascading stylesheets (CSS files) and the rules around them to controlthe look of your output in one place. This helps to keep the content separate from its presentation,which is very important when it comes to single-sourcing. CSS isn’t a MadCap Software idea. It’s aninternational standard for formatting web content, and it was developed by a group called the WorldWide Web Consortium (or W3C). You can learn all about the W3C at w3.org.
For all kinds of information about styles—including steps and examples—see the online Help or theStyles Guide.
Local FormattingLocal formatting is a way to change the look and feel of content directly so that the changes areapplied only to that specific content (as opposed to applying the changes throughout your projectvia the use of styles).
Styles are recommended over local formatting.
CHAPTER 4 25

Common Ways to Make Your Output LookGoodFollowing are some of the primary ways that you can make your output look good.
AutonumbersAutonumbering is just what it sounds like—a feature where content is numbered automatically. It isoften used to place numbers on chapter titles, table captions, image captions, and so on.
To create autonumbers, you should add an autonumber format to a style in your stylesheet. Fordetails about how to do this, see the online Help, the Autonumbers Guide, or the Styles Guide.
Following are some of the most popular ways to use autonumbering:
n Chapter, Section, and Volume Numbers If you are producing output that is organized into mul-tiple chapters, sections, and/or volumes, you can apply autonumbers to those different ele-ments. Not only does this let you produce numbers automatically for chapter, section, andvolume headings, but you can also incorporate this numbering into other content (e.g., pagenumbers, figure captions, table headings).
n Paragraphs You can apply autonumbering to different levels of paragraphs in your project.
EXAMPLE
You might specify that the first-level paragraphs contain number formats suchas 1.0, 2.0, 3.0, and so on. Maybe your second level paragraphs would be format-ted as 1.1, 1.2, 1.3, 2.1, 2.2, and so on. And finally, the third level paragraphsmight be formatted as 1.1.1, 1.1.2, 1.2.1, 1.2.2, 1.2.3, and so on.
n Figure Captions Perhaps you have inserted multiple images into your project, with a captionunder each image. If you want the captions for each chapter to be numbered (e.g., "Figure 1-1," "Figure 1-2," "Figure 1-3," "Figure 2-1," "Figure 2-2"), you can apply autonumber formats tothat content. If you insert a new figure caption with that format between existing captions,Flare will renumber them automatically.
n Table Headings Another way to make use of autonumbering is to apply them to headings fortables in your project (e.g., Table 1, Table 2, Table 3).
CHAPTER 4 26

ListsFlare lets you work with numbered and bulleted lists in a variety of ways. This includes creatingsimple, multi-level, and custom format lists.
The easiest way to create a numbered or bulleted list is to use Flare's quick drop-down menu button
in the Home ribbon. Click the down arrow next to the list button and select a format from themenu.
Inserts a bullet list.
Inserts a circle bullet list.
Inserts a square bullet list.
Inserts a numbered list.
Inserts a lower alpha numbered list.
Inserts an upper alpha numbered list.
Inserts a lower Roman numbered list.
Inserts an upper Roman numbered list.
Paragraph FormattingYou can affect the look and behavior of paragraphs in various ways. These settings can be appliedlocally or to the style used for the paragraph. Modifying the style is typically preferable to changingthe settings locally for a single paragraph.
Some of the most common formatting changes to paragraphs include alignment, background,breaks, indentation, line spacing, and spacing above/below. But there are many more ways toformat your paragraphs than just these.
For details on how you can format your paragraphs—including steps and examples—see the onlineHelp or the Flare Styles Guide.
CHAPTER 4 27

Positioning ElementsYou can adjust the positioning of content in a couple of ways:
n Absolute Positioning You can use absolute positioning, which frees content from the maintext so you can click and drag it anywhere in the topic to reposition it.
CHAPTER 4 28
n Floats Another way to position an object is to "float" it to the left or right on a page. When youfloat an object to the left, wraparound text can flow on the right side of the object. When youfloat an object to the right, wraparound text can flow on the left side of the object. You canalso float objects outside of the frames where the normal text flow occurs.
For details on positioning—including steps and examples—see the online Help, the Flare Styles Guide,or the Print-based Output Guide.
CHAPTER 4 29

SkinsA skin is a file that contains information about the appearance of an online output window. Depend-ing on the type of output, a skin can help to determine the following:
n Pane position
n Slide-out menu style
n Main menu position
n Top menu depth levels
n User interface text
n How big the output window should be and where it should be positioned on the user's screen
n Which online elements (e.g., TOC, index, search) are included in the output and which oneshould be the default element (the one that is active when users first access the output)
n And other settings…
To add a skin file, open the Project Organizer on the left side of Flare. Right-click the Skins folder andselect Add Skin. After the skin is created and opened, you can edit it in the Skin Editor to the right.
For more information on creating and using skins, see the online Help or the Skins Guide.
CHAPTER 4 30

CHAPTER 5
Developing TargetsThe first task in developing a target for your project is to determine which type of output is mostappropriate for your needs. You might even need to produce multiple outputs and require more thanone output type. After you decide on the kinds of outputs, you can add targets based on thoseformats and editing the settings for each.
For more detailed information about developing targets—including examples—see the online Help,the Targets Guide, or the Print-based Output Guide.
This chapter discusses the following:
Targets 32
Online Versus Print-based Output 33
HTML5—Recommended Online Output Type 34
PDF and Word—Recommended Print-based Output Types 36
Other Output Types 37
Legacy Output Options 38
Output Type Comparison Tables 38
Conditions 39
CHAPTER 5 31
TargetsThere are several types of online output and print-based output that you can produce in Flare.HTML5 is the recommended online output type, and for print-based output, PDF and Word are pre-ferred. Each output type has its own set of advantages.
It is easy to confuse output types with targets, but they are two different (although related) con-cepts. A target is one instance of an output type. It is the engine that takes all of your files and set-tings, and brings them together to produce the end result. When you build your final output, you areessentially building one or more of the targets in your project.
To add a target file, open the Project Organizer on the left side of Flare. Right-click the Targetsfolder and select Add Target. After the target is created and opened, you can edit it in the TargetEditor to the right. The editor is different for each output type.
For more information about targets—including steps and examples—see the online Help or the Tar-gets Guide.
CHAPTER 5 32
Online Versus Print-based OutputThere is a fine line between what is called "online output" and what is called "print-based output."The truth is that topics in virtually any of Flare's online output types can be sent to a printer, andtherefore considered print-based. Similarly, any of the print-based output types can be viewed elec-tronically, and therefore considered online.The real distinction between online and print-based out-puts has to do with their primary purpose. Online outputs are usually intended to be viewed on ascreen, rather than on a printed page. The idea is to show only small pieces of content at a time andallow users to jump around to other topics or elements of the output.On the other hand, print-basedoutput follows a more traditional format that you would find in an actual book or manual—with thepieces of the output following one after the other on pages until the end of the book (e.g., title page,table of contents, preface, chapters, index, appendixes—with page numbers, as well as header orfooter content, shown along the way).Then there is EPUB output, which is intended to be viewed ona screen, but follows a structure closer to print-based outputs.
CHAPTER 5 33
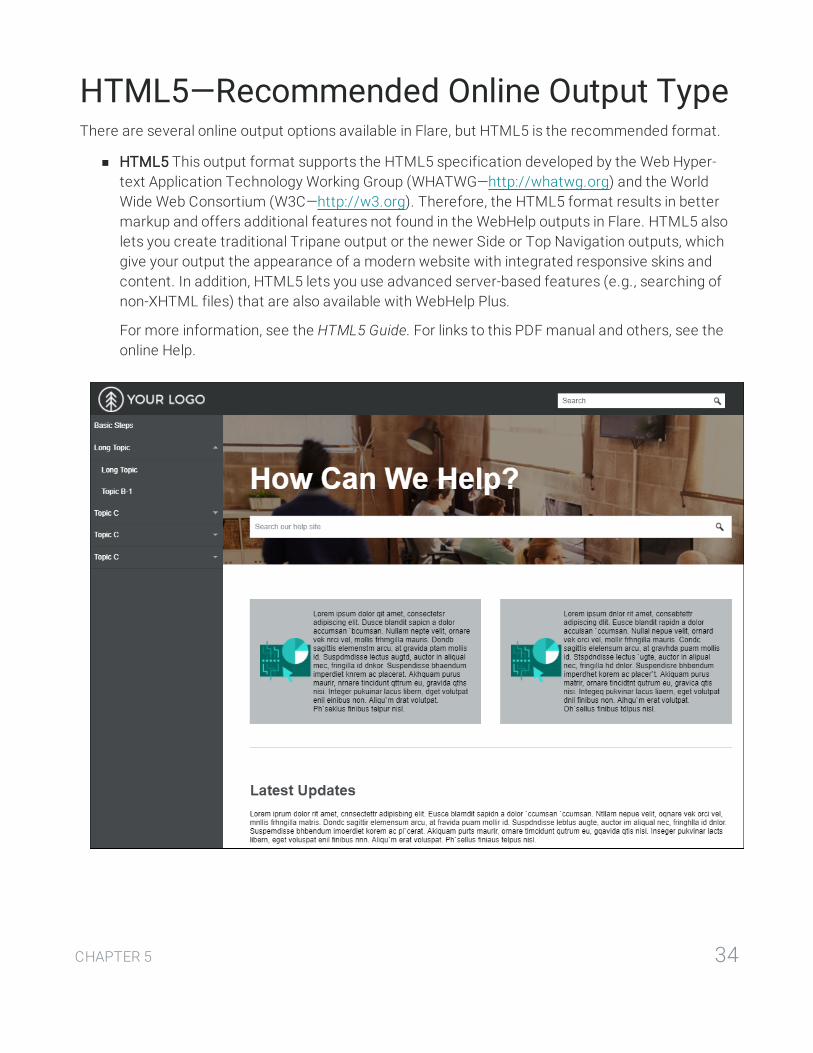
HTML5—Recommended Online Output TypeThere are several online output options available in Flare, but HTML5 is the recommended format.
n HTML5 This output format supports the HTML5 specification developed by the Web Hyper-text Application Technology Working Group (WHATWG—http://whatwg.org) and the WorldWide Web Consortium (W3C—http://w3.org). Therefore, the HTML5 format results in bettermarkup and offers additional features not found in the WebHelp outputs in Flare. HTML5 alsolets you create traditional Tripane output or the newer Side or Top Navigation outputs, whichgive your output the appearance of a modern website with integrated responsive skins andcontent. In addition, HTML5 lets you use advanced server-based features (e.g., searching ofnon-XHTML files) that are also available with WebHelp Plus.
For more information, see the HTML5 Guide. For links to this PDF manual and others, see theonline Help.
CHAPTER 5 34

CHAPTER 5 35

PDF and Word—Recommended Print-basedOutput TypesFlare provides multiple print-based output options, but PDF and Word are recommended.
n Adobe PDF Short for "Portable Document Format," PDF is an open standard format for elec-tronic documentation exchange invented by Adobe. PDF files are used to represent a two-dimensional document in an device- and resolution-independent fixed-layout format.
n Microsoft Word The output is exported to Microsoft Word in one of the following file formats.
l XML This is the default document format created (if you do not select one of the otherformats in this list).
l DOC You can export Word to the standard DOC format.
l DOCX This is Microsoft Word's platform-independent, open XML format.
l PDF In addition to sending output directly to PDF, you can generate a PDF file auto-matically when building Word output. You can send Word output to PDF format, even ifyou do not have the Adobe Distiller installed.
l XPS You can generate an XPS file automatically when building Word output. You can dothis by installing a free add-in download from Microsoft.
For more information, see the Print-based Output Guide. For links to this PDF manual and oth-ers, see the online Help.
CHAPTER 5 36
Other Output TypesFollowing are a few other unique output options in Flare:
n Clean XHTML Clean XHTML produces basic HTML files that are free of MadCap-specific tagsand not dependent upon other MadCap-generated files. The output does not include anyskins, search, navigation, or other extra features; it is simply your single-sourced content. Thisallows you to re-purpose your output in many flexible ways (e.g., you can embed the outputfiles into other applications, such as project management tools, wikis, or eLearning systems).You might also perform other types of post-processing tasks with the output.
n DITA Darwin Information Typing Architecture (DITA) file content is supported in Flare. DITA isan XML-based markup language with its own schema for authoring, producing, and deliveringtechnical information. It is a standard of the Organization for the Advancement of StructuredInformation Standards (OASIS), and it consists of a set of design principles for creating"information-typed" modules at a topic level and for using that content in various deliverymodes.In Flare you can generate output that produces DITA files. When you build this type ofoutput, a DITA map file is generated, with multiple DITA files in it. The XHTML tags are con-verted to DITA elements. In other words, although it is considered an "output" from the stand-point of the Flare process, the end result is actually a collection of "source" files, which youcan later use in another tool (or import back into Flare) to produce the final output.
n Eclipse Help This is a Java-based Help system that requires the latest Java Runtime Envir-onment (JRE) and Java version. Use Eclipse Help to create an Eclipse plug-in for the EclipseHelp Viewer.
For more information, see the Eclipse Help Guide. For links to this PDF manual and others, seethe online Help.
n EPUB This is a format for creating reflowable digital books (ebooks). It is developed and main-tained by the International Digital Publishing Forum (IDPF). EPUB is sort of a hybrid format.The output is designed to be viewed electronically; in that way, it is like an online format. Onthe other hand, its structure is like a book or manual; in that way, it is like a print-based format.In fact, you can follow many of the same steps for creating EPUB output that you would followfor producing a PDF. For additional information about this group and the EPUB format, seehttp://idpf.org/.
CHAPTER 5 37
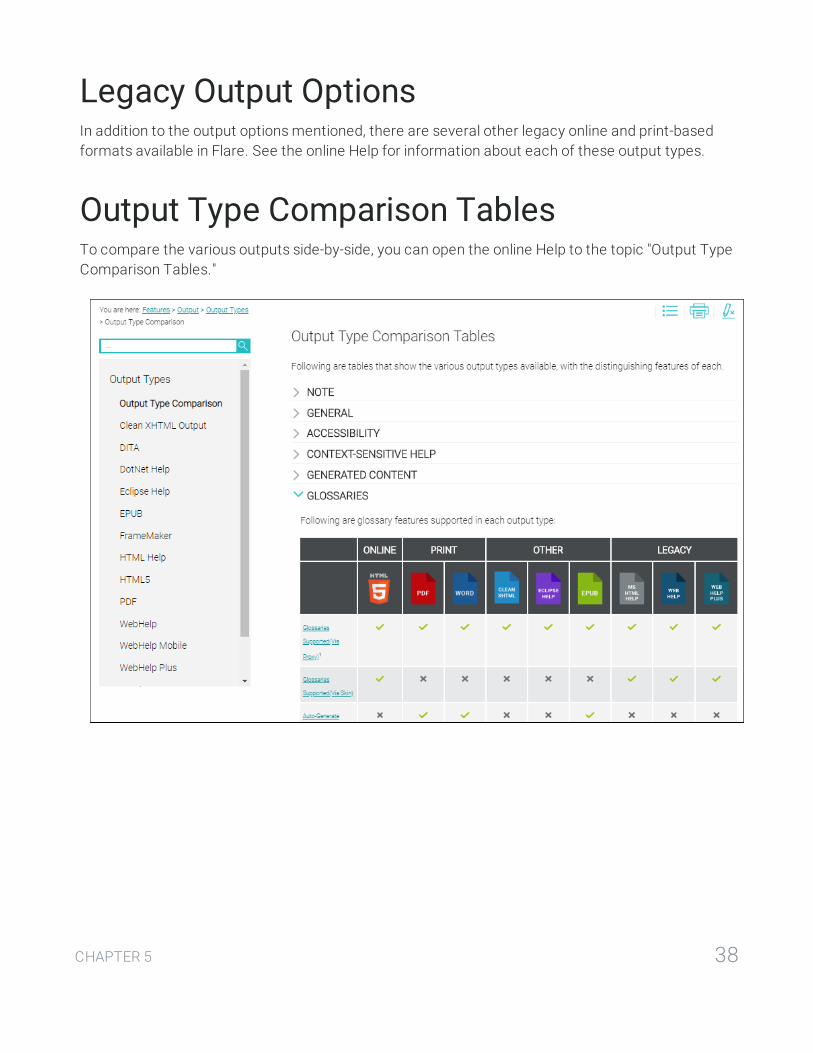
Legacy Output OptionsIn addition to the output options mentioned, there are several other legacy online and print-basedformats available in Flare. See the online Help for information about each of these output types.
Output Type Comparison TablesTo compare the various outputs side-by-side, you can open the online Help to the topic "Output TypeComparison Tables."
CHAPTER 5 38
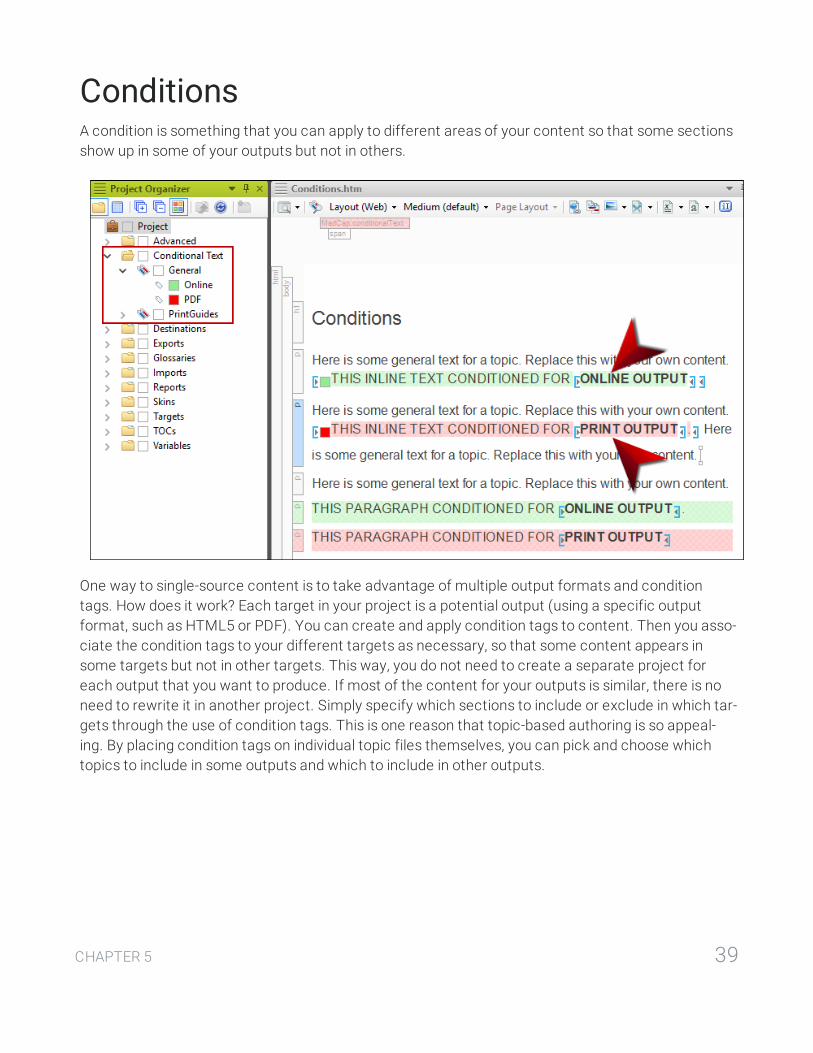
ConditionsA condition is something that you can apply to different areas of your content so that some sectionsshow up in some of your outputs but not in others.
One way to single-source content is to take advantage of multiple output formats and conditiontags. How does it work? Each target in your project is a potential output (using a specific outputformat, such as HTML5 or PDF). You can create and apply condition tags to content. Then you asso-ciate the condition tags to your different targets as necessary, so that some content appears insome targets but not in other targets. This way, you do not need to create a separate project foreach output that you want to produce. If most of the content for your outputs is similar, there is noneed to rewrite it in another project. Simply specify which sections to include or exclude in which tar-gets through the use of condition tags. This is one reason that topic-based authoring is so appeal-ing. By placing condition tags on individual topic files themselves, you can pick and choose whichtopics to include in some outputs and which to include in other outputs.
CHAPTER 5 39

EXAMPLE
Let's say you need to create two PDFs from your project—one for beginning users andanother for advanced users. Rather than creating two separate projects, you can putall of the content into a single project.
Then you can create one condition tag called "Beginner Manual" and another conditiontag called "Advanced Manual."
After that, you can apply the "Beginner Manual" condition tag to the content thatbelongs only in the manual for beginners, and you can apply the "Advanced Manual"condition tag to the content that belongs only in the manual for advanced users.
Finally, you open one PDF target and tell Flare to include the "Beginner Manual" con-dition tag and exclude the "Advanced Manual" condition tag. In the other PDF target,you do the opposite; exclude the "Beginner Manual" condition tag and include the"Advanced Manual" condition tag.
To add a condition tag set file, open the Project Organizer on the left side of Flare. Right-click theConditional Text folder and select Add Condition Tag Set. After the condition tag set is created andopened, you can edit it in the Condition Tag Set Editor to the right, adding asmany conditions as youneed.
There are many ways to apply conditions to files and content. One way to apply a condition to apiece of content is to select the content, then open the Home ribbon and choose Conditions.
For more information about conditions—including steps and examples—see the online Help or theCondition Tags Guide.
CHAPTER 5 40
CHAPTER 6
Building and Publishing OutputAfter you have created a project, added and formatted content, and developed a target, you areready to build and publish the final output. Of course, you can build the output at any point during thedevelopment process, but if you make additional changes to content, targets, or the look and feel,you will need to build the output again to make sure the changes are included in the files that youdeliver to your end users.
For more detailed information about the features in this chapter, including examples, see the onlineHelp or the Targets Guide.
This chapter discusses the following:
Ways to Build and Publish Targets 42
Interface or Command Line 43
Where Output Files are Stored 43
Publishing Features 44
CHAPTER 6 41

Ways to Build and Publish TargetsBuilding the final output involves generating one or more targets in your project, usually with just theclick of a button or two. You can build output in the following ways:
n Primary Target Do this if you are only concerned about building and publishing the primary tar-get for your project.
n Single Target Do this if you want to build and publish a target that may or may not be des-ignated as your primary target.
n Multiple Targets Do this if you want to quickly build and publish multiple targets using anoption in the Builds window pane. The targets do not need to be within the project that you cur-rently have open. This is an alternative to using batch targets.
n Batch Target Do this if you want to build and publish one or multiple targets in a batch file, per-haps scheduled to run at a specific time.
n MadCap Central MadCap Central is a cloud-based platform that lets you plan, track, and man-age the processes, content, and teams that are at the heart of your organization. AlthoughMadCap Central is located in the cloud, it is integrated with MadCap Flare. This integrationlets you store copies of your projects in Central, continue to work on them locally in Flare, andkeep both sets of copies in sync. You can use Central to quickly build and publish output (androll back when necessary) without the need to involve an IT department. You can also sendtopics and snippets for review on Central, as well as use custom checklists to track your pro-gress in Flare projects. For more information about Central and how you can build and publishyour Flare output on it, see the MadCap Central Integration Guide or the online Help.
CHAPTER 6 42
Interface or Command LineYou can build and publish output (primary, single, multiple, or batch targets) using either the Flareinterface or your system's command line. There are benefits to using each method.
User InterfaceThis method lets you build output using options in Flare's workspace. When you generate a targetusing this method, the Builds window pane opens at the bottom of the workspace. You can continueworking in your project while targets are generated behind the scenes.
There are many ways to initiate the building of a target. For example, you can double-click the targetin the Project Organizer. Then in the Target Editor, click Build in the local toolbar.
Command LineThis option is intended for more advanced users. It lets you build targets from your operating sys-tem's command line. Using this method, you do not have to open Flare at all. In addition, this methodallows you to build a single target or all targets in your Flare project in one batch. The best way touse this feature is to create a batch file with the necessary commands in it. Then you can use ascheduling tool (such as the "Scheduled Tasks" utility in Windows) to run the batch file automaticallywhenever you want. This is similar to the "batch target" feature. However, the command line featureworks outside of the Flare interface, is a bit more manual, and does not support as many processes.For steps see the online Help.
Where Output Files are StoredWhen you build a target, Flare creates output files and places them in a folder named after the tar-get, which is stored in a subfolder of your project called "Output." For example, let's say your projectis stored here: C:\MyProject. In that case, after you generate output, the files would be stored here:
C:\MyProject\Output\MyName\TargetName
Depending on the output type associated with the target, the generated output might consist ofmany files.
CHAPTER 6 43

Publishing FeaturesTo distribute output, you can simply open your Output folder to retrieve the files manually, or youcan use Flare's publishing destination feature to automatically send a copy of the output files toanother location (e.g., to a network folder or a website).
NOTE: If you choose to use Flare’s integration with MadCap Central, your published outputcan be hosted on MadCap servers.
Retrieving Files ManuallySelect the Project ribbon. In the Build section select Open Output Folder.
You can also select this button in the Builds window pane.
Navigate to the folder showing the name of your target. Then you can copy those files to any loc-ation you want, whether it is on a network, in a version control directory, or up on a web server. Youmight need to work with your network or web administrator to learn the proper way to move files inyour company, including login credentials.
CHAPTER 6 44

Using the Publishing Destination FeatureTo use this automated feature, you must first create a publishing destination for your output. In theProject Organizer, right-click the Destinations folder and select Add Destination.
Next, open your target and on the Publishing tab, associate the publishing destination with the tar-get.
Then when you build your output (or after you build it) you simply use the Publish button or checkbox, depending on the method you use for generating the output (e.g., build primary target, singletarget, batch target).
CHAPTER 6 45

TIP: You do not need to build the target to see how a particular topic will look in the final out-
put. You can always preview topics as you develop your project by clicking in the localtoolbar of the XML Editor. If you click the face of the button, the preview is shown based onthe format specified in the primary target. If you click the down arrow, you can select any ofthe targets in your project from a menu. The preview is then displayed using the outputformat specified in that target. As you make changes in a topic, snippet, or master page, thepreview window pane updates automatically.
CHAPTER 6 46

APPENDIX
PDFsThe following PDFs are available for download from the online Help.
TUTORIALS
Getting Started Tutorial
Product Foldout Tutorial
Side Navigation Tutorial
Top Navigation Tutorial
Tripane and PDF Tutorial
USER GUIDES
Accessibility Guide Getting Started Guide
Analysis and Reports Guide Global Project Linking Guide
Architecture Guide HTML Help Guide
Autonumbers Guide HTML5 Guide
Condition Tags Guide Images Guide
Context-sensitive Help Guide Importing Guide
DotNet Help Guide Index Guide
Eclipse Help Guide Key Features Guide
APPENDIX 47

Language Support Guide Source Control Guide: Git
MadCap Central Integration Guide Source Control Guide: Perforce
Movies Guide Source Control Guide: Subversion
Navigation Links Guide Source Control Guide: Team Foundation Server
Plug-In API Guide Styles Guide
Print-based Output Guide Tables Guide
Project Creation Guide Tables of Contents Guide
Pulse Guide Targets Guide
QR Codes Guide Templates Guide
Reports Guide Topics Guide
Reviews & Contributions Guide Touring the Workspace Guide
Search Guide Transition From FrameMaker Guide
SharePoint Guide Variables Guide
Skins Guide WebHelp Outputs Guide
Snippets Guide What's New Guide
CHEAT SHEETS
Folders and Files Cheat Sheet
Print Output Cheat Sheet
Shortcuts Cheat Sheet
Structure Bars Cheat Sheet
Styles Cheat Sheet
APPENDIX 48