firestore fs-100 workflow guide for final cut pro - 5 … fs-100 workflow guide for final cut pro -...
TRANSCRIPT

FireStore FS-100 Workflow Guide for Final Cut Pro - 5 Easy StepsApril 20, 2006
IntroductionThe Focus Enhancements FireStore FS-100 is a powerful tool designed tointerface with the Panasonic AG-HVX200, enabling the end user to captureDVCPRO HD and DVCPRO 50 video clips (as well as standard DV/ DVCPRO25) in the Panasonic P2 media format. Equipped with an internal 100GB harddisk, the FireStore FS-100 offers long record times in a unique, portableenclosure.
When using the FireStore FS-100 to capture P2 Media from the Panasonic AG-HVX200, it is possible to capture a wide variety of Panasonic P2 formatsgenerated by the AG-HVX200. Hence, it is important to properly set Final Cut Pro(v5) to the correct settings to handle the particular format to be edited.
Following is a list of the formats currently supported with Final Cut Pro v5.1:DVCPRO HD: 720/60P, 720/30P, 720/24, 1080/60i , 1080/24PDVCPRO 50: 60i, 30P, 24P and 24PA (Advanced Pulldown)The P2 formats 720/30PN and 720/24PN are not yet supported for live capture over FireWire. Asof this writing, the P2 format 1080/30P is not yet natively supported in Final Cut Pro v5.1.
Breaking Down the Workflow into 5 Easy StepsIn general, the workflow for ingesting and editing P2 Media captured with theFireStore FS-100 can be broken down into five easy steps:
1: Organize P2 Folder on FS-100 Prior to Importing to Final Cut Pro2: Set FS-100 to Disk Drive Mode and connect to your Mac3: Set Up Final Cut Pro Preferences to Coincide with P2 Captured Format4: Treat FS-100 Clips as P2 Media in Final Cut Pro: Import P25: Edit the FS-100 P2 clips as you would normally edit P2 Media
Assuming that you have successfully captured P2 media from the Panasonic AG-HVX200 onto the FireStore FS-100, let's begin with the first step.
STEP 1: Organize P2 Folder on FS-100 Prior to Importing to Final Cut ProYou have just captured P2 media clips with the FireStore FS-100 and are nowready to import those clips into Final Cut Pro. Before importing P2 media fromthe FS-100 to your Final Cut Pro workstation, you must first run the "OrganizeP2" utility within the FS-100…a) Once shooting with the FS-100 is complete, navigate to the "UTILITIES"screen on the FS-100 using the LEFT or RIGHT Arrow Keyb) Scroll down to "ORGANIZE P2". (Figure 1.01)

c) Press the SELECT key on the FS-100 to initiate the "Organize P2" operation.
Figure 1.01: Organize P2 Utility
A progress bar will appear for several seconds as the "Organize P2" operationproceeds. Once the "Organize P2" operation is completed, the FS-100 displaywill return to the main HOME screen.
Now you are ready to set the FS-100 to "Disk Drive" Mode to connect the FS-100to your Mac.
STEP 2: SET FS-100 to Disk Drive Mode and connect to your MacNow that you have performed the "Organize P2" utility within the FireStore FS-100, you are ready to connect the FS-100 to your Mac using a 6-pin to 6-pinFireWire 400 cable.
The FS-100 hard disk is formatted as FAT-32 automatically by the FS-100 to bedirectly compatible with Mac OS X (or either Windows 2000 or Windows XP ifyou decide to edit in your favorite PC NLE).
a) Connect the FS-100 COMPUTER I/O port to the FireWire 400 I/O port on yourMac with a 6pin-to-6pin FireWire 400 cable.b) On the FS-100, navigate to the “HDD MODE” screen, select “DD DRIVE”,then select “ENABLE.”
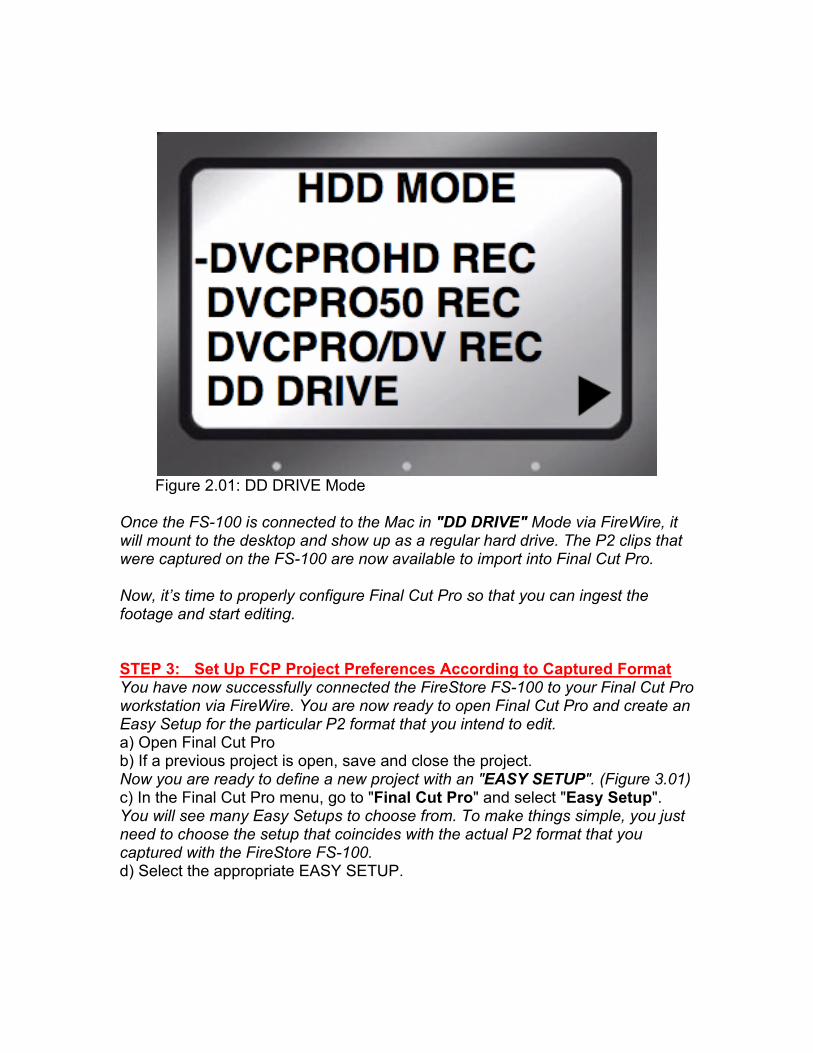
Figure 2.01: DD DRIVE Mode
Once the FS-100 is connected to the Mac in "DD DRIVE" Mode via FireWire, itwill mount to the desktop and show up as a regular hard drive. The P2 clips thatwere captured on the FS-100 are now available to import into Final Cut Pro.
Now, it’s time to properly configure Final Cut Pro so that you can ingest thefootage and start editing.
STEP 3: Set Up FCP Project Preferences According to Captured FormatYou have now successfully connected the FireStore FS-100 to your Final Cut Proworkstation via FireWire. You are now ready to open Final Cut Pro and create anEasy Setup for the particular P2 format that you intend to edit.a) Open Final Cut Prob) If a previous project is open, save and close the project.Now you are ready to define a new project with an "EASY SETUP". (Figure 3.01)c) In the Final Cut Pro menu, go to "Final Cut Pro" and select "Easy Setup".You will see many Easy Setups to choose from. To make things simple, you justneed to choose the setup that coincides with the actual P2 format that youcaptured with the FireStore FS-100.d) Select the appropriate EASY SETUP.

Selecting a particular Easy Setup allows Final Cut Pro to use the correct Projectpreferences Presets to coincide with the format of the clips you wish to edit.These Presets include: Sequence Preset, Capture Preset, Device ControlPreset, Playback Output Video and Playback Output Audio.
Figure 3.01: Easy Setup Tool
Following is a list of the individual Easy Setups available for each P2 formatsupported in Final Cut Pro v5.1:
P2 FORMAT EASY SETUP720/60P DVCPRO HD - 720p60720/30P DVCPRO HD - 720p30720/24P DVCPRO HD - 720p241080/60i DVCPRO HD - 1080i601080/24P DVCPRO HD - 1080P24DVCPRO 50: 60i DV50 - NTSCDVCPRO 50: 30P DV50 - NTSCDVCPRO 50: 24P DV50 - NTSC (Edit and Output as 29.97 DV)DVCPRO 50/24PA (23.98) DV50 - NTSC 24P (23.98)
Once you have selected the appropriate Easy Setup, you should then review theAudio/Video Settings for that setup to make sure everything is set up correctly.
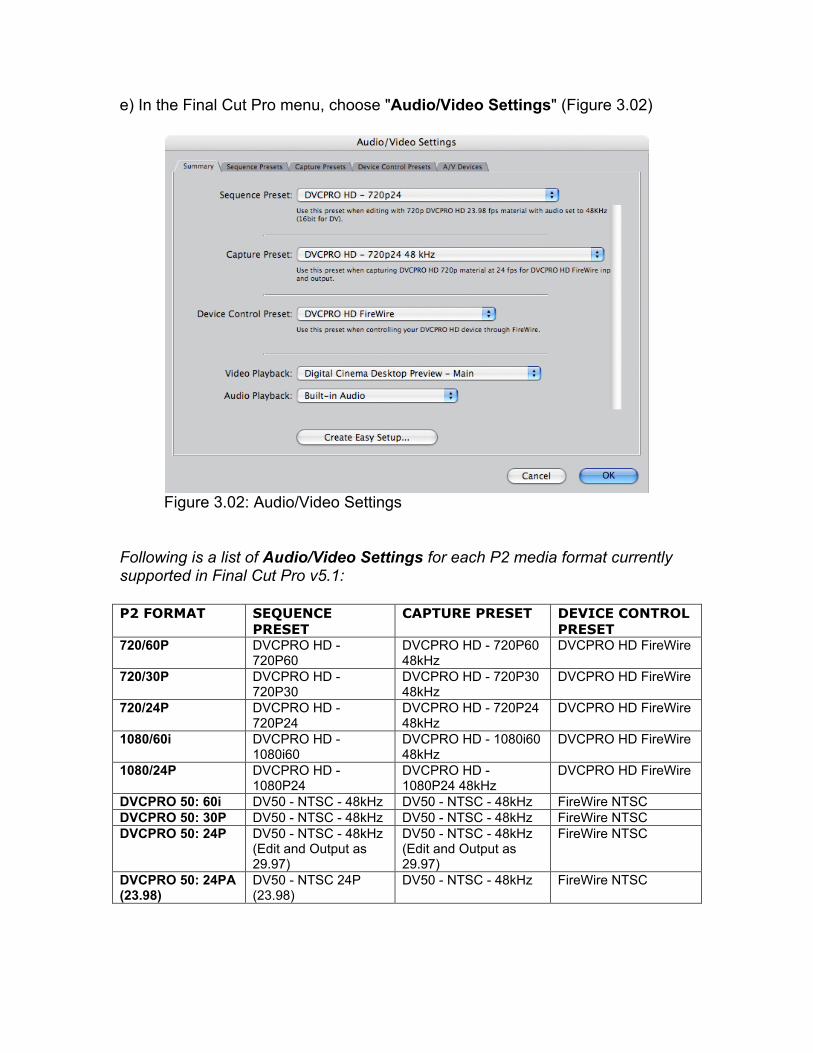
e) In the Final Cut Pro menu, choose "Audio/Video Settings" (Figure 3.02)
Figure 3.02: Audio/Video Settings
Following is a list of Audio/Video Settings for each P2 media format currentlysupported in Final Cut Pro v5.1:
P2 FORMAT SEQUENCEPRESET
CAPTURE PRESET DEVICE CONTROLPRESET
720/60P DVCPRO HD -720P60
DVCPRO HD - 720P6048kHz
DVCPRO HD FireWire
720/30P DVCPRO HD -720P30
DVCPRO HD - 720P3048kHz
DVCPRO HD FireWire
720/24P DVCPRO HD -720P24
DVCPRO HD - 720P2448kHz
DVCPRO HD FireWire
1080/60i DVCPRO HD -1080i60
DVCPRO HD - 1080i6048kHz
DVCPRO HD FireWire
1080/24P DVCPRO HD -1080P24
DVCPRO HD -1080P24 48kHz
DVCPRO HD FireWire
DVCPRO 50: 60i DV50 - NTSC - 48kHz DV50 - NTSC - 48kHz FireWire NTSCDVCPRO 50: 30P DV50 - NTSC - 48kHz DV50 - NTSC - 48kHz FireWire NTSCDVCPRO 50: 24P DV50 - NTSC - 48kHz
(Edit and Output as29.97)
DV50 - NTSC - 48kHz(Edit and Output as29.97)
FireWire NTSC
DVCPRO 50: 24PA(23.98)
DV50 - NTSC 24P(23.98)
DV50 - NTSC - 48kHz FireWire NTSC
Once the Audio/Video Settings are correctly set to coincide with the P2 Format ofthe FS-100 clips to be edited, you are now ready to import the FS-100 P2 mediaclips into the Final Cut Pro Project Browser.
STEP 4: Treat FS-100 Clips as P2 Media in Final Cut Pro: Import P2You are now ready to import the FS-100 P2 media clips using the "ImportPanasonic P2" import menu.
The FireStore FS-100 can capture DVCPRO HD and DVCPRO 50 (as well asstandard DV/ DVCPRO 25) as P2 media from the Panasonic AG-HVX200 in thesame P2 file format that the AG-HVX200 records to P2 cards. When importingFS-100 P2 media into Final Cut Pro, treat the FS-100 P2 clips in the same wayyou would with P2 media clips captured to a P2 card.
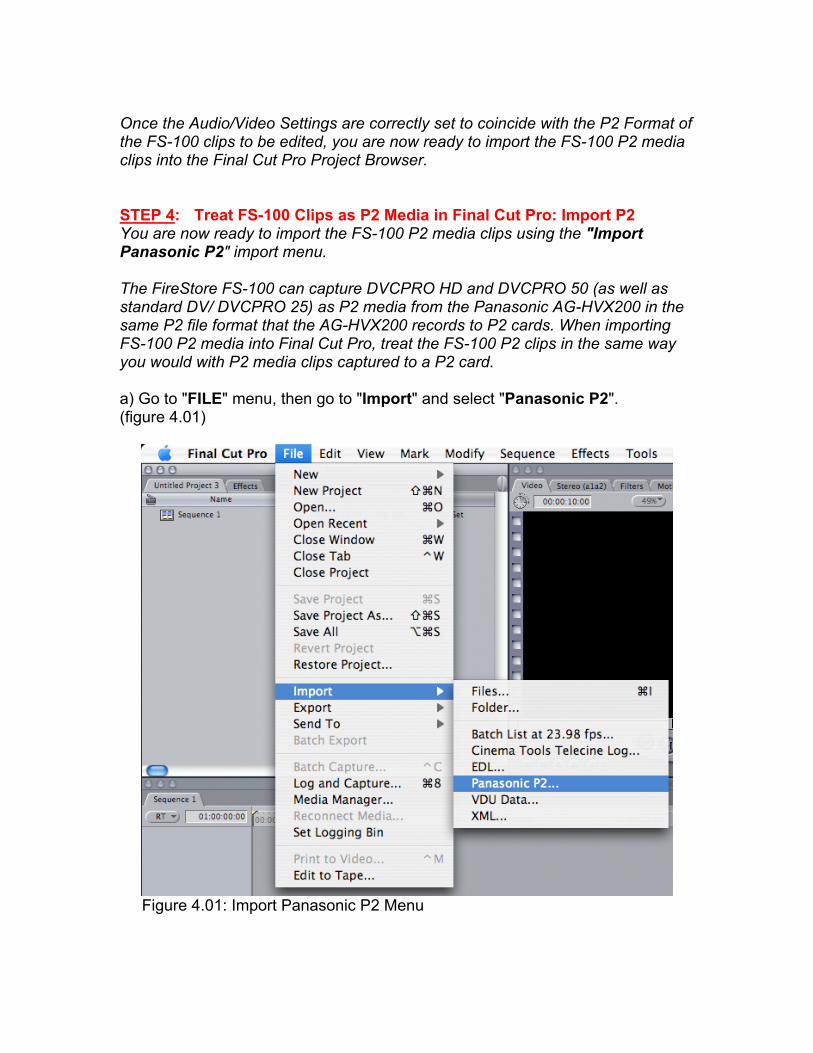
a) Go to "FILE" menu, then go to "Import" and select "Panasonic P2".(figure 4.01)
Figure 4.01: Import Panasonic P2 Menu

Version 5.1 of Final Cut Pro offers an additional Import P2 "RemoveDuplicate/Adv. Pull-down Frames" option that allows you to remove duplicateframes when transferring footage to your Final Cut Pro scratch disk. (Figure 4.02)
By checking this new option during P2 import, Final Cut Pro will create aQuickTime file at the native frame rate coinciding with the particular frame rate inwhich the Panasonic AG-HVX200 was set to during capture.
Simply put, if you set the AG-HVX200 to capture 720/24P, 720/30P or1080/24PA, choosing the new "Remove Duplicate/Adv. Pull-down Frames"option will remove the added frames and yield a genuine 24P (23.98) or 30P clip- depending on which format mode you captured in.
This will allow you to edit in a native 23.98 or 30P sequence and to output agenuine 23.98 or 30P deliverable.**: 1080/30P is not yet natively supported in Final Cut Pro v5.1.
Figure 4.02: Remove duplicate/adv. pull-down frames P2 Import option
Once you select "Import; Panasonic P2", the Import Panasonic P2 tool windowwill appear. (Figure 4.03)
The Import Panasonic P2 tool will by default select the connected FireStore FS-100 as the source for your P2 media clips.
b) Simply highlight the clips that you want to import and select the "Import"button.
You can select any or all of the clips for import.

Figure 4.03: Import Panasonic P2 Tool Window
c) To import all of the available FS-100 P2 clips, select the "Import All" button.
A progress bar will appear as the selected P2 clips are being imported into thebrowser. (Figure 4.04)
Figure 4.04 Import Panasonic P2 Progress Bar

STEP 5: Edit the FS-100 P2 clips as you would normally edit P2 MediaFinal Cut Pro will handle the FireStore FS-100 just in the same way it will handlea standard Panasonic P2 media card.
No need to copy the contents of the FireStore FS-100 to your Final Cut Proworkstation before importing your P2 clips - Final Cut Pro will handle that for youas your P2 media clips are transcoded to QuickTime .mov files during import.
When the Import Panasonic P2 function is complete, all of your ingested P2media clips will appear in the Final Cut Pro Browser Window as .mov files.(Figure 5.01) This is exactly the same process as if you were importing P2 mediaclips from a standard P2 media card.
Your clips are now ready to start editing!
Figure 5.01: Now your ingested clips are ready to edit.
For More Information on FireStore, please visit http://www.firestore.com