instruction and service manual - tegam | …€¦ · instruction and service manual ... keithley...
TRANSCRIPT

10 TEGAM WAY • GENEVA, OHIO 44041 440-466-6100 • FAX 440-466-6110 • www.tegam.com
AVM-2000
HIGH SENSITIVITY ANALOG DC VOLTMETER/NULLMETER
Instruction and Service Manual
PN# AVM2000-900 Publication Date: October 2010
REV. B

10 TEGAM WAY • GENEVA, OHIO 44041 440-466-6100 • FAX 440-466-6110 • www.tegam.com
TEGAM is a manufacturer of electronic test and measurement equipment for metrology, calibration, and production test. We also provide repair, calibration, and other support services for a wide variety of test and measurement equipment including RF power sensor calibration systems, RF attenuation measurement systems, ratio transformers, arbitrary waveform generators, micro-ohmmeters, LCR meters, handheld temperature calibrators, thermometers, humidity and temperature control devices, and more. TEGAM also repairs and calibrates test and measurement equipment formerly manufactured by Electro-Scientific Industries (ESI), Gertsch, Keithley Instruments, Lucas Weinschel, and Pragmatic Instruments. A complete list can be viewed on our Product Service Directory at www.tegam.com For more information about TEGAM and our products, please visit our website at www.tegam.com: or contact one of our customer service representatives at [email protected] or 800-666-1010.
10 Tegam Way,
Geneva, Ohio 44041 Telephone: (440) 466-6100 Fax: (440) 466-6110 E-mail: [email protected]
10 TEGAM WAY • GENEVA, OHIO 44041 440-466-6100 • FAX 440-466-6110 • www.tegam.com
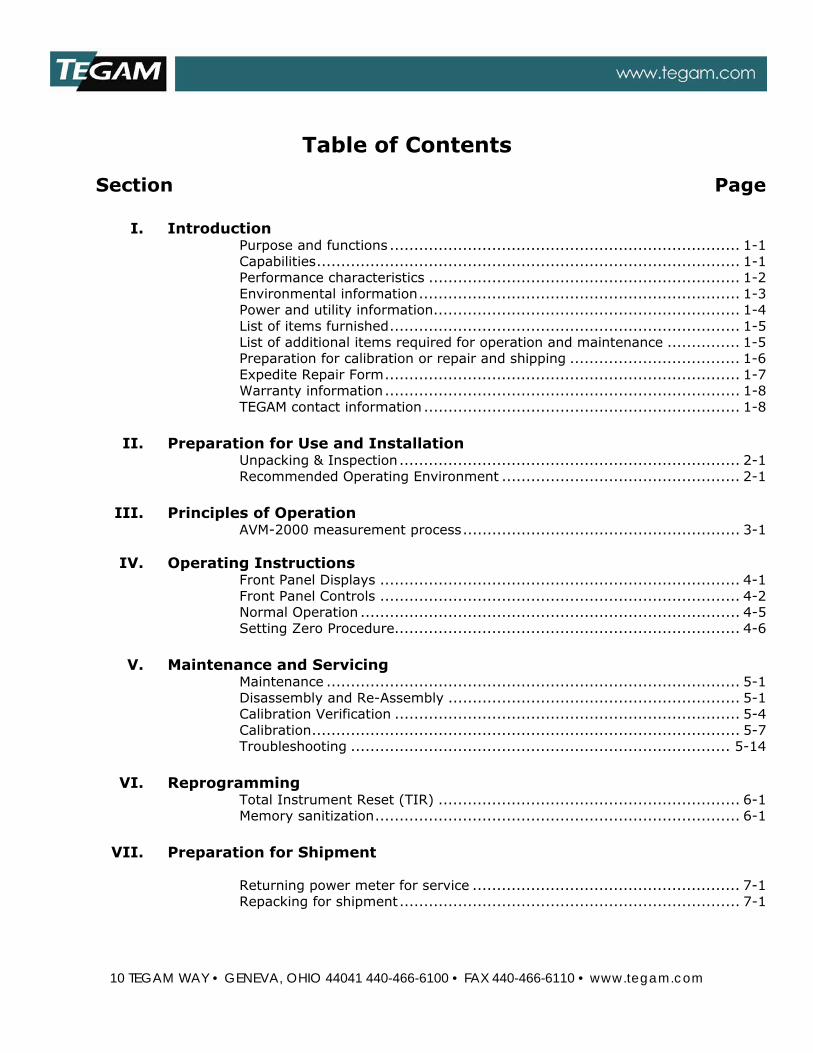
Table of Contents
Section Page
I. Introduction Purpose and functions ........................................................................ 1-1 Capabilities ....................................................................................... 1-1 Performance characteristics ................................................................ 1-2 Environmental information .................................................................. 1-3 Power and utility information ............................................................... 1-4 List of items furnished ........................................................................ 1-5 List of additional items required for operation and maintenance ............... 1-5 Preparation for calibration or repair and shipping ................................... 1-6 Expedite Repair Form ......................................................................... 1-7 Warranty information ......................................................................... 1-8 TEGAM contact information ................................................................. 1-8
II. Preparation for Use and Installation
Unpacking & Inspection ...................................................................... 2-1 Recommended Operating Environment ................................................. 2-1
III. Principles of Operation
AVM-2000 measurement process ......................................................... 3-1
IV. Operating Instructions Front Panel Displays .......................................................................... 4-1 Front Panel Controls .......................................................................... 4-2 Normal Operation .............................................................................. 4-5 Setting Zero Procedure....................................................................... 4-6
V. Maintenance and Servicing
Maintenance ..................................................................................... 5-1 Disassembly and Re-Assembly ............................................................ 5-1 Calibration Verification ....................................................................... 5-4 Calibration ........................................................................................ 5-7 Troubleshooting .............................................................................. 5-14
VI. Reprogramming
Total Instrument Reset (TIR) .............................................................. 6-1 Memory sanitization ........................................................................... 6-1
VII. Preparation for Shipment
Returning power meter for service ....................................................... 7-1 Repacking for shipment ...................................................................... 7-1

10 TEGAM WAY • GENEVA, OHIO 44041 440-466-6100 • FAX 440-466-6110 • www.tegam.com
VIII. Storage
Temperature and other environmental limitations .................................. 8-1
Safety Information & Precautions: The following safety information applies to both operation and service personnel. Safety precautions and warnings may be found throughout this instruction manual and the equipment. These warnings may be in the form of a symbol or a written statement. Below is a summary of these precautions. Terms in This Manual: CAUTION statements identify conditions or practices that could result in damage to the equipment or other property. WARNING statements identify conditions or practices that could result in personal injury or loss of life. Terms as Marked on Equipment: CAUTION indicates a personal injury hazard not immediately accessible as one reads the marking, or a hazard to property including the equipment itself. DANGER indicates a personal injury hazard immediately accessible as one reads the marking. Symbols: As Marked in This Manual:
!
This symbol denotes where precautionary information may be found.
As Marked on Equipment:
!
CAUTION – Risk of Danger
DANGER – Risk of Electric Shock
Earth Ground Terminal
l On
O Off
Frame or Chassis Terminal
Earth Ground Terminal
Alternating Current
10 TEGAM WAY • GENEVA, OHIO 44041 440-466-6100 • FAX 440-466-6110 • www.tegam.com
1-1
Section I – Introduction
Purpose and Function The AVM-2000 is a multi-range analog DC Voltmeter/Nullmeter. It has 21 bipolar ranges from ± 100 nanovolts full scale to ± 1000 volts full scale in a 1-3-10 sequence. The AVM-2000 functions either as an isolated null detector or as an isolated analog voltmeter. Key functions of the AVM-2000:
The AVM-2000 is a freestanding bench instrument housed in a protective metal enclosure. A single unit may be mounted in a standard 19 inch rack using a conventional rack shelf.
Bail front feet allow the user to tilt the instrument for optimal viewing. Voltage readings are displayed on a taut-band, zero-center, 4½ inch, mirror-backed, dual-scale
analog meter. A rotary control provides selection of the instrument’s 21 ranges. Instrument status (range, offset voltage, filter settings, battery condition, input impedance
selection, etc.) are displayed on a front panel LCD. The AVM-2000 may be operated from the AC power line, an internal rechargeable battery or an
external DC source of 12 – 30 V. The instrument’s internal battery charger operates any time the AVM-2000 is connected to a power source and the instrument is in a standby mode .
Voltages to be measured are applied to the AVM-2000 via low-thermal EMF front panel input terminals—HI and LO. A GUARD terminal is provided to connect input wiring shields.
A FILTER selection feature allows the operator to choose signal filtering from 0.1 to 100 seconds to improve measurements.
An OFFSET feature allows the user to offset a wide range of input voltages. An OPERATE/ZERO switch allows the user to disconnect the HI input terminal from the amplifier
input and short the amplifier input to input common (LO). The user may select any one of 4 different input impedances for ranges below 3 mV and either 10 or 100 MΩ for ranges of 3 mV to 300 V. The 1 kV range input impedance is fixed at 100 MΩ.
A multi-mode INPUT OFFSET control allows the user to adjust the instrument’s zero (voltage) for the current range, to inject an input offset current of up to ± 2.5 nA to offset the effects of input bias currents on high impedance voltage sources or to select the digit of offset voltage to be changed.
A two-terminal rear panel output is provided for use with external devices such as chart recorders, remote data acquisition systems, digital readouts, etc. This output allows the AVM-2000 to function as a high sensitivity instrumentation amplifier with gains that are the inverse of the input attenuator settings. These two terminals are an ISOLATED OUTPUT. A third rear panel terminal is connected to the case. A front panel control allows adjustment of the full scale output level from ± 0.5 volts to ± 1.5 volts.
Capabilities The AVM-2000 is designed for the calibration laboratory. By utilizing a unipolar, high gain, low drift amplifier coupled with the ability to attenuate or amplify the input voltage makes the AVM-2000 ideal for nulling applications/calibrations. This is ideal for comparing an unknown to a known (comparing a 10 V source to a voltage standard).

10 TEGAM WAY • GENEVA, OHIO 44041 440-466-6100 • FAX 440-466-6110 • www.tegam.com
1-2
Section I – Introduction
Specifications (Includes performance characteristics, description, power and utility information and environmental information)
Table 1.1 Physical and Electrical Specifications Inputs and Ranges • One set of input terminations for all ranges
• HI LO & Guard • Low end 100nV full scale deflection with 2nV resolution • High-end range ≥1000V full scale deflection. with 5V or better resolution • 21 selectable ranges, (1-3-10 sequence)
Outputs and Indicators 2 output indications • Analog meter • Isolated analog rear panel output
Analog Output Accuracy Resolution Linearity
± 0.5% of full scale of range selected (typically 0.1%) Within 0.1% of full scale of selected range (after floor noise compensation) Within 0.5% of full scale of selected range
Analog Meter Accuracy1 Scaling Linearity Resolution
± 2% of full scale of selected range Mirrored zero center 10-0-10 and 3-0-3 ≤ ± 1% of full scale of selected range ≤1% of full scale of selected range (typically, 0.5% of full scale of selected range)
Meter Response Time2 (To 90% of final reading) 100 nV - 1 μV full scale: 5 seconds 3 μV full scale: 3 seconds All other ranges: 1.5 seconds
Input Impedance 100 nV to 1 mV FS 3 mV to 300 V FS 1 KV FS
1 MΩ, 10 MΩ, 100 MΩ, or 1 GΩ Selectable +/- 10% 10 MΩ or 100 MΩ +/- 5% 100 MΩ +/- 5%
Offset Current Adjustable (± 2.5 nA) to zero at front panel
Filter
10-position digital low pass filter selectable from front panel 100, 200, 500 mSec, 1, 2, 5, 10, 20, 50, 100 Sec
Offset Resolution Accuracy
Continuously variable (0 to ±999.9% of range) offset for all ranges ≤ .01% of offset full scale ≤±0.5% of offset full scale
Series Mode Rejection > 80dB at 50Hz-60 Hz
1 Meter specification measurements and terms per ANSI C39.1 2 With filter response time set to 100 ms. Otherwise, filter response times add to meter response time.

10 TEGAM WAY • GENEVA, OHIO 44041 440-466-6100 • FAX 440-466-6110 • www.tegam.com
1-3
Section I – Introduction
Instrument Noise 400 pV (peak-to-peak, shorted input33) RTI Equivalent noise source approximately 30 ohms
Outputs Isolated yielding ±0.5 to ±1.5V (user adjustable) for full scale deflection
Isolation Input to case or output > 100 GΩ (typically > 500 GΩ)
Overload Protection 1100 VDC or peak on any range
Indicators
Meter: 4 ½” Mirror Backed with – 3 –- 0 –- +3 and -10 –- 0 –- +10 Scales Status Backlit LCD: Range, Offset, Filter Response Time, Input Impedance,
ZERO/OPERATE Mode, Input Offset Mode and Isolated Output Mode
Dimensions 6.5” H X 11.5”W X 13.5” D
Weight 22.5 lbs
Connectors • Low thermal EMF input terminals plus guard • Two output Binding Posts, plus a third for case common • Input terminal cover
Power Supply • Internal rechargeable battery • External 12 to 30 V DC @1.25 Ampere • External “Power Cube” included
Environmental Operating Temperature Range: 15 - 30 °C Full Specifications Operating Humidity Range: 0 - 50% RH Full Specifications Storage Temp / Humidity: -20 to + 60 °C / 0 - 80% non- condensing
3 Inputs shorted by a low EMF strap firmly connected between HI and LO input connections. (Lesser performance may be experienced when shorted input is accomplished by ZERO switch). Constant temperature.

10 TEGAM WAY • GENEVA, OHIO 44041 440-466-6100 • FAX 440-466-6110 • www.tegam.com
1-4
Section I – Introduction
Line Voltage Selection: The AVM-2000 is delivered with an AC Power Module for operation from 120 ±10% VAC, 60 Hz. If the AVM-2000 is to be operated from a 240 ±10% VAC, 50-400 Hz power source, or the input power range needs to be changed from a previous selection, an alternative AC Power Module is required. Contact TEGAM for a selection of input Power Modules.
CAUTION: DO NOT APPLY POWER TO THE INSTRUMENT BEFORE READING THIS SECTION.
Check the Power Cord Make sure the power cord supplied with the Model AVM-2000 is not frayed, broken, or cracked. A damaged power cord is a fire and electrical hazard. If the power cord is damaged, it should be replaced. Use the Proper Fuse To avoid fire hazard, use only the correct fuse type as specified for the AC power supply in the unit. The correct fuse for the AVM-2000 is a 1 1/4A, 3AG Slow Blow Fuse. The fuse is located just below the power cord socket. Before replacing the fuse, place the Model AVM-2000 front panel power switch to the OFF position and remove power cord on the back of the Model AVM-2000. To replace the fuse, gently slide out the fuse drawer. Remove the old fuse and snap a new one into the fuse holder. Reinstall the fuse by simply pushing the fuse drawer back into its original position. The fuse drawer should snap into place. Grounding the Equipment ISOLATED OUTPUT Two (Red and Black) binding posts with banana sockets (4mm) are provided to connect the AVM-2000’s ISOLATED OUTPUT to an external device. A third (Yellow) binding post connected to the AVM-2000 case which may be connected to earth ground via other connections to the instrument. The ISOLATED OUTPUT red and black binding posts are electrically isolated from the HI and LO input terminals. The signal level present at the ISOLATED OUTPUT is adjustable, via the OUTPUT LEVEL control, from ± 0.5 V to ±1.5 V full scale for the RANGE selected. The ISOLATED OUTPUT zero reference is adjusted during the Setup mode using the OUTPUT LEVEL control. WARNING: To avoid electrical shock or other potential safety hazards, plug the power cord into a properly wired receptacle before using this instrument. The proper grounding of this instrument is essential for safety and optimizing instrument operation. WARNING: Applying more than 1100 Volts across the input terminals or from either input terminal to common or ground results in instrument damage not covered by the warranty. NOTE: Rapid changes in input voltage potentially can result in voltages well in excess of 1100 Volts due to reactive effects in the supply circuit—such induced voltage may damage the instrument.
!

10 TEGAM WAY • GENEVA, OHIO 44041 440-466-6100 • FAX 440-466-6110 • www.tegam.com
1-5
Section I – Introduction
Items Included with the AVM-2000
Item Part Number
AC Power Module Rechargeable Battery Input Terminal Shield
GUARD to LO Nickel Plated Shorting Link 2 μF Filter Block Mounted on Dual Banana Jack
Technical (Instruction and Service) Manual
PS-107 BA-105 0600-081 J-5 0600-090 AVM2000-900
Table 1.2— AVM-2000 Packing List
Additional items required for operation and maintenance
Precision voltage and current source 0 to 1000 Volts DC & AC RMS and 10 μA – 1 A DC, such as Fluke model 5100 or 5720 Multi Product Calibrator
Precision DMM with range of 0 to ±1000 V DC and AC RMS such as Fluke model 8508A, Keithley 2002 or Agilent 3458A.
Oscilloscope such as Tektronix model TDS-1000 Environmental chamber capable of housing the AVM-2000 with ability to regulate temperature from
10°C to 35°C ±0.1°C such as Thermotron model S-5.5 3800 Megohmmeter such as PPM model R1M-A Low-thermal EMF shielded test leads (solid copper wire or solid copper wire with gold plated spade
terminals) Pure copper shorting strap 10 mΩ 10 A shunt, 0.1% 25 Ω resistor, ¼ Watt, 1% 30 Ω resistor, ¼ Watt, 1% 10 kΩ resistor. ¼ Watt, 1% 1 MΩ resistor, ¼ Watt, 1% 10 MΩ resistor, ¼ Watt, 2% 100 MΩ resistor, ¼ Watt, 2%
10 TEGAM WAY • GENEVA, OHIO 44041 440-466-6100 • FAX 440-466-6110 • www.tegam.com
1-6
Section I – Introduction
Preparation For Calibration Or Repair Service Once you have verified that the cause for the AVM-2000 malfunction cannot be solved in the field and the need for repair and calibration service arises, contact TEGAM customer service to obtain an RMA, (Returned Material Authorization), number. You can contact TEGAM customer service via the TEGAM website, www.tegam.com or by calling 440.466.6100 (All Locations) OR 800.666.1010 (United States Only). The RMA number is unique to your instrument and will help us identify you instrument and to address the particular service request by you which is assigned to that RMA number. Of even importance, a detailed written description of the problem should be attached to the instrument. Many times repair turnaround is unnecessarily delayed due to a lack of repair instructions or of a detailed description of the problem. This description should include information such as measurement range, and other instrument settings, type of components being tested, are the symptoms intermittent, conditions that may cause the symptoms, has anything changed since the last time the instrument was used, etc. Any detailed information provided to our technicians will assist them in identifying and correcting the problem in the quickest possible manner. Use a copy of the Repair and Calibration Service form provided on the next page. Once this information is prepared and sent with the instrument to our service department, we will do our part in making sure that you receive the best possible customer service and turnaround time possible.
10 TEGAM WAY • GENEVA, OHIO 44041 440-466-6100 • FAX 440-466-6110 • www.tegam.com
1-7
Section I – Introduction
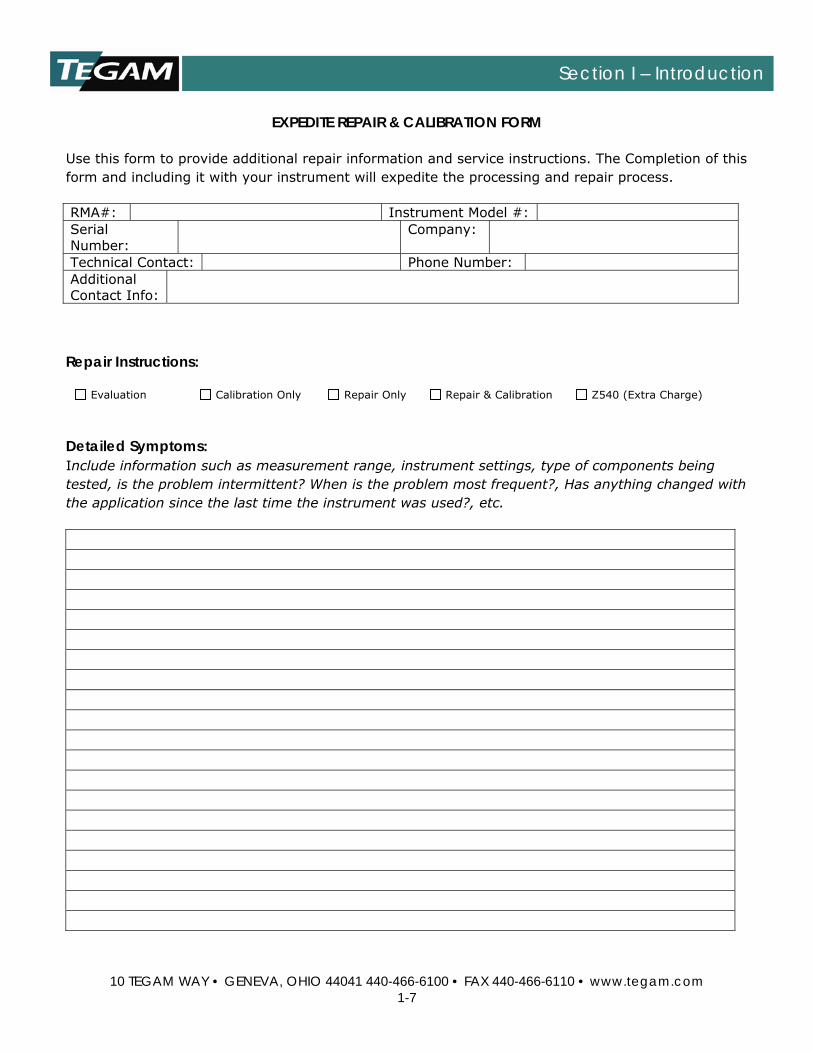
EXPEDITE REPAIR & CALIBRATION FORM
Use this form to provide additional repair information and service instructions. The Completion of this form and including it with your instrument will expedite the processing and repair process.
RMA#: Instrument Model #: Serial Number:
Company:
Technical Contact: Phone Number: Additional Contact Info:
Repair Instructions: Evaluation Calibration Only Repair Only Repair & Calibration Z540 (Extra Charge)
Detailed Symptoms: Include information such as measurement range, instrument settings, type of components being tested, is the problem intermittent? When is the problem most frequent?, Has anything changed with the application since the last time the instrument was used?, etc.

10 TEGAM WAY • GENEVA, OHIO 44041 440-466-6100 • FAX 440-466-6110 • www.tegam.com
1-8
Section I – Introduction
Warranty TEGAM, Inc. warrants this product to be free from defects in material and workmanship for a period of one year from the date of shipment. During this warranty period, if a product proves to be defective, TEGAM Inc., at its option, will either repair the defective product without charge for parts and labor, or exchange any product that proves to be defective. TEGAM, Inc. warrants the calibration of this product for a period of 1 year from date of shipment. During this period, TEGAM, Inc. will recalibrate any product, which does not conform to the published accuracy specifications. In order to exercise this warranty, TEGAM, Inc., must be notified of the defective product before the expiration of the warranty period. The customer shall be responsible for packaging and shipping the product to the designated TEGAM service center with shipping charges prepaid. TEGAM Inc. shall pay for the return of the product to the customer if the shipment is to a location within the country in which the TEGAM service center is located. The customer shall be responsible for paying all shipping, duties, taxes, and additional costs if the product is transported to any other locations. Repaired products are warranted for the remaining balance of the original warranty, or 90 days, whichever period is longer. Warranty Limitations The TEGAM, Inc. warranty does not apply to defects resulting from unauthorized modification or misuse of the product or any part. This warranty does not apply to fuses, batteries, or damage to the instrument caused by battery leakage. Statement of Calibration This instrument has been inspected and tested in accordance with specifications published by TEGAM Inc. The accuracy and calibration of this instrument are traceable to the National Institute of Standards and Technology through equipment, which is calibrated at planned intervals by comparison to certified standards maintained in the laboratories of TEGAM Inc. Document publishing dates may lag product changes. Visit www.tegam.com to download the latest version of this manual.
Contact Information: TEGAM INC.
10 TEGAM WAY GENEVA, OHIO 44041
PH: 440.466.6100 FX: 440.466.6110
EMAIL: [email protected] WEB: http://www.tegam.com

10 TEGAM WAY • GENEVA, OHIO 44041 440-466-6100 • FAX 440-466-6110 • www.tegam.com
2-1
Section II – Preparation for Use and Installation
Unpacking & Inspection Each AVM-2000 is put through a series of electrical and mechanical inspections before shipment to the customer. Upon receipt of your instrument unpack all of the items from the shipping carton and inspect for any damage that may have occurred during transit. Report any damaged items to the shipping agent. Retain and use the original packing material for reshipment if necessary. Upon Receipt, inspect the carton for the following items:
Model AVM-2000 RF Power Meter AC Power Module Rechargeable Battery Input Terminal Shield GUARD to LO Nickel Plated Shorting Link 2 μF Filter Block Mounted on Dual Banana Jack Technical (Operation and Maintenance) Manual
Mounting The AVM-2000 is a free-standing bench instrument housed in a protective metal enclosure. A single unit may be mounted in a standard 19 inch rack using a conventional rack shelf. Bail front feet allow the user to tilt the instrument for optimal viewing. Use in Proper Environment Normal calibration laboratory practice dictates that the environment should be closely controlled. This will minimize errors introduced by temperature and humidity changes. A nominal temperature of 15 - 30 °C provides a good working condition. CAUTION: The AVM-2000 has a specified ambient temperature range 15 - 30 °C. Operating beyond these limits can affect the accuracy of the instruments and damage internal circuitry. CAUTION: When the AVM-2000 is to be stored for extended periods, pack the instrument into a container. Place container in a clean, dry, temperature-controlled location. If instrument is to be stored in excess of 90 days, place desiccant with items before sealing container. The safe environmental limits for storage are -20° to +60°C and 0% to 80% non-condensing relative humidity. Do Not Use in Explosive Environments CAUTION: The AVM-2000 is not designed for operation in explosive environments. Ensure Power Switch is Accessible CAUTION: Ensure that the POWER switch is easily accessible at all times and nothing is in place that would impede proper use. Do Not Operate Without Covers WARNING: This device should be operated with all panels and covers in place. Operation with missing panels or covers could result in personal injury.

10 TEGAM WAY • GENEVA, OHIO 44041 440-466-6100 • FAX 440-466-6110 • www.tegam.com
3-1
Section III – Principles of Operation
Understanding the AVM-2000 Measurement Process Basic operation of the AVM-2000 and an understanding of how it achieves its specified levels of performance follow. The AVM-2000 architecture consists of three main sections: an Isolated Analog Subsystem; a Front Panel Subsystem; and a Power Supply Subsystem. The Isolated Analog Subsystem is optically (and therefore electrically) isolated from the balance of the instrument to ensure minimum noise introduction into the measurement signals from control/digital signals and to ensure that, when operating as a floating null meter, the impedance to chassis/earth ground from either of the two input terminals is extremely high. The heart of the AVM-2000 is in the Isolated Analog Subsystem. This is where nano-volt level signals are amplified via low-drift, low-noise, amplifiers to a level where they can drive a wide dynamic range 24-bit analog-to-digital converter and where initial analog filtering (10 Hz 4-pole Butterworth, low-pass) is applied. Once the signal is in digital format, it is further filtered, scaled and transferred across the isolating boundary for meter display and rear panel output as a high-speed serial signal. An ISOLATED OUTPUT is available so the AVM-2000 may be operated as a high-gain instrumentation amplifier with isolated output. When used as an instrumentation amplifier, the amplifier’s gain is the inverse of the AVM-2000’s range control setting. For example, at the 1 μV range and with the ISOLATED OUTPUT set to 1 V for full scale response, the amplifier gain is 1 V / 1 μV = 1,000,000. Input signals are applied to the AVM-2000’s low-thermal EMF binding posts. From here the signals are routed directly to the programmable input attenuator. Depending on the selected measurement range, the input signal is applied directly to the input amplifier (100 nV – 1 mV ranges) via a matched set of low-thermal EMF polarity reversal relays, or is attenuated to be compliant with the input amplifier’s dynamic range and then applied to the input amplifier (3mV – 1000V). On all ranges, all stages of the input amplifier allow sufficient head room so peak noise does not cause limiting and very high loop gains ensure low-distortion. This allows the AVM-2000 to make full use of the digital filtering technology to eliminate unwanted noise from the measured signals. Before signals are applied to the input amplifier, they pass through input protection circuitry. This protects the input amplifier from the direct application of excess voltage (up to 1,100 VDC/peak) on any input range. Additionally, the AVM-2000 input attenuator can be configured (in the 100-nV to 1-mV full scale ranges) as a 1 MΩ, 10 MΩ, 100 MΩ or 1 GΩ input termination resistance (user selectable). Input impedances for ranges between 3 mV full scale and 300 V full scale are 10 MΩ or 100 MΩ. The 1 kV range input impedance is fixed at 100 MΩ. Signals that are to be applied directly to the amplifier pass through a matched set of polarity reversing relays. When measuring signals on ranges of 1 mV or less, one half of all measurements are made with the relays in the NORMAL configuration and one half of all measurements are made with the relays in the ALTERNATE (polarity reversal) configuration. When the respective signals are digitized, they are subtracted from each other thus minimizing the impact of noise, thermal drifts and other undesired signals that tend to be of a single polarity. Further, averaging of these responses also minimizes the impact of drift. Amplification of the input signal occurs in a low-noise, low-drift, multi-stage programmable gain amplifier. The input amplifier housing is shielded to ensure minimal impact from external electro-magnetic signals and short-term temperature changes in the operating environment. The amplifier components are chosen to ensure Johnson Noise and other similar noise contributors fall below an equivalent noise resistance of 25Ω. Early stages of the input amplifier are provided with basic filtering that permits the amplifier to maintain its DC performance characteristics with the simultaneous application of a line-frequency (50 Hz or

10 TEGAM WAY • GENEVA, OHIO 44041 440-466-6100 • FAX 440-466-6110 • www.tegam.com
3-2
Section III – Principles of Operation
greater)signal up to 80 dB greater than the signal being measured. Precise and highly-stable offset current is also applied to the input amplifier via a 16-bit DAC whose output value is set by the front panel INPUT OFFSET control. The output of the multi-stage amplifier is applied to the input of a precision 24-bit analog-to-digital converter. This high-precision, high-stability analog-to-digital converter samples the input signal (including input noise) many times per second. Various filtering/averaging algorithms are applied to this 24-bit result based on front panel FILTER settings. The processor then converts the 24-bit word into a bit stream that is optically coupled to the Front Panel Subsystem. The 24-bit conversion gives a resolution in excess of one part in 16 million to provide a high degree of overall linearity and resolution (ultimately, after processing, 18 bits—17-bits of amplitude resolution and one sign bit). The 24-bit conversion allows extensive digital filtering and manipulation to assist in the measurement and noise reduction process. Once the digitized (and optically isolated) measurement information is received by the Front Panel Subsystem the output is converted from serial information and is sent to a 20-bit digital-to-analog converters with updates every 200 mS. The digital-to-analog converter output is buffered and sent to the 4 ½ inch, zero-center, mirror-backed meter movement. This meter provides a high-resolution readout with both 10 – 0 – 10 and 3 – 0 – 3 scales. A second 20-bit digital-to-analog converter output is sent to a buffer amplifier. This output is normalized to ±1 V at full scale (corrected for any gain normalizations set by the operator who can make gain adjustments which set the ISOLATED OUTPUT full scale level at ±0.5 V - ± 1.5 V for a full scale input) and is applied to the ISOLATED OUTPUT rear panel terminals. This output allows the operator to utilize the AVM-2000 as a high-gain, high-linearity, (chopper-stabilized for ranges of 1mV and below) instrumentation amplifier with isolated output. A front panel knob allows operator adjustment of the isolated output amplitude. The Front Panel Subsystem control circuits consist of a microprocessor, LCD, 6 pushbuttons and 3 rotary encoders. The microprocessor continuously scans the switches and rotary encoders to detect any changes. It also regularly updates the LCD with the current AVM-2000 status as selected by the user with the pushbuttons and rotary encoder. The microprocessor regularly poles the Isolated Analog Subsystem via a high-speed optically isolated serial communications bus. The Isolated Analog Subsystem responds, supplying the results of the current analog to digital conversions of the applied input signal. In addition to polling the Isolated Analog Subsystem, Front Panel Subsystem communications include information such as current RANGE, FILTER, OFFSET, OPERATE/ZERO, ZIN, and ZERO selections. When operated in the setup mode (special menu on the LCD selected by depressing the Range Control), the microprocessor communications are modified to contain special requests such as ZERO, GAIN and setting the 2.667 volt reference.

10 TEGAM WAY • GENEVA, OHIO 44041 440-466-6100 • FAX 440-466-6110 • www.tegam.com
4-1
Section IV – Operating Instructions
Front Panel Displays LCD Display: Instrument operating status is indicated on the front panel LCD. Information displayed includes:
RANGE : 21 Ranges from 100 nV to 1 kV (full scale) INPUT IMPEDANCE: 1, 10, 100 MΩ, 1 GΩ or ZERO (Shorted input) OFFSET: ±30,000.00 μV in 0.01 μV steps BATTERY STATUS: Vertical bar graph showing 0 – Full Charge VARIABLE CONTROL LOCK: Status of variable control locks FILTER: Filter times from 0.1 s to 100 s in 1-2-5 sequence
Power ON indication is also on the LCD display indicating the amount of battery life remaining. The LCD blinks CHARGING if the instrument is connected to a charging source with power turned OFF. The battery graph indicates ERR if the battery voltage is abnormally low with charging current applied. Analog Display: Voltage readings are displayed on a taut-band 4 1/2 inch, zero center, mirror-backed meter with dual scales (± 0 - 3 or ± 0 – 10). The scale used depends on the range selected.
Figure 4.1 - AVM-2000 Front Panel

10 TEGAM WAY • GENEVA, OHIO 44041 440-466-6100 • FAX 440-466-6110 • www.tegam.com
4-2
Section IV – Operating Instructions
Front Panel Controls Power -- Pushbutton Push ON / Push OFF RANGE/PUSH FOR MENU -- Rotary Control/Pushbutton This is a multi-function button and should be thoroughly understood prior to operating any other controls on the AVM-2000. Range: In the default position, meaning the rotary button was not pressed only rotated, the rotary control button selects one of 21 full scale voltage ranges: 100 nV, 300 nV, 1 μV, 3 μV, 10 μV, 30 μV, 100 μV, 300 μV, 1 mV, 10 mV, 30 mV, 100 mV, 300 mV, 1 V, 3 V, 10 V, 30 V, 100 V, 300 V, 1 kV (1000 V). The selected range full-scale value displays on the LCD. Push For Menu: This control performs secondary functions such as instrument setup routines. To access to these functions depress the RANGE control for approximately 5 seconds, after which the set up menu appears in the LCD. Rotating the RANGE control in this mode causes the LCD to display various setup options. FILTER -- Pushbuttons Two momentary action FILTER pushbuttons allow the user to increase (+) or decrease (-) the filter setting. Filter integration time is shown on the LCD. The available filters: 0.1, 0.2, 0.5, 1, 2, 5, 10, 20, 50, and 100 seconds. An input signal is averaged (running average) before driving the meter movement or isolated output over these times. NOTE: Input ranges of 10 μV and below have a restricted range of filter times (see Table 4-1).
Range Filter Input Ω 100nV 2 sec to 100 sec 1MΩ, 10MΩ, 100MΩ, 1GΩ 300nV 2 sec to 100 sec 1MΩ, 10MΩ, 100MΩ, 1GΩ 1μV 1 sec to 100 sec 1MΩ, 10MΩ, 100MΩ, 1GΩ 3μV 0.5 sec to 100 sec 1MΩ, 10MΩ, 100MΩ, 1GΩ 10μV 0.5 sec to 100 sec 1MΩ, 10MΩ, 100MΩ, 1GΩ 30μV 0.1 sec to 100 sec 1MΩ, 10MΩ, 100MΩ, 1GΩ 100μV 0.1 sec to 100 sec 1MΩ, 10MΩ, 100MΩ, 1GΩ 300μV 0.1 sec to 100 sec 1MΩ, 10MΩ, 100MΩ, 1GΩ 1mV 0.1 sec to 100 sec 1MΩ, 10MΩ, 100MΩ, 1GΩ 3mV 0.1 sec to 100 sec 10MΩ, 100MΩ 10mV 0.1 sec to 100 sec 10MΩ, 100MΩ 30mV 0.1 sec to 100 sec 10MΩ, 100MΩ 100mV 0.1 sec to 100 sec 10MΩ, 100MΩ 300mV 0.1 sec to 100 sec 10MΩ, 100MΩ
1V 0.1 sec to 100 sec 10MΩ, 100MΩ 3V 0.1 sec to 100 sec 10MΩ, 100MΩ 10V 0.1 sec to 100 sec 10MΩ, 100MΩ 30V 0.1 sec to 100 sec 10MΩ, 100MΩ 100V 0.1 sec to 100 sec 10MΩ, 100MΩ 300V 0.1 sec to 100 sec 10MΩ, 100MΩ 1000V 0.1 sec to 100 sec 100MΩ
Table 4-1 - Table of Ranges, Input Impedance and Available Filter Settings

10 TEGAM WAY • GENEVA, OHIO 44041 440-466-6100 • FAX 440-466-6110 • www.tegam.com
4-3
Section IV – Operating Instructions
OFFSET -- Pushbuttons Two momentary action OFFSET pushbuttons allow the user to increase (+) or decrease (-) an internal offset voltage that is applied when the instrument is in the OPERATE mode. The indication displayed on the meter (or output at the rear panel) is the sum of the input voltage and the displayed (LCD) value of offset voltage. The offset voltage can be varied from -30,000.00 μV to + 30,000.00 μV in 0.01 μV steps. Each digit within the offset voltage display is adjusted up or down independently. The digit to be adjusted is indicated by an underscore (e.g. 03,000.00 or 00,300.00). The position of the underscore is selected using the INPUT OFFSET control while the padlock icon () is displayed to the left of the control. Depressing and holding one of the OFFSET pushbuttons allows continuous movement of the selected OFFSET voltage digit. NOTE: Incrementing or decrementing a position within the displayed OFFSET voltage causes a carry to higher order or lower order digit as appropriate. Depressing both OFFSET pushbuttons simultaneously resets the offset to 00,000.00 μV. NOTE: Each range has a maximum permissible offset. Exceeding this offset produces no further offset and the μV icon blinks. OPERATE/ZERO -- Pushbutton A momentary action pushbutton switch selects the OPERATE (measurement) or ZERO mode. In the ZERO mode the connection between the HI input terminal and the internal amplifiers is opened, the amplifier input is shorted to the amplifier common and any OFFSET voltage is removed. When the ZERO mode is selected, the instrument input impedance setting (as displayed on the LCD) is replaced with ZERO. In the OPERATE mode the voltage to be measured is applied to the input amplifier and the displayed/output voltage is the sum of the input voltage and the indicated OFFSET voltage. NOTE: This is NOT the button used to zero the meter. INPUT/MΩ -- Pushbutton The INPUT / MΩ momentary action pushbutton allows the user to select the value of resistance present between the HI and LO input terminals. By successively depressing the momentary INPUT/MΩ pushbutton increments through: 1 MΩ, 10 MΩ, 100 MΩ and 1 GΩ for ranges 100nV through 1mV, 10MΩ, 100MΩ, from 3mV through 300V ranges 100MΩ 1,000 V range. NOTE: This button is not active when OPERATE/ZERO button is set to ZERO. INPUT OFFSET -- Rotary Control/Pushbutton This is a multi-function button and should be thoroughly understood prior to operating any other controls on the AVM-2000. The INPUT OFFSET rotary control is a rotary encoder that, when enabled by momentarily depressing the control, allows the user to perform a number of zeroing functions. When the instrument is first initialized, the control is locked. This is shown by a (a padlock icon) adjacent to the control in the LCD. Depressing the control once changes the padlock icon to V and depressing the control again changes the icon to I. When V is displayed the control allows the user to fine tune the current range and mode zero position. Turning the control clockwise moves the meter upscale and turning the control counterclockwise moves the meter downscale. The control has a range of approximately ± full scale. The zero adjustment setting is stored at anytime a range, zero/operate or input impedance change occurs or if the control’s position is reset to the center or neutral position. The user can reset the control to the center (neutral—i.e. no offset) position by depressing and holding the control depressed for 5 seconds.

10 TEGAM WAY • GENEVA, OHIO 44041 440-466-6100 • FAX 440-466-6110 • www.tegam.com
4-4
Section IV – Operating Instructions
When I is displayed, the control allows the user to inject currents of ± 2.5 nA into the input amplifier and its driving source. This adjustment allows the user to offset any natural instrument and/or measurement bias currents flowing through driving impedances (causing an offset voltage). Turning the control clockwise injects a positive current and counterclockwise injects a negative current. Holding the control depressed for 5 seconds or longer resets the offset current to 0. NOTE: The level of injected offset current does NOT change as ranges are changed; thus, the input offset current need only be set once; however, the offset current returns to zero when the instrument power is turned off. NOTE: When nulling input bias currents, the user may find using a 100kΩ low-noise resistor or a low-noise resistor value approximating the source impedance of the device connected between the HI and LO input terminals is beneficial. When using a 100 kΩ resistor, the 30 μV range is a good choice as a starting point. The 30 μV range and a 100 kΩ resistance shows input bias currents of ± 300 pA (full scale) and allows nulling these input bias currents to substantially less than 1 pA. If the initial indication is off scale, change the range to 100 μV and then downrange to 30 μV. Alternatively, the 1 MΩ input impedance selection may be used. Once the range is zeroed or a desired level of input offset current is selected, the INPUT OFFSET control may be locked (by depressing the control until the padlock icon is displayed). This prevents further adjustment of the range zero function or input offset current. The control’s locked/unlocked status is shown in an adjacent area of the status LCD. A(closed padlock) indicates locked status. Either V or I indicate unlocked status. NOTE: with the padlock displayed, adjusting the INPUT OFFSET control allows the user to select which digit of the OFFSET voltage responds to the OFFSET up and down pushbuttons. An underscore is displayed under the selected digit (e.g. 03,000.00 or 00,300.00). OUTPUT LEVEL -- Rotary Control/Pushbutton This is a multi-function button and should be thoroughly The OUTPUT LEVEL rotary control is a rotary encoder that allows the user to adjust the ISOLATED OUTPUT level. The range of this control allows the user to adjust the ISOLATED OUTPUT voltage from ± 0.5 volt to ± 1.5 volt when the meter is deflected to full scale. The OUTPUT LEVEL control also serves to set the ISOLATED OUTPUT zero voltage when in Setup mode. The OUTPUT LEVEL control is unlocked or locked by depressing the control once. The control’s locked/unlocked status is shown in an adjacent area of the LCD. A (closed padlock) indicates locked status. OVER VOLTAGE If a potentially harmful over voltage exists at the instrument’s input amplifier, the Over Voltage circuit is activated. Once activated, the instrument is disconnected from the input terminals and an over voltage status is shown on the LCD. NOTE: The Over Voltage only operates when the instrument Range is 1 mV or below unless an extreme over voltage occurs (> 1,300 V) on the 3 mV and above ranges—such voltages are likely to damage the instrument. When an over voltage condition occurs, the first step is to remove the source of input over voltage. After the over voltage source is cleared, depressing the OPERATE/ZERO pushbutton once returns the instrument to operation in the ZERO mode. Depressing the OPERATE /ZERO pushbutton once again returns the instrument to the OPERATE mode.
10 TEGAM WAY • GENEVA, OHIO 44041 440-466-6100 • FAX 440-466-6110 • www.tegam.com
4-5
Section IV – Operating Instructions
WARNING: FAILURE TO REMOVE THE SOURCE OF INPUT OVER VOLTAGE BEFORE RESTORING NORMAL INSTRUMENT OPERATION MAY CAUSE SERIOUS DAMAGE TO THE INSTRUMENT! NOTE: Although the over voltage circuits protect the instrument from substantial excessive voltages at its inputs, it cannot protect the instrument against damage from extremely high voltage spikes that can occur when the over voltage condition is transient in nature and the voltage spikes are very high due to inductive spiking. For this reason, great care should be taken when using the instrument in high- sensitivity modes (especially on ranges of 1 mV and lower) with very high measurement differential voltages. Normal Operation Normal calibration laboratory practice dictates that the environment should be closely controlled. This will minimize errors introduced by temperature and humidity changes. A nominal temperature of +20°C provides a good working condition. A tolerance of ±5°C gives allowable temperature spread. Controlled temperatures also stabilize the aging process of the standards.

10 TEGAM WAY • GENEVA, OHIO 44041 440-466-6100 • FAX 440-466-6110 • www.tegam.com
4-6
Section IV – Operating Instructions
Setting Zero Procedure Purpose: The AVM-2000 zeroing procedure is significantly different from older Null Meters such as the Fluke 845. It is important to remember that when adjusting for zero in the ZERO mode, the adjustments do not affect the OPERATE mode measurements. The benefit of zeroing in the ZERO mode allows the user to observer any possible drift in the instrument amplifiers since the last zero. This observation helps determines any possible drift errors affect the current test procedure. Equipment:
TEGAM AVM-2000 Null Meter Connections:
1. Plug in all test and measurement equipment 2. Connect shorting strap between the HI(red) and LO(black) terminal of the AVM-2000.
NOTE: A zero may be accomplished while in a test configuration such as a Kelvin-Varley Divider calibration. For this type of zero it is important to insure the voltage source is connected and power output is set to 0 and the output is off. This will give you a zero through the entire configuration rather than simply shorting the AVM-2000 at the input. Procedure for Zeroing the AVM-2000 in ZERO mode:
1. Power On the AVM-2000 and allow for normal instrument warm up. 2. Set the Filter to 2.0 sec.
a. Press the Filter push button(s) until the display shows 2.0 sec. b. Other Filter ranges may be used but 2.0 sec is the optimal for zeroing.
3. Select what Ranges need zeroing. NOTE: Knowing what ranges to zero can reduce your procedure time exponentially. For example to achieve sub-part per million results while calibrating a 10 V source the operator would calibrate fro 10 V to 1 µV. There would really be no need to calibrate the ranges above 10 V or below 1 µV.
4. Place the AVM-2000 in ZERO mode. a. Press the OPERATE/ZERO button until the ZERO appears in the display. b. Other impedance settings are ignored at this point.
5. Dial the Range -- Rotary Control/Pushbutton to the range on the display changes to 1 µV. 6. Press the INPUT OFFSET -- Rotary Control/Pushbutton until the (closed padlock) changes to V. 7. Dial the INPUT OFFSET -- Rotary Control/Pushbutton until zero is attained on the analog display. 8. Dial the Range -- Rotary Control/Pushbutton changing the range to 3 µV and repeat step 7 and
repeat on every range up to and including 10 V. Procedure for Zeroing the AVM-2000 in OPERATE mode:
1. Power On the AVM-2000 and allow for normal instrument warm up. 2. Set the Filter to 2.0 sec.
a. Press the Filter push button(s) until the display shows 2.0 sec. b. Other Filter ranges may be used but 2.0 sec is the optimal for zeroing.
3. Select what Ranges need zeroing.

10 TEGAM WAY • GENEVA, OHIO 44041 440-466-6100 • FAX 440-466-6110 • www.tegam.com
4-7
Section IV – Operating Instructions
NOTE: Knowing what ranges to zero can reduce your procedure time exponentially. For example to achieve sub-part per million results while calibrating a 10 V source the operator would calibrate fro 10 V to 1 µV. There would really be no need to calibrate the ranges above 10 V or below 1 µV.
4. Place the AVM-2000 in OPERATE mode. a. Press the OPERATE/ZERO button until the 10 MΩ appears in the display.
NOTE: 10 MΩ is selected because that is the impedance of the Fluke 845 and familiar to most users and calibration procedures. The user can select the desired impedances at this point. It is important to note that a separate zero needs to be performed for each impedance as well as range. It is not typical to changes impedances during a calibration.
5. Dial the Range -- Rotary Control/Pushbutton to the range on the display changes to 1 µV. 6. Press the INPUT OFFSET -- Rotary Control/Pushbutton until the (closed padlock) changes to V. 7. Dial the INPUT OFFSET -- Rotary Control/Pushbutton until zero is attained on the analog display. 8. Dial the Range -- Rotary Control/Pushbutton changing the range to 3 µV and repeat step 7 and
repeat on every range up to and including 10 V.

10 TEGAM WAY • GENEVA, OHIO 44041 440-466-6100 • FAX 440-466-6110 • www.tegam.com
5-1
Section V – Maintenance and Servicing
Maintenance No regular maintenance is required, other than to keep the internal battery charged. Calibration Verification should be performed yearly or as required. The exterior of the Model AVM-2000 should be cleaned periodically, as is necessary, using a soft cloth dampened with a mild non-abrasive, water soluble, detergent, and then rinsed with a water dampened soft cloth. DO NOT use alcohol, solvents, harsh chemicals, or abrasive materials to clean the AVM-2000 Meter, or other plastic knobs and connectors. Clean the AVM-2000 Meter exterior face using a soft cloth dampened with a mild non-abrasive, water soluble, detergent, and then rinse with a water dampened soft cloth. Wipe dry with another soft cloth. DO NOT use common paper towel products in place of a soft cloth, as some brands may contain fibers which could scratch the AVM-2000 Meter. DO NOT use alcohol, solvents, harsh chemicals, or abrasive materials to clean the AVM-2000 Meter. Periodically inspect the AVM-2000 to make sure all the switch and control knobs are on tight. If they are loose, tighten with the proper size Allen wrench or a small flat blade screw driver as appropriate.
Disassembly and Re-Assembly Make sure the AC Power Module (or any other source of charging current) is disconnected and removed from the AVM-2000 before any disassembly or reassembly of the instrument. The reader should become familiar with drawings, parts identification, parts layout and other mechanical information. CAUTION: The battery must be disconnected as the first step in any disassembly process. CAUTION: Follow ESD (ELECTROSTATIC DISCHARGE) Procedures when handling the AVM-2000 printed circuit boards and their components. POWER SUPPLY SUBSYSTEM
1. Make sure the POWER switch is in the OFF (out) position. 2. Disconnect the AC Power Module (or other charging source) from the AVM-2000. 3. Remove the 8 screws (left and right sides of the instrument case) that attach the top cover to the
front and rear panels. Slide the top cover vertically from the instrument. 4. With the top cover removed, disconnect the 3-pin battery cable J3, 10-pin power cable J4, and, the
3-pin ISOLATED OUTPUT interconnect cable, J1, from the power supply board to facilitate access. 5. With the battery and power supply board completely disconnected from the balance of the
instrument, remove the two screws that fasten the base plate to the rear panel. 6. With the back panel free from the case, unsolder the charging jack pins, the ISOLATED OUTPUT
binding posts and the fuse wires from the power supply board. 7. Remove the power transistor cable J2. 8. Remove the captivating nuts, lock washers from the mounting studs, and remove the power supply
board from the back panel. 9. If the power transistor is to be replaced, remove the transistor by first removing the retaining nut
from the mounting stud. Clean any residual heat sink compound from the back panel with denatured alcohol and reapply fresh compound prior to the installation of the new transistor. Be sure a new isolating shoulder washer is placed over the stud and centered in the power transistor’s mounting hole before the nut is tightened.
CAUTION: Many connectors are similar in appearance. When re-assembling the instrument, be sure connector and jack numbers match and those connectors are installed correctly.

10 TEGAM WAY • GENEVA, OHIO 44041 440-466-6100 • FAX 440-466-6110 • www.tegam.com
5-2
Section V – Maintenance and Servicing
Front Panel Subsystem 1. Make sure the POWER switch is in the OFF (out) position. 2. Disconnect the AC Power Module (or other charging source) from the AVM-2000. 3. Remove the 8 screws (left and right sides of the instrument case) that attach the top cover to the
front and rear panels. Slide the top cover vertically from the instrument. 4. With the top cover removed, disconnect the 3-pin battery cable, J3, from the power supply board.
At the front panel, disconnect the 10-pin power cable, J1, the 3-pin rear panel, J4, and meter, J5, connections from the front panel board as well as the 10-pin Isolated Analog Subsystem connector, J2, from the front panel board.
5. Using a hex key, loosen the set screws holding the three front panel knobs on their respective shafts and remove the knobs. Additionally, the range control is secured to the front panel by a hex nut and flat washer that must be removed. An internal tooth lock washer is located on the range control bushing.
6. With the front panel board completely disconnected from the balance of the instrument, remove the two screws that fasten the base plate to the front panel.
7. Remove the captivating screws, lock washers from the mounting studs, and remove the front panel board from the front panel.
8. Installation of a front panel board is performed by reversing the order of the above removal steps. Isolated Analog Subsystem
1. Make sure the POWER switch is in the OFF (out) position. 2. Disconnect the AC Power Module (or other charging source) from the AVM-2000. 3. Remove the 8 screws (left and right sides of the instrument case) that attach the top cover to the
front and rear panels. Slide the top cover vertically from the instrument. 4. With the top cover removed, disconnect the 3-pin battery cable J3 from the power supply board. 5. Disconnect the 10-pin cable coming from the Isolated Analog Subsystem to the front panel, J2. 6. Disconnect the 10-pin cable coming from the power supply board to the front panel board, J1. 7. Remove the two screws that fasten the base plate to the front panel. 8. Tip the front panel forward sufficiently to expose the rear of the three front panel binding posts,
unsolder the HI and LO input terminal connections (NOTE: These connections are made with high-quality silver solder to minimize input thermal EMF) and disconnect the Isolated Analog Subsystem from the GUARD binding post.
9. To remove the Isolated Analog Subsystem as a unit, place the instrument on its side and remove the 8 nylon bolts that connect the Isolated Analog Subsystem to the instrument base plate.
CAUTION: The Isolated Analog Subsystem in its metal box is very heavy. Assistance in the disassembly process helps reduce the potential of damage from dropping components during the disassembly/assembly process.
10. Remove the metal box containing the analog subsystem together with its connection cables and insulating plate from the case.
11. If access to the internal Isolated Analog Subsystem board is required, remove the top cover, retaining screws and top cover. Next remove the captivating screws and lock washers from the 4 mounting studs to free the Isolated Analog Subsystem board. If the board is being replaced, the inter-connect cables must also be removed for reinstallation on the replacement board.
12. Installation of the isolated analog subsystem and/or the analog subsystem board is performed by reversing the order of the above removal steps. Be sure to use silver solder to re-connect the Isolated Analog Subsystem input cable to the input binding posts.

10 TEGAM WAY • GENEVA, OHIO 44041 440-466-6100 • FAX 440-466-6110 • www.tegam.com
5-3
Section V – Maintenance and Servicing
NOTE: Failure to keep components and/or the printed circuit board in the Isolated Analog Section clean of contaminants may compromise the performance of the AVM-2000. Avoid touching the electrical surfaces of the printed circuits, unless wearing clean gloves.

10 TEGAM WAY • GENEVA, OHIO 44041 440-466-6100 • FAX 440-466-6110 • www.tegam.com
5-4
Section V – Maintenance and Servicing
Calibration Verification (Preliminary Calibration Operations)
1. Connect test equipment to appropriate power sources, set POWER switches to ON and allow a warm-up period (Suggest 4 hours).
NOTE: Recommend use of low-thermal EMF shielded test leads (solid copper wire or solid copper wire with gold plated spade terminals). NOTE: Before continuing, ensure AVM-2000 has been connected to external power for a minimum of 20 hours.
2. With AVM-2000 POWER switch set to OFF, disconnect AVM-2000 from external power source and mechanically zero AVM-2000 meter.
NOTE: The AVM-2000 must remain at the same tilt level during warm-up and throughout the Calibration Process.
3. Set AVM-2000 POWER switch to On, ensure AVM-2000 indicates a fully charged battery and allow a one hour warm-up period.
4. Connect the Digital Multimeter HI and LO INPUT terminals to AVM-2000 rear panel + and -
terminals, observe polarity.
5. Set the Digital Multimeter FUNCTION for DCV and AUTO range.
If AVM-2000 LCD OFST: indication is not 00,000.00 μV, using the INPUT OFFSET knob to select the place value and the OFFSET buttons to select the numerical value, set OFST: indication to 00,000.00 μV.
6. Press AVM-2000 INPUT OFFSET knob until V is displayed. Press and hold AVM-2000 INPUT OFFSET knob for approximately 5 seconds.
7. Press AVM-2000 INPUT OFFSET knob until I is displayed. Press and hold AVM-2000 INPUT OFFSET knob for approximately 5 seconds.
8. Press AVM-2000 INPUT OFFSET knob until a padlock symbol is displayed in the lower right of the LCD.
9. If required, press AVM-2000 OPERATE/ZERO button to select IMPEDANCE: ZERO as indicated on AVM-2000 LCD.
10. Press and hold AVM-2000 RANGE knob for approximately 5 seconds until AVM-2000 LCD indicates METER OFFSET.
11. Using AVM-2000 OUTPUT LEVEL knob, adjust AVM-2000 meter for a zero indication.
12. Turn AVM-2000 RANGE knob one step clockwise and AVM-2000 LCD readout will indicate METER GAIN +.
10 TEGAM WAY • GENEVA, OHIO 44041 440-466-6100 • FAX 440-466-6110 • www.tegam.com
5-5
Section V – Maintenance and Servicing
13. Using AVM-2000 OUTPUT LEVEL knob, adjust AVM-2000 for a + 10 (full scale positive) indication.
14. Turn AVM-2000 RANGE knob one step clockwise and AVM-2000 LCD readout will indicate METER GAIN -.
15. Using AVM-2000 OUTPUT LEVEL knob, adjust AVM-2000 for a - 10 (full scale negative) indication.
16. Turn AVM-2000 RANGE knob one step clockwise and AVM-2000 LCD readout will indicate OUTPUT
OFFSET.
17. Using AVM-2000 OUTPUT LEVEL knob, adjust for a zero ±3 mV indication on the Digital Multimeter.
18. Turn AVM-2000 RANGE knob one step clockwise.
19. If AVM-2000 LCD indicates ZERO RANGE, simultaneously press OFFSET buttons so that AVM-2000 LCD readout indicates ZERO ALL, otherwise, proceed to next step.
NOTE: Auto Zero is a very time consuming process that does not always yield perfect results due to the large number of ranges. The user may want to skip to manual zero process. CAUTION: Do not turn AVM-2000 RANGE switch clockwise again with the short attached. AVM-2000 could be damaged if a reference voltage is selected with a short attached.
20. Connect a short between AVM-2000 HI and LO terminals.
21. Press AVM-2000 OUTPUT LEVEL knob.
22. TI LCD will indicate a blinking ZERO ALL. When the ZERO ALL indication stops blinking, the zeroing process is complete (approximately 10 minutes).
23. Press AVM-2000 RANGE knob.
24. Press AVM-2000 OPERATE/ZERO button to select IMPEDANCE: (a resistance value, not ZERO) as
indicated on AVM-2000 LCD.
25. Press and hold AVM-2000 RANGE knob for approximately 5 seconds until AVM-2000 LCD indicates METER OFFSET.
26. Turn TI RANGE knob clockwise until AVM-2000 LCD indicates ZERO RANGE or ZERO ALL. If AVM-
2000 LCD indicates ZERO RANGE, simultaneously press OFFSET buttons so that AVM-2000LCD readout indicates ZERO ALL, otherwise, proceed to next step.
CAUTION: Do not turn AVM-2000 RANGE switch clockwise again with the short attached. AVM-2000 could be damaged if a reference voltage is selected with a short attached.
27. Press AVM-2000 OUTPUT LEVEL knob.
28. AVM-2000 LCD will indicate a blinking ZERO ALL. When the ZERO ALL indication stops blinking, the zeroing process is complete (approximately 5 minutes).
29. Press AVM-2000 RANGE knob.

10 TEGAM WAY • GENEVA, OHIO 44041 440-466-6100 • FAX 440-466-6110 • www.tegam.com
5-6
Section V – Maintenance and Servicing
30. Disconnect the Digital Multimeter and remove the short connected to AVM-2000 HI and LO terminals.

10 TEGAM WAY • GENEVA, OHIO 44041 440-466-6100 • FAX 440-466-6110 • www.tegam.com
5-7
Section V – Maintenance and Servicing
Calibration Process Required Equipment METER CALIBRATOR: Range: 0 to 1020 VDC; 0 to 0.306 ADC Accuracy: VDC, ±0.239% of output; ADC, ±0.072% of output Suggestion: Fluke 5700A CURRENT SHUNT: Range: 0.01 Ω Accuracy: ±0.072% of value Suggestion: Guildline 9211A DIGITAL MULTIMETER: Range: 0 to 1.5 VDC Agilent Accuracy: ±0.072% of rdg Suggestion: Agilent 3458A Analog Meter Calibration
1. Connect the Meter Calibrator OUTPUT HI and LO terminals to AVM-2000 front panel HI and LO terminals, respectively.
2. Using AVM-2000 FILTER buttons, set FILTER: to 2.0 Sec.
3. Using AVM-2000 RANGE knob, select the first AVM-2000 range listed in the Range column of Table
5.1 and set IMPEDANCE to 10 MΩ using the INPUT/MΩ button (not required on the 1000 V range).
4. Manually Zero Range of AVM-2000. a. Manual Range Zero of the AVM-2000:
i. Set the Meter Calibrator for zero VDC and set the OPR/STBY switch to OPR. ii. If required, select AVM-2000 IMPEDANCE ZERO function using the OPERATE/ZERO
button. iii. Press AVM-2000 INPUT OFFSET knob until a V indication is displayed. iv. Adjust AVM-2000 INPUT OFFSET knob for a zero indication on AVM-2000 analog
meter. v. Press AVM-2000 OPERATE/ZERO button. vi. Adjust AVM-2000 INPUT OFFSET knob for a zero indication on AVM-2000 analog
meter. vii. Press AVM-2000 INPUT OFFSET knob until a padlock symbol is displayed in the lower
right of the LCD. viii. Set the Meter Calibrator OPR/STBY switch to STBY.
5. Set the Meter Calibrator for the first positive value listed in the Applied column of Table 5.1 and set
the OPR/STBY switch to OPR.
6. Edit the Meter Calibrator output amplitude until AVM-2000 analog meter indicates full scale.
7. The Meter Calibrator must indicate within the corresponding positive values listed in the Limits column of Table 5.1.
8. Set the Meter Calibrator OPR/STBY switch to STBY.

10 TEGAM WAY • GENEVA, OHIO 44041 440-466-6100 • FAX 440-466-6110 • www.tegam.com
5-8
Section V – Maintenance and Servicing
9. Repeat steps 5 through 8 for the first negative value listed in the Applied and Limits column of Table 5.1.
10. Repeat steps 3 through 9 for each remaining value listed in the Range and Applied columns of
Table 5.1.
Range (VDC) Applied (VDC) Limits (VDC) 10 m ±10 m ±9.80 to 10.20 m 30 m ±30 m ±29.40 to 30.60 m 100 m ±100 m ±98.0 to 102.0 m 300 m ±300 m ±294.0 to 306.0 m 1 ±1 ±0.980 to 1.020 3 ±3 ±2.940 to 3.060 10 ±10 ±9.80 to 10.20 30 ±30 ±29.40 to 30.60 100 ±100 ±98.0 to 102.0 300 ±300 ±294.0 to 306.0 1000 ±1000 ±980.0 to 1020.0
Table 5.1
11. Using AVM-2000 RANGE knob, select AVM-2000 1 V range.
12. Perform Manual Range Zero of AVM-2000 (leave the Meter Calibrator in OPR).
13. Press the Meter Calibrator OFFSET button.
14. Set the Meter Calibrator for 1 VDC.
15. Edit the Meter Calibrator output amplitude until AVM-2000 analog meter indicates full scale.
16. Press the Meter Calibrator SCALE button.
17. Set the Meter Calibrator for 0.8 VDC and edit the output amplitude until AVM-2000 analog meter indicates this value.
18. The LinError indication on the Meter Calibrator display (rounded to the nearest whole percentage)
must be within -2 to +2%.
19. Repeat steps 17 and 18 for 0.6, 0.4 and 0.2 VDC.
20. Press the Meter Calibrator SCALE button (setting the function off).
21. Repeat steps 14 through 19 with negative applied voltages.
22. Set the Meter Calibrator OPR/STBY switch to STBY and press the SCALE and OFFSET buttons (setting the functions off).
23. Using AVM-2000 RANGE knob, select AVM-2000 3 Volt range.
24. Repeat Manual Range Zero of AVM-2000 (leave the Meter Calibrator in OPR).
25. Press the Meter Calibrator OFFSET button.

10 TEGAM WAY • GENEVA, OHIO 44041 440-466-6100 • FAX 440-466-6110 • www.tegam.com
5-9
Section V – Maintenance and Servicing
26. Set the Meter Calibrator for 3 VDC.
27. Edit the Meter Calibrator output amplitude until AVM-2000 analog meter indicates full scale.
28. Press the Meter Calibrator SCALE button.
29. Set the Meter Calibrator for 2 VDC and edit the output amplitude until AVM-2000 analog meter
indicates this value.
30. The LinError indication on the Meter Calibrator display (rounded to the nearest whole percentage) must be within -2 to +2%.
31. Repeat steps 29 and 30 for 1 VDC.
32. Press the Meter Calibrator SCALE button (setting the function off).
33. Repeat steps 26 through 31 with negative applied voltages.
34. Set the Meter Calibrator OPR/STBY switch to STBY and press the SCALE and OFFSET buttons
(setting the functions off).
35. Disconnect test setup.
36. Connect equipment as follows.
a. Connect AVM-2000 HI to Current Shunt Potential (+) and the LO to the Potential (-). b. Connect the Meter Calibrator HI to the Current Shunt 10 A. c. Connect Meter Calibrator LO to the Current Shunt Common.
37. Install the Current Shunt shorting plugs in the 10 A holes.
38. Using AVM-2000 RANGE knob, select the first AVM-2000 range listed in the Range column of Table 5.2.
39. Perform Manual Range Zero of the AVM-2000 except set the Meter Calibrator for 0 ADC in step
4.a.i.
40. Set the Meter Calibrator for the first positive value listed in the Applied column of Table 5.2 and set the OPR/STBY switch to OPR.
41. Edit the Meter Calibrator output amplitude until AVM-2000 analog meter indicates full scale.
42. The Meter Calibrator must indicate within the corresponding positive values listed in the Limits column of Table 5.2.
43. Set the Meter Calibrator OPR/STBY switch to STBY.
44. Repeat steps 40 through 43 for the first negative value listed in the Applied and Limits column of
Table 5.2.

10 TEGAM WAY • GENEVA, OHIO 44041 440-466-6100 • FAX 440-466-6110 • www.tegam.com
5-10
Section V – Maintenance and Servicing
45. Repeat steps 38 through 44 for each remaining value listed in the Range and Applied columns of Table 5.2.
Range (VDC) Applied (ADC) Limits (ADC) 3 m ±0.3 ±0.2940 to 0.3060 1 m * ±100 m ±98.00 to 102.00 m 300 μ ±30 m ±29.40 to 30.60 m 100 μ ±10 m ±9.80 to 10.20 m 30 μ ±3 m ±2.940 to 3.060 m 10 μ ±1 m ±0.980 to 1.020 m 3 μ ±0.3 m ±0.2940 to 0.3060 m 1 μ ±100 μ ±98.0 to 102.0 μ
* Set TI IMPEDANCE to 1 MΩ using the INPUT/MΩ button.
Table 5.2 Isolated Output Calibration
1. Connect the Digital Multimeter INPUT HI and LO terminals to AVM-2000 rear panel + and - terminals, respectively.
2. Set the Digital Multimeter FUNCTION for DCV and AUTO range.
3. Using AVM-2000 RANGE knob, select the 1 mV range.
4. Perform Manual Range Zero of the AVM-2000 except set the Meter Calibrator for 0 mA DC and
leave the Meter Calibrator in OPR.
5. Edit the Meter Calibrator output amplitude until the Digital Multimeter indicates 0.000 ±0.003 VDC.
6. Press the Meter Calibrator OFFSET button.
7. Set the Meter Calibrator for 100 mA DC.
8. Adjust AVM-2000 OUTPUT LEVEL knob until the Digital Multimeter indicates 1.500 ±0.003 VDC.
9. Press the Meter Calibrator SCALE button.
10. Set the Meter Calibrator for 80 mA DC and edit the output amplitude until the Digital Multimeter indicates 1.200 ±0.003 VDC.
11. The LinError indicated on the Meter Calibrator display must be within -0.5000 to +0.5000%.
12. Repeat steps 10 and 11 with 60 mA DC and 0.9 VDC, 40 mA DC and 0.6 VDC, 20 mA DC and 0.3
VDC.
13. Press the Meter Calibrator SCALE button (setting the function off).
14. Repeat steps 7 through 12 with negative applied current and Digital Multimeter indications.
15. Set the Meter Calibrator OPR/STBY switch to STBY and press the SCALE and OFFSET buttons (setting the functions off).

10 TEGAM WAY • GENEVA, OHIO 44041 440-466-6100 • FAX 440-466-6110 • www.tegam.com
5-11
Section V – Maintenance and Servicing
16. Disconnect test setup.

10 TEGAM WAY • GENEVA, OHIO 44041 440-466-6100 • FAX 440-466-6110 • www.tegam.com
5-12
Section V – Maintenance and Servicing
Offset Voltage Calibration 1. Connect the Meter Calibrator OUTPUT HI and LO terminals to AVM-2000 front panel HI and LO
terminals, respectively.
2. Perform Manual Range Zero on AVM-2000 1 mV and 3 mV ranges.
3. Using AVM-2000 RANGE knob, select the 30 mV range.
4. Set the Meter Calibrator for 27 mV DC and set OPR/STBY switch to OPR.
5. Using AVM-2000 INPUT OFFSET knob to select the place value and the OFFSET buttons to select the numerical value, set AVM-2000 OFST: indication for -27,000.00 μV.
6. Using AVM-2000 RANGE knob, select the 3 mV range.
7. Using AVM-2000 INPUT OFFSET knob to select the place value and the OFFSET buttons to
select the numerical value, adjust TI OFST value for a null indication on AVM-2000 analog meter.
8. The AVM-2000 OFST value must be within -27,150.00 to -26,850.00 μV.
9. Using AVM-2000 RANGE knob, select the 1 mV range.
10. Repeat steps 7 and 8.
11. Using AVM-2000 RANGE knob, select the 30 mV range.
12. Using AVM-2000 INPUT OFFSET knob to select the place value and the OFFSET buttons to select the numerical value, set AVM-2000 OFST: indication for 00,000.00 μV.
13. Set the Meter Calibrator for -27 mV DC.
14. Using AVM-2000 INPUT OFFSET knob to select the place value and the OFFSET buttons to
select the numerical value, set TI OFST: indication for +27,000.00 μV..
15. Repeat steps 6 through 12 using positive (+) values in step 8.
16. Set the Meter Calibrator OPR/STBY switch to STBY.
17. Set all POWER switches to OFF/STBY, disconnect and secure all equipment.

10 TEGAM WAY • GENEVA, OHIO 44041 440-466-6100 • FAX 440-466-6110 • www.tegam.com
5-13
Section V – Maintenance and Servicing
Range (VDC) Applied (VDC) Accuracy Limits (VDC) 1 μ ±1 μ ±0.980 to 1.020 μ 3 μ ±3 μ ±2.940 to 3.060 μ 10 μ ±10 μ ±9.80 to 10.20 μ 30 μ ±30 μ ±29.40 to 30.60 μ 100 μ ±100 μ ±98.0 to 102.0 μ 300 μ ±300 μ ±294.0 to 306.0 μ 1 m ±1 m ±0.980 to 1.020 m 3 m ±3 m ±2.940 to 3.060 m 10 m ±10 m ±9.80 to 10.20 m 30 m ±30 m ±29.40 to 30.60 m 100 m ±100 m ±98.0 to 102.0 m 300 m ±300 m ±294.0 to 306.0 m 1 ±1 ±0.980 to 1.020 3 ±3 ±2.940 to 3.060 10 ±10 ±9.80 to 10.20 30 ±30 ±29.40 to 30.60 100 ±100 ±98.0 to 102.0 300 ±300 ±294.0 to 306.0 1000 ±1000 ±980.0 to 1020.0 1 0 Ref ±1 Ref ±0.8 ±2% ±0.6 ±2% ±0.4 ±2% ±0.2 ±2% 3 0 Ref ±3 Ref ±2 ±2% ±1 ±2%
Table 5.3 Analog Meter Calibration Performance Table
Range (VDC) Applied (mV DC) Linearity Limits 1 mV 0 Ref ±1 Ref ±0.8 ±0.5% ±0.6 ±0.5% ±0.4 ±0.5% ±0.2 ±0.5%
Table 5.4 Isolated Output Calibration Performance Table
Range (VDC) Applied (VDC) Accuracy Limits (VDC) 30 m ±27 m ±27.15000 to 26.85000 m
Table 5.5 Offset Voltage Calibration Performance Table

10 TEGAM WAY • GENEVA, OHIO 44041 440-466-6100 • FAX 440-466-6110 • www.tegam.com
5-14
Section V – Maintenance and Servicing
TROUBLESHOOTING WARNING: Dangerous voltages from the ac power line, test instruments, and measured source can be present when troubleshooting the avm-2000. Exercise proper safety precautions! CAUTION: Follow esd (electrostatic discharge) procedures when handling the AVM-2000 printed circuit boards and their components. NOTE: The AVM-2000 setup processes must be performed after making any repairs. Depending on the observed symptom, probable areas for investigation or repair in the AVM-2000 are indicated. Refer to disassembly instructions to gain access to the indicated areas, as well as reassembly instructions. Refer to the theory of operation for the affected section. The parts layout, test points and control/adjustment locations and schematics are found in parts list. When replacing any soldered component on one of the printed circuit boards, particularly the Isolated Analog Section, make sure to clean completely away any solder flux residue. The AVM-2000’s operation is highly dependent on internal software-based functions within the two microprocessor-based subsystems. Any component level troubleshooting requires access to software development tools and the accompanying interfaces to connect the software development system to the two microprocessors. Troubleshooting in this manual is limited to identifying problems with the instrument’s major subsystems, which can be returned to PPM for repair/exchange if a defective subsystem is identified. Techniques are presented below to identify a need to replace/exchange one of the following: AC Power Module Rechargeable Battery Power Supply Subsystem Front Panel Subsystem Isolated Analog Subsystem Meter Movement Interconnection Cables NOTE: Failure to keep the Isolated Analog Subsystem Board clean of contaminants may compromise the performance of the AVM-2000. Avoid touching the electrical surfaces of this board, unless wearing clean gloves. Troubleshooting Tip: Always check signals/voltages at BOTH ends of the indicated cable/connector. If the indicated signal is present at one end of the cable but not at the other, a defective cable is indicated rather than a defective subsystem. In the steps below, only one end of the cable is called out in each step. If the indicated positive results are not obtained in the step, always check the like connection (i.e. red wire, #5 pin, etc.) at the other end of the cable to eliminate a defective interconnection cable.

10 TEGAM WAY • GENEVA, OHIO 44041 440-466-6100 • FAX 440-466-6110 • www.tegam.com
5-15
Section V – Maintenance and Servicing
Symptom: AVM-2000 does not operate with line power and internal rechargeable battery does not charge or the battery charge indicator continuously displays ERR. AC Power Module is not plugged in or is not connected. Action: Check the connections at both ends. Power Supply Subsystem fuse is blown. Action: Replace the fuse with one of the same type and value. If the Power Supply Subsystem fuse continues to blow, the Power Supply Subsystem or one of the subsystems it feeds is defective.
Action: Disconnect the balance of the AVM-2000 from the Power Supply Subsystem by removing connector J4.
If the fuse continues to blow, disconnect the battery, J3, and measure the open circuit battery voltage.
If the open circuit battery voltage lies between 5.3 and 7.0 volts, the Power Supply Subsystem is defective. Action: replace the Power Supply Subsystem. If the open circuit battery voltage is substantially below 5.3 volts, the battery has one or more shorted cells. Action: Replace the battery. If the fuse does not continue to blow, the problem lies with either the Front Panel or Isolated Analog Subsystem. Action: Disconnect the Isolated Analog Subsystem from the Front Panel Subsystem by unplugging connector J2 of the Front Panel Subsystem. If the fuse continues to blow, the Front Panel Subsystem is defective. Action: Replace the Front Panel Subsystem. If the fuse no longer blows, the Isolated Analog Subsystem is defective. Action: Replace the Isolated Analog Subsystem.

10 TEGAM WAY • GENEVA, OHIO 44041 440-466-6100 • FAX 440-466-6110 • www.tegam.com
5-16
Section V – Maintenance and Servicing
Symptom: AVM-2000 operates with the AC Power Module connected, but not properly on the internal rechargeable battery. Internal rechargeable battery needs to be charged. Action: Charge battery as described. There is a problem with the battery charging circuit. Action: Check the voltage across the battery terminals (the voltage should be between 6.0 and 7.5 volts DC when the AC Power Module is connected—i.e. when the battery is charging). A lower voltage indicates a failed Power Supply Subsystem, a failed rechargeable battery or a deeply discharged battery (allow sufficient time to charge the battery). Disconnect the battery and measure its open circuit voltage. If the open circuit battery voltage lies between 5.3 and 7.0 volts, the Power Supply Subsystem is defective. Action: Replace the Power Supply Subsystem. If the open circuit battery voltage is substantially below 5.3 volts, the battery has one or more shorted cells. Action: Replace the battery. Symptom: AVM-2000 internal rechargeable battery charges, but the level displayed on the AVM-2000 LCD does not show the normal fully charged reading. Disconnect the battery and measure its open circuit voltage. If the open circuit battery voltage lies between 5.3 and 7.0 volts, the Front Panel Subsystem battery monitoring circuit is defective. Action: Replace the Front Panel Subsystem. If the open circuit battery voltage is substantially below 5.3 volts, the battery has one or more shorted cells. Action: Replace the battery.

10 TEGAM WAY • GENEVA, OHIO 44041 440-466-6100 • FAX 440-466-6110 • www.tegam.com
5-17
Section V – Maintenance and Servicing
Symptom: No AVM-2000 Meter readings and no signal at the ISOLATED OUTPUT on all ranges. Action: Ensure the AVM-2000 front panel OPERATE/ZERO Switch is in the OPERATE position. If not above, check that the power supply voltage being delivered to the Isolated Analog Subsystem as measured between pins 1,2 and ,4 at connector J1 is + 5 VDC ± 0.25 volts. If + 5 volts is not being delivered to the Isolated Analog Subsystem, check the voltage into the Front Panel Subsystem at connector J1 (pin 3 to 9 and pin 4 to 10). This should be between +5.3 and 7.0 volts. If no voltage is present, there is a Power Supply Subsystem / Battery problem. Action: Use the steps above to isolate a Power Supply Subsystem / Battery problem. If the voltage is present at the input to the Front Panel Subsystem but not being delivered to the Isolated Analog Subsystem, the Front Panel Subsystem is defective. Action: Replace the Front Panel Subsystem. If not above, rotate the AVM-2000 RANGE control to the 100 mV range, and apply a 100 mV DC input signal to the AVM-2000. Using an oscilloscope (or pulse detecting logic probe), check for serial communications from the Isolated Analog Subsystem to the Front Panel Subsystem--19,200 baud 10 character bursts should be present at connector J2 Pin 6. If bursts are present, the Front Panel Subsystem is not properly detecting and interpreting them. Action: Replace the Front Panel Subsystem. If no bursts are present, look for similar bursts from the Front Panel Subsystem to the Isolated Analog Subsystem at connecter J2, Pin 5 of the Front Panel Subsystem. If no bursts are present, the Front Panel Subsystem is not properly generating them. Action: Replace the Front Panel Subsystem. If bursts are present, the Isolated Analog Subsystem is not properly detecting and interpreting them. Action: Replace the Isolated Analog Subsystem. Symptom: AVM-2000 does not operate properly in some RANGE control positions but operates correctly on other ranges or the OFFSET function, FILTER function, Z IN function or ZERO function fails to operate, a defective Isolated Analog Subsystem is indicated. Action: Replace the Isolated Analog Subsystem.

10 TEGAM WAY • GENEVA, OHIO 44041 440-466-6100 • FAX 440-466-6110 • www.tegam.com
5-18
Section V – Maintenance and Servicing
Symptom: No output on AVM-2000 Meter, but signal at ISOLATED OUTPUT. Make sure the Meter connector J5 (see page 49) is properly seated and that a voltage is being developed across the meter terminals (approximately 35 mV for a full scale deflection). If a voltage is being developed and there is no meter movement, the meter movement is defective. Action: Replace the meter movement. NOTE: If the meter movement requires replacement, the replacement includes special setup instructions required to ensure proper system linearity. If there is no voltage present across the meter terminals, the Front Panel Subsystem is defective. Action: Replace the Front Panel Subsystem. Symptom: Output on AVM-2000 Meter, but no signal at ISOLATED OUTPUT. Check for the appropriate DC signal (i.e. a scaled ± 1 volt for ± full-scale meter deflection) at connector J4 pin 2 or TP8 of the Front Panel Subsystem. If the signal is present at J4 pin 2 or TP8, the output cable is defective. Action: Replace the output cable. If no signal is present at J4 pin 2 or TP8, the Front Panel Subsystem is defective. Action: Replace the Front Panel Subsystem. Symptom: Poor 60 Hz AC noise rejection. Most frequently, poor 50/60 Hz noise rejection is a function of improper measurement configuration. Action: Carefully check all cable routing, ground connections, sequencing of connections, etc. NOTE: Ground loops (i.e. multiple paths for ground currents) can be a significant source of undesirable/interfering electrical noise. Disconnecting the instrument from any non-measurement related connections to other apparatus (recorders, chargers, etc.) is a good way to isolate such problems. If the problem persists and all indications point to a problem with the AVM-2000, the problem lies with the Isolated Analog Subsystem. Action: Replace the Isolated Analog

10 TEGAM WAY • GENEVA, OHIO 44041 440-466-6100 • FAX 440-466-6110 • www.tegam.com
6-1
Section VI – Reprogramming
Total Instrument Reset (TIR) If the instrument basic functions do not seem to operate (ranges cannot be selected, meter is always pegged, the meter is unresponsive to ZERO functions, etc.), a total instrument reset may be needed. Before this action is performed, ensure a reasonable level of battery charge is shown on the battery charge level indicator (at least ½ scale). NOTE: A TIR does not correct problems with the instrument Front Panel Subsystem. Such problems are indicated by incomplete LCD indications (missing or partial characters, for example). If this is the case, proceed to TROUBLESHOOTING To perform a total instrument reset:
1. Turn the instrument OFF. 2. Allow the instrument to remain off for at least 5 minutes with the power adaptor disconnected (or
any source of charging current disconnected). 3. Reconnect the power adaptor. 4. Turn the instrument ON. 5. Verify the problem continues to exist. 6. Depress and hold the RANGE control until the LCD reads METER OFFSET. 7. Simultaneously depress and then release both FILTER pushbuttons. 8. Wait at least 10 seconds. 9. Simultaneously depress and then release both OFFSET pushbuttons. 10. The LCD momentarily displays OFFSET TRIM and then returns to displaying METER OFFSET. 11. Depress the RANGE control to return the instrument to the normal operating mode.
If a Total Instrument Reset is successfully performed, the instrument, when in ZERO mode, with no OFFSET should display meter indications of 0 ± 1/3 of full scale for all ranges greater than 3 μV. Once a successful Total Instrument Reset is performed, the instrument requires re-zeroing of each range (in both ZERO and OPERATE modes). Gain calibration may or may not be required. Memory Sanitization Procedure Since there is no external access to the any of the AVM-2000 memory, there is no memory system to sanitize on the AVM-2000.

10 TEGAM WAY • GENEVA, OHIO 44041 440-466-6100 • FAX 440-466-6110 • www.tegam.com
7-1
Section VII – Preparation for Shipment
Returning AVM-2000 for Service Use the information in this section if you need to return your AVM-2000 to TEGAM.
Package AVM-2000 for Shipment Use the following steps to package the AVM-2000 for shipment to TEGAM for service:
1. Fill the EXPEDITE REPAIR & CALIBRATION FORM (found in Section I) and attach it to the AVM-2000. Please be as specific as possible about the nature of the problem. Send a copy of any or all of the following information:
o Any error messages that appeared on the power meter display. o Any information on the performance of the AVM-2000.
2. Use the original packaging materials or a strong shipping container. The carton must be both large
enough and strong enough to accommodate the power meter and allow at least three to four inches on all sides of the power meter for packing material.
3. Surround the power meter with at least three to four inches of packing material or enough to prevent the power meter from moving in the carton.
4. Seal the shipping container securely with strong nylon adhesive tape.
5. Mark the shipping container “FRAGILE, HANDLE WITH CARE” to ensure careful handling.
CAUTION: AVM-2000 damage can result from using packaging materials other than those specified.
6. Retain copies of all shipping papers. NOTE: Refer to page 1-6 of the introduction for information on how to obtain a RMA from TEGAM.

10 TEGAM WAY • GENEVA, OHIO 44041 440-466-6100 • FAX 440-466-6110 • www.tegam.com
8-1
Section VIII – Storage
Storage When the AVM-2000 is to be stored for extended periods, pack the instrument into a container. Place container in a clean, dry, temperature-controlled location. If instrument is to be stored in excess of 90 days, place desiccant with items before sealing container. The safe environmental limits for storing the AVM-2000 are -20 to + 60 °C / 0 - 80% non- condensing. CAUTION: AVM-2000 has a rechargeable battery. It is essential to either remove the battery if storing periods longer than 6 months. Another solution is to charge the battery periodically (within 6 months) during the storage period.