financials i
TRANSCRIPT

8/20/2019 Financials I
http://slidepdf.com/reader/full/financials-i 1/563
MICROSOFT DYNAMICS ®
AX 2009
COURSE 80016: FINANCIALS I

8/20/2019 Financials I
http://slidepdf.com/reader/full/financials-i 2/563
Last Revision: June 2008
The information contained in this document represents the current view of Microsoft Corporation on the issues
discussed as of the date of publication. Because Microsoft must respond to changing market conditions, it should
not be interpreted to be a commitment on the part of Microsoft, and Microsoft cannot guarantee the accuracy of any
information presented after the date of publication.
This document is for informational purposes only. MICROSOFT MAKES NO WARRANTIES, EXPRESS, IMPLIED
OR STATUTORY, AS TO THE INFORMATION IN THIS DOCUMENT.
Complying with all applicable copyright laws is the responsibility of the user. Without limiting the rights undercopyright, no part of this document may be reproduced, stored in or introduced into a retrieval system, or
transmitted in any form or by any means (electronic, mechanical, photocopying, recording, or otherwise), or for any
purpose, without the express written permission of Microsoft Corporation.
Microsoft may have patents, patent applications, trademarks, copyrights, or other intellectual property rights
covering subject matter in this document. Except as expressly provided in any written license agreement from
Microsoft, the furnishing of this document does not give you any license to these patents, trademarks, copyrights, or
other intellectual property.
© 2008 Microsoft Corporation. All rights reserved. Microsoft Dynamics®, AX 2009 are either trademarks or
registered trademarks of Microsoft Corporation or Great Plains Software, Inc. or their affiliates in the United Statesand/or other countries. Great Plains Software, Inc. is a subsidiary of Microsoft Corporation. The names of actual
companies and products mentioned herein may be the trademarks of their respective owners.
This course content is designed for Microsoft Dynamics® 2009 formerly a part of Microsoft® Business Solutions.

8/20/2019 Financials I
http://slidepdf.com/reader/full/financials-i 3/563
Table of Contents
i
Introduction to Financials I in Microsoft Dynamics ® AX 2009 0-1
Welcome ............................................................................................................ 0-1
Microsoft Dynamics Courseware Contents ........................................................ 0-2
Documentation Conventions .............................................................................. 0-3
Student Objectives ............................................................................................. 0-4
Chapter 1: General Ledger Setup 1-1
Objectives ........................................................................................................... 1-1
Introduction ......................................................................................................... 1-1
Currency and Exchange Rate Setup .................................................................. 1-2
Periods and Fiscal Year Setup ......................................................................... 1-12
Date Intervals ................................................................................................... 1-19
Reason Codes .................................................................................................. 1-24
Dimensions ....................................................................................................... 1-27
Dimension Focus .............................................................................................. 1-33
Generated Allocations ...................................................................................... 1-38
Summary .......................................................................................................... 1-48
Quick Interaction: Lessons Learned ................................................................. 1-49
Solutions ........................................................................................................... 1-50
Chapter 2: Chart of Accounts Setup 2-1
Objectives ........................................................................................................... 2-1
Introduction ......................................................................................................... 2-1
Ledger Account Categories ................................................................................ 2-2
Chart of Accounts ............................................................................................... 2-4
Account Allocation Terms ................................................................................. 2-14
System Accounts .............................................................................................. 2-18
Inquiries and Reports Related to the Chart of Accounts .................................. 2-20
Summary .......................................................................................................... 2-27
Test Your Knowledge ....................................................................................... 2-28
Quick Interaction: Lessons Learned ................................................................. 2-29
Solutions ........................................................................................................... 2-30
Chapter 3: Journal Setup 3-1
Objectives ........................................................................................................... 3-1
Introduction ......................................................................................................... 3-1
Journal Setup ..................................................................................................... 3-2
Journal Controls ............................................................................................... 3-10
Journal Texts .................................................................................................... 3-11
Balance Control Accounts ................................................................................ 3-12
General Ledger Parameters ............................................................................. 3-13 Set Up Journals ................................................................................................ 3-15
Summary .......................................................................................................... 3-17
Test Your Knowledge ....................................................................................... 3-18
Quick Interaction: Lessons Learned ................................................................. 3-19
Solutions ........................................................................................................... 3-20
Chapter 4: Financial Features 4-1
Objectives ........................................................................................................... 4-1

8/20/2019 Financials I
http://slidepdf.com/reader/full/financials-i 4/563
Financials I in Microsoft Dynamics® AX 2009
ii
Introduction ......................................................................................................... 4-1
Reason Codes .................................................................................................... 4-2
Fill Utility ............................................................................................................. 4-7
Summary ............................................................................................................ 4-9
Quick Interaction: Lessons Learned ................................................................. 4-10
Solutions ........................................................................................................... 4-11
Chapter 5: General Ledger Daily Procedures 5-1
Objectives ........................................................................................................... 5-1
Introduction ......................................................................................................... 5-1
General Ledger Journals .................................................................................... 5-2
Enter General Ledger Transactions ................................................................... 5-4
Lab 5.1 - Daily Transactions ............................................................................... 5-9
Lab 5.2 - Daily Transactions with Dimensions.................................................. 5-11
Lab 5.3 - Daily Transactions with Balance Control ........................................... 5-14
Posting Multiple Journals ................................................................................. 5-16
Lab 5.4 - Post All Unposted General Journals ................................................. 5-19
Approval Journals ............................................................................................. 5-20
Example: Gathering Data For an Approval Journal .......................................... 5-25
Voucher Templates .......................................................................................... 5-26
Periodic Journals .............................................................................................. 5-29
Lab 5.5 - Entering Periodic Transactions ......................................................... 5-34
General Ledger Transaction Reversal.............................................................. 5-37
Reversing Entries - GL ..................................................................................... 5-40
Inquire and View Reports on Daily Journal Transactions ................................. 5-43
Summary .......................................................................................................... 5-49
Quick Interaction: Lessons Learned ................................................................. 5-50
Solutions ........................................................................................................... 5-51
Chapter 6: Sales Tax Setup 6-1
Objectives ........................................................................................................... 6-1
Introduction ......................................................................................................... 6-1
Sales Tax Overview ........................................................................................... 6-2
Ledger Posting Groups ...................................................................................... 6-3
Lab 6.1 - Create a Ledger Posting Group .......................................................... 6-9
Sales Tax Authorities ....................................................................................... 6-11
Lab 6.2 - Create a Sales Tax Authority ............................................................ 6-14
Lab 6.3 - Create and Assign a Vendor to the Sales Tax Authority ................... 6-15
Sales Tax Settlement Periods .......................................................................... 6-17
Lab 6.4 - Setup of Sales Tax Settlements ........................................................ 6-21
Sales Tax Codes .............................................................................................. 6-23
Sales Tax Codes Intervals................................................................................ 6-29
Lab 6.5 - Set Up Sales Tax Codes Intervals .................................................... 6-34
Sales Tax Groups ............................................................................................. 6-36
Item Sales Tax Groups ..................................................................................... 6-41
Sales Tax Jurisdictions ..................................................................................... 6-43
Lab 6.6 - Comprehensive Setup of Sales Tax .................................................. 6-46
Lab 6.7 - Including Sales Tax in Journal Amounts ........................................... 6-53
Sales Tax Transactions .................................................................................... 6-54
Sales Tax Exemption ....................................................................................... 6-60

8/20/2019 Financials I
http://slidepdf.com/reader/full/financials-i 5/563
Table of Contents
iii
Lab 6.8 - EU 115 Sales Tax Directive .............................................................. 6-63
Withholding Sales Tax ...................................................................................... 6-66
Summary .......................................................................................................... 6-69
Quick Interaction: Lessons Learned ................................................................. 6-70
Solutions ........................................................................................................... 6-71
Chapter 7: Bank Management Setup 7-1
Objectives ........................................................................................................... 7-1
Introduction ......................................................................................................... 7-1
Scenario ............................................................................................................. 7-2
Bank Transaction Types ..................................................................................... 7-2
Bank Transaction Groups ................................................................................... 7-4
Lab 7.1 - Create Bank Transaction Types and Bank Transaction Groups ......... 7-6
Bank Management Parameters .......................................................................... 7-8
Payment Purpose Codes ................................................................................... 7-9
Bank Groups .................................................................................................... 7-10
Bank Accounts ................................................................................................. 7-11
Create a Bank Group and Bank Account ......................................................... 7-16
Check Layout ................................................................................................... 7-18
Lab 7.2 - Define a Check Layout ...................................................................... 7-24
Summary .......................................................................................................... 7-25
Test Your Knowledge ....................................................................................... 7-26
Quick Interaction: Lessons Learned ................................................................. 7-27
Solutions ........................................................................................................... 7-28
Chapter 8: Accounts Payable Setup 8-1
Objectives ........................................................................................................... 8-1
Introduction ......................................................................................................... 8-1
Payment Schedule ............................................................................................. 8-2
Terms of Payment .............................................................................................. 8-5
Payment Days .................................................................................................... 8-9
Lab 8.1 - Terms of Payment ............................................................................. 8-11
Cash Discount .................................................................................................. 8-12
Payment Fee .................................................................................................... 8-17
Methods of Payment ........................................................................................ 8-22
Lab 8.2 - Method of Payment, Terms of Payment, and Cash Discount ........... 8-27
Vendor Groups ................................................................................................. 8-29
Lab 8.3 - Create a Vendor Group ..................................................................... 8-34
Accounts Payable Posting Profiles ................................................................... 8-35
Lab 8.4 - Vendor Posting Profile ...................................................................... 8-38
Accounts Payable Vendors .............................................................................. 8-40
Lab 8.5 - Vendors ............................................................................................. 8-47
Summary .......................................................................................................... 8-49
Quick Interaction: Lessons Learned ................................................................. 8-50
Solutions ........................................................................................................... 8-51
Chapter 9: Accounts Payable Daily Procedures 9-1
Objectives ........................................................................................................... 9-1
Introduction ......................................................................................................... 9-1
Invoice Journals in Accounts Payable ................................................................ 9-2

8/20/2019 Financials I
http://slidepdf.com/reader/full/financials-i 6/563
Financials I in Microsoft Dynamics® AX 2009
iv
Invoice Register .................................................................................................. 9-2
Invoice Approval Journal .................................................................................. 9-13
Lab 9.1 - Register an Invoice ........................................................................... 9-17
Invoice Pool Excluding Posting ........................................................................ 9-19
Lab 9.2 - Invoice Pool Excl. Posting ................................................................. 9-21
Invoice Journal ................................................................................................. 9-23
Lab 9.3: Invoice Journal ................................................................................... 9-25
Voucher Template ............................................................................................ 9-26
Payment Journals ............................................................................................. 9-28
Lab 9.4 - Payment Journals ............................................................................. 9-36
Invoice Matching .............................................................................................. 9-40
Edit Open Transactions .................................................................................... 9-46
Reverse a Closed Transaction ......................................................................... 9-48
Lab 9.5 - Reverse a Closed Transaction .......................................................... 9-50
Print Management ............................................................................................ 9-51
Print Management ............................................................................................ 9-51
Summary .......................................................................................................... 9-57
Test Your Knowledge ....................................................................................... 9-58
Quick Interaction: Lessons Learned ................................................................. 9-59
Solutions ........................................................................................................... 9-60
Chapter 10: Accounts Receivable Setup 10-1
Objectives ......................................................................................................... 10-1
Introduction ....................................................................................................... 10-1
Payment Schedule ........................................................................................... 10-2
Terms of Payment ............................................................................................ 10-5
Payment Days .................................................................................................. 10-8
Lab 10.1 - Terms of Payment ......................................................................... 10-10
Cash Discount ................................................................................................ 10-11
Payment Fee .................................................................................................. 10-14
Methods of Payment ...................................................................................... 10-18
Lab 10.2 - Set up a Method of Payment ......................................................... 10-22
Customer Groups ........................................................................................... 10-23
Lab 10.3 - Create a Customer Group ............................................................. 10-27
Accounts Receivable Posting Profiles ............................................................ 10-28
Lab10.4 - Set Up a Customer Posting Profile................................................. 10-31
Accounts Receivable Customers.................................................................... 10-33
Lab 10.5 - Create a Customer ........................................................................ 10-39
Summary ........................................................................................................ 10-40
Test Your Knowledge ..................................................................................... 10-41
Quick Interaction: Lessons Learned ............................................................... 10-42
Solutions ......................................................................................................... 10-43
Chapter 11: Accounts Receivable Daily Procedures 11-1
Objectives ......................................................................................................... 11-1
Introduction ....................................................................................................... 11-1
Free Text Invoice - Description and Usage ...................................................... 11-2
Lab 11.1 - Create Free Text Invoices ............................................................... 11-8
Payment Journals ........................................................................................... 11-10

8/20/2019 Financials I
http://slidepdf.com/reader/full/financials-i 7/563
Table of Contents
v
Lab 11.2 - Settlements - Entering an Accounts Receivable Payment Journal(Cash Receipt) ............................................................................................... 11-21
Edit Open Transactions .................................................................................. 11-23
Lab 11.3 - Edit Open Transactions ................................................................. 11-28
Placing an Accounts Receivable Transaction on Hold ................................... 11-30
Reverse Settlements ...................................................................................... 11-31
Lab 11.4 - Reverse a Settlement .................................................................... 11-33
Reimburse a Customer .................................................................................. 11-34
Lab 11.5 - Reimburse a Customer ................................................................. 11-36
Reason Codes ................................................................................................ 11-38
Print Management - AR .................................................................................. 11-39
Summary ........................................................................................................ 11-47
Quick Interaction: Lessons Learned ............................................................... 11-48
Solutions ......................................................................................................... 11-49
Chapter 12: Bank Management Daily Procedures 12-1
Objectives ......................................................................................................... 12-1
Introduction ....................................................................................................... 12-1
Scenario ........................................................................................................... 12-2
Create Checks .................................................................................................. 12-2
Delete a Check ................................................................................................. 12-4
Lab 12.1 - Create and Delete a Check ............................................................. 12-6
Deposit Slips .................................................................................................... 12-7
Lab 12.2 - Create a Deposit Slip .................................................................... 12-11
Void Unposted Checks ................................................................................... 12-13
Lab12.3 - Void Unposted Checks ................................................................... 12-14
Refund Checks ............................................................................................... 12-16
Lab 12.4 - Check Refund ............................................................................... 12-18
Bank Remittance ............................................................................................ 12-19
Payment Reversal .......................................................................................... 12-20
Reconcile a Bank Account ............................................................................. 12-21
Summary ........................................................................................................ 12-25
Test Your Knowledge ..................................................................................... 12-26
Quick Interaction: Lessons Learned ............................................................... 12-27
Appendix A: Reports and Inquiries A-1
Sales Tax Reports ............................................................................................. A-1
Accounts Payable Reports ................................................................................ A-6
Accounts Receivable Inquiries ........................................................................ A-18
Accounts Receivable Reports ......................................................................... A-20
Bank Management Inquiries ............................................................................ A-28
Bank Management Reports ............................................................................. A-30
Quick Interaction: Lessons Learned ................................................................ A-39

8/20/2019 Financials I
http://slidepdf.com/reader/full/financials-i 8/563
Financials I in Microsoft Dynamics® AX 2009
vi

8/20/2019 Financials I
http://slidepdf.com/reader/full/financials-i 9/563
Introduction
0 - 1
INTRODUCTION TO FINANCIALS I IN MICROSOFTDYNAMICS
®AX 2009
WelcomeWe know training is a vital component of retaining the value of your Microsoft
Dynamics® AX 2009 investment. Our quality training from industry experts
keeps you up-to-date on your solution and helps you develop the skills necessary
for fully maximizing the value of your solution. Whether you choose Online
Training, Classroom Training, or Training Materials; there is a type of training to
meet everyone's needs. Choose the training type that best suits you so you can
stay ahead of the competition.
Online Training
Online Training delivers convenient, in-depth training to you in the comfort of
your own home or office. Online training provides immediate access to training24 hours-a-day. It is perfect for the customer who does not have the time or
budget to travel. Our newest online training option, eCourses, combine the
efficiency of online training with the in-depth product coverage of classroom
training, with at least two weeks to complete each course.
Classroom Training
Classroom Training provides serious, in-depth learning through hands-on
interaction. From demonstrations to presentations to classroom activities, you
receive hands-on experience with instruction from our certified staff of experts.
Regularly scheduled throughout North America, you can be sure you will find a
class convenient for you.
Training Materials
Training Materials enable you to learn at your own pace, on your own time with
information-packed training manuals. Our wide variety of training manuals
feature an abundance of tips, tricks, and insights you can refer to again and again:
Microsoft Dynamics Courseware
The Microsoft Dynamics Courseware consists of detailed training manuals,
designed from a training perspective. These manuals include advanced topics as
well as training objectives, exercises, interactions and quizzes.
Look for a complete list of manuals available for purchase on the MicrosoftDynamics website: www.microsoft.com/Dynamics.

8/20/2019 Financials I
http://slidepdf.com/reader/full/financials-i 10/563
Financials I in Microsoft Dynamics® AX 2009
0 - 2
Microsoft Dynamics Courseware Contents
Test Your Skills
Within the Microsoft Dynamics Training Materials you find a variety of different
exercises. These exercises are offered in three levels to accommodate the varietyof knowledge and expertise of each student. We suggest you try the level three
exercises first, if you need help completing the task look to the information in the
level two exercises. If you need further assistance each step of the task is outlined
in the level one exercise.
Challenge Yourself!
Level 3 exercises are the most challenging. These exercises are designed for the
experienced student who requires little instruction to complete the required task.
Need a Little Help?
Level 2 exercises are designed to challenge students, while providing someassistance. These exercises do not provide step by step instructions, however, do
provide you with helpful hints and more information to complete the exercise.
Step by Step
Level 1 exercises are geared towards new users who require detailed instructions
and explanations to complete the exercise. Level 1 exercises guide you through
the task, step by step, including navigation.
Quick Interaction: Lessons Learned
At the end of each chapter within the Microsoft Dynamics Training Material, you
find a Quick Interaction: Lessons Learned page. This interaction is designed to
provide the student with a moment to reflect on the material they have learned.By outlining three key points from the chapter, the student is maximizing
knowledge retention, and providing themselves with an excellent resource for
reviewing key points after class.

8/20/2019 Financials I
http://slidepdf.com/reader/full/financials-i 11/563
Introduction
0 - 3
Documentation Conventions
The following conventions and icons are used throughout this documentation to
help you quickly and effectively navigate through the information.
CAUTION : Cautions are found throughout the training manual and are preceded by
the word CAUTION in bold. Cautions are used to remind you of a specific result of a
specific action which may be undesirable.
HINT : Hints are found throughout the training manual and are preceded by the word
HINT in bold. Hints are used to suggest time-saving features or alternative methods for
accomplishing a specific task.
NOTE : Notes are found throughout the training manual and are preceded by the word
NOTE in bold. Notes are used to provide information which, while not critical, may be
valuable to an end user.
BEYOND THE BASICS : Advanced information found throughout the training manualis preceded by the words BEYOND THE BASICS in bold. Beyond the Basics provides
additional detail, outside of standard functionality, that may help you to more optimally
use the application.
EXAMPLE : Examples are found throughout the training manual and are preceded by
the word EXAMPLE in bold. Examples bring to light business scenarios that may better
explain how an application can be used to address a business problem.

8/20/2019 Financials I
http://slidepdf.com/reader/full/financials-i 12/563
Financials I in Microsoft Dynamics® AX 2009
0 - 4
Student Objectives
What do you hope to learn by participating in this course?
List three main objectives below.
1.
2.
3.

8/20/2019 Financials I
http://slidepdf.com/reader/full/financials-i 13/563
Chapter 1: General Ledger Setup
1-1
CHAPTER 1: GENERAL LEDGER SETUP
Objectives
The objectives are:
• Set up Currencies and Exchange Rates
• Create Periods in a new fiscal year
• Create Date intervals
• Create, modify, and delete reason codes
• Create a Dimension Value
• Create a Dimension Focus
• Set up allocation rules
• Contrast the various allocation methods
Introduction
A general ledger is a formal ledger that contains a company’s accounting records
in Microsoft Dynamics® AX 2009, and includes the financial accounts and
statements.
Use the General Ledger to set up currencies and exchange rates. Microsoft
Dynamics AX 2009 offers extensive functionality with multicurrency handling
so you can record transactions in various currencies and report in parallel
currencies.
The General Ledger Setup course explains how to work with an infinite number
of dimensions with various modules in Microsoft Dynamics AX 2009. You can
use dimension focuses to track profits, cost centers, and other important financial
information.
The General Ledger Setup course describes the various components of anallocation rule and the purpose of each allocation method.

8/20/2019 Financials I
http://slidepdf.com/reader/full/financials-i 14/563
Financials I in Microsoft Dynamics® AX 2009
1-2
Currency and Exchange Rate Setup
You can use currencies in Microsoft Dynamics AX 2009 to record transactions.
If a company operates with multiple currencies because it trades with foreign
entities, Microsoft Dynamics AX 2009 offers extensive functionality on
multicurrency.
A default currency always must be set up for a company.
Use the Exchange rates form to set up currencies with corresponding exchange
rates.
FIGURE 1.1 EXCHANGE RATES FORM

8/20/2019 Financials I
http://slidepdf.com/reader/full/financials-i 15/563
Chapter 1: General Ledger Setup
1-3
Procedure: Create a Currency
Follow these steps to set up a currency.
1. To access the Exchange rates form, click General ledger, click
Setup, and then click Exchange rates.2. Press CTRL+N to create a new record.
3. Enter the currency code in the Currency field on the Overview tab.
This field can only contain up to three characters. Currency code
examples include USD for U.S. dollar, EUR for Euro, and CAD for
Canadian dollar.
4. Enter the currency name in the Name field. The currency name
appears on printed checks and should be descriptive, such as U.S.
dollars, Danish kroner, or Swiss francs.
5. Enter the ISO currency code in the ISO currency code field. The
ISO currency code is provided by the International Organization for
Standardization.6. Enter a symbol for the currency in the Symbol field to add clarity to
reports and inquiries. Because some currencies do not have a
symbol, this field is not required.
Procedure: Select the Default Company Currency
Follow these steps to designate the company currencies.
1. To access the Company information form, click Basic, click Setup,
and then click Company Information.
2. Click the Other tab.
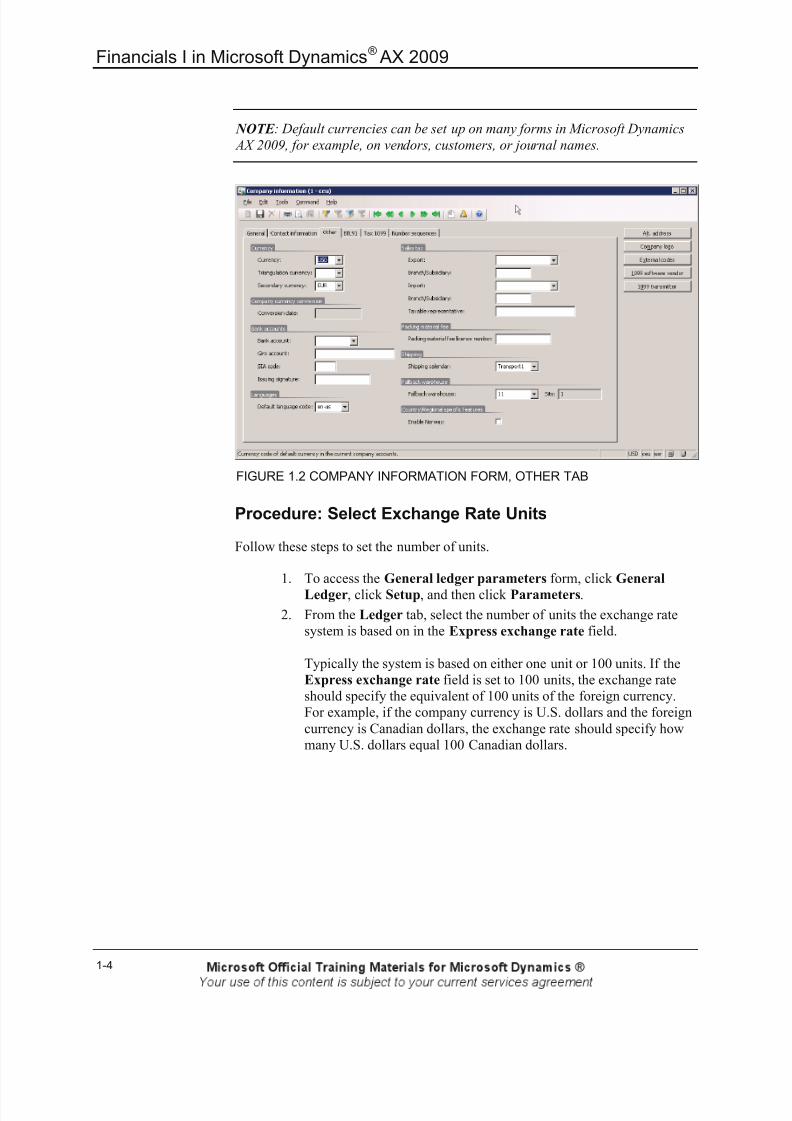
3. Select the default company currency in the Currency field.
4. After you create an additional currency, you can select a secondary
reporting currency in the Secondary currency field. A company's
business accounts can be kept in two parallel currencies for
reporting.
Microsoft Dynamics AX 2009 automatically converts all transactions
into a secondary currency. In reports, results can be viewed in both
the company currency and secondary currency.
8/20/2019 Financials I
http://slidepdf.com/reader/full/financials-i 16/563
Financials I in Microsoft Dynamics® AX 2009
1-4
NOTE : Default currencies can be set up on many forms in Microsoft Dynamics
AX 2009, for example, on vendors, customers, or journal names.
FIGURE 1.2 COMPANY INFORMATION FORM, OTHER TAB
Procedure: Select Exchange Rate Units
Follow these steps to set the number of units.
1. To access the General ledger parameters form, click General
Ledger, click Setup, and then click Parameters.
2. From the Ledger tab, select the number of units the exchange rate
system is based on in the Express exchange rate field.
Typically the system is based on either one unit or 100 units. If the
Express exchange rate field is set to 100 units, the exchange rate
should specify the equivalent of 100 units of the foreign currency.
For example, if the company currency is U.S. dollars and the foreign
currency is Canadian dollars, the exchange rate should specify how
many U.S. dollars equal 100 Canadian dollars.

8/20/2019 Financials I
http://slidepdf.com/reader/full/financials-i 17/563
Chapter 1: General Ledger Setup
1-5
NOTE : In the Exchange rates form, the exchange rate for the company currency
is changed automatically according to the Express exchange rate specified in
the General Ledger parameters form.
FIGURE 1.3 GENERAL LEDGER PARAMETERS FORM
Procedure: Create Additional Currencies and ExchangeRates
If a company trades with multiple currencies, follow these steps to set up the
additional currencies and their corresponding exchange rates.
1. From the Exchange rates form, create the additional currencies as
described in the Procedure: Create a Currency topic.
2. Enter a start date in the Start date field, on the Exchange rate tab in
the lower pane of the form. Because the same currency can haveseveral rates, the posting date determines the rate applied.

8/20/2019 Financials I
http://slidepdf.com/reader/full/financials-i 18/563
Financials I in Microsoft Dynamics® AX 2009
1-6
For example, an exchange rate is entered on January 1, and another
exchange rate is entered on February 1. If a sales order is invoiced on
January 15, the exchange rate from January 1 is used to calculate the
invoice amount. If an exchange adjustment is run on February 2,
however, the rate from February is used as an adjustment. The rate is
based on the date that is entered in the Date of rate field when the
exchange rate adjustment is run.
If the Start date field is blank, the exchange rate does not have astart date and the original exchange rate is effective until another
exchange rate is entered into the system. It is mandatory that the
Start date be blank for the first exchange rate entered for a currency.
3. Enter the exchange rate of the foreign currency in the Exchange
Rate field. Consider the value that was set in the Express currency
rate field in the General ledger parameters form. For example if
the Express currency rate field value is 100, you must specify how
many foreign exchange units equal 100 units of the company
currency.
The relationship between the foreign currency and the company
currency is displayed at the bottom of the Exchange rate form.
Procedure: Set Rounding Options
Follow these steps to set the Rounding options for each currency.
1. From the Exchange Rates form, select a currency.
2. Click the Round-off tab.
3. Round off the sums according to a fixed unit. For example, amountson transactions are rounded to the nearest unit to 0.01. Specify the
general unit for rounding in the General round-off field.
Different rounding options exist for Accounts Receivable (Round
off order) and Accounts Payable (Round off purchase) modules, as
well as prices (Rounding price).
All posting amounts are rounded off to the nearest factor of the
specified unit, regardless of whether they are calculated and posted
automatically or entered manually by the user.
4. In the General ledger parameters form on the Ledger tab:
o Specify the maximum rounding amount for a voucher in thedefault currency, in the Maximum penny difference field.
o Set up the rounding for secondary currencies in the Maximum
penny-rounding in secondary currency field.

8/20/2019 Financials I
http://slidepdf.com/reader/full/financials-i 19/563
Chapter 1: General Ledger Setup
1-7
NOTE : The value in the General round-off field affects all values in all
modules.
NOTE : To print the Currency report, which lists all company currencies andrelated exchange rates, click General Ledger , click Reports , click Base Data ,
and then click Currency.
Procedure: Enable a Currency for Currency Conversion
In Microsoft Dynamics® AX 2009, the currency converter makes it possible to
display transactions and balances in another currency on reports and in forms.
Follow these steps to convert to another currency.
1. To open the Exchange rates form, click General Ledger, click
Setup, and then click Exchange Rates.
2. Select a currency.
3. Click the Currency converter tab.
4. Select the Conversion check box to enable a currency for
conversion.
5. Specify the currency's symbol before or after an amount, in the
Prefix or Suffix fields.
HINT : Enter a space before the currency symbol to separate the currency
amount and the symbol.
Procedure: Change the Display Currency
After a currency has been enabled for currency conversion, follow these steps to
display financial information in a currency other than the default company
currency.
1. On the status bar, click the Currency field to open the Currency
converter form.
2. Select any of the currencies that have been set up for conversion in
the Currency converter form.
3. Enter the date used for the conversion in the Date of rate field.
4. Click a currency to select the new currency.
The Currency converter form automatically closes, and the
Currency field on the status bar displays the new currency. All the
screens, inquiries, and reports that originally showed amounts in the
company's currency display the new currency.

8/20/2019 Financials I
http://slidepdf.com/reader/full/financials-i 20/563
Financials I in Microsoft Dynamics® AX 2009
1-8
Follow these steps to return to the default company currency.
1. Open the Currency converter form.
2. Click the Reset button to return to the default company currency.
NOTE : When you change the display currency, the default currency of a
company does not change. Also, this is not a global change; it does not affect
any other users in the company, nor does it change the original transaction.
Test Your Knowledge
Task: Simon, the System Implementer at Contoso Entertainment USA (CEU), is
helping Phyllis, the Accounting Manager, with the implementation of Microsoft
Dynamics AX 2009. CEU conducts business primarily in the United States and
also in Canada. As of April 1, 2008, 1 Canadian Dollar (CAD) equals 0.97 US
Dollars (USD). Help Phyllis and Simon determine the correct steps to set up
multicurrency for CEU.
Step _____ : Create the CAD Currency in the Exchange rates form
Step _____ : Set the exchange rate value for CAD as of no date to 0.97
Step _____ : In the General ledger parameters form, enter 1 in the Express
exchange rate field
Step _____ : In the Company information form, select USD in the Currency field
Step _____ : Set the exchange rate value for CAD as of April 1, 2008 to 0.97
Step _____ : Create the USD Currency in the Exchange rates form
What effect does the value in the General round-off field have on the values in
Microsoft Dynamics AX 2009?

8/20/2019 Financials I
http://slidepdf.com/reader/full/financials-i 21/563
Chapter 1: General Ledger Setup
1-9
When you change the display currency, it affects all users.
( ) True
( ) False

8/20/2019 Financials I
http://slidepdf.com/reader/full/financials-i 22/563
Financials I in Microsoft Dynamics® AX 2009
1-10
Lab 1.1- Enter a Currency and Print the Currencies
Scenario
Ken is the Controller for Contoso Entertainment USA (CEU). CEU uses US
dollars as the company's default currency. CEU recently gained a new customerthat is located in South Africa and uses the South African Rand (ZAR).
Transactions for this currency should be tracked to two decimal places. As of
April 1, 2008, 12.35 USD equals 100 ZAR.
After some research, Ken has found that the following posting accounts should
be set for the new currency.
Field Value
Realized Loss 801300
Realized Profit 801500
Unrealized Loss 801400
Unrealized Profit 801600
Challenge Yourself!
• Set up the South African Rand (ZAR) as a currency and specify the
posting accounts and rounding options.
• Set up the exchange rate.
• Make ZAR available for currency conversion.
• Print a copy of the currency rates that are set up in the system.
Need a Little Help?
1. To set up the currency and specify the posting accounts and rounding
options, follow these steps:
a. Open the Exchange Rates form to set up the South African Rand
(ZAR) currency.
b. Click the Posting tab to enter the posting accounts.
c. Click the Round-off tab to enter the rounding option
2. Set up the exchange rate. Every currency requires one exchange rateentry with a blank date.
3. To set up ZAR for currency conversion, click the Currency
converter tab.
4. Print a report with the exchange rates for the Controller.

8/20/2019 Financials I
http://slidepdf.com/reader/full/financials-i 23/563
Chapter 1: General Ledger Setup
1-11
Step by Step
First, set up the currency and specify the posting accounts and rounding options.
1. Click General ledger, click Setup, and then click Exchange rates.
2. Press CTRL+N to add a line in the Overview tab.
3. In the Currency field, enter ZAR.
4. In the Name field, enter South African Rand.
5. In the ISO Currency Code, enter ZAR.
6. Click the Posting tab.
7. In the Realized loss field, enter 801300.
8. In the Realized profit field, enter 801500.
9. In the Unrealized loss field, enter 801400.
10. In the Unrealized profit field, enter 801600.
11. Click the Round-off tab.
12. In the General round-off field, enter .01
Next set up the exchange rate. Every currency requires one exchange rate entry
with a blank date.
1. On the Exchange rate form, click in the Exchange rate field on the
line.
2. In the Exchange rate field, enter 12.35.
3. Press CTRL+N to create a new exchange rate.
4. In the Start Date field, click the calendar icon.
5. Select 04/01/08.
6. In the Exchange rate field, enter 12.35
Then, set up ZAR for currency conversion.
1. Click the Currency converter tab.
2. Select the Conversion check box.
Finally, print a report for the Controller with the exchange rates.
1. Click the Print exchange rates button to open the Exchange rates
form.
2. Click OK to print the Exchange rates report.

8/20/2019 Financials I
http://slidepdf.com/reader/full/financials-i 24/563
Financials I in Microsoft Dynamics® AX 2009
1-12
Periods and Fiscal Year Setup
The fiscal year in Microsoft Dynamics AX 2009 can be:
• Set to any length
• Divided into any number of periods
Both fiscal year and periods can be set up by the following measurements of
time:
• Years
• Months
• Days
Each period can be:
• Closed completely or stopped to block transaction postings
• Set to enable selected users to continue an update of one or more
modules
The periods and fiscal year feature is very useful for the preparation and
reconciliation of periodic and yearly accounts.
Set Up Periods and Fiscal Year
Before you post transactions in Microsoft Dynamics AX 2009, you must create a
new fiscal year that is divided into periods because you cannot post transactions
unless a period is created for the posting date.
With the Periods form you can:
• Create a new fiscal year.
• Define fiscal periods.
• Modify fiscal periods in existing company accounts.
• Recalculate period balances, if the periods of a fiscal year with
transactions are changed.
NOTE : Microsoft Dynamics AX 2009 posts transactions according to dates and
not according to periods. Accounting periods are used for reporting. Closing ofaccounting periods lets the user close the sub-ledger to make sure that no
additional transactions are recorded.

8/20/2019 Financials I
http://slidepdf.com/reader/full/financials-i 25/563
Chapter 1: General Ledger Setup
1-13
Scenario
Before he closes a fiscal year, Ken, the Controller of Contoso Entertainment
USA (CEU), sets up a new fiscal year with a 12-month period. Ken prepares
monthly financial statements to measure the delivery of actual results against the
budget, the operating result, financial position, and cash flow.
The monthly reporting is important so you can track budgets.
When you set up a new fiscal year, Microsoft Dynamics AX 2009 creates:
• a number of periods, with the status of Open
• a closing period, with the status of Stopped
• the opening period into the new fiscal year, with the status Closed
Procedure: Create Periods in a New Fiscal Year
Follow these steps to create periods in a new fiscal year.
1. Click General Ledger, click Setup, click Periods, click Periods,
and then click Create New Fiscal Year.
2. Enter the date the fiscal year starts in the Enter start of fiscal year
field.
3. Enter the date the fiscal year closes in the Enter close of fiscal year
field.
4. Specify the length of each period in the Desired length of period
field.

8/20/2019 Financials I
http://slidepdf.com/reader/full/financials-i 26/563
Financials I in Microsoft Dynamics® AX 2009
1-14
5. Enter the unit of measurement for that length in the Unit list.
For example, for each month in a year to be a period, the length of
the periods is 1 and the unit is Month(s).
6. Click OK to create the period(s) and view the Periods form.
FIGURE 1.4 CREATE NEW FISCAL YEAR FORM
Review New Periods
Based on the values entered in the Create new fiscal year form, fiscal year
information is displayed in the Periods form. Click General Ledger > Setup >
Periods > Periods to access the form.
FIGURE 1.5 PERIODS FORM

8/20/2019 Financials I
http://slidepdf.com/reader/full/financials-i 27/563
Chapter 1: General Ledger Setup
1-15
Microsoft Dynamics AX 2009 always creates two additional periods:
• An opening period to which to transfer the opening transactions from
the year-end closing routine. The opening transactions result from
the previous years’ balance accounts.
• A closing period to which to enter year-end close specific
transactions.
The following information is displayed in the fields of the Periods form:
• Start - This field specifies the beginning date of the period.
• Period code - This field is specified automatically by the system
based on the setup of periods. The possible values are:
o Opening - Opening is the period used by the system to open
transactions from the year-end closing routine.
o Normal - Normal is the period used to enter transactions.
o Closing - Closing is the period used to enter year-end close
specific transactions.
• End - This indicates the end date of the current period.
• Status - The four available statuses include:
o Stopped - The default period code is Closing.
o Open - The default period code is Normal. The periods must be
set to open to enter transactions.
o Closed - The default period code is Opening.
o Year closed - This field is used to close the fiscal year.
NOTE : A stopped period can be opened. A closed period cannot be opened.
Procedure: Select Authorized Users
Follow these steps to select the users who are authorized to update the General
Ledger module.
1. From the Periods form, click the Module status tab.
2. In the Module status lists, select the users authorized to update the
various modules.
o All - All users are authorized to update in the General Ledgermodule in the selected period.

8/20/2019 Financials I
http://slidepdf.com/reader/full/financials-i 28/563
Financials I in Microsoft Dynamics® AX 2009
1-16
o None - No users are authorized to update in the General Ledger
module in the selected period. For example, if a company wants
to make some adjustments to a closed period, the modules that
will not be adjusted are set to None.
o User group - Specific user groups are authorized to make
General Ledger updates in the selected period.
3. In the Module user group area, specify the user group that can make
changes, when the module status is set to User group.
For example, after a period is stopped, limit access to the Ledger to
only the user group that makes closing entries. This ensures no new
entries are made during the financial closing process. You can select
one group of users to enter the last postings in the old period and
select other groups to continue working only in the new period.
Use Periods and Additional Options
When you work with the Fiscal Period Setup, additional functions are available
from the Periods form.
• To divide an existing periods into two periods, click the Divide
period button. Enter the start date of the new period, and then click
OK to create the new period and return to the Periods form.
• To create a closing period for a fiscal period, click the Create
Closing period button. The system automatically creates an opening
and closing period for the fiscal year, but not for each individual
period.
• To delete any period with an Open status or change the number of
periods, click the Delete period button. The Delete Period button isnot available if the selected fiscal period has a status of “Stopped” or
“Closed.” No warning or error message appears when an open period
with transaction history is deleted. The transactions are not deleted,
and the end date of the period prior to the deleted period changes to
coincide with the beginning date of the next period.
• To delete the fiscal year furthest into the future, click the Delete
fiscal year button. As with the Delete Period button, no warning or
error message appears when the fiscal year with transaction history is
deleted. The transactions are not deleted and the year can be
recreated.
• To make adjustments for a closer period and recalculate the balancefor a specific period, select that period, and then click the
Recalculate Period Balances button. Select whether to run the
recalculation in batch or immediately.
8/20/2019 Financials I
http://slidepdf.com/reader/full/financials-i 29/563
Chapter 1: General Ledger Setup
1-17
Test Your Knowledge
Is it possible to post activity that uses a date for which a period has not been
created?
( ) Yes( ) No

8/20/2019 Financials I
http://slidepdf.com/reader/full/financials-i 30/563
Financials I in Microsoft Dynamics® AX 2009
1-18
Lab 1.2 - Create Periods in a New Fiscal Year
Scenario
Ken, the Controller for Contoso Entertainment USA (CEU), must create a new
fiscal year. CEU has a fiscal year that begins on July 1, and is divided into one-month periods.
Challenge Yourself!
Create the fiscal year for 2011, which begins on July 1, 2010.
Need a Little Help?
1. In the Periods form, click the Create new fiscal year button to
create the fiscal year for 2011.
2. Select the period length of one month.3. Review the new fiscal year in the Periods form.
Step by Step
1. Click General ledger, click Setup, click Periods, and then click
Periods.
2. Click the Create new fiscal year button.
3. In the Enter start of fiscal year field, enter 7/1/2010.
4. In the Enter close of fiscal year field, enter 6/30/2011.
5. In the Desired length of period field, enter 1.6. In the Unit field, click the arrow to select Months.
7. Click OK to create the year. The fiscal year for 2011 is added to the
Periods form.

8/20/2019 Financials I
http://slidepdf.com/reader/full/financials-i 31/563
Chapter 1: General Ledger Setup
1-19
Date Intervals
Create and manage date intervals that can be used in financial statements and
reports. Date intervals allow you to create dynamic dates. When you use date
intervals, you can set up predefined periods when you run financial statements.
Date intervals can also be used when setting up an allocation rule.
Scenario
Ken, the Controller at Contoso Entertainment USA (CEU), runs a dimension
statement every month. Instead of entering the dates every time he runs the
report, he selects a date interval.
The date interval automatically fills in the start date and the end date. Therefore,
Ken does not have to specify the start date and the end date when he runs the
dimension statement.
Procedure: Create Date Intervals
Follow these steps to create date intervals.
1. To access the Date intervals form, click General Ledger, click
Setup, click Periods, and then click Date Intervals.
2. Press CTRL+N to create a new record.
3. Enter a date interval code in the Date interval code field. Use a code
that is easy to identify when you set up date intervals on statements
and reports, such as CP for the Current period.

8/20/2019 Financials I
http://slidepdf.com/reader/full/financials-i 32/563
Financials I in Microsoft Dynamics® AX 2009
1-20
4. Enter a short description of the date interval, in the Description
field.
5. Enter the period for the date interval in the From date and To date
fields.
FIGURE 1.6 DATE INTERVALS FORM
Procedure: Create Date Intervals - Start/End
Follow these steps to further define the date interval start and end dates.
1. From the Date intervals form, click the General tab.
2. Select thetime unitthat is the basis of the calculation in the Before
list.
3. Specify the starting point of the interval in the Start/End field. This
data is used with the value in the Before list to set the starting point
of the date interval.
8/20/2019 Financials I
http://slidepdf.com/reader/full/financials-i 33/563
Chapter 1: General Ledger Setup
1-21
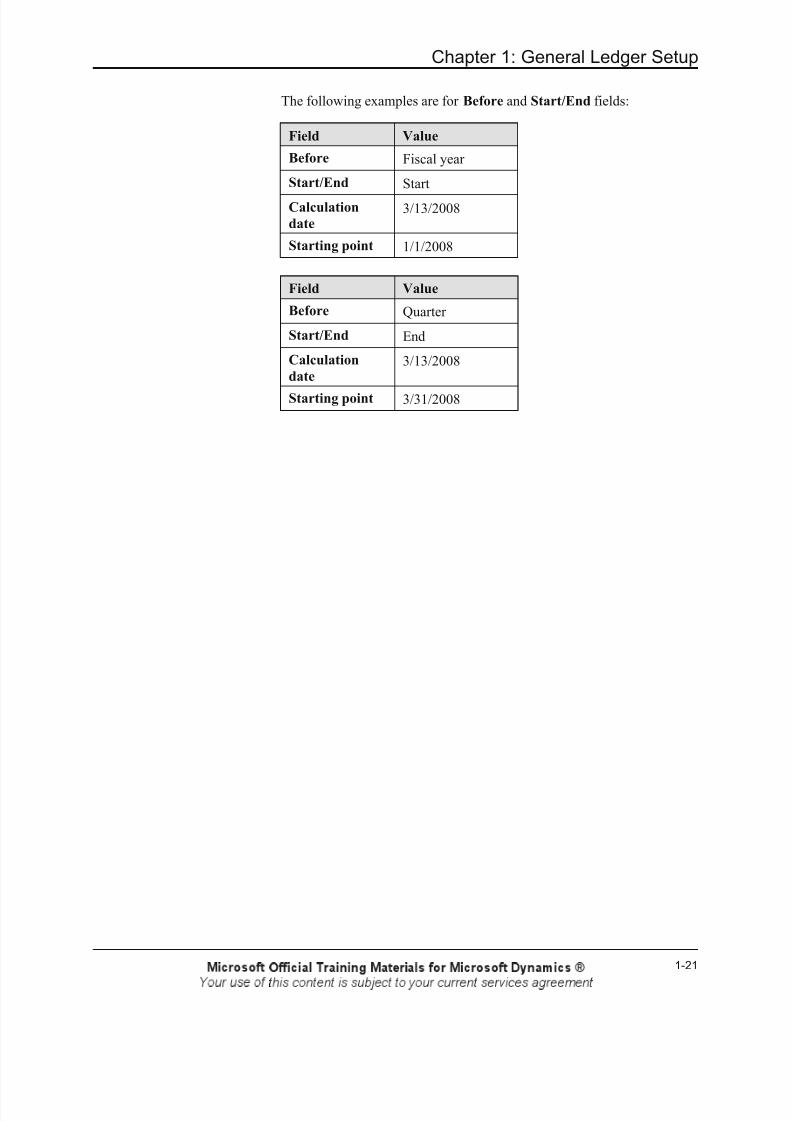
The following examples are for Before and Start/End fields:
Field Value
Before Fiscal year
Start/End Start
Calculation
date 3/13/2008
Starting point 1/1/2008
Field Value
Before Quarter
Start/End End
Calculation
date 3/13/2008
Starting point 3/31/2008

8/20/2019 Financials I
http://slidepdf.com/reader/full/financials-i 34/563
Financials I in Microsoft Dynamics® AX 2009
1-22
NOTE : The Calculation date field is equal to the system date. By changing the
system date, ( Microsoft Dynamics AX > Tools > Session Date ), all the values in
the Date calculation area of the form will be changed accordingly.
FIGURE 1.7 DATE INTERVALS FORM, GENERAL TAB
Procedure: Create Date Intervals - Future or Past
Follow these steps to set whether a date interval moves into the future or the past.
1. From the Date intervals form, click the General tab.
2. Indicate whether the interval should move into the future or into the
past, by selecting + for future or - for past in the +/- field. The +/-
field is based on the Before field.The number is multiplied by the
time units in the Days, months, years or periods field.
3. Select the unit for change of start date in the interval in the Days,
Months, Years or periods field. The number of units is displayed in
the +/- field. The choices are reflected in the After adjustments
field.

8/20/2019 Financials I
http://slidepdf.com/reader/full/financials-i 35/563
Chapter 1: General Ledger Setup
1-23
The following examples are of the +/- field and the Days, months,
years and period fields:
Field Value
Before Year
Start/End Start
+/- 1
Days, months, years and periods Years
Calculation date 3/13/2008
Starting point 1/1/2008
After adjustment 1/1/2009
Field Value
Before Year
Start/End Start
+/- - 1
Days, months, years and periods Years
Calculation date 3/13/2008
Starting point 1/1/2008
After adjustment 1/1/2007
NOTE : If the +/- field and Days, Months, Years or periods field are empty, the After adjustments field equals the starting point value.
Procedure: Create Date Intervals - After
Follow these steps to select the basis for adjustment of the date in the After
adjustments field.
1. From the Date intervals form, click the General tab.
2. Select a time unit used to determine the start date or the end date of
the From date field in the After field.
The From date fieldis based on the value in the After adjustments
field. The From date is used as the basis of calculation in financial
statement columns, and can be the start or the end date of a time unit
selected in the After field

8/20/2019 Financials I
http://slidepdf.com/reader/full/financials-i 36/563
Financials I in Microsoft Dynamics® AX 2009
1-24
3. Select whether the time unit in the After field should be set in the
beginning or the end of the time unit in the Start/End field.
The following examples are of the After field and the Start/End
field.
Field Value
After
adjustments
4/17/2008
After Fiscal year
Start/End Start
From date 1/1/2008
Field Value
After
adjustments
4/17/2008
After Quarter
Start/End End
From date 6/30/2008
Procedure: Create Date Intervals - Locked Start
Follow these steps to use a specific date.
1. From the Date intervals form, click the General tab.
2. Enter a fixed start date, in the Locked start field. All other values
are overwritten, and the value is transferred to the From date field.
Reason Codes
Reason codes are standardized codes that can be used in various transaction types
or changes to field values to provide background data about the transaction. For
example, auditors or managers frequently want to see reasons recorded forvarious transactions.

8/20/2019 Financials I
http://slidepdf.com/reader/full/financials-i 37/563
Chapter 1: General Ledger Setup
1-25
When you use standard reason codes instead of transaction text, you have
guidelines for which codes to select from. Standard reason codes also allow
management and auditors to analyze transaction history by specific reason.
Reason codes can be used with:
• Fixed assets
• General ledger
• Accounts payable
• Accounts receivable
• Bank
NOTE : For more information about using reason codes with Fixed assets, refer
to the Fixed assets collection.
Procedure: Create a Reason Code
A reason code can be selected in the following General ledger forms:
• General journal
• Process allocation request
• Elimination proposal
• Consolidation, Online periodic
Follow these steps to create a General ledger reason code.
1. To access the Reasons form, click General Ledger, click Setup,
and then click Ledger reasons.2. Press CTRL+N to create a new reason.
3. Enter a unique Reason Code as identification.

8/20/2019 Financials I
http://slidepdf.com/reader/full/financials-i 38/563
Financials I in Microsoft Dynamics® AX 2009
1-26
4. Enter a Default Comment for the reason code. The comment
entered here is displayed as the default comment when you select
this reason in transactions. You can change the default reason
comment.
FIGURE 1.8 LEDGER REASONS FORM
NOTE : Use the Reasons form from Basic to create reason codes for manyinancial modules. You also can open the Reasons form from a specific module.
The Reasons form in Basic provides extra fields to assign the reason code to
any of five account types, but in each of the other modules, reason codes bydefault are assigned to the account type that is related to that module. For
example, if the Reasons form opens from Accounts payable , the Vendor checkbox is selected and the reason codes created can be used only with vendor
transactions unless the Vendor check box is unmarked.
Procedure: Modify a Reason Code
Reason codes can be modified at any time. The Default comment and Account
types can be changed.
Follow these steps to modify a reason code.
1. To access the Reasons form, click General Ledger, click Setup,
and then click Ledger reasons.
2. Select the Reason Code to modify.
3. Modify the Default Comment for the reason code.
4. Clear the Ledger check box. As soon as the Ledger check box is
cleared, the reason code is no longer displayed in the General ledger
transaction entry forms, and is unable to be used.

8/20/2019 Financials I
http://slidepdf.com/reader/full/financials-i 39/563
Chapter 1: General Ledger Setup
1-27
Procedure: Delete a Reason Code
Follow these steps to delete a reason code.
1. To access the Reasons form, click General Ledger, click Setup,
and then click Ledger reasons.2. Select the Reason Code to be deleted.
3. Clear the Ledger check box. You can delete a Reason code only if
no account types are associated with it. If the Reason code has been
selected for use from another module, clear the other Account type
check boxes or view the Reasons form from Basic to clear all
Account type check boxes.
4. Click the delete icon.
5. Click Yes in the Confirm deletion dialog box.
Test Your Knowledge
What are reason codes?
Dimensions
Dimensions have the following characteristics:
• Provide a more detailed description of a transaction.
• Simplify the accounting process when you enable detailed analysis
without the creation of a detailed Chart of Accounts.
• Resemble separate accounts for:
o Departments
o Cost centers
o Purposes

8/20/2019 Financials I
http://slidepdf.com/reader/full/financials-i 40/563
Financials I in Microsoft Dynamics® AX 2009
1-28
• Are defined to analyze and classify financial transactions as follows:
o Financial transactions usually are organized according to
voucher and account number.
o Additional grouping and classification options are available
when you assign several dimensions to transactions.
• Enable you to view the data file from different perspectives to
improve the effectiveness in tracking figures across accounts.
• Can be used throughout the system.
• Add dimensions to base data such as:
o Ledger accounts
o Customers
o Vendors
• Are copied to transactions automatically.
Default Dimension Settings
Three default dimension settings exist:
• Department
• Cost center
• Purpose
NOTE : Use the Financial Dimension Wizard to create extra dimensions in
Microsoft DynamicsAX 2009. It requires a MorphX license to add extra
dimensions in the application. To access the wizard, click Microsoft Dynamics AX , click Tools , click Development Tools , click Wizards , and then click
Financial Dimension Wizard . The number of financial dimensions is finite,
however, the number of dimension values within a financial dimension is infinite.
NOTE : These dimensions are financial dimensions. Microsoft Dynamics AX
2009 also has Inventory dimensions, which are different from financial
dimensions.
Scenario
Ken, the Controller at Contoso Entertainment USA, must analyze company
figures from a perspective other than only ledger accounts. Ken wants to make
reports and sales statistics inquiries based on cost centers and departments.
Therefore, he decides to set up dimensions as a supplement to voucher and
account numbers.

8/20/2019 Financials I
http://slidepdf.com/reader/full/financials-i 41/563
Chapter 1: General Ledger Setup
1-29
Procedure: Create a Dimension Value
Follow these steps to create a new dimension value.
1. To access the Dimensions form, click General ledger, and then
click Dimensions.
2. Select the relevant dimension in the Dimension list.
3. Press CTRL+N to create a new line. The value in the Dimension
field is populated based on the selection in step 2.
4. Enter a unique identifier for the dimension value in the Number
field.
5. Enter a name for the dimension value in the Description field.
6. Select an employee responsible for this dimension, in the Employee
drop-down list. This field is optional.
FIGURE 1.9 DIMENSIONS FORM
After dimension values are set up, you can assign them to the following:
• Ledger accounts
• General ledger transactions
• Accounts Receivable transactions
• Customers
• Accounts Payable transactions
• Vendors
For example, in the Customers form on the Dimensions tab, set up department
and cost center dimensions for customer 4037. When a sales order is created forcustomer 4037, the defined dimensions are populated on the sales order
automatically, but the values can be changed.

8/20/2019 Financials I
http://slidepdf.com/reader/full/financials-i 42/563
Financials I in Microsoft Dynamics® AX 2009
1-30
Throughout Microsoft Dynamics AX 2009, you can separate data in different
ways when you use dimensions. For example, you can attach a department
number to each transaction and then run a query that shows balances by
department code.
Procedure: Select Dimension Validation Options
Validation options for dimension values can be assigned to specific account
numbers. Follow these steps to specify a dimension validation option for an
account.
1. To open the Chart of Accounts form, click General Ledger and
then click Chart of Account Details.
2. Select the account number, and then click the Dimension tab.
3. Select a validation option value from the Mandatory Dimensions
lists, which include the following value options:
o Optional - Entry of a dimension value is optional; a value is not
checked when you post.o To be filled in - Microsoft Dynamics AX 2009 verifies that a
dimension value is entered, but the specific value is not checked.
The Dimension field must contain data, however, the data does
not have to be a valid dimension in the Dimension table.
o Table - Microsoft Dynamics AX 2009 verifies that a Dimension
value is entered, and that the value matches the value specified in
the ledger account.
o List - Microsoft Dynamics AX 2009 verifies that a Dimension
value is entered. The value must be a valid dimension in the
Dimension table.
o Fixed - The dimension selected on the ledger account always is
used when you post and replaces any other dimension value that
may have been entered.
o Default - For all transactions without any value set, the value
stated on the ledger account is used. The default dimension value
can be changed before you post.
HINT : For accounts that have a List validation option selected, you must define
the Dimension table values in the Validate dimension form. To access the
Validate dimension form, click General ledger , click Chart of Accounts , select
the account number, click the Validation list button, and then click Dimension.

8/20/2019 Financials I
http://slidepdf.com/reader/full/financials-i 43/563
Chapter 1: General Ledger Setup
1-31
Test Your Knowledge
Which of the following is one of the default dimension settings? (Select all that
apply.)
( ) Department
( ) Vendor
( ) Cost center
( ) Purpose

8/20/2019 Financials I
http://slidepdf.com/reader/full/financials-i 44/563
Financials I in Microsoft Dynamics® AX 2009
1-32
Lab 1.3 - Assign Ledger Account Dimension Values
Scenario
Phyllis, the Accounting Manager, at Contoso Entertainment USA (CEU) has
been asked by Charlie, the President and CEO, for monthly financial reports bydepartment, cost center, and purpose. Phyllis has determined that cleaning
expenses for the building always should be recorded to the Building maintenance
cost center.
Challenge Yourself!
Help Phyllis enter the necessary dimension validation options for account
605110.
Need a Little Help?
1. To guarantee the accuracy of the financial reports, make sure that
transactions posted to the cleaning expense account (605110) always
specify:
o Cost center dimension 0101, Building maintenance
2. Specify these validation options in the Chart of Accounts form.
Step by Step
1. Click General ledger, and then click Chart of Account Details.
2. Select account 605110, Cleaning expense, and then click theDimension tab.
3. In the Cost center field, click the arrow to select 0101, Building
maintenance.
4. In the Validate cost center field, click the arrow to select Fixed.

8/20/2019 Financials I
http://slidepdf.com/reader/full/financials-i 45/563
Chapter 1: General Ledger Setup
1-33
Dimension Focus
Dimension focuses make it easy for you to create financial reports that are based
on dimensions and ledger accounts transactions. They also define the order in
which dimensions and ledger accounts should be printed.
A dimension focus combines dimensions and ledger accounts. For example, one
focus can consists of:
• Ledger accounts
• Department
• Purpose
Another focus can consist of:
• Department
• Ledger accounts
For example, you can use the dimension focuses to view balance statements
based on multiple dimensions and ledger accounts.
Scenario
Sara, the Chief Financial Officer (CFO) at Contoso Entertainment USA (CEU),
must:
• Analyze financial transactions based on dimensions and ledger
accounts combined. For example, Sara views sales revenue for each
department or country.
• Determine how financial transactions should be organized when
users run reports and make inquiries.
To view the sales revenue for all departments in CEU, Sara decides to create a
dimension focus that consists of ledger accounts and departments dimensions.
Procedure: Create a Dimension Focus
Follow these steps to create a dimension focus:
1. To access the Dimension focuses form, click General Ledger, click
Setup, click Financial Statement, and then click Dimension
Focuses.
2. Enter a unique identifier to name the new dimension focus in the Set
field.
3. Enter a descriptive name in the Description field.
4. Click the Dimension tab.

8/20/2019 Financials I
http://slidepdf.com/reader/full/financials-i 46/563
Financials I in Microsoft Dynamics® AX 2009
1-34
5. Select one or more dimensions in the Available dimensions pane
that should be included in the dimension focus.
Click the arrows to add the dimensions to the Selected dimensions
pane. At least one dimension must be selected for each dimension
focus.
The dimension that is the primary row pattern (main focus) must be
listed first, and the dimension shown within each primary row must be listed second (secondary focus). For example, to print a report that
displays sales revenue per department, the department dimension
should be selected first and ledger accounts selected second.
NOTE : The Dimension Entry check box cannot be edited. It identifies whether
the dimension set is used with the dimension hierarchy feature. A dimension set
that drives the entry of dimension automatically is considered a focus also, but
must not be edited, modified or deleted from the Dimension focuses form. The
dimension set can be edited only in the Dimension sets form, which you canaccess when you click General ledger > Setup > Dimensions > Dimension Set .
FIGURE 1.10 DIMENSION FOCUSES FORM

8/20/2019 Financials I
http://slidepdf.com/reader/full/financials-i 47/563
Chapter 1: General Ledger Setup
1-35
Procedure: Select the Default Dimension Focus
After you complete the steps to create a dimension focus, you can use the
dimension focus in various reports and statements. For example, use the
dimension focus in financial or dimension statements.
A default dimension focus is selected automatically when various reports are
printed. For example, the default dimension focus is selected when you open the
Dimension Statement form when you click General ledger > Reports >
Transactions > Dimension Statement.
Follow these steps to select the default dimension focus.
1. To open the General ledger parameters form, click General
ledger, click Setup, and then click Parameters.
2. On the Ledger tab select the default dimension focus in the Default
focus for dimension rendering list.

8/20/2019 Financials I
http://slidepdf.com/reader/full/financials-i 48/563
Financials I in Microsoft Dynamics® AX 2009
1-36
Lab 1.4 - Create a Dimension Focus and Print the DimensionStatement
Scenario
In June 2008, Sara, the Chief Financial Officer (CFO) at Contoso Entertainment
USA (CEU), advised staff that all entries made to income statement accounts
must include a department dimension.
Challenge Yourself!
Run a report to verify that entries for the month of June include the department
dimension.
Need a Little Help?
1. Create a new dimension focus for account - department.
2. View the results in the Dimension Statement report.
Step by Step
Follow these steps to create a new Dimension focus for Account-Department.
1. To access the Dimension focuses form, click General ledger, click
Setup, click Financial statement, and then click Dimension
focuses.
2. Press CTRL+N to create a new dimension focus.
3. In the Set field, enter Acc-Dept.4. In the Description field, enter Account – Department.
5. Click the Dimension tab.
6. Drag the Ledger account field from Available dimensions to
Selected dimensions.
7. Drag the Department field from Available dimensions to Selected
dimensions.
8. Click the Overview tab.
9. Press CTRL+S to save the record. Microsoft Dynamics AX 2009
displays a confirmation message.
10. Click the Yes button.
11. Close the Dimension focuses form.
Next, follow these steps to run the Dimension statement report.
1. Click General ledger, click Reports, click Transactions, and then
click Dimension statement.
2. In the Main focus field use the arrow to select Acc-Dept.
3. In the From date field, enter 6/1/2008.

8/20/2019 Financials I
http://slidepdf.com/reader/full/financials-i 49/563
Chapter 1: General Ledger Setup
1-37
4. In the To date field, enter 6/30/2008.
5. Click the Select button to open the Inquiry form.
6. On the Range tab on the Ledger account row enter 400000..999999
in the Criteria column.
7. Click OK to close the Inquiry form.
8. Click OK to view the report.9. Review the report to determine whether accounts that have entries
without departments are listed.

8/20/2019 Financials I
http://slidepdf.com/reader/full/financials-i 50/563
Financials I in Microsoft Dynamics® AX 2009
1-38
Generated Allocations
Allocation is the process of distributing monetary amounts to one or more
accounts or account and dimension combinations.
New to Microsoft Dynamics AX 2009 is the ability to use predefined allocationrules to perform generated allocations. Generated allocation is the distribution of
posted or fixed amounts to combinations of destination accounts and dimensions
at any time, which generate new journal entries.
Allocation rules have numerous calculation methods, including:
• Basis
• Fixed percentage
• Fixed weight
• Spread even
Microsoft Dynamics AX 2009 also provides the ability to allocate across
multiple companies, also known as Intercompany allocations.
Scenario
Phyllis, the Accounting Manager at Contoso Entertainment USA (CEU), creates
a new Intercompany allocation rule for Electric Utilities to distribute overhead
utility expense to each department based on fixed percentages. The rule is for the
new fiscal year that begins on January 1, 2008. Because Phyllis does not want the
new rule to be used until then, she enters 01/01/2008 as the start date for the rule.
Because CEU typically reviews its allocation rules every fiscal year, Phyllis
enters 12/31/2008 as the end date for the rule.
Phyllis enters detailed notes about the basis and reasons for the allocation rule.
Phyllis then selects the Microsoft® Word template that was implemented when
CEU experienced a SOX review to document the allocation rule completely.
When Phyllis has finished writing the document, she attaches a copy of it to the
rule. Anyone who wants additional information about the rule can open the
document or print an Allocation rules definition report.
Allocation Rules
Allocation Rules allow you to define the results you want in the allocation
business process.
Each allocation rule has four primary components:
• The General settings dictate which fields are available in the rule
tabs.
• The Source data for the allocation is also known as the allocation
pool.

8/20/2019 Financials I
http://slidepdf.com/reader/full/financials-i 51/563
Chapter 1: General Ledger Setup
1-39
• The Destination defines how the results of the allocation calculation
must be distributed to the destination distribution lines.
• Offset entries balance the destination distribution lines.
Procedure: Create an Allocation Rule
Follow these steps to create an allocation rule.
1. Click General ledger, click Setup, click Posting, and then click
Ledger allocation rule.
2. Press CTRL+N to create a new rule.
3. Enter the Rule as identification.
4. Enter a Description of the rule.
5. Optionally select the Effective start date and Effective end date for
the rule.
6. Select the Active check box, if the allocation rule is available to be
processed.
FIGURE 1.11 LEDGER ALLOCATION RULE FORM

8/20/2019 Financials I
http://slidepdf.com/reader/full/financials-i 52/563
Financials I in Microsoft Dynamics® AX 2009
1-40
Procedure: Create an Allocation Rule - General
Follow these steps to complete the setup of allocation rule general settings, which
dictate what fields are available in the rule tabs.
1. From the Ledger allocation rule form, select the General tab.
2. Review or change settings from the Overview tab in the
Identification and Administration sections.
3. View the Date last run, which displays the date when a user last
processed the allocation rule and created distributions.
4. Select the Intercompany rule check box if the allocation rule
involves being processed among multiple companies.
5. Select the Allocation method:
o Basis: Defines how and in what proportion the source amounts
are distributed to the various destination lines. For example,
allocation based on revenue dollars, in which the cost of
corporate advertising expense is shared across all departments, is based on each department's sales in proportion to total
departmental sales.
o Fixed percentage: Takes criteria defined in the allocation source
and uses a fixed percentage amount that the user entered, to
determine the allocation amount for the destination.

8/20/2019 Financials I
http://slidepdf.com/reader/full/financials-i 53/563
Chapter 1: General Ledger Setup
1-41
o Fixed weight: Takes criteria defined in the allocation source and
uses a fixed weight amount that the user entered, to determine
the allocation amount for the destination.
o Spread even: Takes criteria defined in the allocation source and
disperses the amount evenly across the destination distribution
lines.
FIGURE 1.12 LEDGER ALLOCATION RULE FORM, GENERAL TAB
6. In the Data source field, select the source of the amount to allocate:
o Ledger
o Fixed value
7. If Fixed value is selected in the Data source field, enter a value in
the Fixed value field.
8. If Ledger is selected in the Data source field, select an arithmetic
operation to apply to the source value in the Mathematical
operation field.
9. If Ledger is selected in the Data source field and either Multiply or
Divide is selected in the Mathematical operation field, enter the
Amount by which to multiply or divide the source value.
10. If Ledger is selected in the Data source field, select a date interval
to determine the account periods used for the allocation rule source.
If a date interval is not selected, all balanced for the chosen account
or account-dimension combination will be selected for source
allocation.
11. Select an allocation Journal name. The Description displays the
allocation journal description.

8/20/2019 Financials I
http://slidepdf.com/reader/full/financials-i 54/563
Financials I in Microsoft Dynamics® AX 2009
1-42
12. If the Spread even Allocation method is selected, select from the
Keep account from list to use the source account.
13. If the Spread even Allocation method is selected, select from the
Keep dimension form list to indicate if you want to use the source
destination account and dimension or a user-specified destination
account and dimension.
Procedure: Create an Allocation Rule - Source
Follow these steps to complete the setup of settings for the allocation rule source,
also known as the allocation pool.
1. From the Ledger allocation rule form, select the Source button.
2. Press CTRL+N to create a new record.
3. From the Field setting list select to allocate from an Account or
account Dimension combination.
4. If Dimension is selected in the Field setting field, select a
Dimension.5. In the Source criteria field enter the account or dimension
information from which to allocate. You can use wildcard characters
to specify accounts or dimension codes. For example, if the selected
Dimension is Department and the source criteria = Admin,“”, the
system displays information that includes the department dimension
equal to Admin or a department dimension has not been specified.
FIGURE 1.13 LEDGER ALLOCATION RULE SOURCE FORM

8/20/2019 Financials I
http://slidepdf.com/reader/full/financials-i 55/563
Chapter 1: General Ledger Setup
1-43
Procedure: Create an Allocation Rule - Destination
Follow these steps to complete the setup of allocation rule destination settings,
which define how the results of the allocation calculation must be distributed to
the destination distribution lines.
1. From the Ledger allocation rule form, select the Destination
button.
2. Press CTRL+N to create a new record.
3. The Company field displays the company in which the allocation
rule was created. If the allocation rule is an inter-company rule, users
can change this field.
4. Select the account to allocate to in the To Account field.
5. Select the Department dimension to which to allocate.
6. Select the Cost center dimension to which to allocate.
7. Select the Purpose dimension to which to allocate.
8. If the Allocation method is Basis, select the Basis ID with which to
associate the destination line.
FIGURE 1.13 LEDGER ALLOCATION RULE DESTINATION FORM

8/20/2019 Financials I
http://slidepdf.com/reader/full/financials-i 56/563
Financials I in Microsoft Dynamics® AX 2009
1-44
Procedure: Create an Allocation Rule - Offset
Follow these steps to complete the setup of allocation rule Offset settings, which
define the offset entries that balance the destination distribution lines.
1. From the Ledger allocation rule form, select the Offset tab.
2. In the Offset account from field, select where to find the offset
account.
o Source: The allocation process will use the respective account
defined in source.
o User specified: The allocation process will use the offset
account value specified.
3. If the Offset account from is set to User specified, select the Offset
account.
4. In the Offset dimension from field, select where to find the offset
account.
o Source: The allocation process will use the respective dimension
value that was defined in source.
o User specified: The allocation process will use the specified
offset dimension value.
5. If the Offset dimension from field is set to User specified, selectthe dimension to associate to the allocation rule.
FIGURE 1.14 LEDGER ALLOCATION RULE FORM, OFFSET TAB

8/20/2019 Financials I
http://slidepdf.com/reader/full/financials-i 57/563
Chapter 1: General Ledger Setup
1-45
Scenario
Phyllis runs the Allocation rules definition report that details the allocation rules
for the current year. The report contains details about each rule including the rule
ID, description, From/To account number and dimension combinations, effective
start and end dates, calculation method details, usage information, and othersetup information.
Procedure: Print the Allocation Rules Definition Report
Follow these steps to print the Allocation Rules Definition report:
1. To access the Allocation Rules Definition report, click General
Ledger, click Reports, click Base data, click Various, and then
click Allocation rules definition.
2. Select criteria such as Ledger allocation rule.
3. Click OK to print.
FIGURE 1.15 ALLOCATION RULES DEFINITION REPORT
Scenario
Phyllis runs an allocation proposal without posting it to review the allocation
results and the detailed distributions that will be created based on the allocation
rule used. If the results are accurate, Phyllis posts the entry.
8/20/2019 Financials I
http://slidepdf.com/reader/full/financials-i 58/563
Financials I in Microsoft Dynamics® AX 2009
1-46
Procedure: Process Allocation Request
As soon as an allocation rule has been created, you can process it and either
preview or post an allocation journal. To set up an allocation journal, move to
General ledger > Setup > Journals > Journal names.
Use the Process allocation request form to create an allocation journal.
1. Click General ledger, click Periodic, and then click Process
allocation request.
2. Select an allocation rule.
3. Select the date to include ledger amounts for allocation in the As of
date field. This date corresponds with the Date interval on the
allocation rule.
4. Select the date to post the allocation journal to the general ledger in
the GL posting date field.
5. Select the action to occur if the allocation process generates a zero
source amount.o Select Process to create destination distributions, where
applicable.
o Select Stop to create an error that indicates when a zero source
amount is selected and stops the allocation process.
6. In the Proposal options field, select a posting preference.
o Select Proposal only to review allocation results without
posting.
o Select Post only to post the allocation results directly to the
general ledger.
7. Click OK .

8/20/2019 Financials I
http://slidepdf.com/reader/full/financials-i 59/563
Chapter 1: General Ledger Setup
1-47
NOTE : The Date last run field displays the last date when a user processed an
allocation rule and created distribution lines.
FIGURE 1.16 PROCESS ALLOCATIONREQUEST FORM
Test Your Knowledge
What are the parts of an allocation rule? (Select all that apply.)
( ) General
( ) Source
( ) Destination
( ) Offset
Which allocation method defines how and in what proportion the source amounts
are distributed to the various destination lines, by referring to balances in other
account-dimensions?
( ) Basis
( ) Fixed percentage
( ) Fixed weight
( ) Spread even

8/20/2019 Financials I
http://slidepdf.com/reader/full/financials-i 60/563
Financials I in Microsoft Dynamics® AX 2009
1-48
Summary
The General ledger setup course describes the initial setup to start working with
Microsoft Dynamics AX 2009 financials. The course provides basic
introductions to set up:
• Currencies and exchange rates
• Periods, fiscal year and date intervals
• Dimensions and dimension focuses
• Generated allocations

8/20/2019 Financials I
http://slidepdf.com/reader/full/financials-i 61/563
Chapter 1: General Ledger Setup
1-49
Quick Interaction: Lessons Learned
Take a moment and write down three key points you have learned from this
chapter:
1.
2.
3.

8/20/2019 Financials I
http://slidepdf.com/reader/full/financials-i 62/563
Financials I in Microsoft Dynamics® AX 2009
1-50
Solutions
Currency and Exchange Rate Setup
Test Your Knowledge
Task: Simon, the System Implementer at Contoso Entertainment USA (CEU), is
helping Phyllis, the Accounting Manager, with the implementation of Microsoft
Dynamics AX 2009. CEU conducts business primarily in the United States and
also in Canada. As of April 1, 2008, 1 Canadian Dollar (CAD) equals 0.97 US
Dollars (USD). Help Phyllis and Simon determine the correct steps to set up
multicurrency for CEU.
Step 4 : Create the CAD Currency in the Exchange rates form
Step 5 : Set the exchange rate value for CAD as of no date to 0.97
Step 3 : In the General ledger parameters form, enter 1 in the Express exchange
rate field
Step 2 : In the Company information form, select USD in the Currency field
Step 6 : Set the exchange rate value for CAD as of April 1, 2008 to 0.97
Step 1 : Create the USD Currency in the Exchange rates form
What effect does the value in the General round-off field have on the values in
Microsoft Dynamics AX 2009?
MODEL ANSWER - The value is used to round all amounts in all modules.
When you change the display currency, it affects all users.
( ) True
(•) False
Periods and Fiscal Year Setup
Test Your Knowledge
Is it possible to post activity that uses a date for which a period has not been
created?
( ) Yes
(•) No

8/20/2019 Financials I
http://slidepdf.com/reader/full/financials-i 63/563
Chapter 1: General Ledger Setup
1-51
Reason Codes
Test Your Knowledge
What are reason codes?
MODEL ANSWER - Reason codes are standardized codes that can be used
in various transaction types or changes to field values to provide background
data about the transaction.
Dimensions
Test Your Knowledge
Which of the following is one of the default dimension settings? (Select all that
apply.)
(√) Department
( ) Vendor
(√) Cost center
(√) Purpose
Generated Allocations
Test Your Knowledge
What are the parts of an allocation rule? (Select all that apply.)
(√) General
(√) Source
(√) Destination
(√) Offset
Which allocation method defines how and in what proportion the source amounts
are distributed to the various destination lines, by referring to balances in other
account-dimensions?
(•) Basis
( ) Fixed percentage
( ) Fixed weight
( ) Spread even

8/20/2019 Financials I
http://slidepdf.com/reader/full/financials-i 64/563
Financials I in Microsoft Dynamics® AX 2009
1-52

8/20/2019 Financials I
http://slidepdf.com/reader/full/financials-i 65/563
Chapter 2: Chart of Accounts Setup
2-1
CHAPTER 2: CHART OF ACCOUNTS SETUP
Objectives
The objectives are:
• Create, edit, close, or delete Ledger Account Categories
• Create a new account in the Chart of Accounts (COA)
• Set up Account Allocation Terms
• Set up System Accounts
• View inquiries and reports related to the Chart of Accounts
Introduction
A Chart of Accounts is a list of all accounts tracked by Microsoft Dynamics®
AX2009. It captures financial information to make sound financial decisions. Each
account is assigned an account number as a unique identifier.
Use the Chart of Accounts to create, manage, and view the company's General
Ledger accounts in a structured list. Additionally, different allocation terms can
be set up for an account to distribute the amount to several accounts and account-
dimension combinations, and system accounts help users handle automatic
postings.
The Chart of Accounts Setup course also shows all the reports and inquiries
related to the Chart of Accounts.

8/20/2019 Financials I
http://slidepdf.com/reader/full/financials-i 66/563
Financials I in Microsoft Dynamics® AX 2009
2-2
Ledger Account Categories
Ledger account categories can be used to better classify a general ledger account.
Use ledger account categories primarily for grouping or selection of ledger
accounts for reports.
By default, over fifty ledger account categories are provided.
Scenario
Phyllis, the Accounting Manager, wants to include the Current Ratio on the
Short-term solvency KPI report. Current Ratio is calculated by dividing a
company’s current assets by current liabilities. Current assets typically consist of
cash, cash equivalents, accounts receivable, inventory, and marketable securities.
Current Liabilities consist of any liabilities that are payable within one year.
The following table shows which type accounts are defined in Contoso
Entertainment USA:
Ledger account Account name
110100 Cash
130000 Accounts receivable
140000 Inventory
170000 Fixed Assets
To derive the Current Asset value, Phyllis must sum the values of the Cash,
Accounts receivable, and Inventory accounts. Fixed Assets are not considered
current assets. To perform this calculation, Phyllis uses the Ledger accountcategory field. Accounts later added to the chart of accounts will also use the
Ledger account category to automatically be included in existing calculations.
Procedure: Create Ledger Account Categories
Follow these steps to create a Ledger account category.
1. To access the Ledger account categories form, click General
Ledger, click Setup, and then click Ledger account categories.
2. Press CTRL+N to create a new record.
3. Enter a unique name for the Ledger account category and a
Description.
4. Select an Account type to associate with the account category. The purpose of selecting an Account type is to reduce the lookup of
available Ledger account categories when you create a new account
within the Chart of accounts form.

8/20/2019 Financials I
http://slidepdf.com/reader/full/financials-i 67/563
Chapter 2: Chart of Accounts Setup
2-3
5. To link an account category to a ledger account, click the Link
ledger accounts button. Or, link a Ledger account category to an
account from the Chart of Accounts form. For more information,
refer to the topic titled Create a New Account - Ledger Account
Category.
FIGURE 2.1 LEDGER ACCOUNT CATEGORIES FORM
Edit Ledger Account Categories
The Ledger account category, Description, and Account Type assignment
values can be changed at any time for user-defined and default Ledger Account
Categories.
Close Ledger Account Categories
To inactivate a ledger account category, including any of the default ledger
account categories, select the Closed check box in the Ledger account
categories form. If you try to close a Ledger account category that is already
linked to a ledger account, a warning message that has a listing of linked ledger
accounts is displayed. Select to continue or cancel.
After a Ledger account category is closed, it cannot be linked to ledger
accounts.
Delete Ledger Account Categories
A user-defined Ledger account category can be deleted, as long as it is not
assigned for use with Purchase Requisitions in the Accounts Payable
Parameters form.
None of the default Ledger account categories can be deleted.

8/20/2019 Financials I
http://slidepdf.com/reader/full/financials-i 68/563
Financials I in Microsoft Dynamics® AX 2009
2-4
Chart of Accounts
The Chart of Accounts (COA), the central collection location for daily financial
transactions, is the cornerstone of the General Ledger module. It provides
information about a company's financial state. Use the COA to:
• Create accounts
• Set standard parameters
• Access transactions
• View a company's financial state
With the Chart of Accounts users can perform:
• Ledger budgeting
• Validation
• Definition of the terms of allocation
Plan the Chart of Accounts
To create the COA, we recommend that users list accounts that fall together and
group kinds of revenues, costs, and balance accounts.
Before you create a company's Chart of Accounts, consider the following:
• What degree of specification is needed
• How the Chart of Accounts must be structured
• If external accountants offered any suggestions about the structure of
the Chart of Accounts
Make sure that there is sufficient space so that in the future, additional ledger
accounts can be created between the existing accounts. Decide whether operating
accounts must come before balance accounts or the other way around.
Create the Chart of Accounts by:
• Setting up the accounts one by one.
• Importing default data from the installation CD or another company.
(The existing accounts can always be altered, or new ones can be
created).
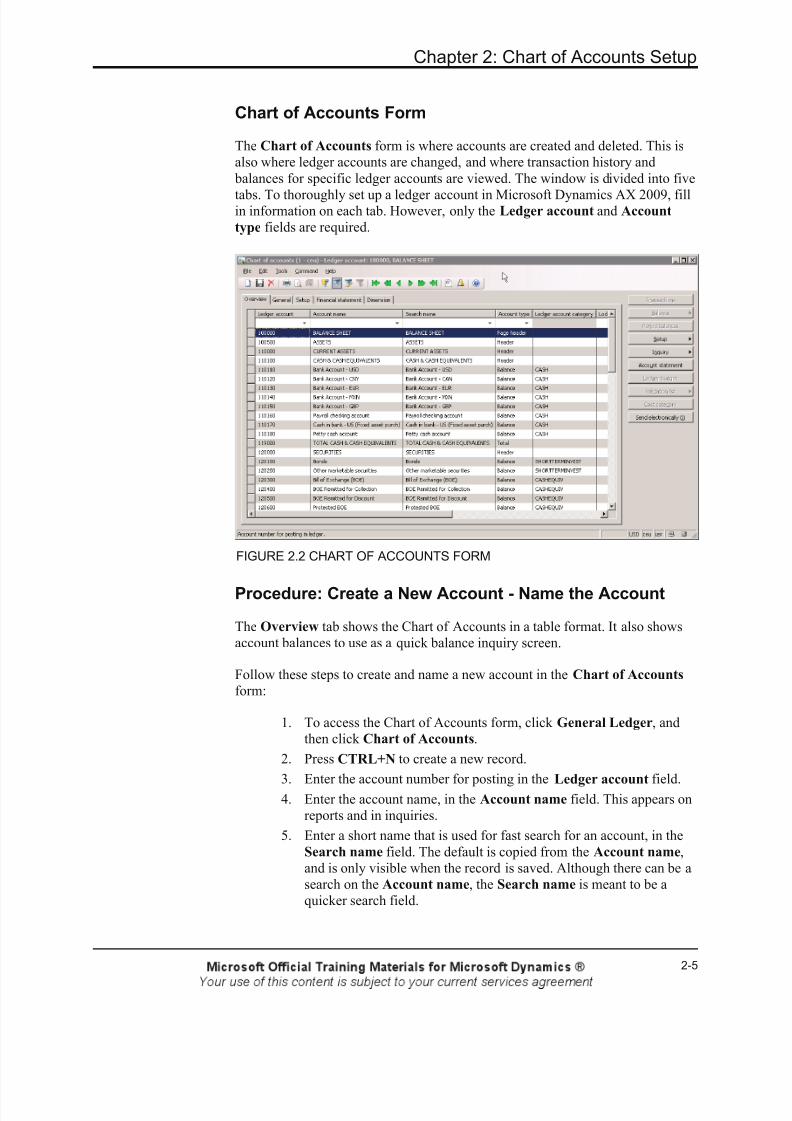
8/20/2019 Financials I
http://slidepdf.com/reader/full/financials-i 69/563
Chapter 2: Chart of Accounts Setup
2-5
Chart of Accounts Form
The Chart of Accounts form is where accounts are created and deleted. This is
also where ledger accounts are changed, and where transaction history and
balances for specific ledger accounts are viewed. The window is divided into five
tabs. To thoroughly set up a ledger account in Microsoft Dynamics AX 2009, fillin information on each tab. However, only the Ledger account and Account
type fields are required.
FIGURE 2.2 CHART OF ACCOUNTS FORM
Procedure: Create a New Account - Name the Account
The Overview tab shows the Chart of Accounts in a table format. It also shows
account balances to use as a quick balance inquiry screen.
Follow these steps to create and name a new account in the Chart of Accounts
form:
1. To access the Chart of Accounts form, click General Ledger, and
then click Chart of Accounts.
2. Press CTRL+N to create a new record.
3. Enter the account number for posting in the Ledger account field.4. Enter the account name, in the Account name field. This appears on
reports and in inquiries.
5. Enter a short name that is used for fast search for an account, in the
Search name field. The default is copied from the Account name,
and is only visible when the record is saved. Although there can be a
search on the Account name, the Search name is meant to be a
quicker search field.

8/20/2019 Financials I
http://slidepdf.com/reader/full/financials-i 70/563
Financials I in Microsoft Dynamics® AX 2009
2-6
CAUTION : Leave space between the account numbers for future changes to the
Chart of Accounts.
Procedure: Create a New Account - Select Account Type
Follow these steps to select the account type:
From the Chart of Accounts form Overview tab, select an account type to
define the ledger account category in the Account type list, which determines
how the account is handled by Microsoft Dynamics AX 2009. Select one of the
following options:
• Profit & Loss, Revenue and Cost - These are posting accounts. Use
Profit & Loss to record revenue and expenses. The sum of all
operating accounts determines the year-end results.
Revenue and Cost account have the same function as a Profit &
Loss account and gives a debit or credit proposal when you use that
account in a journal.
• Balance, Asset and Liability - A Balance account resembles a
transaction account. Use it to record assets and liabilities. Assets and
Liabilities have the same function as Balance.
However, they additionally specify the balance for reporting,
because that offers more possibilities for limiting balance reports.
• Header - Use this to enter the name of an account as a header in
inquiries and reports.
• Empty header - Creates a space in an inquiry or report.
• Page header - Creates a new page immediately before the
designated account, and uses the name of the account as a header.
This is used in inquiries and reports.
For example, organize the Chart of Accounts and financial
statements by using the account type Page header with the transition
from the balance sheet to the profit and loss statement.
• Total - Use this to add account intervals. For example, frequently it
is useful to make a total of a range of revenue accounts to obtain aquick overview of the total sales for the current period when you run
a financial statement.

8/20/2019 Financials I
http://slidepdf.com/reader/full/financials-i 71/563
Chapter 2: Chart of Accounts Setup
2-7
For example, view the total balances of the revenue accounts on the
Overview tab in the Chart of Accounts form. Configure Account
type total by clicking Setup > Totals, where total groups are
balanced for all account intervals.
• Group Total - Use this to create a group total based on the prefix of
the account. This resembles the Total field but it is automated based
on the Group total account length field in the Ledger tab of the
General Ledger parameters form.
CAUTION : Account numbers used for headers or calculations cannot be used
as transaction accounts.
Procedure: Create a New Account - Ledger AccountCategory
The Ledger account category field can be used to better classify a generalledger account, if the account type is Profit and loss, Revenue, Cost, Balance,
Asset, or Liability. Ledger account categories are used primarily for grouping or
selection of ledger accounts for business intelligence reporting, such as Key
Performance Indicators (KPIs) or Microsoft SQL Reporting Services (SRS).
To set the Ledger account category field value, from the Chart of Accounts
form Overview tab, select a Ledger account category from the drop-down list.
Procedure: Create a New Account - Locked in Journal
Select the Locked in journal check box to prevent posting on the account in
general journals. Posting can occur if it comes from a subsidiary journal, forexample, if the Accounts Payable ledger account has this check box selected,
posting from the Accounts Payable invoice journal is permitted. Posting cannot
be made to the Accounts Payable ledger account from a general journal. The
locked in journal functionality prevents direct posting on an account.
For example, the summary ledger accounts that are used by the Accounts
Receivable module are set up in the Accounts Receivable Posting profile form.
When the Locked in journal check box is selected, there can be no direct
posting. If there is direct posting, the Accounts Receivable ledger account will
not remain in balance with the Accounts Receivable sub-ledger.

8/20/2019 Financials I
http://slidepdf.com/reader/full/financials-i 72/563
Financials I in Microsoft Dynamics® AX 2009
2-8
Procedure: Create a New Account - General Tab
The General tab contains many of the same fields as the Overview tab. Follow
these steps to enter additional information on the General tab.
1. Access the General tab on the Chart of Accounts form by clicking
General Ledger, Chart of Accounts, General tab.
2. Select if transactions in this account are usually debits or credits, in
the DB/CR proposal list.
Therefore, when you leave the Transaction text field, the pointer in
the general journal is automatically positioned according to thechoice. If the field is left blank, the debit is automatically proposed.
3. Select if an account is used only for debiting or for crediting in the
DB/CR requirement list.
If an account is limited to only debiting or crediting, the systemchecks this when it validates and posts the general journal. However,
when the amount is a credit, a negative credit can still be entered.
4. In the Balance control list, select the balance control criterion for
the transactions on the current account.
For example, when transactions are entered in a journal for the
account, if Debit control is selected, the system makes sure that total
amount of the journal transactions do not make the balance for the
account go into a credit.
When lines are entered in a payment journal, click Balance controlto view the balance of petty cash and all bank accounts.
5. Select the Closed check box to prevent all posting on the account if,
for example, an account can no longer be used.

8/20/2019 Financials I
http://slidepdf.com/reader/full/financials-i 73/563
Chapter 2: Chart of Accounts Setup
2-9
6. In the Offset account list, select the default offset account for an
account in the general journal.
By creating a default offset account, you can settle certain costs from
the same payment account without having to manually specify the
account every time.
FIGURE 2.3 CHART OF ACCOUNTS FORM, GENERAL TAB

8/20/2019 Financials I
http://slidepdf.com/reader/full/financials-i 74/563
Financials I in Microsoft Dynamics® AX 2009
2-10
Create a New Account - Setup Tab
Use the Setup tab to set transaction defaults - such as sales tax and currency -
when a transaction is made on an account. Most of these fields only set up
proposed values. This means the default value can be changed when the
transaction is entered. The default offset account can also be overwritten.
FIGURE 2.4 CHART OF ACCOUNTS FORM, SETUP TAB
Create a New Account - Validation Options
There are four posting validation settings that can be defined for each account.Posting validation can be set for the following:
• Sales tax
• Currency
• User ID
• Posting types
Validation settings can be based on the following:
• Optional - The field is not validated at the time of posting. This is
the default setting.
• To be filled in - Microsoft Dynamics AX 2009 verifies that the field
is completed for posting. The value is not checked.

8/20/2019 Financials I
http://slidepdf.com/reader/full/financials-i 75/563
Chapter 2: Chart of Accounts Setup
2-11
• Table - Microsoft Dynamics AX 2009 verifies that the field is
completed for posting and that the value corresponds with the value
specified in the account.
• List - The Microsoft Dynamics AX 2009 system verifies that the
field is completed with one of the values that are defined on the
Validation list button.
Procedure: Create a New Account - Validate Currency
Follow these steps to define currency information for an account:
1. Access the Setup tab on the Chart of Accounts form by clicking
General Ledger, Chart of Accounts, Setup tab.
2. In the Currency list, select a proposal for currency when recording
in the current account in the general journal. The proposal can be
overwritten in the journal, depending on the setting of the Validate
currency code list.
3. In the Validate currency code list, determine how the currency must be validated for posting. For more information, refer to the topicCreate a New Account - Validation Options.
Procedure: Create a New Account - Validate User
Follow these steps to specify authorized users for posting:
1. In the User ID list, specify the user who is authorized to post to this
account. The Validate user field determines how User ID must be
validated for posting.
2. In the Validate user list, determine how User ID must be validated
for posting. For more information, refer to the topic Create a NewAccount - Validation Options.
Procedure: Create a New Account - Validate Posting
Follow these steps to set posting validation for an account:
1. In the Posting type list, determine the posting types allowed for the
current account to make sure that only the defined posting types are
accepted.
2. In the Validate posting list, determine how posting must be
validated. For more information, refer to the topic Create a New
Account - Validation Options.

8/20/2019 Financials I
http://slidepdf.com/reader/full/financials-i 76/563
Financials I in Microsoft Dynamics® AX 2009
2-12
Create a New Account - Financial Statement Tab
Use the Financial statement tab to set up how a ledger account appears on a
financial statement.
For more information about financial statement options, refer to the Financials IIcourse.
Create a New Account - Dimension Tab
Use the Dimension tab to set up default dimensions and validation rules for the
current account. Throughout Microsoft Dynamics AX 2009, dimensions are a
great method to separate data in different ways. For example:
• Attach a department number to each transaction and then run a query
that shows balances by department code.
• The dimensions entered are proposed dimensions for transactions
made that use the selected account number.
• Each dimension can be changed by the user when the transaction is
made.
• In addition to the standard dimensions of department, cost center,
and purpose, there are also the validate options.
When you create the Chart of Accounts, many fields are optional, but it is a good
idea to carefully consider what degree of detail is necessary for a given system.
The Chart of Accounts must be designed to capture financial information to make
sound financial decisions.
Test Your Knowledge
True or False: Using posting types reduces the risk of selecting a wrong account
when you set up posting profiles.
( ) True
( ) False
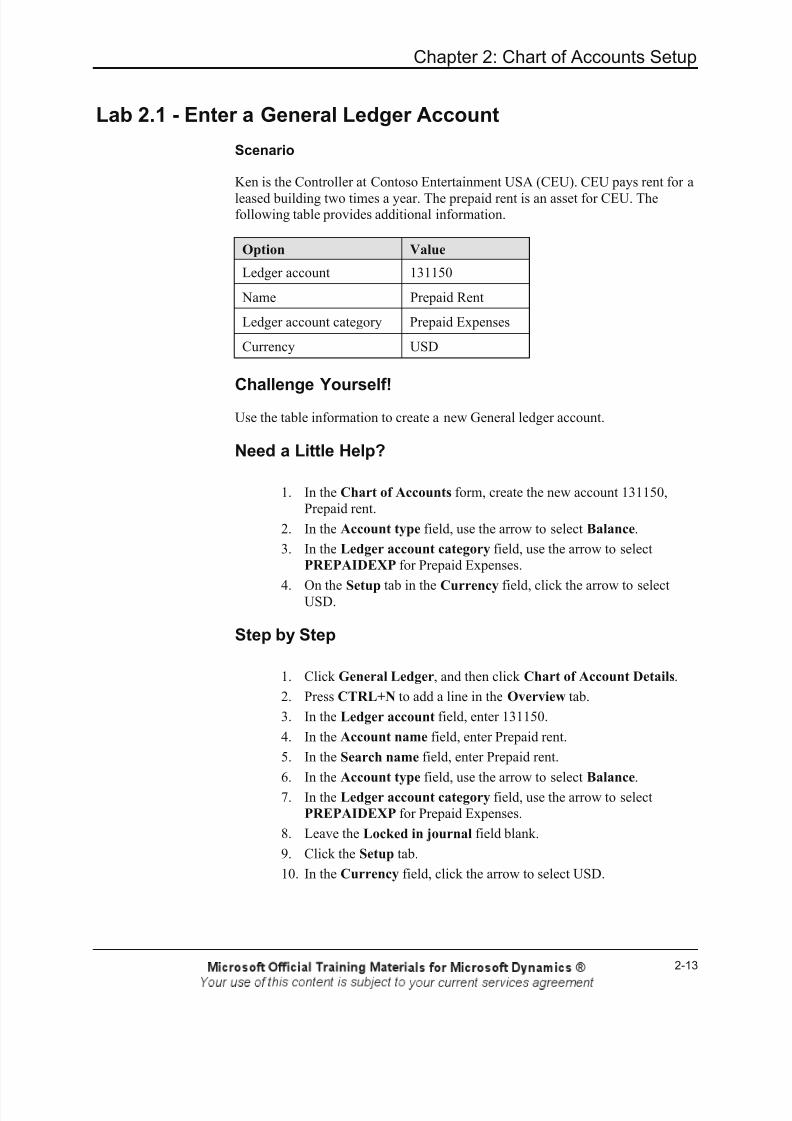
8/20/2019 Financials I
http://slidepdf.com/reader/full/financials-i 77/563
Chapter 2: Chart of Accounts Setup
2-13
Lab 2.1 - Enter a General Ledger Account
Scenario
Ken is the Controller at Contoso Entertainment USA (CEU). CEU pays rent for a
leased building two times a year. The prepaid rent is an asset for CEU. Thefollowing table provides additional information.
Option Value
Ledger account 131150
Name Prepaid Rent
Ledger account category Prepaid Expenses
Currency USD
Challenge Yourself!Use the table information to create a new General ledger account.
Need a Little Help?
1. In the Chart of Accounts form, create the new account 131150,
Prepaid rent.
2. In the Account type field, use the arrow to select Balance.
3. In the Ledger account category field, use the arrow to select
PREPAIDEXP for Prepaid Expenses.
4. On the Setup tab in the Currency field, click the arrow to selectUSD.
Step by Step
1. Click General Ledger, and then click Chart of Account Details.
2. Press CTRL+N to add a line in the Overview tab.
3. In the Ledger account field, enter 131150.
4. In the Account name field, enter Prepaid rent.
5. In the Search name field, enter Prepaid rent.
6. In the Account type field, use the arrow to select Balance.
7. In the Ledger account category field, use the arrow to select
PREPAIDEXP for Prepaid Expenses.
8. Leave the Locked in journal field blank.
9. Click the Setup tab.
10. In the Currency field, click the arrow to select USD.

8/20/2019 Financials I
http://slidepdf.com/reader/full/financials-i 78/563
Financials I in Microsoft Dynamics® AX 2009
2-14
Account Allocation Terms
Allocated transactions redistribute account balances from one account to one or
more destination accounts or account-dimension combinations. The allocation
feature is valuable when centrally administrated expenses must be distributed to,
for example, individual cost centers.
Use allocation for realized and budget transactions. During allocation to the
given accounts, the net amount is totaled. After allocation, any remainder relative
to the journal line is posted to the original account with the original dimensions.
Scenario - Using Allocation Terms for an Account
When Susan, the order processor in the Contoso Entertainment USA (CEU)
Company, posts a sales order, 10 percent of the revenue posted must be allocated
as a royalty payment. To achieve this, Cassie, the Accountant, creates an
allocation term so that every time there is a posting to the revenue account in
question, 10 percent is allocated to the royalty account.
Set Up Allocation Terms for an Account
Use the allocation terms to automatically distribute a transaction amount to
different accounts. Follow these steps to set up allocation terms for an account.
1. To access the Allocation form, click General Ledger, click Chart
of Account Details, click the Setup button, and then click
Allocation Terms.
2. Make sure that the specific account is selected for allocation in the
Chart of Accounts form on the General tab, before setting up
allocation terms for an account.
Select the Allocation check box to determine if the account must
execute any allocation for posting from other parts of the application
and when you post from the journals.
If this field is selected, allocation is automatically executed as
defined in Allocation terms.
3. In the To account list, select the ledger account to allocate to when
transactions are created automatically.
To distribute the amount to several accounts, add more lines in the
Allocation terms form. To distribute the amount to another
dimension within the same ledger account, leave the account blank
or enter the current account.
4. In the To department, To cost center and To purpose lists, select
the dimension for transactions created automatically during
allocation.

8/20/2019 Financials I
http://slidepdf.com/reader/full/financials-i 79/563
Chapter 2: Chart of Accounts Setup
2-15
5. In the Allocation percentage field, enter the percentage of the
amount allocated to the specified account. The Percentage in total
field checks that the allocation does not exceed 100 percent.
6. Limit the allocation to the selected dimensions that are on the
Dimension tab. When it searches for allocations, the system uses all
lines where the dimension is empty or where it matches the given
line.
For example, in a journal entry where a given expense is sharedevenly between two departments, set up an allocation term where
any entry on the account allocates 50 percent between the two
dimensions set up on the Dimension tab page.
Test Your Knowledge
True or False: Account allocation is used for realized transactions and budget
transactions.
( ) True
( ) False

8/20/2019 Financials I
http://slidepdf.com/reader/full/financials-i 80/563
Financials I in Microsoft Dynamics® AX 2009
2-16
Lab 2.2 - Account Allocation Terms
Scenario
At Contoso Entertainment USA (CEU), entries posted to account 600200,
Repairs & Maintenance Expense, must be allocated between departments basedon dimensions, as shown in the following table.
Number Description Percentage
010 Administration 20
030 Sales 10
050 Customer Service 15
080 Professional Services 55
Challenge Yourself!Use the information in the table to enter the allocation terms for account 600200.
Need a Little Help?
1. Open the Chart of Accounts form.
2. After locating account 600200, Repair & Maintenance Expense,
open the Allocation form.
3. Set the Allocation terms according to the table in the scenario. Enter
each department on a separate line. When the entries are complete,
make sure that the Percentage in total field displays 100.
Step by Step
1. On the Navigation Pane, click General Ledger and then click Chart
of Accounts.
2. Locate account 600200, Repair & Maintenance Expense.
3. To open the Allocation form, click the Setup button and then click
Allocation terms.
4. In the To department field, use the arrow to select department 010.
5. In the Allocation percentage field, enter 20.
6. Press CTRL+N to add a new line.
7. In the To department field, use the arrow to select department 030.
8. In the Allocation percentage field, enter 10.
9. Press CTRL+N to add a new line.
10. In the To department field, use the arrow to select department 050.

8/20/2019 Financials I
http://slidepdf.com/reader/full/financials-i 81/563
Chapter 2: Chart of Accounts Setup
2-17
11. In the Allocation percentage field, enter 15.
12. Press CTRL+N to add a new line.
13. In the To department field, use the arrow to select department 080.
14. In the Allocation percentage field, enter 55. Notice that the
Percentage in total field displays 100.
15. Close the Allocation form.

8/20/2019 Financials I
http://slidepdf.com/reader/full/financials-i 82/563
Financials I in Microsoft Dynamics® AX 2009
2-18
System Accounts
The modules in Microsoft Dynamics AX 2009 are highly integrated and many
postings are handled automatically. For example, when an invoice is posted
where a discount is given, this amount is posted automatically to an account for
discounts. The appropriate account for that kind of posting must be set up,through system accounts.
In the System accounts form:
• Specify the system accounts for automatic transactions that cannot be
set up elsewhere in Microsoft Dynamics AX 2009.
• There are other automatic accounts set up in each module, for
example, posting profiles in the Accounts Receivable and Accounts
Payable modules.
• The posting set up is discussed when each module is introduced.
The following chart shows how Microsoft Dynamics AX 2009 handles aninvoice discount entry.
FIGURE 2.5 POSTING OF AN INVOICE DISCOUNT
If the relation between the system account Customer invoice and ledger account50310 is set up, the invoice discount amount of 50 is posted to ledger account
50310.
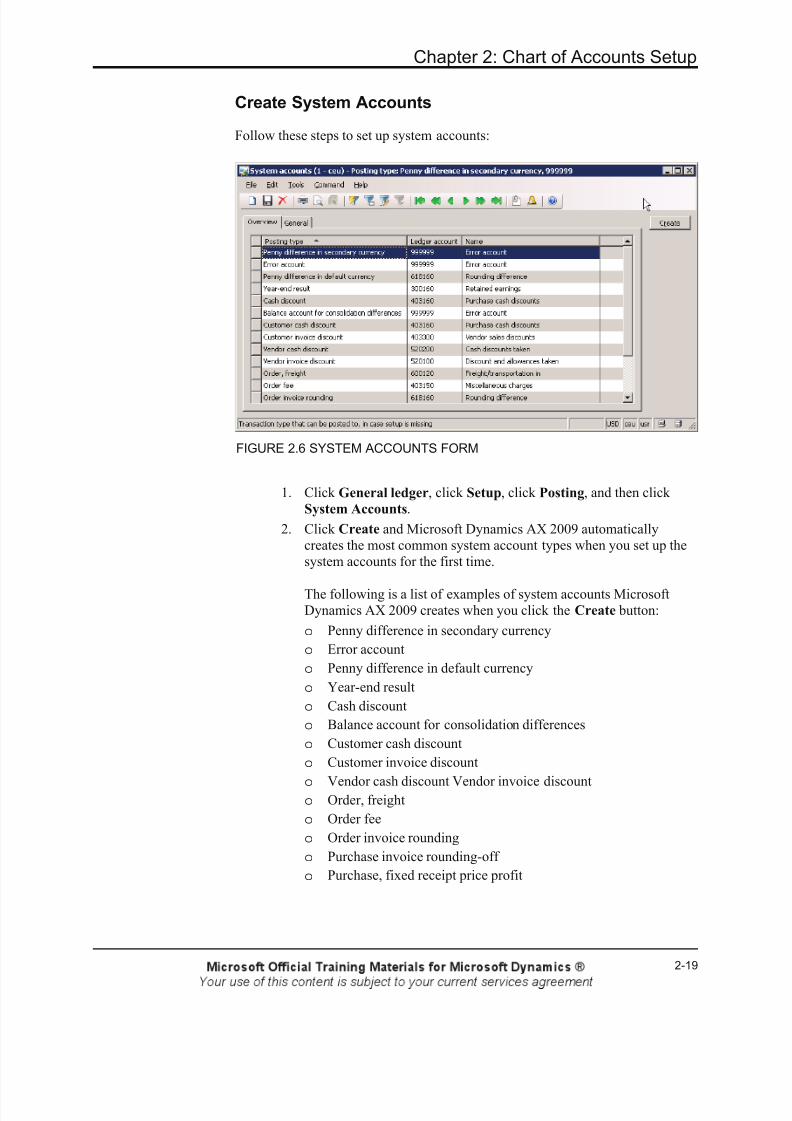
8/20/2019 Financials I
http://slidepdf.com/reader/full/financials-i 83/563
Chapter 2: Chart of Accounts Setup
2-19
Create System Accounts
Follow these steps to set up system accounts:
FIGURE 2.6 SYSTEM ACCOUNTS FORM
1. Click General ledger, click Setup, click Posting, and then click
System Accounts.
2. Click Create and Microsoft Dynamics AX 2009 automatically
creates the most common system account types when you set up the
system accounts for the first time.
The following is a list of examples of system accounts MicrosoftDynamics AX 2009 creates when you click the Create button:
o Penny difference in secondary currency
o Error account
o Penny difference in default currency
o Year-end result
o Cash discount
o Balance account for consolidation differences
o Customer cash discount
o Customer invoice discount
o Vendor cash discount Vendor invoice discounto Order, freight
o Order fee
o Order invoice rounding
o Purchase invoice rounding-off
o Purchase, fixed receipt price profit
8/20/2019 Financials I
http://slidepdf.com/reader/full/financials-i 84/563
Financials I in Microsoft Dynamics® AX 2009
2-20
NOTE : The Error Account, Penny Difference, and Year-end Result system
accounts are mandatory. The other system accounts are set up depending on
whether that functionality is used. If a service pack is installed, new system
accounts may be introduced. Click the Create button after you install a service
ack to make sure you have all the latest default account types.
3. Press CTRL+N to create a new system account, if system accounts
are already created.
4. Attach the relevant ledger account for each system account in the
Ledger account list. The name of the system account is automatically
inserted in the Name field.
NOTE : To interrupt updates with an error message when the error account is
used in the posting process, select the Interrupt in case of error account check
box in the General ledger parameters form.
NOTE : To register or manually change a cash discount in the settlement
rocess, a cash discount system account must be set up.
To offer a discount on the total invoice amount, a customer invoice discount,
vendor invoice discount, or both must be set up.
Test Your Knowledge
Which of the following system accounts are required to be set up? (Select all that
apply.)
( ) Error account
( ) Cash difference
( ) Year-end result
( ) Penny difference
Inquiries and Reports Related to the Chart of Accounts
This lesson describes those Microsoft Dynamics AX 2009 standard inquiries and
reports, in addition to their functionalities that are related to the Chart of
Accounts.
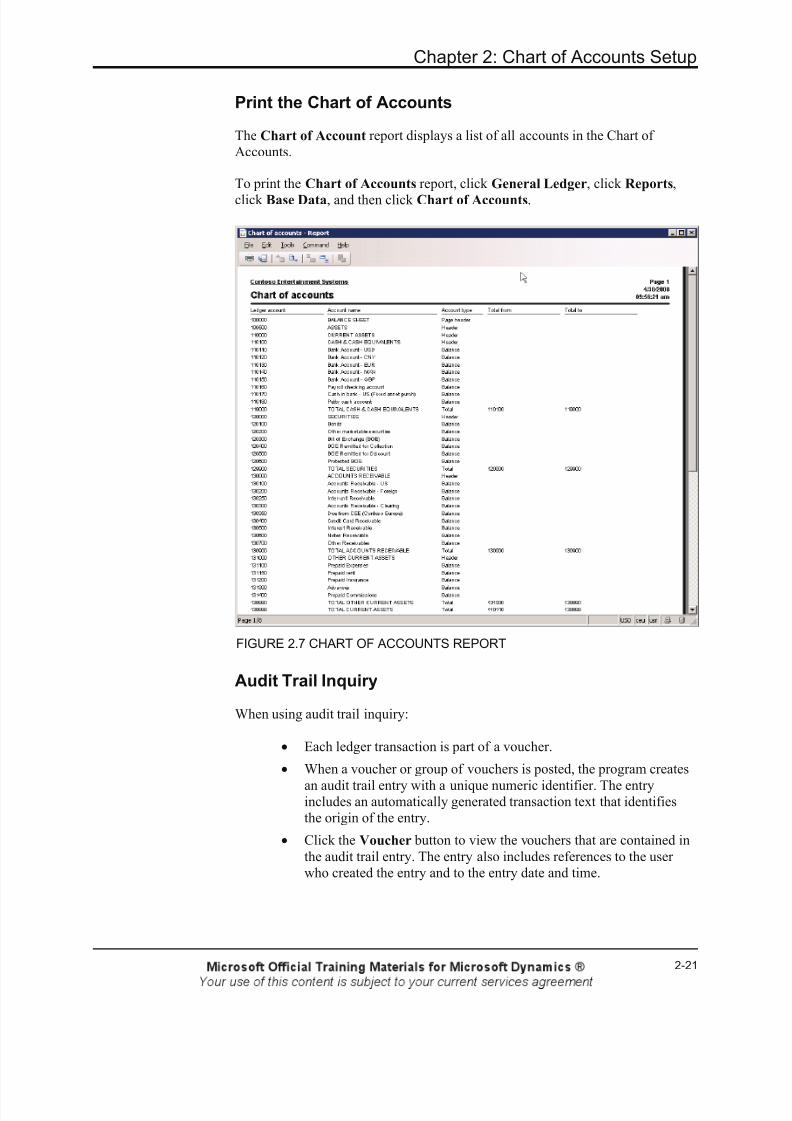
8/20/2019 Financials I
http://slidepdf.com/reader/full/financials-i 85/563
Chapter 2: Chart of Accounts Setup
2-21
Print the Chart of Accounts
The Chart of Account report displays a list of all accounts in the Chart of
Accounts.
To print the Chart of Accounts report, click General Ledger, click Reports,
click Base Data, and then click Chart of Accounts.
FIGURE 2.7 CHART OF ACCOUNTS REPORT
Audit Trail Inquiry
When using audit trail inquiry:
• Each ledger transaction is part of a voucher.
• When a voucher or group of vouchers is posted, the program creates
an audit trail entry with a unique numeric identifier. The entryincludes an automatically generated transaction text that identifies
the origin of the entry.
• Click the Voucher button to view the vouchers that are contained in
the audit trail entry. The entry also includes references to the user
who created the entry and to the entry date and time.

8/20/2019 Financials I
http://slidepdf.com/reader/full/financials-i 86/563
Financials I in Microsoft Dynamics® AX 2009
2-22
To access the Audit Trail form, click General Ledger, click Inquiries, and then
click Audit Trail.
FIGURE 2.8 AUDIT TRAIL FORM
If a journal that consists of several vouchers is posted, only one line is created in
the audit trail. Check the specific vouchers by clicking the Ledger transactions
button.
View Account Transactions
When you view account transactions, consider the following:
• You can use the Account transactions form to view a list of all
posted transactions on the current account.
• The entries result from posting transactions in:
o Journals
o Sales and purchase orders
o Any other modules that post to ledger
• The information in the fields in the ledger transactions cannot be
modified.
• To correct an entry, make a transfer which then appears in the form.

8/20/2019 Financials I
http://slidepdf.com/reader/full/financials-i 87/563
Chapter 2: Chart of Accounts Setup
2-23
To open the Account Transactions form, click General Ledger, click Chart of
Account Details, and then click Transactions or click General Ledger, click
Reports, click Transactions, and then click Ledger Transaction List.
FIGURE 2.9 ACCOUNT TRANSACTIONS FORM
• Select the Show open only check box to only display transactions
not settled in the Ledger settlements form.
• In the Account Transactions form:
o All the transactions posted to the current account are displayed.o The transactions are identified in the Voucher field and it
displays when the ledger transaction is posted.
o The Period code is also listed and the code is usually Normal.
However, Opening may also display for entries made in an
opening period and Closing for entries made in a closing period.
• The amount is shown as:
o Currency - Displays the currency code specified at posting.
o Amount currency - Displays the transaction amount in the
currency specified on that transaction.
o Amount - Displays the transaction amount in the defaultcompany currency.
o Amount in secondary currency - Amount in secondary
currency. The secondary currency is defined on the Other tab of
the Company information form.
8/20/2019 Financials I
http://slidepdf.com/reader/full/financials-i 88/563
Financials I in Microsoft Dynamics® AX 2009
2-24
View Account Balances
From the Chart of Accounts form, use the Balance button for a quick inquiry of
ledger account balances in Microsoft Dynamics AX 2009.
Clicking the Balance button retrieves a list of options:
• Balance - Displays a small window that displays the balance for the
selected account.
• Balance by currency - Displays an overview of the account's
balance in the:
o Posted currencies
o Default currency
o Percentage of the total balance for each specified currency.
Define the period for the balance displayed in the Setup form
under the Balance button.
• Balance by dimension - Select the dimension with which to
calculate the balance.
• Transactions on balance - View the posted transactions and the
current account for the period specified in setup on the Balance
button. The window that appears resembles what appears from the
Transactions button on the Chart of Accounts window.
• Balance graphically - Displays the balance for the account in a
graphical format.
• Setup - Specify the accounting year for the balance to be obtained.
Specify whether the balances are shown with operating or fiscal
adjustments. If Operations is selected, the sum of currenttransactions and operating adjustments display. If TAX is selected,the sum of current transactions and tax related adjustments display.
View Period Balances
From the Chart of Accounts form, use the Period balances button to display the
Period balances form for the current ledger account.
If there are revenue accounts with this functionality, you can quickly view the
revenue in a period without having to print reports.
Use the Period balances form to display balances for the current year in whichthe system date falls.

8/20/2019 Financials I
http://slidepdf.com/reader/full/financials-i 89/563
Chapter 2: Chart of Accounts Setup
2-25
To change the fiscal year, change the Date field at the top of the window to a
date in another fiscal year.
FIGURE 2.10 PERIOD BALANCES FORM
View Account References
Use the Account references form to locate the use of an account in the system.
This means if an account is used in an automatic transaction, its references can beviewed.
To access the Account references form, click General Ledger, click Chart of
Account Details, click the Inquiry button, and then click References.
For the view to be updated:
• Set up the references to be inspected. Do this in General Ledger >
Setup > Posting > Account Reference in the Account reference
form. This process sets up the references for each related table and
then updates them.
• After the reference is established, the account reference can be
viewed through the inquiry form.
For example, update the account references BankAccountTable and
BankAccountTrans in Ledger > Setup > Posting > Account reference by
checking the Include box. Locate a cash account like 110110 in the chart of
accounts, click the Inquiry button, and select References. The form will show
the bank account that the ledger account is associated with.
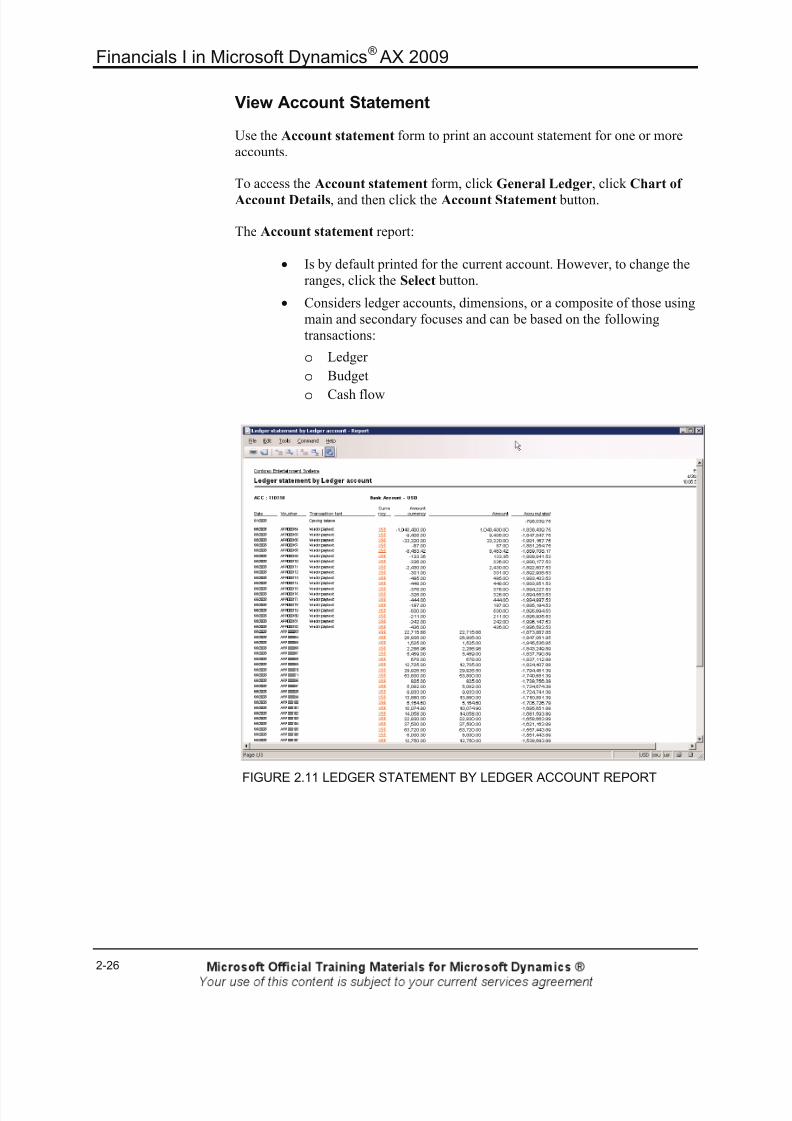
8/20/2019 Financials I
http://slidepdf.com/reader/full/financials-i 90/563
Financials I in Microsoft Dynamics® AX 2009
2-26
View Account Statement
Use the Account statement form to print an account statement for one or more
accounts.
To access the Account statement form, click General Ledger, click Chart of
Account Details, and then click the Account Statement button.
The Account statement report:
• Is by default printed for the current account. However, to change the
ranges, click the Select button.
• Considers ledger accounts, dimensions, or a composite of those using
main and secondary focuses and can be based on the following
transactions:
o Ledger
o Budget
o Cash flow
FIGURE 2.11 LEDGER STATEMENT BY LEDGER ACCOUNT REPORT

8/20/2019 Financials I
http://slidepdf.com/reader/full/financials-i 91/563
Chapter 2: Chart of Accounts Setup
2-27
Summary
This course, Chart of Accounts Setup, covers the basic information about the
Chart of Accounts, allocation terms, system accounts, and inquiries and reports
related to these topics. The Chart of Accounts, the central collection location for
daily financial transactions, is the cornerstone of the General Ledger module. It
provides information about a company's financial state.
Allocated transactions redistribute account balances from one account to one or
more destination accounts. This is practical and can be used to set up automatic
posting of, for example, percentage allocation of accounts postings.

8/20/2019 Financials I
http://slidepdf.com/reader/full/financials-i 92/563
Financials I in Microsoft Dynamics® AX 2009
2-28
Test Your Knowledge
Test your knowledge with the following questions.
Question 1
1. Which tasks are completed from the Chart of Accounts in Microsoft
Dynamics AX 2009? (Select all that apply.)
( ) Create accounts
( ) Set standard parameters
( ) Access transactions
( ) View a company's financial state

8/20/2019 Financials I
http://slidepdf.com/reader/full/financials-i 93/563
Chapter 2: Chart of Accounts Setup
2-29
Quick Interaction: Lessons Learned
Take a moment and write down three key points you have learned from this
chapter:
1.
2.
3.

8/20/2019 Financials I
http://slidepdf.com/reader/full/financials-i 94/563
Financials I in Microsoft Dynamics® AX 2009
2-30
Solutions
Chart of Accounts
Test Your Knowledge
True or False: Using posting types reduces the risk of selecting a wrong account
when you set up posting profiles.
(•) True
( ) False
Account Allocation Terms
Test Your Knowledge
True or False: Account allocation is used for realized transactions and budgettransactions.
(•) True
( ) False
System Accounts
Test Your Knowledge
Which of the following system accounts are required to be set up? (Select all that
apply.)
(√) Error account
( ) Cash difference
(√) Year-end result
(√) Penny difference
Test Your Knowledge
Question 1
1. Which tasks are completed from the Chart of Accounts in Microsoft
Dynamics AX 2009? (Select all that apply.)
(√) Create accounts
(√) Set standard parameters
(√) Access transactions
(√) View a company's financial state

8/20/2019 Financials I
http://slidepdf.com/reader/full/financials-i 95/563
Chapter 3: Journal Setup
3-1
CHAPTER 3: JOURNAL SETUP
Objectives
The objectives are:
• Set up journal names
• Set up journal controls
• Create journal texts
• Set up balance control accounts
• Set up General Ledger parameters
Introduction
A journal is a worksheet that you can use before you enter postings into thesystem manually. Before you use financials in Microsoft Dynamics® AX 2009,
review the setup procedures for journals in this course. The procedures explains
the basic setup of journals such as journal names, controls, and texts. You can
use journals quickly and efficiently when you set them up correctly in Microsoft
Dynamics AX 2009.

8/20/2019 Financials I
http://slidepdf.com/reader/full/financials-i 96/563
Financials I in Microsoft Dynamics® AX 2009
3-2
Journal Setup
All manual postings are entered into the system through journals. When you use
a journal entries are not posted immediately. Before you can post entries, they
can be:
• Changed
• Reviewed
• Approved
• Deleted
In Microsoft Dynamics AX 2009, you can use journals to:
• Control different kinds of entries - you can apply an approval system
so that special journals are posted only after they are approved.
• Review data imported from external ledger systems - you can ensure
that all valid fields contain a value and that all restrictions for thetransaction are fulfilled.
• Make sure that the necessary voucher series is set up before you
create journals - you can set up number sequences and attach them to
the appropriate references.
Working with Journals
Working with journals is divided into three steps:
FIGURE 3.1 WORKING WITH JOURNALS

8/20/2019 Financials I
http://slidepdf.com/reader/full/financials-i 97/563
Chapter 3: Journal Setup
3-3
1. Set up journal names. Use the journal setup as a template for all new
journals by using the name listed in Journal names. This means all
the journals use the voucher series, offset account, and other
information that you set up.
2. Create a new journal. Many of the modules in Microsoft Dynamics
AX 2009 use journals for entering transactions. In General Ledger,use journals for ledger posting. In Accounts Receivable, use Sales
journals for sales postings, and so on. When you open a journal
dialog box, create new journals by using the template that is
associated with the journal type.
3. Create journal lines and post transactions. When a new journal is
created, enter posting transactions in the journal and post it or
transfer the journal for someone else to review and approve.
Journal Examples
See the following examples of journals:
• Daily
• Periodic
• Invoice register
• Approval
• Customer payment
EXAMPLE : Select a Daily journal type to create a journal for daily
transactions. When you create new daily journals in General ledger >
Journals > General ledger journal , the journal names with the journal type of
Daily appear in the Name list.
Procedure: Create Journal Names – Overview
Follow these steps to set up journal names.
1. To access the Journal names form, click General Ledger, click
Setup, click Journals, and then click Journal Names.
2. Enter a recognizable journal name in the Name field.
3. Enter a description of the journal that clearly describes the purpose
of the journal in the Description field.
4. Select the type of journal in the Journal type list. The journal type determines what the journal is used for and in which module it is
available. For example, the customer payment journal type is used
only for customer payment journals.

8/20/2019 Financials I
http://slidepdf.com/reader/full/financials-i 98/563
Financials I in Microsoft Dynamics® AX 2009
3-4
5. Select a number sequence for the journal name in the Voucher
series list. Number sequences control automatic allocation of
voucher numbers, invoice numbers, and journal numbers. For
example, the number sequence is applied to journal lines
automatically. You can set up number sequences in the Number
sequences form.
HINT : Use number sequences with alphanumeric characters so that you can
recognize voucher numbers for future inquiries and reporting. To define number
sequence codes, click Basic , click Setup , click Number sequences , and then
click Number sequence.
FIGURE 3.2 JOURNAL NAMES FORM
Procedure: Create Journal Names - Approval
Follow these steps to define approval options for a journal.
1. Select a journal from the Journal names form, and then click the
General tab.
2. In the Approval area, select the Active check box if the journal must
be approved before it is invoiced. The approval system enables
journal transactions to be reported as one of the following:o Ready
o Approved
o Rejected.
3. Specify the users who can approve the journal in the Approve list.

8/20/2019 Financials I
http://slidepdf.com/reader/full/financials-i 99/563
Chapter 3: Journal Setup
3-5
NOTE : You can define approval options in the Journal names form on the
Overview tab.
FIGURE 3.3 JOURNAL NAMES FORM, GENERAL TAB
Procedure: Create Journal Names - Workflow Approval
Follow these steps to define workflow approval options for a journal.
1. From the Journal names form, General tab, select the Approval
workflow check box to start the workflow journal approval for the
journal name.
2. From the Configuration list, enter the workflow configuration to use
for the workflow approval for this journal name.
NOTE : You cannot use both the manual approval system and the workflow
approval system for the same journal name.
Procedure: Create Journal Names - Blocking
Follow these steps to restrict the usage of a journal.
1. From the Journal names form, click the General tab.
2. In the Blocking area, specify if the journal should be available foronly a limited group of people. In the Private for user group list,
select a user group to restrict the usage of the journal.
8/20/2019 Financials I
http://slidepdf.com/reader/full/financials-i 100/563
Financials I in Microsoft Dynamics® AX 2009
3-6
Procedure: Create Journal Names - Voucher Number
To define voucher number options, follow these steps:
1. From the Journal names form, click the General tab.
2. In the Voucher number area, select when a new voucher number isassigned.
3. In the New voucher list, select from the following:
o In connection with balance - If an offset account is not entered,
keep entering transactions with the same voucher number as long
as the lines on the voucher number do not balance.
However, if an offset account is entered, either as a default
account or as a manually entered account number, a new voucher
is assigned for every line, because every line balances.
o Manual - New voucher numbers are assigned manually.
o One voucher number only - Only one voucher number isemployed for all journal lines. When you create a new journal a
new voucher number is allocated automatically.
NOTE : You cannot enter multiple customer or vendor transactions by using the
One voucher number only selection, if there is an invoice number that is used.
4. Specify the number of the external document in the Document field.
For example, a vendor invoice number that generated the voucher
will appear on the journal lines, where it can be associated with a
document date.
5. Select the Number allocation at posting check box to start vouchernumber allocation in journals at posting.
NOTE : If the Continuous check box is selected in the Number sequences form
on the General tab, the voucher number is generated automatically from the
revious voucher number without gaps in the voucher numbers. For example, the
order is 1,2,3,4 and not 1,3,8.

8/20/2019 Financials I
http://slidepdf.com/reader/full/financials-i 101/563
Chapter 3: Journal Setup
3-7
Procedure: Create Journal Names - Offset AccountProposal
Follow these steps to define the offset account for the journal.
1. In the Journal names form, click the General tab.
2. In the Offset account proposal area, specify the default offset
account type for the journal name in the Account type list. For
example, when recording a vendor payment and specifying Vendor
in Account type, offset posting occurs in the vendor account. At the
same time, posting occurs automatically in the vendor summary
account in General Ledger.
3. Select a default offset account for the journal in the Offset account
list.
4. Select the Fixed offset account check box to prevent the default
offset account from being changed. For example, select that a daily
journal always must have a bank account as the default offsetaccount.
5. Select the Beginning-Ending balance control check box to check
the beginning-ending balance control in the journal.
Procedure: Create Journal Names - Posting
Follow these steps to set up information about posting.
1. In the Journal names form, click the General tab.
2. Set up information about journal posting details in the Posting area.
In the Detail level list, specify how journal lines should be
summarized:
o Details - Every instance of an account number in the journal
lines is posted as a separate account transaction.
o Summary - A summation of journal lines into one transaction is
performed automatically during posting if voucher with date,
account number, dimension, and currency code contain the same
values.
NOTE : Summation is not performed on transactions with sales tax.
3. Select the Delete lines after posting check box to delete journallines when posting is completed. Database space is saved. However,
the ability to inquire on posted journal lines is not saved.
4. Select which layer the journal transactions are posted to in the
Posting layer list.

8/20/2019 Financials I
http://slidepdf.com/reader/full/financials-i 102/563
Financials I in Microsoft Dynamics® AX 2009
3-8
NOTE : Three posting layers can be used: Current , Operations , and Tax .
Current is the default layer that is used the same as Operations for entry of
transactions. These are part of the periodic financial reporting. The Tax layer is
where you record transactions that impact tax reporting.
5. Select how to handle the posting of fees in the Fees posting list, for
example, for remittance. Select among three options:
o Keep fees in journal - Keep fees in the actual journal for future
posting.
o Transfer fees, keep voucher no. - During posting of remittance
journal, the fees are transferred into the journal set up in the Fee
journal field on the bank account for the remittance. The journal
keeps the original voucher number.
o Transfer fees, new voucher no. - During posting of remittance
journal, the fees are transferred into the journal set up on the
bank account, and a new voucher number is allocated
automatically.Specify how many journal lines are allowed in the
Lines limit field. If the number of journal lines exceeds the
number that is specified in the Lines limit field, the journal lines
are distributed into several smaller journals.
6. Specify how many journal lines are allowed in the Lines limit field.
If the number of journal lines exceeds the number that is specified in
the Lines limit field, the journal lines are distributed into several
smaller journals.
Procedure: Create Journal Names - CurrencyFollow these steps to define journal currency options.
1. In the Journal names form, click the General tab.
2. In the Currency area, select the default currency for the journal
name in the Currency field.
3. Select the fixed rate check box if a fixed exchange rate should be
used. The fixed exchange rate is specified in the individual Journal
forms on the Setup tab.
If the Currency or fixed rate fields are blank, the company currency
setup is used for the journal name automatically.

8/20/2019 Financials I
http://slidepdf.com/reader/full/financials-i 103/563
Chapter 3: Journal Setup
3-9
Procedure: Create Journal Names - Sales Tax
Follow these steps to define journal sales tax options.
1. In the Journal names form, click the General tab.
2. In the Sales tax area, select the Amount incl. sales tax check box toinclude sales tax in the journal transactions when a sales tax group is
set up. The total includes sales tax.
Procedure: Create Journal Names - Dimension
Follow these steps to define journal dimension options.
1. In the Journal names form, click the Dimension tab.
2. Set up default dimensions for the journal names. The dimensions are
inserted automatically when you create new journals. However, the
dimensions are overwritten if, for example, another dimension is set
up on vendors or customers.
Procedure: Create Journal Names - Define PostingRestrictions
The posting restrictions feature enables an organization to specify, on a journal
name basis, if specific users or user groups can only post the journals that the
user or user group members entered or created. Posting restrictions can be
defined by user group or user.
Follow these steps to define posting restrictions for a journal:
1. Select a journal from the Journal names form, and then click the
Posting restrictions button.
2. In the How do you want to set up posting restrictions? field, select
the restrictions for users. Restrict journal posting to the user who
created the journal for those who are assigned the control. If the user
is not assigned to a posting restriction, he or she can post all journals
for the journal name. Select from the following:
o By user group
o By user

8/20/2019 Financials I
http://slidepdf.com/reader/full/financials-i 104/563
Financials I in Microsoft Dynamics® AX 2009
3-10
o No posting restrictions
For example, Arnie, the Accounts Receivable (AR) Manager at
Contoso, is a member of the AR user group. The AR user group
has been assigned to a posting restriction for AR journals.
Because of this posting restriction assignment, members of the
AR user group can post AR journals that only they created.
Phyllis, the Accounting Manager, decides to allow Arnie to postall AR journals, not only those that he created. Phyllis must clear
the posting control for Arnie so that he can post to all AR
journals.
Journal Controls
Set up journal control options to set up posting rules for the journal name.
ScenarioContoso uses journal control to set up limitations to certain journals. For
example, the bank journal name is set up so that it is only possible for users to
make bank account postings, and the customer payment journal allows only
customer type postings.
Procedure: Set Up Journal Controls
Follow these steps to set up posting rules for a journal template.
1. To access the Journal control form, click General ledger, click
Setup, click Journals, click Journal names, and then click the
Journal control button.
2. Select the company accounts that allow posting for the current
journal in the Company accounts list.
3. Specify whether recording is allowed for only profit and loss
accounts, for only balance accounts, or for both types of accounts in
the Posting accounts list.
4. Select the Ledger account in which to post in the From account list.
5. Define account intervals with the To account list. To create
additional account intervals press CTRL+N.
6. Select the first account type that is available to use in the journal in
theFrom account type
list.
7. Select the last account type available to use in the journal in the To
account type list.
For example, if only a journal for ledger transactions is used, set boththe From account type and the To account type to ledger. If you
are posting to a ledger account and the off set account should be a
bank account or fixed asset, you must enter the To account type as a
bank account or fixed asset.

8/20/2019 Financials I
http://slidepdf.com/reader/full/financials-i 105/563
Chapter 3: Journal Setup
3-11
Journal Texts
Use journal texts to enter and reuse transaction texts when you record in journals.
Users frequently enter the same transaction text every time that they post a
certain transaction. For example, users transfer from petty cash to bank or
payment of invoice number. You can save the transaction texts in a table with asearch name so that you can reuse the transaction text.
Procedure: Create Journal Texts
Follow these steps to set up standard journal texts.
FIGURE 3.4 LEDGER JOURNAL TEXTS FORM
1. To access the Ledger journal texts form, click General ledger,click Setup, click Journals, and then click Journal texts.
2. Press CTRL+N to create a new record.
3. Enter an ID for the transaction text, in the Identification field. You
can use the identification as a hotkey together with the search name
when you enter the transaction texts.

8/20/2019 Financials I
http://slidepdf.com/reader/full/financials-i 106/563
Financials I in Microsoft Dynamics® AX 2009
3-12
4. Enter a short, memorable name in the Search name field. The search
name frequently resembles the value in the Identification field.
For example, enter:
o 1 in the Identification field
o Daily in the Search name field
o
Daily transactions in the Transaction text field
Microsoft Dynamics AX 2009 automatically finds the text Daily
transactions if 1 or Daily is entered in the Transaction text field
in any Journal lines form.
Balance Control Accounts
Use the Balance control accounts form to monitor the current and expected
balance on an account as transactions are entered in a journal. You are not
required to set up balance control accounts to work with Microsoft Dynamics AX
2009. However, it is good practice generally.
Scenario
Phyllis, the Accounting Manager at Contoso, wants to track the current and
expected balance of liquidity accounts better, such as bank accounts and petty
cash accounts. After Phyllis has set up the balance control accounts, April, the
Accounts Payable Coordinator, verifies the expected balance of the bank account
to make sure the balance is sufficient to pay invoices. The expected balance
includes posted and unposted journals.
Procedure: Set Up Balance Control Accounts
Follow these steps to set up balance control accounts.
1. To access the Balance control accounts form, click General ledger,
click Setup, click Journals, and then click Balance control
accounts.
2. Press CTRL+N to create a new record.
By default, bank accounts are included in the balance control.
3. In the Ledger account field, select the ledger account for balance
control. The account is typically a liquidity account.
The Name field is populated with the Account name of the ledger
account.
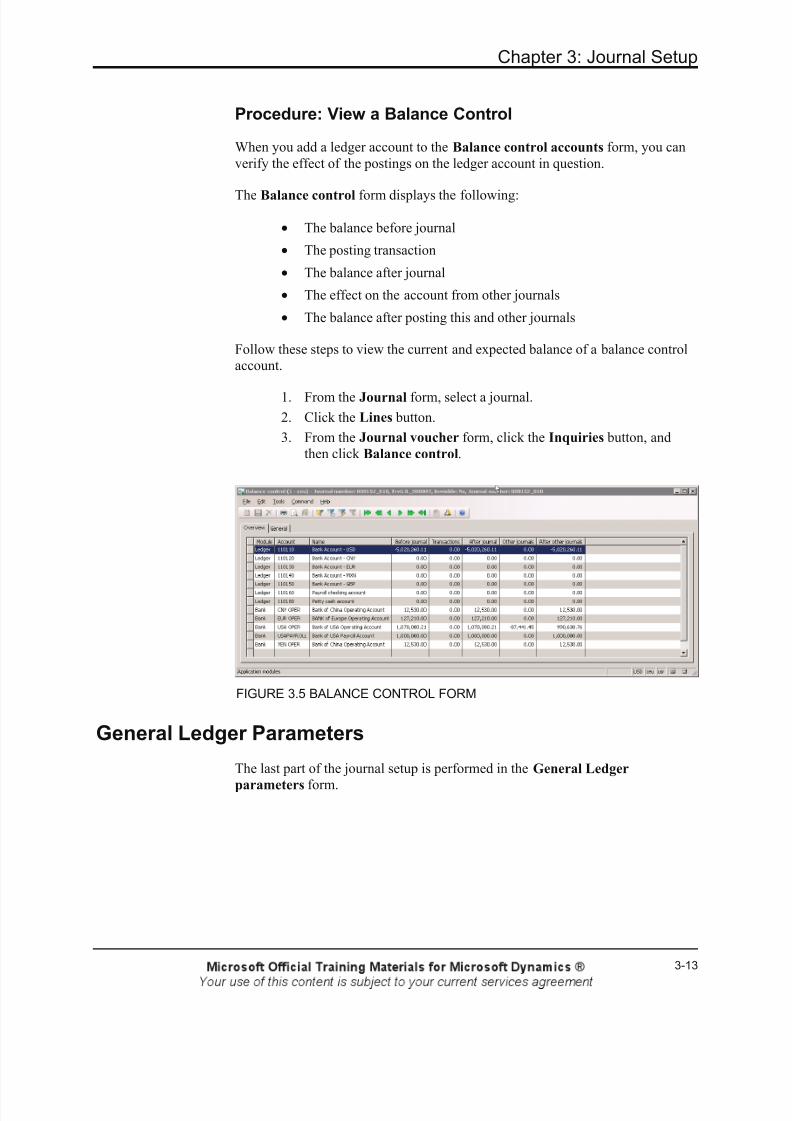
8/20/2019 Financials I
http://slidepdf.com/reader/full/financials-i 107/563
Chapter 3: Journal Setup
3-13
Procedure: View a Balance Control
When you add a ledger account to the Balance control accounts form, you can
verify the effect of the postings on the ledger account in question.
The Balance control form displays the following:
• The balance before journal
• The posting transaction
• The balance after journal
• The effect on the account from other journals
• The balance after posting this and other journals
Follow these steps to view the current and expected balance of a balance control
account.
1. From the Journal form, select a journal.
2. Click the Lines button.
3. From the Journal voucher form, click the Inquiries button, and
then click Balance control.
FIGURE 3.5 BALANCE CONTROL FORM
General Ledger Parameters
The last part of the journal setup is performed in the General Ledger
parameters form.
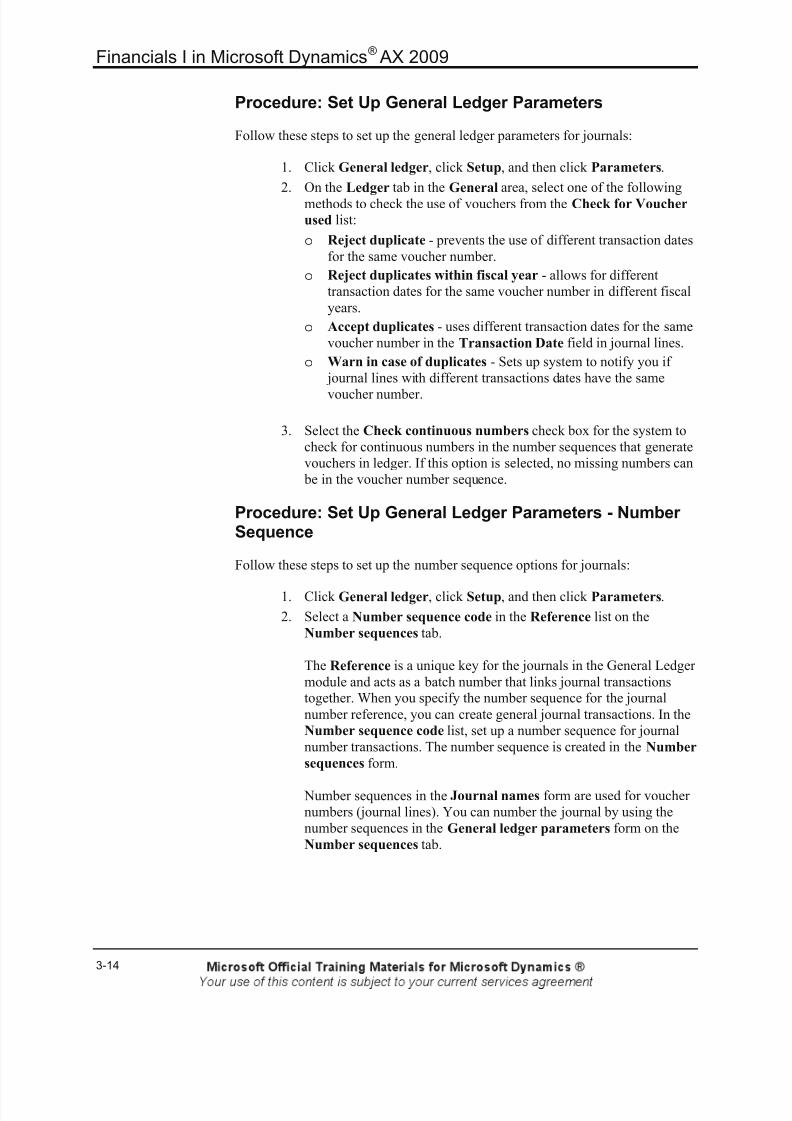
8/20/2019 Financials I
http://slidepdf.com/reader/full/financials-i 108/563
Financials I in Microsoft Dynamics® AX 2009
3-14
Procedure: Set Up General Ledger Parameters
Follow these steps to set up the general ledger parameters for journals:
1. Click General ledger, click Setup, and then click Parameters.
2. On the Ledger tab in the General area, select one of the following
methods to check the use of vouchers from the Check for Voucher
used list:
o Reject duplicate - prevents the use of different transaction dates
for the same voucher number.
o Reject duplicates within fiscal year - allows for different
transaction dates for the same voucher number in different fiscal
years.
o Accept duplicates - uses different transaction dates for the same
voucher number in the Transaction Date field in journal lines.
o Warn in case of duplicates - Sets up system to notify you if
journal lines with different transactions dates have the same
voucher number.
3. Select the Check continuous numbers check box for the system to
check for continuous numbers in the number sequences that generate
vouchers in ledger. If this option is selected, no missing numbers can
be in the voucher number sequence.
Procedure: Set Up General Ledger Parameters - NumberSequence
Follow these steps to set up the number sequence options for journals:
1. Click General ledger, click Setup, and then click Parameters.
2. Select a Number sequence code in the Reference list on the
Number sequences tab.
The Reference is a unique key for the journals in the General Ledger
module and acts as a batch number that links journal transactionstogether. When you specify the number sequence for the journal
number reference, you can create general journal transactions. In the
Number sequence code list, set up a number sequence for journal
number transactions. The number sequence is created in the Number
sequences form.
Number sequences in the Journal names form are used for voucher
numbers (journal lines). You can number the journal by using the
number sequences in the General ledger parameters form on the
Number sequences tab.

8/20/2019 Financials I
http://slidepdf.com/reader/full/financials-i 109/563
Chapter 3: Journal Setup
3-15
Set Up Journals
Scenario
Ken, the Controller at Contoso, must set up two journals in Microsoft Dynamics
AX 2009. One journal records vendor invoices daily and a second journal recordswhere periodic rent entries will be recorded. The table provides additional
information about the journals.
Journal Option Value
Vendor Journal Name of Journal Day3
Description Vendor Invoice
Journal Type Daily
Voucher Series Acco_18
Account Type LedgerRent Journal Name of Journal PerRent
Description Rent Journal
Journal Type Periodic
Voucher Series Acco_23
Account Type Ledger
Offset Account 131150
Journal control 605150
Challenge Yourself!
Use the information in the table to set up the journals.
Need a Little Help?
1. Set up the Vendor Invoice journal.
2. Set up the Rent Journal. Define a journal control for account 605150.
3. Set up journal text for the Rent Journal.
Step by StepFirst, set up the Vendor Invoice journal.
1. Click General ledger, click Setup, click Journals, and then click
Journal names.
2. Press CTRL+N to add a line.
3. In the Name field, enter Day3.

8/20/2019 Financials I
http://slidepdf.com/reader/full/financials-i 110/563
Financials I in Microsoft Dynamics® AX 2009
3-16
4. In the Description field, enter Vendor Invoice.
5. In Journal type, use the arrow to select Daily.
6. In the Voucher series field, use the arrow to select Acco_18.
7. In the Account type field, verify Ledger is populated automatically.
8. Click the General tab.
9. In the New voucher field, verify that In connection with balance isselected.
Set up the Rent Journal.
1. From the Journal names form, click the Overview tab.
2. Press CTRL+N to add a line.
3. In the Name field, enter PerRent.
4. In the Description field, enter Rent Journal.
5. In the Journal type field, use the arrow to select Periodic.
6. In the Voucher series field, use the arrow to select Acco_23.
7. In the Account type field, verify Ledger is populated automatically.
8. In the Offset account field, click the arrow to select 131150.
9. Click the Journal control button.
10. In the Company accounts field, click the arrow to select CEU.
11. In the From account field, enter 605150.
12. In the To account field, enter 605150.
13. Close the form.
Set up journal text for the Rent Journal.
1. Click General ledger, click Setup, click Journals, and then clickJournal texts.
2. Press CTRL+N to add a line.
3. In the Identification field, enter ren. Notice the Search name
defaults with the same value.
4. In the Transaction text field, enter rent.
5. Close the form.
8/20/2019 Financials I
http://slidepdf.com/reader/full/financials-i 111/563
Chapter 3: Journal Setup
3-17
Summary
After the journal setup is complete, Microsoft Dynamics AX 2009 is ready to
create journal and journal lines so that you can record vendor and customer
transactions.
You can set up journal validation and journal approval for every financial
journal. With journal validation, you can lace restrictions on users, accounts, and
modules. For each journal type, you can set an approval procedure for
verification before any update.
Because user rights are also important, you can select the level of detail kept in
fields and individual records. You can also define access as read, edit, add, or
delete.

8/20/2019 Financials I
http://slidepdf.com/reader/full/financials-i 112/563
Financials I in Microsoft Dynamics® AX 2009
3-18
Test Your Knowledge
Test your knowledge with the following questions.
1. Task: Correctly order the following steps for working with journals.
Step _____ : Post transactions.
Step _____ : Create new journal.
Step _____ : Create journal lines.
Step _____ : Set up journal names.
2. Use ___________ to monitor the current and expected balance on an account
as transactions are entered in a journal.
( ) Journal names
( ) Journal controls( ) Balance control accounts
( ) General ledger parameters
8/20/2019 Financials I
http://slidepdf.com/reader/full/financials-i 113/563
Chapter 3: Journal Setup
3-19
Quick Interaction: Lessons Learned
Take a moment and write down three key points you have learned from this
chapter:
1.
2.
3.

8/20/2019 Financials I
http://slidepdf.com/reader/full/financials-i 114/563
Financials I in Microsoft Dynamics® AX 2009
3-20
Solutions
Test Your Knowledge
1. Task: Correctly order the following steps for working with journals.
2.
Step 4 : Post transactions.
Step 2 : Create new journal.
Step 3 : Create journal lines.
Step 1 : Set up journal names.
3. Use ___________ to monitor the current and expected balance on an account
as transactions are entered in a journal.
( ) Journal names
( ) Journal controls
(•) Balance control accounts
( ) General ledger parameters

8/20/2019 Financials I
http://slidepdf.com/reader/full/financials-i 115/563
Chapter 4: Financial Features
4-1
CHAPTER 4: FINANCIAL FEATURES
Objectives
The objectives are:
• Create, modify, and delete reason codes
• Describe how and when to use the Fill utility
Introduction
This course describes features that you can use across the various financial
modules in Microsoft Dynamics® AX 2009.
This course describes how to set up reason codes, which let you analyze
transaction history by specific reason.
This course also describes how to use the Fill utility to update multiple records,
similar to find and replace functionality.
8/20/2019 Financials I
http://slidepdf.com/reader/full/financials-i 116/563
Financials I in Microsoft Dynamics® AX 2009
4-2
Reason Codes
Reason codes are standardized codes that you can use in various transaction types
or changes to field values which provide background data about the transaction.
For example, auditors or managers frequently want to see recorded reasons for
various transactions. When you use standard reason codes instead of transaction
text, users have guidelines on what codes to select from. Standard reason codes
provide management and auditors with the ability to analyze transaction history
by specific reason.
Use reason codes with:
• Fixed Assets
• General Ledger
• Accounts Payable
• Accounts Receivable
• Bank
Scenario
Cassie, the Accountant at Contoso, is responsible for managing the company's
fixed assets. Contoso's auditors have required explanations for all new assets purchased, in addition to certain changes to existing assets. Cassie has decided
that using reason codes will satisfy the auditors.
To accommodate the auditors’ requirement, Cassie establishes internal controls
in Microsoft Dynamics AX 2009 by setting up parameter values, which enforce
use of reason codes during various transactions and value changes in the
accounting records.
Cassie also develops a list of standard fixed asset reason codes and descriptions.
These codes can be used with asset transactions. For example, one of Contoso's
vehicles (vehicle number 17) was recently in an accident. Because of the accident
damage, Cassie must adjust downward the asset's value, service life, and
expected scrap value. She creates a reason code titled “V-ACC-SC,” with a
description of “Vehicle Accident - Single Car” for transactions related to this
accident.
Later, Cassie records the write-down adjustment to the vehicle and changes the
other asset values. Because of the selected parameter settings, she uses the “V-
ACC-SC” reason code with the asset journals and the other forms that requirereason codes.
When the auditors next review the accounting records, they can see within the
accounting records and history forms that vehicle number 17 was adjusted
because of the accident and that no other car was involved in the accident.

8/20/2019 Financials I
http://slidepdf.com/reader/full/financials-i 117/563
Chapter 4: Financial Features
4-3
Procedure: Create a Reason Code
Use the Reasons form in the Basic module to create reason codes for many
financial modules, or alternatively open the Reasons form from a specific
module to set up reason codes for only that module. The difference between the
two is that the Reasons form in Basic provides additional fields to assign the
reason code to any of five account types, but in each module, reason codes areassigned only to the account type that relates to that module. For example, if the
Reasons form opens from Accounts Payable, the account type is set to Vendor
automatically, and the reason codes created are usable only with vendor
transactions.
FIGURE 4.1 REASONS FORM
Follow these steps to create a reason code.
1. To access the Reasons form, click one of the following:
o Basic > Setup > Reasons
o Fixed assets > Setup > Asset reasons
o
General ledger > Setup > Ledger reasonso Accounts receivable > Setup > Customer reasons
o Accounts payable > Setup > Vendor reasons
o Bank > Setup > Bank reasons
2. Press CTRL+N to create a new reason.
3. Enter a unique Reason code as identification.

8/20/2019 Financials I
http://slidepdf.com/reader/full/financials-i 118/563
Financials I in Microsoft Dynamics® AX 2009
4-4
4. Enter a Default comment for the reason code. The comment you
enter here appears as the default comment when you select this
reason in transactions.
5. Select the Account type with which to use the reason code. An
account type limits the reason codes displayed in reason lists when
you create or modify a transaction of that type. For example, only
reason codes with an account type of Asset are available when you
enter fixed asset transactions. All the account type fields are visible
only if you open the Reason form from Basic.
Procedure: Modify a Reason Code
You can modify reason codes at any time. You also can change the Default
comment and Account types.
Follow these steps to modify a reason code.
1. To access the Reasons form, click one of the following:
o Basic > Setup > Reasons
o Fixed assets > Setup > Asset reasons
o General ledger > Setup > Ledger reasons
o Accounts receivable > Setup > Customer reasons
o Accounts payable > Setup > Vendor reasons
o Bank > Setup > Bank reasons
2. Select the Reason code to modify.
3. Modify the Default comment for the reason code.
4. Select or clear the Account type check boxes. As soon as the
account type is cleared, the reason code will not display in thetransaction entry or asset forms, and the system will not allow its
use.
Procedure: Delete a Reason Code
Follow these steps to delete a reason code.
1. To access the Reasons form, click one of the following:
o Basic > Setup > Reasons
o Fixed assets > Setup > Asset reasons
o General ledger > Setup > Ledger reasons
o Accounts receivable > Setup > Customer reasons
o Accounts payable > Setup > Vendor reasons
o Bank > Setup > Bank reasons

8/20/2019 Financials I
http://slidepdf.com/reader/full/financials-i 119/563
Chapter 4: Financial Features
4-5
2. Select the Reason code to delete.
3. Clear all Account type check boxes. You can delete a reason code
only if no account types are associated with it. If you are using any
form other than the Reasons form accessed from the Basic menu,
ensure that you clear the necessary account types from other
modules.
4. Click the delete icon.
5. Click Yes in the Confirm deletion dialog box.
Reason Codes
After you have created reason codes, select reasons for transactions or other
entries in the following forms.
Module Transaction Type Path
General Ledger General journal General ledger >
Journals > General
Journal > Lines button >
General tab
General Ledger Process allocation
request
General ledger >
Periodic > Process
allocation request
General Ledger Elimination proposal General ledger >
Journals > Elimination >
Lines button > General
tab
General Ledger Consolidation, Online General ledger >
Periodic > Consolidate >
Consolidation, Online
Fixed Assets Fixed assets journal General ledger >
Journals > Fixed assets >
Lines button > General
tab
Fixed Assets Inventory to fixed assets
journal
General ledger >
Journals > Inventory to
fixed assets > Lines
button > General tab
Fixed Assets Depreciation book
journal
General ledger > Fixed
Asset Details >
Depreciation books
button > Transactions
button > General tab
Accounts Receivable Cancel payment Bank > Deposit slip >
Cancel payment button

8/20/2019 Financials I
http://slidepdf.com/reader/full/financials-i 120/563
Financials I in Microsoft Dynamics® AX 2009
4-6
Module Transaction Type Path
Accounts Receivable Free text invoice Accounts receivable >
Free Text Invoice Details
> Invoice lines tab
Bank Payment reversal Bank > Checks >Payment reversal button
Accounts Payable Invoice journal Accounts payable >
Journals > Invoices >
Invoice journal > Lines
button > General tab
Accounts Payable Check reversals journal Bank > Journals >
Check reversals > Lines
button > General tab
Accounts Payable Deposit slip payment
cancellations journalBank > Deposit slip >
Cancel payment button
NOTE : You must select the reason codes as available for all transaction types
within the journal line to be posted. This must include the ledger offset account.
For example, to use a reason code for a fixed asset journal line transaction, you
must enable the selected reason code for general ledger usage in the General
Ledger Reasons form.
Reason Comments
Optional reason comments can be entered on the respective Reasons form.
Although you can set up default reason comments for each reason code, no setupis required.
If you select a reason code for a transaction, the default comment that is set up in
the Reasons form displays in the Reason comment field. You can change the
default reason comment. If you enter a reason comment first and then select a
reason code, the typed reason comment is not replaced.
8/20/2019 Financials I
http://slidepdf.com/reader/full/financials-i 121/563
Chapter 4: Financial Features
4-7
Test Your Knowledge
What are reason codes?
Fill Utility
The Fill utility enables authorized users and/or administrators to mass-update
records, similar to the find and replace functionality. This utility assists
administrators or users during implementations or when business process
changes affect multiple records.
Scenario
Contoso has decided to change its payment terms. High-priority customers will
now receive a longer discount period. Instead of updating each account
individually, Phyllis, the Accounting Manager, will use the Fill utility to update
the discount terms of all high priority customers in one step.
Procedure: Update Multiple Records
Update multiple records at the same time by using the Fill utility.
This feature is available only if the Fill utility configuration key is enabled and
the user is assigned to the Fill utility security key.
NOTE : Make a backup before you perform this process.
Follow these steps to update multiple records by using the Fill utility.
1. Open the form that contains the field to update. For example, to
update the payment terms for multiple customers, access the
Customers form. Select a customer and select the Payment tab.
2. Right-click the field to update, such as the Terms of payment field,
and select Record info from the menu.
3. Click the Fill utility button.

8/20/2019 Financials I
http://slidepdf.com/reader/full/financials-i 122/563
Financials I in Microsoft Dynamics® AX 2009
4-8
4. In the Inquiry form, modify the selection of records as necessary,
and then click OK .
5. Verify that the list of records to update is correct, and then click OK .
A warning icon appears that recommends to backup your database
before you perform this process.
6. Select the value to change the field to for the list of records, and thenclick OK .
CAUTION : Be aware that changing numerous records at the same time can be
time-consuming.
Fill Utility Log
Use the Fill Utility Log form to view a record of the changes that you have made
by using the Fill Utility. To access the Fill Utility Log form, click Basic, click
Inquiries, and then click Fill Utility Log.
FIGURE 4.2 FILL UTILITY LOG FORM

8/20/2019 Financials I
http://slidepdf.com/reader/full/financials-i 123/563
Chapter 4: Financial Features
4-9
The following tables provide descriptions for the fields in this form.
Field Description
Name of table Displays the name of the table that was
modified for the selected Fill Utility Log
record.Modified field Displays the name of the field that was
modified for the selected Fill Utility Log
record.
New value Displays the new value for the field that
was modified for the selected Fill Utility
Log record.
Created by Displays the user name of the person
who made the change, which is indicated
in the selected Fill Utility Log record.
Created date andtime Displays the date and time that thechange occurred.
Query statement Displays the query statement that was
used to update the records for the
selected Fill Utility record.
Old value Displays the old value for the field that
was modified for the selected Fill Utility
Log record.
Test Your Knowledge
Which of the following statements correctly describe the Fill utility? (Select allthat apply.)
( ) The Fill utility enables authorized users to mass-update records.
( ) Users can view a log of changes that the Fill utility made,
( ) The system prompts that users create a backup before they use the Fill
Utility.
( ) The system automatically makes a back up before it uses the Fill
utility.
Summary
The Financial Features course described the setup of reason codes and the use ofthe Fill utility.

8/20/2019 Financials I
http://slidepdf.com/reader/full/financials-i 124/563
Financials I in Microsoft Dynamics® AX 2009
4-10
Quick Interaction: Lessons Learned
Take a moment and write down three key points you have learned from this
chapter:
1.
2.
3.

8/20/2019 Financials I
http://slidepdf.com/reader/full/financials-i 125/563
Chapter 4: Financial Features
4-11
Solutions
Reason Codes
Test Your Knowledge
What are reason codes?
MODEL ANSWER - Reason codes are standardized codes that you can use
in various transaction types or changes to field values which provide
background data about the transaction.
Fill Utility
Test Your Knowledge
Which of the following statements correctly describe the Fill utility? (Select all
that apply.)
(√) The Fill utility enables authorized users to mass-update records.
(√) Users can view a log of changes that the Fill utility made,
(√) The system prompts that users create a backup before they use theFill
Utility.
( ) The system automatically makes a back up before it uses the Fillutility.
8/20/2019 Financials I
http://slidepdf.com/reader/full/financials-i 126/563
Financials I in Microsoft Dynamics® AX 2009
4-12

8/20/2019 Financials I
http://slidepdf.com/reader/full/financials-i 127/563
Chapter 5: General Ledger Daily Procedures
5-1
CHAPTER 5: GENERAL LEDGER DAILYPROCEDURES
ObjectivesThe objectives are:
• Create General Ledger Journals
• Enter General Ledger Transactions
• Post multiple journals
• Create Approval Journals
• Demonstrate data needed to create an Approval journal
• Create a Voucher Template
• Create and Retrieve Periodic Journals• General Ledger Transaction Reversal
• Create General Ledger Reversing Entries
• Inquire and Report on Daily Journal Transactions
Introduction
Every manual posting you enter into Microsoft Dynamics AX 2009 is enteredthrough a journal. A journal is a type of worksheet where entries do not postimmediately. You can review, change, and verify them, however, until thecompleted journal is ready for posting.
As discussed in the Journal Setup course, there are many ways to set up the journals to control different kinds of entries and to apply an approval system sothat special journals post only after they have been approved. You also canchoose whether to keep the used journals for historical purposes.
This course explains journal management and journal transactions in the Generalledger module.

8/20/2019 Financials I
http://slidepdf.com/reader/full/financials-i 128/563
Financials I in Microsoft Dynamics® AX 2009
5-2
General Ledger Journals
Users can post transactions to the following accounts by using a general journal:
• General ledger
• Bank• Customer
• Vendor
• Projects
• Fixed assets
In a general journal, users enter the relevant information for the transaction, suchas the:
• Posting date
• Amount• Accounts to post to
The information that users enter in a general journal is temporary and can bechanged as long as it remains unposted within the journal.
Procedure: Create a General Ledger Journal
Use the General journal form to create and view journals within the GeneralLedger module in Microsoft Dynamics AX 2009. The Show list determineswhether only open, posted, or all transactions display in the form.

8/20/2019 Financials I
http://slidepdf.com/reader/full/financials-i 129/563
Chapter 5: General Ledger Daily Procedures
5-3
Follow these steps to create a general journal entry.
FIGURE 5.1 THE JOURNAL FORM
Click General Ledger, select Journals, and then click General Journal.
1. Press CTRL+N to create a new journal in the General journal
form.
2. Enter the name of the journal in the Name list, or select the namefrom the journal name list for the general journal type. The journalnumber is inserted automatically from the voucher series set up inthe Journal names form. The description from the Journal names
form also is inserted automatically, but you can overwrite it. Thevoucher number is created automatically from the number sequenceset up in the General ledger parameters form, and the descriptioncomes from the Journal names form.
NOTE : The Posted check box is selected automatically after the journal has
been posted. The General journal form filters journals by the Show field. You
can select to display only open, all, or posted journals.

8/20/2019 Financials I
http://slidepdf.com/reader/full/financials-i 130/563
Financials I in Microsoft Dynamics® AX 2009
5-4
Procedure: Create a General Ledger Journal - Lines
Follow these steps to create the General Journal Lines:
1. Use the tabs, for example the General or Dimension tab, to change
or add to any of the field information that is entered automaticallyfrom the Journal names form.
2. Click Lines to create a transaction.
3. To inquire about transactions within a journal at any time, highlightthe journal and click the Lines button.
4. To print the journal and other reports, click the Print button.
5. To save the lines, press CTRL+S at the end of each line or use thedown arrow to enter a new transaction line.
6. Click the Post button either in the General journal form or in theGeneral journal lines form to post transactions to the GeneralLedger immediately after you create transactions. When you post the
journal lines in either form, the results are the same. A transactiondoes not affect account balances until you post it.
Enter General Ledger Transactions
Journal entries in Microsoft Dynamics AX 2009 are the same as any other type ofaccounting entry. A ledger account is debited or credited, and then an offsetaccount is designated.
The only information that you must have to create a journal entry is the:
• Accounting date
• Ledger account
• Debit or credit amount
• Offset account
Use the Journal lines form is to enter transactions within a journal. Click theLines button on the General Journal to open the Journal lines form.

8/20/2019 Financials I
http://slidepdf.com/reader/full/financials-i 131/563
Chapter 5: General Ledger Daily Procedures
5-5
Procedure: Enter General Ledger Transactions - OverviewTab
FIGURE 5.2 JOURNAL VOUCHER FORM
The Overview tab is where you make entries. It contains the basic informationneeded to make a journal entry. You can use this tab to enter transactions in theGeneral Ledger.
When you set up the Overview tab, you can view or enter the posting date in theDate field. The system date is the default, but you can change the field. TheVoucher field displays the voucher number for the transaction that is generatedfrom the number sequence in the Journal names form
NOTE : Set up a voucher series in the Number sequences by clicking Basic , then
clicking Setup , then selecting Number sequences , and then clicking Number
sequences. The voucher series is attached to the journal name in the Voucher
ield series by clicking General Ledger , selecting Setup , clicking Journals , and
then clicking Journal Names. If you set the number sequence to Continuous and
ou allow no user changes, the field is skipped automatically. Refer to the Microsoft Dynamics AX 2009 Introduction manual for more information about
number sequences.

8/20/2019 Financials I
http://slidepdf.com/reader/full/financials-i 132/563
Financials I in Microsoft Dynamics® AX 2009
5-6
Procedure: Enter General Ledger Transactions - AccountType
You can determine which type of transaction to create by using the Account type
field. Follow these suggestions to select the account type.
1. Select one of the following account types to use for the general journal transaction in the Account type field:
a. Ledger - Use Ledger for transactions in a ledger account.
b. Customer - Use Customer for transactions to customers.
c. Vendor - Use Vendor for posting to a vendor account. Forexample, when you record a vendor payment and specify Vendoras the Account type, posting occurs in the specified vendoraccount. At the same time, posting occurs automatically in thevendor summary account in the General Ledger.
d. Project - Use Project to post to a specific project number.
e. Fixed assets - Use Fixed assets to post to a specific assetnumber.
f. Bank - Use Bank if a bank account transaction is involved.
2. However, frequently different modules have specific journals forthese purposes. For example, there is a specific Payment Journal forrecording payments to vendors.
3. Summary accounts are set up in the Accounts Receivables andAccounts Payables modules, using the Posting profiles form for themodule. Do not use journals to manually post to ledger accounts thatyou use as summary accounts.
4. Ensure that the account field Locked in Journal is enabled forledger accounts that you use as summary accounts.
Procedure: Enter General Ledger Transactions - Accounts
After you enter the account type, follow these steps to select the accounts andamounts to use.
1. Select an account number for the current account type in theAccount field.
2. Enter a text about the transaction in the Transaction text field.When you specify an offset account, use the same text as long as noother offset transaction text is specified. Alternatively, enter the codefor a journal text that is created in the Journal texts form in theSetup folder.
NOTE : Click Functions, then click Journal Texts to create a new transaction
text that you can reuse when you record in journals.

8/20/2019 Financials I
http://slidepdf.com/reader/full/financials-i 133/563
Chapter 5: General Ledger Daily Procedures
5-7
3. Enter the debit amount in the given currency in the Debit field.
4. Enter the credit amount in the given currency in the Credit field.
5. Select an Account type in the Offset account type list, and thenselect the offset account in the Offset account list.
NOTE : Set up the default offset account for an account in the Journal namesorm. By creating a default offset account, this field is populated automatically
without you having to specify the account manually every time. Also, set up
default accounts and posting account restrictions in the Journal names form by
clicking the Journal Control button.
Procedure: Enter General Ledger Transactions - PostJournal
After you enter General Ledger transactions into the journal and you verify thatthe information is correct, you now can post the journal. Follow these steps to
post the journal.
1. Click Post to post without first validating. If the journal containserroneous entries, you will receive an error message and the journalwill not post. Note: click Validate to verify that there are no errors before you click Post.
2. Click Post and transfer to transfer the line that contains errors intothe next journal of the same type. All of the correct lines then will post.
Procedure: Enter General Ledger Transactions - ViewResults
You can view the results of posting the journal by printing the journal. Followthese steps to view the results.
1. Click Print and select Journal or click on General Ledger, thenclick Reports, then click Journals, then click Print Journal andselect the journal number you just created. The Print journal form prints a list of transactions for each journal.
2. Select the Specifications check box to print additional information,such as invoice number, approval information, and more.
3. Select the Totals check box to show total amounts in currencies for
ledger accounts for every journal.4. Select the Accrual schemes check box to identify accrued
transactions.
5. Click OK to print the journal report.

8/20/2019 Financials I
http://slidepdf.com/reader/full/financials-i 134/563
Financials I in Microsoft Dynamics® AX 2009
5-8
Test Your Knowledge
General journals are used to post transactions in which of the followingaccounts? (Select all that apply.)
( ) General ledger( ) Bank
( ) Customer
( ) Vendor
The information you enter in a general journal is temporary and changeable aslong as the journal is unposted.
( ) True
( ) False
What information are needed to create a journal entry? (Select all that apply.)
( ) Accounting date
( ) Ledger account
( ) Offset account
( ) Debit or credit amount

8/20/2019 Financials I
http://slidepdf.com/reader/full/financials-i 135/563
Chapter 5: General Ledger Daily Procedures
5-9
Lab 5.1 - Daily Transactions
This lab will demonstrate creating and posting transactions in a General journal.
Scenario
Ken is the Controller for Contoso. On Contoso paid 6,000.00 USD for the rent ofoffice space through December 31.
Use the information in the following table to enter the transaction.
Option
Name of Journal GenJrn
Journal Number Accept the SystemDefault
Description Prepaid RentAccount 131100
Transaction Text Pay
Debit 6000
Offset Account 110180
Challenge Yourself!
• Help Ken record the activity in the prepaid rent expense account inMicrosoft Dynamics AX 2009. Enter a journal for the prepaid rent
expense.• After you enter the transaction information, post the journal.
Need a Little Help?
1. Select the journal name.
2. Select the desired transaction text.
3. Click the Post button on the Journal voucher form.
NOTE : Normal accounting procedures would not disburse a large payment
rom a Petty Cash account. This account (number 110180) has been chosen to simplify this lab procedure.

8/20/2019 Financials I
http://slidepdf.com/reader/full/financials-i 136/563
Financials I in Microsoft Dynamics® AX 2009
5-10
Step by Step
Create the Journal:
1. On the Navigation Pane, click General ledger, click Journals, click
General journal.
2. Press CTRL+N to add a line.
3. In the Name field, click the arrow to select GenJrn.
4. In the Journal number field, accept the system default.
5. In the Description field, enter Prepaid Rent.
Create the Journal Lines:
1. Click the Lines button.
2. In the Date field, enter 06/30/2008.
3. In the Account field, enter 131100.
4. In the Transaction text field, enter pay. Use the Tab key to move tothe next field.
5. In the Debit field, enter 6000.
6. In the Offset account field, enter 110180.
Post the Journal:
1. Click the Post button.
2. Click the Post option. An Infolog form displays, which providesinformation about the post process.
3. Close the Infolog form.
4. Close the Journal voucher form.
5. In the Posted field, verify that the system selected the field.
6. Close the Journal form.

8/20/2019 Financials I
http://slidepdf.com/reader/full/financials-i 137/563
Chapter 5: General Ledger Daily Procedures
5-11
Lab 5.2 - Daily Transactions with Dimensions
This lab will demonstrate entering a General journal with dimensions.
Scenario
Cassie is the accountant for Contoso. On Contoso receives a bill for autoinsurance from vendor 8004 in the amount of 1,400.00 USD. Help Cassie postthe insurance by using the following dimensions.
Department Cost
CenterDebit
010 0101 200
030 0401 500
030 0402 300
030 0403 400
After you enter the transaction information, post the journal.
Challenge Yourself!
• Determine an expense account to use for auto insurance.
• Enter a journal for the auto insurance, using the correct dimensions.
After you enter the transaction information, post the journal.
Need a Little Help?
There is an account named Vehicle insurance expense in the Chart of Accountsthat would be appropriate to use. You must change the dimensions on thisaccount.
1. Ensure that the Validate department and Validate cost center
fields are set to “To be filled in” (or “Optional”) to avoid postingerrors.
2. Change the dimension settings on the vehicle insurance expenseaccount before you post.
3. Use the GenJrn journal.4. For the offset account, use Vendor for the Offset account type and
select vendor number 8004.

8/20/2019 Financials I
http://slidepdf.com/reader/full/financials-i 138/563
Financials I in Microsoft Dynamics® AX 2009
5-12
Step by Step
Modify account 604400:
1. On the Navigation Pane, click General Ledger, and then select
Chart of Account details. 2. Find the Vehicle insurance expense account number 604400.
3. Click the Dimension tab.
4. In the Validate department field, click the arrow to select To be
filled in.
5. In the Validate cost center field, click the arrow to select To be
filled in.
6. Close the form.
Enter the journal:
1. On the Navigation Pane, click General ledger, then click Journals, then click General journal.
2. Press CTRL+N to add a line.
3. In the Name field, click the arrow to select GenJrn.
4. In the Journal number field, accept the system default.
5. In the Description field, enter Auto Insurance.
6. Click the Lines button.
7. In the Date field, enter 06/30/2008.
8. In the Account field, click the arrow to select account 604400(vehicle insurance expense).
9. In the Transaction text field, enter Inv. Use the Tab key to move tothe next field.
10. In the Debit field, enter 200.
11. In the Offset account type field, use the arrow to select Vendor.
12. In the Offset account field, enter 8004.
13. Click the Dimension tab.
14. In the Department field, ensure that 010 is selected.
15. In the Cost center field, click the arrow to select 0101.
16. Save the record by clicking Ctrl-S.
17. Click the Overview tab.
18. Use the down arrow to move to the next line in the journal.19. Repeat steps 7 to 17 and enter the rest of the information that the
table provides. Some fields may already be filled in for you.

8/20/2019 Financials I
http://slidepdf.com/reader/full/financials-i 139/563
Chapter 5: General Ledger Daily Procedures
5-13
Post the journal:
1. Click the Post button, and then click the Post option. An Infolog
form displays, which provides information about the post process.
2. Close the Infolog form.
3. Close the Journal voucher form.
4. In the Posted field, notice that the field is selected automatically.
5. Close the Journal form.

8/20/2019 Financials I
http://slidepdf.com/reader/full/financials-i 140/563
Financials I in Microsoft Dynamics® AX 2009
5-14
Lab 5.3 - Daily Transactions with Balance Control
This lab will demonstrate the use of the Balance control feature.
Scenario
Ken is the controller for Contoso. On June 25, 2008 he received an invoice fromvendor 3002 for 800.00 USD. A journal is to be created, using the GenJrn journal, for the expense, debiting account 606300 and entering a second line,crediting 110180. Help Ken validate the journal and review the balance controlaccounts online. The payable to vendor 3002 is not set up in this lab.
Challenge Yourself!
• Enter and post a journal for office expenses, using two lines of entryinstead of an offset account.
• Validate the journal.
• Review the balance control accounts online.
Need a Little Help?
1. Validate the journal in the Journal voucher form by clicking theValidate button.
2. Review the balance control accounts from the Journal voucher form by using the Balance control option available from the Inquiries
button.
Step by Step
Create the General Journal:
1. On the Navigation Pane, click General ledger, then click Journals,
and then click General journal.
2. Press CTRL+N to add a line.
3. In the Name field, click the arrow to select GenJrn.
4. In the Journal number field, accept the system default.
5. In the Description field, enter Electricity.
6. Click the Lines button.7. In the Date field, enter 06/25/2008.
8. In the Account field, click the arrow to select account 606300(Office supplies expense).
9. In the Transaction text field, enter Inv. Use the Tab key to move tothe next field.
10. In the Debit field, enter 800.
11. Press the down arrow key to add a line.

8/20/2019 Financials I
http://slidepdf.com/reader/full/financials-i 141/563
Chapter 5: General Ledger Daily Procedures
5-15
12. In the Date field, enter 06/25/2008. Note that this field may already be filled in.
13. In the Account field, click the arrow to select account 110180.
14. In the Transaction text field, enter Inv. Use the Tab key to move tothe next field.
15. In the Credit field, enter 800.
Validate the General Journal:
1. Click the Validate button, and then click the Validate option. AnInfolog form displays, which provides information for issues in the journal that may affect posting.
2. Close the Infolog form.
Review the Balance Control:
1. Click the Inquiries button.
2. Click the Balance control option. Note the display for the line foraccount 110180.
3. Close the Balance control form.
4. Close the Journal voucher form.
5. Close the Journal form.

8/20/2019 Financials I
http://slidepdf.com/reader/full/financials-i 142/563
Financials I in Microsoft Dynamics® AX 2009
5-16
Posting Multiple Journals
You can use the Post journals menu option to post multiple journals with large processes in a batch. You also can post multiple journals that you have created inthe following modules by selecting the Post journals menu option:
• General ledger
• Accounts receivable
• Accounts payable
• Project
You can post journals immediately or set them up as a job for batch processing.
Scenario
Using Journal Batch Processing
Contoso uses batch processing at the end of its business day to process large jobs.During the day, Susan, the order processor, opens and creates multiple journals.The journals are not posted in case Susan must make corrections or add moreitems to the journals during the day. At the end of the day, Susan runs a journal batch job to post all the open journals at the same time.
Procedure: Post Multiple Journals - Select Journals
FIGURE 5.3 POST JOURNALS FORM

8/20/2019 Financials I
http://slidepdf.com/reader/full/financials-i 143/563
Chapter 5: General Ledger Daily Procedures
5-17
Follow these steps to post multiple journals:
1. Open the Post journals form by clicking General Ledger, thenclicking Periodic, and then clicking Post Journals.
2. Click Select to select open journals for multiple posting. The range is
already set up to include open journals. Then click OK to return tothe Post journals form.
3. Manually add or delete journals from the resulting list of journals to be posted. To add a journal, press CTRL+N to create a line, and thenselect the appropriate journal type and number.
4. When necessary, press ALT+F9 to delete a journal.
5. Select the Transfer errors check box on the individual journal linesso that vouchers with errors do not delay the posting of voucherswithout errors. When this check box is selected, the posting process posts vouchers without errors and transfers vouchers with errors to anew journal.
Procedure: Post a Journal Batch - Transfer Errors AndPost
You can configure the transfer of errors for just the selected lines by clickingDefault values.
1. Select or deselect the Transfer errors check box in the Set up
posting form, and then click Apply.
2. Click Insert All to apply the setting to all the selected journal linesor click User default to apply the setting to all users.
3. Click OK to return to the Post journals form.
4. Click OK to post the multiple journals.
NOTE : If Lines limit is set up in the Journal names form, you may have to
create several journals during posting. The number of the first journal posted is
saved automatically in each associated journal that you create.
NOTE : A power failure during posting can cause some journals to post while
others are unposted. If this occurs, start the posting again by using the same
criteria for subsequent selection in the original request. The journals that did not
get posted appear in this form for posting.

8/20/2019 Financials I
http://slidepdf.com/reader/full/financials-i 144/563
Financials I in Microsoft Dynamics® AX 2009
5-18
HINT : Use the Delete posted journals form ( General ledger > Periodic >
Cleanup > Ledger journals clean up) to cleanse the Journals form. The Delete
osted journals form deletes all posted journals in the Journals form to free
space.
Test Your Knowledge
When can Multiple journals be posted? (Select all that apply.)
( ) Yearly
( ) Immediately
( ) On a delayed schedule
( ) Set up as a job for batch processing

8/20/2019 Financials I
http://slidepdf.com/reader/full/financials-i 145/563
Chapter 5: General Ledger Daily Procedures
5-19
Lab 5.4 - Post All Unposted General Journals
This lab demonstrates posting multiple journals.
Scenario
Cassie is the Accountant for Contoso. One of Cassie's responsibilities is postingall unposted General journals at the end of the day. Cassie performed extra taskstoday and the end of the day is near. Help Cassie run the process.
Challenge Yourself!
Select the unposted General journals and post them as a multiple journal set.
Need a Little Help?
• Select the criteria of Daily in the Ledger Journal MultiPost form.• Click the Select button in the Post journals form.
Step by Step
1. Click General ledger, then click Periodic, then click Post journals,and then click the Select button.
2. In the Range tab in the bottom pane, click the line with the fieldJournal type.
3. In the Criteria field, click the arrow to select Daily.
4. Click OK in the Ledger JournalMultiPost form.
5. Click OK in the Post journals form.
6. An Infolog form displays and provides information for issues in the journal that affect posting.
7. Close the Infolog form.

8/20/2019 Financials I
http://slidepdf.com/reader/full/financials-i 146/563
Financials I in Microsoft Dynamics® AX 2009
5-20
Approval Journals
Use Microsoft Dynamics AX 2009 to set up an unlimited number of journaltemplates in the Journal names form. You can set up the journal templates withor without a mandatory approval of the transactions before posting. The person
responsible for journal routines sets up the approval system in one of the journals.
Scenario: Journal Approval
At Contoso, a sample of 100 daily journal transactions shows that less than halfare completed correctly, are authorized correctly, or have documented supportsufficiently for the recorded transaction amounts. The sample shows that in manyinstances, information fields were left blank or contain insufficient or incompleteinformation.
Without appropriate journal approval controls, however, the causes of these
errors or misstatements are difficult to identify. Therefore Phyllis, the accountingmanager, has decided to start the journal approval procedure to make surespecific user groups approve and validate the journals.

8/20/2019 Financials I
http://slidepdf.com/reader/full/financials-i 147/563
Chapter 5: General Ledger Daily Procedures
5-21
Procedure: Create an Approval Journal
Follow these steps to start the approval journal feature.
1. Open the Journal names form by clicking General Ledger, thenclicking Setup, then clicking Journals, and then clicking Journal
Names.
FIGURE 5.4 JOURNAL NAMES FORM
2. Enter the name of the journal that you use throughout MicrosoftDynamics AX 2009 in the Name field. Give it a name that isrecognizable by its name alone.
3. Enter a description of the journal's purpose in the Description field.
4. Select the type of journal in the Journal type field. The journal typedetermines what the journal is used for and which module it isavailable in. For example, the Customer payment journal type is usedonly for customer payment journals. The customer payment journalis used only within Accounts Receivable, to post a payment directlyto a customer account. Therefore, a description such as “ARPayment” would be appropriate when you select this journal type.

8/20/2019 Financials I
http://slidepdf.com/reader/full/financials-i 148/563
Financials I in Microsoft Dynamics® AX 2009
5-22
Procedure: Create an Approval Journal - NumberSequences
Follow these steps to create number sequences for an approval journal.
Select a number sequence for the journal name in the Voucher series list. Numbersequences manage automatic allocation of voucher numbers, invoice numbers,and journal numbers used by Microsoft Dynamics AX 2009. You can set upnumber sequences in the Number sequences form.
The number sequence automatically is applied to, for example, journal lines.
NOTE : To define number sequence codes, go to Basic , then click Setup , click
Number Sequences , and click Number Sequence.
Procedure: Create an Approval Journal - Accounts
Follow these steps to select the Account type and other options for an approval journal.
1. Select the default account type for the journal name in the Account
type list. For example, when you record a vendor disbursement andspecify Bank in Account type, posting occurs in the bank accountselected in the journal. At the same time, posting occursautomatically in the bank's posting account in the General Ledger.
2. Optionally, you can select a default offset account for the journal inthe Offset account list.
NOTE : If an offset account is set up, in the General tab, select the Fixed offset
account check box to prevent users from changing the default offset account.
3. Select the Active check box to start the approval system. Thisenables journal transactions to be reported as ready, approved, orrejected.
4. Specify the user group whose members should approve the journal inthe Approve field.
5. Close the Journal names form.
NOTE : There is also a Workflow approval process which is separate from thisapproval process. if you are using Workflow approval, do not use steps 3 and 4.

8/20/2019 Financials I
http://slidepdf.com/reader/full/financials-i 149/563
Chapter 5: General Ledger Daily Procedures
5-23
Procedure: Create an Approval Journal - RestrictingAccess
There are several ways to further restrict access to the journal:
• On the General tab, specify if the journal should be available onlyfor a limited group of people. In the Private for user group list,select a user group to restrict the usage of the journal.
• On the Posting restrictions button, you can create an additionallayer of control on posting.
• In the Approval workflow field, you can enable approval workflowfor the journal by selecting and selecting a workflow Configuration.However, if workflow is used, you cannot use the approval systemenabled by the Active field within the same journal name record.
Procedure: Create an Approval Journal - Entering Data in
the Journal
Follow these steps to create an approval journal when another person enters datainto the journal in which the approval system is set up. Note that the Post buttonis unavailable until the journal is approved.
1. Go to General Ledger, then click Journals, and then click General
Journal.
2. Press CTRL+N to create a new journal and select the journal namewith the approval system enabled. Other journal types also may usethe approval system, although this example uses a General Journal.
HINT : View the history of approvals on the History tab of the Journal form and
the Journal voucher form.

8/20/2019 Financials I
http://slidepdf.com/reader/full/financials-i 150/563
Financials I in Microsoft Dynamics® AX 2009
5-24
3. Click the Lines button to open the Lines form.
FIGURE 5.5 JOURNAL VOUCHER FORM
4. Create the journal transactions by pressing CTRL+N and enteringinformation in the fields.
5. Click Approval, and click Report as ready to make the journalready for approval as soon as you complete the transaction.
Procedure: Create an Approval Journal - Approval
Follow these example steps to approve a journal when a member of the usergroup designated in the Journal names form approves, for example, a General
journal. If a different journal type was created and used, the path in step 1 will be different, but the remaining steps 2 and 3 will be the same.
1. Click General ledger in the Navigation pane, then click Journals,then click General journal.
2. Click the Approval button, and then click Approve to approve the journal.
3. When the journal is approved, the Post button is enabled within that journal. This allows the user who created the journal and the journallines to post the transactions.

8/20/2019 Financials I
http://slidepdf.com/reader/full/financials-i 151/563
Chapter 5: General Ledger Daily Procedures
5-25
NOTE : If the journal has errors, click Approval , and click Reject .
Test Your Knowledge
In Microsoft Dynamics AX 2009, you can set up journals that require mandatoryapproval.
( ) True
( ) False
Example: Gathering Data For an Approval Journal
Let's look at an example in gathering some of the data needed to create anApproval journal.
Scenario
Phyllis, the Accounting Manager for Contoso, has the responsibility forguaranteeing the accuracy of transactions posted in Microsoft Dynamics AX2009. Phyllis has noticed many errors on entries posted by Alfredo FuentesEspinosa (AFE) in the GenJrn journal, a journal used only by Admin. NowPhyllis has decided that entries made to GenJrn must be approved by a memberof the Finance team, Alex Roland (ASR). Phyllis needs help establishing the proper procedures to enable this approval.
What Data Is Needed?
In this scenario, we will use tables to assist us in gathering the neededinformation. The tables are as follows:
Request to Link Users to Groups Required Data or Field Value
User ID
User Group
User ID
User Group
Request to Enable Journal Approval Required Data or Field ValueJournal Name
Active Select
Approve
Private for user group

8/20/2019 Financials I
http://slidepdf.com/reader/full/financials-i 152/563
Financials I in Microsoft Dynamics® AX 2009
5-26
How would we complete the following tables to provide Phyllis with the setupthat she needs? Some hints and the completed table is shown in the next lessonsections.
Need a Little Help?
Here are some hints:
• Alfredo is a member of the Admin user group.
• Because only Admin makes entries to the GenJrn journal, you canuse the Private for user group field to prevent other users fromaccessing the journal. If you do this, however, then the approvinguser must also be a member of the Private for user group valueselected to see the journal for approval.
Solution- Data Required
The completed tables are as follows:
Request to Link Users to Groups Required Data or Field Value
User ID AFE
User Group Admin
User ID ASR
User Group Finance; Admin
Request to Enable Journal Approval Required Data or Field Value
Journal Name GenJrn
Active Select
Approve Finance
Private for user group Admin
Voucher Templates
A voucher template is a voucher that you can use as the basis of future vouchers.Use voucher templates with a general journal or an accounts payable invoice
journal.
Scenario
Phyllis, the Accounting Manager at Contoso, is entering a voucher to recordinterest expense on a fixed-rate long-term note. The voucher debits InterestExpense and credits Interest Payable for 350.00 U.S. dollars (USD) each.
8/20/2019 Financials I
http://slidepdf.com/reader/full/financials-i 153/563
Chapter 5: General Ledger Daily Procedures
5-27
This voucher for the same amount must be recorded each month. To reducefuture data entry time, Phyllis decides to save the voucher as a voucher template by amount.
The next time Phyllis records an interest expense, she selects the Load vouchertemplate action and chooses the interest entry. The original ledger accounts and
amounts are loaded into the form automatically.
Scenario
April, the Accounts Payable Coordinator, receives a telephone bill that she mustenter. At Contoso, April records the telephone expenses across all departmentsequally. April enters the voucher with the appropriate department breakdown.The following table shown is an example of the distributions for an invoice in theamount of 600.00 U.S. dollars (USD).
Account Debit Amount Credit Amount
Telephone Expense -Sales 150 USD
Telephone Expense -Accounting
150 USD
Telephone Expense -Production
150 USD
Telephone Expense -Administration
150 USD
Accounts Payable 600 USD
April saves this entry as a Voucher template by percent. This will hold the value
assigned to each account as a percentage of the total. In this case, April willassign each department 25 percent.
The next time April receives the telephone bill, she must retrieve the Vouchertemplate and enter only the amount of the telephone bill. The distributions thenare created based on the original percentage.
Procedure: Create a Voucher Template
Follow these steps to create a voucher template.
1. Enter a transaction through either the Invoice journal lines form
(Click Accounts payable, then click Journals, then click Invoice, then click Invoice journal, then click Lines) or the General journal
lines form (Click General ledger, then click General journal, thenclick Lines).
2. Click Functions, and then click Save voucher template.
8/20/2019 Financials I
http://slidepdf.com/reader/full/financials-i 154/563
Financials I in Microsoft Dynamics® AX 2009
5-28
3. From the Template type list, select one of the following:
o Percent - uses the percentage of the original voucher totalrepresented by each voucher line.
o Amount - uses the original voucher total and line amounts.
4. Click OK .
Procedure: Use a Voucher Template
After a voucher template has been created, follow these steps to use a vouchertemplate to create a new general journal or accounts payable invoice journal.
1. Create a transaction through either the Invoice journal lines form(click Accounts payable, then click Journals, then click Invoice, then click Invoice journal, then click Lines) or General journal
lines form (click General ledger, then click General journal, thenclick Lines).
2. Click Functions, and then click Select voucher template.3. Select the correct template in the Voucher templates form.
4. Click OK .
5. If you select a percent voucher template, enter the Amount of thenew transaction. When you create a new voucher based on a percenttype voucher template, the percentage calculated for each new lineautomatically is applied to the value entered in the Voucher
amounts dialog. It determines the amount for that new voucher line.
Test Your Knowledge
With which journals can you use voucher templates? (Select all that apply.)
( ) General journal
( ) Fixed assets journal
( ) Accounts payable invoice journal
( ) Purchase journal
Which voucher template type allows users to recreate a voucher for the sameaccounts and values as the original entry?
( ) Percent
( ) Division( ) Aggregate
( ) Amount

8/20/2019 Financials I
http://slidepdf.com/reader/full/financials-i 155/563
Chapter 5: General Ledger Daily Procedures
5-29
Periodic Journals
A periodic journal is a journal that users enter only periodically. For example:
• During each month-end accounting close, a user makes the same
entry with the same account numbers and currency amounts.
• The user sets up a periodic journal to make this process quicker.
• Then, each month, the user retrieves the journal and posts it with theappropriate accounting date.
Procedure: Create a Periodic Journal
Follow these steps to create a periodic journal that is the same as a regular journal.
1. Click on General Ledger, then click on Journals, and then click
General Journal.2. Press CTRL+N to create a new journal.
3. Enter the periodic journal description to define it as a periodic journal.
4. Click the Lines button to open the Journal voucher window.
5. Create the transactions in the periodic journal the same way that youwould create a transaction in a normal General journal. Decidewhether to leave the date field blank. If you plan to use this journalmore than one time, you can leave the date blank. However, if youwant to use the automatic period incrementation functionality of periodic journals, enter a starting date.

8/20/2019 Financials I
http://slidepdf.com/reader/full/financials-i 156/563
Financials I in Microsoft Dynamics® AX 2009
5-30
6. Click the Period journal, then click Save Journal when thetransaction is complete. A new window appears.
7. Either save the journal in an existing journal or create a new journal.
FIGURE 5.6 SAVE JOURNAL AS PERIODICJOURNAL FORM
Procedure: Create a Periodic Journal - Notes and Hints
HINT : Be as descriptive as possible when you enter the Name of a new periodic
ournal. It will be easier to identify the correct journal when you retrieve the
eriodic journal.
NOTE : When you create a new periodic journal, the Period journal you select
must first exist as a Journal name with Journal type periodic in the Journal
names form. This can be found by clicking General ledger , then clicking Setup ,
then clicking Journals , and then clicking Journal names.
NOTE : After you create the periodic journal, you can post or delete the General
ournal that you created by these steps. A record will be created automatically in
the Periodic journals form found by clicking General ledger , then clicking
Periodic , and then clicking Periodic journals.
Procedure: Retrieve the Periodic Journal - First Steps
Follow these steps to retrieve and use the periodic journal from the Journal
voucher window.
1. Go to and click General Ledger, then click Journals, and then clickGeneral Journal.
2. Press CTRL+N or open an existing journal.

8/20/2019 Financials I
http://slidepdf.com/reader/full/financials-i 157/563
Chapter 5: General Ledger Daily Procedures
5-31
3. Click the Lines button.
4. Click Period Journal button, then click Retrieve Journal on theJournal voucher window. A new form appears titled Period
journal.
FIGURE 5.7 THE PERIOD JOURNAL FORM
Procedure: Retrieve the Periodic Journal - Set DateConditions
Follow these steps to set up the conditions for retrieving lines from a periodic journal to the current journal.
1. Enter the posting date for transactions or last date for transfer of periodic transactions, in the To date field. This is the date the systemuses when searching through the periodic journals, and evaluatingwhether to retrieve the periodic journal. Enter a date that is after thedate you saved the journal, even if the journal does not have an
accounting date.2. Enter a date to use for the accounting date in the Empty date field if
the Date field in the periodic journal is empty. If the Date field isempty, the To date automatically is used as a posting date.
3. Select the periodic journal to use in the Periodic journal number
field list.
4. Select either Copy or Move in the Copy or move journal field list.This will determine whether or not the lines from the selectedPeriodic journal number are left in a reusable status. If the lines arecopied, you can use the journal again. If the lines are moved, the journal is not available for further retrieval.
5. Click OK to create the journal lines.
6. Post the journal as you normally would.
7. Go to General Ledger, click Periodic, then click Periodic Journal
to view or create all the periodic journals.

8/20/2019 Financials I
http://slidepdf.com/reader/full/financials-i 158/563
Financials I in Microsoft Dynamics® AX 2009
5-32
Procedure: Modify a Periodic Journal
After you create a Periodic journal, you can modify it. Follow these steps tomodify a periodic journal.
1. Go to and click on General ledger, then click Periodic, and thenclick Periodic journals.
2. Click to highlight the desired periodic journal.
3. Click the Lines button to open the Journal voucher form.
4. Make the changes you want.
5. Close the form.
NOTE : You also can create periodic journals by using this form.
Periodic Journal: Fields On The Periodic Tab
You can access the Periodic journal at General ledger, Periodic, Periodic
journals. When you modify a periodic journal, note the following about thePeriodic tab:
• Unit field - Select the unit to use for the selected periodictransaction, for example, Months for monthly postings. If you do notselect a date, the Unit field does not apply.
• Number of units field - Enter the number of units defined in theUnit field that make up the interval in which to post transactions forthe selected journal line. For example, if you have entered Months inthe Unit field and want to make quarterly postings, enter 3 in theNumber of units field. If you entered Days in the Unit field and 14in Number of units field, you indicate that the periodic journal lineis posted every two weeks.
• Last date field - This field contains the Session date of the last timeyou transferred the periodic line to a journal. The system updates thefield automatically.
NOTE : To automatically establish an initial baseline date for Periodic journal
osting, ensure that the Date field of the Journal voucher form within a Periodic
ournal is populated.
8/20/2019 Financials I
http://slidepdf.com/reader/full/financials-i 159/563
Chapter 5: General Ledger Daily Procedures
5-33
Periodic Journal: Using Periodic Tab Fields WhenRetrieving Periodic Journals
You can access the Periodic Tab Fields by clicking General ledger, thenclicking Periodic, then clicking Periodic journals. Next, click the Lines button,
and then click the Periodic tab. Use these fields to determine the next Periodic
journal posting date. You also can determine whether a journal will be retrievedautomatically into the General journal form based on the selection criteria youset up.
Every time you post the Periodic journal by using the General journal form,the Date field in the Periodic journal, Journal voucher is incrementedautomatically by the values set up in the Periodic tab. This field is found byclicking General ledger, then clicking Periodic, and then clicking Periodic
journals. Next, click the Lines button, and click the Date field.
When you select a Periodic journal to retrieve into the General journal form,
the value found in the To date field (click General ledger, then click Journals,then click Lines, then click the Period journal button, then click Retrieve
journal, then click To date) determines whether to retrieve the journal. Thesystem retrieves the journal only when the To date field value entered in theretrieval form is equal to or greater than the Date field in the Periodic journal
Journal voucher form line (found by clicking General ledger, then clickingPeriodic, then clicking Periodic journals, and then clicking Lines).
However, if the Date field in the Periodic journal Journal voucher form line is blank, the line automatically transfers one time per retrieval, and the posting dateis set based on the values you enter during retrieval.

8/20/2019 Financials I
http://slidepdf.com/reader/full/financials-i 160/563
Financials I in Microsoft Dynamics® AX 2009
5-34
Lab 5.5 - Entering Periodic Transactions
This lab demonstrates creating a Periodic Journal
Scenario
Ken is the Controller for Contoso. It is the end of June and therefore one-sixth ofthe prepaid rent must be expensed. Accounting staff must make an entry to movethe used portion of 1,000.00 USD to Rent Expense. Ken asks you to create thePeriodic journal and post the June entry.
Use the following information to enter the transaction.
Option
Name of Journal RentExp
Description Rent Expense
Date 06/30/2008
Account 131100
Transaction Text Rent Expense
Credit $1,000.00
Offset Account 605150 RentExpense
Unit Month(s)
Number 1
Challenge Yourself!
• Create a Periodic journal to use for posting the monthly expense.
• Post the entry for June.
NOTE : Set the Session date to 06/30/2008 for this lab.
Need a Little Help?
1. Create a Journal name for RentExp.
2. After you enter the Periodic Journal, click the Save button.3. Retrieve the Periodic Journal and post the first transaction on .

8/20/2019 Financials I
http://slidepdf.com/reader/full/financials-i 161/563
Chapter 5: General Ledger Daily Procedures
5-35
Step by Step
Set up the Journal name:
1. On the Navigation Pane, click General ledger, then click Setup,
then click Journals, and then click Journal names.2. Press CTRL+N to add a line.
3. In the Name field, enter RentExp.
4. In the Description field, enter Rent Expense.
5. In the Journal type field, click the arrow to select Periodic.
6. In the Voucher series field, select Acco_23.
7. In the Offset account field, enter 605150.
8. Click the Journal control button.
9. In the Company accounts field, click the arrow to select CEU.
10. In the From account field, enter 131100.
11. In the To account field, enter 131100.
12. Press CTRL+N to add a line.
13. In the Company accounts field, click the arrow to select CEU.
14. In the From account field, enter 605150.
15. In the To account field, enter 605150.
16. Close the Journal control form.
17. Close the Journal names form.
Create the Periodic Journal:
1. On the Navigation Pane, click General ledger, then click Periodic, and then click Periodic journals.
2. Press CTRL+N to add a line.
3. In the Name field, click the arrow to select RentExp.
4. In the Journal number field, accept the system default. In theDescription field, the field populates based on the the Journal
names form setup.
5. Click the Lines button.
6. In the Account field, enter 131100.
7. In the Transaction text field, enter Rent. Use the Tab key to moveto the next field.
8. In the Credit field, enter 1000.9. In the Unit field, use the arrow to select Months.
10. In the Number field, enter 1.
11. Close the Journal voucher form.
12. Close the Journal form.

8/20/2019 Financials I
http://slidepdf.com/reader/full/financials-i 162/563
Financials I in Microsoft Dynamics® AX 2009
5-36
Post the entry for June:
1. On the Navigation Pane, click General ledger, then click Journals,and then click General journal.
2. Press CTRL+N to add a line.
3. In the Name field, click the arrow to select GenJrn.
4. Click the Lines button.
5. Click the Period journal button.
6. Click the Retrieve journal option.
7. In the To date field, enter 06/30/2008.
8. In the Periodic journal number field, use the arrow to selectRentExp.
9. Click OK to retrieve the journal information.
10. In the Journal voucher form, click the Post button.
11. Click Post.
12. Close the Infolog form.
13. Close the Journal voucher form.
14. Close the Journal form.

8/20/2019 Financials I
http://slidepdf.com/reader/full/financials-i 163/563
Chapter 5: General Ledger Daily Procedures
5-37
General Ledger Transaction Reversal
Microsoft Dynamics AX 2009 enables users to easily reverse transactions postedincorrectly. The transaction reversal feature includes:
• Setup options in General Ledger parameters
• Number sequences for tracing purposes
• The ability to reverse a transaction and subledger transactions
• The ability to undo a reversal
• Inquiry on tracing
The following transactions can be reversed:
• General Ledger transactions
• Customer transactions, except transactions that relate to sales orders
or projects
• Vendor transactions, except transactions that relate to purchaseorders
• Fixed asset transactions
General Ledger Transaction Reversal - FurtherDescription
You can select only one transaction at a time for reversal, and you must reverse itat the last transaction level. For example, an invoice only can be reversed if it isnot paid. To reverse a paid invoice, you first must reverse the payment.
The reversal functionality applies to:
• The last transaction level
• Transactions in the origin module
The reversal functionality does not apply to:
• Transactions included in the bank reconciliation
• Project invoices and credit notes
• Vendor invoices entered through purchase orders
• Sales invoices entered through sales orders
• Inventory transactions
• Delivery notes posted into the ledger
NOTE : You also can enable Reason codes for transaction reversal.

8/20/2019 Financials I
http://slidepdf.com/reader/full/financials-i 164/563
Financials I in Microsoft Dynamics® AX 2009
5-38
Procedure: Reverse a Transaction - Set Up NumberSequence
Before you use the reverse functionality, select a number sequence forTransaction Reversal and Trace number in General ledger parameters on theNumber sequences tab.
Follow these steps to reverse a transaction.
1. Enter a number sequence for the Trace number reference. Thesystem uses the trace number on the original transaction and also onthe reversal of the reversal. This makes it possible to trace the:
o Original transaction
o Reversed transaction
o Reversal of the reversed
2. Enter a number sequence for the Transaction reversal reference.
NOTE : You can set the number sequence to Continuous by clicking Basic , then
clicking Setup , then clicking Number Sequences , clicking Number Sequences ,
and then clicking General Tab.
3. Optionally, select the Correction check box on the Ledger tab toreverse the connected ledger transaction by using correction. Youcan reverse a debit transaction by adding a minus debit transaction,and you can reverse a credit transaction by adding a minus credit
transaction.
NOTE : You cannot reverse a transaction in a previously closed fiscal year.
Procedure: Reverse a Transaction - Transaction Level
You can use the following examples of forms to reverse a transaction:
• Click General Ledger, click Chart of Account details, and clickTransactions
• Click Accounts Receivables, then click Customers, and then clickTransactions
• Click Accounts Payables, then click Vendor, and then clickTransactions

8/20/2019 Financials I
http://slidepdf.com/reader/full/financials-i 165/563
Chapter 5: General Ledger Daily Procedures
5-39
Follow these steps to reverse a transaction at the transaction level.
1. Select the transaction to reverse.
2. Click Reverse transaction.
3. Select the date of posting for the reversal transaction. The date
cannot be before the original posting date or in a closed period.
4. Click OK . The transaction itself and all related transactions that werecreated when the original transaction is posted are reversed.
The results include the following:
• Both new and old reversed transactions now receive a specialmarking ‘’R(eversed)‘’ allowing you to select these transactions in:
o Reports
o Inquiries
o Periodic jobs
• The ‘’R‘’ marking identifies all transactions settled through reversaland are currently still settled.
Procedure: Revoke a Reversed Transaction
You also can reverse a reversal which involves the following actions:
• Settlements between the original transaction and its reverse arecanceled.
• The original transaction is marked as an original transaction.
Follow these steps to reverse a reversal.
1. Follow one of these paths:
o Click General Ledger, then click Chart of Account details,and then select Transactions.
o Click Accounts Receivable, then click Customers, and thenclick Transactions.
o Click Accounts Payable, then click Vendors, and then clickTransactions.
2. Select the reversed or original transaction to revoke the reversed
transaction.
3. Click Reverse Transaction.
4. Select the date of posting for the revocation transaction, and thenclick OK . The reversed transaction and all transactions that youcreated by using the reversal are revoked, and the revocationtransactions share the same trace number.
5. Select a transaction to view all the transactions with the same tracenumber, and then click Reversed Tracing.

8/20/2019 Financials I
http://slidepdf.com/reader/full/financials-i 166/563
Financials I in Microsoft Dynamics® AX 2009
5-40
NOTE : Reversed tracing is active only for reversed transactions and reversed
transactions that you revoke.
Inquiry and Reports on Transaction ReversalWhen you use inquiries and reports:
• The identification of the reversal (trace number) and the reversalmarking (‘R’) must be displayed.
• In the dialog of some inquiries and reports in General Ledger,Accounts Receivable, and Accounts Payable, select whether thereport or inquiry should include transactions that are reversed andsettled (‘R’ transactions).
• The ‘Include reversed’ parameter is, for example, included in reportssuch as account statements and aging reports.
Test Your Knowledge
You can select multiple transactions for reversal at the same time.
( ) True
( ) False
Reversing Entries - GL
The action of reversing entry functionality lets users enter a general journal
transaction with a reversing date. After you post the transaction in the general journal, the original transaction is posted based on the transaction date, and thetransaction reversal is posted based on the reversing date.
The action of reversing entry functionality provides an easy way to performtransaction reversal for accruals. You need accrual type transactions to accuratelyreflect balances on financial statements.
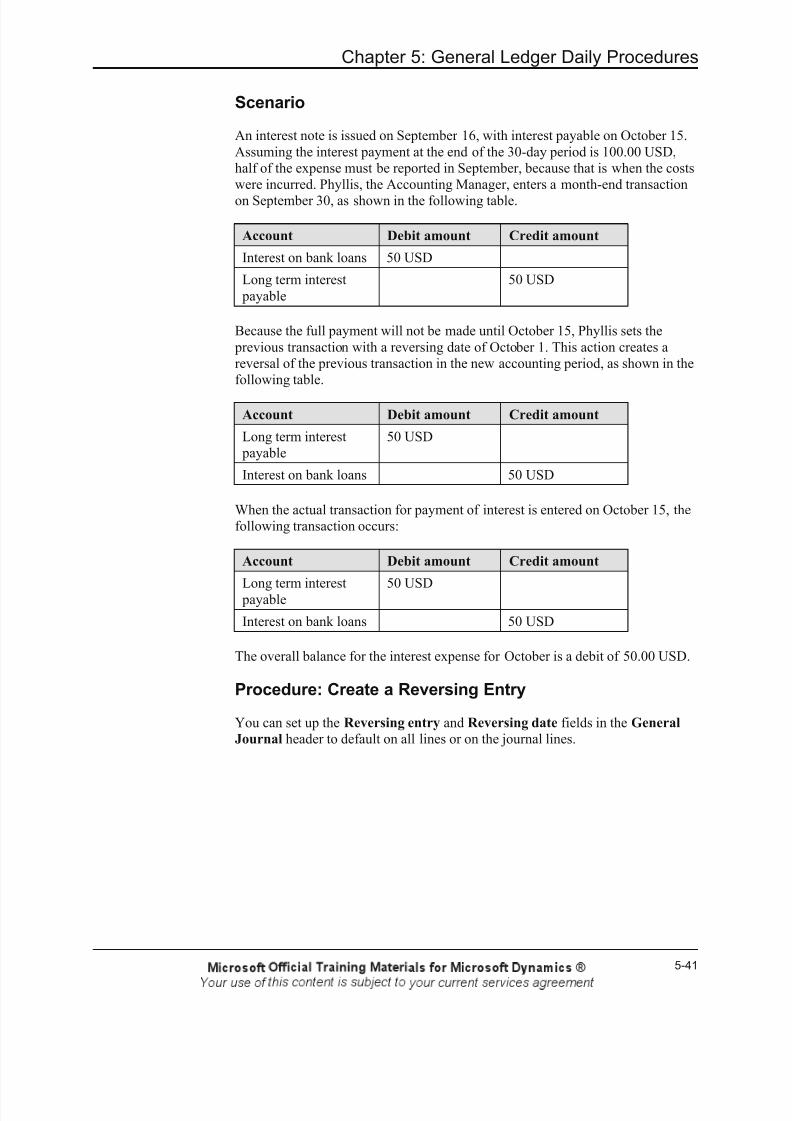
8/20/2019 Financials I
http://slidepdf.com/reader/full/financials-i 167/563
Chapter 5: General Ledger Daily Procedures
5-41
Scenario
An interest note is issued on September 16, with interest payable on October 15.Assuming the interest payment at the end of the 30-day period is 100.00 USD,half of the expense must be reported in September, because that is when the costswere incurred. Phyllis, the Accounting Manager, enters a month-end transaction
on September 30, as shown in the following table.
Account Debit amount Credit amount
Interest on bank loans 50 USD
Long term interest payable
50 USD
Because the full payment will not be made until October 15, Phyllis sets the previous transaction with a reversing date of October 1. This action creates areversal of the previous transaction in the new accounting period, as shown in thefollowing table.
Account Debit amount Credit amount
Long term interest payable
50 USD
Interest on bank loans 50 USD
When the actual transaction for payment of interest is entered on October 15, thefollowing transaction occurs:
Account Debit amount Credit amount
Long term interest payable 50 USD
Interest on bank loans 50 USD
The overall balance for the interest expense for October is a debit of 50.00 USD.
Procedure: Create a Reversing Entry
You can set up the Reversing entry and Reversing date fields in the General
Journal header to default on all lines or on the journal lines.

8/20/2019 Financials I
http://slidepdf.com/reader/full/financials-i 168/563
Financials I in Microsoft Dynamics® AX 2009
5-42
Follow these steps to designate on the header that a general journal entry is areversing entry:
1. To access the Journal form, click on General ledger, then click Journals, and then click General journal.
2. Enter a journal.
3. Select the Reversing entry check box. If the Reversing entry check box is selected, you must enter a date in the Reversing date field.
4. In the Reversing date field, enter a posting date for the reversingvoucher.
NOTE : You also can access the Reversing entry and Reversing date fields from
the General tab in the Journal form .
HINT : If a Transaction text is defined in Basic > Setup > Transaction Text for
Ledger - Reversing Entry , the text will be used automatically as prefix text in thereversing entry's transaction text field.
NOTE :To change the reversing date of an individual transaction in this journal,
click the Lines button to open the Journal voucher form. Enter a new date in the
Reversing date field.
Test Your Knowledge
Which of the following statements correctly describe Microsoft Dynamics AX
2009 Reversing Entry functionality? (Select all that apply.)
( ) Reversing entry functionality lets users enter a general journaltransaction with a reversing date.
( ) After you post transactions, the original transaction posts based on thetransaction date, and the transaction reversal posts based on thereversing date.
( ) Reversing entry functionality provides transaction reversal foraccruals. Accrual type transactions are needed to accurately reflect balances on financial statements.
( ) Reversing entry functionality serves only the purpose of correcting or backing out incorrect transactions.

8/20/2019 Financials I
http://slidepdf.com/reader/full/financials-i 169/563
Chapter 5: General Ledger Daily Procedures
5-43
Which of the following fields designates a reversing entry? (Select all thatapply.)
( ) Reversing entry
( ) Correcting entry
( ) Reversing date
( ) Correction date
Inquire and View Reports on Daily Journal Transactions
You can run various reports to help you review and reconcile General Ledger posted data.
Report: Print Journal
There are two ways to print a list of transactions in a General journal:
• Go to General ledger, then click Journals, then click General
journal. Next, highlight and select the journal you wish to print, andthen click the Print button, and finally click Journal.
FIGURE 5.8 GENERAL JOURNAL REPORT
• Go to General Ledger, then click Reports, then click Journals, andclick Print Journal to print a list of transactions entered in thecurrent journal.

8/20/2019 Financials I
http://slidepdf.com/reader/full/financials-i 170/563
Financials I in Microsoft Dynamics® AX 2009
5-44
Report: Nonposted journal lines
Use one of these paths to print the Nonposted journal lines report:
• General Ledger, then click Reports, then click Journals, and then
click Nonposted Journal Lines.• General Ledger, then click Chart of Account Details, then click
Inquiry, and then click Daily Journal Transactions.
NOTE : The account must be the account in the Chart of Accounts. For example,
no value displays if you enter the account in the journal as a debit to the bank
account, and then later you make an inquiry on the ledger account for that
specific bank account.
The Non-posted journal lines report prints the journal lines that have not yet been posted.
FIGURE 5.9 NONPOSTED JOURNAL LINES REPORT

8/20/2019 Financials I
http://slidepdf.com/reader/full/financials-i 171/563
Chapter 5: General Ledger Daily Procedures
5-45
Report: Account Statement
Go to General Ledger, then click Chart of Account Details, and then clickAccount Statement to print an account statement to view a record oftransactions on accounts and their effect on account balances.
FIGURE 5.10 ACCOUNT STATEMENT REPORT
Report: Balance List
Print a Balance list report that shows the opening and closing balance for allaccounts for a given period. Use the report to:
• View debit and credit totals
• Quickly analyze development in the different accounts

8/20/2019 Financials I
http://slidepdf.com/reader/full/financials-i 172/563
Financials I in Microsoft Dynamics® AX 2009
5-46
To access this report, click General ledger, click Reports, click Transactions, click Periodic, and click Balance list.
FIGURE 5.11 BALANCE LIST REPORT
Report: Trial Balance
If the total of the debits and credits are error free and posted correctly to the
General Ledger:
• The total of all the debit balances should equal the total of all thecredit balances. If the debits do not equal the credits, then an erroroccurred somewhere in the process.
• The total of all accounts on the debit side and on the credit side isknown as the trial balance. Print the trial balance to verify the debitsand the credits equal.

8/20/2019 Financials I
http://slidepdf.com/reader/full/financials-i 173/563
Chapter 5: General Ledger Daily Procedures
5-47
To access this report, click General ledger, click Reports, click Transactions, click Periodic, and click Trial balance.
FIGURE 5.12 TRIAL BALANCE REPORT
Report: Audit Trail
Use the Audit trail form to trace a transaction to its origin for internal and
external auditing and analysis. An audit trail is a time-stamped record of all thechanges made to a record. It contains the name/identification of the user whomade the modification and typically also includes the reason for the change. Anaudit trail enables you to audit the system for a record of alterations, and also toreconstruct the data at a specified time.

8/20/2019 Financials I
http://slidepdf.com/reader/full/financials-i 174/563
Financials I in Microsoft Dynamics® AX 2009
5-48
To access this form, click General ledger, click Inquiries, and click Audit trail.
FIGURE 5.13 AUDIT TRAIL FORM
Report: Voucher Transactions
Use the Voucher Transactions form to view ledger transactions by vouchernumber and posting date.
To access this form, click General ledger, click Inquiries, and click Voucher
transactions. After you enter the criteria in the Inquiry form, click OK tocontinue.
FIGURE 5.14 VOUCHER TRANSACTIONS FORM

8/20/2019 Financials I
http://slidepdf.com/reader/full/financials-i 175/563
Chapter 5: General Ledger Daily Procedures
5-49
Summary
By using the connectivity in Microsoft Dynamics AX 2009, many transactions inthe general ledger are posted automatically. This applies to sales and purchases,cost of goods sold, discounts, interest payments, exchange rate adjustments ofaccounts receivable and accounts payable, project invoices and costs, work in progress, fixed asset transactions and inventory transactions.
However, you also can enter General Ledger transactions manually when you usegeneral ledger journals. You can control the posting in the journals by the wayyou set up of the Chart of Accounts and the journal templates. The journal itselfoffers various posting options, as well.

8/20/2019 Financials I
http://slidepdf.com/reader/full/financials-i 176/563
Financials I in Microsoft Dynamics® AX 2009
5-50
Quick Interaction: Lessons Learned
Take a moment and write down three key points you have learned from thischapter:
1.
2.
3.

8/20/2019 Financials I
http://slidepdf.com/reader/full/financials-i 177/563
Chapter 5: General Ledger Daily Procedures
5-51
Solutions
Enter General Ledger Transactions
Test Your Knowledge
General journals are used to post transactions in which of the followingaccounts? (Select all that apply.)
(√) General ledger
(√) Bank
(√) Customer
(√) Vendor
The information you enter in a general journal is temporary and changeable as
long as the journal is unposted.
(•) True
( ) False
What information are needed to create a journal entry? (Select all that apply.)
(√) Accounting date
(√) Ledger account
(√) Offset account
(√) Debit or credit amount
Posting Multiple Journals
Test Your Knowledge
When can Multiple journals be posted? (Select all that apply.)
( ) Yearly
(√) Immediately
( ) On a delayed schedule
(√) Set up as a job for batch processing

8/20/2019 Financials I
http://slidepdf.com/reader/full/financials-i 178/563
Financials I in Microsoft Dynamics® AX 2009
5-52
Approval Journals
Test Your Knowledge
In Microsoft Dynamics AX 2009, you can set up journals that require mandatory
approval.
(•) True
( ) False
Voucher Templates
Test Your Knowledge
With which journals can you use voucher templates? (Select all that apply.)
(√) General journal
( ) Fixed assets journal
(√) Accounts payable invoice journal
( ) Purchase journal
Which voucher template type allows users to recreate a voucher for the sameaccounts and values as the original entry?
( ) Percent
( ) Division
( ) Aggregate
(•) Amount
General Ledger Transaction Reversal
Test Your Knowledge
You can select multiple transactions for reversal at the same time.
( ) True
(•) False

8/20/2019 Financials I
http://slidepdf.com/reader/full/financials-i 179/563
Chapter 5: General Ledger Daily Procedures
5-53
Reversing Entries - GL
Test Your Knowledge
Which of the following statements correctly describe Microsoft Dynamics AX
2009 Reversing Entry functionality? (Select all that apply.)
(√) Reversing entry functionality lets users enter a general journaltransaction with a reversing date.
(√) After you post transactions, the original transaction posts based onthe transaction date, and the transaction reversal posts based on thereversing date.
(√) Reversing entry functionality provides transaction reversal foraccruals. Accrual type transactions are needed to accurately reflect balances on financial statements.
( ) Reversing entry functionality serves only the purpose of correcting or
backing out incorrect transactions.
Which of the following fields designates a reversing entry? (Select all thatapply.)
(√) Reversing entry
( ) Correcting entry
(√) Reversing date
( ) Correction date

8/20/2019 Financials I
http://slidepdf.com/reader/full/financials-i 180/563
Financials I in Microsoft Dynamics® AX 2009
5-54

8/20/2019 Financials I
http://slidepdf.com/reader/full/financials-i 181/563
Chapter 6: Sales Tax Setup
6-1
CHAPTER 6: SALES TAX SETUP
Objectives
The objectives are:
• Provide an overview on sales tax
• Create Ledger Posting Groups
• Create Sales Tax Authorities
• Create Sales Tax Settlement Periods
• Create Sales Tax Codes
• Create Sales Tax Codes Intervals
• Create Sales Tax Groups
• Create Item Sales Tax Groups• Set up Sales tax jurisdictions.
• Create Sales Tax Transactions
• Create Sales Tax Exempt Data
• Calculate and Post Withholding Sales Tax
Introduction
The requirements for tax calculation and tax reporting differ significantly fordifferent countries. Therefore, the tax module of a true international EnterpriseResource Planning (ERP) system must be comprehensive. In MicrosoftDynamics® AX 2009, the tax module offers many different options for:
• Tax calculation
• Posting
• Reporting
This course explores the extensive functionality for sales tax handling.

8/20/2019 Financials I
http://slidepdf.com/reader/full/financials-i 182/563
Financials I in Microsoft Dynamics® AX 2009
6-2
Sales Tax Overview
All businesses must collect and pay taxes to various tax authorities. Differentcountries have different rules and rates. In some countries, the rules differ between states or counties.
This topic provides a general overview on taxes, with the focus on sales taxes,although the tax system in Microsoft Dynamics AX 2009 can process many kindsof taxes and duties.
The sales tax system within Microsoft Dynamics AX 2009 functions as follows:
• The user specifies where to post sales taxes by entering a ledgeraccount in the Ledger posting groups.
• The user specifies the sales tax authorities by using the Sales tax
authorities form.
• The user specifies when and how frequently to settle under sales tax
settlement periods.
• The user defines how much to collect or pay as a certain amount or percentage; the user sets this up under the Sales tax codes.
• The system determines whether a sales tax should be imposed on asale or purchase order through a combination of the Sales tax groupand the Item sales tax group.
Sales Tax Overview - Suggested Steps
The image illustrates the steps for setting up tax information. If you follow thesteps in this order, you can avoid having to go back and forth between dialog
boxes in Microsoft Dynamics AX 2009.
FIGURE 6.1 SALES TAX SETUP

8/20/2019 Financials I
http://slidepdf.com/reader/full/financials-i 183/563
Chapter 6: Sales Tax Setup
6-3
When you buy an item from a vendor or sell an item to a customer, the systemmust calculate all the applicable sales taxes.
The calculated sales tax in Microsoft Dynamics AX 2009 is based on the salestax codes included in both of the tax groups that are attached to the customer or
vendor and the item.
Sales Tax Overview- Example
The following table shows the:
• Sales tax setup for a customer and an item
• Attached tax groups and the associated tax codes
If you sell the item P Lamp to customer TTL Tire, the system calculates the salestaxes based on tax codes CA and Fed because those codes exist in both groups.
FIGURE 6.2 AFFECT OF SALES TAX CODES ON SALES TAX CALCULATION
When you attach settlement period and posting group to the tax codes, youspecify how to post and pay the taxes. Finally, you can set up the tax reporting onthe sales tax code.
Ledger Posting Groups
The ledger posting groups control the automatic posting of sales taxes in
Microsoft Dynamics AX 2009. You must create the accounts that General Ledgeruses in the Chart of Accounts before you can use them to set up the ledger posting groups. The following characteristics apply to ledger posting groups:
• A ledger account is updated automatically when the systemcalculates taxes and updates invoice posting.
• The system attaches the ledger accounts that the taxes are posted into the sales tax code.

8/20/2019 Financials I
http://slidepdf.com/reader/full/financials-i 184/563
Financials I in Microsoft Dynamics® AX 2009
6-4
• Because each ledger account can use several tax codes, a ledger posting group determines posting.
• Each ledger posting group can contain several ledger accounts. Thedescription field for that account indicates the way each account isused.
• You can set up ledger accounts that have the posting type Sales taxto select the accounts in the Account group form.
• Changes that you make to the ledger account numbers in Ledger posting groups only affect transactions that have not yet posted.
Ledger Posting Groups - Types of Accounts
The number of accounts you must set up depends on the use of the group andnational law. For example, you can set up accounts for:
• Sales-tax payable
• Use-tax payable• Settlement account
Procedure: Create Ledger Posting Groups - Overview Tab
Follow these steps to create ledger posting groups:
FIGURE 6.3 ACCOUNT GROUP- LEDGER POSTING GROUPS FORM
1. Click General ledger, then click Setup, then click Ledger posting
groups, and then click the Overview tab.
2. Enter a unique name for the ledger posting group in the Ledger
posting group field.
3. Enter a meaningful name to describe the ledger posting group in theDescription field. The description appears on reports and other areasthroughout Microsoft Dynamics AX 2009.

8/20/2019 Financials I
http://slidepdf.com/reader/full/financials-i 185/563
Chapter 6: Sales Tax Setup
6-5
HINT : Describe the groups so that you can recognize them. This description
appears with the code of the ledger posting group.
4. Select the ledger account in the Sales tax payable list, where youmust post the outgoing sales tax as part of the company's revenue.The system debits the outgoing tax in the customer account and thencredits this account. Debits automatically are recorded in the accountand settled upon payment of the taxes. The ledger accounts availablein the Sales tax payable list are the posting type of sales tax on theSetup tab in the Chart of accounts form. However, if you want toselect other ledger accounts, click According to account type in theSales tax payable, Use tax payable or Settlement account lists.
Create Ledger Posting Groups - Posting Example
Here is a brief example about posting sales taxes.
These sales taxes are collected by the company on behalf of the tax authoritywhen you sell taxable goods and services. The amount you receive includes thesales tax.
For example, if a customer makes a purchase of 95.00 USD and the tax amount is5.00 USD, the ledger transactions are as follows:
Ledger account Debit ($) Credit ($)
Customer account(Accounts Receivable)
100
Sales tax payable* 5
Sales account(domestic)
95
** The sales tax payable line represents the ledger account specified in the Sales
tax payable field on the Ledger posting group form. The system credits thisaccount for sales tax amounts received from customers and debits the appropriatecustomer accounts.

8/20/2019 Financials I
http://slidepdf.com/reader/full/financials-i 186/563
Financials I in Microsoft Dynamics® AX 2009
6-6
Procedure: Create Ledger Posting Groups - Sales TaxReceivable
Follow these steps to create sales tax receivable ledger posting groups:
1. Select the ledger account for incoming taxes (receivable from the taxauthority) in the Sales tax receivables list. Vendors collect thesetaxes on behalf of the tax authority when the company purchasestaxable goods and services, and the amount paid to the vendorincludes taxes. For example, if a vendor sends an invoice of 100.00USD, of which 5.00 USD is value-added tax, the ledger transactionsare as follows:
Ledger account Debit ($) Credit ($)
Vendor account(Accounts payable)
100
VAT paid (Sales tax
receivable)**
5
Inventory account(Expense account)
95
2. Enter the ledger account for posting deductible incoming taxes thatvendors do not claim or report to the tax authority in the Use-tax
expense list.
NOTE : If the Apply US sales tax and use tax rules check box is selected on the
General Ledger Parameters form on the Sales tax tab, the Sales tax payable
ield is unavailable. Instead, the system debits sales taxes paid to vendors as
expenditures (costs) to the same accounts as the purchases.
Procedure: Create Ledger Posting Groups - Use TaxPayable
Follow these steps to create use tax payable ledger posting groups:
Enter the ledger account that offsets the use tax expense for taxes that vendors donot claim in the Use tax payable list. The way you use this account depends onthe type of tax system your company chooses.
• Non-U.S. taxes - You must indicate a use tax expense account for theLedger posting group. For any sales tax groups that contributeamounts to this ledger account, you must select the Use Tax field onthe Setup tab on the Sales tax group form, found at General
Ledger, Setup, Sales tax.
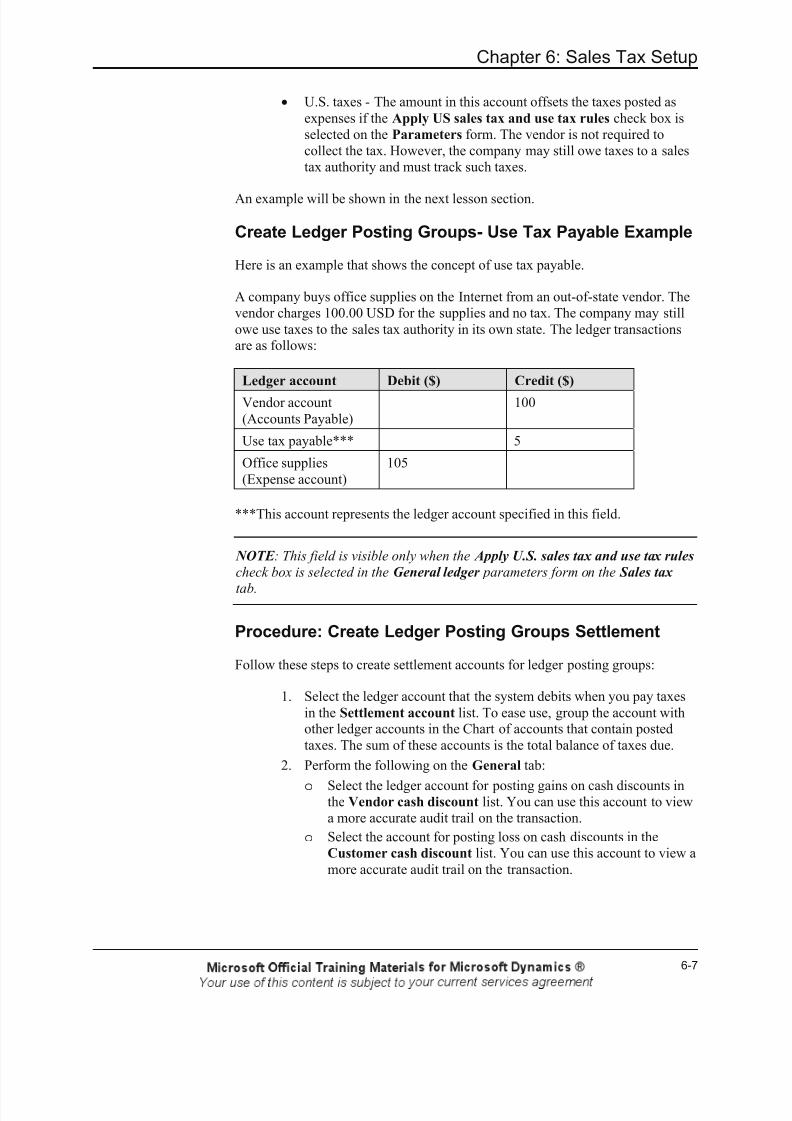
8/20/2019 Financials I
http://slidepdf.com/reader/full/financials-i 187/563
Chapter 6: Sales Tax Setup
6-7
• U.S. taxes - The amount in this account offsets the taxes posted asexpenses if the Apply US sales tax and use tax rules check box isselected on the Parameters form. The vendor is not required tocollect the tax. However, the company may still owe taxes to a salestax authority and must track such taxes.
An example will be shown in the next lesson section.
Create Ledger Posting Groups- Use Tax Payable Example
Here is an example that shows the concept of use tax payable.
A company buys office supplies on the Internet from an out-of-state vendor. Thevendor charges 100.00 USD for the supplies and no tax. The company may stillowe use taxes to the sales tax authority in its own state. The ledger transactionsare as follows:
Ledger account Debit ($) Credit ($)
Vendor account(Accounts Payable)
100
Use tax payable*** 5
Office supplies(Expense account)
105
***This account represents the ledger account specified in this field.
NOTE : This field is visible only when the Apply U.S. sales tax and use tax rules
check box is selected in the General ledger parameters form on the Sales tax
tab.
Procedure: Create Ledger Posting Groups Settlement
Follow these steps to create settlement accounts for ledger posting groups:
1. Select the ledger account that the system debits when you pay taxesin the Settlement account list. To ease use, group the account withother ledger accounts in the Chart of accounts that contain postedtaxes. The sum of these accounts is the total balance of taxes due.
2. Perform the following on the General tab:
o Select the ledger account for posting gains on cash discounts inthe Vendor cash discount list. You can use this account to viewa more accurate audit trail on the transaction.
o Select the account for posting loss on cash discounts in theCustomer cash discount list. You can use this account to view amore accurate audit trail on the transaction.

8/20/2019 Financials I
http://slidepdf.com/reader/full/financials-i 188/563
Financials I in Microsoft Dynamics® AX 2009
6-8
The ledger posting groups have the following characteristics:
• You can attach them to individual sales tax codes
• They determine the ledger accounts to which the sales taxescalculated for the sales tax code are posted
Test Your Knowledge
Each ledger account can use several tax codes. True or False?
( ) True
( ) False
Changes that you make to the ledger account numbers in ledger posting groupsonly affect ____.
( ) Posted transactions
( ) Deleted transactions
( ) Not yet posted transactions
( ) Posted transactions from previous months
Before creating ledger posting groups, you must create a(n) _________ in theGeneral Ledger to link to ledger posting group.
( ) Tax Group
( ) Sales Tax
( ) Account
( ) Group

8/20/2019 Financials I
http://slidepdf.com/reader/full/financials-i 189/563
Chapter 6: Sales Tax Setup
6-9
Lab 6.1 - Create a Ledger Posting Group
In this lab, you will set up ledger accounts and a ledger posting group for use in posting sales tax transactions.
Scenario
Phyllis is the Accounting Manager for Contoso. Contoso has a new customer inAlabama. A ledger account must be set up to record the sales tax liability and payments made (settlements) to the taxing authority in Alabama automatically.Phyllis asks you to perform these tasks for her.
Challenge Yourself!
• Create an account to record the sales tax payable and the sales taxsettlements for the Alabama customer.
• Set up a new ledger posting group to assign to the Alabama customerto automate postings of sales tax transactions.
Need a Little Help?
1. When you create a new account for the sales tax liability for theAlabama customer, use account 220105 in the Chart of Accounts.
2. Create a new ledger posting group for the Alabama customer in theLedger posting form that uses the Ledger posting group ALST(Alabama State Tax).
Step by Step
Set up the ledger account:
1. On the Navigation Pane, click General ledger, then click Chart of
Account details.
2. Press CTRL+N to add a line.
3. In the Ledger account field, enter 220105.
4. In the Account name field, enter Alabama state sales tax payable.
5. In the Search name field, enter ALsales tax pay.
6. In the Account type field, click the arrow to select Balance.
7. Click the Setup tab.
8. In the Posting type field, click the arrow to select Sales tax.
9. Close the Chart of accounts form.

8/20/2019 Financials I
http://slidepdf.com/reader/full/financials-i 190/563
Financials I in Microsoft Dynamics® AX 2009
6-10
Now, set up the ledger posting group:
1. On the Navigation Pane, click General ledger, then click Setup,
then click Sales tax, click Ledger posting groups, and then click
Overview tab.
2. Press CTRL+N to add a line.3. In the Ledger posting group field, enter ALST.
4. In the Description field, enter Alabama State Tax.
5. In the Sales tax payable field, click the arrow to select account220105.
6. In the Settlement account field, click the arrow to select account220105.
7. Close the Account group form.

8/20/2019 Financials I
http://slidepdf.com/reader/full/financials-i 191/563
Chapter 6: Sales Tax Setup
6-11
Sales Tax Authorities
Companies pay and report taxes to authorities. The authorities determine whenand where the company pays its taxes. Tax authorities can be countries, states,regions, and cities.
You can pay sales tax through a vendor or to the sales tax authority directly. To pay sales tax through a vendor, specify the vendor's account number togetherwith the correct sales tax authority. Sales tax payments are transferred by thesystem to the vendor making the payment. To make payments to the sales taxauthority, enter the sales tax authority's address information.
Procedure: Create a Sales Tax Authority - Overview Tab
Follow these steps to create a sales tax authority:
FIGURE 6.4 AUTHORITY FORM
1. Click General ledger, then click Setup, then click Sales tax, clickSales tax authorities, and then click the Overview tab.
2. Enter a unique code for the authorities that you send tax declarations
and payments in the Authority field. Microsoft Dynamics AX 2009uses this code throughout the system to refer to a particular authority.
3. Enter the name of the tax authority in the Name field. It displays onreports and in other areas throughout the system.
NOTE : Give the tax authority a name that easy to identify. The name display
together with the tax authority code.

8/20/2019 Financials I
http://slidepdf.com/reader/full/financials-i 192/563
Financials I in Microsoft Dynamics® AX 2009
6-12
4. Select the vendor to make tax payments to the appropriate authoritiesin the Vendor account list. The sales tax payments then are postedautomatically to the settlement account specified in the Ledger
posting group. When you select a vendor, the vendor's address isentered automatically. If you leave the field blank, you must pay thetax authorities directly.
5. Select the report layout to print for the tax authority in the Report
layout list.
Procedure: Create a Sales Tax Authority - General Tab
Follow these steps to create a sales tax authority, for fields on the General tab:
1. Select the rounding form to use for rounding the sales tax amount onthe General tab in the Rounding form list. This feature is availableonly for the German and standard sales tax reports. The followingrounding forms are available:
o Normal - Round up numbers five and higher and round downnumbers lower than five to the right of the specified unit.
o Downward - Round down any number to the right of thespecified unit.
o Rounding-up - Round up any number adjacent to the specifiedunit.
o Own advantage - Round any number to the company'sadvantage. When the system settles sales tax, the total sales taxamount rounds automatically according to the setup on the salestax authority.
2. Specify:
o The general unit for rounding sales tax amounts in the Round-
off field, according to the chosen rounding form.
The ledger accounts to post gains and losses for rounding in the Account gain
and Account loss fields.
EXAMPLE : If you select Own advantage, with a Round-off of 0.10, the system
rounds a figure of 10.16 to 10.10 and -10.16 to -10.20. This ensures that the
rounding is always to the advantage of the company.

8/20/2019 Financials I
http://slidepdf.com/reader/full/financials-i 193/563
Chapter 6: Sales Tax Setup
6-13
Procedure: Create a Sales Tax Authority- Address andContact Tabs
Follow these steps to create a sales tax authority, for fields on the Address andContact information tabs:
1. On the Address tab, enter the address of the Sales tax authority.
2. Enter the remaining contact information on the Contact
Information tab of the Sales tax authority.
Create as many sales tax authorities as needed, each with specific address andcontact information and report layout. The company can pay sales taxes to theauthority directly or through a vendor account created for the sales tax authority.
NOTE : If you have not set up the tax authority as a vendor, prepare a manual
ayment to the tax authority on the appropriate due date.
Test Your Knowledge
Tax authorities can be ______. (Select all that apply.)
( ) Countries
( ) States
( ) Regions
( ) Cities
Sales tax can be paid by the AX system to _____ ? (Select all that apply.)
( ) A client
( ) An employee
( ) A vendor
( ) A sales tax authority

8/20/2019 Financials I
http://slidepdf.com/reader/full/financials-i 194/563
Financials I in Microsoft Dynamics® AX 2009
6-14
Lab 6.2 - Create a Sales Tax Authority
This lab demonstrates how to create a sales tax authority in AX 2009.
Scenario
Phyllis, the Accounting Manager for Contoso, has asked for your assistance insetting up a sales tax authority. Contoso recently started conducting business witha customer in Alabama. A new sales tax authority must be set up to use to reportsales taxes to the Alabama authorities.
Challenge Yourself!
Set up the Alabama sales tax authority. Use ALA for the authority name.
Need a Little Help?
1. Click General ledger, then click Setup, then click Sales tax, andthen click Sales tax authorities.
2. Create a new sales tax authority. Contoso uses the field value“Normal” for the rounding method and it rounds to the nearest penny.
Step by Step
1. On the Navigation Pane, click General ledger, then click Setup, then click Sales tax, and then click Sales tax authorities.
2. Press CTRL+N to add a new line.3. In the Authority field, enter ALA.
4. In the Name field, enter Alabama Authorities.
5. In the Report layout field, click the arrow to select U.S. reportlayout.
6. Click the General tab.
7. In the Rounding form field, click the arrow to select Normal.
8. In the Round-off field, enter .01.
9. Close the Authority form.

8/20/2019 Financials I
http://slidepdf.com/reader/full/financials-i 195/563
Chapter 6: Sales Tax Setup
6-15
Lab 6.3 - Create and Assign a Vendor to the Sales TaxAuthority
To make paying the sales tax authorities more efficient, you can assign a vendor
to the authority. This lab shows how to assign a vendor.
Scenario
Phyllis, the Accounting Manager for Contoso, has discovered that assigning avendor to a sales tax authority has the following advantages:
• She can make payments as a part of the typical payment routines.
• When she runs the Sales tax payment periodic job, the amount thecompany owes the sales tax authority transfers to the sales taxauthority's vendor account.
• During the company's usual payment routine, the payment to the
sales tax authority is created automatically with payments to othervendors.
To automate payments to the Alabama sales tax authority, Phyllis has asked youto set the Alabama sales tax authority up as a vendor. Use the followinginformation for the vendor.
Field Value
Name State of Alabama
Search name AL tax
Group 10Terms of payment M15-Month end + 15
days
Method of payment USAUSD_CHK
Challenge Yourself!
• Create a vendor for Alabama sales tax.
• Assign the vendor to the sales tax authority for Alabama.

8/20/2019 Financials I
http://slidepdf.com/reader/full/financials-i 196/563
Financials I in Microsoft Dynamics® AX 2009
6-16
Need a Little Help?
1. When you add a vendor, Microsoft Dynamics AX 2009 can assignthe vendor number because of the Accounts Payable setup inContoso. Ensure that this setup is correct.
2. Assign the new vendor to the sales tax authority for the State ofAlabama.
Step by Step
Ensure that the setup is correct for automatic vendor numbering:
1. Click Basic, then click Setup, then click Number sequences, andthen click Number sequences.
2. Select the AP_001 number sequence.
3. Click the General tab.
4. Make sure that the Manual check box is not selected.
5. Close the Number sequences form.
Set up the vendor:
1. On the Navigation Pane, click Accounts payable, then click Vendor
details.
2. Press CTRL+N to add a line. In Contoso, because of accounts payable setup, the next available vendor number is assignedautomatically.
3. In the Name field, enter State of Alabama.
4. In the Search name field, enter AL tax.
5. In the Group field, click the arrow to select 70- Tax Authorities.
6. Click the Payment tab.
7. In the Term of payment field, use the arrow to select M15.
8. In the Method of payment field, use the arrow to selectUSAUSD_CHK.
9. Close the Vendor form.
Assign the vendor to the authority:
1. On the Navigation Pane, click General ledger, then click Setup,
then click Sales tax, and then click Sales tax authorities.
2. Locate the line for Alabama Authorities.
3. In the Vendor account field, click the arrow to select State ofAlabama.
4. Close the Authority form.

8/20/2019 Financials I
http://slidepdf.com/reader/full/financials-i 197/563
Chapter 6: Sales Tax Setup
6-17
Sales Tax Settlement Periods
Sales tax settlement periods specify the intervals when the company reports and pays taxes. The company then can determine which sales tax transactions toreport to the authorities and which not to report. The system automatically marks
the settlement period when it must report the transaction. After it reports to theauthorities, the system prints transactions from the current period.
NOTE : If the Include corrections field on the Sales tax tab page in the General
ledger parameters form is selected, Microsoft Dynamics AX 2009 automatically
rints all transactions that it must include in previous periods.
Reporting periods depend on the size of the company, laws, and the authorities.Typical periods could be:
• Monthly
• Quarterly
• Yearly
Procedure: Create Sales Tax Settlement Period - OverviewTab
Follow these steps to create a sales tax authority:
FIGURE 6.5 AUTHORITY FORM

8/20/2019 Financials I
http://slidepdf.com/reader/full/financials-i 198/563
Financials I in Microsoft Dynamics® AX 2009
6-18
1. Click General ledger, then click Setup, then click Sales tax, clickSales tax authorities, and then click the Overview tab.
2. Enter a unique code for the authorities that you send tax declarationsand payments in the Authority field. Microsoft Dynamics AX 2009uses this code throughout the system to refer to a particular authority.
3. Enter the name of the tax authority in the Name field. It displays onreports and in other areas throughout the system.
NOTE : Give the tax authority a name that easy to identify. The name display
together with the tax authority code.
4. Select the vendor to make tax payments to the appropriate authoritiesin the Vendor account list. The sales tax payments then are postedautomatically to the settlement account specified in the Ledger
posting group. When you select a vendor, the vendor's address isentered automatically. If you leave the field blank, you must pay thetax authorities directly.
5. Select the report layout to print for the tax authority in the Report
layout list.
Procedure: Create Sales Tax Settlement Periods - PeriodInterval
Follow these steps to set up period intervals for the sales tax settlement periods:
1. Click General ledger, then click Setup, click Sales tax, and thenclick Sales tax settlement periods.
2. Select the reporting interval in days, months, or years, in the Periodinterval list, on the General tab.
3. Enter the length of the settlement period in the Number of units
field. Based on how you define the Period interval, the settlement period displays in days, months, or years.
EXAMPLE : If the Period interval is set to Month(s) and the Number of units is
set to 1, a new period automatically is one month. However, if the Period
interval is set to Month(s) and the Number of units is set to 12, the length of one
eriod is one year or 12 months. You can create new periods automatically by
clicking New periods.

8/20/2019 Financials I
http://slidepdf.com/reader/full/financials-i 199/563
Chapter 6: Sales Tax Setup
6-19
4. To create a new period, click on the Periods tab, and then pressCTRL+N, or click New period.
5. Enter the first day and last day of a period interval in the From date
and To date fields. You cannot change an updated period interval.This means that you cannot remove tax transactions from the original period interval. You can correct errors with an offset transaction thatis identical to the original transaction, but with the oppositemathematical sign.
Example: Create Sales Tax Settlement Periods
In the year 2008, Contoso settles its sales taxes every quarter. To create the first period, enter January 1, 2008 in the From date field and March 31, 2008 in theTo date field. To create the other quarters of the year, click New period threeadditional times.
FIGURE 6.6 SALES TAX SETTLEMENT PERIODS FORM
CAUTION : The sum of period intervals must cover whole periods so that no tax
transactions fall outside the calculation periods. Period intervals may not
overlap.
Inquire about Sales Tax Settlement Periods
When you set up the sales tax settlement periods, you can inquire, report and paysales tax for specific settlement periods.

8/20/2019 Financials I
http://slidepdf.com/reader/full/financials-i 200/563
Financials I in Microsoft Dynamics® AX 2009
6-20
The Sales Tax Settlement Periods form contains several methods to inquire onSales tax transactions:
• View the sales tax payments for a specific sales tax authority byselecting a sales tax authority on the Overview tab and clickingSales tax payments. Additionally, view sales tax payments for a
specific period by selecting an interval on the Periods tab andclicking Interval sales tax settlements.
HINT : Click General ledger > Reports > External > Sales tax payments to
rint a report about all settled sales taxes.
• View posted sales tax transactions for a specific sales tax authority by selecting a sales tax authority on the Overview tab and clickingPosted sales tax. This provides an overview of each sales taxtransaction, which is posted in Microsoft Dynamics AX 2009 with asales tax code. Alternatively, click Sales tax per interval to view
posted sales tax transactions for a specific interval.
Use settlement periods to create and manage the periods the company uses toreport sales tax.
Test Your Knowledge
You use settlement periods to create and manage the periods the company uses toreport sales tax.
( ) True
( ) False
Sales tax settlement periods specify at what intervals the company reports taxes.
( ) True
( ) False

8/20/2019 Financials I
http://slidepdf.com/reader/full/financials-i 201/563
Chapter 6: Sales Tax Setup
6-21
Lab 6.4 - Setup of Sales Tax Settlements
This lab explains an example of setting up a sales tax settlement period.
Scenario
Ken, the Controller for Contoso, wants April, the accounts payable coordinator,to pay Contoso's Alabama sales tax liability quarterly. The sales tax authoritiesexpect settlement 15 days after the close of the quarter. The sales tax settlement period and deadlines are laid out in the following table:
Settlement period Deadline for reporting
January 1 - March 31 April 15
April 1 - June 30 July 15
July 01 - September 30 October 15
October 1 - December 31 January 15, the following year
April has asked for your assistance in completing the setup for the Alabama salestax settlement so that April can generate the tax payments automatically.
Challenge Yourself!
Set up the required sales tax settlement for Alabama.
Need a Little Help?
1. Create the Sales tax settlement period.2. Attach the Terms of payment to the settlement period.
3. Set up the Period length.
4. Create the individual Settlement periods.
Step by Step
Set up the Overview tab:
1. On the Navigation Pane, click General ledger, click Setup, clickSales tax, and then click Sales tax settlement periods.
2. Press CTRL+N to insert a line.3. In the Settlement period field, enter AL.
4. In the Description field, enter Alabama Quarterly.
5. In the Authority field, click the arrow to select ALA-AlabamaAuthorities.
6. In the Terms of payment field, use the arrow to select N015.

8/20/2019 Financials I
http://slidepdf.com/reader/full/financials-i 202/563
Financials I in Microsoft Dynamics® AX 2009
6-22
Set up the General tab:
1. Click the General tab.
2. In the Period interval field, use the arrow to select Months.
3. In the Number of units field, enter 3.
Set up the Periods tab:
1. Click the Periods tab.
2. Press CTRL+N to add a line, if needed.
3. In the From date field, enter 01/01/2008.
4. In the To date field, enter 03/31/2008.
5. Click the New period button three additional times to create theremaining quarters.
6. Close the Sales tax settlement periods form.

8/20/2019 Financials I
http://slidepdf.com/reader/full/financials-i 203/563
Chapter 6: Sales Tax Setup
6-23
Sales Tax Codes
The Sales tax code is a central part of the setup. It specifies:
• How taxes are calculated
• The value that is used for tax calculation
The sales tax value is very important because no tax is calculated without it.
A sales tax code includes information about:
• How the tax is calculated, posted and reported
• When the payments are made
• To whom the payments are made
You can define the sales tax rate for:
• Various intervals and periods in Values
• Limits on sales tax amounts in Limits
Sales Tax Codes - When to Create
Create sales tax codes when you initially set up the system. Update the sales taxcodes when you need to make changes to existing taxes or when you add newtaxes. Because taxes frequently depend on geographic location, changes to thecompany's market can result in the need for new sales tax codes.
NOTE : If a company operates in the United States, it is highly recommendedthat you set up sales tax jurisdictions, as well as sales tax codes. You must attach
sale tax jurisdictions to sales tax groups. You can attach sales tax codes to the
sales tax group through the sales tax jurisdictions.

8/20/2019 Financials I
http://slidepdf.com/reader/full/financials-i 204/563
Financials I in Microsoft Dynamics® AX 2009
6-24
Procedure: Create a Sales Tax Code - Overview
Follow these steps to create a sales tax code:
FIGURE 6.7 SALES TAX CODES FORM
1. Click General ledger, then click Setup, click Sales tax, then clickSales tax codes, and then click the Overview tab.
2. Press CTRL+N to create a line for the new sales tax code.
3. Enter a unique identifier for the sales tax code in the Sales tax code
field. This is the basis for calculation of tax, purchase duty, and packing duty throughout Microsoft Dynamics AX 2009.
4. Enter a meaningful name for the new sales tax code in the Name
field. This describes the function of the code and appears on reportsand throughout the Microsoft Dynamics AX 2009 system.
NOTE : If a company operates in the United States, set up sales tax jurisdictions
in the Sales tax jurisdiction list.
5. Select the period and the sales tax authority used to calculate thesales tax code in the Settlement period list.
6. Select ledger posting group for a sales tax code in the Ledger
posting group list. The posting group contains information aboutwhich accounts to use when the sales tax amounts automatically are
posted in the General Ledger. You can create the posting groups inthe Ledger posting groups form.

8/20/2019 Financials I
http://slidepdf.com/reader/full/financials-i 205/563
Chapter 6: Sales Tax Setup
6-25
Procedure: Create a Sales Tax Code - Calculation options
Follow these steps to set up calculation options when you create a sales tax code:
1. Click General ledger, then click Setup, click Sales tax, then click
Sales tax codes, and then click the Overview tab.2. Select from the following options in the Origin list:
o Percentage of net amount - Percentage of purchase or sale,excluding any other taxes.
o Percentage of gross amount - Percentage of purchase or sale,including any other taxes. Sales tax calculates as a percentage ofthe purchase or sale amount. This includes all other taxes orduties.
o Percentage of sales tax - Percentage of another tax. The tax codethat this calculation is based on must exist in the system. On theCalculation tab, set up the specific sales tax code that you based
the current sales tax code on, in the Sales on sales tax field.
CAUTION : If the Sales on sales tax field is blank, this indicates that the
amounts include all other taxes.
o Amount per unit - Indicate the unit with a Unit. If the transactionis in another unit, it converts automatically based on Unitconversion in Inventory.
Calculated percentage of the net amount. On the Calculation tab inthe Unit list, select the unit to use when taxes are calculated. If the
transaction is expressed in another unit, it converts automaticallyaccording to the Unit conversion.
NOTE : If the basis for tax is the number of units, this Unit field is mandatory.
Procedure: Create a Sales Tax Code - AdditionalCalculation Options
Follow these steps to set up additional calculation options when you create asales tax code:
1. Click General ledger, then click Setup, click Sales tax, then clickSales tax codes, and then click the Calculation tab.
2. Click the Values button. Enter the Percentage/Amount in theValues form. Click Values to set up the sales tax rate. Also refer tothe procedure on how to create sales tax codes intervals. Close theValues form.

8/20/2019 Financials I
http://slidepdf.com/reader/full/financials-i 206/563
Financials I in Microsoft Dynamics® AX 2009
6-26
3. Click the General tab. Select the currency in which tax must becalculated in the Sales tax code form on the General tab in theCurrency list. If the original transaction is in another currency, thetax converts automatically.
NOTE : Also set up a purchase duty on a sales tax code by selecting the Purchase duty check box. Users typically use the purchase duty if, for example,
a European company imports goods from a non-European company. Set up the
urchase duty in the General ledger > Setup > Posting > Purchase duty form.
4. Select whether a code or the sales tax rate should print with the salestax specifications in invoice documents by making a selection in thePrint field on the General tab.
5. Define an identifier that specifies the sales tax code on printedinvoices in the Print code field, but only if Print code is selected inthe Print list. The sales tax code identifier is an alphanumeric string
that may include special characters.
Procedure: Create a Sales Tax Code- Rounding andReport Setup
Follow these steps to set up rounding and reports when you create a sales taxcode:
1. Click General ledger, then click Setup, click Sales tax, then clickSales tax codes, and then click the Calculation tab.
2. Enter the lowest absolute value of a calculated tax on theCalculation tab in the Round-off field. For example, if taxes should
round off to a unit that is 1/100 of the currency of the tax, enter thevalue as a decimal (0.01). The Rounding form field indicates thekind of rounding to use. Refer to the following table for rounding onthe amount $98,765.435 with different rounding values set up.
Round-off = 0.01 Round-off =
0.10
Round-off =
1.00
Round-off =
100.00
98,765.43 98,765.40 98,765.00 98,800.00
3. Click the Report setup or Report setup - credit note tab.
4. Insert the Reporting code numbers to facilitate reporting on theReport setup and Report setup - credit note tab pages. Frequentlythe tax authorities have special forms with numbered cells forreporting of taxes. For example, in the Taxable sales list, you canselect the number of the field in the tax report that contains taxablesales. A series of forms exists within Microsoft Dynamics AX 2009,which contains numbered cells that you can report to variousauthorities. The sales tax code is included in these reports in the cellindicated in this field.
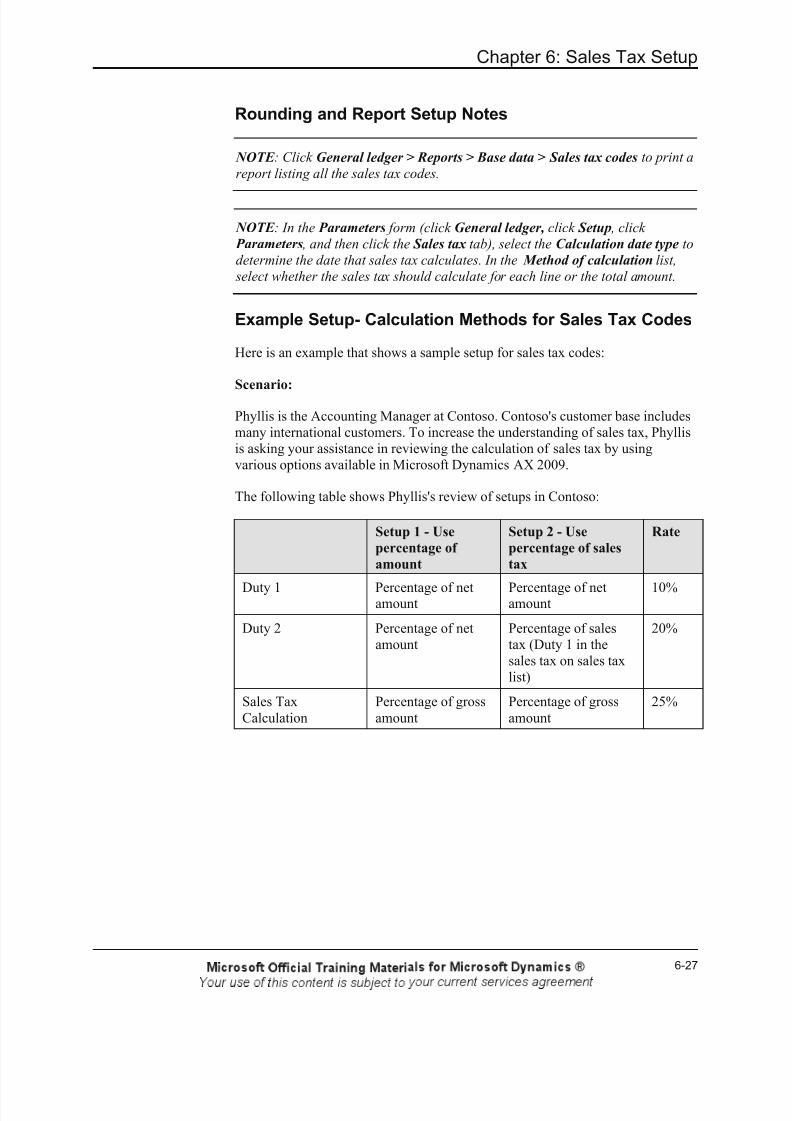
8/20/2019 Financials I
http://slidepdf.com/reader/full/financials-i 207/563
Chapter 6: Sales Tax Setup
6-27
Rounding and Report Setup Notes
NOTE : Click General ledger > Reports > Base data > Sales tax codes to print a
report listing all the sales tax codes.
NOTE : In the Parameters form (click General ledger, click Setup , click
Parameters , and then click the Sales tax tab), select the Calculation date type to
determine the date that sales tax calculates. In the Method of calculation list,
select whether the sales tax should calculate for each line or the total amount.
Example Setup- Calculation Methods for Sales Tax Codes
Here is an example that shows a sample setup for sales tax codes:
Scenario:
Phyllis is the Accounting Manager at Contoso. Contoso's customer base includesmany international customers. To increase the understanding of sales tax, Phyllisis asking your assistance in reviewing the calculation of sales tax by usingvarious options available in Microsoft Dynamics AX 2009.
The following table shows Phyllis's review of setups in Contoso:
Setup 1 - Use
percentage of
amount
Setup 2 - Use
percentage of sales
tax
Rate
Duty 1 Percentage of netamount
Percentage of netamount
10%
Duty 2 Percentage of netamount
Percentage of salestax (Duty 1 in thesales tax on sales taxlist)
20%
Sales TaxCalculation
Percentage of grossamount
Percentage of grossamount
25%

8/20/2019 Financials I
http://slidepdf.com/reader/full/financials-i 208/563
Financials I in Microsoft Dynamics® AX 2009
6-28
Example Setup- Calculation Methods for Sales TaxCodes- Incomplete Table
How would you apply the information in the table above to determine the effectof each setup on an invoice for 10.00 USD by completing the following tablewith the provided information?
Setup 1 Setup 2
Rate Formula Calculation Formula Calculation
Duty 1 10%
Duty 2 20%
GrossAmount
Sales TaxCalculation
25%
Duty +Sales Tax
Total Sale
The completed table will be shown in the next lesson section.
Example Setup- Calculation Methods for Sales TaxCodes- Completed Table
The completed table as shown here:
Setup 1 Setup 2
Rate Formula Calculation Formula Calculation
Duty 1 10% $10 *10%
$1.00 $10 *10%
$1.00
Duty 2 20% $10 *20%
$2.00 ($10+1)*20%
$2.20
GrossAmount
$10+1+2 $13.00 $10+1+2.20
$13.20
Sales Tax
Calculation
25% $13 *
25%
$ 3.25 $13.20
* 25%
$ 3.30
Duty +Sales Tax
$1+2+3.25
$ 6.25 $1+2.20+3.30
$ 6.50
Total Sale $10 +6.25
$16.25 $10 +6.50
$16.50

8/20/2019 Financials I
http://slidepdf.com/reader/full/financials-i 209/563
Chapter 6: Sales Tax Setup
6-29
Test Your Knowledge
A sales tax code includes information about which of the following? (Select allthat apply.)
( ) When the payments are made
( ) How the tax is posted
( ) How the tax is calculated
( ) The currency in which the sales tax is calculated
Sales Tax Codes Intervals
Use Microsoft Dynamics AX 2009 to specify:
• The sales tax rates to use in different intervals
• A lower and upper amount limit for sales tax calculations
Sales taxes lower than the minimum limit amount are not recorded, and salestaxes over the upper limit amount are set to the upper limit amount automatically.You can attach the limits to specific dates. The sales tax code defines the limits.Changes to minimum and upper limits do not affect sales tax that is alreadyupdated and posted.
Procedure: Create Sales Tax Codes Intervals - EffectiveDates
Follow these steps to set up the From date and To date field in sales tax codeintervals, both Limits and Values:
FIGURE 6.8 SALES TAX VALUES FORM

8/20/2019 Financials I
http://slidepdf.com/reader/full/financials-i 210/563
Financials I in Microsoft Dynamics® AX 2009
6-30
1. Click General ledger, then click Setup, then click Sales tax, thenclick Sales tax codes, and then click Limits OR click General
ledger, then click Setup, then click Sales tax, then click Sales tax
codes, and then click Values.
2. Enter the first date the tax limits apply in the From date field.
NOTE : The previous limits are visible because they are not overwritten when
users make changes.
3. Enter the last date the tax limits apply in the To date field.
4. With From date and To date fields, indicate a period that thecalculated tax applies to. The posting date determines when the taxfalls outside the given period.
If you have made changes to the limits, close the old period to indicate an ending
date in the To date field and create a period with a new starting date in the Fromdate field. Extend the old period by changing the date in the To date field. Youcan change the limits taking effect at a later date.
Procedure: Create Sales Tax Codes Intervals - Minimumsand Maximums
Follow these steps to set up the minimums and maximums in sales tax codeintervals in the Limits form:
1. Enter the lower sales tax limit in the Minimum sales tax field. If thetax is lower than this minimum amount, it is reduced to zero
automatically. The amount in this field must be the same currency asthe currency specified in the sales tax code.
2. Enter the upper sales tax limit in the Maximum sales tax field. If thetax is more than the amount indicated, it is adjusted automatically tomatch this amount. The amount in this field must be the samecurrency as the currency specified in the sales tax code.
Follow these steps to set up the field in the Values form:
1. In the Values form, specify a sales tax rate for the different intervals.
2. In the Value field, define the tax percentage, or amount for each unit.If the basis for the calculation of tax is an amount, the entry in theValue field on the Overview tab of the Values form is the percentage value used in the calculation.
3. If the basis is several units, such as Purchase duty or Packing duty,the entry in the Value field on the Overview tab of the Values formis the amount for each unit used in the calculation. You can defineunits by using the Unit field found on the Calculation tab on theSales tax codes form.
8/20/2019 Financials I
http://slidepdf.com/reader/full/financials-i 211/563
Chapter 6: Sales Tax Setup
6-31
Sales Tax Code Intervals- Values Versus Limits
For a sales tax code, Values define the tax to calculate, on either a percentage oramount per unit, based upon the effective interval dates and the minimum andupper limits. These minimum and upper limits are the minimum and upper sales
amount to which the amount entered in the Value field applies.
For a sales tax code, Limits define the tax to calculate, based upon the effectiveinterval dates and the minimum and maximum sales tax. These minimum andmaximum sales tax limits are the minimum and maximum sales tax that will becalculated on the sale, after all tax calculations are performed.
Procedure: Create Sales Tax Codes Intervals - MarginalBase Options
Follow these steps to set up the marginal base options in sales tax code intervals:
1. In the Sales tax code form on the Calculation tab, select the originfor the sales tax limits in the Marginal base list.
2. Select from the following options:
o Net amount per line - Value of the line, excluding any othertaxes.
o Net amount per unit - Value of the unit, excluding any othertaxes. This can involve the unit price specified by using a unit inthe Unit field.
o Net amount of invoice balance - The total value for the invoice,excluding any other taxes.
o Gross amount per line - Value of the line. This includes any
other taxes. You can include only one tax code with this or thenext property in the individual calculation.
o Gross amount per unit - Value of the unit. This includes anyother taxes. You can include only one tax code with this or the previous property in the individual calculation.
o Invoice total incl. other sales tax amounts - The total value forthe invoice. This includes any other taxes. You can include onlyone tax code with this property in the individual calculation.

8/20/2019 Financials I
http://slidepdf.com/reader/full/financials-i 212/563
Financials I in Microsoft Dynamics® AX 2009
6-32
Procedure: Create Sales Tax Codes Intervals - Method ofCalculation
Follow these steps to set up the method of calculation in sales tax code intervals:
1. Select the origin for the sales tax limits in the Method of
calculation, in the Sales tax code form on the Calculation tab.
2. Select from the following options:
o Whole amount - The sales tax calculates for the whole amount,which the tax rate for the interval that includes the transactiondetermines.
o Interval - The base is divided into intervals. The part within agiven interval is calculated automatically based on the tax ratefor that interval.
NOTE : Click the Inquiries button > Included in sales tax groups or Included
in item sales tax groups to view or attach sales tax codes to sales tax groups or
item sales tax groups.
Click the Inquiries button > Posted sales tax to display posted sales tax
transactions for a sales tax code and an itemization of each tax. Use this function
or inquiries and error detection. In the Sales tax transactions form, click
Voucher to view related ledger transactions.
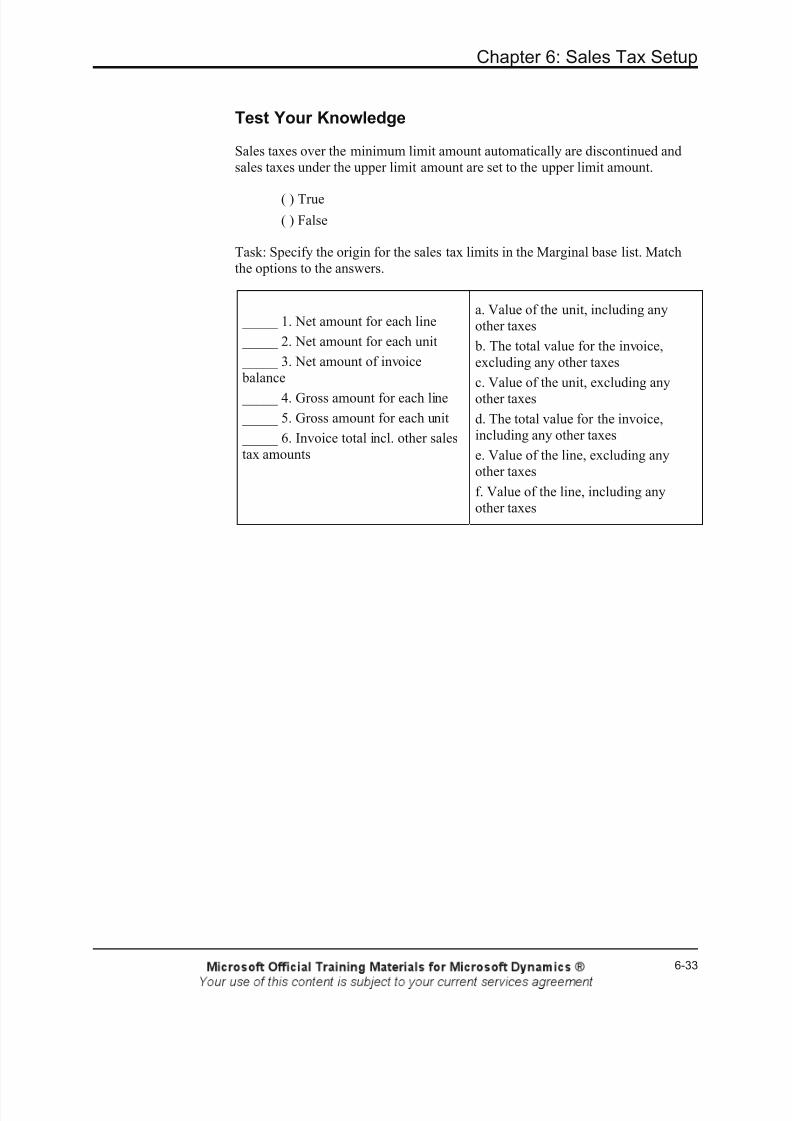
8/20/2019 Financials I
http://slidepdf.com/reader/full/financials-i 213/563
Chapter 6: Sales Tax Setup
6-33
Test Your Knowledge
Sales taxes over the minimum limit amount automatically are discontinued andsales taxes under the upper limit amount are set to the upper limit amount.
( ) True
( ) False
Task: Specify the origin for the sales tax limits in the Marginal base list. Matchthe options to the answers.
_____ 1. Net amount for each line
_____ 2. Net amount for each unit
_____ 3. Net amount of invoice balance
_____ 4. Gross amount for each line
_____ 5. Gross amount for each unit
_____ 6. Invoice total incl. other salestax amounts
a. Value of the unit, including anyother taxes
b. The total value for the invoice,excluding any other taxes
c. Value of the unit, excluding anyother taxes
d. The total value for the invoice,including any other taxes
e. Value of the line, excluding anyother taxes
f. Value of the line, including anyother taxes

8/20/2019 Financials I
http://slidepdf.com/reader/full/financials-i 214/563
Financials I in Microsoft Dynamics® AX 2009
6-34
Lab 6.5 - Set Up Sales Tax Codes Intervals
This lab provides practice in setting up sales tax code intervals.
Scenario
Ken, the Controller for Contoso, has received a notification from the State ofFlorida that as of 07/01/2008, a tiered tax is due on video recorder sales. Kenasks for your assistance in setting up tax codes that comply with the newstructure. The notice specifies the following rates:
Minimum limit Maximum limit Tax rate
0.00 50.00 10%
50.01 100.00 9%
100.01 0.00 8%
Challenge Yourself!
• Use sales tax code intervals to structure the AV_FLST tax rate inMicrosoft Dynamics AX 2009 for the new rates.
• Microsoft Dynamics AX 2009 will require an ‘ending’ date for thetax. Plan to enter an artificial date of 12/31/2020.
Need a Little Help?
1. Before you add a new line to the Values form, you must enter dates
on the existing line. Suggested dates are 1/01/2003 - 6/30/2008.
2. Add the lines to the Values form. All of them will be assigned thesame date range assigned.
Step by Step
Edit the LA-FLST line:
1. On the Navigation Pane, click General ledger, then click Setup, then click Sales tax, and then click Sales tax codes.
2. Locate the line for AV_FLST.
3. Click the Values button.
Edit the existing line by adding dates:
1. In the From date field, enter 01/01/2003.
2. In the To date field, enter 06/30/2008.
3. Press CTRL+N to add a line.

8/20/2019 Financials I
http://slidepdf.com/reader/full/financials-i 215/563
Chapter 6: Sales Tax Setup
6-35
4. In the From date field, enter 07/01/2008.
5. In the To date field, enter 12/31/2020.
6. In the Minimum limit field, enter 0.00.
7. In the Upper limit field, enter 50.00.
8. In the Value field, enter 10.00.
Create the rest of the lines:
1. Press CTRL+N to add a line.
2. Repeat steps 1 through 8 to add the remaining tax intervals to theform.
3. Close the Values form.
4. Close the Sales tax codes form.

8/20/2019 Financials I
http://slidepdf.com/reader/full/financials-i 216/563
Financials I in Microsoft Dynamics® AX 2009
6-36
Sales Tax Groups
A sales tax group includes all sales tax codes that apply when you trade goods orservices with customers and vendors.
In most countries, different tax rules apply when you trade with domestic andforeign customers. The tax rules for foreign trade frequently are split up based on bilateral and multilateral trade agreements. Therefore, you must create tax groupsdepending on the taxes that may apply for a certain group of customers orvendors. A careful analysis of the different types of customers and vendors thatthe company trades with is a good starting point for determining the types ofSales tax groups needed, and the setup of those Sales tax groups.
Sales Tax Groups - Example Comparison
If your company needs the following tax codes, here is an example of how toapply sales tax codes to a sales tax group:
• VAT (only applies for domestic customers)
• Export Tax (only applies for foreign customers)
• Environmental duty (applies to all customers)
In a table, they appear as follows:
Domestic customers Foreign customers
VAT Yes No
Export Tax No Yes
Environmental
Duty
Yes Yes
The two groups of customers (domestic and foreign) do not have identical taxneeds. Therefore, you must create two different sales tax groups that reflect thedifferences:
• Foreign customers: this group would contain the Export Tax andEnvironmental Duty tax codes
• Domestic customers: this group would contain the VAT andEnvironmental Duty tax codes
After you create the sales tax groups, attach the appropriate sales tax group to:
• Customers
• Vendors
• Ledger accounts

8/20/2019 Financials I
http://slidepdf.com/reader/full/financials-i 217/563
Chapter 6: Sales Tax Setup
6-37
Procedure: Create a Sales Tax Group
Follow these steps to create a sales tax group:
FIGURE 6.9 SALES TAX GROUP FORM
Because the geographic location of the customer or the supplier determines taxes,you usually assign the same Sales tax group to similar trading partners in thesystem. The correct tax codes used by the system are attached to this Sales tax
group. The Sales tax group then associates with customer information specifiedin the Sales tax group field found on the Setup tab in the Customers form.
1. Click General ledger, then click Setup, then click Sales tax, thenclick Sales tax groups, and then click the Setup tab.
2. Enter a unique name for the sales tax group in the Sales tax group
field.3. Enter a name that identifies the sales tax group in the Description
field.
4. Select Sales tax code in the Sales tax group setup list. If thecompany is located in a country with sales tax jurisdiction, select theSales tax jurisdictions value.
NOTE : If the Sales tax jurisdictions value is selected in the Sales tax group
setup list, a new tab called Jurisdictions setup appears.
5. Select the rounding criteria for the sales tax group in the Roundingby list.
8/20/2019 Financials I
http://slidepdf.com/reader/full/financials-i 218/563
Financials I in Microsoft Dynamics® AX 2009
6-38
Rounding By- Additional Information
The following is additional information on the choices available in the Rounding
by field on the Sales tax group form.
The Rounding by field controls the rounding principle that applies to the taxesof the sales tax group. This field is available if your company configurationincludes sales tax jurisdictions.
The two kinds of rounding that you can select that apply to the sales tax groupare:
• Sales tax codes – Rounding is according to the sales tax code round-off. You can see the value in the Round-off field on the Calculation
tab of the Sales tax codes form.
• Sales tax code combinations - Rounding is according to the salestax code combination that is attached to each invoice line.
Procedure: Create a Sales Tax Group - Additional Fields
Follow these steps to set up additional fields in Sales tax groups:
1. Click General ledger, then click Setup, then click Sales tax, thenclick Sales tax groups, and then click the Setup tab.
2. Enter a form of identification to identify a sales tax group based onspecific criteria, such as country, state, or county, in theCountry/State and County/Purpose fields. This provides anothermethod to identify the group.
3. Select the Reverse sales tax on cash discount check box to reversesales tax on a cash discount on the General tab. States in the UnitedStates have different requirements, so you must set up thisinformation on the sales tax group. When you create a sales taxgroup, the selection in the Reverse sales tax on cash discount fieldin Parameters defaults to the field.
4. Select one or more sales tax codes to use with the sales tax group onthe Setup tab. The fields on the Setup tab automatically fill in withvalues from the Sales tax codes form.

8/20/2019 Financials I
http://slidepdf.com/reader/full/financials-i 219/563
Chapter 6: Sales Tax Setup
6-39
5. Select the Use-tax check box to indicate whether the company isresponsible for calculating and paying use-tax on the purchase. Thisis U.S.-specific functionality. If the company is not responsible, thevendor calculates and pays the tax. If the vendor did not charge tax,the system credits the tax to the account shown in the Use-tax
payable field in Ledger posting groups. How the tax is debited
depends on how you configured Parameters in the Use sales taxmodule for the United States tax system. If the Use-tax option isselected, the tax posts to the same account as the expense. If the tax posts to the account specified in the Use-tax expense field in Ledger
posting groups, there are no deductions for taxes on purchases andthe tax posts together with the expense. The value is enteredautomatically from the Use-tax field in Sales tax groups, but youcan change it if necessary.
Procedure: Create a Sales Tax Group - Attach toCustomer or Vendor
Follow these steps to attach a sales tax group to a customer or vendor:
1. Attach a sales tax group to a customer or vendor on the Setup tab ofthe Customers form or Vendors form. This is the default sales taxgroup for transactions that involve the customer. As with all defaults,you can change the sales tax group on individual transactions, ifnecessary. Additionally, you can attach a default sales tax group toeach ledger account for purchases or sales excluding a customer orvendor are posted, for example, the ledger account for officeequipment. The default sales tax group appears automatically ontransactions for the customer or vendor; however, you can changethe sales tax group on individual transactions before you post
transactions.
2. Indicate whether the amounts entered in journals include sales tax.For example, if the total invoice amount of EUR 110.00 is entered inthe Debit or Credit field in a journal, and this amount includes thesales tax, then Microsoft Dynamics AX 2009 uses this information tocalculate the net amount and sales tax amount. In this example, thenet amount is EUR 100.00 (110.00/1.10), and the sales tax amount isEUR 10.
3. Specify this information for the system by selecting the Amount
incl. Sales tax check box in the General ledger parameters formon the Sales tax tab, in the Journal Names form on the General tab,
or for a specific journal on the Setup tab.

8/20/2019 Financials I
http://slidepdf.com/reader/full/financials-i 220/563
Financials I in Microsoft Dynamics® AX 2009
6-40
Amount Includes Sales Tax- Additional Information
You can indicate if the amounts entered in journals include sales tax or do notinclude sales tax. You can specify this information in three different forms:
General ledger, Parameters form – Specify the default setting of lowest priorityregarding the inclusion of sales tax in journal amounts. This is the setting thatwill apply to amounts on journals if no other information is supplied through adefault setting of higher priority or through a manual setting in a line.
General ledger, Journal names form – Specify a default setting that overridesthe default setting on the Parameters form. Lines in journals that are patterned ona specific journal template automatically receive the journal template defaultsetting regarding the inclusion of sales tax in journal amounts, unless you haveentered a setting on the journal itself.
Individual Journal forms – Specify a default setting on an individual journal to
override the default settings of the Journal names and Parameters forms.
The highest priority setting is entered automatically on journal templates, journals, and journal lines as they are created, but you can select or clear theAmount incl. sales tax field at any time.
If you select the Amount incl. sales tax field, you must enter gross amounts in journals. Sales taxes are calculated on the basis of the gross amount and posted tothe sales tax account. The net amount is posted to the ledger account entered inthe journal.
If you do not select the Amount incl. sales tax field, you must enter net amountsin journals. The net amount is posted to the ledger account entered in the journal.The sales taxes are calculated on the basis of the net amount and are postedautomatically.
Test Your Knowledge
When the sales tax groups are created, attach the sales tax group to ______.(Select all that apply.)
( ) Company
( ) Customers
( ) Ledger accounts
( ) Vendors
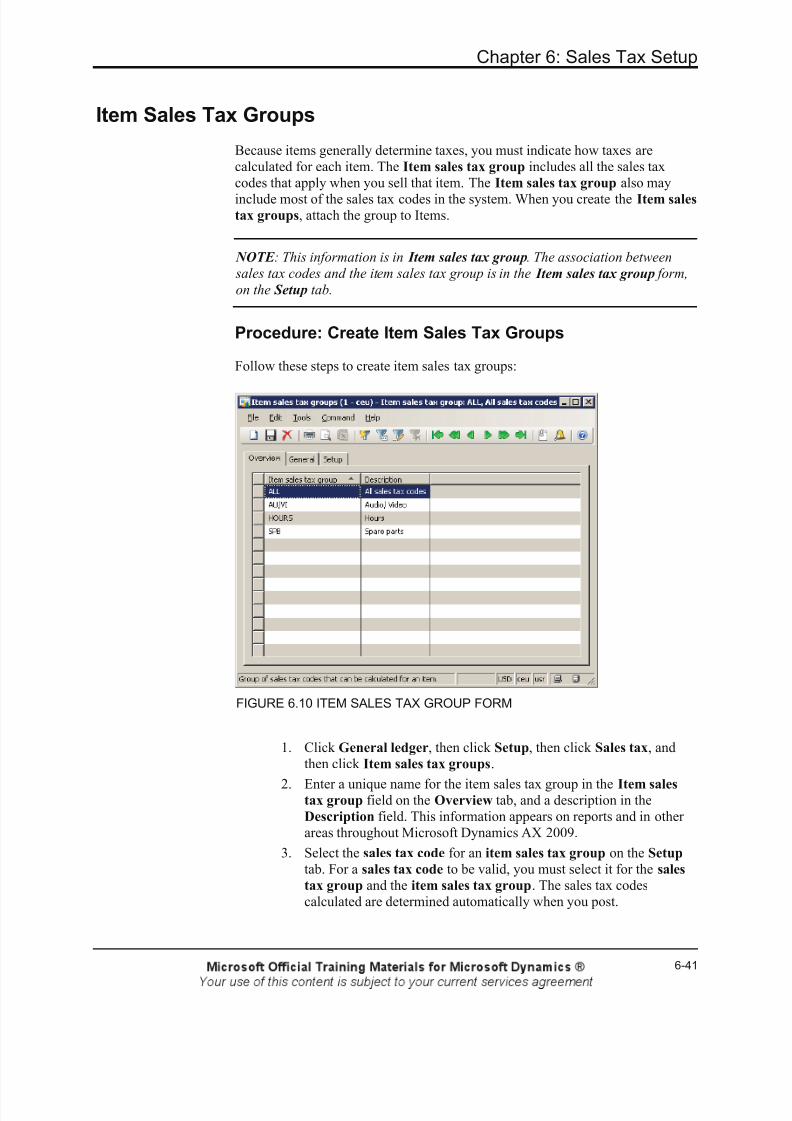
8/20/2019 Financials I
http://slidepdf.com/reader/full/financials-i 221/563
Chapter 6: Sales Tax Setup
6-41
Item Sales Tax Groups
Because items generally determine taxes, you must indicate how taxes arecalculated for each item. The Item sales tax group includes all the sales taxcodes that apply when you sell that item. The Item sales tax group also may
include most of the sales tax codes in the system. When you create the Item salestax groups, attach the group to Items.
NOTE : This information is in Item sales tax group. The association between
sales tax codes and the item sales tax group is in the Item sales tax group form,
on the Setup tab.
Procedure: Create Item Sales Tax Groups
Follow these steps to create item sales tax groups:
FIGURE 6.10 ITEM SALES TAX GROUP FORM
1. Click General ledger, then click Setup, then click Sales tax, andthen click Item sales tax groups.
2. Enter a unique name for the item sales tax group in the Item salestax group field on the Overview tab, and a description in theDescription field. This information appears on reports and in otherareas throughout Microsoft Dynamics AX 2009.
3. Select the sales tax code for an item sales tax group on the Setup
tab. For a sales tax code to be valid, you must select it for the sales
tax group and the item sales tax group. The sales tax codescalculated are determined automatically when you post.

8/20/2019 Financials I
http://slidepdf.com/reader/full/financials-i 222/563
Financials I in Microsoft Dynamics® AX 2009
6-42
Procedure: Set Up a Default Item Sales Tax Group for anItem
To ensure sales tax calculates on all transactions for a specific item, set up adefault item sales tax group for an item. Follow these steps to set up the default:
1. Click Inventory management, then click Items.
2. Select an item on the Overview tab.
3. Select a value in the Item sales tax group lookup field on theReferences tab in the Purchase order section. This value is thedefault item sales tax group for the selected item when you enter iton a purchase order line.
4. Select a value in the Item sales tax group lookup field in the Sales
order section. This value is the default item sales tax group for theselected item when you enter it on a sales purchase line.
Set Up a Default Item Sales Tax Group for a Ledger
Account
To ensure sales tax calculates on all journal transactions that you post to ledgeraccounts:
• Set up a default item sales tax group for all ledger accounts
• Set up default item sales tax groups for particular ledger accounts, ifnecessary
You can change any default item sales tax group that appears automatically on a journal line as necessary before the transaction posts.
NOTE : In sales journals, purchase journals, and other journals where you enter
an item number, the item sales tax group attached to the item automatically is
entered on the journal lines.
Procedure: Set Up a Default Item Sales Tax Group for aLedger Account
Follow this procedure to select a default item sales tax group for all ledgeraccounts:
1. Click General ledger, then click Setup, then click Parameters.2. Select the default item sales tax group in the Item sales tax group
list on the Sales tax tab.
The item sales tax group in this field is entered automatically on journal lines asyou create them, unless a specific item sales tax group is attached to the ledgeraccount that you enter in the line.

8/20/2019 Financials I
http://slidepdf.com/reader/full/financials-i 223/563
Chapter 6: Sales Tax Setup
6-43
Follow these steps to set up a default item sales tax group for a particular ledgeraccount:
1. Click General ledger, then click Chart of accounts and select theledger account.
2. Select the default item sales tax group in the Item sales tax group
list on the Setup tab.
Test Your Knowledge
You cannot change any default item sales tax group that appears automatically ona journal line before you post the transaction.
( ) True
( ) False
Sales Tax Jurisdictions
Sales tax jurisdictions can be entered by clicking General ledger, then clickingSetup, then clicking Sales tax, and then clicking Sales tax jurisdictions.
Use this form to create the sales tax jurisdictions for which the company mustcollect sales tax. The sales tax jurisdiction functionality is designed forcompanies that operate in the United States, but is not a legal requirement. Theform is available if an administrator enables the Sales tax jurisdictions
configuration key.
A sales tax jurisdiction is a grouping of sales tax codes for a particular settlement period (including the sales tax authority). Each jurisdiction is assigned one or
more sales tax codes and has only one tax authority. Additionally, transactionsthat are posted for the sales tax jurisdiction are posted to the ledger postingaccounts that are assigned to the tax account group that is selected in this form.
Some state tax authorities collect taxes for all the jurisdictions within the state. Ifa state has many jurisdictions and a complex tax code structure, using jurisdictions makes it easier for a company to pay correct tax amounts to theauthority.
NOTE : A sales tax jurisdiction is not a geographical area. A geographical area
can be covered by several jurisdictions, for example a district, town, country or
state.

8/20/2019 Financials I
http://slidepdf.com/reader/full/financials-i 224/563
Financials I in Microsoft Dynamics® AX 2009
6-44
Procedure: Set Up Sales Tax Jurisdictions
Follow this procedure to set up sales tax jurisdictions:
1. Make sure that the configuration key is turned on for sales tax
jurisdictions. Click on Administration, click Setup, click System,then click Configuration. Expand the General ledger configurationkey, then expand the Sales tax key, and then if needed click theSales tax jurisdictions key to activate it. Close the form, and allowthe system to update the system configuration.
2. Click General ledger, click Setup, click Sales tax, and click Sales
tax jurisdictions.
3. Press CTRL+N to create a new sales tax jurisdiction record.
4. In the Sales tax jurisdiction code check box, enter a uniqueidentifier for a sales tax jurisdiction.
5. In the Name text box, enter the name of the jurisdiction.
6. On the General tab, in the Settlement period and the Ledgerposting group lookup fields, select the values that you want.
7. In the Currency lookup field, select the currency of the sales tax jurisdiction.
8. Click Sales tax codes. In the Sales tax codes form, create sales taxcodes for sales taxes that the sales tax authority collects in the salestax jurisdiction.
9. Close the forms.
NOTE : To create a jurisdiction sales tax code from an existing sales tax code:Click General ledger > Setup > Sales tax > Sales tax codes. In the line for the
sales tax code on the Overview tab, in the Sales tax jurisdiction code lookup
ield, select a jurisdiction.
Procedure: Set Up Sales Tax Groups for Jurisdictions
Follow this procedure to set up sales tax groups for jurisdictions:
1. Click General ledger, click Setup, click Sales tax, and click Sales
tax groups.
2. In the Sales tax group setup drop-down list, select Sales tax jurisdictions. The Jurisdiction setup tab appears.
3. On the Jurisdiction setup tab, in the Rounding by drop-down list,select the rounding convention for the sales tax group.
4. On the Jurisdiction setup tab, select the sales tax jurisdictions thatapply to the sales tax group, and enter information about tax exemptstatus and use tax if applicable. The sales tax codes that are attachedto a selected sales tax jurisdiction appear automatically on the Setup
tab.

8/20/2019 Financials I
http://slidepdf.com/reader/full/financials-i 225/563
Chapter 6: Sales Tax Setup
6-45
5. If necessary, you can change the sales tax codes of the jurisdiction inthe Sales tax jurisdictions form.
6. Click the General tab. In the Print drop-down list, select the wayyou want sales taxes printed on the invoice.
7. Close the Sales tax groups form.
When a journal line or purchase or sales order line is created, the sales tax codeson the sales tax jurisdictions that are attached to sales tax groups are matched tothe sales tax codes on the item sales tax groups, and sales taxes are calculated forthe transaction.

8/20/2019 Financials I
http://slidepdf.com/reader/full/financials-i 226/563
Financials I in Microsoft Dynamics® AX 2009
6-46
Lab 6.6 - Comprehensive Setup of Sales Tax
This lab offers comprehensive practice in setting up sales tax information inMicrosoft Dynamics AX 2009.
Scenario
Ken, the Controller for Contoso, has decided to do business with a new vendor,Blue Yonder Airlines, located in Little Rock, Arkansas where business has not previously been conducted. April, the accounts payable coordinator, receives aninvoice for $50,000 from Blue Yonder Airlines, and comes to you for help because the necessary setups are to post this invoice are not in MicrosoftDynamics AX 2009.
You determine to do the following:
• Set up Blue Yonder Airlines as a vendor
• Set up the Arkansas Department of Revenue as a vendor• Set up two accounts in the Chart of Accounts: one for the Arkansas
state sales tax payable (account 220107) and one for the Little Rockcity sales tax payable (account 220245)
• Set up both ledger posting groups
• Set up a sales tax authority
• Set up sales tax settlement periods
• Set up sales tax codes
• Set up sales tax code intervals
• Set up sales tax groups
• Set up item sales tax groups
The vendor's information is in the following table:
Field Value
Name Blue Yonder Airlines
City Little Rock
State AR
ZIP Code/Postal
Code
72205
Group 10
Currency USD
Terms of Payment N030
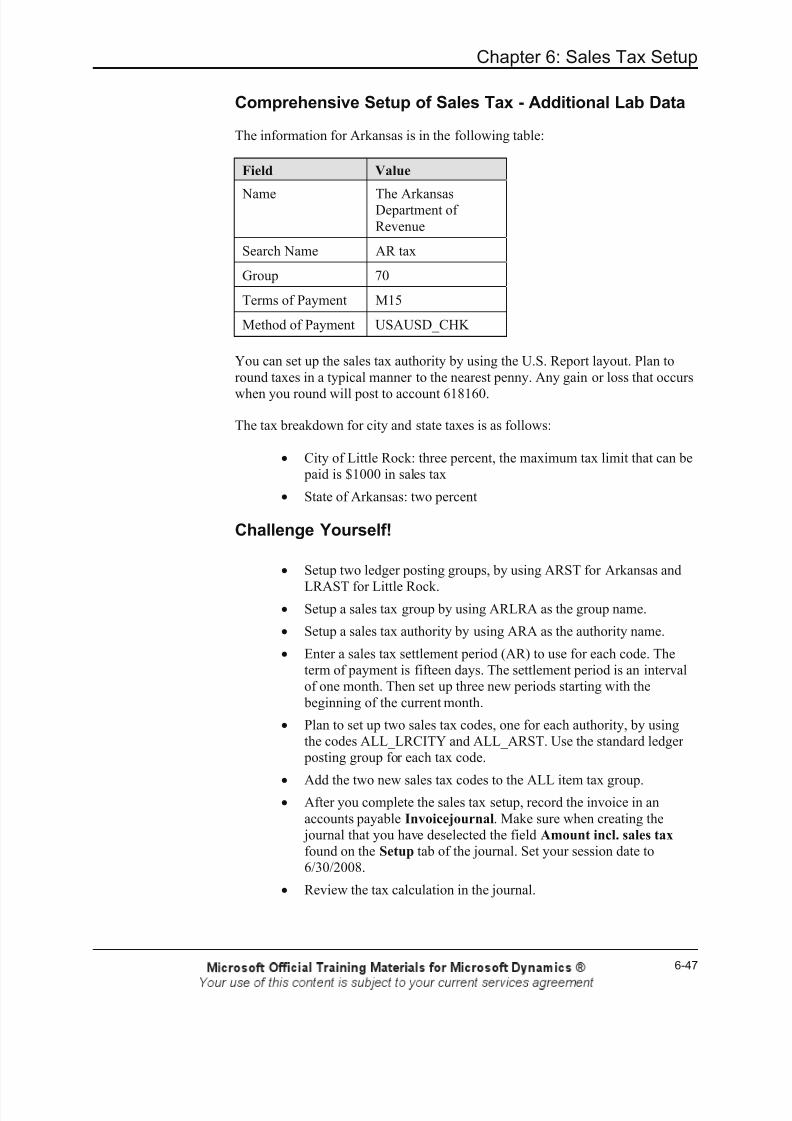
8/20/2019 Financials I
http://slidepdf.com/reader/full/financials-i 227/563
Chapter 6: Sales Tax Setup
6-47
Comprehensive Setup of Sales Tax - Additional Lab Data
The information for Arkansas is in the following table:
Field Value
Name The ArkansasDepartment ofRevenue
Search Name AR tax
Group 70
Terms of Payment M15
Method of Payment USAUSD_CHK
You can set up the sales tax authority by using the U.S. Report layout. Plan toround taxes in a typical manner to the nearest penny. Any gain or loss that occurs
when you round will post to account 618160.
The tax breakdown for city and state taxes is as follows:
• City of Little Rock: three percent, the maximum tax limit that can be paid is $1000 in sales tax
• State of Arkansas: two percent
Challenge Yourself!
• Setup two ledger posting groups, by using ARST for Arkansas and
LRAST for Little Rock.• Setup a sales tax group by using ARLRA as the group name.
• Setup a sales tax authority by using ARA as the authority name.
• Enter a sales tax settlement period (AR) to use for each code. Theterm of payment is fifteen days. The settlement period is an intervalof one month. Then set up three new periods starting with the beginning of the current month.
• Plan to set up two sales tax codes, one for each authority, by usingthe codes ALL_LRCITY and ALL_ARST. Use the standard ledger posting group for each tax code.
• Add the two new sales tax codes to the ALL item tax group.• After you complete the sales tax setup, record the invoice in an
accounts payable Invoicejournal. Make sure when creating the journal that you have deselected the field Amount incl. sales tax found on the Setup tab of the journal. Set your session date to6/30/2008.
• Review the tax calculation in the journal.

8/20/2019 Financials I
http://slidepdf.com/reader/full/financials-i 228/563
Financials I in Microsoft Dynamics® AX 2009
6-48
Need a Little Help?
For a visual representation of the sales tax setup process, refer to the figure foundin the lesson titled Sales Tax Overview- Suggested steps.
Note that Sales tax jurisdictions will not be used in this lab example.
Review the tax calculation by clicking Inquiry and then clicking Sales tax
totals. It is not necessary to post the invoice.
Step by Step
Set up Blue Yonder Airlines as a vendor:
1. On the Navigation Pane, click Accounts payable, then click Vendors.
2. Press CTRL+N to add a line. In CEU, the next available vendornumber is assigned automatically based on setups in the sample data.
3. In the Name field, enter Blue Yonder Airlines.
4. In the Search name field, enter Blue Yonder.
5. In the Group field, click the arrow to select 10.
6. Click the Address tab. Click CTRL+N to create a new address.
7. In the Zip code field, enter 72205.
8. Verify that the tab entries are correct; these values were populatedautomatically based on setups in the sample data.
9. Click the Payment tab.
10. In the Term of payment field, use the arrow to select N030.
11. In the Method of payment field, use the arrow to selectUSAUSD_CHK.
12. Click the Save icon on the toolbar.
Set up the Arkansas Department of Revenue as a vendor:
1. Click the Overview tab.
2. Press CTRL+N to add a line. The next available vendor number isassigned automatically.
3. In the Name field, enter The Arkansas Department of Revenue.
4. In the Search name field, enter AR tax.
5. In the Group field, click the arrow to select 70.
6. Click the Payment tab.
7. In the Term of payment field, use the arrow to select M15.
8. In the Method of payment field, use the arrow to selectUSAUSD_CHK.
9. Close the Vendor form.

8/20/2019 Financials I
http://slidepdf.com/reader/full/financials-i 229/563
Chapter 6: Sales Tax Setup
6-49
Set up accounts in the Chart of accounts account for sales tax payable:
1. On the Navigation Pane, click General ledger, then click Chart of
account details.
2. Press CTRL+N to add a line.
3. In the Ledger account field, enter 220107.
4. In the Account name field, enter Arkansas state sales tax payable.
5. In the Search name field, enter AR sales tax pay.
6. In the Account type field, click the arrow to select Balance.
7. Click the Setup tab.
8. In the Posting type field, click the arrow to select Sales tax.
9. Click the Overview tab.
10. Repeat steps 2 through 8, adding an account 220245 for Little Rockcity sales tax payable.
11. Close the Chart of accounts form.
Set up ledger posting groups:
1. On the Navigation Pane, click General ledger, then click Setup,then click Sales tax, then click Ledger posting groups, then clickthe Overview tab.
2. Press CTRL+N to add a line.
3. In the Ledger posting group field, enter ARST.
4. In the Description field, enter Arkansas State Tax.
5. In the Sales tax payable field, click the arrow to select account220107.
6. In the Settlement account field, click the arrow to select account220107.
7. Repeat steps 2 through 6, adding a ledger posting group for LittleRock.
8. Close the Account group form.
Set up a sales tax authority for Arkansas:
1. On the Navigation Pane, click General ledger, then click Setup, then click Sales tax, and then click Sales tax authorities.
2. Press CTRL+N to add a new line.
3. In the Authority field, enter ARA.4. In the Name field, enter Arkansas Authorities.
5. In the Vendor account field, click the arrow to select The ArkansasDepartment of Revenue.
6. In the Report layout field, click the arrow to select U.S. reportlayout.
7. Click the General tab.
8. In the Rounding form field, click the arrow to select Normal.

8/20/2019 Financials I
http://slidepdf.com/reader/full/financials-i 230/563
Financials I in Microsoft Dynamics® AX 2009
6-50
9. In the Round-off field, enter .01.
10. In the Account gain field, enter 618160.
11. In the Account loss field, enter 618160.
12. Close the Authority form.
Set up a sales tax settlement periods:
1. On the Navigation Pane, click General ledger, then click Setup,then click Sales tax, and then click Sales tax settlement periods.
2. Press CTRL+N to insert a line.
3. In the Settlement period field, enter AR.
4. In the Description field, enter Arkansas Monthly.
5. In the Authority field, click the arrow to select ARA-ArkansasAuthority.
6. In the Terms of payment field, use the arrow to select M15.
7. Click the General tab.
8. In the Period interval field, use the arrow to select Months.
9. In the Number of units field, enter 1.
10. Click the Periods tab.
11. If a new line is not available, press CTRL+N to add a line.
12. In the From date field, enter 06/01/2008.
13. In the To date field, enter 06/30/2008.
14. Click the New period button twice to create two additional months.
15. Close the Sales tax settlement periods form.
Set up sales tax codes and sales tax code intervals for Arkansas and Little Rock:
1. On the Navigation Pane, click General ledger, then click Setup, then click Sales tax, and then click Sales tax codes.
2. Press CTRL+N to add a line.
3. In the Sales tax code field, enter ALL_ARST.
4. In the Name field, enter Arkansas State - All.
5. In the Settlement period field, click the arrow to select AR.
6. In the Ledger posting group field, click the arrow to select ARST.
7. Click the Values button.
8. Edit the existing line.
9. In the Minimum limit field, enter 0.00.10. In the Upper limit field, enter 0.00.
11. In the Value field, enter 2.00 for the percentage.
12. Close the Values form.
13. Repeat steps 2 through 6 for Little Rock and enter ALL_LRCITY.
14. Click the Values button.
15. Edit the existing line.

8/20/2019 Financials I
http://slidepdf.com/reader/full/financials-i 231/563
Chapter 6: Sales Tax Setup
6-51
16. In the Minimum limit field, enter 0.00.
17. In the Upper limit field, enter 0.00.
18. In the Value field, enter 3.00 for the percentage.
19. Close the Values form.
20. Click the Limits button.
21. Edit the existing line.
22. In the Minimum sales tax field, enter 0.00
23. In the Maximum sales tax field, enter 1000.00
24. Close the Limits form.
25. Close the Sales tax codes form.
Set up a sales tax group:
1. On the Navigation Pane, click General ledger, then click Setup, then click Sales tax, and then click Sales tax groups.
2. Press CTRL+N to add a line.
3. In the Sales tax group field, enter ARLRA.
4. In the Description field, enter Arkansas and Little Rock.
5. In the Sales tax group setup field, select Sales tax codes.
6. In the Rounding by field, select Sales tax codes.
7. Click the Setup tab.
8. In the Sales tax code field, select ALL_ARST.
9. Press CTRL+N to add a line.
10. In the Sales tax code field, select ALL_LRCITY.
11. Close the Sales tax group form.
12. On the Navigation Pane, click General ledger, click Setup, clickSales tax, and then click Item sales tax groups.
13. On the Overview tab, click the line.
14. Click the Setup tab.
15. Press CTRL+N to add a line.
16. In the Sales tax code field, use the arrow to select ALL_ARST.
17. Press CTRL+N to add a line.
18. In the Sales tax code field, use the arrow to select ALL_LRCITY.
19. Close the form.
Record the invoice in an accounts payable invoice journal:
1. Click Accounts payable, click Journals, click Invoices, and clickInvoice journal.
2. Press CTRL+N to add a line.
3. Click the Name field, and select APInv.
4. Click the Setup tab, and make sure that the Amount incl. sales tax
check box is not selected.

8/20/2019 Financials I
http://slidepdf.com/reader/full/financials-i 232/563
Financials I in Microsoft Dynamics® AX 2009
6-52
5. Click the Lines button.
6. Enter 06/30/2008 in the Date field. Accept the Voucher number andVendor Account type.
7. Select Blue Yonder Airlines in the Account field.
8. In the Invoice field, enter COMPLAB.
9. Enter 50,000 in the Credit field.10. Enter 618900 in the Offset account field.
11. In the Sales tax group field, select ARLRA.
12. In the Item sales tax group field, select ALL.
13. Click the Inquiries button, then click Sales tax totals. Verify thecorrect calculation of sales tax:
a. For Arkansas, two percent of 50,000 is 1,000.
b. For Little Rock, three percent of 50,000 is 1,500; however, themaximum tax should be 1,000.
c. Total tax should be 2,000.
14. Close all forms.

8/20/2019 Financials I
http://slidepdf.com/reader/full/financials-i 233/563
Chapter 6: Sales Tax Setup
6-53
Lab 6.7 - Including Sales Tax in Journal Amounts
This lab demonstrates how to set up sales tax in journal amounts.
Scenario
Ken is the Controller for Contoso. He wants to include sales taxes in journalamounts to make it easier to create journal entries. Ken requests your assistance.
For example, suppose the sales tax is ten percent and the total invoice amount is110.00 USD. If it is specified that the journal amount includes sales tax, the netamount is 100.00 USD (110.00/1.10), and the sales tax amount is 10.00 USD.
Challenge Yourself!
Help Ken find the two forms within Microsoft Dynamics AX 2009 that canspecify whether the journal amounts include sales tax.
Need a Little Help?
Check the General ledger parameters and the Journal names form.
Step by Step
Follow these steps:
1. On the Navigation Pane, click General ledger, then click Setup, andthen click Parameters.
2. Click the Sales tax tab.
3. In the Amount incl. sales tax field, select the field.
4. Close the form.
5. On the Navigation Pane, click General ledger, then click Setup, then click Journals, and then click Journal names.
6. Click the General tab.
7. In the Amount incl. sales tax field, select the field.
8. Use the GenJrn journal.
9. Close the form.

8/20/2019 Financials I
http://slidepdf.com/reader/full/financials-i 234/563
Financials I in Microsoft Dynamics® AX 2009
6-54
Sales Tax Transactions
Sales tax transactions are important in every business. In Microsoft DynamicsAX 2009, you can:
• Run a sales tax payment report
• Revise the sales tax amount on a transaction before posting
• Post sales tax on prepayments
• Create transactions with conditional sales tax
• Import a sales tax
Procedure: Run a Sales Tax Payment Report
Follow these steps to run a sales tax payments report to calculate the sales taxthat is due for a given period:
FIGURE 6.11 SALES TAX PAYMENT FORM
1. Click General ledger, then click Periodic, then click Sales tax
payment, then click Sales tax payment.
2. In the Settlement period list, select the settlement period for whenthe sales tax payment is being calculated.
3. In the From date field, enter the first day of the sales tax settlement period to be calculated. This corresponds to the date in the From
date field on the Sales tax settlements period form.
4. In the Transactions date field, enter the date for when the sales tax
report is calculated. The default value is the system date. However,you can change this date. For example, if you enter the end date ofthe settlement period, the sales tax payment calculates for alltransactions that are posted in the settlement period.

8/20/2019 Financials I
http://slidepdf.com/reader/full/financials-i 235/563
Chapter 6: Sales Tax Setup
6-55
Procedure: Run a Sales Tax Payment Report - Sales TaxPayment Version Options
Follow these steps to select the kind of transactions to include in the Sales TaxPayment Report, when clicking the Sales Tax Payment Version field:
1. Select Original to select sales tax transactions on the first postedsettlement calculation for the period interval.
2. Select Corrections to select sales tax transactions that are notincluded in the first posted settlement calculation for the periodinterval. The report includes all subsequent payments that are postedfor the settlement period.
3. Select Latest corrections to select sales tax transactions that areincluded in the most recent settlement calculation made for the period. If you select the Update check box and this option, thesettlement calculation of the current job becomes the most recentsettlement calculation.
4. Select Total list to select all sales tax transactions to settle in thecurrent period.
NOTE : This field is not available if you select the Include corrections check box
on the Sales tax tab of the General ledger parameters form.
Procedure: Run a Sales Tax Payment Report- Using theUpdate Check Box
The settlement calculation only includes the sales tax that you have not yet paid
to the sales tax authority. You can make several payments for a single period.
Follow these steps to enter additional information when you run a Sales TaxPayment Report:
1. To post the settlement automatically, specify a number sequence forthe sales tax payment voucher on the Number sequences tab in theGeneral ledger parameters form.
2. If you create a vendor account for the sales tax authority on thesettlement period, a vendor transaction is created automatically whenyou select the Update check box and then click OK . If you do notspecify a vendor account, you must create a payment to the sales tax
authority manually to pay the sales tax you owe for the settlement period.
3. To run the Sales tax payment report without posting it to check thestatus of the outstanding sales taxes, run the report with the Update
option deselected.
4. Click OK to run the report.

8/20/2019 Financials I
http://slidepdf.com/reader/full/financials-i 236/563
Financials I in Microsoft Dynamics® AX 2009
6-56
HINT : To report the sales tax payment correctly to the sales tax authority,
select the correct report format in the Report Layout list on the Sales Tax
Authority form.
HINT : Click General ledger > Reports > Transactions > Periodic > Sales tax
list to print a report about sales tax postings that you have not yet updated.
Procedure: Revise the Sales Tax Amount on aTransaction Before Posting
In Microsoft Dynamics AX 2009, most of the sales tax posting and calculationoccurs automatically. However, occasionally a company may receive severalinvoices on which the sales tax amount differs from what Microsoft DynamicsAX 2009 calculates automatically. To make the sales tax amounts match the
invoices, the user may have to change the sales tax amount on a transaction before posting.
Follow these steps to change the calculated sales taxes in a journal line, purchaseorder line, or sales order line:
1. Select the transaction line that needs the sales tax revision.
2. Click Sales tax to open the Temporary sales tax transactions form.
NOTE : If you are working on purchase order or sales order lines, you must first
click Setup and then click Sales tax to open the Temporary Sales tax
transaction form.
Procedure: Revise the Sales Tax Amount on aTransaction Before Posting - Select Revision Type
Follow these steps to revise the sales tax amount:
1. Select one of the three types of revisions:
o Enter a correction of the sales tax amount in the Adjusted
amount field for a selected sales tax code line on theAdjustment tab. This amount appears in the Adjusted amount
in total field at the top of the form.
o Enter an adjustment amount in the Adjusted amount in total
field if the transaction has several sales tax code lines. Thisamount distributes among the sales tax code lines that appear inthe Temporary sales tax transactions form.
o Enter adjustments to the use tax amount in the Adjusted sales
tax charge field if the sales tax code line applies to use taxes onthe Adjustment tab. View the original use tax for the sales taxcode line in the Sales tax charge field.
8/20/2019 Financials I
http://slidepdf.com/reader/full/financials-i 237/563
Chapter 6: Sales Tax Setup
6-57
2. Click Apply to close the form and to save the changes or click Reset
to cancel changes.
3. Press ESC to close the Temporary sales tax transactions form andreturn to the journal lines or order lines.
Procedure: Post Sales Tax on PrepaymentsA tax authority can require a company to record sales taxes on prepayments fromcustomers, although a sale is not made. Follow these steps to set up sales tax on prepayments:
1. Click Accounts receivable, then click Setup, then clickParameters.
2. Select the Sales tax on prepayments check box on the Ledger and
sales tax tab. Sales tax calculates and posts whenever you post a prepayment.
3. Select a posting profile in the Posting profile with prepayments list
that defines the ledger account where the sales tax transactions on prepayments post temporarily.
NOTE : Create a posting profile for the purpose of posting sales tax onrepayments in Accounts receivable > Setup > Posting profiles in the Posting
rofiles form. Then select the appropriate ledger account on the Setup tab in
the Sales tax prepayments list.
4. Select the Prepayment check box on the Payment tab when you post a prepayment through a journal. If you omit this step, the sales
tax posts incorrectly.
5. When you create a sales invoice and settle the prepayment, anautomatic transaction on the sales tax prepayments account offsetsthe first temporary sales tax transaction.

8/20/2019 Financials I
http://slidepdf.com/reader/full/financials-i 238/563
Financials I in Microsoft Dynamics® AX 2009
6-58
Transactions with Conditional Sales Tax
Users generally report sales taxes in the period when they create the invoice.When they use conditional sales tax, users must only report the sales tax and baseamount to the sales tax authorities when they pay the invoice. If they do not settle
the invoice in full with a single payment, the sales taxes automatically arereported proportionally to the actual amount paid on the invoice.
EXAMPLE : On June 10 Contoso creates an invoice of EUR 10,000 plus EUR
2,500 in sales tax.
On July 10 the company reports taxes for June. The EUR 2,500 is not included in
the sales tax payment because the invoice is unpaid.
On July 15 the customer pays half of its balance due, which is EUR 5,000 plus
EUR 1,250 in sales tax.
On August 10 the company reports taxes for July. The EUR 1,250 is included in
the sales tax payment because the customer paid only part of the invoice. When
the rest of the invoice is paid, the rest of the sales tax is reported. In some
countries, the sales tax authorities require companies to report tax for the full
invoice amount, regardless of whether the full amount is paid.
Procedure: Create Transactions with Conditional SalesTax
Follow these steps to set up conditional sales tax on a transaction:
1. Create a separate ledger account(s) for posting sales taxes forinvoices awaiting settlement (Optional). This step is optional, because you can choose to post the conditional tax on the sameaccount as the ordinary sales tax. However, many countries legallyrequire separation of these postings.
2. Create a separate ledger posting group for posting the conditional taxto the separate ledger accounts (Optional). If you post the conditionaltax to a separate ledger account, you must create a separate ledger posting group to control the postings.
3. Create two settlement periods: one to control conditional tax and oneto report sales taxes to the authorities. A separate settlement period
for the conditional tax has the following advantages:
o It prevents the conditional sales tax from being reportedincorrectly
o It allows you to generate a report that displays undeclaredconditional sales tax amounts
8/20/2019 Financials I
http://slidepdf.com/reader/full/financials-i 239/563
Chapter 6: Sales Tax Setup
6-59
Follow these steps to continue to set up conditional sales tax on a transaction:
1. Create two sales tax codes for:
o the conditional tax
o the sales taxes that you must report
2. When you create the sales tax code for the conditional sales tax,select the General tab.
3. Select the sales tax code used for real sales taxes in the Paymentsales tax code list. The conditional sales tax then transfers to theselected sales tax code.
NOTE : The sales tax rate, which is set up in the Values form, must be the same
or both.
4. Set up sales tax groups and item sales tax groups.
5. Select the Conditional tax check box in the General ledger
parameters form on the Sales tax tab. This parameter ensures thesales tax amount transfers from the ledger account for temporary posting of conditional taxes to the real sales tax account.
Sales Tax Import
If you must recode the import of sales tax, you may need to post a document withthe whole amount treated as sales tax. This is necessary when you receive aninvoice from the tax authorities for imported goods, and no base exists, and thetax amount is posted directly.
Scenario: Sales Tax Import
A European subsidiary of Contoso purchased goods from a vendor that is locatedin a non-EU country. The vendor did not charge sales tax on the invoice. Thecustoms office sends an invoice to claim tax because the goods crossed the border and the company declared them at customs.
Procedure: Sales Tax Import
Direct Posting of Sales Tax Import
Direct posting of sales tax codes is the only situation in which the sales tax codemanually is entered in the invoice journal on the General tab. Follow these stepsto make a direct posting of sales tax import:
1. Create a ledger account for sales tax import.
2. Create a sales tax code for import sales tax.
3. Create a ledger posting group for sales tax import and attach theledger posting group to the import sales tax code.

8/20/2019 Financials I
http://slidepdf.com/reader/full/financials-i 240/563
Financials I in Microsoft Dynamics® AX 2009
6-60
4. Open an invoice journal by clicking Accounts payable, then click Journals, then click Invoices, then click Invoice journals, and thenclick Invoice journal lines.
5. Select the import sales tax code on the General tab in the Sales tax
code list.
6. Enter the invoice amount and select the import sales ledger accountin the Offset account on the Overview tab. The invoice amount alsois listed in the Sales tax amount field.
7. Click Post to post the journal. The sales tax amount is registered inthe import sales tax ledger account automatically.
Test Your Knowledge
When you create a sales invoice and settle the prepayment, an automatictransaction on the sales tax prepayments account offsets the first temporary salestax transaction.
( ) True( ) False
Sales Tax Exemption
Certain countries or regions, for example the European Union, require companiesto record justification for sales tax exemption. If no sales tax applies to tradedocuments, you must report why the sales order is sales tax exempted. To reportsales tax exemption, you must associate a sales tax exempt description in tradedocuments.
The sales tax exempt description is saved on sales tax transactions for history and
reprinting.
When you post sales orders in Microsoft Dynamics AX 2009:
• The sales tax group and sales tax rate is recorded automatically onthe transaction.
• The actual invoice groups the sales tax transactions according tosales tax rates when the sales tax is not exempted.
If the invoice has sales tax exemptions, it groups the transactions according tosales tax exempt descriptions.

8/20/2019 Financials I
http://slidepdf.com/reader/full/financials-i 241/563
Chapter 6: Sales Tax Setup
6-61
Procedure: Create a Sales Tax Exempt Code
Follow these steps to provide justification to sales tax exemption:
FIGURE 6.12 SALES TAX EXEMPT CODES FORM
1. Click General ledger, then click Setup, then click Sales tax, thenclick Sales tax exempt codes.
2. Press CTRL+N to create a new sales tax exempt code and then enterthe Exempt code and the Description. Close the Sales tax exempt
code form.3. Open General ledger, then click Setup, then click Sales tax, and
then click Sales tax group. On the Setup tab, select the sales taxcode that you want to use, select the Exempt check box and select anexempt code in the Exempt code list. The description of the sales taxexemption prints on the same line as the exempt code. Close theform.
4. Open General ledger, then click Setup, then click Sales tax, andthen click Sales tax code. Select the sales tax code that you checkedas exempt on the Sales tax groups form in the Setup tab in step 2 ofthis process.
5. Click Print code in the Print list in the Sales tax code form on theGeneral tab to print the sales tax exemption description in tradedocuments. The print code and the sales tax rate do not print on thesales tax specification line because several sales tax codes withdifferent sales tax rates may be involved.

8/20/2019 Financials I
http://slidepdf.com/reader/full/financials-i 242/563
Financials I in Microsoft Dynamics® AX 2009
6-62
NOTE : You also can print sales tax exempt rates on interest notes and collection
letters. Select the Print sales tax exempt number on interest notes and
collection letters check box in Accounts receivable > Setup > Forms > Form
setup > Interest notes/collection letter tabs.
NOTE : You can set up tax exempt numbers for customers and vendors in the
Customers or Vendors form on the Setup tab.
Test Your Knowledge
If the invoice has sales tax exemptions, it groups the transactions according tosales code descriptions.
( ) True
( ) False

8/20/2019 Financials I
http://slidepdf.com/reader/full/financials-i 243/563
Chapter 6: Sales Tax Setup
6-63
Lab 6.8 - EU 115 Sales Tax Directive
This is a lab on the EU 115 Sales Tax Directive.
Scenario
Ken is the Controller of Contoso, a company that has decided to specify sales taxexemptions on invoices for their European subsidiary. Ken asks you to set thisup. Before implementing the EU sales tax directive, test the setup using theCalifornia Sales tax groups.
Challenge Yourself!
Set up the sales tax system so that, when you use tax codes that are markedexempt in the tax system, the Exempt code prints on invoices.
Create a new sales tax code named Exempt. Use the Settlement periods, Ledger
posting groups, and Sales tax groups already set up in the data for California.
Use the following data:
Field Data value
Settlement period CA
Ledger postinggroup
CAST
Sales tax group CA
Customer 9100
Item number 1000
Exempt code Subsidiary
Description Sales to Subsidiary
Need a Little Help?
Use the tax information that already is set up for California sales tax codes.
Step by Step
Follow these steps:
1. Click General ledger, then click Setup, then click Sales tax, thenclick Sales tax exempt codes.
2. Press CTRL+N to create a new sales tax exempt code and then enterSubsidiary in the Exempt code field and Sales to Subsidiary in theDescription field. Close the Sales tax exempt code form.

8/20/2019 Financials I
http://slidepdf.com/reader/full/financials-i 244/563
Financials I in Microsoft Dynamics® AX 2009
6-64
3. On the Navigation Pane, click General ledger, then click Setup,then click Sales tax, then click Sales tax codes.
4. Press CTRL+N to add a line.
5. In the Sales tax code field, enter Exempt.
6. In the Description field, enter Sales tax exemption.
7. In the Settlement Period field, use the arrow to select CA.8. In the Ledger posting group field, use the arrow to select CAST.
9. Click the General tab.
10. In the Print field, click the arrow to select Print code. This will printthe sales tax exemption description.
11. Close the Sales tax code form.
12. On the Navigation Pane, click General ledger, then click Setup, then click Sales tax, and then click Sales tax groups.
13. Select the ‘CA’ sales tax group in the Sales tax group form.
14. Click the Setup tab.
15. Delete all the sales tax codes by highlighting the rows and then byusing the delete icon on the toolbar. Accept the warning message byclicking Yes.
16. Press CTRL+N to insert a line on the Setup tab.
17. In the Sales tax code list, use the arrow to select the ‘Exempt’ salestax code that you just created.
18. Click to select the Exempt check box.
19. Click the Exempt code field, and select Subsidiary.
20. Close the form.
21. On the Navigation Pane, click General ledger, then click Setup,then click Sales tax, then click Item sales tax groups.
22. Click the line.
23. Click the Setup tab.
24. Press CTRL+N to add a line.
25. In the Sales tax code field, click the arrow to select Exempt.
26. Close the form.
27. On the Navigation Pane, click Accounts receivable, then click Sales
order details.
28. Click the Advanced button, if that button is visible.
29. Press CTRL+N to add a new order.
30. In the Customer account field, use the arrow to select customer
9100.
31. Click Yes to transfer the customer information, if prompted to do so.
32. Click OK to close the Create sales order form.
33. Click OK to close the Infolog form.
34. Click the Item number field in the lower pane.
35. In the Item number field, enter 1000.
36. In the Quantity field, enter 10.
8/20/2019 Financials I
http://slidepdf.com/reader/full/financials-i 245/563
Chapter 6: Sales Tax Setup
6-65
37. Click the Setup tab in the lower pane.
38. In the Item sales tax group field, use the arrow to select ALL.
39. In the Sales tax group field, use the arrow to select CA.
40. Click the Posting button in the header.
41. Click the Invoice option.
42. Close the Infolog form if necessary.
43. In the Quantity field on the Parameters form, use the arrow toselect All. This may already be selected for you.
44. In the Print invoice field, select the field. This may already beselected for you.
45. Click the OK button in the Posting confirmation form.
46. Click Yes in the warning window. The invoice displays to the screen.
47. Verify that the sales tax exempt description is on the invoice.
48. Close the Invoice report.
49. Close the Sales order form.

8/20/2019 Financials I
http://slidepdf.com/reader/full/financials-i 246/563
Financials I in Microsoft Dynamics® AX 2009
6-66
Withholding Sales Tax
In some countries, the buyer is legally responsible for paying withholding tax.Withholding tax is due on non-inventory deliveries, frequently services, that asupplier, who is not an employee of the company, delivers.
The buyer is legally responsible for withholding a certain percentage of theinvoice amount at the time of payment.
The net amount (= invoice amount reduced by the withholding tax) is paid to thesupplier. The tax withheld posts to a ledger account for withholding tax, and periodically is paid to the authorities. The buying company is legally responsiblefor submitting a report to the tax authorities and to the supplier.
Withholding tax:
• Is a tax on vendors, that does not create sales tax transactions.
• Is a liability if it is calculated on vendor payments. Therefore, only balance sheet accounts or liability accounts are valid accounts for posting withholding tax.
• Is reported in fixed reports.
Procedure: Set Up Withholding Tax in Administration andGeneral Ledger
Follow these steps to set up withholding tax in Administration and GeneralLedger:
1. Click Administration, then click Setup, then click System, and thenclick Configuration.
2. Expand the General ledger node and select the Withholding tax
check box.
3. Click General ledger, then click Setup, then click Withholding tax,and then click Withholding tax codes.
4. Enter withholding tax codes with values and limits.
5. Click General ledger, then click Setup, then click Withholding tax,and then click Withholding tax groups.
6. Enter withholding tax groups and attach the relevant withholding taxcodes on the Setup tab.

8/20/2019 Financials I
http://slidepdf.com/reader/full/financials-i 247/563
Chapter 6: Sales Tax Setup
6-67
Procedure: Set Up Withholding Tax in Accounts Payable
Because withholding tax applies only to vendor invoices, you must complete thesetup in the Accounts payable section. Setting up withholding tax makes it moreefficient to:
• Start the calculation of withholding tax when you pay a vendorinvoice.
• Keep basis data about the vendor for reporting.
• Allow for the journal to propose this setup by default when you entera payment into a journal for a vendor who is set up for withholdingtax. However, you also can edit the calculated amounts, select adifferent withholding tax, or deactivate the withholding taxcalculation for this particular payment.
Follow these steps to set up withholding tax in Accounts Payable and General
Ledger:
1. Click Accounts Payable, and then click Vendors.
2. Select the Calculate withholding tax check box and a withholdingtax group to start the calculation when you enter a payment in a journal on the Setup tab.
Procedure: Calculate and Post Withholding Tax
Calculate and post withholding tax in the Payment journal form in the Accounts payable section, or in the General journal form in the General ledger section.The default withholding tax group of the vendor displays in the withholding tax
group list. Follow these steps to calculate and post withholding tax:
1. Click Accounts Payable, then click Journals, then click Payments,and then click Payment journal.
2. Click CTRL-N to create a new journal and then click Lines.
3. Enter a payment date and select the vendor account that is set up tocalculate withholding tax.
4. Replace the default group with another group or delete it to avoidcalculating withholding tax for the line. By default, the withholdingtax group list contains the vendor's withholding tax group.
5. Click Functions, then click Settlement and select the Mark check
box on the open invoice or invoices to pay.6. Verify the Infolog form's information about the calculated
withholding tax.

8/20/2019 Financials I
http://slidepdf.com/reader/full/financials-i 248/563
Financials I in Microsoft Dynamics® AX 2009
6-68
This is a continuation of the procedure to calculate and post Withholding Tax.Follow these steps to continue:
1. Close the Infolog form, and optionally click the Withholding tax
tab for each selected line to edit or delete the calculated withholding
tax, or create new lines and enter the information.2. Close the Settlements form. The payment amount on the journal line
is reduced by the withholding tax amount automatically.
3. Validate and post the payment journal.
NOTE : In the Payment journal lines form, all transactions are considered as
ayments and the withholding tax setup always is handled as described in the
revious steps.
In the General journal lines form, withholding tax is calculated automaticallywhen the following conditions are true:
• You select a vendor account set up to calculate withholding tax onthe journal line
• You see no entry in the Invoice field on the journal line's Invoice tab
Procedure: Withholding Sales Tax Reports and Inquiry
Follow these steps to create withholding sales tax reports and an inquiry:
1. Click General ledger, then click Reports, then click Transactions,and then click Withholding sales tax transactions to view a report
about posted transactions with withheld sales tax.2. Use the Monthly report to report withholding tax to tax authorities
once a month. To run the report, click General ledger, then click Reports, then click External, and then click Withholding tax -
monthly report.
3. Use the Yearly report to report withholding tax to tax authoritiesonce a year. To run the report, click General ledger, then clickReports, then click External, and then click Withholding tax -
yearly report.
4. Send the Certification report, which is in the form of a letter, to thesupplier. It contains the withholding tax data grouped by withholdingtax source. To run this report, click General ledger, then click
Reports, then click External, and then click Withholding tax -certification report.
5. Click General ledger, then click Inquiries, then click Tax, and thenclick Posted withholding tax to view withholding tax transactionswith the possibility to view the ledger transactions for eachwithholding tax entry.

8/20/2019 Financials I
http://slidepdf.com/reader/full/financials-i 249/563
Chapter 6: Sales Tax Setup
6-69
Test Your Knowledge
What is a withholding tax? (Select all that apply.)
( ) Is calculated on a vendor payment, which is a liability. Therefore,
only balance sheet accounts or liability accounts are valid accountsfor posting withholding tax.
( ) Is recorded on the transaction.
( ) Is a tax on vendors, which does not create sales tax transactions.
( ) Is reported in fixed reports.
Summary
The requirements for tax calculation and tax reporting differ greatly for differentcountries. Therefore the tax module of a true international ERP system must becomprehensive.
In Microsoft Dynamics AX 2009, the tax module offers many different optionsfor tax calculation, posting, and reporting. The features include:
• Percentage calculation
• Fixed tax amounts
• Tax on tax
• EU tax
• Tax exemption
• Packing duty
• Multiple tax calculation
• Flexible settlement periods
• Country-specific tax reporting and additional options
For EU countries, special EU statistic reports such as Intrastate and EU sales listare also available.

8/20/2019 Financials I
http://slidepdf.com/reader/full/financials-i 250/563
Financials I in Microsoft Dynamics® AX 2009
6-70
Quick Interaction: Lessons Learned
Take a moment and write down three key points you have learned from thischapter:
1.
2.
3.
8/20/2019 Financials I
http://slidepdf.com/reader/full/financials-i 251/563
Chapter 6: Sales Tax Setup
6-71
Solutions
Ledger Posting Groups
Test Your Knowledge
Each ledger account can use several tax codes. True or False?
(•) True
( ) False
Changes that you make to the ledger account numbers in ledger posting groupsonly affect ____.
( ) Posted transactions
( ) Deleted transactions
(•) Not yet posted transactions
( ) Posted transactions from previous months
Before creating ledger posting groups, you must create a(n) _________ in theGeneral Ledger to link to ledger posting group.
( ) Tax Group
( ) Sales Tax
(•) Account
( ) Group
Sales Tax Authorities
Test Your Knowledge
Tax authorities can be ______. (Select all that apply.)
(√) Countries
(√) States
(√) Regions
(√) Cities

8/20/2019 Financials I
http://slidepdf.com/reader/full/financials-i 252/563
Financials I in Microsoft Dynamics® AX 2009
6-72
Sales tax can be paid by the AX system to _____ ? (Select all that apply.)
( ) A client
( ) An employee
(√) A vendor
(√) A sales tax authority
Sales Tax Settlement Periods
Test Your Knowledge
You use settlement periods to create and manage the periods the company uses toreport sales tax.
(•) True
( ) False
Sales tax settlement periods specify at what intervals the company reports taxes.
(•) True
( ) False
Sales Tax Codes
Test Your Knowledge
A sales tax code includes information about which of the following? (Select allthat apply.)
(√) When the payments are made
(√) How the tax is posted
(√) How the tax is calculated
(√) The currency in which the sales tax is calculated

8/20/2019 Financials I
http://slidepdf.com/reader/full/financials-i 253/563
Chapter 6: Sales Tax Setup
6-73
Sales Tax Codes Intervals
Test Your Knowledge
Sales taxes over the minimum limit amount automatically are discontinued and
sales taxes under the upper limit amount are set to the upper limit amount.
( ) True
(•) False
Task: Specify the origin for the sales tax limits in the Marginal base list. Matchthe options to the answers.
e 1: Net amount for each line
c 2: Net amount for each unit
b 3: Net amount of invoice balance
f 4: Gross amount for each line
a 5: Gross amount for each unit
d 6: Invoice total incl. other sales taxamounts
a. Value of the unit, including anyother taxes
b. The total value for the invoice,
excluding any other taxesc. Value of the unit, excluding anyother taxes
d. The total value for the invoice,including any other taxes
e. Value of the line, excluding anyother taxes
f. Value of the line, including anyother taxes
Sales Tax Groups
Test Your Knowledge
When the sales tax groups are created, attach the sales tax group to ______.(Select all that apply.)
( ) Company
(√) Customers
(√) Ledger accounts
(√) Vendors

8/20/2019 Financials I
http://slidepdf.com/reader/full/financials-i 254/563
Financials I in Microsoft Dynamics® AX 2009
6-74
Item Sales Tax Groups
Test Your Knowledge
You cannot change any default item sales tax group that appears automatically on
a journal line before you post the transaction.
( ) True
(•) False
Sales Tax Transactions
When you create a sales invoice and settle the prepayment, an automatictransaction on the sales tax prepayments account offsets the first temporary salestax transaction.
(•) True
( ) False
Sales Tax Exemption
Test Your Knowledge
If the invoice has sales tax exemptions, it groups the transactions according tosales code descriptions.
( ) True
(•) False
Withholding Sales Tax
Test Your Knowledge
What is a withholding tax? (Select all that apply.)
(√) Is calculated on a vendor payment, which is a liability. Therefore,only balance sheet accounts or liability accounts are valid accountsfor posting withholding tax.
( ) Is recorded on the transaction.
(√) Is a tax on vendors, which does not create sales tax transactions.(√) Is reported in fixed reports.

8/20/2019 Financials I
http://slidepdf.com/reader/full/financials-i 255/563
Chapter 7: Bank Management Setup
7-1
CHAPTER 7: BANK MANAGEMENT SETUP
Objectives
The objectives are:
• Set up bank transaction types
• Set up bank transaction groups
• Set up bank parameters
• Set up payment purpose codes
• Set up bank groups
• Create a bank account
• Define the check layout for a bank account
Introduction
In Microsoft Dynamics® AX 2009, companies use the Bank Management module
to create and maintain bank accounts. The bank account table contains a record
for each bank account. Each record contains bank account information, such as
the following:
• Registration number and account number
• Address
• Other contact information
• Currency• Check set up
• Ledger account for posting
The application uses this information to process all bank transactions, such as
payments and deposits.
To use the Bank Management module, set up the following:
• Bank transaction types
• Bank transaction groups
• Bank groups
• Bank parameters
• Bank accounts
• Checks

8/20/2019 Financials I
http://slidepdf.com/reader/full/financials-i 256/563
Financials I in Microsoft Dynamics® AX 2009
7-2
Scenario
Annie, the bookkeeper at Contoso, must set up the banking functions for a new
company. Annie first sets up the kinds of transactions Contoso must make, such
as deposits and withdrawals. She then groups these transaction types to allow for
an additional level for reporting and analysis. Next, Annie sets up bank groupsfor the banks with whom the company holds multiple accounts. Annie creates
payment purchase codes for reporting to the central bank. Finally, Annie
indicates which account is used for checks returned from the bank and the
number series that is used for banking documents.
After Annie finishes setting up the banking functions, she enters the information
for the company's bank accounts and indicates, for each account, how checks are
to be designed.
Bank Transaction Types
Use bank transaction types to set up the types of transactions to be made in
company bank accounts, such as deposit slips, fees, and interest charges. If the
bank reports transactions on its account statements, companies can use a
summation of the transaction types for summary reconciliation.
Users can indicate the transaction type on journal worksheets. When the journal
is recorded, the application copies the contents of the Bank transaction type
field to the bank transaction.
Create one transaction type for Non-Sufficient Funds (NSF) transactions. NSF
transactions occur when a check is returned from the bank because the bank
account lacks sufficient funds to honor the check.

8/20/2019 Financials I
http://slidepdf.com/reader/full/financials-i 257/563
Chapter 7: Bank Management Setup
7-3
Procedure: Create Bank Transaction Types
Follow these steps to create bank transaction types.
FIGURE 7.1 BANK TRANSACTION TYPE FORM
1. Click Bank , click Setup, and then click Bank transaction type.
2. Press CTRL+N to create a new record.
3. Enter a unique code in the Bank transaction type field.
4. Enter the name of the transaction type in the Name field.
5. Click the Ledger account arrow to select the ledger account to post
corrections to and to add data for bank reconciliation.
6. Repeat steps 2 through 5 to create each new Bank transaction type.
NOTE : Only one bank transaction type can be marked as NSF.

8/20/2019 Financials I
http://slidepdf.com/reader/full/financials-i 258/563
Financials I in Microsoft Dynamics® AX 2009
7-4
Bank Transaction Groups
Use bank transaction groups to set up groups of different bank transaction types.
In the bank statement reconciliation, calculate totals for each bank transaction
group and for each bank transaction type. For example, a group of transfers may
include the bank transaction types of transfer and wire transfer.
FIGURE 7.2 BANK TRANSACTION GROUPS FORM
Procedure: Create Bank Transaction Groups
Follow these steps to set up bank transaction groups.
1. Click Bank , click Setup, and then click Bank transaction groups.
2. Press CTRL+N to create a new record.
3. In the Bank transaction groups field, enter a group identification
code that refers to this group when a code is used in other Microsoft
Dynamics AX 2009 tables. The bank transaction group is an
alphanumeric string of up to 10 characters.
4. Enter a short description in the Description field.
5. Select a Bank transaction group to associate with a bank
transaction type.
6. Click the Type tab.
7. Click the Bank transaction type arrow and select a bank transaction
type to relate to the selected bank transaction group. The Name field
is populated automatically with the Bank transaction type name.

8/20/2019 Financials I
http://slidepdf.com/reader/full/financials-i 259/563
Chapter 7: Bank Management Setup
7-5
Test Your Knowledge
What is a Bank Transaction Group?

8/20/2019 Financials I
http://slidepdf.com/reader/full/financials-i 260/563
Financials I in Microsoft Dynamics® AX 2009
7-6
Lab 7.1 - Create Bank Transaction Types and BankTransaction Groups
Scenario
Annie, the bookkeeper at Contoso, must create a bank transaction type for cash
withdrawals. In addition, Contoso wants the option to analyze the total charges
paid to each bank. Annie will create an additional bank transaction group for
bank fees and interest charges.
Challenge Yourself!
Help Annie by creating a new bank transaction type of 20 for cash withdrawals
and a new bank transaction group of 80.
Need a Little Help?
1. Create a bank transaction type for cash withdrawals.
2. Create a bank transaction group for bank charges.
3. Associate the new bank transaction group with fees and interest
charges.
Step by Step
Create a bank transaction type for cash withdrawals.
1. Click Bank , click Setup, and then click Bank transaction type.
2. Press CTRL+N to insert a new record.
3. In the Bank transaction type field, enter 20.
4. Enter the name Cash Withdrawal in the Name field.
5. Leave the Ledger account field blank.
6. Close the Bank transaction type form.
Create a bank transaction group for bank charges.
1. Click Bank , click Setup, and then click Bank transaction groups.
2. Press CTRL+N to insert a new record.
3. In the Bank transaction groups field, enter 80.
4. Enter Bank Charges in the Description field.

8/20/2019 Financials I
http://slidepdf.com/reader/full/financials-i 261/563
Chapter 7: Bank Management Setup
7-7
Associate the new bank transaction group with fees and interest.
1. From the Bank transaction groups form click the Type tab.
2. Click the Bank transaction type arrow and select the bank
transaction type of 07 for Fees. The Name field is automatically
populated with the Bank transaction type name.3. Press CTRL+N to insert a new record.
4. Click the Bank transaction type arrow and select the bank
transaction type of 08 for Interest charges. The Name field is
automatically populated with the Bank transaction type name.

8/20/2019 Financials I
http://slidepdf.com/reader/full/financials-i 262/563
Financials I in Microsoft Dynamics® AX 2009
7-8
Bank Management Parameters
Use the Bank parameters form to define rules for checks and to indicate the
number sequences for the various kinds of transactions within Microsoft
Dynamics AX 2009.
FIGURE 7.3 BANK PARAMETERS FORM
Procedure: Define Bank Parameters
Follow these steps to set up Bank parameters.
1. Click Bank , click Setup, and then click Parameters.
2. Select the Bank transaction type that is used for Non-Sufficient
Funds (NSF) from the NSF list.
NSF is used to identify returned payments. When the bank returns a
payment the NSF identifier automatically cancels the payment from
the system. It also marks the payment so that it is not selected when
you reconcile the bank account.
3. Select the Allow checks for bank or ledger accounts check box to
indicate whether a check can be printed for a bank or ledger account.
4. Select the Allow check reuse check box to indicate whether a check
number can be reused if the check was printed incorrectly or the
check stock was not used.
5. To require reason codes for bank transactions, select one or more of
the following check boxes in the Reason code requirements area:
o Require reasons for payment reversals
o Require reasons for deposit slip payment cancellations

8/20/2019 Financials I
http://slidepdf.com/reader/full/financials-i 263/563
Chapter 7: Bank Management Setup
7-9
6. Click the Number sequences tab.
7. Select a number sequence to associate with each reference from the
Number sequence code list.
NOTE : To define number sequence codes, click Basic , click Setup , click
Number sequences , and then click Number sequences.
Payment Purpose Codes
Use the Payment purpose codes form to create payment purpose codes for the
central bank, if it is required. The central bank is the official bank of a country or
region.
FIGURE 7.4 PAYMENT PURPOSE CODES FORM
Procedure: Create Payment Purpose Codes
Follow these steps to set up payment purpose codes.
1. Click Bank , click Setup, and then click Payment purpose codes.
2. In the Central Bank Purpose Code field, enter the code used when
reporting to the central bank.
3. Enter the name of the payment purpose code in the Name field.
4. Click the General tab.
5. Enter a description of the payment purpose code in the Purpose text
field.
6. Enter any additional information about the payment purpose code in
the Text field.

8/20/2019 Financials I
http://slidepdf.com/reader/full/financials-i 264/563
Financials I in Microsoft Dynamics® AX 2009
7-10
Bank Groups
Use bank groups when several bank accounts share the same address information
or routing number. When you create a new bank account and enter the bank
group, the bank group information is copied to the account automatically. For
example, you can create a bank group for one financial institution at which fiveaccounts are open.
Procedure: Create Bank Groups
Follow these steps to create bank groups.
1. Click Bank , click Setup, and then click Bank groups.
2. Press CTRL+N to create a new record.
3. Enter a unique code in the Bank groups field
4. Enter the bank's routing number in the Routing number field. The
bank provides the routing number.5. Enter a brief description of the bank group in the Description field.
6. Click a Bank group and then click the General tab.
7. On the General tab, enter any additional information for this
account, such as the following:
o Currency: Currency code for the bank group.
o Validate bank account: Validation method that is used to
validate bank account numbers.
o Post account: Also known as PTT. This is an account that is
used in European countries for electronic banking. It is a
combined postal, telephone, and telegraph ID.
o Days: Time limit, in days, for feedback from the bank on payments.
o Suffix: Suffix of the bank.
o Drawer: Code of the drawer. The bank provides this code.
8. Click the Address tab and enter the address for the bank.
9. Click the Contact Information tab and enter the information for the
bank group's contact person.

8/20/2019 Financials I
http://slidepdf.com/reader/full/financials-i 265/563
Chapter 7: Bank Management Setup
7-11
Test Your Knowledge
What is a Bank Group?
Bank AccountsEnter and maintain all information for the company bank accounts in the Bank
accounts form. Use the buttons on the form to view the details for each bank
account, such as transactions, current balance, and checks that have been created.
FIGURE 7.5 BANK ACCOUNTS FORM

8/20/2019 Financials I
http://slidepdf.com/reader/full/financials-i 266/563
Financials I in Microsoft Dynamics® AX 2009
7-12
Procedure: Create Bank Accounts - Overview
Follow these steps to create a new bank account.
1. To access the Bank accounts form, click Bank , and then click Bank
Account details.
2. Press CTRL+N to create a new record.
3. In the Bank account field, enter a unique ID number to identify the
bank account.
You cannot modify the bank account value for existing bank
accounts.
4. In the Name field, enter a name that is used to identify this account
on printed reports and other areas.
NOTE : Name accounts so that they can be easily identified. In Microsoft
Dynamics AX 2009, bank accounts are identified by name and account number.
5. Select the group to which this bank belongs, if applicable, from the
Bank groups list.
6. If the bank does not belong to a bank group, enter the Routing
number that is provided by the bank. If a Bank group is selected,
the Routing number field will be populated automatically based on
the bank group setup.
7. Enter the bank-assigned account number in the Bank account
number field.
8. Select a ledger account from the Ledger account to post records
from the bank account.
When you enter a transaction in the daily journal, it is posted to the
ledger account when the record is entered in the bank account. If you
enter the transaction directly in the bank account, it is posted in the
Ledger when the account is reconciled. You can reconcile accounts
by using reconcile account.
9. Select the currency code from the Currency list.
Procedure: Create Bank Accounts - General
Follow these steps to enter additional details on the bank account.
1. From the Bank accounts form, click the General tab.
2. Select the kind of bank account routing number from the Routing
number type list. If your company makes international payments,
you must make a selection in this field.
3. In the SWIFT code field, enter the Society for Worldwide Interbank
Financial Telecommunication code, also known as the Bank
Identifier Code (BIC).

8/20/2019 Financials I
http://slidepdf.com/reader/full/financials-i 267/563
Chapter 7: Bank Management Setup
7-13
4. Enter the International Bank Account Number (IBAN) in the IBAN
field.
5. Enter the bank or postal identification of the company in the
Company ID and Division fields.
FIGURE 7.6 BANK ACCOUNTS FORM, GENERAL TAB
Procedure: Create Bank Accounts - Setup
Follow these steps to enter more information for the bank account.
FIGURE 7.7 BANK ACCOUNTS FORM, SETUP TAB
1. From the Bank accounts form, click the Setup tab.
2. Select the More currencies check box to enable posting in more
than one currency for this bank account.
When you generate deposit slips, one deposit slip is generated for
each currency.
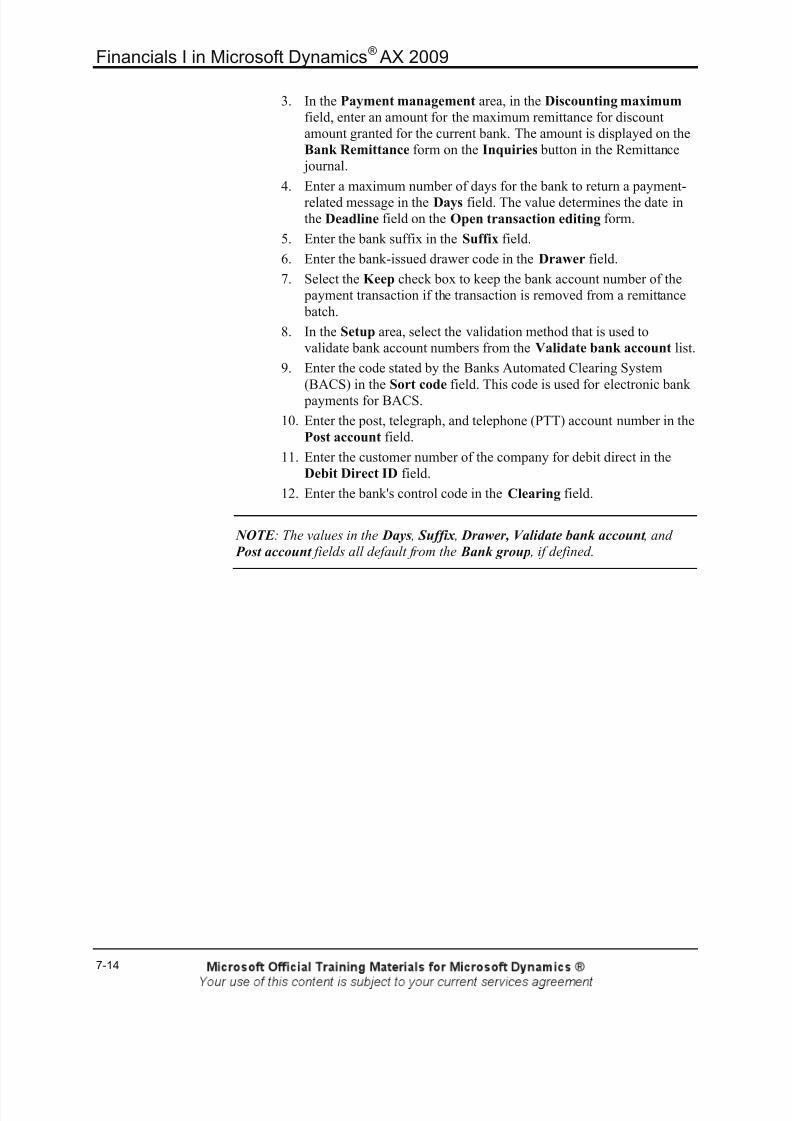
8/20/2019 Financials I
http://slidepdf.com/reader/full/financials-i 268/563
Financials I in Microsoft Dynamics® AX 2009
7-14
3. In the Payment management area, in the Discounting maximum
field, enter an amount for the maximum remittance for discount
amount granted for the current bank. The amount is displayed on the
Bank Remittance form on the Inquiries button in the Remittance
journal.
4. Enter a maximum number of days for the bank to return a payment-
related message in the Days field. The value determines the date in
the Deadline field on the Open transaction editing form.
5. Enter the bank suffix in the Suffix field.
6. Enter the bank-issued drawer code in the Drawer field.
7. Select the Keep check box to keep the bank account number of the
payment transaction if the transaction is removed from a remittance
batch.
8. In the Setup area, select the validation method that is used to
validate bank account numbers from the Validate bank account list.
9. Enter the code stated by the Banks Automated Clearing System
(BACS) in the Sort code field. This code is used for electronic bank
payments for BACS.
10. Enter the post, telegraph, and telephone (PTT) account number in the
Post account field.
11. Enter the customer number of the company for debit direct in the
Debit Direct ID field.
12. Enter the bank's control code in the Clearing field.
NOTE : The values in the Days , Suffix , Drawer, Validate bank account , and
Post account fields all default from the Bank group , if defined.
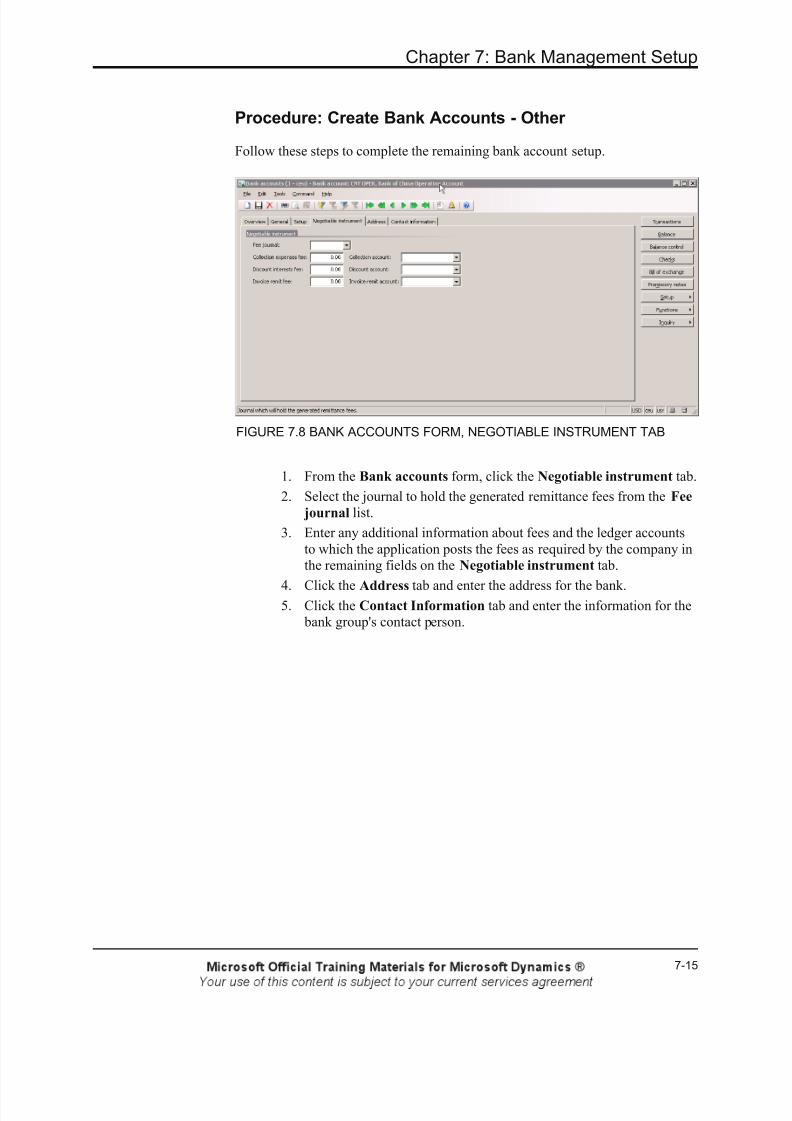
8/20/2019 Financials I
http://slidepdf.com/reader/full/financials-i 269/563
Chapter 7: Bank Management Setup
7-15
Procedure: Create Bank Accounts - Other
Follow these steps to complete the remaining bank account setup.
FIGURE 7.8 BANK ACCOUNTS FORM, NEGOTIABLE INSTRUMENT TAB
1. From the Bank accounts form, click the Negotiable instrument tab.
2. Select the journal to hold the generated remittance fees from the Fee
journal list.
3. Enter any additional information about fees and the ledger accounts
to which the application posts the fees as required by the company in
the remaining fields on the Negotiable instrument tab.
4. Click the Address tab and enter the address for the bank.5. Click the Contact Information tab and enter the information for the
bank group's contact person.

8/20/2019 Financials I
http://slidepdf.com/reader/full/financials-i 270/563
Financials I in Microsoft Dynamics® AX 2009
7-16
Create a Bank Group and Bank Account
Scenario
Contoso has opened a new bank account. The bank account will operate
primarily in Chinese Yuan (CNY), but may operate in other currencies. Annie,the bookkeeper, must create a new bank group and new bank account in
Microsoft Dynamics AX 2009 for this bank. Annie does not have address
information for the bank account, but she does have the following specifications:
• For the bank group:
o The bank group name is CHTB for Chinese Trade Bank.
o The bank group routing number is 9876.
• For the bank account:
o The bank account name is Bank Account - CNY.
o The bank account is part of the Chinese Trade Bank group.
o The bank account number is 433090321489.
o Postings should use a new balance account called Bank account -
CNY.
Challenge Yourself!
• Create the new bank group.
• Create the new bank account.
Need a Little Help?
1. Add a new account for Cash in bank - CNY to the Chart of accounts.
2. Create the new bank group and assign the Chinese Yuan (CNY) to
the group.
3. Create the new bank account, which is part of the CHTB bank group.
Select the option to enable posting in more than one currency for this
bank account.
Step by Step
Create a new account for Cash in bank - CNY to the Chart of accounts.
1. Click General ledger, and then click Chart of Account Details.
2. Press CTRL+N to insert a new record.
3. In the Ledger account field, enter 110115.
4. In the Account name field, enter Bank Account – CNY.
5. In the Search name field, enter Bank Account – CNY.
6. Click the Account type arrow and select Balance.
8/20/2019 Financials I
http://slidepdf.com/reader/full/financials-i 271/563
Chapter 7: Bank Management Setup
7-17
7. Select the Locked in journal check box.
8. Click the Setup tab.
9. Click the arrow in the Currency field and select CNY.
10. Close the Chart of accounts form.
Create the new bank group and assign the Chinese Yuan (CNY) to it.
1. Click Bank , click Setup, and then click Bank groups.
2. Press CTRL+N to insert a new record.
3. In the Bank groups field, enter CHTB.
4. Enter 9876 in the Routing number field.
5. In the Description field, enter Chinese Trading Bank.
6. Click the General tab.
7. From the Currency list select CNY.
8. Close the Bank groups form.
Create the new bank account that is part of the CHTB bank group.
1. From the Navigation pane, click Bank , and then click Bank
Account Details.
2. Press CTRL+N to create a new record.
3. In the Bank account field, enter CNYBANK.
4. In the Name field, enter Bank Account - CNY.
5. Click the Bank groups arrow and select CHTB.
6. The Routing number field automatically will display 9876.
7. In the Bank account number field, enter 433090321489.
8. Click the Ledger account field arrow and select 110115.9. The Currency field automatically displays CNY, which defaults
from the bank group.
10. Click the Setup tab. In the More currencies field, select the check
box to enable posting in more than one currency for this bank
account.
11. Close the Bank account form.
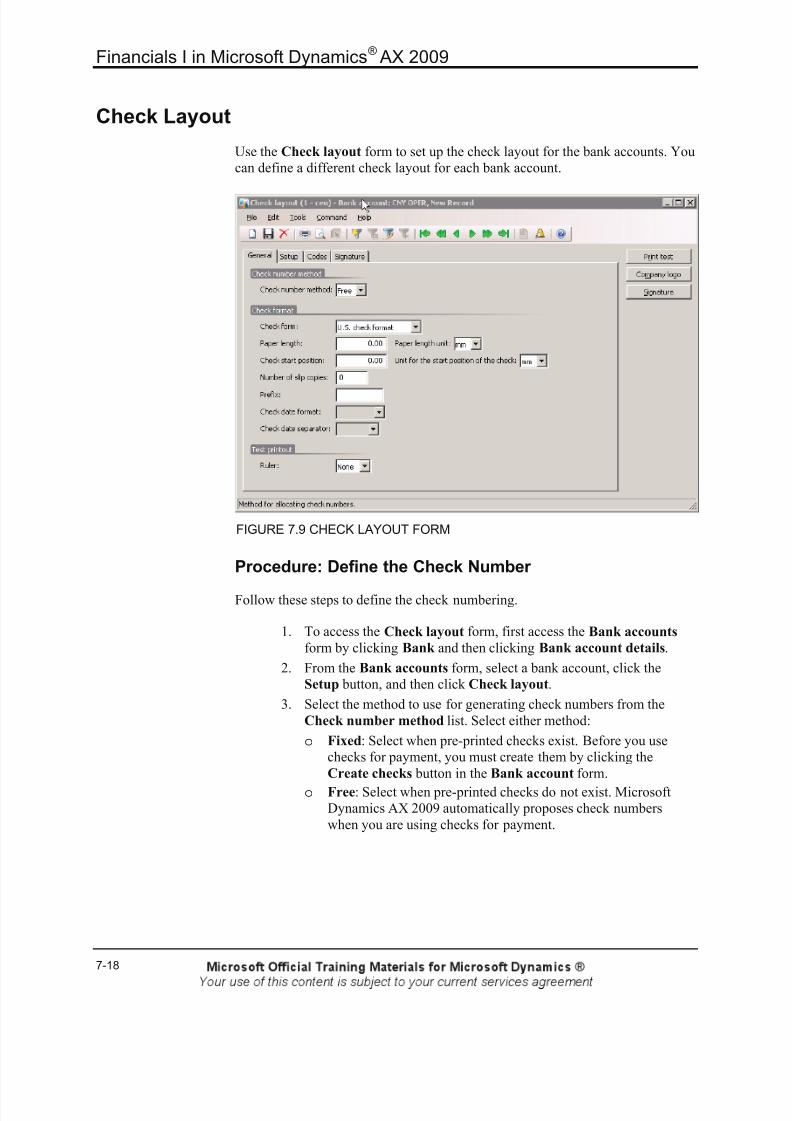
8/20/2019 Financials I
http://slidepdf.com/reader/full/financials-i 272/563
Financials I in Microsoft Dynamics® AX 2009
7-18
Check Layout
Use the Check layout form to set up the check layout for the bank accounts. You
can define a different check layout for each bank account.
FIGURE 7.9 CHECK LAYOUT FORM
Procedure: Define the Check Number
Follow these steps to define the check numbering.
1. To access the Check layout form, first access the Bank accounts
form by clicking Bank and then clicking Bank account details.
2. From the Bank accounts form, select a bank account, click the
Setup button, and then click Check layout.
3. Select the method to use for generating check numbers from the
Check number method list. Select either method:
o Fixed: Select when pre-printed checks exist. Before you use
checks for payment, you must create them by clicking the
Create checks button in the Bank account form.
o Free: Select when pre-printed checks do not exist. Microsoft
Dynamics AX 2009 automatically proposes check numbers
when you are using checks for payment.

8/20/2019 Financials I
http://slidepdf.com/reader/full/financials-i 273/563
Chapter 7: Bank Management Setup
7-19
Procedure: Define Check format
To define the check format, follow these steps:
1. In the Check layout form, click the General tab.
2. Select a layout for the check in the Check form field.
3. Enter the length of the paper on which the check is printing in the
Paper length field.
4. Select the unit in which the paper size is measured from the Paper
length unit list
5. Enter the starting position on the paper where the check must be
printed in the Check start position field.
6. Enter the unit in which the start position is measured from the Unit
for the start position of the check list.
EXAMPLE : To start the check 3 inches from the top of the paper, enter 3.00 inthe Check start position field and select ‘INCH’ in the Unit for the start position
of the check field.
7. Enter either 1 or 2 to indicate whether to print one or two slip text
copies in the Number of slip copies field. Even if you enter a
number larger than two, no more than two copies can be printed atthe same time.
BEST PRACTICES : Print two slip texts so that you can keep one and send the
other.
8. In the Prefix field, enter the text to print in front of the amount on
the check.
For example, if you are entering USD in this field and the check
amount is 1000.00, the printer will print USD 1000.00 on the check.
9. From the Ruler list, select one of the following rulers to display
when you test print.
o None: shows no ruler on test prints.
o Cm: shows the ruler in centimeters.
o Inch: shows the ruler in inches.

8/20/2019 Financials I
http://slidepdf.com/reader/full/financials-i 274/563
Financials I in Microsoft Dynamics® AX 2009
7-20
Procedure: Select the Fields to Print on the Check
Follow these steps to select the fields that print on the check.
FIGURE 7.10 CHECK LAYOUT FORM, SETUP TAB
1. From the Check layout form, click the Setup tab.
2. Select from the following list of check boxes for every field to be
printed on the check.
o Bank account
o Bank name
o Bank number
o Company name
o Company logo
If you select the Company logo check box, click the Company logo
button to select the company logo to print on the checks. From the
Image form, click the Change button to select the file that contains
the company logo.
3. Click the Codes tab.
4. Select the option to print ABC codes on the check. For each check
box selected, enter the associated routing number to print on the
check.

8/20/2019 Financials I
http://slidepdf.com/reader/full/financials-i 275/563
Chapter 7: Bank Management Setup
7-21
Procedure: Define MICR Options
Follow these steps to define MICR options.
FIGURE 7.11 CHECK LAYOUT FORM, CODES TAB
1. From the Check layout form, click the Codes tab.
2. Select the Print MICR line check box to print the MICR line on the
check.3. Enter the following information:
o Leading zeros: Indicate whether the MICR line contains leading
zeros.
o Length of check number: Indicate the number of characters
entered in the MICR line for the check number.
o MICR-line: Enter the complete MICR line, which includes the
delimiters. The check number cannot be entered because it is
unique to each check. Designate the place for the check number
in the MICR line with the character sequence %1.
NOTE : The MICR line can be included only if the check is being printed on
blank paper without preprinted information, such as watermarks.

8/20/2019 Financials I
http://slidepdf.com/reader/full/financials-i 276/563
Financials I in Microsoft Dynamics® AX 2009
7-22
Procedure: Define Signatures
Follow these steps to define signatures.
FIGURE 7.12 CHECK LAYOUT FORM, SIGNATURE TAB
1. From the Check layout form, click the Signatures tab.
2. Select the check box for Print first signature or Print second
signature to print signatures on the check.
3. Enter the highest amount that each signature is allowed in the First
amount limit and Second amount limit fields.
4. If the Print first signature or Print second signature check boxes
are selected, click the Signature button to select the signatures to
print on the checks.
5. For each selected signature, click the Change button to select the file
that contains the signature.
Procedure: Print a Test Check
When the check layout is complete, click the Print test button to preview thecheck layout.

8/20/2019 Financials I
http://slidepdf.com/reader/full/financials-i 277/563
Chapter 7: Bank Management Setup
7-23
Test Your Knowledge
If you are using pre-printed checks, what method do you select in the Check
number method field?
( ) Variable
( ) Fixed
( ) Original
Multiple Answer Question
How many signatures can the application print on a check? (Select all that apply.)
( ) 1
( ) 2
( ) 3( ) 4

8/20/2019 Financials I
http://slidepdf.com/reader/full/financials-i 278/563
Financials I in Microsoft Dynamics® AX 2009
7-24
Lab 7.2 - Define a Check Layout
Scenario
Set up the check layout for the new bank account that you created in the previous
lab. Use these check layout requirements.
• Pre-printed checks cannot be used for this account.
• Checks must be printed in the U.S. format.
• The paper must be 8.5 inches long.
• The checks must print two inches under the top of the page.
• Two slip copies are required for each check.
• Before the check amount, the letters CHY must be displayed.
• The bank account, name, and number must be printed on the check.
Challenge Yourself!
• Define the check layout for CNYBANK.
• Preview the check layout.
Need a Little Help?
1. From the Bank accounts form, select CNYBANK.
2. Open the Check layout form.
3. On the General and Setup tabs, enter the specified information.
4. Print a preview of the check layout.
Step by Step
1. Click Bank , and then click Bank Account Details.
2. Click the line for CNYBANK.
3. Click the Setup button, and then select Check layout.
4. In the Check number method field, select Free, because pre-printed
checks are not used.
5. In the Check form field, select U.S. check format.
6. In the Paper length field, enter 8.5.
7. In the Paper length unit field, select Inch.
8. In the Check start position field, enter 2.
9. In the Unit for the start position of the check field, select Inch.
10. In the Number of slip copies field, enter 2.

8/20/2019 Financials I
http://slidepdf.com/reader/full/financials-i 279/563
Chapter 7: Bank Management Setup
7-25
11. In the Prefix field, enter CHY.
12. Click the Setup tab. Select the check boxes for:
o Bank account
o Bank name
o Bank number
13. Click the Print test button to preview the check layout.
Summary
This course focused on how banking functions are structured in Microsoft
Dynamics AX 2009. Companies define bank transaction types to manage
transactions, such as the following:
• Deposits
• Fees
• Payments
Companies then create groups of transaction types for analysis and reporting. In
Microsoft Dynamics AX 2009, companies have the option to create bank groups
for banks in which they hold more than one bank account.
The bank account window holds all the information about each company bank
account and provides quick access to detailed information about each account,
which includes transactions and current balance. For each bank account from
which checks are printed, companies define how the checks for that account will
look.
8/20/2019 Financials I
http://slidepdf.com/reader/full/financials-i 280/563
Financials I in Microsoft Dynamics® AX 2009
7-26
Test Your Knowledge
Test your knowledge with the following questions.
1. Task: Put the following steps in order to create an account for checks that are
returned from the bank because the company lacks sufficient funds.
Step _____ : Create a Bank Transaction Type of NSF.
Step _____ : In the Bank Parameters form, in the NSF field, select the NSF
Bank transaction type.
8/20/2019 Financials I
http://slidepdf.com/reader/full/financials-i 281/563
Chapter 7: Bank Management Setup
7-27
Quick Interaction: Lessons Learned
Take a moment and write down three key points you have learned from this
chapter:
1.
2.
3.

8/20/2019 Financials I
http://slidepdf.com/reader/full/financials-i 282/563
Financials I in Microsoft Dynamics® AX 2009
7-28
Solutions
Bank Transaction Groups
Test Your Knowledge
What is a Bank Transaction Group?
MODEL ANSWER - A bank transaction group is used to set up groups of
different bank transaction types. In the bank statement reconciliation, totals
can be calculated for each bank transaction group and for each bank
transaction type.
Bank Groups
Test Your Knowledge
What is a Bank Group?
MODEL ANSWER - A bank group is used when several bank accounts
share the same address information. When you create a new bank account
and enter the bank group, the bank group information is copied to the
account.
Check Layout
Test Your Knowledge
If you are using pre-printed checks, what method do you select in the Check
number method field?
( ) Variable
(•) Fixed( ) Print
( ) Original
8/20/2019 Financials I
http://slidepdf.com/reader/full/financials-i 283/563
Chapter 7: Bank Management Setup
7-29
Multiple Answer Question
How many signatures can the application print on a check? (Select all that apply.)
(√) 1
(√) 2
( ) 3
( ) 4
Test Your Knowledge
1. Task: Put the following steps in order to create an account for checks that are
returned from the bank because the company lacks sufficient funds.
Step 1 : Create a Bank Transaction Type of NSF.
Step 2 : In the Bank Parameters form, in the NSF field, select the NSF Banktransaction type.

8/20/2019 Financials I
http://slidepdf.com/reader/full/financials-i 284/563
Financials I in Microsoft Dynamics® AX 2009
7-30

8/20/2019 Financials I
http://slidepdf.com/reader/full/financials-i 285/563
Chapter 8: Accounts Payable Setup
8-1
CHAPTER 8: ACCOUNTS PAYABLE SETUP
Objectives
The objectives are:
• Create a payment schedule
• Create terms of payment
• Create a payment day
• Set up a cash discount
• Create a payment fee
• Create a method of payment
• Set up vendor groups
• Set up posting profiles• Create a new vendor
Introduction
This course describes the different Accounts Payable setup options in Microsoft
Dynamics® AX 2009. It shows setup procedures and defaults used throughout the
Accounts Payable module. This course explains topics such as payment options,
vendor setup and posting profiles.
Microsoft Dynamics AX 2009 offers extensive functionality to set up different
vendor payment options. These global payment options are used in both the
Accounts Payable and Accounts Receivable modules, and include the following:
• Payment schedules
• Payment days
• Terms of payment
• Cash discounts
• Methods of payment
• Payment fees
This course also explains the vendor setup to help you manage vendors and
vendor transactions quickly and efficiently.

8/20/2019 Financials I
http://slidepdf.com/reader/full/financials-i 286/563
Financials I in Microsoft Dynamics® AX 2009
8-2
Payment Schedule
Use payment schedules to pay invoices in installments. Define the following to
set up a payment schedule:
• Number of installments
• Amount of each installment
• Due date of each installment
A payment schedule consists of consecutive payments in set time intervals. The
payments can be a:
• Set amount
• Specified number of payments in which the amount owed is divided
into create equal payments
For example, an invoice of 10,000 USD is recorded. It is paid at 2,000 USD each
month until the balance is paid. During this period the invoice is not considered
past due as long as the scheduled payments are made on time. This is also known
as a finance plan, or contract payments.
Procedure: Create a Payment Schedule
Follow these steps to create a payment schedule.
1. To access the Payment schedules form, click Accounts payable,
click Setup, click Payment, and then click Payment schedules.
2. On the Overview tab, enter a name to be used as identification of the
payment schedule in the Payment Schedule field.3. Enter a description in the Description field.
4. Click the General tab.
5. In the Allocation list, select an allocation method:
o Total - Total amount outstanding on the invoice due.
o Fixed amount - A specific, fixed amount is due for each
payment on the specified payment dates.

8/20/2019 Financials I
http://slidepdf.com/reader/full/financials-i 287/563
Chapter 8: Accounts Payable Setup
8-3
o Fixed quantity - Payment of the total amount is divided into a
fixed quantity of payments.
o Specified - A specified amount is due on each specified payment
date. If Specified is selected, the payment schedules and
amounts must be defined on the Payment lines tab.
FIGURE 8.1 PAYMENT SCHEDULES FORM, GENERAL TAB
Depending on the value selected in the Allocation list, different fields are
enabled on the General and Payment lines tabs.
Procedure: Create a Total Payment Schedule
If Total is selected in the Allocation list, no other fields are enabled on the
General tab.
Procedure: Create a Specified Payment Schedule
If the Specified option is selected in the Allocation list, follow these steps to
complete the payment schedule setup.
1. From the Payment schedules form, General tab, in the Paymentper list, select the date interval in Days, Months, or Years. Thesystem uses this information when it calculates the due date of each
installment.
2. Use the Sales tax allocation list to distribute the sales tax amount to
the payment schedule installments.

8/20/2019 Financials I
http://slidepdf.com/reader/full/financials-i 288/563
Financials I in Microsoft Dynamics® AX 2009
8-4
3. Click the Payment Lines tab to define the line information for the
payment schedule, to designate how many different payments there
should be, and to divide how much of the total should be paid in each
payment.
4. Enter the time interval for each installment in the Quantity field.
5. Enter the value of the installment in the Amount currency field.Enter either the value of the installment as a percentage of the
amount invoiced or as an absolute amount, depending on the value in
the Percentage/Amount field.
6. Select whether the value entered is a percent or an absolute amount
in the Percentage/Amount list.
Procedure: Create a Fixed Amount or Quantity PaymentSchedule
If Fixed amount or Fixed quantity is selected in the Allocation list, follow
these steps to complete the payment schedule setup.
1. From the Payment schedules form, General tab, in the Payment
per list, select the date interval in Days, Months, or Years. The
system uses this information when it calculates the due date of each
installment.
2. In the Change field, enter the number of units related to the payment
per value between the due dates of each installment.
3. If the Allocation field is set to fixed quantity, enter the fixed number
of installments in the Number of payments field.
4. If the Allocation field is set to fixed amount, enter the fixed amount
in the Amount currency field.
5. In the Minimum field, enter the minimum installment amount.Minimum amounts override calculated payment amounts.
Procedure: Apply or Change a Payment Schedule
You can apply the payment schedule to vendors or purchase orders.
Follow these steps to apply the payment schedule to a purchase order.
1. Click Accounts payable, and then click Purchase Order Details.
2. Click the Advanced button.
3. Click the Price/discount tab. Select a payment schedule in the
Payment schedule list.
8/20/2019 Financials I
http://slidepdf.com/reader/full/financials-i 289/563
Chapter 8: Accounts Payable Setup
8-5
Follow these steps to change the payment schedule.
1. From the Purchase order form, click the Setup button, and then
click Payment schedule.
2. Click the Payment lines tab. The payment plan is expanded into a
worksheet for the purchase order.3. Change the values in the Due date, Value, Disc. date, or Discount
amount fields.
Payment schedules also can be attached to terms of payment. The terms of
payment determine the due date of the first installment. The due date of the
following installments is calculated based on the information set up in the
Payment schedules form.
Test Your Knowledge
A payment schedule consists of _____________.
( ) payments
( ) consecutive time intervals
( ) consecutive payments
( ) consecutive payments in set time intervals
What elements must be defined to create a payment schedule? (Select all that
apply.)
( ) Vendor account
( ) Due date of each installment
( ) Amount of each installment
( ) Number of installments
Terms of Payment
Use the Terms of payment form to define all the terms of payment used by a
company and the vendors. Use a term of payment for calculation of a due date
based on the date of the invoice.
Specify terms of payment for each:
• Vendor in the Vendors form.
• Customer in the Customers form.
• Purchase order in the Purchase order form.
• Sales order in the Sales order form.

8/20/2019 Financials I
http://slidepdf.com/reader/full/financials-i 290/563
Financials I in Microsoft Dynamics® AX 2009
8-6
Scenario
Contoso has a standard vendor payment term of Net 30 days. If an invoice with a
Net 30 payment term ships goods on September 15, and the invoice is dated
November 15, payment is due December 15. With a Net 30 Days settlement,
Contoso must pay the net due within 30 days of the invoice date, according to thesettlement. After that date, if the payment is not completed, an interest charge of
a specified percent per month may be added to the invoice. Other services
charges may also apply.
Procedure: Create Terms of Payment
Follow these steps to create a term of payment.
FIGURE 8.2 TERMS OF PAYMENT FORM
1. Click Accounts payable, click Setup, click Payment, and then click
Terms of payment.
2. Press CTRL+N to create a new record.
3. On the Overview tab, in the Terms of payment field, enter a code
or a short name for the term of payment.
4. Enter a descriptive name for the current terms of payment in theDescription field.
8/20/2019 Financials I
http://slidepdf.com/reader/full/financials-i 291/563
Chapter 8: Accounts Payable Setup
8-7
Procedure: Create Terms of Payment - Setup
Follow these steps to define the setup information for a term of payment.
1. From the Terms of payment form click the Setup tab.
2. Select the method that is used to calculate the due date in thePayment method list.
o Net
o Curr. Mth
o Curr. Qtr.
o Curr. Year
o Curr. Week
o C.O.D.
3. Enter the number of months to add to the payment method to
calculate the due date in the Months field.
4. Enter the number of days to add to the payment method to calculate
the due date in the Days field.
For example, select Net and enter 20 in the Days field to pay a
vendor 20 days after the invoice date.
Or, select Curr. Mth. to pay the vendor invoice during the month of
the invoice date. To extend the period add days to the Days field.
5. Link a Payment schedule to the term of payment in the Payment
schedule list. The payment schedule defines how an invoiced
amount is split into installments that must be paid in specific
intervals.
NOTE : If a term of payment is linked to a payment schedule, the rules set up inthe term of payment are used to calculate the due date of the first installment.
The rules set up in the payment schedule are used to calculate the due date of the
ollowing installments.
6. Select a payment day used for calculation of due date in the
Payment day list. The due date is always rounded up to the nearest
specified date. The payment day can be specified:
o For a specific day in the week
o For a specific day in the month

8/20/2019 Financials I
http://slidepdf.com/reader/full/financials-i 292/563
Financials I in Microsoft Dynamics® AX 2009
8-8
Procedure: Create Terms of Payment - Language
Follow these steps to define additional language options for the terms of
payment.
1. From the Terms of payment form, click the Language text buttonto translate the search name into more languages.
For example, if a French language text is created the text is shown on
invoices for all vendors that are set up with French as the language.
Procedure: Create Terms of Payment - C.O.D.
If the C.O.D. (Cash on delivery) payment method is selected, follow these steps,
to complete the term of payment setup.
1. Select the Cash payment check box to indicate if payments should
be made in cash and not by check.2. In the Ledger posting area from the Cash list, select a ledger
account for settlement of invoices that will be used for cash payment.
Procedure: Attach a Payment Term
You can attach the terms of payment to purchase orders or vendors. To attach a
term of payment to a purchase order click Accounts payable, and then click
Purchase Order Details. On the Price/discount tab, select the terms of paymentin the Terms of payment list.
Test Your Knowledge
Task: Outline the steps to setting up a term of payment. Place the following steps
in order.
Step _____ : Create a new record.
Step _____ : Type a terms of payment identifier.
Step _____ : Specify the days (or other time unit).
Step _____ : Select the payment method.
Step _____ : Access the Terms of payment form in Accounts Payable.
Step _____ : Type a description.

8/20/2019 Financials I
http://slidepdf.com/reader/full/financials-i 293/563
Chapter 8: Accounts Payable Setup
8-9
Payment Days
Use payment days to define the payment day used for calculating due date. The
due date always is rounded up to the nearest specified date.
Payment day can be specified for a specific:
• Day in the week
• Day in the month
Procedure: Create a Payment Day
Follow these steps to create a payment day.
FIGURE 8.3 PAYMENT DAYS FORM
1. Click Accounts payable, click Setup, click Payment, and then click
Payment Days.
2. Press CTRL+N to create a new record.
3. In the Payment day field, enter a short identification of the payment
day and enter a description of the payment day identification in the
Description field, on the Overview tab.4. On the Payment day lines tab, select between Week and Month in
the Week/Month list. If Week is selected, select a value from the
Weekday list, and if Month is selected, enter in the Day field a
value between 1 and 31.

8/20/2019 Financials I
http://slidepdf.com/reader/full/financials-i 294/563
Financials I in Microsoft Dynamics® AX 2009
8-10
Set up the payment day in the Terms of Payment form on the Setup tab to
define the payment date used for calculation of the due date.
Test Your Knowledge
The payment day can be specified in what interval? (Select all that apply.)
( ) Specific day in a week
( ) Specific date in a month
( ) Specific day in a year
( ) Specific day in a quarter

8/20/2019 Financials I
http://slidepdf.com/reader/full/financials-i 295/563
Chapter 8: Accounts Payable Setup
8-11
Lab 8.1 - Terms of Payment
Scenario
Cassie, the Accountant at Contoso, has been asked to set up a new term of
payment for a vendor that Contoso has been slow in paying. The vendor,Southbridge Insurance Co., now requests that payments are paid in 12 days.
Challenge Yourself!
Help Cassie create the new term of payment titled N012 and assign it to the
vendor.
Step by Step
Create the new term of payment and name it N012.
1. Click Accounts payable, click Setup, click Payment, and then clickTerms of payment.
2. Press CTRL+N.
3. In the Terms of payment field, type N012.
4. In the Description field, type Net 12 days.
5. Click the Setup tab.
6. Click the Payment method arrow, and then click Net.
7. In the Days field, type 12.
8. Close the form.
Assign the new term of payment to the vendor Southbridge Insurance Co.
1. Click Accounts Payable, and then click Vendor Details.
2. Click the record for vendor 8004 (Southbridge Insurance Co.).
3. Click the Payment tab.
4. In the Terms of payment list, select the newly created term of
payment N012.

8/20/2019 Financials I
http://slidepdf.com/reader/full/financials-i 296/563
Financials I in Microsoft Dynamics® AX 2009
8-12
Cash Discount
Cash discounts are:
• Earned if a company meets the vendor payment terms on time, or are
given to customers when they pay their invoices in a specified period.
• Linked to the Customer tables and Vendor tables.
• Posted to the ledger account specified for the cash discount
automatically if an invoice is settled on time.
Scenario
Contoso obtains a cash discount if it pays vendor invoices within certain dates.
Contoso has set up the following codes:
• 5D10% - Cash discount of 10 percent when the amount is paidwithin five days.
• 10D5% - Cash discount of 5 percent when the amount is paid within
ten days.
• 14D2% - Cash discount of 2 percent when the amount is paid within
14 days.
The three cash discounts follow one another as the cash discount date nears.
However, only one cash discount is granted.
To specify the cash discounts following one another on the 5D10% code, the
10D5% code is selected in the Next discount code list. On the 10D5% code, the14D2% code is selected in the Next discount code list. Finally, on the 14D2%
code the Next discount code is left blank.

8/20/2019 Financials I
http://slidepdf.com/reader/full/financials-i 297/563
Chapter 8: Accounts Payable Setup
8-13
Procedure: Set Up Cash Discounts
Follow these steps to set up cash discounts.
FIGURE 8.4 CASH DISCOUNTS FORM
1. Click Accounts payable, click Setup, click Payment, and then click
Cash discounts.
2. Enter an alphanumeric code for the cash discount in the Cash
discount field. For example, enter 7D4 to indicate the company
receives a four percent discount if payment is made seven days before the due date.
3. Enter a brief description for the cash discount in the Description
field. For example, enter 7 days - 4% Discount for the discount code
7D4.
4. Select the cash discount code used when the criteria for obtaining the
current cash discount is exceeded in the Next discount code list.
This selection lets you to define a set of cash discounts that follow
one another.

8/20/2019 Financials I
http://slidepdf.com/reader/full/financials-i 298/563
Financials I in Microsoft Dynamics® AX 2009
8-14
Procedure: Set Up Cash Discounts - Setup
Follow these steps to define setup options for cash discounts.
FIGURE 8.5 CASH DISCOUNTS FORM, SETUP TAB
1. From the Cash discounts form click the Setup tab.
2. Select the method applicable for the cash discount from the
Net/Current list. The method specified, together with the value
given in the Days field and/or Months field, is used to calculate the
last date that you can make a payment and receive any available cash
discount.
3. Enter the number of months during the period when the cash
discount is applicable in the Months field.
4. Enter the number of days during the period when the cash discount is
applicable in the Days field.
5. Enter the cash discount as a percentage of the invoiced amount in the
Discount pct. field.
6. Select the ledger account for posting cash discounts received from
vendors in the Account received list.
NOTE : Assign cash discounts to vendors, journals, or purchase orders.
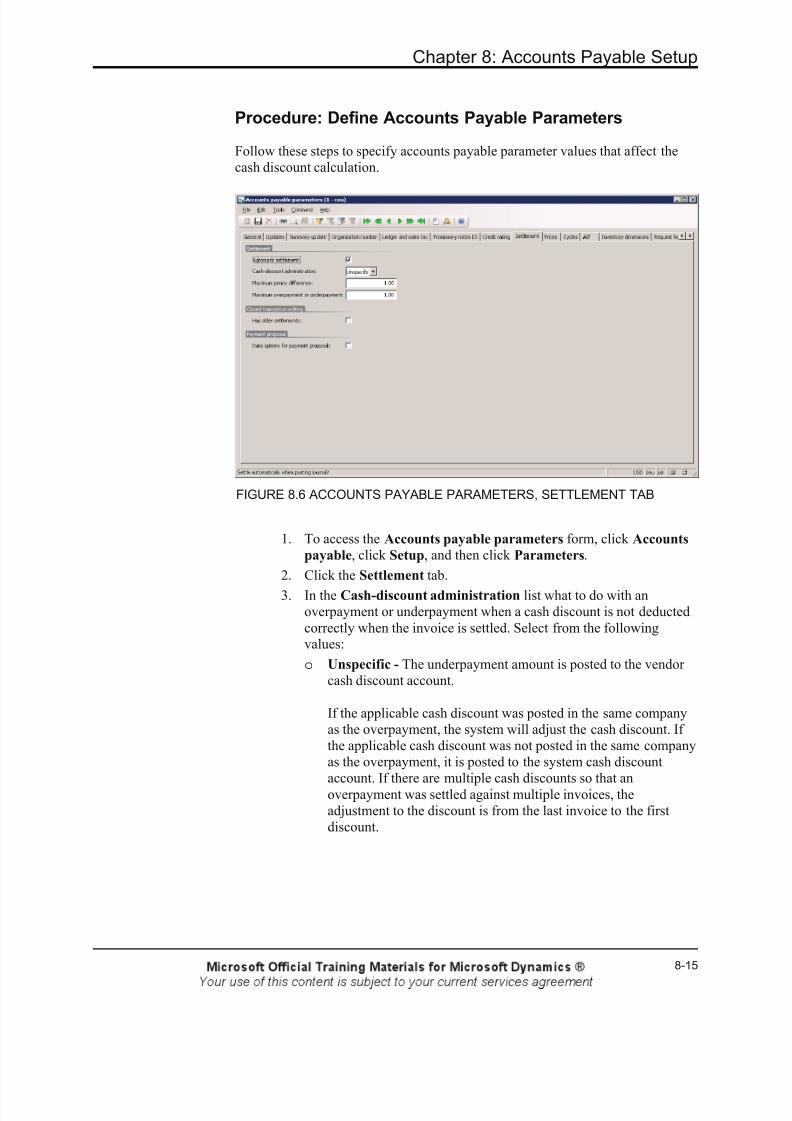
8/20/2019 Financials I
http://slidepdf.com/reader/full/financials-i 299/563
Chapter 8: Accounts Payable Setup
8-15
Procedure: Define Accounts Payable Parameters
Follow these steps to specify accounts payable parameter values that affect the
cash discount calculation.
FIGURE 8.6 ACCOUNTS PAYABLE PARAMETERS, SETTLEMENT TAB
1. To access the Accounts payable parameters form, click Accounts
payable, click Setup, and then click Parameters.
2. Click the Settlement tab.
3. In the Cash-discount administration list what to do with an
overpayment or underpayment when a cash discount is not deducted
correctly when the invoice is settled. Select from the followingvalues:
o Unspecific - The underpayment amount is posted to the vendor
cash discount account.
If the applicable cash discount was posted in the same company
as the overpayment, the system will adjust the cash discount. If
the applicable cash discount was not posted in the same company
as the overpayment, it is posted to the system cash discount
account. If there are multiple cash discounts so that an
overpayment was settled against multiple invoices, the
adjustment to the discount is from the last invoice to the first
discount.

8/20/2019 Financials I
http://slidepdf.com/reader/full/financials-i 300/563
Financials I in Microsoft Dynamics® AX 2009
8-16
o Specific - The overpayment or underpayment amount is posted
to the vendor cash discount account.
For example, a vendor's invoice total is 105.00 USD, and the
obtainable cash discount is 10.50 USD. Considering the cash
discount, the vendor will be paid 94.50 USD (105-10.50).
However the amount actually paid to the vendor is 95.00 USD.
If the Cash-discount administration parameter is set toUnspecific, the invoice is settled, and the difference of 0.50 is
posted to the ledger account specified for cash discountdifferences.
If the Cash-discount administration parameter is set to
Specific, the invoice is settled, and the difference of 0.50 is
posted to the vendor's cash discount account.
Procedure: Define General Ledger Parameters
Follow these steps to specify general ledger parameter values that affect the cash
discount calculation.
FIGURE 8.7 GENERAL LEDGER PARAMETERS FORM, SALES TAX TAB

8/20/2019 Financials I
http://slidepdf.com/reader/full/financials-i 301/563
Chapter 8: Accounts Payable Setup
8-17
1. To access the General ledger parameters form, click General
ledger, click Setup, and then click Parameters.
2. Click the Sales tax tab.
3. Select the Cash discount is calculated on amount incl. sales tax
check box in the Vendor cash discount area to specify that the cash
discount is calculated based on the amount plus sales tax.
Test Your Knowledge
Cash discounts are linked to what tables?
( ) Sales and Purchase Order
( ) Payment Days and Payment Fees
( ) Terms of Payment and Payment Days
( ) Customer and Vendor
Payment FeeUse payment fees to:
• Specify if any additional charges are added to the vendor invoice.
For example, a vendor might add a fee for issuing a promissory note
or a company might be charged a vendor bank remittance fee.
• Define fee identifications, specify bank relations, and identify how to
generate fees.
Scenario
Contoso electronically transfers vendor-due invoice amounts to its bank and the bank then transfers the money directly into a vendor's designated banking
account. After the invoice amount is transferred, a paper remittance advice is sent
automatically to each vendor explaining the specific account the payment is
posted to and also the amount of the payment issued.
To manage the payment fees from the bank, Contoso decides to set up payment
fees for vendor invoices.
Procedure: Create a Payment Fee
Follow these steps to create a payment fee.
1. Click Accounts payable, click Setup, click Payment, and then click
Payment fee.
2. Enter an identification in the Fee ID field.
3. Enter a brief description in the Description field.
4. Enter a text that is used in reports and inquiries in the Transaction
text field.

8/20/2019 Financials I
http://slidepdf.com/reader/full/financials-i 302/563
Financials I in Microsoft Dynamics® AX 2009
8-18
5. Select whether to charge the Vendor or Ledger to use a financial
cost for the fee in the Charge list. If Ledger is selected, select an
account number in the Ledger account list for posting in the ledger.
6. Click the General tab.
7. Select the journal type for which the fee is valid for in the Journal
type list. This journal type is typically vendor bank remittance.
FIGURE 8.8 PAYMENT FEE FORM

8/20/2019 Financials I
http://slidepdf.com/reader/full/financials-i 303/563
Chapter 8: Accounts Payable Setup
8-19
Procedure: Define Payment Fee Setup
You can define a payment fee to set up lines for each fee used for different
banks, methods of payment, remittance types, payment specifications, currencies,
time periods, and amount intervals. Follow these steps to set up a payment fee.
FIGURE 8.9 PAYMENT FEE SETUP FORM
1. From the Payment fee form, click the Payment fee setup button.
2. Select the kind of bank information that is required to start the fee in
the Grouping list. The fee is valid for each field for:
o Table - The bank account selected in the field Bank relation
o Group - The bank group selected in Bank relation
o All - All the bank accounts
3. Select a bank relation from the Bank relation list if:
o A bank account - Table is selected in the Grouping list
o Bank groups - Group is selected in the Grouping list
o Skip - All is selected in the Grouping list

8/20/2019 Financials I
http://slidepdf.com/reader/full/financials-i 304/563
Financials I in Microsoft Dynamics® AX 2009
8-20
4. Select a method of payment used for the actual payment fee in the
Method of payment list.
5. If the company agrees with the bank to specify the payment, select
the payment specifications in the Payment specification list.
6. Select the currency that enables the fee in the Currency list. Only
transactions with this currency can enable the fee. If you leave thisfield blank, all currencies enable the fee.
7. Select the calculation method in the Percentage/Amount list. Select
among:
o Amount
o Percent
o Interval
8. Enter the size of the fee in the percentage of the payment or the
amount for one payment in the Fee amount field.
9. Select the currency code for the fee in the Currency list.
Procedure: Define Payment Fee Setup - General
Follow these steps to define additional options for the Payment Fee Setup.
FIGURE 8.10 PAYMENT FEE SETUP FORM, GENERAL TAB
8/20/2019 Financials I
http://slidepdf.com/reader/full/financials-i 305/563
Chapter 8: Accounts Payable Setup
8-21
1. From the Payment fee setup form, click the General tab.
2. Enter the minimum transaction amount to enable the fee in the
Minimum field.
3. Enter the maximum transaction amount to enable the fee in the
Maximum field.
4. Enter the date the date interval starts for fee calculation in the Fromdate field.
5. Enter the ending date for date interval for fee calculation in the To
date field.
6. If the calculated fee is less than the value entered in the Minimum
fee field, it will not be applied.
7. If a financial cost is selected, you can select a Sales tax group and
an Item sales tax group to generate the relevant taxes.
NOTE : If sales tax is calculated, the net amount is posted on a ledger account,and the sales tax amount is posted on a sales tax account.
Procedure: Define Payment Fee Setup - Interval
You can enter fees for the selected payment fee setup line that depend on the
interval between the remittance and due dates.

8/20/2019 Financials I
http://slidepdf.com/reader/full/financials-i 306/563
Financials I in Microsoft Dynamics® AX 2009
8-22
Follow these steps to define an interval payment fee setup.
FIGURE 8.11 PAYMENT FEE SETUP FORM, INTERVAL TAB
1. From the Payment fee setup form, click the Interval tab.
2. Enter the number of days between the posting date (discounting date)
of the remittance and the due date of the promissory note in the Days
field.
3. Select whether the specification is a percentage or an absolute
amount in the Percentage/Amount field.
4. Enter the size of the fee in percent of the payment or amount for one
payment in the Fee amount field.
Methods of Payment
Many companies offer several methods to pay due invoices, such as the
following:
• Credit
• Cash in advance
• Bill of exchange
• Check and electronic payments

8/20/2019 Financials I
http://slidepdf.com/reader/full/financials-i 307/563
Chapter 8: Accounts Payable Setup
8-23
In the Methods of payment form, specify all the methods of payment the
company uses to pay its vendors. For each method of payment, enter information
that states how payments should be summarized and posted.
FIGURE 8.12 METHODS OF PAYMENT - VENDORS FORM
Methods of payment can be assigned to:
• Vendors
• Journals
• Purchase orders
Procedure: Create a Method of Payment
Follow these steps to create a method of payment.
1. Click Accounts payable, click Setup, click Payment, and then click
Methods of payment.
2. Press CTRL+N to create a new record.
3. Enter a name for the new method of payment in the Method of
payment field.
4. Select whether Microsoft Dynamics AX 2009 should total the
invoices in an automatic payment proposal. Options include the
following:
o Invoice - creates one payment transfer for each invoice
o Date - combines the payment for all invoices for vendors with
the same due date

8/20/2019 Financials I
http://slidepdf.com/reader/full/financials-i 308/563
Financials I in Microsoft Dynamics® AX 2009
8-24
o Week - combines all invoices for vendors with a due date within
the same week
o Total - combines all invoices from vendors for the same
payment
5. Enter a description of the method of payment in the Description
field.
6. Enter the number of days the vendor gives to make the payment after
the specified method of discount, and still give a cash discount in the
Days of grace field.
7. Select the payment status that is required to post a payment with this
method of payment in the Payment status list.
8. In the Posting area in the Account type list, select the kind of offset
account that is used for payments. The most common account type is
Bank.
9. Select the liquidity account for payment in the Payment account
list.
10. Enter the transaction type for a bank account in the Bank
transaction type list. The transaction type is marked on every
transaction generated in the payment proposal. This field is active
only when the account type is Bank.
Procedure: Create a Method of Payment - File Formats
Follow these steps to specify the file format.
FIGURE 8.13 METHODS OF PAYMENT - VENDORS FORM, FILE FORMATSTAB
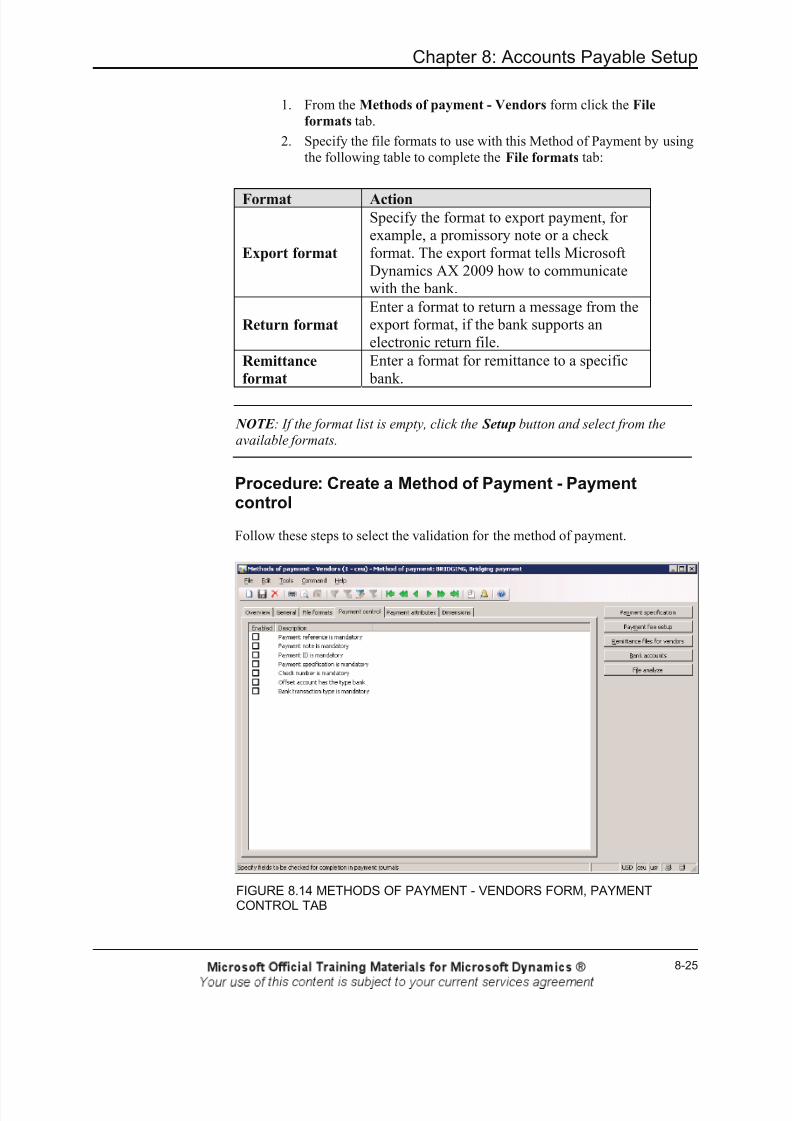
8/20/2019 Financials I
http://slidepdf.com/reader/full/financials-i 309/563
Chapter 8: Accounts Payable Setup
8-25
1. From the Methods of payment - Vendors form click the File
formats tab.
2. Specify the file formats to use with this Method of Payment by using
the following table to complete the File formats tab:
Format Action
Export format
Specify the format to export payment, forexample, a promissory note or a check
format. The export format tells Microsoft
Dynamics AX 2009 how to communicatewith the bank.
Return format
Enter a format to return a message from theexport format, if the bank supports an
electronic return file.
Remittance
format
Enter a format for remittance to a specific
bank.
NOTE : If the format list is empty, click the Setup button and select from the
available formats.
Procedure: Create a Method of Payment - Paymentcontrol
Follow these steps to select the validation for the method of payment.
FIGURE 8.14 METHODS OF PAYMENT - VENDORS FORM, PAYMENTCONTROL TAB
8/20/2019 Financials I
http://slidepdf.com/reader/full/financials-i 310/563
Financials I in Microsoft Dynamics® AX 2009
8-26
1. From the Methods of payment - Vendors form click the Payment
control tab.
2. Select the validation for the method of payment. Validation is
executed during posting if a method of payment is selected on a
journal. Select one or more of the following validation methods:o Payment reference is mandatory - Verifies that a payment
reference is entered
o Payment note is mandatory - Verifies that a note follows the
payment
o Payment ID is mandatory - Verifies that a payment
identification is filled in
o Payment specification is mandatory - Verifies that the
payment method's specification is entered
o Check number is mandatory - Verifies that the check number
is entered
o Offset account has the type bank - Verifies that the offsetaccount type selected is Bank
o Bank transaction type is mandatory - Verifies that a bank
transaction type is selected
Test Your Knowledge
What are some methods of payment a company might use? (Select all that apply.)
( ) Credit
( ) Cash in advance
( ) Check and electronic payments
( ) Bill of exchange

8/20/2019 Financials I
http://slidepdf.com/reader/full/financials-i 311/563
Chapter 8: Accounts Payable Setup
8-27
Lab 8.2 - Method of Payment, Terms of Payment, and CashDiscount
Scenario
April, the Accounts Payable Clerk at Contoso has been asked to set up a new
method of payment called special cash discount (SCD). The SCD was requested
by Lake Electronics, a vendor with whom Contoso collaborates. The vendor has
asked Contoso to pay cash with a special discount, for the next few months to
help them with some accounts receivable shortfalls. Lake Electronics is offering
good terms with a 2 percent cash discount if the invoice is paid within seven days
and net payment due in 14 days.
These are the other details:
Field Value
Payment status None
Account type Bank
Payment account EUR OPER
Bank transaction
type
03
Fee account 618190
Export Format 1 (Test)
Return Retur. Format 1 pr.
payment
Challenge Yourself!
Help April set up the method of payment. Attach the new terms of payment and
cash discount to the vendor.
Need a Little Help?
• Create a new method of payment and name it SCD, Special Cash
Discount.
• Assign the new method of payment to the vendor. Also, assign the
N014 terms of payment to the vendor, which specifies that the
balance is due in 14 days.

8/20/2019 Financials I
http://slidepdf.com/reader/full/financials-i 312/563
Financials I in Microsoft Dynamics® AX 2009
8-28
Step by Step
Create a new method of payment called SCD, Special Cash Discount.
1. Click Accounts payable, click Setup, click Payment, and then click
Methods of payment.2. Press CTRL+N to create a new method of payment.
3. In the Method of payment field, type SCD.
4. Click the Period arrow, and then click Invoice.
5. In the Description field, type Special Cash Discount.
6. In the Days of grace field, type 0.
7. Click the Payment status field, and then click None.
8. Click the Account type arrow, and then click Bank.
9. Click the Payment account arrow, and then click EUR OPER.
10. Click the Bank transaction type arrow, and then click 03 (Checks-
Printed).11. Click the Fee account arrow, and then click 618190.
12. Click the File formats tab.
13. Click the Export format arrow, and then click Format 1 (Test).
14. Click the Return format arrow, and then click Retur format 1 pr. payment.
15. Close all the forms.
Assign the new method of payment to the vendor. Also assign the N014 Terms of
payment to the vendor, which specifies that the balance is due in 14 days.
1. Click Accounts payable, and then click Vendor Details.2. Click Vendor account 4103.
3. Click the Payment tab.
4. Click the Terms of payment arrow, and then click N014.
5. Click the Method of payment arrow, and then click SCD.
6. Click the Cash discount arrow, and then click 2%D07.

8/20/2019 Financials I
http://slidepdf.com/reader/full/financials-i 313/563
Chapter 8: Accounts Payable Setup
8-29
Vendor Groups
Use vendor groups to set up certain information that always defaults when you
enter a new vendor.
For example, use the vendor group to set up automatic posting to General Ledgeraccounts for consumption generated by vendor transactions.
In the Vendor groups form, set up vendor groups. You must set up at least one
vendor group, because a vendor group must be specified when you create a new
vendor.
Scenario
Contoso has multiple vendors to monitor. To simplify the management of
vendors, Contoso has set up several vendor groups to:
• Specify ledger posting per vendor group - to specify accounts foreach vendor group. You can specify accounts, that is, for vendor
debts, an arrival account for a vendor with a corresponding offset
account, a receipt account, item consumption account and account
for vendor line discounts.
• Record sales budgets per vendor group -find additional
information about how to set up budgets for each vendor group in
Financials II training material.
• Generate trade statistics per vendor group - to generate sales
statistics that, for example, show monthly consumption for each
vendor group.

8/20/2019 Financials I
http://slidepdf.com/reader/full/financials-i 314/563
Financials I in Microsoft Dynamics® AX 2009
8-30
Procedure: Create a Vendor Group
Follow these steps to create a new vendor group.
FIGURE 8.15 VENDOR GROUPS FORM
1. Click Accounts payable, click Setup, and then click Vendor
groups.
2. Press CTRL+N to create a new record.
3. Enter a short name for the vendor group in the Vendor group field.Use this name for the vendor group anywhere in Microsoft
Dynamics AX 2009, wherever you must specify a vendor group.
4. Enter the full name of the vendor group in the Description field. The
name acts as additional specification of the vendors included in the
vendor group. To view the name of the vendor in all dialog boxesthat display a vendor group move the pointer over the vendor group
and wait until the name is displayed.
5. Specify a payment term that corresponds to the default time interval
between the purchase of an item and the invoice due date in the
Terms of payment list. Use the Terms of payment list for cash
flow forecasting.
For example, the payment term is used for vendor payment coverage
based on one purchase budget per vendor group. If a purchase budget
is set up for vendor group X and a purchase of 10,000 USD is
budgeted for June 15, a payment term is specified to correspond to
the current month + 30 days. On this basis, coverage is arranged so
that the budgeted item price of 10,000 USD is due for payment on
July 30.

8/20/2019 Financials I
http://slidepdf.com/reader/full/financials-i 315/563
Chapter 8: Accounts Payable Setup
8-31
6. Specify a term of payment that corresponds to the default interval
between the due date and the actual payment time in the Settle
period list. Use the payment terms with vendor payment coverage
based on one purchase budget for each vendor group. Use the Settle
period list in cash flow calculations.
7. Enter or select the default tax group for the selected vendor group in
the Default tax group field.
Procedure: Define Inventory Posting
Follow these steps to set up automatic postings to General ledger accounts for a
vendor group.
1. From the Vendor groups form, click the Setup button, and then
click Inventory posting.
2. Set up general posting rules for all items, accounts, and sales-tax
codes by selecting one of the following in the Item code field.
o Table - This option is the highest in the hierarchy. By selectingTable, the posting in ledger only applies to a specific item
number.
o Group - The posting in the ledger only applies to a particular
item group.
o All - Each transaction is posted for all item numbers in the same
account in the ledger. The first matching account is used for
posting.
FIGURE 8.16 INVENTORY POSTING FORM
Based on the kind of business that you run, decide which accounts you must set
up. The focus of finance is related to consumption and revenue accounts, whereas
the focus of logistics is the issue, receipt, and packing slip accounts.

8/20/2019 Financials I
http://slidepdf.com/reader/full/financials-i 316/563
Financials I in Microsoft Dynamics® AX 2009
8-32
Procedure: Set Parameter Values
Follow these steps to define parameter values.
FIGURE 8.17 ACCOUNTS PAYABLE PARAMETERS FORM, LEDGER ANDSALES TAX TAB
1. To access the Accounts payable parameters form, click Accounts
payable, click Setup, and then click Parameters.
2. Click the Ledger and sales tax tab.
3. In the Posting area, select whether the primary posting should be
assigned to Item or Vendor in the Primary receipt posting field.
For example, set up the Primary receipt posting list to prioritize the Item. If
you buy some of item type B-R14 from vendor 3000, which is part of vendor
group 50, Microsoft Dynamics AX 2009 posts the transaction to account number
510120, because the item relation is more specific than the account relation.
Item
code
Item
relation
Account code Account
relation
Account
number
All All 510100
All Group 50 510800
Table B-R14 All 510120
8/20/2019 Financials I
http://slidepdf.com/reader/full/financials-i 317/563
Chapter 8: Accounts Payable Setup
8-33
If the posting is set up as illustrated in the following table, and the Primary
receipt posting list is set to Vendor, and you bought some of item type B-R14
from vendor 3000, the transaction is posted to account number 510100 becauseof the Accounts Payable parameter setup.
Itemcode
Itemrelation
Account code Accountrelation
Accountnumber
All Table 3000 510100
Table B-R14 All 510120
Test Your Knowledge
How many vendor groups must be set up?
( ) none
( ) one
( ) two
( ) ten

8/20/2019 Financials I
http://slidepdf.com/reader/full/financials-i 318/563
Financials I in Microsoft Dynamics® AX 2009
8-34
Lab 8.3 - Create a Vendor Group
Scenario
Phyllis, the Accounting Manager, has asked April, the Accounts Payable Clerk,
to create a new vendor group. Phyllis will use the vendor group to group vendorswho require Contoso to pay cash on delivery. The new group should be called 83,
and the description should be cash vendor group. After April creates the vendor
group, she must set up automatic posting of receipts to General ledger accounts.
The posting should have the account relation of 80 (other vendors), and post to
account number 211300.
Challenge Yourself!
Help April create a new vendor group that has automatic posting.
Need a Little Help?
• Create a new vendor group, which is titled 83 for cash vendors.
• Assign the terms of payment as cash and the settle periods as COD.
Step by Step
Create a new vendor group, which is titled 13 for cash vendors. Assign a cash
terms of payment and COD settle period.
1. Click Accounts payable, click Setup, and then click Vendor
groups.
2. Press CTRL+N to create a new group.
3. In the Vendor group field, type 83.
4. In the Description field, type Cash Vendors for the description.
5. Click the Terms of payment arrow, and then click P007.
6. Click the Settle period arrow, and then click P007.
Assign the automatic posting to the new vendor group.
1. From the Vendor groups form, click the Setup button, and then
click Inventory posting.
2. Select Receipt.
3. Click the Item code arrow, and then click All.
4. Confirm that the Account code field is set to Group.
5. In the Account relation field, type 80 – Other vendors.
6. In the Account number field, type 141250.

8/20/2019 Financials I
http://slidepdf.com/reader/full/financials-i 319/563
Chapter 8: Accounts Payable Setup
8-35
Accounts Payable Posting Profiles
Posting profiles are common throughout all modules in Microsoft Dynamics AX
2009. In Accounts Payable posting profiles, the summary accounts are defined
for vendors. Summary accounts are temporary accounts where all invoices are
posted to and offset when the vendor is paid. Assign posting profiles to:
• All vendors
• Groups of vendors
• Single vendor
When you post a vendor transaction automatically, the system searches for the
ledger accounts that are shown in the previous order. For example, if:
• a posting profile line exists for the vendor, this line is used.
• no posting profile line exists for the vendor, however, the line
specified for the vendor group that the vendor is attached to is used.
• neither of these exists, the posting profile line for all vendors are
used.
In the Vendor posting profiles dialog box, you can set up many vendor posting profiles. If all vendor transactions are processed together, set up only one posting
profile for all vendors.
Procedure: Create a Posting Profile
Follow these steps to create a posting profile.
FIGURE 8.18 VENDOR POSTING PROFILES FORM

8/20/2019 Financials I
http://slidepdf.com/reader/full/financials-i 320/563
Financials I in Microsoft Dynamics® AX 2009
8-36
1. Click Accounts payable, click Setup, and then click Posting
profiles.
2. Enter a code or a short name for the posting profile in the Posting
profile field.
3. Enter a description of the posting profile in the Description field.
4. Click the Table restrictions tab.5. Select the Settlement check box to indicate whether entries should
be created by using this posting profile for automatic settlement or
the settlement must be manual and use open-transaction editing.
6. Select the Cancel check box to indicate whether you want to be able
to cancel transactions created that have this posting profile.
7. Select the name of any other posting profile to change to when
transactions with this posting profile are closed in the Close list. A
transaction automatically becomes closed when it is settled in full.
Procedure: Create a Posting Profile - Setup
Follow these steps to set up the ledger accounts that are posted to when you posttransactions in Accounts payable.
FIGURE 8.19 VENDOR POSTING PROFILES FORM, SETUP TAB
1. From the Vendor posting profiles form, click the Setup tab.
2. Select an Account code:
o Table
o
Groupo All

8/20/2019 Financials I
http://slidepdf.com/reader/full/financials-i 321/563
Chapter 8: Accounts Payable Setup
8-37
3. Specify which vendors belong to the current posting profile in the
Account/Group number list.
o If Table is selected in the Account code field, enter the account
number of the vendor to whom the posting profile relates.
o If Group is selected in the Account code field, enter the vendor
group to which the posting profile relates.o If All is selected in the Account code field, do not fill in the
field.
4. Select the account number of the ledger account that is used as the
vendor summary account for the vendor(s) to whom the posting
profile relates in the Summary account list.
If you use an invoice register and invoice approval journal, all
vendor invoices recorded as having arrived but not yet approved are
posted in the Arrivals account and the Arrivals offset account. When
these invoices are approved, the debt is transferred to the vendor
summary account. If your company does not use an invoice register
and invoice approval journal, all vendor invoices are updated directlyin the vendor summary account.
5. Select the liquidity ledger account that is used for cash flow forecast.
Cash flow forecast in the Settle account list. You can learn more
about Cash flow forecast in the Microsoft Dynamics AX 2009
Financials II course.
6. Select a ledger account number that is used to make temporary
postings of unapproved vendor invoices, which are updated through
invoice register in the Arrival list.
7. Select in the Offset account list, the ledger account number that is
used for offsetting unapproved vendor invoices, which are updated
through the invoice register. The offset account acts as the offsetaccount for arrival and contains unapproved vendor purchases.
Procedure: Set Parameter Values
Follow these steps to define parameter values.
1. To set up default values for posting click Accounts payable, click
Setup, and then click Parameters.
2. Click the Ledger and Sales tax tab.
3. In the Posting profile list, select a standard vendor posting profile.
Use the standard posting profile if no other posting profile is
specified. A posting profile must be specified for every update of avendor transaction. The standard posting profile must be created in
the Vendor posting profiles form.

8/20/2019 Financials I
http://slidepdf.com/reader/full/financials-i 322/563
Financials I in Microsoft Dynamics® AX 2009
8-38
Lab 8.4 - Vendor Posting Profile
Scenario
Phyllis, the Accounting Manager has asked April, the Accounts Payable Clerk, to
set up a new posting profile for a group of vendors to be paid from a differentcash account than other vendors. Phyllis explained that the profile should be
selected for automatic settlement and should allow for cancellation. These are the
details:
Field Value
Posting Profile COD
Description Cash on Delivery Profile
Account Code Group
Account/Group
Number
80 - Other Vendors
Summary
Account
211100
Settle Account 110180
Arrival 211310
Offset Account 211320
Challenge Yourself!
Help April create the new vendor posting profile for group 80.
Need a Little Help?
You can find the automatic settlement and cancel check boxes on the Table
restrictions tab.
Step by Step
1. Click Accounts payable, click Setup, and then click Posting
profiles.
2. Press CTRL+N to create a new profile.
3. In the Posting profile field, type COD.
4. In the Description field, type Cash on delivery profile.
5. Click the Table restrictions tab.
6. Verify the Settlement check box is selected.
7. Verify the Cancel check box is selected.
8. Click the Setup tab.
9. Click the Account code arrow, and then select Group.

8/20/2019 Financials I
http://slidepdf.com/reader/full/financials-i 323/563
Chapter 8: Accounts Payable Setup
8-39
10. In the Account/Group number, type 80.
11. In the Summary account field, type 211100.
12. In the Settle account field, type 110180.
13. In the Arrival account field, type 211310.
14. In the Offset account field, type 211320.
15. Close the form.

8/20/2019 Financials I
http://slidepdf.com/reader/full/financials-i 324/563
Financials I in Microsoft Dynamics® AX 2009
8-40
Accounts Payable Vendors
A company purchases goods and services from vendors. Each accounts payable
transaction must be associated with a vendor. Use the Vendors form to create,
maintain and inquire about vendors.
Enter as much data as possible when you set up Microsoft Dynamics AX 2009
because the data is used throughout the system for:
• Invoices
• Payments
• Reports
The base data automatically appears as the default for all transactions involving
the vendor.
Default information always can be changed.
Procedure: Create a Vendor
Follow these steps to create a new vendor.
FIGURE 8.20 VENDORS FORM
1. Click Accounts payable, and then click Vendor Details.
2. Press CTRL+N to create a new record.

8/20/2019 Financials I
http://slidepdf.com/reader/full/financials-i 325/563
Chapter 8: Accounts Payable Setup
8-41
3. Enter a Vendor ID with up to 10 characters in the Vendor Account
field, and a vendor name with up to 30 characters in the Name field.
The Vendor account is generated automatically if the vendor
account number sequence is specified in the Accounts payable
parameters form on the Number sequences tab. Some companies
prefer to enter the number sequences manually. To do this, select the
Manual check box on the General tab in the Number sequencesform. Avoid using numbers that can be changed, such as telephone
numbers.
4. Enter the name to use when you search for the vendor in the Search
name field. If it is not entered, the Name field is used by default.
5. Select a vendor account for invoicing in the Invoice account list.
For example, the invoice account is where the invoice amount is
credited if:
o you are linking several vendors to one invoice account
o more than one vendor has the same payment address
o the vendor is paid through a third-party. If the vendor account is
left blank, the vendor account number is used by default.
6. Select the vendor group to which the vendor belongs in the Group
list.
7. Select the currency used for vendor invoices in the Currency list.
NOTE : Currency codes and exchange rates are created and maintained in the
Exchange rates form. You can change the vendor's invoice currency in the
invoice header before you enter purchase order lines.

8/20/2019 Financials I
http://slidepdf.com/reader/full/financials-i 326/563
Financials I in Microsoft Dynamics® AX 2009
8-42
Procedure: Create a Vendor - General
Follow these steps to set additional vendor options.
FIGURE 8.21 VENDORS FORM, GENERAL TAB
1. From the Vendors form, click the General tab.
2. Select the language that is used for all external documents, such as
purchase orders in the Language list. The language code is
mandatory. The language value defaults from the Other tab of theCompany information form. This is a very important feature that
lets you set up the terms of payment in a language other than the
company language to accommodate the vendor.
3. Enter the vendor credit rating in the Credit rating field. It is used for
statistical purposes only.
4. Enter the maximum outstanding amount allowed in the balance of
the vendor's account in the Credit limit field. This amount always is
stated in the default currency.
5. As part of updating purchase orders or invoices, set up the system to
verify whether an account is over its credit limit on the Credit
rating tab of the Accounts payable parameters form. If an account
is beyond the credit limit specified, the update is stopped.
6. Block a vendor account manually in the Stopped list by selecting
one of the following:
o No - all forms of transaction are possible because there is no
blocking
o Invoice - the account is blocked for invoice postings

8/20/2019 Financials I
http://slidepdf.com/reader/full/financials-i 327/563
Chapter 8: Accounts Payable Setup
8-43
o All - all transactions are blocked
Select a buyer group in the Buyer group list. Your selection
creates links between vendors, employees, and items/planned
orders when you create purchases and productions.
For example, use buyer groups to determine which employees
are associated with the current buyer group and to change the
buyer group if an employee changes an area of responsibility.
7. Select a customer account number if vendor is also a customer and
the reimbursement feature is used in the Customer account list.
Procedure: Create a Vendor - Define Vendor Attributes
Vendor attributes allow organizations to track specific details about vendors.
Follow these steps to define vendor attributes.
FIGURE 8.22 VENDORS FORM, DETAILS TAB
1. From the Vendors form, click the Details tab.
2. Enter the worker count in the Number of employees field.
3. Enter the vendor's Organization number.
4. Select an ABC code filter in the Category list.5. Select the Bid only check box if the vendor has submitted quotes or
proposals but has not yet been approved for purchases. You can use
this indicator to associate bids and other documentation with the
vendor account.
6. Select the Locally owned check box if the vendor meets your
guidelines for being a locally owned business. Collecting this data
allows local businesses to have priority on certain contracts.

8/20/2019 Financials I
http://slidepdf.com/reader/full/financials-i 328/563
Financials I in Microsoft Dynamics® AX 2009
8-44
7. Select the Minority owned check box if the vendor is owned by a
minority group. This field is used for statistical purposes only.
8. Select the One-time supplier check box if the vendor is a one-time
supplier. If the One-time supplier check box is selected when a
purchase order is created, the distinction is indicated here.
NOTE : If you are using one-time suppliers you must set up a number sequence
or one-time suppliers in the Accounts payable parameters form on the Number
sequence tab. On the General tab in the Accounts payable parameters form,
select a vendor's account number that can serve as the default template for one-
time suppliers. Information is copied automatically when you create a one-time
supplier in the Vendors form. Microsoft Dynamics AX 2009 automatically
creates a one-time vendor when a purchase order is created for a one-time
supplier. Except for the vendor number, the one-time supplier inherits all base
information from the vendor number that is specified in this field. The one-time
vendor number sequence must be specified in the Number sequences form. If
ou have no one-time suppliers, leave the Default vendor number blank.
9. Select the Small business check box if the vendor meets your
guidelines for being a small business. You can collecting this data to
generate reports about this information.
10. Select the Woman owner check box if the vendor is owned by a
woman. This field is used for statistical purposes only.
Procedure: Create a Vendor - Setup
Follow these steps to further define setup information for a vendor.
FIGURE 8.23 VENDORS FORM, SETUP TAB

8/20/2019 Financials I
http://slidepdf.com/reader/full/financials-i 329/563
Chapter 8: Accounts Payable Setup
8-45
1. From the Vendors form, click the Setup tab.
2. Select the invoice account, if any, to which the vendor is linked in
the Invoice account list. The invoice account is the account to which
the invoice amount is credited when you create a vendor invoice
from a purchase order. If you do not enter an invoice account, the
vendor account is used as the invoice account.Use invoice accounts if you have more than one vendor with the
same billing address, or if the vendor is invoiced through a third
party.
3. Select number sequence for internal numbers on purchase invoice
and purchase order credit note in the Number sequence group list. If
the field is empty, the purchase order number is used automatically.
4. Specify whether tax should be calculated on the invoice in the Sales
tax group list.
5. Select the Prices incl. sales tax check box to include sales tax when
you inform vendors about purchase prices.
6. View the account type and offset account where you offset the
vendor transactions in the Account type and Offset account lists.
These values are inherited from the vendor group setup.
Procedure: Create a Vendor - Other
Follow these steps to complete the vendor setup.
FIGURE 8.24 VENDORS FORM, ADDRESSES TAB

8/20/2019 Financials I
http://slidepdf.com/reader/full/financials-i 330/563
Financials I in Microsoft Dynamics® AX 2009
8-46
1. From the Vendors form, enter the vendor's address and contact
details on the Addresses and Contact information tabs.
2. If a vendor has more than one address, such as invoice, delivery,
purchase, alternative delivery address, or SWIFT, enter additional
addresses by clicking the Setup button and then Address from the
Vendors form.3. Additionally, enter address, contact information, and parameters for
access from the Internet for external contact persons who associate
with vendors by clicking the Setup button and then Contact Details
from the Vendors form.
NOTE : If alternative delivery addresses are in different states or countries,
ensure that you enter the appropriate tax group for each alternative address.
You must associate tax groups with a delivery address.
4. Enter information about how to manage payments on the invoices
entered in Accounts Payable in the Vendors form, on the Paymenttab.
5. Set up specific dimensions for a vendor on the Dimensions tab.
Throughout Microsoft Dynamics AX 2009, you can use dimensions
to group data in different ways.
If you designate dimensions for a vendor, those dimensions
automatically default for transactions made that use that vendor. You
can change these defaulted values when you enter the transaction.

8/20/2019 Financials I
http://slidepdf.com/reader/full/financials-i 331/563
Chapter 8: Accounts Payable Setup
8-47
Lab 8.5 - Vendors
Scenario
Contoso has begun working with a new vendor, Dakota Travel. April, the
Accounts Payable Clerk, must set up this new vendor. She wants to enableautomatic vendor numbering. These are the details:
Field Value
Vendor group 80 - other vendors
Credit limit 10,000
Method of
payment
Check payment - USD
Cash discount 4%D10
Terms of payment N015
Challenge Yourself!
Help April create a new vendor.
Step by Step
Enable automatic vendor numbering.
1. Click Accounts payable, click Setup, and then click Parameters.
2. Click the Number sequences tab.
3. Notice that the number sequence code of AP_001 has been selected.
Right-click the value in the Number sequence code, and then click
Go to the Main Table Form.
4. From the Number sequences form, click the General tab.
5. Click the Manual check box to clear it.
6. Close the forms.
Create the new vendor.
1. Click Accounts payable, and then click Vendor details.
2. Press CTRL+N to create a new vendor. A new vendor account
number will be assigned automatically.
3. In the Name field, type Dakota Travel.
4. Tab to the Group field and type 80.
5. Click the General tab.
6. In the Credit Limit field, type 10,000.

8/20/2019 Financials I
http://slidepdf.com/reader/full/financials-i 332/563
Financials I in Microsoft Dynamics® AX 2009
8-48
7. Click the Payment tab.
8. Click the Terms of payment arrow, and then click N015.
9. Click the Method of Payment arrow, and then click
USAUSD_CHK.
10. Click the Cash discount arrow, and then click 4%D10.

8/20/2019 Financials I
http://slidepdf.com/reader/full/financials-i 333/563
Chapter 8: Accounts Payable Setup
8-49
Summary
Payment options in Microsoft Dynamics AX 2009 are flexible to accommodate
different business processes. You can:
• Define terms based on the number of months and/or days, based on acurrent period (for example, current month or current quarter), and
with or without additional months or days.
• Set up terms of payment for cash payment so that the payment posts
automatically when you issue the invoice.
• Set up advanced payment schedules and use them as terms of
payment based on many factors, including:
o Percentage allocation of the actual invoice amount
o Allocation based on a fixed number of installments
o Combined amounts and percentages of the invoice amount
• Set up cash discounts similar to the terms of payment, based on:
o The current period
o The number of net days
• Set up the cash discounts as multiple (for example, ten days 3
percent and 30 days 1 percent). You can decide whether you want
special ledger accounts to post.
• Set up Microsoft Dynamics AX 2009 to manage the cash discount
with or without sales tax to comply with the tax legislation in various
countries.
You also can group vendors to categorize information so that it is meaningful.
You can:
• Set up automatic posting rules for vendor transactions to ensure that
the transactions affect the correct accounts.
• Become aware of situations and trends more quickly by grouping
vendors with a common identifier to view and analyze financial
causes in more detail. For example, you can group vendors by the
kinds of products you purchase from them or by the dollar volume of
purchases.

8/20/2019 Financials I
http://slidepdf.com/reader/full/financials-i 334/563
Financials I in Microsoft Dynamics® AX 2009
8-50
Quick Interaction: Lessons Learned
Take a moment and write down three key points you have learned from this
chapter:
1.
2.
3.

8/20/2019 Financials I
http://slidepdf.com/reader/full/financials-i 335/563
Chapter 8: Accounts Payable Setup
8-51
Solutions
Payment Schedule
Test Your Knowledge
A payment schedule consists of _____________.
( ) payments
( ) consecutive time intervals
( ) consecutive payments
(•) consecutive payments in set time intervals
What elements must be defined to create a payment schedule? (Select all that
apply.)
( ) Vendor account
(√) Due date of each installment
(√) Amount of each installment
(√) Number of installments
Terms of Payment
Test Your Knowledge
Task: Outline the steps to setting up a term of payment. Place the following steps
in order.
Step 2 : Create a new record.
Step 3 : Type a terms of payment identifier.
Step 6 : Specify the days (or other time unit).
Step 5 : Select the payment method.
Step 1 : Access the Terms of payment form in Accounts Payable.
Step 4 : Type a description.

8/20/2019 Financials I
http://slidepdf.com/reader/full/financials-i 336/563
Financials I in Microsoft Dynamics® AX 2009
8-52
Payment Days
Test Your Knowledge
The payment day can be specified in what interval? (Select all that apply.)
(√) Specific day in a week
(√) Specific date in a month
( ) Specific day in a year
( ) Specific day in a quarter
Cash Discount
Test Your Knowledge
Cash discounts are linked to what tables?
( ) Sales and Purchase Order
( ) Payment Days and Payment Fees
( ) Terms of Payment and Payment Days
(•) Customer and Vendor
Methods of Payment
Test Your Knowledge
What are some methods of payment a company might use? (Select all that apply.)
(√) Credit
(√) Cash in advance
(√) Check and electronic payments
(√) Bill of exchange
Vendor Groups
Test Your Knowledge
How many vendor groups must be set up?
( ) none
(•) one
( ) two
( ) ten

8/20/2019 Financials I
http://slidepdf.com/reader/full/financials-i 337/563
Chapter 9: Accounts Payable Daily Procedures
9-1
CHAPTER 9: ACCOUNTS PAYABLE DAILYPROCEDURES
ObjectivesThe objectives are:
• Explain the different invoice journals
• Register an invoice journal
• Approve an invoice register journal
• Create an invoice excluding posting
• Create an invoice journal
• Use a voucher template to create vouchers
• Create a payment proposal• Run a payment proposal for a marked settlement
• Create a payment journal
• Generate a payment
• Describe invoice matching.
• Edit open transactions
• Reverse a closed transaction
• Define print management settings
IntroductionThis chapter discusses the various Invoice Journals in the Accounts Payablemodule of Microsoft Dynamics AX® 2009. It describes what to use each InvoiceJournal for and how to enter transactions into each journal.
Purchasing goods for resale or as materials for manufacturing or services is alarge responsibility. Tracking those purchases and paying the vendors that supplythe goods is just as challenging.
Companies must monitor Accounts Payable closely and implement procedures toenable management to easily obtain the financial information that they must have
to stay informed about changes in the costs of goods. To give an accurate view ofthe financial condition of the business, all the expenses that affect the net profitare included in Accounts Payable.

8/20/2019 Financials I
http://slidepdf.com/reader/full/financials-i 338/563
Financials I in Microsoft Dynamics® AX 2009
9-2
Invoice Journals in Accounts Payable
The procedure for handling invoices varies from company to company,depending on the company's size, structure and organization. Typically theinvoices are:
• Registered
• Approved
• Paid
Microsoft Dynamics AX 2009:
• Supports several methods of managing incoming invoices to cater todifferent company procedures
• Has a different invoice journal depending on the need of thecompany
The different invoices available are:
• Invoice Register
• Invoice Approval Journal
• Invoice Pool excluding Posting
• Invoice Journal
Invoice Register
The purpose of the invoice register journal is to pre-register invoices when they
arrive at the company and transfer them to an invoice pool for approval. In theinvoice register journal, an employee registers the:
• Vendor account
• Invoice number
• Amount
• Person who approves the invoice
The same employee validates and posts the journal to the accounts specified inthe posting profile. Usually the accounts are pending accounts where the amountsawait the manual approval and reclassification by the person specified in the
journal line.

8/20/2019 Financials I
http://slidepdf.com/reader/full/financials-i 339/563
Chapter 9: Accounts Payable Daily Procedures
9-3
Procedure: Register an Invoice
Follow these steps to register an invoice for approval.
1. Click Accounts payable, click Journals, click Invoices, and thenclick Invoice register.
2. In the Show field, select to view Open, Posted, or All journals. Thedefault view is Open journals.
3. Press CTRL+N to create a new journal.
4. Enter the name of the journal in the Name field or select the namefrom the selection list that contains journal names with the relevant journal type. If only one journal name is defined for this kind of journal, information in the Name field is entered automatically.
HINT : Create and define journal names in the Journal names form. To access
the Journal names form, click General ledger , click Setup , click Journals , and
then click Journal names.
5. The number and description are entered automatically in the Journal
number and Description fields. These values default from theJournal names form, but you can overwrite them.
All subsequent ledger transactions created in this journal contain thesame journal number. This feature enables you to print a list ofledger transactions created in a specific journal. Journal numbering iscontrolled by a number sequence.
FIGURE 9.1 JOURNAL FORM

8/20/2019 Financials I
http://slidepdf.com/reader/full/financials-i 340/563
Financials I in Microsoft Dynamics® AX 2009
9-4
Procedure: Register an Invoice - General
Most of the fields on the General tab inherit data from the Journal names form.Follow these steps to view or define additional posting parameters for the journal.
1. From the Journal form click the General tab.
In the Identification and Journal areas, you can view informationthat was defined on the Overview tab.
2. The kind of transactions that you can post in this journal display inthe Posting layer field.
3. Select the summation level from the Detail level list. Select from thefollowing:
o Details - to post every instance of an account number in the journal lines as a separate account transaction
o Summary - to combine the journal lines into one transactionduring posting if vouchers have the same date, account number,dimension, and currency code values, and the Payment
reference field is blank.
4. Select to delete journal lines when posting is completed by selectingthe Delete lines after posting check box. When you delete journallines, however, you also lose the ability to inquire into journal lineslater.
5. Enter the maximum number of lines in a journal in the Lines limit
field. If this number is exceeded, the posting process distributes thelines into several smaller journals. This value defaults from theJournal names form but you can overwrite it.
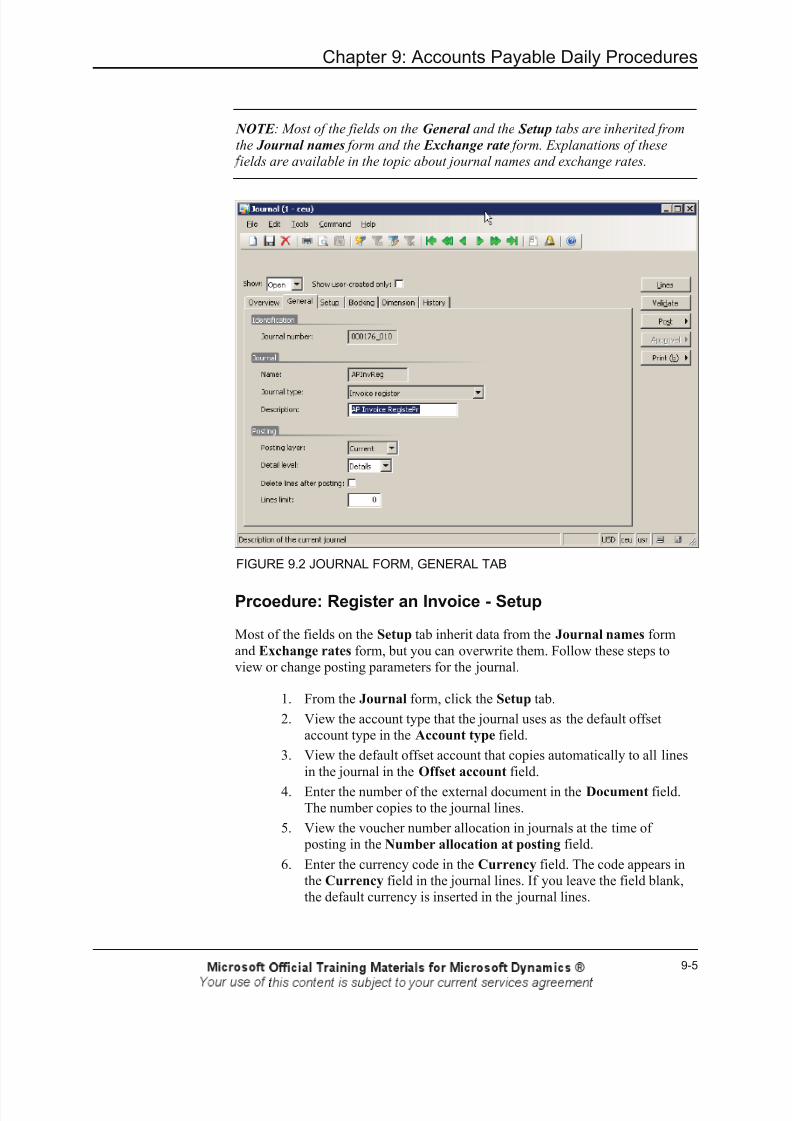
8/20/2019 Financials I
http://slidepdf.com/reader/full/financials-i 341/563
Chapter 9: Accounts Payable Daily Procedures
9-5
NOTE : Most of the fields on the General and the Setup tabs are inherited from
the Journal names form and the Exchange rate form. Explanations of these
ields are available in the topic about journal names and exchange rates.
FIGURE 9.2 JOURNAL FORM, GENERAL TAB
Prcoedure: Register an Invoice - Setup
Most of the fields on the Setup tab inherit data from the Journal names formand Exchange rates form, but you can overwrite them. Follow these steps toview or change posting parameters for the journal.
1. From the Journal form, click the Setup tab.
2. View the account type that the journal uses as the default offsetaccount type in the Account type field.
3. View the default offset account that copies automatically to all linesin the journal in the Offset account field.
4. Enter the number of the external document in the Document field.The number copies to the journal lines.
5. View the voucher number allocation in journals at the time of posting in the Number allocation at posting field.
6. Enter the currency code in the Currency field. The code appears inthe Currency field in the journal lines. If you leave the field blank,the default currency is inserted in the journal lines.

8/20/2019 Financials I
http://slidepdf.com/reader/full/financials-i 342/563
Financials I in Microsoft Dynamics® AX 2009
9-6
7. Select the Forced rate check box to use an exchange rate other thanthe rate that you usually would use according to the posting date forthe selected currency code.
8. Select the Triangulation check box to include the exchange rate intriangulation.
9. Enter the currency exchange rate that applies to the transaction in theExchange rate field. The exchange rate is expressed as the numberof units of the foreign (non-company) currency that displays in theExpress exchange rate field on the Ledger tab in the General
ledger parameters form.
10. Enter the secondary exchange rate in the Secondary exchange rate
field.
11. Select the Amount incl. sales tax check box if the amount in the journal line includes sales tax.
12. Select the default bank account for the journal lines in the Bank
account field.
FIGURE 9.3 JOURNAL FORM, SETUP TAB
Procedure: Register an Invoice - Blocking
Follow these steps to enter and view parameters that indicate how the selected journal can be blocked by the system for use.
1. From the Journal form, click the Blocking tab.
2. View the name of the user who is using the journal currently in theUsed by user field.

8/20/2019 Financials I
http://slidepdf.com/reader/full/financials-i 343/563
Chapter 9: Accounts Payable Daily Procedures
9-7
3. If the system has blocked the journal, the Locked by system check box is selected, and you cannot post in the journal. You also canselect this check box manually. To release a blocked journal, clearthis check box.
4. To exclude users or user groups from the journal, select the Private
check box.
NOTE : For security reasons, only one user at a time can enter lines in a
articular journal.
5. If you select the Private check box, the Private for user fieldcontains your user identification.
6. To exclude users or user groups from the journal, select a group inthe Private for user group field. Only the users associated with theselected group can access the journal.
FIGURE 9.4 JOURNAL FORM, BLOCKING TAB
Procedure: Register an Invoice - Dimension
Follow these steps to select dimension values to propose on the journal lines forthe selected journal.
1. From the Journal form, click the Dimension tab.
2. Select a dimension value in any of the dimension fields. Thesevalues display on the journal lines but you can change them.

8/20/2019 Financials I
http://slidepdf.com/reader/full/financials-i 344/563
Financials I in Microsoft Dynamics® AX 2009
9-8
Procedure: Register an Invoice - History
View details about the approval procedure, if any, for the selected journal on theHistory tab.
Procedure: Register Invoice Lines
Follow these steps to create journal vouchers to validate, print, and post.
1. From the Journal form, click the Lines button.
2. Enter the posting date in the Date field. The system date displays, but you can change it.
3. The Voucher series is entered automatically, because it is attachedto the journal name in the Voucher series field in the Journal
names form. If you set the number sequence code with theContinuous option selected and no user changes are enabled, thefield is skipped.
4. Select the vendor to register the invoice by in the Account field.
5. Enter the invoice number in the Invoice field. You cannot post theinvoice register, if you do not specify an invoice number.
6. Select the text regarding the transaction in the Transaction text list.When you specify an offset account, the system uses the same text,until you specify offset transaction text.
7. Enter the appropriate amount in the given currency in the Debit orCredit fields. Enter an amount in the Credit field if you are enteringan invoice. Enter an amount in the Debit field if you are entering acredit note.
8. In the Offset account type list, specify the account type as one ofthe following:
o Ledger
o Customer
o Vendor
o Project
o Fixed assets
o Bank

8/20/2019 Financials I
http://slidepdf.com/reader/full/financials-i 345/563
Chapter 9: Accounts Payable Daily Procedures
9-9
Use Ledger, Customer, and Vendor when you post the transaction in therespective account. When, for example, you record a vendor invoice and specifyVendor in account type, posting occurs in the current vendor account. At thesame time, posting automatically occurs in the vendor summary account inGeneral Ledger.
Use Project and Fixed assets to post to a specific project number or asset number.Use Bank if a bank account transaction is involved, and the transaction is usedlater for reconciliation in the Bank management module.
FIGURE 9.5 JOURNAL VOUCHER FORM
Procedure: Register Invoice Lines - Sales Tax
Follow these steps to view or edit sales tax information for the journal vouchers.
1. In the Journal voucher form, select a sales tax group for thetransaction in the Sales tax group list. The value defaults from theSales tax group field on the Setup tab of the Vendors form.
2. Specify the item sales tax group for each journal line in the Item
sales tax group list. The value defaults from the Item sales tax
group field in the Chart of Accounts form. If this field is empty, thesystem retrieves the group from the Item sales tax group field onthe Sales tax tab in the General ledger parameters form.
View the sales tax amount that calculates on the invoice in the Sales
tax amount field.
NOTE : If the Exempt field in the Chart of Accounts is selected, the field is
always empty, but you can enter a value manually.

8/20/2019 Financials I
http://slidepdf.com/reader/full/financials-i 346/563
Financials I in Microsoft Dynamics® AX 2009
9-10
3. To view, edit, or enter additional sales tax to the transaction, clickthe Sales tax button. Edit or view the calculated taxes for the currentline.
4. To edit the sales tax, enter either an adjusted amount in the Adjusted
amount field or open the Adjustment tab and enter the corrections.
5. To save the changes, click the Apply button. To cancel the changes,click the Reset button.
6. Close the window to return to the journal.
Procedure: Register Invoice Lines - Invoice
Follow these steps to view or edit invoice information for the journal vouchers.
1. In the Invoice area of the Journal voucher form, specify in theApproved by list which employee approves the transaction. Restrictthe approval function to a specific User group in the Approve field
on the Setup tab of the Journal names form.2. Enter the terms of payment for the current invoice in the Terms of
payment list.
3. Enter the due date for the invoice in the Due date field. The due datecalculates by the terms of payment, but you can change it manually.The calculation of the due date only occurs if an invoice numberappears in the Invoice field.
4. Enter the payment identification used upon payment in the Payment
ID field. If a payment proposal is used, the system suggests the payment ID from the invoice or credit note, but you can change it.
5. Specify the purchase order numbers regarding this invoice in the
Purchase order list. This field is informational only.
Procedure: Register Invoice Lines - Payment
Follow these steps to view or edit payment information for the journal vouchers.
1. In the Payment area of the Journal voucher form, select the payment method to use on the current payment, invoice, or creditnote in the Method of payment list.
2. Specify the payment specification, if any, for the current method of payment in the Payment specification list.
8/20/2019 Financials I
http://slidepdf.com/reader/full/financials-i 347/563
Chapter 9: Accounts Payable Daily Procedures
9-11
Procedure: Register Invoice Lines - Currency
Follow these steps to view or edit currency information for the journal vouchers.
1. In the Currency area of the Journal voucher form, specify the
currency to use in the Currency list. By default the system populatesthis field from the currency defined in the order listed from thefollowing forms:
o Chart of accounts
o Vendors
o Journal names
o Company information
2. If the currency code is included in triangulation, select theTriangulation check box.
3. The currency exchange rate that applies to the transaction displays in
the Exchange rate field. The rate defaults from the set up in theExchange rates form. The exchange rate displays as the number ofunits of the foreign (non-company) currency that is indicated in theExpress exchange rate field on the Ledger tab in the General
ledger parameters form.
4. View the secondary exchange rate in the Secondary exchange rate
field.
5. View the cross rate for the two exchange rates in the Cross rate
field.
6. View the basis for the calculation of the cross rate in the Calculation
method field.
NOTE : In the Validate currency code field in the Chart of Accounts form, you
can set up validation rules for the currency.
Procedure: Register Invoice Lines - Cash Discount andBank
Follow these steps to view or edit cash discount information for the journalvouchers.
1. In the Cash discount area of the Journal voucher form select the
code for the cash discount in the Cash discount list.2. Enter the latest payment date to qualify for a cash discount in the
Cash discount date field. The discount date is calculated based onthe cash discount setup, but you can change it manually.

8/20/2019 Financials I
http://slidepdf.com/reader/full/financials-i 348/563
Financials I in Microsoft Dynamics® AX 2009
9-12
3. Enter the cash discount amount in the Discount amount field.
When you make a payment before the cash discount date, thediscount amount is redeemed and posted automatically. You also canset up the cash discount information on the Cash discount tab.
4. Identify the bank account in the Account identification list.
NOTE : Create the vendor's bank account in the Bank accounts form, which can
be accessed by clicking Accounts payable > Vendors > Setup > Bank accounts.
Procedure: Register Invoice Lines - General
Follow these steps to enter additional information for the journal vouchers.
1. From the Journal voucher form click the General tab.
2. Select the posting profile for the transaction in the Posting profile
list. The posting profile defaults from the setup for the vendor.3. Select the account number for the current offset account transaction
type in the Offset account list.
NOTE : In the Chart of Accounts form, you can set up a default offset account
that appears automatically in the Offset account field.
4. Select an offset transaction text in the Offset-transaction text list.
5. Enter the number or name of the document that is the basis of thetransaction in the Document field.
6. Enter a date for the document in the Document date field.
7. Enter or view the amount to report on the 1099 form in the 1099
amount field.
8. Select the location on the 1099 form where you want to print the1099 amount in the 1099 box list.
9. Specify the state for the delivery in the State field.
10. Enter the amount to report in the 1099 form in the 1099 state
amount field.

8/20/2019 Financials I
http://slidepdf.com/reader/full/financials-i 349/563
Chapter 9: Accounts Payable Daily Procedures
9-13
Procedure: Register Invoice Lines - Dimension
On the Dimension tab, set up the dimensions for the invoice register transaction.If you designate dimensions in the Journal form, they default on eachtransaction. Override any of those defaults now or enter dimensions if no defaults
are set up in the Journal form.
Procedure: Delete an Invoice
To delete an unposted journal line, highlight the line and either click the Delete
button from the Toolbar or click the Functions button and select Delete journal
lines.
Procedure: Post an Invoice
After you enter all the invoice journal lines, click the Post button to post theinvoice journal.
The lines posted in the invoice register transfer to the invoice pool and the physical invoices are given to the person who must approve them. The personapproves with a signature or a stamp and returns the invoices to the AccountingDepartment. When invoices return, the accountant registers the approvals in theinvoice approval journal and posts them. After that, the invoice is ready to be paid, and the amounts post to the real cost accounts.
HINT : If the invoice register is not being used or if most of the incoming
invoices do not require approval, enter the vendor invoices directly into an
invoice journal.
When the invoice is registered, the tax authorities can refund the tax as long asthe invoice is registered. This means the tax handling associates with the invoiceand not the actual payment. This is relevant for non-U.S. tax handling.
Invoice Approval Journal
After you post the lines of the invoice register, the postings display in the invoice pool.
Scenario
April, the Accounts Payable Clerk, registers an incoming invoice in the invoiceregister and posts the registration. April sends the physical invoice to Phyllis, theAccounting Manager, for approval. Phyllis approves the invoice with a signatureor a stamp and returns the invoice to April. April registers and posts the approvalin the invoice approval journal. Now the invoice is ready to be paid.

8/20/2019 Financials I
http://slidepdf.com/reader/full/financials-i 350/563
Financials I in Microsoft Dynamics® AX 2009
9-14
Invoice Pool
To view the postings in the invoice pool click Accounts Payable, clickInquiries, and then click Invoice pool.
When you work with the invoice pool:
• The invoice pool displays the relevant information about the invoicesawaiting approval.
• The invoice pool holds invoices originating from a purchase orderthat originate from an invoice register. Click the Purchase order
button to select and approve the purchase orders.
NOTE : All tabs and fields in the Invoice pool form are discussed in the Invoice
Register lesson.
FIGURE 9.6 INVOICE POOL FORM
Procedure: Print Invoices Not Approved
The Invoices not approved report displays a list of invoices awaiting approval.For example, you may want to run this report by employee, and then give thereport to the relevant people. The report reminds them to approve the invoices.

8/20/2019 Financials I
http://slidepdf.com/reader/full/financials-i 351/563
Chapter 9: Accounts Payable Daily Procedures
9-15
Follow these steps to print the Invoices not approved report.
1. Click Accounts payable, click Reports, click Status, and then clickInvoices not approved.
2. In the query window, you can specify:
o
Vendor accounto Employee
o Due date
3. Click the OK button.
Procedure: Approve an Invoice Register Journal - FetchVouchers
Follow these steps to create an approval journal.
1. Click Accounts Payable, click Journals, click Invoices, and then
click Invoice approval journal.
2. Press CTRL+N to create a record.
3. Select the approval journal in the Name list.
4. Enter in the other relevant information. Refer to the Invoice Registerlesson to view the field explanations.
5. Click the Lines button to open the Journal voucher form.
6. To transfer the voucher to the journal for approval, click the Fetch
vouchers button.
7. Select the approved invoice vouchers, and then click the Select
button to move them to the lower pane. To select all the vouchers,
click the Select all button.
HINT : If a voucher incorrectly displays in the Vouchers to be fetched area of
the Fetch vouchers form, click the Remove button to move the voucher(s) from
the Vouchers to be fetched area to the Vouchers available for fetching area.
8. With the correct vouchers appearing in the Vouchers to be fetched
area, click the OK button.

8/20/2019 Financials I
http://slidepdf.com/reader/full/financials-i 352/563
Financials I in Microsoft Dynamics® AX 2009
9-16
Procedure: Approve an Invoice Register Journal
After the vouchers have been fetched, follow these steps to continue to processthe invoice register.
1. In the Journal voucher form, select one of the vouchers in the upper pane. In the lower pane, view the transaction lines that are createdwhen the voucher posts.
Ledger accounts from the temporary posting are selected already forthese lines, but you must select the appropriate ledger account for theopen line.
2. Click the Validate button, and then click Validate voucher only torun a check to verify that the invoice in the upper pane is ready for posting.
3. Select the next invoice in the upper pane, and enter the accountinformation in the lower pane.
4. Repeat steps 1-3 until you have entered and validated accountinformation for all the invoices.
HINT : Instead of validating each line, click the Validate button, and then click
Validate when the account information is complete for all the invoices.
5. Click the Post button, and then click Post. You can now settle the posted invoices in the Payment journal.
Test Your Knowledge
After you post the lines of the invoice register, the postings display in the payment proposal.
( ) True
( ) False
8/20/2019 Financials I
http://slidepdf.com/reader/full/financials-i 353/563
Chapter 9: Accounts Payable Daily Procedures
9-17
Lab 9.1 - Register an Invoice
Scenario
April, the Accounts Payable Clerk at Contoso, creates invoice registers and
approves invoices. April's typical workflow is to create invoice registers onMonday, view the invoices to be approved in the invoice pool on Tuesday, and ifthere are enough to process, approve the invoices by using the invoice journal onTuesday and Wednesday.
These are the details:
Field Value
Invoice register Inv_R
Vendor account 3002
Invoice number INV123Transaction text Invoice
Credit 150
Approved by BKD
Terms of payment D30
Cash discount 7D4
Invoice approval Inv_A
Invoice approval
description Invoice approval
Invoice offset account 601500
Challenge Yourself!
Use the invoice register, invoice pool, and invoice approval journal to completethe workflow outlined in the scenario.
Need a Little Help?
1. The invoice register and the invoice approval journal are in journals.
2. The invoice pool is in inquiry.3. The approver must be specified in the Approved by field in the
invoice register.

8/20/2019 Financials I
http://slidepdf.com/reader/full/financials-i 354/563
Financials I in Microsoft Dynamics® AX 2009
9-18
Step by Step
Follow these steps to pre-register the invoice and transfer it to an invoice pool.
1. Click Accounts payable, click Journals, click Invoices, and then
click Invoice register.2. Press CTRL+N to create a new register.
3. Click the Name arrow, and then click APInvReg.
4. Click Lines.
5. Click the Account arrow, and then click 3002.
6. In the Invoice field, type INV123.
7. Click the Transaction text arrow, and then click Invoice.
8. In the Credit field, type 150.
9. Tab off the lines.
10. Click the Approved by arrow, and then click BKD.
11. Click the Terms of payment arrow, and then click D30.
12. Click the Cash discount arrow, and then click 7D4.
13. Click the Post button, and then click Post.
14. Close the form
Follow these steps to view the invoice in the invoice pool.
1. Click Accounts payable, click Inquiries, and then click Invoice
pool.
2. Locate the line for the invoice previously created.
3. Close the form.
Follow these steps to create and post an invoice approval journal.
1. Click Accounts payable, click Journals, click Invoices, and thenclick Invoice approval journal.
2. Press CTRL+N to create a new invoice approval journal.
3. Click the Name arrow, and then click APInvApp.
4. Click the Lines button.
5. Click the Fetch vouchers button.
6. Click the voucher for INV123.
7. Click the Select button. The voucher appears in the Vouchers to be
fetched area.
8. Click the OK button.
9. In the Journal voucher form, click the Account arrow, and thenclick 601500.
10. Click the Post button, and then click Post.
11. Click Close to close the Infolog.
12. Close all the forms

8/20/2019 Financials I
http://slidepdf.com/reader/full/financials-i 355/563
Chapter 9: Accounts Payable Daily Procedures
9-19
Invoice Pool Excluding Posting
Invoice pools excluding posting have the following characteristics:
• The invoice register excl. posting is another kind of journal available
in the Accounts Payable module.
• Using the invoice journal represents another procedure for handlingincoming invoices, although it is similar to the invoice register with posting. The difference is that you cannot post the lines. They godirectly into the invoice pool.
• To post the lines, create a new invoice journal, and then clickFunctions. Then select Invoice pool and accept the individualinvoices in the pool after you approve them.
• If you activate the invoice pool by accessing the invoice pool excl. posting item in the Accounts Payable menu, the invoices shown onthe window are registered, unapproved invoices. Although the
invoices are unposted, they are registered in the system.
• Use the invoice journal to transfer the invoices for approval and posting.
Scenario
April, the Accounts Payable Clerk at Contoso, registers the incoming invoice inthe journal invoice pool excluding posting. April sends the invoice to Phyllis, theAccounting Manager, for approval. Phyllis approves the invoice with a signatureor a stamp and returns the invoice to April. April creates a new invoice journal,uses the Function button to fetch the invoice from the invoice pool, and posts the
journal. Now the invoice is ready to be paid.
Procedure: Create an Invoice Excluding Posting
Follow these steps to create an invoice without posting it.
1. Click Accounts payable, click Journals, click Invoices, and thenclick Invoice Pool Excl. Posting.
2. Enter the information necessary to create an invoice excluding posting. The fields are the same as described in the invoice registerlesson.

8/20/2019 Financials I
http://slidepdf.com/reader/full/financials-i 356/563
Financials I in Microsoft Dynamics® AX 2009
9-20
Procedure: Approve and Post an Invoice ExcludingPosting
Follow these steps to approve and post the invoice excluding posting journal.
1. Click Accounts payable, click Journals, click Invoices, clickInvoice journal to open the Journal form.
2. Press CTRL+N to create a new journal. Refer to the topicProcedure: Approve an Invoice Register Journal for moreinformation.
3. Click the Lines button to open the Journal voucher form to transferthe invoice pool excluding posting record for approval and posting.
4. To fetch the invoice from the invoice pool excluding posting form,click the Functions button, and then click Invoice pool excl.
posting.
5. Select one or more invoices in the Invoice pool excl. posting form,
and then click the Accept button to transfer the invoices to theJournal voucher form.
6. To post the transactions click the Post button, and then click Post.
After the invoice posts, it is ready to be paid.
Test Your Knowledge
You can use the invoice pool to view registered invoices that are ready for posting.
( ) True
( ) False

8/20/2019 Financials I
http://slidepdf.com/reader/full/financials-i 357/563
Chapter 9: Accounts Payable Daily Procedures
9-21
Lab 9.2 - Invoice Pool Excl. Posting
Scenario
Phyllis, Accounting Manager at Contoso, has asked April, the Accounts Payable
Clerk, to enter invoices to the invoice pool excluding posting. Phyllis wants toreview April's work.
These are the details:
Field Value
Vendor account 3002
Transaction text Invoice
Credit 1000
Invoice number INV777
Invoice journal name Vend_I
Invoice journal
description Vendor invoice
Approver BKD
Offset account 601500
Challenge Yourself!
Help April enter the invoices into the invoice pool excluding posting. Then helpPhyllis review and approve them in an invoice journal.
Need a Little Help?
1. Designate an approver from the Invoice pool excl. posting form.
2. Approve the invoice from the invoice journal.
Step by Step
1. Click Accounts payable, click Journals, click Invoices, and thenclick Invoice pool excl. posting.
2. Press CTRL+N to create a new journal.3. In the Date field, type today’s date.
4. Click the Vendor account arrow, and then click 3002.
5. Click the Transaction text arrow, and then click Invoice.
6. In the Credit field, type 1000.
7. In the Invoice field, type INV777.
8. Click the History tab.

8/20/2019 Financials I
http://slidepdf.com/reader/full/financials-i 358/563
Financials I in Microsoft Dynamics® AX 2009
9-22
9. Click the Approved by arrow, and then click BKD.
10. Close the form.
11. Click Accounts payable, click Journals, click Invoices, and thenclick Invoice journal.
12. Press CTRL+N to create a new journal.
13. In the Name field, type Vend_I.14. In the Description field, type Vendor invoice.
15. Click Lines.
16. Click the Functions button, and then click Invoice pool excl.
posting.
17. Click the line for INV777.
18. Click Accept.
19. Click the Invoice tab.
20. Select the Approved check box.
21. In the Offset account field that is to the far right of the form on the
Overview tab, enter 601500.22. Click the Post button, and then click Post.
23. Click Close to close the Infolog.
24. Close all the forms.

8/20/2019 Financials I
http://slidepdf.com/reader/full/financials-i 359/563
Chapter 9: Accounts Payable Daily Procedures
9-23
Invoice Journal
A third option for processing incoming invoices is to enter them directly into theinvoice journal.
• By default, the user who is logged in and who enters the journal linesapproves the invoices.
• The invoice journal is designed for users to enter the invoices theyreceive from vendors without using the approval journal. As soon asthe user enters the incoming invoices, the user can post.
Scenario
April, the Accounts Payable Clerk at Contoso, enters the invoice directly into anew invoice journal, and then approves and posts the journal. Now the invoice isready to be paid.
Procedure: Create an Invoice Journal
Follow these steps to create an invoice journal.
1. Click Accounts payable, click Journals, click Invoices, and thenclick Invoice journal.
2. Press CTRL+N to create a new invoice journal.
3. Select a journal name in the Name list.
4. Enter the other relevant information. Refer to the Invoice Registerlesson for field explanations.
Procedure: Create Invoice Journal Lines
Follow these steps to add invoice journal lines.
1. From the Journal form, click the Lines button.
2. Enter any other relevant information. Refer to the Invoice Registerlesson for field explanations.
Procedure: Validate a Journal
After you enter transactions into Microsoft Dynamics AX 2009, you must post
them to update the vendor's balance in the subsidiary ledger and the generalledger account balances.
You can validate and post from two forms, and the process is the same regardlessof which window you use.
• Journal form
• Journal voucher form

8/20/2019 Financials I
http://slidepdf.com/reader/full/financials-i 360/563
Financials I in Microsoft Dynamics® AX 2009
9-24
Validate the Journal before it posts. The validate process ensures that the journalis correct. For example, the system verifies that all mandatory fields haveinformation entered and that the journal balances.
To validate a journal, click the Validate button from either of the forms, and then
click either Validate to validate all the journals or Validate voucher only tovalidate only the selected line.
If Then
The journal is correct A window appears with the message: Journalis OK.
The journal is incorrect A window appears with details of what isincorrect. If a journal does not validatecorrectly, it cannot be posted.
Procedure: Post a Journal
After you validate the journal, it is ready to be posted. To post the journal, clickthe Post button from either of the previous windows. There are two options toselect from:
• Post - Posts the journal (provided it has no errors).
• Post and transfer - Posts all correct vouchers in the journal andtransfers the lines with errors to a separate journal.
Test Your Knowledge
You must validate the journal before you post.
( ) True
( ) False

8/20/2019 Financials I
http://slidepdf.com/reader/full/financials-i 361/563
Chapter 9: Accounts Payable Daily Procedures
9-25
Lab 9.3: Invoice Journal
Scenario
April, the Accounts Payable Clerk at Contoso, has been asked by Phyllis, the
Accounting Manager, to enter an invoice into an invoice journal, validate the journal, and then post it.
These are the details:
Field Value
Invoice journal name APInv
Vendor account 3002
Invoice number INV879
Credit 1300
Offset account type Ledger
Offset account 211320
Challenge Yourself!
Help April enter, validate, and post a journal.
Step by Step
1. Click Accounts payable, click Journals, click Invoices, and then
click Invoice journal.2. Press CTRL+N to create a new journal.
3. Click the Name arrow, and then click APInv.
4. Click the Lines button.
5. Click the Account arrow, and then click 3002.
6. In the Invoice field, type INV879.
7. In the Credit field, type 1300.
8. Click the Offset account arrow, and then click 211320.
9. Click the Validate button, and then click Validate.
10. Click Close to close the Infolog.
11. Click the Post button, and then click Post.
12. Click Close to close the Infolog.

8/20/2019 Financials I
http://slidepdf.com/reader/full/financials-i 362/563
Financials I in Microsoft Dynamics® AX 2009
9-26
Voucher Template
Use a voucher template as the basis of future vouchers. You can use vouchertemplates with an accounts payable invoice journal.
Scenario
Phyllis, the Accounting Manager, is entering a voucher to record interest expenseon a fixed-rate long-term note. The voucher debits Interest Expense and creditsInterest Payable for 350 U.S. dollars (USD) each.
Phyllis must record this voucher for the same amount each month. To reducefuture data entry time, Phyllis decides to save the voucher as a voucher template by amount.
The next time Phyllis records an interest expense, she selects the Load vouchertemplate action and chooses the interest entry. The original ledger accounts and
amounts load into the form.
Scenario
April, the Accounts Payable Coordinator, receives a telephone bill that she mustenter. At Contoso the telephone expenses are distributed across all departmentsequally. April enters the voucher with the appropriate departments. Thefollowing table is an example of the distributions for an invoice in the amount of600.00 U.S. dollars (USD).
Account Debit amount Credit amount
Telephone Expense -Sales 150 USD
Telephone Expense -Accounting
150 USD
Telephone Expense -Production
150 USD
Telephone Expense -Administration
150 USD
Accounts Payable 600 USD
April chooses to save this entry as a Voucher template by percent. This will holdthe value assigned to each account as a percentage of the total. In this case, shewill assign each department 25 percent.
The next time April receives the telephone bill she must retrieve the Vouchertemplate and enter only the amount of the telephone bill. The distributions will becreated automatically based on the original percentage.

8/20/2019 Financials I
http://slidepdf.com/reader/full/financials-i 363/563
Chapter 9: Accounts Payable Daily Procedures
9-27
Procedure: Create a Voucher Template
Follow these steps to create a voucher template.
1. Enter a transaction through the Invoice journal lines form asdescribed in the Invoice Journal lesson.
2. Click the Functions button, and then click Save voucher template.
3. From the Template type list, select one of the following:
o Percent - Uses the percentage of the original voucher totalrepresented by each voucher line.
o Amount - Uses the original voucher total and line amounts.
4. Click OK .
Procedure: Use a Voucher Template
After you create a voucher template, follow these steps to use a voucher template
to create a new accounts payable invoice journal.
1. Click Accounts payable, click Journals, click Invoices, and thenclick Invoice journal.
2. Press CTRL+N to create a new journal. Refer to the Invoice Journallesson for more field information.
3. Click the Lines button.
4. Click the Functions button, and then click Select voucher template.
5. In the Voucher templates form, select the correct template.
6. Click OK .
7. If a percent voucher template is selected, enter the Amount of thenew transaction. When you create a new voucher based on a percent-type voucher template, the percentage calculated for each new line isapplied automatically to the value in the Voucher amounts dialog.The percentage determines the amount for the new voucher line.
Test Your Knowledge
Which voucher template type lets users re-create a voucher for the same accountsand values as the original entry?
( ) Percent
( ) Division( ) Aggregate
( ) Amount
8/20/2019 Financials I
http://slidepdf.com/reader/full/financials-i 364/563
Financials I in Microsoft Dynamics® AX 2009
9-28
Payment Journals
After you register, approve, and post the invoice, it is time to pay the invoice.
Payment journals have the following characteristcs:
• You can create payments through the payment journal.
• Use the payment journal to enter and post payments. Make paymentsand enter them into Microsoft Dynamics AX 2009 according to theterms of payment established with the vendors. In the payment journal there are several ways to create payment lines:
o Click Payment proposal.
o Click Functions and select Settlement.
o Create a journal line and enter the payment details manually.
• There are two methods for selecting the invoices to pay through the
payment journal.
o The Payment proposal option searches for invoice lines thatmeet selected search criteria.
o Use the Settlements option to select the specific invoice lines to pay.
• After you create all the payment lines, use the Generate payments
command on the Functions button to generate the payment. This isthe selected method of payment and the setup of controls ifMicrosoft Dynamics AX 2009 should, for example, print checks orcreate a payment file.
NOTE : To learn more about all the tabs and fields on the Journal window,
review the Invoice Register lesson.
Payment Proposal
You must post payments made to vendors to ensure the Accounts Payablesubsidiary ledger matches the General Ledger.
• The payment proposal function searches for payment lines that eitherare due or have a maximum date for receiving a cash discount.
• The payment proposal function verifies vendor transactions that areopen and approved.
The system includes in the search only transactions with either a due date or acash discount date. As soon as the payment lines generate, edit them in the payment journal.

8/20/2019 Financials I
http://slidepdf.com/reader/full/financials-i 365/563
Chapter 9: Accounts Payable Daily Procedures
9-29
Procedure: Create a Payment Proposal
Follow these steps to create a payment proposal.
1. Click Accounts payable, click Journals, click Payments, and thenclick Payment journal.
2. Press CTRL+N to create a new journal. Enter the additionalinformation as necessary. Refer to the Invoice Register lesson formore information about the fields.
3. Click the Lines button.
4. Click the Payment proposal button, and then click Create payment
proposal.
FIGURE 9.7 VENDOR PAYMENT PROPOSAL FORM
Procedure: Create a Payment Proposal - Options
Follow these steps to designate options for vendor payment proposal.
1. In the Vendor payment proposal form select the kind of payment proposal to create in the Proposal type field. Select from thefollowing options:
o Per due date - transfers the set of vendor payments for dueinvoices

8/20/2019 Financials I
http://slidepdf.com/reader/full/financials-i 366/563
Financials I in Microsoft Dynamics® AX 2009
9-30
o By cash discount - transfers the set of vendor payments thatfulfills the criteria for obtaining a cash discount
o Due date & cash discount - transfers the set of vendor payments that fulfills the criteria for obtaining a cash discountand after that, transfers vendor transactions proposed after thedue date
2. Click the Select button to select specific vendors or a range ofvendors.
3. Select the Generate check box to open the Edit payment
suggestions form that displays invoices to be paid.
4. Enter the total amount to selected for payment in the Amount limit
field.
5. Enter the maximum lines to pay in the Transaction limit field.
6. Enter the period for the customer transactions to include in the payment proposal in the From date and To date fields.
7. Enter the lowest date for the payment in the Minimum date field.8. Enter the date the payment is due in the Total payment date field.
9. Add other criteria as appropriate in the other fields on the Vendor
payment proposal form, and then click the OK button.
Procedure: Create a Payment Proposal - PaymentProposal Lines
After you select options and then click the OK button in the Vendor payment
proposal form, the form will display the following information for you to verify:
• Payment proposal lines that meet the criteria appear in the lowerPayment proposal pane.
• When you select a payment proposal line, view the open invoicetransactions that contribute to the payment proposal line in the upperOpen transactions pane.
• Review each proposal line and the associated open transactions before settlement. For example, delete an open invoice from the opentransactions lines if you are unsatisfied with the items and you do notwant to pay the invoice.
To delete a line, put the pointer on the line and press ALT+F9.
To change certain fields on several lines in one operation, select thelines, click the Multiple change button, and enter the values to beimplemented.

8/20/2019 Financials I
http://slidepdf.com/reader/full/financials-i 367/563
Chapter 9: Accounts Payable Daily Procedures
9-31
HINT : Select the Link check box to synchronize the two parts of the form. When
this option is selected the Open transactions pane only shows transactions
related to the current payment suggestion. When you move between paymet
suggestions, the system updates open transactions.
FIGURE 9.8 VENDOR PAYMENT PROPOSAL FORM
Procedure: Create a Payment Proposal - Transfer,
Validate, and Post
Follow these steps after you are satisfied with the results in the Vendor payment
proposal form and are ready to transfer the proposal lines to the payment journal.
1. After you inspect all the proposed lines click the Transfer button tomove the proposal lines to the payment journal when.
2. In the Payment journal lines form, continue to edit the lines in the payment journal if necessary.
3. Verify the balances of company bank accounts to ensure you canmake the payments.To view the balances, click the Inquiries button, and then click
Balance control.4. Click the Validate button to validate the payment lines.
5. Click the Post button, and then click Post to generate the payments.

8/20/2019 Financials I
http://slidepdf.com/reader/full/financials-i 368/563
Financials I in Microsoft Dynamics® AX 2009
9-32
Procedure: Mark Settlements
Use the settlement option as a second option for selecting invoice lines to pay.
Follow these steps to run a payment proposal for a marked settlement.
1. Click Accounts payable, click Journals, click Payments, and thenclick Payment journal.
2. Press CTRL+N to create a new journal. Enter the additionalinformation as necessary. Refer to the Invoice Register lesson formore information about the fields.
3. Click the Lines button.
4. Select a vendor account in the Account field.
NOTE : The Vendor account and Currency fields must contain values to select
the Settlements option.
5. Click the Functions button, and then click Settlement to open theOpen transaction editing form.
FIGURE 9.9 OPEN TRANSACTION EDITING FORM

8/20/2019 Financials I
http://slidepdf.com/reader/full/financials-i 369/563
Chapter 9: Accounts Payable Daily Procedures
9-33
Procedure: Mark Settlements - Open Transaction Editing
Follow these steps to mark invoices for settlement.
1. From the Open transaction editing form select the Mark check box
to transfer the invoice to the Vendor payment proposal form. Markone or several invoices for settlement.
NOTE : A red mark displays in the Is marked field if a transaction already is
marked for settlement.
2. Select the Payment proposal check box.
3. Close the form after you mark the invoices for payment. When youclose the Open transaction editing form, the Vendor payment
proposal form opens and shows the payment proposal and the opentransactions.
Procedure: Mark Settlements - Transfer, Validate, andPost
Follow these steps after you are satisfied with the results in the Vendor payment
proposal form and are ready to transfer the proposal lines to the payment journal.
1. Click the Transfer button to move the proposal lines to the payment journal after you inspect all the proposed lines.
2. In the Payment journal lines form, continue to edit the lines in the payment journal if necessary.
3. Verify the balances of company bank accounts to ensure that you canmake the payments.To view the balances, click the Inquiries button, and then clickBalance control.
4. Click the Validate button to validate the payment lines.
5. Click the Post button, and then click Post to generate the payments.
Procedure: Create a Manual Payment Journal
You can create a payment journal by entering the invoice information. Followthese steps to create a manual payment journal.
1. Click Accounts payable, click Journals, click Payments, and thenclick Payment journal.
2. Press CTRL+N to create a new journal. Enter the additionalinformation as necessary. Refer to the Invoice Register lesson formore information about the fields.
3. Click the Lines button.

8/20/2019 Financials I
http://slidepdf.com/reader/full/financials-i 370/563
Financials I in Microsoft Dynamics® AX 2009
9-34
4. Enter values in the relevant fields in the first line on the Overview
tab of the Journal voucher form. Some fields may be enteredautomatically with values from fields in the Journal form. Makeentries in the following fields:
o Account
o Transaction Text (This is optional, but it eases the entry of linesin the journal because the pointer automatically goes to theappropriate Debit or Credit field.)
o Enter an appropriate amount in the Debit or Credit field.
o Select an Offset Account Type in the Offset account type list.
o Select an offset account in the Offset Account list.
o Press the down arrow key to create a new line, and then enterinformation about the next voucher.
Procedure: Create a Manual Payment Journal - Validateand Post
Follow these steps to check the entry and post the payment.
1. From the Journal voucher form click the Validate button after youenter all the voucher lines, and then click Validate or Validate
voucher only. This verifies that all the lines or the selected lines areready for posting.
2. Post the lines in the Journal voucher form or in the Journal form.Click the Post button, and then click Post.
NOTE : Click the Inquiries button, and then click Balance control to ensure that
the bank account has funds available to pay the vendor.
Procedure: Generate Payments
After you create the payment journal, it is ready to be paid. The procedure onhow to generate payments is the same for:
• Payment proposals
• Settlements
• Manual payment journals

8/20/2019 Financials I
http://slidepdf.com/reader/full/financials-i 371/563
Chapter 9: Accounts Payable Daily Procedures
9-35
Follow these steps to generate a payment.
1. From the Journal voucher form, click the Functions button, andthen click Generate payments.
2. Select the method of payment for the invoice lines you are paying in
the Method of payment list. For example, if you are making a check payment, select the method of payment for checks. Or, select anexport format in the Export format list.
3. Select the bank account from which to withdraw the payment in the
Bank account list.
Procedure: Generate Payments - Print Checks
Follow these steps to print checks.
1. From the Generate payments form, click the Dialog button to paywith checks.
2. Fill in the fields and then click the Document button to print thecheck.
3. Click OK to print the checks.
NOTE : To print checks, before you run the generate payments process, run the
create checks process in bank management. For information about this refer to
the Bank Management course.
HINT : Before checks print, ensure that the printer has the correct checks ready
to print.
NOTE : To void checks after they are printed, click Payment status and select
Reject .
CAUTION : As soon as checks are printed, the journal lines cannot be deleted
unless the checks are voided.
Procedure: Generate Payments - Post
Follow these steps to post the payment.
1. View the status of the payment in the Status field in the Payment
journal lines form. After the payment generates, the status is set toSent automatically.
2. Click Post to update the vendor account balance in the subsidiaryledger and General Ledger account balances.

8/20/2019 Financials I
http://slidepdf.com/reader/full/financials-i 372/563
Financials I in Microsoft Dynamics® AX 2009
9-36
Lab 9.4 - Payment Journals
Scenario
Sara, the CFO at Contoso, has returned from the annual Microsoft conference
called Convergence. She has submitted her expenses using an outside travelagency called Margie's Travel. April, the Accounts Payable Clerk at Contoso,must register and post the invoices in Microsoft Dynamics AX 2009, each in aseparate journal. She must then validate and post each journal.
These are the details:
Airfare for trip to Convergence
Option Value
Date 4/1/2008
Invoice number 1000Amount 550 USD
Approver Ezio Alboni
Hotel for trip to Convergence
Option Value
Date 4/1/2008
Invoice number 1001
Amount 600 USD
Approver Ezio Alboni
Car Rental for trip to Convergence
Option Value
Date 4/1/2008
Invoice number 1002
Amount 150 USD
Approver Ezio Alboni
Challenge Yourself!
Help April with the following tasks:
1. Register the invoices.
2. Post the approvals for all three of these transactions in one journal.

8/20/2019 Financials I
http://slidepdf.com/reader/full/financials-i 373/563
Chapter 9: Accounts Payable Daily Procedures
9-37
3. Enter the expense accounts to balance each line item:
o For the Airfare line, use account 601500
o For the Hotel line, use account 601500
o For the Car Rental line, use account 601500
4. After you complete the required steps, validate and post this journal.5. Make the appropriate edits and validate the journal again.
6. Post the journal.
7. Generate the payment(s) for this invoice.
8. Print, validate, and post the payments.
Step by Step
Follow these steps to enter invoices in Accounts Payable.
Airfare Invoice
1. To register the invoice, use the Invoice Register. Click Accounts
payable, click Journals, click Invoices, and then click Invoice
register.
2. Press CTRL+N to create a new journal.
3. Click the Name arrow, and then click APInvReg.
4. Click the Lines button.
5. Enter 4/1/08 for the date.
6. In the Account field select 8005 - Margie's Travel.
7. In the Invoice field enter 1000.
8. In the Transaction text field enter Airfare for Convergence.
9. Enter $550 in the Credit field.
10. Click the Approved by arrow, and then click 2100 - Brooke Drynan.
11. Click the Validate button, and then click Validate.
12. In the Infolog click the Close button.
13. Click the Post button, and then click Post.
14. In the Infolog click the Close button.
15. Close the Journal voucher form.
Hotel Invoice
1. From the Journal form, press CTRL+N to create a new journal.2. Click the Name arrow, and then click APInvReg.
3. Click the Lines button.
4. Enter 4/1/08 for the date.
5. In the Account field select 8005 - Margie's Travel.
6. In the Invoice field enter 1001.
7. In the Transaction text field enter Hotel for Convergence.
8/20/2019 Financials I
http://slidepdf.com/reader/full/financials-i 374/563
Financials I in Microsoft Dynamics® AX 2009
9-38
8. Enter $600 in the Credit field.
9. Click the Approved by arrow, and then click 2100 - Brooke Drynan.
10. Click the Validate button, and then click Validate.
11. In the Infolog click the Close button.
12. Click the Post button, and then click Post.
13. In the Infolog click the Close button.
14. Close the Journal voucher form.
Car Rental Invoice
1. From the Journal form, press CTRL+N to create a new journal.
2. Click the Name arrow, and then click APInvReg.
3. Click the Lines button.
4. Enter 4/1/08 for the date.
5. In the Account field select 8005 - Margie's Travel.
6. In the Invoice field enter 1002.7. In the Transaction text field enter Car Rental for Convergence.
8. Enter $150 in the Credit field.
9. Click the Approved by arrow, and then click 2100 - Brooke Drynan.
10. Click the Validate button, and then click Validate.
11. In the Infolog click the Close button.
12. Click the Post button, and then click Post.
13. In the Infolog click the Close button.
14. Close the Journal voucher form.
15. Close the Journal form.
Follow these steps to use the invoice approval journal.
1. Click Accounts payable, click Journals, click Invoices, and thenclick Invoice approval journal.
2. Press CTRL+N to create a new journal.
3. Click the Name arrow, and then click APInvApp.
4. Click the Lines button.
5. Click the Fetch Vouchers button.
6. To select all three vouchers, click theSelect All button, and thenclick OK.
7. With the Airfare line is highlighted, go to thelower section of thescreen. Enter 601500 in the Account field.
8. Highlight the Hotel line in the upper section and add a new line itemin the lower section of the screen.
9. Enter Account 601500.
10. Highlight the Car Rental line in the upper section and add a new lineitem in the lower section of the screen.
11. Enter Account 601500.

8/20/2019 Financials I
http://slidepdf.com/reader/full/financials-i 375/563
Chapter 9: Accounts Payable Daily Procedures
9-39
12. Click the Validate button, and then click Validate.
13. In the Infolog click the Close button.
14. Click the Post button, and then click Post.
15. In the Infolog click the Close button.
16. Close the forms.
Follow these steps to make payments for the invoices.
1. Click Accounts payable, click Journals, click Payments, and thenclick Payment journal.
2. Press CTRL+N to create a new journal.
3. Click the Name arrow, and then click APPay.
4. Click the Lines button.
5. Click the Payment proposal button, and then click Create Payment Proposal.
6. In the Proposal type list, select Due date & cash discount.
7. Click the Select button.
8. Enter 8005 (Margie's Travel) in the Criteria field for the Vendor
account, and then click OK .
9. Enter 5/15/08 in the To Date field.
10. Click OK .
11. In the Vendor Payment Proposal form, click the Transfer button.
12. Click OK .
13. Click the Functions button, and then click Generate payments.
14. Select the Method of Payment of USAUSD_CHK, and then clickOK .

8/20/2019 Financials I
http://slidepdf.com/reader/full/financials-i 376/563
Financials I in Microsoft Dynamics® AX 2009
9-40
Invoice Matching
Accounts payable invoice matching is the process of matching the vendorinvoice, purchase order, and packing slip information. Vendor invoicesfrequently are based on packing slips that represent actual shipments, instead of
on purchase orders. Sometimes the invoiced amounts do not match the purchaseorder amounts, and sometimes the shipped quantities do not match the invoicedquantities. To manage this information, Microsoft Dynamics AX enables you todo the following things:
• Create an accounts payable invoice based on packing slips. Packingslips automatically are suggested for invoicing, and you can selectwhich packing slips to use. You also can select specific packing slipline items from multiple purchase orders, if necessary.
• Enter and save an invoice before a shipment arrives. After the packing slip that represents the shipment arrives, you can match the
appropriate packing slip lines to the invoice lines.• View and approve quantity differences between the invoiced
quantity on the invoice and the received quantity on the packing slip.If there is a difference, you can save the invoice and later match it toa different packing slip or change the invoice quantity to match thereceived quantity.
• Enter invoice amounts that were not included on the original purchase order so that the invoice information matches the invoicethat you received from your vendor. You can compare themiscellaneous charges for purchase orders with the miscellaneouscharges for invoices. If necessary, you can add miscellaneouscharges to invoices and allocate them to invoice lines.
• View and approve price match discrepancies between the invoice netunit price and the purchase order net unit price. You can set up pricetolerance percentages for companies, vendors, and items. If thevendor invoice line price is not within the acceptable price tolerance,you can save the invoice until it is approved for posting, or until youreceive a correction from the vendor.
Scenario
Alicia, the Buyer at Contoso, enters a purchase order with one line item for 50 bulbs at a price of 2.00 U.S. dollars (USD) each. The purchase order is approved
and submitted to the vendor.
The vendor ships only 30 bulbs. Sammy, the Shipper, enters a packing slip for 30 bulbs.

8/20/2019 Financials I
http://slidepdf.com/reader/full/financials-i 377/563
Chapter 9: Accounts Payable Daily Procedures
9-41
April, the Purchasing Agent, receives the invoice in the mail for 50 bulbs at a price of 2.00 USD each for a total of 100 USD, but the totals that April isviewing reflect 30 bulbs at 2.00 USD each, for a total of 60 USD. April examinesthe vendor invoice and notices that the quantity is 50, not 30 as the systemdefaulted. She changes the invoice quantity to 50. The system flags April with aQuantity matching discrepancy, because the quantity on the invoice does not
equal the total matched quantity for the invoice line.
April cannot post the invoice, but she chooses to put it on hold so she can checkwith Alicia or Sammy to inquire why the invoice has arrived for a quantity thatdiffers from the packing slip quantity currently posted in the system.
Procedure: Define Parameters
Invoice Matching enables the set up of price tolerance percentages that you canuse to identify discrepancies among purchase order line prices, packing slip linequantities, and invoice line prices and quantities.
Follow these steps to enable invoice matching.
1. Click Accounts Payable, click Setup, and then click Parameters.
2. Select the Updates tab.
3. Select the Use invoice matching for this company check box.
4. In the Post invoice match discrepancies field, select from the list torequire approval before posting an invoice that contains invoicematching discrepancies by selecting one of the following options:
o Allow with warning
o Require approval
5. In the Display price match icon field, select from the list to displayan icon:
o If line prices are greater than allowed tolerance
o If line prices are greater than or less than allowed tolerances
For example, if the tolerance is five percent and the purchaseorder unit price is 10.00 U.S. dollars, a price match icon isshown if the invoice unit price exceeds 10.50 U.S. dollars. If theDisplay price match icon field is set to If line prices are
greater than or less than allowed tolerances, an icon displaysif the invoice unit price is less than 9.50 U.S. dollars.
NOTE : These fields are available only if the Invoice matching configuration
key is selected.

8/20/2019 Financials I
http://slidepdf.com/reader/full/financials-i 378/563
Financials I in Microsoft Dynamics® AX 2009
9-42
Procedure: Modify an Inventory Model Group for InvoiceMatching
Price discrepancies between the price of an item on a packing slip and the priceon a corresponding invoice may affect the recorded inventory cost of the item. Tohelp ensure that users record inventory costs correctly, require that packing slipinformation be posted before invoice information can post.
1. Click Inventory management, click Setup, click Inventory, andthen click Inventory model groups.
2. Select an inventory model group.
3. On the Setup tab, select the Receiving requirements check box todesignate that users must update item receipts physically before theycan update the receipts financially. Users must enter and post a packing slip before they can post the corresponding vendor invoice.
If there is a difference between the received quantity on the packingslip and the invoiced quantity on the invoice, an icon displays in thePacking slip quantity match column in the Posting invoice form.
4. Select the Deduction requirements check box. When selected, usersmust update item deductions physically before they update themfinancially. Users must enter and post a packing slip before they posta corresponding vendor invoice.
If there is a difference between the deducted quantity on the packingslip and the negative invoiced quantity on the invoice, an icondisplays in the Packing slip quantity match column in the Posting
invoice form.
5. Repeat steps 2 through 4 for the inventory model groups for whichyou want to use invoice matching.
Procedure: Create Item Price Tolerance Groups
You can set up price tolerance information for all items in your company, foritem price tolerance groups, or for individual items. To set up item pricetolerances by group, first create item price tolerance groups and then assign eachitem to the appropriate group. For example, you might set up three item pricetolerance groups: High, Medium, and Low.
Follow these steps to set up price tolerance information.
1. Click Inventory management, click Setup, click Price/Discount,and then click Item price tolerance groups.
2. Press CTRL+N to create a new item price tolerance group.
3. Enter an identifier for the item price tolerance group and a name.
4. Repeat steps 2 and 3 for the remaining item price tolerance groups.
5. Click Inventory management, and then click Item details.

8/20/2019 Financials I
http://slidepdf.com/reader/full/financials-i 379/563
Chapter 9: Accounts Payable Daily Procedures
9-43
6. Select an item.
7. On the General tab, select an item price tolerance group.
8. Repeat steps 6 and 7 for the remaining items.
Procedure: Create Vendor Price Tolerance Groups
Set up price tolerance information for all vendors in your company, for vendor price tolerance groups, or for individual vendors. To set up vendor pricetolerances by group, first create vendor price tolerance groups and then assigneach vendor to the appropriate group. For example, set up two vendor pricetolerance groups: 10 percent and 5 percent.
Follow these steps to set up price tolerance information for vendors.
1. Click Accounts payable, click Setup, click Price/Discount, andthen click Vendor price tolerance groups.
2. Press CTRL+N to create a new vendor price tolerance group.
3. Enter an identifier and a name for the vendor price tolerance group.4. Repeat steps 2 and 3 for the remaining vendor price tolerance
groups.
5. Click Accounts payable, and then click Vendor Details.
6. Select a vendor.
7. On the Setup tab, select a Vendor price tolerance group.
8. Repeat steps 6 and 7 for the remaining vendors.
Price Tolerance Setup
Set up price tolerance percentages for your company, items, and vendors. When
the system compares vendor invoices with purchase order information, itsearches for the applicable price tolerance percentage in the following order.
Item code Account code
Table Table
Table Group
Table All
Group Table
Group Group
Group All
All Table
All Group
All All

8/20/2019 Financials I
http://slidepdf.com/reader/full/financials-i 380/563
Financials I in Microsoft Dynamics® AX 2009
9-44
The default company price tolerance is zero percent and it applies to all items andall accounts (All, All). You cannot delete the default company price tolerancerecord.
For example, you can set up the following price tolerance percentage records.
Item
code
Item
relation
Account
code
Account
relation
Price
tolerance
percentage
Notes
All All 1% This percentageapplies to allitems and allvendors,unless one ofthe otherscenariosapplies. Thisis thecompany pricetolerance percentage.
Table Battery All 1% This percentageapplies to theBattery itemfrom all
vendors.
Group Low All 2% This percentageapplies to allitems whoseitem valuemodel grouphas the “Low”item pricetolerancegroupassigned totheir itemvalue modelgroups, andall vendors.
Group Medium All 6%

8/20/2019 Financials I
http://slidepdf.com/reader/full/financials-i 381/563
Chapter 9: Accounts Payable Daily Procedures
9-45
Item
code
Item
relation
Account
code Account
relation
Price
tolerance
percentage
Notes
Group High All 15%
All Group 5 percent 5%
All Group 10 percent
10% This percentageapplies tovendors whoare assigned tothe “10 percent”
group, and Allitems.
Procedure: Set Up Price Tolerance
Follow these steps to set up price tolerance.
1. Click Accounts payable, click Setup, click Price/Discount, andthen click Price tolerance setup.
2. In the first row, you can change the default company price tolerance.
3. Press CTRL+N to create a new price tolerance percentage.
4. Enter information about the item and vendor combination that the price tolerance applies to, and the price tolerance percentage.
5. Repeat steps 3 and 4 for the remaining price tolerance percentages.
NOTE : You cannot enter negative price tolerance percentages. By default,
Microsoft Dynamics AX 2009 allows negative price discrepancies. To track
negative price tolerance percentages, select If line prices are greater than or
less than allowed tolerance in the Display price match icon field in the
Accounts payable parameters form.
8/20/2019 Financials I
http://slidepdf.com/reader/full/financials-i 382/563
Financials I in Microsoft Dynamics® AX 2009
9-46
Test Your Knowledge
Invoice matching is the process of matching information from what documents?(Select all that apply.)
( ) Purchase Order
( ) Vendor Invoice
( ) Packing Slip
( ) Vendor Checks
Edit Open Transactions
Use the Open transactions editing form to make changes in transactions forvendors or customers. Only unapplied transactions are available for editing. Usethe Open transaction editing form, for example, to settle invoices and paymentsthat are unsettled in the payment journal.
When you settle invoices and payments:
If Then
The amount paid is greater than theamount due
The invoice is settled and a paymenttransaction is created for the amount by which the payment exceeded theamount due
The amount paid is less than theamount due
The payment is subtracted from theamount due and the invoice remainsopen
The amount paid equals the amountdue
A payment transaction is generatedfor the payment amount, and thetransaction is closed.
Procedure: Settle Invoices and Payments
Follow these steps to settle invoices against payments or make corrections toopen transactions.
1. Click Vendor Details.
2. Select a vendor record.
3. Click the Functions button, and then click Open transaction
editing.
4. Select the relevant postings to settle.

8/20/2019 Financials I
http://slidepdf.com/reader/full/financials-i 383/563
Chapter 9: Accounts Payable Daily Procedures
9-47
NOTE : In the Is marked field, a red icon appears if a transaction is
already selected for settlement.
When the transactions are settled they disappear from this form and can be
ound on the Closed-transaction editing form.
5. Place the pointer on the primary payment line, if any, and select thePrimary payment check box. The purpose of a primary payment isto get a more correct history or select the basis currency used forcross rate.
6. Click Update. The selected vouchers offset each other. If a voucheris not settled in full, it is recorded as Open.
FIGURE 9.10 OPEN TRANSACTION EDITING FORM
Procedure: Enable Automatic Settlement
In some cases, it is more convenient to use automatic settlement of invoices and payments, for example, if a company must handle many small vendors with few payments. Follow these steps to enable automatic settlement.
1. Click Accounts payable, click Setup, and then click Posting
profiles.
2. Select the relevant vendor posting profile.
3. Click the Table restrictions tab.
4. Select the Settlement check box.
8/20/2019 Financials I
http://slidepdf.com/reader/full/financials-i 384/563
Financials I in Microsoft Dynamics® AX 2009
9-48
Test Your Knowledge
In the Is marked field, a red icon appears if a transaction already is selected forsettlement.
( ) True( ) False
Reverse a Closed Transaction
When you work with reverse settlements:
• Use the Closed-transaction editing form to edit fully applied orsettled transactions that are in history.
• Use reverse settlements if the bank does not honor a payment or ifyou use the wrong date or settlement amount.
• Note that a settlement is not a transaction, but it is a link between the payment and the invoice.
• Note that the system considers an unsettled invoice unpaid.
Scenario
Phyllis, the Accounting Manager at Contoso, reviews and approves the AccountsPayable transactions. Phyllis realizes that a consulting fee was paid twice and shewants to reverse the settlement.
Procedure: Reverse a Closed Transaction
Follow these steps to reverse a closed transaction.
1. Click Accounts payable, and then click Vendor Details.
2. Select a vendor record.
3. Click the Functions button, and then click Closed-transaction
editing.
4. Select the Mark check box to reverse the invoice or payment that isassociated with the settlement. The Mark field of the transaction thatoffsets the transaction marked is selected automatically.

8/20/2019 Financials I
http://slidepdf.com/reader/full/financials-i 385/563
Chapter 9: Accounts Payable Daily Procedures
9-49
5. Click the Reverse button. The system changes the settlementamount, makes corrections, and changes the status. History displaysan overview of settlements for the current voucher.
FIGURE 9.11 CLOSED TRANSACTION EDITING FORM
Test Your Knowledge
For what is the closed transactions editing functionality used?(Select all thatapply.)
( ) Editing settlements
( ) Reversing settlements not honored by the bank
( ) Reversing settlements with incorrect information, such as dates
( ) Editing fully applied or settled transactions

8/20/2019 Financials I
http://slidepdf.com/reader/full/financials-i 386/563
Financials I in Microsoft Dynamics® AX 2009
9-50
Lab 9.5 - Reverse a Closed Transaction
Scenario
April, the Accounts Payable Clerk at Contoso, realizes the last transaction posted
for vendor account 5001 should have been posted to vendor account 2001. Shemust reverse the transaction and check history to ensure she reverses thetransaction. She then will make a note to enter the transaction correctly in themorning.
Challenge Yourself!
Help April reverse the transaction and check history to ensure she reversed itcorrectly.
Need a Little Help?
You can reverse closed transactions by using the closed transaction editingfunction.
Step by Step
1. Click Accounts payable, and then click Vendor Details.
2. Click Vendor account 5001.
3. Click the Functions button, and then click Closed transaction
editing.
4. Click the last line in the form.
5. Select the Marked check box.6. Click the Reverse button.
7. Click the Inquiry button, and then click History to view thereversed transactions.

8/20/2019 Financials I
http://slidepdf.com/reader/full/financials-i 387/563
Chapter 9: Accounts Payable Daily Procedures
9-51
Print Management
You can define print management original records, copy records, and conditionalsettings at the module, account, or transaction level. You can control variousactivities that include the following:
• Number of copies to produce
• Multilingual document footer text
• Print destination
How Print Management Works
When you are printing documents such as invoices or packing lists, use definedsettings for the original or copy records in print management. The effectiverecords are the records established in Print management that control the printedoutput of original and copy records. An original or copy record contains theinformation that print management uses to print the document. The record that is
used to print a document determines the footer text for the document, the printerto use, and how many copies to print. For example, to print three copies of thesales order packing slip, each with different footer text, set up an original recordand two copy records.
You can define the print management setup information for each document typein a hierarchical list that consists of modules, accounts, and transactions. At eachlevel of the hierarchy, define print management original records, copy records,and settings for any of the available document types.
When a document generates, it prints according to the effective original recordand effective copy records. An effective record can inherit information from a
higher level in the hierarchy or create a new record for the current level in thehierarchy, or it can override an inherited record that has the same name.
Each original record or copy record can associate with a default setting thatspecifies the footer text, printer destination, and number of identical copies to print. If the Default setting check box in the Print management setup form isselected, a document prints according to the specifications for the default setting.If this field is not selected, a document prints only if a query for an associatedconditional setting successfully returns results.
Each original record or copy record can have up to 19 conditional settingsassociated with it. Each conditional setting has a related query. For example, you
can create a query to print footer text in a different language for a specificvendor. When the document generates during posting, the queries that associatewith the conditional settings are evaluated automatically in the order in which thesettings appear in the Print Management setup form. The setting that associateswith the first successful query is used to print the document.

8/20/2019 Financials I
http://slidepdf.com/reader/full/financials-i 388/563
Financials I in Microsoft Dynamics® AX 2009
9-52
Procedure: Print Management at the Module Level
You can define print management settings for each module, account, transaction,or any combination of these three. You can create up to 99 original or copyrecords for every document type. You can create up to 19 conditional settings foreach original or copy record, in addition to the default setting.
Setting up print management at the module level requires the least amount ofsetup and minimizes the maintenance work when settings change, such asinstallation of a new printer. However, if business needs require, settings forspecific accounts or individual transactions can override module settings.
NOTE : You can use print management settings when you reprint documents.
Select Preview/Print > Use print management to reprint a document that uses
the effective print management settings.
Procedure: Set Up Print Management
Follow these steps to set up print management at the module level.
1. Click Accounts Payable, click Setup, click Forms, and then clickForm Setup.
2. Click the Print management button. The hierarchical list in the left pane displays the module, documents, original or copy records, andconditional settings. The fields in the right pane are the options thatyou can specify for each type of record. The displayed fields vary,depending on the selected record. When the hierarchy list isunexpanded, a plus (+) icon in front of the document type indicatesthat a setup record exists.
3. To create a new record, right-click a document name and select New.A new original or copy record is created and is displayed in the listautomatically.
4. In the right pane in the Original/copy field, select to create anoriginal or copy record. You can create only one original record foreach document, but you can create multiple copy records for eachdocument.
5. If you are creating a copy, enter a name in the Name field.
6. If the Do not print check box is selected, the original or copy willnot print. If there is an override of an original or copy record from ahigher level in the print management hierarchy, use this option tostop a document from printing instead of only changing thedestination, number of copies, or footer text.
7. If the Default setting check box is selected, the original or copy prints even if the queries for any applicable conditional settings donot return any results. The original or copy is denoted in thehierarchical list by the word Default.
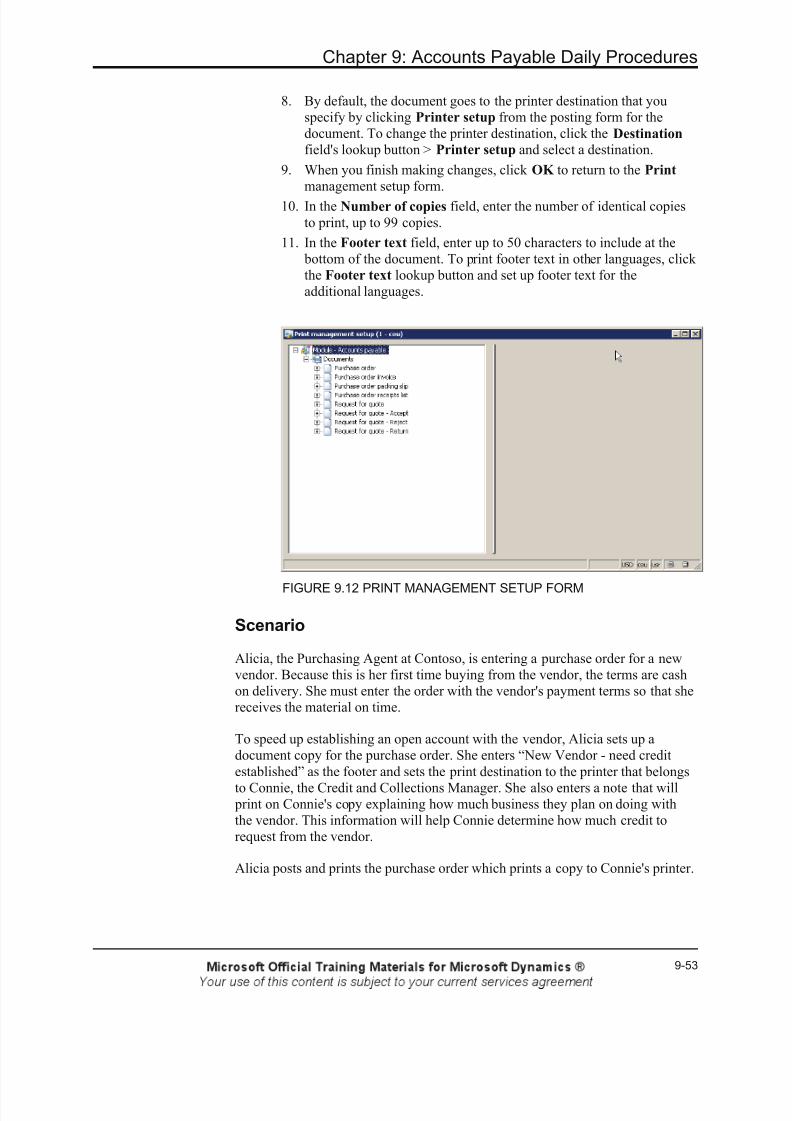
8/20/2019 Financials I
http://slidepdf.com/reader/full/financials-i 389/563
Chapter 9: Accounts Payable Daily Procedures
9-53
8. By default, the document goes to the printer destination that youspecify by clicking Printer setup from the posting form for thedocument. To change the printer destination, click the Destination
field's lookup button > Printer setup and select a destination.
9. When you finish making changes, click OK to return to the Print
management setup form.
10. In the Number of copies field, enter the number of identical copiesto print, up to 99 copies.
11. In the Footer text field, enter up to 50 characters to include at the bottom of the document. To print footer text in other languages, clickthe Footer text lookup button and set up footer text for theadditional languages.
FIGURE 9.12 PRINT MANAGEMENT SETUP FORM
Scenario
Alicia, the Purchasing Agent at Contoso, is entering a purchase order for a newvendor. Because this is her first time buying from the vendor, the terms are cashon delivery. She must enter the order with the vendor's payment terms so that shereceives the material on time.
To speed up establishing an open account with the vendor, Alicia sets up adocument copy for the purchase order. She enters “New Vendor - need creditestablished” as the footer and sets the print destination to the printer that belongs
to Connie, the Credit and Collections Manager. She also enters a note that will print on Connie's copy explaining how much business they plan on doing withthe vendor. This information will help Connie determine how much credit torequest from the vendor.
Alicia posts and prints the purchase order which prints a copy to Connie's printer.

8/20/2019 Financials I
http://slidepdf.com/reader/full/financials-i 390/563
Financials I in Microsoft Dynamics® AX 2009
9-54
Procedure: Set Up Print Management for an Account
Follow these steps to set up print management for a specific vendor account.
1. Click Accounts payable, and then click Vendors.
2. Select an account.
3. Click Setup, and then click Print management.
4. In the left pane, expand the list for a document that is listed under thecustomer or vendor account. Any original or copy records display.An icon with a blue arrow indicates that the original or copy recordinherits information from the module level of the hierarchy. This print management information is used for the customer or vendor,unless you perform an override to make changes at the account level.
5. Review the original or copy record information. If changes arenecessary, override the inherited record, copy an inherited record,create a new record, or create a new setting.
o To override, right-click an original or copy record and selectOverride. The icon changes to display a red X to indicate thatthe record is now an override record.
o To copy, right-click an original or copy record and select Copy.A copy displays in the list. The copy must have a new name.
o To create a new original or copy record, right-click a documenttype in the list and select New. A new record displays in the list.
o To create a new conditional setting, right-click an original orcopy record and select New. A new conditional setting displaysin the list. The conditional setting must have a description andselect query information.
Procedure: Set Up Print Management for a Transaction
Set up print management original or copy records and conditional settings for atransaction, such as a purchase order. This may be necessary if you use adifferent printer for a specific transaction.
Refer to the following table for the complete list of documents supported inAccounts Payable and the path that gives access to the print management setupfor each document.
Document Path
Purchase order
Purchase order invoice
Purchase order packing slip
Purchase order receipts list
Accounts payable > Purchase order
> Advanced > Setup > Printmanagement
Request for quote Accounts payable > Request for
Quote > Setup > Print management
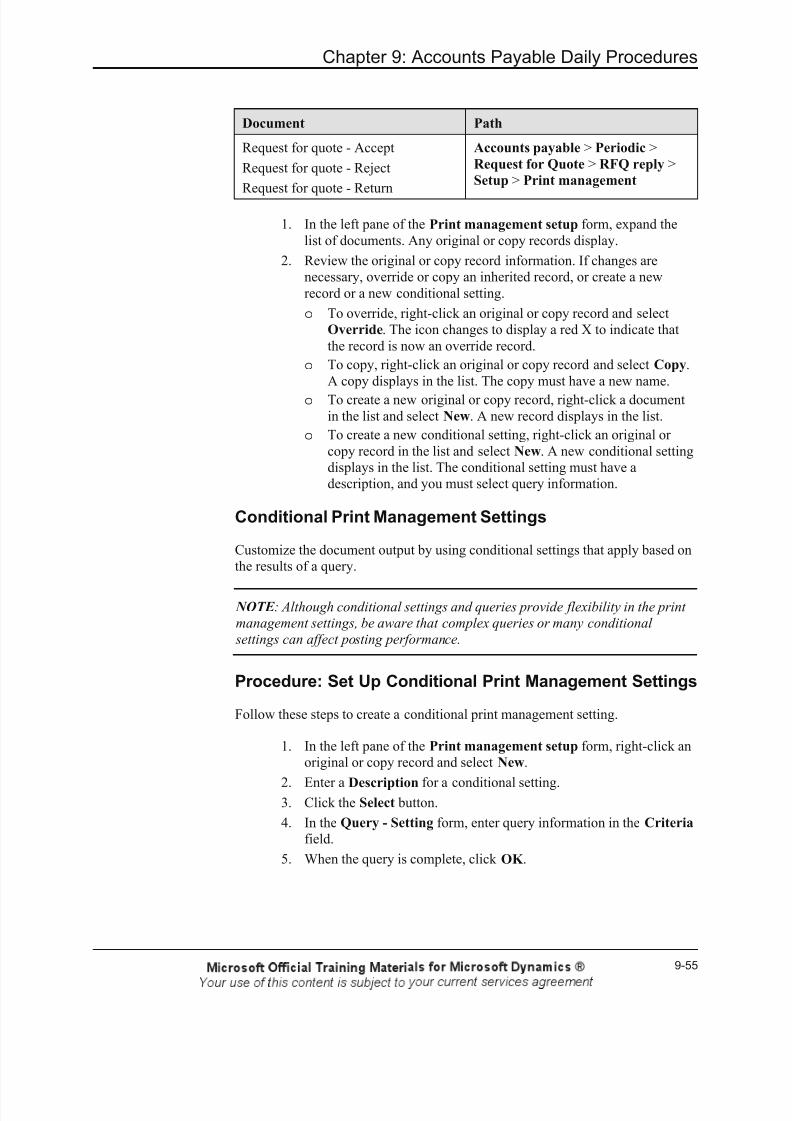
8/20/2019 Financials I
http://slidepdf.com/reader/full/financials-i 391/563
Chapter 9: Accounts Payable Daily Procedures
9-55
Document Path
Request for quote - Accept
Request for quote - Reject
Request for quote - Return
Accounts payable > Periodic >
Request for Quote > RFQ reply >
Setup > Print management
1. In the left pane of the Print management setup form, expand thelist of documents. Any original or copy records display.
2. Review the original or copy record information. If changes arenecessary, override or copy an inherited record, or create a newrecord or a new conditional setting.
o To override, right-click an original or copy record and selectOverride. The icon changes to display a red X to indicate thatthe record is now an override record.
o To copy, right-click an original or copy record and select Copy.A copy displays in the list. The copy must have a new name.
o To create a new original or copy record, right-click a documentin the list and select New. A new record displays in the list.
o To create a new conditional setting, right-click an original orcopy record in the list and select New. A new conditional settingdisplays in the list. The conditional setting must have adescription, and you must select query information.
Conditional Print Management Settings
Customize the document output by using conditional settings that apply based onthe results of a query.
NOTE : Although conditional settings and queries provide flexibility in the print
management settings, be aware that complex queries or many conditional
settings can affect posting performance.
Procedure: Set Up Conditional Print Management Settings
Follow these steps to create a conditional print management setting.
1. In the left pane of the Print management setup form, right-click anoriginal or copy record and select New.
2. Enter a Description for a conditional setting.3. Click the Select button.
4. In the Query - Setting form, enter query information in the Criteria
field.
5. When the query is complete, click OK .

8/20/2019 Financials I
http://slidepdf.com/reader/full/financials-i 392/563
Financials I in Microsoft Dynamics® AX 2009
9-56
Test Your Knowledge
1. How are print management settings defined?
( ) for each module
( ) for each account
( ) for each transaction
( ) for each module, account, transaction, or any combination of thesethree.
2. Which of the following activities are uncontrollable with print managementsettings?
( ) Number of copies to produce
( ) Page orientation
( ) Multilingual document footer text
( ) Print destination

8/20/2019 Financials I
http://slidepdf.com/reader/full/financials-i 393/563
Chapter 9: Accounts Payable Daily Procedures
9-57
Summary
Microsoft Dynamics AX 2009 offers several important features for managingAccounts Payable. For example:
• Several options for recording vendor invoices including a two-step posting for separate handling of approved and unapproved invoices,and the option to match vendor invoices to physical deliveries ofgoods.
• Payment proposals.
Microsoft Dynamics AX 2009 enhances the preferred procedures for handlingfinancial interactions with both simple and advanced options. If you recordinvoices for every date, do so in the invoice pools. Record approved invoicesdirectly in the invoice journal.

8/20/2019 Financials I
http://slidepdf.com/reader/full/financials-i 394/563
Financials I in Microsoft Dynamics® AX 2009
9-58
Test Your Knowledge
Test your knowledge with the following questions.
1. What are the different invoices available in Microsoft Dynamics AX 2009?(Select all that apply.)
( ) Invoice register
( ) Invoice approval journal
( ) Invoice journal
( ) Invoice pool excluding posting
2. What does validation do? (Select all that apply.)
( ) Ensures that everything is correct prior to posting.
( ) Ensures that you have selected the correct vendor.
( ) Verifies that the journal balances.
( ) Verifies that all mandatory fields are filled in.
3. How do you create payment lines in the payment journal? (Select all thatapply.)
( ) Manual payment journal
( ) Payment transfer
( ) Settlement
( ) Payment proposal
8/20/2019 Financials I
http://slidepdf.com/reader/full/financials-i 395/563
Chapter 9: Accounts Payable Daily Procedures
9-59
Quick Interaction: Lessons Learned
Take a moment and write down three key points you have learned from thischapter:
1.
2.
3.
8/20/2019 Financials I
http://slidepdf.com/reader/full/financials-i 396/563
Financials I in Microsoft Dynamics® AX 2009
9-60
Solutions
Invoice Approval Journal
Test Your Knowledge
After you post the lines of the invoice register, the postings display in the payment proposal.
( ) True
(•) False
Invoice Pool Excluding Posting
Test Your Knowledge
You can use the invoice pool to view registered invoices that are ready for posting.
(•) True
( ) False
Invoice Journal
Test Your Knowledge
You must validate the journal before you post.
( ) True
(•) False
Voucher Template
Test Your Knowledge
Which voucher template type lets users re-create a voucher for the same accountsand values as the original entry?
( ) Percent
( ) Division( ) Aggregate
(•) Amount

8/20/2019 Financials I
http://slidepdf.com/reader/full/financials-i 397/563
Chapter 9: Accounts Payable Daily Procedures
9-61
Invoice Matching
Test Your Knowledge
Invoice matching is the process of matching information from what documents?
(Select all that apply.)
(√) Purchase Order
(√) Vendor Invoice
(√) Packing Slip
( ) Vendor Checks
Edit Open Transactions
Test Your Knowledge
In the Is marked field, a red icon appears if a transaction already is selected forsettlement.
(•) True
( ) False
Reverse a Closed Transaction
Test Your Knowledge
For what is the closed transactions editing functionality used? (Select all thatapply.)
( ) Editing settlements
(√) Reversing settlements not honored by the bank
(√) Reversing settlements with incorrect information, such as dates
(√) Editing fully applied or settled transactions

8/20/2019 Financials I
http://slidepdf.com/reader/full/financials-i 398/563
Financials I in Microsoft Dynamics® AX 2009
9-62
Print Management
Test Your Knowledge
How are print management settings defined?
( ) for each module
( ) for each account
( ) for each transaction
(•) for each module, account, transaction, or any combination of thesethree.
Which of the following activities are uncontrollable with print managementsettings?
( ) Number of copies to produce
(•) Page orientation
( ) Multilingual document footer text
( ) Print destination
Test Your Knowledge
1. What are the different invoices available in Microsoft Dynamics AX 2009?(Select all that apply.)
(√) Invoice register
(√) Invoice approval journal
(√) Invoice journal
(√) Invoice pool excluding posting
2. What does validation do? (Select all that apply.)
(√) Ensures that everything is correct prior to posting.
( ) Ensures that you have selected the correct vendor.
(√) Verifies that the journal balances.
(√) Verifies that all mandatory fields are filled in.
3. How do you create payment lines in the payment journal? (Select all that
apply.)
(√) Manual payment journal
( ) Payment transfer
(√) Settlement
(√) Payment proposal

8/20/2019 Financials I
http://slidepdf.com/reader/full/financials-i 399/563
Chapter 10: Accounts Receivable Setup
10-1
CHAPTER 10: ACCOUNTS RECEIVABLE SETUP
Objectives
The objectives are:
• Create a payment schedule
• Create terms of payment
• Create a payment day
• Set up a cash discount
• Create a payment fee
• Create a method of payment
• Set up customer groups
• Set up posting profiles• Create a new customer
Introduction
There are different Accounts Receivable setup options in Microsoft Dynamics®
AX 2009. This course introduces the setup procedures and defaults you can usethroughout the Accounts Receivable module.
Microsoft Dynamics AX 2009 offers extensive functionality to set up differentcustomer payment options. This includes the following:
• Payment schedules
• Payment days
• Terms of payment
• Cash discounts
• Methods of payment
• Payment fees
This course also explains Customer setup so you can process customers andcustomer transactions quickly and efficiently.

8/20/2019 Financials I
http://slidepdf.com/reader/full/financials-i 400/563
Financials I in Microsoft Dynamics® AX 2009
10-2
Payment Schedule
Use payment schedules to pay invoices in installments. To set up a paymentschedule, define the following:
• Number of installments
• Amount of each installment
• Due date of each installment
A payment schedule consists of consecutive payments in set time intervals. The payments can be a:
• Set amount
• Specified number of payments wherein the amount owed is dividedto create equal payments
For example, an invoice of 10,000 USD is recorded. The customer pays 2,000USD each month until the balance is paid. During this period the invoice is notconsidered past due as long as the customer makes the scheduled payments ontime. This is known as a finance plan, or contract payments.
Procedure: Create a Payment Schedule
Follow these steps to create a payment schedule.
1. To access the Payment schedules form, click Accounts
receivable, click Setup, click Payment, and then click Payment
schedules.
2. Enter a name as identification of the payment schedule in thePayment schedule field.
3. Enter a description in the Description field.
4. Click the General tab.
5. Select an allocation method in the Allocation list:
o Total - The total amount outstanding on the invoice is due.
o Fixed amount - A specific, fixed amount is due for each payment on the specified payment dates.
o Fixed quantity - Payment of the total amount is divided intoa fixed quantity of payments.
o Specified - A specified amount is due on each specified date.
If Specified is selected, the payment schedules and amountsmust be defined on the Payment lines tab.

8/20/2019 Financials I
http://slidepdf.com/reader/full/financials-i 401/563
Chapter 10: Accounts Receivable Setup
10-3
Depending on the value you select in the Allocation list, the General and
Payment lines tabs enable different fields.
FIGURE 10.1 PAYMENT SCHEDULES FORM
Procedure: Create a Total Payment Schedule
If Total is selected in the Allocation list, no other fields are enabled on theGeneral tab.
Procedure: Create a Specified Payment Schedule
If you select Specified in the Allocation list, follow these steps to complete thePayment schedule setup.
1. From the Payment schedules form, General tab, in the Payment
per list, select the date interval in Days, Months, or Years. Thesystem uses this information when it calculates the due date ofeach installment.
2. Use the Sales tax allocation list to distribute the sales tax amounton a bill of exchange to the payment schedule installments.
3. Click the Payment Lines tab to define the line information for the payment schedule, designate the number of different payments,and divide the percent of the total that is due in each payment.
4. In the Quantity field, enter the time interval for each installment.
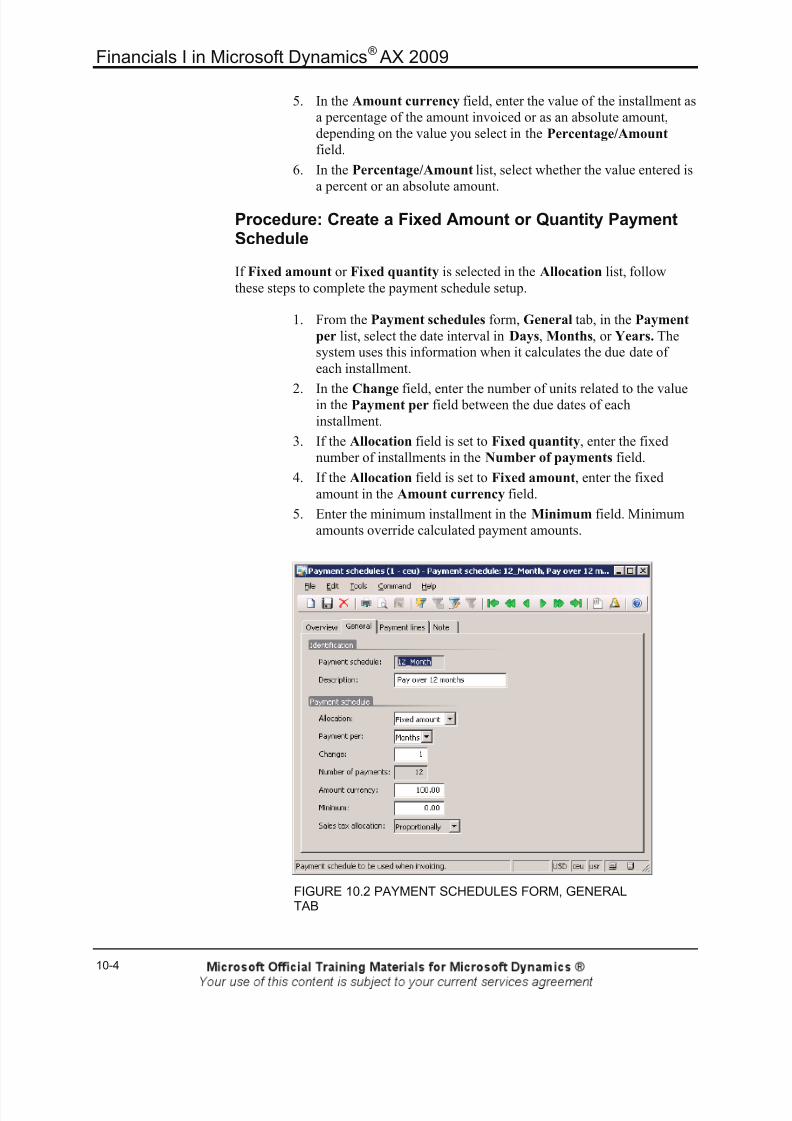
8/20/2019 Financials I
http://slidepdf.com/reader/full/financials-i 402/563
Financials I in Microsoft Dynamics® AX 2009
10-4
5. In the Amount currency field, enter the value of the installment asa percentage of the amount invoiced or as an absolute amount,depending on the value you select in the Percentage/Amount
field.
6. In the Percentage/Amount list, select whether the value entered isa percent or an absolute amount.
Procedure: Create a Fixed Amount or Quantity PaymentSchedule
If Fixed amount or Fixed quantity is selected in the Allocation list, followthese steps to complete the payment schedule setup.
1. From the Payment schedules form, General tab, in the Payment
per list, select the date interval in Days, Months, or Years. Thesystem uses this information when it calculates the due date ofeach installment.
2. In the Change field, enter the number of units related to the valuein the Payment per field between the due dates of eachinstallment.
3. If the Allocation field is set to Fixed quantity, enter the fixednumber of installments in the Number of payments field.
4. If the Allocation field is set to Fixed amount, enter the fixedamount in the Amount currency field.
5. Enter the minimum installment in the Minimum field. Minimumamounts override calculated payment amounts.
FIGURE 10.2 PAYMENT SCHEDULES FORM, GENERALTAB

8/20/2019 Financials I
http://slidepdf.com/reader/full/financials-i 403/563
Chapter 10: Accounts Receivable Setup
10-5
Procedure: Apply or Change a Payment Schedule
You can apply the payment schedule to customers, sales orders, or free-textinvoices.
Follow these steps to apply the payment schedule to a sales order.
1. Click Accounts receivable, and then click Sales order Details.
2. Click the Advanced button.
3. Click the Price/discount tab. Select a payment schedule in thePayment schedule list.
Follow these steps to change the payment schedule.
1. From the Sales order form, click the Setup button, and then clickPayment schedule.
2. Click the Payment lines tab. The payment plan expands into aworksheet for the sales order.
3. Change the values in the Due date, Invoice amount, Disc. date,or Discount amount fields.
Test Your Knowledge
To set up a payment schedule, define the following. (Select all that apply.)
( ) Number of schedules
( ) Number of installments
( ) Amount of each installment
( ) Due date of each installment
Terms of Payment
Use the Terms of payment form to define all the terms of payment that acompany and its customers use. You can also use a term of payment to calculatethe due date based on the date of the invoice.
Specify terms of payment for each:
• Vendor in the Vendors form.
• Customer in the Customers form.
• Purchase order in the Purchase order form.
• Sales order in the Sales order form.

8/20/2019 Financials I
http://slidepdf.com/reader/full/financials-i 404/563
Financials I in Microsoft Dynamics® AX 2009
10-6
Scenario
Contoso has a standard customer payment term of Net 30 days. If an invoice witha Net 30 payment term ships goods on September 15, and the invoice is dated November 15, payment is due December 15. With a Net 30 Days settlement, the
customer must pay the net due within 30 days of the receipt of goods or receipt ofthe invoice, according to the settlement. After that date, if the payment is notcompleted, you may add an interest charge of a specified percent for each monthto the invoice along with other services charges.
Procedure: Create Terms of Payment
Follow these steps to create a term of payment.
1. Click Accounts receivable, click Setup, click Payment, and thenclick Terms of payment.
2. Press CTRL+N to create a new record.
3. On the Overview tab, in the Terms of payment field, enter a codeor a short name for the term of payment, and then enter adescriptive name for the current terms of payment in theDescription field.
Procedure: Create Terms of Payment - Setup
Follow these steps to enter setup information for a term of payment.
1. From the Terms of payment form, click the Setup tab.
2. In the Payment method list, select the method to calculate the duedate:
o Net
o Curr. Mth.
o Curr. Qtr.
o Curr. Year
o Curr. Week
o C.O.D.
3. Enter the number of months to add to the payment method tocalculate the due date in the Months field.
4. Enter the number of days to add to the payment method to
calculate the due date in the Days field.5. In the Payment schedule list, link a payment schedule to the term
of payment. The payment schedule defines how an invoicedamount is split up into installments that must be paid in specificintervals.

8/20/2019 Financials I
http://slidepdf.com/reader/full/financials-i 405/563
Chapter 10: Accounts Receivable Setup
10-7
NOTE : If a term of payment is linked to a payment schedule, the rules set up in
the term of payment are used to calculate the due date of the first installment. The
rules set up in the payment schedule are used to calculate the due date of the
ollowing installments.
6. In the Payment day list, select a payment day used for calculationof due date.
7. Use the Language text button to translate the search name intomore languages. For example, if a French language text is createdthe text is shown on invoices for all customers set up with Frenchas the language.
FIGURE 10.3 TERMS OF PAYMENT FORM, SETUP TAB
Procedure: Create Terms of Payment - C.O.D.
If the C.O.D. (Cash on delivery) payment method is selected, follow these stepsto complete the term of payment setup.
1. Select the Cash payment check box to indicate whether customers
must make payments in cash and not by check.2. In the Ledger posting area from the Cash list, select a ledger
account for settlement of invoices that the system will use for cash payment.

8/20/2019 Financials I
http://slidepdf.com/reader/full/financials-i 406/563
Financials I in Microsoft Dynamics® AX 2009
10-8
Procedure: Attach a Payment Term
You can attach the terms of payment to sales orders, free text invoices, orcustomers. For example, click Accounts receivable, and then click Free text
invoice. On the Payments tab, select the terms of payment in the Terms of
payment list.
Test Your Knowledge
Which of the following can be selected in the Payment method list to calculatethe due date? (Select all that apply.)
( ) Net
( ) Curr. Week
( ) Curr. Year
( ) C.O.D.
Payment Days
Use payment days to define the payment day to use for calculating the due date.The due date always is rounded up to the nearest specified date automatically.
You can specify the payment day for:
• A specific day in the week
• A specific date in the month
Procedure: Create a Payment DayFollow these steps to create a payment day.
1. Click Accounts receivable, click Setup, click Payment, and thenclick Payment Days.
2. Press CTRL+N to create a new record.
3. Enter a short identification of the payment day in the Payment day
field and then enter a description of the payment day identificationin the Description field, on the Overview tab.
4. On the Payment day lines tab, select between Week and Month inthe Week/Month list. If you select Week , select a value from the
Weekday list, and if you select Month, enter a value between oneand 31 in the Day field.

8/20/2019 Financials I
http://slidepdf.com/reader/full/financials-i 407/563
Chapter 10: Accounts Receivable Setup
10-9
Set up the payment day in the Terms of Payment form on the Setup tab todefine the payment date to use to calculate the due date.
FIGURE 10.4 PAYMENT DAYS FORM

8/20/2019 Financials I
http://slidepdf.com/reader/full/financials-i 408/563
Financials I in Microsoft Dynamics® AX 2009
10-10
Lab 10.1 - Terms of Payment
Scenario
Connie, Contoso's Credit and Collections Manager, has been reviewing theoutstanding customer balances. She noticed that the customer Cave Wholesaleshas a large outstanding balance. After a telephone call to Cave Wholesales, both parties agreed that Cave Wholesales will now make payments within 18 days.
Challenge Yourself!
Help Connie create a new term of payment to fulfill this requirement and assignit to Cave Wholesales.
Need a Little Help?
The term of payment is assigned to the customer on the Payment tab of theCustomers form.
Step by Step
Follow these steps to create a new term of payment.
1. Click Accounts receivable, click Setup, click Payment, and thenclick Terms of payment.
2. Click the New button or press CTRL+N.
3. In the Terms of Payment ID field, enter N018.
4. In the Description field, enter Net 18 days.
5. On the Setup tab, in the Payment Method field, select Net.
6. In the Days field, type 18.
7. Close the window.
Follow these steps to assign a new term of payment to Desk World.
1. Click Accounts receivable, and then click Customer Details.
2. Select 1103, Cave Wholesales as the customer.
3. Click the Payment tab.
4. In the Terms of payment field, select N018.

8/20/2019 Financials I
http://slidepdf.com/reader/full/financials-i 409/563
Chapter 10: Accounts Receivable Setup
10-11
Cash Discount
Cash discounts are:
• Earned if a customer pays the invoices within a specified period.
• Linked to the Customer tables and Vendor tables.
• Posted to the ledger account specified for the cash discount when aninvoice is settled in time to obtain a cash discount.
Scenario
Contoso's customers receive a cash discount if they pay invoices due withincertain dates. Contoso has set up the following codes:
• 5D10% - Cash discount of 10 percent when the amount is paidwithin five days.
• 10D5% - Cash discount of 5 percent when the amount is paid withinten days.
• 14D2% - Cash discount of 2 percent when the amount is paid within14 days.
The three cash discounts follow one another as the payment nears the cashdiscount date. However, only one cash discount is granted.
To specify this on the 5D10% code, the 10D5% code is selected in the Next
discount code list. On the 10D5% code, the 14D2% code is selected in the Next
discount code list. Finally, on the 14D2% code the Next discount code is left
blank.
Procedure: Set Up Cash Discounts
Follow these steps to set up cash discounts.
1. Click Accounts receivable, click Setup, click Payment, and thenclick Cash discounts.
2. Enter an alphanumeric code for the cash discount in the Cash
discount field. For example, enter 10D2% to indicate the customerreceives a two percent discount if payment is made ten days beforethe due date.
3. Enter a brief description for the cash discount in the Descriptionfield. For example, enter 10 days/2% for the discount code10D2%.
4. Select the cash discount code used when the criteria for obtainingthe current cash discount is exceeded in the Next discount code
list. This selection allows you to define a set of cash discounts thatfollow one another.

8/20/2019 Financials I
http://slidepdf.com/reader/full/financials-i 410/563
Financials I in Microsoft Dynamics® AX 2009
10-12
Procedure: Set Up Cash Discounts - Setup
Follow these steps to define setup information for cash discounts.
1. From the Cash discounts form, click the Setup tab.
2. Select the method applicable for the cash discount from theNet/Current list. The method specified, together with the valuegiven in the Days field and/or Months field, is used to calculatethe last date the customer can make a payment and receive anyavailable cash discounts.
3. Enter the number of months during the period when the cashdiscount is applicable in the Months field.
4. Enter the number of days during the period when the cash discountis applicable in the Days field.
5. Enter the cash discount as a percentage of the invoiced amount inthe Discount pct. field.
6. Select the ledger account for debiting the cash discounts given to acustomer in the Account allowed list.
NOTE : Assign cash discounts to customers, journals, or sales orders.
FIGURE 10.5 CASH DISCOUNTS FORM, SETUP TAB

8/20/2019 Financials I
http://slidepdf.com/reader/full/financials-i 411/563
Chapter 10: Accounts Receivable Setup
10-13
Procedure: Define Accounts Receivable Parameters
Follow these steps to specify accounts receivable parameter values that affect thecash discount calculation.
1. To access the Accounts receivable parameters form, clickAccounts receivable, click Setup, and then click Parameters.
2. Click the Settlement tab.
3. In the Cash-discount administration list select what to do with anoverpayment or underpayment when a cash discount is notdeducted correctly when the invoice is settled. Select from thefollowing values:
o Unspecific - The underpayment amount is posted to thecustomer cash discount account.
If the applicable cash discount was posted in the same
company as the overpayment, the system will adjust the cashdiscount. If the applicable cash discount was not posted in thesame company as the overpayment, it is posted to the systemcash discount account. If there are multiple cash discounts sothat an overpayment was settled against multiple invoices, theadjustment to the discount is from the last invoice to the firstdiscount.
o Specific - The overpayment or underpayment amount is postedto the customer cash discount account.
For example, a customer's invoice total is 105.00 USD and theobtainable cash discount is 10.50 USD. Considering the cash
discount, the customer should pay 94.50 USD ($105-10.50).However the amount actually paid by the customer is 95.00USD.If the Cash-discount administration parameter is set toUnspecific, the invoice is settled and the difference of 0.50 is posted to the ledger account specified for cash discountdifferences automatically.If the Cash-discount administration parameter is set toSpecific, the invoice is settled, and the difference of 0.50 is posted to the customer's cash discount account.
8/20/2019 Financials I
http://slidepdf.com/reader/full/financials-i 412/563
Financials I in Microsoft Dynamics® AX 2009
10-14
Procedure: Define General Ledger Parameters
Follow these steps to specify general ledger parameter values that affect the cashdiscount calculation.
1. To access the General ledger parameters form, click Generalledger, click Setup, and then click Parameters.
2. Click the Sales tax tab.
3. Select the Customer Cash Discount: Cash discount is calculated
on amount incl. sales tax check box to specify that the cashdiscount is calculated based on the amount plus sales tax.
Test Your Knowledge
Customers earn cash discounts by paying an invoice within a specified period.
( ) True
( ) False
Payment Fee
Use payment fees to:
• Specify if any additional charges are added to the customer invoice.
• Define fee identifications, specify bank relations, and identify how togenerate fees.
ScenarioContoso defined guidelines on how to handle late payments:
• If a customer does not pay an invoice within the due date, it issubject to late payment fees.
• Contoso assesses most invoices late payment fees 30 days after theinvoice date.
Procedure: Create a Payment Fee
Follow these steps to create a payment fee.
1. Click Accounts receivable, click Setup, click Payment, and thenclick Payment fee.
2. Enter an identification in the Fee ID field.
3. Enter a brief description in the Description field.
4. Enter a text that is used in reports and inquiries in the Transaction
text field.

8/20/2019 Financials I
http://slidepdf.com/reader/full/financials-i 413/563
Chapter 10: Accounts Receivable Setup
10-15
5. Select whether to charge the Customer or Ledger to use afinancial cost for the fee in the Charge list. If Ledger is selected,select an account number in the Ledger account list for posting inthe ledger.
6. Click the General tab.
7. Select the journal type for which the fee is valid in the Journaltype list.
FIGURE 10.6 PAYMENT FEE FORM
Procedure: Define Payment Fee Setup
You can define a payment fee to set up lines for each fee used for different
banks, methods of payment, remittance types, payment specifications, currencies,time periods, and amount intervals. Follow these steps to set up a payment fee.
1. From the Payment fee form, click the Payment fee setup button.
2. Select the kind of bank information that is required to start the feein the Grouping list. The fee is valid for each field for:
o Table - the bank account selected in the field Bank relation
o Group - the bank group selected in Bank relation
o All - all the bank accounts
3. Select a bank relation from the Bank relation list if:
o A bank account - Table is selected in the Grouping listo Bank groups - Group is selected in the Grouping list
o Skip - All is selected in the Grouping list
4. Select a method of payment used for the actual payment fee in theMethod of payment list.
5. If the company agrees with the bank to specify the payment, selectthe payment specifications in the Payment specification list.
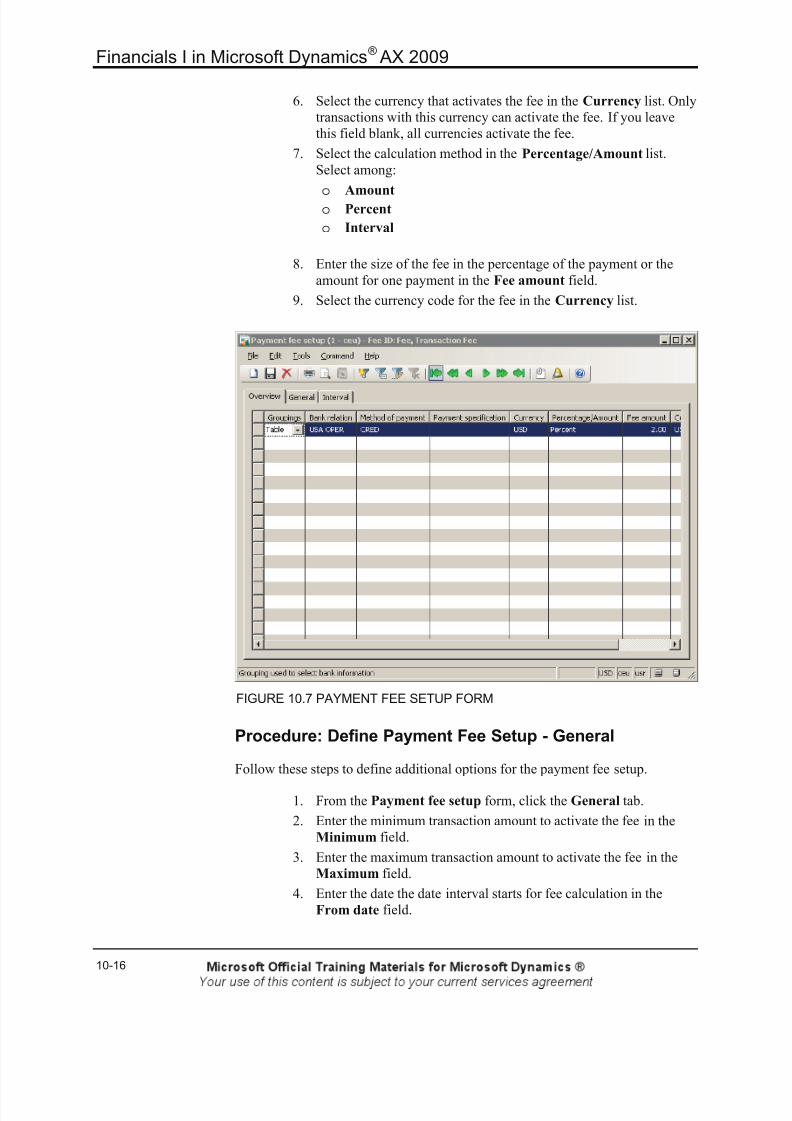
8/20/2019 Financials I
http://slidepdf.com/reader/full/financials-i 414/563
Financials I in Microsoft Dynamics® AX 2009
10-16
6. Select the currency that activates the fee in the Currency list. Onlytransactions with this currency can activate the fee. If you leavethis field blank, all currencies activate the fee.
7. Select the calculation method in the Percentage/Amount list.Select among:
o
Amounto Percent
o Interval
8. Enter the size of the fee in the percentage of the payment or theamount for one payment in the Fee amount field.
9. Select the currency code for the fee in the Currency list.
FIGURE 10.7 PAYMENT FEE SETUP FORM
Procedure: Define Payment Fee Setup - General
Follow these steps to define additional options for the payment fee setup.
1. From the Payment fee setup form, click the General tab.
2. Enter the minimum transaction amount to activate the fee in theMinimum field.
3. Enter the maximum transaction amount to activate the fee in theMaximum field.
4. Enter the date the date interval starts for fee calculation in theFrom date field.

8/20/2019 Financials I
http://slidepdf.com/reader/full/financials-i 415/563
Chapter 10: Accounts Receivable Setup
10-17
5. Enter the ending date for date interval for fee calculation in the To
date field.
If the calculated fee is less than the value entered in the Minimum
fee field, it will not be applied.
If a financial cost is selected, you can select a Sales tax group andan Item sales tax group to generate the relevant taxes.
NOTE : If sales tax is calculated, the net amount is posted on a ledger account,
and the sales tax amount is posted on a sales tax account.
FIGURE 10.8 PAYMENT FEE SETUP FORM, GENERAL TAB
Procedure: Define Payment Fee Setup - Interval
You can enter fees for the selected payment fee setup line that depend on theinterval between the remittance and due dates.
Follow these steps to define an interval payment fee setup.
1. From the Payment fee setup form, click the Interval tab.
2. Enter the number of days between the posting date (discountingdate) of the remittance and the due date of the invoice in the Days
field.
8/20/2019 Financials I
http://slidepdf.com/reader/full/financials-i 416/563
Financials I in Microsoft Dynamics® AX 2009
10-18
3. Select whether the specification is a percentage or an absoluteamount in the Percentage/Amount field.
4. Enter the size of the fee in percent of the payment or amount forone payment in the Fee amount field.
Methods of PaymentMany companies offer several methods to pay due invoices, such as thefollowing:
• Credit
• Cash in advance
• Bill of exchange
• Check and electronic payments
In the Methods of payment form, specify all the methods of payment the
company uses to receive pay from its customers. For each method of payment,enter information that states how payments should be summarized and posted.
Methods of payment can be assigned to:
• Customers
• Journals
• Sales orders
Procedure: Create a Method of Payment
Follow these steps to create a method of payment.
1. Click Accounts receivable, click Setup, click Payment, and thenclick Methods of payment.
2. Press CTRL+N to create a new record.
3. Enter a name for the new method of payment in the Method of
payment field.
4. Select whether Microsoft Dynamics AX 2009 should total theinvoices in an automatic payment proposal in the Period list.Select from the following options:
o Invoice - creates one payment transfer for each invoice
o Date - combines all invoices for customers who have thesame due date
o Week - combines all invoices for customers who have a duedate within the same week
o Total - combines all invoices from customers for the same payment
5. Enter a description of the method of payment in the Description
field.

8/20/2019 Financials I
http://slidepdf.com/reader/full/financials-i 417/563
Chapter 10: Accounts Receivable Setup
10-19
6. Enter the number of days the customer can make the payment afterthe specified method of discount, and still receive a cash discountin the Days of grace field.
7. Select the payment status required to post a payment with thismethod of payment in the Payment status list.
8. In the Posting area in the Account type list, select the type ofoffset account that is used for payments. The most commonaccount type is bank.
9. Select the liquidity account for payment in the Payment account
list.
10. Enter the transaction type for a bank account in the Bank
transaction type list. The transaction type is marked on everytransaction generated in the payment proposal. This field is onlyactive when the account type is bank.
FIGURE 10.9 METHODS OF PAYMENT - CUSTOMERS FORM

8/20/2019 Financials I
http://slidepdf.com/reader/full/financials-i 418/563
Financials I in Microsoft Dynamics® AX 2009
10-20
Procedure: Create a Method of Payment - File Formats
Follow these steps to specify the file format.
1. Click the File formats tab.
2. Specify the file formats to use with this Method of Payment byusing the following table to complete the File formats tab:
Format Action
Export format Specify the format to exportelectronic payment.
Import format Specify the file format for the bankreport about payments fromcustomers.
Return format Specify a format to return a
message from the export format ifthe bank supports an electronicreturn file.
Remittance format Specify the file format forremittances to a specific bank.
NOTE : If the format list is empty, click the Setup button and select from the
available formats.
Procedure: Create a Method of Payment - PaymentControl
Follow these steps to select the validation for the method of payment.
1. From the Methods of payment - Customers form click thePayment control tab.
2. Select the validation for the method of payment. Validation isexecuted in the journals upon posting when the payment method isused. Select one or more of the following validation methods:
o Check number is mandatory - verifies that the checknumber is entered
o Payment reference is mandatory - verifies that a paymentreference is entered
o Use deposit slip must be checked - indicates that the optionto use a deposit slip must be selected
o Offset account has the type bank - verifies that the offsetaccount type selected is Bank
o Bank transaction type is mandatory - verifies that a banktransaction type is selected

8/20/2019 Financials I
http://slidepdf.com/reader/full/financials-i 419/563
Chapter 10: Accounts Receivable Setup
10-21
Test Your Knowledge
What are some ways that companies may pay due invoices? (Select all thatapply.)
( ) Cash in advance( ) Credit
( ) Bill of exchange
( ) Check and electronic payments

8/20/2019 Financials I
http://slidepdf.com/reader/full/financials-i 420/563
Financials I in Microsoft Dynamics® AX 2009
10-22
Lab 10.2 - Set up a Method of Payment
Scenario
One of Contoso's European customers has asked for the option to pay invoices in
cash in the Euro.
Phyllis, the Accounting Manager, has decided to also offer a two-day grace period for all Euro cash payments.
Here are the details for the method of payment:
Field Value
Period Total
Days of grace 2
Payment status NoneAccount type Bank
Payment account EUR OPER
Bank transaction type 02
Challenge Yourself!
Set up a new method of payment for European cash payments with a two-daygrace period.
Step by Step
1. Click Accounts receivable, click Setup, click Payments, and thenclick Methods of payment.
2. Press CTRL+N to create a new method of payment.
3. In the Method of payment field, type in CASH_EUR.
4. Click the Period arrow, and then click Total.
5. In the Description field, type Cash - Euro.
6. In the Days of grace field, type 2.
7. Click the Payment status field, and then click None.
8.
Click the Account type arrow, and then click Bank .9. Click the Payment account arrow, and then click EUR OPER .
10. Click the Bank transaction type arrow, and then click 02.

8/20/2019 Financials I
http://slidepdf.com/reader/full/financials-i 421/563
Chapter 10: Accounts Receivable Setup
10-23
Customer Groups
Using customer groups:
• Use Customer groups to set up certain information that always
defaults when entering a new customer. For example, use thecustomer groups to set up automatic posting to General Ledgeraccounts for revenue generated by customers.
• Also, set up ledger accounts for the automatic transactions generatedin connection with receipt and issues of inventory.
• In the Customer group form, set up any number of customer groups.At least one customer group must be set up, because a customergroup must be specified when you set up a new customer.
Scenario
Contoso has many customers to track. To simplify the handling of customers, theContoso Company set up several customer groups to:
• Specify ledger posting per customer group. For each customer group,you can specify accounts, that is, for customer debts, an arrivalaccount for a customer who has a corresponding offset account, areceipt account, item revenue account and account for customer linediscounts.
• Record sales budgets per customer group.
• Generate trade statistics per customer group. For example, togenerate sales statistics that shows monthly sales per customer
group.
Procedure: Create a Customer Group
Follow these steps to create a new customer group.
1. Click Accounts receivable, click Setup, and then click Customer
groups.
2. Press CTRL+N to create a new record.
3. Enter a short name for the customer group in the Customer group
field. Use this name for the customer group anywhere in MicrosoftDynamics AX 2009, whenever required to specify a customer
group.
4. Enter the full name of the customer group in the Description field.The name acts as additional specification of the customersincluded in the customer group. To view the name of the customerin all dialog boxes in which customer group is shown point themouse at the customer group and wait until the name is displayed.

8/20/2019 Financials I
http://slidepdf.com/reader/full/financials-i 422/563
Financials I in Microsoft Dynamics® AX 2009
10-24
5. Specify a payment term that corresponds to the default timeinterval between the sale of an item and the due date on the invoicein the Terms of payment list. Use the payment term in connectionwith coverage of customer payments based on one sales budget percustomer group.
For example, a sales budget is set up for customer group X. Then asale of $10,000.00 is budgeted for June 15. A payment term is thenspecified that corresponds to the current month + 30 days. On this basis, coverage is arranged so that the budgeted item sale of$10,000.00 is due for payment on July 30.
6. Specify a term of payment that corresponds to the default interval between the due date and the actual payment date in the Settle
period list. Use the payment terms with coverage of customer payments based on one sales budget for each customer group.
FIGURE 10.10 CUSTOMER GROUP FORM
Procedure: Define Inventory Posting
Follow these steps to set up automatic postings to General ledger accounts for acustomer group.
1. From the Customer groups form, click the Setup button, and thenclick Inventory posting.
2. Set up general posting rules for all items, accounts and sales-taxcodes. In the Item code field, select one of the following:
o Table: This option is the highest in the hierarchy. Byselecting Table, the posting in ledger only applies to aspecific Item number.

8/20/2019 Financials I
http://slidepdf.com/reader/full/financials-i 423/563
Chapter 10: Accounts Receivable Setup
10-25
o Group: The posting in the ledger only applies to a particularItem group.
o All: Each transaction is posted for all Item numbers in thesame account in the ledger. The first matching account is usedfor posting.
Based on the type of business being run, decide which accounts must be set up.The focus of finance is related to consumption and revenue accounts, and thefocus in logistics is the issue, receipt, and packing slip accounts.
FIGURE 10.11 INVENTORY POSTING FORM
Procedure: Set Parameter Values
Follow these steps to define parameter values.
FIGURE 10.12 ACCOUNTS RECEIVABLE PARAMETERS FORM, LEDGER AND SALES TAX TAB

8/20/2019 Financials I
http://slidepdf.com/reader/full/financials-i 424/563
Financials I in Microsoft Dynamics® AX 2009
10-26
1. To access the Accounts receivable parameters form, clickAccounts receivable, click Setup, and then click Parameters.
2. Click the Ledger and sales tax tab.
3. In the Posting area, select in the Primary sales posting, Primary
consumption transaction, and Primary discount posting fields
to indicate whether the primary posting should be assigned to Itemor Customer.
For example, set up the Primary sales posting list to prioritize the Item. If youare selling some of item type B-R14 to customer 4000, which is part of customergroup 40, Microsoft Dynamics AX 2009 posts the transaction to account number401130, because the item relation is more specific than the account relation.
Item code Item
relation
Account
code
Account
relation
Account
number
All All 401100
All Group 40 401120Table B-R14 All 401130
If you have set up the posting as illustrated in the following table, and you set thePrimary sales posting list to Customer, and some of item type B-R14 is sold tocustomer 4000, the transaction is posted to account number 401100 because ofthe Accounts Receivable parameter setup.
Item code Item
relation
Account
code
Account
relation
Account
number
All Table 4000 401100
Table B-R14 All 401130
Test Your Knowledge
How many customer groups must you create in Microsoft Dynamics AX 2009?
( ) At least one
( ) At least two
( ) At least three
( ) At least four

8/20/2019 Financials I
http://slidepdf.com/reader/full/financials-i 425/563
Chapter 10: Accounts Receivable Setup
10-27
Lab 10.3 - Create a Customer Group
Scenario
Contoso is negotiating a deal with a group of Travel Agencies. Kevin, the Sales
Manager, has asked Arnie, the Accounts Receivable Clerk, to create a newcustomer group for travel agencies. Arnie should assign the new group the codeof 60 and name it Travel Agencies. The payment term should be the currentmonth plus 15 days, with a 14-day settle period.
For this new group, automatic posting should have the Account code of all and post to Account number 142300.
Challenge Yourself!
Create the new customer group with the correct setup options.
Need a Little Help?
1. Create the new Customer Group 60, Travel Agencies.
2. Define automatic posting for the new group.
Step by Step
Create the new Customer Group 60, Travel Agencies.
1. Click Accounts receivable, click Setup, and then click Customer
groups.
2. Press CTRL+N to create a new group.3. In the Customer group field, type 60.
4. In the Description field, type Travel Agencies.
5. Click the Terms of payment arrow, and then click M15.
6. Click the Settle period arrow, and then click N014.
For the new group, define automatic posting.
1. From the Customer groups form, click the Setup button, and thenclick Inventory posting.
2. Verify that inventory posting has been set for the All Item code
and All Account code to Account number 142300.

8/20/2019 Financials I
http://slidepdf.com/reader/full/financials-i 426/563
Financials I in Microsoft Dynamics® AX 2009
10-28
Accounts Receivable Posting Profiles
Posting Profiles are common throughout all modules in Microsoft Dynamics AX2009. In Accounts Receivable posting profiles, the summary accounts are definedfor customers. Summary accounts are temporary accounts where all invoices are
posted to and offset when the customer pays. Assign posting profiles to:
• All customers
• Groups of customers
• Single customers
When you post a customer transaction automatically, the system searches for theledger accounts that are shown in the previous order. For example if:
• a posting profile line for the customer, this line is used.
• no posting profile line exists for the customer, the line specified for
the customer group that the customer is attached to is used.
• neither of these exists, the posting profile line for all customers isused.
In the Customer posting profiles form, you can set up many customer posting profiles. If all customer transactions are processed together, set up only one posting profile for all customers.
Procedure: Create a Customer Posting Profile
Follow these steps to set up a customer posting profile.
1. Click Accounts receivable, click Setup, and then click Posting
profiles.
2. Enter in the Posting profile field, a code or a short name in the posting profile and a description of the posting profile in theDescription field.
3. Click the Table restrictions tab.
4. Select the Settlement check box to indicate whether entries should be created by using this posting profile for automatic settlement, orwhether settlement must be manual by using open-transactionediting.
5. Select the Interest check box to indicate that the applicationshould calculate interest on outstanding balances for customerswho have this profile. If this check box is cleared, interest will not be calculated for customers who have this profile.

8/20/2019 Financials I
http://slidepdf.com/reader/full/financials-i 427/563
Chapter 10: Accounts Receivable Setup
10-29
6. Select the Collection letter check box if a collection letter may beissued for customers who have this profile.
7. Select from the Close list, the name of any other posting profile tochange to when transactions with this posting profile are closed. Atransaction is regarded as closed when it is settled in full.
FIGURE 10.13 CUSTOMER POSTING PROFILE FORM
Procedure: Create a Customer Posting Profile - Setup
Follow these steps to set up the ledger accounts that the system posts to whenyou post transactions in Accounts Receivable.
1. From the Customer posting profiles form, click the Setup tab.
2. Select an Account code:
o Table
o Group
o All
3. Specify which customers belong to the current posting profile inthe Account/Group number list.
o If Table is selected in the Account code field, enter theaccount number of the customer to whom the posting profilerelates.
o If Group is selected in the Account code field, enter thecustomer group to which the posting profile relates.
o If All is selected in the Account code field, do not fill in thefield.
4. Select the account number of the ledger account that is used as thecustomer summary account for the customer(s) to whom the posting profile relates in the Summary account list.

8/20/2019 Financials I
http://slidepdf.com/reader/full/financials-i 428/563
Financials I in Microsoft Dynamics® AX 2009
10-30
5. Select the liquidity ledger account that is used for cash flowforecast in the Settle account list. You can learn more about Cashflow forecast in the Microsoft Dynamics AX 2009 Financials IIcourse.
6. Select a ledger account number to use for sales tax payments youreceive in advance in the Sales tax prepayments list.
7. Enter the identification of the collection letter sequence in theCollection letter sequence field.
8. Select the code used for calculation in the Interest code field.
FIGURE 10.14 CUSTOMER POSTING PROFILE FORM, SETUP TAB
Procedure: Define Parameters
Follow these steps to specify accounts receivable parameter values related to posting profiles.
1. To access the Accounts receivable parameters form, clickAccounts payable, click Setup, and then click Parameters.
2. Click the Ledger and Sales tax tab.
3. Select a standard customer posting profile in the Posting profile
list.
The standard posting profile is used if no other posting profile isspecified.
Test Your Knowledge
Assign posting profiles to: (Select all that apply.)
( ) All customers
( ) All employees
( ) Groups of customers
( ) Single customers

8/20/2019 Financials I
http://slidepdf.com/reader/full/financials-i 429/563
Chapter 10: Accounts Receivable Setup
10-31
Lab10.4 - Set Up a Customer Posting Profile
Scenario
Phyllis, the Accounting Manager at Contoso, has asked Arnie, the Accounts
Receivable Clerk, to set up a new posting profile for a group of retail customers.
Select the appropriate options to ensure the following:
• Entries should be created by using this profile for automaticsettlement.
• The application should calculate interest on outstanding balances forcustomers who have this profile.
• A collection letter may be issued for customers who have this profile.
• When transactions are settled in full, the transactions should not
change to another posting profile.
• Transactions for the retail customers group should post to thesummary account 130100 and settle account 110110.
The following information is for the new customer posting profile:
Field Value
Posting Profile Prom
Description Promotion
Account Code Group
Collection letter sequence High
Challenge Yourself!
Help Arnie create the new customer posting profile.
Step by Step
1. Click Accounts receivable, click Setup, and then click Posting
profiles.
2. Click the New button or press CTRL+N.3. On the Overview tab, in the Posting Profile field, type Prom.
4. In the Description field, type Promotion.
5. On the Table restrictions tab, make sure that the following check boxes are selected:
o Settlement
o Interest
o Collection letter

8/20/2019 Financials I
http://slidepdf.com/reader/full/financials-i 430/563
Financials I in Microsoft Dynamics® AX 2009
10-32
6. Verify that the Close field is blank.
7. On the Setup tab, in the Account code field, select group.
8. In the Account\Group Number field, select 30 Retail Customers.
9. In the Summary account field, select 130100.
10. In the Settle account field, select 110110.
11. In the Collection letter sequence field, select High.
12. Close the form.

8/20/2019 Financials I
http://slidepdf.com/reader/full/financials-i 431/563
Chapter 10: Accounts Receivable Setup
10-33
Accounts Receivable Customers
Each Accounts Receivable transaction must be associated with a customer. Usethe Customer form to create, maintain and inquire about customers.
Enter as much data as possible in advance, because the data is used throughoutMicrosoft Dynamics AX 2009 for:
• Invoicing
• Payments
• Reports
The base data automatically is displayed as the default for all transactions thatinvolve the customer.
You can change default information at any time.
Procedure: Create a Customer
Follow these steps to create a new customer.
1. Click Accounts receivable, and then click Customer Details.
2. Press CTRL+N to create a new record.
3. Enter a Customer ID with up to ten characters in the Customer
Account field, and then enter a customer name with up to 30characters in the Name field.
The system automatically generates the Customer account if the
customer account number sequence is specified in the Accountsreceivable parameters form on the Number sequences tab.
4. Enter the name to use when you search for the customer in theSearch name field. If you do not enter a name, the system willdefault and uses the Name field.
5. Select a customer account for invoicing in the Invoice account
list.
For example, if you are linking several customers to one invoiceaccount, if there is more than one customer who has the same payment address, or if the customer's account is paid through a
third-party, then the invoice account is where the invoice amount iscredited.
If you leave the field blank, the system uses the customer accountnumber by default.
6. Select the customer group to which the customer belongs in theCustomer group list.
7. Select the currency used for customer invoices in the Currency
list.

8/20/2019 Financials I
http://slidepdf.com/reader/full/financials-i 432/563
Financials I in Microsoft Dynamics® AX 2009
10-34
NOTE : You can create and maintain currency codes and exchange rates in the
Exchange rates form. You can change the customer's invoice currency in the
invoice header before you enter sales order lines.
FIGURE 10.15 CUSTOMERS FORM
Procedure: Create a Customer - General
Follow these steps to set additional customer options.
1. From the Customers form, click the General tab.
2. Select in the Language list, the language that is used for allexternal documents such as sales orders. The language code ismandatory. The language value defaults from the Other tab of theCompany information form.
3. Select the Mandatory credit limit check box to check forexceeded credit limits and, if found, to display an error message.
4. Enter in the Credit rating field, the credit rating of the customer.
It is used only for statistical purposes.5. Enter in the Credit limit field, the maximum outstanding amount
allowed in the balance of the customer's account. This amount isalways stated in the default currency.

8/20/2019 Financials I
http://slidepdf.com/reader/full/financials-i 433/563
Chapter 10: Accounts Receivable Setup
10-35
NOTE : Configure the system to check whether an account is over its credit limit
on the Credit rating tab of the Accounts receivable parameters form.
6. Depending upon the selection in the Address book type field on the
Overview tab, in the Government identification area you mayenter values in the ID number, License number,Country/region, or State fields. These government-establisheddata values are commonly used to protect companies againstfinancial loss due to delinquent accounts.
NOTE : Configure the system to require identification on the Credit rating tab of
the Accounts receivable parameters form.
7. Block a customer account manually in the Stopped list, byselecting one of the following:
o No - No blocking. All forms of transaction are possible.
o Invoice - The account is blocked for everything beforeInvoice. Money can still be received, and an invoice can besent on goods delivered before the blocking.
o All - All transactions are blocked.
FIGURE 10.16 CUSTOMERS FORM, GENERAL TAB
8. Select the One-time customer check box to indicate if thecompany only deals with this customer one time.

8/20/2019 Financials I
http://slidepdf.com/reader/full/financials-i 434/563
Financials I in Microsoft Dynamics® AX 2009
10-36
NOTE : If you are using one-time customers, you must set up a number sequence
in the Accounts receivable parameters form on the Number sequence tab. On
the General tab in the Accounts receivable parameters form, select a customer's
account number that can serve as the default template for one-time customers.
Information is copied automatically when you create a one-time supplier in theCustomers form.
Microsoft Dynamics AX 2009 automatically creates a one-time customer when
ou create a sales order for a one-time customer. Except for the customer
number, the one-time customer inherits all base information from the customer
number specified in this field. You must specify the one-time customer number
sequence in the Number sequences form. If you do not use a one-time customer,
leave the Default customer number blank.
9. Select a statistical group in the Statistics group list to make
reports and statistics about this customer.10. Specify the frequency of when you send the customer an account
statement by using the Account statement list. Select from thefollowing options:
o Always - Monthly
o Quarter - Every three months
o Biannually - Every six months
o Annually - One Time per year
o Never - Not printed
11. Select a vendor account number in the Vendor account list if thecustomer is also a vendor. Use the vendor account forreimbursement. If a customer has a credit amount because ofoverpayment or a credit note, you can transfer the amount to thevendor account.
Procedure: Create a Customer - Setup
Follow these steps to further define setup information for a customer.
1. From the Customers form, click the Setup tab.
2. Select a number sequence for internal numbers on sales invoicesand sales order credit notes in the
Number sequence grouplist. If
the field is empty, the system uses the sales order number.

8/20/2019 Financials I
http://slidepdf.com/reader/full/financials-i 435/563
Chapter 10: Accounts Receivable Setup
10-37
3. Specify whether tax should be calculated on the invoice in theSales tax group list. Select the Prices incl. sales tax check box toensure that you include sales tax when you inform customers aboutsales prices.
FIGURE 10.17 CUSTOMERS FORM, SETUP TAB
Procedure: Create a Customer - Other
Follow these steps to define further setup information for a customer.
1. From the Customers form, enter on the Addresses and Contact
information tabs, the customer address and contact details.
2. If a customer has more than one address, such as invoice, delivery, purchase, or alternative delivery address, enter additional addresses by clicking the Setup button and then Address from theCustomers form.
3. Enter address, contact information, and parameters for access fromthe Internet for external contact persons who associate withcustomers by clicking the Setup button and then Contact Details
from the Customers form.
NOTE : If alternative delivery addresses are in different states or countries,
ensure that you enter the appropriate tax group for each alternative address.
You must associate tax groups with a delivery address.

8/20/2019 Financials I
http://slidepdf.com/reader/full/financials-i 436/563
Financials I in Microsoft Dynamics® AX 2009
10-38
4. Enter information about how to manage payments on the invoicesentered in Accounts Receivable in the Customer form, on the
Payment tab. Enter the following payment information:
o Terms of payment
o Method of payment
o Payment specification
o Payment schedule
o Payment day
o Cash discount
5. Set up specific dimensions for a customer on the Dimensions tab.Throughout Microsoft Dynamics AX 2009, you can usedimensions to group data in different ways. If you designatedimensions for a customer, those dimensions automatically defaultfor transactions for that customer. You can change these defaultedvalues when you enter the transaction.

8/20/2019 Financials I
http://slidepdf.com/reader/full/financials-i 437/563
Chapter 10: Accounts Receivable Setup
10-39
Lab 10.5 - Create a Customer
Scenario
Contoso has begun working with a new customer, Adventure Works. Arnie, the
Accounts Receivable Clerk, must set up this new customer. These are the details:
Option Value
Customer group Retail
Credit limit 10,000 USD
Mode of delivery Air
Sales tax group Illinois
Terms of payment Net 30 days
Method of payment CHCK
Challenge Yourself!
Create a new customer.
Step by Step
1. Click Accounts receivable, and then click Customer details.
2. Press CTRL+N to create a new customer.
3. In the Customer account field, type 3000.
4. In the Address book type field, select Organization.5. In the Customer name field, type Adventure Works.
6. In the Address book with Adventure Works selected, click theSelect button
7. In the Customer group field, select customer group 20.
8. Click the General tab.
9. In the Credit limit field, enter 10000.
10. Click the Setup tab.
11. In the Mode of delivery field, select 20, Air.
12. In the Sales tax group field, select IL.
13. Click the Payment tab.14. In the Terms of payment field, select N030.
15. In the Method of payment field, select CHCK.

8/20/2019 Financials I
http://slidepdf.com/reader/full/financials-i 438/563
Financials I in Microsoft Dynamics® AX 2009
10-40
Summary
Payment options in Microsoft Dynamics AX 2009 are flexible to accommodatedifferent business processes. You can:
• Define terms based on:
o The number of months or days
o A current period (for example, current month or currentquarter), and with or without additional months or days
• Set up terms of payment for cash payment so that the payment postsautomatically when you issue the invoice
• Set up advanced payment schedules and use them as terms of payment based on many factors including:
o Percentage allocation of the actual invoice amount
o Allocation based on a fixed number of installmentso Combined amounts and percentages of the invoice amount
• Set up cash discounts based on a current period or a number of netdays. If you require cash discounts, you can be set them up asmultiple (for example, ten days 3 percent and 30 days 1 percent).Decide whether you need special ledger accounts to post
• Set up Microsoft Dynamics AX 2009 to manage the cash discountwith or without sales tax to comply with the tax legislation in variouscountries
You can also group customers to categorize information so that it is meaningful.You can:
• Set up automatic posting rules for customer transactions to ensurethat the transactions affect the correct accounts
• Become aware of situations and trends more quickly by groupingcustomers who have a common identifier to view and analyzefinancial results in more detail. For example, you can groupcustomers by the types of products you sell them or by the dollarvolume of sales

8/20/2019 Financials I
http://slidepdf.com/reader/full/financials-i 439/563
Chapter 10: Accounts Receivable Setup
10-41
Test Your Knowledge
Test your knowledge with the following questions.
1. Use ____________ to pay invoices in installments.
( ) Method of payment
( ) Customer groups
( ) Payment schedules
( ) Payment fee
8/20/2019 Financials I
http://slidepdf.com/reader/full/financials-i 440/563
Financials I in Microsoft Dynamics® AX 2009
10-42
Quick Interaction: Lessons Learned
Take a moment and write down three key points you have learned from thischapter:
1.
2.
3.

8/20/2019 Financials I
http://slidepdf.com/reader/full/financials-i 441/563
Chapter 10: Accounts Receivable Setup
10-43
Solutions
Payment Schedule
Test Your Knowledge
To set up a payment schedule, define the following. (Select all that apply.)
( ) Number of schedules
(√) Number of installments
(√) Amount of each installment
(√) Due date of each installment
Terms of Payment
Test Your Knowledge
Which of the following can be selected in the Payment method list to calculatethe due date? (Select all that apply.)
(√) Net
(√) Curr. Week
(√) Curr. Year
(√) C.O.D.
Cash Discount
Test Your Knowledge
Customers earn cash discounts by paying an invoice within a specified period.
(•) True
( ) False

8/20/2019 Financials I
http://slidepdf.com/reader/full/financials-i 442/563
Financials I in Microsoft Dynamics® AX 2009
10-44
Methods of Payment
Test Your Knowledge
What are some ways that companies may pay due invoices? (Select all that
apply.)
(√) Cash in advance
(√) Credit
(√) Bill of exchange
(√) Check and electronic payments
Customer Groups
Test Your Knowledge
How many customer groups must you create in Microsoft Dynamics AX 2009?
(•) At least one
( ) At least two
( ) At least three
( ) At least four
Accounts Receivable Posting Profiles
Test Your Knowledge
Assign posting profiles to: (Select all that apply.)
(√) All customers
( ) All employees
(√) Groups of customers
(√) Single customers
Test Your Knowledge
1. Use ____________ to pay invoices in installments.
( ) Method of payment( ) Customer groups
(•) Payment schedules
( ) Payment fee

8/20/2019 Financials I
http://slidepdf.com/reader/full/financials-i 443/563
Chapter 11: Accounts Receivable Daily Procedures
11-1
CHAPTER 11: ACCOUNTS RECEIVABLE DAILYPROCEDURES
ObjectivesThe objectives are:
• Create a Free Text Invoice
• Edit an Open Free Text Invoice
• Create a Payment Proposal
• Mark customer transactions for Settlement
• Create a Payment Journal
• Edit Open Transactions
• Place an Accounts Receivable transaction on hold• Reverse a Settlement
• Reimburse a Customer
• Describe Reason codes in Accounts receivable
• List the activities that you can control with print managementsettings
• Examine print management setup
Introduction
This course discusses the free text invoice and the payment journal. The coursealso explains various Accounts Receivable transactions that you may use in daily procedures in the Accounts Receivable module of Microsoft Dynamics® AX2009.

8/20/2019 Financials I
http://slidepdf.com/reader/full/financials-i 444/563
Financials I in Microsoft Dynamics® AX 2009
11-2
Free Text Invoice - Description and Usage
Use free text invoices to create a sales invoice with order lines that include thefollowing:
• Ledger accounts
• Free-text descriptions
• The entry of a sales amount
You cannot enter an item number on this kind of invoice; however, you can enterthe appropriate sales tax information.
NOTE : After you post a free-text invoice, the program automatically saves a
copy; however, you can no longer make changes to it.
Differences Between a Free Text and an Ordinary Invoice
The difference between a free text invoice and an ordinary invoice is as follows:
• On an ordinary invoice:
o The user specifies the item number, and the system posts theitem-related transactions in the ledger.
o A sales order makes inventory transactions, but a free textinvoice never uses item inventory because a free text invoicedoes not create stock transactions. Users frequently use free textinvoices to sell fixed assets because the free text invoicescalculate the costs or income when you depreciate and sell the
asset. Refer to the Fixed Assets training manuals to learn moreabout the fixed asset topic.
• On a free text invoice:
o No item numbers are specified by the user.
o A ledger account for the sale is selected by the user and isdisplayed on each order line. The system posts the customer balance to the summary ledger account for the posting profileinherited from the customer, unless the user specifies a different posting profile on the free text invoice.
Free Text Invoice - Typical Usage ScenarioScenario - Using Free Text Invoices
At Contoso, the Accounts Receivable Administrator uses free text invoices forservice charges that are not listed in the items table. For example, some of theProduct Managers consult with customers about specific product design proposals, and the consulting fees are invoiced by using free text invoices.
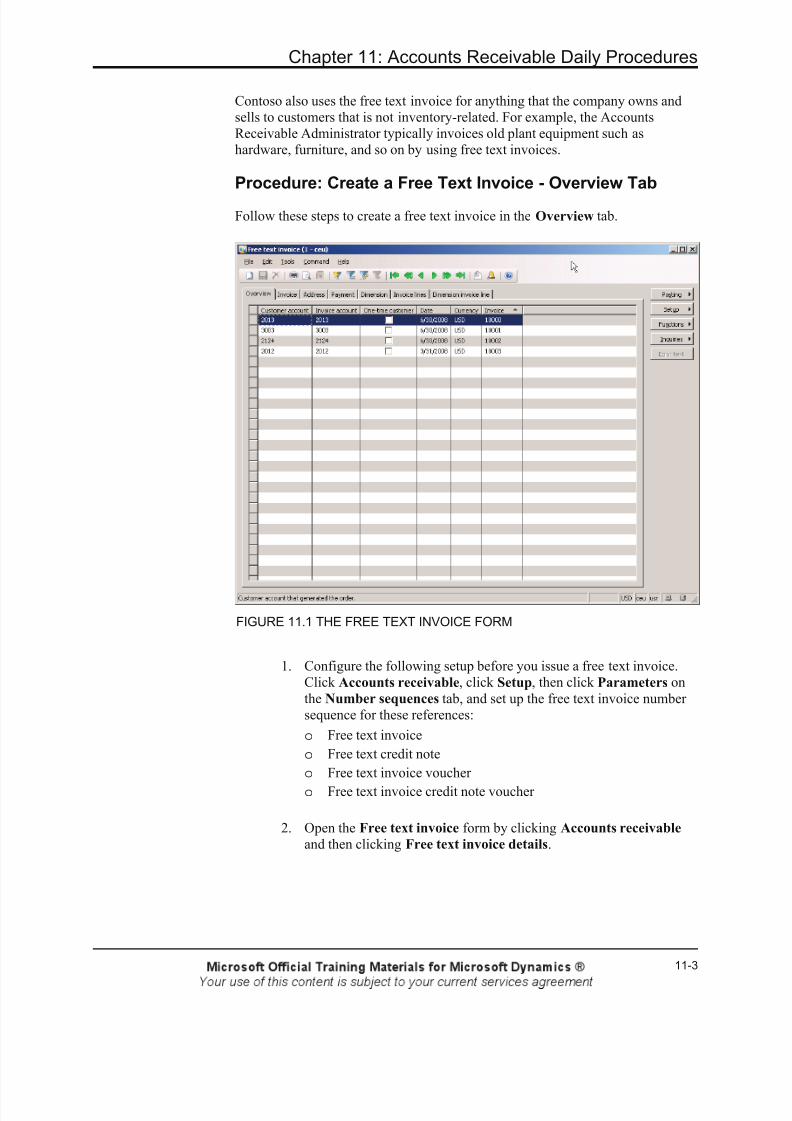
8/20/2019 Financials I
http://slidepdf.com/reader/full/financials-i 445/563
Chapter 11: Accounts Receivable Daily Procedures
11-3
Contoso also uses the free text invoice for anything that the company owns andsells to customers that is not inventory-related. For example, the AccountsReceivable Administrator typically invoices old plant equipment such ashardware, furniture, and so on by using free text invoices.
Procedure: Create a Free Text Invoice - Overview Tab
Follow these steps to create a free text invoice in the Overview tab.
FIGURE 11.1 THE FREE TEXT INVOICE FORM
1. Configure the following setup before you issue a free text invoice.Click Accounts receivable, click Setup, then click Parameters onthe Number sequences tab, and set up the free text invoice numbersequence for these references:
o Free text invoice
o Free text credit note
o Free text invoice voucher
o Free text invoice credit note voucher
2. Open the Free text invoice form by clicking Accounts receivable
and then clicking Free text invoice details.

8/20/2019 Financials I
http://slidepdf.com/reader/full/financials-i 446/563
Financials I in Microsoft Dynamics® AX 2009
11-4
3. Select the desired customer from the Customer account list. Thisselection identifies the customer to which the transaction will post.However, if the one time customer check box is enabled before youselect the customer, then the customer number will be createdautomatically from the next number in the one-time customernumber sequence.
4. Select the account number to invoice in the Invoice account list if itdiffers from what is set up in the Customers form.
5. Select the One-time customer check box to create a one-timecustomer by using the one-time customer number sequence.
6. Change the date and currency, if necessary. The date and currencyare entered automatically when you select a customer account.
NOTE : The Invoice field is entered automatically when the invoice posts.
Procedure: Create a Free Text Invoice - Invoice Tab
Follow these steps to create a free text invoice in the Invoice tab.
1. On the Invoice tab, in the Recipient field, select the employee whoreceived the order. This field is optional.
2. Change the language, if necessary, in the Language field. Thelanguage is set automatically to the default language code set up byclicking Basic, clicking Setup, and then clicking Company
information.
3. Change the Posting profile, if necessary. The Posting profile isinherited from the value contained in the customer record of thecustomer you select. The Posting profile is one source of receivablesledger accounts.
4. Enter a number sequence group in the Number sequence group list. Number sequence groups are collections of number sequences thatare grouped and assigned with one common heading to easeadministration. This field is optional.
5. Do not enter information in the Date field. The Date field is populated automatically from the Overview tab. The Due date andthe Discount date fields are populated automatically depending onthe payment terms specified on the Payment tab. A Release date may be entered.
6. Change the Sales tax field group values, if necessary. The Sales tax
field group values default from the Customers form. All fields areoptional.
7. In the References area, enter customer information such as a contact person, a customer reference, or the number of the service or productthat the customer requested. All fields are optional.
8. Optionally, enter Document date and Foreign trade information.

8/20/2019 Financials I
http://slidepdf.com/reader/full/financials-i 447/563
Chapter 11: Accounts Receivable Daily Procedures
11-5
Procedure: Create a Free Text Invoice - Other Tabs
Follow these steps to create a free text invoice in the Address, Payment, andDimension tabs.
1. Enter or change customer address information on the Address tab, ifnecessary.
2. Enter or change customer payment information on the Payment tab,if necessary. This tab is explained in detail in the Accounts
Receivable Setup course.
3. Enter or change customer dimensions on the Dimension tab, ifnecessary, or apply dimensions for specific invoice lines on theDimension invoice line tab.
Procedure: Create a Free Text Invoice - Invoice Line Tab
Follow these steps to create a free text invoice in the Invoice Line tab.
1. On the Invoice lines tab, in the Description field, enter a shortdescription of the item or service. The way the invoice is set updetermines the amount of text that appears on the invoice printout.You cannot edit the text after you update an invoice.Optionally, enteran extended description in the Invoice text field. If you enter text inthis field, the system uses these words instead of the text in theDescription field when the invoice prints.
2. In the Ledger account list, select a ledger account to which the linewill post. This account is typically a revenue account, to which thesales amount post in General Ledger. The total invoice amount posts,as an offset account transaction, to the Summary account that isspecified in the Posting profile field on the invoice tab.
3. Change the Sales tax group information in the Sales tax group andItem sales tax group lists if necessary.
4. In the Amount field, enter the invoice line amount, excluding salestax, in invoice currency.
Optional fields allow you to associate text, a fixed asset number, or value modelto the invoice line You also can enter Reason codes. Note that the use of Reason
codes may be mandatory elsewhere in the system. Additionally, you can entermore detailed information about foreign trade.

8/20/2019 Financials I
http://slidepdf.com/reader/full/financials-i 448/563
Financials I in Microsoft Dynamics® AX 2009
11-6
Procedure: Create a Free Text Invoice - Posting
Click the Setup or Posting buttons, and follow these steps to post the Free text
invoice.
1. Optionally, before you post, click the Setup button to change or add
miscellaneous charges, sales tax, payment schedules, or deliveryaddress.
2. To post the invoice, click the Posting button, then click Free text
invoice after you have entered all the necessary information. Postingcreates the ledger entries for the free text invoice. Optionally, youcan print the invoice.
3. To view the posted invoice after posting, click the Inquiries button,and then click Invoice. You can reprint the invoice by clicking thePreview/Print button, and then selecting one of the print options.
4. To view the posted voucher and ledger entries, go to the Free text
invoice form, and then click the Inquiries button, click Invoice, and
click the Voucher button.
Procedure: Free Text Invoice - Edit Open Transactions
Follow these steps to edit open transactions on a free text invoice.
Click Accounts receivable, click Free text invoice details, click Functions, then click Open transaction editing to edit an open free text invoice transaction.
Use the open transaction editing functionality to change a free text invoice thatyou have not yet settled. You can only perform limited editing in this form, forexample adjusting the cash discount. You cannot mark transactions when you use
the open transaction editing functionality from a free text invoice.
You can perform a more thorough edit of unposted and posted receivabletransactions by clicking Accounts receivable, clicking Customer details, clicking the Functions button, and then clicking Open transaction editing.
Free Text Print Enhancements
In Microsoft Dynamics AX 2009, several sections have a form tab that relates toFree text invoices:
• The Form setup form – to open, click Accounts receivable, then
click Setup, click Forms, and finally click Form setup. • The Form sorting parameters form – to open, click Accounts
receivable, then click Setup, click Forms, and finally click Form
sorting.

8/20/2019 Financials I
http://slidepdf.com/reader/full/financials-i 449/563
Chapter 11: Accounts Receivable Daily Procedures
11-7
In addition, you can use two types of form notes specifically for Free textinvoices:
• Customer free text invoice
• Customer free text invoice credit note
To open these form notes, click Accounts receivable, then click Setup, clickForms, and finally click Form notes.
Use print management functionality for Free text invoices on the Free text
invoice form, by clicking the Setup button, and then clicking Print
management.
Test Your Knowledge
You can create inventory transactions that use item numbers by using Free textinvoices.
( ) True
( ) False
An ordinary invoice consists of _____. (Select all that apply.)
( ) The company’s bank accounts
( ) A ledger account for the sale is indicated on each order line, and thecustomer balance is posted for each customer group, unless specifiedotherwise
( ) A sales order that makes the inventory transactions
( ) The item number that specifies and posts in the ledger

8/20/2019 Financials I
http://slidepdf.com/reader/full/financials-i 450/563
Financials I in Microsoft Dynamics® AX 2009
11-8
Lab 11.1 - Create Free Text Invoices
This lab provides practice for you to create and post a free text invoice.
Scenario
Susan, the Order Processor at Contoso, has taken an order from ForestWholesales for consulting design, which she invoices to the customer withoutcreating a sales order. Your task is to help Susan complete the order by creating afree text invoice for the consulting, and then posting the invoice.
Use the following information to create an invoice for the sale of the designservices in Accounts Receivable.
Customer Account Forest Wholesales(1101)
Invoice Account Forest Wholesales(1101)
Date System date
Enter the line for the invoice. Use the following information to create lineinformation:
Description Invoice forConsulting Design
Ledger Account 401190
Sales Tax Accept the default
Item Sales Tax Accept the default
Amount $1450.00
Challenge Yourself!
Use any of the methods described in this section to create and post the free textinvoice.
Need a Little Help?
1. Create a free text invoice.
2. Use the invoice register to register and post the invoice.

8/20/2019 Financials I
http://slidepdf.com/reader/full/financials-i 451/563
Chapter 11: Accounts Receivable Daily Procedures
11-9
Step by Step
Follow these steps to complete the exercise and set up the Accounts ReceivableFree Text Invoice.
1. To enter the free text invoice, go to Accounts receivable and thenclick Free text invoice details.
2. Press CTRL+N to create a new record.
3. In the Customer Account field, click the drop down arrow, andselect customer 1101 (Forest Wholesales).
4. In the Invoice Account field, enter 1101 (Forest Wholesales).
5. In the Date field, enter System date.
6. To enter the line for the invoice, click the Invoice lines tab.
7. In the Description field, enter Invoice for Consulting Design.
8. In the Ledger Account field, enter 401190.
9. In the Sales Tax field, enter Accept the default.10. In the Item Sales Tax field, enter Accept the default.
11. In the Amount field, enter $1450.00.
12. To post the invoice, select Free text invoice under the Posting
button.
13. Click OK to post the invoice.
14. Close the Infolog form.
15. Close the Free text invoice form.

8/20/2019 Financials I
http://slidepdf.com/reader/full/financials-i 452/563
Financials I in Microsoft Dynamics® AX 2009
11-10
Payment Journals
After you register, approve, and post the invoice, the customer must pay for theinvoice. When you receive a customer payment, use the payment journal toregister it.
For information on the Centralized payments functionality, please refer to theFinancials II in Microsoft Dynamics AX 2009 collection.
You can use payment journals to:
• Enter and post payments.
• Make and enter payments into Microsoft Dynamics AX 2009according to the terms of payment established with the customers. Inthe Payment journal, you can select the customer invoices to which payments will be recorded by creating the journal's payment lines:
o Use a Payment proposal to search for invoice lines that meetcertain selected search criteria. For example, you must generate payment lines based on payment due dates.
o Use the Settlements option to select the specific invoice lines tosettle, and to which to record payments.
o Create a Payment journal line manually to enter the paymentdetails manually.
Payment Proposal
When customers make payments, you must create and post them in a payment journal, both to record the payments to the customer's accounts, and also to
ensure that you can reconcile the Accounts Receivable information with GeneralLedger information. Use a payment proposal as an effective way to select the payment records and create the payment journal. The payment proposal:
• Searches for payment lines that either are due or have a maximumdate for receiving a cash discount.
• Checks open and approved customer transactions.
Only transactions with either a due date or a cash discount date are included inthe search. As soon as the system generates payment lines, you can edit them inthe payment journal.

8/20/2019 Financials I
http://slidepdf.com/reader/full/financials-i 453/563
Chapter 11: Accounts Receivable Daily Procedures
11-11
Procedure: Create a Payment Proposal - General Process
Follow these steps to create a payment proposal.
FIGURE 11.2 PAYMENT PROPOSAL
1. Open the Payment proposal form by clicking Accounts receivable
in the Navigation pane, and then clicking Journals. Then click
Payments and click Payment journal. After the basic journalinformation is created, click the Lines button. Finally, click thePayment proposal button, and then click Create payment
proposal.
2. In the Customer payment proposal form, select the type of payment proposal to create in the Proposal type field. Create the proposal by due date, cash discount date, or by both due date andcash discount date.
a. Select Per due date to transfer the set of customer payments thatare due.
b. Select By cash discount to transfer the set of customer payments
that fulfills the criteria for obtaining a cash discount.c. Select Due date & cash discount to transfer the set of customer
payments that fulfills the criteria for obtaining a cash discountand after that to transfer customer transactions proposed after thedue date.
8/20/2019 Financials I
http://slidepdf.com/reader/full/financials-i 454/563
Financials I in Microsoft Dynamics® AX 2009
11-12
3. Click the Select button to select specific customers or a range ofcustomers.
4. Select the Generate check box to indicate that you want to generatethe payment proposal transactions.
Procedure: Create a Payment Proposal - RefiningSelections and Creating the Proposal
Follow these steps to further refine the criteria for selecting the transactions thatappear in the Payment proposal.
1. Enter the total amount to be selected for payment in the Amount
limit field.
2. Enter the maximum lines to be paid in the Transaction limit field.
3. Enter the period for the customer transactions to be included in the payment proposal in the From date and To date fields.
4. If the customer transaction has a Method of payment whose period
is set to the Total type, the payment proposal uses the date enteredin the Total payment date field to aggregate the transactions. Enterthe payment date that you want to use in the Total payment date
field.
5. Add other criteria as appropriate in the other fields on the Customer
payment proposal selection form, and then click OK . This willopen a Customer payment proposal edit form, which has thefollowing panes:
a. The Open transactions pane of the form shows the open invoicetransactions for the selected payment proposal line.
b. The Payment proposal pane of the form shows the payment
proposal lines, which includes transactions from all customers based upon the criteria selected.
Procedure: Working With Open Transactions in PaymentProposals
Follow this procedure to modify the Payment proposal lines in the edit form.
1. Inspect each proposal line and the associated open transactions toensure that they are ready for settlement. For example, you canreview if you want to delete one or more of the open invoicetransactions from the Open transactions lines in the Open
transactions pane, if payment of these items is unacceptable orunwanted.
2. To delete a line, put the cursor on the line and press ALT+F9.
3. To change certain fields on several lines in one operation, select thelines, click the Multiple change button, and enter the values toimplement.

8/20/2019 Financials I
http://slidepdf.com/reader/full/financials-i 455/563
Chapter 11: Accounts Receivable Daily Procedures
11-13
HINT : Select the Link check box to synchronize the two parts of the form. When
selected, the Open transactions pane shows only transactions related to the
selected Payment proposal pane line. The open transactions displayed are
updated when they move between Payment proposal pane lines.
Procedure: Create a Payment Proposal - Move SelectedLines into Payment Journal and Post
Follow this procedure to transfer the selected lines from the Payment proposal
into the Payment journal.
1. Continue in the Customer payment proposal form to edit the linesif necessary.
2. Verify the balances of company bank accounts to ensure that you canmake the payments. To view the balances, click the Balance control
button.3. Click Transfer to move the proposal lines to the Payment journal
after you have reviewed them and made any changes.
4. Click Validate to validate the payment lines.
5. Click the Post button, and then click Post to post the payment journal. These actions post the payments to the customer records,update the General Ledger with the voucher transactions, andindicate the customer invoice transactions as settled.
NOTE : Sometimes, the customer allows the company to withdraw the payment
directly from their bank accounts. In such a case, click the Functions button,
then click Generate payments.You must do this before you post.
NOTE : You can use workflow with payment journals. Some buttons in the form
are unavailable when a journal has been submitted for workflow journal
approval.
Procedure: Create a Payment Proposal - Mark forSettlements Method
You can use the Settlement option to select invoice lines to pay instead of using
the payment proposal option. Follow these steps to create a payment proposal fora marked settlement.
1. Open the Payment journal form by clicking Accounts receivable inthe Navigation pane, and then clicking Journals. Then clickPayments, click Payment journal. After you create the basic journal information, click the Lines button.
2. Select a customer account in the Account field.

8/20/2019 Financials I
http://slidepdf.com/reader/full/financials-i 456/563
Financials I in Microsoft Dynamics® AX 2009
11-14
3. Click the Functions button, then click Settlement to open the Open
transaction editing form.
FIGURE 11.3 OPEN TRANSACTION EDITING FORM- SETTLEMENTS
4. Select the Mark check box to select the invoices to transfer to theCustomer payment proposal form. Mark one or several invoicesfor settlement.
NOTE : A red mark shows in the Is marked field if a transaction already is
marked for settlement.
NOTE : You must enter a Customer account and Currency to use the
Settlements option.
Procedure: Transfer Marked Settlements to PaymentProposal and Payment Journal
Follow these steps to transfer the marked settlements to the Payment proposal
and Payment journal.
1. Select the Payment proposal check box and close the form when theinvoices are marked for payment. When you close the Open
transaction editing form, the Customer payment proposal formopens and shows the payment proposal and the open transactions.
2. Modify the transactions in the Customer payment proposal form.Click Transfer to move the payment suggestions to the payment journal lines to make the payment. A confirmation form will open.Click OK to confirm and continue.

8/20/2019 Financials I
http://slidepdf.com/reader/full/financials-i 457/563
Chapter 11: Accounts Receivable Daily Procedures
11-15
3. Verify that the information is correct in the Journal voucher form.
4. Optionally validate the journal lines by clicking the Validate buttonand clicking Validate.
5. Click the Post button, and then click Post to post the payment journal. These actions post the payments to the customer records,
update the General Ledger with the voucher transactions, andindicate the customer invoice transactions as settled.
NOTE : Sometimes, the customer allows the company to withdraw the payment
directly from their bank accounts. In such a case, click the Functions button,
then click Generate payments. You must do this before you post.
Procedure: Manually Create a Payment Journal - Createthe Journal
You also can create a Payment journal manually by entering the invoice
information into the journal. Follow these steps to manually create a Payment journal.
1. Open Accounts receivable, and then click Journals, clickPayments, and then click Payment journal.
2. Click CTRL + N to create a new journal.
3. Select a payment journal in the Name field.
4. Enter information in other fields, such as the Description field, asappropriate and then click Lines.
NOTE : Some fields in the journal contain default values that the Journal names
orm assigns to the journal, and these fields usually are not edited by the user.
NOTE : Some journals are more limited, such as the Invoice register form, and
not all fields listed in the example are available.
Payment Journal Fields
After you click the Lines button, these fields display in the Journal voucher
form:
Field name Description
Date View or enter the posting date. The system date(today's date) is entered automatically, but youcan select another date as appropriate.
Company accounts Select the company to associate with thecustomer for this transaction.

8/20/2019 Financials I
http://slidepdf.com/reader/full/financials-i 458/563
Financials I in Microsoft Dynamics® AX 2009
11-16
Field name Description
Account Enter or view the account number for theaccount type that is selected in the Account typefield.
Invoice Enter or select the invoice number that relates tothe payment. For example, if you received a payment receipt from your bank, enter theinvoice number. Information about the customerdisplays. If multiple invoices are related to the payment, use the Open transaction editing formto select the invoices, instead. If an asterisk (*)displays, it indicates that multiple invoices ortransactions other than invoices are assigned tothe payment.
Transaction text Enter descriptive text about the transaction.
Alternatively, enter the code for the standard journal text created in the Journal texts form.
Debit Enter a debit amount in the currency selected forthe journal line. This could be, for example, usedfor customer refunds.
Credit Enter a credit amount in the currency selected forthe journal line. Users typically (but not always)enter customer payment amounts in this field.
Use a deposit slip Select this check box to indicate that the amountmust be deposited with a deposit slip.
Offset account type Select the account type for the offset transactionto the customer payment. This is typically the bank account type for customer payment journallines.
Offset account Enter or view the account number for the offsetaccount type that is selected in the Offsetaccount type list.
Procedure: Payment Journal Lines - Invoice NumberKnown
After you create the Payment journal and click the Lines button, use this procedure if you know which invoice number the payment is for. Follow thesesteps to create a payment journal line with a known invoice number.
1. In the Invoice field, enter or select the invoice that you have receiveda payment for. Customer information displays automatically.
2. Click Validate to validate the payment line, and then click Post, andclick Post again.

8/20/2019 Financials I
http://slidepdf.com/reader/full/financials-i 459/563
Chapter 11: Accounts Receivable Daily Procedures
11-17
Procedure: Payment Journal Lines - Customer Known orMultiple Invoices
After you create the Payment journal and click the Lines button, use this procedure in the Journal voucher form, if you know which customer account
the payment is for, or if you intend to use the payment to settle multiple invoices.Follow these steps to create a payment journal line for multiple invoices.
1. In the Account field, enter the customer account that you havereceived a payment for.
2. TAB to the Invoice field and click the arrow. All open invoices forthe customer will display.
3. For a known customer and a single invoice, select the invoice thatyou want and skip to step 8, or alternatively proceed to step 4 formultiple invoices.
4. Click Functions, and click Settlement.
5. In the Open transaction editing form, select the Mark field on theline for the customer invoice that corresponds to the received payment.
6. If the customer has sent a payment that applies to several invoices,select the Mark field on each relevant invoice line. To see if the payment results in a discount for the customer for a specific invoice, place your cursor on the invoice line and click the Cash discount
tab. If a discount applies, it will be subtracted from the originalinvoice amount automatically when you create the payment line inthe next step.
7. Close the Open transaction editing form. The payment line or linesappear in the Journal voucher form with the correct invoiceinformation.
8. Click Validate to validate the payment line or lines, and then clickPost, and click Post again.
Payment Journal - Notes on Generating Payments
Sometimes, customers allow the company to withdraw the payment directly fromtheir bank accounts. In such a case, use the generate payment functionality towithdraw the payment from the account. In these cases, when you create the payment journal, it is ready to be paid. The procedure on how to generate payments is the same for payment proposals, settlements, and manual payment
journals.
8/20/2019 Financials I
http://slidepdf.com/reader/full/financials-i 460/563
Financials I in Microsoft Dynamics® AX 2009
11-18
Enter Customer Payments Form
In AX2009, an alternative to manual creation of Payment journal lines is theuse of the Enter customer payments functionality. Use this form to enter, settle,and save customer payments. You can select Transactions based on a variety oflookup fields, including:
• Customer account information
• Customer invoice information, including:
o Open invoice
o Credit note
o Collection letter
You also may view customer transaction records across multiple companies anddefine other aspects of the payment line, such as Method of payment, Offset
account type, etc.
Procedure: Enter Customer Payments Form
Follow these steps to enter customer payments using the Enter customer
payments form.
1. Click on Accounts Receivable, then click Journals, and clickPayment journal.
2. Create a new Payment journal by clicking CTRL+N, oralternatively use an existing Payment journal.
3. Click the Enter customer payments button.
4. If you know the invoice, interest note, collection letter, or other
transaction identifier, enter the identifier and click the lookup buttonin the Search for customer transactions field group. Select adocument and skip to step 6.
5. If you do not know the identifier, enter the information about the payment in the Customer payment information field group.
6. In the Select to pay field group, select the invoices or otherdocuments to settle with the payment.
7. Click Save in journal.
8. Repeat steps 3 through 6 for the remaining payments.
9. Click Close.
10. In the Journal form, click Validate to validate the payment line or
lines, and then click Post, and click Post again.

8/20/2019 Financials I
http://slidepdf.com/reader/full/financials-i 461/563
Chapter 11: Accounts Receivable Daily Procedures
11-19
Procedure: Enter Customer Payments Form - Select byCustomer
Follow these steps to view and select transactions for a specific customer.
1. Select the company, and then select the customer in the Customerfield. In the Select to pay pane of the form, all open transactions forthe selected customer will display.
2. Select the Mark check box next to each transaction that you want tosettle against this payment.
3. To save the marked lines in the Payment journal and remain in theform, click the Save in journal button.
4. To save the marked lines in the Payment journal and close theform, click the Close button. The form will close, and the Journal
form will display. You may then continue working in the Payment
journal.
Enter Customer Payments Form - Notes and Hints
If the amount in the Amount field of the Enter customer payment form doesnot equal the total of the marked transactions, then the form will display awarning that The payment is not fully settled. Adjust the marked transactions oramount accordingly if you want to; if you do transfer payment to the journalwithout adjustment, normal overpayment or underpayment posting rules willapply.
NOTE : To clear any transactions marked for payment in the Enter customer
ayments form, click the Clear button.
HINT : To view the details of the selected customer transaction, click the Show
document button.
NOTE : If the selected transaction is not an invoice transaction or credit note
transaction, then an asterisk will appear in the Invoice field of the created
ayment line.
Procedure: Edit Customer Payments FormThe Edit customer payments form works similarly to the Enter customer
payments form. It does not contain the Search for customer transactions
functionality and it also does not contain the Clear and Save in journal buttons.

8/20/2019 Financials I
http://slidepdf.com/reader/full/financials-i 462/563
Financials I in Microsoft Dynamics® AX 2009
11-20
Follow these steps to use the Edit customer payments form.
1. Click on Accounts receivable, then click Journals, click Payments, and then click Payment journal.
2. Select or create the payment journal record, and then click the Lines
button. You also can use the Enter customer payments function
prior to clicking Lines.
3. If you have not used the Enter customer payments function tocreate the payment line, create the payment line manually. If theEnter customer payments function was used, the created linesdisplay in the journal.
4. Select the line to edit, and click the Edit customer payments button.This button is inactive unless you have created and saved a paymentline, although you do not have to specify all fields in that line.
5. If you entered either a customer transaction or a customer account onthe payment journal line, then all open invoices for the enteredcustomer will appear in the Select to pay pane of the Edit customer
payments form. The Mark check box for the transaction selected inthe payment line already will be selected. You can continue to markother customer transactions by clicking Mark . If you entered neitheran invoice or customer payment on the payment line, the edit formwill not show transactions, and you may proceed to select a customerand mark transactions.
6. To select additional customer transactions, repeat steps 1 to 6.
7. Click the Close button to exit the form and return to the Payment
journal. Post the journal as you normally would.
Test Your Knowledge
When the invoice is registered and approved, the customer must pay for theinvoice.
( ) True
( ) False
What does the payment proposal function do? (Select all that apply.)
( ) Searches for due payment lines
( ) Searches for vendors
( ) Searches for payment lines that have a maximum date for receiving a
cash discount
( ) Checks open and approved customer transactions

8/20/2019 Financials I
http://slidepdf.com/reader/full/financials-i 463/563
Chapter 11: Accounts Receivable Daily Procedures
11-21
Lab 11.2 - Settlements - Entering an Accounts ReceivablePayment Journal (Cash Receipt)
This lab enables you to practice settling an invoice.
Scenario
Contoso has received a payment from Sunflower Shopping Mall. Use thefollowing information to create a settlement for the invoice in AccountsReceivable.
Date Use the system date
Account Sunflower ShoppingMall
Credit 2,499.00
Offset Account 110180
Challenge Yourself!
1. Create a payment journal.
2. Use open transaction editing to apply this payment to the correctinvoice.
Need a Little Help?
1. Post the Payment journal.
2. Apply this payment to the original invoice by using Open
transaction editing to apply this payment.
3. Mark the invoice for settlement.
Step by Step
Follow these steps to create a payment journal and use open transaction editing toapply this payment to the correct invoice.
Create the Payment journal:
1.
Click Accounts receivable, then click Journals, click Payments,and then click Payment journals.
2. Press CTRL+N to create a new journal.
3. Select ARPay in the Name field.

8/20/2019 Financials I
http://slidepdf.com/reader/full/financials-i 464/563
Financials I in Microsoft Dynamics® AX 2009
11-22
4. Click the Lines button and enter the information specified in theexample for the payment.
o Use customer number 2112, Sunflower Shopping Mall
o Enter the amount of 2,499
o Use offset account 110180
5. Click the Post button.
6. Click Post to post the invoice.
7. Close the Infolog form.
8. Close the Payment journal form.
9. Close the Journal form.
Perform Open transaction editing in the Customer form:
1. Apply the payment to the original invoice of the same amount, byusing the Open transaction editing function in the Customer form.
To do this, click Accounts receivable, then click Customer details,and then select the customer Sunflower Shopping Mall. Next, clickFunctions, and then click Open transaction editing.
2. Select the Mark check box for both the payment and the invoice andthen click the Update button to apply the payment to the invoice.
3. Close the Open transaction editing form.
4. Close the Customers form.

8/20/2019 Financials I
http://slidepdf.com/reader/full/financials-i 465/563
Chapter 11: Accounts Receivable Daily Procedures
11-23
Edit Open Transactions
Use the Open transactions editing form to make changes in transactions forcustomers. Only unapplied transactions are available for editing.
The following procedures explain how to:
• Settle invoices and payments
• Specify a cross rate between invoices and payments
• Reorganize transactions with new due dates
Settling Invoices and Payments
You can settle invoices and payments in the Edit open transaction form, if, forexample, the invoice and payment are not settled when you create the payment.
When you settle invoices and payments:
If Then
The amount paid is morethan the amount due
The system settles the invoice and the paymenttransaction remains open for the amount bywhich the payment exceeded the amount due
The payment amount isless than the amount due
The system subtracts the payment from theamount due and the invoice remains open
The amount paid equalsthe amount due
The system generates a payment transaction forthe payment amount, and then closes thetransaction
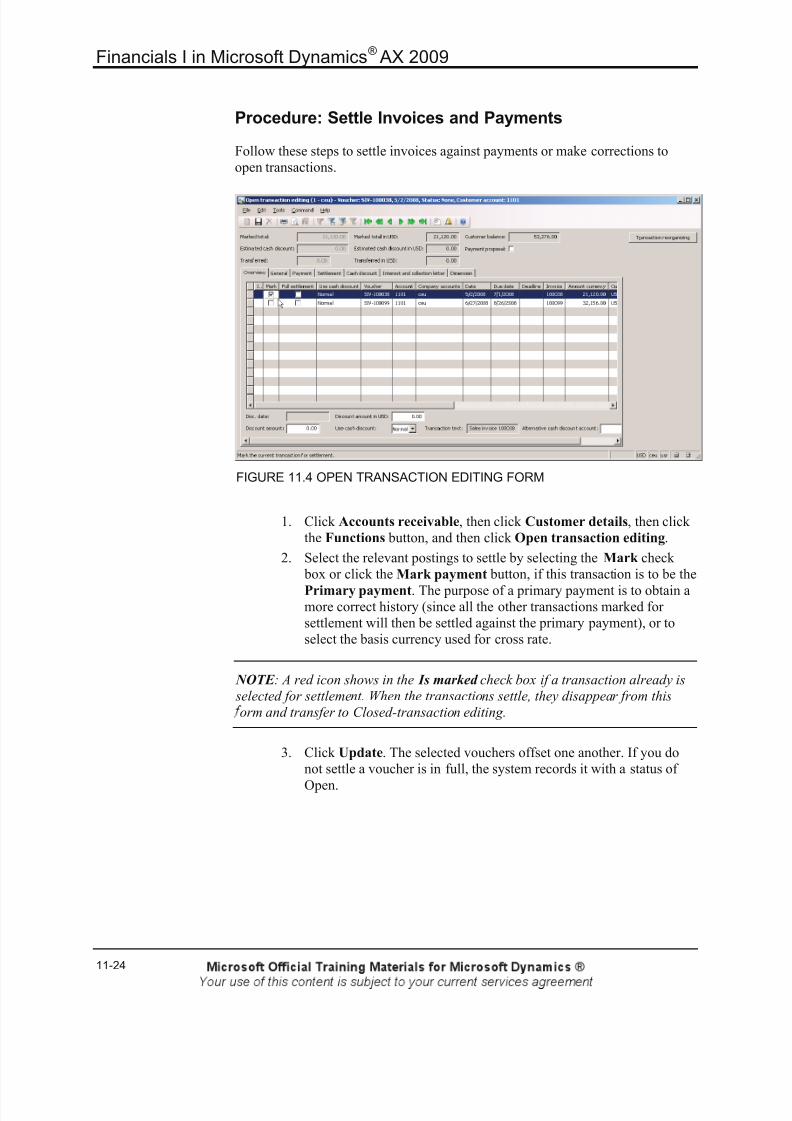
8/20/2019 Financials I
http://slidepdf.com/reader/full/financials-i 466/563
Financials I in Microsoft Dynamics® AX 2009
11-24
Procedure: Settle Invoices and Payments
Follow these steps to settle invoices against payments or make corrections toopen transactions.
FIGURE 11.4 OPEN TRANSACTION EDITING FORM
1. Click Accounts receivable, then click Customer details, then clickthe Functions button, and then click Open transaction editing.
2. Select the relevant postings to settle by selecting the Mark check box or click the Mark payment button, if this transaction is to be the
Primary payment. The purpose of a primary payment is to obtain amore correct history (since all the other transactions marked forsettlement will then be settled against the primary payment), or toselect the basis currency used for cross rate.
NOTE : A red icon shows in the Is marked check box if a transaction already is
selected for settlement. When the transactions settle, they disappear from this
orm and transfer to Closed-transaction editing.
3. Click Update. The selected vouchers offset one another. If you donot settle a voucher is in full, the system records it with a status of
Open.

8/20/2019 Financials I
http://slidepdf.com/reader/full/financials-i 467/563
Chapter 11: Accounts Receivable Daily Procedures
11-25
4. To enable automatic settlements, click Accounts receivable, thenclick Setup, then click Posting profiles. Select the relevant customer posting profile, and on the Table tab select the Settlement check box. In some cases, it is convenient to allow for an automaticsettlement of invoices and payments. For example, if a company hasto handle numerous small customers who have few payments, such
as subscribers to magazines, this can be an efficient solution to posting payments.
Procedure: Specify the Cross Rate in Open TransactionEditing
You can use a cross rate when you settle a payment with an invoice, and the payment and invoice lines are in different currencies. When you select an invoiceand a primary payment, you can enter a cross rate for the invoice line. The crossrate is the exchange rate between the currencies for those transactions as of thesettlement date. Follow these procedures.
1. Click Accounts receivable, then click Customers.
2. Select the customer whose open transactions you are settling.
3. Click Functions, then click Open transaction editing.
4. Select the transaction that is the primary payment, and click theMark payment button. The check box in the Mark column isselected, and an information icon is shown in Primary payment
column.
5. In the Cross rate field, enter the exchange rate multiplier betweenthe invoice currency and the payment currency, as of the settlementdate.
Reorganizing Open Transactions
You or a customer might pay one invoice on multiple dates or might use multiple payment methods, such as a check and cash. When this happens, you canreorganize an invoice into several parts and assign a separate payment method toeach part. After you reorganize the invoice, you can settle each new invoice linewith a separate payment.
You can refer to the following information to reorganize customer transactions inaccounts receivable journals and vendor transactions in accounts payable journals.
NOTE : You also can reorganize transactions in the general journal and in
ayment journals.
8/20/2019 Financials I
http://slidepdf.com/reader/full/financials-i 468/563
Financials I in Microsoft Dynamics® AX 2009
11-26
Procedure: Reorganizing Open Transactions
Follow these steps to reorganize payments.
1. Click Accounts receivable > Customer details.
2. Select an account.
3. Click Functions, then click Open transaction editing.
4. On the Overview tab, select the Mark check box for an invoice.
5. Click Transaction reorganizing.
6. Select whether to reorganize the transaction by percentage or byamount.
7. On the Overview tab, create a new line for each new due date. Foreach due date, enter the percentage or amount of the originaltransaction that is due on that date.
8. To reorganize the original transaction by method of payment, you
can enter the same due date for each line. You will select the methodof payment in step 12.
9. Verify that the percentage or amount shown in the Remainder fieldis 0.
10. Click Accept to transfer the reorganized transactions to the Open
transaction editing form.
11. Select a new transaction.
12. Select the Payment tab and select a method of payment and a payment specification.
13. Repeat steps 11 and 12 for the remaining new transactions.
NOTE : Alternatively, you can reorganize the due dates by using a payment
schedule. Click the Payment schedule button, select a payment schedule and a
starting point, and click OK . The Payment schedule configuration key must be
selected to reorganize transactions according to a payment schedule.
Test Your Knowledge
In open transactions, you can:
( ) Edit unapplied transactions
( ) Make changes in transactions for customers
In open transactions, you can: (Select all that apply.)
( ) Create a payment proposal
( ) Edit unapplied transactions
( ) Create a free text invoice
( ) Make changes in transactions for customers
8/20/2019 Financials I
http://slidepdf.com/reader/full/financials-i 469/563
Chapter 11: Accounts Receivable Daily Procedures
11-27
What is the cross rate functionality used for?
( ) When the payment and the invoices are in different currencies
( ) When the payment and the invoices are in the same currencies
( ) When the customer and the invoices are in the same currencies
( ) When the customer needs to be reimbursed
If the invoice and payment are not settled when you create the payment, wherecan these be settled?
( ) Free text invoice
( ) Payment proposals
( ) In the Edit open transactions form
( ) In the Reverse settlements function
It is possible to split open transactions.
( ) True
( ) False

8/20/2019 Financials I
http://slidepdf.com/reader/full/financials-i 470/563
Financials I in Microsoft Dynamics® AX 2009
11-28
Lab 11.3 - Edit Open Transactions
You can practice editing open transactions in this lab.
Scenario
You are an Accounts Receivable Coordinator at Contoso. Whale Wholesales(Customer account 1301) has purchased some design consultancy from Contoso.You need to create a free text invoice because the sale is not an inventorytransaction. The price agreed on for consulting $99.00 plus tax.
Two weeks later, a check for $108.90 arrives from the customer, so you thenmust create a payment journal and post it for this amount. As part of the weekending process, you now must check the Open transactions for all customers.
When you check the Whale Wholesales account, you notice that transactions areopen. Mark them for payment and update the account. To ensure that you have
done this correctly, check the Closed transactions for Whale Wholesales andverify the transactions in the Closed transactions form.
Challenge Yourself!
1. Create the Free Text Invoice. Use ledger account 401200.
2. Record the payment and apply the payment to the correct invoice byusing Open transaction editing.
Need a Little Help?
1. Create a Free text invoice.
2. Create and post a Payment journal.
3. Use the Open transactions editing functionality to mark thetransactions.
4. Use the Closed transactions editing functionality to view thetransactions.
Step by Step
Create the invoice:
1. From the Navigation pane, click Accounts receivable, then clickFree text invoice details.
2. Press CTRL+N to create a new invoice.
3. In the Customer account field, type 1301.
4. Click the Invoice lines tab.
5. In the Description field, type Design consultancy.
6. Click the Account arrow, and then click 401200.

8/20/2019 Financials I
http://slidepdf.com/reader/full/financials-i 471/563
Chapter 11: Accounts Receivable Daily Procedures
11-29
7. TAB to the Amount field, and type 99.00.
8. Click the Posting button, then click Free text invoice.
9. Click OK .
10. Close the Infolog form.
11. Close the Free text invoice form.
12. Close the Print form.
Create and post the Payment journal:
1. Click Accounts receivable, then click Journals, click Payments,and then click Payment journal.
2. Press CTRL+N to create a new journal.
3. In the Name field, select ArPay.
4. Click Lines.
5. In the Account field, type 1301.
6. Click the Transaction text arrow, type Pay, and TAB to the next
field.
7. In the Credit field, type 108.90.
8. Click the Post button, and then click Post.
9. Click OK to close the Infolog dialog box.
10. Close the form.
Settle the invoice:
1. Click Accounts receivable, then click Customer details.
2. Click Customer account 1301.
3. Click the Functions button, then click Open transaction editing.4. Select the Mark check box for the invoice line just created.
5. Select the Mark check box for the payment line just created.
6. Click Update.
7. Close the form.
Verify the settlement:
1. Remain in the Customer details form.
2. Click Customer account 1301 if needed.
3. Click the Functions button, then click Closed transaction editing.
4. View the transactions in this form.5. Close all the forms.

8/20/2019 Financials I
http://slidepdf.com/reader/full/financials-i 472/563
Financials I in Microsoft Dynamics® AX 2009
11-30
Placing an Accounts Receivable Transaction on Hold
To make data entry more flexible, you can enter a transaction on one date, andthen put it on hold to prevent users from posting it until a specified date. Thisfunctionality is useful if you have an agreement with a customer about when a
transaction can be posted.
To prevent a transaction from being posted until a specified date, enter a releasedate, until which the transaction is on hold. You can edit and save transactionsthat are on hold, but you cannot post them unless you first remove the hold.
Procedure: Place an Accounts Receivable Transaction onHold
You can place an accounts receivable transaction on hold by using one of thefollowing paths:
• Click Accounts receivable, then click Free Text Invoice Details
• Click Accounts receivable, then click Journals, click Payments,click Payment journal, and then click Lines
• Click Accounts receivable, click Journals, click Payments, andthen click Payment transfer
• Click Accounts receivable, click Journals, and then click Bill of
exchange. Open any Bill of Exchange journal, and then click Lines
Follow these steps to place an accounts receivable transaction on hold.
1. In the Release date field, enter the date when the transaction is nolonger on hold and becomes available for posting.
2. To remove a hold on a transaction, you can clear the entry in thisfield. Any user can clear the release date, regardless of who initiallyentered it.
3. Press CTRL+S to save the transaction.
About Release Date for Held Transactions in DifferentTime Zones
If your organization includes users who work across multiple time zones, the dateand time when a transaction is released from a hold is based on the time zone of
the user who most recently modified the Release date value. Because thetransactions release at midnight on the specified date in that user's time zone, theactual date and time of the release adjust accordingly for users in other timezones.
For example, on December 31 in New York, a user puts a transaction on hold atnoon Eastern Time, and enters a release date of January 1 (the next day). Theuser sets up the transaction to be on hold until midnight Eastern Time, so the usermust wait 12 hours for the transaction to be released.

8/20/2019 Financials I
http://slidepdf.com/reader/full/financials-i 473/563
Chapter 11: Accounts Receivable Daily Procedures
11-31
Users in London, which is five hours ahead of New York, also must wait 12hours. However, because the transaction was put on hold at 17:00 GreenwichMean Time on December 31, the transaction will not be released until 05:00Greenwich Mean Time on January 1.
For users in Seattle, which is three hours behind New York, the transaction was
put on hold at 09:00 Pacific Time on December 31. When the transaction isreleased 12 hours later (at 21:00 Pacific Time), it will still be December 31 forthese users.
Reverse Settlements
When you work with reverse settlements:
• Use the Closed-transaction editing window to edit fully applied orsettled transactions that are in history.
• Use reverse settlements if the bank does not honor a payment, or if
you used the wrong date or settlement amount.• An unsettled invoice is considered unpaid and is handled together
with collection letters.
Scenario - Reversing Settlements
At Contoso, the Accounting Manager reviews and approves the AccountsReceivable transactions. The Accounting Manager realizes that a customer payment is settled with the wrong invoice and wants to reverse the settlement.

8/20/2019 Financials I
http://slidepdf.com/reader/full/financials-i 474/563
Financials I in Microsoft Dynamics® AX 2009
11-32
Procedure: Reverse Settlements
Follow these steps to reverse a closed transaction.
FIGURE 11.5 CLOSED TRANSACTION EDITING FORM
1. Click Accounts receivable, then click Customer details, then clickthe Functions button, and then click Closed transaction editing.
2. Put the cursor on the line that contains the settlement to reverse.
3. Select the Mark field to reverse the invoice or payment to associatewith the settlement. The Mark field of the transaction that offsets thetransaction marked is selected automatically.
4. Click Reverse.
As soon as the changes that you want are made, the system changes thesettlement amount, makes the corrections, and changes the status. View thehistory by clicking the Inquiries button, then clicking History. The History formdisplays an overview of settlements for the current voucher.
Test Your Knowledge
You can reverse a settlement if the bank does not honor a payment.
( ) True
( ) False

8/20/2019 Financials I
http://slidepdf.com/reader/full/financials-i 475/563
Chapter 11: Accounts Receivable Daily Procedures
11-33
Lab 11.4 - Reverse a Settlement
Scenario
You are the Accounts Payable Coordinator at Contoso. You just realized that the
settlement posted to Whale Wholesales should have posted to customer account1203- Pelican Wholesales, and you now must reverse the settlement to Customeraccount 1301.
Challenge Yourself!
Use the Closed transactions editing function to reverse this settlement.
Need a Little Help?
Use the Functions button, and then click Closed transaction editing, to reversethe payment posting error.
Step by Step
1. From the Navigation pane, click Accounts receivable, then clickCustomer details.
2. Click customer account 1301.
3. Click the Functions button, then click Closed transaction editing.
4. Click the transaction line that recorded a payment for 108.90.
5. Select the Mark check box.
6. Click the Reverse button.
7. Close all the forms.

8/20/2019 Financials I
http://slidepdf.com/reader/full/financials-i 476/563
Financials I in Microsoft Dynamics® AX 2009
11-34
Reimburse a Customer
When you work with the reimbursement feature:
• Use it to repay customers who have credit amounts because of
overpayment or credit notes.
• It transfers the balance to a vendor account.The vendor account is set up in the Customer form, otherwise a one-time vendor account is created automatically.
• The Accounts Payable Coordinator can create an ordinary paymentwhen the balance amount transfers to a vendor account.
Scenario - Reimbursing Customers
Contoso has a compensation policy that guarantees customers are reimbursed ifContoso does not meet the service level described in customer agreements. For
example, if there is product damage or a delay in delivery, Contoso reimbursesthe customer five percent of the invoice amount.
Procedure: Reimburse a Customer
Follow these steps to reimburse a customer.
1. Click Accounts receivable, click Setup, and then click Parameters.
2. On the General tab, in the Minimum Reimbursement field, enter aminimum amount for reimbursement of customer overpayments. Ifthe reimbursement amount is equal to or greater than the value in theMinimum Reimbursement field, the balance transfers to the vendor
account.
3. Close the Parameters form.
4. Click Accounts receivable, click Periodic, and then clickReimbursement.
FIGURE 11.6 THE REIMBURSEMENT DIALOG

8/20/2019 Financials I
http://slidepdf.com/reader/full/financials-i 477/563
Chapter 11: Accounts Receivable Daily Procedures
11-35
5. Click Select to reimburse specific customer accounts, and to specifythe customer accounts in the CustOverPayment query form. Toreimburse all customer accounts, click OK .
6. The credit amounts transfer to the vendor accounts of the customersand are processed automatically as ordinary payments.
NOTE : If a customer does not have a vendor account, the system automatically
creates a one-time vendor account for the customer. You can set up vendor
accounts for customers by clicking Customer details, selecting the desired
customer, and then clicking the General tab. The Vendor account field is
located on that tab.
7. Click Accounts receivable, then click Reports, click Transactions,click Payment management, and then click Reimbursement toview the reimbursement transactions created.

8/20/2019 Financials I
http://slidepdf.com/reader/full/financials-i 478/563
Financials I in Microsoft Dynamics® AX 2009
11-36
Lab 11.5 - Reimburse a Customer
This lab demonstrates how to use customer reimbursements.
Scenario
Whale Wholesales purchases additional design consultancy services with thesame price as before - $99.00, plus tax. As the Accounts ReceivableAdministrator, you create a free text invoice for this order. The Accounts PayableCoordinator at Whale Wholesales sends a check for $120.00 immediately because he could not remember the exact amount of the consulting order, butthought that the last order was for about $120.00.
You receive the payment, and then create and post a payment journal. Again, as part of the week-ending process, you edit open transactions, including the opentransactions for Whale Wholesales. You notice the overpayment, so after youedit the open transactions, you generate reimbursements so that you can
reimburse your customers, including Whale Wholesales, for their overpayments.
Challenge Yourself!
Create the invoice for Whale Wholesales, post the payment, and generate thereimbursement for the overpayment.
Need a Little Help?
1. Change the Minimum reimbursement field for Accounts
receivable parameters to 5.00.
2. Create and post a Free text invoice for the sale. Use ledger account401200.
3. Create and post a Payment journal for the payment.
4. Edit the open transactions.
5. Generate the reimbursements.
Step by Step
Set the Minimum reimbursement value:
1. From the Navigation pane, click Accounts receivable, click Setup,and then click Parameters.
2. In the Minimum reimbursement field, type 5.00.
3. Close the form.
Create the Free text invoice:
1. Click Accounts receivable, then click Free text invoice details.
2. Press CTRL+N to create a new invoice.

8/20/2019 Financials I
http://slidepdf.com/reader/full/financials-i 479/563
Chapter 11: Accounts Receivable Daily Procedures
11-37
3. In the Customer account field, type 1301.
4. Click the Invoice lines tab.
5. In the Description field, type Consulting.
6. Click the Ledger Account arrow, and then type 401200.
7. TAB to the Amount field, and then type 99.00.
8. Click the Posting button, and then click Free text invoice.
9. Click OK .
10. Close the print form., and all other forms.
Create and post the Payment journal:
1. Click Accounts receivable, then click Journals, click Payments,and then click Payment journal.
2. Press CTRL+N to create a new journal.
3. In the Name field, type ARPay.
4. Click the Lines button.
5. In the Account field, type 1301.
6. Click the Transaction text arrow, enter Pay, and then TAB to thenext field.
7. In the Credit field, type 120.
8. Click the Post button, then click Post.
9. Click OK to close the dialog box.
10. Close all the forms.
Settle the invoice and the payment:
1. Click Accounts receivable, then click Customer details.2. Click customer account 1301.
3. Click the Functions button, then click Open transaction editing.
4. Select the Mark check box for the invoice line just created.
5. Select the Mark check box for the payment line just created.
6. Click the Update button.
7. Close all the forms.
Record the reimbursement:
1. C lick Accounts receivable, click Periodic, and then click
Reimbursement.2. Click the Select button.
3. In the Criteria field on the Customer account line, type 1301.
4. Click OK and click OK again.
5. Click Close to close the dialog box.
6. Close all the forms.

8/20/2019 Financials I
http://slidepdf.com/reader/full/financials-i 480/563
Financials I in Microsoft Dynamics® AX 2009
11-38
Reason Codes
Reason codes are standardized codes that you can use in various transaction typesor changes to field values to provide background data about the transaction. Forexample, auditors or managers frequently want to see reasons recorded for
various transactions. Using standard reason codes instead of transaction textgives users guidelines on what codes to select from, and provides managementand auditors with the ability to analyze transaction history by specific reason.Reason codes can be used with:
• Fixed assets
• General ledger
• Accounts payable
• Accounts receivable
• Bank
Require Reason Codes in Accounts Receivable
In Accounts receivable, you can set up parameters to require reason codes whentransactions are reversed or canceled, or when return orders are posted. You canview historical reasons in the Customer transactions and Voucher transactions
forms.
To require reason codes for receivable transactions, select the check boxes nextto one or more of the following Reason code requirements settings in theAccounts receivable parameters form:
• Require reasons for payment cancellations• Require reasons for return orders
• Require reasons for transaction reversals
Reason Codes in Accounts Receivable Transactions
After you have created reason codes, select reasons for transactions or otherentries in the following forms in the Accounts receivable module:
• Cancel payment form
• Free text invoice form
• Transaction reversal form
Reason Comments
Enter a reason comment in the same forms where you select reason codes.Reason comments are optional, and although you can set up default reasoncomments for each reason code, no setup is required.
8/20/2019 Financials I
http://slidepdf.com/reader/full/financials-i 481/563
Chapter 11: Accounts Receivable Daily Procedures
11-39
If you select a reason code for a transaction, the default comment that is set up inthe Reasons form displays in the Reason comment field. You can change thedefault reason comment. If you type a reason comment first and then select areason code, the typed reason comment is not replaced.
View Reason Codes in Accounts Receivable
View reasons for transactions in journals in the following areas:
Type To open the form
Free text invoice details Accounts receivable > Common Forms > Free
Text Invoice Details
View reasons for transactions in history:
Type To open the form
Customer transactions Accounts receivable > Common Forms >Customer Details > Transactions
Voucher transactions Accounts receivable > Common Forms >Customer Details > Transactions > Voucher
Print Management - AR
Print management works with Accounts Receivable and Accounts Payable. Youcan define print management original records, copy records, and conditionalsettings at the module, account, or transaction level, so that you can controlvarious activities that include the following:
• Number of copies to produce
• Multilingual document footer text
• Print destination
How Print Management Works
When you print documents such as invoices or packing lists, use defined settingsfor the original or copy records in print management. The effective records arethe records established in Print management that control the printed output oforiginal and copy records. An original or copy record contains the informationthat print management uses to print the document. The record that is used to printa document determines the footer text for the document, which printer to use, andthe number of copies to print. For example, to print three copies of the sales order packing slip, each with different footer text, set up an original record and twocopy records.

8/20/2019 Financials I
http://slidepdf.com/reader/full/financials-i 482/563
Financials I in Microsoft Dynamics® AX 2009
11-40
The print management setup information for each document type is defined in ahierarchical list that consists of modules, accounts, and transactions. At eachlevel of the hierarchy, define print management original records, copy records,and settings for any of the available document types. When you generate adocument, it prints according to the effective original record and effective copyrecords. An effective record can be inherited from a higher level in the hierarchy
or created as a new record for the current level in the hierarchy, or it can overridean inherited record that has the same name.
You can set up a default setting for each original record or copy record thatspecifies the footer text, printer destination, and number of identical copies to print. If you select the Default setting check box in the Print management
setup form, a document prints according to the specifications for the defaultsetting. If you do not select this field, a document prints only if a query for anassociated conditional setting successfully returns results.
Each original record or copy record can have up to 19 conditional settingsassociated with it. Each conditional setting has a related query. For example, you
can create a query to print footer text in a different language for a specificcustomer. When you generate the document during posting, the queries that areassociated with the conditional settings are evaluated automatically in the orderin which the settings appear in the Print Management setup form. The setting thatis associated with the first successful query is used to print the document.
Set Up Print Management at the Module Level
You can define print management settings for each module, account, transaction,or any combination of these three. You can create up to 99 original or copyrecords for every document type. You can create up to 19 conditional settings foreach original or copy record, in addition to the default setting.
Setting up print management at the module level requires the least amount ofsetup and minimizes the maintenance work when settings change, such asinstallation of a new printer. However, if business needs require, settings forspecific accounts or individual transactions can override module settings.
NOTE : You can use print management settings when you reprint documents.
Select Preview/Print > Use print management to reprint a document that uses
the effective print management settings.
Scenario
Simon, the System Implementer, has collected information about the printing ofsales invoices. Contoso uses the same invoice for all types of customer orders.Therefore, Simon specifies that the setup applies not only to the Sales orderinvoice, but also to the free text invoice and project invoice.

8/20/2019 Financials I
http://slidepdf.com/reader/full/financials-i 483/563
Chapter 11: Accounts Receivable Daily Procedures
11-41
Contoso requires five copies. Simon enters the footer information for each copy,which is as follows:
• “Customer” for the first and second copy
• “Remittance Copy” for the third copy
• “Customer File” for the fourth copy, which is filed by Customername
• “Numeric File” for the fifth copy, which is filed in a numeric invoicefile
For each copy, Simon specifies the intended audience so that each document prints in the appropriate language. For the Customer and Remittance Copy,Simon enters the footer text for multiple languages so that all the text on theinvoice prints with the language appropriate to the customer.
Arnie in Accounts Receivable prints all the copies; thus, Simon specifies thatcopies 1, 3, 4, and 5 must print to Arnie's printer. He sets up copy 2 to print to the
Archive.
Simon finishes setting up all the documents for Contoso and then begins settingup Contoso Europe. For this company, the customer invoice documents areunique. Simon sets up the footer text, printing order, sort order, and printerdestination for each document.
Simon sets up the Sales order Packing Slip document next. Because ContosoEurope has several warehouses, he must set up copies for each warehouse. ForWarehouse A1, he specifies three copies, footer text, printing order, sort order,and printer destination. For Warehouse A2, he specifies four copies, footer text,order in which the copies print, sort order, and printer destination. The
appropriate document and copies print automatically based on the warehouselocation for each Sales order line.
When Simon finishes setting up the documents for all the companies, he sends ane-mail to the implementation team stating that the setup is complete andrequesting that each member verify the document setup for his or her particulardepartment.
Prakash, the Project Manager at Contoso, receives Simon's e-mail and verifiesthe print setup. He reviews the setup for all the documents and is satisfied thatSimon set them up correctly.

8/20/2019 Financials I
http://slidepdf.com/reader/full/financials-i 484/563
Financials I in Microsoft Dynamics® AX 2009
11-42
Procedure: Set Up Print Management
Follow these steps to set up print management at the module level.
1. Click Accounts Receivable, click Setup, click Forms, click Form
Setup, and click Print management button. The hierarchical list in
the left pane displays the module, documents, original or copyrecords, and conditional settings. The fields in the right pane displaythe options that you can specify for each type of record. Thedisplayed fields vary, depending on the selected record. When youexpand the hierarchy list, a plus (+) icon in front of the documenttype indicates that a setup record exists.
2. To create a new record, right-click a document name and select New.A new original or copy record is created and is displayed in the listautomatically.
3. In the right pane in the Original/copy field, make a selection tocreate either an original or copy record. You can create only one
original record for each document, but you can create multiple copyrecords for each document.
4. If you are creating a copy, enter a name in the Name field.
5. To set up the original or copy so that it does not print, select the Do
not print check box. If there is an override of an original or copyrecord from a higher level in the print management hierarchy, usethis option to stop a document from printing instead of only changingthe destination, number of copies, or footer text.
This is a continuation of setting up Print management. Follow these steps tocontinue.
1. Click Accounts Receivable, click Setup, click Forms, click FormSetup, and click Print management button.
2. If the Default setting check box is selected, the original or copy prints even if the queries for any applicable conditional settings donot return any results. The original or copy is denoted in thehierarchical list by the word Default.
3. By default, the document prints at the specified printer destinationwhen you click Printer setup from the posting form for thedocument. To change the printer destination, click the Destination
field's lookup button and then click Printer setup to select adestination. After you make changes, click OK to return to the Print
management setup form.
4. In the Number of copies field, enter the number of identical copiesto print, up to 99 copies.
5. In the Footer text field, enter up to 50 characters to include at the bottom of the document. To print footer text in other languages, clickthe Footer text lookup button and set up footer text for theadditional languages.
8/20/2019 Financials I
http://slidepdf.com/reader/full/financials-i 485/563
Chapter 11: Accounts Receivable Daily Procedures
11-43
Scenario
Arnie, the Accounts Receivable Coordinator, is entering a sales order for a newcustomer. Because this is the first time he is selling to the customer, the terms arecash on delivery. He must enter the order with the customer's payment terms sothat the material will be sold and delivered on time.
To speed up establishing an open account with the customer, Arnie sets up adocument copy for the sales order. He enters “New Customer- need creditestablished” as the footer and sets the print destination to the printer that belongsto Connie, the Credit and Collections Manager. He also enters a note that will print on Connie's copy that explains how much business they plan to conductwith the customer. This information will help Connie determine how much creditto grant to the customer.
Arnie posts and prints the sales order, which prints a copy to Connie's printer.
Procedure: Set Up Print Management for an Account
Follow these steps to set up print management for a specific customer, prospect,or vendor account.
1. Click Accounts receivable, and click Customer details.
2. Select an account.
3. Click Setup and then click Print management.
4. In the left pane, expand the list for a document that is listed under thecustomer or vendor account. Any original or copy records aredisplayed. An icon with a blue arrow indicates that the original orcopy record is inherited from the module level of the hierarchy. This
is the print management information to use for the customer orvendor, unless you perform an override to make changes at theaccount level.
5. Review the original or copy record information. If changes arenecessary, override the inherited record, copy an inherited record,create a new record, or create a new setting.
o To override, right-click an original or copy record and selectOverride. The icon changes to display a red X to indicate thatthe record is now an override record.
o To copy, right-click an original or copy record and select Copy.A copy is displayed in the list. Give the copy a new name.
8/20/2019 Financials I
http://slidepdf.com/reader/full/financials-i 486/563
Financials I in Microsoft Dynamics® AX 2009
11-44
o To create a new original or copy record, right-click a documenttype in the list and select New. A new record displays in the list.
o To create a new conditional setting, right-click an original orcopy record and select New. A new conditional setting displaysin the list. The conditional setting must have a description, andyou must select query information.
6. Refer to the Set up Print Management procedure for moreinformation about the fields available in the Print Management
setup form.
Set Up Print Management for a Transaction
Set up print management original or copy records and conditional settings for atransaction, such as a sales order. This may be necessary if you use a different printer for a specific transaction.
Refer to the following table for the complete list of documents supported inAccounts receivable, and the path that gives access to the print managementsetup for each document.
Module Documents Path
Accounts receivable Free text invoice Accounts receivable > Free
text invoice > Setup > Print
management
Accounts receivable Quotation Accounts receivable > Sales
quotation > Setup > Print
management
Accounts receivable Sales orderconfirmation
Sales order invoice
Sales order packingslip
Sales order pickinglist
Accounts receivable > Salesorder > Advanced > Setup >
Print management
1. In the left pane of the Print management setup form, expand thelist of documents. Any original or copy records display.
2. Review the original or copy record information. If changes arenecessary, override an inherited record, copy an inherited record,create a new record, or create a new conditional setting.
o To override, right-click an original or copy record and selectOverride. The icon changes to display a red X to indicate thatthe record is now an override record.
o To copy, right-click an original or copy record and select Copy.A copy displays in the list. The copy must have a new name.

8/20/2019 Financials I
http://slidepdf.com/reader/full/financials-i 487/563
Chapter 11: Accounts Receivable Daily Procedures
11-45
o To create a new original or copy record, right-click a documentin the list and select New. A new record displays in the list.
o To create a new conditional setting, right-click an original orcopy record in the list and select New. A new conditional settingdisplays in the list. You must enter a description for theconditional setting and you must select query information.
3. Refer to the Set up Print Management procedure for moreinformation about the fields available in the Print Management
setup form.
Example: Conditional Print Management Settings
You can customize the document output by using conditional settings that apply based on the results of a query. For example, one copy might be sufficient formost customers, but an extra customer copy may be necessary for a certain set ofcustomers. Set up an additional copy record and a conditional setting with anassociated query for the customer accounts that must have the additional copy printed, such as customer accounts 1101 through 1103, and then define“Customer copy 2” as the footer text for the extra copy.
If you post sales orders for customer accounts 1102 and 1104 with the original orcopy records and defined conditional setting, the following results will occur.
Customer Documents that print
Customer 1102 Original
Customer copy
Customer copy 2 (because thecustomer account falls withinthe query results for the setting)
Warehouse copy
Customer 1104 Original
Customer copy
Warehouse copy

8/20/2019 Financials I
http://slidepdf.com/reader/full/financials-i 488/563
Financials I in Microsoft Dynamics® AX 2009
11-46
NOTE : Although conditional settings and queries provide flexibility in the print
management settings, complex queries or numerous conditional settings can
affect posting performance.
Procedure: Set Up Conditional Print Management Settings
Follow these steps to create a conditional print management setting.
1. In the left pane of the Print management setup form, right-click anoriginal or copy record and select New.
2. Enter a Description for a conditional setting.
3. Click the Select button.
4. In the Query - Setting form, enter query information in the Criteria
field.
5. When the query is complete, click OK .
6. Refer to the Set up Print Management for more information aboutavailable fields in the Print Management setup form.
Test Your Knowledge
How are print management settings defined?
( ) For each module
( ) For each account
( ) For each transaction
( ) For each module, account, transaction, or any combination of thesethree
Which of the following activities can you not control with print managementsettings?
( ) Number of copies to produce
( ) Page orientation
( ) Multilingual document footer text
( ) Print destination

8/20/2019 Financials I
http://slidepdf.com/reader/full/financials-i 489/563
Chapter 11: Accounts Receivable Daily Procedures
11-47
Summary
For efficient management of Accounts Receivable, Microsoft Dynamics AX2009 offers many advanced options, including:
• Extensive options for credit assessment and credit control
• Flexible terms of payment and cash discount
You can give each customer a unique credit limit. Apply the credit limits to onlycustomer balances or to include uninvoiced, delivered items, or even sales orders.
Decide whether the credit limit applies on the total of the sales order or if youneed to control each sales order line separately. You can set up the system to stopdelivery when you reach the credit limit or set up an automatic warning that youcan overrule. You also can stop the customer account automatically at any stepduring the collection procedure.
Microsoft Dynamics AX 2009 offers extensive options for editing opentransactions, reopening closed transactions, and entering renegotiated paymentschedules directly into the system. You can view the customer invoice and print acopy of it directly from the customer account.

8/20/2019 Financials I
http://slidepdf.com/reader/full/financials-i 490/563
Financials I in Microsoft Dynamics® AX 2009
11-48
Quick Interaction: Lessons Learned
Take a moment and write down three key points you have learned from thischapter:
1.
2.
3.

8/20/2019 Financials I
http://slidepdf.com/reader/full/financials-i 491/563
Chapter 11: Accounts Receivable Daily Procedures
11-49
Solutions
Free Text Invoice - Description and Usage
Test Your Knowledge
You can create inventory transactions that use item numbers by using Free textinvoices.
( ) True
(•) False
An ordinary invoice consists of _____. (Select all that apply.)
( ) The company’s bank accounts
( ) A ledger account for the sale is indicated on each order line, and the
customer balance is posted for each customer group, unless specifiedotherwise
(√) A sales order that makes the inventory transactions
(√) The item number that specifies and posts in the ledger
Payment Journals
Test Your Knowledge
When the invoice is registered and approved, the customer must pay for theinvoice.
( ) True
(•) False
What does the payment proposal function do? (Select all that apply.)
(√) Searches for due payment lines
( ) Searches for vendors
(√) Searches for payment lines that have a maximum date for receiving acash discount
(√) Checks open and approved customer transactions

8/20/2019 Financials I
http://slidepdf.com/reader/full/financials-i 492/563
Financials I in Microsoft Dynamics® AX 2009
11-50
Edit Open Transactions
Test Your Knowledge
In open transactions, you can:
( ) Edit unapplied transactions
(•) Make changes in transactions for customers
In open transactions, you can: (Select all that apply.)
( ) Create a payment proposal
(√) Edit unapplied transactions
( ) Create a free text invoice
(√) Make changes in transactions for customers
What is the cross rate functionality used for?
(•) When the payment and the invoices are in different currencies
( ) When the payment and the invoices are in the same currencies
( ) When the customer and the invoices are in the same currencies
( ) When the customer needs to be reimbursed
If the invoice and payment are not settled when you create the payment, wherecan these be settled?
( ) Free text invoice
( ) Payment proposals
(•) In the Edit open transactions form
( ) In the Reverse settlements function
It is possible to split open transactions.
(•) True
( ) False
Reverse Settlements
Test Your Knowledge
You can reverse a settlement if the bank does not honor a payment.
(•) True
( ) False

8/20/2019 Financials I
http://slidepdf.com/reader/full/financials-i 493/563
Chapter 11: Accounts Receivable Daily Procedures
11-51
Print Management - AR
Test Your Knowledge
How are print management settings defined?
( ) For each module
( ) For each account
( ) For each transaction
(•) For each module, account, transaction, or any combination of thesethree
Which of the following activities can you not control with print managementsettings?
( ) Number of copies to produce
(•) Page orientation
( ) Multilingual document footer text
( ) Print destination

8/20/2019 Financials I
http://slidepdf.com/reader/full/financials-i 494/563
Financials I in Microsoft Dynamics® AX 2009
11-52

8/20/2019 Financials I
http://slidepdf.com/reader/full/financials-i 495/563
Chapter 12: Bank Management Daily Procedures
12-1
CHAPTER 12: BANK MANAGEMENT DAILYPROCEDURES
ObjectivesThe objectives are:
• Create checks
• Delete checks
• Create a bank deposit entry
• Void checks
• Create a refund that prints out a check
• Use bank remittances
• Reverse a posted check payment• Reconcile bank statements
Introduction
Within the Bank Management module, users manage the financial transactions between the company and its bank accounts. These transactions include thefollowing:
• Processing payments to bank and ledger accounts
• Processing payments from bank and ledger accounts
• Reconciling the records of financial transactions from banks with therecords in the Microsoft Dynamics® AX 2009
This section discusses the various processes available to manage banktransactions in Microsoft Dynamics AX 2009.

8/20/2019 Financials I
http://slidepdf.com/reader/full/financials-i 496/563
Financials I in Microsoft Dynamics® AX 2009
12-2
Scenario
At Contoso Annie is the Bookkeeper and she manages the creation, deletion, andvoiding of checks and electronic payments. Annie creates check refunds forcustomers when required and processes payments to vendors. Also, whenContoso receives a bank statement, Annie reconciles the statement with thetransactions in the application.
Create Checks
In Microsoft Dynamics AX 2009, the Check form provides access both to viewexisting check transactions and to create new checks. Access the Check form inone of two ways:
• Through the Bank accounts form. Users must select a bank accountfrom the list and then click the Checks button. The application onlydisplays the checks for the selected bank account.
• From the Bank menu which provides a view of check transactionsfor all bank accounts.
FIGURE 12.1 CHECK FORM

8/20/2019 Financials I
http://slidepdf.com/reader/full/financials-i 497/563
Chapter 12: Bank Management Daily Procedures
12-3
Procedure: Create Checks
Follow these steps to create checks.
1. Click Bank , and then click Bank Account Details.
2. Select the bank account from which you will write the checks.
3. Click the Checks button.
4. From the Check form, click the Create checks button. In theCreation of check form, the selected bank account is displayed inthe Bank account field.
5. In the From field, enter the check number for the first check to becreated.
6. In the Quantity field, enter the number of checks to be created.
7. Click OK .
EXAMPLE : For Microsoft Dynamics AX 2009 to start with check number 2000and to create 1250 checks, in the From field, type 2000, and in the Quantity
ield, type 1250. Microsoft Dynamics AX 2009 will create checks numbered 2000
to 3249.
NOTE : As soon as created checks are available, checks generate through the
Accounts Payable payment journal . Generate a check on a bank account by
selecting the Account type of Vendor and the Offset account type of Bank .
Generate a check on a ledger account by selecting the Account type of Vendor
and the Offset account type of Ledger .
Test Your Knowledge
Annie, the Bookkeeper at Contoso, must create checks numbered 2361 through2366. What values must she enter in the From and Quantity fields to do this?
( ) Enter 2361 in the From field and 5 in the Quantity field
( ) Enter 2366 in the From field and 5 in the Quantity field
( ) Enter 2361 in the From field and 6 in the Quantity field
( ) Enter 2366 in the From field and 6 in the Quantity field

8/20/2019 Financials I
http://slidepdf.com/reader/full/financials-i 498/563
Financials I in Microsoft Dynamics® AX 2009
12-4
Delete a Check
After users create a check in Microsoft Dynamics AX 2009, they can delete thecheck as long as it has not been used. Checks that you create but do not use havethe status of Created in the Status field.
Procedure: Delete a Check
Follow these steps to delete a check.
1. Click Bank , and then click Bank Account Details.
2. Select the bank account from which to delete a check.
3. Click the Checks button.
4. Click the Delete checks button.
5. In the From field, enter the number of the first check to delete.
6. In the To field, enter the number of the last check to delete.
7. To verify the deletion, type Delete in the Type Delete if you want to
delete field, and then click OK .
FIGURE 12.2 DELETE CHECKS FORM
NOTE : If you include checks that have a status other than Created in the
interval between the From and To fields, no checks are deleted and the Delete
checks job is canceled.

8/20/2019 Financials I
http://slidepdf.com/reader/full/financials-i 499/563
Chapter 12: Bank Management Daily Procedures
12-5
Test Your Knowledge
What status must a check have for you to delete it?
( ) Void
( ) Processed
( ) Created
( ) Invoiced

8/20/2019 Financials I
http://slidepdf.com/reader/full/financials-i 500/563
Financials I in Microsoft Dynamics® AX 2009
12-6
Lab 12.1 - Create and Delete a Check
Scenario
Annie, the Bookkeeper at Contoso, must complete a check run that consists of 15
checks, starting with check number 101. The checks are from the EUR OPER bank account.
After Annie created the checks, she learned that only 12 of the checks wereneeded. The last 3 checks must be deleted.
Challenge Yourself!
Help Annie to create checks, and then delete the unnecessary checks.
Need a Little Help?
• Create 15 checks for the EUR OPER bank account, starting withcheck number 101.
• Delete the final three checks.
Step by Step
Create 15 checks for the EUR OPER bank account, starting with check number101.
1. Click Bank , and then click Bank Account Details.
2. Select the line for the EUR OPER bank account.
3. Click the Checks button.
4. Click the Create checks button.
5. In the From field, type 101.
6. In the Quantity field, type 15.
7. Click OK .
8. Click the Close button in the Infolog.
Delete the final three checks.
1. From the Check form, click the Delete checks button.
2. In the From field, type 113.3. In the To field, type 115.
4. Type Delete in the Type Delete if you want to delete field, and thenclick OK .
5. Click the Close button in the Infolog.

8/20/2019 Financials I
http://slidepdf.com/reader/full/financials-i 501/563
Chapter 12: Bank Management Daily Procedures
12-7
Deposit Slips
A deposit slip is a document that you can use to deposit checks, credit card notes,and cash into a bank account. Use the Deposit slip form to view and managedeposit slips for payments into bank accounts.
Access deposit slips in the following ways:
• Click Bank , Bank Account Details, select a Bank account, click the
Inquiry button, and then click Deposit slip to view only the depositslips for the selected bank account.
• Click Bank , and then click Deposit slip to view all deposit slips,organized by bank account.
FIGURE 12.3 DELETE CHECKS FORM
Procedure: Create a Deposit Slip
Follow these steps to create a deposit slip.
1. Click Accounts receivable, click Journals, click Payments, andthen click Payment journal.
2. Press CTRL+N to create a new record.
3. Select a journal name from the Name list.
4. Click the Lines button to access the Journal voucher form.
Or, click the Enter customer payments button to enter the paymentin the Enter customer payments form.
5. From the Journal voucher form, in the Account field, select theaccount of the customer who made the deposit.
6. Select a Transaction text to attach a note about the transaction tothe deposit.
7. In the Credit field, type the deposit amount.

8/20/2019 Financials I
http://slidepdf.com/reader/full/financials-i 502/563
Financials I in Microsoft Dynamics® AX 2009
12-8
8. Select the Use a deposit slip check box.
9. In the Offset account type field, select Bank .
10. In the Offset account field, select the bank account in which to makethe deposit.
11. In the Currency field, enter the currency code of the bank account in
which to make the deposit.12. In the Payment reference field, enter a reference for the payment if
applicable.
13. On the Dimension, Payment, Payment Fee, and Bank tabs, enterany applicable information.
14. Click the Post button, and then click Post.
15. Click Functions, and then click Deposit slip.
16. In the dialog box, enter the date in the Bank account statement date
field, and then click OK to view the deposit slip.
Procedure: Cancel a Deposit Slip Payment
You might cancel a deposit slip payment if a customer payment is invalid. If youalready have reconciled the deposit slip in the bank statement, you cannot cancelthe payment. Follow these steps to cancel a deposit slip.
1. Click Bank , and then click Deposit slip.
2. Select the line with the deposit slip to cancel.
When you cancel a deposit slip payment, the single payment iscanceled, not the whole deposit slip. Other deposit lines remainunchanged.
3. Click the Cancel payment button.
4. In the Cancel payment form, select a reason for cancellation fromthe Reason code list.
NOTE : The system may require a Reason code if the Require reasons for
deposit slip payment cancellations check box is selected on the General tab of
the Bank parameters form.
5. Accept the default value or modify the value in the Reason
comment field.
6. Depending on which method your organization prefers and whether
the Use review process for deposit slip payment cancellationscheck box is selected on the General tab of the Bank parameters
form, do one of the following:
o Click the OK button to post the cancellation.
o Enter a Journal name, and then click the OK button to send thecancellation for review.

8/20/2019 Financials I
http://slidepdf.com/reader/full/financials-i 503/563
Chapter 12: Bank Management Daily Procedures
12-9
Procedure: Review a Deposit Slip Payment Cancellation
You can submit a deposit slip payment cancellation for review. The systemrequires a review if the Use review process for deposit slip payment
cancellations check box is selected on the General tab of the Bank parameters
form.
During review, you can either approve and post the journal, or reject thecancellation. Follow these steps to review cancellations.
1. Click Bank , click Journals, and then click Deposit slip payment
cancellations.
2. Select the cancellation journal to review and then click the Lines
button.
3. Review the cancellation and select one of the following approvaloptions:
o
To approve and post the cancellation journal, click the Post button, and then click Post or Post and transfer.
o To reject the cancellation, click the Delete Record icon on thetoolbar.
FIGURE 12.4 JOURNAL VOUCHER FORM

8/20/2019 Financials I
http://slidepdf.com/reader/full/financials-i 504/563
Financials I in Microsoft Dynamics® AX 2009
12-10
Procedure: Verify a Deposit Slip Payment Cancellations
Follow these steps to verify that the system has canceled the deposit.
1. Select the line for the canceled deposit slip in the Deposit slip form,
and then click the General tab.
2. Verify that a check mark is in the Canceled field.
FIGURE 12.5 DEPOSIT SLIP FORM
Test Your Knowledge
How can you tell if a deposit slip is canceled?

8/20/2019 Financials I
http://slidepdf.com/reader/full/financials-i 505/563
Chapter 12: Bank Management Daily Procedures
12-11
Lab 12.2 - Create a Deposit Slip
Scenario
Annie, the Bookkeeper for Contoso, must enter a deposit for Customer 2022 for1000 USD. The deposit was made to the USA OPER bank account and the payment reference is 1987.
Annie realizes that she entered the deposit slip in error. The payment referenceshould be 1988.
Challenge Yourself!
Help Annie complete the following:
• Create a customer payment journal
•
View the deposit slip to verify it exists• Cancel the deposit slip
• Verify that the system canceled the deposit slip
Need a Little Help?
• Select the Use a deposit slip check box in the Customer payment
journal.
• Click the Cancel payment button from the Deposit slip form tocancel the deposit slip.
Step by Step
Create a customer payment journal:
1. Click Accounts receivable, click Journals, click Payments, andthen click Payment journal.
2. Press CTRL+N to create a new record.
3. Select ARPay in the Name list.
4. Click the Lines button.
5. In the Account field, select customer account 2022.
6. In the Credit field, type 1000.7. Select the Use a deposit slip check box.
8. Make sure that the Offset account field contains USA OPER.
9. Make sure that the Currency field contains USD.
10. In the Payment reference field, type 1987.
11. Click the Post button, and then click Post.
12. Click the Close button in the Infolog.

8/20/2019 Financials I
http://slidepdf.com/reader/full/financials-i 506/563
Financials I in Microsoft Dynamics® AX 2009
12-12
Verify that the deposit slip is created by viewing it:
1. Click the Functions button, and then click Deposit slip.
2. In the Deposit slip form, accept the default date, and then click OK .
3. Click OK again to view the deposit slip.
Cancel the deposit slip:
1. Click Bank , and then click Deposit slip.
2. Select the line that contains the deposit slip to cancel.
3. Click the Cancel payment button.
4. Select ERROR in the Reason code field.
5. Select BA_Dep_Rev in the Journal name field.
6. Click OK .
7. Click the Close button in the Infolog.
Verify that the system canceled the deposit slip:
1. Select the line for the canceled deposit slip in the Deposit Slip form,and then click the General tab.
2. Verify that a check mark is in the Pending Cancellation field.

8/20/2019 Financials I
http://slidepdf.com/reader/full/financials-i 507/563
Chapter 12: Bank Management Daily Procedures
12-13
Void Unposted Checks
After printing or trying to print checks, you may be unable to use them. Forexample, if a check is damaged while it is printed, you must void the unusedchecks.
Procedure: Void Unposted Checks
Follow these steps to void a check.
1. In the appropriate payment journal, select the lines ordered for the printing of the checks.
For example, to void an unposted Accounts Payable payment journal, click Accounts payable, click Journals, click Payments,and then click Payment journal.
2. Click the Payment status button, and then click Rejected. Theapplication removes the check numbers from the journal.
NOTE : This procedure can be used only if you have not posted the checks.
Procedure: Verify Checks Are Void
Follow these steps to verify the checks are voided.
1. Click Bank , and then click Bank Account Details.
2. Select the relevant bank account, and then click the Checks button.
3. In the Status field, look for checks with the value Void.
FIGURE 12.6 CHECK FORM

8/20/2019 Financials I
http://slidepdf.com/reader/full/financials-i 508/563
Financials I in Microsoft Dynamics® AX 2009
12-14
Lab12.3 - Void Unposted Checks
Scenario
April is the Accounts Payable Clerk at Contoso. One of her regular tasks is tocreate checks. Yesterday, April created a check from the Bank of USA OperatingAccount for Topaz Electronics for 385 USD, and left before posting the check.Today, April opened the payment journal she created last night, only to see thatshe had made an error. She had created the check for $385, but should havecreated it for $3850.
Challenge Yourself!
Help April complete the following steps:
1. Create a payment journal and generate a check payment. Do not postthe payment.
2. Use the Payment Status button to void the checks.
3. View the checks for the Bank of USA Operating Account to verifythe check numbers is voided.
Need a Little Help?
Create a payment journal and generate a check payment, but do not post the payment:
1. In the Journal form, create a new journal.
2. In the Journal voucher form, enter the payment information for
Topaz Electronics for 385 USD. The Method of Payment isUSAUSD_CHK.
3. Use the Functions button to generate the check.
4. Use the USA OPER Bank account.
Use the Payment Status button to void the checks:
1. In the Journal form, highlight the payment journal created previously, and then click the Lines button.
2. Use the Payment Status button to change the Payment status toRejected.
View the checks for the Bank of USA Operating Account to verify that the checknumbers are voided.

8/20/2019 Financials I
http://slidepdf.com/reader/full/financials-i 509/563
Chapter 12: Bank Management Daily Procedures
12-15
Step by Step
Create a payment journal and generate a check payment, but do not post the payment:
1. Click Accounts payable, click Journals, click Payments, and then
click Payment journal.
2. Press CTRL+N to create a new journal.
3. Select APPay in the Name list.
4. Click the Lines button.
5. In the Account list, select 1201 for Topaz Electronics.
6. In the Debit field, enter 385.
7. Verify that USAUSD_CHK is selected in the Method of Payment
field.
8. Click the Functions button, and then click Generate payments.
9. Select the Method of Payment of USAUSD_CHK.
10. In the Bank account list, select USA OPER, and then click OK .
Use the Payment Status button to void the checks.
1. Notice that the Payment status field currently displays Sent. Tochange the value of the Payment status field, click the Payment
status button, and then click Rejected.
2. In the Void check dialog box, select Yes to confirm the void.
View the checks for the Bank of USA Operating Account to verify the checknumbers are voided:
1. Click Bank , and then click Bank Account Details.
2. Select the USA OPER bank account.
3. Click the Checks button.
4. In the Status field, verify that the check's Status is Voided.

8/20/2019 Financials I
http://slidepdf.com/reader/full/financials-i 510/563
Financials I in Microsoft Dynamics® AX 2009
12-16
Refund Checks
Under certain circumstances, companies must generate payment refunds to theircustomers or process refunds they received from their vendors. This usuallyoccurs when credit notes, overpayments, and bonuses are involved in third-party
transactions.
In Microsoft Dynamics AX 2009 users can create a check refund that prints out acheck. The refunding feature is implemented in payment journals for customers.
Procedure: Create a Check Refund
Follow these steps to create a check refund for a customer:
1. Create a customer payment journal line with a negative amount. Toaccess the customer payment journal click Accounts receivable,click Journals, click Payments, and then click Payment journal.
2. Press CTRL+N to create a new record, and then name the journal.
3. Click the Lines button to access the Journal voucher form.
4. From the Journal voucher form, in the Account field, select theaccount of the customer who will receive the refund.
5. Select a Transaction text to attach note about the transaction to thecheck refund.
6. In the Credit field, type a negative amount for the refund amount.
7. In the Offset account type field, select Bank .
8. In the Offset account field, select the bank account from which todraw the refund.
9. In the Currency field, enter the currency code of the bank accountfrom which to draw the refund.
10. On the Dimension, Payment, Payment Fee, and Bank tabs, enterany applicable information.
11. Modify the Method of payment to Refund.
12. Click the Functions button, and then click Generate payments.
13. In the Method of payment field, select Refund.
14. Select the Bank account from which to draw the refund.
15. Click OK to generate the check.
16. Click the Post button, and then click Post.
8/20/2019 Financials I
http://slidepdf.com/reader/full/financials-i 511/563
Chapter 12: Bank Management Daily Procedures
12-17
NOTE : Before you create a check refund, set up a Method of payment to
refund a check to a customer if you have not done this already. For more
information about Methods of payment , review the Accounts Receivable Setupand Accounts Payable Setup courses.
Test Your Knowledge
Task: Create a check refund by placing the following steps in order:
Step _____ : Create a customer payment journal line with a negative amount.
Step _____ : Post the payment journal.
Step _____ : Generate the refund check.
Step _____ : Modify the method of payment to Check Refund on the negative
payment journal line.

8/20/2019 Financials I
http://slidepdf.com/reader/full/financials-i 512/563
Financials I in Microsoft Dynamics® AX 2009
12-18
Lab 12.4 - Check Refund
Scenario
Contoso received an overpayment on account from Triangle Headquarters.Annie, the Bookkeeper, must issue a refund check to Triangle Headquarters for396 USD. The system should draw the refund from the US Operating BankAccount.
Challenge Yourself!
Help Annie create a refund check to pay Triangle Headquarters the overpaymentamount of 396 USD.
Need a Little Help?
1. From the customer payment journal, create a new journal.
2. Create in the Journal voucher form, a line for TriangleHeadquarters for the refund amount of 396 USD.
3. Enter the amount as a negative value to indicate that it is a refund.
4. Change the Method of payment to Refund.
5. Use the Functions button to create the check.
6. Post the refund amount.
Step by Step
1. To access the customer payment journal click Accounts receivable,
click Journals, click Payments, and then click Payment journal.2. Press CTRL+N to create a new record.
3. In the Name field, select ARPay.
4. Click the Lines button to access the Journal voucher form.
5. From the Journal voucher form, in the Account field, select 2022,Triangle Headquarters.
6. In the Credit field, type -396.
7. Verify that Bank is selected in the Offset account type field andUSA OPER display in the Offset account field.
8. From the Method of payment list, select Refund.
9. Click the Functions button, and then click Generate payments.10. In the Method of payment field, verify that Refund is selected.
11. In the Bank account field, verify that USA OPER is selected
12. Click OK to generate the check.
13. Click the Post button, and then click Post again.

8/20/2019 Financials I
http://slidepdf.com/reader/full/financials-i 513/563
Chapter 12: Bank Management Daily Procedures
12-19
Bank Remittance
Use the Remittance form to view the remittances that are made to company bankaccounts.
Procedure: Create a Bank Remittance
Follow these steps to create a bank remittance entry.
1. Click Accounts receivable, click Journals, click Payment
management, and then click Remittance.
2. Press CTRL+N to insert a new record.
3. In the Method of payment field, select the method of payment touse for this payment.
4. In the Bank account field, select the bank account for thisremittance.
5. The Printed field displays the date in the printed payment advice.
NOTE : For each step, you can define the minimum amount of information thatthe user must enter before he or she can continue to the next step. To ensure that
the bank advice is printed before posting, set a post validation for print.
6. The File creation date field displays the date that the file wascreated.
NOTE : For each step, you can define the minimum amount of information that
must be filled in before continuing to the next step. To ensure that the file iscreated before posting, set a post validation for file creation date.
7. Click the General tab.
8. In the Payment step identification field, select the step associatedwith the payment.
9. In the Currency field, verify that the currency code used for the payment is displayed.
10. In the Remittance format field, select the remittance format for the payment.
11. Click the Posting button, and then click Post to post the remittance.

8/20/2019 Financials I
http://slidepdf.com/reader/full/financials-i 514/563
Financials I in Microsoft Dynamics® AX 2009
12-20
Payment Reversal
Occasionally, you must reverse a check after you have made a payment and posted the check. For example, the delivery company may have the check or amember of the accounting staff may notice that an employee paid the check inerror. Microsoft Dynamics AX 2009 provides a function to reverse posted check payments.
Procedure: Reverse a Payment
Follow these steps to reverse a posted check.
1. Click Bank , and then click Bank Account Details.
2. Select the bank account that has a check to cancel.
3. Click the Checks button.
4. Select the line with the check number to cancel.
FIGURE 12.7 PAYMENT REVERSAL FORM
NOTE : To reverse a check after it is posted, the check must have the status of
Paid .
5. Click the Payment reversal button.
6. In the Payment reversal form, enter the date.
7. Select a reason for the reversal from the Reason code list.
NOTE : A Reason code may be required, if the Require reasons for payment
reversals check box is selected on the General tab of the Bank parameters
orm.

8/20/2019 Financials I
http://slidepdf.com/reader/full/financials-i 515/563
Chapter 12: Bank Management Daily Procedures
12-21
8. Accept the default value or modify the value in the Reason
comment field.
9. Depending on which method your organization prefers and whetherthe Use review process for payment reversals check box isselected on the General tab of the Bank parameters form, do one of
the following:o Click the OK button to post the cancellation.
o Enter a Journal name, and then click the OK button to send thecancellation for review.
Procedure: Review a Payment Reversal
You can submit a payment reversal for review. The system requires a review ifthe Use review process for payment reversals check box is selected on the
General tab of the Bank parameters form.
During review, you can either approve and post the journal, or reject the reversal.
Follow these steps to review reversals.
1. Click Bank , click Journals, and then click Check reversals.
2. Select the reversal journal to review and then click the Lines button.
3. Review the reversal and select one of the following approval options:
o To approve and post the reversal journal, click the Post button,and then click Post or Post and transfer.
o To reject the cancellation, click the Delete Record icon on thetoolbar.
Reconcile a Bank Account
Bank Reconciliation is an important component of the Microsoft Dynamics AX2009 financial management system. Bank Reconciliation contains the featuresthat:
• Manage cash receipts and disbursements
• Enter additional transactions that affect balances
• Automate the reconciliation process
Procedure: Begin a Bank Account Reconciliation
Follow these steps to reconcile a bank account.
1. Click Bank , and then click Bank Account Details.
2. Select the bank account to reconcile, click the Functions button, andthen click Account reconciliation.
3. Press CTRL+N to insert a new record.
4. In the Bank Account Statement Date field, enter the date from the bank account statement.

8/20/2019 Financials I
http://slidepdf.com/reader/full/financials-i 516/563
Financials I in Microsoft Dynamics® AX 2009
12-22
5. In the Bank Statement field, enter the number of the bank accountstatement.
6. In the Currency field, verify that the application inserts the correctcurrency for the selected bank account.
7. In the Ending Balance field, enter the total ending balance on the
bank account statement.
NOTE : The Reconciled field displays the date of account reconciliation. The
system enters the date automatically when you post the transaction lines that
reconcile company bank records with the bank statement.
FIGURE 12.8 BANK ACCOUNT STATEMENT FORM
Procedure: Reconcile Transactions
As soon as you have entered information about the bank reconciliation, you canstart to review the transactions in the bank account instead of the transactions onthe bank statement. Follow these steps to review transactions.
1. From the Bank account statement form, click the Transactions button.
2. Select the transactions to include in the reconciliation by selectingthe Cleared check box.
3. To select a check interval to clear for reconciliation, click the Mark
check interval for reconciliation button. In the Mark check
interval form, enter the range of cleared check numbers in the From
and To fields.

8/20/2019 Financials I
http://slidepdf.com/reader/full/financials-i 517/563
Chapter 12: Bank Management Daily Procedures
12-23
NOTE : You cannot change the amount of the transaction during reconciliation.
To edit the amount of a transaction during reconciliation, enter the corrected
amount in the Correction Amount field. Ensure that you enter the correction in
the currency used for the account.
FIGURE 12.9 ACCOUNT RECONCILIATION FORM
Procedure: Enter Missing Transactions
Sometimes transactions that have not been recorded in the system appear on the bank statement. Follow these steps to create transactions that have not beenrecorded in the account.
1. Select the correct transaction type in the Bank Transaction Type
list.2. Enter the date of the transaction in the Date field.
3. If you used a check for the transaction, enter the check number in theCheck Number field. Click the Checks button to view a list of thechecks for this account.

8/20/2019 Financials I
http://slidepdf.com/reader/full/financials-i 518/563
Financials I in Microsoft Dynamics® AX 2009
12-24
4. In the Deposit Slip field, enter the number for the deposit slip that a payment should be associated with, if applicable to the transaction.Click the Deposit Slip button to view a list of the deposits for thisaccount.
5. In the Amount Currency field, enter the transaction amount in thespecified currency.
6. In the Ledger Account field, indicate which ledger account thesystem should offset when you create the new transactions duringreconciliation. The corrections post when you update thereconciliation.
7. In the Transaction Text field, enter text that describes thetransaction.
8. On the Dimension tab, enter any required dimensions for thetransaction.
NOTE : When you create transactions manually during reconciliation, the
application automatically will assign a voucher number, from the number sequence and will mark it Bank-account reconciled . The voucher number is
displayed on the General tab.
Procedure: Complete a Bank Account Reconciliation
As soon as you have reconciled the transactions, click the Reconcile account
button to perform the reconciliation of the Bank Account.
Procedure: Print Reconciliation Reports
Follow these steps to print reconciliation reports.
1. Click the Print button, and then click Reconciliation summary to print a bank reconciliation report. In the Bank reconciliation form,select the fields to include in the report:
o Reconciliation summary
o Cleared transaction detail
o Uncleared transaction detail
2. Click the Print button, and then click Bank reconciliation to print areport that takes non-reconciled transactions into account and showstransactions after reconciliation date.

8/20/2019 Financials I
http://slidepdf.com/reader/full/financials-i 519/563
Chapter 12: Bank Management Daily Procedures
12-25
Test Your Knowledge
When you perform bank reconciliation, how do you exclude transactions that arein the application but not on the bank statement from the reconciliation?
( ) Open the transaction( ) Delete the transaction
( ) Select the Cleared check box
( ) Do not select the Cleared check box
Summary
This course covered the main procedures in the Bank Management module inMicrosoft Dynamics AX 2009. The application provides functionality to managecheck payments, as well as procedures for resolving special situations withchecks. Therefore, users can delete, refund, and void checks, in addition to
generating and issuing checks according to company specifications. In addition, because the system records all financial transactions, companies can use the bankreconciliation function to match internal company records of transactions against bank statements.

8/20/2019 Financials I
http://slidepdf.com/reader/full/financials-i 520/563
Financials I in Microsoft Dynamics® AX 2009
12-26
Test Your Knowledge
Test your knowledge with the following questions.
Explain the circumstances in which you would delete, void, or reverse a check.

8/20/2019 Financials I
http://slidepdf.com/reader/full/financials-i 521/563
Chapter 12: Bank Management Daily Procedures
12-27
Quick Interaction: Lessons Learned
Take a moment and write down three key points you have learned from thischapter:
1.
2.
3.

8/20/2019 Financials I
http://slidepdf.com/reader/full/financials-i 522/563
Financials I in Microsoft Dynamics® AX 2009
12-28
Solutions
Create Checks
Test Your Knowledge
Annie, the Bookkeeper at Contoso, must create checks numbered 2361 through2366. What values must she enter in the From and Quantity fields to do this?
( ) Enter 2361 in the From field and 5 in the Quantity field
( ) Enter 2366 in the From field and 5 in the Quantity field
(•) Enter 2361 in the From field and 6 in the Quantity field
( ) Enter 2366 in the From field and 6 in the Quantity field
Delete a Check
Test Your Knowledge
What status must a check have for you to delete it?
( ) Void
( ) Processed
(•) Created
( ) Invoiced
Deposit Slips
Test Your Knowledge
How can you tell if a deposit slip is canceled?
MODEL ANSWER - On the Deposit slip form, on the General tab, the
Canceled check box is selected.

8/20/2019 Financials I
http://slidepdf.com/reader/full/financials-i 523/563
Chapter 12: Bank Management Daily Procedures
12-29
Refund Checks
Test Your Knowledge
Task: Create a check refund by placing the following steps in order:
Step 1 : Create a customer payment journal line with a negative amount.
Step 4 : Post the payment journal.
Step 3 : Generate the refund check.
Step 2 : Modify the method of payment to Check Refund on the negative payment journal line.
Reconcile a Bank Account
Test Your Knowledge
When you perform bank reconciliation, how do you exclude transactions that arein the application but not on the bank statement from the reconciliation?
( ) Open the transaction
( ) Delete the transaction
( ) Select the Cleared check box
(•) Do not select the Cleared check box
Test Your Knowledge
1. Explain the circumstances in which you would delete, void, or reverse acheck.
MODEL ANSWER - Checks that are created but not used have the status of
Created in the Status field. Checks with a Created Status can be deleted.
After printing or trying to print checks, but before posting, checks may be
voided. This may happen if checks are damaged in printing. If payment has
been made and a check has been posted, you can reverse it.

8/20/2019 Financials I
http://slidepdf.com/reader/full/financials-i 524/563
Financials I in Microsoft Dynamics® AX 2009
12-30

8/20/2019 Financials I
http://slidepdf.com/reader/full/financials-i 525/563
Appendix A: Reports and Inquiries
A-1
APPENDIX A: REPORTS AND INQUIRIES
Sales Tax Reports
Sales Tax Codes
The Sales tax codes report prints the sales tax codes with information about sales
tax details and limits.
General ledger > Reports > Base data > Sales tax codes
FIGURE 1.1 SALES TAX CODES REPORT

8/20/2019 Financials I
http://slidepdf.com/reader/full/financials-i 526/563
Financials I in Microsoft Dynamics® AX 2009
A-2
Sales Tax Transactions
The Sales tax transactions report prints a list of posted sales taxes.
General ledger > Reports > Transactions > Sales tax transactions
FIGURE 1.2 SALES TAX TRANSACTIONS REPORT

8/20/2019 Financials I
http://slidepdf.com/reader/full/financials-i 527/563
Appendix A: Reports and Inquiries
A-3
Sales Tax List
The Sales tax list report prints a list of sales tax postings not yet updated.
General ledger > Reports > Transactions > Periodic > Sales tax list
FIGURE 1.3 SALES TAX LIST REPORT
Sales Tax Transactions - Details
The Sales tax transactions - Details report prints a list of posted tax transactions
within a given time and sales tax code interval. This report shows where the tax
base amount to each tax transaction is posted in the ledger.

8/20/2019 Financials I
http://slidepdf.com/reader/full/financials-i 528/563
Financials I in Microsoft Dynamics® AX 2009
A-4
General ledger > Reports > Transactions > Groupings > Sales tax
transactions - Details
FIGURE 1.4 SALES TAX TRANSACTIONS - DETAILS REPORT
Sales Tax Specification by Ledger Transaction
The Sales tax specification by ledger transaction report prints ledger
transactions on which sales tax is calculated. For every ledger transaction, all
sales tax codes together with the calculated sales tax amounts for the transaction
are printed. All amounts are summed by ledger account.

8/20/2019 Financials I
http://slidepdf.com/reader/full/financials-i 529/563
Appendix A: Reports and Inquiries
A-5
General ledger > Reports > Transactions > Groupings > Sales tax
specification by ledger transaction
FIGURE 1.5 SALES TAX SPECIFICATION BY LEDGER TRANSACTIONREPORT
Reconciliation Sales Tax/Ledger
The Reconciliation sales tax/ledger report helps reconcile the balances of salestax and ledger accounts. The sum of all sales tax transactions is compared with
the sum of all the ledger transactions posted on the related sales tax summaryaccounts.
Click General ledger, click Reports, click Reconciliation, click Sales tax, and
then click Sales tax to reconcile sales tax and ledger accounts.
In the Reconciliation sales tax/ledger form, specify intervals for dates, vouchers
and ledger accounts.
If the Ledger account fields are empty, only the summary accounts that are
defined in the Ledger posting form are shown in the report.

8/20/2019 Financials I
http://slidepdf.com/reader/full/financials-i 530/563
Financials I in Microsoft Dynamics® AX 2009
A-6
NOTE : If clearing the Specification check box and selecting the Differences
only check box, the report presents lines with balance differences that includes
the transaction date, voucher number, tax balance, ledger balance, and the
balance difference.
If converting the company currency by running the job in the Company currencyconversion form, penny differences may occur and are ignored in this report.
FIGURE 1.6 RECONCILIATION SALES TAX/LEDGER REPORT
Accounts Payable Reports
Vendor Base Data
Use the Vendor Base Data report to receive a list of vendor base data for all
vendors that contain the default settings specified in the Vendors form in
Microsoft Dynamics AX. To specify a specific vendor click Select in the Vendor
base data form. There is also the capability to print a list with certain information
such as vendors invoicing in a certain currency or using a specific term of
payment.

8/20/2019 Financials I
http://slidepdf.com/reader/full/financials-i 531/563
Appendix A: Reports and Inquiries
A-7
Accounts payable > Reports > Base data > Vendor base data
FIGURE 1.7 VENDOR BASE DATA REPORT
The vendor base data report prints a list of vendors and all their base data. To
print a more simple report that has vendor contact details click Accounts
payable, click Reports, click Base data, and then click Vendors.
Vendor Phone List
The Vendor phone list report prints a list of vendors and their contactinformation. There is also the capability to print a phone list of vendors with
specific information such as terms of payment, currency, and so on.

8/20/2019 Financials I
http://slidepdf.com/reader/full/financials-i 532/563
Financials I in Microsoft Dynamics® AX 2009
A-8
Accounts payable > Reports > Base data > Vendor phone list
FIGURE 1.8 VENDOR PHONE LIST REPORT
Open Invoice Transactions
Use the Open invoice transactions report to view all open invoices per vendor
together with additional invoice information to check all invoices not yet paid.

8/20/2019 Financials I
http://slidepdf.com/reader/full/financials-i 533/563
Appendix A: Reports and Inquiries
A-9
Accounts payable > Reports > Transactions > Invoice > Open invoice
transactions
FIGURE 1.9 OPEN INVOICE TRANSACTIONS REPORT
Invoice Specification
The Invoice specification report prints a detailed breakdown of each invoice in
the system. Use this report to print a list of all invoices with detailed information
such as what items or services are purchased.

8/20/2019 Financials I
http://slidepdf.com/reader/full/financials-i 534/563
Financials I in Microsoft Dynamics® AX 2009
A-10
Accounts payable > Reports > Transactions > Invoice > Invoice specification
FIGURE 1.10 INVOICE SPECIFICATION REPORT
Vendor Account Statement
Use the Vendor account statement report to print account statements per
vendor. It includes:
• Base information, such as vendor name, address, and terms of
payment.• Transaction information, such as transaction date, voucher number,
invoice number, due date, and amounts based on instructions.
To print a vendor account statement report, select from the following options:
1. Click Accounts payable, click Reports, click Transactions, click
Vendor, and then click Account statement.
2. Select in the From date and To date field, the date for the balance at
the end of the period.
3. Specify in the Assessment date field, the date of assessment of open
transactions. If a date is not specified, assessment is made based onthe dates defined in the From date and To date fields.
4. Select Discount in the Details list, to show transactions with a cash
discount or select currency to show amounts in both registered
currency and domestic currency.
5. Select the Only open check box,if it is selected the account
statement only includes open transactions. If the Only open check
box is not selected, all transactions are included.

8/20/2019 Financials I
http://slidepdf.com/reader/full/financials-i 535/563
Appendix A: Reports and Inquiries
A-11
6. Select the Show payment schedule, toprint the Payment schedule at
the time of invoice in detail.
7. Select the Without transactions check box to only print the account
statement if it contains at least one transaction. If Without
transactions is not selected, all account statements selected are
printed, even if they do not contain any transactions.
8. Select the New page check box, to make a page break before
printing a new account statement. If New page is not selected, the
account statements are printed one after the other, and only when the
page is full printing continues on a new page.
FIGURE 1.11 VENDOR ACCOUNT STATEMENT REPORT
Vendor Transactions
Use the Vendor transactions report to print all transactions for specific or all
vendors. For example, print a report to receive a list of invoiced vendor
transactions to view the amount in different currencies.

8/20/2019 Financials I
http://slidepdf.com/reader/full/financials-i 536/563
Financials I in Microsoft Dynamics® AX 2009
A-12
Accounts payable > Reports > Transactions > Vendor > Transactions
Three options can be selected when generating this report:
Field Description
Only open If Only open is selected, transactions that aresettled are not shown.
Include reversed Select the Include reversed check box to
include transactions that are reversed using
the Transaction reversal functionality.
Exchange rates Select between Invoice date and Adjustment
date.
FIGURE 1.12 VENDOR TRANSACTIONS REPORT
History by Transaction
The History by transaction report documents the connection between the
vendor accounts and the ledger accounts. Use this report to check the postings set
up of vendors.
Select the Totals per ledger account only check box if only a total is relevant
per ledger account. The report then displays the total for all vendor transactions
of the selected ledger accounts within the selected period. The date, the voucher
number and the invoice number do not display.

8/20/2019 Financials I
http://slidepdf.com/reader/full/financials-i 537/563
Appendix A: Reports and Inquiries
A-13
Accounts payable > Reports > Transactions > Vendor > History by
transaction
FIGURE 1.13 HISTORY BY TRANSACTION REPORT
Vendor Aging
The Vendor aging report prints an aging report for vendor account balances. Use
this report to know when the open invoices are due.
Several different options can be selected when printing this report. Functionalityis described as follows:
Field Description
Balance as on Enter the balance as of date.
Start date Select the date for calculation of columns.
Criteria Select if the report is made per due date or per
invoice date.
Aging buckets Select an aging bucket. The aging bucket is
set up in the Aging buckets form in
Accounts payable > Setup > Statistics >Aging buckets.
The interval is overruled if an aging bucket is
selected.
Print aging bucket
description Select Yes to print a description of the aging
bucket.
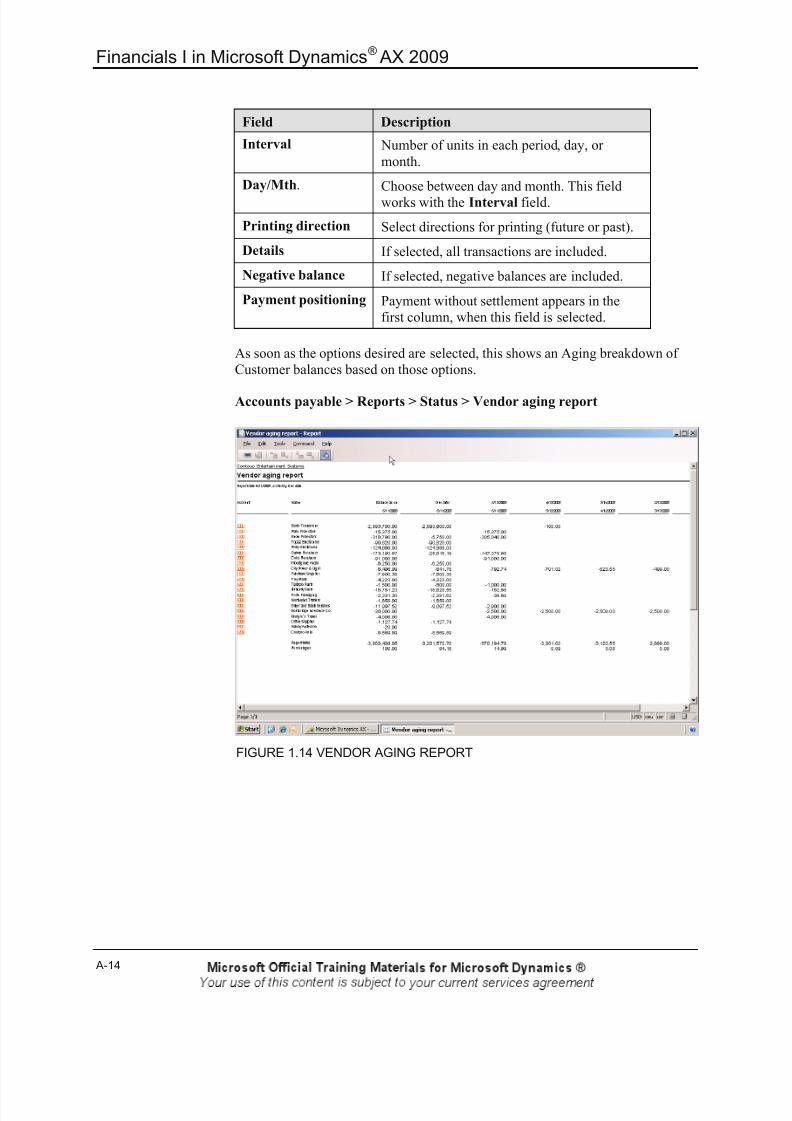
8/20/2019 Financials I
http://slidepdf.com/reader/full/financials-i 538/563
Financials I in Microsoft Dynamics® AX 2009
A-14
Field Description
Interval Number of units in each period, day, or
month.
Day/Mth. Choose between day and month. This field
works with the Interval field.
Printing direction Select directions for printing (future or past).
Details If selected, all transactions are included.
Negative balance If selected, negative balances are included.
Payment positioning Payment without settlement appears in the
first column, when this field is selected.
As soon as the options desired are selected, this shows an Aging breakdown of
Customer balances based on those options.
Accounts payable > Reports > Status > Vendor aging report
FIGURE 1.14 VENDOR AGING REPORT

8/20/2019 Financials I
http://slidepdf.com/reader/full/financials-i 539/563
Appendix A: Reports and Inquiries
A-15
Vendor Balance List
Use the Vendor balance list report to show side by side, how the vendor
balances change during a defined sub period, for example, last month, and a
defined period, for example, current year.
The report shows credit totals. This often represent the amounts invoiced, and
debit totals, usually amounts paid. Therefore, the report can be used for fast
analysis of development in Accounts Payable.
Field Description
From date This is the date for the opening balance
column.
Report period start
date This is the start date for the report period
displayed in the debit and credit columns.
To date This is the end date for the report perioddisplayed in the debit and credit columns, and
date for the closing balance column.
Criteria None – Prints accounts regardless of
transactions or balance in the period.
Opening balance – Prints accounts that have
opening balance on From date.
Transactions – Prints accounts that have
transactions in the period between From date
and To date.
Closing balance – Prints accounts that have
closing balance on To date, which meansaccounts with transactions in the period
between From date and To date or with an
opening balance.

8/20/2019 Financials I
http://slidepdf.com/reader/full/financials-i 540/563
Financials I in Microsoft Dynamics® AX 2009
A-16
Accounts payable > Reports > Status > Vendor balance list
FIGURE 1.15 VENDOR BALANCE LIST REPORT
Vendor Invoice Turnover
Use the Vendor invoice turnover report to print the earnings for vendor
invoices. Follow these steps to print this report.
1. Select in the Grouping by list, to group the report by Accountnumber, or by Tax exempt number.
2. The Time interval is proposed as the current year to the system date,
as the report is annual.
3. Enter in the Minimum amount field,a minimum transaction amount
in the default currency.
4. Click Select for additional criteria, and then click OK (this is
optional).

8/20/2019 Financials I
http://slidepdf.com/reader/full/financials-i 541/563
Appendix A: Reports and Inquiries
A-17
Accounts payable > Reports > Statistics > Invoice > Invoice turnover report
FIGURE 1.16 VENDOR INVOICE TURNOVER REPORT
Vendor Invoice Journal
The Vendor invoice journal report prints a list of vendor invoices with the
ability to set up criteria for a Misc. charges code and a Sales tax code. To sort the
vendor information additional click Select.

8/20/2019 Financials I
http://slidepdf.com/reader/full/financials-i 542/563
Financials I in Microsoft Dynamics® AX 2009
A-18
Accounts payable > Reports > Statistics > Invoice > Invoice journal
FIGURE 1.17 VENDOR INVOICE JOURNAL REPORT
Accounts Receivable Inquiries
Customer Transactions
Use the Customer transactions form to display an overview of all transactions
that are posted or updated for the selected customer, including:
• Invoices
• Payments
• Interest
• Collection letters

8/20/2019 Financials I
http://slidepdf.com/reader/full/financials-i 543/563
Appendix A: Reports and Inquiries
A-19
Accounts receivable > Customer Details > Transactions button
FIGURE 1.18 CUSTOMER TRANSACTIONS FORM
Customer Balance
Use the Customer balance form to view the current balance for the selected
customer. It shows both the:
• Default customer currency balance
• The balance for any transactions entered in a different currency

8/20/2019 Financials I
http://slidepdf.com/reader/full/financials-i 544/563
Financials I in Microsoft Dynamics® AX 2009
A-20
Accounts receivable > Customer Details > Balance button
FIGURE 1.19 CUSTOMER BALANCE FORM
Accounts Receivable Reports
Customer
Use the Customer report for a list of customer base data for all customers that
contains the default settings specified in the Customers form in Microsoft
Dynamics AX 4.0. To specify a specific customer click Select in the Customer base data form, for example, print a list with certain information such as vendors
invoicing in a certain currency or using a specific term of payment.

8/20/2019 Financials I
http://slidepdf.com/reader/full/financials-i 545/563
Appendix A: Reports and Inquiries
A-21
Accounts receivable > Reports > Base data > Customer base data
FIGURE 1.20 CUSTOMER REPORT
The Customer base data report prints a list of customers and all their base data.
To print a more simple report that has customer contact details click Accounts
receivable, click Reports, click Base data, and then click Customer.

8/20/2019 Financials I
http://slidepdf.com/reader/full/financials-i 546/563
Financials I in Microsoft Dynamics® AX 2009
A-22
Customer Phone List
The Customer phone list report prints a list of customers and their contact
information, for example print a phone list of customers who have specific
information such as terms of payment, currency, and so on.
Accounts receivable > Reports > Base data > Customer phone list
FIGURE 1.21 CUSTOMER PHONE LIST REPORT

8/20/2019 Financials I
http://slidepdf.com/reader/full/financials-i 547/563
Appendix A: Reports and Inquiries
A-23
Invoice Journal
The Invoice journal report displays a list of all invoices for a selected customer
and date.
Accounts receivable > Reports > Transactions > Invoice > Invoice journal
FIGURE 1.22 INVOICE JOURNAL REPORT

8/20/2019 Financials I
http://slidepdf.com/reader/full/financials-i 548/563
Financials I in Microsoft Dynamics® AX 2009
A-24
Customer Transactions
The Customer transactions report lists all transactions for a customer.
Accounts receivable > Reports > Transactions > Customer > Transactions
FIGURE 1.23 CUSTOMER TRANSACTIONS REPORT
Customer Aging
The Customer aging report shows a balance due per customer per given period.
Field Description
Balance as on Enter the balance as of date.
Start date Select the date for the calculation of columns.
Criteria Select if the report is made per due date or per
invoice date.
Aging buckets Select an aging bucket. The Interval field is
overruled if an aging bucket is selected.
Print aging bucket
description Select yes if the report should print a
description of the aging bucket as defined in
the Aging buckets form in Accounts
receivable > Setup > Statistics > Aging
buckets.

8/20/2019 Financials I
http://slidepdf.com/reader/full/financials-i 549/563
Appendix A: Reports and Inquiries
A-25
Field Description
Interval Select the number of units in each period, day
or month.
Day/Mth. Choose between day and month. This field
works with the preceding field.
Printing direction Select directions for printing (future or past).
Details If selected all transactions are included.
Negative balance If selected negative balances are included.
Payment positioning Payment without settlement appears in the
first column, when this field is selected.
Accounts receivable > Reports > Status > Customer aging report
FIGURE 1.24 CUSTOMER AGING REPORT

8/20/2019 Financials I
http://slidepdf.com/reader/full/financials-i 550/563
Financials I in Microsoft Dynamics® AX 2009
A-26
Detailed Due Day List
The Detailed due day list report prints a detailed list of due customers.
Accounts receivable > Reports > Status > Detailed due day list
FIGURE 1.25 DETAILED DUE DAY LIST REPORT

8/20/2019 Financials I
http://slidepdf.com/reader/full/financials-i 551/563
Appendix A: Reports and Inquiries
A-27
Customer Balance List
The Customer balance list report shows the balance for each customer in local
currency based on the value according to the latest exchange adjustment.
Accounts receivable > Reports > Status > Customer balance list
FIGURE 1.26 CUSTOMER BALANCE LIST REPORT
Customer Top 100
The Customer top 100 report prints a list of the top customers based on:
• Account
• Revenue
• Margin
• Quantity

8/20/2019 Financials I
http://slidepdf.com/reader/full/financials-i 552/563
Financials I in Microsoft Dynamics® AX 2009
A-28
Accounts receivable > Reports > Statistics > Customer > Top 100
FIGURE 1.27 CUSTOMER TOP 100 REPORT
Bank Management Inquiries
Bank Transactions
The Bank Transactions form provides an overview of the bank transactions
with information about the:
• Voucher
• Date
• Check number
• Deposit slip number
• Transaction history

8/20/2019 Financials I
http://slidepdf.com/reader/full/financials-i 553/563
Appendix A: Reports and Inquiries
A-29
Bank > Inquiries > Bank transactions
FIGURE 1.28 BANK TRANSACTIONS FORM
Select from the buttons on the right of the window to view additional inquiries.
The options are:
Inquiry Description
Voucher Select from the buttons on the right of the
window to view additional inquiries. Theoptions are:
Checks Displays a list of existing checks that are
associated with the selected bank account.
Use this function to inquire about the status of
previously created checks.
Deposit Slips Provides an overview of existing deposit
slips. The deposit slip is a document used to
deposit checks, credit card notes and cash into
a bank account.
Original Document Displays the origin of the transaction.
NOTE : The Bank Transactions form can also be accessed from Bank > Bank
accounts > View > Transactions.

8/20/2019 Financials I
http://slidepdf.com/reader/full/financials-i 554/563
Financials I in Microsoft Dynamics® AX 2009
A-30
Balance Control
The Balance control form displays the:
• Current balance for all bank accounts.
• Current balance for the ledger accounts set up for control in Balance
control under Setup.
• Amount of transactions in the current journal and other journals.
• Balance after posting of the current and other journals.
All amounts are in the default currency.
Bank > Inquiries > Balance control
FIGURE 1.29 BALANCE CONTROL FORM
NOTE : The Balance Control inquiry window can also be accessed from
Bank > Bank accounts > Balance control .
NOTE : For a quick view of balance and remittance information for an
individual bank account, click Bank > Bank accounts > Balance button.
Bank Management Reports
Bank Statement
The Bank statement report displays all transactions in a bank account for a
given period.

8/20/2019 Financials I
http://slidepdf.com/reader/full/financials-i 555/563
Appendix A: Reports and Inquiries
A-31
Follow these steps to create a bank statement report.
1. Click Bank , click Reports, click Transactions, and then click Bank
account statement.
2. In the Period field, enter the Opening and the Closingdates.
3. To select a particular bank account, click Select.4. In the Criteria field, select the bank account and then click OK .
5. Click OK to display the report.
FIGURE 1.30 BANK STATEMENT REPORT

8/20/2019 Financials I
http://slidepdf.com/reader/full/financials-i 556/563
Financials I in Microsoft Dynamics® AX 2009
A-32
Payment Summary by Date
The Payment summary by date report displays all transactions for a bank
account for any date.
Bank > Reports > Statistics > Payment summary by date
FIGURE 1.31 PAYMENT SUMMARY BY DATE REPORT
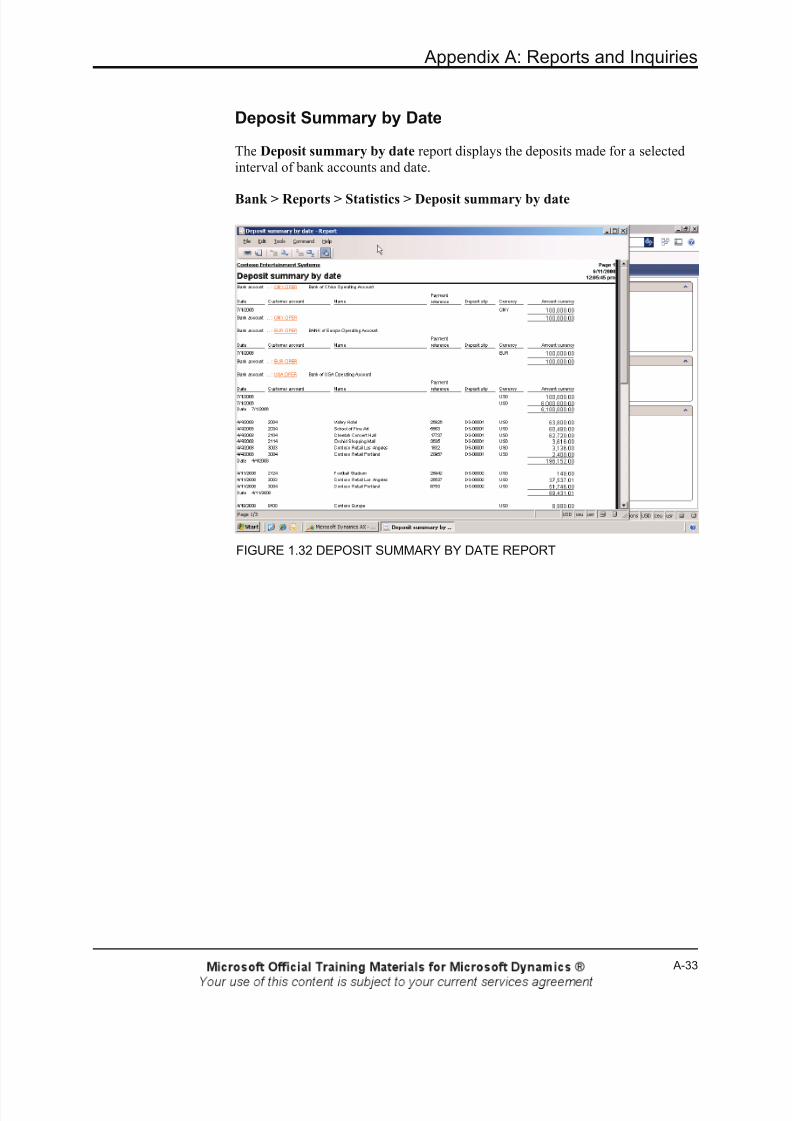
8/20/2019 Financials I
http://slidepdf.com/reader/full/financials-i 557/563
Appendix A: Reports and Inquiries
A-33
Deposit Summary by Date
The Deposit summary by date report displays the deposits made for a selected
interval of bank accounts and date.
Bank > Reports > Statistics > Deposit summary by date
FIGURE 1.32 DEPOSIT SUMMARY BY DATE REPORT

8/20/2019 Financials I
http://slidepdf.com/reader/full/financials-i 558/563
Financials I in Microsoft Dynamics® AX 2009
A-34
Bank Payment Summary by Vendor
The Bank Payment summary by vendor report prints the payments made to
vendors.
Bank > Reports > Statistics > Bank payment summary by vendor
FIGURE 1.33 BANK PAYMENT SUMMARY BY VENDOR REPORT

8/20/2019 Financials I
http://slidepdf.com/reader/full/financials-i 559/563
Appendix A: Reports and Inquiries
A-35
Deposit Summary by Customer
The Deposit summary by customer report prints the deposits made by
customers.
Bank > Reports > Statistics > Deposit summary by customer
FIGURE 1.34 DEPOSIT SUMMARY BY CUSTOMER REPORT
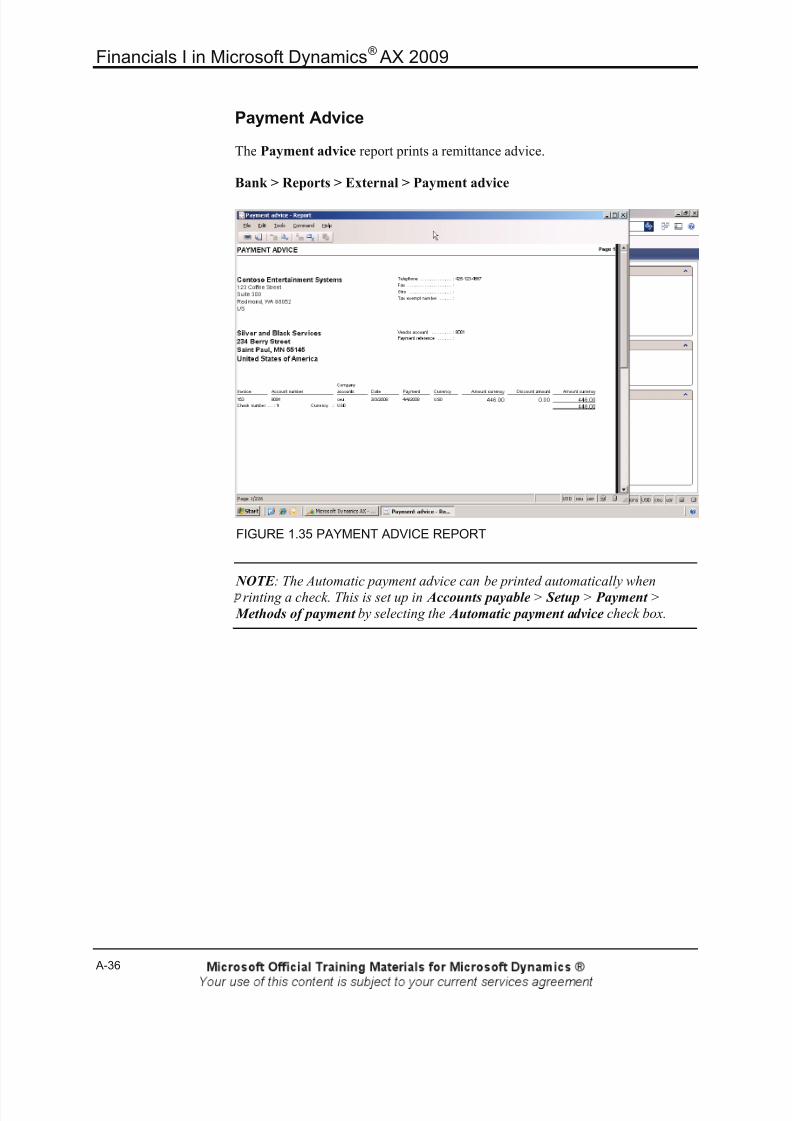
8/20/2019 Financials I
http://slidepdf.com/reader/full/financials-i 560/563
Financials I in Microsoft Dynamics® AX 2009
A-36
Payment Advice
The Payment advice report prints a remittance advice.
Bank > Reports > External > Payment advice
FIGURE 1.35 PAYMENT ADVICE REPORT
NOTE : The Automatic payment advice can be printed automatically when
rinting a check. This is set up in Accounts payable > Setup > Payment >
Methods of payment by selecting the Automatic payment advice check box.
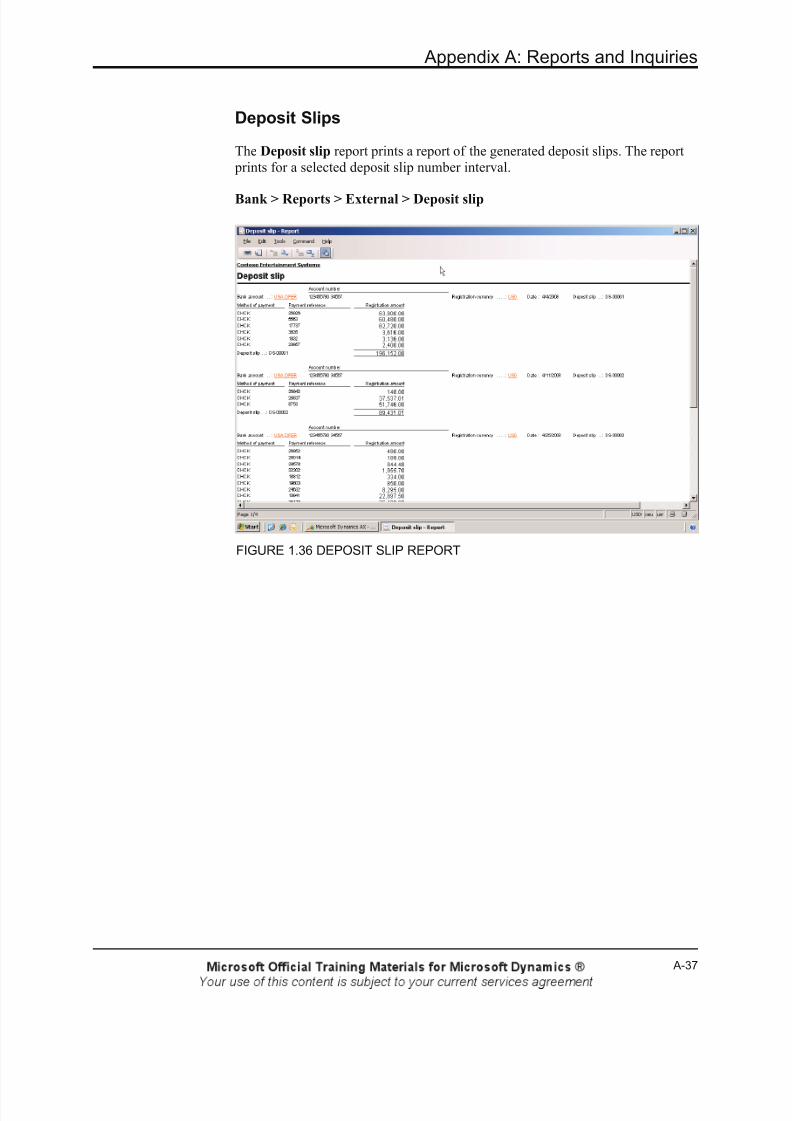
8/20/2019 Financials I
http://slidepdf.com/reader/full/financials-i 561/563
Appendix A: Reports and Inquiries
A-37
Deposit Slips
The Deposit slip report prints a report of the generated deposit slips. The report
prints for a selected deposit slip number interval.
Bank > Reports > External > Deposit slip
FIGURE 1.36 DEPOSIT SLIP REPORT

8/20/2019 Financials I
http://slidepdf.com/reader/full/financials-i 562/563
Financials I in Microsoft Dynamics® AX 2009
A-38
Unreconciled Bank Transactions
The Unreconciled bank transactions report prints a list of unreconciled bank
transactions.
Bank > Reports > Reconciliation > Unreconciled bank transactions
FIGURE 1.37 UNRECONCILED BANK TRANSACTIONS REPORT

8/20/2019 Financials I
http://slidepdf.com/reader/full/financials-i 563/563
Appendix A: Reports and Inquiries
Quick Interaction: Lessons Learned
Take a moment and write down three key points you have learned from this
chapter:
1.