fiji sun suit - diy crush · fiji sun suit this pattern is free – written by whimsy couture for...
TRANSCRIPT

Fiji Sun Suit
This pattern is free – written by Whimsy Couture for DIY Crush
1
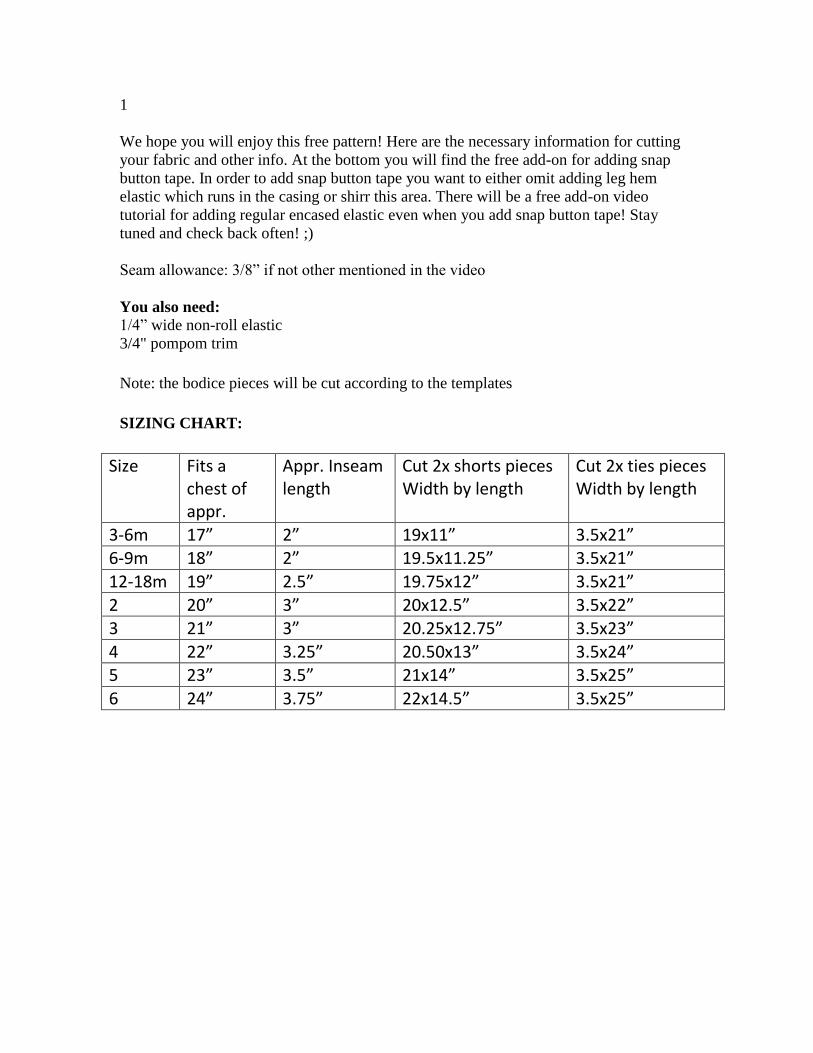
We hope you will enjoy this free pattern! Here are the necessary information for cutting
your fabric and other info. At the bottom you will find the free add-on for adding snap
button tape. In order to add snap button tape you want to either omit adding leg hem
elastic which runs in the casing or shirr this area. There will be a free add-on video
tutorial for adding regular encased elastic even when you add snap button tape! Stay
tuned and check back often! ;)
Seam allowance: 3/8” if not other mentioned in the video
You also need:
1/4” wide non-roll elastic
3/4" pompom trim
Note: the bodice pieces will be cut according to the templates
SIZING CHART:
Size Fits a chest of appr.
Appr. Inseam length
Cut 2x shorts pieces Width by length
Cut 2x ties pieces Width by length
3-6m 17” 2” 19x11” 3.5x21” 6-9m 18” 2” 19.5x11.25” 3.5x21”
12-18m 19” 2.5” 19.75x12” 3.5x21”
2 20” 3” 20x12.5” 3.5x22” 3 21” 3” 20.25x12.75” 3.5x23”
4 22” 3.25” 20.50x13” 3.5x24” 5 23” 3.5” 21x14” 3.5x25”
6 24” 3.75” 22x14.5” 3.5x25”
2
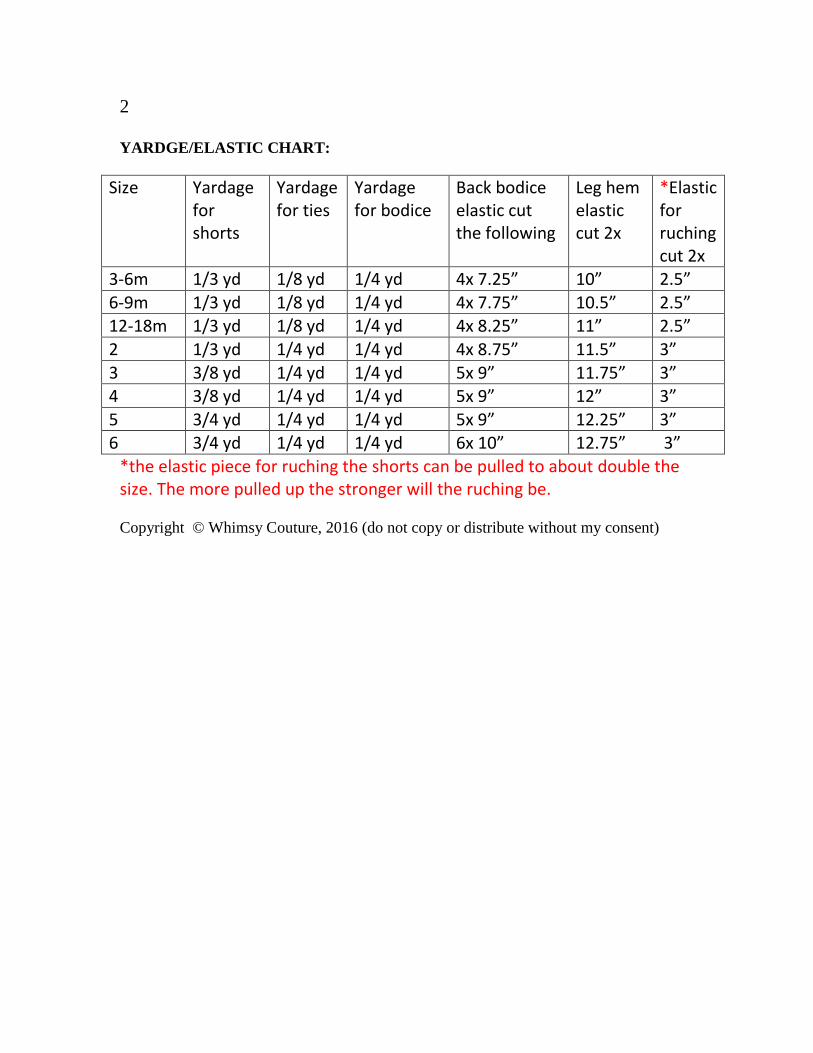
YARDGE/ELASTIC CHART:
Size Yardage for shorts
Yardage for ties
Yardage for bodice
Back bodice elastic cut the following
Leg hem elastic cut 2x
*Elastic for ruching cut 2x
3-6m 1/3 yd 1/8 yd 1/4 yd 4x 7.25” 10” 2.5”
6-9m 1/3 yd 1/8 yd 1/4 yd 4x 7.75” 10.5” 2.5”
12-18m 1/3 yd 1/8 yd 1/4 yd 4x 8.25” 11” 2.5”
2 1/3 yd 1/4 yd 1/4 yd 4x 8.75” 11.5” 3”
3 3/8 yd 1/4 yd 1/4 yd 5x 9” 11.75” 3” 4 3/8 yd 1/4 yd 1/4 yd 5x 9” 12” 3”
5 3/4 yd 1/4 yd 1/4 yd 5x 9” 12.25” 3” 6 3/4 yd 1/4 yd 1/4 yd 6x 10” 12.75” 3”
*the elastic piece for ruching the shorts can be pulled to about double the size. The more pulled up the stronger will the ruching be.
Copyright © Whimsy Couture, 2016 (do not copy or distribute without my consent)
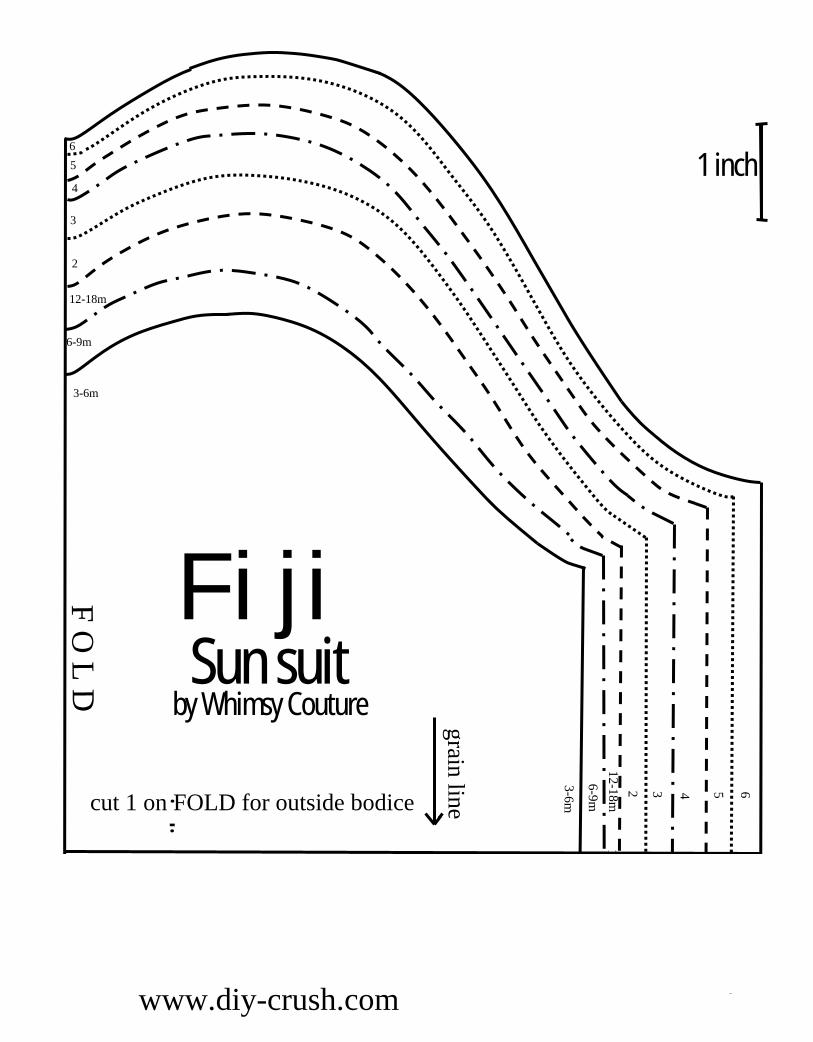
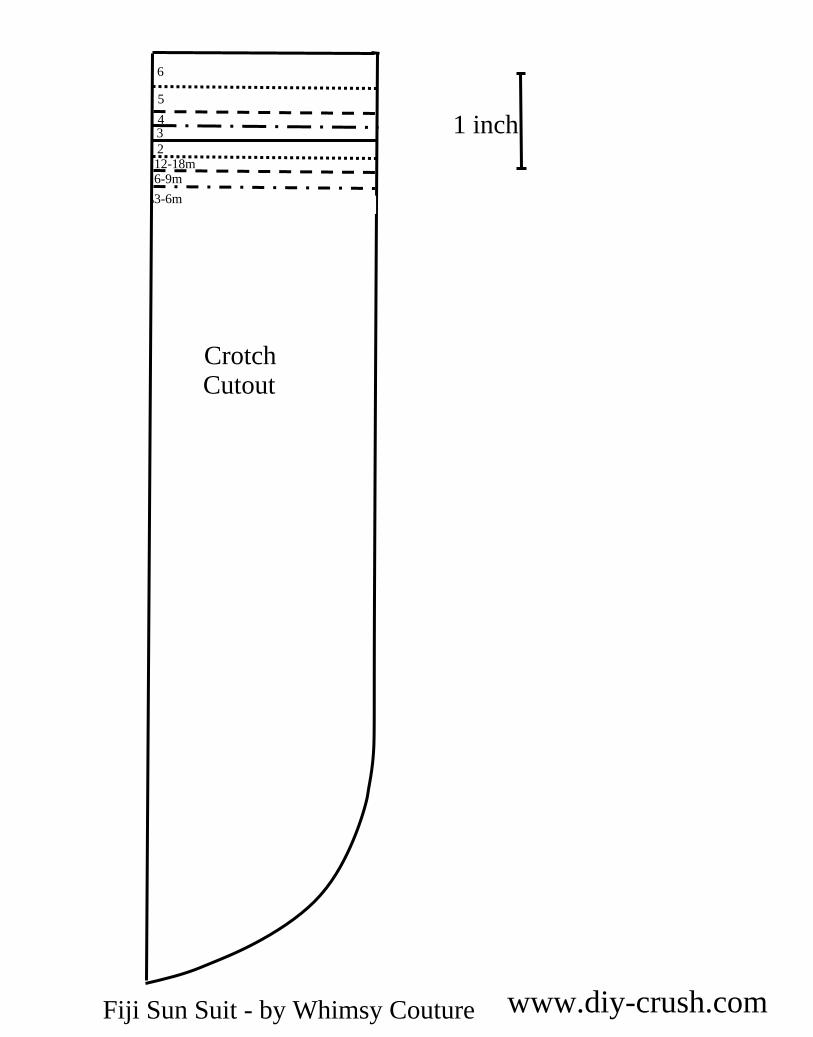
F O L D
FijiSun suit
by Whimsy Couture
grain line
1 inch
{cut 2 on fold}
65
4
3
2
12-18m
6-9m
3-6m
65432
12-18m6-9m
3-6m
Bib65432
12-18m6-9m3-6m
3-6m
6-9m12-18m
2 3 4 5 6cut 2 on FOLD
grain linecut 1 on FOLD for outside bodice
www.diy-crush.com
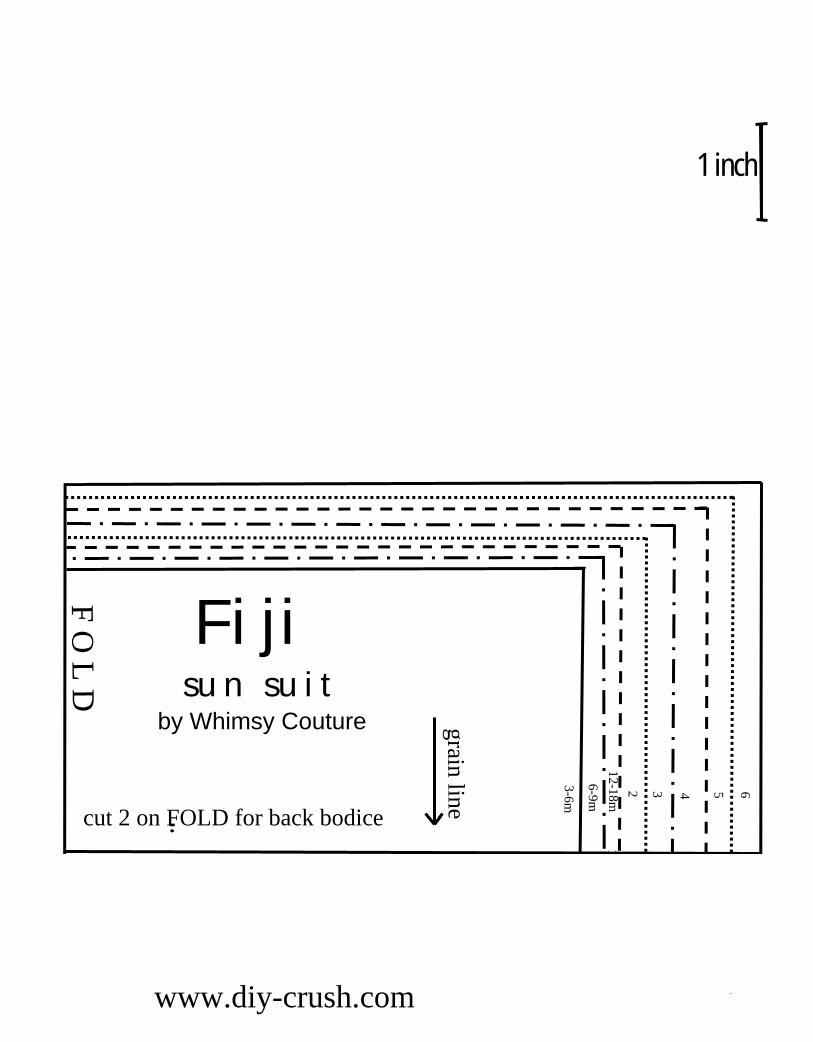
F O L D
FijiSun suit
by Whimsy Couture
grain line
1 inch
{cut 2 on fold}
65
4
3
2
12-18m
6-9m
3-6m
65432
12-18m6-9m
3-6m
Bib65432
12-18m6-9m3-6m
3-6m
6-9m12-18m
2 3 4 5 6cut 2 on FOLD
grain linecut 1 on FOLD for outside bodicecut 2 on FOLD for back bodice
Fijisun suit
by Whimsy Couture
www.diy-crush.com
6
543212-18m6-9m3-6m
1 inch
CrotchCutout Leg strip
{to slimdown thelegs}
align withcrotchcorner
Fiji Sun Suit - by Whimsy Couture www.diy-crush.com
Sizing chart for making a two pieced peasant dress based on the width of the Bodacious Bow Peasant
Dress:
Size Cut 2 for Bodice Length
Cut 2 for skirt length
NB 6” 7”
3-6m 6 ¼” 8”
9-12m 6.5” 11”
18m 6 ¾” 12 ¼”
2t 7” 13”
3t 7 ¼” 14”
4t 7.5” 16”
5 8” 17”
6 8.5” 18”
7 9” 20 ¼”
8 9.5” 20 ¾”
9 10” 21 ¼”
10 10.5” 22”
11/12 11.5” 23”
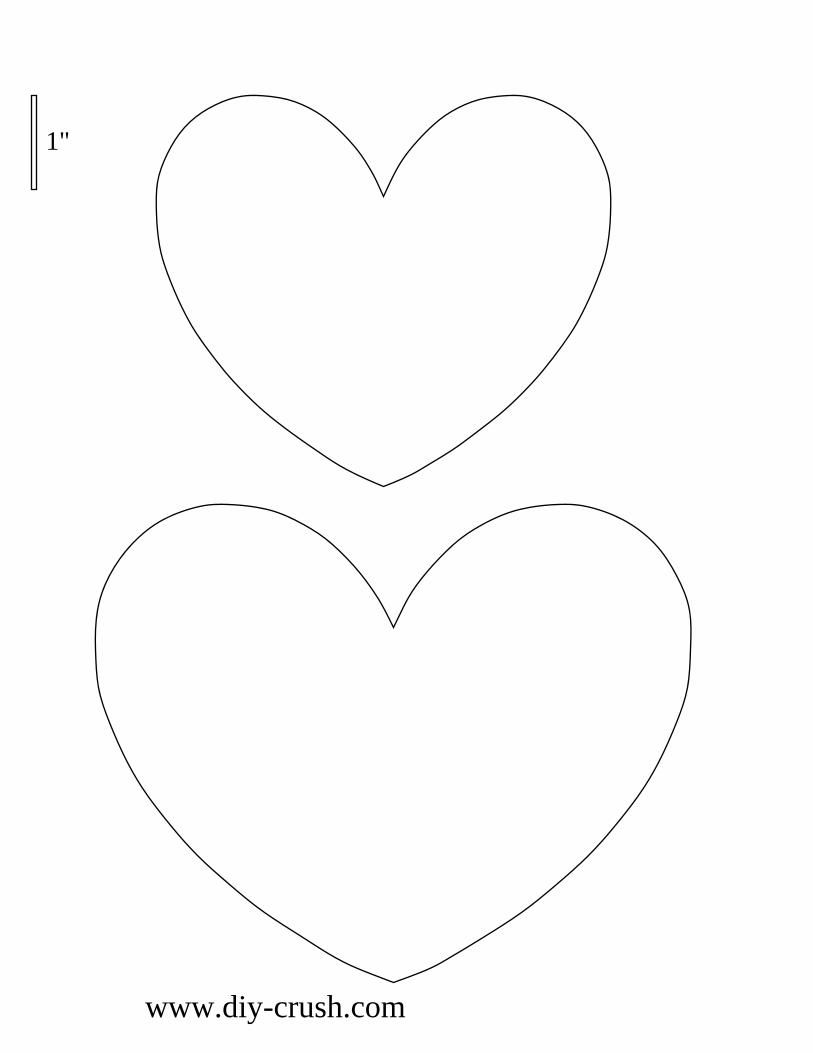
1"
www.diy-crush.com

Tutorial for adding snap buttons to the Tutorial for adding snap buttons to the Tutorial for adding snap buttons to the Tutorial for adding snap buttons to the
legslegslegslegs of rompers/overalls & pantsof rompers/overalls & pantsof rompers/overalls & pantsof rompers/overalls & pants
Tutorial for adding snap buttons to the Tutorial for adding snap buttons to the Tutorial for adding snap buttons to the Tutorial for adding snap buttons to the
of rompers/overalls & pantsof rompers/overalls & pantsof rompers/overalls & pantsof rompers/overalls & pants
Tutorial for adding snap buttons to the Tutorial for adding snap buttons to the Tutorial for adding snap buttons to the Tutorial for adding snap buttons to the
of rompers/overalls & pantsof rompers/overalls & pantsof rompers/overalls & pantsof rompers/overalls & pants

1
This tutorial is an addition and can be used for all pants, rompers, overalls etc. even store bought ones! For those you can rip the inner seams and pull all the loose threads and start from the beginning of this tutorial.
For handmade rompers/overalls, pants I suggest to go one size up in length to make up for the difference in the crotch area.
List of required materials:
• Sewing machine
• Serger/overlock machine ( recommended but not required)• Zipper foot
• Seam ripper (in case of a seam sewn wrong)• Snap button tape
• Scissors • pins
• Pants, overall, romper etc.
If you are adding snap buttons to your sewn garment, finish it up until you reach the inner legs which should be unsewn:
This tutorial is an addition and can be used for all pants, rompers, overalls etc. even store bought ones! For those you can rip the inner seams and pull all the loose threads and start from the beginning of this
ants I suggest to go one size up in length to make up for the
Serger/overlock machine ( recommended but not required)
Seam ripper (in case of a seam sewn wrong)
If you are adding snap buttons to your sewn garment, finish it up until you reach the inner legs which
This tutorial is an addition and can be used for all pants, rompers, overalls etc. even store bought ones! For those you can rip the inner seams and pull all the loose threads and start from the beginning of this
ants I suggest to go one size up in length to make up for the
If you are adding snap buttons to your sewn garment, finish it up until you reach the inner legs which
2
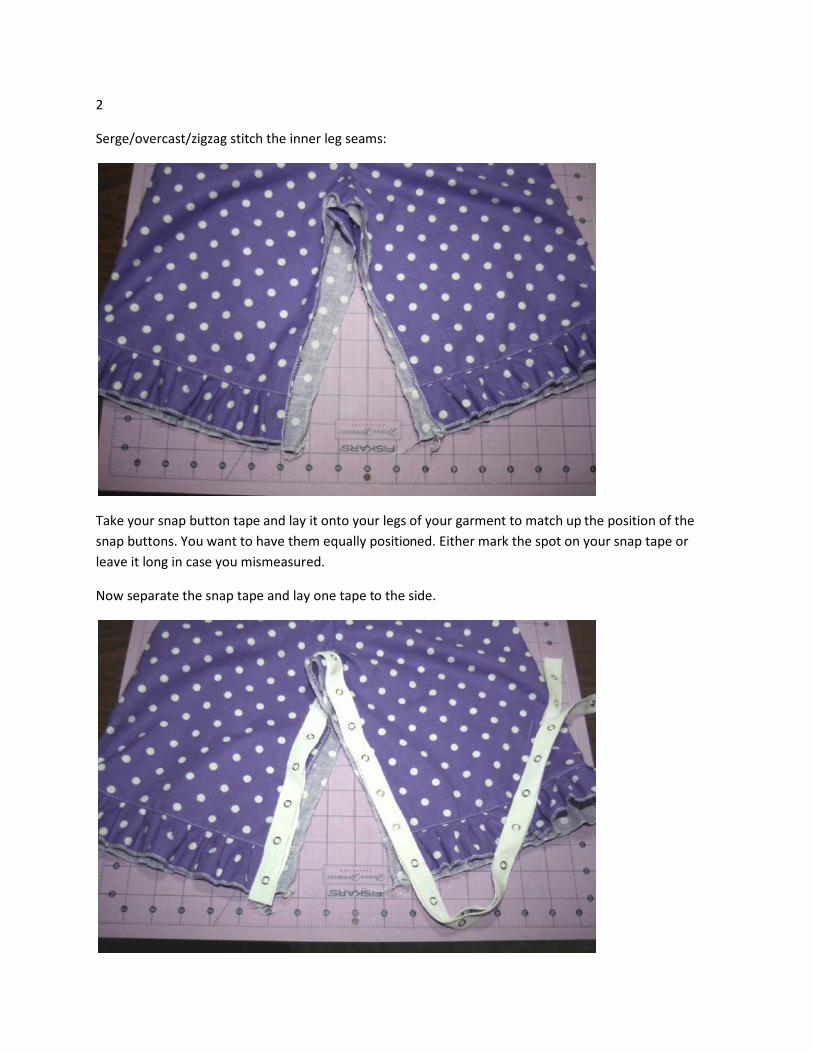
Serge/overcast/zigzag stitch the inner leg seams:
Take your snap button tape and lay it onto your legs of your garment to match up the position of the snap buttons. You want to have them equally positioned. Either mark the spot on your snap tape or leave it long in case you mismeasured.
Now separate the snap tape and lay one tape t
Serge/overcast/zigzag stitch the inner leg seams:
and lay it onto your legs of your garment to match up the position of the snap buttons. You want to have them equally positioned. Either mark the spot on your snap tape or leave it long in case you mismeasured.
Now separate the snap tape and lay one tape to the side.
and lay it onto your legs of your garment to match up the position of the snap buttons. You want to have them equally positioned. Either mark the spot on your snap tape or
3
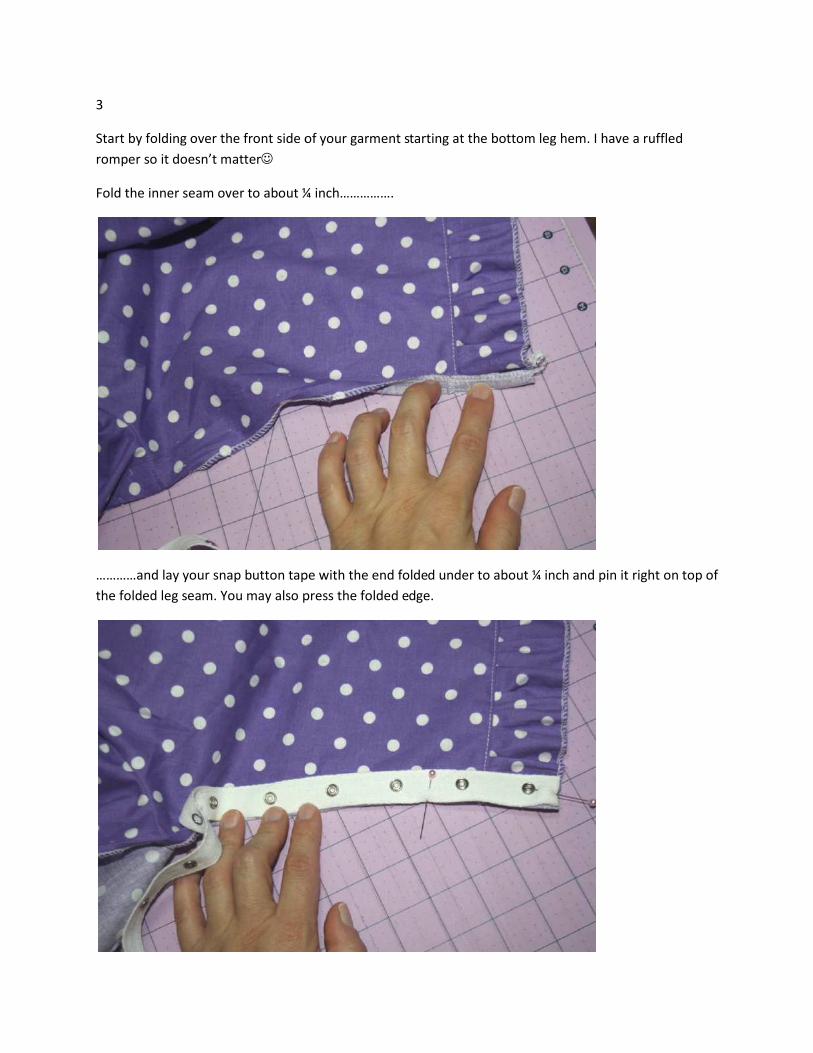
Start by folding over the front side of your garment starting at the bottom leg hem. I have a ruffled romper so it doesn’t matter☺
Fold the inner seam over to about ¼ inch…………….
…………and lay your snap button tape with the end folded the folded leg seam. You may also press the folded edge.
Start by folding over the front side of your garment starting at the bottom leg hem. I have a ruffled
Fold the inner seam over to about ¼ inch…………….
…………and lay your snap button tape with the end folded under to about ¼ inch and pin it right on top of the folded leg seam. You may also press the folded edge.
Start by folding over the front side of your garment starting at the bottom leg hem. I have a ruffled
under to about ¼ inch and pin it right on top of
4
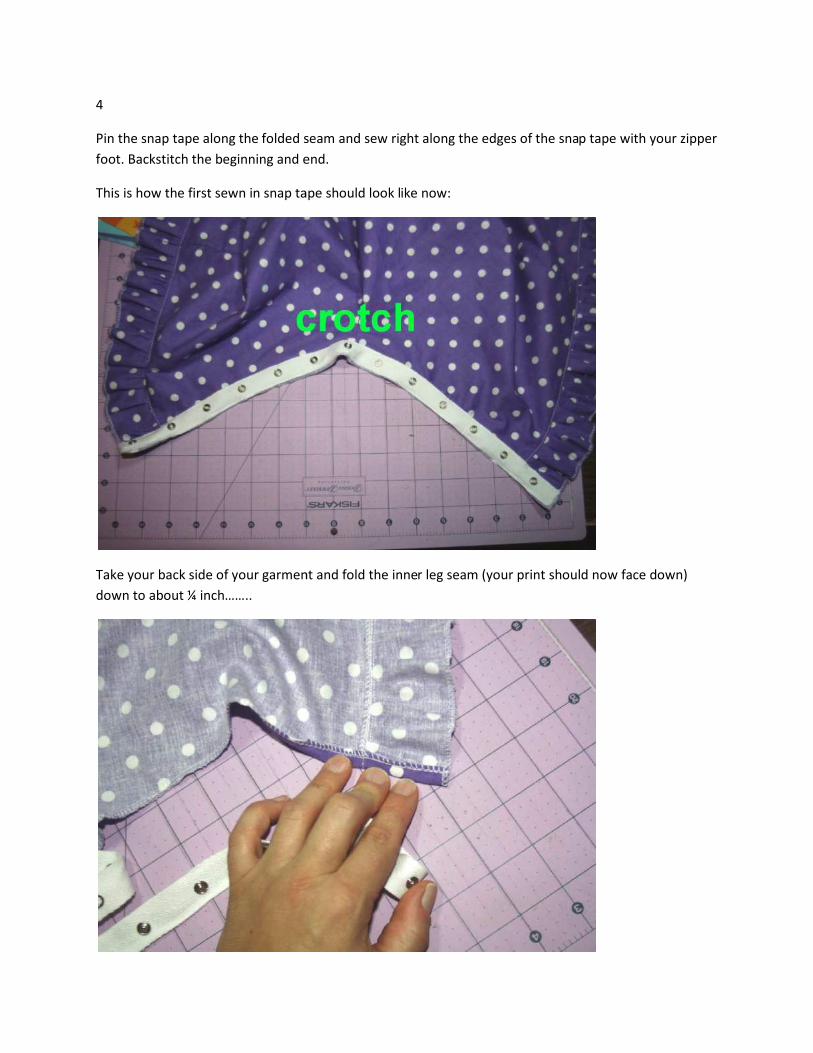
Pin the snap tape along the folded seam and sew right along the edges of the snap tape with your zipper foot. Backstitch the beginning and end.
This is how the first sewn in snap tape should look like now:
Take your back side of your garment and fold the inner leg seam (your print should now face down) down to about ¼ inch……..
folded seam and sew right along the edges of the snap tape with your zipper foot. Backstitch the beginning and end.
his is how the first sewn in snap tape should look like now:
Take your back side of your garment and fold the inner leg seam (your print should now face down)
folded seam and sew right along the edges of the snap tape with your zipper
Take your back side of your garment and fold the inner leg seam (your print should now face down)
5
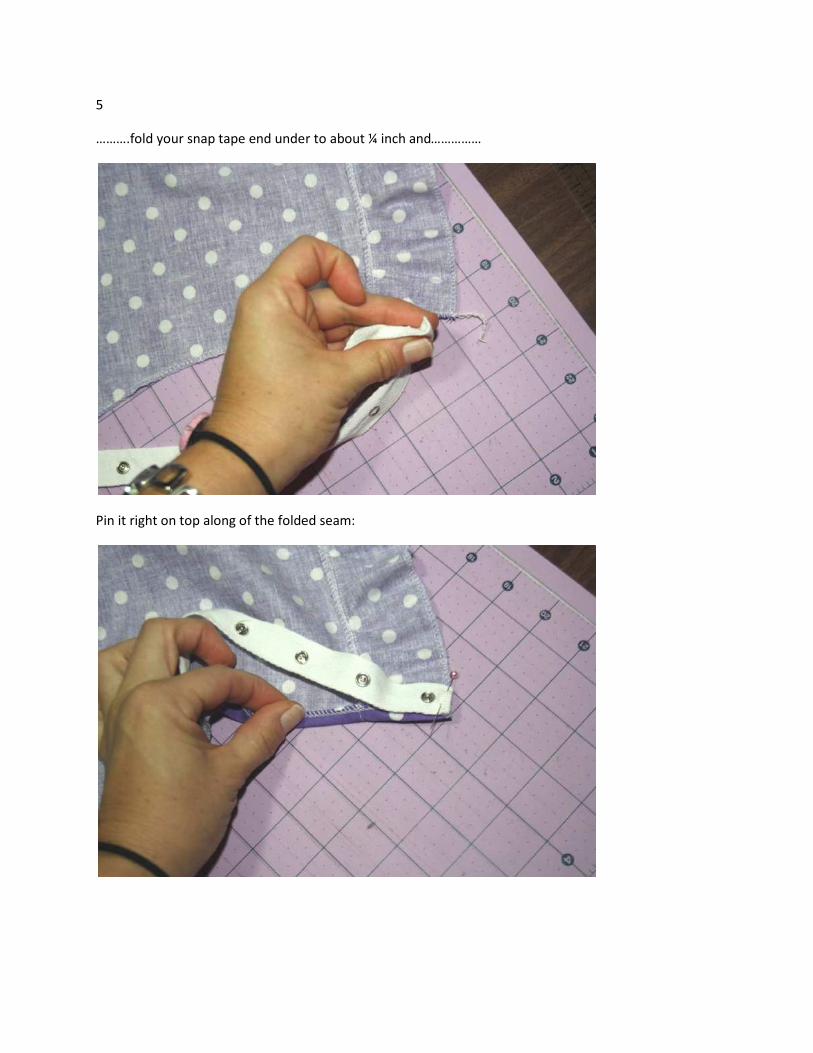
……….fold your snap tape end under to about ¼ inch and……………
Pin it right on top along of the folded seam:
……….fold your snap tape end under to about ¼ inch and……………
it right on top along of the folded seam:
6
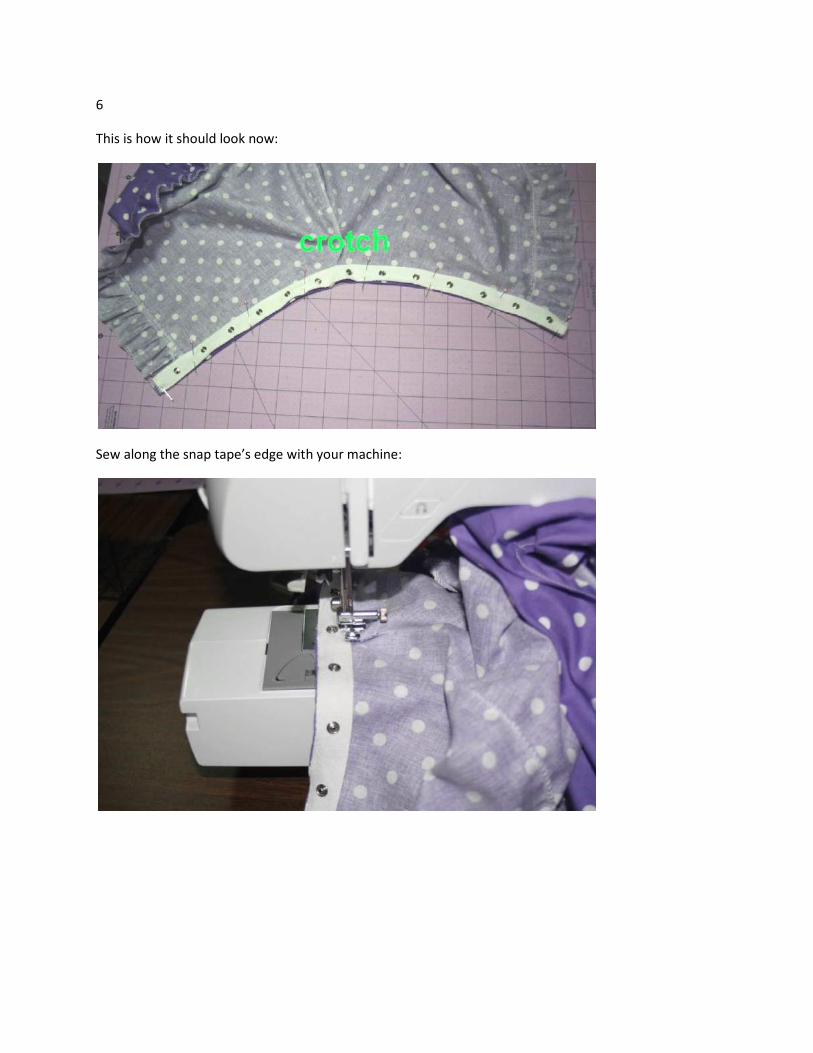
This is how it should look now:
Sew along the snap tape’s edge with your machine:
Sew along the snap tape’s edge with your machine:
7
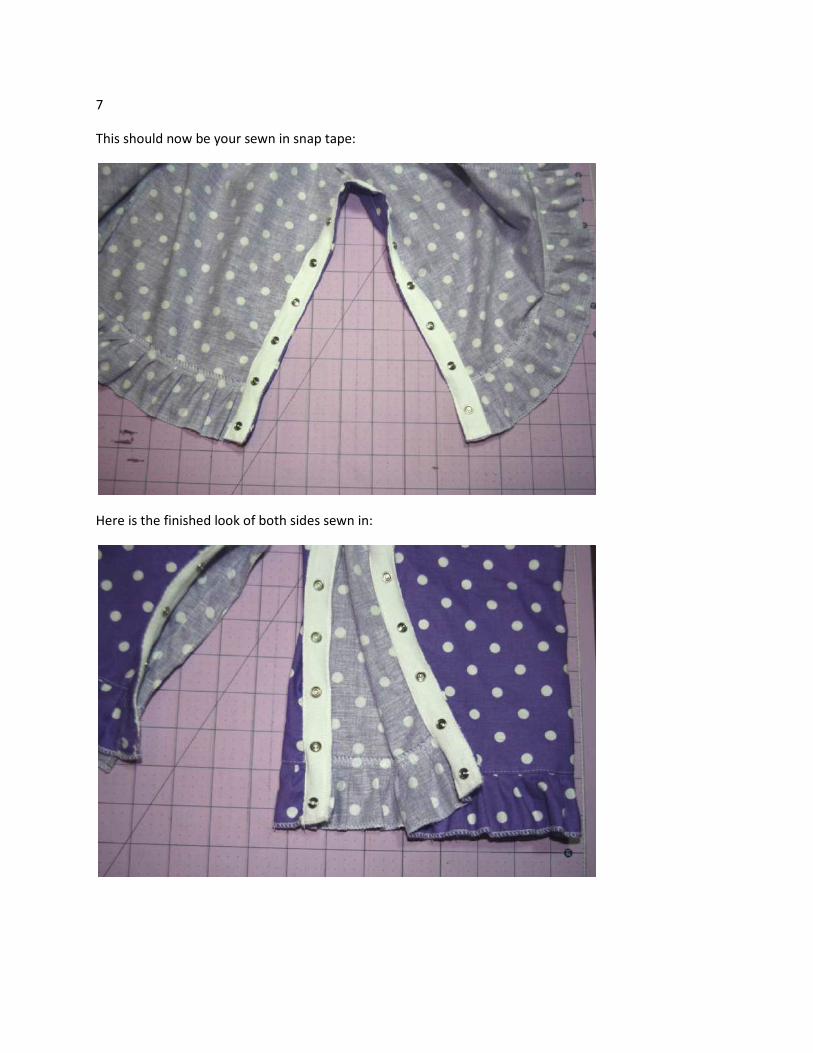
This should now be your sewn in snap tape:
Here is the finished look of both sides sewn in:
This should now be your sewn in snap tape:
Here is the finished look of both sides sewn in:
8
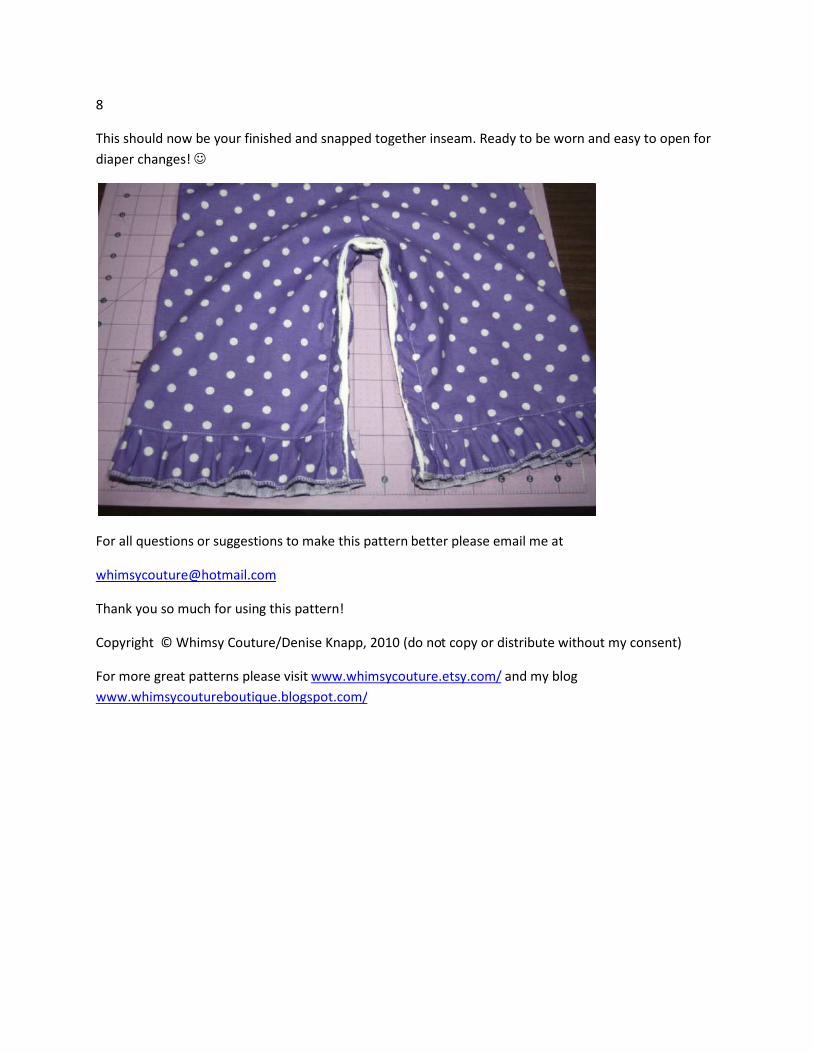
This should now be your finished and snapped together inseam. Ready to be worn and easy to open for diaper changes! ☺
For all questions or suggestions to make this pattern better please email me at
Thank you so much for using this pattern!
Copyright © Whimsy Couture/Denise Knapp, 2010 (do not copy or distribute without my consent)
For more great patterns please visit www.whimsycoutureboutique.blogspot.com/
This should now be your finished and snapped together inseam. Ready to be worn and easy to open for
For all questions or suggestions to make this pattern better please email me at
Thank you so much for using this pattern!
Copyright © Whimsy Couture/Denise Knapp, 2010 (do not copy or distribute without my consent)
For more great patterns please visit www.whimsycouture.etsy.com/ and my blog www.whimsycoutureboutique.blogspot.com/
This should now be your finished and snapped together inseam. Ready to be worn and easy to open for
Copyright © Whimsy Couture/Denise Knapp, 2010 (do not copy or distribute without my consent)