featuring homebody collection by
TRANSCRIPT
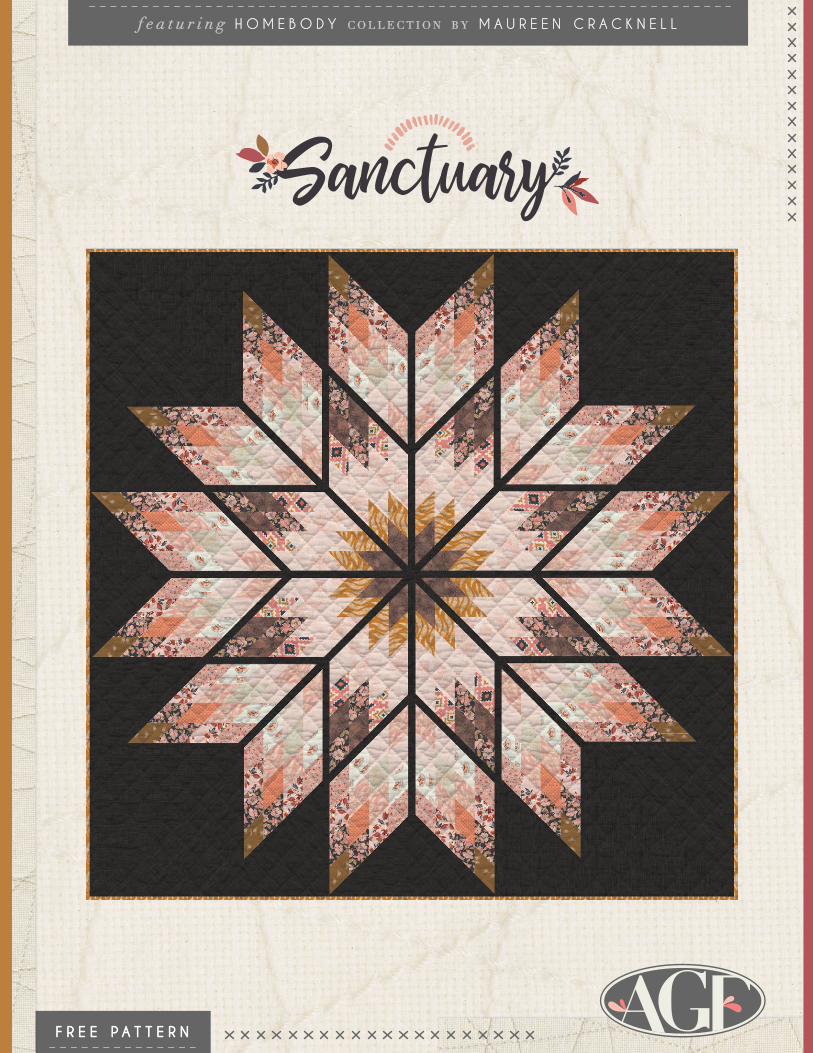
F R E E P A T T E R NF R E E P A T T E R N
f e a t u r i n gf e a t u r i n g H O M E B O D Y H O M E B O D Y C O L L E C T I O NC O L L E C T I O N B YB Y M A U R E E N C R A C K N E L LM A U R E E N C R A C K N E L L

© 2020 Courtesy of Art Gallery Quilts LLC. All Rights Reserved.
F A B R I C S D E S I G N E D B Y M A U R E E N C R A C K N E L L
Q U I L T D E S I G N E D B Y
SO
ME
WH
ER
E S
LO
WE
RS
OM
EP
LA
CE
QU
IET
HMB-44957CRAFTED BLOOMS CACAO
HMB-44956MAKE & MEND SHADOW
HMB-44950TOGETHERNESS AT HEART
HMB-34956MAKE & MEND SHINE
HMB-44951DOMESTIC CHARM WALNUT
HMB-34952HOMELIKE DREAMS
HMB-44955PRESENTLY PLUMES ROSE
HMB-34958NATIVE TAPESTRY
HMB-34955PRESENTLY PLUMES GOLD
HMB-34953COCOONING

artgal lery fabr ics . com
FE-501 SPICY BROWN
DEN-S-2000 WICKED SKY
FE-504 SAND
FE-518 BALLERINA
PE-471 SWEET MACADAMIA
ADD IT IONAL BLENDERS FOR TH IS PROJECT ADD IT IONAL BLENDERS FOR TH IS PROJECT
artgal lery fabr ics . com
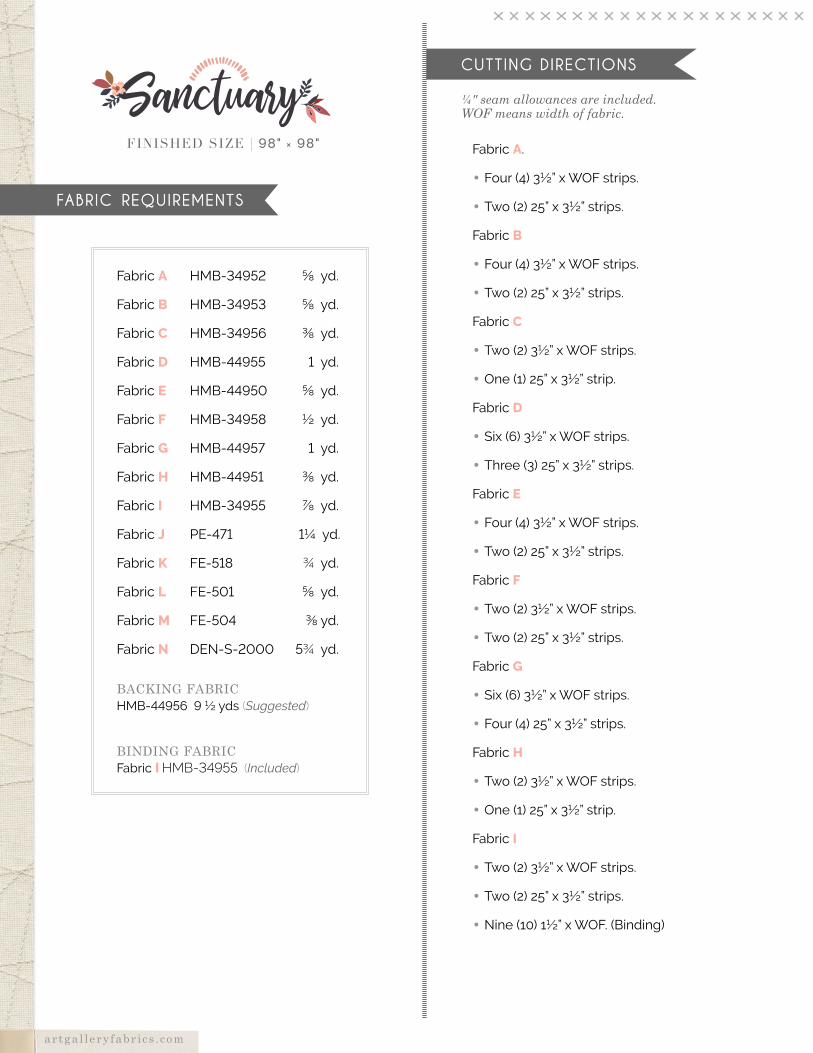
FINISHED SIZE | 98" × 98"
FABR IC REQUIREMENTSFABR IC REQUIREMENTS
CUTT ING D IRECT IONSCUTT ING D IRECT IONS
¼" seam allowances are included.WOF means width of fabric.
Fabric A.
• Four (4) 3½” x WOF strips.
• Two (2) 25” x 3½” strips.
Fabric B
• Four (4) 3½” x WOF strips.
• Two (2) 25” x 3½” strips.
Fabric C
• Two (2) 3½” x WOF strips.
• One (1) 25” x 3½” strip.
Fabric D
• Six (6) 3½” x WOF strips.
• Three (3) 25” x 3½” strips.
Fabric E
• Four (4) 3½” x WOF strips.
• Two (2) 25” x 3½” strips.
Fabric F
• Two (2) 3½” x WOF strips.
• Two (2) 25” x 3½” strips.
Fabric G
• Six (6) 3½” x WOF strips.
• Four (4) 25” x 3½” strips.
Fabric H
• Two (2) 3½” x WOF strips.
• One (1) 25” x 3½” strip.
Fabric I
• Two (2) 3½” x WOF strips.
• Two (2) 25” x 3½” strips.
• Nine (10) 1½” x WOF. (Binding)
Fabric A HMB-34952 ⅝yd.
Fabric B HMB-34953 ⅝yd.
Fabric C HMB-34956 ⅜yd.
Fabric D HMB-44955 1yd.
Fabric E HMB-44950 ⅝yd.
Fabric F HMB-34958 ½yd.
Fabric G HMB-44957 1yd.
Fabric H HMB-44951 ⅜yd.
Fabric I HMB-34955 ⅞yd.
Fabric J PE-4711¼yd.
Fabric K FE-518¾yd.
Fabric L FE-501 ⅝yd.
Fabric M FE-504 ⅜yd.
Fabric N DEN-S-2000 5¾yd.
BACKING FABRIC HMB-449569½yds (Suggested)
BINDING FABRIC Fabric I HMB-34955 (Included)

artgal lery fabr ics . com
• Finda45degreelineinyourrulerandcutatotal of sixteen (16) 3½” wide diagonal strips.
• Repeat the same step with one (1) 3½” x WOF strip from fabrics A, B, J, D and with one (1) 25” x 3½” strip from fabrics A, B, J, D.
DIAGRAM 2
DIAGRAM 3
DIAGRAM 4
CONSTRUCT IONCONSTRUCT ION
Sew all rights sides together with ¼"seam allowance.
For this project we will be working with eight differentstripsetcombination.
Strip Set 1 (SS1)
• Join (1) 3½” x WOF strip from fabrics A, B, J, D, and sew each strip about 3” inch in from the previous strip as shown above.
Strip Set 2 (SS2)
• Repeat the same step as in strip set 1, with two (2) 3½” x WOF strip from fabrics E, D, M, J, and with one (1) 25” x 3½” strip from fabrics E, D, M, J.
• Cut a total of sixteen (16) 3½” wide diagonal strips.
Strip Set 3 (SS3)
• Repeat the same step as in strip set 1, with two (2) 3½” x WOF strip from fabrics G, C, D, B, and one (1) 25” x 3½” strip from fabrics G, C, D, B.
• Cut a total of sixteen (16) 3½” wide diagonal strips.
Fabric J.
• Seven (7) 3½” x WOF strips.
• Five (5) 25” x 3½” strips.
Fabric K.
• Four (4) 3½” x WOF strips.
• Four (4) 25” x 3½” strips.
Fabric L
• Three (3) 3½” x WOF strips.
• Three (3) 25” x 3½” strips.
Fabric M
• Two (2) 3½” x WOF strips.
• One (1) 25” x 3½” strip.
Fabric N (See diagram 25 for cutting instructions)
• Eight (8) 20” squares.
• Four (4) 25” squares.
• Ninetysix(96)21”x1”strips.
DIAGRAM 1
SS1
SS2
SS3
x16
x16
x16
3½
3½
3½

artgal lery fabr ics . com
DIAGRAM 5
DIAGRAM 6
DIAGRAM 7
DIAGRAM 8
DIAGRAM 9
DIAGRAM 10
Strip Set 4 (SS4)
• Repeat the same step as in strip set 1, with two (2) 3½” x WOF strip from fabrics H, G, E, A. and one (1) 25” x 3½” strip from fabrics H, G, E, A.
• Cut a total of sixteen (16) 3½” wide diagonal strips..
SS4
SS6
x16
x8
Strip Set 5 (SS5)
• Repeat the same step as in strip set 1, with one (1) 3½” x WOF strip from fabrics J, K, I, L. and one (1) 25” x 3½” strip from fabrics J, K, I, L.
• Cut a total of eight (8) 3½” wide diagonal strips.
Strip Set 6 (SS6)
• Repeat the same step as in strip set 1, with one (1) 3½” x WOF strip from fabrics F, K, J, I. and one (1) 25” x 3½” strip from fabrics F, K, J, I.
• Cut a total of eight (8) 3½” wide diagonal strips.
Strip Set 7 (SS7)
• Repeat the same step as in strip set 1, with one (1) 3½” x WOF strip from fabrics L, G, K, K, and one (1) 25” x 3½” strip from fabrics L, G, K, K.
• Cut a total of eight (8) 3½” wide diagonal strips.
Strip Set 8 (SS8)
• Repeat the same step as in strip set 1, with one (1) 3½” x WOF strip from fabrics G, L, F, J, and one (1) 25” x 3½” strip from fabrics G, L, F, J.
• Cut a total of eight (8) 3½” wide diagonal strips.
Now, we will start building the blocks with the stripssetspreviouslymade.
Block a:
• Join one (1) SS1, (1) one SS2, one (1) SS3, one (1) SS4. See diagram 10 for reference.
SS5
SS1 SS2 SS3 SS4
SS7
x8
x8
SS7
x8
Block a
3½
3½
3½
3½
3½

artgal lery fabr ics . com
• Take four (4) 21” x 1” strip from fabric N and sew one (1) strip to the top of the block a, one (1) strip to right side of block a, one (1) strip to the left side of the block a, and one (1) strip at the bottom of the block a. Repeat the same steps in all sixteen (16) blocks a.
• See diagram 11 for reference.
• Take four (4) 21” x 1” strip from fabric N and sew one (1) strip to the top of the block b, one (1) strip to right side of block b, one (1) strip to the left side of the block b, and one (1) strip at the bottom of the block b. Repeat the same steps in all eight (8) blocks b.
• See diagram 11 for reference.
• Finishtriming.youshouldhavesixteenunits. • Finishtriming.youshouldhaveeightunits.
• Take four (4) 25“ squares from fabric N and cut themdiagonallytogeteight(8)25"halfsquaretriangles.
• Repeat the same step with eight (8) 20“ squares from fabric N.togetsixteen(16)20"half square triangles. See diagram below.
Block b:
• Join one (1)SS5, one (1) SS6, one (1) SS7, one (1) SS8. See diagram 13 for reference.
DIAGRAM 11
DIAGRAM 12
DIAGRAM 13
DIAGRAM 14
DIAGRAM 15
DIAGRAM 16
TOP TOP
LEFT LEFT
RIGHT RIGHT
x8
25” x 25”20” x 20”
a
b
c
BOTTOM BOTTOM
x16
SS5 SS6 SS7 SS8 Block b

artgal lery fabr ics . com
Block 1
• Take two (2) 20” triangles from fabric N and attach them to block a, as shown on diagram 17. This will be unit A. Set aside.
• Repeat this step 7 more times.
• Join one (1) 25” triangle from fabric N with one (1) block a, and one (1) block b. This will be unit B.
• Payattentiontothedirectionofeachblock a and b.
• Trimexcessfabricfromthe25"triangleoffabric N.
• Repeat this step 3 more times.
• Join unit A and B, repeat this setp 3 more times.
• You should have a total of four (4) blocks 1
Block 2
• Join one (1) 25” triangle from fabric N with one (1) block a, and one (1) block b. This will be unit C
• Payattentiontothedirectionofeachblock a and b.
• Trimexcessfabricfromthe25"triangleoffabric N.
• Repeat this step 3 more times.
DIAGRAM 17
DIAGRAM 19
DIAGRAM 20
DIAGRAM 18
Unit A
Unit A
Unit B
Trim
Trim
Trim
Unit C
Unit B
Block a
x4
x4
x8
x4
Block a
Block a
Block 1
Block b
Block b

artgal lery fabr ics . com
QUILT TOPQUILT TOP
• Arrange all four (4) blocks 3 in two rows of two blocks each, and sew rows together.
• See diagram 24 for reference.
• Join unit C with unit A, and repeat this setp 3 more times.
• Repeatthisstep3moretimes,youshouldhavea total of four blocks 2.
Block 3
• Join block 1 and block 2.
• Repeat this step 3 more times.
DIAGRAM 21DIAGRAM 23
DIAGRAM 22
Unit C
Unit A
Block 2
Block 2
Block 3
x4
Block 1
• Trim excess fabric.

artgal lery fabr ics . com
QUILT ASSEMBLYQUILT ASSEMBLY
Sew rights sides together.
• Place BACKING FABRIC on a large surface wrong side up. Stretch it with masking tape against that surface.
• Place BATTING on top of backing fabric.
• Place TOP on top of the batting with right side facingup.Smoothawaywrinklesusingyourhands.
• Pinalllayerstogetherandbastewithbastingthread, using long stitches. You can also use safetypinstojointhelayers.
• Machine or hand quilt starting at the center and working towards the corners. Remember that quilting motifs are a matter of personal prefer-ence.Havefunchoosingyours!
• Afteryoufinished,trimexcessofanyfabricorbatting, squaring the quilt to proceed to bind it.
QUILT ASSEMBLYQUILT ASSEMBLY
B IND INGB IND ING
Sew rights sides together.
• Cutenoughstrips1½"widebythewidthofthefabric I tomakeafinalstrip402"long.Startsewing the binding strip in the middle of one of the sides of the quilt, placing the strip right sidedownandleavinganapproximated5"tail.Sewwith¼"seamallowance(usingstraightstitch), aligning the strip’s raw edge with the quilt top’s raw edge.
• Stopstitching¼"beforetheedgeofthequilt(DIAGRAM B 1). Clip the threads. Remove the quilt from under the machine presser foot. Fold the strip in a motion of 45° and upward, pressingwithyourfingers(DIAGRAM B2). Holdthisfoldwithyourfinger,bringthestripdown in line with the next edge, making a horizontal fold that aligns with the top edge of the quilt (DIAGRAM B3).Startsewingat¼"oftheborder,stitchingallthelayers.Dothesame in the four corners of the quilt.
• Stopstitchingbeforeyoureachthelast5or6inches. Cut the threads and remove the quilt fromunderthemachinepresserfoot.Laytheloose ends of the binding flat along the quilt edge, folding the ends back on themselves wheretheymeet.Pressthemtogethertoforma crease. Using this crease as the stitching line, sew the two open ends of the binding withrightsidestogether(youcanhelpyour-self marking with a pencil if the crease is difficult to see).
• Trimseamto¼"andpressopen.Completethe sewing. Turn binding to back of the quilt, turnrawedgeinsideandstitchbyhandusingblind stitch.
45˚
DIAGRAM B2
DIAGRAM B1 Stop stitching here
DIAGRAM B3 fold
Fabric N cutting instructions
• ArrangeyourpiecesfromfabricN as shown on diagram below.
DIAGRAM 25

artgal lery fabr ics . com
NOTE: While all possible care has been taken to ensure the accuracy of this pattern, We are not responsible for printing errors or the way in which individual work varies.
Please read instructions carefully before starting the construction of this quilt. If desired, wash and iron your fabrics before starting to cut.
artgal lery fabr ics . comartgal lery fabr ics . com
© 2020 Courtesy of Art Gallery Quilts LLC. All Rights Reserved.