feature package 3 triad-s system programming
TRANSCRIPT

Feature Package 3
TRIAD-SSystemProgramming
a new dimension in business communications

STARPLUS Triad-S
System Programming Manual
Part Number: 5050-13 Issue 3.2 - March 2001
TM

Copyright © 2001 VODAVI Technology, Inc.
All Rights Reserved
This material is copyrighted by VODAVI Technology, Inc., and may be duplicated byAuthorized Dealers only. Any unauthorized reproductions, use or disclosure of thismaterial, or any part thereof, is strictly prohibited and is a violation of the CopyrightLaws of the United States (17 U.S.C. Section 101 et. seq.).
VODAVI reserves the right to make changes in specifications at any time and withoutnotice. The information furnished by VODAVI in this material is believed to be accurateand reliable, but is not warranted to be true in all cases.
STARPLUS and TRIAD™ are Registered trademarks of VODAVI Technology, Inc.
mlj/2001
Issue Release Date Changes
2 8-99 Feature Package 2 {FP2} enhancements have been added. Manual content contains extensive revisions.
2.1 12-99 Feature Package 2 {FP2} updates have been added. Manual content has been revised.
3 5-00 Feature Package 3 {FP3} enhancements have been added. Manual layout has been reformatted.
3.1 8-00 Manual content has been revised.
3.2 3-01 Manual content has been revised for correctness and clarity.
LIFE SUPPORT APPLICATIONS POLICY
VODAVI Technology, Inc. products are not authorized for and should not be usedwithin Life Support applications. Life Support systems are equipment intended tosupport or sustain life and whose failure to perform when properly used inaccordance with instructions provided can be reasonably expected to result insignificant personal injury or death.
VODAVI Technology, Inc. warranty is limited to replacement of defectivecomponents and does not cover injury to persons or property or other consequentialdamages.

Contents
1 Customer Database ProgrammingIntroduction ........................................................................................................... 1-3Program Mode Entry (Key Station) ................................................................ 1-19Program Mode Entry (Data Terminal or PC) ............................................... 1-19Initialization ........................................................................................................... 1-20Database Programming Worksheets ........................................................... 1-20Database Upload/Download Routine .......................................................... 1-21
Upload/Download through Remote Administration ...................... 1-21
2 System Parameters ProgrammingSystem Timers ....................................................................................................... 2-3
System Hold Recall Timer .......................................................................... 2-4Exclusive Hold Recall Timer ...................................................................... 2-5Attendant Recall Timer ............................................................................... 2-6Transfer Recall Timer ................................................................................... 2-6Preset Forward Timer .................................................................................. 2-7Call Forward No Answer Timer ................................................................ 2-8Pause Timer .................................................................................................... 2-8Call Park Recall Timer .................................................................................. 2-9Conference / DISA Timer ........................................................................... 2-9Paging Time-Out Timer .............................................................................. 2-10CO Ring Detect Timer ................................................................................. 2-11SLT DTMF Receiver Timer .......................................................................... 2-11Message Wait Reminder Tone ................................................................. 2-12SLT Hook Flash Timer .................................................................................. 2-13SLT Hook Flash Debounce Timer ............................................................ 2-13SMDR Call Qualification Timer ................................................................. 2-14Automatic Call Back Timer ........................................................................ 2-15Reminder Ring Timer .................................................................................. 2-15Inter-Digit Time-Out .................................................................................... 2-16
Additional System Timers ................................................................................. 2-17Repeat Redial Timer ..................................................................................... 2-18Attendant Display Timer ............................................................................ 2-19Call Coverage Ring Timer .......................................................................... 2-19

ii March 2001
Modem Answer Timer ................................................................................ 2-20Pulse Dial Inter-Digit Timer ....................................................................... 2-20DTMF On/Off Time Operation ................................................................. 2-21
System Features 1 Programming .................................................................. 2-21Attendant Override ..................................................................................... 2-23Hold Preference ............................................................................................ 2-23External Night Ring ...................................................................................... 2-24Executive Override Warning Tone ......................................................... 2-24Page Warning Tone ..................................................................................... 2-25Background Music ....................................................................................... 2-26Least Cost Routing (LCR) ............................................................................ 2-26Account Codes - Forced ............................................................................. 2-27Group Listening ............................................................................................ 2-28Idle Speaker Mode ....................................................................................... 2-28Call Cost Display ........................................................................................... 2-29Music-On-Hold .............................................................................................. 2-29Call Qualifier Tone ........................................................................................ 2-30
System Features 2 Programming .................................................................. 2-31Barge-In Warn Tone ..................................................................................... 2-32CO Ring Tones ............................................................................................... 2-33Verified Account Codes .............................................................................. 2-34Call Forward Display .................................................................................... 2-34External Day Ring ......................................................................................... 2-35Overflow Station Forward ......................................................................... 2-35Direct Transfer Mode .................................................................................. 2-36Station ID Lock .............................................................................................. 2-37LCR Call Progress .......................................................................................... 2-37One-Touch Recording Warning Tone ................................................... 2-38Ringback on Transfer .................................................................................. 2-39ACD Agent Recall ......................................................................................... 2-39911 Feature ..................................................................................................... 2-40
Enhanced 911 (Proctor PBX-ANI-LINK Unit) ............................................... 2-40VMID Station Numbers ...................................................................................... 2-41Programmable Flash Rates .............................................................................. 2-42
Incoming CO Line Ringing ........................................................................ 2-43Incoming Intercom Ringing ..................................................................... 2-44
March 2001 iii
Call Forward Button ..................................................................................... 2-44Message Wait / VM Button ........................................................................ 2-45Message Callback - DSS / BLF ................................................................... 2-46Do Not Disturb - DSS / BLF ........................................................................ 2-46Auto Callback - DSS / BLF .......................................................................... 2-47UCD Available / Unavailable - DSS / BLF .............................................. 2-47Transfer CO Ringing .................................................................................... 2-48Recall CO Ringing ......................................................................................... 2-49Queued CO Ringing ..................................................................................... 2-49Exclusive Hold ................................................................................................ 2-50System Hold ................................................................................................... 2-50In-Use Hold (I-Hold) ..................................................................................... 2-51Camp-On Button .......................................................................................... 2-52Call Back Button ............................................................................................ 2-52Line Queue Button ....................................................................................... 2-53Do Not Disturb Button ................................................................................ 2-53Intercom Hold Button ................................................................................. 2-54
System Parameters ............................................................................................. 2-55MOH Assignments ....................................................................................... 2-56
Attendant Station Assignment ....................................................................... 2-57System Time and Date ....................................................................................... 2-58PBX Dialing Codes ............................................................................................... 2-59Executive / Secretary Pairs ................................................................................ 2-60On-Board Relay Programming ........................................................................ 2-61Baud Rate Assignments ..................................................................................... 2-62Networking Tables .............................................................................................. 2-63Access Codes ......................................................................................................... 2-66
DISA Access Code ......................................................................................... 2-66Database Admin Password ....................................................................... 2-67
Station Message Detail Recording (SMDR) ................................................ 2-67SMDR Enable / Disable ............................................................................... 2-68Long Distance / All Calls ............................................................................. 2-69Character Print Assignment ..................................................................... 2-69Baud Rate Display ......................................................................................... 2-70SMDR Port Assignments ............................................................................ 2-70
Weekly Night Mode Schedule ......................................................................... 2-71

iv March 2001
Automatic / Manual Operation ............................................................... 2-71Day of Week Programming ...................................................................... 2-72
Directory Dialing .................................................................................................. 2-72Hunt Groups .......................................................................................................... 2-76
Hunt Group Programming ........................................................................ 2-76Hunt Group ..................................................................................................... 2-77Station / Pilot / Pilot Ring All -- Hunting Assignments .................... 2-78
Verified Account Codes / Traveling Class of Service ............................... 2-79CO Line Group Queuing .................................................................................... 2-81Local Number / Name Translation Table .................................................... 2-82
3 CO Line Attributes ProgrammingPage A Introduction ............................................................................................ 3-3
DTMF / Dial Pulse Programming ............................................................. 3-4CO / PBX Programming .............................................................................. 3-5Universal Night Answer (UNA) ................................................................ 3-5DISA CO-to-CO .............................................................................................. 3-6Privacy .............................................................................................................. 3-7Loop Supervision Programming ............................................................. 3-8DISA Programming ...................................................................................... 3-9CO Line Group Programming .................................................................. 3-10Class of Service (COS) .................................................................................. 3-10CO Line Ringing Assignments ................................................................. 3-12CO Line Identification Display ................................................................. 3-13CO Direction ................................................................................................... 3-15Display Ring Assignments ......................................................................... 3-16911 Trunk ......................................................................................................... 3-17
Page B Introduction ............................................................................................ 3-18Transmit Volume .......................................................................................... 3-19Preset Call Forward Destination .............................................................. 3-20Preset Forward Voice Mail ID ................................................................... 3-21Universal Day Answer (UDA) .................................................................... 3-21Music-On-Hold (per CO Line) ................................................................... 3-22Ring Tone (per CO Line) ............................................................................. 3-23
Page C Introduction ............................................................................................ 3-24Flash Timer ...................................................................................................... 3-25

March 2001 v
Ring Delay Timer ........................................................................................... 3-26Reseize Timer ................................................................................................. 3-27Guard Timer .................................................................................................... 3-27Preset Forward Timer .................................................................................. 3-28
Miscellaneous CO Parameters ........................................................................ 3-29Dial Pulse Parameters ................................................................................. 3-29
ICLID Programming ............................................................................................ 3-30ICLID Ringing Assignments ...................................................................... 3-30View ICLID Ringing Assignments ............................................................ 3-32
Direct Inward Dialing (DID) Programming ................................................. 3-34DID Phone Number ..................................................................................... 3-36Name Assigned to DID Number .............................................................. 3-36Erasing a DID Table Entry .......................................................................... 3-37
4 Station Attributes ProgrammingPage A Introduction ............................................................................................ 4-3
Paging Access ................................................................................................ 4-4Do Not Disturb .............................................................................................. 4-5Conference Enable / Disable (Per Station) .......................................... 4-5Executive Override ....................................................................................... 4-6Privacy (Per Station) .................................................................................... 4-7System Speed Dial Access ......................................................................... 4-8Line Queuing ................................................................................................. 4-9Preferred Line Answer ................................................................................ 4-9Off-Hook Voice Over (OHVO) ................................................................... 4-10Call Forwarding ............................................................................................. 4-11Forced Least Cost Routing (LCR) ............................................................. 4-11ACD Supervisor Monitor with Barge-In ................................................ 4-12Executive Override Blocking .................................................................... 4-13CO Line Ringing Options ........................................................................... 4-14Name / Number Display at Idle ............................................................... 4-14Zap Tone .......................................................................................................... 4-15CO Loop Pool Flex ........................................................................................ 4-16Administration Access ................................................................................ 4-16
Page B Introduction ............................................................................................ 4-17Station Identification .................................................................................. 4-18Station ID for DSS / DLS Console with Map ........................................ 4-19

vi March 2001
Station Day Class of Service (COS) ......................................................... 4-21Station Night Class of Service (COS) ...................................................... 4-23Speakerphone / Headset ........................................................................... 4-24Pickup Group(s) ............................................................................................. 4-24Paging Zone(s) .............................................................................................. 4-25Line Group Access - Station ...................................................................... 4-26LCR Class of Service (COS) ......................................................................... 4-26Off-Hook Preference .................................................................................... 4-27Flexible Button .............................................................................................. 4-28Keyset Mode ................................................................................................... 4-33Voice Mail ID Translation ........................................................................... 4-33Display Flexible Buttons ............................................................................. 4-34Cordless KTU Feature Button ................................................................... 4-36
Page C Introduction ............................................................................................ 4-36Preset Call Forward ...................................................................................... 4-38Speed Dial Access ......................................................................................... 4-40Flexible Numbering Assignment ............................................................ 4-40
5 ICLID (Caller ID) Route ProgrammingIntroduction ........................................................................................................... 5-3
Calling Number / Name Display .............................................................. 5-3Incoming Number/Name for SMDR Records ..................................... 5-4
ICLID Features ....................................................................................................... 5-5Enable / Disable ............................................................................................ 5-5Name in Display ............................................................................................ 5-6Baud Rate Display ......................................................................................... 5-6Port Assignment ........................................................................................... 5-7
6 Automatic Call Distribution (ACD)ACD Group Programming ................................................................................ 6-3
ACD Group Name ......................................................................................... 6-4Alternate ACD Group Assignment ......................................................... 6-5ACD Overflow Station Assignment ........................................................ 6-5ACD Supervisor ............................................................................................. 6-6ACD CIQ Threshold ...................................................................................... 6-7ACD Auto Wrap-Up Timer ......................................................................... 6-7

March 2001 vii
Primary Agents .............................................................................................. 6-8Secondary Agents ........................................................................................ 6-9Guaranteed RAN ........................................................................................... 6-9Primary RAN ................................................................................................... 6-10Secondary RAN .............................................................................................. 6-11Transferred RAN ............................................................................................ 6-11ACD Overflow Timer .................................................................................... 6-12Call Factor ........................................................................................................ 6-12
ACD Timers ............................................................................................................ 6-13ACD Ring Timer ............................................................................................. 6-14ACD Message Interval Timer .................................................................... 6-14ACD No-Answer Recall Timer ................................................................... 6-15ACD No-Answer Retry Timer .................................................................... 6-15Guaranteed Message Timer ...................................................................... 6-16
ACD Announcement Tables (RAN) ................................................................ 6-17PC / ACD Interface Trace ................................................................................... 6-20
Enable / Disable ............................................................................................ 6-20Trace Port Assignment ............................................................................... 6-21Baud Rate Display ......................................................................................... 6-21
7 Uniform Call Distribution (UCD)UCD Group Programming ................................................................................ 7-3
Alternate UCD Group Assignment ......................................................... 7-4UCD Overflow Station Assignment ........................................................ 7-4UCD Primary Agent Assignments ........................................................... 7-5UCD Primary RAN Assignments .............................................................. 7-6Secondary RAN .............................................................................................. 7-6
UCD Timers ............................................................................................................ 7-7UCD Ring Timer ............................................................................................. 7-7UCD Message Interval Timer .................................................................... 7-8UCD Overflow Timer ................................................................................... 7-9UCD Auto Wrap-Up Timer ......................................................................... 7-9UCD No-Answer Recall Timer ................................................................... 7-10UCD No-Answer Retry Timer .................................................................... 7-10
UCD Announcement Tables ............................................................................ 7-11
8 Voice Mail Groups (VM)

viii March 2001
Voice Mail Programming .................................................................................. 8-3Alternate Voice Mail Group ....................................................................... 8-4Leave Mail Index Entry ................................................................................ 8-5Retrieve Mail Index Entry ........................................................................... 8-6Station Assignments ................................................................................... 8-6
Voice Mail Outpulsing Table ............................................................................ 8-7Voice Mail In-Band Signaling ................................................................... 8-7Voice Mail Disconnect Table .................................................................... 8-9
Voice Mail In-Band Features ............................................................................ 8-10Voice Mail In-Band Digits ........................................................................... 8-10Voice Mail Transfer / Forward .................................................................. 8-11Voice Mail Broker .......................................................................................... 8-12Voice Mail ID Digit Length ........................................................................ 8-12
Voice Mail Index Table ....................................................................................... 8-13
9 Exception TablesException Tables Programming ..................................................................... 9-3Related Items To Toll Restriction .................................................................... 9-5
CO/PBX Lines ................................................................................................. 9-5Forced Account Codes ............................................................................... 9-5SLT DTMF Receivers ..................................................................................... 9-6LCR Versus Toll Restriction ........................................................................ 9-6
Toll Restriction ...................................................................................................... 9-7Entering Toll Table ....................................................................................... 9-7Allow Table ..................................................................................................... 9-9Deny Table ...................................................................................................... 9-11Special Table .................................................................................................. 9-13Display Toll Table Entries ........................................................................... 9-15
10 Least Cost Routing (LCR)Introduction ........................................................................................................... 10-3LCR Tables .............................................................................................................. 10-4
3-Digit Table ................................................................................................... 10-46-Digit Table (Office Codes) ...................................................................... 10-4Daily Start Time Tables ............................................................................... 10-4Default LCR Database ................................................................................. 10-4

March 2001 ix
Exception Tables ........................................................................................... 10-4Insert/Delete Tables .................................................................................... 10-5LCR Routing for Toll Information ............................................................ 10-5Route List Tables ........................................................................................... 10-5Weekly Time Tables ..................................................................................... 10-5
LCR Operation ....................................................................................................... 10-73-Digit Area / Office Code Table ............................................................. 10-86-Digit Office Code Table .......................................................................... 10-9Exception Code Table ................................................................................. 10-10Route List Table ............................................................................................. 10-10Insert / Delete Table .................................................................................... 10-13Daily Start Time Table ................................................................................. 10-15Weekly Schedule Table .............................................................................. 10-16LCR Routing for Toll Information ............................................................ 10-18Default LCR Database ................................................................................. 10-19
11 Initializing Database ParametersIntroduction ........................................................................................................... 11-3
Initialize System Parameters .................................................................... 11-4Initialize CO Line Attributes ...................................................................... 11-9Initialize Station Attributes ....................................................................... 11-10Initialize CO / Station Port Parameters ................................................. 11-13Initialize Exception Tables ......................................................................... 11-13Initialize System Speed Numbers ........................................................... 11-14Initialize LCR Tables ..................................................................................... 11-15Initialize ICLID Tables .................................................................................. 11-16Initialize Directory Dialing Table Parameters ..................................... 11-17Initialize Hunt Group Parameters ........................................................... 11-18Initialize ACD / UCD Group Parameters ............................................... 11-19Initialize Voice Mail Group Parameters ................................................. 11-21Initialize Verified Account Code Table .................................................. 11-22System Reset .................................................................................................. 11-23
12 Printing System Database ParametersIntroduction ........................................................................................................... 12-3
Print Database Parameters ....................................................................... 12-3Database Printing ................................................................................................ 12-4

x March 2001
Print System Parameters ............................................................................ 12-4Print CO Line Attributes ............................................................................. 12-7Print Station Attributes .............................................................................. 12-9Print CO Port Parameters ........................................................................... 12-11Print Exception Tables ................................................................................ 12-12Print System Speed Numbers .................................................................. 12-14Print LCR Tables ............................................................................................ 12-15Print Entire System Database ................................................................... 12-27Print ICLID - DID Tables .............................................................................. 12-28Print Directory Dial Table Parameters ................................................... 12-31Print Hunt Group Parameters .................................................................. 12-33Print ACD / UCD Group Parameters ....................................................... 12-34Print Voice Mail Group Parameters ........................................................ 12-35Print Verified Account Codes ................................................................... 12-37

March 2001 xi
Figures
Data Terminal Program Codes Cross Reference .................................................. 1-4Programming Button Mapping ................................................................................. 1-5Hook Switch Activity ..................................................................................................... 2-14Wiring - Music Source to a CO Line .......................................................................... 2-57DID Name/Number Codes .......................................................................................... 3-37LCR Flowchart .................................................................................................................. 10-6Daily Start Time and Weekly Schedule Tables ..................................................... 10-16Daily and Weekly Start Time Table ........................................................................... 10-18System Parameters Printout ....................................................................................... 12-5CO Line Attributes Printout ........................................................................................ 12-8Station Attributes Printout .......................................................................................... 12-10CO Port Attributes Printout ........................................................................................ 12-11Exception Tables Printout ........................................................................................... 12-13System Speed Numbers Printout ............................................................................. 12-14LCR Tables Printout ........................................................................................................ 12-16Three-Digit Tables Printout ........................................................................................ 12-18ICLID Translation Tables Printout ............................................................................. 12-29Directory Dialing Table Printout ............................................................................... 12-32Hunt Group Parameters Printout .............................................................................. 12-33ACD Group Parameters Printout ............................................................................... 12-34Voice Mail Group Parameters Printout ................................................................... 12-36Verified Account Codes Printout .............................................................................. 12-37

xii March 2001

xiii March 2001
Tables
Default Values .................................................................................................................. 1-6Database Download Settings .................................................................................... 1-22System Timer Defaults .................................................................................................. 2-4Additional System Timers Defaults .......................................................................... 2-18System Features 1 Defaults ......................................................................................... 2-22System Features 2 Defaults ......................................................................................... 2-32CO Line Barge In Flag .................................................................................................... 2-33Flash Rates ........................................................................................................................ 2-43System Parameters Programming ........................................................................... 2-56Networking Tables ......................................................................................................... 2-65Dial Pad Keys .................................................................................................................... 2-75CO Line Conference Flag ............................................................................................. 3-6CO Line Privacy Flag ...................................................................................................... 3-8Class of Service (COS) .................................................................................................... 3-11CO Line Ringing Assignments ................................................................................... 3-12Dial Pad Keys .................................................................................................................... 3-14MOH Programming Codes .......................................................................................... 3-22Ringing Tones .................................................................................................................. 3-23ICLID Ringing Assignments ......................................................................................... 3-31DID & ICLID Default Table Entries ............................................................................. 3-38Station Privacy Flag ....................................................................................................... 4-8Class of Service (COS) .................................................................................................... 4-22Flex Button Codes for Remote Programming ...................................................... 4-31Flex Button Display Designations ............................................................................. 4-35Default Numbering Plan .............................................................................................. 4-43Dial Pad Keys .................................................................................................................... 6-4Voice Mail RAN Announcer Options ........................................................................ 6-19Voice Mail RAN Announcer Options ........................................................................ 7-14Class of Service ................................................................................................................ 9-3Allow / Deny Table ......................................................................................................... 9-4LCR Class of Service Table ........................................................................................... 10-13System Parameter Defaults ......................................................................................... 11-5CO Line Attribute Defaults .......................................................................................... 11-9Station Attribute Defaults ........................................................................................... 11-11

xiv March 2001
Exception Table Defaults ............................................................................................. 11-14LCR Table Defaults ......................................................................................................... 11-15ICLID-DID Table Defaults ............................................................................................. 11-16Directory Dialing Table Defaults ............................................................................... 11-17Hunt Group Defaults ..................................................................................................... 11-18UCD Group Defaults ...................................................................................................... 11-19ACD Group Defaults ...................................................................................................... 11-20Voice Mail Group Defaults ........................................................................................... 11-21Verified Account Code Table Defaults .................................................................... 11-22

1 Customer DatabaseProgramming
This manual provides the information necessary to program theTriad-S system. The described features are based on the currentsoftware release. If any of these features do not work on your system,call your sales representative regarding upgrading your system.


Introduction 1-3
Introduction
The STARPLUS Triad-S Telephone System is programmed to meet each customer’s individual needs. All programming is done at any 24-Button Executive Telephone as the programming station or through an ASCII terminal or PC. The digital display model is required for programming.
When the programming mode is entered, the digital telephone being used no longer operates as a telephone but as a programming station with all of the buttons redefined. The keys on the dial pad are used to enter data fields (Program Codes) associated with system, station, and CO line features as well as specific data that requires a numeric entry. Flexible buttons toggle on or off features, or enable entry of specific data fields. LEDs and the LCD display provide a visual indication of entered data and their value.
Programming is also performed using an ASCII terminal, or a computer capable of emulating an ASCII terminal. This form of programming is done locally (on-site) by connecting the terminal directly to the RS-232C connector on the Miscellaneous Service Unit (MISU) or is performed remotely (off-site) through the use of the optional 9600 baud modem. The method and steps to program the system via a PC are identical to those used when programming from a digital key set. A button to keyboard mapping is provided (refer to Figure 1-2: Programming Button Mapping) to help minimize familiarization and training time.
The system must be initialized to load default data into memory at the time of installation. If this pre-programming is acceptable to the customer, initialization is all that is needed. Refer to Table 1-1: Default Values for a listing of all the default values.
When features are programmed, tones are provided to determine if a correct or incorrect entry has been made. A solid one second tone indicates the data was accepted. An interrupted tone means an error was made. When this occurs, re-enter the data and information. Until new data is entered and accepted, the system continues to operate under default or previously entered values.

1-4 Introduction
The system database is updated on a real-time basis as new data is entered, by pressing the Hold button. The system continues to operate with the current database and is updated with any newly entered or changed data without interruption to telephone operation or call processing in progress. However, if for example a station’s attributes are changed while that station is off-hook on an active call, the newly entered data does not take effect until the station goes on-hook or becomes idle.
When using a PC to program the system, the following chart presents the data terminal characters that are equivalent to the key set buttons.
Figure 1-1: Data Terminal Program Codes Cross Reference
Some features must have m ore than one data field programmed for that feature to work. This inform ation is stated in the instructions.
adm>REMOTE ADMIN KEY DEFINITIONKeyset Term Keyset Term Keyset Term---------------------------------------------0 0 FLEX 1 Q FLEX 13 D1 1 FLEX 2 W FLEX 14 F2 2 FLEX 3 E FLEX 15 G3 3 FLEX 4 R FLEX 16 H4 4 FLEX 5 T FLEX 17 J5 5 FLEX 6 Y FLEX 18 K6 6 FLEX 7 U FLEX 19 L7 7 FLEX 8 I FLEX 20 :8 8 FLEX 9 O FLEX 21 Z9 9 FLEX 10 P FLEX 22 X* * FLEX 11 A FLEX 23 C# # FLEX 12 S FLEX 24 VTRANS B MUTE N ON-OFF MFLASH ‘ HOLD CRadm>
;

Introduction 1-5
Figure 1-2: Programming Button Mapping
FLEX 5 FLEX 6 FLEX 7 FLEX 8
FLEX 9 FLEX 10 FLEX 11 FLEX 12
FLEX 13 FLEX 14 FLEX 15 FLEX 16
FLEX 17 FLEX 18 FLEX 19 FLEX 20
FLEX 21 FLEX 22 FLEX 23 FLEX 24
T Y U I
O P A S
D F G H
J K L ;
Z X C V
FLEX 1 FLEX 2 FLEX 3 FLEX 4
Q W E R

1-6 Introduction
Table 1-1: Default Values
FeaturesPage
#Program
CodeFlex
ButtonDefault Value
SYSTEM PARAMETERS PROGRAMMING 2-1
SYSTEM TIMERS 2-3 FLASH 01
System Hold Recall Timer 2-4 1 60 sec
Exclusive Hold Recall Timer 2-5 2 180 sec
Attendant Recall Timer 2-6 3 1 min
Transfer Recall Timer 2-6 4 45 sec
Preset Forward Timer 2-7 5 10 sec
Call Forward No/Answer Timer 2-8 6 15 sec
Pause Timer 2-8 7 2 sec
Call Park Recall Timer 2-9 8 180 sec
Conference/DISA Timer 2-9 9 10 min
Paging Time-Out Timer 2-10 10 15 sec
CO Ring Detect Timer 2-11 11 3=300ms
SLT DTMF Receiver Timer 2-11 12 20 sec
Message Wait Reminder Tone 2-12 13 000=Disabled
SLT Hook Flash Timer 2-13 14 10 (1 sec)
SLT Hook Flash Debounce Timer 2-13 15 030=300ms
SMDR Call Qualification Timer 2-14 16 30 sec
Automatic Call Back Timer 2-15 17 03 sec
Reminder Ring Timer 2-15 18 00 sec
Inter-Digit Time-Out 2-16 20 5 sec
ADDITIONAL SYSTEM TIMERS 2-17 FLASH 02
Repeat Redial Timer 2-18 1 60 sec
Attendant Display Timer 2-19 2 01 sec
Call Coverage Ring Timer 2-19 3 5 sec
Modem Answer Timer 2-20 4 25 sec
Pulse Dial Inter-Digit Timer 2-20 5 300 ms* Features available with Optional Software

Introduction 1-7
DTMF On/Off Time Operation 2-21 6 1=100 ms
SYSTEM FEATURES 1 PROGRAMMING 2-21 FLASH 05
Attendant Override 2-23 1 Disabled
Hold Preference 2-23 2 System
External Night Ring 2-24 3 Disabled
Executive O verride Warning Tone 2-24 4 Enabled
Page Warning Tone 2-25 5 Enabled
Background Music 2-26 6 Enabled
Least Cost Routing (LCR) 2-26 7 Disabled
Account Codes – Forced 2-27 8 Disabled
Group Listening 2-28 9 Disabled
Idle Speaker Mode 2-28 10 Disabled
Call Cost Display Feature 2-29 11 Disabled
Music-On-Hold 2-29 12 Enabled
Call Qualifier Tone Option 2-30 13 Disabled
SYSTEM FEATURES 2 PROGRAMMING 2-31 FLASH 06
Barge In Warn Tone 2-32 1 Enabled
CO Ring Tones 2-33 2 Enabled
Verified Account Codes 2-34 3 Disabled
Call Forward Display 2-34 4 Enabled
External Day Ring 2-35 5 Disabled
Overflow Station Forward 2-35 6 Disabled
Direct Transfer Mode 2-36 7 Enabled
Station ID Lock 2-37 8 Disabled
LCR Call Progress 2-37 9 Enabled
One-Touch Recording Warn Tone 2-38 10 Enabled
Ringback on Transfer 2-39 11 Disabled
Table 1-1: Default Values
FeaturesPage
#Program
CodeFlex
ButtonDefault Value
* Features available with Optional Software

1-8 Introduction
ACD Agent Recall 2-39 12 Disabled
911 Feature 2-40 13 Disabled
Enhanced 911 2-40 14 Disabled
VMID Station Numbers 2-41 15 --
FLASH RATES (Programmable) 2-42 FLASH 07
Incoming CO Line Ringing 2-43 1 Red 480 ipm flutter
Incoming Intercom Ringing 2-44 2 Red 120 ipm flutter
Call Forward Button 2-44 3 Red Steady On
Message Wait/VM Button 2-45 4 Red Steady On
Message CallBack – DSS/BLF 2-46 5 Red 120 ipm flutter
Do Not Disturb – DSS/BLF 2-46 6 Red 60 ipm Dbl Wink
Auto CallBack – DSS/BLF 2-47 7 Red 120 ipm flash
UCD Available/Unavailable – DSS/BLF 2-47 8 Red 60 ipm Dbl Wink
Transfer CO Ringing 2-48 9 Red 120 ipm flash
Recall CO Ringing 2-49 10 Red 480 ipm flutter
Queued CO Ringing 2-49 11 Green 480 ipm flutter
Exclusive Hold 2-50 12 Green 120 ipm flash
System Hold 2-50 13 Red 60 ipm Dbl wink
In-Use Hold (I-Hold) 2-51 14 Green 60 ipm flash
Camp-On Button 2-52 15 Red 120 ipm flash
Call Back Button 2-52 16 Red 120 ipm flash
Line Queue Button 2-53 17 Red 480 ipm flutter
Do Not Disturb Button 2-53 18 Red Steady On
Intercom Hold Button 2-54 19 Red 15 ipm flash
SYSTEM PARAMETERS PROGRAMMING 2-55 FLASH 09
MOH Assignments (Channels 3-8) 2-56 1-6 None
ATTENDANT STATION ASSIGNMENT 2-57 FLASH 10 STA 100
Table 1-1: Default Values
FeaturesPage
#Program
CodeFlex
ButtonDefault Value
* Features available with Optional Software

Introduction 1-9
SYSTEM TIME AND DATE 2-58 FLASH 11 1 MMM/DD/YY, 12-hr display
PBX DIALING CODES 2-59 FLASH 12 -- None
EXECUTIVE/SECRETARY PAIRS 2-60 FLASH 13 1-4 None
ON-BOARD RELAY PROGRAMMING 2-61 FLASH 14 1-2 None
BAUD RATE ASSIGNMENTS 2-62 FLASH 15
Port #1 (MISU) 2-62 1 9600 Baud
Port #2 (MISU) 2-62 2 9600 Baud
Port #3 (Modem) 2-62 3 9600 Baud
NETWORKING TABLES 2-63 FLASH 16
Trunk Group 2-63 1 00
Station Range (FROM) 2-63 2 1000
Station Range ( TO) 2-63 3 9999
Page Up 2-63 22 None
Page Down 2-63 23 None
System Number 2-63 24 None
ACCESS CODES 2-66 FLASH 20
DISA Access Code 2-66 1 100
Database Admin Password 2-67 2 3226
STATION MESSAGE DETAIL RECORDING 2-67 FLASH 21
SMDR Enable/Disable 2-68 1 No
Long Distance/All Calls 2-69 2 Long Distance
Character Print Assignment 2-69 3 80
Baud Rate Display 2-70 4 9600
SMDR Port Assignments 2-70 5 Port #1
WEEKLY NIGHT MODE SCHEDULE 2-71 FLASH 22
Automatic/Manual Operation 2-71 12-8
Manual=NoneAuto =M-F 08:00 17:00,Sat -Sun ##:## ##:##
Table 1-1: Default Values
FeaturesPage
#Program
CodeFlex
ButtonDefault Value
* Features available with Optional Software

1-10 Introduction
Day of Week Programming 2-72 None
DIRECTORY DIALING 2-72 FLASH 23
Bin/ICM 2-74 1 None
Name 2-75 2 None
Clear 2-75 3 None
Backspace to Correct Error 2-75 4 None
HUNT GROUPS 2-76 FLASH 30
Hunt Group Programming 2-76 1-12 None
Station/Pilot/Pilot Ring All --Hunting Assignments
2-78 13 Pilot
VERIFIED ACCOUNT CODES 2-79 FLASH 31
Account Code 2-79 1 None
Class of Service 2-79 2 None
Delete Code 2-80 3 None
Erase Digits 2-80 4 None
CO LINE GROUP QUEUING 2-81 FLASH 39 1-24 Enabled
CO LINES ATTRIBUTES PROGRAMMING(Press HOLD for entire range)
3-1
PAGE A INTRODUCTION 3-3 FLASH 40 Btn 19
DTMF/Dial Pulse Programming 3-4 Page A 1 DTMF
CO/PBX Programming 3-5 2 CO
Universal Night Answer (UNA) 3-5 3 Enabled
DISA CO-to-CO 3-6 4 Enabled
Privacy 3-7 5 Enabled
Loop Supervision Programming 3-8 6 4=400ms
DISA Programming 3-9 7 None
Line Group Programming 3-10 8 Group 1
Class of Service (COS) Programming 3-10 9 COS 1
Table 1-1: Default Values
FeaturesPage
#Program
CodeFlex
ButtonDefault Value
* Features available with Optional Software

Introduction 1-11
CO Line Ringing Assignments 3-12 10 (blank)
CO Line Identification Display 3-13 11 Line XXX
CO Direction 3-15 12 Incoming/Outgoing
Display Ring Assignments 3-16 13 100A
911 Trunk 3-17 15 Disabled
PAGE B INTRODUCTION 3-18 FLASH 40 Btn 20
Transmit Volume Option 3-19 Page B 1 5=0 dB
Preset Call Forward Destination 3-20 2 ####
Preset Forward Voice Mail ID 3-21 3 ####
Universal Day Answer (UDA) 3-21 4 Disabled
Music-On-Hold (per CO Line) 3-22 5 Channel 1
Ring Tone (per CO Line) 3-23 6 Tone # 00
PAGE C INTRODUCTION 3-24 FLASH 40 Btn 21
Flash Timer Programming 3-25 Page C 1 10=1.0 sec
Ring Delay Timer 3-26 2 00=Disabled
Reseize Timer 3-27 3 200=200ms
Guard Timer 3-27 4 05=.5 sec
Preset Forward Timer 3-28 5 10 sec
MISCELLANEOUS CO PARAMETERS 3-29 FLASH 41 Btn 1
Dial Pulse Parameters 3-29 1 60/40, 10PPS
ICLID PROGRAMMING 3-30
ICLID RINGING ASSIGNMENT(S) 3-30 FLASH 43 1
None
View ICLID Ringing Assignments 3-32 17
Next ICLID Route Number 3-33 18
Previous ICLID Route Number 3-33 19
Select Route Number 3-33 20
DID PROGRAMMING 3-34 FLASH 44
Table 1-1: Default Values
FeaturesPage
#Program
CodeFlex
ButtonDefault Value
* Features available with Optional Software

1-12 Introduction
Route Number 3-34 1
DID Phone Number 3-36 2
Name Assigned to Number 3-36 3 None
Erasing a DID Table Entry 3-37 4
STATION ATTRIBUTES PROGRAMMING 4-1
PAGE A INTRODUCTION 4-3 FLASH 50 Btn 19
Paging Access 4-4 Page A 1 Enabled
Do Not Disturb 4-5 2 Enabled
Conference Enable/Disable (Per Station) 4-5 3 Enabled
Executive O verride 4-6 4 Disabled
Privacy (Per Station) 4-7 5 Enabled
System Speed Dial Access 4-8 6 Enabled
Line Queuing 4-9 7 Enabled
Preferred Line Answer 4-9 8 Enabled
Off-Hook Voice O ver (OHVO) 4-10 9 Disabled
Call Forwarding 4-11 10 Enabled
Forced Least Cost Routing (LCR) 4-11 11 Disabled
ACD Supervisor Monitor with Barge-In 4-12 12 Disabled
Executive O verride Blocking 4-13 13 Disabled
CO Line Ringing Options 4-14 14 Muted Ring
Name/Number Display at Idle 4-14 15 Name (Enabled)
ACD Zap Tone 4-15 16 Disabled
CO Loop Pool Flex 4-16 17 Disabled
Admin Access 4-16 18 Disabled
PAGE B INTRODUCTION 4-17 FLASH 50 Btn 20
Station Identification 4-18 Page B 1 006 (24-Btn Key set)6 (SLT w/o MWt)
Station Day Class of Service (COS) 4-21 2 COS 1
Table 1-1: Default Values
FeaturesPage
#Program
CodeFlex
ButtonDefault Value
* Features available with Optional Software

Introduction 1-13
Station Night Class of Service (COS) 4-23 3 COS 1
Speakerphone/Headset Programming 4-24 4 0 (Full Speakerphone)
Pick-Up Group(s) Programming 4-24 5 Group 1
Paging Zone(s) Programming 4-25 6 Zone 1
Line Group Access - Station 4-26 8 Group 1
LCR Class of Service (COS) 4-26 9 0 (Unrestricted Access)
Off-Hook Preference Programming 4-27 10 00 (Keyset)
Flexible Button Programming 4-28 11 (blank)
Keyset Mode 4-33 12 Inactive Mode
Voice Mail ID Translation 4-33 13 XXXX (Station #)
Display Flexible Buttons 4-34 14 None
Cordless Key (CKTU) Button 4-36 17 00
PAGE C INTRODUCTION 4-36 FLASH 50 Btn 21
Internal No Answer Forward 4-38 Page C 1 None
Internal Busy Forward 4-38 2 None
External No Answer Forward 4-38 3 None
External Busy Forward 4-39 4 None
No Answer Timer 4-39 5 10 sec
Speed Dial Access 4-40 6 None
FLEXIBLE NUMBERING ASSIGNMENT 4-40 FLASH 52
Changing a Flexible Code 4-41 1
Erasing a Flexible Code 4-41 2None
Selecting a Flexible Code 4-40 21
Selecting a Fixed Code 4-40 24
LOCAL NUMBER/NAME TRANSLATION TABLE
2-82 FLASH 55
Route Number 2-82 1 None
Table 1-1: Default Values
FeaturesPage
#Program
CodeFlex
ButtonDefault Value
* Features available with Optional Software

1-14 Introduction
Phone Number 2-82 2 None
Name 2-82 3 None
Clear Entry 2-82 4 None
ICLID FEATURES 5-5 FLASH 56
Enable/Disable 5-5 1 Disabled
Name in Display 5-6 2 0=Number
Baud Rate Display 5-6 9600
Port Assignment 5-7 4 Port #1
AUTOMATIC CALL DISTRIBUTION* 6-1
ACD GROUP PROGRAMMING* 6-3 FLASH 60
Group Name 6-4 1 None
Alternate Group 6-5 2 None
Overflow Station 6-5 3 None
Supervisor 6-6 4 None
CIQ Threshold 6-7 5 00
Wrap-Up Timer 6-7 6 4 sec
Primary Agents 6-8 7 None
Secondary Agents 6-9 8 None
Guaranteed RAN 6-9 9 None
Primary RAN 6-10 10 None
Secondary RAN 6-11 11 None
Transferred RAN 6-11 12 None
Overflow Timer 6-12 13 60 sec
Call Factor 6-13 14 None
ACD TIMERS 6-13 FLASH 61
ACD Ring Timer 6-14 1 60 sec
ACD Message Interval Timer 6-14 2 60 sec
Table 1-1: Default Values
FeaturesPage
#Program
CodeFlex
ButtonDefault Value
* Features available with Optional Software

Introduction 1-15
ACD No-Answer Recall Timer 6-15 5 000 sec (Disabled)
ACD No-Answer Retry Timer 6-15 6 300 sec
ACD Guaranteed Message Timer 6-16 7 5 sec
ACD RAN ANNOUNCEMENT TABLES* 6-17 FLASH 62 1–8 None
PC/ACD INTERFACE TRACE 6-20 FLASH 63
Event Trace Disable/Enable 6-20 1 No (Disabled)
Trace Port Assignment 6-21 2 Port #1
Baud Rate Display 6-21 - - 9600 Baud
UNIFORM CALL DISTRIBUTION (UCD) 7-1
UCD GROUP PROGRAMMING 7-3 FLASH 60
Alternate UCD Group Assignment 7-4 2 None
UCD Overflow Station Assignment 7-4 3 None
UCD Primary Agent Assignments 7-5 7 None
UCD Announcement Assignment(s) 7-5 10-11 None
UCD TIMERS 7-7 FLASH 61
UCD Ring Timer 7-7 1 60 sec
UCD Message Interval Timer 7-8 2 60 sec
UCD Overflow Timer 7-9 3 60 sec
UCD Auto Wrap-Up Timer 7-9 4 4 sec
UCD No-Answer Recall Timer 7-10 5 000 sec (Disabled)
UCD No-Answer Retry Timer 7-10 6 300 sec
UCD ANNOUNCEMENT TABLES (RAN) 7-11 FLASH 62 1–8 None
VOICE MAIL GROUPS 8-1
VOICE MAIL PROGRAMMING 8-3 FLASH 65
Voice Mail Groups (440-447) 8-3 1–8 None
Alternate Voice Mail Group 8-4 9 None
Leave Mail Index Entry 8-5 10 440 = 0
Table 1-1: Default Values
FeaturesPage
#Program
CodeFlex
ButtonDefault Value
* Features available with Optional Software

1-16 Introduction
Retrieve Mail Index Entry 8-6 11 440 = 1
Station Assignment(s) 8-6 12 None
VOICE MAIL OUTPULSING TABLE 8-7 FLASH 66
Voice Mail In-Band Signaling 8-10
(Table 0) 8-8 1 Pre=P7 Suf=None
(Table 1) 8-8 2 Pre=P7 Suf=
(Tables 2-6) 8-8 3-7 None
(Table 7) 8-8 8 Pre=P7 Suf=2
Voice Mail Disconnect Table 8-9 9 None
VOICE MAIL IN-BAND FEATURES 8-10 FLASH 67
Voice Mail In-Band Digits 8-10 1 Enabled
Voice Mail Transfer/Forward 8-11 2 Enabled
Voice Mail Broker 8-12 3 Enabled
VM ID Digit Length 8-12 4 3
VOICE MAIL INDEX TABLE 8-13 FLASH 68
Voice Mail Group 8-1 1 None
Voice Mail ID Number 8-13 2 None
EXCEPTION TABLES PROGRAMMING 9-3
TOLL RESTRICTION PROGRAMMING 9-7 FLASH 70
Allow Table A Programming 9-9 1 None
Deny Table A Programming 9-11 2 None
Allow Table B Programming 9-9 3 None
Deny Table B Programming 9-11 4 None
Special Table 1 Programming 9-13 5 All Codes Denied
Special Table 2 Programming 9-13 6 All Codes Denied
Special Table 3 Programming 9-13 7 All Codes Denied
Special Table 4 Programming 9-13 8 Home
Table 1-1: Default Values
FeaturesPage
#Program
CodeFlex
ButtonDefault Value
* Features available with Optional Software

Introduction 1-17
Area Code for Special Table 1 9-13 9 None
Area Code for Special Table 2 9-13 10 None
Area Code for Special Table 3 9-13 11 None
Displaying Toll Table Entries 9-15 12 None
LEAST COST ROUTING PROGRAMMING 10-1
LCR TABLES PROGRAMMING 10-4 FLASH 75
3-Digit Area/Office Code Table 10-8 1 See LCR Tables
6-Digit Area/Office Code Table 10-9 2 None
Exception Code Table 10-10 3 See LCR Tables
Route List Table 10-10 4
Insert/Delete Table 10-13 5
Daily Start Time Table 10-15 6
Weekly Schedule Table 10-16 7
LCR Routing for Toll Information 10-18 8 00
INITIALIZE DATABASE PARAMETERS 11-1
INTRODUCTION 11-3 FLASH 80
Initialize System Parameters 11-4 1 Default
Initialize CO Line Attributes 11-9 2 Default
Initialize Station Attributes 11-10 3 Default
Initialize CO/Station Port Parameters 11-13 4 Default
Initialize Exception Tables 11-13 5 Default
Initialize System Speed Numbers 11-14 6 Default
Initialize LCR Tables 11-15 7 Default
Initialize ICLID Tables 11-17 8 Default
Initialize Directory Dialing Tbl Parameters
11-17 9 Default
Initialize Hunt Group Parameters 11-18 10 Default
Initialize ACD*/UCD Group Parameters 11-19 11 Default
Table 1-1: Default Values
FeaturesPage
#Program
CodeFlex
ButtonDefault Value
* Features available with Optional Software

1-18 Introduction
Initialize Voice Mail* Group Parameters 11-21 12 Default
Initialize Verified Account Code Table 11-22 14 Default
System Reset 11-23 20
PRINTING SYSTEM DATABASE PARAMETERS 12-1
INTRODUCTION 12-3 FLASH 85
Printing System Parameters 12-4 1 Default
Printing CO Line Attributes 12-7 2 Default
Printing Station Attributes 12-9 3 Default
Printing CO Port Parameters 12-11 4 Default
Printing Exception Tables 12-12 5 Default
Printing System Speed Numbers 12-14 6 Default
Printing LCR Tables 12-15 7 Default
Printing Entire System Database 12-27 8 Default
Printing Directory Dial Table Parameters 12-31 10 Default
Printing Hunt Group Parameters 12-33 11 Default
Printing ACD*/UCD Group Parameters 12-34 12 Default
Printing Voice Mail* Group Parameters 12-35 13 Default
Printing Verified Account Codes 12-37 15 Default
LOAD DATABASE ROUTINE 1-21 FLASH 86
Upload Database 1-21 1 PC Only
Download Database 1-21 2 PC Only
Table 1-1: Default Values
FeaturesPage
#Program
CodeFlex
ButtonDefault Value
* Features available with Optional Software

Program Mode Entry (Key Station) 1-19
Program Mode Entry (Key Station)
Programming is performed at any 24-button Digital Display Telephone. Programming is always done at this type of station regardless of the class of service or which station has been assigned the Attendant(s).
To enter the Program Mode:
1. Press the ON/OFF button (optional). LED lights and intercom dial tone is heard.
2. On the dial pad, press [ ][ ][3][2][2][6] (default password). A confirmation tone is heard.
3. The ON/OFF button LED is lit. The system is ready to program.
Program Mode Entry (Data Terminal or PC)
A PC terminal connected to the RS-232C port on the optional MISU or remotely through the optional 9600 baud modem is used for database programming. When using a data terminal (ASCII or PC capable of emulating an ASCII terminal) on-site or locally, to program the system:
1. Press <Enter> on the terminal.
2. Enter the password [default=3226VODAVI], and press <Enter> again. Proper entry of the password results in the ADM> prompt. Proceed with programming referring to Figure 1-1: Data Terminal Program Codes Cross Reference for terminal characters that represent the key set buttons. By entering [?] from the terminal, a Help screen displays.
When entering the system remotely via a PC, access to the modem is accomplished by accessing Port 499 through a direct ringing assignment or through DISA or by being transferred to Port 499.

1-20 Initialization
Initialization
The system has been pre-programmed with certain features called default data (refer to Table 1-1: Default Values) . These features are loaded into memory when the system is initialized.
Returning System Database to Default Values:
1. Place Switch #1 on the BKSU in the ON position.
2. Turn the power off and on to initialize the system database to the default.
3. Once database is initialized, place Switch #1 in the OFF position to protect the database.
Database Programming Worksheets
Before attempting programming, it is strongly recommended that customer database worksheets be prepared (Refer to Appendix C in the Product Description Manual). These worksheets should become part of the permanent record of customer programming. Refer to the following sections when preparing the worksheets.
The system should be initialized when installed or at any time the database has been corrupted.

Database Upload/Download Routine 1-21
Database Upload/Download Routine
The Database Upload/Download Routine (FLASH 86) provides a maintenance facility which permits the user to download the database to a PC, when a software change is made or when the system needs to be initialized and reprogrammed. In addition, the routine facilitates the programming of a database on an in-house system which is downloaded to a PC and then uploaded to a system in the field. After the system maintenance is completed, the file saved in the PC can then be uploaded to the system.
Upload/Download through Remote AdministrationFirst, connect one end of an RS-232C serial cable from the RS-232C connector on the optional MISU to the desired Comm Port on the PC.
Then load a communication software package (e.g., Procomm) into the PC and complete the following steps to reconfigure the system.
All trace modes such as: SMDR (Flash 21), ICLID (Flash 56), and Maintenance Event Traces MUST be turned off before a download is performed!
Default telephone type = 24 button model
Use a straight-through DB-9 to DB- 9 (fem ale to female) cable.
(DB-9) Connec tion PC Side (DB-9)
1 1
2 2
3 3
4 4
5 5
6 6
7 7
8 8
9 9

1-22 Database Upload/Download Routine
PROCOMM -- Downloading a Database File1. Make necessary changes to the areas shown in the following table,
and save information to capture new system settings.
2. Press <Enter> and the following screen displays:
3. Type the password [default=3226VODAVI] and press <Enter>. Proper entry of the password results in the ADM> prompt.
Table 1-2: Database Download Settings
System Options Settings
Parameters: a + [P]
Baud Rate 9600 BaudN for Parity8 Bits1 Stop Bit
Setup Options: a + [S]
Item AItem DItem EItem FItem IItem JItem KItem L
Echo LocallyCharacter PacingLine PacingPace CharacterCR Translation (upload)LF Translation (upload)CR Translation (download)LF Translation (download)
OFF000NONENONENONENONE
Protocol Options
Item C* Abort xfer if CD lost NO
* For Procomm Plus version 2.01 or higher
En g . V er . 0 .0 e- FF FF D AT E: MM /DD /Y Y TIME : H H: MM: S SEN TE R PAS SW ORD :

Database Upload/Download Routine 1-23
4. To select the appropriate codes for the following screen capture, refer to Figure 1-1 for terminal characters that represent the key set buttons. For assistance, type a [?] to display a Help screen.
5. Press <PgDn> to display the Download Protocol screen.
6. Type X to send the upload file to the X-Modem for tracking and correcting errors during the upload procedure.
E ng . Ve r. 0. 0e -F FFF D ATE: MM/D D /Y Y TI ME: H H : MM: SSE NT ER PA SSW OR D :adm > AD MIN PR OG R AMMIN Gadm >, EN TER P RO GR AM N Oadm >8 6 (a nd pr e ss En te r ) LOA D D ATAB ASE ROU T INE EN TER B U TTON N U MB ERadm >w (a nd pr e ss En te r ) D OWN LOAD D ATAB AS E PR ES S H OLDadm >
The HOLD button on a keyset is the same as the <Enter> key on the keyboard. Press Enter.
Dowload Protocols - 124811648 bytes free
X) XMODEM A) ASCIIZ) ZMODEM R) RAW ASCIIY) YMODEM (Batch) T) TELINKG) YMODEM-G (Batch) M) MODEM7O) 1K-XMODEM W) WXMODEME) 1K-XMODEM-G I) IMODEMC) COMPUSERVE B+ 1) [EXT 1]K) KERMIT 2) [EXT 2]S) SEALINK 3) [EXT 3]
Your Selection: (press ENTER for ZMODEM)

1-24 Database Upload/Download Routine
7. When the Receive XMODEM screen displays, enter path and file name for database file, then press <Enter> to begin the download routine.
The download is complete when a confirmation tone is heard from the communications package and the ADM> prompt returns.
8. Type M and press <Enter>.
9. Press <Alt> + <X>.
10. To exit Procomm and return to the DOS prompt, press <Enter>.
The download file contains a series of ASCII strings with a checksum at the end of the string. The checksum is verified when the system receives the string. An error in the checksum results in rejection of the string. An error message is sent to the PC when a string is received with an error.
If the file uploaded from the PC contains:
Less information in a string than required by the system database, the system maintains default info in the area not covered by string.
More information in a string than required by the system database, the system ignores the additional information.
The Downloaded Database cannot be changed in the PC. TheUpload/Dow nload Routine is only a method to save an existing database. Database changes are made using the remote admin capabilities.
Baud rates on I/O ports are NOT downloaded or uploaded.
The Database m ust be initialized prior to an upload. The system should then be reset after the upload.
Receive XMODEM
Please enter filename:

Database Upload/Download Routine 1-25
PROCOMM -- Uploading an ASCII Database File1. Enter the information on the following screen capture.
2. Press <PgUp> to display the Upload Protocol screen.
3. Type X to send the upload file to the X-Modem for tracking and correcting errors during the upload procedure.
En g . V er . 0 .0 e- FFF F D AT E: MM/D D /Y Y TIME: H H: MM: SSEN TE R PAS SWO RD : adm> A DM IN P R OGR A MMIN Gadm> , EN T ER PR OG R AM N Oadm> 86 ( an d p re s s E nt e r ) LOAD D ATAB A SE R OU TIN E EN T ER BU T TON NU MB ERadm> q (a nd pr e ss En te r ) U P LOA D D ATE BA SE P R ESS H OLDadm>
The HOLD button on a keyset is the same as the <Enter> key on the keyboard. Press Enter.
Upload Protocols - 124811648 bytes free
X) XMODEM A) ASCIIZ) ZMODEM R) RAW ASCIIY) YMODEM (Batch) T) TELINKG) YMODEM-G (Batch) M) MODEM7O) 1K-XMODEM W) WXMODEME) 1K-XMODEM-G I) IMODEMC) COMPUSERVE B+ 1) [EXT 1]K) KERMIT 2) [EXT 2]S) SEALINK 3) [EXT 3]
Your Selection: (press ENTER for XMODEM)
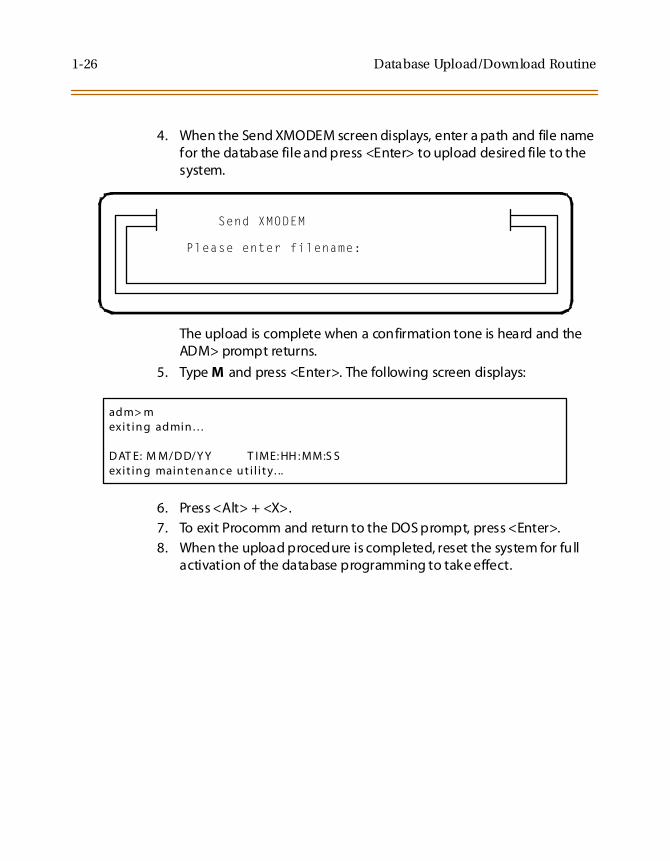
1-26 Database Upload/Download Routine
4. When the Send XMODEM screen displays, enter a path and file name for the database file and press <Enter> to upload desired file to the system.
The upload is complete when a confirmation tone is heard and the ADM> prompt returns.
5. Type M and press <Enter>. The following screen displays:
6. Press <Alt> + <X>.
7. To exit Procomm and return to the DOS prompt, press <Enter>.
8. When the upload procedure is completed, reset the system for full activation of the database programming to take effect.
adm> mexit in g admin . . .
D AT E: M M/D D/Y Y T IME: HH : MM:S Sexit in g main t en an c e u t i l i t y. ..
Send XMODEM
Please enter filename:

Database Upload/Download Routine 1-27
HYPER TERMINAL -- Uploading a Database FileAfter opening Hyper Terminal, and the New Connection screen displays, complete the following steps:
1. Type a connection name and select the appropriate icon, then click <OK>.
2. When the Phone Number screen displays, change the setting in the Connect Using box to: Direct to COM1, and then click <OK>.
3. Once the COM1 Properties screen displays, change the settings as shown, and then click <OK>.
Baud Rate = 9600
Parity = None
Data Bits = 8
Stop Bits = 1
Flow Control = Xon/Xoff
4. Press <Enter> and complete the following fields:
5. On the tool bar, click <Transfer> and select Send File.
6. Change Protocol setting to XMODEM.
7. Click <Browse> to locate database file, and double-click on the filename.
8. Click <Send>. The Adm> prompt displays when the file transfer is complete.
Screen Fields Action
ENTER PASSWORD: Type password: XXXXVODAVI (XXXX = default password for online administration)
ADM>, Type program number.
ADM>86 Load database routine.Type button number.
ADM>Q Upload database.Press HOLD button.
ADM> Press <Enter> key twice.

1-28 Database Upload/Download Routine
HYPER TERMINAL -- Downloading a Database FileAfter opening Hyper Terminal, and the New Connection screen displays, complete the following steps:
1. Type connection name and select appropriate icon, then click <OK>.
2. When the Phone Number screen displays, change the setting in the Connect Using box to: Direct to COM1, and then click <OK>.
3. Once the COM1 Properties screen displays, change the settings as shown, and then click <OK>.
Baud Rate = 9600
Parity = None
Data Bits = 8
Stop Bits = 1
Flow Control = Xon/Xoff
4. Press <Enter> and complete the following fields:
5. On the tool bar, click <Transfer> and select Receive File.
6. Change Receive Protocol setting to XMODEM, and click <Receive>.
7. Type database filename and click <OK>. The Adm> prompt displays when the file transfer is complete.
Screen Fields Action
ENTER PASSWORD: Type password: XXXXVODAVI (XXXX = default password for online administration)
ADM>, Type program number.
ADM>86 Load database routine.Type button number.
ADM>W Download database.Press HOLD button.
ADM> Press <Enter> key twice.

Database Upload/Download Routine 1-29
ECOM -- Uploading a Database FileAfter opening ECOM:
1. Press< Alt> + <P> to open COM Port Options.
2. Change COM port settings as follows, and click <OK>.
Baud Rate = 9600
Parity = None
Data Bits = 8
Stop Bits = 1
Flow Control = no boxes checked, Xon=17, Xoff=19
3. Press <Enter> and complete the following fields:
4. Press <PgUp> on keyboard or locate file and select Upload.
5. Highlight XMODEM and click <OK>.
6. Type or select upload filename and click <OK>. The Adm> prompt displays when the file transfer is complete.
Screen Fields Action
ENTER PASSWORD: Type password: XXXXVODAVI (XXXX = default password for online administration)
ADM>, Type program number.
ADM>86 Load database routine.Type button number.
ADM>Q Upload database.Press HOLD button.
ADM> Press <Enter> key twice.

1-30 Database Upload/Download Routine
ECOM -- Downloading a Database FileAfter opening ECOM:
1. Press< Alt> + <P> to open COM Port Options.
2. Change COM port settings as follows, and click <OK>.
Baud Rate = 9600
Parity = None
Data Bits = 8
Stop Bits = 1
Flow Control = no boxes checked, Xon=17, Xoff=19
3. Press <Enter> and complete the following fields:
4. Press <PgDn> on keyboard or locate file and select Download.
5. Highlight XMODEM and click <OK>.
6. Type or select download filename and click <OK>. The Adm> prompt displays when the file transfer is complete.
Screen Fields Action
ENTER PASSWORD: Type password: XXXXVODAVI (XXXX = default password for online administration)
ADM>, Type program number.
ADM>86 Load database routine.Type button number.
ADM>W Download database.Press HOLD button.
ADM> Press <Enter> key twice.

2 System ParametersProgramming
This chapter describes the procedures and steps needed to programsystem features for the Triad-S Systems.


System Timers 2-3
System Timers
Programming Steps
If the system is in the programming mode, continue using the program codes. If starting to program here, enter the programming mode.
Press FLASH and dial [01]. The following message displays:
Description
This section describes the procedures and steps to program system timers in the System Timers programming area. The buttons on a digital telephone are shown in the following illustration:
SY ST EM TIMER SEN TE R B U TTON N UM BE R
SYSTEM HOLDRECALL
EXCL HOLDRECALL
ATTENDANTRECALL
TRANSFERRECALL
1 Q 2 W 3 E 4 R
PRESETFORWARD
CALL FWDNO/ANSWER
PAUSETIMER
CALL PARKTIMER
5 T 6 Y 7 U 8 ICONF/DISA
TIMERPAGING
TIMEOUTCO RINGDETECT
DISA/SLTRECEIVER
9 O 10 P 11 A 12 SMSG WAITREMINDER
HOOKFLASH
HOOK FLASHDEBOUNCE
SMDR CALLQUALIFICATION
13 D 14 F 15 G 16 HAUTO CALLBACK TIMER
REMINDERRING
INTER-DIGITTIMEOUT
17 J 18 K 19 L 20 ;
21 Z 22 X 23 C 24 V

2-4 System Timers
System Hold Recall Timer
Programming Steps
1. Press the SYSTEM HOLD RECALL TIMER flex button (FLASH 01, Button #1). The following message displays:
2. Enter a valid number on the dial pad that corresponds to 000-300 seconds.
3. Press HOLD to save the entry. A confirmation tone is heard and the display updates.
Table 2-1: System Timer Defaults
Program Code
FlexButton
FeatureDefault
(after initialization)
FLASH 01 123456789
10111213141516171820
System Hold RecallExclusive Hold RecallAttendant Recall TimerTransfer Recall TimerPreset Forward TimerCall Forward No/AnswerPause TimerCall Park Recall TimerConference/DISA TimerPaging Timeout TimerCO Ring Detect TimerSLT DTMF Receiver TimerMSG Wait Reminder ToneSLT Hook Flash TimerSLT Hook Flash DebounceSMDR Call Qualification TimerAuto Call Back TimerReminder Ring TimerInter-Digit Timeout
060 seconds180 seconds01 minute045 seconds10 seconds015 seconds2 seconds180 seconds10 minutes15 seconds300 ms020 seconds000 minutes10 (1 second)030=0.3 second30 seconds03 seconds (enabled)00 seconds (disabled)5 seconds
SY ST EM HOL D R ECA LL 0 00- 30 006 0
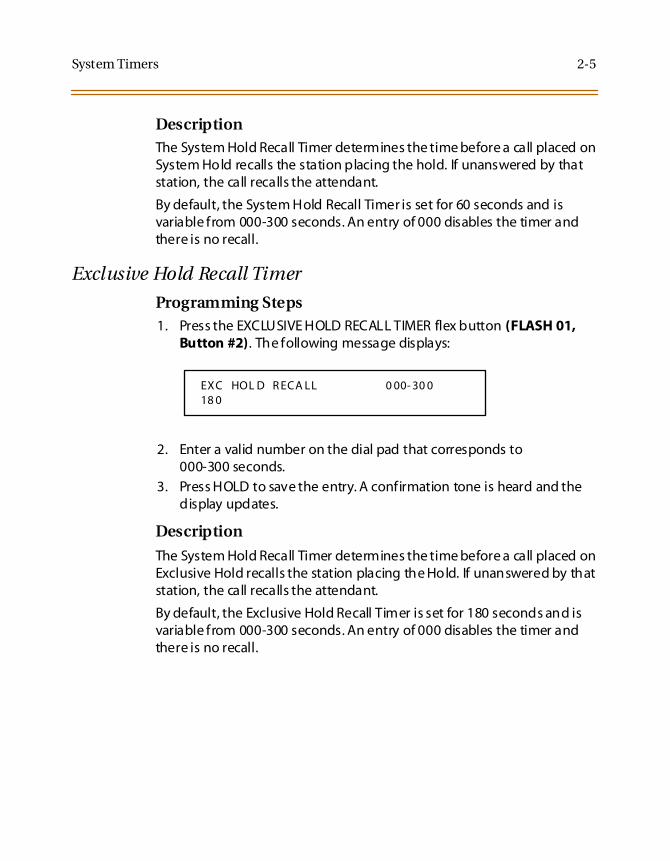
System Timers 2-5
DescriptionThe System Hold Recall Timer determines the time before a call placed on System Hold recalls the station placing the hold. If unanswered by that station, the call recalls the attendant.
By default, the System Hold Recall Timer is set for 60 seconds and is variable from 000-300 seconds. An entry of 000 disables the timer and there is no recall.
Exclusive Hold Recall Timer
Programming Steps1. Press the EXCLUSIVE HOLD RECALL TIMER flex button (FLASH 01,
Button #2). The following message displays:
2. Enter a valid number on the dial pad that corresponds to 000-300 seconds.
3. Press HOLD to save the entry. A confirmation tone is heard and the display updates.
Description
The System Hold Recall Timer determines the time before a call placed on Exclusive Hold recalls the station placing the Hold. If unanswered by that station, the call recalls the attendant.
By default, the Exclusive Hold Recall Timer is set for 180 seconds and is variable from 000-300 seconds. An entry of 000 disables the timer and there is no recall.
EXC HOL D R ECA LL 0 00- 30 018 0

2-6 System Timers
Attendant Recall Timer
Programming Steps1. Press the ATTENDANT RECALL TIMER flex button (FLASH 01,
Button #3). The following message displays:
2. Enter a valid number on the dial pad that corresponds to 00-60 minutes.
3. Press HOLD to save the entry. A confirmation tone is heard and the display updates.
DescriptionThe Attendant Recall Timer determines the time a recalling call rings at the attendant station(s) before the system releases the line. When a CO Line recalls to the Attendant station and is still unanswered, the system releases the line at the expiration of this timer and automatically places the line to an idle condition.
By default, the Attendant Recall Timer is set for 1 minute and is variable from 00–60 minutes. An entry of 00 causes the Attendant(s) to ring until answered.
Transfer Recall Timer
Programming Steps1. Press the TRANSFER RECALL TIMER flex button (FLASH 01,
Button #4). The following message displays:
2. Enter a valid number on the dial pad that corresponds to 000-300 seconds.
3. Press HOLD to save the entry. A confirmation tone is heard and the display updates.
AT N D R ECA LL TIME R 0 0-6 001
TR AN S FER R E CALL 0 00- 30 004 5

System Timers 2-7
DescriptionThe Transfer Recall Timer determines the time a transferred call rings at the station receiving the transfer before it recalls the station making the transfer. If unanswered by that station, the call recalls the attendant. By default, the Transfer Recall Timer is set for 45 seconds and is variable from 000-300 seconds. A 000 entry disables the timer and there is no recall.
Preset Forward Timer
Programming Steps1. Press the PRESET FORWARD TIMER flex button (FLASH 01,
Button #5). The following message displays:
2. Enter a valid number on the dial pad that corresponds to 01-99 seconds.
3. Press HOLD to save the entry. A confirmation tone is heard and the display updates.
DescriptionThe Preset Forward Timer determines the time an outside line rings before being forwarded to a predetermined station. This entry works with Preset Forward station assignments in Station Programming. More than one station can be forwarded to the same party.
This timer also governs the time the DISA call rings at a station before returning to intercom dial tone, if not answered. By default, the Preset Forward Timer is set at 10 seconds and is variable from 01–99 seconds. If no preset forward destination is programmed, the feature is disabled.
P RE SET FW D T IMER 0 0-9 910
Initial incoming CO lines follow the Preset Call Forward Timer when encountering a station in the Forward/No Answer mode.

2-8 System Timers
Call Forward No Answer Timer
Programming Steps1. Press the CALL FORWARD NO ANSWER TIMER flex button (FLASH 01,
Button #6). The following message displays:
2. Enter a valid number on the dial pad that corresponds to 000-600 seconds.
3. Press HOLD to save the entry. A confirmation tone is heard and the display updates.
DescriptionThe Call Forward No Answer Timer is used when a station in the system specifies that no answer calls be forwarded to another station. The timer determines how long an intercom or transferred call rings before it is considered a no-answer call. The call then forwards to the designated station for handling. By default, the Call Forward No Answer Timer is set for 15 seconds and is variable from 000-600 seconds.
Pause Timer
Programing Steps
1. Press the PAUSE TIMER flex button (FLASH 01, Button #7). The following message displays:
2. Enter a valid number on the dial pad that corresponds to 1-9 seconds.
3. Press HOLD to save the entry. A confirmation tone is heard and the display updates.
CAL L F WD N O AN S 0 00- 60 001 5
Initial incoming CO lines follow the Preset Call Forward Timer when encountering a station in the Forward No Answ er mode.
PAUS E TIME R 1- 92

System Timers 2-9
DescriptionThe Pause Timer determines the length of the pause when programmed for use with speed dialing and LCR Insert Tables. By default, the Pause Timer is set at 2 seconds and is variable from 1–9 seconds. There is no 0 entry. Using this feature may affect Centrex transfers.
Call Park Recall Timer
Programming Steps1. Press the CALL PARK RECALL TIMER flex button (FLASH 01,
Button #8). The following message displays:
2. Enter a valid number on the dial pad that corresponds to 001-600 seconds.
3. Press HOLD to save the entry. A confirmation tone is heard and the display updates.
Description
The Call Park Recall Timer determines the time before a call placed in a Call Park location recalls the station placing the call in park. If unanswered by that station, the call recalls the attendant.
By default, the Call Park Recall Timer is set at 180 seconds and is variable from 000–600 seconds. A 000 entry disables the timer and there is no recall.
Conference / DISA Timer
Programming Steps
1. Press the CONFERENCE/DISA TIMER flex button (FLASH 01, Button #9). The following message displays:
CAL L PAR K TIMER 0 00- 60 018 0
CON FER EN CE T IMER 0 0-9 910

2-10 System Timers
2. Enter a valid number on the dial pad that corresponds to 01-99 minutes.
3. Press HOLD to save the entry. A confirmation tone is heard and the display updates.
DescriptionThe Conference/DISA Timer determines the time an unsupervised conference can continue after the initiator of the conference has exited.
By default, the Conference/DISA Timer is set at 10 minutes and is variable from 01–99 minutes. A 00 entry disables the timer and no automatic disconnect occurs.
Paging Time-Out Timer
Programming Steps1. Press the PAGING TIMEOUT TIMER flex button (FLASH 01,
Button #10). The following message displays:
2. Enter a valid number on the dial pad that corresponds to 01-60 seconds.
3. Press HOLD to save the entry. A confirmation tone is heard and the display updates.
The Conference Timer also allows the system administrator to control the time a DISA caller is allowed after establishing a Trunk-to-Trunk call. At the expiration of the Conference Timer, a tone is presented to both DISA parties, then one minute later the system automatically releases both trunks.
The Conference Timer does not affect or control a DISA-to-Station call.
PAG ING TIME OUT 0 0-6 015

System Timers 2-11
DescriptionThe Paging Time-Out Timer determines the maximum length of a page announcement (internal, external or all call). The system automatically disconnects the page at the end of this time unless the person making the page has already hung up.
By default, the Paging Time-out Timer is set at 15 seconds and is variable from 01–60 seconds. A 00 entry disables the timer and pages are not limited in length. This affects the use of the Meet Me Page feature.
CO Ring Detect Timer
Programming Steps1. Press the CO RING DETECT TIMER flex button (FLASH 01,
Button #11). The following message displays:
2. Enter a valid number on the dial pad that corresponds to 2-9 (200 ms to 900 ms).
3. Press HOLD to save the entry. A confirmation tone is heard and the display updates.
DescriptionThe CO Ring Detect Timer controls the time necessary to detect an outside line ringing into the system.
By default, the CO Ring Detect Timer is set at 3 (300 ms), and is variable from 2-9 (200 ms to 900ms). There is no 0 or 1 entry.
SLT DTMF Receiver Timer
Programming Steps1. Press the SLT DTMF RECEIVER TIMER flex button (FLASH 01,
Button #12). The following message displays:
CO R IN G D E TECT 2- 93
SLT R CV R TIME R 0 05- 10 002 0

2-12 System Timers
2. Enter a valid number that corresponds to 005-100 seconds.
3. Press HOLD to save the entry. A confirmation tone is heard and the display updates.
Description
Single line telephones require the use of a DTMF receiver when going off-hook and dialing. When SMDR or toll restriction (via COS assignments) is enabled, a DTMF receiver monitors and screens the SLT digits for the duration of this timer. By adjusting this timer, the system administrator may free system DTMF receivers sooner if system SLT traffic is heavy, or provide a longer monitoring period if toll restriction becomes a problem.
Note that when LCR is enabled, the DTMF receivers are released when the expected number of digits are dialed as entered in the LCR database.
By default, the SLT DTMF Receiver Timer is set at 20 seconds and is variable from 005-100 seconds.
Message Wait Reminder Tone
Programming Steps
1. Press the MESSAGE WAIT REMINDER TONE flex button (FLASH 01, Button #13). The following message displays:
2. Enter a valid number that corresponds to 000-104 minutes.
3. Press HOLD to save the entry. A confirmation tone is heard and the display updates.
Description
The Message Wait Reminder Timer determines the time between repeated reminder tones to a key telephone with a message waiting. Digital station users may be reminded of a message waiting on their telephone with an audible signal presented at a timed interval.
By default, the Message Wait Reminder Tone is set at 000 (disabled) and is variable from 000-104 minutes.
M / W TON E TIMER 0 00- 10 400 0

System Timers 2-13
SLT Hook Flash Timer
Programming Steps1. Press the SLT HOOK FLASH TIMER flex button (FLASH 01,
Button #14). The following message displays:
2. Enter a valid number on the dial pad that corresponds to 0.5-2.0 seconds in 1/10 second increments.
3. Press HOLD to save the entry. A confirmation tone is heard and the display updates.
DescriptionThe SLT Hook Flash Timer determines how long an SLT user presses the hook switch for it to be considered a valid on hook (disconnect) request. An on-hook shorter in duration (but longer than the Hook Switch Bounce Timer) is considered a Hook Flash (transfer) request. Refer to Figure 2-1 .
By default, the SLT Hook Flash Timer is set at 10 (one second) and is variable from 0.5-2.0 seconds.
SLT Hook Flash Debounce Timer
Programming Steps
1. Press the SLT HOOK FLASH DEBOUNCE TIMER flex button (FLASH 01, Button #15). The following message displays:
2. Enter a valid number on the dial pad that corresponds to 0-1 seconds in 10 ms increments.
3. Press HOLD to save the entry. A confirmation tone is heard and the display updates.
H OOK SW ITCH TIME 0 5-2 010
Some SLTs have a fixed or programmable Flash Timer (Flash or Tap button). This Hook Switch Timer must be set longer than the SLT Flash Timer to allow Hook Flash transfer.
H OOK SW T B OU N CE 0 00- 10 003 0

2-14 System Timers
DescriptionThe SLT Hook Flash Debounce Timer determines the time needed to determine a valid on-hook or off-hook condition for single line telephones. On-Hook or Off-Hook signals that are shorter in duration than this timer are ignored by the system. Refer to Figure 2-1 .
By default, the SLT Hook Flash Debounce Timer is set to 0.30 seconds and is variable from 0-1 seconds in 10 ms increments. This is a 3-digit entry where 010 equals 0.1 seconds.
Figure 2-1: Hook Switch Activity
SMDR Call Qualification Timer
Programming Steps
1. Press the SMDR CALL QUAL TIMER flex button (FLASH 01, Button #16). The following message displays:
2. Enter a valid number on the dial pad that corresponds to 00-60 seconds in 1-second increments.
3. Press HOLD to save the entry. A confirmation tone is heard and the display updates.
SMD R CALL QUA L 0 0-6 030
IGN
OR
ED ValidHOOK-FLASH
ValidON-HOOK
TIME(in seconds)
0 .1 .2 .3 .4 .5 .8 .9 1.0 1.5 2.0.7.6

System Timers 2-15
DescriptionThe SMDR Call Qualification Timer determines the time needed to determine a valid SMDR call for reporting purposes. By default, the SMDR Call Qualification Timer is set to 30 seconds and is variable from 00-60 seconds in 1-second increments.
Automatic Call Back Timer
Programming Steps1. Press the AUTO CALL BACK TIMER flex button (FLASH 01,
Button #17). The following message displays:
2. Enter a valid number on the dial pad that corresponds to 00-99 seconds in 1-second increments.
3. Press HOLD to save the entry. A confirmation tone is heard and the display updates.
DescriptionThe Automatic Call Back Timer invokes a call back anytime a user listens to busy tone for a programmable period of time. By default, the Automatic Call Back Timer is set for 03 seconds (enabled), and is variable from 00-99 seconds. A value of 00 disables this timer. An Automatic Call Back does not occur when this timer is disabled.
Reminder Ring Timer
Programming Steps1. Press the REMINDER RING flex button (FLASH 01, Button #18). The
following message displays:
AU TO C ALL B ACK 0 0-9 903
R EMIN D ER R IN G 0 0-9 900

2-16 System Timers
2. Enter a valid number that corresponds to 00-99 seconds in 1 second increments. A value of 00 disables the timer, therefore the user only receives one ring burst at the beginning of the call.
3. Press HOLD to save the entry. A confirmation tone is heard and the display updates.
DescriptionWhen a CO line rings at a busy station, the call rings at the station using muted ringing. The CO Line Ringing Option feature enables a user to receive a reminder ring instead of muted ring. This timer provides a reminder ring every time the timer expires, as long as the incoming CO line remains connected.
If the user continues their present conversation and the CO party does not hang up, the Reminder Ring timer expires and the user receives another ring burst. When the key set user ends the existing call, ringing for the CO call reverts to normal ringing.
By default, the Reminder Ring Timer is set to 00 second and is variable from 00-99 seconds in 1 second increments.
Inter-Digit Time-Out
Programming Steps1. Press the INTER-DIGIT TIMEOUT flex button (FLASH 01, Button #20).
The following message displays:
2. Enter a valid number on the dial pad that corresponds to 01-99 seconds in 1 second increments.
3. Press HOLD to save the entry. A confirmation tone is heard and the display updates.
DescriptionThe Inter-Digit Time-Out feature provides inter-digit time-out programming on a system-wide basis and applies to intercom and LCR calls. DISA, DID. TIE inter-digit time-outs remain unaffected by this timer. By default, the Inter-Digit Time-out is set for 5 seconds, and is variable from 1–99 seconds.
IN TER D IG IT T / O 0 1-9 905

Additional System Timers 2-17
Additional System Timers
Programming Steps
If the system is in the programming mode, continue using the program codes. If starting to program here, enter the programming mode.
Press FLASH and dial [02]. The following message displays:
Description
This section describes the procedures and steps necessary to program additional System Timers in the Timers programming area.
SY ST EM TIMER SEN TE R B U TTON N UM BE R
SYSTEM REDIALTIMER
ATD DISPLAYTIMER
CALL CVRGRING TIMER
MODEMANSWER T/O
1 Q 2 W 3 E 4 R
PULSE DIALI/O TIMER
DTMF TIMEOPERATION
5 T 6 Y 7 U 8 I
9 O 10 P 11 A 12 S
1 3 D 14 F 15 G 16 H
17 J 18 K 19 L 20 ;
21 Z 22 X 2 3 C 24 V

2-18 Additional System Timers
Repeat Redial Timer
Programming Steps
1. Press the RPT REDIAL TIMER flex button (FLASH 02, Button #1). The following message displays
2. Enter a valid number that corresponds to 006-999 seconds.
3. Press HOLD to save the entry. A confirmation tone is heard and the display updates.
Description
The Repeat Redial Timer lets a digital key station press a flexible button or dial a code and redial a busy or no-answer number at specific intervals. The user is signaled via a queue callback indication.
The Redial flexible button flashes at the callback rate of 120 ipm for 15 seconds.
If station does not answer within 15 seconds, the callback is cancelled.
If station is busy with an internal/external call when the Redial queue callback occurs, the callback occurs after the user goes on-hook.
By default, the Repeat Redial Timer is set for 1 minute (60) and is variable from 006-999 seconds.
Table 2-2: Additional System Timers Defaults
Program Code
FlexButton
FeatureDefault
(after initialization)
Additional System Timers
FLASH 02 123456
Repeat Redial TimerATD Display TimerCall Coverage Ring TimerModem Answer Time-outPulse Dial Inter-Digit TimerDTMF Time Operation
060 seconds01 seconds5 seconds
25 seconds300ms
100ms ON / 100ms OFF
R PT R ED IA L 0 06- 99 906 0

Additional System Timers 2-19
Attendant Display Timer
Programming Steps1. Press the ATTENDANT DISPLAY TIMER flex button (FLASH 02,
Button #2). The following message displays:
2. Enter a valid number on the dial pad that corresponds to 00-99 seconds.
3. Press HOLD to save the entry. A confirmation tone is heard and the display updates.
DescriptionThe Attendant Display Timer modifies the way in which multiple calls ringing at the attendant station display. Currently, if two calls are ringing at an attendant station, when the station goes off hook, the first call is answered. The LCD updates to show the second call that is ringing which sometimes does not allow the station to view the current call’s LCD information. This timer keeps the current call’s information on the LCD for the set time period, then shows any other calls ringing in at the time.
By default, the Attendant Display Timer is set for 1 second and is variable from 00-99 seconds.
Call Coverage Ring Timer
Programming Steps1. Press the CALL CVRG RING TIMER flex button (FLASH 02, Button #3).
The following message displays:
2. Enter a valid number on the dial pad that corresponds to 00-99 seconds.
3. Press HOLD to save the entry. A confirmation tone is heard and the display updates.
AT T EN D AN T D ISP LAY 0 0-9 901
CAL L COV E RA GE RIN G 0 0-9 905

2-20 Additional System Timers
DescriptionA Call Coverage Ring Timer enables the user to place another station under a flex button. When that station rings with an internal or external call, the DSS button for that station rings or flashes.
By default, the Call Coverage Ring Timer is set for 5 seconds and is variable from 00-99 seconds. A value of 00 results in the LED flashing but the call coverage station does not ring.
Modem Answer Timer
Programming Steps1. Press the MODEM ANSWER TIMER flex button (FLASH 02,
Button #4). The following message displays:
2. Enter a valid number that corresponds to 025-999 seconds.
3. Press HOLD to save the entry. A confirmation tone is heard and the display updates.
DescriptionThe Modem Answer Timer determines how long the On Board modem provides a carrier tone to a distant modem. If a connection is not made at the end of this timer, the On Board modem hangs up.
By default, the Modem Answer Timer is set for 25 seconds and is variable from 025-999 seconds.
Pulse Dial Inter-Digit Timer
Programming Steps1. Press the PULSE DIAL I/D TIMER flex button (FLASH 02, Button #5).
The following message displays:
2. Enter a valid number on the dial pad that corresponds to 300-600 ms.
MOD EM A NS WE R T/O 0 25- 99 925
IN T D IG IT PU LS E 3 00- 60 030 0

System Features 1 Programming 2-21
3. Press HOLD to save the entry. A confirmation tone is heard and the display updates.
DescriptionThis governs the inter-digit time of the Pulse Dial Digits, rotary dial mode.
By default, the Pulse Dial Ring Timer is set for 300 ms and is variable from 300-600 ms.
DTMF On/Off Time Operation
Programming Steps1. Press the DTMF TIME OPERATION flex button (FLASH 02, Button #6).
The following message displays:
2. Enter a valid number (1-9) for DTMF On and Off Times (100-900 ms).
3. Press HOLD to save the entry. A confirmation tone is heard.
DescriptionThe DTMF On/Off Time feature lets the installer select the DTMF On/Off Time on a system-wide basis. This lets the installer customize the system for certain applications that require more than the standard DTMF Time of 100ms on and 100ms off.
By default, the DTMF Time Operation is set for 100ms On and 100ms Off.
System Features 1 Programming
Programming StepsIf the system is in the programming mode, continue using the program codes. If starting to program here, enter the programming mode.
Press FLASH and dial [05]. The following message displays:
D TMF ON /OF F TIME 1- 91
SY ST EM FEATU R ES 1EN TE R B U TTON N UM BE R

2-22 System Features 1 Programming
DescriptionThis section describes the procedures and steps necessary to program System Features in the System Features programming area. The buttons on a digital telephone are shown in the following illustration:
ATTNOVERRIDE
HOLDPREFERENCE
EXTERNALNIGHT RING
EXECUTIVEOVERRIDE
1 Q 2 W 3 E 4 R
PAGE WARNTONE
BACKGROUNDMUSIC
LCRENABLE
ACCOUNTCODES
5 T 6 Y 7 U 8 I
GROUPLISTENING
IDLE SPEAKERMODE
CALL COSTDISPLAY
MUSICON HOLD
9 O 10 P 11 A 1 2 S
CALL QUALIFIERTONE OPTION
13 D 14 F 15 G 16 H
17 J 18 K 19 L 20 ;
21 Z 22 X 23 C 24 V
Table 2-3: System Features 1 Defaults
Program Code Flex Button FeatureDefault
(After Initialization)
FLASH 05 123456789
10111213
Attendant OverrideHold PreferenceExternal Night RingExecutive WarningPage Warning ToneBackground MusicLeast Cost RoutingAccount CodeGroup ListeningIdle Speaker ModeCall Cost Display FeatureMusic On HoldCall Qualifier Tone Option
DisabledSystem
DisabledEnabledEnabledEnabledDisabledDisabledDisabledDisabledDisabledEnabledDisabled

System Features 1 Programming 2-23
Attendant Override
Programming Steps1. Press the ATTN OVERRIDE flex button (FLASH 05, Button #1).
2. Enter a 0 or 1that corresponds with the following entries:
[0] = Disabled
[1] = Enabled
3. Press HOLD to save the entry. A confirmation tone is heard.
DescriptionWhen the Attendant Override feature is enabled, it lets the attendant override a busy station or a station in DND. By default, Attendant Override is disabled.
Hold Preference
Programming Steps
1. Press the HOLD PREF flex button (FLASH 05, Button #2).
2. Enter a valid number (0 or 1) that corresponds with the following entries:
[0] = Exclusive Hold
[1] = System Hold
3. Press HOLD to save the entry. A confirmation tone is heard.
AT T EN D AN T OV ER R ID E 1- 0D ISA BLE D
Attendant Override functions ONLY when the Attendant station is assigned a flex button designated as Attendant Override.
H OLD P R EFE RE N CE 0- 1SY ST EM
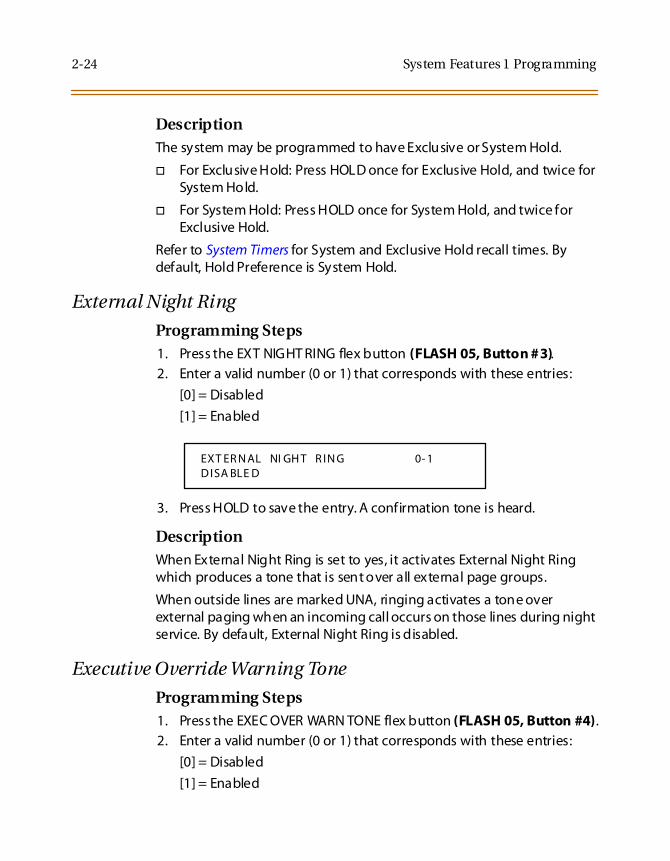
2-24 System Features 1 Programming
DescriptionThe system may be programmed to have Exclusive or System Hold.
For Exclusive Hold: Press HOLD once for Exclusive Hold, and twice for System Hold.
For System Hold: Press HOLD once for System Hold, and twice for Exclusive Hold.
Refer to System Timers for System and Exclusive Hold recall times. By default, Hold Preference is System Hold.
External Night Ring
Programming Steps1. Press the EXT NIGHT RING flex button (FLASH 05, Button #3).2. Enter a valid number (0 or 1) that corresponds with these entries:
[0] = Disabled
[1] = Enabled
3. Press HOLD to save the entry. A confirmation tone is heard.
DescriptionWhen External Night Ring is set to yes, it activates External Night Ring which produces a tone that is sent over all external page groups.
When outside lines are marked UNA, ringing activates a tone over external paging when an incoming call occurs on those lines during night service. By default, External Night Ring is disabled.
Executive Override Warning Tone
Programming Steps1. Press the EXEC OVER WARN TONE flex button (FLASH 05, Button #4).
2. Enter a valid number (0 or 1) that corresponds with these entries:
[0] = Disabled
[1] = Enabled
EXT ER N AL NI GH T R IN G 0- 1D ISA BLE D

System Features 1 Programming 2-25
3. Press HOLD to save the entry. A confirmation tone is heard.
DescriptionThe Executive Override Warning enables Executive stations to override and barge-in on other key sets engaged in conversation on a CO line. Prior to actual cut through of the third party, a warning tone is presented to all parties notifying them of the barge-in. This warning tone, however, is a programmable option on a system-wide basis, that either enables or disables the tone. When the tone is disabled, no audible signal is presented to the parties to signal the barge-in.
By default, Executive Override Warning Tone is enabled.
Page Warning Tone
Programming Steps1. Press the PAGE WARN TONE flex button (FLASH 05, Button #5).2. Enter a valid number (0 or 1) that corresponds with these entries:
[0] = Disabled
[1] = Enabled
3. Press HOLD to save the entry. A confirmation tone is heard.
EXE CUT IV E WAR NI NG 0- 1EN AB LE D
Use of this feature when the Executive Override Warning Tone is disabled may be interpreted as a violation of federal, state, or local laws, and an invasion of privacy. Check applicable laws in your area before intruding on calls using this feature.
A change in volume may occur on the CO line or intercom call after the barge-in occurs. This feature also affects ACD Supervisor Barge-in warning tone.
PAG E WA R NIN G TON E 0- 1EN AB LE D

2-26 System Features 1 Programming
DescriptionThe Page Warning Tone determines whether a page warning tone sounds over the Key Telephone speakers or external paging speakers, prior to a page announcement.
By default, Page Warning Tone is enabled.
Background Music
Programming Steps1. Press the BACKGROUND MUSIC flex button (FLASH 05, Button #6).2. Enter a valid number (0 or 1) that corresponds with these entries:
[0] = Disabled
[1] = Enabled
3. Press HOLD to save the entry. A confirmation tone is heard.
DescriptionThe system can be programmed to let stations activate their Background Music, in addition to Music-On-Hold. A music source must be connected to the BGM/MOH connector on the MISU. By default, the Background Music channel is enabled.
Least Cost Routing (LCR)
Programming Steps1. Press the LCR ENABLE flex button (FLASH 05, Button #7).2. Enter a 0 or 1 that corresponds with these entries:
[0] = Disabled
[1] = Enabled
3. Press HOLD to save the entry. A confirmation tone is heard.
B ACK GR OU N D MU SIC 0- 1EN AB LE D
LEA ST COST R OU TIN G 0- 1D ISA BLE D

System Features 1 Programming 2-27
DescriptionWhen Least Cost Routing is used, it must be enabled here. Before enabling LCR, refer to the Least Cost Routing section (Flash 75) and programming tables (Product Description Manual - Appendix C).
When the tables are programmed, you may then enable LCR for the system. After system initialization, a default LCR database is loaded into the LCR section of memory. By default, LCR is disabled.
Account Codes - Forced
Programming Steps1. Press ACCOUNT CODES flex button (FLASH 05, Button #8) to
determine whether the use of Account Codes is forced or optional.
2. Enter a 0 or 1 that corresponds with the following entries:
[0] = Disabled
[1] = Enabled
3. Press HOLD to save the entry. A confirmation tone is heard.
DescriptionThe system can force account codes on all restricted calls.
When the Forced Account Code option is enabled, and the account code is entered, a station’s Class of Service is upgraded to day COS1, night COS1.
If option is disabled, a station’s COS is not upgraded but the account code continues to be part of the SMDR record.
By default, using account codes is optional.
FOR CED ACCOU N T COD E 0- 1D ISA BLE D

2-28 System Features 1 Programming
Group Listening
Programming Steps1. Press the GROUP LISTENING flex button (FLASH 05, Button #9).
2. Enter a 0 or 1 that corresponds with the following entries:
[0] = Disabled
[1] = Enabled
3. Press HOLD to save the entry. A confirmation tone is heard.
Description
All digital key telephones have built-in speakerphones. Station users may use the speaker to monitor a call while using the handset to converse with the outside party. This enables other people in the room to listen to both parties in the conversation.
Group listening is unavailable when the station is in the headset mode. By default, Group Listening is disabled.
Idle Speaker Mode
Programming Steps
1. Press the IDLE SPEAKER MODE flex button (FLASH 05, Button #10).
2. Enter a 0 or 1 that corresponds with the following entries:
[0] = First digit dialed is Heard (Disabled)
[1] = First digit dialed is Muted (Enabled)
3. Press HOLD to save the entry. A confirmation tone is heard.
Description
The Idle Speaker Mode feature determines whether the first digit dialed is heard over the digital key telephone speaker. This feature can be enabled or disabled on a system-wide basis. By default, this mode is disabled.
G ROU P L ISTE NIN G 0- 1D ISA BLE D
ID LE SP EA KE R MOD E 0- 1D ISA BLE D

System Features 1 Programming 2-29
Call Cost Display
Programming Steps1. Press the CALL COST DISPLAY flex button (FLASH 05, Button #11).
2. Enter a 0 or 1 that corresponds with the following entries:
[0] = Disabled
[1] = Enabled
3. Press HOLD to save the entry. A confirmation tone is heard.
DescriptionThe Call Cost Display feature lets a user view the approximate cost of each call made. This approximate cost also prints as part of the SMDR record. The Call Cost Display replaces the call duration display when a call is made using LCR. Cost information is programmable in LCR Flash 75. This enables the user to program four separate costs based on the time of day.
Costs entered in the tables are costs for one minute, however, costs are calculated using 1/10th of a minute value. These costs are rounded down and based on the call start time, even if the call extends into a different time period. The SMDR printout contains a cost calculated using 1/10th of a minute increment, however the station display updates approximately every 30 seconds. The user must use LCR to get the call cost display. By default, the Call Cost Display feature is disabled.
Music-On-Hold
Programming Steps1. Press the MUSIC-ON-HOLD flex button (FLASH 05, Button #12). This
feature toggles on and off each time the button is pressed; the display updates with each toggle.
[0] = Disabled
[1] = Enabled
CAL L COS T DIS P LAY 0- 1D ISA BLE D

2-30 System Features 1 Programming
2. Press HOLD to save the entry. A confirmation tone is heard.
DescriptionWhen connected to the system, a music source provides music to all lines on Hold, parked calls, transferred calls and calls waiting to be answered by Automatic Call Distribution (ACD) or Uniform Call Distribution (UCD).
This feature is allowed or denied on a system-wide basis in programming. By default, Music-On-Hold is enabled.
Call Qualifier Tone
Programming Steps1. Press the CALL QUAL TONE flex button (FLASH 05, Button #13).
2. Enter a 0 or 1 that corresponds with the following entries:
[0] = Disabled
[1] = Enabled
3. Press HOLD to save the entry. A confirmation tone is heard.
DescriptionThe Call Qualifier Tone feature is associated with the ACD Call Qualifier code and determines if a confirmation tone is heard after the ACD Call Qualifier code is dialed.
If programmed, the confirmation tone is heard through the key set speaker. This feature allows:
Up to four digits for the ACD SMDR reporting functions that are compatible with the Basic ACD software package.
Entry of up to twelve digits.
By default, the Call Qualification Confirmation tone is disabled.
MU SIC ON H OLD 0- 1EN AB LE D
CAL L QU ALIF IER TO NE 0- 1D ISA BLE D

System Features 2 Programming 2-31
System Features 2 Programming
Programming Steps
If the system is in the programming mode, continue using the program codes. If starting to program here, enter the programming mode.
Press FLASH and dial [06]. The following message displays:
Description
This section describes the procedures and steps necessary to program System Features in System Features programming area. The buttons on the digital telephone are shown in the following illustration:
SY ST EM FEATU R ES 2EN TE R B U TTON N UM BE R
BARGE-INWARN TONE
CO RING TONE
VERIFIED ACCT CODESCALL FWD
DISPLAY STATUS1 Q 2 W 3 E 4 R
EXT DAYRINGING
ACD/UCDOVERFLOW STA FWD
DIRECTTRANSFER
STATIONID LOCK
5 T 6 Y 7 U 8 I
LCR CALLPROGRESS
ONE-TOUCH RCDWARNING TONE
RINGBACK ON TRANS-FER
ACD AGENT RECALL
9 O 10 P 11 A 12 S
91 1FEATURE
ENHANCED911
VMIDSTATION NUMBERS
13 D 14 F 15 G 16 H
17 J 18 K 19 L 20 ;
21 Z 22 X 2 3 C 24 V

2-32 System Features 2 Programming
Barge-In Warn Tone
Programming Steps
1. Press the BARGE IN WARN TONE flex button (FLASH 06, Button #1). The following message displays:
2. Enter a 0 or 1 on the dial pad to enable/disable the conference tone.
[0] = Disabled
[1] = Enabled
3. Press HOLD to save the entry. A confirmation tone is heard.
Table 2-4: System Features 2 Defaults
Program Code
FlexButton
FeatureDefault
(after initialization)
System Features 2
FLASH 06 123456789101112131415
Barge-In Warn ToneCO Ring ToneVerified Account CodesCall Forward Display StatusExternal Day RingingACD/UCD Overflow Sta FwdDirect TransferStation ID LockLCR Call ProgressOne-Touch Record Warning ToneRingback on TransferACD Agent Recall911 FeatureEnhanced 911VMID Station Numbers
EnabledEnabledDisabledEnabledDisabledDisabledEnabledDisabledEnabledEnabledDisabledDisabledDisabledDisabled
Station Numbers=VMID
B AR GE IN WAR N TO NE 0- 1EN AB LE D
Display stations continue to receive the CONFERENCE display regardless of the warning tone setting.

System Features 2 Programming 2-33
Privacy is ensured on all communications in the system. If desired, the user may elect to disable the Barge In feature, thus allowing up to seven other stations to join existing CO Line conversations.
CO Ring Tones
Programming Steps1. Press the CO RING TONE flex button (FLASH 06, Button #2). The
following message displays:
2. Enter a 0 or 1 on the dial pad to enable/disable the tone ring signal.
[0] = Disabled
[1] = Enabled
3. Press HOLD to save the entry. A confirmation tone is heard.
DescriptionThe ring tone signal that notifies stations of an incoming call can be changed in administrative programming to provide distinctive ringing on a per CO line basis. A CO Ring Tone can be programmed for each CO line that rings each station. The system provides 36 different ring patterns that can be selected for CO lines in the system. By default, CO Ring Tones is enabled.
Disabling of the Barge In feature may be limited by federal, state, or local law, so check the relevant laws in your area before disabling privacy.
Table 2-5: CO Line Barge In Flag
Station Attempting to Access CO Line
CO Line in Use by Another Station
Privacy Enabled Privacy Disabled
Privacy Enabled Private(no cut-through)
Private(no cut-through)
Privacy Disabled Private(no cut-through)
Privacy Release(cut-through allowed)
CO R IN G TO NE S 0- 1EN AB LE D

2-34 System Features 2 Programming
Verified Account Codes
Programming Steps1. Press the VERIFIED ACCT CODES flex button (FLASH 06, Button #3).
The following message displays:
2. Enter 0 or 1 on the dial pad to enable/disable Verified Account Codes.
[0] = Disabled
[1] = Enabled
3. Press HOLD to save the entry. A confirmation tone is heard.
DescriptionThe Verified Account Code/Traveling Class of Service (COS) feature provides tracking of specific calls by entering a verified, variable length (up to 12-digits) identifier. Each account code can be assigned a day and night Class-of-Service for determining the dialing privileges allowed by that account code. This lets users override a restricted station. If the dialed account code matches the Verified Account code table, an intercom dial tone is returned, otherwise an error tone is returned. SMDR must be enabled for the account code to print as part of the SMDR record. Triad-S allows up to 250 12-digit account codes programmed in at FLASH 31. By default, the Verified Account Codes feature is disabled.
Call Forward Display
Programming Steps1. Press the CALL FWD DISPLAY STATUS flex button (FLASH 06,
Button #4). The following message displays:
2. Enter a 0 or 1 on the dial pad to enable/disable Call Forward Display.
[0] = Disabled
[1] = Enabled
3. Press HOLD to save the entry. A confirmation tone is heard.
V ER IFIE D ACCT TON E S 0- 1D ISA BLE D
CAL L F WD DIS P LAY 0- 1EN AB LE D

System Features 2 Programming 2-35
DescriptionWhen call forwarding is invoked, the LCD display normally indicates the call forwarding mode at all times.
This feature is enabled/disabled in administrative programming on a system-wide basis. By default, the status of the Call Forward Display is enabled.
External Day Ring
Programming Steps1. Press the EXT DAY RINGING flex button (FLASH 06, Button #5). The
following message displays:
2. Enter a 0 or 1 on the dial pad to enable/disable External Day Ring.
[0] = Disabled
[1] = Enabled
3. Press HOLD to save the entry. A confirmation tone is heard.
DescriptionThe system can be programmed so CO lines marked for UDA provides ringing out of the external page ports when the system is in the Day Mode. By default, External Day Ringing is disabled.
Overflow Station Forward
Programming Steps1. Press the ACD/UCD OVERFLOW STA FWD flex button (FLASH 06,
Button #6). The following message displays:
EXT ER N AL D AY R IN G 0- 1D ISA BLE D
OV ER FLOW S TA FW D 0- 1D ISA BLE D

2-36 System Features 2 Programming
2. Enter a 0 or 1 on the dial pad to enable/disable the use of this feature.
[0] = Disabled
[1] = Enabled
3. Press HOLD to save the entry. A confirmation tone is heard.
DescriptionThe Overflow Station Forward feature allows ACD/UCD calls reaching the ACD/UCD Overflow Station to call forward to another station. This enhancement is allowed or denied on a system-wide basis. Once enabled in programming:
An ACD/UCD Overflow station can Busy/No-Answer forward to Voice Mail Groups, ACD/UCD Groups, Hunt Groups and stations.
If the ACD/UCD Overflow station is busy or does not answer before the no-answer call timer expires, the ACD/UCD call forwards to the destination.
By default, this feature is disabled.
Direct Transfer Mode
Programming Steps1. Press the DIRECT TRANSFER flex button (FLASH 06, Button #7). The
following message displays:
2. Enter a 0 or 1 on the dial pad to enable/disable this feature.
[0] = Disabled
[1] = Enabled
3. Press HOLD to save the entry. A confirmation tone is heard.
DescriptionWhen enabled, supervised transfers (screened transfers) to stations in the handset mode connect calls directly to the handset. The station user must have a direct appearance of that CO line or a Loop button. This feature is programmed on a system-wide basis. By default, the Direct Transfer Mode is enabled.
D IR ECT XFE R 0- 1EN AB LE D

System Features 2 Programming 2-37
Station ID Lock
Programming Steps1. Press the STATION ID LOCK flex button (FLASH 06, Button #8). The
following message displays:
2. Enter a 0 or 1 on the dial pad to enable/disable the use of this feature.
[0] = Disabled
[1] = Enabled
3. Press HOLD to save the entry. A confirmation tone is heard.
DescriptionThe Station ID Lock feature enables the installer/programmer to lock the station ID of all extensions on the system. It also prevents the loss of station programming that results when a different station type is plugged into a port already designated as another station type. This feature is programmed on a system-wide basis. By default, the Station ID Lock feature is disabled.
The proper procedure(s) for changing the Station ID with the Station ID Lock feature enabled:
1. Enter programming mode and disable the Station ID Lock feature.
2. Plug the new device into the jack. The set is automatically identified.
3. Enter programming mode and disable the Station ID Lock feature.
4. Enter programming and perform Station ID programming. (FLASH 50, PAGE B, button #1). The set is automatically identified.
LCR Call Progress
Programming Steps1. Press the LCR CALL PROGRESS flex button (FLASH 06, Button #9).
The following message displays:
STAT ION LOCK 0- 1D ISA BLE D
LCR CA LL PR OG RE SS 0- 1EN AB LE D

2-38 System Features 2 Programming
2. Enter a 0 or 1 on the dial pad to enable/disable the use of this feature.
[0] = Disabled
[1] = Enabled
3. Press HOLD to save the entry. A confirmation tone is heard.
DescriptionThe LCR CALL PROGRESS Feature enables the installer to select, on a system-wide basis, whether users hear call progress indications. By default, the LCR Call Progress feature is enabled.
One-Touch Recording Warning Tone
Programming Steps
1. Press the ONE-TOUCH RCD WARNING TONE flex button (FLASH 06, Button #10). The following message displays:
2. Enter a 0 or 1 on the dial pad to enable/disable the use of this feature.
[0] = Disabled
[1] = Enabled
3. Press HOLD to save the entry. A confirmation tone is heard.
Description
The One-Touch Recording Warning Tone feature lets the installerenable/disable the One-Touch Recording Warning Tone on a system-wide basis. By default, the Recording Warning Tone is enabled.
If this feature is disabled, a confirmation tone is given after the last digit is dialed. The user does not hear the line being seized or the outpulsing of digits to the Central Office.
R ECOR DO NG WAR N TON E 0- 1EN AB LE D
Use of this feature when the One-Touch Recording Warn Tone is disabled may be interpreted as a violation of federal, state, or local laws, and an invasion of privacy. Check applicable laws in your area before recording calls using this feature.

System Features 2 Programming 2-39
Ringback on Transfer
Programming Steps1. Press the RINGBACK ON TRANSFER flex button (FLASH 06,
Button #11). The following message displays:
2. Enter a 0 or 1 on the dial pad to enable/disable the use of this feature.
[0] = Disabled (Music)
[1] = Enabled (Ringback Tone)
3. Press HOLD to save the entry. A confirmation tone is heard.
DescriptionThe Ringback on Transfer feature provides on a system-wide basis music on hold or ringback tone to the CO caller when CO calls are transferred. Callers currently hear music. By default, the Ringback on Transfer feature is disabled.
ACD Agent Recall
Programming Steps1. Press ACD AGENT RECALL button (FLASH 06, Button #12). The
following message displays:
2. Enter a 0 or 1 on the dial pad to enable/disable the use of this feature.
[0] = Disabled
[1] = Enabled
3. Press HOLD to save the entry. A confirmation tone is heard.
DescriptionThe ACD Agent Recall allows/disallows calls that have been transferred from an ACD Agent to recall the Agent.
R ING B ACK ON XFE R 0- 1D ISA BLE D
ACD AG EN T R ECAL L 0- 1D ISA BLE D

2-40 Enhanced 911 (Proctor PBX-ANI-LINK Unit)
911 Feature
Programming Steps1. Press the 911 FEATURE flex button (FLASH 06, Button #13). The
following message displays:
2. Enter a 0 or 1 on the dial pad to enable/disable the use of this feature.
[0] = Disabled
[1] = Enabled
DescriptionThe 911 Feature allows stations in the system to dial 911 without using an access code. 911 calls are placed on 911 marked lines. If all lines are busy, an existing call is dropped and the 911 call is placed. When feature is enabled, Trunk Group/LCR Access Code 9 is not available.
Enhanced 911 (Proctor PBX-ANI-LINK Unit)
Programming Steps1. Press the ENHANCED 911 button (FLASH 06, Button #14). The
following message displays:
2. Enter a 0 or 1 on the dial pad to enable/disable the use of this feature.
[0] = Disabled
[1] = Enabled
DescriptionThe Enhanced 911 feature enables 911 integration with the Proctor PBX-ANI-LINK product. Loop Start lines can be connected to the Proctor unit and programmed to be 911 lines (FLASH 40, PAGE A, Button 15).
91 1 FE AT UR E 0- 1D ISA BLE D
EN H AN CED 9 11 0- 1D ISA BLE D

VMID Station Numbers 2-41
When a 911 call is made from a station in the system, the system will send 911XXXX (XXXX=Station # that placed the 911 call) in DTMF format to the Proctor. If the station number is less than 4 digits, a leading 0 will automatically be added. The Proctor unit then accesses a call trunk and sends the information in the proper format to the 911 Center.
Conditions
The 911 Feature (FLASH 06, button 13) must also be enabled for the Proctor Integration to work.
Only the lines connected to the Proctor should have the 911 Enable programmed (FLASH 40, PAGE A, Button 15).
It is recommended to have a power failure procedure in place to ensure that 911 calls are always routed. Refer to FLASH 09, Button 7 for programming information.
VMID Station Numbers
Programming Steps
1. Press VMID STATION button (FLASH 06, Button #15). The following message displays:
2. Press HOLD to save the entry. A confirmation tone is heard.
Description
The VMID Station Numbers feature must be used after changing station numbers with the Flexible Numbering feature. Voice Mail ID numbers will be changed to match the current station number once the HOLD button is pressed.
This eliminates the need for the technician to program individual VMID numbers.
V MID SAME AS STA #P RE SS H OLD
This feature should be accomplished after the flexible numbers are assigned. Implementing this feature could cause the VM box numbers to be re-programm ed.

2-42 Programmable Flash Rates
Programmable Flash Rates
Programming Steps
If the system is in the programming mode, continue using the program codes. If starting to program here, enter the programming mode.
Press FLASH and dial [07]. The following message displays:
Description
This section describes the procedures and steps necessary to program the Flash Rates in the Flash Rates Programming area. The buttons on the digital telephone are shown in the following illustration:
SY ST EM FLAS H R ATESEN TE R B U TTON N UM BE R
INCCO RING
INCICW RING
CALL FORWARDBTN
MSG WAIT/VMBTN
1 Q 2 W 3 E 4 R
MSG CBCKDSS/BLF
DNDDSS/BLF
AUTO CBCKDSS/BLF
UCD UNAVLDSS/BLF
5 T 6 Y 7 U 8 I
TRANSFERCO RING
RECALLCO RING
QUEUEDCO RING
EXCLUSIVEHOLD
9 O 10 P 11 A 12 S
SYSTEMHOLD
IN USEHOLD
CAMP-ONBTN
CALLBACKBTN
1 3 D 14 F 15 G 16 H
LINE QUEUEBTN
DNDBTN
ICM HOLDBTN
17 J 18 K 19 L 20 ;
21 Z 22 X 2 3 C 24 V

Programmable Flash Rates 2-43
Incoming CO Line Ringing
Programming Steps
1. Press the INC CO RING flex button (FLASH 07, Button #1). The following message displays:
2. Enter a valid number (00-28) on the dial pad that correspond to one of the 29 available options. (Refer to Table 2-6: Flash Rates.)
3. Press HOLD to save the entry. A confirmation tone is heard and the display updates.
Description
The Incoming CO Line Ringing flash rate is the rate at which an Incoming CO line or Loop Button flashes. This flash rate can be programmed to 29 different options identified in the flash rate table, which enables the programmer to customize the key system configuration to desired flash rates. By default, the Incoming CO Ringing flash rate is set for RED 480 ipm Flutter (08).
Table 2-6: Flash Rates
Red LED Flash Rates Green LED Flash Rates
00010203040506 0708091011 121314
OffSteady On30 ipm Flash60 ipm Flash60 ipm Dbl Wink240 ipm Flash240 ipm Flutter 480 ipm Flash480 ipm Flutter15 ipm Flash120 ipm Flash120 ipm Flutter30 ipm Dbl Flash480 ipm Dbl Wink480 ipm Dbl Flash
151617181920 2122232425262728
Steady On30 ipm Flash60 ipm Flash60 ipm Dbl Wink240 ipm Flash240 ipm Flutter 480 ipm Flash480 ipm Flutter15 ipm Flash120 ipm Flash120 ipm Flutter30 ipm Dbl Flash480 ipm Dbl Wink480 ipm Dbl Flash
IN C CO R IN G 0 0-2 8R ED 4 80 IPM FLU T TER

2-44 Programmable Flash Rates
Incoming Intercom Ringing
Programming Steps1. Press the INC ICM RING flex button (FLASH 07, Button #2). The
following message displays:
2. Enter a valid number (00-28) on the dial pad to correspond to one of the 29 available options. Refer to Table 2-6: Flash Rates.
3. Press HOLD to save the entry. A confirmation tone is heard and the display updates.
DescriptionThe Incoming Intercom Ringing flash rate is the rate an Incoming DSS button flashes if you have a DSS appearance for the calling station. This flash rate can be programmed to 29 different options identified in the flash rate table. This enables the programmer to customize the key system configuration to desired flash rates.
By default, the Incoming Intercom Ringing flash rate is set for RED 120 ipm Flutter (11).
Call Forward Button
Programming Steps1. Press the CALL FORWARD BTN flex button (FLASH 07, Button #3).
The following message displays:
2. Enter a valid number (00-28) on the dial pad to correspond to one of the 29 available options. (Refer to Table 2-6: Flash Rates.)
3. Press HOLD to save the entry. A confirmation tone is heard and the display updates.
IN C IC M R IN G 0 0-2 8R ED 1 20 IPM FLU T TER
CAL L F OR WAR D BT N 0 0-2 8R ED S TEA DY ON

Programmable Flash Rates 2-45
DescriptionThe Call Forward Button flash rate is the rate at which the Call Forward button flashes when any type of forward mode is used. This flash rate can be programmed to 29 different options identified in the flash rate table. This enables the programmer to customize the key system configuration to desired flash rates. By default, Call Forward Button flash rate is set for a Red Steady On (01).
Message Wait / VM Button
Programming Steps1. Press the MSG WAIT/VM BTN flex button (FLASH 07, Button #4). The
following message displays:
2. Enter a valid number (00-28) on the dial pad to correspond to one of the 29 available options. (Refer to Table 2-6: Flash Rates.)
3. Press HOLD to save the entry. A confirmation tone is heard and the display updates.
DescriptionThe Message Wait/VM Button flash rate is the rate at which the Message Wait and VM button(s) flashes when you receive a message/voice mail message. This flash rate can be programmed to 29 different options identified in the flash rate table. This enables the programmer to customize the key system configuration to desired flash rates.
By default, Message Wait/VM Button flash rate is set for a Red Steady On (01).
MSG WAIT / V M B TN 0 0-2 8R ED S TEA DY ON
The fixed message button should not be used as a Voice Mail button.

2-46 Programmable Flash Rates
Message Callback - DSS / BLF
Programming Steps1. Press the MSG CBCK – DSS/BLF flex button (FLASH 07, Button #5).
The following message displays:
2. Enter a valid number (00-28) on the dial pad to correspond to one of the 29 available options. (Refer to Table 2-6: Flash Rates.
3. Press HOLD to save the entry. A confirmation tone is heard and the display updates.
DescriptionThe Message Call Back DSS/BLF flash rate is the rate at which a DSS button of a station returning your message flashes. This flash rate can be programmed to 29 different options identified in the flash rate table. This enables the programmer to customize the key system configuration to desired flash rates. By default, Message Callback DSS/BLF flash rate is set for a Red 120 ipm Flutter (11).
Do Not Disturb - DSS / BLF
Programming Steps1. Press the DND – DSS/BLF flex button (FLASH 07, Button #6). The
following message displays:
2. Enter a valid number (00-28) on the dial pad to correspond to one of the 29 available options. (Refer to Table 2-6: Flash Rates.)
3. Press HOLD to save the entry. A confirmation tone is heard and the display updates.
MSG CB CK / D SS / B LF 0 0-2 8R ED 1 20 IPM FLU T TER
D N D D SS / B LF 0 0-2 8R ED 6 0 IP M D B L WIN K

Programmable Flash Rates 2-47
DescriptionThe Do Not Disturb DSS/BLF flash rate is the rate at which a DSS button of a station flashes when you are in a Do Not Disturb mode. This flash rate can be programmed to 29 different options identified in the flash rate table. This enables the programmer to customize the key system configuration to desired flash rates. By default, Do Not Disturb DSS/BLF flash rate is set for a Red 60 ipm Double Wink (04).
Auto Callback - DSS / BLF
Programming Steps1. Press the AUTO CBCK – DSS/BLF flex button (FLASH 07, Button #7).
The following message displays:
2. Enter a valid number (00-28) on the dial pad to correspond to one of the 29 available options. (Refer to Table 2-6: Flash Rates.)
3. Press HOLD to save the entry. A confirmation tone is heard and the display updates.
DescriptionThe Auto Callback DSS/BLF flash rate is the rate at which a DSS button of a station returning your call back flashes. This flash rate can be programmed to 29 different options identified in the flash rate table. This enables the programmer to customize the key system configuration to desired flash rates. By default, Auto Callback DSS/BLF flash rate is set for a Red 120 ipm Flash (10).
UCD Available / Unavailable - DSS / BLF
Programming Steps1. Press the UCD UNAVL – DSS/BLF flex button (FLASH 07, Button #8).
The following message displays:
AU TO C BCK D SS / B LF 0 0-2 8R ED 1 20 IPM FLA SH
U CD U N AV L D SS / B LF 0 0-2 8R ED 6 0 IP M D B L WIN K

2-48 Programmable Flash Rates
2. Enter a valid number (00-28) on the dial pad to correspond to one of the 29 available options. (Refer to Table 2-6: Flash Rates.)
3. Press HOLD to save the entry. A confirmation tone is heard and the display updates.
DescriptionThe UCD Available/Unavailable DSS/BLF flash rate is the rate at which a DSS appearance for a station in ACD/UCD Unavailable mode flashes. This flash rate can be programmed to 29 different options identified in the flash rate table. This enables the programmer to customize the key system configuration to desired flash rates. By default, UCDAvailable/Unavailable DSS/BLF flash rate is set for a Red 60 ipm Double Wink (04).
Transfer CO Ringing
Programming Steps1. Press the TRANSFER CO RING flex button (FLASH 07, Button #9). The
following message displays:
2. Enter a valid number (00-28) on the dial pad to correspond to one of the 29 available options. (Refer to Table 2-6: Flash Rates.)
3. Press HOLD to save the entry. A confirmation tone is heard and the display updates.
DescriptionThe Transfer CO Ringing flash rate is the rate at which a CO Line button or Loop button flashes when a call is transferred to you. This flash rate can be programmed to 29 different options identified in the flash rate table. This enables the programmer to customize the key system configuration to desired flash rates. By default, Transfer CO Ringing flash rate is set for a Red 120 ipm Flash (10).
TR AN S FER CO R IN G 0 0-2 8R ED 1 20 IPM FLA SH

Programmable Flash Rates 2-49
Recall CO Ringing
Programming Steps1. Press the RECALL CO RING flex button (FLASH 07, Button #10). The
following message displays:
2. Enter a valid number on the dial pad to correspond to one of the 29 available options. (Refer to Table 2-6: Flash Rates .)
3. Press HOLD to save the entry. A confirmation tone is heard and the display updates
DescriptionThe Recall CO Ringing flash rate is the rate at which a CO Line button or Loop button flashes when a call recalls to your station. This flash rate can be programmed to 29 different options identified in the flash rate table. This enables the programmer to customize the key system configuration to desired flash rates. By default, Recall CO Ringing flash rate is set for a Red 480 ipm Flutter (08).
Queued CO Ringing
Programming Steps1. Press the QUEUED CO RING flex button (FLASH 07, Button #11). The
following message displays:
2. Enter a valid number (00-28) on the dial pad to correspond to one of the 29 available options. (Refer to Table 2-6: Flash Rates.)
3. Press HOLD to save the entry. A confirmation tone is heard and the display updates.
R ECAL L CO R IN G 0 0-2 8R ED 4 80 IPM FLU T TER
QU EU ED CO R IN G 0 0-2 8G RE EN 4 80 I PM FLU TT ER

2-50 Programmable Flash Rates
DescriptionThe Queued CO Ringing flash rate is the rate at which a CO Line button or Loop button flashes when a queued line becomes available. This flash rate can be programmed to 29 different options identified in the flash rate table. This enables the programmer to customize the key system configuration to desired flash rates. By default, Queued CO Ringing flash rate is set for a Green 480 ipm Flutter (22).
Exclusive Hold
Programming Steps1. Press the EXCLUSIVE HOLD flex button (FLASH 07, Button #12). The
following message displays:
2. Enter a valid number (00-28) on the dial pad to correspond to one of the 29 available options. (Refer to Table 2-6: Flash Rates.)
3. Press HOLD to save the entry. A confirmation tone is heard and the display updates.
DescriptionThe Exclusive Hold flash rate is the rate at which a CO Line button or Loop button flashes when a call is placed on Exclusive Hold. This flash rate can be programmed to 29 different options identified in the flash rate table. This enables the programmer to customize the key system configuration to desired flash rates. By default, Exclusive Hold flash rate is set for a Green 120 ipm Flash (24).
System Hold
Programming Steps1. Press the SYSTEM HOLD flex button (FLASH 07, Button #13). The
following message displays:
EXCLUS IV E H OLD 0 0-2 8G RE EN 1 20 I PM FLA SH
SY ST EM H OLD 0 0-2 8R ED 6 0 IP M D B L WIN K

Programmable Flash Rates 2-51
2. Enter a valid number (00-28) on the dial pad to correspond to one of the 29 available options. (Refer to Table 2-6: Flash Rates.)
3. Press HOLD to save the entry. A confirmation tone is heard and the display updates.
DescriptionThe System Hold flash rate is the rate at which a CO Line button or Loop button flashes when a call is placed on System Hold. This flash rate can be programmed to 29 different options identified in the flash rate table. This enables the programmer to customize the key system configuration to desired flash rates. By default, System Hold flash rate is set for a Red 60 ipm Double Wink (04).
In-Use Hold (I-Hold)
Programming Steps1. Press the IN-USE HOLD flex button (FLASH 07, Button #14). The
following message displays:
2. Enter a valid number (00-28) on the dial pad to correspond to one of the 29 available options. (Refer to Table 2-6: Flash Rates.)
3. Press HOLD to save the entry. A confirmation tone is heard and the display updates.
DescriptionThe In Use-Hold (I-Hold) flash rate is the rate at which a CO Line button or Loop button flashes when a call is placed on In-Use Hold (I-Hold). This flash rate can be programmed to 29 different options identified in the flash rate table. This enables the programmer to customize the key system configuration to desired flash rates. By default, In-Use Hold (I-Hold) flash rate is set for a Green 60 ipm Flash (17).
IN -U SE H OLD 0 0-2 8G RE EN 6 0 IP M F LAS H

2-52 Programmable Flash Rates
Camp-On Button
Programming Steps1. Press the CAMP-ON BTN flex button (FLASH 07, Button #15). The
following message displays:
2. Enter a valid number (00-28) on the dial pad to correspond to one of the 29 available options. (Refer to Table 2-6: Flash Rates.)
3. Press HOLD to save the entry. A confirmation tone is heard and the display updates.
DescriptionThe Camp-On Button flash rate is the rate at which the Camp-On Button flashes when you receive a Camp-On. This flash rate can be programmed to 29 different options identified in the flash rate table. This enables the programmer to customize the key system configuration to desired flash rates. By default, Camp-On Button flash rate is set for a Red 120 ipm Flash (12).
Call Back Button
Programming Steps1. Press the CALL BACK BTN flex button (FLASH 07, Button #16). The
following message displays:
2. Enter a valid number (00-28) on the dial pad to correspond to one of the 29 available options. (Refer to Table 2-6: Flash Rates.)
3. Press HOLD to save the entry. A confirmation tone is heard and the display updates.
CAM P ON BT N 0 0-2 8R ED 1 20 IPM FLA SH
CAL L B ACK BT N 0 0-2 8R ED 1 20 IPM FLA SH

Programmable Flash Rates 2-53
DescriptionThe Call Back Button flash rate is the rate at which the Call Back Button flashes when a station at which you left a call back request becomes available. This flash rate can be programmed to 29 different options identified in the flash rate table. This enables the programmer to customize the key system configuration to desired flash rates. By default, Call Back Button flash rate is set for a Red 120 ipm Flash (10).
Line Queue Button
Programming Steps1. Press the LINE QUEUE BTN flex button (FLASH 07, Button #17). The
following message displays:
2. Enter a valid number (00-28) on the dial pad to correspond to one of the 29 available options. (Refer to Table 2-6: Flash Rates.)
3. Press HOLD to save the entry. A confirmation tone is heard and the display updates.
DescriptionThe Line Queue Button flash rate is the rate at which the Line Queue Button flashes after queueing onto a busy line. This button flashes when the busy line becomes available. This flash rate can be programmed to 29 different options identified in the flash rate table which enables the programmer to customize the key system configuration to desired flash rates. By default, Line Queue Button flash rate is set for a Red 480 ipm Flutter (08).
Do Not Disturb Button
Programming Steps1. Press the DND BTN flex button (FLASH 07, Button #18). The
following message displays:
LIN E QU EU E BT N 0 0-2 8R ED 4 80 IPM FLU T TER
D N D B TN 0 0-2 8R ED S TEA DY ON

2-54 Programmable Flash Rates
2. Enter a valid number (00-28) on the dial pad to correspond to one of the 29 available options. (Refer to Table 2-6: Flash Rates.)
3. Press HOLD to save the entry. A confirmation tone is heard and the display updates.
DescriptionThe Do Not Disturb Button flash rate is the rate at which your Do Not Disturb Button flashes when you place your station in a Do Not Disturb mode. This flash rate can be programmed to 29 different options identified in the flash rate table. This enables the programmer to customize the key system configuration to desired flash rates. By default, Do Not Disturb Button flash rate is set for Red Steady On (01).
Intercom Hold Button
Programming Steps1. Press the ICM HOLD BTN flex button (FLASH 07, Button #19). The
following message displays:
2. Enter a valid number (00-28) on the dial pad to correspond to one of the 29 available options. (Refer to Table 2-6: Flash Rates.)
3. Press HOLD to save the entry. A confirmation tone is heard and the display updates.
DescriptionThe Intercom Hold Button flash rate is the rate at which your Hold button flashes when you receive an intercom call and your station’s intercom mode selector switch is in the T position. This flash rate can be programmed to 29 different options identified in the Flash Rate table. This enables the programmer to customize the key system configuration to desired flash rates.
By default, Intercom Hold Button flash rate is set for a Red 15 ipm Flash (09).
ICM HO LD B TN 0 0-2 8R ED 1 5 IP M F LAS H

System Parameters 2-55
System Parameters
Programming Steps
If the system is in the programming mode, continue using the program codes. If starting to program here, enter the programming mode.
Press FLASH and dial [09]. The following message displays:
Description
This section describes the procedures and steps necessary to program System Parameters in the System Parameters programming area. The buttons on the digital telephone are shown in the following illustration:
SY ST EM PA R AMET ER SEN TE R B U TTON N UM BE R
MUSICCH #3
MUSICCH #4
MUSICCH #5
MUSICCH #6
1 Q 2 W 3 E 4 R
MUSIC CH #7
MUSICCH #8
5 T 6 Y 7 U 8 I
9 O 10 P 11 A 12 S
13 D 14 F 15 G 16 H
17 J 18 K 19 L 2 0 ;
21 Z 22 X 2 3 C 24 V

2-56 System Parameters
MOH Assignments
Programming Steps
1. Press the MUSIC CH # flex button (FLASH 09, Button #1 through #6). The following message displays:
X= 3-8
YYY = CO Line number
2. Enter a valid number (001-012) that corresponds to the CO line number desired.
3. Press HOLD to save the entry. A confirmation tone is heard.
Description
The MOH Assignments feature enables the system to assign CO line circuits as additional 6 music-on-hold inputs. This increases the capacity of music channels beyond the 2 available on the MISU board for use by MOH sources. A total of 8 channels are available for use on the system. By default, no channels are assigned.
Table 2-7: System Parameters Programming
Program Code
FlexButton
FeatureDefault
(after initialization)
FLASH 09 123456
Music Channel #3*Music Channel #4*Music Channel #5*Music Channel #6*Music Channel #7*Music Channel #8*
##################
* Music Channels 3-8 can only be used for Music-On-Hold functions
The leading digit feature is removed in FP3. The leading digit feature is replaced by a networking table (FLASH 16).
MU SIC CH AN N EL X ## # , 0 01 - 01 2Y Y Y

Attendant Station Assignment 2-57
Figure 2-2: Wiring - Music Source to a CO Line
Attendant Station Assignment
Programming Steps
1. Press FLASH and dial [10]. The following message displays:
2. Enter a valid station number (100-131) on the dial pad.
3. Press HOLD to save the entry. A confirmation tone is heard and the display updates.
Description
The system identifies an attendant station for the purpose of receiving recalls and activating night service. The system can have up to three attendant(s) programmed. Entering [#] three times removes that attendant assignment or different station numbers can be programmed. By default, Station 100 is assigned as the first attendant.
AT N D STA A SSIG N MEN T10 0, ## #, # ##
1 0 uF 1 0 uF + - - +
R es is to rs a re 6 80 O hm / 1w .C ap ac ito rs a re 1 0u F /5 0v .
+ -
K SU
C OM u si csou rce
P ow er S up ply+ 24 o r -48 VD C
68 0O hm
68 0O hm
12 0vac

2-58 System Time and Date
System Time and Date
Programming Steps
To set the time and date that appears on display telephones:
1. Press FLASH and dial [11]. The following message displays:
MM M = Month
DD = Day
YY = Year
HH= Hour
MM = Minute
2. Choose display format by pressing the appropriate button in the flexible button field. The time can be displayed in the standard 12-hour format or the 24-hour format
3. Dial the time and date in the order shown below (2 digits for each entry, for a total of 10 digits):
Year
Month
Day
Hour
Minute
4. Press HOLD to save the entry. A confirmation tone is heard and the display updates.
D AT E AN D TIMEMMM D D Y Y H H : MM am
To program a pm time after selecting the 12-hour format, use 24-hour numbering, e.g., To program a time of 5:00 pm, enter 17:00.
12/24HOUR
1 Q 2 W 3 E 4 R

PBX Dialing Codes 2-59
By default, the time is set for 12 hour display format. When entering the time and date, use the following data:
LED Off = 12 Hour Display
LED On = 24 Hour Display
PBX Dialing Codes
Programming Steps
1. Press FLASH and dial [12]. The following message displays:
2. Enter valid numbers (one right after the other) on the dial pad, up to ten digits. If a single digit code is required, enter code followed by [#].
3. Press HOLD to save the entry. A confirmation tone is heard and the display updates.
4. To delete a code, enter [#] [#] and press HOLD.
Description
Five 1- or 2-digit PBX access codes can be programmed into memory. When dialed, these codes signal the system so toll restriction is applied at the next dialed digit. When a single digit code [9] is entered, it must be followed by [#] as the second digit. To delete an entry, enter [#] twice and Press HOLD. Lines must be programmed as PBX lines before these codes apply. By default, no PBX dialing codes are assigned. Programming is performed in FLASH 40, PAGE A, Button 2.
The Date and Time can be changed or set by the First Attendant station using dial code [692].
P BX D IAL COD ES## , ## , ## , # #, # #
Table 1 -- Can be set to dial [9] for Centrex 911 calls. If the CO is set to 911, enter yes and the unit is on Centrex. This w ill dial the Centrex 9 (not LCR).

2-60 Executive / Secretary Pairs
Executive / Secretary Pairs
Programming Steps
1. Press FLASH and dial [13]. The following message displays:
The first button is lit indicating the first pair may be programmed.
2. Enter a valid Executive station number.
3. Enter a valid Secretary station number.
4. Press HOLD to save the data. A confirmation tone is heard and the display updates.
To program a second pair, press the second flexible button in the flexible button field and enter station numbers as in steps 2-4.
To program a third pair, press the third button in the flexible button field and enter station numbers as in steps 2-4.
To program a fourth pair, press the fourth button in the flexible button field and enter station numbers as in steps 2-4.
Description
There are four Executive/Secretary pairs available. When an Executive station is busy or in DND, intercom calls and transfers are automatically routed to the designated Secretary.The assigned secretary may Camp-On to the Executive Station when the station is busy or in Do-Not-Disturb. There can be only one pairing of stations, with no duplicates. You cannot pair Executive 100 to Secretary 101, then pair Secretary 101 to Executive 100. The same Secretary station can be specified for more than one Executive station (101-105 and 102-105). Entering [#] six times removes the assignments. Individual pairs may be changed by pressing the associated flexible button. By default, no Executive / Secretary pairs are assigned.
EXE C S ECY PA IRIN G S## #, # ## PA IR 1
EXEC / SECYPAIR #1
EXEC / SECYPAIR #2
EXEC / SECYPAIR #3
EXEC / SECYPAIR #4
1 Q 2 W 3 E 4 R

On-Board Relay Programming 2-61
On-Board Relay Programming
Programming Steps
1. Press FLASH and dial [14]. Button #1 is lit to indicate Relay #1 is selected. The following message displays:
X = 1-2YYYYYYYYYYYY = Ext Page Zone 1-2, LBC Sta XXX, Ran Start X, CO Control XX
2. Press the button that corresponds to the desired relay. That button lights. Enter one of the following sequences on the keypad:
[1] + [1] External Page Zones
[2] +[1 through 8] = RAN Start (RAN Announcement Tables 1-8)
[3]+ STA # = Loud Bell
[4]+ CO # = CO Line Con trol
[0]= Disables Relay
3. Press HOLD to save the entry. A confirmation tone is heard and the display updates.
Each time the user presses a relay button, the LCD updates with the relay number and the function assigned to it.
Description
The Triad-S has two relays on the BKSU that can be programmed to perform certain functions. These functions are loud bell, external page control, RAN Start, and CO Line control.
R ELAY X TY P EY Y Y Y Y Y Y Y Y Y Y Y
RELAY1
RELAY2
1 Q 2 W 3 E 4 R
5 T 6 Y 7 U 8 I

2-62 Baud Rate Assignments
Baud Rate Assignments
Programming Steps
Press FLASH and dial [15]. The first button is lit and ready for programming Port #1. The following message displays:
Description
The Triad-S System provides outputs such as SMDR or ICLID to the optional RS-232 connectors on the MISU.
Port #1, #2, #3 Baud Rates
Programming Steps
1. Press the desired PORT # flex button (FLASH 15, Buttons #1, #2, or #3) to determine the port to program.
2. Enter a 1-digit number for the baud rate:
[1] = 150 Baud
[2] = 300 Baud
[3] = 600 Baud
[4] = 1200 Baud
[5] = 2400 Baud
[6] = 4800 Baud
[7] = 9600 Baud
[8] = 19.2K Baud
3. Press HOLD to save the entry. A confirmation tone is heard and the display updates.
P ORT BAUD1 960 0
PORT #1MISU 1
PORT #2MISU 2
PORT #3MODEM
1 Q 2 W 3 E 4 R
5 T 6 Y 7 U 8 I

Networking Tables 2-63
DescriptionPort #1 -- First RS-232C port on the optional MISUPort #2 -- Second RS-232 port on the optional MISUPort #3 -- Optional Modem
By default, Port #1 (MISU RS-232C), Port #2 (MISU RS-232) and Port #3 (Modem) baud rates are set for 9600.
Networking Tables
Programming Steps1. Press FLASH and dial [16]. The following message displays:
2. Press the desired button, make the necessary entry, and then press HOLD after each entry to select a trunk group, station range, and system number:
[1] = Select Trunk Group (0-23)
[2]= Station Range FROM (1000-9999)
[3] = Station Range TO (1000-9999)
[4] = Reserved for future feature
[22] = Page Up
[23] = Page Down
[24] = Select system number (1-16)
N ET WOR K IN G TAB LESSEL ECT S YS N O

2-64 Networking Tables
Description
The Networking Table identifies the system number (1-16); the CO group (0-23); and the range of station numbers (from XXXX to XXXX).
TRUNK GRPSTATION
RANGE FROMSTATION
RANGE TO1 Q 2 W 3 E 4 R
5 T 6 Y 7 U 8 I
9 O 10 P 11 A 12 S
1 3 D 14 F 15 G 16 H
17 J 18 K 19 L 20 ;
PAGE UP PAGE DOWN SYSTEM NO
21 Z 22 X 2 3 C 24 V

Networking Tables 2-65
Conditions
With Flexible Numbering enabled/used, the call forwarding feature changes.
Feature access codes cannot conflict with station numbering.
CO line numbers are fixed and cannot be changed other than the current FLASH 42 re-assignment.
The VMID digits need to be programmed separately.
Table 2-8: Networking Tables
System CO GroupStation Range
From To
1
2
3
4
5
6
7
8
9
10
11
12
13
14
15
16
Button 24 Button 1 Button 2 Button 3
Only 4-digit extensions will work with Network Tables.
The numbers entered in the station range cannot conflict with the Flexible Numbering Plan.
When systems are tied together, each system has to have access to 911 through local lines.

2-66 Access Codes
The SMDR will output up to 4-digit numbers in the station field. If less than 4 digits are selected in the numbering plan, leading spaces will be added in place of numbers. The 3-4 digit SMDR programming area is removed from programming in FP3. Call Accounting devices need to be configured to accept 4 digits.
Access Codes
Programming Steps
If the system is in the programming mode, continue using program codes. If starting to program here, enter the programming mode.
Press FLASH and dial [20]. The following message displays:
Description
This section describes the procedures and steps necessary to program Access codes.
DISA Access Code
Programming Steps
1. Press the DISA ACCESS CODE flex button (FLASH 20, Button #1). The following message displays:
2. Enter a valid number (000–999) for the DISA access code.
3. Press HOLD to save the entry. A confirmation tone is heard and the display updates.
ACCES S COD ESEN TE R B U TTON N UM BE R
DISAACCESS CODE
ADMINPASSWORD
1 Q 2 W 3 E 4 R
D ISA ACCE SS COD E10 0

Station Message Detail Recording (SMDR) 2-67
DescriptionThe DISA Access Code feature permits assigning a 3-digit access code to the system. Anyone calling on a DISA line must use this code to gain access to system features. To disable the DISA access code, enter (#) three times. By default, 100 is the assigned access code. Use of this feature with or without access code can be abused by callers.
Database Admin Password
Programming Steps1. Press the ADMIN PASSWORD flex button (FLASH 20, Button #2). The
following message displays:
2. Enter a valid number that corresponds with 0000-9999.
3. Press HOLD to save the entry. A confirmation tone is heard and the display updates.
DescriptionThe password used to enter customer database programming can be customized by the programmer. This lets the system administrator block unauthorized personnel from entering database admin.
Station Message Detail Recording (SMDR)
Programming Steps1. Press FLASH and dial [21]. The following message displays:
AD MIN PASS WOR D32 26
Care should be taken when changing the programming password so authorized personnel are not locked out, which could prevent or delay them from making necessary programming changes.
SD R T PE P N T B AUD P OR TN O LD 8 0 9 60 0 1

2-68 Station Message Detail Recording (SMDR)
2. To program SMDR features, use the flexible button(s) as defined in the following procedures.
3. The ENABLE/DISABLE, TYPE, and PRINT features toggle on and off each time the button is pressed. The display updates with each toggle.
4. After all entries are made, press HOLD to save the entry. A confirmation tone is heard.
DescriptionThe Triad-S System can provide SMDR output to the optional RS-232C connectors on the MISU. When SMDR is desired, the following system-wide parameters determine how SMDR information is reported.
SMDR Enable / Disable
Programming Steps
1. Press the ENABLE/DISABLE flex button (FLASH 21, Button #1). This feature toggles on and off each time the button is pressed. The display updates with each toggle.
LED ON = SMDR is enabled
LED OFF = SMDR is disabled
2. Press HOLD to save the entry. A confirmation tone is heard.
Description
A call accounting device can be installed allowing the system to track calls by outside line number, number dialed, time of day, date, station that placed or received the call, and duration of the call. By default, SMDR is disabled.
ENABLE /DISABLE
CALL TYPE PRINT FORMAT BAUD RATE
1 Q 2 W 3 E 4 R
SMDR PORTASSIGNMENTS
5 T 6 Y 7 U 8 I

Station Message Detail Recording (SMDR) 2-69
Long Distance / All Calls
Programming Steps1. Press the CALL TYPE flex button (FLASH 21, Button #2) to determine
the type of calls to record. This feature toggles on and off each time the button is pressed. The display updates with each toggle.
LED ON = Long Distance is enabled
LED OFF = All Calls is enabled
2. Press HOLD to save the entry. A confirmation tone is heard.
DescriptionThe system can be set to record all outgoing calls or only outgoing long distance calls. Long Distance calls are defined as beginning with a 1 or 0, or containing eight or more digits. Incoming calls are only recorded if TYPE is set for all calls. By default, the system records long distance (LD) calls only.
Character Print Assignment
Programming Steps1. Press PRINT FORMAT flex button (FLASH 21, Button #3) to
determine the print format of SMDR records. This feature toggles on and off each time the button is pressed. The display updates with each toggle.
LED On= 80-Character is enabled
LED Off = 30-Character is enabled
2. Press HOLD to save the entry. A confirmation tone is heard.
DescriptionThe system can be programmed to print individual SMDR records in either a 1-line 80-character format or a 3-line 30-character format. By default, the 1-line 80-character format is selected.

2-70 Station Message Detail Recording (SMDR)
Baud Rate Display
Programming StepsThe SMDR Baud Rate is programmed using Flash 15, Baud Rate Assignments. FLASH 21, Button #4 returns an error tone when pressed. The LCD displays the current baud rate based on which port is assigned to the SMDR Port number.
DescriptionThe Triad-S System provides SMDR output to the standard RS-232C connector on the optional MISU. The baud rate is displayed as 150, 300, 600, 1200, 2400, 4800, or 9600 baud.
SMDR Port Assignments
Programming Steps1. Press the PORT flex button (FLASH 21, Button #5) to determine
which port to use for SMDR information.
2. Enter a valid number for the SMDR Port number:
[1]= Port #1 (MISU On-Board RS-232C)
[2]= Port #2 (MISU On-Board RS-232C)
The LCD displays the current baud rate based on which Port number is assigned to the SMDR Port number.
3. Press HOLD to save the entry. A confirmation tone is heard and the display updates.
DescriptionPort #1 -- Refers to the RS-232C connector on the optional MISU.
Port #2 -- Refers to the RS-232C connector on the optional MISU.
By default, Port #1 is used for SMDR.
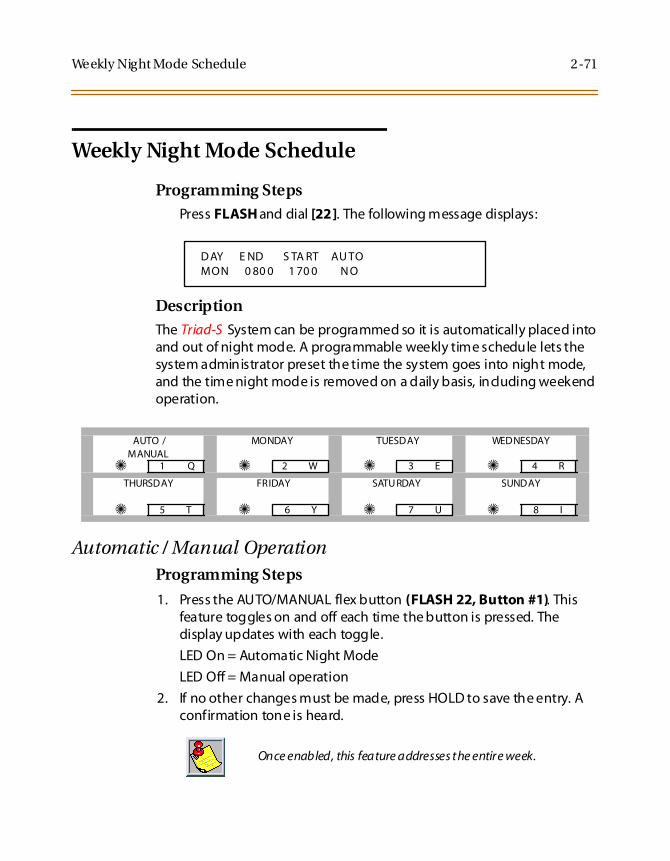
Weekly Night Mode Schedule 2-71
Weekly Night Mode Schedule
Programming Steps
Press FLASH and dial [22]. The following message displays:
Description
The Triad-S System can be programmed so it is automatically placed into and out of night mode. A programmable weekly time schedule lets the system administrator preset the time the system goes into night mode, and the time night mode is removed on a daily basis, including weekend operation.
Automatic / Manual OperationProgramming Steps
1. Press the AUTO/MANUAL flex button (FLASH 22, Button #1). This feature toggles on and off each time the button is pressed. The display updates with each toggle.
LED On = Automatic Night Mode
LED Off = Manual operation
2. If no other changes must be made, press HOLD to save the entry. A confirmation tone is heard.
D AY E ND S TA RT AU TOMON 0 80 0 1 70 0 N O
AUTO / MANUAL
MONDAY TUESDAY WEDNESDAY
1 Q 2 W 3 E 4 R
THURSDAY FRIDAY SATURDAY SUNDAY
5 T 6 Y 7 U 8 I
Once enabled, this feature addresses the entire week.

2-72 Directory Dialing
DescriptionIf the system is operated in the automatic night mode the attendant(s) can override the automatic mode by pressing the night key on the attendant(s) phone. The schedule does not go into effect until the attendant(s) press the night key again. When the system is placed into night mode, CO line ringing follows the night ringing assignments and stations are governed by their respective night COS. The default times for automatic night mode are:
Monday to Friday 08:00 17:00 (Daytime operation 8:00 am to 5:00 pm)
Saturday and Sunday ##:## ##:## (24-hour night-mode operation)
- An entry of 00:00 23:59 indicates 24 hours of day mode.
- An entry of ##:## ##:## directs the system to ignore these days.
Day of Week Programming
Programming StepsThe MONDAY flex button (Button #2) LED is lit. To change days of week:
1. Press the appropriate DAY OF WEEK flex button (FLASH 22, Buttons 2-8).
2. Enter a valid number for the hour and minutes to end night mode.
3. Press HOLD to save the entry. (Example: 07301830 [HOLD]) A confirmation tone is heard and the display updates.
Directory Dialing
Programming StepsTo enter, change, erase or view entries in the Directory Dialing list:
Press FLASH and dial [23].The following message displays
AAA = Directory list entry number (000-199)
XXXX = station, system spee d dial bin, or Local Nbr/Name Translation table number
nnn = programmed name (blank if none)
D IR LST AAA / ICM : XXXXn n n nn n n n n n n nn n n n n n n n nn n n n n n n

Directory Dialing 2-73
Selecting a Directory List Entry1. Press Flexible button #20 for a directory list entry.
2. Dial a valid directory list entry number (000–199).
3. Press HOLD to save the entry. A confirmation tone is heard and the display updates.
Scrolling Through the Directory List:
Press the NEXT flex button (FLASH 23, Button #18) to scroll up (next entry).
Press the PREV flex button (FLASH 23, Button #19) to scroll back (previous entry).
DescriptionDirectory Dialing enables station users obtain a directory of station users and have the system dial the extension currently displayed. The Triad-S System provides locations for up to 200 names (000-199). Directory dialing also lets users program a name with a speed dial bin for use in later locating a speed dial number. When prompted, the system displays the name associated with a speed dial number so when the desired name is shown, the user may then have the system dial the number.
Directory Dialing also lets users associate a name with an entry in the local number/name translation table. When prompted, the system displays the name associated with the table so when the desired name is shown, the user may then have the system dial the number. The Triad-S System provides locations for up to 200 names.
The Directory Dialing list may be programmed and maintained at the first assigned attendant station in one of two ways. However, this admin routine lets the directory list be maintained by the system programmer locally (at Station 100) or remotely via modem access.

2-74 Directory Dialing
Associating a Number to: Intercom Number or System Speed Dial Bin1. Press the BIN/ICM flex button (FLASH 23, Button #1).2. Enter one of the following: a Station Intercom number, a System
Speed Dial number, or a Local Number/name Translation Table number.
100-131 = Triad-S Extension Numbers
1020–1999 = System Speed Numbers (with expanded memory)
600-799 = Local Number/Name Table
3. Press HOLD to save the entry. A confirmation tone is heard and the display updates.
BIN/ICM – Each entry in the directory dialing list must be associated to a system speed dial bin (for calling a destination outside of the system) or to an intercom station (for calling internal station including CO line transfers).
Entering/Changing Current Name Shown on the Display1. Press the NAME flex button (FLASH 23, Button #2).
2. Enter the name (up to 24-characters may be entered) by using keys on the dial pad as illustrated on the following page:
BIN /ICM
NAME CLEAR BACKSPACE
1 Q 2 W 3 E 4 R
5 T 6 Y 7 U 8 I
9 O 10 P 11 A 12 S
1 3 D 14 F 15 G 16 H
NEXTENTRY
PREVENTRY
NEWENTRY
17 J 18 K 19 L 20 ;
21 Z 22 X 2 3 C 24 V

Directory Dialing 2-75
3. If an error is made while entering the name, press the BACK SPACE flex button (FLASH 23, Button #4). This button backspaces one character at a time.
4. Press HOLD to save the entry. A confirmation tone is heard and the display updates.
Name – A name up to 24-characters may be entered into each directory dial list entry. The names display alphabetically when accessed by a station user. It is possible to have multiple entries that are associated to the same station number or system speed dial bin. This lets the same name be entered into the list several times.
For example, by last name and by first name, pointed to a station number and a speed dial bin (home, or mobile phone number). Or, several different names associated to the same speed dial bin.
Clearing an Entry1. Press the CLEAR flex button (FLASH 23, Button #3).
2. Press HOLD to save the entry. A confirmation tone is heard and the display updates. The entry is erased (both the BIN/ICM assignment and the programmed name).
Clear – Table entries may be erased and cleared from the table to allow placement of another entry into the list. When a system speed dial bin is deleted/changed, the name associated to the bin must also be erased. When a multiple table listing is associated to one system speed dial bin it may be necessary to clear more than one entry.
Table 2-9: Dial Pad Keys
Other Codes
1 = 1# 8 = 8# = 01 * = *#
2 = 2# 9 = 9# , = 02 ( = #1
3 = 3# 0 = 0# ? = 03 ) = #2
4 = 4# Space = 11 / = 04 + = #3
5 = 5# : = 12 ! = *1 = = #4
6 = 6# - = 13 $ = *2 # = ##
7 = 7# ‘ = 14 & = *4 . = 24

2-76 Hunt Groups
Hunt Groups
Hunt Group Programming
Programming Steps
1. Press FLASH and dial [30]. The following message displays:
The top left button in the flexible button field is lit for programming Hunt Group 1 (450).
2. To change Hunt Groups or enter a different Hunt Group, press the appropriate flexible button 1-12 (450-461) and perform the following procedures.
3. Enter a valid three digit station number, or station numbers up to eight stations per group. Hunt groups are joined together by entering another Hunt Group Pilot Number as the last entry of the group.
4. Press HOLD to save the entry. A confirmation tone is heard and the display updates.
Description
The system can be programmed for up to 12 Hunt Groups. Each Hunt Group can contain up to 8 stations each. Each Hunt Group can be independently arranged to use a pilot hunting or station hunting technique. If a station is in DND or is forwarded to another station, it is considered busy.
H UN T 4 50 P LT ON E # ## , ##### #, ## #, # ##, ### , ## #, # ##

Hunt Groups 2-77
Hunt Group
Programming Steps1. Press FLASH and dial [30].2. To select the desired Hunt Group, press Buttons 1-12.
3. Enter the station number(s) (up to 24 digits and 8 stations). Hunt Groups are joined together by entering another Hunt Group Pilot number as the last entry of the group.
4. Press HOLD to save the entry.
Removing Stations from a Hunt Group1. Enter [#] three times on the dial pad.
2. Press HOLD. A confirmation tone is heard and the display updates. This removes all stations previously programmed in that group.
DescriptionThe Hunt Group feature is used to add and delete stations from a specified Hunt Group.
HUNT GRP450
HUNT GRP451
HUNT GRP452
HUNT GRP453
1 Q 2 W 3 E 4 R
HUNT GRP454
HUNT GRP455
HUNT GRP456
HUNT GRP457
5 T 6 Y 7 U 8 I
HUNT GRP458
HUNT GRP459
HUNT GRP460
HUNT GRP461
9 O 10 P 11 A 12 S
STATION /PILOT
1 3 D 1 4 F 15 G 16 H
H UN T4 5 0 A AA B B B XXX XXXXXX XXX XXX XXX XXX XXX

2-78 Hunt Groups
Station / Pilot / Pilot Ring All -- Hunting Assignments
Programming Steps1. Press the STATION/PILOT flex button (FLASH 30, Button #13) to
indicate Station Hunting, Pilot, or Pilot Ring All Hunting.
2. Dial a valid number (0-2):
[0] = Pilot (Default; shown on LCD as PLT ONE)
[1] = Pilot Ring All Hunting (Shown on LCD as PLT ALL)
[2] = Station Hunting (Shown on LCD as CIR)
Description
Pilot Hunting -- Incoming CO, transferred CO, and intercom calls can be directed to a pilot number of a hunt group. The system searches sequentially (in the order the extensions were entered in the database programming) for an idle station in the group and rings that station. Calls directly to stations (by calling the extension number) within the hunt group do not hunt but receive call progress tones from the extension.
Pilot All Ring Hunting -- rings all idle stations in a particular Hunt group at one time.
Station (Circular) Hunting -- Transferred CO, and intercom calls that are presented to a busy, or DND station, that are members of a Station Hunt Group, search sequentially (in the order the extensions were entered in database programming) for an idle station in the group and rings that station. Direct ringing CO Line calls to the station number ring at the station. If station hunting is desired on a direct ringing call, program the station hunting pilot number in the CO Line ring assignment list. This lets the member of the hunt group to receive private/hunt group calls.
458-461 are ONLY for RAN applications.
“All Ring” hunt groups cannot be chained together.

Verified Account Codes / Traveling Class of Service 2-79
Verified Account Codes / Traveling Class of Service
Programming Steps
1. Press FLASH and dial [31]. The following message displays:
ACCT = Up to 12-digit account code
COS = Class of Service for account codes
2. Press the ACCT CODE flex button (FLASH 31, Button #1). Enter up to 12 digits (0-9, *, #). [*] represents a do not care digit. The system ignores all digits after this digit when entering an account code. The [#] represents a single do not care digit.
3. Press the CLASS OF SERVICE flex Button (FLASH 31, Button #2). Enter a 2-digit Class of Service Number (1-7) that corresponds to Class of Service 1-7. The first digit represents Day COS and the second digit represents Night COS.
4. Press HOLD to complete the entry. A confirmation tone is heard.
Description
The Verified Account Code/Traveling Class of Service (COS) feature provides tracking of specific calls by entering a verified, variable length (up to 12 digits) identifier. Each account code can be assigned a day and night Class of Service for determining the dialing privileges allowed by that account code. This provides a means for users to override a restricted station.
If the dialed account code matches the Verified Account code table, an intercom dial tone is returned, otherwise an error tone is returned. The use of forced Account Codes is optional, offered on a system-wide basis. SMDR must be enabled for the account code to print as part of the SMDR record. The Triad-S System allows up to 250 12-digit account codes and must be enabled in Flash 06, Button 3.
By default, no Account Codes are assigned.
ACCT COSXXXXXXXXXXXX ##

2-80 Verified Account Codes / Traveling Class of Service
Deleting the Currently Displayed Account Code1. Press the DELETE CODE flex button (FLASH 31, Button #3) to delete
the entire account code entry.
2. To display the next account code on the LCD, press the NEXT flex button (FLASH 31, Button #18).
3. To display the previous account code on the LCD, press the PREVIOUS flex button (FLASH 31, Button #19).
Re-enter the correct digits and press HOLD to complete the entry. A confirmation tone is heard.
Erasing Previously Entered Digits1. Press the ERASE DIGITS flex button (FLASH 31, Button #4)2. Each press of the button erases one digit. Continue until all desired
digits are erased.
3. Re-enter the correct digits and press HOLD to complete the entry. A confirmation tone is heard.
ACCTCODE
CLASS OFSERVICE
DELETE ACCTCODE
ERASEDIGITS
1 Q 2 W 3 E 4 R
5 T 6 Y 7 U 8 I
9 O 10 P 11 A 12 S
1 3 D 1 4 F 15 G 16 H
NEXT PREV
17 J 18 K 19 L 20 ;
21 Z 22 X 2 3 C 24 V

CO Line Group Queuing 2-81
CO Line Group Queuing
Programming Steps
1. Press FLASH and dial [39]. The following message displays:
2. Press button 1-24 to select desired CO Group. This message displays:
3. Dial a 0 or 1 to enable/disable this feature.
[0] = Disabled
[1] = Enabled
4. Press HOLD to save the entry. A confirmation tone is heard.
Description
The CO Line Group Queuing feature allows trunk group queuing to be turned on (enabled) or turned off (disabled) on a per group basis.
CO L INE G R OU P QU EU IN GEN TE R B U TTON N UM BE R
G ROU P 1 0- 1EN AB LE D
GROUP0
GROUP1
GROUP2
GROUP3
1 Q 2 W 3 E 4 R
GROUP4
GROUP5
GROUP6
GROUP7
5 T 6 Y 7 U 8 I
GROUP8
GROUP9
GROUP10
GROUP11
9 O 10 P 11 A 12 S
GROUP12
GROUP13
GROUP14
GROUP15
1 3 D 1 4 F 15 G 16 H
GROUP16
GROUP17
GROUP18
GROUP19
17 J 18 K 19 L 20 ;
GROUP20
GROUP21
GROUP22
GROUP23
21 Z 22 X 2 3 C 24 V

2-82 Local Number / Name Translation Table
Local Number / Name Translation Table
Programming Steps
1. Press FLASH and dial [55]. The following message displays:
XXX = Table Number 600-799
### = Route Number 000–499
The Route Number LED (Button #1) is lit.
2. Enter a Route Number (000–499) from what was entered in program code, FLASH [43].
Programming a Phone Number into the Translation Table1. Press the PHONE NUMBER flex button (FLASH 55, Button #2) to
enter the desired phone number into the translation table. Maximum length of a phone number is 14 digits, including hyphens. Phone numbers must be in the following format: 1-480-XXX-XXXX.
2. Press HOLD to update the database. The BACK SPACE flex button (FLASH 55, button #5) erases current number for error correction.
Programming a Name into the Translation Table1. Press the NAME flex button (FLASH 55, Button #3) to enter the
desired name into the translation table. Maximum length is 24 characters. (Refer to Table 2-9: Dial Pad Keys for dial pad keys.)
2. Press HOLD to update the database. The BACK SPACE flex button (FLASH 55, Button #5) erases the current letter for error correction.
Erasing a Current Phone Number/Name Entry
Press the CLEAR ENTRY flex button (FLASH 55, Button #4) to clear an entire phone number and name from the current index.
Press the NEXT TABLE flex button (FLASH 55, Button #18) to advance to the next index and continue entering information into the translation table.
Press the PREV TABLE flex button (FLASH 55, Button #19) to return to a previous index that is already programmed.
S - XXX ### ,

Local Number / Name Translation Table 2-83
Locating an Existing Index for Editing1. Press the TABLE NUMBER flex button (FLASH 55, Button #20). The
following message displays:
2. Enter a valid number that corresponds to the table numbers 600-799.
3. Press HOLD to complete the entry.
DescriptionAn administrable table in the KSU provides a local translation from a received calling number to a name. This is administrable by the customer from the attendant console position. This table is also shared by the ICLID features. In cases of conflict between the name delivered from the CO and that in the local translation table, the local translation table rules. 200 entries are provided in this table for the Triad-S System.
An option was added to the Local Number/Name translation table to route an ICLID or Caller Entered ID Digits, based on a partial compare with the number entered in the translation table.
EN TE R TAB LE N UM BE R
ROUTENUMBER
PHONENUMBER
NAME CLEARENTRY
1 Q 2 W 3 E 4 R
BACKSPACE
5 T 6 Y 7 U 8 I
9 O 10 P 11 A 12 S
1 3 D 1 4 F 15 G 16 H
NEXTTABLE
PREVTABLE
TABLENUMBER
17 J 18 K 19 L 20 ;
21 Z 22 X 2 3 C 24 V
If a match is found between a number in the translation table and an incoming call record, the translated name is displayed and/or stored in the unanswered call table.

2-84 Local Number / Name Translation Table

3 CO Line AttributesProgramming
This chapter describes the procedures and steps necessary to program COLine attributes. If the system is in the programming mode, continue usingthe program codes. If starting to program here, you must first enter theprogramming mode. Refer to Figure 1-2: Programming Button Mapping inchapter 1.


Page A Introduction 3-3
Page A Introduction
Programming Steps
1. Press FLASH and dial [40]. The following message displays:
2. Enter a valid number for the range of lines being programmed. If only one line is being programmed, enter that number twice (001 001).
3. Press HOLD to save the entry. A confirmation tone is heard and the display updates. Flexible Button #19 (Page A) is lit. The following message displays to indicate current programming of that line or group of lines:
XXX-XXX = CO Line Range (001-012)
Description
When entering the CO Line attributes portion of the database, the programmer may decide to enter information for a range of CO lines or one specific CO Line.
Range programming lets the programmer change a specific parameter or a few parameters for an entire range of CO Lines leaving intact the remaining data fields that do not require change. Those data fields continue to operate with the previously programmed data.
CO L INE AT TR IB UT ESSEL ECT A CO LIN E RA N GE
If HOLD is pressed without entering a CO range, ALL CO lines (001-012) are selected.
XXX - XXX PA GE AEN TE R B U TTON N UM BE R

3-4 Page A Introduction
By default, Page A is shown.
DTMF / Dial Pulse Programming
Programming Steps1. Press the DTMF/DIAL PULSE flexible button (FLASH 40, Page A,
Button #1).
2. Enter a 0 or 1 that corresponds with the following entries:
[0] = Dial Pulse
[1] = DTMF
3. Press HOLD to save the entry. A confirmation tone is heard.
DescriptionEach individual outside line can be programmed to be DTMF (tone) or dial pulse. By default, all lines are set for DTMF.
DTMF /DP
CO / PBX
UNADISA
CO TO CO
1 Q 2 W 3 E 4 R
PRIVACYLOOPSUPV
DISACO
GROUP
5 T 6 Y 7 U 8 I
COSRING
ASSIGNCO LINE
IDCO
DIRECTION
9 O 10 P 11 A 12 S
DISPLAYRING
911TRUNK
1 3 D 1 4 F 15 G 16 H
PAGE A PAGE B
17 J 18 K 19 L 20 ;
PAGE C NEXT (FWD) NEXT (BACK) NEW RANGE
21 Z 22 X 2 3 C 24 V
P ULS E / D TMF 0- 1D TMF

Page A Introduction 3-5
CO / PBX Programming
Programming Steps1. Press the CO/PBX flexible button (FLASH 40, Page A, Button #2). 2. Enter a 0 or 1 which corresponds with the following entries:
[0] = PBX
[1] = CO
3. Press HOLD to save the entry. A confirmation tone is heard.
DescriptionEach individual outside line connected to the system may be programmed as a CO or PBX line. Use the PBX mark when identifying Centrex lines. By default, all lines are assigned as CO lines.
Universal Night Answer (UNA)
Programming Steps1. Press the UNA flexible button (FLASH 40, Page A, Button #3).
2. Enter a 0 or 1 on the dial pad to enable/disable this feature.
[0] = Disabled
[1] = Enabled
3. Press HOLD to save the entry. A confirmation tone is heard.
DescriptionIf a line is marked UNA, this activates night service answering of incoming calls on this line by stations not normally assigned access to the line(s). This station must have a direct CO appearance or an available loop key assigned to do this. Lines marked as UNA also activate Night Ringing over External Page when in the night mode if External Night Ringing is set to Yes. By default, UNA is enabled.
P BX / CO 0- 1CO
U NA 0- 1EN AB LE D

3-6 Page A Introduction
DISA CO-to-CO
Programming Steps1. Press the DISA CO-TO-CO flexible button (FLASH 40, Page A,
Button #4).
2. Enter a 0 or 1 on the dial pad to enable/disable this feature.
[0] = Disabled
[1] = Enabled
3. Press HOLD to save the entry. A confirmation tone is heard.
DescriptionThe DISA CO-to-CO (or Conference) mark on the CO line governs a DISA caller’s ability to access other outside lines. CO lines must have DISA CO-to-CO enabled to allow a DISA caller to establish an outgoing CO-to-CO connection. This allows for specific CO line access restriction on DISA calls. A station with Conference enabled can initiate a conference on CO lines regardless of the CO line conference marking. By default, DISA CO-to-CO is enabled for all CO lines.
The CO line conference flag affects a DISA caller’s ability to access outgoing CO lines as shown in the following table:
D ISA CO- TO- CO 0- 1EN AB LE D
Table 3-1: CO Line Conference Flag
Incoming DISA CODISA Caller Attempts to Access
CO-to-CO Enabled CO-to-CO Disabled
CO-to-CO Enabled Call Allowed Call Denied
CO-to-CO Disabled Call Denied Call Denied

Page A Introduction 3-7
Privacy
Programming Steps1. Press the PRIVACY flexible button (FLASH 40, Page A, Button #5).2. Enter a 0 or 1 on the dial pad to enable/disable this feature.
[0] = Disabled
[1] = Enabled
3. Press HOLD to save the entry. A confirmation tone is heard.
Disabling Privacy Function
The system can be programmed to eliminate CO Line Privacy, which allows another station to join existing outside line conversations as follows:
Stations must have a direct CO line appearance to join CO line conversations in progress.
A station must also have Privacy disabled before the system allows that station to enter an existing conversation.
A programmed warning tone is presented to both parties prior to actual cut-through (Flash 06, Button 1).
Up to seven other stations may join an existing conversation.
The station joining the call receives a solid red LED indication.
P RIV ACY 0- 1EN AB LE D
Disabling the privacy feature may be limited by federal, state or local law, so check the relevant law s in your area before disabling privacy.

3-8 Page A Introduction
By default, Privacy is enabled for all CO Lines.
Loop Supervision Programming
Programming Steps
1. Press the LOOP SUPV flexible button (FLASH 40, Page A, Button #6).
2. Enter a valid number (1-9) on the dial pad which corresponds to 100-900 ms. (0 = disabled).
3. Press HOLD to save the entry. A confirmation tone is heard and the display updates.
Description
Loop Supervision is used primarily with DISA, Voice Mail/Auto Attendant and with unsupervised conference applications. It lets the system detect when loop current is broken and an outside line is no longer being used. To determine timer value for loop supervision, consult your local central office for type and duration of loop supervision signal. By default, Loop Supervision is set for 400 ms for all CO Lines.
Table 3-2: CO Line Privacy Flag
Station Attempting toAccess CO Line
CO Line in Use by Another Station
Privacy Enabled Privacy Disabled
Privacy Enabled Private(no cut-through)
Private(no cut-through)
Privacy Disabled Private(no cut-through)
Privacy Release(cut-through allowed)
LOOP SU P ER V ISION 0- 94

Page A Introduction 3-9
DISA Programming
Programming Steps1. Press the DISA flexible button (FLASH 40, Page A, Button #7).
2. Enter a valid number (0-5) on the dial pad to indicate type of DISA desired.
[0] = No DISA
[1] = 24-Hour DISA
[2] = Night DISA
[3] = 24-Hour DISA with forwarding
[4] = Night DISA with forwarding
[5] = Telecenter 24-Hour DISA with forwarding
3. Press HOLD to save the entry. A confirmation tone is heard and the display updates.
DescriptionEach CO can be assigned as a DISA line using 1 of the 5 DISA types available.
DISA can be programmed using Range programming.
DISA callers are subject to the Class of Service placed on the line accessed for out dialing.
The system administrator can control the call duration after establishing a Trunk-to-Trunk call.
After expiration of the Conference Timer, a tone is presented to both DISA parties, then one minute later the system automatically releases both trunks.
The Conference Timer does not affect or control a DISA-to-Station call. By default, there are no outside lines assigned as DISA lines.
D ISA T Y PE 0- 5N ON E

3-10 Page A Introduction
CO Line Group Programming
Programming Steps1. Press the CO LINE GROUP flexible button (FLASH 40, Button #8).2. Enter a valid number on the dial pad (0-23) which corresponds to
Groups 0-23.
3. Press HOLD to save the entry. A confirmation tone is heard and the display updates.
DescriptionTwenty four line groups are available for CO line assignment. Groups should be assigned according to type (local, FX, WATS, etc.) . All unassigned CO lines should be programmed into a different group so they are not accessed by Line Queuing, Pooled Group access (Pool Buttons), Speed Dial, or LCR features. Line Group 0 is for programming a line(s) as a private. CO Lines assigned to Line Group 0 can only be accessed by stations with a direct CO appearance (button) on their phone. All unused COs should be placed in Line Group 0. By default, all lines are placed in Line Group 1.
Class of Service (COS)
Programming Steps
1. Press the LINE COS flexible button (FLASH 40, Page A, Button #9).2. Enter a valid number on the dial pad (1-5) which corresponds to five
possible class-of-service to which a line may be assigned:
COS1 = No restrictions
COS2 = Table A governs, Station COS 2 and 4 are monitored
COS3 = Table B governs, Station COS 3 and 4 are monitored
LIN E GR OU P 0-2 31
When tiering mult iple systems together, use the Networking Table (FLASH 16).

Page A Introduction 3-11
COS4 = Restricts [0], [1], [*], [#] dialed as first-digit and places a 7-digit dialing limitation. Allowed are: 1-800, 1-888, 1-866, 1-877, 1-911, and 1-611. Denied are: 411, 976, and 555.
COS5 = Overrides Station COS 2, 3, 4, 5 and allows unrestricted dialing.
3. Press HOLD to save the entry. A confirmation tone is heard and the display updates.
DescriptionThrough assignments of a CO Class of Service, the assigned CO line interacts with a station Class of Service, provides a canned restriction, or provides unrestricted dialing capabilities. (When a CO line is marked PBX, COS restrictions apply to the station only if one of five PBX codes are dialed first.)
CLA SS OF SER V ICE 1- 51
Table 3-3: Class of Service (COS)
STATION
COS
CO LINE CLASS OF SERVICE
1 2 3 4 5
1 Unrestricted Unrestricted Unrestricted Canned Restricted*
Unrestricted
2 Table A Table A Unrestricted Canned Restricted*
Unrestricted
3 Table B Unrestricted Table B Canned Restricted*
Unrestricted
4 Table A and B Table A Table B Canned Restricted*
Unrestricted
5 Canned Restricted*
Canned Restricted*
Canned Restricted*
Canned Restricted*
Unrestricted
6 Intercom Only Intercom Only Intercom Only Intercom Only Intercom Only
* Canne d Restriction: No [0], [1], [#], [*] as first dial ed digi t, and 7-digit dialing limitation; plus 1-800, 1-888,1-866, 1-877, 1-911, 1-611 are al lowe d, and 411, 976, and 555 numbers are denied.

3-12 Page A Introduction
CO Line Ringing Assignments
Programming Steps1. Press the RING ASSIGNMENT flexible button (FLASH 40, Page A,
Button #10). The display shows the following information:
2. Enter a valid Destination (DDD) and Ring type (R) followed by the HOLD button. A confirmation tone is heard and the display updates.
Adding Multiple StationsEnter: DDDR HOLD DDDR HOLD DDDR HOLD...etc.
(Example: 1073 HOLD, 1083 HOLD, 1093 HOLD)
Deleting a Single StationEnter: DDD0 HOLD
(Example: 1080 HOLD)
Deleting Multiple StationsEnter: DDD0 HOLD DDD0 HOLD...etc.
(Example: 1080 HOLD, 1090 HOLD)
R ING ASS IG NM EN TSEN TE R D D D R
Table 3-4: CO Line Ringing Assignments
Valid 3-Digit Destinations (DDD) Valid Ring Types (R)
[020-999] = System Speed Bins 1020–1999, for Off-Net Ringinga
a. Expanded Speed Dial Bins require Expanded Memory.
[0] = No Ring; unassigned; or to delete a station
[100-131] = Triad-S Extension Numbers [1] = Day Ring [D]
[440-447] = Voice Mail Groups 1–8 [2] = Night Ring [N]
[450-457] = Hunt Groups 1–8 [3] = Day/Night Ring [DN]
[499] = Direct Ringing to Modem [4] = Special Only [S]
[550-565] = ACD Groups 1–16 [5] = Day/Special [DS]
[550-557] = UCD Groups 1–8 [6] = Night/Special [NS]
[7] = All Modes [Day/Night/Special [A]

Page A Introduction 3-13
DescriptionEach CO Line may be assigned to ring any station in the system; UCD, Voice Mail or Hunt Group, or Off-Net (via speed dial). CO Line ringing is programmed on a per CO Line destination basis. Each destination may be designated to ring during the day, during the night, or receive both Day and Night ringing. Stations that are assigned for initial ring-in must have a LOOP button(s) to answer calls if a direct CO appearance is unavailable.
An incoming CO line may be programmed to any number of stations but it cannot be programmed to ring a mixture of stations and groups in the same time period. Incoming calls directed Off-Net are connected to an outgoing system speed bin. CO lines assigned to ring multiple stations do not follow any station’s forwarding. By default, all CO lines ring at the Attendant, Station 100 during Day and Night Modes.
CO Line Identification Display
Programming StepsEach CO line in the system can be programmed to have a name associated to it in database programming.
1. Press the CO LINE IDENTIFICATION flexible button (FLASH 40, Page A, Button #11). The following message displays:
2. Enter the name by using keys on the dial pad as follows. Valid alphanumeric characters are: [A-Z], [0-9], [ ], [#], [-] [spaces] and other ASCII characters as listed in Table 3-5 .
LIN E IDLIN E 00 1

3-14 Page A Introduction
The name may be entered in any combination up to 12-characters (this represents 24-digits entered).
3. Press HOLD to save the entry. A confirmation tone is heard and the display updates.
Description
The Co Line Identification Display feature allows the entry of a name for each line (trunk) connected to the system. Once entered into the database, LCD phones, including the Attendant stations, receive the programmed line name in place of the default LINE XXX message. This applies to all line call processing conditions where the current LINE XXX message displays.
SMDR continues to print out the line number in place of the programmed name. If the line name was not programmed, the current LINE XXX display is the default. A programmable data field is available for each line in the system. Line names may be assigned using the range programming.
Table 3-5: Dial Pad Keys
Other Codes
1 = 1# 8 = 8# = 01 * = *#
2 = 2# 9 = 9# , = 02 ( = #1
3 = 3# 0 = 0# ? = 03 ) = #2
4 = 4# Space = 11 / = 04 + = #3
5 = 5# : = 12 ! = *1 = = #4
6 = 6# - = 13 $ = *2 # = ##
7 = 7# ‘ = 14 & = *4 . = 24

Page A Introduction 3-15
A message similar to the following display is used for all CO Line displays when a name is programmed for a CO Line.
CO Direction
Programming Steps
1. Press the TRUNK DIRECTION flexible button. (FLASH 40, Page A, Button #12). The following message displays:
2. Enter a valid number (0-3) on the dial pad which corresponds to the desired CO type:
[0] = Out-of-Service (OOS)
[1] = Incoming Only
[2] = Outgoing Only
[3] = Both Incoming and Outgoing
3. Press HOLD to save the entry. A confirmation tone is heard and the display updates.
Description
CO Lines can be programmed on a per CO Line basis for the type of CO Line desired: Incoming, Outgoing, or Incoming and Outgoing.
Incoming
Incoming restricts the CO Line for incoming calls only.
Users can place call on hold, park the call, and other stations can pick-up the call.
LIN E R ING IN Gn n n nn n n n n n n n H H :M M am
Entries can be made using a keyboard by following the same outlined procedures using Figure 1-1 .
CO D IR EC TION 0- 3IN COMIN G - OUT GOIN G

3-16 Page A Introduction
Outgoing
Outgoing restricts the CO Line to outgoing calls only.
Users can place call on hold, park the call, and other stations can pick-up the call.
Incoming and Outgoing
Incoming and outgoing type allow calls to be received or dialed out.
By default, all CO Lines default to both incoming and outgoing type.
Display Ring Assignments
Programming Steps1. Press FLASH 40, Page A, Button #13 to display ring assignments.
Assignments are displayed in sets of 8, up to the number programmed. The following format displays the assignments.
DDD = Destination
RR:
[0] = No Ring
1 [D] = Day Ring
2 [N] = Night Ring
3 [DN] = Day/Night Ring
4 [S] = Special Only
5 [DS] = Day/Special
6 [NS] = Night/Special
7 [A] = All Modes (Day/Night/Special )
2. Press FLASH 40, Page A, Button #13 additional times to cycle to the next group of eight ring assignments. Ring assignments are displayed in numerical order, from the lowest to the highest number.
D D DR R DD D R R D D D R R D D D RRD D DR R DD D R R D D D R R D D D RR

Page A Introduction 3-17
911 Trunk
Programming Steps1. Press FLASH 40, Page A, Button #15 to designate the line for 911
use. The following message displays:
2. Enter a 0 or 1 on the dial pad to enable/disable this feature.
[0] = Disabled
[1] = Enabled
3. Press HOLD to save the entry. A confirmation tone is heard and the display updates.
DescriptionWhen the 911 system feature is enabled (FLASH 06), this identifies which CO lines are to be used for placing 911 calls. The Attendant is alerted via the display and flexible button as to the time, date, and station number(s) that placed the 911 call.
91 1 TR U N K 0- 1D ISA BLE D
Lines must be programmed for 911 to enable the 911 Feature.
Failure to program lines for 911 disables the 911 Feature.

3-18 Page B Introduction
Page B Introduction
Programming Steps
If the system is in the programming mode, continue using the program codes. If starting to program here, enter the programming mode. If Page B CO Line features must be changed:
1. Press FLASH and dial [40]. The following message displays:
2. Enter a valid number for the range of lines being programmed. If only one line is being programmed, enter that number twice (001 001).
3. Press HOLD to save the entry. A confirmation tone is heard and the display updates. Flexible Button #19 (Page A) is lit.
4. Press the PAGE B flexible button (Button #20). The following message displays:
XXX-XXX = CO Line Range
001-012= Triad-S
Description
This section describes the procedures and steps necessary to program CO Line attributes. When entering the CO Line attributes portion of the database, the programmer may decide to enter information for a range of CO lines or one specific CO Line. Range programming lets the programmer change a specific parameter or a few parameters for an entire range of CO Lines leaving intact the remaining data fields that do not require change. Those data fields continue to operate with the previously programmed data.
CO L INE AT TR IB UT ESSEL ECT A CO LIN E RA N GE
If HOLD is pressed without entering a CO range, ALL CO lines (001-012) are selected.
XXX - XXX PA GE BEN TE R B U TTON N UM BE R

Page B Introduction 3-19
When programming the Page B features, the flexible buttons are mapped as follows:
Transmit Volume
Programming Steps1. Press the TRANSMIT VOLUME flexible button (FLASH 40, Page B,
Button #1). The following message displays:
2. Enter a valid number (0-9) for the desired volume level.
3. When the desired level is selected, press HOLD to complete the entry. A confirmation tone is heard and the display updates.
XMTVOLUME
P FWDDEST
P FWDVMID
UDA
1 Q 2 W 3 E 4 R
MOHPER CO
RINGTONE
5 T 6 Y 7 U 8 I
9 O 10 P 11 A 12 S
1 3 D 1 4 F 15 G 16 H
PAGE A PAGE B
17 J 18 K 19 L 20 ;
PAGE C NEXT (FWD) NEXT (BACK) NEW RANGE
21 Z 22 X 2 3 C 24 V
TR AN S MIT V OLU ME 0- 90 D B
[0] -15 dB [5] 0 dB
[1] -12 dB [6] +3 dB
[2] -9 dB [7] +6 dB
[3] -6 dB [8] +7.5 dB
[4] -3 dB [9] +9 dB

3-20 Page B Introduction
DescriptionUp to ten volume levels are available for each CO Line in the system. By default, all CO lines are programmed for level 5 (0 dB).
Preset Call Forward Destination
Programming Steps
1. Press the PRESET FWD DESTINATION flexible button (FLASH 40, Page B, Button #2). The following message displays:
2. Enter a valid forward destination on the dial pad.
[1020-1999] = System Speed Bins[100-131] = Triad-S Station Extensions[440-447] = Voice Mail Groups 1-8[450-457] = Hunt Groups 1-8[499] = System Modem[550-557] = UCD Groups 1-8[550-565] = ACD Groups 1-6
3. A confirmation tone is heard and the LCD display updates.
Description
The Preset Call Forward Destination feature enables a CO line to initially ring at multiple stations and forward to a pre-determined destination. The destination can be a station (EKT-SLT) or Hunt group. Each CO line has a Preset Forward Timer. Each CO line also has a VMID field to allow sending of specific VM digits when a CO line forwards to a VM group. Calls ringing into ACD/UCD Groups or Voice Mail Groups continue to ring the group. The CO line does not forward when ringing one of these types of groups. By default, no destinations are assigned.
Do NOT adjust this option without consulting Technical Support first. The default settings were set to apply to most applications. Have the dB readings on all CO lines available when calling Technical Support.
P RE SET F OR WAR D DE ST## ##

Page B Introduction 3-21
Preset Forward Voice Mail ID
Programming Steps1. Press the PRESET FWD VMID flexible button (FLASH 40, Page B,
Button #3). The following message displays:
2. Enter a valid number on the dial pad that corresponds to 0000-9999 for Voice Mail ID digits.
3. Press HOLD to complete the entry. A confirmation tone is heard and the display updates.
Deleting Numbers Currently Entered1. Press [#] button four times.
2. Press the HOLD button to update. (All information is erased.)
DescriptionThe Preset Forward Voice Mail ID feature allows a programmer to assign which digits are sent to voice mail when a CO line is programmed to Preset Forward. By default, no digits are sent.
Universal Day Answer (UDA)
Programming Steps1. Press the UNIV. DAY ANSWER flexible button (FLASH 40, Page B,
Button #4). The following message displays:
2. Enter a 0 or 1 on the dial pad to enable/disable this feature.
[0] = Disabled
[1] = Enabled
3. Press HOLD to save the entry. A confirmation tone is heard and the display updates.
P RE SET FO R WA R D V MID 0 00 0-9 99 9## ##
U NIV E RS AL D AY AN SW ER 0- 1D ISA BLE D

3-22 Page B Introduction
DescriptionUDA-assigned CO lines can signal over external page port(s). External Day ringing is programmed on a system-wide basis in administrative programming. Stations that do not have access to a line during the day can answer that line while the System is in the day mode by dialing a UDA code [#5]. To use this feature, a LOOP button or an appearance of the trunk must be present on the station. By default, the Universal Day Answer feature is disabled.
Music-On-Hold (per CO Line)
Programming Steps1. Press the MUSIC-ON-HOLD flexible button (FLASH 40, Page B,
Button #5). The following message displays:
2. Enter a valid number on the dial pad to change this feature.
[0] = No Music-On-Hold
[1] = Channel 1
: : : : :
[8] = Channel 8
3. Press HOLD to save the entry. A confirmation tone is heard and the display updates.
MOH C HA N NE L 0- 81
Table 3-6: MOH Programming Codes
Program Code
FlexButton
FeatureDefault
(after initialization)
FLASH 09 123456
Music Channel #3*Music Channel #4*Music Channel #5*Music Channel #6*Music Channel #7*Music Channel #8*
############
* Music Channels 3-8 can only be used for Music-On-Hold functions

Page B Introduction 3-23
DescriptionThe Music-On-HOLD feature allows a user to select the Music-On-Hold channel for each CO line. This feature lets the system assign CO line circuits as additional music inputs. This increases the capacity of music channels beyond the two available on the MISU to be used for MOH sources. A total of eight channels are available for use on the system. The CO line can be assigned to NOT PLAY music for callers on hold. By default, Channel 1 is used for Music-On-Hold.
Ring Tone (per CO Line)
Programming Steps1. Press the RING TONE flexible button (FLASH 40, Page B, Button #6).
The following message displays:
2. Enter a valid number on the dial pad to change this feature.
3. Press HOLD to save the entry. A confirmation tone is heard and the display updates.
R ING TON E 0 0-3 600
Table 3-7: Ringing Tones
Tone# Freq Tone# Freq Tone# Freq Tone # Freq
00 697/770 10 770/1209 20 852/0 30 1336/1477
01 697/852 11 770/1336 21 941/1209 31 1336/1633
02 697/941 12 770/1477 22 941/1336 32 1336/0
03 697/1209 13 770/1633 23 941/1477 33 1477/1633
04 697/1336 14 770/0 24 941/1633 34 1477/0
05 697/1477 15 852/941 25 941/0 35 1633/0
06 697/1633 16 852/1209 26 1209/1336 36 No Ring
07 697/0 17 852/1336 27 1209/1477
08 770/852 18 852/1477 28 1209/1633
09 770/941 19 852/1633 29 1209/0Tone Duration = 50 ms/50 ms

3-24 Page C Introduction
DescriptionThe ring tone signal used to notify stations of an incoming call can be changed in administrative programming to provide distinctive ringing on a per CO line basis. A distinctive ring tone can be programmed for each CO line that rings each station. The system provides 36 different ring patterns that can be selected for each CO line in the system. By default, Ring Tone is set for 00 (697/770).
Page C Introduction
Programming Steps
If the system is in the programming mode, continue using the program codes. If starting to program here, enter the programming mode first.
1. Press FLASH and dial [40]. The following message displays:
2. Enter a valid number for the range of lines being programmed. If only one line is being programmed, enter that number twice (001 001).
3. Press Button #21 to select Page C. The display updates. The following message displays to indicate current programming of that line or group of lines:
XXX-XXX = CO Line Range 001-012
CO Ring Tone overrides station distinctive ringing.
CO L INE AT TR IB UT ESSEL ECT A CO LIN E RA N GE
If HOLD is pressed without entering a CO range, ALL CO lines (001-012) are selected.
XXX - XXX PA GE CEN TE R B U TTON N UM BE R

Page C Introduction 3-25
DescriptionWhen entering the CO Line attributes portion of the database, the programmer may decide to enter information for a range of CO lines or one specific CO Line. Range programming lets the programmer change a specific parameter or a few parameters for an entire range of CO lines, leaving intact the remaining data fields that do not require change. Those data fields continue to operate with the previously programmed data. (By default, Page A is shown.)
When programming the Page C features, the flexible buttons are mapped as follows:
Flash Timer
Programming Steps1. Press the FLASH TIMER flexible button (FLASH 40, Page C,
Button #1).
2. Enter a valid number on the dial pad (01–20) which corresponds to 10ms to 2 seconds.
3. Press HOLD to save the entry. A confirmation tone is heard and the display updates.
FLASH TIMER RING DELAY RESEIZE TIMER GUARD TIMER
1 Q 2 W 3 E 4 R
PRESET FWD TIMER
5 T 6 Y 7 U 8 I
9 O 10 P 11 A 12 S
1 3 D 1 4 F 15 G 16 H
PAGE A PAGE B
17 J 18 K 19 L 20 ;
PAGE C NEXT (FWD) NEXT (BACK) NEW RANGE
21 Z 22 X 2 3 C 24 V
FLA SH T IMER 0 1-2 010

3-26 Page C Introduction
DescriptionFlash is a programmable opening on a line for signaling. When using an outside line, flash lets a user obtain a new dial tone without losing the line. This is particularly useful behind a PBX or Centrex. Each CO line can be programmed for a flash time. By default, the Flash Timer is set for 10 (1.0 seconds) and is variable from 01-20 (100ms to 2 seconds).
Ring Delay Timer
Programming Steps1. Press the RING DELAY TIMER flexible button (FLASH 40, Page C,
Button #2). The following message displays:
2. Enter a valid number on the dial pad (00–20) which corresponds to 00-20 seconds.
3. Press HOLD to save the entry. A confirmation tone is heard and the display updates.
DescriptionThe Ring Delay timer was added to accommodate ICLID interface requirements. The Ring Delay timer is started whenever a CO Line detects incoming ringing. When the timer expires, CO line ringing is detected by digital telephones and SLTs.
The purpose of this timer is to wait until after the first ring cycle to be detected by the digital system so the ICLID information is passed down the CO line prior to being answered. In some cases, it may be necessary to set the Ring Delay Timer to four seconds so all the ICLID information is received from the Central Office. By default, the Ring Delay Timer is set at 00 (disabled) and is variable from 00-20 seconds.
R ING D ELAY TIM ER 0 0-2 000

Page C Introduction 3-27
Reseize Timer
Programming Steps1. Press the RESEIZE TIMER Button (FLASH 40, Page C, Button #3) in
the flexible button field. The following message displays:
2. Enter a valid number on the dial pad that corresponds to 000–255 (0ms to 2.55 seconds).
3. Press HOLD to save the entry. A confirmation tone is heard and the display updates.
DescriptionThe Reseize Timer option lets the user adjust the Reseize Timer on a per CO Line basis. The Reseize Timer can be used on any trunk type. This timer sets the time period that a trunk is held disconnected after receiving a disconnect before being reseized when a device is queued for a member of the trunk group. By default, the Reseize Timer is set for two seconds.
Guard Timer
Programming Steps1. Press the GUARD TIMER button (FLASH 40, Page C, Button #4) in the
flexible button field. The following message displays:
2. Enter a valid number on the dial pad which corresponds to 1–60 (100ms to 6 seconds).
3. Press HOLD to save the entry. A confirmation tone is heard and the display updates.
R ESE IZE T IMER 0 00- 25 520 0
G UAR D TIME R 1-6 005

3-28 Page C Introduction
DescriptionThe outgoing Guard Timer is used to set the length of time a CO is held busy to outgoing seizure after a valid release is detected. If a user attempts to access a CO line before the Guard Timer expires, their LED illuminates to indicate that the line is seized, however the CO line is not actually seized until the timer expires. The user gets a busy tone, and may receive a delayed CO dial tone if the timer is set to a large value. By default, the Guard Timer is set for .5 seconds.
Preset Forward Timer
Programming Steps1. Press the PRESET FWD TIMER flexible button (FLASH 40, Page C,
Button #5). The following message displays:
2. Enter valid number on dial pad which corresponds to 00–99 seconds.
3. Press HOLD to save the entry. A confirmation tone is heard and the display updates.
DescriptionThe Preset Forward Timer determines the time an outside line rings before being forwarded to a predetermined destination. If a forward destination is programmed in the CO line field, the CO calls forward to that destination after the CO preset forward timer expires. This forward occurs regardless of how many stations the line is ringing.
The digits entered for the CO line are sent in the station field.This feature applies to initial CO ringing lines only and works with Preset Forward CO Line assignments. By default, the CO Line Preset Forward Timer is set at 10 seconds and is variable from 00-99 seconds. A [00] entry disables the timer and the feature is disabled.
P RE SET FW D T IMER 0 0-9 910

Miscellaneous CO Parameters 3-29
Miscellaneous CO Parameters
Programming Steps
If the system is in the programming mode, continue using the program codes. If starting to program here, enter the programming mode first.
1. Press FLASH and dial [41]. The following message displays:
2. Select any feature by pressing the appropriate flexible button(s) in the flexible field.
3. Press HOLD to save the entry. A confirmation tone is heard and the display updates.
Description
When entering the Miscellaneous CO Parameters programming area the buttons on the digital telephone are defined as shown below:
Dial Pulse Parameters
Programming Steps
1. Press the DIAL PULSE flexible button (FLASH 41, button #1). The following message displays:
CO F EATU RE SEN TE R B U TTON N UM BE R
DIALPULSE
1 Q 2 W 3 E 4 R
5 T 6 Y 7 U 8 I
D IAL P ULS E60 / 4 0 1 0 PP S

3-30 ICLID Programming
2. Enter a valid number (0–3) which corresponds with the following entries:
[0] = 60/40 (RATIO), 10 pps (SPEED)
[1] = 66/33 (RATIO), 10 pps (SPEED)
[2] = 60/40 (RATIO), 20 pps (SPEED)
[3] = 66/33 (RATIO), 20 pps (SPEED)
3. Press HOLD to save the entry. A confirmation tone is heard and the display updates.
DescriptionThe Dial Pulse option lets the installer adjust the dial pulse ratio and speed when using dial pulse (rotary) type signaling. By default, all lines are DTMF (tone) signaling. If pulse dialing is required, the individual outside line must be programmed for Dial Pulse (DP).
When Dial Pulse is selected, this system-wide parameter must be set to determine the break/make ratio and the dial speed of the dial pulse signal.
ICLID Programming
ICLID Ringing Assignments
Programming Steps
1. Press FLASH and dial [43]. The following message displays:
000 = Route Number (000–499)
XXX = Ringing Destination
Y = Ringing Type
This program code is only used when an outside (CO) line is programmed for Dial Pulse.
R OUT E 00 0 XXXXY

ICLID Programming 3-31
2. Press the RING ASSIGNMENT flexible button (FLASH 43, Button #1). LED #1 is lit indicating Route 000 is ready for programming.
3. Enter a valid Destination (XXX) and Ring type (Y) followed by HOLD. A confirmation tone is heard and the display updates.
Description
ICLID Ringing Assignments let you change the ring assignment based on the incoming number received. This feature permits you to select from 500 ringing routes for each entry in the name to number translation table and DID table (Flash 55). For example, this feature could be used to reroute selected customers to a specific ACD or UCD group and bypass the general Attendant. The Direct Inward Dialing (DID) feature permits one-way direct inward dialing access to stations on specific DID lines from the public telephone network, without going through an Attendant answering position. DID capabilities refer to incoming calls only. The system accepts 3-7 digits from the Central Office. This lets the name and number field of the LCD display on a DID call be presented to the ICLID port. Calls are identified in the SMDR field as answered (I) or Unanswered (U) followed by a DID number. At least one DTMF receiver must be installed.
Table 3-8: ICLID Ringing Assignments
Valid 3-Digit Destinations (XXX) Valid Ring Types (Y)
[020-999] = System Speed Bins 1020–1999, for Off-Net Ringing
[0] = No Ring; unassigned; or to delete a station
[100-131] = Extension Numbers [1] = Day Ring [D]
[440-447] = Voice Mail Groups 1–8 [2] = Night Ring [N]
[450-457] = Hunt Groups 1–8 [3] = Day/Night Ring [DN]
[499] = Direct Ringing to Modem [4] = Special Only [S]
[550-565] = ACD Groups 1–16 [5] = Day/Special [DS]
[550-557] = ACD Groups 1–8 [6] = Night/Special [NS]
[7] = All Modes [Day/Night/Special [A]
All previously programmed routes will be lost when upgrading from FP2 to FP3.

3-32 ICLID Programming
View ICLID Ringing Assignments
Programming Steps1. Press FLASH 43, Button #17 to display ring assignments. Assignments
are displayed in sets of six, up to the number programmed. Press FLASH 43, Button #17 additional times to cycle to the next group of six ring assignments.
DDD = Destination
RR:
[0] = No Ring
[D] = Day Ring
[N] = Night Ring
[DN] = Day/Night Ring
[S] = Speci al Only
[DS] = Day/Special
[NS] = Night/Special
[A] = All Modes (Day/Night/Special)
Multiple station assignments are accomplished by assigning another destination with ring status, DDDR, and pressing HOLD. This can be done for up to the maximum number of stations on the system.
RINGINGASSIGNMENTS
1 Q 2 W 3 E 4 R
5 T 6 Y 7 U 8 I
9 O 1 0 P 11 A 12 S
13 D 14 F 15 G 16 H
DISPLAY RINGINGASSIGNMENTS
NEXT ROUTENUMBER
PREVIOUS ROUTENUMBER
SELECT ROUTENUMBER
17 J 18 K 19 L 20 ;
21 Z 22 X 23 C 2 4 V
R OUT E 00 0 D D D R R D D D RD D DR D DD R D D D R D D D R

ICLID Programming 3-33
Ring assignments are continuous and display in order of the destination number from 020-557. A maximum of eight stations display. Additional stations and ringing assignments are displayed using Button #17.
Advancing to the Next RoutePress the NEXT flexible button (FLASH 43, Button #18) to advance to the next ICLID Route number.
Returning to a Previous RoutePress the PREVIOUS flexible button (FLASH 43, Button #19) to return to the previous ICLID Route number.
Selecting a Different Route1. Press the SELECT ROUTE NUMBER flexible button (FLASH 43,
Button #20) to select the desired route number.
2. Enter a valid ICLID route number (000–252).
3. Press HOLD to change to the different route entered. A confirmation tone is heard.
DescriptionKeysets designated to ring on an incoming CO line but not designated to ring on the ICLID ring, may receive a ring cycle before the call is moved. The same ringing restrictions applied to CO line ringing are applied to ICLID ringing. By default, no destinations or ringing assignments exist.

3-34 Direct Inward Dialing (DID) Programming
Direct Inward Dialing (DID) Programming
Programming Steps
Press FLASH and dial [44]. The following message displays:
[RRR] = Route Number (000-499)
[###] = DID Number (Directory # from Central Office)
[n...n] = Name Assigne d to DID Number
The top left button (ROUTE) in the flexible button field is lit for programming the Route number. The LEDs for the UP Button (FLASH 44, Button #18), the DOWN Button (FLASH 44, Button #19) is also lit.
Changing to a Different DID Route Number1. Press either the UP Button (FLASH 44, Button #18),
-or-
Press the DOWN Button (FLASH 44, Button #19).
2. Enter a valid Route Number (000-499) to be associated with the DID Number.
This Route Number is the same Route Number in the ICLID Ringing Assignments Table (FLASH 43) and determines the destination of the DID number associated with this Route Number. The display shows the route number as it is entered.
3. Press HOLD button to save the entry. A confirmation tone is heard.
D ID R R R XXXXXXXn .. . . . .n

Direct Inward Dialing (DID) Programming 3-35
DescriptionDID calls are treated as an incoming call and follow the same rules established for CO lines. DID information transferred from the network is captured and translated to direct a specific DID number to a specific station, ACD or Hunt group of stations, or Voice Mail group. The DID call appears at the destination station under an assigned LOOP or CO button.
When receiving a DID call, the destination station hears the CO line ringing and the assigned CO or LOOP button flashes at the incoming CO line flash rate. The destination station then presses the flashing CO or LOOP button, is connected to the incoming DID call, and CO line ringing stops and the LED for the CO or LOOP button lights steady.
If the outside caller disconnects from a two-party conversation, the Central Office opens the loop and returns the line to idle state. The system detects the disconnect signal, release the line, and provides a busy tone to the keyset/SLT (unless the SLT is a VM port), and disconnects from the DID line. If the extension called hangs up the phone, the central office detects disconnects, and returns the line to the idle state.
The buttons on the digital telephone are defined as shown when entering the DID Table programming area:
By default, all entries in the DID Table (000-999) have phone numbers assigned. Refer to Figure 3-9 for additional information.
ROUTENUMBER
PHONENUMBER
NAMECLEARENTRY
1 Q 2 W 3 E 4 R
BACKSPACE
5 T 6 Y 7 U 8 I
9 O 10 P 1 1 A 12 S
13 D 14 F 15 G 16 H
UP DOWN
17 J 18 K 19 L 20 ;
21 Z 22 X 23 C 24 V

3-36 Direct Inward Dialing (DID) Programming
DID Phone Number
Programming Steps1. Press the PHONE NUMBER flexible button (FLASH 44, Button #2) to
program the DID Number.
2. Enter the DID Number to be associated with a valid Route Number (000–499). Up to 7 digits can be entered.
By default, only the last three digits are used for routing which is determined in Flash 45.
3. Use the BACK SPACE flexible button (FLASH 44, Button #5) to erase the current number or to correct for errors.
4. Press HOLD to save the entry. A confirmation tone is heard.
If the DID number is already in the DID Translation Table, the Route Number associated with the DID number displays.
Name Assigned to DID Number
Programming Steps
1. Press the NAME flexible button (FLASH 44, Button #3) to enter the desired name for the DID trunk. Maximum length is 8-characters.
2. Press the HOLD button to update the database. A confirmation tone is heard.
3. Use the BACK SPACE flexible button (FLASH 44, Button #5) to erase the current letter to correct for errors.
By default, the DID Table is filled with numbers. If error tone is received when the HOLD button is pressed, the DID Table is full and an entry needs to be deleted to make room for this new phone number.

Direct Inward Dialing (DID) Programming 3-37
DID Name and Number Codes
The display shows the DID name or number as it is entered.
Figure 3-1: DID Name/Number Codes
Erasing a DID Table Entry
Programming Steps
Clearing Entries from DID Table1. Press the CLEAR ENTRY Button (FLASH 44, Button #4) to clear an
entire Phone Number, Name and Route from the DID Table.
2. Press the HOLD button to save the entry. A confirmation tone is heard.
Changing to a Different DID RoutePress the UP button (FLASH 44, Button #18) to advance to the DID Route Number,
-or-
Press the DOWN button (FLASH 44, Button #19) to return to a previous DID Route Number.
Other Codes
1 = 1# 8 = 8# “ = 01 * = *#
2 = 2# 9 = 9# , = 02 ( = #1
3 = 3# 0 = 0# ? = 03 ) = #2
4 = 4# Space = 11 / = 04 + = #3
5 = 5# : = 12 ! = *1 = = #4
6 = 6# - = 13 $ = *2 # = ##
7 = 7# ‘ = 14 & = *4 . = 24

3-38 Direct Inward Dialing (DID) Programming
DescriptionBy default, all entries in the DID Table (000–999) have phone numbers assigned.
The following table shows the default configuration for the DID Table entries and the ICLID Ringing assignments.
Route 000 in the ICLID Ringing Assignment Table is used as the intercept route. Calls to numbers not contained in the DID table follow Route 000. If Route 000 is defaulted to None, the call follows Route 001.
Route 001 is used as the Busy DID Route. DO NOT program any entries in this Route if you intend to provide a busy tone to callers dialing a busy DID/DVIS number.
Table 3-9: DID & ICLID Default Table Entries
DID Translation Table ICLID Translation Table
DID Table Entry
Default Route(s)
ICLID Table Entry
Default Destination
000-098099
100-198199
200-298299
300-398399
400-498499
500-598599
600-698699
700-798799
800-898899
900-998999
100-198199
100-198199
100-198199
100-198199
100-198199
100-198199
100-198199
100-198199
100-198199
100-198199
100-198199
100-198199
100-198199
100-198199
100-198199
100-198199
100-198199
100-198199
100-198199
100-198199
100A-198A499A
100A-198A499A
100A-198A499A
100A-198A499A
100A-198A499A
100A-198A499A
100A-198A499A
100A-198A499A
100A-198A499A
100A-198A499A

4 Station AttributesProgramming
This chapter describes the steps and procedures necessary toprogram station attributes.


Page A Introduction 4-3
Page A Introduction
Programming Steps
If the system is in the programming mode, continue using the program codes. If starting to program here, enter the programming mode.
1. Press FLASH and dial [50]. Flexible button #24 (New Range) is lit and the following message displays:
2. Enter a valid number for the station range being programmed. If one station is being programmed, enter that number twice (100100).
3. Press HOLD to save the entry. A confirmation tone is heard and the display updates. Flexible button #19 is lit and the display updates to current programming for Page A:
XXX-XXX = Station Range (100-131)
Description
Range programming enables the programmer to change a specific parameter or a few parameters for a range of stations, leaving intact the remaining data fields not requiring changes. Those data fields continue to operate with the previously programmed data. By default, Page A is shown.
STAT ION AT TR IB UT ESSELE CT A STAT ION R A NG E
If HOLD is pressed w ithout entering a station range, ALL stations (100-131 ) are selected.
XXX - XXX PAG E AEN TER B UT TON N UMB ER

4-4 Page A Introduction
When programming the Page A features, the flexible buttons are mapped as follows:
Paging Access
Programming Steps1. Press the PAGE ACCESS flexible button (FLASH 50, Page A,
Button #1). The following message displays:
2. Enter a 0 or 1 on the dial pad to enable/disable this feature.
[0] = Disabled
[1] = Enabled
3. Press HOLD to save the entry. A confirmation tone is heard.
PAGEACCESS
DO NOTDISTURB
CONFERENCEEXECUTIVEOVERRIDE
1 Q 2 W 3 E 4 R
PRIVACYSYSTEMSPEED
LINEQUEUING
PREF LINEANSWER
5 T 6 Y 7 U 8 I
OHVOCALL
FORWARDFORCED
LCRACD SUPVBARGE-IN
9 O 10 P 11 A 12 S
EXEC OVRDBLOCKING
CO LINE RINGOPTIONS
NAME / NUMBERDISPLAY
ZAPTONE
1 3 D 14 F 15 G 16 H
CO, LOOP,POOL FLEX
PAGE A PAGE B
17 J 18 K 19 L 20 ;
PAGE C NEXT (FWD) NEXT (BACK) NEW RANGE
21 Z 22 X 2 3 C 24 V
PA GE A CCESS 0- 1EN AB LED

Page A Introduction 4-5
DescriptionStations can individually be allowed or denied the ability to make pages. This applies to all internal and external zone paging. A station denied access to paging may still answer a meet-me page announcement. (Station COS 6 does not deny a station the ability to make a page.) By default, Paging is enabled at all stations.
Do Not Disturb
Programming Steps1. Press the DO NOT DISTURB flexible button (FLASH 50, Page A,
Button #2). The following message displays:
2. Enter a 0 or 1 on the dial pad to enable/disable this feature.
[0] = Disabled
[1] = Enabled
3. Press HOLD to save the entry. A confirmation tone is heard.
DescriptionStations can be individually allowed or denied the ability to place their telephone in Do Not Disturb. By default, Do Not Disturb is enabled at all stations. The first programmed Attendant cannot utilize DND.
Conference Enable / Disable (Per Station)
Programming Steps1. Press the CONFERENCE flexible button (FLASH 50, Page A,
Button #3). The following message displays:
D O N OT D IST UR B 0- 1EN AB LED
CONF ER EN CE 0- 1EN AB LED

4-6 Page A Introduction
2. Enter a 0 or 1 on the dial pad to enable/disable this feature.
[0] = Disabled
[1] = Enabled
3. Press HOLD to save the entry. A confirmation tone is heard.
DescriptionThe Conference Enable/Disable feature lets the system be programmed on a per Station basis for the ability to initiate a conference.
Executive Override
Programming Steps1. Press the EXECUTIVE OVERRIDE flexible button (FLASH 50, Page A,
Button #4). The following message displays:
2. Enter a 0 or 1 on the dial pad to enable/disable this feature.
[0] = Disabled
[1] = Enabled
3. Press HOLD to save the entry. A confirmation tone is heard.
Description
The Executive Override feature lets certain stations be designated as Executive stations with the ability to override and barge-in on other key sets engaged in a CO line or intercom conversation. If Supervisor Monitor with barge-in function is denied, this feature MUST be disabled An optional warning tone is programmed on a system-wide basis to enable or disable the tone.
EXEC OV ER R ID E 0- 1D ISAB LE D
Use of this feature when the Executive Override Warning Tone is disabled may be interpreted as a violation of federal, state, or local laws, and an invasion of privacy. Check applicable laws in your area before intruding on calls using this feature.
A change in volume may occur on the CO line or intercom call after the barge- in occurs.

Page A Introduction 4-7
This tone is presented to all parties prior to actual cut through of the third party.
By default, Executive Override is disabled for all stations. Supervisor Barge-In can be programmed in [FLASH 50] [Button 12].
Privacy (Per Station)
Programming Steps1. Press the PRIVACY flexible button (FLASH 50, Page A, Button #5).
The following message displays:
2. Enter a 0 or 1 on the dial pad to enable/disable this feature.
[0] = Disabled
[1] = Enabled
3. Press HOLD to save the entry. A confirmation tone is heard.
For Single Line Telephones:1. Enter a 0 or 1 on the dial pad to enable/disable the Camp-On feature.
[0] = No Camp-On is allowed
[1] = Camp On is allowed
2. Press HOLD to save the entry. A confirmation tone is heard.
Description
The system provides privacy on all communications in the system which prevents other stations from accidentally entering an existing conversation. However, the system provides the ability for a station to join an existing outside CO line conversation (on a per station basis).
The Executive Override Blocking feature (Flash 50, Page A, Button #13) allows or disallows an Executive to override an extension. This prevents an extension with override capability from overriding designated stations.
PR IVA CY 0- 1EN AB LED
Disabling the privacy feature may be limited by federal, state, and local law, so check the relevant laws in your area before disabling privacy.

4-8 Page A Introduction
Each station can be granted the privilege to join an existing CO line conversation by simply pressing the CO line button of a CO line in use.
Privacy on an SLT can be useful in situations where a modem is using the SLT port for data transmission.
Disabling this feature lets data transfer proceed without being interrupted with a Camp On tone. Both the station and the CO Line must have Privacy disabled before the system allows cut-through.
If Privacy is disabled and a station joins an existing call, a programmable warming tone is presented to both parties prior to actual cut-through.
If Privacy is disabled, up to eight other stations may join in on an existing conversation.
Privacy is enabled for all stations in default.
System Speed Dial Access
Programming Steps
1. Press the SPEED flexible button (FLASH 50, Page A, Button #6). The following message displays:
2. Enter a 0 or 1 on the dial pad to enable/disable this feature.
[0] = Disabled
[1] = Enabled
3. Press HOLD to save the entry. A confirmation tone is heard.
Table 4-1: Station Privacy Flag
Station Attempting to Access CO Line
CO Line in Use by Another Station
Privacy Enabled Privacy Disabled
Privacy Enabled Private(No Cut-through)
Private(No Cut-through)
Privacy Disabled Private(No Cut-through)
Privacy Released(Cut-through Allowed)
SY STE M S PE ED 0 -1 EN AB LED

Page A Introduction 4-9
DescriptionStations can be individually allowed or denied the ability to use system speed dial (100–999) numbers. (System speed numbers 060-099 are not monitored by toll restriction.) Stations cannot be prevented from using station speed dial. By default, System Speed Dialing is enabled at all stations.
Line Queuing
Programming Steps
1. Press the QUEUING flexible button (FLASH 50, Page A, Button #7). The following message displays:
2. Enter a 0 or 1 on the dial pad to enable/disable this feature.
[0] = Disabled
[1] = Enabled
3. Press HOLD to save the entry. A confirmation tone is heard.
Description
Stations can be allowed or denied the ability to manually queue for a busy group of CO lines. Even when disabled, stations have automatic LCR queuing privileges. By default, CO Line Queuing is enabled at all stations.
Preferred Line Answer
Programming Steps
1. Press the PREF LINE ANSWER flexible button (FLASH 50, Page A, Button #8). The following message displays:
When upgrading from FP2 to FP3, all previously programmed speed dial buttons will be lost.
LIN E QU EU ING 0- 1EN AB LE D
P RE F L INE A N SWE R 0- 1EN AB LE D

4-10 Page A Introduction
2. Enter a 0 or 1 on the dial pad to enable/disable this feature.
[0] = Disabled
[1] = Enabled
3. Press HOLD to save the entry. A confirmation tone is heard.
DescriptionStations can be given the ability to answer a call by simply going off-hook. By default, Preferred Line Answer is enabled on all stations.
Off-Hook Voice Over (OHVO)
Programming Steps1. Press the OHVO flexible button (FLASH 50, Page A, Button #9). The
following message displays:
2. Enter a 0 or 1 on the dial pad to enable/disable this feature.
[0] = Disabled
[1] = Enabled
3. Press HOLD to save the entry. A confirmation tone is heard.
DescriptionWhen enabled, the Off-Hook Voice Over feature allows a digital station to receive OHVO while on a call. A station can be denied the ability to receive OHVO calls by disabling this feature. By default, Off-Hook Voice Over is disabled for all stations. The station must be in H or P mode to enable this feature.
OFF H OOK V OIC E O VE R 0- 1D ISA BLE D

Page A Introduction 4-11
Call Forwarding
Programming Steps1. Press the CALL FORWARD flexible button (FLASH 50, Page A,
Button #10). The following message displays:
2. Enter a 0 or 1 on the dial pad to enable/disable this feature.
[0] = Disabled
[1] = Enabled
3. Press HOLD to save the entry. A confirmation tone is heard.
DescriptionStations can be allowed or denied the ability to forward incoming CO calls, intercom calls, or transferred outside lines to another station or group. By default, Call Forwarding is enabled at all stations.
Forced Least Cost Routing (LCR)
Programming Steps1. Press the FORCED LCR flexible button (FLASH 50, Page A,
Button #11). The following message displays:
2. Enter a 0 or 1 on the dial pad to enable/disable this feature.
[0] = Disabled
[1] = Enabled
3. Press HOLD to save the entry. A confirmation tone is heard.
CAL L F OR WAR D 0- 1EN AB LE D
FOR CE LCR 0- 1D ISA BLE D

4-12 Page A Introduction
DescriptionStations may be forced to place outgoing CO calls by use of LCR (dial [9]) to access an outside line. This lets the system administrator control dialing patterns and lines used for outgoing CO calls. This can be enabled/disabled on a per-station basis for additional flexibility and control. Forced LCR is optional (disabled) for all stations, and eliminates access to all other line groups.
ACD Supervisor Monitor with Barge-In
Programming Steps1. Press the SUPV BARGE-IN flexible button (FLASH 50, Page A,
Button #12). The following message displays:
2. Enter a 0 or 1 on the dial pad to enable/disable this feature.
[0] = Disabled
[1] = Enabled
3. Press HOLD to save the entry. A confirmation tone is heard.
ACD SU PV B AR G E IN 0- 1D ISA BLE D
The use of Supervisor Monitor with Barge-In is l imited by federal law and may also be limited or prohibited by state or local law, so check the relevant laws in your area before employing these features.
A change in volume may occur on the CO line or intercom call after the barge-in occurs.

Page A Introduction 4-13
DescriptionThis feature is available with optional software. The ACD Supervisor Monitor with Barge-In feature provides a means for an ACD Supervisor to monitor an agents call in progress to coach sales techniques or customer relations skills. When used, a supervisor may intrude into an agent’s call in a listen-only mode or in a true conference mode. Prior to barge-in, a supervisor must log into the agent’s group using the supervisor log-in code 576XXX. This feature is available with or without a warning tone. By default, the Supervisor Monitor with Barge-In feature is disabled.
Executive Override Blocking
Programming Steps1. Press the EXECUTIVE OVERRIDE BLOCKING flexible button (FLASH 50,
Page A, Button #13). The following message displays:
2. Enter a 0 or 1 on the dial pad to enable/disable this feature.
[0] = Disabled
[1] = Enabled
3. Press HOLD to save the entry. A confirmation tone is heard.
DescriptionThe Executive Override Blocking feature allows or disallows override of an extension. This prevents an extension with override capability from overriding a station. By default, Executive Override is disabled at all stations.
Executive Override is a system feature and, therefore, takes precedence over this feature. If Supervisor Monitor with Barge-In is used properly, Executive Override MUST be disabled. Otherwise, the barge-in is performed with the MUTE button OFF.
EXE C OV E RR ID E B LO CK 0- 1D ISA BLE D
The Executive Override Blocking feature also blocks an ACD Supervisor Monitor with Barge-In.

4-14 Page A Introduction
CO Line Ringing Options
Programming Steps1. Press the RINGING OPTIONS flexible button (FLASH 50, Page A,
Button #14). The following message displays:
2. Enter a 0 or 1 on the dial pad to enable/disable this feature.
[0] = Reminder Ring
[1] = Muted Ring
3. Press HOLD to save the entry. A confirmation tone is heard.
DescriptionWhen a CO call rings at a busy station, the call rings at the station using a muted ring signal. This option lets a user receive a reminder ring at his station, instead of muted ring. In addition, a reminder ring timer has also been added to the system to provide the reminder ring every time the timer expires, for as long as the incoming CO line has not been disconnected. By default, Muted Ringing is allowed at all stations.
Name / Number Display at Idle
Programming Steps1. Press the NAME/NUMBER DISPLAY flexible button (FLASH 50,
Page A, Button #15). The following message displays:
2. Enter a 0 or 1 on the dial pad to enable/disable this feature.
[0] = Extension number
[1] = Name
3. Press HOLD to save the entry. A confirmation tone is heard.
CO R IN G OP TI ONS 0- 1MU TED R ING
N AME AT ID LE LC D 0- 1N AME

Page A Introduction 4-15
DescriptionThe Name/Number Display feature displays the standard idle LCD showing the programmed 7-digit name and station number together. This option is programmable on a per station basis, however, the feature must be enabled / disabled in admin programming.
If a station has this feature enabled but has not programmed a name, the name portion of the LCD is blank. The idle display priority is UCD/ACD, Hunt, Station/Name, or Station. By default, the Name displays on the LCD.
Zap Tone
Programming Steps1. Press the Zap Tone flexible button (FLASH 50, Page A, Button #16).
The following message displays:
2. Enter a valid number (0 or 1) on the dial pad.
[0] = Disable feature
[1] = Enable feature
3. Press HOLD to save the entry. A confirmation tone is heard.
DescriptionThe Zap Tone feature enables ACD agents in the headset mode, to have ACD calls connected to them automatically. The feature removes the requirement for the agent to press the ON/OFF button to answer ACD calls. ACD calls are connected when the agent is logged into any group and is available. By default, this feature is disabled.
ACD Z AP TON E 0- 1D ISA BLE D

4-16 Page A Introduction
CO Loop Pool Flex
Programming Steps1. Press the CO LOOP POOL flexible button (FLASH 50, Page A,
Button #17). The following message displays:
2. Enter a 0 or 1 on the dial pad to enable/disable this feature.
[0] = Disable
[1] = Enable
3. Press HOLD to save the entry. A confirmation tone is heard.
DescriptionThe CO Loop Pool feature enables the station user to program CO Line, Loop, and Pool Keys using flexible button programming. By default, this feature is disabled.
Administration Access
Programming Steps1. Press the ADMIN ACCESS flexible button (FLASH 50, Page A,
Button #18). The following message displays:
1. Press the ADMIN ACCESS flexible button (FLASH 50, Page A, Button #18). The following message displays:
2. Enter a 0 or 1 on the dial pad to enable/disable this feature.
[0] = Disable
[1] = Enable
3. Press HOLD to save the entry. A confirmation tone is heard.
CO LOOP POO L F LEX 0- 1D ISA BLE D
AD MIN ACCES S 0- 1D ISA BLE D

Page B Introduction 4-17
DescriptionThe Administration Access feature allows a station to access Database Administration. Each station can be enabled/disabled for system programming. By default, feature is disabled.
Page B Introduction
Programming Steps
If the system is in the programming mode, continue using the program codes. If starting to program here, enter the programming mode.
1. Press FLASH and dial [50]. Flexible button #24 (New Range) is lit and the following message displays:
2. Enter a valid number for the station range being programmed. If one station is being programmed, enter that number twice, e.g., [100100].
3. Press HOLD to save the entry. A confirmation tone is heard and the display updates. Flexible button #19 (Page A) is lit.
4. Press button #20. The display updates to reflect programming for Page B.
XXX = Station Range (100-131)
Station 100 always has programming access regardless of this setting.
STAT ION AT TR IB UT ESSEL ECT A STATION RA N GE
If HOLD is pressed without entering a station range, all stations (100-131) are selected.
XXX - XXX PA GE BEN TE R B U TTON N UM BE R

4-18 Page B Introduction
DescriptionRange programming enables the programmer to change a specific parameter or a few parameters for a range of stations, leaving intact the remaining data fields not requiring changes. Those data fields continue to operate with the previously programmed data.
When programming the Page B features, the flexible buttons are mapped as follows:
Station Identification
Programming Steps1. Press the STATION ID flexible button (FLASH 50, Page B, Button #1).
STATIONID
DAY CLASS OFSERVICE
NIGHTCLASS OF SERVICE
SPEAKERPHONE
1 Q 2 W 3 E 4 R
GROUPPICKUP
PAGINGZONES
CO LINE GROUPACCESS
5 T 6 Y 7 U 8 I
LCR CLASSOF SERVICE
OFF-HOOKPREFERENCE
BUTTONASSIGN
KEYSET MODE
9 O 10 P 11 A 12 S
VMIDTRANSLATION
DISPLAYBUTTONS
1 3 D 14 F 15 G 16 H
CKTU PAGEA
PAGEB
17 J 18 K 19 L 20 ;
PAGEC
NEXT(FWD)
NEXTBACK)
NEWRANGE
21 Z 22 X 2 3 C 24 V
STAT ION ID 0- 8K EY SET - SP 24 B TN

Page B Introduction 4-19
2. Enter a valid number on the dial pad to identify type of telephone:
[1]=DSS Console (Refer to “Station ID for DSS / DLS Console with Map” for details)
[6]=SLT without Message Wait
[7]=SLT with Message Wait (90 Vdc)
[006]= 24-Button Telephone
[007]=12-Button Telephone
[008]=8-Button Telephone
[009]=16-Button Telephone
[015]=SLA
[016]=Large Display 30-Button Telephone
3. Press HOLD to save the entry. A confirmation tone is heard and the display updates.
DescriptionEach system port must be programmed to identify the type of station that operate on that port. Each station type must be identified. By default, all Key Telephone Boards (DTIB) default to ID 006 (24-Button Digital Telephone), all Single Line Boards (SLIB) default to ID 6.
Station ID for DSS / DLS Console with Map
Programming Steps1. Dial [1] on the dial pad.
2. Enter a station number to which the DSS/DLS Console is associated.
3. Press HOLD to save the entry. A confirmation tone is heard and the display updates.
X =1
XXX = Station Range (100-131)
When identifying a station as a DSS / DLS console, you must also enter the station number of the key telephone to which the DSS / DLS console is associated. To associate a DSS console with Station 100, the entry w ould be 1100 [HOLD].
STAT ION ID 0- 8D SS MA P X A 5S SOC XXX

4-20 Page B Introduction
MAP #1 by default has all 12 CO Lines and all 32 Stations, 100–131. This provides a default layout for a 12x32 configuration. Station/Feature buttons are flexible and can be changed by the station user. CO Line buttons are NOT changeable.
CO1 CO2 CO3 CO4
CO5 CO6 CO7 CO8
CO9 CO10 CO11 CO12
100 101 102 103
104 105 106 107
108 109 110 111
112 113 114 115
116 117 118 119
120 121 122 123
124 125 126 127
128 129 130 131
Call Park 430 Call Park 431 Ext Page RLS

Page B Introduction 4-21
MAP #2 by default has 32 Stations, 100–131. All buttons are flexible and can be changed by the station user. This map can be duplicated on another DSS/DLS console and assigned to the same station.
Station Day Class of Service (COS)
Programming Steps
1. Press the DAY COS flexible button (FLASH 50, Page B, Button #2).
The seven classes of service are:
COS 1 = No restrictions
COS 2 = Table A governs
COS 3 = Table B governs
COS 4 = Table A and B govern
D AY COS 1- 71
100 101 102 103
104 105 106 107
108 109 110 111
112 113 114 115
116 117 118 119
120 121 122 123
124 125 126 127
128 129 130 131

4-22 Page B Introduction
COS 5 = Restricts [0], [1], [ ], [#] dialed as first-digit and places a 7-digit maximum
COS 6 = Intercom Only(no CO line access - results in a 911 block unless 911 Feature is active)
COS 7 = Restricts [0], [1], [ ], [#] dialed as first-digit with a 10-digit maximum
2. Press HOLD to save the entry. A confirmation tone is heard and the display updates.
DescriptionEach station must be assigned a certain COS for Day and Night Mode operation. Class of Service (COS) determines the station’s dialing privileges. By default, all stations are assigned a COS 1 for Day Mode.
Table 4-2: Class of Service (COS)
STATION
COS
CO Line Class of Service
1 2 3 4 5
1 Unrestricted Unrestricted Unrestricted Canned Restricted*
Unrestricted
2 Table A Table A Unrestricted Canned Restricted*
Unrestricted
3 Table B Unrestricted Table B Canned Restricted*
Unrestricted
4 Table A&B Table A Table B Canned Restricted*
Unrestricted
5 Canned Restricted*
Canned Restricted*
Canned Restricted*
Canned Restricted*
Unrestricted
6 Intercom Only Intercom Only Intercom Only Intercom Only Intercom Only
7 Canned Restricted*
Canned Restricted*
Canned Restricted*
Canned Restricted*
Unrestricted
* Canne d Restriction: No [0], [1], [#], [*] as first dial ed digi t, and 7-digit dialing limitation; plus 1-800, 1-866, 1-877, 1-888, 1-911, 1-611 are al lowed, and 411, 976, and 555 numbers are denied. COS 7 allows 10-digitdialing maximum.
Page B Introduction 4-23
Station Night Class of Service (COS)
Programming Steps1. Press the NIGHT COS flexible button (FLASH 50, Page B, Button #3).
a
The seven classes of service are:
COS 1 = No restrictions
COS 2 = Table A governs
COS 3 = Table B governs
COS 4 = Table A and B govern
COS 5 = Restricts [0], [1], [ ], [#] dialed as first-digit and places a 7-digit maximum
COS 6 = Intercom Only(no CO line access - results in a 911 block unless 911 Feature is active)
COS 7 = Restricts [0], [1], [ ], [#] dialed as first-digit with a 10-digit maximum
2. Press HOLD to save the entry. A confirmation tone is heard and the display updates.
DescriptionEach station must be assigned a COS for Night Mode operation. The Night COS goes into affect when the system is manually or automatically placed into Night Mode. This prevents misuse of phones after hours. Class of Service (COS) determines the station’s dialing privileges. By default, all stations are assigned a COS 1 for Night Mode.
N IGH T COS 1- 71

4-24 Page B Introduction
Speakerphone / Headset
Programming Steps1. Press the SPEAKERPHONE flexible button (FLASH 50, Page B,
Button #4). The following message displays:
2. Enter a valid number (0-4) on the dial pad to identify the speakerphone operation.
[0]= Works as normal speakerphone. Full speakerphone capabilities on CO lines and Intercom.
[1]= Speakerphone enabled for intercom calls only. Speakerphone capabilities disabled for outgoing CO line calls (monitoring and on-hook dialing are still permitted).
[2]= Permits toggling of speakerphone and headset operation via the [634] Headset code.
[3] = Forces the telephone to always ring in the tone intercom mode.
[4] = Forces the telephone to the hand-free intercom mode always.
3. Press HOLD to save the entry. A confirmation tone is heard.
DescriptionSpeakerphones are programmable. By default, all stations are assigned an ID of 0 (Full Speakerphone).
Pickup Group(s)
Programming Steps1. Press the GROUP PICKUP flexible button (FLASH 50, Page B,
Button #5). The following message displays:
SP EA KE RP H ON E 0- 4FU LL SP EAK E RP H ON E
P ICKU P G R OU PS 0- 81

Page B Introduction 4-25
2. Enter a valid number (1-8) to program pickup groups.
3. Press HOLD to save the entry. A confirmation tone is heard and the display updates.
DescriptionStations are assigned to pick-up groups. Stations can be in any combination of the eight groups or in no group at all. By default, all stations are in Group 1.
Paging Zone(s)
Programming Steps1. Press the PAGING ZONES flexible button (FLASH 50, Page B,
Button #6). The following message displays:
2. Enter a valid number (1-8) to program paging zone(s).
3. Press HOLD to save the entry. A confirmation tone is heard and the display updates.
DescriptionStations are assigned to Page Zones. At least one station must be assigned to a Zone for that Zone to be active. Stations can be in any combination of the eight zones or in none of the zones. By default, all stations are in Zone 1.
[0] = No Group [5] = Group 5
[1] = Group 1 [6] = Group 6
[2] = Group 2 [7] = Group 7
[3] = Group 3 [8] = Group 8
[4] = Group 4
PAG E ZON E 0- 81
[0] = No Zone [5] = Zone 5
[1] = Zone 1 [6] = Zone 6
[2] = Zone 2 [7] = Zone 7
[3] = Zone 3 [8] = Zone 8
[4] = Zone 4

4-26 Page B Introduction
Line Group Access - Station
Programming Steps1. Press the CO LINE GROUP ACCESS flexible button (FLASH 50, Page B,
Button #8). The following message displays:
2. To add a Line Group, enter a valid number (00, or 01–23) to designate the outside line groups that the station can access, press 1, and then press HOLD to save the entry. A confirmation tone is heard and the display updates.
3. To delete a Line Group, enter a valid number (00, or 01-23), press 0, and then press HOLD. A confirmation tone is heard and the display updates.
DescriptionA station can access any combination of outside line groups, or a station may not be allowed access to outside lines. CO line groups are used primarily by single line telephones or for flexible buttons assigned as pooled group buttons on a Key Telephone. By default, stations are allowed access to Group 1.
LCR Class of Service (COS)
Programming Steps1. Press the LCR COS flexible button (FLASH 50, Page B, Button #9).
The following message displays:
LIN E GR OU P A CC ESS 1-2 31
00+1+HOLD = No Access (911 calls are blocked unless 911 Feature is active).
01+1+HOLD = Access to Group 1 by dialing Code 9 or 801(Code 800 if 911 Feature is active).
Users access Line Groups 2-23 by dialing 802-823, respectively.
LCR CLA SS OF SE R VIC E 0- 60

Page B Introduction 4-27
2. Enter a valid number (0–6) to correspond to the LCR Class of Service desired.
3. Press HOLD to save the entry. A confirmation tone is heard and the display updates.
DescriptionStations can be given a class of service assignment for Least Cost Routing. The range is between 0-6, with 0 being unrestricted and 6 the most restricted. A station can use LCR routes with a priority number equal to or higher than the stations LCR COS assignment. Stations are given unrestricted access (0).
Off-Hook Preference
Programming Steps1. Press the OFF-HOOK PREF flexible button (FLASH 50, Page B,
Button #10). The following message displays:
2. Enter a valid number (01–24) or (00) to indicate no specific button is preferred. (SLTs use [01] to enable or [00] to disable.)
3. Enter one of the following:
[0]= Disables programmable preference so users may not change the off-hook preference as set in programming. Also use for SLT stations.
[1]= Enables programmable preference to key station users so that they may change the off-hook preference through a user dial code.
4. Press HOLD to save the entry. A confirmation tone is heard and the display updates.
DescriptionThe Off-Hook Preference feature lets a key station user automatically have a flex button selected when going off-hook or when pressing the ON/OFF button. An SLT user may have a particular CO line or a CO line group selected automatically when going off-hook.
OFF H OOK PR EF EN CE BT N XXY00 D IS AB LED

4-28 Page B Introduction
This may be established in programming so that key station users can select and/or change their off-hook preference through the use of a dial code [691]+BB (01-24). Dialing [691]+00 disables Off-Hook Preference. This user programmable preference may be allowed or denied in programming. When establishing an off-hook preference for SLT stations, it is necessary to program the SLTs CO line, or line group, to access when going off-hook, using a flex button programming procedure. By default, all digital telephones can change their preference but no button is assigned (00). SLT stations cannot use this feature.
Flexible Button
Programming Steps1. Press the BUTTON ASSIGN flexible button (FLASH 50, Page B,
Button #11). The following message displays:
2. Enter a valid button number [01-24] to program, followed by the desired button function:
[0] = Flexible/user changeable
[1] = CO line
[2] = Loop button/all-purpose CO appearance
[3] = Pool for specific groups
[4] = Direct feature programmable
[#] = Locks button
DescriptionEach digital telephone has 8, 12 or 24 flexible buttons that can be programmed. One of the following five operations can be selected in programming for each button.
Assigning a Flexible Button (user programmable)Enter: [BB], [0], [HOLD]
When a button is assigned as a flexible button [0], the user can program any features or functions on the buttons to which they have access.
FLE X B U TT ON P R OGEN TE R B U TTON D ATA

Page B Introduction 4-29
Assigning a CO Line Button:Enter: [BB], [1], [LLL], [HOLD]
LLL = CO Line 001-012
Example:
Buttons assigned as specific CO lines provide direct access and appearance of the CO line at a station. The station receives call status indications such as LED flash rates for incoming ringing when the line is placed on HOLD, etc. CO Line ringing is programmed in CO Line Attribute programming.
Assigning a Loop Button:Enter: [BB], [2], [HOLD]
Example:
Used for a station without direct CO line appearance to answer the line ringing in or transferred to the station. It is recommended that all stations be given a loop button so they can receive a transferred call on a line for which they have no button access.
Assigning a Pool Group Button:Enter: [BB], [3], [GG], [HOLD]
GG = Line Group Number (00-23)
0 1 1 0 01 H OLD0 2 1 0 020 3 1 0 03
B u t to n CO CON u mbe r Code L ine
0 5 2 H OLD
B ut t o n Lo o pN um ber Co de

4-30 Page B Introduction
Example:
Some or all outside CO lines may be grouped together and accessed via a POOL button for the purpose of placing an outgoing CO call. Pressing this button accesses the highest numbered unused CO line in that CO line group.
Assigning a Feature Button (admin programmable):Enter: [BB], [4], [XXX], [HOLD]
This feature enables flexible buttons to be programmed from a remote location. Range programming can be used to assign these buttons to multiple stations. When a button is assigned as a feature button [4], the programmer can program any features on the buttons.
Unassigning (lock out) a Button:Enter: [BB], [#], [HOLD]
If SLT stations must be programmed for off-hook preference, program the desired CO line, or CO line group the SLT must access when going off-hook.
Assigning a CO Line for an SLT (with off-hook preference):Enter: [01], [1], [LLL], [HOLD]
LLL = CO Lines (001-012)
Assigning a CO Line Group for an SLT (with off-hook preference):Enter: [01], [3], [GG], [HOLD]
GG = Line Group Number (00-23)
When upgrading software from FP2 to FP3, which supports this feature, all previously programmed trunk groups will be lost .
2 0 3 02 HOL D
B u t to n P oo l Lin eN u mbe r Co de G r ou p

Page B Introduction 4-31
Table 4-3: Flex Button Codes for Remote Programming
Account Code 627 Disable CO Outgoing 602
ACD Call Qualifier 570+[XXX] Do Not Disturb 631
ACD Calls in Queue Display 579+[XXX] Executive Override 625
ACD Login (Primary Grp) 572+[XXX] Group Pickup 771
ACD Login (Secondary Grp) 582+[XXX] Headset Mode 634
ACD Member Status 573 Hunt Groups 450-457
ACD Secondary Grp Logout 581 ICLID Answered Call 659
ACD Supervisor Help 574 ICLID Unanswered Call 635
ACD Supervisor Login 576+[XXX] Intercom Button 645
ACD Supervisor Logout 575+[XXX] Page - All Call 700
ACD Supervisor Status 577+[XXX] Page - External 761-762
ACD/UCD Avail/Unavail 566 Page - Internal All Call 709
ACD/UCD Calls in Queue 567 Page - Internal Zone 701-708
Answering Mach. Emulation 654+[0, 1] Page - Meet Me 770
Attendant Avail/Unavail 607 LCR 773
Attendant Override 601 LCR Queue Cancel 626
Background Music 632 Line Queue 621
Call Back 622 Mailbox Button (IDX = 001-255) 644+[IDX]
Call Coverage (Non-Ringing) 647+[XXX] Night Service 604
Call Coverage (Ringing) 646+[XXX] OHVO 628
Call Factor 580+[5XX]+F One-Touch Record (VM 440-447) 649+[44V ]
Call Forward 640 Overflow Avail /Unavail 578
Call Park (Personal) 438 Personalized Message 633+[XX]
Call Park (Station) 439 Primary ACD Group Logout 571+[XXX]
Call Park (System) 430-437 Release Key 641
Caller ID Name/Nbr Toggle 653 Repeat Redial 643
CO Line Direct Access 88+[LLL] Ring Tone 695+[01-35]
CO O ff-Net Forward 603 Station Speed Bins 000-019
Conference 624 System Speed Bins 020-999
Custom Message 694 Triad-S DSS 100- 131
Dial by Name 772 Universal Day / Night Answer 774
Directory Dial 680 VM Pilot Groups 440-447

4-32 Page B Introduction
Digital KeysetsSpecific buttons may be assigned as unused or locked out. When a button is programmed as unused, the button may not be programmed by the station user using flex button programming procedures.
24-Button Default:
12-Button Default
8-Button Default
STA 10 0 STA 101 STA 102 STA 103
1 Q 2 W 3 E 4 R
STA 10 4 STA 105 STA 106 STA 107
5 T 6 Y 7 U 8 I
STA 10 8 STA 109 STA 110 STA 111
9 O 10 P 11 A 12 S
CO 1 CO 2 CO 3 CO 4
13 D 14 F 15 G 1 6 H
CO 5 CO 6 LOOP POOL
17 J 18 K 19 L 20 ;
CALL BACK PICKUP DND LINE QUEUE
2 1 Z 22 X 23 C 24 V
STA 100 STA 101 STA 102 STA 10 3
1 Q 2 W 3 E 4 R
CO 1 CO 2 LOOP POOL
5 T 6 Y 7 U 8 I
CALL BACK PICKUP DND LINE QUEUE
9 O 10 P 11 A 1 2 S
STA 100 STA 101 LOOP POOL
17 J 18 K 19 L 20 ;
CALL BACK PICKUP DND LINE QUEUE
2 1 Z 22 X 23 C 24 V

Page B Introduction 4-33
Keyset Mode
Programming Steps1. Press the KEYSET MODE flexible button (FLASH 50, Page B,
Button #12). The following message displays:
2. Enter a valid number (0-4) to change the mode of a digital telephone:
[0] = Inactive Mode (normal mode without CTI box)
[1] = PC Phone (Discovery Desktop) Mode at 4800 baud
[2] = ATD Command Mode at 4800 baud
[3] = ATH Command Mode at 4800 baud
[4] = CKTU Mode at 4800 baud
[5] = SPI Mode at 4800 baud
3. Press HOLD to save the entry. A confirmation tone is heard and the display updates.
DescriptionThe Keyset Mode feature lets the station user determine the mode in which the Digital Telephone with CTI Box (optional) operates. The 5 modes are: Inactive, PC Phone (Discovery Desktop), ATD Command, ATH Command and CKTU. Through the use of a dial code, the station user can also determine the baud rate for each mode selected. This setting is stored in back-up memory in the event of a power outage or system reset. By default, Keyset is set for Inactive Mode.
Voice Mail ID Translation
Programming Steps1. Press the VMID TRANSLATION flexible button (FLASH 50, Page B,
Button #13). The following message displays:
2. Enter a VMID number which corresponds to 0000 to 9999.
K EY SET MOD E 0- 5IN ACTIV E MO DE
V OICEMA IL ID 0 00 0-9 99 901 00

4-34 Page B Introduction
3. Press HOLD to update the table. A confirmation tone is heard and the display updates.
DescriptionThe Voice Mail ID Translation feature enables programming of the station number sent to the Voice Mail via In-Band integration. By default, the station number is sent to the Voice Mail system. In station programming, there is a field to insert a 4-digit entry (0000-9999) which can be sent to the Voice Mail system in place of the station number. By default, Station Numbers are assigned as VMID Digits. (Refer to Chapter 8, Voice Mail ID Digit Length.)
Display Flexible Buttons
Programming StepsPress the DISPLAY BUTTONS flexible button (FLASH 50, Page B, Button #14) to display programming assignments. The following message displays:
XXX = Station Number
BB = Button Number
YYY = Button Function (Refer to Table 4-4 .)
DescriptionEach time the DISPLAY BUTTONS flexible button is subsequently pressed, the next four buttons display starting with the lowest button number.
When a button is assigned as Flex Button [0], the user can program any features or functions on the buttons to which they have access.
When the buttons are programmed with user programmed functions, the display shows the function assigned to the button.
B UT TON S XXX - Y Y Y 0 1D 10 002 D 10 1 03 D 10 3 0 4D 1 04

Page B Introduction 4-35
Table 4-4: Flex Button Display Designations
FlexButton
DesignationFlex
ButtonDesignation
A[AAA] ACD Group with Pi lot Number MMP Meet Me Page
ACC Account Code Enter MUL Flexible Button
ACP Al l Call Page MUS Background Music
ALI Agent Login NTS Night Ser vice
ALO Agent Logout OFD ACD Overflow Station Avail/Unavail
AMD Agent Member D isplay OHP Off-Hook Preference
ANS Answering Mach. Emulation Mode OHV Off-Hook Voice Over
AOR Attendant Override (attn) P[CCC] Call Park with Park Location
AVL ACD or UCD Avail/Unavail PKU Pickup
CBK Cal l Back PL[GG] Pool with CO Line Group Number
CID Cal ler ID Name / Number Toggle PPK Personal Park
CIQ ACD or UCD Calls in Queue S[YY ] Speed Dial Button with Bin Number
CO[LLL] CO Line Button (CO Line [LLL] ) SCP Station Call Park
CQD ACD Calls in Queue Display SLI Supervisor Login
D[XXX] Station DSS / BLF SLO Supervisor Logout
DND Do Not Disturb SNR Save Number Redial
DRG Distinctive Ringing STS Supervisor Status Display
DUA Display Unanswered Calls U[UUU] UCD Group with Pi lot Number
EAC External All Cal l UNA Universal Night Answer
EOR Executive Override V[VVV ] VM Group with Pilot Number
EP[N] External Page with Zone
FFW Incoming Transfer CO Line -------------------------- LEGEND -----------------------
H[HHH] Hunt Group with Pilot Number [AAA] ACD Group Pilot Number
HLP Agent Help [CCC] Call Park Location
HST Headset Mode [GG] Pool or CO Line Group Number
IAC Internal All Call Page [HHH] Hunt Group Number
IP[N] Internal Page with Zone [LLL] CO Line Number
LCR LCR Access [N] Page Zone Number
LP Loop [UUU] UCD Group Pilot Number
IAC Internal All Call Page [VVV] Voice Mail Group Number
LNR Last Number Redial [XXX] Station Number
LQU Line Queue [YY] Speed Dial Bin
M[ZZ] Personalized Messag e w/ Msg Nbr [ZZ] Personal ized Message Number

4-36 Page C Introduction
Cordless KTU Feature Button
Programming StepsPress the CORDLESS KEY flexible button (Flash 50, Page B, Button #17) to assign the FEAT Buttons. The following message displays:
XX = Assigned FEAT Button
00 = None
01-24 = Button 1-24 (01-30 for Large Screen Display te lephone)
DescriptionIf a CKTU is associated with the station, the FEAT Button on the CKTU may be assigned to function as any one (1) of the 24 Flexible Buttons on the telephone. This programming area defines which Flexible Button on the telephone will be applied to the CKTU FEAT Button. Not all features are available to be assigned to the CKTU FEAT Button. By default, no button (00) is assigned to the FEAT.
Page C Introduction
Programming Steps1. Press FLASH and dial [50]. Flexible Button #24 (New Range) is lit and
the following message displays:
2. Enter a valid number for the station range to be programmed. To program one station, enter the number twice (100100).
COR DL ESS K EY BT N 0 0-3 0XX
STAT ION AT TR IB UT ESSEL ECT A STATION RA N GE
If the HOLD button is pressed without entering a station range, ALL stations are selected.

Page C Introduction 4-37
When programming the Page C features, the flexible buttons are mapped as follows:
3. Press HOLD to save the entry. A confirmation tone is heard and the display updates. Flexible Button #19 (Page A) is lit.
4. Press Button #21. The display updates to reflect current programming for Page C.
XXX-XXX = Station Range (100-131)
DescriptionRange programming enables the programmer to change a specific parameter or a few parameters for a range of stations, leaving intact the remaining data fields not requiring changes. Those data fields continue to operate with the previously programmed data.
INTERNAL NOANSWER FWD
INTERNALBUSY FWD
EXTERNAL NOANSWER FWD
EXTERNALBUSY FWD
1 Q 2 W 3 E 4 R
NO ANSWERTIMER
SPEED DIALACCESS
5 T 6 Y 7 U 8 I
9 O 10 P 11 A 12 S
1 3 D 1 4 F 15 G 16 H
PAGE A PAGE B
17 J 18 K 19 L 20 ;
PAGE C NEXT (FWD) NEXT (BACK) NEW RANGE
21 Z 22 X 2 3 C 24 V
XXX-XXX PAG E CEN TE R B U TT ON N U MB ER

4-38 Page C Introduction
Preset Call Forward
Programming StepsTo program internal and external calls with separate Busy and No Answer destinations, perform the following steps.
Internal No Answer Destination1. Press FLASH 50, Page C, Button #1. The following message displays:
2. Enter a valid number and press HOLD.
3. To delete the entry, press the [#] key and then press HOLD.
Internal Busy Destination1. Press FLASH 50, Page C, Button #2. The following message displays:
2. Enter a valid number and press HOLD.
3. To delete the entry, press the [#] key and then press HOLD.
External No Answer Destination1. Press FLASH 50, Page C, Button #3. The following message displays:
2. Enter a valid number and press HOLD.
3. To delete the entry, press the [#] key and then press HOLD.
Valid destination entries are:1020-1999 = Speed bins.100- 131 = Station numbers.440- 447 = Voice mail groups.450- 457 = Hunt groups.550- 565 = ACD groups.
IN TER N AL N O AN SW ER F WD## ##
IN TER N AL B U SY F WD## ##
EXT ER N AL N O AN SW ER F WD## ##

Page C Introduction 4-39
External Busy Destination1. Press FLASH 50, Page C, Button #4. The following message displays:
2. Enter a valid number and press HOLD.
3. To delete the entry, press the [#] key and then press HOLD.
No Answer Timer1. Press FLASH 50, Page C, Button #5. The following message displays:
2. Enter a valid number (00-99) and press HOLD (00=disable).
DescriptionThe Preset Call Forward feature provides separate Busy and No Answer destinations for internal and external calls with a No Answer Timer associated to each station. External calls ringing that particular station, transferred calls, and internal calls follow this Preset Forward feature. By default, the Timer is set at 10 seconds.
ConditionsStation Forwarding overrides the Preset Forward settings.
EXT ER N AL BU SY FW D## ##
N O A N SWE R TIM ER 0 0-9 910

4-40 Page C Introduction
Speed Dial Access
Programming Steps1. Press the SPEED DIAL ACCESS button (FLASH 50, PAGE C,
Button #6). The following message displays:
2. Enter a range of speed bins to be allowed (100-999).
3. Press HOLD to save the entry.
DescriptionThe System Speed Dial Access feature has 900 entries available (with expanded memory). A station can be allowed or denied access to bins 100-999. Stations may be granted the ability to dial all Speed Dial Numbers within the range.
Flexible Numbering Assignment
Programming StepsPress FLASH and dial [52]. The following message displays:
Selecting a Fixed or Flexible Code1. Press Button 24 (Fixed) or Button 21 (Flex).
2. Enter the desired code to change.
3. Press HOLD. The Fixed and Flex Number as well as a description of the code displays on the LCD.
SY S SP EE D B IN 1 00- 99 9## # - # ##
FIX: 10 0 F LEX: 10 0N AME: STATION 10 0
You can scroll through Fixed Codes by using the PREVIOUS button (23) or the NEXT button (22).

Page C Introduction 4-41
Changing a Flexible Code1. Select the desired code.
2. Press Button 1. The red LED illuminates.
3. Delete the Flex Number by pressing Button 2 and then pressing HOLD. The Flex number field will be blank
4. Enter the new code (2-4 digits).
5. Press HOLD.
Erasing a Flexible Code1. Select the desired code, then pess Button 1 (must be lit).
2. Press Button 2, then press HOLD.
Description
The Flexible Numbering feature allows the system numbering plan to be modified from its default value to accommodate specific customer requirements. Station, Pilot, and Feature Access Code numbers may be changed with this feature. The length of these numbers may also be modified to meet specific customer applications. The buttons on the key telephone are defined as shown when entering the Flexible Numbering Assignment feature programming area:
Station/Pilot numbers can only contain 0-9.
Feature codes can contain 0-9, *, #.
CHANGEFLEXIBLE CODE
ERASEFLEXIBLE CODE
1 Q 2 W 3 E 4 R
5 T 6 Y 7 U 8 I
9 O 10 P 11 A 12 S
13 D 1 4 F 15 G 1 6 H
17 J 18 K 19 L 20 ;
NEW FLEXIBLECODE ENTRY
NEXT FIXEDCODE ENTRY
PREVIOUS FIXEDCODE ENTRY
NEW FIXEDCODE ENTRY
21 Z 22 X 23 C 24 V

4-42 Page C Introduction
Conditions
Feature access codes cannot conflict with station numbering.
CO line numbers are fixed and cannot be changed.
If no VM ID digits are programmed in the station field, the flexible number assigned to the station will be sent to the VM unit.
The SMDR will output 4-digit numbers in the station field. If less than 4 digits is selected in the numbering plan, leading spaces will be added in place of the numbers. The 3-4 digit SMDR programming area will be removed from programming.
The Discovery ACD event trace source and destination fields will be 4 digits. Station numbers less than 4 digits will be prefixed with leading zeros.
The programming will print out as part of the CO-STA port programming area. The flexible numbering can be initialized in the CO-STA initialization area.
If programming with a telephone -- All programming will be done using Fixed Codes, regardless of the flexible codes.
EXAMPLE: If a station has been renumbered from 4500-4531, in programming they are still referred to as 100-131.
The leading digit feature is removed in FP3. The leading digit feature is replaced by networking feature (FLASH 16).

Page C Introduction 4-43
Table 4-5: Default Numbering Plan
Function Code Function Code Function Code
911 Atnd Alert Clear 608 Call Park - Station 439 Name In Display 6 90
Account Code 627 Call Park P/U - Station #6 Night Service 6 04
ACD Call Factor 580 Camp On 620 Off-Hook Preference Prog 6 91
ACD Call Qualifier 570 Cancel LCR Que ue 626 OHVO 6 28
ACD Group 1 -16 550-565 Clear Fwd, DND, Msg 662 One Touch Record 6 49
ACD CIQ Display Btn 579 Clear VM Alarm 656 Page - All Call 7 00
ACD CIQ Status Disp 567 CO Line Direct Access 88 Page - Ext Zone All, 1, 2 7 60-762
ACD Help 574 CO Line Group 0-23 800-823 Page - Int Zone 1-8, All 7 01-709
ACD Member Display 573 CO Line Queue 621 Page - Meet Me (Ans) 7 70
ACD Overflow Avail/Unav 578 Conference 624 Pause/Resume Rec 6 55
ACD PRI Login 572 Custom Msg 694 Personalized Msgs 6 33
ACD PRI Logout 571 Dial By Name 6 Pickup Park Group 1 -8 #4 30-#437
ACD Sec Login 582 Directory Dial 680 Pool All 8 24
ACD Sec Logout 581 Dir List Pgm Code 693 Release 6 41
ACD Supv Disp 577 Distinctive Ring 695 Repeat Redial 6 43
ACD Supv Login 576 Do Not Disturb 631 Save Number Redial [SPEED]+[ ]
ACD Supv Logout 575 DTMF Receiver Test 657 Set Clock 6 92
ACD/UCD Avail/Unav 566 Executive Override 625 SLT Directed Call P/U #1
Ans Machine Ring 6540 Flash 660 SLT Message Wait Return 6 63
Ans Machine Spkr 6541 Group Call Pickup #0 SLT Conference Park 6 64
Atnd Clear T-1 Alarm 606 Headset Mode 634 SLT Speed Dial 6 68
Atnd Disable CO Line 602 HPT 667 SLT Speed Prog 6 61
Atnd Off-Net Forward 603 Hunt Group 1-8 450-457 Station 100-131 1 00-131
Atnd Override 601 ICLID Ans Call 659 Station Relocate 6 36
Atnd Unans CO Call Xfer 639 ICLID Name/Number 653 Stop Trace 6 58
Atnd Unavailable 607 ICLID Unans Call 635 Telecenter Adm 6 52
Attendant 0 Intercom Button 645 Telecenter Ext 6 50
Background Music 632 Keyset Mode 648 Tone Ring 6 #
Call Back 622 Last Number Redial [SPEED]+[#] UNA/UDA #5
Call Coverage 647 LCR 800 VM Group 1-8 4 40-447
Call Coverage Ring 646 Loop Key (Reqs Btn) 89 VM Msg Cancel 4 21
Call Forward 640 Mailbox Button 644 VM Msg Set 4 20
Call Forward Override 5# Modem 499 VM Msg Set W/Count 4 22
Call Forward - Remote 642 MPB Version 605 Volume 6 38
Call Park - Group 1-8 430-437 Msg Wait 623
Call Park - Personal 438 Mute 629

4-44 Page C Introduction

5 ICLID (Caller ID) RouteProgramming
This chapter provides the functional and implementation definitionsfor adding the ICLID features to the STARPLUS Triad-S System.


Introduction 5-3
Introduction
ICLID, or Caller ID, is a service provided from the telephone company. Usually this service provides the number and name (not available in some cases) of the calling party for identification prior to answering the call. Calling party number and name are delivered in between this first and second ring using FSK (Frequency Shift Key) format.
For this feature to operate properly, it must be activated from the Central Office so the numbers or name, if available, of the calling party are delivered over the individual tip and ring of the CO lines during the first silent interval between ringing.
Calling Number / Name DisplayWhenever an incoming call is received at the system, the number received with the ringing signal is stored in the line control tables and used during the call processing.
The Triad-S System can use the Caller ID information to display the number and/or name of the calling party on the system telephone display. By default, the system displays the telephone number of the caller. The system can be changed to display the name (if provided) in place of the telephone number.
The system also offers a Number/Name Translation Table. This allows numbers to be matched to names in a system table. If a name/number from the telephone company matches an entry in the table, the name programming in the table is presented in place of the name provided from the telephone company.
If two lines are ringing at the same time, the display shows the oldest line information. After one of the lines is answered, the display shows the information on the unanswered lines.
00 00 00 00 01 11 11 11 1 11 22 22 212 34 56 78 90 12 34 56 7 89 01 23 4

5-4 Introduction
OR
If no name is available, supplied from the Central Office or internally from the translation table, the delivered number is positioned centered in the display as shown above for the 14 Ns.
An option was added to the Local Number/Name Translation Table to route ICLID or Caller Entered ID Digits based on a partial compare with the number entered in the translation table.
Incoming Number/Name for SMDR RecordsWhen the Incoming Number/Name feature is implemented, the system operates normally in the absence of ICLID information or the failure of the ICLID equipment. If the information is present at the time that an SMDR record is generated for a call, it alters the content and format of the SMDR output record.
If the calling number is available, the number is output in the SMDR record in the same location as the dialed number is located in the outgoing call record.
If the calling name is present, an additional line is output in the SMDR identifying the name. This record immediately follows the normal SMDR record. The normal SMDR record includes an indicator that states the following record with name identification is present.
Unanswered calls are recorded in the SMDR record for incoming calls with a U indicator to provide caller identification for statistical and callback purposes.
bbbbbN N NN N N N NN N N N NN bbbbb
XXXXXXXXXXXXXXXXXXXXXXXX

ICLID Features 5-5
ICLID Features
Programming Steps
1. Press FLASH and dial [56]. The following message displays:
2. To program ICLID features, use the flexible button(s) as defined in the following procedures.
Button # 1 = Disable/Enable
Button # 2 = Name In Display
Button # 3 = Baud Rate Display
Button # 4 = Port Assignment
3. After all entries are made, press HOLD to accept the data.
Description
The Triad-S System provides ICLID input on the RS-232C connector on the optional MISU. When ICLID is desired, the following system-wide parameters determine how the ICLID information is distributed. When entering the ICLID features programming area the buttons on the digital telephone are defined as shown below:
Enable / DisableProgramming Steps
1. Press the DISABLE/ENABLE flexible button (FLASH 56, Button #1).
2. Enter a valid number (0 or 1) on the dial pad to enable/disable this feature.
[0] = Disabled
[1] = Enabled
3. Press HOLD to save the entry. A confirmation tone is heard.
ICLID NA ME B AU D P OR TN O YE S 9 60 0 1
ENABLE / DISABLE
NAME BAUDRATE
PORT
1 Q 2 W 3 E 4 R

5-6 ICLID Features
DescriptionThe ICLID (Incoming Calling Line IDentification) feature was added to the Triad-S System, and are unavailable unless the Basic ICLID Software package was purchased separately. For this feature to operate properly, it must be activated from the Central Office so the numbers of the calling party are delivered over the individual tip and ring of the CO lines during the first silent interval between ringing. By default, ICLID is disabled.
Name in Display
Programming Steps1. Press the NAME flexible button (FLASH 56, Button #2) to determine
whether the name shows in the LCD display instead of the incoming telephone number.
2. Enter a 0 or 1 on the dial pad.
[0] = Telephone number in display
[1] = Name in display
3. Press HOLD to save the entry. A confirmation tone is heard.
DescriptionThe system can be set to display the incoming telephone number or the person's name on the LCD display. By default, the system shows the telephone number on the LCD display.
Baud Rate Display
Programming StepsThe ICLID baud rate is programmed using FLASH 15 Baud Rate assignments. The LCD displays the current baud rate based on which number is assigned to the ICLID Port number.
Description
The Triad-S System can provide ICLID input on the standard RS-232C on the optional MISU. The baud rate is displayed as 150, 300, 600, 1200, 2400, 4800, or 9600 baud. The default is 9600 baud.
When FLASH 56, Button #3 is pressed, an error tone is received.

ICLID Features 5-7
Port Assignment
Programming Steps1. Press the PORT flexible button (FLASH 56, Button #4) to determine
which port to use for ICLID information.
2. Enter a valid number for one of the ICLID Ports:
[1] = Port # 1 (RS-232C on optional MISU)
[2] = Port # 2 (RS-232C on optional MISU)
[3] = Port # 3 (Optional modem)
(LCD displays current baud rate assigned to the ICLID Port number.)
3. Press HOLD to accept the data. A confirmation tone is heard and the display updates.
By default, the On-Board Modem baud rate is 2400 Baud.
ICLID NA ME B AU D P OR T N O Y ES 9 60 0 1

5-8 ICLID Features

6 Automatic CallDistribution (ACD)
The ACD Group feature is available with optional software.


ACD Group Programming 6-3
ACD Group Programming
Programming Steps
If the system is in the programming mode, continue using the program codes. If starting to program here, enter the programming mode.
1. Press FLASH and dial [60].
2. Enter the group number (550-565) on the dial pad.
3. Press HOLD to save the entry. A confirmation tone is heard and the display updates.
Description
There can be 16 ACD groups of up to 252 stations each. The ACD groups use a pilot hunting technique. If the pilot number is dialed, the assigned stations in that ACD group are searched for the station in an idle condition for the longest period of time. Each ACD Group may have an assigned Alternate ACD Group, an Overflow Station, and up to 252 stations as ACD members. The eight system RAN ports (tables) may also be referenced on a per ACD group basis. By default, ACD Group Tables are empty.
The buttons on the digital telephone are defined as shown:
GROUPNAME
ALTERNATEGROUP
OVERFLOWSTATION
SUPERVISOR
1 Q 2 W 3 E 4 R
CIQTHRESHOLD
WRAP-UPTIMER
PRIMARYAGENTS
SECONDARYAGENTS
5 T 6 Y 7 U 8 I
GUARANTEEDRAN
PRIMARYRAN
SECONDARYRAN
TRANSFERREDRAN
9 O 10 P 11 A 12 S
OVERFLOWTIMER
CALLFACTOR
13 D 14 F 15 G 16 H
1 7 J 1 8 K 19 L 20 ;
PREVIOUSGROUP
NEXTGROUP
NEWRANGE
21 Z 22 X 23 C 24 V

6-4 ACD Group Programming
ACD Group Name
Programming Steps1. Press the GROUP NAME flexible button (FLASH 60, Button #1). The
following message displays:
2. Enter the desired name using the dial pad (up to eight characters).
3. Press HOLD to save the entry. A confirmation tone is heard and the display updates.
Description
A Group Name can be assigned to each of the 16 ACD groups to provide each with a unique identification. A Group Name only appears during a ringing ACD call. A Group Name is not presented on an idle display.
ACD 5 XX N AME ACD 5XX
Table 6-1: Dial Pad Keys
Other Codes
1 = 1# 8 = 8# = 01 * = *#
2 = 2# 9 = 9# , = 02 ( = #1
3 = 3# 0 = 0# ? = 03 ) = #2
4 = 4# Space = 11 / = 04 + = #3
5 = 5# : = 12 ! = *1 = = #4
6 = 6# - = 13 $ = *2 # = ##
7 = 7# ‘ = 14 & = *4 . = 24

ACD Group Programming 6-5
Alternate ACD Group Assignment
Programming Steps1. Press the ALTERNATE GROUP flexible button (FLASH 60, Button #2).
The following message displays:
2. Enter desired pilot number (550 to 565) of the alternate ACD group.
3. Press HOLD to save the entry. A confirmation tone is heard and the display updates.
Deleting an Alternate ACD Group1. Press [#] three times.
2. Then press the HOLD button.
DescriptionAn Alternate ACD Group can be programmed so if no station in a group is available, the alternate group is checked for an available station. This provides a way to chain or link ACD groups together.
ACD Overflow Station Assignment
Programming Steps1. Press the OVERFLOW ASSIGN flexible button (FLASH 60, Button #3).
2. Enter a valid station number to designate the ACD Group’s overflow station.
3. Press HOLD to save the entry. A confirmation tone is heard and the display updates.
Deleting an ACD Overflow Station1. Press [#] three times.
2. Then press the HOLD button.
ACD 5 XX ALTER N ATE G R OUPXXX
ACD 5 XX OV ER FLOW STAT IONXXX

6-6 ACD Group Programming
DescriptionWhen an overflow station is assigned, callers that remain in queue for a specified amount of time are routed to the assigned overflow station. The overflow station may not be one of the ACD group stations. Only CO calls transferred to a ACD group overflow to the overflow station when RAN tables are assigned.
ACD Supervisor
Programming Steps1. Press the ACD SUPV flexible button (FLASH 60, Button #4).
2. Enter a valid station number of the desired ACD Supervisor station.
3. Press HOLD to save the entry. A confirmation tone is heard and the display updates.
Deleting an ACD Supervisor Station1. Press [#] three times.
2. Then press the HOLD button.
DescriptionThe ACD Supervisor Station assignment feature provides a means to assign each ACD group a supervisor. This Supervisor Station can receive the calls in queue display in real time, receives No Answer/Out of Service conditions, HELP displays from the groups to which the supervisor is assigned, and can barge-in on active calls in their ACD Group or groups.
A supervisor can be assigned in ADMIN to a group or groups to receive the help request and out of service (OOS) messages. If a supervisor station is assigned in ADMIN, it is considered logged in. A supervisor can dial a supervisor login code [576] followed by the ACD group that the supervisor is logging into and their 4-digit Agent ID number.
ACD 5 XX SU P ER V ISOR STAXXX

ACD Group Programming 6-7
ACD CIQ Threshold
Programming Steps1. Press the CIQ THRESHOLD flexible button (FLASH 60, Button #5).
The following message displays:
2. Enter a valid value on the dial pad that corresponds to 00–99 calls.
3. Press HOLD to save the entry. A confirmation tone is heard and the display updates.
DescriptionThe ACD CIQ Threshold feature determines how many calls appear in queue before the LED flashes at 240 ipm flutter. Once the number of calls in queue falls below the CIQ threshold, the LED extinguishes. By default, this feature is disabled.
Conditions
Any ACD station can have a button assigned to view the calls in queue of any ACD group.
The CIQ flexible button (579+5XX) must be assigned on the telephone(s).
ACD Auto Wrap-Up Timer
Programming Steps1. Press the WRAP-UP TIMER flexible button (FLASH 60, Button #6).
The following message displays:
2. Enter a valid number on the dial pad which corresponds to 000-999 seconds (000=disable).
3. Press HOLD to save the entry. A confirmation tone is heard and the display updates.
ACD 5 XX C IQ T H RS HOL D 0 0-9 900
ACD 5 XX W RA P- U P 0 00- 99 900 4
6-8 ACD Group Programming
DescriptionAfter completion of a ACD call (on-hook) the agent is not subjected to another ACD call for the duration of the Auto Wrap-Up Timer allowing the agent to finish call related work or access other facilities. This lets agents remove themselves from the group (e.g., DND, Call Forward) or originate another call. By default, the ACD Auto Wrap-Up Timer is set for 4 seconds and is variable from 000-999 seconds.
Primary Agents
Programming Steps1. Press the PRIMARY AGENT flexible button (FLASH 60, Button #7).
The following message displays:
2. To add a station as a primary agent of the ACD group:
Enter SSS 1 (SSS = station).
Press the HOLD button.
3. To delete a station from being a primary agent of the ACD group:
Enter SSS 0 (SSS = station).
Press HOLD to save the entry. A confirmation tone is heard and the display updates.
4. To view primary agents in the ACD group, press button #7. (Each depression toggles through seven agents at a time.)
DescriptionThe Primary Agent Assignment feature allows the stations serving as primary agents to be entered into the ACD group. Agents can login to both a primary and secondary group. A primary agent’s ACD calls from their primary group are always presented ahead of any ACD calls in their secondary group.
ACD 5 XX P RIM AR Y AG EN TSEN D
Overflow Station Forward (Flash 06, Button #6) allows/disallows excess calls to be forwarded to another station.
ACD Agent Recall (Flash 06, Button #12) allows/disallows calls that have been transferred from an ACD Agent to recall the Agent.
ACD Group Programming 6-9
Secondary Agents
Programming Steps1. Press the SECONDARY AGENT flexible button (FLASH 60, Button #8).
The following message displays:
2. To add a station as a secondary agent of the ACD group, use the dial pad as follows:
Enter SSS 1 (SSS = station).
Press HOLD.
3. To delete a station from being a secondary agent of the ACD group, use the dial pad as follows:
Enter SSS 0 (SSS = station).
Press HOLD to save the entry. A confirmation tone is heard and the display updates.
4. To view secondary agents in the ACD group, press button #7. (Each depression toggles through seven agents at a time.)
DescriptionThe Secondary Agent Assignment feature allows the stations serving as secondary agents to be entered into the ACD group. Agents can login to both a primary and secondary group. A primary agent’s ACD calls from their primary group are always presented ahead of any ACD calls in their secondary group.
Guaranteed RAN
Programming Steps1. Press the GUARANTEED RAN flexible button (FLASH 60, Button #9).
The following message displays:
ACD 5 XX SE COND A RY AG EN TSEN D
ACD 5 XX G UAR A NT EED R AN 1- 8X

6-10 ACD Group Programming
2. Enter a valid number (1-8 for) the desired RAN Announcement Table or a (#) to remove the entry.
3. Press HOLD to save the entry. A confirmation tone is heard and the display updates.
DescriptionA Guaranteed Message announcement may be assigned to the group to force callers to listen to the announcement prior to entering the queue or ringing an agent.
Callers listening to this type of announcement may dial digits (up to 14) using their dial pad. These digits can then be compared against the Local Number/Name Translation Table and routed to destinations based on table overrides. These digits (or a translation table entry’s digit/name) then show on an agent’s display as calling number identification digits.
This RAN function is only used for incoming CO calls to ACD Groups.
Primary RAN
Programming Steps1. Press the PRIMARY RAN flexible button (FLASH 60, Button #10). The
following message displays:
2. Enter a valid number (1-8) for the desired RAN Announcement Table or a (#) to remove the entry.
3. Press HOLD to save the entry. A confirmation tone is heard and the display updates.
DescriptionA Primary Message Announcement may be assigned to the group. This message is the first one presented to the caller, if the guaranteed message has not been enabled and the call has been transferred to the ACD Group.
This message plays after the Message Interval Timer expires and no agents are available.
ACD 5 XX P RIM AR Y R AN 1- 8X

ACD Group Programming 6-11
Secondary RAN
Programming Steps1. Press the SECONDARY RAN flexible button (FLASH 60, Button #11).
The following message displays:
2. Enter a valid number (1-8) for the desired RAN Announcement Table or a (#) to remove the entry.
3. Press HOLD to save the entry. A confirmation tone is heard and the display updates.
DescriptionA Secondary Message Announcement may be assigned to the group. This announcement can be used for follow-up information after the Primary messages.
Transferred RAN
Programming Steps1. Press the TRANSFERRED RAN flexible button (FLASH 60,
Button #12). The following message displays:
2. Enter a valid number (1-8) for the desired RAN Announcement Table or a (#) to remove the entry.
3. Press HOLD to save the entry. A confirmation tone is heard and the display updates.
DescriptionThe Transferred RAN Message is for CO callers who are transferred to an ACD group. This forces callers transferred to an ACD Group to listen to the announcement prior to entering the queue or ringing an agent.
ACD 5 XX SE COND A RY R AN 1- 8X
ACD 5 XX XFE R R AN 1- 8X

6-12 ACD Group Programming
ACD Overflow Timer
Programming Steps1. Press the OVERFLOW TIMER flexible button (FLASH 60, Button #13).
The following message displays:
2. Enter a valid number on the dial pad which corresponds to 000–600 seconds.
3. Press HOLD to save the entry. A confirmation tone is heard and the display updates.
DescriptionThe ACD Overflow Timer determines the total length of time a caller remains in queue for a particular ACD group. When the timer expires, the caller is routed to the designated overflow station.
The timer starts when an incoming call is answered and presented to the first recorded announcement. Transferred CO callers overflow at the expiration of the Overflow Timer.
By default, the ACD Overflow Timer is set for 60 seconds and is variable from 000–600 seconds.
Call Factor
Programming Steps1. Press the CALL FACTOR flexible button (FLASH 60, Button #14). The
following message displays:
2. Enter a valid number (0-999 minutes) for the desired call factor time. (0 disables this function.)
3. Press HOLD to save the entry. A confirmation tone is heard and the display updates.
ACD 5 XX OV E RF LO W 0 00- 60 006 0
ACD 5 XX C ALL FACTOR 0 -99 9XXX

ACD Timers 6-13
DescriptionThe Call Factor feature is used exclusively with the digital voice mail to provide the average call duration to the caller. This feature can be activated from administration or the ACD supervisor can use a flexible button [580]+5XX (ACD Group number)+XXX (Call Factor) to enter the factor (average call duration).
The following formula is used to calculate the average call duration:
(Place in Queue) (Call Factor) ---------------------------------------------- Number of Agents Logged into Group
ACD Timers
Programming StepsPress FLASH and dial [61]. The following message displays:
DescriptionSix timers for ACD operation are programmable on a system-wide basis. The ACD timers include: A Ring Timer, Message Interval Timer, an Overflow Timer (Flash 60, Button #13), a No/Answer Recall Timer, aNo/Answer Retry Timer, and a Guaranteed Message Timer. Each timer is described in the following section.
The buttons on the digital telephone are defined as shown when entering the ACD Timers programming area:
ACD TIME RSEN TE R B U TTON N UM BE R
RINGTIMER
MITTIMER
1 Q 2 W 3 E 4 R
NO-ANSWERRECALL
NO-ANSWERRETRY
GUARANTEEDMSG TIMER
5 T 6 Y 7 U 8 I

6-14 ACD Timers
ACD Ring Timer
Programming Steps1. Press the RING TIMER flexible button (FLASH 61, Button #1). The
following message displays:
2. Enter a valid number on the dial pad which corresponds to 000-300 seconds.
3. Press HOLD to save the entry. A confirmation tone is heard and the display updates.
DescriptionThe ACD Ring Timer determines how long a call rings into a busy ACD group before being presented to the first recorded announcement. By default, the ACD Ring Timer is set for 60 seconds, and is variable from 000–300 seconds.
ACD Message Interval Timer
Programming Steps
1. Press the MIT TIMER flexible button (FLASH 61, Button #2). The following message displays:
2. Enter a valid number on the dial pad which corresponds to 000-600 seconds.
3. Press HOLD to save the entry. A confirmation tone is heard and the display updates.
R ING 0 00- 30 006 0
A RAN Table must be specified in ACD programming. If a RAN Table is NOT specified, incoming CO callers are not answered but continue to receive ringback.
MES SAG E IN TE RV AL 0 00- 60 006 0
The ACD Ring and Message Interval timers only apply when RAN ports are specified. If RAN ports are not specified, incoming callers continue to receive a ringback tone.

ACD Timers 6-15
DescriptionThe ACD Message Interval Timer (MIT) determines the length of time a caller remains in queue (listening to MOH, if provided) between recorded announcements. By default, the ACD Message Interval Timer is set for 60 seconds and is variable from 000-600 seconds.
ACD No-Answer Recall Timer
Programming Steps1. Press the NO-ANSWER RECALL TIMER flexible button (FLASH 61,
Button #5). The following message displays:
2. Enter a valid number on the dial pad which corresponds to 000-300 seconds.
3. Press HOLD to save the entry. A confirmation tone is heard and the display updates.
DescriptionIf a call routed to a station via ACD is not answered by the ACDAgent/Station before the No-Answer Recall Timer expires, the call is returned to ACD Queue with the highest priority. In addition, the station that failed to answer the ringing ACD call is placed into an out-of-service (OOS) state. By default, the ACD No-Answer Timer is at 000 (disabled) and is variable from 000–300 seconds.
ACD No-Answer Retry Timer
Programming Steps1. Press the NO-ANSWER RETRY TIMER flexible button (FLASH 61,
Button #6). The following message displays:
N O - AN S R ECA LL 0 00- 30 000 0
N O A N SWE R R ETR Y 0 00- 99 930 0

6-16 ACD Timers
2. Enter a valid number on the dial pad which corresponds to 000-999 seconds.
3. Press HOLD to save the entry. A confirmation tone is heard and the display updates.
DescriptionWhen the No-Answer Recall Timer expires, a station that failed to answer the ringing ACD call is placed into an out-of-service (OOS) state. The station that was taken out-of-service (OOS) is placed back in service if the agent presses the available flex button or dials the available flex code. The agent is placed back in service if the No-Answer Retry Timer expires.
If the agent does not answer their next ACD call, they are taken out-of-service. This cycle continues until the station answers calls, logs out, or goes unavailable.
By default, the ACD No-Answer Retry Timer is set for 300 seconds and is variable from 000–999 seconds.
Guaranteed Message Timer
Programming Steps1. Press the GUARANTEED MESSAGE TIMER flexible button (FLASH 61,
Button #7). The following message displays:
2. Enter a valid number on the dial pad which corresponds to 000-300 seconds.
3. Press HOLD to save the entry. A confirmation tone is heard and the display updates.
DescriptionThe Guaranteed Message Timer determines how long a call rings before being answered by Guaranteed Message RAN when the Guaranteed Message RAN feature is added to an ACD Group.
By default, the Guaranteed Message Timer is set for 5 seconds and is variable from 000-300 seconds.
G UAR AN T EED MSG 0 00- 30 000 5

ACD Announcement Tables (RAN) 6-17
ACD Announcement Tables (RAN)
Programming Steps
If Recorded Announcement (RAN) devices are installed to operate with ACD, these tables must be programmed.
1. Press FLASH and dial [62]. The following message displays:
The top left button in the flexible button field is lit for programming ACD RAN Announcement Table #1.
2. To change to another ACD RAN Announcement Table, press FLASH 62 and a flexible button 2-8 for Tables 2-8 respectively.
To program a table for a CO line port:1. Press the TABLE X flexible button (1-8).
2. Dial [1] for CO Port Interface.
3. Dial [001-012] for CO Lines used.
4. Enter message duration (000-300 seconds).
5. Press HOLD to save the entry. A confirmation tone is heard and the display updates.
To program a table for an SLT port:1. Press the TABLE X flexible button (1-8).
2. Dial [2] for SLT Port Interface.
3. Dial [100-131] for Triad-S SLT stations used.
4. Enter message duration (000-300 seconds).
5. Press HOLD to save the entry. A confirmation tone is heard and the display updates.
AN N OU NC EMEN T TAB LE 1T YP E # IND X ## # T IME ###
ANNOUNCEMENTTABLE 1
ANNOUNCEMENTTABLE 2
ANNOUNCEMENTTABLE 3
ANNOUNCEMENTTABLE 4
1 Q 2 W 3 E 4 R
ANNOUNCEMENTTABLE 5
ANNOUNCEMENTTABLE 6
ANNOUNCEMENTTABLE 7
ANNOUNCEMENTTABLE 8
5 T 6 Y 7 U 8 I

6-18 ACD Announcement Tables (RAN)
To program a table for a RAN Hunt Group port:1. Press the TABLE X flexible button (1-8).
2. Dial [3] for RAN Hunt Group.
3. Dial [458-461] for RAN Hunt Group used.
4. Enter message duration (000-300 seconds).
5. Press HOLD to save the entry. A confirmation tone is heard and the display updates.
To program a table for Digital Voice Mail:1. Press the TABLE X flexible button (1-8).
2. Dial [4] for the Digital Voice Mail function.
3. Dial [44X] (X=0-7) for the Voice Mail Group.
4. Dial a three-digit menu number [000-999].
5. Dial [0-9].
0 = No DTMF Detection, No Messages Played. (Default)
1 = DTMF Detection, No Message.
2 = No DTMF, Place In Queue Message.
3 = DTMF Detection, Place In Queue Message.
4 = No DTMF, Hold Time Message.
5 = DTMF Detection, Hold Time Message.
6 = No DTMF, Both Messages.
7 = DTMF Detection, Both Messages.
8 = Not used at this time.
9 = Not used at this time.
6. Press HOLD to save the entry. A confirmation tone is heard and the display updates.
Clearing Entries1. Press the [#] button.
2. Then press HOLD.
DescriptionDetermines the type, index (port) number and message length for the eight available Recorded Announcements (RAN). There are eight RAN Tables that can be programmed. Table 1 can be the answer port for unanswered incoming calls to an ACD group.

ACD Announcement Tables (RAN) 6-19
The type can be either a CO line port, an SLT port, Digital Voice Mail, or a RAN Hunt Group port. The index number specifies which circuit for the type of interface. The message length is used to match the maximum length of the message to the device that is used.
Digital Voice Mail can be used as a RAN Announcer for ACD Groups. A menu is provided to play the announcement, as well as collect DTMF digits and route the caller to an alternate destination. In addition, a place in queue and an average hold time message can be played to the caller. The ability to detect DTMF, play average hold time, and place in queue are all programmable in this area.
When using the Digital Voice Mail as a RAN Announcer, the following options are available:
Table 6-2: Voice Mail RAN Announcer Options
Option Action
0 Do NOT take a menu action on any DTMF dialed by the caller; DO NOT play Place in Queue or Hold Time message. (Default)
1 Take menu action only on DTMF dialed by the caller; DO NOT play Place in Queue or Hold Time message.
2 DO NOT take menu action on any DTFM dialed by user; play the Place in Queue message only.
3 Take menu action on DTMF; play the Place in Queue message.
4 DO NOT take menu action on any DTFM dialed by user; play the Hold Time Message only.
5 Take menu action on DTMF; play Hold Time message.
6 DO NOT take menu action on any DTFM dialed by user; play the Place in Queue and Hold Time message.(No Message Duration for type [4] entries is required.)
7 Take menu action on DTMF; play the Place in Queue and Hold Time message.
8-9 Not used at this time
DVM software version must be 2.89 or greater to have RAN functionality.

6-20 PC / ACD Interface Trace
PC / ACD Interface Trace
Programming Steps
Press FLASH and dial [63]. The following message displays:
Description
The PC/ACD Interface Trace feature is available with optional software. The PC/ACD Interface Trace feature provides an event trace output which is compatible with Discovery ACD Reporting package. The buttons on the digital telephone are defined as shown when entering the PC/ACD Event Trace feature programming area:
Enable / DisableProgramming Steps
1. Press the DISABLE/ENABLE flexible button (FLASH 63, Button #1). The following message displays:
2. Press the ENABLE/DISABLE flexible button.
LED On = YES (Enabled)
LED Off = NO (Disabled)
3. Press HOLD to save the entry. A confirmation tone is heard and the display updates.
ACD _ EV T _ TR ACE I /O B AU DN O 1 96 00
ENABLE /DISABLE
TRACE PORTASSIGNMENT
1 Q 2 W 3 E 4 R
ACD _ EV T _ TR ACE I /O B AU DY ES 1 96 00

PC / ACD Interface Trace 6-21
DescriptionThe PC/ACD Interface Trace provides a series of events trace output which is compatible with the Discovery ACD Reporting package. By default, the PC/ACD Event Trace is disabled (NO).
Trace Port Assignment
Programming Steps1. Press the TRACE PORT ASSIGNMENT flexible button (FLASH 63,
Button #2) to determine the port to use for PC/ACD Interface Trace.
2. Enter a valid number for the PC/ACD Event Trace Port number:
[1] = Port #1 (MPB On-Board RS-232-C)
[2] = Port #2 (On-Board Modem)
[3] = Port #3 Serial Interface Unit (SIU2)
[4] = Port #4 Serial Interface Unit (SIU2)
The LCD displays the current baud rate based on which Port number is assigned to the ACD SMDR Port number (default is Port #1).
3. Press HOLD to save the entry. A confirmation tone is heard and the display updates.
DescriptionBy default, the trace port assignment is set to 1.
Baud Rate Display
Programming StepsThe PC/ACD Port Baud Rate is programmed using FLASH 15 baud rate assignments. The LCD displays the current baud rate based on which Port number is assigned to the ACD SMDR Port number. The following message displays:
ACD _ EV T _ TR ACE I /O B AU DN O 1 96 00
P ORT B AUD1 96 00

6-22 PC / ACD Interface Trace
DescriptionThe system can provide PC/ACD Reporting output to the standard RS232C I/O ports on the MPB or the optional SIU2 module connector(s). The baud rate is displayed as 300, 1200, 2400, 4800, or 9600 baud. By default, the PC/ACD baud rate is set to 9600.

7 Uniform CallDistribution (UCD)
This chapter provides the functional steps necessary to use the UCDfeatures with the STARPLUS Triad-S System. To implement the callcoverage desired, you must first enter the Programming Mode.


UCD Group Programming 7-3
UCD Group Programming
Programming Steps
1. Press FLASH and dial [60]. The following message displays:
2. Enter the group number (550-557), then press HOLD.
Description
There can be eight UCD Groups of no more than eight stations each. The UCD Groups use a pilot hunting technique. If the pilot number is dialed, the assigned stations in that UCD Group are searched for the station which has been in an idle condition for the longest time period.
Each UCD Group may have an assigned Alternate UCD Group, an Overflow Station, and up to eight stations as UCD members. The two system RAN ports (tables) may also be referenced on a per UCD Group basis. By default, UCD Group Tables are empty. The buttons on the digital telephone are defined as shown when entering the UCD Group(s) programming area:
U CD AT TR IB UT ESSEL ECT A G R OUP
ALTERNATEUCD GROUP
UCD OVERFLOWASSIGN
1 Q 2 W 3 E 4 R
PRIMARYAGENTS
5 T 6 Y 7 U 8 I
PRIMARYRAN
SECONDARYRAN
9 O 1 0 P 1 1 A 12 S
13 D 14 F 15 G 16 H
17 J 1 8 K 19 L 2 0 ;
PREVIOUSGROUP
NEXTGROUP
NEWRANGE
21 Z 22 X 23 C 24 V

7-4 UCD Group Programming
Alternate UCD Group Assignment
Programming Steps1. Press the ALTERNATE UCD GROUP flexible button (FLASH 60,
Button #2).
2. Enter the pilot number (550 to 557) for desired Alternate UCD Group.
3. Press HOLD to save the entry. A confirmation tone is heard and the display updates.
Deleting an Alternate UCD Group1. Press [#] three times.
2. Then press the HOLD button.
DescriptionAn Alternate UCD Group can be programmed so if no station in a group is available, the alternate group is checked for an available station. This provides a way to chain or link UCD Groups together.
UCD Overflow Station Assignment
Programming Steps1. Press the OVERFLOW ASSIGN flexible button (FLASH 60, Button #3).
2. Enter a station number to designate the UCD Groups Overflow Station.
3. Press HOLD to save the entry. A confirmation tone is heard and the display updates.
Deleting an UCD Overflow Station1. Press [#] three times.
2. Then press the HOLD button.
U CD 5XX ALT ER N AT E G R OU PXXX
U CD 5XX O VE R FLOW STAT IONXXX

UCD Group Programming 7-5
DescriptionWhen an Overflow Station is assigned, callers that remain in queue for a specified amount of time are routed to the assigned Overflow Station. The Overflow Station MAY NOT be one of the UCD Group stations. Only CO calls transferred to a UCD Group, overflow to the Overflow Station when RAN Tables are assigned.
UCD Primary Agent Assignments
Programming Steps1. Press the PRIMARY AGENT flexible button (FLASH 60, Button #7).
The following message displays:
2. To add a station as a primary agent of the UCD group, use the dial pad as follows:
Enter SSS 1 (SSS = station).
Press the HOLD button.
3. To delete a station from being a primary agent of the UCD group, use the dial pad as follows:
Enter SSS 0 (SSS = station).
Press HOLD to save the entry. A confirmation tone is heard and the display updates.
4. To view primary agents in the UCD group, press button #7.
DescriptionThe Primary Agent Assignment feature allows the stations serving as primary agents to be entered into the UCD group. Up to 8 UCD Agents can be entered into a Group.
U CD 5XX P R IMAR Y A GE N TSXXX XXX XXX XXX XXX XXX

7-6 UCD Group Programming
UCD Primary RAN Assignments
Programming Steps1. Press the PRIMARY RAN flexible button (FLASH 60, Button #10).
2. Enter a valid number (1-8) for the desired RAN Announcement Table or a (#) to remove the entry.
3. Press HOLD to save the entry. A confirmation tone is heard and the display updates.
DescriptionA Primary Message Announcement may be assigned to the group. This message is the first one presented to the caller.
Secondary RAN
Programming Steps1. Press the SECONDARY RAN flexible button (FLASH 60, Button #11).
The following message displays:
2. Enter a valid number (1-8) for the desired RAN Announcement Table or a (#) to remove the entry.
3. Press HOLD to save the entry. A confirmation tone is heard and the display updates.
DescriptionA Secondary Message Announcement may be assigned to the group. This announcement can be used for follow-up information after the Primary message.
U CD 5XX P R IMAR Y R A N 1- 8X
U CD 5XX S ECON D AR Y R AN 1- 8X

UCD Timers 7-7
UCD Timers
Programming Steps
Press FLASH and dial [61]. The following message displays:
Description
Six timers for UCD operation are programmable on a system-wide basis. The UCD timers include: a Ring Timer, Message Interval Timer, an Overflow Timer, an Auto Wrap-Up Timer, a No/Answer Recall Timer, and a No/Answer Retry Timer. Each timer is described in the following section
The buttons on the digital telephone are defined as shown when entering the UCD Timers programming area:
UCD Ring TimerProgramming Steps
1. Press the RING TIMER flexible button (FLASH 61, Button #1). The following message displays:
2. Enter a valid number on the dial pad which corresponds to 000-300 seconds.
3. Press HOLD to save the entry. A confirmation tone is heard and the display updates.
U CD T IMER SEN TE R B U TTON N UM BE R
RINGTIMER
MITTIMER
OVERFLOWTIMER
WRAP-UP
1 Q 2 W 3 E 4 R
NO-ANSWERRECALL
NO-ANSWER RETRY
5 T 6 Y 7 U 8 I
R ING 0 00- 30 006 0

7-8 UCD Timers
DescriptionThe UCD Ring Timer determines how long a call rings into a busy UCD group before being presented to the first recorded announcement. By default, the UCD Ring Timer is set for 60 seconds, and is variable from 000–300 seconds.
UCD Message Interval Timer
Programming Steps
1. Press the MIT TIMER flexible button (FLASH 61, Button #2). The following message displays:
2. Enter a valid number on the dial pad which corresponds to 000-600 seconds.
3. Press HOLD to save the entry. A confirmation tone is heard and the display updates.
DescriptionThe UCD Message Interval Timer (MIT) determines the length of time a caller remains in queue (listening to MOH, if provided) between recorded announcements. By default, the UCD Message Interval Timer is set for 60 seconds and is variable from 000 to 600 seconds.
A RAN Table must be specified in UCD programming. If a RAN Table is NOT specified, incoming CO callers are not answered but continue to receive ringback.
MES SAG E IN TER VA L 0 00- 60 006 0
The UCD Ring and Message Interval Timers only apply when RAN ports are specified. If RAN ports are not specified, incoming callers continue to receive a ringback tone.

UCD Timers 7-9
UCD Overflow Timer
Programming Steps1. Press the OVERFLOW TIMER flexible button (FLASH 61, Button #3).
The following message displays:
2. Enter a valid number on the dial pad which corresponds to 000-600 seconds.
3. Press HOLD to save the entry. A confirmation tone is heard and the display updates.
DescriptionThe UCD Overflow Timer determines the total length of time a caller remains in queue for a particular UCD group. When the timer expires, the caller is routed to the designated overflow station.
The timer starts when an incoming call is answered and presented to the first recorded announcement. Transferred CO callers overflow at the expiration of the Overflow Timer. By default, the UCD Overflow Timer is set for 60 seconds and is variable from 000–600 seconds.
UCD Auto Wrap-Up Timer
Programming Steps1. Press the AUTO-WRAP TIMER flexible button (FLASH 61, Button #4).
The following message displays:
2. Enter a valid number on the dial pad which corresponds to 000-999 seconds.
3. Press HOLD to save the entry. A confirmation tone is heard and the display updates.
OV ER FLOW 0 00- 60 006 0
U CD 5XXA WR A P- U P 0 00- 99 900 4

7-10 UCD Timers
DescriptionAfter completion of a UCD call (on-hook) the agent is not be subjected to another UCD call for the duration of the Auto Wrap-Up Timer allowing the agent to finish call related work or access other facilities. This lets agents remove themselves from the group (e.g., DND, Call Forward) or originate another call. By default, the UCD Auto Wrap-Up Timer is set for 4 seconds and is variable from 000 to 999 seconds.
UCD No-Answer Recall Timer
Programming Steps1. Press the NO-ANSWER RECALL TIMER flexible button (FLASH 61,
Button #5). The following message displays:
2. Enter a valid number on the dial pad which corresponds to 000-300 seconds.
3. Press HOLD to save the entry. A confirmation tone is heard and the display updates.
DescriptionIf a call routed to a station via UCD is not answered by the UCDAgent/Station before the No-Answer Recall Timer expires, the call is returned to UCD Queue with the highest priority. In addition, the station that failed to answer the ringing UCD call is placed into an out-of-service (OOS) state. By default, the UCD No-Answer Timer is at 000 (disabled) and is variable from 000–300 seconds.
UCD No-Answer Retry Timer
Programming Steps1. Press the NO-ANSWER RETRY TIMER flexible button (FLASH 61,
Button #6). The following message displays:
N O - AN S R ECA LL 0 00- 30 000 0
N O - AN S WER RE TR Y 0 00- 99 930 0

UCD Announcement Tables 7-11
2. Enter a valid number on the dial pad which corresponds to 000-999 seconds.
3. Press HOLD to save the entry. A confirmation tone is heard and the display updates.
DescriptionWhen the No-Answer Recall Timer expires, a station that failed to answer the ringing UCD call is placed into an Out-Of-Service (OOS) state.
The station that was taken out-of-service is placed back in service if the agent hits their available flex button or dials the available flex code.
The agent is placed back in service if the No-Answer Retry Timer expires. If the agent does not answer their next UCD call, they are taken out-of-service again. This cycle continues until the station: answers calls, logs out, or goes unavailable. By default, the UCD No-Answer Retry Timer is set for 300 seconds and is variable from 000–999 seconds.
UCD Announcement Tables
Programming StepsIf Recorded Announcement (RAN) devices are installed to operate with UCD, these tables must be programmed.
1. Press FLASH and dial [62]. The following message displays:
The top left button in the flexible button field is lit for programming UCD RAN Announcement Table #1.
2. To change to another UCD RAN Announcement Table, press FLASH 62 and a flexible button 2-8 for Tables 2-8 respectively.
AN N OU NC EMEN T TAB LE 1T YP E # IND X ## # T IME ###
ANNOUNCEMENTTABLE 1
ANNOUNCEMENTTABLE 2
ANNOUNCEMENTTABLE 3
ANNOUNCEMENTTABLE 4
1 Q 2 W 3 E 4 R
ANNOUNCEMENTTABLE 5
ANNOUNCEMENTTABLE 6
ANNOUNCEMENTTABLE 7
ANNOUNCEMENTTABLE 8
5 T 6 Y 7 U 8 I

7-12 UCD Announcement Tables
To program a table for a CO line port:1. Press the TABLE X flexible button (1-8).
2. Dial [1] for CO Port Interface.
3. Dial [001-012] for CO Lines used.
4. Enter message duration (000-300 seconds).
5. Press HOLD to save the entry. A confirmation tone is heard and the display updates.
To program a table for an SLT port:1. Press the TABLE X flexible button (1-8).
2. Dial [2] for SLT Port Interface.
3. Dial [100-131] for SLT stations used.
4. Enter message duration (000-300 seconds).
5. Press HOLD to save the entry. A confirmation tone is heard and the display updates.
To program a table for a RAN Hunt Group port:1. Press the TABLE X flexible button (1-8).
2. Dial [3] for RAN Hunt Group.
3. Dial [458-461] for RAN Hunt Group used.
4. Enter message duration (000-300 seconds).
5. Press HOLD to save the entry. A confirmation tone is heard and the display updates.
To program a table for Digital Voice Mail:1. Press the TABLE X flexible button (1-8).
2. Dial [4] for the Digital Voice Mail function.
3. Dial [44X] (X=0-7) for the Voice Mail Group.
4. Dial a three-digit menu number [000-999].

UCD Announcement Tables 7-13
5. Dial [0-9].
0 = No DTMF Detection, No Messages Played. (Default)
1 = DTMF Detection, No Message.
2 = No DTMF, Place In Queue Message.
3 = DTMF Detection, Place In Queue Message.
4 = No DTMF, Hold Time Message.
5 = DTMF Detection, Hold Time Message.
6 = No DTMF, Both Messages.
7 = DTMF Detection, Both Messages.
8 = Not used at this time.
9 = Not used at this time.
6. Press HOLD to save the entry. A confirmation tone is heard and the display updates.
Clearing Entries1. Press the [#] button.
2. Then press HOLD.
DescriptionDetermines the type, index (port) number and message length for the eight available Recorded Announcements (RAN). There are eight RAN Tables that can be programmed. Table 1 can be the answer port for unanswered incoming calls to a UCD group.
The type can be either a CO line port, an SLT port, Digital Voice Mail, or a RAN Hunt Group port. The index number specifies which circuit for the type of interface. The message length is used to match the maximum length of the message to the device that is used.
Digital Voice Mail can be used as a RAN Announcer for UCD Groups. A menu is provided to play the announcement, as well as collect DTMF digits and route the caller to an alternate destination. In addition, a place in queue and an average hold time message can be played to the caller. The ability to detect DTMF, play average hold time, and place in queue are all programmable in this area.

7-14 UCD Announcement Tables
When using the Digital Voice Mail as a RAN Announcer, the following options are available:
Table 7-1: Voice Mail RAN Announcer Options
Option Action
0 Do NOT take a menu action on any DTMF dialed by the caller; DO NOT play Place in Queue or Hold Time message. (Default)
1 Take menu action only on DTMF dialed by the caller; DO NOT play Place in Queue or Hold Time message.
2 DO NOT take menu action on any DTFM dialed by user; play the Place in Queue message only.
3 Take menu action on DTMF; play the Place in Queue message.
4 DO NOT take menu action on any DTFM dialed by user; play the Hold Time Message only.
5 Take menu action on DTMF; play Hold Time message.
6 DO NOT take menu action on any DTFM dialed by user; play the Place in Queue and Hold Time message.(No Message Duration for type [4] entries is required.)
7 Take menu action on DTMF; play the Place in Queue and Hold Time message.
8-9 Not used at this time
DVM software version must be 2.89 or greater to have RAN functionality.

8 Voice Mail Groups (VM)
This chapter provides the functional steps necessary to use the VoiceMail features with the STARPLUS Triad-S System. To implement thevoice mail options desired, you must first enter the ProgrammingMode.


Voice Mail Programming 8-3
Voice Mail Programming
Programming Steps
1. Press FLASH and dial [65]. The following message displays.
[G] =Voice Mail Group Number (0-7)
[AA A] = Alternate Group (440-447)
[LLL] = Le ave Mail I ndex
[R] = Retrieve Mail Index from outpulsing table for retrievi ng messages (0-7)
[XXX] = Voice Mail Station Numbers (ports) up to 24 stations maxi mum
The top left button in the flexible button field is lit for programming Voice Mail Group 440.
2. To change Voice Mail groups or enter further voice mail groups, press the appropriate flexible button, 1-8 (440–447) and perform the following procedures.
Description
Up to 8 Voice Mail groups can be configured in the STARPLUS Triad-S System. Each group can contain up to 24 Voice Mail designated ports, each of which interfaces with a port on an SLT card (or DIDB if using a Digital Voice Mail). An externally provided Voice Mail system or Auto Attendant must be connected to the Triad-S System for Voice Mail or Auto Attendant operation. Voice Mail automatically handles unanswered calls. Station user can then retrieve messages left at their stations.
V M 4 4G A AA LLL R XXX, XXX,XXX, XXX, XXX, XXX, XXX, XXX
If installing a STARPLUS Voice Mail system, skip directly to Button 12 and enter voice mail ports.
Certain programming is required in the Voice Mail system connected to the Triad- S System for proper operation.
Tone Mode Calling option (6#) must be programm ed as leading digits in transfer sequence(s) of Voice Mail system to force tone ringing to key telephones in the hands-free mode.

8-4 Voice Mail Programming
Auto Attendants can handle incoming calls and route callers to station users without intervention from the systems Attendant. Direct incoming ring to Voice Mail/Auto Attendant groups can be done directly through CO Line Ringing Assignments. By default, all Voice Mail stations are assigned to Pick-Up Group 1. The buttons on the digital telephone are defined as shown when entering the Voice Mail programming area:
:
Alternate Voice Mail Group
Programming Steps1. Press the ALTERNATE VM GROUP flexible button (FLASH 65,
Button #9).
2. Enter the pilot number (440 to 447) of the desired group.
3. Press HOLD to save the entry. A confirmation tone is heard and the display updates.
Deleting an Alternate Voice Mail Group Assignment1. Press [#] three times.
2. Then press the HOLD button.
VM GROUP440
VM GROUP441
VM GROUP442
VM GROUP443
1 Q 2 W 3 E 4 R
VM GROUP444
VM GROUP445
VM GROUP446
VM GROUP447
5 T 6 Y 7 U 8 I
ALTERNATIVEVM GROUP
LEAVE RETRIEVESTATIONASSIGN
9 O 10 P 11 A 12 S
1 3 D 1 4 F 15 G 16 H
17 J 18 K 19 L 20 ;
21 Z 22 X 2 3 C 24 V
V M 4 4G A AA LLL R XXX, XXX,XXX, XXX, XXX, XXX, XXX, XXX

Voice Mail Programming 8-5
DescriptionAn Alternate Voice Mail Group may be programmed so that if all voice mail ports are in use, the call can be routed to an alternate group. This is useful when more than eight ports are required for voice mail traffic.
Leave Mail Index Entry
Programming Steps1. Press the LEAVE flexible button (FLASH 65, Button #10).
2. Enter a valid Leave Mail Index number on the dial pad:
First Digit = Standard Leave Table number (0-7).
Second Digit = Leave Table to utilize when station is forwarded to VM in a No-Answer condition.
Third Digit = Leave Table to utilize when station is forwarded to VM in a Busy condition.
3. Press HOLD to save the entry. A confirmation tone is heard and the display updates.
Deleting a Leave Mail Index Entry1. Press [#] in the desired location on the keypad.
2. Then press the HOLD button.
EXAMPLE -- Tables 1,2,3 entered, to delete only Table 2, enter [1],[#],[3] and press HOLD).
DescriptionThe Leave Mail Index specifies the outpulsing Table where the in-band digits required to connect a caller, forwarded into voice mail, to the called stations mail box are stored. By default, Voice Mail Group 1 (440) Leave Mail Index is set to zero (0).
V M 4 4G A AA LLL R XXX, XXX,XXX, XXX, XXX, XXX, XXX, XXX

8-6 Voice Mail Programming
Retrieve Mail Index Entry
Programming Steps1. Press the RETRIEVE flexible button (FLASH 65, Button #11).2. Enter a valid outpulsing table number (0-7) on the dial pad.
3. Press HOLD to save the entry. A confirmation tone is heard and the display updates.
Deleting a Retrieve Mail Index Entry1. Press the pound key once [#].
2. Then press the HOLD button.
DescriptionThe Retrieve Mail Index specifies the outpulsing table where the In-Band digits required to connect a station user to their own mailbox are stored. By default, Voice Mail Group 1 (440) Retrieve Mail Index is set to 1.
Station Assignments
Programming Steps1. Press the STATION ASSIGN flexible button (FLASH 65, Button #12).2. Enter SSS 1 to add a station.
-or-
Enter SSS 0 to delete a station. (SSS = station number)
3. Press HOLD to save the entry. A confirmation tone is heard and the display updates.
V M 4 4G A AA LLL R XXX, XXX,XXX, XXX, XXX, XXX, XXX, XXX
V M 4 4G A AA LLL R XXX, XXX,XXX, XXX, XXX, XXX, XXX, XXX

Voice Mail Outpulsing Table 8-7
DescriptionUp to twenty-four (24) extension numbers may be programmed into a voice mail group. A flexible button may be programmed with a voice mail group pilot number (440-447). This button then acts as a DSS for that voice mail group when pressed and also serves as the message waiting indication for that VM group.
Voice Mail Outpulsing Table
Voice Mail In-Band Signaling
Programming Steps1. Press FLASH and dial [66]. The following message displays:
Y = Table I ndex (0–7)
X = Entered Digits (0–9, #, , Pauses)
2. The TABLE 00 flexible button (Button #1) led is lit. To change tables, press the appropriate flexible button (Buttons 2–8) and perform the following procedures.
3. Dial one of the following, when required:
[0] = If a prefix is required
[1] = If a suffix is required
[#] = If entry is to be deleted
4. Enter up to 12 digits, including [ ] and [#], TRANS button = pause.
5. Press HOLD to save the entry. A confirmation tone is heard and the display updates.
Clearing Entries in a TablePress the pound key once [#], followed by HOLD.
V OICE PR E XXXXXXXXXXXXEMAIL Y SU F XXXXXXXXXXXXE

8-8 Voice Mail Outpulsing Table
DescriptionEntries in one of the eight Voice Mail Outpulsing Tables determine the In-Band signaling required for:
Retrieving messages (allows stations to pick up mail).
Leaving messages (allows stations to leave messages in voice mail) .
Suggested Uses:
Build a table (0 for example) for any additional digits other than the station extension number (e.g., Voice Mail Box number) needed for a caller to leave a message in a station’s mailbox (Leave).
Build another table (1 for example) for any additional digits needed for a mailbox holder to retrieve a message (Retrieve).
By Default:
TABLE0
TABLE1
TABLE2
TABLE3
1 Q 2 W 3 E 4 R
TABLE4
TABLE5
TABLE6
TABLE7
5 T 6 Y 7 U 8 I
DISCONNECTTABLE 8
9 O 1 0 P 1 1 A 12 S
13 D 14 F 15 G 16 H
17 J 1 8 K 19 L 2 0 ;
21 Z 22 X 23 C 24 V
Table 0 Prefix = P7 (Pause+7) Suffix = None
Table 1 Prefix = P7 (Pause+7) Suffix =
Table 7 Prefix = P7 (Pause+7) Suffix = 2
Entries are not required in the Outpulsing Table. However, a table must be referenced when setting up the Voice Mail groups.

Voice Mail Outpulsing Table 8-9
Voice Mail Disconnect Table
Programming Steps1. Press the DISCONNECT TABLE 8 flexible button (FLASH 66,
Button #9). This table number is used for the voice mail disconnect signal.
2. Enter up to 12 digits used for the disconnect signal, including [ ] and [#], TRANS button = pause.
3. Press HOLD to save the entry. A confirmation tone is heard and the display updates.
DescriptionA disconnect signal can be programmed into the Triad-S System to notify the VM system that a call has been abandoned. This is accomplished through in-band signaling. If a CO or Intercom disconnect signal is detected, the Triad-S System sends a series of DTMF digits programmed in the voice mail disconnect table to the voice mail port. This can be any digit stream up to 12 digits including [ ] and [#].
This table serves all eight voice mail groups. When no digits are programmed in the disconnect table, silence is provided to the voice mail port followed by busy tone to aid the voice mail system to recognize that the caller has abandoned the call.
The Triad-S System provides Loop Supervision monitoring while a CO call is connected to a port designated as voice mail.
By default, there are no entries in the Disconnect Table (Table #8).
V OICE D IS EMAIL
Loop Supervision must be enabled on the CO lines (in CO Line programming) for the VM Disconnect feature to operate.

8-10 Voice Mail In-Band Features
Voice Mail In-Band Features
Programming Steps
Press FLASH and dial [67]. The following message displays:
Description
Entries into the Voice Mail In-Band Features determines the in-band signaling required for ICID Incoming ID Digits (forwards incoming CO callers directly to a Station’s Voice Mail Box), and Forward to VM Groups (lets voice mail calls, upon reaching a forwarded to VM station, forward back into the voice mail system).
Voice Mail In-Band DigitsProgramming Steps
1. Press the IN-BAND DIGS CO CALL flexible button (FLASH 67, Button #1). The following message displays.
2. Enter a 0 or 1 to Enable/Disable this feature.
[0] = Disabled
[1] = Enabled
3. Press HOLD to save the entry. A confirmation tone is heard and the display updates.
V M FEATU R ESEN TE R B U TT ON N U MB ER
IN-BAND DIGSCO CALL
FORWARD TOVM GROUPS
VMBROKER CALLS
VM ID DIGITS
1 Q 2 W 3 E 4 R
IN -B A ND D IG S CO CALL 0- 1EN AB LE D

Voice Mail In-Band Features 8-11
DescriptionThe Voice Mail In-Band Digits feature enables and disables station in-band signaling. Incoming CO callers can be Station Call Forwarded into voice mail only when the ringing CO line is programmed to ring at one station. CO lines programmed to ring at an Attendant station, call forward into the voice mail system (if programmed to ring only at one Attendant station). Callers are presented to the main greeting (not the Attendant stations’ mail box) even when ID digits are enabled. By default, ID digits for incoming CO calls is enabled.
Voice Mail Transfer / Forward
Programming Steps1. Press the FORWARD TO VM GROUPS flexible button (FLASH 67,
Button #2). The following message displays:
2. Enter a 0 or 1 to Enable/Disable this feature.
[0] = Disabled
[1] = Enabled
3. Press HOLD to save the entry. A confirmation tone is heard and the display updates.
DescriptionThe Voice Mail Transfer/Forward feature forwards voice mail calls, upon reaching a forwarded to VM station, back into the voice mail unit. It is useful when VM ports are being used as both Auto Attendant and VM ports. This feature can be enabled/disabled for all VM groups. By default, the VM Transfer/Forward feature is enabled.
FOR WA RD TO V M GR OU P S 0- 1EN AB LE D

8-12 Voice Mail In-Band Features
Voice Mail Broker
Programming Steps1. Press the VM BROKER CALLS flexible button (FLASH 67, Button #3).
The following message displays:
2. Enter a 0 or 1 to Enable/Disable this feature.
[0] = Disabled
[1] = Enabled
3. Press HOLD to save the entry. A confirmation tone is heard and the display updates.
DescriptionThe Voice Mail Broker Calls feature modifies the operation of voice mail ports when disabled. Broker operation is unavailable when using supervised transfers to stations. When enabled, the current broker mode operation during supervised transfers remains in effect. This means the call to the station remains as the second party in a broker mode. If disabled, the VM port disconnects the call to a station and returns to the original party. By default, the VM Broker feature is enabled.
Voice Mail ID Digit Length
Programming Steps1. Press the VM ID DIGITS flexible button (FLASH 67, Button #4). The
following message displays:
2. Enter a valid number (2, 3, or 4) that corresponds to the number of digits to be dialed.
3. Press HOLD to save the entry. A confirmation tone is heard.
V M BR OK ER CAL LS 0- 1EN AB LE D
V M ID D IG ITS 2- 43

Voice Mail Index Table 8-13
DescriptionThe Voice Mail ID Digit Length feature modifies the station and CO voice mail identification fields such that the maximum length of these fields is four digits.
Voice Mail Index Table
Programming StepsTo add Mailbox buttons, or change VM groups and ID numbers:
Press FLASH and dial [68]. The following message displays:
The top left button in the flexible button field (FLASH 68, Button #1) is lit for programming VM Group 1 (440).
Changing VM Groups1. Enter the VM Group number (440–447).
2. Press HOLD to save the entry. A confirmation tone is heard and the display updates.
Changing the VMID Number1. Press the VMID NUMBER flexible button (FLASH 68, Button #2).
2. Enter the VMID number which corresponds to 0000–9999. A value of 0000 disables this table entry. In this case, no VM digits are sent.
3. Press HOLD to save the entry. A confirmation tone is heard and the display updates.
Advancing to the Next VM Index NumberPress the NEXT flexible button (FLASH 68, Button #18). The Mailbox Table number increments by 1.
Returning to a Previous VM Index NumberPress the PREV flexible button (FLASH 68, Button #19). The Mailbox Table number decrements by 1.
MAIL BOX TB L: XXXV M G R OU P: Y Y Y V MID Z ZZ Z

8-14 Voice Mail Index Table
Changing to a Different VM Index Number1. Press the SELECT flexible button (FLASH 68, Button #20).2. Enter a Mailbox Table number (001–255).
3. Press HOLD to save the entry. A confirmation tone is heard and the display updates and shows the new Mailbox Table number.
DescriptionThe Voice Mail Index feature provides an Attendant or station user a way to transfer a caller directly into a voice mail box. Station identification digits can be entered by the transferring party.
Using this feature, a caller can be transferred to a voice mail box when:
A station user on the system is not forwarded to VM, or
The destination voice mail box owner is not a station user.
CO trunks and internal calls may be transferred into voice mail using this feature. If no voice mail ID digits are dialed by the transferring station, the ID digits of the transferring station are sent to voice mail. This feature permits dialing digits 0000-9999 when using the VM with ID feature. On a per station basis, the ID number that is sent to voice mail can be flexible. By default, the station number is sent to the voice mail system. In administrative programming, there is a field to insert from 0-4 digits (0000–9999) which can be sent to the voice mail system in place of the station number. This is useful when a station user manually transfers a caller to a mailbox. By default, no mailbox buttons are assigned at key stations.
VMGROUP
VMIDNUMBER
1 Q 2 W 3 E 4 R
5 T 6 Y 7 U 8 I
9 O 10 P 11 A 12 S
1 3 D 1 4 F 15 G 16 H
NEXT PREVIOUS SELECT
17 J 18 K 19 L 20 ;
21 Z 22 X 2 3 C 24 V

9 Exception Tables
This chapter provides the functional steps necessary to use theException Tables with the STARPLUS Triad-S System. To implementthe toll restriction options desired, you must first enter theProgramming Mode.


Exception Tables Programming 9-3
Exception Tables Programming
The STARPLUS Triad-S System offer a flexible means of applying toll restriction to stations or individuals. Dialing privileges (or toll restriction) is determined through assignment of station and CO line Class Of Service (COS). Several types of restriction can be derived simply by programming COS assignments and CO line access to stations. This may, in some cases, be all that is necessary. However, when a more complex or specific type of restriction is desired the system offers two Allow and two Deny tables along with four special tables. These tables can be programmed in a variety of ways to handle applications that are straight forward or applications that require a more complex arrangement. The Allow and Deny tables are assigned to stations based on their station Class of Service (COS) assignment. The Station (COS) interacts with CO Line COS assignments to provide several different types of dialing privileges.
Table 9-1: Class of Service
STATION
COS
CO LINE CLASS OF SERVICE
1 2 3 4 5
1 Unrestricted Unrestricted Unrestricted CannedRestricted*
Unrestricted
2 Table A Table A Unrestricted CannedRestricted*
Unrestricted
3 Table B Unrestricted Table B CannedRestricted*
Unrestricted
4 Table A&B Table A Table B CannedRestricted*
Unrestricted
5 CannedRestricted*
CannedRestricted*
CannedRestricted*
CannedRestricted*
Unrestricted
6 Intercom Only Intercom Only Intercom Only Intercom Only Intercom Only
7 CannedRestricted*
CannedRestricted*
CannedRestricted*
CannedRestricted*
Unrestricted
* Canned Restriction: No [0], [1], [#], [S] as first diale d digit, and 7-di git di aling l imitation; plus 1-800, 1-888, 1-911, 1-611 are allowed, and 411, 976, and 555 numbers are denied. COS 7 allows all COS 5 and 10-di git local dialing.

9-4 Exception Tables Programming
The Allow and Deny tables enable entries of either general or specific allow and deny codes such as allowing all [1-800] type calls, and/or denying all [1]+ or [0]+ calls. The Allow and Deny tables allow a maximum of 8 digits to be entered as allow or deny digits. This enables entry of certain area codes or office codes that can specifically be allowed or denied. For example, the code [1-555-1212] may be entered in the Deny Table to deny local toll information calls. Each Allow Table contains 20 bins for entry of allow codes. Each Deny Table contains 10 bins for entry of deny codes.
Rules for Setting Up Allow/Deny TablesRule 1--- If both tables have no entries, no restriction is applied.
Rule 2--- If entries are made in the Allow Table and only there, then only those numbers are allowed. All other dialing is denied.
Rule 3--- If entries are made in the Deny Table and only there, then only those numbers are denied. All other dialing is allowed.
Rule 4--- If there are entries in both Allow and Deny tables, the Allow Table is searched first, and if a match is found, it is allowed. If a match is not found, the Deny Table is searched; if a match is found, the call is denied. If number does not match an entry in either table, it is allowed.
A special Do Not Care character (D) may be entered to allow or deny any digit dialed in that digit sequence.
Table 9-2: Allow / Deny Table
Allow Table Deny TableConditions and Results
Dialed No. A/D Dialed No. A/D
RULE 1 No Entries No Entries Allow
RULE 2Entries No Entries Found A
Not Found D
RULE 3No Entries Entries Found D
Not Found A
RULE 4
Entries Entries Found A
Not Found Found D
Not Found A

Related Items To Toll Restriction 9-5
Special Reference TablesThe Triad-S System also offers four special tables (found in the Product Description Manual) that can be referenced from within the two Allow Tables.
Three of the special tables can be assigned to specific area codes that require further toll restriction definition.
The fourth Special Table is reserved for use as a home area code table (numbers within the same area code as the site where the system is installed). This provides expanded ability to apply toll restriction on numbers that are dialed within an area code.
Each Special Table allows up to 800 entries (200–999). This offers the ability to allow every office code on an individual basis.
Related Items To Toll Restriction
CO/PBX LinesWhen CO lines are marked as PBX lines the system first checks the PBX code table for a valid match. If the first digits dialed do not match the entries in the PBX code table the call is considered an attempt to call another PBX extension and no toll restriction is applied. If the first digits dialed are found in the PBX code table (FLASH 12), toll restriction starts with the next dialed digit.
Forced Account CodesThe system can be programmed to force the use of account codes on all restricted calls. When forced account codes are enabled an account code must be entered to place a call that is otherwise restricted through toll restriction. By entering an account code, the station class of service becomes unrestricted.
When account codes are forced on a system wide basis selected users may be instructed on how to enter account codes from any station and be allowed to dial unrestricted from a station that may otherwise be restricted. Use of account codes in this manner, as a traveling class of service, is however, not controlled by the system. Any station user with knowledge of how to enter account codes to override a stations toll restriction can do so.

9-6 Related Items To Toll Restriction
SLT DTMF ReceiversWhen Single Line Telephones are connected to the Triad-S System and toll restriction is enabled, the DTMF receivers located in the system monitors the call for a programmed time period. While the DTMF receiver is monitoring the digits being dialed by a single line telephone, it is considered busy and not available for monitoring another SLT attempting to dial. When all DTMF receivers are busy, an SLT attempting to go off-hook does not receive dial tone until a receiver is available.
The Triad-S System allows up to 5 DTMF receivers for monitoring SLT dialing. If a system has heavy SLT usage, then toll restriction may inhibit dialing by SLT stations.
Two (2) options are available to help alleviate this problem:
1. Shorten the SLT receiver timer [FLASH 01] [Button 12]. This frees up DTMF receivers faster, but may not provide the desired toll restriction for SLT stations.
2. Enable LCR and force LCR on SLT stations.
When the LCR database is set up, the 3-digit table allows entry of the number of digits to expect. When a SLT dials the appropriate number of digits, LCR releases the DTMF receiver and then be available for another SLT call.
LCR Versus Toll RestrictionLCR is not an alternative to toll restriction nor is toll restriction an alternate to LCR. They work best when programmed together. Toll restriction specifies station dialing privileges, and LCR provides call routing to appropriate lines.
LCR can enhance toll restriction by providing Store and Forward operation to analyze digits being dialed before a trunk is seized. This prevents users from by-passing toll restriction by taking advantage of the time required for a central office line to provide dial tone. LCR is recommended when toll restriction is enabled.

Toll Restriction 9-7
Toll Restriction
Entering Toll Table
Programming Steps
If the system is in the programming mode, continue using the program codes. If starting to program here, enter the programming mode.
1. Press FLASH and dial [70]. The following message displays:
2. To program Allow/Deny tables, press the appropriate Table button and enter information as outlined in the following procedures.
3. To program Special Tables 1-3, it is necessary to associate an area code to the table. This is done by pressing the appropriate AREA CODE TABLE button and assign the area code.
4. To display entries in any of the tables, press the DISPLAY TABLES button (FLASH 70, Button #12). Entries in the Allow/Deny tables display two at a time. Entries in the Special tables display six at a time in ascending order.
EX TA BL ESEN TE R B UT TON N U MB ER
Special Table 4 is reserved for the home area code and does not require an area code entry.

9-8 Toll Restriction
DescriptionAll toll tables have been conveniently placed under one program code to allow entry of all toll restriction data.
The buttons on the digital terminal are defined as shown below when entering the Toll Restriction programming area:
When the system searches the Allow and Deny tables, the entries are checked starting with Bin 01 and proceeding sequentially through the table to the last bin. In addition the Allow Table is always searched before looking at the Deny Table. Therefore, the entry order is important. Entries that are specific (e.g., [1716] ) are placed ahead of entries that are more general (usually include Do Not Care digits; e.g., [1 D 1] ).
Once a match is found in the Allow Table that references a Special Table, the number dialed are checked for an allowed code in the Special Table. If a match is not found in the Special Table, the system continues to check for a match in the next Allow or Deny Table to check. The system does not return to the table that sent the call to the Special Table.
ALLOWTABLE A
DENYTABLE A
ALLOWTABLE B
DENYTABLE B
1 Q 2 W 3 E 4 R
SPECIALTABLE 1
SPECIALTABLE 2
SPECIALTABLE 3
SPECIALTABLE 4
5 T 6 Y 7 U 8 I
AREA CODETABLE 1
AREA CODETABLE 2
AREA CODETABLE 3
DISPLAYTABLES
9 O 10 P 11 A 12 S
1 3 D 1 4 F 15 G 16 H
17 J 18 K 19 L 20 ;
21 Z 22 X 2 3 C 24 V

Toll Restriction 9-9
Allow Table
Programming Steps1. Press the ALLOW TABLE A or ALLOW TABLE B flexible button (FLASH
70, Button #1 or #3). The following message is shown on the display telephone:
The first two bin locations display.
2. Enter a valid bin number (01–20) of the bin to be programmed.
It is recommended that:
Bin 17 be reserved for an entry that references SPECIAL TABLE 1
Bin 18 be reserved for an entry that references SPECIAL TABLE 2
Bin 19 be reserved for an entry that references SPECIAL TABLE 3
Bin 20 be reserved for an entry that references the Home Area Code Table, SPECIAL TABLE 4.
3. Enter the Allow Code.
[0–9], [ ], [#] = Corresponding allow digits (numbers)
MUTE = Do Not Care digit (D)
TRANS = Search Special Table (S)
4. Press the HOLD button to save the entry. A confirmation tone is heard and the display now updates.
5. When all entries for one table are complete, press the flexible button for the next table.
Erasing a Bin Number1. Enter a valid bin number.
2. Press the HOLD button.
ALLOW TAB LE A01 E 02E

9-10 Toll Restriction
DescriptionEach Allow Table contains 20 bin numbers. Each bin number may be up to 8 digits, including Do Not Care digits and Search Special Table commands. Entries into the Allow Table represent exceptions to numbers or codes that are to be allowed only if they would otherwise be restricted by an entry in the Deny Table.
ExampleIf [1 555 1212] is allowed but [1+] numbers are denied, by an entry into the Deny Table, [1 555 1212] is entered into the Allow Table as an allowed number.
Allow Table A is referenced and searched first (before Deny Table A) when Station COS is 2 and CO Line COS is either 1 or 2.
Allow Table B is referenced and looked at first (before Deny Table B) when Station COS is 3 and CO Line COS is either 1 or 3.
When Station COS is 4 and CO Line COS is 1 both allow tables are looked at first (Allow Table A first, then Allow Table B) then both deny tables (Deny Table A first, then Deny Table B).
Do Not Care digits specify that the system should consider any digit dialed in that position as a match. Do Not Care digits should not be entered as the last digit in an entry, as this would be an unnecessary or meaningless command.
Search Special Table commands must be entered in a specific manner and should always be the last entries in the Allow Table. It is recommended that the last four bins (17–20) in the Allow Table be reserved for referencing the four special tables with the reference to the home area code (Special Table 4) always being located in bin number 20. Search Special table commands can only be entered into the allow tables.
Rem ember to enable 911 for all Classes of Service

Toll Restriction 9-11
Rules for Entries that Reference Special TablesFor entries referencing the first three special tables a specific area code must be identified (one for each table needed). Then make note as to how the numbers are dialed when dialing numbers to this area code (e.g., with a leading digit [1] or no leading digit [1] ).
The entry into the Allow Table would be entered as follows:
Leading Digit [1]: Enter [BB] [1] [XXX] [DDD] [S] or,
Non-Leading [1]: Enter [BB] [XXX] [DDD] [S]
BB = Bin Number (Bins 17-19)
XXX= Area Code (must match AREA-X entry)
DDD = Do Not Care digit (three entries, DND button)
[S] = Search Special Table Command (TRANS button)
For an entry that references the Home Area Code table (Special Table 4) the entry may also be entered to expect or not expect a leading digit [1]. In fact, in some cases it may be desirable to enter both of the following entries:
Leading Digit [1] -- Enter [BB] [1] [DDD] {S}
and/or,
Non-Leading [1] -- Enter [BB] [DDD] {S}
BB = Bin number (Bin 20)
DDD = Do Not Care digit (three entries, MUTE button)
{S} = Search Special Table Command (TRANS button)
Deny Table
Programming Steps
1. Press the DENY TABLE A or DENY TABLE B flexible button (FLASH 70, Button #2 or #4). The following message displays:
If both leading digit [1] and non-leading digit [1] entries are made to reference the same table, it is necessary to place the leading digit [1] entry ahead of the non-leading digit [1] entry in the Allow Table.
D EN Y TAB LE A01 E 02E

9-12 Toll Restriction
2. When the first two bin locations are displayed, enter the 2-digit bin number (01–10) of the bin to be programmed.
3. Enter the deny code:
[0–9], [ ], [#] = Corresponding deny digits numbers
MUTE = Do Not Care digit
4. Press the HOLD button to save the entry. A confirmation tone is heard and the display now updates.
5. When all entries for one table are complete, press the flexible button for the next table.
Erasing a Bin Number1. Enter a valid bin number.
2. Press the HOLD button.
DescriptionEach Deny Table contains ten bin numbers. Each bin number may be up to eight-digits including {Do Not Care} digits. Entries in the Deny Table represent numbers or codes that are to be denied or restricted. Common entries would be [1] for restricting all [1+] type of calls. Exceptions to this restriction would be entered into the Allow Table.
Deny Table A is referenced and searched only after the Allow Table A is checked when Station COS is 2 and CO Line COS is either 1 or 2.
Deny Table B is referenced and searched only after the Allow Table B is checked when Station COS is 3 and CO Line COS is either 1 or 3.
When Station COS is 4 and CO Line COS is 1, both allow tables are looked at first (Allow Table A first, then Allow Table B) then both deny tables (Deny Table A first, then Deny Table B).
- Do Not Care digits specify that the system should consider any digit dialed in that position as a match. Do Not Care digits should not be entered as the last digit in an entry.
- Search Special Table commands cannot be entered into the Deny tables.

Toll Restriction 9-13
Special Table
Programming StepsTo program a Special Table, it is first necessary to assign an area code to the table (except for the home area code).
1. Press the appropriate AREA CODE TABLE (#1 to #3) flexible button (FLASH 70, Buttons #9 to #11). The following message displays:
2. Enter a valid area code.
3. Press the HOLD button to save the entry. A confirmation tone is heard and the display updates.
Entering Office Codes in a Special Table1. Press the SPECIAL TABLE (#1 to #4) flexible button (FLASH 70,
Buttons #5 to #8) that corresponds to the area code programmed above. The following message displays:
XXX = Area Code
2. Enter the office codes that are to be allowed or removed as follows:
XXX [1] = Allow Code
XXX [0] = Remove Code from the list(XXX = An office code from 200 to 999)
3. Press HOLD after every code entered. A confirmation tone is heard and the display updates. Multiple codes may be entered in a row. The display updates showing the first six codes in ascending order.
SP ECIA L TAB LE 1 AC
SP ECIA L TAB LE 1 A C XXX

9-14 Toll Restriction
DescriptionThe Special Tables provide greater flexibility in designing a toll plan for a particular site.
Each Special Table allows entry of up to 800 office codes (200–999).
Three of these tables must be assigned an area code by which they are referenced. The fourth table is reserved for the home area code and requires no area code entry.
The Special Tables are referenced through entries in the allow tables. Four area codes, including the home area code, can be referenced to these special tables for further definition. When a Special Table is referenced, entries must be made in the Special Table specifying what office codes are allowed.
Codes can be added to the allow list or removed from the list. When a Special Table is checked for a match to a 3-digit code and not found, the system continues to search the next Allow/Deny Table to be checked. The system does not return to the Allow Table which routed the call to the Special Table. By default, no codes are on the allow list.
ALLOWTABLE A
DENYTABLE A
ALLOWTABLE B
DENYTABLE B
1 Q 2 W 3 E 4 R
SPECIALTABLE 1
SPECIALTABLE 2
SPECIALTABLE 3
SPECIALTABLE 4
5 T 6 Y 7 U 8 I
AREA CODETABLE 1
AREA CODETABLE 2
AREA CODETABLE 3
DISPLAYTABLES
9 O 10 P 11 A 12 S
1 3 D 1 4 F 15 G 16 H
17 J 18 K 19 L 20 ;
21 Z 22 X 2 3 C 24 V

Toll Restriction 9-15
Display Toll Table Entries
Programming StepsPress the DISPLAY TABLES flexible button (FLASH 70, Button #12) while entering information into a table.
Viewing Entries in an Allow or Deny TableTwo entries at a time are displayed on the bottom line of the display.
1. Press the DISPLAY TABLES button again, the next higher bins displays.
2. When the last entries are displayed, press the DISPLAY TABLES button again to show the first two entries.
X = Allow or Deny Code
E = End of Entry
Viewing Entries in a Special TableSix 3-digit codes allowed display in ascending order starting with the lowest entry.
Press the DISPLAY TABLES button again, the next 6 entries display. This continues until all codes are displayed.
XXX= Area Code
YYY= Allowed Offi ce Code
DescriptionTo view all entries in the toll tables using the display on the Executive telephone, press, the DISPLAY TABLES flexible button (FLASH 70, Button #12) multiple times to scroll through the entries.
ALLOW TAB LE A01 XXXXXXXE 02 XXXXXXXX
SP ECIA L TAB LE 1 A C XXXY Y Y Y Y Y Y Y Y Y Y Y Y Y Y Y Y Y
It is recommended to view all entries in the Allow and Deny Table before leaving programming. Entries can be entered near the bottom of the list for searching the special tables or entries made in error. Viewing the entire Allow Table ensures proper entry and operation.

9-16 Toll Restriction

10 Least Cost Routing(LCR)
This chapter provides the functional steps necessary to use the LCRfeatures with the STARPLUS Triad-S System. To implement the mosteconomical routes for an outside call, you must first enter theProgramming Mode.


Introduction 10-3
Introduction
Least Cost Routing (LCR) was designed to select the most economical programmed route for an outgoing call. When a station user dials an outside number, the LCR feature analyzes the number and then automatically chooses an outside line from the group that has been programmed as most economical.
The LCR feature puts the responsibility of choosing the least expensive route for each area code and exchange code on the system administrator, not on the station user. In order to make a routing decision, the LCR feature is programmed in the system database. The successful operation of this feature is completely dependent on the accuracy of the programming.
There are eight (8) different tables which are set up to monitor the dialing of digits of a station and to select the best route programmed for the call.
1. 3-Digit Area/Office Code Routing Table
2. 6-Digit Office Code Routing Table
3. Exception Table
4. Route List Table
5. Insert/Delete Table
6. Daily Start Time Table
7. Weekday (Weekly) Schedule
8. Toll Information Table

10-4 LCR Tables
LCR Tables
3-Digit TableThe 3-Digit Table is divided into two sections: Leading 1 (1 is dialed before the number) and Non-Leading 1 (no 1 is dialed before the number). This gives the system the ability to handle call routing in areas that require a 1 before a long distance number as well as in areas that do not require the 1.
6-Digit Table (Office Codes)The 6-Digit Table can accommodate 20 indexes. Each index is associated with an area code and can be programmed to route up to 800 office codes using 1 of the 16 possible routes. Several indexes can be used with the same area code to provide routing flexibility.
Daily Start Time TablesThe Daily Start Time Tables allow the user to match the Time Periods discount structure to the carriers rate schedule.
Default LCR DatabaseIn an effort to decrease installation and set-up time usually associated with LCR, a default LCR Database has been incorporated. The default LCR Database provides basic routing for all local and long distance dialing.
Exception TablesThe Exception Table is used to route operator assisted calls and any other calls which would use a one or two-digit number rather than a three-digit area code.

LCR Tables 10-5
Insert/Delete TablesThere are 20 Insert/Delete Tables. Up to 20-digits, including pauses, can be inserted and up to 16-digits deleted. To insure that a pause is inserted in LCR at default, the database programming has been changed to add a pause in each of the 20 LCR Insert and Delete Tables and Insert Table 0 in each of the route tables.
LCR Routing for Toll InformationThe LCR Routing for Toll Information feature adds provisions to the LCR call processing which allows common call routing for all toll information calls. 1-(XXX)555-1212, (XXX)555-1212, 1-555-1212, and 555-1212 calls are intercepted and sent to a selected route in the Route List Table. Numbers dialed are integrated and if it is a toll information call, preceded with or without an area code or a leading digit 1, the call is sent to the route designated in programming.
Route List TablesUp to 16 different routes can be programmed. Each route can contain up to four route lists, one for each of the four time periods. Up to seven CO line groups (routing choices) and their corresponding Insert/Delete Tables may be programmed within each route list.
Weekly Time TablesThe least costly route for a particular dialed number may not be the same at different times of the day or on different days of the week. For these situation, there are two Time-of-Day tables: a Daily Start Time Table and a Weekly Schedule Table. The Weekly Time Table determines which one of the four Routes LCR to use based on the Time-of-Day and Day-of-the-Week.

10-6 LCR Tables
Figure 10-1: LCR Flowchart
ROUTEASSIGNED
FROM6-DIGITTABLE

LCR Operation 10-7
LCR Operation
Programming Steps
If the system is in the programming mode, continue using the program codes. If starting to program here, enter the programming mode.
1. Press FLASH and dial [75]. The following message displays:
2. There are eight tables which can be programmed here for LCR (you must also program LCR Class of Service in Station Programming). Use the procedures listed below to program these LCR tables.
Description
The Least Cost Routing (LCR) feature allows automatic selection of the most economical trunk according to the number dialed and the time of the day and day of the week. There are eight (8) different tables set up to monitor the dialing of digits of a station and to select the best route programmed for the call.
The buttons on the digital telephone are defined as shown when entering the LCR Tables Programming area:
LCR TAB LESEN TE R B U TTON N UM BE R
It is extremely im portant that the worksheets be completed before program ming the LCR tables.
Flash 05, button #7 must be used to enable the Least Cost Routing feature.
3-DIGITTABLE
6-DIGITTABLE
EXCEPTIONTABLES
ROUTE LISTTABLE
1 Q 2 W 3 E 4 R
INSERT /DELETE TABLE
DAILY TIMETABLE
WEEKLY TIMETABLE
TOLLINFORMATION
5 T 6 Y 7 U 8 I

10-8 LCR Operation
3-Digit Area / Office Code Table
Programming Steps1. Press the 3-DIGIT TABLE flexible button (FLASH 75, Button #1). The
following message displays:
L = [0] for Non-Leading 1 (1 not dialed), [1] for Leading 1 (1 is dialed)
NNN = A rea/Office Code
RR = Route List Number 00-15
Y = [0] Do not go to 6-digit table, [1] Go to 6-digit table
PP = Number of digits expe cted to be dialed.
2. Press the HOLD button to save the entry. A confirmation tone is heard and the display updates.
DescriptionBoth Leading 1 and Non-Leading 1 tables include all area codes (NPAs), and office codes (NXXs), from 000 to 999, including such numbers as 911, 411, etc. A complete entry into these tables include a route list table to be used, if the 6-digit table is to be checked and the number of digits likely to be dialed (Example: 7 or 10 digits). All local office codes must be entered in this table even if they do not require long distance calling.
The number of digits to expect entry aids the system in identifying when the last digit is dialed and to begin routing the call. This also helps to free SLT DTMF receivers if SLT traffic in the system is heavy.
For international calls, use 00 as number of digits to expect. This causes the system to wait five seconds (or inter-digit time-out) after user dials last digit before the system accesses a CO Line and dials out.
3 D IG IT ROU T ING TA B LEEN TE R L N N N R R Y PP HOL D

LCR Operation 10-9
6-Digit Office Code Table
Programming Steps1. Press the 6-DIGIT TABLE flexible button (FLASH 75, Button #2). The
following message displays:
= [0] to remove codes, [1] to add codes
AAA = Area Code
RR = Route Number 00-15
NNN = Office Code
2. Press the HOLD button to save the entry. A confirmation tone is heard and the display updates.
3. Enter additional office codes to be programmed into the same Area Code/Route Table, pressing HOLD after each office code entry.
4. Press a flexible button to program a different table.
Deleting All Entries in an Area Code/Route Table
Enter [0 AAA RR ###].
DescriptionThe 6-Digit Office Code Table determines a route for one or a group of individual office codes within an area code. Certain office codes within an area code can be given unique or special routing. If the office code dialed is not found in the 6-digit Office Code Table, the call is then routed according to the route list table as was entered in the 3-digit table.
The system allows twenty 6-digit Area/Office code tables that may be used to route specific office codes within an area code. Each table routes calls for a common area code to a specified route. All entries made to a table route those office codes to the specified route list table. An area code may be entered into more than one 6-digit table with different routes specified.
6 D IG IT ROU T ING TA B LEEN TE R A AA R R N NN HO LD

10-10 LCR Operation
Exception Code Table
Programming Steps1. Press EXCEPTION TABLES flexible button (FLASH 75, Button #3). The
following message displays:
= [0] to remove code from table, [1] to add code to table
XX = Exception codes for singl e digit codes, press MUTE button as 2nd digit. (The [ ] may be entered as the 1st digit only.)
RR = Route Table Number 00–15
2. Press the HOLD button to save the entry. A confirmation tone is heard and the display updates.
3. Press FLASH 75, Button #3 again for further entries. Up to 20 Exception Codes may be programmed in this table.
DescriptionThe Exception Code Table is used for operator calls and any other calls that use a one- or two-digit entry, rather than a three-digit area code.
Route List Table
Programming Steps1. Press the ROUTE LIST TABLE flexible button (FLASH 75, Button #4).
The following message displays:
RR = Route List Table Number 00–15
T = Time Pe riod Route List 1–4
GG = CO Line Group 00–23
DD = Insert/Delete Table reference 00-19 (## for none)
L = LCR Class of Service (LCOS)
EXCEP TION COD E TA B LEEN TE R XX RR HOL D
R OUT E LIST TAB LER R T GG D D L

LCR Operation 10-11
2. To create an entry, dial:
a. [RR]
b. [T]
c. [GG]
d. [DD]
e. [L]
3. Press [HOLD] to save the entry. A confirmation tone is heard and the display updates.
4. To enter additional CO Line groups in the same Time Period Route List number:
a. Dial [GG]
b. Dial [DD]
c. Dial [L]
d. Press [HOLD]
Entering Data for a Different Time Period Route List1. Press program FLASH 75, Button #4 and enter all data
(RR T GG DD L).
2. Repeat the above to program a new Route Number 00 to 15 or press a flexible button to program other LCR information.
3. To advance to the next entry, use Button #18.
4. To return to a previous entry, use Button #19.
When Call Cost feature is enabled in FLASH 05, Button #11, the following message displays.
RR = Route List Table Number 00- 15
T = Time Pe riod Route List 1- 4
CCC = Cost for one minute ($ 0.00– $ 9.99)
GG = CO Line Group 00-23
DD = Insert/Delete Table reference 00-19 (## for none)
L = LCR Class of Service (LCOS)
R OUT E LIST TAB LER R T CCC GG D D L

10-12 LCR Operation
DescriptionEach of the 16 Route List Tables available contains four Time Period Routing Lists, one for each of the 4 daily start time periods. Within each Time Period Route List up to 7 CO (outside) line groups and their corresponding Insert/Delete table, if any, and LCR Class Of Service Priority are programmed on a per line group basis.
When routing a CO call through LCR, CO Line groups are accessed in sequence so that the first line group entered represents the least costly (and first selected) and the last line group entered represents the most costly (and last selected).
The Route List Table references many other tables when processing a call for routing. First, the Daily Start Time Table is referenced to determined what start time entry should be checked in the Weekly Schedule Table. The corresponding entry in the weekly schedule table depending on the day of the week then determines which Time Period Route List should be used within the Route List Table.
The system then begins to check for idle lines in the first entered CO line group and proceeds until an idle line is found. While it is searching for an idle CO line the Station LCR COS is checked against the entries for LCR COS Priority of the specific CO line groups (see LCR COS Priority explanation).
When an idle CO Line is found with a LCR priority equal to or higher than the stations LCR COS, then a final check is made to determine if an Insert/Delete Table should be referenced.
When all of the tables and entries are checked the system then processes the call on the outside CO line.
LCR COS PriorityA station should be assigned a class of service for LCR. The LCR COS can be between 0 and 6, with 0 being unrestricted and 6 being the most restrictive. Within the time period route List table, line groups are given an LCR COS Priority assignment between 0 and 6.
Make sure you made entries into all Time P eriod Route Lists referenced in the weekly schedule table.

LCR Operation 10-13
A station using LCR is able to use only those CO (outside) line groups with a priority assignment of equal or higher value than the station ’s LCR Class of Service (e.g., a station with LCOS 3 can use line groups with a priority between 3 and 6).
Insert / Delete Table
Programming Steps
1. Press INSERT/DELETE TABLE flexible button (FLASH 75, Button #5). The following message displays:
Table 10-1: LCR Class of Service Table
Allow AccessTo Route
LCR CO Line Group Priority
0 1 2 3 4 5 6
STA
LCR
COS
0 Y Y Y Y Y Y Y
1 N Y Y Y Y Y Y
2 N N Y Y Y Y Y
3 N N N Y Y Y Y
4 N N N N Y Y Y
5 N N N N N Y Y
6 N N N N N N Y
N = Cannot Use Line GroupY = Has Access to Line Group
D IGI T IN SE R T / D ELET EEN TE R T T X D D D H OLD

10-14 LCR Operation
2. Enter the table information as follows:
T T = Insert/Delete Table Number 00–19
X = [0] Pre-Delete numbers (first digits dialed in the number),
-or-
[1] Pre-Insert numbers (insert digits in front of number dialed,
-or-
[2] Post-Insert numbers (insert digits behind number dialed).
DDD = Digits (up to 16-digits may be deleted from the beginningof the number dialed and up to 40 digits can be inserted(20 pre and 20 post).
3. Press the HOLD button to save the entry. A confirmation tone is heard and the display updates.
Adding and Deleting Numbers in the Same Table1. Enter the different Insertion/Deletion tables in step 1.
2. Enter as separate entries using the same table number.
3. In the Insert Tables for LCR Programming, press the TRANS button for a pause.
The [ ] and [#] digits are allowed as valid digits for inserting digits dialed over the network.
The [ ] and [#] are valid entries for adding digits in both the pre (in front of) or post (behind the number) tables.
The [ ] and [#] cannot be used as delete characters in the Delete tables.
Deleting a Table
Enter a valid table number and press the HOLD button.
DescriptionDigits can be either added or deleted when dialing a number. For instance, if a user dials a long distance call that should be placed on a foreign exchange (FX) line, the digit [1] and the three-digit area code (NPA) dialed by the user must be deleted before the call can be placed on that FX line. An Insert/Delete table can be programmed to do this. Digits can also be added to a number that has been dialed by the user.

LCR Operation 10-15
For instance, Other Common Carrier (OCC) access codes and authorization (ID) codes can be automatically inserted by the system either in front of, and/or behind the number dialed. There are twenty Insert/Delete Tables and each allows entries in a delete table and a pre- and post insert table. Up to 40 digits (including pauses) can be inserted (20 pre and 20 post) and up to 16 digits can be deleted. Digits can be inserted before or after the number dialed, but can be deleted only from the start of the number dialed. To ensure that a pause is inserted in LCR at default, the database programming adds a pause in each of the 20 LCR Insert and Delete Tables and insert table 0 in each of the route tables.
Daily Start Time Table
Programming Steps1. Press the DAILY START flexible button (FLASH 75, Button #6). The
following message displays:
2. Enter times in military format (2400 hours) in succession.
3. Press the HOLD button to save the entry. A confirmation tone is heard and the display updates.
Default times are 0800, 1700, 2300 (8 AM, 5 PM, and 11 PM), and the fourth time is disabled (####).
To change a Start Time, all times must be re-entered. Four pound signs [####] are displayed if nothing is entered for a specific time.
DescriptionThe Daily Start Time Table correlates the LCR Routing Table to the time sensitive discount structure offered by the customers carrier.
Example -- In the most common situation:
The most expensive rate period is between 8:00 am and 5:00 pm, often called the day rate.
The first discount period usually starts at 5:00 pm and runs until 11:00 pm, often called Evening Rates.
The remaining time (from 11:00 pm until 8:00 am) is referred to as night time rates which usually have the biggest discount.
D AILY STAR T TIME TA B LEH HMM H H MM H H MM H H MM HOL D

10-16 LCR Operation
Weekly Time Table -- With the wide selection of Common Carriers, the least costly route for a particular area code may be different at different times of the day. To accommodate this situation, this table and the Weekly Time Table work together, dividing the day into four possible time periods. By default these tables are set at the standard divisions of 8AM, 5PM, and 11PM. However, these times can be changed.
Entries in the Daily Start Time table are used to select the time period to reference in the weekly schedule. Based on the time a call is placed, the daily start time table selects the time period to choose in the weekly schedule. The weekly schedule is then used to determine the time period route list in the Route List Table to use for routing the call for a particular day of the week. Times are entered in the 24 hour format.
Figure 10-2: Daily Start Time and Weekly Schedule Tables
Weekly Schedule Table
Programming Steps1. Press the WEEKLY SCHED flexible button (FLASH 75, Button #7). The
following message displays:
D = Day of the Week:
[0] = Monday
[1] = Tuesday
WE EK LY S CH ED UL E TA BL EEN TE R D T T T T H OLD
LCR Operation 10-17
[2] = Wednesday
[3] = Thursday
[4] = Friday
[5] = Saturday
[6] = Sunday
T = Time Period Route List (1-4) to use for the time-of-day (based on the Daily Start Time table). Enter values for all time periods specified in the Daily Start Time table for that day.
First T = Time Period Route List for the FIRST Daily Start Time (applies to all Route List tables).
Second T = Time Period Route List for the SECOND Daily Start Time (applies to all Route List tables).
Third T = Time Period Route List for the THIRD Daily Start Time (applies to all Route List tables).
Fourth T = Time Period Route List for the FOURTH Daily Start Time (applies to all Route List tables).
2. Press the HOLD button after each complete daily entry. A confirmation tone is heard and the display updates.
DescriptionThe Weekly Schedule Table determines what Time Period Route List to use within the Route List Table. When a call is placed and ultimately sent to a route list (call is not denied) based on the time of day the call is placed, the Daily Start Time Table selects the time period to reference in the Weekly Schedule Table.
The Time Period Route entered for the specified time period, as determined in the Daily Start Time Table and based on the day of week, is then selected and the call ia routed according to the specified Time Period Route List.

10-18 LCR Operation
ExampleIf a call is placed at 5:45 pm on a Monday, then according to the Daily Start Time Table (using default values) the entry for time period two of the weekly schedule is checked. Because it is Monday the entry for time period two on Monday is used and the result is that the Time Period Route List number two (again using default values) is used for all routes.
Thus, the call is routed according to the entries in Time Period Two Route List no matter what route (00–15) is selected.
Figure 10-3: Daily and Weekly Start Time Table
LCR Routing for Toll Information
Programming Steps1. Press the TOLL INFO flexible button (FLASH 75, Button #8). The
following message displays:
2. Enter a valid Route List number (00–15) for the Route to be referenced in the Route List table.
3. Press the HOLD button after programming the Route number. A confirmation tone is heard and the display updates.
4. Enable LCR at this point.
LCR R OU TE FOR 55 5 - 1 21 2EN TE R R OU TE

LCR Operation 10-19
DescriptionThe LCR Routing for Toll Information feature adds provisions to the LCR call processing which allows common call routing for all toll information calls. 1-(XXX) 555-1212, (XXX) 555-1212, 1-555-1212, and 555-1212 calls are intercepted and sent to a selected route in the Route List Table. Numbers dialed are integrated and if it is determined to be a toll information call, either preceded with an area code or without or with a leading digit 1 or not, the call is sent to the route designated in programming.
By default, Toll Information Calls are sent to Route List Table Zero (0) which allows toll information calls to be placed on the system at default. A Toll Information route is chosen over a 3-digit or 6-digit route assignment if both are assigned. Entering the pound key twice [##] denies all Toll Information Calls.
Default LCR Database
Programming StepsIn an effort to decrease installation and set up time usually associated with LCR, a default LCR database was incorporated.
DescriptionThe default LCR database provides basic routing for local and long distance dialing. Default entries have been made in the 3-Digit Table for local office codes (NNXs) and all area codes (NPAs). Six routes have been established with the default database for routing of all calls under default.

10-20 LCR Operation

11 Initializing DatabaseParameters
This chapter describes the procedures and steps necessary toinitialize the system database, returning any programmed data to itsoriginal or default value.


Introduction 11-3
Introduction
Programming Steps
If the system is in the programming mode, continue using the program codes. If starting to program here, enter the programming mode to initialize Database Parameters.
Press FLASH and dial [80]. The following message displays:
Description
This section lets portions of the database be initialized individually. The only way to initialize the entire database is to move switch #1 on the BKSU board to the ON position and reset or power off/on the system. A System Reset (button #20) command is also included in this section for clearing meantime errors without initializing the database.
The buttons on the key telephone are defined as shown:
IN ITIA LIZ E D ATAB ASEEN TE R B UT TON N U MB ER
SYSTEMPARAMETERS
CO LINEATTRIBUTES
STATIONATTRIBUTES
PORT -STA/CO
1 Q 2 W 3 E 4 R
EXCEPTIONTABLES
SYSTEM SPEEDNUMBERS
LCRTABLES
ICLID/DIDTABLES
5 T 6 Y 7 U 8 I
DIRECTORYDIAL TABLE
HUNTGROUPS
ACD* OR UCDGROUPS
VOICE MAILGROUPS
9 O 10 P 11 A 1 2 S
DID-TIEPARAMETERS
VERIFIEDACCT CODES
ISDNPARAMETERS
13 D 14 F 15 G 16 H
SYSTEM RESET
17 J 18 K 19 L 20 ;
21 Z 22 X 2 3 C 24 V

11-4 Introduction
Initialize System Parameters
Programming Steps1. Press the SYSTEM PARAMETERS flexible button (FLASH 80,
Button #1). The following message displays:
2. Press the HOLD button. A confirmation tone is heard.
DescriptionThe System Parameters may be initialized setting all data fields to their original, default values. The following data fields are returned to their default values upon initializing the System Parameters.
IN ITIA LIZ E S YS PAR AMP RE SS HO LD

Introduction 11-5
Table 11-1: System Parameter Defaults
Program Code
FlexButton
FeaturesDefault Value
(after initialization)
FLASH 01 SYSTEM TIMERS
1 System Hold Recall Timer 060 sec
2 Exclusive Hold Recall Timer 180 sec
3 Attendant Recall Timer 01 min
4 Transfer Recall T imer 045 sec
5 Preset Forward Timer 10 sec
6 Call Forward No/Answer Timer 15 sec
7 Pause Timer 2 sec
8 Call Park Recall Timer 180 sec
9 Conference/DISA Timer 10 min
10 Paging Time-out Timer 15 sec
11 CO Ring Detect Timer 3=300 ms
12 SLT DTMF Receiver Timer 20 sec
13 Message Wait Reminder Tone 000 min=Disabled
14 SLT Hook Flash Timer 10=1 sec
15 SLT Hook Flash Debounce Timer 300 ms
16 SMDR Call Qualification Timer 30 sec
17 Automatic Call Back Timer 03 sec
18 Reminder Ring Timer 00 sec
20 Flexible Inter-Digit Timeout 5 sec
FLASH 02 ADDITIONAL SYSTEM TIMERS
1 Repeat Redial Timer 60 sec
2 Attendant Display Timer 01 sec
3 Call Coverage Ring Timer 5 sec
4 Modem Answer T / O 25 sec
5 Pulse Dial Inter-Digit Timer 300 ms
6 Programmable DTMF Time Operation 1=100ms

11-6 Introduction
FLASH 05 SYSTEM FEATURES 1
1 Attendant Override Disabled
2 Hold Preference System
3 External Night Ring Disabled
4 Executive O verride Warning Tone Enabled
5 Page Warning Tone Enabled
6 Background Music Channel Enabled
7 Least Cost Routing Disabled
8 Account Codes - Forced Disabled
9 Group Listening Disabled
10 Idle Speaker Mode Disabled
11 Call Cost Display Feature Disabled
12 Music-On-Hold Enabled
13 Call Qualifier Tone Option Disabled
FLASH 06 SYSTEM FEATURES 2
1 Barge-In Tone Enabled
2 CO Ring Tones Enabled
3 Verified Account Codes Disabled
4 Call Forward Display Enabled
5 External Day Ring Disabled
6 Overflow Station Forward Disabled
7 Direct Transfer Mode Enabled
8 Station ID Lock Disabled
9 LCR Call Progress Enabled
10 One-Touch Recording Warning Tone Enabled
11 Ringback on Transfer Disabled
12 ACD Agent Recall Disabled
13 911 Feature Disabled
14 Enahnced 911 Disabled
15 VMID Station Numbers STA Numbers = VMID
Table 11-1: System Parameter Defaults
Program Code
FlexButton
FeaturesDefault Value
(after initialization)

Introduction 11-7
FLASH 07 FLASH RATES
1 Incoming CO Line Ringing Red 480 ipm flutter
2 Incoming Intercom Ringing Red 120 ipm flutter
3 Call Forward Button Red Steady On
4 Message Wait/VM Button Red Steady On
5 Message CallBack – DSS/BLF Red 120 ipm flutter
6 Do Not Disturb – DSS/BLF Red 60 ipm Dbl Wink
7 Auto CallBack – DSS/BLF Red 120 ipm flash
8 UCD Available/Unavailable – DSS/BLF Red 60 ipm Dbl Wink
9 Transfer CO Ringing Red 120 ipm flash
10 Recall CO Ringing Red 480 ipm flutter
11 Queued CO Ringing Green 480 ipm flutter
12 Exclusive Hold Green 120 ipm flash
13 System Hold Red 60 ipm Dbl Wink
14 In Use Hold (I-Hold) Green 60 ipm flash
15 Camp-On Button Red 120 ipm flash
16 Call Back Button Red 120 ipm flash
17 Line Queue Button Red 480 ipm flutter
18 Do Not Disturb Button Red Steady On
19 Intercom Hold Button Red 15 ipm flash
FLASH 09 1-6 MOH Assignments None
FLASH 10 -- Attendant Station Assignment STA 100
FLASH 11 1-4 System Time And Date MMM/DD/YY,12-hr display
FLASH 12 -- PBX Dialing Codes None
FLASH 13 1-4 Executive/Secretary Pairs None
FLASH 14 1-6 On-Board Relay None
Table 11-1: System Parameter Defaults
Program Code
FlexButton
FeaturesDefault Value
(after initialization)

11-8 Introduction
FLASH 15 BAUD RATE ASSIGNMENTS
1 Port #1 (1st RS-232C port on Optional MISU) 9600 Baud
2 Port #2 (2nd RS-232C port on Optional MISU) 9600 Baud
3 Port #3 (Optional Modem) 9600 Baud
FLASH 16 1-3 Networking Tables None
FLASH 20 1 DISA Access Code 100
2 Database Admin Password 3226
FLASH 21 1 SMDR Enable/Disable No
2 Long Distance/Local Assignment Long Distance
3 Character Print Assignment 80
4 Baud Rate Display 9600
5 SMDR Port Assignments Port #1
FLASH 22 1 Automatic/Manual Operation Manual
2-8 Day of Week Programming Manual=None; Auto=M-F 08:00 17:00
Sat-Sun ##:## ##:##
FLASH 23 1-4 Directory Dialing Table None
FLASH 30 1-12 Hunt Group None
13 Station/Pilot/Pilot Ring All--Hunting Assignments
Pilot
FLASH 31 1 Verified Account Code Entry None
2 COS None
FLASH 39 1-24 CO Group Queuing Enabled
FLASH 41 1 Dial Pulse Parameters 60/40, 10 pps
Table 11-1: System Parameter Defaults
Program Code
FlexButton
FeaturesDefault Value
(after initialization)

Introduction 11-9
Initialize CO Line Attributes
Programming Steps1. Press the CO LINE ATTRIBUTES flexible button (FLASH 80,
Button #2). The following message displays:
2. Press the HOLD button. A confirmation tone is heard.
DescriptionThe CO Line Parameters may be initialized setting all data fields to their original, default values. The following data fields are returned to their default value upon initializing the CO Line Attributes.
IN ITIA LIZ E CO LIN ESP RE SS HO LD
Table 11-2: CO Line Attribute Defaults
Program Code
FlexButton
FeaturesDefault Value
(after initialization)
FLASH 40
PAGE A
1 DTMF/Dial Pulse Programming DTMF
2 CO/PBX Programming CO
3 UNA Programming Enabled
4 DISA CO-to-CO Enabled
5 Privacy Enabled
6 Loop Supervision Programming 4=400 ms
7 DISA Programming None
8 CO Line Group Programming Group 1
9 Class of Service (COS) Programming COS 1
10 CO Line Ringing Assignments (blank)
11 CO Line Identification Display Line XXX
12 Trunk Direction Bothway
13 Display Ring Assignments None
14 DID/TIE Signal Type Wink
15 911 Trunk Disabled

11-10 Introduction
Initialize Station Attributes
Programming Steps1. Press the STATION ATTRIBUTES flexible button (FLASH 80,
Button #3). The following message displays:
2. To initialize the Station Attributes, press the HOLD button. A confirmation tone is heard.
DescriptionThe Station Parameters may be initialized setting all data fields to their original, default values. The following data fields are returned to their default value upon initializing the Station Attributes.
FLASH 40
PAGE B
1 Transmit Volume Option 5 (0 db)
2 Preset Call Forward Destination ####
3 Preset Forward Voice Mail ####
4 Universal Day Answer Disabled
5 Music-On-Hold per CO Line Channel 1
6 Ring Tone 00
FLASH 40
PAGE C
1 Flash Timer Programming 10
2 Ring Delay Timer 10
3 Reseize Timer 200 ms
4 Guard Timer 05 sec
5 Preset Forward Timer 10 sec
IN ITIA LIZ E S TATION SP RE SS HO LD
Table 11-2: CO Line Attribute Defaults
Program Code
FlexButton
FeaturesDefault Value
(after initialization)

Introduction 11-11
Table 11-3: Station Attribute Defaults
Program Code
FlexButton
FeaturesDefault Value
(after initialization)
FLASH 50 1 Paging Access Enabled
PAGE A 2 Do Not Disturb Enabled
3 Conference Enable/Disable (Per Station) Enabled
4 Executive Override Disabled
5 Privacy (Per Station) Enabled
6 System Speed Dial Access Enabled
7 Line Queuing Enabled
8 Preferred Line Answer Enabled
9 Off-Hook Voice Over (OHVO) Disabled
10 Call Forwarding Enabled
11 Forced Least Cost Routing (LCR) Disabled
12 ACD Supervisor Monitor w/Barge-In Disabled
13 Executive Override Block Disabled
FLASH 50
PAGE A
14 CO Line Ringing Disabled
15 Name/Number Display at Idle Name (Enabled)
16 ACD Zap Tone Disabled
17 CO Loop Pool Flex Disabled
18 Administration Access Disabled

11-12 Introduction
FLASH 50
PAGE B
1 Station Identification 006 (24-Btn Keyset)6 (SLT w/o MWt)
2 Station Day Class of Service 1
3 Station Night Class of Service 1
4 Speakerphone/Headset Programming 0=Full Speakerphone
5 Pick-Up Group(s) Programming 1
6 Paging Zone(s) Programming 1
8 CO Line Group Access 1
9 LCR Class of Service (COS) 0
10 Off-Hook Preference Programming 00 (Keyset)
11 Flexible Button Programming (blank)
12 Keyset Mode Inactive Mode
13 Voice Mail ID Translation XXXX(Station #)
14 Display Flexible Buttons None
17 Cordless Key Button 00
FLASH 50
PAGE C
1 Internal No Answer Destination None
2 Internal Busy Destination None
3 External No Answer Destination None
4 External Busy Destination None
5 No Answer Timer 10 sec
6 Speed Dial Access None
Table 11-3: Station Attribute Defaults
Program Code
FlexButton
FeaturesDefault Value
(after initialization)

Introduction 11-13
Initialize CO / Station Port Parameters
Programming Steps1. Press the PORT-STA/CO flexible button (FLASH 80, Button #4). The
following message displays:
2. To initialize the Station/CO Port Parameters, press the HOLD button. A confirmation tone is heard.
DescriptionStation numbers can be initialized and reset to their original default values after the user has performed the Station Relocation Feature (636).
Initialize Exception Tables
Programming Steps1. Press the EXCEPTION TABLES flexible button (FLASH 80, Button #5).
The following message displays:
2. To initialize the Exception Tables, press the HOLD button. A confirmation tone is heard.
DescriptionThe Exception Tables Parameters, including the Allow/Deny Tables and the Special Tables, may be initialized setting all tables to their original, default values.
The following Tables are cleared returning to their default value upon initializing the Exception Tables parameters:
IN ITIA LIZ E P OR T - STA / COP RE SS HO LD
IN ITIA LIZ E E X TAB LESP RE SS HO LD

11-14 Introduction
Initialize System Speed Numbers
Programming Steps
1. Press the SYSTEM SPEED NUMBERS flexible button (FLASH 80, Button #6). The following message displays:
2. To initialize the System Speed bins, press the HOLD button. A confirmation tone is heard.
Description
Numbers entered in the System Speed Dial Table may be initialized by clearing all bins to their original default value. Bins 020-999 are returned to their default value (empty) upon initializing the Speed Dial Table.
Table 11-4: Exception Table Defaults
Program Code
FlexButton
FeaturesDefault Value
(after initialization)
FLASH 70 TOLL RESTRICTION
1 Allow Table A
Table Cleared(No Entries)
2 Deny Table A
3 Allow Table B
4 Deny Table B
5 Special Table 1 Table Cleared
(No Entries allowed,No Area Code specified)
6 Special Table 2
7 Special Table 3
8 Special Table 4 (Home Area Code) Table Cleared(No Entries allowed)
9 Area Code for Special Table 1
10 Area Code for Special Table 2
11 Area Code for Special Table 3
12 Displaying Toll Table Entries
IN ITIA LIZ E S YS SP EE D N OP RE SS HO LD
When upgrading software from FP2 to FP3, all previously programmed speed dial buttons will be lost.

Introduction 11-15
Initialize LCR Tables
Programming Steps1. Press the LCR TABLES flexible button (FLASH 80, Button #7). The
following message displays:
2. To initialize the LCR Tables, press the HOLD button. A confirmation tone is heard.
DescriptionThe LCR Tables may be initialized setting all tables to their original, default values. The following tables are reset to their original default value after initialization of the LCR Tables:
IN ITIA LIZ E LCR TAB LE SP RE SS HO LD
Table 11-5: LCR Table Defaults
Program Code
FlexButton
FeaturesDefault Value
(after initialization)
FLASH 75 LCR TABLES
1 3-Digit Area/Office Code Table
Default values assigned
2 6-Digit Area/Office Code Table
3 Exception Code Table
4 Route List Table
5 Insert/Delete Table
6 Daily Start Time Table
7 Weekly Schedule Table
8 LCR Routing for Toll Information

11-16 Introduction
Initialize ICLID Tables
Programming Steps1. Press the ICLID TABLES flexible button (FLASH 80, Button #8). The
following message displays:
2. To initialize the ICLID Tables, press the HOLD button. A confirmation tone is heard.
DescriptionICLID Table Parameters may be initialized, setting all data fields to their original default values.
IN ITIA LIZ E IC LIDP RE SS HO LD
Table 11-6: ICLID-DID Table Defaults
Program Code
FlexButton
FeaturesDefault Value
(after initialization)
FLASH 43 ICLID-DID TABLES
1 ICLID Ringing Assignments None
18 Next ICLID Route Number --
19 Previous ICLID Route Number --
20 Select Route Number --
FLASH 55 LOCAL NUMBER/NAME TRANSLATION
1 Route Number None
2 Phone Number None
3 Name None
4 Clear Entry None
FLASH 56 1 ICLID Disable/Enable Disabled
2 ICLID Name in Display Telephone Number
3 ICLID Baud Rate Display 9600
4 ICLID Port Assignment Port #1

Introduction 11-17
Initialize Directory Dialing Table Parameters
Programming Steps1. Press the DIRECTORY DIAL TABLE flexible button (FLASH 80,
Button #9). The following message displays:
2. To initialize the Directory Dialing Table Parameters, press the HOLD button. A confirmation tone is heard.
DescriptionThe Directory Dialing Table Parameters may be initialized setting all data fields to their original default values.
IN ITIA LIZ E D IR - DIA LP RE SS HO LD
Table 11-7: Directory Dialing Table Defaults
Program Code
FlexButton
FeaturesDefault Value
(after initialization)
FLASH 23 DIRECTORY DIALING TABLE
1 Bin/ICM
None2 Name
3 Clear

11-18 Introduction
Initialize Hunt Group Parameters
Programming Steps1. Press the HUNT GROUPS flexible button (FLASH 80, Button #10).
The following message displays:
2. To initialize the Hunt Group Parameters, press the HOLD button. A confirmation tone is heard.
DescriptionHunt Group Parameters may be initialized setting all data fields to their original, default value
IN ITIA LIZ E H U N T G R OU PP RE SS HO LD
Table 11-8: Hunt Group Defaults
ProgramCode
FlexButton
FeaturesDefault Value
(after initialization)
FLASH 30 HUNT GROUPS
1-12 Hunt Group Programming None
13 Station/Pilot Hunting Assignment Pilot

Introduction 11-19
Initialize ACD / UCD Group Parameters
Programming Steps1. Press the ACD* or UCD GROUPS flexible button (FLASH 80,
Button #11). The following message displays:
2. To initialize the ACD* or UCD Group Parameters, press the HOLD button. A confirmation tone is heard.
DescriptionACD* or UCD Group Parameters may be initialized setting all data fields to their original default values.
Table 11-9: UCD Group Defaults
IN ITIA LIZ E A CD G RO UPP RE SS HO LD
Program Code
FlexButton
FeaturesDefault Value
(after initialization)
FLASH 60 UCD GROUPS 550-557
2 Alternate Group Assignment None
3 Overflow Station Assignment None
7 UCD Primary Agent Assignment None
10-11 Recorded UCD Announcement Assignment(s)
None
FLASH 61 UCD TIMERS
1 UCD Ring Timer 60 sec
2 UCD Message Interval Timer 60 sec
3 UCD Overflow Timer 60 sec
4 UCD Auto Wrap-Up Timer 04 sec
5 UCD No-Answer Recall Timer 000=Disabled
6 UCD No-Answer Retry Timer 300 sec
FLASH 62 1-8 UCD Announcement Tables (RAN) None

11-20 Introduction
Table 11-10: ACD Group Defaults
Program Code
FlexButton
FeaturesDefault Value
(after initialization)
FLASH 60 ACD GROUPS 550-565
1 Group Name None
2 Alternate Group Assignment None
3 Overflow Station Assignment None
4 Supervisor Programming None
5 CIQ Threshold Disabled
6 Auto Wrap-Up Timer (Per Group) 04 sec
7 Primary Agents None
8 Secondary Agents None
9 Guaranteed RAN None
10 Primary RAN None
11 Secondary RAN None
12 Transferred RAN None
13 Overflow Timer 60 sec
14 Call Factor None
FLASH 61 ACD TIMERS
1 ACD*/UCD Ring Timer 60 sec
2 ACD*/UCD Message Interval Timer 60 sec
5 ACD*/UCD No-Answer Recall Timer 000=Disabled
6 ACD*/UCD No-Answer Retry Timer 300 sec
7 ACD* Guaranteed Message Timer 05 sec
FLASH 62 1-8 ACD* Ran Announcement Tables None
FLASH 63 1 Event Trace Disable/Enable Disabled
2 Trace Port Assignment Port #1
-- Baud Rate Display 9600 Baud
* Features available with opti onal software

Introduction 11-21
Initialize Voice Mail Group Parameters
Programming Steps1. Press the VOICE MAIL GROUPS flexible button (FLASH 80,
Button #12). The following message displays:
2. Press the HOLD button. A confirmation tone is heard.
DescriptionVM Group Parameters may be initialized, setting all data fields to their original default values.
IN ITIA LIZ E V M G ROU PP RE SS HO LD
Table 11-11: Voice Mail Group Defaults
Program Code
FlexButton
FeaturesDefault Value
(after initialization)
FLASH 65 VOICE MAIL GROUPS
1-8 Voice Mail Groups(440-447) None
9 Alternate Voice Mail Group None
10 Leave Mail Index Entry 440=0
11 Retrieve Mail Index Entry 440=1
12 Station Assignments None
FLASH 66 1-8 Voice Mail In-Band Signaling Table 0: Pre=P7, Suf=NoneTable 1: Pre=P7, Suf=
Tables 2-6: NoneTable 7: Pre=P7, Suf=2
9 Voice Mail Disconnect Table None
FLASH 67 1 Voice Mail In-Band Digits Enabled
2 Voice Mail Transfer/Forward Enabled
3 Voice Mail Broker Enabled
4 VM ID Digits 3
FLASH 68 1 Voice Mail Group None
2 Voice Mail ID Number None

11-22 Introduction
Initialize Verified Account Code Table
Programming Steps1. Press the VERIFIED ACCT CODES flexible button (FLASH 80,
Button #14). The following message displays:
2. To initialize the Verified Account Code Table, press the HOLD button. A confirmation tone is heard.
DescriptionThe Verified Account Code Table may be initialized setting all data fields to their original, default values.
IN ITIA LIZ E A CC T COD E SP RE SS HO LD
Table 11-12: Verified Account Code Table Defaults
Program Code
FlexButton
FeaturesDefault Value
(after initialization)
FLASH 31 VERIFIED ACCOUNT CODES
1 Account Code None
2 Class of Service (COS) None
3 Delete Account Code None
4 Erase Digits None

Introduction 11-23
System Reset
Programming StepsIf the System must be reset but not initialized:
1. Press the RESET flexible button (FLASH 80, Button #20). The following message displays:
2. To reset the system without initializing the database, press the HOLD button. No confirmation tone is heard and the system resets.
DescriptionThe System Reset feature provides a hard system reset from the keyset instead of the KSU. This is useful in cases where miscellaneous data errors have occurred and the system needs to be reset without initializing the entire database.
R ESE T S YS TEMP RE SS HO LD

11-24 Introduction

12 Printing SystemDatabase Parameters
This chapter describes the procedures and steps necessary to printthe system database parameters and various portions of the system.


Introduction 12-3
Introduction
Print Database Parameters
Programming Steps
Press FLASH and dial [85]. The following message displays:
Description
The buttons on the key telephone are defined as shown in the following table when entering the Print Database Parameters programming area:
The Print Database Parameters command dumps the entire database as a permanent record which can serve as a hardcopy of the database. The system baud rate must match that of the printer or receiving device.
Refer to the following figures for examples of the database printouts. Also refer to the following paragraphs for instructions on printing portions of the database.
PR IN T D ATAB A SEEN TER B UT TON N UMB ER
SYSTEMPARAMETERS
CO LINEATTRIBUTES
STATIONATTRIBUTES
PORT -STA/CO
1 Q 2 W 3 E 4 R
EXCEPTIONTABLES
SYSTEM SPEEDNUMBERS
LCRTABLES
ENTIRESYSTEM
5 T 6 Y 7 U 8 I
ICLID-DIDTABLES
DIRECTORYDIAL TABLE
HUNTGROUPS
ACD* OR UCDGROUPS
9 O 10 P 11 A 12 S
VOICE MAILGROUPS
VERIFIEDACCT CODES
13 D 1 4 F 15 G 16 H
17 J 18 K 19 L 20 ;
21 Z 22 X 23 C 24 V
* Features available with opti onal software.

12-4 Database Printing
Database Printing
Print System Parameters
Programming Steps
1. Press the SYSTEM PARAMETERS flexible button (FLASH 85, Button #1). The following message displays:
2. To print the System Parameters database, press the HOLD button. The following message displays:
When the system finishes sending the information to the printer, a confirmation tone is heard.
Description
The currently stored customer database can be printed or uploaded into a file. This command dumps the entire database as a permanent record which can serve as a hardcopy of the database. The system baud rate must match that of the printer or receiving device. When printing the System Parameters the following data prints:
All System Timers
All System Wide Options (External Night Ringing, Hold Preference)
Attendant Station(s) Programming
Other System Assignments (Page/Relay Assign, Exec/Sec, SMDR)
Weekly Night Mode Schedule
P RIN T SY S PAR AMP RE SS H OLD
P RIN T SY S PAR AM

Database Printing 12-5
Figure 12-1: System Parameters Printout
----- SYSTEM PARAMETERS ---- --------------------SYSTEM FEATURES -------------
SYS HOLD RECALLEXC HOLD RECALLATND RECALL TIMERTRANSFER RECALLPRESET FWD TIMERCALL FWD NO ANSPAUSE TIMERCALL PARK TIMERCONFERENCE TIMERPAGING TIMEOUTCO RING DETECTSLT RCVR TIMERM/W TONE TIMERHOOK SWITCH TIMEHOOK SWT BOUNCESMDR CALL QUALAUTO CALL BACKREMINDER RINGRELEASE GUARDINTERDIGIT T/ORPT REDIALATTENDANT DISPLAYCALL COVERAGE RINGMODEM ANSWER T/OINT DIGIT PULSEDTMF ON/OFF TIME
-- SYSTEM FEATURES
ATTENDANT OVERRIDEHOLD PREFERENCEEXTERNAL NIGHT RINGEXECUTIVE WARNINGPAGE WARNING TONEBACKGROUND MUSICLEAST COST ROUTINGFORCED ACCOUNT CODEGROUP LISTENINGIDLE SPEAKER MODECALL COST DISPLAYMUSIC ON HOLDCALL QUALIFIER TONEBARGE IN WARN TONE
60180145101521801015320010103030356015253001
--------
DISABLEDSYSTEMDISABLEDENABLEDENABLEDENABLEDDISABLEDDISABLEDDISABLEDDISABLEDDISABLEDENABLEDDISABLEDENABLED
CO RING TONESVERIFIED ACCT CODESCALL FWD DISPLAYEXTERNAL DAY RINGOVERFLOW STA FWDDIRECT XFERSTATION LOCKLCR CALL PROGRESSRECORDING WARN TONEMAINTENANCERINGBACK ON XFER911 FEATURE
-------------SYSTEM
INC CO RINGINC ICM RINGCALL FORWARD BTNMSG WAIT VM BTN MSG CBCK DSS/BLFDND DSS/BLFAUTO CBCK DSS/BLFUCD UNAVL DSS/BLFTRANSFER CO RINGRECALL CO RINGEXCLUSIVE HOLDQUEUED CO RINGSYSTEM HOLDIN USE HOLDCAMP ON BTNCALL BACK BTNLINE QUEUE BTNDND BTNICM HOLD BTNLEADING DIGIT 1LEADING DIGIT 2LEADING DIGIT 3LEADING DIGIT 4LEADING DIGIT 5LEADING DIGIT 6LEADING DIGIT 7LEADING DIGIT OPTIONCENTREX DIGITSVM ID DIGITS
ENABLEDDISABLEDENABLEDDISABLEDDISABLEDENABLEDDISABLEDENABLEDENABLEDDISABLEDDISABLEDDISABLED
LED
REDREDREDREDREDREDREDREDREDREDGREENGREENREDGREENREDREDREDREDREDLEADINGNONENONENONENONENONENONEDISABLED43
FLASH RATES -------
480 IPM FLUTTER120 IPM FLUTTERSTEADY ONSTEADY ON120 IPM FLUTTER60 IPM DBL WINK OFF120 IPM FLASH60 IPM DBL WINK OFF120 IPM FLASH480 IPM FLUTTER120 IPM FLASH480 IPM FLUTTER60 IPM DBL WINK OFF60 IPM FLASH120 IPM FLASH120 IPM FLASH480 IPM FLUTTERSTEADY ON15 IPM FLASHDIGIT

12-6 Database Printing
MUSIC CHANNEL[3..8] CABINET SLOT TYPECO - ## #### ## ## ## ------- ---- ----
0 0 LCOBATTENDANT STATIONS 0 1 DTIB100 ## ## ## ## ## ## 0 2 LCOB
0 3 DTIBDATE & TIME FORMAT 0 4 LCOBMM/DD/YY, 12 HOURS 0 5 DTIB
0 6 LCOBPBX DIALING CODES 0 7 DTIB## ## ## ## ##
EXECUTIVE/SECRETARY PAIRINGS1 = ### ###2 = ### ###3 = ### ###4 = ### ### POWER SUPPLY TYPES
----------------------------ON BOARD RELAY ASSIGNMENTS 10 AMPS 10 AMPS 10 AMPS 10 AMPSNONE NONE
ALARM DESC. ALARM PERIOD THRESHOLD ATTENDANTMINOR MAJOR
I/O BAUD RATE CARRIER LOSS Y 5 15 30 Y------------------ BLUE ALARM Y 5 15 30 YPort 1 = 9600 YELLOW ALARM Y 5 15 30 YPort 2 = 9600 RED ALARM Y 5 15 30 YPort 3 = 9600 BIPOLAR VAR. Y 5 15 30 YPort 4 = 9600 SLIP ALARM Y 5 15 30 Y
DATA ERRORS Y 5 15 30 YAUTO NIGHT MODE N
COLINE GROUP QUEUINGWEEKLY NIGHT MODE SCHEDULE ---------------------------------------------- GROUP 0 ENABLED
END START GROUP 1 ENABLEDDAY TIME TIME GROUP 2 ENABLEDM 0 0800 1700 GROUP 3 ENABLEDT 1 0800 1700 GROUP 4 ENABLEDW 2 0800 1700 GROUP 5 ENABLEDT 3 0800 1700 GROUP 6 ENABLEDF 4 0800 1700 GROUP 7 ENABLEDS 5 #### ####S 6 #### ####
DIAL PULSE - 60/40 10 PPS
Figure 12-1: System Parameters Printout

Database Printing 12-7
Print CO Line Attributes
Programming Steps1. Press the CO LINE ATTRIBUTES flexible button (FLASH 85,
Button #2). The following message displays:
2. To print data for:
ALL CO Lines, press the HOLD button.
A specified CO Line Range, enter 6 digits (3 digits for the first line and 3 digits for the last line in the range)
One CO Line, enter that line twice: [001001]
3. Then press the HOLD button. The following message displays and the CO Line data prints:
When the system finishes sending the requested information to the printer, a confirmation tone is heard.
DescriptionThe Print CO Line Attributes command dumps the entire database as a permanent record which can serve as a hardcopy of the database The system baud rate must match that of the printer or receiving device.
When printing the CO Line attributes the following data prints:
All CO Line parameters within the specified range.
CO Line ringing assignments within the specified range.
Dial Pulse Ratio and Speed settings
P RIN T CO LIN ESP RE SS H OLD
P RIN TI NG CO LIN E S

12-8 Database Printing
Figure 12-2: CO Line Attributes Printout
CO LINE ATTRIBUTES------------------
CO 01 CO 02------ -----DIAL PULSE/DTMF - DTMF DIAL PULSE/DTMF - DTMF
PBX/CO - CO PBX/CO - COUNIVERSAL NIGHT ANS - ENABLED UNIVERSAL NIGHT ANS - ENABLED
DISA TRK TO TRK - ENABLED DISA TRK TO TRK - ENABLEDPRIVACY - ENABLED PRIVACY - ENABLEDLOOOP SUPERVISION - 4 LOOP SUPERVISION - 4
DISA TYPE - NONE DISA TYPE - NONELINE GROUP - 1 LINE GROUP - 1
CLASS OF SERVICE - 1 CLASS OF SERVICE - 1LINE IDENTIFICATION - LINE 01 LINE IDENTIFICATION - LINE 02CO DIRECTION - INCOMING-OUTGOING CO DIRECTION - INCOMING-OUTGOING
RING ASSIGNMENTS RING ASSIGNMENTS100A 100A
TRANSMIT VOLUME - 0DB TRANSMIT VOLUME - 0DBPRESET FORWARD DEST - NONE PRESET FORWARD DEST - NONEPRESET FWD VMID - NONE PRESET FWD VMID - NONE
UNIVERSAL DAY ANSWER - DISABLED UNIVERSAL DAY ANSWER - DISABLEDMOH CHANNEL - 1 MOH CHANNEL - 1
RING TONE - 0 RING TONE - 0911 TRUNK - DISABLED 911 TRUNK - DISABLEDFLASH TIMER - 10 FLASH TIMER - 10
RING DELAY TIMER - 0 RING DELAY TIMER - 0WINK TIMER - 140 WINK TIMER - 140
RELEASE TIMER - 20 RELEASE TIMER - 20RESEIZE TIMER - 200 RESEIZE TIMER - 200GUARD TIMER - 50 GUARD TIMER - 50
SEIZE TIMER - 10 SEIZE TIMER - 10PRESET FWD TIMER - 100 PRESET FWD TIMER - 100
... and so on through CO lines 012
Database Printing 12-9
Print Station Attributes
Programming Steps1. Press the STATION ATTRIBUTES flexible button (FLASH 85,
Button #3). The following message displays:
2. To print data for:
All stations, press the HOLD button.
A specified Station Range, enter six digits to specify the Station range (three digits for the first station and three digits for the last station in the range):
[100-131] = Triad-S
One station, enter that station twice: [101101]
3. Then press the HOLD button. The following message displays and the requested information prints:
When the system finishes sending the requested information to the printer, a confirmation tone is heard.
DescriptionThe Print Station Attributes command dumps the entire database as a permanent record which can serve as a hardcopy of the database. The system baud rate must match that of the printer or receiving device.
When printing the Station attributes the following data prints:
>>> All Current Station Parameters
P RIN T STATION SP RE SS H OLD
P RIN TI NG STAT ION S

12-10 Database Printing
Figure 12-3: Station Attributes Printout
STATION ATTRIBUTESSTA 100 STA 101
PAGE ACCESS ENABLED PAGE ACCESS ENABLEDDO NOT DISTURB ENABLED DO NOT DISTURB ENABLEDCONFERENCE ENABLED CONFERENCE ENABLEDEXEC OVERRIDE DISABLED EXEC OVERRIDE DISABLEDPRIVACY ENABLED PRIVACY ENABLEDSYSTEM SPEED ENABLED SYSTEM SPEED ENABLEDLINE QUEUING ENABLED LINE QUEUING ENABLEDPREF LINE ANSWER DISABLED PREF LINE ANSWER DISABLEDOFF HOOK VOICE OVER DISABLED OFF HOOK VOICE OVER DISABLEDCALL FORWARD ENABLED CALL FORWARD ENABLEDFORCE LCR DISABLED FORCE LCR DISABLEDACD SUPV BARGE IN DISABLED ACD SUPV BARGE IN DISABLEDEXEC OVERRIDE BLOCK DISABLED EXEC OVERRIDE BLOCK DISABLEDCO RING OPTIONS MUTED RING CO RING OPTIONS MUTED RINGNAME AT IDLE LCD EXT NUMBER NAME AT IDLE LCD EXT NUMBERACD ZAP TONE DISABLED ACD ZAP TONE DISABLEDSTATION ID KEYSET - SP 24BTN STATION ID KEYSET - SP 24BTNCO LOOP POOL FLEX DISABLED CO LOOP POOL FLEX DISABLEDDAY COS 1 DAY COS 1NIGHT COS 1 NIGHT COS 1SPEAKERPHONE FULL SPEAKERPHONE SPEAKERPHONE FULL SPEAKERPHONEPICKUP GROUPS 1 PICKUP GROUPS 1PAGE ZONE 1 PAGE ZONE 1INTERNAL NO ANSWER ### INTERNAL NO ANSWER ###INTERNAL BUSY ### INTERNAL BUSY ###EXTERNAL NO ANSWER ### EXTERNAL NO ANSWER ###EXTERNAL BUSY ### EXTERNAL BUSY ###NO ANSWER TIMER 10 NO ANSWER TIMER 10LINE GROUP ACCESS 1 LINE GROUP ACCESS 1LCR CLASS OF SERVICE 0 LCR CLASS OF SERVICE 0OFFHOOK PREFENCE BTN 00 ENABLED OFFHOOK PREFENCE BTN 00 ENABLEDKEYSET MODE INACTIVE MODE 2400 KEYSET MODE INACTIVE MODE 2400VOICE MAIL ID 100 VOICE MAIL ID 101CORDLESS KEY BTN 00 LIGHT CONTROL NONEBUTTONS: DISPLAY LCD MSG NONE01D100 02D101 03D102 CORDLESS KEY BTN 0004D103 05D104 06D105 BUTTONS:07D106 08D107 09D108 01100 02D101 03D10210D109 11D110 12D111 04D10 05C001 06C00213L001 14C002 15L003 07LP 08PL1 09CBK16L004 17L005 18L006 10PKU 11DND 12LQU19LP 20PL1 21CBK 13L001 14C002 15L00322PKU 23DND 24LQU 16L004 17L005 18L00625FLA 26XFR 27SPD 19LP 20PL1 21CBK28CNF 29MSG 30FWD 22PKU 23DND 24LQU31MUT 32CPO 33MON34HLD 35VOL 36VOL ... and so on through stations: 131
NOTE: The bu tton p rintout fo r the 8-button keyset d isp la ys all flexible AND f ixed butto ns, the same a s the 24-bu tton keyset.

Database Printing 12-11
Print CO Port Parameters
Programming Steps1. Press the CO PORT flexible button (FLASH 85, Button #4). The
following message displays:
2. To print the CO Port parameters, press the HOLD button. The following message displays:
When the system finishes sending the requested information to the printer, a confirmation tone is heard.
DescriptionThe Print CO Port command dumps the entire database as a permanent record which can serve as a hardcopy of the database. The system baud rate must match that of the printer or receiving device.
Figure 12-4: CO Port Attributes Printout
P RIN T CO POR T S/COD ESP RE SS H OLD
P RIN TI NG CO P OR T
CO PORT NUMBERS
010509
020610
030711
040812

12-12 Database Printing
Print Exception Tables
Programming Steps1. Press the EXCEPT TABLES flexible button (FLASH 85, Button #5). The
following message displays:
2. To print the Except Tables, press the HOLD button. The following message displays:
When the system finishes sending the requested information to the printer, a confirmation tone is heard.
DescriptionThe Print Exception Tables command dumps the entire database as a permanent record which can serve as a hardcopy of the database. The system baud rate must match that of the printer or receiving device.
When printing information from the Exception Tables, the following data prints:
Allow Table A
Deny Table A
Allow Table B
Deny Table B
Special Table 1
Special Table 2
Special Table 3
Special Table 4
P RIN T EX TAB LESP RE SS H OLD
P RIN TI NG EX TA BL ES

Database Printing 12-13
Figure 12-5: Exception Tables Printout
ALLOW TABLE A SPECIAL TABLE 1 AREA CODE------------- --------------------------------01 11 ALLOWED OFFICE CODES02 1203 1304 1405 15 SPECIAL TABLE 2 AREA CODE06 16 --------------------------------07 17 ALLOWED OFFICE CODES08 1809 1910 20
SPECIAL TABLE 3 AREA CODEDENY TABLE A --------------------------------------------- ALLOWED OFFICE CODES01 0602 0703 0804 09 SPECIAL TABLE 4 HOME AREA CODE05 10 --------------------------------
ALLOWED OFFICE CODESALLOW TABLE B-------------01 1102 1203 1304 1405 1506 1607 1708 1809 1910 20
DENY TABLE B-------------01 0602 0703 0804 0905 10

12-14 Database Printing
Print System Speed Numbers
Programming Steps1. Press the SYSTEM SPEED flexible button (FLASH 85, Button #6). The
following message displays:
2. To print the System Speed bins, press the HOLD button. The following message displays:
When the system finishes sending the requested information to the printer, a confirmation tone is heard.
DescriptionThe System Speed Numbers command dumps the entire database as a permanent record which can serve as a hardcopy of the database. The system baud rate must match that of the printer or receiving device.
Figure 12-6: System Speed Numbers Printout
P RIN T SY S SP EE D N OP RE SS H OLD
P RIN TI NG SY S SP EED N O
SYSTEM SPEED NUMBERS020 037021 038022 039023 040024 041025 042026 043027 044028 045029 046030 047031 048032 049033 050034 051035 052036 ... and so on through Speed Number 999
(with expanded memory)

Database Printing 12-15
Print LCR Tables
Programming Steps1. Press the LCR TABLES flexible button (FLASH 85, Button #7). The
following message displays:
2. To print the LCR Tables, press the HOLD button. The following message displays:
When the system finishes sending the requested information to the printer, a confirmation tone is heard.
DescriptionThe Print LCR Tables command dumps the entire database as a permanent record which can serve as a hardcopy of the database. The system baud rate must match that of the printer or receiving device.
When printing information from the LCR Tables, the following data prints:
Exception Table
Route List Table
Insert/Delete Table
Daily Time Table
Weekly Time Table
Toll Tables
6-Digit Table
3-Digit Table
P RIN T LCR TAB LE SP RE SS H OLD
P RIN TI NG LC R TAB LES

12-16 Database Printing
EXCEPTION CODE TABLE----------------------
DIGIT INS/DEL TABLE-----------------------
CODE ROUTE NO----------------------
TABLE DIGITS--------------------
ROUTE LIST TABLE----------------------
01
PREPRE
P
RT TIME COST CO GRP INS/DEL GRP PR 2 PRE P
0 1234
026026026026
1111
0000
1111
3456
PREPREPREPRE
PPPP
1 1234
000000000000
1111
0000
1111
78910
PREPREPREPRE
PPPP
2 1234
010010010010
1111
0000
1111
11121314
PREPREPREPRE
PPPP
3 1234
072072072072
1111
0000
1111
15161718
PREPREPREPRE
PPPP
4 1234
171171171171
1111
0000
1111
19 PRE P
5 1234
106106106106
1111
0000
1111
DAILY START TIME TABLE-----------------------------------TABLE TIME
6 1234
277277277277
1111
0000
1111
1234
80017002300####
Figure 12-7: LCR Tables Printout

Database Printing 12-17
WEEKLY SCHEDULE TABLE-----------------------------------START
TIME M T W T F S S
-----------------------------------
800 1 1 1 1 1 3 3
1700 2 2 2 2 2 3 2
2300 3 3 3 3 3 3 3
#### 3 3 3 3 3 3 3
LCR ROUTE FOR 555-1212
-----------------------------------
0
6 DIGIT TABLE
-----------------------------------
AREA ROUTE
OFFICE CODES
CODE NO
Figure 12-7: LCR Tables Printout

12-18 Database Printing
3 DIGIT TABLE 597 2 8 N 1 7 N---------------------- 598 2 8 N 1 7 N
CODE LEADING 1 NON-LEADING 1 599 2 8 N 1 7 NRR PP 6 RR PP 6 600 0 11 N 1 7 N
--------------------------------- 601 0 11 N 1 7 N11 ## ## N 6 ## N 602 0 11 N 1 7 N200 0 11 N 1 7 N 603 0 11 N 1 7 N201 0 11 N 1 7 N 604 0 11 N 1 7 N202 0 11 N 1 7 N 605 0 11 N 1 7 N203 0 11 N 1 7 N 606 0 11 N 1 7 N204 3 11 N 1 7 N 607 0 11 N 1 7 N205 0 11 N 1 7 N 608 0 11 N 1 7 N206 0 11 N 1 7 N 609 0 11 N 1 7 N207 0 11 N 1 7 N 610 0 11 N 1 7 N208 0 11 N 1 7 N 611 ## ## N 1 7 N209 0 11 N 1 7 N 612 0 11 N 1 7 N210 0 11 N 1 7 N 613 3 11 N 1 7 N211 ## ## N 1 7 N 614 0 11 N 1 7 N212 0 11 N 1 7 N 615 0 11 N 1 7 N213 0 11 N 1 7 N 616 0 11 N 1 7 N214 0 11 N 1 7 N 617 0 11 N 1 7 N215 0 11 N 1 7 N 618 0 11 N 1 7 N216 0 11 N 1 7 N 619 0 11 N 1 7 N217 0 11 N 1 7 N 620 2 8 N 1 7 N218 0 11 N 1 7 N 621 2 8 N 1 7 N219 0 11 N 1 7 N 622 2 8 N 1 7 N220 2 8 N 1 7 N 623 2 8 N 1 7 N221 2 8 N 1 7 N 624 2 8 N 1 7 N222 2 8 N 1 7 N 625 2 8 N 1 7 N223 2 8 N 1 7 N 626 0 11 N 1 7 N224 2 8 N 1 7 N 627 2 8 N 1 7 N225 2 8 N 1 7 N 628 2 8 N 1 7 N226 2 8 N 1 7 N 629 2 8 N 1 7 N227 2 8 N 1 7 N 630 0 11 N 1 7 N228 0 11 N 1 7 N 631 2 8 N 1 7 N229 2 8 N 1 7 N 632 2 8 N 1 7 N230 2 8 N 1 7 N 633 2 8 N 1 7 N231 2 8 N 1 7 N 634 2 8 N 1 7 N232 2 8 N 1 7 N 635 2 8 N 1 7 N233 2 8 N 1 7 N 636 2 8 N 1 7 N234 2 8 N 1 7 N 637 2 8 N 1 7 N235 2 8 N 1 7 N 638 2 8 N 1 7 N236 2 8 N 1 7 N 639 2 8 N 1 7 N237 2 8 N 1 7 N 640 2 8 N 1 7 N238 2 8 N 1 7 N 641 2 8 N 1 7 N239 2 8 N 1 7 N 642 2 8 N 1 7 N
Figure 12-8: Three-Digit Tables Printout

Database Printing 12-19
240 0 11 N 1 7 N 643 2 8 N 1 7 N241 2 8 N 1 7 N 644 2 8 N 1 7 N242 2 8 N 1 7 N 645 2 8 N 1 7 N243 2 8 N 1 7 N 646 2 8 N 1 7 N244 2 8 N 1 7 N 647 2 8 N 1 7 N245 2 8 N 1 7 N 648 2 8 N 1 7 N246 2 8 N 1 7 N 649 2 8 N 1 7 N247 2 8 N 1 7 N 650 0 11 N 1 7 N248 0 11 N 1 7 N 651 2 8 N 1 7 N249 2 8 N 1 7 N 652 2 8 N 1 7 N250 2 8 N 1 7 N 653 2 8 N 1 7 N251 2 8 N 1 7 N 654 2 8 N 1 7 N252 2 8 N 1 7 N 655 2 8 N 1 7 N253 0 11 N 1 7 N 656 2 8 N 1 7 N254 0 11 N 1 7 N 657 2 8 N 1 7 N255 2 8 N 1 7 N 658 2 8 N 1 7 N256 2 8 N 1 7 N 659 2 8 N 1 7 N257 2 8 N 1 7 N 660 0 11 N 1 7 N258 2 8 N 1 7 N 661 2 8 N 1 7 N259 2 8 N 1 7 N 662 2 8 N 1 7 N260 2 8 N 1 7 N 663 2 8 N 1 7 N261 2 8 N 1 7 N 664 2 8 N 1 7 N282 2 8 N 1 7 N 665 2 8 N 1 7 N283 2 8 N 1 7 N 666 2 8 N 1 7 N264 2 8 N 1 7 N 667 2 8 N 1 7 N265 2 8 N 1 7 N 668 2 8 N 1 7 N266 2 8 N 1 7 N 669 2 8 N 1 7 N267 2 8 N 1 7 N 670 2 8 N 1 7 N268 2 8 N 1 7 N 671 2 8 N 1 7 N269 2 8 N 1 7 N 672 2 8 N 1 7 N270 2 8 N 1 7 N 673 2 8 N 1 7 N271 2 8 N 1 7 N 674 2 8 N 1 7 N272 2 8 N 1 7 N 675 2 8 N 1 7 N273 2 8 N 1 7 N 676 2 8 N 1 7 N274 2 8 N 1 7 N 677 2 8 N 1 7 N275 2 8 N 1 7 N 678 2 8 N 1 7 N276 2 8 N 1 7 N 679 2 8 N 1 7 N277 2 8 N 1 7 N 680 2 8 N 1 7 N278 2 8 N 1 7 N 681 2 8 N 1 7 N279 2 8 N 1 7 N 682 2 8 N 1 7 N280 2 8 N 1 7 N 683 2 8 N 1 7 N281 0 11 N 1 7 N 684 2 8 N 1 7 N282 2 8 N 1 7 N 685 2 8 N 1 7 N283 2 8 N 1 7 N 686 2 8 N 1 7 N284 2 8 N 1 7 N 687 2 8 N 1 7 N285 2 8 N 1 7 N 688 2 8 N 1 7 N286 2 8 N 1 7 N 689 2 8 N 1 7 N
Figure 12-8: Three-Digit Tables Printout

12-20 Database Printing
287 2 8 N 1 7 N 690 2 8 N 1 7 N288 2 8 N 1 7 N 691 2 8 N 1 7 N289 2 8 N 1 7 N 692 2 8 N 1 7 N290 2 8 N 1 7 N 693 2 8 N 1 7 N291 2 8 N 1 7 N 694 2 8 N 1 7 N292 2 8 N 1 7 N 695 2 8 N 1 7 N293 2 8 N 1 7 N 696 2 8 N 1 7 N294 2 8 N 1 7 N 697 2 8 N 1 7 N295 2 8 N 1 7 N 698 2 8 N 1 7 N296 2 8 N 1 7 N 699 2 8 N 1 7 N297 2 8 N 1 7 N 700 0 11 N 1 7 N298 2 8 N 1 7 N 701 0 11 N 1 7 N299 2 8 N 1 7 N 702 0 11 N 1 7 N300 0 11 N 1 7 N 703 0 11 N 1 7 N301 0 11 N 1 7 N 704 0 11 N 1 7 N302 0 11 N 1 7 N 705 3 11 N 1 7 N303 0 11 N 1 7 N 706 4 11 N 1 7 N304 0 11 N 1 7 N 707 0 11 N 1 7 N305 0 11 N 1 7 N 708 0 11 N 1 7 N306 3 11 N 1 7 N 709 3 11 N 1 7 N307 0 11 N 1 7 N 710 0 11 N 1 7 N308 0 11 N 1 7 N 711 ## ## N 1 7 N309 0 11 N 1 7 N 712 0 11 N 1 7 N310 0 11 N 1 7 N 713 0 11 N 1 7 N311 ## ## N 1 7 N 714 0 11 N 1 7 N312 0 11 N 1 7 N 715 0 11 N 1 7 N313 0 11 N 1 7 N 716 0 11 N 1 7 N314 0 11 N 1 7 N 717 0 11 N 1 7 N315 0 11 N 1 7 N 718 0 11 N 1 7 N316 0 11 N 1 7 N 719 0 11 N 1 7 N317 0 11 N 1 7 N 720 2 8 N 1 7 N318 0 11 N 1 7 N 721 2 8 N 1 7 N319 0 11 N 1 7 N 722 2 8 N 1 7 N320 0 11 N 1 7 N 723 2 8 N 1 7 N321 2 8 N 1 7 N 724 0 11 N 1 7 N322 2 8 N 1 7 N 725 2 8 N 1 7 N323 0 11 N 1 7 N 726 2 8 N 1 7 N324 2 8 N 1 7 N 727 2 8 N 1 7 N325 2 8 N 1 7 N 728 2 8 N 1 7 N326 2 8 N 1 7 N 729 2 8 N 1 7 N327 2 8 N 1 7 N 730 2 8 N 1 7 N328 2 8 N 1 7 N 731 2 8 N 1 7 N329 2 8 N 1 7 N 732 0 11 N 1 7 N330 0 11 N 1 7 N 733 2 8 N 1 7 N331 2 8 N 1 7 N 734 0 11 N 1 7 N332 2 8 N 1 7 N 735 2 8 N 1 7 N333 2 8 N 1 7 N 736 2 8 N 1 7 N
Figure 12-8: Three-Digit Tables Printout

Database Printing 12-21
334 0 11 N 1 7 N 737 2 8 N 1 7 N335 2 8 N 1 7 N 738 2 8 N 1 7 N336 2 8 N 1 7 N 739 2 8 N 1 7 N337 2 8 N 1 7 N 740 0 11 N 1 7 N338 2 8 N 1 7 N 741 2 8 N 1 7 N339 2 8 N 1 7 N 742 2 8 N 1 7 N340 2 8 N 1 7 N 743 2 8 N 1 7 N341 2 8 N 1 7 N 744 2 8 N 1 7 N342 2 8 N 1 7 N 745 2 8 N 1 7 N343 2 8 N 1 7 N 746 2 8 N 1 7 N344 2 8 N 1 7 N 747 2 8 N 1 7 N345 2 8 N 1 7 N 748 2 8 N 1 7 N346 2 8 N 1 7 N 749 2 8 N 1 7 N347 2 8 N 1 7 N 750 2 8 N 1 7 N348 2 8 N 1 7 N 751 2 8 N 1 7 N349 2 8 N 1 7 N 752 2 8 N 1 7 N350 2 8 N 1 7 N 753 2 8 N 1 7 N351 2 8 N 1 7 N 754 2 8 N 1 7 N352 0 11 N 1 7 N 755 2 8 N 1 7 N353 2 8 N 1 7 N 756 2 8 N 1 7 N354 2 8 N 1 7 N 757 0 11 N 1 7 N355 2 8 N 1 7 N 758 2 8 N 1 7 N356 2 8 N 1 7 N 759 2 8 N 1 7 N357 2 8 N 1 7 N 760 0 11 N 1 7 N358 2 8 N 1 7 N 761 2 8 N 1 7 N359 2 8 N 1 7 N 762 2 8 N 1 7 N360 0 11 N 1 7 N 763 2 8 N 1 7 N361 2 8 N 1 7 N 764 2 8 N 1 7 N362 2 8 N 1 7 N 765 0 11 N 1 7 N363 2 8 N 1 7 N 766 2 8 N 1 7 N364 2 8 N 1 7 N 767 2 8 N 1 7 N365 2 8 N 1 7 N 768 2 8 N 1 7 N366 2 8 N 1 7 N 769 2 8 N 1 7 N367 2 8 N 1 7 N 770 0 11 N 1 7 N368 2 8 N 1 7 N 771 2 8 N 1 7 N369 2 8 N 1 7 N 772 2 8 N 1 7 N370 2 8 N 1 7 N 773 0 11 N 1 7 N371 2 8 N 1 7 N 774 2 8 N 1 7 N372 2 8 N 1 7 N 775 2 8 N 1 7 N373 2 8 N 1 7 N 776 2 8 N 1 7 N374 2 8 N 1 7 N 777 2 8 N 1 7 N375 2 8 N 1 7 N 778 2 8 N 1 7 N376 2 8 N 1 7 N 779 2 8 N 1 7 N377 2 8 N 1 7 N 780 2 8 N 1 7 N378 2 8 N 1 7 N 781 0 11 N 1 7 N379 2 8 N 1 7 N 782 2 8 N 1 7 N380 2 8 N 1 7 N 783 2 8 N 1 7 N
Figure 12-8: Three-Digit Tables Printout

12-22 Database Printing
381 2 8 N 1 7 N 784 2 8 N 1 7 N382 2 8 N 1 7 N 785 0 11 N 1 7 N383 2 8 N 1 7 N 786 2 8 N 1 7 N384 2 8 N 1 7 N 787 2 8 N 1 7 N385 2 8 N 1 7 N 788 2 8 N 1 7 N386 2 8 N 1 7 N 789 2 8 N 1 7 N387 2 8 N 1 7 N 790 2 8 N 1 7 N388 2 8 N 1 7 N 791 2 8 N 1 7 N389 2 8 N 1 7 N 792 2 8 N 1 7 N390 2 8 N 1 7 N 793 2 8 N 1 7 N391 2 8 N 1 7 N 794 2 8 N 1 7 N392 2 8 N 1 7 N 795 2 8 N 1 7 N393 2 8 N 1 7 N 796 2 8 N 1 7 N394 2 8 N 1 7 N 797 2 8 N 1 7 N395 2 8 N 1 7 N 798 2 8 N 1 7 N396 2 8 N 1 7 N 799 2 8 N 1 7 N397 2 8 N 1 7 N 800 0 11 N 1 7 N398 2 8 N 1 7 N 801 0 11 N 1 7 N399 2 8 N 1 7 N 802 0 11 N 1 7 N400 0 11 N 1 7 N 803 0 11 N 1 7 N401 0 11 N 1 7 N 804 0 11 N 1 7 N402 0 11 N 1 7 N 805 0 11 N 1 7 N403 3 11 N 1 7 N 806 0 11 N 1 7 N404 0 11 N 1 7 N 807 3 11 N 1 7 N405 0 11 N 1 7 N 808 0 11 N 1 7 N406 0 11 N 1 7 N 809 5 11 N 1 7 N407 0 11 N 1 7 N 810 0 11 N 1 7 N408 0 11 N 1 7 N 811 ## ## N 1 7 N409 0 11 N 1 7 N 812 0 11 N 1 7 N410 0 11 N 1 7 N 813 0 11 N 1 7 N411 1 4 N 1 3 N 814 0 11 N 1 7 N412 0 11 N 1 7 N 815 0 11 N 1 7 N413 0 11 N 1 7 N 816 0 11 N 1 7 N414 0 11 N 1 7 N 817 0 11 N 1 7 N415 0 11 N 1 7 N 818 0 11 N 1 7 N416 3 11 N 1 7 N 819 0 11 N 1 7 N417 0 11 N 1 7 N 820 2 8 N 1 7 N418 3 11 N 1 7 N 821 2 8 N 1 7 N419 0 11 N 1 7 N 822 2 8 N 1 7 N420 2 8 N 1 7 N 823 2 8 N 1 7 N421 2 8 N 1 7 N 824 2 8 N 1 7 N422 2 8 N 1 7 N 825 2 8 N 1 7 N423 0 11 N 1 7 N 826 2 8 N 1 7 N424 2 8 N 1 7 N 827 2 8 N 1 7 N425 0 11 N 1 7 N 828 2 8 N 1 7 N426 2 8 N 1 7 N 829 2 8 N 1 7 N427 2 8 N 1 7 N 830 0 11 N 1 7 N
Figure 12-8: Three-Digit Tables Printout

Database Printing 12-23
428 2 8 N 1 7 N 831 0 11 N 1 7 N429 2 8 N 1 7 N 832 2 8 N 1 7 N430 2 8 N 1 7 N 833 2 8 N 1 7 N431 2 8 N 1 7 N 834 2 8 N 1 7 N432 2 8 N 1 7 N 835 2 8 N 1 7 N433 2 8 N 1 7 N 836 2 8 N 1 7 N434 2 8 N 1 7 N 837 2 8 N 1 7 N435 0 11 N 1 7 N 838 2 8 N 1 7 N436 2 8 N 1 7 N 839 2 8 N 1 7 N437 2 8 N 1 7 N 840 2 8 N 1 7 N438 2 8 N 1 7 N 841 2 8 N 1 7 N439 2 8 N 1 7 N 842 2 8 N 1 7 N440 0 11 N 1 7 N 843 0 11 N 1 7 N441 5 11 N 1 7 N 844 2 8 N 1 7 N442 2 8 N 1 7 N 845 2 8 N 1 7 N443 0 11 N 1 7 N 846 2 8 N 1 7 N444 2 8 N 1 7 N 847 0 11 N 1 7 N445 2 8 N 1 7 N 848 2 8 N 1 7 N446 2 8 N 1 7 N 849 2 8 N 1 7 N447 2 8 N 1 7 N 850 0 11 N 1 7 N448 2 8 N 1 7 N 851 2 8 N 1 7 N449 2 8 N 1 7 N 852 2 8 N 1 7 N450 2 8 N 1 7 N 853 2 8 N 1 7 N451 2 8 N 1 7 N 854 2 8 N 1 7 N452 2 8 N 1 7 N 855 2 8 N 1 7 N453 2 8 N 1 7 N 856 2 8 N 1 7 N454 2 8 N 1 7 N 857 2 8 N 1 7 N455 2 8 N 1 7 N 858 2 8 N 1 7 N456 2 8 N 1 7 N 859 2 8 N 1 7 N457 2 8 N 1 7 N 860 0 11 N 1 7 N458 2 8 N 1 7 N 861 2 8 N 1 7 N459 2 8 N 1 7 N 862 2 8 N 1 7 N460 2 8 N 1 7 N 863 2 8 N 1 7 N461 2 8 N 1 7 N 864 0 11 N 1 7 N462 2 8 N 1 7 N 865 2 8 N 1 7 N463 2 8 N 1 7 N 866 2 8 N 1 7 N464 2 8 N 1 7 N 867 2 8 N 1 7 N465 2 8 N 1 7 N 868 2 8 N 1 7 N466 2 8 N 1 7 N 869 2 8 N 1 7 N467 2 8 N 1 7 N 870 0 11 N 1 7 N468 2 8 N 1 7 N 871 2 8 N 1 7 N469 2 8 N 1 7 N 872 2 8 N 1 7 N470 2 8 N 1 7 N 873 2 8 N 1 7 N471 2 8 N 1 7 N 874 0 11 N 1 7 N472 2 8 N 1 7 N 875 2 8 N 1 7 N473 2 8 N 1 7 N 876 2 8 N 1 7 N474 2 8 N 1 7 N 877 2 8 N 1 7 N
Figure 12-8: Three-Digit Tables Printout

12-24 Database Printing
475 2 8 N 1 7 N 878 2 8 N 1 7 N476 2 8 N 1 7 N 879 2 8 N 1 7 N477 2 8 N 1 7 N 880 2 8 N 1 7 N478 2 8 N 1 7 N 881 2 8 N 1 7 N479 2 8 N 1 7 N 882 2 8 N 1 7 N480 2 8 N 1 7 N 883 2 8 N 1 7 N481 2 8 N 1 7 N 884 2 8 N 1 7 N482 2 8 N 1 7 N 885 2 8 N 1 7 N483 2 8 N 1 7 N 886 2 8 N 1 7 N484 2 8 N 1 7 N 887 2 8 N 1 7 N485 2 8 N 1 7 N 888 2 8 N 1 7 N486 2 8 N 1 7 N 889 2 8 N 1 7 N487 2 8 N 1 7 N 890 2 8 N 1 7 N488 2 8 N 1 7 N 891 2 8 N 1 7 N489 2 8 N 1 7 N 892 2 8 N 1 7 N490 2 8 N 1 7 N 893 2 8 N 1 7 N491 2 8 N 1 7 N 894 2 8 N 1 7 N492 2 8 N 1 7 N 895 2 8 N 1 7 N493 2 8 N 1 7 N 896 2 8 N 1 7 N494 2 8 N 1 7 N 897 2 8 N 1 7 N495 2 8 N 1 7 N 898 2 8 N 1 7 N496 2 8 N 1 7 N 899 2 8 N 1 7 N497 2 8 N 1 7 N 900 0 11 N 1 7 N498 2 8 N 1 7 N 901 0 11 N 1 7 N499 2 8 N 1 7 N 902 3 11 N 1 7 N500 0 11 N 1 7 N 903 0 11 N 1 7 N501 0 11 N 1 7 N 904 0 11 N 1 7 N502 0 11 N 1 7 N 905 4 11 N 1 7 N503 0 11 N 1 7 N 906 0 11 N 1 7 N504 0 11 N 1 7 N 907 0 11 N 1 7 N505 0 11 N 1 7 N 908 0 11 N 1 7 N506 3 11 N 1 7 N 909 0 11 N 1 7 N507 0 11 N 1 7 N 910 0 11 N 1 7 N508 0 11 N 1 7 N 911 1 4 N 1 3 N509 0 11 N 1 7 N 912 0 11 N 1 7 N510 0 11 N 1 7 N 913 0 11 N 1 7 N511 ## ## N 1 7 N 914 0 11 N 1 7 N512 0 11 N 1 7 N 915 0 11 N 1 7 N513 0 11 N 1 7 N 916 0 11 N 1 7 N514 3 11 N 1 7 N 917 0 11 N 1 7 N515 0 11 N 1 7 N 918 0 11 N 1 7 N516 0 11 N 1 7 N 919 0 11 N 1 7 N517 0 11 N 1 7 N 920 0 11 N 1 7 N518 0 11 N 1 7 N 921 2 8 N 1 7 N519 3 11 N 1 7 N 922 2 8 N 1 7 N520 0 11 N 1 7 N 923 2 8 N 1 7 N521 2 8 N 1 7 N 924 2 8 N 1 7 N
Figure 12-8: Three-Digit Tables Printout

Database Printing 12-25
522 2 8 N 1 7 N 925 0 11 N 1 7 N523 2 8 N 1 7 N 926 2 8 N 1 7 N524 2 8 N 1 7 N 927 2 8 N 1 7 N525 2 8 N 1 7 N 928 2 8 N 1 7 N526 2 8 N 1 7 N 929 2 8 N 1 7 N527 2 8 N 1 7 N 930 2 8 N 1 7 N528 2 8 N 1 7 N 931 0 11 N 1 7 N529 2 8 N 1 7 N 932 2 8 N 1 7 N530 0 11 N 1 7 N 933 2 8 N 1 7 N531 2 8 N 1 7 N 934 2 8 N 1 7 N532 2 8 N 1 7 N 935 2 8 N 1 7 N533 2 8 N 1 7 N 936 2 8 N 1 7 N534 2 8 N 1 7 N 937 0 11 N 1 7 N535 2 8 N 1 7 N 938 2 8 N 1 7 N536 2 8 N 1 7 N 939 2 8 N 1 7 N537 2 8 N 1 7 N 940 0 11 N 1 7 N538 2 8 N 1 7 N 941 0 11 N 1 7 N539 2 8 N 1 7 N 942 2 8 N 1 7 N540 0 11 N 1 7 N 943 2 8 N 1 7 N541 0 11 N 1 7 N 944 2 8 N 1 7 N542 2 8 N 1 7 N 945 2 8 N 1 7 N543 2 8 N 1 7 N 946 2 8 N 1 7 N544 2 8 N 1 7 N 947 2 8 N 1 7 N545 2 8 N 1 7 N 948 2 8 N 1 7 N546 2 8 N 1 7 N 949 0 11 N 1 7 N547 2 8 N 1 7 N 950 2 8 N 1 7 N548 2 8 N 1 7 N 951 2 8 N 1 7 N549 2 8 N 1 7 N 952 2 8 N 1 7 N550 2 8 N 1 7 N 953 2 8 N 1 7 N551 2 8 N 1 7 N 954 0 11 N 1 7 N552 2 8 N 1 7 N 955 2 8 N 1 7 N553 2 8 N 1 7 N 956 0 11 N 1 7 N554 2 8 N 1 7 N 957 2 8 N 1 7 N555 2 8 N 1 7 N 958 2 8 N 1 7 N556 2 8 N 1 7 N 959 2 8 N 1 7 N557 2 8 N 1 7 N 960 2 8 N 1 7 N558 2 8 N 1 7 N 961 2 8 N 1 7 N559 2 8 N 1 7 N 962 2 8 N 1 7 N560 2 8 N 1 7 N 963 2 8 N 1 7 N561 0 11 N 1 7 N 964 2 8 N 1 7 N562 0 11 N 1 7 N 965 2 8 N 1 7 N563 2 8 N 1 7 N 966 2 8 N 1 7 N564 2 8 N 1 7 N 967 2 8 N 1 7 N565 2 8 N 1 7 N 968 2 8 N 1 7 N566 2 8 N 1 7 N 969 2 8 N 1 7 N567 2 8 N 1 7 N 970 0 11 N 1 7 N568 2 8 N 1 7 N 971 2 8 N 1 7 N
Figure 12-8: Three-Digit Tables Printout

12-26 Database Printing
569 2 8 N 1 7 N 972 0 11 N 1 7 N570 2 8 N 1 7 N 973 0 11 N 1 7 N571 2 8 N 1 7 N 974 2 8 N 1 7 N572 2 8 N 1 7 N 975 2 8 N 1 7 N573 0 11 N 1 7 N 976 2 8 N 1 7 N574 2 8 N 1 7 N 977 2 8 N 1 7 N575 2 8 N 1 7 N 978 0 11 N 1 7 N576 2 8 N 1 7 N 979 2 8 N 1 7 N577 2 8 N 1 7 N 980 2 8 N 1 7 N578 2 8 N 1 7 N 981 2 8 N 1 7 N579 2 8 N 1 7 N 982 2 8 N 1 7 N580 0 11 N 1 7 N 983 2 8 N 1 7 N581 2 8 N 1 7 N 984 2 8 N 1 7 N582 2 8 N 1 7 N 985 2 8 N 1 7 N583 2 8 N 1 7 N 986 2 8 N 1 7 N584 2 8 N 1 7 N 987 2 8 N 1 7 N585 2 8 N 1 7 N 988 2 8 N 1 7 N586 2 8 N 1 7 N 989 2 8 N 1 7 N587 2 8 N 1 7 N 990 2 8 N 1 7 N588 2 8 N 1 7 N 991 2 8 N 1 7 N589 2 8 N 1 7 N 992 2 8 N 1 7 N590 2 8 N 1 7 N 993 2 8 N 1 7 N591 2 8 N 1 7 N 994 2 8 N 1 7 N592 2 8 N 1 7 N 995 2 8 N 1 7 N593 2 8 N 1 7 N 996 2 8 N 1 7 N594 2 8 N 1 7 N 997 2 8 N 1 7 N595 2 8 N 1 7 N 998 2 8 N 1 7 N596 2 8 N 1 7 N 999 2 8 N 1 7 N
Figure 12-8: Three-Digit Tables Printout

Database Printing 12-27
Print Entire System Database
Programming Steps1. Press the ENTIRE SYSTEM flexible button (FLASH 85, Button #8). The
following message displays:
2. To print the entire database, press the HOLD button. The display updates to indicate what portion of the database is printing.
3. When the system finishes sending the database to the printer, a confirmation tone is heard.
DescriptionThe Print System Database command dumps the entire database as a permanent record which can serve as a hardcopy of the database. The system baud rate must match that of the printer or receiving device. Printing the entire database takes a while to print. The database is printed in the following order:
P RIN T D ATA BA SEP RE SS H OLD
1. All System Parameters2. All CO Line Programming3. All CO Ports4. All Station Attributes5. All Station Ports6. Exception Tables (Allow/Deny/Special)7. System Speed Dial Numbers8. ICLID Ringing Assignment Table9. Directory Dialing Table
10. Hunt Group Parameters (Bins 020–999)11. LCR Tables12. ICLID Parameters and Table(s)13. ACD* or UCD Group Parameters14. Voice Mail Group Parameters15. DID Translation Table16. DID-TIE Timers17. Verified Account Codes Table*This feature is available with optional software.

12-28 Database Printing
Print ICLID - DID Tables
Programming Steps1. Press the ICLID-DID TABLES flexible button (FLASH 85, Button #9).
The following message displays:
2. To print the ICLID-DID Table(s), press the HOLD button. The following messages display:
3. When the system finishes sending the requested information to the printer, a confirmation tone is heard.
DescriptionThe Print ICLID-DID Tables command dumps the entire database as a permanent record which can serve as a hardcopy of the database. The system baud rate must match that of the printer or receiving device. When printing the ICLID-DID Table(s), the following data prints:
ICLID Features
ICLID Translation Table
ICLID Unanswered Call Table
ICLID Answered Call Table
ICLID Ringing Assignments Table
DID Translation Table
P RIN T ICLID - D IDP RE SS H OLD
P RIN TI NG ICLID - DID
P RIN TI NG RO UT E
P RIN TI NG ICLID TR AN S N O

Database Printing 12-29
Figure 12-9: ICLID Translation Tables Printout
ICLID NAME BAUD PORT ICLID UNANSWERED CALL TABLE---------------------------
N Y 9600 1 NONEICLID TRANSLATION TABLE ICLID ANSWERED CALL TABLE----------------------- ---------------------------
NONEENTRY ROUTE NAME NUMBER ROUTE RING ASSIGNMENTS600 ## . ----------------------601 ## . 00602 ## . NONE603 ## .604 ## . 01605 ## . NONE606 ## .607 ## . 02608 ## . NONE609 ## .610 ## . 03611 ## . NONE612 ## .613 ## . 04614 ## . NONE615 ## .616 ## . 05617 ## . NONE618 ## .619 ## . 06620 ## . NONE621 ## .622 ## . 07623 ## . NONE624 ## .625 ## . 08626 ## . NONE627 ## .628 ## . 09629 ## . NONE630 ## .631 ## . 10632 ## . NONE633 ## .634 ## . 11635 ## . NONE636 ## .637 ## . 12638 ## . NONE
... and so on through 799

12-30 Database Printing
13 106NONE 106A
14 107NONE 107A
15 108NONE 108A
16 109NONE 109A
17 110NONE 110A
18 ...NONE ...
19 130NONE 130A
20 ...NONE ...
21 150NONE 150A
... and so on through 99 ......
100100A 170
170A101
101A ......
102102A 190
190A103
103A ......
104104A 210
210A105
105A ... and so on through 252
Figure 12-9: ICLID Translation Tables Printout

Database Printing 12-31
Print Directory Dial Table Parameters
Programming Steps1. Press the DIRECTORY DIAL TABLE flexible button (FLASH 85,
Button #10). The following message displays:
2. To print the Directory Dialing Table parameters, press the HOLD button. The following message displays:
When the system finishes sending the requested information to the printer, a confirmation tone is heard.
DescriptionThe Print Directory Dialing Table command dumps the entire database as a permanent record which can serve as a hardcopy of the database. The system baud rate must match that of the printer or receiving device. This is an example of the Directory Dialing Table database printout.
P RIN T D IR - D IALP RE SS H OLD
P RIN TI NG D IR - D IA L

12-32 Database Printing
LST---000001002003004005006007008009010011012013014015016017018019020021022023024025026027028029030031032033034035036037038041042043044045046047048
BIN---100 101 102 103 104 105 106 107 108 109 110 111 112 113 114 115 116 117 118 119 120 121 122 123 124 125 126 127 128 129 130 131 132 133 134 135 136 137 138 141 142 143 144 145 146 147 148
NAME 049050051052053054055056057058059060061062063064065066067068069070071072073074075076077078079080081082083084085086087088089090093094095096097098099
149150151152153154155156157158159160161162163164165166167168169170171172173174175176177178179180181182183184185186187188189190193194195196197198199
Figure 12-10: Directory Dialing Table Printout

Database Printing 12-33
Print Hunt Group Parameters
Programming Steps1. Press the HUNT GROUPS flexible button (FLASH 85, Button #11).
The following message displays:
2. To print data for Hunt Group Parameters, press the HOLD button. The following message displays:
When the system finishes sending the requested information to the printer, a confirmation tone is heard.
DescriptionThe Print Hunt Group command dumps the entire database as a permanent record which can serve as a hardcopy of the database. The system baud rate must match that of the printer or receiving device.
P RIN T H U NT G R OU PP RE SS H OLD
P RIN TI NG HU N T G ROU P
HUNT GROUPS-----------HG 0..450 PILOT RING ONEHG 1..451 PILOT RING ONEHG 2..452 PILOT RING ONEHG 3..453 PILOT RING ONEHG 4..454 PILOT RING ONEHG 5..455 PILOT RING ONEHG 6..456 PILOT RING ONEHG 7..457 PILOT RING ONE
RAN HUNT GROUPS---------------HG 8..458 PILOT RING ONEHG 9..459 PILOT RING ONEHG10..460 PILOT RING ONEHG11..461 PILOT RING ONE
Figure 12-11: Hunt Group Parameters Printout

12-34 Database Printing
Print ACD / UCD Group Parameters
Programming Steps1. Press the ACD* or UCD GROUPS flexible button (FLASH 85,
Button #12). The following message displays:
2. To print data for the ACD* or UCD Group Parameters, press the HOLD button. The following message displays:
When the system finishes sending the requested information to the printer, a confirmation tone is heard. * The ACD feature is available with optional software.
DescriptionThe Print ACD/UCD Group command dumps the entire database as a permanent record which can serve as a hardcopy of the database. The system baud rate must match that of the printer or receiving device. This represents the ACD or UCD Group Parameters database printout.
Figure 12-12: ACD Group Parameters Printout
P RIN T ACD G RO UPP RE SS H OLD
P RIN TI NG ACD GR OU P
ACD IQ Thrshold Wrapup Time Overflow Timer Call Factor------------------------------------------------------------------------------------------550 0 4 60 0551 0 4 60 0552 0 4 60 0553 0 4 60 0554 0 4 60 0555 0 4 60 0556 0 4 60 0557 0 4 60 0558 0 4 60 0559 0 4 60 0560 0 4 60 0561 0 4 60 0562 0 4 60 0563 0 4 60 0564 0 4 60 0565 0 4 60 0
ACD Timers-----------------RING MIT OVER WRAP NAT NAR FRT 60 60 60 4 0 300 5
Announcement Table---------------------------------Table Type Index Time 1 # ### ### 2 # ### ### 3 # ### ### 4 # ### ### 5 # ### ### 6 # ### ### 7 # ### ### 8 # ### ###ACD SMDR Repor ting--------------------------------CO ICM EVT I/O BAUD N N N 1 9600

Database Printing 12-35
Print Voice Mail Group Parameters
Programming Steps1. Press the VOICE MAIL GROUP flexible button (FLASH 85,
Button #13). The following message displays:
2. To print data for Voice Mail Group Parameters, press the HOLD button. The following message displays:
When the system finishes sending the requested information to the printer, a confirmation tone is heard.
DescriptionThe Print Voice Mail Group command dumps the entire database as a permanent record which can serve as a hardcopy of the database. The system baud rate must match that of the printer or receiving device. When printing the VM Group Parameters, the following data prints:
Voice Mail Group Parameters
Voice Mail Outpulsing Table (including the disconnect table)
P RIN T V M GR OU PP RE SS H OLD
P RIN TI NG V M G R OU P

12-36 Database Printing
Voice Mail Options
Figure 12-13: Voice Mail Group Parameters Printout
VM ALT LEV RET STN#---------------------------440 0## 1441 ### #442 ### #443 ### #444 ### #445 ### #446 ### #447 ### # VOICE MAIL OUT TABLE--------------------TABLEIDX PREFIX SUFFIX 0 P7E 1 P7E *E 2 3 4 5 6 7 2EVOICE MAIL CO DISCONNECT SIGNAL
APPLY IN-BAND DIGITS TO CO CALLSY
ALLOW FORWARD TO VM GROUPY
VM BROKER CALL Y
Mailbox Table-------------Index Group ID 1 440 2 440 3 440 4 440 5 440 6 440 7 440 8 440 9 440 10 440 11 440 12 440 13 440 14 440 15 440 16 440 17 440 18 440 19 440 20 440 .. ... .. ... 240 440 241 440 242 440 243 440 244 440 245 440 246 440 ... ... ... ... 255 440

Database Printing 12-37
Print Verified Account Codes
Programming Steps1. Press the VERIFIED ACCT CODES flexible button (FLASH 85,
Button #15). The following message displays:
2. To print the VERIFIED ACCT CODES, press the HOLD button. The following message displays:
When the system finishes sending the requested information to the printer, a confirmation tone is heard.
DescriptionThe Print Verified Account Codes command dumps the entire database as a permanent record which can serve as a hardcopy of the database. The system baud rate must match that of the printer or receiving device.
Figure 12-14: Verified Account Codes Printout
P RIN T ACCT COD ESP RE SS H OLD
P RIN TI NG ACCT COD ES
ACCOUNT CODE TABLE 111213141516171819202122232425
##############################
262728293031323334353637383940
##############################
ENTRY-----
COS---
DGTS----
0001020304050607080910
######################
... and so on through 249

12-38 Database Printing

Index
Numerics3-Digit Area/Office Code Table (LCR)10-86-Digit Office Code Table (LCR) 10-9911 Feature 2-40911 Trunk 3-17
AAccess Codes 2-66Account Codes - Forced 2-27ACD/UCD Grp Parameters, initializing11-19Administration Access 4-16Agent Recall (ACD) 2-39Allow Table 9-9Alternate Group
Assignment (ACD) 6-5Assignment (UCD) 7-4Voice Mail 8-4
Announcement TablesACD 6-17
Announcement Tables (UCD) 7-11Attendant
Display Timer 2-19Override 2-23Recall Timer 2-6Station Assignment 2-57
Auto Callback - DSS/BLF 2-47Auto Wrap-Up Timer
ACD 6-7UCD 7-9
Automatic Call Back Timer 2-15Automatic/Manual Operation 2-71
BBackground Music 2-26Barge-In Warn Tone 2-32Baud Rate Assignments 2-62Baud Rate Display 2-70
ICLID 5-6PC/ACD 6-21
CCall Back Button 2-52Call Cost Display 2-29Call Coverage Ring Timer 2-19Call Factor 6-12Call Forward
Button 2-44Display 2-34No/Answer Timer 2-8
Call Forwarding 4-11Call Park Recall Timer 2-9Call Qualifier Tone 2-30Calling Number/Name Display 5-3Camp-On Button 2-52Character Print Assignment 2-69CIQ Threshold (ACD) 6-7Class of Service COS) 3-10CO / PBX Programming 3-5CO Direction 3-15CO Line
Group Queuing 2-81Identification Display 3-13Initializing Attributes 11-9Printing Attributes 12-7Ringing Assignments 3-12Ringing Options 4-14
ii March 2001
CO Line AttributesPage A 3-3Page B 3-18Page C 3-24
CO Line Group Programming 3-10CO Loop Pool Flex 4-16CO Parameters (Miscellaneous) 3-29CO Port Parameters
Printing 12-11CO Ring Detect Timer 2-11CO Ring Tones 2-33CO/PBX Lines (Toll Restrictions) 9-5CO/Station Port Parameters, initializ-ing 11-13Conference
Enable/Disable 4-5Conference / DISA Timer 2-9Cordless KTU Feature Button 4-36Customer Data Worksheets 1-20
DDaily Start Time Table (LCR) 10-15Database 1-20
Admin Password 2-67Initializing Parameters 11-1Upload/Download Routine 1-21
Database ParametersPrinting 12-3
Day of Week Programming 2-72Deny Table 9-11Dial Pulse Parameters 3-29DID Phone Number 3-36DID Programming 3-34Direct Transfer Mode 2-36Directory Dialing 2-72
Initializing Table Parameters 11-17Printing Table Parameters 12-31
DISA Access Code 2-66DISA CO-to-CO 3-6DISA Programming 3-9Disconnect Table (VM) 8-9Display
Flexible Buttons 4-34Ring Assignments 3-16Toll Table Entries 9-15
Do Not Disturb 4-5Button 2-53DSS/BLF 2-46
DTMF / Dial Pulse Programming 3-4DTMF On/Off Time Operation 2-21
EECOM
Downloading Database 1-30Uploading Database 1-29
Enable/Disable (ICLID) 5-5Enable/Disable (PC/ACD) 6-20Enhanced 911 2-40Erasing a DID Table Entry 3-37Exception Code Table (LCR) 10-10Exception Tables
Initializing 11-13Printing 12-12Programming 9-3
Exclusive Hold 2-50Exclusive Hold Recall Timer 2-5Executive Override 4-6
Blocking 4-13Executive Override Warning Tone 2-24Executive/Secretary Pairs 2-60External
Day Ring 2-35Night Ring 2-24

March 2001 iii
FFlash Timer 3-25Flexible Button 4-28Flexible Numbering Assignment 4-40Forced Account Codes (Toll Restric-tions) 9-5Forced Least Cost Routing (LCR) 4-11
GGroup
Listening 2-28Name (ACD) 6-4Printing Parameters (ACD/UCD)
12-34Programming (ACD) 6-3Programming (UCD) 7-3
GuaranteedMessage Timer 6-16RAN Announcement (ACD) 6-9
Guard Timer 3-27
HHold Preference 2-23Hunt Group 2-77
Initializing Parameters 11-18Printing Parameters 12-33Programming 2-76
Hyper TerminalDownloading Database 1-28Uploading Database 1-27
IICLID
(Caller ID) Route Programming 5-1Initializing Tables 11-16
Ringing Assignments 3-30Viewing Ringing Assignments 3-
32ICLID-DID
Printing Tables 12-28Idle Speaker Mode 2-28In-Band Digits (VM) 8-10In-Band Signaling (VM) 8-7Incoming
CO Line Ringing 2-43Intercom Ringing 2-44
Index Table (VM) 8-13Initialization (Default Values) 1-20Insert/Delete Table (LCR) 10-13Intercom Hold Button 2-54Inter-Digit Time-Out 2-16In-Use Hold (I-Hold) 2-51
KKeyset Mode 4-33
LLCR
Call Progress 2-37Class of Service (COS) 4-26Default Database 10-19Versus Toll Restriction 9-6
LCR Tables 10-4Initializing 11-15Printing 12-15
Least Cost Routing (LCR) 2-26, 10-1Leave Mail Index Entry (VM) 8-5Line
Queue Button 2-53Line Group Access - Station 4-26Line Queuing 4-9

iv March 2001
Local Number/Name Translation Ta-ble 2-82Long Distance/All Calls 2-69Loop Supervision Programming 3-8
MMessage
Callback - DSS/BLF 2-46Interval Timer (ACD) 6-14Interval Timer (UCD) 7-8Wait / VM Button 2-45Wait Reminder Tone 2-12
Modem Answer Timer 2-20MOH Assignments 2-56Music-On-Hold 2-29, 3-22
NName Assigned to DID Number 3-36Name in Display (ICLID) 5-6Name/Number Display at Idle 4-14Networking Tables 2-63No-Answer Recall Timer
ACD 6-15UCD 7-10
No-Answer Retry TimerACD 6-15UCD 7-10
OOff-Hook Preference 4-27Off-Hook Voice Over (OHVO) 4-10On-Board Relay Programming 2-61One-Touch Recording Warning Tone2-38Outpulsing Table (VM) 8-7Overflow Station Assignment
ACD 6-5UCD 7-4
Overflow Station Forward 2-35Overflow Timer
ACD 6-12UCD 7-9
PPage Warning Tone 2-25Paging
Access 4-4Time-Out Timer 2-10Zones 4-25
Pause Timer 2-8PBX Dialing Codes 2-59PC/ACD Interface Trace 6-20Pickup Group(s) 4-24Pilot Hunting Assignment 2-78Pilot Ring All - Hunting Assignment 2-78Port #1, #2, #3 Baud Rates 2-62Port Assignment (ICLID) 5-7Preferred Line Answer 4-9Preset Call Forward 4-38Preset Call Forward Destination 3-20Preset Forward Timer 2-7, 3-28Primary Agent Assignments
ACD 6-8UCD 7-5
Primary RANAnnouncement (ACD) 6-10Assignments (UCD) 7-6
Privacy 3-7, 4-7Program Mode 1-19Programmable Flash Rates 2-42Pulse Dial Inter-Digit Timer 2-20

March 2001 v
QQueued CO Ringing 2-49
RRecall CO Ringing 2-49Reminder Ring Timer 2-15Repeat Redial Timer 2-18Reseize Timer 3-27Retrieve Mail Index Entry (VM) 8-6Ring Delay Timer 3-26Ring Timer UCD 7-7Ring Tone (per CO Line) 3-23Ringback on Transfer 2-39Route List Table (LCR) 10-10
SSecondary Agents (ACD) 6-9Secondary RAN Announcement
ACD 6-11UCD 7-6
SLTDTMF Receiver Timer 2-11Hook Flash Timer 2-13
SLT DTMF Receivers (Toll Restrictions)9-6SMDR
Call Qualification Timer 2-14Enable/Disable 2-68Port Assignments 2-70
Speakerphone/Headset 4-24Special Table 9-13Station
Attributes - Printing 12-9Day Class of Service (COS) 4-21Hunting Assignment 2-78ID Lock 2-37
Identification 4-18Night Class of Service (COS) 4-23Voice Mail Assignments 8-6
Station AttributesInitializing 11-10Page A 4-3Page B 4-17Page C 4-36
Station IDDSS/DLS Console W/Map 4-19
Station Message Detail Recording 2-67Supervisor (ACD) 6-6Supervisor Monitor with Barge-In(ACD) 4-12System
Additional Timers 2-17Hold 2-50Hold Recall Timer 2-4Initializing Speed Nbr Database
11-14Parameters 2-55Printing Entire Database 12-27Printing Speed Number Database
12-14Speed Dial Access 4-8Time and Date 2-58Timers 2-3
System ParametersInitializing 11-4Printing 12-4
System Reset 11-23
TTimers
ACD 6-13, 6-14

vi March 2001
UCD 7-7Toll Information (LCR Routing) 10-18Toll Restriction (Related Items) 9-5Toll Table - Entering 9-7Trace Port Assignment (PC/ACD) 6-21Transfer
CO Ringing 2-48Recall Timer 2-6
Transfer/Forward (VM) 8-11Transferred RAN (ACD) 6-11Transmit Volume 3-19Traveling Class of Service 2-79
UUCD Avail/Unavail - DSS/BLF 2-47Universal Night Answer (UNA) 3-5
VVerified Account Codes 2-34, 2-79
Initializing Table 11-22Printing Database 12-37
VMID Station Numbers 2-41Voice Mail
Broker 8-12Initializing Group Parameters 11-
21Printing Group Parameters 12-35Programming 8-3
Voice Mail IDTranslation 4-33
Voice Mail ID Digit Length 8-12
WWeekly Night Mode Schedule 2-71Weekly Schedule Table (LCR) 10-16
ZZap Tone 4-15

www.vodavi.com
©2000 Vodavi Technology, Inc.VODAVI is a registered trademark of Vodavi Technology, Inc. 5050-13
we’re talking technology