facility inspection installation guide
TRANSCRIPT

FFaacciilliittyy IInnssppeeccttiioonn TTrraacckkiinngg SSyysstteemm
Installation Guide
Page 1 of 18
Introduction
The Facility Inspection Tracking System (FITS) allows building inspectors to record observations made after a detailed visual inspection of room types such as classrooms, the room types' features such as walls, and the features' dimensions such as cleanliness. During the inspection process, inspectors can also use FITS to attach pictures of severe defects to their corresponding features. Inspectors will use FITS on a Tablet PC and will use the digital camera Canon PowerShot S410 Digital Elph to take the pictures. The FITS administrator will use FITS on a desktop PC to support the inspectors.
This document describes 5 procedures that you need to complete in order for inspectors and the FITS
Administrator to be able to use FITS.
After you have completed all 5 procedures, notify the FITS programmer so that the initial user
configuration can be set up.
The procedures are as follows:
1. Install MSDE.
2. Configure distributed transactions.
3. Install the local database.
4. Install FITS.
5. Set up the digital camera.
System Requirements
In order to install and run FITS, the following must be installed on the Tablet or desktop PC:
• One of the following:
� Windows XP Tablet PC Edition 2003 or higher for a Tablet PC installation
� Windows XP Professional Service Pack 2 for a desktop PC installation
• .NET Framework 1.1
• Microsoft SQL Server Desktop Engine
• Software for the Canon PowerShot S410 Digital Elph camera:
� digital camera software configured with the correct auto-download setting
� drivers

Facility Inspection Tracking System Installation Guide
Page 2 of 18
Prerequisites
In order for an Inspector to be able to use FITS, the following prerequisites must be met:
• The user must be set up as an Administrator.
• The user must have read and write access to this folder:
\\44vsstats\School_Stats_Photographs.
Part 1: Installing MSDE
1. At the command prompt, change the directory to the location in which MSDE resides: D: \MSDERela>
2. Type the following with admin password and press Enter:
D:\MSDERela> setup SAPWD=”password”
This will start installing MSDE. Once you get back to another command prompt, the
installation is complete.
You can confirm by going to:
Start > Settings > Control Panel > Add/Remove Programs and looking for “Microsoft SQL
Server Desktop Engine”.
3. Set login mode to SQL Server to “Mixed” by doing the following:
Go to: Start > Run, type regedt32, press Enter, and go to:
HKEY_LOCAL_MACHINE>SOFTWARE>MICROSOFT>MSSQL
SERVER.>MSSQLSERVER
On the right hand pane look for LoginMode and double-tap or double click on it. Change
the value to 2.

Facility Inspection Tracking System Installation Guide
Page 3 of 18
4. Click Start > Run, type svrnetcn, and press Enter. You will see the following screen.
Enable TCP\IP. Tap or click OK.
5. Click Start > Run, type cliconfg, and press Enter. You will see the following screen.

Facility Inspection Tracking System Installation Guide
Page 4 of 18
6. Add Alias for MTSQLVS06\MTSQLINS06 with TCP\IP selected and dynamic port
Unchecked with port 3975. Tap or click OK, and OK again on the previous screen. You
can add other aliases if needed with appropriate ports.
7. Restart the services MSSQLSERVER and SQLSERVERAGENT. Make sure they are set
to automatic.

Facility Inspection Tracking System Installation Guide
Page 5 of 18
Part 2: Configuring Distributed Transactions
1. Make sure that the Log On As account for the MSDTC service is the Network Service
account. To do this, follow these steps:
a. Click or tap Start > Run.
b. In the Run dialog box, type Services.msc, and then tap or click OK.
c. In the Services window, locate the Distributed Transaction Coordinator service
under Name in the right pane.
d. Under the Log On As column, see whether the Log On As account is Network
Service or Local System.
*Before you sign off, make sure the Distributed Transaction Coordinator service is
started and set to automatic*.
If the Log On As account is Network Service, go to step 2. If the Log On As
account is Local System, complete steps e-m below.
e. Tap or click Start > Run.
f. In the Run dialog box, type cmd, and then click OK.
g. At the command prompt, type Net stop msdtc to stop the MSDTC service.
h. At the command prompt, type Msdtc –uninstall to remove MSDTC.
i. At the command prompt, type regedit to open Registry Editor.
j. In Registry Editor, locate, and then delete the following subkey:
HKEY_LOCAL_MACHINE\SOFTWARE\Microsoft\MSDTC.
k. Close Registry Editor.
l. At the command prompt, type Msdtc –install to install MSDTC.
m. At the command prompt, type Net start msdtc to start the MSDTC service.
Note: The Log On As account for the MSDTC service is set to the Network
Service account.
2. To allow the network transaction, you must enable MSDTC. To do this, follow these steps:
a. Tap or click Start > Run.
b. In the Run dialog box, type dcomcnfg.exe, and then click OK.
c. In the Component Services window, expand Component Services, expand
Computers, and then expand My Computer.
d. Select My Computer.
e. Select Action > Properties.
f. In the My Computer Properties dialog box, tap or click Security Configuration on
the MSDTC tab.

Facility Inspection Tracking System Installation Guide
Page 6 of 18
g. In the Security Configuration dialog box, select the Network DTC Access check box.
h. To allow the distributed transaction to run on this computer from a remote computer, click to select the Allow Inbound check box.
i. To allow the distributed transaction to run on a remote computer from this computer, select the Allow Outbound check box.
j. Under the Transaction Manager Communication group, select No Authentication
Required.
k. In the Security Configuration dialog box, tap or click OK.
l. In the My Computer Properties dialog box, tap or click OK.
3. Add a registry key to the client machine to give the server enough time to send the Bind
packet:
a. Launch the Registry Editor.
b. Navigate to: HKEY_LOCAL_MACHINE\Software\Microsoft\MSDTC.
c. Add this new DWORD value: CmMaxNumberBindRetries.
d. Right-click on the DWORD name.
e. Click Modify.

Facility Inspection Tracking System Installation Guide
Page 7 of 18
f. Under Base, choose Decimal.
g. In the Value Data box, enter 60.
h. Click OK.
i. Close the Registry Editor.

Facility Inspection Tracking System Installation Guide
Page 8 of 18
Part 3: Installing the Local Database
Please note: The installation of the database assumes that the physical location of the database will be
in: C:\Program Files\Microsoft SQL Server\MSSQL\Data.
1. Go to: \\3300optwebdev01\psal dev area\FacilityInspectionApp.
2. Launch FacilityInspectionPRODUCTION.sql.
3. When the File Download dialog appears, tap or click Save.
4. Save the FacilityInspectionPRODUCTION file on the Desktop.
5. Execute FacilityInspectionPRODUCTION.sql in the local PC’s MSDE master database.
6. Delete the SQL script file from the desktop.
Facility Inspection Tracking System Installation Guide
Page 9 of 18
Part 4: Installing FITS
Before installing FITS, verify that the following processes are running:
• SQL Server Agent
• Distributed Transaction Coordinator
To install FITS:
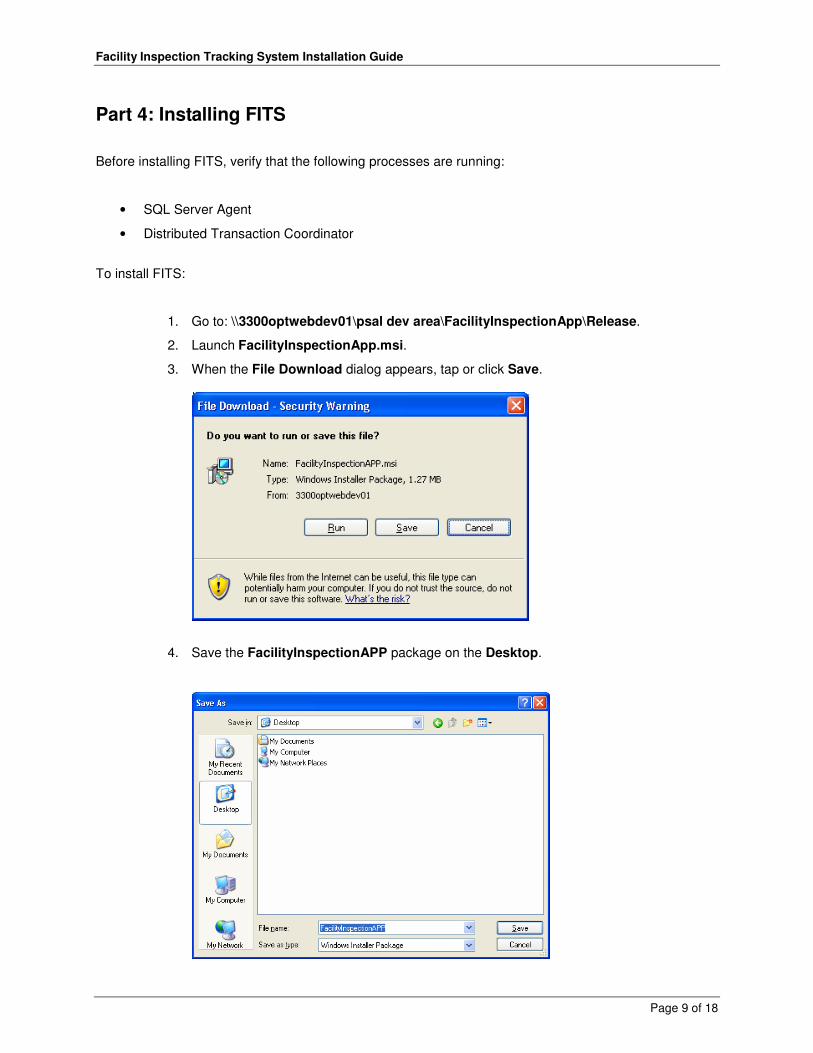
1. Go to: \\3300optwebdev01\psal dev area\FacilityInspectionApp\Release.
2. Launch FacilityInspectionApp.msi.
3. When the File Download dialog appears, tap or click Save.
4. Save the FacilityInspectionAPP package on the Desktop.

Facility Inspection Tracking System Installation Guide
Page 10 of 18
5. Tap or click Close.
6. On the Desktop, double-tap or double-click on the FacilityInspectionAPP icon.
7. When the first dialog in the Setup Wizard appears, tap or click Next.

Facility Inspection Tracking System Installation Guide
Page 11 of 18
8. The Folder path should be set to C:\FacilityInspectionApp.
9. Under Install FacilityInspectionMSI for yourself, or for anyone who uses this
computer:, select Everyone.
10. Tap or click Next.
11. In the Confirm Installation dialog, tap or click Next.

Facility Inspection Tracking System Installation Guide
Page 12 of 18
12. FITS will be installed.
13. After FITS has been installed, this message will appear: “FacilityInspectionApp has been
successfully installed.”
14. Tap or click Close to exit the wizard.

Facility Inspection Tracking System Installation Guide
Page 13 of 18
15. The FacilityInspection application shortcut will appear on the desktop.
16. Delete the FacilityInspectionAPP package icon from the desktop.

Facility Inspection Tracking System Installation Guide
Page 14 of 18
Part 5: Setting up the Digital Camera
In order for inspectors to be able to attach pictures of defects to their inspection observations, the
following must occur:
1. The digital camera software must be installed on the Tablet or desktop PC using the
Digital Camera solution disk that accompanies the Canon PowerShot S410 Digital Elph
camera.
2. The drivers for the digital camera must be installed.
3. The auto-download setting for the camera must be configured.
Installing the Digital Camera Software
1. Go to: \\3300optwebdev01\psal dev area\
FacilityInspectionApp\Canon\SOFTWARE\ZOOMBRSR\ENGLISH.
2. Launch SETUP.EXE.
3. Follow the prompts to install the software.
After the software has been installed, the ZoomBrowserEX icon will appear on the
desktop as shown below. ZoomBrowser EX is the application that will allow users to
download pictures from the camera to the Tablet or desktop PC.
Installing the Digital Camera Drivers
1. Connect the camera to the Tablet or desktop PC using the interface cable IFC-400PCU.
2. When Windows detects the camera, the drivers will be installed automatically.

Facility Inspection Tracking System Installation Guide
Page 15 of 18
Configuring the Auto-download Setting
To specify that pictures should be automatically downloaded to the Tablet or desktop PC and to
specify the folder in which to save pictures, do the following:
1. Double-tap or double-click on the ZoomBrowserEX icon on the desktop.
2. In the ZoomBrowser EX window, select Camera > Auto-download setting.

Facility Inspection Tracking System Installation Guide
Page 16 of 18
3. Select Images are automatically downloaded to computer while camera is
connected.
4. Uncheck Display confirm message before downloading.
5. Tap or click Next.
6. Select New Images.
7. Tap or click Next.
Facility Inspection Tracking System Installation Guide
Page 17 of 18
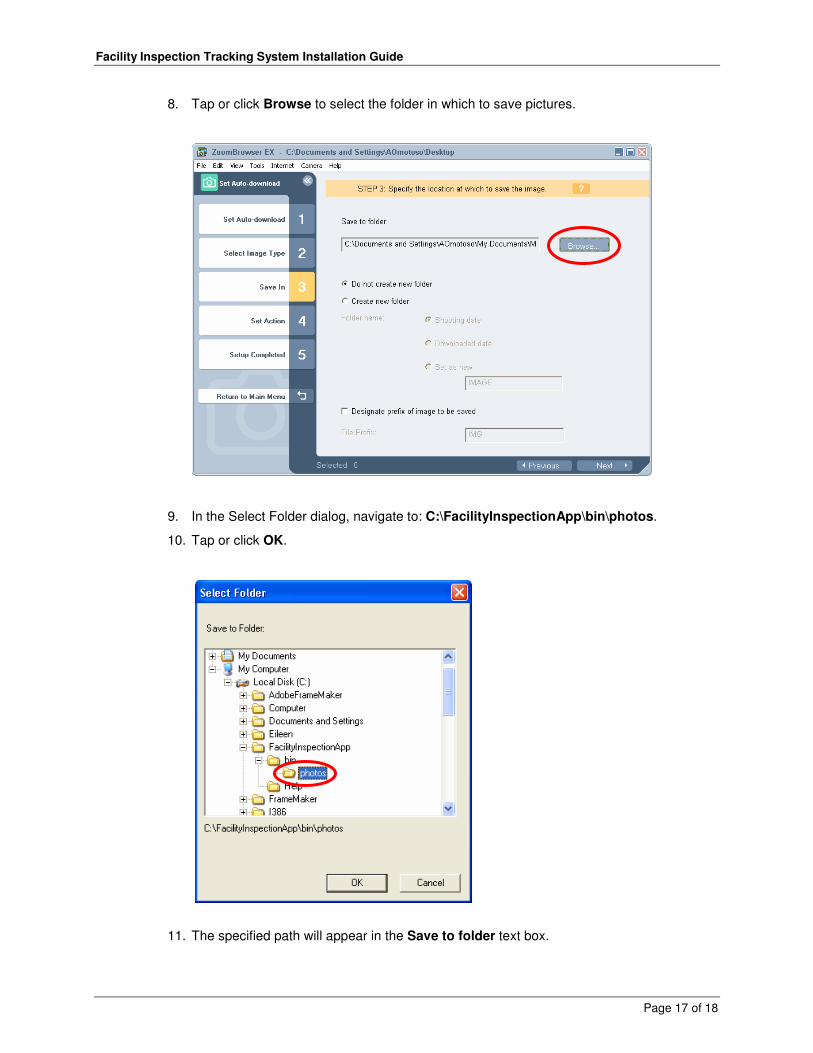
8. Tap or click Browse to select the folder in which to save pictures.
9. In the Select Folder dialog, navigate to: C:\FacilityInspectionApp\bin\photos.
10. Tap or click OK.
11. The specified path will appear in the Save to folder text box.
Facility Inspection Tracking System Installation Guide
Page 18 of 18
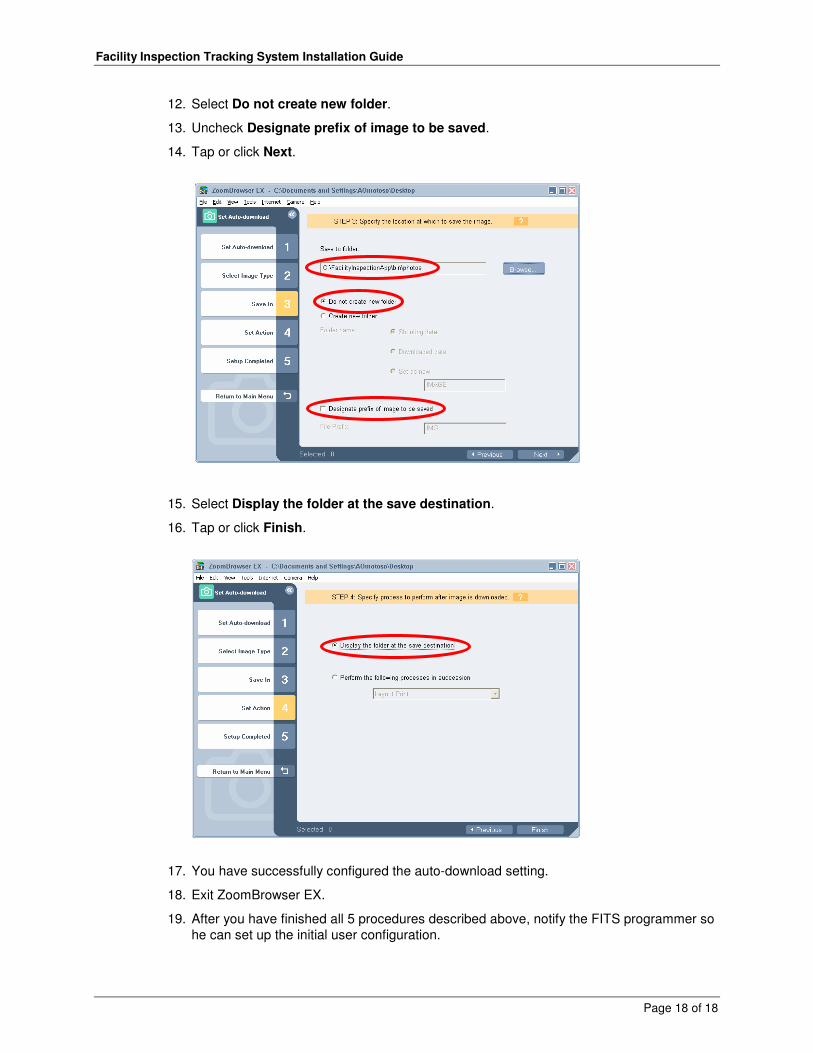
12. Select Do not create new folder.
13. Uncheck Designate prefix of image to be saved.
14. Tap or click Next.
15. Select Display the folder at the save destination.
16. Tap or click Finish.
17. You have successfully configured the auto-download setting.
18. Exit ZoomBrowser EX.
19. After you have finished all 5 procedures described above, notify the FITS programmer so
he can set up the initial user configuration.