faa san diego icm setup - greatknight.comgreatknight.com/wp-content/uploads/2017/09/faasdicm.pdffaa...
TRANSCRIPT
FAA SAN DIEGO Cisco Intelligent Contact
Management (ICM) Setup
Prepared For: FAA San Diego
Prepared By:
AT&T
Version 1.1 September 9th, 2008

AT&T Consulting Services
September 9, 2008 ▪ Version 1.0 • ii
This document and the information it contains is for FAA San Diego’s use only and is not for resale and/or revenue generation purposes to third parties.
Sign-Off Sheet I certify agreement that this specification meets all requirements for the stated portion of the FAA San Diego Call Center upgrade project.
Any changes to this specification must be agreed to in writing by all parties prior to any action being taken on such changes.
_____________________________________________ _____________________
FAA San Diego IT [Rick Smith] Date
_____________________________________________ _____________________
AT&T Consulting [Steve Smith] Date

AT&T Consulting Services
September 9, 2008 ▪ Version 1.0 • iii
This document and the information it contains is for FAA San Diego’s use only and is not for resale and/or revenue generation purposes to third parties.
Modification History
AUTHOR VERSION DATE COMMENTS
Jason Israel 1.0 09/07/2008 Created document

AT&T Consulting Services
September 9, 2008 ▪ Version 1.0 Executive Summary • iv
This document and the information it contains is for FAA San Diego’s use only and is not for resale and/or revenue generation purposes to third parties.
Table of Contents EXECUTIVE SUMMARY............................................................................................................ 1
REQUIREMENTS .....................................................................................................................2
THE PRINCIPAL ICM COMPONENTS .....................................................................................3
CISCO SERVER SPECIFICATIONS.............................................................................................4
INSTALLING CISCO ICM (ROUTER).......................................................................................5
INSTALLING CISCO ICM (LOGGER)..................................................................................... 25
INSTALLING CISCO ICM (CTI SERVER) .............................................................................. 45
INSTALLING CISCO ICM (ADMIN WORKSTATION).............................................................. 52
INSTALLING CISCO ICM (PERIPHERAL GATEWAY)............................................................. 58
NETWORK CARD SETTINGS.........................................................................................................69
SNMP MANAGEMENT .................................................................................................................70
INSTALLING THE WINDOWS FIREWALL.....................................................................................72
REMOTE MONITORING SYSTEM REQUIREMENTS ....................................................................73
ROUTING AND REMOTE ACCESS CONFIGURATION.................................................................73
AUTOMATIC UPDATES..................................................................................................................74
EVENT VIEWER CONFIGURATION .............................................................................................75
REMOTE CONTROL OPTIONS......................................................................................................75
CONNECTIVITY VALIDATION......................................................................................................75

AT&T Consulting Services
September 9, 2008 ▪ Version 1.0 Executive Summary • 1
This document and the information it contains is for FAA San Diego’s use only and is not for resale and/or revenue generation purposes to third parties.
Executive Summary The purpose of this document is to provide a guideline for the setup of The Cisco Intelligent Contact Management (ICM) software. This guide will address the areas of setup based on best practices provided from Cisco Systems with any modifications required for equipment deployment in the FAA SAN DIEGOenvironment.
The Cisco ICM software is a distributed software application that routes toll-free calls, Web enquiries, and e-mail across geographically distributed contact centers. A typical ICM system includes a number of computers located at different sites.
Some preinstallation planning is necessary to ensure successful installation of the ICM software.
This installation documentation includes information on topics such as provisioning IXC access, preparing ACDs, and determining the ICM datacom requirements.
This guide has been designed to be usable by either an experienced IT engineer or one with less experience in the area of software setup. This document was designed to help the engineer through the many choices offered during setup to achieve a designated configuration for Cisco ICM/IPCC environment on a Windows Server 2003 operating system.

AT&T Consulting Services
September 9, 2008 ▪ Version 1.0 Requirements • 2
This document and the information it contains is for FAA San Diego’s use only and is not for resale and/or revenue generation purposes to third parties.
Requirements
1. Hardware Planning and Staging
a. See Server Specifications below
2. Windows Planning and Staging
a. Understanding and planning for a supported Windows model is a critical task during the planning phase of an ICM software deployment.
b. During this phase, you must document the specifications of the ICM system and then you must accept them before starting to stage a new system. This System Design Specification must include a detailed description and diagrams of the Windows Model for Active Directory and
c. You will need to install Microsoft SQL 2000 SP4 on the server running the Logging function of ICM.
i. You will need to set up Microsoft SQL to do its sorting in Binary mode; this setup will require rebuilding the Master database that you have installed with Microsoft SQL. The rebuild utility comes with the application.
ii. You will need enough licenses to support the requirements you have for this install.
iii. You will need the storage to support the data that is generated by this system; all these items are dependent on the size of the call center you are putting in.
d. The setup of SNMP will also need to be addressed for connectivity between systems.
For additional information on the planning of your environment, please download the Cisco ICM staging document. That document, which was the basis for this document, will be valuable during your design phase of this installation.

AT&T Consulting Services
September 9, 2008 ▪ Version 1.0 The Principal ICM components • 3
This document and the information it contains is for FAA San Diego’s use only and is not for resale and/or revenue generation purposes to third parties.
The Principal ICM components
1. CallRouter. The component of the Central Controller that makes routing decisions and both gathers and distributes data from remote sites; generally referred to in this document simply as the Router. (Central Controller is the term used when discussing a CallRouter/Logger configuration.)
2. Logger. The component of the Central Controller that controls the central database.
3. Admin Workstation. The human interface to ICM software. An Admin Workstation (AW) can be located at any central or remote site. The AW allows users to monitor call handling within the system and make changes to configuration data or routing scripts.
4. Network Interface Controller (NIC). The interface between the ICM platform and the Interexchange Carrier signaling network.
5. Peripheral Gateway (PG). The interface between the ICM platform and third-party hardware in each contact center, such as an ACD. A PG is typically located at the contact center.
6. CTI Server. The (optional) component that allows an external CTI application to communicate with a Peripheral Gateway.
7. WebView. The (optional) component that provides Web-based contact center reporting. The ICM Software CD contains the software for all of these components. You can install any component from the ICM Setup program.

AT&T Consulting Services
September 9, 2008 ▪ Version 1.0 Cisco Server Specifications • 4
This document and the information it contains is for FAA San Diego’s use only and is not for resale and/or revenue generation purposes to third parties.
Cisco Server Specifications This section has been based on the Cisco® MCS 7845-I2 (IBM) Media Convergence Server, which is a high-availability server platform for Cisco Unified Communications solutions.
• Two Intel 5140 Xeon 2.33-GHz processors, a 1333-MHz front side bus (FSB), and 4 MB of Level 2 cache
• 4-GB ultra-fast fully buffered 667-MHz PC2-5300 double-data-rate 2 (DDR2) Error Checking and Correcting (ECC) memory with Chipkill protection (Must be installed in pairs)
• IBM ServeRAID 8k Redundant Array of Independent Disks (RAID) Controller with 256-MB memory and battery-backed caching
• Dual-port Gigabit Ethernet controller (embedded)
• Quick-deployment third-party rail kit
• Support for up to eight small form-factor hot-plug hard drives
• Hot-plug redundant power supplies
• Hot-plug redundant fans
• IBM LightPath Diagnostics to assist in identifying failed components
• IBM Slimline Remote Supervisor Adaptor II (RSA II)
• The adapter continuously monitors system environmental elements (temperatures and voltages); operating system status; and critical system components such as processors, voltage regulator modules (VRMs), memory, fans, power supplies, and power backplanes (where supported by the system).
• Video compression hardware is built in, eliminating drivers.
• Faster graphics support makes monitoring and control more efficient.
• RSA II SlimLine supports Secure Sockets Layer (SSL) and Lightweight Directory Access Protocol (LDAP).
• The adapter is integrated with IBM Director and Director Agent.
• Built-in LAN and serial connectivity supports virtually any network infrastructure.
• Multiple alerting functions warn systems administrators of potential problems via e-mail, pager support, LAN, or Simple Network Management Protocol (SNMP).
• The adapter installs on the system planar using a dedicated connector, eliminating the need to use a PCI-X slot.
• The RSA II SlimLine features are similar to the RSA II with the exception of the following features:
o The reset button is not accessible from the back of the system.
o A mini-USB cable is no longer required; the device uses an internal USB bus. The system has a designated systems management Ethernet port, activated only when RSA II SlimLine is installed.
o An external AC adapter is not required (the device uses standby power from system power supplies).
o Status LEDs are not externally viewable.
o The RSA II SlimLine no longer supports the prior RSA II interconnect function.

AT&T Consulting Services
September 9, 2008 ▪ Version 1.0 Installing Cisco ICM (Router) • 5
This document and the information it contains is for FAA San Diego’s use only and is not for resale and/or revenue generation purposes to third parties.
Installing Cisco ICM (Router) 1. After the system has been prepared with Windows 2003 R2 Server, put in the CD
marked Cisco ICM Enterprise 7.0.
2.
a. The auto-start of the CD produces this splash screen.
3.
a. You must make sure you have or will do the correct SNMP & WMI
installation and setup so you can finish installing the Cisco ICM software.
Please refer to the SNMP & WMI section of this document or access the
ICM/IPCC Staging Document from Cisco.
AT&T Consulting Services
September 9, 2008 ▪ Version 1.0 Installing Cisco ICM (Router) • 6
This document and the information it contains is for FAA San Diego’s use only and is not for resale and/or revenue generation purposes to third parties.
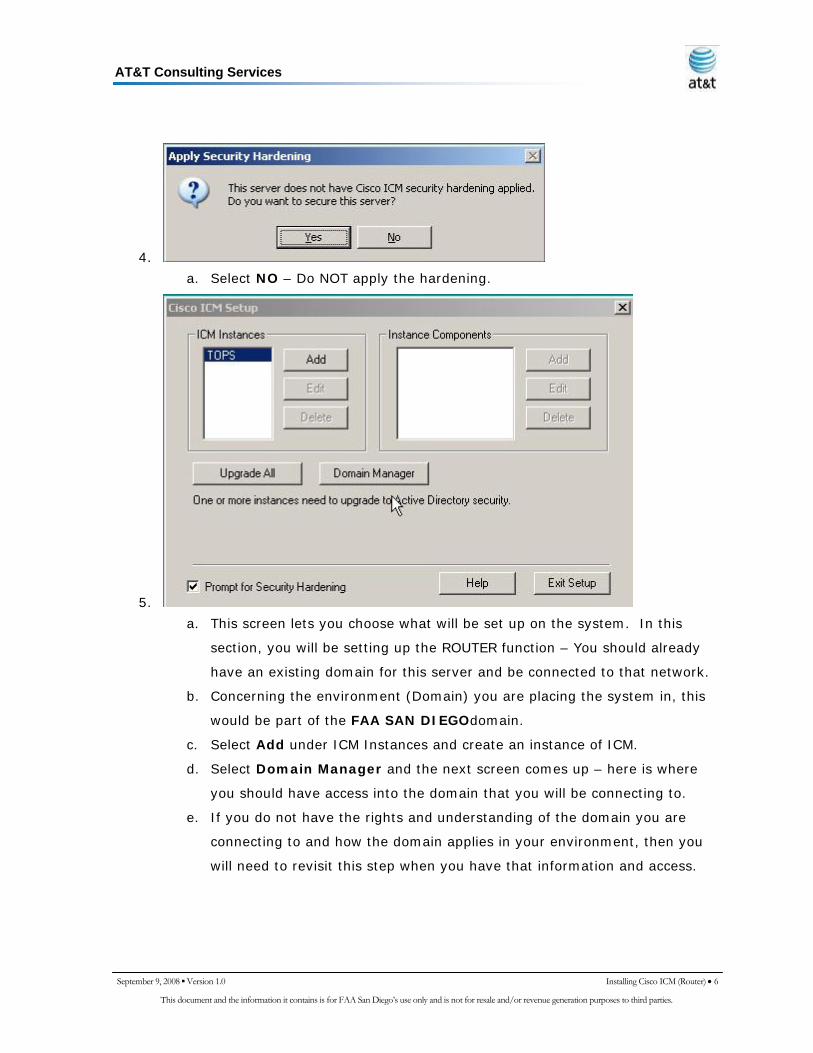
4.
a. Select NO – Do NOT apply the hardening.
5.
a. This screen lets you choose what will be set up on the system. In this
section, you will be setting up the ROUTER function – You should already
have an existing domain for this server and be connected to that network.
b. Concerning the environment (Domain) you are placing the system in, this
would be part of the FAA SAN DIEGOdomain.
c. Select Add under ICM Instances and create an instance of ICM.
d. Select Domain Manager and the next screen comes up – here is where
you should have access into the domain that you will be connecting to.
e. If you do not have the rights and understanding of the domain you are
connecting to and how the domain applies in your environment, then you
will need to revisit this step when you have that information and access.

AT&T Consulting Services
September 9, 2008 ▪ Version 1.0 Installing Cisco ICM (Router) • 7
This document and the information it contains is for FAA San Diego’s use only and is not for resale and/or revenue generation purposes to third parties.
6.
a. This example was installed on a server that was a DC with a test domain of
TOPSRCK.COM.
b. Click the Select button under the domains section to start.

AT&T Consulting Services
September 9, 2008 ▪ Version 1.0 Installing Cisco ICM (Router) • 8
This document and the information it contains is for FAA San Diego’s use only and is not for resale and/or revenue generation purposes to third parties.
7.
a. You should already have a domain selected – Click OK.

AT&T Consulting Services
September 9, 2008 ▪ Version 1.0 Installing Cisco ICM (Router) • 9
This document and the information it contains is for FAA San Diego’s use only and is not for resale and/or revenue generation purposes to third parties.
8.
a. You get the error shown if your domain is not in the Windows 2003
functional level (Native).
b. Now you can select Add to add the CISCO ROOT button to your new or
existing domain.
AT&T Consulting Services
September 9, 2008 ▪ Version 1.0 Installing Cisco ICM (Router) • 10
This document and the information it contains is for FAA San Diego’s use only and is not for resale and/or revenue generation purposes to third parties.
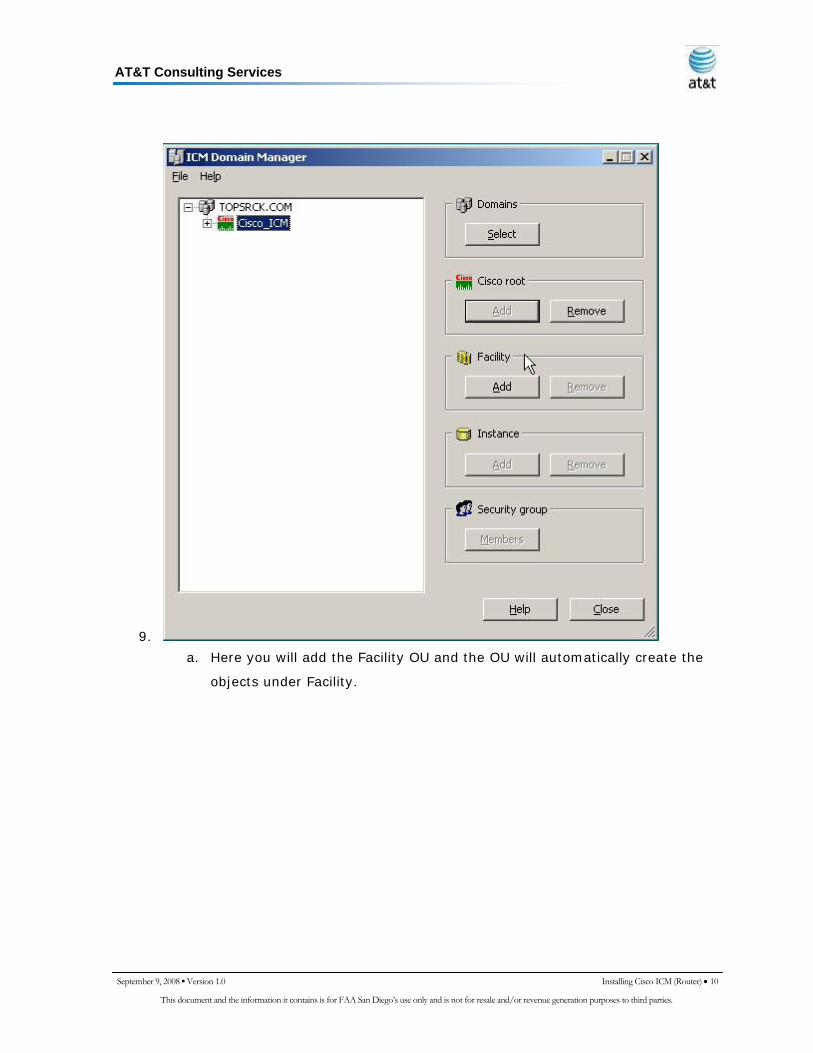
9.
a. Here you will add the Facility OU and the OU will automatically create the
objects under Facility.

AT&T Consulting Services
September 9, 2008 ▪ Version 1.0 Installing Cisco ICM (Router) • 11
This document and the information it contains is for FAA San Diego’s use only and is not for resale and/or revenue generation purposes to third parties.
10.
a. Now you can add the Instance OU.

AT&T Consulting Services
September 9, 2008 ▪ Version 1.0 Installing Cisco ICM (Router) • 12
This document and the information it contains is for FAA San Diego’s use only and is not for resale and/or revenue generation purposes to third parties.
11.
a. Select the Domain with the Cisco Root and Facility, then select OK.

AT&T Consulting Services
September 9, 2008 ▪ Version 1.0 Installing Cisco ICM (Router) • 13
This document and the information it contains is for FAA San Diego’s use only and is not for resale and/or revenue generation purposes to third parties.
12.
a. Now that all the OUs are created, you can start adding the Members to the
Security group(s) for each object.

AT&T Consulting Services
September 9, 2008 ▪ Version 1.0 Installing Cisco ICM (Router) • 14
This document and the information it contains is for FAA San Diego’s use only and is not for resale and/or revenue generation purposes to third parties.
13.
a. Here is where you will start assigning users to the Security Groups.
b. This same task will be repeated for the Config, Setup, and WebView object
in each OU to add DomainAdmin or other designated User to each object.
14. While assigning the DomainAdmin, if you have a listing of the users who will
participate in the different ICM functions, you could add those users as well at this
point; however, you can do this step at a later time.

AT&T Consulting Services
September 9, 2008 ▪ Version 1.0 Installing Cisco ICM (Router) • 15
This document and the information it contains is for FAA San Diego’s use only and is not for resale and/or revenue generation purposes to third parties.
15.
a. Select Add and you will go to the Search Screen.

AT&T Consulting Services
September 9, 2008 ▪ Version 1.0 Installing Cisco ICM (Router) • 16
This document and the information it contains is for FAA San Diego’s use only and is not for resale and/or revenue generation purposes to third parties.
16.
a. In this setup, we are only selecting Administrator as an example.
b. When all users have been added, you can close the ICM Domain Manager
for the next steps.
AT&T Consulting Services
September 9, 2008 ▪ Version 1.0 Installing Cisco ICM (Router) • 17
This document and the information it contains is for FAA San Diego’s use only and is not for resale and/or revenue generation purposes to third parties.
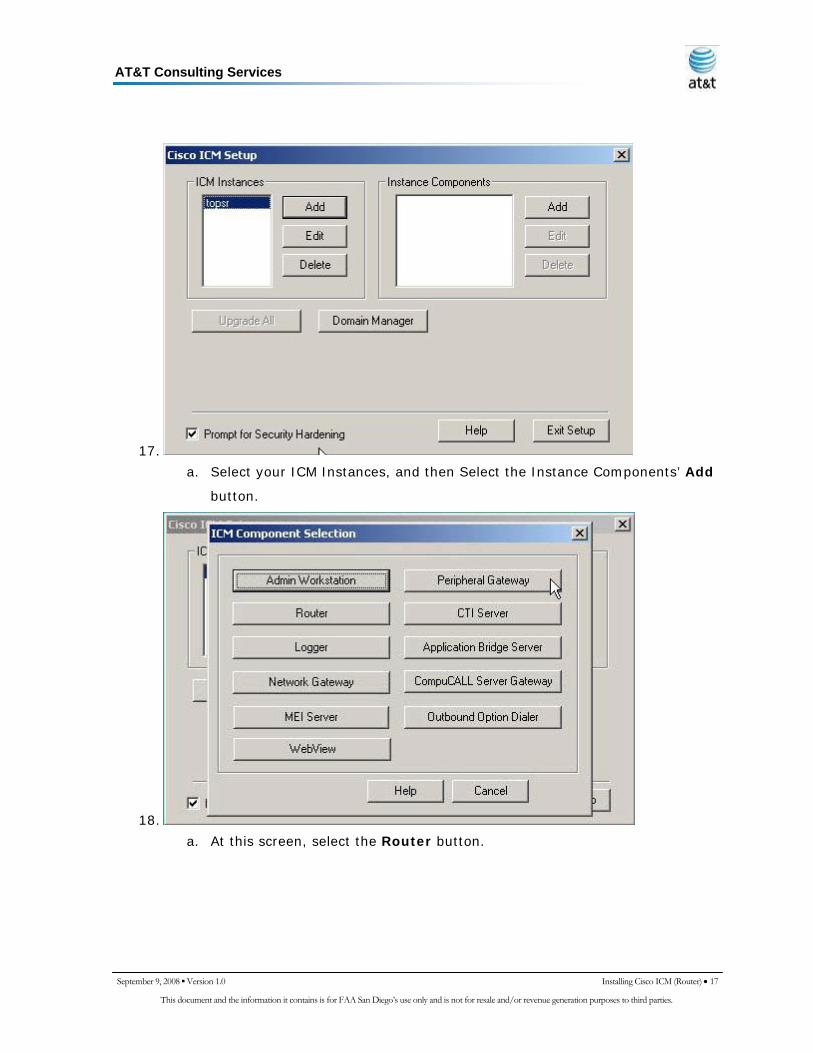
17.
a. Select your ICM Instances, and then Select the Instance Components’ Add
button.
18.
a. At this screen, select the Router button.

AT&T Consulting Services
September 9, 2008 ▪ Version 1.0 Installing Cisco ICM (Router) • 18
This document and the information it contains is for FAA San Diego’s use only and is not for resale and/or revenue generation purposes to third parties.
19.
a. Under Router Properties, you should have these defaults.
i. Production Mode
ii. Auto Start at System Startup
iii. Duplexed Router

AT&T Consulting Services
September 9, 2008 ▪ Version 1.0 Installing Cisco ICM (Router) • 19
This document and the information it contains is for FAA San Diego’s use only and is not for resale and/or revenue generation purposes to third parties.
20.
a. Keep the defaults and select Next unless you have a known Network
Interface.
AT&T Consulting Services
September 9, 2008 ▪ Version 1.0 Installing Cisco ICM (Router) • 20
This document and the information it contains is for FAA San Diego’s use only and is not for resale and/or revenue generation purposes to third parties.
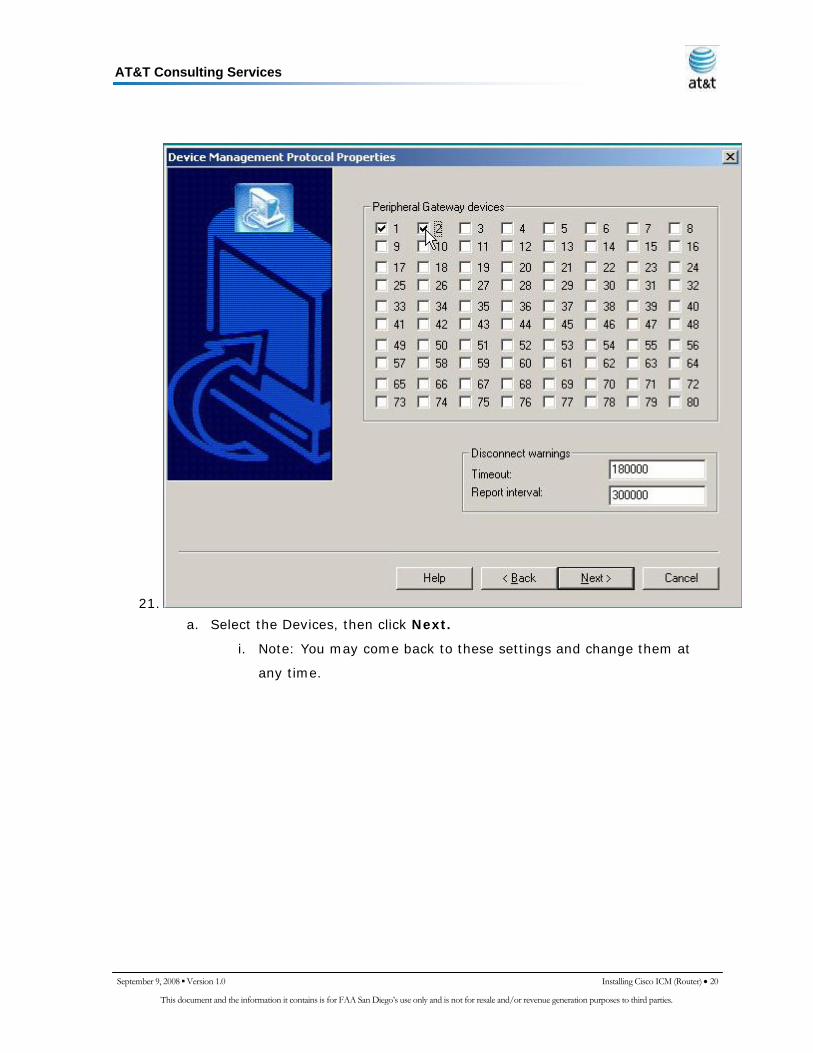
21.
a. Select the Devices, then click Next.
i. Note: You may come back to these settings and change them at
any time.
AT&T Consulting Services
September 9, 2008 ▪ Version 1.0 Installing Cisco ICM (Router) • 21
This document and the information it contains is for FAA San Diego’s use only and is not for resale and/or revenue generation purposes to third parties.
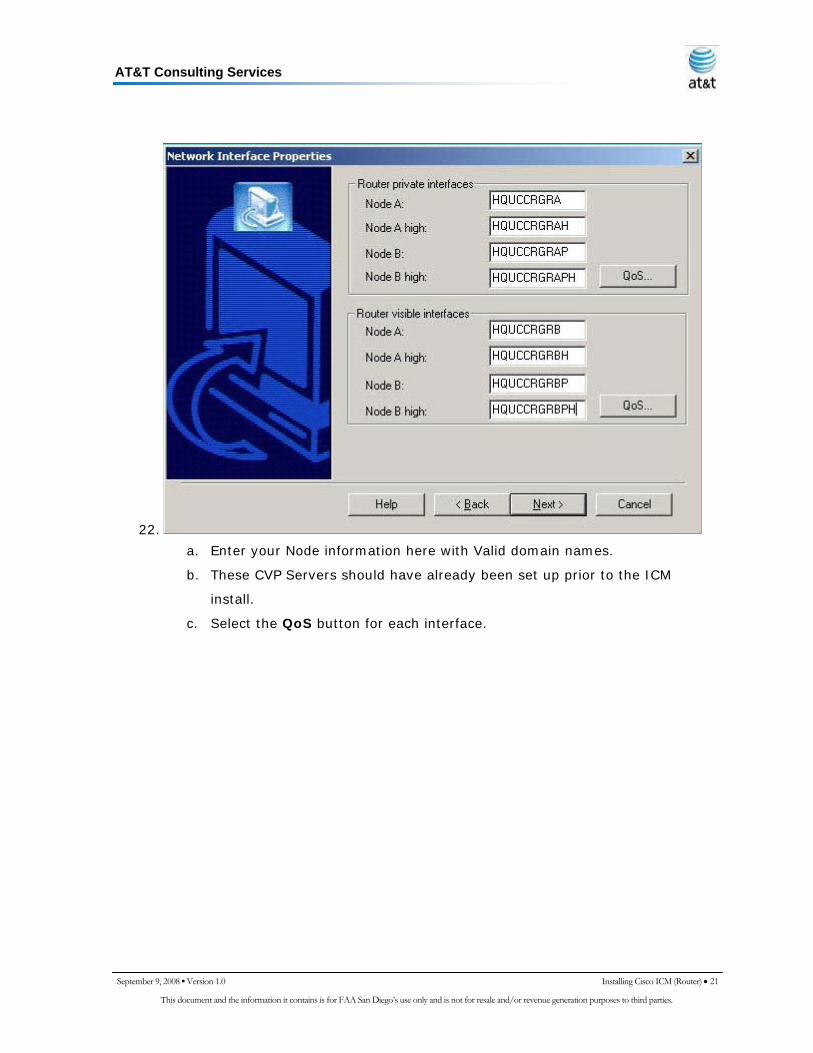
22.
a. Enter your Node information here with Valid domain names.
b. These CVP Servers should have already been set up prior to the ICM
install.
c. Select the QoS button for each interface.

AT&T Consulting Services
September 9, 2008 ▪ Version 1.0 Installing Cisco ICM (Router) • 22
This document and the information it contains is for FAA San Diego’s use only and is not for resale and/or revenue generation purposes to third parties.
23.
a. Select the Enable QoS box and Enable the Packet Scheduler [not
shown].
AT&T Consulting Services
September 9, 2008 ▪ Version 1.0 Installing Cisco ICM (Router) • 23
This document and the information it contains is for FAA San Diego’s use only and is not for resale and/or revenue generation purposes to third parties.
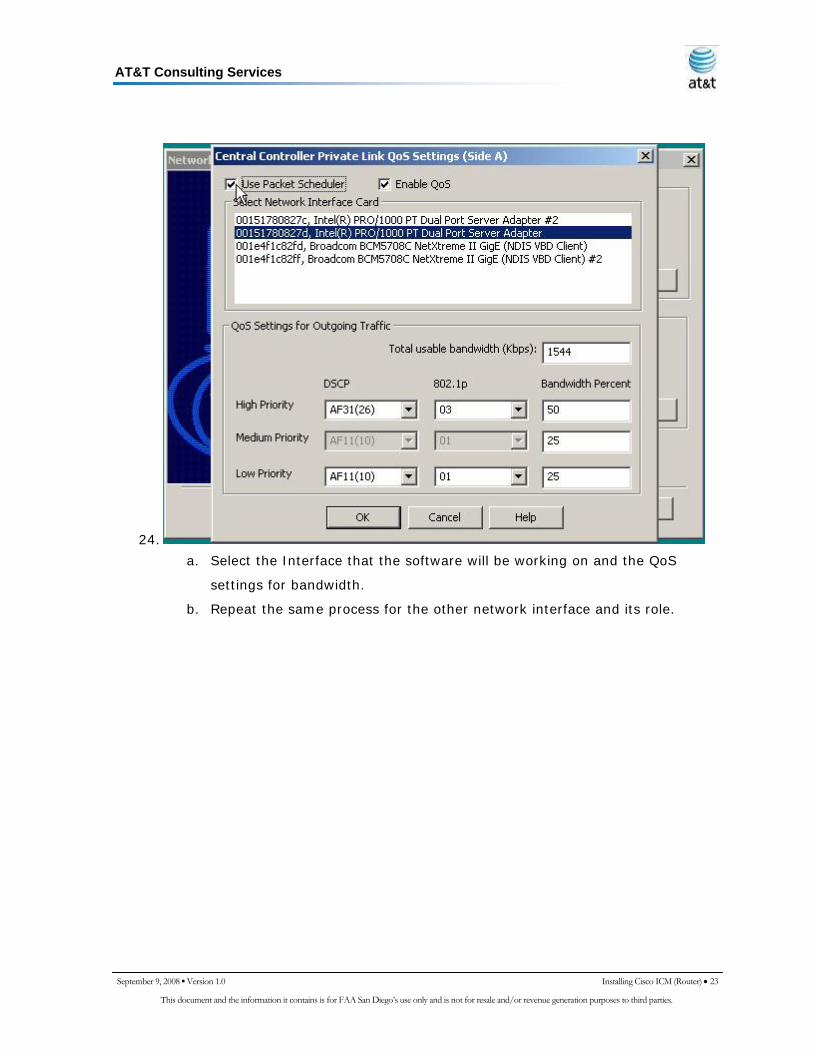
24.
a. Select the Interface that the software will be working on and the QoS
settings for bandwidth.
b. Repeat the same process for the other network interface and its role.

AT&T Consulting Services
September 9, 2008 ▪ Version 1.0 Installing Cisco ICM (Router) • 24
This document and the information it contains is for FAA San Diego’s use only and is not for resale and/or revenue generation purposes to third parties.
25.
a. Please review all the settings for the setup, then select Next.
26.
a. At this point, you do want to restart the server. Select, “Yes, I want to
restart my computer now.”

AT&T Consulting Services
September 9, 2008 ▪ Version 1.0 Installing Cisco ICM (Logger) • 25
This document and the information it contains is for FAA San Diego’s use only and is not for resale and/or revenue generation purposes to third parties.
Installing Cisco ICM (Logger)
1. Put in the CD Marked Cisco ICM Enterprise 7.0
a. STOP! You will need to have Microsoft SQL 2000 SP4 installed for this part
of the setup to work.
b. STOP! You will also need to set the Microsoft SQL 2000 SP4 into Binary
Sort Mode – This is done by rebuilding the Master Database, using the
rebuild utility that came with SQL 2000.
2.
a. The auto-start of the CD produces the splash screen.
3.
a. You must make sure you have or will do the correct SNMP & WMI
installation and setup so you can finish installing the Cisco ICM software.

AT&T Consulting Services
September 9, 2008 ▪ Version 1.0 Installing Cisco ICM (Logger) • 26
This document and the information it contains is for FAA San Diego’s use only and is not for resale and/or revenue generation purposes to third parties.
Please refer to the SNMP & WMI section of this document or access the
ICM/IPCC Staging Document from Cisco.
4.
a. Select NO – Do NOT apply the hardening.
5.
a. Select Add for Instance Components
i. Note: This example assumes that you have already set up the ICM
Router and have addressed the Domain Manager section under the
Installing ICM Router topic.

AT&T Consulting Services
September 9, 2008 ▪ Version 1.0 Installing Cisco ICM (Logger) • 27
This document and the information it contains is for FAA San Diego’s use only and is not for resale and/or revenue generation purposes to third parties.
6.
a. From this screen, select the following choices (If not already the default).
i. Production mode
ii. Auto start at system startup
iii. Duplexed Logger
iv. Historical Data Replication
b. You will need to have Microsoft SQL 2000 SP3 installed for this function,
with its sort method changed to binary.

AT&T Consulting Services
September 9, 2008 ▪ Version 1.0 Installing Cisco ICM (Logger) • 28
This document and the information it contains is for FAA San Diego’s use only and is not for resale and/or revenue generation purposes to third parties.
7.
a. Select the ICM Instance, which should already been defined.
8.
a. Select the Logger button.
AT&T Consulting Services
September 9, 2008 ▪ Version 1.0 Installing Cisco ICM (Logger) • 29
This document and the information it contains is for FAA San Diego’s use only and is not for resale and/or revenue generation purposes to third parties.
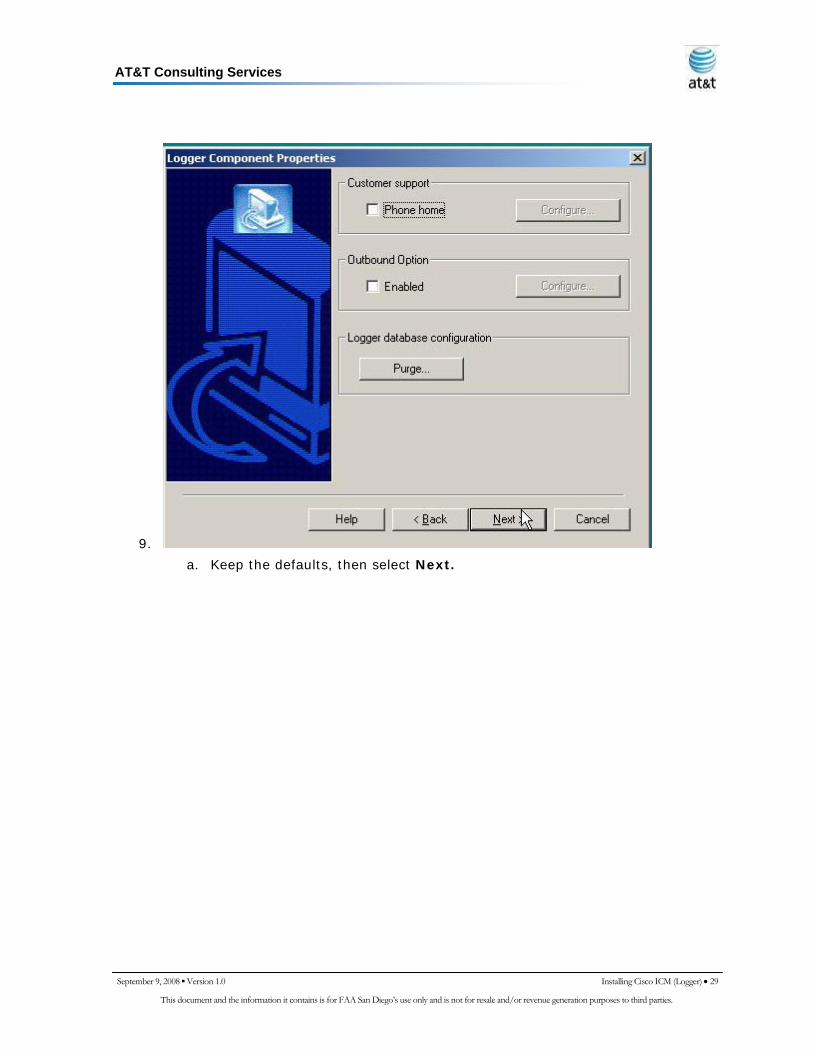
9.
a. Keep the defaults, then select Next.

AT&T Consulting Services
September 9, 2008 ▪ Version 1.0 Installing Cisco ICM (Logger) • 30
This document and the information it contains is for FAA San Diego’s use only and is not for resale and/or revenue generation purposes to third parties.
10.
a. Enter your Logger information, then select Next.

AT&T Consulting Services
September 9, 2008 ▪ Version 1.0 Installing Cisco ICM (Logger) • 31
This document and the information it contains is for FAA San Diego’s use only and is not for resale and/or revenue generation purposes to third parties.
11.
a. Confirm the setup information.
12.
a. Make sure that Node Manager service is installed.

AT&T Consulting Services
September 9, 2008 ▪ Version 1.0 Installing Cisco ICM (Logger) • 32
This document and the information it contains is for FAA San Diego’s use only and is not for resale and/or revenue generation purposes to third parties.
13.
a. You must finish and run the ICMDBA application from the desktop to
complete the Logger installation.
14.
a. Go to Start > Run > then type icmdba and click OK.
b. The ICMDBA already should have been installed.
15.

AT&T Consulting Services
September 9, 2008 ▪ Version 1.0 Installing Cisco ICM (Logger) • 33
This document and the information it contains is for FAA San Diego’s use only and is not for resale and/or revenue generation purposes to third parties.
a. Select YES for expanding tempdb.
16.
a. Select YES for expanding tempdb log.
17.
a. Select the object you will be working on (“LoggerA”) to start creating the
databases.
AT&T Consulting Services
September 9, 2008 ▪ Version 1.0 Installing Cisco ICM (Logger) • 34
This document and the information it contains is for FAA San Diego’s use only and is not for resale and/or revenue generation purposes to third parties.
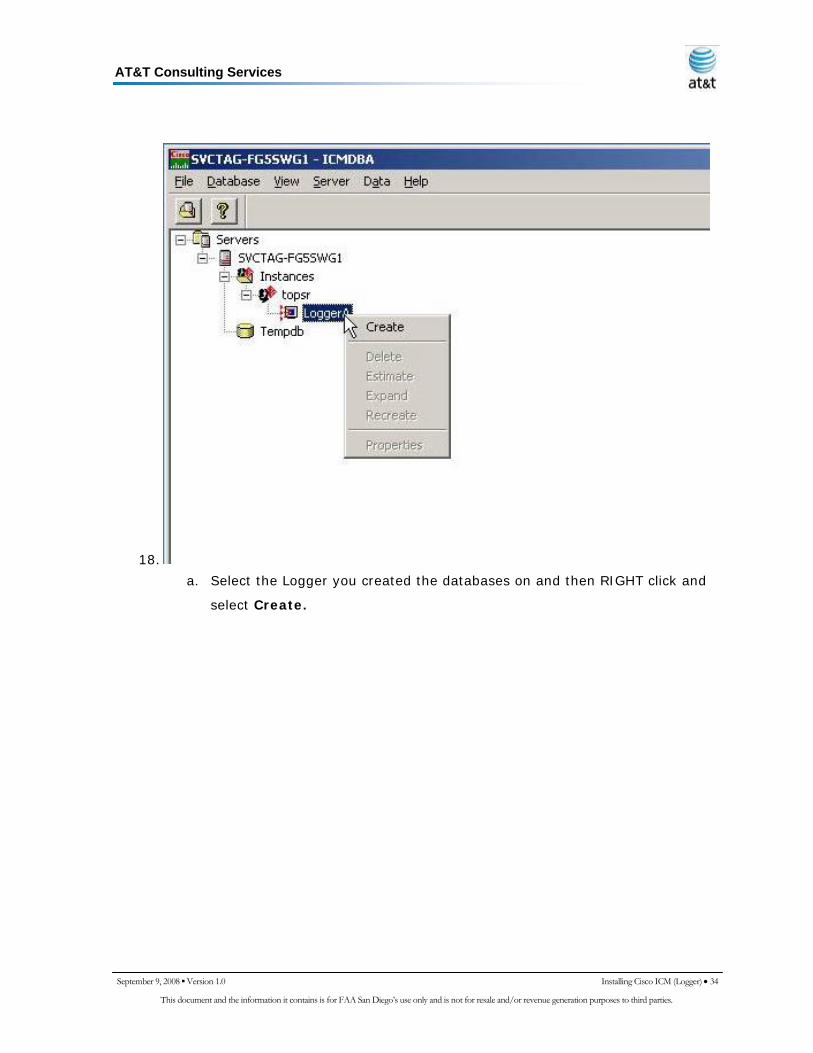
18.
a. Select the Logger you created the databases on and then RIGHT click and
select Create.

AT&T Consulting Services
September 9, 2008 ▪ Version 1.0 Installing Cisco ICM (Logger) • 35
This document and the information it contains is for FAA San Diego’s use only and is not for resale and/or revenue generation purposes to third parties.
19.
a. Select YES to start defining the SQL Server.

AT&T Consulting Services
September 9, 2008 ▪ Version 1.0 Installing Cisco ICM (Logger) • 36
This document and the information it contains is for FAA San Diego’s use only and is not for resale and/or revenue generation purposes to third parties.
20.
a. From the defaults, the only change that should be required is to set
“Recovery Interval” to [1].

AT&T Consulting Services
September 9, 2008 ▪ Version 1.0 Installing Cisco ICM (Logger) • 37
This document and the information it contains is for FAA San Diego’s use only and is not for resale and/or revenue generation purposes to third parties.
21.
a. Select YES to stopping the SQL Server.

AT&T Consulting Services
September 9, 2008 ▪ Version 1.0 Installing Cisco ICM (Logger) • 38
This document and the information it contains is for FAA San Diego’s use only and is not for resale and/or revenue generation purposes to third parties.
22.
a. Now you can create the two databases needed for the ICM Logger.
b. You should do capacity planning to estimate your needs, so you can set the
size of each database.

AT&T Consulting Services
September 9, 2008 ▪ Version 1.0 Installing Cisco ICM (Logger) • 39
This document and the information it contains is for FAA San Diego’s use only and is not for resale and/or revenue generation purposes to third parties.
23.
a. First, set the Data Database and select OK.

AT&T Consulting Services
September 9, 2008 ▪ Version 1.0 Installing Cisco ICM (Logger) • 40
This document and the information it contains is for FAA San Diego’s use only and is not for resale and/or revenue generation purposes to third parties.
24.
a. Now, select the size of the LOG Database.

AT&T Consulting Services
September 9, 2008 ▪ Version 1.0 Installing Cisco ICM (Logger) • 41
This document and the information it contains is for FAA San Diego’s use only and is not for resale and/or revenue generation purposes to third parties.
25.
a. After reviewing the Database options, you may now select CREATE and you
will have two new Databases for the Logger.

AT&T Consulting Services
September 9, 2008 ▪ Version 1.0 Installing Cisco ICM (Logger) • 42
This document and the information it contains is for FAA San Diego’s use only and is not for resale and/or revenue generation purposes to third parties.
26.
a. After you select the Start button, you will see the software create all the
database structure, then select Close.

AT&T Consulting Services
September 9, 2008 ▪ Version 1.0 Installing Cisco ICM (Logger) • 43
This document and the information it contains is for FAA San Diego’s use only and is not for resale and/or revenue generation purposes to third parties.
27.
a. Select YES to restart the Logger.

AT&T Consulting Services
September 9, 2008 ▪ Version 1.0 Installing Cisco ICM (Logger) • 44
This document and the information it contains is for FAA San Diego’s use only and is not for resale and/or revenue generation purposes to third parties.
28.
a. Open the Database Icon under the LoggerA and review the tables.
29. You have now completed the installation of the Logger part of the ICM install.

AT&T Consulting Services
September 9, 2008 ▪ Version 1.0 Installing Cisco ICM (CTI Server) • 45
This document and the information it contains is for FAA San Diego’s use only and is not for resale and/or revenue generation purposes to third parties.
Installing Cisco ICM (CTI Server) 1. After the system has been prepared with Windows 2003 R2 Server, put in the CD
marked Cisco ICM Enterprise 7.0.
2.
a. The auto-start of the CD produces the splash screen.
3.
a. You must make sure you have or will do the correct SNMP & WMI
installation and setup so you can finish installing the Cisco ICM software.
Please refer to the SNMP & WMI section of this document or access the
ICM/IPCC Staging Document from Cisco.

AT&T Consulting Services
September 9, 2008 ▪ Version 1.0 Installing Cisco ICM (CTI Server) • 46
This document and the information it contains is for FAA San Diego’s use only and is not for resale and/or revenue generation purposes to third parties.
4.
a. Select NO – Do NOT apply the hardening.
5.
a. Select CTI Server.

AT&T Consulting Services
September 9, 2008 ▪ Version 1.0 Installing Cisco ICM (CTI Server) • 47
This document and the information it contains is for FAA San Diego’s use only and is not for resale and/or revenue generation purposes to third parties.
6.
a. Select Production Mode
b. Select Auto Start at system startup
c. Select Duplexed CTI Server
AT&T Consulting Services
September 9, 2008 ▪ Version 1.0 Installing Cisco ICM (CTI Server) • 48
This document and the information it contains is for FAA San Diego’s use only and is not for resale and/or revenue generation purposes to third parties.
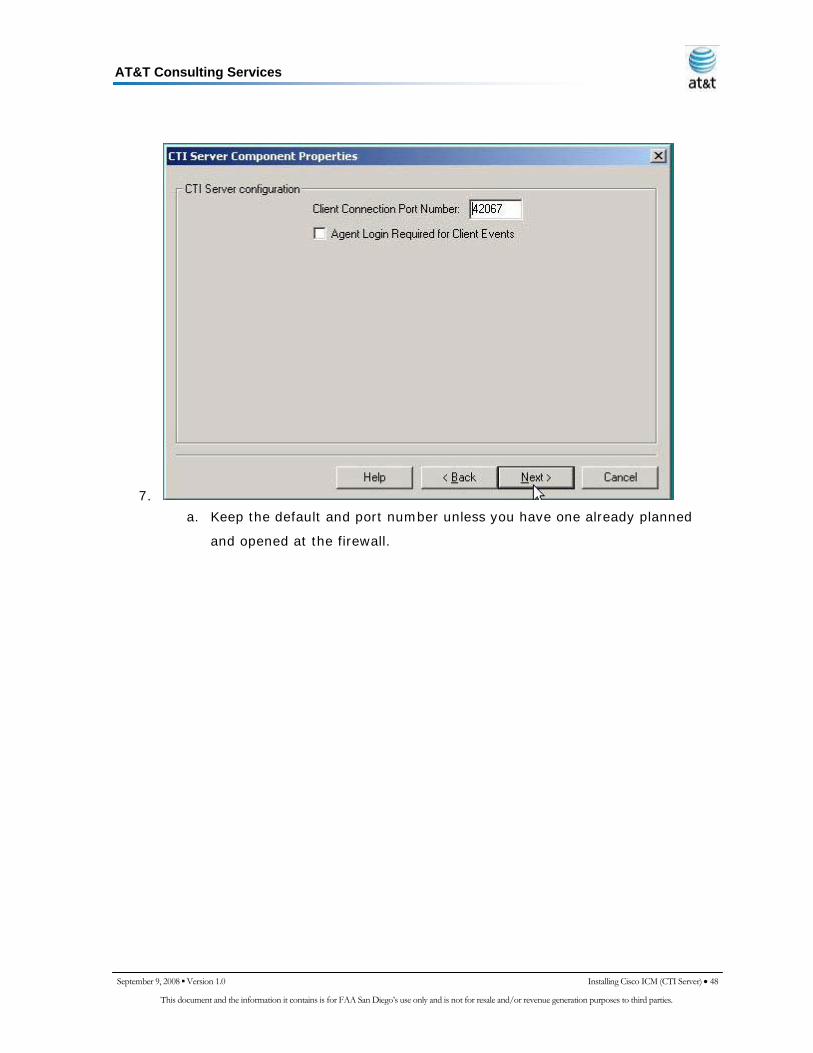
7.
a. Keep the default and port number unless you have one already planned
and opened at the firewall.

AT&T Consulting Services
September 9, 2008 ▪ Version 1.0 Installing Cisco ICM (CTI Server) • 49
This document and the information it contains is for FAA San Diego’s use only and is not for resale and/or revenue generation purposes to third parties.
8.
a. Enter the corresponding node names here, then select Next.
AT&T Consulting Services
September 9, 2008 ▪ Version 1.0 Installing Cisco ICM (CTI Server) • 50
This document and the information it contains is for FAA San Diego’s use only and is not for resale and/or revenue generation purposes to third parties.
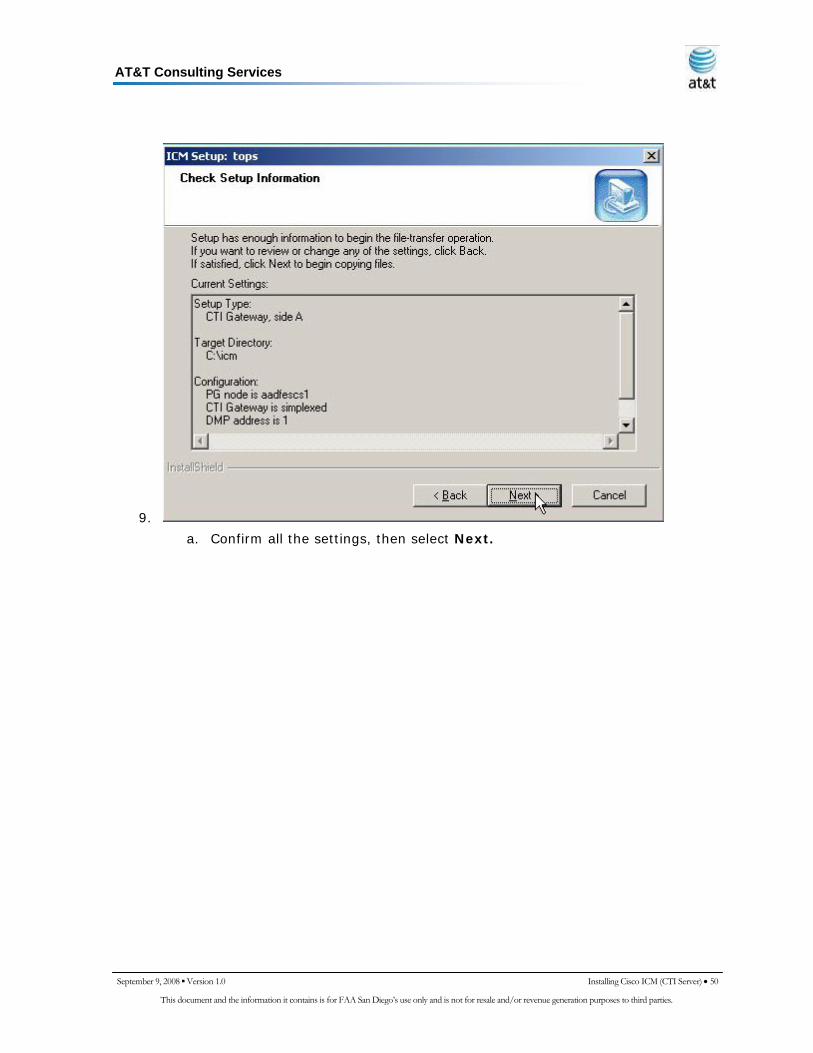
9.
a. Confirm all the settings, then select Next.

AT&T Consulting Services
September 9, 2008 ▪ Version 1.0 Installing Cisco ICM (CTI Server) • 51
This document and the information it contains is for FAA San Diego’s use only and is not for resale and/or revenue generation purposes to third parties.
10.
a. When setup is complete, select Finish.

AT&T Consulting Services
September 9, 2008 ▪ Version 1.0 Installing Cisco ICM (Admin Workstation) • 52
This document and the information it contains is for FAA San Diego’s use only and is not for resale and/or revenue generation purposes to third parties.
Installing Cisco ICM (Admin Workstation)
1. After the system has been prepared with Windows 2003 R2 Server, put in the CD
marked Cisco ICM Enterprise 7.0.
2.
b. The auto-start of the CD produces the splash screen.
3.
a. You must make sure you have or will do the correct SNMP & WMI
installation and setup so you can finish installing the Cisco ICM software.
Please refer to the SNMP & WMI section of this document or access the
ICM/IPCC Staging Document from Cisco.

AT&T Consulting Services
September 9, 2008 ▪ Version 1.0 Installing Cisco ICM (Admin Workstation) • 53
This document and the information it contains is for FAA San Diego’s use only and is not for resale and/or revenue generation purposes to third parties.
4.
c. Select NO – Do NOT apply the hardening.
5.
d. Select Add for Instance Components.

AT&T Consulting Services
September 9, 2008 ▪ Version 1.0 Installing Cisco ICM (Admin Workstation) • 54
This document and the information it contains is for FAA San Diego’s use only and is not for resale and/or revenue generation purposes to third parties.
6.
e. Select Admin Workstation.
7.
f. Choose the defaults, then select Next.

AT&T Consulting Services
September 9, 2008 ▪ Version 1.0 Installing Cisco ICM (Admin Workstation) • 55
This document and the information it contains is for FAA San Diego’s use only and is not for resale and/or revenue generation purposes to third parties.
8.
g. Choose the defaults, then select Next.
AT&T Consulting Services
September 9, 2008 ▪ Version 1.0 Installing Cisco ICM (Admin Workstation) • 56
This document and the information it contains is for FAA San Diego’s use only and is not for resale and/or revenue generation purposes to third parties.
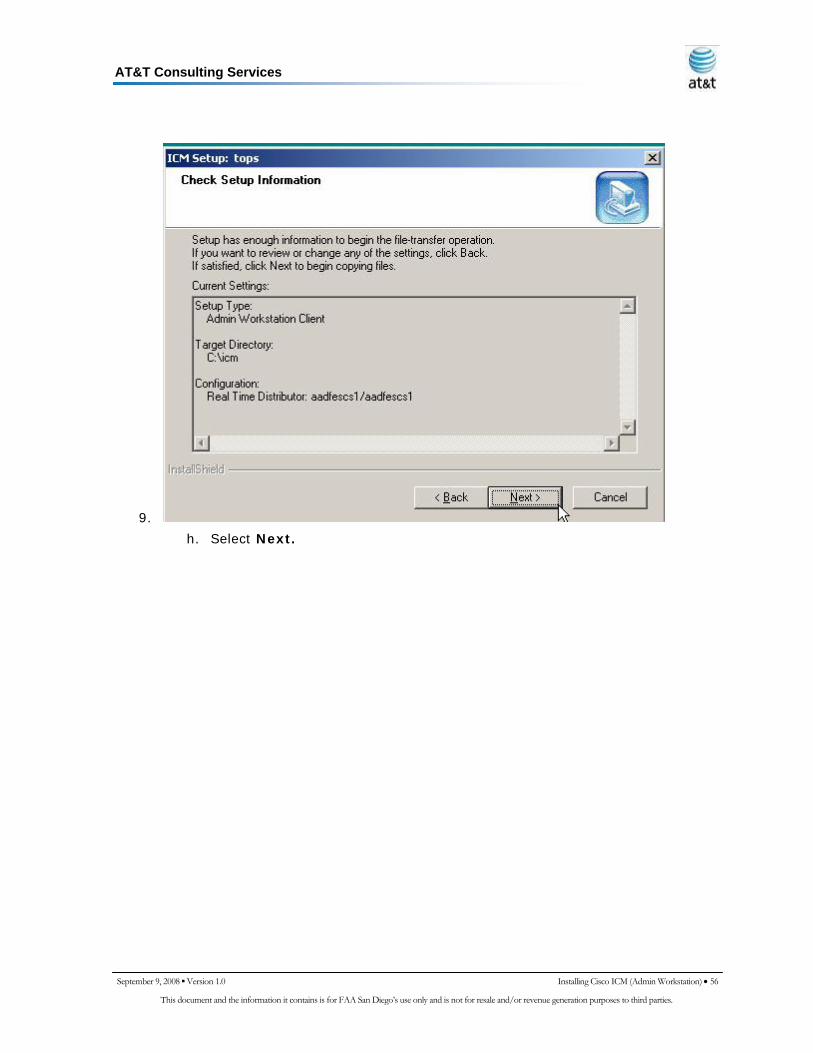
9.
h. Select Next.

AT&T Consulting Services
September 9, 2008 ▪ Version 1.0 Installing Cisco ICM (Admin Workstation) • 57
This document and the information it contains is for FAA San Diego’s use only and is not for resale and/or revenue generation purposes to third parties.
10.
i. Select Finish.

AT&T Consulting Services
September 9, 2008 ▪ Version 1.0 Installing Cisco ICM (Peripheral Gateway) • 58
This document and the information it contains is for FAA San Diego’s use only and is not for resale and/or revenue generation purposes to third parties.
Installing Cisco ICM (Peripheral Gateway)
1. After the system has been prepared with Windows 2003 R2 Server, put in the CD
marked Cisco ICM Enterprise 7.0.
2.
a. The auto-start of the CD produces the splash screen.
3.
a. You must make sure you have or will do the correct SNMP & WMI
installation and setup so you can finish installing the Cisco ICM software.
Please refer to the SNMP & WMI section of this document or access the
ICM/IPCC Staging Document from Cisco.

AT&T Consulting Services
September 9, 2008 ▪ Version 1.0 Installing Cisco ICM (Peripheral Gateway) • 59
This document and the information it contains is for FAA San Diego’s use only and is not for resale and/or revenue generation purposes to third parties.
4.
a. Select NO – Do NOT apply the hardening.
5.
a. Select Add for Instance Components.

AT&T Consulting Services
September 9, 2008 ▪ Version 1.0 Installing Cisco ICM (Peripheral Gateway) • 60
This document and the information it contains is for FAA San Diego’s use only and is not for resale and/or revenue generation purposes to third parties.
6.
a. Select the Peripheral Gateway button.
7.
AT&T Consulting Services
September 9, 2008 ▪ Version 1.0 Installing Cisco ICM (Peripheral Gateway) • 61
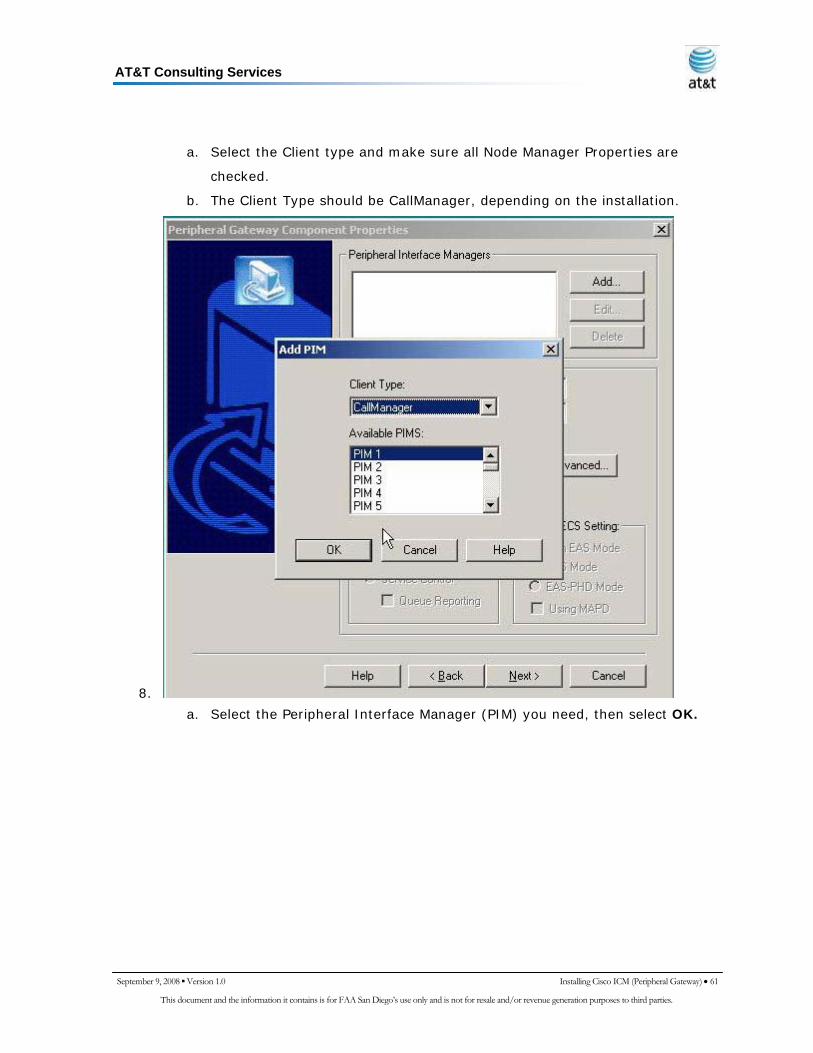
This document and the information it contains is for FAA San Diego’s use only and is not for resale and/or revenue generation purposes to third parties.
a. Select the Client type and make sure all Node Manager Properties are
checked.
b. The Client Type should be CallManager, depending on the installation.
8.
a. Select the Peripheral Interface Manager (PIM) you need, then select OK.

AT&T Consulting Services
September 9, 2008 ▪ Version 1.0 Installing Cisco ICM (Peripheral Gateway) • 62
This document and the information it contains is for FAA San Diego’s use only and is not for resale and/or revenue generation purposes to third parties.
9.
a. Enter the configuration and enable the PIM, then select OK.
AT&T Consulting Services
September 9, 2008 ▪ Version 1.0 Installing Cisco ICM (Peripheral Gateway) • 63
This document and the information it contains is for FAA San Diego’s use only and is not for resale and/or revenue generation purposes to third parties.
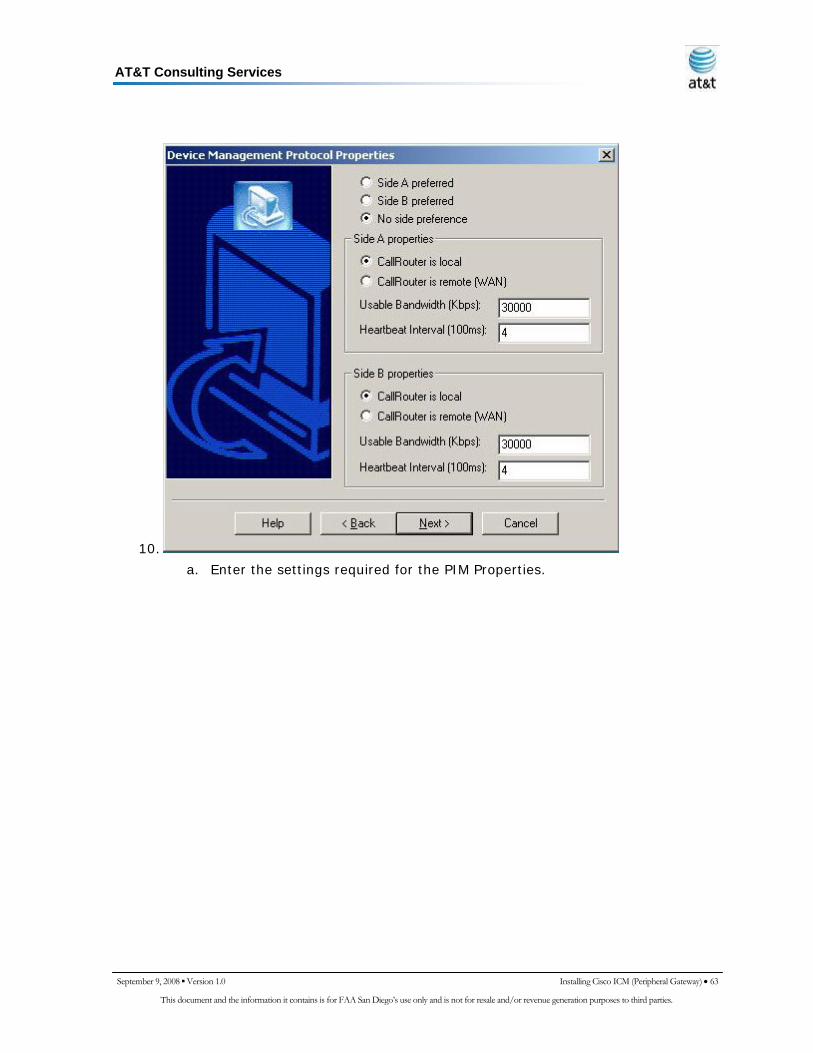
10.
a. Enter the settings required for the PIM Properties.
AT&T Consulting Services
September 9, 2008 ▪ Version 1.0 Installing Cisco ICM (Peripheral Gateway) • 64
This document and the information it contains is for FAA San Diego’s use only and is not for resale and/or revenue generation purposes to third parties.
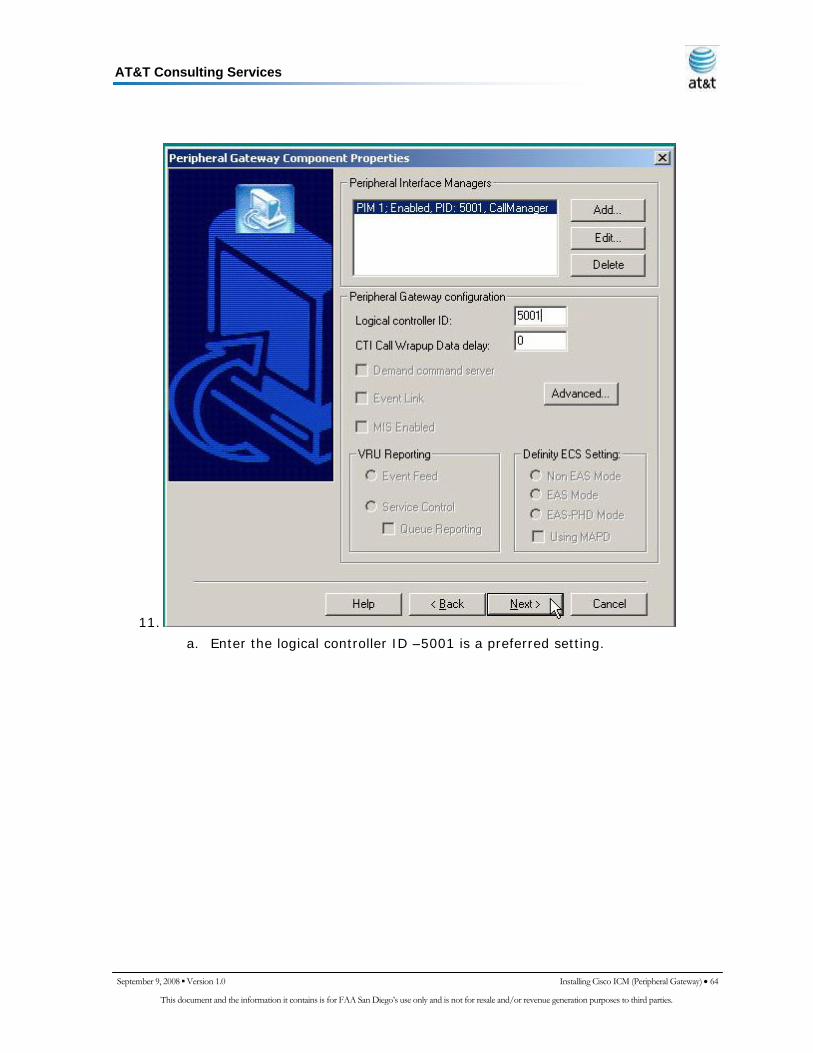
11.
a. Enter the logical controller ID –5001 is a preferred setting.

AT&T Consulting Services
September 9, 2008 ▪ Version 1.0 Installing Cisco ICM (Peripheral Gateway) • 65
This document and the information it contains is for FAA San Diego’s use only and is not for resale and/or revenue generation purposes to third parties.
12.
a. Match the settings for the connection required for CVP connectivity, then
select the QoS button for the interface.

AT&T Consulting Services
September 9, 2008 ▪ Version 1.0 Installing Cisco ICM (Peripheral Gateway) • 66
This document and the information it contains is for FAA San Diego’s use only and is not for resale and/or revenue generation purposes to third parties.
13.
a. The default settings should be correct; but should be supported by the
switch, firewall, routers, and ISP if connecting over the WAN.

AT&T Consulting Services
September 9, 2008 ▪ Version 1.0 Installing Cisco ICM (Peripheral Gateway) • 67
This document and the information it contains is for FAA San Diego’s use only and is not for resale and/or revenue generation purposes to third parties.
14.
a. The default settings should be correct for the second connection; but
should be supported by the switch, firewall, routers, and ISP if connecting
over the WAN.

AT&T Consulting Services
September 9, 2008 ▪ Version 1.0 Installing Cisco ICM (Peripheral Gateway) • 68
This document and the information it contains is for FAA San Diego’s use only and is not for resale and/or revenue generation purposes to third parties.
15.
a. Review all the settings, then select Next.
16.
a. Select YES, then select OK to reboot the server.

AT&T Consulting Services
September 9, 2008 ▪ Version 1.0 Installing Cisco ICM (Peripheral Gateway) • 69
This document and the information it contains is for FAA San Diego’s use only and is not for resale and/or revenue generation purposes to third parties.
Network Card Settings
1. To set up the network card settings:
a. Select Start > Control Panel > Network Connections then, in the menu bar,
click Advanced > Advanced Settings. The Advanced Settings dialog box
appears.
b. Use the following guidelines to configure network card settings:
i. Rename each Local Area Connection to private, visible, and
san as required.
1. In the Advanced tab to the connection properties, configure
the network (link) speed and duplex mode.
2. For example: Set card to 100 MB per second and Full
duplex.
a. Warning: Do NOT leave configuration set to Auto
mode.
c. In the Advanced tab, do the following:
i. In the Connection section of the Adapters and bindings tab, sort the
section so that the visible connection is at the top, the Private
connection is second, and any remaining connections follow.
1. For the Private connection, uncheck File and Printer
Sharing for Microsoft Networks and Client for Microsoft
Networks.
2. Move any disabled Bindings for all connections to the
bottom of the list.
d. Persistent Static Routes
i. For geographically distributed ICM software central controller sites,
duplexed Call Router and Logger components have a Private IP
WAN connection, used to communicate between Side A and Side B.
Because Windows only allows one default gateway for each
server (which sends the Private Network traffic to the Visible

AT&T Consulting Services
September 9, 2008 ▪ Version 1.0 Installing Cisco ICM (Peripheral Gateway) • 70
This document and the information it contains is for FAA San Diego’s use only and is not for resale and/or revenue generation purposes to third parties.
Network), you must add a set of Static Routes to all the servers
running the Call Router and Logger.
ii. On the Side A Call Router and Logger servers, enter route add
<networknumber>mask<subnet mask><gateway IP> -p.
iii. For example:
1. On Side A servers, enter route add 192.168.142.42 mask
255.255.255.192 192.168.141.126 -p.
2. On Side B servers, enter route add 192.168.141.64 mask
255.255.255.192 192.168.142.126 -p.
3. The network number of the remote Private Network is
192.168.142.42
4. The subnet mask for this remote network is
255.255.255.192
5. The gateway address for the Private Network Adaptor is
192.168.141.126
6. Note: The -p option sets the route as persistent.
SNMP Management
SNMP management support is installed and enabled by default on ICM/IPCC Enterprise
and Hosted Edition servers. However, to ensure seamless integration with the Microsoft
native SNMP components, installation of the Microsoft Management and Monitoring Tools
subcomponents is required.
1. To install these required subcomponents, from the Control Panel:
a. Select Start > Settings > Control Panel > Add/Remove Programs >
Add/Remove Windows Components
b. Select Management and Monitoring Tools.
i. Select Details.
ii. Select Simple Network Management Protocol and WMI Windows
Installer Provider.
iii. Select OK ,then select Next to continue with the wizard to install
these subcomponents.
AT&T Consulting Services
September 9, 2008 ▪ Version 1.0 Installing Cisco ICM (Peripheral Gateway) • 71
This document and the information it contains is for FAA San Diego’s use only and is not for resale and/or revenue generation purposes to third parties.
1. Note: You may need to have your Microsoft Windows 2003
Server CD handy to complete the installation.
iv. When the installation is complete, select Finish.
2. If SNMP management support has already been installed and configured for this
server, the existing configuration parameters should be collected so they can be
used to configure the components installed by ICM SETUP. These parameters can
be found on the property sheets associated with the Microsoft SNMP Service.
a. To collect existing SNMP properties:
i. On the Services MMC console, locate and select the SNMP Service in
the list.
ii. Select Start > Programs > Control Panel > Services.
iii. Select Properties (or select the Properties context menu).
iv. On the SNMP Service Properties dialog, select the Security tab.
1. Note the following settings and configuration data:
a. The state of the Send authentication trap checkbox.
b. The Accepted community names.
c. If Accept SNMP packets from these hosts is checked,
collect the host names and/or IP addresses
configured in the associated list box.
2. Note: If host names (vs. IP addresses) have been
configured, you need to determine the actual IP address of
each host name to configure the Cisco SNMP agents. For
security reasons, using static addresses for management
stations is preferred.
v. Select the Traps tab on the SNMP Service Properties dialog box.
vi. Collect the configured trap destinations and the associated
community name.
1. Note: If host names were configured for trap destinations,
you need to determine the actual IP address of each host
name.
vii. On the SNMP Service Properties dialog, select the Agent tab.
viii. Collect the information from the Contact and Location fields.

AT&T Consulting Services
September 9, 2008 ▪ Version 1.0 Installing Cisco ICM (Peripheral Gateway) • 72
This document and the information it contains is for FAA San Diego’s use only and is not for resale and/or revenue generation purposes to third parties.
ix. If the server has not been configured for SNMP manageability,
engage in a dialog with the customer IT professionals to:
1. Determine whether the customer desires SNMP
manageability.
2. Acquire the necessary configuration information to enable
SNMP access.
3. The necessary configuration information includes:
a. The IP addresses of the management station(s).
i. If using SNMP v1 or SNMP v2c:
1. Community names (if using SNMP v1 or
SNMP v2c)
2. Trap destinations and the community
name expected by each management
station
ii. If using SNMP v3:
1. User names
2. Authentication protocol used (if
authentication is required)
3. Privacy protocol used (if privacy is
required)
4. Trap destinations and the user name
expected by each management station
5. The installed Microsoft Management
Console Snap-In (Cisco SNMP Agent
Management) is used to configure the
SNMP properties. Please consult the
ICM/IPCC SNMP User Guide for details.
Installing the Windows Firewall
1. Load the appropriate Service Pack. Do not manually configure the firewall; use the
CiscoICMfwConfig application, which installs and configures the Windows firewall.

AT&T Consulting Services
September 9, 2008 ▪ Version 1.0 Installing Cisco ICM (Peripheral Gateway) • 73
This document and the information it contains is for FAA San Diego’s use only and is not for resale and/or revenue generation purposes to third parties.
a. For additional information, refer to the Security Best Practices Guide for
Cisco ICM/IPCC Enterprise & Hosted Editions, Release7.0(0)
(http://www.cisco.com/univercd/cc/td/doc/product/icm/icmentpr/icm70doc
/coreicm7/config7/index.htm)
b. For detailed information on supported platforms for ICM software, see the
Cisco ICM/IPCC Enterprise & Hosted Editions Release 7.0(0) Hardware and
System Software Specifications (Bill of Materials)
(http://www.cisco.com/en/US/products/sw/custcosw/ps1001/products_use
r_guide_list.html)
c. For additional information on the Windows Firewall see the:
i. Windows Server 2003 Windows Firewall (WF)
(http://www.microsoft.com/technet/prodtechnol/windowsserver200
3/technologies/wf.mspx) Help: Windows Firewall How
To...(http://www.microsoft.com/technet/prodtechnol/windowsserve
r2003/library/ServerHelp/005d7651-fefa-4e00-8f55-
714fc0175fe1.mspx)
Remote Monitoring System Requirements
1. Follow the instructions below if you plan to use the Phone Home capabilities of
Cisco Remote Monitoring System (RMS) software. The RMS software sends events
to the Cisco Technical Assistance Center.
a. Note: Enable the Phone Home system on servers running the Logger
component
2. Drive Shares
a. You must configure a hidden share folder on the C drive of servers
running the Logger component in order for RMS Listeners to access Phone
Home events.
Routing and Remote Access Configuration
1. If the Logger is using Phone Home functionality via a modem, you must configure
a Listener server for Routing and Remote Access. This provides dial-up access to

AT&T Consulting Services
September 9, 2008 ▪ Version 1.0 Installing Cisco ICM (Peripheral Gateway) • 74
This document and the information it contains is for FAA San Diego’s use only and is not for resale and/or revenue generation purposes to third parties.
the Listener for the Remote Monitoring System (page 94) and Phone Home
functionality.
2. Typically, a deployment also has one Peripheral Gateway that the Cisco Technical
Assistance Center can access.
a. Note: When monitoring pre-ICM 5.0(0) systems, you must use Windows
2000 as your operating system due to the NET BEUI requirements for RMS.
3. When Monitoring ICM 5.0(0) and ICM 6.0(0) systems using NET BEUI, you must
have Windows 2000 as your operating system until you reconfigure the Logger to
use TCP/IP. At this point, you can upgrade to Windows 2003.
a. Refer to the Remote Monitoring Suite Administration Guide for Cisco
ICM/IPCC Enterprise & Hosted Editions, Cisco Remote Monitoring Suite
Release 2.1(0), for information concerning how to configure routing and
remote access using the Routing and Remote Access Server Setup Wizard.
Automatic Updates
1. Refer to the Security Best Practices Guide for Cisco ICM/IPCC Enterprise & Hosted
Editions, Release 7.0(0)
(http://www.cisco.com/univercd/cc/td/doc/product/icm/icmentpr/icm70doc/coreic
m7/config7/index.htm) for information on this setting.
2. Display Settings
a. Through the Windows Control Panel Display dialog box:
i. Ensure that no Screen Saver is selected.
ii. Set the AW display for at least 1024 by 768 pixel resolution.
iii. Set at least 65K colors and at least 60 MHz.
b. System Properties
i. Through the Windows Control System dialog box Advanced tab:
1. When setting virtual memory, set the initial and maximum
total paging file sizes to the values recommended by the
system.
2. For Startup and Recovery settings, set the value of the Time
to display list of operating systems to 3 seconds.

AT&T Consulting Services
September 9, 2008 ▪ Version 1.0 Installing Cisco ICM (Peripheral Gateway) • 75
This document and the information it contains is for FAA San Diego’s use only and is not for resale and/or revenue generation purposes to third parties.
3. On the Advanced tab of the System Properties dialog box,
set the Performance Options to either Programs or
Background Services.
Event Viewer Configuration
1. Configure the Event Viewer:
a. For each type of event, set the Maximum log size to 8192 KB.
b. Select Overwrite events as needed.
1. Note: These settings are configured by the Security Template
provided with automated hardening on Windows Server 2003.
Refer to the Security Best Practices Guide for Cisco
ICM/IPCCEnterprise & Hosted Editions, Release 7.0(0)
(http://www.cisco.com/univercd/cc/td/doc/product/icm/icmentpr/i
cm70doc/coreicm7/config7/index.htm) for additional information.
Remote Control Options
2. Refer to the following documents for information on remote control options:
a. Cisco ICM/IPCC Enterprise & Hosted Editions Release 7.0(0) Hardware and
System Software Specifications (Bill of Materials)
(http://www.cisco.com/en/US/products/sw/custcosw/ps1001/products_use
r_guide_list.html)
b. Security Best Practices Guide for Cisco ICM/IPCC Enterprise & Hosted
Editions, Release 7.0(0)
(http://www.cisco.com/univercd/cc/td/doc/product/icm/icmentpr/icm70doc
/coreicm7/config7/index.htm)
Connectivity Validation
1. Before you begin the ICM software installation process, you should validate
network connectivity for all servers that are part of the ICM software system.
2. On each server:

AT&T Consulting Services
September 9, 2008 ▪ Version 1.0 Installing Cisco ICM (Peripheral Gateway) • 76
This document and the information it contains is for FAA San Diego’s use only and is not for resale and/or revenue generation purposes to third parties.
a. Validate the TCP/IP properties for each network card, including the DNS
settings.
b. Validate that you can ping each machine on the visible network.
c. If applicable, validate that you can ping each private network connection.