experiment packet for organic lab 1& 2 summer 08faculty.seattlecentral.edu/ptran/bastyr/summer...
TRANSCRIPT

1 6/26/2008
Experiment Packet
For
Organic Lab 1& 2
Summer 08

2 6/26/2008

3 6/26/2008
BASTYR UNIVERSITY
COURSE INFORMATION FOR STUDENTS
Summer Quarter '08
COURSE NUMBER BC3116 & BC3126 COURSE TITLE Organic 1 & II INSTRUCTOR Tess Cabasco-Cebrian CLASS TIME Friday, 8:00-12:50 CREDITS 1 STUDENT ADVISING HOURS
Friday 1-1:30 by appointment
PHONE (W)(206)587-4075 (H) (Email)[email protected] Website: www.chemsccc.org
Students are responsible for knowing and adhering to Academic Policies and Procedures as outlined in the Student Handbook.
1. Table of Contents
Course Overview and Objective Requirements Evaluation Lab Schedule Lab Report Format Sample Lab Report
2. Course Overview
• Course Description The course is designed as a practical application of the theories learned in lecture. Experiments are picked to have relevancy to the ND,Nutrition and herbal science programs. Experiments include techniques of simple, fractional and steam distillation, esterification of fatty acids, and isolation of natural product. Intrumentation introduced are gas chormatography and FTIR spectroscopy. The experiments will vary in degree of difficulty. As the quarter progresses, the experiments will be more challenging but also more interesting and relevant to your program. It is important to come to lab prepared, on time and with a positive attitude. Remember the definition of “experiment." Although the experiments have been tried and are known to work, sometimes they do not. Failure of an experiment is just as important a learning tool as one that works. It allows you to examine the procedure more thoroughly to figure out what went wrong. A degree of enthusiasm and the willingness to learn and work hard are the key to a successful lab experience. • Major Course Competencies
-Learn organic chemistry lab techniques. -Develop data analysis skill. -Apply theories learned from lecture to interpret data gathered from the experiments. -Learn to write a complete, clear and concise lab report.

4 6/26/2008
• Organization & Requirements
1. Completion of all experiments and participation in the presentation are required to complete the
course. 2. One makeup lab is allowed. The make up experiment is isolation of caffeine and will be held on the
last Friday of the quarter, August 31, 2005. Lab report for the make up lab is due Saturday, Sept 1, by email only.
3. Experiments will be performed in pairs (no more) unless otherwise instructed. 4. A lab notebook (composition type- not binders or spiral type) is required for the course. All notes
and record keeping during the experiment will be done in the lab notebook not in loose pieces of paper. Write in pen only. Record all data on the lab notebook. Cross-out unwanted data. Do not erase or block-out data. Transfer data to the printed data sheet, if available, in the hand-out to be included in the lab report. There have been many data sheets misplaced or lost, having the data recorded in the notebook reduces the probability of loosing important data.
5. The pre-lab assignment for each experiment is to prepare a flow chart of the experiment in your lab notebook. The purpose of this exercise is to allow you to understand the procedure clearly. Prelab assignments will be checked off at the beginning of each lab period. You will not be allowed to start the lab until prelab assignment is completed.
6. Lab reports and postlab questions are due the next lab period after the completion of the experiment. A 10-point deduction per week will be applied for late report.
7. Compliance to the laboratory rules is essential for the safety of class. • Prerequisite Knowledge General chemistry techniques. • Instructional Materials and Resources Hand-outs
4. GRADING • Evaluation Standards with Criteria for Passing and Remediation
EVALUATION:
Your lab grade will be based on the following Prelab assignment 10pts each Formal lab reports/postlab question And laboratory performance 100pts each Notebook 10pts each
Laboratory performance will be an evaluation of lab technique, lab preparedness, lab etiquette; which includes cleaning after oneself, keeping track of lab glassware, putting away chemicals, effort given to make for a successful experiment, and most important, following safety instructions. Courtesy to lab instructor and classmates is expected.
Grading will be as follows: Undergraduate and Graduate courses (including BC courses for these programs) are graded on the following system: A 95-100% or 4.0 A- 90-94.9% or 3.7 B+ 87 - 89.9% or 3.3 (B grades cannot be changed except for faculty error) B 83-86.9% or 3.0 B- 80-82.9% or 2.7 C+ 77 - 79.9% or 2.3 (C grades cannot be changed except for faculty error) C 73-76.9% or 2.0

5 6/26/2008
C- 70-72.9% or 1.7 D+ 67 - 69.9% or 1.3 undergraduate only (D grades cannot be changed except for faculty error) D 63 - 66.9% or 1.0 undergraduate only D- 60 - 62.9% or 0.7 undergraduate only F Below 60% or 0.0 (F grades cannot be changed except for faculty error)
5. Study Strategies & Class Participation Expectations
1. A positive attitude and willingness to learn is essential to be successful. 2. You must come to lab prepared. Read the experiments ahead of time. Write down questions that
come up as you reading the experiment. Ask questions! Prepare a pictorial flow chart of the procedure.
3. Remind yourself of the definition of "experiment" when things are not working out well with your experiment.
4. Although good results are the ultimate goal, determining why an experiment did not work and understanding the experiment is equally or more valuable.
6. Course Outline & Time Schedule
**Attached 7. Syllabus Chapters/Materials (if applicable) All experiments are Hand-outs. 8. Laboratory Safety
9. Report Format
TITLE
AUTHORS
1. The person who did the work and wrote the paper is generally listed as the first author of a research paper. 2. For published articles, other people who made substantial contributions to the work are also listed as authors. Ask your mentor's permission before including his/her name as co-author. INTRODUCTION What question did you ask in your experiment? Why is it interesting? The introduction summarizes the relevant literature so that the reader will understand why you were interested in the question you asked. End with a sentence explaining the specific question you asked in this experiment or the experiment’s objectives. MATERIALS AND METHODS 1. There should be enough information here to allow another scientist to repeat your experiment. Look at other papers that have been published in your field to get some idea of what is included in this section. 2. If you had a complicated protocol, it may helpful to include a diagram, table or flowchart to explain the methods you used. 3. Do not put results in this section. You may, however, include preliminary results that were used to design the main experiment that you are reporting on. ("In a preliminary study, I observed the owls for one week, and found that 73 % of their locomotor activity occurred during the night, and so I conducted all subsequent experiments between 11 pm and 6 am.")

6 6/26/2008
4. Mention relevant ethical considerations. If you used human subjects, did they consent to participate. If you used animals, what measures did you take to minimize pain? RESULTS 1. This is where you present the results you've gotten. Use graphs and tables if appropriate, but also
summarize your main findings in the text. Do NOT discuss the results or speculate as to why something happened; that goes in the Discussion.
2. Use appropriate methods of showing data. Don't try to manipulate the data to make it look like you did more than you actually did.
TABLES AND GRAPHS
1. If you present your data in a table or graph, include a title describing what's in the table ("Enzyme activity at various temperatures", not "My results".) For graphs, you should also label the x and y axes.
2. Don't use a table or graph just to be "fancy". If you can summarize the information in one sentence, then a table or graph is not necessary.
DISCUSSION
1. Highlight the most significant results, but don't just repeat what you've written in the Results section. How do these results relate to the original question? Do the data support your hypothesis? Are your results consistent with what other investigators have reported? If your results were unexpected, try to explain why. Is there another way to interpret your results? What further research would be necessary to answer the questions raised by your results? How do y our results fit into the big picture?
2. End with a one-sentence summary of your conclusion, emphasizing why it is relevant. Word process all formal lab reports.
7 6/26/2008
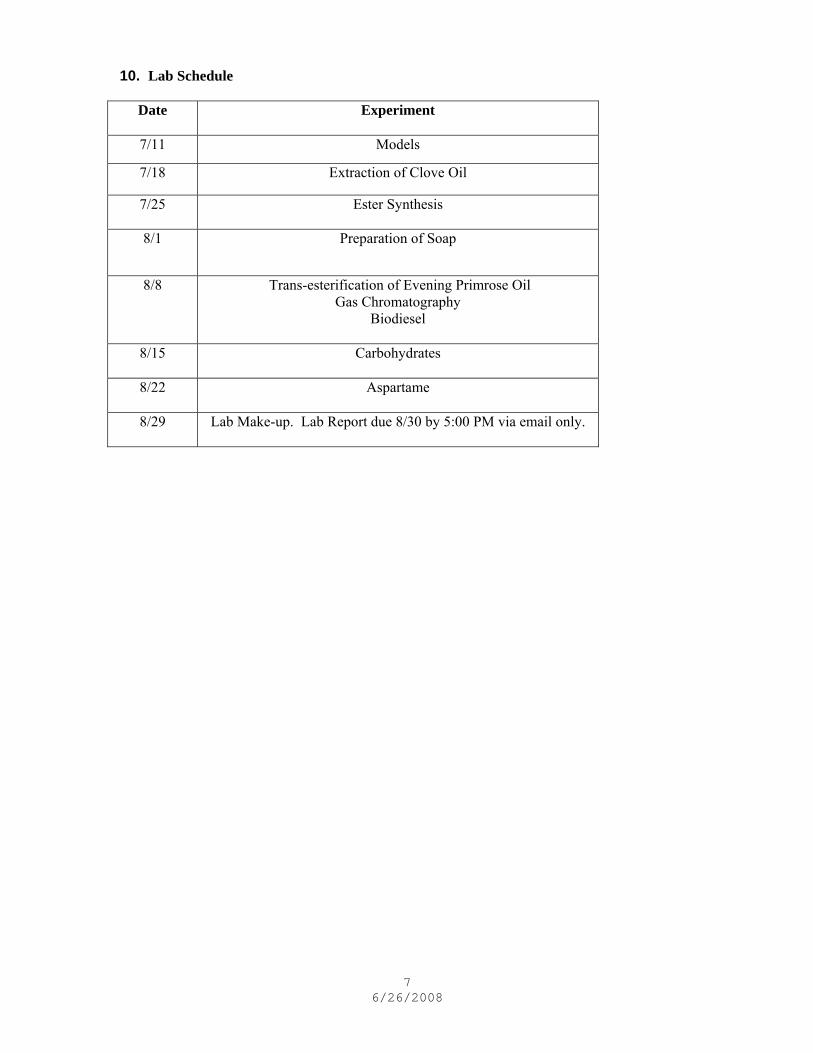
10. Lab Schedule
Date
Experiment
7/11 Models
7/18 Extraction of Clove Oil
7/25 Ester Synthesis
8/1 Preparation of Soap
8/8
Trans-esterification of Evening Primrose Oil Gas Chromatography
Biodiesel
8/15
Carbohydrates
8/22
Aspartame
8/29
Lab Make-up. Lab Report due 8/30 by 5:00 PM via email only.

8 6/26/2008

SAFETY RULES FOR ORGANIC CHEMISTRY
1. Experiments can only be done during scheduled time only. Hood space is limited. 2. Organic chemistry lab involves working with chemicals that are carbon base. Organic
chemicals can be one or all of the following: a. Volatile b. Flammable c. Toxic or carcinogenic d. Respiratory irritants
3. Modes of exposure to organic chemicals are: • inhalation • absorption through the skin • ingestion
4. Minimize your exposure. A. Inhalation
a. Keep your time in the lab at a mininum by coming to lab prepared. Read experiments ahead of time. Ask questions during the lab lecture.
b .Use the hoods. B. Absorption through the skin
a. Wear gloves. b. Wear goggles at all times.
C. Ingestion: a. Don’t eat or drink in the lab.
6. Know the health hazard of your reagents. MSDS are available on-line. 7. Dress appropriately for lab. Tie back long hair. The following are clothing are not allowed in
lab: a. open toed shoes or sandals b. halter tops, tops that exposes the midribs-stomach area, short shorts or mini skirts. c. Loose sleeves.
8. If pregnant or trying to be pregnant - consider taking the lab at a later time. 9. Dispose of all organic waste into waste jars. 10. Keep flammables away from open flame. If heating is required as much as possible use water
baths. Baths are heated with a hot plate. 11. Read your labels very carefully. Inadvertently mixed chemicals can cause serious explosion. 12. Excess chemicals are considered waste. DO NOT RETURN CHEMICALS BACK TO
THE REAGENT BOTTLE. 13. Prevent contamination by pouring our liquids into your own container. Don’t use droppers in
the reagent bottle. Use a clean, dry spatula to get solids out of the reagent bottle. 14. No food or drinks are allowed in the lab. 15. Dispose of broken glass in the broken glass bucket. 16. Rinse chemicals off skin for at least 15 minutes with cold water. 17. Know the locations of the safety equipment, such as the fire extinguisher, eye wash station, and
emergency shower.
9 6/26/2008

10 6/26/2008

11 6/26/2008
Organic
Lab 1
Experiments

12 6/26/2008

13 6/26/2008
Organic Lab I Experiment 1
Molecular Geometry:
Experience with Models
Objective:
To become familiar with the three-dimensional aspects of organic molecules. Materials: Molecular models (ball and stick). A black sphere with four holes represents carbon, hydrogen by a white sphere with one hole, and chlorine by a green sphere with one hole. Background: Organic compounds are extremely numerous—in fact, there are approximately 2 X 10⁶ known organic compounds. The chemical and physical properties of these compounds depend upon what elements are present, how many atoms of each element are present, and how these atoms are arranged in the molecule. Molecular formulas often, but not always, permit one to distinguish between two compounds. For example, even though there are eight atoms in both C2H6 and C2H5Cl, we know immediately that these are different substances on the basis of their molecular formulas. Similarly, inspection of the molecular formulas C2H6 and C3H8 reveals that these are different compounds. However, there are many substances that have identical molecular formulas but are completely different compounds. Consider the molecular formula C2H6O. There are two compounds that correspond to this formula: ethyl alcohol and dimethyl ether. While the molecular formula gives no clue as to which compound one may be referring, examination of the structural formula immediately reveals a different arrangement of atoms for these substances: H H H H
⏐ ⏐ │ │ H —C—C—O—H H—C—O—C—H │ │ │ │ H H H H
Ethyl alcohol Dimethyl ether
In addition, when molecular models (ball-and-stick type) are used, trial and error will show that there are just two ways that two carbons, six hydrogens, and one oxygen can be arranged without violating the usual valances of these elements. (Remember, carbon has a valance of 4, oxygen 2, and hydrogen 1.) Compounds that have the same molecular formula but different structural formulas are termed isomers. This difference in molecular structure results in differences in chemical and physical properties of isomers. In the case of ethyl alcohol and dimethyl ether, whose molecular formula is C2H6O, these differences are very pronounced (see Table 37.1). In other cases, the differences may be more subtle.
TABLE 1 Properties of Ethyl Alcohol and Dimethyl Ether
Property Ethyl Alcohol Dimethyl Ether Boiling point 78.5oC -24oC Melting point -117°C -139°C Solubility in H20 Infinite Slight Behavior toward sodium Reacts vigorously, liberating No reaction
hydrogen

14 6/26/2008
The importance of the use of structural formulas in organic chemistry becomes evident when we consider the fact that there are 35 known isomers corresponding to the formula C9H20! For the sake of convenience, condensed structural formulas are often used. The structural and condensed structural formulas for ethyl alcohol and dimethyl ether are
Structural formulas Ethyl alcohol Dimethyl ether
H H H H ⏐ ⏐ │ │ H —C—C—O—H H—C—O—C—H │ │ │ │ H H H H
Condensed structural formulas
CH3CH2OH CH3OCH3
A short glance at these formulas readily reveals their difference. The compounds differ in their connectivity. The atoms in ethyl alcohol are connected or bonded in a different sequence from those in dimethyl ether. You must learn to translate these condensed formulas into three-dimensional mental structures and to translate structures represented by molecular models to condensed structural formulas. Naming alkanes, the IUPAC way.
1. The longest continuous chain of carbon atoms is the parent chain. If there is no longest chain because two or more chains are the same longest length, then the parent chain is defined as the one with the most branches. (The idea here is to keep the name simpler. More branches numbered from the parent chain means fewer parentheses needed later.)
2. Carbon atoms connected to the parent chain but not part of it are parts of branches. To avoid ambiguity, branches are numbered based on the carbon number of the parent chain at the point of attachment to the parent chain.
3. The general idea in naming organic compounds is to always aim for the smallest numbers possible. Whenever two or more possibilities exist, which is usually the case, because there are two ends you can start numbering from on all acyclic chains, "smallest numbers" means smallest at the first difference. Thus:
• Between 3-ethyl-4,8-dimethylnonane and 7-ethyl-2,6-dimethylnonane, the first results in the lower first-different number.
• Between 2,3,8-trimethylnonane and 2,7,8-trimethylnonane, the first results in the lower first-different number.
4. Basically, what this means is that if you start checking from both ends of the chain, stepping toward the center of the chain one carbon at a time counting 1, 2, 3,..., then the branch you get to first sets all the other numbers for the name. If two branches are reached at the same time, then the "winning" branch is

the one that is first alphabetically. If the branches are the same, then you have to keep stepping in toward the center until a difference is found. If no difference is found, then it doesn't matter which end you number from.
5. Once all the numbers for the branches are determined, the branches are named using -yl, and ordered alphabetically. If branches themselves are branched, then the complete name of the branch (with numbers) must be determined at this time. It is the complete name of the branch which is alphabetized. Thus, for example:
• (2,2-dimethylbutyl) comes before ethyl
• isopropyl comes before sec-butyl
• If a halogen is a substituent, it is named first before the alkyl group.
6. Finally, when more than one of the same branch is present, the prefixes di, tri, tetra, etc. for simple branches. The name is constructed by separating numbers with commas and adding hyphens before and after sets of numbers so that they don't run into words. Branches with numbers are set off with parentheses so that it is clear that the numbers only refer to that branch. Other than that, there is no punctuation and there are no spaces in the names.
PROCEDURE: Construct models of the molecules as directed and determine the number of isomers by trial and error as directed below. Answer all questions that are bolded at the end of each section. A. Methane Construct a model of methane, CH4. Place the model on the desktop and note the symmetry of the molecule. Note that the molecule looks the same regardless of which three hydrogens are resting on the desk. All four hydrogens are said to be equivalent. Now, grasp the top hydrogen and tilt the molecule so that only two hydrogens rest on the desk and the other two are in a plane parallel to the desk top (see Figure 1). Now imagine pressing this methane model flat onto the desktop. The resulting imaginary projection in the plane of the desk is the conventional representation of the structural formula of methane:
FIGURE 1 Model of methane.
Replace one of the hydrogen atoms with a chlorine atom to construct a model of chloromethane (or methyl chloride), CH3Cl. Replace a second hydrogen atom by a chlorine atom to make dichloromethane, CH2Cl2. Con-vince yourself that the two formulas represent the same three-dimensional structure and are not isomers.
15 6/26/2008
H Cl

16 6/26/2008
│ │ Cl—C—Cl and Cl—C—H │ │ H H Replace another hydrogen to make CHCl3, chloroform (or trichloromethane). Finally, make CCl4, carbon tetrachloride. Question: Draw the structural formula each of the chloromethanes and name them. B. Ethane Make a model of ethane, C2H6, from your model of CH4 by replacing one of the hydrogens with a CH3 unit; the —CH3 unit is called the methyl group. Note that the hydrogens of ethane are all equivalent. Replace one of the hydrogens in your ethane model with a chlorine ball. Does it matter which hydrogen you replace? How many compounds result? Now examine your model of C2H5Cl and note how many different hydrogen atoms are present. If another hydrogen of C2H5Cl is replaced by a chlorine atom to yield C2H4Cl2 how many isomers would result? Questions:
1. Does the formula C2H4Cl2 distinguish the possible molecules corresponding to this formula?
2. Write the condensed structure for C2H5Cl and name each compound.
3. Write the condensed structural formulas for all isomers of C2H4Cl2 and assign the IUPAC names to each.
C. Propane From your model of ethane, construct a molecular model of propane, C3H8, by replacing one of the hydrogen atoms by a methyl group, —CH3. Examine your model of propane and determine how many different hydrogen atoms are present in propane. If one of the hydrogens of propane is replaced with chlorine, how many isomers of C3H7Cl are possible? Question:
1. Write the condensed formulas of the isomers of C3H7Cl and give their names.
2. How many isomers are there corresponding to the condensed formula C3H6Cl2.Write the structural condensed structural formulas and IUPAC names for these isomers. By this stage in this experiment, you should realize that a systematic approach is most useful in determining the numbers of isomers for a given formulas.
3. Determine the number of isomers with the formula C3H5Cl3. Write the condensed structural formula of all isomers.
D. Butane The formula of butane is C4H10. From your model of propane, C3H8, construct all of the possible isomers of butane by replacing a hydrogen atom with a methyl group, —CH3. Questions:
1. How many isomers of butane are there? Give their condensed structural formulas and IUPAC names.
2. There are four isomers corresponding to the formula C4H9Cl. Write their condensed structural formulas and name them.
3. Write the condensed structural formulas and name all of the isomers of C4H8Cl2. Use your models to help answer this question.

17 6/26/2008
E. Pentane Questions:
1. Use your models in a systematic manner to determine how many isomers there are for the formula C5H12. Write their condensed structural formulas and name them.
2. Write and name all isomers for the formula C5H11Cl.
F. Cycloalkanes Cycloalkanes corresponding to the formula CnH2n exist. Try to construct (but do not force too much in your attempt) models of cyclopropane, C3H6; cyclobutane,C4H8; cyclopentane, C5H10; and cyclohexane, C6H12. Questions:
1. Although cyclopropane and cyclobutane exist, would you anticipate these to be highly stable molecules?
G. Alkenes Using two curved connectors for bonds, construct a model of ethene (ethylene), C2H4. Note the rigidity of the molecule; note that there is no rotation about the carbon-carbon double bond as there is in the case of carbon-carbon single bonds such as in ethane or propane. Questions:
1. How many isomers are there corresponding to the formulas C2H3Cl? C2H2Cl2?
2. Give the structures and names of all the isomers.

18 6/26/2008

19 6/26/2008
Organic Lab 1 Experiment 2
Isolating Clove Oil from Cloves Using Steam Distillation
INTRODUCTION Simple and fractional distillations are carried out on miscible mixtures. Ideal mixtures follow Raoult's law: The total vapor pressure of the system is determined by adding together the products of the vapor pressure and the respective mole fraction of each compound. For a two-compound system, this relationship is shown in Equation 1, where PT is the total vapor pressure, P1° and P2° are the vapor pressures of pure compounds 1 and 2, and X1 and X2 are the respective mole fractions.
PT = P1°X1 + P2°X2 (Eq.l)
Distillation can also be performed on mixtures in which the two compounds are not miscible. This process is called codistillation. When one of the compounds is water, the process is called steam distillation. When two immiscible liquids are distilled, the total vapor pressure PT above the liquid is equal to the sum of the vapor pressures of each compound. This relationship, known as Dalton's law, is shown in Equation 2.
PT = P1° + P2° (Eq.2)
The respective mole fractions are not included in this equation because, in an ideal situation, each liquid vaporizes independently of the other. When PT is equal to atmospheric pressure of 760 torr, compounds 1 and 2 begin to codistill, with each compound contributing to PT. Consider water as compound 1. The vapor pressure of pure water at its boiling point of 100 °C is 760 torr. Because compound 2 also contributes to PT, the mixture will distill at a temperature less than 100 °C. The actual distillation temperature will depend on the vapor pressure of compound 2. Steam distillation offers an advantage in that volatile compounds that are unstable or have high boiling points can codistill with water at relatively low temperatures. This process avoids decomposition that might occur at the normal boiling point of the compound of interest. For example, eugenol, the major compound of clove oil, boils at a relatively high temperature of 254 °C. Steam distillation avoids this high temperature and results in the distillation of eugenol at a temperature slightly less than 100 °C. In practice, steam distillation is usually carried out by one of two methods. In the first method, an excess of water is added to the compound of interest in a distilling flask. The mixture is then heated to the boiling point. The resulting vapor is condensed and collected in a receiving flask. The compound of interest is then separated from the water, often by extraction. In the second method, steam is bubbled into the compound of interest to effect the distillation. In this experiment, you will use the first method because it is easier to set up. Clove oil belongs to a large class of natural products called the essential oils. Many of these compounds are used as flavorings and perfumes and, in the past, were considered to be the "essence" of the plant from which they were derived. Cloves are the dried flower buds of the clove tree, Eugenia caryo-phyllata, found in India and other locations in the Far East. Steam distillation of freshly ground cloves results in clove oil, which consists of several compounds. Eugenol is the major compound,

comprising 85-90 percent. Eugenol acetate comprises 9-10 percent. These structures are shown in Figure 1.
Qualitative Tests
Eugenol contains a carbon-carbon double bond and an aromatic hydroxyl group called a phenol. These functional groups provide the basis for simple chemical test used to characterize the clove oil.
A potassium permanganate (KMnO4) solution can oxidize a double bond at room temperature to form a 1,2-diol with the simultaneous reduction of Mn7+ in KMnO4 to Mn4+ in manganese dioxide (MnO2), as shown in Equation 4. A positive test is the disappearance of the purple KMnO4 and the appearance of MnO2 as a muddy brown precipitate.
Phenols (Ar-OH) react with the Fe3+ ion in iron(III) chloride (FeCl3) to give complexes that are blue, green, red, or purple, as shown in Equation 5. The color may last for only a few seconds or for many hours, depending on the stability of the complex.
In this experiment, you will steam distill clove oil from freshly ground cloves. Following the distillation, clove oil and water will be present in the receiving flask. Because clove oil will be a minor fraction of the distillate, the clove oil must be extracted from the water into an organic solvent such as dichloromethane. Removing the dichloromethane layer leaves clove oil as the product. Reagents and Properties Equipment Bunsen burner 10, 100 mL graduated cylinders Marking pen 4 pasteur pipets with latex bulb 4 test tubes (qual tubes) Steam Distillation apparatus
20 6/26/2008

Part 1. Conducting Steam Distillation
1. Weigh 5 g of ground cloves and record the mass. 2. Use a powder funnel to transfer the ground cloves to a 250-mL round-bottom flask. Add 40 mL of
deionized or distilled water and a boiling chip to the flask. Mix well with a glass stirring rod. Mark the level of the mixture on the side of the flask with a permanent marker.
3. Add 30 mL of water to a 100-mL round-bottom flask. Mark the level of the water on the side of the flask. Then discard the water from the flask.
4. Assemble the steam distillation apparatus shown in Figure 2. Grease all glass joints lightly. Use the 250-mL round-bottom flask as the boiling pot. Use the 100-mL round-bottom flask as the receiver. Pour 30 mL of water into the addition funnel. Start the flow of water through the condenser.
5. Adjust a Bunsen burner flame to lessen the hot central cone. Heat the boiling pot by waving the flame back and forth under the pot. Do not heat the mixture too rapidly. The clove oil tends to foam when rapidly heated. The burner flame can easily be added and withdrawn to control the heating rate. Maintain a distillation rate of approximately one-drop every 3-5 s.
6. Add water to the 100-mL round bottom flask as needed to keep the water level at the mark. Stop the distillation when approximately 30 mL of distillate has been collected.
Part 2. Extracting the Clove Oil
Caution: Dichloromethane is a strong irritant. This portion of the experiment must be done in a fume hood. Clove oil (eugenol) is irritating. Prevent eye, skin, and clothing contact.
1. Allow the receiver to cool to room temperature. Transfer the distillate from the receiver into a 125-mL separatory funnel using a pipet. Add 10 mL of saturated NaCl solution.
2. Dismantle the condenser from the distilling head. Significant amounts of clove oil will adhere to the condenser and the sides and neck of the receiving flask. Using a dropper pipet, carefully rinse the condenser and the inside neck of the receiving flask with 5 mL of dichloromethane. Swirl the flask gently to dissolve the remaining clove oil. Add this dichloromethane to the distillate in the separatory funnel using a pipet.
21 6/26/2008

22 6/26/2008
3. Cap the separatory funnel and gently swirl the contents for several seconds. Vent the separatory funnel frequently. After the pressure has been vented, shake the contents vigorously to thoroughly mix the two layers.
4. Swirl the separatory funnel. At the same time, gently tap the outside of the separatory funnel with your index finger to force into the bottom layer any droplets of dichloromethane that are adhering to the sides of the funnel.
5. Allow the layers to separate. Remove the stopper from the separatory funnel and drain the lower dichloromethane layer into a 50-mL Erlenmeyer flask, making certain that none of the aqueous layer is transferred to the flask.
6. Rinse the condenser and the receiver with a second 5-mL portion of dichloromethane. Transfer the rinsing to the separatory funnel. Repeat the extraction of the aqueous layer.
7. Drain the second dichloromethane extract from the separatory funnel and combine it with the first one in the 50-mL Erlenmeyer flask. Repeat the rinsing and extraction process with a third 5- mL portion of dichloro-methane. Combine the third extract in the same 50-mL Erlenmeyer flask.
Part 3. "Drying the Dichloromethane layer" Caution: Anhydrous sodium sulfate (Na2SO4) is irritating and hygroscopic. Do not inhale and ingest this
compound. This portion of the lab must be done in the fume hood.
1. Add approximately 0.5 g increments of anhydrous Na2SO4 to the flask containing the dichloromethane extracts
until the anhydrous Na2SO4 no longer clumps. Parafilm the flask. Allow the extracts to dry for 5 min. 2. Add a boiling chip to a clean, dry 50-mL boiling flask. Weight the boiling flask with the boiling chip to the
nearest 0.001 g and record the mass. Using a pipet, transfer the dried dichloromethane into the preweighed boiling flask, making certain that no Na2SO4 is transferred with the solution. Use three additional 2-mL portions of dichloromethane to rinse the Na2SO4 and ensure complete transfer of the clove oil to the boiling flask.
3. Label the beaker with you name using a permanent marker. Cover the boiling flask with parafilm and give the flask to your instructor to evaporate. When all of the dichloromethane has evaporated, cool the boiling flask.. Weigh it to the nearest 0.001 g and record the mass. Subtract the mass of the empty flask to obtain the mass of the clove oil.
Part 4. Analyzing Clove Oil by flammable Chemical Tests
Caution: Clove oil (eugenol) is irritating. Methanol is flammable and toxic. Keep away from flames or other heat sources. Prevent eye, skin, and clothing contact.
1. Dissolve the clove oil in 10 mL of methanol*. 2. Obtain four test tubes and label them 1-4. Label tubes 1 and 2 "control". Add 1 mL of methanol to each of the
four tubes. 3. Using a Pasteur pipet, add 5 drops of the methanol-clove oil solution prepared in step 1 to test tube 3 and 10
drops into test tube 4. Gently swirl each tube.
Testing with Potassium Permanganate Caution: Potassium permanganate (KMnO4) is corrosive and oxidizing. Prevent eye, skin, and clothing
contact. Do not inhale or ingest KMnO4.
4. Using a Pasteur pipet, add three drops of 0.05M KMnO4 to test tubes 1 and 3 and record your observations.
Testing with Iron (III) Chloride
Caution: Iron(III) chloride (FeCl3) is toxic and corrosive. Prevent eye, skin, and clothing contact. Do not inhale or ingest FeCl3.
5. Using a Pasteur pipet, add two drops of 1% FeCl3 solution to test tubes 2 and 4. Record your observations.

23 6/26/2008
Post-Laboratory Questions 1. Calculate the percent yield of clove oil based upon the initial mass of the ground cloves. 2. Give your test results for the reaction of your eugenol product with each of the test reagents. 3. Complete the following reactions, giving the correct structure for each organic product. (a) eugenol + KMnO4 (b) eugenol + FeCl3

24 6/26/2008

25 6/26/2008
Organic Lab 1 Experiment 3
The Synthesis of an Ester Simple esters tend to have pleasant odors. In most cases the characteristic flavors and fragrances of flowers and fruits are due to the compounds with the ester functional group. An exception is the essential oils. Although the odors and flavors can be due to single esters, more often the aroma is due to a complex mixture in which a single ester predominates. Some esters and their odors are listed Table 1 below. TABLE 1
n-propyl acetate pear isobutyl propanoate rum isopentyl acetate banana n-octyl acetate orange methyl salicylate wintergreen methyl anthranilate grape benzyl acetate peach isobutyl propanoate floral ethyl propanoate fruity propyl propanoate pineapple butyl benzoate balsamic methyl benzoate prune ethyl benzoate fruit geranyl acetate rose
Food and beverage manufacturers often use esters as additives to enhance flavor or odor of a dessert or beverage. Many times such flavors or odors do not have a natural basis. The “juicy fruit” flavor, isopentyl acetate is an example. Instant pudding that has the flavor of rum does not contain rum in its ingredients; this flavor is duplicated by the combination of ethyl formate and isobutyl proprionate. The natural flavor and odor are not exactly duplicated, but give the essence of the flavor it tries to duplicate.
A single compound is rarely used in good-quality imitation flavorings. A formula for imitation pineapple flavor is listed in Table 2 below.
TABLE 2 Pure Compound % Essential Oils % Ally caproate 5 Oil of sweet birch 1 Isoamyl acetate 3 Oil of spruce 2 Isoamyl isovalerate 3 Balsam Peru 4 Ethyl Acetate 15 Volatile mustard oil 1 Ethyl Butyrate 22 Oil cognac 5 Terpinyl propionate 3 Concentrated orange oil 4 Ethyl crotonate 5 Distilled oil of lime 2 Caproic acid 8 19 Butyric acid 12 Acetic Acid 5 81 Although the fruity tastes and odor of esters are pleasant, rarely are they used in perfumes and scents applied to the body. The ester group is not as stable to perspiration as essential oils. Esters on contact with sweat will undergo hydrolysis, giving organic acids. These acids, unlike their precursor esters, generally do not have a pleasant odor. Esters have the general formula, RCOOR. The reaction below depicts the Fischer esterification reaction for the synthesis of an ester. A Fischer esterification is the acid-catalyzed synthesis of an ester from an alcohol and a carboxylic acid. In this reaction, the acid and alcohol reactants are in equilibrium with the ester product.

To determine what alcohol and carboxylic acid you need in order to synthesize your ester; you have to remember how to name an ester. In an ester's name, the first word is the name of the group derived from the alcohol. The second word is the name of the acid, where "-ic" has been dropped and "oate" (or "ate") has been added. For example, methyl anthranilate is synthesized from methanol (methyl) and anthranilic acid (anthranilate).
In this experiment, you will synthesize, and purify, an ester, isopentyl acetate from isopentyl alcohol and acetic acid. This ester is often referred to as banana oil.
Isopentyl acetate Because the reaction is in equilibrium, both the product and reactants will be present in the reflux liquid. To increase the yield of the product we will utilize Le Chatelier's principle – if a stress is placed on a system that is in equilibrium, it will adjust to correct the stress. In the reaction above, if one of the reagents is in excess, the equilibrium will be driven to the right (product). Usually, a fivefold molar excess of one of the reagents is sufficient to drive the equilibrium to the right in an esterification reaction. Concentrated sulfuric acid is used to catalyze the reaction. Procedure Part A: Reaction 1. Gather the parts to assemble a reflux apparatus as shown below. A hot plate will be used for heating. In order to
control the vapors, a drying tube packed with anhydrous calcium chloride will be placed on top of the condenser.
26 6/26/2008

2. Weigh a clean and dry 10 mL graduated cylinder and record its mass. In the hood, place
approximately 5.0 mL of isopentyl alcohol into the graduated cylinder and reweigh it. Calculate the mass of the alcohol (mass of alcohol and graduated cylinder – graduated cylinder).
3. In the hood, use a funnel to transfer the isopentyl alcohol to the 25 or 50 mL boiling flask. Without cleaning or washing the graduated cylinder, add approximately 7.0 mL of acetic acid (MW = 60 g/mole and density = 1.06 g/mL) and add the acid to the alcohol already in the boiling flask.
4. Using a calibrated dropper pipet, add 1 mL of concentrated sulfuric acid to the alchohol/carboxylic acid mixture and mix. Add one boiling chip to the reaction mixture.
Safety caution: Both Acetic Acid and Sulfuric Acid are very corrosive. If spilled on the skin, rinse immediately with cold water for 15 minutes. Neutralize acid spills first with baking soda before wiping. 5. Assemble the reflux apparatus, greasing the joints with vacuum grease. Start the water circulating and bring the
mixture to boil. Heat, using a hot plate, under reflux for 60 minutes. While refluxing calculate the theoretical yield of the reaction using the mass of the isopentyl alcohol. Remember the acetic acid is used in excess.
Part B Extraction 1. In the hood carefully clamp a 125 mL separatory funnel to a ring stand using a two prong clamp. Be sure that the
stopcock is closed. Disassemble the reflux apparatus and transfer the reaction mixture (use a dropper, don’t pour) to a 125 mL separatory cylinder. Avoid transferring the boiling chip. Grease the stopper lightly.
2. Add 10 mL of distilled water; stopper the funnel and mix, venting frequently. Allow the layers to separate and unstopper the funnel.
3. Drain the lower aqueous layer into a beaker. Extract the organic layer with 5 mL of 5% sodium bicarbonate. Again drain the lower aqueous layer. Repeat the sodium bicarbonate extraction.
Part C Drying 1. Transfer the crude ester to a clean, dry 50 mL Erlenmeyer flask and add approximately 1.0 gram of anhydrous
sodium sulfate. Mix.
27 6/26/2008

2. Cover the flask with parafilm and let sit for 10 minutes while you prepare the distillation apparatus.
Simple Distillation Apparatus Use a hot plate in place of a heating mantle.
3. If the mixture does not appear "dry" - the drying agent is clumping and/or the solution is cloudy - add another 0.5
gram of anhydrous sodium sulfate and mix. Let it sit for another 10 minutes. Part D Distillation 1. Assemble a distillation apparatus using a 50 mL boiling flask as the distillation flask. 2. Preweigh a clean and dry 50 mL Erlenmeyer flask to function as the collection flask. 3. Immerse the collection flask in a beaker of ice to ensure condensation and reduce the odor. 4. Collect the distillate between 120-142oC, isopentyl acetate's boiling point. Stop when the temperature of the
distillate falls below 120 or above 142 oC. 5. Weigh the product and calculate the percentage yield of the ester. Post Laboratory Questions 1. One method of favoring the formation of an ester is to add excess acetic acid. Suggest another method, involving
the right hand side of the equation that will favor the formation of the ester. 2. Why is the mixture extracted with sodium bicarbonate? Give an equation and explain its relevance.
28 6/26/2008

Organic Lab 1 Experiment 4
Preparation and Properties of Soap Introduction A soap is the sodium or potassium salt of a long-chain fatty acid. The fatty acid usually contains 12 to 18 carbon atoms. The source of the fatty acids is either from animal fats or vegetables which are esters of carboxylic acids. They have a high molecular weight and contained alcohol and glycerol. Chemically, these fats and oils are called triglycerides. Solid soaps usually consist of sodium salts of fatty acids, whereas liquid soaps consist of the potassium salts of fatty acids. A soap such as sodium stearate consists of a nonpolar end (the hydrocarbon chain of the fatty acid) and a polar end (the ionic carboxylate).
nonpolar polar dissolves in oils) (dissolves in water)
Because "like dissolves like/' the nonpolar end (hydrophobic or water-hating part) of the soap molecule can dissolve the greasy dirt, and the polar or ionic end (hydrophilic or water-loving part) of the molecule is attracted to water molecules. Therefore, the dirt from the surface being cleaned will be pulled away and suspended in water. Thus soap acts as an emulsifying agent, a substance used to disperse one liquid (oil molecules) in the form of finely suspended particles or droplets in another liquid (water molecules). Treatment of fats or oils with strong bases such as lye (NaOH) or potash (KOH) causes them to undergo hydrolysis (saponification) to form glycerol and the salt of a long-chain fatty acid (soap).
Triglycerides glycerol sodium stearate
(a soap)
Natural fatty acids are rarely a single type in any given fats or oil. In fact, a single tryglyceride molecule in a fat may contain three different acid residues (R1COOH, R2COOH, R3COOH), and not every triglyceride in the substance will be identical. The fats and oils that are most common in soap preparations are lard and tallow from animal sources and coconut, palm and olive oils from the vegetable sources. The length of the hydrocarbon chain and number of double bonds in the carboxylic acid salt of the carboxylic acid portion of the fat or oil determine the properties of the resulting salt. For example, the salt
29 6/26/2008

of a saturated long chain acid make a harder, more insoluble soap. Chain length also affects solubility. Tallow is the principal fatty material used in making soap. The solid fats of cattle are melted with steam and tallow layer formed at the top is removed. Soap makers usually blend tallow with coconut oil and saponify this mixture. The resulting soap contains mainly the salts of palmitic, stearic and oleic acids from the tallow and the salts of lauric and myristic acids from coconut oil. The coconut oil is added to produce a softer, more soluble soap. Lard differs from tallow in that lard contains more oleic acids. Pure coconut oil yields a soap that is very soluble in water. It is so soft that it will lather even in salt water. Palm oil contains mainly two acids, palmitic and oleic acid, in equal amount. Saponification of this oil yields a soap that is an important constituent of toilet soaps. Olive oil contains mainly oleic acid. It is used to prepare Castille soap. Acid Structure Palmitic acid CH3(CH2)14COOH Stearic acid CH3(CH2)16COOH Oleic acid CH3(CH2)7CH=CH(CH2)7COOH Lauric acid CH3(CH2)10COOH Myristic acid CH3(CH2)12COOH
Table 1 Structure of Acids Commonly Found in Soap
Toilette soaps generally have been carefully washed free of any alkali remaining from saponification. As much glycerol as possible is usually left in the soap and perfumes and medicinal agents are sometimes added. Soft soaps are made by using potassium hydroxide, yielding potassium salts. They are used in shaving creams and liquid soaps. Because soaps are salts of strong bases and weak acids, they should be weakly alkaline in aqueous solution. However, a soap with free alkali can cause damage to skin, silk, or wool. Therefore, a test for basicity of the soap is quite important. Soap has been largely replaced by synthetic detergents during the last two decades, because soap has two serious drawbacks. One is that soap becomes ineffective in hard water; this is water that contains appreciable amounts of Ca2+ or Mg2+ salts.
The other is that, in an acidic solution, soap is converted to free fatty acid and therefore loses its cleansing action.
30 6/26/2008

Procedure Preparation of a soap 1. Measure 23 mL of a vegetable oil or 23 grams of lard into a 250-mL Erlenmeyer
flask. 2. Add 10 mL of ethyl alcohol (to act as a solvent) and 20 mL of 25% sodium
hydroxide solution (25% NaOH). While stirring the mixture constantly with a glass rod, the flask with its contents is heated gently in a boiling water bath.
3. A 600-mL beaker containing about 200 mL of tap water and a two boiling chips can serve as a water bath (Fig. 1).
Figure 1
Set up for preparation of soap
Caution: Alcohol is flammable!
4. After being heated for about 20 min, the odor of alcohol will disappear,
indicating the completion of the reaction. A pasty mass containing a mixture of the soap, glycerol, and excess sodium hydroxide is obtained.
5. Use an ice-water bath to cool the flask with its contents. To precipitate or "salt out" the soap, add 150 mL of a saturated sodium chloride solution to the soap mixture while stirring vigorously. This process increases the density of the aqueous solution; therefore, soap will float out from the aqueous solution.
6. Filter the precipitated soap with 4 ply cheese cloth on a gravity funnel and wash it with 10 mL of ice cold water. Observe the appearance of your soap and record your observation on the Report Sheet. Set aside a small portion of the
31 6/26/2008

32 6/26/2008
crude soap. 7. Rinse and save the cheese cloth to filter the purified soap below.
Purification of Soap
1. Transfer you soap into a 600 mL beaker. Add water about half the volume of your soap and heat until all the soap dissolves.
2. Place the beaker into an ice-water bath and let cool. Add about 150 mL of saturated water to precipitate out the soap.
3. Filter the soap with the rinsed cheese cloth.
Properties of a soap Use the purified soap for the tests below.
Emulsifying Properties. 1. Shake 5 drops of mineral oil in a test tube containing 5 mL of water. A
temporary emulsion of tiny oil droplets in water will be formed. 2. Repeat the same test, but this time add a small piece of the soap you have
prepared before shaking. Allow both solutions to stand for a short time. 3. Compare the appearance and the relative stabilities of the two emulsions. 4. Record your observations on the Report Sheet.
Hard Water Reactions. 1. Place about one-third spatula full of the soap you have prepared in a 50-mL
beaker containing 25 mL of water. 2. Warm the beaker with its contents to dissolve the soap. 3. Pour 5 mL of the soap solution into each of 5 test tubes (nos. 1, 2, 3, 4, and 5). 4. Test no. 1 with 2 drops of a 5% solution of calcium chloride (5% CaCl2), no. 2
with 2 drops of a 5% solution of magnesium chloride (5% MgCl2), no. 3 with 2 drops of a 5% solution of iron(III) chloride (5% FeCl3), and no. 4 with tap water. The no. 5 tube will be used for a basicity test, which will be performed later.
5. Record your observations on the Report Sheet.
Alkalinity (Basicity). 1. Test both the crude and purified soap solution with a wide-range pH paper. 2. What is the approximate pH of your soap solution? Record your answer on the Report Sheet.

33 6/26/2008
Name:_________________________________________________________________
REPORT SHEET Preparation Describe the appearance of your soap. Observation of the hard water reaction No. 1 + CaCl2__________________________________________________________ No. 2 + MgCl2_____________________________________________________________________________________________
No. 3 + FeCl3______________________________________________________________________________________________ No. 4 + tap water________________________________________________________ Alkalinity pH of your crude soap solution _____________________________________________ pH of your purified soap solution____________________________________________
Name:__________________________________________________________________

34 6/26/2008
POST-LAB QUESTIONS
1. When you made soap, first you dissolved vegetable oil in ethanol. What happened to the ethanol during the reaction?
2. What are the two main disadvantages of soaps versus detergent?
3. Soaps that have a pH above 8.0 tend to irritate some sensitive skins. Was your soap good enough to compete with commercial preparations.
4. Did you determine that one purification step is enough to lower the pH of the soap solution?

35 6/26/2008
Organic
Lab 2
Experiments

36 6/26/2008

37 6/26/2008
Organic Lab Experiment 5
Esterification of Linoleic and Linolenic Acids from Evening Primrose Oil
Background Evening Primrose is a biennial plant indigenous to North America. Oil from the plant is cold pressed. Evening primrose oil is composed of fatty acids of oleic acid, palmitic acid, gamma-linolenic acid (GLA) and linoleic acid (LA). Both gamma-linolenic and linoleic acids are essential fatty acids. Evening primrose oil contains 72% linoleic acid and 9% gamma-linolenic acid. Essential fatty acids (EFA’s) play important roles in our body’s overall health. They are part of every cell, and establish and control the cellular metabolism. EFA’s are essential in four primary body functions: a) provide energy, b) maintain body temperature, c) insulate our nerves and d) cushion and protect body tissues. Linoleic acid, an omega-6-fatty acid, is not produced by the body and must be obtained through dietary intake. Linoleic acid acts as an energy source and is what the body converts to gamma linolenic acid (GLA). GLA, an omega-6-fatty acid is converted to eicosanoids which are hormone-like substances that regulate platelet aggregation, blood vessel tone, salt and water balance, gastrointestinal function, neurotransmitter function and secretion of insulin. Ecosanoids include the prostaglandin, throboxanes and leucotrienes. Because EPO is a rich source of gamma-linolenic acid, it is highly valuable for individuals who cannot otherwise form GLA from linoleic acid. The fatty acids in EPO are easily oxidized when exposed to air. They also have high boiling points making separation by distillation difficult. By esterifying the fatty acids to their methyl esters, the problem of oxidation is alleviated. Carboxylic acids react with alcohol when catalyzed with acid to form esters. The general reaction is: R1COOH + R2OH → R1COOR2 + H2O In oils, carboxylic acid varies considerably in their fatty acid content. They commonly occur as triglycerides. Triglycerides are triesters of glycerol with, most times, different acid groups attached to the glycerol. If sodium methoxide in methanol is used, the triglycerides are converted to methyl esters cleanly as shown on the next page. The reaction must be done in anhydrous condition. Acetic acid is added to the reaction to acidify the mixture. The methyl esters are extracted into hexane layer. The methyl esters is isolated from the hexane is by distillation.
R1COOCH2 R1COOCH3 HO⎯CH2 ⏐ ⏐
R2COOCH2 CH3O-Na+ R2COOCH3 + HO⎯CH2 ⏐ CH3OH ⏐ R3COOCH2 R2COOCH3 HO⎯CH2 Triglyceride methyl esters glycerol

In this experiment, gamma-linolenic acid, linoleic acid, palmitic acid, oleic acid palmitic acid and stearic acid will be esterified into their corresponding methyl esters and analyzed by gas chromatograph. Other fatty acids may be isolated but will not be identified. Gas Chromatography Ideally, separation by vacuum distillation is performed to be able to separate each component. However, this requires a vacuum source that is not available. Instead, separation and quantification of the components will be done by gas chromatography. Gas chromatography is often used as a tool to separate, identify and quantify components of a mixture. The components are separated through a column that contains an adsorbent that is coated with a liquid. The liquid coated adsorbent is the stationary phase. The sample is injected through a heated injection port. It vaporizes and is carried through the heated column by the carrier gas, commonly helium. The carrier gas is the mobile phase. The sample is passed through the column and separates. The separation occurs because the components are attracted to mobile and stationary phases differently. As the components separate, they go through the detector at different times. A signal is sent to the detector and peaks are generated as each component goes through the detector. The distance from injection mark to the peak, multiplied by the chart speed is called retention time.
If the chart speed is constant, the distance is normally reported as the retention time. Given there is
no change in the flow rate of carrier gas and temperature, the retention time for the given compound
will always be the same. The retention times of the components are compared to the retention time
of the known standards to identify the components.
38 6/26/2008

The areas of the peaks are proportional to amount of the components. To determine the percent component, the areas of the peaks are measured. Each of the component areas is divided by the total area and multiplied by 100. In the past, the areas of the peaks were calculated by triangulation of the peak, height (at ½ width) x width. For this experiment, the integrator will measure the areas for you. A computer prints out with the areas and % areas will accompany your chromatogram.
In this experiment we will convert the triglycerides present in the EPO to the corresponding methyl esters using the procedure used by Pavia et al. We will identify the presence of GLA and LA and minor fatty acids ,palmitic, oleic and stearic acids, in EPO. We will also quantify the fatty acid components of EPO. Gas Chromatography will be used for both identification and quantification of product. A flame ionization detector (FID) with a column specific to fatty acid will be used. Materials: Per pair of students 1 clean dry test tube 1 cork to fit test tube 1-50 mL Erlenmeyer flask Pasteur pipets and bulbs Cotton Vial with lids (10 mL capacity) Simple distillation apparatus (2- 50 mL boiling flasks, 3 way connector, straight tube adapter, thermometer adapter, vacuum adapter, thermometer, 2-water hoses) Funnel Filter paper Ring stand 2 clamps 1 small ring Per Class Nitrogen gas 2 sets of water baths set to 40oC with test tube racks. Set one on each side of the lab away from the sink area. Chemicals: GC standards (methyl palmitate, methyl oleate, methyl linoleate, gamma methyl linolenate, methyl stearate). Prepare a mixture of 0.2 mL of each of the methyl ester dissolved in 1 mL methylene chloride.
39 6/26/2008

40 6/26/2008
Anhydrous sodium sulfate mixed with 10% (w/w) sodium bicarbonate (10 gram grams of sodium bicarbonate mixed with 90 grams of anhydrous sodium sulfate). Set the following chemicals in a dispensing hood. 1. 1.Tetrahydrofuran (THF) dried over molecular sieves (1 week prior to use), stock bottle 2. Sodium methoxide in anhydrous methanol, stock bottle 3. 4 – 2 mL syringes 4. glass syringe (1 mL) 5. Nitrogen gas tank with regulator and a hose hook-up. Set items 1 to 5 in a hood that is centrally located. 6. Evening Primrose oil, 50 pill Set up items 7 to 9 in each of the 6 hoods (total of 6 chemical bottles) 7. Glacial Acetic Acid, 25 ml/bottle with droppers 8. Hexane, 200 mL/bottle provide a 25 mL or 10 mL graduated cylinder with each bottle. Label hexane at the bottom of the grad cylinder. 9. Methylene Chloride, 25 mL/bottle with droppers Procedure: Part A: Esterification of EPO
Important: Maintain an anhydrous condition until the acetic acid is added. 1. Slit open a capsule of evening primrose oil. Place two drops of the oil in a clean and dry small test tube. Label your test tube with your name. 2. Have your instructor add 1 mL of (dry) tetrahydrofuran (THF) and 2 mL of 0.5 M sodium methoxide in anhydrous methanol. This will be done in the dispensing hood. 3. Loosely insert a cork in the test tube containing the reactants mixed above. Swirl gently to mix the reagents 4. Place the test tube in 40 oC bath in the hood. Allow the mixture to react for 10 minutes in the water bath. Part B: Extraction of methyl ester Do all of Part B in the hood. Reagents are already in the hoods. 1. Remove the test tube from the water bath and add one drop of glacial acetic acid while swirling gently. 2. Add 5 mL of distilled water and mix with a stirring rod. 3. Add 5 mL of hexane to extract the methyl ester. Stir the mixture for 2 minutes. 4. Let the mixture settle. There should be two layers. If an emulsion forms, it should dissipate on standing. 5. Using a Pasteur pipet, remove the top hexane layer and place it into 50 mL Erlenmeyer flask. Cover the flask with parafilm to prevent contamination. 6. Add another 5 mL of hexane to the aqueous layer to extract the remaining methyl esters. Again remove the upper hexane layer and add it to the first hexane extract. 7. Dry the hexane layer with the anhydrous sodium sulfate/sodium bicarbonate solid mixture to remove any residual water. 8. Fold a filter paper in half and then in quarter. Make a cone and place the coned filter paper in a gravity funnel. Wet the filter paper with hexane (this is a very important step). Filter the hexane layer into a vial labeled with your name. Turn in the vial to your instructor to be run on the GCMS.

41 6/26/2008
Part C: Gas Chromatography Identification of GLA and LA 1. Identify the peaks based on the retention time of the standards. 2. Determine the percent fatty acid components of your product? Post Lab Questions. 1. How are you able to identify the components of your product? 2. Are you able to identify all the fatty acid components? Pavia D., Lampman, G, Kriz, G and Engel, R. Introduction to Organic Laboratory Techniques, A Small Scale Approach. Saunders College Publishing. 1998

42 6/26/2008

43 6/26/2008
Biodiesel
Biodiesel as an alternative to fossil fuel has generated a great deal attention. Because biodiesel’s production is sustainable, it is an appealing fuel option. Source of biodiesel for large scale production is being scrutinized. Soy beans is the most discussed crop for large scale oil production. The drawback is land availability or the replacement of land farmed for food to cultivate soy bean for biodiesel. Production of oil by algae is currently being investigated as viable option. Pure biodiesel fuel can be used in compression –ignition diesel ignitions diesel cars with no major modification requirements; however certain mixes with petroleum allow the fuel to function in other cars and certain farm machinery. Biodiesel is defined as a mono alkyl esters of long chain fatty acid derived from vegetable oils or animal fats which conform to ASTM D6751 specifications for diesel engines. Biodiesel refers to the pure fuel before blending with diesel fuel. Biodiesel blends are denoted as “BXX” with “XX” representing the percent of biodiesel in the blend. An example is B20 which is a blend that contains 20% biodiesel and 80% petroleum diesel. Emission of vehicles and machineries using biodiesel has been touted to be better for the environment than fossil fuel. Although carbon dioxide emission is less than fossil oil, the carbon dioxide generated by the crop grown to produce the biodiesel increases the green house effect. One analysis found that clearing forests and grasslands to grow the crops releases vast amounts of carbon into the air -- far more than the carbon spared from the atmosphere by burning biofuels instead of gasoline. Even converting existing farmland from food to biofuel crops increases greenhouse gas emissions as food production is shifted to other parts of the world, resulting in the destruction of more forests and grasslands to make way for farmland, the second study found. Comparison of emissions of biodiesel and diesel showed substantial reductions in unburned hydrocarbons, particulate matters and carbon monoxide. There is complete elimination of sulfur oxides and sulfates. Nitrogen oxides increase or decrease depending on the engine family and testing procedures. Biodiesel is synthesized by trans-esterification of the triglyceride in the presence of a basic catalyst.
R1COOCH2 R1COOCH3 HO⎯CH2 ⏐ ⏐ R2COOCH2
CH3O-Na+ R2COOCH3 + HO⎯CH2 ⏐ CH3OH ⏐ R3COOCH2 R2COOCH3 HO⎯CH2 Triglyceride Fatty acids Glycerol Methyl esters (biodiesel) In this experiment you will synthesize biodiesel from corn oil, prepare the catalyst sodium methoxide and separate the biodiesel from the glycerol. Procedure Gather the following glassware:
• 10 mL pipet • 15 mL plastic centrifuge tube • Glass stirring rod • Pasteur or plastic dropper • Hot plate

• Centrifuge Caution: NaOH is extremely corrosive. Wear eye protection and gloves.
1. Measure 2 mL of sodium methoxide into a 15 mL centrifuge tube. 2. Warm up 10 mL of unused vegetable oil in a 50 mL beaker to about 60o C – do not go over this
temperature. 3. Slowly add the warm vegetable oil to the sodium methoxide and mix for 30 minutes. You can
use the vortex mixer to rest your arm. 4. Centrifuge the test tube for 5 minutes. There should be two layers, the top layer is the biodiesel
and the bottom layer contains glycerol and methanol. Centrifuge another 5 minutes if the biodiesel layer appears cloudy or if the layers did not separate.
5. Using a pipet draw the top layer of biodiesel into a clean, dry 10 mL graduated cylinder. 6. Measure the volume of biodiesel and calculate the percent by volume based on the starting
volume of oil and volume of biodiesel synthesized. Expected conversion is 70%, how did your compare and propose a reason for any major deviation.
Post Lab Questions: 1. CH3(CH2)10COOCH2 │ CH3(CH2)4(CH=CHCH2)2(CH2)6COOCH2
│ CH3(CH2)16COOCH2 The triglyceride above was reacted with CH3O- and CH3OH. What are the products of the reaction. Using table below identify the methyl esters products.
Research for this experiment was provided by the Organic Class of Fall 07. Special appreciation for contribution by the following:
Nuria Ugalde Adam Sandford Erica Joseph Leslie Elvig
44 6/26/2008

45 6/26/2008
No formal report for the biodiesel lab. Present your data when answering question on Procedure #6 answer the postlab question.

46 6/26/2008

A Study of Carbohydrates
Objectives: Carry out several of the more common carbohydrate reactions. Identify an unknown sugar.
Monosaccharides and Disaccharides Carbohydrates, also known as sugars or saccharides, are one of the most important classes of compounds dealt with in organic chemistry. These compounds function as sources of energy in living organisms and as structural material for cells. Carbohydrates are complex molecules containing both alcohol and carbonyl functional groups. One of the main sources of carbohydrates in our diet is starch from grains and cereals Carbohydrates, such as starch, can also be viewed as polymers of various monosaccharides. A monosaccharide is the simplest type of carbohydrate; it cannot be further hydrolyzed into smaller units. One such example of a monosaccharide is glucose, which is shown below.
D-(+) Glucose (hemiacetal form) D-(+) Glucose (aldehyde form) Because glucose has both an alcohol and a carbonyl functional group, it can form a cyclic hemiacetal, as shown in the reaction above. The hemiacetal form is in equilibrium with the open chain form. Because both of these forms exist, one would expect that the chemistry of these sugars would be similar to that of an aldehyde. In the case of glucose, its aldehyde form can be easily oxidized. Carbohydrates that can be oxidized are known as reducing sugars. A disaccharide is a molecule composed of two monosaccharide units. One such compound is sucrose (structure shown below), also known as table sugar. Sucrose is composed of a fructose unit and a glucose unit. Note that the fructose and glucose units are joined by an acetal link involving both their carbonyl carbons, which means that the aldehyde and ketone forms of these sugars are unavailable. Because sucrose is not in equilibrium with any aldehyde form, it is considered to be a nonreducing sugar.
Two other common disaccharides are maltose (composed of two glucose units) and lactose (which contains glucose and galactose). Polysaccharides are carbohydrates composed of many monosaccharide units linked together. The characteristic linkage of most disaccharides and polysaccharides is an acetal. The formation of an acetal linkage produces water; thus, the addition of water will break acetal linkages
47 6/26/2008

(hydrolysis). The relationships between the various carbohydrates are illustrated by the following hydrolysis reactions. Note that the reactions are acid-catalyzed: H+ H+ polysaccharides + H2O → disaccharides + H2O → monosaccharides starch, cellulose sucrose, glucose, fructose, lactose, maltose galactose, xylose The monomer glucose is used to form two different polymers, starch and cellulose. The difference between these two polymers is how the polymeric linkage is formed. We, as humans, can utilize starch as a source of glucose because we can hydrolyze the linkages between the glucose units in starch (α linkages). In contrast, we cannot use cellulose as a source of glucose because we do not contain the enzyme (β-glycosidase) to hydrolyze the β linkages found in cellulose.
48 6/26/2008

EXPERIMENTAL PROCEDURE
A. Fermentation
During fermentation, certain carbohydrates are converted into CO2 gas and ethanol. This transformation is brought about by several enzymes.
Yeast contains enzymes capable of fermenting glucose as well as many other sugars.
PROCEDURE
1. Obtain an unknown sugar solution (each student gets their own unknown) and record the unknown identification (ID) number in Table 1 of the Data and Report Sheet.
2. Carry out the following procedure and those in Parts B to D with 4% solutions of the sugars fructose, glucose, lactose, sucrose, xylose, you and your partner’s unknowns, honey and water.
3. Label eight test tubes with the identity of the solutions and add 3 mL of the appropriate sugar solution to each tube.
4. Add 3 mL of yeast suspension to each tube. (Shake the yeast bottle before using.)
49 6/26/2008
5. Invert once to mix and place the tubes in a 250-mL beaker that is half full of warm water (45 to

50°C) and put the beaker with the tubes in a 45o water bath.. Take care not to overheat the bath; higher temperatures will deactivate the yeast. The bath does not have to be heated after the tubes are put in.
6. Allow the tubes to remain undisturbed for 1 hour. Gas (CO2) will form, bubble off and create a foam on the top of some of the tubes within an hour.
7. While this test is proceeding, go on to other tests. 8. Record in Table1 which samples produced CO2 and which did not.
B. Benedict's Test
Benedict's reagent is a mild, alkaline oxidizing agent that will oxidize all monosaccharides, whether they are aldoses or ketoses, and some disaccharides. Sugars are classified as reducing or nonreducing, depending on whether or not they react with the Benedict's reagent. A color change from blue to orange, red, or dark brown indicates a reaction has taken place.
PROCEDURE
1. Label test tubes and place 20 drops of the appropriate (listed in Table 1) solutions in each tube. 2. Add 20 drops of Benedict's solution to each tube and agitate to mix the contents. 3. Place all the rubes in a boiling-water bath at the same time. 4. Heat them for 2 minutes after the water starts boiling again. 5. Note and record in Table 1 the color of the agitated contents of each tube after the 2-minute
boiling is complete. C. Barford
Barfoed's reagent is a slightly acidic solution containing Cu2+ ions, but it is a weaker oxidizing agent than the alkaline Benedict's solution. Barfoed's reagent will oxidize monosaccharides (and produce the red-colored precipitate Cu2O) but will not oxidize disaccharides. Thus, Barfoed's reagent serves to distinguish between monosaccharides and disaccharides.
Procedure 1. Label eight test tubes and place 20 drops of the appropriate solution in each tube (listed in Table 1). 2. Add 20 drops of Barford's reagent to each tube and agitate to mix the contents. 3. Place all the tubes in a boiling-water bath at the same time. 4. Heat them for 2 minutes after the water starts boiling again. At the end of 2 minutes, note and record in Table 1 the appearance of any red precipitate. D. Seliwanoff's Test Hexoses (sugars containing six carbon atoms) are dehydrated and form hydroxymethylfurfural when heated with HC1. Ketohexoses (such as fructose) and disaccharides (such as sucrose) that contain a ketohexose yield larger amounts of this product and react faster than aldohexoses. These differences are the basis of the Seliwanoff test for ketoses in which resorcinol is used to form a red product with the generated hydroxymethylfurfural. Other sugars produce gray, yellow, or faintly pink colors.
50 6/26/2008

Dehydration of Aldohexose and Ketohexose to Hydroxymethylfurfural
51 6/26/2008

52 6/26/2008
CAUTION: Seliwanoff's reagent is 6 M in hydrochloric acid, and will vigorously attack tissue. Wear gloves. If contact occurs, wash the contacted area with cool water.
PROCEDURE
1. Label eight test tubes with the solutions listed on Table 1. 2. Place 2 mL of Seliwanoff's reagent in each tube. 3. Add 1 drop of each solution to the appropriate tube and mix well. 4. Place all the samples in a boiling-water bath at the same time. 5. Heat them for 3 minutes after the boiling starts again. 6. Note and record in Table 1 the resulting color of each solution.
A to d. Positive Results
1. Look through the data of Tables 1 and decide what experimental result constitutes a positive test in each case.
2. Record a summary of these characteristic positive tests in Table 2.
A to E. Summary of Sample Behavior
1. Use the positive results summarized in Table 2 and the test results for each sample recorded in Tables1 through 4 to decide which samples gave positive results for each test.
2. Record these results in Table 6 by placing an X in the blanks to indicate which samples gave positive results.
A to D. Identification of Unknowns
1. Your unknown contained a single sugar. Use the results in Table 3 to identify the sugar.
4. Honey contains two sugars; one is glucose. Identify and record the name of the other one.

53 6/26/2008
Unknown #________________________
TABLE 1 DATA TABLE
Sugars Fermentation
(CO2 Gas)
Benedicts (Color of solution and color and degree of ppt)
Barfoed’s Test (Red Precipitate)
Seliwanoff’s Test (Color)
Water (negative control)
Fructose
Lactose
Sucrose
Xylose
Honey
Glucose
Unknown
TABLE 2
POSITIVE RESULTS
TEST SUGARS THAT GAVE POSITIVE RESULTS Fermentation
Benedict’s Test
Barfoed’s Test
Seliwanoff’s Test Which reacted first?

54 6/26/2008
TABLE 3 SUMMARY OF SAMPLE BEHAVIOR
SUGAR
SOLUTION FERMENTATION BENEDICTS BARFOED’S SELIWANOFF
Water
Fructose
Glucose
Lactose
Sucrose
Xylose
Honey
Unknown
Post lab Questions: 1. Find the structures for the following carbohydrates (sugars) in a reference work or textbook and
decide whether they are reducing or nonreducing carbohydrates (sugars): sorbose, mannose, ribose, maltose, raffinose and cellulose.

ASPARTAME The Study of a Peptide Bond
INTRODUCTION
Aspartame, commonly known as NutraSweet or Equal, is the most popular artificial, low-calorie sweetener available to consumers today. Chemically, aspartame is much different than sucrose, the natural sugar. Its chemical name is L-aspartyl-L-phenyl-alanine methyl ester; it is categorized as a modified dipeptide consisting of two amino acids, aspartic acid and phenylalanine. The phenylalanine possesses a methyl ester group on its carboxyl end. Weight for weight, aspartame is almost 200 times sweeter than sucrose.
Aspartame is used in almost phenomenal amounts, where an estimated 100 million Americans consume the artificial sweetener every year. Furthermore, approximately 5 million pounds of aspartame are sold each year at a price of $20 per pound. Since the patent for NutraSweet expired in December of 1992, prices are expected to decline in the future. The use of aspartame does register some drawbacks. First of all, aspartame seems to have a relatively short shelf life since it can be converted to a tasteless cyclic form in solution in as little as 3 months.1 Second, aspartame is not stable in the presence of heat or strongly acidic/basic media. Aspartame's use as a calorie control substance is somewhat deceiving. Research shows that the intake of this artificial sweetener can produce a craving for carbohydrates. Furthermore, many research experiments have led to the agreement that aspartame does not aid in weight loss or weight control. In essence, the term "diet" in reference to the use of this low-calorie sweetener is misleading. The most serious drawback concerning aspartame is the question of its safety, a topic under great debate. The proposed health risks range from headaches and seizures in humans to brain tumors in rats.2 By July of 1988, 4 years after its approval, the Food and Drug Administration received over 6000 complaints concerning side effects (mainly headaches) from the consumption of the sweetener. Only 251 reports of seizures were brought to the attention of the Adverse Reaction Monitoring System, a subgroup of the FDA. The conclusion reached after the evaluation of these cases was that the occurrences of seizures were not decisively linked to the intake of aspartame. In the end, if the hydrolysis of aspartame is studied, doubts about its safety can be better understood.
55 6/26/2008

Aspartame breaks down into its respective amino acids and methanol when it is metabolized in the body. Methanol is normally toxic to the body, but research has shown that the amount formed is so small that idoes not cause any harmful effects.
Other artificial sweeteners available now to consumers include saccharin and sorbitol. Sorbitol is similar in structure to glucose, a monosaccharide. Instead of possessing an aldehyde group in its structure, sorbitol is a polyalcohol. The use of saccharin is hampered by its controversial cancer link. Sorbitol also has its limitations due to the symptoms that can appear with heavy consumption. These include abdominal cramps, intestinal bloating, and diarrhea. Furthermore, unlike its competition, it is NOT non-caloric.
The newest artificial sweeteners that are clost to being approved or found some limited approval by the FDA include Sunnette (noncaloric, 200X sweeter than sucrose); Sucrolose (chlorinated sucrose derivative, 600X sweeter than sucrose); and Alitame (amino acid derivative, 2000X sweeter than sucrose.) An aspartame solution and two hydrolyzed aspartame solutions will be test for the presence of an alcohol. Remember that the methanol is a product in the hydrolysis of aspartame. The ceric nitrate reagent turns from yellow to reddish orange in the presence of alcohol. The potassium permanganate reagent acts as an oxidizing agent. A positive test form methanol is indicated by a change in color from purple to brown.
56 6/26/2008

57 6/26/2008
The following laboratory experiment will involve the technique of thin layer chromatography (TLC). Chromatography is a technique sued widely to purify, to separated or to identify substance. While several types of chromatography are available, the theory behind each type is the same. Chromatography involves two phases; the stationary phase that works to adsorb the substance to some extent, and the moving phase which works to move the substances along the stationary phase. The technique works on the concept that compounds of similar structure or polarity attract and hold together. For example, if the stationary phase is made up of a very polar compound/s, a substance being tested that possesses polar groups will tend to be held to this stationary phase. Polar substances, in this will not be carried will by the moving phase. Non-polar substances, on the other hand, would move easily along a polar stationary. They would not be readily adsorbed by the polar stationary phase. TLC can utilize commercial chromatography plates that have some type of chemical coating that functions as the stationary phase. The plates for this experiment possess acetylated cellulose coating. The substances to be tested will be spotted on this plate. Then the plate will be set in a covered jar that contains a small amount of solvent. This is called the developing chamber. The solvent makes up the moving phase, as it functions to carry the substances up the TLC plate. When the solvent nears the top of the plate, the plate is removed from the jar and solvent front (the place where the solvent stops) is marked. The spots represent how far the substances traveled and should be marked or circles lightly with a pencil. By knowing the distance the solvent moves and the distance that each substance moves, Rf values can be calculated. Rf values have no units and are solvent dependent. Rf = Distance substance traveled Distance solvent traveled PROCEDURE
1. Prepare a chromatography chamber, 400 mL beaker and enough solvent (n-butanol, glacial acetic acid, and water in a 6:2:2 ratio) so that the level is 0.4-0.6 cm high. The developing chamber should be kept under the hood. Cover the beaker with parafilm immediately after adding the solvent. Let it sit for several minutes to become vapor saturated.
2. With gloves on, obtain of chromatography paper. HANDLE THEM ONLY AT THE EDGES TO AVOID CONTAMINATION!!!
3. Draw a light pencil line 1 cm up from the bottom of the plates which is 5 cm across. This is your line of origin. Mark 9 hash marks lightly on the line, equally spaced on the paper.
4. Obtain each of the solutions in Table 1 on a spot plate.

58 6/26/2008
Table 1 Solution Preparation_
Solutions Description
1 Aspartame-prepared
2 Phenylalanine—prepared
3 Aspartic acid—prepared
4 Base-hydrolyzed aspartame: prepared
Dissolve 12 mg of aspartame in 20 ml_ of water and 10 ml of acetone; add 10 drops of 6 M NaOH, stir and heat for 60 minutes; add H2O, if necessary, during the heating.
5 Beverage "A" (diet soft drink): prepared
Measure 5 mL of diet soft drink and add 10 drops of ethanol.
6 Beverage "B": prepared Measure 10 mL of diet soft drink into a 50 mL beaker, add 10 drops of 6 M NaOH and stir for 20 minutes; divide in half; add 10 drops ethanol to one half—this is used for TLC only.
7 Beverage "C": prepared Measure 20 mL of diet soft drink into a 50 mL beaker; add 10 drops of 6 M NaOH and heat to a boil for 1 5-20 minutes; let cool anddivide into 2 portions. Add 10 drops of ethanol to the portion that will be used for TLC.
8 Beverage "D" ("aged" aspartame-sweetened beverage): prepared Measure 5 ml and add 10 drops of ethanol.
5. Spot the TLC plates according to Table 2. Make sure that the spots dry before applying more solution. Remember that the beverage and aspartame solutions should contain ethanol to facilitate the spotting procedure. The ethanol-spiked solutions should not be used for the ceric nitrate and potassium permanganate tests.
Table 2 Spotting descriptions____________________________ Spot No. of spotting times Solution Paper #1 #1 6 Aspartame (solution #1) #2 6 Phenylalanine (solution #2) #3 6 Aspartic acid (.solution #3) #4 20 Hvdrolyzed aspartame (solution #4) #5 20 Beverage "A" (solution #5) #6 20 Beverage "B" (solution #6) #7 20 Beverage "C" (solution #7) #8 6 Aspartame (solution #1)
#9 20 Beverage "D" (solution #8)
6. Align the bottom edges so that they are flushed. Staple the edges without overlapping Place paper cylinder in the developing chamber. Make sure that the solvent is below the line of origin.
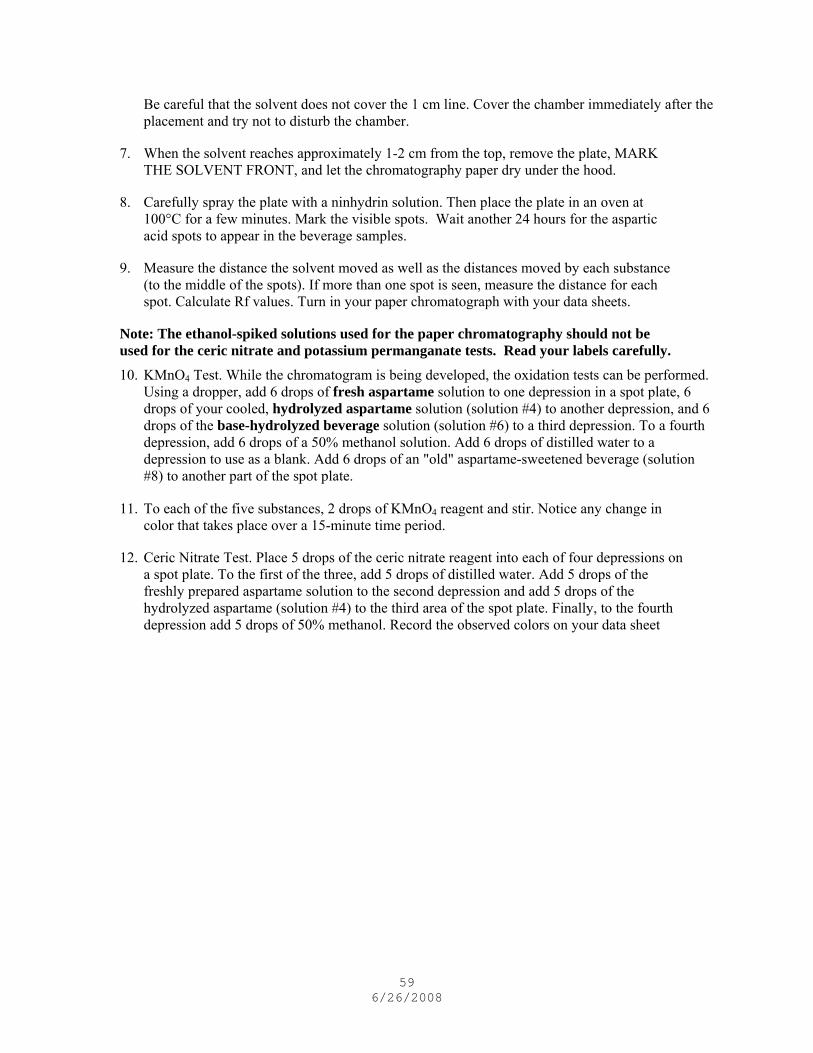
Be careful that the solvent does not cover the 1 cm line. Cover the chamber immediately after the placement and try not to disturb the chamber.
7. When the solvent reaches approximately 1-2 cm from the top, remove the plate, MARK THE SOLVENT FRONT, and let the chromatography paper dry under the hood.
8. Carefully spray the plate with a ninhydrin solution. Then place the plate in an oven at 100°C for a few minutes. Mark the visible spots. Wait another 24 hours for the aspartic acid spots to appear in the beverage samples.
9. Measure the distance the solvent moved as well as the distances moved by each substance (to the middle of the spots). If more than one spot is seen, measure the distance for each spot. Calculate Rf values. Turn in your paper chromatograph with your data sheets.
Note: The ethanol-spiked solutions used for the paper chromatography should not be used for the ceric nitrate and potassium permanganate tests. Read your labels carefully.
10. KMnO4 Test. While the chromatogram is being developed, the oxidation tests can be performed. Using a dropper, add 6 drops of fresh aspartame solution to one depression in a spot plate, 6 drops of your cooled, hydrolyzed aspartame solution (solution #4) to another depression, and 6 drops of the base-hydrolyzed beverage solution (solution #6) to a third depression. To a fourth depression, add 6 drops of a 50% methanol solution. Add 6 drops of distilled water to a depression to use as a blank. Add 6 drops of an "old" aspartame-sweetened beverage (solution #8) to another part of the spot plate.
11. To each of the five substances, 2 drops of KMnO4 reagent and stir. Notice any change in color that takes place over a 15-minute time period.
12. Ceric Nitrate Test. Place 5 drops of the ceric nitrate reagent into each of four depressions on a spot plate. To the first of the three, add 5 drops of distilled water. Add 5 drops of the freshly prepared aspartame solution to the second depression and add 5 drops of the hydrolyzed aspartame (solution #4) to the third area of the spot plate. Finally, to the fourth depression add 5 drops of 50% methanol. Record the observed colors on your data sheet
59 6/26/2008

60 6/26/2008