eventtracker upgrade guide · pdf file5 version 8.3 upgrade guide • ibm aix:kernel...
TRANSCRIPT

EventTracker Upgrade Guide Upgrade to v8.3
Publication Date: May 26, 2017

1
Version 8.3 Upgrade Guide
Introduction The purpose of this document is to help the existing users of EventTracker Enterprise to upgrade to a newer version, and to verify the expected functionality and performance of all its components.
If you encounter any problems during upgrade process, please contact support team to get quick and thorough instructions.
Technical Support Contact Details: Toll Free: 877-333-1433 ext. 2 Phone: +1-410-953-6776 ext. 2 Fax: +1-410-953-6780 Email: [email protected]
Audience It is incumbent upon all users of EventTracker v7.6 to v8.2 who wish to upgrade to v8.3 Enterprise. EventTracker strongly recommends that you read the entire document thoroughly before you begin the upgrade process. For the user’s convenience, this document is separated in two parts: ‘Upgrade- Quick View’ and ‘Upgrade- Detailed View’.
Upgrade - Quick view is written for the system administrators or the experts who are familiar with EventTracker Enterprise and upgrade process. It is presumed that the user of this section has enough knowledge of system and configuration process.
Upgrade - Detailed View is meant for EventTracker users who upgrade EventTracker for the first time. In this section, upgrade process is explained with the help of GUI.
NOTE:
• It is recommended not to install/upgrade EventTracker in a Domain Controller.
• It is recommended to run the EventTracker Manager Console on a Dedicated Windows Server.
Before you upgrade: 1. Thoroughly read the ‘EventTracker Architecture’ guide. This guide explains the architecture and
sample deployment methods with illustrations.
Managing Billions of Logs Everyday.
2. Contact [email protected] for information regarding license keys or license certificates.
3. Make sure that Windows Updates is up-to-date with .NET Framework 4.5.
2
Version 8.3 Upgrade Guide
*IMPORTANT:
• After upgrade, in a Collection Master, the user might notice inconsistency in Reports/ Log Search/Cab received status (Admin>Collection Master>Archives status), till the database migration is in process.
• After Upgrade, in Collection Point, the user may not be able to view the exact Cab transfer status in (Admin>Collection Point Configuration-> manage archives) till the database migration is in process.
**RECOMMENDED
• It is suggested that v6.4 to v7.5 user(s), please upgrade to v7.6 and then upgrade to the newer version 8.3.
Who can upgrade to v8.3?
The user(s) who are having the mentioned versions: v7.6/v8.0/v8.1/v8.2.
NOTE: After upgrading from 8.2 (build 14) to 8.3 (build 9) and after applying the update ET83U17-009, the admin can manually give the permission for Tools option in the user management page.
The information contained in this document represents the current view of EventTracker. on the issues discussed as of the date of publication. Because EventTracker must respond to changing market conditions, it should not be interpreted to be a commitment on the part of EventTracker, and EventTracker cannot guarantee the accuracy of any information presented after the date of publication.
This document is for informational purposes only. EventTracker MAKES NO WARRANTIES, EXPRESS OR IMPLIED, AS TO THE INFORMATION IN THIS DOCUMENT.
Complying with all applicable copyright laws is the responsibility of the user. Without limiting the rights under copyright, this paper may be freely distributed without permission from EventTracker, if its content is unaltered, nothing is added to the content and credit to EventTracker is provided.
EventTracker may have patents, patent applications, trademarks, copyrights, or other intellectual property rights covering subject matter in this document. Except as expressly provided in any written license agreement from EventTracker, the furnishing of this document does not give you any license to these patents, trademarks, copyrights, or other intellectual property.
The example companies, organizations, products, people and events depicted herein are fictitious. No association with any real company, organization, product, person or event is intended or should be inferred.
© 2017 EventTracker Security LLC. All rights reserved. The names of actual companies and products mentioned herein may be the trademarks of their respective owners.

3
Version 8.3 Upgrade Guide
Table of Contents Introduction ............................................................................................................................................................. 1
Audience .................................................................................................................................................................. 1
Before you upgrade: ........................................................................................................................................... 1
New Categories/Alerts/Reports available in v8.3 ................................................................................................. 4
Prerequisites .......................................................................................................................................................... 17
Planning .................................................................................................................................................................. 17
Upgrade - Quick View ............................................................................................................................................ 17
Common steps for all upgrades ............................................................................................................................ 18
Before you start with the upgrade process ..................................................................................................... 18
After Upgrade process: ..................................................................................................................................... 20
Before you start with the upgrade process ..................................................................................................... 21
Upgrade Procedure ........................................................................................................................................... 21
Post Upgrade Process ....................................................................................................................................... 21
Upgrade from v7.6.x to v8.3.x .......................................................................................................................... 24
Upgrade from v8.0.x/v8.1.x /v8.2.x to v8.3.x .................................................................................................. 25
Upgrade - Detailed View ....................................................................................................................................... 25
Upgrade from v7.6.x to v8.3.x .............................................................................................................................. 25
Import the newly added Behavior Rules after upgrade: ................................................................................ 38
Configure Service Accounts .................................................................................................................................. 53
Using the Default Agent Filters in EventTracker version 8.3 .............................................................................. 57
Upgrade from v8.0.x/v8.1.x/v8.2.x to v8.3.x ....................................................................................................... 66
Important for user(s) upgrading from v8.2 to v8.3:........................................................................................ 67

4
Version 8.3 Upgrade Guide
New Categories/Alerts/Reports available in v8.3 The details about new categories/alerts/reports available in EventTracker v8.3 is mentioned below.
New Categories
• Aerohive WAP: Client activity • Aerohive WAP: DHCP activity • Aerohive WAP: IP traffic details • Aerohive WAP: Rogue AP detected • Aerohive WAP: User login success • AirWatch MDM: All events • AirWatch MDM: Application management • AirWatch MDM: Compromised status changed • AirWatch MDM: Enrollment activity • AirWatch MDM: Profile management • AirWatch MDM: Security information management • Blue Coat ProxySG: Web access allowed • Blue Coat ProxySG: Web access denied • Cisco IronPort WSA: Incomplete requests • Cisco IronPort WSA: URL filtering • ET Honeynet: Connections from suspect • ET Honeynet: Packet count summaries • ET Honeynet: Packet size summaries • ET Honeynet: Suspect hostile activity • Hyper V: Image management service status • Hyper V: Switch port created • Hyper V: Virtual machine operational message • Hyper V: Virtual SAN management • Hyper V: VM failed to unregister • IBM AIX:Account management • IBM AIX:Administrator logon activity • IBM AIX:Audit configuration • IBM AIX:Backup and restore activity • IBM AIX:Cron activity • IBM AIX:Device management • IBM AIX:File access control changes • IBM AIX:File management • IBM AIX:FIle system activity • IBM AIX:General activity • IBM AIX:Group management

5
Version 8.3 Upgrade Guide
• IBM AIX:Kernel process activity • IBM AIX:Logical volume management activity • IBM AIX:Password changed • IBM AIX:Security objects audit • IBM AIX:Security roles management • IBM AIX:System resource controller • IBM AIX:System start and stop • IBM AIX:TCPIP activity • IBM AIX:User authentication failed • IBM AIX:User management • iboss: Web traffic allowed • iboss: Web traffic blocked • Juniper Secure Access VPN: Primary authentication failed • Juniper Secure Access VPN: Primary authentication success • Juniper Secure Access VPN: Cache cleaner activity • Juniper Secure Access VPN: User login failed • Juniper Secure Access VPN: User login success • Juniper Secure Access VPN: File transfer activity • Juniper Secure Access VPN: User session status • Juniper Secure Access VPN: Cache cleaner activity • Juniper Secure Access VPN: File transfer activity • Juniper Secure Access VPN: Primary authentication failed • Juniper Secure Access VPN: Primary authentication successful • Juniper Secure Access VPN: User login failed • Juniper Secure Access VPN: User login success • Juniper Secure Access VPN: User session status • Kaspersky Security Center: Application settings change • Kaspersky Security Center: Blocked files • Kaspersky Security Center: Device control • Kaspersky Security Center: Malware detected • Kaspersky Security Center: Object quarantine • Kaspersky Security Center: Vulnerability detected • Kaspersky Security Center: Task for specific computer • Malwarebytes: Client management activity • Malwarebytes: Group management • Malwarebytes: Management console user logon and logoff • Malwarebytes: Policy management • Malwarebytes: Scan status • Malwarebytes: Threat detected

6
Version 8.3 Upgrade Guide
• Malwarebytes: User management • Malwarebytes: User password changed • Microsoft DHCP Server: *All DHCP events • Microsoft DHCP Server: Audit logging error • Microsoft DHCP Server: Authorization failure • Microsoft DHCP Server: BOOTP IP deleted • Microsoft DHCP Server: BOOTP leased • Microsoft DHCP Server: BOOTP request rejected • Microsoft DHCP Server: Client address conflicts • Microsoft DHCP Server: Database backup and restore • Microsoft DHCP Server: Database integrity • Microsoft DHCP Server: Database migration • Microsoft DHCP Server: DHCP client configuration error • Microsoft DHCP Server: DHCP client network error • Microsoft DHCP Server: DHCP client trace event • Microsoft DHCP Server: DHCP critical events • Microsoft DHCP Server: Communication error • Microsoft DHCP Server: Service failure • Microsoft DHCP Server: DNS update failed • Microsoft DHCP Server: DNS update request • Microsoft DHCP Server: DNS update successful • Microsoft DHCP Server: Dynamic BOOTP leased • Microsoft DHCP Server: Interface configuration error • Microsoft DHCP Server: IP address conflict • Microsoft DHCP Server: IP cleanup started • Microsoft DHCP Server: IP cleanup statistics • Microsoft DHCP Server: Lease deleted • Microsoft DHCP Server: Lease denied • Microsoft DHCP Server: Lease expired • Microsoft DHCP Server: Lease released • Microsoft DHCP Server: Lease renewed • Microsoft DHCP Server: Lease request could not be satisfied • Microsoft DHCP Server: Log paused • Microsoft DHCP Server: Log started • Microsoft DHCP Server: Log stopped • Microsoft DHCP Server: Network policy server error • Microsoft DHCP Server: New IP released • Microsoft DHCP Server: Rogue detection • MySQL: Alter table

7
Version 8.3 Upgrade Guide
• MySQL: Insert table • MySQL: Rename table • MySQL: Rename user • MySQL: User logoff • MySQL: User password reset • Nessus: Badlock detection • Nessus: Bash shellshock detection • Nessus: Basic network scan • Nessus: Credentialed patch audit • Nessus: Drown detection • Nessus: Host discovery • Nessus: Malware detection • Nessus: MDM config audit • Nessus: Mobile device scan • Nessus: Offline config audit • Nessus: Scap and oval auditing • Nessus: Web application test • Percona MySQL: Database management • Percona MySQL: User authentication failed • Percona MySQL: User authentication success • Percona MySQL: Table management • Percona MySQL: User management • Percona MySQL: Variable change • pfSense: Traffic allowed and blocked details • SEP: Application blocked • SEP: Device disable • TippingPoint: IPS traffic allowed • TippingPoint: IPS traffic blocked • Vipre AV: Policy management • Vipre AV: Protected systems • Vipre AV: Quarantined detail • Vipre AV: Scan detail • Vipre AV: Threat detection
New Alerts
• Aerohive WAP: Rogue AP detected • Barracuda WSG:Configuration changes • Barracuda WSG:Content filtering • Barracuda WSG:Inline traffic details • Barracuda WSG:Login and logoff activity

8
Version 8.3 Upgrade Guide
• Barracuda WSG:Login failure • Barracuda WSG:Malware detection • Blue Coat ProxySG: Web access denied • Check Point: Configuration changes • Check Point: Interface status changed • Check Point: Login failure • Check Point: Upgrade and downgrade activity • Check Point: User management activity • Cisco IronPort ESA: Email bounced • Cisco IronPort ESA: User authentication failed • Cisco IronPort WSA: Web access blocked • Cisco Sourcefire: High priority alert generated • Citrix NetScaler: AAA session login failed • Citrix NetScaler: AppFW DOS attack detected • Citrix NetScaler: AppFW security violation detected • Citrix NetScaler: Console logon failure • EMC Isilon: Login failed • EMC Isilon: File permission changes • EMC Isilon: File or directory deleted • ET Honeynet: Suspect hostile activity • EventTracker: Unknown dormant MD5 hash detected • EventTracker: Unsafe dormant MD5 hash detected • Hyper V-Configuration error • Hyper V-Network adapter failed • Hyper V-Network conflict • Hyper V-Server shutdown • Hyper V-System create failed • Hyper V-Network resource error • Hyper V-Virtual machine deleted. • IBM AIX: Account disabled • IBM AIX: Device removed • IBM AIX: Security role changed • IBM AIX: System rebooted • iboss: Web traffic blocked • Juniper Secure Access VPN: Login success • Juniper Secure Access VPN: Primary authentication failed • Juniper Secure Access VPN: User login failed • Juniper Netscreen: IP address conflict • Juniper Netscreen: VPN service down

9
Version 8.3 Upgrade Guide
• Kaspersky Security Center: Policy changed • Kaspersky Security Center: Malicious object detected • Kaspersky Security Center: Malware detected • Kaspersky Security Center: Blocked files • Linux MySQL: Delete database • Linux MySQL: Delete Table • Linux MySQL: Privilege change • Linux MySQL: Service down • Linux MySQL: User authentication failed • Linux MySQL: User created • Linux MySQL: User password reset • Malwarebytes: Threat detected • MSSQL:Error detected • MSSQL:Audit created or deleted or modified • MSSQL:Database backed up or restored • MSSQL:Database created or deleted or modified • MSSQL:Schema created or deleted or modified • MSSQL:View created or deleted or modified • MSSQL:User enabled or disabled or unlocked • MSSQL:Permission granted or revoked or denied • MSSQL:Role created or deleted or modified • MSSQL:Stored procedure created or deleted or modified • MSSQL:Table created or deleted or modified • MSSQL:Index created or deleted or modified • MSSQL:Trigger created or deleted or modified • MSSQL:User created or deleted or modified • MSSQL:User logon failure • MSSQL:Password reset or changed • Percona MySQL: User management • PoliWall: Blacklisted IP detected in allowed traffic • PoliWall: New IP detected in allowed traffic • PoliWall: Threat detected • Suricata: High priority alert generated • TippingPoint: IPS traffic blocked • Vipre AV: Policy management • Vipre AV: Threat detected • WatchGuard XTM: Attack detected • WatchGuard XTM: Authentication server unavailable • WatchGuard XTM: Customized certificate generation error

10
Version 8.3 Upgrade Guide
• WatchGuard XTM: Device configuration changed • WatchGuard XTM: Feature expiration reminder • WatchGuard XTM: Feature key download failed • WatchGuard XTM: Feature key expired • WatchGuard XTM: Shutdown requested by system • WatchGuard XTM: User authentication failed • WatchGuard XTM: User logon failed • Windows MySQL: Delete database • Windows MySQL: Delete table • Windows MySQL: Privilege change • Windows MySQL: Service down • Windows MySQL: User authentication failed • Windows MySQL: User created • Windows MySQL: User password reset
New Flex Reports
• Aerohive WAP-User login success • Aerohive WAP-Client activity • Aerohive WAP-DHCP activity • Aerohive WAP-IP traffic details • Aerohive WAP-Rogue AP detected • AirWatch MDM-All events • AirWatch MDM-Profile management • AirWatch MDM-Application management • AirWatch MDM-Status change • AirWatch MDM-Security information management • AirWatch MDM-Enrollment activity • Barracuda WSG-Configuration changes • Barracuda WSG-Login failed • Barracuda WSG-Content filtering • Barracuda WSG-Inline traffic content • Barracuda WSG-Malware detection • Barracuda WSG-Login and logoff activity • Barracuda WSG-Clean policy denied traffic • Barracuda WSG-Clean policy allowed traffic • Blue Coat ProxySG: Web access allowed • Blue Coat ProxySG: Web access denied • Check Point-Login and logout activity • Check Point-Logon failure • Check Point-Configuration changes

11
Version 8.3 Upgrade Guide
• Check Point-Interface activity • Check Point-Device maintenance messages • Check Point-Upgrade and downgrade activity • Check Point-DHCP server activity • Check Point-Traffic allowed • Check Point-Traffic denied • Check Point-User management activity • Cisco ASA-Teardown connection • Cisco Sourcefire-IPS activity • Cisco Sourcefire-Admin logon details • Cisco Sourcefire-Configuration change details • Cisco Switch-Port status change • Cisco Switch-Access denied • Cisco Switch-Authentication failure • Cisco Switch-Configuration change • Cisco Switch-Administrative account activity • Cisco Switch-Vlan management • Cisco Switch-VTP management • Cisco Switch-Port security • Cisco Switch-User logon failure • Cisco Switch-User logon success • Cisco IronPort ESA: Inbound SMTP authentication failed • Cisco IronPort ESA: Outbound SMTP authentication failed • Cisco IronPort WSA-Incomplete requests • Cisco IronPort WSA-URL filtering • Citrix NetScaler-TCP session details • Citrix NetScaler-SSLVPN ICA application started or terminated • Citrix NetScaler-SSLVPN session details • Citrix NetScaler-HTTP or Non-HTTP resource access denied • Citrix NetScaler-AAA session login or logout • Citrix NetScaler-AAA session login failed • Citrix NetScaler-ACL rule hit details • Citrix NetScaler-AppFW security violation details • Citrix NetScaler-AppFW DOS attack details • Citrix NetScaler-SSLVPN session login or logout • Citrix NetScaler-Console logon failure • Citrix NetScaler-Console logon success • Citrix NetScaler-Command execution details • EMC Isilon-Logon and logoff activities

12
Version 8.3 Upgrade Guide
• EMC Isilon-Logon failed • EMC Isilon-File operations • EMC Isilon-File permission checked and changed • ET Honeynet-Packet size summaries • ET Honeynet-Connections from suspect • ET Honeynet-Packet count summaries • EventTracker-Dormant MD5 hash detected • Exchange-Admin audit details • Exchange-Mailbox audit details • Exchange-Mailbox accesses by non-owner • Exchange-Database changes by admin • Exchange-Mailbox changes by admin • Exchange-User permission changes by admin • Hyper V-Virtual machine operational message • Hyper V-Virtual hard disk partition management • Hyper V-Virtual port switch created • Hyper V-Virtual SAN management • Hyper V-Virtual disk image management • Hyper V-Virtual Switch management • Hyper V-Image management service status • Hyper V-VM failed to unregister • Hyper V-Virtual machine create • IBM AIX-Administrator logon activity • IBM AIX-System resource controller • IBM AIX-Corn activity • IBM AIX-Logical volume management activity • IBM AIX-User management • IBM AIX-Group management • IBM AIX-User authentication failed • IBM AIX-Device management • IBM AIX-File management • IBM AIX-File system activity • IBM AIX-File access control changes • IBM AIX-Kernel process activity • IBM AIX-Password changed • IBM AIX-Security objects audit • IBM AIX Audit configuration • iboss-Web traffic allowed • iboss-Web traffic blocked

13
Version 8.3 Upgrade Guide
• Juniper Secure Access VPN-File transfer activity • Juniper Secure Access VPN-Primary authentication failed • Juniper Secure Access VPN-Primary authentication success • Juniper Secure Access VPN-User session status • Juniper Secure Access VPN-User login failed • Juniper Secure Access VPN-Cache cleaner activity • Juniper Secure Access VPN-User login success • Kaspersky Security Center-Task for specific computer • Kaspersky Security Center-Policy management • Kaspersky Security Center-Group task management • Kaspersky Security Center-Administrative group management • Kaspersky Security Center-Report management • Kaspersky Security Center-All Management Activity Report • Kaspersky Security Center-Malicious object scan status • Kaspersky Security Center-Application privilege management • Kaspersky Security Center-Application settings change • Kaspersky Security Center-Vulnerability detected • Linux-User logon success • Linux-User logon failed • Linux-Commands executed in sudo mode • Malwarebytes-Management console user logon and logoff • Malwarebytes-User management • Malwarebytes-Group management • Malwarebytes-User password changed • Malwarebytes-Client management activity • Malwarebytes-Threat detection • Malwarebytes-Scan status • Malwarebytes-Policy management • Microsoft IIS-Suspicious SQL Injection • Microsoft IIS-Cross site scripting • Microsoft IIS-Backup finder • Microsoft IIS-Directory traversal • Microsoft IIS-Referal report • Microsoft IIS-Sites with errors • MSSQL Audit-Table created or deleted or modified • MSSQL Audit-Database created or deleted or modified • MSSQL Audit-View created or deleted or modified • MSSQL Audit-Stored procedure created or deleted or modified • MSSQL Audit-Index created or deleted or modified

14
Version 8.3 Upgrade Guide
• MSSQL Audit-Trigger created or deleted or modified • MSSQL Audit-Schema created or deleted or modified • MSSQL Audit-User created or deleted or modified • MSSQL Audit-Role created or deleted or modified • MSSQL Audit-Password reset or changed • MSSQL Audit-User enabled or disabled or unlocked • MSSQL Audit-Database backed up or restored • MSSQL Audit-Permission granted or revoked or denied • MSSQL Audit-Audit created or deleted or modified • MSSQL Audit-User logon success • MSSQL Audit-User logon failure • MSSQL Extended-Table created or deleted or modified • MSSQL Extended-Database created or deleted or modified • MSSQL Extended-View created or deleted or modified • MSSQL Extended-Stored procedure created or deleted or modified • MSSQL Extended-Index created or deleted or modified • MSSQL Extended-Trigger created or deleted or modified • MSSQL Extended-User created or deleted or modified • MSSQL Extended-Role created or deleted or modified • MSSQL Extended-Schema created or deleted or modified • MSSQL Extended-Password reset or changed • MSSQL Extended-User enabled or disabled or unlocked • MSSQL Extended-Database backed up or restored • MSSQL Extended-Permission granted or revoked or denied • MSSQL Extended-Extended event session created or deleted or modified • MSSQL Extended-User logon success • MSSQL Extended-Error details • MSSQL Extended-User logon failure • Nessus-Badlock detection • Nessus-Basic network scan • Nessus-Credentialed patch audit • Nessus-Host discovery • Nessus-Malware detection • Nessus-Web application tests • Nessus-Bash shellshock detection • Nessus-Drown detection • Nessus-MDM config audit • Nessus-Mobile device scan • Nessus-Offline config audit
15
Version 8.3 Upgrade Guide
• Nessus-Scap and oval auditing • Paloalto firewall-Configuration success and failure • Paloalto firewall-User authentication success • Paloalto firewall-VPN configuration success • Paloalto firewall-VPN user logon success • Paloalto firewall-VPN user logon failed • Paloalto firewall-User authentication failed • Percona MySQL-Database management • Percona MySQL-Table management • Percona MySQL-User management • Percona MySQL- User authentication failed • Percona MySQL-User authentication success • Percona MySQL-Variable change • Percona MySQL-Failed events • pfSense-Traffic allowed and blocked details • PoliWall-Allowed traffic details • PoliWall-Blocked traffic details • PoliWall-Threat traffic details • PoliWall-Blacklisted IP activity details • SonicWALL UTM-Application management • SonicWALL UTM-User login status • SonicWALL UTM-Website access status • SonicWALL UTM-DHCP lease status • SonicWALL UTM-Firewall access rule change • SonicWALL UTM-FTP logon status • SonicWALL UTM-Traffic status • SonicWALL UTM-Firewall IDS attacks • SonicWALL UTM-Spam detected • SonicWALL UTM-Configuration change details • TippingPoint-IPS traffic blocked • TippingPoint-IPS traffic allowed • Vipre AV-Policy management • Vipre AV-Protected system • Vipre AV-Threat detected • Vipre AV-Scan detail • Vipre AV-Quarantined details • WatchGuard XTM-Device configuration change details • WatchGuard XTM-System management details • WatchGuard XTM-User logon and logout success

16
Version 8.3 Upgrade Guide
• WatchGuard XTM-User authentication failed • WatchGuard XTM-User authentication success • WatchGuard XTM-User logon failed • WatchGuard XTM-Attack detected • WatchGuard XTM-IP spoofing and blocked site traffic detected • WatchGuard XTM-Traffic details • WatchGuard XTM-IPS traffic detected • WatchGuard XTM-SSL VPN user logon and logout success • WatchGuard XTM-SSL VPN user logon failed • Windows File Access Success • Windows File Access Failure • ZoneDirector-Admin password changed • ZoneDirector-Admin login failure • ZoneDirector-Interface management • ZoneDirector-Admin locked out • ZoneDirector-Service status • ZoneDirector-FM user login failed • ZoneDirector-FM user login success • ZoneDirector-Access point activity • ZoneDirector-Admin logon and logout success • ZoneDirector-All VLAN management status • ZoneDirector-WLAN group management • ZoneDirector-Access point management
Updated Knowledge Packs:
Updated Alerts:
• Cisco IronPort ESA: Email bounced • Cisco IronPort ESA: User authentication failed • Cisco IronPort WSA: Web access blocked • Cisco Sourcefire: High priority alert generated • Juniper Netscreen: IP address conflict • Juniper Netscreen: VPN service down
Updated Flex Reports:
• Windows Audit Log Cleared Report • Windows User Logon or Logoff Success Report • Windows Active Directory Object Access Report • Windows Software Install or Uninstall on System Report • Microsoft DNS-Name resolution failure • Microsoft DNS-Name resolution success

17
Version 8.3 Upgrade Guide
• BIG-IP LTM-System configuration changed • Cisco IronPort WSA-Web access allowed • Cisco IronPort WSA-Web access denied • Cisco ASA-IDS intrusion detection • Cisco ASA-Connection denied
Updated Categories
• Cisco IronPort ESA: Email bounced • Cisco IronPort ESA: User authentication failed • Cisco IronPort ESA: User authentication success • Cisco IronPort WSA: Web access allowed • Cisco IronPort WSA: Web access blocked
Prerequisites Before you begin with the upgrade process, please follow this checklist and make sure that you have all the components in place to perform a successful upgrade.
• Microsoft .NET Framework 3.5 SP1 (For SQL purpose) and .NET Framework 4 or 4.5.2. Refer: Install .NET Framework.
• IIS or IIS Express. Refer: IIS-Configuration Guide • Make sure Windows updates with all the latest service packs is installed.
The most effective upgrade method is to first export all the custom settings using Export Import Utility, install the new version, and then import the custom settings. There is no need to export all policy settings since all the Categories included in any prior versions have been retained.
The recommended method is to first upgrade the Manager, validate all its functionality, next upgrade the Agents, and lastly verify the performance.
Planning This section gives you a rough estimation of time required for upgrade as well as monitoring the successful upgrade. It might take 60 – 90 minutes for you to read this document and to complete the upgrade process gracefully. You will also require spending a few minutes the following day after the upgrade, to verify all your ‘Scheduled Reports’ are being generated. If any reports fail to generate, then please read the Validation section at the end of this document.
Upgrade - Quick View In this section, you can get quick insight into upgrade process
• Common steps for all upgrades

18
Version 8.3 Upgrade Guide
• Upgrade from v7.6.x to v8.3.x Enterprise • Upgrade from v8.0.x/v8.1.x/v8.2.x to v8.3.x Enterprise
IMPORTANT:
• For an upgrade from v7.6 to v8.3, the earlier configured reports (HTML and DOCX), the reports will be generated in HTML and DOCX export types, until the user edits the reports and saves the changed configuration. The user can also generate the earlier configured report (HTML & DOCX) in the newer version, by importing it from EventTracker Control Panel> Export Import Utility.
• The transferred TLS reports from Collection Point will not display the selected reports, on clicking the information icon in Collection Master, in case the main reports are selected for transferring in Collection Point.
Common steps for all upgrades
Before you start with the upgrade process Verify that all the prerequisites have been satisfied.
For customers who are running EventTracker on SQL 2005, it is recommended to upgrade to SQL Server 2008 (Express/Enterprise), before upgrading from v7.6/v8.0/v8.1/v8.2 to v8.3.
When upgrading from v7.6 to v8.3, please verify all prerequisites are installed manually on server machine.
While uninstalling v7.6, user has to enable the option to retain all the configuration and data. After uninstalling, please check if all prerequisites are installed manually on server machine.
For v7.6, you can take a backup of the database from EventTracker Control Panel -> Diagnostics which is explained in detail in Upgrade from v7.6x to v8.3.x.
If you have incorporated your company logo into EventTracker, then take a backup of .jpg file of your company logo before uninstalling the EventTracker. You need to replace the backed up image file after installing EventTracker Enterprise.
For CM and CP set up, please upgrade CM (Collection Master) first, and then upgrade CP (Collection point).
Preferred: Before upgrading EventTracker, the user has to export the user defined (user created/modified) alerts and categories.
Before upgrading from v7.6 to v8.3, make sure that .NET 4.5 is installed. If Microsoft .NET Framework 4.5.2 is not installed, refer the Install Guide v8.3.

19
Version 8.3 Upgrade Guide
NOTE: If .NET 4.0 is already present, the pre-install check will not install .NET 4.5 and the user will have to install it manually.
The logged in user who is upgrading to EventTracker v8.3 should have SQL sysadmin privilege. If the user does not have sufficient permission then an error message is displayed.
Figure 1
NOTE: Before upgrading EventTracker from v7.6 to v8.3, run the “UpdateBehaviorActivity” utility. The Utility will perform the database related changes.
• Why to use the “UpdateBehaviorActivity” utility?
This utility resolves IP addresses as private or public and converts IP address into network order. The same process was being done through upgradation of EventTracker. During this process database log file (.ldf) was growing and installation was not possible in some cases. To avoid the installation failure, this utility should be used.
• When to run the “UpdateBehaviorActivity” utility?
1. This utility should be executed only if installation is an upgrade from EventTracker v7.6.
• How to run “UpdateBehaviorActivity” utility?
1. Before uninstalling EventTracker v7.6, download the utility ‘UpdateBehaviorActivity.exe’ and copy it to a desired location
2. Run or Execute the utility UpdateBehaviorActivity.exe 3. Check in the log file “UpdateBehaviorActivity.log” from the path where the
UpdateBehaviorActivity.exe has been launched. 4. Uninstall the EventTracker version 7.6 with retaining configuration and rerun the utility
“UpdateBehaviorActivity.exe”. 5. Upgrade to EventTracker version 8.3.

20
Version 8.3 Upgrade Guide
After Upgrade process: If SSL (HTTPS) is configured in earlier version, then the configuration will not be retained after upgrade
to v8.3. Please make sure to reconfigure it again as mentioned in Securing IIS Web Server with SSL.
As the menu options have been changed, the User Privileges configuration won’t be retained after upgrade to v8.3 for non-admin users. You have to reconfigure it again.
After upgrade, if the user wants to import the newly added behavior rules, please refer to: Import newly added Behavior Rules.
If the user wants to use the default agent filters after upgrading to v8.3, please refer to: Use Default Agent Filters.
If the user has configured JSON file in DLA Manager in the older version, after upgrading, the user will have to reconfigure the same.
If you have upgraded from the older versions of EventTracker to v 8.3, then the following two services needs to be added in the service restart list.
1) EventTracker WatchList 2) EventTracker Monitoring Daemon
To add the above services to the restart list, go to EventTracker Control Panel-> Double click EventTracker Agent Configuration -> Click the Services Tab.
In the Service Restart List Pane, click the Add button and add the service name.

21
Version 8.3 Upgrade Guide
Before you start with the upgrade process 1. Verify that all the prerequisites have been satisfied. 2. Backup all custom Categories, Alerts (Please check the ‘Export E-mail Settings’ check box), Filters,
Scheduled Reports and RSS Feeds using Export Import Utility. 3. Please note down the custom changes you have made in the ‘Trusted List’ (Agent Configuration ->
Network Connection Monitor -> Suspicious Traffic Only (SNAM) -> Trusted List).
Upgrade Procedure 1. Uninstall the existing version by retaining old configuration and data. 2. Restart the EventTracker Manager server or system. 3. Install EventTracker v8.3.x Enterprise. 4. Configure the service accounts, if the archives/reports are stored in the network path. 5. Using Export Import Utility, import all the custom Categories, Alerts, Filters, Scheduled Reports and
RSS Feeds. 6. Verify that the Categories, Alerts, Filters, Legacy Reports and RSS Feeds are intact. 7. Upgrade all agents using the System Manager. 8. Update the Trusted List with the changes you have noted down earlier.
Post Upgrade Process 1. Logon to EventTracker Enterprise. 2. Click the Admin menu, and then click Alerts.
EventTracker displays Alert Management page. 3. Click the alert name to be modified.
EventTracker displays Alert Configuration page. 4. Select the threat level from Threat Level dropdown. 5. Click the Finish button.
EventTracker saves the configuration settings.
For agent upgrade details, please click here.
Upgrade from v7.6.x/v8.0.x/v8.1.x /v8.2.x to v8.3.x
1. Uninstall the existing version by retaining old configuration and data.

22
Version 8.3 Upgrade Guide
Figure 2
2. Restart the EventTracker manager server or system. 3. Install EventTracker v8.3. 4. Configure the service accounts, if the archives/reports are stored in the network path. 5. Verify that the Categories, Alerts, Filters, Scheduled Reports and RSS Feeds are intact. 6. Upgrade all windows agents using ‘System Manager’. 7. Preferred: Import Knowledge Objects after upgrade. Details are explained in Upgrade from v7.6.x to
v8.3.x. 8. Preferred: Import the parsing rules, token templates and Defined Reports based on the user
requirement. 9. Optional: To utilize newly added/Modified categories/alerts import the complete alerts /complete
categories files from the configuration directory (Install directory). Prior to importing user has to manually delete existing categories and alerts from the application. Then import all categories and all alerts from configuration files.
NOTE:
Behavior
• From EventTracker v7.6 onwards, the Behavior Dashlets have been renamed. So after upgrading to v8.3, you have to reset the personalization and then configure the dashlets .Please follow the steps given below.
a. Logon to EventTracker Enterprise. b. Select the Behavior menu, select Security/Operations drop down.
c. Select Reset Personalization icon .
Figure 3
23
Version 8.3 Upgrade Guide
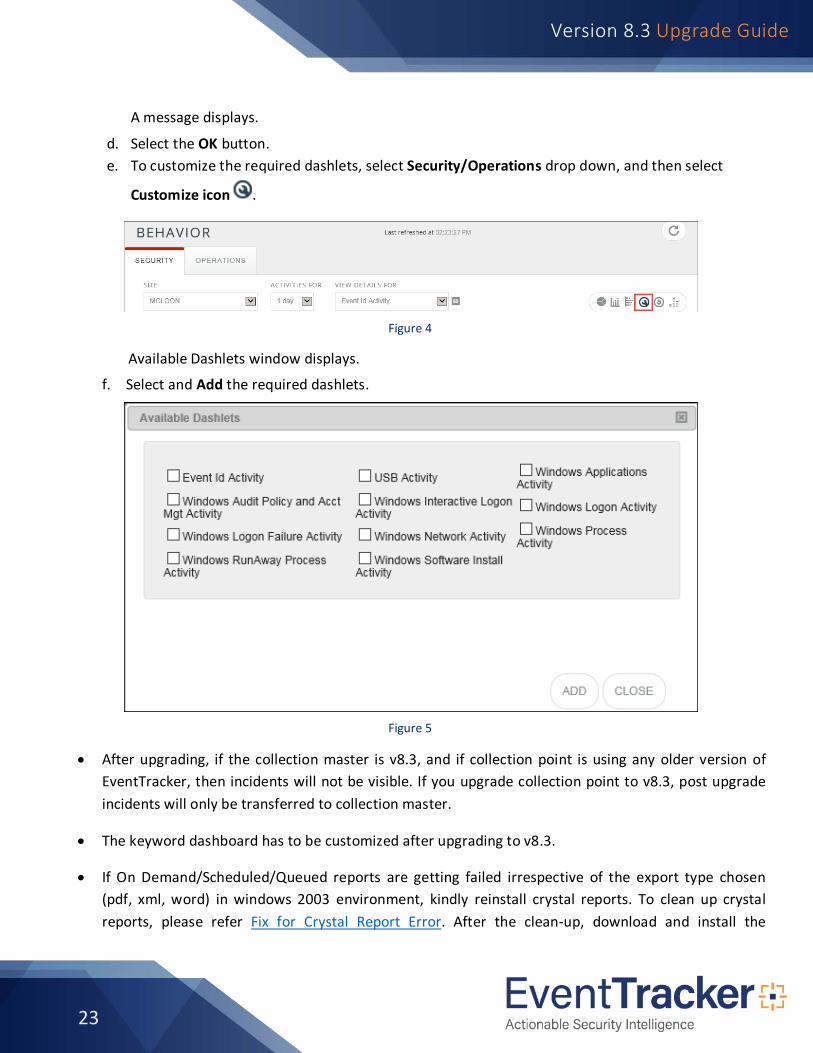
A message displays.
d. Select the OK button. e. To customize the required dashlets, select Security/Operations drop down, and then select
Customize icon .
Figure 4
Available Dashlets window displays.
f. Select and Add the required dashlets.
Figure 5
• After upgrading, if the collection master is v8.3, and if collection point is using any older version of EventTracker, then incidents will not be visible. If you upgrade collection point to v8.3, post upgrade incidents will only be transferred to collection master.
• The keyword dashboard has to be customized after upgrading to v8.3.
• If On Demand/Scheduled/Queued reports are getting failed irrespective of the export type chosen (pdf, xml, word) in windows 2003 environment, kindly reinstall crystal reports. To clean up crystal reports, please refer Fix for Crystal Report Error. After the clean-up, download and install the

24
Version 8.3 Upgrade Guide
executable file 32bit.msi for Support Pack 10 (v. 13.0.10.1385) from the location http://scn.sap.com/docs/DOC-7824.
Dashboard
• The Dashlets in Security/Operations are preserved after the upgrade and the user can customize the
dashlets by selecting the customize icon .
Figure 6
My EventTracker
• The dashlets created under My EventTracker> Dashboard are also preserved after the upgrade
process and the user can further customize it by selecting the customize icon .
Figure 7
Upgrade from v7.6.x to v8.3.x The procedure to upgrade from v7.6.x to v8.3.x is mentioned in the detail section.

25
Version 8.3 Upgrade Guide
Upgrade from v8.0.x/v8.1.x /v8.2.x to v8.3.x The procedure to upgrade from v8.0.x /v8.1.x/v8.2.x to v8.3.x is same like upgrade from v7.6.x to v8.3.x.
Upgrade - Detailed View In this section, you will learn upgrade process in detail.
• Upgrade from v7.6.x to v8.3.x Enterprise • Upgrade from v8.0.x/v8.1.x/v8.2.x to v8.3.x Enterprise
Upgrade from v7.6.x to v8.3.x • Please refer Common steps for all upgrades for more details. • Before upgrading, please take a backup of the database and details are given below.
a) Double-click EventTracker Control Panel, double-click Diagnostics. b) Click the Backup Configuration button.
Backup & Restore window displays.
Figure 8
c) Browse and select the folder you wish to back up. d) Click the Backup now button.
After the backup has been taken, go to folder for which the backup has been taken. A file with the extension .bkp will be used to restore later.

26
Version 8.3 Upgrade Guide
Step 1: Close/terminate all the EventTracker Components
Before you start with upgrade, it is very crucial to close/terminate all the EventTracker components present in the system, like EventTracker Enterprise, EventTracker Control Panel, and even RDP (Remote Desktop Protocol) session.
During uninstall, if any of the previous EventTracker component is open then EventTracker asks you to close the program.
Close the open component, and then click the Retry button. EventTracker resumes uninstall process.
Step 2: Uninstall v7.6
1. Select the Start button, select Settings, and then select Control Panel. 2. Select Add or Remove Programs, select EventTracker, and then select the Remove button.
Figure 9
(OR) Select the Start button, select Programs, and then select Prism Microsystems. Select EventTracker, and then select Uninstall EventTracker. EventTracker will display the confirmation message.
Figure 10
3. If you have installed EventTracker agents on different systems then a message box will appear to confirm the uninstall process.

27
Version 8.3 Upgrade Guide
Figure 11
4. Click the Yes button to continue the installation process. EventTracker starts uninstall process, and displays ‘Uninstall EventTracker’ dialog box.
Figure 12
By default all the file options are selected. Keep the default selection to retain the data and configurations.
5. Click the Ok button.
Step 3: Restart the EventTracker Manager Server or System
1. Close all the open applications on the desktop. 2. Click the Start button and then click Shut Down drop down. 3. Select Restart option, and then click the OK button.
Step 4: Install EventTracker v8.3 Enterprise
Kindly follow the steps mentioned below for upgrade process.
1. To install v8.3, launch EventTrackerSetup.exe. EventTracker will Extract the files.

28
Version 8.3 Upgrade Guide
Figure 13
NOTE: For Windows 2008, 2008R2 (32bit/64bit), Windows 7 (32bit/64bit), Microsoft.NET Framework 4.5.2 will be installed.
And for Windows 2008, 2008R2 (32bit/64bit), Windows 7 (32bit/64bit), Windows 8.1 and Windows 2012, PowerShell 3.0 will be installed.
Microsoft.NET Framework 4.5.2 Installation page displays.
Figure 14
After the .NET Framework 4.5.2 is installed, EventTracker Pre-Install Check message displays.

29
Version 8.3 Upgrade Guide
Figure 15
2. Click on Yes.
The Pre-Installer welcome window displays. For the detailed Pre-Installation Check process, please refer Install Guide v 8.3.
EventTracker - Install Shield Wizard displays.
Figure 16
InstallShield Wizard displays the Welcome screen.

30
Version 8.3 Upgrade Guide
Figure 17
3. Click Next >. InstallShield Wizard displays the License Agreement screen.
4. Read the license agreement, click ‘I accept the terms in the license agreement’ option and then click the Next > button.
Figure 18
31
Version 8.3 Upgrade Guide
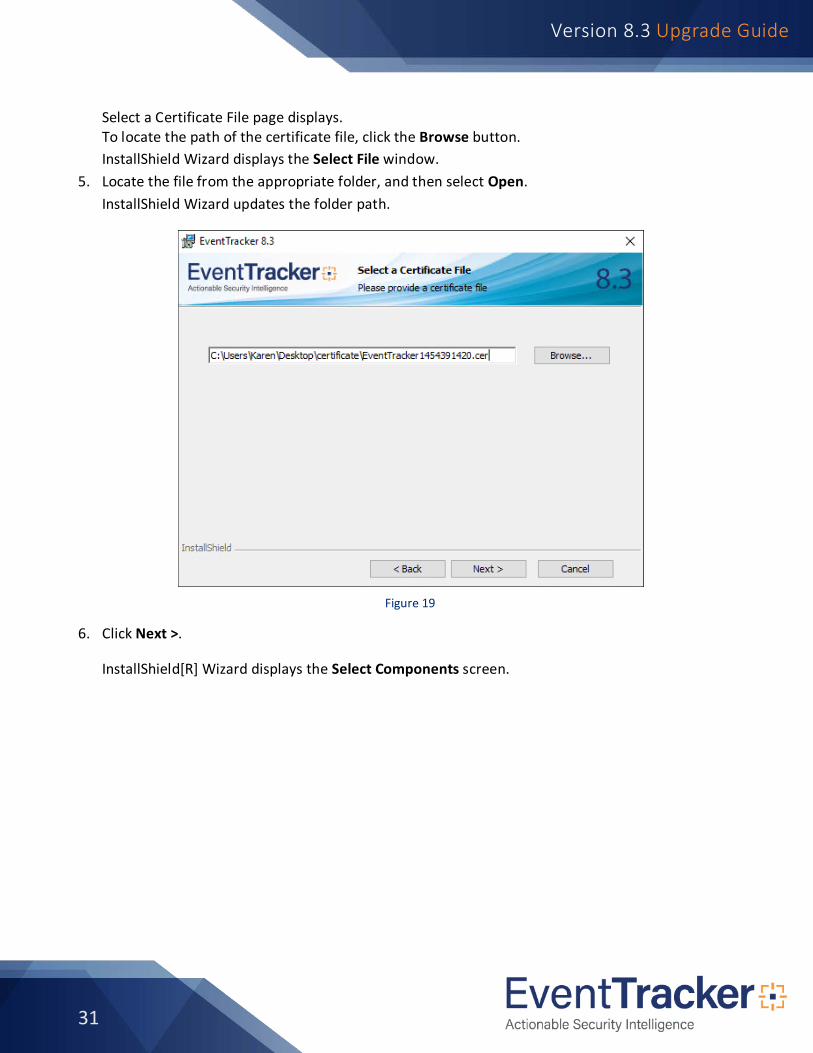
Select a Certificate File page displays. To locate the path of the certificate file, click the Browse button. InstallShield Wizard displays the Select File window.
5. Locate the file from the appropriate folder, and then select Open. InstallShield Wizard updates the folder path.
Figure 19
6. Click Next >.
InstallShield[R] Wizard displays the Select Components screen.

32
Version 8.3 Upgrade Guide
Figure 20
7. Click the Next > button.
Select EventTracker Console Type page displays.
Figure 21

33
Version 8.3 Upgrade Guide
8. Select a console type (Standard/Collection Point/Collection Master).
a. If Collection Point Console Type is selected, click Next >.
b. Enter Collection Master details, click Next >.
Figure 22
c. Enter Collection Master: details, enable Skip option, and then click Next >.
Figure 23
34
Version 8.3 Upgrade Guide
(OR)
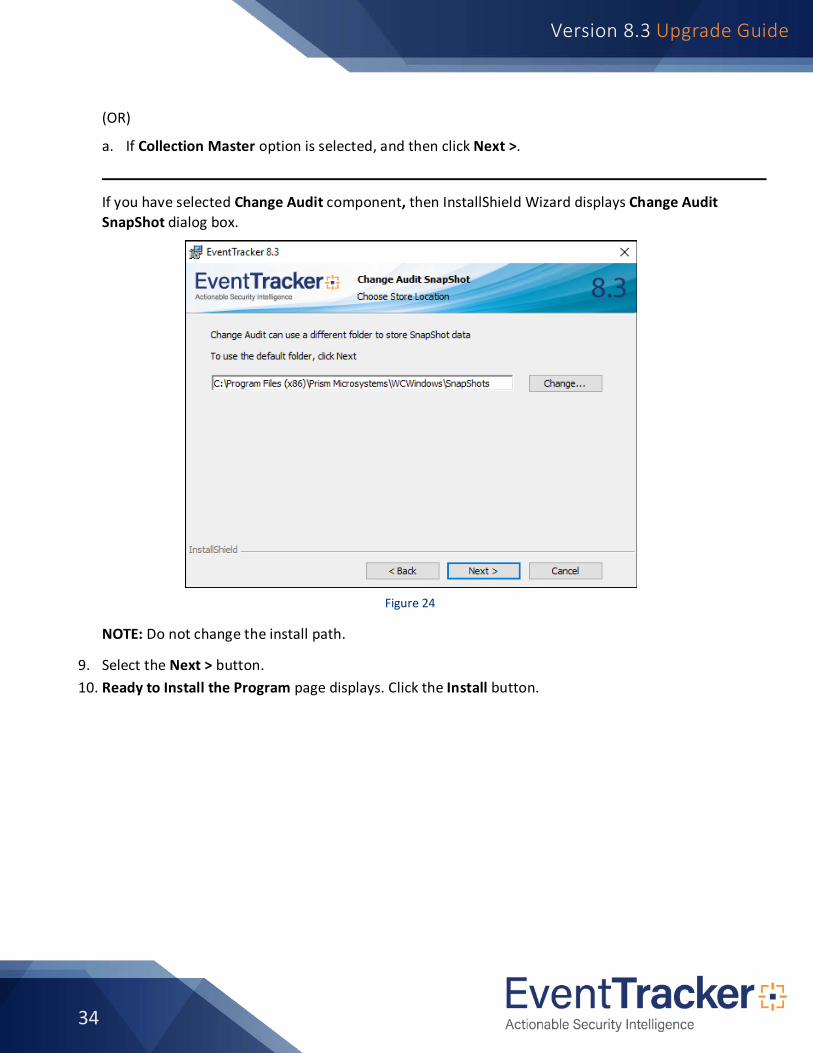
a. If Collection Master option is selected, and then click Next >.
If you have selected Change Audit component, then InstallShield Wizard displays Change Audit SnapShot dialog box.
Figure 24
NOTE: Do not change the install path.
9. Select the Next > button. 10. Ready to Install the Program page displays. Click the Install button.

35
Version 8.3 Upgrade Guide
Figure 25
11. In the final screen “Ready to Install the Program”, after you click Install button, the installation process will start, with a message displaying “Please wait, Migration in Progress….”
Figure 26 (Upgrade from v7.6 to v8.3)

36
Version 8.3 Upgrade Guide
Basic Configuration window displays.
Figure 27
12. Select appropriate options, and then select the OK button.
InstallShield Wizard displays the last screen.

37
Version 8.3 Upgrade Guide
Figure 28
13. Click Finish to conclude the installation process.
InstallShield Wizard displays the EventTracker Configuration screen.
Figure 29

38
Version 8.3 Upgrade Guide
14. Type valid user credentials in the User Name and Password fields respectively and then click the OK button.
After successfully validating the user credentials, InstallShield[R] Wizard displays the EventTracker Configuration message box.
Figure 30
15. Click the OK button.
Step 5: Configure the service accounts, if the archives/reports are stored in the network path.
Click ‘Configure the service accounts’ section.
Import the newly added Behavior Rules after upgrade: (This is common for all the upgrades from older versions to v8.3)
• After upgrading to v8.3, the user has to import the newly added behavior rules using the Export Import Utility. The newly added behavior rules are kept in the Install directory, i.e. <Install folder>\EventTracker\Configuration Files...
• To import the newly added Behavior rule, go to Export Import Utility>Select Import> click the Behavior Rule option> browse the behavior rule file (.isrule) from the configuration files folder.
Figure 31
39
Version 8.3 Upgrade Guide
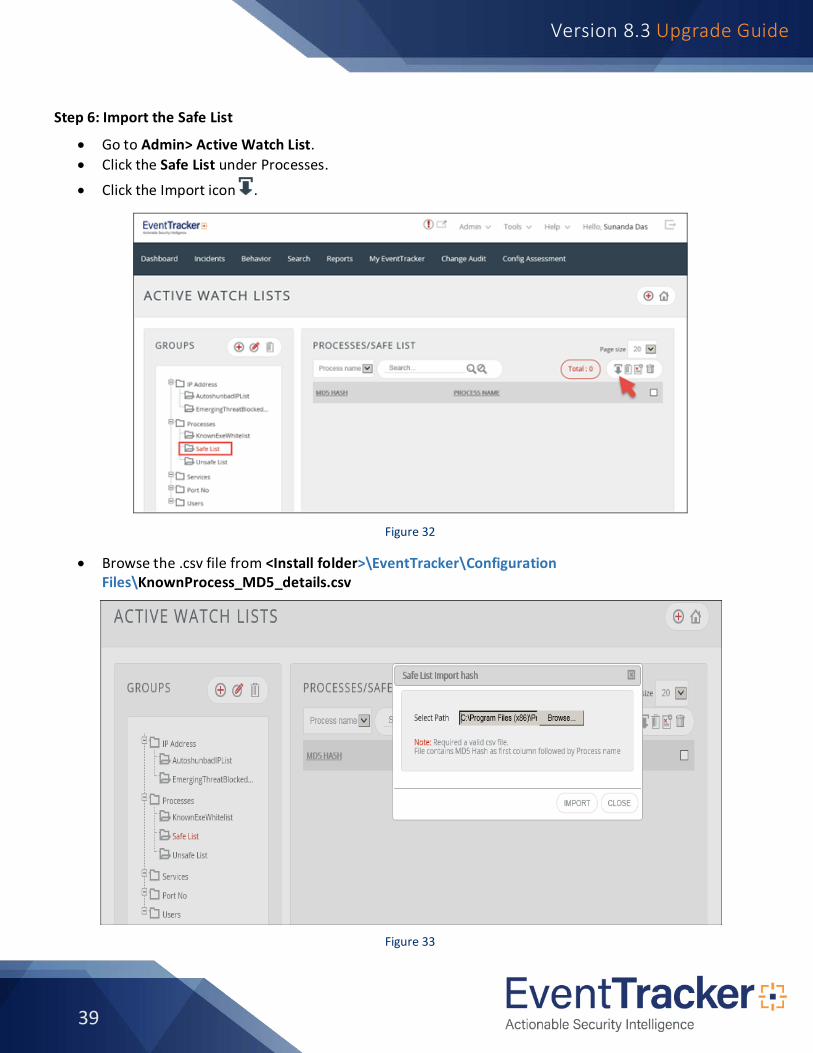
Step 6: Import the Safe List
• Go to Admin> Active Watch List. • Click the Safe List under Processes.
• Click the Import icon .
Figure 32
• Browse the .csv file from <Install folder>\EventTracker\Configuration Files\KnownProcess_MD5_details.csv
Figure 33

40
Version 8.3 Upgrade Guide
Figure 34
• The list will be retained after importing.
Figure 35
Step 7: Verify that the Categories, Alerts, Filters, and RSS Feeds are intact
1. Logon to EventTracker Enterprise.
Verify Category:
2. Click the Admin menu, and then click Category. EventTracker displays Category Management Page.
3. Search for the imported custom category under Category Tree tab. In addition, you can find the custom category on the right side of the page, in Last 10 modified categories list. Example: New Category
41
Version 8.3 Upgrade Guide
Figure 36
(OR)
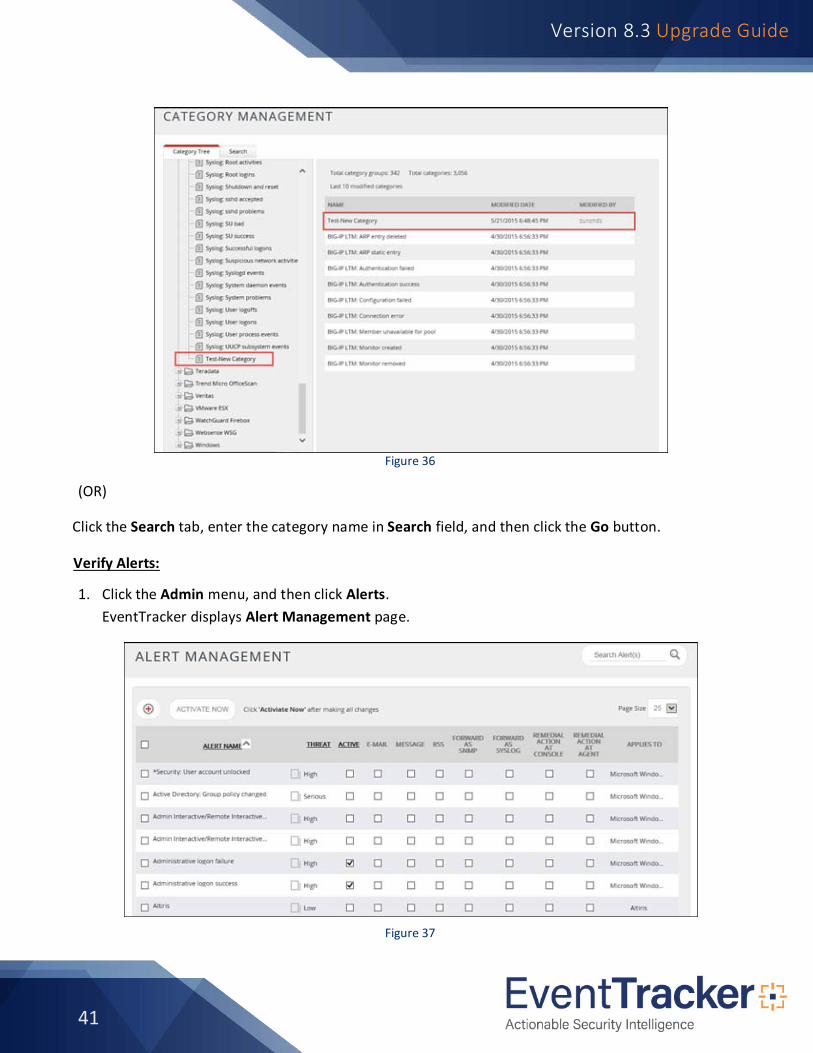
Click the Search tab, enter the category name in Search field, and then click the Go button.
1. Click the Admin menu, and then click Alerts.
Verify Alerts:
EventTracker displays Alert Management page.
Figure 37

42
Version 8.3 Upgrade Guide
2. Enter the alert name in Search Field, and click the Go button.
Figure 38
To find alert(s) in the list, you can make use of scroll bar and the page numbers provided at the bottom of Alert Management page.
1. Click the Admin menu, and click Event Filters.
Verify Filters:
EventTracker displays Event Filters page. The newly imported filters are listed in this page.
Figure 39
2. Click the filter name to see the imported filter details. EventTracker displays Event Filter configuration page.

43
Version 8.3 Upgrade Guide
Figure 40
1. Click the Admin menu, and then click RSS.
Verify RSS Feeds:
EventTracker displays RSS Feeds page. The newly imported RSS Feeds are listed in this page.
Figure 41
Step 8: Upgrade all Windows agents using the System manager
NOTE: After upgrading from the earlier versions, if the user wants the newly added agent filter settings available in EventTracker 8.3, please refer to the section “Using the Default Agent Filters in EventTracker version 8.3” to upgrade the remote agents. If not, please follow the below mentioned steps:
EventTracker agent upgrade is necessary to keep the agents up to date with the manager system.
1. Logon to EventTracker Enterprise. 2. Select the Admin menu, and select Systems.

44
Version 8.3 Upgrade Guide
EventTracker displays System manager page.
3. Right-click the desired domain/group name and then select Upgrade agent.
Figure 42
EventTracker displays Upgrade Remote Agent(s) dialog box.
Figure 43

45
Version 8.3 Upgrade Guide
Option To
All systems in the selected group
Click this option to upgrade all the agents in the selected group.
Take systems from the text file
Create a text file containing agent system names for which the upgrade has to be done. The text file should contain one system name per line. If you select this option then browse the text file to select the agent system names.
Agent type Select the agent to upgrade.
Specific systems in the selected group
Out of all the agent systems present in the group, select specific agent system(s) to upgrade.
(OR)
Select the icon corresponding to the remote system’s name (where the agent is to be upgraded), and then click Upgrade Agent from the dropdown list.
Figure 44
EventTracker displays Upgrade Remote agent(s) pop-up window.

46
Version 8.3 Upgrade Guide
Figure 45
4. Check the agent type option which you wish to upgrade, and then click the Next button.
Figure 46
5. Select Windows Domain Network option, and fill in the user credentials.

47
Version 8.3 Upgrade Guide
Figure 47
(OR)
If the remote agent is in some other non trusted domain or the remote system is not accessible using Windows file sharing, then select the Upgrade over IP (Non Windows Domain) option.
Figure 48
6. Check Install default Remedial Action EXEs on this system option to install remedial action scripts.
EventTracker displays a message box.

48
Version 8.3 Upgrade Guide
Figure 49
Remedial Actions are scripts or executable files that can be launched at either the agent or the manager side, in response to events. If this option is enabled, predefined scripts will be placed in the EventTracker\Agent\Script folder at the manager side. These may be installed at the agent side also, during deployment via the System manager.
7. Click OK to install remedial action EXEs
(OR)
Click Cancel to not to install remedial action EXEs.
The agent will be installed on the selected machine with the default etaconfig.ini configuration.
8. Click the Advanced button to set a more specific configuration while agent upgrade.
Figure 50

49
Version 8.3 Upgrade Guide
The Default option is selected by default to apply manager side ‘Agent configuration’ settings (etaconfig.ini).
(OR)
Select the Custom config option to select a custom configuration file.
The custom configuration will provide you the templates which you have created in Agent configuration and two more predefined templates.
You can select the template of your choice.
etaconfig_Servers.ini: This predefined template contains the ideal server configurations which can be applied to the selected agent system.
etaconfig_Workstations.ini: This predefined template contains the ideal workstation configurations which can be applied to the selected agent system. This option disables the ‘Offline event sending’ option.
9. Click the Upgrade button.
EventTracker displays information message.
Figure 51
10. Click the OK button.
EventTracker displays System Status screen.
Figure 52

50
Version 8.3 Upgrade Guide
11. Click the button, to see the latest status.
Figure 53
NOTE: It may take some time to load the status.
Step 10:
As the menu options have been changed, the User Privileges configuration won’t be retained after upgrade to v8.3 for non-admin users. You have to reconfigure it again.
a) To configure the privileges, go to Admin hyperlink, select Users. EventTracker displays User Management window.
b) Select Assign Privileges from the dropdown list by clicking the icon .
Figure 54
EventTracker displays the Add Privileges window.
c) Select required field and click OK.

51
Version 8.3 Upgrade Guide
Figure 55
Step 11: Import Knowledge Objects after upgrade
1. Logon to EventTracker Enterprise. 2. To import Knowledge Objects, select the Admin menu, and then select Knowledge Objects.
3. Select the Import icon. EventTracker Knowledge Objects Import/Export window displays.
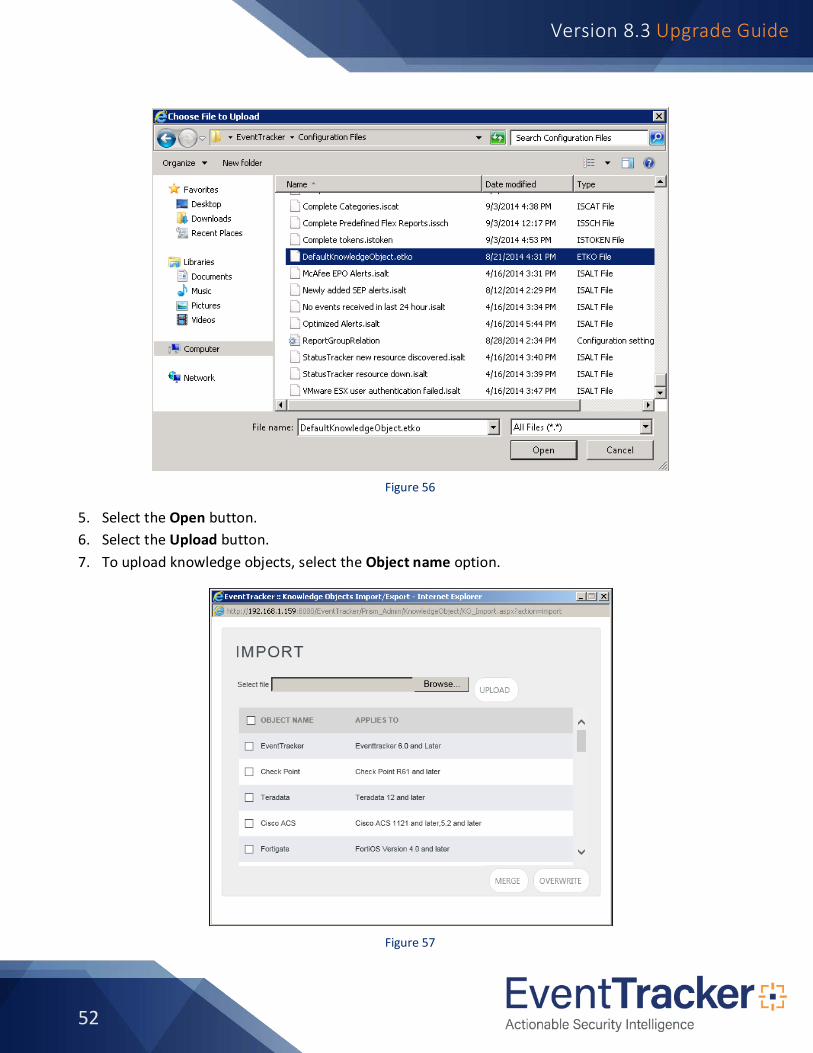
4. Select the Browse… button and then select the file from desired location. NOTE: The file extension should be ‘.etko’ only. The default knowledge object is available in \\InstallDIR\EventTracker\Configuration Files\DefaultKnowledgeObject.etko. And individual knowledge Object files are also available and the user can import them as per requirement.
52
Version 8.3 Upgrade Guide
Figure 56
5. Select the Open button. 6. Select the Upload button. 7. To upload knowledge objects, select the Object name option.
Figure 57

53
Version 8.3 Upgrade Guide
8. Select the Merge/OverWrite button as per the requirement.
NOTE:
• After upgrading from v7.5/ v7.6 /v8.0 to v8.3, the user will first have to import the new Token templates (with the extension .ettd) from the.. install DIR\Program Files\Prism MicroSystems\EventTracker\Configuration Files and then import the newly available Defined Reports ( with the extension .issch) from the same path.
• While importing the newly added defined reports from the EventTracker Control Panel, the user has to select the Old Type option with extension .issch.
Configure Service Accounts If the user is setting UNC path (Uniform Naming Convention) for storing Archives/Reports, then service account of EventTracker Scheduler, EventTracker EventVault, EventTracker Reporter, EventTracker Indexer and Event Correlator (if available) services should be made to run on the user account which will have full permission on the set UNC path.
1. Open the “EventTracker Configuration” from the Start button, and “Run as administrator”.
Figure 58
2. Configure the same with a user who has full permissions to access the shared archives folder.

54
Version 8.3 Upgrade Guide
Figure 59
** "Karen" has full permissions to access the archives UNC path.
NOTE: Please ignore the above steps, if it is already configured with the required user.
1. Select the Start button, and then select Run. 2. Type services.msc, and click the OK button.
Figure 60
3. In the Services window, search for EventTracker services.

55
Version 8.3 Upgrade Guide
Figure 61
4. Right click the service name, and click Properties. • For example: Right click EventTracker EventVault service. • ‘EventTracker EventVault Properties (Local Computer)’ dialog box will appear on the screen.
Figure 62

56
Version 8.3 Upgrade Guide
5. Click Log On tab, and select This account option.
Figure 63
6. Enter the user credentials and correct password. The user name should be in ‘domain name\user name’ format.
7. Click the Apply button. Warning message will be displayed on the desktop.
Figure 64
8. Click the OK button. 9. To run the service with new logon name, stop and start the service. 10. Likewise, for rest of the services, repeat step 4 to step 10 to change the service account.
The Log On As column will display the changed service account name.
Figure 65
57
Version 8.3 Upgrade Guide
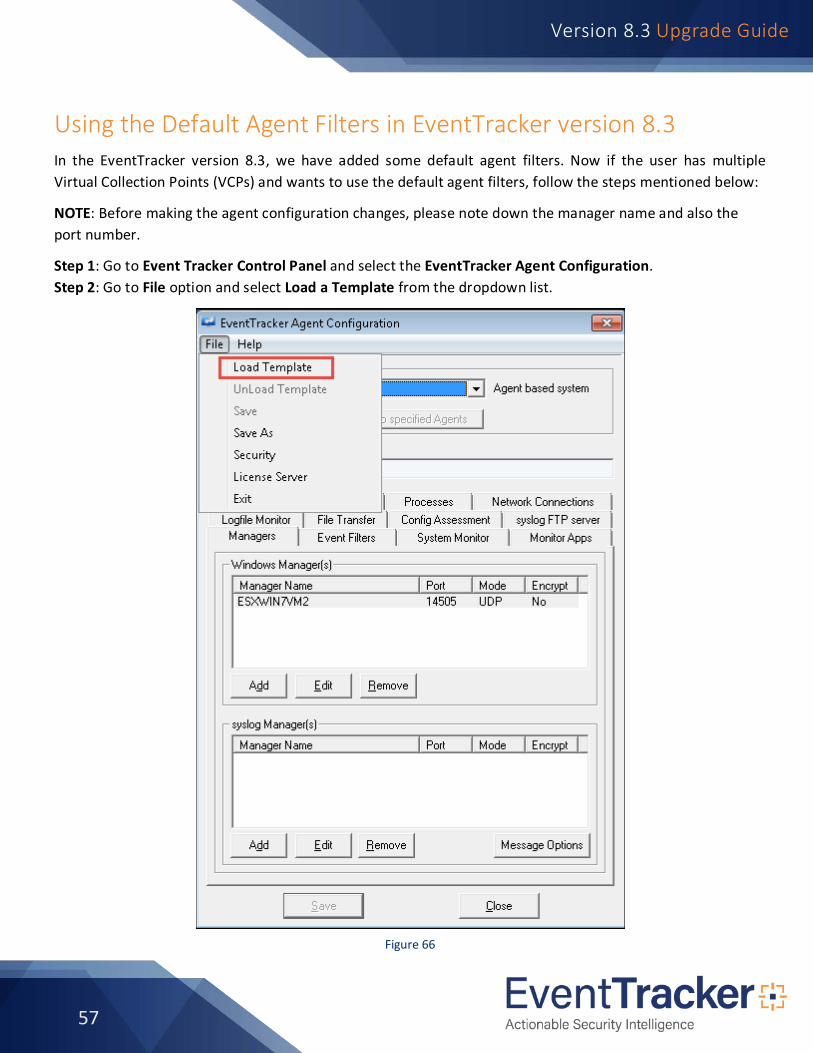
Using the Default Agent Filters in EventTracker version 8.3 In the EventTracker version 8.3, we have added some default agent filters. Now if the user has multiple Virtual Collection Points (VCPs) and wants to use the default agent filters, follow the steps mentioned below:
NOTE: Before making the agent configuration changes, please note down the manager name and also the port number.
Step 1: Go to Event Tracker Control Panel and select the EventTracker Agent Configuration. Step 2: Go to File option and select Load a Template from the dropdown list.
Figure 66

58
Version 8.3 Upgrade Guide
Step 3: Select the etaconfig.ini file from install DIR\Program Files\Prism MicroSystems\EventTracker\Configuration Files and click Open.
Figure 67
The below message gets displayed:
Figure 68
Step 4: Click Yes to continue. Step 5: Now, in the Manager tab, click the Add button to add the manager name with the default port, i.e. 14505.

59
Version 8.3 Upgrade Guide
Figure 69
The Add Destination window displays. Add the Manager name and click OK.

60
Version 8.3 Upgrade Guide
Figure 70
Step 6: Now, in the File Transfer tab, add the manger name and port by clicking the Add button.
Figure 71
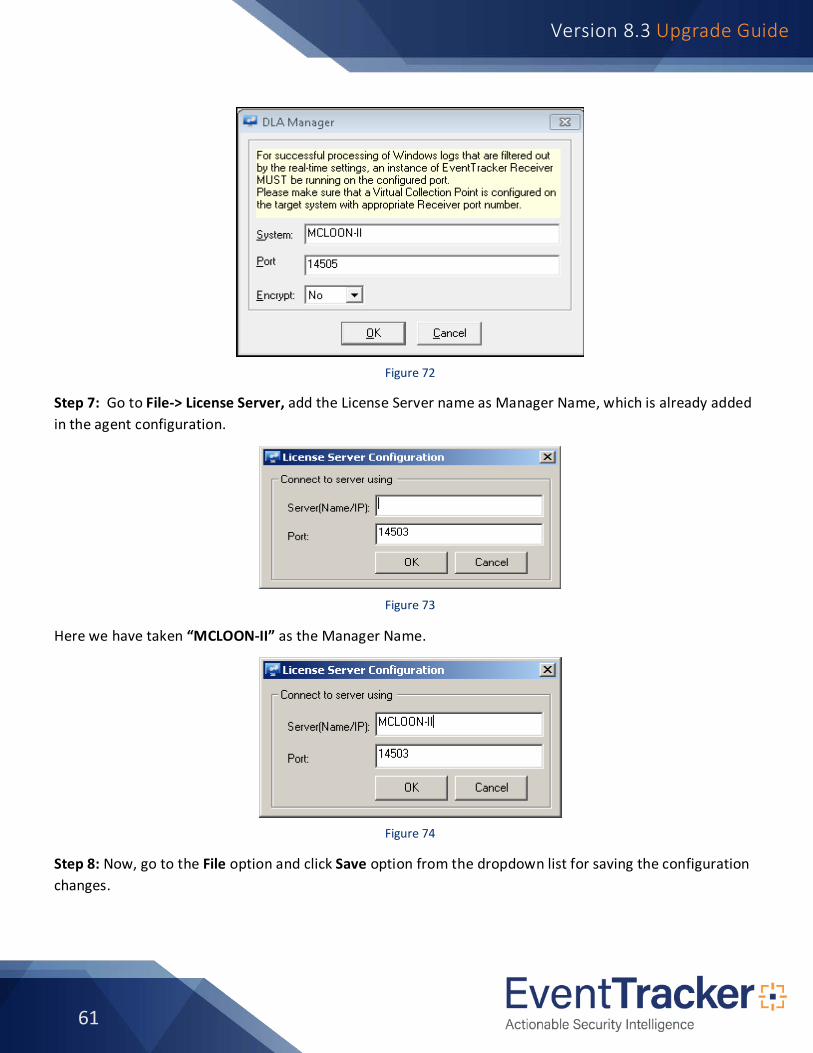
In the DLA Manager window, add the manager name and then click OK.
61
Version 8.3 Upgrade Guide
Figure 72
Step 7: Go to File-> License Server, add the License Server name as Manager Name, which is already added in the agent configuration.
Figure 73
Here we have taken “MCLOON-II” as the Manager Name.
Figure 74
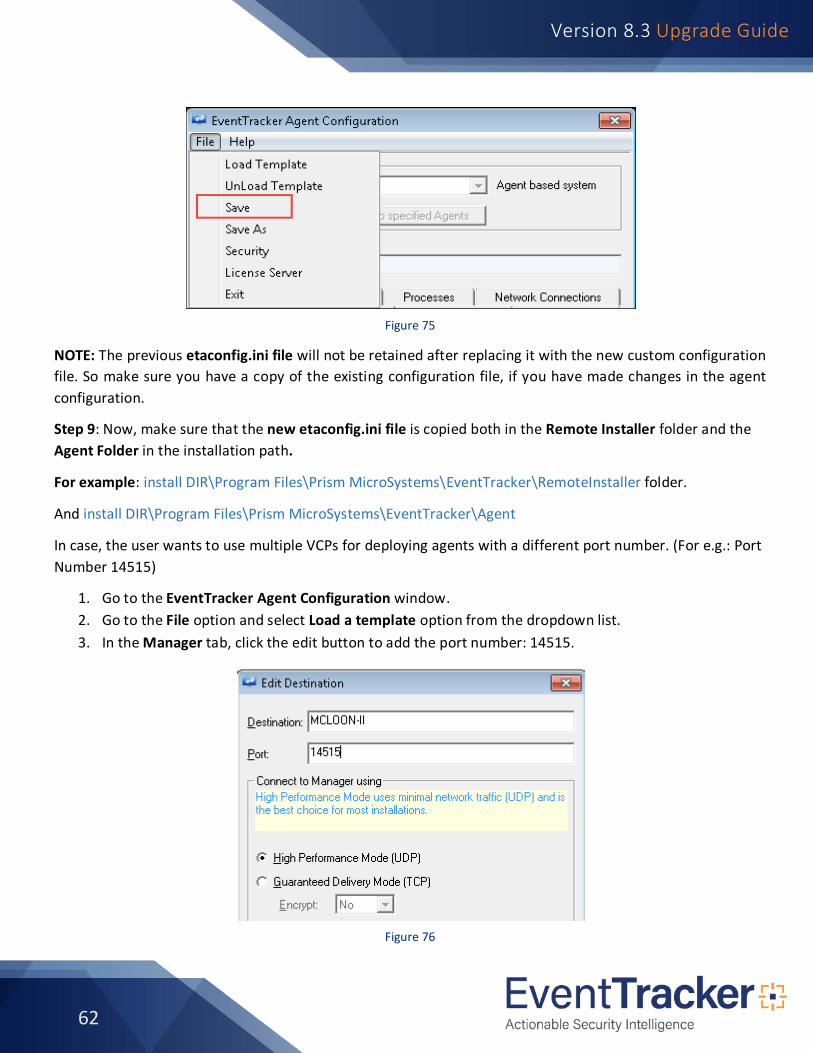
Step 8: Now, go to the File option and click Save option from the dropdown list for saving the configuration changes.
62
Version 8.3 Upgrade Guide
Figure 75
NOTE: The previous etaconfig.ini file will not be retained after replacing it with the new custom configuration file. So make sure you have a copy of the existing configuration file, if you have made changes in the agent configuration.
Step 9: Now, make sure that the new etaconfig.ini file is copied both in the Remote Installer folder and the Agent Folder in the installation path.
For example: install DIR\Program Files\Prism MicroSystems\EventTracker\RemoteInstaller folder.
And install DIR\Program Files\Prism MicroSystems\EventTracker\Agent
In case, the user wants to use multiple VCPs for deploying agents with a different port number. (For e.g.: Port Number 14515)
1. Go to the EventTracker Agent Configuration window. 2. Go to the File option and select Load a template option from the dropdown list. 3. In the Manager tab, click the edit button to add the port number: 14515.
Figure 76
63
Version 8.3 Upgrade Guide
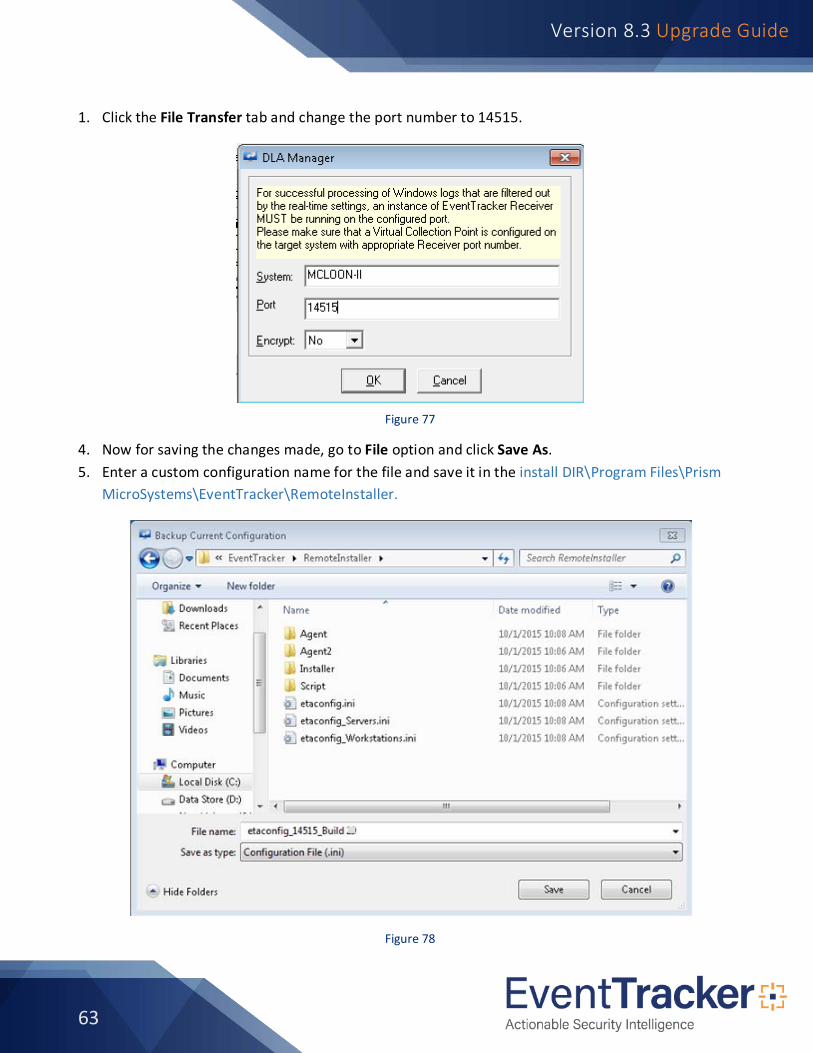
1. Click the File Transfer tab and change the port number to 14515.
Figure 77
4. Now for saving the changes made, go to File option and click Save As. 5. Enter a custom configuration name for the file and save it in the install DIR\Program Files\Prism
MicroSystems\EventTracker\RemoteInstaller.
Figure 78
64
Version 8.3 Upgrade Guide
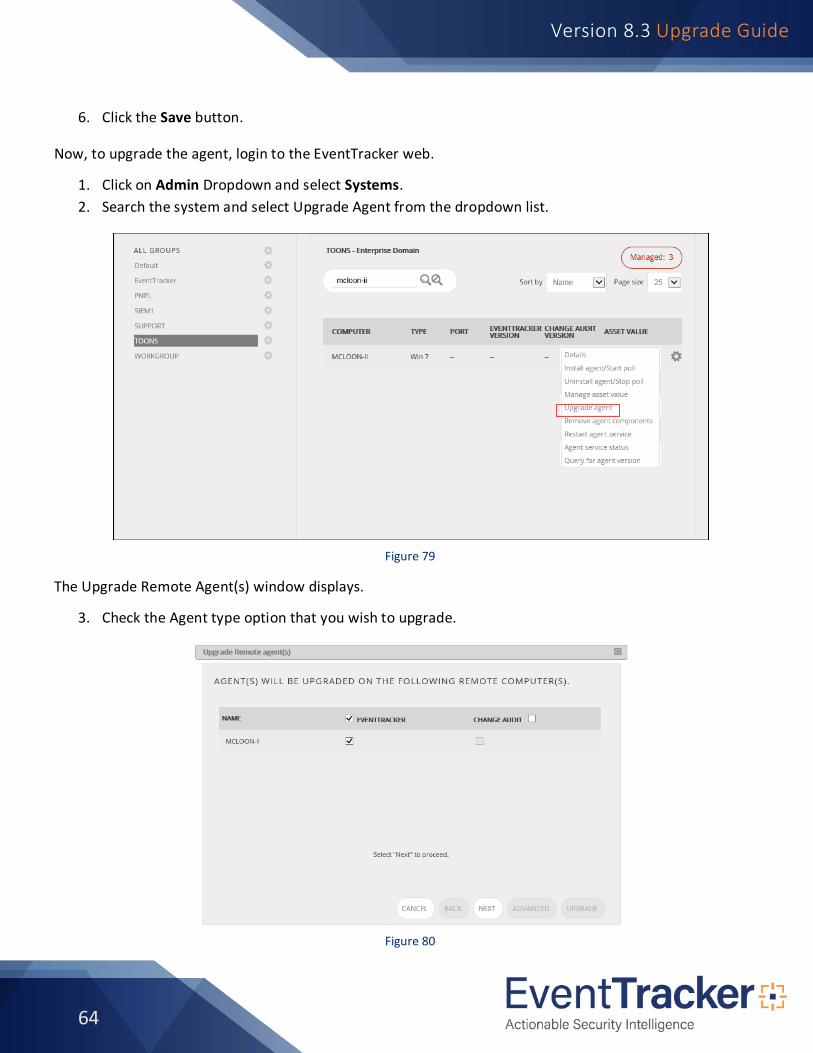
6. Click the Save button.
Now, to upgrade the agent, login to the EventTracker web.
1. Click on Admin Dropdown and select Systems. 2. Search the system and select Upgrade Agent from the dropdown list.
Figure 79
The Upgrade Remote Agent(s) window displays.
3. Check the Agent type option that you wish to upgrade.
Figure 80
65
Version 8.3 Upgrade Guide
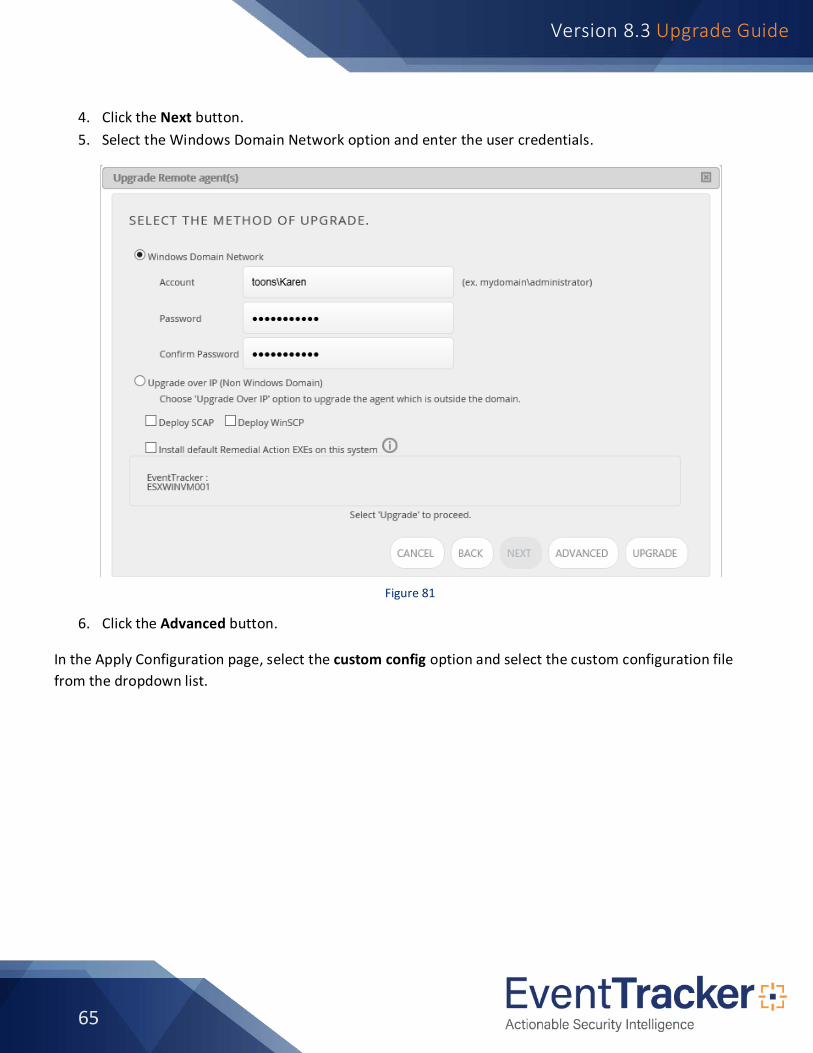
4. Click the Next button. 5. Select the Windows Domain Network option and enter the user credentials.
Figure 81
6. Click the Advanced button.
In the Apply Configuration page, select the custom config option and select the custom configuration file from the dropdown list.

66
Version 8.3 Upgrade Guide
Figure 82
7. Click the Upgrade button.
NOTE: If you follow the above steps mentioned, the default configuration settings will be overwritten by the custom configuration settings selected.
Upgrade from v8.0.x/v8.1.x/v8.2.x to v8.3.x The upgrade procedure from v8.0/v8.1/v8.2.x to v8.3 is the same as v7.6 to v8.3. The detail procedure is described in Upgrade from v7.6.x to v8.3.x.
NOTE:
• For upgrading from v8.0.x/v8.1.x/v8.2.x to v.8.3.x, the user will not have to follow the section “Using the Default Agent Filters in EventTracker version 8.3” as the default agent filters will already be available in v8.0/v8.1/v8.2.
• For upgrading from v8.0/v8.1/v8.2 to v8.3, the user need not import any of the Behavior Rules.

67
Version 8.3 Upgrade Guide
• Before upgrading, please take a backup of the database and follow the instructions mentioned in Upgrade from v7.6.x to v8.3.x.
This is an alternate method to take a backup of the database from v7.3 Build 59 onwards via EventTracker Control Panel -> Diagnostics otherwise please refer Backup and Restore Guide.
• Please refer Common steps for all upgrades for more details.
Important for user(s) upgrading from v8.2 to v8.3:
During the un-installation of v8.2, the following screen gets displayed:
• Retain the configuration as per your requirement and click on Clean button.
• The confirmation message gets displayed. Click on Yes.

68
Version 8.3 Upgrade Guide
• Once you click Yes, it starts uninstalling the EventTracker, and writes the log.
• Once the un-installation is successfully done, click View Log to see the logs.
• Make sure you close the EventTracker Uninstall Utility window, once the logs are viewed.

69
Version 8.3 Upgrade Guide
Now, you can follow with the Installation steps for the upgrading to EventTracker 8.3.