version 7.1.1 to 7.2 upgrade guide - ibm - united states · pdf file2 ibm tivoli provisioning...
TRANSCRIPT

Provisioning Manager
Version 7.1.1 to 7.2 Upgrade Guide
���

Provisioning Manager
Version 7.1.1 to 7.2 Upgrade Guide
���
NoteBefore using this information and the product it supports, read the information in “Notices” on page 51.
Last updated: November 2011
This edition applies to IBM Tivoli Provisioning Manager 7.2.
© Copyright IBM Corporation 2003, 2014.US Government Users Restricted Rights – Use, duplication or disclosure restricted by GSA ADP Schedule Contractwith IBM Corp.

Contents
Chapter 1. Upgrade overview . . . . . 1Supported platforms and compatibility . . . . . 1Upgrade process . . . . . . . . . . . . . 2
Chapter 2. Preinstallation tasks forupgrading to Tivoli ProvisioningManager 7.2 . . . . . . . . . . . . . 3Verify the disk space requirements . . . . . . . 3Verify the required utilities . . . . . . . . . 5Verify user requirements . . . . . . . . . . 6Verify automation packages . . . . . . . . . 6Back up your installation . . . . . . . . . . 8Verify the upgrade package . . . . . . . . . 9Configure DB2 parameters . . . . . . . . . 10Check the status of the Oracle database . . . . . 12Bypass device manager federator upgrade . . . . 13Reconfigure WebSphere Application Server to run astioadmin . . . . . . . . . . . . . . . 14
Chapter 3. Upgrade tasks. . . . . . . 17Upgrading middleware components to version 7.2 17
Upgrading DB2 to version 9.5 . . . . . . . 17Upgrading the base services to version 7.2 . . . . 19Upgrading core components to version 7.2 . . . . 21Upgrading web components to version 7.2 . . . . 26
Chapter 4. Post-installation tasks forTivoli Provisioning Manager version 7.2 29Pre-WebSphere Application Server: upgrading TivoliCommon Agent . . . . . . . . . . . . . 29Upgrading Tivoli Provisioning Manager for OSDeployment . . . . . . . . . . . . . . 30Upgrading reports . . . . . . . . . . . . 31Updating virtual server templates . . . . . . . 32Configuring RSA credentials. . . . . . . . . 33
Running security upgrades . . . . . . . . . 33Optional: Upgrading the monitoring agent . . . . 34Enabling tivoli09 as the default skin . . . . . . 35Upgrading the Start Center . . . . . . . . . 35Recompile Java classes. . . . . . . . . . . 35Reinstall custom workflows . . . . . . . . . 36
Chapter 5. Troubleshooting the fix packinstallation . . . . . . . . . . . . . 37Maximo business objects are out of sync betweenthe deployment engine and the WebSphere run time 37Base services fails during upgrade . . . . . . . 38Tivoli Provisioning Manager engine does not start 38Recovery steps for problems during the agentmanager upgrade . . . . . . . . . . . . 39Slow verification and copying of NFS mountedimages during core component installation ofWebSphere Application Server . . . . . . . . 41DB2 transaction log error during the base servicesupgrade of Tivoli Provisioning Manager . . . . . 42Using the integrity checker tool. . . . . . . . 42Error CTGIN0143E and CTGIN0130E whileupdating web components . . . . . . . . . 42Error CTGIN2489E upgrading base services . . . 43MAXADMIN authentication forTPWEBSERVICEUSER group . . . . . . . . 44
Chapter 6. Other upgrade information 45Best practice recommendations for base servicescustomization . . . . . . . . . . . . . 45
Overview . . . . . . . . . . . . . . 45Tips for customizing particular artifact types . . 46
Installation directories and other paths . . . . . 48
Notices . . . . . . . . . . . . . . 51
© Copyright IBM Corp. 2003, 2014 iii

iv IBM Tivoli Provisioning Manager Version 7.2 Upgrade Guide

Chapter 1. Upgrade overview
Supported platforms and compatibilityTivoli® Provisioning Manager supports specific operating systems and is compatible with other productsthat are installed together with the base services.
Supported operating systems
The supported operating systems, including the specific update levels, reflect the version of the operatingsystem that has been tested with Tivoli Provisioning Manager. Differences in other editions or changesimplemented in other update levels for an operating system might cause errors during or afterinstallation. Therefore, ensure that you are using the specific edition and version of the operating systemas indicated in this topic. For example, the supported Windows Server 2003 are at the Service Pack 2level. Windows Server 2003 R2 is not supported.
You can upgrade from Tivoli Provisioning Manager 7.1.1 to Tivoli Provisioning Manager 7.2 if you haveTivoli Provisioning Manager 7.1.1 installed on the following operating systems: Windows
v Windows Server 2008 Enterprise Edition SP1 (x86 64-bit)v Windows Server 2008 Standard Edition SP1 (x86 64-bit)v Windows Server 2003 R2 Enterprise Edition SP1 (x86 64-bit)v Microsoft Windows Server 2003 Enterprise Edition SP2 (x86 64-bit)v Microsoft Windows Server 2003 Standard Edition SP2 (x86 64-bit)v Windows Server 2003 Enterprise Edition SP2 (x86 32-bit)v Windows Server 2003 Standard Edition SP2 (x86 32-bit)
Note: Windows 32-bit operating systems are not recommended because they can only support 6000managed computers. If you are managing more than 6000 computers, upgrade your operating system to64-bit, and then upgrade to Tivoli Provisioning Manager version 7.2.
AIX
v AIX® 6.1 TL2 SP2 (IBM® System p® 64-bit)v AIX 5.3 TL8 SP2 (IBM System p 64-bit) for single computer deploymentv AIX 5.3 TL6 SP2 (IBM System p 64-bit) for multiple server deployment
Linux
v Red Hat Enterprise Linux 5 Update 1 or Update 3 (x86 64-bit)v Red Hat Enterprise Linux 5 Update 1 or Update 3 (IBM System z® 64-bit)v SUSE Linux Enterprise Server 10 SP2 (x86 64-bit)v SUSE Linux Enterprise Server 10 SP1 (IBM System z 64-bit)v SUSE Linux Enterprise Server 10 SP3 (IBM System z 64-bit)
Solaris
v Solaris 10 (SPARC)
Compliance with Federal Information Processing Standard 140-2
FIPS 140-2 compliance is only available for fresh installation of Tivoli Provisioning Manager. If you areupgrading from a previous version of Tivoli Provisioning Manager, configuration of FIPS 140-2compliance is not supported.
© Copyright IBM Corp. 2003, 2014 1

Upgrade processThese steps describe the pre-upgrade tasks, the upgrade of the software, and the post-upgrade tasks.
1. Perform pre-upgrade tasks
2. Upgrade middleware
3. Upgrade base services
4. Upgrade core components
5. Upgrade Web components
6. Perform post-upgrade tasks
7. Software is ready to use
2 IBM Tivoli Provisioning Manager Version 7.2 Upgrade Guide

Chapter 2. Preinstallation tasks for upgrading to TivoliProvisioning Manager 7.2
Before you begin1. Verify your version of Tivoli Provisioning Manager. This upgrade can only be applied to an
installation of Tivoli Provisioning Manager 7.1.1.2. If you customized the interface in your existing installation, verify your changes with the
customization best practices. Following the best practices helps you to retain your customizationduring the upgrade process. For more information see “Best practice recommendations for baseservices customization” on page 45.
Verify the disk space requirementsBefore you proceed with the upgrade, verify your disk requirements.
Procedure
Verify disk space requirements: Windows
Table 1. Disk space requirements for Windows
Location Disk space requirements
Installation images 5 GB
Disk space to extract files from installation images 5 GB
Disk space for upgrade installation 6 GB
Database installation directory
The default location is: C:\CTGINST1
1 GB
Tivoli Monitoring agent installation directory
The default location is: C:\ibm\tivoli\ITM\
50 MB
The agent manager installation directory
The default location is: C:\Program Files\IBM\AgentManager\
50 MB
Tivoli Provisioning Manager for Job Management Servicefederator installation directory
The default location is: C:\Program Files\IBM\DeviceManager\
50 MB
Tivoli Provisioning Manager for dynamic contentdelivery installation directory
The default location is: C:\Program Files\IBM\tivoli\CDS
50 MB
Tivoli Provisioning Manager installation directory
The default location is: C:\Program Files\IBM\tivoli\tpm
3 GB
© Copyright IBM Corp. 2003, 2014 3
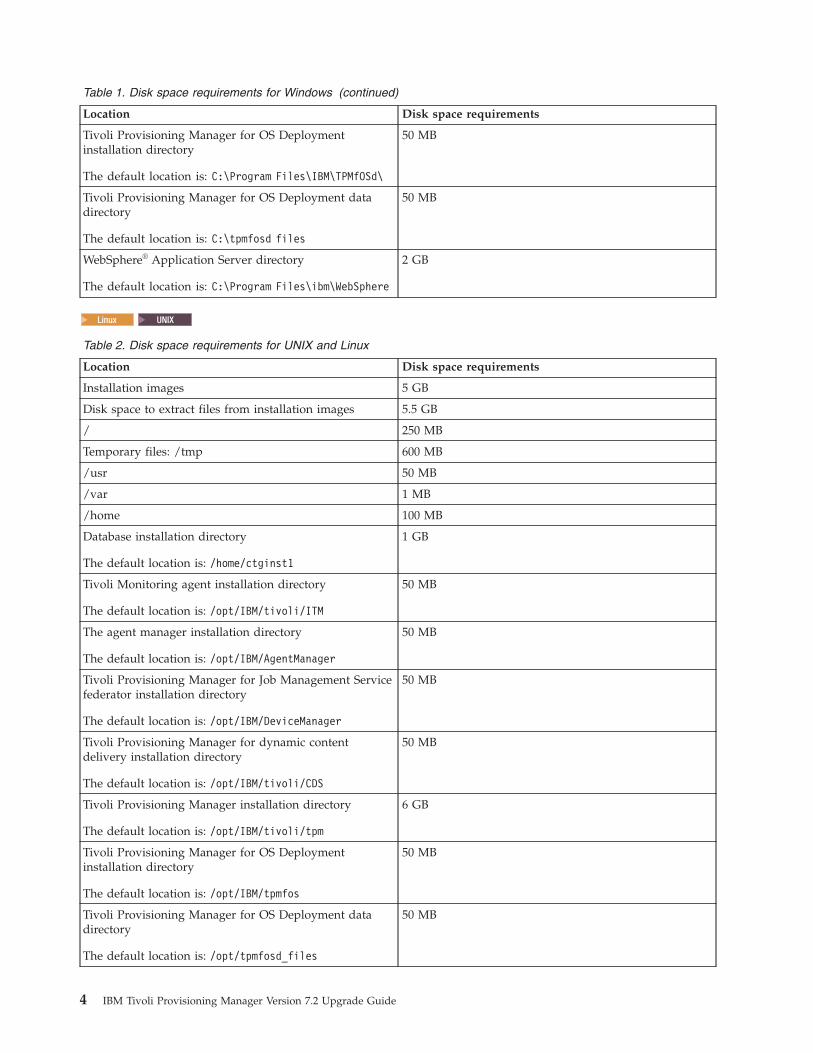
Table 1. Disk space requirements for Windows (continued)
Location Disk space requirements
Tivoli Provisioning Manager for OS Deploymentinstallation directory
The default location is: C:\Program Files\IBM\TPMfOSd\
50 MB
Tivoli Provisioning Manager for OS Deployment datadirectory
The default location is: C:\tpmfosd files
50 MB
WebSphere® Application Server directory
The default location is: C:\Program Files\ibm\WebSphere
2 GB
Linux UNIX
Table 2. Disk space requirements for UNIX and Linux
Location Disk space requirements
Installation images 5 GB
Disk space to extract files from installation images 5.5 GB
/ 250 MB
Temporary files: /tmp 600 MB
/usr 50 MB
/var 1 MB
/home 100 MB
Database installation directory
The default location is: /home/ctginst1
1 GB
Tivoli Monitoring agent installation directory
The default location is: /opt/IBM/tivoli/ITM
50 MB
The agent manager installation directory
The default location is: /opt/IBM/AgentManager
50 MB
Tivoli Provisioning Manager for Job Management Servicefederator installation directory
The default location is: /opt/IBM/DeviceManager
50 MB
Tivoli Provisioning Manager for dynamic contentdelivery installation directory
The default location is: /opt/IBM/tivoli/CDS
50 MB
Tivoli Provisioning Manager installation directory
The default location is: /opt/IBM/tivoli/tpm
6 GB
Tivoli Provisioning Manager for OS Deploymentinstallation directory
The default location is: /opt/IBM/tpmfos
50 MB
Tivoli Provisioning Manager for OS Deployment datadirectory
The default location is: /opt/tpmfosd_files
50 MB
4 IBM Tivoli Provisioning Manager Version 7.2 Upgrade Guide

Table 2. Disk space requirements for UNIX and Linux (continued)
Location Disk space requirements
WebSphere Application Server directory
The default location is: /opt/IBM/Websphere
2 GB
Table 3. Disk space requirements for the administrative workstation on Windows
Location Disk space requirements
Installation images 2.5 GB
Disk space to extract files from installation images 3 GB
Disk space for upgrade installation 5 GB
Base services deployment directory. The default locationis: C:\ibm\SMP
1.5 GB
What to do next
Proceed to “Verify the required utilities.”
Verify the required utilitiesBefore you proceed with the upgrade, verify the required utilities.
Procedure1. Ensure that WMI Windows Installer Provider is installed.
v Windows 2008 WMI Windows Installer Provider is installed by default.
v Windows 2003 If WMI Windows Installer Provider is not installed, follow these steps:a. In Windows Control Panel, select Add or Remove Programs.b. Select Add/Remove Windows Components.c. In the Windows Components Wizard, select Management and Monitoring Tools and then click
Details.d. In the Management and Monitoring Tools dialog box, select WMI Windows Installer Provider
and then click OK.e. Click Next.
2. AIX Linux Ensure that the zip and unzip utilities are installed on the provisioning server,and are in the system PATH. This is required so that upgrade files can be extracted. To check if thezip and unzip tools are available, run zip and unzip on the command line. If not already installed,download the RPM zip and unzip packages from the following locations:
v AIX Go to IBM AIX Toolbox download information.
v Linux The packages are provided on the Linux installation media, and are typically installed bydefault.
3. AIX Linux Ensure that tar is installed.
4. AIX During installation, the installer runs the command df -Mk. On AIX, the GNU tar commanddoes not support the -Mk option. For the upgrade, set native AIX tar as default system tar. You maychoose to change any existing symboling link to point to native AIX tar.
What to do next
Proceed to “Verify user requirements” on page 6.
Chapter 2. Pre-upgrade tasks 5

Verify user requirementsBefore you proceed with the upgrade, verify your user requirements.
Before you begin
Ensure that the umask value is set to 022 for the root and tioadmin users. If a umask setting exists,change the value to 022. To set the umask value:
v AIX In the file /etc/security/user, change the umask setting for root to umask = 022.
v Linux If using the bash shell, in the home directory for root, add the line umask 022 at the end ofthe .bashrc file. If using the Korn shell, in the home directory for root, add the line umask 022 to the.profile file.
v Solaris In the file /etc/profile, change the umask setting for root to umask = 022.
Procedure
Verify the passwords to perform the upgrade.v The password for the WebSphere Application Server administrator. The default ID for this user is
wasadmin for LDAP.v The password for the agent manager. If you installed version 7.1.1 into the default installation path, the
password is the Generic password.v The password for the database instance owner.
– 2000DB2 The default user ID is ctginst1. If you installed version 7.1.1 into the default installationpath, the database user is maximo.
– AIX Linux 2000Oracle The default database user is sys.
What to do next
Proceed to “Verify automation packages.”
Verify automation packagesBefore you proceed with the upgrade, verify your automation packages.
Before you begin1. Ensure that Tivoli Provisioning Manager is running.2. Ensure that the variable JAVA_HOME is set on the computer where you verify the automation
packages.3. You can either use IBM SDK Java Technology Edition Version 1.5 or IBM SDK Java Technology
Edition Version 1.6. To be able to use Version 1.6, you must upgrade WebSphere Application Server toVersion 7.0.
4. The TIO_HOME/apde_JDK16 directory contains the AutomationPackageVerifier_JDK16.zip that iscompatible with IBM SDK Java Technology Edition Version 1.6.
Windows 2008 Select the option Run as administrator for all the commands that you run fromTIO_HOME\tools. For more information about user account control in Windows 2008, see User AccountControl Step-by-Step Guide.
Custom automation packages are combined with the out-of-the-box automation packages to validate thecompatibility of the custom automation packages with Tivoli Provisioning Manager version 7.2automation packages.
6 IBM Tivoli Provisioning Manager Version 7.2 Upgrade Guide
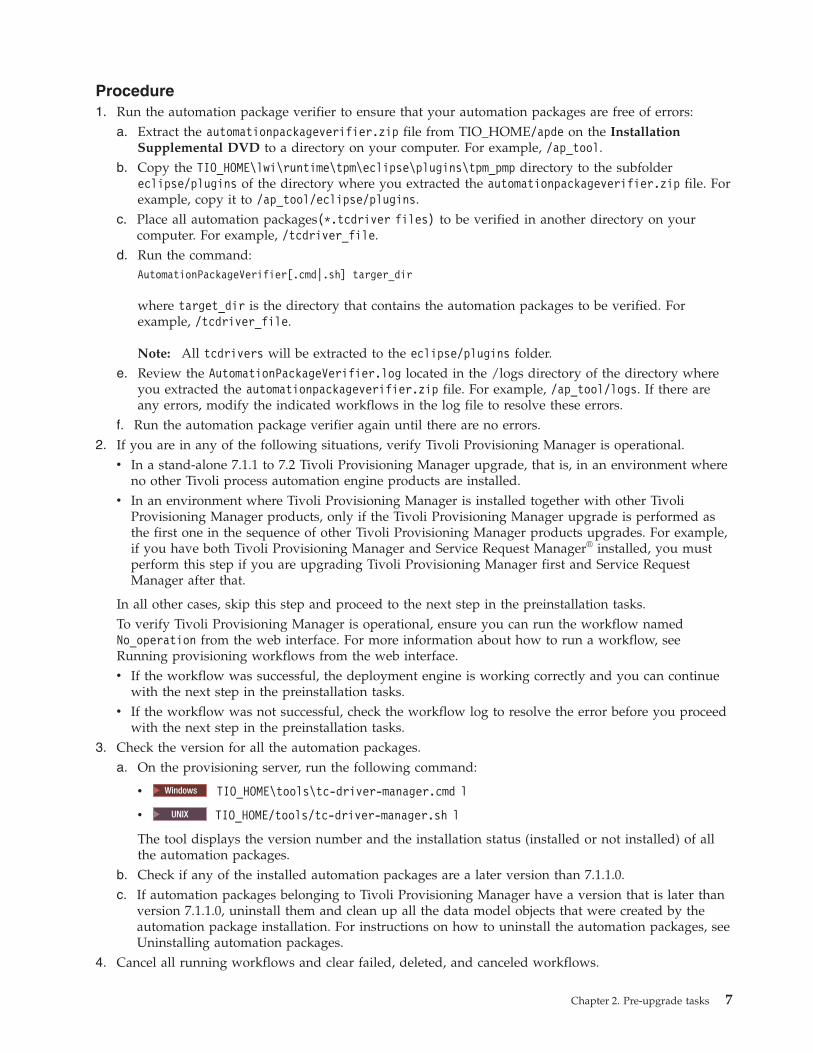
Procedure1. Run the automation package verifier to ensure that your automation packages are free of errors:
a. Extract the automationpackageverifier.zip file from TIO_HOME/apde on the InstallationSupplemental DVD to a directory on your computer. For example, /ap_tool.
b. Copy the TIO_HOME\lwi\runtime\tpm\eclipse\plugins\tpm_pmp directory to the subfoldereclipse/plugins of the directory where you extracted the automationpackageverifier.zip file. Forexample, copy it to /ap_tool/eclipse/plugins.
c. Place all automation packages(*.tcdriver files) to be verified in another directory on yourcomputer. For example, /tcdriver_file.
d. Run the command:AutomationPackageVerifier[.cmd|.sh] targer_dir
where target_dir is the directory that contains the automation packages to be verified. Forexample, /tcdriver_file.
Note: All tcdrivers will be extracted to the eclipse/plugins folder.e. Review the AutomationPackageVerifier.log located in the /logs directory of the directory where
you extracted the automationpackageverifier.zip file. For example, /ap_tool/logs. If there areany errors, modify the indicated workflows in the log file to resolve these errors.
f. Run the automation package verifier again until there are no errors.2. If you are in any of the following situations, verify Tivoli Provisioning Manager is operational.
v In a stand-alone 7.1.1 to 7.2 Tivoli Provisioning Manager upgrade, that is, in an environment whereno other Tivoli process automation engine products are installed.
v In an environment where Tivoli Provisioning Manager is installed together with other TivoliProvisioning Manager products, only if the Tivoli Provisioning Manager upgrade is performed asthe first one in the sequence of other Tivoli Provisioning Manager products upgrades. For example,if you have both Tivoli Provisioning Manager and Service Request Manager® installed, you mustperform this step if you are upgrading Tivoli Provisioning Manager first and Service RequestManager after that.
In all other cases, skip this step and proceed to the next step in the preinstallation tasks.To verify Tivoli Provisioning Manager is operational, ensure you can run the workflow namedNo_operation from the web interface. For more information about how to run a workflow, seeRunning provisioning workflows from the web interface.v If the workflow was successful, the deployment engine is working correctly and you can continue
with the next step in the preinstallation tasks.v If the workflow was not successful, check the workflow log to resolve the error before you proceed
with the next step in the preinstallation tasks.3. Check the version for all the automation packages.
a. On the provisioning server, run the following command:
v Windows TIO_HOME\tools\tc-driver-manager.cmd l
v UNIX TIO_HOME/tools/tc-driver-manager.sh l
The tool displays the version number and the installation status (installed or not installed) of allthe automation packages.
b. Check if any of the installed automation packages are a later version than 7.1.1.0.c. If automation packages belonging to Tivoli Provisioning Manager have a version that is later than
version 7.1.1.0, uninstall them and clean up all the data model objects that were created by theautomation package installation. For instructions on how to uninstall the automation packages, seeUninstalling automation packages.
4. Cancel all running workflows and clear failed, deleted, and canceled workflows.
Chapter 2. Pre-upgrade tasks 7
a. Open a command window.b. Log on to the provisioning server as tioadmin.c. Go to the tools directory.
v Windows %TIO_HOME%\tools
v AIX Linux $TIO_HOME/tools
d. Run the following commands:
v Windows
cancel-all-in-progress.cmdclean-up-deployment-requests.cmd
v AIX Linux
./cancel-all-in-progress.sh
./clean-up-deployment-requests.sh
The command marks all the in-progress deployment requests as abandoned (failed). The logfiles cancel-all-in-progress.log and clean-up-deployment-requests.log are created with theresults of the commands.
What to do next
Proceed to “Back up your installation.”
Back up your installationBefore you proceed with the upgrade, back up your installation.
The upgrade modifies the database, directory server, and files in the Tivoli Provisioning Managerinstallation directory. These changes cannot be rolled back. If the upgrade fails, you must restore abackup of the product from before you applied the upgrade or reinstall the product, and then try toupgrade again. To back up your installation:
Procedure1. Use your own backup tools to perform a full system backup or see Backing up the database and
important data in the Tivoli Provisioning Manager wiki.2. Back up the Tivoli Provisioning Manager installation directory (TIO_HOME).3. Back up the agent manager by running the following command: AM_HOME/toolkit/bin/
backupTool.sh|bat -file <filename>.4. If the directory server or the database is on a separate computer, back up that data also.5. Optional: If you have custom classes written for the web interface, you must deploy them to the
administrative workstation. For example, C:\ibm\SMP\maximo\applications\maximo\maximouiweb\webmodule\WEB-INF\classes.
6. Back up the administrative workstation. For more information, see Backing up the administrativeworkstation.
7. Save workflows that you created in the web interface that you want to keep. If you create a workflowin the web interface the workflow is saved in the data model and is associated with the automationpackage called default_automation_package by default. A copy of the workflow is not saved in theautomation package file default_automation_package.tcdriver. The default_automation_packageautomation package can cause problems during the upgrade and is therefore deleted during theinstallation. If you want to save a workflow that you created in the web interface, perform thefollowing steps:a. Click Provisioning Workflows.b. Search for the workflow name.
8 IBM Tivoli Provisioning Manager Version 7.2 Upgrade Guide

c. In the search results, click the workflow that you want to save.d. Click Save Workflow.
What to do next
Proceed to “Verify the upgrade package.”
Verify the upgrade packageBefore you proceed with the upgrade, verify the upgrade package.
Before you begin1. Remove the following files from the DCD_HOME directory:
v /scripts/CDSUpdateAPP.py
v /scripts/MC-WAS-update.cmd
v /scripts/MC-WAS-update.sh
v cds_control_file
v CDSInstalled
v DownloadGridUpdate.zip
v manager.properties
2. Ensure that you have downloaded the following packages to the provisioning server for a single nodeor multi-node update from the IBM Support Portal:
Windows
v 7.1.1-TIV-Components-Windows-FP0001.zip
v 7.1.1-TIV-TPM-Windows-FP0001.zip
v 7.1.1-TIV-WebComp-Windows-FP0001.zip
AIX
v 7.1.1-TIV-Components-AIXPPC64-FP0001.tar
v 7.1.1-TIV-TPM-AIXPPC64-FP0001.tar
v 7.1.1-TIV-WebComp-Unix-FP0001.tar
Linux
v 7.1.1-TIV-Components-Linux-FP0001.tar
v 7.1.1-TIV-TPM-Linux-FP0001.tar
v 7.1.1-TIV-WebComp-Unix-FP0001.tar
System z Linux
v 7.1.1-TIV-Components-zLinux-FP0001.tar
v 7.1.1-TIV-TPM-Linux-FP0001.tar
v 7.1.1-TIV-WebComp-Unix-FP0001.tar
Solaris
v 7.1.1-TIV-Components-Solaris-FP0001.tar
v 7.1.1-TIV-TPM-SolarisSparc-FP0001.tar
v 7.1.1-TIV-WebComp-Unix-FP0001.tar
3. To update the administrative workstation, ensure that you have the following package downloaded:
v Windows 7.1.1-TIV-WebComp-Windows-FP0001.zip
v UNIX 7.1.1-TIV-WebComp-Unix-FP0001.tar
Chapter 2. Pre-upgrade tasks 9

Procedure1. Verify your downloaded packages by validating their checksum values.
a. Ensure that you have downloaded the .md5 file that corresponds to each .zip or tar file from theupgrade download page.
b. Windows Open a Cygwin window.c. Ensure that the .md5 files are in the same directories as the corresponding .zip or .tar files when
the md5sum check is run. For example,
Windows To validate the file 7.1.1-TIV-WebComp-Windows-FP0001.zip, run the command:md5sum -c 7.1.1-TIV-WebComp-Windows-FP0001.zip.md5
AIX Linux To validate the file 7.1.1-TIV-WebComp-Unix-FP0001.tar, run the command:
v Linux md5sum -c 7.1.1-TIV-WebComp-Unix-FP0001.tar.md5
v AIX csum -i 7.1.1-TIV-WebComp-Unix-FP0001.tar.md5
2. Create a temporary directory for the upgrade. In these instructions, the directory is called fp_temp.The temporary directory must meet these requirements:v It exists outside the Tivoli Provisioning Manager installation directory.v It meets the disk space requirements for the Tivoli Provisioning Manager server mentioned in
“Verify the disk space requirements” on page 3.
v Windows The Administrator user must have read and write permission to this directory.
v AIX Linux The root, maximo, and tioadmin users must have read and write permission tothis directory.
v There are no spaces in the name of the directory or the names of the parent directories.3. Extract the contents of the upgrade downloads (Tivoli Provisioning Manager and components) to the
same temporary directory. After you extract the files, you can delete the compressed upgradedownloads to free space in the directory if necessary.
Note: Windows If you extracted the downloads using Cygwin, ensure that all files under the fp_tempdirectory have read and write permissions.
What to do next
Proceed to “Configure DB2 parameters” or “Check the status of the Oracle database” on page 12.
Configure DB2 parametersBefore you proceed with the upgrade, configure the DB2® parameters.
Before you begin1. Ensure that Tivoli Provisioning Manager is stopped. For more information, see Starting and stopping
the server and components Tivoli Provisioning Manager.2. Ensure that the Tivoli Provisioning Manager directory server is still running so the upgrade can
complete successfully.If you are using Tivoli Directory Server:
Windows
v Open the Services control panel.v Find the entry for the IBM Tivoli Directory Server instance.v If the server instance is not started, right-click the server instance name and click Start.
UNIX Linux
10 IBM Tivoli Provisioning Manager Version 7.2 Upgrade Guide

v Run the following command:ibmdirctl -D cn=root -w password status
where password is the password for the base DN (cn=root)If you are using Microsoft Active Directory:
Windows
a. Click Start > Administrative Tools > Manage Your Server.b. In the list of server roles, verify that server is configured with the Domain Controller (Active
Directory) role.
Procedure1. Verify the status of the DB2 Universal Database™ and start it, if necessary:
Windows
a. Log in as Administrator on the DB2 Universal Database server.b. Open the Services control panel.c. Find the DB2 instance and check the status of the service. If there are multiple DB2 instances
listed, find the one for the Tivoli Provisioning Manager database owner.d. If the database instance is not started, right-click the database instance name and click Start.
UNIX Linux
a. Switch to the DB2 Universal Database instance owner. For example, if you are using the defaultinstance owner ctginst1, run the command:su - ctginst1
b. To start DB2 Universal Database, run the command:db2start
DB2 Universal Database is started if it is not already running. If the database is already running,the following message is displayed:SQL1026N The database manager is already active
2. Ensure that the number of primary log files LOGPRIMARY and the number of secondary log filesLOGSECOND are set to 30 and 20. To change the settings, run the following commands:db2 update db cfg for MAXDB71 using LOGPRIMARY 30db2 update db cfg for MAXDB71 using LOGSECOND 20
3. Set the DB2 instance:
v Windows Runset DB2INSTANCE=CTGINST1
and verify your connection to the databasedb2 connect to MAXDB71 user db2admin
v UNIX Linux Log in to ctginst1
su - ctginst1
and verify your connection to the databasedb2 connect to MAXDB71 user ctginst1
4. If you are using DB2® 9.1 and want to continue to use it, ensure that the dbheap is set to more than6000. To set the dbheap if it is less than 6000, run the following commands:a. Connect to the database:
db2 connect to <database_name> user <database_user> using <database_password>
where,
Chapter 2. Pre-upgrade tasks 11

v Windows <database_user> is db2admin by default
v UNIX Linux <database_user> is ctginst1 by defaultb. Update the database configuration:
db2 update db cfg using dbheap 6000
c. Reset the database connection:db2 connect reset
5. If you are using DB2® 9.5 as your database, ensure that the dbheap is set to automatic.To set the dbheap to automatic, run the following commands:a. Connect to the database:
db2 connect to <database_name> user <database_user> using <database_password>
where,
v Windows <database_user> is db2admin by default
v UNIX Linux <database_user> is ctginst1 by defaultb. Update the database configuration:
db2 update db cfg using dbheap AUTOMATIC
c. Reset the database connection:db2 connect reset
6. If you are using DB2® 9.5 as your database, ensure that the specific configuration parameter is set toautomatic.To set the configuration parameter to automatic, run the following commands:a. Connect to the database:
db2 connect to <database_name> user <database_user> using <database_password>
where,v <database_name> is maxdb71
v <database_user> is maximo.b. Run the following command to check if the stat_heap_sz is set to automatic:
db2 get db cfg
c. If it is not set to automatic, run the following command:db2 update db cfg using stat_heap_sz Automatic
d. Close the database connection:db2 terminate
Check the status of the Oracle databaseUNIX 2000Oracle
Before you proceed with the upgrade, check the status of the Oracle database.
Before you begin1. Ensure that Tivoli Provisioning Manager is stopped. For more information, see Starting and stopping
the server and components Tivoli Provisioning Manager.2. Ensure that the Tivoli Provisioning Manager directory server is still running so the upgrade can
complete successfully.If you are using Tivoli Directory Server:
Windows
12 IBM Tivoli Provisioning Manager Version 7.2 Upgrade Guide

v Open the Services control panel.v Find the entry for the IBM Tivoli Directory Server instance.v If the server instance is not started, right-click the server instance name and click Start.
UNIX Linux
v Run the following command:ibmdirctl -D cn=root -w password status
where password is the password for the base DN (cn=root)If you are using Microsoft Active Directory:
Windows
a. Click Start > Administrative Tools > Manage Your Server.b. In the list of server roles, verify that server is configured with the Domain Controller (Active
Directory) role.
Procedure
Verify the status of the Oracle database:AIX Linux
1. Log in as the Oracle user by typing su - oracle.2. Check if the Oracle database listener is running by typing lsnrctl status. If the listener is running,
detailed information about the listener is displayed. If the listener is not running, the followingmessage is displayed:TNS-12541: TNS:no listener
3. If the listener is not running, type lsnrctl start to start the listener.4. To check if the Oracle database is running, type sqlplus / as sysdba. If the database is running, a
message like the following example is displayed:Connected to: Oracle Database 10g Enterprise Edition Release
If the database is stopped, the following message is displayed:Connected to an idle instance.
5. If the database is stopped, type startup in SQL Plus to start it.
Bypass device manager federator upgradeIf you are at Tivoli Provisioning Manager 7.1.1-IF00006 or higher, you will need to bypass the devicemanager federator upgrade before upgrading Tivoli Provisioning Manager to version 7.2.
Procedure1. Go to TIO_HOME/properties/version/history, or create the directory if it does not exist.2. Create a new platform-specific file:
Windows tpm711_fp1_win_CoreComp.progres
AIX tpm711_fp1_aix_CoreComp
Linux tpm711_fp1_linux_CoreComp
Solaris tpm711_fp1_solaris_CoreComp
3. Open the file and add:Device Manager Federator Upgrade|DONEStopping WAS after DMS Upgrade|DONE
Chapter 2. Pre-upgrade tasks 13

Note: The values are case-sensitive.4. Add a new line and save the file.
What to do next
Proceed to Chapter 3, “Upgrade tasks,” on page 17.
Reconfigure WebSphere Application Server to run as tioadminUNIX Linux
Upgrading Tivoli Provisioning Manager will not work if WebSphere Application Server was installed onanother non-root user.
You must switch the owner to run as tioadmin if WebSphere Application Server was installed on anothernon-root user.
Procedure1. Log in as <custom-WAS-user>.2. Start the deployment manager:
WAS_HOME/profiles/ctgDmgr01/bin/startManager.sh
3. Start the node agent:WAS_HOME/profiles/ctgAppSrv01/bin/startNode.sh
4. Start the MX Server:WAS_HOME/profiles/ctgAppSrv01/bin/startServer.sh MXServer
5. Start the agent manager profile:WAS_HOME/profiles/casprofile/bin/startServer.sh server1
6. Configure the agent manager profile to run as tioadmin:TIO_HOME/migration/scripts/.script/was_runastioadmin.sh <wasHome> <wasUser><wasPwd> <isND> <casProfile> <nodeName> <serverName> <isValidation>
For example,was_runastioadmin.sh /opt/IBM/WebSphere/AppServer wasadmin ******* falsecasprofile hostnameNode01 server1 false
7. Stop the agent manager profile:WAS_HOME/profiles/casprofile/bin/stopServer.sh server1 -usernamewasadmin -password
8. Log in as root.9. Change the permissions for the agent manager profile:
TIO_HOME/migration/scripts/.script/was_unixsetup.sh <isND><wasHome> <dmProfile> <appProfile> <casProfile>
./was_unixsetup.sh false /opt/IBM/WebSphere/AppServer ctgDmgr01 ctgAppSrv01 casprofile
10. Change the AM_HOME owner and group to tioadmin:cd /opt/IBMchown -R tioadmin:tioadmin AgentManager
11. Log in as tioadmin.12. Start the casprofile as tioadmin:
WAS_HOME/profiles/casprofile/bin/startServer.sh server1
13. Log in as <custom-WAS-user>.14. Configure the MX Server to run as tioadmin:
14 IBM Tivoli Provisioning Manager Version 7.2 Upgrade Guide

TIO_HOME/migration/scripts/.script/was_runastioadmin.sh <wasHome> <wasUser><wasPwd> <isND> <mxserverProfile> <nodeName> <serverName> <isValidation>
For example,was_runastioadmin.sh /opt/IBM/WebSphere/AppServer wasadmin ******* truectgDmgr01 ctgNode01 MXServer false
15. Stop the MX Server:WAS_HOME/profiles/ctgAppSrv01/bin/stopServer.sh MXServer -usernamewasadmin -password
16. Stop the node agent:WAS_HOME/profiles/ctgAppSrv01/bin/stopNode.sh -username wasadmin -password
17. Stop the deployment manager:WAS_HOME/profiles/ctgDmgr01/bin/stopManager.sh -username wasadmin -password
18. Log in as root.19. Change the profile permissions:
TIO_HOME/migration/scripts/.script/was_unixsetup.sh <isND> <wasHome><dmProfile> <appProfile> <casProfile>
For example,was_unixsetup.sh true /opt/IBM/WebSphere/AppServer ctgDmgr01 ctgAppSrv01 casprofile
20. Change permissions for TIO_LOGS/COP/logs/j2ee to tioadmin:cd /usr/ibm/tivoli/common/COP/logschown -R tioadmin:tioadmin j2ee
21. Change the CDS_HOME owner and group to tioadmin:cd /opt/IBM/tivolichown -R tioadmin:tioadmin CDS
22. Change the DMS_HOME owner and group to tioadmin:cd /opt/IBMchown -R tioadmin:tioadmin DeviceManager
23. Change the report temp directory in TIO_HOME to tioadmin:cd /opt/IBM/tivoli/tpmchown -R tioadmin:tioadmin tmp/
24. Log in as tioadmin.25. Start the WebSphere Application Server:
TIO_HOME/tools/tio.sh start was
Chapter 2. Pre-upgrade tasks 15

16 IBM Tivoli Provisioning Manager Version 7.2 Upgrade Guide
Chapter 3. Upgrade tasks
Upgrading middleware components to version 7.2This procedure provides instructions for upgrading the middleware components to the required versionsso that they work with Tivoli Provisioning Manager version 7.2.
Before you begin1. Ensure that the directory server is running. For more information, see Starting the Tivoli Directory
Server on Windows or Starting the Tivoli Directory Server on UNIX and Linux.2. Ensure that Tivoli Provisioning Manager is stopped. For more information, see Starting and stopping
the provisioning server on Windows or Starting or stopping the provisioning server on UNIX orLinux.
To upgrade the middleware:
Procedurev Verify that your version of WebSphere Application Server is 6.1.0.23. To check the installed version, log
in to the system and from the WAS_HOME/bin directory, run:
– Windows versionInfo.bat
– UNIX Linux versionInfo.sh
Important for Websphere Application Server support: Only WebSphere Application Server is 6.1.0.23is supported. Do not update to a later level of WebSphere Application Server.
v 2000Oracle If using Oracle 10g database, upgrade the database to Oracle 10g Release 2 patch 3 or Oracle11g. For more information, see your Oracle documentation.
v 2000DB2 Optional: If you have DB2 9.1 installed, you can upgrade the database to version 9.5 FP3a totake advantage of database improvements.
v Optional: If you have IBM Tivoli Directory Server version 6.1.0.10 installed, you can upgrade to version6.2.0.2. For more information, see Upgrading from previous releases in the Tivoli Directory Serverinformation center.
Upgrading DB2 to version 9.5If you have DB2 9.1 installed, it is recommended to upgrade the database to version 9.5 FP3a to takeadvantage of database improvements.
Advantages of moving to DB2 9.5 FP3a include:v Improvements in DB2 locking semantics that result in fewer lock contention issues in Tivoli
Provisioning Manager.v Improvements to DB2 High Availability and Disaster Recovery solutions.v Support for real-time statistics.
Database statistics are key to database performance and lock management. For DB2, the utility tomanage statistics is generally referred to as runstats. The Tivoli Provisioning Manager DB2 database isconfigured to support automatic runstats through the AUTO_RUNSTATS database configurationparameter. However, automatic runstats is configured to run at two hour intervals by default, which isnot granular enough for Tivoli Provisioning Manager. DB2 9.5 FP3a supports real-time statistics,meaning that statistics calculations are always up-to-date instead of being updated every two hours.When using a DB2 9.5 server, enabling real-time statistics is recommend for the Tivoli ProvisioningManager database.
© Copyright IBM Corp. 2003, 2014 17

To upgrade an existing DB2 9.1 installation to version 9.5 FP3a, offline maintenance is recommended. Thefollowing table describes the databases to upgrade:
Database Default instance nameDefault database names in theinstance
Tivoli Provisioning Manager andTivoli Provisioning Manager for OSDeployment database
ctginst1 v maxdb71
v tpmfosd
Tivoli Directory Server database, ifyou are using Tivoli Directory Serveras your directory server.
idsccmdb security
Procedure1. Stop the Tivoli Provisioning Manager database instance. For more information, see Stopping
middleware.2. Upgrade the database to version 9.5 FP3a or later using the DB2 recommended installation and
migration instructions.
v Windows You can select the Work with Existing option on the Install a Product panel. Then in theWork with Existing window, choose the DB2 copy name with the migrate action. All your instancesrunning on the selected DB2 copy and your DB2 Administration Server are automatically migratedto the DB2 Version 9.5 copy. You can then migrate the databases instances.
v AIX You can only select the Install New option on the Install a Product panel. Follow theDB2 documentation to migrate the instances, DB2 Administration Server, and the databaseinstances.
3. Ensure that real-time statistics is enabled. The following example shows the command to enable thisoption for the database maxdb71:db2 update db cfg for MAXDB71 using AUTO_STMT_STATS ON
4. Start the Tivoli Provisioning Manager instance.5. Start the middleware:
v Windows Starting middleware on Windows
v UNIX Linux Starting middleware on UNIX and Linux6. Start provisioning server:
v Windows Starting and stopping the provisioning server on Windows
v UNIX Linux Starting or stopping the provisioning server on UNIX or Linux
Results
The database is now upgraded to DB2 9.5 and real-time statistics are enabled.
AIX If you have problems starting the Tivoli Directory Server database when you start TivoliDirectory Server, perform the following steps and then start the database again:1. Run the command su – idsccmdb or su – ctginst1
2. Run the following commands:db2set DB2COMM=TCPIPdb2 update dbm cfg using SVCENAME 3708
18 IBM Tivoli Provisioning Manager Version 7.2 Upgrade Guide

What to do next
To set the dbheap to automatic, run the following commands:1. Connect to the database:
db2 connect to <database_name> user <database_user> using <database_password>
where,
v Windows <database_user> is db2admin by default
v UNIX Linux <database_user> is ctginst1 by default2. Update the database configuration:
db2 update db cfg using dbheap AUTOMATIC
3. Reset the database connection:db2 connect reset
To set the configuration parameter to automatic, run the following commands:1. Connect to the database:
db2 connect to <database_name> user <database_user> using <database_password>
where,v <database_name> is maxdb71
v <database_user> is maximo.2. Run the following command to check if the stat_heap_sz is set to automatic:
db2 get db cfg
3. If it is not set to automatic, run the following command:db2 update db cfg using stat_heap_sz Automatic
4. Close the database connection:db2 terminate
Upgrading the base services to version 7.2This procedure provides instructions for upgrading the base services to the required version so that theywill work with Tivoli Provisioning Manager version 7.2.
Before you begin1. Ensure that the Windows Installer service is started.2. Ensure that the TEMP variable is set:
v Windows C:\Documents and Settings\Administrator\Local Settings\Temp
v Windows 2008 C:\Users\Administrator\AppData\Temp
v UNIX Linux /tmp
3. Log in as tioadmin on the provisioning server.4. Stop the MXServer:
WAS_HOME/profiles/ctgAppSrv01/bin/stopServer[.bat|.sh] MXServer -username [was username]-password [password]
It could take several minutes for the server to completely shut down.
5. Stop the Tivoli Provisioning Manager deployment engines: Windows
%TIO_HOME%\tools\tio.cmd stop tpm
Chapter 3. Upgrade tasks 19

UNIX Linux
$TIO_HOME/tools/tio.sh stop tpm
To upgrade the Tivoli Provisioning Manager the base services:
Procedure1. Log on to the administrative workstation:
v Windows Log on as Administrator.
v UNIX Linux Log on as root.2. Create a temporary directory for the upgrade. In these instructions, the directory is called fp_temp.
The temporary directory must meet these requirements:v It must include at least 3 GB of free space to contain the upgrade after it is extracted.v The Administrator user must have read and write permissions to this directory.
3. Extract the contents of the Tivoli Provisioning Manager web components upgrade file that youdownloaded:
v Windows 7.1.1-TIV-WebComp-Windows-FP0001.zip
v UNIX Linux 7.1.1-TIV-WebComp-Unix-FP0001.tar
to the temporary directory. After you extract the files, you can delete the upgrade file that youdownloaded to free space, if necessary.
4. If your provisioning server is at version 7.1.1-IF00004 or at a later version, you must download thelatest delta_tpm_pmp_7.2.zip file. Replace the existing file in the fp_temp/repository directory withthe latest downloaded file version. If your provisioning server is at version 7.1.1 or on an earlierversion than 7.1.1-IF00004 (for example, 7.1.1 or 7.1.1-IF00003), don't take any action and proceed toStep 5.
5. Back up the administrative workstation. For more information, see Backing up the administrativeworkstation.
6. Ensure that the deployment engine is working by running the following commands and examiningthe output:
v Windows %ProgramFiles%"\IBM\Common\acsi\bin\listIU.cmd
v UNIX Linux /usr/ibm/common/acsi/bin/listIU.sh
If the listIU command reports no output or a return code of 2, then the deployment engine is not ina working state.v Check the log files:
– Windows %ProgramFiles%\IBM\Common\acsi\logs\Administrator
– UNIX Linux /usr/ibm/common/acsi/logs/root
v Use the Windows Control Panel to stop and start the service called IBM ADE Service.v Run the listIU.bat|sh command again.
7. Run the base services installer from the fp_temp/repository directory:
Windows
v Windows 64-bit install_win64.exev Windows 32-bit install.exe
UNIX Linux
v install_<platform>.bin
8. In the Introduction panel, click Next.9. Validate your packages from the Package Validation Results panel and click Next.
20 IBM Tivoli Provisioning Manager Version 7.2 Upgrade Guide

This panel lists version information for both new and existing packages on the system. Targetpackage version information indicates the package version being currently deployed. In certainupgrade scenarios, a question mark can be displayed alongside a package listed. This symbol servesas a reminder that there might be an updated version of this package available. It does not indicate afailure of the installer.
10. Review the dependant packages and click Next.11. Accept the license agreement and click Next.12. Select Deploy optional content during upgrade and click Next.13. Select the Database is ready for upgrade check box and click Next.14. Optional: Enter your SMTP details and click Next.15. Ensure that you select Perform installation configuration now and Deploy application files
automatically. Click Next.16. Review the Input summary and click Next.17. Click Install.18. Upgrade common PMPs and install the Maximo® base services hotfix. From the fp_temp directory,
run
Windows
tpaeCompUpgrade.bat -wasuser <wasuser> -waspwd <waspwd>
UNIX Linux
tpaeCompUpgrade.sh -wasuser <wasuser> -waspwd <waspwd> -MBSHOME <MBSHOME>
where
MBSHOMEThe Maximo base services home directory. For example:
v Windows C:\Program Files\ibm\SMP
v UNIX Linux /opt/IBM/SMP/
was_pwdThe password for the WebSphere Application Server administrator.
was_userThe WebSphere® Application Server administrator ID. The default user ID is wasadmin.
Upgrading core components to version 7.2This procedure provides instructions for upgrading the Tivoli Provisioning Manager core componentsfrom version 7.1.1 to version 7.2.
Before you begin1. Ensure that the directory server and database are running. For more information, see Starting the
Tivoli Directory Server on Windows or Starting the Tivoli Directory Server on UNIX and Linux.2. Ensure the Tivoli Provisioning Manager deployment engine is stopped. To stop the deployment
engine:v Go to the TIO_HOME/tools directory and run:
tio.cmd|sh stop tpm
3. Start the agent manager:v Go to the AM_HOME/bin directory and run:
startServer.bat|sh
4. If you have the Tivoli Monitoring Agent installed, ensure that it is stopped. For more information, seeStarting and stopping the Tivoli Monitoring agent.
Chapter 3. Upgrade tasks 21

5. If you are at Tivoli Provisioning Manager 7.1.1-IF00006 or higher, you will need to bypass the DMSupgrade before upgrading Tivoli Provisioning Manager to version 7.2. For more information, see“Bypass device manager federator upgrade” on page 13.
6. Ensure that you have a backup of the /opt/IBM/tivoli/tpm directory, database, agent manager, andTivoli Provisioning Manager system before proceeding with the installation.
Procedure1. Log on to the provisioning server.
v Log on as tioadmin.
v UNIX Linux Log on as root.2. Prepare to upgrade:
v Windows Open a DOS command window, either locally or using remote desktop. Change to thefp_temp directory. Running the installer from Cygwin or a remote SSH connection is not supported.
v 2008 Open a DOS command window, either locally or using remote desktop, by right clickingthe command prompt icon and selecting the Run as Administrator option. Change to the fp_tempdirectory. Running the installer from Cygwin or a remote SSH connection is not supported.
v UNIX Linux Run the following command, depending on what is supported on youroperating system:export TERM=ansi
orexport TERM=xterm
orexport TERM=vt100
3. 2000DB2 Set the DB2 instance:
v Windows Runset DB2INSTANCE=CTGINST1
and verify your connection to the databasedb2 connect to MAXDB71 user db2admin
v UNIX Linux Log in to ctginst1su - ctginst1
and verify your connection to the databasedb2 connect to MAXDB71 user ctginst1
4. Terminate connection to the database:db2 connect reset
5. Run the following command to upgrade the core components. These options are case-sensitive.
v Windows
winCoreCompUpgrade.bat -WASadmin was_adminID -WASadminPWD was_admin_pwd -DBAdmin db_adminID-DBAdminPWD db_admin_pwd -DB2Inst db2_instance -AMPWD am_pwd [-SkipTPMFOSD]
The parameter variables are as follows:
was_adminIDthe WebSphere Application Server administrator ID. If you are using read-only LDAPauthentication, the default user ID is wasadmin.
was_admin_pwdthe password for the WebSphere Application Server administrator. If you are using read-onlyLDAP authentication, enter the password for the wasadmin user.
22 IBM Tivoli Provisioning Manager Version 7.2 Upgrade Guide

db_adminIDthe database administrator or instance owner that was used to install Tivoli ProvisioningManager. The default value is db2admin.
db_admin_pwdthe password of the database instance owner that was specified during Tivoli ProvisioningManager installation.
db2_instancethe database instance owner that was used to install Tivoli Provisioning Manager. The defaultvalue is ctginst1.
am_pwdthe password of the Agent Manager that was specified during Tivoli Provisioning Managerinstallation.
-SkipTPMFOSDto skip upgrading Tivoli Provisioning Manager for OS Deployment during the fix packinstallation.
Note: You must include this parameter if your version of Tivoli Provisioning Manager for OSDeployment is newer than the version provided by the fix pack. If your version of TivoliProvisioning Manager for OS Deployment is older than the version included with TivoliProvisioning Manager 7.2, then you do not need to include this tag because Tivoli ProvisioningManager for OS Deployment is automatically upgraded together with Tivoli ProvisioningManager 7.2.
Command example:winCoreCompUpgrade.bat -WASadmin wasadmin -WASadminPWD p5ssword -DBAdmin db2admin-DBAdminPWD p5ssword -DB2Inst CTGINST1 -AMPWD p5ssword
v UNIX Linux
For DB2 Universal Database:unixCoreCompUpgrade.sh -WASadmin was_adminID -WASadminPWD was_admin_pwd -DBAdmin db_adminID-DBAdminPWD db_admin_pwd -AMPWD am_pwd [-SkipTPMFOSD]
For Oracle Database:unixCoreCompUpgrade.sh -WASadmin was_adminID -WASadminPWD was_admin_pwd -DBAdmin db_adminID-DBAdminPWD db_admin_pwd -AMPWD am_pwd -CDSOraclePWD cds_schema_pwd [-SkipTPMFOSD]
where
was_adminIDthe WebSphere Application Server administrator ID. If you are using read-only LDAPauthentication, the default user ID is wasadmin.
was_admin_pwdthe password for the WebSphere Application Server administrator. If you are using read-onlyLDAP authentication, enter the password for the wasadmin user.
db_adminIDthe database instance owner that was used to install Tivoli Provisioning Manager. The defaultvalue is ctginst1.
db_admin_pwdthe password of the database instance owner that was specified during Tivoli ProvisioningManager installation.
am_pwdthe password of the Agent Manager that was specified during Tivoli Provisioning Managerinstallation.
Chapter 3. Upgrade tasks 23

cds_schema_pwdthe password for the CDSSCHEMA user.
-SkipTPMFOSDto skip upgrading Tivoli Provisioning Manager for OS Deployment during the fix packinstallation. This parameter is optional.
Command example for DB2:unixCoreCompUpgrade.sh -WASadmin wasadmin -WASadminPWD p5ssword -DBAdmin ctginst1-DBAdminPWD p5ssword -AMPWD p5ssword
Command example for Oracle:unixCoreCompUpgrade.sh -WASadmin wasadmin -WASadminPWD p5ssword -DBAdmin sys -DBAdminPWD p5ssword-AMPWD p5ssword -CDSOraclePWD p5ssword
6. Manually back up your application data:a. On the computer where WebSphere Application Server is installed, log on as tioadmin.b. Back up the application server data with the following commands. Enter each command on a
single line:
Windows
"WAS_HOME\bin\backupConfig.bat" "C:\BACKUPS\dmgr_beforeMBSbackup.zip" -nostop -logfile"C:\BACKUPS\backup_dmgr.log" -profileName ctgDmgr01"WAS_HOME\bin\backupConfig.bat" "C:\BACKUPS\appSrv01_beforeMBSbackup.zip" -nostop -logfile"C:\BACKUPS\backup_appSrv01.log" -profileName ctgAppSrv01
Note: AIX Linux Verify that /var/tmp/backups directory exists before running thefollowing commands:WAS_HOME/bin/backupConfig.sh /var/tmp/backups/dmgr_beforeMBSbackup.zip -nostop -quiet -logfile/tmp/backup_dmgr.log -profileName ctgDmgr01
WAS_HOME/bin/backupConfig.sh /var/tmp/backups/appSrv01_beforeMBSbackup.zip -nostop -quiet -logfile/tmp/backup_appSrv01.log -profileName ctgAppSrv01
c. Back up your WAS_HOME/systemApps/isclite.ear folder and restore it in case the installation fails.7. Stop the WebSphere Application Server.
a. Change directory to TIO_HOME:cd TIO_HOME/tools
b. Stop the WebSphere Application Server:
AIX Linux
./tio.sh stop was
Windows
tio.cmd stop was
Windows 2008 Select the option Run as administrator for all the commands that you runfrom TIO_HOME\tools. For more information about user account control in Windows 2008, seeUser Account Control Step-by-Step Guide.
c. Wait for a couple of minutes after the stop command finishes for the server to be fully initialized.8. Manually back up your database:
a. Back up the database. The following instructions are for DB2. For Oracle, see your Oracledocumentation.Run the following commands:
Windows
24 IBM Tivoli Provisioning Manager Version 7.2 Upgrade Guide

set DB2INSTANCE=CTGINST1db2cmd
db2stop forcedb2start
db2 CONNECT TO <db2_db_name>db2 QUIESCE DATABASE IMMEDIATE FORCE CONNECTIONSdb2 CONNECT RESETdb2 BACKUP DATABASE <db2_db_name> TO <db2_backup_dir>WITH 2 BUFFERS BUFFER 1024 PARALLELISM 1 COMPRESS WITHOUT PROMPTING
db2 CONNECT TO <db2_db_name>db2 UNQUIESCE DATABASEdb2 CONNECT RESET
AIX Linux
su - ctginst1db2stop forcedb2start
db2 CONNECT TO <db2_db_name>db2 QUIESCE DATABASE IMMEDIATE FORCE CONNECTIONSdb2 CONNECT RESETdb2 BACKUP DATABASE <db2_db_name> TO <db2_backup_dir>WITH 2 BUFFERS BUFFER 1024 PARALLELISM 1 COMPRESS WITHOUT PROMPTING
db2 CONNECT TO <db2_db_name>db2 UNQUIESCE DATABASEdb2 CONNECT RESET
Replace <db2_db_name> with the name of the database and <db2_backup_dir>.
where
<db2_db_name>The default value is MAXDB71.
<db2_backup_dir>The directory where you want to store the backup.
9. Start the WebSphere Application Server as tioadmin.
AIX Linux
su - tioadmin
Change directory to TIO_HOME:
cd TIO_HOME/tools
Start the WebSphere Application Server: AIX Linux
./tio.sh start was
Windows
tio.cmd start was
Wait for a couple of minutes after the start command finishes for the server to be fully initialized.
Windows 2008 Select the option Run as administrator for all the commands that you run fromTIO_HOME\tools. For more information about user account control in Windows 2008, see UserAccount Control Step-by-Step Guide.
Note: Do not delete the *undo.jar file from the TIO_HOME/properties/version/backup directory. Thisfile will be required in a later fix pack or interim fix installation. If the file is removed, your upgradewill fail.
Chapter 3. Upgrade tasks 25

What to do next
If you have the IBM monitoring agent installed, you will have to restart it after the core componentsupgrade is complete. To restart the monitoring agent:
Windows From a command window, runnet start KPECMA
UNIX Linux
1. Ensure you are logged in as tioadmin.2. Go to the ITMAGENT_HOME/bin directory and run the following command:
./itmcmd agent start all
Upgrading web components to version 7.2This procedure provides instructions for upgrading the Tivoli Provisioning Manager web componentsfrom version 7.1.1 to version 7.2.
Before you begin1. Ensure that the core components of Tivoli Provisioning Manager have been upgraded successfully.2. Ensure that the Windows Installer service has started.3. Ensure that the directory server, database, and WebSphere Application Server are running. For more
information, see Starting middleware on Windows or Starting middleware on UNIX and Linux.
To upgrade the Tivoli Provisioning Manager web components:
Procedure1. Log on to the administrative workstation with administrative permissions:
v Windows Log on as Administrator.
v UNIX Linux Log on as root.2. Back up the administrative workstation. For more information, see Backing up the administrative
workstation.3. Ensure that the deployment engine is working by running the following commands and examining
the output:
Windows
v "%ProgramFiles%"\IBM\Common\acsi\setenv
v "%ProgramFiles%"\IBM\Common\acsi\bin\listIU
UNIX
v /usr/ibm/common/asci/bin/listIU.sh
If the listIU command reports no output or a return code of 2, then the deployment engine is not ina working state. Windows
a. Check the log files under %ProgramFiles%\IBM\Common\acsi\logs\Administrator.b. Use the Windows Control Panel to stop and start the service called IBM ADE Service.c. Run the listIU command again.
UNIX
a. Check the log files under /usr/ibm/common/asci/logs/root.b. Stop and start the service called IBM ADE Service.
26 IBM Tivoli Provisioning Manager Version 7.2 Upgrade Guide

c. Run the listIU command again.If the WebSphere Application Server remote access admin user was not using tioadmin whenpreviously deploying other Tivoli Process Automation Engine applications or base, the WebSphereApplication Server remote access user name must be changed to tioadmin in the install.properitesfile from the administrative workstation. To change the WebSphere Application Server remote accessuser name and password:a. Go to the SMP\etc directory and edit theinstall.properties file.b. Change the value of the key WAS.RemoteAccessUserName to tioadmin.c. Change the value of the key WAS.RemoteAccessPassword to be the clear text password for
tioadmin.
Note: Clear text password values are encrypted when you run the installation task later.d. Save the file.
4. Run the web components installer:
v Windows C:\IBM\SMP\bin\solutionInstallerGUI.bat
v UNIX Linux /opt/IBM/SMP/bin/solutionInstallerGUI.sh
5. In the Introduction panel, click Next.6. Click Choose to select the package fp_temp/repository/delta_tpm_pmp_7.2.zip and click Next.
Note: If your provisioning server is at version 7.1.1-IF00004 or at a later version, ensure that youdownloaded the latest delta_tpm_pmp_7.2.zip file and, that you replaced the file in thefp_temp/repository directory with the downloaded version.
7. Validate your package and click Next.8. Enter the following information:
v Maximo database user name and password. The default user name is maximo.v WebSphere administrator user name and password. The default user name is wasadmin.v WebSphere remote access user name and password. The default name is
– Windows administrator
– tioadmin
v Click Next.9. Ensure the check boxes for the Supported Package Options are not selected and click Next.
10. Review the Pre-install summary and click Next.11. Review the Package Deployment summary and click Next.12. Clear the check box for Install Another Package and click Done.13. Refresh/delete the browser cache before starting the UI for the first time after the upgrade.
Chapter 3. Upgrade tasks 27

28 IBM Tivoli Provisioning Manager Version 7.2 Upgrade Guide

Chapter 4. Post-installation tasks for Tivoli ProvisioningManager version 7.2
This procedure provides instructions for tasks to be done after upgrading Tivoli Provisioning Managerversion 7.1.1 to version 7.2.
Before you begin1. Ensure that all the steps listed in the Chapter 2, “Preinstallation tasks for upgrading to Tivoli
Provisioning Manager 7.2,” on page 3 and Chapter 3, “Upgrade tasks,” on page 17 sections have beencompleted.
2. Ensure that the directory server and database are running. For more information, see Starting theTivoli Directory Server on Windows or Starting the Tivoli Directory Server on UNIX.
3. Ensure your are logged in with tioadmin privileges.4. Start Tivoli Provisioning Manager.
Note: Because this is the first time that the provisioning server is starting, and it is performing theautomation package upgrade at the same time, it can take a while for the provisioning server to fullystart. Wait until the provisioning server has fully started before you stop it or try to do another task.The provisioning workflow fails if it does not complete the upgrade, causing problems later when anautomation package is called during a task but fails because it was not upgraded properly.
Windows 2008 Select the option Run as administrator for all the commands that you run fromTIO_HOME\tools. For more information about user account control in Windows 2008, see UserAccount Control Step-by-Step Guide.From TIO_HOME/tools directory, run the following command:
Windows
tiostatus.cmd wasadmin_username wasadmin_password
UNIX Linux
./tioStatus.sh wasadmin_username wasadmin_password
where wasadmin_username and wasadmin_password is the user name and password for your WebSphereApplication Server administrator.
5. Verify that the workflow TCAupgrade_CreateSPBs ran successfully.6. Verify that new SPB files have been created in the TIO_HOME/repository/TCA_upgrade_SPB/spb
directory, and that there is one SPB file per platform.7. Remove the fp_temp directory, where fp_temp is the temporary directory you created for the upgrade.
Pre-WebSphere Application Server: upgrading Tivoli Common AgentBefore you upgrade WebSphere Application Server to Fix Pack 6.1.0.29 and higher levels, you mustpublish and install a software package block. This software package block prevents a compatibility issuefrom occurring between Tivoli Provisioning Manager and existing Tivoli Common Agent services ontarget computers. This software package block is only required for existing common agents on targetcomputers. You can install new common agents on target computers after you install Tivoli ProvisioningManager V7.2, Fix Pack 1 IF00001 and they are automatically packaged with the required binaries.
You must publish and install this software package block after you install Tivoli Provisioning ManagerV7.2, Fix Pack 1 IF00001 and before you upgrade WebSphere Application Server to Fix Pack 6.1.0.29.
© Copyright IBM Corp. 2003, 2014 29

Procedure1. Click Go To > Deployment > Software Management > Software Product Publishing.2. Click Select Software, click the TPM PKCS package for TCA software module, click the
TCA_ibmpkcs_jar.spb software package block, then click OK.3. Click Select Depots and select the depot to which you want to publish the SPB for distribution to
target computers.4. Click Submit to publish the software package block.5. Verify that the software package block has been published to the depot server, as follows:
a. Click Go To > Administration > Provisioning > Dynamic Content Delivery Configuration.b. Click the Depots tab.c. Click the depot server to which you published the software package block.d. Verify that the software package block is available in the Files on Depot server.
6. Complete the following steps to distribute the software package block to the target computers:a. Click Go To > Deployment > Software Management > Software Product Distribution.b. Click Select Software, click the TPM PKCS package for TCA software module, click the
TCA_ibmpkcs_jar.spb software package block, then click OK.c. From Selected Targets, click Select > Computers or Groups and click the computers or groups to
which you want to distribute the software package block.d. Click Submit.
7. Complete the following steps to install the software package block on target computers:a. Click Go To > Deployment > Software Management > Software Product Installation.b. From Selected Software, click Select Software, click the TPM PKCS package for TCA software
module, click the TCA_ibmpkcs_jar.spb software package block, then click OK.c. From the Selected Targets, click Select > Computers or Groups and click the computers or groups
on which you want to install the software package block, then click OK.d. Click Submit.When you submit the task, the Provisioning Task Tracking page is displayed. You can click the taskname to see details about its status and monitor its progress until the task has completed. ClickRefresh to see an update on its status. The software package block is now installed on all of the targetcomputers in your group. To verify that the software package block is installed, click Click Go To >Deployment > Provisioning Computers. Find one of the target computers in your group and clickthe computer name. Click the Software tab. The software package block is listed as installed software.
Upgrading Tivoli Provisioning Manager for OS DeploymentIf you have Tivoli Provisioning Manager for OS Deployment installed, follow these steps after upgradingTivoli Provisioning Manager from version 7.1.1 to version 7.2.
Procedure1. Start Tivoli Provisioning Manager for OS Deployment on all Tivoli Provisioning Manager server.2. Run the TPMfOSD Version Discovery:
a. Click Go To > Discovery > Provisioning Discovery > Discovery Configurations.b. Search for TPMfOSD Version Discovery.c. Click TPMfOSD Version Discoveryd. Click Run Discovery -> Submit.
3. If you have other Tivoli Provisioning Manager for OS Deployment servers installed, follow these stepsto upgrade them:a. Shut down any remote Tivoli Provisioning Manager for OS Deployment servers.
30 IBM Tivoli Provisioning Manager Version 7.2 Upgrade Guide

b. The local Tivoli Provisioning Manager for OS Deployment server was already upgraded duringthe Tivoli Provisioning Manager 7.2 upgrade process. If the local server, that is, the provisioningserver, is not the parent server, then upgrade the parent server first. If the parent server is the localserver, then proceed with step 3. To upgrade a single server:v Click Go To > Deployment > Software Management > Software Product Upgrade.v Select the target server.v Select to upgrade to a new version and click Submit.
c. Manually copy the new version of the binary files for the child server to TIO_HOME/repository/tpmfosd.
d. Upgrade all child servers.e. Start each Tivoli Provisioning Manager for OS Deployment server.
Note: If you have created Tivoli Common Agent software modules before the 7.2 upgrade, you mustupgrade the software modules. For more information, see Creating a software module of the commonagent.
Upgrading reportsFollow these steps after upgrading Tivoli Provisioning Manager from version 7.1.1 to version 7.2 toupgrade the reports, or after installing any interim fixes.
Procedure1. On the administrative workstation, open the MAXIMO_HOME/maximo/reports/birt/tools/
reporttools.properties file and replace its contents with the following information:maximo.report.birt.hostname=host_namemaximo.report.birt.port=9443maximo.report.birt.ssl=truemaximo.report.birt.username=usernamemaximo.report.birt.password=passwordmaximo.report.birt.outputfolder=./../../birt
where
MAXIMO_HOMEThe directory where the base services are installed. The default path is:
v Windows C:\IBM\SMP
v UNIX Linux /opt/IBM/SMP
host_nameThe fully-qualified host name (or IP address) of the provisioning server.
usernameThe default user name is maxadmin.
2. Copy the TIO_HOME/cert/tpmui.cer certificate file from the provisioning server to the administrativeworkstation.
3. Add the certificate from the provisioning server to the base services security keystore
v Windows Go to the MAXIMO_HOMEjre/bin directory and run the following command:keytool -import -trustcacerts -keystore MAXIMO_HOME/maximo/tools/java/jre/lib/security/cacerts-file CERT_LOC/tpmui.cer
where, CERT_LOC is the directory containing the certificate file.
v UNIX Linux Go to the MAXIMO_HOME/jre/jre/bin directory and run the following command:keytool -import -trustcacerts -keystore MAXIMO_HOME/maximo/tools/java/jre/lib/security/cacerts-file CERT_LOC/tpmui.cer
Chapter 4. Post-upgrade tasks 31

where, CERT_LOC is the directory containing the certificate file. If the Tivoli Provisioning Managerconfiguration does not require a separate administrative workstation, CERT_LOC is equivalent toTIO_HOME/cert.
4. When prompted for a password, type changeit. Enter yes to confirm the certificate has been added.5. Verify that the timestamp of the MAXIMO_HOME/maximo/tools/java/jre/lib/security/cacerts file is
updated.
6. UNIX Linux Back up the MAXIMO_HOME/maximo/tools/java/jre/lib/security/java.securityfile.
7. UNIX Linux In the MAXIMO_HOME/maximo/tools/java/jre/lib/security/java.security file,enable the JSEE socket factories and disable the WebSphere Application Server socket factories bychanging the lines:# Default JSSE socket factories#ssl.SocketFactory.provider=com.ibm.jsse2.SSLSocketFactoryImpl#ssl.ServerSocketFactory.provider=com.ibm.jsse2.SSLServerSocketFactoryImpl# WebSphere socket factories (in cryptosf.jar)ssl.SocketFactory.provider=com.ibm.websphere.ssl.protocol.SSLSocketFactoryssl.ServerSocketFactory.provider=com.ibm.websphere.ssl.protocol.SSLServerSocketFactory
to# Default JSSE socket factoriesssl.SocketFactory.provider=com.ibm.jsse2.SSLSocketFactoryImplssl.ServerSocketFactory.provider=com.ibm.jsse2.SSLServerSocketFactoryImpl# WebSphere socket factories (in cryptosf.jar)# ssl.SocketFactory.provider=com.ibm.websphere.ssl.protocol.SSLSocketFactory# ssl.ServerSocketFactory.provider=com.ibm.websphere.ssl.protocol.SSLServerSocketFactory
8. In the MAXIMO_HOME/maximo/reports/birt/tools directory, run the importreports.cmd|.sh reportscommand.
9. On the web interface, click Go To > Administration > Reporting > Report Administration and clickGenerate Request Pages.
Updating virtual server templatesVirtual server templates that have been upgraded from version 7.1.1 must be updated with the Typeattribute.
The Virtualization Type attribute has been added to virtual server templates. For any virtual servertemplates that you have upgraded, add the appropriate value to this attribute so that the templates willfilter appropriately for the technology that you are using. For example, if you are creating a KVM virtualserver, only the virtual server templates that have the KVM type will be shown as options for creatingyour virtual server.
Procedure1. Click Go To > IT Infrastructure > Provisioning Inventory > Virtual Server Templates.2. Select a template that you have migrated.
3. Beside Virtualization Type, click Select Value .4. Select the appropriate virtualization technology for this virtual server template.
5. Click Save .
Results
The virtual server template is now associated with the virtualization technology.
32 IBM Tivoli Provisioning Manager Version 7.2 Upgrade Guide

Configuring RSA credentialsAfter upgrading to version 7.2, the RSA credentials have to be configured.
Before you begin
The target computers must already be defined in Tivoli Provisioning Manager.
After upgrade, you cannot manage target computers using the RSA authentication. For this ServiceAccess Point to be functional, perform the following steps:
Procedure1. Log in as tioadmin.2. Create a new directory in the TIO_HOME/keys directory. For example, TIO_HOME/keys/RSA.3. Copy the RSA private generated key which was generated previously to TIO_HOME/keys/RSA and
rename the file to identity.4. Log in to the web interface.5. Click Go To > Deployment > Provisioning Computers.6. Click the computer where the RSA SAP was initially set up on.7. Click the Credentials tab and click the SSH-Server SAP.8. In the RSA Credentials section, select the RSA/identity key from the Private Key list.9. If you specified a private key in any RSA credentials before installing Tivoli Provisioning Manager 7.2,
you must update the RSA manually with the private key file location. To update the RSA with theprivate key file location, enter the location of the private key.
Note: The RSA private key is an optional field. If you do not define it, you must create a globalvariable for the default private key and the value that you specify for the global variable is used. Theglobal variable must have the key name RSA credential default private key and the componentmust be Entire system. To create the global variable:a. Log on to the Tivoli Provisioning Manager web interface.b. Click Go To > Administration > Provisioning > Provisioning Global Settings.c. Click the Variables tab.d. Click New Row.e. In the Variable field, enter RSA credential default private key.f. From the Component list, select Entire system.g. In the Value field, enter the full path and file name of the private key.
h. Click Save.
Running security upgradesAfter upgrading Tivoli Provisioning Manager, use the information in this topic to upgrade your securityconfiguration. There are two workflows available for adding users with the TPADMIN role to the newrole for the TPWEBSERVICEUSER web service. You can run these workflows at any time aftersuccessfully upgrading Tivoli Provisioning Manager.
The following table provides information about the Tivoli Provisioning Manager upgrade workflows forsecurity.
Chapter 4. Post-upgrade tasks 33
Table 4. User attribute mapping from LDAP to Tivoli Provisioning Manager
Upgrade workflow Description
GenerateLdifFileForMigration Generates an ldif file for adding users with theTPADMIN role to the TPWEBSERVICEUSER role.
Required parameters: this workflow requires the filelocation that the ldif data is written to. You must specifythe directory and the file name.Note: The GenerateLdifFileForMigration workflow doesnot check the underlying LDAP for existing usermembership of TPWEBSERVICEUSER. Because this roleis new in Tivoli Provisioning Manager 7.2, it is assumedthat no user is already a member ofTPWEBSERIVCEUSER role.
AddTPWebServiceGroupForTPADMINUsers Adds users in the TPADMIN group to theTPWEBSERVICEUSER role in the Tivoli ProvisioningManager database.
Required parameters: there are no required parameters.Note: If a user is already a member of theTPWEBSERVICEUSER, it returns a message that the useris already a member. It continues processing the nextusers in the list.
To run these workflows:1. Click Go To > Provisioning Reports > Provisioning Workflows.2. Use the search feature to search for the security workflows.3. From the Select Action menu, click Run Workflow.4. Specify the full path for the ldif file. Use the same path that you defined when running the
GenerateLdifFileForMigration workflow for the first time.5. Click Run.
Optional: Upgrading the monitoring agentThis procedure provides instructions to manually upgrade the monitoring agent and restart it.
Procedure
For more information, see Upgrading from a previous installation in the Installation and Setup Guide in theIBM Tivoli Monitoring information center.
What to do next
Restart the monitoring agent.
Windows From a command window, runnet start KPECMA
UNIX Linux
1. Log in as tioadmin.2. Go to the ITMAGENT_HOME/bin directory and run the following command:
./itmcmd agent start all
34 IBM Tivoli Provisioning Manager Version 7.2 Upgrade Guide

Enabling tivoli09 as the default skinAfter upgrading to version 7.2, a new user interface skin is available. The new skin improves usability byincreasing spacing in the user interface views, using larger icons, and providing better navigation.
You can enable the new skin if you want to take advantage of the interface improvements. Do not enablethe new skin if, for example, you installed a process automation engine product that does not support thenew skin.
Procedure1. Extract the properties.jar file:
v Windows C:/Program Files/IBM/WebSphere/AppServer/profiles/ctgAppSrv01/installedApps/ctgCell01/MAXIMO.ear
v UNIX Linux /usr/IBM/WebSphere/AppServer/profiles/ctgAppSrv01/installedApps/ctgCell01/MAXIMO.ear
2. Open the webclient.properties file in a text editor. In the file, locate the following line:# webclient.skin=tivoli09
Uncomment the line by removing the # symbol at the beginning of the line.3. Compress the content back to create an updated properties.jar file.4. Restart the provisioning server.
Upgrading the Start CenterAfter upgrading to version 7.2, you can upgrade the Start Center to take advantage of new features.
To upgrade the Start Center:
Procedure1. In the Start Center, click Update Start Center.2. Click Yes.
Note: Once you have upgraded the user interface, you cannot revert back to the previous version.For more information about customizing your Start Center, see “Start Center Templates” on page 46.
Recompile Java classesAfter upgrading Tivoli Provisioning Manager to version 7.2, you must recompile the Java™ classes beforeusing them
If you built custom Java classes based on a previous version of Tivoli Provisioning Manager, these classescannot be used in the current Tivoli Provisioning Manager version. You must recompile the classes withthe installed Tivoli Provisioning Manager version before using them.
Procedure
Using the development environment where the custom Java classes:1. Update the class path to point to the installed Java classes for the current Tivoli Provisioning Manager
version.2. Resolve any class path errors.3. Compile the Java classes.4. Stop the provisioning server.
Chapter 4. Post-upgrade tasks 35
5. Copy the recompiled Java classes into the appropriate location, overwriting the original files, whereapplicable.
6. Restart the provisioning server.7. Verify that the user interface works correctly.
Reinstall custom workflowsAfter upgrading Tivoli Provisioning Manager to version 7.2, you must reinstall custom workflows.
Any custom workflows should be reinstalled after the migration process completes.
Procedure1. Copy any custom automation packages to the TIO_HOME/drivers directory.2. Reinstall the custom drivers using the tc-driver-manager script:
Windows
tc-driver-manager.cmd fid <custom-driver-name>
UNIX Linux
tc-driver-manager.sh fid <custom-driver-name>
36 IBM Tivoli Provisioning Manager Version 7.2 Upgrade Guide

Chapter 5. Troubleshooting the fix pack installation
The following are common troubleshooting problems that you might encounter when installing TivoliProvisioning Manager V7.2 Fix Pack 2.
For information about uninstalling Tivoli Provisioning Manager components, see Uninstalling TivoliProvisioning Manager in the information center.
Windows 2008 Select the option Run as administrator for all the commands that you run fromTIO_HOME\tools. For more information about user account control in Windows 2008, see User AccountControl Step-by-Step Guide.
Maximo business objects are out of sync between the deploymentengine and the WebSphere run timeEnsure that the Tivoli Provisioning Manager deployment engine runtime and the Maximo WebSphereApplication Server runtime must be in sync. If any changes are made from base services, or additionalpackages to WebSphere Application Server runtime under the base services are added, it could causecode binary level to be out of sync.
SymptomsThe Tivoli Provisioning Manager server uses Maximo businessobjects.jar and other version-related xmlfiles in its deployment engine runtime, while starting MXServer as part of provisioning server startup.
CausesThe businessobjects.jar file and other xml files must be synchronized between WebSphere ApplicationServer runtime and the Tivoli Provisioning Manager LWI runtime.
Resolving the problemAfter installation or upgrade, the user must check the businessobjects.jar file size and make sure thatthe version from both WebSphere Application Server and Tivoli Provisioning Manager LWI runtime arethe same size.
Note: : If this is an ISM integration use case, you must do this check each time you install or update anew Tivoli Process Automation Engine (TPAE) or application. For example, if a user installs a Changeand Configuration Management database (CCMDB) or Service Request Manager (SRM) on top of theexisting Tivoli Provisioning Manager server, or upgrading TPAE fixes/hotfixes you must check that thefiles are in sync.If the file sizes are different, you must manually align the runtimes.1. Log in to the provisioning server as tioadmin.2. Back up the businessobjects.jar folder:
v Windows TIO_HOME\lwi\runtime\tpm\eclipse\plugins\tpm_pmp\maximoLibs
v UNIX TIO_HOME/lwi/runtime/tpm/eclipse/plugins/tpm_pmp/maximoLibs
3. Go to the /WebSphere/AppServer/profiles/ctgAppSrv01/installedApps/ctgCell01/MAXIMO.ear/ andlocate the businessobjects.jar file.
4. Copy the businessobjects.jar file from the MAXIMO.ear/ folder to the Tivoli Provisioning ManagerLWI runtime folder:cp businessobjects.jar $TIO_HOME/lwi/runtime/tpm/eclipse/plugins/tpm_pmp/maximoLibs/businessobjects.jar
5. Restart the provisioning server.
© Copyright IBM Corp. 2003, 2014 37

Base services fails during upgradeSee the following information to recover from problems during the base services upgrade.
SymptomsBase services upgrade fails with the following error:An error occurred during one or more of the configuration
CausesDeployment engine service failed to start. The base services upgrade did not run on any components. Thedeployment engine is stopped because of locks created in the logs directory.
Resolving the problem1. Stop the deployment engine:
v Windows Restart IBM ADE Service Start > Administrative Tools > Services and select Stop fromthe Action menu.
v UNIX /usr/ibm/common/acsi/bin/acsisrv.sh -stop
2. Delete all the locks found at:
v Windows C:\Program Files\IBM\Common\acsi\logs
v UNIX /usr/ibm/common/acsi
Check the \logs directory and delete all files with the *.lock or *.lck in the filename:v .lock_0_* - READ locksv .lock_1_* - WRITE locks. There is only one write lock, it should always be .lock_1_1.lck.v .lock_2_* - EXCLUSIVE lock. There is only one exclusive lock, it should always be .lock_2_1.lck
Note: We do not recommend deleting the lock files under <DE_install_dir>\acsi\repos\IURegistryDB directory under normal circumstances. If the provisioning server install is hung, it ispossible that the deployment engine database was out of sync and there is no way to proceed withthe installation other than deleting the lock files. The failure might occur if the machine still had someold deployment engine instances.
3. Restart IBM ADE Service Start > Administrative Tools > Services.4. Verify that the deployment engine is running.5. Restart the base services upgrade installation.
a. Go to the SMP_HOME/scripts directory.b. From a command prompt, run
taskrunner.bat STOPONERROR CONTINUE
6. Once the base services installation completed successfully, upgrade the Tivoli Provisioning Managerupgrade script. For more information, see “Upgrading web components to version 7.2” on page 26
Tivoli Provisioning Manager engine does not startTivoli Provisioning Manager engine does not start.
SymptomsThe Tivoli Provisioning Manager engine cannot be started.
CausesIn an integrated environment, some of the Tivoli Provisioning Manager components are updated bycomponent installers. This causes the Tivoli Provisioning Manager engine startup failure.
38 IBM Tivoli Provisioning Manager Version 7.2 Upgrade Guide

Resolving the problemTo synchronize the Tivoli Provisioning Manager engine with the installed components, perform thefollowing steps:1. Stop the provisioning server.2. In the WebSphere Application Server installation directory, expand .../MAXIMO.EAR/properties.jar
3. Copy the following files from .../MAXIMO.EAR/properties.jar:v change_pmp.xml
v change_pmp_content.xml
v common_pmp.xml
v serviceprovider.xml
v uiwidgets_pmp.xml
Back up and replace the same set of files in the following locations:v TIO_HOME\lwi\runtime\tpm\eclipse\plugins\tpm_pmp\properties\product
v TIO_HOME\eclipse\plugins\tpm_pmp\properties\product
4. Start the provisioning server.
Recovery steps for problems during the agent manager upgradeSee the following information to recover from problems during the agent manager upgrade.
SymptomsThe upgrade of the agent manager fails during the Tivoli Provisioning Manager upgrade from version7.1.1 to version 7.2.
Resolving the problemPerform the following steps:1. Back up the AM_HOME/install/AMInstall.properties file2. Uninstall the agent manager. For more information, see Uninstalling the agent manager. If the agent
manager cannot be uninstalled, delete the AM_HOME directory and then remove the agent managerentries from the vpd.script file:
v Windows %CommonProgramFiles%\InstallShield\Universal\common\Gen2\_vpddb\vpd.script
v AIX /usr/lib/objrepos/InstallShield/Universal/common/Gen2/_vpddb/vpd.script
v Linux SUSE /root/InstallShield/Universal/common/Gen2/_vpddb/vpd.script
v Solaris /tmp/AMInstallTemp<timestamp>/logs/vpd.script
Remove the following lines:INSERT INTO INSTALLED_SOFTWARE_OBJECT VALUES(1,’4886af1c5eb4f6c75d84991853b6aa2f’,’C:\PROGRA~1\IBM\AGENTM~1’,1,’1.4.2.0’,3,’true’,NULL,’false’,’IBM’,’http://www.ibm.com’,’product1’,’Agent Man-ager’,NULL,’"_uninst" "uninstall.jar" "uninstall.dat" "assembly.dat""run.inf" "C:\\Program Files\\Common Files\\InstallShield\\Universal\\common\\Gen2\\engine\\1.0\\engine.jar" "C:\\Program Files\\Common Files\\InstallShield\\Universal\\common\\Gen2\\engine\\1.0\\ext" "" ""’,’true’,’true’,’1.0.18’)INSERT INTO INSTALLED_SOFTWARE_OBJECT VALUES(2,’eef68f520521fc598b01e2c8daa709c6’,’C:\PROGRA~1\IBM\AGENTM~1’,1,’’,3,’true’,NULL,’false’,NULL,NULL,’feature1’,’Agent Manager Core Compo-nents’,NULL,NULL,’false’,’false’,’1.0.18’)INSERT INTO INSTALLED_SOFTWARE_OBJECT VAL-UES(3,’3d60d0422dd1b2b8340e40a0eccf770e’,’C:\PROGRA~1\IBM\AGENTM~1’,1,’’,3,’true’,NULL,’false’,NULL,NULL,’component1’,’Agent Manager Windows’,NULL,NULL,’false’,’false’,’1.0.18’)
INSERT INTO PARENT_SOFTWARE_OBJECT_TABLE VALUES(3,2)INSERT INTO PARENT_SOFTWARE_OBJECT_TABLE VALUES(2,1)INSERT INTO PARENT_SOFTWARE_OBJECT_TABLE VALUES(1,1)
Chapter 5. Troubleshooting 39

INSERT INTO DATABASE_META VALUES(’2’)INSERT INTO LOCAL_PERSISTED_VARIABLES_TABLE VALUES(1,’WAS_PASS’,’’,NULL,’false’)INSERT INTO LOCAL_PERSISTED_VARIABLES_TABLE VALUES(1,’CONTAINER_WAS’,’true’,NULL,’false’)INSERT INTO LOCAL_PERSISTED_VARIABLES_TABLE VALUES(1,’CONTAINER_EWAS’,’’,NULL,’false’)INSERT INTO LOCAL_PERSISTED_VARIABLES_TABLE VALUES(1,’WAS_USER’,’’,NULL,’false’)
3. Install the agent manager again using the agent manager image file:a. Extract the agent manager image <fp_temp>/CAS/AM_V142_PLATFORMS.[zip|tar] into a location on
your computer.b. Run the ./setupSolaris.bin -is:javahome /opt/IBM/WebSphere/AppServer/java/jre file.
Note: Ensure that the Java path is constructed in such a way that both the /bin and /lib foldersare available under the /jre.
c. Select Custom for the installation type and click Next.d. Select the agent manager installation directory.e. Select the Install from relocation image check box.f. Select the backup file in the Relocation Image File Name field.g. Select an empty temporary folder in the Relocation Temporary Storage Directory Name field.
4. Perform the rest of the steps in the wizard to complete the installation. Ensure that you use theparameters specified in the pre-upgrade AM_HOME/install/AMInstall.properties andAM_BACKUPFILE/configuration-backup.xml files.
Note: Stop the agent manager server if you get the following error:"Port 9513 is in use"
5. Run the following command:AM_HOME/toolkit/bin/MigrationClosureTool.sh -toolkitPassword <pass> -close -force
This tool is located in the AM_HOME/toolkit/bin directory.6. Restart the agent manager server.7. Modify the new AM_HOME/install/AMInstall.properties to remove the proxy ports info.
v Change the PortCount to 3 from 6.v Remove the following lines:
HostName4=*PortNumber4=9611SSLEnabled4=trueSSLProfileName4=nc042187Node01/AgentManagerSSLKeyFileName4=/opt/IBM/AgentManager/certs/agentManagerKeys.jksTrustFileName4=/opt/IBM/AgentManager/certs/agentManagerTrust.jksClientAuth4=false\#\#HostName5=*PortNumber5=9612SSLEnabled5=trueSSLProfileName5=nc042187Node01/AgentManagerClientAuthSSLKeyFileName5=/opt/IBM/AgentManager/certs/agentManagerKeys.jksTrustFileName5=/opt/IBM/AgentManager/certs/agentManagerTrust.jksClientAuth5=true\#\#HostName6=*PortNumber6=9613SSLEnabled6=false\#\#
v Edit the PortNumber from 7 to 4:HostName7=*PortNumber7=80SSLEnabled7=false
40 IBM Tivoli Provisioning Manager Version 7.2 Upgrade Guide
8. Solaris Update the Globally Unique Identifier. For more information, see Updating the GloballyUnique Identifier on Solaris.
Updating the Globally Unique Identifier on SolarisIf the provisioning server is installed on Solaris, perform the following procedure so that the GloballyUnique Identifier (GUID) is updated correctly. This is necessary for software distribution tasks to workproperly.
Before you begin
Perform the following steps on the administrative workstation:1. If you used downloaded files for the installation, go to the directory where you downloaded the
TPM_V711_QS.zip file. If you used DVDs for the installation, this file is located on the Quick StartDVD.
2. Extract the file solaris_tivguid\guid_solaris_sparc.tar from the TPM_V711_QS.zip file.3. Copy the file guid_solaris_sparc.tar from the administrative workstation to a directory on the
provisioning server, for example, /var/tmp.
Solaris
To update the GUID, perform the following steps on the provisioning server:
Procedure1. Log on as tioadmin
2. Go to AM_HOME/guid.3. Extract the file guid_solaris_sparc.tar by running tar -xvf /var/tmp/guid_solaris_sparc.tar
4. Runsu - rootunmask 002
5. Run ./installguid_solaris2.sh. You will be getting a confirmation message, such as:Creating TIVOLI Global Unique Identifier ...
Tivoli GUID utility - Version 1, Release 3, Level 4.(C) Copyright IBM Corporation 2002, 2009 All Rights Reserved.
BTATG0004I A GUID already exists on this host. A new GUID will not be created.Guid:...
Slow verification and copying of NFS mounted images during corecomponent installation of WebSphere Application ServerChecksum validation can be skipped.
SymptomsNFS mounted images are used and the checksum validation is slow.
Resolving the problemRemove the md5 directory under <DVD_ image_ location>/install.
Chapter 5. Troubleshooting 41
DB2 transaction log error during the base services upgrade of TivoliProvisioning Manager
2000DB2
See the following information to recover from problems during the base services upgrade.
SymptomsDB2 transaction log error causes a failure of the base services upgrade.
CausesThe upgrade of the base services fails due to transaction log for the database is full during the TivoliProvisioning Manager upgrade from version 7.1.1 to version 7.2
Resolving the problem1. Increase the transaction log by running the following commands:
db2 update db cfg for maxdb71 using LOGFILSIZ 20000db2 update db cfg for maxdb71 using LOGPRIMARY 50db2 update db cfg for maxdb71 using LOGSECOND 100
2. Try the upgrade again.
Using the integrity checker toolThe Maximo integrity checker tool can produce false error messages, and can corrupt the database if usedwith the fix option.
Ignore error messages
The Maximo integrity checker tool reports spurious errors when run against Tivoli Provisioning Managerdatabase tables. These errors can be ignored safely, because they do not impact the functioning of theTivoli Provisioning Manager. The error messages can still be used to diagnose errors in other tableswithin the database.
Avoid the fix option
The Maximo integrity checker tool must not be used with the fix option against the Tivoli ProvisioningManager database, because this will cause corruption. If the integrity checker is run against the database,the database will need restoration from a clean backup.
For more information about the integrity checker, see the Maximo Migration Manager Guide in the TivoliProvisioning Manager information center.
Error CTGIN0143E and CTGIN0130E while updating web componentsAn error occurs during web components update
SymptomsThe following messages can occur during the update of web components:CTGIN0143E: An action error ocurred during the processing of a deploymentoperation. Action identifier: "UPGRADE_UNDEPLOY_HELP_WAR". Action displayname: "Undeploy Help War from the WebSphere Application Server".
CTGIN0130E: Errors were detected during an attempt to upgrade the/var/fp_temp/repository/delta_tpm_pmp_7.2.0.1.zip package.
When checking the log file Maximo_HOME/logs/CTGInstallTrace00.log, the following error can occur:
42 IBM Tivoli Provisioning Manager Version 7.2 Upgrade Guide

Caused by: java.net.ConnectException: CTGRI0035E An error occurred whilecopying a file to the target. The target returned the following error:scp: /usr/IBM/WebSphere/AppServer/temp/removeISCWarRemote.jacl: Permission denied.
CausesThe messages indicate that the Maximo database user name and password or the WebSphere remoteaccess user name and password specified in the web components installer might be incorrect.
Resolving the problemClick Back in the web components update panel. Enter the correct user name and password, then clickNext to continue with the update.
Error CTGIN2489E upgrading base servicesAn error occurs during the base services upgrade.
SymptomsThe following message can occur in the CCMDB_install.log file:CTGIN2489E: The Maximo database contains backup tables that must be manuallyremoved before this update can be applied. Please refer to the readme informationthat came with this update or the upgrade section of the guide for Planningand installing the product for more information.
CausesThis message indicates that there were changes made in your environment that need to be committed inthe database before new products can be added into the database.
Resolving the problemManually remove the backup tables. From the administrative system, run the following commands:1. cd <base_services_install_dir>\maximo\tools\maximo
2. configdb
3. restorefrombackup
4. dropbackup
5. dropbackup
Note: You are running the dropbackup command twice.
If any records are left, you will need to bind to resolve the problem.1. To get access to perform the BIND commands, run the following command:
Windows
set DB2INSTANCE=DB_INSTANCE
AIX Linux
su - DB_INSTANCE
where DB_INSTANCE is the DB2 instance that was used to install Tivoli Provisioning Manager. Thedefault instance name is ctginst1.
2. To BIND, run the following commands:db2 terminatedb2 CONNECT TO TPMFOSDdb2 BIND path\db2schema.bnd BLOCKING ALL GRANT PUBLIC SQLERROR CONTINUEdb2 BIND path\@db2ubind.lst BLOCKING ALL GRANT PUBLIC ACTION ADDdb2 BIND path\@db2cli.lst BLOCKING ALL GRANT PUBLIC ACTION ADD
Chapter 5. Troubleshooting 43

where path is the full path name of the directory where the bind files are located, such asINSTHOME\sqllib\bnd where INSTHOME represents the home directory of the DB2 instance. db2ubind.lstand db2cli.lst contain lists of required bind files used by DB2 database products.
Retry the base services upgrade.
MAXADMIN authentication for TPWEBSERVICEUSER groupAfter upgrading to Tivoli Provisioning Manager 7.2, the MAXADMIN user might fail authentication forDynamic Content Delivery related tasks.
SymptomsThe MAXADMIN user cannot authenticate for Dynamic Content Delivery related tasks and the followingerror message occurs in the LWI log error-log-<number>.xml file:SecurityHandler::The user, maxadmin, does not have the requiredweb service role, which is defined in the ws-security-role elementin the user-factory.xml file
CausesDuring the upgrade to Tivoli Provisioning Manager 7.2, only users in the TPADMIN group areautomatically added to the TPWEBSERVICEUSER group. The MAXADMIN user might not be a memberof the TPADMIN group and therefore is not automatically added to the TPWEBSERVICEUSER group.
Resolving the problemTo resolve this problem, add the MAXADMIN user to the TPWEBSERVICEUSER group.
44 IBM Tivoli Provisioning Manager Version 7.2 Upgrade Guide

Chapter 6. Other upgrade information
Best practice recommendations for base services customizationHow to ensure base services customization in Tivoli Provisioning Manager are preserved whenupgrading.
OverviewThere are numerous customization points in the base services applications and artifacts. For example,Security Group configurations, Start Center templates, and User Interfaces. Some artifacts such as UserInterfaces have a built-in Delta mechanism to ensure that the upgrade works properly, even whencustomized. To avoid loss of customization during upgrades of products on the base services such asTivoli Provisioning Manager 7.2, there are some recommended best practices for particular artifact types.These practices can be considered for implementation if you are making a substantial number ofcustomization in real product deployment to avoid reconfiguration of customization and to help ensureintegrity of the stock definitions and your required customization. In addition, carrying out these bestpractices provides a mechanism to retain a copy of the base artifact, which can be used to create the basedefinition of the object again.
General RecommendationsThe general guideline for nontrivial customization in a production deployment is to use and editclones of artifacts when feasible. This avoids loss of those customization if the artifacts areupgraded or replaced in future versions. This also provides backup copies of the base artifact incase comparison or reverting to the base copy becomes necessary.
List of artifacts that can be customized and best practice recommendations
Table 5. A brief summary of some of the types of artifacts that can be customized, and the basic recommendations ifyou customize these in a production deployment
Artifact Type Recommendation Related Application
Presentation XML/GUI definitions For minor modifications toapplications, modifying the baseapplication definitions is acceptable.But for extensive modifications,duplicate and edit a new copy of theapplication.
Application Designer
Start Center Templates When using the Modify ExistingTemplate:
v For the Global Start CenterTemplates, create a duplicate andedit the copy
v For user Instances of templates,you can modify these templatesdirectly because they are alreadycopies of the global template
Start Center, Modify ExistingTemplate and related functions.
Base Services Workflow Duplicate and Edit
Although there is a mechanism forthese to be revision controlled, it isrecommended to create a DuplicateProcess for default processes in orderto be able to retain a backup copyand support updates of the basedefinitions.
Workflow Designer
© Copyright IBM Corp. 2003, 2014 45

Table 5. A brief summary of some of the types of artifacts that can be customized, and the basic recommendations ifyou customize these in a production deployment (continued)
Artifact Type Recommendation Related Application
Security Groups (ApplicationAuthorization)
Duplicate and Edit Security Groups
Conditions Create new conditions. It is stronglyrecommended to not modify thedefault Conditions, as these aretypically tied to specific UIoperations.
Conditional Expression Manager
Tips for customizing particular artifact types
Presentation XML/GUI DefinitionsFor minor modifications to applications, changing the base application definitions is acceptable. A deltamechanism is in place for performing application upgrades from previous releases. But for extensivemodifications, it is recommended to duplicate and edit a new copy of the application. An entireapplication can be duplicated from the Select Action menu, click Duplicate Application Definition.
Note: any associated Application Authorization enablement will need to be defined or enabled in theSecurity Groups application for each appropriate Security Group.
Start Center TemplatesCreating a duplicate and editing the copy of the Start Center Template is the recommended practice. Thisrelates to Modify Existing Template capability to edit the Global Start Center Templates rather than userInstances of the templates. Editing user instances of Start Center Templates is fine, as these are alreadycopies of the global template. It is fairly simple to create a clone by SQL commands.
DB2 Commands to Clone Start Centers
TPDEPLOYMENTSPECIALIST Start Centerinsert into sctemplate(sctemplateid, description,name, contentuid, createdon, presentation)
select nextval for SCTEMPLATESEQ, ’My Deployment Specialist’,’Template-MYTPDEPLOYMENTSPECIALIST’, ’MYTPDEPLOYMENTSPECIALIST’,current date, presentation from sctemplate where contentuid =’TPDEPLOYMENTSPECIALIST’
TPADMIN Start Centerinsert into sctemplate(sctemplateid, description,name, contentuid, createdon, presentation)
select nextval for SCTEMPLATESEQ, ’My Provisioning Administrator’,’Template-MYTPADMIN’, ’MYTPADMIN’, current date , presentationfrom sctemplate where contentuid = ’TPADMIN’
TPCOMPLIANCEANALYST Start Centerinsert into sctemplate(sctemplateid, description,name, contentuid, createdon, presentation)
select nextval for SCTEMPLATESEQ, ’My Compliance Analyst’,’Template-MYTPCOMPLIANCEANALYST’, ’MYTPCOMPLIANCEANALYST’,current date , presentation from sctemplate where contentuid =’TPCOMPLIANCEANALYST’
TPCONFIGURATIONLIBRARIAN Start Center
46 IBM Tivoli Provisioning Manager Version 7.2 Upgrade Guide
insert into sctemplate(sctemplateid, description,name, contentuid, createdon, presentation)select nextval for SCTEMPLATESEQ, ’My Configuration Librarian’,’Template-MYTPCONFIGURATIONLIBRARIAN’, ’MYTPCONFIGURATIONLIBRARIAN’,current date , presentation from sctemplate where contentuid =’TPCONFIGURATIONLIBRARIAN’
TPDEVELOPER Start Centerinsert into sctemplate(sctemplateid, description,name, contentuid, createdon, presentation)select nextval for SCTEMPLATESEQ, ’My Automation Package Developer’,’Template-MYTPDEVELOPER’, ’MYTPDEVELOPER’, current date,presentation from sctemplate where contentuid = ’TPDEVELOPER’
Oracle Commands to Clone Start Centers
TPDEPLOYMENTSPECIALIST Start Centerinsert into sctemplate(sctemplateid, description,name, contentuid, createdon, presentation)select SCTEMPLATESEQ.nextval, ’My Deployment Specialist’,’Template-MYTPDEPLOYMENTSPECIALIST’, ’MYTPDEPLOYMENTSPECIALIST’,CURRENT_DATE, presentation from sctemplate where contentuid =’TPDEPLOYMENTSPECIALIST’
TPADMIN Start Centerinsert into sctemplate(sctemplateid, description,name, contentuid, createdon, presentation)select SCTEMPLATESEQ.nextval, ’My Provisioning Administrator’,’Template-MYTPADMIN’, ’MYTPADMIN’, CURRENT_DATE , presentationfrom sctemplate where contentuid = ’TPADMIN’
TPCOMPLIANCEANALYST Start Centerinsert into sctemplate(sctemplateid, description,name, contentuid, createdon, presentation)select SCTEMPLATESEQ.nextval, ’My Compliance Analyst’,’Template-MYTPCOMPLIANCEANALYST’, ’MYTPCOMPLIANCEANALYST’,CURRENT_DATE , presentation from sctemplate where contentuid =’TPCOMPLIANCEANALYST’
TPCONFIGURATIONLIBRARIAN Start Centerinsert into sctemplate(sctemplateid, description,name, contentuid, createdon, presentation)select SCTEMPLATESEQ.nextval, ’My Configuration Librarian’,’Template-MYTPCONFIGURATIONLIBRARIAN’, ’MYTPCONFIGURATIONLIBRARIAN’,CURRENT_DATE, presentation from sctemplate where contentuid =’TPCONFIGURATIONLIBRARIAN’
TPDEVELOPER Start Centerinsert into sctemplate(sctemplateid, description,name, contentuid, createdon, presentation)select SCTEMPLATESEQ.nextval, ’My Automation Package Developer’,’Template-MYTPDEVELOPER’, ’MYTPDEVELOPER’, CURRENT_DATE,presentation from sctemplate where contentuid = ’TPDEVELOPER’
Base Services WorkflowCreating a Duplicate and Editing the copy of the workflow process is the recommended practice.Although there is a mechanism for processes to be revision controlled, it is recommended to create aDuplicate Process for the default processes in order to be able to retain a backup copy and supportupdates of the base definitions. A entire application can be duplicated in the Workflow Designer from theSelect Action menu, click Duplicate Process.
Security GroupsDepending on your security needs or concerns related to customization, you might be able to edit thedefault Security Groups or clone and then edit the groups. If you directly modify the default security
Chapter 6. Other upgrade information 47

groups, any new application authorization options corresponding to new functions might be granted toparticular Security Groups during product upgrade. If there are concerns regarding new operations beingmade available automatically to particular roles and security groups, you can want to create separategroups to more tightly access this access. A entire copy of a Security Group can be created from theSecurity Groups application from the Select Action menu, click Duplicate Group. You will also need tocreate this Security Group and assign users in your LDAP or corresponding user management system,depending on your deployment configuration.
ConditionsConditions are used in a wide variety of UI widget operations. It is strongly recommended to keep thepreexisting Conditions unchanged, as these are typically tied to specific UI behaviors. A entire copy of aSecurity Group can be created from the Security Groups application from the Select Action menu, clickDuplicate Group.
Installation directories and other pathsThis topic provides information about installation directories and other path variables.
The following variables are used to represent installation and other directory paths. In some cases, thevariable name matches the name of an environment variable that is set in the operating system. Forexample, TIO_HOME represents the environment variable:
v Windows %TIO_HOME%
v UNIX Linux TIO_HOME
Table 6. Path variables
Path variable Component Default directory
AM_HOME The agent managerv Windows C:\Program
Files\IBM\AgentManager
v UNIX Linux /opt/IBM/AgentManager
APDE_HOME Automation Package DeveloperEnvironment
APDE_HOME/eclipse
DB2_HOME DB2v Windows SystemDrive:\Program
Files\IBM\SQLLIB
v AIX Linux Solaris
/opt/ibm/db2/V9.7
Windows SystemDrive is the disk drive thatcontains the hardware-specific files used tostart Windows. Typically, the system drive isC.
DCD_HOME Tivoli Provisioning Manager fordynamic content delivery v Windows %Program Files%\IBM\tivoli\
CDS
v UNIX Linux /opt/IBM/tivoli/CDS
DMS_HOME The device manager serviceinstallation directory v Windows C:\Program
Files\ibm\DeviceManager
v UNIX Linux /opt/IBM/DeviceManager
ECLIPSE_HOME Eclipse Defined by the user.
48 IBM Tivoli Provisioning Manager Version 7.2 Upgrade Guide

Table 6. Path variables (continued)
Path variable Component Default directory
HTTP_HOME IBM HTTP Serverv Windows C:\Program
Files\IBM\HTTPServer
v AIX /usr/IBM/HTTPServer
v Solaris Linux /opt/IBM/HTTPServer
ITM_HOME Tivoli Monitoring agentv Windows C:\ibm\tivoli\ITM
v UNIX Linux /opt/IBM/tivoli/ITM
JAVA_HOME Java Runtime Environment v For Automation Package DeveloperEnvironment, APDE_HOME\java\jre. Forexample:
– Windows C:\APDE\java\jre
– UNIX Linux
/opt/APDE/java/jre
v For IBM Tivoli Provisioning Manager,WAS_HOME/java
MAXIMO_HOME The base servicesv Windows C:\IBM\SMP
v UNIX Linux /opt/IBM/SMP
AIX Linux
Windows MWI_workspace
Middleware installer directoryv Windows C:\ibm\tivoli\mwi\workspace
v AIX /ibm/tivoli/mwi/workspace
v Linux /root/ibm/tivoli/mwi/workspace
UNIX
2000Oracle ORACLE_HOME
Oracle Database $ORACLE_BASE/product/version/db_1, where$ORACLE_BASE is the directory in which allOracle Database software is installed:
v /u01/app/oracle/product/10.2.0/db_1 (forOracle 10g)
v /u01/app/oracle/product/11.1.0/db_1 (forOracle 11g)
OSD_DATADIR Tivoli Provisioning Manager for OSDeployment data directory
Default data directory for Tivoli ProvisioningManager for OS Deployment parent servers:
v Windows %SYSTEMDRIVE%\tpmfosd files
v UNIX Linux /opt/tpmfosd_files
Default data directory for Tivoli ProvisioningManager for OS Deployment child servers:
v Windows %SYSTEMDRIVE%\TPMfOSd Files
v UNIX Linux /opt/tpmfosd/tpmfos/files
Chapter 6. Other upgrade information 49

Table 6. Path variables (continued)
Path variable Component Default directory
OSD_HOME Tivoli Provisioning Manager for OSDeployment installation directory
Parent servers, installed by the TivoliProvisioning Manager installer:
v Windows %COMMONPROGRAMFILES%\IBMTivoli
v UNIX Linux /opt/IBM/tpmfos
Child servers, installed by the TivoliProvisioning Manager for OS Deploymentworkflows:
v Windows %COMMONPROGRAMFILES%\IBMTivoli
v UNIX Linux /opt/tpmfosd/tpmfos
TCA_HOME common agentv Windows C:\Program Files\tivoli\ep
v AIX /usr/tivoli/ep
v Linux Solaris
/opt/tivoli/ep
TDS_HOME Tivoli Directory Serverv Windows C:\Program
Files\IBM\LDAP\V6.3
v UNIX Linux /opt/IBM/ldap/V6.3
TIO_HOME Tivoli Provisioning Managerv Windows C:\Program
Files\IBM\tivoli\tpm
v UNIX Linux /opt/IBM/tivoli/tpm
TIO_LOGS Tivoli Provisioning Manager runtimelogs v Windows C:\Program
Files\IBM\tivoli\common\COP\logs
v UNIX Linux /usr/ibm/tivoli/common/COP/logs
Windows %TEMP% Windows directory for temporary files When logged on as Administrator,C:\Documents and Settings\Administrator\Local Settings\Temp
WAS_HOME WebSphere Application Serverv Windows C:\Program
Files\IBM\WebSphere\AppServer
v AIX /usr/IBM/WebSphere/AppServer
v Linux Solaris /opt/IBM/WebSphere/AppServer
50 IBM Tivoli Provisioning Manager Version 7.2 Upgrade Guide

Notices
This information was developed for products and services offered in the U.S.A.
IBM may not offer the products, services, or features discussed in this document in other countries.Consult your local IBM representative for information on the products and services currently available inyour area. Any reference to an IBM product, program, or service is not intended to state or imply thatonly that IBM product, program, or service may be used. Any functionally equivalent product, program,or service that does not infringe any IBM intellectual property right may be used instead. However, it isthe user's responsibility to evaluate and verify the operation of any non-IBM product, program, orservice.
IBM may have patents or pending patent applications covering subject matter described in thisdocument. The furnishing of this document does not grant you any license to these patents. You can sendlicense inquiries, in writing, to:
IBM Director of LicensingIBM CorporationNorth Castle DriveArmonk, NY 10504-1785U.S.A.
For license inquiries regarding double-byte (DBCS) information, contact the IBM Intellectual PropertyDepartment in your country or send inquiries, in writing, to:
Intellectual Property LicensingLegal and Intellectual Property LawIBM Japan Ltd.1623-14, Shimotsuruma, Yamato-shiKanagawa 242-8502 Japan
The following paragraph does not apply to the United Kingdom or any other country where suchprovisions are inconsistent with local law: INTERNATIONAL BUSINESS MACHINES CORPORATIONPROVIDES THIS PUBLICATION "AS IS" WITHOUT WARRANTY OF ANY KIND, EITHER EXPRESS ORIMPLIED, INCLUDING, BUT NOT LIMITED TO, THE IMPLIED WARRANTIES OFNON-INFRINGEMENT, MERCHANTABILITY OR FITNESS FOR A PARTICULAR PURPOSE. Somestates do not allow disclaimer of express or implied warranties in certain transactions, therefore, thisstatement may not apply to you.
This information could include technical inaccuracies or typographical errors. Changes are periodicallymade to the information herein; these changes will be incorporated in new editions of the publication.IBM may make improvements and/or changes in the product(s) and/or the program(s) described in thispublication at any time without notice.
Any references in this information to non-IBM Web sites are provided for convenience only and do not inany manner serve as an endorsement of those Web sites. The materials at those Web sites are not part ofthe materials for this IBM product and use of those Web sites is at your own risk.
IBM may use or distribute any of the information you supply in any way it believes appropriate withoutincurring any obligation to you.
© Copyright IBM Corp. 2003, 2014 51
Licensees of this program who wish to have information about it for the purpose of enabling: (i) theexchange of information between independently created programs and other programs (including thisone) and (ii) the mutual use of the information which has been exchanged, should contact:
IBM Corporation2Z4A/10111400 Burnet RoadAustin, TX 78758 U.S.A.
Such information may be available, subject to appropriate terms and conditions, including in some casespayment of a fee.
The licensed program described in this document and all licensed material available for it are providedby IBM under terms of the IBM Customer Agreement, IBM International Program License Agreement orany equivalent agreement between us.
Information concerning non-IBM products was obtained from the suppliers of those products, theirpublished announcements or other publicly available sources. IBM has not tested those products andcannot confirm the accuracy of performance, compatibility or any other claims related to non-IBMproducts. Questions on the capabilities of non-IBM products should be addressed to the suppliers ofthose products.
COPYRIGHT LICENSE:
This information contains sample application programs in source language, which illustrate programmingtechniques on various operating platforms. You may copy, modify, and distribute these sample programsin any form without payment to IBM, for the purposes of developing, using, marketing or distributingapplication programs conforming to the application programming interface for the operating platform forwhich the sample programs are written. These examples have not been thoroughly tested under allconditions. IBM, therefore, cannot guarantee or imply reliability, serviceability, or function of theseprograms. The sample programs are provided "AS IS", without warranty of any kind. IBM shall not beliable for any damages arising out of your use of the sample programs.
Trademarks
IBM, the IBM logo, and ibm.com are trademarks or registered trademarks of International BusinessMachines Corp., registered in many jurisdictions worldwide. Other product and service names might betrademarks of IBM or other companies. A current list of IBM trademarks is available on the Web at“Copyright and trademark information” at www.ibm.com/legal/copytrade.shtml.
Adobe, the Adobe logo, PostScript, and the PostScript logo are either registered trademarks or trademarksof Adobe Systems Incorporated in the United States, and/or other countries.
IT Infrastructure Library is a registered trademark of the Central Computer and TelecommunicationsAgency which is now part of the Office of Government Commerce.
Intel, Intel logo, Intel Inside, Intel Inside logo, Intel Centrino, Intel Centrino logo, Celeron, Intel Xeon,Intel SpeedStep, Itanium, and Pentium are trademarks or registered trademarks of Intel Corporation or itssubsidiaries in the United States and other countries.
Linux is a registered trademark of Linus Torvalds in the United States, other countries, or both.
Microsoft, Windows, Windows NT, and the Windows logo are trademarks of Microsoft Corporation in theUnited States, other countries, or both.
52 IBM Tivoli Provisioning Manager Version 7.2 Upgrade Guide

ITIL is a registered trademark, and a registered community trademark of the Office of GovernmentCommerce, and is registered in the U.S. Patent and Trademark Office.
UNIX is a registered trademark of The Open Group in the United States and other countries.
Java and all Java-based trademarks and logos are trademarks or registered trademarks of Oracle and/orits affiliates.
Other product and service names may be trademarks of IBM or other companies.
Notices 53

54 IBM Tivoli Provisioning Manager Version 7.2 Upgrade Guide


����
Printed in USA