eprime manual · 2019-08-09 · access to eprime > how to get access ... eprime v4 manual –...
TRANSCRIPT

NATO/EAPC/PFP UNCLASSIFIED Releasable to MD, ICI, Afghanistan, Iraq, Pakistan, Australia, Japan, Korea, New Zealand
IN TE RN ATIO N AL M ILITAR Y STAFF
E T AT-M AJO R M ILITAIRE IN T E RN AT IO N AL
Partnership Real-Time Information, Management and Exchange System (ePRIME)
ePRIME Manual for Version 4
March 2010

ePRIME V4 Manual – March 2010
NATO/EAPC/PFP UNCLASSIFIED Releasable to MD, ICI, Afghanistan, Iraq, Pakistan, Australia, Japan, Korea, New Zealand
Page 2 of 85
Contents Introduction to ePRIME……………………………………………………………………………………………..6
Introduction to ePRIME > What is ePRIME?.....................................................................................6 Introduction to ePRIME > Table of Terms / Definitions .....................................................................6
Entities handled in ePRIME .....................................................................................................................7 Actors in ePRIME .....................................................................................................................................8
ePRIME Workflows .........................................................................................................................................9 ePRIME Workflows > Approval System for all Entries in ePRIME except Clearinghouse ...............9
Visibility of the data during the approval process ..................................................................................10 ePRIME Workflows > Document-based Workflows > The Clearinghouse approval system .........10 ePRIME Workflows > Event-based Workflows > Event Supporting Documents............................11 ePRIME Workflows > Document-based Workflows > Documents stored in Document Library ....11 ePRIME Workflows > Document-based Workflows > Documents stored in Clearinghouse..........11 ePRIME Workflows > Feedback and Review..................................................................................12 ePRIME Workflows > The Invitation Mechanism ............................................................................12
Access to ePRIME ........................................................................................................................................13 Access to ePRIME > How to get Access.........................................................................................13 Access to ePRIME > Access Rights and Roles ..............................................................................14 Access to ePRIME > Security Issues ..............................................................................................14
General Features ..........................................................................................................................................15 General Features > Login Page ......................................................................................................15 General Features > Entry Page.......................................................................................................16
Programmes..................................................................................................................................................17 Programmes > ePRIME Reference System....................................................................................18 Programmes > Navigation ...............................................................................................................19 Programmes > Functions.................................................................................................................20
Functions > Retrieval of Data.................................................................................................................20 Functions > Reports ...............................................................................................................................22 Functions > The Event Detail Dialog......................................................................................................23 Functions > The Participation Detail Dialog...........................................................................................25 Functions > Adding an Event, Activity, or Participation .........................................................................25 Functions > Categorisation in ePRIME..................................................................................................27 Functions > History.................................................................................................................................31 Functions > Supporting Documents.......................................................................................................32 Functions > User profiles and User Selections......................................................................................34 Functions > Statistics .............................................................................................................................34 Functions > Import / Export of Data .......................................................................................................35
Document Library.........................................................................................................................................36 Document Library > Advanced Search and Search Result.............................................................37
Instant Messaging ........................................................................................................................................38 Instant Messaging > Starting a Chat ...............................................................................................38 Instant Messaging > Chatting with another Person.........................................................................38 Instant Messaging > Chat History....................................................................................................39
Working Groups............................................................................................................................................40 Working Groups > Today Area ........................................................................................................40 Working Groups > My Working Groups...........................................................................................41 Working Groups > Adding a new Working Group ...........................................................................41
Working Groups > Visibility and Accessibility ........................................................................................43 Working Groups > Working Group Page.........................................................................................44

ePRIME V4 Manual – March 2010
NATO/EAPC/PFP UNCLASSIFIED Releasable to MD, ICI, Afghanistan, Iraq, Pakistan, Australia, Japan, Korea, New Zealand
Page 3 of 85
Working Groups > Adding and Replacing Documents....................................................................45 Working Groups > Adding Documents > Working with Document Versions ........................................45
Working Groups > Start a new Discussion......................................................................................46 Working Groups > Discussions > Post a Comment/Reply..............................................................47 Working Groups > Functionality for Moderators..............................................................................48
Working Groups > Functionality for Moderators > Managing Working Group Members......................48 Working Groups > Functionality for Moderators > Deleting Content.....................................................49
Learning Materials........................................................................................................................................51 Learning Materials > Advanced Search and Search Result ...........................................................52 Learning Materials > Add/Edit/Approve a Learning Tool ................................................................52 Learning Materials > Add Learning Materials to Events .................................................................54
Mail Area......................................................................................................................................................56 Mail Area > Access to the Mail area ................................................................................................56
Mail Area > Find a contact..............................................................................................................56 Mail Area > Create a new contact ...................................................................................................57 Mail Area > Create a group of contacts ...........................................................................................57 Mail Area > How to import users from MS Outlook or MS Access .................................................58 Mail Area > Sending e-mails............................................................................................................59
My Profile.......................................................................................................................................................62 System Tools ................................................................................................................................................63
System Tools > Release Notes .......................................................................................................63 System Tools > Downloads .............................................................................................................63 System Tools > Feedback & Bug Report ........................................................................................63 System Tools > User Management .................................................................................................63
System Tools > User Management > Managing/Creating User Accounts............................................63 System Tools > User Management > Delete/Expire User ..............................................................67
System Tools > User Management > Impact of NATO IT Security Policies .........................................67 Editorial Content...........................................................................................................................................68
Editorial Content Management > How to get access ......................................................................68 Editorial Content Management > Home Page.................................................................................68 Editorial Content Management > Edit Content Item........................................................................69 Editorial Content Management > Icons in all detailed dialogue screens ........................................70 Editorial Content Management > Revisions ....................................................................................70 Editorial Content Management > Copy and Duplicate ....................................................................71 Editorial Content Management > Delete content item ....................................................................71 Editorial Content Management > How to add a new Country Profile .............................................72 Editorial Content Management > Search Area................................................................................74
Typical Tasks ................................................................................................................................................75 Typical Tasks > Viewing/Printing Data ............................................................................................75 Typical Tasks > Editing Data ...........................................................................................................76 Typical Tasks > Approving Data......................................................................................................78 Typical Tasks > Advanced Features ...............................................................................................78
Colours and Symbols...................................................................................................................................79

ePRIME V4 Manual – March 2010
NATO/EAPC/PFP UNCLASSIFIED Releasable to MD, ICI, Afghanistan, Iraq, Pakistan, Australia, Japan, Korea, New Zealand
Page 4 of 85
Figures
Figure 1- Layered Approval Structure and Visibility........................................................................................ 9 Figure 2 - One-step approval system for documents stored in the Clearinghouse...................................... 10 Figure 3 – Login Page ................................................................................................................................... 15 Figure 4 – Entry Page.................................................................................................................................... 16 Figure 5 - ePRIME’s Main Areas................................................................................................................... 19 Figure 6 - Functional sections in ePRIME..................................................................................................... 19 Figure 7 - How a list of records is retrieved .................................................................................................. 20 Figure 8 – How to access Detail Activity and Event Dialogs ........................................................................ 21 Figure 9 - A report listing with print options................................................................................................... 23 Figure 10 - Event detail dialog....................................................................................................................... 24 Figure 11 - Participation tab (Event detail dialog) and Participation detail dialog ........................................ 25 Figure 12 - 11-step Add Event dialog (in Wizard mode)............................................................................... 26 Figure 13 - Add Event dialog (in classic mode) ............................................................................................ 26 Figure 14 - Add Participation dialog (in classic mode).................................................................................. 27 Figure 15 - Categorization tree in the Add event dialog (Wizard mode) ...................................................... 28 Figure 16 - Categorization tree in the SEARCH PROGRAMME area.......................................................... 29 Figure 17 - Categories tab in the Add Document dialog (wizard mode)....................................................... 30 Figure 18 - Search result in the Advanced History Search (Programmes Today Area) .............................. 32 Figure 19 - Add document dialog for event supporting documents.............................................................. 33 Figure 20 - Add Registration Document Dialog (in wizard mode) ................................................................ 33 Figure 21 – Document Library....................................................................................................................... 36 Figure 22 – Document Library Advanced Search......................................................................................... 37 Figure 23 – Who is Online?........................................................................................................................... 38 Figure 24 - Chat window.............................................................................................................................. 38 Figure 25– Message History ......................................................................................................................... 39 Figure 26 – Working Groups Today Area ..................................................................................................... 40 Figure 27 – My Working Groups ................................................................................................................... 41 Figure 28 – Add Working Group, Details ...................................................................................................... 41 Figure 29 – Add Working Group, Categories................................................................................................ 42 Figure 30 – Add Working Group, Members .................................................................................................. 42 Figure 31 – Add Working Group, Add Members........................................................................................... 42 Figure 32 – Add Working Group, Members Added....................................................................................... 43 Figure 33 – Working Group Page ................................................................................................................. 44 Figure 34 – Add New Document ................................................................................................................... 45 Figure 35 – New Document Added ............................................................................................................... 45 Figure 35a - Replace Document.................................................................................................................. 45 Figure 36 – Add New Version ....................................................................................................................... 46 Figure 37 – Add New Discussion .................................................................................................................. 46 Figure 38 – New Discussion Added .............................................................................................................. 47 Figure 39 – Discussion Detail........................................................................................................................ 47 Figure 40 – Discussion Detail with Posts ...................................................................................................... 48 Figure 41 – Member Management................................................................................................................ 49 Figure 42 – Delete Discussion Post .............................................................................................................. 50 Figure 43 – Learning Materials...................................................................................................................... 51 Figure 44 – Learning Materials Advanced Search........................................................................................ 52 Figure 45 – Learning Materials > Working Area ........................................................................................... 53

ePRIME V4 Manual – March 2010
NATO/EAPC/PFP UNCLASSIFIED Releasable to MD, ICI, Afghanistan, Iraq, Pakistan, Australia, Japan, Korea, New Zealand
Page 5 of 85
Figure 46 – Add or Edit a Learning Tool ....................................................................................................... 53 Figure 47 – Learning Materials > Add Learning Materials to Event ............................................................. 54 Figure 48 – Learning Materials > Search for Learning Tool ......................................................................... 54 Figure 49 – Learning Materials > Reference Learning Materials ................................................................. 55 Figure 50 – Mail Area > Navigation............................................................................................................... 56 Figure 51 – Mail Area > How to find contacts ............................................................................................... 56 Figure 52 – Mail Area > Dialog Edit Group > Tab “Contacts”....................................................................... 57 Figure 53 – Mail Area > Upload Contacts file from MS Outlook or MS Acces ............................................. 58 Figure 54 – Mail Area > Selecting the users that will be imported ............................................................... 59 Figure 55 – Mail Area > Dialog “Compose”, tab “General” ........................................................................... 59 Figure 56 – Mail Area > Dialog “Compose”, tab “Attachments”.................................................................... 60 Figure 57 – Mail Area > Dialog “Compose”, tab “Options” ........................................................................... 61 Figure 58 – My Profile > General .................................................................................................................. 62 Figure 59 – My Profile > Personal................................................................................................................. 62 Figure 60 – User Management...................................................................................................................... 64 Figure 61 – Account information ................................................................................................................... 65 Figure 62 – User Rights................................................................................................................................. 66 Figure 63 – Expiration of User Account ........................................................................................................ 66 Figure 64 – Print Welcome Letter ................................................................................................................. 67 Figure 65 - Home Page Editorial Content Management Interface ............................................................... 68 Figure 66 – Detailed Dialogue…………………………………………………………………………………….. 69 Figure 67 – Icons in detailed dialogue screens…………………………………………………………………. 70 Figure 68 – Standard dialogue > Actions > Revisions…………………………………………………………. 70 Figure 69 – Standard dialogue > Actions > ‘Copy’ and ‘Duplicate’………………………………………….... 71 Figure 70 – Add new content type dialogue……………………………………………………………………... 72 Figure 71 – Search…………………………………………………………………………………………………. 74

ePRIME V4 Manual – March 2010
NATO/EAPC/PFP UNCLASSIFIED Releasable to MD, ICI, Afghanistan, Iraq, Pakistan, Australia, Japan, Korea, New Zealand
Page 6 of 85
Introduction to ePRIME
Introduction to ePRIME > What is ePRIME? ePRIME is a management tool for development and review of the NATO cooperation programmes:
EAPWP Euro-Atlantic Partnership Work Plan provides political-military guidance for the implementation of NATO cooperation policies and objectives, and lists all activities and related events proposed by various NATO bodies, Allies and Partner nations, in all agreed areas of cooperation.
IPP’s Individual Partnership Programme describe the individual Partner countries’ policies, objectives, contribution and participation in events offered in the EAPWP.
MTEP Military Training and Exercise Programme is developed in consistence with PfP Minimum Military Training Requirements (MMTR) and NATO’s Military Cooperation Programmes and reflects the training needs of partners across the spectrum of Deployable Forces’ Missions.
MDWP Mediterranean Dialogue Work Programme supports the cooperation policies and objectives pursued by NATO in the framework of the MD and lists all activities proposed by the various bodies, individual Allies and partner nations.
MD ICP’s Individual Cooperation Programmes for MD countries describe the individual MD countries’ policies, objectives, contributions and participation in MDWP events.
ICI Menu ICI Menu of Practical Activities the principal cooperation programme for ICI countries, created in 2005 following the Istanbul Summit decision. Supports the cooperation policies and objectives pursued by NATO in the framework of the ICI and lists all activities proposed by the various bodies, individual Allies and partner nations.
ICI ICP’s Individual Cooperation Programmes for ICI countries describe the individual ICI countries’ policies, objectives, contributions and participation in events offered in the ICI Menu.
ACWP Afghan Cooperation Work Programme a support mechanism for cooperation between NATO and Afghanistan which sets out the activities offered by NATO bodies, individual Allies and partner nations in agreed areas of cooperation.
ACP Afghan Cooperation Programme an agreed framework for cooperation between NATO and Afghanistan which sets the main principles of this cooperation, the type of cooperation activities, how the cooperation will be implemented and the main areas of cooperation.
Introduction to ePRIME > Table of Terms / Definitions In this chapter a definition of typical ePRIME terms will be given and the different roles ePRIME users can have, will be explained.

ePRIME V4 Manual – March 2010
NATO/EAPC/PFP UNCLASSIFIED Releasable to MD, ICI, Afghanistan, Iraq, Pakistan, Australia, Japan, Korea, New Zealand
Page 7 of 85
Entities handled in ePRIME
The ePRIME database is designed in accordance with the NATO cooperation programmes it covers. The structure of a cooperation programme consists of a number of main entities (also referred to as records in this handbook).
Entity Description
Activity An Activity is a receptacle for events. Therefore, it has no date. Each Activity is associated with a specific PfP Area of Cooperation and a default NATO Cooperation Programme (EAPWP etc.). An Activity does not necessarily have attached events in each cycle. Once approved at NATO level an Activity can not be edited any more.
Event An Event is a specific occurrence of an activity with a start and an end date (seminar, exercise, briefing etc.). It is always associated with an Activity and its correspondent Area of Cooperation. An event can be edited at any time.
Participation A Participation is the attendance of an event by a partner nation, independent from the number of people sent. A participation always refers to a specific event. A participation can be edited at any time.
Executive IPP/ICP
The Executive IPP/ICP is a summary of partner objectives, contribution to and participation in the related cooperation programme. It is submitted as a text file.
Clearinghouse An informal forum for discussions on assistance programmes and initiatives envisaged by NATO authorities or nations, this forum may also be used to avoid duplication and to de-conflict aspects of specific programmes.
Supporting Document
Document linked to events listed in ePRIME. In the event detail dialog, the owner of an event can add such documents in support of the event: Invitation documents (invitation letter, registration form), feedback documents (AARs etc.), and other documents pertaining to the event.
Feedback After an event has taken place, feedback is given 1. by the proposing body or the action authority and 2. by the participants. They upload their feedback to ePRIME using the feedback form in the event details dialog. Feedback submitted by the participants becomes visible to the proposing body and the action authority. (See detailed explanation below: Introduction to ePRIME > ePRIME Workflows > Feedback and Review).
Points of Contact
A Point of Contact (POC) is the person responsible for the organization of an event or for the participation in an event. References to POCs are attached to each record in ePRIME to facilitate communication when it comes to the implementation of the cooperation programmes. ePRIME supports a standardized list of POCs, meaning that the coordinates of each POC only need to be entered into the database once and can then be assigned via a drop-down menu. ePRIME also provides comprehensive features to manage POC entries.
All proposing and participating bodies are requested to include POCs in their ePRIME records. POCs must refer to an individual person and include the full name, address, e-mail, and telephone or fax numbers. Generic POCs with only the name of an organization are not useful.
Profiles and User Selections
A user profile can be created by an ePRIME user in order to set up user selections in which items listed in ePRIME can be stored for future reference. Once a user profile and user selections have been established, single items in ePRIME (e.g. event, activitiy, participation entries) can be selected and copied into the appropriate user selection. User selections are comparable to folders storing bookmarks (here, linking to items stored in the database).This function is available to all ePRIME users (see also: General Features > User profiles and User selections).

ePRIME V4 Manual – March 2010
NATO/EAPC/PFP UNCLASSIFIED Releasable to MD, ICI, Afghanistan, Iraq, Pakistan, Australia, Japan, Korea, New Zealand
Page 8 of 85
Actors in ePRIME The following table lists the different actors in ePRIME, their roles, and the entities (bodies) they belong to. Body (member, nation)
The political entity that accesses ePRIME: Allied-or partner-nations NATO bodies and agencies
Users and User Roles
Access rights to ePRIME are granted to individuals belonging to members. See below for details on different access levels (Introduction to ePRIME > Access Rights and Roles)
Bodies and their roles
Related to the objects handled in ePRIME (list above) are the following roles that NATO organizations and nations (= bodies) can have in ePRIME:
Proposing Body
The authority that submits and is responsible for an activity and its related events, i.e. either a NATO body or a nation.
Coordinating Body
An authority responsible for the overall direction of an ensemble of activities and events proposed by a group of subordinate authorities. This is currently implemented only for NATO bodies, e.g. ACO is the Coordinating Body of SHAPE, JFC HQ Brunssum, JFC HQ Naples, etc.
Action Authority
The authority responsible for the implementation of the proposed event. The Action Authority is often identical to the Proposing Body.
Participating Body
The national authority that submits IPP or ICP participation to events and is responsible for the supervision of these participations.
Throughout the system, these bodies are always expressed by their ePRIME abbreviation, e.g. ACO for Allied Command Operations, GE for Germany, SWE for Sweden etc.

ePRIME V4 Manual – March 2010
NATO/EAPC/PFP UNCLASSIFIED Releasable to MD, ICI, Afghanistan, Iraq, Pakistan, Australia, Japan, Korea, New Zealand
Page 9 of 85
ePRIME Workflows
The following section provides an introduction to the basic workflows of the NATO cooperation programmes featured in ePRIME and their implementation in the software. A distinction is made between event-based workflows and document-based workflows. Events and their supporting documents (such as the event’s agenda, feedback forms etc.) are stored in a different section than documents listed in the Document Library. These two repositories for documents are subject to different approval regimes. In the Document Library, all NATO/EAPC/UNCLASSIFIED official documents are stored which are relevant to the Euro Atlantic Partnership. This chapter also describes the feedback and review process for events taking place in the framework of the cooperation programmes and outlines the invitation mechanism in the current version of ePRIME.
ePRIME Workflows > Approval System for all Entries in ePRIME except Clearinghouse The principle of self-differentiation as observed by the partnership implies that the development of the cooperation programmes follows a pre-defined agreement and approval process between the programme management at NATO HQ, the participating nations, and the other NATO bodies involved. ePRIME reflects this through an electronic workflow that involves a three-step approval process. Only after final approval by the programme manager at NATO HQ are records validated and thus accepted as an official part of the cooperation programmes respectively. The following table illustrates this layered approval system in ePRIME:
Figure 1- Layered Approval Structure and Visibility

ePRIME V4 Manual – March 2010
NATO/EAPC/PFP UNCLASSIFIED Releasable to MD, ICI, Afghanistan, Iraq, Pakistan, Australia, Japan, Korea, New Zealand
Page 10 of 85
Visibility of the data during the approval process
ePRIME ensures that during the development of cooperation and participation programmes, users will only be able to access records they are authorized to view. The general rules are: All users are able to view all records that have been approved at NATO level. Records approved
by NATO are part of the official programmes and are therefore released to the whole user community.
Additionally, users can access records owned by their nation/organization up to one access level below their own user rights in the approval chain. E.g., Coordinating Bodies can access records of their organization down to "Owner approved" status. Records actively set to status "None" can only be viewed by the Proposing Body. The programme manager at NATO, on the other hand, can access all records down to "Coordinator approved" status, since these records are supposed to be ready for NATO approval.
It is not possible for any user to access records owned by another nation or NATO organization that have not yet passed through the whole review chain, i.e., that do not have final NATO approval.
The actions each user can perform with the records depend upon his/her user rights. Users with Editing or Coordinator rights are only able to edit or approve records owned by their nation or organization.
These rules apply to all types of records (activities, events, participations, IPP/ICP, text) throughout the ePRIME system. The table above illustrates the visibility of the records depending on their approval status within the ePRIME workflow.
ePRIME Workflows > Document-based Workflows > The Clearinghouse approval system A document uploaded to the Clearinghouse always belongs to the body that added it (e.g. a partner country). Each document is subject to a one-step approval system: Only after approval by the owner (i.e. coordinator of the body that owns the document) it becomes visible to the whole ePRIME community (layered approval system). The following table illustrates the one-step approval system for Clearinghouse documents:
Figure 2 - One-step approval system for documents stored in the Clearinghouse

ePRIME V4 Manual – March 2010
NATO/EAPC/PFP UNCLASSIFIED Releasable to MD, ICI, Afghanistan, Iraq, Pakistan, Australia, Japan, Korea, New Zealand
Page 11 of 85
ePRIME Workflows > Event-based Workflows > Event Supporting Documents Scope ePRIME offers its users the possibility to upload, manage, and exchange
documents. Documents which are uploaded in support of event-entries are linked to the corresponding event.
Only ePRIME users with an edit-account to ePRIME can add documents to event entries.
Event-supporting Documents
These documents are linked to events listed in ePRIME. These can include:
• Event programme or other background/administrative material.
• Documents related to participation (supporting documents or pre-training package). They always pertain to one event.
• Invitation documents (invitation forms pertaining to events listed in ePRIME).
• Feedback supporting documents (After Action Reports etc.). See next chapter for details.
For a detailed description on how to use this functionality of ePRIME please refer to the section Typical Tasks > Editing Data in this handbook.
ePRIME Workflows > Document-based Workflows > Documents stored in Document Library Scope In addition to storing event-supporting documents in ePRIME (described above),
official NATO documents (classification ‘NATO/PFP/EAPC UNCLASSIFIED’) which are important to the Euro Atlantic Partnership are uploaded to ePRIME by the NATO Central Registry. These documents contain basic information on the Partnership or pertain to other NATO cooperation programmes and are stored in ePRIME’s Document Library.
Documents in the Document Library are only visible to authorized users e.g. documents relating to PfP will not be visible to users of the other cooperation programmes.
Different search criteria are supported (including a full text search) to facilitate finding documents. Document from the Library can also be linked to events (similar to event supporting documents).
The documents are available for download in PDF-Format.
ePRIME Workflows > Document-based Workflows > Documents stored in Clearinghouse
Documents stored in Clearinghouse can pertain to one of the following categories:
Clearinghouse documents
• Official Clearing House documents (Clearing House policy, meetings etc.) • Partner assistance requirements • National assistance programmes

ePRIME V4 Manual – March 2010
NATO/EAPC/PFP UNCLASSIFIED Releasable to MD, ICI, Afghanistan, Iraq, Pakistan, Australia, Japan, Korea, New Zealand
Page 12 of 85
ePRIME Workflows > Feedback and Review Scope ePRIME supports not only the development of the cooperation programmes, but
also its feedback and review process. ePRIME allows both the Proposing Bodies (sponsors and organizers of events) as well as the participating bodies (nations that attend events) to submit their feedback electronically. The ePRIME feedback is fully integrated into the official After Action Reporting (AAR) procedures of the PfP.
Why use feedback? All Proposing and Participating Bodies are requested to submit their event and participation feedback right after the event has taken place. The feedback functionality is a critical tool for the evaluation of NATO cooperation programmes and their future development. The feedback function only applies to NATO approved records in ePRIME after a related event has taken place.
Feedback given through ePRIME has a direct impact on the IPP/ICP of affected members. When the Proposing Body of an event or an exercise updates the participation figures on the feedback form after the event has taken place, the participation figures in the respective IPPs/ICPs will be automatically updated. Thus, the statistical analysis used for future planning purposes is directly affected by the feedback given in ePRIME.
Feedback workflow ePRIME offers an integrated feedback function for events and participations listed. The current version of ePRIME features three types of feedback: (1) feedback given by the participants of an event, (2) feedback given by the Proposing Body of an event, and (3) feedback given by the Proposing Body of an exercise. Event feedback includes such information as event details, topic, participation information, POC, and a set of evaluation questions (= short After Action Report, AAR). Furthermore, a full AAR can be added by uploading it or referring to an Internet address (URL) where it resides.
The feedback function is to be found in the event or participation detail dialog. When filling in a feedback form, ePRIME users can choose the “wizard mode” which guides them through the process. Only ePRIME users who have editor rights to a given event (or participation) are able to submit feedback.
Visibility of feedback The event and participation feedbacks are accessible only selectively, in accordance with the self-differentiation rules of the partnership:
All ePRIME users can view the event feedback submitted by the Proposing Body.
Each nation can view their own participation feedback for an event. It is not possible, however, to view the participation feedback submitted by other participating nations/bodies.
The Proposing Body of an event can view both the event feedback and the participation feedback to this event submitted by any participant.
More information More on adding feedback to an event in General Features > Advanced Functionality > Supporting Documents.
ePRIME Workflows > The Invitation Mechanism The current version of ePRIME considerably simplifies and speeds up the invitation process for events taking place in the NATO cooperation programmes covered by ePRIME. The organizer of an event can attach an official invitation document together with a registration form to an event which is listed in ePRIME (plus other supporting documents). The registration form should be made available at least 90 days before the event will take place. The participants can then download the registration form, fill it in and return it to the originator. This document can be uploaded in any text format and is then automatically converted to PDF format. The registration form can also be uploaded in RTF format in which case it is not automatically converted but can be filled in on the screen and returned electronically. Invitation forms in all other file formats will have to be printed before they are filled in and sent back to the originator via regular mail or fax.

ePRIME V4 Manual – March 2010
NATO/EAPC/PFP UNCLASSIFIED Releasable to MD, ICI, Afghanistan, Iraq, Pakistan, Australia, Japan, Korea, New Zealand
Page 13 of 85
Access to ePRIME
Access to ePRIME > How to get Access ePRIME is a secure internet system that is accessible to authorized members of the community. To access the ePRIME database over the internet, the following technical infrastructure and user authorization are required:
Technical requirements
ePRIME was designed as an internet system that is accessible from any standard computer with an internet connection. Nevertheless, certain minimal technical requirements apply: Standard PC using MS Windows operating system Internet connection (for users with editing/approval rights, a fast internet
connection is recommended) MS Internet Explorer® 6.0 browser (or higher). ePRIME does not work with
other browser systems. Java Runtime Environment Cookies should be enabled
User authorization To limit access to ePRIME on the internet to authorized people each user needs to register in ePRIME with a unique user authorization. The user authorization consists of the following elements: A login ID A password
Where to request ePRIME access
Please contact your national coordinator or the Database Manager to get access to ePRIME.
ePRIME Database Manager NATO HQ, IMS, C&RS/PSE Branch Boulevard Léopold III B –1110 Brussels, Belgium Tel. +32 (0)2 707 26 27 Fax +32 (0)2 707 26 15 Email [email protected]
Internet Address ePRIME can be accessed at the following internet address: https://prime.hq.nato.int (don't forget the "s" in "https://").

ePRIME V4 Manual – March 2010
NATO/EAPC/PFP UNCLASSIFIED Releasable to MD, ICI, Afghanistan, Iraq, Pakistan, Australia, Japan, Korea, New Zealand
Page 14 of 85
Access to ePRIME > Access Rights and Roles Depending on the user’s role within the development process, ePRIME provides access rights at different levels. The following table shows the five levels of access rights and typical roles and tasks associated with them:
Type of Access Type of User Roles and Tasks
Coordinator access Authority in a nation/organisation who coordinates the development and approval of the national cooperation programmes. There is only one Coordinator per nation/organisation.
Review and approve (eventually also add) new records in ePRIME; act as ePRIME POC; create and manage ePRIME accounts for own nation (on request User Management rights can be allowed).
Editing access Bodies that make major contributions to cooperation programmes
Add and manage contributions to the cooperation programmes
Read-only access Everybody in a nation/organisation who does not enter data
Retrieve data; prepare reports for planning and decision-making.
Access to ePRIME > Security Issues Data Security ePRIME is an Internet system that is approved for "NATO/EAPC/PfP
UNCLASSIFIED" data. This data is released for disclosure to the partner community, but not to the general public. For this reason, the ePRIME server is secured and access to ePRIME over the Internet is controlled by means of a user ID and password. These measures provide a fair level of data security.
Nevertheless, ePRIME relies on communication through the Internet. It can therefore not be regarded as a completely secure system under all circumstances. ePRIME should therefore never be used for storage or distribution of information with a higher classification level than "NATO/EAPC/PfP Unclassified".
IMPORTANT! To ensure the secure functioning of the system, it is critical that all ePRIME users fully comply with the instructions supplied by the ePRIME Database Manager together with the user authorization details. The following principles are especially important:
All user authorization profiles are strictly for personal use. The details of these user authorization profiles must be stored in a safe place. It is forbidden to disclose them to other people, even within an organization.
Access to ePRIME is always associated with a specific nation or organization, and allows besides access to all approved information, also access to unapproved information from this nation or organization.
Designated coordinators may get User Management rights which permits them to create user accounts for their own nation/ organisation.
User profiles (passwords and user-id’s) must never be sent to users via e-mail, since normal e-mail is not a secure way of communication.
Session Security After an idle time (time a user is logged on to ePRIME without doing anything) of + 20 min’s the session will be timed-out and the user will have to log in again (automatic referral to the login page).
Implementation The ePRIME security architecture was created and is operated by the Information, Communication, Technology Management (ICTM) at NATO HQ. It has got accreditation from the NATO Office of Security (NOS).

ePRIME V4 Manual – March 2010
NATO/EAPC/PFP UNCLASSIFIED Releasable to MD, ICI, Afghanistan, Iraq, Pakistan, Australia, Japan, Korea, New Zealand
Page 15 of 85
General Features
General Features > Login Page The ePRIME application can be accessed under: https://prime.hq.nato.int. The login page is the entry point to the ePRIME application. Enter your user name and password in the corresponding fields and log in to access the different ePRIME services.
Figure 3 – Login Page
1 User name and password: Enter your user name and password here.
2 Login button: Click here to login to ePRIME.
3 Certificate download: The public server certificate can be downloaded here. Installing the certificate on your workstation speeds up access to ePRIME but is optional.

ePRIME V4 Manual – March 2010
NATO/EAPC/PFP UNCLASSIFIED Releasable to MD, ICI, Afghanistan, Iraq, Pakistan, Australia, Japan, Korea, New Zealand
Page 16 of 85
General Features > Entry Page After login you are forwarded to the ePRIME entry page. This page gives you access to all ePRIME services and provides you with up-to-date information about who of your contacts is online, the latest news items provided by ISN and an Events Calendar.
Figure 4 – Entry Page
1
All ePRIME Services: Click on a link to access one of the ePRIME services.
2 Who is Online: Shows your list of contacts. You can see what person on your contact list is currently on- and offline. Double clicking the name opens an instant messaging window.
3 My Profile and Logout: Click on “My Profile” to view and update your personal information and your password. “Logout” ends your work session and forwards you to the login page.
4 Programmes: Clicking the box or links takes you to the cooperation programmes services (EAPWP/IPP, MDWP/ICP, MTEP, ICI Menu/ICP).
5 Document Library: Click this box to access the ePRIME Document Library.
6 Working Groups: Click here to access the Working Groups section.
7 Learning Materials: Click to access the Learning Materials repository.
8 Search in all ePRIME Services: Enter topics and terms of interest and click “Search”. The resulting list will show you all ePRIME items in which the terms are found.
9 Countries and NATO and partnerships: This editorial content section informs you about the nature of NATO cooperation programmes and provides you information on partner nations.
10 External ISN Service: The International Security Network ISN (www.isn.ethz.ch) is an external and independent service provider with focus on international security.
11 Events Calendar: Shows all events offered by your country/organisation (WP) or in which your country/organisation plans to participate (IPP/ICP/PP)
1

ePRIME V4 Manual – March 2010
NATO/EAPC/PFP UNCLASSIFIED Releasable to MD, ICI, Afghanistan, Iraq, Pakistan, Australia, Japan, Korea, New Zealand
Page 17 of 85
Programmes The focus of this area is the management of the cooperation programmes. Navigation in Programmes is subdivided into six main areas which can be accessed via the Programmes navigation area on the ePRIME Entry Page.
Programmes Today
PROGRAMMES TODAY is the entry page to the programmes area. It displays general information:
1) Last 10 changes: The ten most recently added or updated ePRIME event-related data records (activities, events, participations). By default, the list shows the records owned by the user’s nation or organization, thus highlighting records that directly affect him/her.
2) Simple Search: direct access to the Search Programme functionality 3) Programme selection: Another programme than the default one can be selected
here .
Reports The REPORTS area is used to view (and print) reports pertaining to all cooperation programmes in the system in a standard format. The area only shows NATO approved records. All ePRIME users can access the same records in this area. Different views and sorting orders are available.
Calendar The CALENDAR area is used to produce tables of events or participations according to a selected period. The area gives access to all events and participation lists approved at NATO level. Different views and sorting orders are available.
Search Programme
The SEARCH PROGRAMME area is used for all event-related search tasks in ePRIME: 1) To target specific sets of events for inclusion in the participation programmes or to
produce customized reports for working purposes. It allows users to search events according to various categories, including NTL tasks and Objectives. In the Advanced Search, categories and filters can be freely combined in multiple ways.
2) The area gives access to all event lists approved at NATO level. Different views and sorting orders are available.
3) In the Search Area the full list of NTL tasks/Objectives with their description can be downloaded and printed.
Working Area The WORKING AREA is the administration area for the cooperation programmes managed in ePRIME. In this area, users can only access records owned by their nation/organization. Different views and sorting orders are available. The following tasks are performed in the WORKING AREA: Add and update owned contributions (activities and related events) in the WP (Work
Programme) of the cooperation programme selected. View and print reports of the draft contributions/participations, etc. The views include
the approval status of each record. Approval of contributions to and participations in the cooperation programmes. Administrate POCs of the NATO body or nation (coordinator task). Administrate the user’s User Profile and related User Selections. Export and import data sets to and from other databases.

ePRIME V4 Manual – March 2010
NATO/EAPC/PFP UNCLASSIFIED Releasable to MD, ICI, Afghanistan, Iraq, Pakistan, Australia, Japan, Korea, New Zealand
Page 18 of 85
Programmes > ePRIME Reference System
ePRIME applies a standardized system to identify and describe objects and their relation to the Proposing and Participating Bodies. The reference IDs are automatically assigned and cannot be edited. They provide important information about the object in question. It is recommended to mention the ePRIME ID reference when referring to an event in other documents, e.g. formal invitation letters, programme outlines, event reports etc.
ACO.1891 Activity IDs are made up of a two-part alphanumeric code. The letters in the first part of the ID (in this example, “ACO”) indicate the acronym of the organization or nation proposing the activity. The numerical ID sequence (in this example, “1891”) indicates the activity reference number.
ACO.1891.4 Event IDs are made up of a three-part reference code. The first two components of the sequence (in this example, “ACO.1891”) indicate the reference ID of the activity that the event is part of. The last number (in this example, “4”) is the event's reference number within the activity.
ACO.1891.4.SWI Participation IDs are made up of a four-part reference code. The first three components (in this example, “ACO.1891.4”) indicate the reference ID of the event that the participation refers to. The last part of the ID sequence (in this example, “SWI”) indicates the country that submitted the participation.
IPP.SWI.2010 Reference ID for an Executive Summary (IPP/ICP Text). The three sequences that make up the Text ID indicate the record type (in this example IPP), the country (SWI) and the year (2010) respectively. The country code is assigned in accordance with the affiliation of the user entering the record. The year refers to the first year of the cycle for which the text was submitted.
EAPC(SCEPC)A(2010)0044 Reference ID of a Document Library document. This is the official reference of the documents provided by NATO.
LM.SWI.14 Reference ID of a Learning Tool. LM defines the entity as a Learning Material. The second part of the reference (in this example, “SWI”) indicates the country that submitted the Learning Tool. The last number (in this example, “14”) is the Learning Tools sequence number (e.g. this is the 14th Learning Tool SWI has submitted).
DEX.SWE.15 The Reference for a Clearinghouse document consists of the record type (= DEX), the body that owns the document, and a sequence number.
WG.16 The Reference for a Working Group. WG defines the entity as a Working Group. The second part of the reference (in this example “16”) is the Working Group sequence number.

ePRIME V4 Manual – March 2010
NATO/EAPC/PFP UNCLASSIFIED Releasable to MD, ICI, Afghanistan, Iraq, Pakistan, Australia, Japan, Korea, New Zealand
Page 19 of 85
Programmes > Navigation
Figure 5 - ePRIME’s Main Areas
1 Programmes Today section is in the foreground
2 The Programme button on the bottom of the screen can be used to toggle between the NATO cooperation programmes managed in ePRIME. This selection is available in all areas of the programmes section.
3 The User Selections button is used to create and manage personal user profiles. This selection is available in all areas of the programmes section.
Further Navigation
The main ePRIME areas are further subdivided into functional sections. Users may navigate through these sections by moving the cursor over the horizontal light blue navigation bar at the top of the screen. The required functional section or subsection can then be selected.
Figure 6 - Functional sections in ePRIME
1 Make your selection

ePRIME V4 Manual – March 2010
NATO/EAPC/PFP UNCLASSIFIED Releasable to MD, ICI, Afghanistan, Iraq, Pakistan, Australia, Japan, Korea, New Zealand
Page 20 of 85
Programmes > Functions This section introduces ePRIME’s functionality, i.e. the functions to display and retrieve data stored in the database. A number of screenshots from ePRIME illustrate the main navigational options for retrieving data stored in ePRIME and for viewing records.
Functions > Retrieval of Data
Data retrieval in ePRIME is typically performed in two steps:
1. Producing a List: Records (activities, events, participations, etc.) are retrieved as a list resulting from the filters selected by the user. The list contains the main record information and can be printed or exported.
2. Accessing Detail Views: By clicking on the references, users can view more detailed information.
The following screenshots illustrate this principle which is applied throughout all ePRIME areas.
Figure 7 - How a list of records is retrieved
1 Select criteria
2 Click ‘Show’
ePRIME V4 Manual – March 2010
NATO/EAPC/PFP UNCLASSIFIED Releasable to MD, ICI, Afghanistan, Iraq, Pakistan, Australia, Japan, Korea, New Zealand
Page 21 of 85
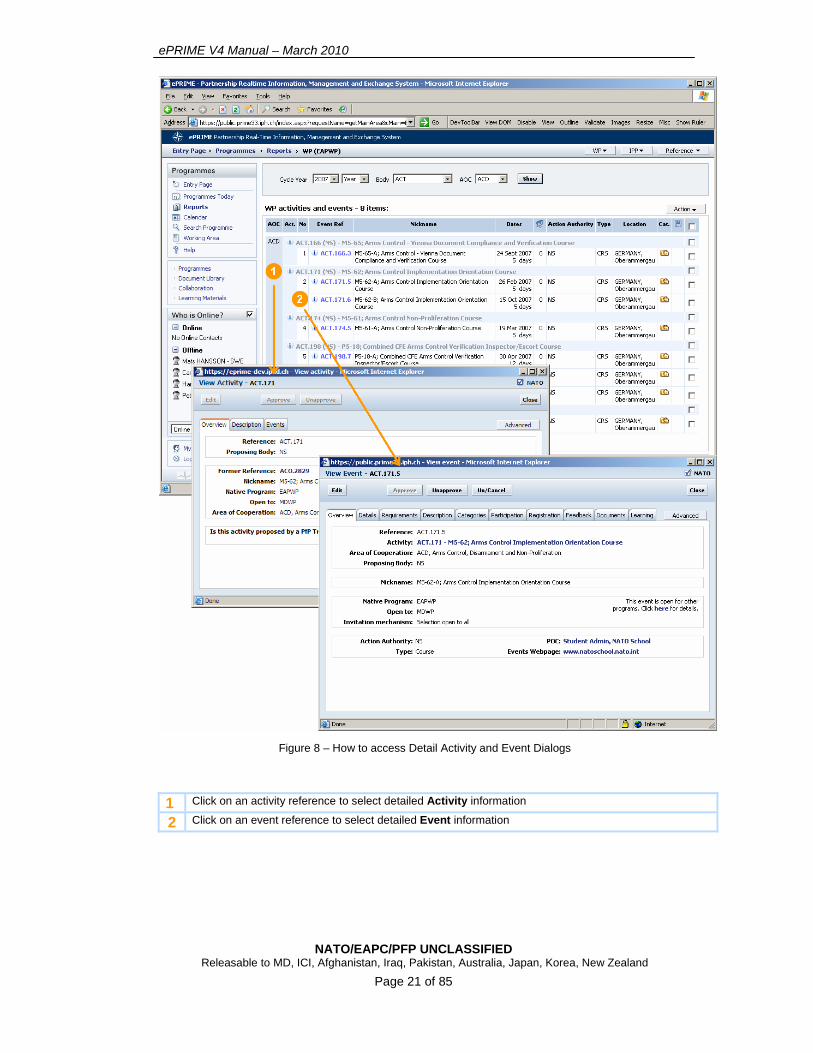
Figure 8 – How to access Detail Activity and Event Dialogs
1 Click on an activity reference to select detailed Activity information
2 Click on an event reference to select detailed Event information

ePRIME V4 Manual – March 2010
NATO/EAPC/PFP UNCLASSIFIED Releasable to MD, ICI, Afghanistan, Iraq, Pakistan, Australia, Japan, Korea, New Zealand
Page 22 of 85
Functions > Reports
The REPORTS area of ePRIME is used to view reports pertaining to the WP (Work Programme) and the PP (Participation Programme) of the cooperation programmes featured in ePRIME. The listings generated can be adapted to the user’s needs. The following options are available to work with reports:
In WP, activities and events can be viewed as …
- Online reports = A listing of records created by the user by selecting a period (cycle, year), a coordinating body (NATO organization or nation) and an Area of Cooperation.
- Printed reports = Any list of records created by the user can be printed. To print, use the Action button:
- The print command will open a dialog where additional information can be picked to be included in the printed report (see illustration below > Print report options).
- Excel reports = The list of matching records created by the user can be displayed as a file in Excel format -> use the ACTION button. The Excel view of a report contains all available information in tabular view. The Excel file may be saved to the hard disk.
- The Print- and Excel functions are particularly useful to perform the following tasks:
For printing reports pertaining to specific sections: Note that due to its size, the full e.g. EAPWP can only be retrieved from the database in pieces (e.g. by Areas of Cooperation).
To produce printouts of tailored lists of records (e.g. contributions to the draft cooperation programme by a certain nation/body, events matching certain NTL tasks).
The Excel export feature is particularly useful for further work on a list (e.g. to adapt the report, to embed it in another document etc.).
A further advantage of these two features is that they always provide the full list of records in one file, while lists are sometimes displayed in pages of 25 records when viewed online.
- Filter function = The report list created by the user can be filtered to display only entries that are relevant to the user or to move a selection of entries to the personal user selection folder for future reference (see chapter on user selections for this feature). Use the ACTION button to filter a report list or to move a selection of entities to your user selection.

ePRIME V4 Manual – March 2010
NATO/EAPC/PFP UNCLASSIFIED Releasable to MD, ICI, Afghanistan, Iraq, Pakistan, Australia, Japan, Korea, New Zealand
Page 23 of 85
Figure 9 - A report listing with print options
1 Select criteria and click on ‘Show’
2 Click ‘Action’ and select option
3 For Print Report Options, select fields to be printed. If nothing selected a standard report will be printed
4 Select output option: HTML, Word, or Word 2003
5 To filter a list, select records to be kept and click ‘Filter’
Functions > The Event Detail Dialog
The detail dialog for events and participations lists all event- and participation-related information by making it available in clearly structured tabs. Furthermore, the Wizard function guides inexperienced ePRIME users step-by-step through the process of entering data in the detail dialog (described in the next chapter).
In the Event Detail Dialog, all event-related information is displayed as follows:

ePRIME V4 Manual – March 2010
NATO/EAPC/PFP UNCLASSIFIED Releasable to MD, ICI, Afghanistan, Iraq, Pakistan, Australia, Japan, Korea, New Zealand
Page 24 of 85
Figure 10 - Event detail dialog
1 The Overview tab gives an overview of the most important information of the event: Name, reference number, AOC, Proposing Body, Action Authority, type of event etc.
2 The Details tab indicates such information as dates, location, number of participants, etc.
3 Under the Requirements tab Language and Skill requirements can be found.
4 The Description tab indicates the event’s topic, target audience, and remarks.
5 The Categories tab lists the NTL tasks, Objectives and AOCs supported by the event.
6 The Participation tab indicates which body participates or participated (when it lies in the past) in the event. In this tab, a participation to an event can be added. Note that a participation can also be added by feedback after the event has taken place (reflecting the actual participation figures). In this tab, ePRIME users with editor rights can also add a participation. Owners of the event can use the invite function if participation in the event is restricted.
Under the Participation tab the following buttons can be found: 1) the ‘Add Participation’ button: ePRIME editors can submit a participation to the event for their
body/nation 2) the ‘Invite’ button: is used to invite a body or nation if an event is on invitation only (in the
event detail dialog, such an event is set to “Selection by Action Authority”).
7 The Registration tab informs about the status of the Registration Process (not started/started) and provides the event’s invitation form for download (the organizer of the event uploads the invitation form in this tab).
8 The Feedback tab is used to upload event feedback provided by the Action Authority and to display feedback given by the participants of the event.
9 The Documents tab lists all available event supporting documents (either uploaded to the event or linked from the Document Library).
10 The Learning tab lists all available event supporting Learning Tools available for this event (the list references the entries in the Learning Materials repository).
11 The “Advanced” button can be used to view the history of the event entries (earlier changes), to copy the event to other activities, or to print all information pertaining to the event (information from all tabs is displayed in a print preview and can then be printed).

ePRIME V4 Manual – March 2010
NATO/EAPC/PFP UNCLASSIFIED Releasable to MD, ICI, Afghanistan, Iraq, Pakistan, Australia, Japan, Korea, New Zealand
Page 25 of 85
Functions > The Participation Detail Dialog
Figure 11 - Participation tab (Event detail dialog) and Participation detail dialog
1 Select Participation tab on Event Detail Dialog
2 Click a Participation reference
3 Participation detail dialog will open. Further options: The “Advanced” Button can be used to view the history of the participation entry, or to print the information pertaining to the participation (the information from all tabs will be displayed in a print preview window).
Functions > Adding an Event, Activity, or Participation ePRIME users with editing rights have two options to enter a new event in ePRIME. Activities and events are added in their native programme and can then be opened to one or more of the other programmes. Experienced users can use the classic dialog to enter the appropriate information; editors who are new to ePRIME can work with the Wizard Function, a step-by-step-process which helps the user to fill in the event data. In the WORKING AREA, choose “Add event” from the WP pulldown menu to start entering event data; the wizard mode dialog appears by default and includes 11 steps to enter the data (experienced users can skip this dialog and go directly to the classic mode). Note that events are grouped by activities. If an event is to be added to an existing activity (same activity as last year), this activity can be selected from a dropdown menu. If this is not the case, a new activity has to be created (choose the

ePRIME V4 Manual – March 2010
NATO/EAPC/PFP UNCLASSIFIED Releasable to MD, ICI, Afghanistan, Iraq, Pakistan, Australia, Japan, Korea, New Zealand
Page 26 of 85
option “Add activity”). Entering a new activity can also be done in the Wizard mode (4 step process) or directly in the “Add activity” window dialog (WP > Add Activity). For entering a new event, the following information has to be entered: by default, an event is defined in your default programme. If the event is to be shared with another cooperation programme, the programme selection must be selected in the edit event dialog (Overview tab). First the activity to which this event belongs must be opened for the programme to be shared with, only then can the event be opened for this programme. The “Invitation mechanism” option defines if an event is open to all bodies or if participations are on invitation only. Events that are on invitation only are in principle only “expert visits” or “mobile training teams”.
Figure 12 - 11-step Add Event dialog (in Wizard mode)
Figure 13 - Add Event dialog (in classic mode)

ePRIME V4 Manual – March 2010
NATO/EAPC/PFP UNCLASSIFIED Releasable to MD, ICI, Afghanistan, Iraq, Pakistan, Australia, Japan, Korea, New Zealand
Page 27 of 85
Adding a participation to an event listed in ePRIME is done in the ‘Reports’, ‘Calendar’ or ‘Search’ area or in the WORKING AREA (only for events owned by the body/country the user represents). The participation tab in the event detail dialog features the “Add participation” option. In order to add a participation, the event has to be NATO approved and has to be marked as “Selection open to all”. The “Invite” link is used by the organizer or the Action Authority to invite individuals to the event when the event is “Selection by Action Authority” (see screenshot of the Participation tab above). A participation can also be added by feedback after an event has taken place (in the participation tab of the event detail dialog), such a participation will be marked with the ”Added by feedback” icon ( -> see icon list in chapter Colours and Symbols).
Figure 14 - Add Participation dialog (in classic mode)
Functions > Categorisation in ePRIME
Entries in ePRIME are categorised to facilitate the filing process and to make them available with a sophisticated search tool. ePRIME distinguishes between two categorisation processes: 1) categories used to find events and documents (in the Documents Library) and 2) categories used to retrieve documents in the Clearinghouse area.
Categorisation in ePRIME > How to categorise EVENTS
Events are categorised according to official NTL (NATO Task List), Objectives, and supported AOCs (Areas of Cooperation). This categorisation is done by ePRIME editors when they enter information in the event detail dialog.
In the event detail dialog, ePRIME users can see which NTL tasks, Objectives, and AOCs an event pertains to. Furthermore, they can search for events using these categories in the SEARCH PROGRAMME area (for example to create a list of events with the same NTL tasks/Objectives or belonging to the same AOC).
An event can be linked to sub-categories from the following overarching categories:

ePRIME V4 Manual – March 2010
NATO/EAPC/PFP UNCLASSIFIED Releasable to MD, ICI, Afghanistan, Iraq, Pakistan, Australia, Japan, Korea, New Zealand
Page 28 of 85
NTL NATO Task List
Objectives Objectives relate to areas of cooperation that are not covered by NTL, especially civil-military and non-military areas.
Supported AOCs An event is always related to one primary AOC but may also support additional secondary AOCs which can be selected from this category.
These categories are presented to the ePRIME editor in a categorisation tree. Here, items pertaining to an overarching category can be selected in the hierarchically structured tree (check the appropriate boxes in the dialog to identify the event with it).
Figure 15 - Categorization tree in the Add event dialog (Wizard mode)
1 Categories must be selected in the lowest node (no ‘+’ sign in front of reference nr)
2 Keep cursor over reference nr in order to see title on bottom line
Categorisation in ePRIME > Using categories in the SEARCH PROGRAMME area
The SEARCH PROGRAMME area of ePRIME offers a wide range of options to search for a particular event. In the search dialog, an event can be found by reference code or event nickname, or by searching with the following search criteria: Year, Organising Body, Action Authority, AOC, Event Type. The search results can also be narrowed down by selecting items from the categorisation tree (same categories and sub-categories as in the Add event dialog - see illustration below).

ePRIME V4 Manual – March 2010
NATO/EAPC/PFP UNCLASSIFIED Releasable to MD, ICI, Afghanistan, Iraq, Pakistan, Australia, Japan, Korea, New Zealand
Page 29 of 85
Figure 16 - Categorization tree in the SEARCH PROGRAMME area
1 Toggle between simple and advanced search
Categorisation in ePRIME > How to categorise documents in the ‘Clearinghouse’
Categorisation also plays an important role in the Clearinghouse. Documents listed in Clearinghouse are stored according to a different categorisation system than events. When a document is added to Clearinghouse, the owner defines the document’s name, its type, and the year it was published. Furthermore, a set of categorisation terms can be assigned belonging to the following overarching categories:
Clearing House Keywords added to identify the type of Clearing House documents. Either this are “Partner requests” or “Assistance programmes”.
NATO Categories • Bodies/Structures The political body/NATO structure the event is associated with (CoE, IMS, National Representation/Mission, NDC, PSE etc.
• Committees/Groups E.g. CCMS, EAPC, MCWG, NAC, Science Committee etc.
• Mechanism/Programmes NATO cooperation programmes or mechanisms, e.g. Consortium, EAPWP, IPSP, MD, MTEP etc.
Type of Documents Document type when a document is added to an event – e.g. Agenda, Invitation, Policy/Guidance/Directive etc.
Keywords Keywords added when an event is stored to make it easier to find it using the Search Function.

ePRIME V4 Manual – March 2010
NATO/EAPC/PFP UNCLASSIFIED Releasable to MD, ICI, Afghanistan, Iraq, Pakistan, Australia, Japan, Korea, New Zealand
Page 30 of 85
Clearinghouse documents are searchable according to the categories defined when the document is uploaded to Clearinghouse. Experienced Clearinghouse editors can assign the categories directly in the categories tab of the add document dialog (see illustration). Users who are unsure about what classification terms can be used should use the wizard function where they can select the terms from an extensive categorisation tree (see illustration below).
Figure 17 - Categories tab in the Add Document dialog (wizard mode)
Categorisation in ePRIME > NTL / Objectives
What is NTL? NATO Tasks List (NTL), serves as a common language and reference system for NATO's Strategic Commanders, their subordinate commanders and agencies, operational planners, and for training and exercise planners. Designed as a menu of capabilities, the NTL provides common terms of reference for exercises, operations and determination of required capabilities. The NTL also supports the operational planning process by providing a common language and reference system for identification of tasks in the mission statement, concept of operations and subordinate tasking. Integration of MTIs into the NTL, allows Partners to have a broader menu of tasks to help Partner units to be interoperable with NATO. The NTL is organised into three separate levels: Strategic, Operational and Tactical levels, and the tasks defined in the NTL are a menu for commanders of "what" tasks can be performed without specifying "how" they will be performed or "who" performs them.
What are MTIs? MTIs have been replaced by NTL in 2008. MTIs only used in data before 2009.
Military Tasks for Interoperability (MTIs) define specific tasks that partner units must be capable of performing in order to achieve the overall aim of interoperability. MTIs also provide evaluation criteria against which progress can be measured. MTIs are important for planners in the NATO Commands to develop and co-ordinate education, training, and exercises. They are also important for partners, allowing them to concentrate on activities relevant to their own interoperability aims. Furthermore, MTIs contribute directly to further cycles of the PfP Planning and Review Process (PARP), where Partnership Goals (PGs) and MTIs have been harmonized to ensure common direction within the PfP programme. MTIs apply to both PARP and non-PARP nations.

ePRIME V4 Manual – March 2010
NATO/EAPC/PFP UNCLASSIFIED Releasable to MD, ICI, Afghanistan, Iraq, Pakistan, Australia, Japan, Korea, New Zealand
Page 31 of 85
What are Objectives?
Objectives in areas not covered by NTL (abbreviated as “Objectives” hereafter) are a complementary set of PfP objectives. They relate to areas of cooperation that are not covered by NTL, especially civil-military and non-military areas.
What are Supporting AOCs?
Supporting Areas of Cooperation define additional AOCs an event may support. An event is always related to one primary AOC, but may also support a set of secondary AOCs.
When to use NTL/, Objectives and supporting AOCs?
An electronic linkage between events and NTL/Objectives/AOCs has been made possible to allow Partners selecting their participation in events as much as they support the NTL tasks or Objectives they want to fulfil. Therefore:
• Proposing bodies of activities must link as much as possible events they are entering into ePRIME to NTL, Objectives and AOCs. A special field in the “Add Event” form allows to assign NTL tasks, Objectives and AOCs from a selection tree.
Participating bodies may use NTL, Objectives and AOCs when creating their IPP/ICP table of participations. NTL, Objectives and AOCs are essential for comparing individual interoperability goals with Partnership Goals. In the SEARCH PROGRAMME area, a special tool allows users to find events that match their NTL tasks, Objectives and AOCs.
More information A list of all NTL/Objectives and AOCs with their full description can be viewed in the
Search Area. Click on the symbol on the top right hand side of the page to retrieve and print this list.
Functions > History
ePRIME keeps track of the changes that editors make in the system. Users can therefore always get an overview of the latest changes made in event-related entries and in Clearinghouse entries (described below). Furthermore, the Advanced History option can be used to look at more specific changes that were made in ePRIME entries earlier on (events or participations added, Clearinghouse documents uploaded etc.). The history of actions is also reflected in the event detail dialog where all changes that were made to the event entry can be seen as a list (described below).
The history function in the Programmes Today Area
Programmes Today always displays a list of the last 10 event-related changes that occurred in ePRIME (by default, the last 10 changes affecting the country or NATO body the ePRIME user belongs to are displayed).
The section where the last 10 event-related changes are listed features an advanced history search function (click Show Advanced History) which can be used to produce a list of changes that occurred in a selectable timeframe. Single entries can also be filtered (yielding a list of only the items selected) or added to a user selection (see chapter Programmes > Functions > User Profiles and User Selections for details).

ePRIME V4 Manual – March 2010
NATO/EAPC/PFP UNCLASSIFIED Releasable to MD, ICI, Afghanistan, Iraq, Pakistan, Australia, Japan, Korea, New Zealand
Page 32 of 85
Figure 18 - Search result in the Advanced History Search (Programmes Today Area)
The history function in the Event Detail Dialog
In the event detail dialog, the Advanced button can be used to access a list of all changes that were made to the event entry in the past (click Advanced and History). The list reveals when a change occurred, what action was performed (approval, cancellation, uncancellation etc.), who performed it and what changes were made.
Functions > Supporting Documents
As was already described above, ePRIME distinguishes between documents that are event-related and were added to an event (supporting documents like an invitation form, the event’s agenda, etc.), documents stored in the Clearinghouse area and documents stored in the Document Library (official documents pertaining to the Euro Atlantic Partnership). In the following, a description is given how event supporting documents are added.
Uploading Event Supporting Documents
In the event detail dialog, the assign/upload document function is located in the Documents tab and is used to add a document to an event. Note that only ePRIME editors who represent the NATO body or nation that owns the event can upload a document. The ePRIME editor assigns a name to the document, and gives an optional document description (separate tab). He/she then uploads the file that will be added to this document entry. Alternatively, an Internet Address (URL) can be indicated, if the document(s) are located elsewhere in the Internet. Note that all Microsoft Office formats (.doc, .xls, .pps), RTF or PDF files are accepted. Office files will be automatically converted to PDF. For files in RTF, the conversion is optional. Before a file is uploaded, the language the document is written in is defined (pulldown menu).

ePRIME V4 Manual – March 2010
NATO/EAPC/PFP UNCLASSIFIED Releasable to MD, ICI, Afghanistan, Iraq, Pakistan, Australia, Japan, Korea, New Zealand
Page 33 of 85
Figure 19 - Add document dialog for event supporting documents
Uploading a Registration Form
As was described above (see chapter “The Invitation Mechanism”), the invitation workflow for events is an automated process, allowing the participating body to upload the registration form after having filled it in. Uploading a registration form is done in the view participation dialog with the Upload Registration Form option. The upload is done by filling in the appropriate fields in the Overview tab and uploading the file with the add/replace-file option. In the Description tab, the user adds a detailed description about the file that is uploaded. Alternatively, a 4-step upload dialog (wizard mode) can be chosen to submit the registration document (see illustration).
Figure 20 - Add Registration Document Dialog (in wizard mode)

ePRIME V4 Manual – March 2010
NATO/EAPC/PFP UNCLASSIFIED Releasable to MD, ICI, Afghanistan, Iraq, Pakistan, Australia, Japan, Korea, New Zealand
Page 34 of 85
Functions > User profiles and User Selections
What are User Selections?
User Selections are sets of private folders created by ePRIME users to store items found in ePRIME for later reference (e.g. event–related entries like events or participations, or Clearinghouse documents). The items are stored in the folder as references to entries in ePRIME and are comparable to Internet bookmarks. User selections make it easier to gather and process larger groups of events. The advantage over lists of events generated by the ePRIME standard selection menus is that in a user selection folder, events can be included individually, and the list can be used again at a later time. The User Selections feature is available to all users, irrespective of their access rights.
How are User Selections set up?
In order to establish a User Selection, a user profile has to be created in the User Selections section of the PROGRAMMES TODAY area. The profile information includes the user’s email address and a password (note that not the same password must be used as the one for accessing ePRIME). Then, a selection can be created by naming it, indicating if the selection is to be monitored, and defining the object type that is to be stored in the selection (options: event, activity, document, participation). From now on, this user selection will be accessible via a link “User Selections” in the PROGRAMMES TODAY area. If several user selections have been set up, the user can toggle between them in the “User Selections” menu ( -> My selections).
If a user selection is set to “Monitored”, the user will be informed as soon as a change has occurred in any of the items stored in the selection (e.g. if an event date was changed by the Action Authority).
Event-related entries or documents can be moved into a user selection by selecting them in listings (check the box) and adding them to a selection via the Action button.
When to use them The “User Selection” feature is recommended for the following tasks:
For users with editing rights (e.g.: national coordinators) To assemble a draft list of events for the national IPP/ICP. It can be used
to make printouts, to consolidate the list, and for similar tasks prior to adding the participation information.
To add and update (and eventually approve) IPP/ICP participation information in a selection of events. This can be done more quickly with the user selection than with the normal event lists.
To mark a list of events that require further editing.
For all users, irrespective of access rights: To assemble a list of events for re-use at a later time (e.g., the events the
user plans to attend). To monitor specific lists of events, a user can set his selections to
“Monitored”. He will then be notified by e-mail when changes occur in the items included in that folder.
Functions > Statistics
What is the Statistics Function?
The Statistics Function is a tool providing an overview of the status of events listed in ePRIME. With this tool, ePRIME users can obtain a detailed breakdown of all events pertaining to a proposing body, including such specifications as the status of events (e.g. cancelled events), their approval levels, participations in the Participation Programme (PP), number of events in AOCs, number of participations in AOCs.
How does it work? The statistics function can be accessed in the REPORTS area (-> Reference tab, -> Statistics). Here, statistics pertaining to any body represented in ePRIME (nation, NATO body) can be generated with these parameters: cycle/year, body, type of listing (Work Programme - WP, Participation Programme - PP, IPP/ICP

ePRIME V4 Manual – March 2010
NATO/EAPC/PFP UNCLASSIFIED Releasable to MD, ICI, Afghanistan, Iraq, Pakistan, Australia, Japan, Korea, New Zealand
Page 35 of 85
Text, WP by AOC, PP by AOC). The statistics function produces statistical overviews of event-related data of nations and NATO bodies. Overviews generated by the statistics function can be printed or exported to Excel (use the “Action” button).
When to use it? The statistics function is a powerful tool for ePRIME users interested in getting an overview of the status of event related data pertaining to a body (e.g. to see all events with their respective approval levels, status etc.). It is particularly useful for officials involved in the planning processes of NATO coordination programmes.
In the REPORTS area, the Reference Section (-> pull down menu “Reference”) also provides the option to call up a list of all bodies (nations, NATO bodies) mapped in ePRIME, listed by year (choose Body Structure). Furthermore, the Reference menu features a Links page, where hyperlinks to websites that are relevant to the ePRIME community can be found.
Functions > Import / Export of Data
Importing and Exporting Data Sets ePRIME provides two interfaces that enable limited interaction between ePRIME and other databases (e.g., national budgeting or administrative systems).
Export Feature This export feature allows all ePRIME users to export ePRIME data sets into an MS Access® database. The exported database includes an easy-to-use interface for printing EAPWP and IPP/ICP Reports. The exported data sets can also be further processed, e.g. for statistical evaluation, budgeting, or other purposes in other databases. The EAPWP data of any body can be exported according to approval level and allowing for some additional specifications. It is also possible to export the full EAPWP for a given year or cycle. The data can then be imported into a national system. For exporting the data, the two data formats ZIP and MDB are available.
Import Feature The import feature allows users with editing rights to upload information on IPP/ICP participation into ePRIME from a text file. This is an alternative to entering the information via the individual participation detail views. It saves time, especially with large lists of IPP/ICP participations.
IMPORTANT! The use of the export/import feature is recommended for the management of IPP/ICP data only, and for preparing after-action statistics. For all records, the export feature is a one-way process. It is not technically possible to re-import contributions from another system into the ePRIME database. Therefore, information related to the cooperation programmes must always be entered and updated in ePRIME.
Technical requirements
The export feature requires that the user has available the MS Access® software for the opening and further processing of the database. Also, the use of the WinZip® software is recommended, since downloading the database in the ZIP format will save considerable time.
Required skills Exporting a database and printing reports is relatively easy and does not require particular skills.
For further processing the exported data sets as well as for the import feature, skills in database administration are required.
How does it work? The Import/Export function can be found in the WORKING AREA in the Tools Menu. To export a cooperation programme of a body, select the available options (which body, cycle/year, etc.) and the format the export should be carried out in. The whole Work Programme can be exported too.
In the Import Function, the IPP/ICP participation information is imported from a simple text file with the data in a comma-delimited format. Refer to the example of the IPP/ICP import template for details.

ePRIME V4 Manual – March 2010
NATO/EAPC/PFP UNCLASSIFIED Releasable to MD, ICI, Afghanistan, Iraq, Pakistan, Australia, Japan, Korea, New Zealand
Page 36 of 85
Document Library The ePRIME Document Library provides access to all NATO/EAPC/PfP unclassified documents released by the NATO Central Registry for ePRIME users whose default programme is EAPWP. New documents are uploaded in regular intervals.
Figure 21 – Document Library
1 Document Library: Click on a link to access the Document Library pages or go back to the entry page.
2 Today Area: Clicking on this link gives you access to the Document Library entry page (as shown above).
3 Advanced Search: Click this link to go to the advanced search page providing more specific search options.
4 Shortcut to other ePRIME Services: This navigation list provides you fast access to the most important ePRIME services.
5 Hot Documents: This ranking list shows you the documents most often requested by ePRIME users.
6 Document Reference: Clicking the reference of a list entry opens the detail view of the corresponding document.
7 Download Document: Click the PDF icon for downloading a copy of a document.
8 Simple Search: Enter terms of interest or a document reference and click “Search”. The resulting list shows you all documents in the ePRIME document library matching your search terms.

ePRIME V4 Manual – March 2010
NATO/EAPC/PFP UNCLASSIFIED Releasable to MD, ICI, Afghanistan, Iraq, Pakistan, Australia, Japan, Korea, New Zealand
Page 37 of 85
Document Library > Advanced Search and Search Result You can search more specifically by using the Document Library advanced search.
Figure 22 – Document Library Advanced Search
1 Search term: Enter terms of interest or a document reference and click “Search”. The resulting list shows you all documents in the ePRIME document library matching your search terms.
2 Document date: Limit the search to documents created during the specified time frame. 3 Language: Limit the search to documents of the selected language. 4 Sort order: Specify the sort order of the resulting list. 5 Categorization tree: Limit the search to documents of the selected categories. Check the small box in
the top left corner of the tree to enable the categorisation tree. 6 Search: Click this button to start the search. 7 Clear: Clicking this button removes all search criteria and sets the form to the default values. The result of the search is presented in a similar list as the Hot Documents list.

ePRIME V4 Manual – March 2010
NATO/EAPC/PFP UNCLASSIFIED Releasable to MD, ICI, Afghanistan, Iraq, Pakistan, Australia, Japan, Korea, New Zealand
Page 38 of 85
Instant Messaging Instant messaging lets you chat with other ePRIME users with very little time delay. You can have a “real-time” discussion with other colleagues working in a different organisation and even in different countries. All they need is an ePRIME account.
Instant Messaging > Starting a Chat You can initiate a chat with any online ePRIME user by adding the corresponding contact to your contact list. ePRIME will show you if the user is online and ready to accept a chat message. You can also send a chat message to an offline user. This message will be displayed the next time the user logs in.
1 To chat with a person, double click the person’s name in the online list.
2 You can change your state showing other users if you are online, busy or away.
3 Chat history: Click this icon to see a history of your chats with other people.
4 Add contact: Click here to add contacts to your contact list.
5 Disable instant messaging: Uncheck this checkbox to completely disable the instant messaging. You appear offline to all ePRIME users.
Figure 23 – Who is Online?
Instant Messaging > Chatting with another Person A separate chat window opens, when you double-clicked a contacts name. Enter your message in the white field and click the send button. The target person will see a similar window showing the message you typed. Answers entered by your contact are directly shown to you (instantly).
Figure 24 – Chat Window
1 Message text: Enter the text to be sent in this field.
2 Send button: Click here to send the message you typed.
3 Conversation: The complete conversation is shown in this frame.
4 Remove Contact: Click here to remove the contact from your contact list.
5 Block User: Blocking a user prevents the user from sending you any messages.

ePRIME V4 Manual – March 2010
NATO/EAPC/PFP UNCLASSIFIED Releasable to MD, ICI, Afghanistan, Iraq, Pakistan, Australia, Japan, Korea, New Zealand
Page 39 of 85
Instant Messaging > Chat History Sometimes it is convenient to go back to a conversation for reference. Clicking the Message History button opens a window in which you see your latest conversations with other ePRIME users.
Figure 25– Message History

ePRIME V4 Manual – March 2010
NATO/EAPC/PFP UNCLASSIFIED Releasable to MD, ICI, Afghanistan, Iraq, Pakistan, Australia, Japan, Korea, New Zealand
Page 40 of 85
Working Groups A Working Group is a place for collaboratively working on events, documents or other products for which several people have to work together. Any ePRIME user can start a new Working Group, edit access rights are not necessary.
Working Groups provide a discussion platform similar to “forums” or ”bulletin boards” and allow users to upload documents for collaborative working by other group members. Differentiated access rights allow a clear definition of who can access content in a Working Group. The following sections cover how you can join an existing working group or create your own.
Working Groups > Today Area
Figure 26 – Working Groups Today Area
1 Today Area: Clicking on this link gives you access to the Working Groups main page (as shown above).
2 My Working Groups: Provides you with a list of all Working Groups you are a member off. 3 Popular Working Groups: The today area gives an overview on popular Working Groups (e.g.
Working Groups with many posts, or new Working Groups). 4 Subject: Every Group has a subject to be covered in the Group’s discussion or uploaded documents. 5 Membership: Depending on the working group accessibility, you can directly become a member or you
have to request membership for a group. See section “Visibility and Accessibility “ for more information. 6 Add Working Group: Click this button to create a new Working Group. Any ePRIME user can create a
new Working Group. 7 Search Working Group: Enter a term to search for in the Working Group subject. Use the advanced
search to also search in Working Group documents and discussions.
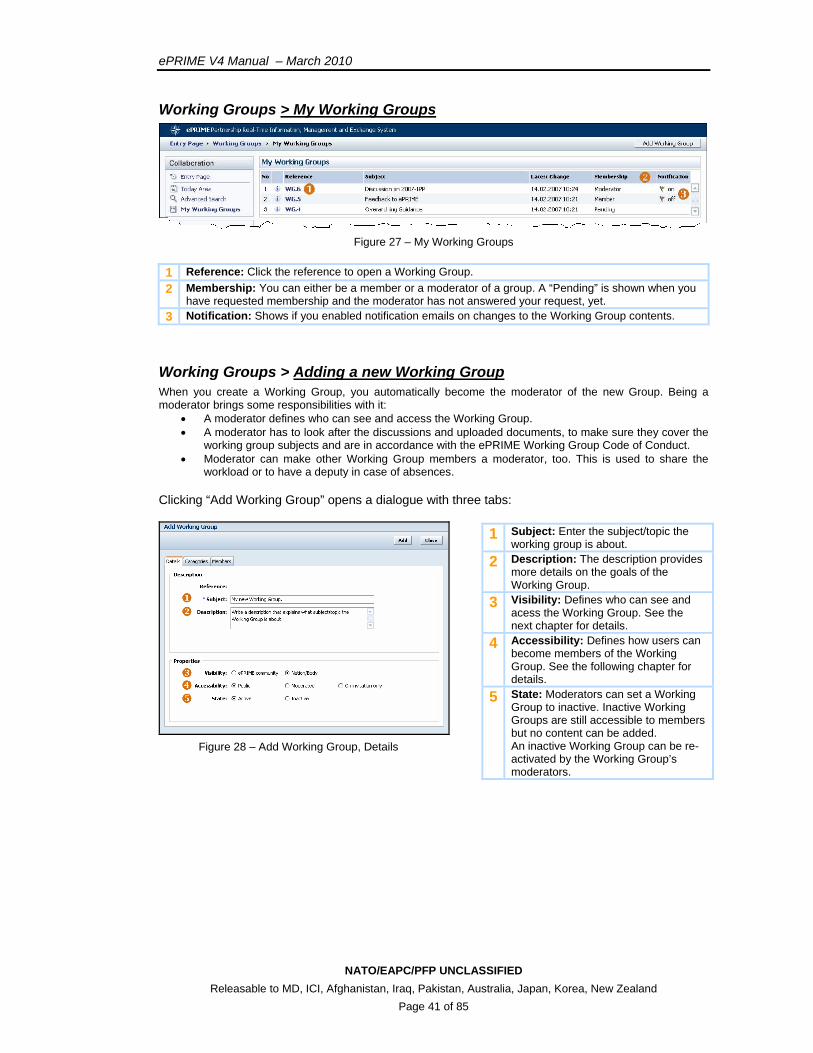
ePRIME V4 Manual – March 2010
NATO/EAPC/PFP UNCLASSIFIED Releasable to MD, ICI, Afghanistan, Iraq, Pakistan, Australia, Japan, Korea, New Zealand
Page 41 of 85
Working Groups > My Working Groups
Figure 27 – My Working Groups
1 Reference: Click the reference to open a Working Group. 2 Membership: You can either be a member or a moderator of a group. A “Pending” is shown when you
have requested membership and the moderator has not answered your request, yet. 3 Notification: Shows if you enabled notification emails on changes to the Working Group contents.
Working Groups > Adding a new Working Group When you create a Working Group, you automatically become the moderator of the new Group. Being a moderator brings some responsibilities with it:
• A moderator defines who can see and access the Working Group. • A moderator has to look after the discussions and uploaded documents, to make sure they cover the
working group subjects and are in accordance with the ePRIME Working Group Code of Conduct. • Moderator can make other Working Group members a moderator, too. This is used to share the
workload or to have a deputy in case of absences. Clicking “Add Working Group” opens a dialogue with three tabs:
Figure 28 – Add Working Group, Details
1 Subject: Enter the subject/topic the working group is about.
2 Description: The description provides more details on the goals of the Working Group.
3 Visibility: Defines who can see and acess the Working Group. See the next chapter for details.
4 Accessibility: Defines how users can become members of the Working Group. See the following chapter for details.
5 State: Moderators can set a Working Group to inactive. Inactive Working Groups are still accessible to members but no content can be added. An inactive Working Group can be re-activated by the Working Group’s moderators.

ePRIME V4 Manual – March 2010
NATO/EAPC/PFP UNCLASSIFIED Releasable to MD, ICI, Afghanistan, Iraq, Pakistan, Australia, Japan, Korea, New Zealand
Page 42 of 85
Figure29 – Add Working Group, Categories
1 Categories: If applicable, please categorize Working Groups. The same categories as for events are available. This is very valuable for other ePRIME users, as it gives better searching possibilities in the advanced search.
2 Change categories: Click this link to define or change Working Group Categories.
Figure 30 – Add Working Group, Members
1 Add Working Group Member: Clicking this link allows the moderator to add/invite ePRIME users to Working Group. See the next screenshot on how this works.
2 Hotspot: Move the mouse pointer over the to see the user’s contact details.
3 Member since: This column shows when a user has become member of the Working Group.
4 Membership: A user can either be a member or a moderator.
Figure 31 – Add Working Group, Add Members
1 Search: You can search for a user by entering the name in the user field. If you leave the field empty, all users (of the selected body) will be returned. The body field is fixed if the Working Group has its visibility set to “Nation/Body”.
2 Check Boxes: Select the people you want to add to the members list by checking their corresponding box.
3 Add/Close: Click “Add” to include the selected people in the member lists. Clicking “Close” brings you back to the Working Group Dialogue, discarding all actions.

ePRIME V4 Manual – March 2010
NATO/EAPC/PFP UNCLASSIFIED Releasable to MD, ICI, Afghanistan, Iraq, Pakistan, Australia, Japan, Korea, New Zealand
Page 43 of 85
Figure 32 – Add Working Group, Members Added
1 Additional Members: The list of Working Group members is now enlarged by the two persons you have selected before.
2 Add: Click “Add” to create the new Working Group. You are taken directly to the newly added Working Group after you have clicked on “Add” (more in the chapter “Working Group Page”).
Working Groups > Visibility and Accessibility
It is important to understand how ePRIME handles the visibility and accessibility of Working Groups.
Generally speaking, all ePRIME users can become members of a Working Group and only members can access, add and change Working Group content.
Beside this general rule, a moderator can define visibility and access also on a finer level.
The visibility, defines if users can see the working group in lists (in the Today Area, in search results and in the My Working Groups list). Two level of visibility exist:
• ePRIME community, all ePRIME user can see the Working Group
• Nation/Body, only users of the moderator’s body can see the Working Group
If the visibility is changed from “ePRIME community” to “Nation/Body”, all members remain in the member list, but people of bodies other than the moderator’s will not any longer see the Working Group in their lists, and thus cannot access this Working Group any more. It is recommended to manually remove such members from the list of members.
The accessibility defines how an ePRIME user can become a member:
• Public, allows any user to become a member, by simply clicking “Become member” in a list of Working Groups.
• Moderated, a moderator reviews every membership request. Moderators get notified by email from the ePRIME-system on any membership request.
• On invitation only, is a very special accessibility: Users cannot apply for membership as only a moderator can invite them to the Working Group by adding them directly to the member list. Additionally, “on invitation” Working Groups are only visible to members of the Group and not to any other ePRIME user.
Remark: NATO’s ePRIME database administrator can browse all Working Groups and their description, but to see their content she must become a member/moderator first.

ePRIME V4 Manual – March 2010
NATO/EAPC/PFP UNCLASSIFIED Releasable to MD, ICI, Afghanistan, Iraq, Pakistan, Australia, Japan, Korea, New Zealand
Page 44 of 85
Working Groups > Working Group Page The screen shot below shows the main page of a Working Group. It summarizes the available content and serves as a switch board to different Working Group content.
Figure 33 – Working Group Page
1 Header & Statistics: The header shows the Working Group subject and description with some additional information on the Working Group’s.
2 Switch Notifications on/off: Click this link to receive daily information by email on changed content from within this working group. The email will contain changes to all of your Working Groups with active notification. So you will get one email a day – not an email for every Working Group.
3 Show Details: Click this link to see detailed information (e.g. member list) on the Working Group. As a “normal” member you can view the available information, a moderator can also edit the Working Group details. Additionally, if you are a moderator, you see the number of pending membership request. Click the number to get directly to the member list to evaluate the requests. See section “Functionality for Moderators” to learn more.
4 See list: Opens the Working Group detail page with the list of moderators and members. 5 Add Document: Click this link to upload a new document to the Working Group. See the next section
to learn more on Working Group Documents. 6 Replace Document: Click this link to replace a document in the Working Group. See the next section
to learn more on Working Group Documents. 7 Add Discussion: Click this link to start a new discussion. See section “Start a new Discussion” to
learn more.

ePRIME V4 Manual – March 2010
NATO/EAPC/PFP UNCLASSIFIED Releasable to MD, ICI, Afghanistan, Iraq, Pakistan, Australia, Japan, Korea, New Zealand
Page 45 of 85
Working Groups > Adding and Replacing Documents As shown in the previous screen, a click on “Add Document” allows any Working Group member to upload new documents to the Working Group through the screen below.
Click on “Replace Document” allows any Working Group member to replace a document in the Working Group, this action overwrites the existing document and puts the new document in its place.
Figure 34 – Add New Document
1 Document Title: Enter the title of the document in this field.
2 Browse: Click on Browse to select the file to be uploaded to ePRIME.
3 Add/Cancel: Clicking add saves the new document.
The new document is then shown in the document list of the Working Group:
Figure 35 – New Document Added
1 Hotspot: Move the mouse pointer over the to see a summary of the document details. 2 Reference: Clicking the reference opens the detailed document dialogue for adding new document
versions. The next screenshot shows how to add a new version of a document. 3 File-Icon: Click the icon to download the latest version of a document.
Working Groups > Adding Documents > Working with Document Versions
ePRIME Working Groups documents are versioned. This means, you can upload new versions of the same document (even with an identical (file-) name) while still having the old versions available to you.
Clicking the document reference opens the document detail dialogue
Figure 35a – Replace Document
1 Documents: Select the title of the document to be replaced in this field.
2 Browse: Click on Browse to select the file which will replace the document selected under (1)
3 Replace: Clicking replace will replace and save the new document.
1 Documents: Select the document which needs to be replaced.
2 Browse: Click on Browse to select the new file which will replace the selected document.
3 Replace: Clicking “Replace” will replace and save the new document.

ePRIME V4 Manual – March 2010
NATO/EAPC/PFP UNCLASSIFIED Releasable to MD, ICI, Afghanistan, Iraq, Pakistan, Australia, Japan, Korea, New Zealand
Page 46 of 85
Figure 36 – Add New Version
1 Document Title: All Working Group members can change the title any time.
2 Reference: The latest document version is always on top. The reference also shows the sequence of version.
3 Document Type: Click the blue text to change the document type.
4 Delete version: A Working Group member can delete the latest version if he/she has uploaded the file. Moderators can delete all document versions and also the document itself.
5 Add new version: Clicking this link will open a small dialogue for uploading a new version of this document.
6 Update/close: Clicking “Update” stores all changes.
Working Groups > Start a new Discussion Any Working Group member can start a new discussion by clicking on “Add Discussion”. This opens the screen below:
Figure 37 – Add New Discussion
1 Discussion Subject: Choose a short subject for the discussion. 2 Text: Write the text for the other members to respond on in this field. You can format your text with
the available tools (e.g. bold, italic, underline, etc.). 3 Add/Close: Click add to start the discussion
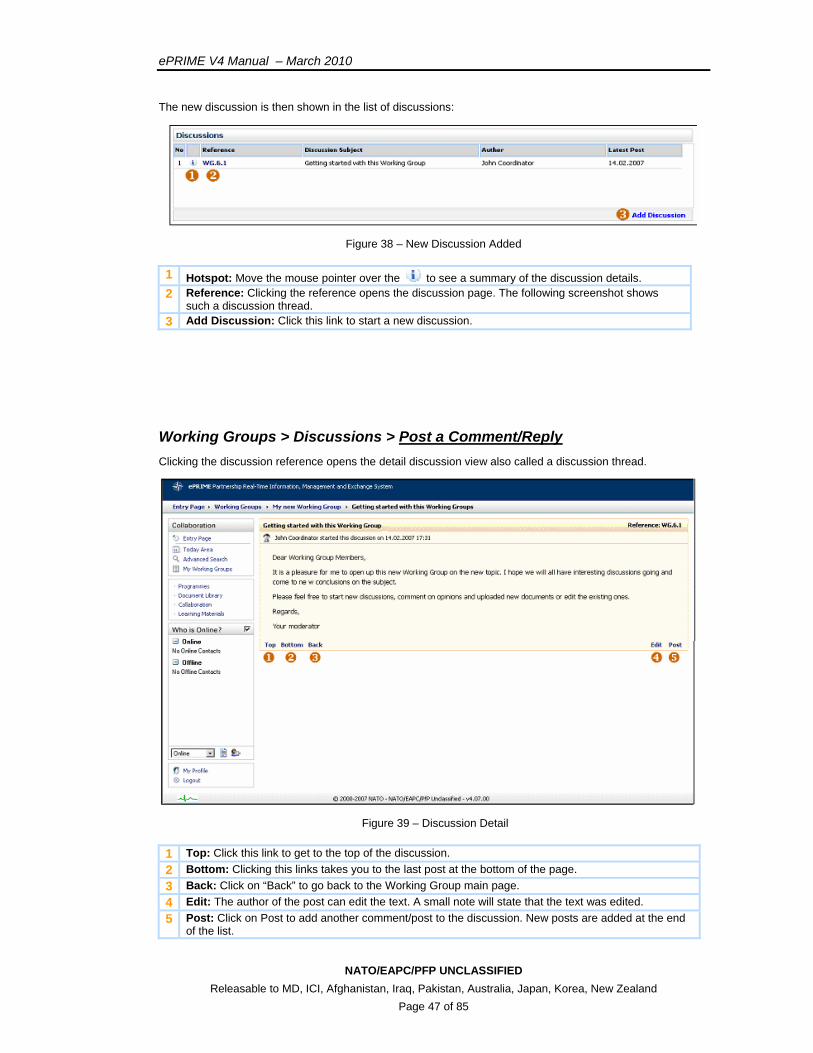
ePRIME V4 Manual – March 2010
NATO/EAPC/PFP UNCLASSIFIED Releasable to MD, ICI, Afghanistan, Iraq, Pakistan, Australia, Japan, Korea, New Zealand
Page 47 of 85
The new discussion is then shown in the list of discussions:
Figure 38 – New Discussion Added
1 Hotspot: Move the mouse pointer over the to see a summary of the discussion details. 2 Reference: Clicking the reference opens the discussion page. The following screenshot shows
such a discussion thread. 3 Add Discussion: Click this link to start a new discussion.
Working Groups > Discussions > Post a Comment/Reply Clicking the discussion reference opens the detail discussion view also called a discussion thread.
Figure 39 – Discussion Detail
1 Top: Click this link to get to the top of the discussion. 2 Bottom: Clicking this links takes you to the last post at the bottom of the page. 3 Back: Click on “Back” to go back to the Working Group main page. 4 Edit: The author of the post can edit the text. A small note will state that the text was edited. 5 Post: Click on Post to add another comment/post to the discussion. New posts are added at the end
of the list.

ePRIME V4 Manual – March 2010
NATO/EAPC/PFP UNCLASSIFIED Releasable to MD, ICI, Afghanistan, Iraq, Pakistan, Australia, Japan, Korea, New Zealand
Page 48 of 85
The screenshot below shows how a discussion thread looks after some people added their posts. All posts are shown in the order they were posted. New post will always be added to the end of the list, regardless of which “Post” link you click.
Figure 40 – Discussion Detail with Posts
Working Groups > Functionality for Moderators Working Group Moderators have some tools exclusively available to them. This section introduces these specific tools and workflows.
Working Groups > Functionality for Moderators > Managing Working Group Members
Within the Working Group Details Dialogue you can access the list of members. As many lists in ePRIME also this list has an “Action” button with functions to be applied to selected Working Group members.

ePRIME V4 Manual – March 2010
NATO/EAPC/PFP UNCLASSIFIED Releasable to MD, ICI, Afghanistan, Iraq, Pakistan, Australia, Japan, Korea, New Zealand
Page 49 of 85
Figure 41 – Member Management
1 Accept membership: Click to accept a user’s membership request. 2 Deny membership: Click to deny a user’s membership request. 3 Promote to moderator: The selected user will be promoted to moderator. 4 Remove from moderator list: Remove the selected moderators from the list of moderators. At least
one moderator has to be defined in a Working Group. 5 Remove member: The selected Working Group members are removed from the Working Group. 6 Check boxes: Check the boxes to select members the action will be applied to.
Working Groups > Functionality for Moderators > Deleting Content
As a Working Group moderator, you can delete content being not appropriate for the Working Group or violating the code of conduct.
Deleting content is possible for:
• Document versions
• Entire Documents
• Posts in Discussion
Please be careful when deleting an entire document or document versions as the delete action is irrevocable! Only Working Group Posts can be undeleted.
When you delete a Working Group post, the post will not simply vanish but its content is not shown anymore. Moderators can delete and undelete Post, but cannot edit Posts.

ePRIME V4 Manual – March 2010
NATO/EAPC/PFP UNCLASSIFIED Releasable to MD, ICI, Afghanistan, Iraq, Pakistan, Australia, Japan, Korea, New Zealand
Page 50 of 85
Figure 42 – Delete Discussion Post

ePRIME V4 Manual – March 2010
NATO/EAPC/PFP UNCLASSIFIED Releasable to MD, ICI, Afghanistan, Iraq, Pakistan, Australia, Japan, Korea, New Zealand
Page 51 of 85
Learning Materials In the Learning Materials repository you find ILIAS e-Learning courses as well as files and websites related to education and training. The so-called Learning Tools can be suggested by any ePRIME user having the needed editing rights (LM Editor). Once approved by NATO, learning tools are available to all ePRIME users and can be linked to events. Learning Materials are proposed and approved with a similar workflow as events in the Programmes area:
1. Any ePRIME user with Learning Materials “Edit” rights can propose a learning tool. A learning tool is automatically owner approved when added to the list and therefore only visible to ePRIME users belonging to the proposing body.
2. The coordinator or a user with Learning Materials “Approve” rights can approve learning tools. Coordinator approved learning tools are visible for all ePRIME users of the proposing body and NATO users.
3. Finally NATO approves the learning tool on the NATO level, thus making it visible to all ePRIME users.
Important remark: Only NATO approved learning tools can be referenced by events. The service is structured similar to the document library. The descriptions below thus focus on functionality different from the document library.
Figure 43 – Learning Materials
1 Today Area: Clicking on this link gives you access to the Learning Materials entry page (as shown above).
2 Working Area: The working area provides you the needed functionality to suggest new or approve existing learning tools.
3 Latest 10 Learning tools: This list shows the latest 10 new or updated learning tools. Click the reference to see more detailed information or click on the icon in the “Type” column to access the learning tool.

ePRIME V4 Manual – March 2010
NATO/EAPC/PFP UNCLASSIFIED Releasable to MD, ICI, Afghanistan, Iraq, Pakistan, Australia, Japan, Korea, New Zealand
Page 52 of 85
Learning Materials > Advanced Search and Search Result The advanced search looks similar to the document library advanced search, please see Document Library > Advanced Search and Search Result for a description of the different options. The search result shows the same information as the Latest 10 Learning Tools list.
Figure 44 – Learning Materials Advanced Search
1 Filter check box: Check the box to filter the list.
2 Filter: Selecting filter reduces the list to learning tools you have previously selected by checking the corresponding checkbox. This is an ideal tool to reduce large lists before printing.
3 Print Report: Select print report to print the list for later reference, e.g. when you create new events or discuss learning tools during a meeting.
4 Paging: Use the arrows to go to the next page of the search result or to select how many items are shown per page.
5 Refine search: Clicking refine search takes you back to the advanced search page. Your previously entered search terms are kept and you can adjust them.
Learning Materials > Add/Edit/Approve a Learning Tool Go to the Learning Materials Working Area to add new learning tools or to approve learning tools submitted by ePRIME users of your body.

ePRIME V4 Manual – March 2010
NATO/EAPC/PFP UNCLASSIFIED Releasable to MD, ICI, Afghanistan, Iraq, Pakistan, Australia, Japan, Korea, New Zealand
Page 53 of 85
Figure 45 – Learning Materials > Working Area
1 Search term: Enter a search term and click search to show only items of interest. All items are
shown if you do not enter a search term 2 Approval level: Select the approval level of learning tools to search for. 3 Reference: Click the reference to open the learning tools detail dialog. In the detail dialogue, you can
view and edit the learning tool’s data. You can approve a learning tool in the detail dialogue only. 4 Approval level: This icon symbolizes the current approval level of the learning tool. “O” stands for
owner approved, “C” for coordinator approved. NATO approved items do not show an icon in this list. 5 Action: Click this button to print the list. 6 Add Learning Tool: Click this button to propose a new learning tool.
Clicking on “Add Learning Tool” opens the following dialogue:
Figure 46 – Add or Edit a Learning Tool
1 View/Edit button: Click this button to switch between edit and view mode.
2 Approve/Unapprove: Clicking this button approves/unapproves the item to the next level (e.g. owner to coordinator).
3 Add, Delete, Update, and Close: Use these buttons to add, delete or update an item. Click close to close the dialog without saving any data.
4 Detail information tabs: The tabs contain the detailed information on the learning tool.
5 Advanced: Click advanced to print the learning tool detail information.
6 Tool Type: You can choose of three tool types: ILIAS course, uploaded file or a link to an external website.

ePRIME V4 Manual – March 2010
NATO/EAPC/PFP UNCLASSIFIED Releasable to MD, ICI, Afghanistan, Iraq, Pakistan, Australia, Japan, Korea, New Zealand
Page 54 of 85
Learning Materials > Add Learning Materials to Events Learning Materials can be added to events similarly to Document Library Documents. See the screenshot below on how to add a Learning Tool.
Figure 47 – Learning Materials > Add Learning Materials to Event
1 Learning Tab: Contains the list of referenced Learning Materials. 2 Add Reference: Click this link to add a Learning Tool to the list of Learning Materials.
Clicking “Add Reference” opens the dialogue below:
Figure 48 – Learning Materials > Search for Learning Tool
1 Search: Enter the search term in the field and click “Search” to find Learning Tools matching the term. Leave the field empty if you want to return all Learning Tools. Note: Only NATO approved Learning Materials can be referenced in Events.
2 Selection Box: Check the box of Learning Tools you want to reference. 3 Add: Click on Add to store the references in the Event.

ePRIME V4 Manual – March 2010
NATO/EAPC/PFP UNCLASSIFIED Releasable to MD, ICI, Afghanistan, Iraq, Pakistan, Australia, Japan, Korea, New Zealand
Page 55 of 85
The added Learning Materials are then visible in the Learning Reference List of the Event. The following screenshot shows the final result.
Figure 49 – Learning Materials > Reference Learning Materials
1 Hotspot: Move the mouse pointer over the to see a summary of the Learning Tool details. 2 Reference: Click the reference link to see the Learning Tool’s detail. 3 Type/Icon: Clicking the icon opens the Learning Tool - e.g. downloads a file, takes you to a website
or ILIAS. 4 Waste Basket: Click on the waste basket to remove a Learning Tool from the list. This will not delete
the Learning Tool itself, but only the link to this event.

ePRIME V4 Manual – March 2010
NATO/EAPC/PFP UNCLASSIFIED Releasable to MD, ICI, Afghanistan, Iraq, Pakistan, Australia, Japan, Korea, New Zealand
Page 56 of 85
Mail Area The main functionalities of the Mail Area are “Maintenance of contacts” and “Sending e-mails”.
Mail Area > Access to the Mail area Click on “Mail Area” in the navigation block at lefthand side on Entry Page. For further navigation there are three links: “Contacts”, “Compose mail” and “Outbox”.
Figure 50 – Mail Area > Navigation
Mail Area > Find a contact Fill in the criteria in the filter form:
Figure 51 – Mail Area > How to find contacts

ePRIME V4 Manual – March 2010
NATO/EAPC/PFP UNCLASSIFIED Releasable to MD, ICI, Afghanistan, Iraq, Pakistan, Australia, Japan, Korea, New Zealand
Page 57 of 85
1 Term: fill in the name or part of it
2 Search in: select, from the drop-down, whether the search must be performed in the contacts list or in the groups list
3 Show only imported contacts: specify whether only imported contacts will be shown
4 Results: click on the “Show” button to get the result list
5 Edit Contact: by clicking on the e-mail hyperlink, a new dialog opens, in which the user can update the contact's data
Mail Area > Create a new contact
Click on the “Action” button in the upper right corner, select “Add contact”, fill in the contact's dialog and click “Add”.
Mail Area > Create a group of contacts Click on the “Action” button in the upper right corner, select “Add group” and fill in the group's dialog:
• specify the name of the group • fill in a description • click the “Add” button.
Once the group is created the user can add contacts to it:
Figure 52 – Mail Area > Dialog Edit Group > Tab “Contacts”
1 Edit Group: Click 2nd tab “Contacts”
2 Add contacts: Click “Add contacts” and click “Search” under Search Contacts. Then select contact(s) in righthand column and click “Add”

ePRIME V4 Manual – March 2010
NATO/EAPC/PFP UNCLASSIFIED Releasable to MD, ICI, Afghanistan, Iraq, Pakistan, Australia, Japan, Korea, New Zealand
Page 58 of 85
Mail Area > How to import users from MS Outlook or MS Access Step 1. Export contacts from MS Outlook in CSV (comma-separated file) or MS Access database
Go to MS Outlook
• To export contacts from MS Outlook: Click on File > Import and Export > Export to a file > Comma Separated Values (Windows) > Contacts > Browse > Select name of file to be imported (e.g. Contacts) > Select Actions to be performed.
• To export contacts from MS Access: Click on> File > Import and Export > Import from another program or file > MS Access > Browse > Select name of file to be imported (e.g. Contacts) > Select Actions to be performed.
Step 2: Upload the exported file
Figure 53 – Mail Area > Upload Contacts file from MS Outlook or MS Acces
1 Import Contacts: Click “Actions” button and “Import Contacts”
2 Select file: Select the file exported from MS Outlook and click “Open”
3 Get the list of contacts: Click on “Parse”

ePRIME V4 Manual – March 2010
NATO/EAPC/PFP UNCLASSIFIED Releasable to MD, ICI, Afghanistan, Iraq, Pakistan, Australia, Japan, Korea, New Zealand
Page 59 of 85
Step 3: Pick contacts to be imported from the list
The content of the imported file is shown before the actual import and the user decides which contacts will be imported. Existing and invalid contacts are disabled and can not be imported. The user selects the contacts (clicks the check boxes) and clicks on “Import” button in the upper right corner.
Figure 54 – Mail Area > Selecting the users that will be imported
1 Select names: Click check boxes at right hand side
2 Import names: Click “Import”
Mail Area > Sending e-mails
Sending e-mails comprises 3 main components: composing emails, attaching local files and attaching ePrime entities (e.g. event, document, e-learning course).
In the “Compose” dialog, select one or more contacts as recipients and add personal or ePRIME resources as attachments. To open the dialog below click on the “Compose mail” link in the navigation block at lefthand side.
Figure 9: Dialog “Compose mail”. Tab General.
Figure 55 – Mail Area > Dialog “Compose”, tab “General”

ePRIME V4 Manual – March 2010
NATO/EAPC/PFP UNCLASSIFIED Releasable to MD, ICI, Afghanistan, Iraq, Pakistan, Australia, Japan, Korea, New Zealand
Page 60 of 85
1 ePRIME contacts and groups: is used for sending e-mails to ePRIME or already imported users. The “To” button opens a dialog, where the mail recipients can be selected: these can be one or more individual contacts and/or one or more groups.
2 External contacts: is used to send e-mails to users outside ePRIME. Type the e-mail address of the recipient.
The “Attachments” tab allows adding personal and ePrime resources to the email (as attachments). Each attachment can be removed from the mail.
Figure 56 – Mail Area > Dialog “Compose”, tab “Attachments”
1 External Attachments: In the “External Attachments” frame, personal files (not included in the file system) can be attached. Click on the “Browse” button and choose files from local resource, then click on “Add” button.
2 ePRIME Attachments: ePrime objects (documents, events, e-learning materials) can be attached to the mail by clicking “Attach ePrime objects”.
3 Search for ePRIME Attachments: A search dialog will open, search criteria must be filled in and on the results list ePRIME objects can be selected.
4 Add to list: After clicking on the “Add” button the selected items are added to the list of attached files
After completing the tabs “General” and “Attachments” the e-mail can be sent by simply clicking on the “Send” button.

ePRIME V4 Manual – March 2010
NATO/EAPC/PFP UNCLASSIFIED Releasable to MD, ICI, Afghanistan, Iraq, Pakistan, Australia, Japan, Korea, New Zealand
Page 61 of 85
The additional “Options” tab provides more advanced features, giving two extra possibilities:
Figure 57 – Mail Area > Dialog “Compose”, tab “Options”
1 Mini website format: For advanced users there is an option to send the e-mail, archived, in a web format. The recipient will open a web page, called index.html, with the attached files shown in groups – events, documents, learning materials and external items. By clicking on the name, the user can view the content of the file.
2 Zip format: For users sending numerous items there is an option called “Zip format”, which compresses the files and reduces the size of the e-mail..

ePRIME V4 Manual – March 2010
NATO/EAPC/PFP UNCLASSIFIED Releasable to MD, ICI, Afghanistan, Iraq, Pakistan, Australia, Japan, Korea, New Zealand
Page 62 of 85
My Profile Click on “My Profile” to access your personal information stored in ePRIME. You find the link in the lower left hand corner of any ePRIME screen. Your profile is shown in a detail dialogue with several tabs. This chapter covers the first two tabs: the general and personal tabs. The general tab is used to set the default programme and change the password. You can also review your account details.
Figure 58 – My Profile > General
1 Update button: Click this button to update your profile with the data you have changed.
2 Close: Click close to leave this dialogue without changing any information.
3 Default Programme: Choose your default programme from this list. This selection influences the search and list of the programme service.
4 Password: To change your password, type the new password twice in the corresponding fields. Click update to save the new password.
5 Auto generate Password: Check this box to have ePRIME generate a secure password for you.
Password complexity rule: Your password needs to consist of at least nine characters and include small and capital characters as well as numbers. Important remark: Due to NATO security policies passwords can only be changed once every 24 hours. The user profile mentioned here is not to be confused with the user selection profile used in the programme management area (bottom right menu).
The personal tab contains your contact information. Please keep this information up-to-date - especially the email address, as ePRIME automatically sends notification emails to this address. Fields preceded by an asterisk are mandatory and must be filled in.
1 My User Manager: Here you see the name and address information of your user manager. Please contact this person if you need any additional information in regard of your ePRIME account or if you have general ePRIME questions.
2 Personal Information: Please keep this information up-to-date.
Figure 59 – My Profile > Personal
ePRIME V4 Manual – March 2010
NATO/EAPC/PFP UNCLASSIFIED Releasable to MD, ICI, Afghanistan, Iraq, Pakistan, Australia, Japan, Korea, New Zealand
Page 63 of 85
System Tools The System Tools Service provides a number of tools and information:
System Tools > Release Notes Under Release Notes the differences between ePRIME versions are shown.
System Tools > Downloads In downloads a number of important files are provided. Especially the ePRIME Manual is worth reading.
System Tools > Feedback & Bug Report It is very helpful for the developers of ePRIME to be immediately informed if you as a user come across a bug in ePRIME (unjustified error message, a function that does not work correctly etc.).
Please report a bug in the ENTRY PAGE > System Tools > Feedback & Bug Report. Here, you can create a “Bug Report” or provide feedback.
The Bug Report dialog offers a number of selectable options to report a bug. This makes reporting a bug an easy task which can be done in no time. The area and section the error occurred in can be chosen from a pull down menu, as can the form of error (Java Script Error, Server Error, etc.) and the operating system and Internet browser version used. It is also useful if the user writes or pastes the error message he encountered into the window in the Error Message tab.
The bug report will be transferred to the ePRIME technical team and will be dealt with expeditiously.
System Tools > User Management ePRIME has the possibility to delegate management of user accounts. This right can be delegated to so-called user managers. They can manage all aspects of user accounts including the creation of new accounts. However this right is limited to the corresponding body (e.g. a user manager can only create accounts for his own body/nation). Please contact NATO’s ePRIME Database Manager, if you wish to manage the user accounts of your organization. Typically, there is one user manager per body (in most cases the Coordinator).
System Tools > User Management > Managing/Creating User Accounts
If you are a designated user manager, please follow the steps below to create a new user account:
1. Go to Entry Page › System Tools › User Management. 2. Click on “Add User” in the top right corner of the screen. 3. Fill in the required information including a password for the first login. 4. Clicking the “Add” button results in:
a) The user account is created in ePRIME. b) A welcome email is sent to the new user. A copy for later reference is sent to you and the
NATO ePRIME administrator. 5. You can then print the welcome letter containing the password of the account. The password is only
visible in the letter right after creating the account or changing the password. The new user then has to do the following:

ePRIME V4 Manual – March 2010
NATO/EAPC/PFP UNCLASSIFIED Releasable to MD, ICI, Afghanistan, Iraq, Pakistan, Australia, Japan, Korea, New Zealand
Page 64 of 85
1. Once the user has received his/her password, he/she accesses ePRIME at https://prime.hq.nato.int. 2. He/She logs on with the login name and the password he/she got from his/her user manager. 3. The system now asks to provide a new password. This ensures that only he/she knows the current
password. 4. He/She is now logged-on to ePRIME.
The screenshot below shows you the User Management page.
Figure 60 – User Management
1 Add User: Click this button to create a new user account.
2 Search filters: Adjust the search term and additional criteria to limit the list to your needs.
3 Login Name: Click the user’s login name to open a detail dialogue. Here you can edit the user’s contact information and his rights as well as see his access and change history.
4 User Rights: The boxes symbolize the rights assigned to the user. Move the mouse pointer over the to get a legend of the different access rights.
5 Action Button: Clicking this button gives you the options to print the list of users, to export the list into an Microsoft Excel file, to send an Email to all users visible in the list and to filter the list based on the selected check boxes. Note: If you wish to send an email only to specific users and not to all, first select their checkboxes and the click on Action Filter to filter the list. “Send Mails” then works with the filtered list only.

ePRIME V4 Manual – March 2010
NATO/EAPC/PFP UNCLASSIFIED Releasable to MD, ICI, Afghanistan, Iraq, Pakistan, Australia, Japan, Korea, New Zealand
Page 65 of 85
The next illustration shows the add user dialog. First, you have to specify the account information:
Figure 61 – Account information
1 Username: Enter a username. The
prefix “prime” and your body’s short name (e.g. SWI) are added automatically. Normally the user name consists of the family name and optional initials if necessary to make the user name unique.
2 Description: If you wish, add a description for this account.
3 Default Programme: Choose a default programme from this list. This selection defines the active programme after login into ePRIME. The user can switch to another programme at any time.
4 Password: Enter the password twice in the corresponding fields.
5 Auto generate password: Check this box to have ePRIME generate a secure password for you.
6 User must…: This box is always checked and prompts the user to change his password during first login.
7 Send welcome email: Check this box to send a welcome email to the user. The user is informed about the new account and his user-id and that he must contact his user manager to receive his password.
Important remark: For security reasons do not send passwords by email. Instead give the password by telephone or regular mail.
In the second tab, you must add the user’s contact information. The third tab “User Rights” allows you to define what the user can do. Important remark: You can only grant access rights lower than what you possess yourself: e.g. if you have EAPWP “Approval” rights, you can give up to edit rights to other users. Only NATO can grant approval rights. If you do not check any box, the user has read-only access to ePRIME (beside his personal information). Read-only access does permit the user to open, upload documents and post messages in the Working Group section.

ePRIME V4 Manual – March 2010
NATO/EAPC/PFP UNCLASSIFIED Releasable to MD, ICI, Afghanistan, Iraq, Pakistan, Australia, Japan, Korea, New Zealand
Page 66 of 85
Figure 62 – User Rights
1 Programme right: Click the checkbox to grant the user the edit (add and edit event data) and/or approve (approve events to coordinator level) right. The available boxes reflect the programmes your body/nation is in.
2 Clearinghouse: Defines if a user can edit and/or approve Clearinghouse content.
3 DocLib admin: This right is given only to NATO personnel administering ePRIME document library.
4 Learning Materials: Defines if a user can edit and/or approve Learning Materials.
5 User Manager: User Manager rights can only be granted by NATO
6 Maintenance account: Such accounts are used by and reserved to NATO’s technical staff maintaining the ePRIME system.
7 Heart beat: The heart beat functionality keeps the (modem) connection alive with regular “pings” to the server. This right can only be granted by NATO.
8 Data import: Defines if the user can import data directly into ePRIME. This right can only be granted by NATO.
9 Advanced Button: Click the advanced button to see a short help.
Please contact ePRIME Database Manager if you would like to have made available to you any of the extended management or special access rights.
The last tab lets you define when the user’s account will expire:
1 Expires: Select never, if the account will be valid indefinitely or specify a date when this account will expire.
2 Message: You can enter an additional message to be displayed when the account expires. This message will be shown to the user 90 days in advance of the actual expiration date. This gives the user time to contact you.
3 Advanced Button: Click the advanced button to see a short help.
4 Add Button: Click the add button to create the new user account.
5 Close: Click the close button to leave the dialogue without creating a new user account.
Figure 63 – Expiration of User Account

ePRIME V4 Manual – March 2010
NATO/EAPC/PFP UNCLASSIFIED Releasable to MD, ICI, Afghanistan, Iraq, Pakistan, Australia, Japan, Korea, New Zealand
Page 67 of 85
After creating a new user account you can print a welcome letter. The password will only be shown in the welcome letter right after you have created the account or changed the password. If you edit the account information afterwards the welcome letter will not display the password, because ePRIME does no longer know the user password once stored.
1 Click here to print…: This prints the welcome letter.
Figure 64 – Print Welcome Letter
System Tools > User Management > Delete/Expire User If you wish to remove a user from the user list, you can set the expiration date to the current date. This immediately prevents the user from using the account while keeping the data of the user available. You can also delete accounts which have no related data in ePRIME. Typically, this only works for users that have never logged-on to ePRIME or have not logged-on for a rather long time.
System Tools > User Management > Impact of NATO IT Security Policies The NATO servers running ePRIME have a set of security policies that influence the behaviour in regards to passwords:
• A password must be of at least 9 characters, contain capital and small letters as well as numbers. You can have ePRIME create a password that complies with the rules.
• A password can be changed only once within 24 hours. This also applies when you create a new account. Thus a user has to wait 24h before he can log on the first time and every time you change/reset a password.
• If a user changes the password, the new password has to be different to the last 5 passwords.

ePRIME V4 Manual – March 2010
NATO/EAPC/PFP UNCLASSIFIED Releasable to MD, ICI, Afghanistan, Iraq, Pakistan, Australia, Japan, Korea, New Zealand
Page 68 of 85
Editorial Content The Editorial Content Platform contains information on ‘Countries’ and ‘NATO and Partnerships’ and can be accessed from the Entry Page. Each partner nation will assign a person who is responsible for creating and maintaining their country profile. On request, database administrator will allow specific rights to this user who will then be able to manage information, add recent news, important documents and useful links.
Editorial Content Management > How to get access 1) click System Tools, located in left-hand navigation bar on Entry page 2) click Manage Editorial Content
Editorial Content Management > Home Page The home page of the Editorial Content management interface is organized in four sections
Figure 65 - Home Page Editorial Content Management Interface
1 Editorial Content management interface navigation. The user can select from three actions: o ‘Home’ – Shows the entry page of the Editorial Content Management Interface o ‘Search’ – Opens a search form, used to search for content items o ‘Add New’ – The user adds new items (documents, news, links, etc.)
2 Content Items Overview table – the table displays information about already created items in the Editorial Content area. A user can only see content that is created for his ‘body’ – e.g. if the user is logged in with ‘swi.username’, only content associated with the ‘swi’ body is displayed. The columns of the table represent approval levels, the rows account for content types. Each table cell shows how many items of a particular type are at the corresponding approval level. By clicking on a number the user gets a list of those items.
3 Monitoring area - four tabs help organize the information about all content items visible to the user. o The ‘Monitor’ tab contains information for recently created, updated or modified items. The

ePRIME V4 Manual – March 2010
NATO/EAPC/PFP UNCLASSIFIED Releasable to MD, ICI, Afghanistan, Iraq, Pakistan, Australia, Japan, Korea, New Zealand
Page 69 of 85
items are sorted in chronological order. The table is divided into three columns: ‘’Item’, ‘User & Date’ and ‘Action’. The ‘Item’ column enlists content items that have been changed recently. The ‘User & Date’ column shows who has managed the content item and when it was modified. The ‘Action’ column shows the executed actions.
o The ‘Monitor Today’ and ‘Monitor Yesterday’ tabs filter information from the ‘Monitor’ tab to only display information about today and yesterday’s actions.
o The ‘Statistics’ tab provides information on the amount of items currently in the system.
4 The table consists of content items with a pending approval. The newly added items can be found there as well as in the ‘Monitor’ tab at the top of the list.
Editorial Content Management > Edit Content Item A content item can be e.g. a country profile, country story, document, institution, etc. Each content item has a type (object type) that defines the properties and relations of the item. For example, the Country Profile has a title, a description, an image, as well as relations to documents, country stories, etc.
To edit a Content Item: 1) Click on a number in the ‘Content Items Overview’ (see Fig. 65). 2) In the list of Content Items, click on the item to be edited. 3) Detailed Dialogue for this item will be opened.
Fig 66 - Detailed Dialogue
In the ePRIME system all detailed dialogues are organized in several tabs which make the information easily manageable. The approval icons as well as the “Apply” and “Close” buttons are placed at the top of each

ePRIME V4 Manual – March 2010
NATO/EAPC/PFP UNCLASSIFIED Releasable to MD, ICI, Afghanistan, Iraq, Pakistan, Australia, Japan, Korea, New Zealand
Page 70 of 85
dialogue. The “Preview” tab is common for all created items. It shows how the item will be displayed in the ePRIME system. The actions induced by each icon used in the Editorial Content are enlisted below.
Editorial Content Management > Icons in all detailed dialogue screens
Icon Description
Opens a browsing dialogue, so that the user can locate, upload and relate a file
Removes the relation between the current item and the related one
Opens a “Search” form, used to locate an item among existing Editorial Content items
Opens a dialogue where the enlisted items can be reordered
Opens an “Edit” dialogue
Approves, Unapproves or Rejects the content object
Shows the specific dialogue structure
Displays the specific actions that can be taken for the page
Figure 67 - Icons in detailed dialogue screens
Editorial Content Management > Revisions The revision is a snapshot of a content item. The user can make a revision to track the changes in the content item and/or to revert it to one of its previous states. The revision is performed from the ‘Actions’ menu placed in the top right corner of the detailed dialogue. When a revision is made for the first time a new dialogue tab called ‘Revisions’ appears. The user can compare two different revisions (select 2 revisions at right-hand side and click ‘Compare Selected’), compare the current version of an item with a revision, delete revisions or replace the current item version with a revision. The comparison dialogue outlines the differences between versions by showing which fields have been changed and what is the exact difference in each field.
Figure 68: Standard dialogue > Actions > Revisions

ePRIME V4 Manual – March 2010
NATO/EAPC/PFP UNCLASSIFIED Releasable to MD, ICI, Afghanistan, Iraq, Pakistan, Australia, Japan, Korea, New Zealand
Page 71 of 85
Editorial Content Management > Copy and Duplicate
o Actions > ‘Copy’ creates a new content item with the same properties and relations as the original. This functionality is most commonly used when a user has to create one or more items with similar content. The copied item is not related to the original item. There is no restriction on the number of copies that a user can make. All copies can be published online along with the original item.
o Actions > ‘Duplicate’ creates a new content item with the same properties and relations as the
original. The duplicate is strongly related to the original item. Only one duplicate of a content item can be made (the duplicate cannot be duplicated). The duplicate and the original cannot be both NATO approved (online) at the same time. If the original item is online and a NATO user tries to publish online its duplicate, the original item will be automatically disapproved and the duplicate will go online. The same workflow is valid if the duplicate is online and the user tries to approve the original item to an online state. The original and duplicate items can be compared from the ‘Revisions’ tab.
Fig 69 - Standard dialogue > Actions > ‘Copy’ and ‘Duplicate’
Important remark : Information about the duplicates and revisions of a content item is available in the ‘Revisions’ tab of the content item detailed dialogue (see Fig. 68).
Editorial Content Management > Delete content item Only content items that are not published online (items not approved by NATO) can be deleted. When an item is deleted it remains in the system trash and can be restored at a later stage. Content items pass through two delete operations before disappearing from the system. The first delete operation places items in the system trash. Deleted content items can be reviewed in the ‘Edit area’ by choosing the ‘deleted objects’ option of the ‘Show Only’ dropdown in the search form. Once deleted, a content item can be restored or completely erased. The second delete operation (Final Delete) removes the content item from the system.

ePRIME V4 Manual – March 2010
NATO/EAPC/PFP UNCLASSIFIED Releasable to MD, ICI, Afghanistan, Iraq, Pakistan, Australia, Japan, Korea, New Zealand
Page 72 of 85
o Deleting a content item (placing it in the System Trash) - Open the ‘content item’ detailed dialog - From the ‘Actions’ menu select the ‘Delete’ operation
o Completely remove an item from the system - Select the ‘deleted objects’ option in the ‘Show Only’ dropdown of the search form in the ‘Edit area - Use the search form to find the content item to be removed - Open the ‘content item’ dialog box by clicking on its title - Click on the ‘Final Delete’ button, located on the right side of the detailed dialog buttons bar - Confirm or cancel the final delete operation.
- The dialogues of the items in the system trash have two additional buttons: ‘Restore’ and ‘Final delete’
The following chapter thoroughly describes the most common operations each authorized user can perform in the Editorial Content area.
Editorial Content Management > How to add a new Country Profile
Figure 70 - Add new content type dialogue
1 Editorial Content management interface > Click ”Add New” A dialogue opens with a dropdown menu called “Content Type”.
2 From the dropdown menu an item must be selected (see hereunder for details on items 1 to 7)
3 Click the “Apply” button, this will open a detailed dialogue screen
1. Country profile: There are 6 tabs in which information about the country can be filled in: 1.1 ‘General’ – Fill in the country-name, add an Image (usually the country flag), a short text about the
country and a long description. 1.2 ‘Stories’ –News related to the country and its partnership can be added here. There is a choice between
creating a new “Country story” item and selecting already existing “Country story” items. There is also the possibility to reorder associated story items (this will affect the order in which they will appear on the Country Profile page in ePRIME).
1.3 ‘Institutions’ – New institutions for the country can be created or a selection can be made from a list of already existing institutions.
1.4 ‘Publications’ – Documents related to the country can be added or viewed.

ePRIME V4 Manual – March 2010
NATO/EAPC/PFP UNCLASSIFIED Releasable to MD, ICI, Afghanistan, Iraq, Pakistan, Australia, Japan, Korea, New Zealand
Page 73 of 85
1.5 ‘Points of Contact’ – A new POC for the country can be added or an existing POC can be selected. 1.6 ‘Contributions and Activities’ – New contributions and activities can be added or existing ones can be
selected.
2. Document Fill in Title, Author, Publication date and Description fields. From the icon a file located on your computer must be selected. Click the “Upload” button so that the file is added to the ePRIME database. Select your country profile from the dropdown menu and then click on the “Add” button to save the object. The document will be listed in the Country profile page after national coordinator approval and NATO approval. 3. Institution Fill in the name of the Institution (Title), add the Institution logo or other image (Image) and write a description. Then select the country profile from the drop down menu. Finally click on the “Add” button to save the new item in the database. The institution will be displayed in the Country profile page after national coordinator approval and NATO approval. 4. Country Story Fill in the title, add an image and insert short and/or long text into the description fields. Then select the country profile from the dropdown menu. Finally click on the “Add” button to insert the item in the ePRIME database. After national coordinator approval and NATO appproval the country story will be displayed in the Country profile page. 5. National POC Fill in the personal data of the POC, select a country profile from the dropdown menu and click on “Add” button. After approval by the national coordinator and NATO, the national Point of Contact details become visible in the Country profile page. 6. Contributions and Activities: There are two tabs for this dialogue: 6.1 “General” – Fill in the title, description and select a country profile from the dropdown menu. The
information about the “Contributions and Activities” item can be expanded by attaching additional pages to it. The additional pages will be listed in the “Contributions and Activities” detailed page in the ePRIME system.
6.2 “Documents” – The user attaches useful documents; 7. Additional Page Fill in title and description for the page. Finally click on the “Add” button to save the new item. Additional pages can be assigned to “Contributions and Activities”. (see point 6: “ Contributions and Activities”). After national coordinator approval and NATO approval the additional page is listed in the corresponding Contributions and Activities page. IMPORTANT REMARK New content items (news, documents, links, etc.) can be created from the “Add New” button. A content item has to wait for NATO approval before it becomes available online on the country profile page. There are two options to modify the country profile page once it is NATO approved and online:
1. Make a duplicate of the page. The original page will remain online while changes are being applied in the duplicate. As soon as the changes are ready, the user should contact his NATO Point of Contact and request to replace the original page with the duplicate.
2. Contact the NATO Point of Contact with the request to disapprove the country profile. After NATO disapproval, changes can be applied. Be aware, however, that using the second method will take the country profile offline and it will not be visible on the entry page until later approval.

ePRIME V4 Manual – March 2010
NATO/EAPC/PFP UNCLASSIFIED Releasable to MD, ICI, Afghanistan, Iraq, Pakistan, Australia, Japan, Korea, New Zealand
Page 74 of 85
Editorial Content Management > Search Area
Figure 71: Search
1 Editorial Content management interface > Click ”Search”
2 The Search can be narrowed by specifying a Term, Content Type and/or Domain. Search is applied among online (NATO approved) items from other domains and all items from the own domain. A domain in the context of Manage Editorial Content area usually accounts for a country, body/member in the ePRIME system.
3 Click the “Search” button to show the results

ePRIME V4 Manual – March 2010
NATO/EAPC/PFP UNCLASSIFIED Releasable to MD, ICI, Afghanistan, Iraq, Pakistan, Australia, Japan, Korea, New Zealand
Page 75 of 85
Typical Tasks The following section lists typical tasks that ePRIME users perform in an easy to follow, step-by-step description. You can refer to this manual for assistance when working with ePRIME.
The relevance of the information given in this section is dependant on your ePRIME access right (refer to Background on ePRIME > Access Rights and Roles for details).
Typical Tasks > Viewing/Printing Data
For all users
Note: To print a listing, click the ‘Action’ button and select ‘Print Report’ (this is valid for all areas in ePRIME where a listing can be displayed)
Task ePRIME Area Actions
View/print a WP (Work Programme) report
Reports > WP
NATO approved data only
Select cycle year, AOC and/or Proposing Body.
Click on "Show". View/print an IPP/ICP (Participation Programme) report
Reports > IPP/ICP > Participation
NATO approved data only
Select Participating Body and cycle year. Select AOC. Click on "Show".
View/print IPP/ICP Text
Reports > IPP/ICP > Text
NATO approved data only
Select Participating Body and cycle year. Click on "Show". Select IPP/ICP > Text.
View/print draft WP report
WORKING AREA > WP > List
Data of your own body/nation only
Select criteria Click on "Show".
View/print draft IPP/ICP report
WORKING AREA > IPP/ICP > Participation > List
Data of your own body/nation only
Make filter selection. Click on “Show”.
View/print draft IPP/ICP Text
WORKING AREA > IPP/ICP > IPP/ICP Text > List
Data of your own body/nation only
Select correct cycle year and Approval level.
Click on "Show". Click on IPP/ICP Text and select it in the
overview tab to download Select it in the list view and use the Action
button to print it. View/print a list of POCs
WORKING AREA > POC > List
By default, the POCs of your own body/country are shown in the first list
If needed, select another Proposing Body and click on “Show”.
Use the Print option of your browser to print.
Search and display events
Retrieve list of events in the REPORTS, CALENDAR, SEARCH PROGRAMME or WORKING AREA.
Use the search filters in the respective area to display event(s)
Click on event entry to call up the event detail dialog.

ePRIME V4 Manual – March 2010
NATO/EAPC/PFP UNCLASSIFIED Releasable to MD, ICI, Afghanistan, Iraq, Pakistan, Australia, Japan, Korea, New Zealand
Page 76 of 85
Search and view documents
Document Library Area Use the search filters to retrieve documents Click on a document entry to access it You can make a selection in the list view to
filter or print.
Typical Tasks > Editing Data
For users with editing rights
Task ePRIME Area Actions
Add new event to WP Select native programme
WORKING AREA> WP > Add Event
Select “WP” select “Add Event” from the top (right).menu.
Choose parent activity or click “Add” button to enter new activity.
Enter event information in the dialog and click on “Add”.
If necessary, open event for other programme(s) (activity must be open for other programme before event can be opened)
Add new event to WP with the add event wizard
Select native programme
WORKING AREA > WP > Add Event
Follow steps as prompted by Wizard.
Add new activity Select native programme
WORKING AREA > WP > Add Activity
Enter activity information in dialog and click on “Add”.
Add event feedback WORKING AREA > WP > List
Select year or enter ID reference. Click on “Show”. Find event in list and click on it to open. Click feedback tab in event dialog. Click “Add feedback” link. Enter feedback and click “Add”.
Edit activity
Once an Activity is NATO approved, it cannot be changed anymore. (Ask Database Manager to change if necessary)
WORKING AREA > WP > List
Make selections or enter ID reference. Click on “Show”. Find the activity in the list and open it. Edit the activity and click on “Update”.
Edit existing event WORKING AREA > WP > List
Select cycle year or enter event ID reference.
Click on "Show". Find the event in the list and click on it to
open. Edit event and click on “Update”.

ePRIME V4 Manual – March 2010
NATO/EAPC/PFP UNCLASSIFIED Releasable to MD, ICI, Afghanistan, Iraq, Pakistan, Australia, Japan, Korea, New Zealand
Page 77 of 85
Open existing event for another programme (create a shared event)
Select native programme
WORKING AREA > WP> List
Make selections or enter the ID reference. Click on “Show”. Find activity in list and open it in Edit mode. Open detailed event screen and click on
the button of the programme with which the event must be shared (e.g. MDWP, or ICI Menu). (If an activity is not opened for other programmes, new events added to this activity can also not be shared with other programmes)
Not all events pertaining to an activity need to be opened for the same programmes.
The programme sharing needs to be approved separately by NATO
For information on the approval status of shared activities and/or events, open the approval window by clicking on the button “This event is opened for other programs. Click here for details” in the detailed activity or event screen.
Add participation feedback
WORKING AREA > IPP/ICP > Participation > List
Select year or enter ID reference. Click on “Show”. Find participation in list and open it. Click feedback tab in participation dialog. Click on “Add feedback” link. Enter feedback and click on “Add”.
Enter an IPP/ICP Text WORKING AREA > IPP/ICP > IPP/ICP Text
Select "Download Template" and save the file locally.
Prepare and save the Text with your Word processor.
Select "Add new Text" to upload the file into ePRIME.
Develop table of participations for your body/nation
SEARCH PROGRAMME, or CALENDAR, or REPORTS area
Find interesting events and open them. Click Participation tab Activate the "New Participation"
command. Enter participation information and click on
“Add”. Alternatively (recommended): Add the interesting events to a user
selection. Add participation information via the
WORKING AREA > IPP/ICP > Participation > Current Selection.
Edit a Clearinghouse document
Clearinghouse Enter search criteria. Find document in list and open it. Edit document and click on “Update”.
Add/update event-supporting document
Event dialog Open “Documents” tab. To add: click on “Assign/Upload
document”. To edit: find document in list and open it for
editing. Add a POC WORKING AREA > POC >
Add new POC Enter POC information and click on "Add".
Alternatively, POC details can be added in any event or participation detail view.
Edit a POC WORKING AREA > POC > List
By default the POCs of your own country are shown in the first list. Find the POC in question and open it. Edit the POC and click on “Update”.

ePRIME V4 Manual – March 2010
NATO/EAPC/PFP UNCLASSIFIED Releasable to MD, ICI, Afghanistan, Iraq, Pakistan, Australia, Japan, Korea, New Zealand
Page 78 of 85
Important note on programme sharing: If an event is already in ePRIME for a certain programme, e.g. EAPWP and is offered to other programme(s) as well, do not enter it again, but go to the native programme (in this case EAPWP) and open it for one or more of the other programmes as follows:
(1) select native programme
(2) put cross in detailed activity screen (if not done yet)
(3) put cross in detailed event screen
Typical Tasks > Approving Data
For users with approval rights
Task ePRIME Area Actions
Approve individual content object
Object detail dialog Open the detail dialog and click on the “Approve” button.
Approve lists
(WP contributions, participations)
WORKING AREA > WP or IPP/ICP > Participation > List
Select cycle year and approval level. Click on "Show". Select the “Approval view” tab Select all objects you want to approve and
click on the “Approve“ button.
Approve the executive IPP/ICP of your nation
WORKING AREA > IPP/ICP > IPP/ICP Text > List
Select cycle year. Click on "Show". Select Text to approve (selection box is to
the left of each record). Click on "Approve".
Typical Tasks > Advanced Features
For users with editing rights
Task ePRIME Area Actions
Add profile and user selection
User selections > New profile(Bottom menu of each main area)
Enter your e-mail address and password. Click on “Create”. Open “Selections” tab. Click on “Add selection”. Enter selection details and choose content
type for the selection (Activity / Event / Participation / Document).
Click on “Create”. Selection is now activated (in menu on
bottom of each main area). Select content and add to user selection
List or object dialog Load or create a user selection (“User Selections” menu)
Create report and select “Add to user selection” in the “Action” menu;
or: Open detail dialog and select “Add to selection” in the “Advanced” menu.
Cooperation programme selection
“Programme” link (in each area > menu at bottom, left)
Switching between the NATO cooperation programmes featured in ePRIME

ePRIME V4 Manual – March 2010
NATO/EAPC/PFP UNCLASSIFIED Releasable to MD, ICI, Afghanistan, Iraq, Pakistan, Australia, Japan, Korea, New Zealand
Page 79 of 85
Colours and Symbols The following list is an overview of all symbols (icons) and colour codes used in ePRIME:
Icon Image Icon Meaning Used In Detailed Explanation
ePRIME uses standard symbols and a colour code to provide certain information intuitively and to ease navigation.
Common icons used across the application
Action button to execute the following commands: print, export to Excel, filter, adding items to a personal user selection.
REPORTS area, DOCUMENTS Area, CALENDAR area, SEARCH PROGRAMME area, WORKING AREA
This button can be used to print a report , export a list to Excel, filter records from a list (= selecting a number of items) or to add selected items to your personal user selection.
Print command button SEARCH PROGRAMME area
Use this function to print a list of NTL/Objectives and AOCs (all items listed in the classification tree)
Indicates cancellation status of an entity (event, participation,...)
Dialogs This icon indicates that an event has been cancelled. In addition, the event reference will be crossed out.
Hot spot, hint, when pointed user gets more information on the listed item
WORKING AREA Lists, Reports, dialogs
Moving the curser on this hotspot will display the most important information on an item in a pop-up window
Date picker icon CALENDAR area, edit event dialog
Use this icon to display a small calendar to define a specific period
Activity hotspot icon WORKING AREA lists, CALENDAR area lists
Moving the cursor on the icon reveals details about an activity or an event
Category hotspot icon, REPORTS area lists Moving the cursor on this icon reveals the categories (NTL etc.) assigned to an event
Event info icon REPORTS area -> participation lists;
WORKING AREA lists
Moving the cursor on this icon reveals details about an event in lists of events
Bold blue records The user is authorized to edit this record.
Light blue records These records refer to events in the future.
Gray records Gray records refer to events in the past.
Participation ID (3) Red colour in participation IDs means that the participating organization has applied for funding. The number in brackets indicates the number of participants.
Participation ID (1) Black colour in participation IDs means that the Participating Body has not applied for funding. The number in brackets indicates the number of participants announced.

ePRIME V4 Manual – March 2010
NATO/EAPC/PFP UNCLASSIFIED Releasable to MD, ICI, Afghanistan, Iraq, Pakistan, Australia, Japan, Korea, New Zealand
Page 80 of 85
Plain ID (not underlined)
A record where the ID and nickname is not underlined means that you do not have access rights (e.g. because the record was submitted but not yet approved). Therefore, you will not be able to access the detail information of the record. Nevertheless, the system gives a hint that the record was submitted. This hint only shows up in the detail views.
Icons used in lists
List view tab icon WORKING AREA lists Identifies the list view tab in lists created in the WORKING AREA
Approval view tab icon WORKING AREA lists Identifies the approval view tab in lists created in the WORKING AREA
Deleted Items tab icon WORKING AREA lists Identifies the recycle bin tab in lists created in the WORKING AREA
Indicates cancellation status of an entity (event, participation)
WORKING AREA Lists, Reports
This event has been cancelled (applies also to participations that had to be cancelled due to the cancellation of the event).
Indicates entities derived from other programmes
WORKING AREA Lists, Reports
Indicates that an activity or event is derived from another programme (means the entity has another native programme and was opened for the current programme)
Indicates participation records added through feedback
WORKING AREA lists Indicates that the participation was added through the feedback form. This participation is directly NATO approved.
Indicates participation records added through invitation
WORKING AREA lists Indicates that the participation was added by an invitation action (means the proposing body has invited a participating body)
On invitation only WORKING AREA lists Indicates that an event is “on invitation only”, participation records can only be added by the proposing body
On invitation only for derived events
WORKING AREA lists Indicates that this is an event derived from another programme. Participation records can only be added by the proposing body
Item has status New WORKING AREA lists Icon used in the event/participation status column of lists -> this event/participation is new
Item has status Updated WORKING AREA lists Icon used in the event/participation status column of lists -> this event/participation has been updated

ePRIME V4 Manual – March 2010
NATO/EAPC/PFP UNCLASSIFIED Releasable to MD, ICI, Afghanistan, Iraq, Pakistan, Australia, Japan, Korea, New Zealand
Page 81 of 85
Item has status Restored WORKING AREA lists Icon used in the event/participation status column of lists -> this event/participation has been restored after it had been deleted
Can add feedback icon WORKING AREA lists Icon used in the feedback column of lists -> feedback can be added
Feedback present icon WORKING AREA lists Icon used in the feedback column of lists -> feedback has been added
Invitation should be sent icon
WORKING AREA lists Indicates that invitations for an event should be sent out
Invitation sent out icon WORKING AREA lists Indicates that invitations for an event have been sent out
Derived from other programme
WORKING AREA lists Indicates that a given item is derived from another programme
Open to other programme WORKING AREA lists Indicates that a given item is open to other programme
Approval status icon – not approved
WORKING AREA lists Indicates approval level of item: approval level has been set to “NONE”
Approval status icon – Owner-approved
WORKING AREA lists Indicates approval level of item: item is owner-approved (default value)
Approval status icon – Coordinator-approved
WORKING AREA lists Indicates approval level of item: item is coordinator-approved
Approval status icon – NATO-approved
WORKING AREA lists Indicates approval level of item: item is NATO-approved
Approval status icon – Coordinator-approved in native programme
WORKING AREA lists Indicates approval for derived items from another programme: the item is coordinator-approved in native programme, but not approved for the current programme
Approval status icon – NATO-approved in native programme
WORKING AREA lists Indicates approval for derived items from another programme: Item is NATO-approved in native programme, but not approved for the current programme
Document has Draft status Clearinghouse lists Clearinghouse document has not been approved yet (2 step approval process)
Document is approved Clearinghouse lists Clearinghouse document has been approved

ePRIME V4 Manual – March 2010
NATO/EAPC/PFP UNCLASSIFIED Releasable to MD, ICI, Afghanistan, Iraq, Pakistan, Australia, Japan, Korea, New Zealand
Page 82 of 85
Icons used in event and activity dialogs
Approval Status icon – not approved
Event dialog, Participant tab Approval status "None": the record has been actively deferred by the owner for further processing. Owner approval is required for the entry to be re-conveyed into the ePRIME workflow.
Approval status icon – Owner-approved
Event dialog, Participant tab Approval status "Owner" (default value when adding a new record): the record has been entered by an editor of the proposing organization and is ready for approval by the coordinator. These records are visible only to members of the proposing organization and to their coordinator. They are not visible to the PfP programme manager at NATO or to any other ePRIME user.
Approval status icon – Coordinator approved
Event dialog, Participation tab
Approval status "Coordinator": The record has been approved by the coordinator and is ready for approval by the PfP programme manager at NATO. These records are visible to all members of the Proposing Body and to the PfP programme manager at NATO, but not yet to other nations or organizations.
Approval status icon – Coordinator-approved in native programme
Activity and event dialogs In the native programme this record has been approved on the coordinator level and is ready for approval by the PfP programme manager at NATO. The record has not been approved in the current programme.
Approval status icon – NATO-approved
Event dialog, Participation tab
This record has been approved at NATO level. The record is part of the WP/PPs and visible to all registered ePRIME users. This icon is only shown in the detail views. In lists, records approved at NATO level will not be marked by any icon.

ePRIME V4 Manual – March 2010
NATO/EAPC/PFP UNCLASSIFIED Releasable to MD, ICI, Afghanistan, Iraq, Pakistan, Australia, Japan, Korea, New Zealand
Page 83 of 85
Approval status icon – NATO-approved in native programme
Activity and event dialogs In the native programme this record has been approved at NATO level. The record is part of the WP/PPs and visible to all registered ePRIME users. The record has not been approved in the current programme.
New item Dialogs This record has been newly added to ePRIME in the last 90 days.
Updated item Dialogs This record has been updated in the last 90 days. In the detail views, this tag indicates the fields that were updated. The record history will provide more information on the nature of the update.
Past event Dialogs This tag is displayed in the detail view beneath the date when a record referring to an event in the past has been edited or if a record that previously referred to an event in the future is changed to refer to the past.
Participant added by participation
Event dialog, Participation tab
Indicates that a participant was added by participation
Participant added by feedback
Event dialog, Participation tab
Indicates that a participant was added by feedback(after the event has taken place)
Participant added by invitation
Event dialog, Participation tab
Indicates that a participant was added by invitation (for “on invitation only” events)
POC List and dialog icons
Main POC icon WORKING AREA, POC List, POC Dialog
Indicates that this person is the main POC for an event or in a list of POCs of a body/nation.
User selection icons
Monitored selection icon User Selections dialog Indicates that this user selection is set to “Monitored” -> the user will be informed via email about changes that occur to items in this selection

ePRIME V4 Manual – March 2010
NATO/EAPC/PFP UNCLASSIFIED Releasable to MD, ICI, Afghanistan, Iraq, Pakistan, Australia, Japan, Korea, New Zealand
Page 84 of 85
Feedback Participation and Add/Edit participation dialogs icons
Remove Participation from the list
Participation lists Recycle bin icon used to remove a participation from a list
Participation can not be removed
Participation lists Recycle bin indicating that a participation cannot be removed
Document dialog icons
Document approval status icon
Document View/Edit dialog Indicates draft status
Document approval status icon
Document View/Edit dialog Indicates approved status
Message dialog icons
Message priority icon Message Inbox/Outbox dialog
Indicates High priority
Message priority icon Message dialog Inbox/Outbox
Indicates Low priority

ePRIME V4 Manual – March 2010
NATO/EAPC/PFP UNCLASSIFIED Releasable to MD, ICI, Afghanistan, Iraq, Pakistan, Australia, Japan, Korea, New Zealand
Page 85 of 85
INTENTIONALLY LEFT BLANK