enterprise messaging exchange 2007 technology/documents/email...commonwealth of pennsylvania...
TRANSCRIPT
COMMONWEALTH OF PENNSYLVANIA ENTERPRISE MESSAGING
EXCHANGE 2007 USER GUIDE PAGE 1 OF 34
ENTERPRISE MESSAGING
EXCHANGE 2007
USER GUIDE
Version: 1.4
Last Updated: 4/25/2014
SECURITY WARNING
The information contained herein is proprietary to the Commonwealth of Pennsylvania and must not be
disclosed to un-authorized personnel. The recipient of this document, by its retention and use, agrees to
protect the information contained herein. Readers are advised that this document may be subject to the
terms of a non-disclosure agreement.
DO NOT DISCLOSE ANY OF THIS INFORMATION WITHOUT OBTAINING PERMISSION FROM
THE MANAGEMENT RESPONSIBLE FOR THIS DOCUMENT.

COMMONWEALTH OF PENNSYLVANIA ENTERPRISE MESSAGING
EXCHANGE 2007 USER GUIDE PAGE 2 OF 34
Version History Date Version Modified By / Approved By Section(s) Comment
9/28/2007 1.0 Asgar Rizwan All Initial Version
10/01/2007 1.1 Drew Patel All Update
11/06/2008 1.2 C. Reber Cover Page Inserted new OA logo on cover page
9/04/2009 1.3 C. Reber All Change ESF to EMT on Cover Page and minor formatting edits
4/25/2014 1.4 C. Reber Cover Page Update format

COMMONWEALTH OF PENNSYLVANIA ENTERPRISE MESSAGING
EXCHANGE 2007 USER GUIDE PAGE 3 OF 34
Table of Contents 1 INTRODUCTION ................................................................................................................................. 4
1.1 OVERVIEW ...................................................................................................................................... 4
2 IMAP AND POP CONFIGURATION ............................................................................................... 5
2.1 IMAP CONFIGURATION USING MICROSOFT OUTLOOK ................................................................ 5 2.2 POP CONFIGURATION USING MICROSOFT OUTLOOK ............................................................... 10 2.3 IMAP CONFIGURATION USING OUTLOOK EXPRESS .................................................................. 15 2.4 POP CONFIGURATION USING OUTLOOK EXPRESS ................................................................... 20
3 MAILBOX ACCESS ......................................................................................................................... 25
3.1 MAILBOX ACCESS USING OUTLOOK ANYWHERE FROM OUTLOOK 2007 CLIENT .................... 25
4 USING AND CREATING ‘PST’ PERSONAL FOLDERS .......................................................... 29
5 OUTLOOK ARCHIVE OPTIONS ................................................................................................... 30
5.1 MANUAL ARCHIVE – OPTION 1 .................................................................................................... 30 5.1.1 Compacting the Personal Folders File ............................................................................ 31
5.2 AUTOARCHIVE – OPTION 2 ......................................................................................................... 32
6 EMAIL ACCESS USING EXCHANGE 2007 OWA ..................................................................... 33
7 APPENDIX A – RESOURCES & REFERENCES ....................................................................... 34

COMMONWEALTH OF PENNSYLVANIA ENTERPRISE MESSAGING
EXCHANGE 2007 USER GUIDE PAGE 4 OF 34
1 Introduction
1.1 OVERVIEW
This document explains about adding and removing accounts to the various Exchange administrator roles
within Exchange 2007 organization.

COMMONWEALTH OF PENNSYLVANIA ENTERPRISE MESSAGING
EXCHANGE 2007 USER GUIDE PAGE 5 OF 34
2 IMAP and POP Configuration
The following sections provide details for configuring IMAP and POP protocols for MS Outlook XP and
Outlook Express clients. Please contact Exchange server administrators for configuration of Windows
CE, Palm Pilots and other devices.
2.1 IMAP CONFIGURATION USING MICROSOFT OUTLOOK
To create a new profile in Exchange using Microsoft Outlook:
1. Double click the Mail icon in your Control Panel.
2. Click Show Profiles.

COMMONWEALTH OF PENNSYLVANIA ENTERPRISE MESSAGING
EXCHANGE 2007 USER GUIDE PAGE 6 OF 34
3. Click Add to create a new E-mail profile.
4. Enter the Profile Name: IMAP and click OK. This will start the E-mail Accounts wizard.

COMMONWEALTH OF PENNSYLVANIA ENTERPRISE MESSAGING
EXCHANGE 2007 USER GUIDE PAGE 7 OF 34
5. Select “Add a new e-mail account” and then click Next.
6. Select IMAP, and then click Next.

COMMONWEALTH OF PENNSYLVANIA ENTERPRISE MESSAGING
EXCHANGE 2007 USER GUIDE PAGE 8 OF 34
7. Configure Internet E-mail settings (IMAP) for the account you are creating.
a. Incoming mail server (IMAP) = webmail.state.pa.us.
b. Outgoing mail server (SMTP) = smtp.state.pa.us.
8. When complete, click More Settings.

COMMONWEALTH OF PENNSYLVANIA ENTERPRISE MESSAGING
EXCHANGE 2007 USER GUIDE PAGE 9 OF 34
9. Select the Outgoing Server tab and select the settings:
a. Check “My outgoing server (SMTP) requires authentication”.
b. Select “Log on using”, and enter the log on credentials.
c. Check “Log on using Secure Password Authentication (SPA)”
10. Select the Advanced tab, select the settings shown below, and then click OK:
a. Check “This server requires an encrypted connection (SSL)”
b. Click the Use Defaults button and auto resolve will set the IMAP port being used by the
Client Access Server (CAS):
i. Incoming server (IMAP) = Port 993.
ii. Outgoing server (SMTP) = Port 25
c. Check “This server requires an encrypted connection (SSL)”.
11. Click Next and then click Finish to complete the E-mail Accounts wizard.

COMMONWEALTH OF PENNSYLVANIA ENTERPRISE MESSAGING
EXCHANGE 2007 USER GUIDE PAGE 10 OF 34
2.2 POP CONFIGURATION USING MICROSOFT OUTLOOK
To create new POP profile in Exchange using Microsoft Outlook:
1. Double click the Mail icon in the Control Panel.
2. Click Show Profiles.

COMMONWEALTH OF PENNSYLVANIA ENTERPRISE MESSAGING
EXCHANGE 2007 USER GUIDE PAGE 11 OF 34
3. Click Add to create a new E-mail profile.
4. Enter the Profile Name: POP3 and click OK. This will start the E-mail Accounts wizard.

COMMONWEALTH OF PENNSYLVANIA ENTERPRISE MESSAGING
EXCHANGE 2007 USER GUIDE PAGE 12 OF 34
5. Select “Add a new e-mail account” and then click Next.
6. Select POP3, and then click Next.

COMMONWEALTH OF PENNSYLVANIA ENTERPRISE MESSAGING
EXCHANGE 2007 USER GUIDE PAGE 13 OF 34
7. Configure Internet E-mail settings (POP3) for the account you are creating:
a. Incoming mail server (POP3) = webmail.state.pa.us.
b. Outgoing mail server (SMTP) = smtp.state.pa.us.
8. When complete, click More Settings.

COMMONWEALTH OF PENNSYLVANIA ENTERPRISE MESSAGING
EXCHANGE 2007 USER GUIDE PAGE 14 OF 34
9. Select the Outgoing Server tab and select the settings:
a. Check “My outgoing server (SMTP) requires authentication”.
b. Select “Log on using”, and enter the log on credentials.
c. Check “Log on using Secure Password Authentication (SPA)”
10. Select the Advanced tab, select the settings shown below, and then click OK:
a. Check “This server requires an encrypted connection (SSL)”
b. Click the Use Defaults button and auto resolve will set the POP3 port being used by the
Client Access Server (CAS):
i. Incoming server (POP3) = Port 995.
ii. Outgoing server (SMTP) = Port 25
c. Check “This server requires an encrypted connection (SSL)”.
12. Click Next and then click Finish to complete the E-mail Accounts wizard.
COMMONWEALTH OF PENNSYLVANIA ENTERPRISE MESSAGING
EXCHANGE 2007 USER GUIDE PAGE 15 OF 34
2.3 IMAP CONFIGURATION USING OUTLOOK EXPRESS
To create a new profile in Exchange using Outlook Express:
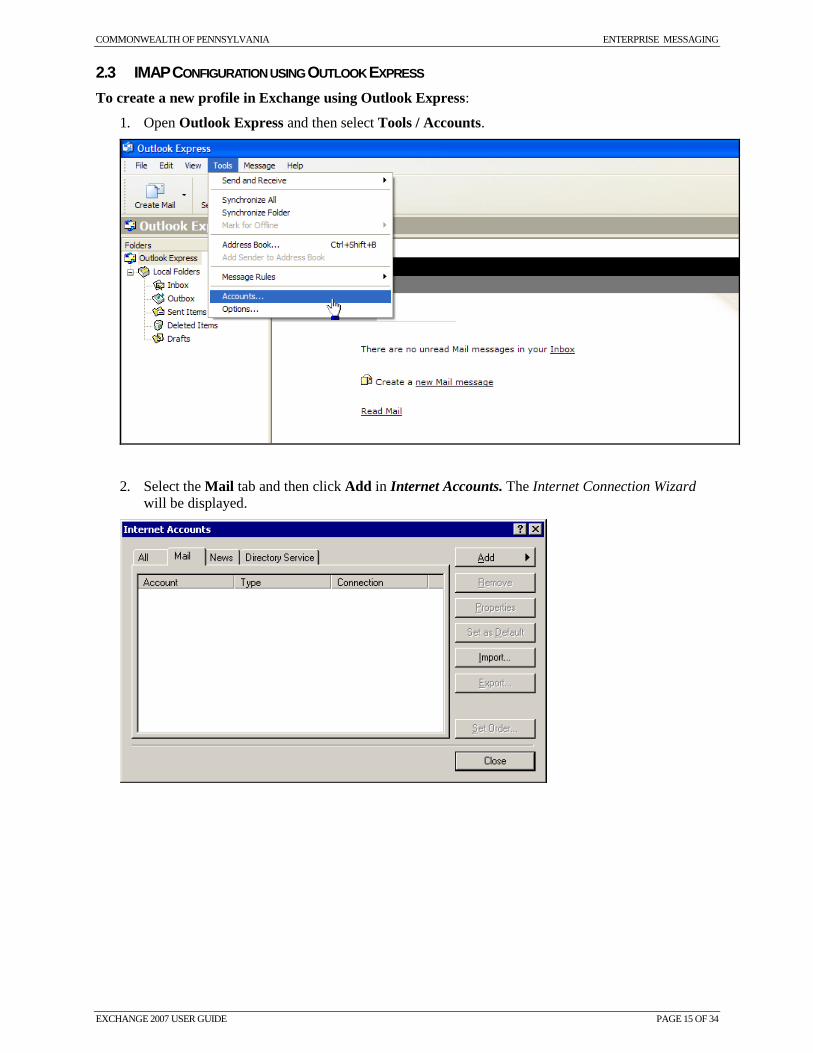
1. Open Outlook Express and then select Tools / Accounts.
2. Select the Mail tab and then click Add in Internet Accounts. The Internet Connection Wizard
will be displayed.

COMMONWEALTH OF PENNSYLVANIA ENTERPRISE MESSAGING
EXCHANGE 2007 USER GUIDE PAGE 16 OF 34
3. Enter a Display name and click Next, on the Your Name screen.
4. Enter the E-mail address of the user (address other people use to send e-mail messages to you)
and click Next, on the Internet E-mail Address screen.

COMMONWEALTH OF PENNSYLVANIA ENTERPRISE MESSAGING
EXCHANGE 2007 USER GUIDE PAGE 17 OF 34
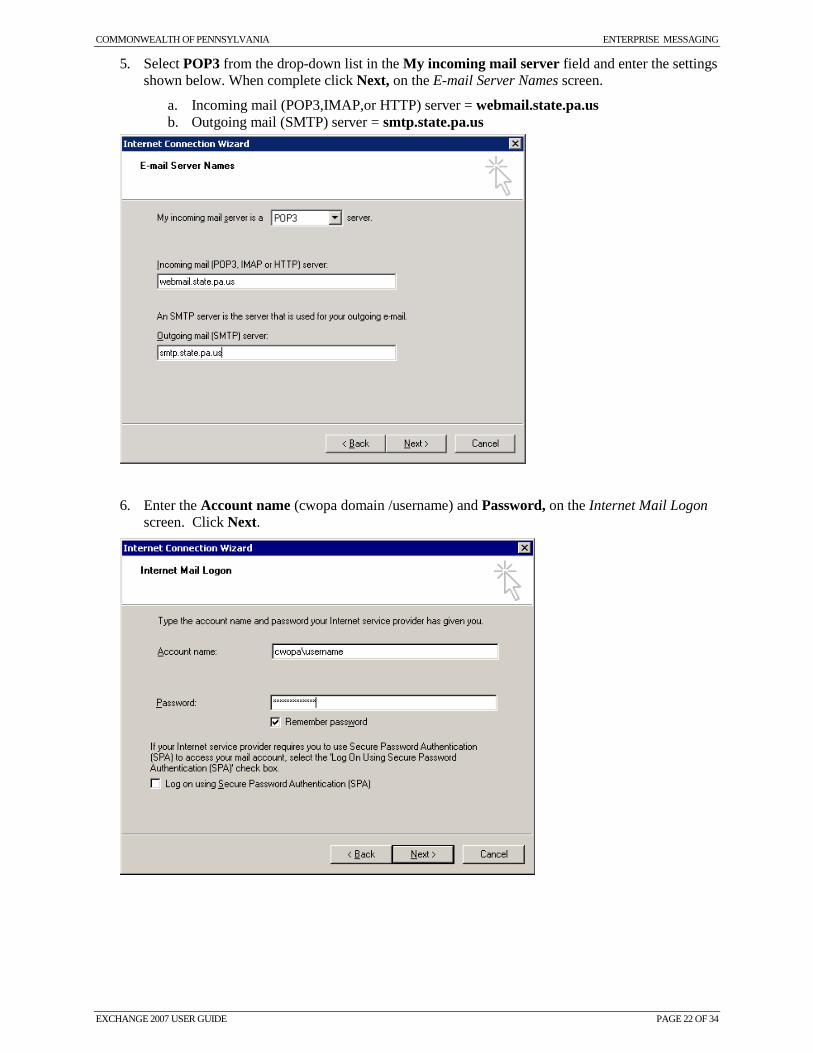
5. Select IMAP from the drop-down list in the My incoming mail server field and enter the
settings shown below. When complete click Next, on the E-mail Server Names screen.
a. Incoming mail (POP3, IMAP, or HTTP) server = webmail.state.pa.us
b. Outgoing mail (SMTP) server = smtp.state.pa.us
6. Enter the Account name (cwopa domain /username) and Password, on the Internet Mail Logon
screen. Click Next.

COMMONWEALTH OF PENNSYLVANIA ENTERPRISE MESSAGING
EXCHANGE 2007 USER GUIDE PAGE 18 OF 34
7. You have successfully entered all of the information required to set up your account. To save
these settings, click Finish.
8. Go to the Internet Accounts window, click on the IMAP internet account that was just created,
and click Properties.
9. Select the Servers tab, check “My server requires authentication” in the Outgoing Mail Server
section, and then click the Settings button.

COMMONWEALTH OF PENNSYLVANIA ENTERPRISE MESSAGING
EXCHANGE 2007 USER GUIDE PAGE 19 OF 34
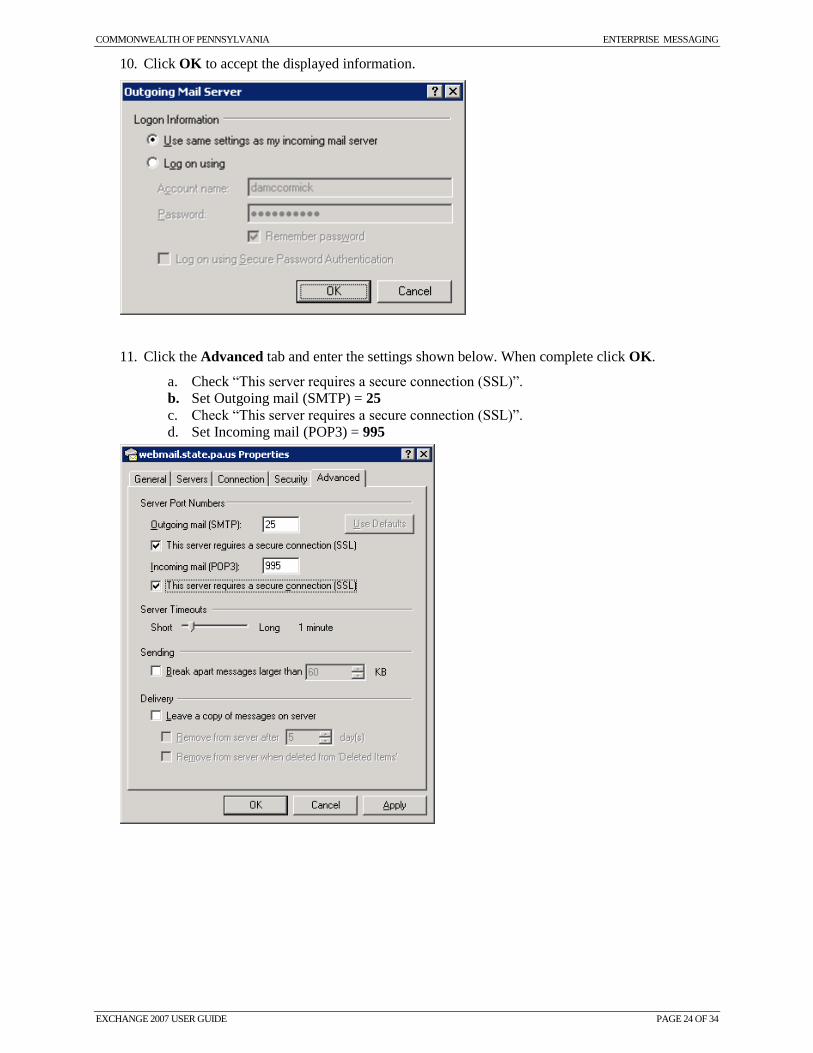
10. Click OK to accept the displayed information.
11. Click the Advanced tab and enter the settings shown below. When complete click OK.
a. Check “This server requires a secure connection (SSL)”.
b. Set Outgoing mail (SMTP) = 25
c. Check “This server requires a secure connection (SSL)”.
d. Set Incoming mail (IMAP) = 993

COMMONWEALTH OF PENNSYLVANIA ENTERPRISE MESSAGING
EXCHANGE 2007 USER GUIDE PAGE 20 OF 34
2.4 POP CONFIGURATION USING OUTLOOK EXPRESS
To create new POP profile in Exchange using Outlook Express:
1. Open Outlook Express and then select Tools / Accounts.
2. Select the Mail tab and then click Add on the Internet Account screen. The Internet Connection
Wizard will be displayed.

COMMONWEALTH OF PENNSYLVANIA ENTERPRISE MESSAGING
EXCHANGE 2007 USER GUIDE PAGE 21 OF 34
3. Enter a Display name and click Next, on the Your Name screen.
4. Enter the E-mail address of the user (address other people use to send e-mail messages to you)
and click Next, on the Internet E-mail Address screen.
COMMONWEALTH OF PENNSYLVANIA ENTERPRISE MESSAGING
EXCHANGE 2007 USER GUIDE PAGE 22 OF 34
5. Select POP3 from the drop-down list in the My incoming mail server field and enter the settings
shown below. When complete click Next, on the E-mail Server Names screen.
a. Incoming mail (POP3,IMAP,or HTTP) server = webmail.state.pa.us
b. Outgoing mail (SMTP) server = smtp.state.pa.us
6. Enter the Account name (cwopa domain /username) and Password, on the Internet Mail Logon
screen. Click Next.

COMMONWEALTH OF PENNSYLVANIA ENTERPRISE MESSAGING
EXCHANGE 2007 USER GUIDE PAGE 23 OF 34
7. You have successfully entered all of the information required to set up your account. To save
these settings, click Finish.
8. Go to the Internet Accounts window, click on the POP internet account that was just created,
and click Properties.
9. Select the Servers tab, check “My server requires authentication” in the Outgoing Mail Server
section, and then click the Settings button.
COMMONWEALTH OF PENNSYLVANIA ENTERPRISE MESSAGING
EXCHANGE 2007 USER GUIDE PAGE 24 OF 34
10. Click OK to accept the displayed information.
11. Click the Advanced tab and enter the settings shown below. When complete click OK.
a. Check “This server requires a secure connection (SSL)”.
b. Set Outgoing mail (SMTP) = 25
c. Check “This server requires a secure connection (SSL)”.
d. Set Incoming mail (POP3) = 995

COMMONWEALTH OF PENNSYLVANIA ENTERPRISE MESSAGING
EXCHANGE 2007 USER GUIDE PAGE 25 OF 34
3 Mailbox Access
3.1 MAILBOX ACCESS USING OUTLOOK ANYWHERE FROM OUTLOOK 2007 CLIENT
You must create a new profile and then assign the appropriate settings:
1. Enter a new Profile Name and then click OK.
2. Select Manually configure server settings or additional server types, and then click Next.

COMMONWEALTH OF PENNSYLVANIA ENTERPRISE MESSAGING
EXCHANGE 2007 USER GUIDE PAGE 26 OF 34
3. Select Microsoft Exchange, and then click Next.
4. Enter the required information to connect to Microsoft Exchange, and then click Next.
COMMONWEALTH OF PENNSYLVANIA ENTERPRISE MESSAGING
EXCHANGE 2007 USER GUIDE PAGE 27 OF 34
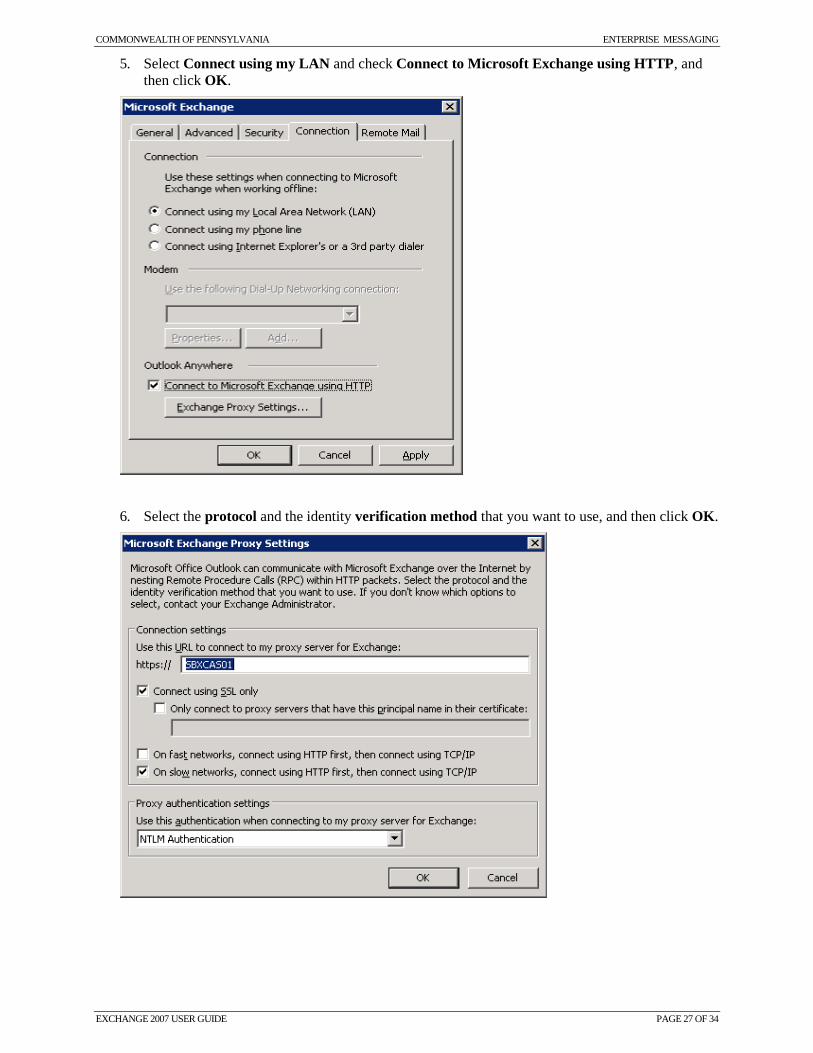
5. Select Connect using my LAN and check Connect to Microsoft Exchange using HTTP, and
then click OK.
6. Select the protocol and the identity verification method that you want to use, and then click OK.

COMMONWEALTH OF PENNSYLVANIA ENTERPRISE MESSAGING
EXCHANGE 2007 USER GUIDE PAGE 28 OF 34
7. Test E-mail Auto Configuration and then review the results.

COMMONWEALTH OF PENNSYLVANIA ENTERPRISE MESSAGING
EXCHANGE 2007 USER GUIDE PAGE 29 OF 34
4 Using and Creating ‘PST’ Personal Folders
Personal Folders can be created in Microsoft Outlook so that you can store, manage, and archive your e-
mail on your local computer's hard drive. By using Personal Folders, you may reduce the amount of space
used on the central mail server, and avoid receiving warning messages that you are over quota.
The Commonwealth of PA provides 50 MB of storage space for each Exchange e-mail account. To check
how much space you are using, in Microsoft Outlook, right-click Mailbox - Your Full Name, click
Properties, and click the Folder Size button. This will show you the total amount of space used by your e-
mail account as well as the amount of space being used by each individual folder.
NOTE: It is important to remember that any messages in your Personal Folders are stored on your local
computer's hard drive and not on the server. If your computer's hard drive ceases to work or the .pst file is
deleted or becomes corrupted, the messages you've placed in this folder will be lost. To protect yourself
from data loss, make certain to back up your .pst file regularly to another location such as your personal
or departmental network storage.
Procedure:
1. Creating a Personal Folder in Microsoft Outlook 2003 and Outlook 2007:
a. Select the File menu, point to New, and click Outlook Data File.
b. In the New Outlook Data File window, select Office Outlook Personal Folders File
(.pst), and click OK.
c. In the Create or Open Outlook Data File window, in the File name box, enter a name
for the file, and click OK.
d. In the Create Microsoft Personal Folders window, in the Name box, enter a name to use
for this folder if you would like it named other than Personal Folder, and click OK.
e. The folder will now be listed in the All Mail Folders section of the Navigation Pane.
2. Creating a Personal Folder in Microsoft Outlook 2002
a. Select the File menu, point to New, and click Outlook Data file.
b. In the New Outlook Data File window, select Personal Folder File (.pst), and click OK.
c. In the Create or Open Outlook Data File window, in the File name box, enter a name
for the file, and click OK.
d. In the Create Microsoft Personal Folders window, in the Name box, enter a name to use
for this folder if you would like it named other than Personal Folder, and click OK.
e. The folder will now be listed in the Folder List. NOTE: If your view is not set to the
Folder List, select the View menu, and click Folder List.
3. Creating a Personal Folder in Microsoft Outlook 2000
a. Select the File menu, point to New, and click Personal Folders File (.pst).
b. In the Create Personal Folders window, in the File name box, enter a name for the file,
and click OK.
c. In the Create Microsoft Personal Folders window, in the Name box, enter a name to use
for this folder if you would like it named other than Personal Folder, and click OK.
d. The folder will now be listed in the Folder List. NOTE: If your view is not set to the
Folder List, select the View menu, and click Folder List.

COMMONWEALTH OF PENNSYLVANIA ENTERPRISE MESSAGING
EXCHANGE 2007 USER GUIDE PAGE 30 OF 34
5 Outlook Archive Options
You can archive your Outlook email in two different ways. Either option will work properly, but the
choice of one over the other is dependent on how much control you wish to have over the Archive
process.
Option 1: Manual Archive
The manual Archive option requires you to create an Archive.pst file and manually move the messages
and/or folders that you no longer need in your main .pst file. This option gives you more control over the
Archive process, allowing you to select folders and messages to archive, regardless of date.
Option 2: AutoArchive
Outlook's AutoArchive wizard archives mail by modified date. Specify a date and the AutoArchive folder
will archive all email modified before that date. The modified date differs from the received date in that if
you receive a message on 8/1/2007 and forward it on 9/1/2007, it is then modified and will not be
archived if you select all mail before 9/1/2007. Copying, replying to, and importing items will also
change the modified date.
This option is faster and easier than the manual archive procedure and preserves your current Outlook
email folder structure. However, it does not provide the same level of control and flexibility as a manual
archive.
Due to the manner in which Outlook imports mail and address items, you will not be able to run the
AutoArchive wizard on any email messages or contacts that were imported from email programs other
than Outlook. If you are attempting to archive items that were imported from Eudora or Outlook Express,
use the manual archive procedure.
5.1 MANUAL ARCHIVE – OPTION 1
To start the archive process, you will need to create an Archive.pst file:
1. Open Outlook.
2. Click the File menu, click New, and then choose Outlook Data File.
3. Select Office Outlook Personal Folders File (.pst) and click OK.
4. Type archive.pst in the File name field and click OK.
5. Type Personal Folders Archive in the Name field and click OK.
You should now see a Personal Folders Archive in the list of "All Mail Folders" on the left side of the
Outlook window. If Outlook is not configured to show the list of mail folders, click the View menu then
click Navigation Pane.
You can now move email messages out of your main .pst file into the Archive folder. If you want to move
mail folders, left-click on the folder and drag it into the Archive folder. If you want to move only certain
messages to the Archive folder, first make a folder within Archive to hold the messages, and then drag the
messages out of the main Personal Folder into the Archive folder.

COMMONWEALTH OF PENNSYLVANIA ENTERPRISE MESSAGING
EXCHANGE 2007 USER GUIDE PAGE 31 OF 34
5.1.1 Compacting the Personal Folders File
Once you have moved all of the email folders and messages that you wish to archive, you need to
"Compact" your main .pst file.
This step is important, as Outlook does not automatically shrink the .pst file when you archive data. For
example, if you archived out 100 MB of email from a 500 MB Outlook.pst file, the Outlook.pst file will
not shrink to 400 MB until you compact the .pst file. This process may take between 5 and 30 minutes to
complete, depending on the size of your Outlook.pst file.
To compact your .pst file:
1. Click on the File menu, and then click Data File Management.
2. Select the Personal Folders (not Personal Folder Archive) and then click the Settings button.
3. Click the Compact Now button to compact the mailbox.
4. Once Outlook finishes compacting, you're done!

COMMONWEALTH OF PENNSYLVANIA ENTERPRISE MESSAGING
EXCHANGE 2007 USER GUIDE PAGE 32 OF 34
5.2 AUTOARCHIVE – OPTION 2
To start the AutoArchive wizard:
1. Click the File menu and select “Archive...”
2. Select the folders you wish to archive, and then select a date for which old items should be
archived. All email older than this date will be archived.
3. If you wish to have the AutoArchive wizard archive all folders in the Personal Folder File,
click Personal Folders and make sure the option to Archive this folder and all subfolders is
selected.
4. Click OK to archive your selected folders and subfolders.
NOTES:
The archive process may take as long as 30 minutes. Please refrain from using Outlook while Archiving is
in progress. You can monitor the archive status in the lower right corner of the screen (i.e., "Archiving
Deleted Items to D:\Documents and Settings...").
Using Outlook Web Access (OWA) is a solution for remote access to CWOPA email. OWA allows you
to use your favorite web browser to access email from anywhere at anytime. Just log on from our OWA
web page and you can check and send messages, find names from the Global Address List (GAL), and
add appointments to your calendar.

COMMONWEALTH OF PENNSYLVANIA ENTERPRISE MESSAGING
EXCHANGE 2007 USER GUIDE PAGE 33 OF 34
6 Email Access using Exchange 2007 OWA
1. Type the following link in your web browser. https://webmail.state.pa.us/.
2. Enter your log in credentials and click Log On.
3. Your OWA interface is displayed

COMMONWEALTH OF PENNSYLVANIA ENTERPRISE MESSAGING
EXCHANGE 2007 USER GUIDE PAGE 34 OF 34
7 Appendix A – Resources & References
Provide supplementary material, if available. If there are multiple appendices, add section additions (i.e.,
Section 5, Section 6, etc.) as required.