english complete car audio package cd receiver with … · 1 press band/esc. returning to the...
TRANSCRIPT

Owner’s ManualManual de instrucciones
COMPLETE CAR AUDIO PACKAGECD RECEIVER WITH FOUR 6-1/2" 2WAY SPEAKERS
PAQUETE DE AUDIO PARA AUTOMÓVIL COMPLETORADIO CD CON CUATRO ALTAVOCES DE DOS VÍAS 6-1/2”
DXT-2266UB
Eng
lishEsp
añol

Thank you for purchasing this PIONEER product.To ensure proper use, please read through this manual before using this product. Itis especially important that you read and observe WARNINGs and CAUTIONs inthis manual. Please keep the manual in a safe and accessible place for future refer-ence.
Before You StartInformation to User 3For Canadian model 3The Safety of Your Ears is in Your Hands 3About this unit 3After-sales service for Pioneer products 4In case of trouble 4Visit our website 4
Operating this unitHead unit 5Display indication 5Basic Operations 5Menu operations identical for function
settings/audio adjustments/initial settings/lists 6
Tuner 6CD/CD-R/CD-RW and USB storage
devices 7Audio Adjustments 8Initial Settings 9Using an AUX source 9Displaying the clock 9
ConnectionsConnection diagram 11
InstallationDIN front/rear mount 12Securing the front panel 13Speaker installation 13
Additional InformationTroubleshooting 16Error messages 16Handling guideline 17Compressed audio compatibility (disc,
USB) 18Sequence of audio files 19Copyright and trademark 19
Specifications 20
Contents
En2

This device complies with part 15 of the FCCRules. Operation is subject to the followingtwo conditions:(1) This device may not cause harmful interfer-ence, and (2) this device must accept any inter-ference received, including interference thatmay cause undesired operation.
Information to User
Alteration or modifications carried out withoutappropriate authorization may invalidate theuser’s right to operate the equipment.
For Canadian model
This Class B digital apparatus complies withCanadian ICES-003.
The Safety of Your Ears is inYour HandsGet the most out of your equipment by playingit at a safe level—a level that lets the soundcome through clearly without annoying blar-ing or distortion and, most importantly, with-out affecting your sensitive hearing. Soundcan be deceiving. Over time, your hearing“comfort level” adapts to higher volumes ofsound, so what sounds “normal” can actuallybe loud and harmful to your hearing. Guardagainst this by setting your equipment at asafe level BEFORE your hearing adapts.
ESTABLISH A SAFE LEVEL:! Set your volume control at a low setting.! Slowly increase the sound until you can
hear it comfortably and clearly, without dis-tortion.
! Once you have established a comfortablesound level, set the dial and leave it there.
BE SURE TO OBSERVE THE FOLLOWINGGUIDELINES:! Do not turn up the volume so high that you
can’t hear what’s around you.! Use caution or temporarily discontinue use
in potentially hazardous situations.! Do not use headphones while operating a
motorized vehicle; the use of headphonesmay create a traffic hazard and is illegal inmany areas.
About this unitThe tuner frequencies on this unit are allo-cated for use in North America. Use in otherareas may result in poor reception.
WARNINGHandling the cord on this product or cords asso-ciated with accessories sold with the productmay expose you to chemicals listed on proposi-tion 65 known to the State of California and othergovernmental entities to cause cancer and birthdefect or other reproductive harm.Wash handsafter handling.
CAUTION:USE OF CONTROL OR ADJUSTMENT ORPERFORMANCE OF PROCEDURESOTHER THAN THOSE SPECIFIED HEREINMAY RESULT IN HAZARDOUS RADIATIONEXPOSURE.CAUTION:THE USE OF OPTICAL INSTRUMENTSWITH THIS PRODUCT WILL INCREASEEYE HAZARD.
En 3
English
Presection
Before You Start

CAUTION! Do not allow this unit to come into contact
with liquids. Electrical shock could result.Also, damage to this unit, smoke, and over-heating could result from contact with liquids.
! Always keep the volume low enough to hearoutside sounds.
! Avoid exposure to moisture.! If the battery is disconnected or discharged,
any preset memory will be erased.
CAUTION1 Do not touch the speaker flexible wire1.2 Do not change the direction of the speaker
terminal assembly2.3 Make sure lead and speaker terminals do not
contact metal.4 When making connections, refer also to the
instruction manual of the car stereo used.
1
2
Important (Serial number)
The serial number is located on the bottom ofthis unit. For your own security and convenience,be sure to record this number on the enclosedwarranty card.
After-sales service forPioneer productsPlease contact the dealer or distributor fromwhere you purchased this unit for after-salesservice (including warranty conditions) or anyother information. In case the necessary infor-mation is not available, please contact thecompanies listed below:Please do not ship your unit to the companiesat the addresses listed below for repair withoutadvance contact.
U.S.A.Pioneer Electronics (USA) Inc.CUSTOMER SUPPORT DIVISIONP.O. Box 1760Long Beach, CA 90801-1760800-421-1404CANADAPioneer Electronics of Canada, Inc.CUSTOMER SATISFACTION DEPARTMENT300 Allstate ParkwayMarkham, Ontario L3R 0P21-877-283-5901905-479-4411
For warranty information please see the Lim-ited Warranty sheet included with this unit.
In case of troubleShould this unit fail to operate properly, pleasecontact your dealer or nearest authorizedPIONEER Service Station.
Visit our websitehttp://www.pioneerelectronics.comin Canadahttp://www.pioneerelectronics.ca! Learn about product updates (such as firm-
ware updates) for your product.! Register your product to receive notices
about product updates and to safeguardpurchase details in our files in the event ofloss or theft.
! Access owner's manuals, spare parts infor-mation, service information, and muchmore.
En4
Presection
Before You Start

Head unit
� ��� � ����
���������
��� ��������
����
���
Part Part
1 DISP/ /SCRL 8AUX input jack (3.5mm stereo jack)
2 SRC/OFF 9 USB port
3MULTI-CONTROL(M.C.)
a (list)
4 Disc loading slot b 1 to 6
5 h (eject) c a/b/c/d
6 CLOCK d BAND/ESC
7 Detach button
CAUTIONUse an optional Pioneer USB cable (CD-U50E) toconnect the USB audio player/USB memory asany device connected directly to the unit will pro-trude out from the unit and may be dangerous.Do not use unauthorized products.
Display indication�
�
��
�
� ��
�
�
Indicator State
1 (disc)The disc (album) name is dis-played.
2 (artist)The disc (track) artist name is dis-played.
Indicator State
3Main dis-play sec-tion
! Tuner: band and frequency! Built-in CD player and USB:
elapsed playback time andtext information
4 (song)
The track (song) name is dis-played.A playable audio file has been se-lected while operating the list.
5 cAn upper tier of folder or menuexists.
6 (folder) The list function is operated.
7 dA lower tier of folder or menu ex-ists.
8 LOC The local seek tuning is on.
9LOUD
(loudness)The loudness is on.
a 5 (stereo)The selected frequency is beingbroadcasted in stereo.
b (repeat) Track or folder repeat is on.
c(ran-
dom)Random play is on.
d (sound re-triever)
The sound retriever function ison.
Basic Operations
Important
! Handle gently when removing or attachingthe front panel.
! Avoid subjecting the front panel to excessiveshock.
! Keep the front panel out of direct sunlight andhigh temperatures.
! To avoid damage to the device or vehicle inter-ior, remove any cables and devices attachedto the front panel before detaching it.
En 5
English
Section
01Operating this unit

Removing the front panel to protect your unit fromtheft1 Press the detach button to release the front
panel.2 Grab the front panel and remove.
! Always keep the detached front panel in aprotection device such as a protection case.
Re-attaching the front panel1 Slide the front panel to the left until it clicks.
Front panel and the head unit are connected onthe left side. Make sure that the front panel hasbeen properly connected to the head unit.
2 Press the right side of the front panel until it isfirmly seated.If you can’t attach the front panel to the head unitsuccessfully, try again. However, forcing the frontpanel into place may result in damage.
Turning the unit on1 Press SRC/OFF to turn the unit on.
Turning the unit off1 Press SRC/OFF and hold until the unit turns off.
Selecting a source1 Press SRC/OFF to cycle between:
TUNER (tuner)—CD (built-in CD player)—USB(USB)—AUX (AUX)
Adjusting the volume1 Turn M.C. to adjust volume.
Note
When this unit’s blue/white lead is connected tothe vehicle’s auto-antenna relay control terminal,the vehicle’s antenna extends when this unit’ssource is turned on. To retract the antenna, turnthe source off.
Menu operations identicalfor function settings/audioadjustments/initialsettings/lists
Returning to the previous displayReturning to the previous list (the folder one levelhigher)1 Press DISP/ /SCRL.
Returning to the main menuReturning to the top tier of list1 Press and hold DISP/ /SCRL.
Returning to the ordinary displayCanceling the initial setting menu1 Press BAND/ESC.
Returning to the ordinary display from the list1 Press BAND/ESC or .
TunerBasic Operations
Selecting a band1 Press BAND/ESC until the desired band (F1, F2,
F3 for FM or AM) is displayed.
Manual tuning (step by step)1 Press c or d.
Seeking1 Press and hold c or d, and then release.
You can cancel seek tuning by briefly pressing c
or d.While pressing and holding c or d, you can skipstations. Seek tuning starts as soon as you re-lease c or d.
Storing and recalling stationsfor each bandYou can easily store up to six stations for eachband as presets.
% When you find a station that you wantto store in memory, press one of the presettuning buttons (1 to 6) and hold until thepreset number stops flashing.Stored radio station frequency can be recalledby pressing the preset tuning button.
En6
Section
01 Operating this unit

# You can also recall stored radio stations bypressinga or b during the frequency display.
Function settings1 Press M.C. to display the main menu.
2 Turn M.C. to change the menu optionand press to select FUNCTION.
3 Turn M.C. to select the function.After selecting, perform the following proce-dures to set the function.
BSM (best stations memory)
BSM (best stations memory) automatically stores thesix strongest stations in the order of their signalstrength.1 Press M.C. to turn BSM on.
To cancel, press M.C. again.
LOCAL (local seek tuning)
Local seek tuning lets you tune in to only those radiostations with sufficiently strong signals for good re-ception.1 Press M.C. to display the setting mode.2 Turn M.C. to select the desired setting.
FM: OFF—LEVEL 1—LEVEL 2—LEVEL 3—LEVEL4AM: OFF—LEVEL 1—LEVEL 2The highest level setting allows reception of onlythe strongest stations, while lower levels allow thereception of weaker stations.
3 Press M.C. to confirm the selection.
CD/CD-R/CD-RW and USBstorage devicesBasic Operations
Playing a CD/CD-R/CD-RW1 Insert the disc into the disc loading slot with the
label side up.
Ejecting a CD/CD-R/CD-RW1 Press h.
Playing songs on a USB storage device1 Open the USB connector cover and plug in the
USB storage device using a USB cable.
Stopping playback of files on a USB storage device1 You may disconnect the USB storage device at
anytime.
Selecting a folder1 Press a or b.
Selecting a track1 Press c or d.
Fast forwarding or reversing1 Press and hold c or d.
Returning to root folder1 Press and hold BAND/ESC.
Switching between compressed audio and CD-DA1 Press BAND/ESC.
Notes
! When playing compressed audio, there is nosound during fast forward or reverse.
! Disconnect USB storage devices from the unitwhen not in use.
Displaying text information
Selecting the desired text information1 Press DISP/ /SCRL.
CD TEXT discs: Play time—disc title—disc ar-tist name—track title—track artist nameWMA/MP3: Play time—folder name—file name—track title—artist name—album title—com-ment—bit rate—folder and track numbersWAV: Play time—folder name—file name—sam-pling frequency—folder and track numbers
Scrolling the text information to the left1 Press and hold DISP/ /SCRL.
Note
Depending on the version of iTunes used to writeMP3 files to a disc or media file types, incompati-ble text stored within an audio file may be dis-played incorrectly.
Selecting and playing files/tracks from the name list1 Press to switch to the file/trackname list mode.
En 7
English
Section
01Operating this unit

2 Use M.C. to select the desired file name(or folder name).
Changing the file or folder name1 Turn M.C.
Playing1 When a file or track is selected, press M.C.
Viewing a list of the files (or folders) in the selectedfolder1 When a folder is selected, press M.C.
Playing a song in the selected folder1 When a folder is selected, press and hold M.C.
Advanced operations usingspecial buttons
Selecting a repeat play range1 Press 6/ to cycle between the following:
CD/CD-R/CD-RW! DISC – Repeat all tracks! TRACK – Repeat the current track! FOLDER – Repeat the current folderUSB audio player/USB memory! TRACK – Repeat the current file! FOLDER – Repeat the current folder! ALL – Repeat all files
Playing tracks in random order1 Press 5/ to turn random play on or off.
Tracks in a selected repeat range are played inrandom order.
Pausing playback1 Press 2/PAUSE to pause or resume.
Enhancing compressed audio and restoring richsound (sound retriever)1 Press 1/S.Rtrv to cycle between:
OFF (off)—1—21 is effective for low compression rates, and 2 iseffective for high compression rates.
Function settings1 Press M.C. to display the main menu.
2 Turn M.C. to change the menu optionand press to select FUNCTION.
3 Turn M.C. to select the function.After selecting, perform the following proce-dures to set the function.
REPEAT (repeat play)
1 Press M.C. to display the setting mode.2 Turn M.C. to select a repeat play range.
For details, refer to Selecting a repeat play range onthis page.
3 Press M.C. to confirm the selection.
RANDOM (random play)
1 Press M.C. to turn random play on or off.
PAUSE (pause)
1 Press M.C. to pause or resume.
S.RTRV (sound retriever)
Automatically enhances compressed audio and re-stores rich sound.1 Press M.C. to display the setting mode.2 Turn M.C. to select the desired setting.
For details, refer to Enhancing compressed audioand restoring rich sound (sound retriever) on thispage.
3 Press M.C. to confirm the selection.
Audio Adjustments1 Press M.C. to display the main menu.
2 Turn M.C. to change the menu optionand press to select AUDIO.
3 Turn M.C. to select the audio function.After selecting, perform the following proce-dures to set the audio function.
FAD/BAL (fader/balance adjustment)
1 Press M.C. to display the setting mode.2 Press M.C. to cycle between fader (front/rear) and
balance (left/right).3 Turn M.C. to adjust speaker balance.
EQUALIZER (equalizer recall)
1 Press M.C. to display the setting mode.2 Turn M.C. to select the equalizer.
DYNAMIC—VOCAL—NATURAL—CUSTOM—
FLAT—POWERFUL3 Press M.C. to confirm the selection.
TONE CTRL (equalizer adjustment)
En8
Section
01 Operating this unit

! Adjusted equalizer curve settings are stored inCUSTOM.
1 Press M.C. to display the setting mode.2 Press M.C. to select BASS (bass)/MID (mid)/TRE-
BLE (treble).3 Turn M.C. to adjust the level.
Adjustment range: +6 to -6
LOUDNESS (loudness)
Loudness compensates for deficiencies in the low-and high-frequency ranges at low volume.1 Press M.C. to display the setting mode.2 Turn M.C. to select the desired setting.
OFF (off)—LOW(low)—HIGH (high)3 Press M.C. to confirm the selection.
SLA (source level adjustment)
SLA (Source Level Adjustment) lets you adjust the vo-lume level of each source to prevent radical changesin volume when switching between sources.! When selecting FM as the source, you cannot
switch to SLA.! Settings are based on the FM volume level, which
remains unchanged.! The AM volume level can also be adjusted with
this function.1 Press M.C. to display the setting mode.2 Turn M.C. to adjust the source volume.
Adjustment range: +4 to –43 Press M.C. to confirm the selection.
Initial Settings1 Press SRC/OFF and hold until the unitturns off.
2 Press M.C. and hold until CLOCK SET ap-pears in the display.
3 Turn M.C. to select the initial setting.After selecting, perform the following proce-dures to set the initial setting.
CLOCK SET (setting the clock)
1 Press M.C. to display the setting mode.2 Press M.C. to select the segment of the clock dis-
play you wish to set.Hour—Minute
3 Turn M.C. to adjust the clock.
AUX (auxiliary input)
Activate this setting when using an auxiliary deviceconnected to this unit.1 Press M.C. to turn AUX on or off.
USB (plug and play)
This setting allows you to switch your source to USBautomatically.1 Press M.C. to turn the plug and play on or off.
ON –When USB storage device is connected, thesource is automatically switched to USB. If youdisconnect your USB storage device, this unit’ssource is turned off.OFF – When USB storage device is connected,the source is not switched to USB automatically.Please change the source to USB manually.
Using an AUX source1 Insert the stereo mini plug into theAUX input jack.
2 Press SRC/OFF to select AUX as thesource.# AUX cannot be selected unless the auxiliarysetting is turned on. For more details, refer toAUX (auxiliary input) on this page.
Displaying the clock% Press CLOCK to turn the clock displayon or off.# The clock display disappears temporarilywhen you perform other operations, but the clockdisplay appears again after 25 seconds.
En 9
English
Section
01Operating this unit

WARNING! Use speakers over 50 W (output value) and be-
tween 4 W to 8 W (impedance value). Do notuse 1 W to 3 W speakers for this unit.
! The black cable is ground. When installingthis unit or power amp (sold separately), makesure to connect the ground wire first. Ensurethat the ground wire is properly connected tometal parts of the car’s body. The ground wireof the power amp and the one of this unit orany other device must be connected to the carseparately with different screws. If the screwfor the ground wire loosens or falls out, itcould result in fire, generation of smoke ormalfunction.
Ground wire
Metal parts of car’s bodyOther devices(Another electronic device in the car)
POWER AMP
Important
! When installing this unit in a vehicle withoutan ACC (accessory) position on the ignitionswitch, failure to connect the red cable to theterminal that detects operation of the ignitionkey may result in battery drain.
ONSTAR
T
OFF
ACC position No ACC position
! Use this unit with a 12-volt battery and nega-tive grounding only. Failure to do so may resultin a fire or malfunction.
! To prevent a short-circuit, overheating or mal-function, be sure to follow the directionsbelow.— Disconnect the negative terminal of the
battery before installation.— Secure the wiring with cable clamps or ad-
hesive tape. Wrap adhesive tape around
wiring that comes into contact with metalparts to protect the wiring.
— Place all cables away from moving parts,such as the gear shift and seat rails.
— Place all cables away from hot places,such as near the heater outlet.
— Do not connect the yellow cable to the bat-tery by passing it through the hole to theengine compartment.
— Cover any disconnected cable connectorswith insulating tape.
— Do not shorten any cables.— Never cut the insulation of the power cable
of this unit in order to share the powerwith other devices. The current capacity ofthe cable is limited.
— Use a fuse of the rating prescribed.— Never wire the negative speaker cable di-
rectly to ground.— Never band together negative cables of
multiple speakers.! When this unit is on, control signals are sent
through the blue/white cable. Connect thiscable to the system remote control of an exter-nal power amp or the vehicle’s auto-antennarelay control terminal (max. 300 mA 12 V DC).If the vehicle is equipped with a glass anten-na, connect it to the antenna booster powersupply terminal.
! Never connect the blue/white cable to thepower terminal of an external power amp.Also, never connect it to the power terminal ofthe auto antenna. Doing so may result in bat-tery drain or a malfunction.
En10
Section
02 Connections

Connection diagram
Connect with RCA cables (sold separately)
Rear output
This product
Antenna jack
Fuse (10 A)
Blue/whiteConnect to system control terminal of the power amp or auto-antenna relay control terminal (max. 300 mA 12 V DC).
YellowConnect to the constant 12 V supply terminal.
RedConnect to terminal controlled by ignition switch (12 V DC).
Black (chassis ground)Connect to a clean, paint-free metal location.
Power amp (sold separately)
System remote control
Left Right
Perform these connections when using the optional amplifier.
Rear speaker Rear speaker
White/black
Violet/black
Violet
With a 2 speaker system, do not connect anything to the speaker leads that are not connected to speakers.
Front speaker Front speaker
White
Gray/black
Gray
Green/black
Green
Rear speaker Rear speaker
En 11
English
Section
02Connections
Important
! Check all connections and systems beforefinal installation.
! Do not use unauthorized parts as this maycause malfunctions.
! Consult your dealer if installation requires dril-ling of holes or other modifications to the vehi-cle.
! Do not install this unit where:— it may interfere with operation of the vehi-
cle.— it may cause injury to a passenger as a re-
sult of a sudden stop.! The semiconductor laser will be damaged if it
overheats. Install this unit away from hotplaces such as near the heater outlet.
! Optimum performance is obtained when theunit is installed at an angle of less than 60°.
60°
DIN front/rear mountThis unit can be properly installed using eitherfront-mount or rear-mount installation.
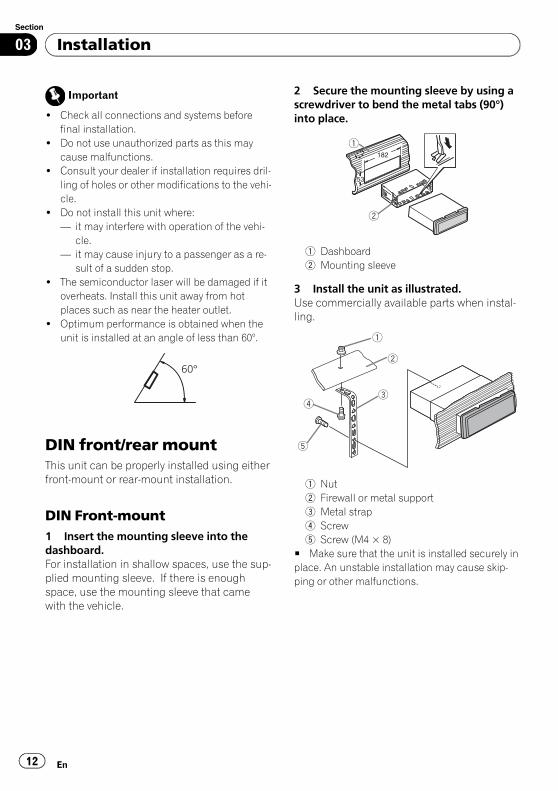
DIN Front-mount1 Insert the mounting sleeve into thedashboard.For installation in shallow spaces, use the sup-plied mounting sleeve. If there is enoughspace, use the mounting sleeve that camewith the vehicle.
2 Secure the mounting sleeve by using ascrewdriver to bend the metal tabs (90°)into place.
1
2
1 Dashboard2 Mounting sleeve
3 Install the unit as illustrated.Use commercially available parts when instal-ling.
1
2
34
5
1 Nut2 Firewall or metal support3 Metal strap4 Screw5 Screw (M4 × 8)
# Make sure that the unit is installed securely inplace. An unstable installation may cause skip-ping or other malfunctions.
En12
Section
03 Installation

DIN Rear-mount1 Determine the appropriate positionwhere the holes on the bracket and theside of the unit match.
2 Tighten two screws on each side.
1
2
3
1 Mounting sleeve2 Mounting bracket3 Dashboard or console
Use either truss (5 mm × 8 mm) or flush sur-face (5 mm × 9 mm) screws, depending onthe bracket screw holes.
Removing the unit1 Remove the trim ring.
1
1 Trim ring! Releasing the front panel allows easier ac-
cess to the trim ring.! When reattaching the trim ring, point the
side with the groove down.
2 Insert the supplied extraction keys intoboth sides of the unit until they click intoplace.
3 Pull the unit out of the dashboard.
Securing the front panelThe front panel can be secured with the sup-plied screw.
1
1 Screw
Speaker installation1 1
2 3
Front
1 45°2 4.3 mm holes (3/16 in. Dia.)3 f 142 mm (5-5/8 in. Dia.)
En 13
English
Section
03Installation

1 2
3 4 5 6
7
Side
1 13 mm (1/2 in.)2 42 mm (1-5/8 in.)3 f 171 mm (6-3/4 in. Dia.)4 f 75 mm (3 in. Dia.)5 f 128 mm (5 in. Dia.)6 f 158 mm (6-1/4 in. Dia.)7 30 mm (1-3/16 in.)
1 Determine the location of the speakeras illustrated.
2 Make holes as illustrated. (If needed,remove the door upholstery.)
1
2
1 f 4.5 (3/16 Dia.)2 f 128 mm (5 in. Dia.)
3 Remove the mesh from the grille.
En14
Section
03 Installation

4 Install the speakers as illustrated.
1
2
1
2
3
1 22
1
1 Speed nut2 Tapping-screws (4 mm × 18 mm)3 Cable (gray or white)
En 15
English
Section
03Installation

Troubleshooting
Symptom Cause Action
The displayautomaticallyreturns to theordinary dis-play.
You did not per-form any opera-tion within about30 seconds.
Perform operationagain.
The repeat playrange changesunexpectedly.
Depending onthe repeat playrange, the se-lected range maychange when se-lecting anotherfolder or track, orwhen fast for-warding/rever-sing.
Select the repeatplay range again.
A subfolder isnot playedback.
Subfolders can-not be playedwhen FOLDER(folder repeat) isselected.
Select another re-peat play range.
NO XXXX ap-pears when adisplay is chan-ged (NO TITLE,for example).
There is no textinformation em-bedded.
Switch the displayor play anothertrack/file.
The unit is mal-functioning.There is inter-ference.
You are using adevice, such as acellular phone,that transmitselectromagneticwaves near theunit.
Move electrical de-vices that may becausing the inter-ference away fromthe unit.
Error messagesWhen you contact your dealer or your nearestPioneer Service Center, be sure to note theerror message.
Built-in CD Player
Message Cause Action
ERROR-11, 12,17, 30
The disc is dirty. Clean the disc.
The disc isscratched.
Replace the disc.
Message Cause Action
ERROR-10, 11,12, 15, 17, 30,A0
There is an elec-trical or mechan-ical error.
Turn the ignitionswitch OFF andback ON, or switchto a differentsource, then backto the CD player.
ERROR-15 The inserted discis blank
Replace the disc.
ERROR-22, 23 Unsupported CDformat
Replace the disc.
FRMT READ Sometimes thereis a delay be-tween the start ofplayback andwhen you start tohear any sound.
Wait until the mes-sage disappearsand you hearsound.
NO AUDIO The inserted discdoes not containany playablefiles.
Replace the disc.
SKIPPED The inserted disccontains DRMprotected WMAfiles.
Replace the disc.
PROTECT All the files onthe inserted discare embeddedwith DRM.
Replace the disc.
USB storage device
Message Cause Action
NO DEVICE When plug andplay is off, noUSB storage de-vice is con-nected.
! Turn the plugand play on.! Connect a com-patible USB sto-rage device.
FRMT READ Sometimes thereis a delay be-tween the start ofplayback andwhen you start tohear any sound.
Wait until the mes-sage disappearsand you hearsound.
NO AUDIO There are nosongs.
Transfer the audiofiles to the USBstorage device andconnect.
The connectedUSB storage de-vice has securityenabled
Follow the USBstorage device in-structions to dis-able the security.
En16
Appendix
Additional Information
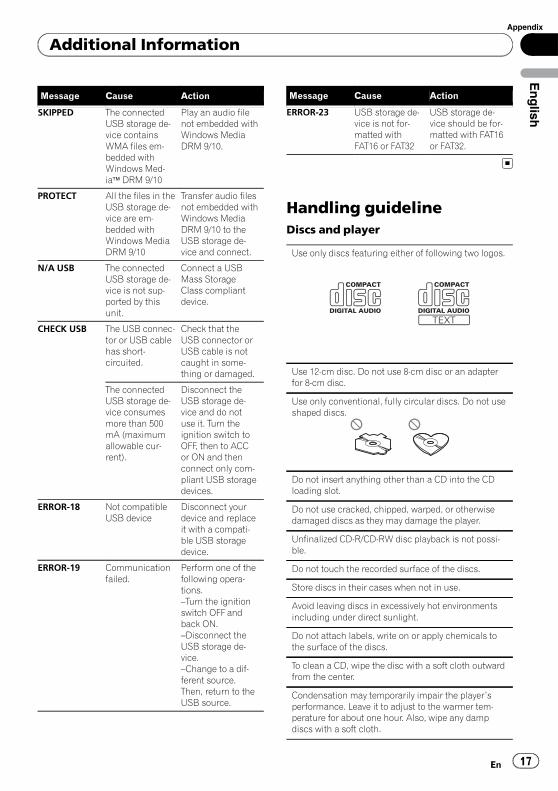
Message Cause Action
SKIPPED The connectedUSB storage de-vice containsWMA files em-bedded withWindows Med-iaä DRM 9/10
Play an audio filenot embedded withWindows MediaDRM 9/10.
PROTECT All the files in theUSB storage de-vice are em-bedded withWindows MediaDRM 9/10
Transfer audio filesnot embedded withWindows MediaDRM 9/10 to theUSB storage de-vice and connect.
N/A USB The connectedUSB storage de-vice is not sup-ported by thisunit.
Connect a USBMass StorageClass compliantdevice.
CHECK USB The USB connec-tor or USB cablehas short-circuited.
Check that theUSB connector orUSB cable is notcaught in some-thing or damaged.
The connectedUSB storage de-vice consumesmore than 500mA (maximumallowable cur-rent).
Disconnect theUSB storage de-vice and do notuse it. Turn theignition switch toOFF, then to ACCor ON and thenconnect only com-pliant USB storagedevices.
ERROR-18 Not compatibleUSB device
Disconnect yourdevice and replaceit with a compati-ble USB storagedevice.
ERROR-19 Communicationfailed.
Perform one of thefollowing opera-tions.–Turn the ignitionswitch OFF andback ON.–Disconnect theUSB storage de-vice.–Change to a dif-ferent source.Then, return to theUSB source.
Message Cause Action
ERROR-23 USB storage de-vice is not for-matted withFAT16 or FAT32
USB storage de-vice should be for-matted with FAT16or FAT32.
Handling guidelineDiscs and player
Use only discs featuring either of following two logos.
Use 12-cm disc. Do not use 8-cm disc or an adapterfor 8-cm disc.
Use only conventional, fully circular discs. Do not useshaped discs.
Do not insert anything other than a CD into the CDloading slot.
Do not use cracked, chipped, warped, or otherwisedamaged discs as they may damage the player.
Unfinalized CD-R/CD-RW disc playback is not possi-ble.
Do not touch the recorded surface of the discs.
Store discs in their cases when not in use.
Avoid leaving discs in excessively hot environmentsincluding under direct sunlight.
Do not attach labels, write on or apply chemicals tothe surface of the discs.
To clean a CD, wipe the disc with a soft cloth outwardfrom the center.
Condensation may temporarily impair the player’sperformance. Leave it to adjust to the warmer tem-perature for about one hour. Also, wipe any dampdiscs with a soft cloth.
En 17
English
Appendix
Additional Information

Playback of discs may not be possible because ofdisc characteristics, disc format, recorded applica-tion, playback environment, storage conditions, andso on.
Road shocks may interrupt disc playback.
Read the precautions for discs before using them.
USB storage device
Address any questions you have about your USB sto-rage device to the manufacturer of the device.
Connections via USB hub are not supported.
Do not connect anything other than a USB storagedevice.
Do not leave the USB storage device in any place withhigh temperatures.
Firmly secure the USB storage device when driving.Do not let the USB storage device fall onto the floor,where it may become jammed under the brake or ac-celerator pedal.
Depending on the USB storage device, the devicemay cause noise to occur on the radio.! Operations may vary.! The storage device may not be recognized.! Files may not be played back properly.! The device may generate noise in the radio.
DualDiscs
DualDiscs are two-sided discs that have a recordableCD for audio on one side and a recordable DVD forvideo on the other.Since the CD side of DualDiscs is not physically com-patible with the general CD standard, it may not bepossible to play the CD side with this unit.Frequent loading and ejecting of a DualDisc may re-sult in scratches on the disc. Serious scratches canlead to playback problems on this unit. In somecases, a DualDisc may become stuck in the disc load-ing slot and will not eject. To prevent this, we recom-mend you refrain from using DualDisc with this unit.Please refer to the information from the disc manu-facturer for more detailed information about Dual-Discs.
Compressed audiocompatibility (disc, USB)WMA
File extension: .wma
Bit rate: 48 kbps to 320 kbps (CBR), 48 kbps to 384kbps (VBR)
Sampling frequency: 32 kHz, 44.1 kHz, 48 kHz
Windows Media Audio Professional, Lossless, Voice/DRM Stream/Stream with video: No
MP3
File extension: .mp3
Bit rate: 8 kbps to 320 kbps
Sampling frequency: 16 kHz to 48 kHz (32, 44.1, 48kHz for emphasis)
Compatible ID3 tag version: 1.0, 1.1, 2.2, 2.3, 2.4 (ID3tag Version 2.x is given priority over Version 1.x.)
M3u playlist: No
MP3i (MP3 interactive), mp3 PRO: No
WAV
File extension: .wav
Quantization bits: 8 and 16 (LPCM), 4 (MS ADPCM)
Sampling frequency: 16 kHz to 48 kHz (LPCM), 22.05kHz and 44.1 kHz (MS ADPCM)
Supplemental information
Only the first 32 characters can be displayed as a filename (including the file extension) or a folder name.
This unit may not operate correctly depending on theapplication used to encode WMA files.
There may be a slight delay when starting playback ofaudio files embedded with image data.
Disc
Playable folder hierarchy: up to eight tiers (A practicalhierarchy is less than two tiers.)
Playable folders: up to 99
En18
Appendix
Additional Information

Playable files: up to 999
File system: ISO 9660 Level 1 and 2, Romeo, Joliet
Multi-session playback: Yes
Packet write data transfer: No
Regardless of the length of blank section between thesongs of the original recording, compressed audiodiscs play with a short pause between songs.
USB storage device
Playable folder hierarchy: up to eight tiers (A practicalhierarchy is less than two tiers.)
Playable folders: up to 500
Playable files: up to 15 000
Playback of copyright protected files: No
Partitioned USB storage device: Only the first partitioncan be played.
There may be a slight delay when starting playback ofaudio files on a USB storage device with numerousfolder hierarchies.
CAUTIONPioneer accepts no responsibility for data lost onthe USB storage device even if that data is lostwhile using this unit.
Sequence of audio filesThe user cannot assign folder numbers andspecify playback sequences with this unit.
Example of a hierarchy
�
�
�
��
Level 1 Level 2 Level 3 Level 4
0102
03
04
05
: Folder: Compressed
audio file01 to 05: Foldernumber1 to6: Playbacksequence
DiscFolder selection sequence or other operationmay differ depending on the encoding or writ-ing software.
USB storage devicePlayback sequence is the same as recordedsequence in the USB storage device.To specify the playback sequence, the follow-ing method is recommended.1 Create the file name including numbers that
specify the playback sequence (e.g., 001xxx.mp3 and 099yyy.mp3).
2 Put those files into a folder.3 Save the folder containing files on the USB
storage device.However, depending on the system environ-ment, you may not be able to specify the play-back sequence.For USB portable audio players, the sequenceis different and depends on the player.
Copyright and trademarkiTunesApple and iTunes are trademarks of AppleInc., registered in the U.S. and other coun-tries.
MP3Supply of this product only conveys a licensefor private, non-commercial use and does notconvey a license nor imply any right to usethis product in any commercial (i.e. revenue-generating) real time broadcasting (terrestrial,satellite, cable and/or any other media), broad-casting/streaming via internet, intranets and/or other networks or in other electronic con-tent distribution systems, such as pay-audio oraudio-on-demand applications. An indepen-dent license for such use is required. For de-tails, please visithttp://www.mp3licensing.com.
En 19
English
Appendix
Additional Information

WMA
Windows Media and the Windows logo are tra-demarks or registered trademarks of MicrosoftCorporation in the United States and/or othercountries.This product includes technology owned byMicrosoft Corporation and cannot be used ordistributed without a license from MicrosoftLicensing, Inc.
SpecificationsGeneralPower source .............................14.4 V DC (10.8 V to 15.1 V
allowable)Grounding system ...................Negative typeMaximum current consumption
.....................................................10.0 ADimensions (W × H × D):
DINChassis .....................178 mm × 50 mm × 165
mm(7 in. × 2 in. × 6-1/2 in.)
Nose ...........................188 mm × 58 mm × 24 mm(7-3/8 in.× 2-1/4 in.× 1 in.)
DChassis .....................178 mm × 50 mm × 165
mm(7 in.× 2 in.× 6-1/2 in.)
Nose ...........................170 mm × 48 mm × 24 mm(6-3/4 in.× 1-7/8 in.× 1 in.)
Weight ..........................................1.3 kg (2.9 lbs)
AudioMaximum power output .......50 W × 4Continuous power output ...22 W × 4 (50 Hz to 15 000
Hz, 5 % THD, 4 W load, bothchannels driven)
Load impedance ......................4 W (4 W to 8 W allowable)Preout maximum output level
.....................................................2.0 V
Tone controls:Bass
Frequency ................100 HzGain ............................±12 dB
MidFrequency ................1 kHzGain ............................±12 dB
TrebleFrequency ................10 kHzGain ............................±12 dB
CD playerSystem ..........................................Compact disc audio systemUsable discs ..............................Compact discSignal-to-noise ratio ...............94 dB (1 kHz) (IHF-A net-
work)Number of channels ..............2 (stereo)WMA decoding format .........Ver. 7, 7.1, 8, 9, 10, 11 (2ch
audio)(Windows Media Player)
MP3 decoding format ...........MPEG-1 & 2 Audio Layer 3WAV signal format ..................Linear PCM & MS ADPCM
(Non-compressed)
USBUSB standard specification
.....................................................USB 2.0 full speedMaximum current supply ....500 mAMinimum memory capacity
.....................................................256 MBUSB Class ...................................MSC (Mass Storage Class)File system ..................................FAT16, FAT32WMA decoding format .........Ver. 7, 7.1, 8, 9, 10, 11 (2ch
audio)(Windows Media Player)
MP3 decoding format ...........MPEG-1 & 2 Audio Layer 3WAV signal format ..................Linear PCM & MS ADPCM
(Non-compressed)
FM tunerFrequency range ......................87.9 MHz to 107.9 MHzUsable sensitivity .....................11 dBf (0.7 µV/75 W, mono,
S/N: 30 dB)Signal-to-noise ratio ...............72 dB (IHF-A network)
AM tunerFrequency range ......................530 kHz to 1 710 kHzUsable sensitivity .....................25 µV (S/N: 20 dB)Signal-to-noise ratio ...............62 dB (IHF-A network)
SpeakerReproduction system ............Coaxial two wayWoofer ..........................................f 158 mm (6-1/4 in. Dia.)
Water-resistant
En20
Appendix
Additional Information

Injection-molded polypropylene coneHigh compliance, rolled edgeHeat-resistant voice coilMagnet: 170 g (6 oz)
Tweeter ..........................................f30 mm (1-3/16 in. Dia.) PEIdome
Magnetic fluidNeodymium magnet 2.1 g (0.07 oz)
Sensitivity ....................................90 dB (±1.5 dB)Frequency response ...............40 Hz to 30 kHz (–20 dB)Nominal impedance ..............4 WMaximum music power .......180 WNominal power .........................30 WGrille material ............................Steel net, heat-proof resinWeight (per speaker including accessory parts)
.....................................................0.71 kg (1 lb 9 oz)
CEA2006 Specifications
Power output .............................14 W RMS × 4 Channels (4W and ≦ 1 % THD+N)
S/N ratio .......................................91 dBA (reference: 1 W into4 W)
Parts includedHead unit
Head unit ...........................1Power cable ......................1Mounting sleeve ............1Screw ..................................1
SpeakerSpeaker ..............................4Tapping screw (4 mm × 18 mm)
...........................................16Speed nut ..........................16Speaker cable (white)
...........................................2Speaker cable (gray) ....2
Note
Specifications and the design are subject to mod-ifications without notice.
En 21
English
Appendix
Additional Information

Gracias por haber adquirido este producto PIONEER.Lea con detenimiento este manual antes de utilizar el producto por primera vezpara que pueda darle el mejor uso posible. Es muy importante que lea y observelas ADVERTENCIAS y PRECAUCIONES de este manual. Una vez leído, guardeel manual en un lugar seguro y a mano para que pueda consultarlo en el futuro.
Antes de comenzarAcerca de esta unidad 23Servicio posventa para productos
Pioneer 23En caso de problemas 23Visite nuestro sitio Web 23
Utilización de esta unidadUnidad principal 25Indicaciones de pantalla 25Funciones básicas 25Las operaciones del menú son idénticas para
los ajustes de función/ajustes de audio/ajustes iniciales/listas 26
Sintonizador 26CD/CD-R/CD-RW y dispositivos de
almacenamiento USB 27Ajustes de audio 29Ajustes iniciales 30Uso de una fuente AUX 30Visualización del reloj 30
ConexionesDiagrama de conexión 32
InstalaciónMontaje delantero/posterior DIN 33Fijación del panel delantero 34Instalación de los altavoces 34
Información adicionalSolución de problemas 37Mensajes de error 37Pautas para el manejo 39Compatibilidad con audio comprimido
(disco, USB) 40Secuencia de archivos de audio 40Copyright y marca registrada 41Especificaciones 41
Índice
Es22

Acerca de esta unidadLas frecuencias del sintonizador de esta uni-dad están asignadas para su uso en Américadel norte. El uso en otras áreas puede causaruna recepción deficiente.
PRECAUCIÓN! No permita que esta unidad entre en contacto
con líquidos, ya que puede producir una des-carga eléctrica. Además, el contacto con líqui-dos puede causar daños en la unidad, humo yrecalentamiento.
! Mantenga siempre el volumen lo suficiente-mente bajo como para poder escuchar los so-nidos que provienen del exterior.
! Evite la exposición a la humedad.! Si se desconecta o se descarga la batería,
cualquier memoria preajustada se borrará.
PRECAUCIÓN1 No se debe tocar el alambre flexible1 del al-
tavoz.2 No cambiar la dirección del ensamblaje de
terminal del altavoz2.3 Asegurarse de que los terminales del altavoz y
el hilo conductor no están en contecto comel metal.
4 Para hacer la conexión consultar también elmanual de instrucciones que se provee parael “reproductor”.
1
2
Servicio posventa paraproductos PioneerPóngase en contacto con el concesionario odistribuidor al que compró esta unidad paraobtener el servicio posventa (incluidas las con-
diciones de garantía) o cualquier otra informa-ción. En caso de que no esté disponible lainformación necesaria, póngase en contactocon las empresas enumeradas abajo.No envíe su producto para su reparación a lasempresas cuyas direcciones se indican abajosin haberse puesto antes en contacto conellas.
EE.UU.Pioneer Electronics (USA) Inc.CUSTOMER SUPPORT DIVISIONP.O. Box 1760Long Beach, CA 90801-1760800-421-1404CANADÁPioneer Electronics of Canada, Inc.CUSTOMER SATISFACTION DEPARTMENT300 Allstate ParkwayMarkham, Ontario L3R 0P21-877-283-5901905-479-4411
Para obtener información sobre la garantía,véase la hoja de Garantía limitada adjunta aeste producto.
En caso de problemasEn caso de que esta unidad no funcione co-rrectamente, póngase en contacto con su con-cesionario o con el centro de servicioPIONEER autorizado más cercano.
Visite nuestro sitio Webhttp://www.pioneerelectronics.comen Canadáhttp://www.pioneerelectronics.ca! Infórmese de las últimas actualizaciones
(por ejemplo, acutalizaciones de firmware)para su producto.
Es 23
PresecciónEsp
añol
Antes de comenzar

! Registre su producto para recibir informa-ción sobre acualizaciones del producto ypara mantener la seguridad de los detallesde su compra en nuestros archivos en casode pérdida o robo.
! Acceso a manuales del propietario, infor-mación sobre piezas de recambio y muchomás.
Es24
Presección
Antes de comenzar

Unidad principal
� ��� � ����
���������
��� ��������
����
���
Parte Parte
1 DISP/ /SCRL 8Conector de entra-da AUX (conectorestéreo de 3,5 mm)
2 SRC/OFF 9 Puerto USB
3MULTI-CONTROL(M.C.)
a (lista)
4Ranura de carga dediscos
b 1 a 6
5 h (expulsar) c a/b/c/d
6 CLOCK d BAND/ESC
7 Botón de soltar
PRECAUCIÓNUtilice un cable USB Pioneer opcional (CD-U50E)para conectar el reproductor de audio USB / me-moria USB, ya que cualquier dispositivo conec-tado directamente a la unidad sobresaldrá deésta y podría resultar peligroso.No utilice productos no autorizados.
Indicaciones de pantalla�
�
��
�
� ��
�
�
Indicador Estado
1 (disco)Se muestra el nombre del disco(álbum).
2 (artista)Se muestra el nombre del artistadel disco (pista).
3
Secciónprincipalde la pan-talla
! Sintonizador: banda y fre-cuencia
! Reproductor de CD incorpora-do y USB: tiempo de repro-ducción transcurrido einformación de texto
4(can-
ción)
Se muestra el nombre de la pista(canción).Se ha seleccionado un archivo deaudio reproducible mientras seexaminaba la lista.
5 cExiste un nivel, carpeta o menúsuperior.
6(carpe-
ta)Se está utilizando la función de lalista.
7 dExiste un nivel, carpeta o menúinferior.
8 LOCLa sintonización por búsquedalocal está activada.
9LOUD
(sonoridad)La sonoridad está activada.
a5 (esté-reo)
La frecuencia seleccionada seestá transmitiendo en estéreo.
b(repeti-
ción)La repetición de carpeta o pistaestá activada.
c(aleato-
rio)La reproducción aleatoria está ac-tivada.
d (Sound Re-triever)
La función Sound Retriever (res-tauración del sonido) está activa-da.
Funciones básicas
Importante
! Proceda con cuidado al retirar o colocar elpanel delantero.
Es 25
SecciónEsp
añol
01Utilización de esta unidad

! Evite someter el panel delantero a impactosexcesivos.
! Mantenga el panel delantero fuera del alcan-ce de la luz solar directa y no lo exponga atemperaturas elevadas.
! Para evitar que el dispositivo o el interior delvehículo sufran daños, extraiga cualquiercable o dispositivo conectado al panel delan-tero antes de extraerlo.
Extracción del panel delantero para proteger la uni-dad contra robo1 Pulse el botón de soltar para liberar el panel de-
lantero.2 Sujete el panel delantero y extráigalo.
! Mantenga siempre el panel delantero que seha extraído en su medio de protección, comopor ejemplo su caja protectora.
Colocación del panel delantero1 Deslice el panel delantero hacia la izquierda
hasta que oiga un chasquido.El panel delantero y la unidad principal están co-nectados por el lado izquierdo. Asegúrese de queel panel delantero está conectado correctamentea la unidad principal.
2 Pulse el lado derecho del panel delantero hastaque se asiente firmemente.Si no puede volver a colocar el panel delantero ala unidad principal, inténtelo de nuevo. Sin em-bargo, si intenta forzar el panel delantero para fi-jarlo, puede que éste se acabe dañando.
Encendido de la unidad1 Pulse SRC/OFF para encender la unidad.
Apagado de la unidad1 Mantenga pulsado SRC/OFF hasta que la unidad
se apague.
Selección de una fuente1 Pulse SRC/OFF para desplazarse entre:
TUNER (sintonizador)—CD (reproductor de CDincorporado)—USB (USB)—AUX (AUX)
Ajuste del volumen1 Haga girar M.C. para ajustar el volumen.
Nota
Si el cable azul/blanco de esta unidad está conec-tado al terminal de control del relé de la antenaautomática del vehículo, la antena se extiendecuando se enciende el equipo. Para retraer la an-tena, apague la fuente.
Las operaciones del menúson idénticas para los ajustesde función/ajustes de audio/ajustes iniciales/listas
Para volver a la visualización anteriorPara volver a la lista anterior (la carpeta de un nivelsuperior)1 Pulse DISP/ /SCRL.
Para volver al menú principalPara volver al nivel superior de la lista1 Mantenga pulsado DISP/ /SCRL.
Para volver a la visualización normalPara cancelar el menú de ajustes iniciales1 Pulse BAND/ESC.
Para volver a la visualización normal desde la lista1 Pulse BAND/ESC o .
SintonizadorFunciones básicas
Selección de una banda1 Pulse BAND/ESC hasta que se visualice la banda
deseada (F1, F2, F3 para FM o AM).
Sintonización manual (paso a paso)1 Pulse c o d.
Búsqueda1 Mantenga pulsado c o d y luego suéltelo.
Se puede cancelar la sintonización por búsquedapulsando brevemente c o d.Al mantener pulsado c o d se pueden saltar lasemisoras. La sintonización por búsqueda comien-za inmediatamente después de que suelte c o d.
Es26
Sección
01 Utilización de esta unidad

Almacenamiento y recuperaciónde emisoras para cada bandaSe pueden almacenar con facilidad hasta seisemisoras presintonizadas por banda.
% Cuando encuentre la emisora quedesea almacenar en la memoria, pulse unode los botones de ajuste de presintonías (1a 6) y manténgalo pulsado hasta que el nú-mero de presintonía deje de parpadear.Una frecuencia de emisora de radio almace-nada se puede recuperar pulsando el botón deajuste de presintonías.# También se pueden recuperar las emisoras deradio almacenadas pulsando a o b durante la vi-sualización de frecuencias.
Ajustes de funciones1 Pulse M.C. para acceder al menú princi-pal.
2 Haga girar M.C. para cambiar la opciónde menú y pulse para seleccionarFUNCTION.
3 Gire M.C. para seleccionar la función.Una vez seleccionada, siga los siguientespasos para ajustar la función:
BSM (memoria de las mejores emisoras)
BSM (memoria de las mejores emisoras) guardaautomáticamente las seis emisoras más fuertes orde-nadas por la intensidad de la señal.1 PulseM.C. para activar la función BSM.
Para cancelar, vuelva a pulsar M.C.
LOCAL (sintonización por búsqueda local)
La sintonización por búsqueda local le permite sinto-nizar sólo las emisoras de radio con señales lo sufi-cientemente intensas como para asegurar unacorrecta recepción.1 PulseM.C. para mostrar el modo de ajuste.2 Gire M.C. para seleccionar el ajuste deseado.
FM: OFF—LEVEL 1—LEVEL 2—LEVEL 3—LEVEL4AM: OFF—LEVEL 1—LEVEL 2El ajuste de nivel superior sólo permite recibir lasemisoras con las señales más intensas, mientrasque los ajustes más bajos permiten recibir lasemisoras con señales más débiles de manera pro-gresiva.
3 PulseM.C. para confirmar la selección.
CD/CD-R/CD-RW y dispositivosde almacenamiento USBFunciones básicas
Reproducción de un CD/CD-R/CD-RW1 Inserte el disco en la ranura de carga de discos
con el lado de la etiqueta hacia arriba.
Expulsión de un CD/CD-R/CD-RW1 Pulse h.
Reproducción de canciones de un dispositivo de al-macenamiento USB1 Abra la tapa del conector USB y conecte el dispo-
sitivo de almacenamiento USB mediante uncable USB.
Detención de la reproducción de archivos en un dis-positivo de almacenamiento USB1 Puede desconectar el dispositivo de almacena-
miento USB en cualquier momento.
Selección de una carpeta1 Pulse a o b.
Selección de una pista1 Pulse c o d.
Avance rápido o retroceso1 Mantenga pulsado c o d.
Es 27
SecciónEsp
añol
01Utilización de esta unidad

Regreso a la carpeta raíz1 Mantenga pulsado BAND/ESC.
Cambio entre audio comprimido y CD-DA1 Pulse BAND/ESC.
Notas
! Al reproducir audio comprimido, no hay soni-do durante el avance rápido o el retroceso.
! Desconecte los dispositivos de almacena-miento USB de la unidad cuando no los utili-ce.
Visualización de informaciónde texto
Selección de la información de texto deseada1 Pulse DISP/ /SCRL.
Discos CD TEXT: tiempo de reproducción—títu-lo del disco—nombre del artista del disco—títulode la pista—nombre del artista de la pistaWMA/MP3: tiempo de reproducción—nombrede la carpeta—nombre del archivo—título de lapista—nombre del artista—título del álbum—co-mentarios—velocidad de grabación—númerosde carpeta y pistaWAV: tiempo de reproducción—nombre de lacarpeta—nombre de archivo—frecuencia demuestreo—números de carpeta y pista
Desplazamiento de la información de texto a la iz-quierda1 Mantenga pulsado DISP/ /SCRL.
Nota
Según la versión de iTunes utilizada para grabararchivos MP3 en un disco u otro tipo de archivosde medios, es posible que los textos contenidosen el archivo de audio no se muestren correcta-mente si su formato es incompatible.
Selección y reproducción dearchivos/pistas de la lista denombres1 Pulse para cambiar al modo de listapor nombre de archivo/pista.
2 Utilice M.C. para seleccionar el nombredel archivo o carpeta deseado.
Cambio del nombre del archivo o la carpeta1 Haga girar M.C.
Reproducción1 Tras seleccionar un archivo o una pista, pulse M.
C.
Visualización de una lista de los archivos (o las carpe-tas) de la carpeta seleccionada1 Tras seleccionar una carpeta, pulse M.C.
Reproducción de una canción de la carpeta seleccio-nada1 Tras seleccionar una carpeta, mantenga pulsado
M.C.
Operaciones avanzadas medianteel uso de botones especiales
Selección de una gama de repetición de reproduc-ción1 Pulse 6/ para desplazarse entre las siguientes
opciones:CD/CD-R/CD-RW! DISC – Repite todas las pistas! TRACK – Repite la pista actual! FOLDER – Repite la carpeta actualReproductor de audio USB/memoria USB! TRACK – Repite el archivo actual! FOLDER – Repite la carpeta actual! ALL – Repite todos los archivos
Reproducción de las pistas en orden aleatorio1 Pulse 5/ para activar o desactivar la reproduc-
ción aleatoria.Las pistas de una gama de repetición selecciona-da se reproducen en orden aleatorio.
Pausa de la reproducción1 Pulse 2/PAUSE para pausar o reanudar.
Mejora del audio comprimido y restauración del soni-do óptimo (Sound Retriever)1 Pulse 1/S.Rtrv para desplazarse entre:
OFF (desactivado)—1—21 es efectivo para tasas de compresión baja, y 2para tasas de compresión alta.
Es28
Sección
01 Utilización de esta unidad

Ajustes de funciones1 Pulse M.C. para acceder al menú princi-pal.
2 Haga girar M.C. para cambiar la opciónde menú y pulse para seleccionarFUNCTION.
3 Gire M.C. para seleccionar la función.Una vez seleccionada, siga los siguientespasos para ajustar la función:
REPEAT (repetición de reproducción)
1 PulseM.C. para mostrar el modo de ajuste.2 Haga girar M.C. para seleccionar una gama de re-
petición de reproducción.Para obtener más información, consulte Selecciónde una gama de repetición de reproducción en lapágina anterior.
3 PulseM.C. para confirmar la selección.
RANDOM (reproducción aleatoria)
1 PulseM.C. para activar o desactivar la reproduc-ción aleatoria.
PAUSE (pausa)
1 PulseM.C. para pausar o reanudar.
S.RTRV (Sound Retriever)
Mejora automáticamente el audio comprimido y res-taura el sonido óptimo.1 PulseM.C. para mostrar el modo de ajuste.2 Gire M.C. para seleccionar el ajuste deseado.
Para obtener más información, consulte Mejoradel audio comprimido y restauración del sonido óp-timo (Sound Retriever) en la página anterior.
3 PulseM.C. para confirmar la selección.
Ajustes de audio1 Pulse M.C. para acceder al menú princi-pal.
2 Haga girar M.C. para cambiar la opciónde menú y pulse para seleccionar AUDIO.
3 Haga girar M.C. para seleccionar la fun-ción de audio.Una vez seleccionada, siga los siguientespasos para ajustar la función de audio:
FAD/BAL (ajuste del fader/balance)
1 PulseM.C. para mostrar el modo de ajuste.2 PulseM.C. para cambiar entre fader (delantero/
trasero) y balance (izquierdo/derecho).3 Gire M.C. para ajustar el balance entre los altavo-
ces.
EQUALIZER (recuperación de ecualizador)
1 PulseM.C. para mostrar el modo de ajuste.2 Haga girar elM.C. para seleccionar el ecualiza-
dor.DYNAMIC—VOCAL—NATURAL—CUSTOM—
FLAT—POWERFUL3 PulseM.C. para confirmar la selección.
TONE CTRL (ajuste de ecualizador)
! Los ajustes de la curva de ecualización configura-dos se almacenan en CUSTOM.
1 PulseM.C. para mostrar el modo de ajuste.2 PulseM.C. para seleccionar BASS (graves)/MID
(medios)/TREBLE (agudos).3 Haga girar M.C. para ajustar el nivel.
Gama de ajuste: +6 a -6
LOUDNESS (sonoridad)
La sonoridad compensa las deficiencias en lasgamas de frecuencias bajas y altas cuando se escu-cha a un volumen bajo.1 PulseM.C. para mostrar el modo de ajuste.2 Gire M.C. para seleccionar el ajuste deseado.
OFF (desactivado)—LOW (bajo)—HIGH (alto)3 PulseM.C. para confirmar la selección.
Es 29
SecciónEsp
añol
01Utilización de esta unidad

SLA (ajuste del nivel de fuente)
SLA (ajuste del nivel de fuente) le permite ajustar elnivel de volumen de cada fuente para evitar cambiosradicales en el volumen cuando se cambia entre lasfuentes.! Al seleccionar FM como fuente, no se puede cam-
biar a SLA.! Los ajustes se basan en el nivel de volumen de
FM, que se mantiene inalterado.! El nivel del volumen de AM también se puede
ajustar con esta función.1 PulseM.C. para mostrar el modo de ajuste.2 Haga girar M.C. para ajustar el volumen de la
fuente.Gama de ajuste: +4 a –4
3 PulseM.C. para confirmar la selección.
Ajustes iniciales1 Mantenga pulsado SRC/OFF hasta quela unidad se apague.
2 Mantenga pulsado M.C. hasta queCLOCK SET aparezca en la pantalla.
3 Haga girar M.C. para seleccionar el ajus-te inicial.Una vez seleccionada, siga los siguientespasos para configurar el ajuste inicial:
CLOCK SET (ajuste del reloj)
1 PulseM.C. para mostrar el modo de ajuste.2 PulseM.C. para seleccionar el segmento de la
pantalla del reloj que desea ajustar.Hora—Minuto
3 Haga girar M.C. para ajustar el reloj.
AUX (entrada auxiliar)
Active este ajuste si utiliza un dispositivo auxiliar co-nectado a esta unidad.1 PulseM.C. para activar o desactivar la función
AUX.
USB (plug and play)
Este ajuste permite cambiar la fuente a USB automá-ticamente.1 PulseM.C. para activar o desactivar plug and
play.ON – Cuando el dispositivo de almacenamientoUSB está conectado, la fuente cambia automáti-camente a USB. Si desconecta su dispositivo dealmacenamiento USB, la fuente de esta unidadse apagará.OFF – Cuando el dispositivo de almacenamientoUSB está conectado, la fuente no cambia auto-máticamente a USB. Cambie la fuente a USB ma-nualmente.
Uso de una fuente AUX1 Inserte el miniconector estéreo en el co-nector de entrada AUX.
2 Pulse SRC/OFF para seleccionar AUXcomo fuente.# No se puede seleccionar AUX si no se activael ajuste auxiliar. Para obtener más información,consulte AUX (entrada auxiliar) en esta página.
Visualización del reloj% Pulse CLOCK para activar o desactivarla visualización del reloj.# La visualización del reloj desaparece momen-táneamente cuando se utilizan otras funciones,pero vuelve a aparecer después de 25segundos.
Es30
Sección
01 Utilización de esta unidad

ADVERTENCIA! Utilice altavoces de más de 50 W (valor de sa-
lida) y de entre 4 W y 8 W (valor de impedan-cia). No utilice altavoces de 1 W a 3 W con estaunidad.
! El cable negro es el cable a tierra. Cuando ins-tale esta unidad o el amplificador de potencia(vendido por separado), siempre conecte pri-mero el cable a tierra. Compruebe que elcable de tierra está conectado adecuadamen-te a las partes metálicas de la carrocería delautomóvil. El cable a tierra del amplificador, elde esta unidad o el de cualquier otro dispositi-vo debe conectarse al automóvil por separadousando tornillos diferentes. Si el tornillo parael cable a tierra se afloja o se cae, puede pro-vocar incendios, humo o averías.
Importante
! Cuando esta unidad se instale en un vehículosin posición ACC (accesorio) en la llave de en-cendido, el cable rojo se debe conectar al ter-minal que pueda detectar la operación de lallave de encendido. De lo contrario, puededescargarse la batería.
ONSTAR
T
OFF
Posición ACC Sin posición ACC
! Utilice esta unidad únicamente con una bate-ría de 12 voltios y conexión a tierra negativa.De lo contrario, pueden producirse incendioso averías.
! Para evitar cortocircuitos, sobrecalentamientoo fallos de funcionamiento, asegúrese de se-guir las siguientes instrucciones.— Desconecte el terminal negativo de la bate-
ría antes de la instalación.— Asegure el cableado con pinzas para ca-
bles o cinta adhesiva. Envuelva con cintaadhesiva las partes en contacto con piezasmetálicas para proteger el cableado.
— Coloque todos los cables alejados de laspartes móviles, como la palanca de cam-bios y los rieles de los asientos.
— Coloque todos los cables alejados de luga-res calientes, como cerca de la salida delcalefactor.
— No conecte el cable amarillo a la bateríapasándolo a través del orificio hasta elcompartimiento del motor.
— Cubra con cinta aislante los conectores decables que queden desconectados.
— No acorte ningún cable.— Nunca corte el aislamiento del cable de ali-
mentación de esta unidad para compartirla corriente con otros equipos. La capaci-dad de corriente del cable es limitada.
— Utilice un fusible con la intensidad nomi-nal indicada.
— Nunca conecte el cable negativo de los al-tavoces directamente a tierra.
— Nunca empalme los cables negativos devarios altavoces.
! Cuando se enciende esta unidad, se emiteuna señal de control a través del cable azul/blanco. Conecte este cable al mando a distan-cia del sistema de un amplificador de poten-cia externo o al terminal de control del relé dela antena automática del vehículo (máx. 300mA 12 V CC). Si el vehículo posee una antenaintegrada en el cristal del parabrisas, conécte-la al terminal de la fuente de alimentación delamplificador de la antena.
! Nunca conecte el cable azul/blanco al termi-nal de potencia de un amplificador de poten-cia externo. Ni tampoco lo conecte al terminalde potencia de la antena automática. De locontrario, puede descargarse la batería o pro-ducirse un fallo de funcionamiento.
Es 31
SecciónEsp
añol
02Conexiones

Diagrama de conexión
Conectar con cables RCA (se venden por separado)
Salida trasera
Este producto
Conector de antena
Fusible (10 A)
Azul/blancoConectar al terminal de control del sistema del amplificador de potencia o al terminal de control del relé de la antena (máx. 300 mA 12 V CC).
AmarilloConectar al terminal de alimentación constante 12 V.
RojoConectar al terminal controlado por la llave de encendido (12 V CC).
Negro (toma de tierra del chasis)Conectar a una parte metálica limpia, sin pintura.
Amplificador de potencia (se vende por separado)
Control remoto del sistema
Izquierda Derecha
Realice estas conexiones cuando utilice el amplificador opcional.
Altavoz trasero Altavoz trasero
Blanco/negro
Violeta/negro
Violeta
Con un sistema de 2 altavoces, no conecte ningún otro aparato a las salidas de cable que no estén conectadas a los altavoces.
Altavoz delantero Altavoz delantero
Blanco
Gris/negro
Gris
Verde/negro
Verde
Altavoz trasero Altavoz trasero
Es32
Sección
02 Conexiones

Importante
! Compruebe todas las conexiones y sistemasantes de la instalación final.
! No utilice piezas no autorizadas, ya que pue-den causar fallos de funcionamiento.
! Consulte a su distribuidor si para la instala-ción es necesario taladrar orificios o hacerotras modificaciones al vehículo.
! No instale esta unidad en un lugar donde:— pueda interferir con el manejo del ve-
hículo.— pueda lesionar a un pasajero como conse-
cuencia de un frenazo brusco.! El láser semiconductor se dañará si se sobre-
calienta. Instale esta unidad alejada de zonasque alcancen altas temperaturas, como cercade la salida del calefactor.
! Se logra un rendimiento óptimo si la unidadse instala en un ángulo inferior a 60°.
60°
Montaje delantero/posterior DINEsta unidad puede instalarse correctamentetanto si se realiza una instalación frontal o tra-sera.
Montaje delantero DIN1 Inserte el manguito de montaje en elsalpicadero.Si realiza la instalación en un espacio pocoprofundo, utilice el manguito de montaje su-ministrado. Si hay suficiente espacio, utilice elmanguito de montaje que venía con el ve-hículo.
2 Fije el manguito de montaje utilizandoun destornillador para doblar las pestañasmetálicas (90°) y colocarlas en su lugar.
1
2
1 Salpicadero2 Manguito de montaje
3 Instale la unidad según la ilustración.En la instalación, emplee piezas disponiblesen el mercado.
1
2
34
5
1 Tuerca2 Muro cortafuego o soporte de metal3 Correa metálica4 Tornillo5 Tornillo (M4 × 8)
# Asegúrese de que la unidad esté firmementeinstalada en su lugar. Una instalación inestablepuede causar saltos en el audio o un mal funcio-namiento de la unidad.
Es 33
SecciónEsp
añol
03Instalación

Montaje trasero DIN1 Determine la posición correcta, demodo que los orificios del soporte y del la-teral de la unidad coincidan.
2 Apriete los dos tornillos en cada lado.
1
2
3
1 Manguito de montaje2 Carcasa3 Salpicadero o consola
Utilice tornillos de cabeza redonda (5 mm × 8mm) o tornillos de cabeza embutida (5 mm ×9 mm), según los orificios roscados del sopor-te.
Retirada de la unidad1 Retire el anillo de guarnición.
1
1 Anillo de guarnición! Libere el panel delantero para acceder más
fácilmente al anillo de guarnición.! Al volver a colocar el anillo de guarnición,
oriente hacia abajo el lado que tiene la ra-nura.
2 Inserte en ambos lados de la unidad lasllaves de extracción provistas hasta que seescuche un ligero chasquido.
3 Extraiga la unidad del salpicadero.
Fijación del panel delanteroEl panel delantero puede fijarse con el tornillosuministrado.
1
1 Tornillo
Instalación de los altavoces1 1
2 3
Delantero
1 45°2 Orificios de 4,3 mm3 f 142 mm
Es34
Sección
03 Instalación

1 2
3 4 5 6
7
Lado
1 13 mm2 42 mm3 f 171 mm4 f 75 mm5 f 128 mm6 f 158 mm7 30 mm
1 Coloque los altavoces en los lugares in-dicados en la ilustración.
2 Haga los agujeros como se indica en lailustración (si es necesario, retire el tapiza-do de la puerta).
1
2
1 f 4,52 f 128 mm
3 Separe la malla de la rejilla.
Es 35
SecciónEsp
añol
03Instalación

4 Instale los altavoces como se indica enla ilustración.
1
2
1
2
3
1 22
1
1 Tuerca rápida2 Tornillos con rosca cortante (4 mm × 18
mm)3 Cable (gris o blanco)
Es36
Sección
03 Instalación

Solución de problemas
Síntoma Causa Resolución
La pantallavuelve automá-ticamente a lavisualizaciónnormal.
No ha realizadoninguna opera-ción en aproxi-madamente 30segundos.
Realice la opera-ción de nuevo.
La gama de re-petición de re-produccióncambia de ma-nera inespera-da.
Dependiendo dela gama de repe-tición de repro-ducción, la gamaseleccionadapuede cambiarcuando seleccio-ne otra carpeta opista o cuandoutilice el avancerápido/retroceso.
Seleccione denuevo la gama derepetición de re-producción.
No se reprodu-ce una subcar-peta.
No se pueden re-producir las sub-carpetas cuandose seleccionaFOLDER (repeti-ción de carpeta).
Seleccione otragama de repeticiónde reproducción.
NO XXXX apa-rece cuando secambia un dis-play (NO TITLE,por ejemplo).
No hay informa-ción de texto in-corporada.
Cambie la pantallao reproduzca otrapista/archivo.
La unidad nofunciona co-rrectamente.Hay una inter-ferencia.
Está usando undispositivo, comoun teléfonomóvil, que trans-mite ondas elec-tromagnéticascerca de la uni-dad.
Aleje de la unidadlos dispositivoseléctricos que pue-dan estar causan-do interferencias.
Mensajes de errorCuando contacte con su concesionario o conel servicio técnico oficial de Pioneer más cer-cano, asegúrese de anotar el mensaje deerror.
Reproductor de CD incorporado
Mensaje Causa Resolución
ERROR-11, 12,17, 30
El disco estásucio.
Limpie el disco.
El disco está ra-yado.
Reemplace eldisco.
ERROR-10, 11,12, 15, 17, 30,A0
Se ha producidoun error eléctricoo mecánico.
Cambie la llave deencendido delautomóvil a la posi-ción de desactiva-ción y luego pasede nuevo a activa-ción, o cambie auna fuente diferen-te, y después vuel-va a activar elreproductor de CD.
ERROR-15 El disco inser-tado aparece enblanco
Reemplace eldisco.
ERROR-22, 23 Formato de CDno compatible
Reemplace eldisco.
FRMT READ A veces se pro-duce un retrasoentre el comien-zo de la repro-ducción y laemisión del soni-do.
Espere hasta queel mensaje desapa-rezca y oiga soni-do.
NO AUDIO El disco inser-tado no contienearchivos reprodu-cibles.
Reemplace eldisco.
SKIPPED El disco inser-tado contiene ar-chivos WMAprotegidos conDRM.
Reemplace eldisco.
PROTECT Todos los archi-vos del disco in-sertado tienenDRM integrado.
Reemplace eldisco.
Es 37
ApéndiceEsp
añol
Información adicional

Dispositivo de almacenamiento USB
Mensaje Causa Resolución
NO DEVICE Si está desactiva-do “plug andplay”, no hay nin-gún dispositivode almacena-miento USB co-nectado.
! Active “plug andplay”.! Conecte un dis-positivo de almace-namiento USBcompatible.
FRMT READ A veces se pro-duce un retrasoentre el comien-zo de la repro-ducción y laemisión del soni-do.
Espere hasta queel mensaje desapa-rezca y oiga soni-do.
NO AUDIO No hay cancio-nes.
Transfiera los ar-chivos de audio aldispositivo de al-macenamientoUSB y conéctelo.
El dispositivo dealmacenamientoUSB conectadotiene la seguri-dad activada
Para desactivar laseguridad, siga lasinstrucciones deldispositivo de al-macenamientoUSB.
SKIPPED El dispositivo dealmacenamientoUSB conectadocontiene archi-vos WMA inte-grados conWindows Me-diaä DRM 9/10
Reproduzca un ar-chivo de audio queno esté integradocon WindowsMedia DRM 9/10.
PROTECT Todos los archi-vos del dispositi-vo dealmacenamientoUSB están inte-grados conWindows MediaDRM 9/10
Transfiera archivosde audio no inte-grados conWindows MediaDRM 9/10 al dispo-sitivo de almacena-miento USB yconéctelo.
N/A USB El dispositivo dealmacenamientoUSB conectadono es compatiblecon esta unidad.
Conecte un dispo-sitivo que cumplacon la clase de al-macenamientomasivo USB.
Mensaje Causa Resolución
CHECK USB El conector USBo el cable USBestá cortocircui-tado.
Compruebe que elconector USB o elcable USB no estéenganchado enalgo ni dañado.
El dispositivo dealmacenamientoUSB conectadoconsume más de500 mA (corrien-te máxima permi-tida).
Desconecte el dis-positivo de almace-namiento USB yno lo utilice. Colo-que la llave de en-cendido delautomóvil en posi-ción OFF, luego enACC u ON y, a con-tinuación, conecteúnicamente dispo-sitivos de almace-namiento USBcompatibles.
ERROR-18 Dispositivo USBno compatible
Desconecte su dis-positivo y sustitúya-lo por undispositivo de al-macenamientoUSB compatible.
ERROR-19 Error de comuni-cación.
Realice una de lassiguientes opera-ciones:–Cambie la llave deencendido delautomóvil a la posi-ción de desactiva-ción y luego pasede nuevo a activa-ción.–Desconecte el dis-positivo de almace-namiento USB.–Cambie a unafuente diferente.Después vuelva ala fuente USB.
ERROR-23 El dispositivo dealmacenamientoUSB no está for-mateado conFAT16 o FAT32
El dispositivo de al-macenamientoUSB debe forma-tearse con FAT16 oFAT32.
Es38
Apéndice
Información adicional

Pautas para el manejoDiscos y reproductor
Use únicamente discos que tengan uno de los si-guientes dos logos.
Utilice discos de 12 cm. No utilice discos de 8 cm oun adaptador de discos de 8 cm.
Utilice sólo discos convencionales y completamentecirculares. No use discos con formas irregulares.
No inserte ningún otro elemento que no sea un CDen la ranura de inserción de CD.
No use discos con roturas, picaduras, deformados odañados de otro modo, ya que pueden causar dañosal reproductor.
No es posible reproducir discos CD-R/CD-RW no fina-lizados.
No toque la superficie grabada de los discos.
Cuando no utilice los discos, guárdelos en sus cajas.
Evite dejar discos en ambientes excesivamente ca-lientes o expuestos a la luz solar directa.
No fije etiquetas, no escriba ni aplique sustanciasquímicas en la superficie de los discos.
Para limpiar un CD, pásele un paño suave desde elcentro hacia afuera.
La condensación puede afectar temporalmente alrendimiento del reproductor. Deje que se adapte alaumento de temperatura durante aproximadamenteuna hora. Además, si los discos tienen humedad, sé-quelos con un paño suave.
Quizá no pueda reproducir algunos discos debido asus características, formato, aplicación grabada, en-torno de reproducción, condiciones de almacena-miento u otras causas.
Las vibraciones en las carreteras pueden interrumpirla reproducción de un disco.
Lea las advertencias de los discos antes de utilizarlos.
Dispositivo de almacenamiento USB
Si tiene preguntas sobre su dispositivo de almacena-miento USB, póngase en contacto con el fabricantedel mismo.
No se admiten las conexiones a través de un concen-trador USB.
No conecte ningún otro objeto que no sea un disposi-tivo de almacenamiento USB.
No deje el dispositivo de almacenamiento USB en lu-gares expuestos a temperaturas elevadas.
Cuando conduzca, fije el dispositivo de almacena-miento USB firmemente. No deje caer el dispositivode almacenamiento USB al suelo, ya que puede que-dar atascado debajo del freno o del acelerador.
Según el dispositivo de almacenamiento USB, el dis-positivo puede generar ruido en la radio.! Las operaciones pueden variar.! Es posible que no se reconozca el dispositivo de
almacenamiento.! Puede que los archivos no se reproduzcan correc-
tamente.! El dispositivo puede generar ruido en la radio.
Discos dobles
Los discos dobles son discos de dos caras que inclu-yen un CD grabable de audio en una cara y un DVDgrabable de vídeo en la otra cara.Debido a que la cara del CD de los discos dobles noes físicamente compatible con el estándar general deCD, es posible que no se pueda reproducir la cara delCD en esta unidad.La carga y expulsión frecuente de un disco doblepuede producir rayaduras en el disco. Las rayadurasgraves pueden producir problemas de reproducciónen esta unidad. En algunos casos, un disco doblepuede atascarse en la ranura de carga del disco y nose expulsará. Para evitarlo, recomendamos que noutilice un disco doble en esta unidad.Consulte la información del fabricante del disco paraobtener más información sobre los discos dobles.
Es 39
ApéndiceEsp
añol
Información adicional

Compatibilidad con audiocomprimido (disco, USB)WMA
Extensión de archivo: .wma
Velocidad de grabación: 48 kbps a 320 kbps (CBR), 48kbps a 384 kbps (VBR)
Frecuencia de muestreo: 32 kHz, 44,1 kHz, 48 kHz
Windows Media Audio Professional, Lossless, Voice/DRM Stream/Stream con vídeo: no
MP3
Extensión de archivo: .mp3
Velocidad de grabación: 8 kbps a 320 kbps
Frecuencia de muestreo: 16 kHz a 48 kHz (32, 44,1, 48kHz para énfasis)
Versiones de etiqueta ID3 compatibles: 1.0, 1.1, 2.2,2.3, 2.4 (la etiqueta ID3 Versión 2.x tiene prioridadsobre la Versión 1.x).
Lista de reproducción M3u: no
MP3i (MP3 interactivo), mp3 PRO: no
WAV
Extensión de archivo: .wav
Bits de cuantificación: 8 y 16 (LPCM), 4 (MS ADPCM)
Frecuencia de muestreo: 16 kHz a 48 kHz (LPCM),22,05 kHz y 44,1 kHz (MS ADPCM)
Información complementaria
Sólo se pueden visualizar los primeros 32 caracterescomo nombre de archivo (incluida la extensión) onombre de carpeta.
Esta unidad puede no funcionar correctamente, de-pendiendo de la aplicación utilizada para codificar ar-chivos WMA.
Es posible que se produzca un pequeño retardo al ini-ciar la reproducción de archivos de audio integradoscon datos de imagen.
Disco
Jerarquía de carpetas reproducibles: hasta ocho nive-les (una jerarquía práctica de carpetas tiene menosde dos niveles).
Carpetas reproducibles: hasta 99
Archivos reproducibles: hasta 999
Sistema de archivos: ISO 9660 Nivel 1 y 2, Romeo, Jo-liet
Reproducción multisesión: sí
Transferencia de datos en formato Packet Write: no
Independientemente de la longitud de la sección enblanco que haya entre las canciones de la grabaciónoriginal, los discos de audio comprimidos se reprodu-cirán con una breve pausa entre cada canción.
Dispositivo de almacenamiento USB
Jerarquía de carpetas reproducibles: hasta ocho nive-les (una jerarquía práctica de carpetas tiene menosde dos niveles).
Carpetas reproducibles: hasta 500
Archivos reproducibles: hasta 15 000
Reproducción de archivos protegidos por derechosde autor: No
Dispositivo de almacenamiento USB particionado:sólo se puede reproducir la primera partición.
Puede producirse cierto retraso cuando se inicie la re-producción de archivos de audio en un dispositivo dealmacenamiento USB con numerosas jerarquías decarpetas.
PRECAUCIÓNPioneer no asume ninguna responsabilidad porla pérdida de datos en el dispositivo de almacena-miento USB, incluso si la pérdida ocurre duranteel uso de esta unidad.
Secuencia de archivos deaudioEl usuario no puede asignar números de car-peta ni especificar secuencias de reproduc-ción con esta unidad.
Es40
Apéndice
Información adicional

Ejemplo de una jerarquía
1
2
3
456
0102
03
04
05
Nivel 1 Nivel 2 Nivel 3 Nivel 4
: carpeta: archivo de audio
comprimido01 a 05: número decarpeta1 a6: secuenciade reproducción
DiscoLa secuencia de selección de carpetas u otrasoperaciones pueden diferir, dependiendo delsoftware de codificación o escritura.
Dispositivo de almacenamiento USBLa secuencia de reproducción es la mismaque la secuencia grabada en el dispositivo dealmacenamiento USB.Para especificar la secuencia de reproduc-ción, se recomienda el siguiente método.1 Cree el nombre del archivo incluyendo núme-
ros que especifiquen la secuencia de repro-ducción (p. ej., 001xxx.mp3 y 099yyy.mp3).
2 Coloque esos archivos en una carpeta.3 Guarde la carpeta que contiene los archivos
en el dispositivo de almacenamiento USB.Sin embargo, dependiendo del entorno del sis-tema, tal vez no pueda especificar la secuen-cia de reproducción.Para reproductores de audio portátiles USB, lasecuencia es diferente y depende delreproductor.
Copyright y marca registradaiTunesApple e iTunes son marcas comerciales deApple Inc., registradas en EE. UU. y otros paí-ses.
MP3La venta de este producto sólo otorga una li-cencia para su uso privado, no comercial. No
otorga ninguna licencia ni concede ningúnderecho a utilizar este producto en transmisio-nes comerciales (es decir, lucrativas) en tiem-po real (terrestres, vía satélite, por cable y/opor cualquier otro medio), transmisiones/streaming por Internet, intranets y/u otrasredes o en otros sistemas de distribución decontenido electrónico, como por ejemplo, apli-caciones de pago por escucha (pay-audio) oaudio bajo demanda (audio-on-demand). Senecesita una licencia independiente para suuso comercial. Para obtener más información,visitehttp://www.mp3licensing.com.
WMA
Windows Media y el logotipo de Windows sonmarcas comerciales o marcas registradas deMicrosoft Corporation en Estados Unidos y/oen otros países.Este producto incluye tecnología propiedad deMicrosoft Corporation, y no se puede usar nidistribuir sin una licencia de MicrosoftLicensing, Inc.
EspecificacionesGeneralesFuente de alimentación ........14,4 V CC (10,8 V a 15,1 V
permisible)Sistema de derivación a tierra
.....................................................Tipo negativoConsumo máximo de corriente
.....................................................10,0 ADimensiones (An × Al × Pr):
DINBastidor ....................178 mm × 50 mm × 165
mmCara anterior ..........188 mm × 58 mm × 24 mm
Es 41
ApéndiceEsp
añol
Información adicional

DBastidor ....................178 mm × 50 mm × 165
mmCara anterior ..........170 mm × 48 mm × 24 mm
Peso ...............................................1,3 kg
AudioPotencia de salida máxima
.....................................................50 W × 4Potencia de salida continua
.....................................................22 W × 4 (50 a 15 000 Hz, 5% THD, 4 W de carga,ambos canales activados)
Impedancia de carga .............4 W (4 W a 8 W permisible)Nivel de salida máxima del preamplificador (Pre-out)
.....................................................2,0 VControles de tono:
GravesFrecuencia ..............100 HzGanancia .................±12 dB
MediosFrecuencia ..............1 kHzGanancia .................±12 dB
AgudosFrecuencia ..............10 kHzGanancia .................±12 dB
Reproductor de CDSistema ........................................Sistema de audio de discos
compactosDiscos utilizables ....................Disco compactoRelación de señal a ruido ....94 dB (1 kHz) (red IHF-A)Número de canales ................2 (estéreo)Formato de decodificación WMA
.....................................................Ver. 7, 7.1, 8, 9, 10, 11 (audio2 canales)(Windows Media Player)
Formato de decodificación MP3.....................................................MPEG-1 & 2 Audio Layer 3
Formato de señal WAV .........PCM lineal & MS ADPCM(No comprimido)
USBEspecificación de la norma USB
.....................................................USB 2.0 velocidad máximaCorriente máxima suministrada
.....................................................500 mACapacidad mínima de memoria
.....................................................256 MBClase USB ...................................MCS (Clase de almacena-
miento masivo)Sistema de archivos ...............FAT16, FAT32
Formato de decodificación WMA.....................................................Ver. 7, 7.1, 8, 9, 10, 11 (audio
2 canales)(Windows Media Player)
Formato de decodificación MP3.....................................................MPEG-1 & 2 Audio Layer 3
Formato de señal WAV .........PCM lineal & MS ADPCM(No comprimido)
Sintonizador de FMGama de frecuencias ............87,9 MHz a 107,9 MHzSensibilidad utilizable ...........11 dBf (0,7 µV/75 W, mono,
Señal/ruido: 30 dB)Relación de señal a ruido ....72 dB (red IHF-A)
Sintonizador de AMGama de frecuencias ............530 kHz a 1 710 kHzSensibilidad utilizable ...........25 µV (señal/ruido: 20 dB)Relación de señal a ruido ....62 dB (red IHF-A)
AltavozSistema e reproducción .......Coaxial de 2 víasWoofer ..........................................f 158 mm
A prueba de aguaMembrana de polipropileno moldeado por inyec-ciónAlta elasticidad, borde laminadoBobina de voz resistente al calorImán : 170 g
Tweeter ..........................................f30 mm Domo PEIFlúido mangéticoImán (Neodimio) : 2,1 g
Sensibilidad ...............................90 dB (±1,5 dB)Respuesta de frecuencia .....40 Hz a 30 kHz (–20 dB)Impedancia nominal ..............4 WMáxima potencia de musica
.....................................................180 WPotencia nominal ....................30 WMaterial de la rejilla ................Malla de acero, resina a
prueba de calorPeso (por altavoz incluyendo accesorios)
.....................................................0,71 kg
Especificaciones CEA2006
Potencia de salida ...................14 W RMS × 4 canales (4 Wy ≦ 1 % THD+N)
Relación de señal a ruido ....91 dBA (referencia: 1 W a 4W)
Es42
Apéndice
Información adicional

Partes que se incluyen:Unidad principal
Unidad principal ............1Cable de alimentación
...........................................1Manguito de montaje
...........................................1Tornillo ................................1
AltavozAltavoz ................................4Tornillo con rosca cortante (4 mm × 18 mm)
...........................................16Tuerca rápida ...................16Cable para altavoz (blanco)
...........................................2Cable para altavoz (gris)
...........................................2
Nota
Las especificaciones y el diseño están sujetos amodificaciones sin previo aviso.
Es 43
ApéndiceEsp
añol
Información adicional

PIONEER CORPORATION1-1, Shin-ogura, Saiwai-ku, Kawasaki-shi,Kanagawa 212-0031, JAPAN
PIONEER ELECTRONICS (USA) INC.P.O. Box 1540, Long Beach, California 90801-1540, U.S.A.TEL: (800) 421-1404
PIONEER EUROPE NVHaven 1087, Keetberglaan 1, B-9120 Melsele, Belgium/BelgiqueTEL: (0) 3/570.05.11
PIONEER ELECTRONICS ASIACENTRE PTE. LTD.253 Alexandra Road, #04-01, Singapore 159936TEL: 65-6472-7555
PIONEER ELECTRONICS AUSTRALIA PTY. LTD.178-184 Boundary Road, Braeside, Victoria 3195, AustraliaTEL: (03) 9586-6300
PIONEER ELECTRONICS OF CANADA, INC.300 Allstate Parkway, Markham, Ontario L3R 0P2, CanadaTEL: 1-877-283-5901TEL: 905-479-4411
PIONEER ELECTRONICS DE MEXICO, S.A. de C.V.Blvd.Manuel Avila Camacho 138 10 pisoCol.Lomas de Chapultepec, Mexico, D.F. 11000TEL: 55-9178-4270
先鋒股份有限公司總公司: 台北市中山北路二段44號13樓電話: (02) 2521-3588
先鋒電子(香港)有限公司香港九龍尖沙嘴海港域世界商業中心9樓901-6室電話: (0852) 2848-6488
Published by Pioneer Corporation.Copyrightã 2010 by Pioneer Corporation.All rights reserved.
Publicado por Pioneer Corporation.Copyrightã 2010 por PioneerCorporation. Todos los derechosreservados.
Printed in ChinaImpreso en China
<YRD5321-A/S> US<KSNZX> <10E00000>