empowhr facilitator guide
TRANSCRIPT

National Finance Center
Government Employee Services Division (GESD) Training
EmpowHR Participant Guide
Version 1.0
Updated as of April 8, 2014

Table of Contents
1.0. Course Information .......................................................................... 1
1.1. Purpose ................................................................................................... 1
1.2. Course Objectives .................................................................................. 1
1.3. Agenda .................................................................................................... 1
1.4. Ground Rules and Expectations ........................................................... 2
1.5. Course Materials and Resources .......................................................... 2
2.0. EmpowHR System Overview .......................................................... 4
2.1. Chapter Overview ................................................................................... 4
2.2. EmpowHR System .................................................................................. 5
2.3. Payroll/Personnel Process Flow and Processing Cycle ..................... 9
2.4. Chapter Review..................................................................................... 13
3.0. Inquiry Systems ............................................................................. 14
3.1. Chapter Overview ................................................................................. 14
3.2. Information/Research Inquiry System (IRIS) ...................................... 19
3.3. Payroll/Personnel Inquiry System (PINQ) .......................................... 47
3.4. Position Management System (PMSO) ............................................... 55
3.5. Table Management (TMGT) .................................................................. 62
3.6. Chapter Review..................................................................................... 73
4.0. EmpowHR Navigation.................................................................... 74
4.1. Chapter Overview ................................................................................. 74
4.2. Accessing EmpowHR Overview .......................................................... 75
4.3. Using the Menu ..................................................................................... 80
4.4. Chapter Review..................................................................................... 91
5.0. Position Management .................................................................... 93
5.1. Chapter Overview ................................................................................. 93
5.2. Position Management Overview.......................................................... 94

5.3. Job Codes ............................................................................................. 96
5.4. Modifying a Job Code ........................................................................ 108
5.5. Creating a Position ............................................................................. 114
5.6. Creating Multiple Positions ............................................................... 142
5.7. Modifying a Position .......................................................................... 144
5.8. Chapter Review................................................................................... 147
6.0. Personnel Action Request (PAR) Processing ........................... 148
6.1. Chapter Overview ............................................................................... 148
6.2. PAR Processing.................................................................................. 149
6.3. HR Processing .................................................................................... 151
6.4. Updates Reports To ........................................................................... 187
6.5. Worklist ............................................................................................... 191
6.6. Chapter Review................................................................................... 194
7.0. Payroll Documents ...................................................................... 195
7.1. Chapter Overview ............................................................................... 195
7.2. Describing Payroll Documents.......................................................... 196
7.3. Processing Payroll Documents ......................................................... 202
7.4. Chapter Review.................................................................................. 245
8.0. Suspense & Corrections ............................................................. 248
8.1. Chapter Overview ............................................................................... 248
8.2. Suspense Transactions ..................................................................... 250
8.3. Error Message Reports ...................................................................... 258
8.4. Correct Applied Action ...................................................................... 266
8.5. Rollback .............................................................................................. 269
8.6. Chapter Review................................................................................... 274
9.0. History Override ........................................................................... 276
9.1. Chapter Overview ............................................................................... 276

9.2. History Override Function ................................................................. 277
9.3. Processing a History Override Package ........................................... 283
9.4. Processing the Rollback of a History Override Package ................ 296
9.5. Chapter Review................................................................................... 303
10.0. Course Summary ......................................................................... 304
10.1. Course Accomplishments ................................................................. 304
10.2. Additional Resources ......................................................................... 305
11.0. Appendices .................................................................................. 306
11.1. Appendix A: HR Processing ............................................................. 306
11.2. Appendix B: Allowances ................................................................... 307
11.3. Appendix C: Master File Change....................................................... 310
11.4. Appendix D: History Override ........................................................... 319
11.5. Appendix E: Course Acronyms ......................................................... 326
11.6. Appendix F: EmpowHR Person Model ............................................. 329

1
1.0. Course Information
1.1. Purpose
The purpose of this course is to provide an overview of the EmpowHR system and how
it interacts with the Payroll/Personnel System (PPS). The course covers all of the main
components within EmpowHR and demonstrates ways to research and correct
suspense errors.
1.2. Course Objectives
By the end of this course, you will be able to:
Describe the EmpowHR system and how it relates to the Payroll/Personnel
System (PPS)
Navigate within EmpowHR
Process Personnel Action Requests (PARs) and Payroll Documents
Identify and correct Suspense errors
Describe and process History Overrides
1.3. Agenda
This course includes the following chapters:
Chapter Duration
Course Information 20 Minutes
EmpowHR System Overview 20 Minutes
Information/Research Inquiry System (IRIS);
Payroll/Personnel Inquiry System (PINQ); Position
Management System (PMSO); Table Management
System (TMGT)
60 Minutes
EmpowHR Navigation 30 Minutes
PAR Processing 1 Hour
Payroll Documents 90 Minutes

2
Chapter Duration
Suspense 30 Minutes
History Overrides 1.5 Days
Course Summary 20 Minutes
1.4. Ground Rules and Expectations
Please follow these ground rules throughout the course:
Sign the attendance sheet
Feel free to ask questions
Be respectful of other participants
Keep us on schedule with timely returns from breaks
Share your knowledge, experience, and ideas
Use the “Parking Lot” to revisit discussion topics
Give helpful feedback
Turn off your cell phones and refrain from checking email
1.5. Course Materials and Resources
You will be provided with the following course materials to assist your learning:
EmpowHR Participant Guide

3
As you move through this participant guide, be sure to take note of the following
messages:
CAUTION: A text field bordered and shaded in red indicates a cautionary
message. CAUTION messages advise you that failure to take or avoid a
specified action could result in loss of data.
IMPORTANT: A text field bordered and shaded in green indicates a very
important message. This type of message provides information essential
to the completion of a task. Subsequent steps in a process are dependent
on the correct data entry or actions specified in an IMPORTANT message.
While other messages may provide helpful suggestions, you should
always adhere to messaging labeled as IMPORTANT.
NOTE: A text field bordered and shaded in blue indicates a note. This
type of message emphasizes or supplements important parts of the main
text. A NOTE supplies information that may apply only in special cases.
TIP: A text field bordered and shaded in yellow indicates a helpful tip.
This type of message helps you apply the techniques and procedures
described in the text to their specific needs. A TIP suggests alternative
methods that may not be obvious and helps you understand the benefits
and capabilities of the product.

4
2.0. EmpowHR System Overview
2.1. Chapter Overview
This chapter focuses on the purpose and main processing components of EmpowHR
and introduces the Payroll/Personnel Process Flow as it relates to EmpowHR.
Chapter Objectives
By the end of this chapter, you will be able to:
Describe the purpose and main components of EmpowHR
Explain how EmpowHR relates to PPS

5
2.2. EmpowHR System
Lesson Overview
This lesson describes EmpowHR and introduces the main components of EmpowHR.
Lesson Objectives
By the end of this lesson, you will be able to:
Describe the purpose of EmpowHR and its main components
EmpowHR is a Human Capital Management System that supports and achieves
effective delivery of critical Human Resources (HR) components in a single enterprise
system. It provides comprehensive employee information that enables agencies to:
Make critical decisions concerning work force utilization
Forecast workforce turnover and placement
Project future resource budget allocations on a fiscal year basis, for optimum
achievement of Agency mission goals

6
EmpowHR has several main components, which comprise the system. They are
introduced in Figure 1: EmpowHR Components and described at a high-level following
the figure.
Figure 1: EmpowHR Components
Position Management
EmpowHR is a personnel position-driven system. The purpose of Position Management
is to create and maintain position data. Once a position is established, you may move
employees in and out of those positions as appropriate.
Personnel Action Request (PAR) Processing
PAR processing is used by HR employees to process any Request for Personnel
Action, SF-52’s, that require a Standard Form 50 (SF-50).

7
Payroll Documents
Payroll Documents allow HR staff to enter information related to an employees’ pay
(e.g., Lump sum payments, Health Benefits, Union Dues documents, etc.). These
documents are required to make disbursements or collections and provide additional
pertinent information pertaining to the employees’ record.
Self-Service
Self Service allows employees online access to payroll, benefits, and performance
evaluation data. Self Service allows managers online access to tools used to
administrate assigned employee professional development and performance.
Employee Self-Service (ESS) offers all employees direct online access to HR
information (i.e., benefits and compensation data). ESS also provides employees
the ability to initiate an online training request or other change requests (i.e.,
address, email, emergency contact information, etc.).
Manager Self-Service (MSS) provides managers with tools and information to
view assigned employees’ HR information and document professional
development (i.e., recommendations, requests, etc.). Managers are able to:
o Initiate a PAR
o Initiate a request to Fill a Position Request new positions
o Manage PAR requests
o Review transactions
o Delegate approvals
ePerformance
ePerformance is a self-service evaluation application for managers, employees, and HR
administrators. ePerfomance can be used as a tool to plan, collaborate, communicate,
assess, and monitor evaluations for two purposes: (1) performance and (2)
development.
Manage Performance
Manage Performance is a USDA only component that serves as a guide to recognize
and reward quality work performance and develop employees that have inadequate
performance and provide training and counseling. HR personnel and includes

8
performance plans, progress reviews, and performance appraisals. HR staff can view
and edit performance documents, as well as monitor the performance process through
queries and reports.
Reporting
Reporting is comprised of reporting tools, such as Query, which enable access to
business intelligence information from within a specific EmpowHR module or use
records from multiple EmpowHR modules. Additionally, there are reports provided
outside of Query and ad-hoc capabilities through the Query function.

9
2.3. Payroll/Personnel Process Flow and Processing Cycle
Lesson Overview
This lesson focuses on how EmpowHR interfaces with PPS.
Lesson Objectives
By the end of this lesson, you will be able to:
Explain the Payroll/Personnel Process Flow and Processing Cycle
The Payroll/Personnel Process Flow
Figure 2: Payroll/Personnel Process Flow illustrates how EmpowHR interfaces with
other systems and how transactions flow from one system to another.
Figure 2: Payroll/Personnel Process Flow

10
As indicated in the HR Component of the Payroll/Personnel Process Flow in Figure 2,
EmpowHR is an application used to process transactions, which are forwarded through
a Front End System Interface (FESI). The transactions are then automatically edited in
the Personnel Input and Edit System (PINE) for accuracy. If the transactions are error
free, the transactions are updated to the PPS, the official system of record. If the
transactions have an error, they are sent back to EmpowHR for reconciliation. Because
of the process described above, you must research and validate information in PPS
systems in order to process successfully in EmpowHR.
IMPORTANT: Daily batches are collected in EmpowHR at 11:00 a.m. and
4:00 p.m. Central Time (CT) and transmitted to NFC between 5:00 p.m.
and 7:00 p.m. CT. The NFC return feed process updates EmpowHR with
the results of the nightly PINE process and occurs between 1:00 a.m. and
3:30 a.m. CT.

11
Payroll/Personnel Processing Cycle
Figure 3: Payroll/Personnel Processing Cycle illustrates the daily processing of
payroll/personnel transactions effective for Pay Period 24. The processing in this
example begins the second week of Pay Period 24 and is completed after the first week
of Pay Period 25.
Figure 3: Payroll/Personnel Processing Cycle
As shown in the above figure, Payroll/Personnel transactions are processed through
PINE every Monday through Friday. The first pass of PINE for the current pay period
processes on the second Monday of the pay period. Transactions must be entered
before the first pass of Pay Computation System (PAYE), which is the first Thursday or
Friday of the following pay period.
Then, Time and Attendance (T&A) Reports are processed through the Time and
Attendance Validation System (TIME) on the first Sunday through Friday of the following
pay period. T&A Reports must be transmitted (certified) to NFC through each Agency’s
respective T&A system before the first pass of PAYE, which is the first Thursday or

12
Friday of the following pay period. All T&As should be transmitted to NFC no later than
the Tuesday following the last day of the pay period.
PAYE processes on the first Thursday after the pay period. It is again processed on
either Friday or Saturday for exceptions or special circumstances. Bi-weekly
Examination Analysis and Reporting (BEAR) processes on the Sunday after PAYE runs
and updates to the reports. Direct Deposit/Electronic Funds Transfer (DD/EFT) payday
is the second Monday of the following pay period. The official Payday is the second
Thursday of the following pay period.

13
2.4. Chapter Review
Knowledge Check
1. What are the seven main components of EmpowHR?
1. ____________________________________________________________
2. ____________________________________________________________
3. ____________________________________________________________
4. ____________________________________________________________
5. ____________________________________________________________
6. ____________________________________________________________
2. Describe the purpose of EmpowHR.
Chapter Summary
Having completed this chapter, you are now able to:
Describe the purpose and main components of EmpowHR
Explain how EmpowHR relates to PPS

14
3.0. Inquiry Systems
3.1. Chapter Overview
This chapter focuses on how components of PPS interact and relate to EmpowHR.
Components include:
Information/Research Inquiry System (IRIS),
Payroll/Personnel Inquiry System (PINQ),
Position Management System (PMSO), and
Table Management (TMGT).
This chapter also explains the importance of using these four systems to research and
validate personnel and position information prior to and after processing an action in
EmpowHR.
Chapter Objectives
By the end of this chapter, you will be able to:
Describe the relationship among IRIS, PINQ, PMSO, and TMGT with EmpowHR
Navigate and research within IRIS, PINQ, PMSO, and TMGT successfully
The lessons in this chapter provide a thorough explanation of each system and how it is
used to research and information in conjunction with EmpowHR. However, before doing
so, the four systems are briefly introduced below:
Information/Research Inquiry System (IRIS)
o IRIS is used to provide immediate access to at least one calendar year of
current and five years of historical payroll/personnel data and certain payroll
document history.
Payroll/Personnel Inquiry System (PINQ)
o PINQ is used to query employee payroll data in PPS and provide immediate
access to one calendar year of employee payroll data.

15
Position Management System (PMSO)
o PMSO is a real time online database system that allows agencies to add,
change, inactivate, reactivate, and delete/restore position data for immediate
update to the PMSO database. PMSO also provides agencies report
generated and online inquiry capabilities from PMSO data and allows for
complete control and management of position data.
Table Management (TMGT)
o TMGT provides direct access to table records containing selected data
elements (i.e., Agency or bureau codes, addresses, etc.) from the
payroll/personnel, financial, and administrative systems. TMGT allows
authorized users to view and update records, request reports, and view
documentation data for various tables used in application programs.

16
Before learning more about each system, you must first learn how to access the
respective four systems through the NFC Mainframe. To do so, follow the procedure
below to gain access.
Step Action
1. Access the NFC mainframe. The U.S. Government Computer Warning
screen displays.
Figure 4: U.S. Government Warning Screen
Step Action
2. Press Enter. The NFC Banner displays.

17
Figure 5: NFC Banner Screen
Step Action
3. Enter your user ID in the ENTER USER ID field.
4. Enter your password in the PASSWORD field.
5. Enter the system abbreviation (IRIS, PINQ, PMSO, or TMGT) you wish to
access in the ENTER APPLICATION NAME field.
6. Press Enter. The respective system’s Main Menu displays.
Now that you are able to access each system, we are going to walk through how to
switch between systems. The following procedure is the same for navigating between
any of the Mainframe systems, but for this example let’s say you are trying to navigate
from PINQ to IRIS.

18
You can access different NFC Mainframe systems using the same steps. For example,
to access a specific IRIS Menu while working in another NFC application (such as
PINQ), you can bypass the IRIS Main Menu entirely by following the below steps:
Step Action
1. Press Pause/Break.
2. Enter the Task Code (e.g., IRIS, PINQ, PMSO, etc.) in the TASK CODE field.
Figure 6: TASK CODE Field
Step Action
3. Press Enter. The requested system screen displays.
Additionally, you can sign out of each system by following the same steps, which are
listed below:
Step Action
1. Press Pause/Break.
2. Enter BYE in the TASK CODE field.
3. Press Enter.
Now that you can access each system, you can focus on learning the purpose of each
system and how it relates to EmpowHR.

19
3.2. Information/Research Inquiry System (IRIS)
Lesson Overview
This lesson provides an overview of IRIS and how it relates to EmpowHR. It also
focuses on how to navigate through IRIS using current and historical data menus to
research and validate personnel actions in EmpowHR.
Lesson Objectives
By the end of this lesson, you will be able to:
Describe the relationship between IRIS and EmpowHR
Navigate menu options within IRIS
Compare an employee’s current and historical personnel data
Validate personnel and payroll transactions
IRIS is a read-only inquiry system that provides access to current and prior payroll and
personnel data within PPS, the system of record. IRIS allows you to validate
information prior to processing an action and following the processing of an action in
EmpowHR. Data is updated in IRIS after one or more of the following have successfully
processed:
PINE
TINQ
BEAR
Personnel actions and payroll documents apply to PPS, and are visible in IRIS if they
pass all PINE edits and are effective in a prior or current pay period.
IRIS: Menu
Figure 7: IR000 IRIS Menu Screen provides six menus from which to choose once
entering the system.

20
Figure 7: IR000 IRIS Menu Screen
The below information outlines the six different menu options in IRIS, and provides a
high-level description of each.
Menu Description
100 - Current Data Menu Displays an employee’s current information.
200 - Transaction History
Menu
Displays historical data on an employee.
300 - Restricted Data Menu Displays restricted information on an employee.
400 - Payroll Data Menu Reserved for future use.

21
Menu Description
500 - Personnel History Menu Displays the current and approximately 11 prior
years of processed personnel history.
600 - Name Employee Inquiry Allows you to search by employee name.
IRIS: Navigation
To access a record in IRIS, follow the steps below:
Step Action
1. Enter the employee’s social security number in the SSNO field.
2. Enter the IRIS Menu/Screen number in the SCREEN NUMBER field.
3. Press Enter. The requested employee record displays.
To move between screens and menus in IRIS, Function Keys are located at the bottom
of each screen and vary from screen to screen. The table below table below describes
the purpose of the reoccurring function keys when navigating in IRIS.
Function Key Description
PF1 Returns you to the IRIS Main Menu or sub-menu.
PF2 Displays additional information.
PF5 Displays Help.
PF7 Used to move up record to record or to move up if at the
bottom of a page.
PF8 Used to navigate from record to record or to page down if the
record is longer than the displayed page.
PF9 Provides access to the first history record for the key data
elements displayed. History records attached to a particular
current table record are numbered separately beginning with
000001.

22
Now that we covered the basic navigation features within IRIS, we are now going to go
into more detail about the specific screens within each of the six menu options.
Validating EmpowHR Transactions in IRIS
The following information provides an overview to verify that the data entered in
EmpowHR has provided accurate results in IRIS.
100 - Current Data Menu
The Current Data record contains data elements for an employee that includes the most
recent PAR action information once all PINE edits are passed and applied to the
database. To see this information, you must navigate from the CURRENT DATA MENU
screen.
Figure 8: IR100 CURRENT DATA MENU Screen and Figure 9: IR1001 CURRENT
DATA MENU CONTINUED Screen consist of 48 separate IRIS screens (numbered
101-148) which make up an employee’s current database record. Screen names are
descriptive of the type of information each screen contains, although additional
descriptions are provided in this lesson.

23
Figure 8: IR100 CURRENT DATA MENU Screen

24
Figure 9: IR1001 CURRENT DATA MENU CONTINUED Screen
NOTE: PF1 returns you to the IRIS CURRENT DATA MENU screen and
PF8 pages down to the next page of the IRIS CURRENT DATA MENU
screen
IMPORTANT: You can review data in the IRIS programs prior to
processing a personnel action on an employee to avoid unnecessary
PINE errors (i.e., checking the WIGI date, pay information, etc.).
A Current Data record is converted to a Transaction History record when a
new personnel action or certain new payroll documents apply to the
database. This action is no longer visible on the CURRENT DATA MENU
screen, but can be found in the HISTORICAL DATA MENU screens.

25
The following table outlines each of the 48 IRIS screens, and provides a description of
each. Additionally, the table provides key validation fields and processing tips.
IRIS
Screen Description
Key Validation
Fields and
Processing Tips
101 Salary Data:
Displays an employee’s salary record and personnel
records associated with it.
Main Screen used to
validate data to
compute pay.
102 Dates & Misc Sal/Pers Data:
Displays general personnel and salary data for an
employee.
SCD, WIGI, WORK
SCHED, CAREER
STATUS, etc.
103 Salary YTD:
Displays year-to-date calculations, for gross pay,
base pay, Thrift Savings Plan base pay, HITS
(Medicare), OASDI (Social Security), earnings
limitation, overpay carryover, premium pay, and
Customs Officers Pay Reform (COPR).
CURRENT YTD PAY
INFO
104 Federal Tax:
Displays employee’s current Federal tax data,
including the number of exemptions, the dollar
amount of the extra deductions, the earned income
credit code, the dollar amount of Federal income tax
withheld year to date, and the processing pay period
and year.
FEDERAL
EXEMPTIONS
105 State Tax:
Displays state tax data, including deduction
information, state code, duty station, private tax code,
the pay period and year, the number of exemptions,
the number of extra exemptions, and the number of
personal exemptions processed for up to two state
tax records.
STATE
EXEMPTIONS
106 City Tax:
Displays city tax deductions year to date for the
taxing year.
(If applicable)
107 County Tax:
Displays county tax deductions year to date for the
taxing year.
(If applicable)
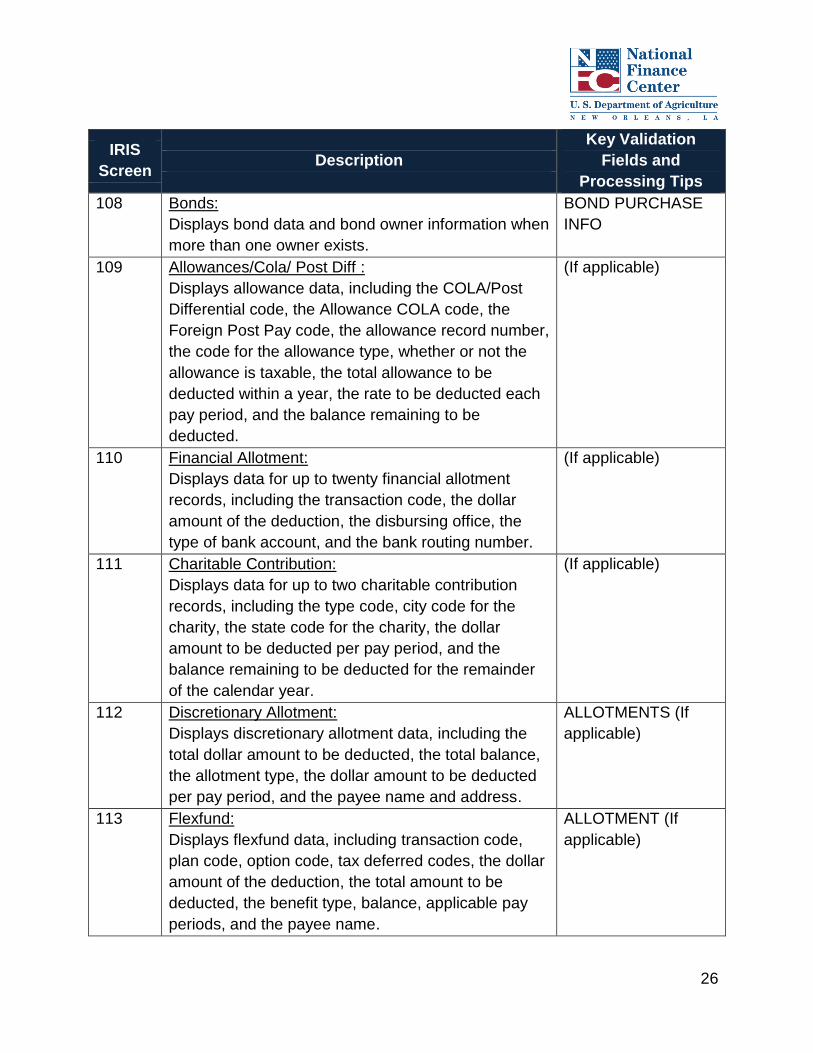
26
IRIS
Screen Description
Key Validation
Fields and
Processing Tips
108 Bonds:
Displays bond data and bond owner information when
more than one owner exists.
BOND PURCHASE
INFO
109 Allowances/Cola/ Post Diff :
Displays allowance data, including the COLA/Post
Differential code, the Allowance COLA code, the
Foreign Post Pay code, the allowance record number,
the code for the allowance type, whether or not the
allowance is taxable, the total allowance to be
deducted within a year, the rate to be deducted each
pay period, and the balance remaining to be
deducted.
(If applicable)
110 Financial Allotment:
Displays data for up to twenty financial allotment
records, including the transaction code, the dollar
amount of the deduction, the disbursing office, the
type of bank account, and the bank routing number.
(If applicable)
111 Charitable Contribution:
Displays data for up to two charitable contribution
records, including the type code, city code for the
charity, the state code for the charity, the dollar
amount to be deducted per pay period, and the
balance remaining to be deducted for the remainder
of the calendar year.
(If applicable)
112 Discretionary Allotment:
Displays discretionary allotment data, including the
total dollar amount to be deducted, the total balance,
the allotment type, the dollar amount to be deducted
per pay period, and the payee name and address.
ALLOTMENTS (If
applicable)
113 Flexfund:
Displays flexfund data, including transaction code,
plan code, option code, tax deferred codes, the dollar
amount of the deduction, the total amount to be
deducted, the benefit type, balance, applicable pay
periods, and the payee name.
ALLOTMENT (If
applicable)

27
IRIS
Screen Description
Key Validation
Fields and
Processing Tips
114 Receipt Accounts:
Displays receipt account data for employee
indebtedness, including receipt account numbers and
amounts, account information, payee bank
information, and payee name and address.
RECEIPT NUMBER,
PAYEE BANK
INFORMATION,
PAYEE NAME &
ADDRESS
115 Health Benefits:
Displays Federal and Non-Federal health benefit
data, such as plan name, enrollment, coverage, and
change codes.
HEALTH BENEFIT
DATA (If applicable)
116 Life Insurance:
Displays Federal and Non-Federal life insurance
data.
LIFE INSURANCE
DATA (If applicable)
117 Retirement Data:
Displays retirement data for Civil Service Retirement,
Federal Employees Retirement System, and others.
RETIREMENT DATA
118 Thrift Savings Data:
Displays Thrift Savings Plan data.
(If applicable)
119 Employee Personnel Data:
Displays data from Document Type 444, EHRI RSM
Element.
CITIZENSHIP, CRED
MIL SVC
120 Thrift Savings Loans:
Displays Federal and Non-Federal Thrift Savings
Plan loans data for up to four loan records.
(If applicable)
121 Thrift Savings Retro Payments:
Displays Thrift Savings Plan collections made.
(If applicable)
122 SF-50B Data Elements:
Displays an employee’s personnel data as recorded
on the SF-50, Notification of Personnel Action.
MOST RECENT
PROCESSED SF-
50B DATA, Date of
Birth, Bargaining Unit
Status Code, Annual
Leave Category
123 Personnel Supplements:
Displays general personnel data.
EDUCATION LEVEL,
PERFORMANCE,
SEX, VET STATUS,
WGI PROJ

28
IRIS
Screen Description
Key Validation
Fields and
Processing Tips
124 Address/Check Information:
Displays an employee’s residence and check
distribution information.
PERSONAL
ADDRESS, BANK
INFO (ROUTING,
ACCOUNT, etc.),
City Code, State
Code, Distribution
Code
125 Personnel Actions Summary:
Displays a listing of personnel actions processed in
the last year.
Listing of all
processed actions
and includes PP, YR,
EFF-DATE, NOA,
and who processed
the action
126 Last Payroll Action:
Displays a listing of the last payroll actions applied.
Listing of payroll
documents and
includes DOC TYPE,
PP, YR, and who
processed the action
127 Details Assign/Temporary Promotion:
Displays current detailed position data and temporary
promotion data.
(If applicable)
128 Retained Grade Data:
Displays save grade data.
(If applicable)
129 Intermittent:
Displays intermittent employee counters for days and
hours worked for service computation purposes.
(If applicable)
130 Education and Certification:
Displays additional educational level and certification
information.
(If applicable)
131 SSNO Change Data:
Displays changes made to an employee’s social
security number.
(If applicable)
132 Separation Information:
Displays employee separation information.
(If applicable)

29
IRIS
Screen Description
Key Validation
Fields and
Processing Tips
133 Separated Leave:
Displays leave information for separated employees.
(If applicable)
134 Severance Payment:
Displays severance pay information.
(If applicable)
135 Severance Pay Computation:
Displays the formula used to compute an employee’s
severance payments.
(If applicable)
136 Annual/Sick Leave:
Displays data associated with annual leave, sick
leave, annual leave restored, U.S. Attorney leave,
and donor leave.
LEAVE BALANCES
137 Reserved for Future Use N/A
138 Other Leave:
Displays data associated with military leave, home
leave, shore leave, administrative leave, and credit
hours.
(If applicable)
139 Compensatory Leave and Rates:
Displays data associated with compensatory leave
and applicable rates.
COMPENSATORY
BALANCES (If
applicable)
140 Non Pay Leave:
Displays data associated with absence without leave,
leave without pay, suspension, and other non-pay
leave categories.
(If applicable)
141 Earnings Limitation:
Displays cash award data.
SALARY YTD
142 Awards:
Displays time off award data.
AWARD DATA (If
applicable)
143 Time Off Award Data:
Displays time off award data.
(If applicable)

30
IRIS
Screen Description
Key Validation
Fields and
Processing Tips
144 Processing Indicators:
Displays various types of system indicators when
certain transactions are processed.
INDICATOR CODES,
When a split T&A
was required for the
particular employee,
a change in TSP
information, a cash
award was given, the
employee transferred
to another
Department/agency,
etc.
145 Demonstration Project Data:
Displays data associated with a demonstration
project.
(If applicable)
146 Building Locator Inquiry:
Displays data pertaining to a General Accounting
Office (GAO) employee’s office location.
N/A
147 Personnel Data (If applicable)
Now that you have been provided a high-level, quick reference resource for the IRIS
screens, we are now going to go into more detail about the most important IRIS screens
when processing in EmpowHR.

31
IRIS 101 - Salary Data Menu
Figure 10: IR101 SALARY DATA Screen is the main screen used to validate
EmpowHR transactions. It contains information needed by PPS to compute an
employee’s current net salary.
Figure 10: IR101 SALARY DATA Screen
IMPORTANT: Press PF2 to display the AGENCY ORGANIZATIONAL
STRUCTURE DESCRIPTION page. Press Enter to return to IRIS 101.
The following data elements can be used to validate information to create a new Current
Data record. The below data elements are annotated in Figure 10: IR101 SALARY
DATA Screen.
Name Description
DOCUMENT
DESCRIPTION CODE
Displays the last type of payroll/personnel action processed
and applied to the data base.
DOCUMENT
EFFECTIVE DATE
Displays the calendar date the last personnel action or payroll
document was effective, for example, 05 23 10.
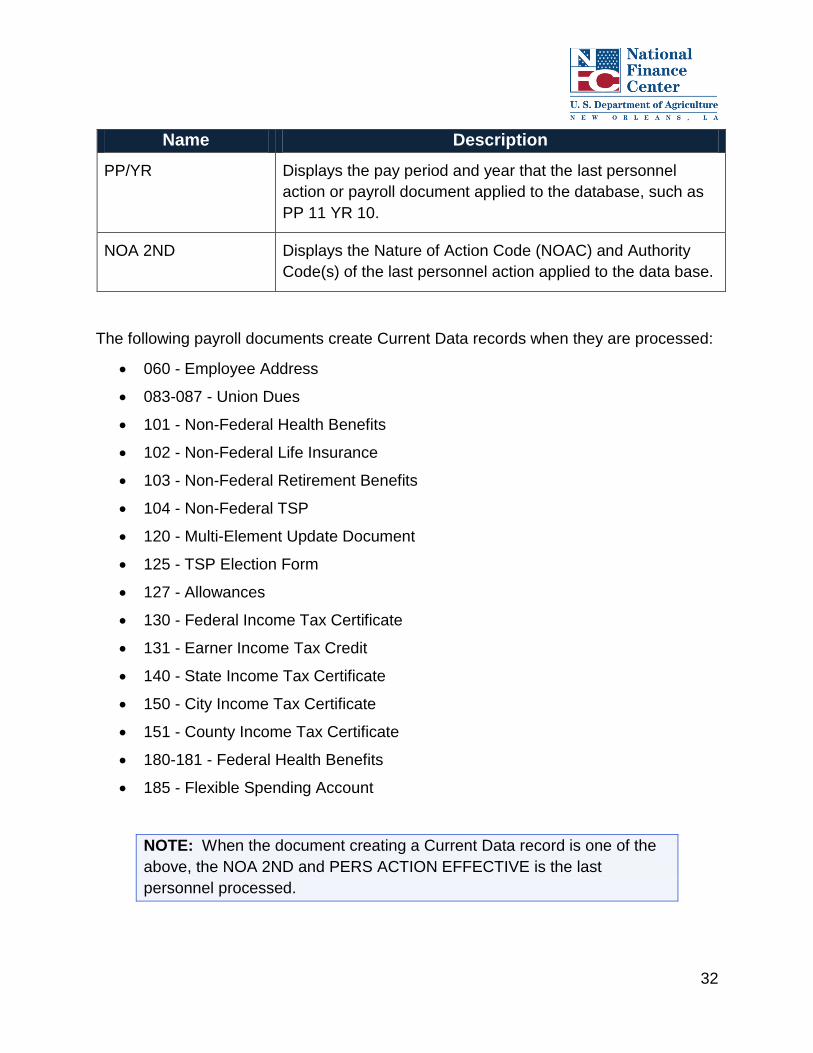
32
Name Description
PP/YR Displays the pay period and year that the last personnel
action or payroll document applied to the database, such as
PP 11 YR 10.
NOA 2ND Displays the Nature of Action Code (NOAC) and Authority
Code(s) of the last personnel action applied to the data base.
The following payroll documents create Current Data records when they are processed:
060 - Employee Address
083-087 - Union Dues
101 - Non-Federal Health Benefits
102 - Non-Federal Life Insurance
103 - Non-Federal Retirement Benefits
104 - Non-Federal TSP
120 - Multi-Element Update Document
125 - TSP Election Form
127 - Allowances
130 - Federal Income Tax Certificate
131 - Earner Income Tax Credit
140 - State Income Tax Certificate
150 - City Income Tax Certificate
151 - County Income Tax Certificate
180-181 - Federal Health Benefits
185 - Flexible Spending Account
NOTE: When the document creating a Current Data record is one of the
above, the NOA 2ND and PERS ACTION EFFECTIVE is the last
personnel processed.

33
NOTE: TIME uses the PERS ACTION EFFECTIVE date field to determine
what record in Current Data or Transaction History is used to edit an
original, corrected, or revalidated T&A report.
200 – Transaction History Menu
Figure 11: IR200 TRANSACTION HISTORY MENU Screen is an extension of a single
record (the same as the CURRENT DATA MENU Screen). The Transaction History
Menu (Figure 11) consists of 20 separate IRIS screens (numbered 201-244).
The screens listed below are organized in the same basic categories as the various
screens which make up current data. The screens of Transaction History are made up
of data records that were previously Current Data.
Figure 11: IR200 TRANSACTION HISTORY MENU Screen

34
NOTE: Transaction History records, which are considered sensitive in
nature, are not listed here. They are listed on the RESTRICED DATA
MENU screen (e.g., Disability, WIGI, Performance, Child Support
information).
For each personnel action processed in the current and prior fiscal years, the
TRANSACTION HISTORY screens store a record of data. Each record of data reflects
the employee’s database record as it stood in Current Data before a subsequent action
applied. Data displayed in IRIS Transaction History programs is used by the PPS PAYE
system to recalculate and compute pay for corrected and revalidated T&As for pay
period(s) prior to the most recently processed personnel action or payroll document,
which creates a Current Data Record.
The record of the most recent personnel action or payroll document that creates a
Current Data record is moved to Transaction History when another personnel action or
payroll document is processed. Transaction History begins with the second most recent
personnel action or payroll document.
The table below outlines each of the 20 IRIS 200 screens, and provides a description of
each. Additionally, the table provides more context about the key validation fields and
processing tips.
IRIS
Screen Description
Key Validation Fields
and Processing Tips
201 Salary Data:
Displays an employee’s position related
information, salary record and personnel records
associated with it.
Main Screen Used To
Validate Data
202 Dates & Misc Sal/Pers Data:
Displays general salary data and associated
dates for an employee.
SCD, WIGI, Work Sched,
Career Status, Etc.
205 State Tax:
Displays an employee’s state tax history record. State Exemptions
206 City Tax:
Displays a history of city tax data. (If Applicable)
207 County Tax:
Displays a history of county tax data. (If Applicable)
209 Allowances/Cola/Post Diff:
Displays a history of allowance data. (If Applicable)

35
IRIS
Screen Description
Key Validation Fields
and Processing Tips
211 Charitable Contribution:
Displays history data for up to two charitable
contribution records per agency transaction
history.
(If Applicable)
213 Flexfund:
Displays a history of flexfund data. Allotment (If Applicable)
215 Health Benefits:
Displays a history of Federal and Non-Federal
health benefits data.
Health Benefit Data (If
Applicable)
216 Life Insurance:
Displays a history of Federal and Non-Federal
life insurance data.
Life Insurance Data (If
Applicable)
217 Retirement Data:
Displays a history of retirement data for Civil
Service Retirement, Federal Employees
Retirement System, and others.
Retirement Data
218 Thrift Savings Data:
Displays a history of Thrift Savings Plan data. (If Applicable)
222 SF-50B Data Elements:
Displays a history of personnel data.
Most Recent Processed
SF-50B Data
223 Personnel Supplements:
Displays a history of general personnel data
such as education level, performance evaluation
data, accession data, etc.
Education Level,
Performance, Sex, Vet
Status, WGI Proj, Other
Data
224 Address/Check Information:
Displays a history of an employee’s residence
address and check distribution information.
Personal Address, Bank
Info (Routing, Account,
Etc.)
225 Personnel Actions Summary:
This program displays a history of personnel
actions processed.
Listing Of All Processed
Actions And Includes PP,
YR, Eff-Date, NOA, & Who
Processed The Action
227 Detail Assign/Temporary Promotion:
Displays a history of current detailed position
data and temporary promotion data.
(If Applicable)
228 Retained Grade Data:
Displays a history of retained grade data. (If Applicable)

36
IRIS
Screen Description
Key Validation Fields
and Processing Tips
242 Awards:
Displays a history of cash award data. Award Data (If Applicable)
244 Processing Indicators:
Displays a history of various types of data used
for processing salary and personnel documents.
Indicator Codes
300 – Restricted Data Menu
Not all Current Data programs are listed on the Current Data Menus; some are listed on
Figure 12: IR300 RESTRICTED DATA MENU Screen. The IRIS Restricted Data
programs are a group of records defined by access level rather than record type. These
records contain sensitive information.
Access to specific programs is granted only when requested by your Agency.
Depending on your permissions, it is possible that you have access to some, but not all,
of the programs. As seen on Figure 12: IR300 RESTRICTED DATA MENU Screen
below, the restricted options are organized by related menu, specifically: Current Data,
Transaction History, Personnel History, and Payroll Data.

37
Figure 12: IR300 RESTRICTED DATA MENU Screen
The table below outlines each of the 15 IRIS 300 screens, and provides a description of
each. Additionally, the table provides more context about the key validation fields and
processing tips.
IRIS
Screen Description
Key Validation Fields and
Processing Tips
302
Disability/RNO/ERI Data:
Displays an employee’s handicap and
race/national origin information.
Current Data Menu
304
WGI Information:
Displays an employee’s within-grade increase
information.
Current Data Menu
305
Performance Evaluation Data:
Displays an employee’s performance
evaluation information.
Current YTD Pay Info

38
IRIS
Screen Description
Key Validation Fields and
Processing Tips
307 Child Support & Alimony:
Displays an employee’s child support and
alimony information.
Current Data Menu (If
Applicable)
309 Union/Association Dues:
Displays an employee’s union/association dues
data.
Current Data Menu (If
Applicable)
313 Investigation Data:
Displays sensitive investigation data.
Current Data Menu
314 SES Performance Data:
Displays an SES employee’s performance
evaluation data.
Current Data Menu (If
Applicable)
303 PERHIS Disability/RNO/ERI Data:
Displays sensitive history data regarding
disability and race/national origin information.
Personnel Hist Menu (See
301 for Current)
306 PERHIS Performance Eval Data:
Displays sensitive history data regarding an
employee’s performance evaluation.
Personnel Hist Menu (See
304 for Current)
312 PERHIS Union/Assoc Dues:
Displays an employee’s union/association dues
data.
Personnel Hist Menu (See
308 for Current)
315 PERHIS SES Performance Data:
Displays sensitive history data regarding an
SES employee’s performance data.
Personnel Hist Menu (See
313 for Current)
310 Union/Association Dues Transaction:
Displays an employee’s union/association dues
transactions data.
Transaction Hist Menu
(See 308 for Current, See
311 For Personnel History)
308 PACS Child Support & Alimony: N/A – Payroll Data Menu
311 PACS Union/Association Dues: N/A – Payroll Data Menu

39
500 – Personal History Menu
Figure 13: IR500 PERSONNEL HISTORY MENU Screen contains 18 programs used
to view over 10 years and current personnel historical (PERHIS) data.
Figure 13: IR500 PERSONNEL HISTORY MENU Screen
The table below outlines each of the 18 IRIS 500 screens, and provides a description of
each. Additionally, the table provides more context about the key validation fields and
processing tips.
IRIS
Screen Description
Key Validation Fields
and Processing Tips
501 Salary Data:
Displays an employee’s position related history
information and salary record and associated
personnel history records.
Main Screen Used To
Validate Data

40
IRIS
Screen Description
Key Validation Fields
and Processing Tips
502 Dates & Misc Sal/Pers Data:
Displays general personnel and salary history
data.
SCD, WIGI, Work Sched,
Career Status, Etc.
515 Health Benefits:
Displays Federal and Non-Federal health
benefits history data.
Health Benefit Data (If
Applicable)
516 Life Insurance:
Displays Federal and Non-Federal life insurance
history data.
Life Insurance Data (If
Applicable)
517 Retirement Data:
Displays retirement history data for Civil Service
Retirement, Federal Employees Retirement
System, and others.
Retirement Data
518 Thrift Savings Data
Displays an employee’s Thrift Savings Plan
history data.
N/A
519 Reserved for Future Use (If Applicable)
522 SF-50B Data Elements:
Displays personnel history data reported to the
Office of Personnel Management on the
SF−50B.
Most Recent Processed
SF-50B Data
523 Personnel Supplements:
Displays general personnel history data.
Education Level,
Performance, Sex, Vet
Status, WGI Proj, Other
Data
524 Address/Check Information:
Displays the employee’s address and check
distribution history information.
Personal Address, Bank
Info (Routing, Account,
Etc.)
525 Personnel Actions Summary:
Displays a listing of personnel actions processed
in the last six years.
Listing Of All Processed
Actions And Includes PP,
YR, Eff-Date, NOA, & Who
Processed The Action
527 Detail Assign/Temporary Promotion:
Displays detailed position and temporary
promotion history data.
(If Applicable)

41
IRIS
Screen Description
Key Validation Fields
and Processing Tips
528 Retained Grade Data:
Displays save grade history data.
(If Applicable)
530 Education And Certificate:
Displays additional educational level and
certification history information.
(If Applicable)
532 Separation Information
542 Awards
543 Time Off Awards Data
547 Service Record
Of all the IRIS 500 screens, Figure 14: IR525 PERHIS PERSONNEL ACTIONS
SUMMARY Screen is the most important for processing in EmpowHR. Additional
information regarding this screen is provided below.
PERHIS Personnel Actions Summary
Figure 14: IR525 PERHIS PERSONNEL ACTIONS SUMMARY Screen displays a
listing of personnel actions processed for over 10 years. This screen is used to validate
the actions on an employee, to see if actions are missing, or to be able to find a specific
historical record to view. This screen is used to see if actions are missing or to view a
specific historical record to view. It is also key when creating History Override packages.

42
Figure 14: IR525 PERHIS PERSONNEL ACTIONS SUMMARY Screen
IMPORTANT: To navigate from IR525 to IR501, press PF9. To navigate
to IR502, press PF502, and to navigate to IR523, press PF11.

43
600 – Accessing Employee Name Inquiry
Figure 15: IR600 EMPLOYEE NAME INQUIRY MENU Screen can be accessed by
entering 600 in the SCREEN/MENU field. You may enter a full or partial Last, First and
Middle name on this screen. Remember that a Last Name as shown on the database
may be followed by a space and “Jr,” “III,” etc. A double last name may or may not be
hyphenated.
Figure 15: IR600 EMPLOYEE NAME INQUIRY MENU Screen
Follow the steps below to research an employee’s record from IR600:
Step Action
1. Enter employee’s name in the EMPLOYEE NAME field.
2. Press Enter. The employee’s respective Agency displays.

44
If a full name was entered and found, it displays as the first name on the list (unless
there are multiple employee’s with the same name). If a partial name was entered or the
name is not located, then the system displays a list of names in the area of the
employee list, similar to what is seen in Figure 16: IR601 EMPLOYEE NAME INQUIRY
Screen. You have the option of entering another spelling for the name or a completely
different name in the EMPLOYEE NAME field at the top of the screen.
Figure 16: IR601 EMPLOYEE NAME INQUIRY Screen
To the left of the employee’s name are two columns that consist of individual fields to be
used to access IRIS records on the specific employee whose name displays. The first
field is the IRIS program (record) number (IR#), for example, 101, 102, 525, etc. By
entering a program number in the field, you are taken to the specific IRIS record for the
employee whose name is shown to the right. You must have security access to the
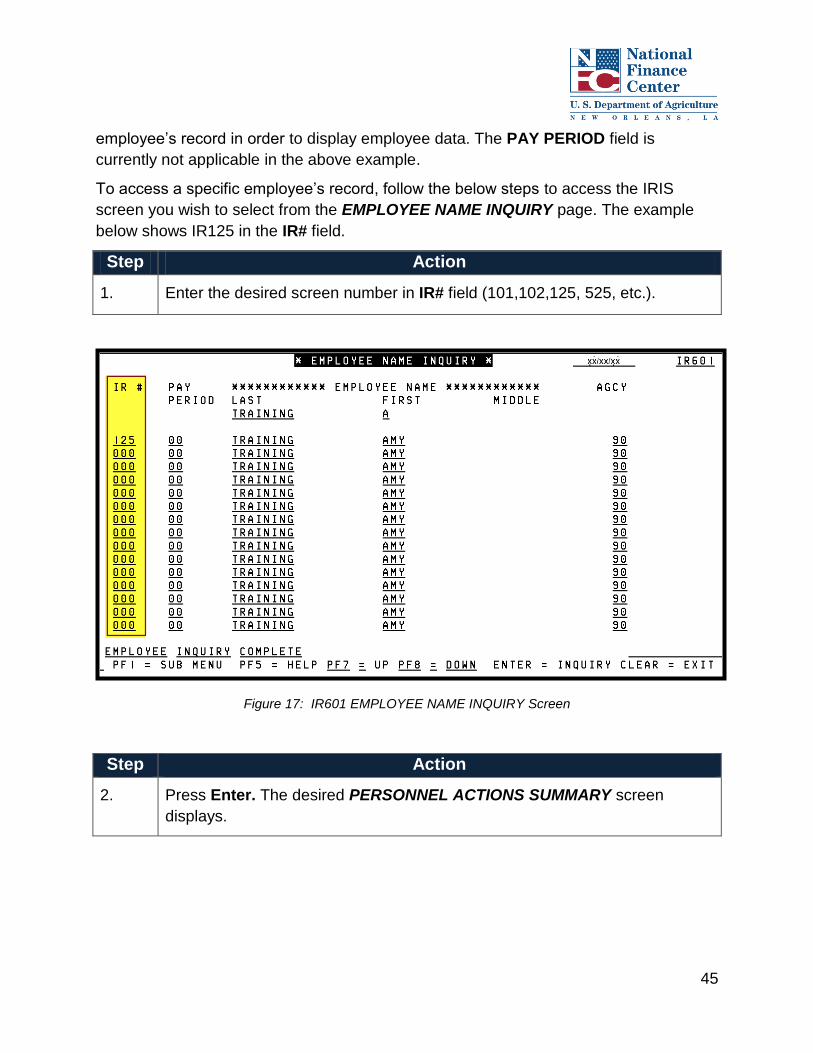
45
employee’s record in order to display employee data. The PAY PERIOD field is
currently not applicable in the above example.
To access a specific employee’s record, follow the below steps to access the IRIS
screen you wish to select from the EMPLOYEE NAME INQUIRY page. The example
below shows IR125 in the IR# field.
Step Action
1. Enter the desired screen number in IR# field (101,102,125, 525, etc.).
Figure 17: IR601 EMPLOYEE NAME INQUIRY Screen
Step Action
2. Press Enter. The desired PERSONNEL ACTIONS SUMMARY screen
displays.

46
Figure 18: IR125 PERSONNEL ACTIONS SUMMARY Screen
For additional information, please refer to the IRIS Procedure Manual:
https://www.nfc.usda.gov/publications/IRIS/IRIS.pdf

47
3.3. Payroll/Personnel Inquiry System (PINQ)
Lesson Overview
This lesson focuses on how PINQ and EmpowHR relate to each other, as well as how
to navigate the menu options within PINQ. Additionally, this lesson focuses on how to
validate when a late action (processed after the effective date) is processed correctly in
EmpowHR and updated in PINQ.
Lesson Objectives
By the end of this lesson, you will be able to:
Describe the relationship between PINQ and EmpowHR
Explain the purpose of PINQ and provide an overview of its functionality
Navigate menu options within PINQ
Validate EmpowHR transactions
Research earnings and deductions data
PINQ provides inquiry capability to view current and historical payroll and personnel.
PINQ allows processors to validate actions processed in EmpowHR. PINQ contains
data which is the result of the processing of T&A reports and the computation of
employees’ pay. Data is updated in PINQ after one or more of these successfully
process:
TIME editing
PAYE processing
ADJP processing
PINQ stores data for the following periods:
26 pay periods for T&A data
25 pay periods for payroll and deduction data

48
PINQ: Menu
Figure 19: PQ000 PINQ Menu Screen consists of 29 programs (numbered 22-83)
which contain current and historical payroll data. Program names are descriptive of the
type of information each contains.
Figure 19: PQ000 PINQ Menu Screen
The top portion of each PINQ screen provides the following data:
PINQ program number (PQ0##)
SSN of the employee
Agency code of the employee
Pay period number
PINQ: Navigation
Follow the below steps to access a specific record from the PINQ Menu:
Step Action
1. Enter the employee’s SSN in the SSNO field.
2. Enter the employee’s two-digit program number (PQXX) in the PG-NO field.
49
Step Action
3. Enter the pay period being requested.
4. Press Enter.
NOTE: To continue research on the same employee in a
different PINQ program, press Tab until the cursor is below the
current program number, enter the two-digit program code (or
00 to access the Menu) and the pay period number if it is
different, and press Enter.
To retrieve the same type of data for another employee, enter
the new SSN and press Enter. If the program has multiple
screens, it is not necessary to return to the first screen.
Validating EmpowHR Transactions in PINQ
The following information provides an overview for how to verify the data entered
through EmpowHR has provided accurate results.
The following table outlines each of the 18 PINQ programs, a description of each
program, and includes information about the key validation fields and processing tips.
PINQ Program
Description Key Validation Fields and Processing Tips
022 Payroll History:
Used to research regular and corrected/revalidated T&A’s, cash awards, adjustments, and other salary related inquiries.
PQ022 stores four screens of data related to an employee’s pay. In addition to pay-related data elements as they existed in “SALARY” at the time the pay period was paid, the program reflects many YTD balances.
This information is useful in researching general payroll and W-2 inquiries. YTD totals are reset at the beginning of a new tax year. This program also contains personnel data from the employee’s data base record in IRIS.
50
PINQ Program
Description Key Validation Fields and Processing Tips
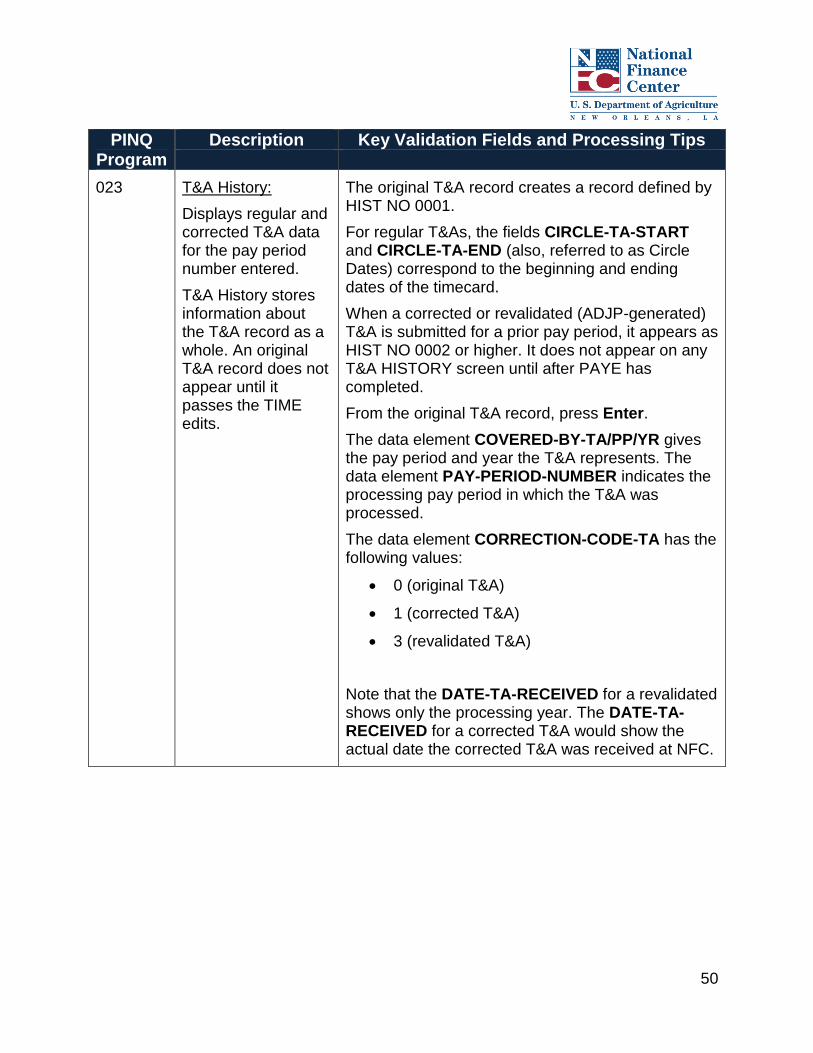
023 T&A History:
Displays regular and corrected T&A data for the pay period number entered.
T&A History stores information about the T&A record as a whole. An original T&A record does not appear until it passes the TIME edits.
The original T&A record creates a record defined by HIST NO 0001.
For regular T&As, the fields CIRCLE-TA-START and CIRCLE-TA-END (also, referred to as Circle Dates) correspond to the beginning and ending dates of the timecard.
When a corrected or revalidated (ADJP-generated) T&A is submitted for a prior pay period, it appears as HIST NO 0002 or higher. It does not appear on any T&A HISTORY screen until after PAYE has completed.
From the original T&A record, press Enter.
The data element COVERED-BY-TA/PP/YR gives the pay period and year the T&A represents. The data element PAY-PERIOD-NUMBER indicates the processing pay period in which the T&A was processed.
The data element CORRECTION-CODE-TA has the following values:
0 (original T&A)
1 (corrected T&A)
3 (revalidated T&A)
Note that the DATE-TA-RECEIVED for a revalidated shows only the processing year. The DATE-TA-RECEIVED for a corrected T&A would show the actual date the corrected T&A was received at NFC.

51
PINQ Program
Description Key Validation Fields and Processing Tips
023 (Continued) When a split T&A is submitted, each half of the split T&A appears as a separate T&A. The first half of an original T&A is shown as “HIST NO 0001,” and the second half as “HIST NO 0002.” Likewise, the first corrected split T&A processed for the pay period in a subsequent pay period would make up “HIST NO 0003 AND 0004.”
The fields CIRCLE-TA-START and CIRCLE-TA-END for split T&As correspond to the beginning and ending dates of each part of the T&A, the SPLIT-TA-CODE field is “Y.” This same logic applies to split T&A information on PQ024 and PQ025.
024 T&A Miscellaneous:
Displays miscellaneous T&A data and is used to research T&A inquiries.
The PQ024 TA MISCELLANEOUS program stores data consisting of TCs for which the employee is not paid (e.g. LWOP, Suspense, Comp Leave Earned, Credit Hours Earned, etc.).
In addition to transaction codes, this screen shows summaries of types of hours or days reported on the T&A, even some from Time in Pay Status (e.g. INTER-DAYS-WKD-PAY-PERIOD, ADMINISTRATIVE-LEAVE-USE-PP, and COMP-LV-USED-PP).

52
PINQ Program
Description Key Validation Fields and Processing Tips
025 T&A Extensions:
Used to research each transaction code and hours recorded on an original or corrected T&A.
The PQ025 TA EXTENSIONS record stores each line of T&A data (each transaction code, corresponding hours from Week 1 and Week 2, and accounting according to week). This program represents the time-in-pay status transaction codes.
When T&As are transmitted to NFC, the original T&A record creates a record defined by a HIST NO 0001. A RCD NO is created for each transaction code per transaction line (or extension) transmitted on the T&A (HIST NO 0001, RCD NO 0001, HIST NO 0001, RCD NO 0002, etc.). Each PQ023 History record has a corresponding PQ025 History record.
Accounting information may have been supplied on the T&A or the system may have assigned it based on an accounting code previously stored in the employee’s Current Data record (IR103). The ACCT-DIST-FLAG code 0 indicates the accounting data being used is valid. Although accounting errors do not interfere with the PAYE process, if the ACCT-DIST-FLAG code is any code other than 0, it should be researched and corrected.
If multiple T&As (i.e. corrected or revalidated) exist for a pay period, the first transaction line from the corrected or revalidated T&A record appears after all transaction lines from the original record or previous records (if there were multiple corrections or revalidations) are exhausted.

53
PINQ Program
Description Key Validation Fields and Processing Tips
032 Payroll Listing:
Used to research non-receipt of salary check.
This program displays an employee’s current plus 25 pay periods of pay data.
PQ032 stores basic gross-to-net data for a particular pay period that results in a pay check or DD-EFT deposit.
Some conditions trigger additional payment records, such as:
Corrected and revalidated T&As
Cash awards, lump sum payments
Refunds when a bond is cancelled, while a
carryover balance exists
These conditions appear on their own PQ032 screens even when they may or may not trigger a separate pay check. Cash awards and lump sum payments generate separate payments as net salary; however, if additional pay results from a corrected or revalidated T&A (or a bond carryover refund) it is included with the net salary deposit. Some transactions do not result in the disbursement of a check; instead they are processed for update purposes only.
The type of payment (Regular T&A, Corrected T&A, Cash Award, NFC29, etc.) is identified immediately above the employee’s name.
The order that payments and/or adjustments update to PQ032 is as follows: Corrected or revalidated T&As and NFC-29 adjustments display prior to gross-to-net salary payments and cash awards and lump sum payments display after gross-to-net salary payments.
Corrected T&A is shown as the type of payment for revalidated as well as corrected T&As.

54
PINQ Program
Description Key Validation Fields and Processing Tips
046 PACS Appropriation Charges:
Used to research salary related inquiries.
PQ046 stores amounts paid by transaction codes with corresponding rates and hours. It provides one screen of data related to each pay transaction code. It is different from PQ025 in that it attaches dollar amounts to each Time Code (TC) and also prorates contributions such as the government’s portion of Federal Employees Health Benefits (FEHB) premiums.
The PAY-TRAN-CODE field indicates which TC is reflected. Pay TCs not shown on the T&A, but derived by the system, are also reflected (TCs for cash award payments, allowances, Administratively Uncontrollable Overtime, Availability Pay, etc.) and overtime under FLSA (the difference between the Title V and FLSA computations). It should also be noted that dollar values are assigned to TCs which are not actually being paid (Comp Leave Earned, Credit Hours Earned, and Quarters Deductions, etc.)
For additional information, please refer to the PINQ Procedure Manual:
https://www.nfc.usda.gov/publications/PINQ/PINQ.pdf

55
3.4. Position Management System (PMSO)
Lesson Overview
This lesson focuses on Position Management System (PMSO) and its relationship with
EmpowHR. Additionally, it provides a high-level overview of the system’s functionality
and navigation features.
Lesson Objectives
By the end of this lesson, you will be able to:
Describe the relationship between PMSO and EmpowHR
Navigate menu options within PMSO
Position Management System (PMSO) is a real time online database system. PMSO
allows agencies to review position data for immediate use in EmpowHR. The Position
Management component is used to review master record and individual positions in
PMSO. A master record must be established before an individual position can be
established.
In EmpowHR, the master record is called job code and the individual position is called
position. The table below describes the type of data contained in each type of record
and the relationship between PMSO and EmpowHR.
PMSO EmpowHR Description
Master Record Job Code Contains basic position data under which one
or more individual positions may be assigned
Individual Position Position Is linked to the master record and identifies a
specific position.
PMSO information is updated only when a user creates or edits Master Record/Job
Code or Individual Position/Position information.

56
PMSO: Menu and Navigation
After you access PMSO, Figure 20: POSITION MANAGEMENT SYSTEM ONLINE
Menu Screen is displayed. The PMSO menu consists of 17 functions, only seven of
which are applicable to EmpowHR validation. These seven main functions, listed in the
table below, may be performed on an individual position or master record, plus two
special functions. However, the individual position and master record are created and
updated in EmpowHR; therefore, PMSO should only be used to research and validate
position management information.
CAUTION: There is no back feed from PMSO to EmpowHR so any
actions performed in PMSO do NOT flow back into EmpowHR.
Figure 20: POSITION MANAGEMENT SYSTEM ONLINE Menu Screen

57
Below is a brief description of the seven functions commonly used in PMSO for
EmpowHR validation:
Function Code Description
Query Master Record
(QM)
Queries a master record on the PMSO database.
Query Individual
Position (QI)
Queries an individual position within a master record on the
PMSO database.
Help Master Record
(HM)
Accesses the help screens for a master record without using the
Add, Change, Delete, Inactivate, Reactivate, or Query option.
Help Individual
Position (HI)
Accesses the help screens for an individual position without using
the Add, Change, Delete, Inactivate, Reactivate, or Query option.
Position Inquiry (PI) Displays all individual positions established for a master record.
Report Selection
Menu (SR)
Specifies the output criteria for selected reports.
Exit Position
Management System
(EX)
Exits the system.
Selecting a Function in PMSO
The table below describes the steps to select a desired function:
Step Action
1. Enter in the two-character code next to the SELECT OPTION field.
2. Press Enter.

58
Key Data Fields
The key data fields at the top of each PMSO screen are used to identify a unique
master record or individual position on the PMSO database.
IMPORTANT: Each master record and individual position has to be a
unique record. There are key data fields that combined ensure that each
master record and individual position is unique.
Each master record screen contains the key fields listed below:
Agency
Department
POI
Master Record Number
Grade
Each individual position screen contains the key fields listed below:
Agency
Department
POI
Master Record Number
Grade
Position Number
Query Master Record or Query Individual Position
The key fields are used to query for a master record or individual position. Query Master
Record is option “QM” and query Individual Position is option “QI” on the PMSO Menu.

59
Follow the below steps to query a record in PMSO:
Step Action
1. Enter “QM” in the FUNCTION field.
2. Enter the data in the key fields in the QM and QI screens as required.
3. Press Enter.
Figure 21: PM00201M QUERY MASTER RECORD Screen is displayed.
Figure 21: PM00201M QUERY MASTER RECORD Screen

60
Figure 22: PM00301M QUERY INDIVIDUAL POSITION Screen is displayed.
Figure 22: PM00301M QUERY INDIVIDUAL POSITION Screen
The selected master record or individual position is displayed as it exists on the PMSO
database with the message “Master Record Found – Last Update xx/xx/xx (date) by
xxxxx (userID) or Individual Position Found – Last Update xx/xx/xx (date) by xxxxx
(userID).” This message indicates the date of the last update to the master record or
individual position and the user ID of the person responsible for the update or auto
generated system that created the update (i.e., BEAR action would generate as XXXX).
If the master record or individual position selected is not on the PMSO database, the
message “Master Record Not Found – Check Key Fields or Individual Position Not
Found – Check Key Fields” is displayed. The cursor returns to the DEPARTMENT
CODE field, and you can select another master record or individual position and press
Enter.

61
Additional PMSO navigation information is provided in the table below:
Function
Key
Navigation Information
Enter To query another Individual Position or Master Record or to change the
applicable key fields.
PF9 To display the QUERY INDIVIDUAL POSITION screen or the QUERY
MASTER RECORD screen.
PF8 To scroll forward through the INDIVIDUAL POSITION or MASTER
RECORD screens.
PF7 To display the QUERY INDIVIDUAL POSITION or the QUERY
MASTER RECORD screen.
Help Screens
Help screens are available for completing the key fields and other fields displayed on
the screen. Help screens display a list of valid codes and/or a narrative description for
each field.
To obtain a help screen at any function screen except the query function, position
the cursor on the field in question and press F5. The applicable help screen is
displayed.
Press Enter to return to the previous screen. Help screens are also available
through the Help Master Record (HM) or Help Individual Position (HI) option at
the PMSO menu.
For additional information, please refer to the PMSO Procedure Manual:
https://www.nfc.usda.gov/publications/PMSO/pmso.pdf

62
3.5. Table Management (TMGT)
Lesson Overview
This lesson focuses on navigating through TMGT and reviewing the relevant processing
tables for EmpowHR.
Lesson Objectives
By the end of this lesson, you will be able to:
Navigate in TMGT
Access the appropriate processing tables
TMGT is a menu-driven database management system which provides direct access to
table records and contains selected data elements from the payroll/personnel, financial,
and administrative systems. TMGT contains tables of data that are commonly used
throughout multiple personnel, payroll and financial systems such as POI’s
organizational structures. TMGT consists of 112 table options. Each table is identified
by a 3-digit numeric code 001 – 128.
TMGT allows authorized users to:
View and update records
Request reports
View documentation data for various tables used in application programs
TMGT maintains an active file which includes all active and deleted records. Certain
tables maintain a history file, which includes at least one inactive record. Records are
identified as (1) active, (2) history, or (3) deleted within each table. Additionally, the
records list the user ID and the date changed.
NOTE: Key data elements are identified on the screens with an asterisk
(*) and are used to access table records. The number of data elements in
a record and the table record format are based on the requirements for the
specified table.
TMGT is updated when an authorized user creates or edits this information.

63
TMGT: Menu and Navigation
Figure 23: TM0010 TABLE MANAGEMENT SYSTEM Menu Screen is displayed.
Figure 23: TM0010 TABLE MANAGEMENT SYSTEM Menu Screen
The following table includes descriptions of functions within TMGT that may be used to
obtain table data:
Function Description
(I)nquiry Used to view active, historical, or deleted records.
(U)pdate Used to add, modify, delete, or reactivate a record.
(R)eport Used to retrieve payroll/personnel data elements for
processing personnel actions and to request ad-hoc reports.
(D)ocumentation Used to retrieve pertinent individual table screen information.
This screen lists the table number, name, record count,
purpose, and description of the table’s data.

64
The following function keys are used to navigate in TMGT:
Function Key Description
PF1 Returns you to the first screen of the TMGT Menu.
PF2 Allows you to directly access the Documentation option.
PF3 Allows you to directly access the Reports option.
PF4 Allows you to directly access the Update option.
PF7 Brings you back respectively, from one current record to another or
from one History record to another.
PF8 Brings you forward respectively, from one current record to another
or from one History record to another.
PF9 Accesses the first history record for the key data elements
displayed. History records attached to a particular current table
record are numbered separately beginning with 000001.
PF10 Takes you to screen two, and then to screen three which displays
rates for specific agencies.
PF12 Allows you to access a particular page of the table.
Follow the below steps to access information from a particular TMGT table:
Step Action
1. Enter the desired Function Code and Table Number in the ENTER
FUNCTION AND TABLE NUMBER field.
2. Press Enter.
Inquiry Function
As in Figure 24: TM01210 HEALTH BENEFITS RATES Screen, the inquiry function is
used to view active, history, or deleted records. This function is the most commonly
used for researching data for EmpowHR transactions.

65
To access the inquiry function:
Step Action
1. Enter “I” immediately followed by the 3-digit table number in the ENTER
FUNCTION AND TABLE NUMBER field.
2. Press Enter. The specified Inquiry page displays.
.
For example, Figure 24: TM01210 HEALTH BENEFITS RATES Screen was displayed
using the “I012” code initially. It shows the current record with rates effective 01/13/13 –
01/11/14.
Figure 24: TM01210 HEALTH BENEFITS RATES Screen
1. The record is identified as ACTIVE, HISTORY, or DELETED on the right side of
the screen when the applicable data is displayed.
2. The element PAGE specifies what page the current record is found within the
entire table.

66
3. The BEG-EFF-DATE and LAST-EFF-DATE fields indicate the period of time
during which the values shown on a particular table are on/were valid. When data
entered on a personnel action or a payroll document is edited by PINE against a
particular table, that data must be valid according to these dates for the effective
date of the action. When the TIME, PAYE and ADJP jobs run, data processed
that must be validated against a particular table, must be valid for the inclusive
dates of the pay period being processed.
4. The USER-ID field identifies the person who established or last changed the
record
5. The DATE-CHANGED field indicates when the record was established or last
changed
Report Function
The report function is used to produce hardcopy versions of tables for Agency reference
or to produce labels of selected tables for mailing purposes. When producing hard copy
tables, you have the option of printing:
Only active records
Only historical records
Both active and historical records
To access the report function:
Step Action
1. Enter “R” immediately followed by the 3-digit table number in the ENTER
FUNCTION AND TABLE NUMBER field.
2. Press Enter. The specific Report page displays.

67
For example, Figure 25: TM012R0 HEALTH BENEFITS RATES Screen was displayed
using the “R012” code initially.
Figure 25: TM012R0 HEALTH BENEFITS RATES Screen
Print Report
You have the option of viewing the report before it is printed using the Interactive
System Productivity Facility (ISPF). The person to whom the report is to be sent as well
as the REMOTE ID number for the printer is required to do so.
Follow the below steps to print using ISPF:
Step Action
1. Enter the HB-Carrier Code, HB-Option Code in the FROM field.
2. Enter the HB-Carrier Code, HB- Option Code in the TO field.
3. Enter “X” next to the type of Report (Active, History, or All) you wish to select.

68
Step Action
4. Press Enter. The Report prints.
Documentation Function
The documentation function is used to list the table number, name, purpose, and a
description of a table’s data elements.
Follow the below steps to access the documentation function:
Step Action
1. Enter “D” immediately followed by the 3-digit table number in the ENTER
FUNCTION AND TABLE NUMBER field.
2. Press Enter. The specific Documentation screen displays.
For example, Figure 26: TM011D0 HEALTH BENEFIT CARRIER NAME AND
ADDRESS Screen was displayed using the “D011” code initially.

69
Figure 26: TM011D0 HEALTH BENEFIT CARRIER NAME AND ADDRESS Screen
Individual Tables
The table blow outlines each of the 14 most important TMGT tables for processing in
EmpowHR. The table provides a description of each. Additionally, the table provides
more context about the key validation fields and processing tips.
Table Description Processing Tips
005 Agency Organizational Structure:
Contains organizational structures and agency/bureau codes with the corresponding description of all active organizational structure levels and agency/bureau codes for reports.
Used by Position Management and PINE to validate eight levels of organizational structure and agency/bureau codes.
Contains an Employee Express Indicator that identifies those Agencies/Departments participating in OPM’s Employee Express Programs.

70
Table Description Processing Tips
016 Geographical Location Codes with Names:
Contains records of state/country, city, and county codes as found in GSA’s Worldwide Geographic Location Codes Handbook.
Validates addresses entered in EmpowHR, the entry of a DUTY-STATION in Position Management, and other tables which contain these codes; i.e. TM007, City Tax, City Name and Address; TM008, County Tax, County Name and Address; TM027, COLA-Post Differential Codes; TM026, Standard Metropolitan Statistical Areas.
029 Pay Table Rates:
Contains salary rates for each pay plan, grade, and step.
Used to compute pay for all employees, including those in occupational special pay areas.
Used by PINE to validate salaries entered on personnel actions and to generate geographic pay.
Annual and Hourly Rate by Steps, Beg-Eff-Date, Last-Eff-Date.
030 Payroll Constants:
Contains the payroll data elements established by law and regulation used to compute an employee’s pay.
Press Enter to populate the fields.
Max-Annual-Pay, Min-Wage-Amt, Apt-Ltm-Hrs-Tot, Ret-Rate-7, Oasdi-Percent, Ag-Cont-Pct-Ret, Fefli-Max-Cover.
031 Special Pay Converters:
Contains occupational special pay area codes used to compute special pay rates for all employees in special pay areas, except Federal Wage System (FWS) employees.
Occ-Series-Code, Duty-Station-Cnty-Code, Occ-Special-Pay-Area, Duty-Station-State-Code, Duty-Station-City-Code.

71
Table Description Processing Tips
033 Wage Board Pay Converters:
Contains occupational special pay area codes used to compute special pay rates for Federal Wage System (FWS) employees.
Occ-Special-Pay-Area, Occ-Special-Pay-Area-Name
052 Remarks Code And Descriptions:
Contains a remarks code and alpha description used for processing personnel actions.
Agencies can query Table 052 data, view documentation data, and generate reports.
Update authority is limited to authorized NFC personnel only.
061 Nature of Action Conversion:
Contains the nature of action conversion table for alpha descriptions, first authority and second authority codes.
Description is represented by the 3-digit nature of action code (NOAC).
Authority code is a law, executive order, rule, regulation or other basis that authorizes the appointing official to effect a personnel action on an employee.
062 3-Digit Nature of Action:
Contains NOACs and descriptions used to denote the specific personnel action for creating or changing a personnel record.
Nat-Act-Ist-3-Pos.
063 Department/Agency/Bureau Contact:
Contains the names of agency personnel who are authorized to contact NFC about payroll/personnel matters.
Must list individuals placing telephone inquiries to the NFC Contact Center in order for information to be released.
074 Official Position Title:
Contains the Official Position Title information.
Occ-series Code, Official Title Code, Position Official Title.
091 OPM NOA Legal Authorities:
Contains the Nature of Action legal authorities used for processing personnel actions as determined by OPM.
OPM-Other-Legal-Auth, Auth-Action-Code, Position-Status-CSC.

72
Table Description Processing Tips
100 – PACT Data Element Description:
Contains the alpha descriptions, attributes, and lengths for the data elements used in the Payroll/Personnel System.
Long-Name, SSNO Short-Name, Attribute, Length, Decimal.
101 PACT Screen Elements (1):
Used with Table 100 and identifies the required, optional, and system generated elements for NOACs.
Blank – Values for a new personnel action.
2 – Values for an official correction in History Override.
3 – Values for an official cancellation in History Override.
For additional information, please refer to the TMGT Procedure Manual:
https://www.nfc.usda.gov/publications/TMGT/TMGT.pdf

73
3.6. Chapter Review
Knowledge Check
1. Describe IRIS, PINQ, PMSO, and TMGT and the purpose of each system as they
relate to EmpowHR.
2. Successfully sign in to IRIS, and then navigate to PMSO using the shortcut
discussed in the chapter. Finally, sign out of the system to demonstrate that you
know how to move between the systems without error.
Chapter Summary
Having completed this chapter, you are now able to:
Describe the relationship between IRIS, PINQ, PMSO, and TMGT with
EmpowHR
Navigate and research within IRIS, PINQ, PMSO, and TMGT successfully

74
4.0. EmpowHR Navigation
4.1. Chapter Overview
This chapter focuses on how to access EmpowHR, use the navigation menu and its
options, and introduces how to utilize the navigation tips.
Chapter Objectives
By the end of this chapter, you will be able to:
Access EmpowHR
Navigate menu options within EmpowHR
Utilize the navigation tips to process in EmpowHR proficiently

75
4.2. Accessing EmpowHR Overview
Lesson Overview
This lesson focuses on how to access EmpowHR by signing in and signing out using
the appropriate links.
Lesson Objectives
By the end of this lesson, you will be able to:
Access EmpowHR
EmpowHR is a secure web-based application and can be accessed through any Web
browser. You need a User ID and password to access the system. For security
purposes, EmpowHR automatically signs you off after a defined period of inactivity.
Signing In
EmpowHR is a Web-based application. You access EmpowHR through a Web portal.
Step Action
1. Open a Web browser.
2. Enter “www.nfc.usda.gov” in the Web browser navigation bar to access the
NFC Home page.
3. Press Enter. The NFC Home page displays.

76
Figure 27: NFC Home Page
Step Action
4. Click on the EmpowHR (All Others) link under APPLICATION
LAUNCHPAD. The EmpowHR page displays.
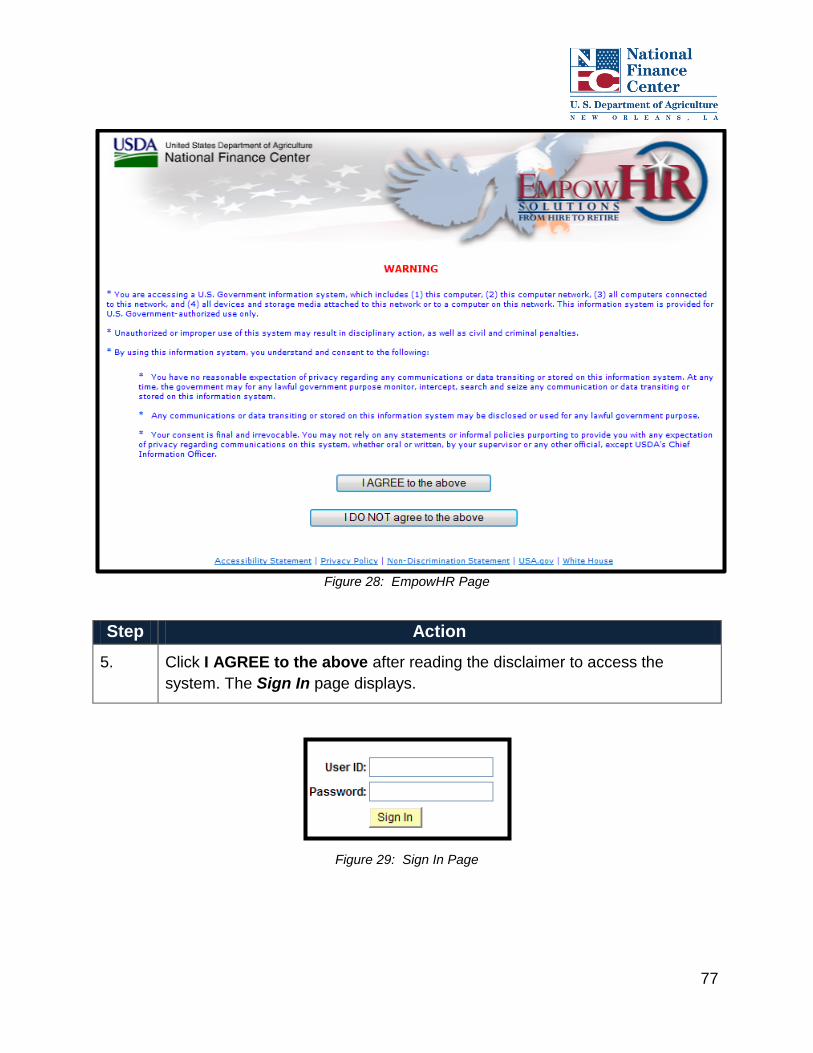
77
Figure 28: EmpowHR Page
Step Action
5. Click I AGREE to the above after reading the disclaimer to access the
system. The Sign In page displays.
Figure 29: Sign In Page

78
Step Action
6. Enter your User ID in the User ID field.
7. Enter your password in the Password field.
8. Click Sign In.
Changing a Password
Once you initially sign in, you are automatically required to change your password. You
also have the ability to change your password as needed by using the Change My
Password component on the main menu. Follow the steps below to change your
password.
Step Action
1. Click Change My Password from the Menu Group.
Figure 30: Change My Password Link
Step Action
2. The Change Password page displays.

79
Figure 31: Change Password Page
Step Action
3. Enter current password in the *Current Password field.
4. Enter new password in the *New Password field.
5. Enter new password in the *Confirm Password field.
6. Click Change Password. The password has been changed successfully.
Signing Out
To sign out of EmpowHR, follow the step below:
Step Action
1. Click the Sign out link on the navigation bar.
Figure 32: Sign Out Link

80
4.3. Using the Menu
Lesson Overview
This lesson focuses on how to navigate within EmpowHR using the menu options, such
as using the Favorites feature, account management tools, and utilizing the search
features.
Lesson Objectives
By the end of this lesson, you will be able to:
Navigate menu options within EmpowHR
EmpowHR Main Menu
Figure 33: EmpowHR Main Menu page is discussed in greater detail following the figure.
Figure 33: EmpowHR Main Menu
Using the Menu Group
On the left side of the page is the menu group of functions in EmpowHR. The menu
group, Figure 34: EmpowHR Menu Group, displays functions available based on the

81
roles assigned by the Agency’s security officer. This menu group displays a hierarchical
view of the application menu.
Figure 34: EmpowHR Menu Group

82
The table below describes the level of information in the menu group.
Using the Navigation Bar
The navigation bar, Figure 35: EmpowHR Navigation Bar, displays in the upper right of
every page in EmpowHR. It remains static as you navigate through EmpowHR.
Figure 35: EmpowHR Navigation Bar
The following table outlines the descriptions for each of the EmpowHR navigation bar
options.
My Favorites
Using My Favorites from the navigation bar is helpful when you use pages frequently for
quick access. Adding a page to My Favorites allows direct navigation to that page
within EmpowHR.
Name Description
Menu Group First level of a menu contains the main functions.
Menu Second level contains menu options within each function.
Menu Item Third level of a menu contains a list of items to access.
Components Fourth level on a menu contains a group of related components
within each menu item.
Name Description
Home Navigates back to the menu displayed at sign in.
Worklist Displays items needing completion, correction, or verification. Each
user has an individual Worklist.
Add to Favorites Saves frequently visited pages within EmpowHR.
Sign out Exits EmpowHR.

83
Follow the steps below to add a favorite page:
Step Action
1. Click the Add to Favorites link on the navigation bar. The Add to Favorites
page displays.
Figure 36: Add to Favorites Page
Step Action
2. Enter a description of the page in the *Description field.
3. Click OK. The page selected is now added to My Favorites.
Additional Navigation Bar Features
The table below outlines the descriptions for the additional navigation bar features.
Name Description
New Window Opens multiple instances of EmpowHR. A duplicate page, called a
child window, opens. This can be useful when working on multiple
functions at once. When the duplicate page is opened, it is completely
independent and allows navigation to any area of EmpowHR.
Help Links to procedure documentation.
http Icon Clicking this icon allows you to copy the complete address (URL) of
the current page to the clipboard.

84
Using Search Feature
Records in EmpowHR are associated with a particular key such as an employee
identification number (EmplID) or a position number. When accessing a component,
EmpowHR displays a Search page to enable you to enter the criteria to identify the
record.
There are two types of Search pages: Basic and Advanced.
To access the basic search, follow the steps below:
Step Action
1. Click the search icon from the EmpowHR Menu Group or search a keyword
in the Search field.
Figure 37: Search Field Page

85
Step Action
2. The Search page displays.
Figure 38: Search Page
NOTE: Partial Search allows entry of partial values to perform a search.
For example, you could search for only the last name “Smith” in the
search feature, and the search would produce all results for “Smith”.
However, it is recommended not to do so since a partial search yields a
high number of results. Additionally, you should note that search results
are limited to 300 records.
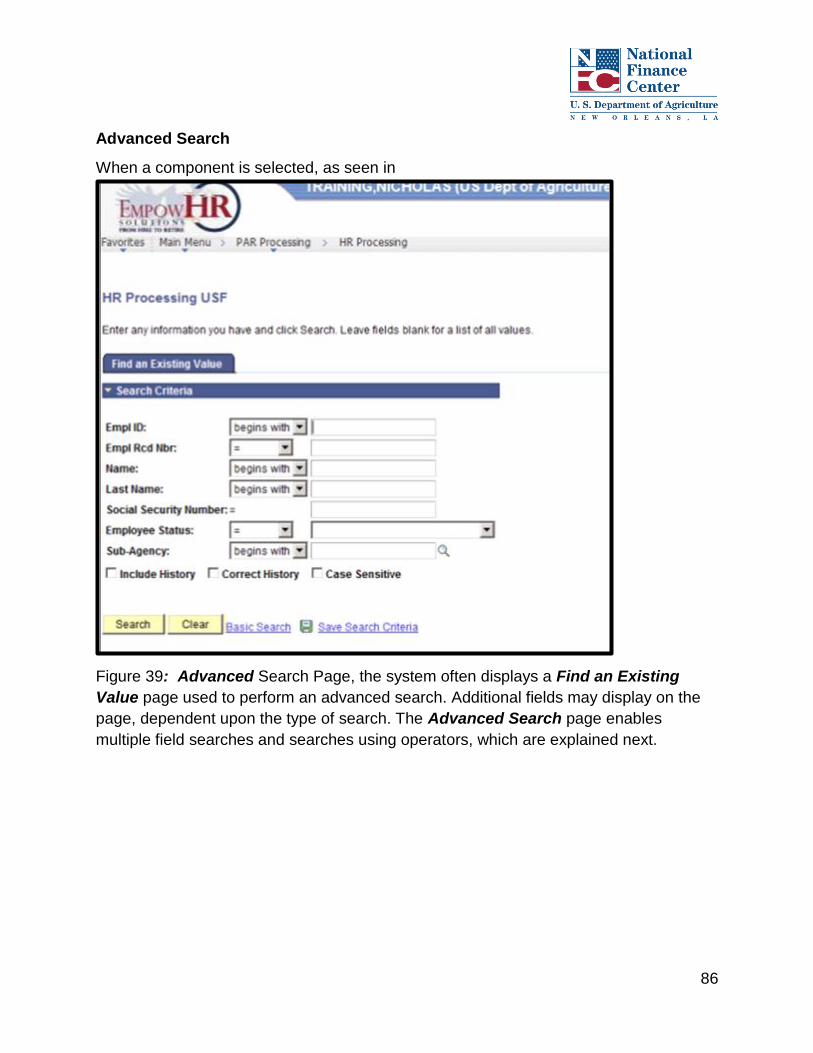
86
Advanced Search
When a component is selected, as seen in
Figure 39: Advanced Search Page, the system often displays a Find an Existing
Value page used to perform an advanced search. Additional fields may display on the
page, dependent upon the type of search. The Advanced Search page enables
multiple field searches and searches using operators, which are explained next.

87
Figure 39: Advanced Search Page
Operators Definition
begins with The data starts with a specific character or characters.
contains The data contains specific characters.
= The data is equal to.
not= The data is not equal to.
< The data is less than.
<= The data is less than or equal to.
> The data is greater than.

88
NOTE: In some components, there are thousands of records; therefore to
narrow the search results and minimize the search time, enter in as much
criteria as possible.
Enter all known criteria using the operators listed in the table below to narrow your
search results.
Advanced Search - Wildcards
When performing an inquiry, you can utilize wildcards in many of the fields. Wildcards
allow a broad search of many different data combinations when you do not know a
complete value or is unsure of how to spell something.
Wildcards cannot be used in every instance or in every application. For example,
wildcards are not viable in date fields, nor can wildcards be used on Social Security
fields.
The table below defines and provides examples for wildcards you can use as an
advanced search feature:
Wildcard Definition Example
% (percent sign) Match one or more
characters.
S%N - Returns any name that begins with
the letter S and ends with the letter N.
_ (underscore) Match any single
character.
_man - Returns all names ending in
“man”.
%man% - You can combine wildcards.
This example returns any name that
contains “man”. For example, “Manuel”,
“Sandmanson”, or “Hillman”.
>= The data is greater than or equal to.
between The data is within a range of two values.
in The data is within a field.

89
Common Page Elements
The elements in the table below are additional icons and links you may see when
navigating in EmpowHR.
Icon or Link Definition
Add a Row/Delete a Row
Drop-down list
Add Multiple Rows
Calendar
Checkbox
* Indicates A Required Field (Next to Field Name)
Previous Record/Next Record
Look Up
Previous Record In List
Next Record In List
Refreshes Page (Calculates Formulas/Values)
Drill Down To Detail (May result in a New Window)
New Window Link that displays a new window
Save Record
Returns to Previous Search Page
Allows For Recall of Existing Record For Revision or Review
Navigates to Next Tab in Component
Includes History with Effective Date information
Returns to Previous tab
Allows correction of information on record.
Sends E-mail Notification

90
EmpowHR Fields
On pages in EmpowHR, there are fields that are colored either: (1) yellow with an
asterisk, (2) lavender, or (3) white with an asterisk. These fields indicate the following:
NOTE: Some Agencies may have additional Required Fields that will need
to be completed (i.e., Reports To).
Color/Symbol Reason
Yellow (Asterisk*) A required NFC field. The action does not “Save” if the
required information is missing. Information in yellow will edit
against PINE.
White (Asterisk*) A required PeopleSoft field. Must include this field information
or the information will not update in EmpowHR.
Lavender An optional field. Information in lavender edits against PINE
but will not flow to the database. Instead, it stays in
EmpowHR.
White (Asterisk*) A required PeopleSoft field. Must include this field information
or the information will not update in EmpowHR.

91
4.4. Chapter Review
Knowledge Check
1. What are two examples of how to use a wildcard when performing an Advanced
Search?
1. _________________________________________________________
2. _________________________________________________________
2. What are the four levels used to navigate through the EmpowHR menu?
1. __________________________________________________________
2. __________________________________________________________
3. __________________________________________________________
4. __________________________________________________________
Chapter Summary
Having completed this chapter, you are now able to:
Access EmpowHR
Navigate menu options within EmpowHR
Utilize the navigation tips to process in EmpowHR proficiently

92

93
5.0. Position Management
5.1. Chapter Overview
This chapter focuses on the Position Management component of EmpowHR and its
relationship with PPS. Additionally, this chapter describes how to navigate and research
in PMSO.
Chapter Objectives
By the end of this chapter, you will be able to:
Describe the purpose of the Position Management component
Describe the relationship between Position Management and PMSO
Create a job code
Modify a Job Code
Describe the purpose of creating a position
Create a new position
Copy a position
Modify an existing position
Create multiple positions

94
5.2. Position Management Overview
Lesson Overview
This lesson focuses on the purpose and functionality of Position Management, as well
as its relationship with PPS.
Lesson Objectives
By the end of this lesson, you will be able to:
Describe the purpose of Position Management and the role it plays to process
personnel actions accurately
Describe the relationship between Position Management and PPS
Position Management is a component in EmpowHR for the creation, maintenance and
history of job code and position data. The data entered into EmpowHR creates the
official master record and individual position records in PMSO. You are able to use and
maintain position information in EmpowHR through Position Management.
Within EmpowHR, Position Management enables you to input and maintain position
description data in PPS basic data, such as occupational series and official position title
code, are entered to create a job code and the job code is used to create one or more
positions. Every employee and vacant position is assigned a position in EmpowHR.
Figure 40: Job Code Overview outlines the process by which positions are created after generating a job code.
Figure 40: Job Code Overview
Within EmpowHR, Position Management enables agencies to research, add, change,
inactivate, reactivate, and delete/restore position data to PPS.
Basic position description
information is entered into
the system to generate a
job code number, which
results in the creation of a
Job Code.
One or more individual
positions are created by
using the job code number
and additional information
specific to the position,
which results in the
creation of positions.
Position #1 is
created.
Position #2 is
created.

95
System Edits
The job codes and positions created contain information that is validated through PINE.
The information is exported for review against information stored on the PPS that, once
verified, becomes a permanent record in PPS. When job codes and position numbers
are created and/or edited, these changes remain in EmpowHR as a historical record.
When information is successfully processed in EmpowHR, it is visible in PMSO.
In PMSO, job codes are identified as master records and positions are identified as
Individual Positions. PMSO is the area in PPS that contains the official positions of
record that are used in the validation process for all personnel actions.
When an error is identified by the system, a Suspense Inquiry (SINQ) error is created
and returned to EmpowHR in the import file.
IMPORTANT: All errors must be corrected in EmpowHR before the job
code or position may effectively be used to process a personnel action.
After the job code or position is corrected in EmpowHR and saved, the status changes
to NFC Ready in Position Management. After the job code or position has applied in
Position Management, the information can be queried in PMSO.

96
5.3. Job Codes
Lesson Overview
This lesson focuses on how to use job codes in Position Management.
Lesson Objectives
By the end of this lesson, you will be able to:
Describe the purpose of job codes
Create a job code
Modify a job code
Job Code Overview
As previously mentioned, a job code record is created in EmpowHR by the input of
basic data from the position description (usually found on the OF8 or AD332). Job
codes are used for grouping similar positions in a logical manner. Additionally, they are
created to identify position descriptions. A few things to remember about job codes
include:
A single job code can be used to create one or more positions
Job codes can cross organizational lines within the same submitting office but
cannot cross grade lines
The job code number is a six-digit number automatically assigned by EmpowHR
when the job code information is saved
The job code component contains three pages that must be completed or verified
before a job code can be created. The first page, Figure 41: Job Code Profile Page,
contains the job code number and the basic position data required to build the job code
record.

97
Figure 41: Job Code Profile Page

98
The following fields are required on the Job Code Profile page for adding a job code:
Field Description
Effective Date Classifies the date on which a table row becomes effective (the date
that the job code is available for use in the system). It also determines
when the information can be viewed. The job code effective date
should always be prior to the effective date of the Personnel action
and the position.
Reason Code Tells the system what job code action you are initiating. Valid values
are:
INA – Inactivate an existing job code temporarily
NEW – Create a new job code
REA – Reactivate an inactive job code
UPD – Change the existing job code information
Occupational
Series
Designates a grouping of positions similar in work and qualification
requirement. A title and a four-digit number designate an Occupational
Series. For valid codes, see TMGT Table 018.
Official Position
Title Code
Classifies the applicable 4-digit Official Title Code. For valid codes,
see TMGT Table 075. Official Titles and Organization Codes can be
found in Tables 74 & 76.
Supervisory
Status
Denotes the Supervisory Status of the job code. Valid values are:
2 – Supervisor or manager under the General Schedule
Supervisory Guide
4 – Supervisory Civil Service Reform Act (CSRA)
5 – Management Official (CSRA)
6 – Leader under Work Leader Grade Evaluation Guide
7 – Team Leader for Two-Grade Interval Work
8 – Other
Functional
Class
Denotes the classification for describing certain types of work
activities. This field is required on certain series. For more information,
see OPM Introduction to the Position Classification Standards.
99
Field Description
Date Classified Denotes the date the classification of the position is approved.
The second tab, Figure 42: Default Compensation Page, contains a comprehensive
breakdown of the job code salary based on the Pay Plan, Salary Plan, and Salary
Grade.

100
Figure 42: Default Compensation Page
IMPORTANT: You should verify that these fields defaulted correctly from
the Add a New Record page

101
The third page, Figure 43: Affected Positions and Emplids Page, displays the job
code number and lists any positions associated with this job code, along with the
EmplID and name of the employee assigned to the position. As new positions are
created using this job code, they become visible on this screen whether encumbered or
vacant.
Figure 43: Affected Positions and Emplids Page
NOTE: The Job Code field displays as New on each page until the
record is saved. Once saved, the job code is created.

102
Exercise 5.1: Creating a Job Code
Description/Scenario
In this exercise, create a job code for a permanent GS-12, Series 2210, IT
Specialist at the USDA NFC facility in Washington, DC effective 06/01/2010. The
classification received final approval on 05/25/2010 and has a Salary
Administration Table of 0000. This position does not involve any supervisory
duties and has an Official Position Title Code of 0004.
Instructions
Follow the steps in the table below to complete Exercise 5.1: Creating a Job
Code.
Step Action Required Data
1. Select Position Management from the Main Menu.
2. Select Job Codes from the Position Management Menu
Options.
3. Click the Add a New Value tab. The Add a New Value
page displays.
4. Enter the Sub-Agency in the Sub-Agency field. 90
5. Enter the Personnel Office ID in the Personnel Office ID
field.
5317
6. Enter the Master Record Number (NFC) field if applicable
7. Enter the Salary Administration Plan in the Salary
Administration Plan field.
0000
8. Enter the Salary Grade in the Salary Grade field. 12
9. Click Add. The Job Code Profile page displays.
10. Enter the Effective Date in the *Effective Date field. 06/01/2010
11. Verify the Status in the *Status field defaulted to Active. Active
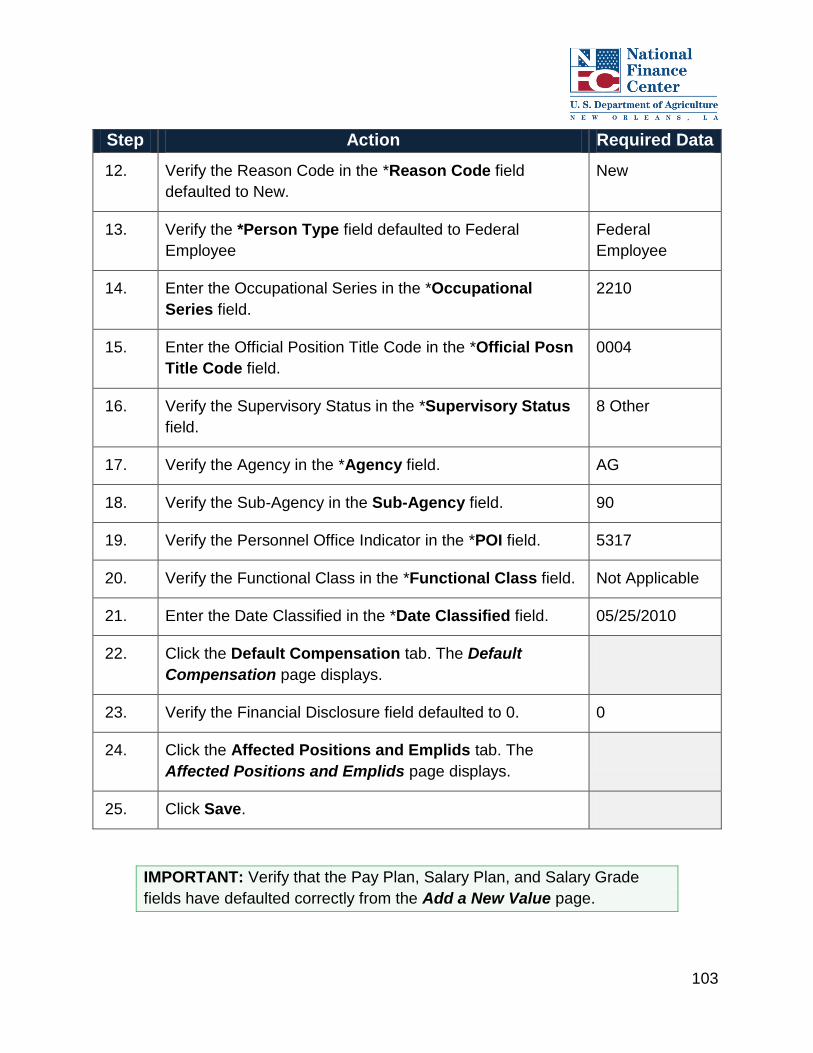
103
Step Action Required Data
12. Verify the Reason Code in the *Reason Code field
defaulted to New.
New
13. Verify the *Person Type field defaulted to Federal
Employee
Federal
Employee
14. Enter the Occupational Series in the *Occupational
Series field.
2210
15. Enter the Official Position Title Code in the *Official Posn
Title Code field.
0004
16. Verify the Supervisory Status in the *Supervisory Status
field.
8 Other
17. Verify the Agency in the *Agency field. AG
18. Verify the Sub-Agency in the Sub-Agency field. 90
19. Verify the Personnel Office Indicator in the *POI field. 5317
20. Verify the Functional Class in the *Functional Class field. Not Applicable
21. Enter the Date Classified in the *Date Classified field. 05/25/2010
22. Click the Default Compensation tab. The Default
Compensation page displays.
23. Verify the Financial Disclosure field defaulted to 0. 0
24. Click the Affected Positions and Emplids tab. The
Affected Positions and Emplids page displays.
25. Click Save.
IMPORTANT: Verify that the Pay Plan, Salary Plan, and Salary Grade
fields have defaulted correctly from the Add a New Value page.

104
A new job code has been successfully established. The job code number now displays
in the Affected Positions and Emplids tab.
Figure 44: Affected Positions and Emplids Page
The job code number is a unique identifier for this job code record. This number is used to query the job code to make any changes to the record and tie a position to the job code.

105
Exercise 5.2: Creating a Job Code
Description/Scenario
In this exercise, create a job code for a temporary GS-07, Series 2210, IT
Specialist at the USDA NFC facility in Washington, DC effective 06/01/2010. This
classification received final approval on 05/20/2010 and has a Salary
Administration Table of 0000. This position does not involve any supervisory
duties and has an Official Title Code of 0004.
Instructions
Follow the steps in the table below to complete Exercise 5.2: Creating a Job
Code.
Step Action Required Data
1. Select Position Management from the Main Menu.
2. Select Job Codes from the Position Management Menu
Options.
3. Click Add a New Value. The Add a New Value page
displays.
4. Enter the Sub-Agency in the Sub-Agency field. 90
5. Enter the Personnel Office ID in the Personnel Office ID
field.
5317
6. Enter the Salary Administration Plan in the Salary
Administration Plan field.
0000
7. Enter the Salary Grade in the Salary Grade field. 07
8. Click Add. The Job Code Profile page displays.
9. Enter the Effective Date in the *Effective Date field. 06/01/2010
10. Verify the Status in the *Status field defaulted to Active. Active
11. Verify the Reason Code in the Reason Code field
defaulted to New.
New

106
Step Action Required Data
12. Enter the Occupational Series in the *Occupational
Series field.
2210
13. Enter the Official Position Title Code in the *Official Posn
Title Code field.
0004
14. Verify the Supervisory Status in the *Supervisory Status
field.
8 Other
15. Verify the Agency in the *Agency field. AG
16. Verify the Sub-Agency in the *Sub-Agency field. 90
17. Verify the Personnel Office Indicator in the *POI field. 5317
18. Verify the Functional Class in the *Functional Class field. Not Applicable
19. Enter the Date Classified in the *Date Classified field. 05/25/2010
20. Enter Salary Grade in the Grade Points field 07
21. Click Add.
22. Click the Default Compensation tab. The Default
Compensation page displays.
IMPORTANT: Verify that the Pay Plan, Salary Plan, and Salary Grade
fields have defaulted correctly.
Step Action Required Data
23. Click the Affected Positions and Emplids tab. The
Affected Positions and Emplids page displays.
24. Click Save. Write down the
Job Code
Number

107
A new job code has been successfully established. The job code number now displays
in Figure 45: Affected Positions and Emplids Page.
Figure 45: Affected Positions and Emplids Page

108
5.4. Modifying a Job Code
Lesson Overview
This lesson provides instruction to modify job codes in Position Management.
Lesson Objective
By the end of this lesson, you will be able to:
Explain the purpose of modifying a job code
Modify a job code
Job code data can be modified by locating an existing job code and clicking the (+) icon.
A new document or row is created and the previous record is preserved as history. If a
data element is modified on the job code, the modification applies to all positions. A
PAR is required when any of the following data is changed:
Occupational Function
PATCOB Code
Pay Plan
Occupational Series
Supervisory Status
Now that you know how to create a job code, next you need to learn how to modify an
existing job code. The Job Code Reason/Status Code Comparison table below
describes the different status you are going to see in EmpowHR.

109
Job Code Reason/Status Code Comparison
Reason Status Description Send
Data
to
NFC
Time Limit
PMSO
INACTIVATE INACTIVE Inactivates a job code
temporarily.
Updates the position data in
Position Management to inactive
and displays the date.
Yes Each Agency
may set to
Abolish after
a certain time
period
NEW ACTIVE Creates a new job code. Yes N/A
REACTIVATE ACTIVE Reactivates an inactivated job
code in the NFC database.
NOTE: When the
job code is
abolished, it
cannot be
reactivated.
Yes
UPDATE ACTIVE Updates certain job code
information on the database for
active job codes.
Yes N/A
CHANGE ACTIVE Submits to NFC as a new job
code.
Yes N/A
Follow the below steps to modify a job code:
Step Action
1. Select Position Management from the Main Menu.
2. Select Job Codes from the Position Management Menu Options. The Find an
Existing Value page displays.

110
Figure 46: Find an Existing Value Page
Step Action
3. Enter the number of the job code to modify in the Job Code field you need to
modify.
4. Click Search. The Job Code Profile page displays.

111
Figure 47: Job Code Profile Page

112
Step Action
5. Click the (+) icon on the Job Code Profile page to add a new row.
6. Change the effective date. This date should reflect the date the change
becomes effective or the date the action begins.
7. Change the Reason Code Field to Update.
8. Modify the applicable fields.
9. Click the Detailed Jobcode Description link. The Detailed Jobcode
Description page displays.
Figure 48: Detailed Jobcode Description Link

113
Step Action
10. Enter the job code description.
11. Click OK.

114
5.5. Creating a Position
Lesson Overview
This lesson provides instruction to create and maintain positions in Position
Management.
Lesson Objective
By the end of this lesson, you will be able to:
Describe the purpose of creating a position
Create a new position
Copy a position
Modify an existing position
Create multiple positions
Positions are created and assigned individual numbers using a previously established
job code to systemically track and identify individual positions within your Agency. A job
code must be created (or already exist) prior to creating one or more position numbers.
A job code contains basic elements common to every linked position number, whereas
position numbers have the basic elements of the linked job code but also include
specific information regarding the individual position number being created.
IMPORTANT: There is a one-to-one relationship between a position and
a “spot” on the Position Organization Listing (POL) of an organization.
Only one employee can be assigned to a position.
When the position information is entered, a number is assigned. The information
successfully passes the edit process (passes all PPS edits), it flows into PMSO where it
can be queried as an individual position number.

115
When a position number is assigned to an employee, it is available in the following
locations:
Below are several data elements within the position record, which affect an employee’s
pay. Once they are passed to an employee’s database record (Salary data and ADJP
History), they are reviewed by PAYE to compute salary:
Fair Labor Standard Act (FLSA) Code - Defaults to “Nonexempt.” To change the
default, select from the drop-down list. Valid values are:
Administrative
Executive
Management
No FLSA Required
Exempt
NOTE: Exempt Employee vs. Nonexempt Employee
FLSA Exempt Employee - One who is not covered by the minimum wage
and overtime provisions of the Fair Labor Standards Act (FLSA or Act).
FLSA Nonexempt Employee - One who is covered by the minimum wage
and overtime provisions of the Act.
Follow the FLSA OPM Regulations as applicable:
http://www.opm.gov/policy-data-oversight/pay-leave/pay-
administration/fact-sheets/guidance-on-applying-flsa-overtime-provisions-
to-law-enforcement-employees-receiving-administratively-uncontrollable-
overtime-pay/
Salary Administration Plan - Indicates the OPM-assigned special salary table
number corresponding to the position’s scheduled salary.
Location - Reviewed by PINE to determine whether an employee is entitled to
geographic pay and, if so, at what rate.
System Location
IRIS Under employee record (IRIS 101, 122, 127, 145).
PMSO Under the Individual Position number (the assigned employee’s SSN
and name are displayed.

116
Law Enforcement Officer (LEO) Indicator - Indicates whether an employee is a
Law Enforcement Officer within the meaning of Section 8331(20) or Section
8401(17) of Title 5 of the U.S. Code with respect to whom the provisions of Chapter
31 of such title apply. The LEO indicator serves several distinct functions:
Confirms that an employee is eligible for LEO GEO pay. The system
automatically makes the appropriate choice among the different types of
geographic pay based upon factors such as the employee’s duty station.
Alerts the system to adjust the salary of LEO’s at Grades 03-10 that are
eligible based on special salary table 0491 and determines whether their
scheduled salary is from table 0491 or not. This step is important because
any type of geographic pay can be paid on top of a 0491 salary. However, it is
not true of all other special salary tables or in all circumstances.
Indicates that LEO’s at any grade are entitled to a special maximum overtime
rate and biweekly maximums, which are different from those of other GS
employees.
LEOs who are FLSA non-exempt, indicates what type of FLSA overtime
computation is used for the position. “Y” indicates that the overtime
computation is to be 7K FLSA; “A” indicates it is to be 7A FLSA. FLSA
exempt LEO’s may be coded either “Y” or “A” without its making any
difference.
While the following data elements do not affect an employee’s pay, they are important
to personnel action processing.
Department or Organizational Structure Code - This code determines what
populates in Blocks 14 and 22 of the SF-50 and determines the positions
included on system produced management reports.
Bargaining Unit Status (BUS) Code - Controls processes associated with
enrollment in unions and the automatic suspension/ resumption of union dues
withholdings.

117
It is important to note that an Agency can maintain and change their current
department/organization structure by successfully performing the functions below with
the following results:
Function Result
Create a new
Position
Adds a vacant position to the organizational structure that can
be used to process a personnel action. It will show as a vacant
position if a department/organizational active position report is
created.
Inactivate a Position Should only be performed on a “Vacant” position as this
position will not be available for future use unless it is “re-
activated,” because it would affect an employee if encumbered.
It will remove this position from a Department/Organization
active position report.
Modify a Position by
changing the
organization structure
code
If changes are made to an encumbered position, it may be
necessary to take additional measures (follow your Agency’s
instruction to document these changes) to change the
Department/Organization structure code.
NOTE: Before creating a new position, ensure that one does not already
exist in an inactivated status. If your organization pulls active position
reports against position data and/or department/organization structure,
inaccurate or missing positions can affect the outcome of this report.
The Position Component contains four pages that must be completed or verified before creating a position. The first tab,

118
Figure 49: Description Page

119
The table below describes the fields within the Description page. An asterisk (*) denotes a required field.
Field Description
* Effective Date Defaults to the current date. This date is the date an action begins. It
also determines when the user can view and change the information.
This date should be prior to or same as the effective date of the
Personnel Action.
* Status Defaults to “Active” when creating a new position.
* Reason Code Valid values (reason that supports the action taken) are:
ABO – Abolish Position
CHG – Submit to NFC as NEW
INA – Position inactivated
NEW – New Position
REA – Reactivate an inactivated Position
UPO – Unabolish
UPD – Position date updated
* Position Status Defaults to “Approved.”
Person Type Associated with the person model and allows agencies utilizing
Person Model, to create position records for people working for the
Agency that are not Federal employees (such as contractors,
volunteers. etc.). It is important because you can only assign an
employee to a position designated as employee and a contractor to a
position not designated as an employee. In addition, employee
position records are submitted to PMSO any other person type
records are not.
* Job Code Enter the applicable job code. The information from the job code
populates certain fields for the position. Search data by clicking the
search icon.
* Department Represents an organization where the position resides. Enter the
applicable data or search by clicking on the search icon.

120
Field Description
Org Stru Organizational structure where the position resides that is system-
generated from the Department selected
* Location Determined from the General Services Administration’s publication,
Worldwide Geographic Location Codes (State, County, City). Enter
the applicable data or search by clicking on the search icon. The
applicable code relates to the actual duty location.
Reports To Indentifies the position this position will report to. This field may be
utilized to maintain hierarchal value if an agency utilizes
ePerformance and/or Manager Self-Service (MSS).
* Competitive
Level
Identifies the positions in a competitive area which are so similar the
agency can readily move an employee from one to another without
significant training and without loss of productivity during a reduction-
in-force. This field is sent to NFC. Enter the competitive level or
select data by clicking the search icon.
* Date Position
Established
The date the position is established.
* Bargaining
Unit
Indicates when a position is eligible for coverage by a bargaining unit
and the union representing the person in the position. Enter the four
position bargaining unit number or select data by clicking the search
icon.
* FLSA Status Defaults to “Nonexempt.” To change the default, select from the
drop-down list. Valid values are:
Administrative
Executive
Management
No FLSA Required
Exempt

121
The second tab,
Figure 49: Specific Information Page

122
The table below describes the main fields within the Specific Information page.
Field Description
* Budgeted Defaults to check if the position is budgeted. If this position’s status is
temporary, clear the checked box.
* Sensitivity Code Defaults to Non-Sensitive. To change the default, select data from the drop-
down list. Valid values are:
Critical Sensitive
High Risk
Moderate Risk
Non Sensitive
Non-Critical, Sensitive
Special Sensitive
* Computer
Sensitivity
Defaults to Non Computer-ADP. To change the default, select data from
the drop-down list. The valid values are:
Non Computer-ADP
Computer-ADP
*Telework Eligibility Determines whether the position is eligible fore telework. Choices are:
Eligible
Not Eligible
* Procurement Integ
Posn
Check this box when the position is covered by the Procurement Integrity
Act.
* Presidential Appt
Posn
Check this box to indicate if the position is a Presidential Appointment.

123
The third tab, Figure 50: Budget and Incumbents Page contains the EmplID, name of
the incumbent, and the Position Type. If the position is not tied to an employee, the
Current Incumbents section is blank. No action is required on this page.
Figure 50: Budget and Incumbents Page

124
The fourth tab, Figure 51: NFC Fields and Tracking Data Page, contains the
classification and position tracking data.
Figure 51: NFC Fields and Tracking Data Page

125
The table below describes the main fields within the NFC Fields and Tracking Data
page. An asterisk (*) denotes a required field.
Field Description
* Financial
Disclosure
Indicates when the duties of the position require the incumbent to file
a conflict of interest statement or a financial disclosure statement.
This field defaults to “Not Required.”
* Classification
Review
Indicates the type of review. Enter the applicable information or
select data from the drop-down list. Options include:
Maintenance Desk Audit
Maintenance Panel Review
Main Paper Review
Main Supervisory Audit
N/A for this field
Normal Desk Audit
Normal PME/Activity Review
Normal Paper Review
Normal Supervisory Audit
* Classification
Action
Indicates the applicable information or selected data from the drop-
down list.
* Accounting
Station Code
Indicates the accounting station or selected data by clicking the
search icon.
* Vacancy
Review
Indicates the management process involved in modifying a vacant
position. Enter the applicable data or select data from the drop-down
list.

126
Exercise 5.3: Creating a Position
Description/Scenario
In this exercise, create a permanent position for a GS-12, Series 2210, IT
Specialist at the USDA NFC facility in Washington, DC. This position is exempt
from the Fair Labor Standards Act and a financial disclosure SF-278 is required.
This non- critical -sensitive, computer-related position requires drug testing for
the incumbent, and has no procurement responsibilities.
Instructions
Follow the steps in the table below to complete Exercise 5.3: Creating a Position.
As asterisk (*) denotes a required field.
Step Action Required Data
1. Select Position Management from the Main
Menu.
2. Select Position Information from the Position
Management Menu Option.
3. Click the Add a New Value tab. The Description
page displays.
4. Enter the Effective Date in the *Effective Date
field.
06/01/2010
5. Verify the Status in the *Status field defaulted to
“Active.”
Active
6. Verify the Reason Code in the *Reason Code
field defaulted to “New.”
New
7. Enter the appropriate job code in the *Job Code
field. The remaining Job Information populates
from the job code, including Salary Plan and
Agency.
Use the Job Code number
created in Position
Management Exercise 1

127
8. Enter the Department in the *Department field.
The Org Stru populates from the Department.
2nd level – 70
3rd level – 20
Select any Dept 936539
9. Enter the duty station in the *Location field. 110010001
10. Enter the Position Supervisor in the Reports To
field.
90419554
11. Enter the Competitive Level in the Competitive
Level field.
0001
12. Enter the Bargaining Unit in the *Bargaining Unit
field.
8888
13. Select a FLSA status from the FLSA Status drop-
down list.
Exempt
14. If used by your agency, select a Position Location
in the Position Location field.
Field
15. Verify the Personnel Office ID in the POI field. 5317
16. Verify the Sub-Agency in the Sub-Agency field. 90
17. Click the Specific Information tab. The Specific
Information page displays.
18. The Budgeted Position checkbox defaults to
Selected for a permanent position. If the position
is temporary, deselect the Budgeted Position
checkbox.
Checked
19. Select the applicable Sensitivity Code from the
*Sensitivity Code drop-down list.
Non-Critical, Sensitive
20. Select the applicable Computer Sensitivity Code
from the *Computer Sensitivity drop- down list.
Computer-ADP

128
21. Select if a Security Clearance is required from the
Security Clearance drop-down list.
Not Required
22. Select the applicable Telework Eligibility
determination from the *Telework Eligibility drop-
down list.
Eligible
23. If the position is subject to the guidelines in the
Procurement Integrity Act, click the *Procurement
Integ Posn checkbox.
Unchecked
24. If the position is a Presidential Appointment, click
the *Presidential Appt Posn checkbox.
Unchecked
25. If the position requires a drug test, select the
*Drug Test (Applicable) option.
Incumbent Only
26. Click the NFC Fields and Tracking tab. The NFC
Fields and Tracking page displays.
27. Select the applicable Financial Disclosure code
from the *Financial Disclosure drop-down list.
SF-278 Required
28. Select the applicable Classification Review code
from the *Classification Review drop-down list.
Normal Desk Audit
29. Select the applicable Classification Action from the
*Classification Action drop-down list.
New Position
30. Enter the Accounting Station Code in the
*Accounting Station Code field.
0010
31. Enter the applicable Vacancy Review code from
the *Vacancy Review drop-down list.
New Position/New FTE
32. Click the Budget and Incumbents tab. The
Budget and Incumbents page displays.

129
33. Click Save. The Office Information page
displays.
Write down the Position
Number

130
A new position number has been successfully established. The Current Incumbents
group box information populates when an employee is added to the position, as shown
in Figure53: Office Information page.
Figure 52: Office Information Page

131
Figure 52: Office Information Page
Step Action Required Data
34. Enter the Office ID in the *Office ID field. The Primary
Address group box information populates.
101982
35. Enter the number of Days at Primary location in the Days
at Primary field.
5
36. Click Save.
37. To verify the Transaction Status field is set to NFC
Ready, return to the Position Information page.

132
Figure 53: Add/Update Position Info Page
Step Action Required Data
38. Enter the Position Number you just created into the
Position Number field on Find an Existing Value page.
XXXXXX
39. Click Search. The Description page displays.
40. Verify that the Trx Status is set to NFC Ready.

133
Figure 54: Description Page

134
Exercise 5.4: Creating a Position
Description/Scenario
In this exercise, create a temporary position for a GS-07, Series 2210, IT
Specialist at the USDA NFC facility in Washington, DC. This position is exempt
from the Fair Labor Standards Act and will not be required to file any financial
disclosures. This non- critical -sensitive, computer-related position requires drug
testing for the incumbent, and has no procurement responsibilities.
Instructions
Follow the steps in the table below to complete Exercise 5.4: Creating a Position.
Step Action Required Data
1. Select Position Management from the Main Menu.
2. Select Position Information from the Position
Management Menu Option.
3. Click Add a New Value. The Description page displays.
4. Enter the Effective Date in the *Effective Date field. 06/01/2010
5. Verify the Status in the *Status field defaulted to Active. Active
6. Verify the Reason Code in the *Reason Code field
defaulted to New.
New
7. Enter the appropriate job code in the *Job Code field.
Press Tab and the remaining Job Information populates
from the job code, including Salary Plan and Agency.
Use the job
code number
created in
Position
Management
Exercise 2
8. Enter the Department in the *Department field. The Org
Stru populates from the Department.
9070200400101
010
9. Enter the Location in the *Location field. 110010001
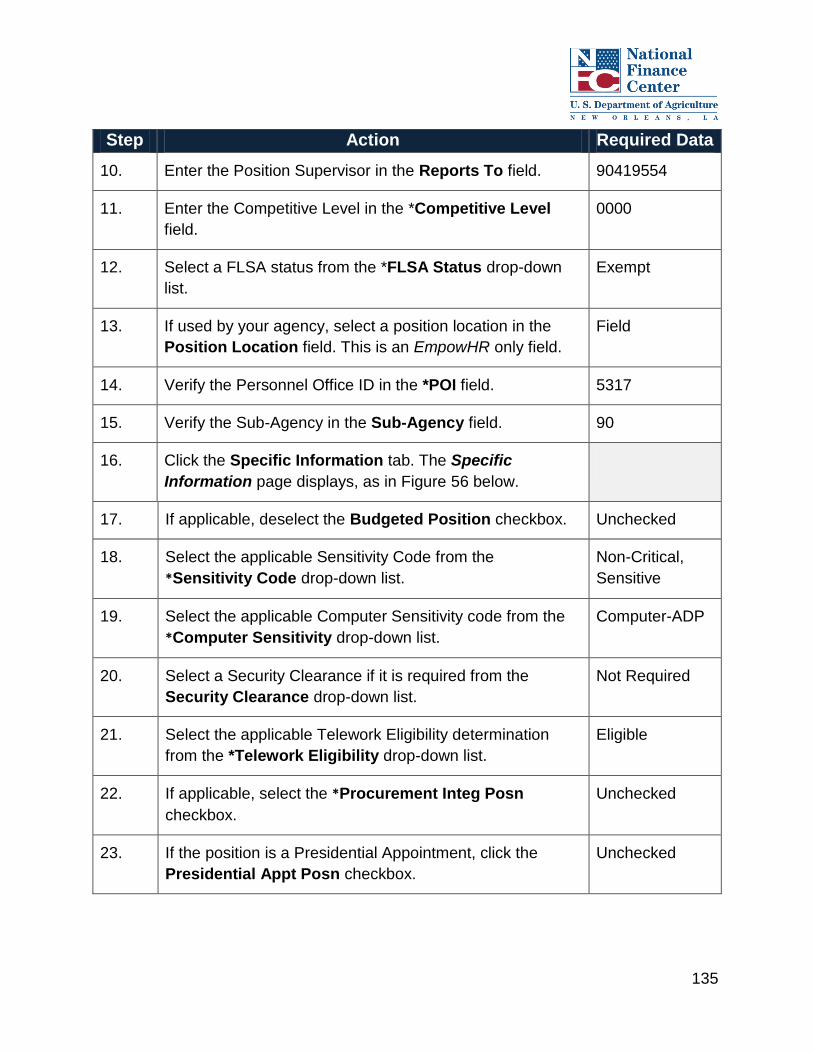
135
Step Action Required Data
10. Enter the Position Supervisor in the Reports To field. 90419554
11. Enter the Competitive Level in the *Competitive Level
field.
0000
12. Select a FLSA status from the *FLSA Status drop-down
list.
Exempt
13. If used by your agency, select a position location in the
Position Location field. This is an EmpowHR only field.
Field
14. Verify the Personnel Office ID in the *POI field. 5317
15. Verify the Sub-Agency in the Sub-Agency field. 90
16. Click the Specific Information tab. The Specific
Information page displays, as in Figure 56 below.
17. If applicable, deselect the Budgeted Position checkbox. Unchecked
18. Select the applicable Sensitivity Code from the
*Sensitivity Code drop-down list.
Non-Critical,
Sensitive
19. Select the applicable Computer Sensitivity code from the
*Computer Sensitivity drop-down list.
Computer-ADP
20. Select a Security Clearance if it is required from the
Security Clearance drop-down list.
Not Required
21. Select the applicable Telework Eligibility determination
from the *Telework Eligibility drop-down list.
Eligible
22. If applicable, select the *Procurement Integ Posn
checkbox.
Unchecked
23. If the position is a Presidential Appointment, click the
Presidential Appt Posn checkbox.
Unchecked

136
Step Action Required Data
24. If the position requires a drug test, select the Drug Test
(Applicable) option from the *Drug Test (Applicable)
drop-down list.
Incumbent Only
25. Click the NFC Fields and Tracking Data tab. The NFC
Fields and Tracking Data page displays.
26. Select the applicable Financial Disclosure code from the
*Financial Disclosure drop-down list.
Not Required
27. Select the applicable Classification Review code from the
*Classification Review drop-down list.
Normal Desk
Audit
28. Select the applicable Classification Action from the
*Classification Action drop-down list.
New Position
29. Enter the Accounting Station code in the *Accounting
Station Code field.
0010
30. Select the applicable Vacancy Review code from the
*Vacancy Review drop-down list.
New
Position/New
FTE
31. Click the Budget and Incumbents tab. The Budget and
Incumbents page displays.
32. Click Save. The Office Information page displays.

137
A new position number has been successfully established and is displayed. The Current
Incumbents group box information populates when an employee is added to the
position, as shown in Figure 56: Office Information page.
Figure 55: Office Information Page
Step Action Required Data
33. Enter the Office ID in the Office ID field. The Primary
Address group box information populates.
101982
34. Enter the number of Days at Primary in the Days at
Primary field.
5
35. Click Save.
36. Verify the Trx Status field is set to NFC Ready on the
Description page.

138
Exercise 5.5: Creating a Position for Promotion
Description/Scenario
In this exercise, create a position for a GS-12, Series 2210, IT Specialist at the
USDA NFC facility in New Orleans, LA. This position is exempt from the Fair
Labor Standards Act and a financial disclosure SF-278 is required. This non-
critical, sensitive, computer-related position requires drug testing for the
incumbent, and has no procurement responsibilities.
Instructions
Now that you have walked through several activities, try to complete the exercise
without the step-by-step instructions. Enter the values below for the Data
Elements to complete Exercise 5.5: Creating a Position for the Promotion. Feel
free to ask your instructor or peers for guidance if you need help during the
exercise.
Position Page
Data Element Value
Effective Date 06/01/2010
Status Active
Reason Code New
Job Code Number created in Exercise 1
Department 907020
Location 221690071
Report To 90419455
Competitive Level 0000
Date Position Established 06/01/2010
Bargaining Unit 8888
FLSA Status Exempt
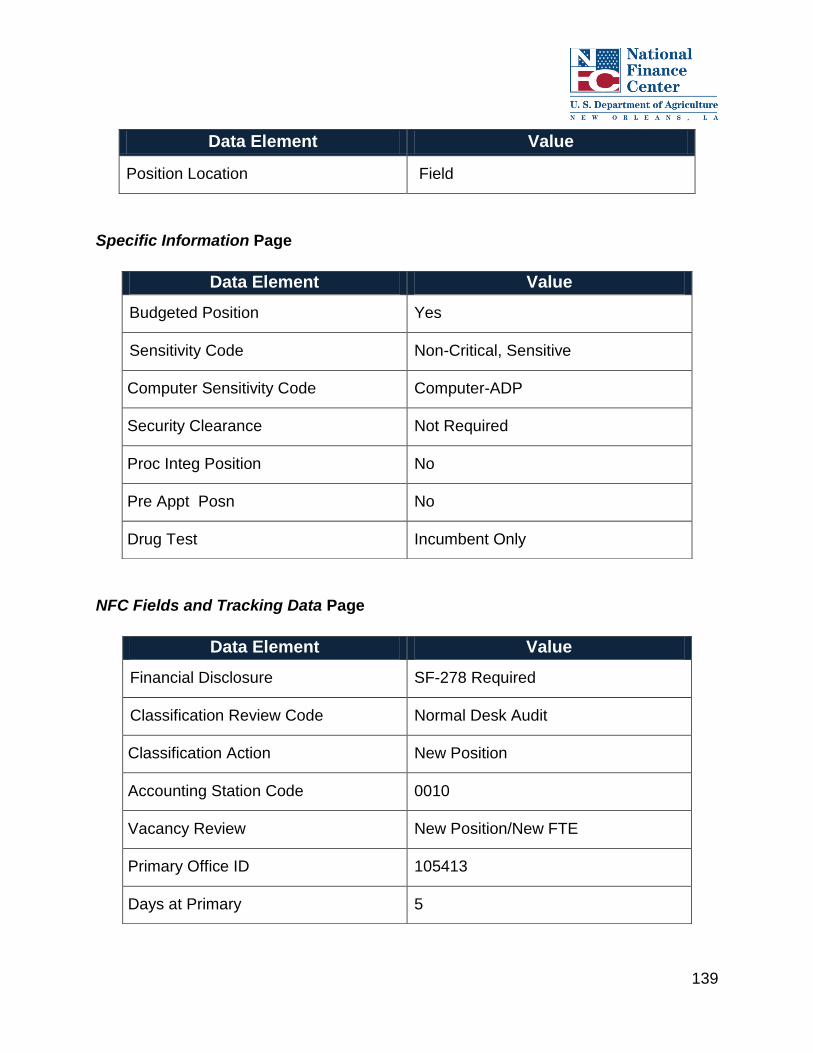
139
Data Element Value
Position Location Field
Specific Information Page
NFC Fields and Tracking Data Page
Data Element Value
Budgeted Position Yes
Sensitivity Code Non-Critical, Sensitive
Computer Sensitivity Code Computer-ADP
Security Clearance Not Required
Proc Integ Position No
Pre Appt Posn No
Drug Test Incumbent Only
Data Element Value
Financial Disclosure SF-278 Required
Classification Review Code Normal Desk Audit
Classification Action New Position
Accounting Station Code 0010
Vacancy Review New Position/New FTE
Primary Office ID 105413
Days at Primary 5

140
Now that you know how to create a position, next you need to learn how to modify an
existing position. The Position Reason/Status Code Comparison table below describes
the different status you are going to see in EmpowHR.
Position Reason/Status Code Comparison
Reason Status Description Send
Data
to
NFC
Time Limit
EmpowHR
ABOLISH INACTIVE Marks the position for
deletion from the NFC
database on an 18-month
cycle.
Yes None. When the
user saves the job
code as abolish, it
is transmitted to
NFC.
INACTIVATE INACTIVE Inactivates a position
temporarily. PMSO sets
a 6−month limit from the
date a position becomes
inactive to move the
position to abolish.
Yes
NEW ACTIVE Creates a new position.
Yes N/A
REACTIVATE ACTIVE Reactivates an
inactivated position in the
NFC database.
Yes When the position
is abolished, it
cannot be
reactivated.
UNABOLISH ACTIVE EmpowHR sends the
abolished position to NFC
as new.
Yes
UPDATE ACTIVE Updates certain position
information on the
database for active job
Yes N/A

141
Reason Status Description Send
Data
to
NFC
Time Limit
EmpowHR
codes.
CHANGE ACTIVE Send as new to NFC; if
the position has been
removed from PMSO but
is still in EmpowHR, use
this code to recreate the
record in NFC
Yes N/A

142
5.6. Creating Multiple Positions
In EmpowHR, if you need to create several “like” positions (same Master Record and
grade(s), you can do so by creating the initial position and using the Build Positions
menu to create multiple positions.
Figure 56: Build Positions page
To create multiple positions follow the instructions below.
Step Action Required Data
1. Select Position Management from the Main Menu.

143
Step Action Required Data
2. Select Build Positions from the Position Management
Menu Option.
3. Enter the Job Code for the position you wish to duplicate.
4. Enter the Department Code of the position you wish to
duplicate.
5. Enter the Location Code of the position you wish to
duplicate.
6. Enter the Position Location (Field or Headquarters) for
the position you wish to duplicate.
7. Enter the Reports To information for the position you wish
to duplicate.
8. Enter the Quantity of positions you wish to duplicate.
9. Click on the BUILD button.
NOTE: Be sure to go and validate or edit the effective date on each of
these new positions. The effective date cannot be before the original
position was created.

144
Figure 57: Position number message display
The numbers for the positions will display on your screen as seen in Figure 57. Write
them down for your reference. You can now create multiple positions.
5.7. Modifying a Position
Lesson Overview
This lesson focuses on the steps necessary to modify a position in EmpowHR.
Lesson Objective
By the end of this lesson, you will be able to:
Modify a position
Position data can be modified by locating an existing position and clicking the (+) icon,
which creates a new row on the position record. When the change is entered in
EmpowHR and the transaction is set to NFC Ready, the change to the position is
exported to NFC.
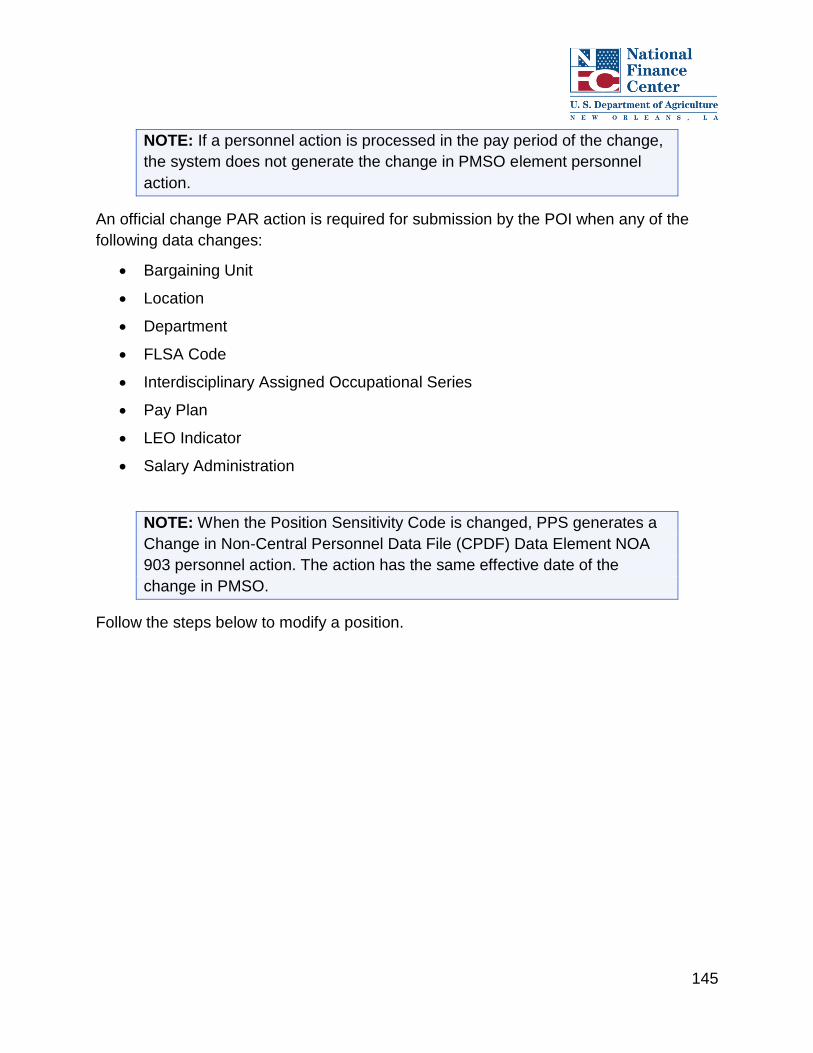
145
NOTE: If a personnel action is processed in the pay period of the change,
the system does not generate the change in PMSO element personnel
action.
An official change PAR action is required for submission by the POI when any of the
following data changes:
Bargaining Unit
Location
Department
FLSA Code
Interdisciplinary Assigned Occupational Series
Pay Plan
LEO Indicator
Salary Administration
NOTE: When the Position Sensitivity Code is changed, PPS generates a
Change in Non-Central Personnel Data File (CPDF) Data Element NOA
903 personnel action. The action has the same effective date of the
change in PMSO.
Follow the steps below to modify a position.
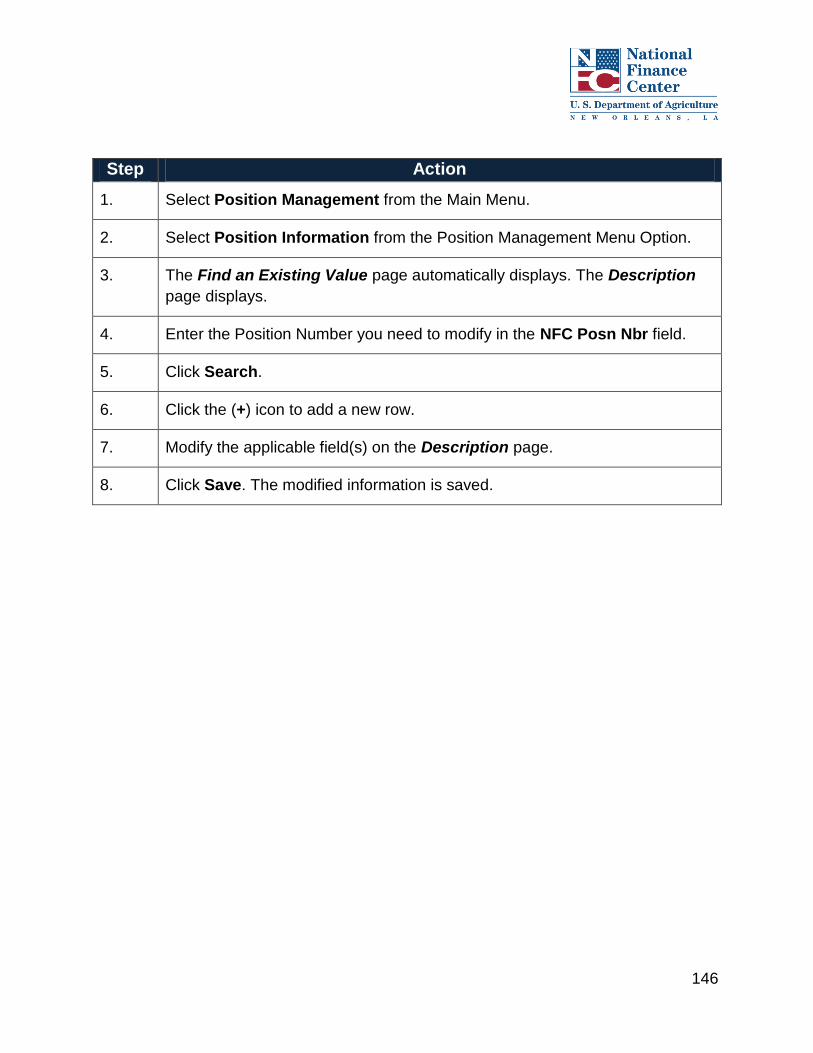
146
Step Action
1. Select Position Management from the Main Menu.
2. Select Position Information from the Position Management Menu Option.
3. The Find an Existing Value page automatically displays. The Description
page displays.
4. Enter the Position Number you need to modify in the NFC Posn Nbr field.
5. Click Search.
6. Click the (+) icon to add a new row.
7. Modify the applicable field(s) on the Description page.
8. Click Save. The modified information is saved.

147
5.8. Chapter Review
Knowledge Check
1. What is EmpowHR Position Management used for?
2. True or False: EmpowHR maintains a data history for job codes and position.
3. How is position data linked to an employee’s record on the PPS database?
Chapter Summary
Having completed this chapter, you are now able to:
Describe the purpose of the Position Management component
Describe the relationship between Position Management and PMSO
Create a job code
Modify a Job Code
Describe the purpose of creating a position
Create a new position
Copy a position
Modify an existing position
Create multiple positions

148
6.0. Personnel Action Request (PAR) Processing
6.1. Chapter Overview
This chapter provides an overview of the PAR process. This chapter focuses on
Workflow and Work-In-Progress (WIP) status, as well as processing options.
Chapter Objectives
By the end of this chapter, you will be able to:
Describe PAR processing
Process personnel actions
Identify status codes
Process HR actions
Modify Update Reports To
Explain workflow

149
6.2. PAR Processing
Lesson Overview
This lesson focuses on describing the PAR process and its purpose.
Lesson Objectives
By the end of this lesson, you will be able to:
Describe purpose of PAR processing
Each person is assigned a unique employee identification code, an EmplID. This
number is system generated and is used to tie all of the employee’s personnel, payroll
and other related actions to the employee.
PAR processing is used for processing personnel actions. These actions are defined as
any action that is necessary to appoint, separate, or make other personnel changes that
require an SF-52 to create an SF-50.
The PAR processing workflow automates, streamlines and controls the flow of
information throughout agencies. Workflow sends personnel actions through a cycle
established by the HR office. The automated workflow process ensures the action
request goes through all the stages an Agency requires until the action is processed.
However, workflow is not used by all Agencies and may differ by Agency as well as the
WIP statuses. Not all statuses may be available depending on the workflow set up.
IMPORTANT: Personnel document transactions are sent to the
mainframe and run through the PINE process for editing. Transactions
that pass the PINE edits are applied to the Payroll/Personnel Database
and returned to EmpowHR. Transactions that reject with suspense errors
show as “Not Applied” and are annotated with an error number and
message.
The WIP status is found under Transaction status when processing an action in
EmpowHR. Applicable WIP status options are found under the PAR status field on the
Data Control tab page. These statuses confirm the current state of the PAR actions that
you process. The following are samples of available workflow status descriptions.

150
Work-In-Progress Status Descriptions
APP Approved
CAN Canceled
DIS Disapproved
INI Initiate
PRO Processed
REQ Requested
RET Returned
SIG Approved/Signed
WTH Withdrawn
COR Correction
Now that you understand the basics of PAR Processing and how to recognize the
applicable statuses for PAR actions, the next step is to learn the steps required to
process PAR actions, which is covered in the next lesson.

151
6.3. HR Processing
Lesson Overview
This lesson focuses on demonstrating how HR specialists process different personnel
actions for employees.
Lesson Objectives
By the end of this lesson, you will be able to:
Describe how to process personnel actions
Process a hire action
Process a promotion
Process a change in work schedule
Process hiring a temporary employee
Process a retirement
The above PAR processing actions all follow a similar pattern of steps required to
successfully complete the action. PAR processing and HR Processing contain the same
pages; however the Hire component is only used to add a new hire. Once the record is
saved, any changes would be done in the HR Processing component. Since the hire
action touches all of the pages, it is used as an example to help teach how PAR
processing works in EmpowHR.
Processing a Hire Action
Please refer to the following steps to complete the Hire Action:
Step Action
1. Select PAR Processing from the Menu Group.

152
Step Action
2. Select the Hire Employee tab. The Hire Employee USF page displays.
NOTE: “Select Hire Employee” is only used when initially
adding a new hire. Once the record is saved, any workflow for
the hire changes to the record, or new actions are completed
in the HR Processing component.
Figure 58: Hire Employees USF
Step Action
3. Verify the default is “NEW” in EmplID field.
NOTE: When creating a new hire, the EmplID defaults to “New”
until the required information is entered and the record is saved.
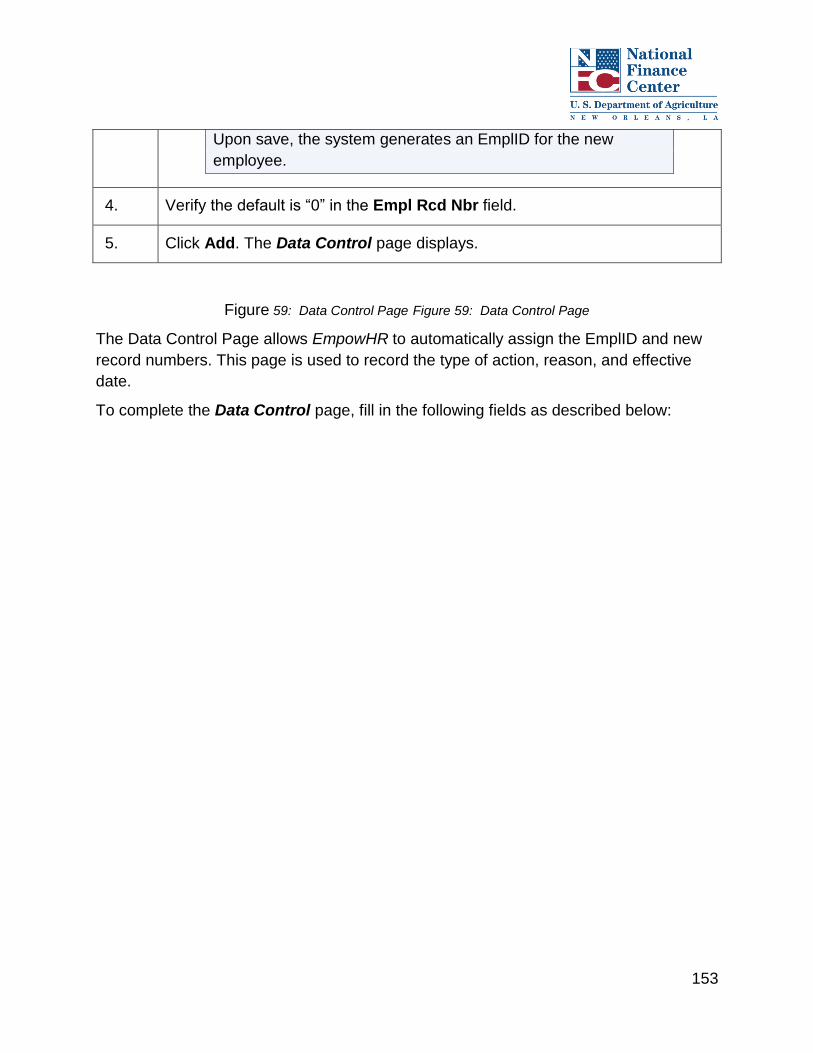
153
Upon save, the system generates an EmplID for the new
employee.
4. Verify the default is “0” in the Empl Rcd Nbr field.
5. Click Add. The Data Control page displays.
Figure 59: Data Control Page Figure 59: Data Control Page
The Data Control Page allows EmpowHR to automatically assign the EmplID and new
record numbers. This page is used to record the type of action, reason, and effective
date.
To complete the Data Control page, fill in the following fields as described below:

154
Field Description
*Effective
Date
Reflects the date on which a personnel action takes place and on
which the employee’s official assignment begins. Once entered on this
page, the effective date will display on each page of the PAR.
Transaction
Status
Reflects the status of the processed action. The status changes when
the PAR is saved, reassigned, etc. Otherwise, the status defaults to In
Progress (NFC Ready, Sent to NFC, Applied, Not Applied).
Effective Seq Populates based on the authentication date. It used to sequence
multiple personnel actions that have the same effective date.
Auth Date The sequence in which actions are processed. It displays the date the
action was approved for processing (determined by Agency). Should
be on or before the effective date.
Contact
EmplID
The employee to contact regarding the personnel action.
Action The action documented by the PAR. Defaults to HIR (Hire) when
processing a new hire.
PAR Status The status of the personnel action request within EmpowHR. The
status changes based on the flow of the work at each Agency and
whether the action is processed, cancelled, or corrected.
Reason Code The reason for the action documented by the PAR.
NOA Code The action being processed. Use the Guide to Processing Personnel
Action and the 5 CFR to determine the correct NOA. This field is
displayed on each page and tab of the PAR.
Authority (1) The Legal Authority code that is the law, Executive Order, regulation,
agency directive, or instruction under which the personnel actions is
taken.
Authority (2) If required, an additional Legal Authority Code.
Agency Type Set IDs that may need to be changed. Defaults to “Fed.”

155
Field Description
Not To
Exceed Date
The end date of the temporary action.
PAR Request
#
SF-52, Request for Personnel Action number.
Step Action
6. Click the PAR Remarks link on the Data Control page once the fields are
populated. The PAR Remarks page displays.
Figure 60: PAR Remarks
The purpose of PAR Remarks is to record information related to the action. The Remark
Code is entered in the field or selected from the search icon. There is a limit of 10
remarks that can be added.

156
To complete the PAR Remarks page, fill in the following fields as described below:
Field Description
Remarks
Code
A three position code that denotes specific verbiage required on the
action based on the NOA and found in The Guide to Processing
Personnel Actions. The tab key generates the verbiage that populates
the SF-50.
Insertion
Required
Indicates when a remark needs employee-specific information. Click this
box if applicable.
PAR
Remarks
Required and may include Agency specific remarks that are found on the
SF-50.
NOTE: Some actions require specific required remarks that
will auto-populate in the Remarks section. See The Guide
to Processing Personnel Actions.
Step Action
7. Click OK to save the remark or click Cancel to clear any entered remark data.
Once completed, the Data Control page displays.
8. Click the Personal Data tab. The Personal Data page displays.

157
Figure 61: Personal Data Page
The Personal Data page stores personal information about the employee. The links at
the bottom of the page allow the storage of Additional Birth Info, Mailing Address,
Personal Phone Number(s), Veterans Info, Marital Info, and Education Details. These
links are selected after the Personal Data page is completed.
IMPORTANT: The Additional Birth Info, Personal Phone Numbers and
Marital Info links are completed but are not sent to NFC.
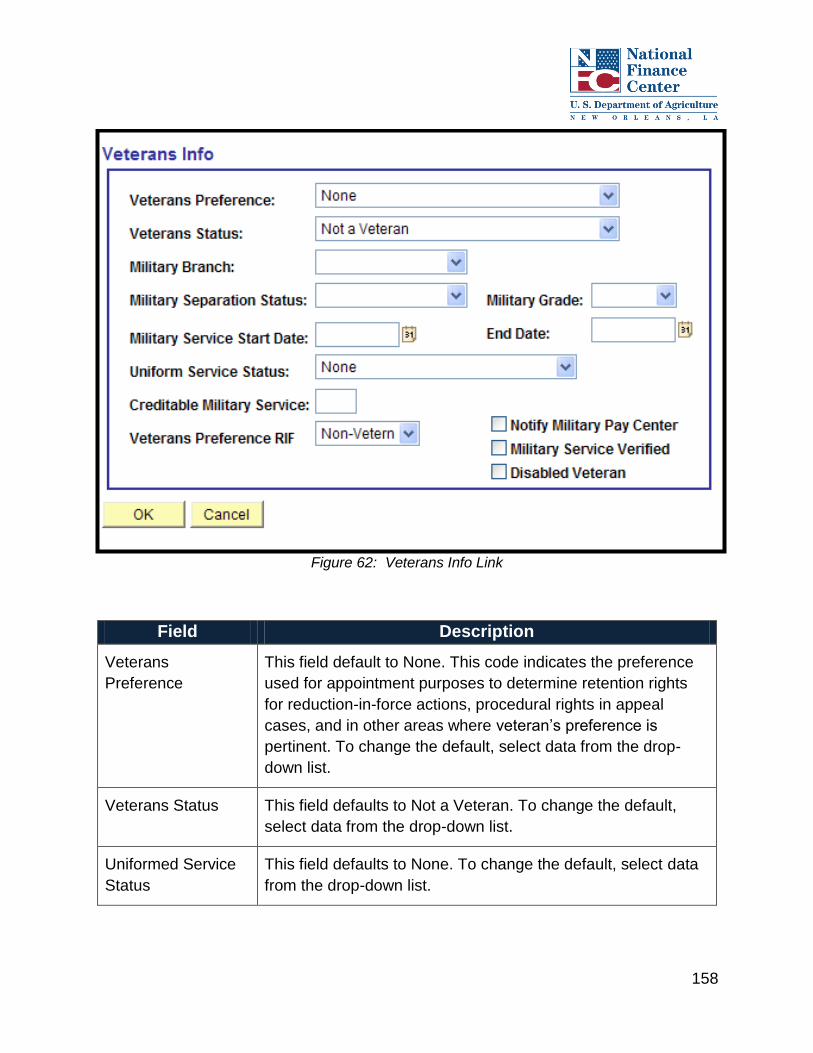
158
Figure 62: Veterans Info Link
Field Description
Veterans
Preference
This field default to None. This code indicates the preference
used for appointment purposes to determine retention rights
for reduction-in-force actions, procedural rights in appeal
cases, and in other areas where veteran’s preference is
pertinent. To change the default, select data from the drop-
down list.
Veterans Status This field defaults to Not a Veteran. To change the default,
select data from the drop-down list.
Uniformed Service
Status
This field defaults to None. To change the default, select data
from the drop-down list.

159
Field Description
Veterans
Preference RIF
This field defaults to Non-Vetern. This field indicates eligibility for veterans preference for the purpose of Reductions In Force. To change the default, select the date from the drop-down list.
Step Action
9. Click the Job tab. The Job page displays.
The information on the Job page, Figure 64: Job Page
The Job Page identifies the employee’s assigned position, job code, and department.
Many values on this page populate as a result of the data stored on the assigned
position and the job code records.
To complete the Job page, fill in the following fields as described below:
Field Description
Position Denotes position number that was established in EmpowHR
Position Management, prior to the current personnel action, and is
assigned to this employee.
NOTE: Tab out of the position number to populate the
other pertinent data on the Job page.
Losing/Gaining
Agency
Denotes Federal Agency or place of employment for an employee
moving in or out of a Federal Agency.
Previous Class
Action
Identifies what should be done with the position when it is being
vacated.
Previous Sub-
Agency
Used when the employee moves from one sub-agency to another,
within the same agency.

160
Step Action
10. Click the Position tab. The Position page displays.
Error! Reference source not found.
The Position Page is used to enter data specific to a position. This page contains the
Personnel Office ID (POI), Type of Appointment, Work Schedule, etc.
To complete the Position page, fill in the following fields as described in the table
below:
Field Description
*POI Displays the POI generated from the position. This number is the
POI of the personnel office to which the employee is assigned.
*Type Appt Identifies the type of appointment that the employee has
accepted.
*Work Schedule Designates the type of work schedule assigned to the employee
(i.e full-time, part-time, etc.) If the position is Part-time, enter the
weekly number of hours in the Standard Hours field.
*FLSA Status Used to indicate if the employee is exempt or non-exempt from
the Fair Labor Standards Act (FLSA).
*Reg/Temp Identifies whether the employee is a regular or temporary
employee. This is a display only field that is populated from the
position number selected.

161
Step Action
11. Click the Compensation tab. The Compensation page displays.
Figure 63: Compensation Page
The Compensation page, Figure 63: Compensation Page, contains information
related to pay. Select and complete the links related to pay compensation as
appropriate.

162
To complete the Compensation page, fill in the following fields as described in the
table below:
Fields Description
Pay Rate
Determinant
Used to identify when the employee is receiving a rate of pay
other than the regular rate for the position and the legal and/or
regulatory basis. This field is populated automatically.
Salary Pay
Plan/Salary Plan
Table/Salary Grade
The pay plan that governs the compensation, the table and
grade used to determine the scheduled rate(s) of pay.
Step Defaults to 1 and indicates a specific salary within a grade,
level, class, rank, or pay band.
Step Entry Date The date the employee entered the step.
Grade Entry Date The date that the employee first entered the grade.

163
Step Action
12. Click the Employment 1 tab. The Employment 1 page displays.
Figure 64: Employment 1 Page
The Employment 1 page, Figure 64: Employment 1 Page, identifies employment
related dates such as Service Computation Date (SCD) and Within-Grade Increase
(WGI) date. Review and enter the correct dates based on the employee employment
history.
To complete Employment 1 page, fill in the following fields as described in the table
below:
Field Description
Leave Date Identifies the computation date for annual leave earnings.
Retire Date Identifies the computation date used for retirement.

164
Field Description
RIF Identifies the employee’s service computation data for reduction-in-
force (RIF) purposes.
TSP Identifies the beginning date of the vesting period for the 1-percent
Government contributions to the Thrift Savings Plan (TSP) and
must be completed for CSRS and FERS employees.
Career Tenure
Date
Identifies the date service starts counting towards career or
permanent tenure.
WGI Status Displays Within-Grade-Increase (WGI) status.
Last Increase Dt Displays date of the last within grade increase.
SCD-WGI Identifies the beginning date from which service is to be credited
toward the employee’s next within-grade increase.
Special
Employment
Program
Click Appt Data link to access the Special Employment Program
information. Indicates the employee is in a Special Employment
Program Code if applicable.

165
Figure 65: Appointment Info Page
Field Description
Special Employment
Program
This field is used to indicate the employee is in a Special
Employment Program Code. Select the special employment
program from the drop-down list.

166
Step Action
13. Click the Employment 2 tab. The Employment 2 page displays.
Figure 66: Employment 2 Page
The Employment 2 page, Figure 66: Employment 2 Page, is divided into sections
(Employment 2, Reports To as of PAR Effective Date, Reports To as of Today, New
Position, Supervisory/Managerial Position, and COOP). Some fields are populated from
data entered on previous pages.

167
To complete the Employment 2 page, fill in the following fields as described in the table
below:
Field Description
Bargaining Unit Displays numbers which are used in identifying specific
Agency and their labor organizations. Each bargaining unit
has its own Certificate of Representative (Unit).
Union Code Denotes the union/association code for the position.
Tenure Identifies the employee’s retention group (for RIF purposes).
Employee Probation
Period Date
Displays the beginning date of the one-year probationary (or
trial) period. The date is automatically removed after one year
of creditable service.
Supervisor/Managerial
Prob Period Reqrd
Denotes applicable value to designate whether the
supervisor/manager is subject to a probationary period.
Supervisor/Managerial
Prob Period Date
Denotes the date a supervisor/manager probationary period or
an SES probation period begins.
Step Action
14. Click the Benefit Data tab. The Benefit Data page displays.

168
Figure 67: Benefits Data Page

169
The Benefit Data page, Figure 67: Benefits Data Page, is used to enter employee
benefit information such as FEHB Eligibility, TSP Eligibility Code, FEGLI Code, Annual
Leave, Pay Allowance, and Retirement for employees. Complete all the applicable
fields.
To complete the Benefit Data page, fill in the following fields as described in the table
below:
Field Description
FEHB Eligibility Denotes if the employee is eligible to participate in FEHB.
Thrift Savings Plan
Eligibility
Denotes if the employee is eligible to participate in TSP.
FEGLI Denotes if the employee is eligible to participate in FEGLI.
Annual Leave Denotes the category in which an employee is eligible to earn
annual leave.
Pay Allowances Denotes the amount employee is entitled to receive for a cost
of living allowance (COLA) and/or post differential.
Retirement Denotes what retirement plan an employee is eligible for.
Retirement/Termination Info link is used for separated
employees only.
Step Action
15. Click Save. The Hire Action is complete and the EmplID displays.

170
Exercise 6.1: Hiring as Employee Action
Description/Scenario
The employee named Hire Training Demo was hired as a Permanent full time,
GS-12, Step 01, IT Specialist, under a Career Conditional Appointment, effective
06/06/2010. He has no previous government or military service and previously
worked in private industry.
Instructions
Follow the steps in the table below to complete Exercise 6.1: Hiring as
Employee Action.
Step Action Required Data
1. From the HR Processing component, enter the Effective
Date for the new hire in the *Effective Date field.
06/06/2010
2. Enter the Authentication Date for the new hire in the Auth
Date field.
06/01/2010
3. Verify the Action Code in the Action Code field. HIR (Default)
4. Using the search icon, select the Reason Code for the new
hire from the Reason Code field.
Lookup Code
for Permanent
Position
5. Enter the Nature of Action Code in the NOA code field. 101
6. Enter the Legal Authority in the Authority (1) field. ACM
7. Enter the Personnel Action Request Number in the PAR
Request # field if applicable to your Agency.
8. Click the PAR Remarks link.
9. Enter each the remark code in the Remark CD field.
TIP: To add a new remarks code record,
click the Add a new row icon.
M01 (Default),
T10, K12, M45
10. Click OK.

171
Step Action Required Data
11. Click the Personal Data tab. The Personal Data page
displays.
12. Enter First Name in the First Name field. Hire
13. Enter Last Name in the Last Name field. Demo
14. Select Gender. Male
15. Enter Date of Birth in the Date of Birth field. 08/20/1960
16. Enter a Disability Code in the Disability Code field. No Handicap
(Default)
17. Enter the Citizenship code in the Citizenship field. U.S. citizen
(Default)
18. Select appropriate ERI code(s).
NOTE: More than one ERI code can be
selected.
African
American
19. Enter the SSN in the SSN field. 331-04-0XXX
(XXX=EMPTD
ID)
20. Click the Address Info link.
21. Enter the Address into the *Address 1, *Address 2, and
*Address 3 fields.
320 First Street
22. Enter the City into the *City field. Chesapeake
Beach
23. Enter the State into the *State field. MD
24. Enter the Postal Code into the *Postal field. 20732
25. Enter the County into the *County field. Calvert (Default)

172
Step Action Required Data
26. Enter the Country into the *Country field. USA (Default)
27. Click OK. The Personal Data page displays.
28. Enter the Education Level in the *Education Details Link
field.
Bachelor’s
Degree
29. Select the Year Acquired from the Year Acquired drop-
down list.
1985
30. Select the Education Major from the Education Major
drop-down list.
Select from the
drop-down list
31. Select the Major Specialization from the Major
Specialization drop-down list.
Select from the
drop-down list
32. Click OK. The Personal Data page displays.
33. Click the Job tab. The Job page displays.
34. Enter the Position number in the *Position field. Use the number
created in
Position
Management
Exercise 3
35. Click Refresh Position Data to populate Job Data
information.
36. Enter Losing/Gaining Department in the *Losing/Gaining
Dept field.
7A
37. Click the Position tab. The Position page displays.
38. Verify the POI in the *POI field. 5317
39. Select the Type of Appointment in the *Type Appt field. Competitive
Career
Conditional
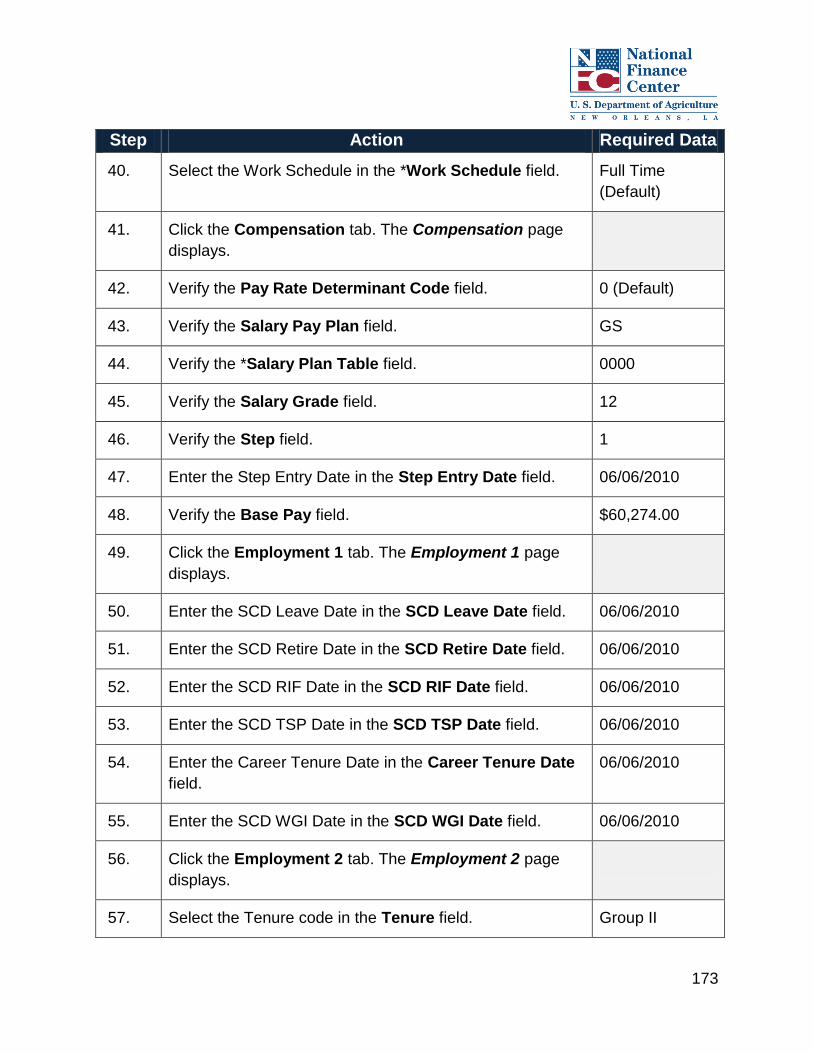
173
Step Action Required Data
40. Select the Work Schedule in the *Work Schedule field. Full Time
(Default)
41. Click the Compensation tab. The Compensation page
displays.
42. Verify the Pay Rate Determinant Code field. 0 (Default)
43. Verify the Salary Pay Plan field. GS
44. Verify the *Salary Plan Table field. 0000
45. Verify the Salary Grade field. 12
46. Verify the Step field. 1
47. Enter the Step Entry Date in the Step Entry Date field. 06/06/2010
48. Verify the Base Pay field. $60,274.00
49. Click the Employment 1 tab. The Employment 1 page
displays.
50. Enter the SCD Leave Date in the SCD Leave Date field. 06/06/2010
51. Enter the SCD Retire Date in the SCD Retire Date field. 06/06/2010
52. Enter the SCD RIF Date in the SCD RIF Date field. 06/06/2010
53. Enter the SCD TSP Date in the SCD TSP Date field. 06/06/2010
54. Enter the Career Tenure Date in the Career Tenure Date
field.
06/06/2010
55. Enter the SCD WGI Date in the SCD WGI Date field. 06/06/2010
56. Click the Employment 2 tab. The Employment 2 page
displays.
57. Select the Tenure code in the Tenure field. Group II

174
Step Action Required Data
58. Enter the Employee Probation Period Date in the Emp
Probation Period Date field.
06/06/2010
59. Click Benefit Data. The Benefit Data page displays.
60. Select the FEHB Code from the FEHB Eligibility choices. 4-Eligible
Pending
61. Select the TSP Eligibility Code from the *Thrift Savings
Plan Eligibility Code drop-down list.
3-Eligible
Immediately
62. Enter the FEGLI Code in the FEGLI Code field. CO (Basic Only)
63. Select the Annual Leave Category from the Annual Leave
Category drop-down list.
4
64. Verify the Earn Leave During Pay Period check box. Checked
(Default)
65. Enter the Special Employee Code in the Special
Employee Code field.
00 (Default)
66. Enter the Retirement Plan in the Retirement Plan field. K
67. Select applicable choice from the Fed Empl Retire Syst
Coverage drop-down list.
Automatically
Covered by
FERS
68. Click Save. You have successfully completed the Hire
action, and the EmplID displays.

175
Exercise 6.2: Completing a Promotion Action
Description/Scenario
James Training has been promoted to Program Analyst, GS-12, Step 01,
effective 06/06/2010. His former position will be left vacant and remain active.
EMPLID: _______________
Instructions
Enter the Data elements and values below to complete Exercise 6.2: Completing
a Promotion Action.
Step Action Required Data
1. From the HR Processing component, Enter the Effective
Date for the promotion in the *Effective Date field.
06/06/2010
2. Enter the Authentication Date for the promotion in the
Auth Date field.
06/06/2010
3. Enter the Action Code in the Action Code field. PRO
4. Enter the Reason Code for the promotion in the Reason
Code field.
CMP
5. Enter the Nature of Action Code in the NOA Code field. 702
6. Enter the Legal Authority in the Authority (1) field. N3M REG
335.102Ltr
6/5/10
7. Enter the Personnel Action Request Number in the *PAR
Request# field.
8. Select the PAR Remarks link. The PAR Remarks page
displays.
9. Enter Remark Code in the Remark CD field. K12
10. Click on the row to populate remarks.

176
Step Action Required Data
11. Enter applicable information. Cert #5-10 –
5/1/2010
12. Click OK.
13. Click the Job tab. The Job page displays.
14. Enter the position number for the promotion in the
Position Number field.
Number
Created in
Position
Management
Exercise 5
15. Press Tab to populate with applicable data.
16. Select Previous Class Action in the Previous Class
Action field.
Leave Position
Vacant and
Active
17. Click the Compensation tab. The Compensation page
displays.
18. Enter the Step in the Step field. 1
19. Click Save. You have successfully completed a Promotion
action.

177
Exercise 6.3: Completing a Change in Work Schedule Action
Description/Scenario
Art Training changed to a part time schedule (24 hours a week) effective
06/06/2010.
EMPLID:_______________
Instructions
Enter the Data elements and values below to complete Exercise 6.3: Completing
a Change in Work Schedule Action.
Step Action Required Data
1. From the HR Processing component, enter the
Effective Date in the *Effective Date field.
06/06/2010
2. Enter the Authentication Date the Auth Date field. 06/06/2010
3. Enter the Action code in Action Code field. DTA
4. Enter the Reason Code in the Reason Code field. CWS
5. Enter Nature of Action code in the NOA code field. 781
6. Enter Legal Authority in the Authority (1) field. VXM
7. Enter the personnel action request number in the
PAR Request# field.
8. Select the PAR Remarks link. The PAR Remarks
page displays.
9. Enter Remark Code in the Remark CD field. B43
10. Click OK.
11. Click the Job tab. The Job page displays.
12. Select Previous Class Action in the Previous Class
Action drop-down list.
Leave Position Vacant
and Active

178
Step Action Required Data
13. Click the Position tab. The Position page displays.
14. Select the Work Schedule from the Work Schedule
drop-down list.
Part Time
15. Enter the number of hours to be worked in the
Standard Hours field.
24.00
16. Click the Compensation tab. The Compensation
page displays.
17. Enter the number of hours schedule for the pay
period in Variable FT Reg Tour of Duty field.
008000
18. Click Save. You have successfully completed a
Change in Work Schedule action.

179
Exercise 6.4: Hiring a Temporary Employee
Description/Scenario
Employee named Temp Hire was hired as a Temporary full time, GS-07, Step 1,
IT specialist, under a Temporary Appointment effective 06/06/2010. He has no
previous government or military service and previously worked in private
industry.
Instructions
Enter the Data Elements and values below to complete Exercise 6.4: Hiring a
Temporary Employee. Now that you have walked through several examples, try
to complete the action without the step-by-step instructions. Please feel free to
ask your facilitator or other participants if you have any questions.
Data Element Value
Data Control Page
EmplID New (Default)
Employee Record No. 0 (Default)
Effective Date 06/06/2010
Auth Date 06/01/2010
Action Code HIR (Default)
Reason Code EXC – Excepted Service
NOA 171
Authority Code Y9K SCH C,213.3202(a)
NTE Date 06/05/2011
Remarks M01 (Default), B03, ZG6, M06
Personal Data Page
First Name Temp

180
Data Element Value
Last Name Hire
Gender Male
Date of Birth 12/17/1982
Disability Code No Handicap (Default)
Citizenship Status U.S. Citizen (Default)
ERI White
SSN 331-03-0XXX(XXX=EMPTD ID)
Address 1 105 Beach Road
City Chesapeake Beach
State MD
Zip 20732
County Calvert (Default)
Country USA (Default)
Veterans Preference None (Default)
Veterans Status Not a Veteran (Default)
Uniform Service Status None (Default)
Veterans Preference RIF Non-Vetrn (Default)
Education Level Associate’s Degree
Year Acquired 2005
Education Major Select from the drop-down list
Major specialization Select from the drop-down list

181
Data Element Value
Job Page
Position # Number Created in Position
Management Exercise 4
Losing/Gaining Dept 7A
Position Page
POI 5317 (Default)
Type Appt Excepted-Temp
Work Schedule Full Time (Default)
Compensation Page
Pay Rate Determinant 0 (Default)
Pay Plan/ Grade/ Step GS/07/01 (Default)
Grade Entry Date 06/06/2010 (Default)
Base Pay 33,979.00
Employment 1 Page
SCD Leave 06/06/2010
Special Employment Program 00
Employment 2 Page
Tenure III
Employee Probation Period
Date
06/06/2010
Benefits Page
FEHB Eligibility Ineligible
TSP Eligibility 6- Ineligible

182
Data Element Value
FEGLI Code Basic only
Annual Leave Category 4
Earn Leave During Pay Period Yes
Annual Leave 45 day Indicator Not Entitled
COLA/Post Differential None
Special Employee code 00
Retirement Plan 2
FERS Previous Coverage
Indicator
No
Previous Retirement Coverage Never Covered
Annuitant Indicator 9
CSRS Previous Coverage
Indicator
No

183
Exercise 6.5: Completing a Retirement Action
Description/Scenario
Cynthia Training retired effective 06/05/2010, which is the last day of Pay Period
11 of 2010. She worked the entire pay period and is entitled to earn leave. Her
former position is to be left vacant and active.
EMPLID:_______________
Instructions
Enter the Data Elements and values below to complete Exercise 6.5: Completing
a Retirement Action.
Data Element Value
Data Control Page
Effective Date 06/05/2010
Auth Date 06/01/2010
Action Code RET
Reason Code ETR
NOA 302
Authority Code SQM, 5 U.S.C. 8336
Remarks M67 (default), N27 (default), R20, 389, 567
Job Page
Losing/Gaining Dept 1B
Previous Class Action Leave Position Vacant and Active
Employment 2 Page
Last Date Worked 06/05/2010
Benefit Data Page

184
Retirement/Termination link Enter all applicable information within this
area.

185
6.4. Updates Reports To
Lesson Overview
The Update Reports To option is used to update the employee’s first level supervisor in
EmpowHR.
Lesson Objective
By the end of this lesson, you will be able to:
Update who an employee’s supervisor is in EmpowHR
To update an employee’s supervisor in EmpowHR, follow the below steps:
Step Action
1. Select PAR Processing from the Menu Group.
2. Select the Updates Reports To tab. The Update Reports To page displays.

186
Figure 68: Update Reports To Page
Step Action
3. Enter the Agency in the Agency field.
4. Enter the Sub-Agency in the Sub-Agency field.
5. Enter the Personnel Office ID in the Personnel Office ID field.
6. Click Search. The EmpowHR Reports_To Update page displays.

187
Figure 69: EmpowHR Reports_To Update Page

188
The list of all active employees for this Sub-Agency and POI displays. This page, Figure
69: EmpowHR Reports_To Update Page, allows you to locate the existing Reports To
information and enter a new Reports To. The position number, employee’s name, and
the supervisor name display. You can enter the new supervisor’s position number and
effective date as of when the employee reports to the new supervisor. This page is
primarily used when multiple records need to be updated; for example, when a new
supervisor is hired or under a reorganization.
Step Action
7. Enter New Reports To in the New Report_To field.
8. Enter Effective Date in the Effective Date field.
9. Click Save. You have successfully updated an employee’s supervisor.

189
6.5. Worklist
Lesson Overview
This lesson provides an overview of the worklist and how to use it in EmpowHR.
Lesson Objectives
By the end of this lesson, you will be able to:
View and modify a worklist
The worklist is essentially your “to-do” list. It contains personnel actions that either
requires an action be taken or describes the transaction status of a processed action.
The list contains applied transactions as well as not applied transactions with errors.
Each User ID has its own unique worklist. When workflow is established for an agency,
the worklist is used to notify the next role in the process that an action needs to be
addressed.
Each time EmpowHR is accessed, you have the ability to view a status of transactions
from the prior day. The transaction results of actions that are processed through PPS
are displayed on the worklist.
For additional information about the worklist, please refer to the following resource:
https://www.nfc.usda.gov/Publications/EMPOWHR/Section7_worklist.pdf
To view or modify a worklist, follow the below steps:
Step Action
1. Select the Worklist from the Menu Group. The Worklist page displays.

190
Figure 70: Worklist Page
Step Action
2. Select any Worklist item listed by clicking the link in the link column associated
with the item.
3. By clicking the action link, the user is automatically taken to the appropriate
record.
NOTE: When using the Worklist links, Worklist items that are
related to workflow for processing actions will automatically be
removed from the Worklist once the personnel action has been
updated and sent to the next step in the workflow. For Worklist
items related to Not Applied actions, click the Marked Worked
button to remove the item from the Worklist once you have
updated the action. The Worklist is updated every day after the
nightly processing.

191
The fields listed on the Worklist page, Figure 70: Worklist Page, are described in the
table below.
Fields Description
From Name of the person that sent the transaction to the Worklist.
Date From Date the transaction was sent to the Worklist.
Work Item Type of transaction and the status of the transaction once it has
been sent to NFC for processing.
Worked By Activity Type of transaction and the status of the transaction once it has
been sent to NFC for processing.
Proposed Effective
Date
Proposed effective date of the action.
Org Structure Organizational structure of the employee or position.
Priority Sets the priority and does not affect another person’s Worklist.
Link Link to the individual transaction. If clicked, the record
automatically displays.
NOTE: The links initially display blue but display
red once a user has opened the item.
Mark Worked Once the suspense transaction is worked, click this button to
remove the item from the Worklist.
Reassign Sends or reassigns the transaction to another person or a role.
Work List Filters Filter used to display only specific work items.
IMPORTANT: The transaction results of an action are typically returned
to the user who processed the action. If the Help Desk or an EmpowHR
Team member is assisting in correcting a problem with an action or
multiple actions and corrects the action(s) and sends for processing, the
item will not updated the user’s Worklist. Manually review those actions
the next day to ensure that they have applied

192
6.6. Chapter Review
Knowledge Check
1. What is a three position code that denotes specific verbiage required on the action
based on the NOA and found in the Guide to Processing Personnel Actions?
2. If more than one action is processing in the same pay period, what date drives the
sequence in the system?
a. Effective Date
b. Authentication Date
c. Date of Birth
3. Describe the purpose of the Nature of Action (NOA) Code.
Chapter Summary
Having completed this chapter, you are now able to:
Describe PAR processing
Identify status codes
Process HR actions
Modify Update Reports To
Explain Workflow

193
7.0. Payroll Documents
7.1. Chapter Overview
This chapter focuses on the purpose and functionality of payroll documents in
EmpowHR and provides instruction for processing payroll documents in EmpowHR.
Chapter Objectives
By the end of this chapter, you will be able to:
Describe payroll documents
Process payroll documents
Payroll documents are entered into EmpowHR to establish and update employee
payroll data in PPS. Payroll documents are required to make disbursements or
collections, as well as to provide other personal and payment information pertaining to
employees’ records.
In terms of processing, payroll document transactions are sent to the mainframe and
are run through the PINE process for editing.
Transactions that pass the PINE edit review reflect an Applied status and are
applied to PPS and updated in EmpowHR.
Transactions that reject during the PINE edit review are sent to suspense with
errors. The transaction status reflects Not Applied on the payroll document. An
error message, number, and hyperlink to the narrative displays in the upper, right
quadrant of the Payroll documents for corrective action.
The following lessons further expand on payroll documents and the processing aspect
of payroll documents.

194
7.2. Describing Payroll Documents
Lesson Overview
This lesson focuses on the purpose of payroll documents used in EmpowHR.
Lesson Objectives
By the end of this lesson, you will be able to:
Describe payroll documents
Explain payroll documents’ purpose for processing in EmpowHR
Payroll documents are entered into EmpowHR to establish and update employee
payroll data in PPS. Payroll documents are processed to:
Withhold mandatory and voluntary deductions, such as health and life insurance,
child support and alimony payments, allotments, taxes, etc.
Disburse payments, such as annual leave and compensatory time payments
Transfer data to PPS from another payroll system (i.e., leave data transfer)
Disburse payments through Direct Deposit/Electronic Funds Transfer (DD/EFT)
Update the database with payroll-related miscellaneous elements, such as
restored annual leave, education and professional certifications, etc.
Before covering each of the payroll documents in EmpowHR, we are first going to
review payroll documents for new hires and individuals that are separating from the
Government.

195
Payroll Documents for New Hire
Payroll documents are processed differently for a New Hire (accession) action. Before
the system allows you to process payroll documents, you must first obtain an EmplID.
The EmplID is necessary to input payroll document data. When adding a payroll
document for a new hire, click on the (+) icon.
IMPORTANT: If an employee transfers from one Agency to another
Agency within PPS and the prior Agency did not process in EmpowHR,
the payroll documents in effect at transfer must be re-entered by the
gaining Agency when the hire action is entered. If the prior Agency did use
EmpowHR, these documents need to be validated in PPS for accuracy
and do not need to be entered unless changes are needed (e.g., address
or insurance info changed due to relocations, etc.).
For a New Hire, the following documents must be processed to establish their payroll
record in the PPS database:
Direct Deposit
Tax Data – Federal, State, City and County data have been combined to one
component

201
Employee Separation/Indebtedness
When an employee separates and/or is indebted to the Government, it is mandatory
that deductions are secured from the employee’s gross salary. If a mandatory deduction
on the list precedes another mandatory deduction, and the salary is not sufficient to
cover both mandatory deductions, the deduction(s) with the highest priority takes
precedence. The order of precedence is shown below in Figure 71: Order of
Precedence for Payroll Deductions.
Figure 71: Order of Precedence for Payroll Deductions

202
7.3. Processing Payroll Documents
Lesson Overview
The navigation and process for entering payroll documents is common for all payroll
documents. This lesson focuses on how to process the more common payroll
documents in EmpowHR.
Lesson Objectives
By the end of this lesson, you will be able to:
Process a payroll document in EmpowHR
Processing Payroll Documents
Payroll documents are entered into EmpowHR and once applied, the deductions are
viewable in IRIS. The payroll documents are located under the Payroll Documents
menu group seen in Figure 72: Payroll Documents.
Figure 72: Payroll Documents
To enter payroll documents into EmpowHR for an employee, follow the below steps:
Step Action
1. Select Payroll Documents from the Menu Group.

203
2. Select the applicable component. The Find An Existing Value page
displays.
Figure 73: Find an Existing Value Page
This procedure is the same to access any payroll document component. Now that you
know how you access a payroll document, each document is described in greater detail
on the subsequent pages. The documents are discussed in the order they appear on
the payroll documents list from the EmpowHR Main Menu.
Step Action
3. Locate the employee’s record by entering the search criteria in the applicable
fields.
4. Click Search. The payroll document for the employee displays.

204
Certifications
Education and certification data records the highest education level attained based on
years of formal schooling and/or academic degrees or certificates conferred. The
Certifications payroll document, Figure 74: Certifications Document, allows for the entry
of professional certifications into the following areas:
Lawyer (member of the bar)
Certified Public Accountant (CPA)
Certified Professional Manager (CPM)
Certified Internal Auditor (CIA)
Certified Information System Auditor (CISA)
Figure 74: Certifications Document
NOTE: Certification data can be verified on IRIS Program, IR130,
Education and Certificate.

205
Education Information
The initial education record is established in EmpowHR, during the accession action as
part of the PAR, and considered the official education record for the employee. That
record is reported to the Central Personnel Data File (CPDF).
If updates are needed to the Education record of the employee, HR processors should
use the Education payroll document to update the education attained.
Figure 75: Education Document
NOTE: Education can be verified on IRIS Program IR130, Education and
Certificate.

206
Allowances
Allowances are payments made to eligible employees in addition to basic pay.
Allowances are paid in addition to the Cost-of-Living allowance (COLA) or as a post
differential provided for duty stations in certain non-foreign areas, and temporary duty
(TDY) post differential. COLA and post differential are entered on a personnel action;
TDY is entered using the Multi-Element Update option.
Figure 76: Allowance Document
For details on the types of applicable allowances and eligibility criteria, refer to Appendix
B.
NOTE: Allowance data can be verified on IRIS Program IR109,
Allowances/COLA/Post Diff.

207
Authorization for Restored Annual Leave
Restored annual leave is annual leave approved for return to the employee instead of
forfeited due to administrative error, exigencies of the public business, or illness.
Figure 77: Authorization for Restored Annual Leave Document
NOTE: If the correction or cancelation of restored annual leave
documents is for the current year, enter the data in EmpowHR. If the
correction is for a prior year, enter the data in TINQ Program TI007,
Annual Leave Restored.
Changes in restored annual leave usage are handled through corrected T&As. The
amount of the restored annual leave does not increase or change an employee’s normal
maximum carryover of annual leave into a new leave year.
NOTE: Restored annual leave can be verified on IRIS Program IR136,
Annual Leave.

208
Charitable Contributions
A charitable contribution is the authorization by an employee to withhold through payroll
deductions, contributions for the Combined Federal Campaign (CFC). Form CFC-804 is
completed by the employee to authorize the deductions.
Figure 78: Voluntary Charitable Contributions Document
All CFC contributions are automatically discontinued only upon expiration of a one year
withholding period, in the event of death or retirement, or upon separation from Federal
service.
When an employee wishes to make a one-time cash contribution, the Agency personnel
office sends the contribution directly to the designated charity or federated group. These
types of documents are not entered into the system.
NOTE: Charitable contributions can be verified on IRIS Program IR111,
Charitable Contributions.

209
Compensatory Time Payments
Compensatory time is hours of irregular or occasional overtime work for which the employee is required to work but has elected to receive time off in lieu of receiving overtime pay. Compensatory leave may be liquidated by the end of the leave year, carried to the following year, or paid in full, in accordance with Agency policy.
Figure 79: Comp Time Payments Document
Compensatory leave payments are paid at the rate of overtime pay applicable at the
time the work was performed. Payments must be charged to the current fiscal year
appropriation regardless of the fiscal year in which the overtime work was performed.
NOTE: Compensatory leave data (including rates at which compensatory
time was earned) can be verified on IRIS Program IR139, Compensatory
Leave and Rates and TINQ Program 05, Compensatory Leave &
Compensatory Other Rate.

210
Court Ordered Child Care/Alimony
A childcare or alimony deduction is the withholding of court ordered or voluntary childcare or alimony payments through payroll deductions.
Figure 80: Court Ordered Child Care or Alimony Deductions Document
A separate document should be entered for each child care/alimony deduction;
however, a maximum of five child care/alimony deductions may be entered in
EmpowHR. Once established, court ordered deductions can only be canceled through a
court order. Voluntary deductions may be canceled at any time.
NOTE: Child care and alimony data can be verified on IRIS Program
IR306, Child Support and Alimony.

211
Deductions Due to Indebtedness
A Federal employee’s salary and wages are subject to garnishment for bankruptcy,
educational loans, tax levies, commercial garnishments and/or other debts. This type of
garnishment occurs when a Governmental Agency is directed, through legal process, to
make a payment from monies otherwise payable to an employee, to another party to
satisfy the employee’s legal obligation.
Figure 81: Deductions Due To Indebtedness Document
NOTE: Commercial garnishment data can be verified on IRIS Program
IR114, Receipt Accounts.

212
Direct Deposit
A Direct Deposit document is processed to transfer an employee’s net pay through
Direct Deposit/Electronic Funds Transfer (DD/EFT) to a financial organization. The
employee must complete an SF-1199A or FMS 2231 with the following information:
Bank Routing Number
Employee’s Account Number
Type of Account (Savings or Checking) into which the deposit is made
Figure 82: Direct Deposit Document
A new document must be processed to:
Change the employee’s depositor account number
Change from a checking account to a savings account or vice versa
Change from one financial institution to another
Change the routing number of a financial institution
NOTE: The Direct Deposit document can be verified on IRIS Program
IR124, Address/Check Information.

213
Discretionary Allotments
A Discretionary Allotment is a recurring deduction authorized by the employee and the
appropriate Approving Official for any purpose deemed appropriate. They are commonly
used for paying employees’ monthly bills to a designated payee, either an individual or
company. Follow your Agency’s policy.
Figure 83: Discretionary Allotments Document
PPS divides the monthly payment into two deductions, effective on the first payday of
the month. If the allotment is established or changed in the middle of the month, it does
not take effect until the beginning of the following month. For the months in which there
are three pay periods, deductions are not withheld for the third payday.
NOTE: Discretionary allotment data can be verified on IRIS Program
IR112, Discretionary Allotment.

214
Financial Allotment/Health Savings Account
A Financial Allotment/Health Savings Account Allotment is a recurring deduction
authorized by the employee for direct deposit in a checking or savings account at a
financial institution. This allotment is deposited through DD/EFT.
Figure 84: Financial Allotment/Health Savings Account Document
The following are guidelines for processing financial allotments correctly:
The savings/checking account must be in the name of the employee
The allotment must be a fixed, whole dollar amount which are to be deducted
from the employee’s salary
The maximum number of financial allotments in effect at one time is 16. If the
employee has more than one allotment, each may be directed to a different
financial organization. A separate transaction must be entered for each financial
allotment
NOTE: Financial allotment data can be verified on IRIS Program IR110,
Financial Allotment.

215
Health Benefits
Health Benefits for each employee are captured in a payroll document as well.
However, before an employee’s respective Heath Benefit document can be entered, a
PAR must be processed with an eligibility code of “4” (Eligible Pending) in the FEHB
Eligibility field.
After a FEHB document has been successfully processed, the database is updated with
the appropriate FEHB coverage code and the carrier copies are sent to the carrier. The
carrier then issues the identification cards.
The Elections document, Figure 85: Health Benefits - Elections Document, captures an
employee’s Health Benefit plan, effective date of the policy, as well as personal contact
information for the coverage.
The Dependents document, Figure 86: Health Benefits - Dependents Document,
captures the personal information of any dependents on the same Health Benefits plan
as the aforementioned employee.

216
Figure 85: Health Benefits - Elections Document

217
Figure 86: Health Benefits - Dependents Document
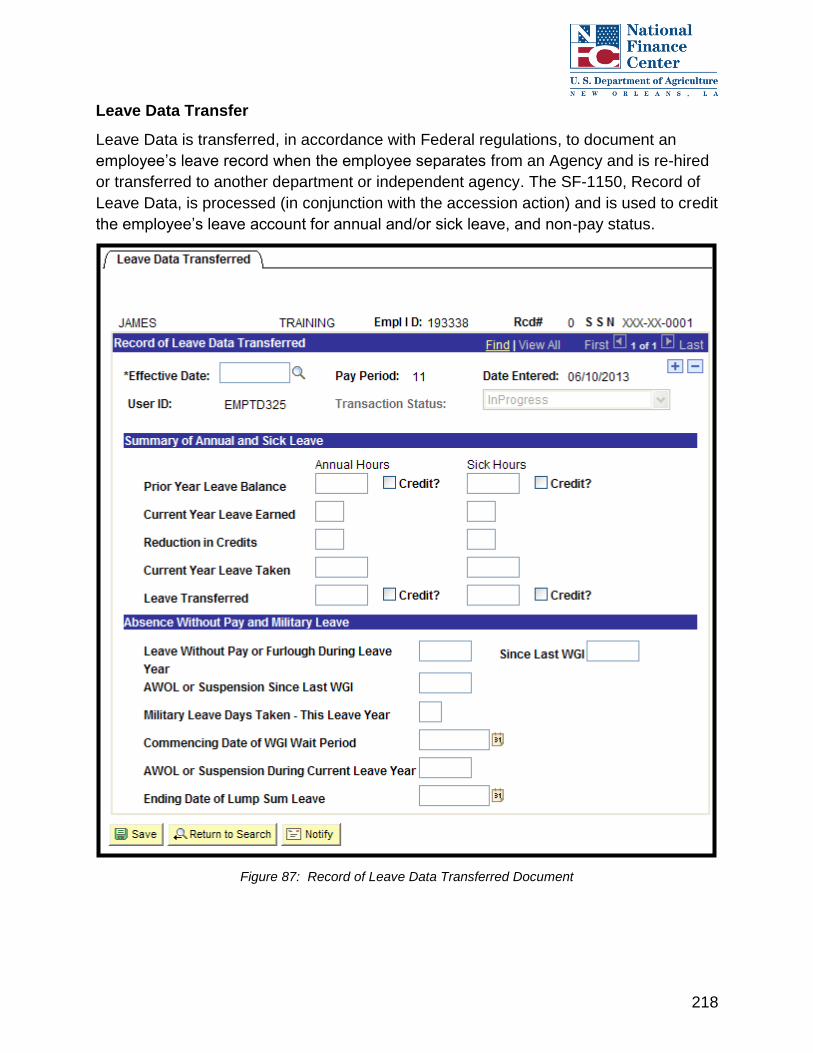
218
Leave Data Transfer
Leave Data is transferred, in accordance with Federal regulations, to document an
employee’s leave record when the employee separates from an Agency and is re-hired
or transferred to another department or independent agency. The SF-1150, Record of
Leave Data, is processed (in conjunction with the accession action) and is used to credit
the employee’s leave account for annual and/or sick leave, and non-pay status.
Figure 87: Record of Leave Data Transferred Document

219
Lump Sum Leave Payment
A Lump Sum Leave Payment document is normally processed when an employee
separates from Federal Service. This payment is a final lump sum payment. However, if
an employee converts to a work schedule that terminates leave earning eligibility (i.e.
from full−time or part−time to intermittent), an interim annual leave payment is made
instead.
Figure 88: Lump Sum Leave Payments Document
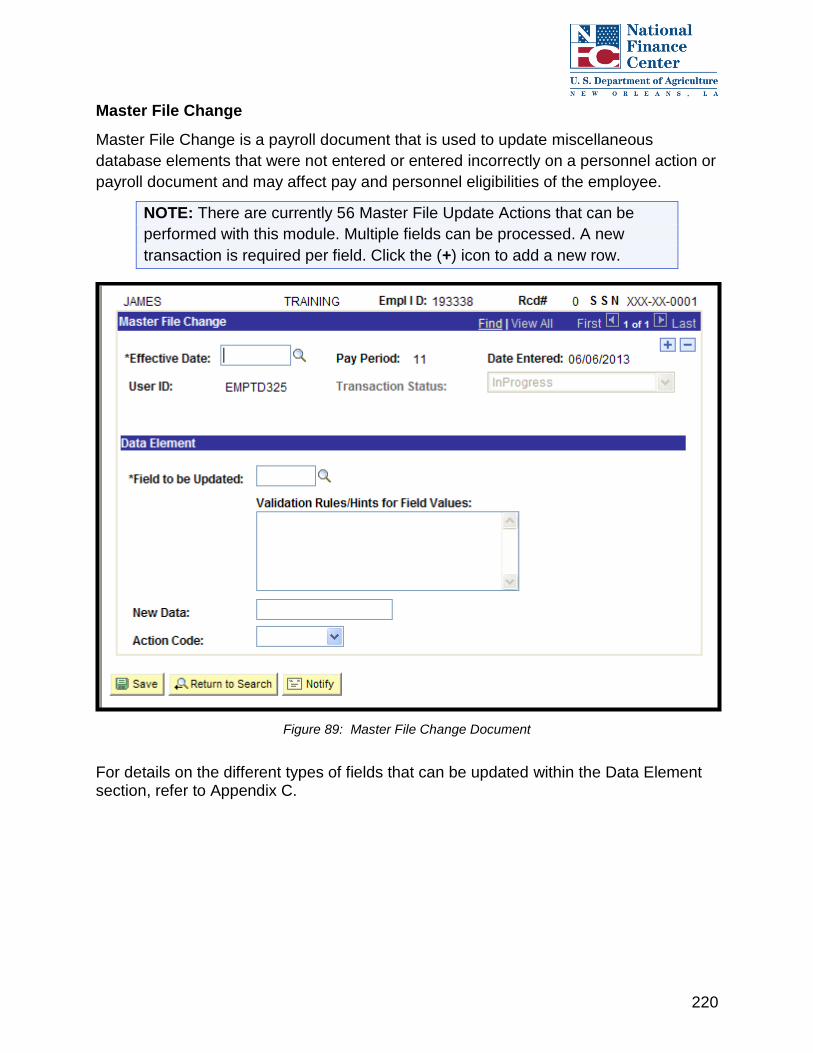
220
Master File Change
Master File Change is a payroll document that is used to update miscellaneous
database elements that were not entered or entered incorrectly on a personnel action or
payroll document and may affect pay and personnel eligibilities of the employee.
NOTE: There are currently 56 Master File Update Actions that can be
performed with this module. Multiple fields can be processed. A new
transaction is required per field. Click the (+) icon to add a new row.
Figure 89: Master File Change Document
For details on the different types of fields that can be updated within the Data Element section, refer to Appendix C.

221
Multi-Element Update
Multi Element Update payroll document is used to update miscellaneous database
elements that are not reflected on a personnel action or payroll document but are used
for reporting requirements as well as to denote expertise or experience in various fields.
Figure 90: Multi-Element Update Document
For details on the different types of fields that can be updated within the Data Element
section, refer to Appendix D.

222
Non-Federal Life Insurance
The Non-Federal Life Insurance Program is a savings and investment plan for certain
eligible employees. It is the retirement plan for Federal employees.
Figure 91: Non-Federal Life Insurance Document
Use the following guidelines to enter Non-Federal Life Insurance documents:
Certain plan codes require the completion of Option 1, Option 2, or Option 3 field,
while others require the field to be blank. Review your Agency instructions for
further guidance
The plan code must be compatible with the Agency
Certain plans require part-time employees to work at least 40 hours per pay
period
Eligible employees can participate in both Federal and non-Federal life insurance plans
NOTE: Life insurance data may be viewed in the IRIS Program IR116, Life
Insurance

223
Non-Federal Retirement
Non-Federal Retirement is a retirement savings and investment plan for certain eligible
employees.
Figure 92: Non-Federal Retirement Document
NOTE: Data is displayed on IRIS Program IR117, Retirement Data

224
Non-Federal Thrift Savings
Non-Federal Thrift Savings Plan is a savings and investment plan for certain eligible
employees. To be eligible for the plan, the employee must be employed at least 180
days.
Figure 93: Non-Federal Thrift Savings Document
NOTE: Data is displayed on IRIS Program IR118, Thrift Savings Data

225
SES Performance Appraisal
SES Performance Appraisal is used to enter information from Form AD-779, Senior
Executive Performance Appraisal, to establish, change, or delete a performance
appraisal score and appraisal period, or bonuses for SES appraisals.
Figure 94: SES Appraisal Document
Review the Remote Forms Queuing System (RFQS) control listing to confirm the
employee’s evaluation is due before entering the SES performance appraisal. An SF-
50-B, NOAC 879, SES Performance Award, is generated after the data is processed.
A maximum of five performance appraisal records are stored in PPS for SES
employees and must be greater than the last performance evaluation anniversary date
on the database.
NOTE: Data can be viewed in IRIS Program 305, PERHIS Performance
Evaluation Data.

226
Severance Payment
Severance pay applies to eligible employees who are involuntarily separated from
service rather than removal for cause.
Figure 95: Severance Pay Data Document
The Severance Pay document is automatically generated whenever Remarks Code
N22 is entered on a separation action. If Remarks Code N22 is entered and the
separation action is released without completing the severance pay document, PPS
changes the PAR status code to an “S, Edited/Waiting for Severance Pay.”
NOTE: IRIS Program 135, Severance Pay Computation, displays a
computation of severance pay based on the salary data on the database.
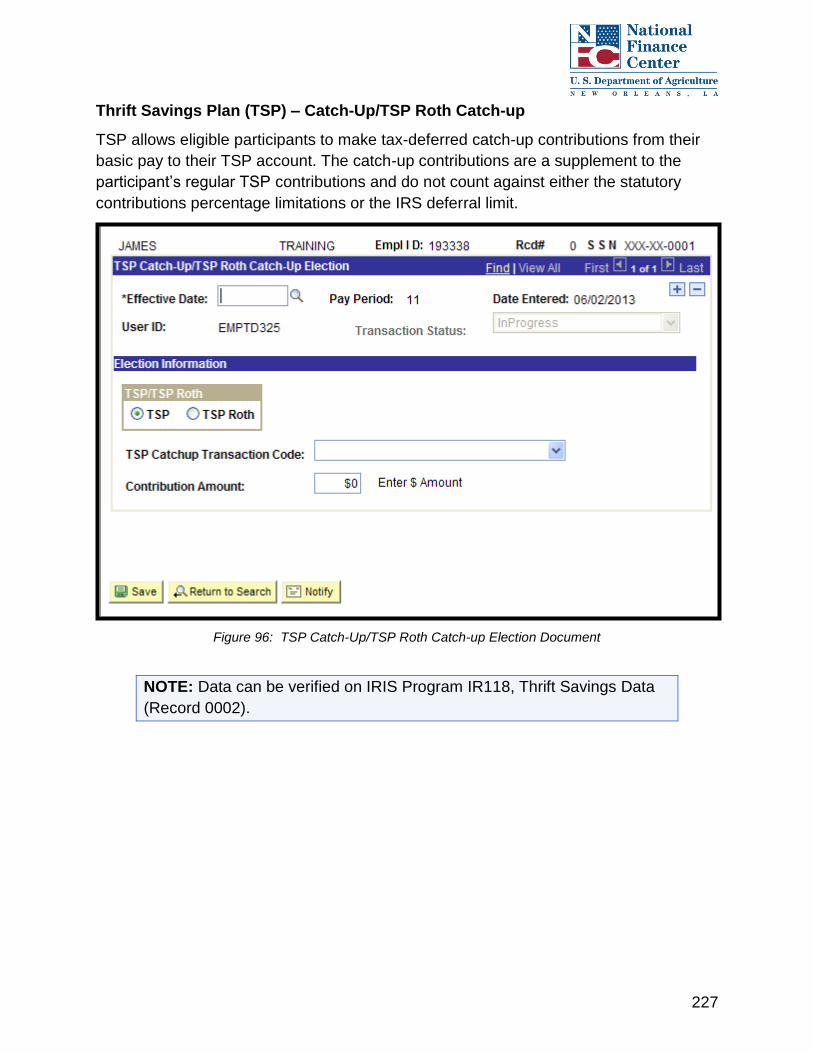
227
Thrift Savings Plan (TSP) – Catch-Up/TSP Roth Catch-up
TSP allows eligible participants to make tax-deferred catch-up contributions from their
basic pay to their TSP account. The catch-up contributions are a supplement to the
participant’s regular TSP contributions and do not count against either the statutory
contributions percentage limitations or the IRS deferral limit.
Figure 96: TSP Catch-Up/TSP Roth Catch-up Election Document
NOTE: Data can be verified on IRIS Program IR118, Thrift Savings Data
(Record 0002).

228
TSP Loan Allotment
TSP participants can apply for loans from their TSP accounts. To apply for a loan,
participants must complete Form TSP-20, Loan Application, and submit the completed
form to the TSP Service Provider.
By law, loan application requests are restricted. Amounts available for loans are limited
to the participant’s contributions to TSP and the earnings attributed to such
contributions.
Figure 97: TSP Loan Allotment Document

229
TSP/TSP Roth
TSP is a retirement savings plan for civilians who are employed by the U.S.
Government and members of the Uniformed Services. Federal employees or members
of the Uniformed Services may elect to start, stop, or change their TSP contributions by
completing a Form TSP-1, Election Form. Employees are immediately eligible to
participate; however, the participant’s election amount should not exceed 65% of their
base pay to ensure all mandatory deductions are met.
z
Figure 98: Thrift Savings Plan/Thrift Savings Plan Roth Document
NOTE: Data can be verified on IRIS Program IR118, Thrift Savings Data.

230
Tax Data
Tax documents are processed for City, County, State, and Federal taxes. Taxes are
withheld each pay period through payroll deductions based on a formula or a
percentage of earnings. There is one component for tax documents that consists of four
tabs. Each tab can be updated and submitted independently without affecting the data
on the other tabs. The four aforementioned taxes are discussed in the subsequent sub-
sections.
City Tax Data
City tax is withheld for the city where the employee works and/or resides. This amount
is determined by the city taxing authority. If an employee’s duty station and residence
have mandatory city taxes, the duty station city tax takes precedence.
Figure 99: City Tax Data Document
NOTE: City tax data can be verified on IRIS Program IR106, City Tax.

231
County Tax Data
County tax is withheld for the county in which an employee works and/or resides. This
amount is determined by the county taxing authority.
Figure 100: County Tax Data Document
NOTE: County tax data can be verified on IRIS Program IR107, County
Tax.
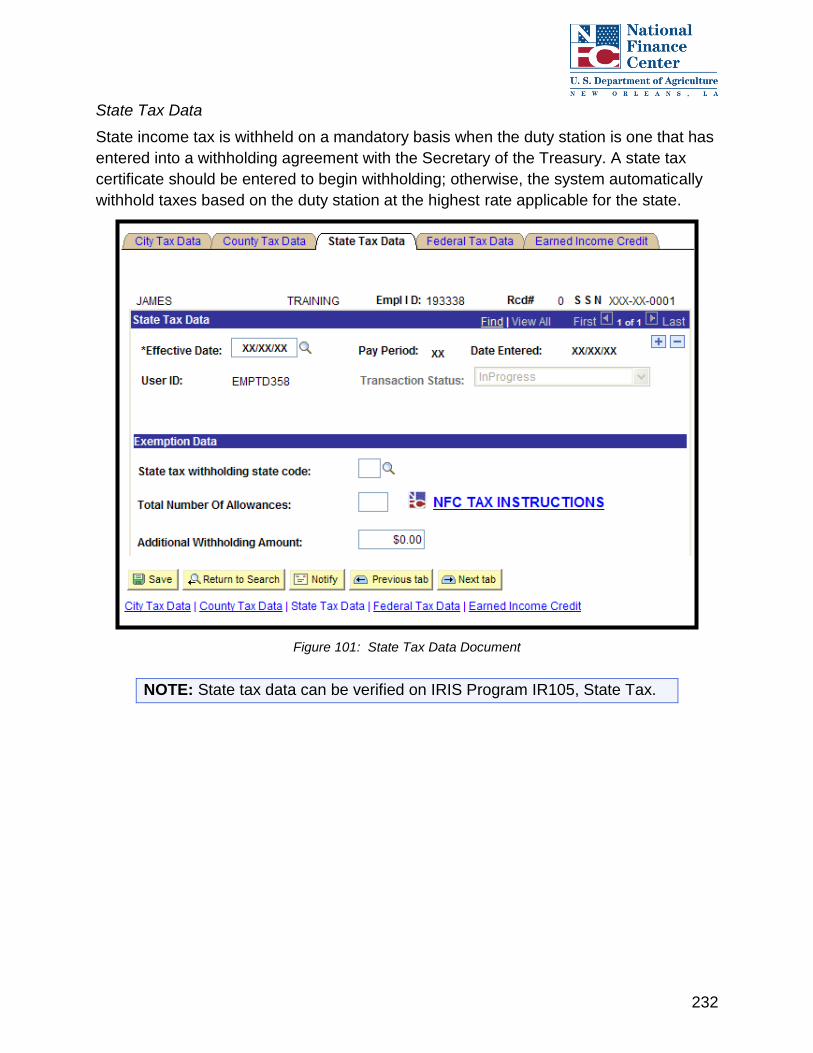
232
State Tax Data
State income tax is withheld on a mandatory basis when the duty station is one that has
entered into a withholding agreement with the Secretary of the Treasury. A state tax
certificate should be entered to begin withholding; otherwise, the system automatically
withhold taxes based on the duty station at the highest rate applicable for the state.
Figure 101: State Tax Data Document
NOTE: State tax data can be verified on IRIS Program IR105, State Tax.

233
Federal Tax Data
Federal tax is withheld through payroll deductions based on the processing of Form
W−4. Federal income tax withholding is based on an IRS formula that includes a
calculation of TSP contributions, the number of allowances claimed, and a tax
withholding table for marital status. From the calculation the tax amount is determined
based on the taxable income amount and the tax percentage.
Figure 102: Federal Tax Data Document
NOTE: The formula is located on the NFC Home Page
(http://www.nfc.usda.gov) under Publications. If no Federal tax document
is processed, PPS withholds at the “single” rate.
NOTE: Federal tax data can be verified on IRIS Program IR104, Federal
Tax.

234
Union Dues
The SF-1187, Request for Payroll Deductions for Labor Organization Dues, or another
appropriate form must be completed by the employee and the union/association to
authorize union dues deductions.
Figure 103: Union Dues Document
NOTE: Union data can be verified on IRIS Program 308,
Union/Association Dues.

235
Enterprise Human Resources Integration (EHRI) Retirement System
Modernization (RSM) Elements
Document type 444, EHRI/RSM Element, was established to allow multiple elements to
be entered and/or changed at the same time. The RSM program is used by OPM to
build complete service history for all Federal employees by using historical Individual
Retirement Records (IRR) submitted to OPM along with historic service data being
maintained by the Agency in both paper and electronic format. Data is sent biweekly to
OPM via the EHRI.
Figure 104: EHRI RSM Document

236
Now that the main payroll documents have been covered, let’s try some exercises to
help learn how to process payroll documents.
Exercise 6.6: Processing a Direct Deposit document.
Description/Scenario
In this exercise, you will process a Direct Deposit document for PAR Exercise 6.
Hire Training Demo would like his direct deposit to go to his checking account.
Instructions
Follow the steps in the table below to complete Exercise 6.6: Processing Direct
Deposit document.
Step Action Required Data
1. Enter the Effective Date in the *Effective Date
field.
Select processing P/P from
the drop-down list.
2. Check the applicable box in the Account Type
field.
Checking
3. Enter the Routing number in the *Routing #
field.
265070532
4. Enter the Account number in the *Account #
field.
12345678
5. Click Save.

237
Exercise 7.1: Processing a Financial Allotment document
Description/Scenario
In this exercise, process a Financial Allotment for new employee processed in
PAR Exercise 1. Hire Training Demo wishes to establish a savings allotment. He
would like to have $150.00 deducted each pay period.
Instructions
Follow the steps in the table below to complete the Exercise 7.1: Processing a
Financial Allotment document.
Step Action Required Data
1. Enter the Effective Date in the *Effective Date
field.
Select Processing P/P
from the drop-down list.
2. Check the applicable box in the Account Type
field.
Savings
3. Enter the Account number in the *Account #
field.
265070532
4. Enter the Routing number in the *Routing #
field.
9713360
5. Enter the Allotment Amount in the Allotment
Amount field.
150.00
6. Click Save.

238
Exercise 7.2: Processing a Federal Tax document
Description/Scenario
In this exercise, process a Federal Tax document for the new hire processed in
the PAR Exercise 1. Hire Training Demo elected to claim married with one
exemption on his W-4. He also elected to have an additional $10.00 per pay
period withheld.
Instructions
Follow the steps in the table below to complete Exercise 7.2: Processing a
Federal Tax document.
Step Action Required Data
1. Enter the Effective Date in the *Effective Date
field.
Select processing P/P from
the drop-down list.
2. Select the applicable Tax Marital Status from
the Tax Marital Status down-down list.
Married
3. Enter the total number of allowances claimed in
the Total Number of Allowance Claimed field.
1
4. Enter the additional withholding amount in the
Additional Withholding Amount field.
$10.00
5. Click Save.

239
Exercise 7.3: Processing a State Tax document
Description/Scenario
In this exercise, process two state tax documents for PAR Exercise 6. Hire
Training Demo is a resident of the state of Maryland; however, his duty station is
Washington, DC. He wants to waive his DC taxes and requests to have tax
withholding based on his resident state. He also elected to have an additional
$10.00 per pay period withheld.
Instructions
Follow the steps in the table below to complete the Exercise 7.3: Processing
State Tax documents.
Step Action Required Data
1. Enter the Effective Date in the *Effective Date
field.
Select processing P/P from
the drop-down list.
2. Enter the State code to be waived in the State
Tax Withholding State Code field.
11 (District of Columbia)
3. Enter the total number of allowances claimed in
the Total Number of Allowances field.
WAV
4. Click Save.
5. Click the Add a New Row icon to add the
additional state tax document.
+
6. Enter the Effective Date in the *Effective Date
field. The effective date needs to be the same
as the previous document.
Select processing P/P from
the drop-down list.
7. Enter the State code to be taxed in the State
Tax Withholding State Code field.
Maryland
8. Enter the total number of allowances claimed in
the Total Number of Allowances field.
S01
9. Enter the additional withholding amount in the
Additional Withholding Amount field.
$10.00

240
Step Action Required Data
10. Click Save.

241
Exercise 7.4: Processing a Thrift Savings Plan document
Description/Scenario
In this exercise, process a Thrift Savings Plan document for the new employee
processed in PAR Exercise 1. Hire Training Demo is a FERS employee and
elected to contribute 10% of his salary to his Thrift Savings Plan.
Instructions
Follow the steps in the table below to complete Exercise 7.4: Processing a Thrift
Savings Plan document.
Step Action Required Data
1. Enter the Effective Date in the *Effective Date
field.
Select processing P/P from
the drop-down list.
2. Select the type of account in the TSP/TSP Roth
field.
TSP
3. Select the TSP Transaction Code from the TSP
Transaction Code drop-down list.
New Enrollment/Change
4. Enter Contribution Rate in the Contribution
Rate field.
10%
5. Click Save.

242
Exercise 7.5: Processing a FEHB Enrollment document
Description/Scenario
In this exercise, process a FEHB Enrollment document for the new employee
processed in PAR Exercise 1. Hire Training Demo elected to enroll in health
benefits. He returned his SF-2809 form on Tuesday (6/8/2010 in training
database).
Instructions
Follow the steps in the table below to complete Exercise 7.5: Processing a
FEHB enrollment document.
Step Action Required Data
1. Enter the Effective Date in the *Effective Date
field.
Select current processing
P/P after receipt of an SF-
2809.
2. Enter the Benefit Plan in the Benefit Plan field. 105
3. Select the applicable Transaction Code from
the Transaction Code down-down list.
N Enrollment
4. Select the applicable Event Code from the
Event Code down-down list.
New Enrollment
5. Enter the Event Date in the Event Date field. Effective Date
6. Enter the date the document was signed in the
Date Document Signed field.
The third day of the
processing pay period.
7. Enter the Event Chance Code in the Event
Change Code field.
1A (Initial Opportunity to
Enroll)
8. Enter the Office Received Date in the Office
Received Date field.
The third day of the
processing pay period.
9. Enter the Personnel Contact information. John Smith
10. Check the Pre-Tax FEHB Premium box.

243
Step Action Required Data
11. Click the Dependents tab. The Dependents
page displays.
12. Enter Dependent’s name in the *Name field.
13. Enter the dependent’s SSNO in the National ID
field.
333-04-1xxx
(xxx = 3 numbers of user
ID)
14. Enter the dependent’s date of birth in the Date
of Birth field.
Any date
15. Select the relationship of the dependent from
the Relationship down-down list.
Spouse
16. Select the gender of the dependent from the
Gender down-down list.
Female
17. Enter the Address Information in the Address
Information fields.
320 First Street,
Chesapeake Beach, MD
18. Click Save.

244
Exercise 7.6: Processing a Union Dues document
Description/Scenario
In this exercise, process Union Dues for the new employee processed in PAR
Exercise 1. Hire Training Demo is joining a union. The Union Code is 52. The
deduction amount is $15.00
Instructions
Follow the steps in the table below to complete Exercise 7.6: Processing a Union
Dues document.
Step Action Required Data
1. Enter the Effective Date in the *Effective Date
field.
Current processing PP
2. Select the dues type from the Dues Type drop-
down list.
086 – Enrollment
3. Enter the Union Code in the *Union Code field. Refer to scenario
4. Enter the Local Number in the *Local field. 2341
5. Enter the Deduction Limit Amount in the
Deduction Limit Amount field.
Refer to scenario
6. Click Save.

245
7.4. Chapter Review
Knowledge Check
1. Briefly describe how payroll documents are processed.
2. True or False: Payroll documents can be processed at the same time as the hire
action in PAR.

246
3. Match the Payroll Documents below with their descriptions.
Chapter Summary
Having completed this chapter, you are now able to:
Describe payroll documents
Process payroll documents
1) Direct Deposit
_____
A. Is based on an IRS formula
that includes a calculation of
TSP contributions, the
number of allowances
claimed, and a tax
withholding table for marital
status
2) Financial Allotment
_____
B. Is processed to transfer an
employee’s net pay through
Direct Deposit/Electronic
Funds Transfer (DD/EFT) to
a financial organization
3) Federal Tax document
_____
C. Should be entered to begin
withholding; otherwise, the
system automatically
withholds taxes based on
the duty station at the
highest rate applicable for
the state
4) State Tax document
_____
D. Is a recurring deduction
authorized by the employee
for direct deposit in a
checking or savings account
at a financial institution

247

248
8.0. Suspense & Corrections
8.1. Chapter Overview
This chapter focuses on how to correct personnel and payroll transactions that rejected
because they failed PINE database edits. It also introduces the user to the PINE edit
messages procedure and how to use it to research and correct suspense errors.
Chapter Objectives
By the end of this chapter, you will be able to:
View and correct suspense errors
Review override codes
Review error message reports
Correct an applied action
Perform a rollback
EmpowHR System Data Validation
Several pages in EmpowHR operate in deferred processing mode. Most fields on these
pages are not updated until the page is saved or refreshed by clicking a button, link, or
tab. Delayed processing has various implications for the field values on the page. For
example, when a field contains a default value, any value entered before the system
updates the page overrides the default.
The system checks data validity in one of three ways.
When data is entered, such as a social security number, the system checks to
see if it is valid or a duplicate exists in the system, immediately upon leaving the
field
When saving a record, the system checks to determine if a required field is left
blank or has information with an error, the system alerts the user to complete or
correct this field.
When the action does not pass the PINE edits after NFC processing
PINE is a subsystem that edits personnel actions and payroll documents before they
apply to the PPS database, comparing the employee’s database record to the data
entered. PINE edits all transactions regardless of the entry system.

249
When an EmpowHR action or document is sent through the PINE processing it comes
either come back as Applied or Non-Applied. Applied actions have been exported to
the NFC mainframe and no further action is needed. Not Applied actions are in
suspense and must be corrected and reprocessed through PINE.
Each PAR or payroll document is identified in PPS by a system-generated document
code known as document type. This code identifies the type of document or type of
activity for a document and is carried throughout the system from the beginning to the
end of the processing cycle.

250
8.2. Suspense Transactions
Lesson Overview
This lesson describes the front-end and database edits that are performed in EmpowHR
and PINE.
Lesson Objectives
By the end of this lesson, you will be able to:
Identify and correct EmpowHR front-end edits
Access the PINE procedure in order to correct suspense errors
Review override codes
PINE Data Validation
PAR and payroll transactions that do not pass the PINE edits are placed in SINQ. To
resolve the error that made the action go into suspense, you must modify the action and
resend it to NFC. Then, the action goes through the editing process again before the
document can apply to the NFC database.
IMPORTANT: Every effort should be made to correct all suspense
transactions to ensure accurate and timely salary payments to your
employees.
As previously covered in Chapter 6: PAR Processing, actions in suspense display on
your Worklist, Figure 105: Worklist Page. Once you access your Worklist page, click
the link for the suspense action and review the error messages. Corrections needed to
the action are dependent on the type of action and the errors received. To better
illustrate, the procedure below walks you through an example of correcting errors from
the change in work schedule PAR.
With multiple systems being used for validation of information through the FESI
process, you may find additional suspense items on your Worklist (i.e., employee
personal page) that will also need to be resolved.

251
Figure 105: Worklist Page
Step Action
1. To display PAR suspense items only, select PAR PRO Not Applied in the
Work Item Filters drop-down list.
2. Select the link for the Worklist item to be worked. The Data Control page for
the item displays.
In our scenario, we processed a Change in Work Schedule for Art Training,
EmpID 193539.

252
Figure 106: Data Control Page
The Data Control page shows that the action is in suspense. Notice the Transaction
Status of our document in suspense is Not Applied.
Step Action
3. Click the View Current SINQ Errors link. The View Current SINQ Errors
page displays.

253
Figure 107: View Current SINQ Errors Page
Step Action
4. There are three errors on the PAR. Review the error information.
5. Click Return. The Data Control page displays.
6. Click the Position tab. The Position page displays.

254
Figure 108: Position Page
The errors for SINQ messages 299 and 479 are going to be corrected on the Position
page, Figure 108: Position Page. According to the suspense error listing and the PINE
Procedure, error message 299 states that when the Work Schedule field indicates that
the employee is part-time, the data entered in the duty hours per pay period must be
greater than one hour but less than 80 hours.
Error message 479 states that when the data entered in the Work Schedule field
indicates part-time, the duty hours per pay period must be between 0100-7900.
Because the Work Period shows Weekly and the Standard Hours are 40.00, PINE is
reading that the employee works eight hours per day with a 40 hour week. Therefore,
the employee is working 80 hours per pay period.
To correct the error enter 24.00 in the standard hours, since the employee is scheduled
to work 24 hours per week. This rate equals a total of 48 hours per pay period. This
correction clears both error messages.

255
To correct the last SINQ error message 850, continue to follow the provided steps:
Step Action
7. Click the Compensation tab. The Compensation page displays.
Figure 109: Compensation Page
According to the suspense error listing, error message 850 shows that Variable FT Reg Tour of Duty for a part-time employee must be greater than zero. The Variable FT Reg Tour of Duty is blank.

256
Step Action
8. Enter “80” in the Variable FT Reg Tour of Duty field.
9. Click Save. Error message 850 is now corrected. The Transaction Status
now displays as NFC Ready. Corrections made will be edited in the next
PINE pass.
Now that we learned about suspense transactions, it is important to understand that not
all actions in suspense need to be corrected. There are certain exceptions to the rule,
discussed below, that require an override code.
Override Codes
Despite various PINE edits to assure compliance with regulations, there are exceptions
to the regulations. In some cases, there are records that go into PINE editing, but PINE
cannot account for every processing scenario. Therefore, an action may go into
suspense but it is a legitimate exception to the rule and should be applied. Override
codes are provided for these types of actions.
When a personnel action or payroll document goes into suspense and the data is valid,
you would select the appropriate override code from the Override Code list to bypass
the edit during the next pass of PINE. The Override Code list shows the override code
and the PINE error message number and description that it will release from suspense.
NOTE: Override codes do not bypass all PINE editing, only those edits
that are strictly related to the type of override.
An example of this would be if an employee chooses to pay state taxes in both his duty
station and his residence state. Two state tax documents are processed for the
employee. When edited by PINE, both tax documents would go into suspense with error
message “070: Document will result in dual rate tax deductions.” Selecting Override
Code C would release the document back to PINE that evening.
To clear the error message:
Step Action
1. From the Worklist page, click the link for the Worklist item to be worked. The
Data Control page for the item displays.

257
Figure 110: Data Control Page
Step Action
2. Click the Override Code magnifying glass to search for the appropriate
Override Code.
3. Select the appropriate Override Code from the Look Up Override Code list.
4. Click Save on the Data Control page. The document transaction status
changes from Not Applied to NFC Ready and will go back through the PINE
process that evening.

258
8.3. Error Message Reports
Lesson Overview
This lesson provides an overview of error message reports in EmpowHR, and how to
access error message reports.
Lesson Objectives
By the end of this lesson, you will be able to:
Access the PMSO, PAR, and Payroll error message reports
EmpowHR includes an HR Reports Option for viewing error message reports for
transactions entered. These reports list the actions in suspense as well as the actual
errors that are preventing the document from applying to the database. The reports are
useful to view all documents in error for an Agency and/or POI, whereas the Worklist
only displays actions that you processed.
There are three error message reports available in EmpowHR:
PMSO Error Messages
PAR Error Messages
Payroll Error Messages
Follow the steps below to view the PMSO Error Message Report:
Step Action
1. Select HR Reports from the Menu Group.
2. Select PMSO Error Messages from the HR Reports Menu Options. The
PMSO Error Messages Report displays.

259
Figure 111: PMSO Error Messages Search Page
Step Action
3. Enter your search criteria.
4. Click Search. The search results are shown at the bottom of the page.
The PMSO Error Messages Report, Figure 111: PMSO Error Messages Search Page,
displays that there are two positions in suspense. For this example, follow the first error
listed.
Step Action
5. Click the item to research. The Transactions with Errors at NFC page
displays.

260
Figure 112: Transactions with Errors at NFC Page
NOTE: Clicking “Edit” takes you to the document to edit the error. Clicking
“Delete Error Message” deletes the error.
Step Action
6. Click View Errors. The Error Message Detail page displays.
Figure 113: Error Message Detail Page
The error message, Figure 113: Error Message Detail Page, indicates that the
Individual Position 90424107 is in suspense because it already exists.
NOTE: Click Back to go back to the Error Message Detail page or click
Next in List to view the next document in error.

261
Next, you will research PAR error messages. Follow the steps below to view the PAR
error messages.
Step Action
1. Select HR Reports from the Menu Group.
2. Select PAR Error Messages from the HR Reports Menu Options. The PAR
Error Messages Report page displays.
Figure 114: PAR Error Message Page
Step Action
3. Click the item to be researched. The Transaction with Errors at NFC page
displays.

262
Figure 115: Transaction with Errors at NFC Page
Step Action
4. Click View Errors. The NFC Error Messages page displays.
Figure 116: NFC Error Messages Page
This example shows that Document type 063 for EmpID 203144 is in error with an
invalid retirement coverage code.
Step Action
5. Click Next in List to see the error message on the next PAR error in the
report.

263
Figure 117: NFC Error Messages Detail Page
This example shows that Document type 063 for EmpID 203145 is in error with three
error messages.
The last report covered in this lesson is the Payroll error message report. Follow the
steps below to view the Payroll error message report.
Step Action
1. Select HR Reports from the Menu Group.
2. Select PRES Error Messages from the HR Reports Menu Options. The Pres
Error Messages Report page displays.

264
Figure 118: PRES Error Messages Page
Step Action
3. Click the item to be researched. The NFC Error Message Detail page
displays.
Figure 119: NFC Error Messages DetailPage
Figure 119: NFC Error Messages DetailPage, EmplID193539 is in suspense for State
Tax purposes, as stated.

265

266
8.4. Correct Applied Action
Lesson Overview
This lesson describes how the correct applied action component allows users to correct
any applied action in the current processing pay period.
Lesson Objectives
By the end of this lesson, you will be able to:
Correct an applied action
When an action applies in PPS, the data on the action is reflected on the applicable
IRIS program and is used to pay employees for the current processing pay period. After
the PAYE and BEAR processes are completed, the current actions are moved to history
and are reflected in the applicable IRIS 500 screens. Actions that have been processed
in this pay period, even if effective dated for a prior pay period, can be corrected in
EmpowHR as long as the PAYE process has not run.
IMPORTANT: Only the fields applicable to the applied NOA can be
modified.
To correct an applied action, follow the below steps:
Step Action
1. Select PAR Processing from the Menu Group.
2. Select Correct Applied Action from the PAR Processing Menu Options.

267
Figure 120: Correct Personnel Action USF
Step Action
3. Enter the EmplID in the EmpIID field.

268
4. Click Search. The Correct Applied Action page displays.
Figure 121: Correct Applied Action Page
Step Action
5. Click OK.
6. Make the necessary corrections on the PAR.
7. Click Save. The applied action has been corrected in the system.

269
8.5. Rollback
Lesson Overview
This lesson describes how to initiate a rollback on an applied action in the current pay
period.
Lesson Objectives
By the end of this lesson, you will be able to:
Initiate a rollback
To delete a current applied action, the action must be removed from PPS prior to the
running of PAYE; this process is known as a rollback.
A Rollback also removes the payroll documents that apply after the personnel action
applied. When the process is complete, these actions are no longer displayed on the
IRIS screens.
A Single action or actions contained in a history correction package that applied in the
current processing pay period, may be rolled back two different ways.
System-generated - Occurs automatically when a personnel action applies to
the database for an employee and another personnel action with an earlier
effective date processes in a later PINE pass during the same processing pay
period and prior to the processing of PAYE.
User-generated - Occurs if the employee’s salary for that pay period has not
been computed by PAYE. If the employee has been paid, the rollback feature is
not available.
Rollback actions are reflected on the Worklist as Not Applied actions. After data is
changed on the current action or the action is deleted, the action(s) is released for
export to PPS. The actions are displayed on the Worklist as Applied or Not Applied
suspense actions. The actions must apply in PPS to be considered official.

270
To initiate a rollback, follow the below steps:
Figure 122: HR Processing USF Page
Step Action
1. Select PAR Processing from the Menu Group.
2. Select HR Processing from the PAR Processing Menu Option. The HR
Processing USF page displays.

271
Figure 123: HR Processing Page - Data Control Tab
Step Action
3. Enter the EmplID in the EmplID field.
4. Click Correct History box.
5. Click Search. The Data Control page displays.
Step Action
6. Click Rollback Indicator box.
7. Click Save. The Transaction Status displays NFC Ready.

272
The next day, the action displays on the Worklist as Not Applied. If the action is not
corrected or deleted, it remains on the Worklist
Now that you have learned about suspense transactions, error message reports,
correcting applied actions, and rollbacks, let’s practice some of the action in the
subsequent exercises.
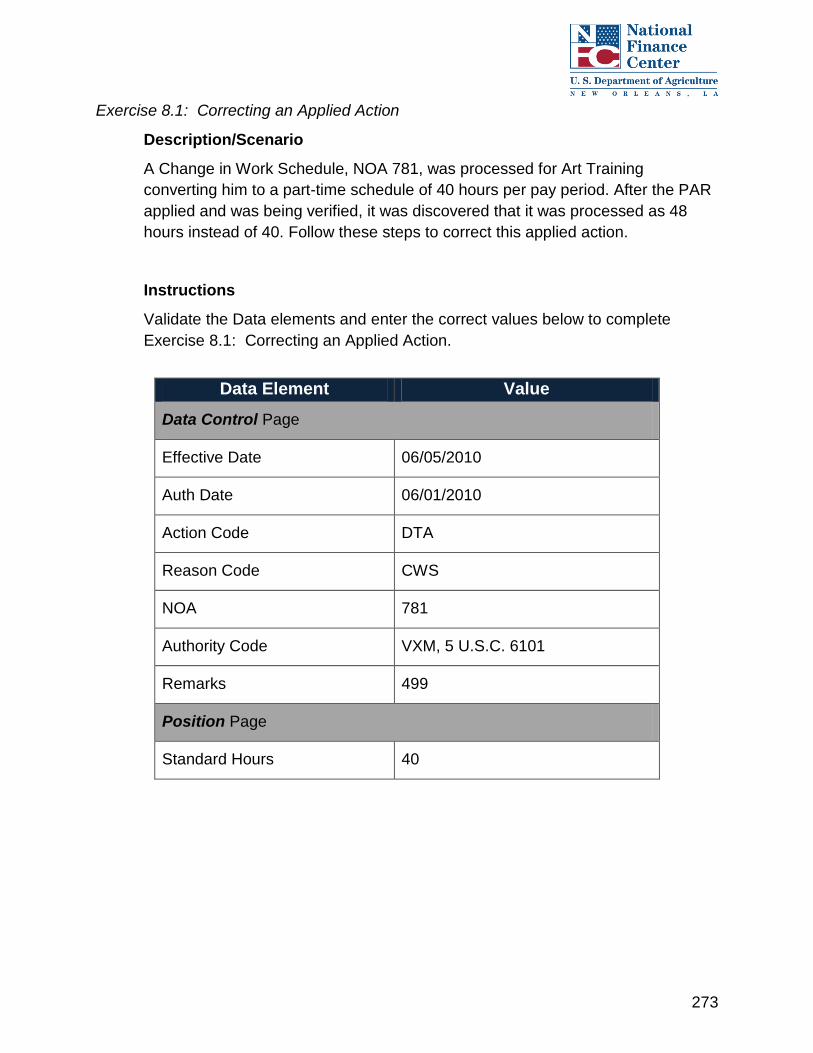
273
Exercise 8.1: Correcting an Applied Action
Description/Scenario
A Change in Work Schedule, NOA 781, was processed for Art Training
converting him to a part-time schedule of 40 hours per pay period. After the PAR
applied and was being verified, it was discovered that it was processed as 48
hours instead of 40. Follow these steps to correct this applied action.
Instructions
Validate the Data elements and enter the correct values below to complete
Exercise 8.1: Correcting an Applied Action.
Data Element Value
Data Control Page
Effective Date 06/05/2010
Auth Date 06/01/2010
Action Code DTA
Reason Code CWS
NOA 781
Authority Code VXM, 5 U.S.C. 6101
Remarks 499
Position Page
Standard Hours 40

274
8.6. Chapter Review
Knowledge Check
1. What is the name of the subsystem that edits every PAR and payroll document
entered in EmpowHR?
A. PINE
B. BEAR
C. PAYE
2. When a PAR goes into suspense and the data is valid, what can you use to bypass
the edit that caused the action to go into suspense?
3. True or False: When correcting an applied action, only the fields applicable to the
applied nature of action can be modified.
4. Which statement below is a rollback (R) and which one is correct applied action (C)?
Write the appropriate letter next to the correct statement.
You entered an action on the wrong employee.
You entered an action with the wrong effective date.

275
5. Which of the following statements is NOT true regarding rollbacks?
A. A rollback would be necessary to add a newly required action you failed to add
before the package applied.
B. A rollback would be necessary if a history correction package was processed in
error or processed incorrectly.
C. PINE recognizes the rollback and reviews all actions for editing purposes.
D. A rollback would be necessary to make a correction to a processed action for the
current pay period.
.
Chapter Summary
Having completed this chapter, you are now able to:
View and correct suspense errors
Review override codes
Review error message reports
Correct an applied action
Perform a rollback

276
9.0. History Override
9.1. Chapter Overview
This chapter focuses on how the history override component functions within
EmpowHR.
Chapter Objectives
By the end of this chapter, you will be able to:
Describe the history override function
Process history override packages
Process the rollback of a history override package
As discussed in Chapter 8, actions processed in the current pay period in EmpowHR
are viewable on the IRIS history screens (IRIS 500 screens). For this lesson IRIS 525 is
used, when applicable, to review historical actions.
277
9.2. History Override Function
Lesson Overview
This lesson focuses on the history override function’s purpose and how to identify
actions that require its use.
Lesson Objectives
By the end of this lesson, you will be able to:
Describe the history override component
Describe the significance of corrective actions within the NFC processing
systems
Describe why historical research is necessary to successfully process corrective
actions (IRIS/PERHIS)
Identify when a history override is needed
Identify the actions on which you can perform a history override
The history override component within EmpowHR is used to correct, cancel or insert
historical overrides.
Historical actions are those which were previously processed and have updated to the
IRIS PERHIS database (IRIS 500 screens). The history override component of
EmpowHR is designed for correcting personnel history data. It also allows for the entry
of late or new actions that must be inserted among actions residing in history. It
simplifies the processing of:
Official correction actions (the starting NOAC is 002)
Official cancellation actions (the starting NOAC is 001)
New actions (required because of an official cancellation or late processing)
History override packages should be started as early as possible in the processing cycle
of the pay period. Before starting a history override package, research IRIS and
EmpowHR for any document that may have applied in the current processing cycle.
These documents could include agency generated as well as system generated
documents. NFC recommends history override packages not be established in Pay
Period 01, and that any outstanding history override packages initiated prior to Pay
Period 01 be deleted, in case there is a BEAR generated action.

278
History override enables you to process corrections to an employee’s personnel history
according to OPM instructions and, at the same time, furnish PPS with the information it
needs to validate the new history record created and to make up to 25 pay periods of
retroactive payroll adjustments.
You specify what the Starting Action (earliest action) is, and the system automatically
identifies subsequent actions which reflect the database at the historical point in time
you have chosen. The entire group of actions makes up a history override package.
You can insert newly required actions in the package.
All cancellation, correction, insertion and replacement actions are edited by PINE and
applied to the database as an inseparable group. Therefore, the entire package must
pass the PINE edits before any of the actions apply.
NFC Processing
When you process any personnel action using PPS, you are doing much more than
updating a database with information that is used to generate an SF-50 "Notification of
Personnel Action" and sending required information to the Office of Personnel
Management (OPM).
You are updating a database with information used by the automated system to
compute an employee's biweekly pay and update retirement records maintained at
NFC. Changing an employee's personnel history often means that you are changing
information which affects how an employee's pay should have been calculated for the
period being corrected. Therefore, it affects all for payroll and benefits (retirement,
health, life, etc.) information.
IMPORTANT: When updating history records, it is important to keep NFC
processing in mind because you may be affecting data from other
systems.
To assure the pay and retirement records are updated, the building of a completely new
personnel history is required by the PPS in almost all cases such as:
The reprocessing of cancelled actions as replacement actions in chronological
order allows PINE to edit each document for validity against the employee’s
database record as updated by the previous action
The ADJP within PAYE interfaces with both the old and the new history to
automatically recalculate an employee's pay
When you process retroactive personnel actions, ADJP automatically uses this new
history along with T&A records stored on the database to recalculate the employee's

279
pay for up to the previous 25 pay periods. The old personnel history remains on the
database so ADJP can use it to re-compute what the employee was originally paid for
the periods involved. This recalculation of pay based on late personnel actions is
referred to as the “revalidation” process.
IRIS/PERHIS
We previously discussed IRIS in Chapter 3. In this section and Appendix E, we discuss
the importance of performing research within IRIS prior to making a correction to an
employee's personnel history. This step is necessary for three basic reasons:
Identifying personnel actions in history
Reviewing information on each of the actions
Verifying the PERHIS Personnel History Database (IR525) agrees with the
History Correction List Window in History Override (What PERHIS records
contain)
The correction of personnel history builds two distinct types of history records in IRIS:
Transaction History (IRIS 200-series and certain 300-series programs) which is
used by TIME) in the re-editing of historical T&A’s based on retroactive personnel
actions and by ADJP in recalculating biweekly pay based on the same actions
PERHIS (IRIS 500-series programs) records which are used to produce
cancellation and replacement actions for the purpose of correcting personnel
history
Transaction history maintains at least five years of records of actions processed:
cancellations, corrections, and replacement actions.
The PERHIS Menu (IRIS 500s) contains the names of all the screens used to store a
record of the current version of an employee's personnel history.
History incorporates all changes made to personnel history as though they were the
original actions. Once the changes have applied to the database, the history records
look the way they would have looked if all personnel actions had been processed
correctly from the beginning. Officially cancelled actions are removed. If officially
corrected, original actions are removed and replaced with the corrected action.

280
Some PERHIS programs are updated by adding a history record each time a personnel
action is processed regardless of whether the data they contain is changed by the
action or not.
Additional IRIS/PERHIS data is explained in Appendix E.
Initial Identification for a Historical Override
When processing history override actions, EmpowHR reviews the employee’s historical
record as a “package”; correcting one historical action may affect the subsequent
historical records. The first action on which a correction or change is made is referred to
as the starting action. The subsequent actions are referred to as intervening action. You
may have one or more intervening actions.
During a history override all starting and intervening actions are processed through
PINE as a single package. When a history override package is saved, EmpowHR
performs front-end edits that validate data entered in each field. After all data is entered
and released, the information is exported to PINE for additional editing. If one action in
the history package fails the edits, all actions in the history package remain in suspense
until the erroneous action is corrected.
NOTE: Refer to Chapter 8, Suspense, for how to correct an action in
suspense.
ADJP automatically adjusts an employee’s pay record for retroactive actions effective
within the last 25 pay periods. The system automatically disburses or collects, in
accordance with the Debit Collection Act, if a correction or cancellation action is
processed that affects the employee’s:
Salary data
Retirement coverage
Cost of living allowance
Post differential
Quarters deductions rate
281
Exception Actions
A history override for an exception action is processed slightly different than all other
history overrides. An exception action is processed at any time without regard to
effective dates. The exception action to be corrected or cancelled is the starting action
and there are no intervening actions; the package only contains one action, the
exception action.
No exception action can be inserted in a history override package. Only certain
exception actions can be corrected or cancelled.
The following Nature of Actions (NOACs) can be corrected through history override:
846 Individual Time Off Award (AWD, AWH, NFC)
847 Group Time Off Award (AWD, AWH, NFC)
The following NOACs can be cancelled through history override:
815 Recruitment Bonus (BON,
NFC, AWD)
816 Relocation Bonus (BON,
NFC, AWD)
825 Separation Incentive (AWD,
BON, NFC)
840 Individual Cash Award RB
(AWD, NFC)
841 Group Cash Award (AWD,
NFC)
842 Individual
Suggestion/Invention Award
(AWD, NFC, AWH)
843 Group Suggestion/Invention
Award (AWD, NFC, AWH)
844 Foreign Language Award
(AWD, NFC)
845 Travel Savings Incentive
Award (AWD, NFC)
846 Individual Time Off Award
(AWD, AWH, NFC)
847 Group Time Off Award
(AWD, AWH, NFC)
848 Applicant Referral Award
(AWD, NFC)
849 Individual Cash Award NRB
(AWD, NFC)
878 Presidential Rank Award
(NFC, AWD)
879 SES Performance Award
(NFC, AWD)
889 Lump Sum Perform Pay (RB-
ILP) (AWD, NFC)
886 Lump Sum Perform Pay (RB-
NIL) (AWD, NFC)
887 Lump Sum Perform Pay
(NRB) (AWD, NFC)
889 Group Award Other (AWD,
NFC, PAY)

282
970 Foreign Language Bonus
(AWD, BON, NFC)
972 Applicant Referral (IRS Only)
(NFC)
973 Lump Sum Retention (IRS
Only) (NFC)
997 Honorary (NFC, AWH, AWD)
The following NOACs are inactive (unable to be edited) exception actions that cannot
be corrected or cancelled in history override:
872 Time Off Award (AWH, NFC)
874 Gainsharing Award (NFC, AWD, AWH)
875 Suggestion Award (AWD, NFC, AWH)
876 Invention Award (NFC, AWD, AWH)
877 Special Act or Service Award (AWD, NFC, AWH)
907 Mainstream Employee (NFC)
922 - 924 Details (NFC, DET, REH, EXT, TDL, EDT)
978 Mass Change Detail (effective PP20 of 2010) (NFC, MSC, XFR)
Now that you have learned about the flow of information transferred through the
components, and where the information is located in the PPS system, you need to
determine what type of historical correction is needed.
Correct an earlier action that was improper, or that contains remarks or other
information that is inappropriate or erroneous and should not have been
documented. Insert actions that were not processed prior to PAYE running.
Cancel/rescind an earlier action that was:
o Improper
o Proper but contains references to an improper action, or
o Contains remarks that are inappropriate or erroneous and should not have
been documented
Insert a personnel action into history that was missing from history or newly
acquired action (e.g., a EEOC ruling that promotes an employee to a higher
grade at an earlier date in the employee’s career)

283
9.3. Processing a History Override Package
Lesson Overview
This lesson focuses on how to process a history override package.
Lesson Objectives
By the end of this lesson, you will be able to:
Correct a History PAR Action
Cancel a History PAR Action
Insert a History PAR Action
Initiating a History Override Package
The History Override page allows you to process an historical override on an existing
employee. The steps below allow you to access the page and process an historical
override.
To correct, cancel or insert a History PAR Action, you first need to access the History
Override Correction component within EmpowHR by following the steps below:
Step Action
1. Select PAR Processing from the Menu Group.
2. Select History Override. The Find an Existing Value page displays, as
shown in Figure 125 below.

284
Figure 124: Find an Existing Value Page
Step Action
3. Enter applicable search criteria (e.g., EmplID, SSN, first name, last name
etc.).
4. Click Search. The History Override Creation page displays.

285
Figure 125: History Override Creation Page
NOTE: Only one package can be done per pay period.
NOTE: If a history override package is being processed, you are to
receive an error message if you try to access the person’s PAR record.

286
Step Action
5. Click Yes. The History Correction page displays, as shown in Figure 127
below.
Figure 126: History Correction Page
You are now on the History Override Correction page where you can correct, cancel
or insert a historical PAR action by following the provided instructions below.
Correcting a History PAR Action
EmpowHR allows you to correct an earlier action that was improper, or that contains
remarks or other information that is inappropriate or erroneous and should not have
been documented.

287
To correct a History PAR Action you follow the steps below:
Step Action
1. Select Starting from the Package Position drop-down list on the oldest
action to be corrected. The WIP Status becomes available once you select
the Package Position.
TIP: The Package Position is automatically populated for all
intervening actions.
Figure 127: Package Position Drop-Down List
Step Action
2. Select the WIP Status applicable to the history override being processed
(e.g., CAN, COR, PRO) and each Intervening action in your package as
appropriate. If the Intervening action(s) do not need correction, leave as
PRO.

288
Figure 128: Look Up WIP Status Page
Step Action
3. For the Starting Action, select the applicable Tab, as shown in Figure 130
below, and make the corrections. For each Intervening action, make
corrections as needed.
Figure 129: Tab Options
Step Action
4. If there are no corrections needed on an Intervening action, check the
Reviewed check box on the Data Control page for these actions.
5. Return to the History Correction page and go to the History Override
Package Status drop-down list

289
6. Select Release Package.
Figure 130: History Override Package Status Page
Step Action
7. Click Save. The save confirmation message displays.
8. Click the OK button. All actions are marked as NFC Ready and go through
the nightly PINE process.

290
Canceling a History PAR Action
The history override component allows you to cancel a personnel action. A cancellation
rescinds an earlier action that was:
Improper
Proper but contains references to an improper action, or
Contains remarks that are inappropriate or erroneous and should not have been
documented
When an action is cancelled, consider the status of the position. The permanent position
of the employee must be active in PMSO. For example, if a cancelation to a separation
is processed for an employee whose job was abolished, the position the employee
returns to must be active in PMSO and EmpowHR.
Step Action
1. Select Starting from the Package Position drop-down list on the action
preceding the action or row to be cancelled. The WIP Status becomes
available.
Ensure all EmpowHR history actions match IRIS Programs IR522 and IR525 actions,
including effective and authentication dates. When the cancelled action is effective
within the last 26 pay periods, the history correction package must start with the action
preceding the cancelled action to ensure ADJP makes the appropriate adjustments.

291
Figure 131: WIP Status Look Up Page
Step Action
2. Click CAN to cancel. On each Intervening action in your package, select the
WIP Status as appropriate. If there are no corrections needed on an
Intervening action, leave as PRO.
3. Enter the appropriate authority in the Cancel Authority (1) field. The cancel
authority is the OPM authority code for the cancellation action.
Figure 132: WIP Status and Cancel Authority

292
Step Action
4. Make changes/corrections to Intervening Actions as appropriate and return to
the History Correction page.
5. Select Release Package from the History Override Package Status drop-
down list.
Figure 133: History Override Package Status Page
Step Action
6. Click Save. The save confirmation message displays.
7. Click the OK button. All actions are marked as NFC Ready.

293
Figure 134: Save Confirmation Message
Inserting a History PAR Action
The History Override component allows users to insert a personnel action into history.
The effective date of the inserted action determines the starting action. Click on the
action immediately preceding where the new action is inserted.
To Insert a History PAR Action, follow the steps below after accessing the History
Override Correction page, Figure 135: History Override Correction Page.

294
Figure 135: History Override Correction Page
Step Action
1. To insert an Action, click the (+) icon on the PAR Action. The Data Control
page displays.
2. Enter appropriate information for processing the inserted transaction and
return to the History Correction page.
3. Select Starting from the Package Position indicator drop-down list on the
Action below the inserted action.
4. On the Starting action, select WIP Status COR.
5. Select the WIP Status on each Intervening action in your package as
appropriate. If there are no corrections needed on an Intervening action,
leave as PRO.
6. If you need to cancel an action, enter the appropriate authority in the Cancel
Authority (1) field.

295
7. Make changes to Intervening Actions as appropriate, check the Reviewed
check box on the Data Control page for each Intervening Action.
Figure 136: Data Control Page
Step Action
8. Click the History Correction tab. The History Correction page displays.
9. Select Release Package from the History Override Package Status drop-
down list.
10. Click Save. The save confirmation message displays.
11. Click the OK button. All actions are marked as NFC Ready.

296
9.4. Processing the Rollback of a History Override Package
Lesson Overview
This lesson focuses on how to process the rollback of a history override package.
Lesson Objectives
By the end of this lesson, you will be able to:
Process a rollback on a history override package
Rollback on History Override Package
There are several reasons you might choose to rollback a history override package,
which is applied to the database in the current processing pay period. A rollback would
be necessary to add a newly required action you failed to add before the package
applied. Another reason to rollback an applied would be because it was processed in
error or processed incorrectly and you want to establish an entirely new package. PINE
recognizes the rollback process and reactive the entire package for editing purposes.
IMPORTANT: EmpowHR should always match what is showing on the
IRIS 525.
To rollback a history override packed, follow the steps below:
Step Action
1. Click the rollback indicator check box on the Data Control page once the
package has applied during the current pay period.
NOTE: Refer to Chapter 8, Suspense, for instructions on how to
rollback an action.

297
Exercise 9.1: Inserting Change in Work Schedule
Description/Scenario
In this exercise, insert a change in work schedule. Art Training changed to a part
time work schedule on 08/01/09. The action was never processed. Please
create a history correction package to insert the change in work schedule.
Correct the subsequent action as appropriate.
EmplID: ______
Instructions
Follow the steps in the table below to complete Exercise 9.1: Inserting a Change
in Work Schedule.
Step Action Required Data
1. Add a new row to the NOA 894 effective 01/04/09.
The inserted action is the Change in Work
Schedule.
2. From the Data Control page, enter the Effective
Date in the *Effective Date field.
08/01/2009
3. Enter the Authentication Date in the *Authentication
Date field.
08/01/2009
4. Enter the Action in the *Action field. DTA
5. Enter the reason code in the *Reason Code field. CWS
6. Enter the Nature Of Action Code in the *NOA Code
field.
781
7. Enter the Authority (1) code in the Authority (1)*
field.
VXM
8. Click PAR Remarks link.

298
9. Enter the Remarks Code in the *Remarks Code
field. Click in Row 1 to populate remark.
TIP: Click the (+) icon to add another
remark.
B43, B45, B51
10. Click OK.
11. Click the History Correction page. The History
Correction page displays.
12. Click NOA 894 effective 1/4/09 as the Starting
action. All subsequent non-exception actions are
changed to HCUP indicators Intervening.
13. Change WIP status for actions in package. Starting is COR
Inserted PAR is PRO
All subsequent action
is COR
14. Click the Position tab. The Position page displays.
15. Enter NOA 781 (Inserted PAR). NOA 781
16. Change Work Schedule on the inserted action in the
*Work Schedule field.
Part Time
17. Change Standard Hours in the *Standard Hours
field.
24.00
18. Make the same changes to all Intervening Actions.
19. Click the Compensation tab. The Compensation
page displays.
20. Click NOA 781 (Inserted PAR).
21. Enter 00800 in the *Variable FT Reg Tour of Duty
field.
008000
22. Make the same changes to all Intervening Actions.

299
23. Click the Data Control tab. The Data Control page
displays.
24. Click the Reviewed check box on all intervening
actions.
25. Click the History Correction tab. The History
Correction page displays.
26. Click the drop-down to change the HCUP Package
Status.
Release Package
27. Click Save. PAR Action(s) successfully saved and
the confirmation message displays.
28. Click OK. The Transaction Status displays NFC
Ready.
Check your work:
Verify the Transaction Status, Package position and WIP status match Figure 137:
History Override Package Status:
Figure 137: History Override Package Status

300
Exercise 9.2: Canceling WGI/Insert Denial
Description/Scenario
In this exercise, you will prepare a history override package cancelling the WGI
and Inserting a denial of within Grade increase.
Exercise 20: A WGI was generated for Dexter Training effective 03/15/09. The
step increase was actually denied and should not have been processed. Cancel
the WGI and insert a denial of the within Grade increase.
EmplID: _________
Instructions
Follow the steps in the table below to complete Exercise 9.2: Canceling
WGI/Insert Denial.
Step Action Required Data
1. From the History Correction page add a new row
to the NOA 894 effective 01/04/09.
2. From the Data Control page, enter the Effective
Date in the *Effective Date field.
03/15/2009
3. Enter the Authentication Date in the
*Authentication Date field.
03/16/2009
4. Enter the Action in the *Action field. PAY
5. Enter the Reason Code in the *Reason Code field. DWI
6. Enter the Nature Of Action Code in the *NOA Code
field.
888
7. Enter the Authority (1) in the *Authority (1) field. Q5M
8. Click PAR Remarks link. The PAR Remarks page
displays.

301
Step Action Required Data
9. Enter the Remarks Code in the *Remarks Code
field. Click in Row 1 to populate remark.
P15(generated)-enter
Step 08 - GS 12, Step
07 in the remarks
verbiage
10. Click OK.
11. Click the History Correction tab. The History
Correction page displays.
12. Click HCUP Indicator Starting for the action
immediately preceding the Inserted PAR. The
HCUP indicator on all subsequent non exception
actions is automatically changed to reflect
Intervening.
13. Change the WIP status for actions in the package to
the following Required Data.
Starting Action is COR
Inserted PAR is PRO
NOA 893 effective
3/15/09 is CAN
14. Change the WIP status for actions in the package to
the following Required Data.
Enter Auth code ATM
All subsequent actions
is COR
15. Click the Compensation tab. The Compensation
page displays.
16. Click NOA 888.
17. Enter the Step in the *Step field. 07
18. Make the same changes to all Intervening Actions
19. Click the Employment 1 tab. The Employment 1
page displays.
20. Enter the SCD WGI in the *SCD WGI field to the
Inserted PAR and all subsequent actions.
03/19/2006

302
Step Action Required Data
21. Click the Data Control tab. The Data Control page
displays.
22. Click the Reviewed check box on all appropriate
actions.
23. Click the History Correction tab. The History
Correction page displays.
24. Click the drop-down to change the HCUP Package
Status
Release Package
25. Click Save. PAR Action(s) successfully saved and
the confirmation message displays.
26. Click OK. The Transaction Status displays NFC
Ready.
Check your work:
Verify the Transaction Status, Package position and WIP status match Figure 138:
History Override Package Status:
Figure 138: History Override Package Status

303
9.5. Chapter Review
Knowledge Check
1. 846 Individual Time Off Award (AWD, AWH, NFC) and 847 Group Time Off
Award (AWD, AWH, NFC) are examples of:
A. Inactive exemptions that cannot be cancelled or corrected
B. Active exemptions that cannot be cancelled or corrected
C. NOACs that can be corrected
D. NOACs that can be cancelled
2. How are history overrides for exception actions different from all other history
overrides?
A. The exception action to be corrected or cancelled is the starting action
B. There are no intervening actions
C. The package only contain one action, the exception action
D. Only A and C
E. All of the above
3. True or False: A rollback on the history override package removes all the
payroll documents that apply after the personnel action applied.
Chapter Summary
Having completed this chapter, you are now able to:
Describe the history override function
Process history override packages
Process the rollback of a history override package

304
10.0. Course Summary
10.1. Course Accomplishments
Having completed this course, you are now able to:
Describe the EmpowHR system and how it relates to the Payroll/Personnel
System (PPS)
Navigate within EmpowHR
Process Personnel Action Requests (PARs) and Payroll Documents
Identify and correct Suspense errors
Describe and process History Overrides

305
10.2. Additional Resources
For additional resources, please refer to the following links.
Resource Type Location
EmpowHR
Publications
https://www.nfc.usda.gov/Publications/EMPOWHR/EMPOWHR_h
ome.html
EmpowHR Web
Site
https://www.empowhr.gov/
NFC Contact
Center
https://www.nfc.usda.gov/Contact_Us/Help_Desks/CHD/CHD_ho
me.html
IRIS Procedure
Manual
https://www.nfc.usda.gov/publications/IRIS/IRIS.pdf
PMSO Procedure
Manual
https://www.nfc.usda.gov/publications/PMSO/pmso.pdf
TMGT Procedure
Manual
https://www.nfc.usda.gov/publications/TMGT/TMGT.pdf
PINQ Procedure
Manual
https://www.nfc.usda.gov/publications/PINQ/PINQ.pdf
Processing Tips
for Payroll
Documents
https://train.nfc.usda.gov/odstrack/Content/EmpowHR%209.0/dat
a/toc.html
EmpowHR Data
Dictionary
https://www.nfc.usda.gov/Publications/EMPOWHR/EMPOWHR_h
ome.html#edd
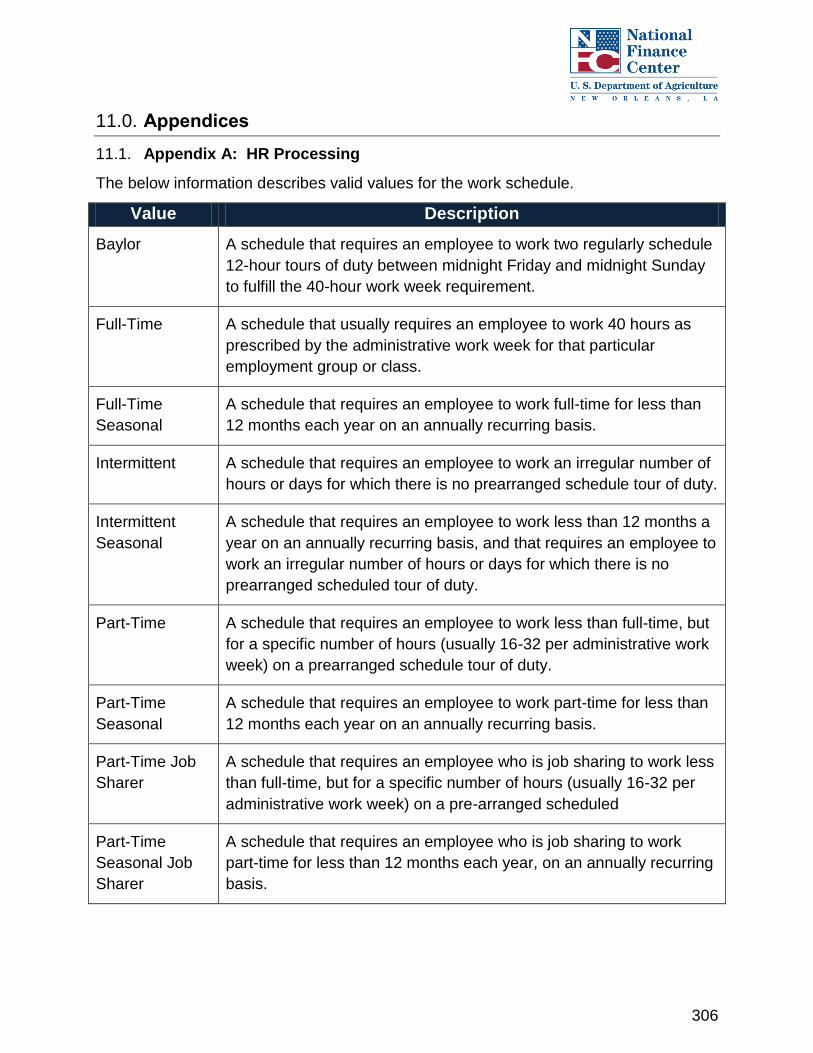
306
11.0. Appendices
11.1. Appendix A: HR Processing
The below information describes valid values for the work schedule.
Value Description
Baylor A schedule that requires an employee to work two regularly schedule
12-hour tours of duty between midnight Friday and midnight Sunday
to fulfill the 40-hour work week requirement.
Full-Time A schedule that usually requires an employee to work 40 hours as
prescribed by the administrative work week for that particular
employment group or class.
Full-Time
Seasonal
A schedule that requires an employee to work full-time for less than
12 months each year on an annually recurring basis.
Intermittent A schedule that requires an employee to work an irregular number of
hours or days for which there is no prearranged schedule tour of duty.
Intermittent
Seasonal
A schedule that requires an employee to work less than 12 months a
year on an annually recurring basis, and that requires an employee to
work an irregular number of hours or days for which there is no
prearranged scheduled tour of duty.
Part-Time A schedule that requires an employee to work less than full-time, but
for a specific number of hours (usually 16-32 per administrative work
week) on a prearranged schedule tour of duty.
Part-Time
Seasonal
A schedule that requires an employee to work part-time for less than
12 months each year on an annually recurring basis.
Part-Time Job
Sharer
A schedule that requires an employee who is job sharing to work less
than full-time, but for a specific number of hours (usually 16-32 per
administrative work week) on a pre-arranged scheduled
Part-Time
Seasonal Job
Sharer
A schedule that requires an employee who is job sharing to work
part-time for less than 12 months each year, on an annually recurring
basis.
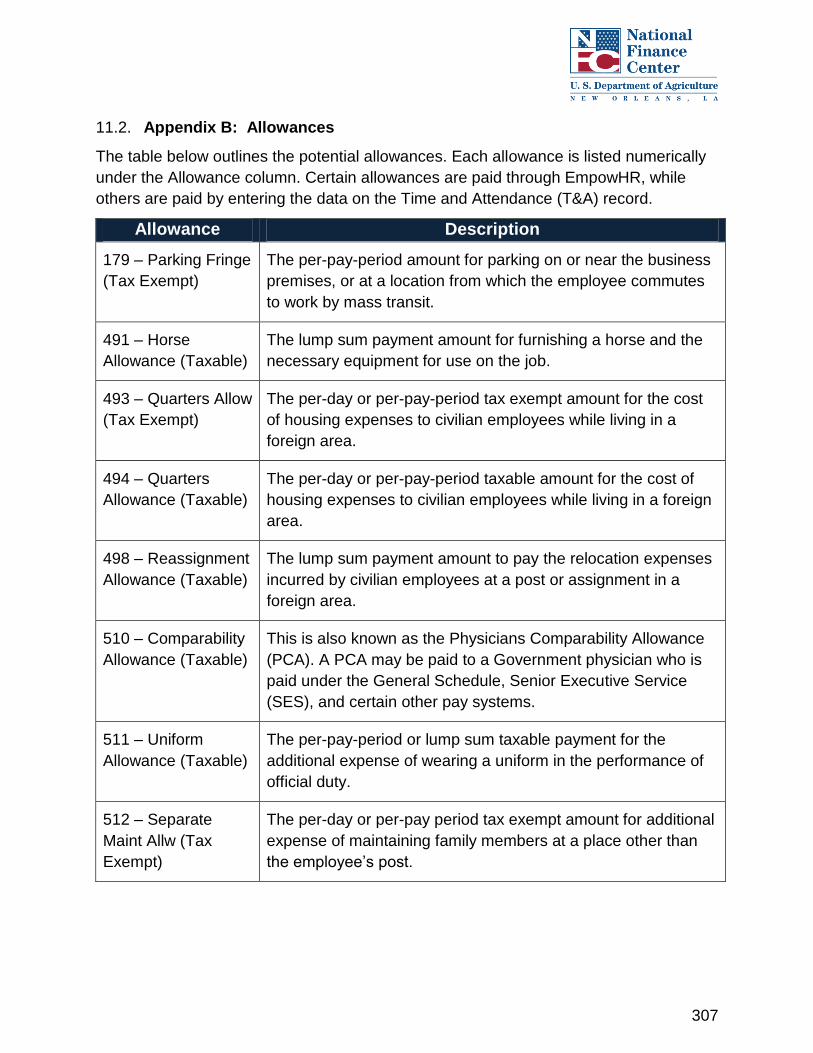
307
11.2. Appendix B: Allowances
The table below outlines the potential allowances. Each allowance is listed numerically
under the Allowance column. Certain allowances are paid through EmpowHR, while
others are paid by entering the data on the Time and Attendance (T&A) record.
Allowance Description
179 – Parking Fringe
(Tax Exempt)
The per-pay-period amount for parking on or near the business
premises, or at a location from which the employee commutes
to work by mass transit.
491 – Horse
Allowance (Taxable)
The lump sum payment amount for furnishing a horse and the
necessary equipment for use on the job.
493 – Quarters Allow
(Tax Exempt)
The per-day or per-pay-period tax exempt amount for the cost
of housing expenses to civilian employees while living in a
foreign area.
494 – Quarters
Allowance (Taxable)
The per-day or per-pay-period taxable amount for the cost of
housing expenses to civilian employees while living in a foreign
area.
498 – Reassignment
Allowance (Taxable)
The lump sum payment amount to pay the relocation expenses
incurred by civilian employees at a post or assignment in a
foreign area.
510 – Comparability
Allowance (Taxable)
This is also known as the Physicians Comparability Allowance
(PCA). A PCA may be paid to a Government physician who is
paid under the General Schedule, Senior Executive Service
(SES), and certain other pay systems.
511 – Uniform
Allowance (Taxable)
The per-pay-period or lump sum taxable payment for the
additional expense of wearing a uniform in the performance of
official duty.
512 – Separate
Maint Allw (Tax
Exempt)
The per-day or per-pay period tax exempt amount for additional
expense of maintaining family members at a place other than
the employee’s post.

308
Allowance Description
513 – Separate
Maint Allw (Taxable)
The per-day or per-pay period taxable amount for additional
expense of maintaining family members at a place other than
the employee’s post.
514 – Post
Allowance (Tax
Exempt)
The per-pay period amount for assignment to a foreign post
where the foreign cost of living is significantly higher than in
Washington, DC.
515 – Education
Allowance (Tax
Exempt)
The per-pay period or lump-sum payment amount to provide
adequate elementary and secondary education for an
employee’s children while serving in a foreign area.
516 – Foreign
Language Allowance
(Taxable)
The percentage of basic pay that is paid each pay period for
employees in foreign service positions to acquire and/or
maintain proficiently in foreign languages used at overseas
posts.
517 – Recruit
Incentive Allow
(Taxable)
The lump sum payment amount for recording cash payments
offered to selectees.
518 – Uniform Allow
(Tax Exempt)
The per-pay-period or lump-sum tax exempt payment amount
for additional expenses of wearing a uniform by regulation or
statute in the performance of official duty.
523 – Hazardous
Duty Allow (Tax)
The per-pay-period amount for hazardous duty for U.S. Capitol
Police only.
524 – Prof Liability
Ins (Tax Exempt)
A per annum reimbursement that allows Federal Agencies to
reimburse their management officials, supervisors, and law
enforcement officers for up to one-half of the cost of their
Professional Liability Insurance. This amount is tax exempt.
525 – Transit
Benefits (Tax
Exempt)
The per-pay-period amount of transit or eligible van pools.
526 – Parking
Benefits
The per-pay-period amount for employee parking. The
employee is taxed on the cash value for parking in excess of
$230 per month.

309
Allowance Description
534 – Gym/Fitness
Reimbursement
The per-pay-period amount for the employee’s gym
membership. The amount is up to $40 quarterly with the entire
amount being paid in the current pay period. The totally amount
is entered in the Allowance Rate field. This allowance is taxable
and is displayed on the employee’s Internal Revenue Service
(IRS) Form W-2, Wage and Tax Statement.

310
11.3. Appendix C: Master File Change
The table below outlines the different types of fields that can be updated within the Data
Element section. To view each of the below fields, click on the magnifying glass next to
the Field to be Updated field.
Field Description
Appnt-NOA/1st-Auth/2nd-Auth
D00056
Used to correct the current appointing authority code
on the original personnel action.
IRIS Program IR123, Personnel Supplements
CSRS-Prev-Cov-Ind
D00057
Indicates if an employee has, at the time of the most
recent appointment to the Federal service, previously
been covered by CSRS.
IRIS Program IR117, Retirement Data
Citizenship Country Code
D00087
The employee’s country of citizenship.
IRIS Program IR119, Employee Personnel
Data
City Tax YTD
D00067
The monetary amount of YTD city tax deduction for
the current taxing authority. City tax record must exist
on IR106.
IRIS Program IR106, City Tax
Correspondence Country
Code
D00093
International Country Code as defined by the United
States Postal Service.
IRIS Program IR119, Employee Personnel
Data
Correspondence Region
DS00092
Region, Province, or other first administrative district
of division of a country other than the U.S. for the
organization or person address.
IRIS Program IR119, Employee Personnel
Data

311
Field Description
County Tax YTD
D00066
The monetary amount of YTD county tax deduction
for the current taxing authority. County tax record
must exist on IR107.
IRIS Program IR107, County Tax
Critical Element Indicator
D00044
Indicates if the performance appraisal is used to
control the granting of WRI.
IRIS Program IR303, WGI Information
Cum-Retire-Deducts-Conv
D00005
The monetary amount of retirement deductions an
employee had prior to being payrolled by PPS
IRIS Program IR117, Retirement Data
Date Appointment Effective
D00072
Miscellaneous database elements that are not
entered on a personnel action or payroll document
but may affect pay and personnel eligibilities of an
employee.
IRIS Program IR102, Dates & Misc Sal/Pers
Data
Date CBPO Retirement SCD
D00074
For use by DHS.
Earnings Limitations YTD
D00068
Amount of compensation a non-executive level or
SES has received to date up to the FEPCA imposed
limit. Includes the employee’s base salary, awards,
allowances, differentials, bonuses, or other similar
payments.
IRIS Program IR102, Dates & Misc Sal/Pers
Data
ERI-Ethnicity-Race-Indicator
D00077
Used to update ERI data for employees hired prior to
January 1, 2006. The data is moved to history when
the next personnel action is processed.
IRIS Program 301, Disability/RNO/ERI Data

312
Field Description
FEGLI Assignment Indicator
D00086
Indicates an employee has completed or has an RI-
76-10 Assignment Form on file.
IRIS Program IR116, Life Insurance
FEGLI Court Order
D00081
Indicates that an employee has a court order for
FEGLI purposes per 5 CFR 870.801 on file.
IRIS Program IR116, Life Insurance
FEHB Part Time Coverage
Code
D00052
Identifies the portion of FEHB paid by the employee.
IRIS Program IR115, Health Benefits
FERS Previous Coverage
Indicator
D00073
Indicates if an employee has, at the time of the most
recent appointment to the Federal service, previously
been covered by FERS.
IRIS Program IR117, Retirement Data
FEHB Date Effective
D00078
Indicates the starting date of a Federal employee’s
health benefits plan.
IRIS Program IR115, Health Benefits
Hospital Insurance Tax
Deduction YTD
D00049
Amount of YTD Medicare deductions.
IRIS Program IR103, Salary YTD Data
Hospital Insurance Tax
Wages YTD
D00048
Amount of YTD Medicare wages.
IRIS Program IR103, Salary YTD Data
Intermittent Days Worked
Calendar Year SCD
D000017
Number of days worked while on an intermittent work
schedule during the calendar year appointment.
IRIS Program IR129, Intermittent
Intermittent Days Worked
Last WGI
D00014
Number of days worked while on an intermittent work
schedule since the last WGI.
IRIS Program IR129, Intermittent

313
Field Description
Intermittent Days Worked
Probation Period
D00023
Number of days worked while on an intermittent work
schedule for an appointment that was subject to one
year of probation or trial period.
IRIS Program IR129, Intermittent
Intermittent Days Worked
This Appointment
D00015
Number of intermittent days worked during the
current appointment.
IRIS Program IR129, Intermittent
Intermittent Days Worked
While On Rolls
D00021
Number of intermittent days worked while employed
by the Agency.
IRIS Program IR129, Intermittent
Intermittent Elapse Calendar
Days Career Tenure
D00020
Number of intermittent elapsed calendar days
towards conversion to career tenure.
IRIS Program IR129, Intermittent
Intermittent Elapse Calendar
Days Probation
D00022
Number of calendar days that have elapsed during an
intermittent work schedule for an appointment that is
subject to one year probationary or trial period.
IRIS Program IR129, Intermittent
Intermittent Elapse Calendar
Days Probation SCD
D00018
Number of intermittent elapsed calendar days toward
the service computation date for leave, retirement,
RIF, and TSP.
IRIS Program IR129, Intermittent
Intermittent Elapse Days
Worked WGI
D00019
Number of calendar days that have elapsed while
serving an intermittent work schedule and in a waiting
period for a WGI.
IRIS Program IR129, Intermittent
Intermittent Hours Worked
Leave Retirement RIF
D00061
Number of calendar days worked that counts towards
leave, retirement and RIF.
IRIS Program IR129, Intermittent

314
Field Description
Intermittent Paid Days to
Career Tenure
D00016
Number of paid intermittent days of creditable service
towards career tenure.
IRIS Program IR129, Intermittent
Mil-Cred-Svc-No-Das
D00098
Number of days of military service that count towards
leave accrual.
IRIS Program IR119, Employee Personnel
Data
Mil-Cred-Svc-No-Mos
D00097
Number of months of military service that count
towards leave accrual.
IRIS Program IR119, Employee Personnel
Data
Mil-Cred-Svc-No-Yrs
D00096
Number of years of military service that count towards
leave accrual.
IRIS Program IR119, Employee Personnel
Data
Military-Lost-Days
D00094
Number of days the military has determined are not
creditable in a service period.
IRIS Program IR119, Employee Personnel
Data
No-Pay-Due-Indicator
D00042
Used to indicate employees who are active on the
database but are not scheduled to be paid.
EmpowHR only
OASDI Deductions YTD
D00012
Amount of YTD Social Security deductions.
IRIS Program IR103, Salary YTD Data
OASDI Wages YTD
D00013
Amount of YTD Social Security wages.
IRIS Program IR103, Salary YTD Data

315
Field Description
Overpayment Carryover YTD
D00070
Amount an employee earned that is not payable in
the current calendar year because it exceeds the
annual earnings limitation imposed by FEPCA.
Amount carries over to the next year so payment can
be made to the employee in the first pay period in the
calendar year.
IRIS Program IR103, Salary YTD Data
Pay-Adjp-PP-Elapsed-Ctr
D00059
Department of Commerce use only.
Perf-Evaluation-Pay-Period
D00046
Pay period In which the performance evaluation is
prepared.
IRIS Program IR123, Personnel Supplements
Perf-Evaluation-Rating Code
D00045
Employee’s performance evaluation rating for the
current rating period.
IRIS Program IR304, Performance Evaluation
Data
Per-Evaluation-Year
D00047
Year in which the performance evaluation is
prepared.
IRIS Program IR123, Personnel Supplements
Perf-Penalty-Status
D00058
Department of Commerce use only.
IRIS Program IR123, Personnel Supplements
Premium-Pay-YTD
D00069
Amount of premium pay the employee has received
YTD.
IRIS Program IR103, Salary YTD Data
Rt-YTD-RED-Earning
D00062
Amount of YTD retirement earnings.
IRIS Program IR117, Retirement Data

316
Field Description
Separation Final TA Rcvd
D00024
Indicates the final T&A has been processed for an
employee in a separated status.
IRIS Program IR132, Separation Information
Svc-Obligation-type-CD1
D00088
Reason for employee’s service obligation.
IRIS Program IR119, Employee Personnel
Data
Svc-Obligation-type-CD2
D00089
Reason for employee’s service obligation. Used to
supplement if there is more than one CD obligation.
IRIS Program IR119, Employee Personnel
Data
Svc-Obligation-type-CD3
D00090
Reason for employee’s service obligation. Used to
supplement if there is more than two CD obligations.
IRIS Program IR119, Employee Personnel
Data
Svc-Obligation-type-CD4
D00091
Reason for employee’s service obligation. Used to
supplement if there is more than three CD
obligations.
IRIS Program IR119, Employee Personnel
Data
TS Deduction YTD- Def
D00063
Deferred amount of TSP for the calendar year.
IRIS Program IR118, Thrift Savings Data
TS-YTD-Thrift-Earnings
D00064
YTD earnings for an employee
IRIS Program IR118, Thrift Savings Data
TSP-Deduction-YTD-Def-
Catch-Up
D00075
Amount of YTD TSP Catch-up deductions.
IRIS Program IR118, Thrift Savings Data

317
Field Description
TSP-Deduct-YTD-Def-Plan-
Spcfc
D00076
Amount of YTD TSP plan specific contributions.
IRIS Program IR118, Thrift Savings Data
WGI-Due-Indicator
D00041
Used to update the database so that the WGI can or
cannot be processed depending on special
circumstances.
IRIS Program IR123, Personnel Supplements

318

319
11.4. Appendix D: History Override
This additional information is provided about the History Override function and explains
processing considerations associated with correcting an employee’s historical personnel
record.
What OPM Has to Say about Correcting Personnel History
Chapter 32 “Interim Relief Actions, Corrections, Cancellations, and Replacement
Actions for Cancellations” of the Office of Personnel Management's (OPM) Guide to
Processing Personnel Actions gives instructions for preparing the SF-52 “Request for
Personnel Action” for new actions, for correcting or cancelling previously issued
actions and for replacing cancelled actions. These types of actions are used to
correct an employee's personnel history.
Instructions in Chapter 32 suggest two types of correction scenarios:
Situations in which personnel history can be corrected just by inserting,
correcting, or cancelling a single retroactive action.
Situations in which a late personnel action requires the insertion, correction, or
cancellation and replacement of one or more subsequent actions.
OPM requires that only invalid actions be officially cancelled. Some actions are invalid
because they were improper (they never should have been processed); some are
invalid only because they contain references to improper actions or contain remarks that
are inappropriate or erroneous. Invalid actions which are officially cancelled may or may
not be replaced. Actions which are valid but are incorrect should be officially corrected.
History Override permits you to correct actions that should be officially cancelled and
replaced. It permits you to officially cancel and replace actions that should only be
officially corrected. The system or the information included in this participant guide
does not tell you when, according to OPM, an action should be corrected or tell you
when an action should be cancelled and replaced with another action. Responsible
personnel in your office must make those decisions. This guide tells you how to use the
History Override application to change an employee's personnel history in the USDA
Payroll/Personnel System (PPS).
When History is Updated
The PERHIS Menu (IRIS 500s) contains the names of all the screens used to store a
record of the current version of an employee's personnel history.

320
How History Records are Organized in IRIS
IR525 is a listing of all personnel actions for which there are history records. Each
personnel action listed has several counterparts or “extensions” among other IRIS 500
programs. For every action on IR525, there is a corresponding IR501, IR502, IR516,
IR517, IR522, IR523, IR527, IR528, and IR547. Together, the extensions make up a
complete personnel history record on an employee for each action processed. IR525
should serve as the first point of reference for locating the personnel actions that make
up an employee’s personnel history.
IR525 lists personnel actions with the most recent action shown at the top. The list can
be one or more pages long.
When PERHIS programs are more than one page in length, the message “INQUIRY
COMPLETE – PRESS F8 FOR MORE RECORDS” displays at the bottom of the
screen.
Each line of data gives you the following information as you read from left to right:
PF select allows you to toggle to associated history records
Pay period and year the personnel action was processed
Effective date of the personnel action
NOAC and authority code of the personnel action
Employing agency and POI as of the effective date of the personnel action
USER-ID of the person who initiated the action or the designation of the
subsystem that generated it for actions after 01/94
While IR525 gives you your first indication of what an employee’s personnel history
looks like, it does not give all the information needed to really understand how that
history is organized. To understand how records are organized you must understand
and distinguish between two similar terms used on other history programs:
PERHIS RCD
RECORD
A PERHIS RCD is a grouping of history records created by personnel actions when an
employee is under a single Organizational Structure Code and Personnel Office
Identifier (POI). Each time a personnel action changes an employee’s Organizational
Structure Code or POI, a new PERHIS RCD is created. The PERHIS RCD created by

321
the most recent change in Organizational Structure Code or POI is designated as
PERHIS RCD 0001. If a PERHIS RCD 0001 already exists at the time the new PERHIS
RCD is created, the new PERHIS RCD becomes number 0001 and the former PERHIS
RCD 0001 becomes PERHIS RCD 0002. All subsequent personnel actions are part of
the new PERHIS RCD until another personnel action changes the employee’s
Organizational Structure Code or POI. This renumbering of PERHIS RCDs continues
each time a personnel action applies changing the employee’s Organizational Structure
or POI so that the more recent record is the lower PERHIS RCD number. The PERHIS
RCD number is located in the upper right-hand corner of each PERHIS screen except
for IR525.
Each record within a PERHIS RCD is created by a personnel action and is assigned a
RECORD number. The last personnel action to update a PERHIS RCD is always
assigned RECORD 0001. As the next action updating the PERHIS RCD is applied, the
previous RECORD 0001 becomes RECORD 0002 so that the more recent the record,
the lower the RECORD number. The RECORD number is located in the center of the
upper portion of the screen.
While the terms PERHIS RCD and RECORD do not appear on IR525, referring to this
screen is very helpful in illustrating the concepts just explained. We have added a few
elements to the IR525 screen below to help make the explanation clearer. First, the
screen has been elongated to show additional actions which would normally be shown
on the second page. The numbers shown in bold on the left side of the screen image
below do not appear on IR525. They have been placed there to serve as an indication
of how records are numbered. A black bar has been inserted into the screen image to
divide PERHIS RCD number 0001 (above the first line) from PERHIS RCD number
0002 (between the lines) from PERHIS RCD number 0003 (below the bottom line).
The last action of the most recent PERHIS Record is the 790 action effective 12/10/06.
It is the action which changed the Organizational Structure Code and began the
renumbering of the records. The same is true for the 702 action effective 04/16/06.
IR501 PERHIS Salary Data, is the personnel history record equivalent to IR101, Salary
Data. There is an IR501 record for each personnel action reflected on IR525. The IR501
contains the NOAC (shown as NOAC 2nd), Authority Code and effective date of the
personnel action that created the record. The only 1st NOAC you see is 002, in cases
where an original action has been replaced in PERHIS by an official correction, and 006
update actions.
The 006 update action is not an official correction action. Only a few elements can be
updated using the 006. If processing a 006 update, use the effective date and
authentication date of the last applied non-exception action. The 006 actions do not

322
create a new line entry on IR125; it attaches itself to the last applied non-exception
action. These actions are not reported to OPM at the time they are processed. They are
reported to OPM with the processing of the next non-exception action or via the
quarterly CPDF report submitted to OPM, whichever happens first.
Caution should be taken when processing a HCUP package after the processing of a
006 action where no subsequent non-exception actions have been processed as the
updated elements from the 006 action does not come into the HCUP package.
NOTE: Due to potential problems, NFC does not encourage the use of
the 006 update action. The preferred method of correction would be an
official correction to the applicable action.
The IR501 record corresponds to the 894 action effective 01/03/10. It is personnel
history RECORD 0002 within PERHIS RCD 0001. When this record is created, new
records for IR501, IR502, IR516, IR517, IR522, IR523, IR525, IR527, IR528 and IR547
are also created. They are assigned RECORD 0002 within PERHIS RCD 0001
because they are all extensions of a single record.
NOTE: The 849 (Cash Award) action effective 11/12/06 occupies
RECORD 0001 within PERHIS RCD 0001. Cash award actions are
considered non-exception actions and are not a part of a HCUP package.
How Cash Award actions are updated is discussed later in this chapter. In
order to fully explain researching records we are going to refer to the 894
action effective 01/03/10.
The easiest way to find all records that belong to a particular personnel action is to note
the RECORD and PERHIS RCD numbers on the IR501 record with the action’s NOAC,
Authority Code and Effective Date. Use the arrow keys ([] and []) to place the cursor
on the data corresponding to a particular action on IR525. Pressing the [F9] key from
that position takes you directly to that action’s IR501 screen. All other records which are
extensions of that record have the same RECORD and PERHIS RCD numbers as
IR501.
The IR501 record corresponds to the 894 action on IR525 effective 01/03/10. Note that
it is RECORD 0002 within PERHIS RCD 0001.
IR522, PERHIS SF-50B Data Elements, is a two-page record which lists the majority of
the data elements present on a personnel action. Displayed is the IR522 record that
corresponds to the 894 action effective 01/03/10.

323
The 840 action was the last action prior to the 790 action effective 12/10/06. Once
again, award actions are not a part of the HCUP package. To research records further
back in history, use the 903 action effective 10/23/06 to show that it occupies RECORD
0002 within PERHIS RCD 0002.
IR542, PERHIS AWARDS, does not update every time a personnel action is processed.
The PERHIS RCD number updates as other personnel actions but the AWARDS
NUMBER is only updated with the processing of a new award.
What PERHIS Records Contain
The following is a brief summary of the types of information used to research an
employee’s personnel history in connection with history correction processing.
We’ve already said there are two basic kinds of PERHIS records:
Records updated each time a personnel action is processed
Records updated when an action is processed that updates the particular type of
information they contain
The PERHIS programs with every personnel action are:
IRIS
Screen
Description Information Contained
IR501 PERHIS Salary Data NOAC, Authority Code, effective date and
Authentication Date identifying the
personnel history record
Data elements needed to compute
employee pay
PMSO data elements
IR502 PERHIS Dates and Misc
Sal/Pers Data
Critical dates like SCD’s and NTE dates
PMSO data elements
IR516 PERHIS Life Insurance FEGLI Coverage Code
IR517 PERHIS Retirement Data Retirement Coverage Code

324
IRIS
Screen
Description Information Contained
IR522 PERHIS SF-50B Data
Elements
All information found on the SF-50B and
more including:
Legal Authority
Remarks Codes
Authentication Date
IR523 PERHIS Personnel
Supplements
Education Level
Instructional Program
Sex Code
IR525 PERHIS Personnel
Actions Summary
NOAC’s by effective date
IR527 PERHIS Detail
Assign/Temporary
Promotion
Information applicable to the employee’s
obligated position
IR528 PERHIS Retained Grade
Data
Information applicable to the employee’s
encumbered position
IR547 PERHIS Service Record A short summary of employee data by action
similar to an SF-7 record

325
PERHIS programs updated only when actions are processed which change the data
they contain:
IRIS
Screen
Description Information Contained
IR542 PERHIS Awards Cash award information
Quality step increase information
IR543 PERHIS Time Off
Award Data
Time Off Award Information
Before Going to History Override
Before you go to HCUP to correct an employee's personnel history, you first want to see
what the history record looks like in PERHIS. You want to do this for three basic
reasons:
To find out the personnel actions in history;
To find out the information on each of the actions; and
To verify the PERHIS Personnel History Database (IR525) agrees with the
History Correction List Window in HCUP
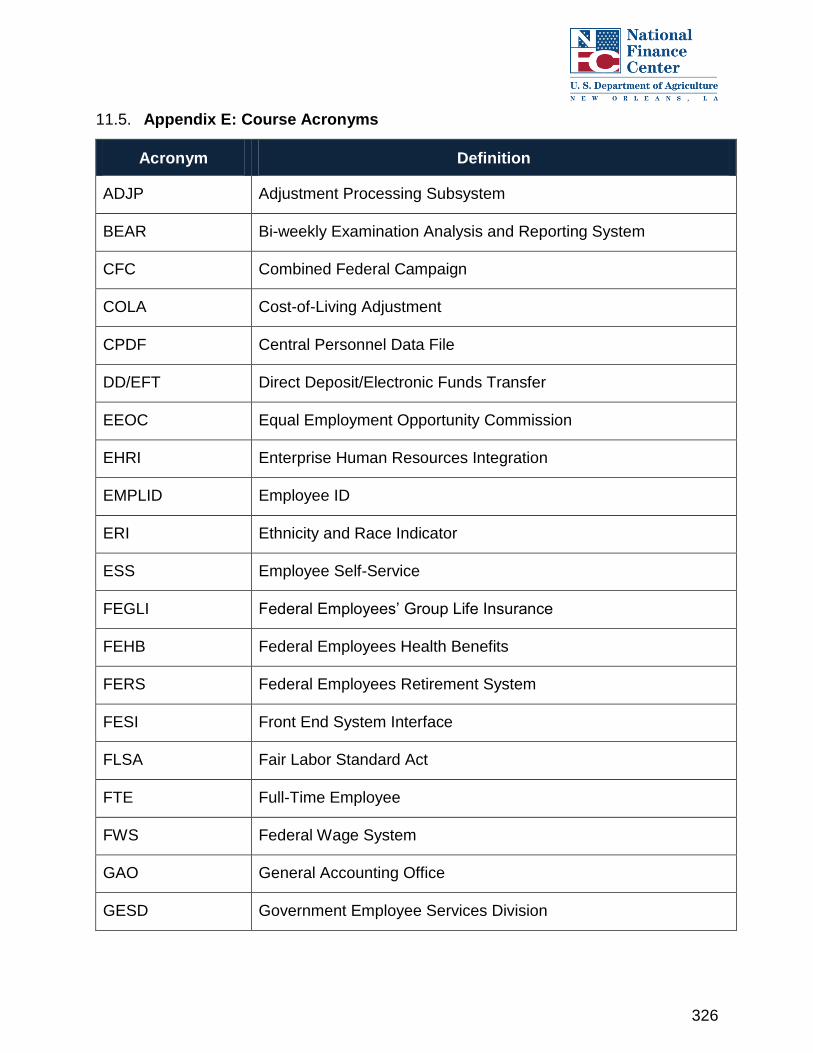
326
11.5. Appendix E: Course Acronyms
Acronym Definition
ADJP Adjustment Processing Subsystem
BEAR Bi-weekly Examination Analysis and Reporting System
CFC Combined Federal Campaign
COLA Cost-of-Living Adjustment
CPDF Central Personnel Data File
DD/EFT Direct Deposit/Electronic Funds Transfer
EEOC Equal Employment Opportunity Commission
EHRI Enterprise Human Resources Integration
EMPLID Employee ID
ERI Ethnicity and Race Indicator
ESS Employee Self-Service
FEGLI Federal Employees’ Group Life Insurance
FEHB Federal Employees Health Benefits
FERS Federal Employees Retirement System
FESI Front End System Interface
FLSA Fair Labor Standard Act
FTE Full-Time Employee
FWS Federal Wage System
GAO General Accounting Office
GESD Government Employee Services Division

327
Acronym Definition
GS Grade Scale
HCUP History Correction Update Processing System
IRIS Information/Research Inquiry System
IRS Internal Revenue Service
ISPF Interactive System Productivity Facility
LEO Law Enforcement Officer
NFC National Finance Center
NOA Nature of Action
NOAC Nature of Action Code
NRB Non Rating-Based
OPM Office of Personnel Management
PAR Personnel Action Report
PAYE Payroll Computation System
PERHIS Personnel History
PI Personal Information
PINE Personnel Input and Edit System
PINQ Payroll/Personnel Inquiry System
PMSO Payroll/Personnel Inquiry System
POI Personnel Office ID
PP Pay Period
PPS Payroll/Personnel System

328
Acronym Definition
QI Query Individual Position
QM Query Master Record
RET Retired
RIF Reduction in Force
RSM Retirement System Modernization
SINQ Suspense Inquiry
SSN Social Security Number
TINQ Time Inquiry-Leave Update System
TMGT Table Management System
TSP Thrift Savings Plan
USDA United States Department of Agriculture
VET Veteran
WIP Work-In-Progress
YR Year
YTD Year-To-Date

329
11.6. Appendix F: EmpowHR Person Model
EmpowHR Person Model is a term used to describe the information captured about a
person and his/her relationship to the organization.
An agency can have many different types of organizational relationships with an
individual. A person can be an employee, a contingent worker or a person of interest
(POI) as defined below:
Contingent Worker – Considered an employee of an agency that is not
processed in EmpowHR, or a non-employee who has a job and position record in
EmpowHR (i.e., Contractor)
Person of Interest (POI) – Someone who does not have a job or position record
in EmpowHR. A Person of Interest can be an affiliate, contractor, fellow, intern or
volunteer.
Federal Employee -
The relationships that a person has to the organization are tracked across the various
affiliations a person has within the EmpowHR system (i.e., a person who is now an
employee but was previously a contractor, the system tracks this person using one ID.
This ID enables their history as a contractor to exist within their history as an employee.)
EmpowHR uses Social Security Number’s (SSN) to create and query the system when
information is entered to place a new or potential employee in the system. If you attempt
to process as an action on an employee that exist in EmpowHR, you will receive a
warning message.
Verify a Person’s Organizational Relationships
To Verify whether a potential candidate is already in EmpowHR and/or determine the
person’s Organizational Relationship follow the steps below:
Step Description
1 Select Workforce Administration from the Main Menu.
2 Select Personal Information from the Workforce Administration
Menu options.
3 Select Person Organizational Summary from the Personal
Information Menu options.
4 Enter the candidates Social Security Number in the SSN field if a
potential candidate or enter the EmplID if you are verifying the
Organizational Relationship information in EmpowHR.

330
Step Description
5 Click on the Search button.
NOTE: If the candidates SSN/EmplID is in the system, a Person
Org Summary page will display with their information.
If the applicant does not exist in the EmpowHR system, “No matching values were
found” will display on the Find an Existing Value page (see Figure XX below).
Figure 139: Person Organizational Summary
"No matching values were found"
In the example below you can see that the candidate has a Person ID in the system.
This ID will be used to track all of the organizational relationships for this individual
(NOTE: Record the ID for future use).

331
Figure 140: Person Org Summary page
NOTE: If the applicant was a contingent worker, the record will not be
accessible through the HR Processing page. You would need to add a new
employment instance.
Add an Employment Instance
The current relationship that a person has to the organization determines what action
needs to be taken. If a person is currently with an EmpowHR agency and is transferring
to another EmpowHR agency, you will process a Department Transfer (PAR
Processing, Departmental Transfer).
If the candidate is currently a Contingent Worker within EmpowHR and is being
hired into an EmpowHR agency, or is in a dual appointment, you will need to add an
employment instance to the individual record. This is done through the New
Employment Instance page.
To add an Employment Instance follow the steps below:
Step Description
1 Select Workforce Administration from the Main Menu.

332
Step Description
2 Select Personal Information from the Workforce Administration Menu
options.
3 Select Organizational Relationship from the Personal Information
Menu options.
4 Click the New Employment Instance USF link.
Figure 141: New Employment Instance USF page
Step Description
5 Enter the SSN or EmplID of the applicant.
6 Click on Search and the New Employment Instance USF page

333
Step Description
displays.
Figure 142: New Employment Instance page
Step Description
7 Click on the Add the Relationship link and the New Employment
Instance USF, Data Control tab displays..
8 Complete all of the appropriate fields for the hire record.
9 Click Save. Once saved, no changes can be made through the New
Employment Instance page. Any further processing will be done
through the HR Processing page (PAR Processing, HR Processing).
10 Click OK.
All future processing for this employee and this employment instance will be done
through the HR Processing page.
Add a Contingent Worker
To add a Contingent Worker follow the steps below:
Step Description
1 Select Workforce Administration from the Main Menu.

334
Step Description
2 Select Personal Information from the Workforce Administration
menu.
3 Select Modify a Person from the Personal Information menu.
4 Select the Add a New Value tab on the Personal Information page.
Figure 143: Add a New Value page
Step Description
5 Click the Add button (see Figure xxx above). This will bring you to the
Biographical Details page.
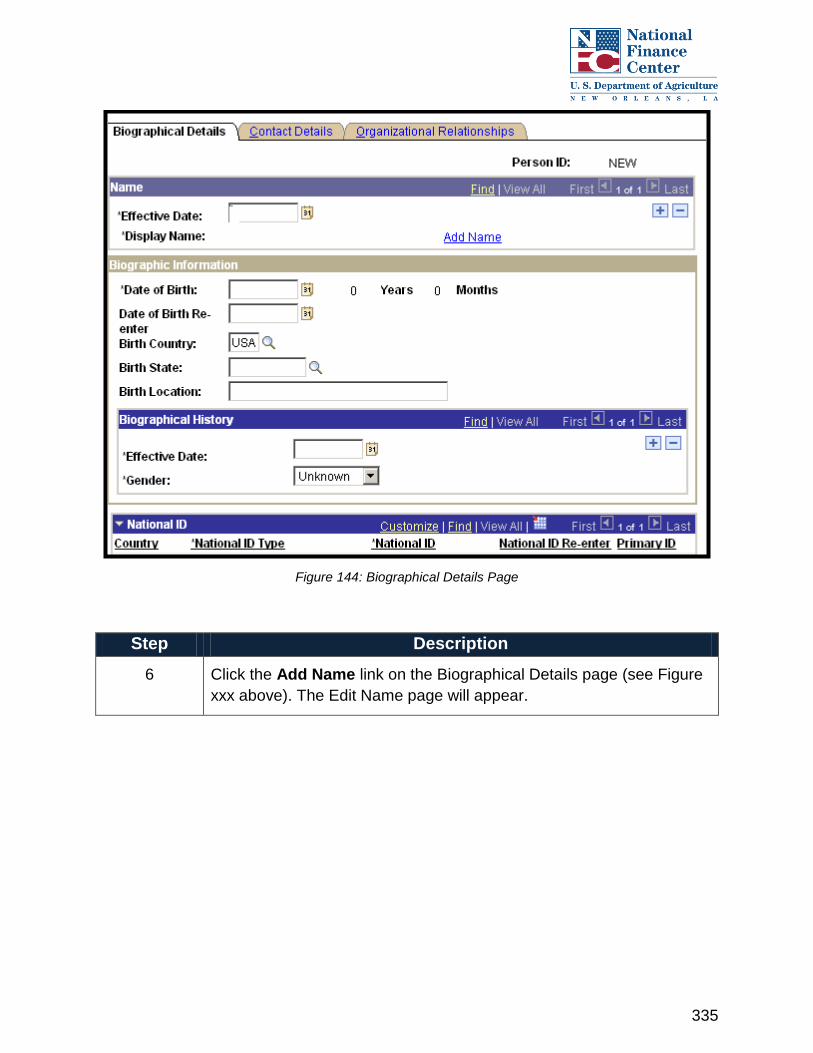
335
Figure 144: Biographical Details Page
Step Description
6 Click the Add Name link on the Biographical Details page (see Figure
xxx above). The Edit Name page will appear.
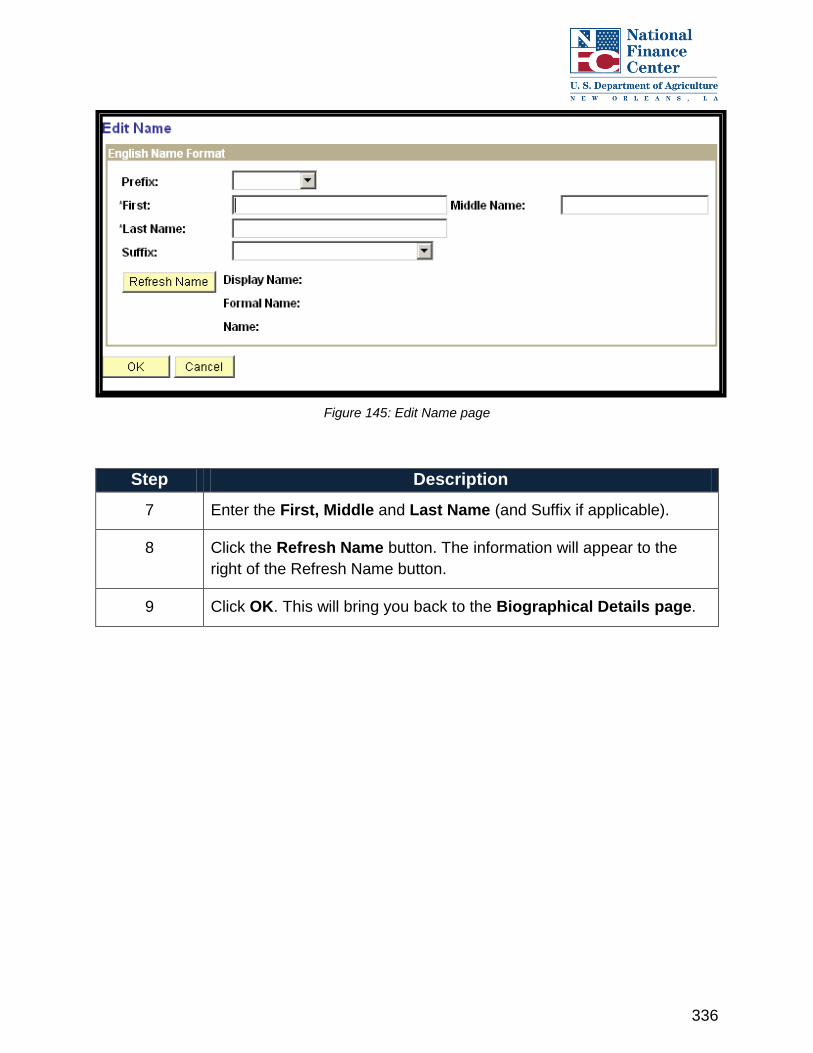
336
Figure 145: Edit Name page
Step Description
7 Enter the First, Middle and Last Name (and Suffix if applicable).
8 Click the Refresh Name button. The information will appear to the
right of the Refresh Name button.
9 Click OK. This will bring you back to the Biographical Details page.

337
Figure 146: Biographical Details page

338
Step Description
10 The Effective Date will auto-populate to the current date. Change as
appropriate.
11 Enter the Date of Birth into the field.
12 Enter Date of Birth Re-Enter into the field.
13 Birth Country defaults to USA (make changes by using the lookup).
14 Enter the Alpha Code for the Birth State into the field (or lookup).
15 Select the Gender from the drop-down list.
16 Enter the Social Security Number in the National ID field.
17 Re-enter the Social Security Number in the National ID Re-enter field.
18 Look up Country of Citizenship and make a selection (i.e., USA).
19 Select the Contact Details tab.

339
Figure 147: Contact Details Page
Step Description
20 Click the Add Address Detail link on the Contact Details page and the
Address History page displays.
Figure 148: Address History page

340
Step Description
21 Click the Add Address link on the Address History page.
22 Enter appropriate information in the Address 1:, City, State, (the
County information will auto-populate) and Postal Code (Zip Code)
and press OK. The Address History page appears with the new
information.
23 Click OK. The Contact Details page appears.
Figure 149: Contact Details page
Step Description
24 From the Phone Type drop down menu, select Business.
25 Enter the number in the Telephone field.
26 Check the Preferred box.
27 The Email Type auto-populates to Business. Enter the email address

341
Step Description
in the Email Address field.
28 Select the Organizational Relationships tab.
Figure 150: Organizational Relationships Page
Step Description
29 Check the Contingent Worker box.
30 Click the Add the Relationship button. The Work Location page
displays and the ID is annotated. Write down the ID number.

342
Figure 151: Work Location Page
Step Description
31 Enter the Position Number in the Position Number field.
32 Use the look up to enter the Company (i.e., AG for Department of
Agriculture).
33 Enter the Department code (i.e., 936406, NATIONAL FINANCE
CENTER)
34 Click OK and Save.

343

344