emily’s mask version - lakdawalla
TRANSCRIPT

Emily’s Mask Version 2 This washable, reusable cloth mask has only two pattern pieces and few seams.
It includes a pipe cleaner across the bridge of the nose for better fit.
Six sizes fit toddler faces to adults with beards.
It’s a good project for a beginner to practice several important basic machine sewing
techniques:
o sewing curved seams;
o making a casing;
o machine basting;
o sewing box pleats; and
o topstitching.
It’s also amenable to hand stitching.
A video of an earlier version of the mask being assembled is available at
https://youtu.be/BN7pxI66sE8
SVG files and pattern updates are available at https://lakdawalla.com/emilysmask
Sizing: Measure the face from base of the ear to
base of the ear across the nose. You may wish to
size up for longer faces or beards. If in doubt, go
with the larger size; it can be adjusted near the end
of assembly by folding over the sides farther. In
general, adults will wear L‐XXL, and children XS‐M.
Size Face measurement
XX‐Large 12” and up
X‐Large 11‐12”
Large 10‐11”
Medium 9.5‐10”
Small 9‐9.5”
X‐Small 9” and down

Materials Fabric: Scrap cotton or cotton/polyester (such as
bedsheets, tea towels, quilter's cotton/fat
quarters, broadcloth, shirting, or flannel). For
most sizes, 1 fat quarter will yield 2 masks.
o The tighter the weave (higher the thread
count), the better the filtration. Hold the
fabric up to sunlight to see how well sunlight
shines through. Less is better.
o It is possible to use cotton jersey T‐shirt
material, but only for one layer, either lining
or main fabric. At least one layer of a woven
material is necessary for stability, and two
layers of pleats in jersey would be too bulky.
o Use different colors for lining and main fabric
to help wearer tell inside from outside.
Consider using well‐worn bedsheet material
for the lining and a more decorative material
for the main fabric.
o Wash all fabrics in very hot water first and
press with a steam iron at its hottest
temperature. This preshrinks the material and
ensures it will survive sanitizing.
Optional filter layer: Featherweight to
mediumweight sew‐in interfacing for inner liner.
Do NOT use fusible interfacing.
Nose crimp: Pipe cleaner or alternative
o Alternatives include garden ties; the wire part
from a bag of coffee; 20‐gauge or similar
jewelry wire; small paper clips opened out
into an “S” shape; Christmas ornament
hangers; disposable aluminum pans cut to
size and with corners rounded off; etc.
o Test material by pouring boiling water on it to
see how it will endure hot‐water washing.
Ties: This photos in this pattern show ponytail
bands but there are MANY options:
o Alternatives include sewing elastic; round
beading elastic; shoelaces; bias tape; cotton
twill tape; macramé cord; athletic lacing;
strips of cotton jersey; etc.
o Stretchy material (pony bands, elastic) are
easier for short‐period use. Ties (shoelaces,
bias tape) are more comfortable for all‐day
wear.
For fun: This mask design has decorative
potential! Consider decorating the top layer with
quilting, applique, or permanent markers before
sewing.

Instructions
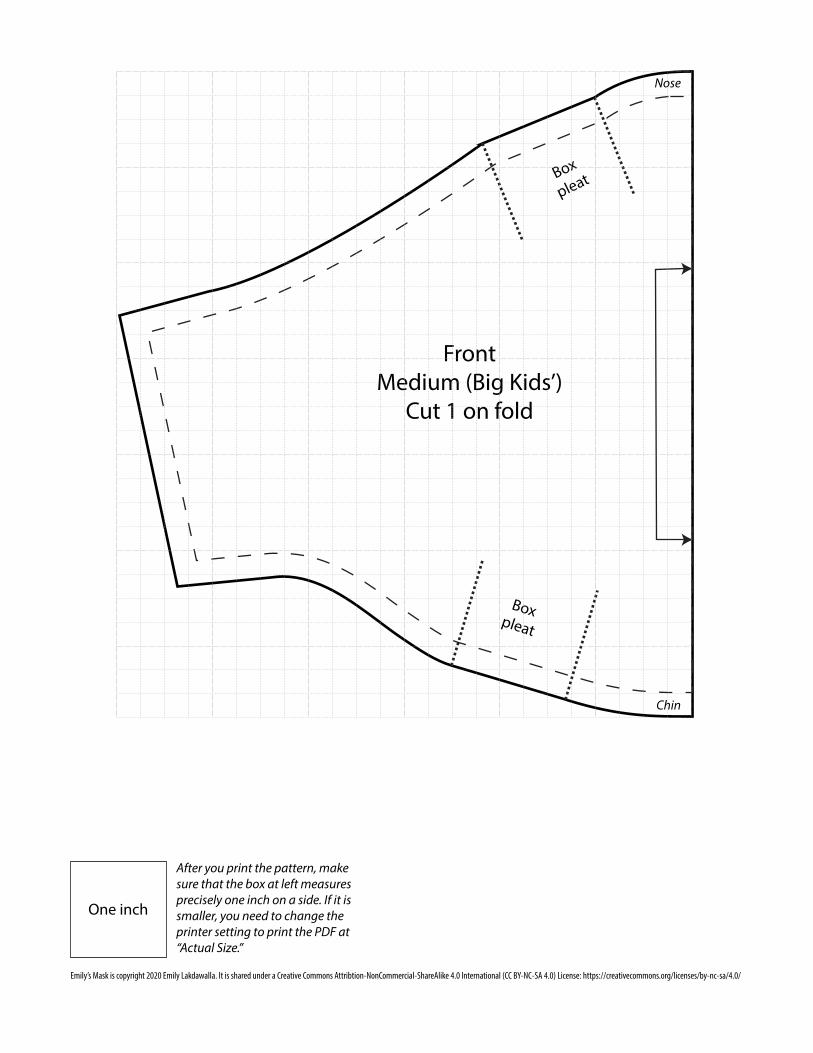
Prepare and Cut Fabric 1. Cut the front and lining pieces. The difference between lining and
front pieces is that the lining is ¼ inch shorter, nose to chin.
2. Transfer markings for pleats to fabric. Two different ways:
a. Cut slits along the markings on the paper pattern piece. Use
a washable pen or a piece of chalk to draw along the slits.
b. OR use the grid printed on the pattern piece as a guide.
Create Pleats Basting is temporary stitching that holds pieces and pleats in position
until permanent stitching is complete. Basting stitches are pulled out
when no longer needed, so it’s useful to baste with a contrast‐colored
thread to make them more visible. To machine baste, set your machine
to its longest stitch. Leave ends about 3” long to help with removal
later. It is easier to pull the bobbin thread than the top thread to
remove basting. In the pictures above right, the bobbin thread is red.
3. To make the pleats (4 each in main fabric and lining), fold the
fabric, right sides together, bringing together two pleat lines.
Pin. Baste.
4. Press the pleat flat. (You can use an iron but finger pressing is
fine.) A chopstick or pencil can help to open out the box pleats.
5. Baste the pleats in place, sewing 1/8” away from edge. If that is
too difficult, sew 3/8” away from the edge. Avoid basting 1/4”
from the edge, where your final stitching line will be.
6. Remove basting along pleat lines (which you did in step 8) by
pulling out the bobbin thread first, then pulling on the top
thread. If you added interfacing, remove that basting too. Leave
in the basting that you did in step 10.
7. After making pleats in both front and lining, change to a thread
that matches front fabric.
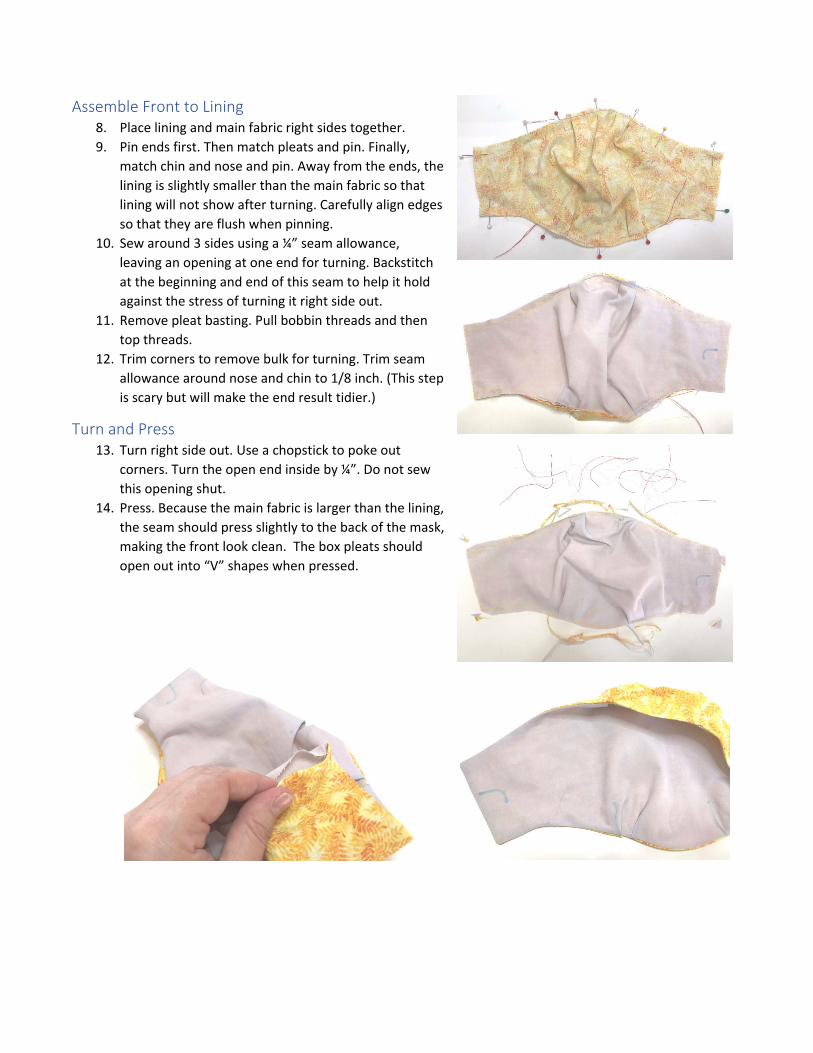
Assemble Front to Lining 8. Place lining and main fabric right sides together.
9. Pin ends first. Then match pleats and pin. Finally,
match chin and nose and pin. Away from the ends, the
lining is slightly smaller than the main fabric so that
lining will not show after turning. Carefully align edges
so that they are flush when pinning.
10. Sew around 3 sides using a ¼” seam allowance,
leaving an opening at one end for turning. Backstitch
at the beginning and end of this seam to help it hold
against the stress of turning it right side out.
11. Remove pleat basting. Pull bobbin threads and then
top threads.
12. Trim corners to remove bulk for turning. Trim seam
allowance around nose and chin to 1/8 inch. (This step
is scary but will make the end result tidier.)
Turn and Press 13. Turn right side out. Use a chopstick to poke out
corners. Turn the open end inside by ¼”. Do not sew
this opening shut.
14. Press. Because the main fabric is larger than the lining,
the seam should press slightly to the back of the mask,
making the front look clean. The box pleats should
open out into “V” shapes when pressed.

Topstitch This step is optional, but the mask will survive
washing much better if it is topstitched.
15. Topstitch around the same 3 sides you
stitched, 1/8 inch away from the edge.
Add Nose Bridge Wire Do not skip this step. It is necessary to fit the mask
to the face. Without it, your breath will enter and
exit through gaps next to your n ose, and will not be
filtered, making the wearing of the mask pointless.
16. Make a casing: On the right side, topstitch
from side to side 3/8 to 1/2 inch away from
the topstitching across the bridge of the
nose.
17. For X‐Small and Small sizes, you may wish to
cut the pipe cleaner shorter by 1 or 2 inches.
18. Bend 1 inch of the end of the pipe cleaner into a tight U shape.
19. Match the ends of the pipe cleaner and
squeeze the loop into another tight U shape.
You will have a double thickness of pipe
cleaner, 6 inches long, with loops at both
ends – one long loop and one very short
loop.
20. Feed the long‐loop end of the wire through the same opening you used for turning and
into the casing. Feed it until it is centered
across the nose. It may take some fiddling to
steer it through the box pleats. If the wire
gets stuck, it is probably stuck inside a pleat.
Pull it back a little and rotate it gently back
and forth to find the gap between the lining
and front mask pleats.
21. Make sure the two wire loop ends are the
same distance from the ends of the mask;
shift the wire as necessary. With chalk or a
pin, mark the locations of the ends of the wire.
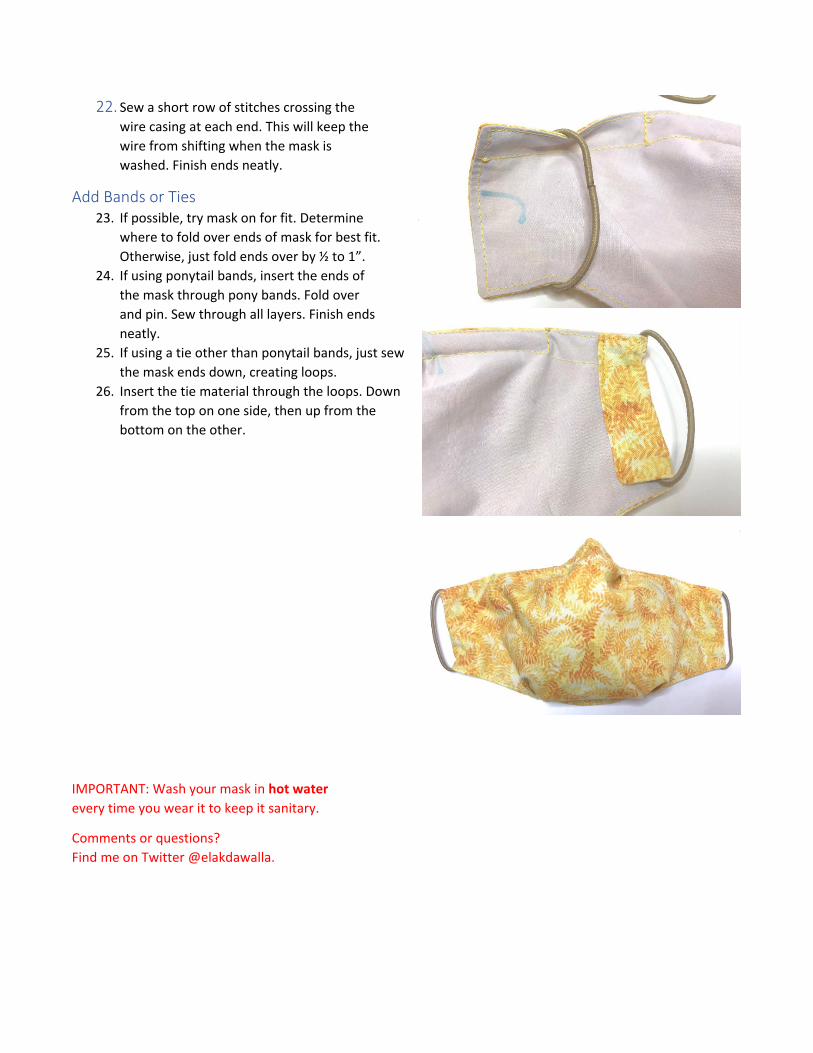
22. Sew a short row of stitches crossing the wire casing at each end. This will keep the
wire from shifting when the mask is
washed. Finish ends neatly.
Add Bands or Ties 23. If possible, try mask on for fit. Determine
where to fold over ends of mask for best fit.
Otherwise, just fold ends over by ½ to 1”.
24. If using ponytail bands, insert the ends of the mask through pony bands. Fold over
and pin. Sew through all layers. Finish ends
neatly.
25. If using a tie other than ponytail bands, just sew the mask ends down, creating loops.
26. Insert the tie material through the loops. Down
from the top on one side, then up from the
bottom on the other.
IMPORTANT: Wash your mask in hot water
every time you wear it to keep it sanitary.
Comments or questions?
Find me on Twitter @elakdawalla.

FrontXX-Large
Cut 1 on fold
Box
pleat
Boxpleat
One inch
After you print the pattern, make sure that the box at left measures precisely one inch on a side. If it is smaller, you need to change the printer setting to print the PDF at “Actual Size.”
Emily’s Mask is copyright 2020 Emily Lakdawalla. It is shared under a Creative Commons Attribtion-NonCommercial-ShareAlike 4.0 International (CC BY-NC-SA 4.0) License: https://creativecommons.org/licenses/by-nc-sa/4.0/
Nose
Chin

LiningXX-Large
Cut 1 on fold
Boxpleat
Box
pleat
One inch
After you print the pattern, make sure that the box at left measures precisely one inch on a side. If it is smaller, you need to change the printer setting to print the PDF at “Actual Size.”
Emily’s Mask is copyright 2020 Emily Lakdawalla. It is shared under a Creative Commons Attribtion-NonCommercial-ShareAlike 4.0 International (CC BY-NC-SA 4.0) License: https://creativecommons.org/licenses/by-nc-sa/4.0/
Nose
Chin

FrontX-Large (Men’s)
Cut 1 on fold
Box
pleat
Boxpleat
One inch
After you print the pattern, make sure that the box at left measures precisely one inch on a side. If it is smaller, you need to change the printer setting to print the PDF at “Actual Size.”
Emily’s Mask is copyright 2020 Emily Lakdawalla. It is shared under a Creative Commons Attribtion-NonCommercial-ShareAlike 4.0 International (CC BY-NC-SA 4.0) License: https://creativecommons.org/licenses/by-nc-sa/4.0/
Nose
Chin

LiningX-Large (Men’s)
Cut 1 on fold
Boxpleat
Box
pleat
One inch
After you print the pattern, make sure that the box at left measures precisely one inch on a side. If it is smaller, you need to change the printer setting to print the PDF at “Actual Size.”
Emily’s Mask is copyright 2020 Emily Lakdawalla. It is shared under a Creative Commons Attribtion-NonCommercial-ShareAlike 4.0 International (CC BY-NC-SA 4.0) License: https://creativecommons.org/licenses/by-nc-sa/4.0/
Nose
Chin

FrontLarge (Women’s)
Cut 1 on fold
Box
pleat
Boxpleat
One inch
After you print the pattern, make sure that the box at left measures precisely one inch on a side. If it is smaller, you need to change the printer setting to print the PDF at “Actual Size.”
Emily’s Mask is copyright 2020 Emily Lakdawalla. It is shared under a Creative Commons Attribtion-NonCommercial-ShareAlike 4.0 International (CC BY-NC-SA 4.0) License: https://creativecommons.org/licenses/by-nc-sa/4.0/
Nose
Chin

LiningLarge (Women’s)
Cut 1 on fold
Box
pleat
Boxpleat
One inch
After you print the pattern, make sure that the box at left measures precisely one inch on a side. If it is smaller, you need to change the printer setting to print the PDF at “Actual Size.”
Emily’s Mask is copyright 2020 Emily Lakdawalla. It is shared under a Creative Commons Attribtion-NonCommercial-ShareAlike 4.0 International (CC BY-NC-SA 4.0) License: https://creativecommons.org/licenses/by-nc-sa/4.0/
Nose
Chin
One inch
After you print the pattern, make sure that the box at left measures precisely one inch on a side. If it is smaller, you need to change the printer setting to print the PDF at “Actual Size.”
Emily’s Mask is copyright 2020 Emily Lakdawalla. It is shared under a Creative Commons Attribtion-NonCommercial-ShareAlike 4.0 International (CC BY-NC-SA 4.0) License: https://creativecommons.org/licenses/by-nc-sa/4.0/
FrontMedium (Big Kids’)
Cut 1 on fold
Box
pleat
Boxpleat
Nose
Chin

One inch
After you print the pattern, make sure that the box at left measures precisely one inch on a side. If it is smaller, you need to change the printer setting to print the PDF at “Actual Size.”
Emily’s Mask is copyright 2020 Emily Lakdawalla. It is shared under a Creative Commons Attribtion-NonCommercial-ShareAlike 4.0 International (CC BY-NC-SA 4.0) License: https://creativecommons.org/licenses/by-nc-sa/4.0/
LiningMedium (Big Kids’)
Cut 1 on fold
Box
pleat
Boxpleat
Nose
Chin
One inch
Emily’s Mask is copyright 2020 Emily Lakdawalla. It is shared under a Creative Commons Attribtion-NonCommercial-ShareAlike 4.0 International (CC BY-NC-SA 4.0) License: https://creativecommons.org/licenses/by-nc-sa/4.0/
After you print the pattern, make sure that the box below measures precisely one inch on a side. If it is smaller, you need to change the printer setting to print the PDF at “Actual Size.”
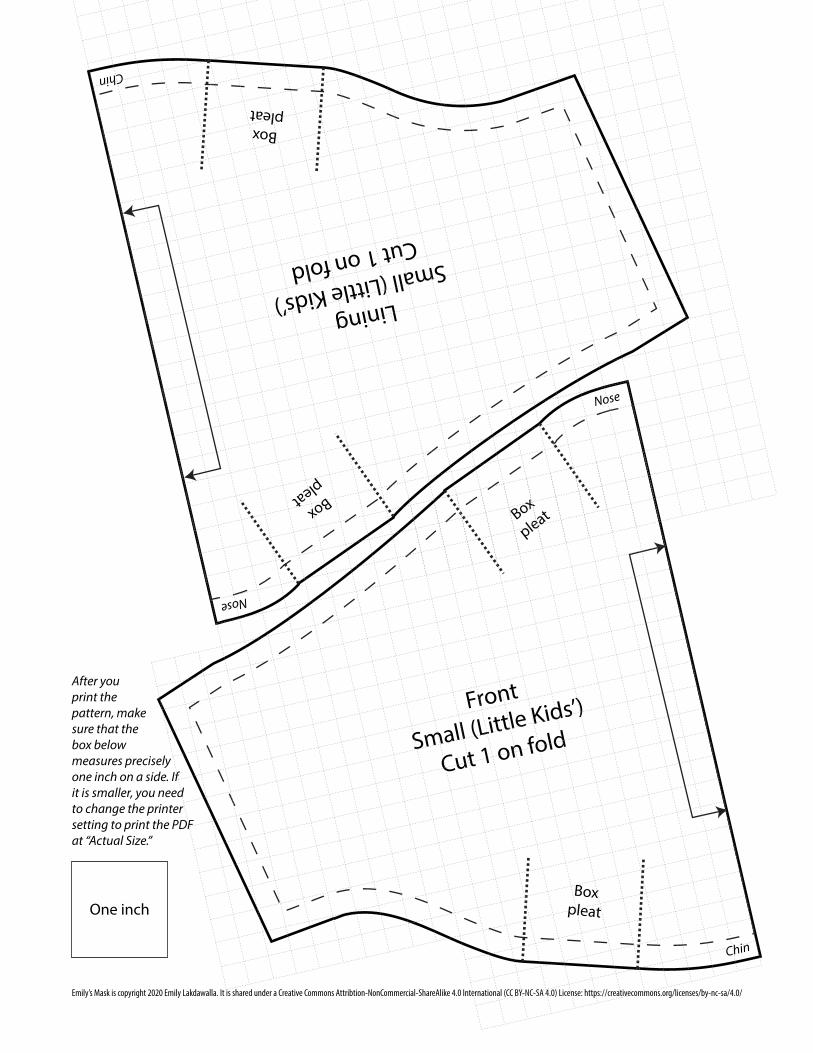
Lining
Small (Little Kids’)
Cut 1 on fold
Box
pleat
Boxpleat
Front
Small (Little Kids’)
Cut 1 on fold
Box
pleat
Boxpleat
Nose
Chin
Nose
Chin

One inch
Emily’s Mask is copyright 2020 Emily Lakdawalla. It is shared under a Creative Commons Attribtion-NonCommercial-ShareAlike 4.0 International (CC BY-NC-SA 4.0) License: https://creativecommons.org/licenses/by-nc-sa/4.0/
After you print the pattern, make sure that the box below measures precisely one inch on a side. If it is smaller, you need to change the printer setting to print the PDF at “Actual Size.”
Front X-Small (Toddler)
Cut 1 on fold
LiningX-Small (Toddler)
Cut 1 on fold
Box
pleat
Boxpleat
Box
pleat
Boxpleat
Nose
Chin
Nose
Chin