emergency response sampling standard … · emergency response sampling procedures ri dem erp 5-1,...
TRANSCRIPT

Emergency Response Sampling Procedures RI DEM ERP 5-1, p. 1
EMERGENCY RESPONSE SAMPLING PROCEDURES
5-1 PURPOSE AND TYPES
General Considerations Purposes For Sampling
Information Disposal Criminal and Enforcement
Types Of Samples Abandoned Materials Spills Soil Surface Water Groundwater
Types of Chemicals Known Semi-known Unknown
SAFETY CONSIDERATIONS RECORD MANAGEMENT
Field Notebook Sample Labels Chain-of-Custody
Chain-of-Custody Form Transferring Samples
Photographs 5-2 SAMPLING EQUIPMENT
Collection Equipment Solids Collection Liquid Collection Sample Jars and Containers
Cleaning Guide Materials Cleaning Procedures
Glass Items Stainless Steel Equipment Plastic or Teflon
5-3 SAMPLE COLLECTION
Sampling Procedures Drum or Container Sampling Soil/Sludge Sampling Spill Sampling Surface Water Sampling Groundwater Sampling
Other Sampling Considerations
Emergency Response Sampling Procedures RI DEM ERP 5-1, p. 2
VOC Vials Sampling Various Material Classes Sample Security
Other Samples Duplicate Samples Background Samples Sample Blanks Composite Samples
Sample Preservation Chemical Preservatives Cooling
Analyses Selection of Parameters Parameters for Enforcement Cases
5-4 PACKING AND SHIPPING
Packing Procedures Packing Samples
Shipping Procedures DOT Regulations
5-5 FIELD TESTING
Purpose of Field Testing Field Instruments
AIM Detector Photoionization Detectors Radiation Detectors Colorimetric Indicator Tubes HazCat Kit
PURPOSE AND TYPES
GENERAL CONSIDERATIONS This document sets forth procedures for situations in which the SOSC (or a DEM contractor working under SOSC direction) collects samples. Examples of such situations include responding to spills, abandoned containers or materials, and illegal dumping. This document does not require the collection of samples but provides guidance for doing so when an SOSC deems it appropriate.
• In all cases, it is ultimately the SOSC's responsibility to ensure that sampling activities are conducted in accordance with accepted scientific procedures.
• The SOSC has the option to select and adapt such protocols to best suit the particular situation and the resources available.
• Each SOSC should strive to obtain specialized training on sampling. • This document is not intended to be a substitute for more detailed sampling
protocols. In the following, there are numerous references to “evidentiary sampling” and “enforcement cases” -- actions covered by criminal, civil, or administrative codes. These codes share
Emergency Response Sampling Procedures RI DEM ERP 5-1, p. 3
some common features, and samples that meet criminal standards would also meet civil/administrative and disposal standards. But the reverse is not necessarily true. In this document, special emphasis is placed on evidence samples because relevant, legally mandated standards are more stringent. PURPOSES FOR SAMPLING
There are three main purposes for which an SOSC might decide to collect samples. • Information. These are situations in which a sample is collected solely to provide
information to help with response and not to be used as evidence in an enforcement action. For example, a SOSC may collect a sample for field or lab tests that indicate the material's hazard to responders or suggest a containment strategy. Such sampling entails the least stringent procedures and does not require adherence to rules for handling evidence.
• Disposal. This is sampling intended to determine how to dispose of a material. Depending on the situation it may resemble informational sampling, but it is usually slightly more stringent. The most common scenario for the SOSC is the collection of a waste sample to be sent to a contractor for initiating disposal arrangements. Since the DEM contractor is required to follow certain quality assurance (QA) procedures, it is appropriate to ensure the SOSC also follows the correct QA procedures, including the use of proper containers, chain-of-custody, etc. The aim is to ensure that the sample is truly representative of the waste and to minimize the potential for error.
• Criminal/Enforcement. These are samples that are collected for administrative, civil, and/or criminal enforcement action. Standards for sampling procedure, documentation, and security are stringent. Although cases may never proceed to a trial, the SOSC and other RI DEM representatives and employees must be prepared from the start to provide testimony, if required, defending sampling activities. Some samples collected under emergency conditions might fail to meet stringent standards, and in such cases the sample is not necessarily invalid, but opposing counsel will likely challenge its validity and admissibility in court. Therefore, whenever possible, standard, evidentiary sample collection and handling procedures should be followed.
TYPES OF SAMPLES
There are some sampling activities that are beyond the scope of emergency response, unless the appropriate equipment, personnel, and procedures are available. For example, storage tank sampling may require uniquely specialized techniques and equipment. The most common types of samples that a SOSC will collect include:
• Abandoned Materials. This type of sampling mainly draws material from abandoned containers of various types and sizes or uncontainerized loose material.
• Spills. This type of sampling draws material from container spills, vehicle accidents, illegally dumped materials, etc.
• Soil. The SOSC may occasionally collect a soil sample in areas of visible soil contamination. The intent of such sampling is to determine if a discharge has actually happened and if further work is needed. This sampling is not intended to assess the extent of contamination, but merely to assure that initial response is appropriate. The SOSC may also sample areas that have been cleaned to verify that actions meet cleanup standards. The samples may consist of visibly contaminated soil and non-contaminated background samples.
Emergency Response Sampling Procedures RI DEM ERP 5-1, p. 4
• Surface Water. These samples are normally collected as a result of a spill that has impacted a surface water body. Sampling techniques must be adapted to the type of material that was spilled. Surface sampling would be appropriate for products lighter than water (petroleum products), water column samples for materials that mix with the water (pesticides, corrosives), and bottom samples for materials heavier than water (many chlorinated solvents).
• Groundwater. DEM ER normally does not collect groundwater samples, except during soil removal and when the groundwater level is high enough to seep into the bottom of a response excavation. In that case the sampling procedures would be the same as for surface waters. There may be occasions when a SOSC will want to collect a sample from a well, but sampling wells is generally not an emergency response function. (The importance of proper sampling of wells cannot be overemphasized. Even though the well that is sampled may be correctly located and constructed, special precautions must be taken to ensure that the sample taken is representative of the groundwater at that location and that the sample is neither altered nor contaminated by the sampling and handling procedures.)
TYPES OF CHEMICALS
The DEM ER encounters many types of chemicals in a wide range of situations. Most incidents involve materials that EPA, USDOT, NFPA, or OSHA regulations deem hazardous. The concentrations may extend from 100% to a few ppm, but the vast majority of ER's samples contain concentrations that exceed regulated thresholds. At the beginning of an incident, the identity and hazard of a material generally fall into one of three categories:
• Known. These are materials in which there is a high level of confidence that the nature and identity of the material is known. Many incidents fall into this category. For example, fuel spilled from a labeled tanker or a vehicle's fuel tank, or a chemical spilled from a labeled raw material container at a facility or in transit. A sample may be collected for field tests to verify its identity and to learn more about its properties (e.g., in preparation for proper disposal) or it may be collected in anticipation of enforcement action.
• Partially Known. These are materials whose identity or nature is incompletely known or is known but with uncertain confidence. Confirmation is required through further investigation, field-testing, or laboratory analyses, depending upon the circumstances.
• Unknown. These are materials whose identity or nature is nearly or entirely unknown. Many abandoned materials are unknown, at least initially, until a sample is collected. Unknowns are presumed to be hazardous materials until determined otherwise. An unknown becomes a partially known or a known material as further information is obtained.
SAFETY CONSIDERATIONS
ER staff should only collect samples when the proper safety guidelines and applicable state and federal regulations are followed -- generally, when conditions for sampling are safe and when the necessary personal protective equipment is available. No activity is important enough for the SOSCs to injure themselves. In particular, the ER staff must not put themselves in danger just to collect a sample of a material. For a fuller discussion of DEM safety policy and procedures see the Department’s Emergency Response Site Safety and Health Plan
Emergency Response Sampling Procedures RI DEM ERP 5-1, p. 5
RECORD MANAGEMENT This section discusses the records that need to be made and kept for various types of sampling activities, as well as labeling and chain-of-custody requirements.
FIELD NOTES
The SOSC must maintain a daily record of significant events, observations, and measurements during field investigations and sampling activities. These field notes are intended to provide a record that is sufficient to enable the SOSC to reconstruct events and activities that occur during projects and to refresh memory (e.g., if called upon to give testimony during enforcement actions). They should be kept as permanent state records. If referred to in a legal proceeding, field notes are admissible as evidence and subject to cross-examination. They therefore must be maintained in a professional manner. Field notes for sampling activities must include
• Date and time of sampling, • Name of the sampler and (if evidentiary) witness • Sample number (or other identification), • Address or location (latitude and longitude, GPS), • Source of material, • Sample type and description, • Suspected hazards in sample, • Results of any field tests, • Description of how the sample was taken and equipment used, • Disposition of the sample, and • Other pertinent details.
All notes are to be written in waterproof ink. If an error is made, the SOSC may make a correction by crossing out the error and entering the correct information, but the errors should never be obliterated. Instead, errors should be corrected, initialed, and dated by the individual who made the original entry.
SAMPLE LABELS
Sample labels must be placed on each container. Use the label that accompanies the new container or another label with sufficient space for identifying the sample. Each sample or set of containers from that sample should have a unique identification number. The most important information on a sample label is the number, date and time, location, sampler's name, type of sample (composite, grab, etc.) and preservatives used. To provide for the safety of others that will be handling the sample, it is a good idea to identify any suspected hazards. If a DEM contractor is used, then samples should be labeled with the ER case number and a sequential number. If samples are collected for which no contractor number is applicable, then the SOSC should devise a logical numbering system and document the number in field notes and associated records.
CHAIN-OF-CUSTODY
A sample is under custody if one or more of the following criteria is met: • The sample is in the sampler's possession. • It is in the sampler's continuous view after being in possession. • It was in the sampler's possession and then was secured in a locked area to
prevent tampering. • It is in a secure designated area.
Emergency Response Sampling Procedures RI DEM ERP 5-1, p. 6
Chain-of-Custody Form Chain-of-Custody forms are sheets of paper that describe each sample and track the transfer of a sample from the point of collection to its final destination -- typically a laboratory or evidence locker. The form shows the name, date, time, signature, and organization of each transfer as well as the name of the sampler and a witness. This form is the most important paperwork item in evidence sampling, but it is also recommended for any sample that is being sent to a laboratory or may be in the future. The form is a legal document and may be examined in any enforcement proceeding by counsel, who may investigate the handling of the samples, looking for inconsistencies. An otherwise good analytical result may be inadmissible in an enforcement proceeding if the defense successfully challenges the chain-of-custody.
• SOSCs must always have access to a blank form in case the need arises. • Any chain-of-custody record can be used, but a form was specifically
designed for ER's use and contains space for information that is likely to be relevant.
• All chain-of-custody forms should be written in waterproof ink. • Any errors should be handled exactly as an error in the field notes: It should
be crossed out and the correct information entered, initialed, and dated. Erroneous information should never be obliterated.
Transferring Samples When a sample is transferred, the individual relinquishing and receiving it should sign, date, and note the time on the form. The method of shipment and other pertinent information should be entered in the "Remarks" section of the chain-of-custody form. If the samples are split with a potential responsible party, that event -- including the name of the person taking the split -- should also be noted in the "Remarks" section of the chain-of-custody record. A separate chain-of-custody record must accompany the potential responsible party's samples, too. A witness to the delivery should be obtained.
PHOTOGRAPHS
Photographs of the site where samples were collected and of the samples themselves often help a judge and jury understand the original appearance of the site and samples. For all photographs taken, record the date, time, ER case number and photographer directly on the back of the picture. The photographer should review photographs or slides and compare them to the field notes, to assure that the notes and photographs match.

Sampling Equipment RI DEM ERP 5-2, p. 1
SAMPLING EQUIPMENT Since ER SOSCs often engage in sampling activities, a supply of basic sampling equipment must be readily available. These items should be in sufficient quantities to perform the necessary tasks and be carried in a response vehicle or stored in a secure site (e.g., at a contract lab or a DEM office) until needed. COLLECTION EQUIPMENT
A variety of equipment should be available from a secure storage site for use by the SOSC, as suggested below. These items can be provided to contractors or fire departments at the discretion of the SOSC. Much of the equipment should be of the disposable type to minimize cleaning, for QA and safety reasons. Additional items may be added as needed.
• Solids Collection. Items for collecting samples of solids:
o Hand Shovels - stainless steel & disposable plastic o Stainless Steel Scoop/Spoon o Tube-type Soil Sampler o Hand Auger - bucket head type o Stainless Steel Pan/Bucket
• Liquid Collection. Items should for collecting samples of liquids:
o Sample Rods and Contaminated Liquid Waste Samplers (Coliwasa) - both glass and disposable plastic
o Pipettes and Droppers - disposable plastic o Bailers - disposable plastic and Teflon o Rope and Stout String o Stainless Steel or Polypropylene Dipper
• Sample Jars and Containers. An assortment should be readily available. To
eliminate possible contamination or reaction of future samples, new sample containers should be used each time, and each should be used only once. New containers may be used out-of-box for information and disposal sampling activities. However, evidence sample containers must be pre-cleaned by the SOSC or purchased as pre-cleaned. Glass containers should have Teflon-lined lids. Recommended sample containers to secure include:
o 40 ml VOC Vials - both clear & amber o Wide Mouth Glass Jars - 8 & 16 ounce o Regular Glass Jars - 8 ounce & 1 liter o Plastic Jars - assorted sizes o 1-gallon Metal Cans
CLEANING GUIDE
In general, the SOSC should arrange for a secure supply of pre-cleaned sampling materials from a DEM-approved vendor. This will eliminate the need for the SOSC to handle, store, and use cleaning materials. Nevertheless, the SOSC will eventually need to clean some sampling supplies. Remember that cleaning procedures probably will be challenged in an enforcement case; so the person who cleans an item must be prepared to testify about cleaning procedures.
Materials
Sampling Equipment RI DEM ERP 5-2, p. 2
For normal emergency response purposes, the following minimum-purity cleaning materials can be used:
o Lab detergent o Deionized water o 10% nitric acid o Spectral-grade isopropanol or acetone.
A secure supply should be obtained from DEM or DEM-approved vendors. Do not reuse cleaning materials, and dispose of all wastes and wastewaters properly.
Cleaning Procedures
DEM normally acquires sample containers as needed from a contract laboratory that pre-cleans them. All cleaning should be done under a fume hood or outdoors, using Level D protection at a minimum. Since nitric acid is a corrosive oxidizer, and isopropanol and acetone are flammable, be careful! After cleaning an item, handle and store it in a manner that prevents contamination. Items should be wrapped in new aluminum foil or in a new sealable plastic bag. Glass Items
1. Wash with lab detergent and rinse with tap water. 2. Rinse with nitric acid if metals are a parameter, if not, go to #4. 3. Rinse with tap water. 4. Rinse with deionized water. 5. Rinse twice with solvent and allow to air dry. 6. Package to prevent contamination.
Stainless Steel Equipment
1. Wash with lab detergent and rinse with tap water. 2. Rinse with deionized water. 3. Rinse twice with solvent and allow to air dry. 4. Package to prevent contamination.
Plastic or Teflon
1. Wash with lab detergent and rinse with tap water. 2. Rinse with nitric acid if metals are a parameter, if not, go to #4. 3. Rinse with tap water. 4. Rinse with deionized water and allow to air dry. 5. Package to prevent contamination. Note: Plastic pipettes or droppers should not be cleaned due to the difficulty of cleaning and drying them. Use only as new in box.
Sample Packing and Shipping RI DEM ERP 5-4, p. 1
SAMPLE COLLECTION
SAMPLING PROCEDURES This section describes how to collect various types of samples in common response situations. An SOSC may alter these procedures, as appropriate, on a case-by-case basis. But regardless of the specific sampling method or equipment used, some basic sampling and handling principles apply:
• Preserve health and safety! Consult the ER Site Safety and Health Plan. • Before commencing collection of samples, thoroughly evaluate the site. Observe
landmarks, hazards, reference and possible sample points. • Record pertinent observations in your field notes. Include a sketch, when
appropriate, identifying sample points. • Prepare all sampling equipment and sample containers properly prior to entering
the site. • Have aluminum foil handy to provide protective wrapping, if necessary. • Have absorbents handy to control spills. • Place containers for receiving samples on a flat, stable surface. • Collect samples first from those areas that are suspected to be the least
contaminated and work to areas of most contamination, thereby minimizing the risk of cross contamination.
• Collect samples and securely close containers as quickly as feasible. • Where possible, record field observations at a safe on-site location rather than
from the sampling point itself. • If a sampling plan has been used, follow the plan in every detail. Document all
steps in the sampling procedures. This is especially important in the event of a criminal investigation.
• For potentially hazardous samples, be sure to clean the outside of the sampling containers prior to packaging them for transportation.
• Label all sample containers with the date and collector's initials. • Complete all chain-of-custody documents and record information in the field
notebook. • Sampling equipment that is reused should be decontaminated between samples.
The following procedures apply to all five types of sampling activities, but informational sampling can be smaller in volume (from a few milliliters for field tests to 8 ounces).
Drum or Container Sampling
1. Approach and open the drum or container only if it is possible to do so following the DEM ER Site Safety and Health Plan. Pay particular attention to “Specific Hazard Attachment: Drums.”
2. Select the sample container that is appropriate for the type of sample you will be obtaining. If Volatile Organic Compounds (VOCs) are to be a parameter, use a VOC vial, especially if the material is aqueous or of other nature that would allow easy volatilization. If the material is VOC contaminated soil, use an 8-oz. wide-mouth jar with a Teflon-lined cap.
3. Select the appropriate sample rod or coliwasa for the chemical to be sampled. Slowly insert a sample rod or coliwasa into the drum. Go to the bottom of the drum in order to obtain a representative sample of all the layers that may be present.
4. If viscous materials are encountered, be careful about the possible breaking of
Sample Packing and Shipping RI DEM ERP 5-4, p. 2
the glass rod. More than one attempt may be needed, or a core sampler may be necessary.
5. Using a gloved hand, cap the end of the rod with a thumb; then quickly withdraw the rod from the drum.
6. Place the bottom end of the rod into a sample container and slowly release the thumb control to allow the material in the sample rod to flow smoothly into the sample container. Put the sample container nearby or atop the drum to lessen the chance of spillage.
7. Repeat the procedure until the desired amount of sample has been obtained. If VOCs are a parameter, fill the sample container completely to the top to minimize volatilization of the sample.
8. Place the rod back into the drum momentarily and close the sample container immediately.
9. Dispose of the rod, o If acceptable to the disposal facility, break the rod and leave it in the drum;
or o Package it with other debris from the site, such as used PPE;
or o If certain that the material is not a hazardous waste, discard it as a solid
waste. 10. Close the drum. 11. Label the sample container and the drum in a manner that allows them to be
referenced to each other. 12. Place the sample container in a shipping container (e.g., a cooler) for
transportation. 13. Repeat this procedure for each drum to be sampled.
Soil or Sludge Sampling
The type of soil sampling the SOSC will normally need to obtain is a surface grab sample at a spill site, a composite sample of a soil pile, or confirmation sampling in an excavation. (DEM OSCs rarely need to obtain deep soil corings; so that aspect will not be discussed.) 1. Select a sample container with a sufficiently wide mouth to facilitate filling. It must
be made of glass and have a Teflon or aluminum-foil seal. 2. Use a clean stainless-steel scoop, spoon, or auger to gather the desired sample. 3. If the area is large or not visibly homogeneous, composite several samples within
the contaminated area. 4. The sample should be as free as possible of twigs, rocks, or other debris. 5. If VOCs are intended to be a parameter, it is important to minimize their
volatilization. Avoid unnecessarily agitating or disturbing the soil sample. To minimize headspace volatilization, fill the sample container as completely as possible.
6. Close, seal, and label the sample container. 7. Place it in a shipping container for transportation. Ice is not generally required for
soil samples, but ice may be used at the discretion of the sampler. However, to preserve their integrity all cyanide and VOC samples must be cooled to 4OC.
Composite Solid Sampling
The aim of this procedure is to composite random samples of solids (e.g., soil, debris, hazardous materials, or fluff) drawn from several locations in a pile. 1. Survey the pile. Measure dimensions with rolling tapes.
Sample Packing and Shipping RI DEM ERP 5-4, p. 3
2. Mark the corners of the pile with wooden stakes. 3. Mark the boundary of the pile with caution tape. 4. Working clockwise, split the pile into four (4) quadrants. 5. Working clockwise, split each quadrant into four (4) squares. 6. Randomly select two (2) squares in each quadrant to be sampled. 7. Take sixteen (16) grab samples in each square and put them in a clean 5-gallon
bucket. Fill a labeled, 2-gallon ziplock bag with material from the 5-gallon bucket. Place the remaining contents of the 5-gallon bucket into a 55-gallon drum.
8. Use a backhoe to quarter the pile from the center point to each corner. 9. Take sixteen (16) grab samples from the resulting trench. Put them in a clean 5-
gallon bucket. Fill a labeled, 2-gallon ziplock bag with material from this bucket. Put the remaining contents of the 5-gallon bucket into the 55-gallon drum.
10. Take a final sample from the center point of the pile. Take sixteen (16) grab samples, from top to bottom at the center point, and put them in a 5-gallon bucket. Fill a labeled, 2-gallon ziplock bag with material from this bucket. Put the remaining contents of the 5-gallon bucket into the 55-gallon drum.
11. Mix the contents of the 55-gallon drum by laying it on its side and rolling it clockwise for ten revolutions. Fill a clean, labeled 5-gallon container with the mixed contents of the drum.
12. Secure all samples -- the 2-gallong ziplock bags and the 5-gallon composite container -- for later transport to an analytical laboratory:.
Spill Sampling
If the spill has already soaked into the ground, follow the steps for soil sampling. If the material has pooled or is spread out on the soil, follow the steps outlined below. 1. Approach spills in compliance with the ER Site Safety and Health Plan. 2. Depending on the type of material spilled, choose the appropriate sample
collection tool and container. 3. Use a pipette or dropper, scoop, bailer, or another sample jar to collect the spill
material. (Alternately, rather than using transfer tool, dip the sample container directly into the pooled material. This will require decontaminating the outside of the sample container to remove any potentially hazardous residue. This alternative is not recommended for unknowns or extremely hazardous materials.) To minimize volatilization when VOCs are a parameter, carefully pour the sample down the side of the sample container. When working with a solid or a sludge exposed to air, it is best to remove carefully the first 1-2 cm of material prior to collecting the sample.
4. Depending upon the nature of the spill, it may be advisable to composite material from several locations within the spill area. Use a Teflon or stainless steel bowl or tray for mixing the composites.
5. Fill the sample container with a stainless steel spoon, scoop or spatula with the desired amount of sample.
6. If the material is aqueous and VOCs are to be a parameter, use a VOC vial and fill it completely. If the material has a significant percentage of solvent, fill the container to approximately 90% capacity to allow for vapor pressure.
7. Check that the Teflon liner is present in the cap. Secure the cap tightly and label the container.
8. Place the sample in a shipping container for transportation.
Surface Water Sampling Often, spilled materials (especially liquids) find their way into bodies of water. The
Sample Packing and Shipping RI DEM ERP 5-4, p. 4
resulting behavior of the material depends on its physical and chemical properties. Materials that are lighter than water will form pools atop calm pockets or float downwind/downstream of the spill site. Materials that are heavier than water will sink and collect in the greatest depths. Material that is water-soluble will diffuse throughout the water column. Hence, sampling must be suited to the material spilled and its behavior after it enters the water. 1. Approach spills in compliance with the ER Site Safety and Health Plan. 2. Select the appropriate sampling equipment and containers for the material spilled
and the target parameters. 3. Use a pipette, dropper, bailer, weighted-bottle sampler, or sample container to
collect the material or water sample. Samples from shallow depths can be collected by merely submerging the sample container. Simply position the container mouth so that it faces upstream. To avoid stirring up sediment, the sampler should be positioned downstream. Of course, the outside of the sample container must be cleaned before packing.
4. Fill the sample container with the desired amount of sample. It may be necessary to use multiple containers to get enough.
5. Check that a Teflon liner (if required) is present in the cap, close, and label the sample container.
6. Place the sample in a shipping container for transportation. Water samples for VOCs, cyanide and low-level inorganics must be cooled to 4OC with ice. (Do not use ice when shipping dioxin samples.)
Groundwater Sampling
The SOSC may occasionally need to sample groundwater from a well, a particularly exacting science. For sampling objectives to be met, the SOSC must know -- before field activities begin -- what contaminants may be present and their behavior in the subsurface groundwater environment. In addition, the SOSC must consider accessibility and construction of the well, the depth to the water, and the availability of power and appropriate equipment. 1. The sample withdrawal device should be completely inert to the suspected
contaminant and easy to clean. 2. All sampling devices should be thoroughly cleaned before use or dedicated to the
particular well throughout the sampling period. A dilute hydrochloric acid rinse, followed by successive rinses with deionized water, acetone, and distilled water, is recommended.
3. The static water level in the well should be measured and recorded at the time of sampling. In wells where the depth is unknown, the bottom of the well should be established by sounding.
4. To obtain a truly representative sample of groundwater, a volume of stagnant water in the well must first be purged. The recommended length of time required to pump or bail a well before sampling depends on the well and aquifer characteristics, the type of sampling equipment being used, and the parameters being sampled. A common procedure is to pump or bail the well until at least three to five well volumes have been removed. Purging is considered complete when any one of the following criteria is met: o Three well volumes have been removed and pH, temperature, and specific
conductance become stable. (Stabilization of field parameters is defined as "consecutive readings within 5% taken at least five minutes apart". Even if field parameters have not stabilized after five well volumes, purging is considered complete.)

Sample Packing and Shipping RI DEM ERP 5-4, p. 5
o Five well volumes (field parameters not monitored) have been removed; and/or
o At least one purge was fully dry. Except for low-recovery wells, all wells must be sampled within six hours of purging.
5. Select proper sample containers for the parameters of concern. 6. Securely fasten all lanyards to down-hole equipment. Bailer lanyards must be
handled in such a manner that they do not touch the ground. 7. Remove the cap from the sample container, being careful not to touch the inside
of the cap or lay the cap on the ground. (At no time must the inside of the container come in contact with anything other than the sample.) Fill the container by tilting it slightly, so the sample gently runs down a side. To minimize aeration, fill the container to approximately one inch of the top (unless it is a VOC vial, in which case, see “VOC Vials” below).
8. Check that the Teflon liner is present in the cap. Replace the cap on the container and label the sample.
9. Place the sample into a cooler and, if appropriate, cool it to 4OC.
OTHER SAMPLING CONSIDERATIONS
VOC Vials Samples that are to be tested for VOCs are best collected in VOC vials to minimize loss of volatile compounds. This is especially true with aqueous samples or other materials that may allow for easy loss of VOCs. To properly fill a VOC vial:
• The vial should be completely filled to prevent any volatilization. • Extreme caution must be taken when filling the vial to avoid agitation or
turbulence that may allow the loss of VOCs. • Gently pour the sample down the side of the vial to fill. • Fill the vial completely to the top, so that a convex meniscus forms atop the vial.
As the cap is put on, some loss of the sample will occur, but this prevents the formation of airspace in the vial.
• Invert the vial and tap it gently to look for air bubbles. If bubbles are observed, repeat the procedure.
If the material to be sampled has significant vapor pressure, such as a concentrated solvent, a VOC vial is not recommended for use. Remember to only fill the sample container to approximately 90% full.
Sampling Various Material Classes Some concerns for sampling various classes and types of hazardous materials commonly encountered in emergency response are given below. The sampling table at the end summarizes more details with regard to the sampling of various materials. This information may not be applicable to all materials or in all situations, but is intended for use as a guide only.
• Explosives. Handling explosives requires specialized equipment and training. DEM ER personnel should normally avoid handling such material. When explosives are present or suspected, contact the state Fire Marshall for assistance.
• Gases. DEM ER personnel should not sample gas cylinders. As with
Sample Packing and Shipping RI DEM ERP 5-4, p. 6
explosives, gas cylinder sampling requires specialized equipment and training that DEM ER staff may not have. Contact a contractor for assistance. The only type of gas products that an SOSC may have need to sample (for field applications) are common consumer spray cans. Testing of spray cans would best be accomplished by sending the entire can to a contract laboratory rather than conventional sampling methods.
• Flammable Liquids. These materials are usually easily identified in the field, and are easily verified through field tests. The main sampling concern is to prevent accidental ignition of the material. Keep all containers closed except when adding or removing contents, and conduct sampling activities away from any source of ignition. Since many flammable liquids (especially wastes) are mixtures, often with distinct layers, it is important to sample all the layers. Be aware that some flammable materials may actually be a carrier for another material that may present an entirely different hazard (such as a pesticide). Many flammables are also lipophilic and easily absorbed through the skin, and/or they are highly volatile and represent an inhalation hazard. Even though such materials are often common, proper PPE should always be worn.
• Flammable Solids. Many of these materials are quite reactive and may burn quickly or almost explosively. Some are dangerously air- or water-reactive. SOSCs must exercise extreme caution to prevent any accidental ignition or reaction. When sampling, keep all water and ignition sources away. A field test of water reactivity is recommended to determine sample handling, labeling, and packaging needs. Gather the sample as gently as possible to minimize friction. Keep a fire extinguisher and dry absorbent nearby.
• Oxidizers. These materials can also be quite reactive and ignite other materials. Many are also corrosive. Prior to any sampling, a field test with pH and oxidizer papers is recommended. Separate oxidizers from organic and corrosive materials as much as possible to prevent accidental reactions. Heavy metals may also be a concern.
• Organic Peroxides. These materials belong a division of oxidizers that are reactive and may result in fires. Ether peroxides that form from ethers can also be shock sensitive and should be handled as explosives rather than peroxides. Some organic peroxides are dissolved in other materials such as solvents and stabilized to inhibit reactions. Prior to sampling, field test for ignitability with peroxide paper.
• Poisons. Some exhibit other hazards such as flammability or corrosivity. Since mixtures may be present, be sure to sample all layers.
• Biological Agents. Contact the Department of Health for assistance. DEM ER SOSCs sample and screen suspected biological agents for radioactivity and volatility. Department of Health officials determine whether the material poses a medical risk (e.g., for infectious disease).
• Radioactive. The DEM ER OSC should never have to sample radioactive materials. Refer all incidents to the Department of Health. The SOSC should use a radiation detector to identify radioactive hazards at incidents, especially abandoned-material sites.
• Corrosives. When above certain concentrations, some corrosives emit visible fumes. Corrosives are usually single-phase materials, but the bottom of waste-corrosives containers may hold solids that contain heavy metals. The SOSC should use pH paper to estimate the pH and categorize the material as an acid or an alkali prior to full-scale sampling of the material.
Sample Packing and Shipping RI DEM ERP 5-4, p. 7
• Other Regulated Material (ORM). Contaminated waste oils and many other non-flammable listed wastes are common to this class. Aqueous materials with multiple layers are frequently encountered; so be sure to sample all layers.
Sample Security
When conducting sampling activities -- especially evidentiary sampling -- the SOSC must ensure the security of each sample. Tampering, accidental mix-up, or improper handling must be prevented. If challenged, the SOSC may have to testify about how the sample was collected, handled, secured, and transported while the sample was in the custody of the SOSC. (Basically, a person has custody of a sample when the sample is in the person's possession or in immediate supervised view or locked in a secure area.) Therefore, the SOSC needs to maintain the security of each sample before, during, and after collection.
• Samples in general should be closed immediately upon collection to prevent any contamination, volatilization, spillage, or other effects.
• Each sample must be kept in the sampler's possession until it is completely packaged for transport to a secure area.
• The sampler must not hand the sample to another person without recording it on a chain-of-custody form. Otherwise the legal chain-of-custody and security is broken.
• The sample must not be left unlocked while the sampler goes to another area for any purpose.
• As soon as possible after collection, the sample container should be secured with evidence tape over the lid and sides so that it cannot be opened without breaking the tape. Evidence tape is perhaps the single best method to ensure the security and integrity of the sample. It can validate a sample's security even if the sample is out of the sampler's view or if the chain-of-custody is broken.
• The SOSC or his/her designee should witness the sampling procedure, sign the chain-of-custody form, and initial and date the evidence tape at the time of placement.
• Be sure to mark the container with a sample number or other identification as soon as possible, or use a pre-numbered container prior to sampling to prevent a mix-up when collecting more than one sample.
• Unless absolutely necessary, avoid opening of evidence samples after they are sealed.
• Any samples that might be collected for field testing should be kept in different containers and stored apart from evidence samples. This will prevent any contamination of the evidence sample.
OTHER SAMPLES
The size and number of samples to collect mainly depends on the type of analysis to be conducted but also on the type of material and number of duplicate samples needed. It is generally better to have too much sample than not enough, especially since obtaining additional sample material may be difficult, expensive, time-consuming, or even impossible.
Duplicate Samples
Duplicate samples are recommended for evidence samples, in case additional
Sample Packing and Shipping RI DEM ERP 5-4, p. 8
sample is needed or the defense wishes to conduct its own tests. Duplicate evidence samples do not necessarily have to be of the same volume. The tests that DEM may have to conduct are often more extensive than what is needed to prove a certain point. Duplicate samples that are found later to be unneeded are easily disposed. A good rule of thumb to use -- especially if you are unsure whether a duplicate will be needed -- is to collect a duplicate 8 ounce minimum for each waste stream. Duplicate samples need to follow the same collection procedures, security and chain-of-custody as other evidence samples. • Since samples with a high vapor pressure should have a 10% outage, a duplicate
sample may be needed if the containers are too small. • The ER OSC should check with a DEM waste disposal contractor for parameters
when preparing samples for disposal. • To determine the minimum amount for evidence samples, refer to the sampling
table at the end of this document. Since those amounts do not include duplicates or amounts that may be needed for disposal analysis, adjust accordingly. If it is not possible to collect those minimum amounts (as from a drum that has only a small amount of material) than collect as much sample as possible, and conduct a few basic field tests to help select parameters that concentrate on enforcement goals as a priority, followed by disposal parameters.
Background Samples
Background samples are rarely needed for disposal and information samples, but are sometimes valuable in verifying the completion of cleanup activities or for enforcement actions. • A background sample can be collected to show that the background soil or
surface water is as clean or cleaner than the incident site. • A background sample should be collected for enforcement cases in general,
unless other evidence eliminates the need. • Background soil samples can be unnecessary for emergency response purposes,
especially when visible contamination exists and a cleanup standard has been established for the contaminant.
Sample Blanks Sample blanks are samples of deionized or distilled water or of other known media that are treated in the same manner as the unknown sample. They are subsequently analyzed to identify possible sources of contamination during collection, preservation, shipping, handling, or analyses. (Obviously, sample blank containers should be the same type and cleanliness as that of the samples.) • Sample blanks rarely, if ever, need to be collected by an ER OSC for information
and disposal sampling activities or for cleanup verification. • Sample blanks are recommended for enforcement cases that entail samples of
water or other dilute types.
Composite Samples Composite samples are mixtures of more than one fraction of material collected at various locations within a given area. Compositing is widely used in emergency response to reduce laboratory costs and turn-around time. Sometimes compositing is done in the field, and other times it is done in the laboratory after receipt and review of the samples. Compositing can be a beneficial tool, but it must be applied with due regard to the circumstances and purpose.
Sample Packing and Shipping RI DEM ERP 5-4, p. 9
• Materials are normally composited when they are similar or identical in nature and when the resulting analytical results are taken to represent the materials.
• Composites can be used for both disposal and evidence samples. • When compositing materials, the most important concern is the compatibility of
the materials. Care must be taken to avoid combining materials that will cause any type of reaction. Such reactions could be dangerous and, even if not dangerous, could change the nature of the materials and thereby influence the laboratory analysis and interpretation of the data. Therefore, during and after field collection, mix some of the materials and watch for any changes, heat, fumes, smoke, polymerization, precipitation, color or phase changes, etc. If reactions occur, then re-sample individually rather than composite.
• In order to avoid potential problems when mixing samples, only composite materials that appear to be similar by both visual checks and field tests. For example, do not composite acids with alkalis or organics with non-organics.
• Even compositing somewhat similar materials can be detrimental. For example, paint thinner and waste oil are compatible, but the mixture might affect the flash point and other parameters; so it may be necessary to handle each as separate hazardous waste for disposal purposes. It is best only to composite materials of the same apparent constituents, such as oils with oils or paints with paints, but not oils with paints.
• Another concern to be considered when compositing is the potential dilution of constituent contaminants. This can affect all types of samples and can skew conclusions about one or more of the sources. Even if source concentrations vary, if the concentration of contaminant in every source exceeds a particular level of concern (such as the standard for defining a hazardous waste), then mixing these materials together will not dilute the contaminant below the standard. For example, mixing two wastewater streams -- one with 10 ppm and the other with 20 ppm chromium -- will not reduce the composite level below the 5 ppm hazardous waste standard. However, mixing materials when one or more has a level below the standard can cause a dilution of concern that would result in an incorrect conclusion. Such incorrect conclusions can result in improper labeling and disposal of materials and can adversely affect enforcement cases. The dilution factor can be countered by multiplying the laboratory result of the composite by the dilution factor to get a maximum possible value for any of the individual samples. This maximum value can be used as the laboratory result or as a range for making disposal decisions.
• The laboratory -- where calibrated equipment is available to obtain exactly equal volumes -- is usually the best place to do compositing prior to analysis. But fairly accurate volumes can also be obtained using graduated cylinders, pipettes, etc in the field. More experienced SOSCs may be able to "eyeball" the compositing by using same-sized jars or sample rods and making a best effort to obtain equal volumes. While this is acceptable, it is not recommended for everyone.
• Materials may be composited in the field but only for information or disposal samples, never with evidence samples that require greater accuracy.
• Unknowns should generally not be composited, unless field observations and field tests show them to be very similar and compatible. Knowns and partially knowns may be composited, if they are similar and compatible.
• An option to consider, particularly when dilution is a concern, is to collect a composite sample and individual samples, and then to request not only certain parameters for the composites but also a few other parameters of special
Sample Packing and Shipping RI DEM ERP 5-4, p. 10
concern for the individual samples. This approach could be necessary in an enforcement action, to allay dilution concern. It may result in extra disposal costs, but the savings in laboratory costs and time typically outweighs any extra disposal cost.
SAMPLE PRESERVATION
The purpose of preservatives is to keep the sample's target parameters as they were at the time of collection -- to prevent unintended changes such as precipitation, chemical or bacteriological degradation, absorption into the walls of the container, oxidation/reduction, etc. Emergency response sampling usually deals with waste and other concentrated materials in which the lack of a preservative will generally not significantly affect the integrity of the sample. So, the use of preservatives in emergency response sampling is not as critical as it is in other types of sampling, such as groundwater sampling. However, there may be borderline concentrations in which the lack of a preservative may give a result that is falsely under a standard. This can affect disposal procedures and can also hamper an enforcement case. Therefore, whenever appropriate, the DEM SOSC should obtain from contract laboratory sample containers that are pre-filled with the appropriate preservative.
Chemical Preservatives
The chemicals that may be used as a preservative include: • Nitric Acid, ACS grade • Sodium Hydroxide, ACS grade, pellets • Sulfuric Acid, ACS grade • Hydrochloric Acid, ACS grade • Sodium thiosulfate, ACS grade, crystalline • Mercuric chloride, ACS grade, powder
For ER purposes, DEM will most often use nitric or sulfuric acid. They are added to sample containers in the following amounts:
• Surface water: 4ml (1:1) acid per liter • Groundwater: 5ml (1:1) acid per liter • Dilute aqueous samples for metals should be acidified with concentrated nitric
acid to a pH<2 (Note: As a QA procedure for evidence samples, the acid should also be tested for the same metals.)
The sampling table at the end of this SOP gives some suggested preservatives whenever preservatives are going to be used. Whenever the SOSC uses pre-preserved bottles for sampling, it is recommended to check the pH of the preserved sample to ensure the pH meets the EPA criteria. If it is not possible to use a preservative for logistical, time or any other reason, then the SOSC should proceed with the sampling with knowledge that the analyses could be incorrect.
Cooling
The most common preservative measure for emergency response sampling is to cool the samples with ice packs or cold packs to 4OC.
• Never use ice to cool materials that are known or suspected to be water reactive.
• Whenever possible, dilute aqueous samples should be cooled, especially in preparation for low- or medium- level organic analysis and low-level inorganic analysis.
• VOC vials of dilute aqueous samples should also contain an appropriate
Sample Packing and Shipping RI DEM ERP 5-4, p. 11
preservative. • All cyanide samples must be shipped on ice. • Concentrated waste samples generally do not need to be preserved, but it is
nevertheless good practice to cool them.
ANALYSES
Selection of Parameters Parameters are the target analytical chemicals or characteristics for which a sample will be analyzed. Informational, disposal and evidence samples may dictate overlapping or totally different parameters. Due to the time and costs involved in laboratory analyses, the selection of parameters needs to be carefully considered. The choice of parameters also affects the sampling procedures and equipment used. The most common DEM ER need for analytical testing is for identification and disposal of abandoned materials. Typically, it is not necessary to completely identify all constituents. Rather, the purpose is to obtain enough information to conduct a hazardous waste determination and to arrange the proper disposal of the material. The DEM ER has set up some standardized analytical groups for a few common waste types, but for most waste types, parameters are selected on a case-by-case basis. • The selection of parameters and testing can be minimized through the use of field
tests, visual observation, experience, applicable label information (if accurate), sampling compositing (where appropriate), estimating parameters (where possible instead of using laboratory tests), and other means. For hazardous waste determinations in emergencies, DEM allows experience, knowledge, and evaluation of the material to influence the selection of parameters. It is not necessary to run a full analytical scheme for all parameters on all materials. For unknowns, the sample should be tested for all TCLP metals and volatiles (TCLP can be done as "totals" without the expensive leaching procedure for disposal samples), ignitability and corrosivity (if not already determined by field test), and any other pertinent parameters. For partially knowns and knowns, knowledge and experience can be used to select or eliminate certain parameters, or sometimes even to forgo all laboratory analysis and simply profile the waste for disposal, usually as a hazardous waste
• The DEM waste disposal contractor largely determines what parameters are necessary for disposal of wastes through them. These parameters are not necessarily needed in full every time, but are a list of parameters often chosen for those types of wastes. In fact, the disposal options and approvals are determined as much by physical characteristics of the waste as by chemical concentrations. The disposal facility is more concerned with things such as percent water, number of layers, viscosity and physical state. Analyses should concentrate only on parameters that are needed to get disposal approval and yet meet applicable regulations.
• Another way to save costs on disposal analytical is to delete or limit the use of the leaching procedure such as the TCLP extraction, and run totals instead (solid samples). Since totals are always greater than leached values, the use of those values would be conservative. The cost of the waste being disposed of as a hazardous waste as a result of using these values is more than offset by the laboratory cost savings. Obviously, evidence samples should never be handled this way since TCLP extraction procedure is required to prove it is or is not a
Sample Packing and Shipping RI DEM ERP 5-4, p. 12
hazardous waste. • Another method to decrease the number of parameters and sometimes eliminate
laboratory analyses is to use generator's knowledge of the material to complete the material profile sheet for disposal approval. This typically entails the assumption that the material is hazardous rather than non-hazardous and estimating the concentration of certain parameters based on field tests or prior experience. Based on ER’s experience analyzing and disposing of various waste materials, there are often situations that profiling in lieu of performing analyses is viable, particularly for the more common materials. Materials for which this is an option include paint-related wastes, corrosives, fuels and waste oils. Be sure to check with the disposal contractor before profiling in this manner and review the hazardous waste list to be confident that no other waste codes are likely to apply.
Parameters for Enforcement Cases
Analytical testing for evidence samples is the most crucial testing. When choosing parameters, the SOSC must first determine what needs to be proven to support a particular citation. Often, the case requires only one or a few parameters to prove a particular point. • For example, a simple flash point test would show a lacquer thinner to be a
hazardous waste, without the need for a full testing scheme. On the other hand, if the goal is to prove that a defendant discharged a particular material, then the parameters would include that material (or components of that material), plus other parameters that might be needed to distinguish the material from other similar materials. For example, to prove a gasoline discharge, choose such typical parameters as aromatics and methyl tert-butyl ether; to distinguish this discharge from a paint thinner with similar aromatics, add acetone and MEK and possibly alcohols that would be present in a paint thinner but not in gasoline.
• If the goal is to prove that a waste is a RCRA hazardous waste, fewer test parameters may be necessary. Remember: Defense attorneys will likely take every opportunity to cloud a case. A simple flash point or pH test is enough to prove that ignitable or corrosive wastes are hazardous. However, a listed hazardous waste typically requires more analyses to prove the identity or concentration of a waste. A listed waste also requires some proof of the source or process for generating the waste.
• If the goal is to prove willful pollution, then it is necessary to show actual pollution; not just potential pollution. Doing so will require soil or water samples. Pollution charges are better supported when the pollution is a violation of some numerical standard rather than guidance or a goal. Frequently, these cases end up as a battle of the experts, in which case a typical jury has neither the scientific background to understand the issues nor the patience to sit through relevant instruction. In choosing the laboratory to conduct tests that will be introduced as evidence, the SOSC should consider the possibility that laboratory personnel may also be required to testify.
• To ensure proper handling of samples and paperwork, notify the laboratory when shipping or delivering evidence samples.
• A joint disposal and evidence situation may require collecting two samples. Send the disposal sample to one laboratory and the evidence sample to another laboratory.
Sample Packing and Shipping RI DEM ERP 5-4, p. 13
PACKING AND SHIPPING
PACKING PROCEDURES This section provides suggestions for packing and shipping samples. The SOSC may use alternative packaging, as long as the same safety and security goals are met. Some of these suggestions may not apply to all situations, but all samples should be packaged in a manner that
• Minimizes the potential for leaks and breakage, especially for hazardous material samples, and
• Meets USDOT regulations for transport of hazardous material. When selecting a packaging procedure, the SOSC should consider the suspected or known hazards in the sample. For packing purposes, samples fall into two types:
• Environmental samples. These are samples that are not expected to contain high levels of hazardous materials and that would not pose a threat during transportation. They include drinking water, groundwater, surface water, background samples, soil, sediment, and wastewater effluent. USDOT does not regulate the shipment of non-hazardous environmental samples; so those samples may be packaged as described below to preserve their integrity.
• Hazardous material samples. These samples contain hazardous materials and must be packaged to meet certain labeling, marking, and shipping regulations. Noted that preservatives used in some environmental samples may cause the samples to be regulated as a hazardous material, particularly where the pH of the sample is preserved to <2 or >12. Pre-preserved sample containers are also considered hazardous materials.
Samples should be packaged for shipment on a common carrier (vs. hand delivery) as follows:
1. Place the sample container in a thick, new, clear plastic bag with a zipper closure. Do not put incompatibles together. As much air as possible should be squeezed from the bag before sealing. Bags may be sealed with evidence tape for added security.
2. A common picnic cooler is typically used as a shipping container for samples. In preparation for shipping samples, the drain plug should be taped shut from the inside and the outside. For extremely hazardous samples, each sample can be placed in another container such as a paint can filled with an absorbent. The lid must be sealed, typically with metal clips, filament strapping, or evidence tape. Be sure to place arrows on the can to indicate which end is up. The outside of each can must contain the proper USDOT shipping name and UN/NA identification number of the sample. These paint cans can then be placed in a cooler as described below.
3. Place the bottles (or cans) in the lined cooler. Put ice packs around the sample (if appropriate) and fill the rest of the remaining space in the cooler with absorbent for cushioning and leakage control. Cardboard separators may be placed between the bottles as an alternative to loose packing or ice packs.
4. Securely close the liner bag and tape it shut. 5. Place a copy of the chain-of-custody form inside a plastic bag, sealed, and
taped to the inside of the cooler lid. The sampler should also keep a copy of the chain-of-custody form. The SOSC should notify the laboratory if the sample is suspected to contain any substance toward which laboratory personnel

Sample Packing and Shipping RI DEM ERP 5-4, p. 14
should take extra safety precautions. 6. Close the cooler and tape it securely shut with strapping tape. For evidence
samples, evidence tape should be used in place of (or in addition to) strapping tape on the outside of the cooler.
7. Mark the cooler with arrows and "This End Up." Mark the cooler with the name, address, and other details that the common carrier requires. Mark the proper shipping name, the USDOT identification number, and the hazard class, as appropriate for the material being shipped. Most samples will qualify as a limited-quantity package. The shipping description for those samples must include "limited quantity" in the description.
8. The cooler is now ready for shipping via common carrier to a contract laboratory. Verify that the common carrier accepts hazardous materials. United Parcel Service (UPS) normally accepts labeled hazardous-material packages and delivers them the next day. Federal Express and other carriers may also accept hazardous materials, but check with them before shipment. Be sure to comply with USDOT hazardous material regulations, if applicable.
SHIPPING PROCEDURES
The USDOT regulates the shipment of hazardous materials, including samples. Since some of the samples collected by a SOSC could be expected to be a hazardous material, the USDOT regulations must be followed.
USDOT Regulations The SOSC must determine if a sample is a hazardous material prior to transportation. If the sample is a known material that is identified or listed in the 49 CFR 172.101 Hazardous Material Table, then the sample must be packaged, marked, labeled and shipped accordingly. However, if the samples are partially known or unknown, the SOSC must select a transportation category in accordance with the USDOT classification scheme:
CLASS MATERIAL
1 Explosives 2 Gases - flammable, non-flammable, and poisonous 3 Flammable and Combustible Liquids 4 Flammable Solids 5 Oxidizers and Organic Peroxides 6 Poisons and Infectious Substances (etiologic agents) 7 Radioactive Materials 8 Corrosives 9 Miscellaneous -- material that is a hazard but that does not fit in
any other hazard class ORM-D Other Regulated Material -- material that presents a limited hazard
during transportation due to its form, quantity, or packaging
In addition, according to 49 CFR 172.101(c)(12) and 172.402(h), when there is a reasonable doubt as to the hazard class and labeling requirements and laboratory testing is needed, the material may be assigned a tentative class and description based upon the defining criteria and hazard precedence, or the SOSC's knowledge of the material. Information obtained from field tests may be used to help classify the material.
Sample Packing and Shipping RI DEM ERP 5-4, p. 15
Many of DEM’s samples will be flammables and corrosives, with some poisons and ORMs. If a sample is unknown, then -- at a minimum -- quick field tests for pH, oxidizer, water solubility, and ignitability should be done to help determine the shipping class. If the material is not flammable, an oxidizer, water reactive or corrosive, it most likely should be classified as a poison (pesticide, cyanide, or a very toxic material) or class 9 (chlorinated solvents, TCLP wastes, soils, or miscellaneous hazardous wastes). Keep in mind that a toxic hazardous waste often does not meet the USDOT definition of poison.
The packing instructions described earlier should meet all the USDOT packaging standards in most situations that an SOSC encounters. Be sure not to package incompatible materials together in the same package.
The USDOT shipping paper requirements can be met by using the common carrier's form, a DEM Shipping Paper, or even a hazardous waste manifest form. More than one exterior package may be listed on a single shipping paper. Use only USDOT authorized abbreviations on a shipping paper.
To meet the USDOT labeling requirements: Use the applicable 4"x4" DOT hazard label(s) on the sample itself or its
container. Another label must be put on the outside of the sample carrier (but not on the bottom).
The USDOT proper shipping name and marking requirements are met by marking the appropriate information on the sample and the outside of the sample carrier, near the hazard label. The words "Laboratory Samples" should also be marked on the outside of the carrier.
Write the shipping name in the format: "Shipping Name", "Hazard Class", "UN/NA #", "Packing Group". The shipping name must also include the letters "RQ" if the package holds a reportable quantity of a hazardous material. (Such a quantity would be rare for samples, but not impossible since some reportable quantities are one pound.) Whenever the shipping name contains "n.o.s.", put in parentheses the main one or two compounds, or suspected compounds that give the material its hazard.
Field Testing RI DEM ERP 5-5, p. 1
FIELD TESTING PURPOSE OF FIELD TESTING
A field test is basically an analytic procedure that is conducted outside of the laboratory using portable instruments, kits, or other testing materials. It can be broad or limited in scope, depending on the situation and information to be obtained. Field testing can be used to:
Gain real-time information for making health and safety decisions for first responders Estimate the extent of contamination Refine sampling plan. Depending on the incident, , for example, field tests may
help to: o Adjust the scope of sampling activities. o Identify or eliminate lab parameters. (Note: A positive field test can be
used to eliminate parameters, but a negative or borderline or inconclusive field test should not be relied upon except in obvious cases, such as a wastewater showing neutral on pH paper.)
o Make compositing decisions. o Tentatively identify or categorize unknown or suspected materials. o Determine if laboratory analyses are necessary. (Note: Field tests are not
as sensitive, specific, or accurate as laboratory methods, so it cannot take the place of laboratory analyses in all situations. All evidence samples will need to be verified by laboratory analyses.)
Help determine when cleanup actions appear adequate. FIELD INSTRUMENTS
All materials that appear to be aqueous should be tested with pH paper in the field, either during or after sample collection. It is recommended that all samples be evaluated for corrosivity, ignitability, oxidizer and water solubility at a minimum, either by field test or knowledge of the material. (See HazCat Kit below.) Further testing may also be considered depending on the situation and results of the first round of tests. This can be done by the SOSC or whoever is collecting the sample. Note: Avoid using smell to identify or categorize materials. Any odors that are detected in an area or near a sample should be evaluated as a potential sign of danger or of a need for personal protection equipment. A smell may provide clues to the identity of the material, but it is unreliable for identification purposes and can be dangerous. Continued inhalation of materials with odor is not recommended unless the SOSC is certain that exposure is not harmful. The use of respiratory protection to minimize potential exposure during sampling is recommended. Do all field testing outdoors in open air, and use small quantities of sample material to decrease the amount of airborne material. The DEM SOSCs also have access to several field instruments. They include vapor detectors, combustible gas/oxygen indicators, radiation detectors, and a HazCat Kit. Each field testing device has distinct strengths, weaknesses, care and use requirements that are detailed in its manual. These instrument manuals should be a responder’s main source of information. The following is a summary of key features and maintenance requirements.
AIM Detector DEM uses the LOGIC Series Gas Detector by AIM. Most AIMs have a combination
Field Testing RI DEM ERP 5-5, p. 2
oxygen sensor unit and a multigas sensor unit. A chlorine sensor is also available. The multigas sensor is a non-specific metal oxide sensor that detects various hydrocarbon based gases and vapors. The detection limits range from 0% to 100% of the LEL. The oxygen sensor is an electrochemical sensor with a detection range of .1% volume to 25% volume. Key inspection and maintenance issues include:
• Battery life is eight to ten hours. • Full recharge requires about six hours. • Replace the oxygen sensor every year. • Replace the combustible sensor every two years, sooner for dusty or acidic
usage. (Very high concentrations can "numb" sensors, and organo-lead compounds can "poison" sensors. Combustible gas detectors have a wide margin of error and are not always reliable, tending to under read a concentration.)
The SOSC should refer to the AIM Users Manual for specific operating instructions.
Photoionization Detectors DEM uses two different brands of PIDs: the Photovac Microtip and the RAE Systems MultiRAE. PIDs measure the total concentration of volatile organic compounds (VOCs) and other gases in the air by utilizing an ultraviolet light (UV) source to ionize the airborne contaminant(s). A fan or pump draws air into the detector of the instrument where the contaminants are exposed to UV light and the resulting ions are collected and measured. For example, a reading of 50 ppm indicates that there are approximately 50 ppm of total ionizable compounds present. Even when calibrated for a specific compound, the instrument is direct reading only if there are no other compounds present.
The Photovac Microtip is DEM’s older PID model. It is a microprocessor-controlled instrument for measuring the presence of photoionizable chemicals in the air at ppm levels. Key inspection and maintenance issues include:
• Battery life is about seven hours. • If not used regularly, charge once per month for 8-72 hours. • Full battery recharge requires about eight hours. • Calibrate with isobutylene before each use. • Clean UV lamp window every 24 hours. (A dirty window or bulb will affect
the accuracy of the instrument.) • Replace the inlet filter every 240 hours of operation, or more often in dusty
environments. The SOSC should refer to the Photovac Users Manual for specific operational instructions.
The MultiRAE is a compact and lightweight PID. It has a monitor for oxygen/LEL, VOC, and toxic gas (CO, H2S, SO2, NO, NO2, CL2, NH3, HCN, PH3) that can be custom calibrated. Key inspection and maintenance issues include:
• Maximum continuous operating time of about 10 hours. • Runs on alkaline batteries, Ni-Cd batteries, or continuously when plugged
into charger or 12 volt adapter. • Full battery recharge requires about 10 hours.
Field Testing RI DEM ERP 5-5, p. 3
• Will operate in 0% - 95% humidity. The SOSC should refer to the MultiRAE Users Manual for specific operational instructions.
Radiation Detector DEM uses a Radiation Alert Monitor 4. This instrument is used to screen for radioactive materials. It will detect alpha, beta and gamma radiation. The instrument needs regular battery changes to keep it functioning properly. The SOSC should refer to the user manual for specific operational instructions.
Colorimetric Indicator Tubes Colorimetric indicator tubes (Drager Tubes) consist of a glass tube impregnated with an indicating chemical. The tube is inserted into a piston or bellows type pump. At a predetermined rate, a fixed volume of air is drawn into the tube. The contaminant reacts with the indicator chemical in the tube, producing a change in color whose length is proportional to the concentration of the contaminant. Colorimetric indicator tubes have the disadvantage of only screening for specific chemical groups and have poor accuracy. Nevertheless, colorimetric indicator tubes are still valuable, especially when trying to identify a chemical.
• Colorimetric tubes have expiration dates, but they will usually work adequately for qualitative usage long after the expiration date.
• If a negative result is obtained during usage, verify the working condition by using it on a known source. For example, if testing for ammonia, the tube should change color from yellow to purple. If the tube remains yellow, indicating a negative test, try it on some ammonia in your HazCat Kit to verify that it will change to purple. If it doesn't, the tube is bad.
HazCat Kit The HazCat Kit (a registered trademark) can be used to categorize and sometimes to identify unknown liquids and solids. It relies on a flow chart of qualitative and a few semi-quantitative chemical tests. Laboratory verification is still necessary, but field tests can be used to help:
• Provide quick, inexpensive information about the incident; • Choose samples for collection; • Identify or eliminate lab parameters; • Assist with composite-sampling determinations; • Assist cleanup activities; and • Provide tentative information while awaiting lab results.
The SOSC should refer to the HazCat Kit Users Manual for specific operational instructions.
The most common tests include.
• Ignition Test. The ignition test is used to estimate the approximate flash point of the material. A lit match is held over the sample (of which about 1 ml is placed on a watch glass or in a foil cup). A material with a flash point less than the current ambient temperature (e.g. flammable liquid) will ignite. If the flame must be touched to the sample to ignite it, then it is combustible (or possibly flammable, if this test is done in a cool environment).
• pH Test.
Field Testing RI DEM ERP 5-5, p. 4
pH paper is used to estimate the pH of aqueous samples (and of water test mixtures).
• Oxidizer Test. Oxidizer paper is used to identify materials with potential oxidizer hazards. For best results, add 1 drop of dilute hydrochloric acid to the KI/starch paper, then touch it to the sample. An oxidizer will turn the paper purple/black. (This test is extremely sensitive to chlorine/bleach type materials and will indicate a positive even for concentrations too small to be an oxidizer hazard).
• Water Solubility Test. A water test is used to determine how a material behaves in water, i.e. its reactivity and solubility. Place a few ml of water in a test tube, add a few drops of sample to the water, shake, and observe if the sample reacts, dissolves, floats, sinks, suspends, or emulsifies.
• Peroxide Test. Peroxide paper is used to test for organic and in-organic peroxides. The paper is moistened and then touched to the material. A blue color is positive. This test can be applied to crystals around a container's lid to screen for potentially explosive organic peroxides. (Note: The paper has an enzyme and is sensitive to prolonged heat. Refrigerate all but a few papers to be kept in the kit. Check the kit supply weekly with household hydrogen peroxide and replace papers with a fresh supply as needed.)
• Sulfide Test. Sulfide paper is used to detect hazardous sulfide ions. Touch the paper to the sample; a brown to black color is positive.
• Evaporation. To measure the evaporation and volatility of a substance, place a small amount on a watch glass or other suitable surface. While conducting other tests, watch its rate of evaporation.
Other useful tests include: • Char Test.
The char test is used to differentiate organic vs. inorganic samples. Place a small amount of the material in a test tube and heat it with a propane or butane torch. There are many things to look for, but the main item is charring, indicative of organic materials. The pH and oxidizer tests can also be applied to the smoke to get more information.
• Chloride Hot Wire Test (Bielstein Test). The chlorine hot wire test is used to detect >500 ppm chlorinated organics. Heat a copper wire in a torch flame until no green flame is visible and allow it to cool a few seconds. Touch the wire to the sample and then place into the flame. A green color is positive.
• Water Detection Test. Water paper is used to determine if a sample contains water. (Note: This test does not work well in concentrated acids.)
• Iodine Crystal Test. The iodine crystal test is used to categorize hydrocarbon solvents. Add a small iodine crystal to a few ml of sample in a test tube and shake. The colors:
COLOR INDICATES EXAMPLES
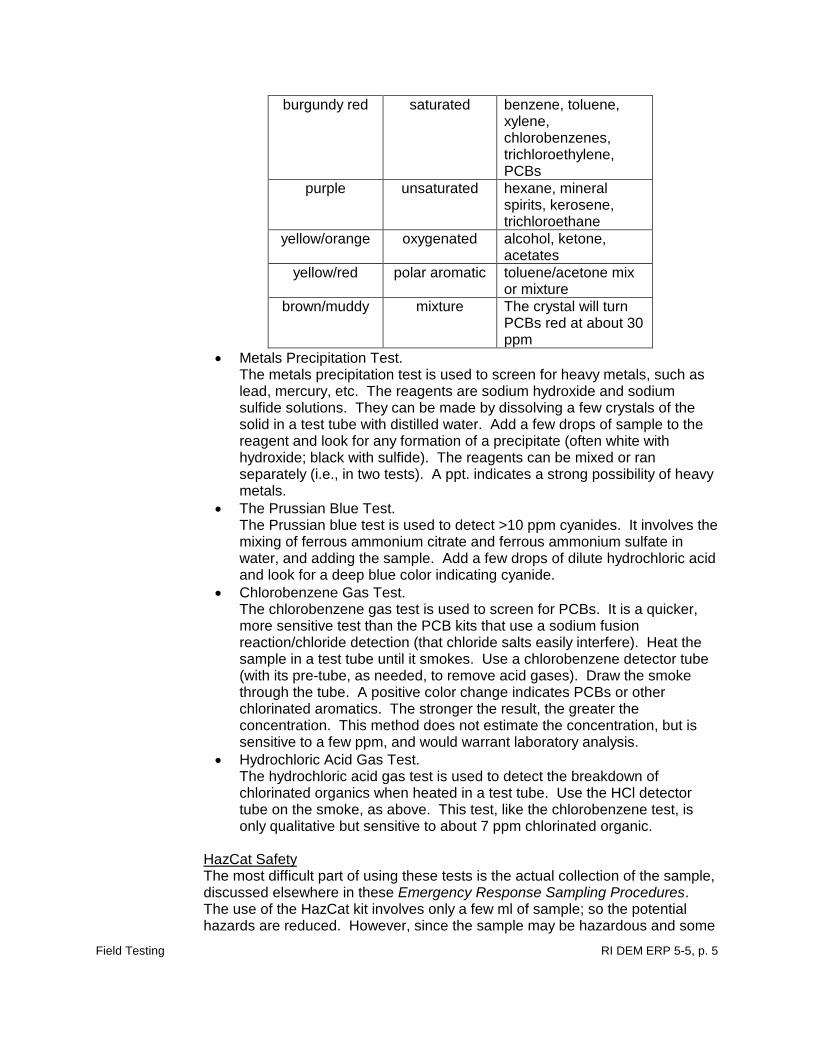
Field Testing RI DEM ERP 5-5, p. 5
burgundy red saturated benzene, toluene, xylene, chlorobenzenes, trichloroethylene, PCBs
purple unsaturated hexane, mineral spirits, kerosene, trichloroethane
yellow/orange oxygenated alcohol, ketone, acetates
yellow/red polar aromatic toluene/acetone mix or mixture
brown/muddy mixture The crystal will turn PCBs red at about 30 ppm
• Metals Precipitation Test. The metals precipitation test is used to screen for heavy metals, such as lead, mercury, etc. The reagents are sodium hydroxide and sodium sulfide solutions. They can be made by dissolving a few crystals of the solid in a test tube with distilled water. Add a few drops of sample to the reagent and look for any formation of a precipitate (often white with hydroxide; black with sulfide). The reagents can be mixed or ran separately (i.e., in two tests). A ppt. indicates a strong possibility of heavy metals.
• The Prussian Blue Test. The Prussian blue test is used to detect >10 ppm cyanides. It involves the mixing of ferrous ammonium citrate and ferrous ammonium sulfate in water, and adding the sample. Add a few drops of dilute hydrochloric acid and look for a deep blue color indicating cyanide.
• Chlorobenzene Gas Test. The chlorobenzene gas test is used to screen for PCBs. It is a quicker, more sensitive test than the PCB kits that use a sodium fusion reaction/chloride detection (that chloride salts easily interfere). Heat the sample in a test tube until it smokes. Use a chlorobenzene detector tube (with its pre-tube, as needed, to remove acid gases). Draw the smoke through the tube. A positive color change indicates PCBs or other chlorinated aromatics. The stronger the result, the greater the concentration. This method does not estimate the concentration, but is sensitive to a few ppm, and would warrant laboratory analysis.
• Hydrochloric Acid Gas Test. The hydrochloric acid gas test is used to detect the breakdown of chlorinated organics when heated in a test tube. Use the HCl detector tube on the smoke, as above. This test, like the chlorobenzene test, is only qualitative but sensitive to about 7 ppm chlorinated organic.
HazCat Safety The most difficult part of using these tests is the actual collection of the sample, discussed elsewhere in these Emergency Response Sampling Procedures. The use of the HazCat kit involves only a few ml of sample; so the potential hazards are reduced. However, since the sample may be hazardous and some
Field Testing RI DEM ERP 5-5, p. 6
of the kit's reagents are hazardous, the SOSC is expected to adhere to strict safety procedures. Safety procedures are more fully discussed in The Emergency Response Site Safety and Health Plan, but the general precautions for HazCat testing include:
• Do all field tests outside the "hot zone". • Do all tests in a well-ventilated area or outdoors, positioned upwind of the
samples and test. • Be careful about handling ignitable materials near flames used in testing. • Keep a small box of baking soda (sodium bicarbonate) handy, for
neutralizing acids used in testing or spillage. • When testing unknowns, use level B personal protection. • When materials are tentatively identified, use the level of personal
protection appropriate for that material. (For example, paints, solvents, non-fuming acids or pesticides may require up to level C personal protection. Waste oil may require only level D.) A good rule of thumb is to dress for maximum protection and downgrade as further information becomes available to justify it.
• The use of odor to categorize a sample is not recommended, especially prior to conducting field tests. If an odor is noticed during any activity, do not ignore the information, but use it to help determine the potential safety steps to be taken.
HazCat Kit Maintenance Most of the reagents in the kit are stable and will last for many years. (The dates on the bottles are the date of manufacture, not an expiration date.) The manual gives details on how to test each reagent. Most reagents can be tested annually, except those that are sensitive, as described below. • When maintaining the kit, wear gloves and eye protection. Squeeze bottles
gently to check for cracks and brittleness. Look for leakage. Bottle checks should be completed quarterly.
• Drager Tubes. Drager tubes have expiration dates, but they will usually work adequately for qualitative usage long after the expiration date. If a negative result is obtained during usage, then verify the working condition by using it on a known source.
• Peroxide Paper. Peroxide paper tends to be heat sensitive. Heat destroys the enzyme used in the manufacture of the paper. Therefore, keep only a few papers at a time in the kit, and the rest in the refrigerator, where they will last for years (even past the expiration date). If the paper turns a light brown color, it is probably bad. Check with household hydrogen peroxide to verify usefulness. Check the papers kept in the kit about once every two to three months.
• Other Sensitive Reagents. Some reagents tend to be heat sensitive and eventually go bad. Most of them are organic reagents dissolved in methanol (CAUTION: FLAMMABLE). Reagents for the following procedures should be tested about every three months to determine usefulness:
o Iron Test o Lead Test o Chromium Test o Fluoride Test
Field Testing RI DEM ERP 5-5, p. 7
o Nickel Test o Cadmium Test o The Cyanide Test (This is the most unstable reagent in the kit.
However, experience shows that it often works long after the expiration date.
Test as described in the manual.