elm-9000c digital lensmeter operation manual · the elm-9000c is designed to measure refractive...
TRANSCRIPT

Lensmeter ELM-9000C
ELM-9000C Digital Lensmeter
Operation Manual
Revision 1.02 2015.12.24

Lensmeter ELM-9000C
Table of Content
1. IMPORTANT NOTICE ...................................................................................1
1.1 Intended Use...........................................................................................1
1.2 Classifications .........................................................................................1
1.3 Caution .................................................................................................2
2. SAFETY....................................................................................................3
2.1 SAFETY INFORMATION ...............................................................................3
2.2 Symbol Information....................................................................................4
2.3 Shape Of Plug .........................................................................................5
2.4 General Safety Information.............................................................................5
2.5 Cautions in Installation, Storage and Transportation ................................................6
2.6 Environment of installing the device .................................................................7
2.7 Labels ..................................................................................................8
3. Features ..................................................................................................9
4. Notes for Using the Instrument .....................................................................9
5. Prerequisites for safety ...............................................................................11
5.1 Preparation before use ................................................................................11
5.2 Preparation when you use.............................................................................11
5.3 Instruction and operation sequence...................................................................11
5.4 Storage after use........................................................................................11
6. Configuration.............................................................................................12
6.1 Front and right side....................................................................................12
6.2 Left side................................................................................................13
6.3 Bottom..................................................................................................14
6.4 GUI (Graphic User Interface) / Display...............................................................15
6.4.1 Normal measurement mode..................................................................15
6.4.2 Progressive power lens measurement mode................................................17
6.4.3 MENU mode...................................................................................18
7. Measurement.............................................................................................20
7.1 Measurement of Normal lens..........................................................................20
7.2 Measurement of Glasses lens.........................................................................21
7.3 Measurement of Multifocal lens.......................................................................22
7.4 Measurement of Progressive lens.....................................................................22
7.4.1 Preparation of measurement..................................................................22
7.4.2 Carrying out Progressive mode...............................................................23
7.4.3 Measurement of far part.......................................................................23
7.4.4 Measurement of near part.....................................................................24
7.5 Measurement of hard contact lens....................................................................26
7.6 Measurement of soft contact lens.....................................................................26
7.7 Measurement of UV penetration ratio..................................................................26
7.8 Marking..................................................................................................28
7.8.1 The lens without astigmatism .................................................................28
7.8.2 The lens with astigmatism.....................................................................28
7.8.3 Prism lens.......................................................................................28
7.9 Printing for measured data.............................................................................28
8. SETUP mode..............................................................................................30
8.1 MEASURE PAGE........................................................................................30
8.2 SYSTEM PAGE..........................................................................................31
8.3 DATE/TIME PAGE.......................................................................................32
8.4 PRINT PAGE.............................................................................................33
9. Self-diagnosis and maintenance....................................................................35
9.1 Check before asking service to sales agent..........................................................35
9.2 Printer paper replacement method....................................................................36
9.3 Move another place....................................................................................36

Lensmeter ELM-9000C
9.4 Fuse Replacement.....................................................................................37
9.5 Service information....................................................................................38
10. Specification.............................................................................................39
11. Accessory.................................................................................................40
12. Packing....................................................................................................41
12.1 Packing Foam Design..........................................................................41
13. EMC (ELECTROMAGNETIC COMPATIBILITY) .....................................................42
1
Lensmeter ELM-9000C
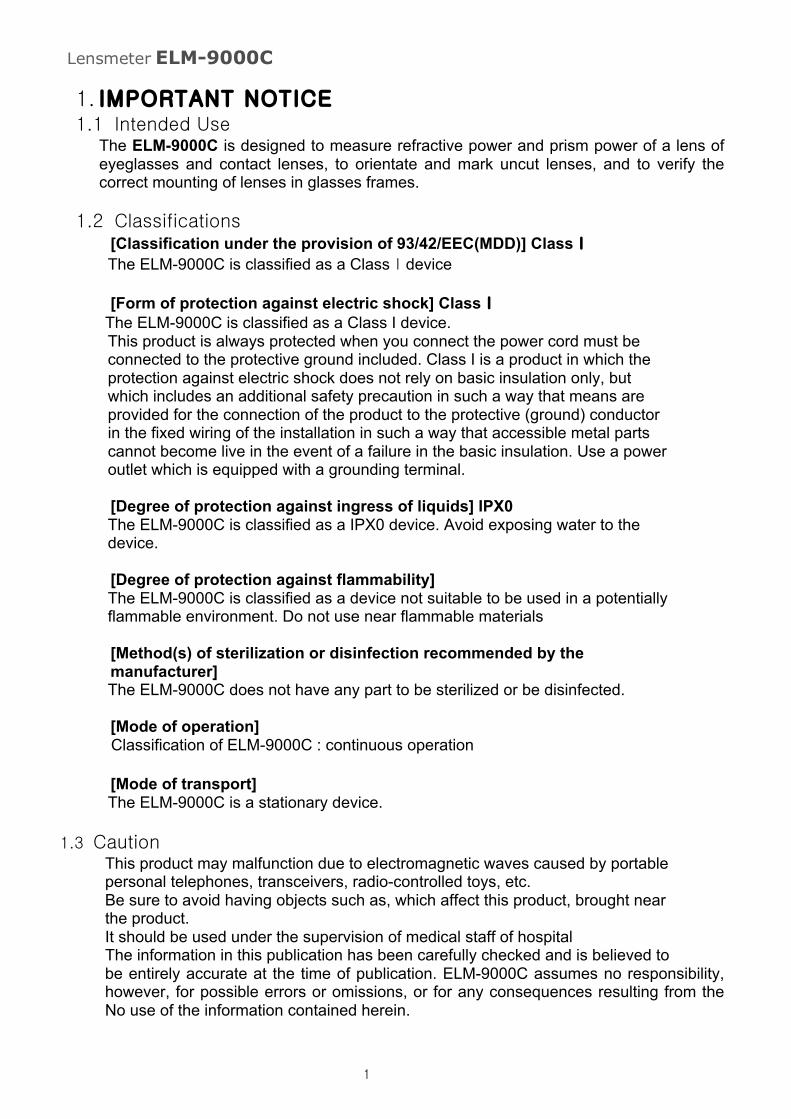
1. IMPORTANT NOTICE 1.1 Intended Use
The ELM-9000C is designed to measure refractive power and prism power of a lens of eyeglasses and contact lenses, to orientate and mark uncut lenses, and to verify the correct mounting of lenses in glasses frames.
1.2 Classifications [Classification under the provision of 93/42/EEC(MDD)] ClassⅠ The ELM-9000C is classified as a ClassⅠdevice [Form of protection against electric shock] ClassⅠ
The ELM-9000C is classified as a Class I device. This product is always protected when you connect the power cord must be connected to the protective ground included. Class I is a product in which the protection against electric shock does not rely on basic insulation only, but which includes an additional safety precaution in such a way that means are provided for the connection of the product to the protective (ground) conductor in the fixed wiring of the installation in such a way that accessible metal parts cannot become live in the event of a failure in the basic insulation. Use a power outlet which is equipped with a grounding terminal. [Degree of protection against ingress of liquids] IPX0 The ELM-9000C is classified as a IPX0 device. Avoid exposing water to the device. [Degree of protection against flammability] The ELM-9000C is classified as a device not suitable to be used in a potentially flammable environment. Do not use near flammable materials [Method(s) of sterilization or disinfection recommended by the manufacturer] The ELM-9000C does not have any part to be sterilized or be disinfected. [Mode of operation] Classification of ELM-9000C : continuous operation [Mode of transport] The ELM-9000C is a stationary device.
1.3 Caution
This product may malfunction due to electromagnetic waves caused by portable personal telephones, transceivers, radio-controlled toys, etc. Be sure to avoid having objects such as, which affect this product, brought near the product. It should be used under the supervision of medical staff of hospital The information in this publication has been carefully checked and is believed to be entirely accurate at the time of publication. ELM-9000C assumes no responsibility, however, for possible errors or omissions, or for any consequences resulting from the No use of the information contained herein.
2
Lensmeter ELM-9000C
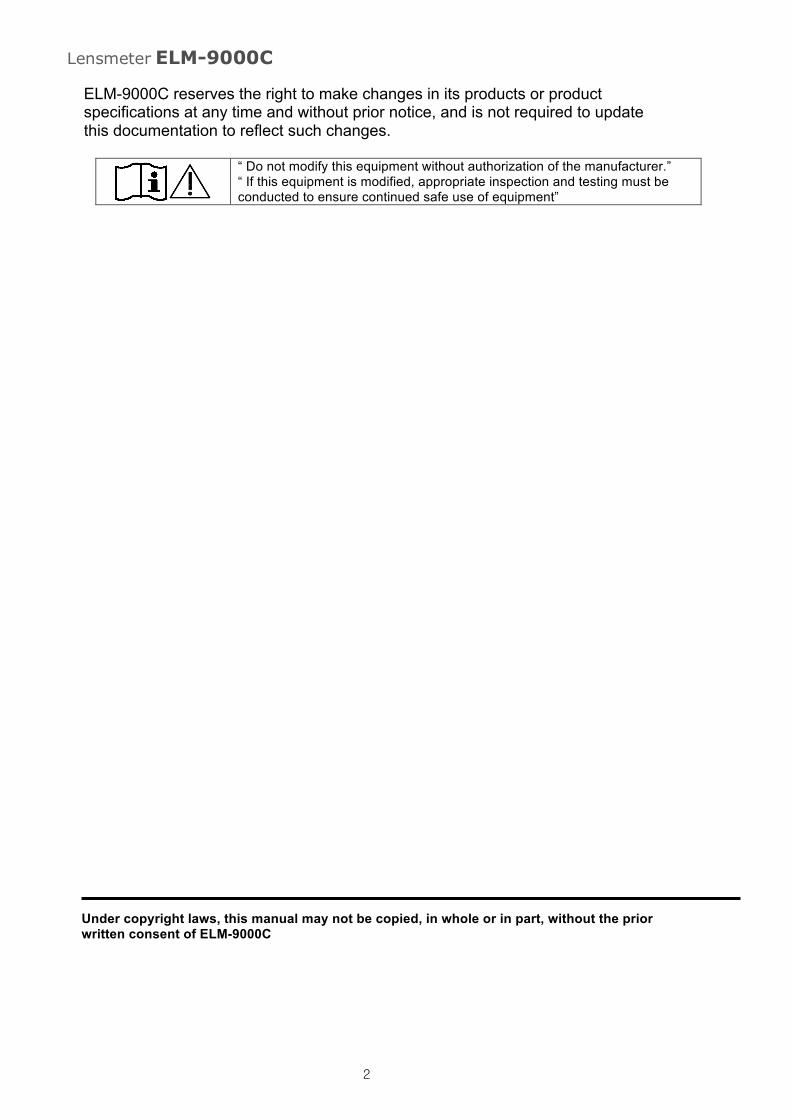
ELM-9000C reserves the right to make changes in its products or product specifications at any time and without prior notice, and is not required to update this documentation to reflect such changes.
“ Do not modify this equipment without authorization of the manufacturer.” “ If this equipment is modified, appropriate inspection and testing must be conducted to ensure continued safe use of equipment”
Under copyright laws, this manual may not be copied, in whole or in part, without the prior written consent of ELM-9000C
3
Lensmeter ELM-9000C
2. SAFETY
2.1 SAFETY INFORMATION
Accessory equipment connected to the analog and digital interfaces must be certificated according to the respective IEC/EN standards (e.g. IEC/EN 60950 for data processing equipment and IEC/EN 60601-1 for medical equipment). Furthermore all configurations shall comply with the system standard EN 60601-1-2:2007. Everybody who connects additional equipment to the signal input part or signal output part configures a medical system, and is therefore responsible that the system complies with the requirements of the system standard EN 60601-1-1:2001. If in doubt, consult the technical service department or your local representative. For EU Countries ! The following mark, the name & address of the EU Representative shows
compliance of the instrument with Directive Council Directive 93/42/EEC of 14 June 1993 as amended by Directive 2007/47/EC concerning medical devices.

4
Lensmeter ELM-9000C
2.2 Symbol Information
Symbol Descriptions
Protective earth (ground)
Alternating current
Off (power: disconnect to the mains)
On (power: connection to the mains)
Do not throw away the waste to inappropriate place
Instruction for user manual
Operating instructions
CAUTION
Keep dry symbol
DO NOT Hand Hooks symbol
Fragile symbol
This way up symbol
Handle with care symbol
Do not build up more than 2 boxes
Manufacture
Europe Representative
Manufacture Date
Only one unit in the box
Temperature between - 40˚C ~ 70˚C
Humidity between 10%RH ~ 95%RH
5
Lensmeter ELM-9000C
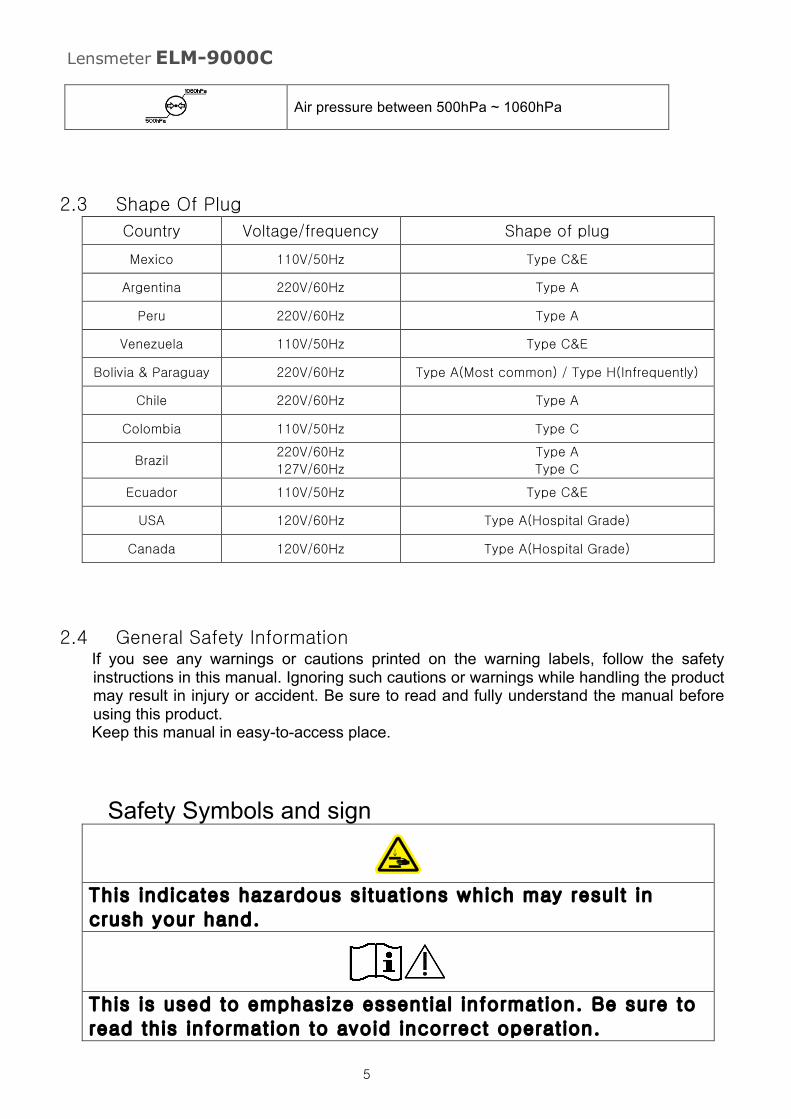
Air pressure between 500hPa ~ 1060hPa
2.3 Shape Of Plug
Country Voltage/frequency Shape of plug
Mexico 110V/50Hz Type C&E
Argentina 220V/60Hz Type A
Peru 220V/60Hz Type A
Venezuela 110V/50Hz Type C&E
Bolivia & Paraguay 220V/60Hz Type A(Most common) / Type H(Infrequently)
Chile 220V/60Hz Type A Colombia 110V/50Hz Type C
Brazil 220V/60Hz
127V/60Hz Type A
Type C Ecuador 110V/50Hz Type C&E
USA 120V/60Hz Type A(Hospital Grade) Canada 120V/60Hz Type A(Hospital Grade)
2.4 General Safety Information If you see any warnings or cautions printed on the warning labels, follow the safety instructions in this manual. Ignoring such cautions or warnings while handling the product may result in injury or accident. Be sure to read and fully understand the manual before using this product. Keep this manual in easy-to-access place.
Safety Symbols and sign
This indicates hazardous situations which may result in
crush your hand.
This is used to emphasize essential information. Be sure to
read this information to avoid incorrect operation.
6
Lensmeter ELM-9000C
2.5 Cautions in Installation, Storage and Transportation
! Exposure to the direct sunlight or too bright indoor lights may influence on the result of
accurate measurement. Use the appropriate Optometry room.appropriate
! Keep the objective glass of the examinee side clean. If it was stained, it may cause on ERROR or inaccurate measurements.
! In case you leave ELM-9000C without using for certain period, disconnect the power supply
and protect the unit with dust cover. ! In case moving this ELM-9000C, fix the stage by using clamping bolt and stage holding knob,
always keep power off, and then lift the bottom of the unit with both hands. ! In case moving this ELM-9000C, do not hold forehead. ! In case moving and connect other device this ELM-9000C, keep in touch with qualified
technician or service agent and place the equipment plain. ! Get worked, store and move under the following environment conditions for proper operation. ! Operation environment :
- Temperature : +10℃ ~ +40℃ - Humidity : 30% ~ 90% RH - Atmospheric pressure range : 700 hPa ~ 1060 hPa
! Storage and Transportation environment : - Temperature : -40℃ ~ +70℃ - Humidity : 10% ~ 95% RH - Atmospheric pressure range : 50 kPa ~ 106 kPa

7
Lensmeter ELM-9000C
2.6 Environment of installing the device
Avoid installing the device on a place where it is exposed to direct sunlight or
near the illumination.
Exposure to the direct sunlight or too bright indoor lights may influence on the
result of accurate measurement.
8
Lensmeter ELM-9000C
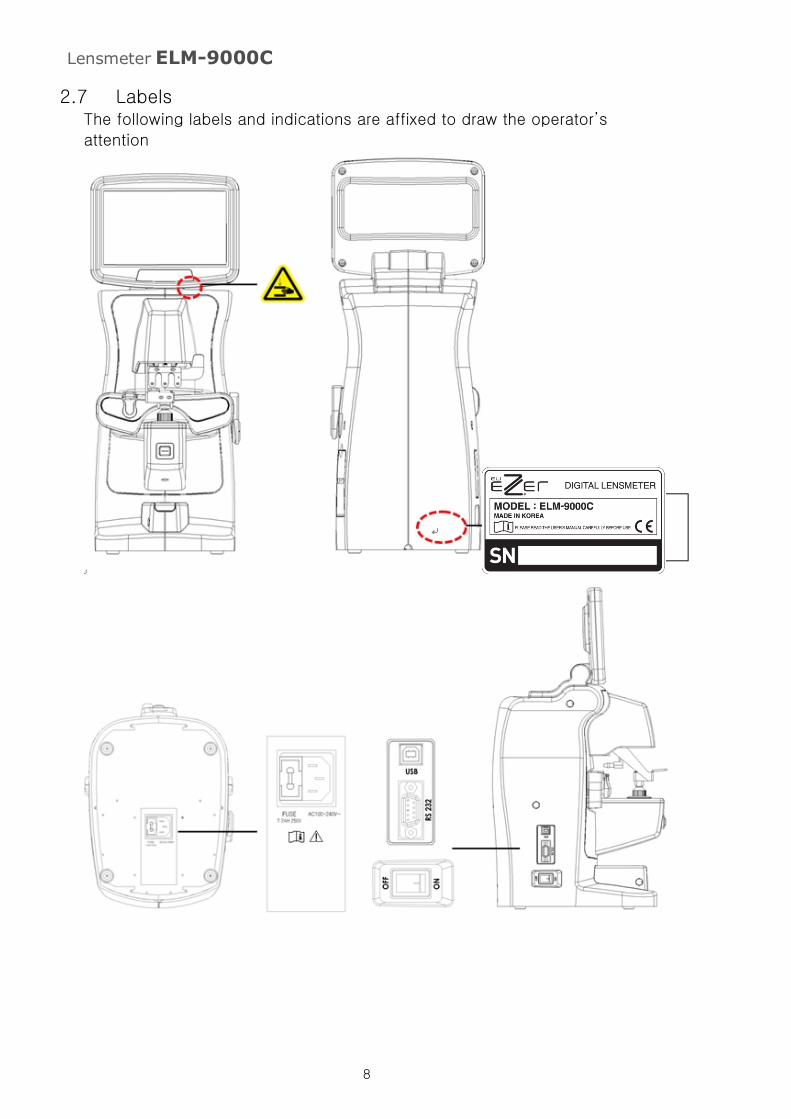
2.7 Labels The following labels and indications are affixed to draw the operator’s
attention
9
Lensmeter ELM-9000C
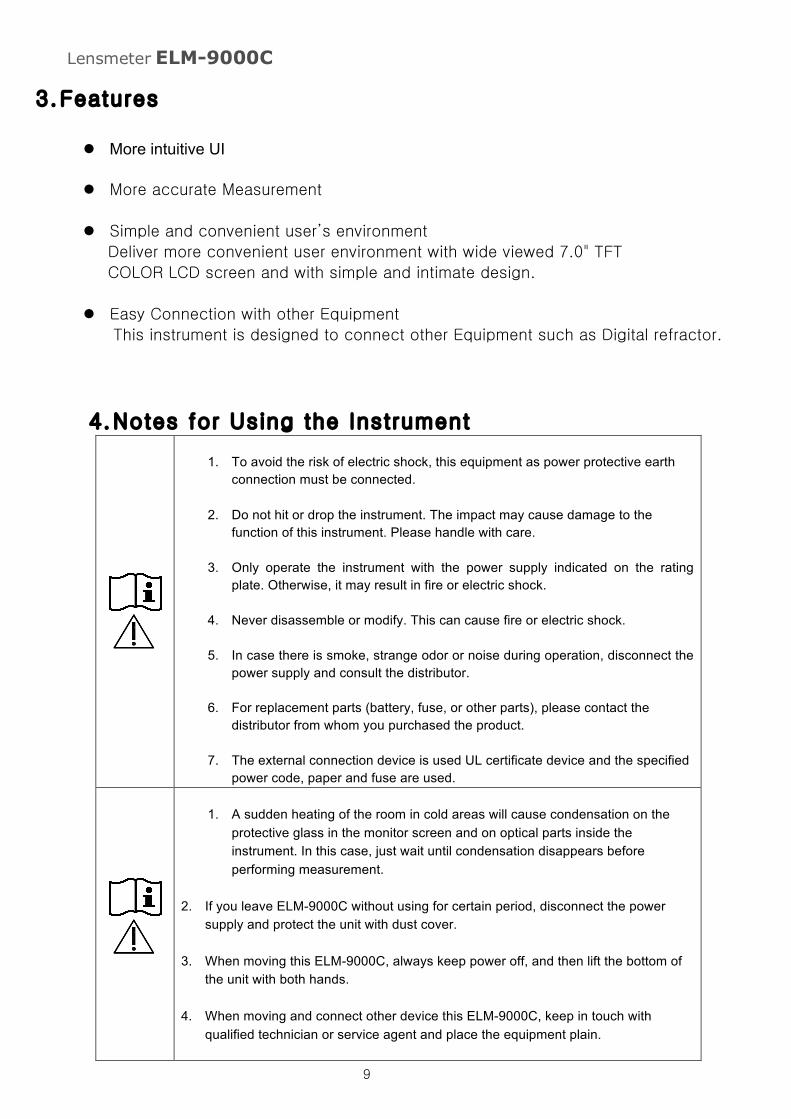
3. Features
! More intuitive UI
! More accurate Measurement
! Simple and convenient user’s environment
Deliver more convenient user environment with wide viewed 7.0" TFT
COLOR LCD screen and with simple and intimate design.
! Easy Connection with other Equipment
This instrument is designed to connect other Equipment such as Digital refractor.
4. Notes for Using the Instrument
1. To avoid the risk of electric shock, this equipment as power protective earth
connection must be connected.
2. Do not hit or drop the instrument. The impact may cause damage to the function of this instrument. Please handle with care.
3. Only operate the instrument with the power supply indicated on the rating plate. Otherwise, it may result in fire or electric shock.
4. Never disassemble or modify. This can cause fire or electric shock.
5. In case there is smoke, strange odor or noise during operation, disconnect the power supply and consult the distributor.
6. For replacement parts (battery, fuse, or other parts), please contact the
distributor from whom you purchased the product.
7. The external connection device is used UL certificate device and the specified power code, paper and fuse are used.
1. A sudden heating of the room in cold areas will cause condensation on the
protective glass in the monitor screen and on optical parts inside the instrument. In this case, just wait until condensation disappears before performing measurement.
2. If you leave ELM-9000C without using for certain period, disconnect the power
supply and protect the unit with dust cover. 3. When moving this ELM-9000C, always keep power off, and then lift the bottom of
the unit with both hands.
4. When moving and connect other device this ELM-9000C, keep in touch with qualified technician or service agent and place the equipment plain.

10
Lensmeter ELM-9000C
1. Don’t use organic solvents such as alcohol, thinner, benzene, etc. to clean the
surface of this instrument. It may damage the instrument.
2. Do not store alcohol, thinner and other flammable vapors and liquids in the vicinity of this equipment.
3. Do not use outdoors. The instrument is designed to be used only indoors.
4. Do not use Humidity or dusty environment
5. Never disassemble or modify this instrument because it may result in fire or
electric shock. Also, since this instrument incorporates high-voltage parts and other hazardous parts, touching them may cause death or serious injury.
6. Keep it away from other persons but qualified technician.
7. Be sure to turn OFF the power switch before connecting or disconnecting the
cables. Also, do not handle them with wet hands. Otherwise, you may get an electric shock that may result in death or serious injury.
8. If you leave this instrument without using for certain period, disconnect the
power supply
9. This equipment may be able to be operated improper by micro waves from cellular phones, walkie-talkie, remote controlled electric toys. Keep it away.
At the time of publishing the information in this book carefully identified and has been
judged to be correct. However, there are mistakes and omissions that Ezer understand
are contained in this book and is not responsible for the results that occurred.
11
Lensmeter ELM-9000C
5. Prerequisites for safety
5.1 Preparation before use -. Do not operate under direct sunlight or too strong lights
-. Do not store alcohol, thinner and other flammable vapors and liquids in the vicinity of this equipment.
-. Check printing papers are ready -. Remove dusts, especially on the nosepiece
5.2 Preparation when you use -. Place this equipment plain
-. Clean the protective glass under the nosepiece every once in while with a blower
-. Do not put others on this equipment -. Do not disassemble or modify on your own -. Stand 40 minutes and get it worked if it is stored at extended temperate
place -. Keep it away from other persons but qualified technician. -. Be sure to unplug if do not use long. -. Do not turn off the instrument before finishing initialization.
(Don’t power off during loading)
5.3 Instruction and operation sequence -. Please connect the power plug.
-. Press “ON” -. Press buttons what you want -. Refer to operation manual of 7 and 9 chapter
5.4 Storage after use
-. If the device will not be used for a long time, disconnect the power cord from the wall outlet
-. Clean with soft cloth, soaped and rinse, wipe dry -. Wipe lens and glass’ dusts out with wind blower and with soft cloth. -. Fix by turning the fixation knob and keep it plain when you are about to move
or lift up -. Do store at the following place
① Not humid place ② Not in the vicinity of water ③ Not dusty and not in the vicinity of filthy place with salt or sulfur ④ Plain place ⑤ Not in the vicinity of vibration or shock ⑥ Not in the vicinity of other flammables vapors or liquids
⑦ Not in the vicinity of direct sunlight -. Store the accessories and cords for next operation.
12
Lensmeter ELM-9000C
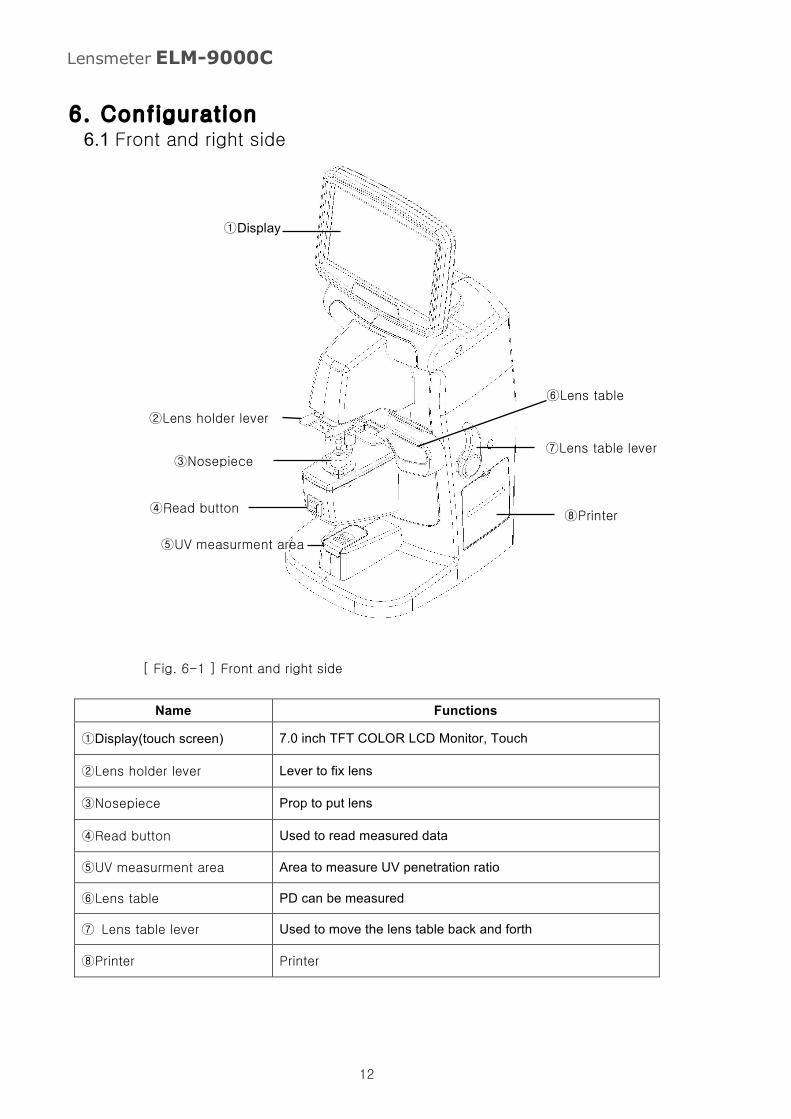
6. Configuration 6.1 Front and right side
[ Fig. 6-1 ] Front and right side
Name Functions
①Display(touch screen) 7.0 inch TFT COLOR LCD Monitor, Touch
②Lens holder lever Lever to fix lens
③Nosepiece Prop to put lens
④Read button Used to read measured data
⑤UV measurment area Area to measure UV penetration ratio
⑥Lens table PD can be measured
⑦ Lens table lever Used to move the lens table back and forth
⑧Printer Printer
①Display
②Lens holder lever
③Nosepiece
④Read button
⑥Lens table
⑤UV measurment area
⑦Lens table lever
⑧Printer

13
Lensmeter ELM-9000C
6.2 Left side
[ Fig. 6-2 ] Left side
Name Function
⑨ USB connector Used to connect a computer
⑩ RS-232 connector Used to connect a computer
⑪ Connector cover Cover to protect a dust or foreign substance
⑫ Power switch Used to turn on or off the power to the device
⑬ PD sensor Sensor to measure PD
⑨USB connector
⑩RS-232 connector
⑪Connector cover
⑫Power switch
⑬PD sensor
14
Lensmeter ELM-9000C
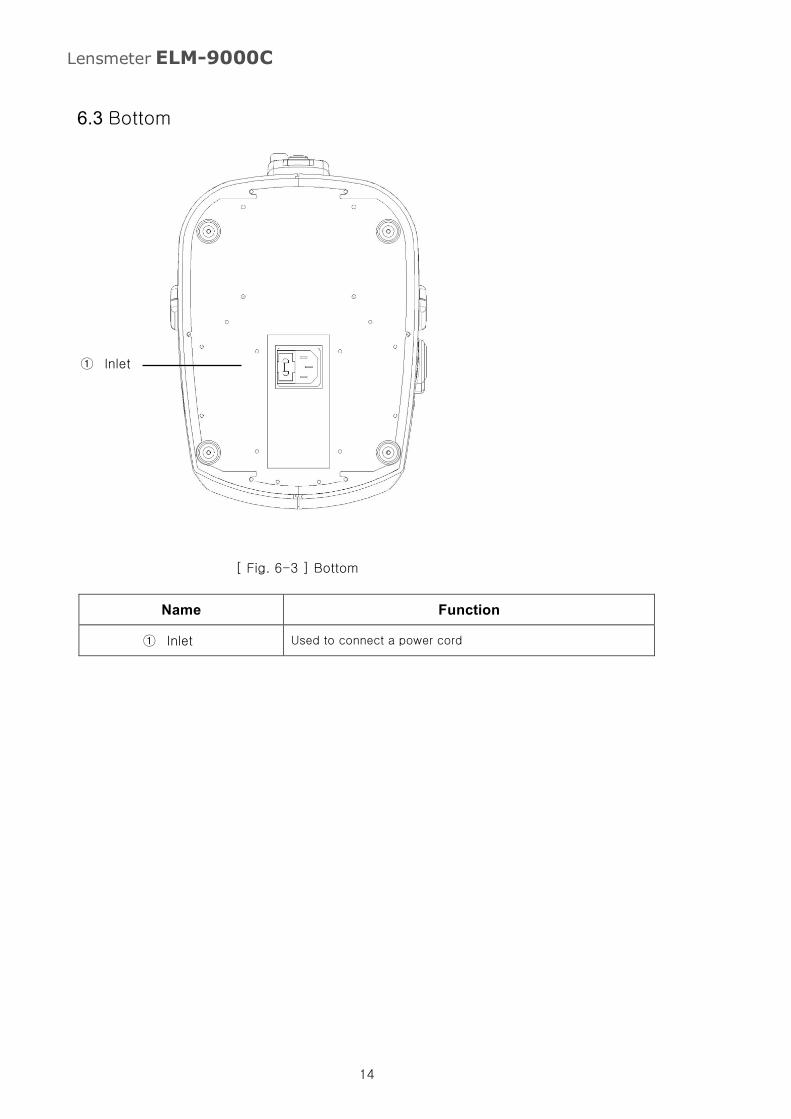
6.3 Bottom
[ Fig. 6-3 ] Bottom
Name Function
① Inlet Used to connect a power cord
① Inlet
15
Lensmeter ELM-9000C
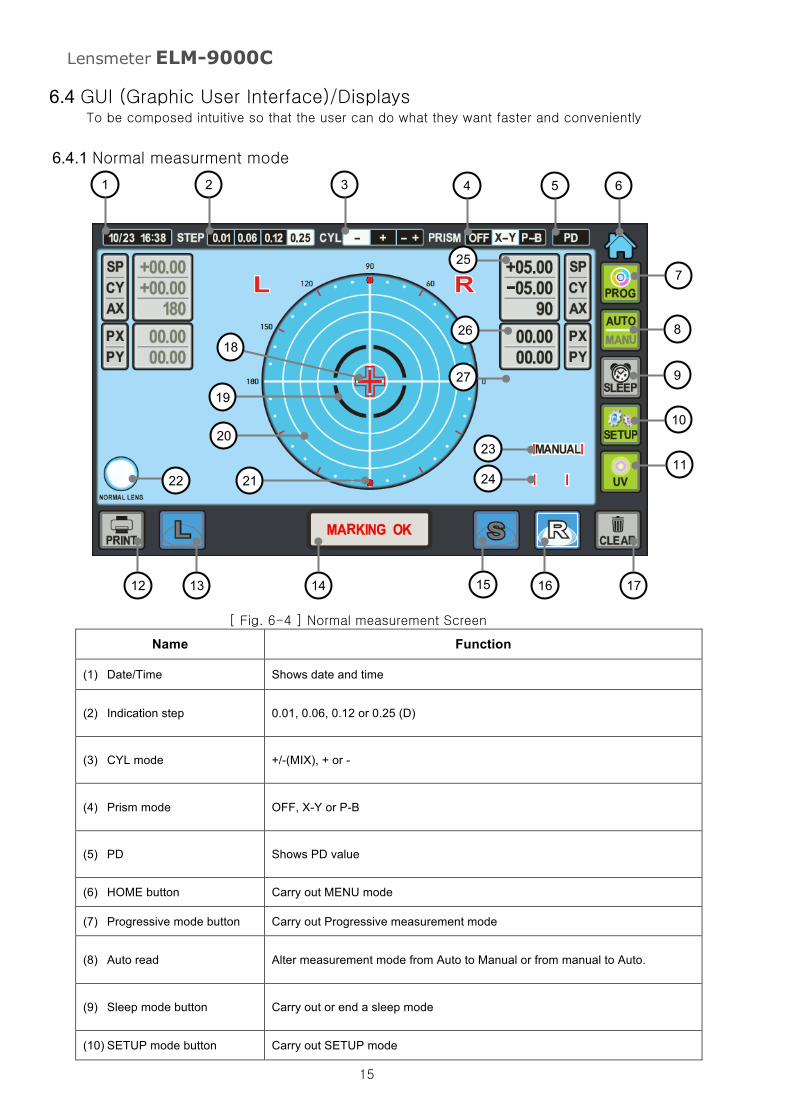
6.4 GUI (Graphic User Interface)/Displays
To be composed intuitive so that the user can do what they want faster and conveniently
6.4.1 Normal measurment mode
[ Fig. 6-4 ] Normal measurement Screen Name Function
(1) Date/Time Shows date and time
(2) Indication step 0.01, 0.06, 0.12 or 0.25 (D)
(3) CYL mode +/-(MIX), + or -
(4) Prism mode OFF, X-Y or P-B
(5) PD Shows PD value
(6) HOME button Carry out MENU mode
(7) Progressive mode button Carry out Progressive measurement mode
(8) Auto read Alter measurement mode from Auto to Manual or from manual to Auto.
(9) Sleep mode button Carry out or end a sleep mode
(10) SETUP mode button Carry out SETUP mode
22
1 2 3 4 5 6
7
8
9
10
11
12 13 14 15 16 17
25
18
19
20
21
23
24
26
27
16
Lensmeter ELM-9000C
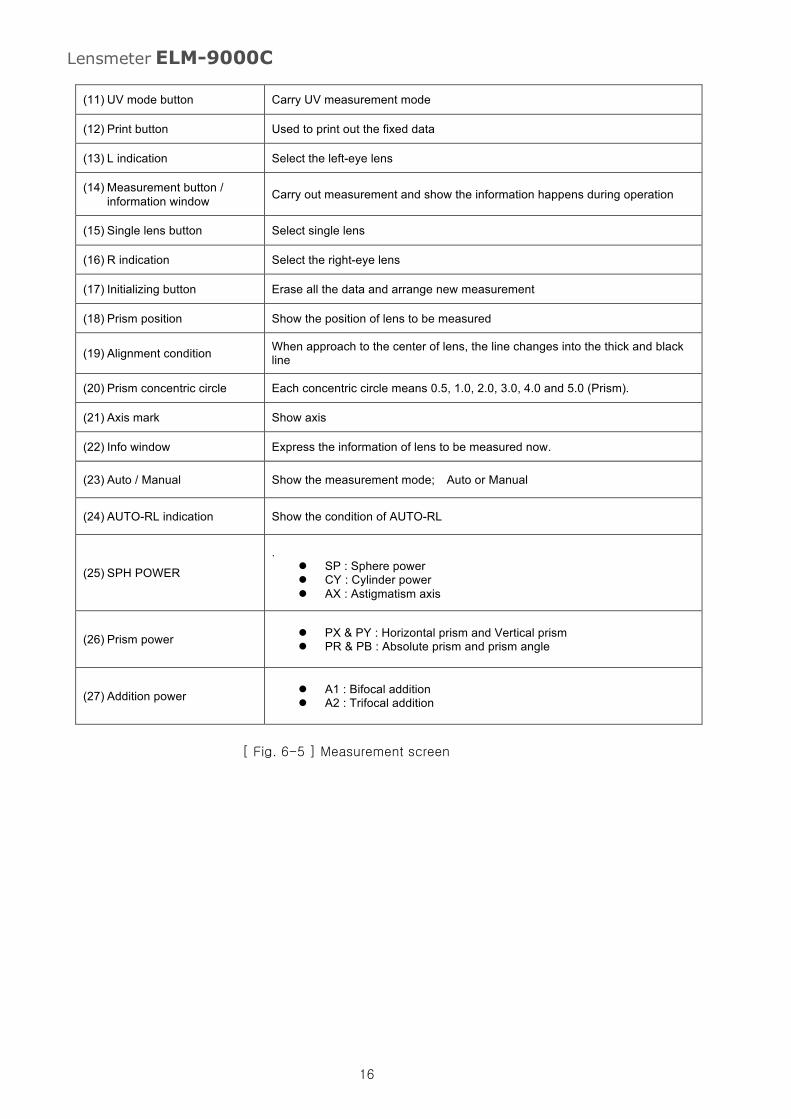
(11) UV mode button Carry UV measurement mode
(12) Print button Used to print out the fixed data
(13) L indication Select the left-eye lens
(14) Measurement button / information window Carry out measurement and show the information happens during operation
(15) Single lens button Select single lens
(16) R indication Select the right-eye lens
(17) Initializing button Erase all the data and arrange new measurement
(18) Prism position Show the position of lens to be measured
(19) Alignment condition When approach to the center of lens, the line changes into the thick and black line
(20) Prism concentric circle Each concentric circle means 0.5, 1.0, 2.0, 3.0, 4.0 and 5.0 (Prism).
(21) Axis mark Show axis
(22) Info window Express the information of lens to be measured now.
(23) Auto / Manual Show the measurement mode; Auto or Manual
(24) AUTO-RL indication Show the condition of AUTO-RL
(25) SPH POWER
. ! SP : Sphere power ! CY : Cylinder power ! AX : Astigmatism axis
(26) Prism power ! PX & PY : Horizontal prism and Vertical prism ! PR & PB : Absolute prism and prism angle
(27) Addition power ! A1 : Bifocal addition ! A2 : Trifocal addition
[ Fig. 6-5 ] Measurement screen

17
Lensmeter ELM-9000C
6.4.2 Progressive Power Lens(PPL) measurement screen
[ Fig. 6-6 ] Progressive Power Lens(PPL) measurement screen
Name Function
(1) Normal mode button Carry out the normal measurement mode
(2) Addition value Shows progressive addition
(3) Measurement position
of far part Shows the position of far part
(4) Target of near part Shows the position of near part
[ Fig. 6-7 ] Function of progressive Power Lens(PPL) measurement screen
1
4
3 2
18
Lensmeter ELM-9000C
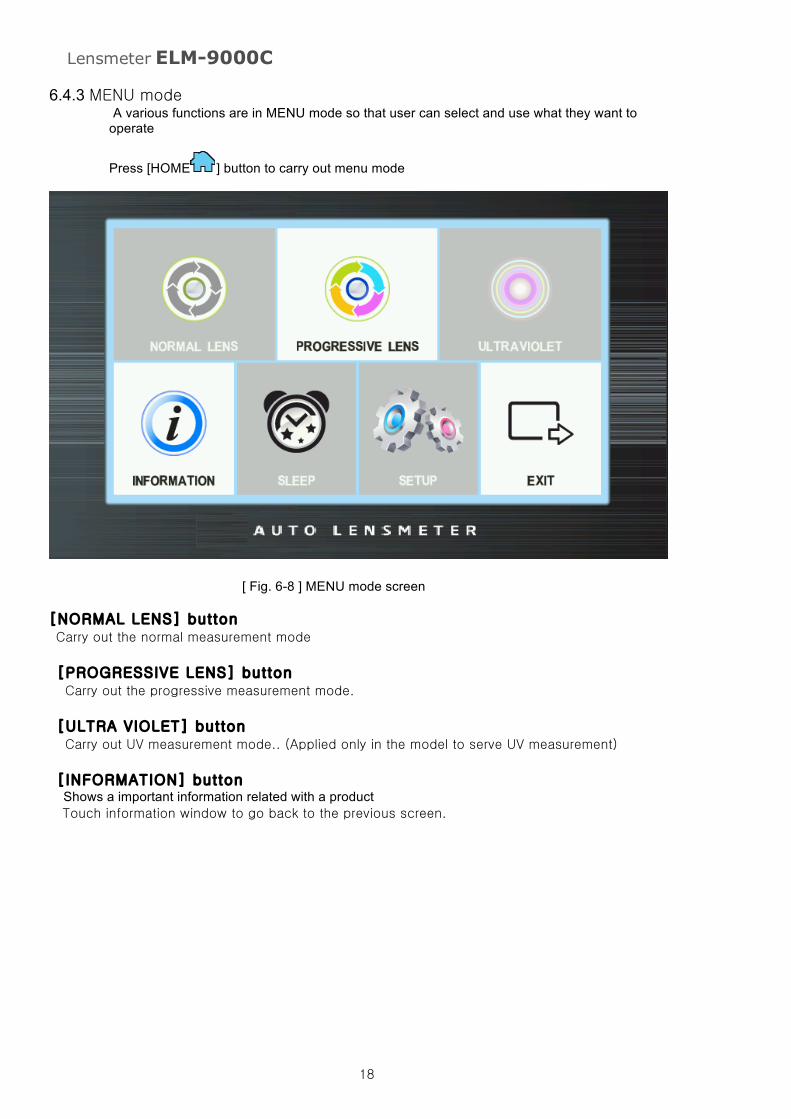
6.4.3 MENU mode
A various functions are in MENU mode so that user can select and use what they want to operate
Press [HOME ] button to carry out menu mode
[ Fig. 6-8 ] MENU mode screen [NORMAL LENS] button Carry out the normal measurement mode
[PROGRESSIVE LENS] button Carry out the progressive measurement mode.
[ULTRA VIOLET] button Carry out UV measurement mode.. (Applied only in the model to serve UV measurement)
[INFORMATION] button Shows a important information related with a product Touch information window to go back to the previous screen.

19
Lensmeter ELM-9000C
[ Fig. 6-9 ] Product Information screen
[SLEEP] button Carry our sleep mode. To end sleep mode, just touch the screen or press a button. Even it’s set up as off in System page , can come to sleep mode pressing this button
[SETUP] button Carry out SETUP mode
[EXIT] button Go back to the previous mode.

20
Lensmeter ELM-9000C
7. Measurement 7.1 Normal lenses measurement
[ Fig. 7-1 ] Measurement method for a normal lens before proess
1) Turn on after checking if there is no lens on nosepiece 2) Press [CLEAR] button to initialize measurement condition 3) Put the lens on nosepiece, fix the lens pulling the lens holder lever and then press [S] button 4)Move lens with care so that prism cursor may go to the center of concentric circle. If
alignment is ok, “ALIGNMENT OK” shows on information window and if focus is matched up, “MARKING OK” shows on information window
< Focal discord condition > < Alignment agreement condition >
< Focus agreement condition >
21
Lensmeter ELM-9000C [ Fig. 7-2 ] Focus adjustment sequence
5) In case of lens with cylinder porer, rotate lens to fit 180 degree
but in case of lens without cylinder power or in case don’t need to mark CYL, don’t need to fit 180 degree
6) Press read button to save measurement data. In case of auto measurement mode, the measurement data is saved automatically when “MARKING OK” continue for the predetermined time. After saving, the measurement data change it’s color from black into red.
7) Press PRINT button to transmit a measurement data to the external device and print out
the data.
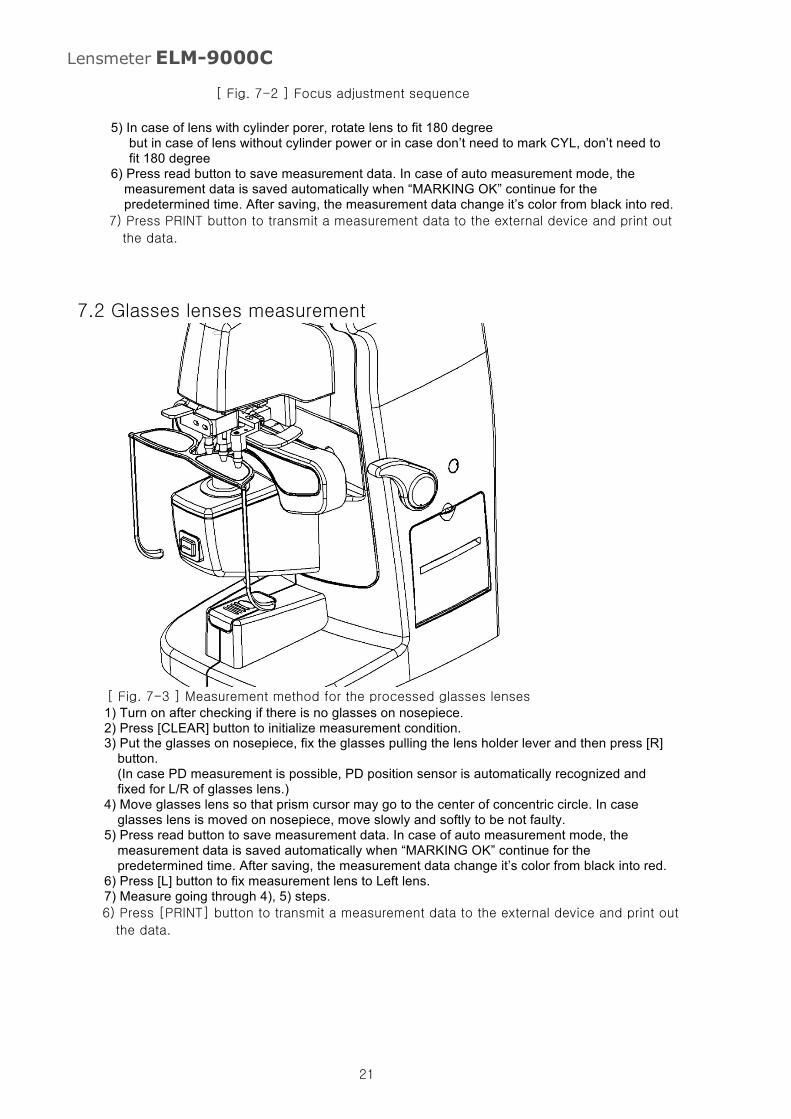
7.2 Glasses lenses measurement
[ Fig. 7-3 ] Measurement method for the processed glasses lenses
1) Turn on after checking if there is no glasses on nosepiece. 2) Press [CLEAR] button to initialize measurement condition. 3) Put the glasses on nosepiece, fix the glasses pulling the lens holder lever and then press [R]
button. (In case PD measurement is possible, PD position sensor is automatically recognized and
fixed for L/R of glasses lens.) 4) Move glasses lens so that prism cursor may go to the center of concentric circle. In case
glasses lens is moved on nosepiece, move slowly and softly to be not faulty. 5) Press read button to save measurement data. In case of auto measurement mode, the
measurement data is saved automatically when “MARKING OK” continue for the predetermined time. After saving, the measurement data change it’s color from black into red.
6) Press [L] button to fix measurement lens to Left lens. 7) Measure going through 4), 5) steps. 6) Press [PRINT] button to transmit a measurement data to the external device and print out
the data.
22
Lensmeter ELM-9000C
7.3 Measurement of Multifocal lens
1) Measure following way of normal lens or glasses lens measurement on 7.1 or 7.2 phrase. 2) Do not move lens and then press read button. AD1 and AD2 of Addition power is added. 3) Position lens on Bifocal addition and then press read button to save measurement value of
AD1. After saving, the measurement data changes from black into red. 4) In case of Bifocal addition, press [PRINT] button to transmit a measurement data to the
external device and print out the data. 5) Position lens on Trifocal addition and then press read button to save measurement value of
AD2. After saving, the measurement data changes from black into red. 6) Press [PRINT] button to transmit a measurement data to the external device and print out
the data.
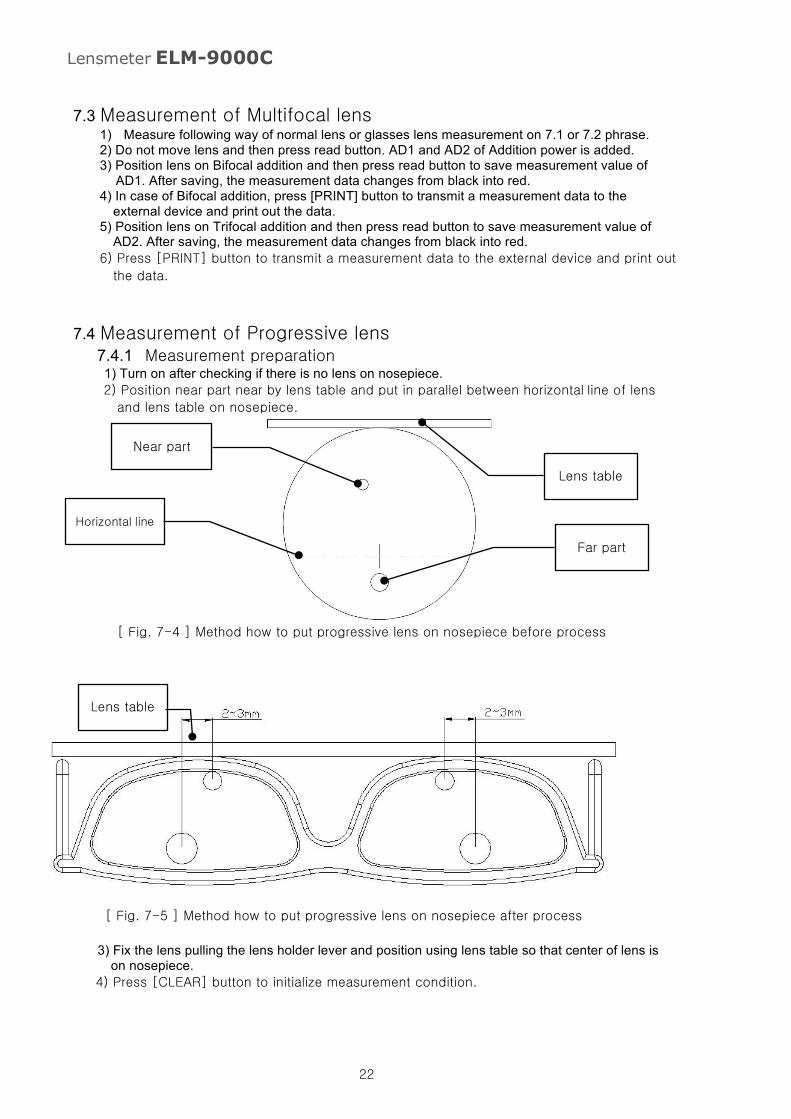
7.4 Measurement of Progressive lens 7.4.1 Measurement preparation
1) Turn on after checking if there is no lens on nosepiece. 2) Position near part near by lens table and put in parallel between horizontal line of lens
and lens table on nosepiece.
[ Fig. 7-4 ] Method how to put progressive lens on nosepiece before process
[ Fig. 7-5 ] Method how to put progressive lens on nosepiece after process
3) Fix the lens pulling the lens holder lever and position using lens table so that center of lens is
on nosepiece. 4) Press [CLEAR] button to initialize measurement condition.
Near part
Horizontal line
Far part
Lens table
Lens table

23
Lensmeter ELM-9000C
7.4.2 Carrying out progressive mode 1) There are two ways to carry out progressive mode. First, press [PROG] button to carry out
progressive mode immediately. Secondly, move lens front, rare, left and right slowly to carry out
progressive mode. In order to use automatic function for progressive lens, ‘PROG RUN’ value of
SEETUP mode must be ‘AUTO’.
[ Fig. 7-6 ] Progressive area of progressive lens
2) After carrying out progressive mode, there is target of far part at the bottom of screen center
7.4.3 Measurement of far part When lens is moved, be careful so that lens is not lifted and maintained fixed angle to have correct measurement value.
1) So that lens is in far part area, move lens horizontally to be in tune with horizontal center. 2) Move lens vertically to far part area. If lens is out of horizontal center when move,
carry out step 1) again.
Progressive
24
Lensmeter ELM-9000C
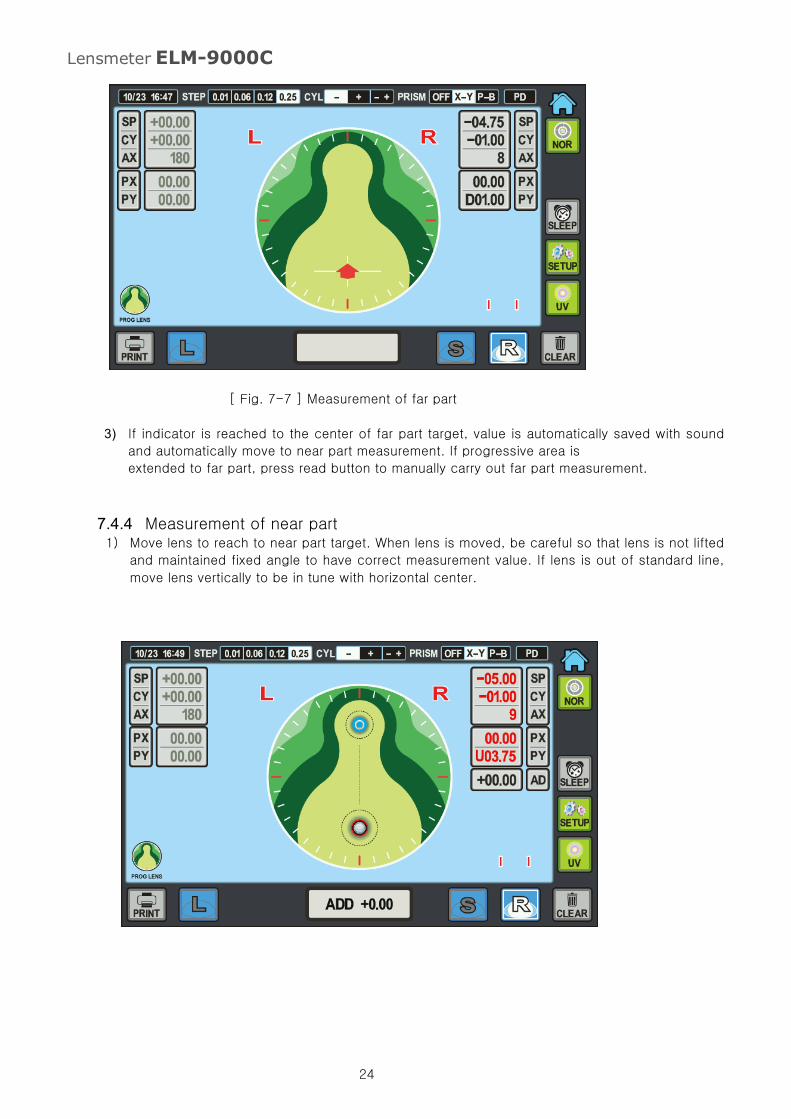
[ Fig. 7-7 ] Measurement of far part
3) If indicator is reached to the center of far part target, value is automatically saved with sound
and automatically move to near part measurement. If progressive area is extended to far part, press read button to manually carry out far part measurement.
7.4.4 Measurement of near part 1) Move lens to reach to near part target. When lens is moved, be careful so that lens is not lifted
and maintained fixed angle to have correct measurement value. If lens is out of standard line,
move lens vertically to be in tune with horizontal center.
25
Lensmeter ELM-9000C
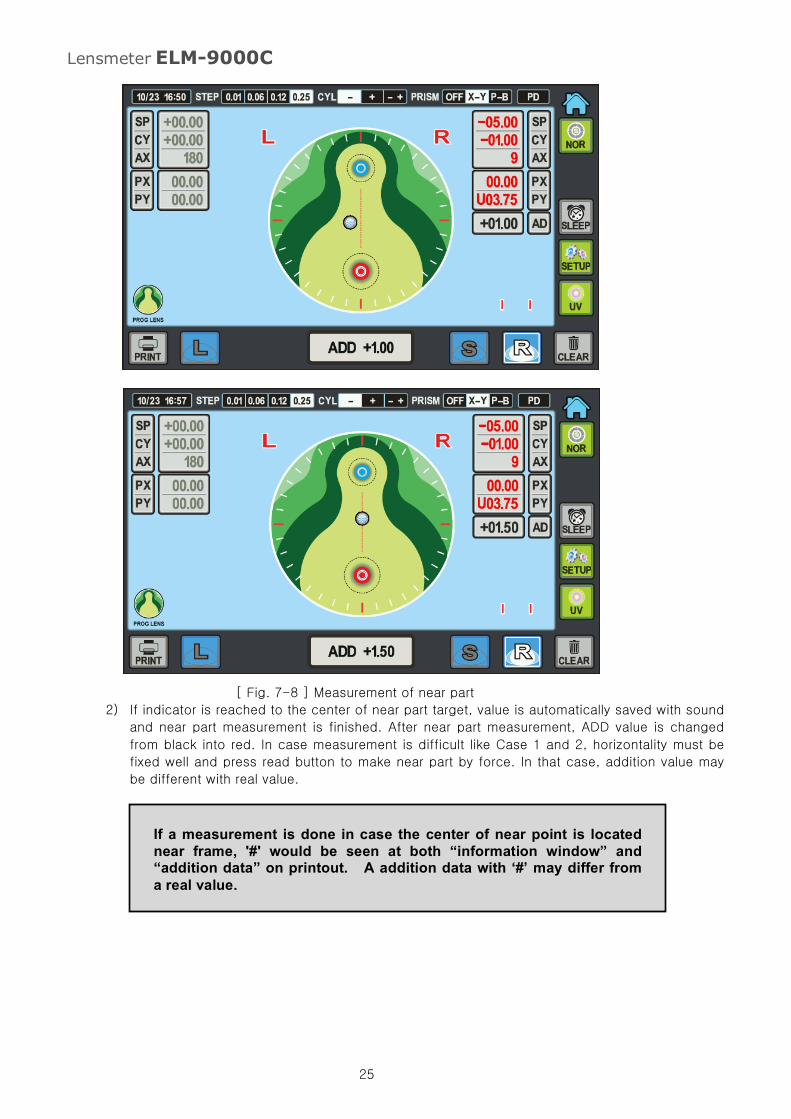
[ Fig. 7-8 ] Measurement of near part 2) If indicator is reached to the center of near part target, value is automatically saved with sound
and near part measurement is finished. After near part measurement, ADD value is changed
from black into red. In case measurement is difficult like Case 1 and 2, horizontality must be
fixed well and press read button to make near part by force. In that case, addition value may
be different with real value.
If a measurement is done in case the center of near point is located near frame, '#' would be seen at both “information window” and “addition data” on printout. A addition data with ‘#’ may differ from a real value.

26
Lensmeter ELM-9000C < Case 1 > < Case 2 >
[ Fig. 7-9 ] Feature of small frame lens
3) Press [PRINT] button to transmit a measurement data to the external device and print
out the data.
7.5 Measurement of hard contact lens
1) Choose ‘HARD CL’ on ‘LENS TYPE’ of SETUP mode. 2) Change a lens prop with a contact lens prop. 3) Dry lens clearly and put convex part of lens right side up. 4) Fix focal point moving lens. 5) Save measurement value pressing read button. 6) Press [PRINT] button to transmit a measurement data to the external device and print out the
data.
7.6 Measurement of soft contact lens 1) Choose ‘SOFT CL’ on ‘LENS TYPE’ of SETUP mode. 2) Change a lens prop with a contact lens prop. 3) In case soft contact lens is easily tore, Dry lens with a towel clearly. 4) put convex part of lens right side up. 5) Fix focal point moving lens. 6) Save measurement value pressing read button. 7) Press [PRINT] button to transmit a measurement data to the external device and print out the
data.
7.7 Measurement of UV penetration ratio
1) Carry out mode of UV penetration ratio pressing ‘UV’.
In case of ELM-9000A , it does not serve this. Only ELM-9000C serve this.
27
Lensmeter ELM-9000C
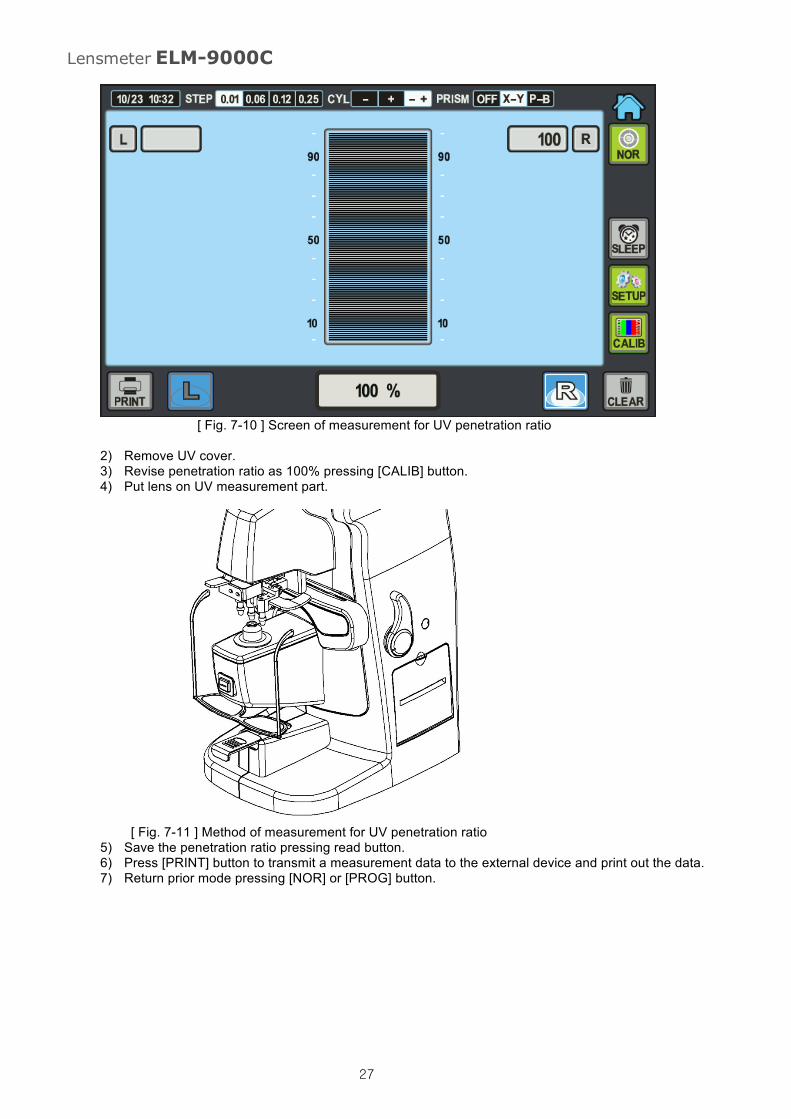
[ Fig. 7-10 ] Screen of measurement for UV penetration ratio
2) Remove UV cover. 3) Revise penetration ratio as 100% pressing [CALIB] button. 4) Put lens on UV measurement part.
[ Fig. 7-11 ] Method of measurement for UV penetration ratio
5) Save the penetration ratio pressing read button. 6) Press [PRINT] button to transmit a measurement data to the external device and print out the data. 7) Return prior mode pressing [NOR] or [PROG] button.

28
Lensmeter ELM-9000C
7.8 Marking
7.8.1 Lens without Astigmatism 1) After putting lens, set the lens to be ‘MARKING OK’ 2) On tilted lever(①), press down the marking lever(②) to mark the lens.
[ Fig. 7-12 ] Method to make a dot
7.8.2 Lens with Astigmatism 1) After putting lens, set the lens to be ‘MARKING OK’. 2) Set the lens to be prescription angle maintaining ‘MARKING OK’. 3) Press down the marking lever to mark the lens.
7.8.3 Prism lens 1) Change to prescribed prism. 2) Set the lens between prescribed prism value and the prism value of the screen concordantly. 3) Press down the marking lever to mark the lens.
7.9 Printing for measured data
After measurement, Press [PRINT] button to print out the measured data. If printing without measured data, it shows “NO MEASURE” on the screen. Change to ‘ON’ for ‘PRINTOUT’ value of SETUP mode if it shows “PRINTOUT OFF” message.
2
1
29
Lensmeter ELM-9000C
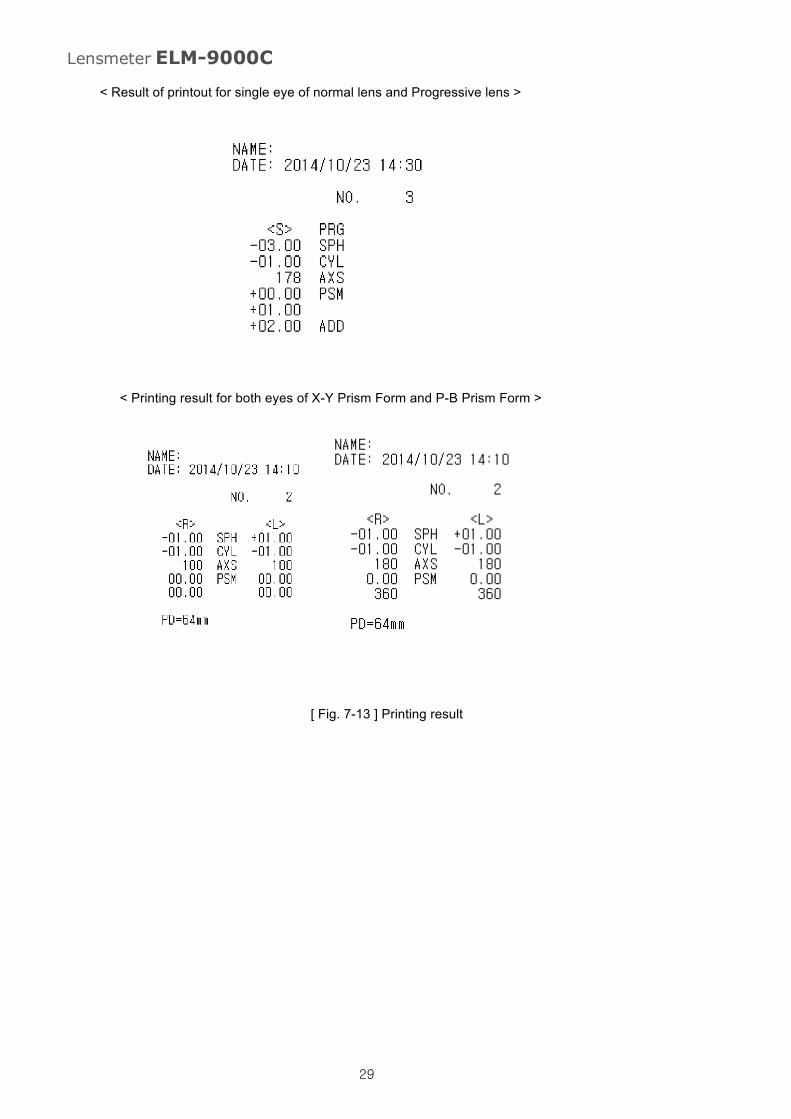
< Result of printout for single eye of normal lens and Progressive lens >
< Printing result for both eyes of X-Y Prism Form and P-B Prism Form >
[ Fig. 7-13 ] Printing result

30
Lensmeter ELM-9000C
8. SETUP MODE Run setup mod after clicking [setup]button Setup mode consist of Measure, system, date/time, print Setup mode use below 3 common buttons
! EXIT( ) : finish setup mode
! RELOAD( ) : Road the last saved data
! SAVE( ) : save all of amended data. If you want to save amended data must click before finishing setup mode
8.1 MEASURE PAGE
Choose [MEASURE] button on the SETUP mode
[ Fig. 8-1 ] MEASURE PAGE
1) STEP
Choose one unit among 0.01/0.06/0.12/0.25 for Spherical, Cylinder, Prism
2) CYL FORM Choose one sign among -/+/+-
3) PRISM Choose one among OFF/X-Y/P-B (1) OFF : It’s not display the prism information (2) X-Y : It’s display the X-Y coordinate for the prism information (3) P-B : It’s display the prism value and axis for the prism information
4) AUTO R/L Choose one among OFF/ON-RL/ON-SRL to recognize the lens automatically
(1) OFF : it’s not use AUTO R/L (2) ON-RL : It’s use AUTO R/L (3) ON-SRL : It’s use AUTO R/L, the initial value is single lens
5) AUTO SHOOTING

31
Lensmeter ELM-9000C
Choose one between OFF and ON for auto shooting (1) OFF : It’s not use auto shooting (2) ON : It’s use auto shooting
8.2 SYSTEM PAGE
Click [system] button on SETUP mode
[ Fig. 8-2 ] SYSTEM PAGE
1) LCD BRIGHT
Possible to choose on among 1 / 2 / 3 / 4 for brightness
2) SLEEP Possible to choose one among 5 / 10 / 30 / ALWAYS for saving electric power
3) KEY SOUND Possible to choose between Off and On to use key sound
4) CODE This is only for service man
32
Lensmeter ELM-9000C
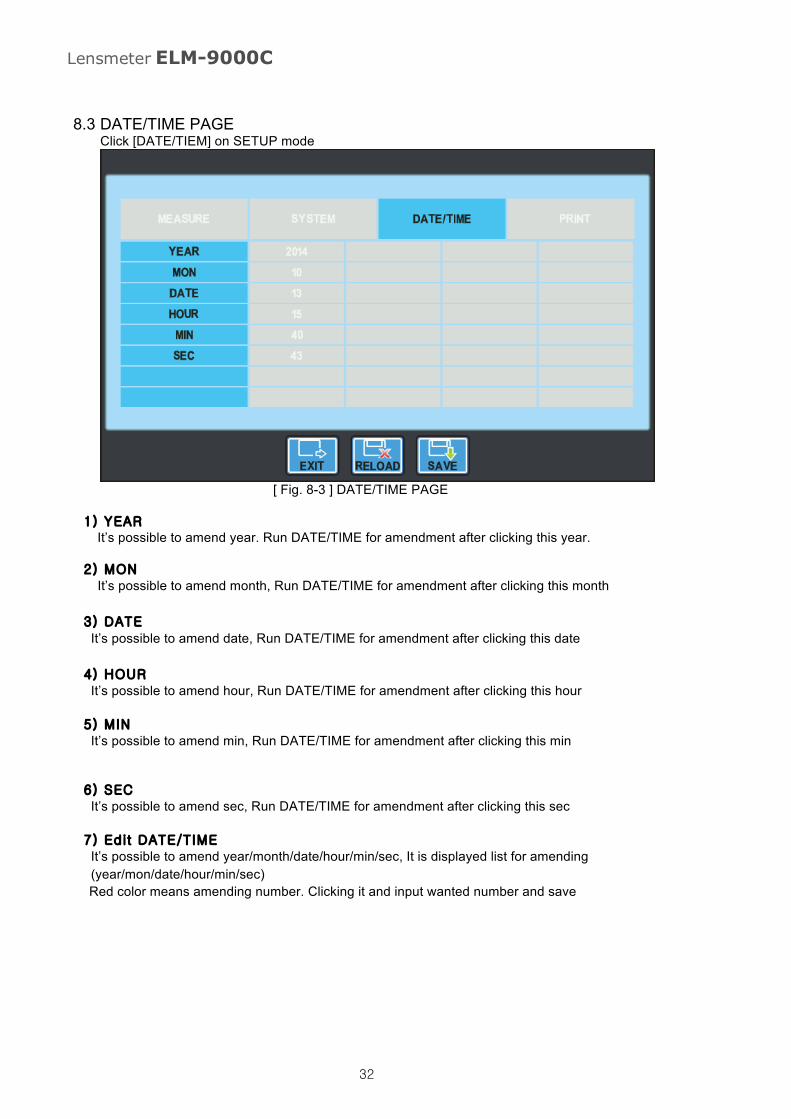
8.3 DATE/TIME PAGE Click [DATE/TIEM] on SETUP mode
[ Fig. 8-3 ] DATE/TIME PAGE
1) YEAR
It’s possible to amend year. Run DATE/TIME for amendment after clicking this year.
2) MON It’s possible to amend month, Run DATE/TIME for amendment after clicking this month 3) DATE
It’s possible to amend date, Run DATE/TIME for amendment after clicking this date
4) HOUR It’s possible to amend hour, Run DATE/TIME for amendment after clicking this hour
5) MIN It’s possible to amend min, Run DATE/TIME for amendment after clicking this min
6) SEC It’s possible to amend sec, Run DATE/TIME for amendment after clicking this sec
7) Edit DATE/TIME It’s possible to amend year/month/date/hour/min/sec, It is displayed list for amending (year/mon/date/hour/min/sec) Red color means amending number. Clicking it and input wanted number and save

33
Lensmeter ELM-9000C
[ Fig. 8-4 ] EDIT DATE/TIME
8.4 PRINT PAGE
Click [PRINT]button on SETUP mode
[ Fig. 8-5 ] PRINT PAGE
1) DATA FORMAT
Choose one between UDTF1 and UDTF2 that is data format. It’s purpose to send measurement data to sed another instruments
2) PRINT OUT Choose one between OFF/ON for printing of measurement value

34
Lensmeter ELM-9000C
3) PRINT NO.
Initialize print NO
4) MESSAGE It’s for print footer. If you run message window after clicking [set] you can writer footer. Red color means amending place. And click [save] for saving
[ Fig. 8-6 ] EDIT MESSAGE
[input word] Click a button to input a word that will be added on the red cursor. And cursor moved right. The maximum number of word is 44. So if input 44 words will be made beep sound. And you can’t input word anymore. [delete word] Click ["] and remove words Save data
Click [Save] button to save edited footer

35
Lensmeter ELM-9000C
9. Self diagnosis and maintenance
9.1 check befor asking service to sales agent
It’s displayed warning when happen matters or malfunction. If then run below steps However, can’t solve matters contact to sales agent after switching off. (1) displayed message when switch on
Message Cause step
Initialization ERROR It’s error for initialization
Remove dust on the measuring screen after
remove the prop or rebooting after dislodging
lens
Contact sales agent if can’t solve it and
displayed the message again
(2) displayed message during running
Message Cause step
ALIGNMENT OK It’s a good alignment The center of lens adjusted in 0.5∆
MARKING OK It’s a good focusing The center of lens is correct
ERROR It’s impossible for
measurement
Measure again after cleaning lens
Remove dust on the measuring screen after
removing the prop And remove dust by air.
OUT It’s over measurement
value It’s overed measurement value
NOT SUPPORT This is not supporting
function
It’s different among models for supporting
range
Check possibility of support for the lens
(3) displayed message during printing
message cause step
NO MEASURE There is no measured
data Reprint after measuring lens
PRINTOUT OFF Can’t print on the
printer paper It’s selected “off” printout menu of SETUP

36
Lensmeter ELM-9000C
9.2 printer paper replacement method Displayed red line on the printer paper it’s time to replace printer paper
[ Fig. 9-1 ] printer paper replacement
a. Open printer cover and put out printer roller to remove remained printer paper b. Fig 0-1 shows how to input printer paper so after installing printer paper fasten by platen roller c. Close printer cover after putting the printer paper into ejection point ※ If the paper is not completely installed pull out printer paper ※ Checking specification of printer paper and must use suitable printer paper
(type: Thermal Paper, specification, width: 55mm, external diameter: 30mm)
9.3 move another place
[ Fig. 9-2 ] move another place
a. switch off
b. Pull out electrical cord
c. Grab bottom side and make horizontally during moving another place
Platen roller

37
Lensmeter ELM-9000C
9.4 Fuse Replacement The power protection fuse protects the product from excess current. If the power monitoring
protection circuit detects excess current, it shut off the current to the equipment in order to
prevent overheating and to restrict the SMPS power output.
To avoid risk of electric shock, always disconnect the plug from the system
prior to fuse replacement.
1. Switch off and pull out electrical cord
2. Open fuse case and remove fuse holder
3. Remove the old fuse and put in the new fuse
4. Connect electrical cord after installing the new fuse
※ Fuse information is shown in the following table
Input Ratings Fuse Ratings Maker Order No.
100~120 VAC 2AH/250V Littelfuse 216_code002
200~240 VAC 2AH/250V Littelfuse 216_code002

38
Lensmeter ELM-9000C
9.5 Service information 1) Repair
If can’t solve matters after checking self-diagnosis and repairing manual shoud contact sales agent When you ask service to sales agent send the machine information of the labelling
(1) model name : ELM-9000C
(2) serial number : it’s showed on the labelling
(3) problem : explain detailed information
(4) Labelling size : 58mm(W) X 34mm(H)
[ Fig. 9-3 ] Labelling

39
Lensmeter ELM-9000C
10. Specification
Measurement Range
Spherical Power (SPH) -25.00 ~ +25.00D (VD 12mm) Increments: 0.01/0.06/0.12/0.25D
Cylinderical Power(CYL) 0.00 ~ ±10.00D Increments: 0.01/0.06/0.12/0.25D
Form : -/+/+-
Axis 1 ~ 180˚ Increments: 1˚
Addition Power 0.00 ~ +10.00D Increments: 0.01/0.06/0.12/0.25D
Prism Power 0.00 ~ 10.00∆ Increments: 0.01/0.06/0.12/0.25∆
Form : OFF/X-Y/P-B
Pupil Distance(PD) 10 ~ 80mm
Applicable lenses
Applicable Lens type
Single lens / double focal lens / Three focal lens / progressive multifocal
lens
Hard contact lens / Soft contact lens (a special accessory is required
respectively)
Lens diameter 000 ~ 100mm
Note
Data Out RS-232C
Internal Printer Thermal printer
Display 7.0 inch TFT COLOR LCD Monitor, Touch
Operation environment
Temperature : +10℃ ~ +40℃
Humidity : 30% ~ 90% RH
Atmospheric pressure range : 70 kPa ~ 106 kPa
Shock (without packaging) : 10g / 6ms
Storage and environmental
condition
Temperature : -40℃ ~ +70℃
Humidity : 10% ~ 95% RH
Atmospheric pressure range : 50 kPa ~ 106 kPa
Shock : 30g / 6ms
Permanent shock : 10g / 6ms
Oscillate(sine curve) : 10Hz ~ 500Hz, 0.5g
Power supply AC100V ~ 240V. 50/60Hz
Power consumption 45 ~ 65VA
Dimension 184.5mm(W) x 255.5mm(D) x 476mm(H)
Weight 5.25kg

40
Lensmeter ELM-9000C
11. Accessory
Name Standard Quantity
① Power cord H05VV-F 175mm, 3G 0.75mm², 175mm 1EA
② Dust cover 200(W) x 270(D) x 470(H) 1EA
③ Printer paper Ø30 x 55 mm 1 rolls
④ User Manual B5(254mm x 180mm) 1EA
⑤ Nosepiece for contact
lenses Ø36 x 20.3 mm 1EA
⑥ Lens Towel 205(W) x 197(D) x 0.4T 1EA
41
Lensmeter ELM-9000C
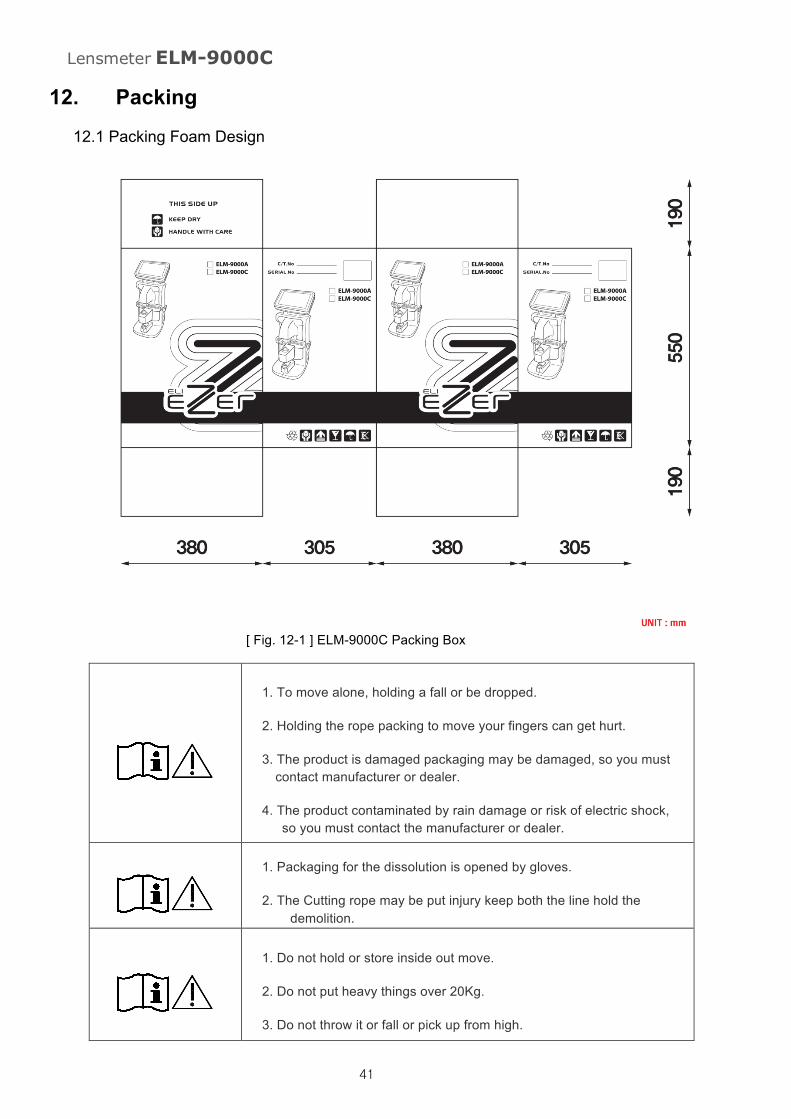
12. Packing 12.1 Packing Foam Design
[ Fig. 12-1 ] ELM-9000C Packing Box
1. To move alone, holding a fall or be dropped.
2. Holding the rope packing to move your fingers can get hurt.
3. The product is damaged packaging may be damaged, so you must contact manufacturer or dealer.
4. The product contaminated by rain damage or risk of electric shock, so you must contact the manufacturer or dealer.
1. Packaging for the dissolution is opened by gloves.
2. The Cutting rope may be put injury keep both the line hold the demolition.
1. Do not hold or store inside out move.
2. Do not put heavy things over 20Kg.
3. Do not throw it or fall or pick up from high.
42
Lensmeter ELM-9000C
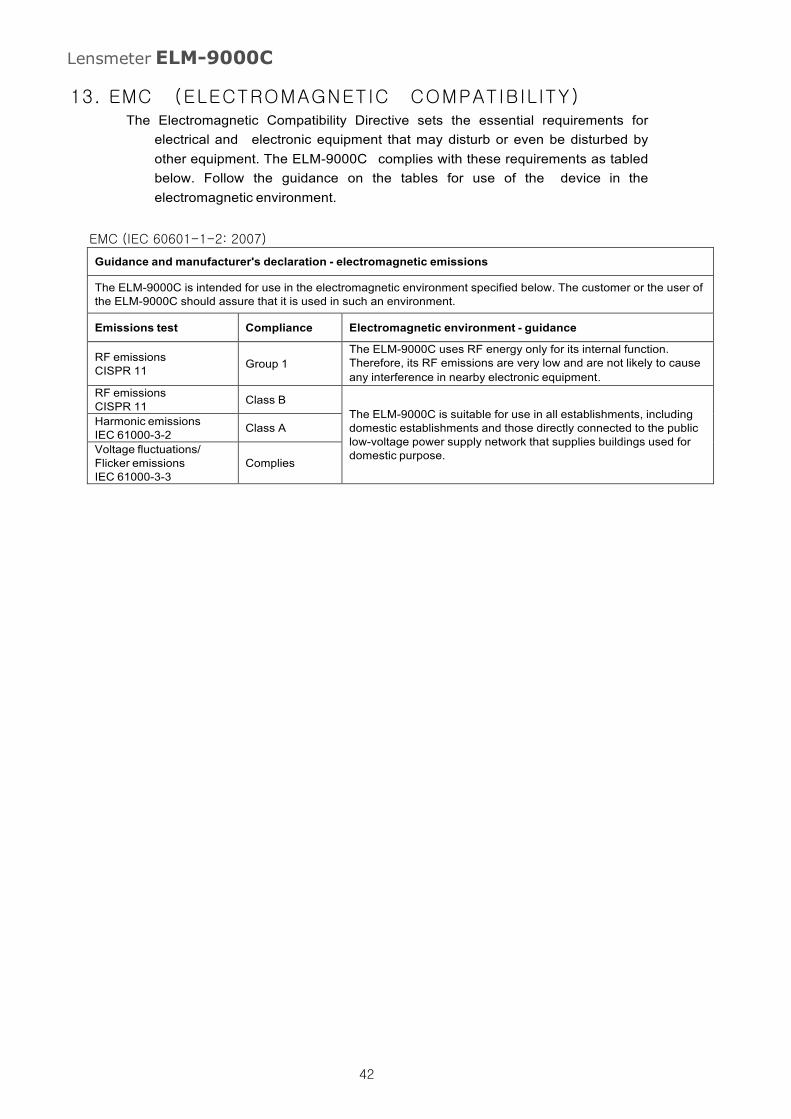
13. EMC ( ELECTROMAGNETIC COMPATIBILITY) The Electromagnetic Compatibility Directive sets the essential requirements for
electrical and electronic equipment that may disturb or even be disturbed by other equipment. The ELM-9000C complies with these requirements as tabled below. Follow the guidance on the tables for use of the device in the electromagnetic environment.
EMC (IEC 60601-1-2: 2007)
Guidance and manufacturer's declaration - electromagnetic emissions
The ELM-9000C is intended for use in the electromagnetic environment specified below. The customer or the user of the ELM-9000C should assure that it is used in such an environment.
Emissions test Compliance Electromagnetic environment - guidance
RF emissions CISPR 11
Group 1
The ELM-9000C uses RF energy only for its internal function. Therefore, its RF emissions are very low and are not likely to cause any interference in nearby electronic equipment.
RF emissions CISPR 11 Class B
The ELM-9000C is suitable for use in all establishments, including domestic establishments and those directly connected to the public low-voltage power supply network that supplies buildings used for domestic purpose.
Harmonic emissions IEC 61000-3-2 Class A
Voltage fluctuations/ Flicker emissions IEC 61000-3-3
Complies
43
Lensmeter ELM-9000C
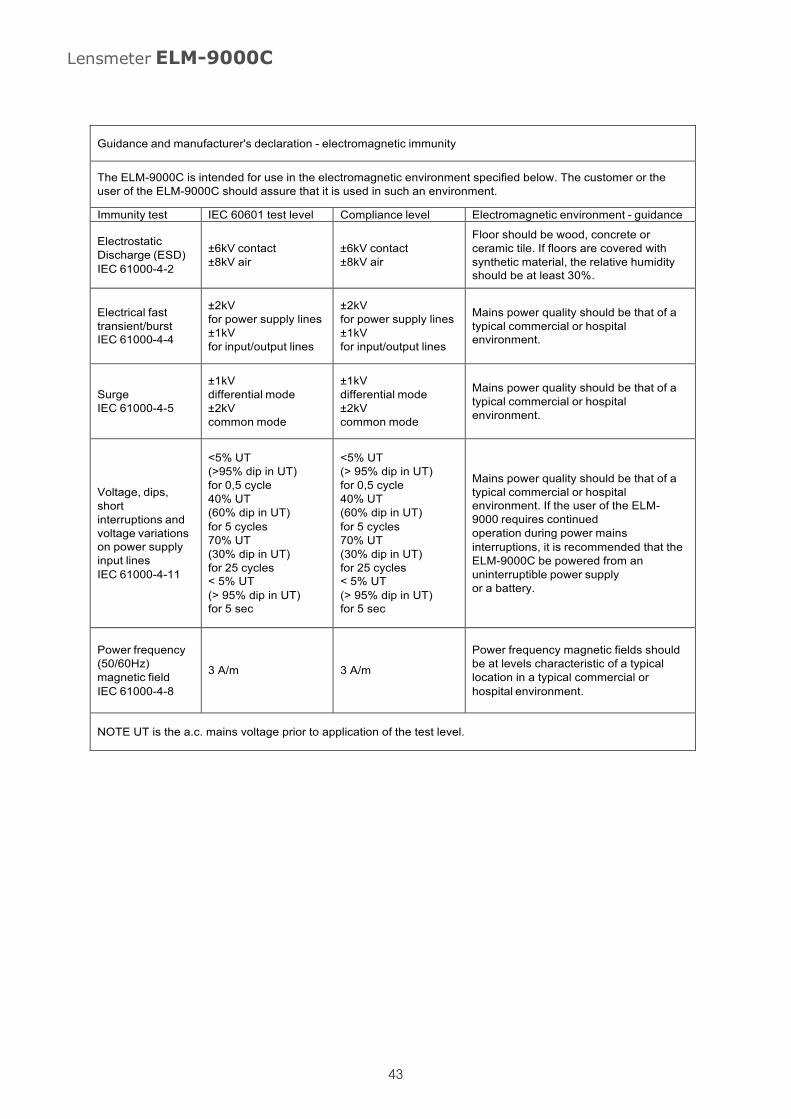
Guidance and manufacturer's declaration - electromagnetic immunity
The ELM-9000C is intended for use in the electromagnetic environment specified below. The customer or the user of the ELM-9000C should assure that it is used in such an environment.
Immunity test IEC 60601 test level Compliance level Electromagnetic environment - guidance
Electrostatic Discharge (ESD) IEC 61000-4-2
±6kV contact ±8kV air
±6kV contact ±8kV air
Floor should be wood, concrete or ceramic tile. If floors are covered with synthetic material, the relative humidity should be at least 30%.
Electrical fast transient/burst IEC 61000-4-4
±2kV for power supply lines ±1kV for input/output lines
±2kV for power supply lines ±1kV for input/output lines
Mains power quality should be that of a typical commercial or hospital environment.
Surge IEC 61000-4-5
±1kV differential mode ±2kV common mode
±1kV differential mode ±2kV common mode
Mains power quality should be that of a typical commercial or hospital environment.
Voltage, dips, short interruptions and voltage variations on power supply input lines IEC 61000-4-11
<5% UT (>95% dip in UT) for 0,5 cycle 40% UT (60% dip in UT) for 5 cycles 70% UT (30% dip in UT) for 25 cycles < 5% UT (> 95% dip in UT) for 5 sec
<5% UT (> 95% dip in UT) for 0,5 cycle 40% UT (60% dip in UT) for 5 cycles 70% UT (30% dip in UT) for 25 cycles < 5% UT (> 95% dip in UT) for 5 sec
Mains power quality should be that of a typical commercial or hospital environment. If the user of the ELM- 9000 requires continued operation during power mains interruptions, it is recommended that the ELM-9000C be powered from an uninterruptible power supply or a battery.
Power frequency (50/60Hz) magnetic field IEC 61000-4-8
3 A/m
3 A/m
Power frequency magnetic fields should be at levels characteristic of a typical location in a typical commercial or hospital environment.
NOTE UT is the a.c. mains voltage prior to application of the test level.

44
Lensmeter ELM-9000C
Guidance and manufacturer's declaration - electromagnetic immunity
The ELM-9000C is intended for use in the electromagnetic environment specified below. The customer or the user of the ELM-9000C should assure that it is used in such an environment.
Immunity test
IEC 60601 test level
Compliance level
Electromagnetic environment - guidance
Conduted RF IEC 61000-4-6
3Vrms 150kHz to 80MHz
3Vrms (V1=3)
Portable and mobile RF communications equipment should be used no closer to any part of the ELM-9000C, including cables, than the recommended separation distance calculated from the equation applicable to the frequency of the transmitter.
Recommended separation distance d=1.2 root(P) d=1.2 root (P) 80MHz to 800MHz d=2.3 root (P) 800MHz to 2,5GHz
where P is the maximum output power rating of the transmitter in watts (W) according to
the transmitter manufacturer and d is the
Radiated RF IEC 61000-4-3
3V/m 80MHz to 2,5GHz
3V/m (E1=3)
recommended separation distance in metres(m).
Field strengths from fixed RF transmitters, as determined by an electromagnetic site survey,a should be less than the compliance level in each frequency range.b Interference may occur in the vicinity of equipment marked with the following symbol:
NOTE 1 At 80MHz and 800MHz, the higher frequency range applies. NOTE 2 These guidelines may not apply in all situations. Electromagnetic propagation is affected by absorption and reflection from structures, objects and people.
a Field strengths from fixed transmitters, such as base stations for radio (cellular/cordless) telephones and land mobile radios, amateur radio, AM and FM radio broadcast and TV broadcast cannot be predicted theoretically with accuracy. To assess the electromagnetic environment due to fixed RF transmitters, an electromagnetic site survey should be considered. If the measured field strength in the location in which the ELM-9000C is used exceeds the applicable RF compliance level above, the ELM-9000C should be observed to verify normal operation. If abnormal performance is observed, additional measures may be necessary, such as reorienting or relocating the ELM-9000C. b Over the frequency range 150kHz to 80MHz, field strengths should be less than 3V/m.

45
Lensmeter ELM-9000C
Recommended separation distances between portable and mobile RF communications equipment and the ELM-9000C
The ELM-9000C is intended for use in an electromagnetic environment in which radiated RF disturbances are controlled. The customer or the user of the ELM-9000C can help prevent electromagnetic interference by maintaining a minimum distance between portable and mobile RF communications equipment (transmitters) and the ELM-9000C as recommended below, according to the maximum output power of the communications equipment.
Rated maximum output power of transmitter W
Separation distance according to frequency of transmitter m
150kHz to 80MHz d=1.2 root(P)
80MHz to 800MHz d=1.2 root(P)
800MHz to 2,5GHz d=2.3 root(P)
0.01 0.12 0.12 0.23 0.1 0.38 0.38 0.79 1 1.2 1.2 2.3
10 3.8 3.8 7.3 100 12 12 23
For transmitters rated at a maximum output power not listed above, the recommended separation distance d in metres (m) can be estimated using the equation applicable to the frequency of the transmitter, where P is the maximum output power rating of the transmitter in watts (W) according to the transmitter manufacturer.
NOTE 1 At 80MHz and 800MHz, the separation distance for the higher frequency range applies. NOTE 2 These guidelines may not apply in all situations. Electromagnetic propagation is affected by absorption and reflection from structures, objects and people.
46
Lensmeter ELM-9000C
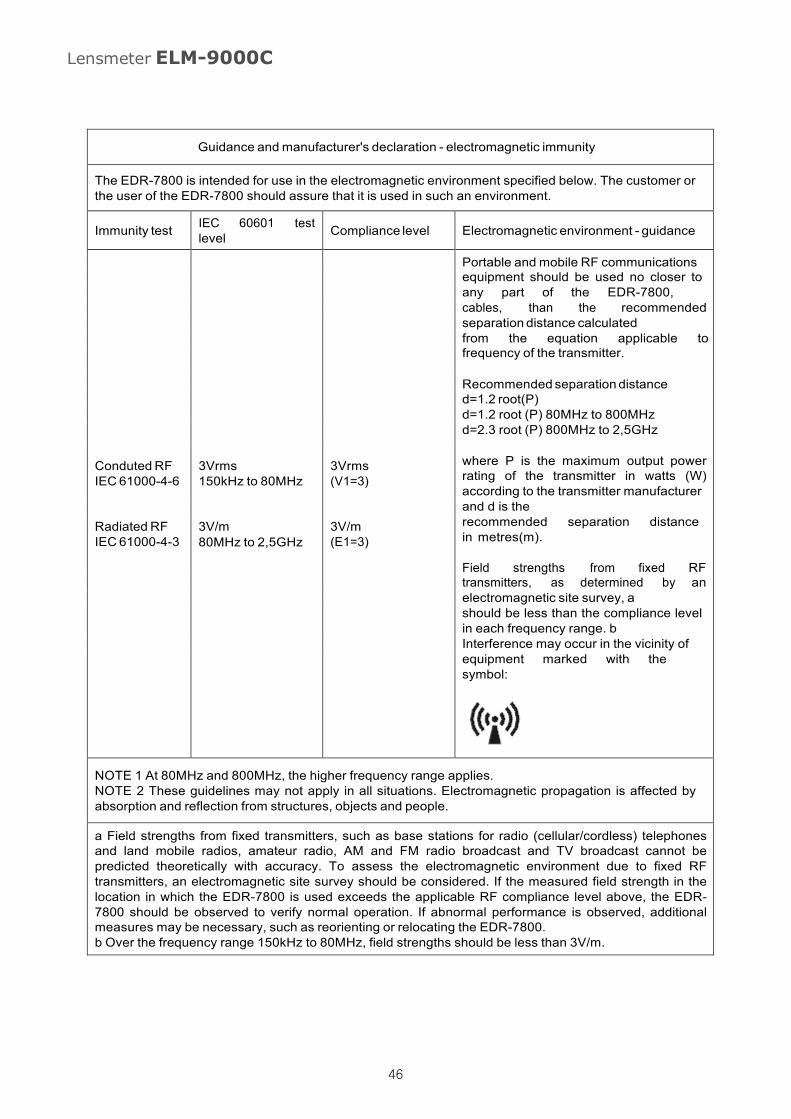
Guidance and manufacturer's declaration - electromagnetic immunity
The EDR-7800 is intended for use in the electromagnetic environment specified below. The customer or the user of the EDR-7800 should assure that it is used in such an environment.
Immunity test IEC 60601 test level Compliance level Electromagnetic environment - guidance
Conduted RF IEC 61000-4-6
3Vrms 150kHz to 80MHz
3Vrms (V1=3)
Portable and mobile RF communications equipment should be used no closer to any part of the EDR-7800, including cables, than the recommended separation distance calculated from the equation applicable to the frequency of the transmitter.
Recommended separation distance d=1.2 root(P) d=1.2 root (P) 80MHz to 800MHz d=2.3 root (P) 800MHz to 2,5GHz
where P is the maximum output power rating of the transmitter in watts (W) according to the transmitter manufacturer
and d is the Radiated RF IEC 61000-4-3
3V/m 80MHz to 2,5GHz
3V/m (E1=3)
recommended separation distance in metres(m).
Field strengths from fixed RF transmitters, as determined by an electromagnetic site survey, a should be less than the compliance level in each frequency range. b Interference may occur in the vicinity of equipment marked with the following symbol:
NOTE 1 At 80MHz and 800MHz, the higher frequency range applies. NOTE 2 These guidelines may not apply in all situations. Electromagnetic propagation is affected by absorption and reflection from structures, objects and people.
a Field strengths from fixed transmitters, such as base stations for radio (cellular/cordless) telephones and land mobile radios, amateur radio, AM and FM radio broadcast and TV broadcast cannot be predicted theoretically with accuracy. To assess the electromagnetic environment due to fixed RF transmitters, an electromagnetic site survey should be considered. If the measured field strength in the location in which the EDR-7800 is used exceeds the applicable RF compliance level above, the EDR- 7800 should be observed to verify normal operation. If abnormal performance is observed, additional measures may be necessary, such as reorienting or relocating the EDR-7800. b Over the frequency range 150kHz to 80MHz, field strengths should be less than 3V/m.

47
Lensmeter ELM-9000C
Recommended separation distances between portable and mobile RF communications equipment and the EDR-7800
The EDR-7800 is intended for use in an electromagnetic environment in which radiated RF disturbances are controlled. The customer or the user of the EDR-7800 can help prevent electromagnetic interference by maintaining a minimum distance between portable and mobile RF communications equipment (transmitters) and the EDR-7800 as recommended below, according to the maximum output power of the communications equipment.
Rated maximum output
power of transmitter W
Separation distance according to frequency of transmitter m
150kHz to 80MHz d=1.2 root(P)
80MHz to 800MHz d=1.2 root(P)
800MHz to 2,5GHz d=2.3 root(P)
0.01 0.12 0.12 0.23 0.1 0.38 0.38 0.79 1 1.2 1.2 2.3 10 3.8 3.8 7.3 100 12 12 23
For transmitters rated at a maximum output power not listed above, the recommended separation distance d in metres (m) can be estimated using the equation applicable to the frequency of the transmitter, where P is the maximum output power rating of the transmitter in watts (W) according to the transmitter manufacturer.
NOTE 1 At 80MHz and 800MHz, the separation distance for the higher frequency range applies. NOTE 2 These guidelines may not apply in all situations. Electromagnetic propagation is affected by absorption and reflection from structures, objects and people.

Lensmeter ELM-9000C
ELM-9000C Digital Lensmeter
9990 NW 14 Street, Suite 105, Doral, FL 33172 Telephone: 888.334.46 40