elemental scientific. 2 4 introduction the onefast system by elemental scientific provides some of...
TRANSCRIPT

REV. 2
ELEMENTAL SCIENTIFIC
oneFAST
Installation and Software Guide

Rev. 2 1
oneFAST
Installation and Software Guide
1999-2012 Elemental Scientific. All rights reserved. 1500 N 24th Street
Omaha, NE 68110 USA Phone 402.991.7800 • Fax 402.991.7799
www.icpms.com
Rev. 2 2
Table of Contents
Introduction ....................................................................................................................................................................... 4
Description ..................................................................................................................................................................... 4
Requirements ................................................................................................................................................................ 4
How It Works ................................................................................................................................................................. 4
Getting Started .................................................................................................................................................................. 5
Software Installation ...................................................................................................................................................... 5
Hardware Installation .................................................................................................................................................... 5
Agilent ChemStation and ASX‐5xx (via VSP) .............................................................................................................. 6
Perkin Elmer Elan and AS‐93+ (via GPIB) ................................................................................................................... 9
Perkin Elmer Elan and ASX‐5xx (via GPIB) ................................................................................................................ 12
Perkin Elmer Elan and S‐10 (via GPIB) ..................................................................................................................... 14
Perkin Elmer NexION and ASX‐5xx........................................................................................................................... 16
Perkin Elmer NexION and S‐10/AS93 ....................................................................................................................... 18
Perkin Elmer WinLab32 Version 3.4 and AS‐93+ (via VSP) ...................................................................................... 20
Perkin Elmer WinLab32 Version 3.4 and ASX‐5xx (via VSP) ..................................................................................... 23
Perkin Elmer WinLab32 Version 3.4 and S‐10 (via VSP) .......................................................................................... 25
Spectro ICP Smart Analyzer Vision and ASX‐5xx (via VSP) ....................................................................................... 27
iTEVA/TEVA and ASX‐5xx (via VSP) .......................................................................................................................... 30
Thermo PlasmaLab and ASX‐5xx (via VSP) ............................................................................................................... 33
Varian ICP Expert I & II and SPS3 (via VSP) .............................................................................................................. 36
Varian ICP Expert I & II and ASX‐5xx (via VSP) ......................................................................................................... 39
Varian ICPMS Expert and SPS3 (via VSP) ................................................................................................................. 42
Varian ICPMS Expert and ASX‐5xx (via VSP) ............................................................................................................ 45
Software Overview .......................................................................................................................................................... 48
Menu Items .................................................................................................................................................................. 49
ESI oneFAST>>File .................................................................................................................................................... 49
ESI oneFAST>>Setup ................................................................................................................................................ 49
ESI oneFAST>>FAST .................................................................................................................................................. 51
ESI oneFAST>>About ................................................................................................................................................ 52
oneFAST Applications ...................................................................................................................................................... 52
Typical Sample Analysis ............................................................................................................................................... 53
Tuning the Instrument when connected to FAST ........................................................................................................ 55
Important Design Criteria for a FAST Method ............................................................................................................. 55
Rev. 2 3
Setting Read‐Delay ................................................................................................................................................... 56
Setting Wash/Rinse Time ......................................................................................................................................... 56
Additional Features ...................................................................................................................................................... 56
Maintenance .................................................................................................................................................................... 57
Maintenance for High Flow FAST Valve ....................................................................................................................... 57
Technical Notes ................................................................................................................................................................ 61
Autostart Batch File Examples‐oneFAST (TN280508) .................................................................................................. 62
Using a GPIB‐232CV‐A with oneFAST (TN290508) ....................................................................................................... 62
Using ICS 4894 with oneFAST (TN010608) .................................................................................................................. 63
Virtual Port not visible in PlasmaLab (TN040908) ....................................................................................................... 64
Setting Background Services Priority (TN050808) ....................................................................................................... 68
Elevating Priority of oneFAST (TN061108) ................................................................................................................... 69
Rev. 2 4
IntroductionThe oneFAST system by Elemental Scientific provides some of the same FAST features found on the SC autosamplers
such as high throughput and fast washout but extends these features to non‐ESI autosamplers.
Integration with an SC Autosampler will provide the full set of FAST features; however, depending on the
autosampler used, some features may not be available.
DescriptionThe oneFAST system can be integrated with an existing instrument (host software), so the user will be able to employ
the use of a “quick loading sample valve” (FAST Valve) to reduce sample uptake and rinse times.
If additional features are required, the user may elect to incorporate the use of an SC Autosampler with the oneFAST
components.
RequirementsOperating Systems: Windows XP, Windows Vista, Windows 7 (x86 or x64)
Computer Disk Space: 50MB
Computer Memory: 512MB minimum depending on OS.
Serial Ports: One additional serial port (USB or DB9), required for most applications. Two ports are required if a GPIB
interface is required (e.g. PE Elan).
Supporting Software: Microsoft Excel
Supported Configurations: See the section; Hardware Installation for a complete listing.
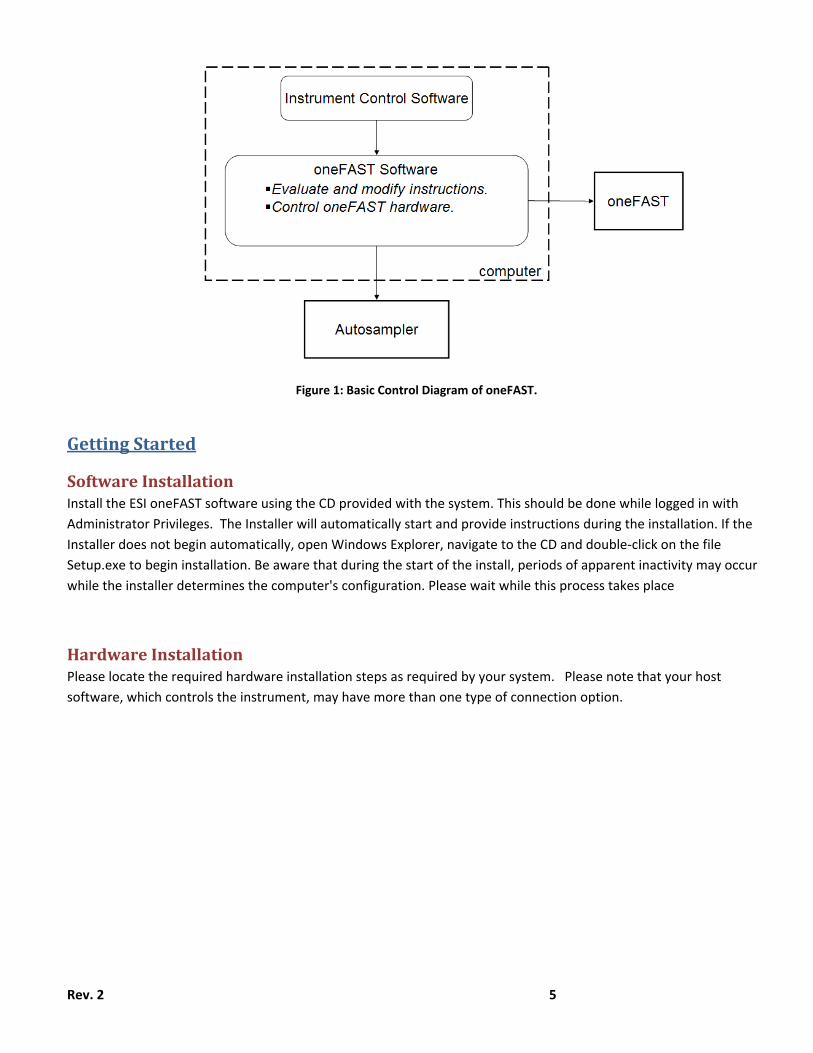
HowItWorksThe oneFAST system works actively to control both the oneFAST hardware the autosampler device. Please refer to
Figure 1: Basic Control Diagram of oneFAST. This illustration identifies the oneFAST software as the mediator
between the Instrument Control Software (host software), the autosampler and the oneFAST hardware. The
oneFAST hardware consists of a sample loop, a 6‐port valve and a vacuum pump for rapid transport of sample.
Please refer to section Hardware Installation for a description of the supported instrument and autosampler
configurations.
The oneFAST software interface provides the user the freedom to work on method development quickly as no
firmware or programming updates are required for the oneFAST devices. Therefore, changes to the oneFAST method
can be made during the execution of an analysis sequence without hesitation. There is no need to pause or stop an
analysis sequence to fine‐tune FAST method times.
Additionally, the oneFAST system can provide the user with some additional flexibility depending on the host
software and autosampler used. These additional features may include:
The ability to mix rack types where previously the host & autosampler configuration was limited to a fixed
layout of rack types. For instance, a limited selection of tray files may have required that all racks be of the
same type; all 21‐position racks or all 60‐position racks.
MoveNext feature will advance the probe above the next sequential sample to reduce autosampler
movement time.
Rev. 2 5
Figure 1: Basic Control Diagram of oneFAST.
GettingStarted
SoftwareInstallationInstall the ESI oneFAST software using the CD provided with the system. This should be done while logged in with
Administrator Privileges. The Installer will automatically start and provide instructions during the installation. If the
Installer does not begin automatically, open Windows Explorer, navigate to the CD and double‐click on the file
Setup.exe to begin installation. Be aware that during the start of the install, periods of apparent inactivity may occur
while the installer determines the computer's configuration. Please wait while this process takes place
HardwareInstallationPlease locate the required hardware installation steps as required by your system. Please note that your host
software, which controls the instrument, may have more than one type of connection option.
Rev. 2 6
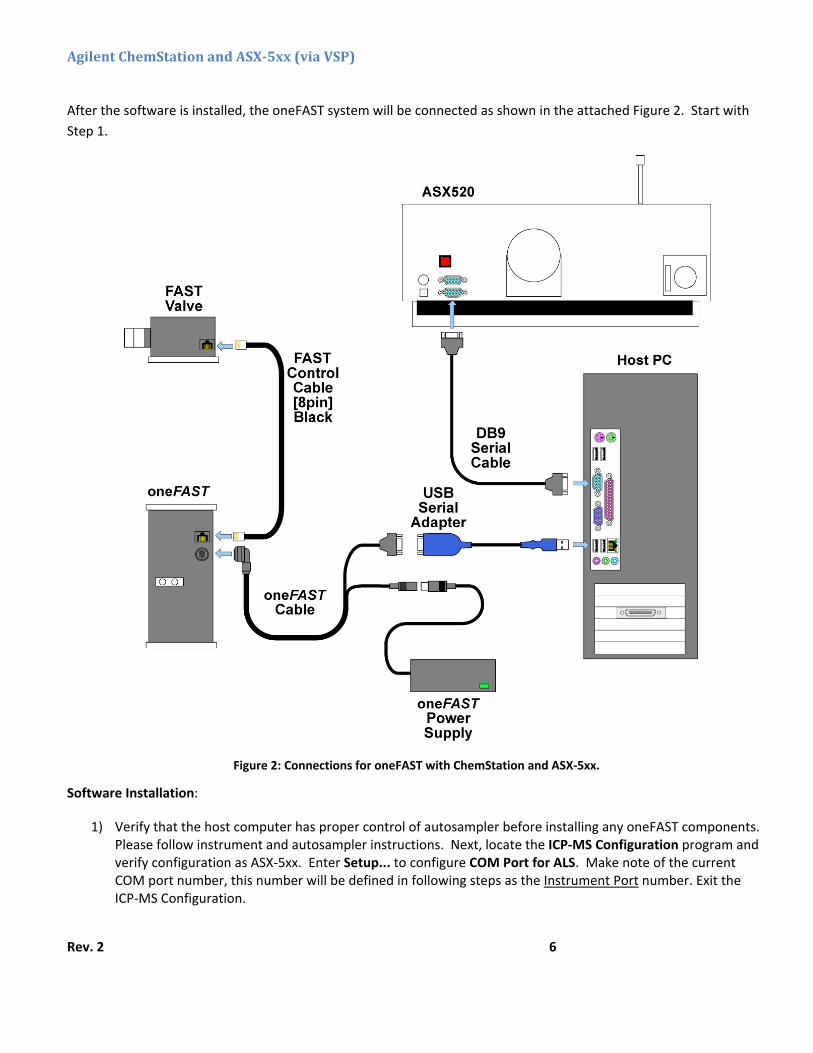
AgilentChemStationandASX‐5xx(viaVSP)
After the software is installed, the oneFAST system will be connected as shown in the attached Figure 2. Start with
Step 1.
Figure 2: Connections for oneFAST with ChemStation and ASX‐5xx.
Software Installation:
1) Verify that the host computer has proper control of autosampler before installing any oneFAST components. Please follow instrument and autosampler instructions. Next, locate the ICP‐MS Configuration program and verify configuration as ASX‐5xx. Enter Setup... to configure COM Port for ALS. Make note of the current COM port number, this number will be defined in following steps as the Instrument Port number. Exit the ICP‐MS Configuration.
Re
H
th
Sy
A
on
in
ev. 2
2) Install
ardware Inst
3) Place tContro
4) ConneAdapte
If a DB‐9 p
hat the same
5) Conne
ystem Setting
6) Next, uCOM plisted i
To change
utosampler C
7) Power
8) In the
9) Systemselectemodififollow
10) On theconfigautosa
If hardwa
n the comput
nitialize them
oneFAST soft
tallation:
the FAST valvol Cable [8‐pin
ect the oneFAer (SC‐0905).
port is not av
type of adapt
ect the oneFA
gs:
using Start>>port matchingin the Ports g
e a COM port
Configuration
r‐ON all devic
oneFAST soft
m Tab: Verify ed to match wication, selected by clicking
e "Devices" tauration requiampler will be
are devices ar
ter. This will
.
tware as desc
ve as close as n] (SC‐0599‐2
ST controller
ailable on the
ters be used t
ST controller
Settings>>Cog the defined group.
t number, righ
n:
es and start t
tware, open t
that the correwhat you havt the approprg the "Click to
ab, ensure thares modificate automatical
re not found o
also try to re‐
cribed in “Sof
possible to th2005), to conn
to computer
e computer, a
throughout t
to power sup
ontrol Panel>Instrument P
ht‐click on the
the oneFAST s
the "Setup" m
ect "OEM Sofe set in your riate instrumeo Re‐Configur
at your Autostion, select thlly initialized w
or initialized
‐establish con
ftware Installa
he instrumennect the valve
r using the on
a USB‐Serial A
he system to
pply (SC‐0210
>>System>>HPort in step (1
e device then
software.
menu.
ftware" was ahost instrument software re" button.
sampler modehe appropriatwhen selecte
properly, Sele
nnection to a
ation” section
t’s nebulizer/e to the oneF
neFAST cable
Adapter (SC‐0
minimize dri
0) using the o
ardware>>De1), and renam
n Properties>
automaticallyent softwaretype and COM
el was correcte selection fred.
ect File>Refre
ny devices cu
7
n. A reboot w
/spray chambFAST controlle
(SC‐0212‐040
0905) may be
iver conflicts.
oneFAST cable
evice Managme to an avail
>>Port Setting
y detected an. If the OEM SM Port from t
ctly found. If trom the drop
esh to refresh
urrently conn
will be require
ber and use ther.
00) and a USB
used. It is re
e.
er>>Ports. Lable number
gs>>Advance
d that the "CSoftware reqthe drop‐dow
the autosamp‐down box; t
h all the COM
ected to the
ed.
he FAST
B‐Serial
ecommended
ocate the r that is not
ed.
OM Port" is uires wn box;
pler he
M/USB ports
PC and
d

Re
H
ev. 2
11) Verifysays:
12) Config
ost Software
13) Configlayout
14) Verify
If com
technical d
y that the tw‘The softwa
gure your ap
e Configuratio
gure the Chem in the ChemS
control of AS
mmunication
document (TN
o tabs, "Devare is config
ppropriate ra
on:
mStation rack Station match
SX‐5xx using I
loss or “time‐
N061108)
vices" and "Sgured!’ Clos
acks by click
layout using h the layout o
CP‐MS Instru
‐out” errors a
System" are se the Softw
king on the d
the ICP‐MS Cof the oneFAS
ument Contro
are encounter
green and thware Setup w
desired rack i
ConfigurationST software.
ol>>ALS>>GoT
red due to re
8
hat the user mwindow.
in the autosa
n program. It Close the con
To….
esource limita
message at th
ampler imag
is required thnfiguration p
ations, please
he bottom
ge.
hat the rack rogram.
refer to
Re
P
Th
H
th
ev. 2
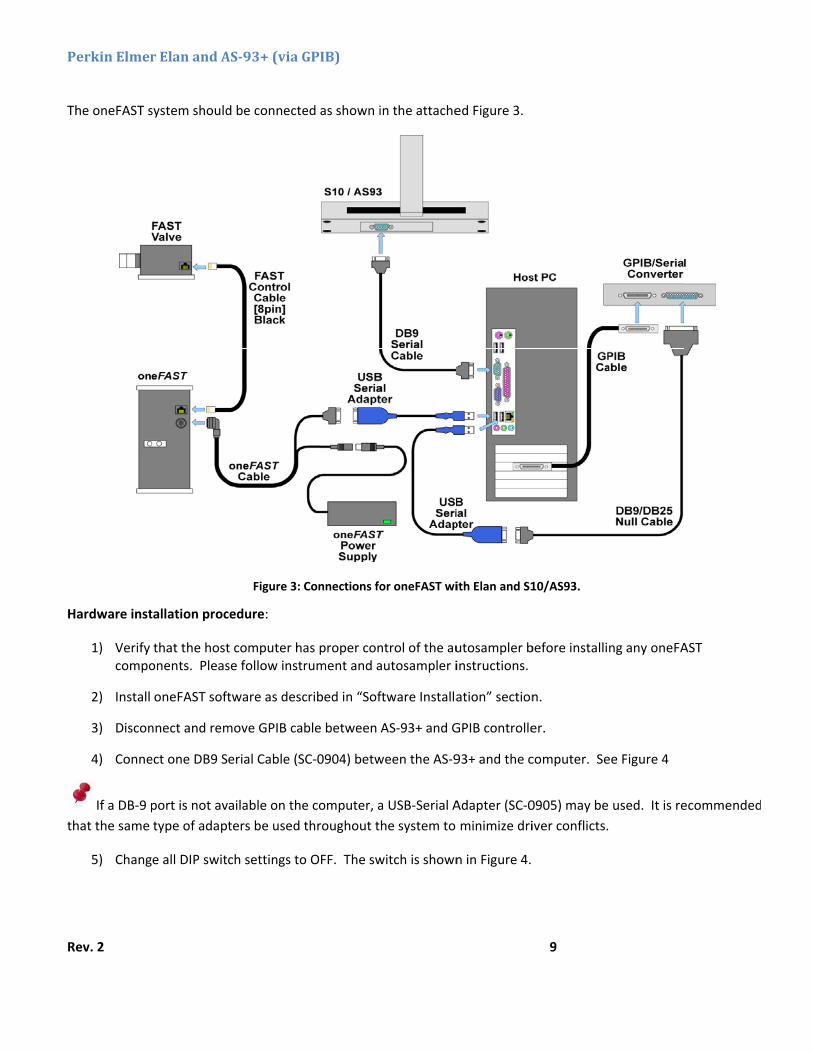
erkinElmer
he oneFAST s
ardware inst
1) Verify compo
2) Install
3) Discon
4) Conne
If a DB‐9 p
hat the same
5) Chang
rElanandA
system should
tallation proc
that the hostonents. Pleas
oneFAST soft
nnect and rem
ect one DB9 S
port is not av
type of adapt
e all DIP swit
AS‐93+(viaG
d be connecte
Figure 3: C
cedure:
t computer hase follow instr
tware as desc
move GPIB ca
erial Cable (S
ailable on the
ters be used t
ch settings to
GPIB)
ed as shown i
Connections fo
as proper conrument and a
cribed in “Sof
ble between
C‐0904) betw
e computer, a
throughout t
o OFF. The sw
in the attache
or oneFAST wi
ntrol of the auautosampler i
ftware Installa
AS‐93+ and G
ween the AS‐9
a USB‐Serial A
he system to
witch is shown
ed Figure 3.
ith Elan and S1
utosampler binstructions.
ation” section
GPIB controlle
93+ and the c
Adapter (SC‐0
minimize dri
n in Figure 4.
9
10/AS93.
before installi
n.
er.
computer. Se
0905) may be
iver conflicts.
ng any oneFA
ee Figure 4
used. It is re
AST
ecommended
d
Re
H
ev. 2
6) Conne
7) Conne0903).
8) Place tContro
9) ConneAdapte
10) Conne
11) Power
12) In the
13) Systemselectemodififollow
14) On theconfigautosa
If hard
ports on th
and initiali
15) Verify ‘The so
16) Config
ost Software
17) Start tshortcfiles\e
ect GPIB Interf
ect GPIB Interf
the FAST valvol Cable [8‐pin
ect the oneFAer (SC‐0905).
ect the oneFA
r‐ON all devic
oneFAST soft
m Tab: Verify ed to match wication, selected by clicking
e "Devices" tauration requiampler will be
dware device
he computer.
ze them.
that the two oftware is con
gure your app
e Configuratio
he Elan softwut named “onsi\oneFAST\S
face (SC‐0901
face to comp
ve as close as n] (SC‐0599‐2
ST controller
ST controller
es and start t
tware, open t
that the correwhat you havt the approprg the "Click to
ab, ensure thares modificate automatical
es are not fou
This will also
tabs, "Devicenfigured!’ Clo
ropriate rack
on:
ware and seleneFAST Elan TSupport Files\
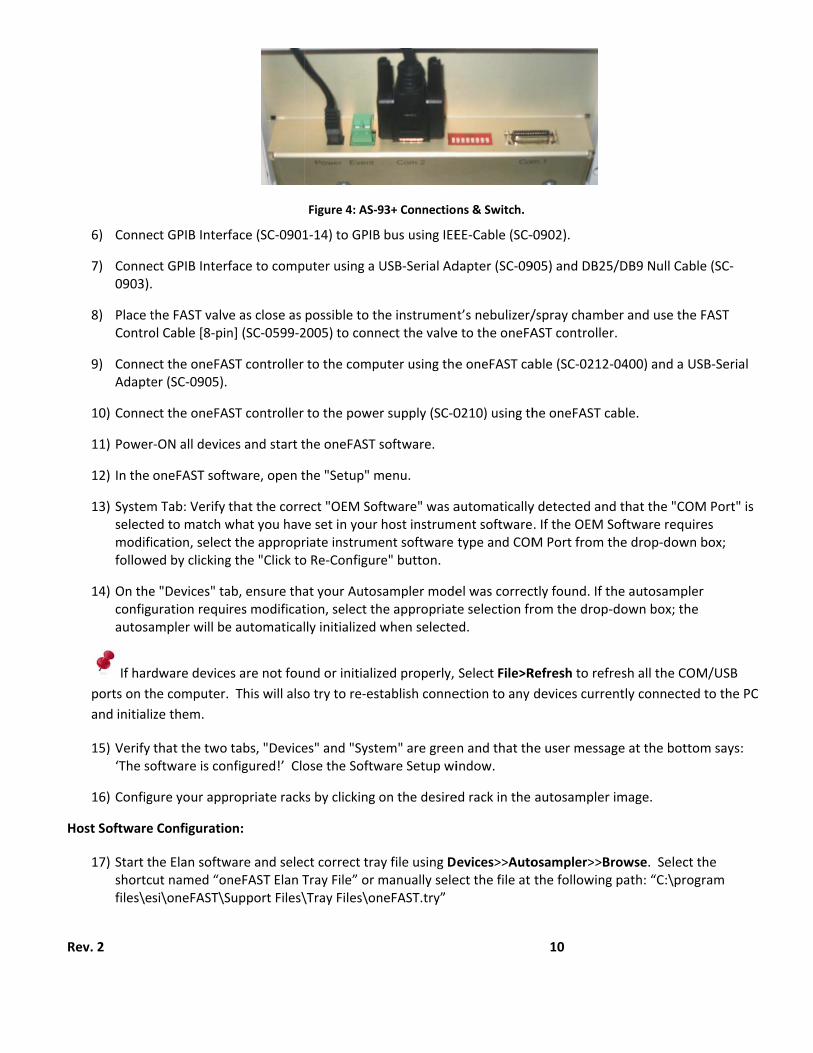
Figure 4: AS‐9
1‐14) to GPIB
puter using a U
possible to th2005) to conn
to the comp
to the powe
the oneFAST s
the "Setup" m
ect "OEM Sofe set in your riate instrumeo Re‐Configur
at your Autostion, select thlly initialized w
nd or initializ
o try to re‐est
es" and "Systeose the Softw
ks by clicking o
ct correct traTray File” or m\Tray Files\on
93+ Connectio
bus using IEE
USB‐Serial Ad
he instrumennect the valve
uter using the
r supply (SC‐0
software.
menu.
ftware" was ahost instrument software re" button.
sampler modehe appropriatwhen selecte
zed properly,
tablish conne
em" are greeware Setup wi
on the desire
y file using Dmanually seleneFAST.try”
ns & Switch.
EE‐Cable (SC‐
dapter (SC‐09
t’s nebulizer/e to the oneFA
e oneFAST ca
0210) using th
automaticallyent softwaretype and COM
el was correcte selection fred.
Select File>R
ection to any
n and that thindow.
ed rack in the
evices>>Autoect the file at
10
‐0902).
905) and DB25
/spray chambAST controlle
able (SC‐0212
he oneFAST c
y detected an. If the OEM SM Port from t
ctly found. If trom the drop
Refresh to ref
devices curre
he user messa
autosampler
osampler>>Bthe following
5/DB9 Null Ca
ber and use thr.
2‐0400) and a
cable.
d that the "CSoftware reqthe drop‐dow
the autosamp‐down box; t
fresh all the C
ently connect
age at the bot
r image.
Browse. Selecg path: “C:\pr
able (SC‐
he FAST
USB‐Serial
OM Port" is uires wn box;
pler he
COM/USB
ted to the PC
ttom says:
ct the rogram

Re
M
al
ev. 2
If Elan is o
Method>>Sam
18) Finally
After any
lso be require
older than ve
mpling>>Selec
y, press the “I
reconfigurat
ed.
rsion 3.4 the
ct…>>Autosa
nitialize” but
ion of the rac
autosampler
mpler Type
tton in the Ela
ck layouts in t
selection is l
an software.
the oneFAST s
ocated at
software, this
11
s initializationn in the Elan ssoftware will
Re
P
Th
H
th
ev. 2
erkinElmer
he oneFAST s
ardware inst
1) Verify Please
2) Install
3) LocateGPIB‐2
If a DB‐9 p
hat the same
Please ref
4) Conne0903).
rElanandA
system should
tallation proc
that the hoste follow instru
oneFAST soft
e the serial ca232CV‐A and
port is not av
type of adapt
fer to Technic
ect GPIB Interf
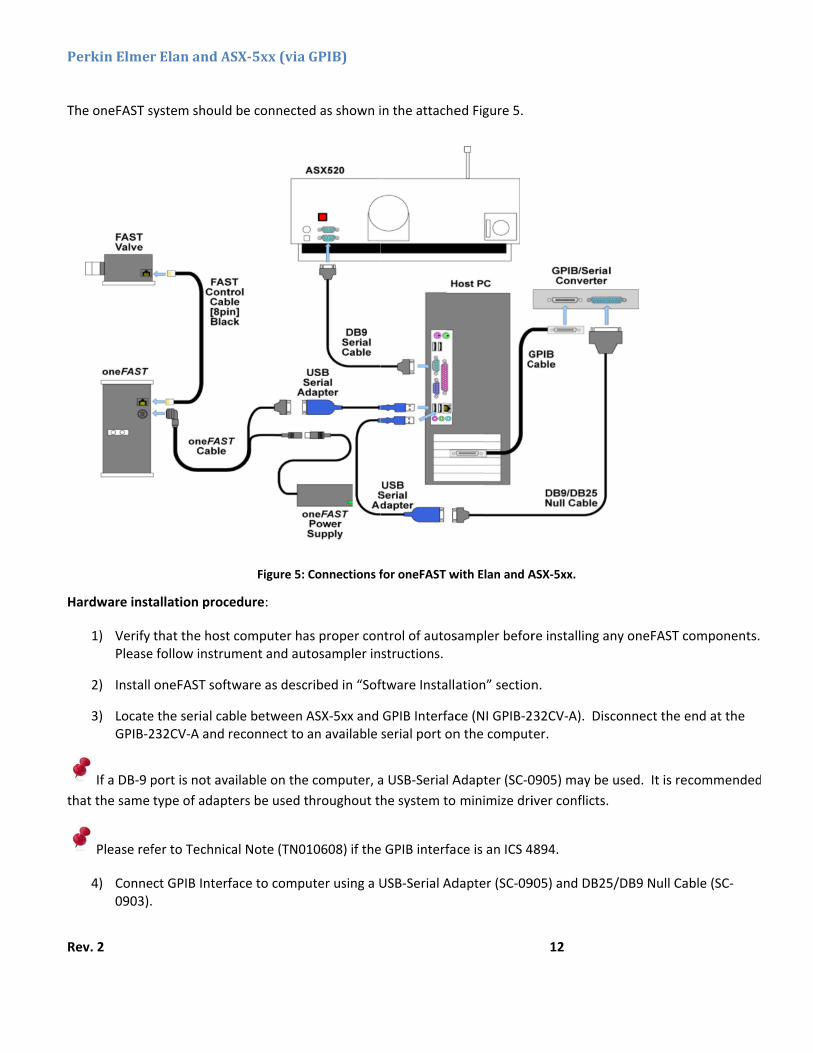
ASX‐5xx(via
d be connecte
Figure 5:
cedure:
t computer haument and au
tware as desc
ble between reconnect to
ailable on the
ters be used t
cal Note (TN0
face to comp
aGPIB)
ed as shown i
Connections f
as proper conutosampler in
cribed in “Sof
ASX‐5xx and an available
e computer, a
throughout t
010608) if the
puter using a U
in the attache
for oneFAST w
ntrol of autosstructions.
ftware Installa
GPIB Interfacserial port on
a USB‐Serial A
he system to
e GPIB interfa
USB‐Serial Ad
ed Figure 5.
with Elan and A
sampler befor
ation” section
ce (NI GPIB‐2n the comput
Adapter (SC‐0
minimize dri
ce is an ICS 4
dapter (SC‐09
12
ASX‐5xx.
re installing a
n.
32CV‐A). Dister.
0905) may be
iver conflicts.
4894.
905) and DB25
any oneFAST c
sconnect the
used. It is re
5/DB9 Null Ca
components.
end at the
ecommended
able (SC‐
d
Re
on
in
H
M
al
ev. 2
5) Place tContro
6) ConneAdapte
7) Conne
8) Power
9) In the
10) Systemselectemodififollow
11) On theconfigautosa
If hardwa
n the comput
nitialize them
12) Verify ‘The so
13) Config
ost Software
14) Start tshortcfiles\e
If Elan is o
Method>>Sam
15) Finally
After any
lso be require
the FAST valvol Cable [8‐pin
ect the oneFAer (SC‐0905).
ect the oneFA
r‐ON all devic
oneFAST soft
m Tab: Verify ed to match wication, selected by clicking
e "Devices" tauration requiampler will be
re devices ar
ter. This will
.
that the two oftware is con
gure your app
e Configuratio
he Elan softwut named “onsi\oneFAST\S
older than ve
mpling>>Selec
y, press the “I
reconfigurat
ed.
ve as close as n] (SC‐0599‐2
ST controller
ST controller
es and start t
tware, open t
that the correwhat you havt the approprg the "Click to
ab, ensure thares modificate automatical
e not found o
also try to re‐
tabs, "Devicenfigured!’ Clo
ropriate rack
on:
ware and seleneFAST Elan TSupport Files\
rsion 3.4 the
ct…>>Autosa
nitialize” but
ion of the rac
possible to th2005), to conn
to computer
to power sup
the oneFAST s
the "Setup" m
ect "OEM Sofe set in your riate instrumeo Re‐Configur
at your Autostion, select thlly initialized w
or initialized p
‐establish con
es" and "Systeose the Softw
ks by clicking o
ct correct traTray File” or m\Tray Files\on
autosampler
mpler Type
tton in the Ela
ck layouts in t
he instrumennect the valve
r using the on
pply (SC‐0210
software.
menu.
ftware" was ahost instrument software re" button.
sampler modehe appropriatwhen selecte
properly, Sele
nnection to a
em" are greeware Setup wi
on the desire
y file using Dmanually seleneFAST.try”
selection is l
an software.
the oneFAST s
t’s nebulizer/e to the oneF
neFAST cable
0) using the o
automaticallyent softwaretype and COM
el was correcte selection fred.
ect File>Refre
ny devices cu
n and that thindow.
ed rack in the
evices>>Autoect the file at
ocated at
software, this
13
/spray chambFAST controlle
(SC‐0212‐040
oneFAST cable
y detected an. If the OEM SM Port from t
ctly found. If trom the drop
esh to refresh
urrently conn
he user messa
autosampler
osampler>>Bthe following
s initialization
ber and use ther.
00) and a USB
e.
d that the "CSoftware reqthe drop‐dow
the autosamp‐down box; t
h all the COM/
ected to the
age at the bot
r image.
Browse. Selecg path: “C:\pr
n in the Elan s
he FAST
B‐Serial
OM Port" is uires wn box;
pler he
/USB ports
PC and
ttom says:
ct the rogram
software will
Re
P
Th
H
ev. 2
erkinElmer
he oneFAST s
ardware inst
1) Verify Please
2) Install
3) Removpresen
Please ref
4) Conne0903).
5) Conne
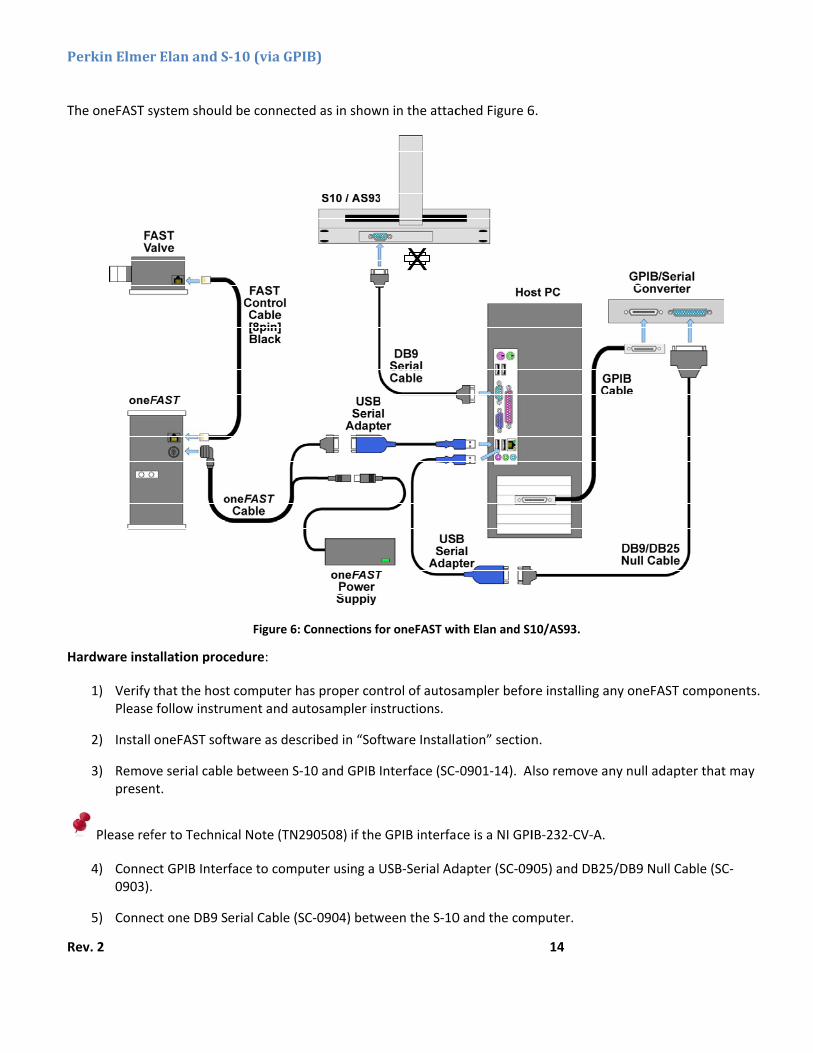
rElanandS
system should
tallation proc
that the hoste follow instru
oneFAST soft
ve serial cablent.
fer to Technic
ect GPIB Interf
ect one DB9 S
‐10(viaGPI
d be connecte
Figure 6: C
cedure:
t computer haument and au
tware as desc
e between S‐
cal Note (TN2
face to comp
erial Cable (S
IB)
ed as in show
Connections fo
as proper conutosampler in
cribed in “Sof
10 and GPIB
290508) if the
puter using a U
C‐0904) betw
wn in the attac
or oneFAST wi
ntrol of autosstructions.
ftware Installa
Interface (SC‐
e GPIB interfa
USB‐Serial Ad
ween the S‐10
X
ched Figure 6
ith Elan and S1
sampler befor
ation” section
‐0901‐14). A
ce is a NI GPI
dapter (SC‐09
0 and the com
14
6.
10/AS93.
re installing a
n.
lso remove a
IB‐232‐CV‐A.
905) and DB25
mputer.
any oneFAST c
ny null adapt
5/DB9 Null Ca
components.
ter that may
able (SC‐
Re
th
on
in
H
M
al
ev. 2
If a DB‐9 p
hat the same
6) Place tContro
7) ConneAdapte
8) Conne
9) Power
10) In the
11) Systemselectemodififollow
12) On theconfigautosa
If hardwa
n the comput
nitialize them
13) Verify ‘The so
14) Config
ost Software
15) Start tshortcfiles\e
If Elan is o
Method>>Sam
16) Finally
After any
lso be require
port is not av
type of adapt
the FAST valvol Cable [8‐pin
ect the oneFAer (SC‐0905).
ect the oneFA
r‐ON all devic
oneFAST soft
m Tab: Verify ed to match wication, selected by clicking
e "Devices" tauration requiampler will be
re devices ar
ter. This will
.
that the two oftware is con
gure your app
e Configuratio
he Elan softwut named “onsi\oneFAST\S
older than ve
mpling>>Selec
y, press the “I
reconfigurat
ed.
ailable on the
ters be used t
ve as close as n] (SC‐0599‐2
ST controller
ST controller
es and start t
tware, open t
that the correwhat you havt the approprg the "Click to
ab, ensure thares modificate automatical
e not found o
also try to re‐
tabs, "Devicenfigured!’ Clo
ropriate rack
on:
ware and seleneFAST Elan TSupport Files\
rsion 3.4 the
ct…>>Autosa
nitialize” but
ion of the rac
e computer, a
throughout t
possible to th2005), to conn
to computer
to power sup
the oneFAST s
the "Setup" m
ect "OEM Sofe set in your riate instrumeo Re‐Configur
at your Autostion, select thlly initialized w
or initialized p
‐establish con
es" and "Systeose the Softw
ks by clicking o
ct correct traTray File” or m\Tray Files\on
autosampler
mpler Type
tton in the Ela
ck layouts in t
a USB‐Serial A
he system to
he instrumennect the valve
r using the on
pply (SC‐0210
software.
menu.
ftware" was ahost instrument software re" button.
sampler modehe appropriatwhen selecte
properly, Sele
nnection to a
em" are greeware Setup wi
on the desire
y file using Dmanually seleneFAST.try”
selection is l
an software.
the oneFAST s
Adapter (SC‐0
minimize dri
t’s nebulizer/e to the oneF
neFAST cable
0) using the o
automaticallyent softwaretype and COM
el was correcte selection fred.
ect File>Refre
ny devices cu
n and that thindow.
ed rack in the
evices>>Autoect the file at
ocated at
software, this
15
0905) may be
iver conflicts.
/spray chambFAST controlle
(SC‐0212‐040
oneFAST cable
y detected an. If the OEM SM Port from t
ctly found. If trom the drop
esh to refresh
urrently conn
he user messa
autosampler
osampler>>Bthe following
s initialization
used. It is re
ber and use ther.
00) and a USB
e.
d that the "CSoftware reqthe drop‐dow
the autosamp‐down box; t
h all the COM/
ected to the
age at the bot
r image.
Browse. Selecg path: “C:\pr
n in the Elan s
ecommended
he FAST
B‐Serial
OM Port" is uires wn box;
pler he
/USB ports
PC and
ttom says:
ct the rogram
software will
d
Rev. 2 16
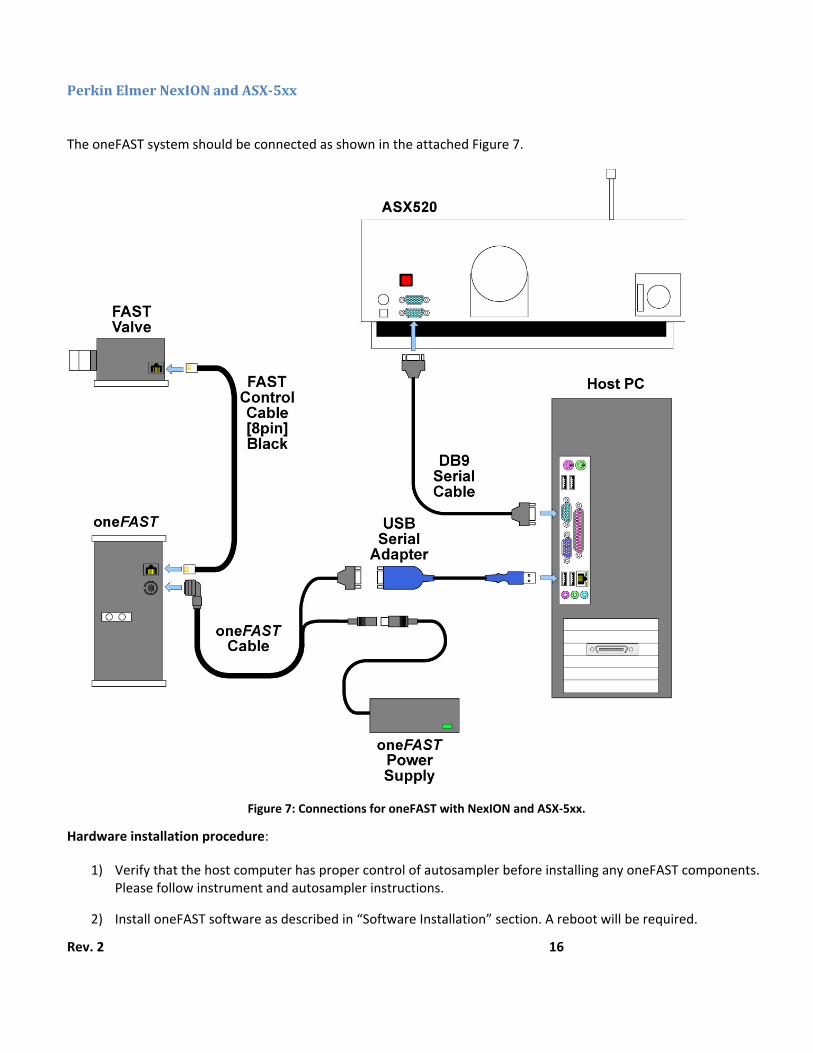
PerkinElmerNexIONandASX‐5xx
The oneFAST system should be connected as shown in the attached Figure 7.
Figure 7: Connections for oneFAST with NexION and ASX‐5xx.
Hardware installation procedure:
1) Verify that the host computer has proper control of autosampler before installing any oneFAST components. Please follow instrument and autosampler instructions.
2) Install oneFAST software as described in “Software Installation” section. A reboot will be required.
Re
th
th
th
H
ev. 2
3) Place tContro
4) ConneAdapte
If a DB‐9 p
hat the same
5) Conne
6) Power
7) In the
8) Systemselectemodififollow
If port 4 is
9) On theconfigautosa
If hardwa
he computer.
hem.
10) Verify ‘The so
11) Config
ost Software
12) Open tand ch
13) Select manuaFiles\o
14) Next, s
the FAST valvol Cable [8‐pin
ect the oneFAer (SC‐0905).
port is not av
type of adapt
ect the oneFA
r‐ON all devic
oneFAST soft
m Tab: Verify ed to match wication, selected by clicking
s not availabl
e "Devices" tauration requiampler will be
re devices ar
This will also
that the two oftware is con
gure your app
e Configuratio
the Perkin Elmhoose “Cetac
the correct tally select theoneFAST.try”
select the sam
ve as close as n] (SC‐0599‐2
ST controller
ailable on the
ters be used t
ST controller
es and start t
tware, open t
that the correwhat you havt the approprg the "Click to
e choose the
ab, ensure thares modificate automatical
e not found o
o try to re‐est
tabs, "Devicenfigured!’ Clo
ropriate rack
on:
mer NexION SASX‐5xx” (Yo
ray file using e file at the fo
me COM port
possible to th2005), to conn
to computer
e computer, a
throughout t
to power sup
the oneFAST s
the "Setup" m
ect "OEM Sofe set in your riate instrumeo Re‐Configur
next lowest
at your Autostion, select thlly initialized w
or initialized p
tablish conne
es" and "Systeose the Softw
ks by clicking o
Software andur Autosamp
the “Browseollowing path
number as th
he instrumennect the valve
r using the on
a USB‐Serial A
he system to
pply (SC‐0210
software.
menu.
ftware" was ahost instrument software re" button.
port number
sampler modehe appropriatwhen selecte
properly, Sele
ection to any d
em" are greeware Setup wi
on the desire
configure bypler Model)
” button. Se: “C:\program
he “Virtual Po
t’s nebulizer/e to the oneF
neFAST cable
Adapter (SC‐0
minimize dri
0) using the o
automaticallyent softwaretype and COM
.
el was correcte selection fred.
ect File>Refre
devices curre
n and that thindow.
ed rack in the
y going to Dev
lect the shortm files\esi\on
ort” set on st
17
/spray chambFAST controlle
(SC‐0212‐040
0905) may be
iver conflicts.
oneFAST cable
y detected an. If the OEM SM Port (4) fro
ctly found. If trom the drop
esh to refresh
ently connect
he user messa
autosampler
vices>Autosa
tcut named “eFAST\Suppo
ep 9 (typicall
ber and use ther.
00) and a USB
used. It is re
e.
d that the "CSoftware reqom the drop‐d
the autosamp‐down box; t
all the COM/
ed to the PC
age at the bot
r image.
ampler>Autos
oneFAST Trayort Files\Tray
y COM 4).
he FAST
B‐Serial
ecommended
OM Port" is uires down box;
pler he
/USB ports on
and initialize
ttom says:
sampler Type
y” or
d
n
e
Rev. 2 18
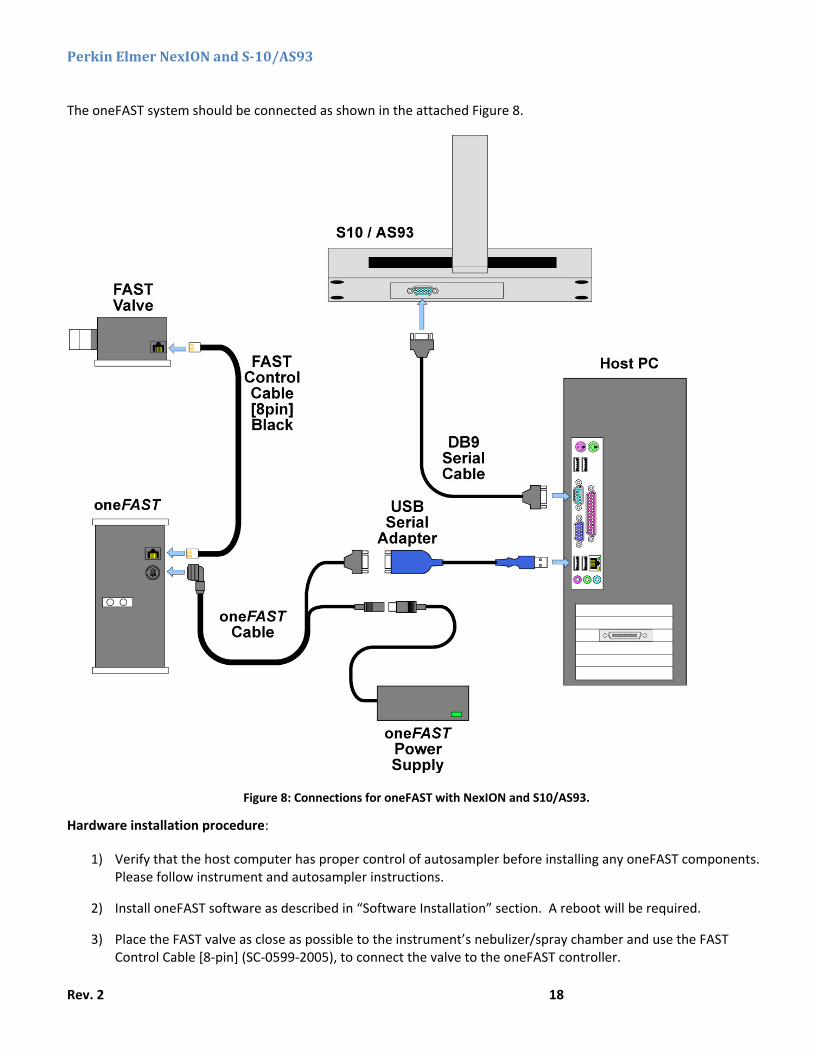
PerkinElmerNexIONandS‐10/AS93
The oneFAST system should be connected as shown in the attached Figure 8.
Figure 8: Connections for oneFAST with NexION and S10/AS93.
Hardware installation procedure:
1) Verify that the host computer has proper control of autosampler before installing any oneFAST components. Please follow instrument and autosampler instructions.
2) Install oneFAST software as described in “Software Installation” section. A reboot will be required.
3) Place the FAST valve as close as possible to the instrument’s nebulizer/spray chamber and use the FAST Control Cable [8‐pin] (SC‐0599‐2005), to connect the valve to the oneFAST controller.
Re
th
th
th
H
ev. 2
4) ConneAdapte
If a DB‐9 p
hat the same
5) Conne
6) Power
7) In the
8) Systemselectemodififollow
If port 4 is
15) On theconfigautosa
If hardwa
he computer.
hem.
16) Verify ‘The so
9) Config
ost Software
10) Open tand ch
11) Select manuaFiles\o
12) Next, s
ect the oneFAer (SC‐0905).
port is not av
type of adapt
ect the oneFA
r‐ON all devic
oneFAST soft
m Tab: Verify ed to match wication, selected by clicking
s not availabl
e "Devices" tauration requiampler will be
re devices ar
This will also
that the two oftware is con
gure your app
e Configuratio
the Perkin Elmhoose “S10” (Y
the correct tally select theoneFAST.try”
select the sam
ST controller
ailable on the
ters be used t
ST controller
es and start t
tware, open t
that the correwhat you havt the approprg the "Click to
e choose the
ab, ensure thares modificate automatical
e not found o
o try to re‐est
tabs, "Devicenfigured!’ Clo
ropriate rack
on:
mer NexION SYour Autosam
ray file using e file at the fo
me COM port
to computer
e computer, a
throughout t
to power sup
the oneFAST s
the "Setup" m
ect "OEM Sofe set in your riate instrumeo Re‐Configur
next lowest
at your Autostion, select thlly initialized w
or initialized p
tablish conne
es" and "Systeose the Softw
ks by clicking o
Software andmpler Model)
the “Browseollowing path
number as th
r using the on
a USB‐Serial A
he system to
pply (SC‐0210
software.
menu.
ftware" was ahost instrument software re" button.
port number
sampler modehe appropriatwhen selecte
properly, Sele
ection to any d
em" are greeware Setup wi
on the desire
configure by)
” button. Se: “C:\program
he “Virtual Po
neFAST cable
Adapter (SC‐0
minimize dri
0) using the o
automaticallyent softwaretype and COM
.
el was correcte selection fred.
ect File>Refre
devices curre
n and that thindow.
ed rack in the
y going to Dev
lect the shortm files\esi\on
ort” set on st
19
(SC‐0212‐040
0905) may be
iver conflicts.
oneFAST cable
y detected an. If the OEM SM Port (4) fro
ctly found. If trom the drop
esh to refresh
ently connect
he user messa
autosampler
vices>Autosa
tcut named “eFAST\Suppo
ep 9 (typicall
00) and a USB
used. It is re
e.
d that the "CSoftware reqom the drop‐d
the autosamp‐down box; t
all the COM/
ed to the PC
age at the bot
r image.
ampler>Autos
oneFAST Trayort Files\Tray
y COM 4).
B‐Serial
ecommended
OM Port" is uires down box;
pler he
/USB ports on
and initialize
ttom says:
sampler Type
y” or
d
n
e
Rev. 2 20
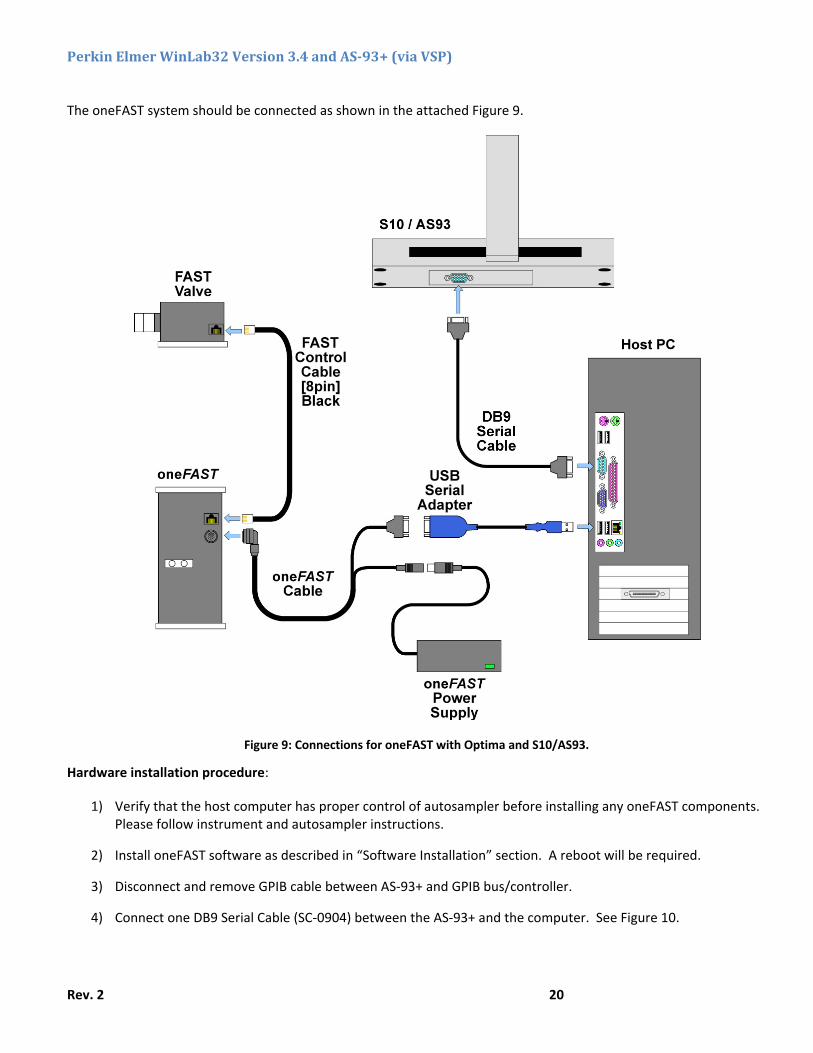
PerkinElmerWinLab32Version3.4andAS‐93+(viaVSP)
The oneFAST system should be connected as shown in the attached Figure 9.
Figure 9: Connections for oneFAST with Optima and S10/AS93.
Hardware installation procedure:
1) Verify that the host computer has proper control of autosampler before installing any oneFAST components. Please follow instrument and autosampler instructions.
2) Install oneFAST software as described in “Software Installation” section. A reboot will be required.
3) Disconnect and remove GPIB cable between AS‐93+ and GPIB bus/controller.
4) Connect one DB9 Serial Cable (SC‐0904) between the AS‐93+ and the computer. See Figure 10.
Re
th
th
th
H
ev. 2
If a DB‐9 p
hat the same
5) Chang
6) Place tContro
7) ConneAdapte
8) Conne
9) Power
10) In the
11) Systemselectemodififollow
If port 6 is
12) On theconfigautosa
If hardwa
he computer.
hem.
13) Verify ‘The so
14) Config
ost Software
15) Run “R
16) Procee
17) Select
port is not av
type of adapt
e all DIP swit
the FAST valvol Cable [8‐pin
ect the oneFAer (SC‐0905).
ect the oneFA
r‐ON all devic
oneFAST soft
m Tab: Verify ed to match wication, selected by clicking
s not availabl
e "Devices" tauration requiampler will be
re devices ar
This will also
that the two oftware is con
gure your app
e Configuratio
Reconfigure”
ed to “Select
the interface
ailable on the
ters be used t
ch settings to
ve as close as n] (SC‐0599‐2
ST controller
ST controller
es and start t
tware, open t
that the correwhat you havt the approprg the "Click to
e choose the
ab, ensure thares modificate automatical
e not found o
o try to re‐est
tabs, "Devicenfigured!’ Clo
ropriate rack
on:
from the “Pe
autosampler
e as Serial (RS
e computer, a
throughout t
o OFF. The sw
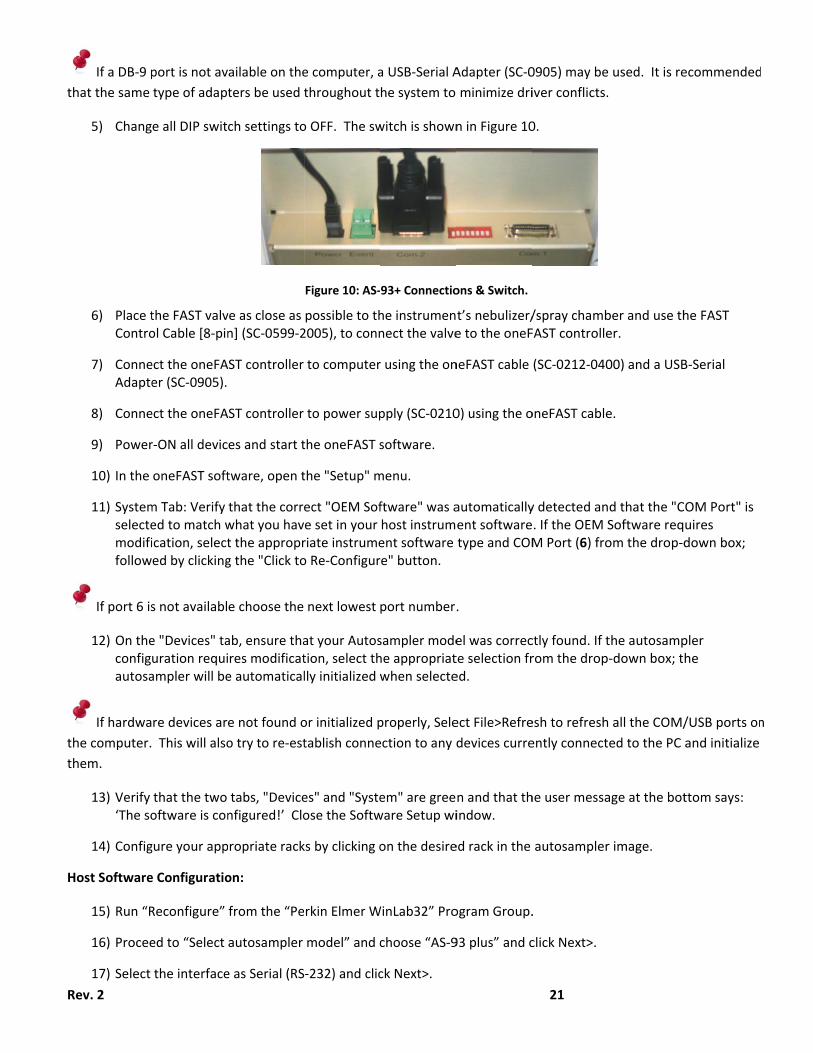
Figure 10: AS‐
possible to th2005), to conn
to computer
to power sup
the oneFAST s
the "Setup" m
ect "OEM Sofe set in your riate instrumeo Re‐Configur
next lowest
at your Autostion, select thlly initialized w
or initialized p
tablish conne
es" and "Systeose the Softw
ks by clicking o
rkin Elmer W
model” and c
‐232) and clic
a USB‐Serial A
he system to
witch is shown
‐93+ Connectio
he instrumennect the valve
r using the on
pply (SC‐0210
software.
menu.
ftware" was ahost instrument software re" button.
port number
sampler modehe appropriatwhen selecte
properly, Sele
ection to any d
em" are greeware Setup wi
on the desire
WinLab32” Pro
choose “AS‐9
ck Next>.
Adapter (SC‐0
minimize dri
n in Figure 10
ons & Switch.
t’s nebulizer/e to the oneF
neFAST cable
0) using the o
automaticallyent softwaretype and COM
.
el was correcte selection fred.
ect File>Refre
devices curre
n and that thindow.
ed rack in the
ogram Group.
93 plus” and c
21
0905) may be
iver conflicts.
0.
/spray chambFAST controlle
(SC‐0212‐040
oneFAST cable
y detected an. If the OEM SM Port (6) fro
ctly found. If trom the drop
esh to refresh
ently connect
he user messa
autosampler
.
click Next>.
used. It is re
ber and use ther.
00) and a USB
e.
d that the "CSoftware reqom the drop‐d
the autosamp‐down box; t
all the COM/
ed to the PC
age at the bot
r image.
ecommended
he FAST
B‐Serial
OM Port" is uires down box;
pler he
/USB ports on
and initialize
ttom says:
d
n

Rev. 2 22
18) Select the same COM port number as the “Virtual Port”; then continue through to “WinLab32 Configuration Complete.”
19) Start WinLab32 and select correct tray file using Options>>Autosampler>>Browse. Select the shortcut named “oneFAST AS93 Tray” or manually select the file at the following path: “C:\program files\esi\oneFAST\Support Files\Tray Files\oneFAST.AS93Tray”

Rev. 2 23
PerkinElmerWinLab32Version3.4andASX‐5xx(viaVSP)
The oneFAST system should be connected as shown in the attached Figure 11.
Figure 11: Connections for oneFAST with Optima and ASX‐5xx.
Hardware installation procedure:
1) Verify that the host computer has proper control of autosampler before installing any oneFAST components. Please follow instrument and autosampler instructions.
2) Install oneFAST software as described in “Software Installation” section. A reboot will be required.
3) Place the FAST valve as close as possible to the instrument’s nebulizer/spray chamber and use the FAST Control Cable [8‐pin] (SC‐0599‐2005), to connect the valve to the oneFAST controller.
Re
th
th
th
H
ev. 2
4) ConneAdapte
If a DB‐9 p
hat the same
5) Conne
6) Power
20) In the
21) Systemselectemodififollow
If port 6 is
22) On theconfigautosa
If hardwa
he computer.
hem.
23) Verify ‘The so
24) Config
ost Software
7) Run “R
8) Procee
9) Select Compl
10) Start Wnamedfiles\e
ect the oneFAer (SC‐0905).
port is not av
type of adapt
ect the oneFA
r‐ON all devic
oneFAST soft
m Tab: Verify ed to match wication, selected by clicking
s not availabl
e "Devices" tauration requiampler will be
re devices ar
This will also
that the two oftware is con
gure your app
e Configuratio
Reconfigure”
ed to “Select
the same COete.”
WinLab32 andd “oneFAST Asi\oneFAST\S
ST controller
ailable on the
ters be used t
ST controller
es and start t
tware, open t
that the correwhat you havt the approprg the "Click to
e choose the
ab, ensure thares modificate automatical
e not found o
o try to re‐est
tabs, "Devicenfigured!’ Clo
ropriate rack
on:
from the “Pe
autosampler
OM port numb
d select correASX5xx Tray” oSupport Files\
to computer
e computer, a
throughout t
to power sup
the oneFAST s
the "Setup" m
ect "OEM Sofe set in your riate instrumeo Re‐Configur
next lowest
at your Autostion, select thlly initialized w
or initialized p
tablish conne
es" and "Systeose the Softw
ks by clicking o
rkin Elmer W
model” and c
ber as the “Vi
ct tray file usor manually s\Tray Files\on
r using the on
a USB‐Serial A
he system to
pply (SC‐0210
software.
menu.
ftware" was ahost instrument software re" button.
port number
sampler modehe appropriatwhen selecte
properly, Sele
ection to any d
em" are greeware Setup wi
on the desire
WinLab32” Pro
choose “Ceta
irtual Port”; t
sing Options>select the file neFAST.Cetac
neFAST cable
Adapter (SC‐0
minimize dri
0) using the o
automaticallyent softwaretype and COM
.
el was correcte selection fred.
ect File>Refre
devices curre
n and that thindow.
ed rack in the
ogram Group.
ac” and click N
hen continue
>>Autosampleat the follow
cTray”
24
(SC‐0212‐040
0905) may be
iver conflicts.
oneFAST cable
y detected an. If the OEM SM Port (6) fro
ctly found. If trom the drop
esh to refresh
ently connect
he user messa
autosampler
.
Next>.
e through to “
er>>Browse. wing path: “C:
00) and a USB
used. It is re
e.
d that the "CSoftware reqom the drop‐d
the autosamp‐down box; t
all the COM/
ed to the PC
age at the bot
r image.
“WinLab32 Co
Select the sh\program
B‐Serial
ecommended
OM Port" is uires down box;
pler he
/USB ports on
and initialize
ttom says:
onfiguration
hortcut
d
n

Rev. 2 25
PerkinElmerWinLab32Version3.4andS‐10(viaVSP)
The oneFAST system should be connected as shown in the attached Figure 12.
Figure 12: Connections for oneFAST with Optima and S10/AS93.
Hardware installation procedure:
1) Verify that the host computer has proper control of autosampler before installing any oneFAST components. Please follow instrument and autosampler instructions.
2) Install oneFAST software as described in “Software Installation” section. A reboot will be required.
Re
th
th
th
H
ev. 2
3) Place tContro
4) ConneAdapte
If a DB‐9 p
hat the same
5) Conne
6) Power
25) In the
26) Systemselectemodififollow
If port 6 is
27) On theconfigautosa
If hardwa
he computer.
hem.
28) Verify ‘The so
29) Config
ost Software
7) Run “R
8) Procee
9) Select Compl
10) Start Wnamedfiles\e
the FAST valvol Cable [8‐pin
ect the oneFAer (SC‐0905).
port is not av
type of adapt
ect the oneFA
r‐ON all devic
oneFAST soft
m Tab: Verify ed to match wication, selected by clicking
s not availabl
e "Devices" tauration requiampler will be
re devices ar
This will also
that the two oftware is con
gure your app
e Configuratio
Reconfigure”
ed to “Select
the same COete.”
WinLab32 andd “oneFAST Ssi\oneFAST\S
ve as close as n] (SC‐0599‐2
ST controller
ailable on the
ters be used t
ST controller
es and start t
tware, open t
that the correwhat you havt the approprg the "Click to
e choose the
ab, ensure thares modificate automatical
e not found o
o try to re‐est
tabs, "Devicenfigured!’ Clo
ropriate rack
on:
from the “Pe
autosampler
OM port numb
d select corre10 Tray” or mSupport Files\
possible to th2005), to conn
to computer
e computer, a
throughout t
to power sup
the oneFAST s
the "Setup" m
ect "OEM Sofe set in your riate instrumeo Re‐Configur
next lowest
at your Autostion, select thlly initialized w
or initialized p
tablish conne
es" and "Systeose the Softw
ks by clicking o
rkin Elmer W
model” and c
ber as the “Vi
ct tray file usmanually selec\Tray Files\on
he instrumennect the valve
r using the on
a USB‐Serial A
he system to
pply (SC‐0210
software.
menu.
ftware" was ahost instrument software re" button.
port number
sampler modehe appropriatwhen selecte
properly, Sele
ection to any d
em" are greeware Setup wi
on the desire
WinLab32” Pro
choose “S‐10
irtual Port”; t
sing Options>ct the file at tneFAST.S10Tr
t’s nebulizer/e to the oneF
neFAST cable
Adapter (SC‐0
minimize dri
0) using the o
automaticallyent softwaretype and COM
.
el was correcte selection fred.
ect File>Refre
devices curre
n and that thindow.
ed rack in the
ogram Group.
0” and click Ne
hen continue
>>Autosamplethe following ray”
26
/spray chambFAST controlle
(SC‐0212‐040
0905) may be
iver conflicts.
oneFAST cable
y detected an. If the OEM SM Port (6) fro
ctly found. If trom the drop
esh to refresh
ently connect
he user messa
autosampler
.
ext>.
e through to “
er>>Browse. path: “C:\pro
ber and use ther.
00) and a USB
used. It is re
e.
d that the "CSoftware reqom the drop‐d
the autosamp‐down box; t
all the COM/
ed to the PC
age at the bot
r image.
“WinLab32 Co
Select the shogram
he FAST
B‐Serial
ecommended
OM Port" is uires down box;
pler he
/USB ports on
and initialize
ttom says:
onfiguration
hortcut
d
n
Rev. 2 27
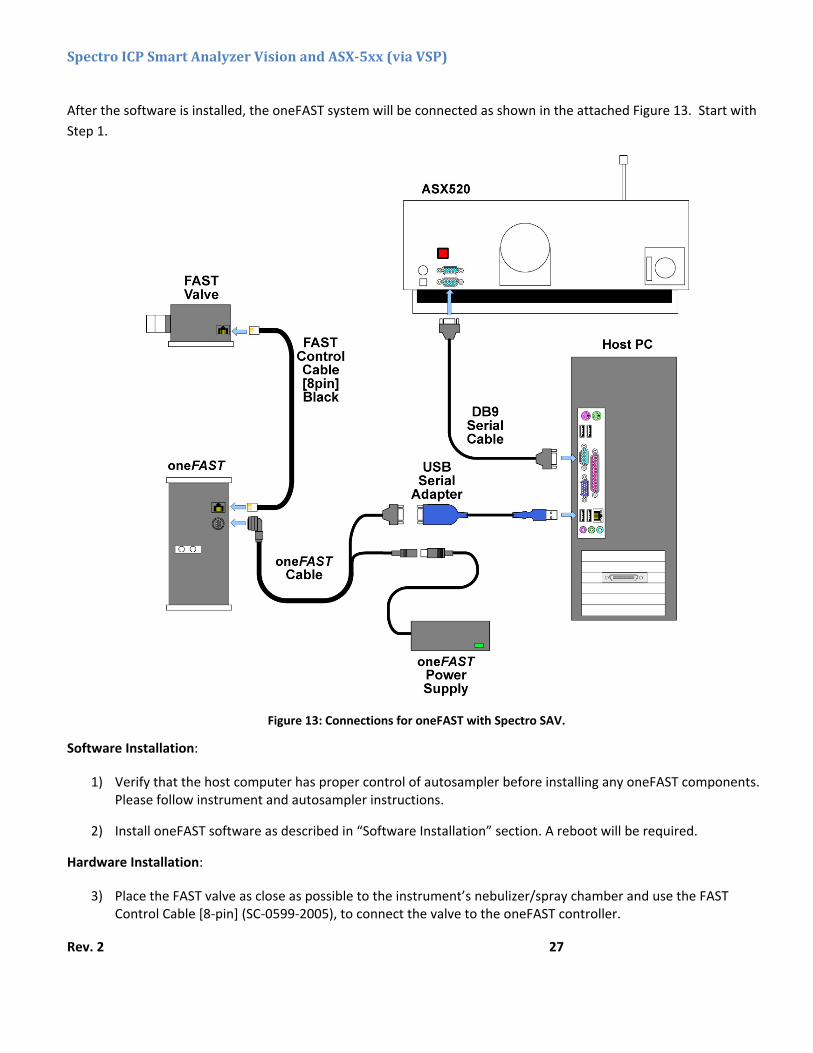
SpectroICPSmartAnalyzerVisionandASX‐5xx(viaVSP)
After the software is installed, the oneFAST system will be connected as shown in the attached Figure 13. Start with
Step 1.
Figure 13: Connections for oneFAST with Spectro SAV.
Software Installation:
1) Verify that the host computer has proper control of autosampler before installing any oneFAST components. Please follow instrument and autosampler instructions.
2) Install oneFAST software as described in “Software Installation” section. A reboot will be required.
Hardware Installation:
3) Place the FAST valve as close as possible to the instrument’s nebulizer/spray chamber and use the FAST Control Cable [8‐pin] (SC‐0599‐2005), to connect the valve to the oneFAST controller.

Re
th
A
th
th
H
ev. 2
4) ConneAdapte
If a DB‐9 p
hat the same
5) Conne
utosampler C
6) Power
7) In the
8) Systemselectemodififollow
9) On theconfigautosa
If hardwa
he computer.
hem.
10) Verify ‘The so
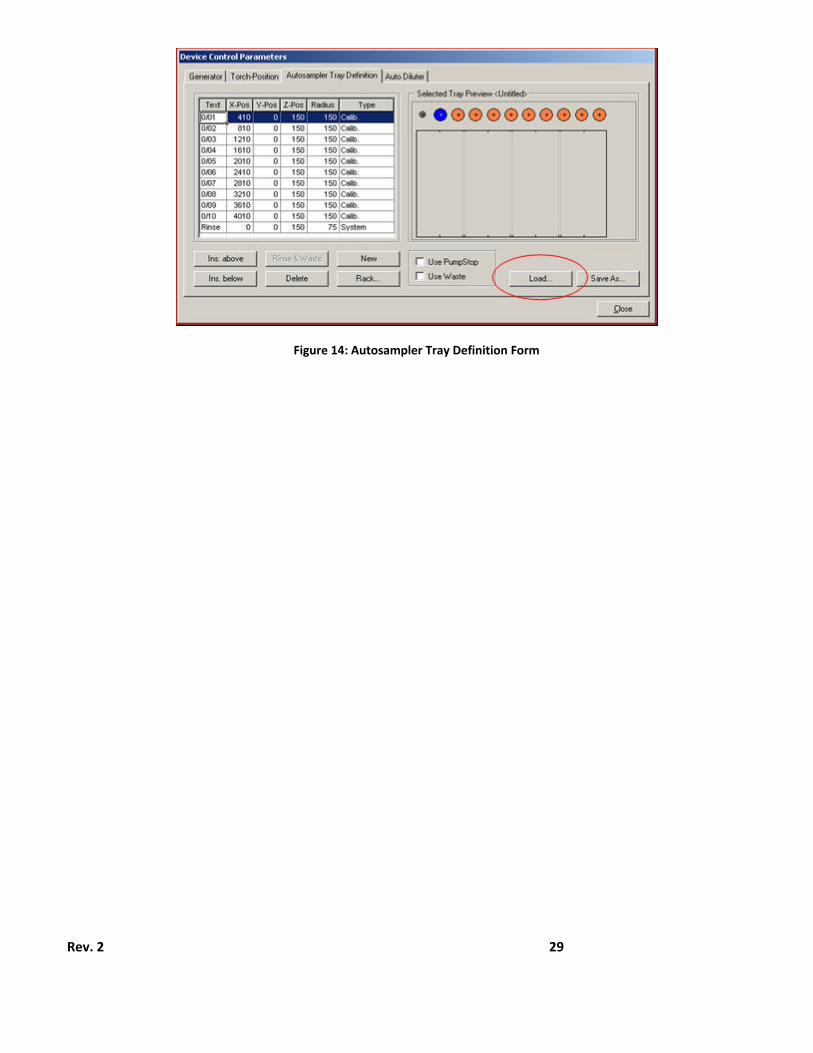
11) Config
ost Software
12) Using SDefinitrack la
ect the oneFAer (SC‐0905).
port is not av
type of adapt
ect the oneFA
Configuration
r‐ON all devic
oneFAST soft
m Tab: Verify ed to match wication, selected by clicking
e "Devices" tauration requiampler will be
re devices ar
This will also
that the two oftware is con
gure your app
e Configuratio
Spectro SAV,tion. Click thayout that wa
ST controller
ailable on the
ters be used t
ST controller
n:
es and start t
tware, open t
that the correwhat you havt the approprg the "Click to
ab, ensure thares modificate automatical
e not found o
o try to re‐est
tabs, "Devicenfigured!’ Clo
ropriate rack
on:
configure the Load buttos selected in
to computer
e computer, a
throughout t
to power sup
the oneFAST s
the "Setup" m
ect "OEM Sofe set in your riate instrumeo Re‐Configur
at your Autostion, select thlly initialized w
or initialized p
tablish conne
es" and "Systeose the Softw
ks by clicking o
e rack layoutn and select tthe oneFAST
r using the on
a USB‐Serial A
he system to
pply (SC‐0210
software.
menu.
ftware" was ahost instrument software re" button.
sampler modehe appropriatwhen selecte
properly, Sele
ection to any d
em" are greeware Setup wi
on the desire
by opening Dthe oneFAST.software.
neFAST cable
Adapter (SC‐0
minimize dri
0) using the o
automaticallyent softwaretype and COM
el was correcte selection fred.
ect File>Refre
devices curre
n and that thindow.
ed rack in the
Device Contro.try file. Ensu
28
(SC‐0212‐040
0905) may be
iver conflicts.
oneFAST cable
y detected an. If the OEM SM Port from t
ctly found. If trom the drop
esh to refresh
ently connect
he user messa
autosampler
ol Parameterure that this t
00) and a USB
used. It is re
e.
d that the "CSoftware reqthe drop‐dow
the autosamp‐down box; t
all the COM/
ed to the PC
age at the bot
r image.
rs >> Autosamtray layout m
B‐Serial
ecommended
OM Port" is uires wn box;
pler he
/USB ports on
and initialize
ttom says:
mpler Tray atches the
d
n
Rev. 2 29
Figure 14: Autosampler Tray Definition Form

Rev. 2 30
iTEVA/TEVAandASX‐5xx(viaVSP)
After the software is installed the oneFAST system should be connected as shown in the attached Figure 15. Start
with step 1.
Figure 15: Connections for oneFAST with iTEVA/TEVA and ASX‐5xx.
Software Installation:
1) Verify that the host computer has proper control of autosampler before installing any oneFAST components. Please follow instrument and autosampler instructions.

Re
H
th
Sy
*D
A
ev. 2
2) Install
ardware Inst
3) Place tContro
4) ConneAdapte
If a DB‐9 p
hat the same
5) Conne
ystem Setting
6) Start tCetac A
7) Next, uCOM pstep (6
To change
Done Autom
CreateAutoSLocate
iTEVA:
iTEVA
TEVA:
utosampler C
8) Power
9) In the
oneFAST soft
tallation:
the FAST valvol Cable [8‐pin
ect the oneFAer (SC‐0905).
port is not av
type of adapt
ect the oneFA
gs:
he iTEVA/TEVASX‐520 or C
using Start>>port this is cu6). Rename to
e a COM port
atically by on
e copies of eSamplerCone the iTEVA or
\Program F
W7: \Users\P
\Program Fi
Configuration
r‐ON all devic
oneFAST soft
tware as desc
ve as close as n] (SC‐0599‐2
ST controller
ailable on the
ters be used t
ST controller
VA Control Ceetac and COM
Settings>>Corrently used to COM9.
t number, righ
neFAST*
existing AutonfigurationSr TEVA install
iles\Thermo\
Public\iTeva\
les\Thermo E
n:
es and start t
tware, open t
cribed in “Sof
possible to th2005), to conn
to computer
e computer, a
throughout t
to power sup
enter and conM1 or COM2
ontrol Panel>to control the
ht‐click on the
oSamplerCSets.xml filedirectory de
\iTeva\Autos
\Autosamp
Elemental \T
the oneFAST s
the "Setup" m
ftware Installa
he instrumennect the valve
r using the on
a USB‐Serial A
he system to
pply (SC‐0210
nfigure underas the curren
>>System>>He autosample
e device then
onfiguratioes and place pending on th
samp.
eva\Autosam
software.
menu.
ation” section
t’s nebulizer/e to the oneF
neFAST cable
Adapter (SC‐0
minimize dri
0) using the o
r Tools>>Instnt sampler an
ardware>>Deer. This COM#
n Properties>
ns.xml, and in “backup”he instrumen
mp.
31
n. A reboot w
/spray chambFAST controlle
(SC‐0212‐040
0905) may be
iver conflicts.
oneFAST cable
trument Optid click OK.
evice Manag# will match t
>>Port Setting
”. nt software.
will be require
ber and use ther.
00) and a USB
used. It is re
e.
ons>>Autosa
er>>Ports. Lthe number t
gs>>Advance
ed.
he FAST
B‐Serial
ecommended
ampler. Selec
ocate the that is used in
ed.
d
t
n
Re
on
in
13
14
H
ev. 2
10) Systemselectemodififollow
11) On theconfigautosa
If hardwa
n the comput
nitialize them
12) Verify ‘The so
3) Configure
4) Pleasewindow clo
ost Software
15) Using iCetac appea
16) Conne
17) Move establi
m Tab: Verify ed to match wication, selected by clicking
e "Devices" tauration requiampler will be
re devices ar
ter. This will
.
that the two oftware is con
your appropr
e note that boses.
e Configuratio
iTEVA/TEVA by oneFAST cr.
ect the autosa
autosampler ished
that the correwhat you havt the approprg the "Click to
ab, ensure thares modificate automatical
e not found o
also try to re‐
tabs, "Devicenfigured!’ Clo
riate racks by
ecause the M
on:
Control Centchoice will be
ampler using t
by right‐click
ect "OEM Sofe set in your riate instrumeo Re‐Configur
at your Autostion, select thlly initialized w
or initialized p
‐establish con
es" and "Systeose the Softw
y clicking on th
MAP files are b
er>Applicatioe available. Cl
the connect i
king on vial lo
ftware" was ahost instrument software re" button.
sampler modehe appropriatwhen selecte
properly, Sele
nnection to a
em" are greeware Setup wi
he desired ra
being generat
ons>Analyst>ick OK, a grap
con
cation and se
automaticallyent softwaretype and COM
el was correcte selection fred.
ect File>Refre
ny devices cu
n and that thindow.
ck in the auto
ted, that ther
>Sequence>Aphic represen
.
electing "Go t
32
y detected an. If the OEM SM Port from t
ctly found. If trom the drop
esh to refresh
urrently conn
he user messa
osampler ima
re may be a s
Auto‐Session>ntation of the
to..." to verify
d that the "CSoftware reqthe drop‐dow
the autosamp‐down box; t
h all the COM/
ected to the
age at the bot
age.
hort delay be
>New Autosae autosampler
y that control
OM Port" is uires wn box;
pler he
/USB ports
PC and
ttom says:
efore the
ampler, the r layout will
l is

Rev. 2 33
ThermoPlasmaLabandASX‐5xx(viaVSP)
After the software is installed, the oneFAST system will be connected as shown in the attached Figure 16. Start with
step 1.
Figure 16: Connections for oneFAST with PlasmaLab and ASX‐5xx.
Software Installation:
1) Verify that the host computer has proper control of autosampler before installing any oneFAST components. Please follow instrument and autosampler instructions. Locate the Instrument>>Configurations>>Configuration Editor in the PlasmaLab and determine what COM port is currently used to control the ASX‐5xx. This COM number will be defined in following steps as the Instrument Port number. Please note this number for reference.
Re
H
th
Sy
A
th
th
ev. 2
2) Install
ardware Inst
3) Place tContro
4) ConneAdapte
If a DB‐9 p
hat the same
5) Conne
ystem Setting
6) Next, uCOM plisted i
To change
utosampler C
7) Power
8) In the
9) Systemselectemodififollow
10) On theconfigautosa
If hardwa
he computer.
hem.
11) Verify ‘The so
oneFAST soft
tallation:
the FAST valvol Cable [8‐pin
ect the oneFAer (SC‐0905).
port is not av
type of adapt
ect the oneFA
gs:
using Start>>port matchingin the Ports g
e a COM port
Configuration
r‐ON all devic
oneFAST soft
m Tab: Verify ed to match wication, selected by clicking
e "Devices" tauration requiampler will be
re devices ar
This will also
that the two oftware is con
tware as desc
ve as close as n] (SC‐0599‐2
ST controller
ailable on the
ters be used t
ST controller
Settings>>Cog the defined group.
t number, righ
n:
es and start t
tware, open t
that the correwhat you havt the approprg the "Click to
ab, ensure thares modificate automatical
e not found o
o try to re‐est
tabs, "Devicenfigured!’ Clo
cribed in “Sof
possible to th2005), to conn
to computer
e computer, a
throughout t
to power sup
ontrol Panel>Instrument P
ht‐click on the
the oneFAST s
the "Setup" m
ect "OEM Sofe set in your riate instrumeo Re‐Configur
at your Autostion, select thlly initialized w
or initialized p
tablish conne
es" and "Systeose the Softw
ftware Installa
he instrumennect the valve
r using the on
a USB‐Serial A
he system to
pply (SC‐0210
>>System>>HPort in step (1
e device then
software.
menu.
ftware" was ahost instrument software re" button.
sampler modehe appropriatwhen selecte
properly, Sele
ection to any d
em" are greeware Setup wi
ation” section
t’s nebulizer/e to the oneF
neFAST cable
Adapter (SC‐0
minimize dri
0) using the o
ardware>>De1), and renam
n Properties>
automaticallyent softwaretype and COM
el was correcte selection fred.
ect File>Refre
devices curre
n and that thindow.
34
n. A reboot w
/spray chambFAST controlle
(SC‐0212‐040
0905) may be
iver conflicts.
oneFAST cable
evice Managme to an avail
>>Port Setting
y detected an. If the OEM SM Port from t
ctly found. If trom the drop
esh to refresh
ently connect
he user messa
will be require
ber and use ther.
00) and a USB
used. It is re
e.
er>>Ports. Lable number
gs>>Advance
d that the "CSoftware reqthe drop‐dow
the autosamp‐down box; t
all the COM/
ed to the PC
age at the bot
ed.
he FAST
B‐Serial
ecommended
ocate the r that is not
ed.
OM Port" is uires wn box;
pler he
/USB ports on
and initialize
ttom says:
d
n

Rev. 2 35
12) Configure your appropriate racks by clicking on the desired rack in the autosampler image.
Host Software Configuration:
13) Configure the PlasmaLab rack layout using the Instrument>>Configurations>>Configuration Editor window in the PlasmaLab software. Select the Cetac 500 from the Available Accessories & Devices. If this device is not present in PlasmaLab 2.0, run the Accessory Wizard and add the Cetac 500. If this device is not present in PlasmaLab 1.0, choose Instrument>Accessories then Add>> the Cetac 500 from the Available Devices. The device should be set to COM#, 9600 and the racks should match the layout of the oneFAST software. The COM# will match the Instrument Port number determined in step (6). If the COM port is not visible as a selection please refer to technical note TN040908.
14) Connect the autosampler using the connect icon.
Rev. 2 36
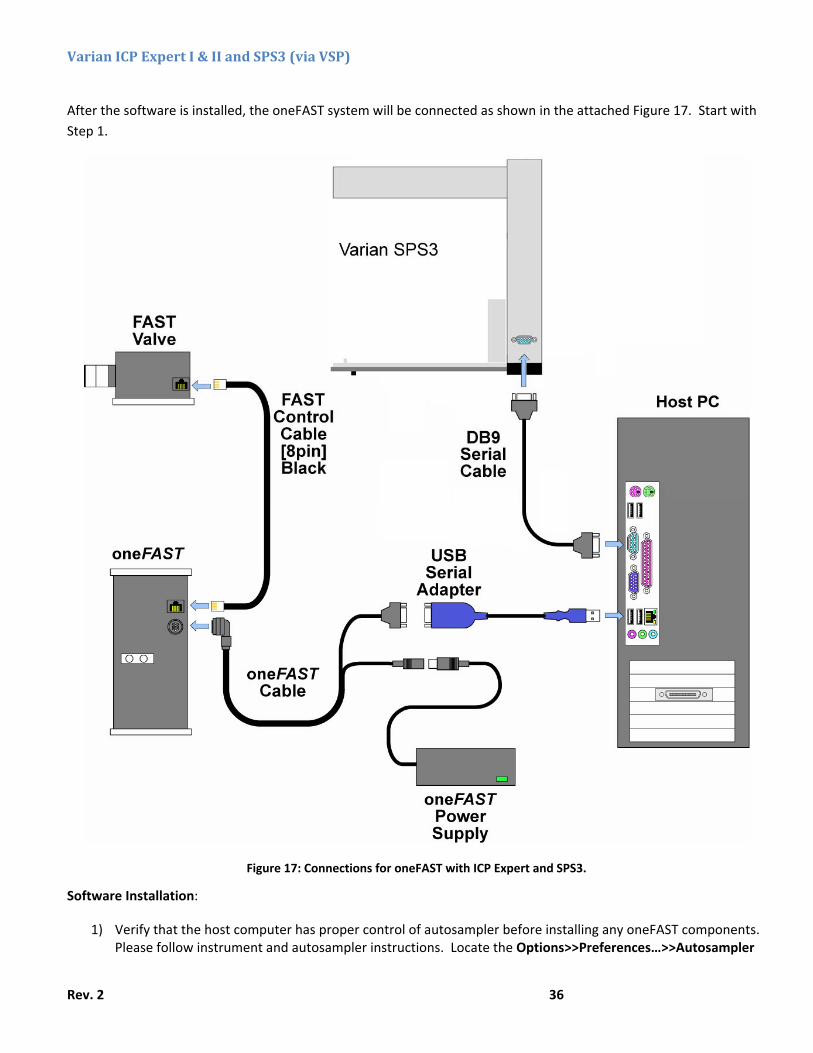
VarianICPExpertI&IIandSPS3(viaVSP)
After the software is installed, the oneFAST system will be connected as shown in the attached Figure 17. Start with
Step 1.
Figure 17: Connections for oneFAST with ICP Expert and SPS3.
Software Installation:
1) Verify that the host computer has proper control of autosampler before installing any oneFAST components. Please follow instrument and autosampler instructions. Locate the Options>>Preferences…>>Autosampler
Re
H
th
Sy
A
th
th
ev. 2
in the steps a
2) Install
ardware Inst
3) Place tContro
4) ConneAdapte
If a DB‐9 p
hat the same
5) Conne
ystem Setting
6) Next, uCOM plisted i
To change
utosampler C
7) Power
8) In the
9) Systemselectemodififollow
10) On theconfigautosa
If hardwa
he computer.
hem.
11) Verify ‘The so
ICP Expert anas the Instrum
oneFAST soft
tallation:
the FAST valvol Cable [8‐pin
ect the oneFAer (SC‐0905).
port is not av
type of adapt
ect the oneFA
gs:
using Start>>port matchingin the Ports g
e a COM port
Configuration
r‐ON all devic
oneFAST soft
m Tab: Verify ed to match wication, selected by clicking
e "Devices" tauration requiampler will be
re devices ar
This will also
that the two oftware is con
nd verify confment Port num
tware as desc
ve as close as n] (SC‐0599‐2
ST controller
ailable on the
ters be used t
ST controller
Settings>>Cog the defined group.
t number, righ
n:
es and start t
tware, open t
that the correwhat you havt the approprg the "Click to
ab, ensure thares modificate automatical
e not found o
o try to re‐est
tabs, "Devicenfigured!’ Clo
figuration as Smber.
cribed in “Sof
possible to th2005), to conn
to computer
e computer, a
throughout t
to power sup
ontrol Panel>Instrument P
ht‐click on the
the oneFAST s
the "Setup" m
ect "OEM Sofe set in your riate instrumeo Re‐Configur
at your Autostion, select thlly initialized w
or initialized p
tablish conne
es" and "Systeose the Softw
SPS3. ICP Exp
ftware Installa
he instrumennect the valve
r using the on
a USB‐Serial A
he system to
pply (SC‐0210
>>System>>HPort in step (1
e device then
software.
menu.
ftware" was ahost instrument software re" button.
sampler modehe appropriatwhen selecte
properly, Sele
ection to any d
em" are greeware Setup wi
pert requires
ation” section
t’s nebulizer/e to the oneF
neFAST cable
Adapter (SC‐0
minimize dri
0) using the o
ardware>>De1), and renam
n Properties>
automaticallyent softwaretype and COM
el was correcte selection fred.
ect File>Refre
devices curre
n and that thindow.
37
that COM 1 b
n. A reboot w
/spray chambFAST controlle
(SC‐0212‐040
0905) may be
iver conflicts.
oneFAST cable
evice Managme to an avail
>>Port Setting
y detected an. If the OEM SM Port from t
ctly found. If trom the drop
esh to refresh
ently connect
he user messa
be defined in
will be require
ber and use ther.
00) and a USB
used. It is re
e.
er>>Ports. Lable number
gs>>Advance
d that the "CSoftware reqthe drop‐dow
the autosamp‐down box; t
all the COM/
ed to the PC
age at the bot
following
ed.
he FAST
B‐Serial
ecommended
ocate the r that is not
ed.
OM Port" is uires wn box;
pler he
/USB ports on
and initialize
ttom says:
d
n
Rev. 2 38
12) Configure your appropriate racks by clicking on the desired rack in the autosampler image.
Host Software Configuration:
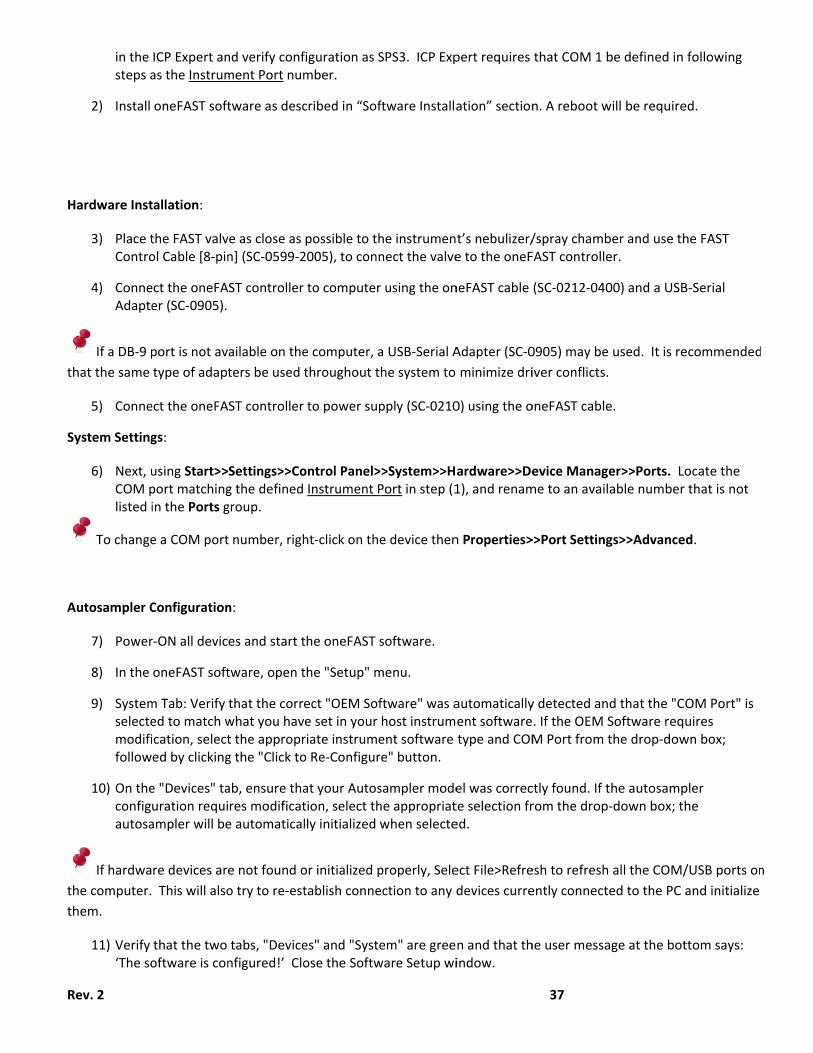
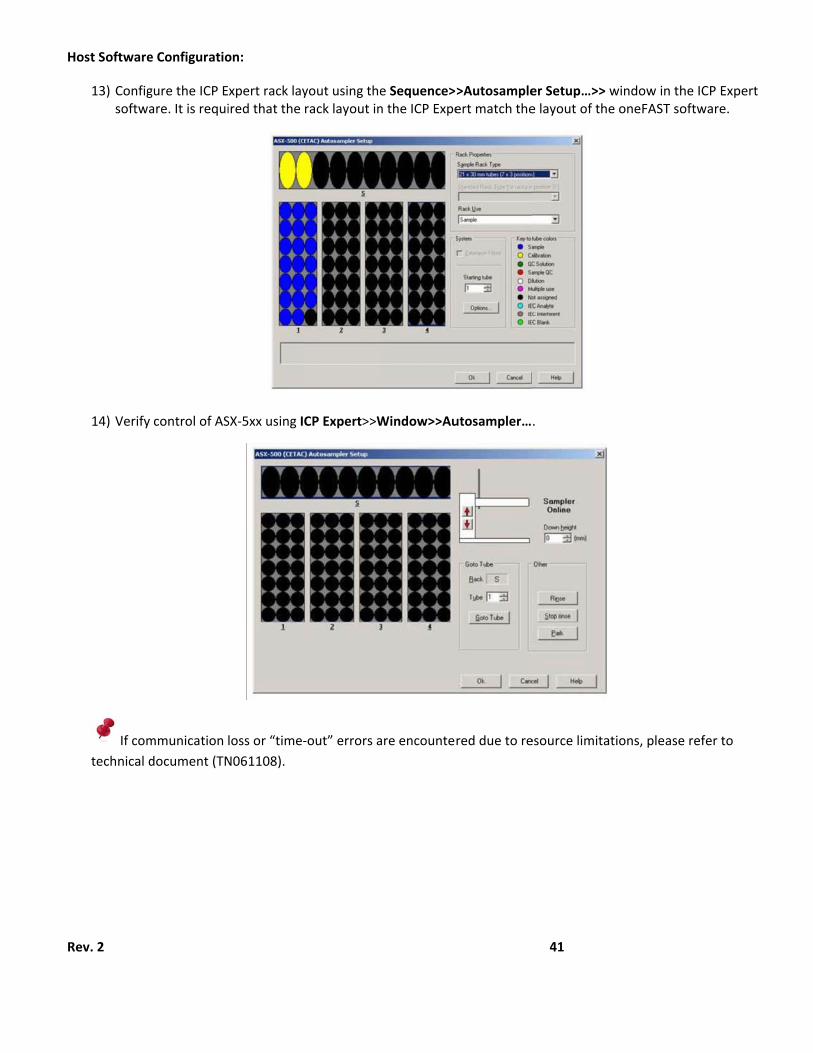
13) Configure the ICP Expert rack layout using the Sequence>>Autosampler Setup…>> window in the ICP Expert software. It is required that the rack layout in the ICP Expert match the layout of the oneFAST software.
14) Verify control of SPS3 using ICP Expert>>Window>>Autosampler….
Rev. 2 39
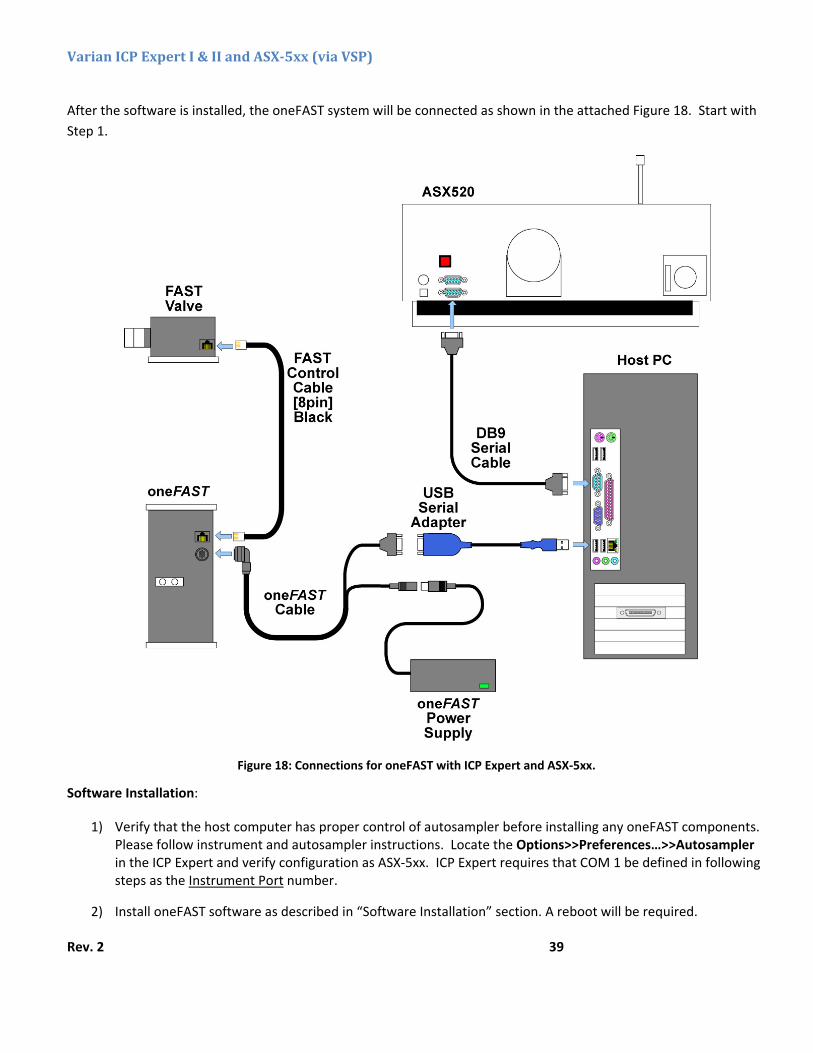
VarianICPExpertI&IIandASX‐5xx(viaVSP)
After the software is installed, the oneFAST system will be connected as shown in the attached Figure 18. Start with
Step 1.
Figure 18: Connections for oneFAST with ICP Expert and ASX‐5xx.
Software Installation:
1) Verify that the host computer has proper control of autosampler before installing any oneFAST components. Please follow instrument and autosampler instructions. Locate the Options>>Preferences…>>Autosampler in the ICP Expert and verify configuration as ASX‐5xx. ICP Expert requires that COM 1 be defined in following steps as the Instrument Port number.
2) Install oneFAST software as described in “Software Installation” section. A reboot will be required.
Re
H
th
Sy
A
th
th
ev. 2
ardware Inst
3) Place tContro
4) ConneAdapte
If a DB‐9 p
hat the same
5) Conne
ystem Setting
6) Next, uCOM plisted i
To change
utosampler C
7) Power
8) In the
9) Systemselectemodififollow
10) On theconfigautosa
If hardwa
he computer.
hem.
11) Verify ‘The so
12) Config
tallation:
the FAST valvol Cable [8‐pin
ect the oneFAer (SC‐0905).
port is not av
type of adapt
ect the oneFA
gs:
using Start>>port matchingin the Ports g
e a COM port
Configuration
r‐ON all devic
oneFAST soft
m Tab: Verify ed to match wication, selected by clicking
e "Devices" tauration requiampler will be
re devices ar
This will also
that the two oftware is con
gure your app
ve as close as n] (SC‐0599‐2
ST controller
ailable on the
ters be used t
ST controller
Settings>>Cog the defined group.
t number, righ
n:
es and start t
tware, open t
that the correwhat you havt the approprg the "Click to
ab, ensure thares modificate automatical
e not found o
o try to re‐est
tabs, "Devicenfigured!’ Clo
ropriate rack
possible to th2005), to conn
to computer
e computer, a
throughout t
to power sup
ontrol Panel>Instrument P
ht‐click on the
the oneFAST s
the "Setup" m
ect "OEM Sofe set in your riate instrumeo Re‐Configur
at your Autostion, select thlly initialized w
or initialized p
tablish conne
es" and "Systeose the Softw
ks by clicking o
he instrumennect the valve
r using the on
a USB‐Serial A
he system to
pply (SC‐0210
>>System>>HPort in step (1
e device then
software.
menu.
ftware" was ahost instrument software re" button.
sampler modehe appropriatwhen selecte
properly, Sele
ection to any d
em" are greeware Setup wi
on the desire
t’s nebulizer/e to the oneF
neFAST cable
Adapter (SC‐0
minimize dri
0) using the o
ardware>>De1), and renam
n Properties>
automaticallyent softwaretype and COM
el was correcte selection fred.
ect File>Refre
devices curre
n and that thindow.
ed rack in the
40
/spray chambFAST controlle
(SC‐0212‐040
0905) may be
iver conflicts.
oneFAST cable
evice Managme to an avail
>>Port Setting
y detected an. If the OEM SM Port from t
ctly found. If trom the drop
esh to refresh
ently connect
he user messa
autosampler
ber and use ther.
00) and a USB
used. It is re
e.
er>>Ports. Lable number
gs>>Advance
d that the "CSoftware reqthe drop‐dow
the autosamp‐down box; t
all the COM/
ed to the PC
age at the bot
r image.
he FAST
B‐Serial
ecommended
ocate the r that is not
ed.
OM Port" is uires wn box;
pler he
/USB ports on
and initialize
ttom says:
d
n
Re
H
ev. 2
ost Software
13) Configsoftwa
14) Verify
If com
technical d
e Configuratio
gure the ICP Eare. It is requi
control of AS
mmunication
document (TN
on:
xpert rack layired that the
SX‐5xx using I
loss or “time‐
N061108).
yout using therack layout in
CP Expert>>W
‐out” errors a
e Sequence>n the ICP Expe
Window>>Au
are encounter
>Autosampleert match the
utosampler…
red due to re
41
er Setup…>> e layout of th
.
esource limita
window in the oneFAST so
ations, please
he ICP Expert oftware.
refer to
Rev. 2 42
VarianICPMSExpertandSPS3(viaVSP)
After the software is installed, the oneFAST system will be connected as shown in the attached Figure 19. Start with
Step 1.
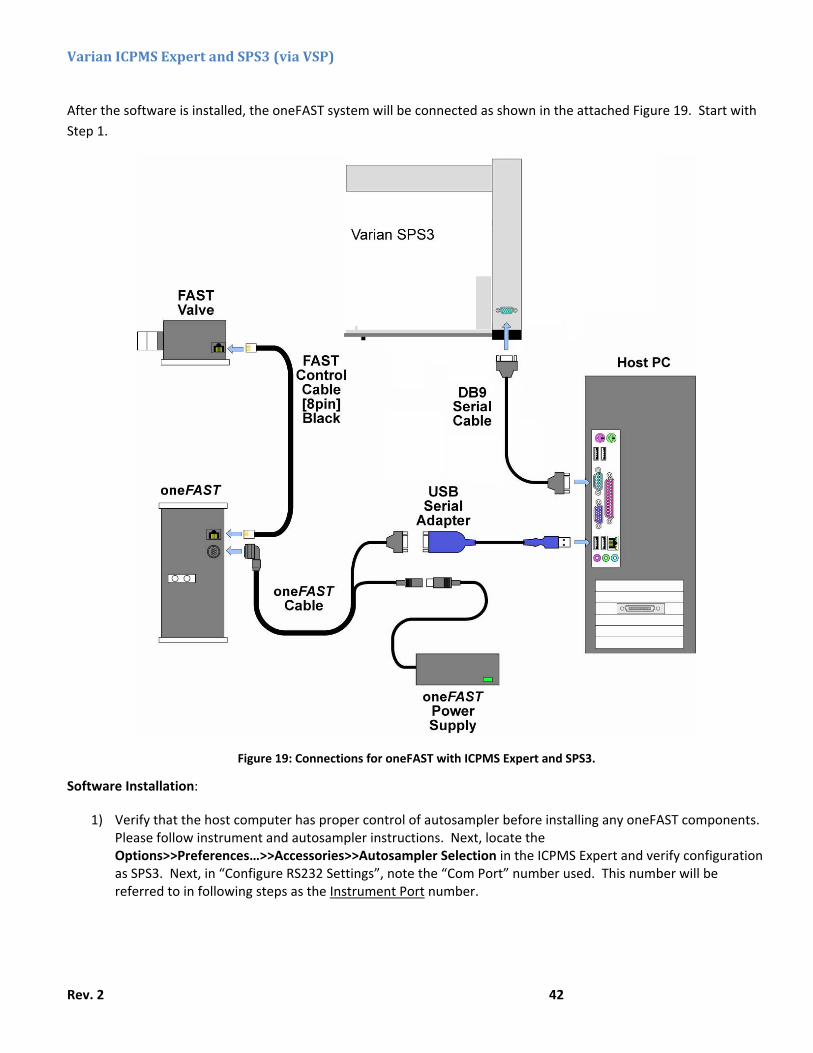
Figure 19: Connections for oneFAST with ICPMS Expert and SPS3.
Software Installation:
1) Verify that the host computer has proper control of autosampler before installing any oneFAST components. Please follow instrument and autosampler instructions. Next, locate the Options>>Preferences…>>Accessories>>Autosampler Selection in the ICPMS Expert and verify configuration as SPS3. Next, in “Configure RS232 Settings”, note the “Com Port” number used. This number will be referred to in following steps as the Instrument Port number.

Re
H
th
Sy
A
ev. 2
2) Install
ardware Inst
3) Place tContro
4) ConneAdapte
If a DB‐9 p
hat the same
5) Conne
ystem Setting
6) Next, uCOM plisted i
To change
utosampler C
oneFAST soft
tallation:
the FAST valvol Cable [8‐pin
ect the oneFAer (SC‐0905).
port is not av
type of adapt
ect the oneFA
gs:
using Start>>port matchingin the Ports g
e a COM port
Configuration
tware as desc
ve as close as n] (SC‐0599‐2
ST controller
ailable on the
ters be used t
ST controller
Settings>>Cog the defined group.
t number, righ
n:
cribed in “Sof
possible to th2005), to conn
to computer
e computer, a
throughout t
to power sup
ontrol Panel>Instrument P
ht‐click on the
ftware Installa
he instrumennect the valve
r using the on
a USB‐Serial A
he system to
pply (SC‐0210
>>System>>HPort in step (1
e device then
ation” section
t’s nebulizer/e to the oneF
neFAST cable
Adapter (SC‐0
minimize dri
0) using the o
ardware>>De1), and renam
n Properties>
43
n. A reboot w
/spray chambFAST controlle
(SC‐0212‐040
0905) may be
iver conflicts.
oneFAST cable
evice Managme to an avail
>>Port Setting
will be require
ber and use ther.
00) and a USB
used. It is re
e.
er>>Ports. Lable number
gs>>Advance
ed.
he FAST
B‐Serial
ecommended
ocate the r that is not
ed.
d
Re
th
th
H
ev. 2
7) Power
8) In the
9) Systemselectemodififollow
10) On theconfigautosa
If hardwa
he computer.
hem.
11) Verify ‘The so
12) Config
ost Software
13) Configsoftwa
r‐ON all devic
oneFAST soft
m Tab: Verify ed to match wication, selected by clicking
e "Devices" tauration requiampler will be
re devices ar
This will also
that the two oftware is con
gure your app
e Configuratio
gure the Variaare. The speci
es and start t
tware, open t
that the correwhat you havt the approprg the "Click to
ab, ensure thares modificate automatical
e not found o
o try to re‐est
tabs, "Devicenfigured!’ Clo
ropriate rack
on:
an rack layoutified rack dim
the oneFAST s
the "Setup" m
ect "OEM Sofe set in your riate instrumeo Re‐Configur
at your Autostion, select thlly initialized w
or initialized p
tablish conne
es" and "Systeose the Softw
ks by clicking o
t using the Semension type s
software.
menu.
ftware" was ahost instrument software re" button.
sampler modehe appropriatwhen selecte
properly, Sele
ection to any d
em" are greeware Setup wi
on the desire
equence>>Samshould match
automaticallyent softwaretype and COM
el was correcte selection fred.
ect File>Refre
devices curre
n and that thindow.
ed rack in the
mpling Setuph the corresp
44
y detected an. If the OEM SM Port from t
ctly found. If trom the drop
esh to refresh
ently connect
he user messa
autosampler
p window in tonding rack i
d that the "CSoftware reqthe drop‐dow
the autosamp‐down box; t
all the COM/
ed to the PC
age at the bot
r image.
the ICP‐MS Exn the oneFAS
OM Port" is uires wn box;
pler he
/USB ports on
and initialize
ttom says:
xpert ST software
n

Rev. 2 45
VarianICPMSExpertandASX‐5xx(viaVSP)
After the software is installed, the oneFAST system will be connected as shown in the attached Figure 20. Start with
Step 1.
Figure 20: Connections for oneFAST with ICPMS Expert and ASX‐5xx.
Software Installation:
1) Verify that the host computer has proper control of autosampler before installing any oneFAST components. Please follow instrument and autosampler instructions. Next, locate the Options>>Preferences…>>Accessories>>Autosampler Selection in the ICPMS Expert and verify configuration as ASX‐5xx. Next, in “Configure RS232 Settings”, note the “Com Port” number used. This number will be referred to in following steps as the Instrument Port number.

Re
H
th
Sy
A
ev. 2
2) Install
ardware Inst
3) Place tContro
4) ConneAdapte
If a DB‐9 p
hat the same
5) Conne
ystem Setting
6) Next, uCOM plisted i
To change
utosampler C
oneFAST soft
tallation:
the FAST valvol Cable [8‐pin
ect the oneFAer (SC‐0905).
port is not av
type of adapt
ect the oneFA
gs:
using Start>>port matchingin the Ports g
e a COM port
Configuration
tware as desc
ve as close as n] (SC‐0599‐2
ST controller
ailable on the
ters be used t
ST controller
Settings>>Cog the defined group.
t number, righ
n:
cribed in “Sof
possible to th2005), to conn
to computer
e computer, a
throughout t
to power sup
ontrol Panel>Instrument P
ht‐click on the
ftware Installa
he instrumennect the valve
r using the on
a USB‐Serial A
he system to
pply (SC‐0210
>>System>>HPort in step (1
e device then
ation” section
t’s nebulizer/e to the oneF
neFAST cable
Adapter (SC‐0
minimize dri
0) using the o
ardware>>De1), and renam
n Properties>
46
n. A reboot w
/spray chambFAST controlle
(SC‐0212‐040
0905) may be
iver conflicts.
oneFAST cable
evice Managme to an avail
>>Port Setting
will be require
ber and use ther.
00) and a USB
used. It is re
e.
er>>Ports. Lable number
gs>>Advance
ed.
he FAST
B‐Serial
ecommended
ocate the r that is not
ed.
d

Re
th
th
H
ev. 2
7) Power
8) In the
9) Systemselectemodififollow
10) On theconfigautosa
If hardwa
he computer.
hem.
11) Verify ‘The so
12) Config
ost Software
13) Configsoftwa
r‐ON all devic
oneFAST soft
m Tab: Verify ed to match wication, selected by clicking
e "Devices" tauration requiampler will be
re devices ar
This will also
that the two oftware is con
gure your app
e Configuratio
gure the Variaare. The speci
es and start t
tware, open t
that the correwhat you havt the approprg the "Click to
ab, ensure thares modificate automatical
e not found o
o try to re‐est
tabs, "Devicenfigured!’ Clo
ropriate rack
on:
an rack layoutified rack dim
the oneFAST s
the "Setup" m
ect "OEM Sofe set in your riate instrumeo Re‐Configur
at your Autostion, select thlly initialized w
or initialized p
tablish conne
es" and "Systeose the Softw
ks by clicking o
t using the Semension type s
software.
menu.
ftware" was ahost instrument software re" button.
sampler modehe appropriatwhen selecte
properly, Sele
ection to any d
em" are greeware Setup wi
on the desire
equence>>Samshould match
automaticallyent softwaretype and COM
el was correcte selection fred.
ect File>Refre
devices curre
n and that thindow.
ed rack in the
mpling Setuph the corresp
47
y detected an. If the OEM SM Port from t
ctly found. If trom the drop
esh to refresh
ently connect
he user messa
autosampler
p window in tonding rack i
d that the "CSoftware reqthe drop‐dow
the autosamp‐down box; t
all the COM/
ed to the PC
age at the bot
r image.
the ICP‐MS Exn the oneFAS
OM Port" is uires wn box;
pler he
/USB ports on
and initialize
ttom says:
xpert ST software.
n

Rev. 2 48
SoftwareOverviewThe oneFAST software must be running to enable the use of the oneFAST system. Additionally, ESI recommends that
the following order of start‐up be followed.
Starting order of configuration components:
1) Power on autosampler and oneFAST modules. 2) Start the oneFAST software and verify that all devices were detected. 3) Start the instrument software.
The main window contains the following controls which may be used to configure the autosampler racks, operate
oneFAST modules or enable/disable the FAST method. Please refer to Figure 21: Main window of oneFAST software.
The autosampler graphic will change to reflect the autosampler detected when the oneFAST software is started. If
no autosampler is found, the message “No Autosampler Found” will be visible instead.
Figure 21: Main window of oneFAST software.
Clicking on the rack locations in the autosampler graphic will permit the user to place a desired rack
from a given list as shown in Figure 22.
Clicking on the image/button “Load ” or “Inject” will toggle the valve between Load and Inject
positions.
Clicking on the checkbox will enable or disable the FAST method from
processing instructions received from the instrument software.

Re
W
em
MTh
ETh
ETh
w
“s
Th
se
th
gr
co
CO
ev. 2
When placing
mulation and
Specifi
Specifi
MenuItemhe main wind
SIoneFAST>his menu per
SIoneFAST>he Ports wind
will not need t
status” tabs s
he tab labele
ettings. The C
he autosampl
This COM
rouping speci
ommunicatio
OM port, it w
Clicking on
and OFF. T
desired racks
d autosampler
ication of pro
ication of the
sdow provides
>>Filemits the user
>>Setupdow, Figure 2
to use this win
should be gre
d “System” p
COM Port: ref
er.
port may be
ifies the port
n between th
will be identifi
the image/bu
The current st
s onto the ima
r. Choices/se
obe Down Hei
e order or dire
access to the
r to close the
3, will provid
ndow other t
en when the
resents infor
fers to the CO
a 9‐pin port
number to be
he Instrument
ed according
utton “Vacuu
tate of the va
age of the aut
ettings availab
ight, or the de
ection that th
Figure 22: Ra
e following w
application a
e access to m
han during th
system is pro
mation regar
OM port numb
on the comp
e used when
t software an
ly.
um ON” or ”V
cuum is also
tosampler, ad
ble through th
epth, that the
he tubes will b
acks Window a
indows or sel
and thereby s
manually conf
he initial selec
operly configu
ding the Host
ber that is ass
uter or a USB
the oneFAST
nd the oneFAS
acuum OFF”
reflected in t
dditional opti
he Rack wind
e probe will a
be counted/in
and settings.
lections:
aving current
figure the one
ction of a Virt
ured.
t Instrument
sociated with
B‐serial port.
T software cre
ST software.
49
will toggle th
he image.
ions may be a
dow will inclu
advance into t
ncremented w
t configuratio
eFAST system
tual Port duri
selection and
h the serial po
The value CO
eates a COM p
If the configu
e vacuum be
available dep
de:
the sample tu
within the rac
on.
m. In most cas
ing initial setu
d communica
ort that is con
OM Port: in th
port that is u
uration uses a
etween ON
ending on
ube,
ck.
ses, the user
up. Both
ation port
nnected to
he “System”
sed for
a physical

Rev. 2 50
Figure 23: System Window.
The tab labeled “Devices”, Figure 2x, present’s information regarding the autosampler hardware and communication
port used.
Figure 24x: Devices Window.
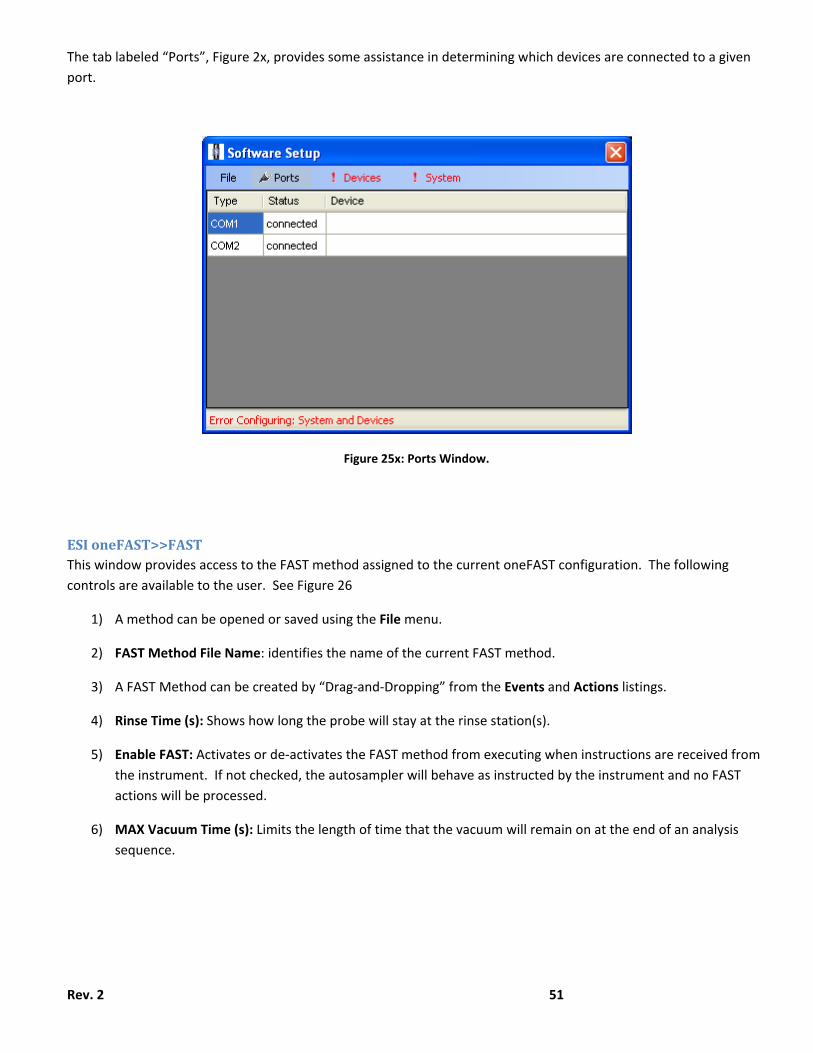
Rev. 2 51
The tab labeled “Ports”, Figure 2x, provides some assistance in determining which devices are connected to a given
port.
Figure 25x: Ports Window.
ESIoneFAST>>FASTThis window provides access to the FAST method assigned to the current oneFAST configuration. The following
controls are available to the user. See Figure 26
1) A method can be opened or saved using the File menu.
2) FAST Method File Name: identifies the name of the current FAST method.
3) A FAST Method can be created by “Drag‐and‐Dropping” from the Events and Actions listings.
4) Rinse Time (s): Shows how long the probe will stay at the rinse station(s).
5) Enable FAST: Activates or de‐activates the FAST method from executing when instructions are received from
the instrument. If not checked, the autosampler will behave as instructed by the instrument and no FAST
actions will be processed.
6) MAX Vacuum Time (s): Limits the length of time that the vacuum will remain on at the end of an analysis
sequence.
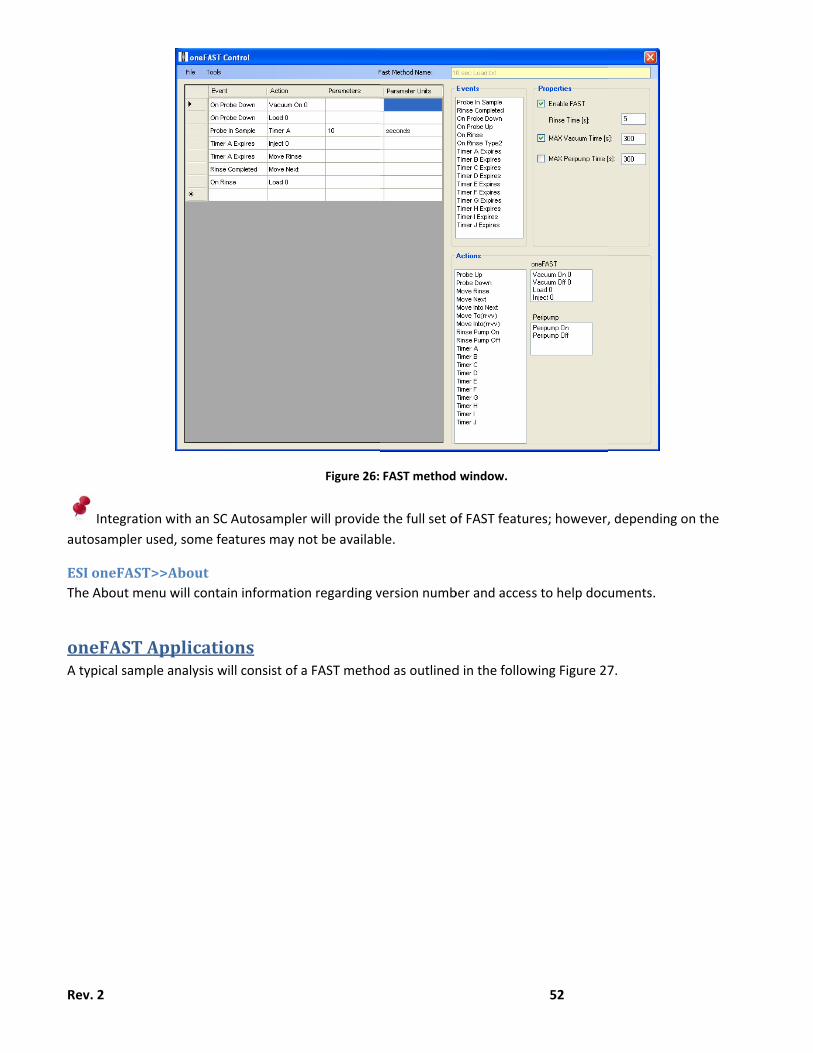
Re
au
ETh
oA
ev. 2
Integratio
utosampler u
SIoneFAST>he About me
oneFASTAtypical samp
on with an SC
sed, some fe
>>Aboutnu will contai
Applicatiople analysis w
Autosampler
atures may n
in informatio
onsill consist of a
Figure 26:
r will provide
not be availab
n regarding v
a FAST metho
FAST method
the full set o
ble.
version numb
od as outlined
window.
of FAST featur
ber and access
d in the follow
52
res; however,
s to help doc
wing Figure 27
, depending o
uments.
7.
on the

Rev. 2 53
Figure 27: Typical FAST Method.
The arrangement of the FAST method associates corresponding Actions in the second column, to Events defined in
the first column. Parameters if required, can be entered/modified in the third column. In the example from Figure
27, the following lines result in the following actions or movements of FAST components.
a) When the host instrument instructs the probe to move down into a sample (On Probe Down), the Vacuum
will turn ON (Vacuum On 0) and the FAST Valve will move to the Load position (Load 0).
b) When the probe reaches the bottom of the sample tube (Probe In Sample) a timer is started that will expire
after 10 seconds, (Timer A)(10).
c) When Timer A expires, the FAST Valve will move to the Inject position (Inject 0) and the autosampler will be
instructed to wash/rinse the probe, (Move Rinse).
d) When the “probe wash” has finished, the autosampler will be instructed to move over the next predicted
sample tube (Move Next).
e) When the host instrument sends a wash/rinse instruction (On Rinse), the FAST valve will move to the Load
position (Load 0).
TypicalSampleAnalysisThe typical sample analysis will consist of configuring the loading and injecting of a loop of sample to the nebulizer.
In addition, the oneFAST software will manage the operations of the FAST valve, vacuum, and autosampler, while
synchronizing to the control of the host software that manages the instrument. The two basic arrangements of the
system and liquid flow paths are illustrated in the following diagrams.
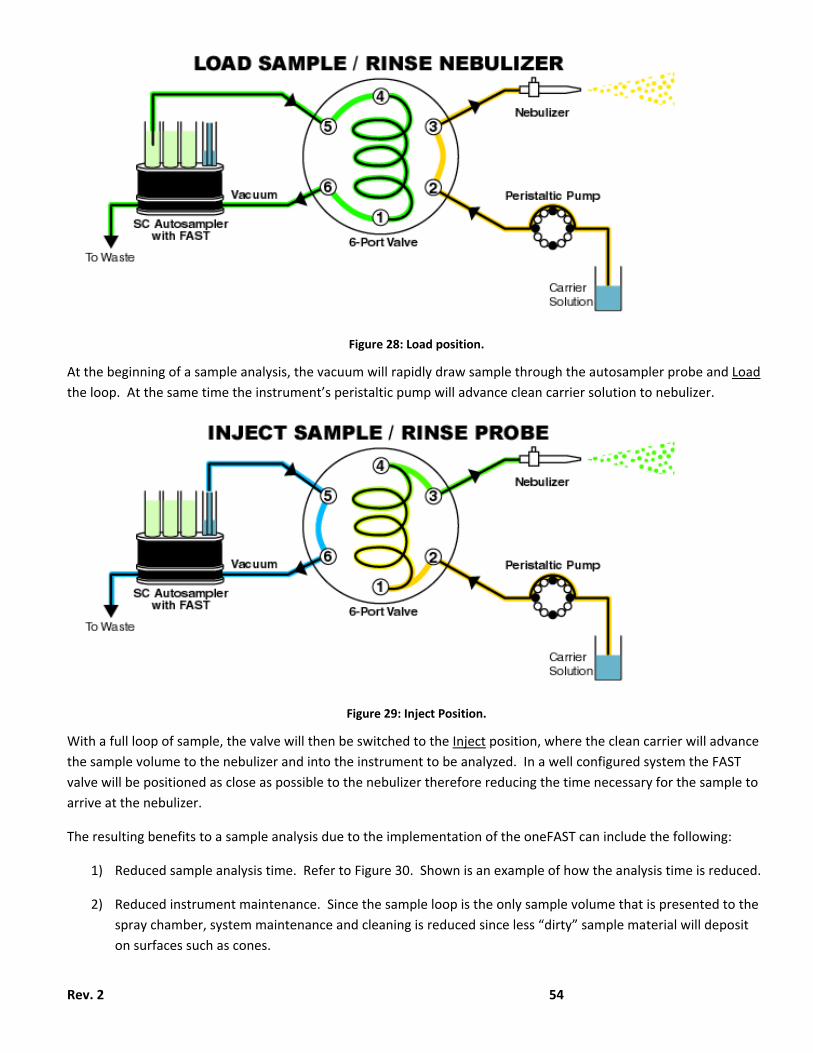
Rev. 2 54
Figure 28: Load position.
At the beginning of a sample analysis, the vacuum will rapidly draw sample through the autosampler probe and Load
the loop. At the same time the instrument’s peristaltic pump will advance clean carrier solution to nebulizer.
Figure 29: Inject Position.
With a full loop of sample, the valve will then be switched to the Inject position, where the clean carrier will advance
the sample volume to the nebulizer and into the instrument to be analyzed. In a well configured system the FAST
valve will be positioned as close as possible to the nebulizer therefore reducing the time necessary for the sample to
arrive at the nebulizer.
The resulting benefits to a sample analysis due to the implementation of the oneFAST can include the following:
1) Reduced sample analysis time. Refer to Figure 30. Shown is an example of how the analysis time is reduced.
2) Reduced instrument maintenance. Since the sample loop is the only sample volume that is presented to the
spray chamber, system maintenance and cleaning is reduced since less “dirty” sample material will deposit
on surfaces such as cones.
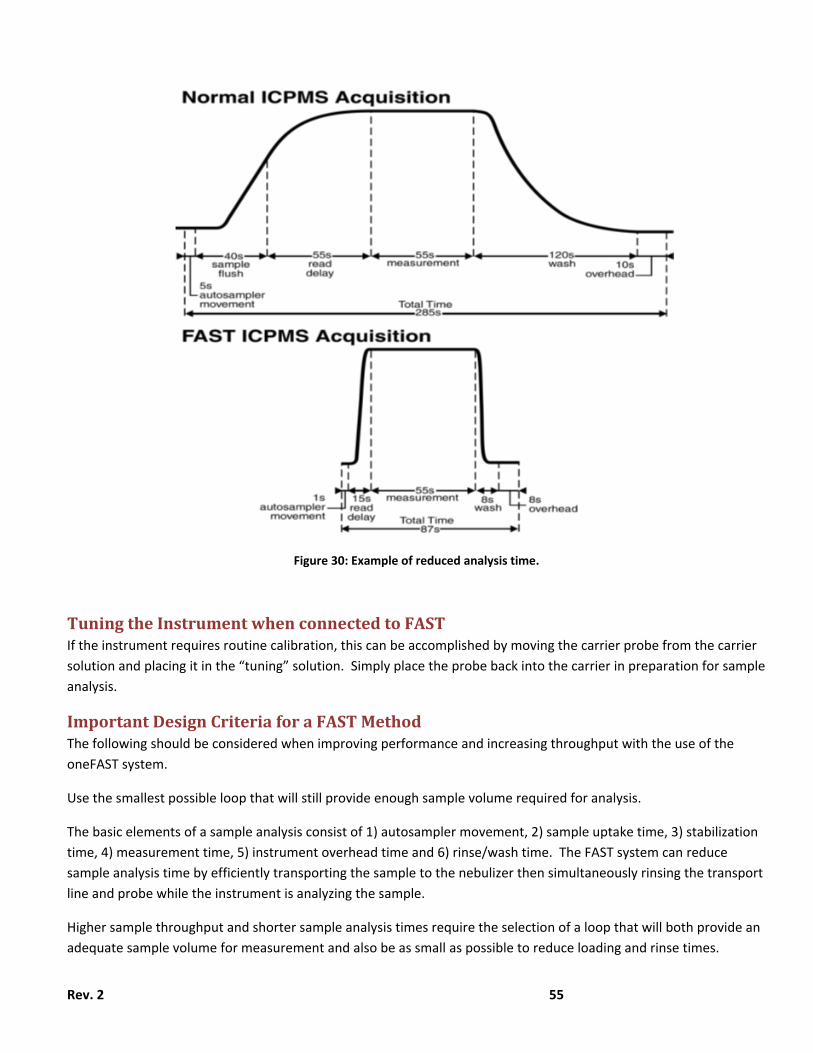
Rev. 2 55
Figure 30: Example of reduced analysis time.
TuningtheInstrumentwhenconnectedtoFASTIf the instrument requires routine calibration, this can be accomplished by moving the carrier probe from the carrier
solution and placing it in the “tuning” solution. Simply place the probe back into the carrier in preparation for sample
analysis.
ImportantDesignCriteriaforaFASTMethodThe following should be considered when improving performance and increasing throughput with the use of the
oneFAST system.
Use the smallest possible loop that will still provide enough sample volume required for analysis.
The basic elements of a sample analysis consist of 1) autosampler movement, 2) sample uptake time, 3) stabilization
time, 4) measurement time, 5) instrument overhead time and 6) rinse/wash time. The FAST system can reduce
sample analysis time by efficiently transporting the sample to the nebulizer then simultaneously rinsing the transport
line and probe while the instrument is analyzing the sample.
Higher sample throughput and shorter sample analysis times require the selection of a loop that will both provide an
adequate sample volume for measurement and also be as small as possible to reduce loading and rinse times.
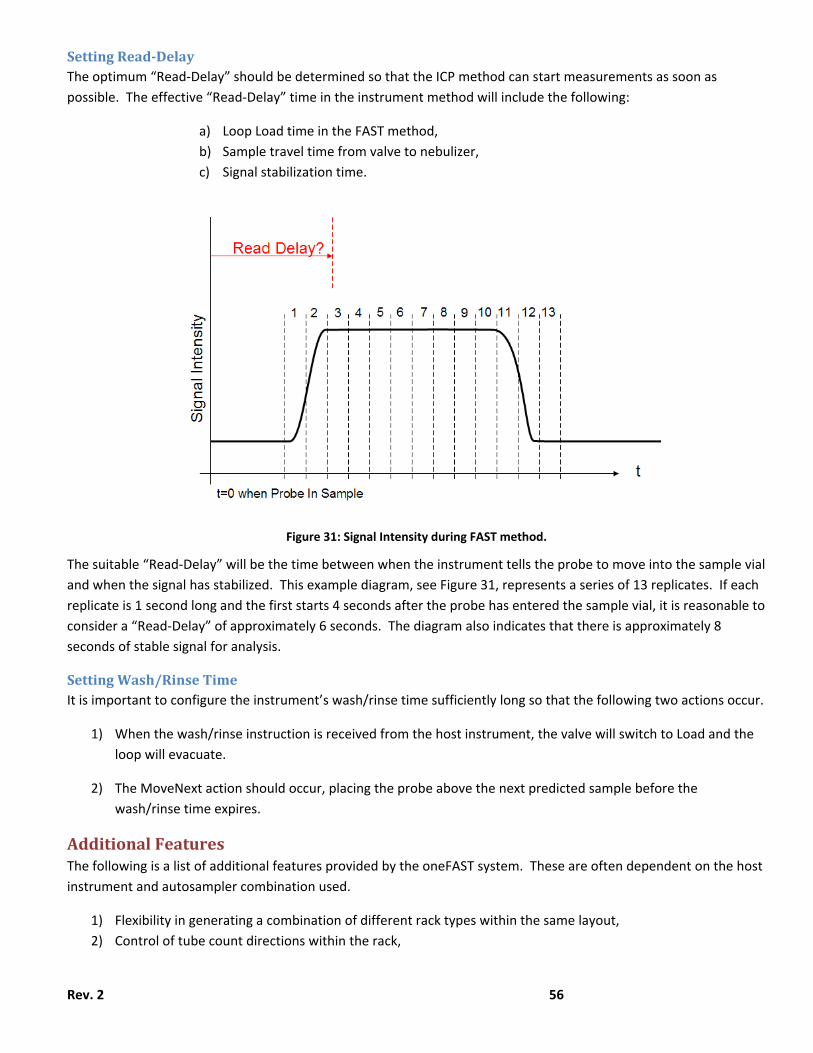
Rev. 2 56
SettingRead‐DelayThe optimum “Read‐Delay” should be determined so that the ICP method can start measurements as soon as
possible. The effective “Read‐Delay” time in the instrument method will include the following:
a) Loop Load time in the FAST method,
b) Sample travel time from valve to nebulizer,
c) Signal stabilization time.
Figure 31: Signal Intensity during FAST method.
The suitable “Read‐Delay” will be the time between when the instrument tells the probe to move into the sample vial
and when the signal has stabilized. This example diagram, see Figure 31, represents a series of 13 replicates. If each
replicate is 1 second long and the first starts 4 seconds after the probe has entered the sample vial, it is reasonable to
consider a “Read‐Delay” of approximately 6 seconds. The diagram also indicates that there is approximately 8
seconds of stable signal for analysis.
SettingWash/RinseTimeIt is important to configure the instrument’s wash/rinse time sufficiently long so that the following two actions occur.
1) When the wash/rinse instruction is received from the host instrument, the valve will switch to Load and the
loop will evacuate.
2) The MoveNext action should occur, placing the probe above the next predicted sample before the
wash/rinse time expires.
AdditionalFeaturesThe following is a list of additional features provided by the oneFAST system. These are often dependent on the host
instrument and autosampler combination used.
1) Flexibility in generating a combination of different rack types within the same layout,
2) Control of tube count directions within the rack,
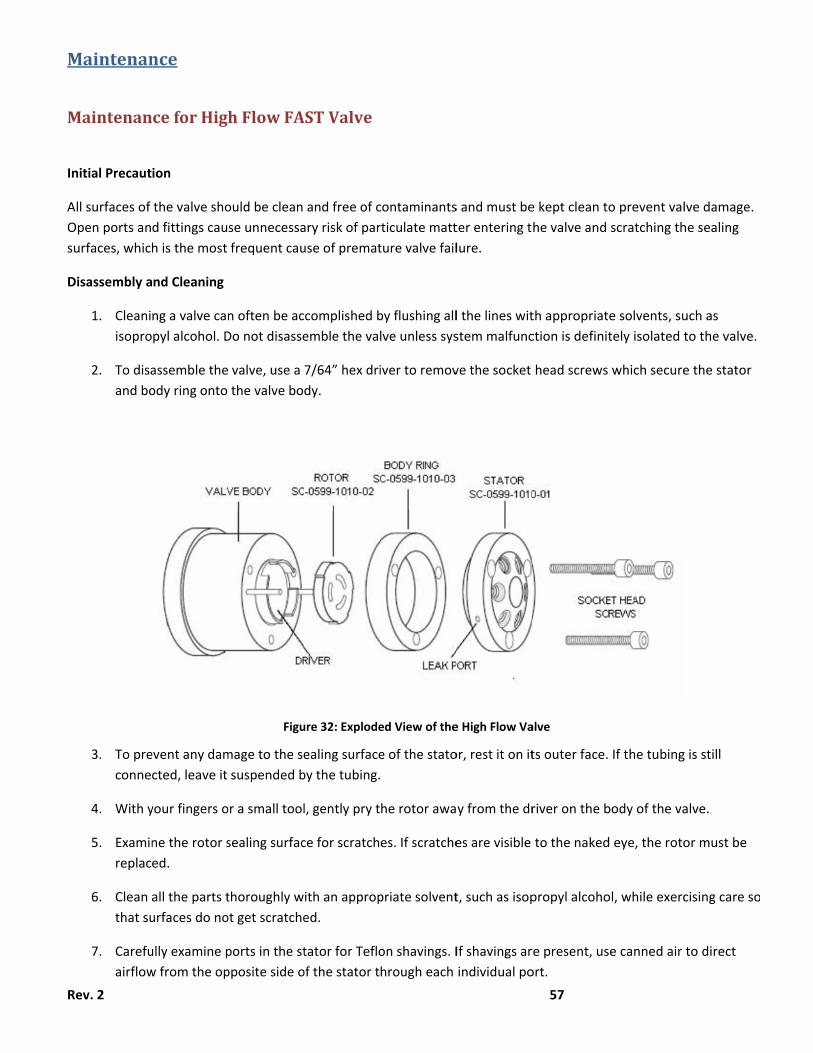
Re
M
M
In
A
O
su
D
ev. 2
Maintenan
Maintenan
nitial Precaut
ll surfaces of
Open ports an
urfaces, which
isassembly a
1. Cleani
isopro
2. To disa
and bo
3. To pre
conne
4. With y
5. Examin
replac
6. Clean
that su
7. Carefu
airflow
nce
ceforHig
ion
the valve sho
d fittings cau
h is the most
nd Cleaning
ng a valve can
pyl alcohol. D
assemble the
ody ring onto
event any dam
cted, leave it
your fingers o
ne the rotor s
ed.
all the parts t
urfaces do no
ully examine p
w from the op
hFlowFA
ould be clean
se unnecessa
frequent cau
n often be ac
Do not disasse
valve, use a
the valve bo
Figu
mage to the se
suspended b
or a small tool
sealing surfac
thoroughly w
ot get scratche
ports in the st
pposite side o
ASTValve
and free of c
ary risk of par
use of premat
complished b
emble the val
7/64” hex dri
dy.
ure 32: Explode
ealing surface
by the tubing.
l, gently pry t
ce for scratch
ith an approp
ed.
tator for Teflo
of the stator t
contaminants
rticulate matt
ture valve fail
by flushing all
lve unless sys
iver to remov
ed View of the
e of the stato
he rotor awa
es. If scratche
priate solvent
on shavings. I
hrough each
s and must be
ter entering t
lure.
l the lines wit
stem malfunc
ve the socket
e High Flow Va
or, rest it on it
y from the dr
es are visible
t, such as isop
If shavings ar
individual po
57
e kept clean t
he valve and
th appropriat
ction is definit
head screws
alve
ts outer face.
river on the b
to the naked
propyl alcoho
re present, us
ort.
o prevent val
scratching th
e solvents, su
tely isolated t
which secure
If the tubing
body of the va
d eye, the roto
ol, while exerc
se canned air
lve damage.
he sealing
uch as
to the valve.
e the stator
g is still
alve.
or must be
cising care so
to direct

Re
Re
ev. 2
8. Use a f
shavin
eassembly
1. Replac
passag
rotor c
2. Replac
3. Replac
The pa
foam swab w
gs deeper int
ce the rotor in
ges is facing o
correctly into
ce the body ri
ce the stator b
attern is asym
with isopropyl
to the port. O
n the driver o
out. The patte
the slots on t
F
ing, being car
by aligning th
mmetrical so b
alcohol to ge
Once this has
on the body, m
ern is asymme
the driver.
Figure 33: Rep
reful to align t
Figure 34
he two holes o
be sure that t
ently clean th
been comple
making sure t
etrical to prev
placing rotor in
the holes for
4: Replacing bo
on the back o
he holes for t
e threads of t
eted, repeat s
that the rotor
vent imprope
nto the driver.
the socket he
ody ring.
of the stator w
the socket he
58
the port, bein
tep 7 with ca
r sealing surfa
er placement
ead screws.
with the pins
ead screws ar
ng careful not
nned air.
ace with its en
so be sure to
on the body
re aligned.
t to force any
ngraved flow
o align the
of the valve.
y
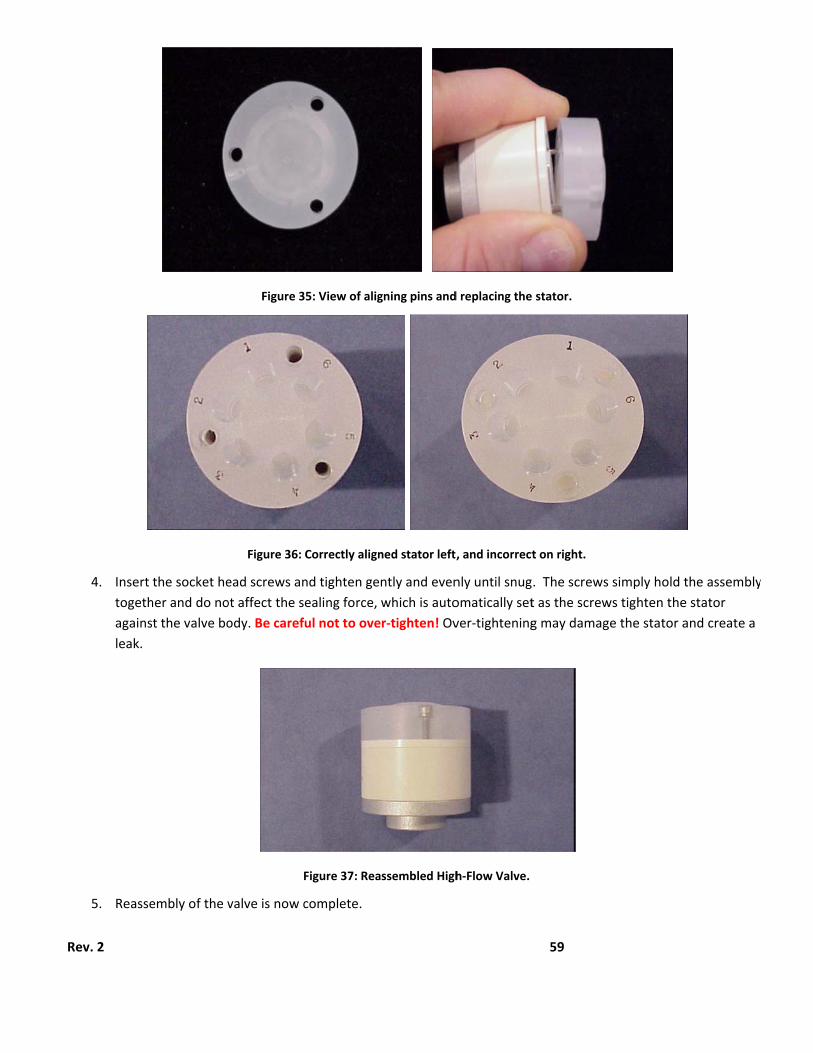
Reev. 2
4. Insert
togeth
agains
leak.
5. Reasse
the socket he
her and do no
t the valve bo
embly of the v
Figure 3
Figure 36:
ead screws an
ot affect the s
ody. Be caref
F
valve is now c
35: View of alig
Correctly align
nd tighten ge
ealing force,
ul not to ove
Figure 37: Rea
complete.
gning pins and
ned stator left,
ntly and even
which is auto
er‐tighten! Ov
assembled High
d replacing the
, and incorrect
nly until snug
omatically set
ver‐tightening
h‐Flow Valve.
59
stator.
t on right.
. The screws
t as the screw
g may damag
simply hold t
ws tighten the
ge the stator a
the assembly
e stator
and create a
y
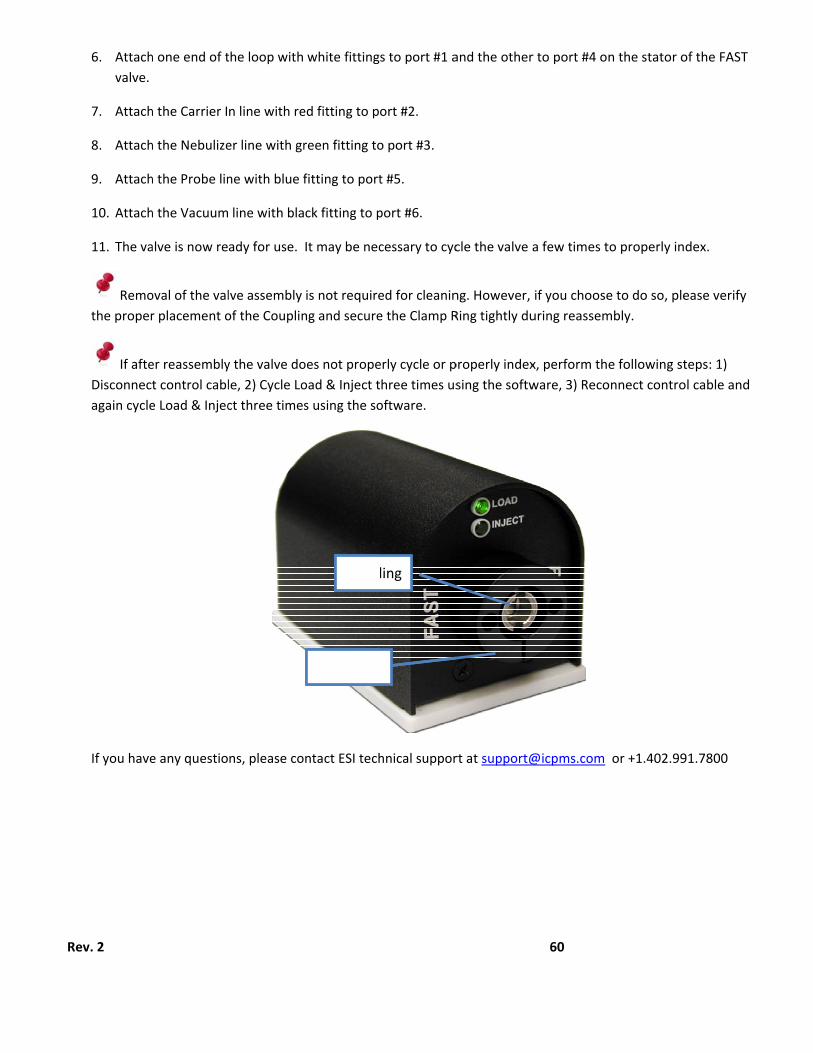
Re
ev. 2
6. Attach
valve.
7. Attach
8. Attach
9. Attach
10. Attach
11. The va
Remo
the proper
If afte
Disconnec
again cycle
If you have
h one end of t
h the Carrier I
h the Nebulize
h the Probe lin
h the Vacuum
alve is now re
oval of the val
r placement o
er reassembly
t control cabl
e Load & Injec
e any questio
the loop with
n line with re
er line with gr
ne with blue f
line with bla
ady for use.
lve assembly
of the Couplin
y the valve do
le, 2) Cycle Lo
ct three times
ns, please co
white fitting
ed fitting to po
reen fitting to
fitting to port
ck fitting to p
It may be nec
is not require
ng and secure
oes not prope
oad & Inject t
s using the so
ntact ESI tech
Clamp
Coupl
s to port #1 a
ort #2.
o port #3.
t #5.
port #6.
cessary to cyc
ed for cleanin
e the Clamp R
erly cycle or p
hree times us
oftware.
hnical suppor
ling
and the other
cle the valve a
ng. However,
Ring tightly du
properly index
sing the softw
rt at support@
60
r to port #4 o
a few times t
if you choose
uring reassem
x, perform th
ware, 3) Reco
@icpms.com
n the stator o
to properly in
e to do so, ple
mbly.
e following st
onnect contro
or +1.402.99
of the FAST
dex.
ease verify
teps: 1)
ol cable and
91.7800
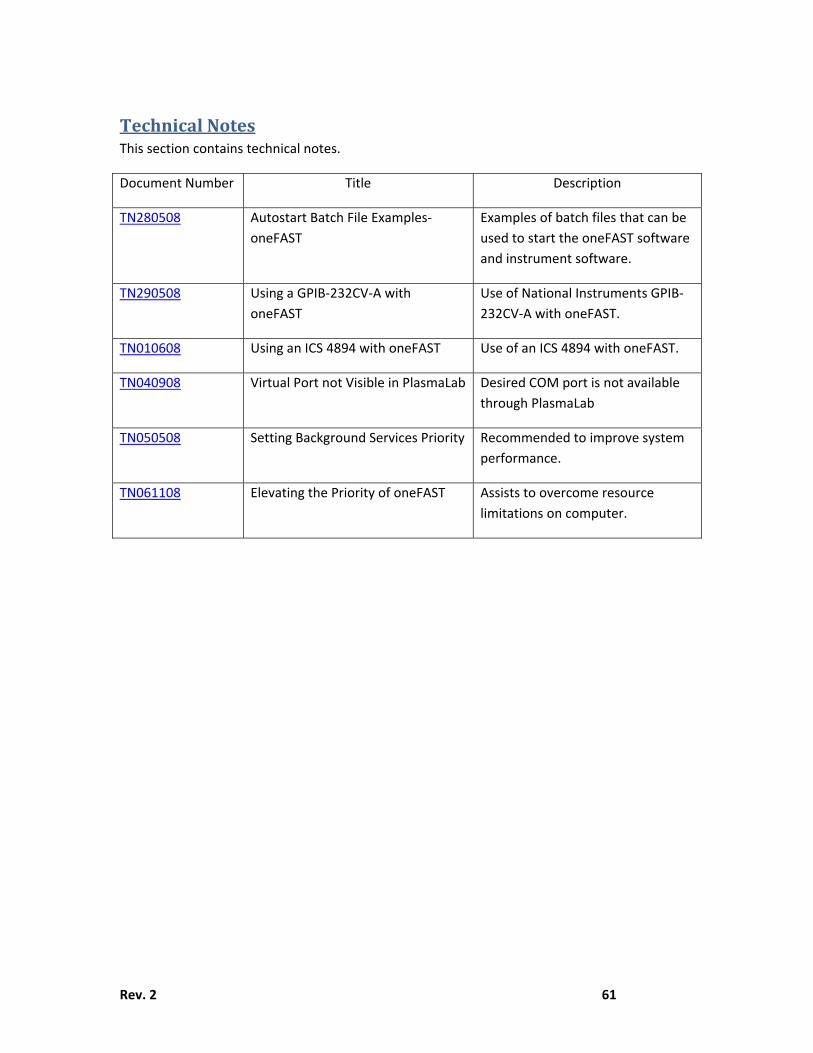
Rev. 2 61
TechnicalNotesThis section contains technical notes.
Document Number Title Description
TN280508 Autostart Batch File Examples‐
oneFAST
Examples of batch files that can be
used to start the oneFAST software
and instrument software.
TN290508 Using a GPIB‐232CV‐A with
oneFAST
Use of National Instruments GPIB‐
232CV‐A with oneFAST.
TN010608 Using an ICS 4894 with oneFAST Use of an ICS 4894 with oneFAST.
TN040908 Virtual Port not Visible in PlasmaLab Desired COM port is not available
through PlasmaLab
TN050508 Setting Background Services Priority Recommended to improve system
performance.
TN061108 Elevating the Priority of oneFAST Assists to overcome resource
limitations on computer.
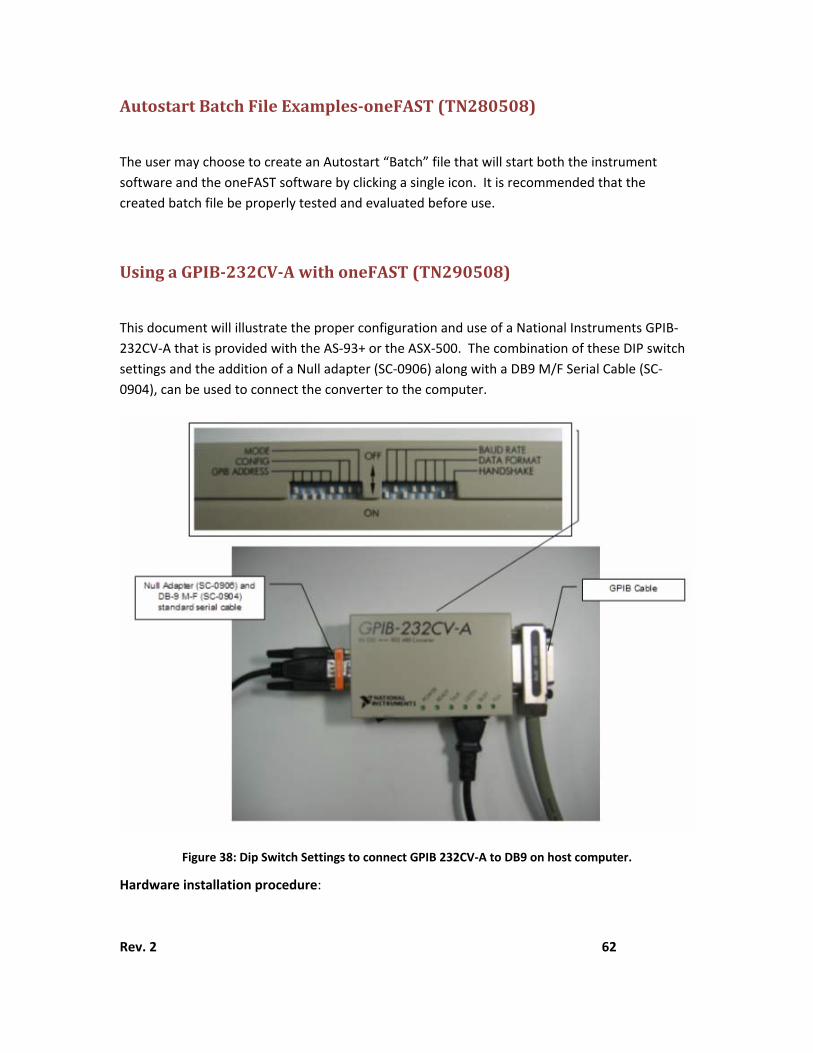
Rev. 2 62
AutostartBatchFileExamples‐oneFAST(TN280508)
The user may choose to create an Autostart “Batch” file that will start both the instrument
software and the oneFAST software by clicking a single icon. It is recommended that the
created batch file be properly tested and evaluated before use.
UsingaGPIB‐232CV‐AwithoneFAST(TN290508)
This document will illustrate the proper configuration and use of a National Instruments GPIB‐
232CV‐A that is provided with the AS‐93+ or the ASX‐500. The combination of these DIP switch
settings and the addition of a Null adapter (SC‐0906) along with a DB9 M/F Serial Cable (SC‐
0904), can be used to connect the converter to the computer.
Figure 38: Dip Switch Settings to connect GPIB 232CV‐A to DB9 on host computer.
Hardware installation procedure:

Rev. 2
1)
2)
3)
Usin
The IC
Hardw
1)
P
2)
2
) Verify thatfirmware w
) Remove thSerial CablDB9 on ho
) Secure oth
ngICS4894
CS 4894 shou
ware installat
) Remove seremove an
Please refer t
) Connect GDB25/DB9
t the GPIB‐23will prevent p
he existing sele (SC‐0904). ost computer.
her end of Ser
4withone
ld be connect
tion procedu
erial cable beny null adapte
o Technical N
PIB Interface9 Null Cable (S
2CV‐A was orproper instal
rial cable and See Figure 3
rial Cable (SC
eFAST(TN
ted as shown
Figure 39: Con
re:
tween autosaer that may p
Note (TN2905
e to computerSC‐0903).
riginally confilation.
d replace with8: Dip Switch
‐0904) to a se
N010608)
n in the attach
nnections for I
ampler and Gresent.
08) if the GPI
r using a USB‐
igured for the
h Null adapteh Settings to c
erial port on h
hed Figure 39
ICS 4894.
GPIB Interface
IB interface is
‐Serial Adapte
6
e autosample
er (SC‐0906) aconnect GPIB
host compute
9: Connection
e (SC‐0901‐14
s a NI GPIB‐23
er (SC‐0905)
63
er. Incorrect
nd DB9 M/F 232CV‐A to
er.
ns for ICS 4894
4). Also
32‐CV‐A.
and
4.

Rev. 2 64
VirtualPortnotvisibleinPlasmaLab(TN040908)
Description: After the installation of oneFAST Software, the proper COM port is visible in the Windows Device Manager but not visible in the Accessory setup and control window of PlasmaLab.
1) Log onto the PlasmaLab computer with Administrator privileges and determine which ports need to be made available in the Accessory setup and control window.
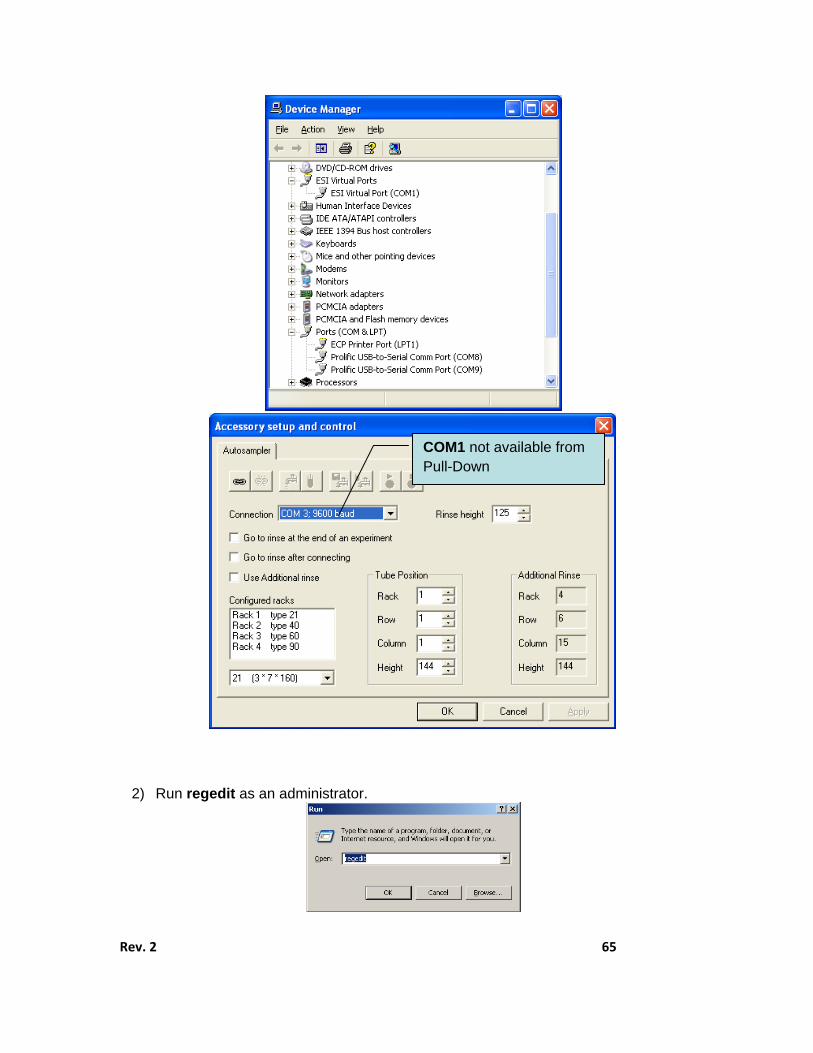
Rev. 2 65
2) Run regedit as an administrator.
COM1 not available from Pull-Down
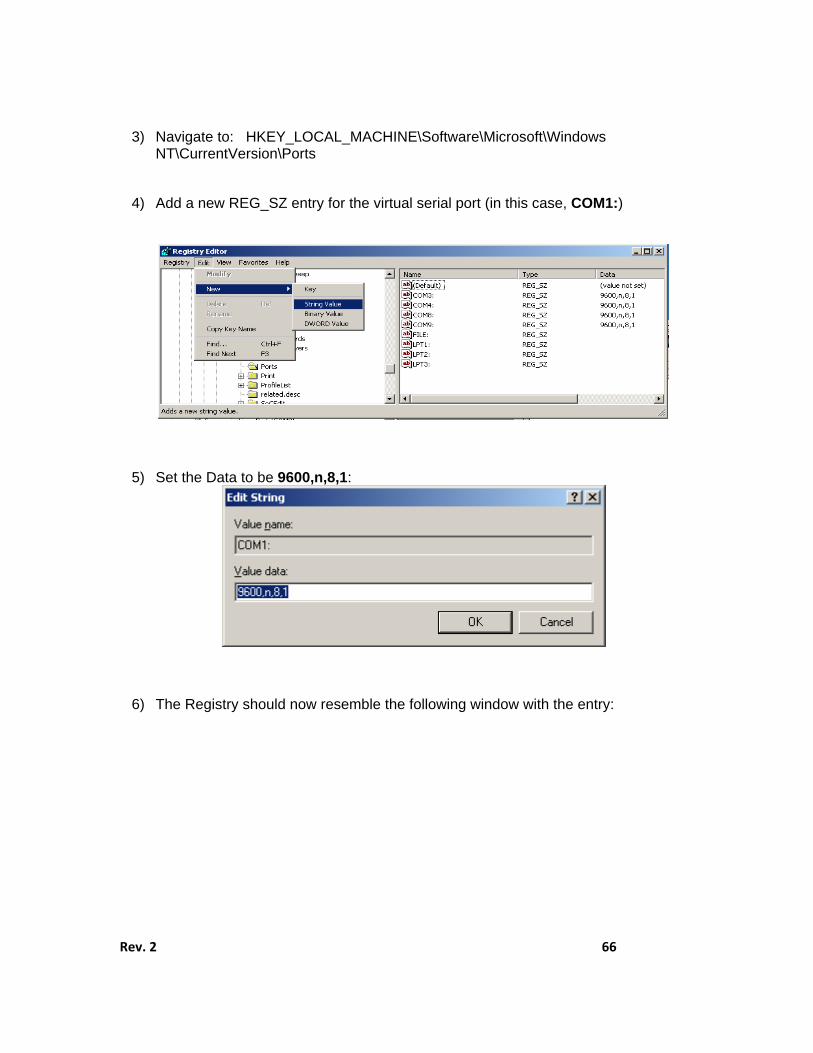
Rev. 2 66
3) Navigate to: HKEY_LOCAL_MACHINE\Software\Microsoft\Windows NT\CurrentVersion\Ports
4) Add a new REG_SZ entry for the virtual serial port (in this case, COM1:)
5) Set the Data to be 9600,n,8,1:
6) The Registry should now resemble the following window with the entry:
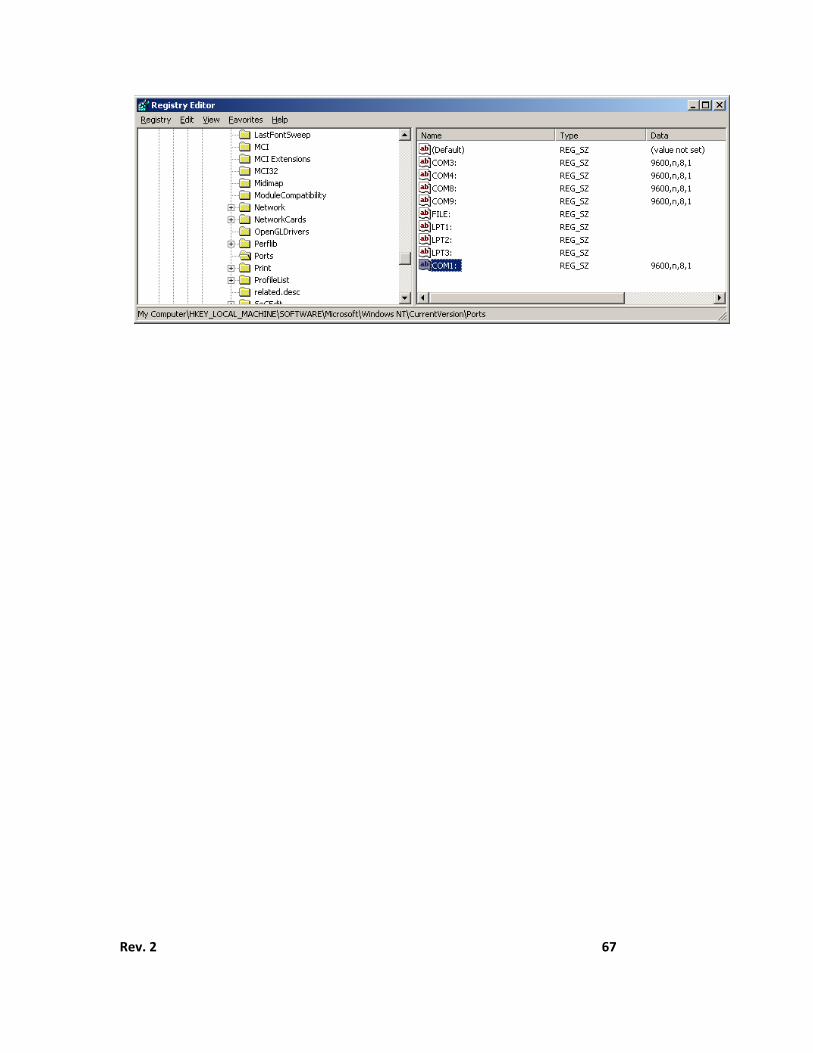
Rev. 2 67
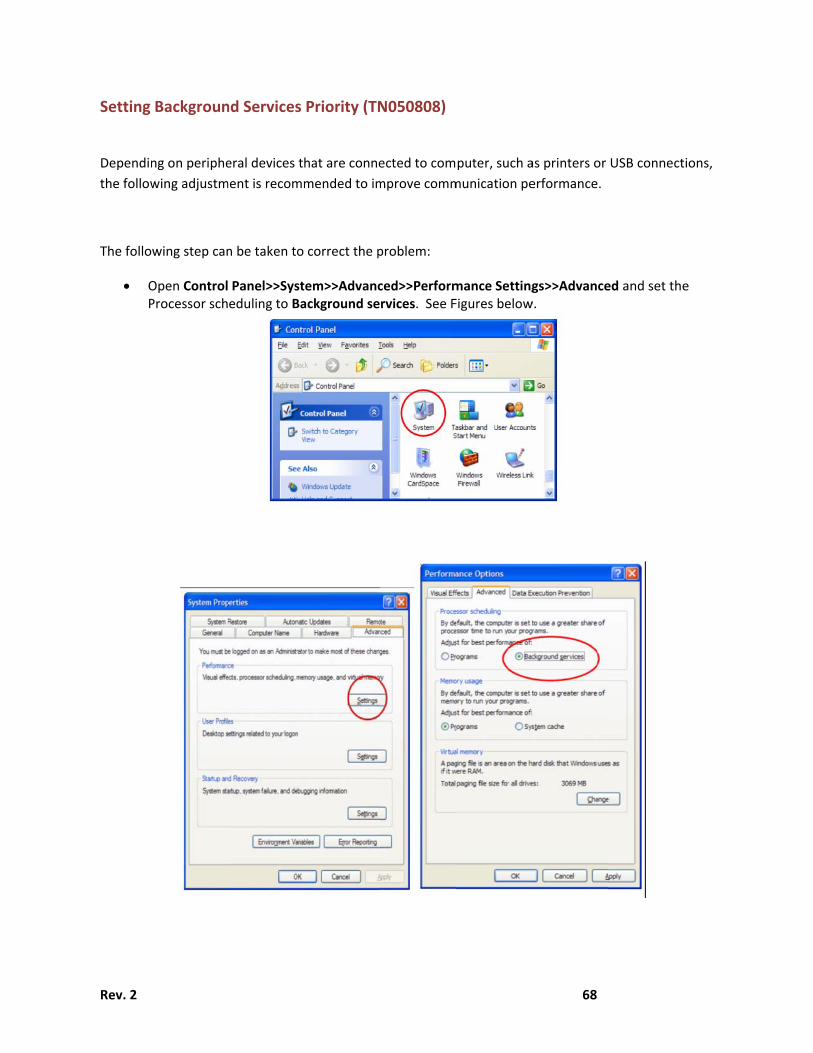
Rev. 2
Setting
Dependin
the follow
The follo
OP
Backgroun
ng on periphe
wing adjustm
wing step can
Open ControlProcessor sch
nd Services
eral devices t
ment is recomm
n be taken to
Panel>>Systeduling to Ba
Priority (TN
hat are conne
mended to im
correct the p
tem>>Advancackground se
N050808)
ected to com
mprove comm
problem:
ced>>Performrvices. See F
puter, such a
munication pe
mance SettingFigures below
68
as printers or
erformance.
gs>>Advancew.
USB connect
ed and set the
ions,
e
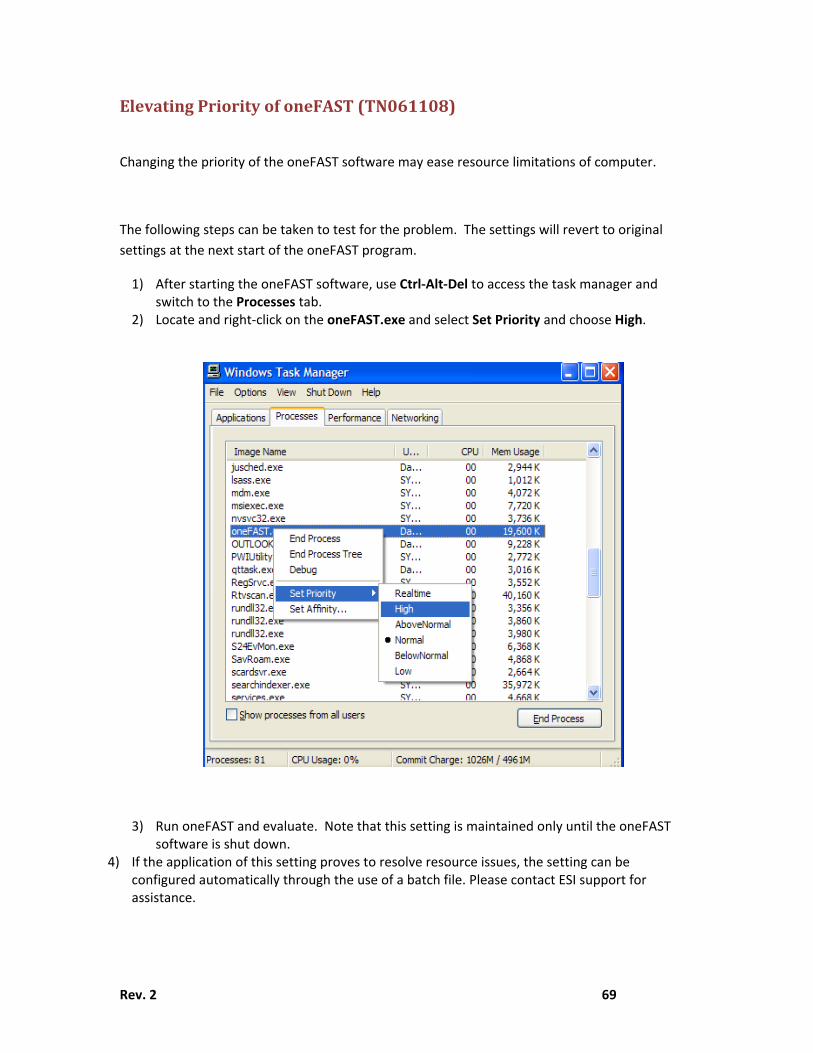
Rev. 2 69
ElevatingPriorityofoneFAST(TN061108)
Changing the priority of the oneFAST software may ease resource limitations of computer.
The following steps can be taken to test for the problem. The settings will revert to original
settings at the next start of the oneFAST program.
1) After starting the oneFAST software, use Ctrl‐Alt‐Del to access the task manager and switch to the Processes tab.
2) Locate and right‐click on the oneFAST.exe and select Set Priority and choose High.
3) Run oneFAST and evaluate. Note that this setting is maintained only until the oneFAST software is shut down.
4) If the application of this setting proves to resolve resource issues, the setting can be configured automatically through the use of a batch file. Please contact ESI support for assistance.