eggplant - ahrahr.com.au/wp-content/...factsheet_eggplant_field.pdf · 1 eggplant field production...
TRANSCRIPT
FARMER FACTSHEET Eggplant
1 Eggplant Field Production
Crop RotationFollow this crop with cucurbits, leafy vegetables, brassicas or sweet corn. Avoid following with sweet pepper, tomato, eggplant.
Climate & SoilThe optimum growing temperature range is 21°– 30°C, with a maximum of 35°C and a minimum of 18°C. Eggplant is a moderately deep rooting crop. They do best on light-textured soils such as sandy loams or alluvial soils that are deep and free draining. Avoid soils with high clay content. A soil pH in the range 6.0–7.0 is desirable.
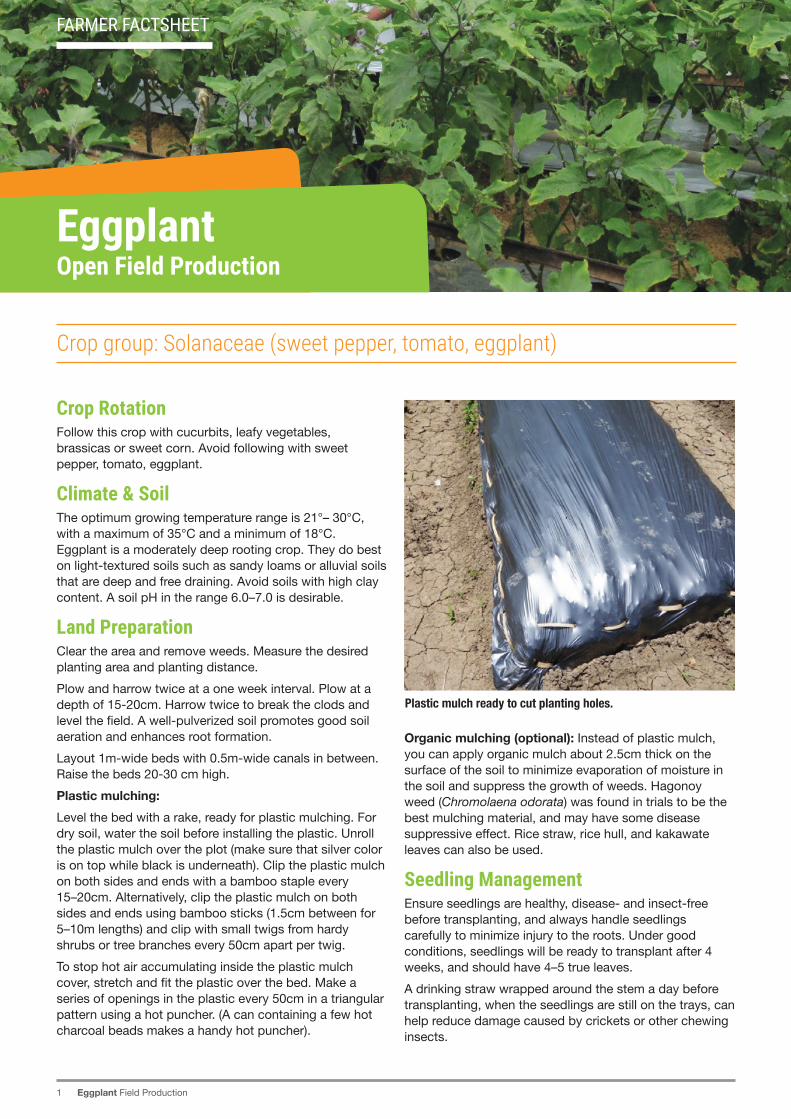
Land PreparationClear the area and remove weeds. Measure the desired planting area and planting distance.Plow and harrow twice at a one week interval. Plow at a depth of 15-20cm. Harrow twice to break the clods and level the field. A well-pulverized soil promotes good soil aeration and enhances root formation. Layout 1m-wide beds with 0.5m-wide canals in between. Raise the beds 20-30 cm high.Plastic mulching:Level the bed with a rake, ready for plastic mulching. For dry soil, water the soil before installing the plastic. Unroll the plastic mulch over the plot (make sure that silver color is on top while black is underneath). Clip the plastic mulch on both sides and ends with a bamboo staple every 15–20cm. Alternatively, clip the plastic mulch on both sides and ends using bamboo sticks (1.5cm between for 5–10m lengths) and clip with small twigs from hardy shrubs or tree branches every 50cm apart per twig.To stop hot air accumulating inside the plastic mulch cover, stretch and fit the plastic over the bed. Make a series of openings in the plastic every 50cm in a triangular pattern using a hot puncher. (A can containing a few hot charcoal beads makes a handy hot puncher).
FARMER FACTSHEET
EggplantOpen Field Production
Crop group: Solanaceae (sweet pepper, tomato, eggplant)
Organic mulching (optional): Instead of plastic mulch, you can apply organic mulch about 2.5cm thick on the surface of the soil to minimize evaporation of moisture in the soil and suppress the growth of weeds. Hagonoy weed (Chromolaena odorata) was found in trials to be the best mulching material, and may have some disease suppressive effect. Rice straw, rice hull, and kakawate leaves can also be used.
Seedling ManagementEnsure seedlings are healthy, disease- and insect-free before transplanting, and always handle seedlings carefully to minimize injury to the roots. Under good conditions, seedlings will be ready to transplant after 4 weeks, and should have 4–5 true leaves.A drinking straw wrapped around the stem a day before transplanting, when the seedlings are still on the trays, can help reduce damage caused by crickets or other chewing insects.
Plastic mulch ready to cut planting holes.

FARMER FACTSHEET Eggplant
2 Eggplant Field Production
TransplantingTransplant late in the afternoon, or morning – if it’s cloudy. Gently press the soil around the plant base to avoid injury of the seedlings, seal the hole with soil. Water immediately to establish good root-soil contact. Drench around the plants with fungicide as needed.
Trelising 1. Trellis the plants two weeks after transplanting.2. Construct the trellis using bamboo ipil-ipil poles or
stakes on each side of the bed, 2–3m apart and 1.5m high.
3. Attach wires to the bamboo post horizontally at a height of 0.5m and tie stems to the wire using twine or blue string.
4. When the plants are fruiting, maintain all branches in upright position to avoid overlapping that causes insect pests to hide. Tie all droopy branches especially those with many fruits to avoid breaking.
Weed Control • Cultivate the soil before planting to reduce weeds or
stale seedbed. • Practice mulching to control or minimise the growth of
weeds. • During the growth of the crop use a bolo to manually
remove weeds• Spray canals and between beds with contact/
systemic herbicide as needed.
Harvesting Fruit are usually ready to harvest 55-65 days after transplanting (DAT) when the fruit reach a marketable size and are deep purple & glossy or depending on the variety, or depending on buyers’ preference. Harvest fruits intended for market preferences at 3–4 day intervals. Immature or over-mature fruit deteriorate fast therefore it is important to pick at optimum harvest maturity. Harvest early in the morning while the temperature is low to minimize field heat load. Place the harvested fruit immediately under shade to avoid sun exposure. Use sharp, clean tools for harvesting.
FARMER FACTSHEET Eggplant
3 Eggplant Field Production
Fertilizer, irrigation, pest and disease management
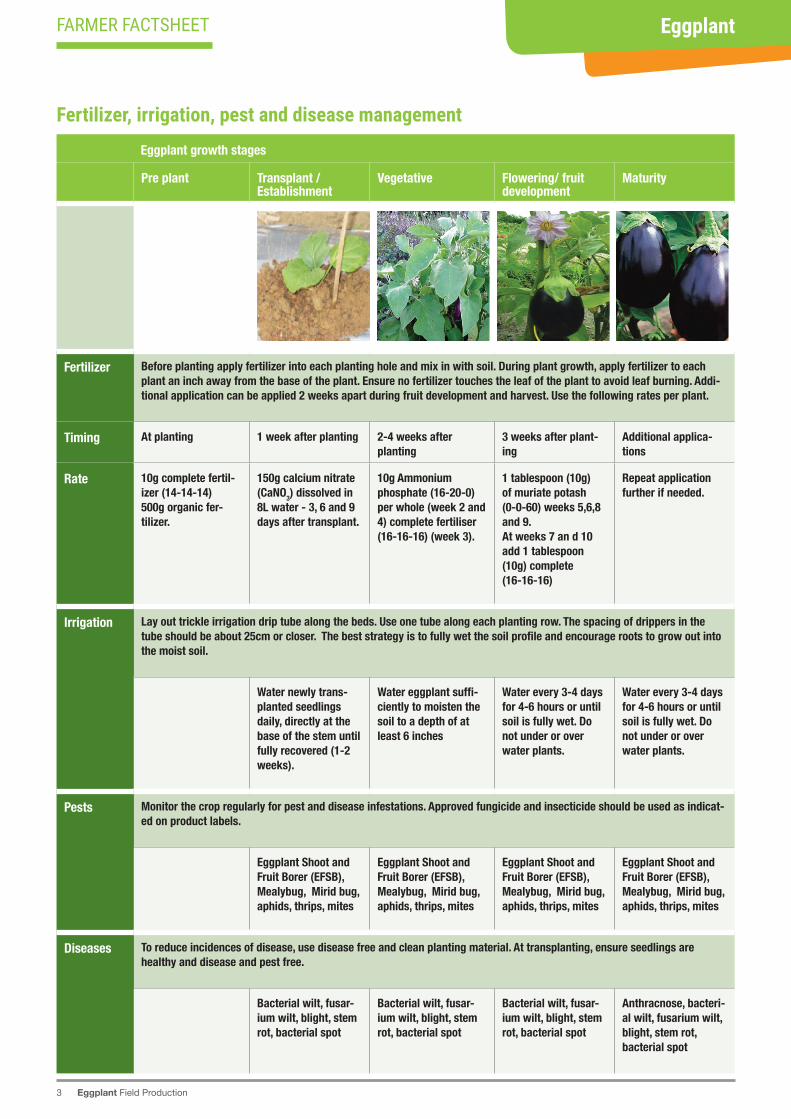
Eggplant growth stages
Pre plant Transplant / Establishment
Vegetative Flowering/ fruit development
Maturity
Fertilizer Before planting apply fertilizer into each planting hole and mix in with soil. During plant growth, apply fertilizer to each plant an inch away from the base of the plant. Ensure no fertilizer touches the leaf of the plant to avoid leaf burning. Addi-tional application can be applied 2 weeks apart during fruit development and harvest. Use the following rates per plant.
Timing At planting 1 week after planting 2-4 weeks after planting
3 weeks after plant-ing
Additional applica-tions
Rate 10g complete fertil-izer (14-14-14) 500g organic fer-tilizer.
150g calcium nitrate (CaNO3) dissolved in 8L water - 3, 6 and 9 days after transplant.
10g Ammonium phosphate (16-20-0) per whole (week 2 and 4) complete fertiliser (16-16-16) (week 3).
1 tablespoon (10g) of muriate potash (0-0-60) weeks 5,6,8 and 9.At weeks 7 an d 10 add 1 tablespoon (10g) complete (16-16-16)
Repeat application further if needed.
Irrigation Lay out trickle irrigation drip tube along the beds. Use one tube along each planting row. The spacing of drippers in the tube should be about 25cm or closer. The best strategy is to fully wet the soil profile and encourage roots to grow out into the moist soil.
Water newly trans-planted seedlings daily, directly at the base of the stem until fully recovered (1-2 weeks).
Water eggplant suffi-ciently to moisten the soil to a depth of at least 6 inches
Water every 3-4 days for 4-6 hours or until soil is fully wet. Do not under or over water plants.
Water every 3-4 days for 4-6 hours or until soil is fully wet. Do not under or over water plants.
Pests Monitor the crop regularly for pest and disease infestations. Approved fungicide and insecticide should be used as indicat-ed on product labels.
Eggplant Shoot and Fruit Borer (EFSB), Mealybug, Mirid bug, aphids, thrips, mites
Eggplant Shoot and Fruit Borer (EFSB), Mealybug, Mirid bug, aphids, thrips, mites
Eggplant Shoot and Fruit Borer (EFSB), Mealybug, Mirid bug, aphids, thrips, mites
Eggplant Shoot and Fruit Borer (EFSB), Mealybug, Mirid bug, aphids, thrips, mites
Diseases To reduce incidences of disease, use disease free and clean planting material. At transplanting, ensure seedlings are healthy and disease and pest free.
Bacterial wilt, fusar-ium wilt, blight, stem rot, bacterial spot
Bacterial wilt, fusar-ium wilt, blight, stem rot, bacterial spot
Bacterial wilt, fusar-ium wilt, blight, stem rot, bacterial spot
Anthracnose, bacteri-al wilt, fusarium wilt, blight, stem rot, bacterial spot

FARMER FACTSHEET Eggplant
4 Eggplant Field Production
Applied Horticultural Research Pty Ltd (AHR), the Australian Centre for International Agricultural Research (ACIAR) and NSW Department of Primary Industries (NSW DPI) make no representations and expressly disclaims all warranties (to the extent permitted by law) about the accuracy, completeness, or currency of information in this fact sheet. Users of this material should take independent action before relying on it’s accuracy in any way. Reliance on any information provided by AHR, ACIAR or NSW DPI is entirely at your own risk. AHR, ACIAR or NSW DPI are not responsible for, and will not be liable for, any loss, damage, claim, expense, cost (including legal costs) or other liability arising in any way from your use or non-use of information in this fact sheet, or from reliance on information AHR, ACIAR or NSW DPI provides to you by any other means.
Postharvest Handling Once harvested, the fruits are much more susceptible to deterioration than while they are attached to the plant1. Harvest in the cooler part of the day – early morning
or late afternoon. 2. Place the harvested fruit out of the sun and in as cool
a place as possible. 3. Remove and discard any fruit which is deformed or
insect damaged.4. Grade the fruit into color and size grades. Keep a
premium grade fruit which is the correct size for your market. Grade into green, breaker and colored fruit, and pack separately. Show grade and colour standards. Put the remaining fruit into a second grade category and send that separately from the first grade. This will maximize the price you get for the first grade fruit.
5. Pack the fruit carefully in cartons if possible, in a way that will minimize damage to the fruit in transit to the market. Do not sit or stand on top of vegetables.
6. Deliver the fruit to market as soon as possible after harvesting. Transport at night or in early morning, if possible. Storage reduces shelf life and quality.
7. Monitor and know the condition of the fruit as it arrived at the market and aim to continuously improve its quality
Follow up in the field The finished crop should immediately be removed and destroyed, and the ground plowed to prevent pest and disease populations spreading to other crops. This is extremely important!